Discover over 100 stunning nail designs, from simple minimalism and cute themes to fierce gothic looks and seasonal trends. Find the perfect manicure for every occasion and style.
18 Adorable Cute Nails
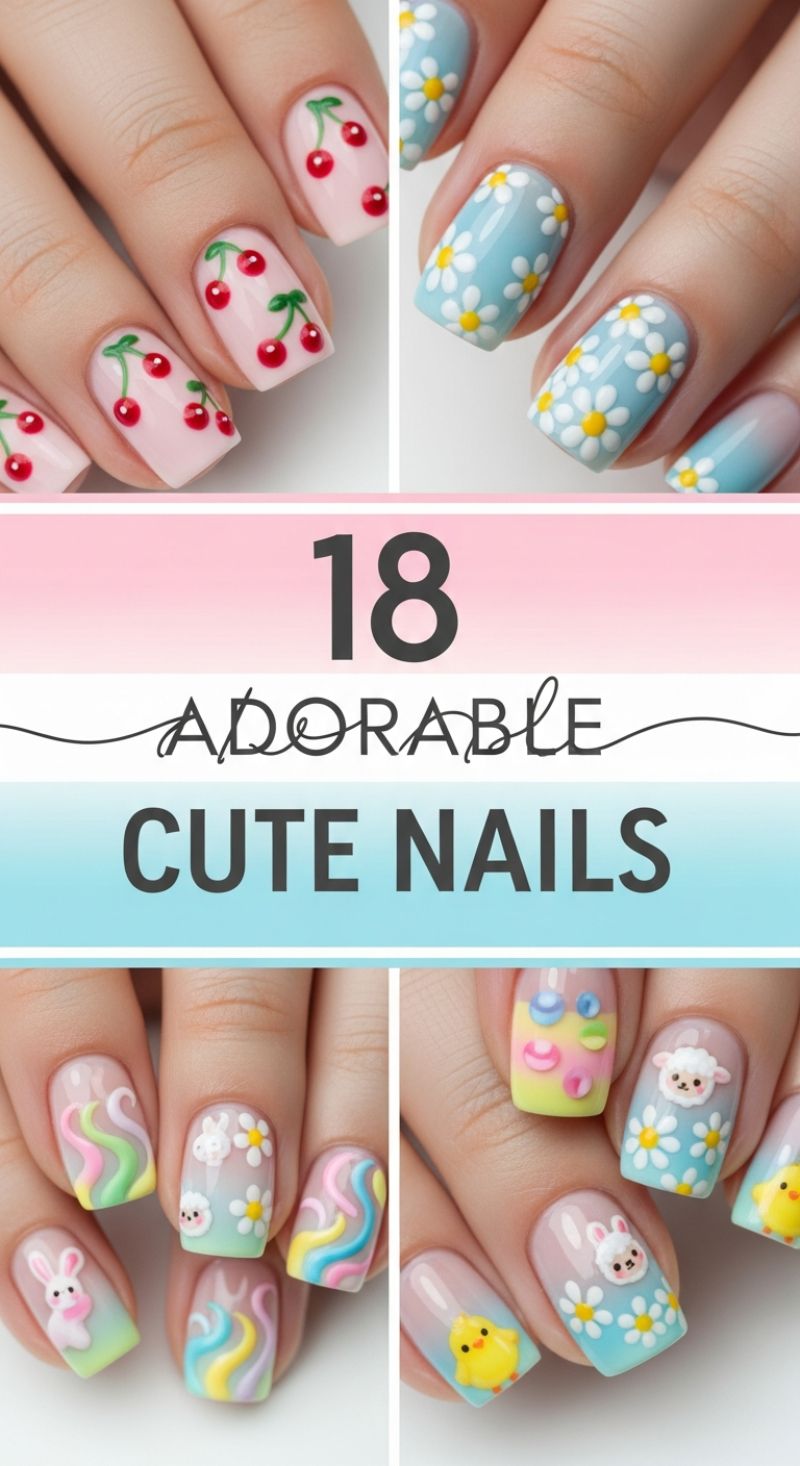
These whimsical and sweet designs encapsulate the playful spirit of spring and summer, ranging from simple flat art motifs to intricate, dimensional sculpting. The aesthetic relies heavily on soft pastel gradients, vibrant yet clean primary colors (like the cherry red), and charming, stylized natural elements. To achieve the classic flat art designs seen in the upper section—the cherries and daisies—start with meticulous color application. For the cherry look, use a sheer, milky pink or nude base. Once cured, employ a medium-sized dotting tool and opaque red polish to create perfectly symmetrical pairs of cherries. The stems require a fine striping brush and vibrant green gel; precision here is key, ensuring the stems connect naturally and include a small leaf element for balance. For the daisy pattern, apply an opaque sky blue base. Use a small dotting tool loaded with white polish, placing five dots closely together to form the petals, then finishing with a tiny yellow dot in the center. Consistency in spacing is vital to making the overall pattern look cohesive and professional.
The true artistry, however, lies in the lower section, which showcases advanced 3D or sculptural nail techniques. These designs, featuring adorable pastel bunnies, lambs, chicks, and abstract swirls, require specialized materials like thick viscosity building gel or ‘gum gel’ (plasti-gel). Begin these looks by preparing the nail bed with a soft, ethereal gradient—blending pale pinks, yellows, mints, and blues, often best achieved using an airbrush or makeup sponge technique. After curing the gradient, the 3D elements are individually sculpted. Take a small amount of the sculpting gel and use a silicone-tipped tool or fine brush to mold the shape directly onto the nail. For the animals, build up features incrementally—creating the head first, then the ears, and finally adding tiny details like rosy cheeks or small black eyes using a very fine detail brush. The swirling pastel ribbons are created by rolling the gum gel into thin strips and carefully placing and curving them before curing, ensuring the different colors do not merge.
To ensure these highly dimensional, adorable manicures last, careful finishing is essential. After all layers, including the 3D elements, are fully cured, apply a robust, high-shine top coat to the surrounding flat areas of the nail. For the sculpted pieces, expert application is crucial: try to ‘seal’ the edges where the 3D art meets the nail surface without globbing polish over the top surfaces of the figures themselves. Flooding the top coat over the sculpted areas will diminish the texture and definition that makes the design so striking. These charming, cute nails are perfect for celebratory spring holidays, themed parties, or simply adding a dose of playful cheer to your daily style, provided you are meticulous with curing and sealing for maximum durability.
5 Easy DIY Hacks for Perfect At-Home Manicure Prep
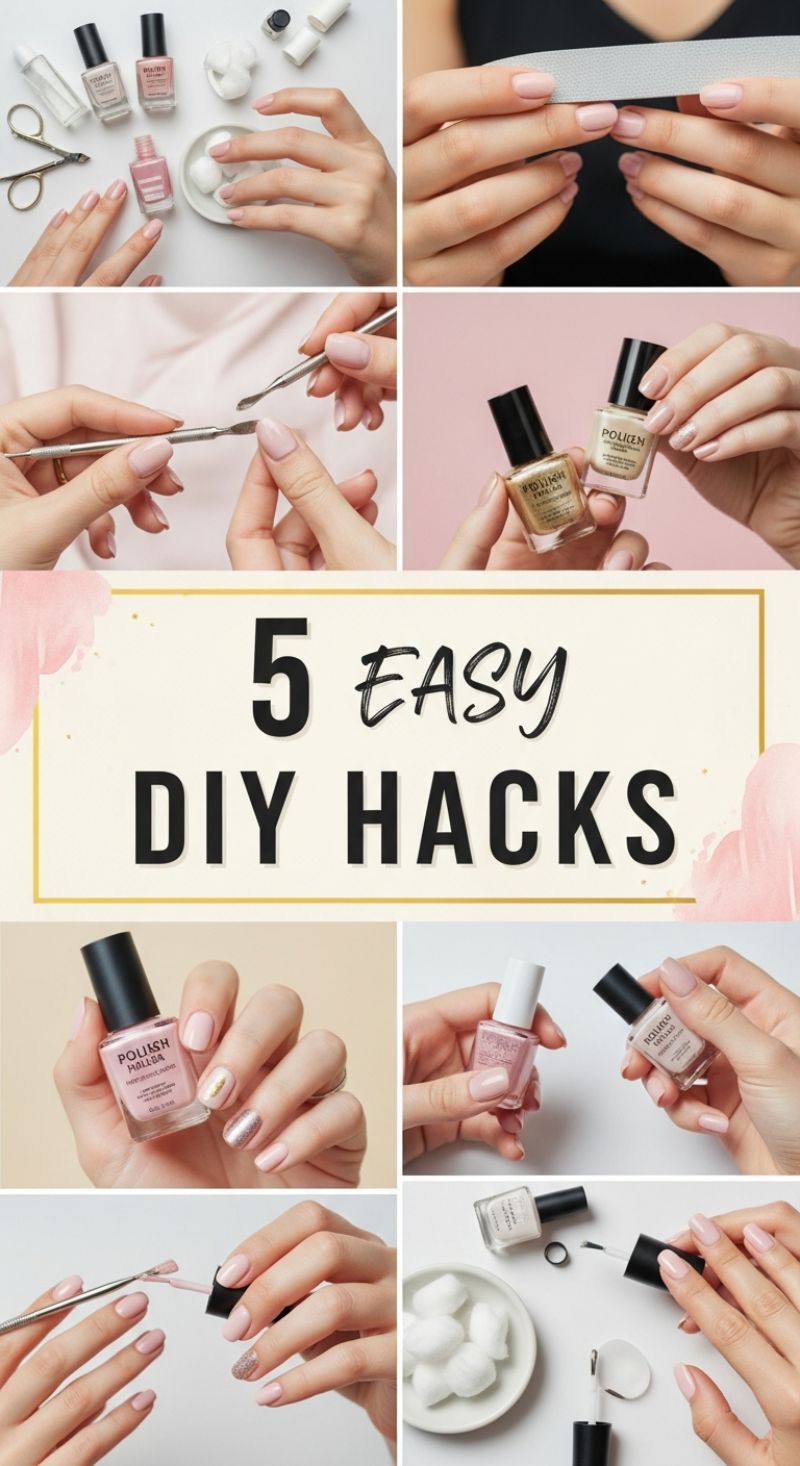
Achieving a professional-looking manicure starts long before the polish bottle is uncorked. The first essential DIY hack is mastering the preparation phase, which accounts for half the success of your final look. As visualized in the initial steps, gathering your tools—nail file, buffer, cuticle pusher, and cotton pads—is paramount. Begin by shaping the nail, using the file in long, smooth strokes in one direction only to prevent fraying or splitting the keratin layers. Following the shaping, focus on cuticle care. Gently push back the cuticles after a short soak (or using a dedicated cuticle softener), ensuring you clear the nail plate of any excess skin residue. This step creates a clean, elongated canvas crucial for seamless polish application and prevents the polish from lifting prematurely. Always wipe the nail plate with a cleanser or rubbing alcohol afterward; removing natural oils and residue drastically improves adhesion for your base coat, which is the unsung hero of any long-lasting manicure.
The next set of hacks involves intentional application and simple accent design. Use a high-quality base coat as your foundation, applying it thinly and carefully. When moving to color (as demonstrated with the elegant nude and light pink shades), adopt the ‘three-stroke rule’: one stripe down the center, followed by a stripe on each side. Keep your coats thin; thicker coats take longer to dry and are far more prone to bubbling or smudging. For an instant upgrade, integrate the easy accent nail hack shown. Whether you choose a contrasting texture, like a subtle gold glitter over a neutral base, or a delicate metallic stripe, limiting the elaborate design to just one or two nails (often the ring finger or middle finger) makes the look appear sophisticated and deliberate without requiring advanced artistry skills. The visual impact is maximized through simplicity, ensuring your manicure looks high-end with minimal effort.
The final, often overlooked, DIY hacks involve sealing and meticulous clean-up. After allowing adequate time for your color coats to dry completely—patience is mandatory here—apply a glossy or matte top coat, making sure to ‘cap the free edge.’ This means sweeping the brush lightly across the very tip of your nail, which acts as a seal against chipping, protecting the paint underneath. The ultimate professional trick, shown in the concluding steps, is precise clean-up. Dip a small, angled brush or the edge of a clean cuticle tool into acetone or non-acetone remover. Carefully trace the boundary between your polish and your skin, lifting away any misplaced color. This small act of precision transforms an amateur home job into a flawless salon-quality finish, providing the crisp, defined edges that make your entire manicure look polished and enduring.
10 TRENDY SHORT NAILS
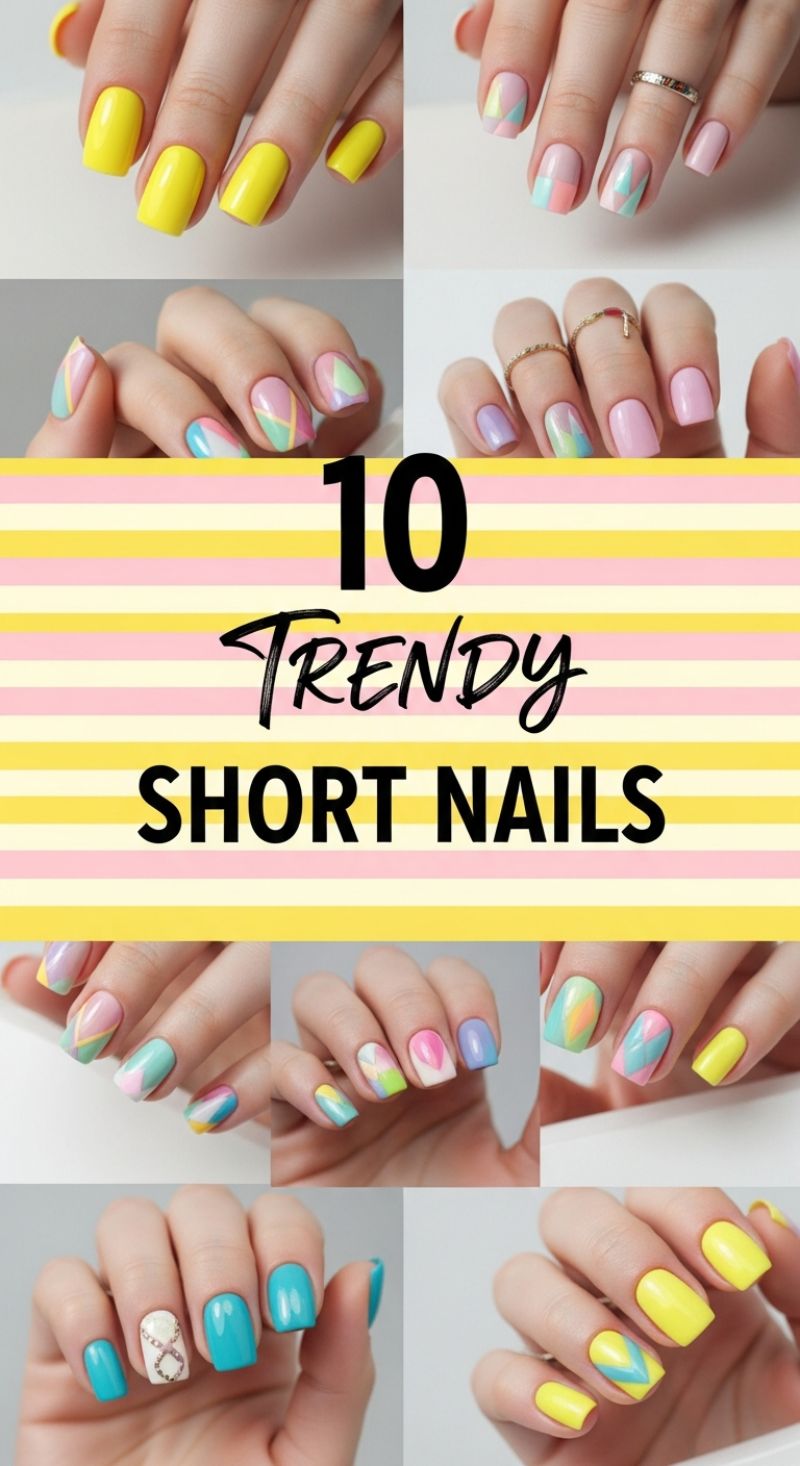
Short nails are experiencing a major moment, proving that stunning nail art doesn’t require excessive length. This trend celebrates clean lines, practicality, and bold color placement, making it perfect for both professional settings and playful weekends. The dominant visual element in this collection is the skillful application of geometric color blocking, often utilizing a dynamic mix of pastel shades (soft pink, lavender, mint) contrasted sharply with vibrant neons (electric yellow, bright aqua). To achieve this high-impact look, preparation is key: ensure your short nails are filed into a clean square or squoval shape. Begin with a sheer nude or milky white base coat, which acts as the ‘negative space’ canvas. Once fully cured or dried, use thin striping tape or specialized vinyl stencils to section off angular shapes like triangles or diagonal lines. Apply your chosen contrasting colors within these taped boundaries. This design excels when you use two to four colors per nail, ensuring they complement but distinctly oppose one another for maximum graphic effect. The goal is sharp, intersecting lines that create a contemporary mosaic appearance, making even the shortest nails feel elongated and architectural.
Mastering the precise geometric patterns requires patience and expert tooling. For sharp diagonals, firmly pressing down the striping tape ensures zero bleed under the edges—a crucial detail for maintaining professionalism. After applying the polish and removing the tape immediately (before the polish fully sets, to prevent ragged edges), an advanced technique is to outline the newly exposed color seams with a super-fine liner brush dipped in black or metallic gold polish. This detailing step, often overlooked, instantly transforms a simple color-block into a high-fashion, graphic statement piece. If freehand detailing isn’t your strength, consider simplifying the design by using the bold neon yellow or vibrant turquoise as a solid color base on the majority of your fingers, reserving the geometric artistry for just one or two accent nails. This balances the look, preventing the design from feeling too busy while still integrating the trend’s key aesthetic elements. Remember, due to the limited nail bed space, keeping the cuticle area perfectly clean and hydrated is essential, as imperfections here become much more noticeable against bright, solid colors.
Beyond the geometric styles, this trend also embraces striking solid colors and carefully placed embellishments. The solid neon yellow and glossy turquoise provide fantastic options for those seeking instant brightness without complexity. For those wanting to incorporate intricate elements, look to the accent nails featured, such as the white nail with the delicate infinity symbol overlay. To recreate this sophisticated accent, apply a pure white base and use stamping plates for precise artwork, or use tiny rhinestones and nail glue to create a custom geometric design along the edge of the nail bed. Because short nails are inherently less prone to breakage and chipping than long extensions, they are ideal candidates for rich, high-pigment polishes. Always finish the entire manicure with a premium, durable high-shine topcoat, enveloping the art in a glass-like finish that emphasizes the crispness of the lines and prolongs the vibrancy of the colors, guaranteeing a stunning, long-lasting wear appropriate for any occasion.
10 Simple Minimalist Nails: The Ultimate Guide to Understated Chic

The minimalist nail aesthetic, popularized by the collage shown, relies on impeccable application, precise shaping, and the strategic use of subtle metallic accents. To achieve this look, start with the perfect foundation: a high-quality nude or blush pink polish. Expert application requires two thin, even coats of an opaque color that complements your skin tone—cooler complexions pair best with dusty mauves or taupes, while warmer undertones shine with peachy beiges or creamy caramels. Before polishing, ensure your nails are filed into a clean, short square or gentle squoval shape, and pay meticulous attention to cuticle care, as the simplicity of the design makes imperfections highly visible. A rubber-base coat is recommended beneath the color to provide maximum smoothness and chip resistance, crucial for maintaining the ‘clean’ visual element characteristic of true minimalism.
Once your base color is fully dry, it’s time to incorporate the delicate detailing, which is the signature element of this trend. The key tools here are a fine striping brush and a small dotting tool (or pre-cut gold foil/stud decals). For the single-dot designs featured, dip the very tip of a dotting tool into highly pigmented gold polish and place the dot precisely at the base of the nail, near the cuticle line, or offset toward one side. For the linear designs, carefully use the striping brush to draw a single, thin vertical line down the center of the nail bed, or use pre-cut metallic striping tape for guaranteed straightness. If replicating the look of small metallic studs, use a tiny amount of clear topcoat or nail glue to affix three to four micro-studs horizontally across the nail bed, ensuring they are evenly spaced. Precision is everything; these embellishments should be small enough to appear intentional but not flashy, allowing the nude base to remain the focal point.
To ensure the longevity and sophisticated finish required for a top-tier look, proper sealing is essential. After the art is completely dry, float a generous coat of high-shine, non-yellowing topcoat over the entire nail, making sure to fully encapsulate any metallic studs or tape so they don’t catch or lift. This protective layer not only adds the glossy sheen seen in the image but also locks the minimalist design securely in place. The beauty of this trend lies in its versatility; it is professional enough for a demanding workplace yet elegant enough for a formal event. For an extra touch of luxury, finish the manicure with a cuticle oil application, massaging it into the skin and nail edges. This final step enhances the appearance of well-hydrated hands, perfectly framing your stunningly simple, minimalist nail design.
6 Quick Nail Designs for Effortless Style
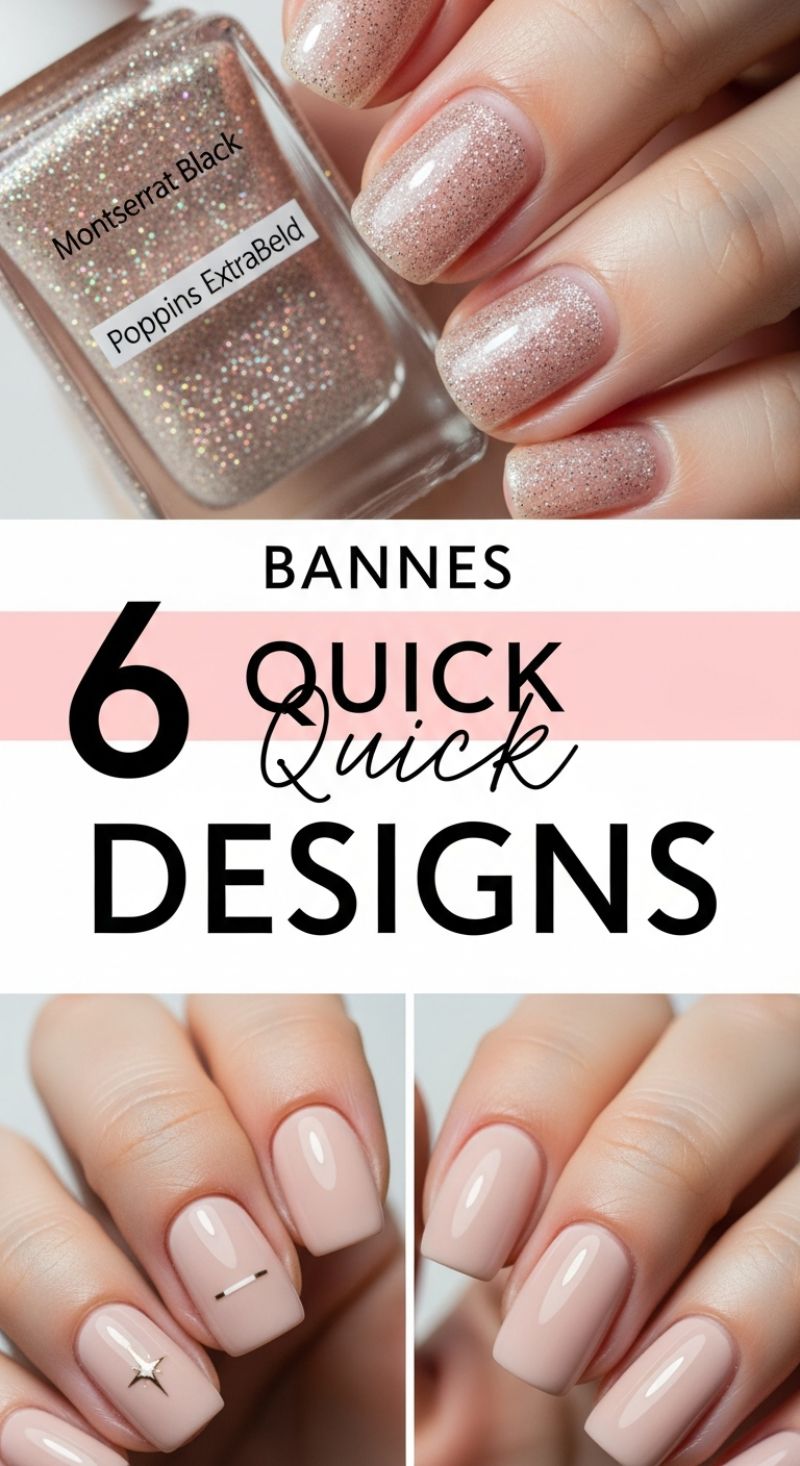
When time is of the essence but you refuse to sacrifice sophisticated style, minimal nail art and high-impact polishes are your best allies. This selection showcases two excellent approaches to achieving a stunning manicure in minutes. The first, featured prominently at the top, utilizes a highly pigmented, multi-dimensional glitter polish. To achieve this look, opt for a light, champagne or rose gold glitter suspended in a clear or translucent base coat. This type of formulation offers immediate visual depth and texture, often minimizing the need for perfectly smooth application. Apply two to three thin coats to build opacity and maximize the sparkle payoff. The beauty of glitter is its forgiving nature; small imperfections disappear into the shimmering finish, making it an ideal choice for a quick DIY manicure that looks professional and festive, suitable for year-round wear.
For a more understated elegance, the bottom designs focus on utilizing minimal accents over a perfectly polished neutral base. Start with a creamy, full-coverage nude or blush lacquer—the key is finding a color that complements your skin tone, ensuring it reads as sophisticated and clean. Once your base coats are cured (or dry), you can introduce the quick art elements. The first accent nail features a delicate metallic horizontal bar placed centrally on the nail bed. The second uses a small, pointed celestial star stud positioned near the cuticle line. These elements are easily applied using specialized nail art glue or a small dot of uncured top coat (if using gel) before sealing. The contrast between the smooth, matte nude base and the precise metallic accents elevates the overall look from simple to chic.
To successfully recreate these quick designs, preparation is paramount. Ensure your nails are filed to a uniform squoval shape and buffed smooth before application. When applying the metal decals, use tweezers for precise placement. If you are worried about lifting, ensure the edges of the decal are completely encapsulated by your final layer of top coat. For the glitter look, using a thicker, glossy top coat will help smooth over the glitter particles, providing a glass-like finish that enhances the shine and protects the manicure, allowing these six effortless styles to last well beyond your quick application time.
13 Edgy Goth VDay Nails
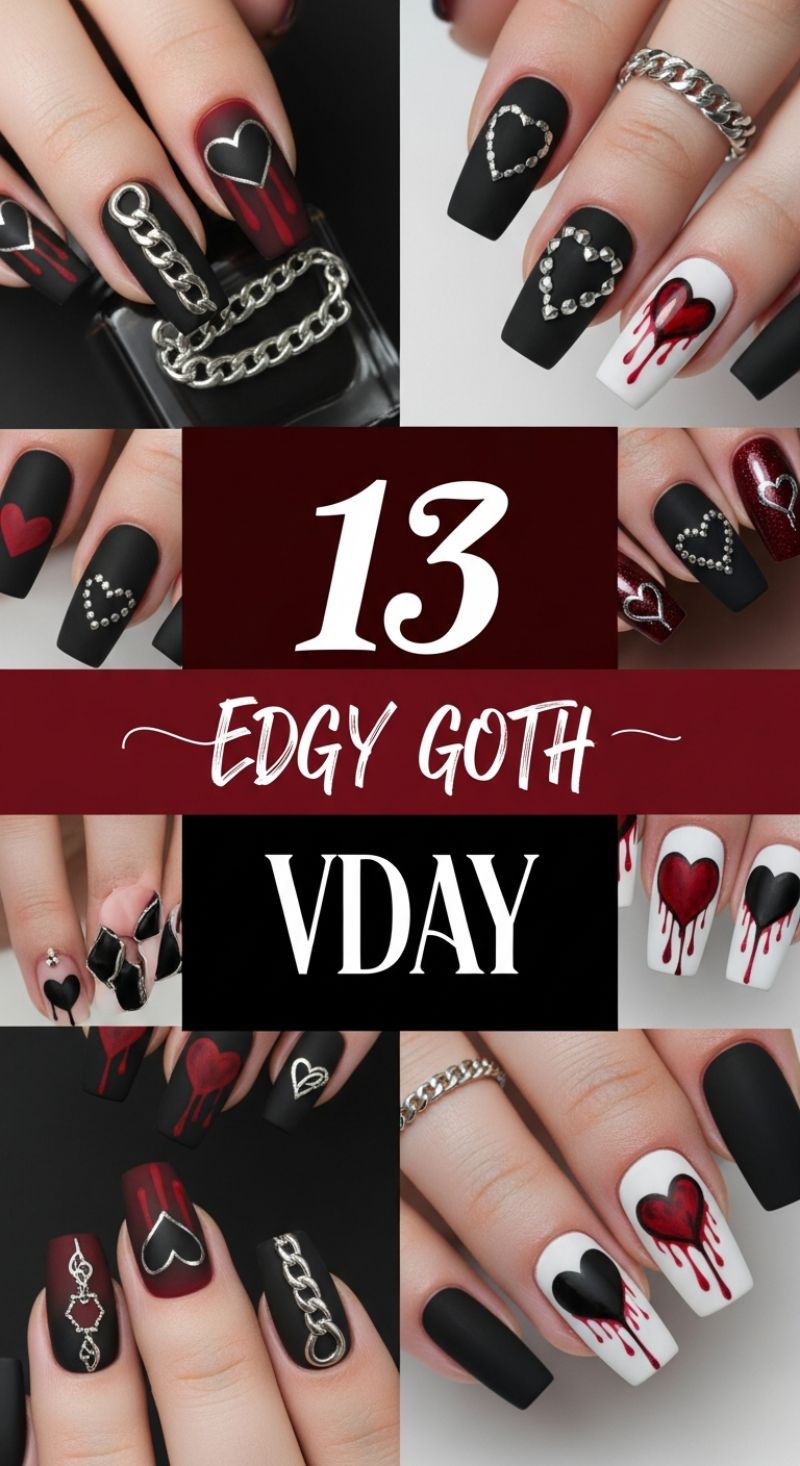
Achieve the ultimate anti-Valentine’s manicure with these striking edgy goth VDay designs, characterized by a dominant matte black base paired with deep crimson and stark white accents. The key to this aesthetic is mastering texture and contrast. Begin by shaping the nails—coffin or tapered square shapes are highly recommended for maximizing the visual impact of the designs. Apply a high-pigment, true black polish, ensuring two coats for full opacity. The crucial preparation step is finishing this base layer with a professional-grade matte top coat. This velvety finish provides the perfect dark canvas for the intense red hearts and metallic hardware. Prepare your palette, focusing on a deep, almost vampiric red for the hearts and blood drips, and select high-quality silver or chrome decals, such as miniature chains or small ball bearings (studs) for the intricate embellishments.
Two prominent techniques define this look: the dripping heart motif and the application of metallic chains or studs. For the iconic bleeding heart design, paint the nail base either entirely matte black or a contrasting bright, glossy white, as seen on the accent nails. Using a fine detail brush, paint a large, slightly irregular heart shape near the cuticle or center. While the polish is still slightly wet, use the detail brush to carefully drag small lines downward from the base of the heart, meticulously mimicking the look of fresh, dripping blood. For maximum realism and dramatic contrast, the drips should be applied using a glossy top coat over the color, ensuring the surrounding nail area remains strictly matte. Alternatively, introduce structure and sparkle using metallic elements. Apply silver chain decals or individual jump rings directly to the matte black nails. These require a strong adhesive, such as builder gel or specific nail art glue, cured thoroughly under a lamp. For the studded heart outlines, use a wax picker tool to meticulously place small silver rhinestones to trace a flawless heart shape on the nail center, securing them with a thin layer of topcoat applied only around the base of the studs to maintain the matte integrity of the background.
To ensure these elaborate designs last through any occasion, encapsulation is key, especially for hardware and larger decals. After placing chains or studs, use a thick layer of clear builder gel or a non-wipe glossy top coat to solidly anchor the metallic piece, focusing on sealing the edges while allowing the chain texture to remain visible. For the simple, solid red or silver outlined hearts, precision is paramount; utilizing a steady hand or specialized stencils will yield the best results. An expert tip for maintaining the perfect matte look is to protect the finish during the application of glossy details—any residue or smudging of the glossy coat onto the matte surface will compromise the desired texture. If the matte finish dulls over time, a quick, fresh application of a matte top coat can instantly revive the deep, velvety appearance, ensuring these dark, romantic designs remain striking and subversive.
16 Stunning Prom Nails
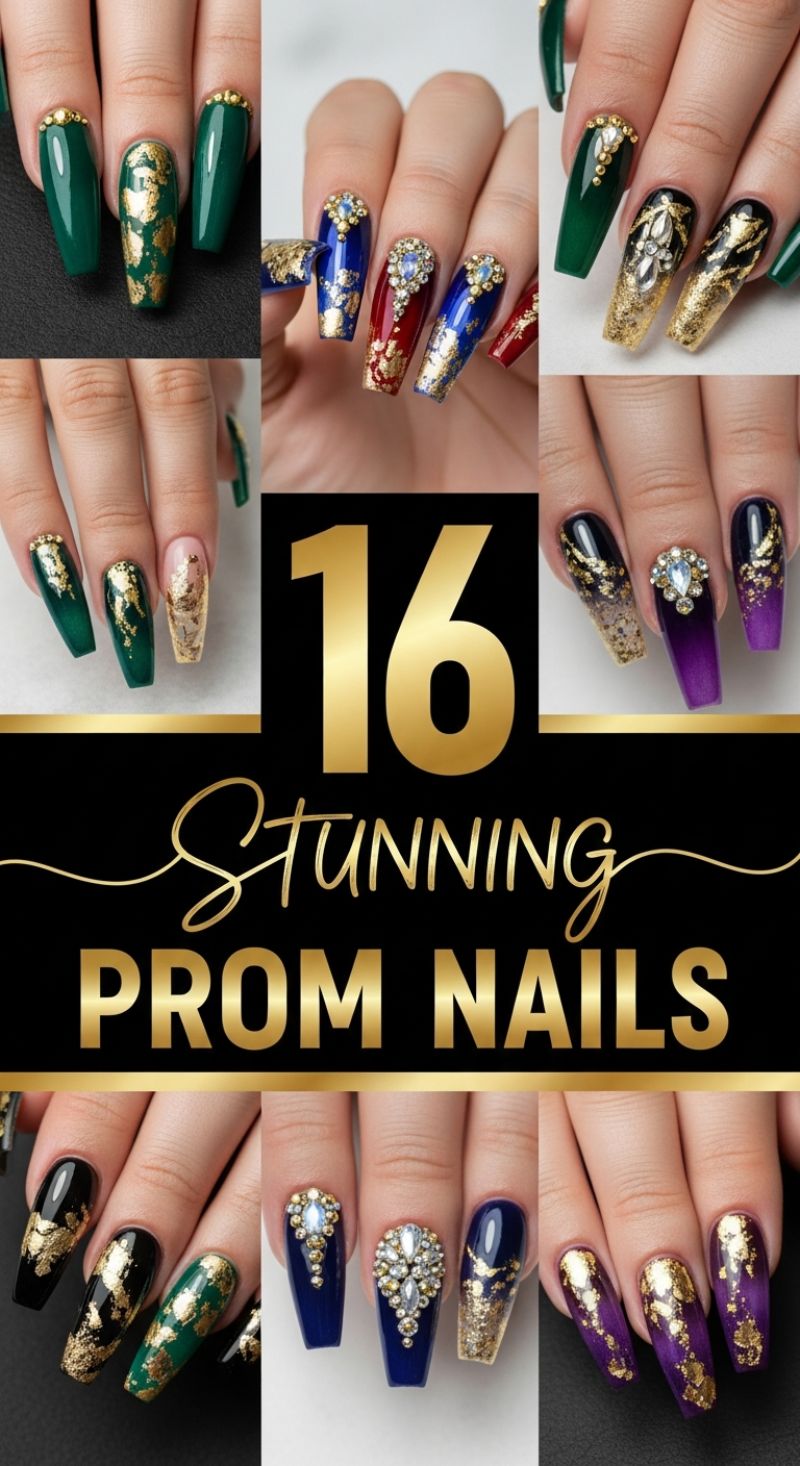
This collection of prom-ready nail art epitomizes high-end glamour, utilizing rich jewel tones and luxurious gold foil to create a regal, statement look. The aesthetic relies heavily on the striking contrast between deep, opaque base colors—such as emerald green, royal sapphire, and deep purple—and the textured, non-uniform application of gold flakies or leaf. This technique offers an organic, expensive feel, mimicking shattered gold across the surface, which is far more dramatic than simple metallic polish. These designs are ideally suited for longer shapes, specifically coffin or ballerina styles, as the extended canvas allows for maximum impact from both the foil artistry and the often-included, elaborate rhinestone clusters. The foundation of this look is a flawless, high-gloss finish, ensuring the vibrant colors and the shimmering gold catch the light from every angle, making them perfect for formal evening events.
To recreate this level of complexity, start with proper preparation, ensuring the extension or natural nail is shaped perfectly before applying a gel base coat. After two coats of your chosen deep jewel tone, it’s time for the signature element: the foil. Apply a specialized foil transfer gel only to the areas where you desire the gold effect, which may include partial coverage, a stunning ombré effect from the tip, or a random, marbled distribution. Cure the transfer gel thoroughly until it reaches maximum tackiness, then press the gold foil sheet firmly, rubbing to ensure adherence before peeling back sharply to leave the metallic pattern. For the dramatic statement nail, use a strong, thick builder gel or dedicated gem glue to anchor large, multi-faceted rhinestones, often arranging them in a chandelier or teardrop pattern near the cuticle line and finishing the design with smaller pavé stones for added brilliance.
Expert advice for maintaining these luxurious manicures throughout the night is crucial. When incorporating large gems, always ensure the topcoat seals the edges of the design and the loose foil but *do not* cover the flat surfaces of the central rhinestones, as this significantly dulls their shine. Use a high-quality, non-wipe top coat, applying two thin layers over the entire nail (avoiding the gem facet tops) and carefully capping the free edge to prevent chipping of the foil details. Notice the versatility in the image; designs can range from mixed-color sets (like the red, white, and blue combination) to deep purple-to-black ombré bases. When combining colors in one set, maintain design cohesion by using the gold foil and rhinestone clusters as unifying elements, ensuring the final result is cohesive and utterly breathtaking for prom.
Relaxing Beach Nails: Seashells, Starfish, and Teal Tides
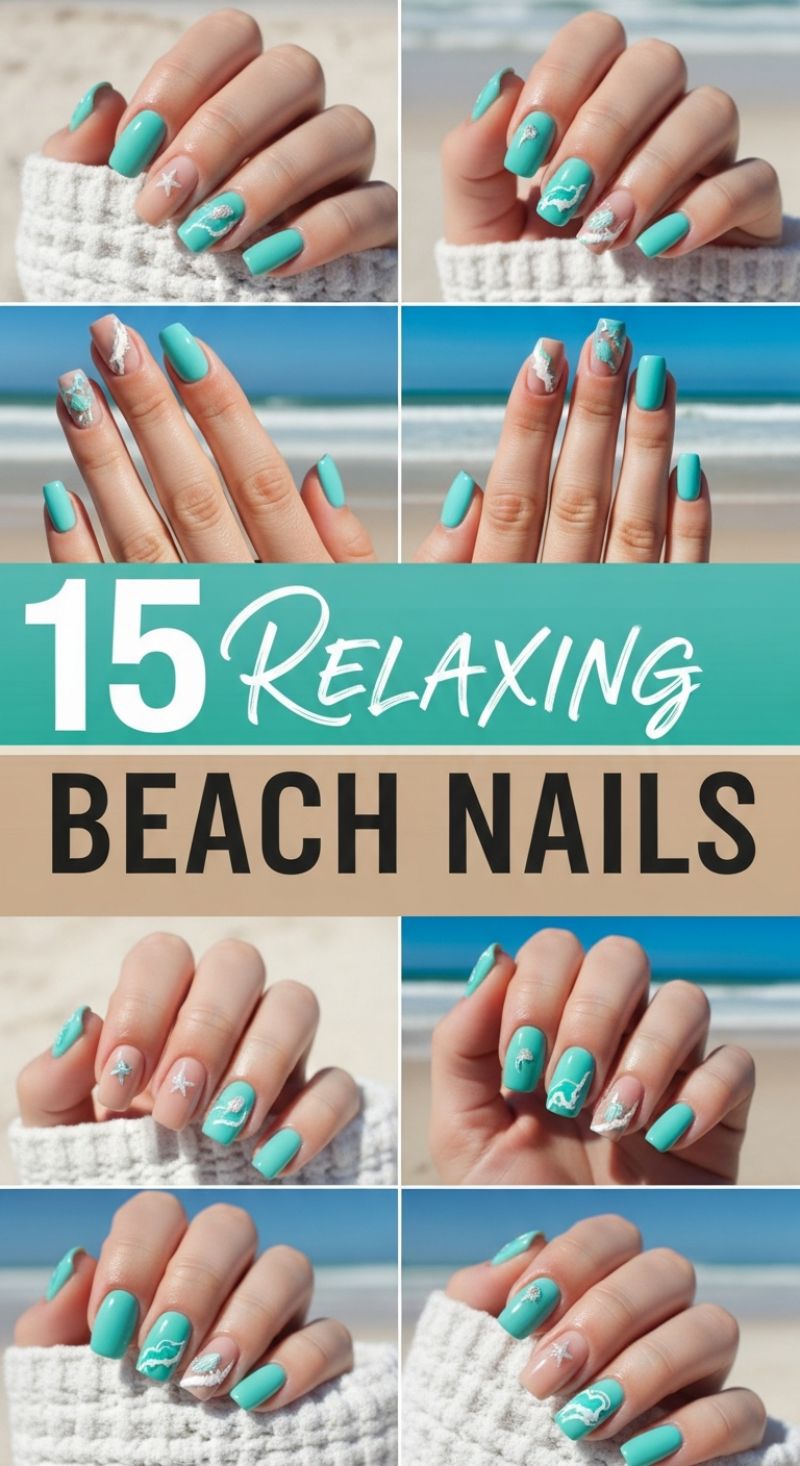
The ‘Relaxing Beach Nails’ design captures the serenity of the ocean with a stunning blend of tropical turquoise and delicate seaside motifs. The foundation of this look is a striking teal shade, reminiscent of clear ocean water, paired expertly with a sheer nude base coat used as negative space to simulate the sand or the natural nail bed. To achieve this polished look, begin by prepping your nails into a neat square-oval (squoval) shape, which is flattering and minimizes breakage. Apply a high-quality base coat. For the solid color nails (typically the thumb, pinky, and one accent finger), apply two smooth coats of the vibrant teal polish. For the key accent nails, apply one coat of a semi-sheer milky white or nude polish. This contrast is fundamental, as it allows the intricate white detailing to truly pop against the neutral canvas, giving the design depth and preventing the overall manicure from appearing too cluttered.
The artistry in this beach-themed manicure lies in the meticulously placed elements: ocean waves, starfish, and delicate seashells. On the nude-based nails, the popular ocean wave effect is created using a fine striping brush and opaque white polish. Start the wave pattern near the free edge, creating sweeping, curved lines. Immediately after applying the line, use a clean, dry detail brush or a fine dotting tool to gently stipple and feather the edges of the white polish. This technique mimics the light, foamy texture of sea spray hitting the shore. For added dimension, integrate micro-silver glitter or iridescence within the wet white foam before curing or drying. For the detailed starfish and seashell elements, professional-grade nail stamping plates or delicate water decals offer the highest precision and consistency. If you opt for 3D elements, such as tiny resin starfish charms, use a high-viscosity clear gel or dedicated nail glue to ensure secure placement, pressing firmly for several seconds, which is crucial for a durable summer manicure.
Longevity is key when creating a summer look that needs to withstand sun, sand, and salt water. Once all designs are completely dry and cured, apply a generous, high-gloss top coat. It is essential to ‘cap the free edge’ of every nail—meaning you brush the topcoat horizontally across the very tip of the nail—to seal the layers and prevent premature chipping. If you’ve incorporated 3D embellishments, carefully paint the top coat around the base of the charm to anchor it securely, but avoid painting over the entire piece if it dulls the sparkle or detail. This step is particularly important for beach vacations. Finally, hydrate the surrounding skin by massaging a high-quality cuticle oil into the nail beds. This offsets the drying effects of the sun and salt, keeping your manicure looking salon-fresh and ensuring your ‘Relaxing Beach Nails’ are vacation-ready for the duration of your trip.
20 Fresh Looks: Mastering Neon French Tips and Springtime Nail Art
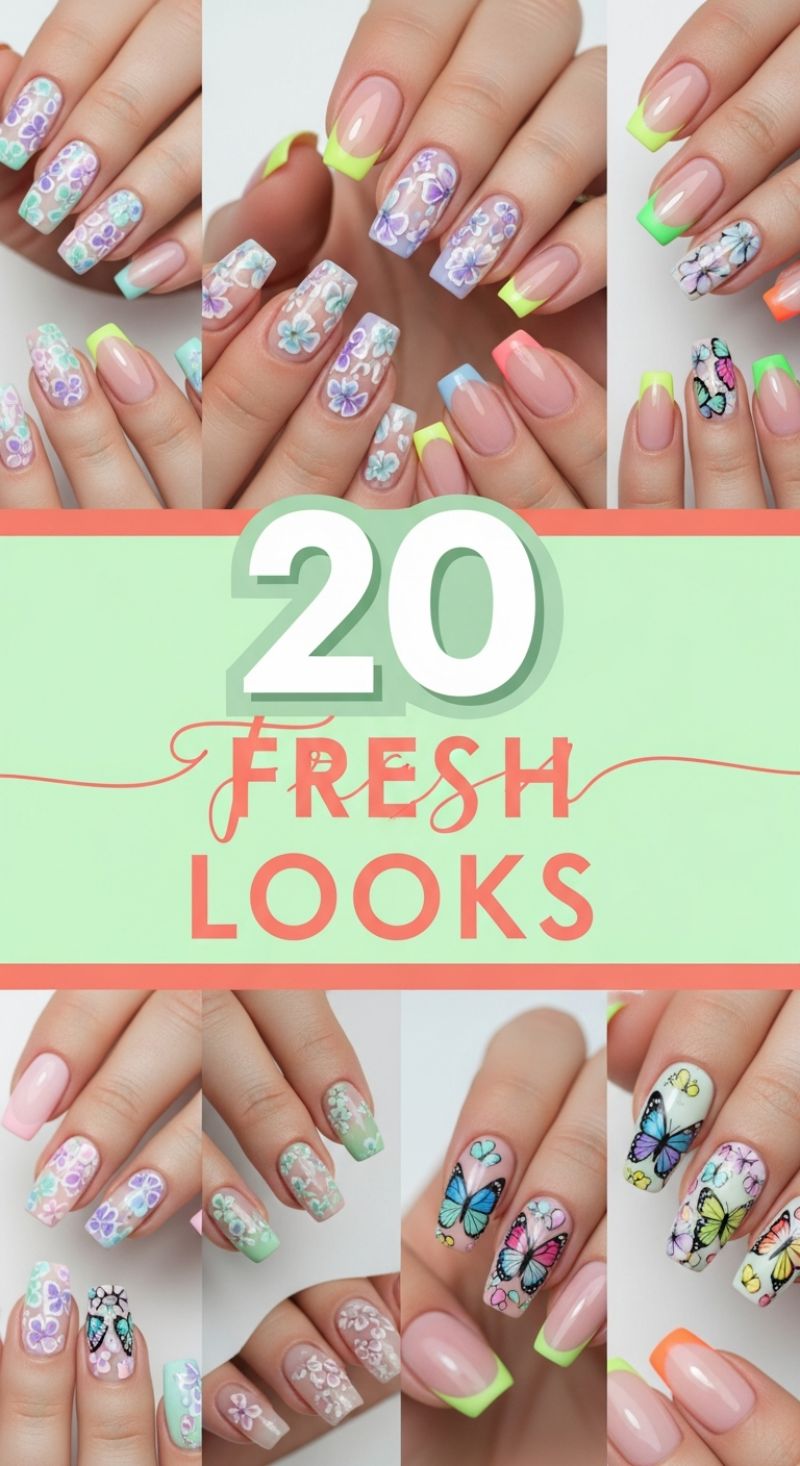
These 20 fresh looks offer the ultimate inspiration for transitioning your manicure wardrobe into spring and summer, perfectly blending classic French elegance with playful, vibrant nail art. The key to achieving this modern aesthetic lies in contrast: pairing a soft, milky nude base coat with high-impact elements like neon tips, delicate florals, and detailed butterfly accents. To recreate the colorful French tips seen throughout this collection, begin by meticulously preparing the nail bed and applying a sheer, natural base coat—this mimics the healthy look of a natural nail plate. Once the base is cured, select your vibrant tip color (think electric lime, neon coral, or pastel lavender). Use a fine-tipped liner brush or a specialized curved stencil to paint a thin, precise line along the free edge of the nail. For a more subtle yet equally fresh effect, consider painting just the corners of a square tip, leaving the center of the free edge clear, offering a modern twist on the traditional smile line.
To integrate the stunning floral and butterfly art, you will be working with thin, translucent layers to maintain that ‘fresh’ and airy appearance. For the floral designs, start by lightly dotting clusters of white polish to create the base shape of the petals. Before fully curing, use highly pigmented yet slightly sheer pastel shades (mint, lilac, baby blue) applied via a small dotting tool or fine brush to fill in the color, allowing the white underneath to create depth and highlight. The goal is a watercolor-like effect, not heavy opacity. The detailed butterfly designs, often reserved for accent nails, require precision. While freehand painting is possible for experts, high-quality stamping plates or custom water-slide decals are the easiest route for achieving the complex symmetrical wings and contrasting black outlines. Always ensure the base layer underneath the art is fully cured and minimally tacky to allow the art elements to sit flat and smoothly without dragging.
Longevity and polish are paramount for making these intricate designs look professional. After completing all art elements, apply a high-gloss, non-yellowing top coat liberally, encapsulating the design to protect it from chipping and sun exposure (which can dull neon pigments). A crucial expert tip is balancing the designs across your hands; you don’t need all ten nails to feature complicated art. Notice how the images perfectly balance intricate floral nails with simple, single-color French tips and bold butterfly accent nails. This strategic placement prevents the look from becoming overwhelming and ensures each design element can truly shine. These manicures are versatile enough for daily wear yet sophisticated enough for spring weddings or summer festivals, capturing the spirit of warm weather through cheerful color and refined detail.
8 CHIC STELLIO DESIGNS

The “8 Chic Stellio Designs” showcased here blend high-octane luxury with cosmic fantasy, creating a truly arresting look suitable for bold occasions. This aesthetic primarily relies on two contrasting yet complementary finishes: high-gloss chrome and deep, intricate galaxy art. To achieve this, start with clean, well-prepped coffin or stiletto nails, as the length and shape maximize the visual impact of both the reflective chrome and the sprawling nebula designs. The key to nailing the metallic element (like the stunning blue and silver mirror finishes shown) is using a true non-wipe top coat over your cured gel base; this ensures the chrome powder adheres smoothly and reflects light flawlessly, eliminating streaks or patchy spots. Expert advice suggests polishing the chrome powder onto the warm, slightly tacky surface of the cured top coat immediately, buffing until you achieve the desired mirror effect before sealing it with another layer of non-wipe top coat.
Mastering the cosmic element requires a detailed, layered technique. Begin by applying a dark, opaque base, typically navy blue or black gel polish. Once cured, use a small piece of sponge or a detail brush to softly dab contrasting colors—such as vibrant indigo, magenta, and turquoise—onto the nail surface. The colors should be diffused and blended while still wet, simulating the gaseous clouds of a nebula. Alternatively, use an alcohol-soaked brush to push the colors gently for a smoky, ethereal effect. The “star” element is crucial for realism: use a fine-tipped brush or a specialized splatter brush with white gel polish to create tiny, scattered dots, focusing heavier concentrations near the bright nebula regions. Strategically placing slightly larger dots for distant planets adds depth and interest. Finish the galaxy nails with a high-shine topcoat to magnify the deep-space effect.
The final touch for the Stellio design is the strategic placement of rhinestones and metallic accents, which provide necessary contrast and dimension. As seen in the combinations, the designs often pair a solid chrome nail with a detailed galaxy nail, using the gems as the uniting factor. For secure gem application, use clear builder gel or specialized rhinestone adhesive placed where the cluster will sit; this provides a robust anchor. Place Swarovski crystals or high-quality gems either clustered near the cuticle (like the popular “bubble” effect) or strung in a clean line down the center of the nail, enhancing the elongated shape. Ensure the rhinestones are fully encased at the base but not covered on top, preserving their sparkle. This careful combination of hyper-reflective surfaces and deep-space dimension results in a cohesive, avant-garde manicure that is both sophisticated and visually striking.
Rustic Western Nails: Cow Print, Turquoise Gems, and Chrome Accents
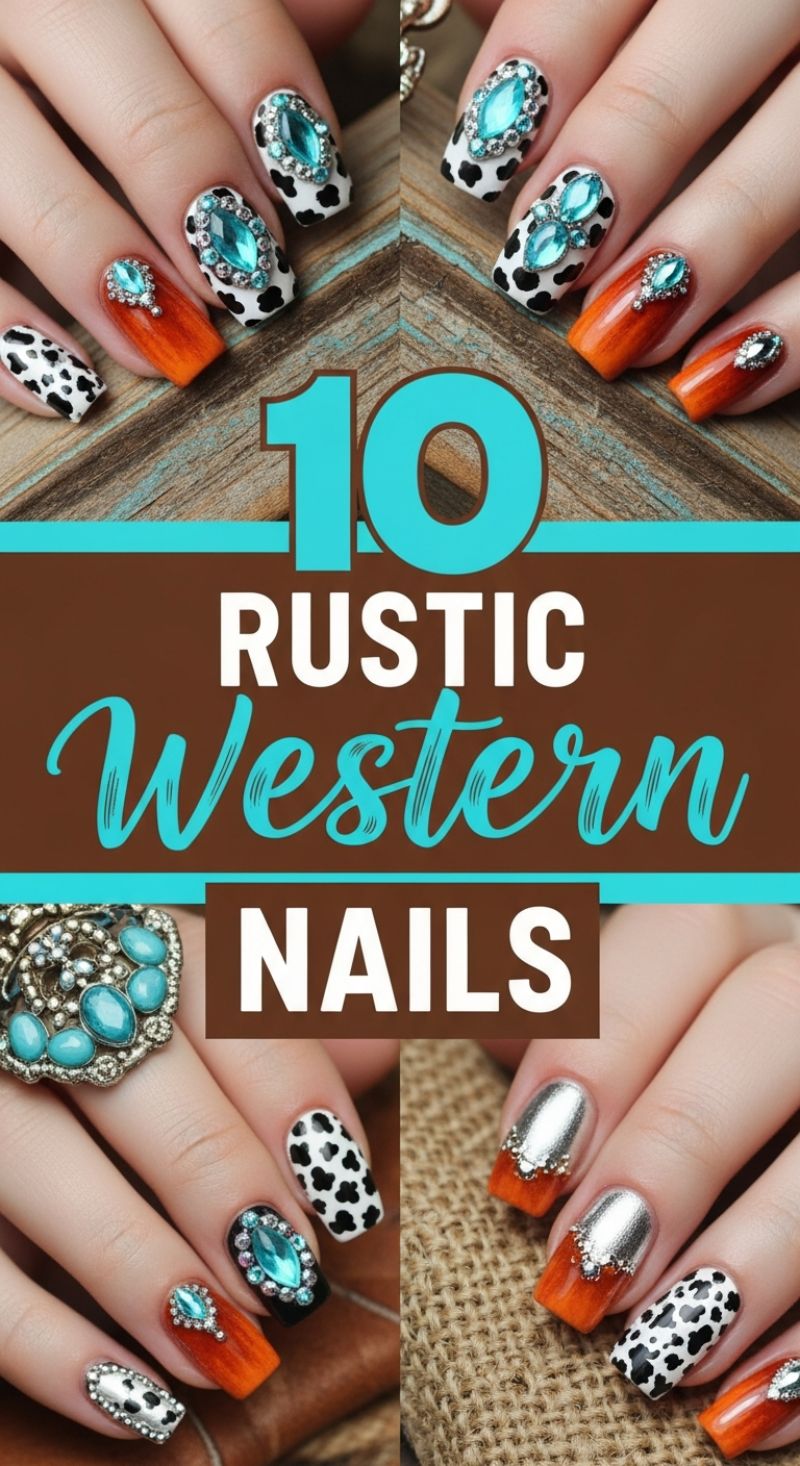
The Rustic Western trend merges high-fashion nail artistry with rugged, Southwestern inspired aesthetics, making use of earthy tones, high-contrast patterns, and prominent gemstone embellishments. To recreate this dynamic look, begin by focusing on the base colors and patterns. The foundational elements are the classic cow print and a rich, burnt orange or rust color, symbolizing leather or terracotta. For the cow print, apply a flawless white base coat. Once dry, use a fine detail brush or a medium-sized dotting tool dipped in black polish to create irregular, organic spots. Ensure the spots vary in size and shape to mimic a natural hide pattern, letting some run off the edge of the nail for a more authentic, cropped look. For the solid accent nails, apply the rust-colored polish, aiming for full opacity. Expert tip: for a truly rustic feel, consider finishing the solid colored nails with a high-quality matte topcoat to give them a textured, leather-like appearance, contrasting beautifully with the high-shine jewels that follow.
The defining feature of this Western style is the opulent ‘turquoise’ jewelry element. Select large, prominent oval or teardrop-shaped rhinestones in a vibrant teal or turquoise hue, often framed by smaller silver or clear gems. These statement stones are typically reserved for the ring or middle fingers, placed centrally over either a cow print or a solid black/orange nail base. For large gems, standard topcoat is insufficient for security; use a thick application of builder gel or a specialized nail adhesive to set the stone firmly in place, curing thoroughly if using gel. To enhance the jewelry effect, use tiny silver microbeads or small circular studs to create a bezel or prong setting around the main gem, giving the appearance of a finely crafted piece of antique silver jewelry. This careful placement and layering of stones is crucial for achieving that authentic Southwestern bling.
To complete the rugged yet luxurious ensemble, incorporate metallic silver accents, often seen as a reverse French manicure or half-moon design, reminiscent of hammered silver or chrome cowboy hardware. Achieve this look by applying a liquid chrome polish to the base of the nail, covering the lunula area, while leaving the rest of the nail the rust color. To separate the metallic cap from the base color, line the curve with a row of tiny silver rhinestones or a thin strip of silver glitter polish, ensuring a crisp and clean transition line. When combining all these elements—cow print, rust polish, turquoise gems, and chrome—remember to maintain balance. Use the boldest elements (the large gems) sparingly on one or two fingers per hand, allowing the cow print and solid colors to serve as supportive, grounding textures. Finish the entire manicure with a long-lasting, high-gloss topcoat over the jeweled and chrome nails, reserving the matte finish for only the rustic-colored sections to maximize textural depth and contrast.
11 Romantic VDay Trends
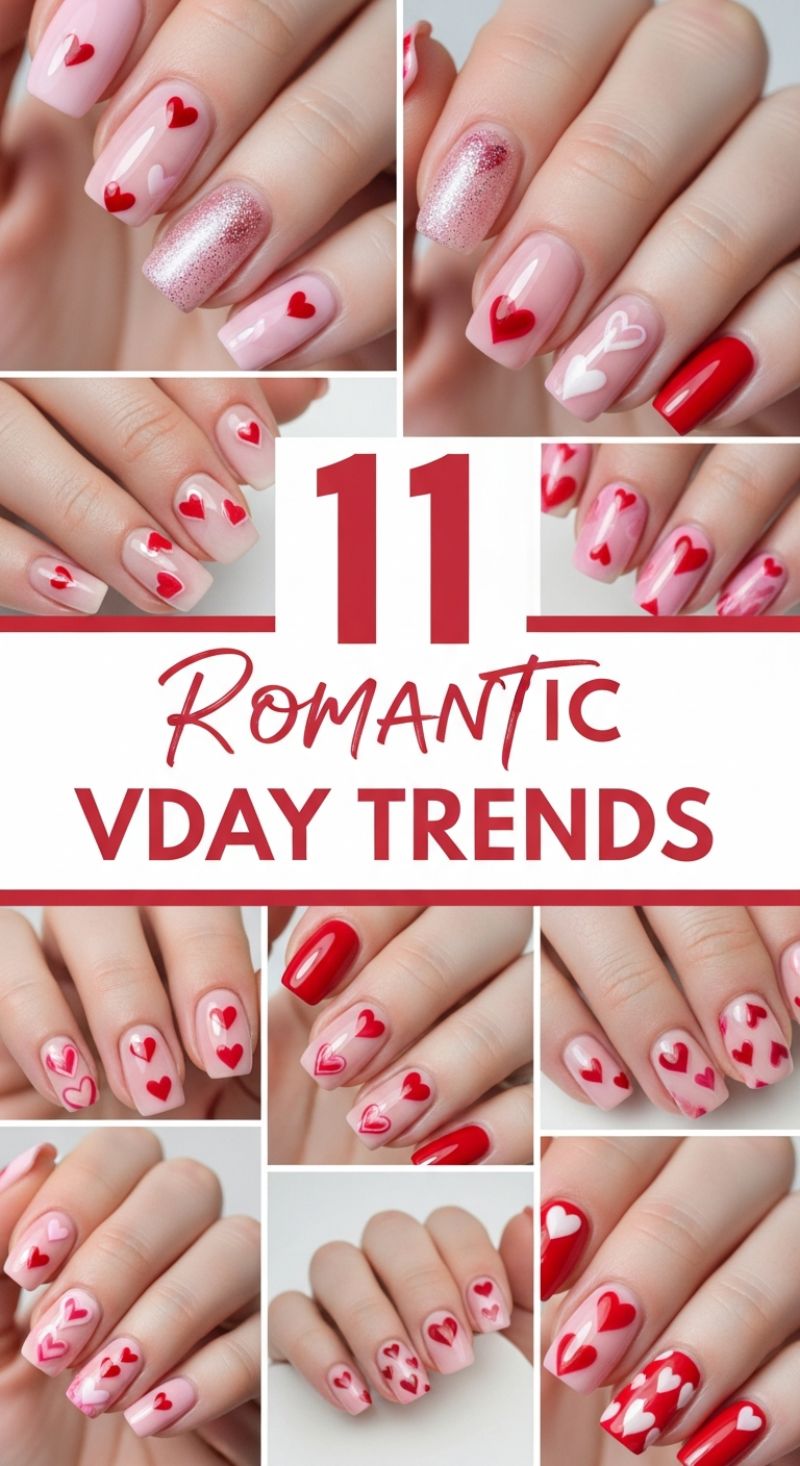
The ‘Romantic VDay Trends’ showcased here offer the perfect blend of sweet femininity and classic glamour, relying heavily on sheer bases, vibrant reds, and delicate heart motifs. To recreate this high-end look, start with immaculate nail preparation: gently push back cuticles and lightly buff the nail plate to ensure a smooth canvas. The foundation is crucial; apply a thin, even coat of a milky pink or sheer nude jelly polish. This provides a natural, soft-focus effect that makes the bold red hearts truly pop without feeling heavy. Cure or let this base dry completely. For designs featuring glitter, select a sheer, finely milled holographic or rose-gold glitter polish and apply it strategically to one accent nail, often the ring finger, ensuring the tips are perfectly capped for maximum shine and wear time. Expert tip: Using a silicone brush to gently press the glitter down after application can prevent a bumpy texture under the top coat, ensuring a salon-quality finish.
Mastering the perfect tiny heart is achievable using either a specialized dotting tool or a fine-tipped art brush. The most efficient technique involves placing two small dots side-by-side where the lobes of the heart will rest, then using the tip of the tool or brush to drag the product down swiftly to connect them at a point. For variety, replicate the different heart styles seen in the collage: try minimalist designs featuring two small red hearts per nail for a subtle look, or go bold by sketching outline hearts in crisp white polish for a dimensional effect. The contrast of solid red accent nails (often on the pinky or thumb) serves to ground the look and integrate the classic Valentine’s color palette. When executing layered designs, such as the full-coverage heart patterns or the Cupid’s arrow motif, ensure each color layer is thin and fully set before moving on to the next detail to prevent smudging or discoloration.
Once all designs are complete and fully dried or cured, sealing your artwork is essential for longevity. Apply a high-gloss, protective top coat evenly over the entire nail surface, paying close attention to encapsulating any glitter or detailed line work. Ensure the top coat is applied relatively quickly and smoothly so as not to drag the heart designs. For clients desiring an extra sophisticated finish, consider opting for a high-quality matte top coat over the base color before adding the glossy red hearts; this creates a striking textural contrast that elevates the manicure. These designs are highly adaptable to different nail lengths, working beautifully on short, squoval nails as well as medium almond shapes. Remember that precision is paramount; investing in quality micro-liner brushes and dotting tools will make recreating these romantic, trending VDay looks significantly easier and more professional.
15 Gorgeous NAIL DESIGNS

Achieving these gorgeous, love-themed nail designs starts with a meticulous foundation, typically utilizing durable shapes like the coffin or tapered square seen throughout the collection. The signature color palette centers on a classic, vibrant red, crisp white, and soft nude/clear bases, perfect for romantic occasions or adding a pop of color. To replicate the solid high-gloss red nails, ensure your base coat is completely cured and the nail bed is perfectly prepped. Apply two thin, even coats of a highly pigmented true red gel polish, carefully “floating” the brush over the second coat to prevent streaks and achieve that mirror-like finish. For the contrasting white accents, choose an opaque, self-leveling white polish and maintain very clean edges around the cuticle. Expert tip: Before curing your colored polish, use a fine detail brush dipped in acetone or cleanser to clean up any slight overlap onto the skin, guaranteeing a sharp, professional perimeter for all 15 designs.
The standout feature across these designs is the varied use of hearts and glitter textures, which provide depth and visual interest. To create the delicate “floating heart” look on a nude or clear base, start with a sheer milky white or soft pink builder gel. Once cured, use a small dotting tool or the tip of a fine liner brush and dip it into the vibrant red polish. Place two small dots next to each other, slightly above the desired center, and then drag the brush down and inward to meet at a sharp point, forming the heart shape. For the impactful red glitter French tips (or reverse French tips), paint the curve directly onto a nude base using a densely packed red micro-glitter polish. To prevent the finished design from feeling chunky or bumpy, pat the glitter product onto the nail rather than brushing, and seal immediately with two layers of thick topcoat to smooth the texture. Mastering the white glitter ombre shown requires a clean blending technique: start with a solid red base, then gently dab a makeup sponge loaded with white iridescent glitter polish onto the tips, gradually fading the density towards the center for a flawless gradient effect.
When combining these gorgeous looks across a single hand, balance is key to prevent the design from looking overwhelming. Treat the solid color nails (the vibrant red) as your anchors, framing the more intricate accent nails. For instance, pair the full red nails with one or two accent nails featuring the delicate scattered red hearts on a clear base, and perhaps one bold white nail featuring a single, centered red heart or a glitter French design. This ensures visual harmony and sophisticated variety. To guarantee long-lasting wear, especially over textured glitter, always carefully cap the free edge completely with your topcoat to seal the design and prevent chipping. Cure the final topcoat layer thoroughly, ensuring it’s a non-wipe formula for maximum, lasting shine. If drawing precise shapes like hearts proves challenging, high-quality vinyl stencils or small nail art stickers can simplify the application process while maintaining a perfectly professional appearance.
10 COZY MANICURES
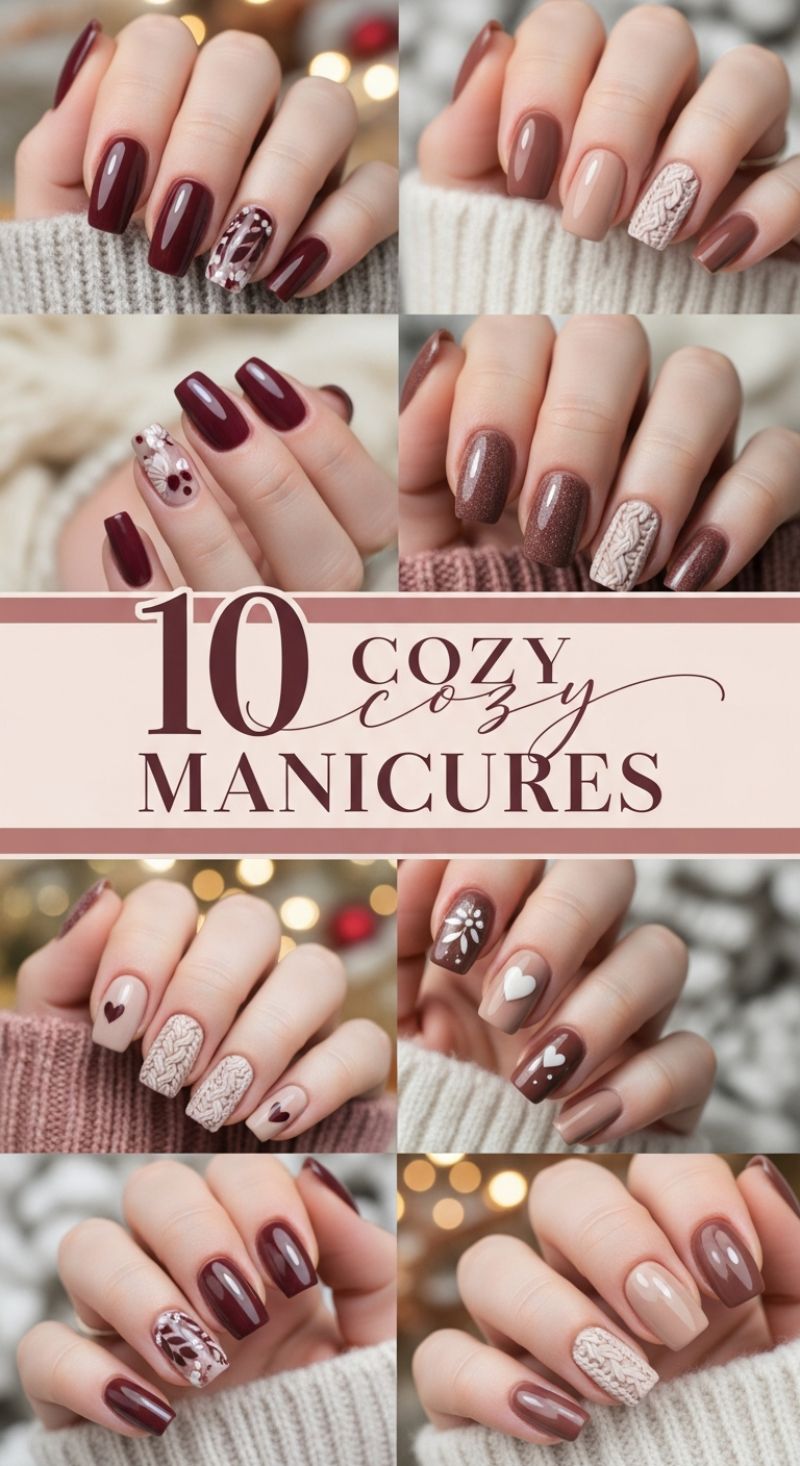
The “10 Cozy Manicures” collection perfectly encapsulates the warmth and rich texture of the cooler months. The featured designs utilize a decadent palette of deep burgundies, rich maroons, creamy taupes, and various shades of warm chocolate brown. This aesthetic is achieved by combining high-gloss solid colors with matte or textural finishes. The visual centerpiece of these cozy looks is the iconic cable knit or “sweater weather” nail art. This 3D design instantly evokes the feeling of wrapping up in a thick wool blanket, making it the definitive winter texture. By pairing these deep, sensual colors with soft nudes and textured accents—such as delicate white leaves, simple hearts, and glitter accents—the manicures achieve depth and sophistication suitable for fall and winter occasions. The cohesion in this set comes from the carefully curated color scheme that mimics textiles like wool and cashmere, ensuring every look feels inviting and luxurious. Achieving the sought-after 3D sweater look requires specialized technique and patience. Start by applying your chosen base color (often a creamy nude or taupe) and curing it, then applying a matte top coat to the accent nails. The key to the raised texture is using a thickened gel polish, sometimes mixed with a small amount of clear acrylic powder for extra structure and durability. Using a very fine, long striping brush, meticulously draw the cable knit pattern—vertical lines, small dots, and precise crisscrosses—over the matte finish. Apply the gel thickly enough to hold its shape, then flash cure to prevent spreading. For maximum dimension, you may need to apply a second, thinner layer of the pattern over the first and cure again fully. For the accent nails featuring simple decals like hearts or snowflakes, use a highly pigmented contrasting polish (e.g., white on dark brown, or burgundy on nude) applied with a dotting tool or fine detail brush. Precision is paramount for clean, professional edges, especially when executing tiny polka dots or delicate leaf veins.
To ensure your cozy manicure lasts through the season, focus on proper preparation and diligent aftercare. The rich, dark colors showcased here can easily stain cuticles and natural nails, so always use a reliable, high-quality base coat to prevent discoloration. When dealing with texture like the cable knit, sealing the edges of the nail properly is crucial during the top coat application to prevent any potential lifting or snagging on clothing. After the final cure, always nourish the surrounding skin with a rich cuticle oil, as the colder months tend to dry out hands quickly, which can make even the most perfect manicure look less polished. Stylistically, these colors are highly adaptable; if you prefer less commitment, opt for just two accent nails (like the ring and middle finger) featuring the texture or complex design, leaving the rest solid and glossy. When selecting your specific brown or nude shade, ensure it complements your skin tone—cooler undertones pair well with taupey browns and dusty roses, while warmer undertones shine with caramel, cocoa, and reddish-brown hues. This careful balance ensures your cozy manicure is not only seasonally fashionable but also perfectly tailored to enhance your natural beauty.
14 Luxe Purple Nails

This stunning collection showcases the ultimate guide to creating opulent purple manicures, blending rich jewel tones with dazzling metallic accents. The primary palette mixes deep, glossy aubergine or royal purple with soft, airy lavenders and lilacs, providing essential depth and contrast across the set. The key to achieving this specific ‘luxe’ aesthetic is the careful balance between high-gloss solid finishes and textured glitter applications. Notice the consistent use of silver—whether it’s a fine dust of glitter, chunky holographic flakes, elegant chrome striping, or sparkling rhinestone clusters. Silver acts as the perfect cool-toned, high-impact counterpoint to the dramatic intensity of the purple, ensuring the manicure reads as regal and sophisticated, making this design highly adaptable for evening wear, festive events, or anyone aiming for a high-fashion statement.
Achieving these intricate purple designs requires precision, especially when layering complex textures and applying embellishments. Start by ensuring your nails are perfectly prepped and filed into the desired sleek almond or tapered oval shape, as this profile best complements the inherent drama of the deep colors. For the solid areas, two to three coats of highly pigmented gel polish are essential to achieve that non-streaky, glass-like finish seen in the photos. When integrating silver glitter, you have several options: use a dense, fine-grade glitter polish for full-coverage accent nails, or apply a light scattering of holographic dust near the cuticle line over the deep purple base for a sophisticated ‘sugar effect’ or subtle sparkle gradient. To replicate the elegant silver stripe patterns or criss-cross designs, use ultra-thin striping tape or a fine detail brush dipped in metallic silver gel paint or chrome powder mixed with top coat. Expert advice dictates curing each painted line immediately to prevent the pigment from spreading before sealing the entire design with a high-shine, non-wipe top coat.
For maximum durability and a lasting shine that maintains the sharp structure of the almond shape, these highly stylized manicures are best executed using professional-grade hard gel or builder gel systems, particularly under the heavy glitter elements. When incorporating dimensional details, such as the 3D molded heart charm, ensure it is anchored securely using builder gel or specialized nail glue, and limit these high-profile embellishments to one or two fingers per hand to maintain an air of sophistication rather than clutter. To adapt this design, consider experimenting with magnetic ‘cat-eye’ purple polishes to introduce shifting, dimensional color that catches the light differently, or swap the cool silver accents for warm rose gold for an autumnal or romantic twist. Finally, elevate the overall ‘luxe’ ensemble by accessorizing with delicate silver or diamond rings that mirror the metallic sparkle on the nails, turning the manicure itself into a focal piece of your personal style.
Sweetheart Nail Designs: Combining Classic French Tips, Glitter Gradients, and Playful Accents
This curated selection of manicures blends timeless techniques with romantic and whimsical accents, making it ideal for occasions from Valentine’s Day to summer parties. To achieve the popular glitter gradient look, start by preparing the nail with a sheer, milky pink or nude base coat. Once dry, apply a high-density, iridescent or holographic purple-pink glitter polish. Instead of painting, use a small makeup sponge or a dedicated nail art sponge to dab the glitter directly onto the free edge of the nail, concentrating the product heavily at the tip. Feather the application upwards toward the cuticle, using lighter pressure and less product to create a seamless ombre transition. For the playful silhouette accents, such as the white heart or black mouse ears shown, utilize a small detail brush or adhesive vinyl stencils. These simple, crisp graphic elements work best when applied over a glossy, opaque nude base, ensuring they stand out without overwhelming the subtle glitter gradient on adjacent nails. Always encapsulate glitter and decals with two generous layers of high-shine top coat to ensure longevity and a smooth finish.
For those seeking a classic look with a romantic twist, the French manicure variations offer incredible versatility. The bottom left design incorporates a traditional white French tip on the perimeter nails, but shifts focus to the accent nails (ring and middle finger) which are covered in scattered hearts. To recreate this, apply a sheer pink base coat. For the heart accents, use a fine dotting tool and highly pigmented red and white polishes. The easiest method for perfect hearts is to place two dots side-by-side, then gently drag a fine brush or the tip of the dotting tool down from the center point to meet, forming the V-shape base of the heart. Expert tip: keep the hearts varied in size and slightly random in placement to maintain a natural, playful energy. Alternatively, the bold red French tip shown provides a chic, modern update. Apply an opaque, vibrant red to the free edge, extending the curve slightly further back than a traditional white tip for a bold color block. Elevate this design further by using a striping brush and white polish to paint a thin, defining line just above the red tip, creating a striking double French effect that frames the nail bed.
The overall aesthetic centers around maintaining clean, well-shaped squoval nails and a cohesive nude base palate, which allows the various patterns to be mixed and matched across both hands without clashing. When combining these distinct styles—from the high-impact glitter fade to the detailed heart art—we recommend dedicating only one or two nails per hand to the most intricate design. For example, pair a full set of the purple glitter ombre with a single accent nail featuring a black silhouette, or combine the red French tips with a nude nail showcasing small scattered white hearts. This balancing act ensures the manicure remains sophisticated and wearable, suitable for everyday flair or themed events. Remember to hydrate cuticles regularly, as clean lines and vibrant colors demand perfectly prepped skin surrounding the nail bed.
12 SIMPLE FUNKY NAILS
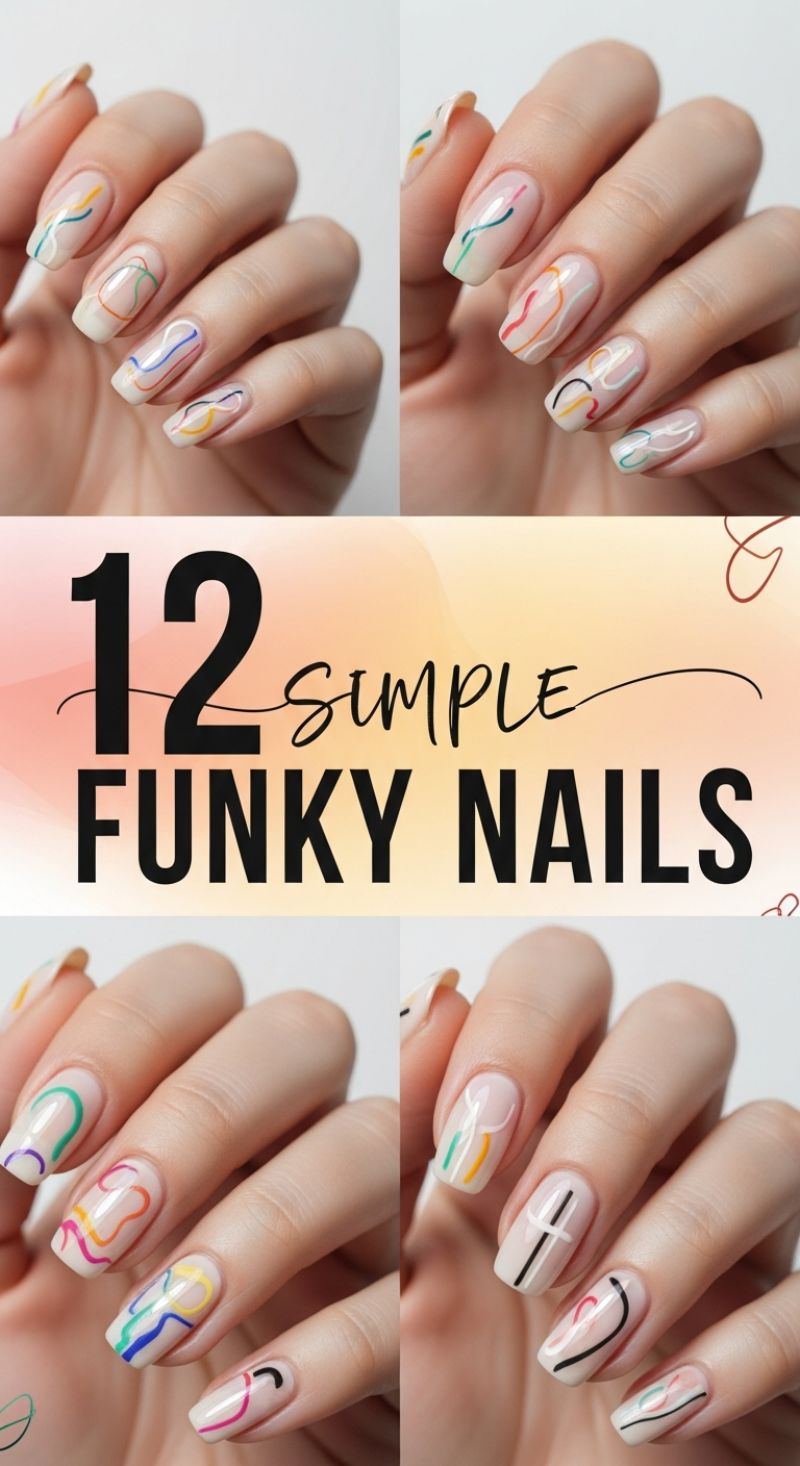
The “Simple Funky Nails” trend embraces modern abstract art, transforming your manicure into a wearable masterpiece. This design features a clean, neutral canvas—achieved by applying a sheer nude or milky pink base coat—which allows the colorful line work to truly pop. The foundation of this look is the use of negative space; the colorful elements are drawn directly onto the base, leaving large portions of the natural nail visible, ensuring the design feels light and fresh, rather than heavy or overwhelming. This style is incredibly versatile, working beautifully on short or medium-length nails, particularly those shaped squoval or slightly almond. The key to mastering this look is a steady hand and a high-quality, ultra-thin detail brush (often 5mm or shorter), essential for creating the fine, continuous lines that define the “funky” aesthetic.
To recreate these intricate abstract lines, begin by ensuring your base coat is fully cured or dried. Select 3 to 5 highly pigmented gel polishes or nail lacquers in a mix of contrasting bright and deep shades (e.g., sunny yellow, cobalt blue, vibrant teal, and rich black). Start with your first color, using the detail brush to draw a single, flowing, often wavy line that travels across the nail plate, focusing on placing the line slightly off-center or looping it near the tip. Once the first line is complete and set, take your second color and draw a parallel or slightly intersecting line. The ‘funky’ element comes from the unplanned, spontaneous nature of the curves. Some nails benefit from having overlapping lines, while others look best with lines that simply mimic each other’s flow. For added dimension, use white or black lines as outlines or shadows around the colored lines, as seen in some of the designs, providing depth and a graphic edge to the composition.
For a truly professional and long-lasting finish, encapsulation is mandatory. After all the line work is complete and cured, apply a thin coat of clear builder gel or a structure gel over the entire design before sealing it with a top coat. This step not only protects the delicate line art from chipping but also smooths the surface, ensuring the finished look is seamless. Expert tip: while a high-gloss top coat enhances the vibrant colors, switching to a matte top coat can instantly elevate the design, giving it a cool, contemporary, street-style vibe, mimicking the look of painted canvas. This style is perfect for those who want a burst of color without committing to a full coverage design, making it a fantastic option for transitioning between seasons, particularly suitable for casual events, music festivals, or adding a playful touch to everyday wear.
7 GLAM BARBIE NAILS
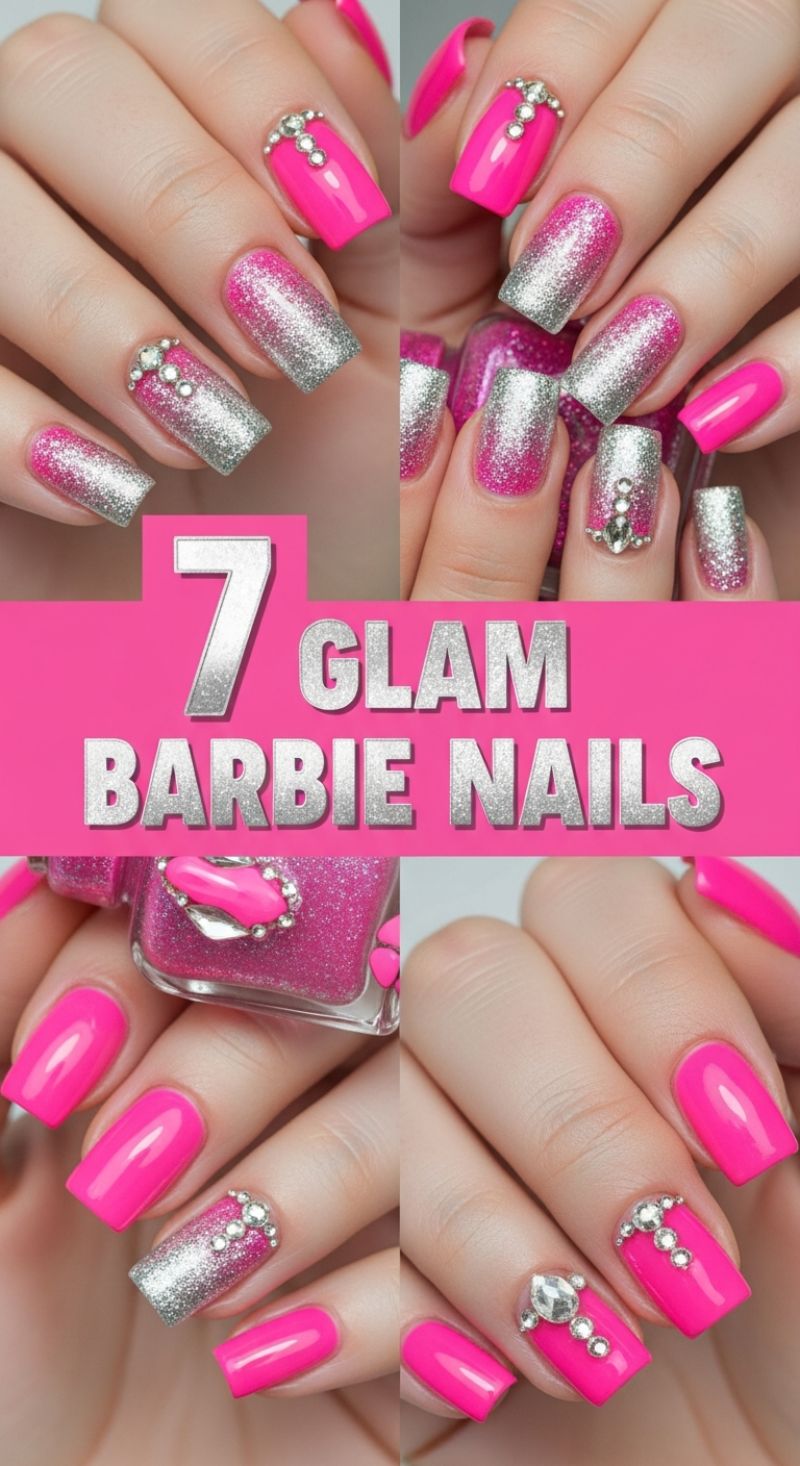
Achieve the ultimate Barbiecore aesthetic with these “7 Glam Barbie Nails,” a look characterized by its audacious blend of neon pink, sparkling silver glitter, and strategically placed rhinestones. Before diving into the color, ensure your nails are prepped: shape them into the modern square or squoval style shown, lightly buff the surface, and apply a high-quality base coat to protect the natural nail and prevent staining from the vibrant pigments. For the primary color, select an intensely pigmented, glossy neon or hot pink polish. Apply two to three thin coats to the nails you intend to keep solid (typically the pinky, index, and thumb). Allow each coat to dry thoroughly to achieve that flawless, streak-free, bubble-less finish essential for such a vivid shade. For a truly professional look, use a small detail brush dipped in nail polish remover to meticulously clean up the edges around the cuticle before sealing the color.
The key element that elevates this design is the dramatic silver glitter gradient, applied primarily to the ring and middle fingers. Start with a full coverage pink base coat on these accent nails. Once dry, use a makeup sponge or a specialized ombre brush to dab a dense, highly reflective silver glitter polish onto the tips. The technique involves concentrating the silver heavily on the free edge and gradually lessening the application as you move towards the cuticle line, creating a smooth, blended transition where the pink dominates the upper half. For the rhinestone accents, security is paramount: secure them using specialized nail glue, a thick top coat, or a clear builder gel cured under a lamp. Placement is crucial: mimic the intricate looks shown by creating an inverted ‘V’ shape following the cuticle line on the pink nails, or a cascading line down the center of the pink-to-silver gradient nails. Use a wax pencil or dotting tool to precisely pick up and place the varying sizes of clear rhinestones and larger focal gems for maximum sparkle and dimension.
Once all your rhinestones are perfectly positioned and the polish is fully set, the final step is crucial for durability: applying a brilliant, scratch-resistant top coat. Carefully float the high-shine top coat over all solid and ombre nails. When sealing the rhinestone-adorned nails, apply the top coat around the edges of the gems, avoiding brushing directly over the facets, as this can dull their brilliant shine. Alternatively, for professional-level security, use a tiny amount of clear builder gel or a specialized rhinestone sealer around the base of the stones and cure it, completely locking them into place. This vibrant, high-impact design is perfect for parties, vacations, or any moment demanding serious, playful glamour. To maintain the crispness of the neon pink and the dazzling shine of the silver, avoid prolonged exposure to harsh cleaning chemicals, and consider reapplying a fresh layer of top coat every few days to protect against chipping and maintain that essential Barbie sparkle.
9 VIBRANT NAIL IDEAS

To achieve this dazzling, carnival-ready manicure, the foundation lies in selecting the perfect triumvirate of Mardi Gras colors: vibrant purple, deep emerald green, and rich gold. Start by applying a strong base coat to protect your natural nails. For the base colors, opt for intensely pigmented holographic or micro-glitter polishes, which perfectly mimic the opulent sparkle of parade floats and beaded throws. Alternate these shades across your nails—perhaps two nails in royal purple and two in emerald green, leaving one nail (like the pinky or index finger) solid in the contrasting color. For maximum glitter density and an opaque finish like the examples shown, apply the polish using the “sponge method,” dabbing the glitter polish onto the nail with a makeup sponge; this removes excess clear suspension fluid and ensures a fully saturated, shimmering canvas ready for the elaborate embellishments.
The true artistry of this design comes from the dimensional gold accents, which elevate the look from simple glitter polish to a luxurious, themed statement. The image prominently features heavy, gold-toned charms, specifically the classic French fleur-de-lis and an intricate, stylized mascarade element. To apply these 3D embellishments securely, you must utilize a strong adhesive. Skip regular topcoats; instead, use specialized nail jewelry glue or a thick clear builder gel (if using UV/LED curing). Apply a small, strategic dab of adhesive precisely where the charm will rest, firmly press the charm onto the nail plate, and then cure or allow the glue to fully set. Expert tip: Ensure the charm is flush against the nail bed, paying extra attention to applying glue beneath any raised edges, especially around the center of the design, to prevent lifting and snagging. These heavy charms are typically best reserved for the ring and middle fingers as the primary focal points.
Finalizing this highly detailed design requires careful sealing to ensure durability without sacrificing the metallic brilliance of the 3D elements. After the base colors and charms are fully dry and secured, apply a durable, glossy top coat over all non-accented nails. When approaching the nails with the 3D gold charms, apply the top coat meticulously around the perimeter of the charm where it meets the polish, essentially sealing its edges to the nail plate for maximum security. However, it is crucial to avoid brushing the top coat directly over the top surface of the metallic gold charms themselves, as this can dull the intricate textured finish and make them appear flat or hazy. For exceptional longevity, especially with raised nail art, advise clients that proper maintenance, including avoiding harsh chemical exposure and protecting the hands, is key to keeping this show-stopping manicure perfect throughout the entire festive season.
7 Fierce Baddie Nails
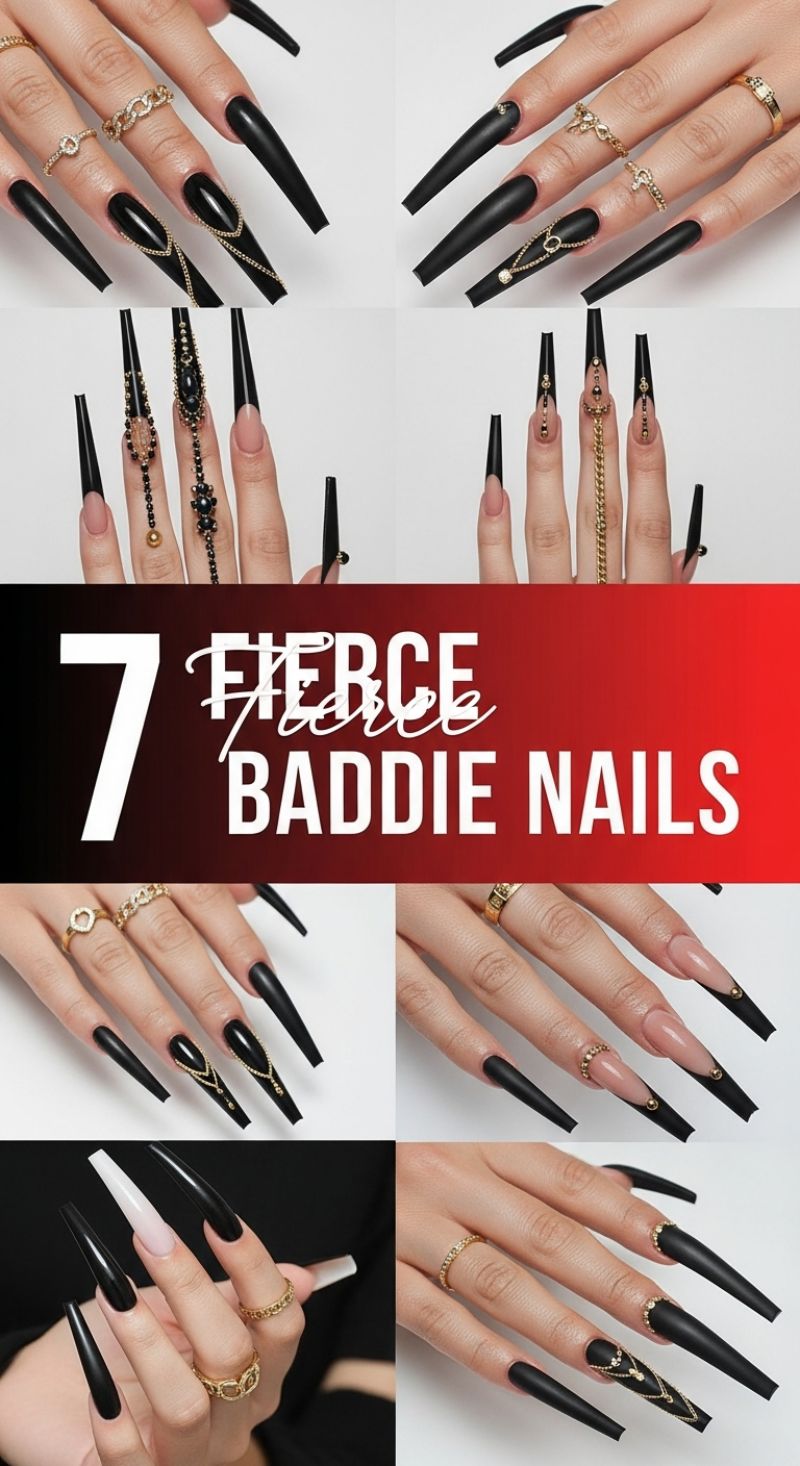
The ‘Baddie’ aesthetic is defined by unapologetic glamour, extreme length, and opulent hardware, making it a standout choice for high-drama styling. To recreate these fierce looks, the foundation is crucial: you must commit to extreme nail lengths, typically achieved through specialized extensions like long coffin, tapered square, or sharp stiletto shapes. The primary color story centers on high-contrast pairings, predominantly utilizing deep, rich black (often in a velvety matte finish to absorb light and enhance the dramatic lines) paired with natural, flawless nude or pale pink bases. For base designs, master the clean, crisp line of a black French manicure or a sharp V-tip design, ensuring the transition between the nude and black is razor-sharp. Alternatively, full matte black coverage serves as a perfect, intimidating canvas for the subsequent 3D embellishments. Remember, the quality of the base shaping and color application is paramount, as the extreme length draws immediate attention to any imperfections. Achieving this level of sleekness usually requires a highly skilled technician utilizing hard gel or acrylic systems.
The true hallmark of the fierce baddie nail style is the strategic placement of gold jewelry and hardware. These designs go beyond simple rhinestones, incorporating micro-chains, pendants, and structural elements that give the nails a luxury, customized feel. To apply these 3D elements, start by mapping out the design on two or three focal nails per hand—typically the ring finger and middle finger carry the heaviest ornamentation. Micro-chains are best secured using a specialized thick builder gel or resin, placed where the chain meets the nail plate, and then cured under a UV lamp to ensure maximum hold. Common placements include draping chains in a symmetrical V-shape extending from the cuticle to the tip, or centering large, multi-faceted rhinestones at the base, encircled by gold beads. For the most avant-garde looks, consider nail piercings to suspend delicate, dangling charms or even linking chains across two adjacent fingers, integrating the jewelry directly into the manicure itself. Always ensure all hardware edges are sealed smoothly to prevent snags and irritation, a key step often overlooked.
While undeniably stunning, these complex designs demand careful maintenance and expertise. Due to the high profile and volume of 3D elements, a protective, glossy topcoat must be meticulously applied around, but not necessarily over, the hardware to preserve the finish while securing the smaller micro-studs. For the matte black sections, use a high-quality non-wipe matte topcoat to maintain that striking texture. These nails are perfect for special occasions, nightlife, or anyone seeking a high-impact, statement look that radiates confidence and power. When consulting with a professional, be specific about the type of gold (e.g., true yellow gold tone versus rose gold) and the shape of the chain links (e.g., curb chain, snake chain) to ensure the final result perfectly captures the lavish, unapologetic ‘baddie’ aesthetic showcased here.