Stop battling flat, fine hair! Discover 15 genius haircuts and easy styling tricks guaranteed to add instant, lasting volume and bounce to thin locks.
SAY GOODBYE TO WINTER DAMAGE: YOUR SPRING HAIR GROWTH ROUTINE

While finding the right haircut is crucial for instant volume, lasting density and lift begin at the scalp. Winter damage—from dry indoor heat to harsh weather—often leaves the scalp congested, dry, and irritated, which can stifle hair growth and prevent fine hair from achieving maximum lift at the root. The key to transitioning into a season of healthy growth is incorporating a dedicated pre-shampoo treatment using the essential tools pictured here: a high-quality hair growth oil and a stimulating silicone scalp massager. This routine is designed to detoxify the follicle, increase localized blood circulation, and deliver vital nutrients directly to the root, setting the stage for thicker, stronger strands that naturally hold more volume.
To execute this damage-reversing routine, first, apply your lightweight growth oil (preferably one containing ingredients like rosemary or peppermint) using the dropper directly onto the main partings of your dry scalp. It is essential for fine hair to avoid coating the entire shaft, as this can weigh down the hair before washing. Once applied, pick up the silicone scalp massager and begin a gentle, circular massage, working across the entire head for three to five minutes. This physical stimulation is not only deeply relaxing, but it mechanically lifts away product buildup and dead skin cells while significantly boosting circulation, ensuring the oil’s active ingredients penetrate effectively. This crucial step encourages the anagen phase (the growth phase), leading to stronger individual strands that contribute to overall density—the foundation of true volume.
After the massage, use a wide-tooth wooden comb, like the one shown, to gently distribute any excess oil mid-length to ends. Unlike plastic brushes, wood is static-free and prevents unnecessary breakage, which is a major enemy of fine hair density. Allow the treatment to sit for at least 30 minutes (or overnight for maximum repair) before shampooing twice. Focusing on scalp health maximizes the quality of your new hair growth, ensuring it emerges robust and ready to be styled for lift. By repairing and invigorating the base, your fine hair will respond better to styling techniques, providing instant and lasting volume that truly elevates your finished look.
Teal Peekaboo Hair Is the Ultimate Winter Color Refresh
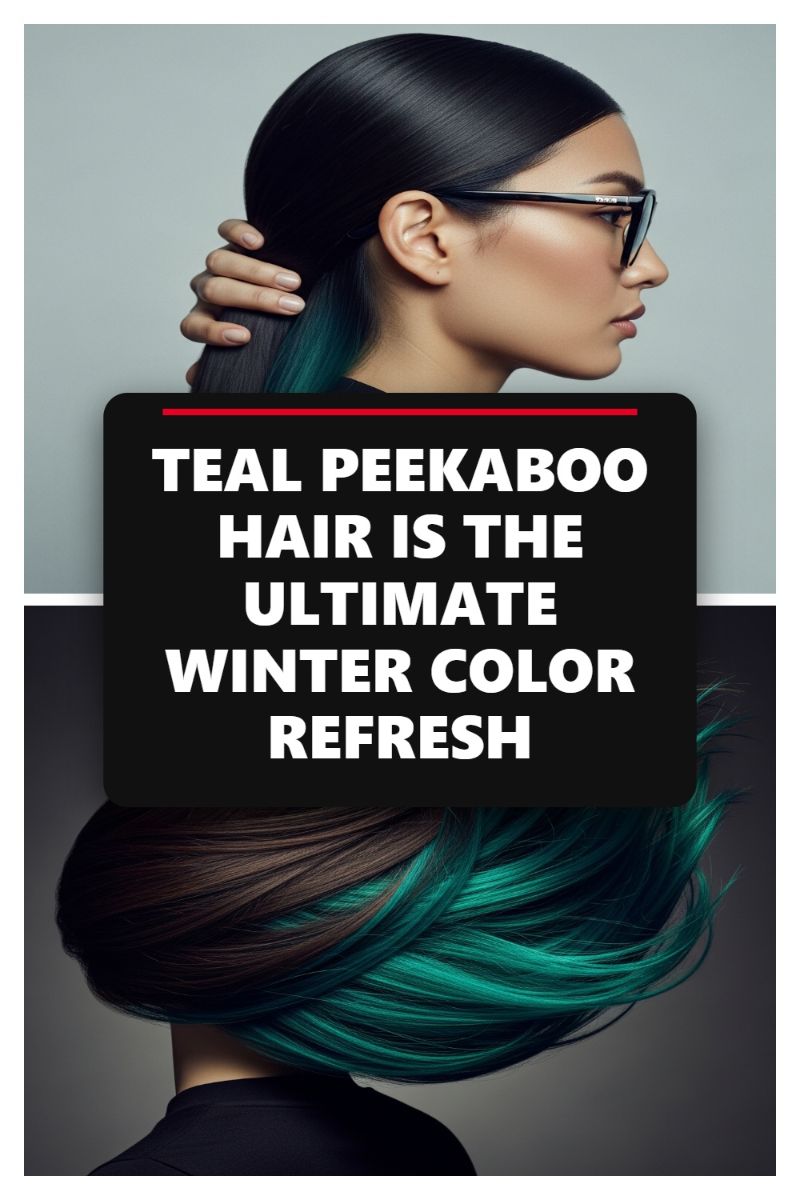
While color changes are often viewed as purely aesthetic, strategic placement of high-contrast color can be a game-changing trick for fine hair looking for instant visual volume. The peekaboo technique, as demonstrated here with vibrant teal hidden beneath deep, glossy black hair, works wonders by creating an optical illusion of depth and thickness. Because the bright color is applied only to the under-layers, when the hair is styled or naturally moves, the stark contrast between the dense outer layer and the vivid inner layer tricks the eye into perceiving more dimension than is actually present. For those with fine hair, choosing a rich, dark shade for the outer layers and a highly saturated, contrasting color for the peekaboo section maximizes this effect, lending a sense of structure and lift where natural density is lacking.
To maximize the volumizing effect of this color strategy, proper styling is essential. Begin by blow-drying the hair using a large round brush, focusing on lifting the roots of the top, darker layers, especially around the crown and nape. This encourages the outer layer to sit up and away from the scalp. When styling with movement, such as large waves or a soft curl, ensure the visible peekaboo layers are curled in slightly opposing directions to the top layer. This intentional contrast in movement amplifies the visual separation, making the overall hairstyle appear fluffier and more multi-layered. Crucially, finish with a lightweight texturizing spray applied directly to the mid-shaft and ends of the darker, top layers—this adds grit and lasting hold, preventing the fine hair from collapsing back down.
Beyond the color application, maintaining the health and shine of the outermost layer is paramount for volume, as glossy hair reflects light better and appears denser. Use high-quality, lightweight shine serums specifically designed not to weigh down fine hair. For the inner teal layers, employ color-safe and sulfate-free products to maintain vibrancy, ensuring the contrast remains sharp. Additionally, when considering the cut for a peekaboo style on fine hair, ask your stylist for seamless, internal layering. This allows the hidden color to peek through without removing too much bulk from the ends, which is critical for fine hair that needs every strand possible to maintain its shape and fullness.
THE MODERN 70S ROCKSTAR HAIR LOOK YOU NEED TO MASTER
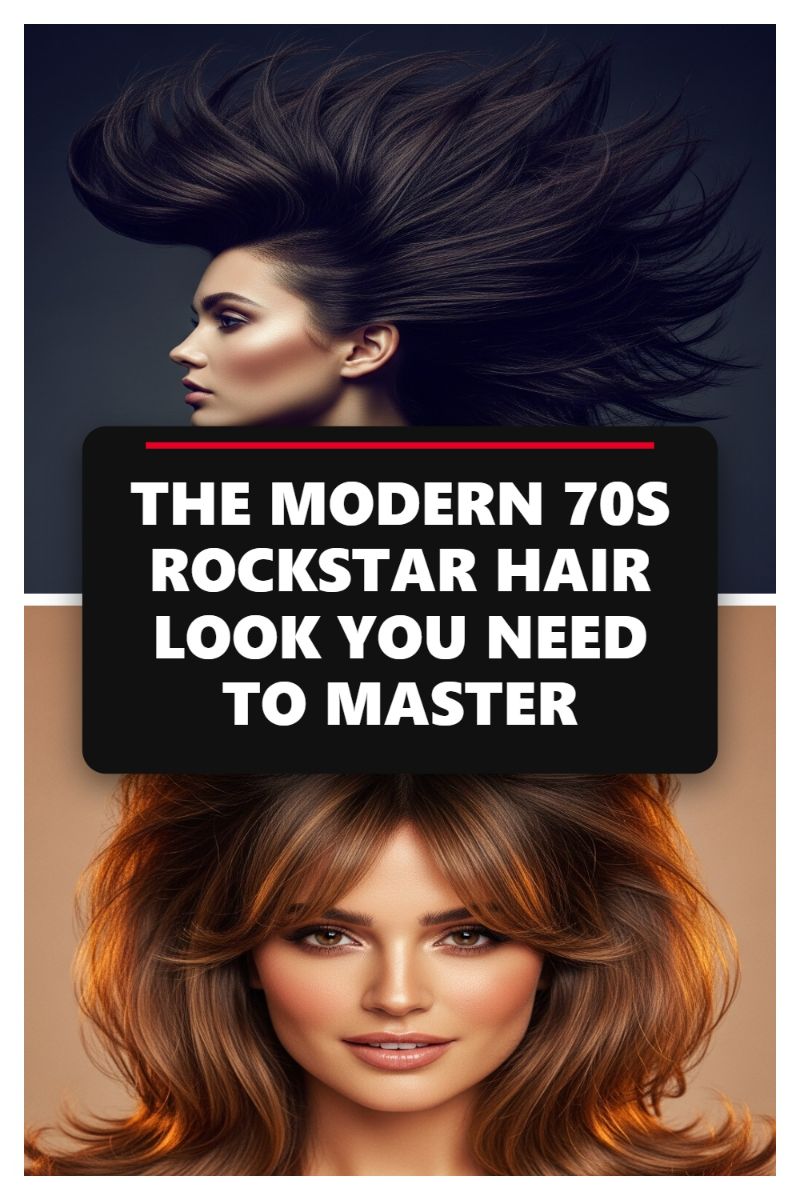
To achieve this iconic, gravity-defying 70s rockstar volume, fine hair requires strategic layering and rigorous preparation. Start by asking your stylist for the “shag” or a heavily layered butterfly cut. Crucially, the layers should be concentrated around the crown and the face (think curtain bangs that seamlessly blend into the sides), creating lift and movement without thinning out the perimeter too much. Before styling, fine hair needs a root-boosting foundation. Apply a volumizing mousse or thickening spray liberally from the roots to mid-shaft while the hair is damp. For maximum lift, flip your head over and rough-dry the hair until it’s about 80% dry, focusing heat primarily at the base. This initial step maximizes the natural potential for lift and ensures the eventual volume isn’t weighed down by moisture.
The signature of the 70s rockstar aesthetic is the pumped-up, rolled-back perimeter, mimicking the feathered look, but in a softer, more modern way. Use a medium to large round brush (ceramic or boar bristles work best for grip and heat retention). Divide your hair into manageable horizontal sections. Starting with the lowest section, over-direct each piece upwards and away from the face, rolling the ends backward under the brush. The key for fine hair is extensive use of the ‘cool shot’ function. Once a section is completely dry, keep the hair wrapped tightly around the brush, hit it with cold air for 10–15 seconds, and only then gently unroll. This rapid temperature change “sets” the lifted volume, giving fine strands the long-lasting memory they need to hold the voluminous shape all day. Repeat this process for all layers, paying special attention to the crown, where you should roll the hair straight up toward the ceiling before setting it.
For the true “rockstar” texture shown in the image—especially the piecey, windswept appearance—finish with lightweight texturizing products rather than heavy hairspray. Once the full blowout is complete, warm a small amount of texturizing paste or flexible hold pomade between your palms. Rake your fingers through the mid-lengths and ends, teasing the hair slightly for that perfectly undone, lived-in feel. If you prefer the smoother, polished volume seen in the second image, spritz a flexible hold hairspray from a distance, focusing the spray underneath the hair to support the lift from below. To maintain this immense volume on day two, apply dry shampoo primarily to the roots, wait five minutes, and then use a small blast of heat from the blow dryer while massaging the scalp. This reactivates the product and instantly restores the iconic, voluminous silhouette.
THE SECRET TO INSANELY GLOSSY, HEALTHY HAIR GROWTH
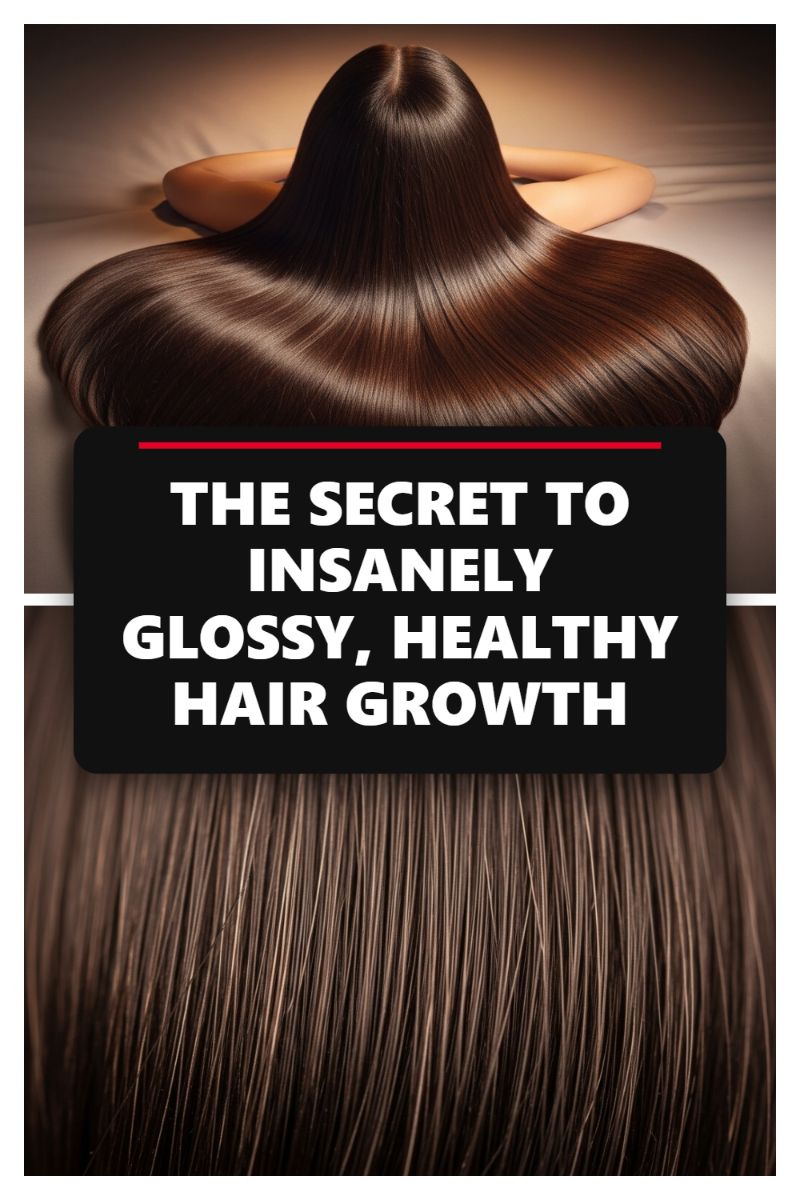
The stunning visual of sleek, highly reflective hair illustrates a critical truth about fine hair: perceived volume isn’t just about lift; it’s about density and health. Fine hair often lacks natural luster, making it appear thinner and lifeless. By achieving the mirror-like gloss seen here, you enhance light reflection across the hair surface, which tricks the eye into seeing more dimensional, thicker strands. The secret lies in rigorously sealing the hair cuticle. For fine textures, this is a delicate balance: you need intense smoothing without using heavy oils or creams that immediately deflate the roots. Start by prepping hair with lightweight leave-in conditioners formulated specifically for fine hair, focusing application from the mid-shaft to the ends. During your routine, incorporate an acid-balanced hair rinse (like apple cider vinegar diluted heavily) or an acidic bond-building treatment once a week; these products physically help tighten and flatten the outer layer of the hair shaft, maximizing light reflection and preventing frizz.
Mastering your blow-dry technique is essential for transforming fine hair into a glossy cascade. After applying a heat protectant that also offers light hold, section the hair meticulously. When drying, always use a narrow concentrator nozzle aimed directly down the hair shaft, moving from root to tip. This directional airflow mechanically smooths the cuticle. To lock in the shine without sacrificing root lift, dry the hair partially using a large round brush to introduce volume at the crown, then switch to a paddle brush for the final drying passes on the lengths to achieve that impeccable sleekness. Finish with a cold blast of air to instantly set the cuticle. Crucially, apply finishing oils or serums sparingly—dispense a pea-sized amount onto your palms, rub them together, and lightly graze your hands over the surface of the dried hair, focusing only on the very ends to mitigate split ends, avoiding the crown entirely to maintain lift.
True, lasting density and volume are intrinsically linked to “Healthy Hair Growth,” as highlighted in the image text. You cannot achieve this level of sheen and strength without optimizing the environment where the hair begins: the scalp. Fine hair is highly susceptible to product buildup, which weighs down the roots and stunts new, healthy growth. Integrate a clarifying shampoo or a gentle scalp scrub into your routine once every two weeks to remove residue and encourage follicular stimulation. Furthermore, consider incorporating growth-boosting serums containing ingredients like biotin, caffeine, or redensifying peptides, massaging them into the scalp nightly to promote blood flow. By tending to the scalp first, you ensure that every new strand emerging is as robust and healthy as possible, leading to better overall density and the structural integrity required to hold volume and reflect light beautifully.
DATE NIGHT HAIR: 5 MINUTE VALENTINE’S DAY HAIRSTYLE
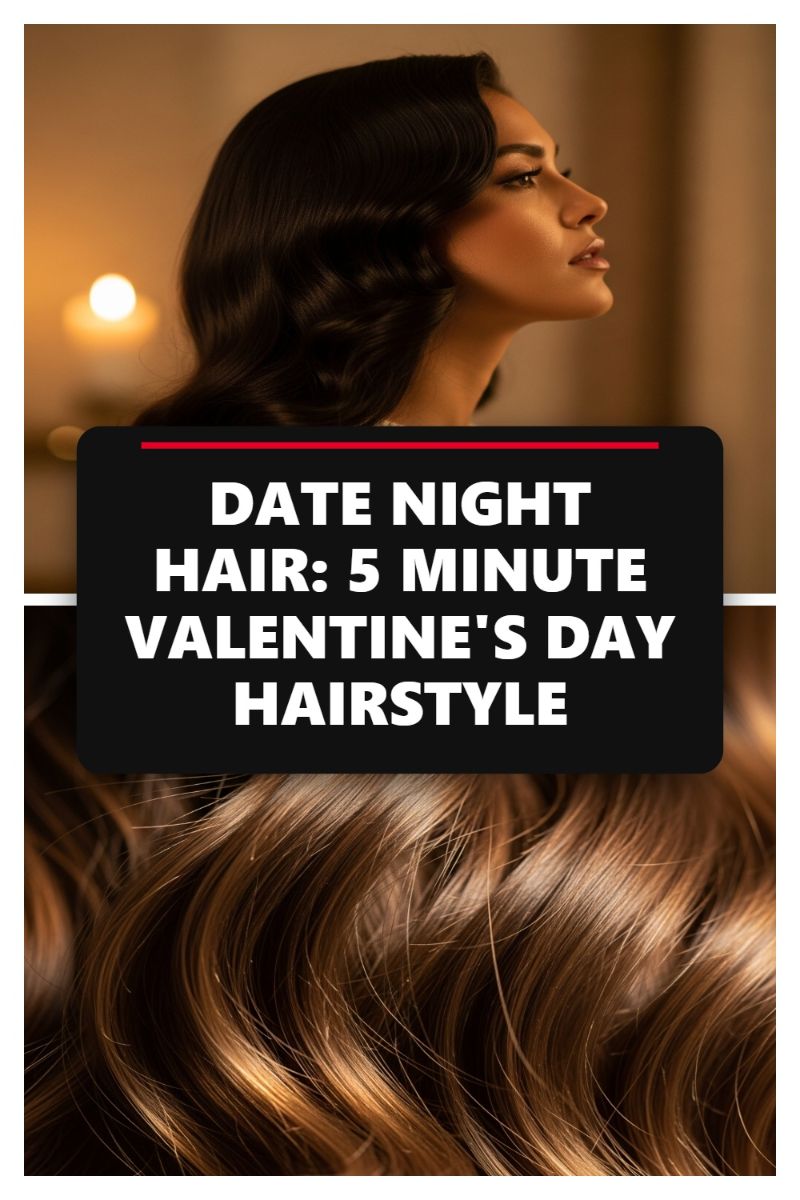
The secret to achieving luxurious, romantic volume like the classic Hollywood waves shown in this image, especially when dealing with fine or limp hair, lies entirely in the setting process. To execute this look quickly and efficiently for your ‘5-minute’ timeline, start with a robust foundation. Before heat styling, mist the hair with a heat protectant that doubles as a volume spray, focusing the application heavily on the root area. Instead of curling vertically (which creates spirals), use a 1.25-inch curling iron and curl sections horizontally around the barrel. The crucial, non-negotiable step for lasting fine hair volume is the immediate set: as soon as you release the curled section, hold it in a perfect coil and secure it flat against the scalp using a metal duckbill clip or a small roller clip. The cool-down time is what locks the curl pattern into place and prevents fine hair from falling flat before you even leave the house.
To truly achieve the ‘five-minute’ goal, maximize your time by leaving the clips in for as long as possible—ideally while you finish your makeup or get dressed. This cool-setting period dramatically increases the longevity and definition of the wave, providing the visual depth and volume necessary for this glamorous, intimate look. Once you are ready to remove the pins, give the entire pinned head a light veil of flexible-hold hairspray. The key differentiation between bouncy curls and sophisticated, continuous Hollywood waves is the brushing technique. Once all clips are released, gently but deliberately brush through the entire head of hair using a soft boar bristle brush or a wide paddle brush. This step merges the tight coils into the signature deep, undulating S-pattern, instantly creating the illusion of significant body and thickness. Avoid raking your fingers through, as this will separate the waves too much and reduce the collective volume.
For fine hair to maintain this high-wattage style, focus on targeted refinement rather than general product application. If your hair tends to droop near the face, take a small section under the surface of the hair near your part and give it a quick back-comb (tease) at the root, laying the smooth top layer back over it. To replicate the gorgeous, high-shine finish visible in the imagery, emulsify a pea-sized amount of lightweight shine serum between your palms and gently smooth it over the surface of the mid-lengths and ends only, carefully avoiding the root area where it could weigh down the meticulously achieved lift. This combination of heat setting, cool pinning, and strategic brushing ensures that even the finest hair can carry off a voluminous, red-carpet-worthy hairstyle that lasts through the entire date night.
EFFORTLESS WAVES FOR V-DAY: GET THE ‘I WOKE UP LIKE THIS’ LOOK
The secret weapon for fine hair aiming for this romantic, volumized style is the half-up Dutch braid crown, as seen in the image. This technique is genius for adding instant lift because the act of weaving the hair and securing it creates tension and volume directly at the crown and temple area, where fine hair usually falls flat. To start, apply a root-lifting spray or volumizing mousse throughout damp hair, focusing on the top three inches of the scalp, and rough-dry using your hands to build grit. Once dry, section off the top half of your hair (from temple to temple). Begin a loose Dutch braid (a reverse French braid where strands cross *under* the center piece instead of over) on one side, following the curve of your head. Keep your hands close to the scalp and pull the sections outward slightly before braiding them in; this technique, known as “pancaking” the braid, instantly makes the woven section look wider and thicker, creating the illusion of denser hair. Secure the finished braid loosely at the back center with bobby pins, camouflaging the ends underneath the opposite side of the braid.
Achieving these soft, bedhead waves requires a specific approach when dealing with fine hair to ensure they don’t fall flat within the hour. Instead of using a large barrel that can weigh down the style, opt for a 1-inch or 1.25-inch curling wand. Before applying any heat, mist the lengths with a heat protectant that offers light hold. When curling, focus the heat on the middle section of the hair, leaving the top inch near the root and the bottom inch of the ends uncurled; this ensures a modern, lived-in texture rather than a formal curl. Crucially, vary the direction of the waves (alternating between curling toward the face and away from the face) to prevent them from merging into one flat sheet of hair. Once a section is curled, gently slide it off the iron and immediately pin the warm curl against the scalp to allow it to cool completely. This cooling process is essential for setting the wave pattern and maximizing longevity in fine hair.
After all the pinned waves are cool to the touch, release them, gently tilting your head back to shake them out instead of raking them with your fingers immediately. The final texture manipulation is key to achieving the “I woke up like this” finish. Instead of a brush, use a wide-tooth comb or your fingertips to softly break up the waves, running them through just the mid-lengths and ends. For lasting volume, finish the look with a generous spritz of dry texturizing spray, particularly underneath the layers and at the roots under the braid, rather than a heavy hairspray. The dry spray provides essential friction and grip, giving the fine strands the body and staying power needed to maintain this effortlessly romantic look throughout your date night.
PROM PONYTAIL HAIRSTYLES THAT LOOK EXPENSIVE AND EFFORTLESS
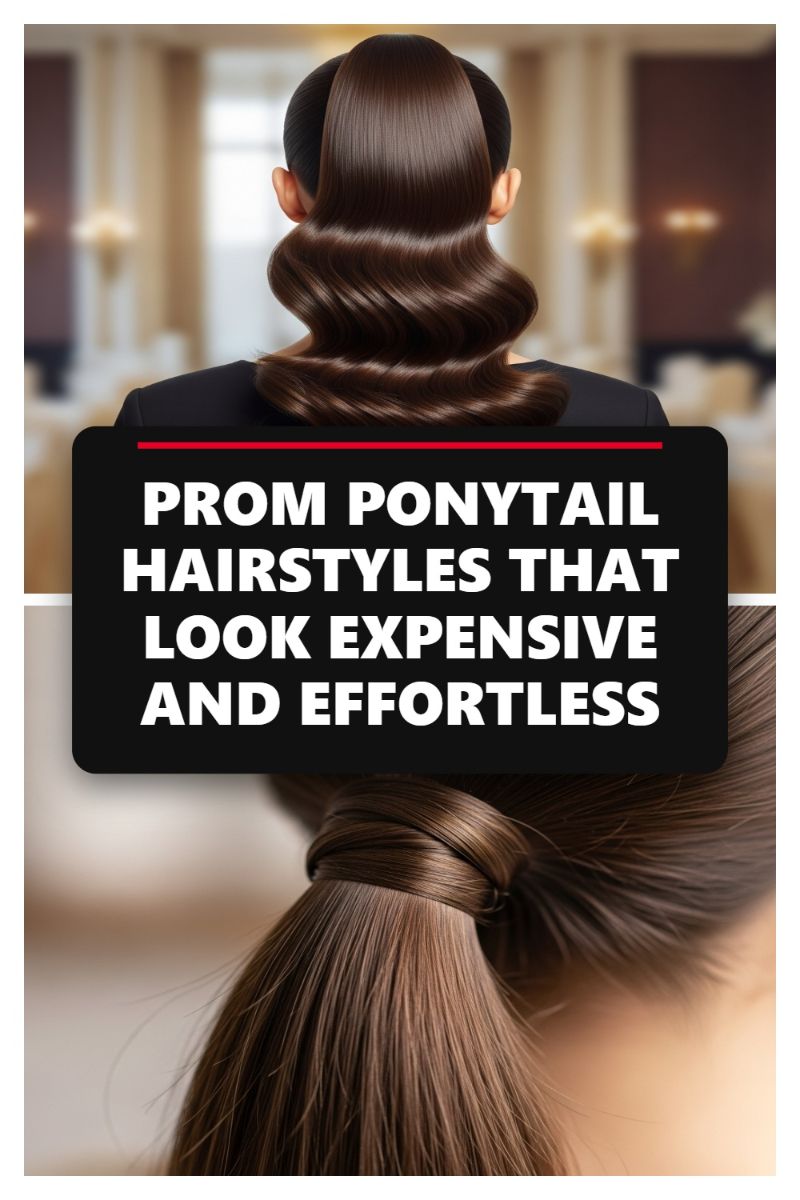
A polished, sleek ponytail is a classic way to elevate any formal look, but for those with fine hair, this style can often fall flat and limp. To achieve the voluminous, high-impact effect shown in the visual—which features extreme height at the crown and deep, luxurious waves—it is essential to build your foundation correctly. Start by prepping dry hair with a volumizing dry texture spray or dry shampoo, focusing heavily on the root area where the ponytail will sit. Before securing, back-comb (tease) the hair around the perimeter of the planned ponytail base using a fine-tooth comb. This adds necessary bulk and friction, preventing the ponytail from sagging. If your hair is particularly fine, consider the ‘stacked ponytail’ trick: secure the top half of your hair into a high pony, and then secure the bottom section directly underneath it (or even slightly overlapping). When styled, this technique instantly adds the illusion of extreme length and double the volume, making the style appear far more substantial.
The secret to the “expensive” look is the highly sculpted texture of the ponytail itself. The image displays deep, uniform waves that catch the light beautifully, maximizing visual density. After securing the base, treat the lengths with a heat protectant and a shine-enhancing serum. Use a large barrel curling iron (1.5 to 2 inches) to create deep, consistent waves, ensuring you curl all sections in the same direction for a unified, glamorous flow. Once curled, allow the hair to cool completely, then gently brush through the waves with a wide-tooth comb or paddle brush to merge them into that soft, cohesive S-wave pattern. Finish by setting the shape with a flexible, yet strong, hold hairspray to ensure the volume and structure hold up throughout the evening.
To perfect the truly effortless and custom finish, integrate the technique of hiding the elastic band. Pull a thin strand of hair from the underside of the secured ponytail—this strand should be long and clean. Lightly mist this section with a strong-hold hairspray for grip, and then meticulously wrap it tightly and smoothly around the hair tie until the elastic is completely concealed. Secure the end of the wrapped piece underneath the ponytail base using a small bobby pin or, for the sleekest finish, a hair extension needle and thread. Lastly, apply a drop of smoothing oil or anti-frizz serum to the surface of the finished ponytail. This final step enhances the hair’s natural luster and guarantees the high-shine, frizz-free finish that truly completes the sophisticated, expensive-looking volume.
SUBTLY SUN-KISSED: CARAMEL HIGHLIGHTS ON DARK BROWN HAIR
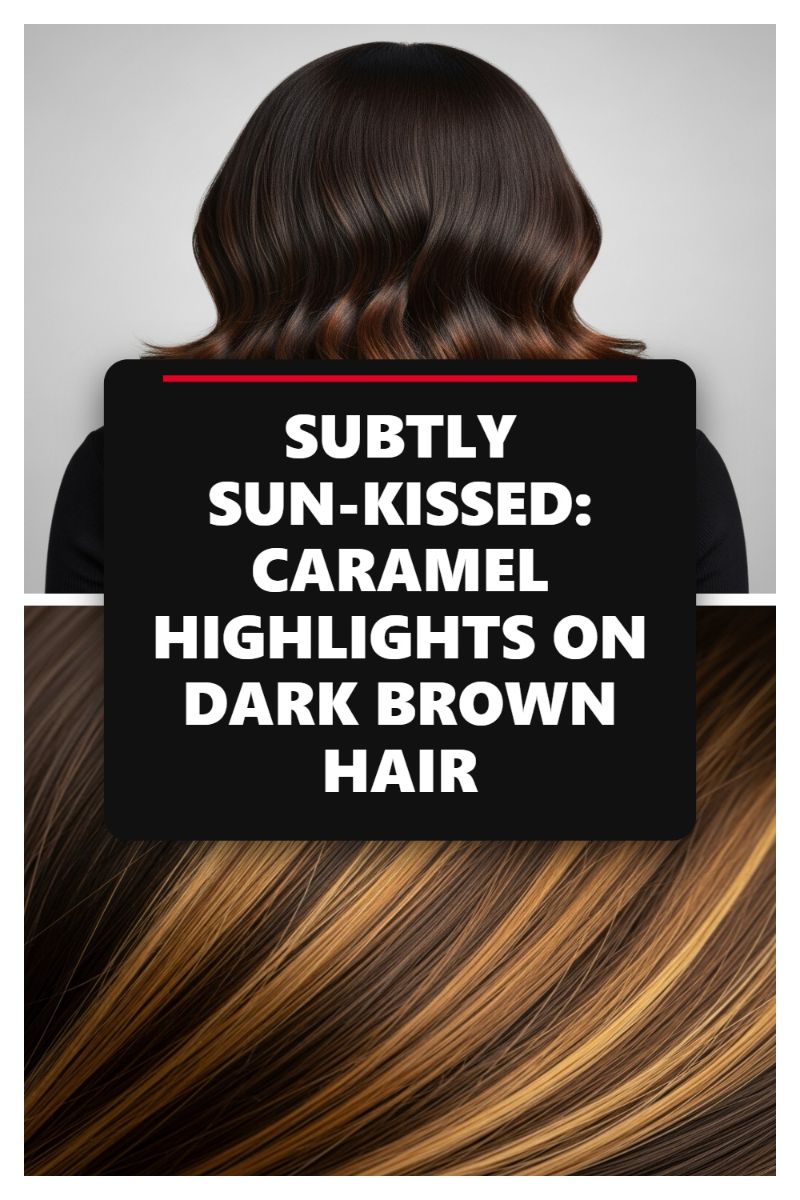
While volume is often achieved through clever cutting and styling, don’t overlook the powerful role of dimensional color in enhancing the appearance of density, especially in fine hair. The technique shown here, featuring rich caramel highlights woven into a dark brown base, is a masterclass in visual trickery. Fine hair often lacks movement and dimension because it reflects light uniformly; it looks like one solid sheet of color. By introducing varying depths of tone—from the shadows of the dark base to the bright reflected light of the sun-kissed caramel—you create a sophisticated contrast. This contrast fools the eye, making the entire hair mass appear significantly thicker and fuller than it truly is, adding immediate lift and texture without adding actual bulk or weight, which is essential for preserving the integrity of fine strands. Strategically placed dimension is arguably the most effective non-cutting trick for instant volume in straight or wavy hair types.
To successfully leverage color for volume, placement and technique are paramount, particularly when dealing with fine textures. For optimal results, request delicate, hand-painted techniques like balayage or micro-highlights (babylights) rather than traditional foiling, which can sometimes create stripes that emphasize flatness. The goal is subtle integration, not chunky contrast. Have your stylist concentrate the brighter, warmer caramel pieces strategically around the face and mid-lengths, graduating the brightness toward the ends, while leaving the root darker to establish maximum depth at the crown. This strategic rooting creates a shadow effect that anchors the illusion of volume and provides visual lift where fine hair needs it most. Because fine hair is more susceptible to damage, ensure your stylist uses bond-building treatments during the lightening process to maintain hair health and prevent the breakage that would otherwise negate any volume gains.
Once the dimensional color is applied, styling becomes crucial to maximizing the visual impact. Soft, loose waves or a gentle blowout will dramatically showcase the contrast between the dark and light pieces, emphasizing the depth that creates the illusion of fullness and movement. Before styling, always use volumizing mousses or lightweight texturizing sprays focused at the roots, steering clear of heavy creams or oils that will flatten the dimension. Maintenance is also key: use sulfate-free, color-safe shampoos designed for fine hair to prevent the highlights from dulling or fading. Regular deep conditioning treatments will maintain the hair’s cuticle health, ensuring maximum reflection—and reflective, shiny hair always looks healthier and therefore more voluminous and dense.
HOW TO GET A MID LENGTH HAIR BLOWOUT THAT LASTS 3 DAYS
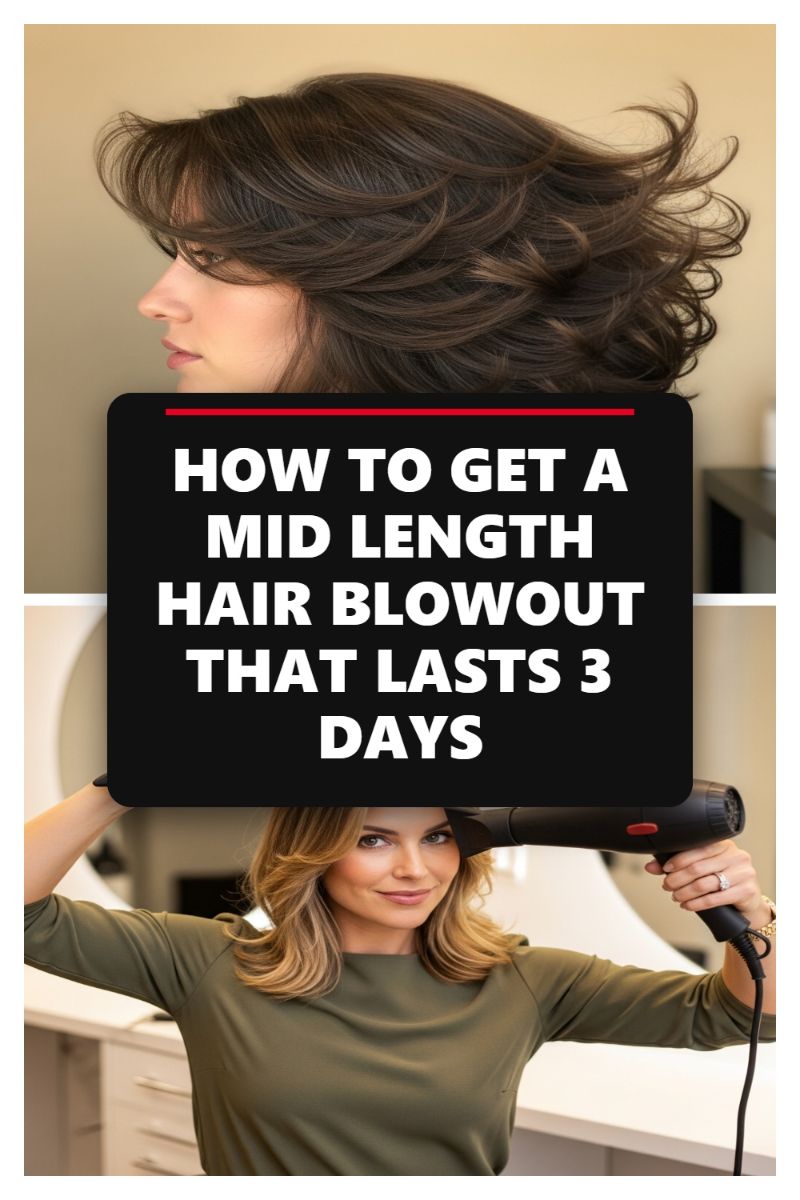
Achieving a voluminous, mid-length blowout that lasts for multiple days—especially with fine hair—starts long before the brush touches the strand. Begin by washing hair twice and applying a volume-boosting mousse or root-lifting spray exclusively to the scalp area while hair is damp. Rough dry the hair until it is about 80% dry, flipping your head upside down to encourage natural root lift. Crucially, when you begin the true blowout, work in small, horizontal sections (no wider than your round brush). To create the lasting, buoyant volume seen in the side profile of the model, you must employ the ‘over-directing’ technique: pull the hair up and over the opposite side of where it naturally falls while applying heat, focusing the air from the dryer’s concentrator nozzle down the cuticle. This technique creates a hinge at the root that keeps the lift upright for days, maximizing the effect of those crucial mid-length layers.
The secret to a blowout that hits the three-day mark is the cooling process, often overlooked in the rush to finish. Heat shapes the hair, but cold sets it. After each section is dried around the brush, keep the hair wrapped and hit the cool shot button for 10-15 seconds. If you have time, securing the warm sections in large velcro rollers (or rolling and pinning them in place like a large pin curl) while they completely cool down will dramatically extend the style’s life by locking in the shape. Additionally, incorporate a light application of dry shampoo immediately after styling is complete, brushing it through lightly. Do not wait for your hair to look greasy; applying it proactively to the roots helps to build texture and absorb moisture before humidity or oil breaks down the blowout’s foundation and causes fine hair to fall flat.
To keep your mid-length style fresh through day two and three, nightly preparation is mandatory. Before bed, loosely twist your hair into a high, gentle bun (often called the ‘pineapple method’) secured with a large scrunchie, ensuring the style rests only on a silk or satin pillowcase to minimize friction and prevent creasing. When you wake up, remove the scrunchie and allow the hair to settle. If the volume has dropped, use a burst of cool air from your hairdryer focused directly on the roots while massaging them with your fingertips. For tired ends, wrap the lowest layer of hair around a large curling iron for a few seconds to revive the curl, always brushing the section out immediately to maintain the soft, voluminous, finished look. This gentle refresh will bring back the bounce without requiring a full re-style or excess product.
IS 2016 HAIR BACK? THE ICONIC VOLUMINOUS WAVE TUTORIAL
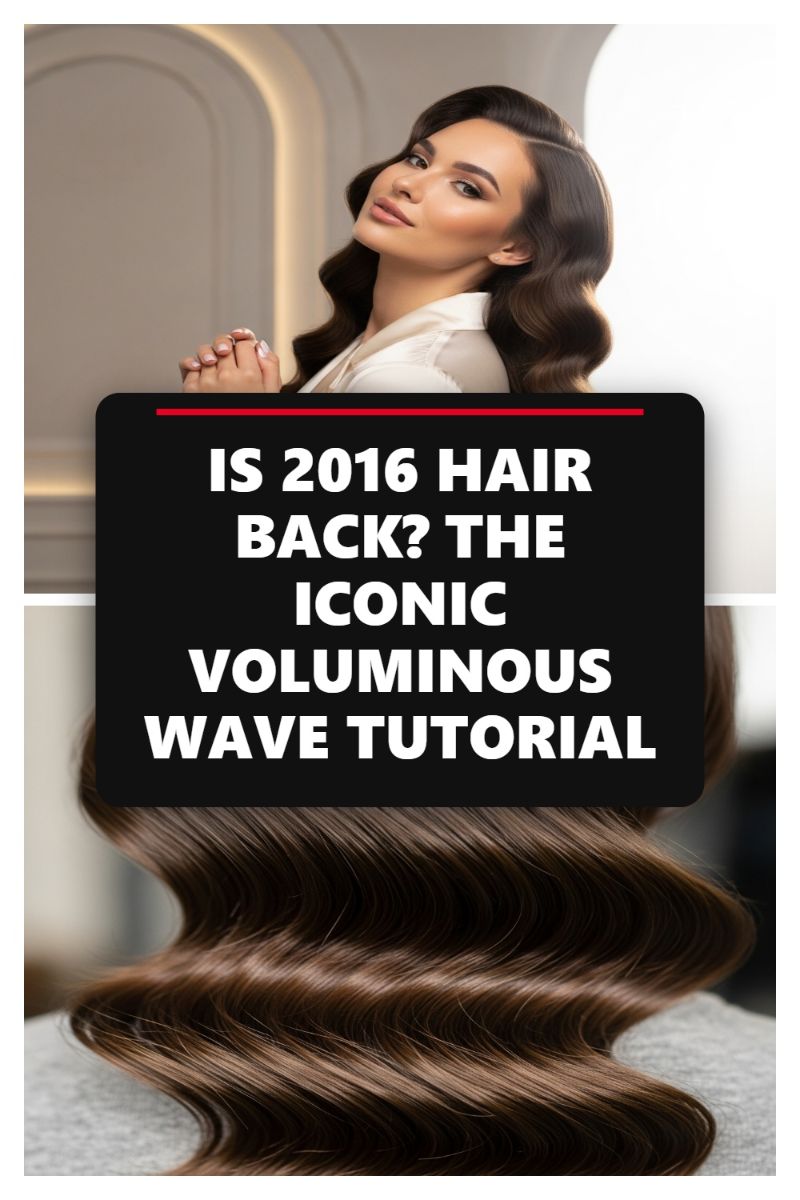
To achieve the iconic, voluminous wave seen in this visual—a look defined by deep, glossy S-curves and supreme root lift—fine hair needs strategic preparation. Start by applying a strong-hold volumizing mousse from root to tip on towel-dried hair. Blow-dry the hair using a round brush, focusing intently on lifting the roots straight up and back; this technique is crucial for creating the structural foundation necessary for lasting volume in fine hair. Once dry, use a large-barrel curling iron (1.25 to 1.5 inches) and curl all sections horizontally toward the face. Critically, after wrapping and releasing each curl, immediately secure it tightly against the scalp using a duckbill clip or flat pin curl clip. This step is non-negotiable for fine hair, as cooling the hair in a tightly wound coil imprints the wave pattern for maximum hold and bounce.
Once the entire head is set and the hair is completely cool (which can take 15 to 30 minutes, or longer if using a cool shot from the dryer), gently release all the clips. The real artistry happens here: take a soft boar-bristle brush and slowly begin brushing the ringlets together, starting at the ends and working your way up. As you brush, the tight curls will merge into seamless, deep S-waves. Pay close attention to defining the ridges by lightly pressing the hair into place after the brush passes through, ensuring the waves are perfectly molded. Additionally, ensure you establish a deep side part, as pictured, which maximizes the visual density and lift at the crown, compensating for lack of natural bulk. Before the final set, lightly spritz a high-shine, lightweight hairspray (avoiding formulas that feel crunchy) to enhance the mirror-like gloss that makes this style so glamorous.
For those with naturally fine strands, maintaining this level of structured volume requires specific maintenance tricks. Never skip the root lifting products, and consider investing in a flexible-hold hairspray specifically designed to fight humidity. An expert tip for longevity: before you brush out the curls, rub a small amount of shine serum or lightweight hair oil between your palms and gently smooth it over the entire length; this reduces flyaways and enhances the reflective quality without weighing the hair down. On subsequent days, refresh the root volume using a targeted texturizing powder, gently massaging it into the scalp line to reactivate the lift without having to re-curl the entire head. This ensures the iconic volume lasts far beyond wash day.
DITCH THE BASIC UPDO: PROM HAIR THAT STAYS VOLUMINOUS
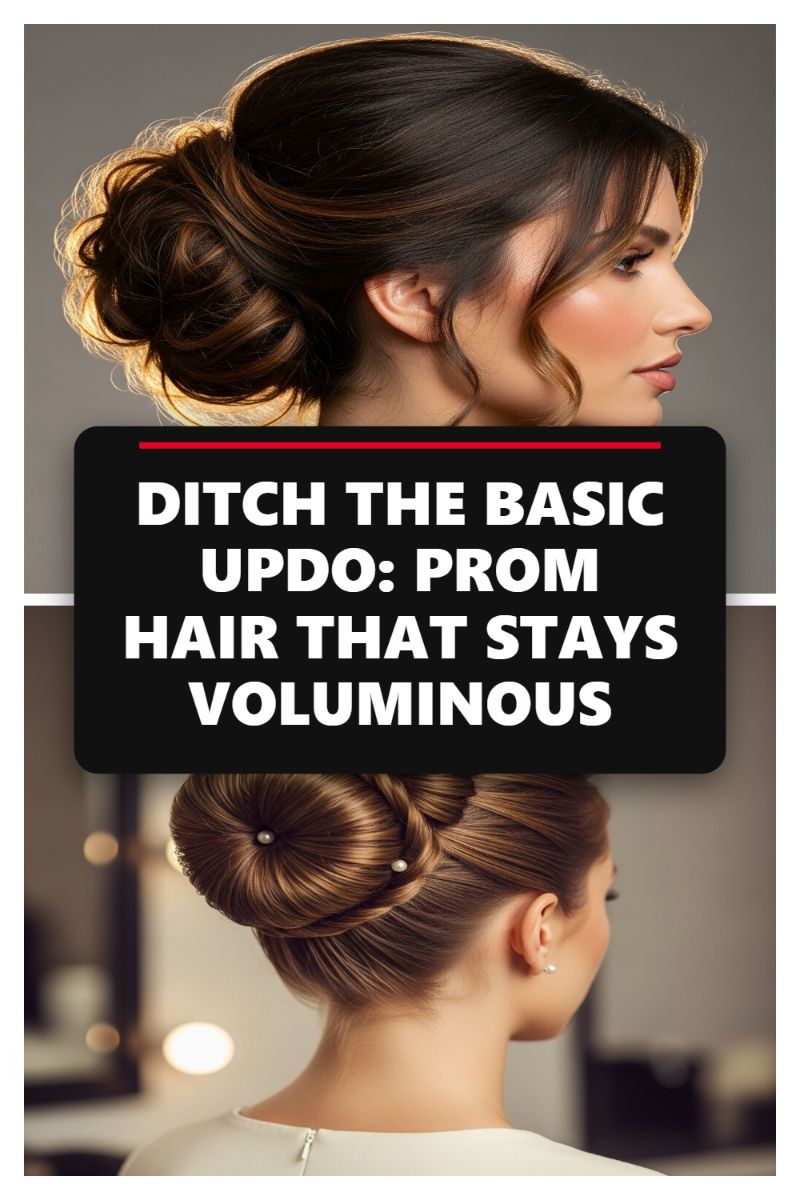
Creating a voluminous, long-lasting updo when you have fine or thin hair requires strategic preparation and layering to build density where none naturally exists. Before reaching for the pins, treat your strands with a root-boosting product, such as a thickening spray or dry shampoo, directly applied to the scalp area while hair is damp or dry. The most critical step is the foundation of the style: backcombing. Section the hair horizontally, starting at the crown, and lightly but thoroughly backcomb the entire area where the bun will sit, from the mid-shaft down to the root. This mass of lightly teased hair acts as an invisible cushion, guaranteeing that when the hair is pinned, it puffs out rather than collapsing flat against the head, providing the instant, lasting volume seen in this elevated style. If needed, a fine layer of hair powder or texture spray over the teased area will provide crucial grip.
To achieve this specific voluminous chignon look, avoid pulling all the hair into a single, tight ponytail at the nape. Instead, utilize a multi-section approach for better control and volume distribution. First, secure the bottom half of the hair into a loose low ponytail. Then, take the remaining top section (the well-teased area) and loosely gather it, twisting it gently toward the back of the head. Rather than coiling the hair, form individual loops, soft knots, and twists from these two sections, pinning them randomly but securely onto the base where they cover the elastic. This method allows you to shape the hair outward, away from the skull, maximizing the visual impact of volume. Ensure the pins are hidden deep within the teased interior, anchoring into the cushion you created without pulling the hair tight.
For the ultimate polished finish, focus on the details, such as the face-framing pieces and the tension of the final style. Lightly curl any sections left free around the face to ensure they maintain softness and movement rather than falling flat. Once the main structure is pinned, gently tug on the outer edges of the loops and twists to subtly loosen them further. This softens any harsh lines and emphasizes the romantic, voluminous texture characteristic of a modern updo. Set the entire look with a flexible-hold hairspray that offers humidity resistance. This ensures that the teased volume and intricate loops stay locked in place through hours of dancing, defying gravity without looking stiff or crunchy.
HAIR OILING 101: HOW TO GET THAT SILKY, SHINY HAIR LOOK
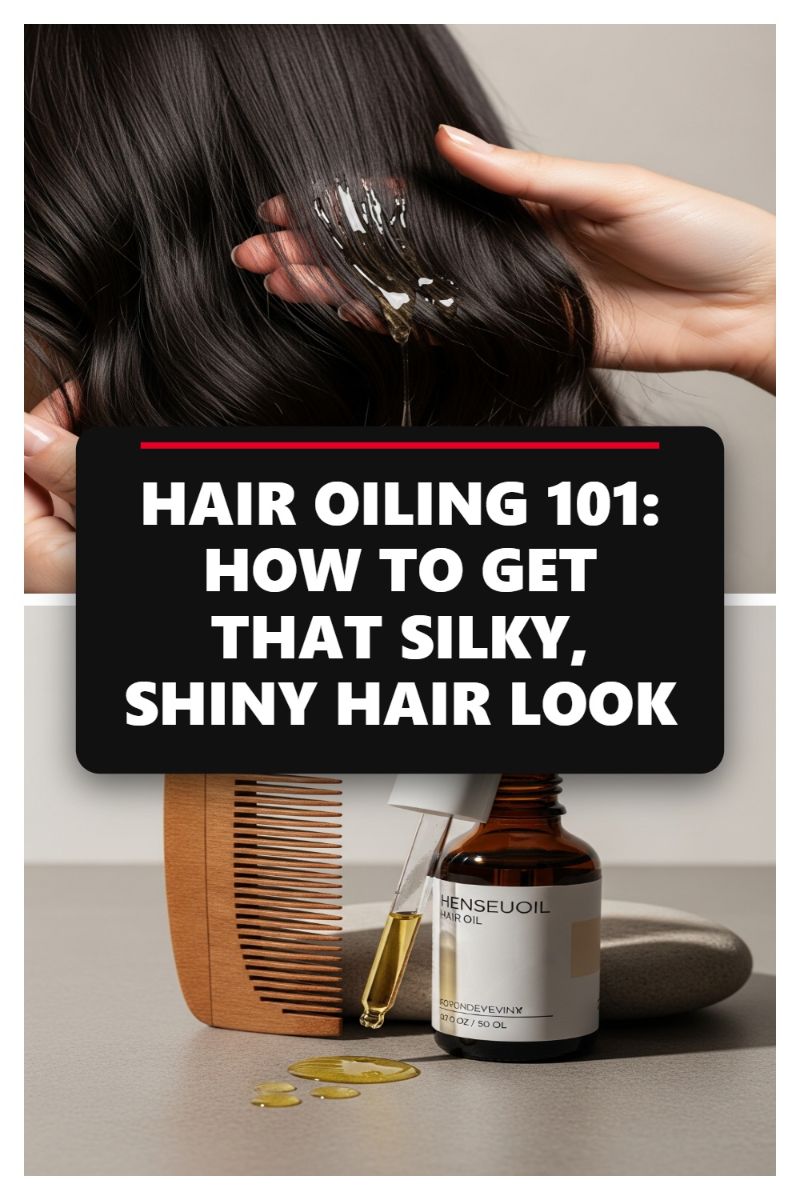
The key to truly voluminous hair isn’t just styling—it’s health. While heavy oils can easily weigh down fine strands, incorporating a strategic hair oiling routine is crucial for strength, elasticity, and shine, all of which contribute to better lift and styling hold over time. For those with fine hair, the most effective approach is often the pre-shampoo treatment. As demonstrated in the image, use a dropper (like the one shown) to apply a lightweight oil—such as argan, jojoba, or pure almond oil—directly to your scalp and mid-lengths. Gently massage the oil in, using the wooden comb visible here to distribute the product evenly from the roots to the tips, ensuring you avoid over-saturation. This process feeds the hair shaft with necessary nutrients without leaving heavy residues post-wash, maintaining the foundation for a voluminous style.
The biggest mistake people with fine hair make is leaving the oil on too long or using too much, leading to the dreaded ‘greasy, flat’ look. For optimal volume retention, limit your pre-shampoo oil treatment to 30 minutes to one hour, allowing sufficient time for the nutrients to penetrate the cortex without making the hair overly heavy. If you are specifically concerned about dullness or dryness, concentrate the oil primarily on the oldest, driest parts of your hair: the ends. When rinsing, emulsify the oil with a tiny bit of water before applying shampoo. Then, use a gentle double cleanse focused mostly on the roots to ensure all residue is removed. A residue-free root is absolutely essential for maximizing natural lift and preventing the hair from looking slick and weighted down immediately after drying.
For a final boost of that silky shine without sacrificing your hard-earned volume, use a sealing oil, like squalane or a silicone-based finishing product, *after* heat styling. Do not use the same heavy oils you used for pre-shampoo treatment as a post-styling product. Dispense only one or two drops onto your palms, rub them together vigorously until the product is barely visible, and lightly smooth the oil over the very surface of your hair, strictly avoiding the scalp and roots. This micro-application seals the cuticle for that reflective, glossy look seen in the visual, ensuring the hair catches the light beautifully while remaining lifted and airy. Remember, healthy hair is inherently stronger and holds a voluminous style longer; strategic oiling is an underlying foundation for volume, not just a cosmetic finish.
RICH GIRL HAIR: WHY CARAMEL HIGHLIGHTS ARE TRENDING RN
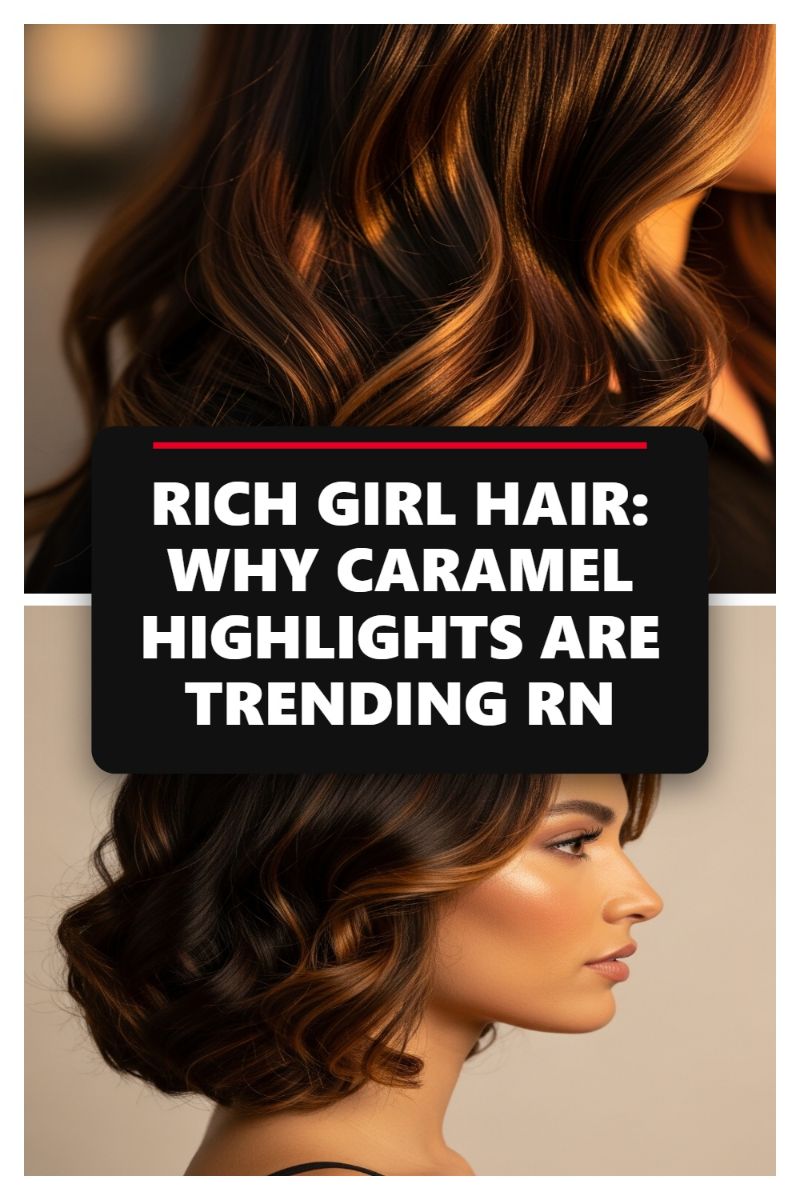
The secret to achieving the coveted “Rich Girl Hair” look, especially when dealing with fine or thin hair, lies not just in the cut, but in sophisticated color placement. Caramel highlights are trending because they are the ultimate tool for visual density. For fine hair, flatness is the enemy. By incorporating strategic lighter ribbons (caramel) against a darker base, you create powerful optical depth. This contrast between light and shadow immediately tricks the eye, making the hair appear thicker, fuller, and significantly more voluminous without adding a single extra strand. This technique breathes life into otherwise limp layers, giving the illusion of multi-dimensional body and bounce, making it a critical styling component for any fine hair volume strategy.To ensure these highlights translate into lasting volume for fine textures, placement is paramount. A skilled colorist should utilize a combination of fine babylights and strategic balayage, focusing the lighter pieces primarily on the surface layers and framing the face. It is critical to preserve depth underneath and near the root. The shadow provided by the darker, uncolored hair is what allows the highlights to ‘pop’ and enhances the voluminous effect. If the highlights are too chunky or too heavily saturated throughout, the visual contrast is lost, and the hair can actually appear flatter and heavier—the exact opposite of our volume goal. Always specify to your stylist that the objective is depth and dimension to complement your fine hair structure, requesting shades that offer a seamless, luxurious blend rather than harsh, stark lines, which contribute to the overall expensive, voluminous look.Beyond the coloring process itself, dimensional color actively works with volumizing styling techniques. As seen in the image, soft, defined waves are crucial. When fine hair is styled into large, undone curls or waves, the caramel highlights catch the light on the high points of the curl pattern, further emphasizing the texture and fullness created by the style. This synergy between color dimension and styling definition multiplies the perception of volume. Maintenance also contributes to fullness: use sulfate-free color-safe products to prevent stripping the richness, and incorporate lightweight volumizing mousse or root-lift spray before heat styling to lock in the shape, ensuring your “rich girl” volume lasts all day.
STOP DOING THIS IF YOU HAVE THIN HAIR (BEST CUTS REVEALED)
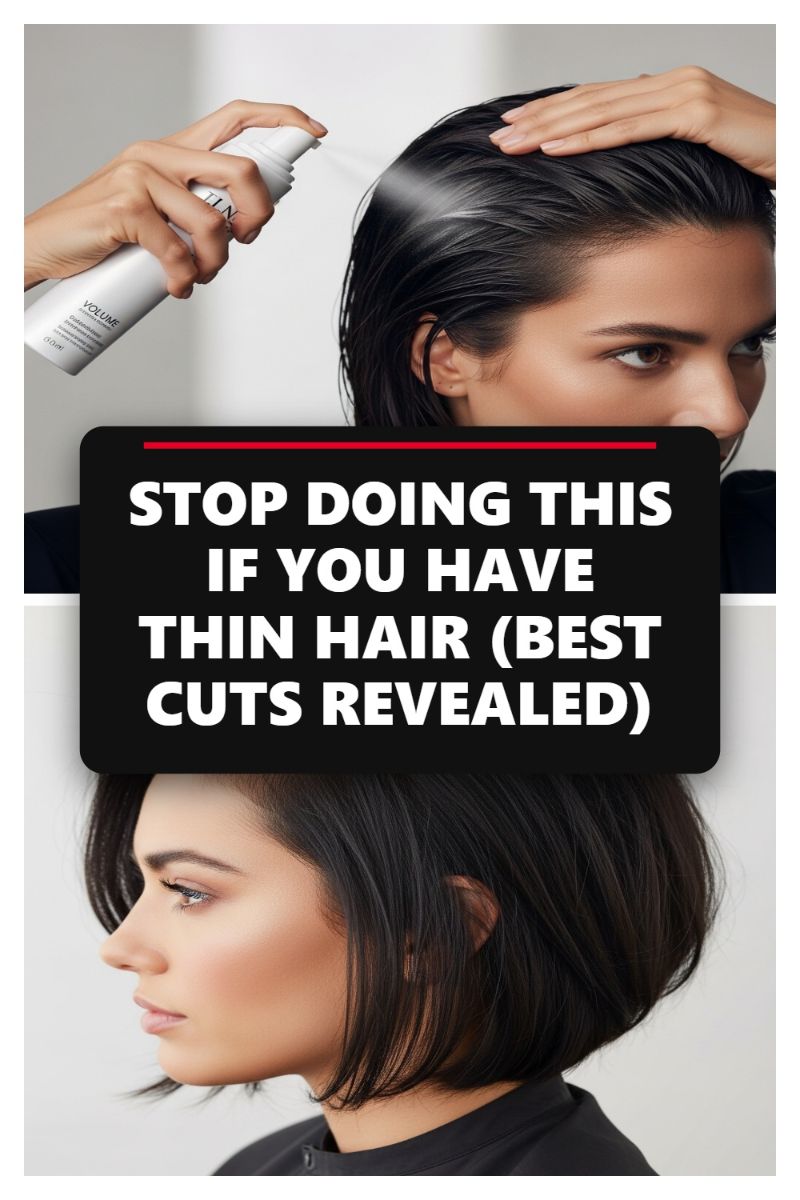
While the image shows the use of a volume spray, the ‘Stop Doing This’ caption often refers to applying heavy, incorrect products or saturating the hair improperly. For fine hair, root-lifting products are essential, but technique is paramount. When applying a volumizing mousse or spray (like the one pictured), focus strictly on the roots—the first two inches—while the hair is only damp, not soaking wet. Excessive moisture dilutes the product, and applying it along the entire length of fine hair can cause it to become stringy and collapse once dry. Ensure you section the hair horizontally and spray underneath the top layer, aiming the nozzle directly at the scalp where foundational lift is needed most. This targeted application prevents product buildup on the visible exterior layer, maintaining natural shine and movement while maximizing crucial support where it matters most.
The lower visual expertly demonstrates the power of a well-executed haircut for enhancing density. For individuals struggling with thin strands, sacrificing length is often the most effective route to instant volume. The structured, slightly inverted bob shown is ideal because it removes sparse ends that often characterize long, fine hair, creating a blunt perimeter that appears drastically thicker and healthier. Expert stylists recommend incorporating subtle internal layering rather than aggressive surface layers. Internal layers remove weight from *underneath* the bulk of the hair, allowing the top section to lay over a supportive structure, promoting bounce and shape without thinning out the ends. Always ask your stylist for a precision cut that maintains full density at the base perimeter, as blunt edges instantly create the illusion of a much thicker head of hair.
To capitalize on the fullness provided by a precision cut, specific blow-drying and finishing tricks must be employed. After applying your root lifter, flip your head upside down and use a blow dryer on medium heat, focusing the air flow directly against the natural growth pattern of the hair—this technique is the quickest way to create unnatural lift at the roots. Once 80% dry, flip back up and use a medium-sized round brush to smooth the ends and lock in the volume seen in the visual. For the most dramatic, lasting results, set the freshly lifted roots with a blast of cold air before removing the brush. Finish the look with a lightweight texturizing spray or powder, applied sparingly through the mid-lengths and ends to add grip and movement, helping the short style maintain its airy, voluminous shape throughout the day, successfully bypassing the need for heavy, deflating hairsprays or waxes.
THE MEDIUM CUT THAT INSTANTLY ADDS VOLUME TO FINE HAIR
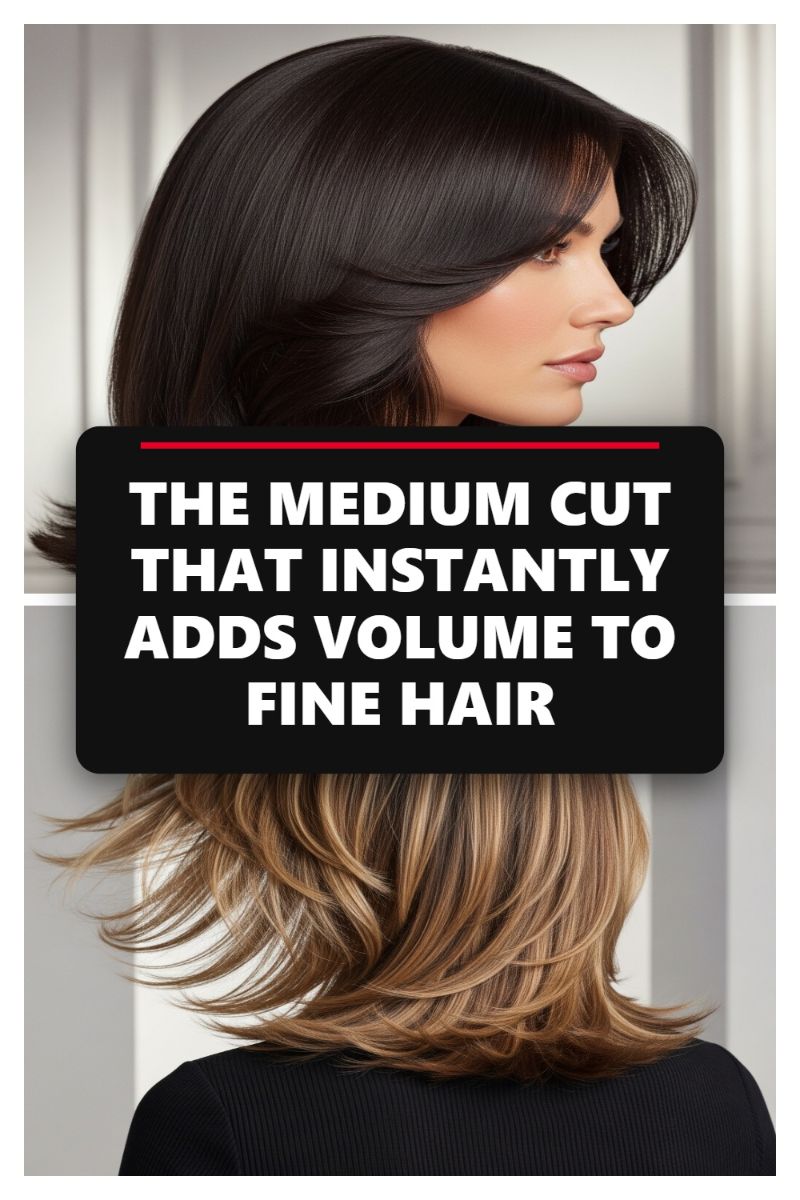
This medium-length, layered haircut is a foundational trick for anyone battling flatness in fine hair. The key lies in strategic layering, often referred to as “invisible layers” or “ghost layers,” particularly around the crown and mid-lengths. Unlike heavy, obvious layers that can make fine ends look thinner, these subtle internal layers are designed to remove weight where the hair is densest (at the root/mid-shaft) while retaining length and bulk at the perimeter. By introducing varying lengths, the hair stacks on itself, creating the illusion of significant body and thickness, as demonstrated by the lifted texture and movement in both the sleek dark style and the shaggy highlighted style. Ask your stylist for face-framing layers that begin around the chin to sweep back gracefully and enhance the overall voluminous silhouette.
To replicate the polished, bouncy volume shown in this style, a proper blowout is essential. Start with damp hair and apply a generous amount of volumizing mousse or root-lifting spray directly to the roots. Using a large round brush (ceramic or boar bristle works best), focus your effort on lifting the roots perpendicular to the scalp while drying. Roll the hair section up fully to the root, hit it with heat, and then finish with a shot of cool air to set the volume. For the ends, roll the brush either slightly under (for the classic smooth bend seen in the top image) or alternating directions (for the shaggy, feathered look in the bottom image). Setting your finished sections with Velcro rollers while the hair cools provides a lasting, salon-quality lift that fine hair often needs to maintain height throughout the day.
Achieving and maintaining this level of volume requires using the right, non-heavy products. Avoid thick creams, oils, and heavy serums which will instantly pull fine hair flat. After drying, use a texturizing spray or volumizing dry shampoo lightly dusted through the mid-lengths and roots—even if your hair is clean—to add grip and plumpness. Finish the look with a lightweight, flexible hold hairspray to lock the shape without stiffness. If you need to refresh the style on day two, flip your head over, mist the roots with dry shampoo, massage it in, and then use a large-barrel curling iron or hot rollers just on the top sections to restore lift without re-wetting the entire head. This combination of structural cut and specialized styling ensures instant and lasting density for even the finest hair types.
BLONDE PEEKABOO HAIR: THE UNDERLAYER TREND THAT’S TAKING OVER PINTEREST
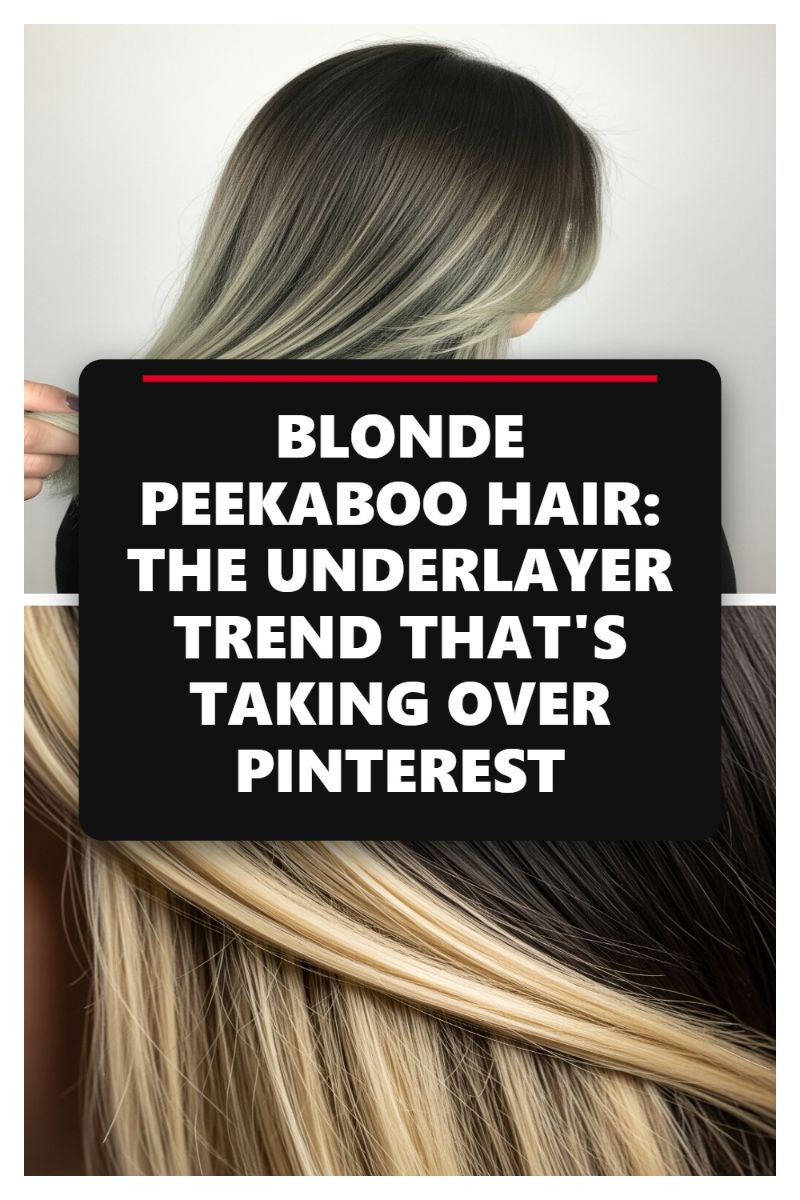
When seeking instant volume for fine hair, many people overlook the powerful effects of strategic color placement. The peekaboo hair trend, which involves dyeing the lower section of your hair a sharply contrasting color, is arguably the most effective optical illusion for making fine strands appear dense and multidimensional. As seen in the image, the technique works by using distinct color blocking: the visible top layer remains a darker, often natural shade (in this case, an ash blonde ombre), while the hidden underlayer is dramatically brighter, typically a platinum or buttery blonde. This sharp contrast between the light and dark blocks fools the eye, making the hair look much thicker than a single-toned color ever could. The dark top layer acts as a shadow, creating the illusion of deep, voluminous density where the hair falls.
To maximize the volumizing effect of the peekaboo technique, precise placement is key. Your stylist should focus the lighter underlayer primarily on the nape and around the ear sections, ensuring that the critical hair at the crown and the parting line remains the darker, grounding color. For fine hair, the lighter underlayer should be lifted at least three to four levels brighter than the top color to achieve the necessary visual “pop.” For those with very thin hair, using a darker root smudge or a slightly darker shade on the top layer enhances the overall depth, making the contrast even stronger. This technique essentially gives fine hair a structured foundation, preventing it from appearing wispy or transparent, which is a common struggle with uniformly light shades.
Styling is crucial to successfully showcasing the depth and volume created by the peekaboo color block. Instead of wearing your hair straight and flat, which minimizes movement and contrast, opt for styles that allow the underlayer to shine through. Soft, voluminous waves or a bouncy blowout are ideal, as the movement dynamically exposes the bright underlayer against the darker top layer, emphasizing the perceived fullness. For styling products, use a lightweight volumizing mousse or root-lifting spray applied exclusively to the darker crown area before blow-drying. Finish with a texture spray rather than a heavy oil or serum, as texture products build grit and fullness without weighing down the fine hair, ensuring the optical density trick holds up all day.
MEDIUM LENGTH THIN HAIR STYLES THAT ACTUALLY LOOK THICK
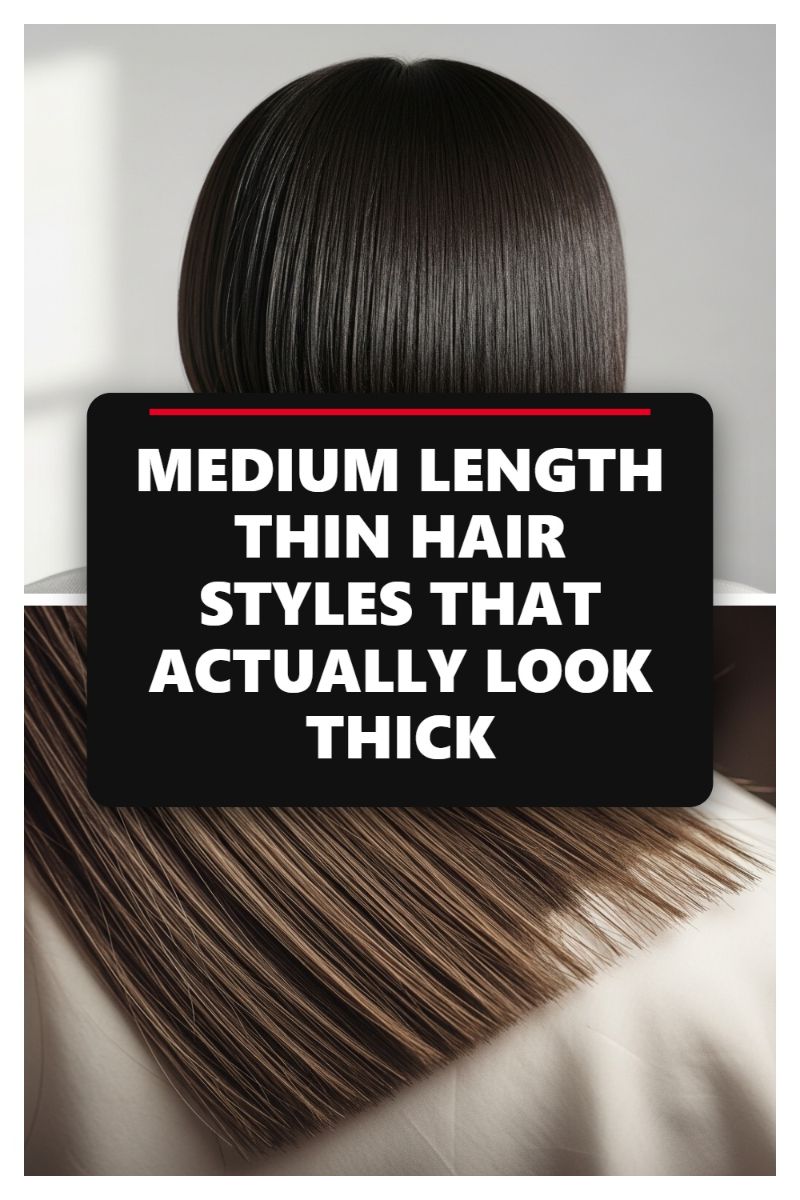
The secret to achieving maximum density in medium-length fine hair lies primarily in the cut. A sharp, blunt perimeter—often executed as a lob (long bob) that hits between the collarbone and shoulders—is non-negotiable. As demonstrated in the image, eliminating heavily layered or feathered ends concentrates the weight of the hair at the bottom, creating a robust, solid line that immediately reads as thicker. When consulting your stylist, request a straight-across cut with minimal internal layering, focusing only on removing necessary bulk to improve movement without sacrificing the crucial bottom density. This technique actively counteracts the natural tendency of fine hair to look stringy or sparse at the ends as it grows past the shoulders, ensuring your medium length maintains a professional, voluminous appearance.
Achieving this sleek, full look requires specific styling products and techniques tailored for fine strands. Before blow-drying, apply a root-lifting mousse or spray directly to the scalp and comb a lightweight heat protectant through the mid-lengths and ends. To maximize volume, use a large round brush while directing the air flow against the natural fall of the hair, focusing on over-directing the sections opposite the way they naturally lay. For the densest appearance, focus on smoothing the cuticle to achieve the intense shine visible in the darker section of the photo; shine reflects light uniformly, enhancing the perception of health and thickness. Once the hair is fully dry, mist a dry texture spray or lightweight dry shampoo at the roots for lasting lift, ensuring you strictly avoid heavy oils or silicone-based serums that could weigh down your meticulously achieved volume.
Beyond the structure of the cut, color plays a critical role in enhancing the illusion of thickness for thin, medium-length hair. A solid, deep color (like the rich black/dark brown seen at the top) works exceptionally well by providing a uniform backdrop that prevents light from passing through easily, immediately making the hair look denser and more substantial. Alternatively, if you prefer lighter shades, subtle lowlights strategically woven underneath the top layer can create necessary shadow and dimension, which cleverly mimics the visual depth found in naturally thick hair. Maintain this density-boosting illusion by scheduling regular trims every 6-8 weeks to keep the ends razor-sharp and by using specialized volumizing product lines that cleanse thoroughly without stripping or, critically, weighing down the fine strands.
THE VIRAL HALF UP PROM HAIR TRICK YOU NEED TO TRY TONIGHT
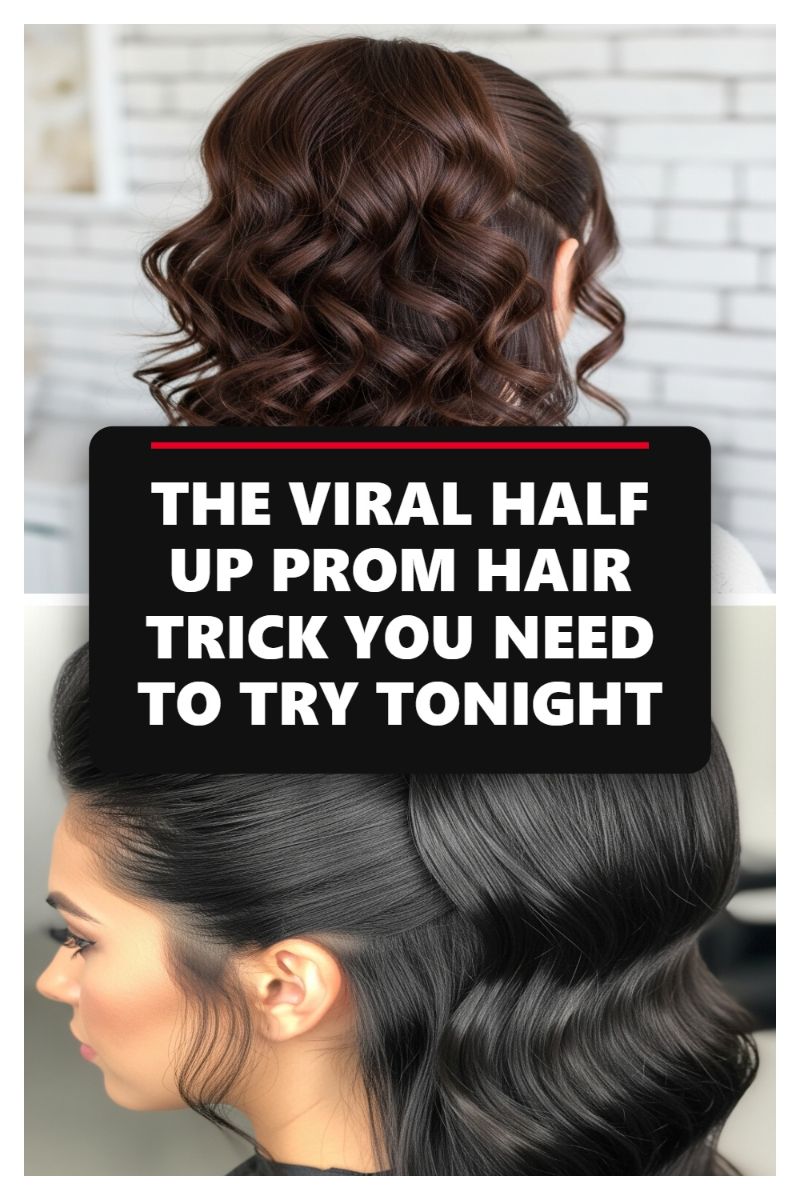
Achieving a truly dramatic and voluminous half-up style, like the glamorous looks pictured, can be challenging for those with fine hair, but this viral trick is specifically designed to maximize lasting height right at the crown. Start with thoroughly dried hair, ensuring you’ve prepped with a lightweight yet powerful volumizing mousse or thickening spray applied liberally at the roots. Before beginning the style, use a 1.25 to 1.5-inch curling iron to put soft, defined waves throughout the lengths of your hair. This foundational texture is crucial, as it prevents the lower portion of the style from falling flat and gives the immediate illusion of thicker hair, providing balance to the dramatic lift you are about to create.
The secret to securing this lasting lift lies in a strategic two-part approach centered around maximizing the ‘bump’ while anchoring it firmly. First, section off the top horseshoe area of your hair (running from temple to temple back to the crown). Take small horizontal slices within this section, holding them straight up, and aggressively backcomb (tease) the base of each slice using a fine-toothed comb. Apply a small shot of dry texture spray or working hairspray directly onto the teased root of each slice before moving on. Once all slices are fully teased, gently smooth the very top layer of hair back over the teasing using a soft bristle brush, creating a seamless, polished dome without compressing the achieved volume. Instead of relying solely on bobby pins to hold this shape, take the entire smoothed and voluminous top section and secure it firmly at the back of your head with a clear elastic, creating a small, solid, and hidden mini-ponytail. This ponytail acts as a structural anchor point that guarantees height and prevents the sophisticated shape from collapsing over the course of the evening.
With the volume locked in via the hidden elastic trick, you can now focus on perfecting the silhouette. Use strong, curved hairpins (bobby pins) to further shape and secure the hair directly above the ears, sweeping the side sections back toward the base of the mini-ponytail. This action ensures a clean profile and secures any loose tendrils. For the most polished finish, gently pull out a few wispy, face-framing pieces around the temples to soften the look, as seen in the examples. Finish the entire style with a high-quality, strong-hold hairspray, focusing the spray heavily both over the polished surface and underneath the secured volume to ensure gravity doesn’t compromise your lift. The combination of root prep, aggressive teasing, and the anchored mini-ponytail technique ensures this voluminous and glamorous look will endure through hours of celebration, making it the ultimate power hairstyle for any formal event.
SLEEK PROM HAIR DOWN STYLES FOR CLASSIC ELEGANCE
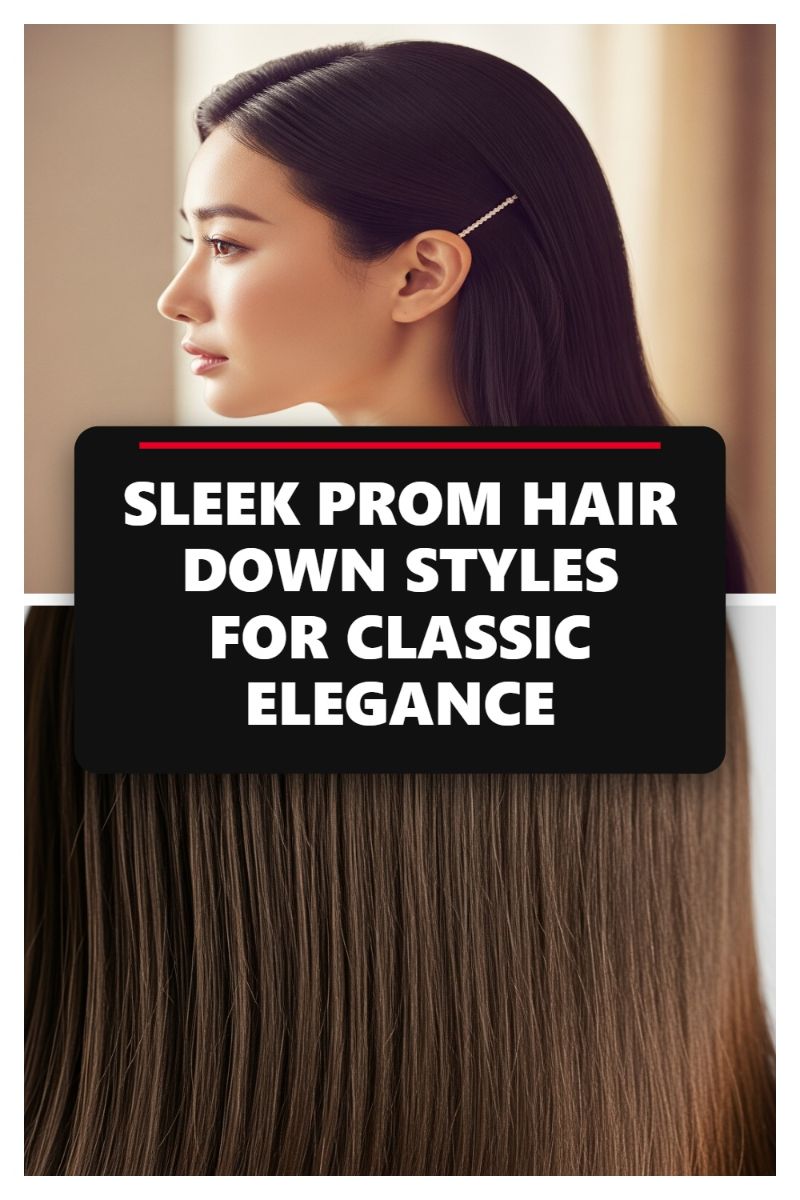
While often seeking volume, fine hair benefits immensely from styles that prioritize polish, smoothness, and high shine—characteristics that inherently mimic thickness and health. The sleek, straight down style shown is the ultimate display of sophisticated simplicity. To achieve this mirror-like finish, start with a professional blowout, focusing on directing the airflow down the hair shaft to seal the cuticle. For naturally fine hair, a crucial step is heat protection and smoothing: use a lightweight, silicone-free smoothing serum or oil applied mid-shaft to ends to maximize shine without weighing down the roots. When using a flat iron, ensure the heat setting is appropriate for your delicate strands (usually below 350°F) and use swift, single passes to create the immaculate, pin-straight texture necessary for this highly controlled look.
The secret to making this down style work for fine hair lies in strategic parting and precision. Adopt a deep, defined side part; this intentional shift immediately lifts the root on the heavier side, giving the illusion of greater density than a center part would allow. The style requires tucking the hair tightly behind the ear on the side with less volume, effectively streamlining the silhouette. This is where your choice of accessory becomes vital. As shown, a delicate, diamante-studded barrette is placed just above the ear. This small, high-impact detail not only secures the hair firmly but draws the eye horizontally, reinforcing the clean lines of the style and ensuring the hair looks meticulously styled rather than limp. The accessory itself acts as a focal point, diverting attention from any lack of inherent thickness.
Longevity and preventing the dreaded ‘collapse’ are paramount for fine hair worn down. Once the hair is fully straightened and parted, use a flexible-hold finishing spray. Instead of spraying directly onto the hair (which can lead to stiffness or residue), spritz the product onto a clean, soft-bristled brush (like a blush brush or a clean toothbrush) and use it to lightly smooth down flyaways along the part line and behind the ears. For the ends, which can sometimes appear stringy in fine hair, apply a tiny amount of pomade or texture cream—micro-dosing is key—to bind the tips together, creating a slightly heavier, seemingly denser fringe. Finish with a humidity shield product to protect the sleekness throughout the night, ensuring this classically elegant style maintains its sharp integrity from start to finish.
SPRING HAIR COLOR REFRESH: THE GLOSSIEST BRUNETTE SHADES
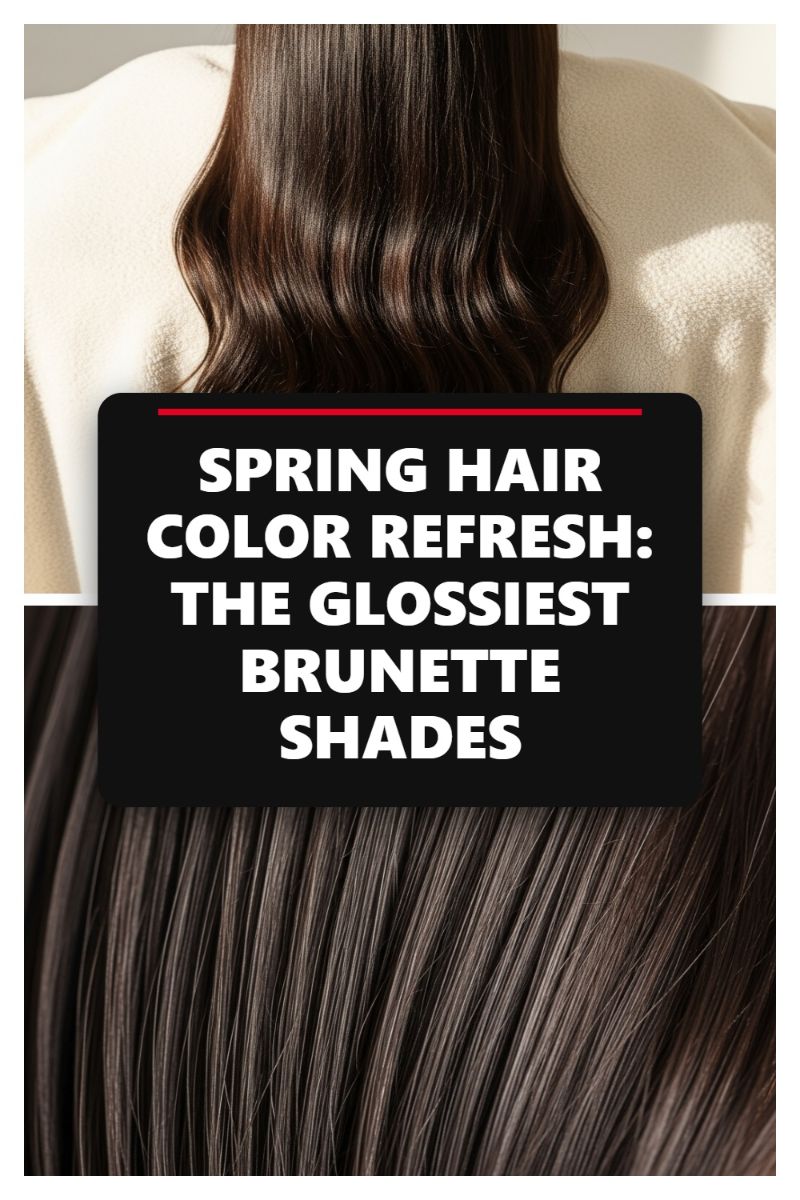
Fine hair often appears sparser when light penetrates easily, highlighting the scalp or increasing translucency. Dark, rich, and intensely glossy brunette shades counteract this effect by absorbing and reflecting light strategically. The deep, solid color base creates an immediate visual contrast against the scalp, minimizing translucency and making the overall hair mass look significantly denser. A high-gloss finish is paramount here; shine equates to health, and healthy fine hair looks fuller and less brittle. When every strand reflects light uniformly, the eye perceives a unified, voluminous sheet of color rather than separate, thin strands, immediately enhancing the perception of density and thickness.
Achieving the “glossiest brunette” involves more than just selecting a dark dye; it requires specific techniques tailored for maintaining the structural integrity of fine hair. We strongly recommend utilizing low-ammonia or non-lifting color treatments like professional glosses or demi-permanents. These methods deposit rich, deep color on the cuticle without roughing up the delicate inner structure, which ensures maximum light reflection and minimizes future breakage—a primary cause of diminished volume. Strategically placed lowlights, which are subtle, darker pieces woven just below the surface layers, are a genius trick for creating a volume illusion. By building depth with varying, rich brown tones (think espresso, dark chocolate, or even a hint of smoky auburn), you trick the eye into seeing stacked layers of hair, adding immediate dimension and perceived fullness without adding physical weight.
Maintaining that high-impact gloss is non-negotiable for keeping the volume illusion strong. Faded or dull brunette hair looks lackluster and, consequently, thinner. Fine hair requires specialized care to lock in color and shine. Always use UV protectants before sun exposure and invest in acidic, pH-balanced, sulfate-free shampoos and conditioners specifically designed for color preservation. Incorporate a weekly deep-conditioning mask or an at-home clear gloss treatment. This regimen seals the hair cuticle, ensuring the surface remains smooth and mirror-like, maximizing light reflection and preventing the color from oxidizing prematurely, thus keeping your faux-volume effect strong and intact between salon appointments.
Mastering fine hair volume is an achievable art, not a battle. By integrating these 15 genius haircuts and styling maneuvers—focusing on structural integrity and weightless product application—you are equipped to achieve the lasting lift you desire. Remember, the key to sustained volume is consistency and finding the perfect product cocktail that doesn’t weigh down your delicate strands. The biggest mistake is over-conditioning the roots; always prioritize texture sprays and dry shampoo for foundational lift. Don’t let this newfound knowledge go unused.
Take the next step: **Book a consultation with your stylist this week to discuss incorporating strategic layers and root-lifting cuts, and start applying these styling tricks tomorrow. We invite you to share your volumized results and favorite trick in the comments below!**