Unlock 15 stunning hairstyles you can easily do yourself! From chic updos and elegant braids to perfect waves, get the ultimate DIY styling cheat sheet for every occasion.
The Dramatic, Pin-Straight Power Bangs
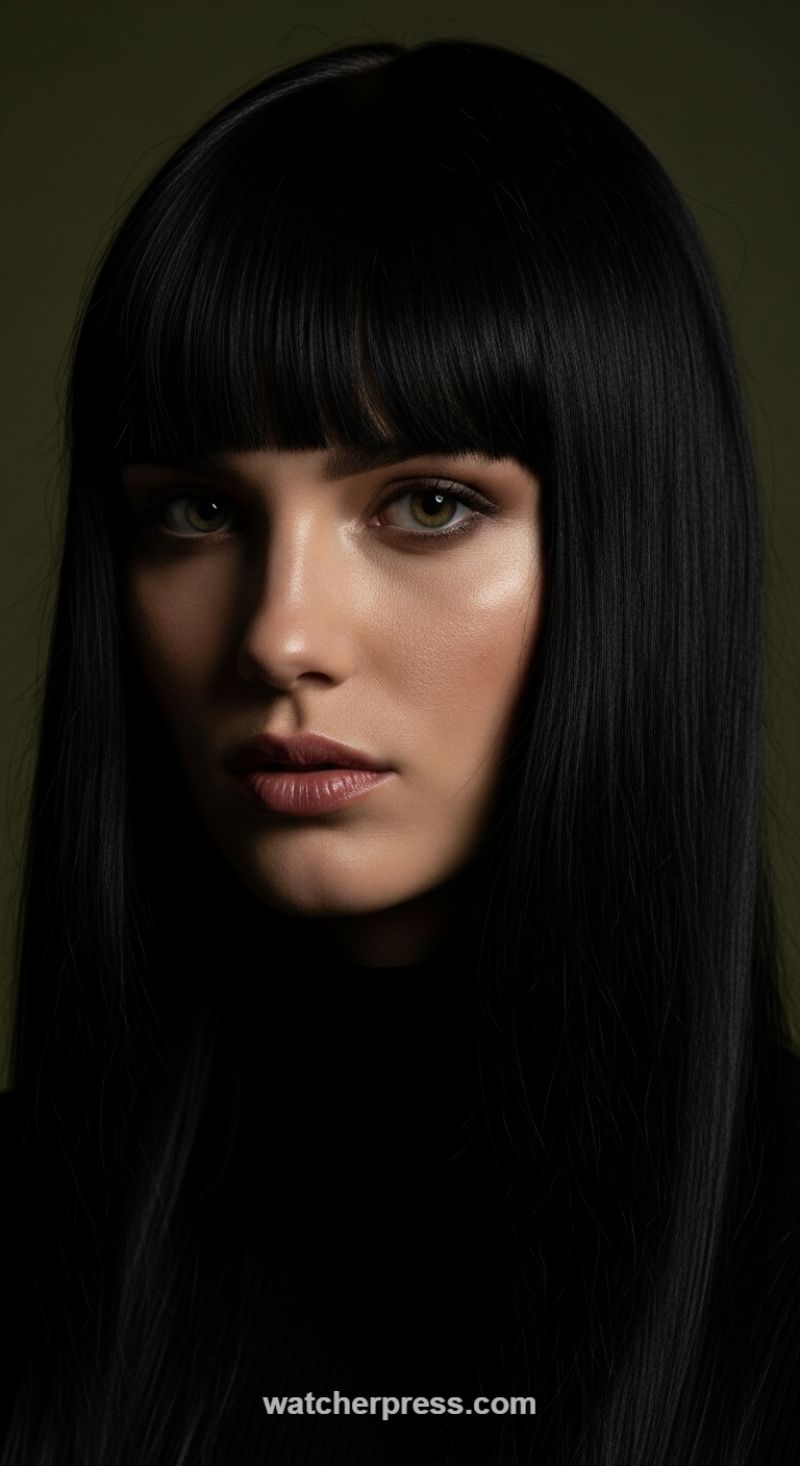
Achieving this high-contrast, dramatically sleek look relies entirely on preparation and precision heat styling. The visual goal is intense shine and absolute straightness, minimizing all natural volume. Begin by washing hair with a smoothing shampoo and conditioner, followed immediately by a lightweight heat protectant and a generous dose of anti-frizz serum applied from root to tip. To ensure the pin-straight finish, skip air drying. Rough-dry the hair until about 80% dry, then use a paddle brush and high heat to pull the remaining moisture out, aiming to flatten the cuticle layer. If your hair is naturally curly or wavy, use the ‘chasing method’ when blow-drying, where the brush leads the dryer, allowing the heat to lock in the straight shape before the flat iron application begins. This base prep is essential for minimizing frizz and maximizing the glossy finish seen in the final portrait.
The defining feature of this powerful style is the dense, blunt fringe. The bangs must lay perfectly flat against the forehead and maintain a uniform, heavy line. Separate the fringe section and treat it with extra care. Using a narrow flat iron (1-inch maximum), iron the rest of the hair in thin, vertical sections, passing the iron slowly from the root downwards to ensure the ends are completely polished and straight. For the fringe, hold the section taut against the forehead and use the flat iron in a single, quick pass. Expert tip: Do not lift the iron at the tips of the bangs; this will create an unwanted, slight curve upwards. Instead, maintain the straight downward motion, or angle the iron slightly inward towards the face, to achieve that weighty, face-framing shadow. Focus on achieving the deepest black tone possible, often enhanced by light-reflecting shine products, which naturally deepen the color’s saturation.
Once the entire head is pin-straight, the finishing touches are crucial for achieving the editorial, high-gloss effect. Lightly mist the lengths of the hair with a non-greasy shine spray, avoiding the roots to maintain lift control. For minor flyaways, particularly near the parting or around the hairline, spray a small amount of strong-hold hairspray onto a clean toothbrush or spoolie brush, and gently smooth down the stray hairs. Because the style is so dependent on perfect uniformity, avoid heavy or oily serums that can cause the hair to clump or lose its movement. Maintain the perfect shape of the fringe throughout the day by carrying a small travel-sized hairspray for quick touch-ups, ensuring the bangs remain dense and monolithic.
The High-Shine, Sleek Power Bob
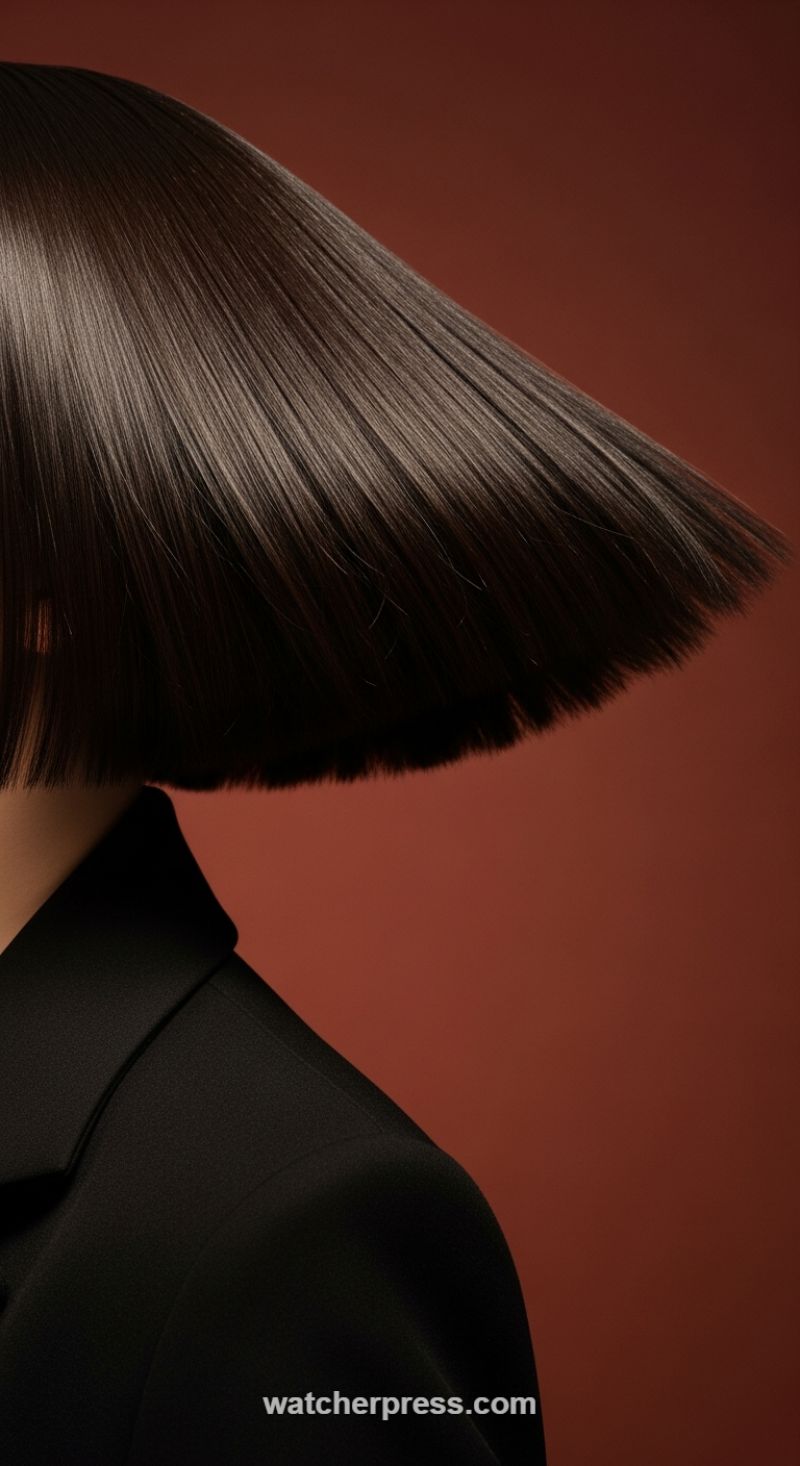
Achieving the polished, light-reflecting finish of this ultra-sleek bob requires meticulous preparation and focused heat styling. To start, the key is moisture and protection. Begin with freshly washed hair using a moisturizing and smoothing shampoo and conditioner to lay the groundwork for high shine. While the hair is still damp, liberally apply a high-quality heat protectant spray or serum, ensuring coverage from root to tip, especially concentrating on the ends which are most prone to heat damage. Next, move to the blowout phase. Using a high-powered dryer fitted with a concentrator nozzle, section your hair into manageable parts. Use a paddle brush to pull the hair taut and dry it in a downward motion, following the brush with the nozzle. This technique is crucial as it seals the hair cuticle, minimizing frizz and maximizing that mirror-like shine seen in the photograph. Finish each section with a cool blast (the ‘cool shot’ function) to lock the smoothness in place before moving to the next section.
Once your hair is 100% dry, you will introduce the flat iron to achieve the razor-sharp precision and flawless straightness characteristic of the ‘glass hair’ trend. Use a ceramic or titanium flat iron set to a medium-high temperature (adjusting lower if your hair is fine or heavily processed). The secret to this look is precision; take extremely thin sections, no wider than an inch, to ensure uniform heat application. Glide the flat iron slowly and steadily from the base of the section all the way through to the ends. Critically, maintain a straight angle as you iron the ends. Do not flick them under or out, but pull them straight down and slightly away from the neck to mimic the structured, slightly lifted look pictured. Work methodically through all sections, ensuring you only pass the iron over each section once or twice to prevent excessive heat exposure and maintain hair health.
To lock in the incredible shine and finish the look, focus on weightless products that deliver gloss without grease. After all sections have been flat ironed and allowed to cool completely (which helps set the style), apply a few drops of a lightweight finishing oil or a high-gloss shine spray evenly over the surface of the hair, avoiding the roots. If you live in a humid climate, a final mist of an anti-humidity, flexible-hold hairspray will protect the sleekness without stiffening the precision cut. This hairstyle thrives on its definition and sharp lines, making it perfect for pairing with structured clothing like the sharp black blazer shown in the image. For maintenance, sleep on a silk pillowcase to reduce friction and minimize static, ensuring your power bob remains perfect until your next wash.
The Elegant Braided Low Chignon
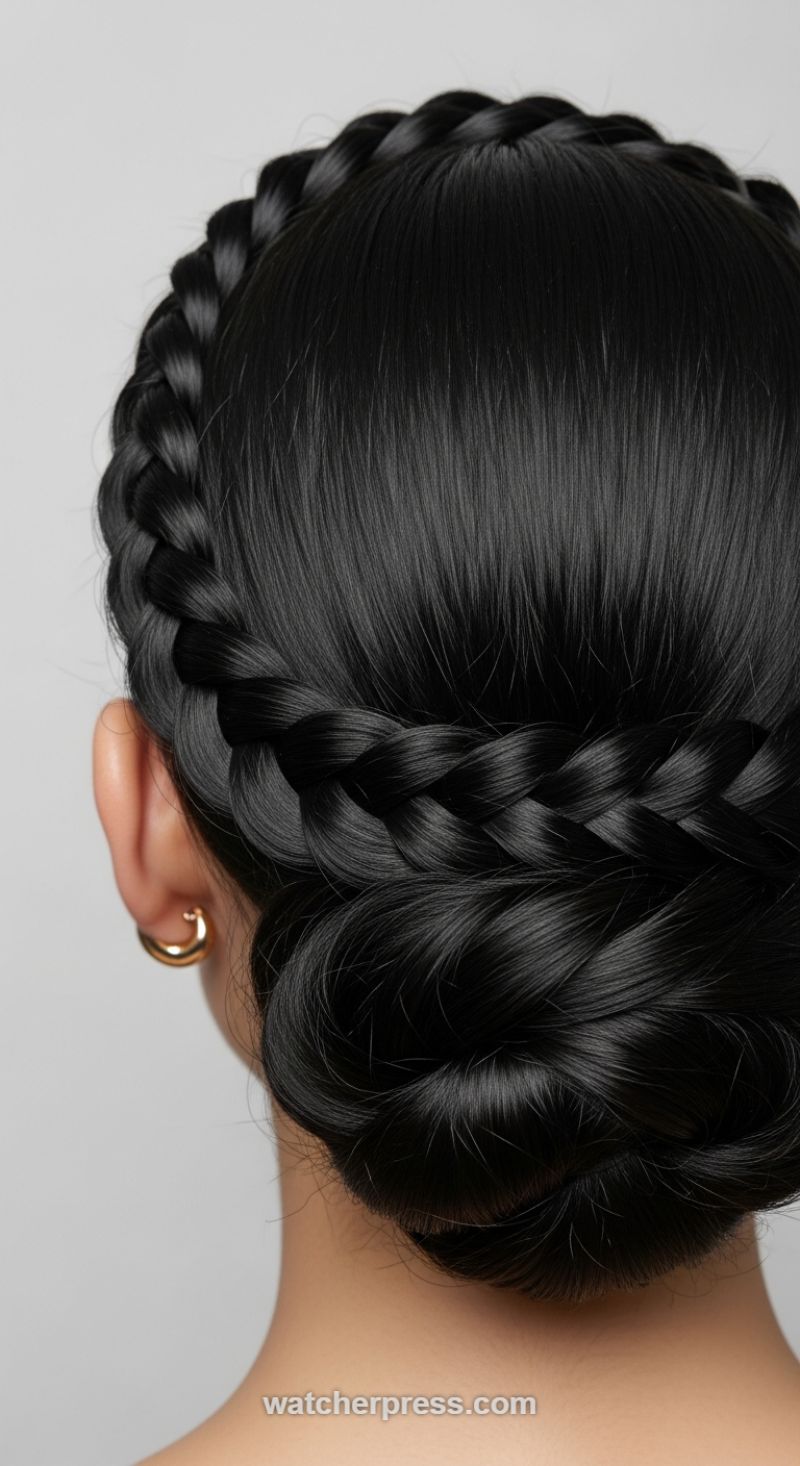
This sophisticated updo, featuring a seamless Dutch braid integrated into a smooth, low bun, is a classic look perfect for formal events or professional settings. To replicate this ultra-sleek finish, preparation is essential: start by treating your hair with a high-shine serum or a light oil to maximize reflectivity and tame flyaways. Begin the style by sectioning the hair just above the ear on one side, working a tight Dutch braid (or French braid, where the strands cross under rather than over) along the hairline. The key here is tension; keep the braid close to the scalp and pull in small, even sections of hair as you work your way around the back of the head. Secure the end of this braided section temporarily with a clear elastic once you reach the opposite ear.
Once the main braid is complete, gather the remaining length of hair, including the tail of the braid, at the nape of the neck. You should have one sleek ponytail base. Twist this ponytail tightly, coiling it around itself clockwise or counter-clockwise to form a tight, structured chignon (low bun). This twist technique ensures the bun has the smooth, solid appearance seen in the image. Secure the coil meticulously using bobby pins that match your hair color, pushing them inward toward the center of the bun to anchor it securely to the base of the ponytail. Hide the elastic holding the braid within the bun structure as you pin.
For expert refinement, focus on the details. Use a fine-tooth comb and a firm-hold hairspray to flatten any small bumps or stray hairs around the crown and the neck. This style relies on absolute neatness, so check your reflection from all angles. To achieve the mirror-like shine of the original photo, finish with a spritz of gloss spray across the entire updo. This regal look pairs beautifully with delicate jewelry, such as small hoop earrings, which highlight the clean line established by the low chignon and the hairline braid.
The Elegant Braided Chignon with Pearl Accents

This sophisticated low chignon combines a super-sleek texture with a delicate woven detail, making it an ideal choice for weddings, proms, or any formal event where elegance is paramount. The key to replicating the mirror-like shine seen in this image is rigorous preparation. Before you begin, apply a smoothing cream or high-shine serum to dry hair. If your natural hair is wavy or curly, a light flat-ironing is essential to ensure maximum sleekness and to prevent flyaways from interrupting the clean silhouette of the updo. Begin by gathering all your hair into a smooth, tight low ponytail secured firmly at the nape of the neck with a strong elastic. To create the foundational volume, wrap the length of the ponytail around a small hair donut or tightly coil it into a neat, firm bun, pinning it securely against the head using bobby pins that match your hair color. Ensure the crown remains smooth and taut before moving to the next step.
Once the foundational bun is secured, you will create the defining braided element. This technique requires reserving a section of hair—ideally a 1-to-1.5-inch wide section taken from the length of the ponytail *before* it was coiled, or a side section incorporated into the low ponytail. Braid this separated strand tightly using a simple three-strand braid technique, maintaining consistent tension throughout its entire length for a polished, refined appearance. Once the braid is complete, gently loosen the edges slightly for a touch of softness, then wrap this element horizontally or slightly diagonally across the center of your main secured bun. This placement creates a textural band that beautifully divides the smoothness of the updo. Secure the ends of the braid discreetly underneath the main bun mass using small pins.
The final, and perhaps most enchanting, touch for this hairstyle is the application of delicate pearl hairpins. Opt for small, individual pearls set on thin wires rather than large, clustered accessories. The expert placement here involves scattering these pins sparsely throughout the woven section and the surrounding coiled hair. Avoid lining them up perfectly; instead, aim for an asymmetrical yet balanced distribution that makes them look organically nestled within the hair. This scattering creates visual depth and catches the light, adding a timeless, refined allure. Finish the entire look with a medium-to-strong hold hairspray applied gently over the surface to tame any remaining wisps and ensure the sleek, perfect silhouette holds its shape throughout the event. Always check the style from the back and sides using a handheld mirror to confirm all pins are hidden and the structure is flawless.
Sculpted Auburn Finger Waves: The Ultimate Guide to Art Deco Glamour

This intricate look, reminiscent of the 1920s and 30s Art Deco era, hinges on achieving deep, flawless waves with maximum shine. To replicate this “Sculpted Auburn Finger Waves” style at home, preparation is crucial. Start with clean, damp hair and apply a generous amount of strong-hold setting lotion or sculpting mousse—this style requires maximum control and definition, ensuring the waves remain tight and polished. Essential tools include a fine-toothed tail comb, professional-grade duckbill clips (or single-prong clips), and a high-gloss finishing spray. Note that this technique works best on short to medium-length hair that is consistently layered, allowing for the smooth manipulation necessary for tight, uniform waves. The rich reddish hue shown in the image dramatically enhances the visual effect, catching the light across the meticulously formed ridges for stunning dimension.
The core technique involves creating the distinctive S-pattern. Using your tail comb, define the first section, typically starting near the part or just above the eyebrow. Press the comb flat against the head and push the hair forward toward the hairline. Place a finger where the ridge begins to form and slide the comb down slightly to smooth the wave, securing this ridge with a duckbill clip pressed firmly into the scalp. Next, use the comb to pull the hair back, creating the second arc of the ‘S’ shape. Use your index finger as a guide to ensure the depth and consistency of the wave before securing that second ridge with another clip. Continue this alternating forward-and-backward motion across the entire head until the waves extend to the ear, ensuring every ridge is defined and clipped precisely. Consistency in the wave depth and ridge height is paramount to achieving the high-fashion, symmetrical finish.
Once the main waves are clipped, focus on the defining detail: the cheekbone-framing spiral curls. At the side hairline near the temple, section off a thin strand. Roll this strand tightly onto itself to form a perfect, flat spiral (a C-shape or pin curl) and secure it flush against the face with a small clip. Repeat this on the opposite side, positioning the curl to enhance the natural curve of the cheekbone. Allow the hair to air dry completely or use a hooded/diffuser dryer on a low setting—do not disrupt the clips until the hair is bone dry. Once dry, carefully remove all clips. Smooth the waves gently with the palm of your hand to settle any flyaways, and secure the length at the back into a tight, neat chignon or low bun, replicating the sleek updo seen in the original image. Finish with a high-shine hairspray or gloss serum to lock in the sculpted, flawless texture.
The Elegant Twisted Low Chignon
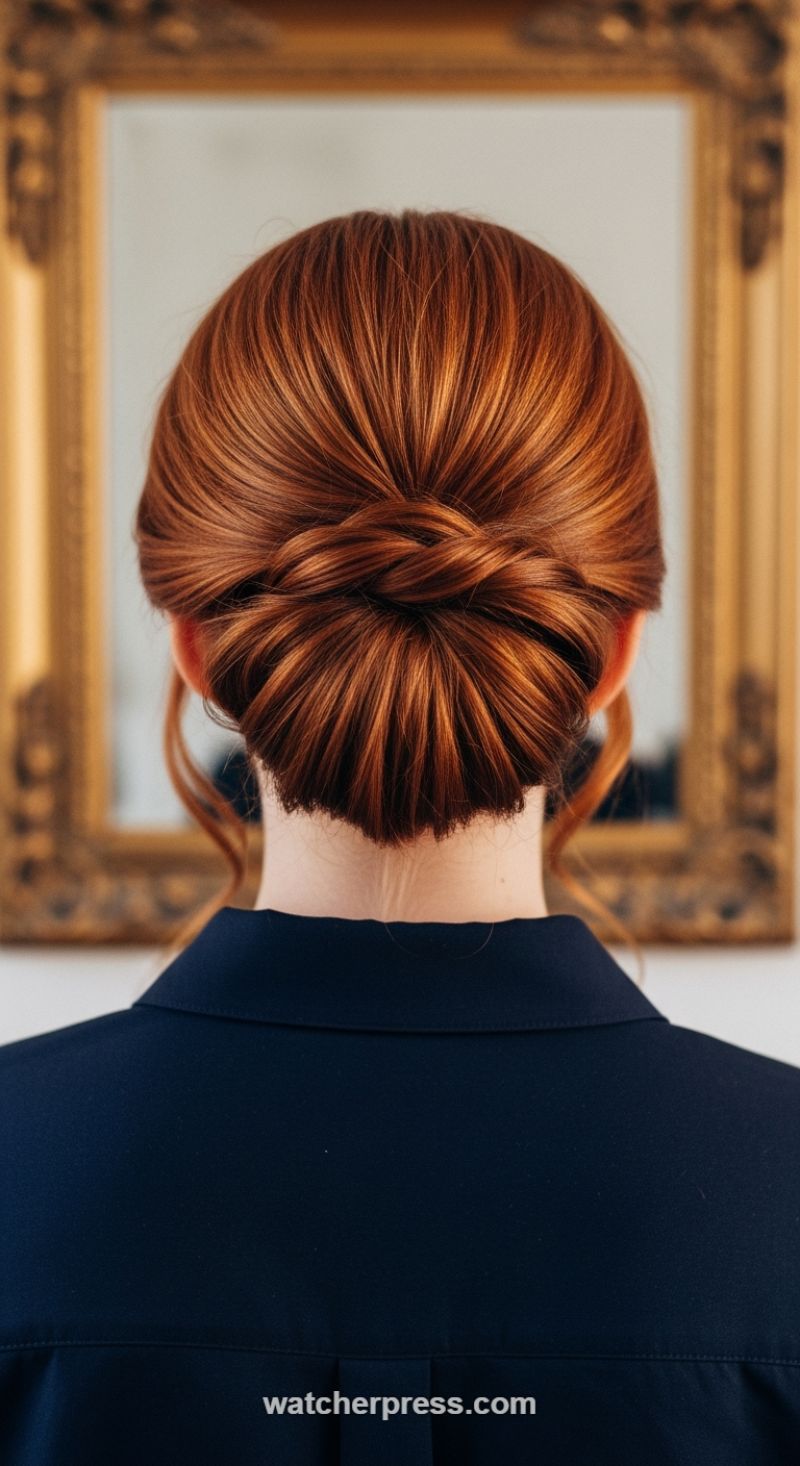
This sophisticated, low-profile updo, often referred to as a twisted chignon or figure-eight bun, exudes professional polish and timeless elegance. Despite its intricate appearance, it is remarkably achievable on your own hair. Begin by ensuring your hair is smooth and well-prepped. If your hair is naturally wavy or curly, a thorough blowout or light flat-ironing will help you achieve the sleek, tight lines seen in this style. Apply a pea-sized amount of smoothing serum or light hair oil throughout your mid-lengths and ends to maximize shine and minimize flyaways. Next, gather all your hair back into a very tight, low ponytail positioned directly at the nape of your neck; secure it with a clear elastic. For added volume and ease of manipulation in the final twist, lightly backcomb the entire ponytail before proceeding to the next step, ensuring the base remains taut against your head. This preparation is key to creating a lasting, structured foundation for the twist.
The essential technique involves creating the signature woven pattern at the base. Once your ponytail is secure, split the hair into two equal sections. Take the first section and twist it tightly, pulling it upward against the back of your head as if you were beginning a standard French twist, but keeping the loop horizontal and low. Use long U-pins or heavy-duty bobby pins inserted vertically to anchor the twisted section securely along the midline of your head. The ends of this section should naturally fall over the elastic. Now, take the second section of hair and wrap it over the secured ends and under the initial twist, creating the interlocking, figure-eight appearance. The goal is to tuck all remaining loose ends neatly underneath the structure you have created, forming a smooth, compact roll that sits just above your hairline at the nape.
To perfect the look, gently fan out the twisted sections before the final pinning to give the chignon its lush, full shape, as this adds dimension and highlights the natural variation in hair color, particularly beautiful on auburn or highlighted hair like the model’s. Once you are satisfied with the shape, use a strong-hold hairspray applied directly to a flat bristle brush or toothbrush to gently sweep back any remaining flyaways around the hairline and neck. If you desire the soft, romantic look shown in the photo, allow a few small strands of hair to fall loosely around the neck and behind the ears, adding a subtle touch of movement. This style is perfect for formal events, professional headshots, or occasions requiring all-day hold and refinement.
The Sunlit Half-Up Braided Headband
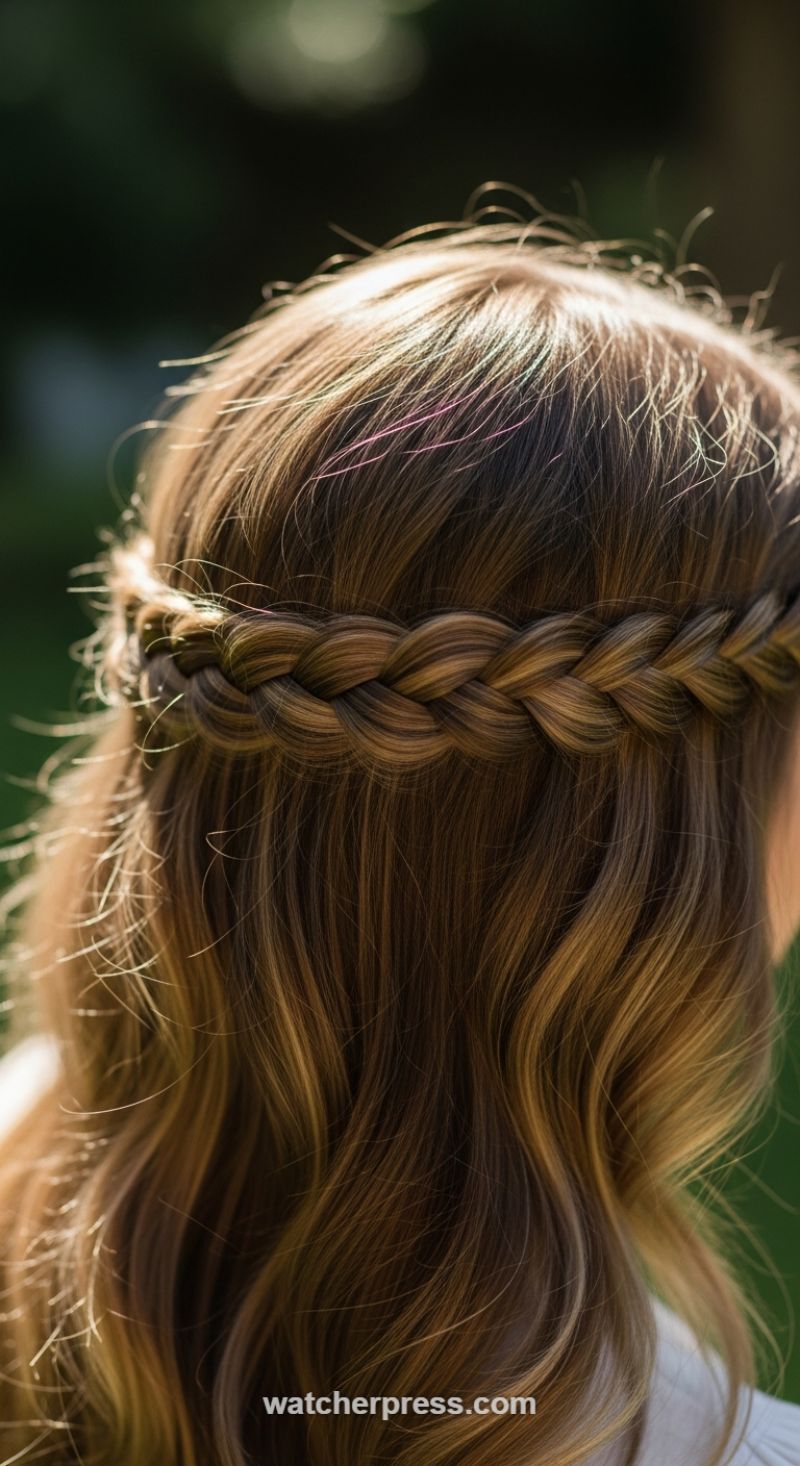
This bohemian, half-up style seamlessly combines soft waves with a beautiful, structural braid, creating an effortless look perfect for festivals, outdoor events, or just elevated everyday wear. To achieve this style, start with dry hair prepped for texture. If your hair is too silky, the braid will slip; we recommend spraying a light layer of dry shampoo or texturizing spray onto the roots and mid-lengths before you begin. The key visual element here is the contrast between the neat, defined braid and the loose, flowing texture beneath it. This style is best suited for hair that has subtle dimension (like the warm brown and caramel highlights visible here) as it helps each strand within the braid stand out, giving it depth and definition. Section off the top portion of your hair, roughly parting from the crown forward, leaving the lower portion loose.
The execution of the braided headband is straightforward. Take a small, manageable section of hair from just above the ear or temple on one side of your head. Begin a standard three-strand braid, keeping the tension loose rather than tight—a looser braid is easier to “pancake” later for volume. Continue braiding across the back of the head, following the line where a traditional headband would sit. Once the braid reaches the area just above the opposite ear, secure the end tightly with a clear or color-matched mini elastic band. The crucial step is anchoring it: use bobby pins to discreetly pin the end of the braid underneath the loose section of hair hanging down, ensuring the pins are completely invisible. For extra security, place a few pins along the underside of the braid to keep it flush against the head.
To perfect the finished look, focus on maximizing volume and softness. Gently pull apart the loops of the finished braid using your fingertips (a technique called “pancaking”) to thicken it and give it that soft, romantic profile seen in the image. Next, address the lower section of hair. Use a large-barrel curling iron or a wave wand to create soft, loose waves, focusing mainly on the hair from the chin down. Expert tip: The soft glow and visible flyaways around the crown are intentional and add to the ethereal feel; don’t try to smooth them completely. Instead, use a very light mist of flexible hold hairspray to set the finished style, focusing primarily on the loose waves and lightly over the braid itself to maintain that airy, sun-kissed finish.
The High Glamour Ponytail with Edge Braids
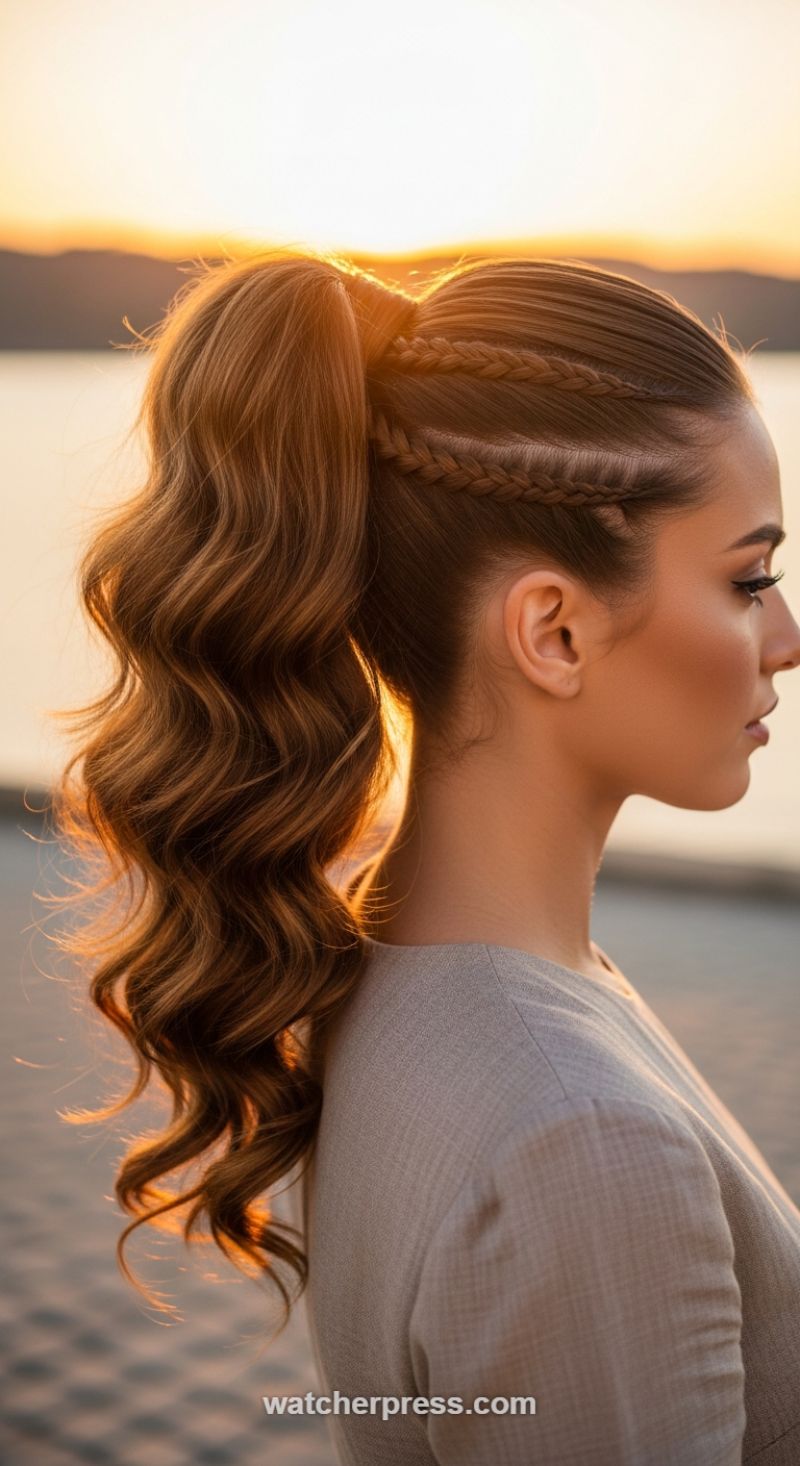
This stunning style combines the elegance of defined waves with the edginess of side braids, creating a powerful look perfect for any evening event or elevated daytime wear. To begin, prepare your hair by ensuring it is smooth and dry, applying a heat protectant and a lightweight smoothing serum to the mid-lengths and ends. The key to this look is structure. First, map out the braiding sections: on both sides, use the high point of your arch as a guide and section off a strip of hair running from the hairline back to where the ponytail will sit (typically high on the crown, visible when viewed from the front). Secure these braiding sections away temporarily. Next, sweep the remaining hair tightly up to your desired ponytail position. To achieve maximum height and security like the visual, use a strong elastic or a hair bungee cord, wrapping it around the base several times. For a polished finish, take a small strand of hair from the underside of the ponytail, wrap it tightly around the elastic base, and secure it with a bobby pin tucked underneath, ensuring the base is completely concealed and lifted.
The unique visual element of this style is the pair of parallel braids on each side, which require precise execution. Using the sections you clipped away, start the first braid close to the hairline. These are best executed as Dutch braids (braiding strands under the middle strand instead of over) to make the braid pop out from the scalp. Keep your tension very firm, only incorporating small, even sections of hair as you move toward the ponytail base. Once the first braid is secured near the base with a small, clear elastic, start the second parallel braid directly below it, mirroring the technique. This careful double-braiding technique provides the ‘warrior’ aesthetic shown. After both sides are braided and secured, use a fine-tooth comb and a touch of edge control product or styling wax to sweep any remaining loose hair from the temples and sides smoothly back into the main ponytail base, ensuring a sleek, seamless transition from the scalp to the hair tie.
Finally, focus on creating the luxurious, S-shaped waves that provide the ponytail its volume and glamour. Use a large-barrel curling iron (1.5 inches or larger) or a deep waver. Divide the ponytail into three or four large horizontal sections. Curl each section using a classic Hollywood wave technique: clamp the hair near the base and roll the iron down, ensuring the entire length of the hair forms a uniform curl pattern. After all the curls have cooled, gently brush through them using a wide-tooth comb or a paddle brush. This step is essential; it breaks up the defined ringlets into soft, voluminous, connected waves, mimicking the fluid texture seen in the image. Finish the entire style with a flexible hold hairspray to maintain the shape while allowing the waves to move naturally, and add a drop of shine serum to the wavy ends for that sunlit, glossy finish.
Soft Sweeping Curtain Bangs and Tousled Mid-Length Layers
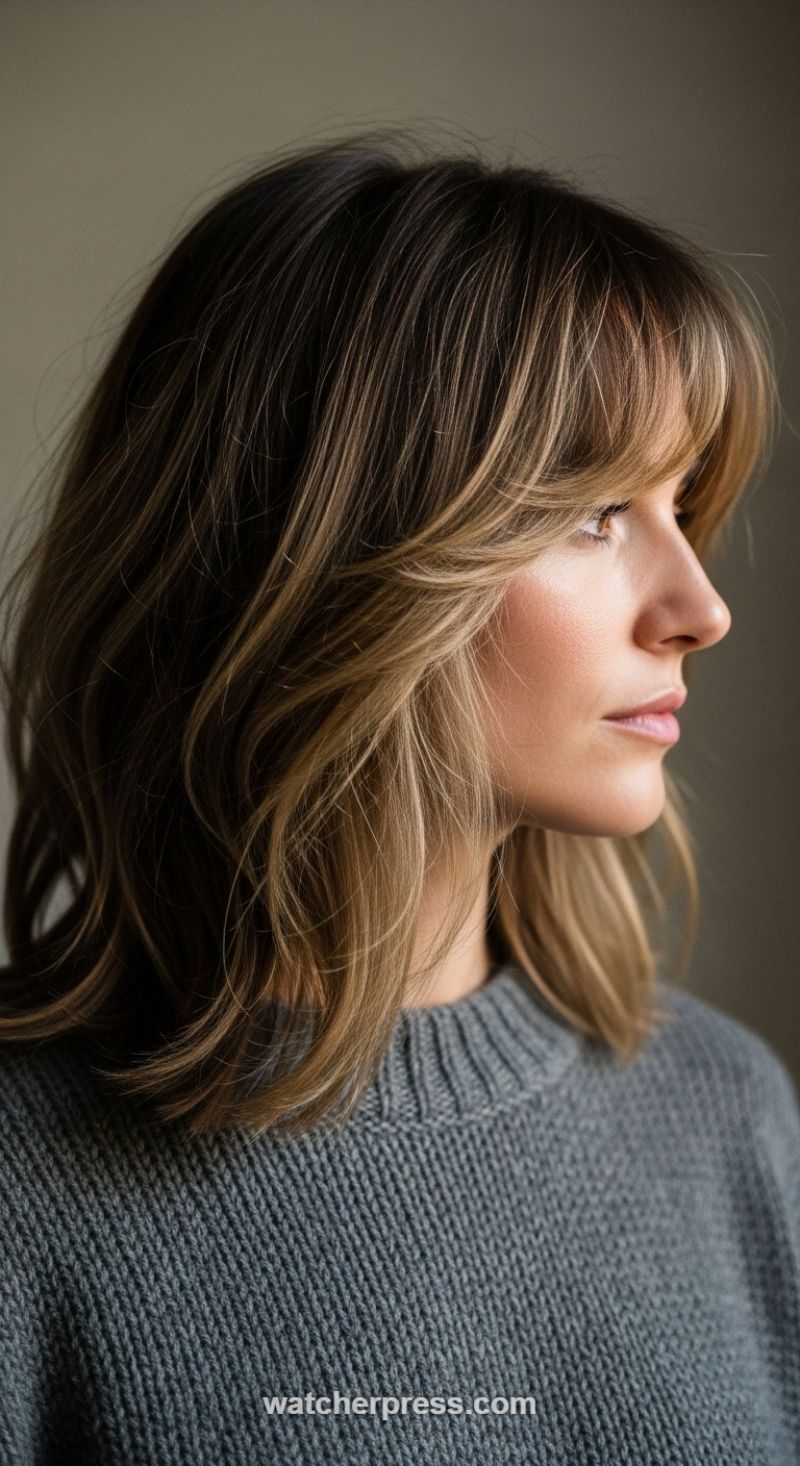
This hairstyle is the epitome of effortless chic, relying on strategic layering and dimensional color to create movement that looks instantly put together yet totally relaxed. The foundation of this look is a mid-length cut (often referred to as a lob or long bob) featuring significant interior layering and the crucial detail: softly blended curtain bangs and face-framing pieces. To achieve this flow, begin with damp hair and prep with a lightweight volumizing mousse or thickening spray applied liberally at the roots and throughout the mid-lengths. Use a paddle brush to rough-dry the hair until it’s about 80% dry, lifting the roots upward for maximum volume. When you get to the final drying stage, switch to a medium-sized round brush. Focus on lifting the crown area while using the brush to subtly bevel the ends inward, creating that gentle, natural bend seen in the image. Remember to direct the hairdryer nozzle down the hair shaft to maintain smoothness and shine, which is essential for showcasing the rich balayage or highlights.
Once the hair is fully dry, the real magic happens with texturizing tools. This style requires more of a loose bend than a structured curl. We recommend using a 1.25-inch curling iron or flat iron for the ‘S-wave’ technique. If using a curling iron, take 1-inch sections and curl the hair predominantly away from the face, holding the iron horizontally or diagonally for a few seconds. The expert trick for maintaining a modern, tousled finish is leaving the last one to two inches of the hair ends straight out of the clamp; this prevents the hairstyle from looking overly ‘done.’ For the curtain bangs, which should sweep beautifully away from the eyes, use the round brush technique again, ensuring the bangs are fully dry. Direct the hair forward and down using the round brush, then immediately sweep the ends back and out. If your bangs tend to fall flat, setting them momentarily in a large, heated velcro roller while you finish the rest of your hair will lock in the shape.
To complete this high-texture, low-maintenance look, refrain from brushing the styled hair immediately. Allow the waves to cool completely, then gently run your fingers through the strands to break up the defined waves into soft, natural bends. The key product for this finished result is a dry texturizing spray or texture powder applied lightly to the root area and misted throughout the layers. This not only absorbs excess oil but provides the necessary grip and separation needed for the ‘lived-in’ appearance. Finish with a light spritz of flexible-hold hairspray or a dab of dry oil or shine serum focused only on the ends. This enhances the definition of the highlights and ensures the ends look healthy and polished, contrasting perfectly with the overall soft, textured volume of this beautiful mid-length style.
Mastering the Sleek, Central French Braid
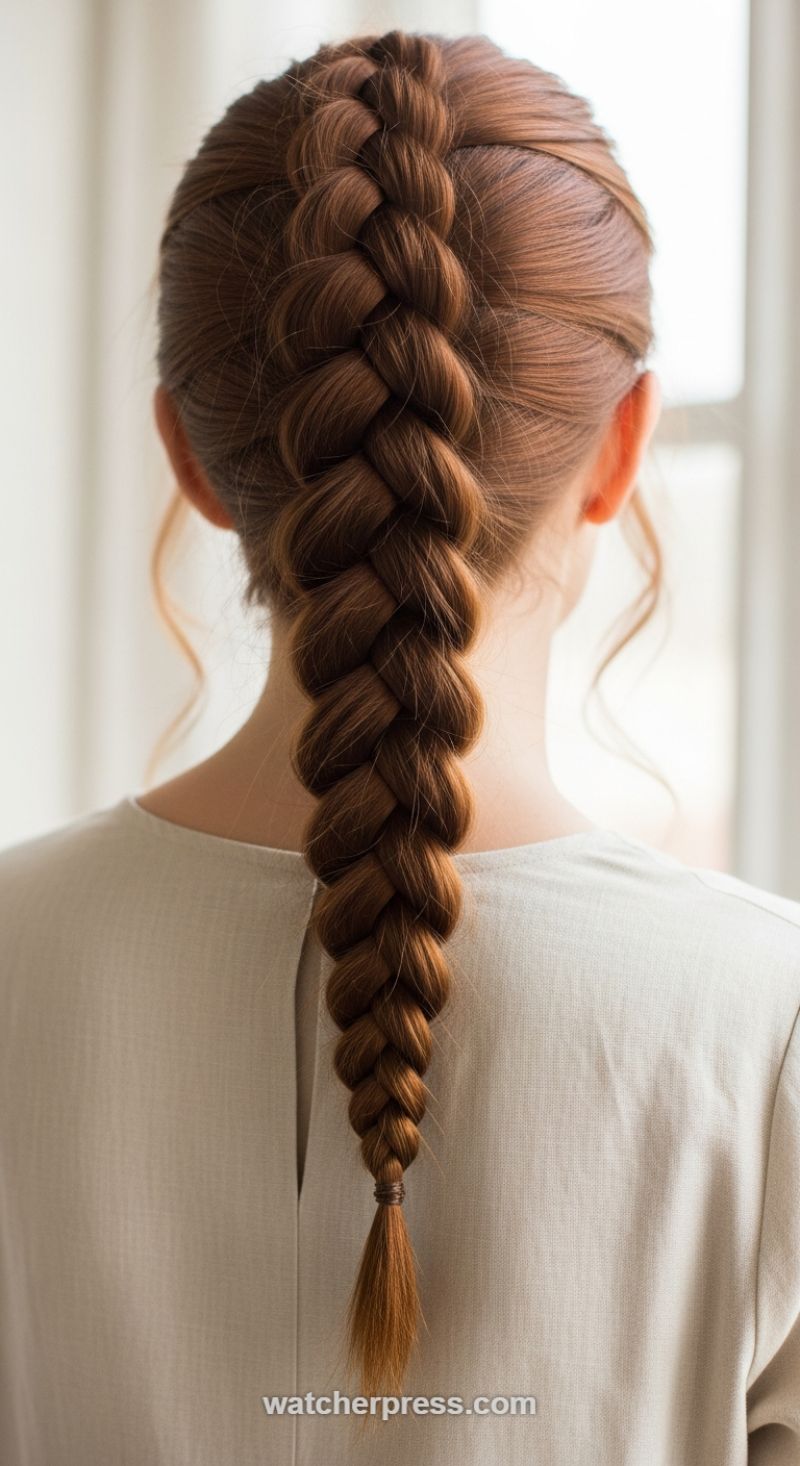
The classic French braid is the epitome of polished simplicity, offering a sophisticated look that keeps every strand neatly contained. To begin this style, ensure your hair is tangle-free and slightly moisturized—second-day hair or hair treated with a lightweight smoothing cream typically provides the best grip and control. Brush all your hair straight back from the forehead and crown. Start by selecting a triangular section of hair right at the top of your head and dividing it into three equal strands. Execute the first two crossovers of a standard three-strand braid (right over middle, then left over middle). Now, the French braiding technique begins: before each subsequent crossover, gather a small, uniform section of loose hair from the corresponding side and smoothly merge it with the active strand you are about to cross over the middle. Consistency in the size of the added sections is crucial for achieving the perfectly uniform, clean appearance seen in this visual guide.
Maintaining consistent tension is the most critical factor for successfully replicating this sleek, tight vertical braid. Work slowly, keeping your elbows up and close to your head to ensure the braid stays centered and taut against the scalp, rather than sagging away from the head. Pay meticulous attention as you reach the curve of the head toward the nape of the neck; this is where tension often fails. Make sure to incorporate all loose hair cleanly by the time you reach the base of the skull. Once all hair has been added, transition to a standard three-strand braid down the length of the hair shaft. Continue braiding until only an inch or two of hair remains unbraided at the end. For very long hair, keep the braid secured tightly to the back, allowing it to fall straight down the spine for an elegant line.
To achieve the refined finish seen in the image, secure the braid with a thin elastic band that matches your hair color. For an expert touch that conceals the hardware, take a small, pencil-thin piece of hair from the tail just below the elastic. Wrap this strand tightly and neatly around the elastic several times until it is completely hidden. Secure the wrapped end underneath the braid using a small bobby pin, tucking it into the braid structure so it is invisible. If you wish to maintain the highly polished, glossy look of the style, finish with a light mist of high-shine, humidity-resistant hairspray, focusing particularly on the hairline and the body of the braid to tame any minor flyaways. Avoid pulling the braid apart, as the beauty of this look lies in its seamless, compact structure.
The Elevated Twisted Half-Up: Effortless Elegance
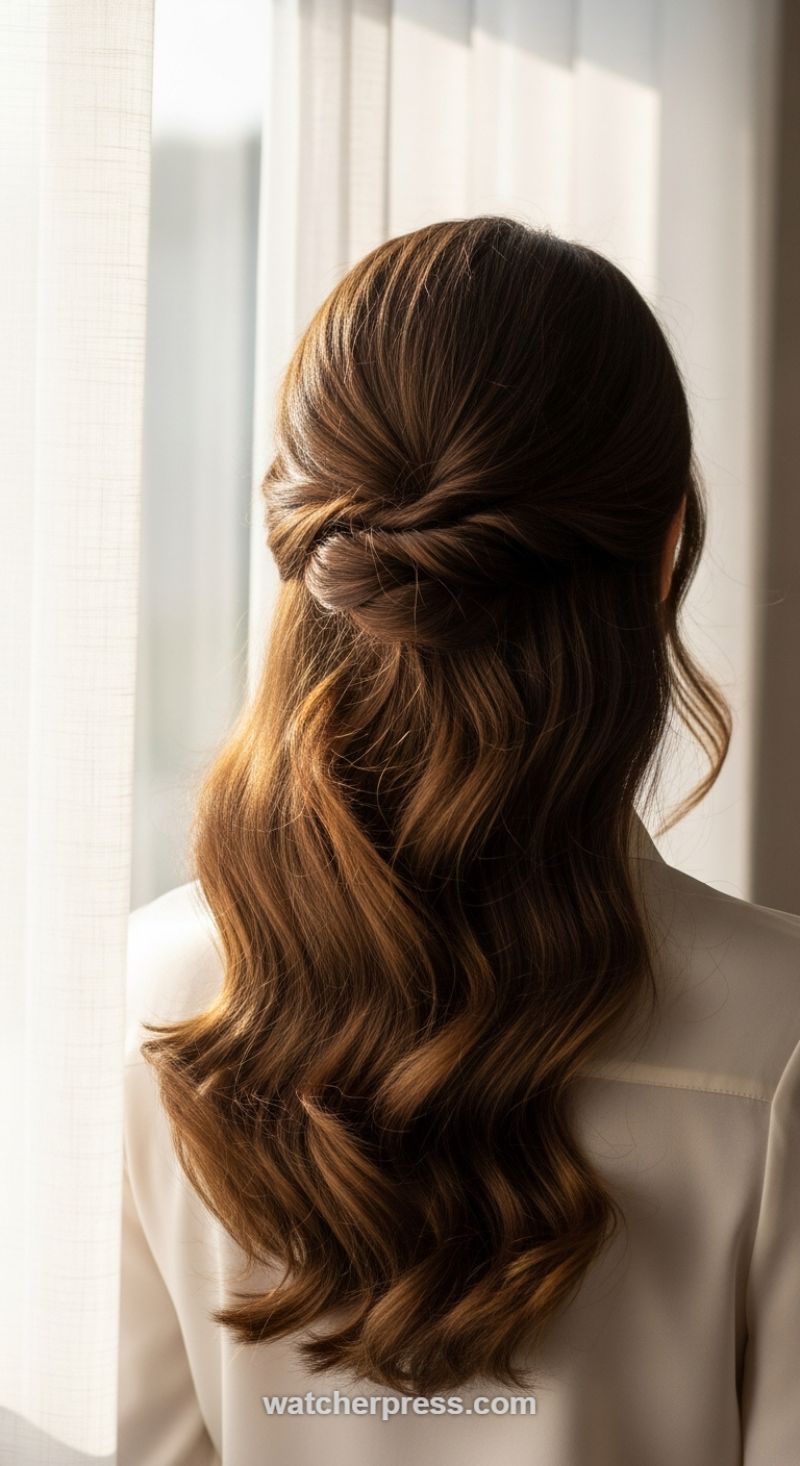
Achieving this polished, romantic look starts with establishing a healthy, wavy base. For long hair like the subject’s, begin by applying a heat protectant and volumizing mousse to ensure body and hold. Using a 1.25-inch curling iron or wand, create uniform, defined S-waves throughout the entire bottom section of your hair (everything below where the twist will sit), ensuring you curl away from your face for a flattering effect. The key to the natural, flowing appearance is brushing through the cooled curls gently with a wide-tooth comb or paddle brush to merge them into soft, cascading waves, mimicking the luxurious, defined texture shown in the photograph. This foundational prep work provides the essential body and movement that contrasts beautifully with the sleekness of the twisted crown, allowing the rich brown and auburn tones to catch the light beautifully.
Now, focus on the signature element: the horizontal twist that creates the seamless half-up effect. Separate the top half of your hair from just above the ears, bringing the hair up smoothly to the crown area. Instead of tying a simple ponytail, take a section of hair from the right temple and twist it gently backward toward the back center of your head, keeping it snug against the scalp, and temporarily securing it. Repeat this exact twisting process on the corresponding section from the left side. Once both sections meet in the middle, carefully wrap the tail ends of the twists around each other and tuck them under the resulting horizontal roll to form a cohesive, smooth knot. This wrapping technique hides any elastics and creates the clean, continuous visual line seen in the image, ensuring the twist itself is the centerpiece.
To finalize this refined style, secure the hidden knot firmly. Use discreet bobby pins matching your hair color, inserting them vertically into the twist structure to anchor it securely against the head without visible hardware. Expert tip: slightly loosen the hair just above the twist before pinning to create a little soft volume at the crown, preventing the style from looking too flat. This hairstyle is exceptionally versatile—perfect for elevating your professional look, serving as a gorgeous bridesmaid style, or wearing for a special date night. For maximum longevity and shine, mist the entire look with a flexible-hold hairspray, paying close attention to the twist to prevent any slippage, and finish the lengths with a high-shine serum to enhance the color and wave definition.
The High-Gloss Sculpted Slick Back
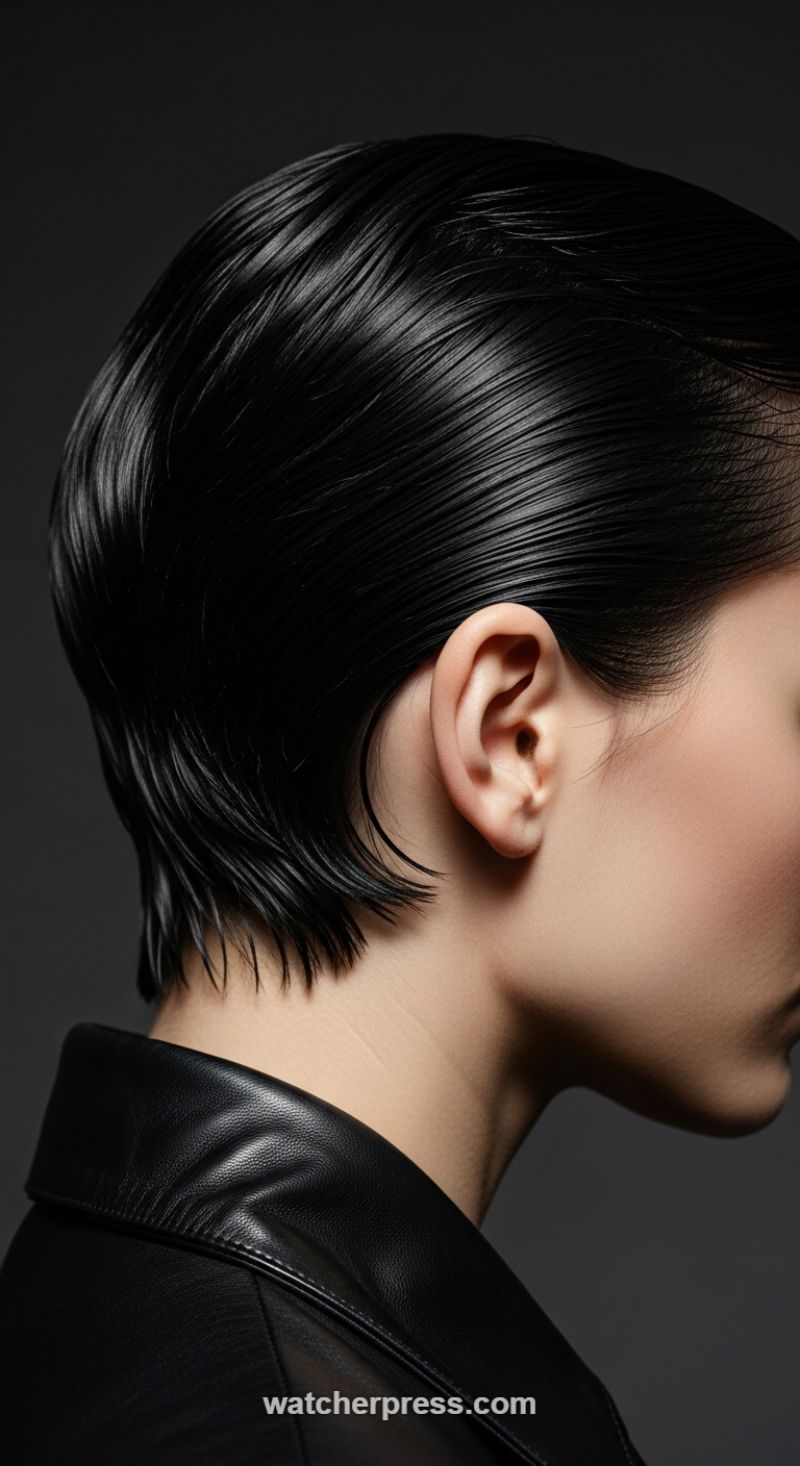
This iconic, editorial-ready style, which we call the High-Gloss Sculpted Slick Back, relies entirely on achieving a glass-like finish that makes the hair appear almost lacquered. To begin, your hair should be freshly washed and towel-dried until it is just damp—not soaking wet. Apply a generous amount of high-shine serum mixed with an equal amount of firm-hold styling gel or high-gloss pomade, distributing it evenly from root to tip. The goal is saturation, as the heavy product is what creates the visual texture and extreme shine. Using a fine-toothed comb, tightly direct all hair away from the face, following the natural curve of the head over the temples and behind the ear. Ensure that every strand lies perfectly flat, eliminating any flyaways or volume at the crown, which would compromise the sleek, structural silhouette seen in the final image. Precision combing is crucial for maintaining the seamless integrity of this style. After the initial sweep-back, use a rattail comb to create defined, parallel streaks across the top of the head, adding to the linear visual texture created by the heavy product application. For the nape area, as seen in the image, the look transitions from severe tightness at the crown to a soft, piecey texture near the neck. Use the remaining product on your hands to pinch and define these shorter pieces, giving them a slight, natural-looking downward wave rather than trying to glue them completely flat. The final step in securing the shape involves a cool-setting blow dryer: lightly direct air over the styled area to set the gel and pomade without disrupting the patterned direction of the hair. Expert tip: If your style looks dull or is showing white flakes from too much product, mist a light veil of shine spray over the surface from at least 12 inches away, but avoid heavy hairspray, which can destroy the ‘wet’ effect. Because this look exposes the ear and jawline completely, careful attention must be paid to the areas surrounding the face. Use the narrow end of your comb or a clean spoolie brush dipped in extra pomade to smooth down any fine baby hairs along the hairline and around the ear’s perimeter. The beauty of the High-Gloss Slick Back is its sharp contrast: the severity of the hair perfectly complements highly structured, high-fashion pieces, as suggested by the subtle texture of the black leather jacket seen accompanying the style. This look is inherently bold and modern, making it ideal for pairing with tailored suits, monochromatic palettes, or dramatic accessory choices. The finished product should feel sculptural, expensive, and fiercely polished, projecting confidence and precision.
The Ethereal Golden Vine Low Chignon
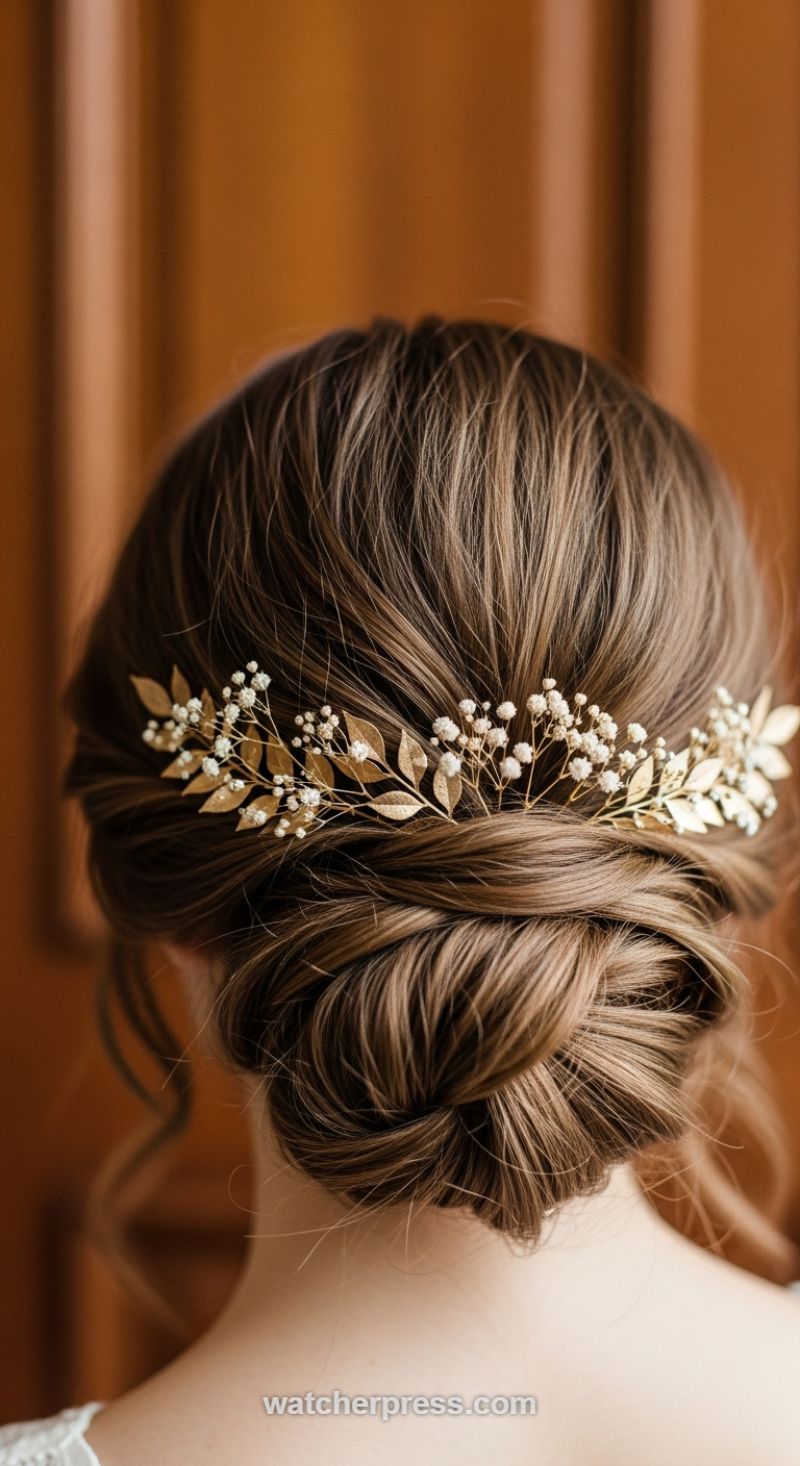
Start by creating a secure foundation for this elegant, romantic low chignon. This style works best on hair that has been prepped for texture and hold—ideally, hair that is either naturally wavy or has been gently curled or waved with a large-barrel iron to provide necessary volume and grip. Gather all your hair into a low, loose ponytail at the nape of the neck. Unlike a severe ballet bun, the goal here is softness. Instead of securing the base tightly, ensure there is a natural, soft curve from the crown down to the base. Twist the ponytail loosely and coil it up and around the elastic base, tucking the ends neatly underneath the roll. Secure the resulting bun with several large U-shaped hairpins, focusing on anchoring the bun to the underlying elastic structure rather than poking through the center. This technique creates the voluminous, slightly twisted texture visible in the final look.
The key to the sophisticated look seen here is the balance between volume on the top and the sleek transition into the chignon. Use a fine-toothed comb to gently back-comb the hair just above the ears and at the crown to build subtle height, ensuring the top layer remains smooth and polished. Once the bun is fully secured, check for symmetry. If the bun looks too flat, gently pull loops of hair within the bun outward to add texture and fullness, mimicking a softly braided or twisted effect without requiring actual braiding skills. Expert stylists often recommend misting the finished bun lightly with a flexible-hold hairspray before adding the accessory, allowing the natural shine and subtle highlights of your hair to catch the light beautifully, reinforcing the delicate appearance.
The final, transformative element is the delicate hair accessory. The image features a stunning golden hair vine adorned with small metallic leaves and clusters of tiny white beads, often called a floral headpiece or vine comb. Choose a hair comb or vine that is about 6-8 inches long to span the top curve of your chignon. Carefully insert the accessory right above the uppermost edge of the bun, ensuring the piece lays flat against the curve of the head and looks seamlessly integrated into the hairstyle. The gold tone provides a beautiful contrast against medium brown hair, making the intricate details pop. Placement is critical: center the accessory so the decorative elements are highlighted symmetrically across the width of the bun, giving the finished style an ethereal, high-end elegance suitable for weddings, galas, or any special occasion where elevated sophistication is desired.
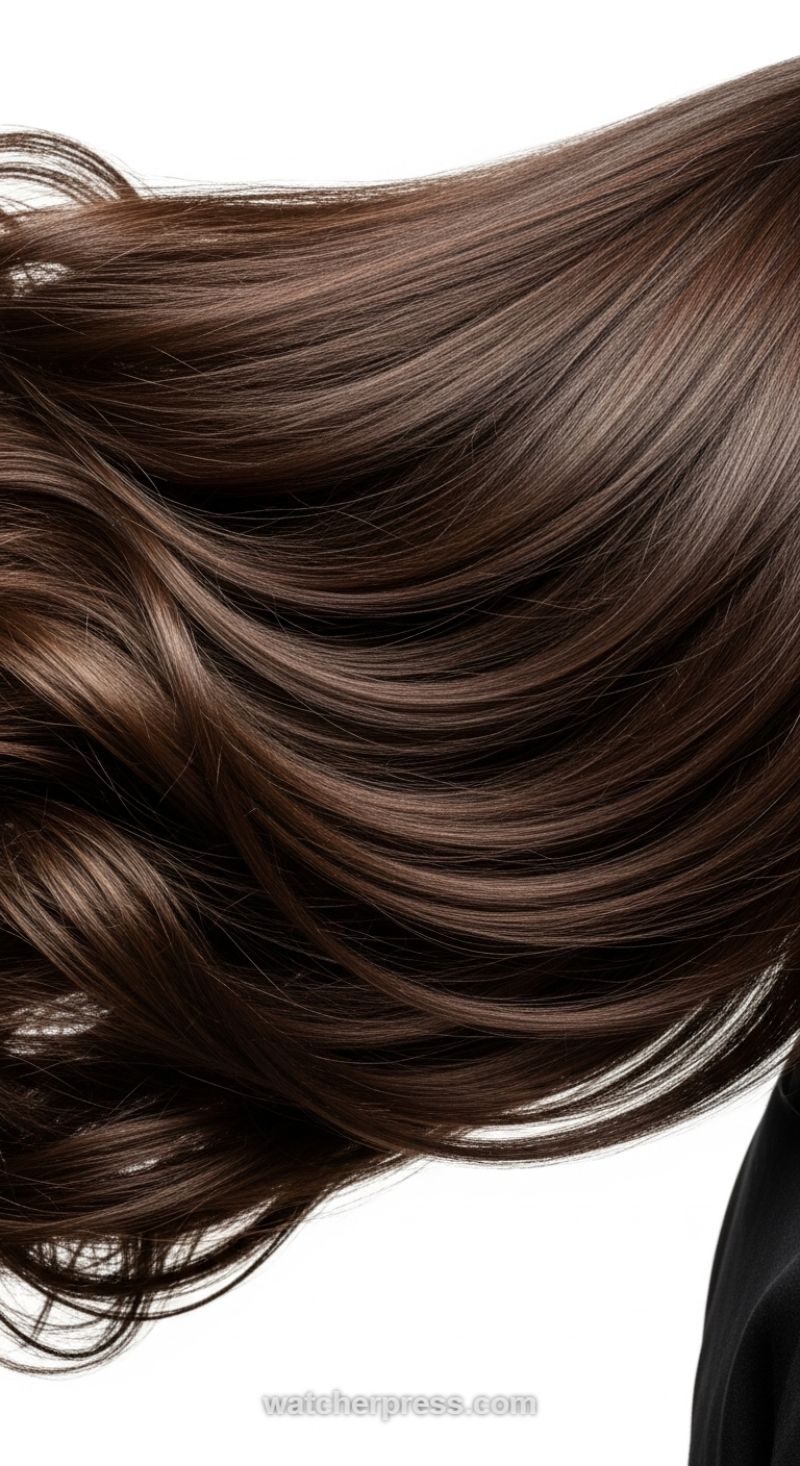
Silken Strands: Achieving the Ultra-Sleek, High-Shine Finish
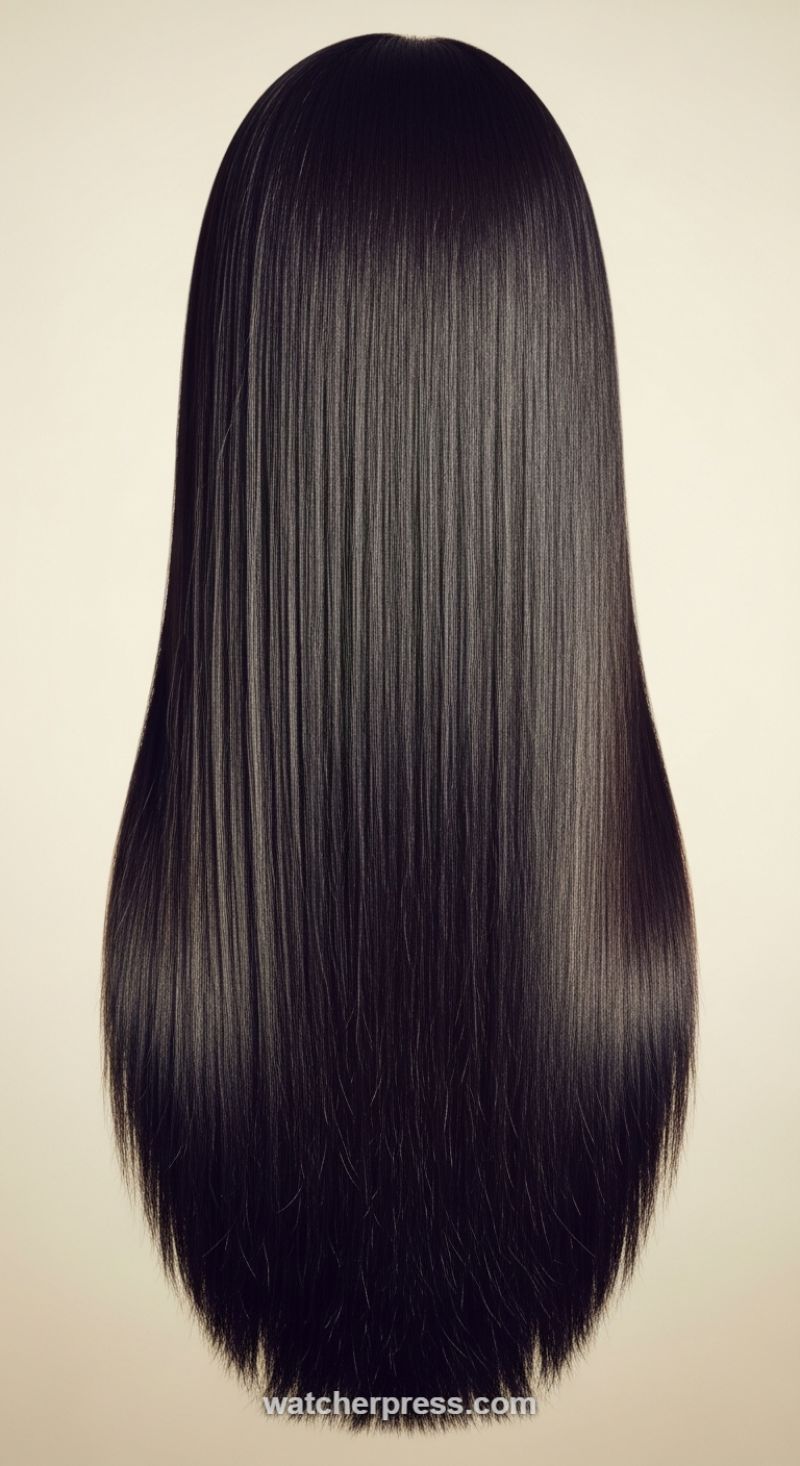
The hairstyle pictured—long, dark, and perfectly straight—is the ultimate standard for healthy, high-gloss hair. Achieving this level of sleekness and mirror-like shine requires meticulous preparation and precise technique, making it a high-impact style you can absolutely master at home. Start with products formulated specifically for smoothing. After shampooing and conditioning with anti-frizz or smoothing agents, gently blot the hair dry with a microfiber towel to minimize friction and prevent roughening the cuticle. Before applying any heat, liberally mist every section with a high-quality heat protectant spray—this is non-negotiable for preserving the natural luster and depth of color visible in the final look. Next, rough dry the hair until it’s about 70% dry. Then, switch to a nozzle attachment and a paddle brush, using maximum tension to pull sections straight while aiming the airflow down the hair shaft. This preliminary blow-dry alignment sets the foundation for flawless straightness.
Once the hair is completely dry, section the hair meticulously. Divide your hair into three main layers (bottom, middle, top) and further break those down into vertical sections no wider than your flat iron plate. The key to the intense linearity seen here is the “chase method”: place a fine-toothed carbon comb right above the section you are about to iron, and follow immediately behind it with your flat iron, ensuring the comb separates and detangles the strands before they meet the heat. Set your iron to an appropriate temperature based on your hair type (typically 350-400°F for medium to thick hair) and perform one slow, steady pass per section rather than multiple fast passes. This technique minimizes repeated heat exposure while maximizing straightness. Pay extra attention to the ends, giving them a slight, inward bevel to replicate the gentle, natural weight distribution shown in the photograph.
To seal the look and achieve that signature glassy reflection, finishing products are crucial. After straightening, warm a pea-sized amount of lightweight shine serum or argan oil between your palms and lightly graze the surface of your hair, starting mid-shaft and working down to the ends. Avoid applying product near the roots, which can diminish volume and cause the hair to appear weighed down. If you notice any stubborn flyaways near the crown, spritz a small amount of flexible hold hairspray onto a clean mascara wand or an unused soft toothbrush and gently smooth them down. This final step enhances the depth of your color and locks in the flawless, silken finish, giving you a professional-grade style that radiates health and shine.
Voluminous, Dimensional Beach Waves
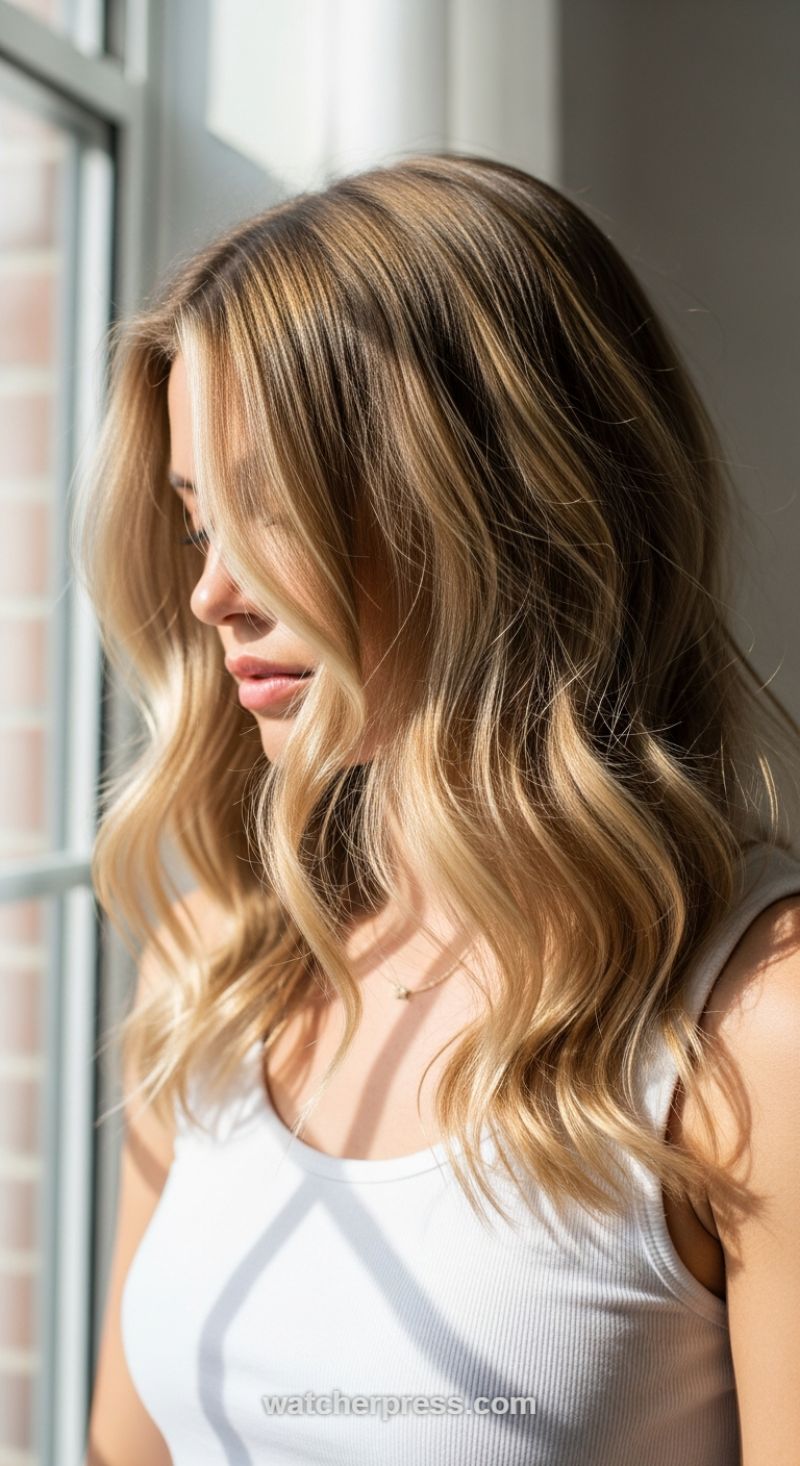
The hairstyle displayed is a perfect example of a sophisticated, sun-kissed wave, often referred to as a dimensional blowout wave. It relies heavily on good color work (blended blonde highlights/balayage) and exceptional volume at the root. To recreate this look, start with freshly washed, towel-dried hair. Apply a generous amount of volumizing mousse or root-lifting spray throughout the crown area and a heat protectant spray from mid-shaft to ends. For this specific texture—which is more of a bend than a tight curl—opt for a 1.25-inch barrel curling iron or a large wand. A crucial step for maximizing lift is rough-drying the hair until it is 80% dry, then using a large round brush to lift the roots upward while drying the remainder, setting the stage for lasting volume.
Once the hair is fully dry, section it horizontally. Begin curling at the nape of the neck, working your way up. For the most flattering result, wrap all sections of hair away from the face, ensuring the direction is consistent. When wrapping, the expert tip is to leave the last inch or two of the ends out of the heat tool. This technique creates that modern, undone finish, preventing the waves from looking too formal or curled. Hold the hair on the tool just long enough for the heat to penetrate, then gently release the curl and pin it up with a small clip while it cools. Allowing the curls to cool completely is the secret to longevity and retaining the maximum amount of shine and definition, mirroring the polished sheen visible in the photograph.
After all sections are curled and cooled (about 10-15 minutes), gently release the pinned sections. Instead of brushing, use a wide-tooth comb or simply run your fingers through the waves to break them up into soft, cohesive bends. To enhance the lived-in texture and volume, flip your head over and mist a light texture spray or dry shampoo at the roots and throughout the mid-lengths. Finish the look by smoothing a tiny amount of lightweight shine serum or argan oil onto the ends. This not only adds gloss, highlighting the beautiful dimension of the color, but also helps the ends look smooth and healthy, achieving this effortless yet polished daytime style.
Sleek, Voluminous Hollywood Waves
The key visual element of this look is its mirror-like shine and rich color depth, suggesting exceptional hair health and precise styling preparation. To replicate this salon-quality finish, start with clarifying and deeply conditioning the hair to ensure a smooth canvas. Apply a dime-sized amount of a silicone-based smoothing serum or shine spray to damp hair, focusing strictly on mid-lengths and ends, followed by a strong heat protectant. Using a large ceramic barrel round brush (ideally 2 inches or larger), section the hair and blow-dry each section from root to tip, aiming the nozzle downward to intentionally flatten the hair cuticle and maximize light reflection. Ensure the hair is 100% dry and cooled immediately with a blast of cool air (using your dryer’s cool-shot button) before moving to the styling stage, as residual moisture or heat will compromise the longevity of the waves and reduce overall shine.
The waves themselves are soft and loose, avoiding a tight, ringlet appearance. This luxurious flow requires a large barrel curling iron—a 1.5-inch or 2-inch tool is necessary for this subtle movement. Section off the hair horizontally, starting at the nape of the neck. For each section, take a 1-inch width of hair and wrap it around the iron, always curling *away* from your face, holding for no more than 8–10 seconds depending on hair thickness. Crucially, after releasing the curl from the iron, gently hold the warm curl in your palm and clip it flat against your scalp using a metal duckbill clip until all sections are complete. This crucial ‘pinning’ step allows the wave to cool fully in its structured shape, which is the secret to ensuring the wave holds its form for hours while maintaining that incredible volume and smooth density seen in the image.
Once all pinned curls are completely cooled (ideally after 15–20 minutes), release the clips. Do not immediately run your fingers through the hair; this will cause frizz and collapse the structure. Instead, use a wide-tooth comb or a soft bristle paddle brush to very gently brush out the set curls. This merging action instantly transforms the separate spiral curls into one cohesive, flowing wave pattern, creating the signature voluminous bounce. To lock in the high shine, mist the entire head with a flexible-hold hairspray. Expert tip: If your hair tends to fall flat, flip your head over while spraying the hairspray from underneath to build internal volume, and then lightly dust the roots with a professional volumizing powder for lift that perfectly complements the dense, polished movement of these Hollywood-inspired waves.
The Face-Framing Blowout: Achieving Soft Movement and Volume

This hairstyle is a masterclass in soft, voluminous movement, perfectly leveraging a strategic layered cut to create depth and frame the face elegantly. To achieve this look at home, preparation is crucial. Start with towel-dried hair and apply a volumizing mousse or root-lifting spray primarily near the crown. Because this style features prominent layers that cascade down to the ends, you will need a medium to large ceramic round brush (a 2-inch diameter works well) and a powerful blow dryer with a nozzle attachment. Divide your hair into horizontal sections, beginning at the nape of the neck. When drying, always pull the hair taught with the round brush, focusing the heat on the roots first to maximize lift. The layered cut enhances volume, but the key is consistent tension and direction during the drying process.
The defining feature of this look is the inward sweep of the ends and the delicate face-framing fringe. Once you reach the side and top sections, shift your focus. For the front layers, take vertical sections, place the round brush under the hair close to the roots, and pull the hair up and slightly forward, rolling the ends inward toward your face. Hold the brush at the ends for a few seconds while applying heat, then hit the section with the cool shot setting on your dryer. This crucial step sets the shape and adds that polished, bouncy curl you see in the image. Work through the remaining body of the hair, making sure to over-direct the sections slightly (pulling hair in the opposite direction from where it naturally falls) to build maximum volume at the root.
To complete the look, gently run your fingers through the curls, avoiding a brush which might eliminate the volume you just built. A lightweight finishing oil or anti-frizz serum applied only to the mid-lengths and ends will enhance the separation of the layers and impart a high-shine finish. Additionally, note how the dimensional blonde color—achieved through babylights or fine highlights combined with a natural, rooted base—makes this style look thicker and more dynamic. The contrast in tone accentuates the light catching the smooth curves of the layers. For longevity, sleep with your hair loosely tied in a high silk scrunchie (a ‘pineapple’ technique) and refresh root volume the next day with a texturizing dry shampoo.
The Intricate Dutch-Braided Chignon
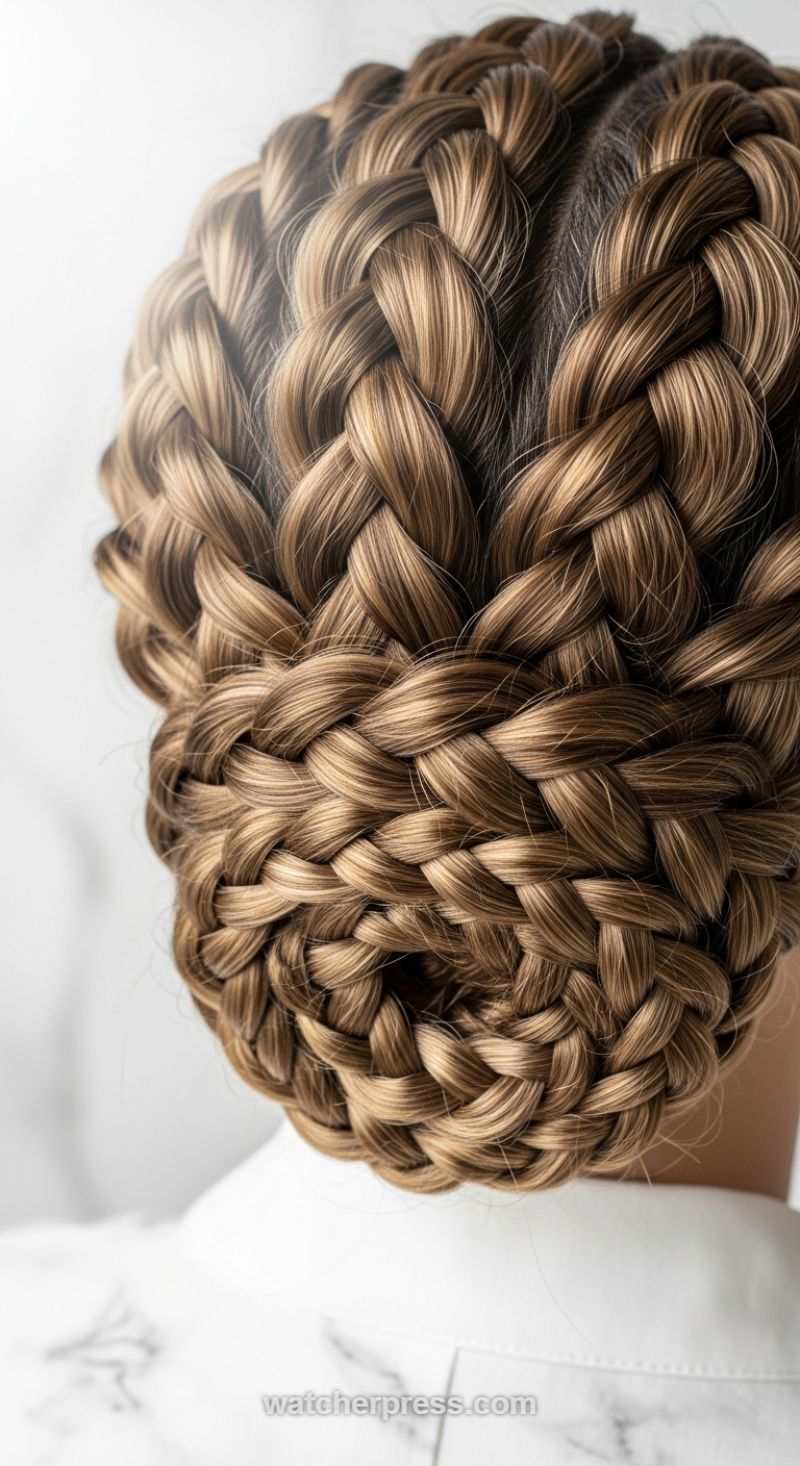
This intricate updo, characterized by its beautifully defined, woven texture, is achieved using the Dutch braiding technique, which causes the braid to sit raised or ‘pop’ off the scalp. To begin this style, ensure hair is clean but not too soft; a light application of texturizing spray or dry shampoo is essential to provide the necessary grip and bulk. Start by partitioning a section of hair near the nape or behind one ear. Divide this section into three equal strands. Unlike a traditional French braid where you cross strands over the center, for a Dutch braid, you cross the working strands *under* the center strand, adding a small section of hair from the perimeter each time you cross under. Maintain tight, consistent tension as you braid across the back of the head, traveling from one side to the other. The goal is to create a flat, continuous band of elevated braids that hugs the contour of your head.
Once the braid has wrapped horizontally across the entire width of the nape, continue braiding the remaining hair in a standard three-strand Dutch style (no longer adding new hair from the scalp) until you reach the end, securing it temporarily with a small elastic band. The crucial step now is forming the chignon structure seen in the image. Take the resulting braid tail and coil it inward and upward, tucking it neatly beneath the primary, fixed braided track. The hair should form a tight, structured bun or chignon directly at the base of the neck. Use plenty of U-pins or hairpins, pushing them through the coiled braid and into the fixed anchor points of the initial scalp braid to ensure maximum hold and concealment. This coiling method creates the multi-layered, voluminous effect visible in the lower portion of the style.
For the polished yet voluminous finish seen here, the secret lies in ‘pancaking’ the braids. Once the style is fully pinned and secure, gently pull at the outer edges of each braid loop along the entire length, subtly loosening the weave. This technique expands the braid, making the hair appear thicker and allowing the dimensional hair color—such as the highlighted ‘bronde’ tones visible in this example—to truly shine and emphasize the woven pattern. Apply a firm-hold hairspray liberally across the finished style, focusing especially on the edges and the coiled base, to prevent flyaways and ensure this sophisticated updo remains immaculate throughout the day or evening. This detailed approach ensures a regal, durable finish suitable for any formal occasion.
The Effortless Voluminous Low Bun
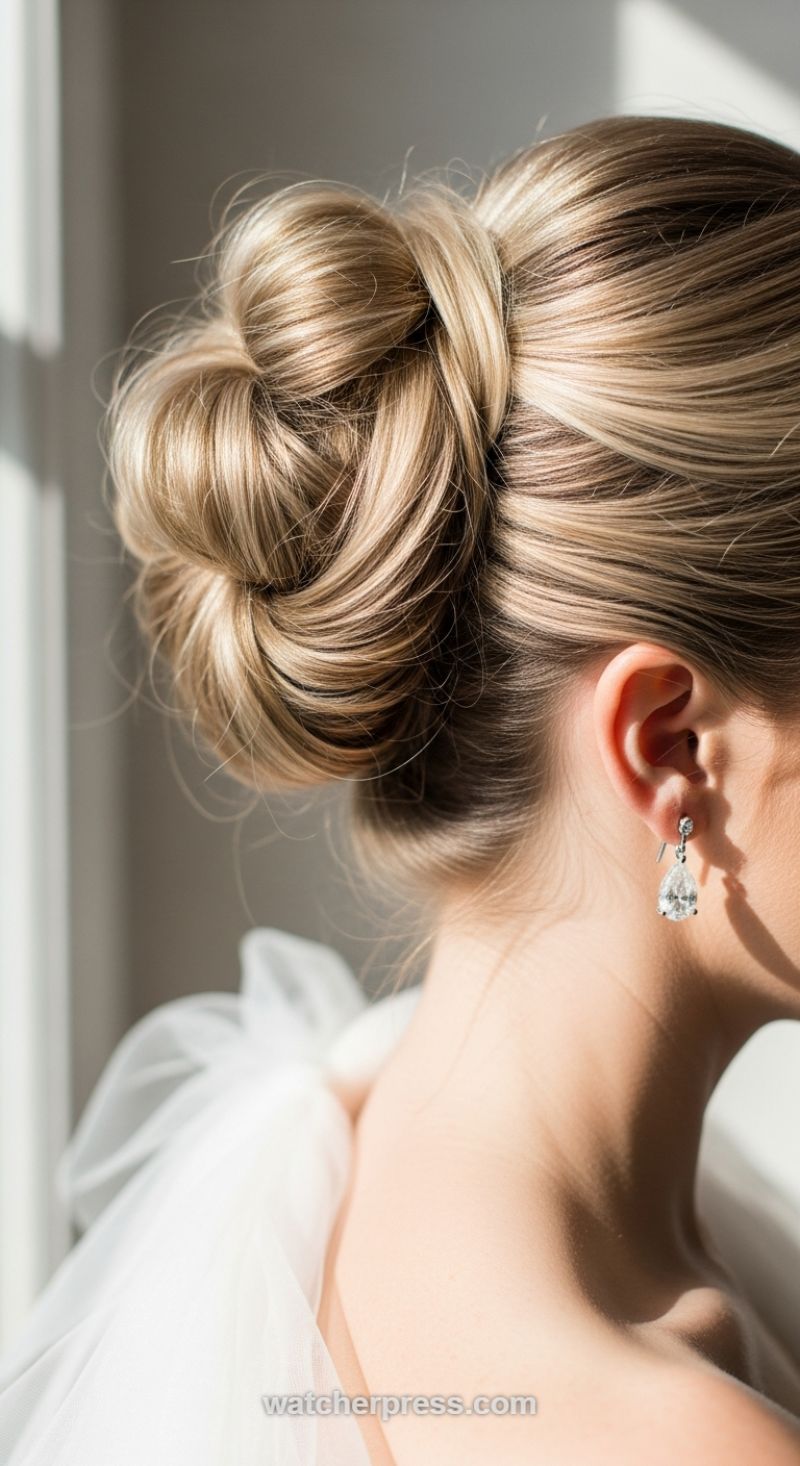
Achieving this highly coveted, voluminous low bun starts with proper preparation, as this style relies heavily on existing texture. Skip the flat iron; instead, mist your hair generously with a lightweight texture spray or dry shampoo to provide the necessary grip and lift. If your hair is naturally fine, gently back-comb the top layer at the crown and the length of your hair to ensure maximum volume before gathering. Next, create a loose ponytail at the very nape of your neck, securing it with a clear, thin elastic. Crucially, do not pull the hair taut against your scalp; the slight slack is essential for achieving the soft, twisted flow seen in the final result. The goal is an organic, relaxed foundation, not a polished ballet bun.
Once the base is secure, the sculpting of the chignon begins. Divide the ponytail into two or three sections of varying thickness. Take the first section and loosely twist it into a soft rope, then gently pull apart the edges of the twist to emphasize the texture and create width. Wrap this twisted section around the base of the ponytail, focusing on building height and fullness rather than wrapping tightly inward. Use long, open U-shaped hairpins—which hold volume better than traditional bobby pins—to anchor the section directly into the surrounding hair and the scalp. Repeat this process with the remaining sections, wrapping them in opposing directions (some clockwise, some counter-clockwise) to build the intricate, interwoven dimension that gives this bun its signature voluminous, textured look.
The final step involves perfecting the profile and setting the style. Gently tug at the loops and twists of the finished bun to exaggerate the fullness and soften any harsh, defined lines. Then, gently loosen the hair framing the face and ears to ensure a romantic, less severe finish, beautifully framing the jawline and neck. Lightly mist the entire style with a flexible hold hairspray to keep flyaways at bay while maintaining movement. As this updo is so clean and elegant, exposing the neck and shoulders (as suggested by the soft, sheer tulle on the shoulder in the image), it pairs exceptionally well with delicate, reflective drop earrings, such as the clear, tear-drop studs featured here. This classic combination elevates the hairstyle, making it ideal for bridal events, sophisticated galas, or any occasion requiring enduring elegance.
The Sculptural Loop Chignon
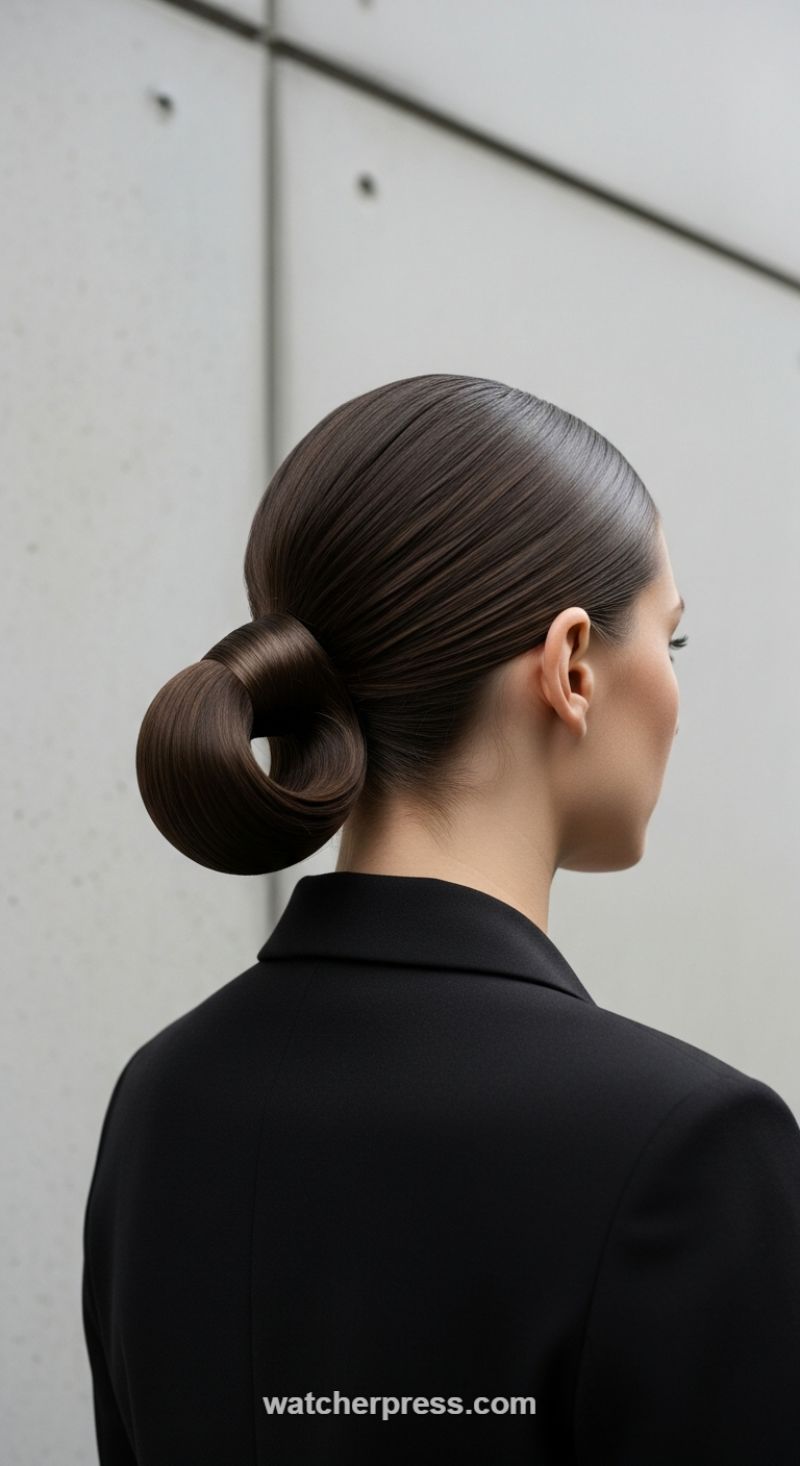
The key to mastering this extremely chic, minimalist chignon is preparation and polish. This look demands a mirror-like finish, meaning zero flyaways and maximum shine. Start by ensuring your hair is perfectly straight; if your natural texture is wavy or curly, a quick pass with a flat iron is necessary after applying a heat-protectant smoothing balm. Once the hair is pin-straight, apply a generous amount of strong-hold smoothing gel or high-quality styling wax from the mid-lengths to the ends, avoiding the scalp area to prevent immediate grease. Using a boar-bristle brush, meticulously pull all your hair back into a tight, low ponytail, secured precisely at the nape of the neck. This ponytail must be tight; the tension is what gives the final loop its architectural integrity.
Now for the sculpting. Unlike a standard ballerina bun, this style involves creating a deliberate loop rather than a twisted coil. Take the secured ponytail and smooth it thoroughly. Fold the hair up toward the base of the ponytail, then loop it back down, creating a large, voluminous circular shape with a perfectly smooth outer edge. The ends of the ponytail should be tucked neatly and completely into the base of the loop, hidden from sight. This circular formation should lie flat against the back of the head. Secure the shape using several large, open-ended U-shaped hairpins, driving them deeply into the base and securing them against the ponytail elastic. Avoid using standard bobby pins, as they can cause visible ridges in the smooth surface of the loop.
To achieve the professional, mirror-like finish seen in the image, the final steps are critical. Take a strong-hold hairspray and mist it directly onto a clean, fine-toothed toothbrush. Use the toothbrush to gently brush down any micro-flyaways around the hairline, behind the ears, and along the crown. This technique allows for precise application without dousing the entire head. For added luxury and dimension, finish with a light mist of shine spray or anti-frizz serum focused only on the surface of the loop. This sleek, executive style is perfect for professional settings, high-stakes meetings, or black-tie events where polished precision is paramount.