Unlock 20 genius home transformation hacks that fit any budget. Learn stylish and affordable DIY decor tips, maximize small spaces, refresh your kitchen and bathroom, and achieve stunning results.
YOU NEED TO TRY THIS! 1/2 BATHROOM TRANSFORMATION HACKS

The secret to maximizing the impact of a small powder room or half bath is radical contrast, as demonstrated brilliantly by the before-and-after shown here. If your space is currently neutral and bland (the beige ‘Before’), the most cost-effective and dramatic hack is embracing a deep, saturated color, such as the rich forest green used in the ‘After’ image. This technique instantly adds depth and sophistication, making the room feel intentional and luxurious, rather than just functional. Beyond paint, maximize the tiny footprint by swapping out the space-hogging pedestal sink for a modern floating vanity. A floating vanity offers necessary storage while exposing more floor area, creating an illusion of spaciousness. Pair this with a trendy vessel sink and a backlit circular mirror, which acts as both a light source and a sculptural focal point, ensuring your small bath punches far above its weight.
To infuse designer luxury without the massive price tag, focus your budget on highly visible accents and strategic use of expensive materials. Notice the visual emphasis placed on elements like the high-gloss emerald green square tiles and the warm, golden hardware shown in the inspiration photos. You don’t need to tile the entire room; select a single accent wall or create a tiled wainscoting effect to keep costs down while still achieving that customized look. Similarly, instead of replacing all internal plumbing, invest in high-quality, statement fixtures like a matte gold or brass faucet that instantly elevate the sink area. When paired with natural wood tones—seen in the vanity and surrounding shelving—these warm metals create a cozy, spa-like ambiance that is both organic and contemporary.
Finally, implement clever lighting and incorporate living elements to finalize the transformation. Ditch harsh, single-point overhead lighting and switch to warm-toned wall sconces, flanking the mirror if possible. These fixtures cast flattering light and add architectural interest, essential for the sophisticated, dimly lit look seen in the full bath concept. For the half bath, integrate natural life (the ‘jungalow’ trend) using trailing plants like Pothos or small ferns; these thrive in humid environments and soften the hard lines of the ceramics and wood. This final step injects texture, color, and life, completing a high-impact transformation that feels custom-designed yet is achievable through smart, budget-conscious hacks focused primarily on surface treatment, fixtures, and strategic focal points.
MAXIMIZE TINY BATHROOMS! 7 GENIUS SMALL SPACE IDEAS

Transforming a tiny bathroom requires strategic planning focused on minimizing footprint while maximizing verticality and visual flow. The fundamental secret is to reclaim floor space using wall-mounted fixtures. For instance, swap traditional pedestal or cabinet sinks for a sleek, wall-hung basin (as seen in the image) and opt for a concealed-tank toilet. Moving the tank inside the wall not only saves valuable inches but also cleans up sight lines, making the entire room feel less cluttered and significantly larger. When considering the layout, study professional floor plans to understand how slight adjustments—such as positioning the shower stall in a tight corner or angling the door swing—can unlock pathways and improve the room’s function without sacrificing essential amenities. Finally, ditch the shower curtain entirely; full or partial frameless glass enclosures, bordered by minimalistic wood accents or metal trim, are crucial, as they allow light to pass completely through the space, preventing the visual division that makes small rooms feel claustrophobic.
Effective storage in a confined space must prioritize depth and height over width. Look for narrow, tall vanities with deep drawers, rather than wide, shallow cabinets, as drawers offer superior organization and prevent items from getting lost or requiring deep reaching. The visual guide demonstrates this perfectly with a tall, modern walnut vanity that uses its height to provide ample storage while maintaining a minimal footprint. Above the sink or toilet, utilize floating shelves made of warm materials like natural wood. These shelves capitalize on previously unused wall real estate, providing necessary surface area for daily essentials, towels, and decorative accents (like plants or diffusers) without adding bulk. Crucially, integrate storage directly into the shower design using built-in niches or ledges. This practice keeps bottles off the floor and prevents clutter, which is exponentially distracting in a small area.
Beyond fixtures and storage, strategic material selection and reflective surfaces are key to optical expansion. Use large mirrors—preferably spanning the width of the vanity or wall—to bounce light and double the perceived size of the room. While the visual example uses a bold mint grid tile, a general rule for tiny spaces is to use lighter, monochromatic tiles or patterns across large surface areas (like the shower surround) to create a continuous, uninterrupted visual field. Lighting should also be carefully considered; recessed ceiling lights eliminate fixtures that protrude into the space, offering powerful, even illumination that banishes dark corners. By implementing these expert hacks—focusing on wall-mounting, vertical storage, clear glass, and reflective materials—even the smallest powder room can be transformed into a highly functional and airy space.
SMALL CHANGES, BIG IMPACT: THE POWER OF PLANTS IN YOUR BATHROOM

Transforming your bathroom into a serene, spa-like sanctuary doesn’t require expensive renovations. The genius hack lies in leveraging the natural environment of your bathroom—high humidity and warmth—to introduce thriving foliage, instantly elevating the space’s aesthetic and air quality. As demonstrated visually, the key is selecting moisture-loving species like the glossy Pothos (ideal for hanging or high shelves near the shower where humidity peaks), the elegant Peace Lily, and the dramatic split-leaf Monstera. Even low-light heroes like the tall, structural Snake Plant (Sansevieria) work perfectly next to a toilet or in a dark corner, requiring minimal attention. This transformation is highly budget-friendly; start with just one or two strategically placed specimens in simple white ceramic pots—a visual trick that maintains a clean, modern contrast against the lush green.
To maximize the visual impact, adopt an expert styling technique utilizing varied heights, turning functional pieces into decorative stages. Notice how the plants around the freestanding tub are placed on small wooden stools; this simple trick instantly adds layers, dynamism, and ensures the plants receive necessary airflow and light. When implementing this hack, remember drainage is crucial, even with the humidity boost. Always use pots with drainage holes and place them inside attractive cachepots. For ultimate savings, consider propagating cuttings from existing houseplants (like Pothos or Philodendron) and letting them root in stylish glass jars on your vanity, creating sophisticated, personalized decor at zero cost. For larger focal plants, investing in mature specimens like the large Monsteras shown will provide an immediate, lush jungle effect, justifying the small expenditure.
Beyond aesthetics, this hack offers tangible wellness benefits. Plants are nature’s air purifiers, helping to filter common bathroom toxins and reduce moisture-related issues. The presence of greenery also contributes to a relaxing, de-stressing environment—a major bonus for a room dedicated to self-care. To ensure your investment thrives, rotate plants regularly if the light source is unidirectional (like a single window) to encourage even growth. While humidity reduces the frequency of watering, always check the soil before adding more water to prevent root rot. By integrating living elements, you achieve a sophisticated, highly curated look that feels both luxurious and genuinely transformative, proving that the most impactful home hacks often involve borrowing from nature.
DRAMATIC KITCHEN GLOW UP! 5 COUNTER DECOR SECRETS
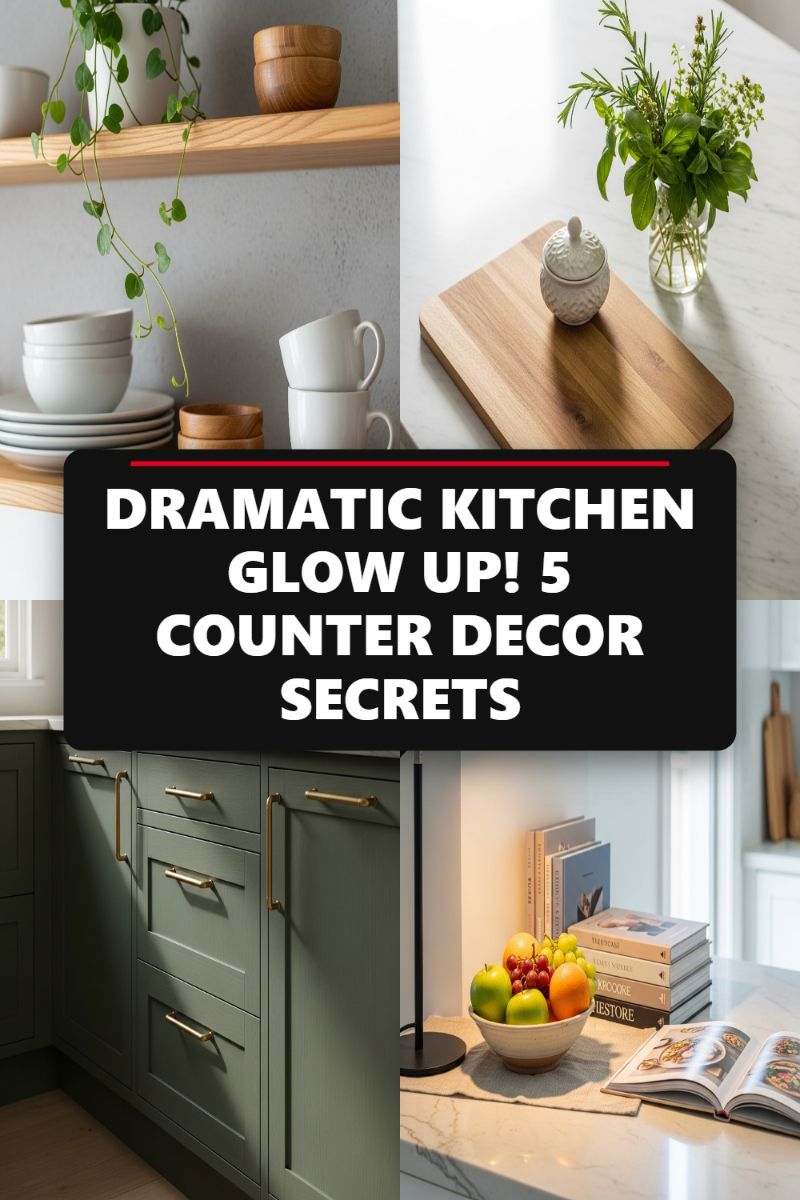
Achieving a dramatic kitchen transformation doesn’t require a full-scale renovation; it often hinges on intentional, high-impact decor choices that utilize your existing countertops and vertical spaces. One of the most effective secrets is anchoring the room with rich color and metallic accents. Observe how the deep olive or sage green cabinetry instantly provides sophistication, which is amplified by long, modern brass hardware. When styling your counters, think in terms of curated vignettes. A counter shouldn’t just be a dumping ground; it should be a stage for beautiful, functional groupings. Start by layering textures: pair cool marble or quartz surfaces with the warmth of natural wood, using elements like thick cutting boards as foundational pieces. Introduce soft textiles, such as a simple linen runner, to ground elements like a large fruit bowl, immediately softening the look and adding depth. The combination of hard and soft, cold and warm, is key to an expensive, professionally styled finish that dramatically elevates the entire room’s aesthetic.
To breathe life and personality into the space, focus on incorporating natural, utilitarian elements. Secret one is maximizing visual appeal with edible decor: a brightly colored bowl of fresh fruit—green apples, oranges, grapes—provides vibrant, ever-changing color pops that are both functional and visually stunning. Secret two involves integrating fresh greenery. Whether it’s a simple glass jar filled with fresh herbs like basil and rosemary, or a trailing plant cascading from open shelving, greenery instantly adds an organic, lively quality that contrasts beautifully with hard kitchen surfaces. Position functional items, like salt cellars or small jars, on top of wooden cutting boards rather than directly on the counter; this simple grouping technique defines the area and makes these everyday items feel intentionally placed. Lastly, never underestimate the power of lighting and literature. A modern, minimalist table lamp on a large island (Secret three) can serve as unique task lighting while adding an unexpected design element, treating the counter like any other surface in your home, such as a living room console. Pairing it with a stack of inspiring cookbooks or art books adds height and reveals your personal interests, transforming a cold workspace into a welcoming, intellectual hub.
Finally, maximize visual flow by treating open shelves as a vertical extension of your counter vignettes. If you lack upper cabinets, open shelving is a budget-friendly hack (Secret four) that opens up the space. The secret to styling these shelves is restraint and repetition (Secret five). Stick to a limited, cohesive color palette, such as the natural wood and crisp white ceramics seen here. Use stacked items (like cups and bowls) to add visual interest and height variation. Remember that successful kitchen counter decor isn’t about clutter; it’s about intentional display. Every piece must earn its spot by being either exquisitely beautiful or immensely useful. By thoughtfully arranging these decorative yet functional items, you create focal points that draw the eye, making your kitchen look meticulously designed and achieving that sought-after dramatic glow-up without breaking your budget.
PLANNING SUMMER VIBES NOW: MUST-HAVE OUTDOOR ENTERTAINMENT

Transforming your backyard into a functional and stylish entertainment hub doesn’t require massive renovations; it requires strategic hacks focused on comfort, utility, and ambiance. The foundation of a successful outdoor space, as demonstrated in the image, is defining distinct zones. To create an instant outdoor living room—a major home transformation hack—focus on achieving comfortable seating and critical shade. Instead of constructing an expensive, permanent roof or pergola, leverage the simplicity and cost-effectiveness of a tensioned sun sail or canopy, visible in the top left quadrant. This hack provides maximum UV protection and a chic, modern aesthetic for a fraction of the cost. Pair this shading solution with modular outdoor furniture (like the streamlined sofa shown) and define the perimeter using budget-friendly privacy screening, such as vertical wood slats, to give the space a contained, intimate feel. For softer seating, use weather-resistant, upholstered pieces (top right) and utilize pillows and throws in bold patterns to bring interior design elegance outdoors, instantly elevating the perceived value of your space.
The second crucial transformation is integrating cooking functionality without installing a custom, permanent structure. While the built-in grill and sink station (bottom left) looks luxurious, the budget hack is focusing on modular stainless steel components and DIY counter construction. Rather than pouring expensive concrete or stone countertops, build a simple frame structure and finish it with affordable yet durable exterior materials, such as concrete board or a porcelain tile veneer, to mimic a high-end built-in look. The key is integration: positioning the grill and prep area close to the dining space ensures smooth entertaining flow. Invest in a dedicated outdoor sink unit—often available modularly—for easy cleanup, minimizing trips inside the house. This approach segments the outdoor space into dedicated zones (cooking, dining, relaxing) which is the secret behind maximizing backyard utility and making it feel like an extension of your indoor square footage.
Finally, mastery of ambiance is the most powerful and often cheapest transformation hack for outdoor entertainment, especially as evening descends. The bottom right image perfectly illustrates the power of layered lighting. The hack here is to avoid expensive electrical work by relying on accessible, battery-operated, or solar solutions. Stringing cafe lights (or Edison bulb string lights) across a simple existing structure, like a pergola or deck railing, provides essential overhead task and glow lighting. Supplement this with multiple ground and table lanterns, which create warm pockets of light and introduce visual depth. These lanterns, often inexpensive and portable, are crucial for adding that cozy, ‘vibey’ element. By using warm-toned LED bulbs (2700K or lower) in all your fixtures, you instantly transform a bare deck into a sophisticated, intimate nighttime retreat, proving that a major home transformation is often more about mood lighting than structural overhaul.
THE ONLY DIY BOHO DECOR GUIDE YOU NEED (BUDGET FRIENDLY!)

Achieving the sought-after Bohemian aesthetic doesn’t require a massive budget; it relies almost entirely on sourcing affordable natural materials and focusing heavily on layered texture. The visual foundation of this style starts with textiles. To replicate the dreamy bedroom seen here, prioritize a neutral palette (creams, whites, beige, terracotta) and introduce complexity through varying fabric weaves. For instance, pair smooth linen sheets with a chunky cable-knit throw and various textured pillow covers, such as macrame, boucle, or chunky cotton weaves. The iconic macrame wall hanging is essential for maximizing the Boho effect above the bed. If buying a large piece is prohibitive, this is a prime DIY opportunity. Source inexpensive cotton cording or yarn and a simple wooden dowel. Numerous tutorials exist for basic knots, allowing you to create a personalized, oversized headboard piece that serves as the room’s main focal point for a fraction of the retail cost. Don’t forget floor coverings; a faux sheepskin rug or woven jute rug introduces softness and anchors the space, enhancing the feeling of cozy comfort.
To complement the textiles, incorporate abstract, nature-inspired art that uses dimension rather than color. The large, textured canvas visible in the image is one of the most effective and budget-friendly DIY tricks. Purchase a low-cost canvas or frame an old piece of wood, and use joint compound or lightweight spackling paste mixed with a small amount of neutral acrylic paint (think blush, taupe, or cream). Apply the paste using a putty knife or spatula to create thick, organic, abstract forms. Once dry, the dimensional art mimics high-end plaster work or relief carving, providing sophisticated visual interest without the cost. Expertly pair this artwork with greenery, which is non-negotiable in Boho design. Incorporate at least one large houseplant, like a Fiddle Leaf Fig or Snake Plant, placed in an authentic terracotta pot to maximize the connection to the outdoors and breathe life into your freshly transformed space.
Finally, the true genius of budget Boho design lies in the intentional styling of surfaces using collected and found objects. Shift away from generic store-bought accessories and curate natural vignettes. On nightstands or shelving, arrange small collections of elements sourced from nature or thrift stores. As seen in the example, this includes rough-cut wood slices (excellent DIY candle risers), small river stones or polished pebbles, dried botanicals (like lavender or pampas grass), and small, antique-inspired mirrors. These seemingly small details ground the room, adding an organic, personalized touch. Remember the rule of three when styling: arrange items in odd numbers and vary their height and texture to create movement and depth, ensuring every surface adds to the room’s overall relaxed, earth-centric aesthetic.
THE SECRET THRIFT FINDS THAT MAKE DECOR LOOK EXPENSIVE
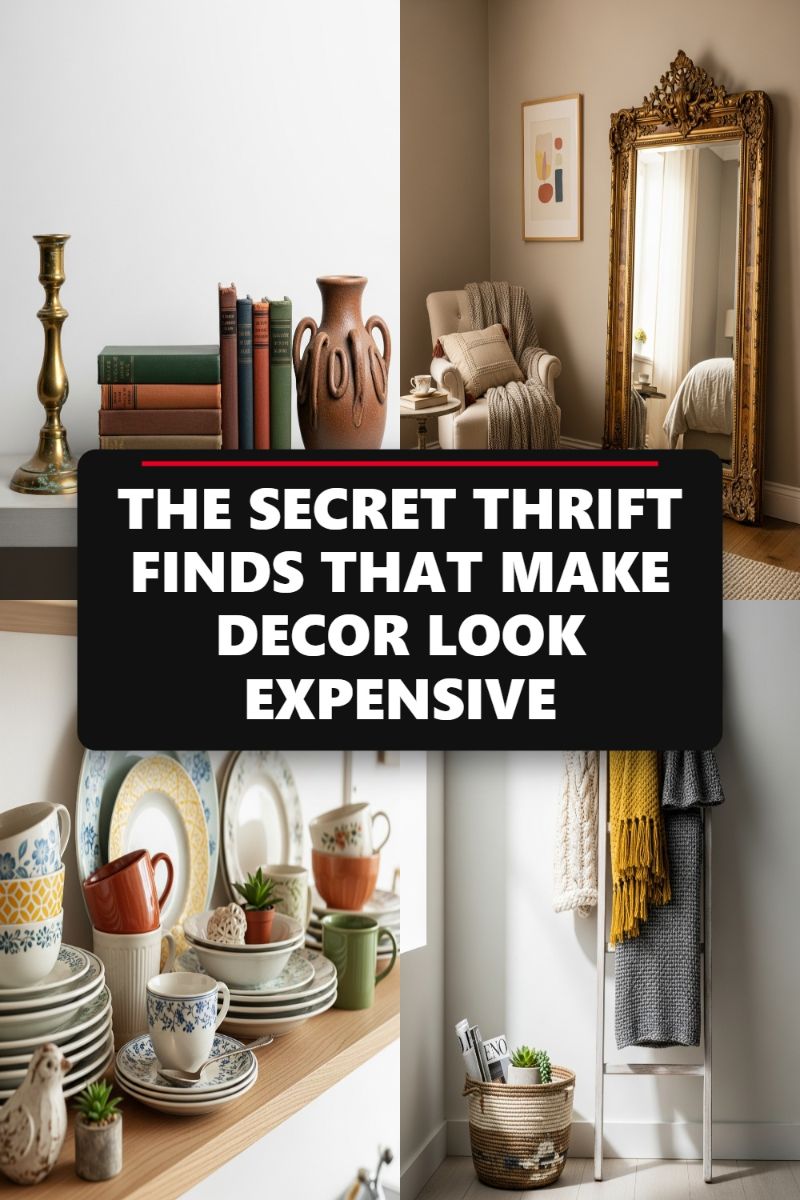
The secret to transforming bargain finds into luxury decor lies in choosing items with history, texture, and inherent quality that transcends their low price tag. Start by focusing on high-impact statement pieces. As seen in the image, an oversized, ornate gold-framed mirror immediately elevates the perceived value of a room. These mirrors can often be found at estate sales or thrift stores at a fraction of the cost of new reproductions. The key is scale—a large item, even if slightly distressed, commands attention and reflects light, instantly making the space feel bigger and more luxurious. Similarly, hunt for items with natural patina, such as solid brass candlesticks or aged metallic accents. The warm tone and imperfections of genuine vintage metals add an irreplaceable depth that modern, manufactured items often lack. Group these metallic elements together on a mantel or shelf for a cohesive, glamorous touch that signals intentional, curated design rather than random accumulation.
Elevated styling hinges on texture and intelligent grouping. To recreate the sophisticated aesthetic shown, focus on layering diverse materials. For shelving and mantels, vintage books are essential; discard the dust jackets and group them either by complementary color schemes (e.g., earthy tones like green, brown, and rust) or by height to create visual rhythm. Pair these organized groupings with unique ceramic finds, such as the textured, oversized vase pictured. Look for heavy, hand-thrown pottery or stoneware, which suggests craftsmanship and quality. When dealing with functional items like dinnerware, don’t shy away from mixing patterns and colors. Displaying a collection of mismatched china and mugs on open shelving turns everyday items into a charming, personal focal point. The mix of florals, geometrics, and solid colors in the image proves that variety, when unified by a similar vintage feel, translates into personality and warmth.
Beyond the surface display, employ strategic thrifting techniques to ensure your “cheap” finds truly look expensive. Always inspect items for quality of material—a heavy, solid piece is preferable to lightweight plastic or veneer, regardless of its current condition, as solid items lend an air of permanence. For textiles, like the throws draped over the ladder and armchair, focus on natural fibers (wool, cotton, linen) and rich textures (chunky knits, cable patterns, deep fringes). Even if the fabric needs intensive cleaning, its inherent quality will shine through. Finally, maximize the visual impact of your styling with smart storage solutions. Utilizing natural, hand-woven baskets (like the one shown) introduces organic texture while hiding necessary clutter like magazines and extra blankets. This combination of curated display items, rich textures, and hidden functionality is the ultimate secret to achieving a high-end, custom look without straining your budget.
Teen Room Aesthetic: How to Get the NYC Loft Look on a Budget
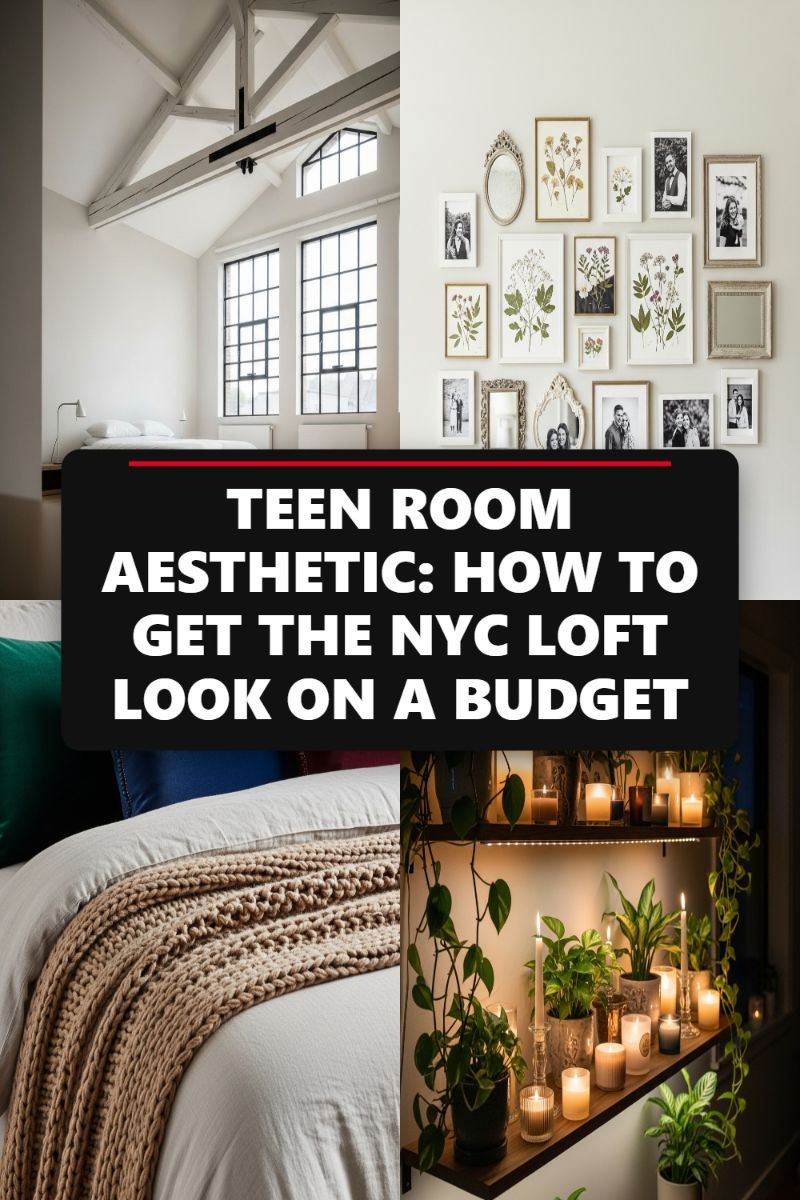
Achieving the coveted NYC loft look hinges on maximizing light, utilizing industrial architectural cues, and layering texture against a minimalist backdrop—all of which can be done without paying Manhattan rent. The key budget hack is creating architectural illusion. Start by bathing the room in a single shade of crisp, matte white paint; paint the walls and ceiling the same color to blur boundaries and make the space feel taller and more expansive, mimicking high loft ceilings. If you lack large factory windows, simulate the classic grid-pane look by using thin strips of black electrical tape or painting faux muntins onto existing windowpanes, instantly injecting that industrial edge. Complement this structure with an eclectic gallery wall, mixing thrifted frames painted in gold, white, or black, and filling them with affordable botanical prints (downloadable art or pressed flowers) alongside black-and-white family photos. This curated mix adds a sense of history and warmth, softening the industrial lines.
Once the architectural base is set, focus on transforming comfort elements. The loft aesthetic uses soft textures to balance the hard, clean lines of the space. Invest in basic, high-quality-feeling textiles like a linen or cotton duvet in a neutral tone (white, cream, or light grey). The magic comes from the layering: introduce a plush, chunky knit throw blanket draped at the foot of the bed, coupled with velvet or highly textured accent pillows in rich jewel tones like deep emerald or navy. This contrast between the industrial backdrop and the luxurious, cozy bedding elevates the entire space, making it feel intentionally designed rather than stark. This textural layering is a highly affordable way to achieve maximum visual impact, creating an inviting focal point out of simple bedding.
Finally, atmosphere is essential, and this is where inexpensive biophilia and ambient lighting come into play. Floating shelves, easily sourced and installed, provide the perfect canvas for cultivating a calming, natural element. Group easy-to-care-for plants like pothos, philodendrons, or succulents, mixing them with candles of varying heights and sizes. The most effective budget trick is installing subtle LED strip lighting underneath the shelves (many battery-operated options are available). This soft, upward-cast lighting creates an instant glow, accentuating the plants and candles and replacing harsh overhead light. This combination of natural elements and warm, indirect illumination is fundamental to the urban loft aesthetic, ensuring the space feels cozy and sophisticated, even on a modest budget.
ELEGANCE MEETS JUNGLE: THE SHOWER TREND OF 2026

This powerful home transformation hack leverages biophilic design to turn a mundane bathroom into an upscale, spa-like sanctuary, fitting perfectly within a modest budget. The central focus is incorporating lush, tropical houseplants directly into the shower enclosure to capitalize on the high humidity—an ideal microclimate for many popular indoor varieties. To execute this look successfully, start by selecting the right plants: look for low-light and high-humidity lovers such as Pothos, Ferns (like Boston or Maidenhair), Peace Lilies, and the ever-stylish Monstera Deliciosa, as pictured. Place the largest plants in heavy, non-porous glazed ceramic planters (like the deep blue and teal pots shown) to provide stability and prevent waterlogging the surrounding floor. Strategic placement is vital; position plants near the shower entrance or on a built-in bench where they receive maximum ambient light and humidity, but are not constantly battered by direct, high-pressure spray. This single, inexpensive addition instantly elevates the room, making it feel less like a functional space and more like a private, luxurious retreat.
To complement the natural elements, the surrounding structure must maintain a sleek, modern elegance. The visual contrast between organic greenery and refined, dark materials is key to this design’s success. Use large-format slate-gray or charcoal tiles on the walls to establish a sophisticated backdrop, an effect that can be achieved affordably using high-quality porcelain instead of natural stone. Balance this industrial feel with warm, natural wood accents—opt for teak or moisture-resistant bamboo for shelving, bath mats, or shower benches, as seen in the detail shots. Look for budget-friendly fixtures, such as the matte black-framed shower doors and rainfall showerhead, which provide a clean, architectural definition. For a splash of mid-century flair, mimic the image’s unique use of mint or seafoam green subway tiles on a specific area, like a knee wall or niche, contrasting sharply with dark wooden trim to add depth and visual interest without overwhelming the space.
Finally, the successful execution of the ‘shower jungle’ relies heavily on practical maintenance and dramatic lighting. Because the humidity provides natural watering, ensure your planters have effective drainage layers (using pebbles or leca) inside the cachepot to prevent root rot. For visual drama, replicate the image’s warm, focused spotlighting. This can be achieved with low-voltage, waterproof LED tape lights installed beneath shelves or recessed niches, directed to highlight the texture of the tiles and the glossy leaves of the plants. This affordable lighting hack transforms the atmosphere, making the shower area appear radiant and deep, even in a small space. By focusing on smart material choices and strategic plant placement, this transformation proves that high-end style doesn’t require high-end spending, delivering a truly genius update to your home.
GREEN CABINETS ARE OUT! WAIT, THEY’RE IN! SEE THE PROOF.

While the design world perpetually debates the staying power of colorful cabinetry, deep, sophisticated greens have cemented their place as a top-tier design choice for high-impact kitchen transformations. Moving far beyond fleeting fads, this trend offers a perfect organic middle ground for homeowners tired of all-white, sterile spaces but who are seeking a timeless alternative to gray or navy. Selecting a rich hue, such as forest green, deep olive, or moss, immediately grounds the room and provides a bespoke, custom feel, making a standard kitchen look instantly elevated. The best budget hack here is leveraging paint: if your existing cabinet boxes are structurally sound, a quality paint job in a deep matte green (ensuring proper degreasing and priming) is infinitely cheaper than a full cabinet replacement, yet yields results that look professional and high-end. The key to success is saturation: lean into muted, earthy tones that have depth, ensuring the color choice feels anchored and complementary to natural materials.
To master the green cabinet aesthetic as brilliantly showcased in these images, successful pairing is absolutely crucial. The dark, matte green works spectacularly when juxtaposed against bright white horizontal surfaces, specifically quartz or marble countertops and classic subway tile backsplashes. This contrast ensures the kitchen remains airy and contemporary despite the significant presence of a dark color. Furthermore, integrating natural wood elements is essential for warmth and texture; note the rustic wood ceiling beams and the light, perhaps white oak, floating shelves. These organic materials prevent the deep green from feeling too cold or severe. For an instant upgrade, ditch generic stainless steel hardware and opt for warm metallics—specifically brass or brushed gold—as seen on the faucets and cabinet pulls. This small change in hardware acts as “jewelry” for the cabinets, dramatically elevating the entire aesthetic and providing the final layer of designer polish that makes the transformation feel complete.
A final genius transformation hack involves strategically utilizing open shelving in place of some upper cabinetry, particularly if your budget is tight. Open shelving saves significantly on materials and labor compared to full wall units while providing crucial display opportunities. To maintain the organic modern theme established by the green cabinets, stock these shelves with curated, neutral ceramics, black matte dishware, and plenty of living plants. This visual break keeps the kitchen from feeling overwhelmed by the deep color. Finally, ensure lighting is maximized. If natural light is limited, invest in modern pendant lighting and under-cabinet LED strips. The combination of deep green cabinetry, warm wood accents, gleaming metallic fixtures, and ample light creates a formula for a magazine-worthy, high-perceived-value kitchen renovation without requiring costly structural or footprint changes.
GALENTINE’S NIGHT SETUP: THE ULTIMATE COZY, GLAM SLEEPOVER

This transformation hack demonstrates how to convert a standard bedroom or living area into an intimate, high-comfort sleepover lounge using layered textiles and strategic lighting—an excellent budget solution for high-impact entertaining. To achieve the inviting ‘cozy’ look (top left), the foundation lies in repurposing existing bedding. Pull thick duvets or even folded-out foam mattresses onto the floor as the base layer. The visual secret is layering soft textures: restrict your palette to luxurious tones like dusty rose, cream, and white, and drape various throws (think knits, faux fur, and plush fleece) over the base. Scatter extra pillows, focusing on varying shapes and textures, to maximize comfort and visual depth. The ultimate low-cost secret weapon for instantly elevating the ambiance is lighting. Bypass harsh overhead fixtures and deploy warm-toned string lights, globe lights, or battery-operated candles around the periphery of the room, especially near reflective surfaces like mirrors, to create a soft, flattering glow that transforms the entire space into a high-end, cozy retreat.
To integrate the sophisticated ‘glam’ aesthetic (bottom left) without permanent renovation, focus on temporary textural upgrades and presentation hacks. If a crystal chandelier is outside the budget, use metallic spray paint on an existing fixture or hang inexpensive glass or acrylic garlands temporarily to mimic a light-catching sparkle. Emulate the rich look of a tufted headboard by smoothing a heavily textured blanket or quilt high behind your bed’s pillows, creating a faux, opulent backdrop. For the party zone (top right), the transformation relies entirely on presentation. Serving snacks and drinks on clean white or metallic tiered platters and pedestal stands instantly elevates simple items like mini sparkling cider bottles, popcorn, and macarons, making them look like custom catering. Grouping items by color—such as the pink treats shown—adds to the unified, glamorous feel.
Expert home transformation advice dictates that the success of a temporary high-glam event relies on visual cohesion. Ensure the color palette from the bedding (pinks and neutrals) is repeated in the party food (bottom right). Focus on store-bought cookies and treats that require only simple icing decorations (XOXO, hearts) to save time and complex baking costs while maintaining a visually impressive dessert display. By focusing on layered comfort, strategic lighting, and vertical food presentation, you prove that achieving a luxurious, blow-out setup requires only clever staging and minimal budget, offering a home hack that transforms a mundane room into an unforgettable, high-impact venue.
VINTAGE FINDS: HOW TO STYLE A BIRDCAGE FOR MAX SHABBY APPEAL
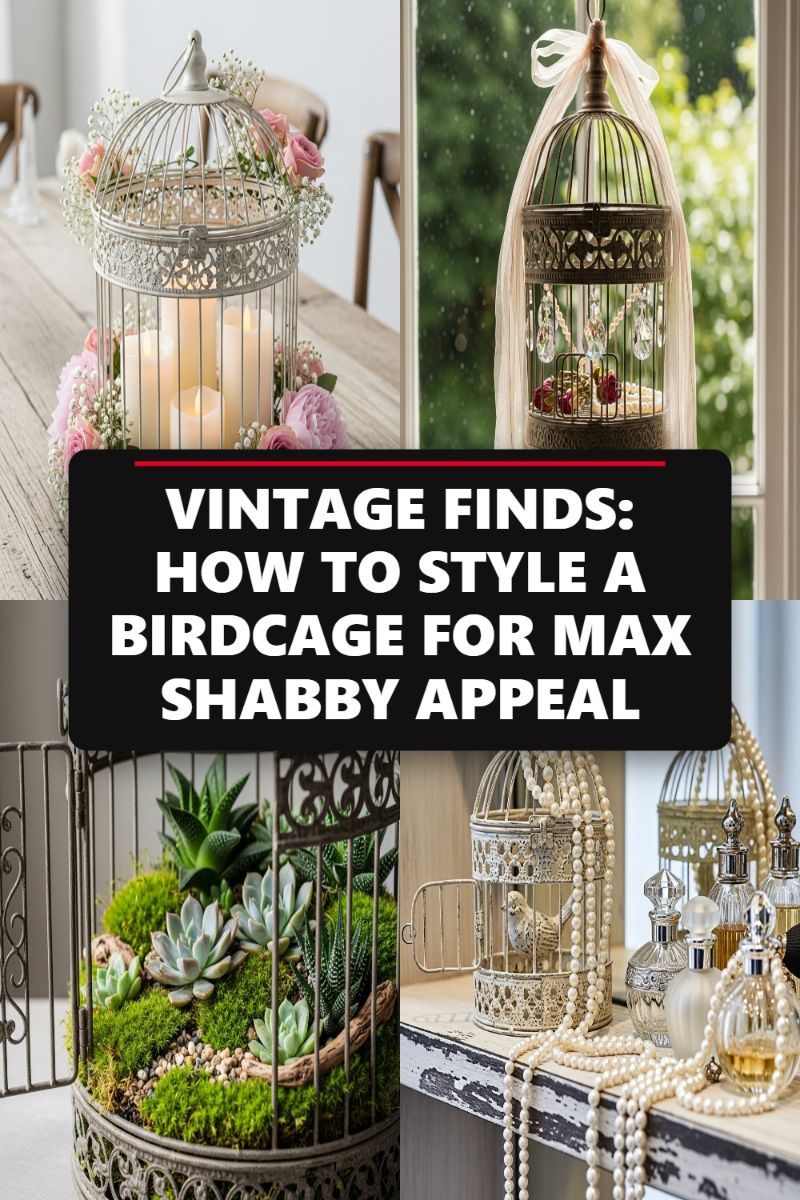
One of the most affordable and impactful ways to inject vintage charm into your home is by repurposing old birdcages. These architectural finds instantly become focal points, lending a delicate, distressed elegance perfect for the shabby chic aesthetic. To create a striking centerpiece, select an oversized, white or cream-distressed metal birdcage. Instead of using real fire, utilize battery-operated pillar candles inside the cage, providing a soft, warm glow that filters beautifully through the bars. The true secret to ‘max shabby appeal’ lies in overwhelming the metallic structure with soft, romantic florals. Drape garlands of blush pink roses, peonies, or baby’s breath around the base and through the openings, creating a lush floral ring that contrasts with the cold metal. For a different accent, hang smaller, darker cages in windows using sheer lace or ribbon. Fill the bottom with scented potpourri or dried petals, and swap out the traditional internal perch for glittering crystal prisms that dangle and catch the natural light, adding instant boudoir glamour to any room.
For a transformative, budget-friendly hack, convert a sturdy vintage birdcage into a stunning botanical terrarium. This repurposing method combines the elegant lines of the metalwork with the organic texture of natural elements. Choose a cage with a wide-opening door and ensure it either has a solid base or can accommodate a liner. This setup is ideal for moisture-loving ferns or low-maintenance succulents and air plants. Start by layering the bottom with drainage material, moss, and appropriate soil media. Arrange varied succulents (like Echeveria or Haworthia) along with textured moss and small river stones inside the cage. The open structure of the cage acts as a protective, yet visible, frame for your miniature ecosystem, offering a unique blend of industrial and natural aesthetics. This display adds a crucial pop of life and texture, turning an overlooked corner into an intentional, curated vignette.
Don’t overlook the power of small-scale styling, particularly in personal spaces like vanities or dressing tables. Small, intricately designed cages—especially those with intentionally chipped paint and visible aging—are perfect accessories. To create a cohesive, vintage look, integrate the cage into a sophisticated vignette using complementary items. Place a small, decorative cage on a distressed white shelf or cabinet top. Accessorize by draping long strands of faux pearls over the top and around the base, allowing them to cascade dramatically off the shelf’s edge. This adds depth and luxurious texture. Complete the transformation by surrounding the cage with delicate, reflective items, such as vintage glass perfume bottles, etched mirrors, or crystal powder jars. Incorporating a tiny ceramic or porcelain bird figurine inside the cage adds a whimsical, sentimental nod to the cage’s original function, elevating a simple decor item into a storytelling focal point that looks expensive but costs next to nothing.
MY COZY BEDROOM SAVED MY SANITY (MUST-HAVE PIECES!)
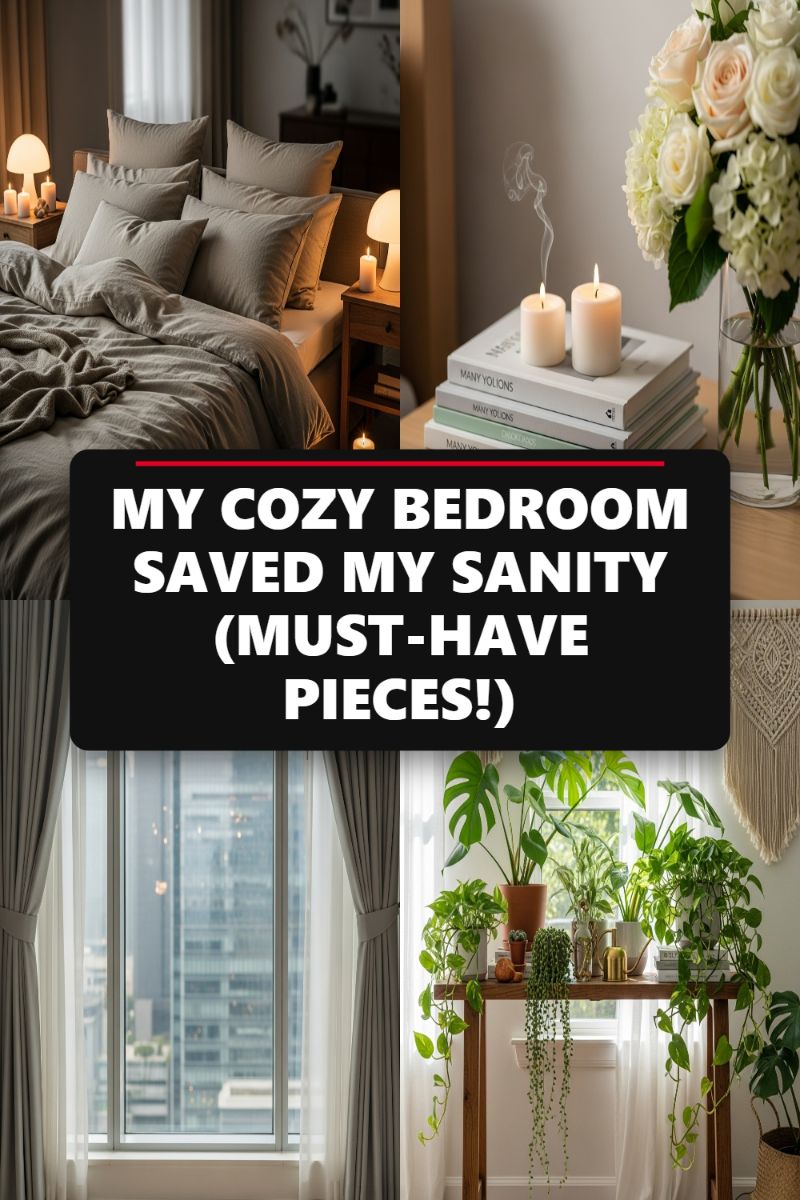
Achieving the ultimate sanctuary bedroom is less about square footage and more about sensory layering—a genius hack for instant transformation and mental well-being. Start by focusing on the bedding experience. The image showcases a monochromatic palette of muted greys and taupes, which immediately lends a sophisticated calm. To achieve this plush look on a budget, focus on tactile materials like washed cotton or linen blends that mimic high-end linen’s textured, lived-in feel. The secret here is volume: use four standard pillows and two or three oversized Euro shams, keeping the covers the same neutral color for cohesive elegance. Crucially, lighting must be soft and strategic. Ditch harsh overhead lights in favor of multiple warm-toned, low-level sources like diffused mushroom lamps and pillar candles. This diffused, golden glow instantly lowers stress levels and transforms the room into a spa-like retreat, making your space feel instantly more expensive and infinitely more relaxing without costly electrical work.
Maximizing natural light and incorporating biophilic design elements are powerful, budget-friendly hacks for any room transformation. If you have an urban view, soften it (or hide it) with intelligent window treatments. Install a double curtain rod system: sheer panels closest to the glass diffuse harsh sunlight and provide privacy without sacrificing light, while heavier, floor-length blackout curtains (like the structured grey ones shown) add vertical drama and are essential for optimal sleep and noise buffering. Next, bring in the greenery. Houseplants are the ultimate cheap sanity-saver, purifying the air and adding vibrant texture. Stage a collection of easy-care varieties (like Pothos, Monsteras, and String of Pearls) on a narrow console table beneath the window. This arrangement utilizes vertical space, ensures plants get adequate light, and instantly shifts the room’s energy from sterile to naturalistic, creating a vital connection to the outside world even when you’re high above the street.
The final layer of this sanity-saving transformation lies in thoughtful, curated styling, requiring minimal investment but high impact. Focus on creating styled vignettes that appeal to the senses. For the nightstand, stack a few well-chosen, neutral-covered books—often found cheaply at thrift stores—to act as a riser for decorative elements like candles and a vase of flowers. Scent is critical; the image shows smoking candles, highlighting the importance of ambient fragrance (consider essential oil diffusers as a safer, budget-conscious alternative). Add textural, handmade elements, such as the macrame wall hanging visible on the right, which softens hard lines and adds bohemian warmth. These small, styled moments elevate the everyday experience of the room, turning simple decor into psychological comfort zones. By hacking your home with texture, layers, and strategic light control, you transform your bedroom into an active tool for stress reduction, fulfilling the promise of a necessary mental escape.
IS YOUR KITCHEN CORNER WASTED SPACE? TRY THIS GENIUS HACK!
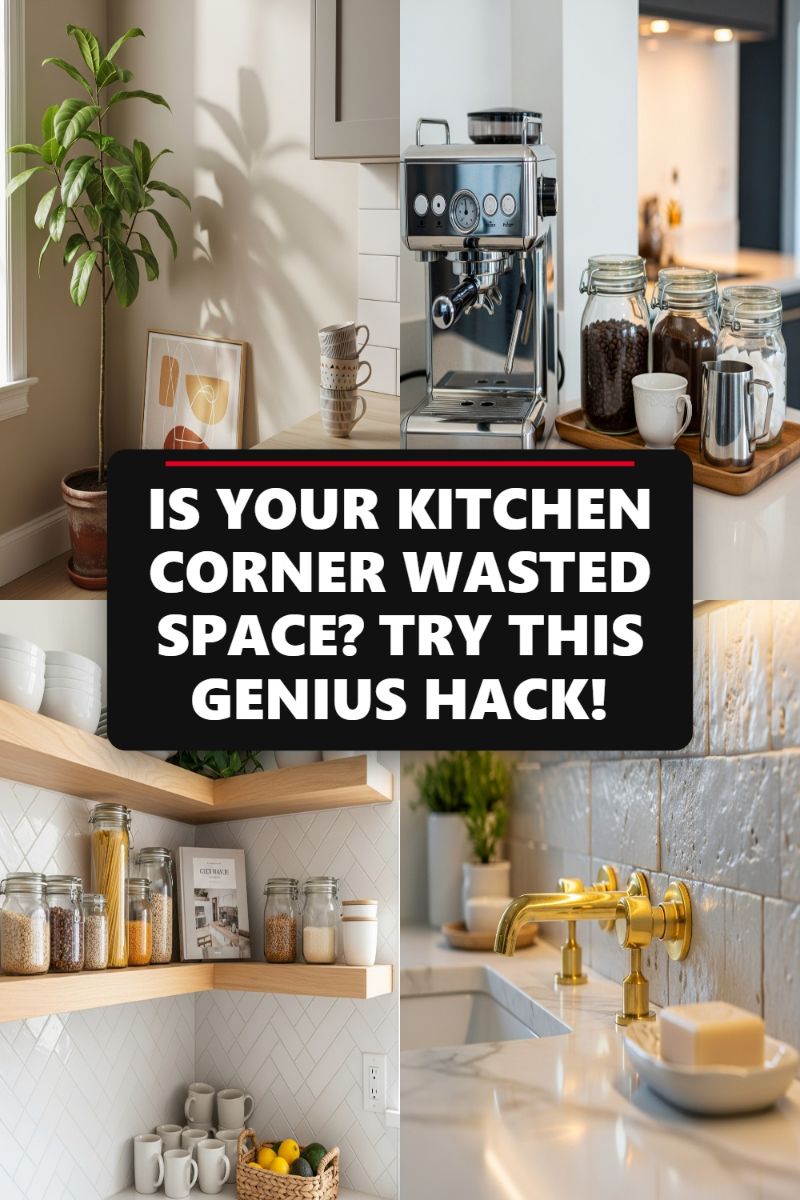
Kitchen corners are notorious for becoming awkward, unused space, whether it’s the cramped countertop area where appliances meet or the upper cabinets that are difficult to access. This transformation demonstrates a brilliant solution: embracing the vertical space with stylish, L-shaped floating shelving. Unlike deep, dark corner cabinets that bury items, open shelving maximizes storage accessibility while simultaneously elevating the room’s design. The key visual element in this hack is the juxtaposition of natural wood shelves against a clean, textured white backsplash (like the herringbone tile shown), creating a light, airy, and contemporary feel. This approach works best in kitchens where storage depth is paramount, as it allows frequently used items, like your coffee station essentials or pantry staples, to be proudly displayed and easily grabbed.
To implement this hack effectively, precise installation is crucial. You must select sturdy, high-quality wood (such as solid oak or maple) and use heavy-duty floating shelf brackets that can support weight without visible hardware, maintaining the clean aesthetic. For a successful corner shelf unit, both shelves must be perfectly level and seamlessly meet at the intersection point. Expert advice suggests measuring and marking bracket placement multiple times, ensuring you secure them into wall studs whenever possible. If studs aren’t available, invest in toggle anchors or heavy-duty mounting hardware rated for substantial weight, as glass jars and ceramics can quickly add up. For the most organized look, dedicate the top shelf for décor or less frequently used items, and the bottom shelf for accessible, daily essentials like mugs and bulk pantry containers.
Maximizing the functionality and aesthetics of the shelves comes down to smart styling. Following the visual cue, decant dry goods like coffee beans, pasta, and grains into uniform, air-tight glass jars. This provides a cohesive, clean look while serving as functional open pantry storage. Grouping items by type and color further enhances organization—for instance, placing your entire coffee station setup on the corner countertop below the shelves, using the shelves for overflow mugs, sweeteners, and brewing tools. Not only does this hack solve a common storage problem, but it also delivers significant budget savings; installing pre-made or DIY floating shelves is dramatically less expensive and labor-intensive than commissioning custom corner cabinetry, making this a true ‘genius hack’ for both design and finance.
BLANKET LADDER DECOR: THE VIRAL STYLING SECRET REVEALED

The blanket ladder is one of the most transformative yet budget-friendly décor hacks sweeping interior design. This simple vertical accessory instantly converts everyday textile clutter into a curated piece of wall art, providing essential functionality without the need for complex mounting or expensive shelving units. Unlike baskets or storage ottomans that hide your throws, the ladder allows you to proudly display luxurious textures, adding warmth and depth to any room. It’s particularly effective in maximizing vertical space in smaller rooms or serving as a crucial transitional piece between a sitting area and a bedroom corner, providing a cozy element that invites relaxation while maintaining a streamlined look. The key to this hack’s genius lies in its dual role: organization meets exhibition.
When executing this styling secret, variation is essential to avoid a static appearance. Expertly styled blanket ladders mix three crucial elements: texture, color, and folding technique. Start by incorporating extreme textures, such as chunky, open-weave knits and fluffy faux fur throws (like the cream pieces shown in the image), which catch the light and add tactile interest. Next, balance these heavy textures with smoother, tightly woven cotton or patterned fleece. For color, maintain a generally cohesive palette that complements your room (neutrals, soft grays, or specific accent colors), but always incorporate at least one high-contrast piece (a deep navy or bold plaid) at the bottom rung to anchor the display and draw the eye. Finally, use a mix of draping styles—roll some blankets tightly for a neat, stacked look, fold others lengthwise for structure, and casually drape the top-most throw for an effortless, lived-in feel.
Beyond the styling of the blankets themselves, strategic placement is vital for maximizing the aesthetic impact of this transformation hack. Position the ladder in areas that often feel bare or lack visual height, such as next to a bed’s headboard, beside a reading armchair, or at the end of a hallway. Because the ladder emphasizes vertical lines, it helps draw the eye upward, giving the illusion of higher ceilings and a more expansive space—a massive plus for transforming compact areas. Furthermore, the blanket ladder is a budget savior; sourcing an inexpensive wooden ladder (or building a simple DIY version) and using throws you already own means you sidestep the expense of costly framed art or heavy, traditional furniture pieces, utilizing function as your primary form of decoration.
COZY VIBES ONLY: DITCH THE COLD LOOK WITH 4 LIGHTING HACKS

The single most effective and often overlooked strategy for transforming a room from sterile to sublime is mastering lighting. Cold, white overhead lights instantly kill ambiance, but shifting your focus to layered, warm sources can make any room feel luxurious and inviting. To achieve this high-end, cozy aesthetic, prioritize warm color temperatures—look for bulbs labeled as “soft white” or those rated 2700K or lower. This golden glow mimics candlelight and is essential for achieving that hygge feeling. The core hack involves embracing layered lighting: ambient light (general, soft illumination like floor lamps), task lighting (specific light for activities like reading), and accent lighting (decorative highlights like candles or string lights). Never rely on just one source; instead, create multiple pools of light around the room, as demonstrated in the living space vignette, to add depth and eliminate harsh shadows.
Two of the most budget-friendly hacks involve string lights and candles. String lights, or fairy lights, are no longer just for holidays. They are a genius way to introduce soft, indirect accent lighting that highlights textures and architectural details. As seen draped across the tufted headboard, these inexpensive LED strands immediately elevate the sleeping space, providing a gentle glow that’s perfect for winding down without the need for bright overhead fixtures. Similarly, utilize candles—or high-quality LED candle alternatives—on bedside tables, coffee tables, and shelving units. The top left image beautifully illustrates combining a soft-glow table lamp with varying heights of pillar candles. This combination not only increases the light level in a localized, comforting way but also adds immediate visual texture and a sense of ritual.
Furthermore, pay close attention to light diffusion. Harsh, direct light is the enemy of coziness. Ensure your table and floor lamps feature shades that are opaque or textured, such as linen or woven materials, to soften the light output and spread it warmly. You want the light to wash the walls or surfaces rather than hitting the eyes directly. The warmth generated by these lighting hacks works synergistically with soft textures and materials, which is why the image includes stacked textiles. Warm light naturally enhances the rich depth of knit throws, plush rugs, and woven baskets, making the entire space feel more tactile and expensive. By implementing these four hacks—warm tone, layering, fairy lights, and diffused light—you can drastically increase your home’s cozy quotient without breaking the bank on new furniture.
HIDDEN OASIS: TURN YOUR BACKYARD INTO A LUXE SPA RETREAT

Achieving a luxe spa retreat begins with strategic infrastructure and mood lighting. Notice how the hot tub in the upper left corner is built into a tiered, rich wooden deck structure. This integration is crucial; simply setting a hot tub on a patio looks temporary, but building it into a raised platform makes it feel like a custom, permanent feature—a major transformation hack. Use composite decking for durability and low maintenance, which mimics the look of high-end wood but better withstands spa splashes and weather. The ambiance is then set by layered lighting: overhead string lights (Edison bulbs or fairy lights) provide a soft canopy, while sturdy floor lanterns placed on the steps and around the perimeter add depth and warmth. This combination avoids harsh spotlights and immerses the area in a golden, relaxing glow, immediately transitioning the space from a functional backyard to a destination.
The modern spa experience extends beyond just soaking; it incorporates curated comfort and entertainment. The top right segment showcases a brilliant hack: integrating a large outdoor screen for movie viewing next to the water feature. This transforms a simple dip into a cinematic event. Instead of bulky outdoor furniture, opt for low-slung, weather-resistant seating like large floor pillows or bean bags, creating an informal, inviting lounge area perfect for drying off or sharing a cocktail. Expertly arrange simple, dark side tables strategically placed among the seating—these are essential for holding beverages and accent candles, keeping the main deck area clutter-free while ensuring necessities are within reach. This approach maximizes comfort and visual flow while keeping furnishing costs lower than traditional outdoor sectional sets.
The true genius of this transformation lies in the carefully selected details. Integrate natural elements seamlessly by lining pathways and deck edges with structured potted plants, such as the tall snake plants shown in minimalist grey planters. This brings a touch of Zen garden serenity and offers subtle visual separation. Crucially, focus on high-quality accessories near the tub: a sturdy, mobile rattan caddy or tray stocked with plush, rolled white towels, high-end bottled water, and ambient candles immediately signals luxury. Choose unscented or subtly spa-scented candles, ensuring the container materials (like glass or ceramics) look refined. Finally, don’t overlook subtle illumination along the ground level—small, glowing cube lights or recessed deck lighting not only enhance safety but provide a sophisticated, low-level architectural element, finalizing the transition into a truly high-end, hidden oasis.
COTTAGECORE MEETS CITY APARTMENT: DREAMY NEUTRAL DECOR

Achieving the soft, romantic feel of cottagecore within the confines of a city apartment requires prioritizing inexpensive textiles and layering to create a sense of airy luxury. The primary transformation hack here is establishing a light, neutral foundation. Start by focusing on the bed: use budget-friendly, ruffled white or cream duvet covers and sheets. To replicate the dreamy canopy effect seen in high-end decor, utilize lightweight, sheer white curtains secured with simple ceiling hooks or a repurposed embroidery hoop kit; this dramatically transforms the focal point of the bedroom for typically under $50. Layering is crucial for texture and depth. Introduce chunky knit throws (excellent finds at thrift stores or as simple DIY projects) and soft, slightly ruffled pillows in varying neutral tones (beige, ivory, taupe). This monochromatic base maximizes light, makes the room feel instantly larger, and provides a calming aesthetic necessary for escaping the urban bustle, all while relying on easily accessible and affordable elements.
The second major transformation involves injecting controlled botanical elements and natural texture—the heart of the cottagecore style—without the commitment of major renovation. The rattan or wicker egg chair is an excellent example of this hack; these pieces are often found affordably at flea markets or online marketplaces and can be instantly updated with fresh paint or a cushion. Pair this with a chunky, high-impact throw (like the rust-colored knit) to introduce a single, grounding pop of autumnal color that adds Hygge warmth. For greenery, focus on low-maintenance potted plants positioned on window ledges, allowing the natural light to filter through them. Embrace the imperfection of nature by using rustic earthenware pitchers or mason jars as vases for inexpensive seasonal wildflowers or greenery clippings. This combination of natural fibers and simple organic accents immediately softens the harsh lines typical of modern city living.
Finally, execute the ultimate budget art hack: the personalized botanical gallery wall. This technique allows for highly custom, detail-oriented art that costs virtually nothing to create. Instead of buying expensive prints, create your own pressed flower art using heavy books or inexpensive framing kits. Alternatively, source free or low-cost digital downloads of vintage botanical illustrations and print them at home. The key to the high-impact look is the arrangement: mix small framed items (pressed flowers or tiny watercolors) with larger canvases, and incorporate varied frame finishes (natural wood, brass, white). By densely arranging small-scale, deeply personal art, you transform a plain wall into a rich visual narrative that speaks directly to the cottagecore ethos, proving that the most transformative decor often comes from clever curation and DIY effort, not significant spending.
SHABBY CHIC IS BACK: 5 ROMANTIC BEDROOM TRANSFORMATIONS
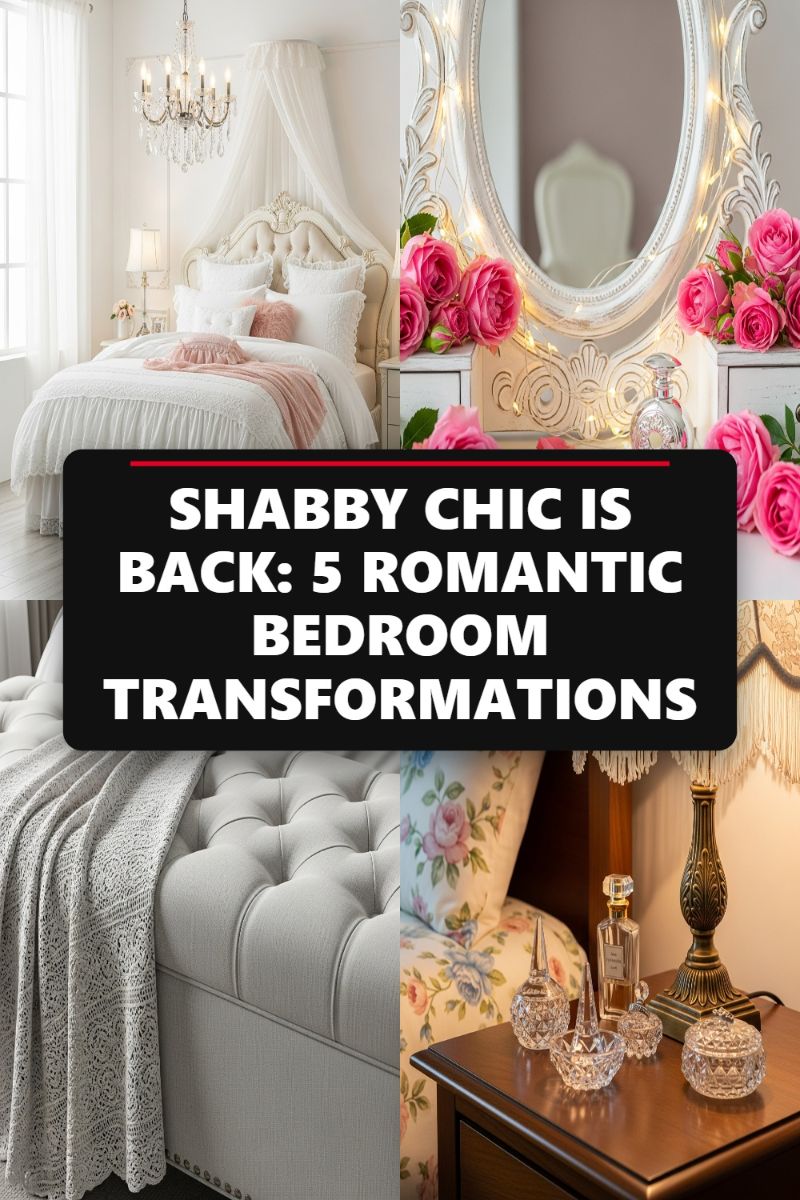
The Shabby Chic aesthetic, characterized by its soft romanticism, antique touches, and layers of luxurious comfort, is one of the most cost-effective routes to a dramatic bedroom makeover. To achieve this look, as showcased in the visual elements of layered white bedding, soft pink accents, and ornate white furniture, the key is texture and light. Start by focusing on the bed, which serves as the centerpiece. Purchase basic white bedding (think ruffles, lace, or eyelet patterns, often available affordably at discounters) and layer throws in complimentary pastels like blush pink or pale gray. Expert advice suggests seeking out a striking headboard or mirror, like the ornate, distressed white examples featured here. If purchasing new is out of budget, find a secondhand wooden piece with interesting carvings and apply a quick coat of chalk paint, using a light sanding technique to create that signature ‘shabby’ patina over the edges and details.
The real genius hack in Shabby Chic transformations lies in repurposing and DIY distressing. Scout flea markets or thrift stores for accessories such as crystal decanters, vintage glass perfume bottles, and brass or ceramic lamp bases. These small details, when grouped together on a simple bedside table (as shown), instantly elevate the space with an air of vintage luxury. For furniture like dressers or nightstands, avoid expensive antiques. Instead, look for solid, functional pieces that can be transformed. Replace the hardware with vintage-style glass or crystal knobs for a massive impact without major structural changes. Incorporating fresh floral prints—even just on accent pillows or a throw draped over an upholstered bench—helps complete the romantic cottage feel.
Finally, maximize the cozy, ethereal ambiance with carefully curated lighting. Move beyond harsh overhead fixtures and incorporate soft, ambient glow sources. A thrifted chandelier, even a modest one, or a lamp with a soft fringed or lace shade adds immediate vintage character. A simple, budget-friendly hack is using battery-operated fairy lights, strategically wrapped around a mirror or headboard, to cast a warm, twinkling light that mimics the expensive look of crystal sparkle. Complete the transformation by adding a tufted upholstered bench or ottoman at the foot of the bed. This element not only adds functional seating but introduces necessary depth and texture, transforming a simple sleeping space into a plush, romantic sanctuary.
STOP SCROLLING! THIS 1/2 BATH RENO WILL BLOW YOUR MIND

The key to transforming any bathroom, especially a small 1/2 bath or powder room, is utilizing high-impact aesthetic swaps that dramatically alter the mood without demanding costly layout changes. As seen in these stunning examples, the quickest route to a mind-blowing renovation involves the strategic use of texture and pattern, creating luxury through clever material pairing. Opt for bold, nature-inspired wallpaper, such as the lush tropical leaf motif shown in the bottom left, which instantly elevates the space, turning a simple room into a conversation starter. Pair this dramatic flair with grounding natural materials—a live-edge wood vanity top, for instance, provides necessary warmth and organic complexity against a crisp white vessel sink, suggesting high-end craftsmanship. This approach focuses the budget entirely on visible, tactile design elements rather than costly structural changes, ensuring every dollar spent delivers maximum visual return on investment, making a massive difference even in the smallest space.
Take inspiration from the full bath spaces shown and introduce the genius hack of biophilic design, which is essential for turning a clinical bathroom into a spa sanctuary. Biophilia—the innate human desire to connect with nature—can be achieved by strategically incorporating humidity-loving plants like ferns, Pothos, or Monsteras onto open shelving. The stunning shower concepts demonstrate how a vertical garden (even in a small alcove) utilizes the room’s high humidity levels to keep plants thriving, while simultaneously transforming the daily routine. If natural light is lacking in your 1/2 bath, invest in small, directional grow lights hidden within decorative shelving or choose low-light tolerant varieties like ZZ plants. This infusion of living greenery cleans the air and introduces a vibrancy that standard décor cannot replicate, creating an immersive, sensory experience that feels undeniably custom and luxurious.
Once the core biophilic aesthetic is set, success lies in the strategic modernization of fixtures and finishing touches—a vital step often overlooked in budget renovations. Focus your remaining funds on modernizing key hardware; the shift from standard chrome to matte black fixtures, as showcased on the sleek sink and freestanding tub faucets, offers an instant, contemporary upgrade that avoids the expense of re-tiling. Similarly, install smart lighting solutions. A backlit LED mirror provides superior task lighting while adding a sophisticated, architectural glow. Finally, incorporate soft, natural textures to prevent the space from feeling too sterile: a woven natural rug (like jute or sisal) and neatly folded, earth-toned towels complete the look. By prioritizing these strategic, thoughtful material selections and focusing on key high-impact swaps, you can achieve a truly transformative renovation without ever approaching the scale of a full gut job.