Discover the 20 hottest hairstyles dominating trends this year! Explore everything from sleek bobs, elegant braided buns, and vibrant colors to classic waves and men’s fades.
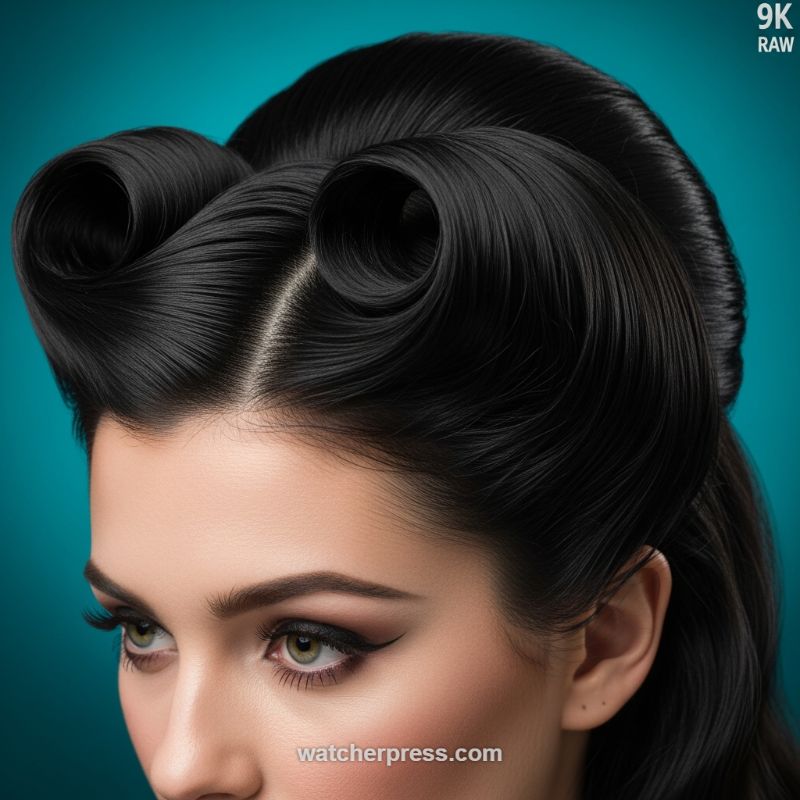
The Dominance of the Center-Parted Glass Hair Look
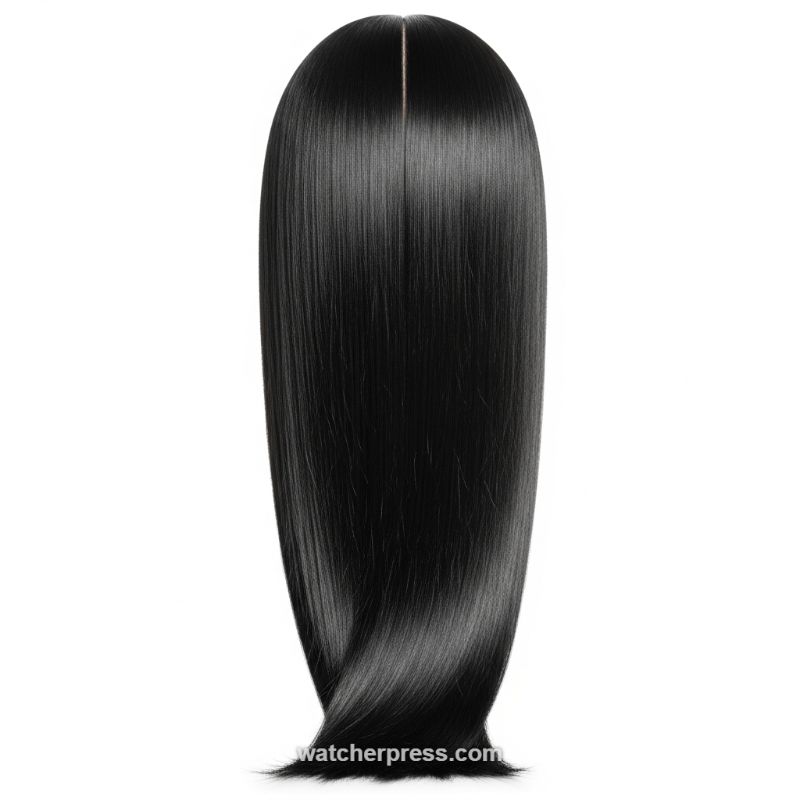
The ultra-sleek, pin-straight style—often dubbed “Glass Hair”—is experiencing a major resurgence, offering a high-impact contrast to the recent dominance of effortless waves. This look is defined by its reflective, mirror-like shine and the surgical precision of the center part, creating an aesthetic that is both futuristic and classically polished. Achieving this level of gloss requires intensive prep work, starting with moisturizing products designed to tame frizz and lock in smoothness. Before applying any heat, ensure hair is fully dry and treated with a high-quality thermal protectant that also contains light-reflecting agents. For naturally dark hair, like the jet black shown here, the glossy effect is amplified, so invest in color-safe serums that enhance depth while protecting against heat damage. Section the hair precisely from ear to ear, ensuring each segment is fully saturated with product, setting the foundation for the smoothest possible finish.
The key to unlocking the true ‘glass’ texture lies in the flat ironing technique. Work in very small, thin sections—no wider than an inch—and employ the “chase method.” This technique involves following the flat iron immediately with a fine-toothed comb, ensuring maximum tension and smoothness from root to tip. Use a high-quality ceramic or titanium iron, setting the temperature appropriate for your hair type (typically between 350-400 degrees Fahrenheit for non-damaged hair). Slow, steady passes are crucial; speeding through the process will compromise the uniformity and reflection. Pay special attention to the ends, ensuring they are not left porous or flared. For the most tailored finish, gently turn the iron under at the last quarter-inch of hair to create that subtle, polished tuck seen in high-fashion editorials, preventing the ends from looking brittle or thin.
Finally, the defining feature of this look is the razor-sharp center part. Use a rat-tail comb to measure and score a perfect line running straight back from the center of the forehead, ensuring no stray hairs overlap the division. To seal the style and maximize longevity, finish with a lightweight, high-shine mist, applying it evenly from mid-shafts to ends while avoiding the scalp to prevent root collapse. For stubborn flyaways near the part line, use a small amount of clear edge control wax or a smoothing pomade applied sparingly with a toothbrush. To maintain this level of sleekness overnight, wrap the hair smoothly around the head and secure it with a silk scarf or wear a silk bonnet; never sleep on cotton, as it will absorb the necessary moisture and disrupt the smooth cuticle layer, leading to loss of that coveted mirror-finish.
The Sculptural Stacked Bubble Ponytail
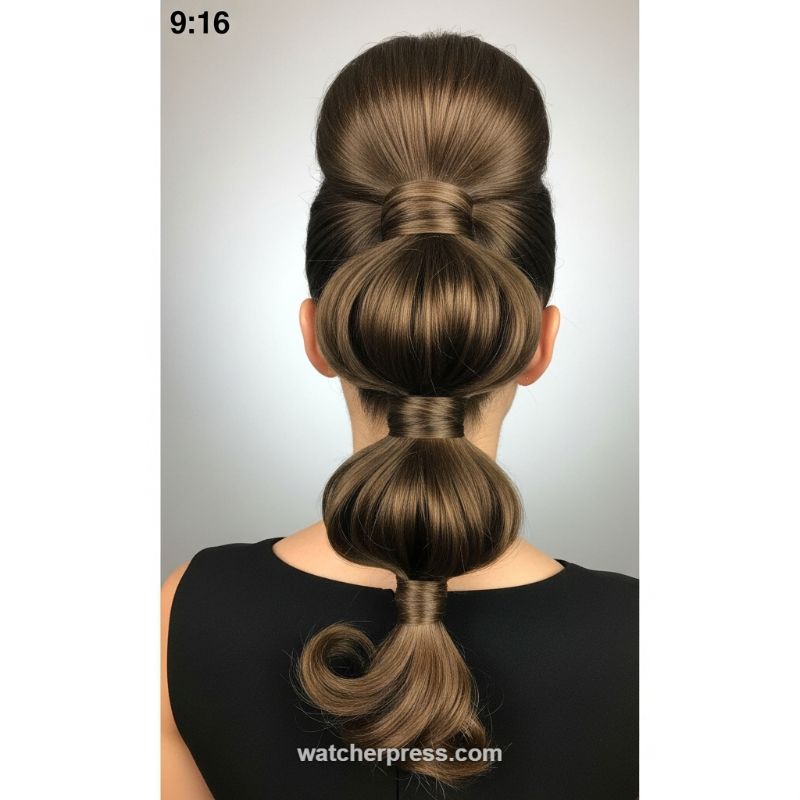
This high-impact, gravity-defying style elevates the classic ponytail into a piece of wearable art, perfect for high-fashion events or making a striking entrance. To execute this sophisticated structure, begin with meticulously prepared hair. Straight, highly-glossed hair is essential; use a flat iron after applying a generous amount of heat protectant and smoothing serum. The foundation of this look is a very tight, high ponytail situated just below the crown. Before securing the entire length into the base, focus on creating the first voluminous element—the bouffant at the crown. Gently tease the hair at the roots above the ponytail line to build height, then smoothly brush the top layer over the teasing and secure the entire section firmly with a strong elastic, ensuring there are no bumps or loose strands at the nape of the neck. Achieving this sleek, seamless transition from the head to the ponytail is critical for the overall polished effect of the style, so use edge control or styling wax around the hairline if necessary.
Once the foundational ponytail is established, the segmentation process begins. This look features two primary ‘bubbles’ descending from the primary bouffant volume. Use clear, strong elastics spaced approximately four to five inches apart to section the ponytail. The key to creating the distinct, rounded silhouette is the technique used immediately after securing each elastic. Gently pull the hair outward and slightly upward from the secured segment, meticulously shaping the hair into a symmetrical, rounded bubble form. Exercise precision and a light touch to ensure the hair remains smooth and doesn’t fray. After shaping each bubble, you must hide the elastic band for a seamless finish. Take a thin strand of hair from the underside of the segment, wrap it tightly around the elastic, and secure it underneath the segment with a small hairpin, ensuring the pin is completely invisible. Repeat this process for all subsequent segments, maintaining even spacing and symmetrical volume throughout the length of the pony.
For expert maintenance and finishing, strong-hold products are non-negotiable. After all segments are formed and secured, apply a fine mist of high-hold hairspray over the entire structure, paying close attention to the outer surface of each bubble to prevent frizz or collapse. The final touch, as demonstrated in this high-end execution, is a polished spiral curl at the very end of the ponytail, adding an element of classic elegance to the modern architecture. Use a medium-barrel curling iron on the remaining length, setting the curl immediately with a touch of shine spray for a rich, reflective finish. This style works best on long hair, often requiring clip-in extensions to achieve the required density and thickness to support the exaggerated volume of the bubbles, ensuring the look holds its sculptural integrity for the duration of any event.
Sleek & Striking: The Pop-Color A-Line Bob
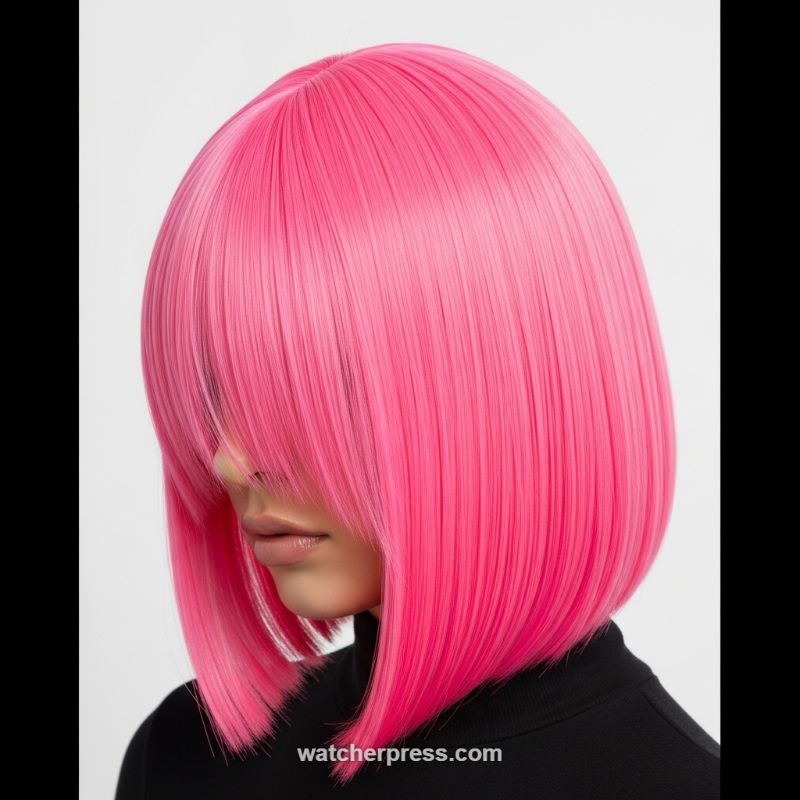
The era of subtle hair color is officially paused; 2024 demands maximalism, and the Pop-Color A-Line Bob delivers an undeniable style statement. This look marries two key trends: the precision of a razor-sharp bob and the unapologetic vibrancy of fantasy color, specifically this shocking neon pink. The bob itself features a severe angle, shorter in the back and dramatically sweeping forward to frame the jawline, creating a structure that feels modern and incredibly clean. Crucially, the look is topped off with a heavy, straight fringe that either completely covers the eyebrows or is meticulously angled to blend seamlessly into the sides. The sleek, almost reflective texture is non-negotiable, requiring the hair to be perfectly straight to showcase the flawless lines of the cut.
Achieving this high-impact hue, if pursued with permanent color, is a significant commitment demanding expert execution. The hair must first be lifted to a level 10 (platinum blonde) to allow the vivid pink pigment to truly pop with saturation. Since fashion colors fade quickly, maintaining the integrity of this shade requires sulfate-free, color-depositing shampoos and rigorous protection from heat and UV exposure. Alternatively, if high commitment isn’t desired, utilizing a high-quality synthetic or human hair wig, as seen here, is the best path forward. Wigs offer instant transformation, eliminating the damage associated with extreme bleaching while ensuring the uniform color saturation and pristine sleekness required for this specific silhouette. Regardless of the route, the cut demands geometric precision; consult a stylist specialized in structural bobs to ensure the A-line profile is perfectly balanced.
Styling this look is focused purely on maximizing shine and minimizing frizz to maintain that glass-like finish. After washing, apply a lightweight heat protectant and a shine serum, then use a flat iron on small sections, ensuring the ends are tucked slightly inwards toward the chin to emphasize the bob’s curve. Because the hair is such a powerful focal point, keep accessories minimal and wardrobe choices sophisticatedthink monochromatic outfits, leather, or structured pieces, much like the black turtleneck featured in the image. For makeup, a clean face with a strong brow and a nude or lightly glossed lip prevents competition with the bright pink hue, letting the hair carry the entire ensemble. This hairstyle is not just a trend; it’s a personality amplification.
The Architectural High Bun: Sculpted Rolls and High Polish
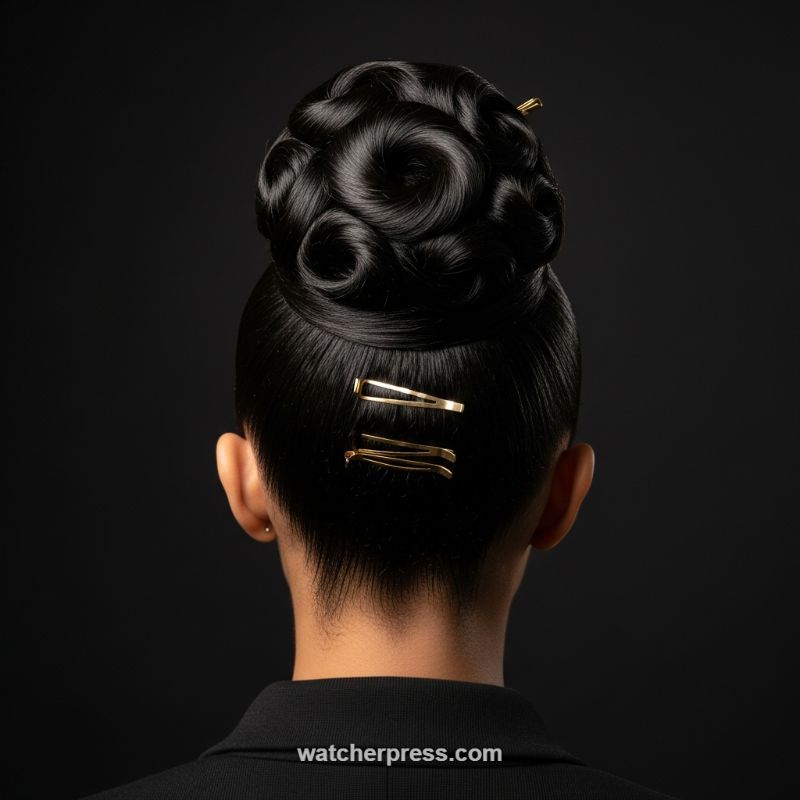
This hairstyle is the epitome of polished sophistication, often seen on runways or at black-tie events, making it a powerful trend for those seeking highly structured elegance. Achieving this ‘Architectural High Bun’ starts with an immaculate foundation. The visual appeal hinges entirely on the high-gloss, mirror-like finish and the absolute absence of flyaways. To begin, treat the hair with a smoothing serum and heat protectant, then flat-iron until completely straight. Use a strong-hold pomade or edge control product to slick the entire hairline back toward the crown, ensuring every strand is taut and smooth against the scalp. Secure the hair into a high, tight ponytail directly at the crown, brushing meticulously with a boar-bristle brush before securing the elastic. This preparatory stage is critical, as any bumps or stray hairs will compromise the final, pristine look.
Once the ultra-sleek base is established, the focus shifts to creating the sculptural element of the bun. The intricate design is achieved by taking sections of the ponytail and manipulating them into deep, smooth barrel curls or pin curls before meticulously laying them flat against the head to form a cohesive, spiraled dome shape. Unlike a traditional sock bun, this technique relies on defined, individual rolls. Separate the ponytail into three to five sections, depending on hair thickness. Curl each section using a large curling iron or roller, then lightly coat with a flexible, yet strong, hairspray. Gently unroll the curl and carefully pin it into place around the ponytail base, ensuring the curves intersect neatly to create the appearance of seamless, swirling waves. This requires strategic placement of bobby pins hidden within the rolls to lock the structure firmly in place.
The final element involves strategic accessorizing to provide a modern edge to the otherwise vintage-inspired silhouette. The dark, glossy hair is perfectly contrasted by minimalist gold accessories, such as the two stacked barrettes or sleek bobby pins seen positioned low near the nape. This placement is key; it draws the eye but does not compete with the dramatic volume and texture of the bun above. Expertly finish the entire style with a heavy-duty shine spray or oil sheen to maximize the reflection of light and emphasize the sculpted shape. This not only adds luminosity but also seals the style, ensuring maximum hold and frizz resistance for hours, cementing this look as a high-fashion statement that demands attention.
The Effortlessly Romantic Halo Braid Updo
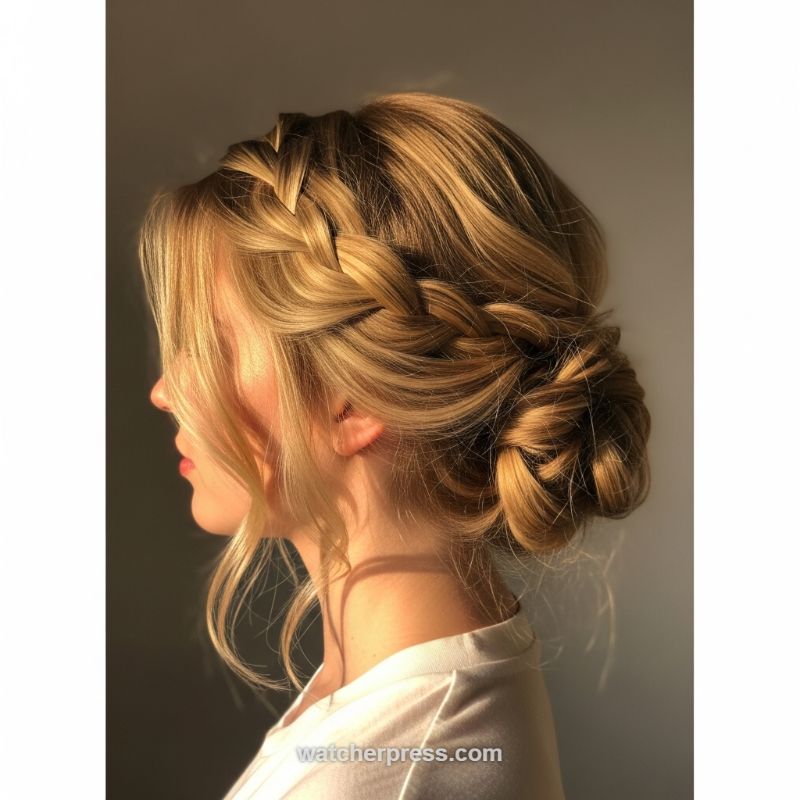
This style, which perfectly balances intricate structure and relaxed softness, is the quintessential bridal or sophisticated daytime look dominating this year’s trends. It features a beautifully executed braided element—likely a Dutch or French braid—that starts near the temple and wraps around the head, seamlessly merging into a voluminous, textured low bun. The key to its appeal lies in the deliberate softness; the braid is gently pulled apart (pancaked) for maximum width and a relaxed, almost lived-in appearance. Note how the golden blonde hair color catches the light, highlighting the dimension of the intertwining strands and making this updo particularly striking on hair with natural or intentional highlights like balayage.
Achieving this polished yet undone look requires building foundational texture. Begin by curling all your hair loosely with a 1.5-inch barrel iron, focusing on creating soft waves rather than tight spirals, then apply a dry texturizing spray or volumizing powder throughout the roots and lengths. Next, establish a deep side part. Start your Dutch braid (braiding strands under, not over, the center strand) above the ear, angling it back along the curve of your head toward the crown. You must feed in small, consistent sections of hair as you move across the back of the head, ensuring the braid lies flat and close to the scalp. Stop the braid when you reach the back center, securing the remaining length with a small, clear elastic.
To construct the luxurious low bun, combine the braided tail with the remaining unsecured hair at the nape of the neck. An expert tip is to avoid twisting the hair into a single, tight coil. Instead, create the bun by loosely wrapping small, separate sections of hair and pinning them individually around the anchor point of the braid. This sectional technique ensures a natural, fuller, and more organic shape with beautiful definition. Crucially, before setting the style, gently tug on the outer loops of the braid (pancaking) and the bun loops to achieve that sought-after volume and romantic sprawl. Finish by pulling out delicate, whispy face-framing tendrils near the ears and hairline for softness, then set everything with a flexible hold hairspray to ensure longevity while maintaining natural movement.
The Romantic Braided Heart Updo (Love Knots)
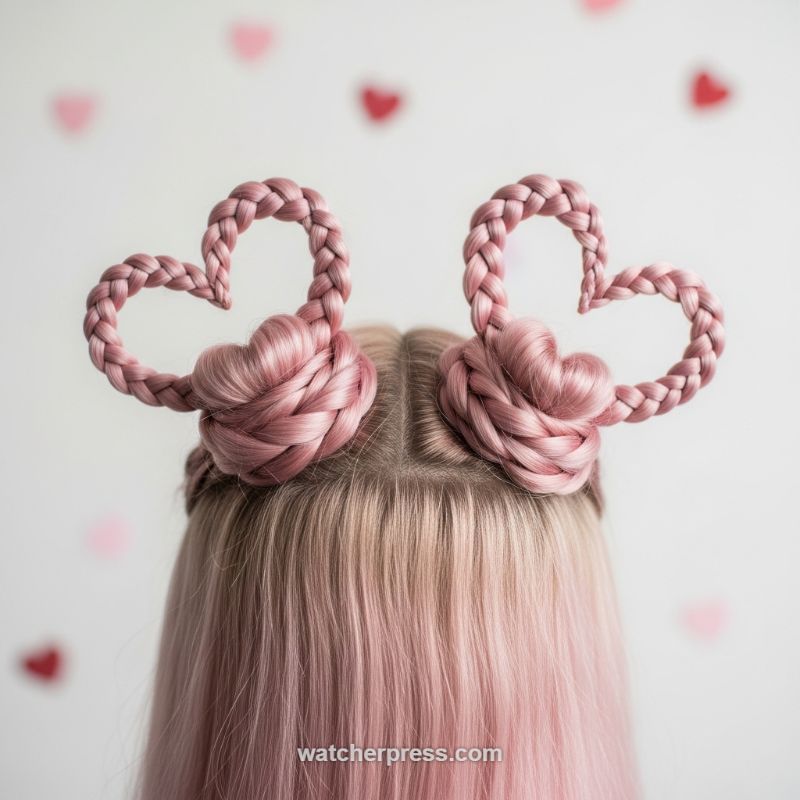
This intricate ‘Love Knot’ hairstyle transforms a simple space bun into a statement piece, blending the playful whimsy of pigtails with the sophisticated structure of formal braiding. The style is defined by two perfectly symmetrical, rigid three-strand braids that emerge from the bun’s base and curve sharply upward to form heart shapes. The foundation consists of tightly coiled knots, which are essential for anchoring the upright structure. While the aesthetic shown is breathtakingly enhanced by the soft blush-pink color palette, which fades from a natural blonde root, this style is equally striking in any solid or contrasting shade. It’s a high-impact look perfect for festivals, themed parties, or making a bold statement on date night, demanding precision in parting and execution to achieve the necessary symmetry and height. To truly dominate this trend, ensure your hair, or the extensions used, is sleek and has uniform texture before you begin styling, as any flyaways will detract from the clean lines of the hearts. The visual appeal lies in the contrast between the smooth, looped braid and the tightly wrapped texture of the base bun.
To recreate this detailed look, start by establishing a clean, crisp middle part, extending from the hairline all the way to the nape of the neck. Secure the hair on both sides into high, taut pigtails, ensuring they are placed symmetrically just above the ears. The key to the heart shape is creating a long, highly structured braid. For each pigtail, section off the hair and execute a very tight, classic three-strand braid, securing the end with a small, clear elastic band. The length of this braid dictates the size of your heart, often requiring supplemental hair or extensions for adequate length and stiffness. Once the braid is secured, take the remaining hair *at the base of the pigtail* (before the braid begins) and coil it tightly around the elastic base to form the compact ‘knot’ or bun, pinning it securely against the head. Finally, carefully shape the stiff braid into a perfect heart, bringing the ends down to meet the coiled bun. Use small, strong bobby pins hidden within the coils of the bun to secure the ‘point’ of the heart where the two sides meet, ensuring the loops remain upright and defined.
Expert advice for maintaining this gravity-defying shape centers on preparation and product. If your natural hair lacks the density or length for the prominent hearts, investing in quality, color-matched braiding extensions is crucial—they provide the necessary stiffness to hold the shape without sagging. Before braiding, run a light amount of texturizing wax or pomade through the strands to reduce slippage and maximize the braid’s thickness. Once the heart is shaped and pinned, finish the entire look with a heavy-duty, humidity-resistant hair lacquer applied liberally, focusing specifically on the inner curve of the heart and the point where the braid meets the bun. For a variation, consider substituting the three-strand braid with a Dutch or French braid technique to incorporate more hair into the loop, resulting in an even thicker, more voluminous heart. Regularly check the pins for security, as the weight and tension of the loops can cause movement throughout the day.
The Retro-Glam Voluminous Blowout Bob
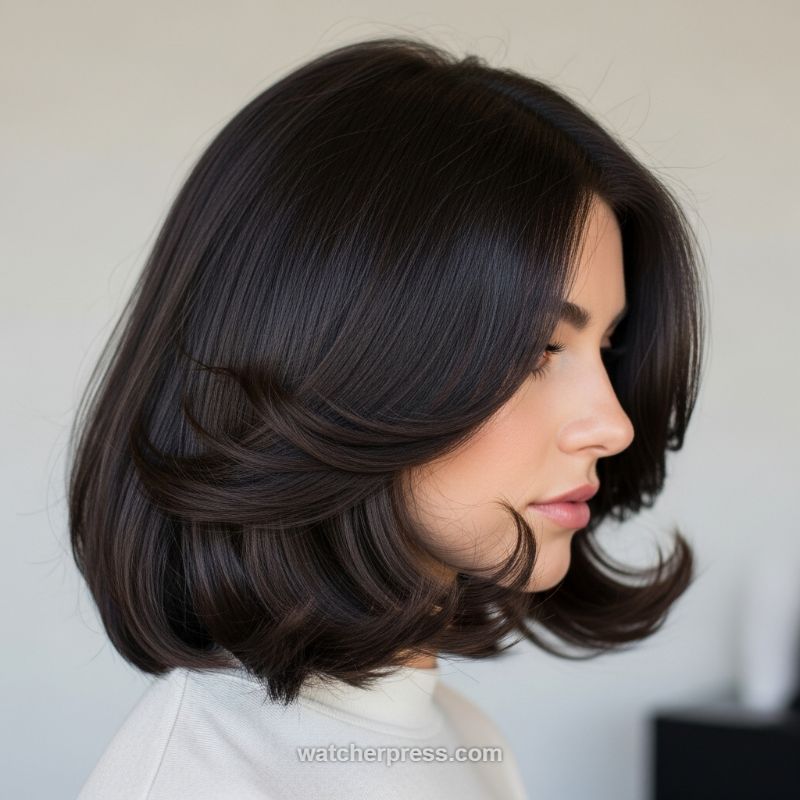
This hairstyle resurrects the iconic, polished glamour of the late ’90s and early 2000s, proving that volume and structure can coexist beautifully in a shorter cut. The foundation of this look is a precisely executed bob, typically hitting between the chin and the collarbone, featuring seamless, strategic layers. These layers are meticulously placed to ensure maximum movement and bounce, often cut using a technique that allows the front pieces to feather away from the face—sometimes referred to as a shorter version of the ‘Butterfly Cut’ or ‘Curtain Bob.’ The hair color, a rich, solid espresso brown or deep chocolate, is essential for maximizing the visual impact and natural shine. Without the depth of a dark, healthy color, the voluminous texture can appear flat or damaged, so be sure to incorporate color-boosting treatments and deep conditioning masks into your routine to replicate this high-shine finish.
Achieving this specific level of bouncy volume requires dedicated styling techniques, primarily focusing on the blowout. Start with freshly washed hair, applying a root-lifting spray or volumizing mousse throughout the damp lengths. When blow-drying, utilize a large round brush (ideally 2 to 3 inches in diameter) and section the hair meticulously. The secret to the signature flips is directional drying: For the ends, wrap the hair tightly around the brush and roll it inward, drying thoroughly while pulling the brush down and then rolling the hair back up. For the crucial face-framing layers, dry them backward and outward, directing the heat away from your face to create that sweeping, retro curve. For ultimate hold and bounce, use hot rollers or large Velcro rollers on each section immediately after blow-drying, letting them cool completely for ten to fifteen minutes before release.
Expert advice for maintaining this luxurious style centers on technique and product choice. Once the rollers are removed, break up the volume slightly using your fingers instead of a brush to preserve the defined curves. A light-hold flexible hairspray should be used primarily at the roots and the underside of the curled ends to maintain the lift without stiffening the hair. This style works best on medium to thick hair density; those with finer hair should consult their stylist about lightweight texturizing sprays or products that build internal volume. This voluminous bob is the quintessential power haircut of the year, perfectly balancing softness with an undeniable aura of sophistication, making it suitable for any setting from the boardroom to a black-tie event.
The Sun-Kissed Tousled Bob: Effortless Texture and Volume
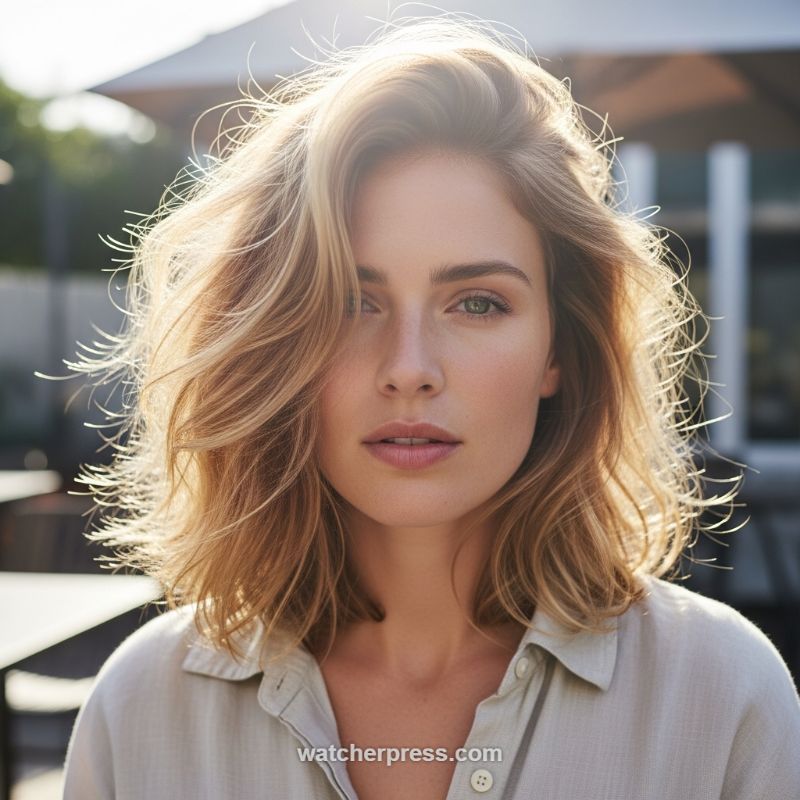
This stunning style captures the essence of sophisticated casualness, making it a frontrunner for trending hairstyles this year. The cut is a blunt, collarbone-grazing bob, but its defining characteristic is the intense, airy volume and artfully undone texture. The color is a multi-dimensional blend of warm blonde and light brown (often called “bronde”), utilizing subtle balayage techniques to create depth that perfectly catches the light. Note the dramatic backlighting, which turns the fine wisps of hair around the crown into a golden halo—this diffused light effect is key to the style’s ethereal, dynamic appeal. Unlike traditional, sleek bobs, this version embraces natural movement and a slightly messy finish, making it highly versatile for various face shapes and suitable for the shift towards more natural, low-maintenance beauty standards.
To replicate this voluminous, lived-in texture, start by prepping damp hair with a lightweight mousse or root-lifting spray, focusing heavily on the crown and mid-lengths. Blow dry your hair upside down until it is about 80% dry to encourage maximum lift, then switch to a low-heat setting using a diffuser attachment to enhance natural waves without creating excessive frizz. Once fully dry, use a large barrel (1.5-inch or larger) curling iron to add soft bends rather than defined curls. It is crucial to alternate the direction of the wrap for each section to prevent the waves from clumping together and to build that coveted separation. The true secret to the lasting ‘tousled’ look lies in a quality texturizing spray or powder applied at the final stage. Flip your head back up, vigorously shake the hair out with your fingers, and then apply the texturizing product generously through the mid-lengths and ends, massaging it gently into the roots for reinforced lift.
Achieving this level of resilient volume requires a strategic haircut; ask your stylist for seamless, internal layering, which removes weight while maintaining the illusion of thickness and structure at the perimeter. For daily maintenance, avoid over-brushing, which will quickly flatten the style and destroy the texture. Instead, refresh the look on day two or three with a burst of dry shampoo at the roots—this not only absorbs oil but also adds grip and volume. For hair color, if your strands are naturally one tone, consider incorporating strategically placed, face-framing highlights, often just a shade or two lighter than your base, to perfectly mimic the sun-kissed dimension visible in this image. This variation in color is essential for allowing the texture and movement to pop, ensuring the final look never appears heavy or static.
High-Impact Double Dutch Braids: The Perfect Summer Look
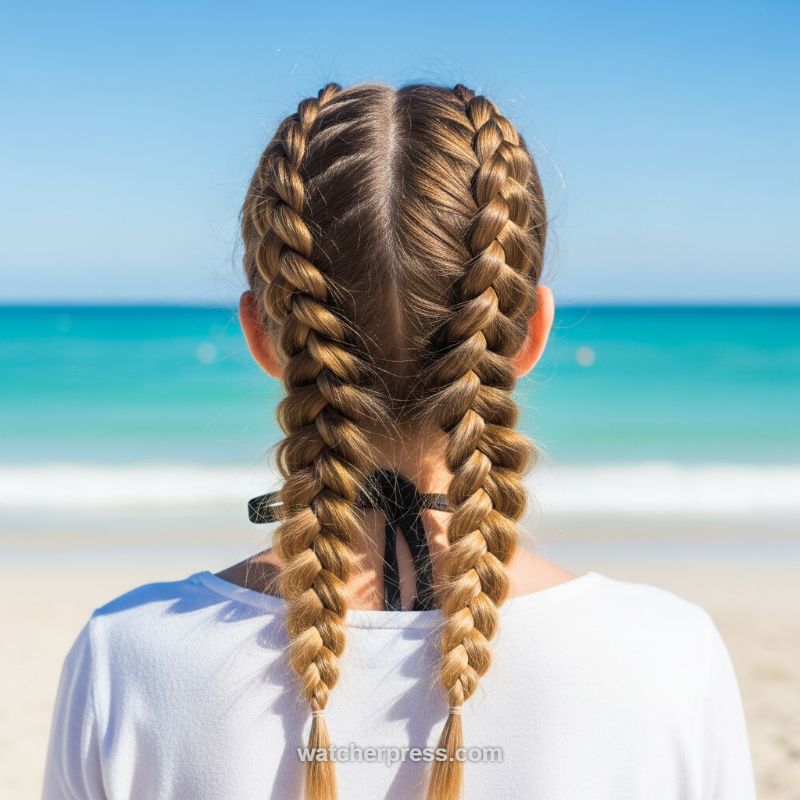
The image showcases the perennial favorite, the Double Dutch Braid (often referred to as Boxer Braids), executed flawlessly. This style is not just practical for keeping hair contained in active or humid environments, like the beautiful beach setting shown, but it is also a highly effective method for adding texture and structure to any look. To achieve this high-impact, symmetrical appearance, begin with clean, detangled hair. The most critical step is establishing a razor-sharp center part that extends straight back to the nape of the neck. Use a rattail comb and a touch of smoothing cream or mousse along the parting lines to ensure sleekness and control flyaways right from the start. Separating the hair into two distinct sections is crucial before commencing the braiding process, as this preparation dictates the overall symmetry and cleanliness of the final style. Pay attention to the crown area; a tight, clean start ensures the braids lie flat against the scalp, maximizing their sculpted visual appeal.
The technique for the Dutch braid is deceptively simple: instead of crossing the hair strands *over* the middle section (as in a French braid), you cross them *under*. Start near the forehead with three small sections. After the initial cross-under, begin incorporating small, consistent sections of hair from the surrounding scalp into your working strands as you move progressively down the head. The key to achieving the defined, raised look seen here is tension; keep the braids extremely tight and close to the scalp, pulling downwards rather than outwards. If your hair is fine, apply a texturizing powder or dry shampoo before you begin to add grit, which helps the strands hold tension better and prevents slippage. Maintain even strand size throughout the process; if you pick up too much hair at once, the braid will widen too quickly, compromising the sleek, uniform appearance.
Once you reach the nape of the neck, transition the style into a standard three-strand braid until you reach the ends, securing them tightly with a clear elastic, as demonstrated in the photo, for a discreet finish. For those seeking an extra voluminous look—though the style in the picture is intentionally sleek—you can gently ‘pancake’ the braids by delicately tugging on the outermost loops of each braid to expand their width. However, if you are aiming for longevity and a polished look ideal for athletic wear or a humid climate, skip the pancaking and seal the entire style with a strong-hold, anti-humidity hairspray. This style is incredibly versatile, working as a standalone look for several days and providing beautiful, heatless waves when removed, making it a must-try trend for maximizing hairstyle efficiency this year.
The Luxe Half-Up with a Statement Velvet Bow
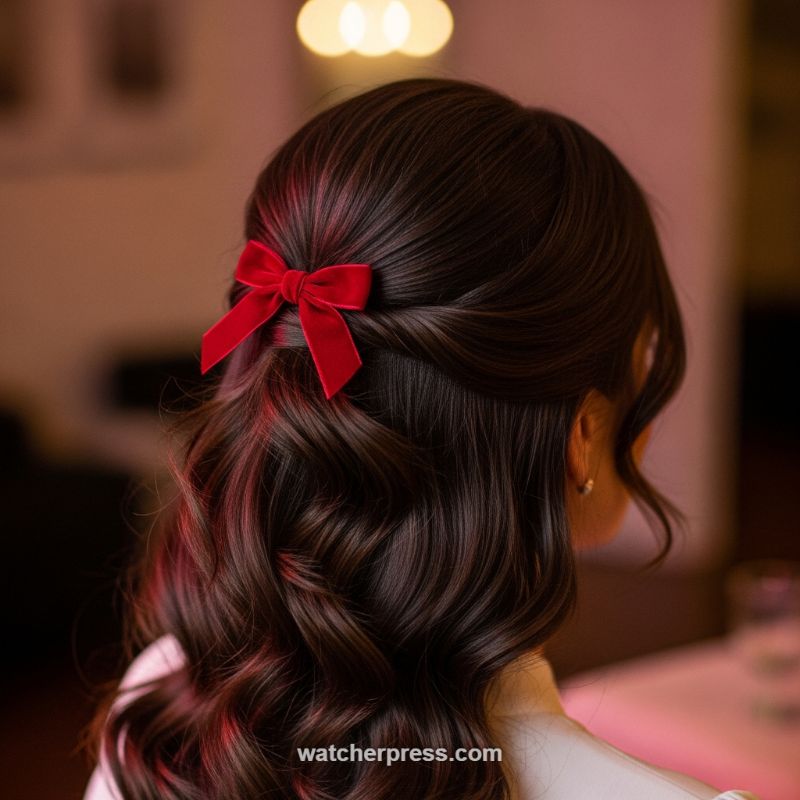
This hairstyle masterfully combines classic glamour with a trending nostalgic accessory, making it perfect for elevated evening events or sophisticated daytime affairs. The foundation of this look is the deep, glossy Hollywood wave. To achieve this, start by applying a heat protectant and a volume mousse to the root area. Using a 1.25-inch curling iron, curl sections of hair away from the face, holding each curl until cooled before releasing. The essential step is the finish: once all hair is curled, gently brush the curls out with a paddle brush or wide-tooth comb. This transforms the tight ringlets into soft, voluminous, S-shaped waves, maximizing shine and fluidity. The rich, dark tone of the hair highlighted with subtle auburn dimension catches the light beautifully, emphasizing the polished texture. Expert tip: focus a lightweight shine spray mid-shaft to ends to capture that high-gloss, expensive look, but avoid spraying near the root to maintain lift.
Executing the half-up section is critical to the style’s elegance. To maintain a smooth, voluminous crown, draw two clean sections of hair back from just above the ears, following the line of the temples. Ensure the pulled-back portion is smooth against the sides of the head, but don’t pull it too tightly, as this can flatten the crown. Secure this section discreetly using a clear elastic or crisscrossed bobby pins placed centrally at the back of the head. For optimal effect, gently push the hair forward right at the crown before securing to create a subtle bump or ‘pouffe,’ preventing a helmet-like appearance. The choice of the accessory—a deep, rich red velvet bow—is what elevates this style from standard to statement. The matte, tactile quality of the velvet offers a stunning contrast to the high-gloss shine of the hair, positioning the look firmly within the current trend of sophisticated, high-texture hair accessories.
This look is not just about the waves; it’s about curated accessorizing. When choosing your bow, opt for materials like velvet, silk, or high-quality grossgrain over overly sequined or metallic options, which can cheapen the overall aesthetic. Place the bow directly over the secured section to conceal the pins or elastic, ensuring the loops of the bow sit symmetrically and the tails fall cleanly against the flowing waves below. To finalize, spritz the pulled-back section with a medium-hold hairspray, paying close attention to any flyaways around the hairline or nape of the neck. This hairstyle perfectly balances soft, romantic movement with structured, polished placement, confirming the trend that understated accessories can be the defining element of a luxurious look.
The Voluminous Slick Back with High Fade: Modern Pompadour Perfection
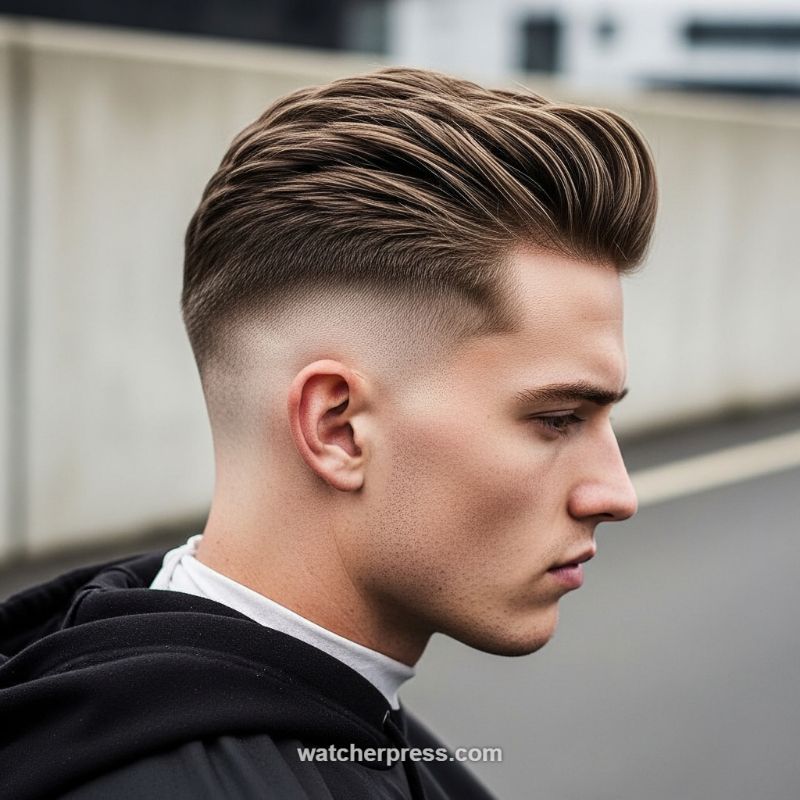
The foundation of this stunning, trend-dominating look is precision cutting and high-contrast fading. Instruct your barber to execute a mid-to-high skin fade, ensuring the shortest point (often down to a foil or zero guard) starts well above the parietal ridge but maintains a seamless, gradual transition up to the substantial length on top. Crucially, the fade must be perfectly blended—there should be no harsh lines, only a flawless gradient that highlights the contrast between the short sides and the voluminous, flowing top. For the top section, a minimum length of 4 to 6 inches is required to achieve this elegant, swept-back volume and movement, reminiscent of a modern pompadour. Instruct your stylist to keep the length consistent across the top, allowing the hair to naturally flow backward rather than being heavily layered, which could disrupt the sleekness of the final style. Pay close attention to the front hairline; a precise line-up or a slight temple taper helps define the edge without making it look overly geometric, preserving a modern, natural feel.
Achieving this controlled yet voluminous sweep requires meticulous technique and the right product selection. Begin the styling process immediately after washing when the hair is towel-dried and damp. Apply a heat protectant and a generous amount of volumizing mousse or sea salt spray throughout the entire top section, concentrating it near the roots. The key to lift is the blow-dry: using a medium-heat setting, work the hair backward and slightly upward using a vent brush or a skeleton brush. For maximum height at the front, utilize a round brush to lift the roots, curving the hair back over the crown, and ensure the heat is directed specifically at the roots to lock in that foundational volume. Once the hair is fully dry and positioned, select a high-quality styling product—a matte finish clay or a medium-hold fiber pomade works best, avoiding heavy, greasy products that could flatten the hard-earned volume. Warm a pea-sized amount between your palms and lightly rake it through the hair, defining the backward sweep and ensuring control without sacrificing the natural texture visible in the image.
To keep this high-contrast style looking sharp and trend-worthy, regular maintenance is non-negotiable. The demanding skin fade component requires a precise trim every three weeks to prevent the shortest sections from growing out and muddying the critical gradient line. For those with particularly thick or heavy hair seeking to emulate the lightweight movement shown, expert advice is to use subtle thinning shears deep within the top layers to lighten the load without removing visible length or affecting the surface flow. Subtle, strategically placed highlights, often in warmer brown or ash blonde tones like those pictured, can dramatically enhance the texture and dimension of the swept-back waves, giving the illusion of even greater volume and depth. Finally, to ensure longevity throughout the day, finish the style with a flexible hold setting spray, and invest in a high-quality shampoo to prevent product buildup which will inevitably weigh down this desired high-volume aesthetic.
Elegant Cornrow Updo into a Low Braided Bun
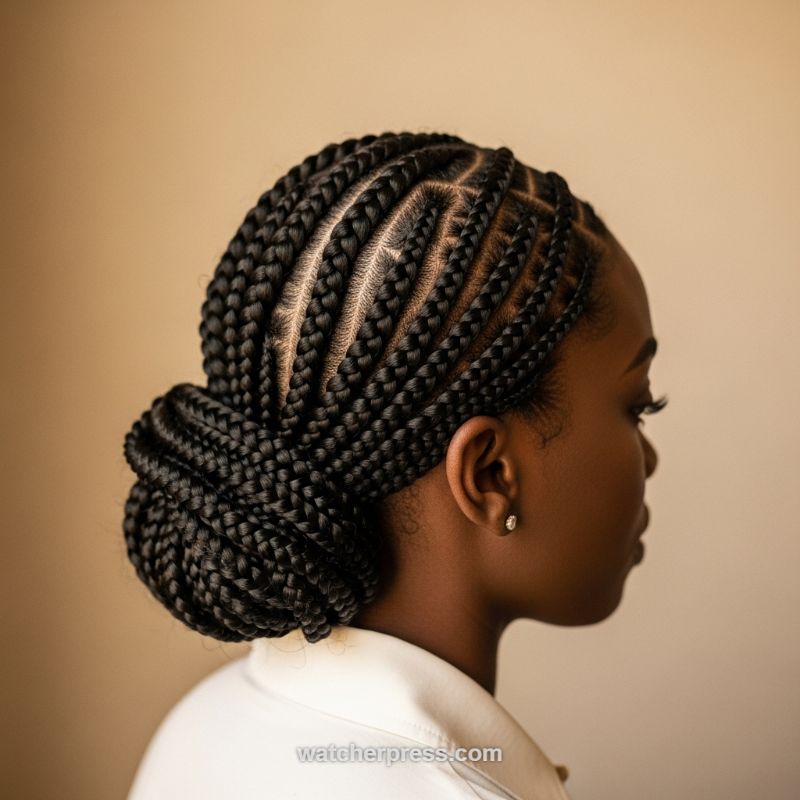
This hairstyle perfectly marries the structured neatness of feed-in cornrows with the timeless sophistication of a low chignon, offering a powerful, elegant, and versatile look dominating protective styling trends. The visual appeal rests heavily on the meticulous craftsmanship of the braids. Notice how the medium-sized cornrows are woven tightly, starting from the hairline and sweeping back toward the nape of the neck. The defining feature is the clean, sharp partings, which run diagonally and perpendicularly across the scalp, creating subtle geometric intersections near the crown. This precision ensures a polished finish, making the style appropriate for high-stakes business meetings, formal events, or a refined everyday appearance.
To recreate this specific polished look, expert attention must be paid to preparation and technique. Begin by thoroughly cleansing and moisturizing the hair and scalp. Using a rat-tail comb, map out the pattern, ensuring the sections are uniform in width. Before braiding each section, apply a quality edge control or styling gel to the root to achieve the razor-sharp parting lines and minimize flyaways. As you execute the cornrow technique, maintain consistent, firm tension while seamlessly feeding in braiding hair. The key is to direct every single braid smoothly toward the central anchoring point located just above the nape of the neck. This deliberate curvature is essential for making the eventual coil of the bun sit flat and look cohesive rather than bulky.
Once all the individual braids meet at the base, they should be gathered and secured, typically with a strong elastic band. The final step involves coiling the lengths of the braids tightly into a voluminous, structured bun, often secured using bobby pins in a neat, symmetrical fashion. This style is not only visually stunning but also highly practical; as a protective style, it minimizes manipulation of the natural hair, promoting growth and retention. Maintain the look by misting the scalp with light oil for hydration and covering the hair with a silk or satin scarf at night to preserve the integrity of the partings and the sleekness of the bun.
Pin-Up Perfection: The High-Gloss Victory Roll
The sophisticated Victory Roll is experiencing a major resurgence, moving beyond costume parties and becoming a fixture of high-fashion formal wear. This style is defined by two key elements showcased in the image: extreme polish and symmetrical structure. To achieve this level of high-gloss sheen and defined shape, preparation is paramount. Start with clean, damp hair and apply a strong heat protectant and a liberal amount of setting lotion or mousse, focusing heavily on the root area where the volume is needed. Blow-dry the hair straight, using a paddle brush to smooth the cuticles down for maximum reflectivity. If your hair is naturally dry or dull, layer a lightweight shine serum through the mid-lengths and ends before any heat styling, ensuring the foundation is sleek and ready to hold a tight, rolled shape. Establishing a precise center part is crucial for the symmetry of the front rolls; use a rat-tail comb to ensure the line is perfectly straight back to the crown.
Creating the rolls themselves requires meticulous sectioning and technique. Take the front section of hair, from the temple up to the center part, and separate it. For maximum lift, backcomb the underside of this section heavily. Smooth the top layer meticulously using a fine-toothed brush and a mist of hairspray. The key to the classic Victory Roll is rolling the hair *under* and toward the center part, creating a tight cylinder. Instead of just rolling with your fingers, use a large, smooth roller or barrel of a curling iron as a guide to ensure the interior space of the roll remains open and voluminous. Once the roll is perfectly shaped, secure the underside edge using bobby pins that match your hair color, pushing them horizontally into the roll’s base to make them invisible. Repeat this process identically on the opposite side, ensuring both rolls are the same height and width, meeting cleanly at the center part without overlapping.
To master the glossy finish seen here, expert stylists recommend a dual-approach to product application. After the structure is set with a strong-hold hairspray, wait five minutes for the lacquer to dry completely. Then, use a fine mist of high-shine spray (or a small amount of pomade warmed between your palms) to gently polish the surface of the rolls and the remainder of the hair, enhancing the light-catching effect. This style demands attention and is beautifully complemented by classic, retro makeup; notice the sharp, dramatic winged eyeliner and perfectly sculpted brow, which further emphasize the mid-century glamour. For longevity, carry extra bobby pins, and if humidity threatens the look, apply an anti-frizz finishing spray before leaving the house. This highly structured and polished look is ideal for black-tie events, weddings, or any occasion where refined, show-stopping elegance is the goal.
The Voluminous Layered Bob: Mastering Dimensional Gray

This sophisticated, layered bob is currently dominating trends, especially for those embracing natural silver or gray tones. What makes this cut a powerhouse of style is its construction: a stacked layering technique combined with deep internal texture. The result is incredible natural volume and movement, addressing a common concern for mature hair that often lacks density. Visually, the varying lengths—which are cut shorter towards the crown and progressively longer toward the jawline—create a seamless, rounded silhouette. The expert use of face-framing layers (or long, side-swept bangs) softens the jawline and cheekbones, providing a youthful lift. Furthermore, the multi-tonal nature of the gray color, featuring bright platinum highlights interwoven with deeper ash tones, ensures the style looks dimensional and vibrant, rather than monochromatic and flat. This particular silhouette proves that short hair can be the ultimate expression of texture and bounce, making it a high-impact, low-effort style winner for the season.
To achieve this specific voluminous finish at home, proper styling technique is non-negotiable. Begin with wet hair and apply a potent volumizing mousse or root-lifting spray directly to the crown and mid-lengths. Using a paddle brush, rough-dry the hair until it is about 70% dry. The critical phase involves the round brush: section the hair horizontally, starting from the nape. Use a medium-sized ceramic round brush, focusing on lifting the roots while blow-drying. To achieve the signature inward curve and stacked look, slightly over-direct each section forward and curl the ends under and inward as you dry. For the top layers and fringe, lift the hair straight up and back to maximize root lift and create that sweeping, side-parted effect seen in the image. Finish with a cool blast of air to set the volume, followed by a light mist of flexible-hold hairspray or a dab of texturizing paste worked into the ends to enhance the definition of the feathered layers.
Maintaining the structural integrity and dazzling color of this layered bob requires specific product and trimming rituals. Due to the high-volume styling, invest in a quality heat protectant applied before every blow-dry session to prevent damage and frizz, which can destroy the sharp lines of the layers. For the silver color, expert advice dictates incorporating a violet or purple toning shampoo once or twice a week; this is essential to counteract any yellow or brassy tones that can dull the bright, crisp gray hue. Because the stacked and rounded shape is dependent on precise layering, regular salon visits are crucial. Plan on a professional trim every five to six weeks to ensure the bottom line remains blunt and the stacked layers retain their movement and lift. Skipping trims will allow the layers to grow out unevenly, causing the style to lose its buoyant, polished shape.
Sculpted Hollywood Waves: The Ultimate Glamour Set
This look is the epitome of vintage sophistication, showcasing deep, uniform Hollywood waves paired with incredible volume achieved through expert roller setting. The visual impact is stunningly glossy, emphasizing the hair’s health and rich color—a vibrant auburn that catches the light beautifully, highlighting the perfect “S” pattern of the waves. Unlike loose, beachy waves, this style is meticulously sculpted, designed for high-impact events like galas or red-carpet appearances. The structured nature of the waves, flowing symmetrically down the back, provides a regal framework, proving that precise setting techniques are making a powerful comeback this year as a statement of polished elegance.
Achieving this highly defined structure begins with the foundation, as demonstrated by the placement of the large barrel rollers across the crown and upper back. To replicate this volume, start by prepping hair with a strong hold setting spray or mousse on damp hair before blow-drying smooth. Use jumbo hot rollers (1.5 to 2 inches) on dry hair, rolling vertically in a brick-lay pattern from the forehead to the nape, ensuring the ends are tucked neatly. The longer section of the hair, where the deep waves form, requires careful execution. After the rollers have cooled completely, remove them and begin brushing out the set. To establish the characteristic deep ridge, use a flat iron or a large-barrel curling iron to create uniformed curls, then softly mold them with a paddle brush, using clips to define the wave shape while the hair cools again, cementing the perfect sculptural flow.
The secret to the flawless, glossy finish lies in the final brushing and product selection. Once the set is completely cooled and defined, lightly brush the entire style downwards using a soft bristle brush to merge the curls into smooth, continuous waves without losing the defined ridges. Apply a dime-sized amount of high-shine serum or oil sparingly to the mid-lengths and ends to boost radiance and minimize flyaways. For maximum longevity, finish with a medium to firm hold flexible hairspray. Expert advice suggests focusing on sectioning the hair precisely before curling and ensuring that every section is curled in the same direction—this consistency is what translates a regular curl into a cohesive, red-carpet-ready sculpted wave. This level of polished detailing elevates the look far beyond everyday styling.
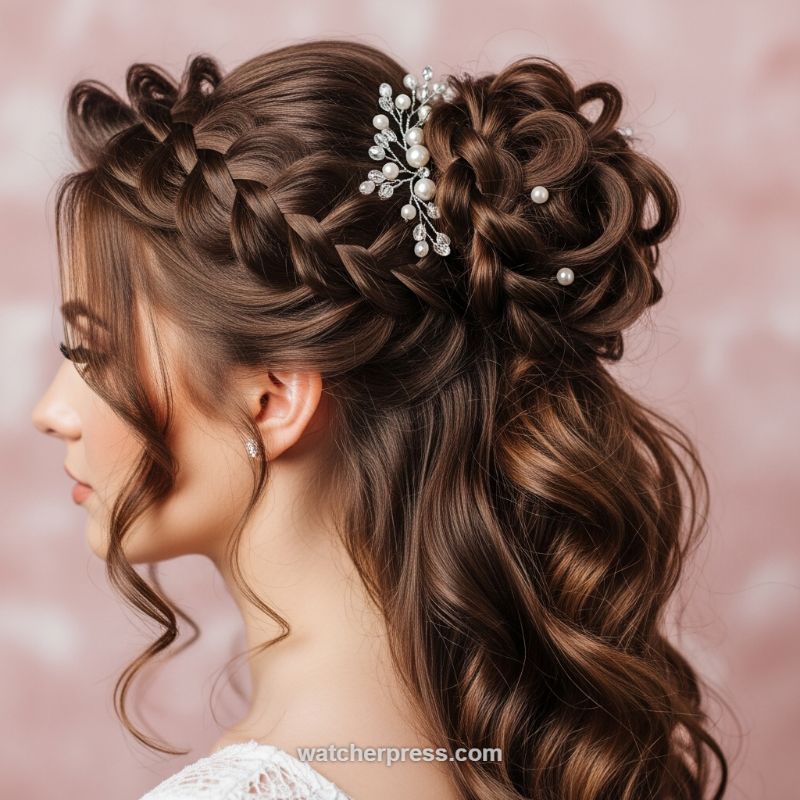
Intricate Braided Bun: The Ultimate Formal Hairstyle
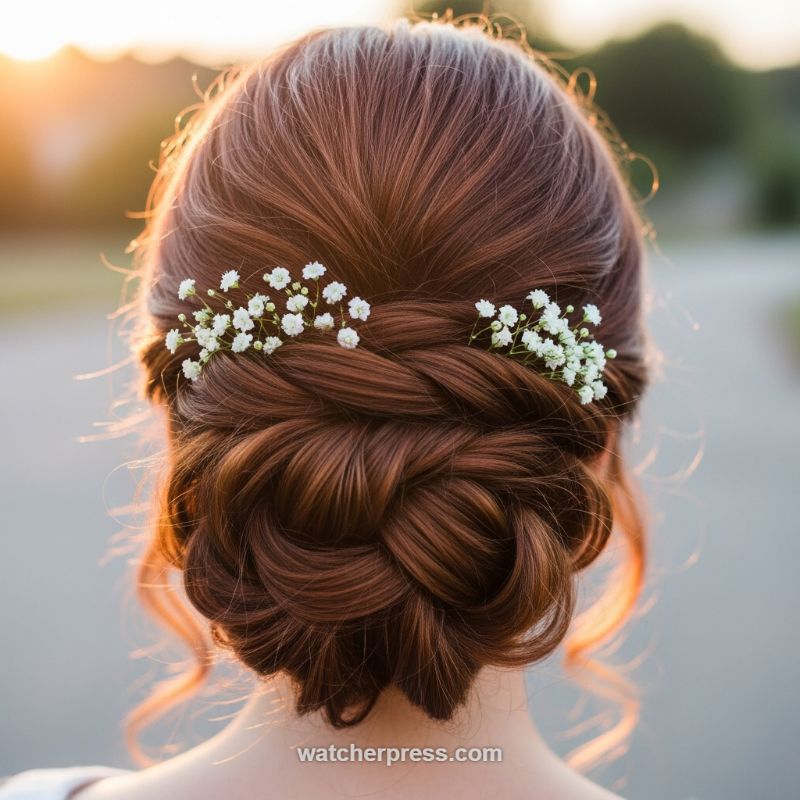
This stunning braided updo exemplifies timeless romance, perfectly captured here during the golden hour which illuminates the rich texture and tone of the hair. This style is not just an elegant choice for a bride or bridesmaid; it is a sophisticated option for any formal event, offering security and structure that lasts all evening. To achieve this level of intricate detail, start with second-day hair or freshly washed hair treated with a texturizing spray or dry shampoo to provide necessary grip. Hair with natural waves or medium to high density works best, and deep auburn or rich brown tones are particularly flattering as the backlighting catches the various layers and weaves, creating dimensional highlights that truly make the style pop. Ensure you apply a lightweight heat protectant and possibly lightly curl the lengths before starting, as this pre-texturizing step ensures that when the hair is woven, the strands lay smoothly yet with substantial volume, preventing the final bun from looking flat or sparse.
The construction of this particular low bun involves complex weaving, combining elements of a thick, voluminous braid that wraps horizontally around the back of the head before converging into a densely coiled chignon at the nape. To replicate the visible structure, separate the hair into three main horizontal sections. Begin with the middle section, executing a loose, three-strand Dutch or rope braid that travels from ear to ear across the back, securing the ends temporarily. The top section should then be smoothed back and draped over the braid, adding fullness to the crown. Finally, combine the remaining lengths of all three sections (including the ends of the horizontal braid) and twist or loop them into a substantial low bun. The key is strategic pinning: use U-pins (hairpins) rather than bobby pins for holding the bulk of the bun, and secure them deeply into the base, ensuring they anchor the style to the scalp without being visible.
The final, essential element of this romantic look is the tasteful addition of fresh florals. Here, delicate sprigs of Baby’s Breath (Gypsophila) are strategically placed just above the main body of the bun, following the line of the horizontal braid. This provides a natural, ethereal touch without overwhelming the intricate hair work. Expert tip: If using fresh flowers, ensure they are secured onto small, discreet hairpins by your florist or stylist, allowing them to be slipped easily and securely into the hair without damaging the delicate petals or disrupting the careful braiding. Finish the entire style with a flexible hold hairspray, focusing on the perimeter and any small flyaways near the neck and temples, guaranteeing the smooth, flawless finish seen here, ready to withstand hours of dancing and celebration.
Hollywood Glam Waves in Intense Ruby Red
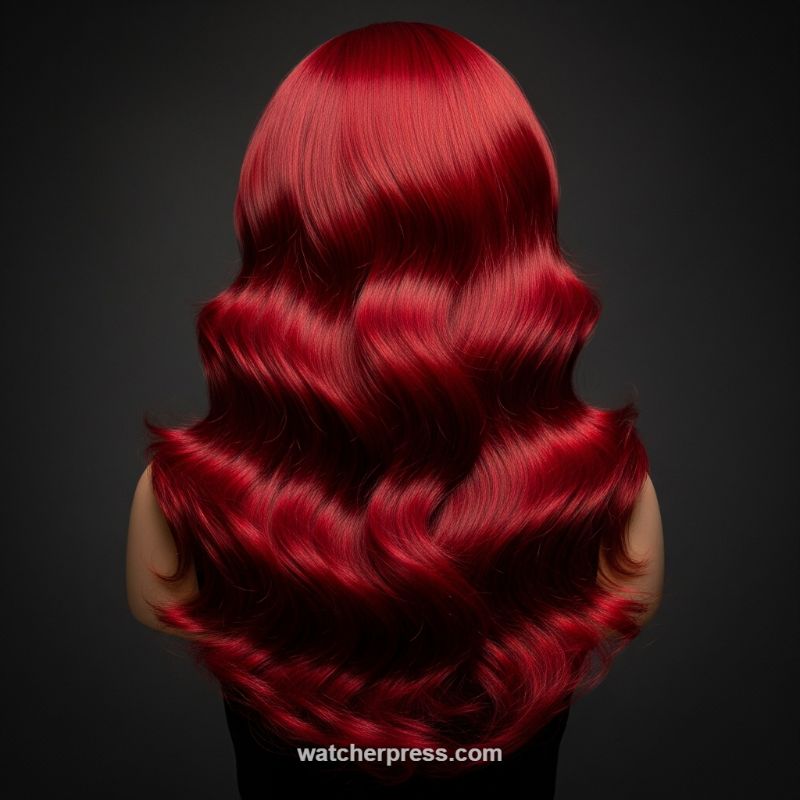
The hairstyle dominating the red carpet and high-fashion editorials this year is the modernized Hollywood Glam Wave, elevated by an explosion of saturated, hyper-glossy color. This look showcases intensely deep ruby red hair, meticulously styled into uniform, flowing S-waves. To achieve this level of color vibrancy, especially on darker hair, expect a professional color service that involves pre-lightening the hair to at least a level 7 or 8 before applying a high-pigment, semi-permanent or permanent ruby dye blend. The key visual element here is the incredible shine; red hair fades notoriously fast, so expert advice dictates using color-safe, sulfate-free shampoos, incorporating a UV protectant spray before sun exposure, and utilizing color-depositing conditioners weekly to maintain that rich, opulent saturation and reflective finish essential for the trend.
Creating these deep-set waves requires precision styling, moving far beyond the typical loose beach wave. Start by prepping fully dried hair with a strong heat protectant spray and a flexible hold mousse or setting lotion to ensure longevity. Using a 1.25-inch curling iron, section the hair horizontally. The critical technique is wrapping every strand around the barrel in the same direction (either all clockwise or all counter-clockwise, typically directed away from the face), ensuring the curl begins near the root for maximum volume and depth. After releasing each curl from the iron, gently roll it back up toward the scalp and secure it with a flat metal clip or duckbill clip while the hair is still hot. This crucial cooling step ‘sets’ the shape into the hair cuticle, ensuring the waves hold their definition and volume.
Once every section is cooled completely—a process that can take 15 to 30 minutes, or can be sped up using a cool shot from a hairdryer—the magic happens during the brush-out. Gently remove all the clips, then use a wide-tooth comb or a soft bristle brush (like a Mason Pearson) to systematically brush through the tight curls. Do not be afraid to brush firmly; the goal is to merge the separate cylinder curls into a single, continuous, cascading ribbon pattern. Use the back of your hand to gently press and shape the emerging S-waves near the face and mid-lengths. Finish the style with a high-shine hairspray, ensuring it offers flexible hold rather than a brittle finish, and apply a drop of lightweight silicone serum or glossing oil to the ends to further enhance the vibrant red tones.
The Elevated Claw Clip Twist: Effortless Chic for Any Occasion
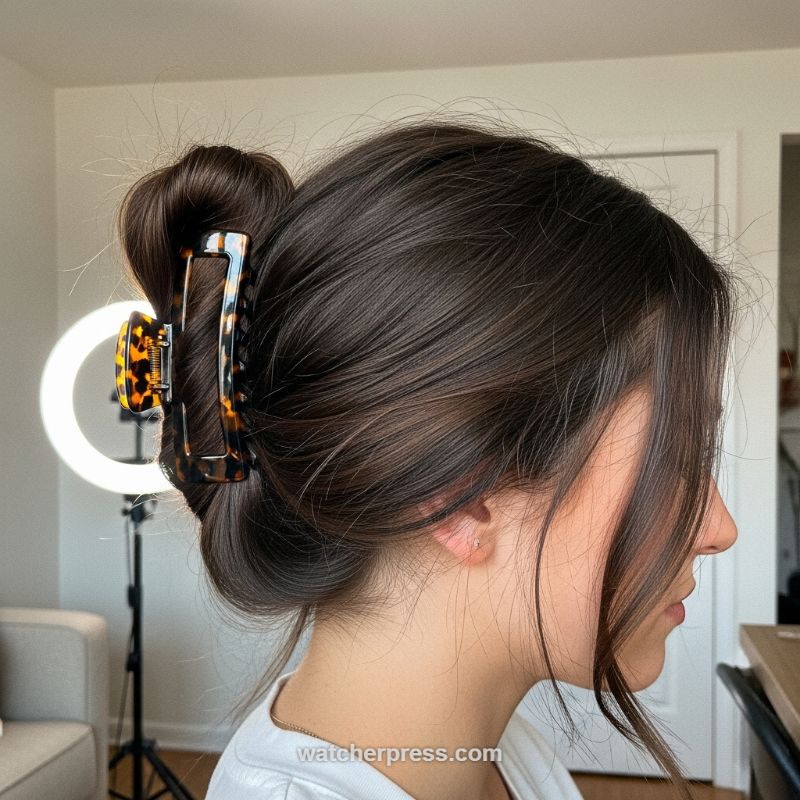
The ubiquitous claw clip has officially moved from a relic of the 90s to a modern style staple, and this look exemplifies its elevated resurgence. This effortless low twist is perfect for both remote work days and quick errands, offering maximum impact with minimal effort. Before starting, ensure your hair has sufficient grip; lightly misting dry shampoo or texturizing spray through the lengths can provide the necessary friction to hold the style securely, especially if your hair is fine or freshly washed. The key aesthetic here is polished yet un-done—the deep, glossy brown color of the hair pairs perfectly with the classic tortoiseshell pattern of the large, rectangular clip, making the accessory a statement piece rather than just a functional tool.
To execute this sophisticated updo, begin by gathering all of your hair tightly at the nape of your neck, similar to starting a low ponytail. Instead of tying it, twist the collected hair firmly upwards along the back of your head towards the crown. Once the twist is secure and taut, loop or fold the twisted section down against your head, creating a compact coil or vertical bun shape. Grasp your large, quality claw clip—in this case, a sturdy rectangular model with an open design is used for maximum hold and visual impact—and open it wide. Place the clip directly over the folded section, ensuring that the bottom teeth catch the hair at the base of the neck and the top teeth secure the folded portion against the scalp. The clip must be oriented vertically to secure the entire updo effectively.
The final, essential step is softening the silhouette to achieve that desirable ‘I woke up like this’ finish. Gently pull out small, face-framing tendrils around the temples and ears to prevent the style from looking too severe and to add dimension around the jawline. For added volume at the crown, lightly tug on the hair above the clip to introduce slight height and texture. If excessive flyaways are distracting, use a light hold hairspray or a dab of lightweight styling cream smoothed over the sides, taking care to avoid heavy gels which would negate the soft, natural texture. This style is incredibly versatile, but works best on medium to thick hair lengths; those with finer hair should focus on root volume and texturizing products before twisting to prevent slippage throughout the day.
The Romantic Volume of Kinky Crochet Curls
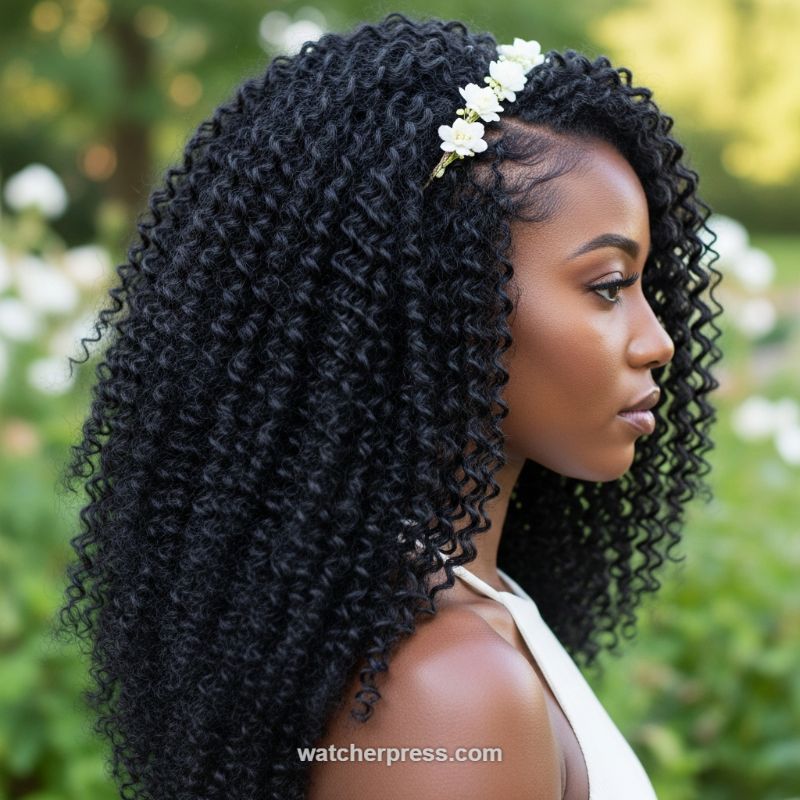
This stunning style highlights the beauty of natural texture combined with exceptional length and volume, making it a standout trend for any formal occasion this year, from weddings to high-profile events. The voluminous, deeply defined kinky curls cascade down the shoulders, creating an ethereal and dramatic silhouette. The key to this look is achieving maximum definition without sacrificing movement. Whether accomplished through a careful rod set on natural hair, or more efficiently via a protective style like crochet braids or high-quality extensions, the goal is uniform, springy coils that hold their shape. The deep side part adds a touch of asymmetry and modern flair, allowing the curls to sweep across the forehead and frame the face beautifully. This style offers the perfect balance between sophisticated polish and untamed, natural elegance.
To replicate this lush volume, especially if utilizing extensions or crochet methods, ensure the hair selected matches a 3C to 4A curl pattern for authentic texture. For natural hair, the process begins with deeply moisturizing products to ensure elasticity and shine. Apply a setting lotion or foam, then use flexi-rods or perm rods (medium size) to create the defined spiral pattern, ensuring the hair is completely dry before carefully unraveling. If using crochet, focus on blending the closure or front pieces seamlessly with your hairline to maintain a natural appearance. Maintenance is crucial: use a light oil sheen or anti-frizz serum, focusing on the ends, and ‘fluff’ the hair from the roots using your fingers—avoiding combs—to boost volume while maintaining curl integrity. Always sleep in a pineapple style or use a silk bonnet to preserve the shape overnight, preventing frizz and crushing the carefully defined spirals.
The final touch that elevates this hairstyle from beautiful to breathtaking is the addition of a delicate floral accent. A simple, thin gold band featuring small, crisp white blooms is strategically placed along the deep side part, resting just above the ear. This placement draws attention to the clean parting and adds a soft, romantic contrast to the rich, dark texture of the hair. Expert advice for accessorizing involves anchoring the hairpiece securely with bobby pins hidden beneath the surrounding curls, ensuring it won’t shift during movement. This look is perfect for the modern bride seeking a natural yet refined aesthetic, or anyone attending a garden event, as the soft lighting and natural backdrop further emphasize the hairstyle’s romantic and free-flowing appeal.
The Romantic Crown Braid Half-Up: Volume and Texture
This hairstyle, which we call the “Romantic Crown Braid Half-Up,” perfectly blends classic elegance with modern volume, positioning it as a dominating trend for formal events this year. The aesthetic is built on intentional contrast: the sleek, structured detail of the braid against the soft, voluminous cascade of natural waves. The crucial feature is the crown detail
f—a thick, loosely executed Dutch braid that starts above one ear and curves across the top of the head, acting as a soft, regal headband. This braid seamlessly feeds directly into a structured but voluminous half-up section at the back, typically composed of loosely twisted coils or loops that create an intricate, airy bun. The remaining length is styled in polished, flowing, medium-barrel curls that tumble down the back, adding softness and essential movement to balance the elaborate top section. This combination maximizes femininity and photographic appeal, making it a favorite for modern brides.
To replicate this look successfully, start with hair prepped for maximum hold and texture, ideally using a root-lifting spray or volumizing mousse applied to damp hair before blow-drying. For the crown braid, isolate a generous section of hair above the temple and begin a Dutch braid (crossing strands *under* the center strand), ensuring the braid stands out from the scalp. As you braid horizontally across the crown, incorporate new sections of hair primarily from the top/front hairline, allowing the hair beneath the braid to remain free for the flowing cascade. Once the braid reaches the occipital bone or center back, gently “pancake” the loops by pulling them outward to achieve that desired thick, airy appearance. The remaining braided tail should then be twisted and pinned into a loose, textured bun or series of intertwined loops, securing the structure softly rather than tightly.
Expert advice dictates that strategic accessorizing is key to elevating this style from everyday elegance to formal couture. The hair vine, typically composed of faux pearls and clear crystal beads, should be nestled precisely where the braid transitions into the coiled bun—this draws the eye to the intricate junction of the style. Further enhance the luminosity and depth by scattering smaller individual pearl or crystal pins throughout the back bun. To ensure this elaborate style maintains its structure through a long event, use a flexible, medium-hold hairspray once all pins are secure, focusing on the coils and curls. For clients with finer hair, a stylist should integrate clip-in extensions (matching the length and color) specifically into the lower half of the hair before curling to achieve the lush volume required for the cascading waves and the thickness of the crown braid, ensuring the style remains impactful from every angle.