Discover 20 stunning manicure ideas that perfectly blend Valentine’s romance (reds, pinks, hearts) with Mardi Gras glamour (purple, green, gold, glitter).
Carnival Queen Two-Tone Manicure: Magenta and Teal Color Blocking
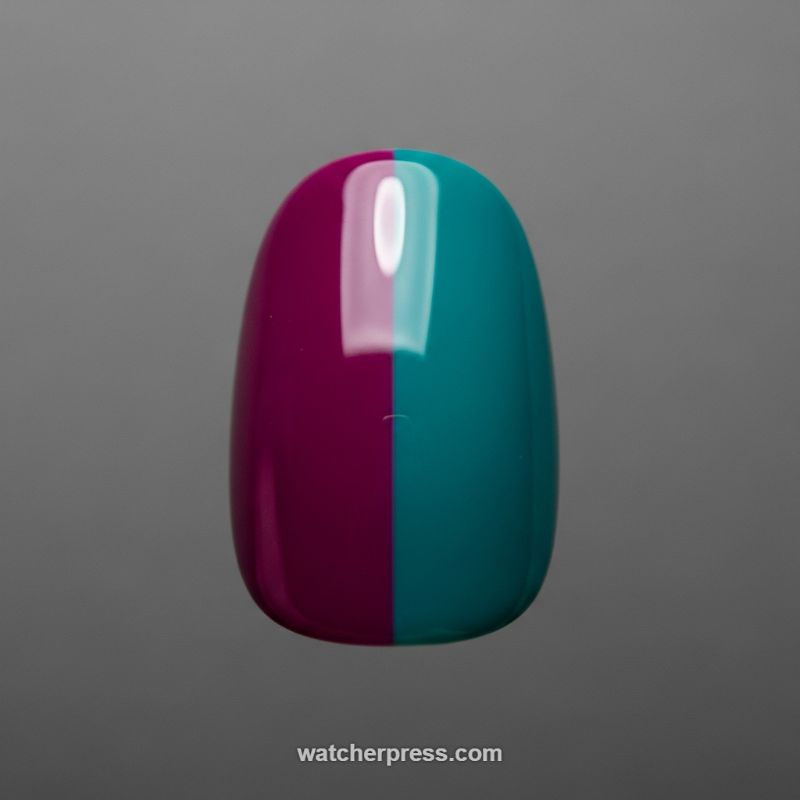
This striking design masterfully fuses the romance of Valentine’s Day with the audacious spirit of Mardi Gras through a high-contrast, vertical split manicure. The visual appeal lies in the meticulous color blocking: a rich, opaque magenta (representing deep passion and romance) sits directly beside a vibrant, jewel-toned teal (a sophisticated nod to the traditional Mardi Gras colors). The extreme precision required for the perfect center line, combined with the intense, glossy finish, elevates this look from a simple duality to a statement of bold glamour. This split decision technique works best on medium to long, rounded nail shapes, such as almond or oval, as the length provides sufficient canvas for the distinct color separation, maximizing the impact of the contrast and the beautiful light reflection visible in the high-shine top coat.
To recreate this impeccable two-tone look, start with a flawless base coat to prevent staining and ensure even adherence. The key to achieving the perfectly straight vertical divide is technique and careful application. First, apply two opaque coats of the deeper magenta polish to the entire left half of the nail, curing or drying thoroughly. Next, apply the vibrant teal polish to the right half, aiming to leave a tiny, unpainted sliver down the center. Do not attempt to meet the colors with the main brush, as this often results in a jagged or messy line. Instead, utilize a very fine, long-bristled striping brush or a square-edged detail brush dipped in either color. Carefully draw the precise border line down the center, filling in any gaps until the colors butt up against each other seamlessly. Work slowly and ensure the brush is wiped nearly dry to prevent flooding the center line and blurring the distinction between the two highly contrasting shades.
For an expert-level finish, focus heavily on the top coat application. Since both colors are highly pigmented and glossy, you need a high-quality, plump top coat—preferably a UV gel formula—to achieve that glass-like reflection and longevity. Apply a generous layer, allowing it to self-level for several seconds before curing to eliminate any minor brush strokes and completely envelop the color divide. As a design variation, consider adding a thin strip of metallic gold or silver glitter polish along the dividing line for extra Mardi Gras sparkle, or applying a matte top coat over the entire design for a modern, velvety texture that still highlights the power of the color contrast. This design is highly adaptable, offering maximum impact for any festive occasion.
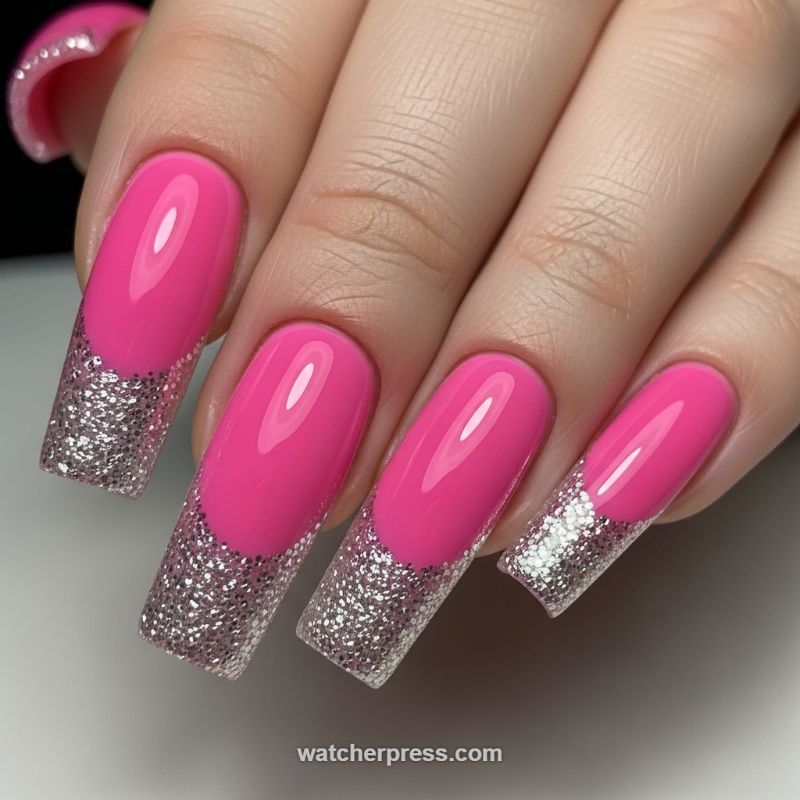
Hot Pink Glamour with a Sweetheart Bow Accent
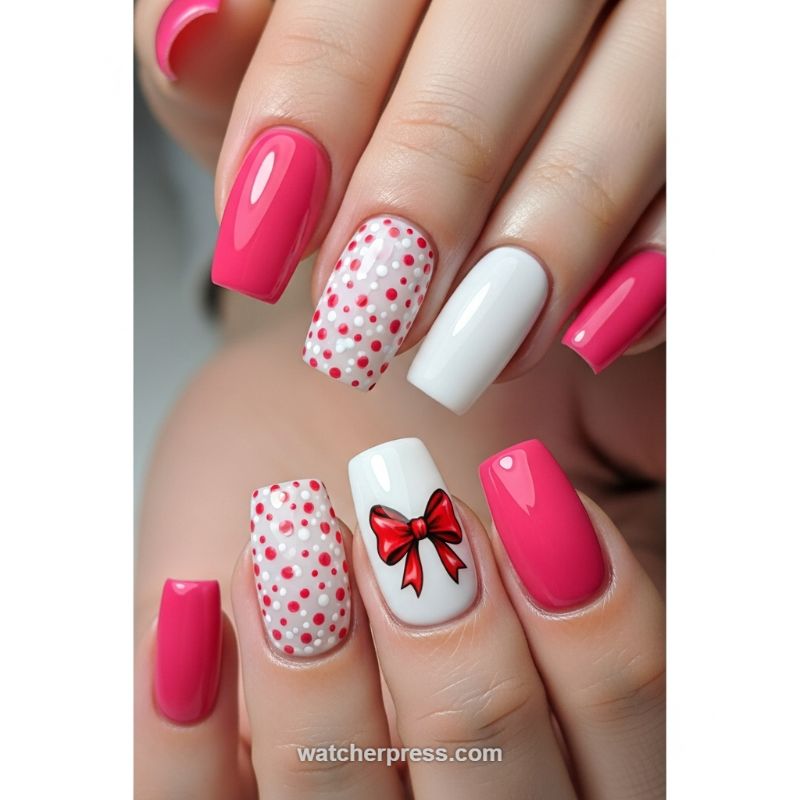
This design perfectly captures the sweet romance of Valentine’s Day while utilizing a hot pink shade vibrant enough for any Mardi Gras celebration. Start by prepping the nails into a sharp square or softly rounded coffin shape, as the length and structure are key to carrying this bold look. The secret to the vibrancy is saturation: apply a high-gloss, opaque magenta gel polish (or a similarly bright fuchsia) to the thumb, pinky, and one alternate nail on the opposing hand. Ensure two thin, evenly cured coats are used for maximum depth and shine. This solid pink provides the necessary “pop” to ground the detailed accent nails and ensures the overall manicure leans toward cheerful glam rather than overly sentimental.
The spotted nail adds subtle, playful dimension, mimicking a delicate sheer fabric. To achieve this layered polka-dot effect, apply a single coat of a milky white or light pink sheer base coat to the chosen accent nail (often the index finger) instead of a solid white. Once cured, use a medium-sized dotting tool to strategically place the larger red dots across the entire surface, aiming for a slightly uneven, organic pattern. After curing the red, switch to a smaller dotting tool and white polish. Overlap some of the red dots slightly and fill in the surrounding negative space with smaller white spots. This careful layering of two different dot sizes and colors creates visual depth, giving the pattern a delicate, almost lace-like texture that contrasts beautifully with the high-gloss solid pink.
Finally, the classic sweetheart bow provides the focal point, placed on a crisp, opaque white base. For a flawless background, apply two coats of pure white polish, ensuring zero streaking. The bow itself can be achieved either with a high-quality, pre-made red nail decal (ensuring it lays completely flat and seamlessly adheres before sealing) or, for advanced artists, hand-painted using a fine liner brush and intensely pigmented red gel paint. Pro tip: adding subtle black outlines around the bow’s edges and defining the folds with white highlights elevates the design from flat decal to dimensional artwork. To finish the entire set, apply a durable, high-shine, non-wipe top coat, carefully capping all free edges to maintain the structural integrity of the long nails and ensure your festive manicure lasts well beyond the holiday weekend.
Matte Emerald and Gothic Spike Accents

The Matte Emerald and Gothic Spike Manicure offers a fierce twist on festive nails, perfectly capturing the drama required for both high-stakes romance and the mysterious allure of a masked Mardi Gras ball. This set features an arresting combination of deep, velvety hunter green and muted slate grey, utilizing the ever-chic stiletto shape for maximum impact. The dominant matte finish lends a luxurious, modern texture, immediately elevating the look beyond standard high-gloss. This specific color palette evokes regal opulence—the deep jewel tones essential for Mardi Gras costume and mask aesthetics—while the sharp, pointed shape and edgy design provide a dramatic silhouette suitable for a bold, anti-romantic Valentine’s statement or a fierce, masked persona. This look is about making a powerful statement through contrast and texture.
Achieving this dramatic look starts with the foundation: the sharp stiletto shape. For longevity and maximum definition, this often requires using strong nail extensions, sculpted polygel, or hard gel, ensuring a smooth, dramatic taper to a clean point. The key to the sophisticated finish lies in the color and texture selection. Select a highly saturated, deep emerald green gel polish and a cool-toned slate grey for the accent nails. After curing the color layers, apply a premium no-wipe matte top coat to the majority of the nails, ensuring complete coverage and a velvety, streak-free finish. Expert tip for a flawless matte result: the texture is unforgiving, so ensure your color application is perfectly smooth and your cuticle prep is immaculate before applying the top coat; any imperfections will be instantly highlighted by the velvety surface.
The defining element of this manicure is the dimensional, black spike and stitch detailing. To achieve the dramatic, raised texture seen on the grey accent nail, you will need a highly pigmented black painting gel or a low-viscosity 3D sculpting gel. Using a fine-tipped striping brush, meticulously paint the jagged spike or Frankenstein-style stitching pattern, varying the size and intensity for visual interest. Because we want a striking textural difference, cure this 3D detail and then either leave it matte black or apply a single, thin coat of glossy top coat just to the black detail, contrasting with the matte base. Notice the strategic variation: one finger uses a glossy emerald green base with black detailing, providing a subtle shift in sheen that breaks up the overall matte aesthetic. This contrast in shape, color, and finish is what elevates this look from simple nail art to high-fashion glamour.
Romantic Marble Waves in Red and Pink
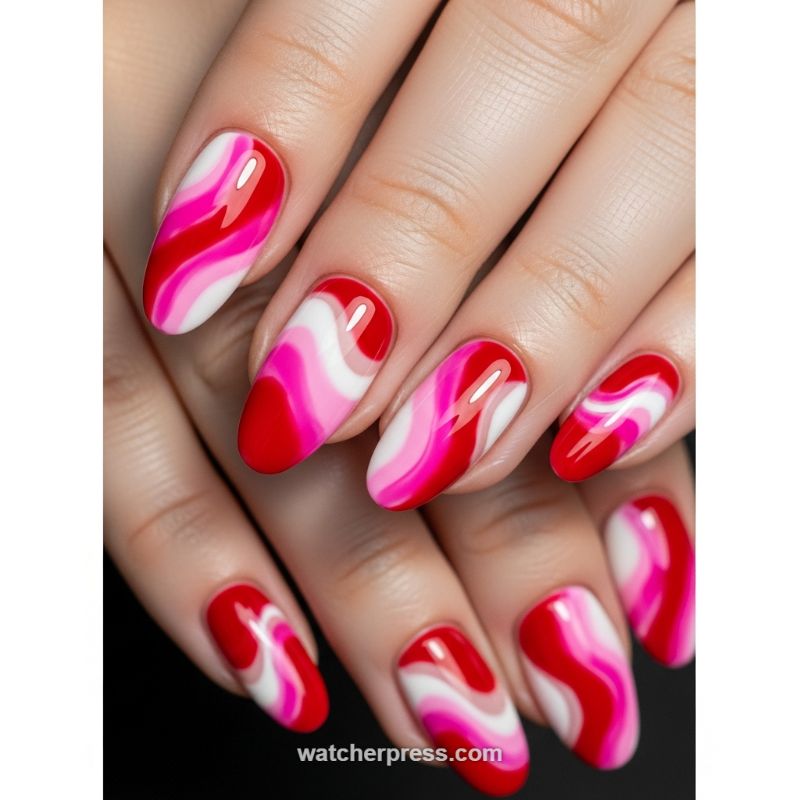
This dynamic nail art design perfectly captures the heart of Valentine’s Romance while delivering the vibrant, high-gloss finish required for Mardi Gras Glamour. The technique utilizes a mesmerizing blend of three intense colors: deep crimson, vibrant fuchsia, and crisp snow white, arranged in fluid, hypnotic waves across an elegant oval or almond nail shape. The visual success lies in allowing the colors to swirl together without completely mixing, maintaining distinct, bold bands that suggest motion and depth. Unlike traditional water marbling, this look is typically achieved using a controlled ‘wet-on-wet’ gel technique, which gives the artist precise control over the flow and saturation, ensuring a professional, high-definition result that pops under party lights. This sophisticated swirl is a stunning alternative to standard hearts or glitter, offering a modern, artistic interpretation of classic festive colors.
To recreate this beautiful marble wave effect, begin by prepping the nail and applying a clear or sheer base coat. The key to achieving the soft diffusion seen here often involves a layer of ‘blooming gel’ applied over a cured base layer, or alternatively, working with thickly pigmented, uncured gel polishes. Apply small, strategic blobs or lines of the three chosen colors (red, pink, and white) sequentially onto the tacky surface of the nail plate. Using a fine-tipped liner brush or a clean dotting tool, gently drag the colors through each other in continuous, sweeping motions, following the desired curve of the wave. Work quickly, as some blooming gels begin spreading immediately. The goal is to blend the edges minimally—just enough to create that watercolor-like transition—while keeping the main body of the color stripes intact. Cure immediately once the desired pattern is achieved to freeze the movement.
For an expert finish that maximizes the Mardi Gras glam factor, the top coat selection is paramount. Apply a thick layer of ultra-glossy, non-wipe top coat, ensuring it smooths out any minor texture from the swirling process and encapsulates the vibrant pigments entirely. This high-sheen finish dramatically increases the luxurious appearance and longevity of the manicure. Expert advice suggests varying the ratio of colors on different nails; for instance, giving one nail a solid red base with white and pink swirls on top, and another an even distribution of all three colors from edge to edge. Furthermore, keeping the shape consistently oval or almond highlights the vertical flow of the waves, making the nail appear longer and the design more fluid and elegant. This design is robust enough to last through any festive celebration while maintaining its chic, romantic appeal.
Matte Aubergine Masquerade
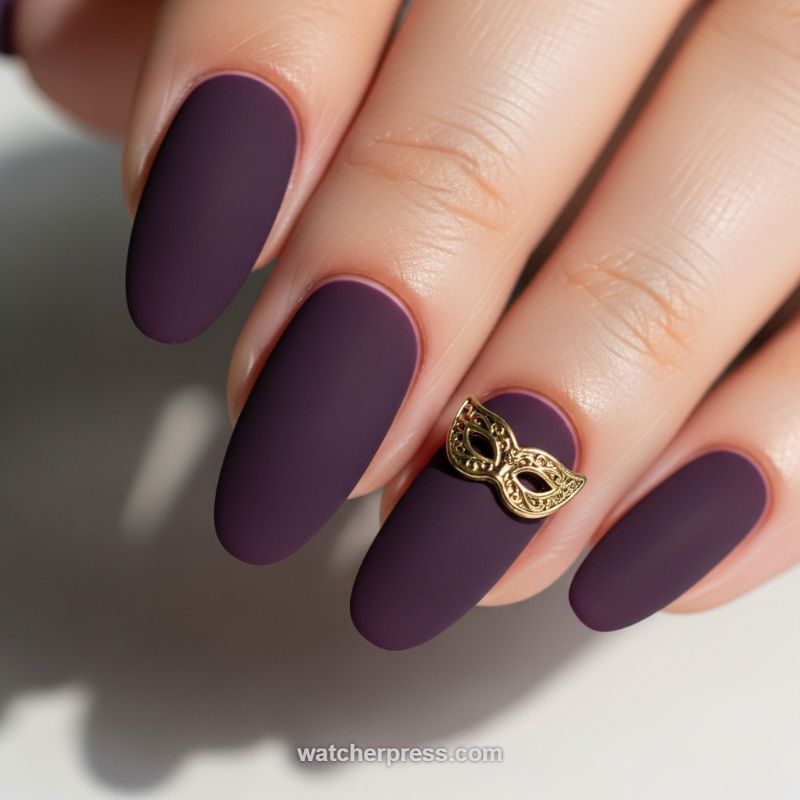
This dramatic manicure perfectly encapsulates mystery and luxury, bridging the gap between Valentine’s intensity and Mardi Gras opulence. The foundation is a rich, deep aubergine or plum shade applied with a velvety matte topcoat. To achieve this high-end finish, ensure thorough preparation: file the natural nail surface lightly before applying a quality base coat, followed by two smooth, opaque coats of the dark polish. The matte finish instantly elevates the color, turning a standard purple into a sophisticated, almost velvet texture. When applying the matte topcoat, work quickly and evenly, ensuring complete coverage over the entire nail to prevent streaks or shiny spots, which can ruin the desired effect. This deep jewel tone speaks of passion and royalty, making it an ideal choice for a celebratory event and offering a modern, sophisticated take on traditional holiday colors.
The centerpiece of this design is the intricate gold masquerade mask charm, strategically placed near the cuticle of the accent nail—typically the ring or middle finger. This 3D metallic element is the definitive nod to the Mardi Gras theme, suggesting a Venetian romance or hidden identity. Securing a charm of this size requires more than standard topcoat; for professional longevity, use a small dab of clear nail art resin or a thick gel builder applied directly to the nail surface where the charm will rest. Press the charm gently into the adhesive and cure (if using gel) or allow to set completely. Expert tip: outline the base of the charm with a tiny amount of non-wipe topcoat using a fine liner brush and cure again. This small detail seals the edges, preventing snagging and ensuring the charm remains firmly in place through all the revelry and dancing.
While the deep matte color dominates the look, proper maintenance is crucial for sustaining the velvety texture. Matte polishes can quickly become shiny if exposed to heavy hand creams or cuticle oils. Advise clients to apply these products only to the surrounding skin, avoiding the nail surface itself, or to wait until the next day after the manicure is fully cured. For those seeking variations on this theme, this look is equally stunning using other deep jewel tones, such as matte emerald green or sapphire blue, maintaining the gold charm for a consistent Mardi Gras motif. The overall long, almond shape keeps the design graceful and prevents the dark color from appearing too heavy or blunt, providing a feminine and elongated canvas that perfectly complements the dramatic gold detailing.
Majestic Mardi Gras Coffin Nails: Regal Purple, Emerald Green, and Gold Diagonals
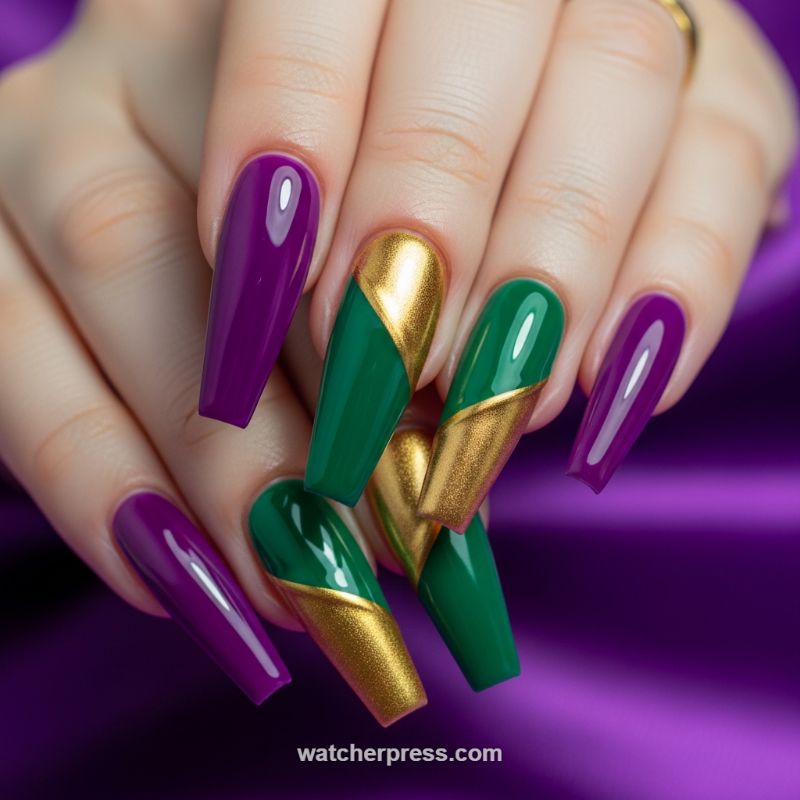
This dramatic manicure perfectly captures the spirit of both Mardi Gras and high-end glamour, making it an ideal choice for any formal event blending romance and festivity. The design employs the three essential colors of Carnival—Purple (Justice), Green (Faith), and Gold (Power)—on an extremely trendy canvas: the long, sculpted coffin shape. The key to its sophistication lies in the intentional color placement: solid, saturated purple nails provide a rich contrast and grounding element, while the remaining nails feature a bold, diagonal color block combining deep emerald green and highly reflective metallic gold. The high-gloss finish is crucial, allowing the light to bounce off the intense pigments, elevating what could be a simple tri-color scheme into a luxurious, jewel-toned statement that suggests confidence and opulence. This is a look for those who favor length and aren’t afraid of striking, perfectly balanced maximalism.
To recreate this stunning diagonal color-block effect, precision is paramount. Begin by preparing the natural or acrylic nails and applying a base layer of highly pigmented gel polish in either the green or the gold shade, ensuring full coverage and curing completely. Once the base is perfectly dry, the secret to a razor-sharp division is the use of thin striping tape or a specialized vinyl stencil, applied diagonally across the center of the nail plate. Press the tape firmly, ensuring the edge is completely sealed to prevent any polish bleed. Now, apply the contrasting color (for this look, the metallic gold often looks best applied second for maximum pop) to the exposed side of the nail. When working with the gold, an expert technique involves gently rubbing chrome powder over a sticky, uncured layer of clear gel, rather than simply brushing on a metallic lacquer; this yields the intense, mirror-like finish seen in the image. Crucially, remove the striping tape immediately while the topcoat is still slightly wet or tacky. This prevents chipping the polish line and ensures the cleanest possible separation between the two tones.
Finishing and longevity are vital for such a dramatic, high-impact manicure. Once the color blocks are cured and the lines are crisp, apply a premium, non-wipe high-gloss top coat to seal the entire design, paying special attention to capping the free edge to prevent premature wear. Given the use of such deep, saturated colors, selecting high-quality, highly opaque polishes is essential for achieving true color payoff in just one or two coats. For those finding the coffin shape too long, this design scales down beautifully onto a shorter almond or square shape, though the visual impact is maximized on a longer canvas. This look is inherently glamorous and pairs best with minimalistic gold jewelry, allowing the nails themselves to remain the primary focal point of the ensemble, perfect for a grand Mardi Gras ball or an extravagantly romantic evening.
Golden Carnival French Manicure with Purple and Green Gemstone Border
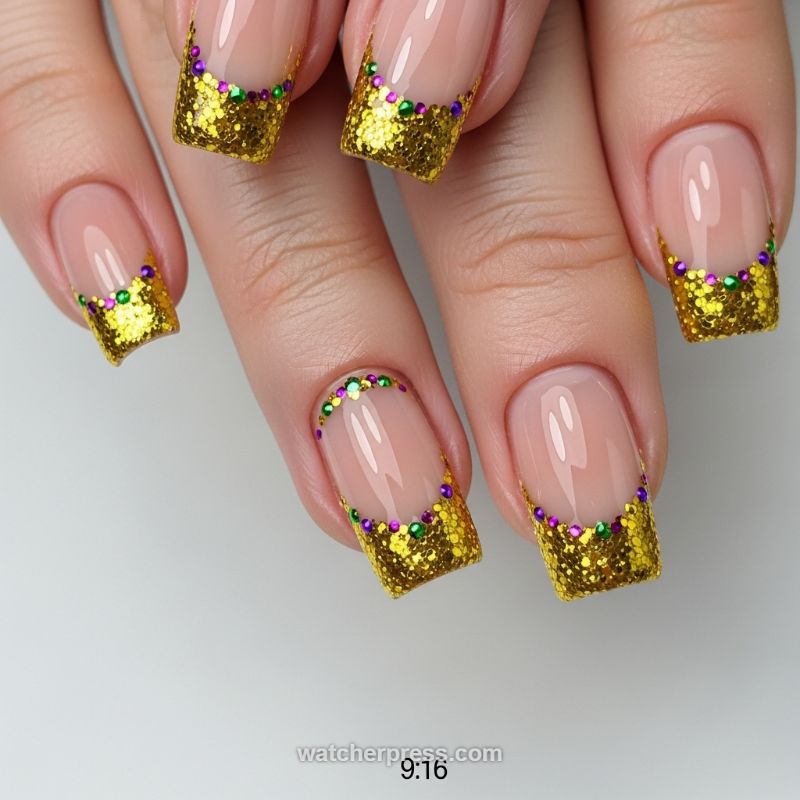
This dazzling design elevates the classic French manicure into a stunning expression of Mardi Gras extravagance. It features a sophisticated nude or sheer pink base, providing a clean canvas that beautifully contrasts with the vibrant, fully opaque tips. The defining feature is the high-density gold glitter used for the French tip, creating a sparkling effect reminiscent of doubloons and masquerade masks. Crucially, the smile line separating the nude base from the glitter is meticulously outlined with tiny embellishments—alternating purple and emerald green microbeads or miniature rhinestones. This detail instantly ties the look into the traditional colors of the Carnival (purple for justice, green for faith, gold for power), offering a festive yet highly refined aesthetic perfect for celebrating events like Valentine’s Day mingling with Carnival season festivities. The combination of high shine and texture makes this a show-stopping look that is surprisingly elegant despite its inherent glamour.
To replicate this polished manicure, start with two thin coats of a sheer nude or milky pink gel polish to mimic a healthy natural nail bed. The gold tip requires careful execution; for maximum saturation and texture, use a highly pigmented, fine-to-chunky gold glitter polish or a fine glitter powder mixed directly into clear builder gel. Achieving the perfect crisp line is paramount: use a curved stencil, a silicone nail shaper, or a thin liner brush dipped in cleanser (if using gel) to wipe away the excess and define a clean, deep ‘smile line’. Apply two layers of the glitter polish or gel to ensure complete opacity at the free edge, ensuring no nude color peeks through the sparkle. Expert tip: Cure or dry the gold tip fully and apply a very thin topcoat layer to smooth the glitter texture before moving on to the gem placement; this creates a level surface that prevents the beads from sliding down or getting lost in the texture.
The precise placement of the microbeads is the key to achieving this manicure’s couture finish. Utilize a dotting tool or a wax-tipped pencil to pick up and place the miniature purple and green gems along the border of the French tip. It is imperative to embed these stones in a medium that offers substantial hold—a thin, strategic layer of specialized rhinestone glue, or a small bead of non-acidic builder gel, works best. Maintain a strict alternating color pattern (green, purple, green, purple) right across the curve of the smile line for maximum visual impact and adherence to the Mardi Gras theme. Once all embellishments are securely placed and cured, apply a robust, non-wipe top coat. When applying the top coat, carefully float it over the nude base and the edges of the gold tip, but avoid completely covering the centers of the microbeads, as this dulls their individual sparkle. However, ensure the bases of the gems are fully encapsulated to prevent snagging and guarantee this glamorous manicure lasts through all the festivities.
Regal Velvet and Gilded Tiger Stripes
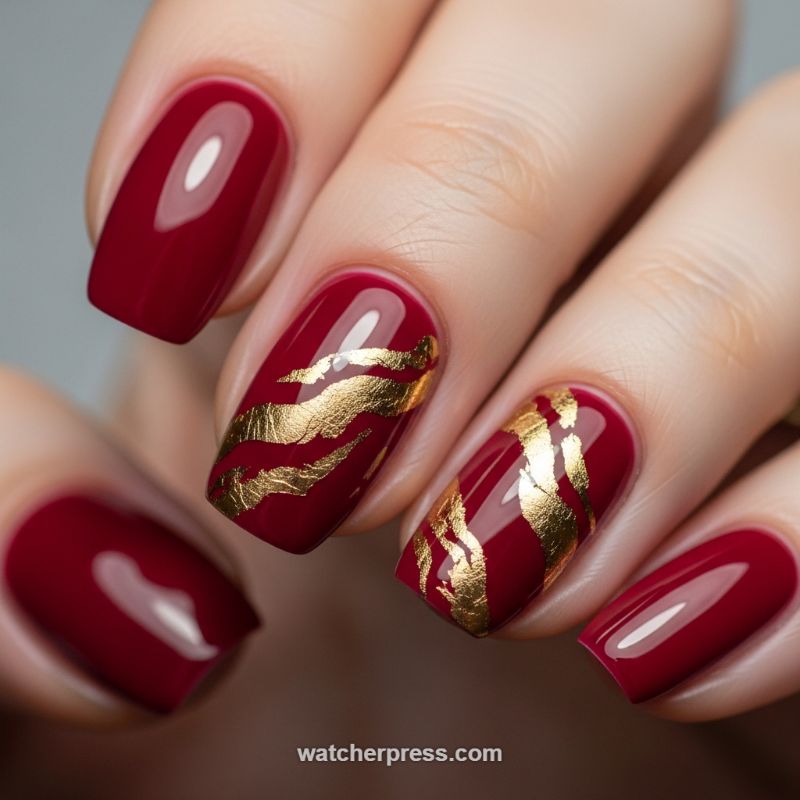
This stunning manicure serves as the ultimate bridge between romantic elegance and high-octane glamour, making it ideal for both Valentine’s Day and the peak of Carnival season. The foundation is a rich, high-gloss crimson or deep burgundy—a classic color symbolizing passion and luxury. This deep base provides a sophisticated, romantic canvas, while the opulent gold accents elevate the look to true masquerade-ready status. The genius of this design lies in its strategic use of accent nails: four fingers maintain the flawless, glossy red, anchoring the design in timeless style, while the middle and ring fingers become dynamic focal points. The gold application is abstract and textured, resembling fluid, stylized tiger stripes or molten metal cascading across the nail bed, lending a captivating sense of movement and drama. This style is inherently luxe and ensures your hands steal the show, whether you’re holding a glass of champagne or tossing Mardi Gras beads.
To recreate this gilded masterpiece, you will primarily need a dark, highly pigmented red polish and quality nail transfer foil or gold leaf. Start by prepping your nails and applying two smooth, opaque coats of your chosen base color, ensuring each coat is fully dry. Once the color is set, apply a specialized foil adhesive (often called ‘transfer foil glue’) to the accent nails. Instead of covering the entire nail, brush the adhesive on in thick, wavy stripes that run diagonally across the nail. The key to achieving this specific, slightly ragged texture is to use an uneven hand, allowing the strips to be broken and varied in thickness. Wait patiently for the adhesive to cure; it typically turns clear and becomes extremely tacky when ready. Next, carefully press a sheet of gold transfer foil (shiny side up) onto the tacky areas. Press down firmly with a cotton swab or a silicone tool across the entire design, then quickly rip the foil sheet away. The gold will only adhere to the glued sections, creating the desirable, imperfectly textured, gilded effect seen in this design.
For a top-tier finish, the sealing process is critical, as foil can be prone to premature wear, especially at the tips and sides. After the gold transfer is complete, apply a layer of clear builder gel or a specialized foil top coat to encapsulate the delicate leaf and smooth out its texture, adding structural integrity. Follow this with a final, high-shine gel top coat to maximize the glossy, deep reflection. Expert tip: The slightly haphazard, abstract nature of the gold pattern is what makes this design look so expensive—avoid making the stripes too uniform or neat. The contrast between the perfect, glossy red base and the intentionally fragmented gold overlay creates the rich dimension. This manicure pairs perfectly with weighty, antique gold jewelry, and its rich color palette ensures it complements virtually any evening attire, transitioning effortlessly from a romantic dinner setting to a dazzling ballroom.
Royal Velvet and Gilded Glamour
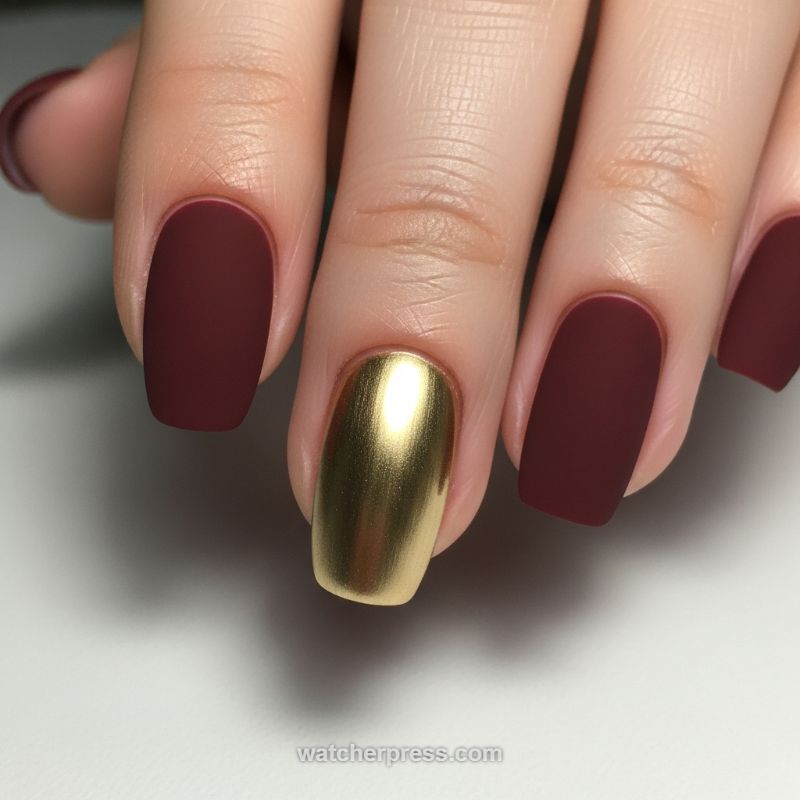
This sophisticated manicure perfectly captures the essence of luxury, bridging the passionate romance of Valentine’s Day with the regal opulence of Mardi Gras. The primary visual element is the stunning contrast between texture and finish: deep, matte burgundy (often called oxblood or maroon) coats most nails, providing a rich, velvety backdrop, while a single accent nail boasts a high-shine, highly reflective metallic gold finish. This deep, jewel-toned red signifies eternal love and passion, making it ideal for a romantic setting. Simultaneously, the brilliant gold chrome reflects the masks, coins, and elaborate decorations associated with New Orleans’ grandest celebration. To achieve this look, start by shaping the nails into a neat square or ‘squoval’ shape, which offers a modern canvas for the contrasting colors. Ensure the application of the base color is flawless, utilizing two thin coats of the burgundy shade, followed by a high-quality matte top coat to achieve that desirable, non-reflective, velvety appearance.
The true secret to the Gilded Glamour accent nail lies in achieving that intense, mirror-like chrome finish. Unlike standard metallic polishes, this requires a specific technique. After curing your base coat, apply a black or coordinating color gel polish (maroon works well under gold to deepen the tone) and cure it. Crucially, apply a ‘no-wipe’ top coat and cure it just enough that it is tacky but not fully set, or follow the instructions for your specific chrome powder. Then, use a foam eyeshadow applicator or a silicone tool to vigorously buff fine gold chrome powder onto the nail surface until it transforms into a liquid metal effect. Ensure the powder is fully sealed, paying extra attention to wrapping the free edge, as chrome polishes are prone to chipping if not properly encased. This accent nail should ideally be placed on the ring finger or middle finger to maximize its visual impact, drawing the eye instantly to the contrast.
For expert maintenance, be aware that matte finishes can attract oil and dust, dulling their velvet effect. Advise clients to clean their matte nails gently with rubbing alcohol on a lint-free wipe if they become shiny from hand creams or cooking oils. Due to the high visibility of the accent nail, apply a second layer of top coat (standard glossy) specifically over the gold chrome to ensure its longevity and mirror shine lasts the full two weeks. This look is universally flattering, though the depth of the burgundy shines beautifully against lighter skin tones, while the powerful gold complements warmer undertones. For customization, if you lean heavier toward the Mardi Gras theme, substitute the burgundy matte for a deep, matte emerald green or royal purple while maintaining the stunning gold accent.
Matte Merlot Elegance: The Geometric V-Cut Accent
This sophisticated manicure perfectly captures the intersection of deep romance and contemporary glamour, making it an ideal choice for blending Valentine’s warmth with Mardi Gras intensity. The foundation of this look is a rich, matte merlot or deep burgundy polish, applied to long, structured coffin or ballerina-shaped nails. The velvety matte texture instantly elevates the color, providing a luxurious, high-end feel that standard glossy finishes simply cannot match. To achieve this depth, ensure two solid coats of high-pigment burgundy are applied, followed immediately by a dedicated matte top coat. Expert tip: Matte finishes are unforgiving; prep the nails meticulously, paying special attention to pushing back and tidying the cuticles, as the lack of shine tends to highlight any uneven application or dry skin. This foundational color alone speaks to a passionate, romantic aesthetic, while the modern shape ensures a bold, glamorous statement.
The artistry centers on the isolated accent nail, typically the ring finger, which acts as a canvas for striking geometric contrast. To recreate this design, start with a solid, opaque coat of nude or blush pink polish on the accent nail. Once dry, utilize thin striping tape or a fine liner brush (size 000) to carefully block out the geometric sections. The design features a deep, inverted V-shape (or triangle) near the cuticle, filled in with the main matte merlot color. This darker section is sharply delineated by thin, crisp black lines that radiate outwards. The upper portion of the nail remains nude, dramatically split by a clean, vertical line of bright white polish running down the center, providing a stark, minimalist contrast against the soft base. Precision is crucial here; allow each layer of liner paint (black and white) to cure or dry completely before removing any taping to ensure the lines remain razor-sharp. If using a gel system, use a non-wipe matte top coat over the entire finished design for a uniform texture.
This design masterfully uses color and geometry to serve both holiday themes. The deep burgundy base anchors the look in traditional Valentine’s romance and sensuality, while the architectural nude accent nail brings the necessary modern edge and visual excitement required for Mardi Gras celebrations. For those looking to lean further into Mardi Gras opulence, consider swapping the white vertical stripe on the accent nail for a thin line of metallic gold or silver chrome polish; this small change adds an immediate celebratory sparkle without compromising the overall sophistication of the matte finish. The cohesion between the full coverage matte nails and the highly detailed accent creates a balanced manicure that is dramatic enough for a masquerade ball yet refined enough for a romantic dinner, proving that high contrast and rich textures are the ultimate keys to successful transitional holiday nail art.
The Glazed Pink Stiletto: Magnetic Mauve for Romantic Glamour
This manicure perfectly captures the essence of both Valentine’s romance and Mardi Gras glamour by marrying a deep, romantic mauve-pink base with an intense, silvery magnetic shimmer. The key element here is the ‘cat-eye’ effect, which utilizes micro-metallic particles in the polish to create a striking, vertical beam of light, giving the nails a three-dimensional, almost holographic quality. Set on a long, gracefully tapered almond or stiletto shape, the look is inherently luxurious and dramatic—ideal for a celebratory occasion. The high-shine, reflective stripe serves as the ultimate piece of subtle statement art, ensuring it transitions effortlessly from an intimate date night to a lavish, glittering masquerade ball. The muted rose tone prevents the look from becoming overly flashy, grounding the high-shine finish in sophisticated femininity.
To replicate this high-impact, reflective finish, you must utilize specialized magnetic gel polish. Start by prepping the nails and applying a cured base coat. Apply the first thin coat of the chosen mauve magnetic polish and cure thoroughly. The magic happens during the second, slightly thicker coat: immediately after applying the polish (before curing), take a powerful nail art magnet and hold it diagonally or vertically over the wet polish surface for 10–15 seconds without touching it. The magnetic force pulls the internal iron filings to create the concentrated, singular stripe seen in the image. Immediately cure the polish to lock the design in place. For maximum durability and brilliant shine, finish the entire look with a high-gloss, non-wipe top coat. Expert tip: The strength and precise placement of your magnet dictate the final look; practice holding it steadily and close enough to the nail surface to maximize particle concentration and achieve that sharp, clean line.
This particular look offers a sophisticated update to the highly popular ‘glazed donut’ aesthetic by leveraging deeply pigmented metallic color instead of sheer chrome powder. For a flawless result, ensure your cuticle work is meticulous, as the extreme high-gloss finish will draw attention to the entire nail bed. To truly elevate this blend of romance and revelry, pair these dramatic nails with delicate gold midi rings or a subtle diamond band—the jewelry will beautifully reflect the magnetic stripe and intensify the sparkle. For outfit styling, consider integrating the mauve hue into your ensemble via a silk blouse or velvet clutch, offsetting the intensity of the nails with soft textures that emphasize the romantic side of Valentine’s Day. This manicure is not merely a coat of color; it is a statement accessory designed for maximum visual intrigue under party lighting.
Dramatic V-Tip French Manicure with Micro Hearts
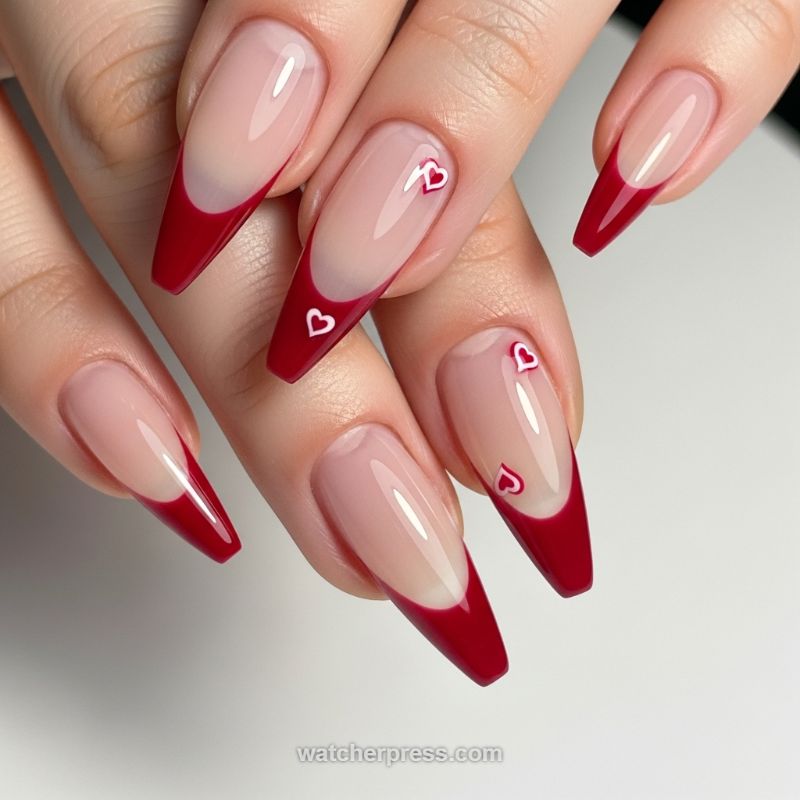
This design takes the timeless elegance of the French manicure and infuses it with high drama, making it perfect for both Valentine’s Day date nights and the opulent atmosphere of Mardi Gras. The canvas is a long, highly structured nail shape, typically a sleek coffin or ballerina, maximizing the impact of the design. Instead of the traditional soft white, the tips are rendered in a rich, highly pigmented crimson or blood-red gel polish. Crucially, the smile line isn’t a gentle curve; it plunges into a sharp, deep ‘V’ or ‘Chevron’ shape. This geometric edge provides a modern, glamorous twist that elevates the look beyond simple romance, fitting perfectly with the maximalist aesthetic of carnival season. The base color is kept neutral—a milky pink or sheer nude—to allow the bold red tips and delicate white heart accents to truly pop.
Achieving this ultra-crisp V-tip requires precision and the right tools. Begin with a foundation of a milky pink or sheer nude builder gel to provide strength and that polished, natural base look; cure this foundation fully. To create the deep V, use a fine-tip liner brush (or striping brush) loaded sparingly with the opaque red polish. Instead of attempting to paint the entire tip at once, map out the deepest point in the center first, then use two separate, steady strokes, angling steeply toward the sidewalls, to connect the point to the edges of the nail. For flawless symmetry, ensure both angled lines meet the center point sharply before filling in the rest of the red tip color. Once the red is fully cured, the romantic element—the micro heart decals—is added. Apply these thin, white heart stickers or carefully drawn outlines (using white gel polish and a tiny dotting tool) sparingly to the accent nails, placing them strategically near the V-line boundary for visual balance without cluttering the sophisticated design.
The final step is critical for achieving that high-gloss, almost liquid shine essential for glamour looks. Apply a thick, non-wipe top coat over the entire nail, paying special attention to capping the free edge to fully seal the design and prevent premature chipping, especially necessary given the extended length of these enhancements. Expert tip: Due to the high contrast between the nude base and the deep red tip, imperfections in the V-line are easily visible. Before applying the top coat, meticulously clean up any bleeding edges around the cuticle or sidewalls using a wooden stick dipped in cleanser. For maintenance, recommend daily cuticle oil application to keep the natural nail bed healthy, and advise clients that this dramatic, high-impact design benefits greatly from professional fill appointments every three weeks to preserve the sharp structural shape and deep color integrity.
Sweetheart Pink and Scattered Romance Accent Nails
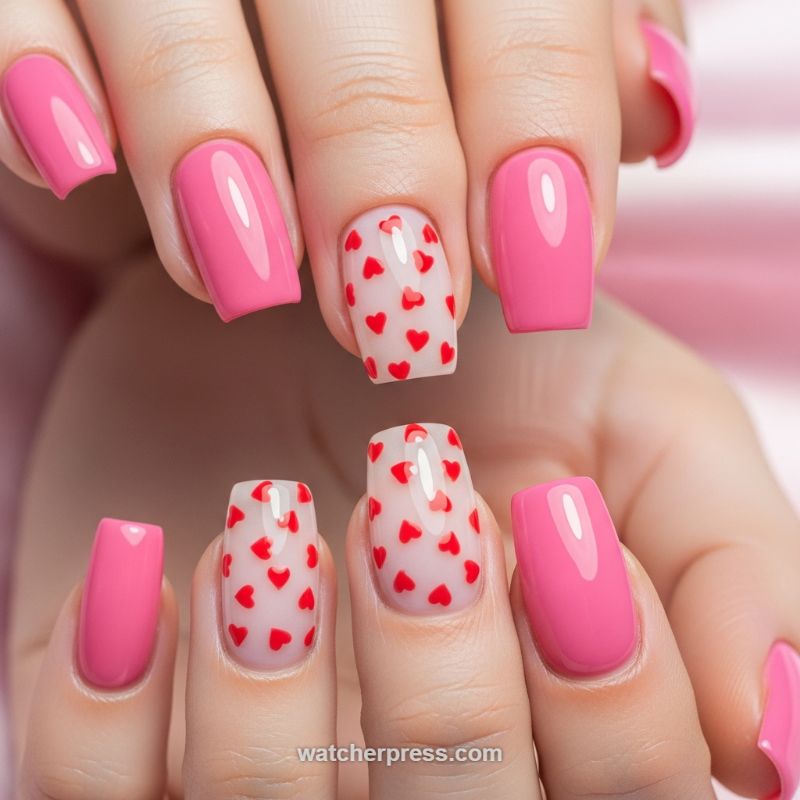
This manicure expertly blends classic Valentine’s romance with a pop of vibrant color, offering a dazzling finish suitable for any festive occasion. The core appeal lies in the strategic use of contrasting finishes: high-gloss, solid hot pink serves as a bold foundation, while accent nails feature delicate red hearts scattered across a soft, milky sheer nude base. To recreate this look, begin by shaping your nails into a uniform soft square or squoval shape. Apply a high-quality base coat to all nails. Next, select your dominant color—a highly pigmented, vibrant fuchsia or bubblegum pink gel polish—and apply two coats to four fingers on each hand (excluding the accent nail fingers, typically the middle or ring finger). Ensure each coat is cured properly and that the edges are fully sealed for a long-lasting, immaculate finish.
For the romantic accent nails, you will first apply two thin coats of a sheer, milky white or translucent nude polish; this softens the look and provides the ideal canvas for the heart design. Once the base is cured, use a highly pigmented red gel polish for the hearts. Precision is paramount here: you can use pre-made red heart decals for perfect uniformity and speed, or master the freehand technique using a small dotting tool and a fine detail brush. To paint the hearts, place two adjacent dots of red polish, then swiftly drag the tip of the detail brush downward from the center V-point to form the tapered bottom. Scatter the hearts across the nail randomly, ensuring some are intentionally placed along the edges to give the illusion that the pattern extends beyond the nail plate—a professional detailing trick. Vary the size slightly for a more organic, playful look.
To elevate this romantic look for Mardi Gras glamour, focus on the top coat and optional embellishments. Apply a thick layer of high-shine, non-wipe gel top coat over all nails, paying extra attention to encapsulating the heart decals or painted art to protect them from wear. The intense shine immediately transforms the manicure into a luxurious accessory. Expert tip: for a subtle nod to carnival extravagance, you can substitute the red hearts with a metallic rose-gold or fine glitter magenta polish, or add a single micro-sized champagne or emerald rhinestone near the cuticle of the solid pink nails. The contrast between the bold, saturated pink and the delicate, glossy heart pattern ensures this design is both sweet enough for Valentine’s Day and sophisticated enough to blend seamlessly with the vibrant atmosphere of Mardi Gras celebrations.
Fuchsia French Tips with Mardi Gras Glitter Glam
This breathtaking manicure perfectly captures the essence of both Valentine’s Day romance and Mardi Gras extravagance by fusing a bold, vibrant base with a high-impact metallic tip. To replicate this glamorous look, begin with meticulous nail preparation, ensuring the chosen shape—a long, structured square or gentle coffin—is clean and consistent across all fingers. The foundation requires a deeply pigmented, hot pink or fuchsia gel polish. Apply the color in two to three thin, precise coats, ensuring each layer is fully cured to maximize opacity and prevent wrinkling. The vibrant solid color should be brought down approximately two-thirds of the nail bed, leaving the remaining free edge bare or covered with a clear tacky layer, which will serve as the canvas for the glitter application. Maintaining a pristine cuticle line and a smooth, reflective surface on the pink section is vital, as this contrast highlights the precision of the ensuing French tip.
The dramatic feature is the deep French tip executed entirely in dense silver glitter. For this level of full coverage, standard glitter polish will not suffice; instead, professional-grade loose silver holographic glitter or heavily concentrated sculpting gel glitter must be used. To ensure a razor-sharp smile line—the dividing curve between the pink and the silver—apply a thin layer of clear builder gel or a specialty glitter adhesive only to the exposed tip area. Using a specialized silicone tool or a soft-bristled brush, carefully press or sprinkle the glitter mix onto the sticky base until the tip achieves complete, opaque coverage. Before curing, take a fine liner brush dipped in alcohol or cleanser and gently refine the curve of the smile line, removing any stray glitter particles to achieve a crisp separation. The deep sweep of the curve here is exaggerated, which elevates this design beyond a classic French, giving it the necessary flair for a festive, celebratory look.
Encapsulation is the crucial final step for this highly textured design. Because chunky glitter can be prone to chipping and snagging, apply a medium-viscosity clear builder gel or a high-density sealing top coat directly over the glitter tip. This step smooths the surface, locks the glitter securely in place, and prevents the rough edges from damaging the finished seal. Cure this encapsulating layer thoroughly, then apply a final coat of a high-shine, non-wipe top coat over the entire nail, making sure to properly ‘cap’ the free edge to prevent premature wear. This technique not only ensures maximum longevity—essential for any celebratory season—but also provides the wet, glass-like finish that enhances the reflective properties of the hot pink base and the dazzling silver glitter, making this manicure the ultimate statement piece for blending passionate romance with glittering revelry.
Mardi Gras Mystique: Shifting Chrome Jewel Tones
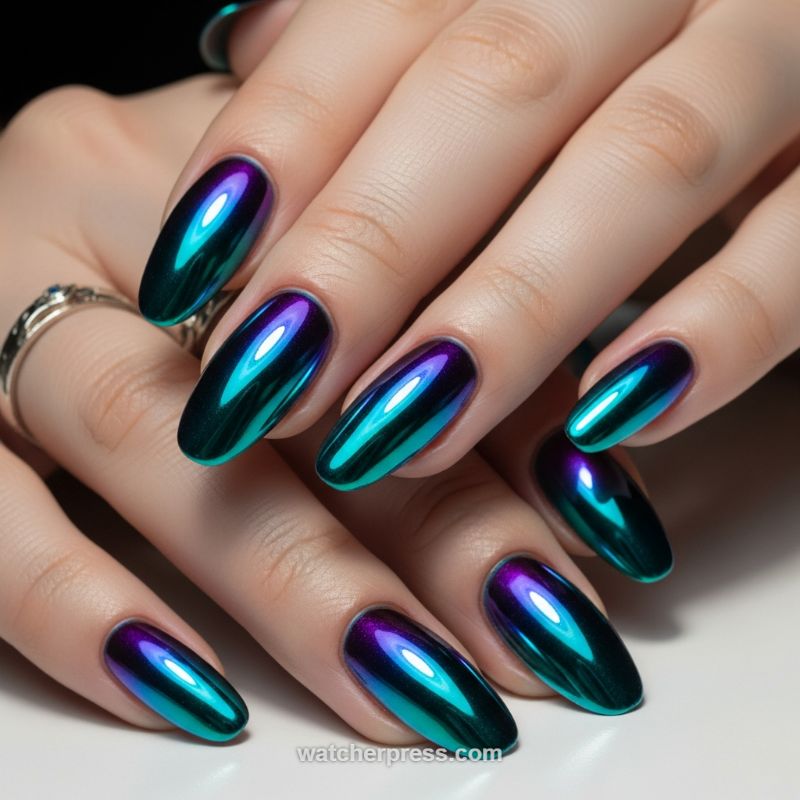
These mesmerizing nails perfectly bridge the celebratory extravagance of Mardi Gras with the deep romanticism of Valentine’s Day by harnessing the power of multi-chrome pigment. This look features a seamless color shift, moving dramatically from a deep, regal purple and magenta hue into a vibrant, electric teal and emerald green, embodying the traditional Mardi Gras palette of Justice (Purple) and Faith (Green) with an intensely modern, metallic finish. The high-gloss, liquid-metal effect is achieved using ultra-fine chrome powder rubbed over a dark gel base coat, which maximizes the visual contrast and makes the color shift appear almost hyper-dimensional. The smooth, elongated almond shape of the nail provides the perfect canvas for showcasing this optical illusion, allowing light to cascade across the surface and fully display the dynamic color transformation.
Achieving this flawless mirror finish requires precise execution of the gel application process. Start by prepping the nail and applying a black gel polish base coat (or a very deep coordinating shade) to ensure the chrome pigment has maximum vibrancy. After curing the base color, the most critical step is the application of the non-wipe gel top coat. This coat should be cured for a specific, often slightly reduced time (e.g., 30 seconds under an LED lamp) to leave a perfectly smooth, slightly receptive layer without being fully cured or tacky to the touch. Immediately upon removal from the lamp, use a dedicated silicone brush or sponge applicator to firmly rub the multi-chrome powder onto the nail surface. Use smooth, rapid, back-and-forth motions until the light-catching mirror effect “blooms” across the entire surface. Expert technique dictates rubbing the product gently but quickly to generate the heat needed for a seamless bond.
To ensure longevity and maintain this high-end aesthetic, the chrome finish must be meticulously sealed. After gently dusting off any excess pigment using a soft cosmetic brush, run a small amount of non-acid primer or bonder just around the free edge of the nail—this helps prevent immediate chipping at the tip. Then, encapsulate the entire design with two separate layers of a durable, non-wipe gel top coat, curing each layer fully according to the manufacturer’s instructions. Applying a second layer is non-negotiable for chrome powder manicures, as the micro-fine particles are prone to detachment. This double encapsulation technique ensures the stunning, high-definition mirror effect remains pristine and reflective throughout your entire celebratory season, allowing the jewel-tone mystique to shine whether you’re at a formal Valentine’s dinner or catching beads at a parade.
The Elegant Minimalist Heart Manicure
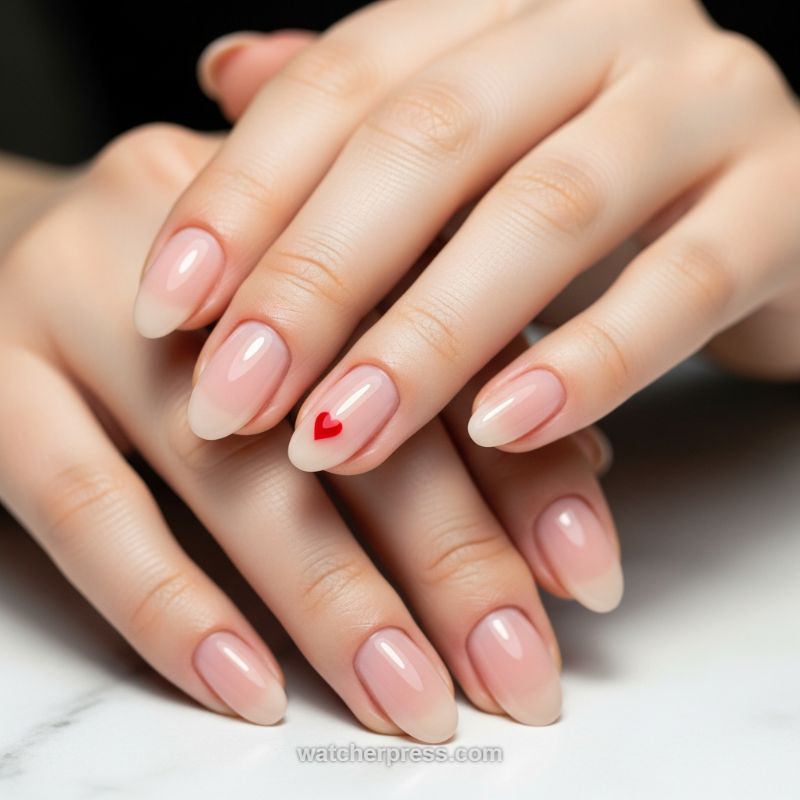
This manicure idea masterfully captures subtle romance through simplicity, offering a sophisticated counterpoint to the season’s typical maximalism. Achieving this look begins with meticulous nail preparation, which is crucial for maximizing the ‘clean girl’ aesthetic. Start by shaping the nails into a perfect oval or soft almond, ensuring smooth edges and uniform length. The base is the most important element: select a sheer, milky pink or nude polish (often referred to as a ‘jelly’ polish or a sheer builder gel) that mimics the natural color of the nail bed while adding a glossy, blurring effect. Apply 2-3 thin, even coats of this base color, allowing complete drying or curing between layers to build a soft gradient, where the natural white tip subtly shows through the sheer overlay. This technique creates a ‘My Nails But Better’ finish that is polished, healthy-looking, and timelessly elegant.
The defining feature is the singular, perfectly placed red heart accent. This step requires precision and the right tools. Once the base layers are completely dry, use a highly pigmented, saturated true red polish. For the heart design, a fine-tipped detail brush or a small dotting tool is necessary. If using a dotting tool, create two small, adjacent dots, then use the fine brush to drag the polish down slightly from the center of the dots to form the point of the heart. Expert tip: keep the heart small and centered near the middle of the nail plate on the ring finger—this specific placement is key to maintaining the minimalist and chic appeal, preventing the design from looking too busy or childish. If you wish to subtly incorporate a Mardi Gras touch without disrupting the elegance, choose a topcoat that features a very fine, almost invisible gold shimmer, adding depth and dimension without compromising the simplicity of the red accent.
To lock in this sophisticated design and ensure maximum longevity (especially vital for a look that should last past Valentine’s Day and into Mardi Gras festivities), apply a high-gloss, non-wipe top coat. Be generous with the top coat application over the heart design to fully encapsulate it and prevent chipping or smudging. For maintenance, regularly apply cuticle oil to the surrounding skin to keep the base looking fresh and glossy. This manicure pairs beautifully with delicate jewelry, such as stacking rings or thin gold bands, allowing the single red heart to remain the undisputed focal point. It is the ideal design for those who value classic beauty over bold statements, offering a whispered promise of romance and refinement.
Regal Gemstone Marble Manicure (Mardi Gras Malachite)
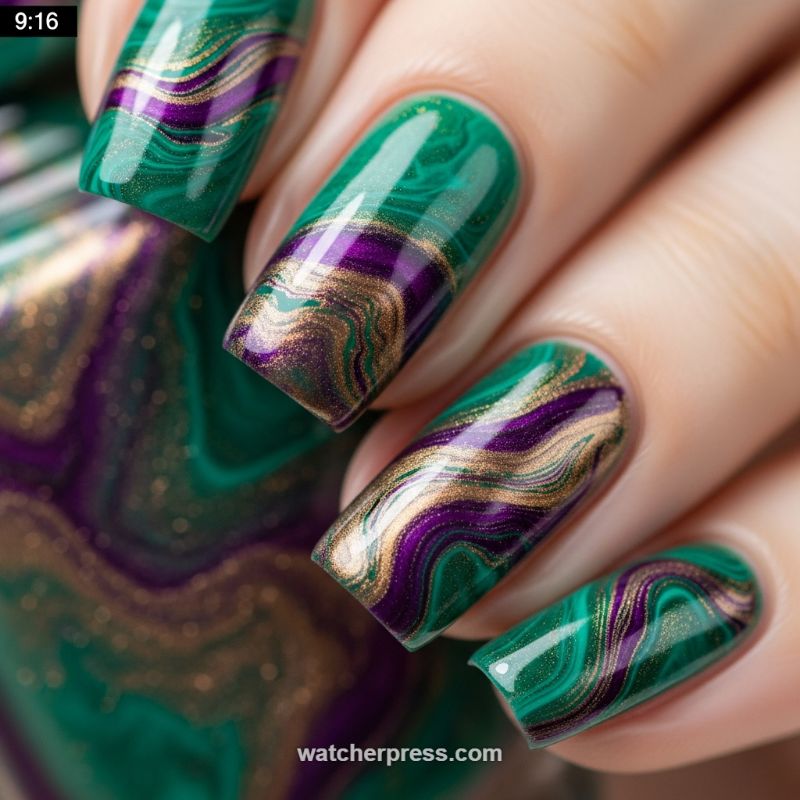
This intricate design elevates the classic Mardi Gras palette (deep emerald green, royal purple, and metallic gold) into a luxurious, stone-inspired masterpiece. The visual effect mimics the natural banding found in high-grade minerals like Malachite or Agate, offering a sophisticated take on holiday glamour. Achieving this level of fluid, organic swirling requires precise technique, often utilizing the ‘blooming gel’ method popular in advanced nail art. The key to the design’s success lies in the high contrast between the saturated jewel tones and the shimmering metallic gold, which acts as the vein structure, providing unparalleled depth and dimension to the finished look. This manicure is the epitome of blending the opulent drama of Mardi Gras with a rich, romantic texture suitable for a Valentine’s celebration.
To replicate this detailed marble effect, start with a meticulous prep and two cured coats of the solid emerald green gel polish. Next, apply a thin, even layer of specialized blooming gel (do not cure this layer). Working quickly, use a dotting tool or a fine liner brush to strategically place small dots or strips of the royal purple and metallic gold polishes across the wet blooming gel surface. Once the colors are applied, use a clean detail brush or a fine stylus to gently drag the colors through the wet blooming layer. The specialized gel will cause the pigments to spread and bleed naturally, forming the characteristic fine, wavy lines. The artistry comes in manipulating the flow to ensure the swirls look natural and unstructured, maintaining the distinction between the colors while letting them interact seamlessly. Once satisfied with the pattern, flash cure immediately to halt the spreading process and lock the design in place.
For expert results, focus on the placement of the metallic gold; it should thread through the center of the design, ensuring the gold streaks are thin and delicate, rather than bulky blocks of color. After curing the marbled design, seal the artwork with a thick layer of ultra-glossy top coat. A high-shine finish is crucial for gemstone manicures as it provides the depth and wet look necessary to emulate polished stone. Ensure the top coat fully caps the free edge to prevent chipping, and perform a final detailed cleanup around the cuticles using an angled brush dipped in alcohol to remove any misplaced pigment before the final cure. This technique requires patience but yields a bold, high-fashion statement perfect for a masquerade ball or an upscale dinner date.
Gilded Romance: Nude Nails with Gold Foil Arrows
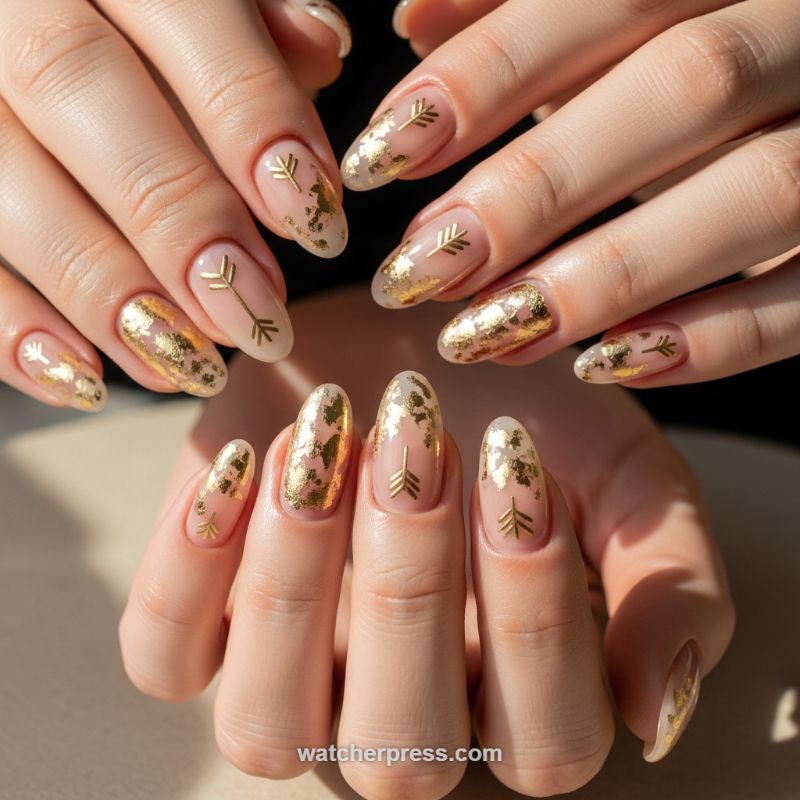
This sophisticated manicure perfectly captures the dual essence of romance and revelry, making it an ideal choice for both Valentine’s Day elegance and Mardi Gras sparkle. The foundation of this look is a sheer, milky nude or blush base coat, applied to beautifully shaped almond nails to provide a clean, healthy canvas that allows the gold elements to truly shine. The glamour comes from the deliberate application of gold foil flakes. To achieve this texture, apply a thin layer of tack-free gel topcoat or a specialized foil adhesive over the cured base color. Before curing, use a silicone tool or tweezers to press small, irregular pieces of gold foil onto the nail plate, concentrating the density primarily around the free edge, mimicking a subtle, distressed French tip. The key to making the foil look organic is ensuring varied coveragesome areas should be dense and opaque, while others should be sparse, allowing the translucent base to peak through, adding depth and dimension.
The romantic element is introduced via the delicate gold arrow decals. These tiny, stylized arrows are symbolic of Cupid’s aim, providing a whimsical and thematic touch that elevates the design beyond simple foil placement. For expert application, place the decals strategically on the nails where the foil is less prominent, often centered on the ring finger or mid-way down the nail plate to draw the eye. Using a fine-tipped brush, apply a microscopic dot of builder gel or a strong topcoat exactly where the decal will rest; this acts as an adhesive anchor. Once the decal is placed and lightly pressed flat, cure immediately. This ensures the decal remains perfectly positioned before the final encapsulation process. The combination of the sheer base and the prominent gold embellishments offers a rich, textural contrast that catches the light beautifully, making this manicure stand out without being overwhelmingly bold.
To ensure longevity and provide that necessary Mardi Gras high-shine finish, the entire design must be properly encapsulated. Apply two smooth, medium layers of a high-quality, non-yellowing topcoat, ensuring that the edges of the gold foil and the arrow decals are completely sealed to prevent lifting or chipping, which is a common hazard when utilizing 3D embellishments. Cure the final layer thoroughly. For an even more luxurious feel, consider using a high-gloss, buffable topcoat to truly maximize the reflection of the gold. Expert tip: if you prefer a subtle transition, you can lightly wipe the tacky layer after the base coat cure and gently buff the nail plate before applying the foil adhesive, ensuring the foils lie flatter against the nail, creating a more professional, salon-quality finish.
Shimmering Pink French Ombre: The Iridescent ‘Baby Boomer’ Fade
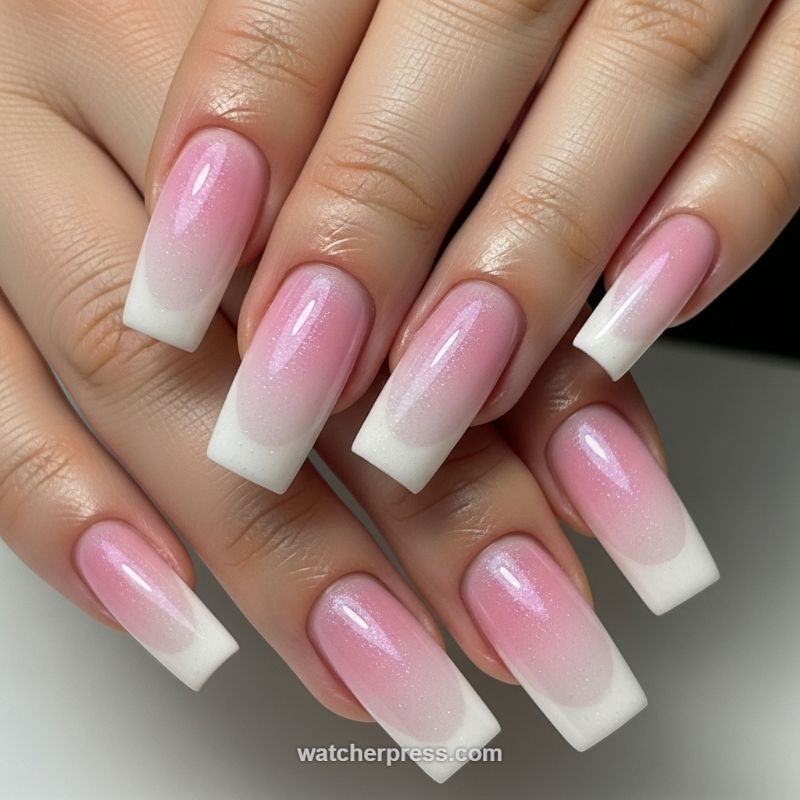
This sophisticated manicure perfectly captures the essence of both holidays by blending timeless romance with subtle, intoxicating glamour. Known classically as the ‘Baby Boomer’ or French Ombre, the look uses a shimmering, pearlescent pink at the base that melts seamlessly into an opaque white tip. The length and squared shape provide a modern canvas, allowing the gradient to truly shine. For the romantic Valentine’s component, the soft pink hue is feminine and delicate, while the fine, holographic shimmer infused in the pink polish provides that essential Mardi Gras sparkle. Unlike typical solid color applications, the Ombre technique here is executed with flawless diffusion, ensuring there are no harsh lines, creating an elegant, cloud-like transition that is both high-end and celebratory.
To recreate this luminous effect, nail professionals often utilize the structural strength of hard gel or acrylic powder systems, which allows for maximum control over the blend. Start by prepping the nail and applying a base coat. The key to the flawless fade is strategic color placement: apply the pure white product directly to the free edge (the tip) and the shimmering pink/nude product to the nail bed near the cuticle. Using a fine-tipped ombre brush or a dense makeup sponge, gently tap and feather the center line where the two colors meet. The trick is to lift and blend in rapid, short motions, working towards the center line to create a foggy, gradual transition. For the ultimate Mardi Gras glow, ensure the pink polish or powder contains a micro-fine iridescent or opal glitter, concentrating the shimmer layer towards the cuticle for maximum reflective depth once the top coat is applied. This technique ensures the nails catch the light dramatically with every movement.
Once the desired blend is achieved and the product is cured/set, the finishing touches elevate this look to top-tier status. File the nails into the desired crisp, elongated square shape, ensuring the side walls are perfectly straight for a professional finish. Apply a thick, high-gloss top coat to encapsulate the color work and create the glass-like shine seen in the image; this intense gloss is crucial for maximizing the visibility of the internal shimmer. For an extra touch of Mardi Gras flair without disrupting the Ombre, consider embedding one or two gold or purple micro-rhinestones near the cuticle line of the accent finger. This manicure is the epitome of polished glamour, offering enduring style and celebratory radiance that lasts well beyond the festivities.
The Ultra-Glossy Scarlet Coffin: A Statement of Passionate Glamour
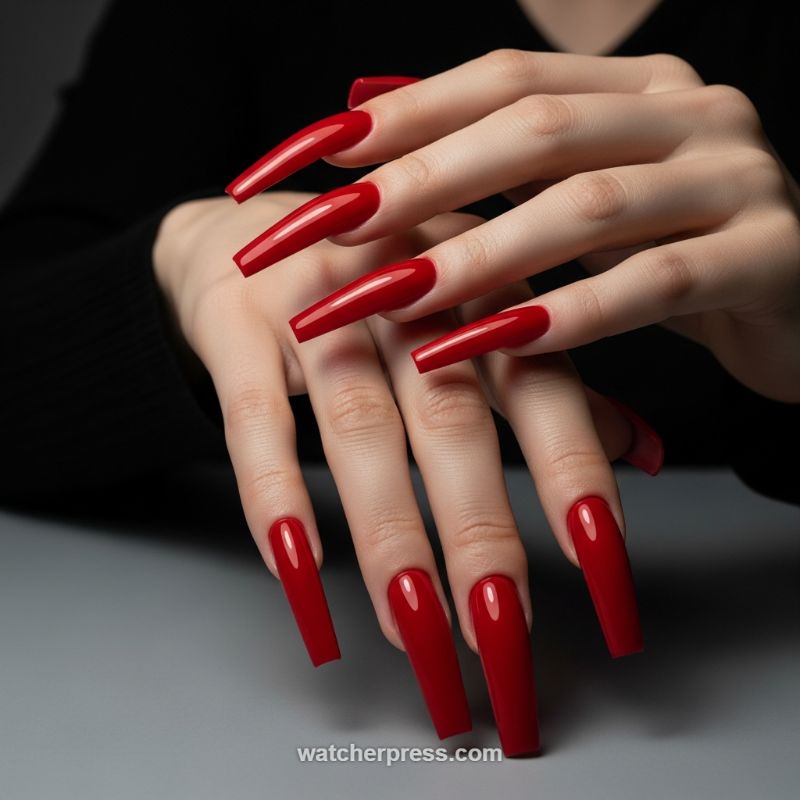
This manicure screams high-stakes romance and unapologetic celebration, making it the ultimate transitional look for Valentine’s Day leading into Mardi Gras. The defining feature is the dramatic length and the highly sought-after coffin (or ballerina) shape, characterized by straight sidewalls and a tapered, squared-off tip. The color is a vibrant, deeply pigmented true red—a scarlet shade that balances romantic passion with bold, theatrical flair. The mirror-like, ultra-glossy finish is crucial, reflecting light to amplify the richness of the color and the perfection of the nail surface. This combination elevates a simple color application into a luxury accessory, demonstrating confidence and high style, whether you’re holding a champagne flute or tossing beads at a parade.
Achieving this level of flawless, uniform extension requires professional application, typically utilizing hard gel or acrylic products to ensure structural integrity at this extreme length. For those attempting a similar effect at a shorter length or using press-ons, meticulous shaping is key. Start by ensuring the sides are filed perfectly straight, then gradually taper the free edge before squaring off the tip sharply—avoiding any rounding. The color application must be immaculate. Use a high-quality, self-leveling gel polish for maximum opacity and minimal streaking. Apply two to three thin coats, curing fully between each. The final, critical step is the top coat: opt for a non-wipe, high-shine formula specifically designed for a “wet look” finish. Ensure the top coat fully encapsulates the entire nail surface, gliding smoothly over the edge to prevent chipping, and cure it properly under a UV/LED lamp for maximum gloss retention.
This bold scarlet shade is universally flattering but requires diligent preparation. Expert advice focuses on the canvas: ensure cuticles are perfectly pushed back and moisturized before application, as the extreme length draws attention to the entire nail bed area. To fully harness the dual holiday appeal, consider the styling implications. For Valentine’s events, this classic red is pure sophistication, pairing beautifully with black lace or soft pinks. For Mardi Gras, this color serves as an excellent anchor; it stands out brilliantly against traditional purple and gold accessories and complements the rich costumes and masks. Keep jewelry minimal—perhaps a delicate gold band—to prevent competing with the vibrant length and shine of the manicure. This look is about confidence; remember that extreme length requires conscious handling to maintain the integrity of the design and ensure your statement manicure lasts through both celebration seasons.