Ready for a hair refresh? Explore 20 stunning, trending hairstyles—including chic braids, polished bobs, and elegant updos. Your ultimate lookbook for the season’s must-have looks.
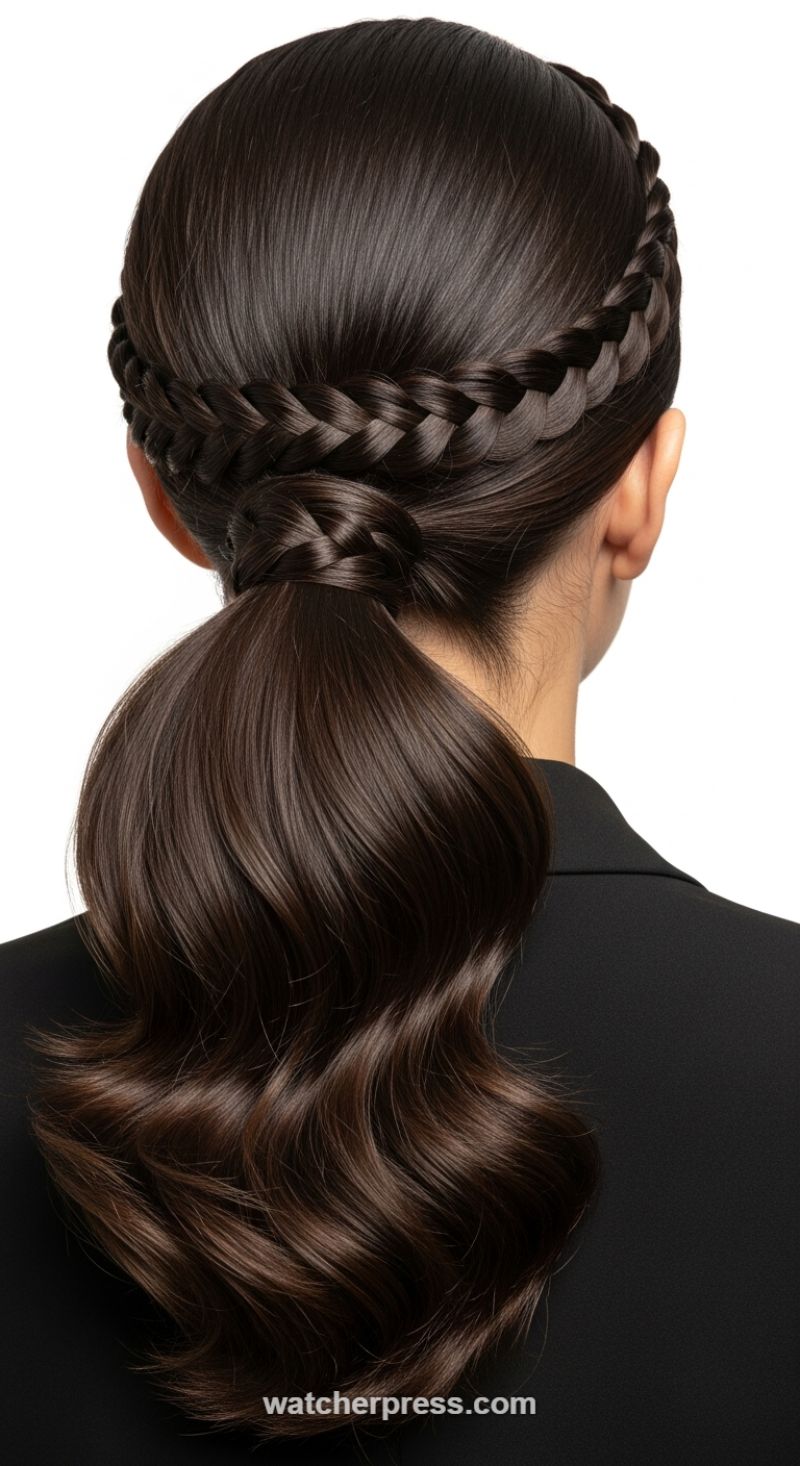
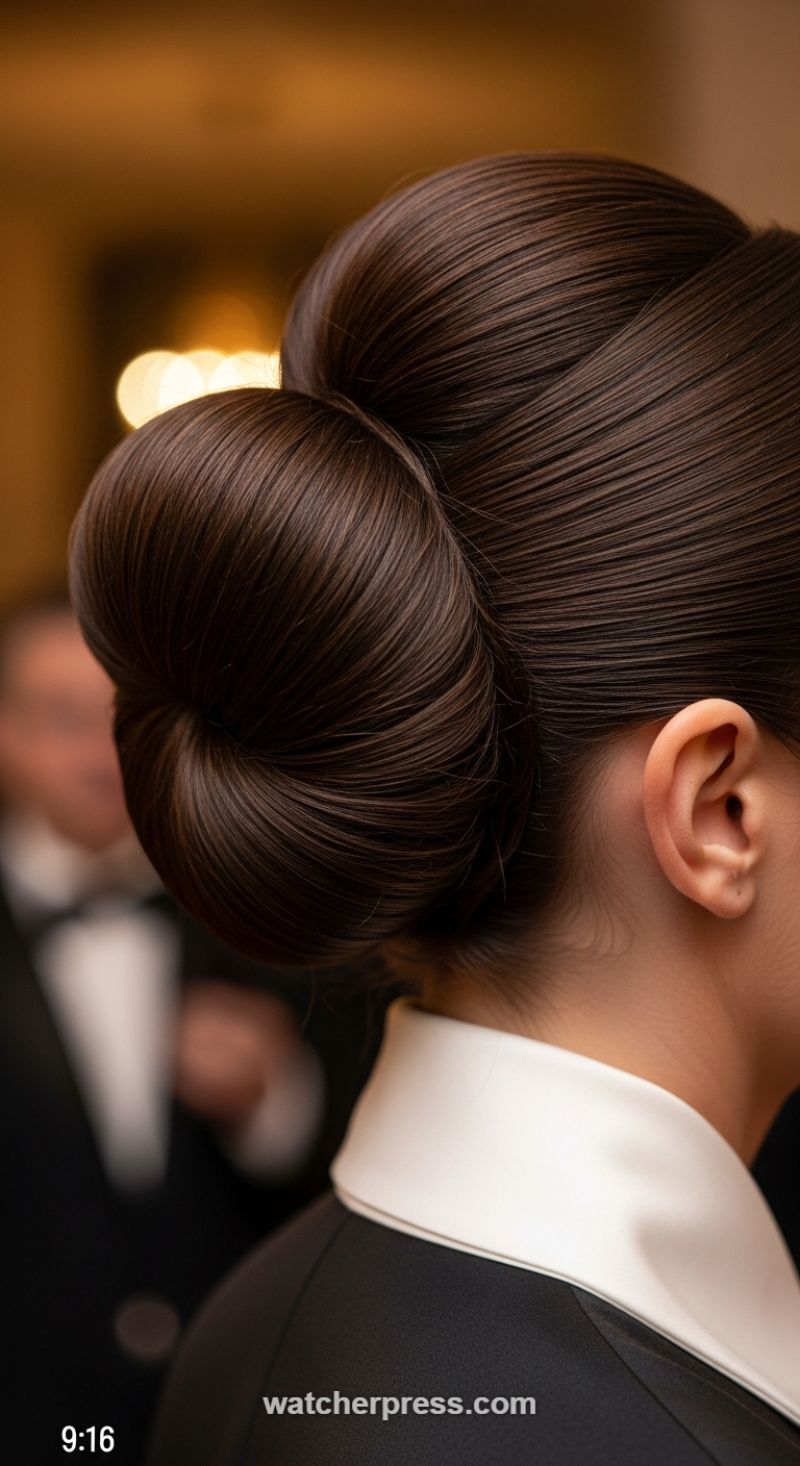
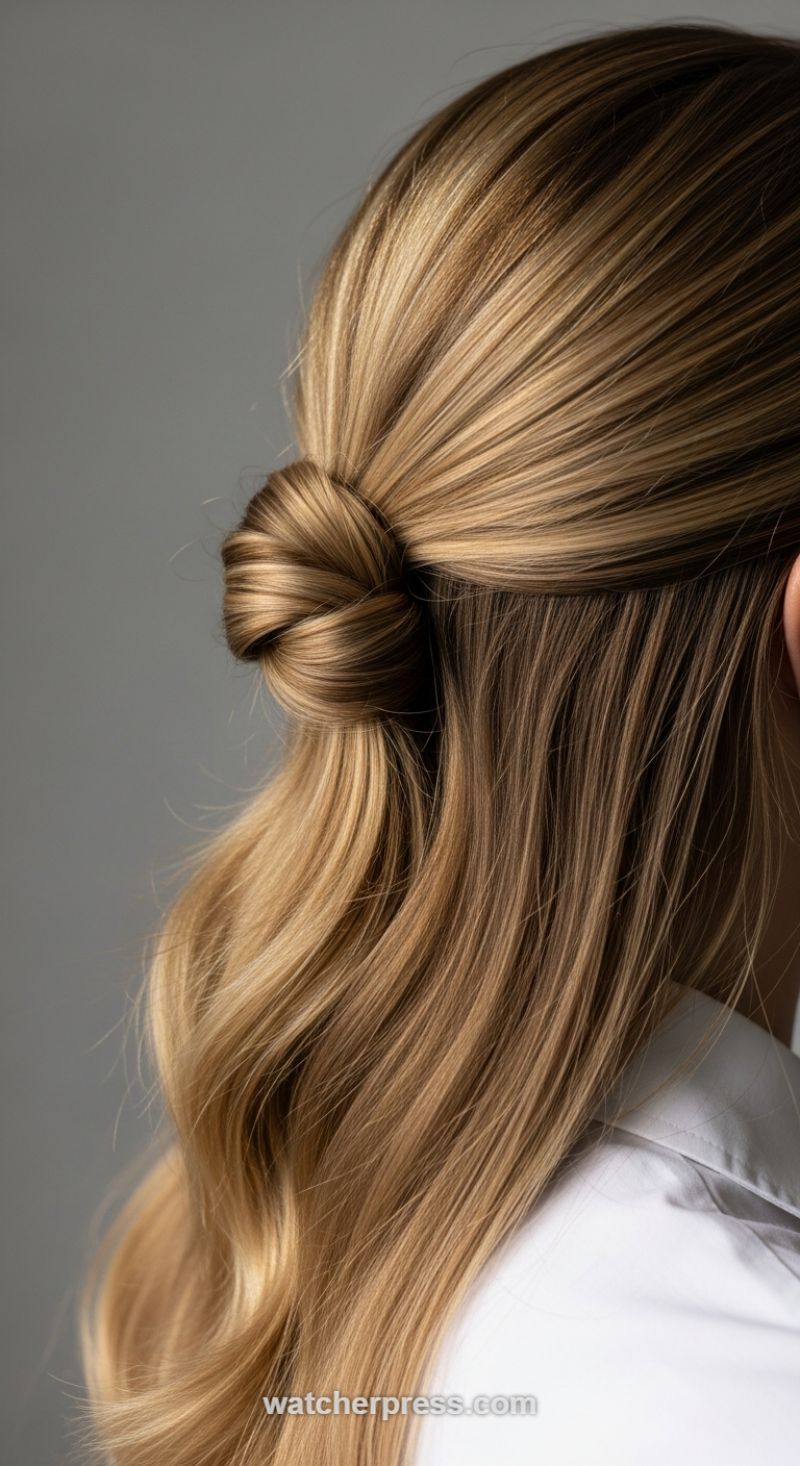
The Ultra-Sleek, High Polished Ponytail with Wrapped Base
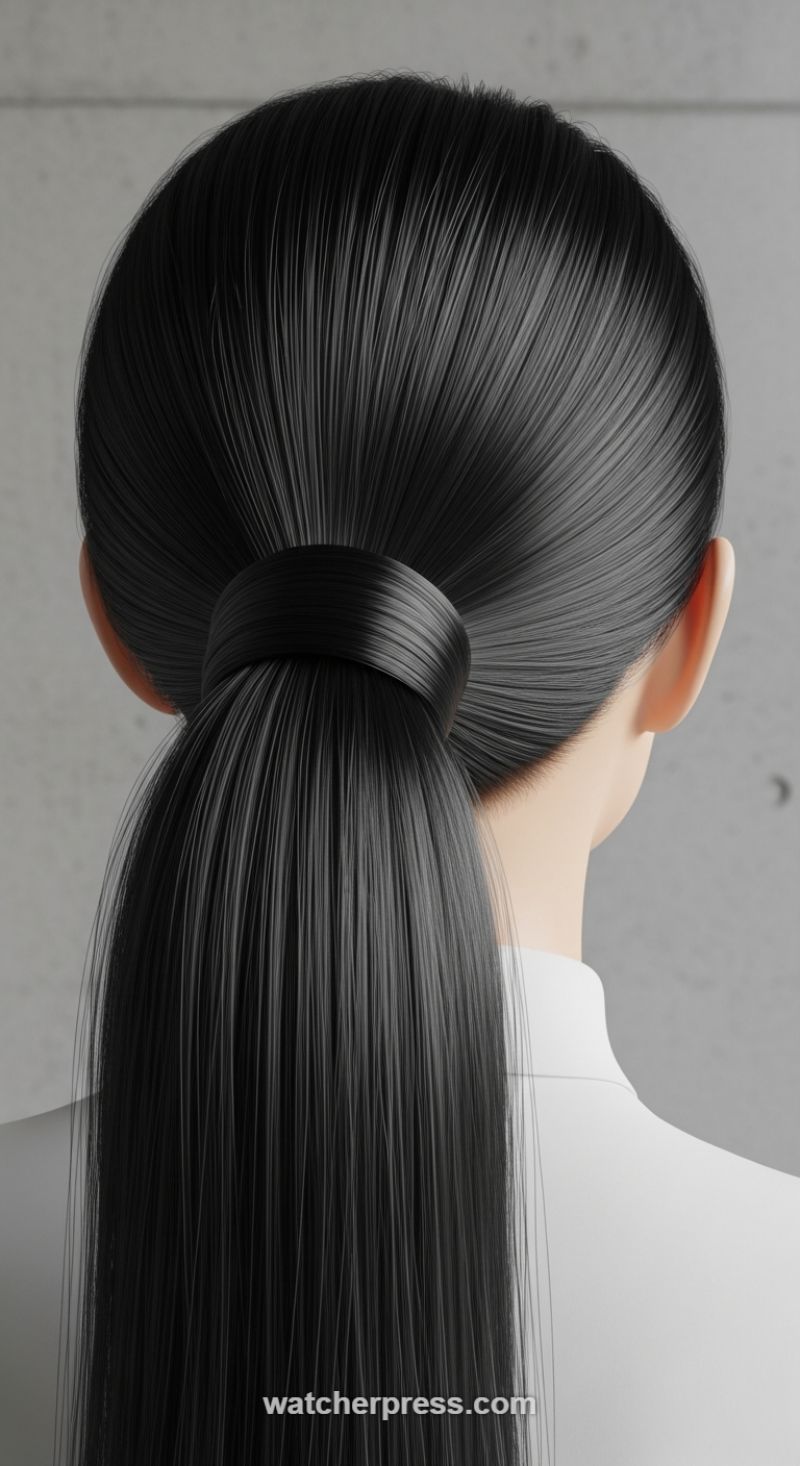
This iconic, high-impact style is less about casual convenience and more about precision engineering. Achieving the flawlessly sleek and reflective surface shown requires meticulous preparation, starting with the foundation. Begin by ensuring your hair is completely straight and smooth. Pre-treat the hair with a professional straightening balm or a heat protectant oil designed to maximize shine, then blow-dry using a paddle brush to enforce flatness and direction. The key to the ‘snatched’ aesthetic is tension: use a boar-bristle brush while pulling the hair back toward the crown, focusing on gathering the ponytail precisely at the occipital bone (the highest point where the head begins to curve downward) to ensure maximum lift and visibility from the front. Secure this base using a high-tension elastic, wrapping it multiple times until the ponytail feels immovable and the surface hair is taut against the scalp.
Once the ponytail is securely anchored, the focus shifts to concealing the elastic and perfecting the glass-like finish. Take a half-inch section of hair from the underside of the ponytail and apply a light coating of pomade or edge control to this piece to flatten any flyaways. Tightly wrap this prepared section around the elastic band until the band is completely covered. To secure the wrap, thread a small bobby pin horizontally through the wrapped hair, pushing it upward into the base of the ponytail, ensuring the pin head is completely hidden beneath the wrap. For the remaining surface area of the head, use a fine-tooth comb or a clean spoolie brush along with a strong-hold hairspray or finishing wax to meticulously smooth down any wispy hairs near the neck, ears, and hairline. This step is non-negotiable for recreating the rendered, polished look of the image.
To give the final length the desired density and reflective quality, consider integrating clip-in extensions if your natural hair lacks volume, ensuring they blend seamlessly into the base of the ponytail before you wrap the final section. Finish the entire style with a specialized high-gloss finishing spray rather than a matte or dry setting spray. Hold the can approximately 10–12 inches away, misting lightly but evenly across the entire surface of the pulled-back hair and down the length of the pony. For an expert finish, avoid touching the hair after the setting product has been applied, and use a cool-shot setting on your hairdryer for a few seconds across the polished sections to truly set the shine and maximize longevity. This hairstyle is perfect for formal events, interviews, or any time a powerful, clean aesthetic is required.
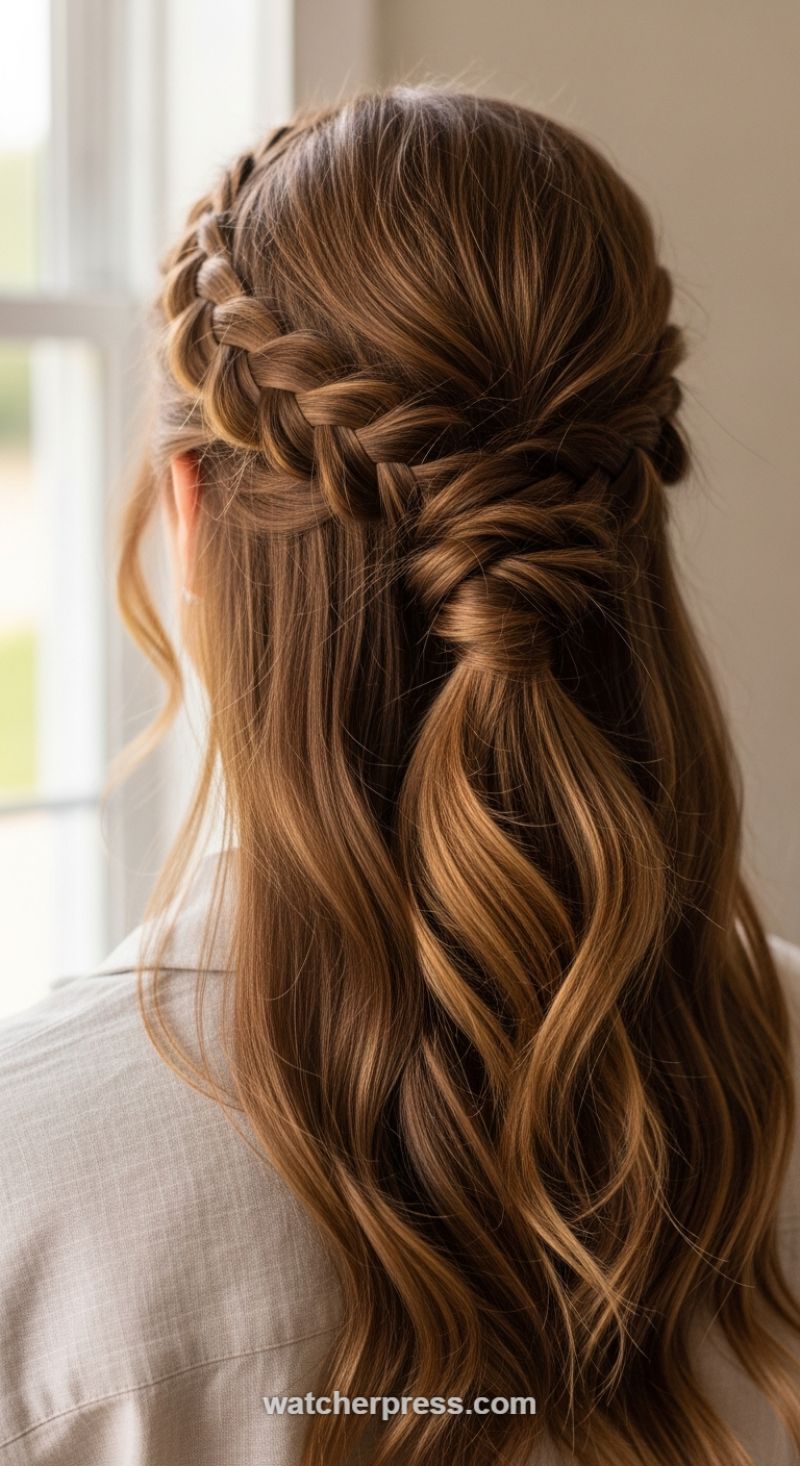
Regal Renaissance Waves with Central Accent Braid
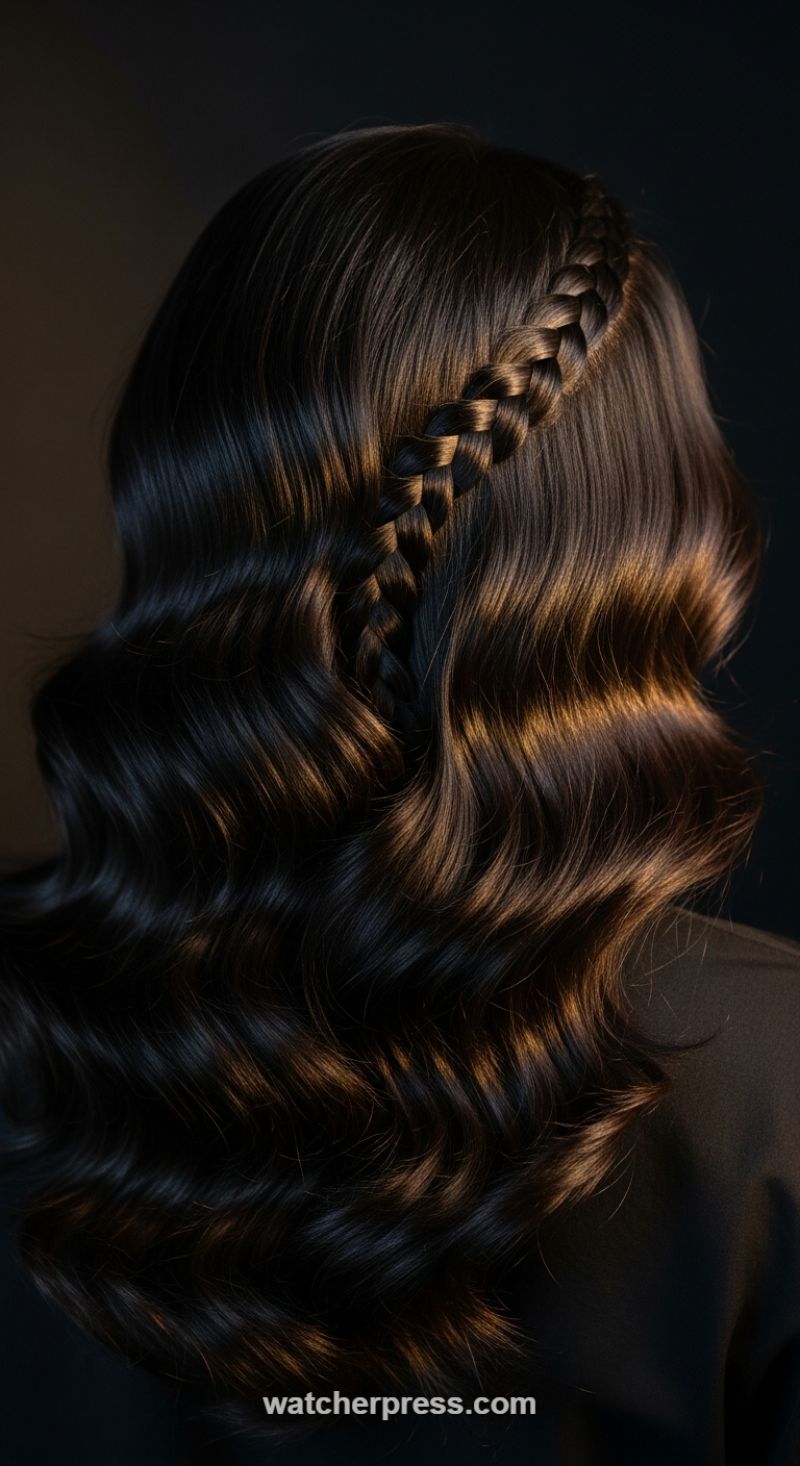
This breathtaking style seamlessly marries the drama of vintage Hollywood waves with the precision of a modern accent braid, resulting in a sophisticated look perfect for gala events or wedding season. To achieve these deep, uniform waves, preparation is paramount, especially on dark hair where shine is essential. Begin with clean, damp hair and apply a substantial amount of heat protectant and a strong-hold setting lotion or mousse, ensuring thorough distribution from root to tip. Using a deep-waver tool, a 1-inch large barrel curling iron, or setting clips (for a traditional finger wave), curl the hair in the same direction, horizontally across the back section of the head. Crucially, allow each wave section to cool completely before removing the iron or pins; this cooling process is what locks in the deep, sculpted S-shape characteristic of Renaissance waves. Once cooled, use a soft-bristled brush to gently merge the curls, transforming them from tight ringlets into fluid, high-gloss undulations, ensuring the defined ridges catch the light beautifully.
The defining feature of this hairstyle is the precise central accent braid, which serves as both a structural divider and a textural contrast to the soft waves. Start by creating a sharp, clean center part running from the crown down to the nape of the neck. Secure the waved sections on either side temporarily. Take a narrow, consistent section of hair along the parting line—this section should be reserved entirely for the braid. Execute a tight Dutch braid (an inverted French braid where strands are crossed *under* the center piece instead of over) along this vertical midline. The Dutch technique ensures the braid stands out three-dimensionally, appearing raised against the scalp. Maintain even tension throughout the braiding process to guarantee uniform thickness and prevent bulging. Once the braid is finished, secure the end neatly underneath the lower waved sections, concealing the elastic for a flawless finish. The goal is to create a striking visual separation, emphasizing the volume and contour of the polished waves on either side.
For expert longevity and maximum visual impact, finishing touches are crucial. Since dark hair is prone to looking dull without proper conditioning, generously apply a lightweight shine serum or gloss spray over the entire wavy portion of the hair, avoiding the scalp area to maintain volume. A flexible-hold hairspray is recommended to keep the sculpted waves intact without making them appear stiff or unnatural. This style works best on medium-to-thick hair that is chest-length or longer, as it requires substantial density to create both the deep waves and the pronounced braid. For individuals with finer hair, consider incorporating clip-in extensions that match the natural color and texture to enhance the overall luxurious thickness and ensure the braid has enough structure. This look speaks volumes about attention to detail and is a sophisticated choice for any occasion demanding high glamour.
The Precision Gloss Bob
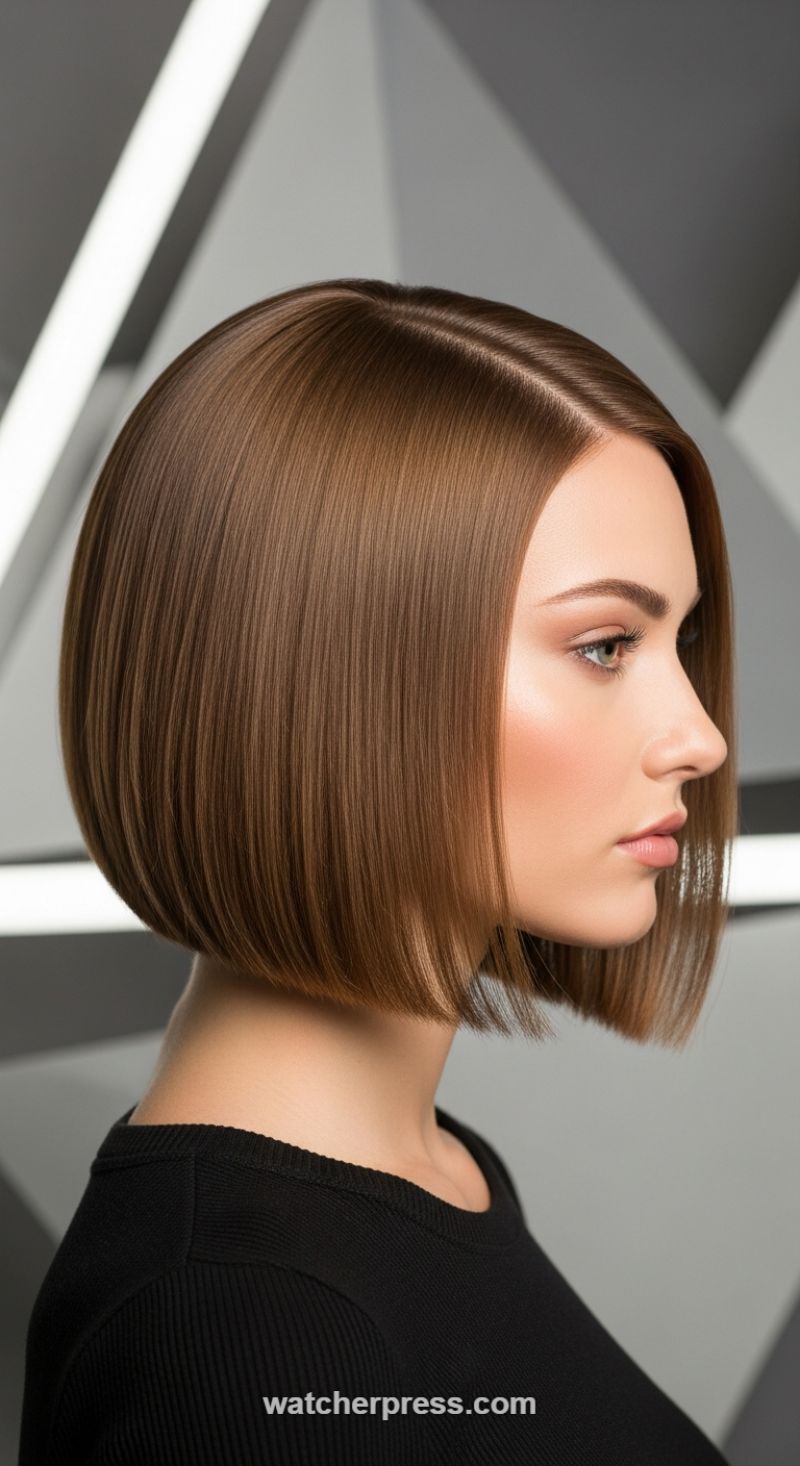
The Precision Gloss Bob is the epitome of structural elegance, combining a timeless silhouette with modern, high-intensity shine. This look requires an expertly executed blunt cut, typically hitting just above the collarbone or skimming the jawline, ensuring that the perimeter is razor-sharp to maximize density and achieve that weighty, clean finish. The entire style is dedicated to achieving the ‘glass hair’ effect, meaning every strand must lay perfectly flat, reflecting light like a mirror. Visually, the uniform, rich color (such as the luminous chestnut brown pictured) is essential, as it prevents scattered light reflection that highlights might cause. This hairstyle is not just a cut; it’s a commitment to polishing, offering an unparalleled level of sophistication that pairs flawlessly with both professional and evening looks. Expert advice suggests that those with naturally coarse or highly textured hair may require a keratin treatment foundation to achieve this extreme level of smoothness.
To style this look at home, preparation is everything. Begin with a professional moisturizing and smoothing wash system. While hair is damp, layer a heat protectant spray with a high-quality, lightweight smoothing serum, paying close attention to coating the mid-lengths and ends. Use a professional blow dryer equipped with a narrow nozzle to direct airflow down the hair shaft, sealing the cuticle for maximum shine. Utilize a paddle brush to pull sections straight and slightly curved inward as you dry. The final crucial step involves flat-ironing. Use a ceramic or titanium flat iron set to an appropriate temperature for your hair texture, taking extremely thin sections (no wider than half an inch). Glide the iron through each section slowly and deliberately, ensuring the hair remains consistently straight from root to tip, maintaining the slight inward bend at the ends for that perfect, sculpted shape.
Maintaining the structural integrity of the Precision Gloss Bob requires regular dedication. Since the definition relies heavily on the sharp perimeter, schedule dustings or full trims every four to six weeks. The distinct, crisp center part seen here is critical for achieving the style’s ultimate symmetry and framing the face beautifully, highlighting the cheekbones and jawline. To keep the exceptional shine between washes, use a silk pillowcase overnight and invest in weekly deep conditioning masks targeted toward smoothing and moisture retention. On non-wash days, a light spritz of an anti-frizz or high-gloss finishing spray can revive the glass-like appearance without weighing down the roots or sacrificing the coveted volume near the crown.
The Seamless Dutch Braid Accent
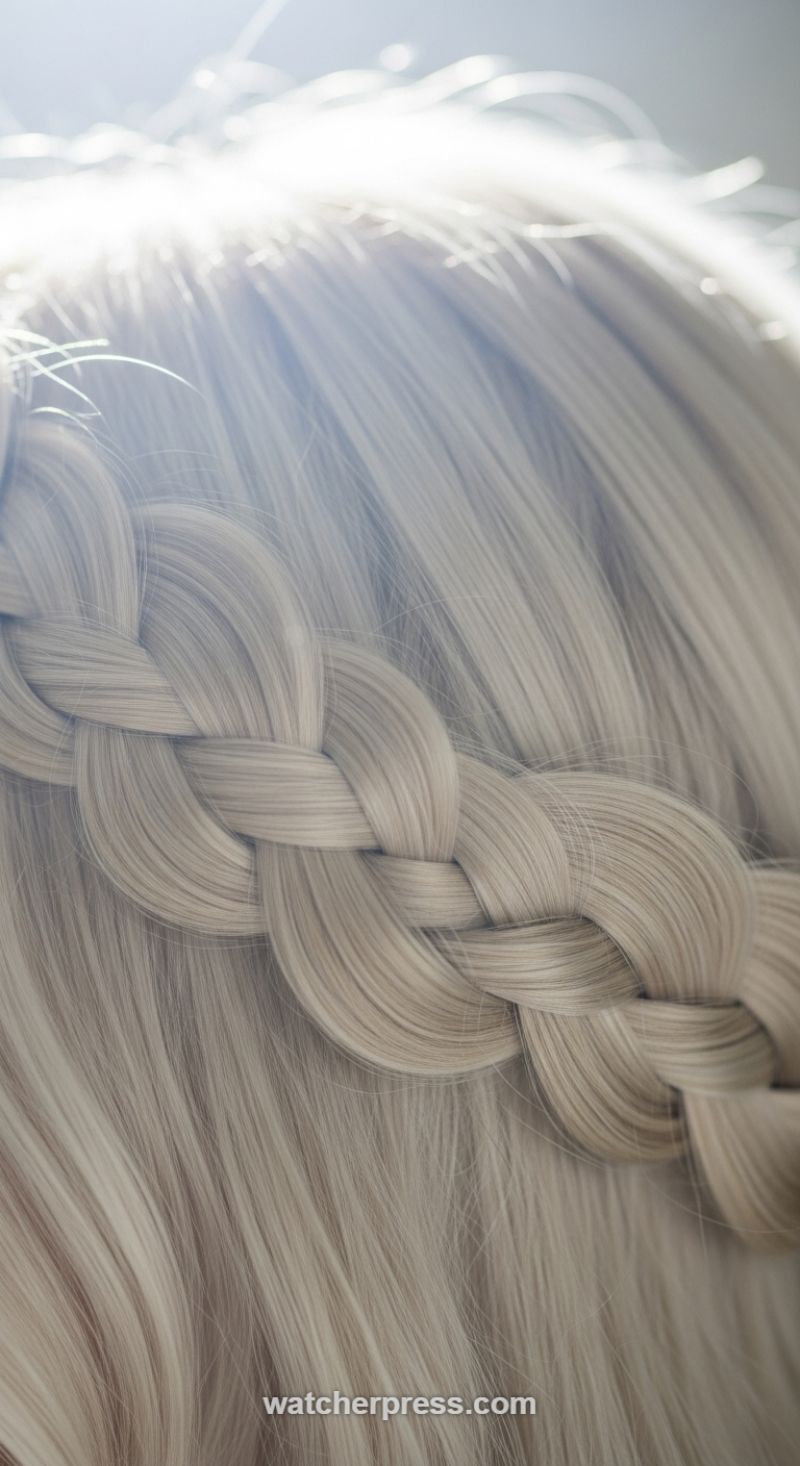
The hairstyle showcased here is the epitome of refined elegance: a meticulously executed Dutch braid seamlessly integrated into smooth, platinum blonde hair. This style, sometimes referred to as an external braid, is achieved by crossing the hair strands under, rather than over, the center strand, which makes the braid appear raised or ‘floating’ on top of the head—a key visual element captured perfectly in this image. To replicate this level of pristine texture and shine, preparation is vital. Begin by ensuring your hair is perfectly smooth, perhaps run through with a flat iron or blowout, and apply a high-shine serum or smoothing balm to eliminate any frizz. This high polish allows the light to refract beautifully, as seen with the dazzling highlights along the crown, giving the overall look a highly stylized, almost ethereal quality that elevates it beyond a casual braid.
To master the ‘Floating Dutch Braid Accent,’ select a starting point near your hairline—this can be near a side part or directly down the center, depending on whether you want a single accent braid or a full crown. Divide a small, even section of hair into three strands. Instead of crossing the left strand over the center strand (the French technique), cross it *under* the center strand. Repeat with the right strand, crossing it *under* the new center strand. Before you cross the next left strand under, pick up a small, even section of hair from the surrounding hairline and incorporate it into the working strand. Repeat this process, adding hair only to the side closest to the forehead, maintaining consistent tension with every loop. The goal is to keep the braid hugging the head tightly, ensuring the added sections are narrow and uniform to create that ‘seamless’ effect visible in the close-up crop. Remember, consistency in the size of the added sections is the difference between a messy braid and this polished look.
Expert stylists note that while many popular braids are ‘pancaked’ (pulled apart) for volume, the current trend, favored for sophisticated events, leans towards a tighter, more structured finish, exactly as shown here. If your hair is naturally slippery, lightly misting the section with a texture spray or a flexible-hold hairspray before starting the braid can help maintain the required tension and prevent slippage. Once the braid reaches the desired length—in this case, running horizontally across the side of the head—secure it temporarily with a clear elastic or pin it discreetly beneath the mass of hair. Finish the entire style with a fine mist of anti-humidity spray and a high-shine finisher. This elegant, structured accent braid serves as a perfect framework for special occasions like weddings or proms, offering a trending look that is both complex and incredibly beautiful.
The Ultra-Clean Symmetrical Dutch Braid (Boxer Braids)
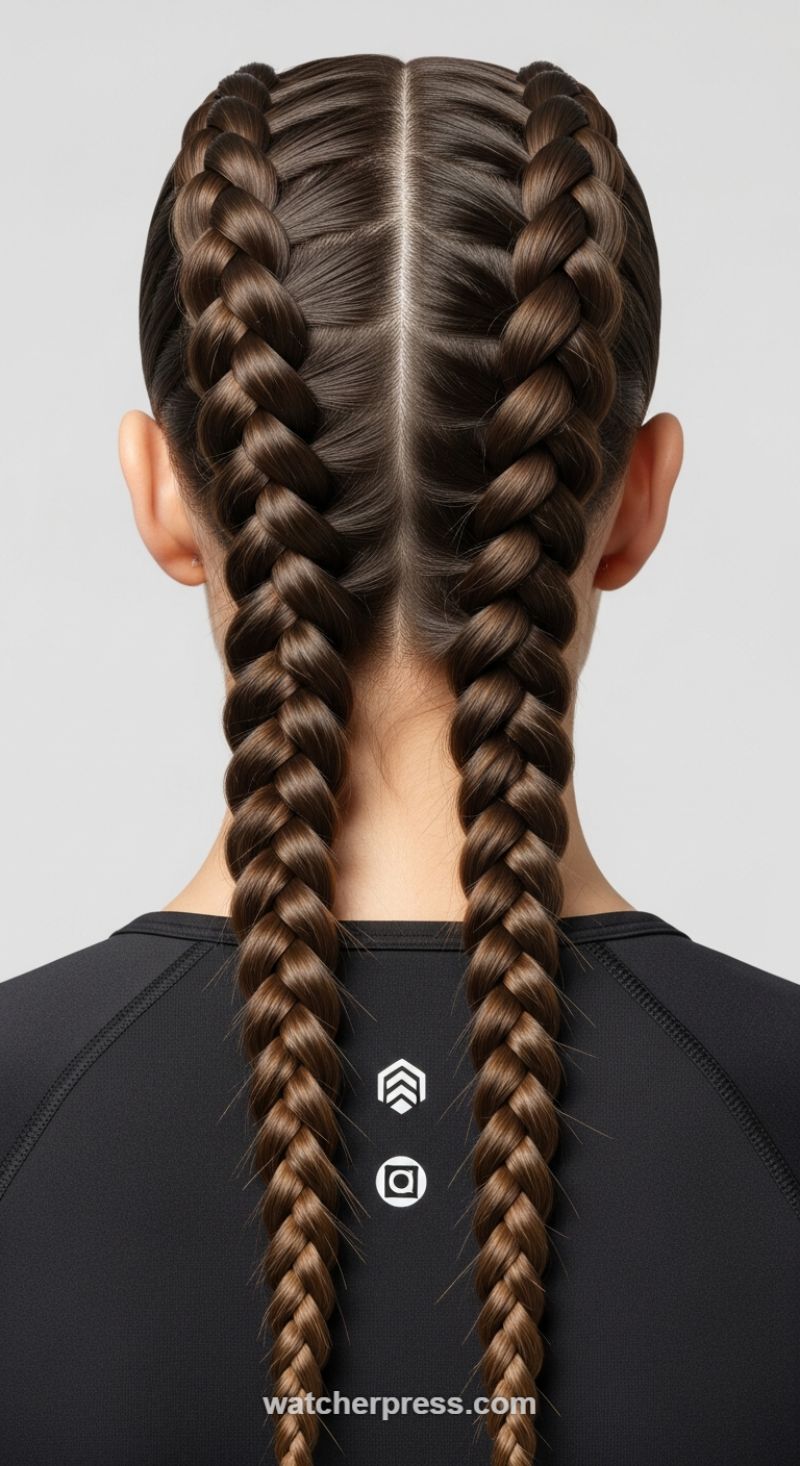
This trending look, often dubbed ‘Boxer Braids,’ is the epitome of polished, athletic chic. It features two perfectly symmetrical, reverse-French braids (Dutch braids) running tightly against the scalp from the hairline down to the tips. The immediate visual elements that define this high-end style are the razor-sharp center part and the high-tension execution, which creates the pronounced, raised, three-dimensional texture of the braids. Before beginning, hair must be thoroughly detangled and prepped with a product that provides excellent hold without stiffness. For fine hair, use a volumizing mousse or dry shampoo at the roots to provide essential grip; for thicker or silkier hair, apply a light coat of braiding gel or pomade through the lengths to smooth flyaways and achieve the high-gloss finish seen in the image. The key to the polished look is absolute precision, so ensure you have a rat-tail comb ready to achieve that flawless parting line that defines the entire aesthetic.
To execute this technique, begin by using the rat-tail comb to draw a precise, straight line from the center of the forehead all the way down to the nape of the neck, dividing the hair into two equal sections. Secure one side with a clip to keep it completely isolated. On the working side, take a small triangular section of hair near the hairline and divide it into three strands. Crucially, start the Dutch braiding process: instead of crossing the outer strands *over* the center strand (as in a traditional French braid), you will cross the outer strands *under* the center strand, causing the braid to stand out from the scalp. With each subsequent rotation, incorporate a small, equal section of new hair into the working strand before passing it under the center piece. The expert secret here is maintaining consistent, firm tension throughout the process, keeping the braid hugging the scalp closely and ensuring that the incorporated sections of hair are symmetrical on both sides as you work toward the nape. Once you run out of scalp hair to incorporate, continue braiding the remaining length in a standard three-strand braid and secure it cleanly at the end.
Once both braids are complete, the focus shifts to refinement and long-term hold. Examine the tightness and symmetry; any looseness can be corrected by gently tugging the hair sections closest to the scalp before setting. Tame any remaining micro-flyaways around the perimeter (especially near the temples and nape) using a precise application of edge control or a high-hold, flexible hairspray applied directly to the comb before smoothing the area. This style is exceptional for prolonged wear—it’s perfect for intense athletic activities or simply lasting through multiple days. As an expert tip, if you plan to wear this for more than 24 hours, cover your hair with a silk bonnet or pillowcase while sleeping to minimize frizz and maintain that sharp, glossy sheen. When it’s time to take them out, running a touch of serum through the braids first will help release the pattern cleanly and leave you with beautiful, heat-free waves.
The Icy Platinum Power Braid: Sleek, High-Volume Dutch Braid
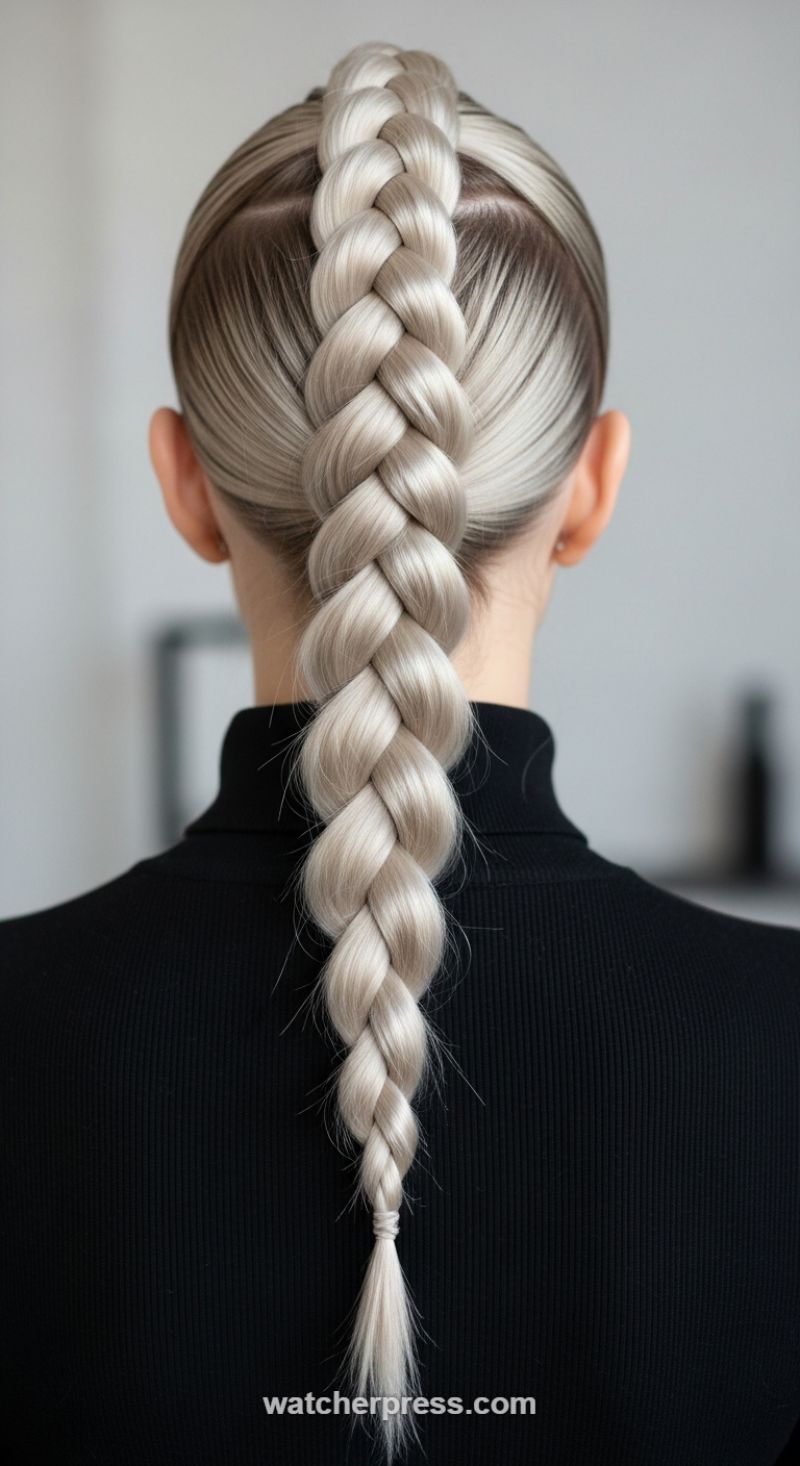
This stunning look marries extreme polish with dramatic volume, creating a sophisticated and trending style perfect for statement wear. The defining characteristic is the high-contrast presentation: the hair along the sides and crown is pulled back with maximum tension to achieve a liquid-smooth finish, highlighting the clean, tight center parting. The high-volume center braid, executed using the Dutch braiding technique (where strands are crossed under the middle piece, making the braid stand proud of the head), provides exceptional texture and bulk. Achieving this look starts with preparation—since the scalp area must be flawlessly sleek, apply a smoothing serum or light pomade to the roots and surrounding hair before you begin. For those with natural hair volume, strategic product placement is key; for those seeking the fullness visible in this image, clip-in extensions matching the striking icy platinum shade will be necessary to ensure the braid looks dense, rounded, and luxurious.
To construct this braid, first ensure your central section is perfectly aligned, running from the forehead (if applicable) straight down to the nape. Begin by taking a small, triangular section of hair right at the crown. Divide this into three equal strands. Start your Dutch braid by crossing the left strand under the center strand, and then the right strand under the new center strand. Before crossing the next strands, integrate a small, even piece of hair from the surrounding sleek area into each outer strand. It is critical to maintain immense tension near the scalp for the entire length of the braid to preserve the clean parting and smooth edges. Continue this process, feeding hair into the braid until you reach the occipital bone (or the nape of the neck). Once all the scalp hair has been integrated, finish the remainder of the length with a standard three-strand Dutch braid and secure it tightly with a clear elastic.
The secret to the braid’s impressive, rounded volume is the technique known as ‘pancaking.’ After securing the end, gently begin pulling outward on the edges of each interwoven loop, starting from the bottom and working your way up. Pull only a small amount at a time, focusing on creating a wide, flat appearance rather than loosening the braid entirely. This method allows the braid to swell, appearing significantly thicker and softer while the scalp tension remains intact. Once the desired volume is achieved, lock the style in place. Expert advice dictates using a high-shine hairspray, misting it lightly over the entire look, followed by an anti-frizz serum wiped along the sleek side sections to ensure every flyaway remains perfectly controlled and the icy color catches the light beautifully.
Sculpted Platinum Waves: Mastering the Modern Marcel
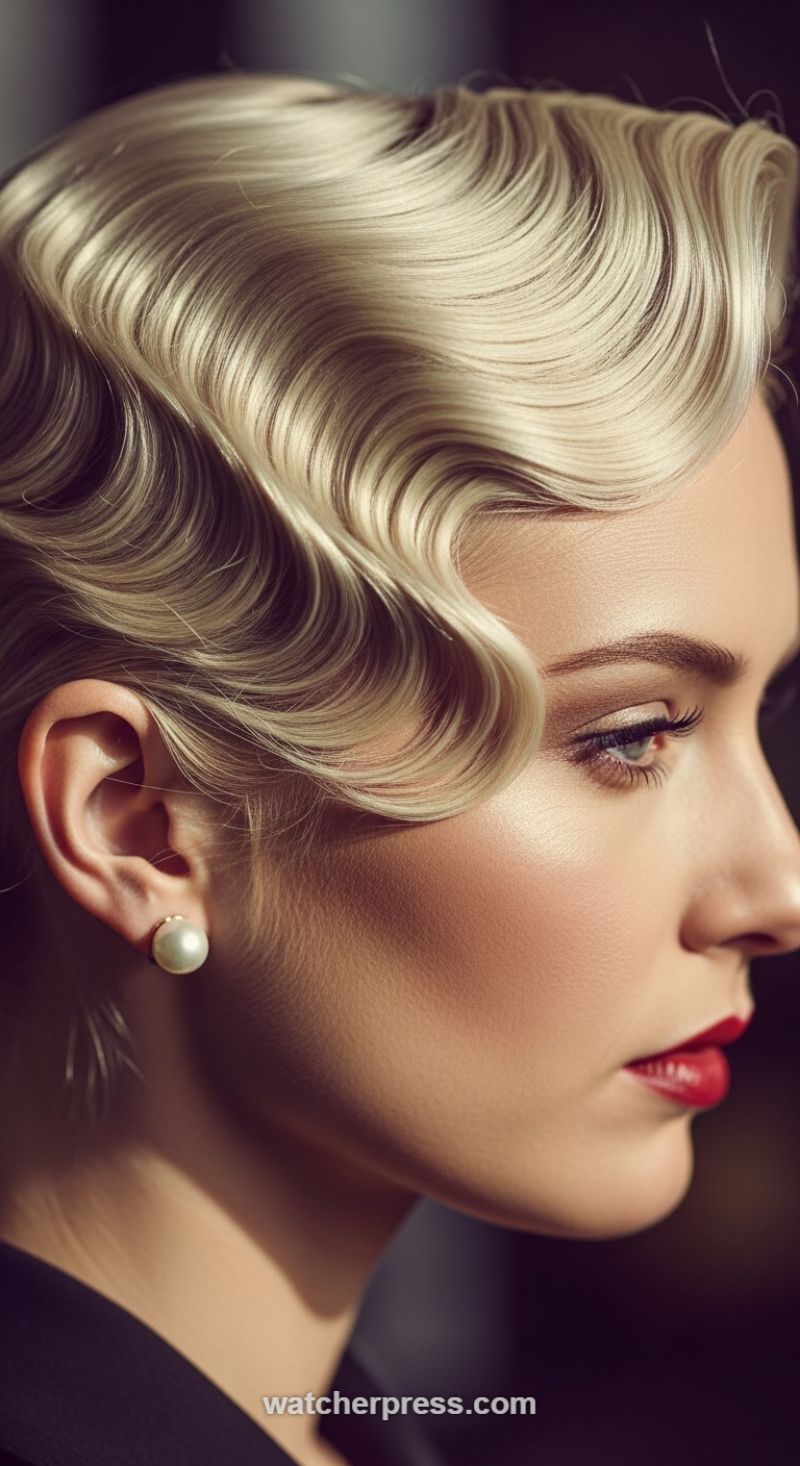
The hairstyle featured—a flawlessly executed interpretation of the Marcel or Finger Wave—is the epitome of Old Hollywood Glamour, currently experiencing a massive resurgence on red carpets and in high-fashion editorial. This style is characterized by deep, defined ‘S’ shapes lying flat against the head, offering incredible precision and polish. To achieve this level of glossy definition, preparation is critical. Begin with clean, damp hair and saturate it generously with a strong-hold setting lotion or a specialized waving mousse, which provides the necessary stiffness and control. The visual impact is amplified by the platinum blonde hue, as the light catches the curves and troughs of the wave pattern, emphasizing its sculptural quality. Ensure the hair is fully detangled, parted deeply to one side (as seen in the image), and ready to be meticulously sculpted for a lasting, sophisticated finish.
Mastering the Marcel wave requires precision tools and patience. While traditional finger waving relies solely on a comb and fingers, modern techniques often utilize flat irons or specialized waver tools for quicker results, though the classic method offers the most authentic depth. If opting for the traditional approach, use a fine-tooth rattail comb and duckbill clips. Starting near the part, use the comb to push the hair forward to create a ridge (the peak of the ‘S’), securing the base of the ridge with a clip. Then, slightly below, use your finger to hold the crest while you comb the hair in the opposite direction, creating the trough. This push-and-clip technique is repeated down the length of the head, ensuring each wave remains uniform in size and tension. For expert definition, aim to keep the waves tightly packed and close to the scalp, mirroring the deep structure seen in this luxurious look.
Longevity and shine are the final touches that elevate this classic look into a modern masterpiece. Once the entire head is clipped, the hair must be dried completely without disturbance—ideally under a hood dryer to set the shape perfectly and prevent frizz. Once dry, carefully unclip the hair, avoiding excessive brushing. Instead, use a wide-tooth comb only if absolutely necessary to smooth the lengths. Lock in the structure with a powerful, high-shine finishing spray that resists humidity. This style is inherently formal and requires equally polished styling complements; notice how the look is paired with radiant, highlighted skin, sharp eyeliner, and classic ruby-red lipstick. This combination creates a cohesive, high-impact aesthetic that perfectly blends 1930s elegance with contemporary haute couture.
Liquid Glass Finish: The Ultra-Smooth, Polished Style
This season, the trend leans heavily into hyper-smooth, highly reflective hair that mimics a liquid glass finish. Achieving this level of polish begins with intense hair preparation and foundational health. To replicate the seamless, expensive-looking texture seen here, start with a regimen focused on hydration and cuticle alignment. Invest in high-quality moisturizing shampoo and conditioner, followed immediately by a leave-in smoothing cream or oil while the hair is damp. The key to the high shine is meticulously directed airflow during the blow-drying process. Using a flat paddle brush and a nozzle concentrator, blow-dry the hair in thin sections, always directing the heat straight down the hair shaft from root to tip. This crucial step forces the cuticle layer to lie flat, which is what maximizes light reflection and eliminates flyaways, creating that signature mirror-like surface.
Once the hair is fully dry, precision styling is required to achieve the pin-straight perfection of the ‘liquid glass’ look. While many styles are embracing texture, this look demands utter smoothness. Use a high-quality flat iron (preferably ceramic or tourmaline for consistent heat distribution) set to the optimal temperature for your hair type—never exceeding 400°F unless your hair is exceptionally coarse. Iron the hair in half-inch sections, running the tool through quickly and smoothly only once or twice per section. For a perfect profile, as demonstrated in the image, ensure the hair around the ear and neck is completely smooth, sometimes requiring a targeted application of a light holding spray to manage shorter layers. The final step is the finish: use a very light shine spray or a drop of specialized smoothing serum (like argan or macadamia oil) dispersed on your palms and lightly grazed over the surface of the hair, focusing primarily on the mid-lengths and ends to avoid weighing down the roots.
Expert advice for maintaining this glossy style centers on both color depth and protection from humidity. The rich, multi-dimensional brunette and caramel tones seen in this look are instrumental to its vibrancy, as darker, richer colors inherently reflect more light. We recommend incorporating a professional glossing treatment every six to eight weeks to refresh the color and reseal the cuticle. Additionally, since this sleek style is highly susceptible to frizz, protection is paramount. Invest in an anti-humidity spray that creates an invisible barrier against moisture in the air. For nighttime maintenance, loosely wrap the hair in a silk or satin bonnet, or sleep on a silk pillowcase. This prevents friction and preserves the hard work of your flat iron, ensuring you wake up with minimal need for restyling and maximum shine.
The Voluminous Multi-Tonal Textured Crop
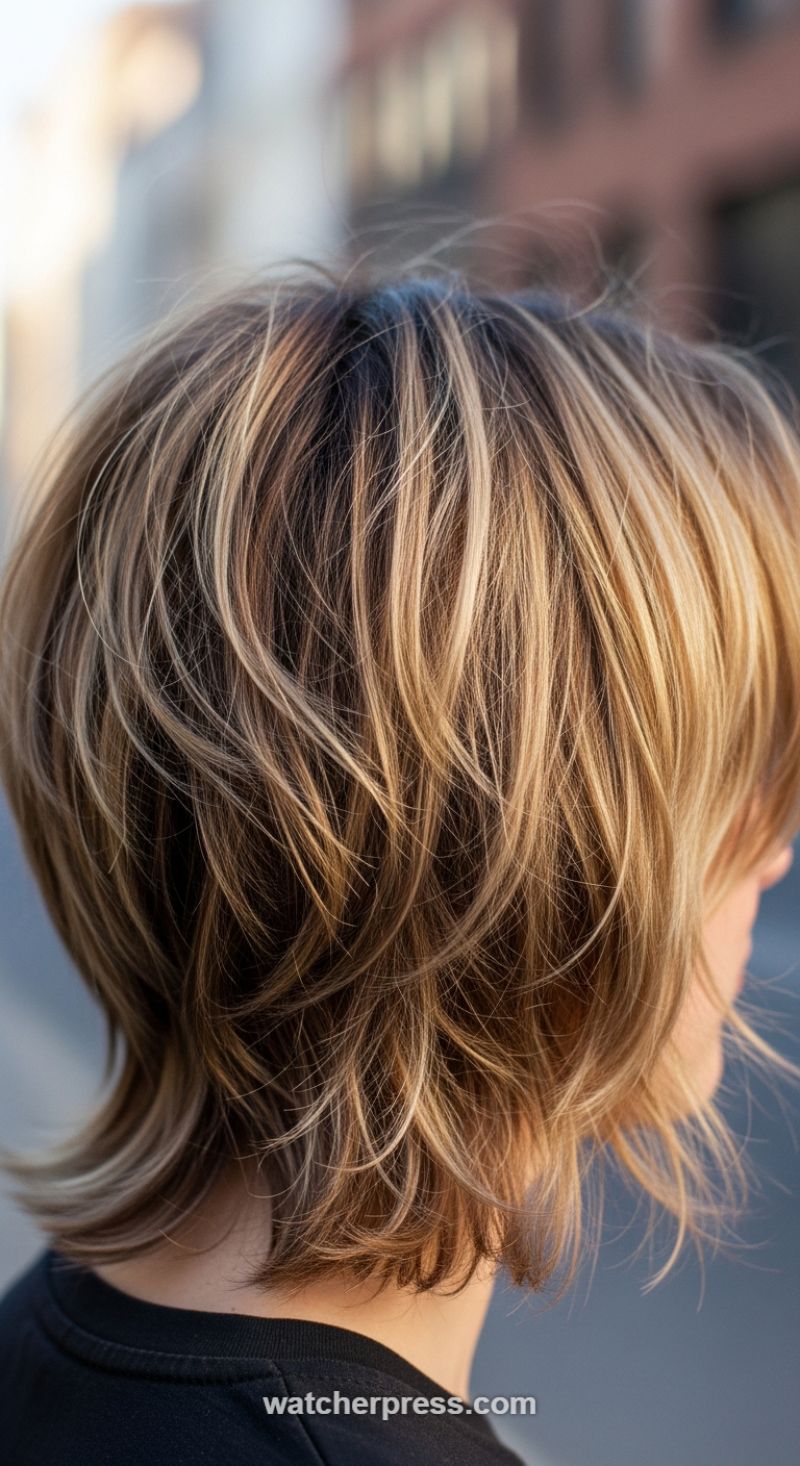
This dynamic hairstyle is the perfect blend of the classic French bob and the modern shag, delivering maximum volume and movement without sacrificing a tailored shape. The visual success of this look hinges entirely on precision layering and shattered texture. When speaking to your stylist, ask for a short, slightly stacked or tapered cut at the nape of the neck, but emphasize dramatic, disconnected layers throughout the mid-lengths and crown. These layers must be finely feathered, often achieved using point cutting or light razor work, to create the airy, piece-y effect visible throughout the style. The overall shape should maintain fullness, lifting the hair away from the head to create that desirable voluminous lift seen here, while the ends are kept light and wispy, preventing the look from becoming heavy or helmet-like. This cut is highly adaptable to most hair textures, but it truly shines on fine to medium hair, as the layering intrinsically helps boost density and body.
Crucial to achieving this stunning dimension is the coloring technique, which relies on a multi-tonal application to emphasize the layers. This is not a single-process color; notice the distinct contrast between the deep, rich brown base (likely the natural color or a carefully applied root smudge) and the bright, buttery blonde highlights that dominate the outer layer and ends. Request a finely woven foilayage or a heavy balayage technique, focusing the lightest tones around the face and through the top layers. The darker roots transitioning smoothly into the lighter strands is key to achieving a low-maintenance, ‘lived-in’ feel that allows for graceful grow-out. Expert advice dictates using warm blonde and caramel tones, which catch the light beautifully and enhance the movement created by the layers. Maintaining this vibrant contrast requires a commitment to sulfate-free, color-safe products and periodic gloss treatments to keep the blonde strands shiny and free of brassiness.
Styling this textured crop focuses on enhancing the existing volume and separation. Start by applying a root-lifting spray or volumizing mousse directly to damp hair at the scalp, paying special attention to the crown area. Blow-dry the hair mostly upside down or use a diffuser to encourage natural lift, or if using a blow dryer and brush, gently use a round brush only at the roots to set the volume, allowing the ends to dry naturally or loosely. The goal is texture, not sleekness. Once dry, the hair must be styled with a lightweight finishing product. Dispense a dime-sized amount of flexible texturizing paste or run a wax-based spray through the mid-lengths and ends, using your fingers to separate and define the individual layers. Avoid heavy oils or serums that could weigh down the style. A final spritz of flexible-hold hairspray will lock the movement in place while maintaining that desirable tousled, effortless appearance.
The Polished Braided Crown Ponytail
This style is the epitome of sophisticated elegance, blending structure with soft movement. Achieving this level of mirror-like sheen and defined structure starts with meticulous preparation. Because the crown must be absolutely flawless, begin by applying a lightweight smoothing serum or a heat protectant designed to combat frizz. Use a fine-tooth comb and a boar-bristle brush to pull the hair back tight, ensuring no flyaways escape the hairline. If your natural texture is wavy or curly, a light pass with a flat iron on the top section of the hair is essential to achieve that sleek, high-gloss finish seen in the lookbook. The contrast between the impeccably smooth crown and the textured tail is what elevates this look from a simple ponytail to a red-carpet-worthy statement. The ponytail itself should be positioned low, resting just at the nape of the neck, providing a foundation for the braided accent.
The defining feature of this look is the decorative braided band that encircles the head and sits just above the ponytail base. To execute the braid seamlessly, section off a horizontal strip of hair running from temple to temple, across the back of the head, leaving the rest of the hair for the ponytail. This section should be thick enough to create a substantial braid—a standard three-strand braid works perfectly, though a flatter Dutch braid can also be used for added texture. Braid the section tightly, ensuring the tension is consistent throughout, and secure the end temporarily. Next, gather all remaining hair (including the ends of the braid) into a low ponytail and fasten it securely with a clear elastic. To finish the base, take a small, one-inch section of hair from the underside of the ponytail, wrap it tightly around the elastic until the band is completely concealed, and secure the end underneath using a bobby pin. This simple step gives the style a professional, finished look.
Finally, focus on creating the rich, voluminous waves that give the ponytail its luxurious movement. Unlike beach waves, these are defined, large, and high-shine curves. Use a large-barrel curling iron (1.5 to 2 inches) and curl the entire length of the ponytail away from the face, holding each curl for several seconds to ensure definition. After releasing the heat, allow the curls to cool completely—this setting time is crucial for longevity. Once cool, gently brush through the curls with a wide-tooth comb or fingers to meld them into soft, continuous waves, achieving that classic, Hollywood glamour finish. Lock the style in place with a flexible but strong-hold hairspray, focusing heavily on the crown and the base of the braid to guarantee day-long sleekness. This style is incredibly versatile, transitioning flawlessly from a high-power business environment to an evening gala.
The Effortlessly Chic Textured High Bun
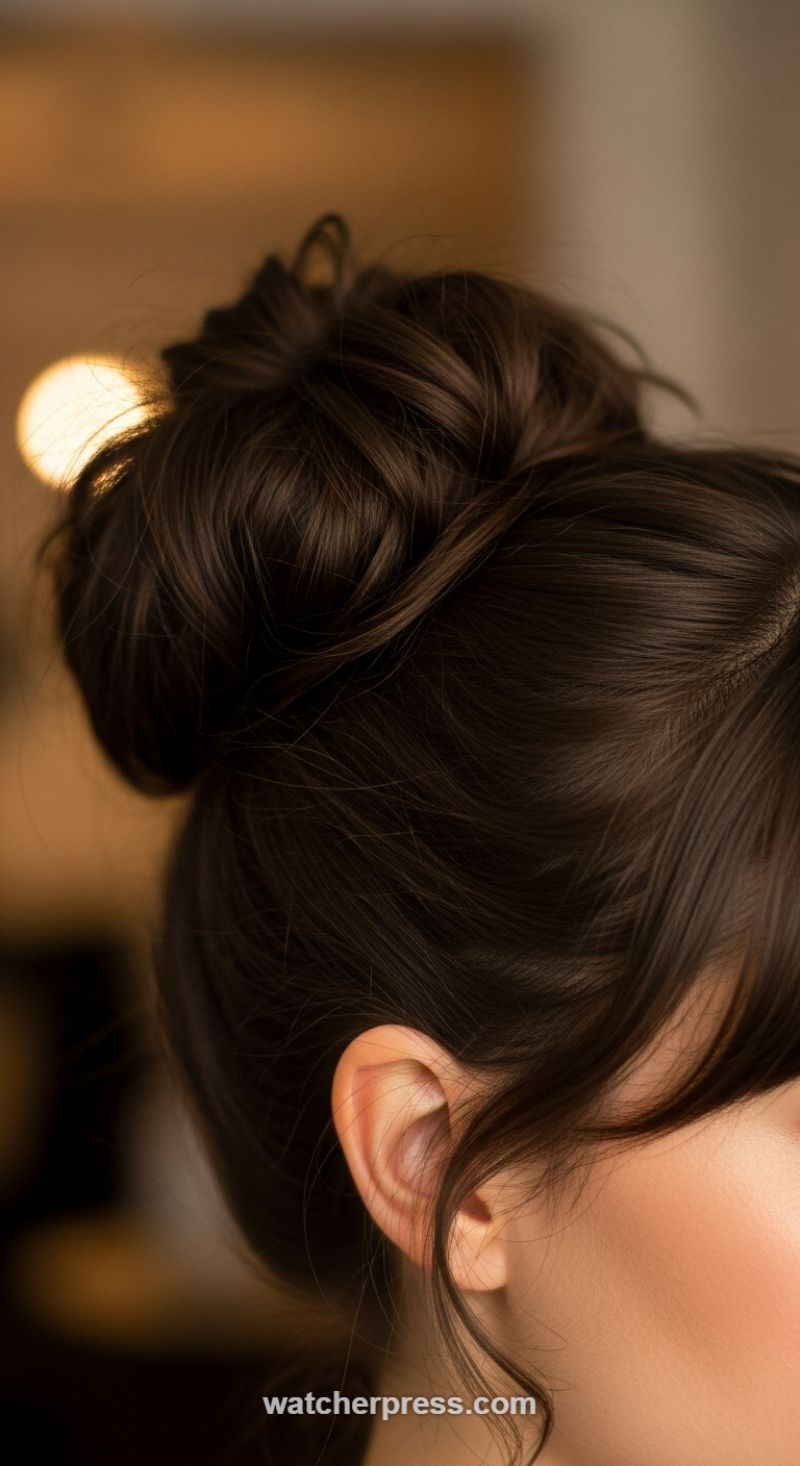
This hairstyle perfectly captures the current trend toward ‘effortless chic,’ combining the polish of an updo with the relaxed feel of an undone look. The visual emphasis is on soft texture and luxurious volume, achieved by securing the hair in a high, loose bun positioned just below the crown. The rich, dark espresso color of the hair is beautifully highlighted by the warm, blurred background lighting (a technique known as bokeh), which creates a soft halo effect and accentuates the multidimensional strands. The key to this style’s romance lies in the intentional flyaways and face-framing tendrils—note the soft, subtle waves pulled out near the ear and along the temple. This deliberate messiness prevents the style from looking severe, making it versatile enough for a wedding or an upscale casual daytime event. Expert hair analysts suggest that this look is best suited for medium to thick hair, as the inherent volume is crucial to achieving that desirable plump, rounded shape seen in the image. The foundation must be healthy, shiny hair to truly reflect the light and deliver a high-end finish.
To recreate this coveted volume and texture, start by prepping the hair. If your hair is too clean, apply a root-lifting product or dry shampoo to the length and roots; this provides the necessary grip and bulk. Gather the hair into a high ponytail near the crown—not on the very top of the head, which can look too severe, but where the bun will naturally sit high and centered when viewed from the side. Secure the ponytail with an elastic. For maximum volume, lightly back-comb the ponytail section by section before shaping the bun. To achieve the loose, textured knot, you have two primary options: either twist the hair loosely into a coil and wrap it around the base, securing with several bobby pins, or use the ‘loop and wrap’ method, where you pull the ponytail halfway through the elastic on the last loop, creating a half-loop bun, and then wrap the remaining ends around the base. The crucial step is resisting the urge to make it tight or perfect; the shape should be airy and imperfect.
The final detailing separates this look from a basic gym bun. Once the bun is pinned securely, gently tug on the outer loops of the bun with your fingers to expand the shape and increase its perceived size and texture. Next, turn your attention to the front and sides: use the tail of a comb or your fingertips to soften the hair surrounding the hairline, pulling out those delicate, face-framing tendrils (the softer the curl or wave in these pieces, the better). Ensure the hair is slightly lifted and voluminous at the crown before the bun starts; a flat crown will undermine the chic appeal. Finish the entire style with a flexible-hold hairspray rather than a firm hold, which would stiffen the texture and lose the desired softness. The contrast between the elevated, textured bun and the delicate, soft waves around the face makes this hairstyle a winning, romantic choice for any occasion requiring polished sophistication.
The Lived-In Blonde with Soft, Textured Fringe
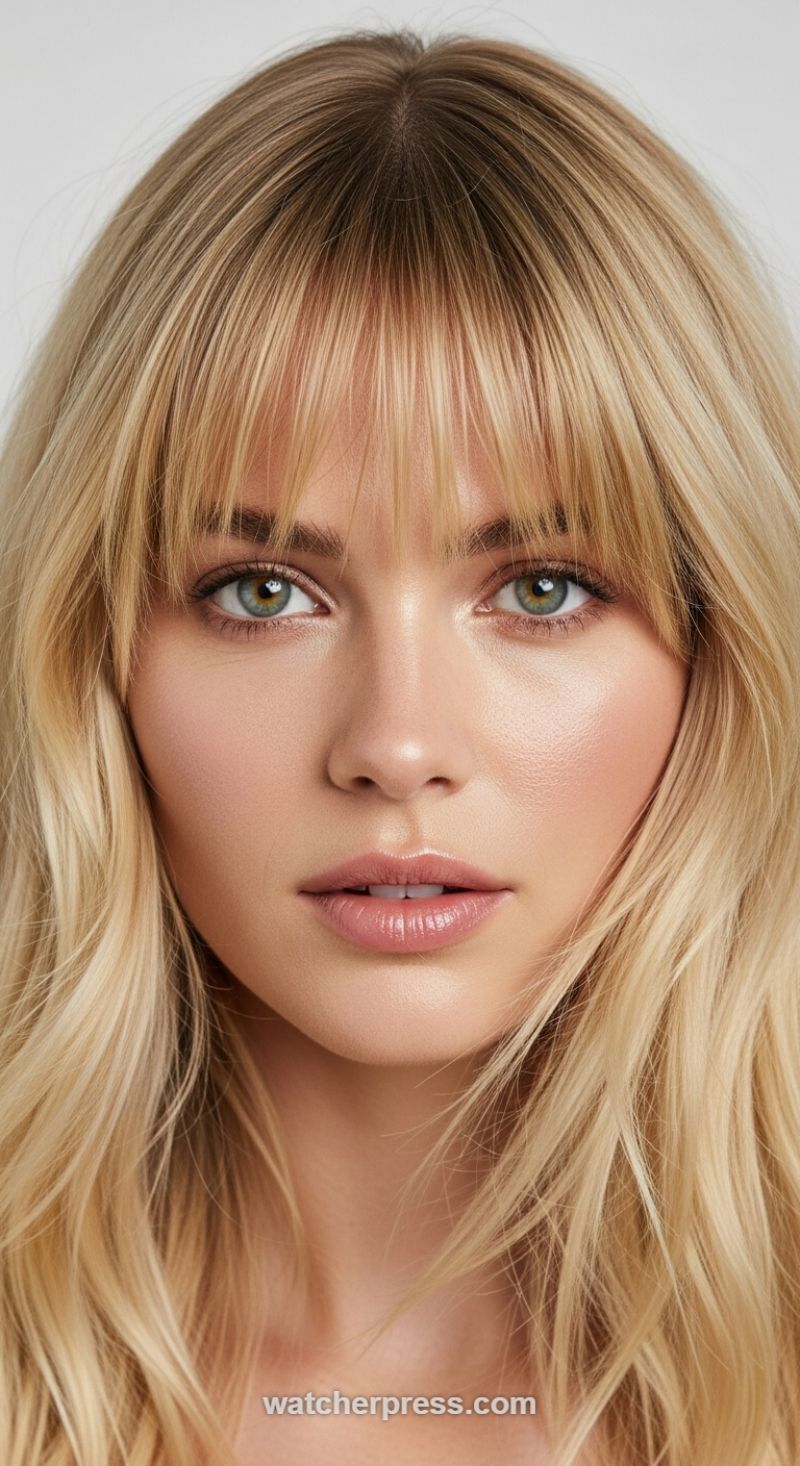
This hairstyle embodies the ultimate effortlessly chic aesthetic, blending precision cutting with a trending low-maintenance color technique. The centerpiece is the soft, textured fringe (often referred to as ‘French-girl bangs’ or a ‘bottleneck fringe’). Unlike heavy, blunt bangs, this look is achieved through strategic point-cutting to create movement and wispy ends. The goal is a light, airy perimeter that allows the forehead to peek through and the bangs to subtly split open, preventing the style from feeling too heavy or helmet-like. Ask your stylist to keep the central portion of the fringe slightly shorter, graduating the length outward so the sides gently connect into the longer face-framing layers. This ensures seamless blending and easy growth. For those new to bangs, this textured variation is far more forgiving as it can be easily swept to the side or parted down the middle without needing constant, rigorous styling.
Beyond the cut, the color work here elevates the look from simple blonde to a highly dimensional, modern masterpiece: the Root Smudge Blonde. This technique is crucial for achieving that desirable lived-in depth and reducing maintenance. The stylist applies a color close to the natural root shade, or slightly darker, and ‘smudges’ it down 1-2 inches before blending it seamlessly into the bright blonde lengths. This creates a soft gradient, eliminating harsh lines and making regrowth virtually invisible for months. The bright blonde lengths themselves are kept multi-tonal, often utilizing a combination of Balayage and fine Foilyage highlights, followed by a cool-toned ash or beige gloss to prevent brassiness. This intentional contrast between the soft dark root and the illuminated ends adds immense volume and dimension, ensuring the color looks sophisticated and expensive, not flat or artificially processed.
To style this look, minimal heat and strategic product use are key. Begin by prepping damp hair with a lightweight texturizing spray or mousse, focusing on the mid-lengths and ends. When blow-drying, use a medium round brush only on the bangs, guiding them straight down and slightly inward to create a soft bend rather than aggressive volume. For the rest of the hair, allow natural texture to emerge, or use a 1.5-inch curling iron to create loose, staggered waves, alternating the direction of the curl to avoid a uniform pattern. Finish the style by raking your fingers through the waves to break them up, and spritz the roots and fringe with a dry texture spray or dry shampoo. This adds necessary lift and ensures the fringe retains its soft, piecey separation throughout the day, perfecting that effortless, just-woke-up glamour this style is famous for.
The Architectural, High-Gloss Chignon
This hairstyle, often dubbed the Architectural Chignon or Voluminous Sculpted Bun, is the epitome of high-polish sophistication and is a perennial favorite for black-tie events and gala appearances. The key visual elements are its immense, flawlessly smooth volume and the high-shine finish that reflects light off the meticulously structured dark hair. Achieving this level of sleekness requires comprehensive preparation. Begin with freshly washed hair that has been treated with a high-quality smoothing cream and heat protectant. Blow-dry the hair using a paddle brush, ensuring every strand is dried flat and smooth, working section by section for maximum tension. The foundational step is securing an extremely taut, high ponytail at the crown or just slightly below, depending on the desired drape. If your natural hair lacks the density seen in the image, integrate extensions or a high-volume hair filler (like a sock or donut bun) into the base of the ponytail to ensure the final updo maintains its impressive silhouette.
Once the ultra-smooth ponytail is established, the sculpting phase begins. If using a bun insert, pull the ponytail through the center of the donut and spread the hair evenly around it. Alternatively, if creating a sculpted twist like the one pictured—which features a distinct swirl rather than a simple coil—you will need to use strong shaping pomades and a heavy-duty bobby pin technique. Divide the ponytail into two to three large, manageable sections. Take the first section, apply a light mist of extra-hold hairspray directly onto a fine-toothed comb, and comb the section completely smooth. Gently wrap this section around the base (or over the donut) in a wide, sweeping motion, ensuring the tension is maintained and the surface remains uncreased. Pin securely, hiding all pins inside the structure. Repeat this meticulous process with the remaining sections, strategically layering the hair to build the voluminous, swirling shape that characterizes this elegant updo.
Expert advice for perfecting this look centers on the finish and maintenance. After the bun is securely pinned, use a targeted spritz of shine spray or a high-gloss mist, avoiding excessive product that could weigh down the structure. If any flyaways appear around the nape or ear (as visible in the image context), use a clean toothbrush or a small makeup brush sprayed with extra-hold lacquer to gently press them flat against the scalp. This style demands precision and pairs exceptionally well with structured fashion, such as the sharp, contrasting white collar seen here, highlighting the neck and profile. While intricate to create, the Architectural Chignon is a timeless trend that projects unparalleled confidence and polished glamour, making it a powerful choice for any formal lookbook.
The High-Volume Textured Chignon with Fingertip Tulle Veil
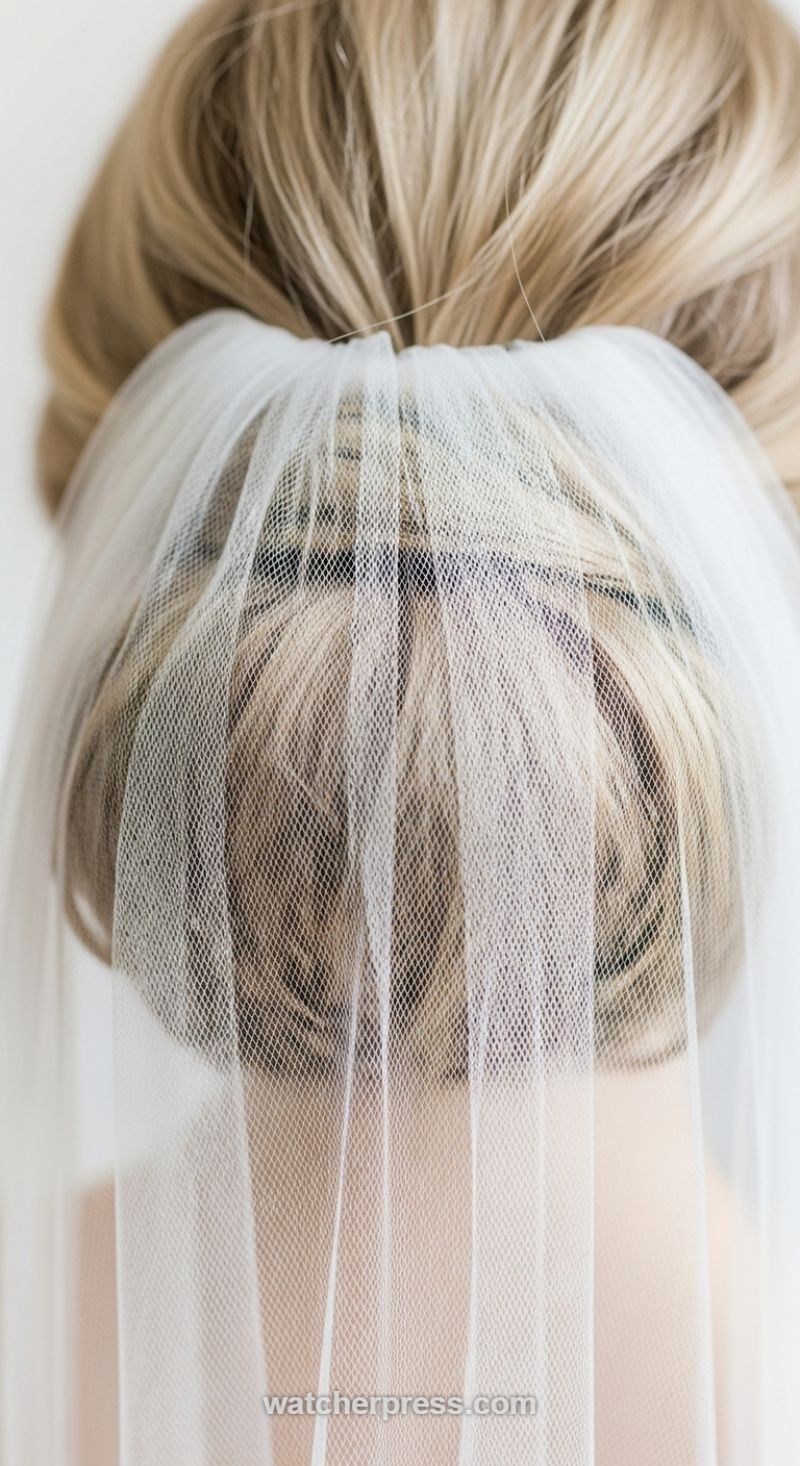
This contemporary updo is a study in controlled effortlessness, blending high volume and soft texture to create a sophisticated foundation for bridal or formal accessories. Achieving this look begins with maximizing hair volume and prepping the texture. Start by applying a heat protectant and voluminous mousse or texturizing spray to damp hair, then blow-dry using a round brush, lifting hair at the roots, or using large hot rollers to set the natural movement. Once dry, slightly backcomb the hair at the crown before gathering it into a high ponytail, positioned just below the occipital bone (the back bump of the skull). The key is to keep the hair relatively loose at the top of the head to maintain a natural, lifted look, avoiding the slicked-back tension of a traditional bun. Secure the ponytail with a clear elastic, ensuring a few delicate strands are left loose around the face and nape for a softer profile.
Once the high ponytail is secured, the next crucial step is sculpting the chignon itself. Unlike a sleek knot, this style demands heavy texture. Take the ponytail and lightly tease the entire length using a fine-toothed comb to create a pillow of volume. Then, loosely twist the teased hair, coiling it around the base of the ponytail to form a voluminous, circular bun. Anchor this shape using several long U-shaped hairpins, focusing on securing the perimeter of the bun into the hair on the scalp. The final visual element of this style is the sheer, single-layer tulle veil, which is attached directly to the top of the bun structure. The light-catching blonde hair is beautifully showcased through the fine diamond-netting of the veil, making the choice of a highly sheer material essential so the hair’s texture remains the focal point.
Expert placement of the accessory is what elevates this hairstyle. The veil, typically gathered onto a small comb, should be inserted horizontally just above the crest of the coiled hair, allowing the gathered tulle to cascade smoothly over the chignon and down the back. To ensure long-lasting security, insert the comb and then cross two small bobby pins over the teeth of the comb, driving them firmly into the structure of the bun underneath the hair. This crisscross technique ensures the accessory won’t slip, even with movement. This specific combination—the voluminous high chignon and the delicate tulle veil—is trending because it offers the formal elegance required for a wedding without appearing rigid or overly traditional, providing a modern, ethereal look perfect for the contemporary bride. For clients with finer hair, incorporating a clip-in hairpiece of a similar shade can help replicate the required volume and substance necessary for the textured bun to hold its shape throughout the entire event.
Dimensional Sun-Kissed Waves (The Golden Hour Glow)
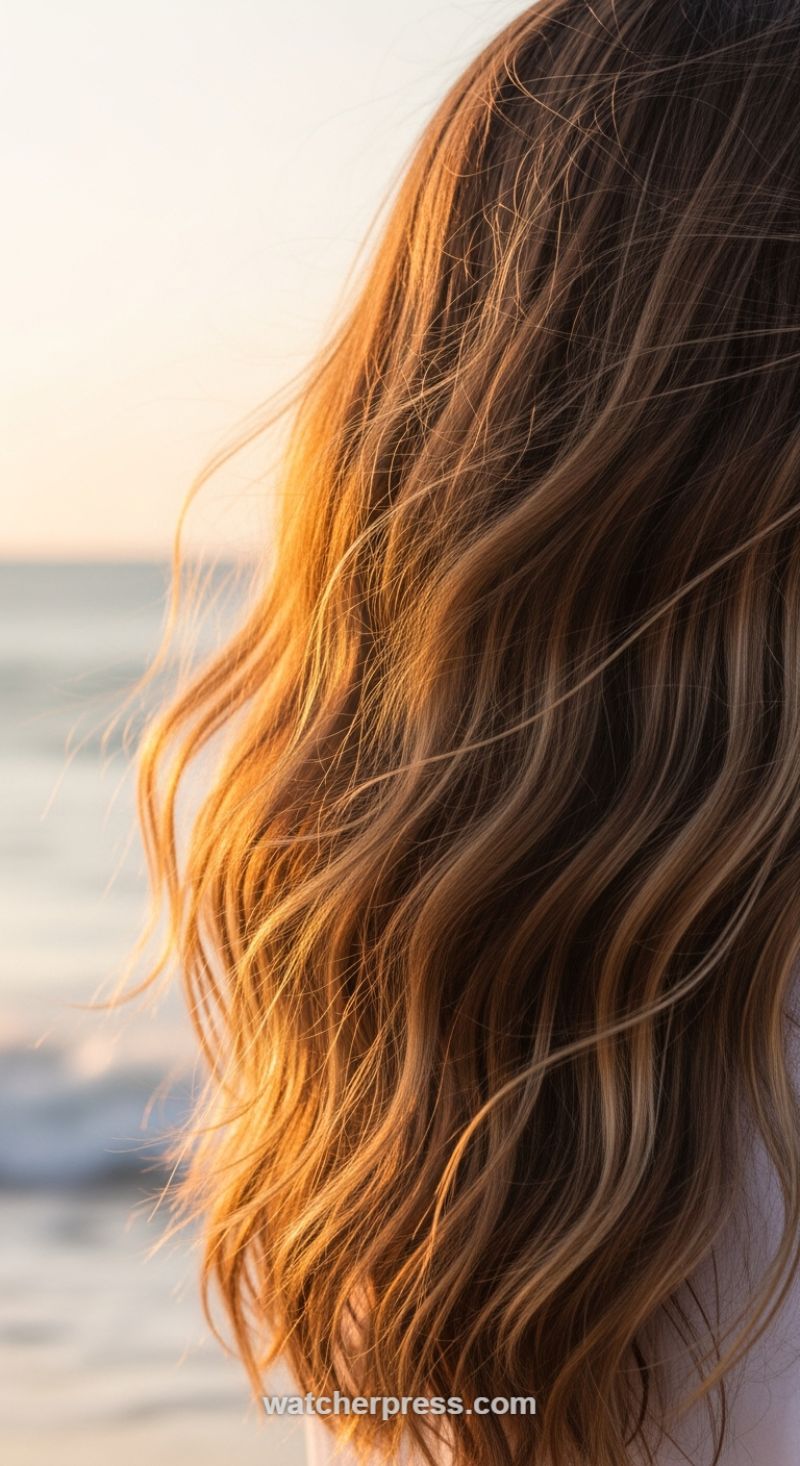
This stunning look perfectly captures the essence of sun-drenched, effortless beauty, achieved through the strategic combination of expert color placement and relaxed, natural texture. The foundation of this trend is dimensional color—a technique, typically balayage or foilyage, that mimics the way the sun naturally lightens hair. Notice the rich, dark base color that provides crucial depth at the root, which then melts seamlessly into luminous, warm golden and amber tones mid-length and through the ends. This graduation ensures a soft grow-out (making it incredibly low maintenance) while allowing the lighter strands to truly pop when illuminated, as seen in this golden hour lighting. To achieve this level of visual depth, ask your colorist for a warm-toned balayage, ensuring the lightest pieces are concentrated around the perimeter and ends to emphasize movement and create that desirable ‘halo’ effect seen from behind.
The second crucial element is the styling, focusing on soft, loose waves with an intentionally windswept, slightly undone finish. This is not a formal curl, but a relaxed, beachy bend that suggests effortless volume. To recreate this at home, start with a heat protectant and use a large-barrel curling iron (1.25 to 1.5 inches). Instead of clamping the hair, wrap large sections loosely around the barrel, ensuring you leave the last inch of the hair out straight. Crucially, vary the direction of the wraps—alternate curling towards the face and then away from the face—to prevent the sections from merging into a single, uniform wave, which is essential for that natural, tousled look. Once the entire head is styled, allow the hair to cool completely before applying a liberal dose of sea salt spray or texturizing mist. The final step is to gently run your fingers through the hair, shaking the root lightly, to break up the curls into soft waves and enhance the natural, wind-blown volume.
To maintain the vibrancy and health of this dimensional color, expert care is paramount. Because sun exposure (the inspiration for this color) can also fade the warmth, always use sulfate-free and color-safe shampoo and conditioner. Additionally, incorporating a hydrating hair oil into your routine will smooth down any frizz and enhance the reflective quality of those highlights, increasing the hair’s overall shine and luminosity. For optimal maintenance of the golden tones, schedule a toner refresh between major coloring appointments; this will keep the amber hues rich and prevent them from turning brassy or overly yellow. This specific style works wonderfully for those with medium to long hair seeking movement and depth, as the contrast between the dark and light pieces is perfectly showcased by the flowing wave pattern.
The Romantic, Heavily Pancaked Dutch Braid
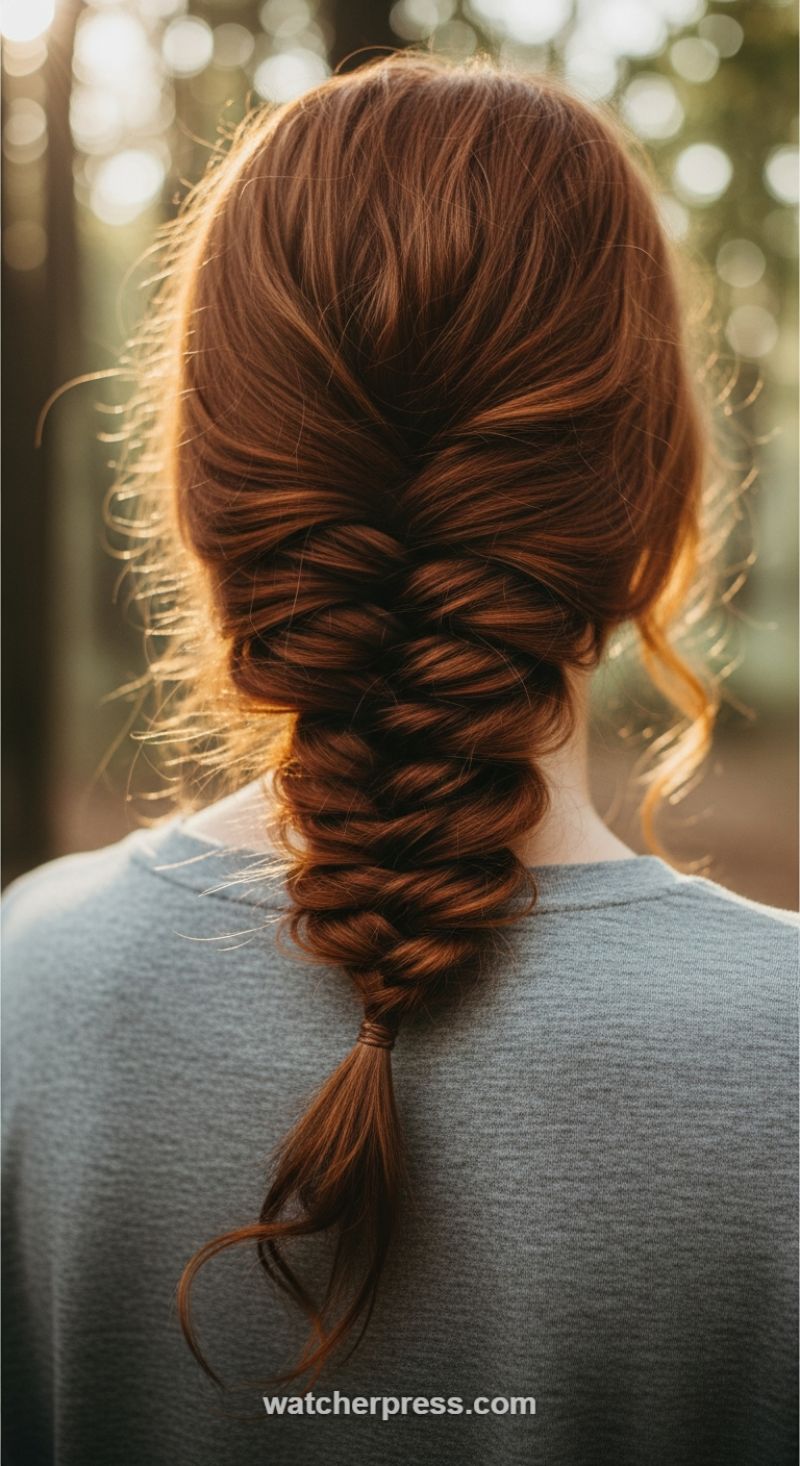
This breathtaking style leverages dramatic volume and natural texture, amplified by soft lighting, to create a deeply romantic and highly wearable look. The featured image beautifully captures the essence of this trend: rich, auburn hair woven into a loose, chunky inversion braid, often referred to as a Dutch braid. Unlike a traditional French braid, where strands cross over the center, the Dutch braid requires crossing the strands *under* the center, making the braid pop off the scalp and achieve instant dimension. To emulate this specific aesthetic, preparation is key. Start by applying a texturizing mousse or sea salt spray to dry hair, concentrating on the roots and mid-lengths. This roughs up the cuticle and provides the necessary grip to allow for aggressive ‘pancaking’ later. Begin your braid high at the crown, sectioning three equal strands, and ensure the tension is loose immediately. Feed new sections of hair into the outer strands as you cross them under the center piece, working down the back of the head until you reach the nape of the neck, maintaining a soft, yet secure, structure.
The critical step that transforms a basic Dutch braid into this highly coveted, voluminous look is the technique of ‘pancaking,’ which involves manually pulling apart the woven sections of the braid once it’s complete. Secure the base of the braid temporarily with an elastic. Starting at the top and working your way down, gently pinch and pull the outer loops of the braid outward. The goal is not just loosening, but creating wide, flat, fluffy sections that maximize the visual width of the style, giving it a chunky, mermaid-like appearance. Focus particularly on pulling apart the hair near the crown for that effortless, windswept lift showcased in the photograph. This aggressive tugging is what guarantees the high-fashion, undone aesthetic, leaving no visible tightness. Once satisfied with the volume, finish the braid just below the shoulders, securing the end with a clear elastic.
For a polished finish that still feels natural, as seen in the image, take a small section of hair from the loose ponytail, wrap it around the securing elastic, and pin it underneath to hide the tie—a professional touch that elevates the entire look. The golden backlighting in this photo highlights the style’s inherent dimension, catching on the subtle flyaways and frizz, which actually enhances the ethereal quality rather than detracting from it. For everyday wear, setting the finished style with a light-hold flexible hairspray will maintain the volume without making the braid feel stiff. This look is universally flattering, but it truly shines on hair colors with depth and dimension, like the rich auburn featured here, as the contrasting tones emphasize the detailed weave and voluminous texture achieved through expert pancaking.
The Sleek, Knotted Half-Updo (The Half-Knot)
This hairstyle embodies polished simplicity, offering a sophisticated alternative to the classic messy half-bun. The key visual element is the small, perfectly coiled knot, which is executed with such precision that it appears almost architectural. This look requires smooth, high-shine hair—often enhanced by strategic dimensional coloring, like the blonde and bronde highlights seen here, which catch the light and emphasize the hair’s movement and health. Before attempting this style, ensure your foundation is prepared. Apply a smoothing serum or light conditioning spray to the mid-lengths and ends. If your hair is naturally curly or extremely wavy, quickly pass a flat iron over the top layers to guarantee the necessary sleekness for the tight knot execution.
To recreate the half-knot, begin by sectioning off the hair. Using your fingers or a paddle brush, gather the top portion of your hair, drawing a line from the top of the ear or temple to the corresponding point on the opposite side. It is crucial to gather this section smoothly and tightly at the desired height on the crown—higher placement adds lift, while a lower placement offers a more reserved elegance. Once secured in a temporary elastic, remove the elastic and begin the knotting process. Divide the gathered ponytail into two strands and perform a tight rope braid or simple twist. Then, carefully coil this twist around the base of where the ponytail was secured. Unlike a full topknot, this knot should be compact and sleek, resting horizontally against the back of the head.
Securing the style effectively requires precision pinning. Rather than relying on a single elastic band, use several small, color-matched bobby pins to anchor the coiled twist firmly against the head. Push the pins into the base of the twist, angling them downwards toward the scalp to ensure maximum grip and invisibility. For expert longevity, finish the style with a medium-hold hairspray applied directly to the gathered hair near the temples and the surrounding hairline to tame any inevitable flyaways. This style pairs beautifully with minimalist attire, such as a crisp white collared shirt, making it ideal for professional settings, yet refined enough for evening occasions.
The Romantic Twisted Braided Crown Half-Updo
This breathtaking style perfectly merges classic elegance with bohemian softness, utilizing dimensional hair color to make the intricate braiding stand out. The look is achieved through a sophisticated half-up, half-down technique, focusing volume and texture toward the ends while maintaining control at the crown. To replicate this, start by ensuring your hair has ample preparation. For long, multi-toned hair like the example (brunette with warm, caramel highlights), curl the entire length using a 1.5-inch curling iron before beginning the braidwork. This pre-curling ensures that the loose sections drape beautifully and prevents the finished look from appearing stiff. Apply a texture spray or dry shampoo to the roots and mid-lengths to add grip and fullness, which is essential for achieving the plush, voluminous appearance of the braids and the effortless finish of the cascading waves.
The defining feature of this look is the braided crown, which is most effectively created using the Dutch braiding technique (braiding under rather than over) as it allows the braid to pop off the scalp. Begin by sectioning off the hair from ear to ear across the top of the head. Starting just above one ear, initiate a Dutch braid, feeding in small sections of hair only from the top/crown portion as you work your way back toward the occipital bone. The key here is braiding loosely; you want the finished crown to look soft and voluminous, not tight against the scalp. Secure the braid temporarily when you reach the center back, then repeat the process identically on the opposite side. Once both braids meet, secure the two ends together using a small, clear elastic band. Expert tip: After securing, gently tug at the outer loops of each braid (known as ‘pancaking’) to fatten them up and hide any imperfections, creating a lush, ribbon-like effect.
To complete the refined half-updo, the point where the braids meet is concealed with a neat twist. Gather the remaining hair from the crown that wasn’t incorporated into the braids, creating a small, loose ponytail that sits just above the secured elastic. Gently twist this ponytail section inward or create a simple knot around the area where the braids meet, pinning the resulting shape securely with bobby pins. This intricate twist adds a polished focal point and cleanly transitions the eye from the structured braids to the flowing waves. Once secured, mist the entire style with a flexible hold hairspray, paying special attention to the braids and the twisted knot to ensure they hold their shape throughout the day. This hairstyle is ideal for events ranging from wedding parties to formal dinners, offering timeless romance and feminine detail.
The Dimensional Bouncy Layered Cut (The Butterfly Blowout)
This stunning style is the quintessential modern interpretation of 90s volume, often referred to as the ‘Butterfly Cut’ or a heavily layered shag. The visual elements are dominated by dramatic, cascading layers designed specifically to maximize bounce and movement without sacrificing overall length. Notice how the layers are cut strategically to frame the face, starting just below the cheekbones and jawline, blending seamlessly into long curtain bangs that sweep softly away from the face. This technique removes weight from the interior, allowing the hair to lift effortlessly at the crown and sides, giving the illusion of immense volume and thickness. The key to this look’s success is the precision of the cut—ask your stylist for heavy, stacked layers that are blended but clearly defined, ensuring the shortest layers are long enough to be swept back during styling.
Achieving this level of polished, bouncy volume is crucial and requires dedicated heat styling, typically a modern rendition of the classic professional blow dry. Start with freshly washed hair prepped with a volumizing mousse at the roots and a heat protectant spray throughout the mid-lengths and ends. The iconic flipped-out or curled-under shape is best achieved using a large round brush and a powerful hairdryer, or by utilizing a modern styling tool like an air styler (e.g., Dyson Airwrap or Shark FlexStyle). When drying, always over-direct the front sections and layers back and away from the face, curling the ends of each section up and under for that signature curved flow. For maximum longevity and bounce, roll the curled sections and secure them with clips or rollers until the hair is completely cool before releasing and shaking the hair out.
Expert advice emphasizes the importance of color dimension to enhance the visual texture of these layers. The model showcases a beautiful blend of a deep neutral root transitioning into warm, honey-toned balayage or foilyage highlights. These multi-tonal streaks are applied strategically to catch the light, emphasizing the movement of the layers and adding depth that flatters the face-framing sections. Maintenance for the cut involves regular dusting every 8 to 10 weeks to keep the ends crisp and the layers defined. For color upkeep, use sulfate-free shampoos and incorporate a gloss treatment between highlight sessions to maintain the warmth and vibrancy of the caramel tones, ensuring the hairstyle retains its luxurious, high-definition finish.