Discover 20+ stunning manicure trends dominating Instagram now! From chic French tips and minimalist designs to bold chrome and matte colors, find your next must-try nail inspiration.
The Opalescent ‘Icy Nude’ Manicure
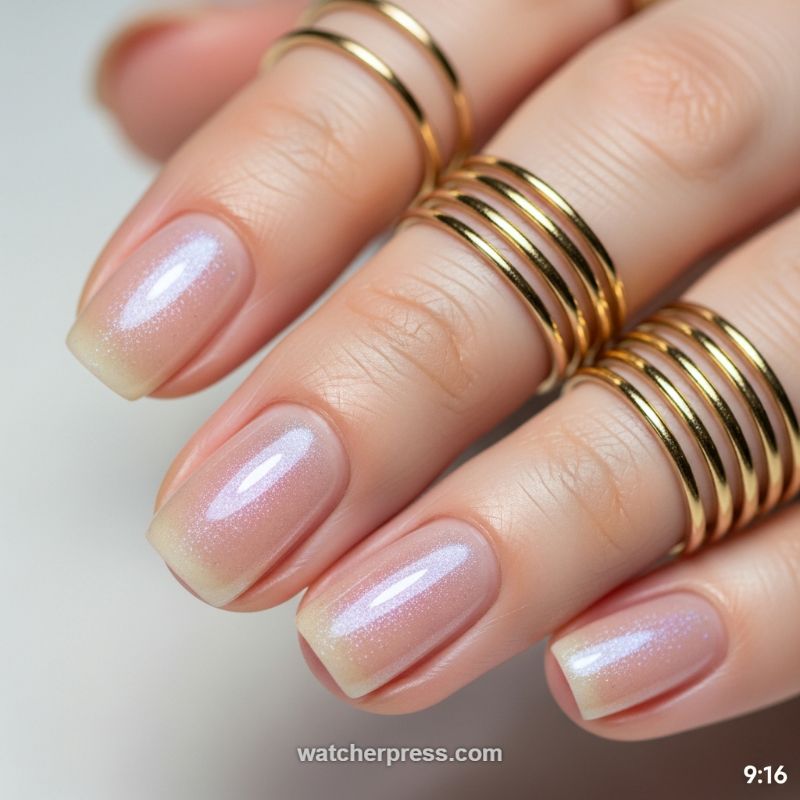
The era of high-saturation colors is taking a backseat to the ethereal, sheer, and highly reflective manicure often dubbed the ‘Icy Nude’ or ‘Glazed Donut’ look. This trend captures light beautifully, offering a sophisticated shimmer that feels both understated and luxurious. The visual appeal lies in its deceptively simple composition: a sheer, milky pink or nude base that mimics healthy nail beds, overlaid with a powerful, finely milled opalescent or white chrome shift. The result is a luminous, almost wet-look finish with a distinct flash of pink, blue, or purple when the light catches the nail. To perfect this style, ensure your nail shape is a clean, gentle squoval or rounded edge, allowing the natural translucence of the free edge to peek through subtly, adding to the overall organic elegance of the manicure.
To recreate this sought-after pearlescent effect, proper preparation is key. Begin with meticulous cuticle care and shaping, as the sheer nature of the polish highlights imperfections. Apply one thin layer of a semi-sheer milky white or pale pink jelly polish as your base color. Once cured (if using gel), the magic happens with the shimmer application. While some nail techs use highly pigmented shimmer top coats, the most intense and authentic ‘glazed’ look is achieved using a non-wipe top coat followed immediately by rubbing in a holographic or white iridescent chrome powder, such as Pearl Pigment, with a soft silicone tool or eyeshadow applicator. The powder must be applied evenly and buffed to a seamless mirror shine before the final sealing top coat is applied and cured. Remember that thin, multiple coats are always superior to thick, uneven layers, especially when working with sheer bases.
Expert manicurists emphasize that the longevity and shine of this trend depend heavily on the quality of the final seal and aftercare. Opt for a highly durable, high-gloss UV top coat to lock in the chrome powder and maximize the reflective surface. For expert styling, this manicure pairs beautifully with minimalist gold jewelry, like the stacked gold bands seen here, enhancing the subtle warmth of the nude base against the cool flash of the shimmer. To maintain the ultimate sheen between salon visits, religiously apply cuticle oil several times a day and avoid harsh chemicals or excessive water exposure without gloves. The Icy Nude is a versatile, high-impact trend that elevates any look, proving that sometimes, the most stunning statement is made with refined subtlety.
Rich Chocolate Manicure with Subtle Crystal Accent
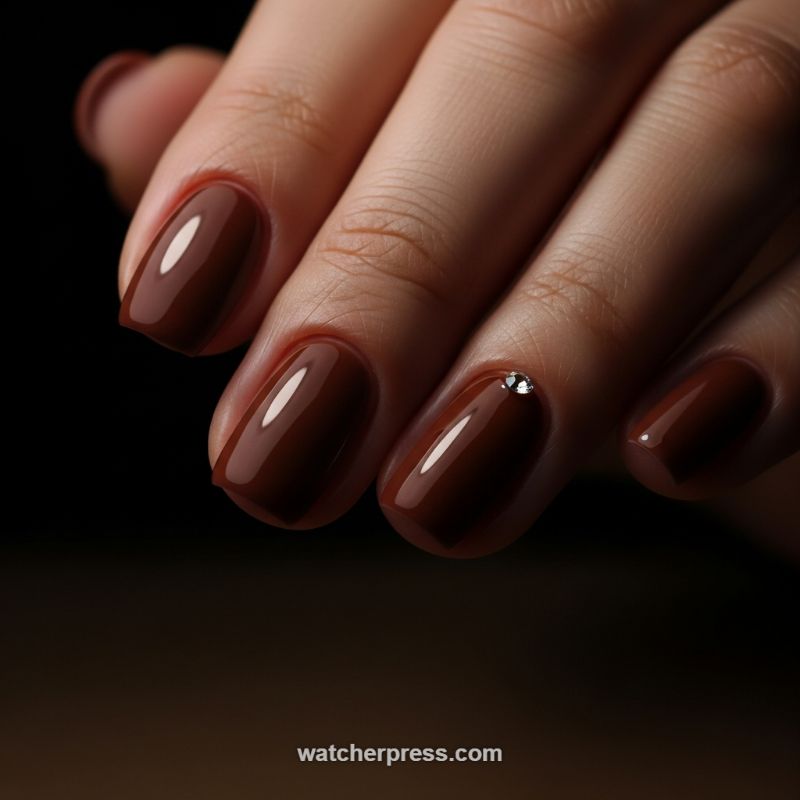
This manicure exemplifies sophisticated minimalism, proving that monochrome doesn’t have to be boring. The core appeal lies in the deep, highly pigmented chocolate brown lacquer—a shade that transcends seasons but is particularly popular during fall and winter months for its warm, grounded richness. This specific hue provides a luxurious, almost leather-like depth, offering an elegant alternative to classic reds or blacks. The high-gloss finish is crucial here; it catches the light, creating dramatic reflections that emphasize the nail shape and the flawless application. It’s the perfect statement for those who favor muted, powerful colors over bright pops, making it incredibly versatile for both professional settings and evening wear.
Achieving this level of mirror-like shine requires meticulous preparation and application, ideally using a high-quality gel system. Start by ensuring a perfect nail foundation: shape the nails into a gentle squoval and flawlessly push back and trim the cuticles, as imperfections are magnified by the deep, reflective color. For the lacquer application, use a highly opaque formula. Two thin, even coats are essential to prevent streaking and ensure the color cures completely (if using gel). The key to the ‘liquid glass’ effect is the top coat; opt for a non-wipe, self-leveling high-shine top coat. Apply it generously enough to create a smooth dome effect without flooding the sidewalls, then cure properly to lock in that flawless reflection.
The defining element of this design is the single, deliberate crystal placement. Unlike maximalist trends, this look uses one tiny, high-quality rhinestone placed strategically near the cuticle line of the ring finger. This placement draws the eye and offers a refined sparkle without distracting from the overall richness of the brown polish. Expert tip: use a clear builder gel or specialized rhinestone glue to securely affix the stone. Once the stone is placed, use a fine detail brush dipped in top coat to encapsulate the base of the crystal (avoid brushing over the top facets, which dulls the sparkle). This ensures maximum longevity and prevents snagging, completing a look that is both deeply elegant and subtly dazzling.
The Vertical Gold Stripe: Minimalist Manicure for Maximum Impact
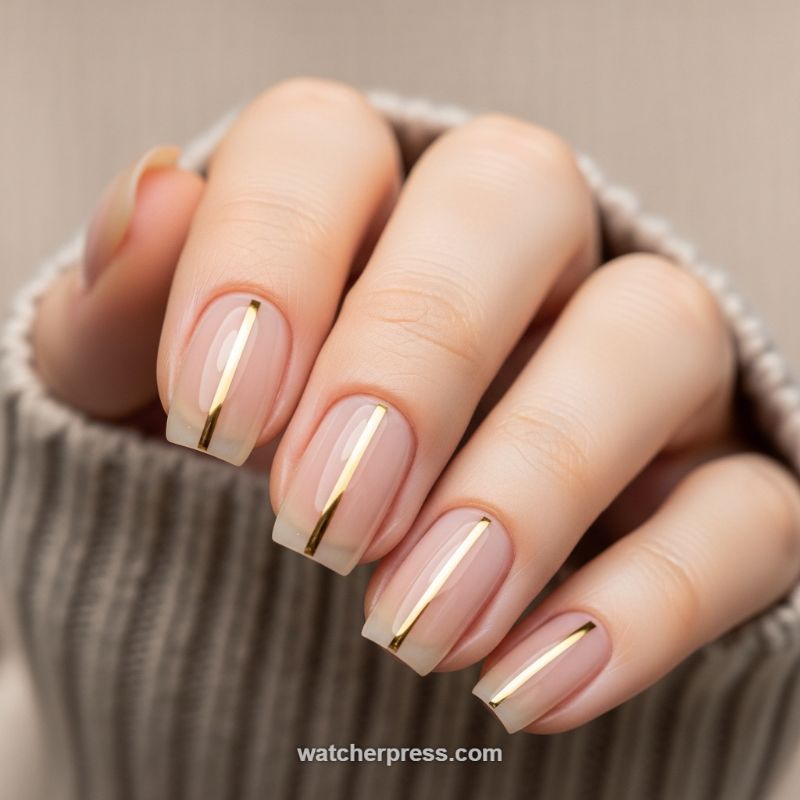
This captivating nail design brilliantly marries the ‘clean girl aesthetic’ with a touch of opulent glamour. The foundation of this look is a perfectly executed sheer, milky nude or pale pink base coat, offering a sophisticated, polished look without being overly opaque. What elevates this simple canvas is the addition of a single, razor-thin vertical gold stripe running down the absolute center of each nail plate. This placement is strategically brilliant; visually, the straight vertical line elongates the nail bed, making shorter nails appear longer and more elegant—a key trick in minimalist nail art. To recreate this high-end style, ensure your nails are filed into a clean, smooth shape (squoval or soft square works best), and prep the base with two thin coats of a high-quality sheer polish to achieve that coveted jelly-like finish.
Executing the perfect gold stripe requires precision, whether you opt for paint or striping tape. For those favoring nail art polish, select a highly pigmented metallic gold and use an ultra-fine liner brush, holding it steady and applying consistent pressure from cuticle to tip. If precision painting proves too challenging, gold metallic striping tape is your best ally. Wait until your base coat is completely dry (or cured if using gel). Unroll a piece of tape, lay it gently over the center line of the nail, and use clean, sharp cuticle scissors to trim the excess precisely at the cuticle and the free edge. The critical steps here are centering the line meticulously—using a dot of polish at the top and bottom as guides can help—and ensuring the tape is fully adhered, especially at the edges, to prevent lifting.
Longevity and high shine are non-negotiable for a premium look like this. Once the gold stripe is in place, seal the entire design with a high-gloss, quick-drying topcoat. Apply the topcoat generously, ensuring you encapsulate the edges of the gold stripe—this is essential for protecting the metallic element, particularly if you used tape, and maximizing chip resistance. This particular trend is highly versatile and transcends seasons; for variations, consider swapping the gold for rose gold or silver, or experimenting with a contrasting matte topcoat over the sheer base while leaving the stripe glossy. This minimalist approach offers an incredibly chic, polished manicure that transitions effortlessly from the office to an evening out, confirming why it’s dominating Instagram feeds.
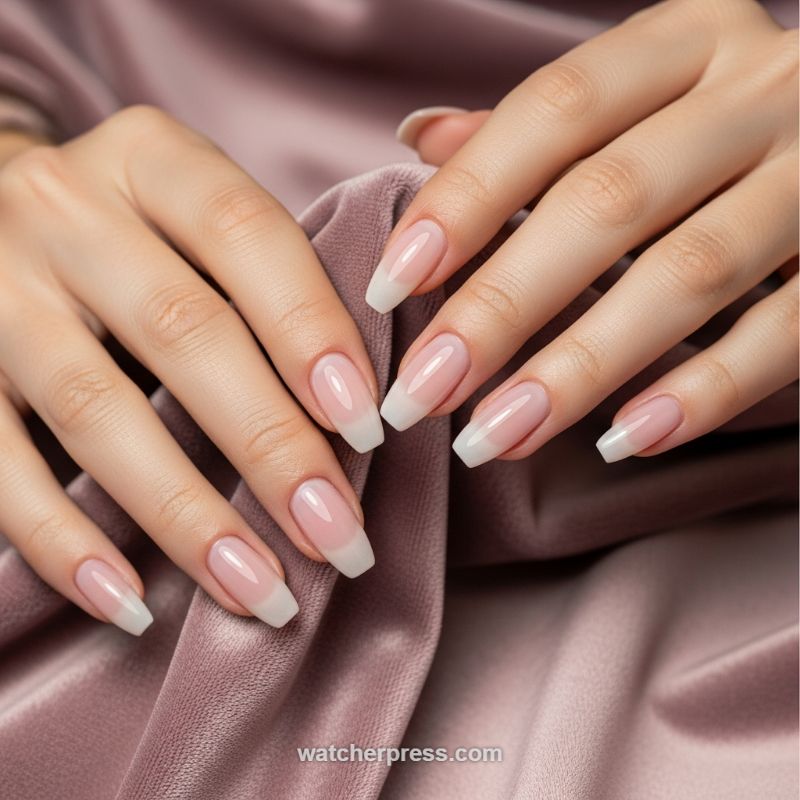
The Pearlescent Double-Lined French Manicure
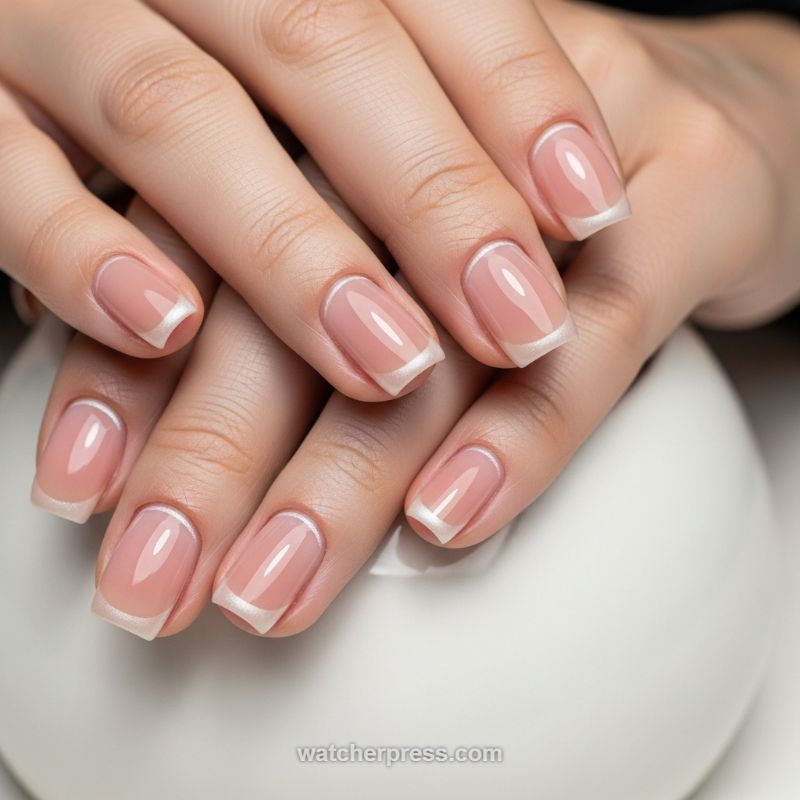
This manicure trend elevates the timeless French tip into the realm of modern luxury, making it a favorite among those who appreciate sophisticated detail. The foundation of this look is a beautiful, sheer milky pink or nude jelly polish, allowing the natural nail bed to shine through while providing a clean, healthy base. The shape is typically a well-maintained squoval (square with rounded edges) or a soft square, offering maximum elegance without the maintenance of sharp points. The crucial innovation lies in the tips: the design ditches the harsh, opaque white for a soft, luminous pearlized or silvery-white polish. This subtle shimmer, applied meticulously in a micro-French style, catches the light beautifully, giving the illusion of a sleek, expensive “glazed” finish, perfectly aligning with current demands for quiet luxury aesthetics.
Achieving this precision, double-lined look requires specialized technique and high-quality polishes. After applying a base coat and 1-2 coats of the sheer pink jelly polish, the next step is the micro-French tip application. Use a fine-tipped striping brush dipped in a chrome or pearl-finish gel polish to create a delicate, thin smile line across the free edge. The key technical detail that transforms this manicure is the addition of the lunula accent, often referred to as the “reverse French.” Using the exact same pearlescent polish, carefully trace an extremely thin line just above the cuticle area (the lunula). This requires a steady hand and a super-fine detail brush, ensuring the line is symmetrical and doesn’t bleed into the sidewalls. Because the precision is the main feature of the design, curing or sealing each layer immediately is essential to maintain perfectly crisp edges.
For maximum impact and wearability, expert technicians advise selecting a high-pigment pearlescent polish that reflects light without looking chunky or glittery—think smooth, finely milled chrome powder or iridescent gel. Because this design relies heavily on light reflection, finishing with a high-shine, non-wipe top coat is mandatory to enhance the glass-like effect of the nude base and the shimmer details. To ensure longevity and prevent chipping, always remember to “wrap the tip” of the nail with both the base coat and the top coat. This sophisticated design is highly popular because it’s appropriate for any occasion, from boardroom meetings to elegant gatherings, offering a subtle yet impactful detail that feels contemporary while remaining utterly timeless.
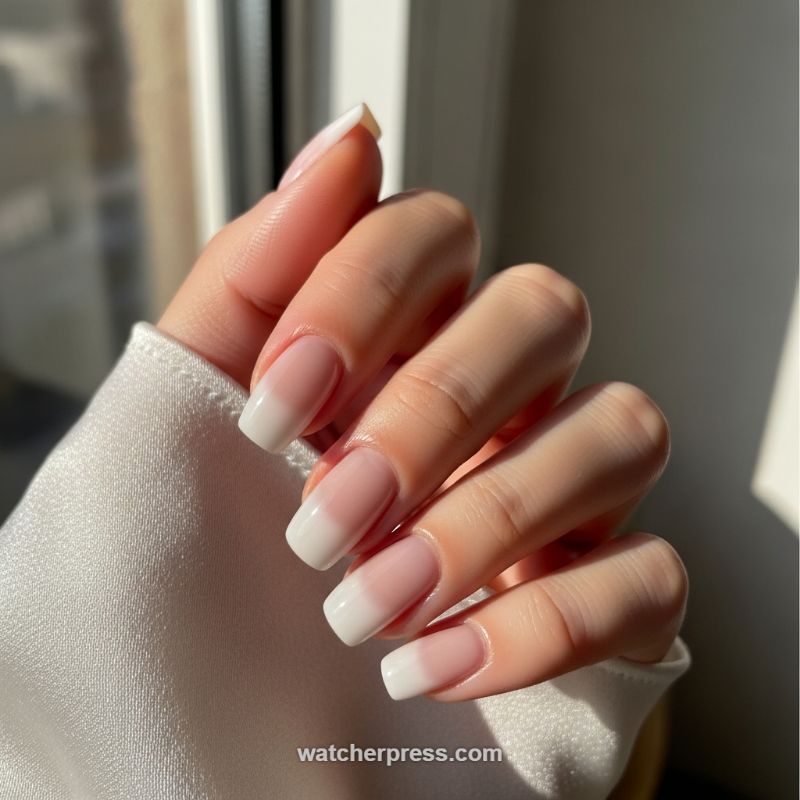
The Elegant Soft Focus French Tip
This sophisticated manicure trend elevates the timeless French tip into a realm of quiet luxury, dominating social media feeds with its refined simplicity. As seen in the image, this style utilizes a long, tapered square or coffin shape, which provides the necessary canvas for the look. The core difference from the traditional French manicure lies in the color palette: a sheer, milky pink or nude is used for the base, giving the natural nail bed a healthy, blurred filter effect. This translucent foundation allows light to penetrate, resulting in a luminous, glass-like finish that pairs beautifully with the soft, opaque white tip. The overall effect is understated elegance, making it incredibly versatile for any occasion while maintaining a high-fashion aesthetic.
To achieve this immaculate Soft Focus French look, begin by ensuring comprehensive nail preparation, including shaping the nails into a consistent long coffin or ballerina shape and meticulously pushing back and cleaning the cuticles. For the base, apply two thin, self-leveling coats of a milky pink builder gel or a highly pigmented sheer nude polish—the goal is to camouflage imperfections without masking the natural nail color entirely. Once the base is cured or dry, select an off-white or soft ivory polish (rather than a harsh, bright white) for the tips. Using a thin, flexible liner brush, carefully paint the smile line. For longer nails like these, the smile line should be elongated and slightly deeper than a standard French tip to visually complement the shape and maintain proportions. Focus on achieving crisp, clean edges on the tip while ensuring the white color saturation is even.
Expert structural integrity is vital when working with this extended length and shape. If clients are prone to breakage, utilize structured soft gel overlays or lightweight acrylic enhancements to reinforce the corners and free edge, preventing chipping and maintaining that precise coffin angle. A crucial maintenance tip for this specific design is the placement of the tip; as the nail grows out, the smile line will shift forward, which can disrupt the aesthetics. Advise clients on scheduled fills every three to four weeks to adjust the foundation and maintain the ideal positioning of the French tip relative to the cuticle line. Finish the entire manicure with a premium, high-shine, non-yellowing top coat to lock in the glassy finish and further enhance the luxurious dimension of the milky base.
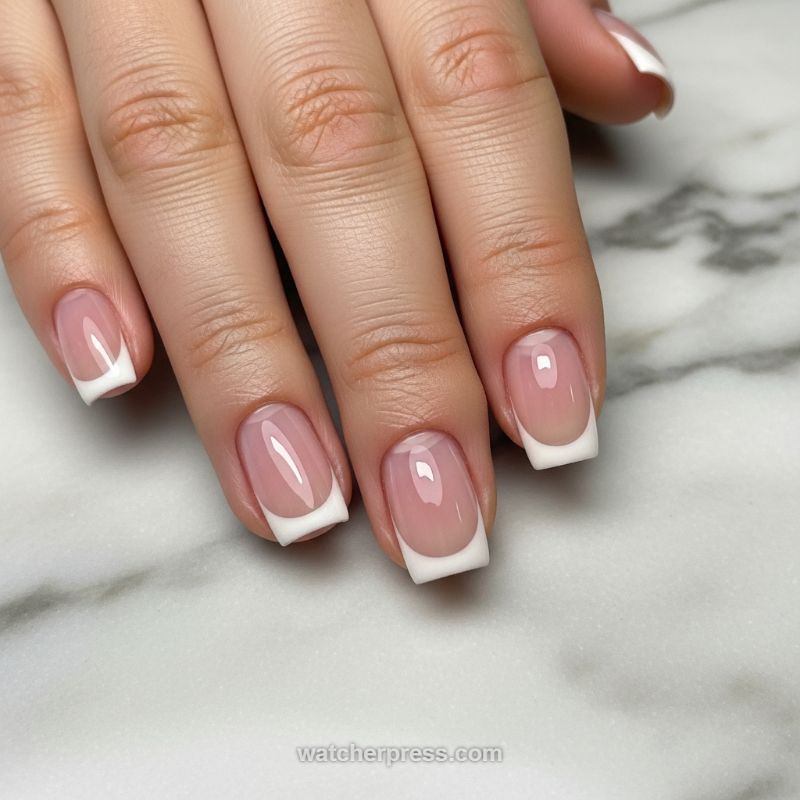
The Timeless French Manicure: A Modern Square Revival
The image perfectly captures the stunning revival of the classic French manicure, transforming a sometimes dated look into a sleek, modern, and highly sought-after trend. This iteration demands precision and clean execution, favoring a refined square or ‘squoval’ shape that provides a larger canvas for the crisp white tip. The base color is key here; instead of an overtly opaque pink, the trend leans toward a translucent milky nude or a sheer blush tone, allowing the natural nail bed to peek through, creating a healthier, more expensive-looking finish. For salon-quality results, ensure your technician meticulously preps the nail bed and cuticles—the flawless, clear skin surrounding the nail plate, as visible in this sunlit photo, is half the battle. This style succeeds because it combines minimal effort in color selection (classic white and nude) with maximum polish and structural perfection, making it incredibly versatile for any occasion.
Achieving this flawless tip requires expert technique, especially when working on a medium-length square nail. The goal is to create a perfectly straight, yet subtly rounded, ‘smile line’ at the tip. For a DIY approach, start by applying two thin coats of your chosen sheer base color, allowing complete drying time between each. To tackle the tip, a highly pigmented white gel or traditional polish is essential. Experts recommend using a dedicated, curved French tip brush, or a fine-tipped striping brush, which allows you to paint the line in three short, connecting strokes: one stroke from the left corner to the center, another from the right corner to the center, and a final sweep to join them perfectly. Alternatively, for those struggling with freehand application, French manicure stencils or dipping methods can provide the necessary clean line, though they often require additional cleanup with a brush dipped in pure acetone for the sharpest edges.
To ensure this elegant look lasts, professional advice emphasizes the sealing process. After the white tip and any artistic correction is complete, apply a resilient, non-yellowing, high-gloss top coat, making sure to ‘cap the edge’ of the nail. Capping the free edge—painting the top coat slightly under and over the very tip—is crucial for preventing chipping and premature wear. Because the French manicure visually highlights the tips, longevity is paramount. Maintain this pristine appearance by regularly moisturizing the cuticles with oil, especially since the bright light in the image emphasizes the healthy shine and hydration. This modernized square French tip is more than just a passing trend; it is the ultimate neutral, offering sophisticated structure and timeless appeal that elevates any hand to red-carpet readiness.
Matte Taupe Nails: The Sophisticated Minimalist Statement

The days of high-gloss finishes ruling the manicure scene are being beautifully challenged by the rise of luxurious, velvety matte textures, perfectly exemplified by this stunning taupe look. This manicure captures the essence of sophisticated minimalism—a trend that dominates Instagram feeds due to its effortless elegance and versatility. The specific shade seen here is a muted, dusty taupe or mauve-nude, hitting the sweet spot between a traditional neutral and a subtle pop of color. The key visual elements include a flawless, opaque color application paired with a matte top coat that instantly elevates the shade, making it appear rich and suede-like. Furthermore, the nails are shaped into a contemporary squoval design (square edges slightly softened), a shape known for being durable, universally flattering, and highly complementary to short-to-medium lengths, emphasizing a clean and polished aesthetic.
Achieving this elevated matte look requires precision, starting with impeccable preparation. First, shape the nails uniformly using a file, ensuring the squoval corners are balanced and the length is consistent across all fingers. Push back and gently trim any excess cuticle, then buff the nail plate lightly to create a smooth canvas, which is essential for a streak-free matte finish. Apply a quality base coat to protect the natural nail. For the color, select a highly pigmented taupe polish; depending on your skin tone, you might opt for a shade with warmer (more brown/beige) or cooler (more gray/mauve) undertones to ensure the color enhances your complexion. Apply two thin, even coats of color, allowing each coat to dry fully. The final and most critical step is the matte top coat. Apply this coat carefully and generously over the cured color. Unlike high-gloss coats, matte finishes highlight any imperfections, so ensure the application is swift and even for that professional, flawless velvet texture.
Maintaining the integrity of a matte manicure is crucial, as the texture can quickly absorb oils and become shiny. Expert tip: Avoid applying heavy cuticle oils or hand creams immediately after the manicure is complete. If you must use oils, apply them sparingly only to the skin surrounding the nail, not directly on the matte surface. This neutral taupe shade is a fantastic chameleon, pairing effortlessly with gold or silver jewelry. Consider stacking delicate rings to draw attention to the sophisticated finish. This monochromatic, medium-length matte look is not just a trend; it’s a staple of modern luxury, offering a refined manicure that transitions seamlessly from professional settings to evening wear, proving that sometimes, the biggest statement is made through polished simplicity.
The Elevated Square French Manicure: Clean Girl Perfection
While the classic French manicure never truly disappears, its current iteration elevates the style far beyond the acrylic sets of the 90s. This modern version, often referred to as the ‘Milky French’ or ‘Structured French,’ defines the sleek ‘Clean Girl’ aesthetic dominating social media. The look is characterized by its perfectly constructed shape—a short to medium square or soft squoval—and its flawless high-gloss finish. The base uses a sheer, milky pink or nude builder gel, which not only provides structural strength and longevity but also gives the nail bed a subtly polished, healthy appearance. This structure is crucial for achieving the sought-after light reflection, or ‘donut glaze’ effect, that makes the manicure look so expensive. Contrast this translucent base with an impeccably crisp and bright white tip, ensuring the smile line is a smooth, shallow curve that complements the nail bed’s natural shape without dipping too deep at the sides.
Achieving this level of precision requires skilled technique, particularly in mastering the balance of the base and the precision of the tip. For maximum durability and a smooth apex, start with a self-leveling builder gel in a soft pink hue; this provides the foundational structure. Once cured, the key challenge is drawing the perfect, symmetrical smile line. Professional nail technicians often use a highly pigmented, opaque white gel polish and a fine, specialized striping brush to hand-paint the crescent shape. Alternatively, for speed and consistency, a reverse French technique using acrylic or hard gel can sculpt the white tip first, followed by overlaying the milky nude shade. Expert advice dictates that the width of the white tip should be consistent across all fingers, generally remaining thin—no more than 2-3mm—to keep the look sophisticated and modern. A slightly thicker application can quickly revert the style to an outdated appearance.
To maintain the luxurious, clean finish, proper aftercare and finishing touches are vital. Always seal the manicure with a non-yellowing, high-shine gel top coat, ensuring it encapsulates the entire nail structure for maximum longevity. Pay special attention to cuticle care; pushing back and moisturizing the cuticles frames the manicure beautifully and accentuates the clean aesthetic. For clients with warmer skin tones, experiment with bases that lean slightly peach or caramel rather than cool pinks to ensure the most flattering transition. This trend proves that sometimes, the simplest looks are the most impactful, requiring the highest level of execution to achieve perfection. With proper application and maintenance, this structured French mani can last flawlessly for three to four weeks.
The Elevated Negative Space Pinstripe Manicure
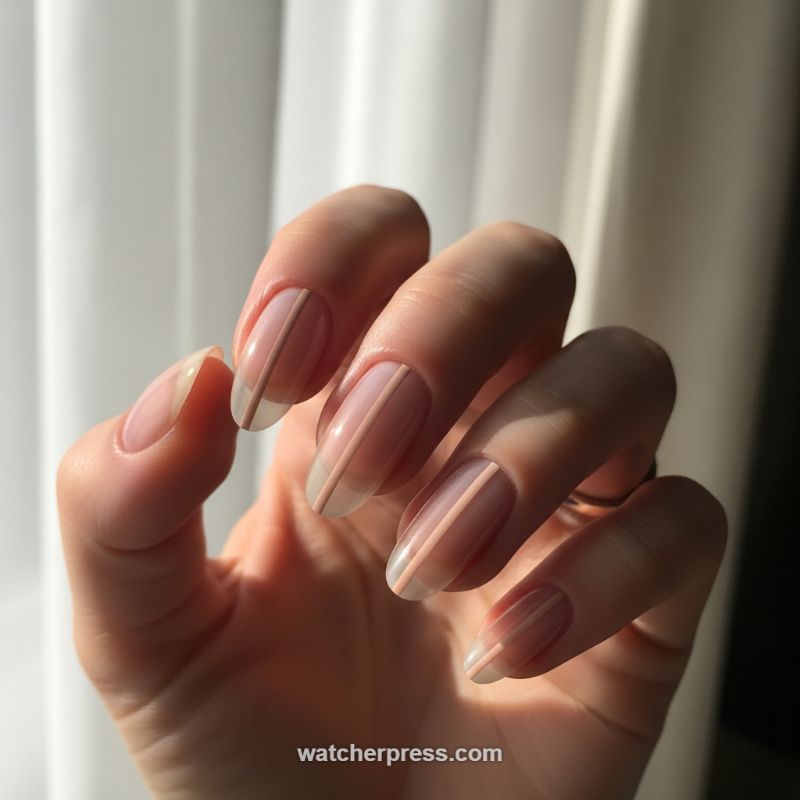
This trend marries minimalist chic with modern geometry, offering a sophisticated take on the classic nude manicure. The base of this design is essential: a long, perfectly shaped nail (typically almond or oval) coated in a sheer, milky pink or soft beige polish. This transparent foundation creates the ‘negative space’ effect, allowing the natural nail bed to show through, achieving a healthy, clean aesthetic reminiscent of luxury ‘no-makeup makeup.’ The focal point is the single, perfectly straight vertical stripe applied down the dead center of the nail plate. This stripe, usually painted in an opaque, warm taupe or nude, acts as a subtle yet powerful graphic detail, elongating the fingers and adding a layer of high-fashion structure to an otherwise simple look. What elevates this design above basic striping is the deliberate placement and high-gloss finish, ensuring the line looks painted directly onto glass.
To recreate this precise look, preparation is key. After filing the nails into a uniform almond shape, apply a ridge-filling base coat followed by one or two very thin layers of a sheer jelly polish, curing or drying thoroughly between coats. The striping process requires a steady hand and a high-quality, ultra-fine detailing brush, often called a striping brush. Dip the brush into your chosen opaque color—a highly pigmented shade like warm terracotta, camel, or a deep chocolate brown works best for maximum contrast. Start the line application at the cuticle line, keeping the brush perpendicular to the nail surface, and drag it in one slow, consistent motion straight towards the free edge, ensuring the line remains perfectly centered. Expert tip: brace your working hand against the table or against your non-dominant hand to minimize any tremor, ensuring the pinstripe is flawlessly crisp from start to finish.
For a truly Instagram-worthy result, attention must be paid to the details surrounding the line. Ensure the base color stops cleanly at the cuticle, and that the vertical line itself has smooth, unblended edges. For longevity and maximum visual impact, seal the design with a thick layer of high-shine, non-yellowing top coat. This gloss finish is crucial as it enhances the glass-like quality of the sheer base, making the centered pinstripe appear even sharper. For customization, while the featured image uses a soft nude stripe, consider experimenting with highly metallic silver or gold for an evening twist, or a vibrant neon for a playful summer update. The elegance of this trend lies in its simplicity and the precision of that single, bold graphic element.
The Ultra-Modern Deep V (Chevron) French Manicure
![]()
The image showcases a sophisticated evolution of the classic French manicure: the Deep V, or Chevron, French tip. This trend is characterized by its sharp, angular white tip, which drastically dips down toward the nail bed rather than following the natural curve of the free edge. The shape chosen here—a long, tapered coffin or ballerina style—is essential for maximizing the dramatic effect of the V-cut, as the elongated canvas allows the milky pink base color to seamlessly blend into the crisp white tips. This design choice is not only highly flattering but offers an incredible optical illusion, making the fingers appear longer and more slender than a traditional rounded or straight-edge French design. To achieve this high-contrast look, ensure your base is a true jelly nude or sheer milky pink, providing a healthy, gradient effect that allows the underlying skin tone to subtly show through, which is key to its popular, polished aesthetic.
Executing the perfect Chevron French requires precision, making it best suited for gel or acrylic extensions where the surface is perfectly smooth and the length is sufficient. To recreate this sharp V-tip, begin by shaping the entire nail meticulously; symmetry in the structure will dictate the final look of the tip. Once the sheer pink base is cured, use a highly pigmented, opaque white gel polish and a thin, long liner brush. Instead of free-handing the curve, start by drawing two diagonal straight lines from the side walls toward the center point of the nail. The point where they meet should be centered perfectly for balance. Expert nail technicians often use stencils or specialized striping tape to ensure the lines are razor-sharp and the angle is consistent across all nails. For a flawless finish, flood the tip area with the white polish after establishing the V boundary, ensuring there are no translucent spots or uneven edges before sealing the design with a robust, non-yellowing top coat.
For customization, while the traditional high-contrast white tip and nude base remain the most popular choice, nail artists can easily adapt this trend by introducing bold color combinations. Consider a matte black Chevron tip on a glossy beige base for an edgy, modern statement, or experiment with chromatic colors like chrome silver or gold for high-fashion appeal. If you opt for extreme length, as seen in this image, using a quality builder gel or acrylic will ensure structural integrity and prevent breakage, which is critical for maintaining the sharp V-points. Remember that keeping the cuticles and surrounding skin hydrated with cuticle oil is paramount, especially with darker skin tones, as it enhances the contrast and overall health of the hands, ensuring your dramatic Deep V manicure looks luxurious and well-maintained between appointments.
The Elegant Squoval French Tip
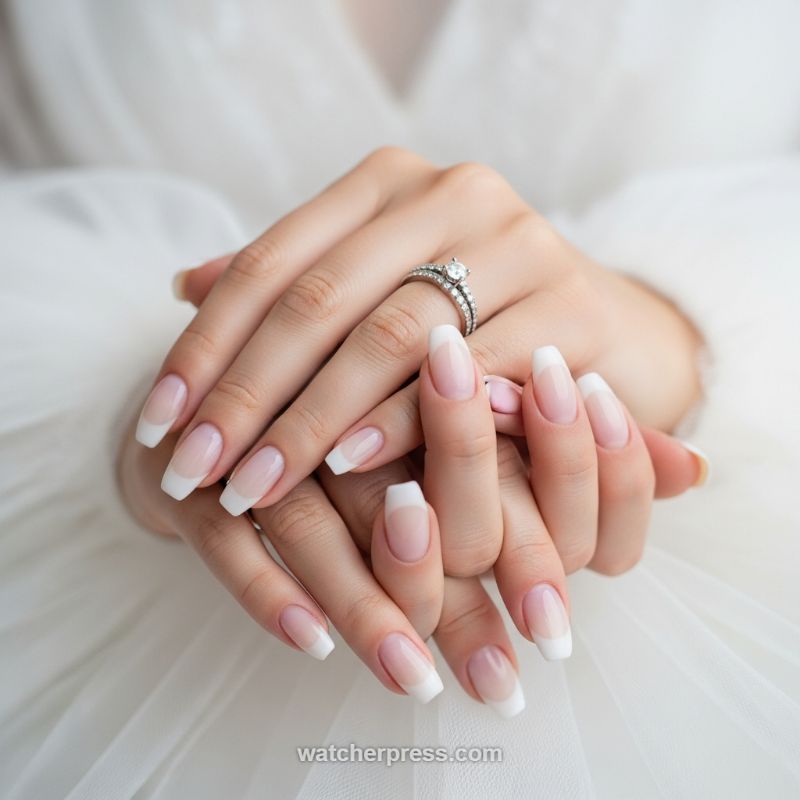
The French Manicure, particularly this elevated, elongated squoval version, proves that classic elegance never fades. This iteration, often featured in bridal and high-fashion spreads, pairs a sheer milky pink base with crisp, uniform white tips. The key to its modern appeal lies in the meticulous shaping; the nails here feature a flattering medium-to-long length with a soft squoval structure, providing the perfect canvas to showcase the bright white crescent tips. This clean, polished aesthetic is perfectly aligned with the prevailing “clean girl” beauty trend, offering a sophisticated and universally appealing look that works for both everyday glamour and landmark occasions like a wedding day, as suggested by the accompanying diamond ring set. Achieving a salon-quality French tip requires precision and patience. Start by shaping the nail carefully using a 180-grit file to ensure the soft square or squoval shape is uniform across all fingers. The base layer is critical; apply two thin coats of a translucent nude or milky pink polish to create that healthy, natural depth. For the white tip, use a highly pigmented lacquer specifically formulated for nail art. Instead of freehanding, experts recommend using a dedicated thin liner brush or a specialized silicone stamp to ensure the white smile line is perfectly symmetrical and deep enough to cover the free edge without dipping too far into the nail bed. Focus on making the curve of the smile line mirror the curve of the cuticle for the most flattering effect. To maintain the pristine look of the white tips and prevent chipping, seal the manicure with a non-yellowing, high-gloss top coat, paying close attention to “capping the edge”—brushing the top coat horizontally across the very tip of the nail. This technique locks the polish layers together, extending the wear time significantly. Given the light colors, daily application of cuticle oil is essential not only for nail health but also to prevent the sheer base from looking dry or cracked. For those seeking this look for photography (like engagement or wedding photos), the medium length and soft squoval shape are ideal as they elongate the fingers beautifully and offer a subtle sophistication that complements delicate jewelry without overpowering it. This timeless style guarantees your hands look flawless in every close-up shot.
Deep Forest Green: The Ultimate Velvet Matte Manicure
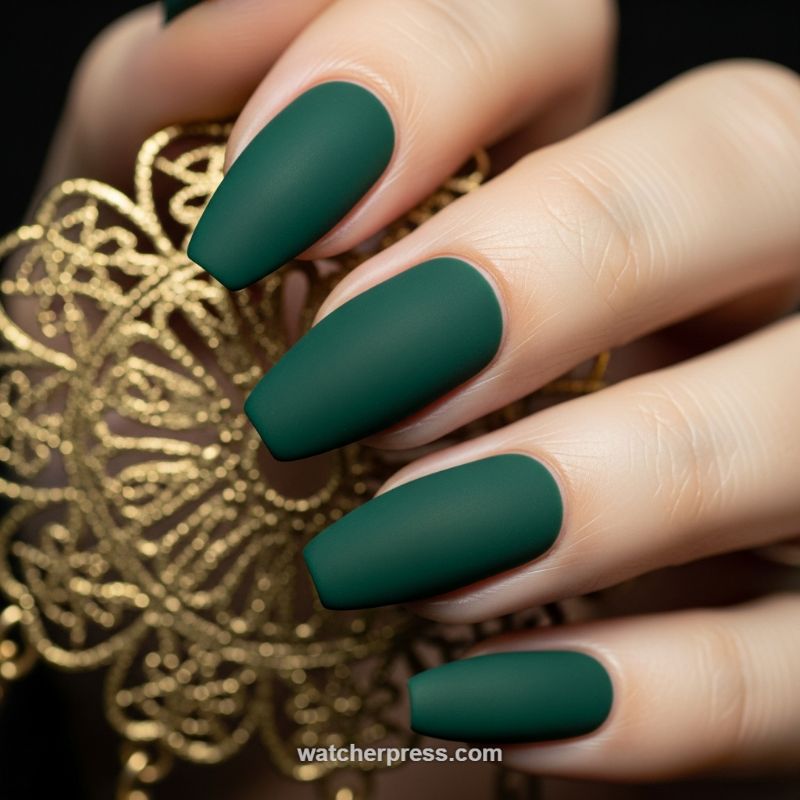
The sophisticated pairing of a deep, emerald green hue with a luxurious velvet matte finish is the definition of quiet luxury dominating Instagram feeds. This manicure trend relies heavily on color saturation and texture contrast. The chosen shade, a rich forest green, acts as a neutral while delivering immense visual depth, making it suitable year-round, though particularly striking in the cooler months. The nail shape featured here is the long coffin (or ballerina) style, which maximizes the visual real estate for the color and emphasizes the chic, angular aesthetic. Expertly done, the matte finish absorbs light rather than reflecting it, giving the nail a plush, almost suede-like quality. Notice how the deep green beautifully contrasts with the warm gold accessory in the image, illustrating how this color is perfectly anchored by rich metallic tones and earthy palettes, cementing its status as an elegant, non-traditional statement.
To achieve this flawless, high-end matte effect, meticulous application is essential. Start with thorough nail preparation, ensuring the surface is perfectly buffed and clean, as matte finishes ruthlessly highlight imperfections and oil residue. Apply two to three thin, even coats of your chosen highly pigmented forest green polish. Allow the color coats to dry completely—this step is non-negotiable for matte success. The magic happens with a high-quality matte topcoat. Apply the matte topcoat in a single, smooth stroke across the entire nail surface, sealing the free edge precisely. A common mistake is applying the matte topcoat too thinly or unevenly, resulting in patchiness. Invest in a dedicated, high-performance matte formula rather than attempting to DIY the finish, as the chemical composition is key to achieving that desirable velvety texture.
Maintaining a matte manicure requires slightly different care than glossy styles. Because the non-reflective surface tends to attract and hold oils from lotions, skin, and cuticles, the finish can start to look slick or dull over time. To preserve the velvet look, avoid using heavy, greasy hand creams immediately after application. If the nails begin to look shiny, a quick wipe down with rubbing alcohol on a lint-free pad can often restore the matte texture, but this should be used sparingly. For professional styling, enhance this rich look by pairing it with delicate gold jewelry, such as stacking rings or thin bangles, mirroring the elegant accessory shown in the image. For an elevated twist, consider applying a single strip of glossy topcoat vertically down the center of one accent nail to introduce a subtle, dimensional contrast.
Earthy Abstract Flow: The Wavy Dotting Tool Manicure
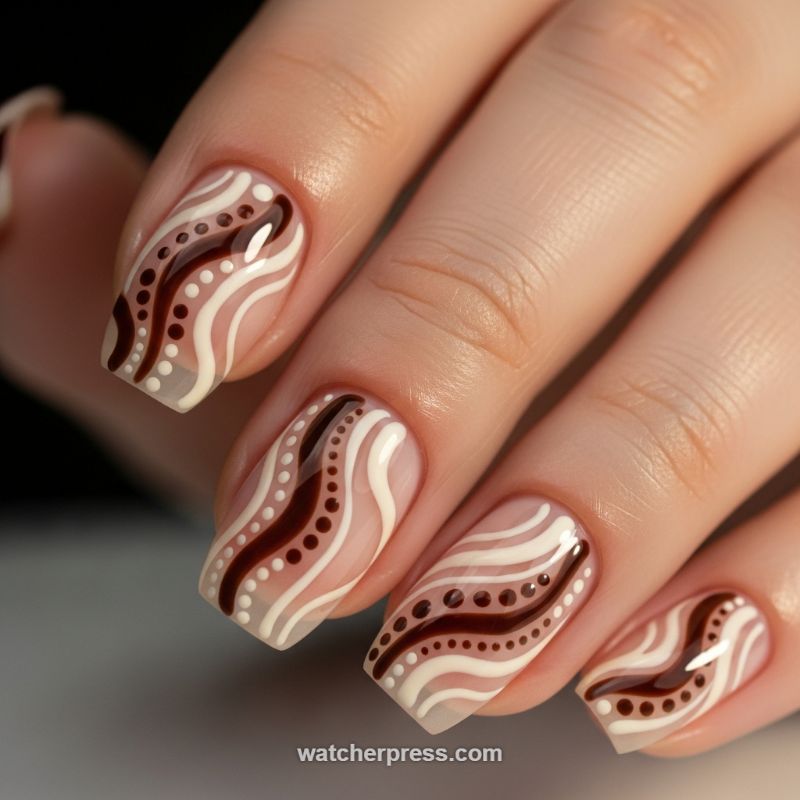
This intricate design, which marries fine line work with precise dotting techniques, creates an organic, sophisticated aesthetic perfect for any season. The visual foundation of this trend is built on a sheer, milky nude or translucent base coat, allowing the natural nail bed to peek through and provide a clean contrast for the art layered on top. The palette focuses on rich, earthy tones—specifically deep chocolate brown and creamy white—applied in flowing, parallel S-curves that move diagonally across the nail plate. To achieve this high-end look, proper preparation is non-negotiable. Ensure cuticles are pushed back and clean, and buff the nail surface lightly before applying the sheer base coat. The success of this design lies in its fluidity and the juxtaposition of solid color blocks against delicate dotted lines, giving it a texture and depth that is both striking and subtle.
To begin the actual artistry, first map out your flow using the lighter color (creamy white). Employ a long, thin striping brush, holding it nearly parallel to the nail surface, to draw 3-4 gentle, wavy lines that run from the proximal end (cuticle) down to the distal tip. Maintain slight variations in thickness for a hand-painted, organic feel. Next, introduce the dark brown lacquer, focusing on the central paths. These lines often appear slightly bolder and serve as the main river along which the dotting patterns will flow. Once the solid lines are cured or dried (depending on the polish type), move to the dotting tool. Using the dark brown, create a center line of dots, starting with a medium-sized dotting tool and ensuring uniform spacing. The dots should follow the precise curve of the solid line previously drawn. Expert tip: Reload your dotting tool after every 2-3 dots to maintain consistent size and saturation for a polished finish.
For the final details, switch to the creamy white polish and use a smaller dotting tool to flank the central brown dotted path. These white dots should typically be smaller than the brown ones, increasing the sense of dimension and framing the main feature. Consistency and rhythm are paramount; ensure the dots are evenly spaced to avoid a cluttered appearance. For an advanced touch, vary the size of the white dots slightly as they travel around the curves—a larger dot at the apex of a curve and smaller dots leading into it can enhance the illusion of movement. Once all designs are complete and completely dry, seal the look with a high-gloss, UV-cured top coat. This step is critical, as the high shine maximizes the contrast between the deep brown and the creamy white, giving the final manicure a professional, glazed finish and ensuring exceptional longevity.
Liquid Metal Chrome: The Ultimate Mirror Manicure
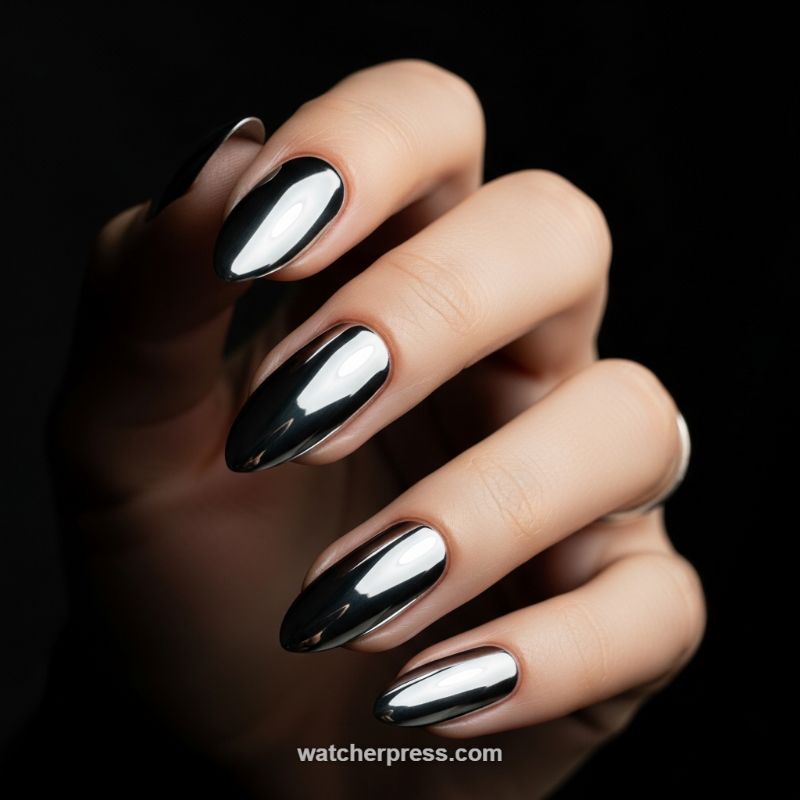
The mirror chrome manicure is the epitome of high-impact nail artistry, perfectly blending futurism and elegance. As showcased in this image, achieving this liquid metal effect requires precision in both shape and application. The long, tapered almond shape provides an expansive canvas, allowing the intense, near-perfect reflective finish to truly shine. Unlike shimmer or standard metallic polishes, true chrome uses ultra-fine pigment powder rubbed into a semi-cured gel base coat to create a seamless, non-granular mirror surface. The deep, dark reflections seen here indicate that a highly pigmented black or charcoal gel polish was used as the base color, which is critical for enhancing the depth and making the resulting silver pigment appear darker and more intensely reflective, yielding a look that often resembles molten mercury.
To replicate this at home (or instruct a technician), the process requires several specific steps. Start with strong foundation work, shaping the nails into a smooth, even almond or stiletto shape to maximize the reflective surface area. Apply two coats of a highly pigmented black gel color, ensuring a full cure for each layer. The next step is vital: apply a non-wipe gel top coat, but cure it only partially (the ‘flash cure’ or specified time from the manufacturer that leaves a slightly hard yet receptive surface). Immediately after this partial cure, use a sponge applicator or a clean silicone brush to firmly buff the chrome powder onto the entire surface. The powder should instantly transform the nail into a blinding mirror. Wipe away excess powder gently and then seal the entire nail meticulously, paying special attention to capping the free edge, using two thin layers of a high-quality, non-yellowing, non-wipe top coat for maximum protection and durability.
This manicure is inherently dramatic and pairs exceptionally well with avant-garde jewelry or high-end nightlife event styling. For expert longevity, advise clients that while the chrome is durable, harsh chemicals or excessive filing on the edges can dull the mirror effect rapidly. If this length is achieved using extensions (gel or acrylic), ensure the underlying structure is flawless, as any imperfection will be magnified tenfold by the highly reflective finish. Due to the precision required for seamless powder application and the structural demands of long nails, this is a look best left to professional nail artists who specialize in gel and chrome techniques, ensuring the high-gloss effect stays immaculate for weeks.
Elevated Ombre with 3D Sculptural Frosted Flowers
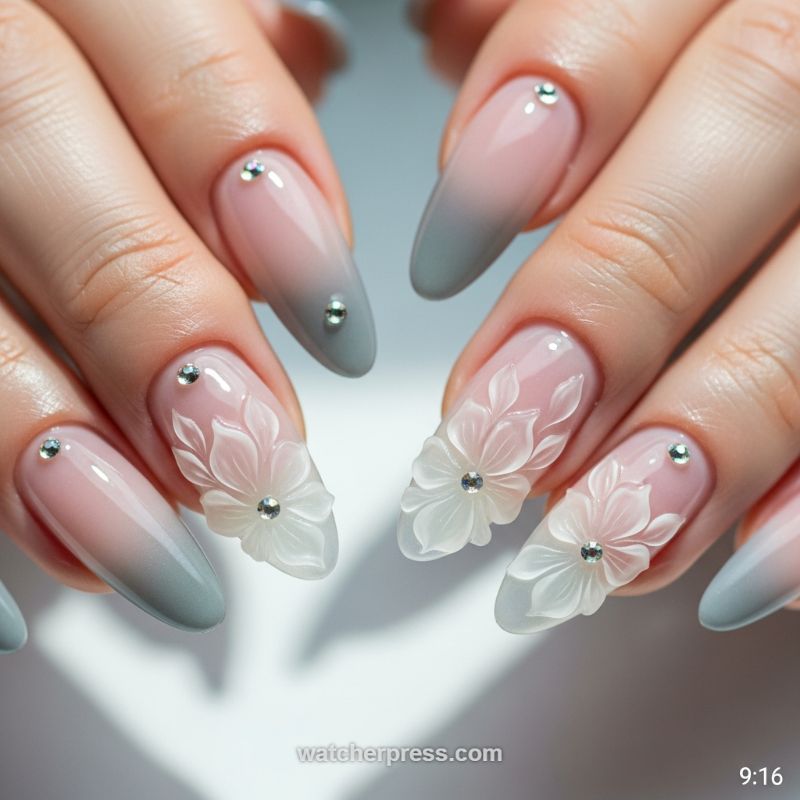
This breathtaking manicure combines the timeless elegance of a sophisticated gradient with the high-relief artistry of 3D sculpting, creating a look that is both romantic and incredibly luxurious. The foundation of this design is a seamless ombre, transitioning from a milky pale pink or nude base at the cuticle to a cool, dusty slate gray or muted sage tone at the tip. To achieve this level of smooth blending, nail technicians typically employ a sponge technique or a detailed airbrush system, ensuring the transition point is perfectly diffused rather than sharp. The nail shape—long and tapered almond or soft coffin—is crucial, as it provides the canvas necessary for the length of the gradient and elegantly supports the heavy three-dimensional elements. The use of a translucent, high-gloss top coat over the ombre base gives the underlying colors a glassy, wet look, setting the stage for the textural accents to follow. Expert tip: When executing the gradient, use sheerer gel polishes for the initial layers to control saturation and build the color depth gradually from the tip, pulling it softly toward the middle of the nail.
The defining feature of this trend is the intricate 3D floral work. These aren’t decals or simple flat paint; they are carefully sculpted flowers, typically rendered in clear or milky translucent white gel or acrylic using a specialty brush. This technique demands precision, as each individual petal is built up in high relief, providing significant depth and texture that catches the light beautifully, giving the flowers a ‘frosted’ or ethereal appearance. The flowers are strategically placed, often on the ring and middle fingers as accent nails, positioned to flow organically from the center toward the free edge. When sculpting, build the flower starting with the central petals and working outwards, applying small beads of 3D product and shaping them gently with the brush tip before curing. The translucent nature of the material ensures the underlying ombre colors are still visible, integrating the art seamlessly into the nail design rather than looking like an applied patch.
To complete this high-end look, strategically placed premium rhinestones add necessary sparkle and finish. A single, high-quality crystal is securely embedded in the center of each 3D flower, serving as the nucleus and anchoring the design. Complementary smaller rhinestones are placed near the cuticle line of the non-sculpted nails, adding just enough minimalist bling to tie the entire hand together. For professional longevity, ensure all stones are set using a dedicated gem glue or a thick builder gel, then cured thoroughly. Because of the high-relief nature of the 3D art, use a non-wipe top coat to seal the surrounding areas and the base of the petals, but avoid coating the raised surfaces entirely, allowing the matte or slightly textured finish of the sculpture itself to shine through. This glamorous yet soft design makes it a perfect choice for bridal manicures, engagement photoshoots, or any formal event where lasting elegance is key.
High-Gloss Oxblood: The Modern Power Manicure
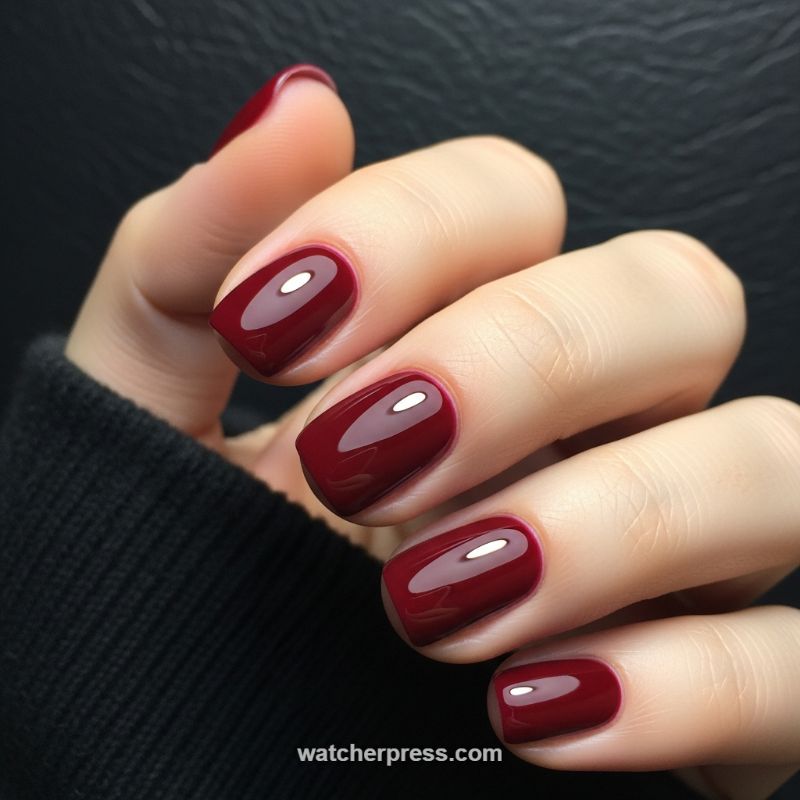
This stunning look takes a classic, universally appealing shade—deep burgundy or oxblood red—and elevates it with a hyper-glossy, reflective gel finish, making it an instant Instagram favorite. The secret to this manicure’s viral appeal lies not just in the rich, vampy color, but in the flawlessly smooth application and intense mirror-like shine that catches every light source. To achieve this depth, select a highly pigmented polish that leans slightly toward blue-red rather than orange-red, offering a sophisticated, almost black-cherry hue. The visible light streak across each nail (known as the ‘reflection line’) is the true indicator of a quality high-gloss top coat, suggesting a non-wipe UV/LED gel top coat was used, which is critical for locking in that wet, liquid look that lasts without dulling. For those using traditional lacquer, invest in a rapid-dry, thick-formula top coat and apply it generously to mimic the gel’s plump effect.
Achieving this level of precision and perfect color saturation requires meticulous prep work. Start by shaping the nails into a short, durable squoval style (square with gently rounded corners), which prevents chipping and complements the dark color’s sophistication. The cuticle area must be absolutely immaculate; gently push back the cuticles and ensure no debris remains on the nail plate, as dark colors highlight every imperfection. When applying the polish, use thin, even coats. Deep reds often require 2-3 coats to achieve full opacity. The key technique is known as ‘floating the polish,’ meaning you apply just enough pressure to lay the color down without dragging, building up coverage gradually. Crucially, ‘capping the free edge’—running the brush tip across the very end of the nail—must be performed with every layer (base, color, and top coat) to prevent premature tip wear and chipping, which is especially noticeable on dark nails.
Expert execution dictates a perfect crescent moon shape where the polish meets the skin, avoiding any flooding of the sidewalls or cuticle area. After applying the final layer of color but before curing the top coat (if using gel), use a tiny, fine-tipped liner brush dipped in pure acetone to meticulously clean up the edges, ensuring the color lifts slightly away from the skin. This step creates the illusion of longer wear and a professional, salon-quality finish. For maintenance, a high-quality base coat is essential to prevent the intense oxblood pigment from staining the natural nail plate. Furthermore, apply a high-shine top coat refresh every four or five days (if using traditional lacquer), and consistently moisturize the surrounding skin and cuticles with oil. Hydrated skin makes the highly glossy manicure pop even more and prevents the gel from lifting prematurely, keeping this chic, powerful look pristine for weeks.
The Dazzling Confetti Holographic Manicure
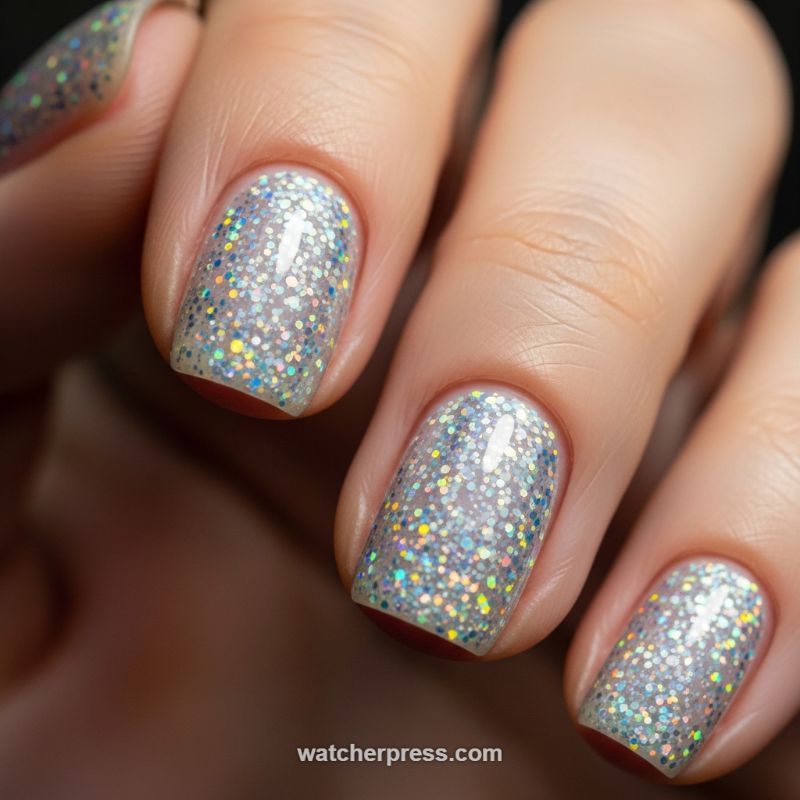
The ‘Diamond Dust’ or Dazzling Confetti manicure is the perfect antidote for those who love sparkle but shy away from chunky glitters. This trending style utilizes densely packed, ultra-fine holographic particles suspended in a sheer, often slightly milky, base coat. The visual impact is pure luxury; under direct light, the nails erupt into a rainbow of iridescent flashes—blue, gold, green, and silver—giving the appearance of finely crushed diamonds scattered across the nail bed. This look is incredibly versatile, translating seamlessly from wedding nails to a high-fashion everyday look. For maximum light play, ensure your nails are meticulously shaped, as the high-shine finish draws attention to the edges and cuticle lines. The magic lies in the subtle sophistication achieved by using micro-glitter, ensuring the look is dazzling rather than juvenile.
To recreate this high-impact look at home, start with a ridge-filling base coat to ensure a smooth canvas; tiny glitters can accentuate surface imperfections. The key is application technique for maximum density. While two or three regular coats of a highly pigmented holographic glitter polish may suffice, professionals often use the ‘glitter sponging’ method. Apply a layer of the polish, then allow it to dry slightly. For the second coat, dab the glitter polish onto a makeup sponge and lightly press the sponge onto the nail. This technique absorbs the excess clear base and deposits a heavy concentration of glitter pigment onto the nail, ensuring the solid coverage seen in the image. Be sure to clean up the edges with a small brush dipped in acetone immediately after sponging, as the texture can be difficult to remove once dry.
Achieving the glass-like smoothness over such dense glitter requires specific finishing steps. Because glitter is naturally textured, simply using a standard topcoat will leave a gritty finish. The secret is utilizing a specialized ‘glitter smoothing’ topcoat or a thick, gel-effect topcoat. Apply the first coat generously, allowing it to self-level and essentially embed the glitter flecks. Once that layer is completely dry, apply a second, high-shine glossy topcoat. This double-layer method ensures a durable, chip-resistant manicure with the essential smooth, domed appearance. Finally, due to the density, glitter polishes can be difficult to remove; always opt for the foil-wrap removal method using pure acetone to protect your nail beds from unnecessary scraping.
Chrome Opalescent Nails: The Ultimate Sheen
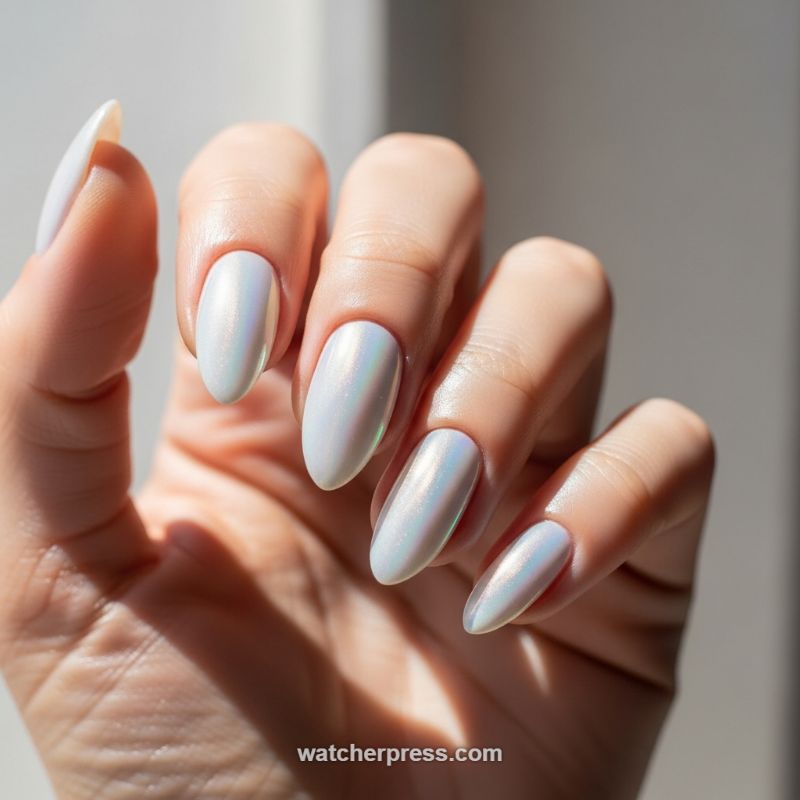
The image showcases the highly sought-after opalescent chrome manicure, often dubbed the ‘glazed donut’ look. This trend elevates the classic milky white polish by layering it with an ultra-fine iridescent pigment, creating a high-gloss, almost liquid finish that shifts colors (typically soft pinks, blues, and greens) depending on how the light hits it. Visually, the nails are filed into a clean, elongated almond shape, which is ideal for this technique as it provides a maximized surface area for light reflection, enhancing the three-dimensional, shimmery effect. This sophisticated finish is universally flattering and offers a luxurious, yet minimalist, aesthetic perfect for any season. To truly achieve this top-tier look, focus on meticulous shaping and ensuring a smooth, flawless application of the base color to prevent any bumps or imperfections from being amplified by the high-shine chrome.
To master this manicure at home, proper preparation and the correct products are essential. Start by prepping the nails: buff lightly and ensure they are completely oil-free. Apply a high-quality gel base coat and cure. Next, apply one to two coats of a sheer, milky white or pale pink gel polish, curing fully after each layer. The critical step involves the chrome application: apply a specialized no-wipe gel top coat (this is crucial, as traditional top coats leave a tacky inhibition layer that ruins the effect) and cure it fully. Immediately after curing, use a dedicated silicone applicator or sponge eyeshadow brush to gently rub the iridescent chrome powder onto the nail surface. Use minimal pressure and watch the powder instantly transform the glossy base into a gleaming, pearlescent mirror. Dust off any excess powder using a soft brush, paying close attention to the cuticles and edges.
For a professional and long-lasting result, always seal the design correctly. Once the chrome powder is thoroughly burnished onto the nail plate, apply a final layer of robust gel top coat. Be sure to ‘cap the free edge’—this means running the top coat slightly under and over the tip of the nail to prevent chipping and peeling, which is often a vulnerability point for chrome manicures. Cure the final top coat thoroughly under the UV/LED lamp. Expert advice recommends daily cuticle oil application to keep the surrounding skin hydrated, as the extreme shine of this manicure draws attention to the entire nail bed area. This trend pairs beautifully with stacked gold or silver rings, highlighting its clean, reflective brilliance, making it the perfect everyday statement manicure.
Mocha French Tips with Minimalist White Heart Accents
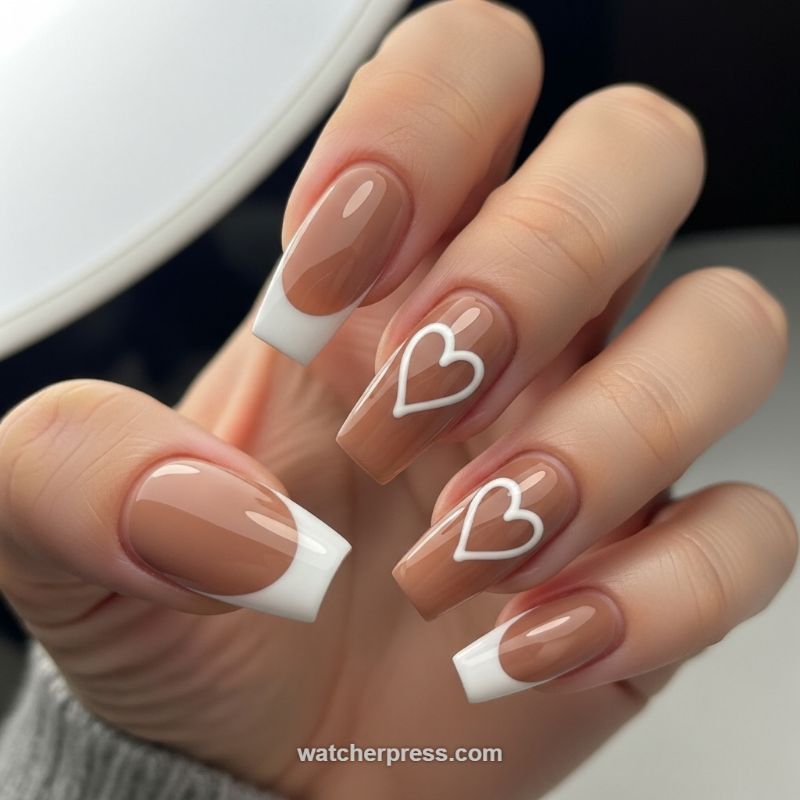
This captivating manicure trend perfectly marries the current ‘Latte Nails’ aesthetic with timeless French elegance, making it an instant hit on social media. The foundation relies on a warm, milky brown or mocha base coat, often achieved using a semi-sheer builder gel to maintain a healthy, plump look over the natural nail. To replicate this high-shine, sophisticated style, start with meticulous cuticle preparation and filing the nails into a sharp, medium-to-long square or coffin shape. The key to the base color is selecting a shade that complements your skin tone; warm, toasted almond or caramel tones work best for achieving the desired rich depth. After curing the base layers, the focus shifts to creating the signature French tip, which utilizes a stark, opaque white polish to create high contrast against the subtle nude base. For nails this long, expert technicians often pull the French tip deeper down the nail bed, forming a generous, pronounced smile line that lengthens the fingers and provides a dramatic visual impact.
Executing the perfect color French tip requires precision and specialized tools. Instead of relying solely on freehand painting, many professionals utilize a thin striping brush or a dedicated curved silicone stamper to achieve that flawless, uniform curve across all non-accent nails. For maximum impact, ensure the white tip is perfectly crisp and opaque, often requiring two thin coats of highly pigmented white gel polish. The depth of the tip should be consistent across all fingers; dipping too shallowly loses the modern, deep-curve effect, while dipping too far can overwhelm the base color. Expert advice suggests curing each tip individually for a few seconds immediately after painting to prevent the gel from running or settling before the final, full cure. This technique is crucial for maintaining the sharp delineation between the two colors, which defines the luxury look of this manicure.
The charming minimalist heart accents, featured prominently on the middle and ring fingers, are what elevate this design from a simple color French to a romantic statement piece. These accents are created using the same bright white polish and the finest detail brush available (typically a size 000 liner brush). To achieve the ‘floating heart’ look, load the brush sparingly and paint the outline of the heart in two clean, deliberate strokes, starting from the top curves and meeting at a sharp point below. Crucially, the heart design should be centered and proportional to the nail plate, ensuring it doesn’t touch the cuticle or the white tip. Once all designs are perfectly placed and cured, encapsulate the entire manicure with a premium non-wipe top coat, applying a careful apex coat to maximize the glossy, glass-like shine and durability, ensuring the manicure maintains its flawless look for weeks.
Precision Geometric Nude: The Minimalist Ruler Manicure
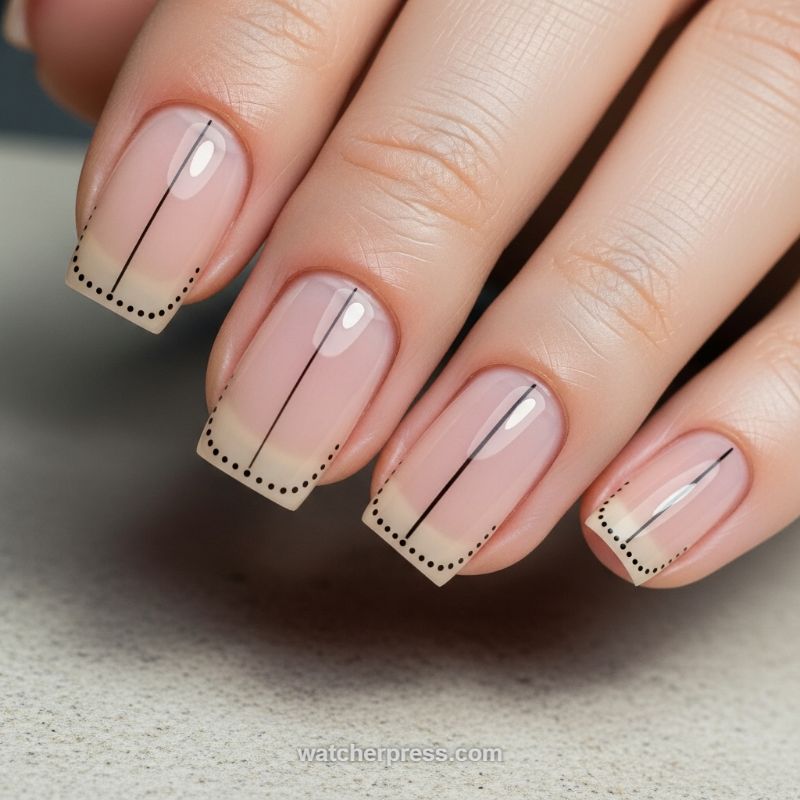
This striking design takes the “clean girl” aesthetic and merges it with architectural precision, offering a high-fashion update to the classic French manicure. The foundation of this look is a perfectly executed sheer nude or milky pink base, giving the nails a healthy, glossy appearance. The artistry is defined by two primary graphic elements: a single, bold, thin black line running vertically down the center of each nail plate, and a sophisticated French tip outlined entirely in tiny, uniform black dots. This geometric contrast makes the design incredibly versatile, pairing effortlessly with both casual and formal wear, proving that maximal impact can be achieved through pure minimalism. It’s a favorite among Instagram users because it looks intricate yet maintains an overall sophisticated, uncluttered visual appeal.
To recreate this precise look, start by prepping the nail meticulously; any imperfection in the nail bed will detract from the design’s sharp nature. Once the sheer base color (a highly recommended soft jelly builder gel or a translucent pale pink polish) is cured or dry, the focus shifts to line work. For the central “ruler” line, use a highly opaque black gel paint and the finest, longest liner brush (often called a ‘striper’ brush). To ensure absolute straightness, steady your hand by anchoring your pinky finger on the table, and paint the line in one smooth, unbroken stroke from the cuticle to the free edge. For those new to line art, using thin strips of nail striping tape as a guide can guarantee a flawless result before carefully filling in the line.
Next, turn your attention to the dotted French tip. Use a small, firm dotting tool, ensuring you dip it lightly into the black gel paint to prevent overloading the tool. The key here is consistency; the dots must be uniform in size and spaced equally to create a delicate, lace-like outline tracing the natural curve of the smile line. Expert tip for longevity: Because fine line work is prone to wear, cap the edges thoroughly when applying your non-wipe top coat. For variation, this design looks stunning when the black is swapped for metallic gold or silver, or try replacing the central line with a stripe of holographic polish to catch the light. This design works exceptionally well on squoval or short square nail shapes, maximizing the modern, structured feel.