Discover 20 breathtaking nail art ideas featuring metallic foil accents, smooth ombre gradients, and chic abstract waves. Elevate your manicure game with these stunning, on-trend designs.
Achieving the Perfect Reflective Hot Pink Chrome Finish

The striking visual showcased here is the ultimate example of a vibrant, high-impact manicure achieved through specialized pigment application, often related to the foil and metallic trends. This look utilizes an intense magenta chrome powder buffed onto a sculpted, long coffin or ballerina shape. To recreate this flawless, mirror-like finish, nail preparation is paramount. Begin by shaping the natural or sculpted extension into a sharp, symmetrical coffin shape, ensuring all edges are smooth. Next, apply a dehydrator and primer, followed by your base coat and a foundation color that complements the chrome—in this case, a rich hot pink or magenta gel polish is ideal, ensuring maximum color depth and opacity in two thin coats. This step is crucial because the chrome powder is somewhat translucent and relies on the underlying color for its vibrant hue. Proper foundation curing will set the stage for the reflective effect.
The key to unlocking this intense, metallic shine lies in the application of the chrome pigment itself. After curing your colored gel base, you must apply a specific ‘no-wipe’ gel top coat. This product cures to a non-tacky finish, creating the perfect surface tension for the ultra-fine pigment to adhere flawlessly. Cure the no-wipe top coat for the minimum recommended time (often 30 seconds LED), as over-curing can prevent the chrome from sticking properly, resulting in a dull or patchy look. Immediately after curing, use a foam eyeshadow applicator or a silicone brush to pick up a tiny amount of the magenta chrome powder. Gently but firmly buff the powder onto the entire nail surface using swift, circular motions. The polish should transform instantly from a glossy color into a seamless, reflective mirror. Expert advice dictates paying special attention to the side walls and the free edge, using a smaller tool or a fingertip wrapped in a lint-free cloth to ensure every millimeter is covered for that truly liquid metal effect.
Once the chrome is fully buffed and the mirror finish is achieved, the critical final steps involve sealing and protecting the look, as chrome is notorious for chipping at the edges. First, use a soft, fluffy brush to gently sweep away any excess pigment from the nail surface and surrounding skin. Before applying the final top coat, it is essential to seal the free edge with a layer of traditional gel top coat or even a thin layer of builder gel. This prevents premature wear and creates a durable barrier. After sealing the tips, apply a final, thick layer of high-quality, durable top coat over the entire nail, ensuring you cap the free edge completely to lock the chrome in place. This high-shine magenta is perfect as a statement set or can be adapted for a trendy accent nail by combining it with matte textures or abstract black line work on neighboring fingers, integrating the required elements of a high-end editorial manicure.
Matte Black Glamour with High-Gloss Heart Accents
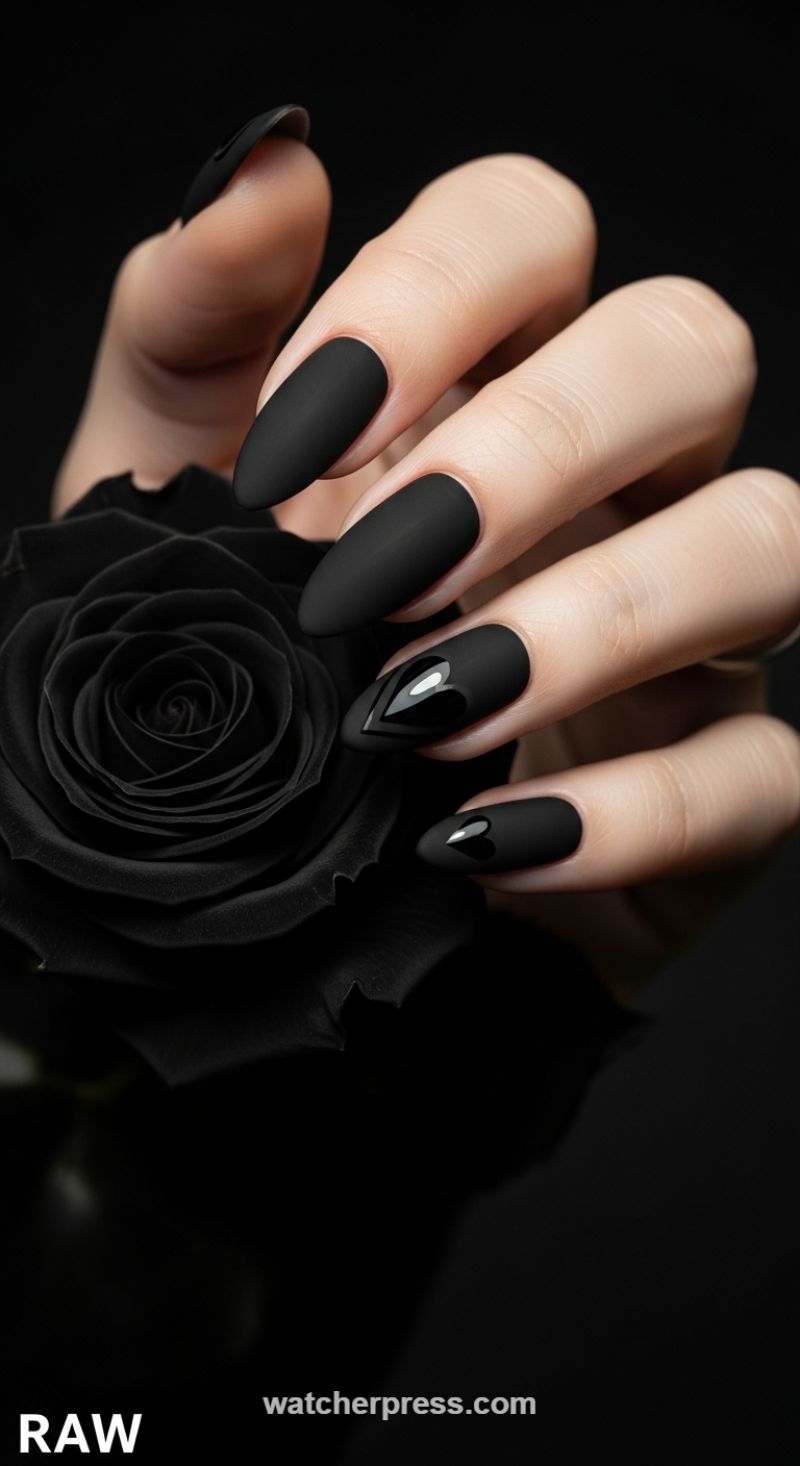
This dramatic look masters sophisticated elegance through texture contrast, moving beyond traditional glitter and foil applications to focus purely on finish and shape. To recreate this stunning gothic manicure, begin by shaping the nails into a sharp stiletto or elongated almond form, which naturally complements the deep, mysterious nature of the design. The foundation is a flawless, opaque black polish cured with a high-quality matte top coat. Achieving a perfect matte finish is crucial; any unevenness or streaking will compromise the luxurious velvet effect. Ensure the nails are fully clean and buffed before application, applying two thin coats of black polish, followed by a single, even coat of matte sealer. This dark canvas sets the stage for the subtle, yet impactful, glossy details that elevate the entire manicure.
The real artistry of this look lies in the precise application of high-gloss detail against the flat matte backdrop. The contrast is achieved by selectively painting a clear, ultra-shiny top coat directly over the cured matte surface. On the middle finger, a bold, inverted V-shaped heart design is applied, carefully following the sharp, tapering point of the stiletto nail. For this design, use a fine-tip nail art brush, starting from the cuticle and tracing the heart’s outline before filling in the shape, ensuring the edges are perfectly crisp against the matte border. The ring finger features a smaller, centered heart—a delicate focal point—which should be applied using a dotting tool or the very tip of a striping brush for immaculate symmetry. The light catching the polished gel adds depth and dimension, mimicking the subtle sheen on the petals of the accompanying black rose.
For expert results, treat the glossy accent like a final layer of gel. After painting the heart shapes, ensure they are thick enough to provide a clear, glass-like shine, but not so thick that they bubble or spill over the matte line. Cure the glossy details under a UV/LED lamp one last time. A top tip for maintaining the high contrast is to advise clients to avoid heavy cuticle oils or lotions immediately after the manicure, as these can dull the matte finish and compromise the visual separation between the textures. This style demonstrates how monochromatic design, utilizing just black polish, can be infinitely more complex and visually striking than multi-colored patterns, making it a powerful choice for those seeking a modern, dramatic, and refined statement nail.
Velvet Red and Molten Silver Drip Hearts
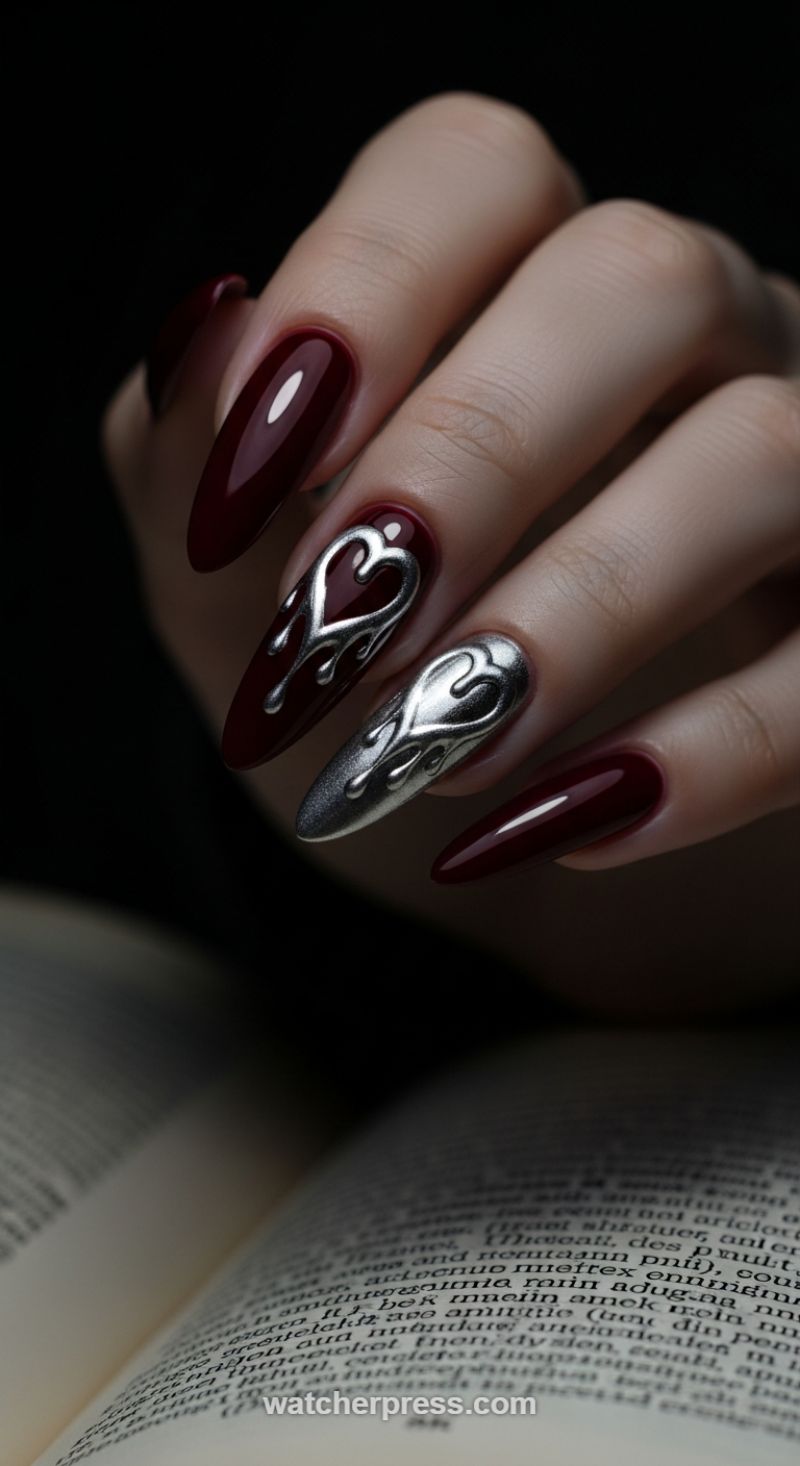
This stunning design marries a classic, high-gloss vampy red base with cutting-edge 3D liquid metal chrome art, achieving a look that is equal parts gothic romance and modern grunge. The foundation begins with a perfectly manicured, long almond or stiletto shape, coated in a deep burgundy or oxblood gel polish. Achieving this intense, rich base requires two to three thin coats of highly pigmented gel, capped with an ultra-shiny, non-tacky top coat. This preparation ensures the dark, smooth background provides maximum contrast for the reflective chrome details that follow. Expert advice dictates curing the base meticulously, as any imperfections will be magnified under the metallic elements. Notice the clever variation between the accent nails: the index finger features the 3D chrome as a sharp, detailed outline, while the middle finger utilizes the chrome as a full metallic base color, enhancing the multi-faceted texture of the design.
To execute the signature molten heart and drip effect, specialized products are essential. Begin by sketching the heart and flowing drip pattern onto the nail using a thick viscosity clear builder gel or a dedicated 3D structured gel. Precision is key here; use a fine lining brush to control the height and flow of the ‘melted’ areas, ensuring the raised surface is dimensionally accurate. Once sculpted, fully cure the gel under an LED lamp. The next crucial step is applying the chrome effect. If your structured gel is already non-wipe, apply a fine silver chrome powder directly to the tacky layer using a sponge applicator, vigorously rubbing until a flawless mirror finish is achieved. If the structured gel requires a top coat before chroming, apply a thin layer of no-wipe top coat over the raised design and cure just enough (usually 10-15 seconds) to leave it perfectly smooth and ready for powder application. Buff away any excess powder with a soft brush before moving on to sealing.
For longevity and maximum impact, the final step involves carefully sealing the artwork without dulling the metallic shine. Since standard top coats can sometimes mute the intensity of chrome powder, avoid brushing the top coat directly over the mirrored surface. Instead, use a precise detail brush dipped in a non-wipe top coat to carefully trace around the edges and base of the 3D chrome element, ensuring the design is anchored securely to the base color while leaving the highly reflective chrome exposed. For the ultimate secure finish, some technicians utilize a thin layer of specialized chrome top coat that preserves the mirror finish. This edgy look is highly versatile; try adapting the base color to a matte black for a deeper aesthetic, or switch the silver chrome for a liquid gold for a warmer, high-fashion statement.
Hot Pink Glamour: Chunky Silver Shard Accent
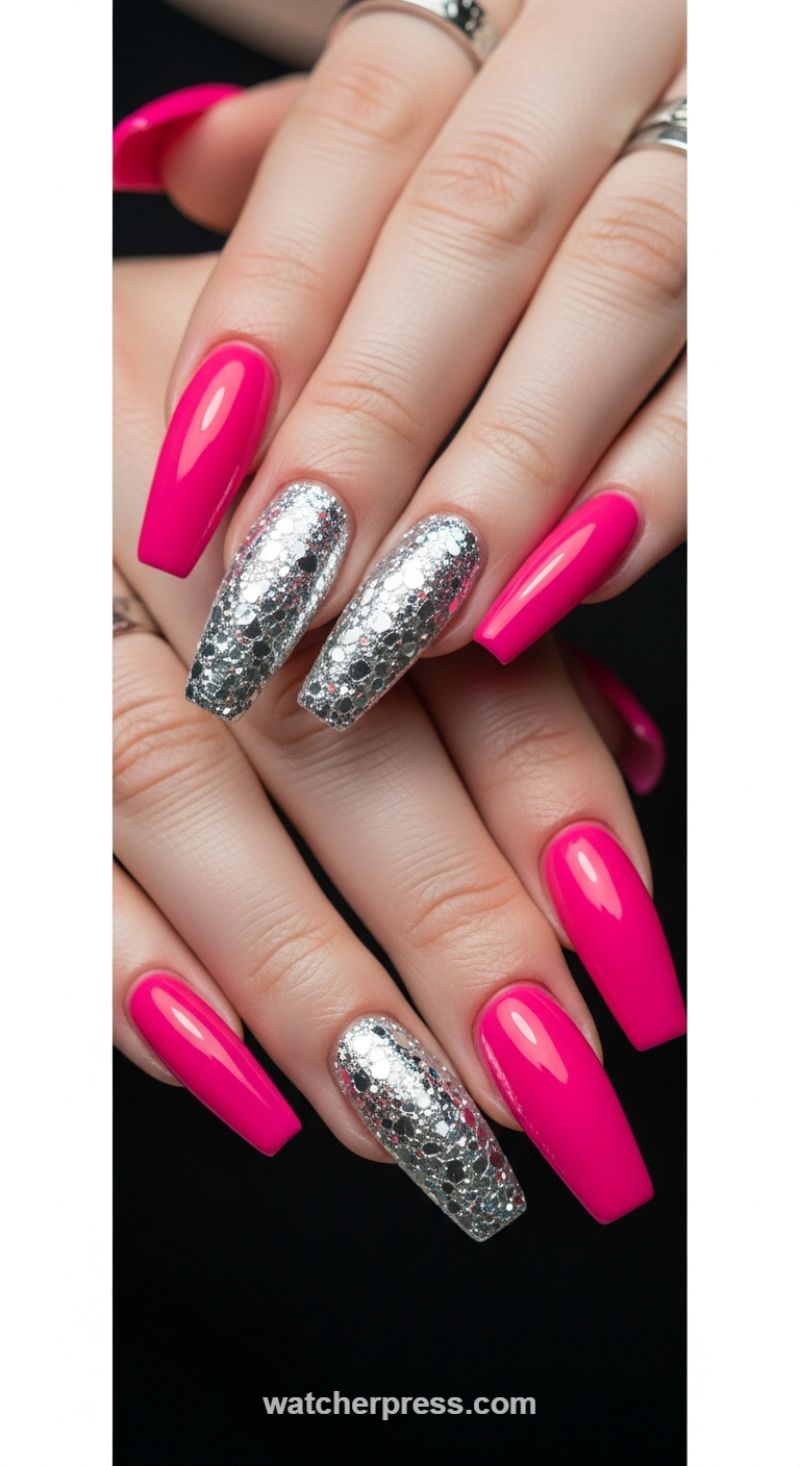
This striking design leverages high-contrast saturation and texture, perfectly embodying a bold, glamorous aesthetic. The primary color uses an intensely glossy, opaque magenta or hot pink, often referred to as fuchsia, applied evenly across the majority of the long, tapered coffin-shaped nails. The vibrant, solid color demands attention but maintains a sleek, refined look due to its flawless high-shine finish. The brilliance of this manicure, however, lies in the carefully selected accent nail—typically the middle finger—which is completely saturated in a densely packed, chunky silver glitter. This isn’t a subtle shimmer; it uses large, multi-sized holographic or metallic silver shards (sometimes referred to as foil flakes or shard glitter) to create intense, multi-dimensional reflectivity, catching the light dramatically and providing an almost crushed-jewel texture that contrasts sharply with the smooth pink.
To recreate this high-impact accent, precision in material application is key. Start by prepping the nails and applying a base coat, followed by two to three thin coats of your chosen vibrant pink gel polish, curing between each layer to ensure maximum color depth and shine. For the accent nail, after applying a clear builder or base gel layer, immediately and heavily sprinkle or press the chunky silver glitter onto the uncured surface until no base color shows through, focusing on dense, uniform coverage from cuticle to tip. If using a pre-mixed chunky glitter gel, apply two thick coats, ensuring the large particles are evenly distributed. Expert tip: Due to the size and irregularity of the glitter particles, proper encapsulation is vital. Once cured, apply a strong, self-leveling top coat—you may need a second layer—to completely smooth over the textured glitter, maintaining the sleek coffin silhouette and preventing the nail from snagging on clothing. File the free edge gently to ensure the glitter is fully encased.
This design is a stunning choice for those seeking a look that fuses pop culture vibrancy with classic luxury, making it ideal for events, parties, or simply a bold everyday statement. While the image displays long coffin nails, the technique translates beautifully to squoval or almond shapes, adjusting the visual impact slightly. For variation, consider swapping the standard silver for an iridescent foil flake, which offers shifts of holographic color, or a true rose gold metallic shard for a warmer aesthetic. Regardless of the metallic shade chosen, the success of this look hinges on the flawless application of the solid color and the intentional, saturated texture of the foil-like accent, proving that sometimes, the simplest contrast yields the most stunning results.
Regal Purple and Emerald Glitter Ombre: A Masquerade Look
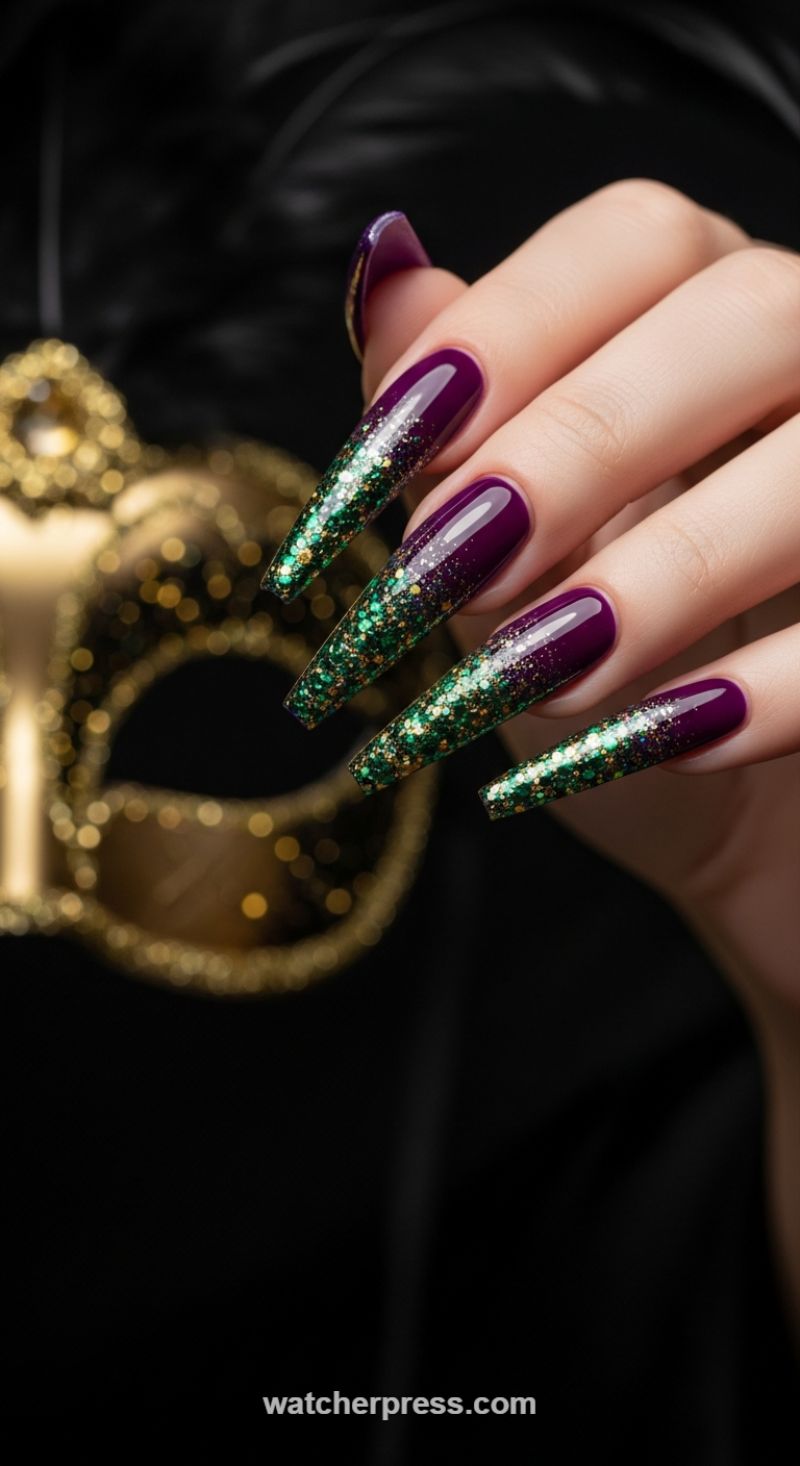
This breathtaking design merges deep, sophisticated jewel tones with explosive glitter, creating an ideal look for a high-fashion event or formal celebration. The foundation uses an intensely pigmented, glossy plum or royal purple, seamlessly transitioning into a dense mix of emerald green and golden micro-glitter toward the free edge. To replicate this glamorous look on a long, sculpted shape (such as coffin or ballerina), begin by applying two coats of the solid purple shade, ensuring complete coverage and a perfectly smooth, high-gloss finish near the cuticle area. Proper application requires meticulously painting close to the sidewalls and cuticle without flooding the skin, which is crucial for achieving the clean, crisp lines demanded by this sharp nail shape. Cure the base color thoroughly if using gel products, or allow sufficient time to air dry if using traditional lacquer, ensuring the surface is dry before beginning the gradient application.
Achieving the dramatic glitter ombre effect requires strategic application and blending. Select a highly saturated glitter mix that includes both fine and chunky particles in emerald green and complementary gold. Using a dense eyeshadow brush or a dedicated nail art sponge, load the glitter mixture onto the tip of the tool. Start dabbing the glitter heavily onto the free edge of the nail, building up maximum opacity at the very tip. As you move the brush or sponge toward the center of the nail, lift the pressure slightly and apply less product, feathering the glitter up toward the purple base. The goal is a delicate, seamless fade where the intense color and shimmer melts into the solid purple approximately two-thirds of the way up the nail plate, avoiding a harsh line. For added depth, you may opt to mix the glitter with a clear top coat and apply it directly, using a light hand to brush upward to control the fade. Cure or dry this layer completely before proceeding.
Expert finishing is essential to maintain the structural integrity and high gloss demanded by this bold design. Since glitter creates texture, apply a generous layer of builder or structural top coat to encapsulate all the glitter particles and smooth the nail surface. After curing this layer, apply a final, high-shine, non-wipe top coat to enhance the depth and brilliance of both the purple and the glittering tips. For optimal longevity, particularly on extended lengths like these coffin nails, ensure the free edge is capped securely with both layers of top coat to prevent chipping. This meticulous sealing process not only protects the manicure but also gives the design its luxurious, glass-like finish, making it truly ready for any spotlight event.
Dual-Tone Pastel Abstract Wave French Manicure
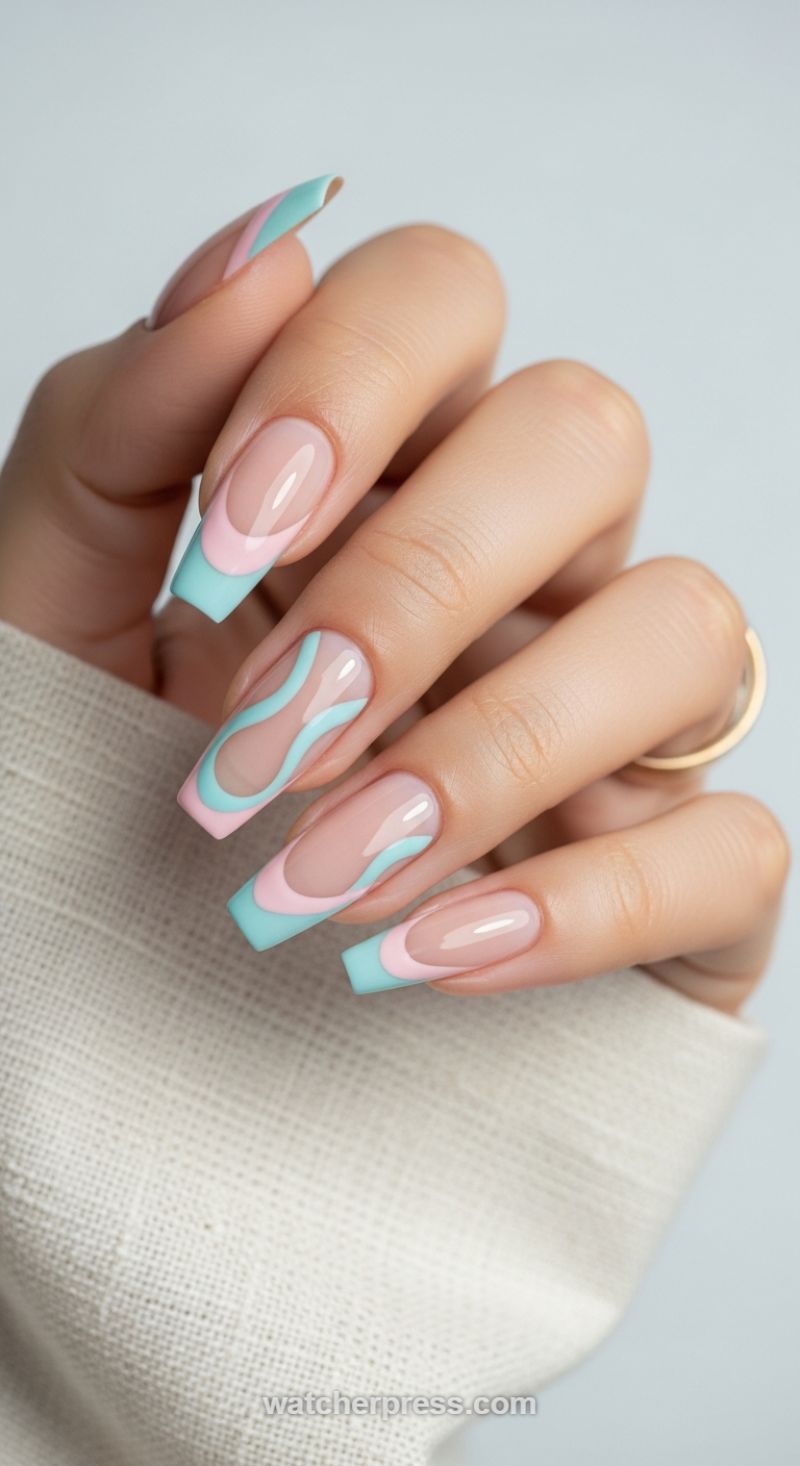
This sophisticated yet playful manicure showcases a trendy fusion of classic French tips and modern abstract wave patterns, utilizing a palette of soft pastel pink and mint turquoise. To recreate this look, begin with meticulous nail preparation, shaping the natural or sculpted nails into a long, crisp square or tapered coffin silhouette. The foundation is critical: apply a sheer milky nude or pale pink rubber base coat to achieve the translucent ‘negative space’ effect visible beneath the abstract designs. Before you begin the detailing, ensure the base is perfectly cured. This design requires excellent control and patience, as you will be executing two distinct techniques across the five nails: clean French tips and fluid, multi-colored waves, ensuring the pastel colors chosen are highly pigmented and opaque enough for single-coat coverage.
Executing the Abstract Wave sections, typically reserved for the middle and ring fingers, demands precision with a fine liner brush (00 or 000 size). Start by dipping your brush into the first color (e.g., the pastel pink) and drawing a continuous, undulating S-shaped curve that runs from the cuticle area down to the free edge. Cure this line immediately. Next, using the second color (the mint blue), draw a parallel, slightly wider curve adjacent to the first line. The key to the ‘abstract’ element is allowing these lines to flow naturally, creating organic loops and swirls that do not perfectly align, resulting in a dynamic, modern contrast against the sheer base. Expert advice suggests stabilizing your hand by resting your pinky finger on the table or a nearby surface—this acts as an anchor, significantly reducing shaking and ensuring cleaner, more defined lines, essential for maintaining the crisp separation between the two colors.
For the remaining nails (index, pinky, and thumb), perfect the French tip application, introducing a colorful, dual-toned variation. Instead of the traditional white, use the pastel pink and mint. The image demonstrates a playful twist where the color often dips lower onto the nail bed than a traditional smile line, creating a deeper curve. To apply this, first use a French tip brush or a steady hand to apply the pink shade to the majority of the tip. After curing, use the mint turquoise to add a small, contrasting block or thin line either right at the free edge or along one corner of the tip, subtly mirroring the dual-tone effect of the abstract waves. Once all designs are complete and fully cured, seal the entire design with a non-wipe, high-gloss top coat, making sure to ‘cap the free edge’ on every nail. Capping prevents shrinkage and chipping, maximizing the longevity of this detailed spring or summer manicure.
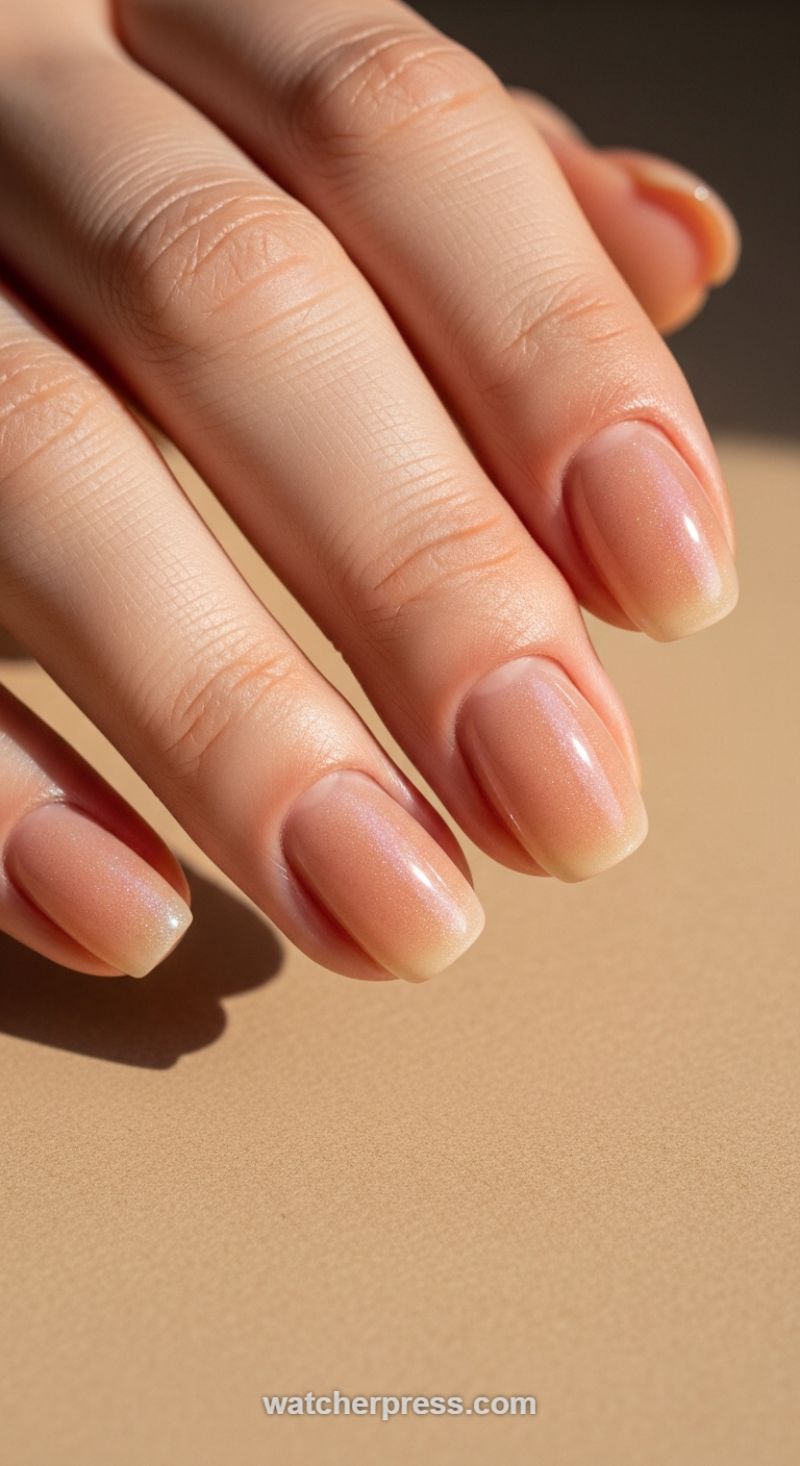
The Classic Ombre: Mastering the Sheer ‘Baby Boomer’ Manicure
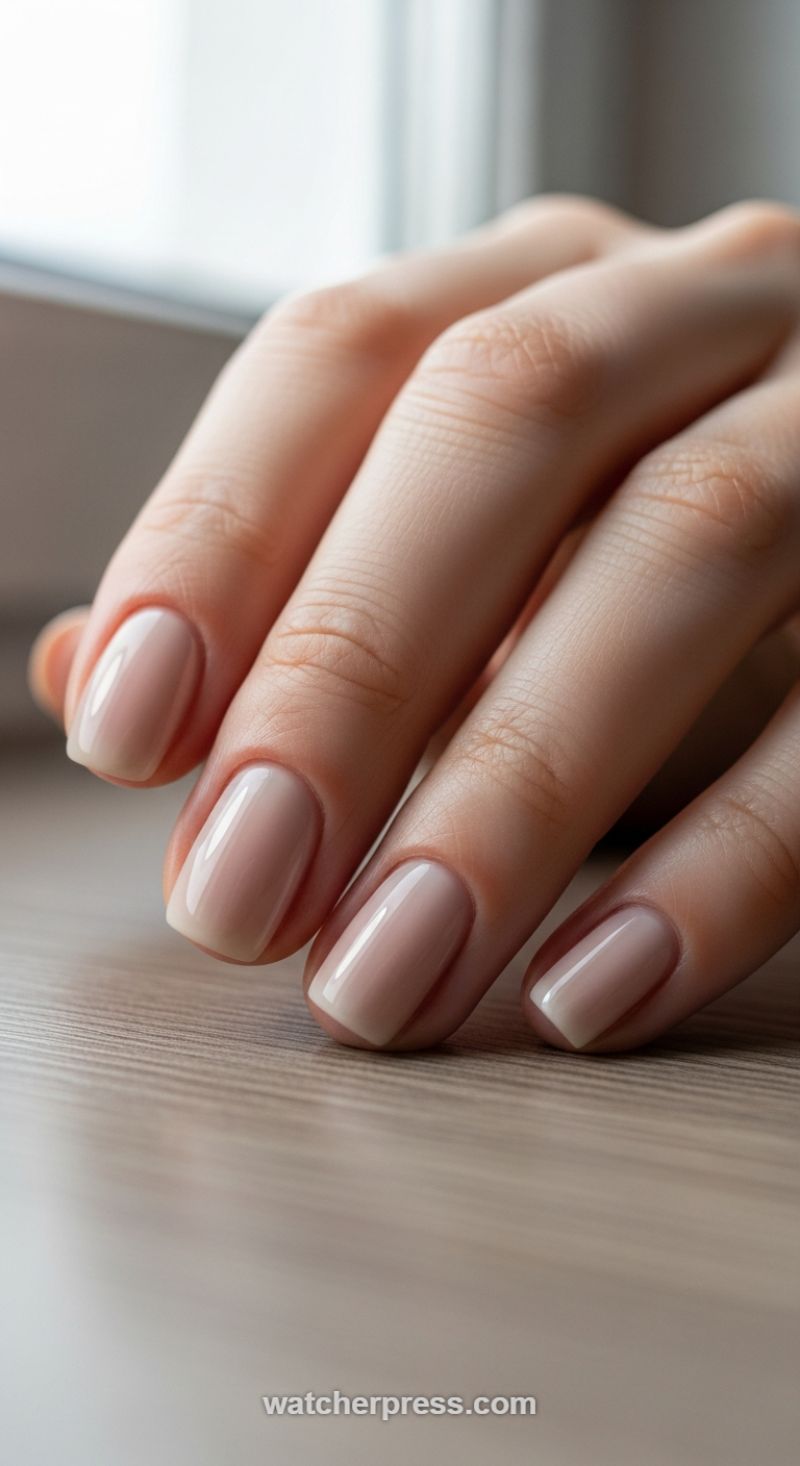
While our main article explores the vibrant potential of foils and bold abstract designs, every high-end nail wardrobe must include a perfected natural look. The style featured here, often known as the ‘Baby Boomer’ or natural French Ombre, is the pinnacle of minimalist elegance, showcasing a beautifully blended gradient from a milky pink or nude base into a soft, sheer white tip. This look demands meticulous preparation; achieving this level of flawless reflection requires perfectly shaped nails, thoroughly pushed-back cuticles, and a smooth, unblemished nail bed. Visually, the design succeeds because of its high-gloss, glass-like finish, which amplifies the subtle color shift and makes the nails appear incredibly healthy and strong. Unlike harsh, defined French tips, this technique utilizes diffusion to create an illusion of depth, ensuring a sophisticated result that complements any skin tone and never goes out of style, making it a powerful foundation for incorporating small, modern design elements.
To expertly recreate this elegant gradient using gel polish, begin by applying a thin layer of sheer base coat and curing. The key to the Baby Boomer technique is building the color in subtle layers. Start with a semi-sheer white (or off-white) gel polish and apply a thin line only to the free edge of the nail. Immediately after application, use a dense, fine-pore sponge or a dedicated angled ombre brush to gently pat and diffuse the white color towards the center of the nail, stopping approximately halfway down the nail bed. Cure the white layer quickly (or flash cure) to lock in the blended tip. Next, select a translucent milky pink or nude builder gel or a highly pigmented sheer color coat. Apply this color over the entire nail, gently dragging it down the surface. The viscosity of the builder gel helps melt and smooth the transition zone where the pink meets the diffused white, eliminating any harsh lines. The goal is a seamless fade that retains the natural look of the nail bed while subtly defining the tip, proving that less is often truly more in professional nail artistry.
Once the blending is complete and the final color coat is cured, maintenance and finishing touches are crucial to achieving the photograph’s level of perfection. Always seal the design with a premium, non-wipe, scratch-resistant top coat to maximize durability and achieve that mirror-like sheen. When filing the shape, the soft square or squoval is the ideal canvas for this design, offering a modern edge without appearing aggressive. For a twist that incorporates elements from the larger article, consider applying a single, minuscule piece of iridescent foil near the base of the ring finger before the final top coat application—this adds a touch of modern metallic shimmer without detracting from the natural aesthetic. Alternatively, this milky base serves as a beautiful foundation for simple, thin, white abstract waves painted minimally across the nail, allowing you to seamlessly bridge this timeless look with contemporary nail art trends.
Glossy 3D Jelly Nails: Dimensional Hearts and Cherries
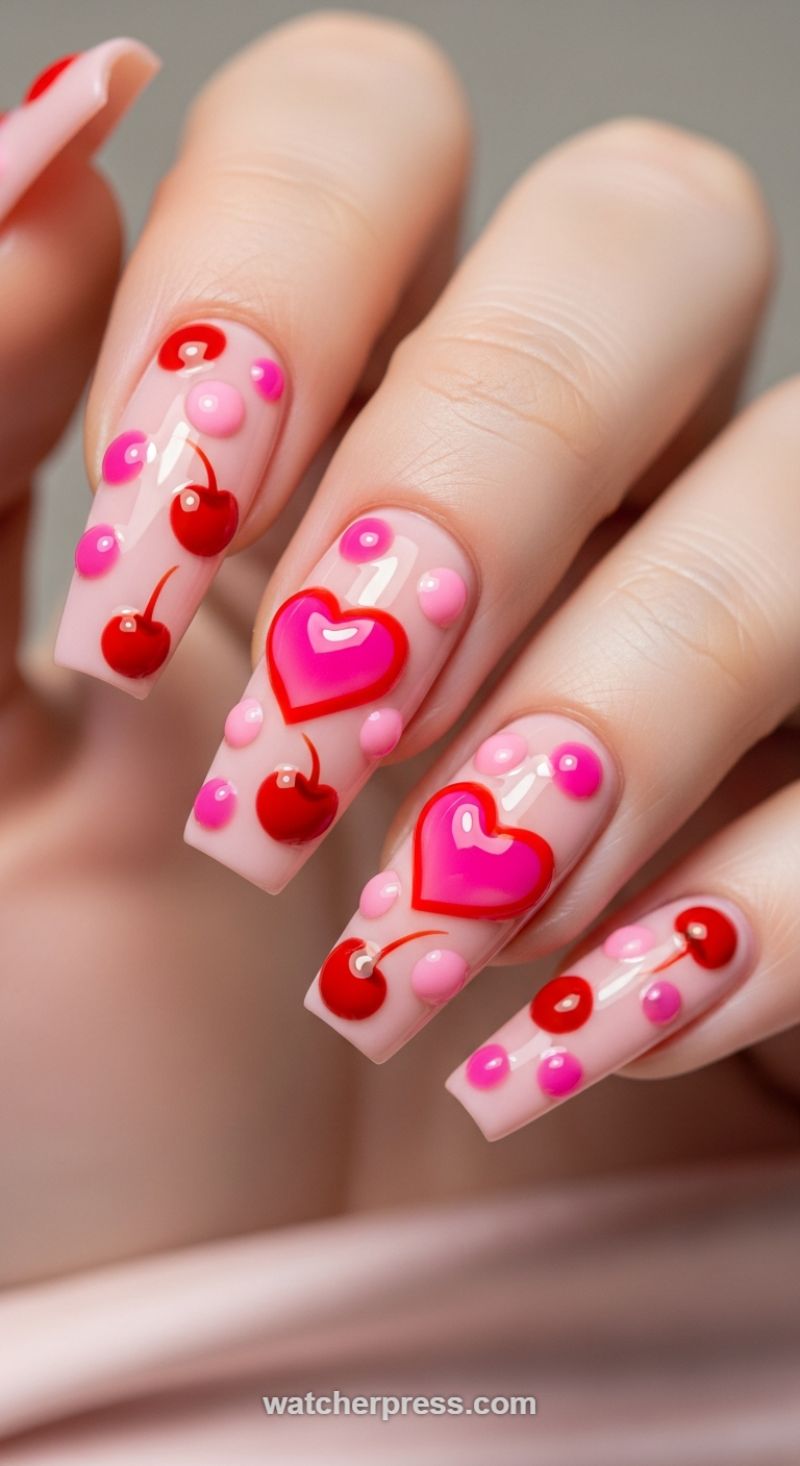
These nails capture the playful ‘Lovecore’ aesthetic through high-gloss, dimensional art that literally pops off the neutral base. The look utilizes structured gel work to create raised, candied features, moving beyond traditional flat decals. The foundation is a milky, semi-sheer nude or pale pink base coat, ensuring the vibrant reds and fuchsia pinks of the 3D elements stand out dramatically. The central design motif involves large, plump hearts and classic double cherries, all rendered with a striking jelly finish. This dimensionality is key to the trend; it transforms the nail into a miniature sculpted canvas, giving the illusion of polished glass candies adhered to the surface. Notice how the placement of small, varying-sized pink and red dots fills the negative space, balancing the larger central motifs and maintaining a cohesive, bubble-like texture across the entire set, offering a whimsical, yet sophisticated, statement.
Achieving this high-relief effect requires specialized materials, primarily thick builder gel or dedicated 3D sculpting gel, rather than standard polish. Start by applying and curing your sheer base color. For the 3D elements, mix your pigmented gel (reds and fuchsias) with clear sculpting gel for the desired jelly transparency and volume. To create the cherries and dots, use a fine dotting tool or a liner brush to meticulously place small balls of the gel mixture, building up the curvature in layers, curing between each layer to prevent spreading or flattening. The large heart shapes require more precision: sketch the outline first using a contrasting color (like the dark pink seen here), then carefully fill the center with the sculpting gel, ensuring the curve and volume are uniform. Professional tip: To achieve the ultra-shiny, ‘wet’ appearance on the raised elements, finish the entire nail with a very thick, non-wipe top coat, taking extra care to encapsulate all the 3D features completely without allowing the top coat to pool around the base of the design.
While visually stunning, the durability of 3D nail art depends heavily on application technique and subsequent maintenance. Since these designs are raised, they are more susceptible to snagging or chipping compared to flat designs. Advise clients to wear this style on medium to long coffin or square shapes, as the length provides the necessary canvas for the detailed artwork and balances the boldness of the raised components. This style is particularly effective for thematic events like Valentine’s Day or vibrant summer aesthetics. For expert care, recommend applying cuticle oil regularly to keep the surrounding skin healthy and avoid rigorous scraping or direct pressure that could lift the edges of the 3D elements. When it comes time for removal, these sets usually require careful filing down of the bulk of the 3D gel before soaking the remaining base, making professional removal highly recommended to protect the natural nail plate.
High Contrast Jewel Tone Color Blocking
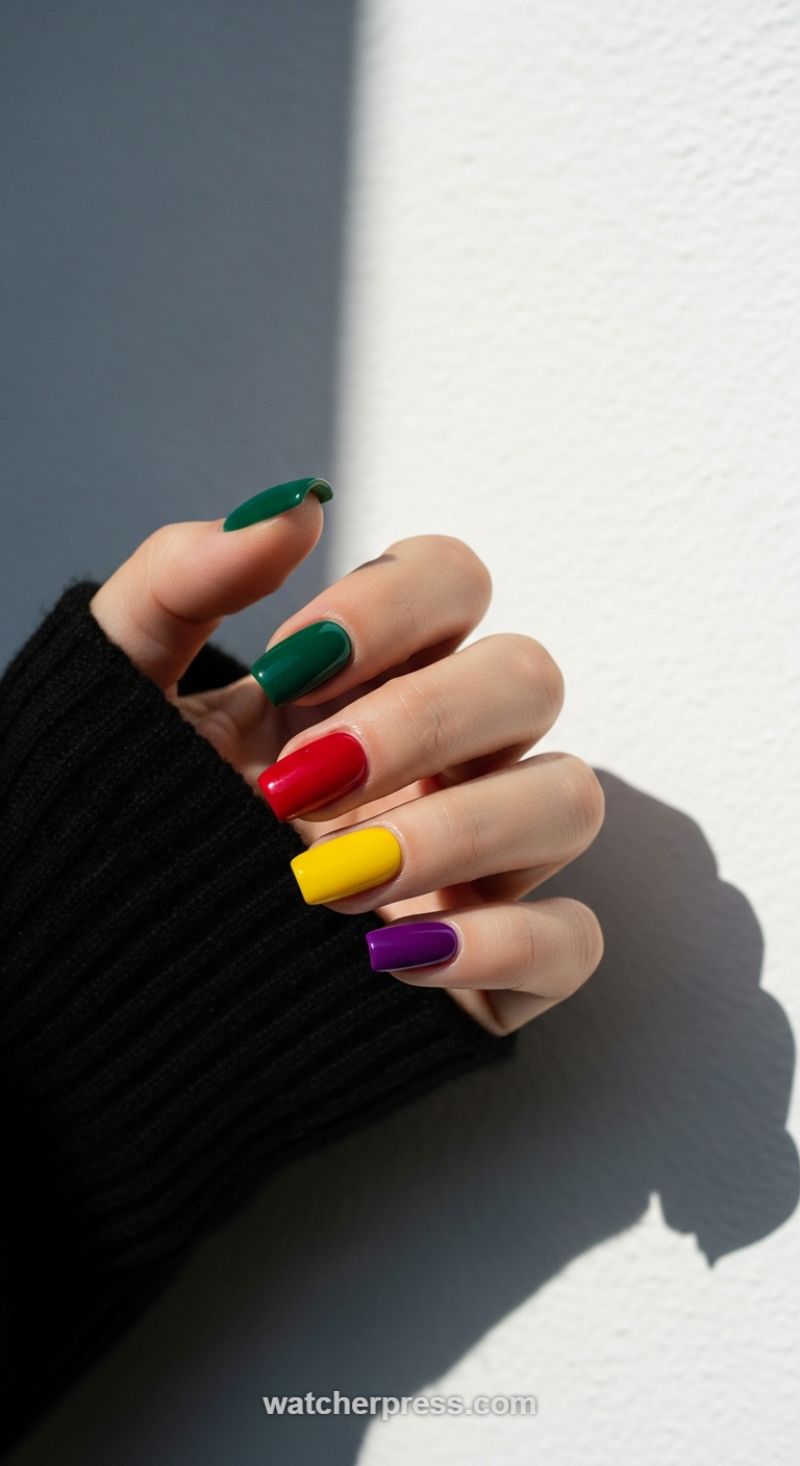
This striking manicure offers a masterclass in high-impact color blocking, utilizing rich, saturated jewel tones like forest green, ruby red, vibrant yellow, and deep royal purple. The beauty of this look lies in its pristine execution and the contrast created by placing each distinct shade on a separate nail, maximizing visual appeal. To achieve this level of color saturation and flawless finish, begin with meticulously prepared nails, filed into a clean, long square or coffin shape. Apply a high-quality base coat, then proceed with two to three thin, highly pigmented coats of each lacquer or gel polish color. The key instructional takeaway here is precision: the solid colors must be applied right up to the cuticle line without touching the skin. Since there is no overlaying art, any imperfection in the solid color application will be noticeable. Allow ample drying time between coats, especially if using traditional lacquer, to prevent streaking or bubbling.
While this base design stands powerfully on its own, it also provides an ideal foundation for integrating complex elements like foil, ombre, or abstract waves, aligning perfectly with this season’s trends. To introduce a textural foil element, select a holographic or gold transfer foil and use a small amount of foil glue to strategically apply small, shattered pieces over one or two nails—the deep purple or red is perfect for contrast. Alternatively, if seeking an abstract wave design, use a fine-liner brush and a contrasting color (such as black or white) to create fluid, curved lines across the nails, effectively transforming the existing solid block into a negative space or color-separated design. For a subtle shift, use the existing colors to paint gentle, undulating waves, separating the green, red, and yellow with a metallic silver striping tape or painted line to mimic a sleek foil effect. Expert advice suggests keeping the application of these embellishments focused on only two nails maximum to maintain the integrity of the bold color-blocked pattern.
To ensure this high-shine, high-contrast look lasts, finish with a UV-cured top coat for exceptional depth and brilliance. The glossy finish is essential, as it intensifies the richness of the jewel tones and creates the stunning light reflection visible in the image. Proper curing is crucial to prevent smudging and chipping. This style pairs beautifully with minimalist accessories and darker apparel, such as the black knit shown, allowing the vibrant manicure to truly pop as the focal point of your look. For at-home maintenance, apply cuticle oil daily to keep the perimeter clean and healthy, further accentuating the flawless application of the base color.
Pop Art Candy Swirls and Graphic Statements
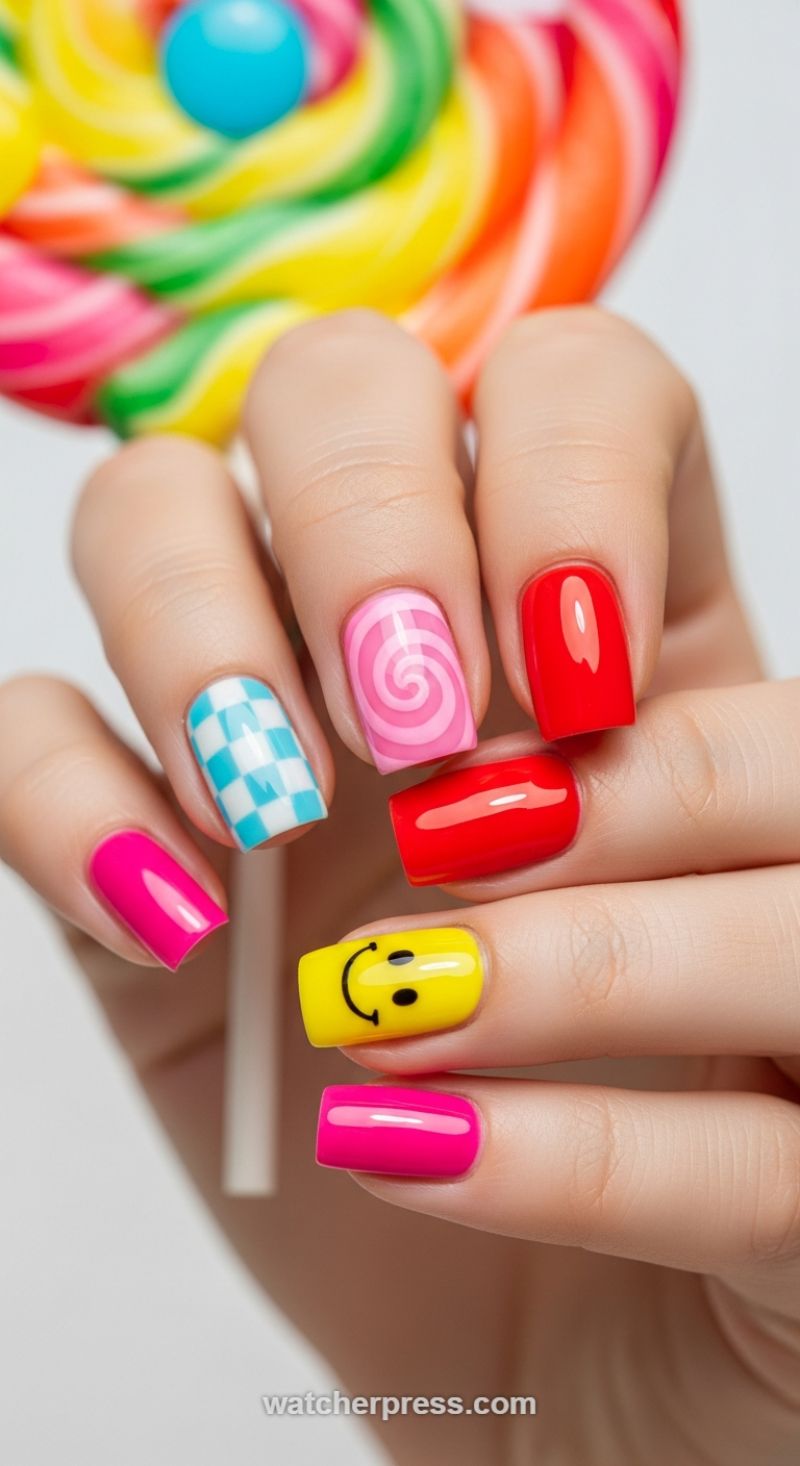
This vibrant design eschews subtle blending in favor of high-impact graphic statements, channeling a playful, retro pop-art aesthetic. The color palette is intentionally bold, featuring primary and secondary colors like saturated red, brilliant yellow, electric magenta, and cool cyan/white. The key to successfully executing this look is achieving maximum opacity and a high-gloss finish, ensuring the nail looks almost like colorful plastic or enamel. To balance the visual weight, this design strategically places bold, intricate patterns—such as the blue and white checkerboard or the central hypnotic pink swirl (which serves as our abstract wave element)—against clean, high-shine solid fields of color, like the solid red and magenta nails. This juxtaposition keeps the overall manicure energetic without becoming overly busy, requiring careful planning of which design goes on which finger for optimal visual harmony.
To recreate the complex graphic patterns, precision tools are essential. For the central pink ‘Abstract Wave Swirl,’ begin with a light pink base coat and fully cure. Using a highly pigmented darker pink or magenta gel polish and a fine-liner brush or specialized dotting tool, begin drawing a continuous, thin spiral starting just off-center. The application must be smooth and deliberate to maintain a fluid, optical illusion effect. For the checkerboard, a clean white base is critical. Allow this layer to fully dry or cure. Use thin stripping tape to mark off equal vertical and horizontal lines, creating a grid. Apply the cyan polish in the designated squares, peel the tape immediately after application, and flash cure before applying the neighboring lines to prevent color bleed. If using stamping plates, ensure the graphic is perfectly centered and applied with firm, even pressure to prevent smudging or distortion of the straight lines.
Expert advice for this specific look revolves around achieving the cleanest lines and maximum durability. Because graphic designs rely entirely on clean edges, always apply a matte base coat to the natural nail before the color layers; this prevents the highly pigmented color gels from pulling away from the cuticle or sidewalls. Once the graphic work is complete, seal every design, including the solid colors, with a high-quality, non-wipe, thick top coat to encapsulate the art and create the desirable highly reflective, glass-like finish seen in the image. Furthermore, when selecting your yellows and reds, choose opaque formulas that deliver full coverage in two thin coats, avoiding any translucency, which would diminish the powerful pop-art impact of this eye-catching, whimsical manicure.
Luxurious Abstract Wave Nails featuring Gold Leaf
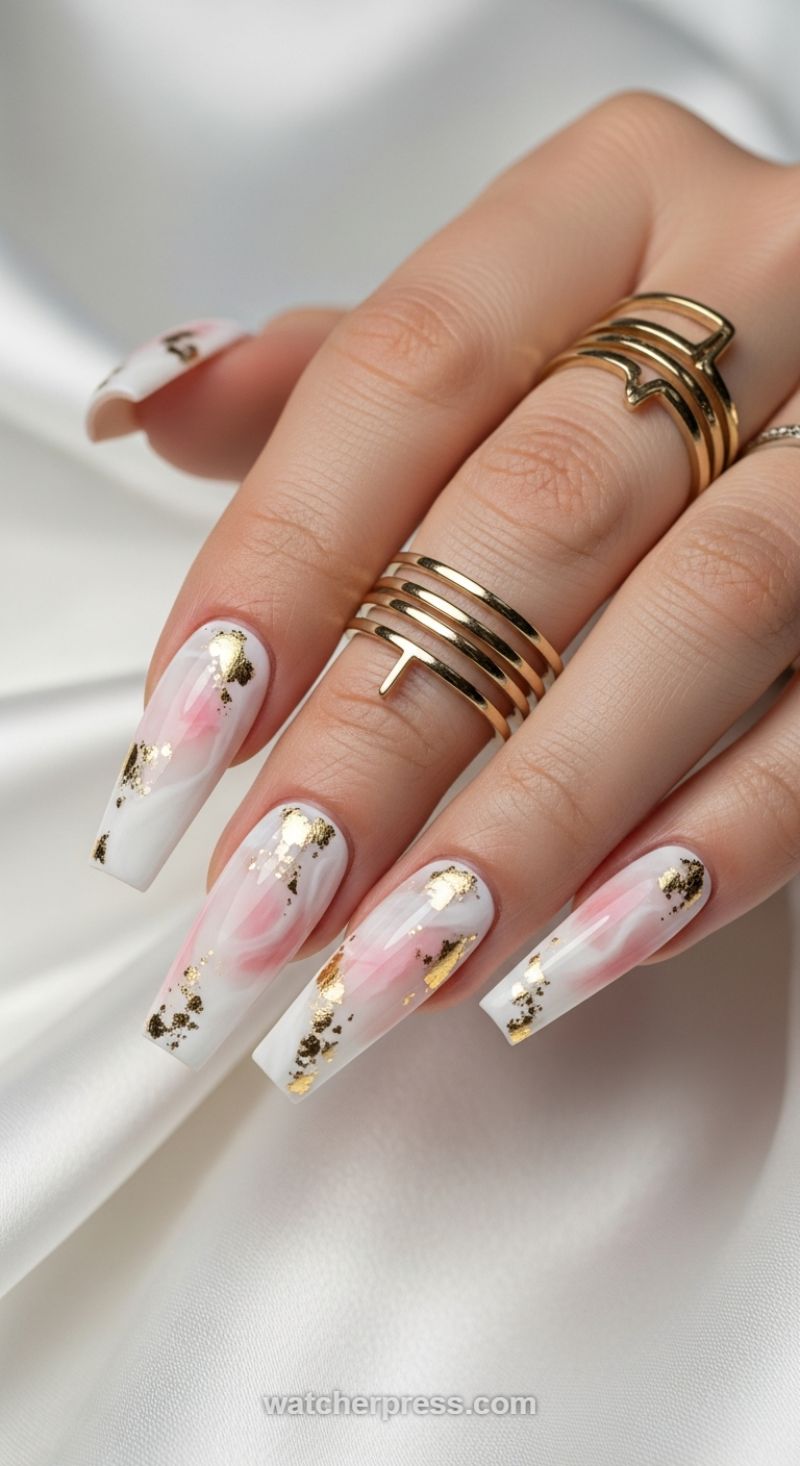
This design masterfully blends abstract waves with luxurious elements. To recreate this opulent look, begin by prepping the nail and applying a clear base coat, followed by a solid layer of bright white gel polish. The key to the soft, diffused, abstract effect lies in using either a dedicated blooming gel or a specialized wet-on-wet technique. Once your base white layer is cured, apply a thin, uncured layer of clear blooming gel. Immediately, drop small amounts of sheer blush pink and a slightly sheerer milk-white polish onto the nail surface. Using a fine detail brush or a marbleizing tool, gently swirl the colors together. Do not overwork the design; allow the blooming gel to naturally spread and soften the edges, creating the organic, smoke-like abstract waves. Cure once the desired diffusion is achieved.
The addition of gold foil elevates this manicure from pretty to truly luxurious. Using very fine, delicate gold leaf flakes, strategically place them onto the sticky inhibition layer remaining after curing the abstract design. Expert advice dictates focusing the foil placement primarily along the edges of the pink swirls or near the cuticle and tip transitions. This placement provides depth and mimics the look of shattered gold suspended within the marble. Use a silicone tool or soft tweezers to pat the foil firmly onto the nail. After securing the foil, brush off any excess with a soft fan brush. Seal the entire design meticulously with two layers of high-shine, non-wipe top coat, ensuring that all edges of the gold leaf are completely encapsulated. This prevents lifting, which is a common issue with foil application, and guarantees the longevity of the long, squared-coffin shape chosen for this dramatic style.
This sophisticated design is incredibly versatile, fitting perfectly for special events, bridal looks, or everyday glamour. The combination of soft pastels and striking metallic elements offers a balanced aesthetic. To complete the high-end look, accessorize with complementary jewelry, such as stacked, minimalist gold rings, mirroring the warm tone of the gold foil. For maintenance, regularly apply cuticle oil to keep the surrounding skin healthy, which enhances the appearance of the long nail shape. Additionally, while the top coat protects the foil, avoid prolonged exposure to strong solvents or harsh cleaning chemicals without gloves to maintain the intense shine and prevent chipping or dulling of the finish. This abstract foil manicure is a striking statement piece that beautifully incorporates multiple cutting-edge nail trends.
Festive Red Abstract Waves with Gold Flake Accents
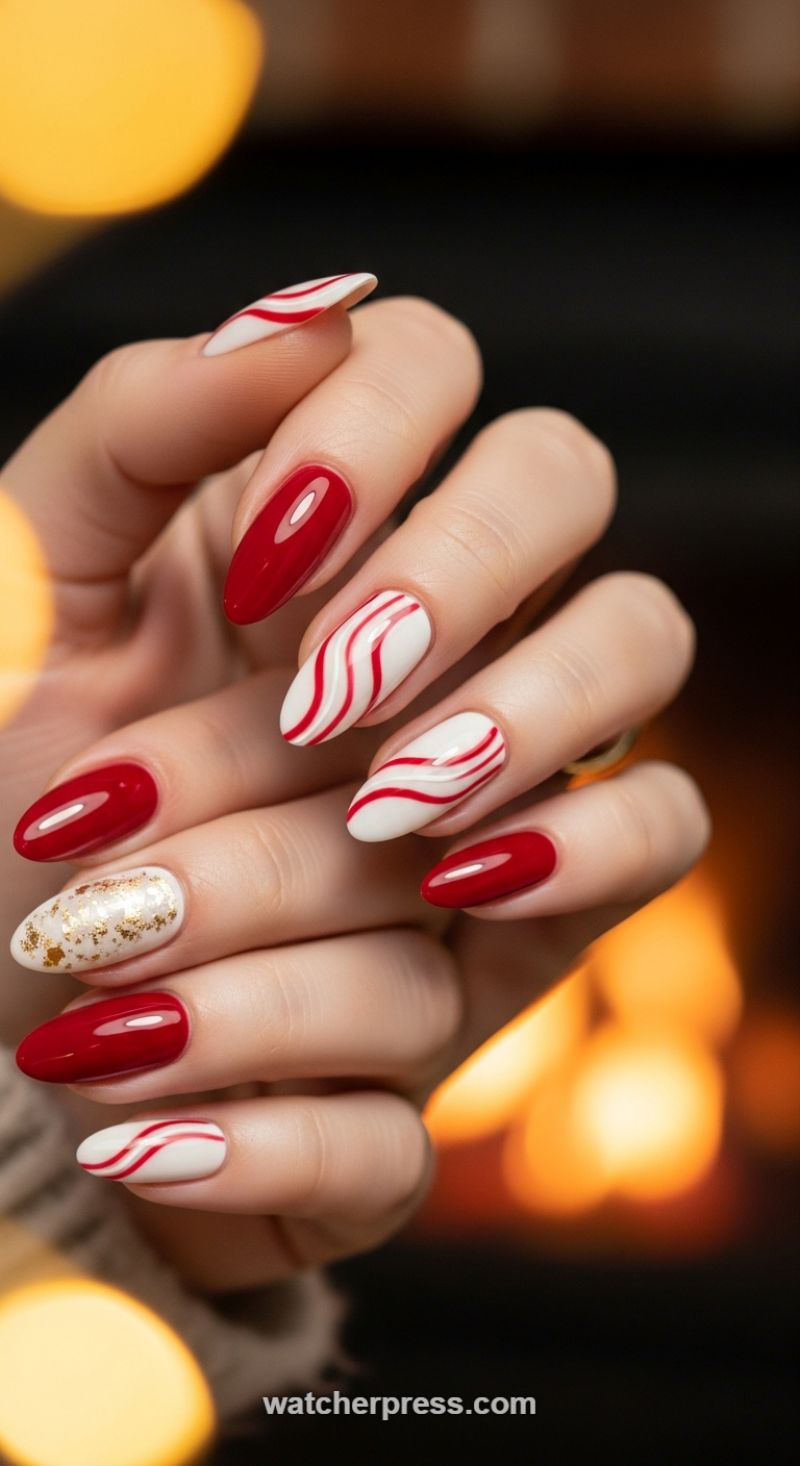
This design flawlessly combines the structural elegance of a long almond nail shape with high-impact holiday color and texture, making it an ideal choice for the festive season. To recreate this look, begin by shaping your nails consistently, as the precision of the design relies on a clean canvas. Select two core colors: a highly pigmented, glossy cherry red and an opaque, crisp white, preferably in gel polish for maximum shine and chip resistance. Apply the solid red polish to the majority of your nails (three fingers per hand, as shown) ensuring two smooth, perfectly cured coats. The remaining nails (the accent nails) will receive the white base coat. Achieve full opacity on the white nails before proceeding to the decorative art, as any translucency will dull the impact of the vibrant red stripes and gold foil accents. The key to this sophisticated holiday manicure is maintaining high contrast and a mirror-like sheen across all solid color sections.
The featured “Abstract Waves” technique, reminiscent of a melting peppermint candy cane, is achieved using a delicate striping brush. After curing the white base coat, dip a thin brush into the red gel polish. Instead of painting simple horizontal stripes, mimic the natural, flowing movement of liquid or fabric. Start your line near the cuticle on one side and curve it dramatically toward the opposite sidewall, ensuring the lines are parallel and slightly varied in thickness—this variation prevents the design from looking manufactured and adds a professional, hand-painted touch. For added dimension, which is subtly visible in this image, consider using a clear builder gel to ‘float’ over the red waves before the final cure; this creates a slight tactile rise, enhancing the 3D effect of the abstract pattern. Cure the finished stripes carefully to lock in the wavy movement.
Finally, elevate one of the accent nails with the shimmering gold foil application. On the chosen white nail, apply a thin layer of foil adhesive or a non-wipe tack coat. Before fully curing (if using a tack coat), or immediately upon application (if using specialized adhesive), gently press irregular pieces of gold leaf or fine metallic flakes onto the surface. The randomness of the foil application, interspersed with tiny specks, adds rich texture without overpowering the intricate waves on the adjacent nails. Seal the entire manicure with a high-gloss, protective top coat, paying special attention to capping the free edge of each nail to maximize longevity and give the finished look a dazzling, reflective quality perfect for holiday lighting.
Dark Berry Ombre with Floating Heart Accents

This stunning nail design, which we call the “Twilight Heart Ombre,” masterfully blends a classic nude base with a deep, dramatic berry or plum tone, heavily infused with fine shimmering pigments—a perfect substitution for or complement to foil elements. To replicate this effect, start by applying two coats of a sheer milky pink or nude gel polish. Once cured, use a cosmetic sponge to dab the dark, shimmering purple polish onto the nail tip, blending upward to achieve a seamless gradient approximately halfway down the nail plate. Repeat the dabbing process until the transition from sheer to saturated sparkle is smooth, focusing on building opacity at the free edge while keeping the cuticle area clean and natural. The subtle shimmer in the dark pigment catches the light beautifully, mimicking the depth and texture often found in fine metallic foil applications.
The crucial step that elevates this design is the precise placement of the small, red heart accents. Using nail decals or thin, heart-shaped foiled confetti pieces (if incorporating foil), strategically position them across the mid-section and lower half of the nail, concentrating them primarily where the nude base begins to meet the dark gradient. Use fine-tipped tweezers and a dab of clear base coat or structure gel to securely position each heart. The scattered, upward-moving placement creates a delicate “floating” effect, ensuring the rich, dark tips remain the focal point while adding playful, romantic dimension. Expert tip: Ensure your heart decals are thin and flat; bulky embellishments will be difficult to encapsulate smoothly in the final steps.
Once the decals are perfectly arranged, securing the design is paramount for longevity and achieving that high-gloss, encapsulated finish evident in the photograph. Apply a thick, self-leveling layer of non-wipe top coat over the entire nail surface. Take care to ensure the top coat fully seals and encapsulates the edges of every heart decal to prevent snagging, lifting, or dulling. Cure completely under an LED/UV lamp. The long, gentle almond or oval silhouette of the nails maximizes the visual length of the seamless gradient. This design is sophisticated yet playful, ideal for a romantic holiday or simply adding a touch of deeply pigmented sparkle and charm to everyday wear.
Modern Abstract Waves: Matte Red and Negative Space Color Blocking
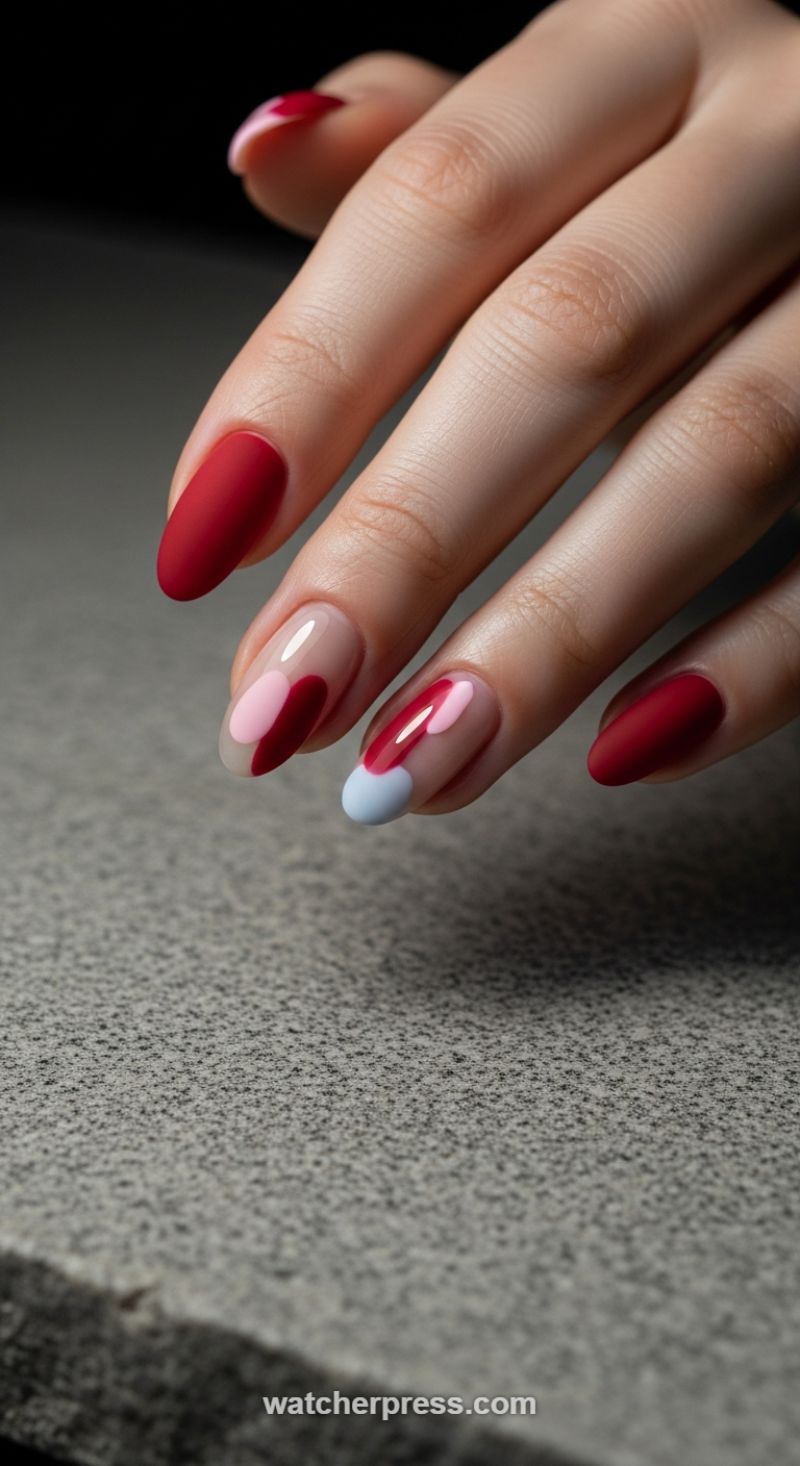
This design masterfully blends contrasting textures and negative space for a truly modern manicure. The nails alternate between a full coverage, velvety matte deep red (on the index and pinky fingers) and a sophisticated abstract design executed over a sheer, milky nude base on the accent nails. The key is the layering of organic, rounded shapes—a technique that falls under the “abstract waves” category—using a vibrant glossy berry red, a soft baby pink, and an unexpected pop of cool pastel blue. This combination elevates a typical manicure, making it highly visually dynamic due to the interplay of textures (matte versus high gloss) and saturation (solid pigment versus sheer base), offering a perfect balance between bold color and subtle artistic detail.
To recreate this complex look, begin by prepping the accent nails and applying a sheer milky base coat or a translucent nude builder gel. Cure fully. The artistic shapes require a fine-tipped detail brush and keeping the paint application slightly thick to ensure full opacity of the colors. Start with the largest or most grounding shape, such as the light blue arc, then carefully layer the contrasting colors (pink and deep red) partially overlapping the initial shape. Do not try to blend the colors; the goal is distinct, defined blocks. Expert technicians should flash cure each shape immediately after placement. This step is crucial to prevent the gel from bleeding into the sheer base or adjacent colors, maintaining those crisp, sharp, defined lines that make the negative space pop. For the solid red nails, apply two even coats of the deep red lacquer, ensuring full coverage before moving to the top coat phase.
The final finish is what truly defines this manicure’s modern edge. While the solid nails demand a perfectly velvety matte top coat, the abstract elements must be sealed with a high-shine, non-wipe glossy top coat. Apply the glossy top coat only over the pigmented shapes and the sheer base of the accent nails to lock in the color and enhance the depth of the layering effect. This intricate design is best suited for medium to long almond or oval nail shapes, as the extended canvas provides the necessary space for the abstract elements to breathe and achieve proper visual balance. Advise clients to protect the matte finish from heavy lotions or oils, which can cause dulling, ensuring the contrasting textures remain clean and salon-fresh.
The Subtle Sophistication of Pearlescent Glaze Nails
While this look appears deceptively simple, it represents the epitome of nail health and meticulous application, making it a perfect foundation or counterpoint to the more complex designs involving foil and abstract waves. This style, often termed the ‘lip gloss’ or ‘glazed donut’ nail, uses a semi-sheer, milky nude or peach base coat infused with a fine, highly reflective iridescent shimmer, typically shifting between pink, gold, and subtle lilac. To achieve the luxurious, structured finish seen here, a builder gel (BIAB) or structure gel is often employed. This technique ensures a perfectly smooth surface and creates a delicate apex, lending strength and a glass-like dimension to the high-gloss topcoat. Success with this design hinges entirely on immaculate nail preparation; cuticles must be perfectly manicured and the nail plate smoothly buffed to allow the sheer polish layers to reflect light without interruption. When transitioning to other elements, remember that this highly reflective base significantly enhances the visual depth of any subsequent layered art.
To recreate the luminous pearlescent glaze, start with a solid foundation of base coat and two thin layers of a sheer, warm-toned polish (such as a milky apricot or dusty rose). The crucial step for maximizing the ethereal glow is the application of the shimmer element. This can be achieved either by using a specific iridescent jelly polish or, for a more intense, customizable effect, by gently rubbing a microfine ‘aurora’ or chrome powder (pink-gold shift) onto a non-wipe top coat layer that has been cured for approximately 30 seconds (creating a sticky-but-cured surface). Once the powder is flawlessly buffed onto all surfaces, ensuring zero residue on the surrounding skin, the nail must be encapsulated with a final, thick layer of ultra high-shine topcoat. This technique locks in the shimmer and provides the flawless, rounded appearance that catches the light so beautifully. Maintain a squoval or soft square shape, filing the free edge precisely to prevent chipping and maintain the neat, polished silhouette.
Expert application requires attention to the structure, especially if using builder gel. Ensure the structure is slightly thicker in the center (the apex) and thinner near the edges and free tip, which is vital for both aesthetics and durability. This pearlescent base serves as an excellent canvas for minimal foil art; instead of covering the entire nail, consider adding a tiny, strategically placed shard of gold or rose gold foil near the cuticle line or the free edge as an accent finger. Furthermore, when combining this glaze with the abstract wave trend, use the iridescent shimmer as a sophisticated ‘watery’ backdrop, applying opaque white or colored lines over the glaze to make the abstract shapes pop against the highly reflective sheen. Maintenance involves frequent application of quality cuticle oil to keep the surrounding skin hydrated and boost the overall glossy appearance.
Classic Glamour: The Scarlet V-Tip Manicure
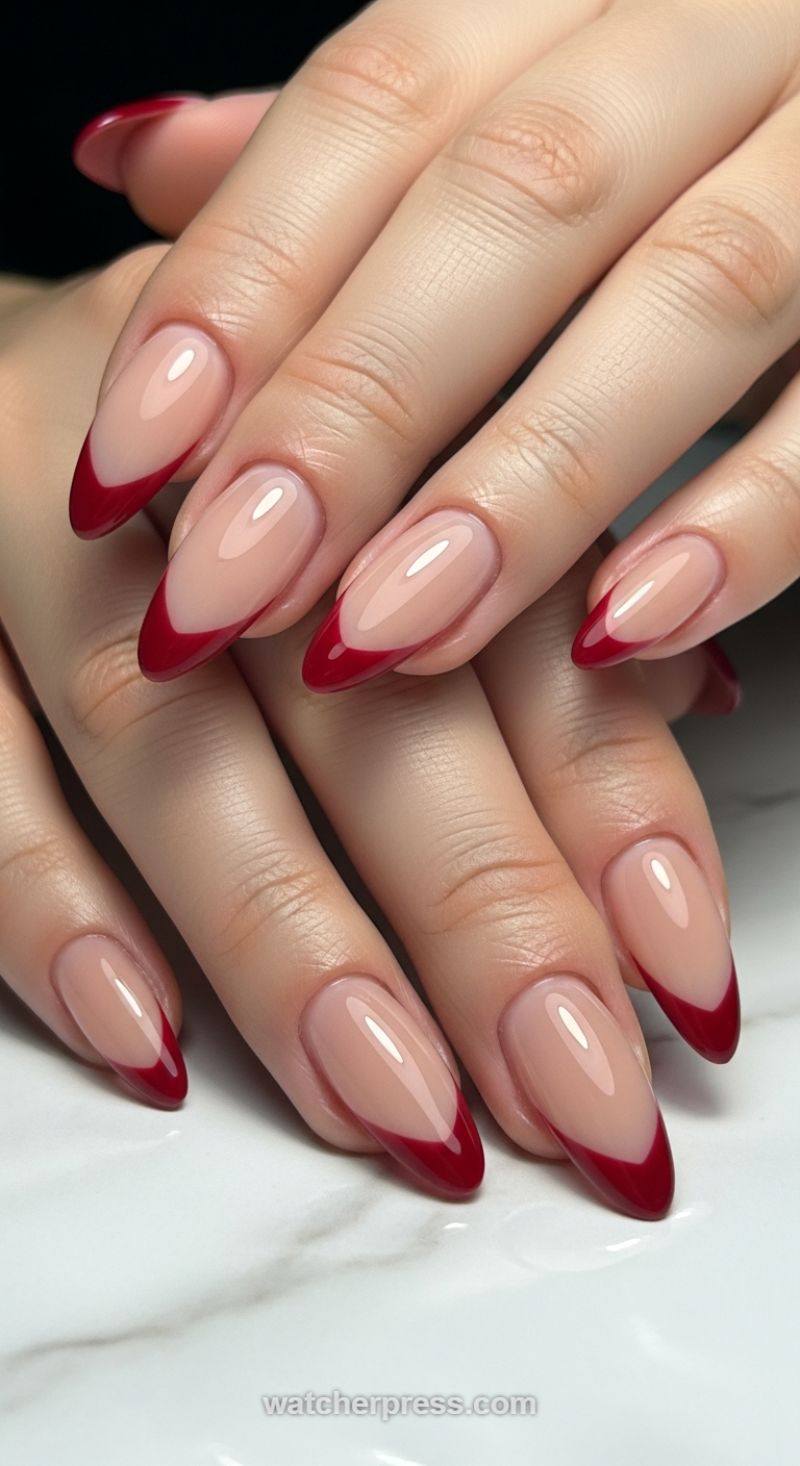
This stunning design elevates the traditional French manicure into a statement look, utilizing a deep, dramatic V-shape (or chevron tip) paired with a rich, opaque scarlet hue. Achieving this level of precision starts with impeccable nail preparation and shaping. The almond or sharp oval shape is critical, as it naturally accentuates the elongated, pointed tip, making the fingers appear slimmer and longer. Begin the process by applying a sheer, milky-pink or nude rubber base coat over the natural nail or extension, ensuring a smooth, self-leveled surface before curing. The goal of the base is to provide a flawless canvas that mimics the healthy, natural nail bed while allowing the dramatic red tip to truly pop. This base structure provides the necessary foundation for the subsequent precise line work.
The key to perfecting the Scarlet V-Tip is mastering the deep smile line. Unlike a traditional curved French tip, the V-tip demands a straight, clean line that meets at a sharp, symmetrical apex in the center of the free edge. Use a highly pigmented, deep cherry-red gel polish and a thin, extra-long striper brush. Start painting from the outer edges of the free wall, sweeping the brush inward toward the apex point. To ensure perfect symmetry and a clean, crisp finish, keep a separate fine brush dipped in cleanser or rubbing alcohol handy. Immediately after laying down the red polish, use the clean-up brush to sharpen the V-line, removing any excess pigment and correcting slight wobbles before curing. Expert tip for fitting this into an article about foil: Once the red V-tip is cured, use transfer gel and a fine liner brush to trace a micro-thin line of adhesive just above the red border. Press on gold or silver foil to create a delicate metallic outline, instantly incorporating a luxury textural element without overshadowing the bold red color.
Once the V-tip and any optional metallic accents are cured, the final step is sealing the entire design with a high-quality, non-yellowing top coat. A thick, high-shine top coat is essential here to encapsulate the color, blur any minor imperfections, and provide that signature glassy finish that makes the gel look so luxurious. Cure for the full recommended time to ensure maximum chip resistance. This look is perfect for those seeking sophisticated drama, offering a clean aesthetic that translates beautifully across all seasons. Maintain the manicure’s high-end appeal by diligently applying cuticle oil daily, keeping the skin around the sharp edges nourished and neat, which enhances the overall polished appearance of the hand.
Luxurious Deep Red Stiletto Nails with Subtle Silver Embellishments
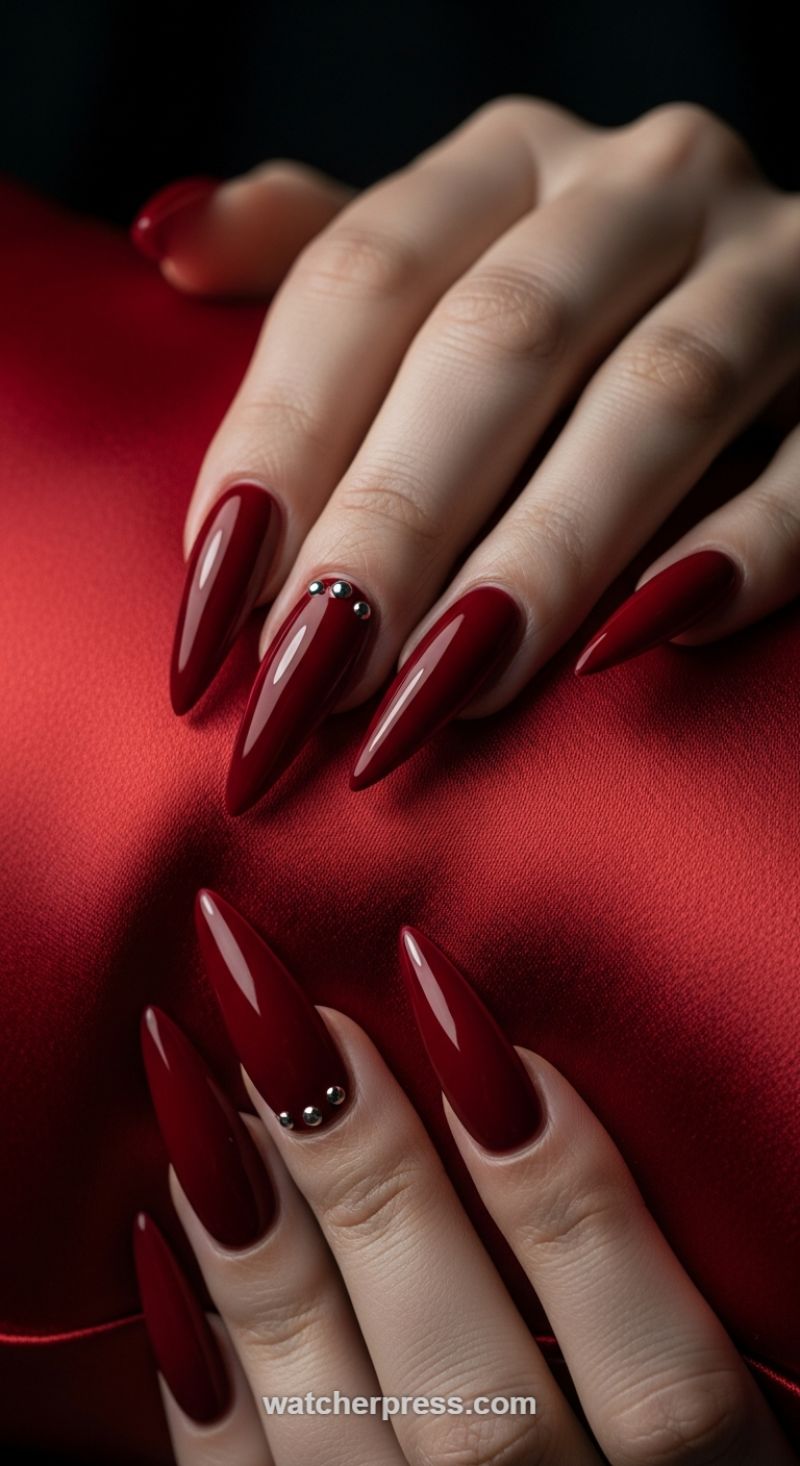
This dramatic manicure showcases the intense beauty of long, sharply tapered nails coated in a high-gloss, deep ruby red. The extreme length and stiletto shaping immediately convey sophistication and bold glamour, making this look perfect for formal events or evening wear. Achieving this flawless finish begins with meticulous nail preparation, especially when working with extended length. For stiletto or ‘almondetto’ shapes, structural integrity is key; professionals typically use hard gel or acrylic extensions to ensure the tips maintain their sharp point without breakage. The color itself must be opaque and uniform—select a rich, highly pigmented gel polish in a burgundy or blood-red shade. Apply two to three thin coats, curing fully between each layer, to achieve the depth and intensity visible here. The final crucial step is applying a high-shine, non-wipe top coat, ensuring the entire surface catches the light, mimicking the luxurious sheen of the red satin background. To seamlessly integrate this style into the article’s theme, consider transitioning the deepest red shade into a subtle black ombre near the cuticle for extra dimension, rather than a solid color.
The defining characteristic of this design, aside from the shape and color, is the strategic placement of the silver microbead embellishments. These tiny accents are clustered in groups of three on the accent fingers, placed low on the nail plate near the cuticle line in a slightly curved arrangement. To recreate this detail, after curing your final color coat but before applying the top coat, use a small dot of thick clear builder gel or specialized nail glue to adhere the metallic beads. Carefully place the beads using a wax-tipped dotting tool or tweezers, ensuring they are positioned symmetrically. Once the beads are set, apply a thin layer of top coat, carefully floating it over the beads without submerging them, which could dull their shine. Cure this final layer thoroughly to seal the entire design and prevent the beads from catching on clothing or falling off. If you wanted to swap the beads for a thematic element like foil, you could apply small, jagged pieces of crimson or holographic red transfer foil over a sticky layer on the accent nails to introduce subtle texture and shimmer.
Expert application advice for extreme shapes like these centers on precision and balance. Ensure both the side walls and the underside of the nail are smooth and fully covered by the top coat to prevent premature chipping and to enhance durability. Maintenance for stiletto nails is vital; moisturizing the cuticles daily will prevent them from cracking under the tension of the long extensions. When pairing this manicure with jewelry, opt for simple silver or diamond rings that complement the microbeads without competing with the dramatic nail shape. This deep red stiletto design is a timeless statement of confidence and elegance, demonstrating that sometimes, the most stunning nail art relies on perfect execution of shape and a breathtakingly rich color palette, enhanced by minimal, carefully placed metallic details.
The Subtle Romantic: French Tips with Heart Accents
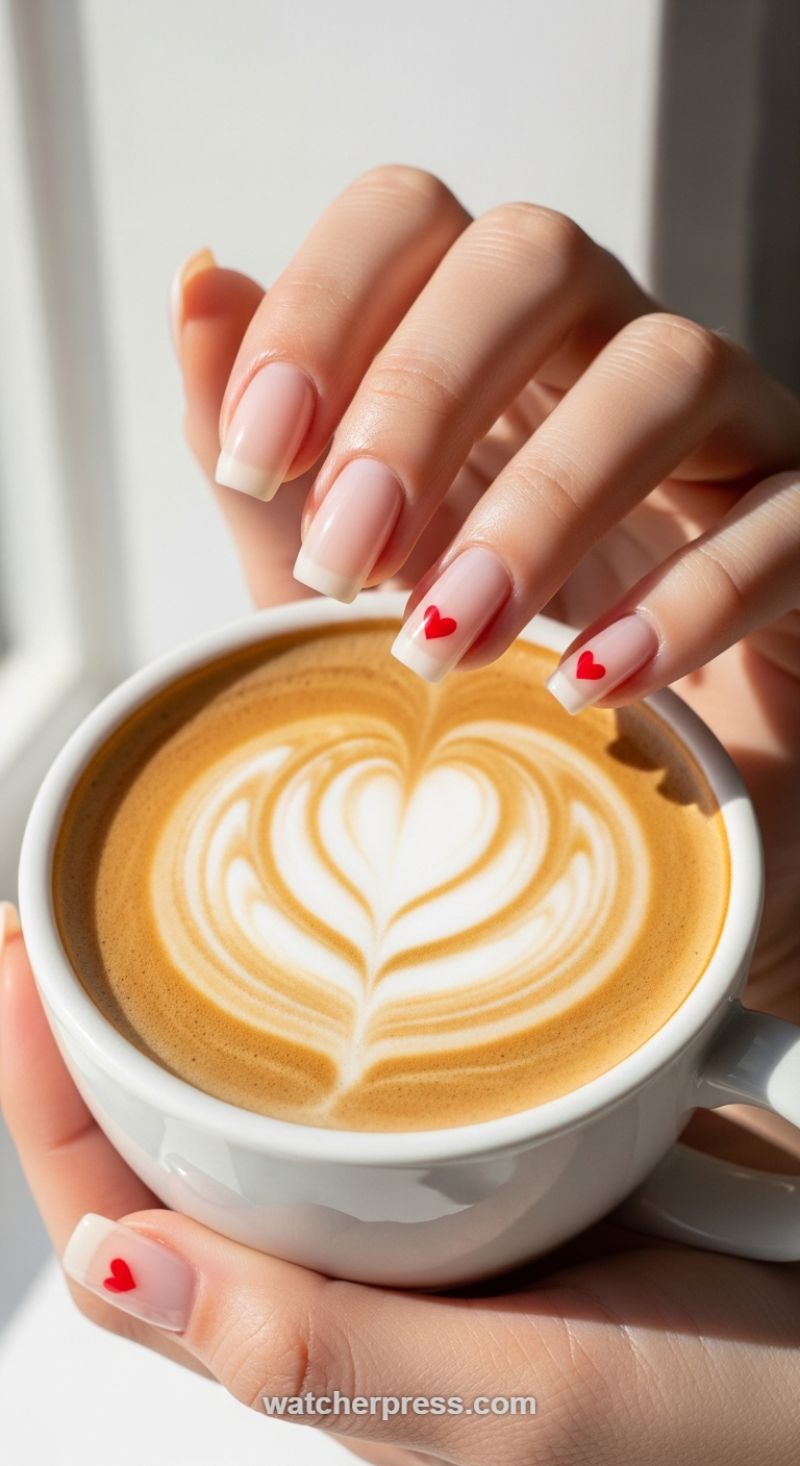
This stunning look marries the timeless elegance of the French manicure with a touch of playful romance, perfect for achieving a refined yet heartfelt statement. To replicate this style, start by ensuring your natural nails are impeccably prepped, filed into a flattering square or squoval shape. The foundation requires a sheer, milky pink or nude gel polish to give the nails a healthy, translucent glow. Apply two thin coats, curing fully between applications. The key to the perfect French tip lies in precision; use a highly pigmented bright white gel polish and a fine, flat brush, or specialized French tip guides, to create a sharp, symmetrical curve across the free edge. For an on-trend variation that aligns with contemporary techniques, consider substituting the stark white tip with a soft baby pink or peach using a subtle ombre fading technique, blending the color seamlessly into the natural base before moving to the decal step.
The defining characteristic of this manicure is the minimalist accent—a single, tiny red heart placed delicately near the apex of the nail or resting just above the white tip. For the sharpest result, use high-quality nail decals or stickers, or if you possess advanced control, utilize a very fine dotting tool and intensely pigmented red polish for freehand execution. For those looking to incorporate the foil element mentioned in our collection, consider selecting metallic red foil hearts instead of traditional polish. Carefully place the heart decal onto the cured base color (or cured tip color) of the ring finger and middle finger, ensuring it lays completely flat. Alternatively, you could apply a micro-thin strip of abstract metallic foil in a complementary color along the side wall of the nail before placing the heart, subtly merging the romantic detail with an abstract flair.
Once your design elements are perfectly placed, the crucial final step is sealing the manicure for maximum longevity and high shine. Apply a robust, scratch-resistant top coat, making sure to fully encapsulate the heart decal to prevent lifting. For superior wear, a non-wipe UV/LED top coat is recommended, applied slightly thicker over the accent nail to smooth over any edges of the decal. Expert tip: While this design is visually clean and uniform, avoid bulky extensions; the beauty of this look is its subtle sophistication. Keep the nail length practical and the shape refined. This style proves that sometimes, the smallest details make the grandest statement, offering a tasteful alternative to full coverage designs while still incorporating modern detailing methods like micro-foiling or subtle color fades on the tip.
Regal Aubergine and Gold Leaf Accent Manicure
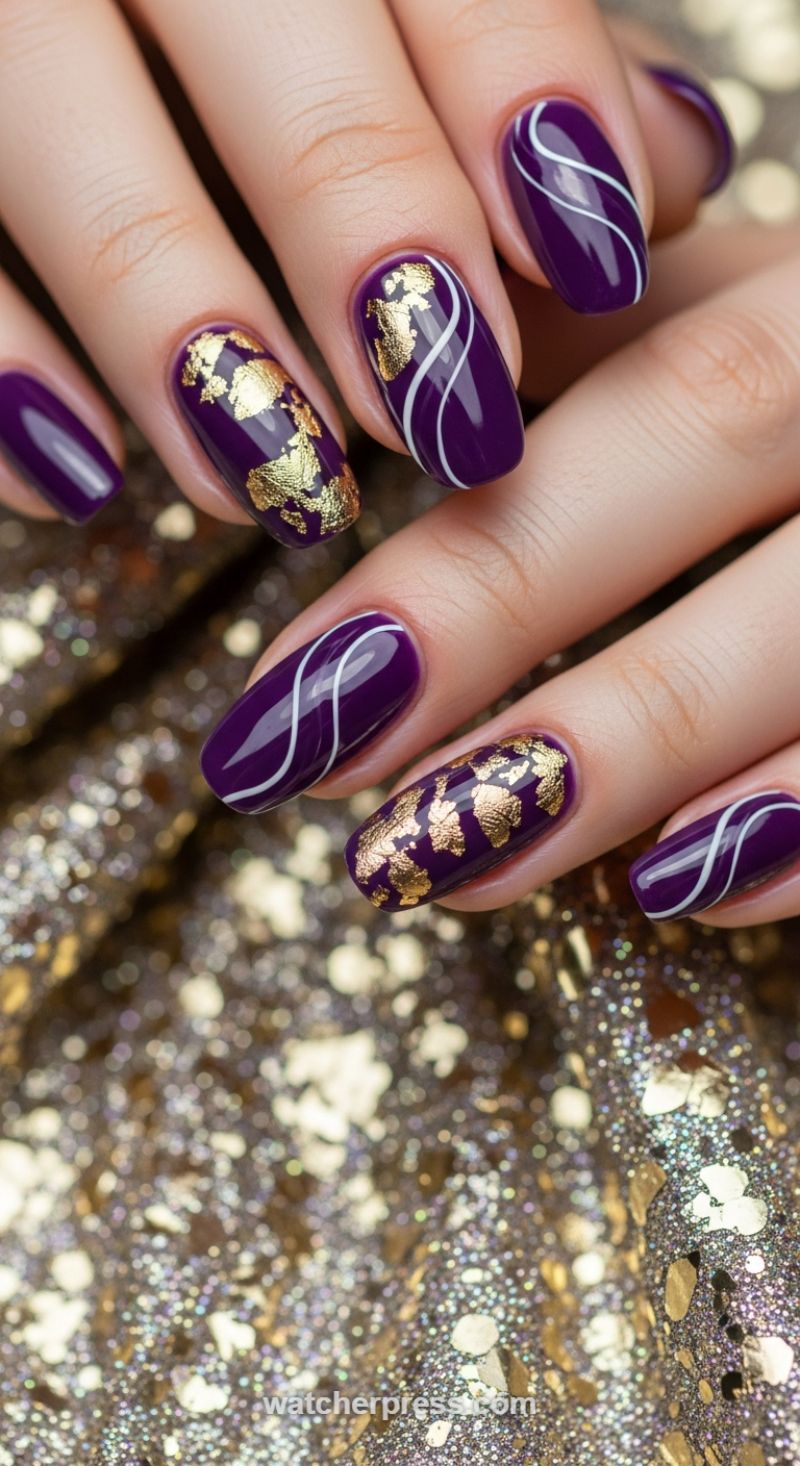
This stunning design masterfully combines luxurious textures and high contrast, making it an ideal choice for the article ’20 Stunning Nail Art Ideas That Incorporate Foil, Ombre, and Abstract Waves.’ The foundation is a rich, highly pigmented deep violet or aubergine gel polish, applied to long, elegantly shaped oval or soft almond nails. This deep base serves as the perfect canvas to showcase two distinct yet complementary accent techniques: abstract white linework and opulent gold leaf flaking. The visual balance is achieved by alternating these demanding techniques across the hand, resulting in a cohesive look that is both dramatic and infinitely sophisticated. The high-gloss finish ensures the color depth and reflective metallic elements truly pop against the dazzlingly glittered backdrop.
To recreate the luxurious gold foil accents, begin by prepping the nail with two even coats of the deep purple base, curing each layer fully. Before applying the final topcoat, use a specialized foil transfer gel on the accent nails. Once cured to a tacky state, use fine tweezers to carefully press irregular pieces of metallic gold leaf (crushed or flaked foil is recommended for this scattered effect) onto the sticky surface. The goal is to achieve an organic, fragmented pattern that allows the purple base to peek through, creating depth and dimension. This method provides far more sparkle and dimension than traditional gold shimmer polish. Once the foil is placed to your satisfaction, seal the entire design immediately with a durable topcoat to encapsulate the flakes and prevent them from peeling or catching on clothing.
The complementary abstract wave design requires precision and a steady hand. Using a highly opaque white gel polish and an ultra-fine striping brush, create smooth, looping lines that flow down the length of the nail. The depicted design utilizes two lines that cross centrally, echoing the shape of an elongated infinity symbol, which visually elongates the nail further. Expert tip: Ensure the lines are fluid and consistent; dipping the brush minimally and maintaining a light touch is key to preventing pooling or uneven application. After the line art is cured, apply a final, high-shine non-wipe topcoat to all nails—including the foiled ones—to lock in the design, protect the integrity of the art, and provide that signature high-end gel finish that will ensure the manicure lasts for weeks.
Sheer Field Daisy Nails
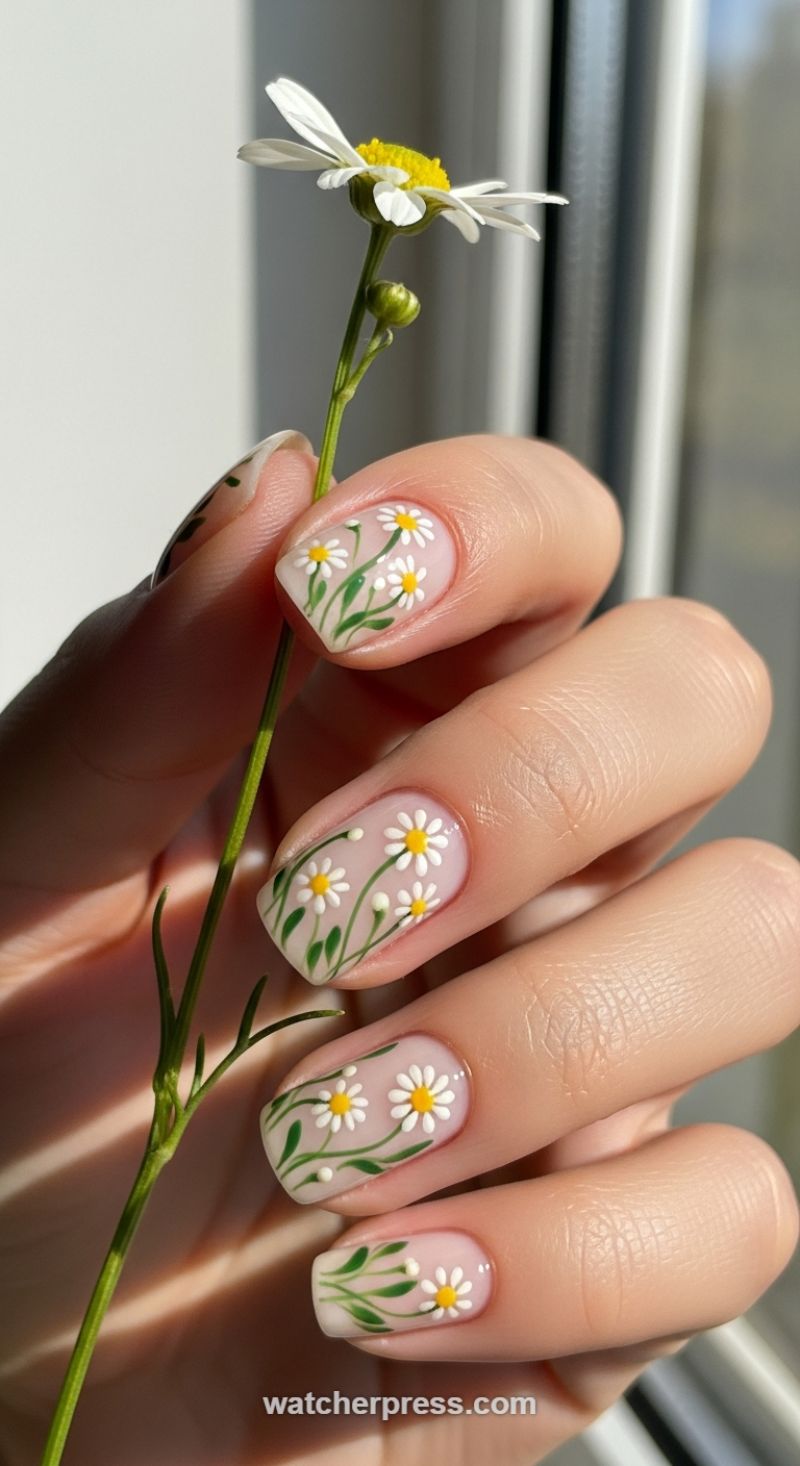
While many modern manicures leverage bold elements like metallic foil and sharp geometric waves, this delicate field daisy design offers a softer, timeless alternative, proving that subtle artistry can be equally stunning. The foundation of this look is a perfectly executed sheer base, often referred to as a ‘milky’ or ‘jelly’ manicure. To achieve this fresh canvas, apply one thin, even coat of a semi-transparent nude or pale pink polish. The key is allowing the natural nail bed to peek through, creating depth and making the vibrant green and white elements truly pop. Expert advice suggests curing a translucent white or sheer pink builder gel for maximum longevity and a glass-like shine, ensuring the base is completely smooth before beginning the intricate flower work. The use of negative space here is paramount, as the design relies on the clean edges and translucent polish to emulate a natural spring meadow.
Executing the daisy pattern requires patience and precision, utilizing high-pigment white and sunny yellow polishes. Start by placing the center dots using a small dotting tool dipped in bright yellow. Once the centers are cured (if using gel) or dry (if using lacquer), switch to a fine detail brush (00 or a liner brush) and opaque white polish. Create the petals by gently pulling short, even strokes outward from the yellow center. The petals should be slightly imperfect and organic, overlapping occasionally to give a sense of dimension and natural growth. Aim for varying sizes of daisies across the nails—some fully bloomed, others appearing smaller and nestled among the greenery. For an added touch of realism, ensure the white polish is applied thickly enough to give the petals a slight raised, three-dimensional texture.
The final, and arguably most crucial, step is the application of the greenery, which brings movement and life to the manicure. Using a thin liner brush and a mossy or olive green polish, paint wispy, vertical stems that appear to be growing up the nail plate. Follow the stems with small, sweeping strokes to form leaves and tiny buds. The leaves should have a subtle taper and dynamic curve. Notice the small, raised white dots sprinkled near the stems; these are optional but highly recommended accents, adding visual texture akin to dew drops or nascent flower buds. Finish the entire design with a thick, non-wipe top coat, taking care to float the top coat over the raised design elements without dragging the bristles, which locks in the artwork and provides that flawless, glossy finish characteristic of salon-quality nail art.