Maximize space and light in your tiny bathroom or kitchen! Discover 25 genius design hacks and layout secrets that make even the smallest rooms feel massive and functional.
BUDGET KITCHEN REMODEL: OLIVE GREEN CABINETS & NATURAL WOOD
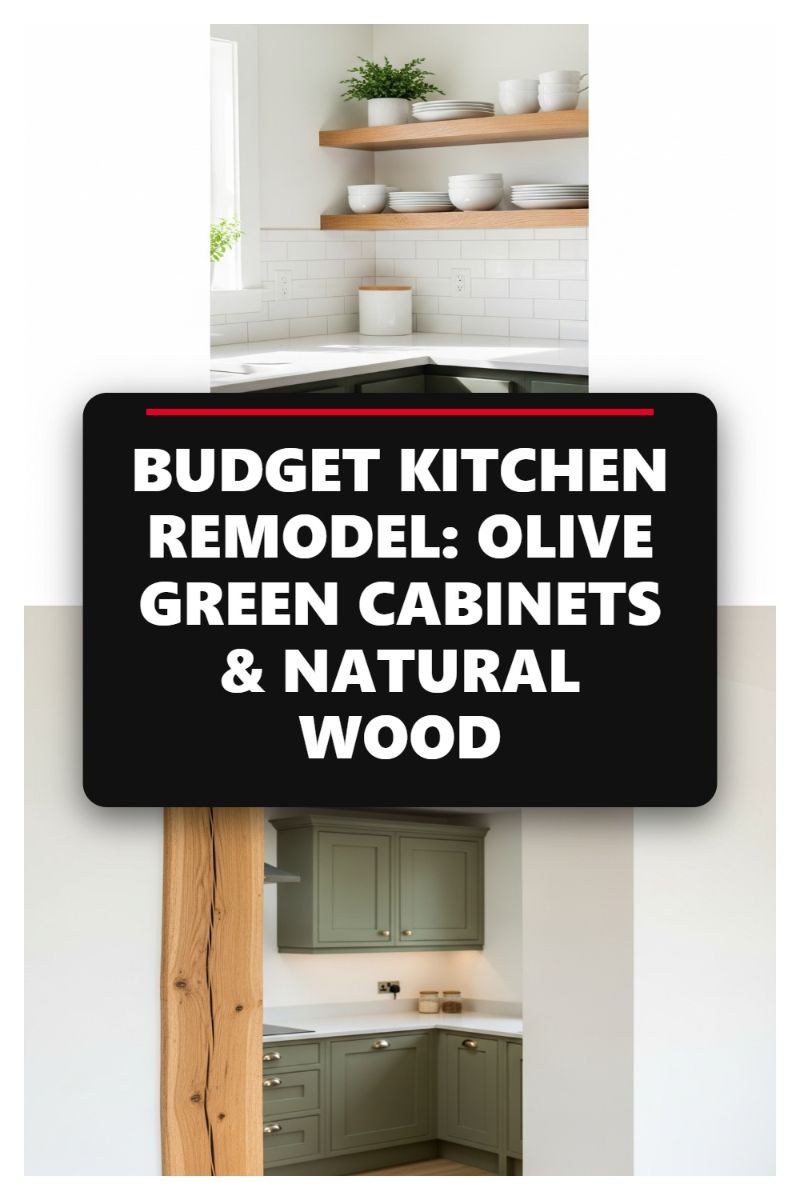
While standard design advice dictates using all-white or light neutral colors to expand a small kitchen, introducing strategic, saturated color can paradoxically create depth and visual interest that prevents the space from feeling cramped or monotonous. This olive green and natural wood design hack masters that balance. Instead of painting all walls dark, focus the deep color on the cabinetry. The olive green functions as an anchor, grounding the room and making the white countertops and crisp subway tile backsplash appear even brighter and more expansive by contrast. In a tiny footprint, high contrast prevents the eye from resting in one place, forcing it to travel across reflective surfaces and rich textures, which tricks the brain into perceiving more volume. For a budget approach, consider painting existing builder-grade cabinets rather than replacing them entirely, achieving a bespoke, high-end look without the corresponding cost.
The key to making this rich palette work in a small area is texture and line integrity. Shaker-style cabinets are essential here; their clean, recessed panels offer detail without introducing visual noise or bulk, unlike ornate traditional doors. The incorporation of natural, unfinished wood, whether through floating shelves (seen in the upper portion of the design) or an exposed structural beam (as shown below), adds a rustic warmth that feels bespoke and luxurious. In a small kitchen, every cubic inch matters. Notice how the layout utilizes the corner space efficiently, employing custom-fitted base cabinets to maximize storage potential where standard modular units might leave dead space. The natural wood should be kept minimal but impactful, providing necessary warmth without competing with the green cabinetry.
Finally, attention to reflective surfaces and vertical sightlines is critical for the ‘massive feel’ hack. The white subway tile, laid in a classic pattern with minimal grout lines, reflects ambient light deep into the room. This effect is further amplified by the consistent vertical line of the upper cabinetry (or the open shelving system). Drawing the eye upward exaggerates the ceiling height, making the entire kitchen feel taller and airier. Finish the space with minimal, sparkling hardware—like the small brass pulls shown—to add little points of light without overwhelming the space. By focusing on saturated colors for grounding, clean lines for efficiency, and reflective whites for expansion, even a compact kitchen corner can achieve dramatic depth.
DIY BOHO DECOR THAT LOOKS EXPENSIVE (UNDER $50 HACKS)

When designing a tiny bathroom or kitchen, introducing texture is paramount to prevent the space from feeling sterile, yet this must be done carefully to avoid visual clutter. The bohemian aesthetic, often rich in texture and natural materials, offers a perfect solution for adding depth while keeping the color palette bright and expansive. Focus on vertical elements, such as the macrame wall hangings shown here. Hanging several pieces of varying lengths creates an eye-catching grouping that draws the gaze upward, subtly tricking the brain into perceiving higher ceilings—a major hack for cramped rooms. To maintain an airy feel, always choose materials like unbleached cotton or natural jute in creams and off-whites, which reflect light rather than absorbing it, maximizing the effect of limited illumination common in smaller service spaces. Ensure any wall decor uses natural, lightweight materials, as heavy frames or dark art can visually compress a space.
One of the most effective ways to introduce luxury on a budget is through contrasting patterns applied to functional items. The white planters featuring bold black geometric patterns are an excellent example of this hack. While the vessels remain fundamentally simple (and likely inexpensive ceramic or painted terracotta), the high-contrast design elevates their appearance significantly, making them look curated and expensive. To integrate greenery into a compact area without sacrificing usable surface area, utilize floating shelves or wall-mounted planters. Choose resilient, low-maintenance plants like Pothos (Devil’s Ivy) or Sansevieria (Snake Plant), which not only thrive in the fluctuating humidity of a bathroom or kitchen but also introduce vital organic shapes that soften the room’s hard lines and corners. This natural element adds freshness and life, distracting from the room’s limited square footage.
To achieve this entire look for under $50, focus heavily on smart sourcing and DIY. Skip pre-made macrame and instead invest in a large spool of cotton cord and driftwood collected from nature; a beginner-level wall hanging can be completed in an afternoon, costing only pennies on the dollar compared to retail. For the planters, buy basic white pots from a garden center and use a permanent black paint marker (or a small bottle of high-quality craft paint) to hand-draw simple tribal or geometric patterns. The slightly imperfect nature of hand-drawn lines actually enhances the authentic, expensive artisan quality of the boho aesthetic. By concentrating your texture and pattern in specific vertical zones and avoiding bulky floor pieces, you achieve a stylish, layered, and open design that feels spacious and uniquely personal.
OUTDOOR PATIO DECORATING SECRETS: THE BEST SUMMER DECOR VIBE
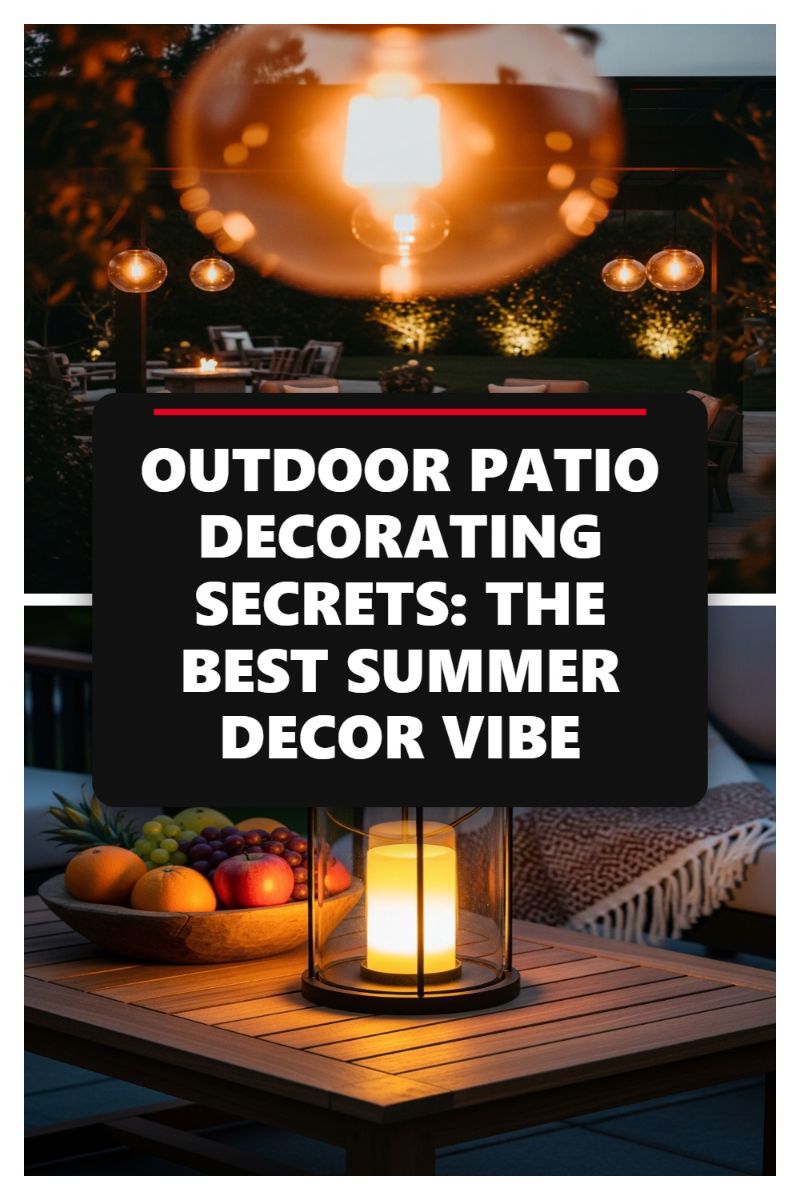
The core lesson from stunning outdoor spaces, like the one pictured, is the power of layered, warm lighting to define and expand space—a technique that translates perfectly to tiny interior rooms. In a small kitchen or bathroom, you must move beyond a single, harsh overhead fixture. Adopt a combination of ambient (a soft ceiling wash), task (under-cabinet or vanity strip), and accent lighting (small directional sconces). Warm-toned bulbs (2700K-3000K, mirroring the golden glow in the image) are crucial; they cast a flattering, inviting light that softens corners and boundaries, effectively dissolving the perception of cramped walls. Drawing the eye up with strategically placed mini pendant lighting or a slim linear track light mimics the vertical effect of the hanging globe lights, which tricks the brain into perceiving a higher ceiling and significantly more volume than the room actually possesses.
The visual openness achieved by the lantern’s clear glass and the reflective nature of the light sources offers a direct design hack for maximizing visual space indoors. Utilize materials that allow light to pass through or reflect it brilliantly. Instead of heavy, solid cabinetry in a small kitchen, opt for glass-fronted upper cabinets or minimalist open shelving, much like the clear glass of the lantern maintains visual continuity. In a tiny bathroom, ensure the shower enclosure is frameless and clear glass to avoid breaking up the sightline. Furthermore, integrate small, highly reflective metallic accents (polished chrome or brass handles) and strategically place mirrors to bounce the warm, layered light around. This amplified light circulation maximizes depth and prevents the space from feeling dark or confined, a common pitfall in smaller rooms.
While the image showcases outdoor relaxation, the principle of using defined, warm elements (the wooden table, the glowing lantern) translates to creating cozy yet expansive zones indoors. In a tiny kitchen, integrate natural wooden elements, like floating shelves or a large wooden cutting board, to ground the space and introduce warmth without visual bulk. In a small bathroom, use a textured rug or a decorative natural wood element (like a slim stool or tray) to provide warmth against reflective tiles. Crucially, embrace verticality for storage. Use tall, slim cabinets or vertical shelving units to draw the eye up, consolidating clutter and maximizing storage efficiency. By ensuring the elements are carefully chosen focal points, just like the intentional placement of the lantern and fruit bowl, you prevent the space from feeling overwhelmingly cluttered, allowing the eye to travel smoothly upward and across the room.
SUMMER READY: THE ULTIMATE OUTDOOR BBQ KITCHEN SETUP

While this stunning setup showcases an expansive outdoor culinary area, its design principles are absolutely paramount for making a tiny indoor kitchen feel massive. The key takeaway from this visual is the seamless integration of built-in appliances and efficient zoning. To apply this to a small interior space, ditch freestanding clutter. Opt for fully integrated, panel-ready appliances and a streamlined, undermount sink to maintain continuous, reflective counter space, which visually doubles the room size. The clean white backdrop of the outdoor kitchen, combined with stainless steel finishes, is a perfect model for light refraction; implement reflective subway tile backsplashes or high-gloss white cabinetry to maximize available natural light and push the walls outward visually. Furthermore, utilize the vertical space shown by the stack of wooden cutting boards: invest in floor-to-ceiling, shallow pantry cabinets and vertical organizers that keep clutter off the sightlines and ensure everything has a dedicated home.
TINY BATHROOM, HUGE IMPACT: GREEN TILE & PLANT DECOR TRENDS FOR SMALL SPACES
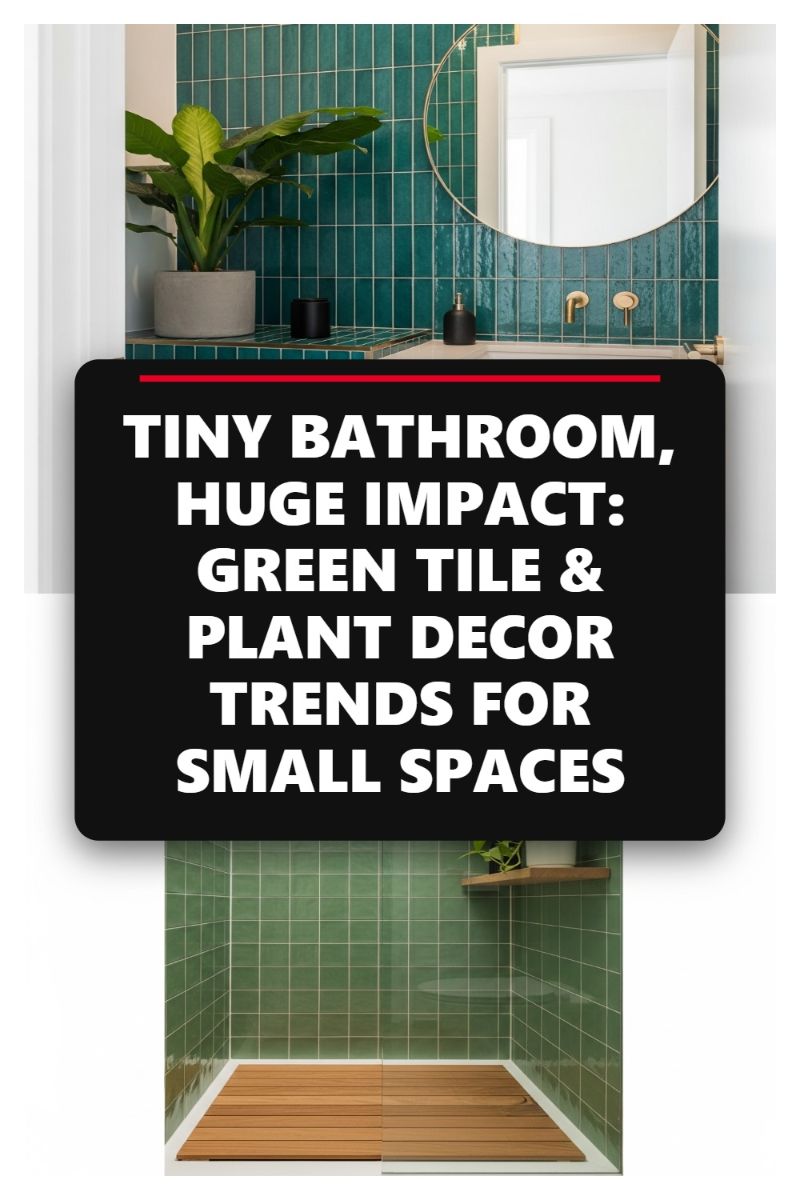
When dealing with extremely limited square footage, the goal is not to hide the size, but to inject so much character and visual depth that the viewer is immediately captivated by the design rather than the dimensions. This is expertly achieved here by using highly saturated, jewel-toned tiles, specifically a deep teal or emerald green. Instead of opting for standard white, a bold color creates a powerful focal point, adding instantaneous depth that tricks the eye into perceiving more space. For optimal height perception, use rectangular subway tiles installed vertically, as seen around the vanity area; this orientation actively draws the gaze upwards, making the ceiling seem higher. Furthermore, notice how the design subtly transitions to a slightly lighter, square sage-green tile in the shower. This technique allows you to delineate different zones within an open or tightly packed floor plan without needing bulky glass walls or curtains, maintaining the overall visual flow while adding architectural interest.
To further amplify the perception of spaciousness, focus heavily on reflective and space-saving elements. A large, circular mirror with a thin, brass frame is a crucial tool in a small bathroom, not only reflecting light from the interior fixtures but also capturing sightlines from the rest of the room, effectively doubling the visual size of the area. Pair this with wall-mounted hardware, such as the sleek gold faucets featured here. Mounting the fixtures directly to the wall is a genius hack for tiny spaces because it eliminates the need for bulky counter space behind the sink and keeps the vanity surface completely clear, promoting a clean, uncluttered, and expansive feeling. When selecting materials, choose metallic accents like brushed brass or gold to contrast the cool green tones, adding necessary warmth and a layer of luxurious sophistication.
Finally, incorporate biophilic design and tactile texture to ensure the small space feels inviting and warm, not cramped or clinical. Introducing a live plant, like the large potted specimen shown, instantly brings life, color, and vertical appeal to the vanity area, which acts as a refreshing counterpoint to the hard tile surfaces. For the shower area, ditch the standard cold tile base and install a custom wooden slatted mat, typically made of teak or bamboo. This solution provides superior drainage while introducing a rich, natural texture and warmth underfoot. This attention to detail elevates the bathroom from a purely functional space to a small, spa-like sanctuary. Remember to maintain verticality in your storage as well—opt for floating shelves above the toilet or slim, tall vertical cabinets to keep essential items stored without encroaching on the floor plan.
The Secret to Making a Small Space Feel Massive: It’s All About Texture

While the image illustrates the power of layered, soft textiles to create an ultra-cozy master bedroom, the underlying design principle—strategic use of texture—is arguably even more crucial when designing tiny kitchens and bathrooms. In compact spaces where you cannot rely on expansive square footage or dramatic furniture to create visual interest, texture becomes your primary tool for adding depth, luxury, and perceived dimension. Rather than thinking of texture solely as fluffy throws or soft bedding, translate this concept to durable, hard surfaces: contrast matte finishes with gloss, rough materials with smooth, and organic weaves with sleek metals. This layering trick prevents tiny rooms from feeling sterile or flat, replacing overwhelming visual clutter with subtle tactile richness. By providing the eye (and the hand) with varying surfaces, you elevate a simple utility room into a sophisticated, high-design space, making it feel less constrained and far more expensive than its footprint suggests.
To effectively apply the texture principle in a small bathroom, focus on creating contrast between the walls, floor, and fixtures. If your vanity features a smooth, polished marble countertop, ensure the floor tile is matte or has a distinctive natural grain, such as a wood-look ceramic or a heavily veined porcelain. Instead of standard drywall, consider shiplap or beadboard paneling for the bottom half of the walls to introduce vertical texture, drawing the eye upward. For soft textures, swap out a flimsy polyester bath mat for a dense, woven jute rug or a luxurious, deep-pile cotton loop rug; these items provide instant tactile warmth. In a small kitchen, where function is paramount, use your backsplash as the textural anchor. Contrast smooth, high-gloss cabinetry with a highly textured backsplash, such as hand-formed Zellige tiles or rough reclaimed brick veneer. If your space is too limited for upper cabinets, utilize open shelving made from richly-grained reclaimed wood, contrasting sharply with sleek stainless steel appliances or industrial black metal brackets. This visual friction between disparate materials adds depth and complexity, distracting from the small dimensions.
Expert application of texture requires restraint in your color palette. In a tiny room, texture should be the star, and neutral, monochromatic schemes (creams, grays, whites, and pale woods, similar to the image’s palette) allow the materials to speak for themselves without the competition of vibrant colors. Furthermore, strategically placed lighting is essential, as the perception of texture changes dramatically under different light sources. Utilize uplighting or focused spotlights to graze rough surfaces (like brick or woven wallpaper) to accentuate the shadows and highlights, enhancing the three-dimensional effect. Conversely, ensure highly reflective, glossy textures (like polished brass hardware or mirrored cabinet fronts) receive ample direct light; these reflective surfaces bounce light across the room, which is the foundational trick for maximizing the sense of space. By balancing rough, light-absorbing textures with smooth, light-reflecting textures, you craft an environment that feels rich, complex, and spacious.
WALK-IN SHOWER LAYOUTS FOR PLANT LOVERS: JUNGLE BATHROOM TRENDS
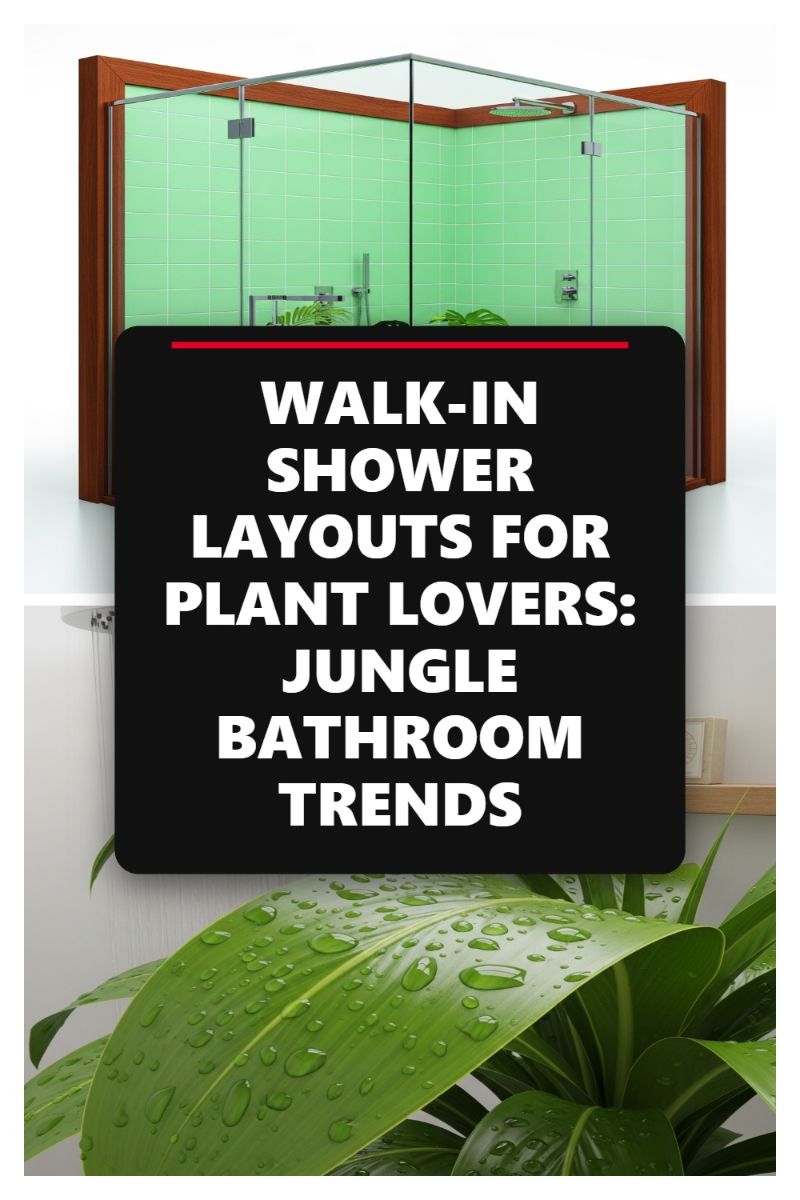
The “Jungle Bathroom Trend” is an ingenious hack for tiny spaces because it merges aesthetics with functionality, making your shower a living design feature rather than a confined box. To execute this look, as seen in the rendering featuring crisp mint green tiles and a sleek glass enclosure, focus on maximizing visual flow. Opt for a true walk-in design where the glass barrier is minimal or entirely frameless (though the example shows a subtle wood frame accent, which adds warmth). The primary design hack here is transparency: the glass allows light and sightlines to pass through the shower, preventing the eye from stopping, which instantly makes the room feel larger. When selecting tiles, choose light, bright shades like this mint green or a clean white, and consider large format tiles or subway tiles laid vertically to further enhance the perception of height and openness. Ensure the flooring seamlessly flows from the bathroom into the shower area (a curbless design) for the ultimate spacious effect, eliminating trip hazards and visual breaks.
The secret to integrating the “jungle” theme effectively without introducing clutter is strategic plant placement. Humidity-loving plants like Boston ferns, Pothos, or even tropical orchids thrive in the warm, damp microclimate of a shower and naturally filter the air. Instead of placing pots on the floor, which can impede movement in a small space, utilize vertical real estate. Install recessed niches directly into the tiled wall—these are perfect for holding small planters or succulents, keeping them out of the way of shower spray while capitalizing on unused wall depth. For larger foliage, consider installing secure, hanging planters from the ceiling near a window if you have natural light, or placing waterproof shelving high up in a corner. Remember to choose appropriate containers; porous materials like terra cotta can mold in high-humidity areas, so opt for glazed ceramics or decorative plastic pots with excellent hidden drainage systems.
For an expert finish that complements the expansive feel, pay close attention to material selection. If you incorporate wood elements, as shown with the shower frame accent, ensure they are naturally moisture-resistant wood varieties like teak or cedar that resist warping, maintaining longevity and aesthetic appeal. Hardware should be minimalist and sleek—brushed nickel or chrome fixtures reflect light beautifully, further brightening the space. Finally, to truly optimize a tiny layout, install a rain shower head (like the one pictured) recessed into the ceiling if possible, along with wall-mounted controls that minimize protrusion into the shower area. This layout keeps the shower space streamlined and functional, fully integrating the lush green accents into a sophisticated, visually massive bathroom design.
Countertop Styling Hacks for Small Kitchens: Aesthetic & Functional Decor
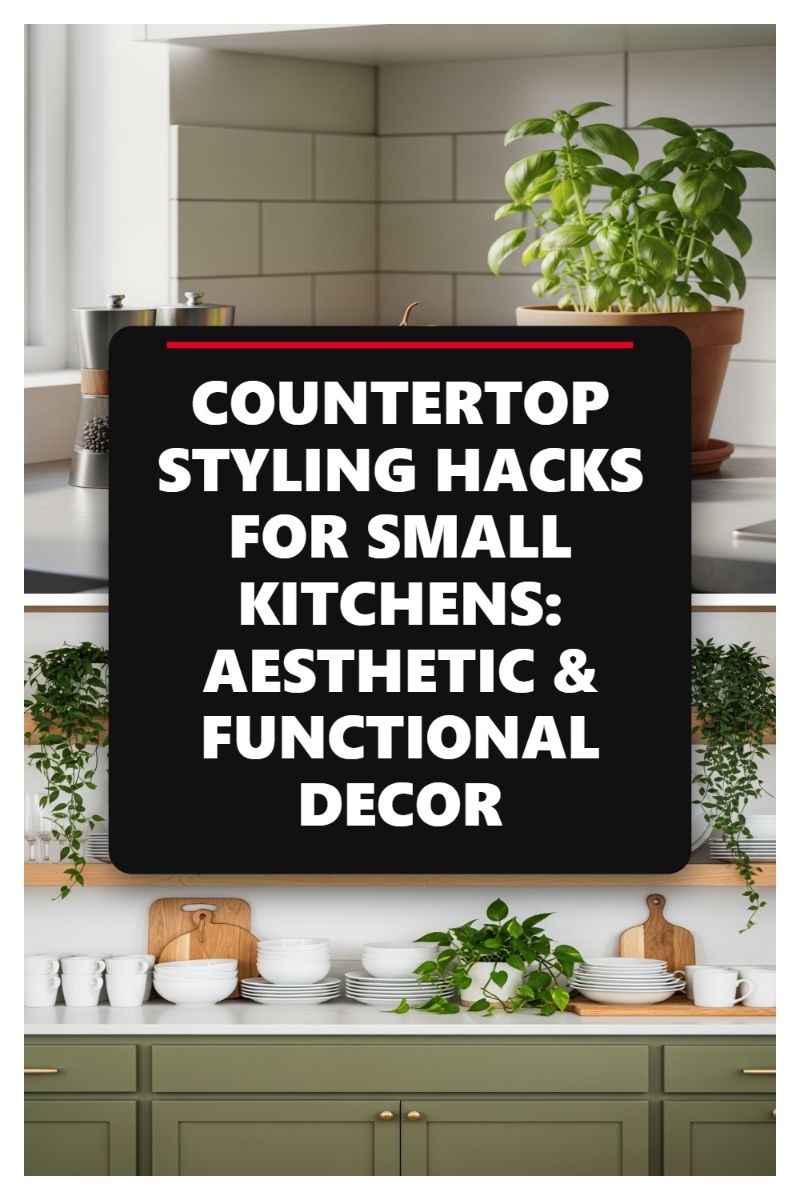
In a small kitchen, the countertop often serves multiple roles—prep space, storage area, and display zone. To prevent visual clutter from eating into your valuable workspace, the key is to prioritize verticality and purposeful grouping. As demonstrated in the visual, utilize vertical stacking techniques for everyday essentials like dinnerware. Instead of spreading plates and bowls horizontally, stack them neatly to gain surface area. Furthermore, functional items that are visually appealing, such as attractive wooden cutting boards, should be leaned against the backsplash. This utilizes the vertical plane for texture and depth while keeping them immediately accessible. By consolidating items into tight, clean groups—like the identical stack of white mugs or the matching spice grinders—you establish organization and minimize the scattered appearance that makes small spaces feel chaotic.
The strategic use of decor, particularly organic elements, can distract the eye from the kitchen’s limited footprint and introduce much-needed life. Introducing live plants, such as the potted basil or the trailing greenery seen on the shelf, adds immediate texture, color, and a sense of depth. Trailing plants, in particular, are excellent small-space decorators because they naturally draw the gaze upward, emphasizing height rather than width. When selecting décor, ensure proportionality; choose pieces that are not overly bulky, maintaining the scale of the room. The inclusion of natural wood tones in the open shelving and cutting boards helps to ground the bright, airy white space, creating visual warmth without adding heavy colors or materials that might absorb light and shrink the perceived dimensions.
Finally, maximize the illusion of space by maintaining a tight, consistent color story for all items displayed on the counter or open shelves. The use of minimalist, matching white dinnerware in the image is intentional; uniformity reduces visual noise significantly. When everything matches, the collection reads as one cohesive element rather than a multitude of individual items. For countertops, stick to light, reflective surfaces and backsplashes (like the white subway tile shown) to bounce light around the room. Group frequently used tools and ingredients on small, designated trays or risers. This keeps the items contained, simplifies cleaning, and, most importantly, clearly defines the remaining open space as the functional work area, tricking the eye into believing the counter offers far more breathing room than its square footage suggests.
THE ULTIMATE ROMANTIC BRIDAL SHOWER DECOR GUIDE: SHABBY CHIC EDITION

While this exquisite setting exemplifies shabby chic romanticism, the underlying design principles—the use of reflective surfaces, bright color palettes, and vertical accents—are paramount when attempting to maximize the sense of space in a tiny kitchen or bathroom. To achieve the airy, expansive feel shown here, start with a highly monochromatic, light color scheme, specifically high-gloss white or very pale pastels, replicating the dominance of white textiles and pale florals. The reflection factor is key: swap matte finishes for glossy or polished materials, much like the sheen on the silver urns and candelabras, to effectively bounce ambient light. In a small bathroom, consider using large format tiles with a reflective glaze, or in a kitchen, integrate glass-front cabinets or polished chrome fixtures. This strategic use of reflectivity tricks the eye into perceiving greater depth, turning tight quarters into a visually expansive retreat.
To further lift the ceiling and combat claustrophobia, employ vertical visual anchors, drawing inspiration from the tall, towering candelabras and lush floral centerpieces. In a tiny bathroom, this translates to utilizing floor-to-ceiling storage solutions, such as tall, narrow linen closets or vertically oriented floating shelves, rather than squat, bulky units. In a small kitchen, verticality can be achieved with open shelving that spans the entire wall height, showcasing beautiful, coordinated dishes. Ensure these vertical elements are visually lightweight; for example, use open wire shelving or thin, elegant supports instead of heavy cabinetry. This deliberate upward movement in design elongates the room and leverages unused airspace, making the room feel proportionally grander than its footprint suggests.
Finally, the ‘shabby chic’ aesthetic is successful in small spaces because it prioritizes strategic layering over clutter, as evidenced by the clean white lines of the vanity below the table setting. When adapting this to a functional tiny space, every item must serve a purpose, and multi-functionality is a must. Integrate a vanity that offers multiple drawer storage (like the small dresser shown) or install recessed medicine cabinets to keep countertops completely clear. Embrace the layering principle by using transparent or glass elements for storage, such as clear glass canisters for bathroom essentials or spices. This allows items to be organized without creating heavy visual blocks. By maintaining extreme control over surface clutter and utilizing multi-functional, aesthetically pleasing storage, you can achieve that open, yet highly detailed, feel necessary for a small room to truly feel massive.
SMALL BATHROOM LAYOUTS THAT FEEL HUGE: DESIGN PLANS
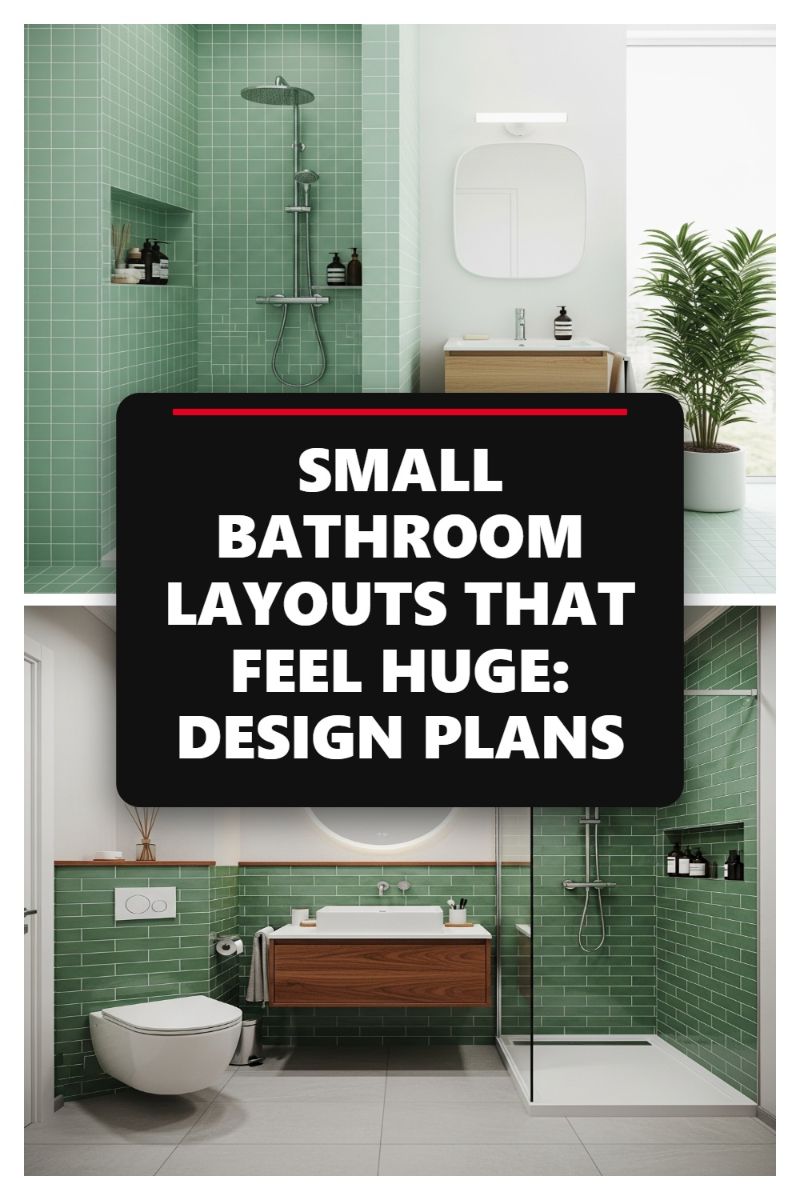
The secret to transforming a compact washroom into a sanctuary of spaciousness lies in adopting a streamlined layout and strategically employing floating elements, a technique masterfully demonstrated in this design. To replicate this effect, begin by integrating wall-mounted fixtures. Notice how both the toilet and the vanity are suspended above the floor. This single design choice immediately exposes a continuous span of flooring, tricking the brain into perceiving the room as much larger than its actual dimensions. When planning your layout, prioritize vertical continuity. The walk-in shower, enclosed only by a clear glass panel, avoids breaking the sightlines, a critical error common in small bath remodels. Furthermore, optimize essential storage by recessing shelving directly into the shower walls (niches). This eliminates protruding obstacles, maintaining the sleek, uncluttered flow necessary for small-space success.
Maximizing light and material consistency is the next crucial step in amplifying perceived space. This bathroom cleverly uses large expanses of uniform, brightly colored tile (such as sage green subway or square tile) contrasted sharply with white walls and minimal grout lines. The uniformity of the tiling draws the eye and creates an unbroken visual path. To further enhance luminosity, incorporate large reflective surfaces; the chosen mirror here is not only generously sized but is also backlit, serving as both a design feature and a powerful light source that bounces illumination across the room. When selecting colors, opt for saturated, clean tones like this green—they add depth and personality without the visual heaviness of darker shades. Pairing these clean surfaces with natural textures, such as the walnut floating vanity and wood accents, introduces warmth and sophistication, preventing the minimalist design from feeling cold.
Finally, ensuring a disciplined approach to decluttering and fixture selection guarantees long-term success in a tiny footprint. Every element in this layout serves a deliberate function and contributes to the overall expansive feeling. Opt for minimal, high-quality hardware (like the simple, modern shower fittings) over bulky, ornamental pieces. Remember that clear surfaces are key; utilizing the built-in shower niches and the floating vanity for storage keeps essential items contained and off the visual plane. By focusing on cohesive design—where the materials of the vanity echo those of the accent shelves—you create a visually integrated space that reads as unified and deliberate, reinforcing the illusion of a larger, well-thought-out room.
BACKYARD HOT TUB SANCTUARY SETUP: COZY OUTDOOR JACUZZI DECOR IDEAS
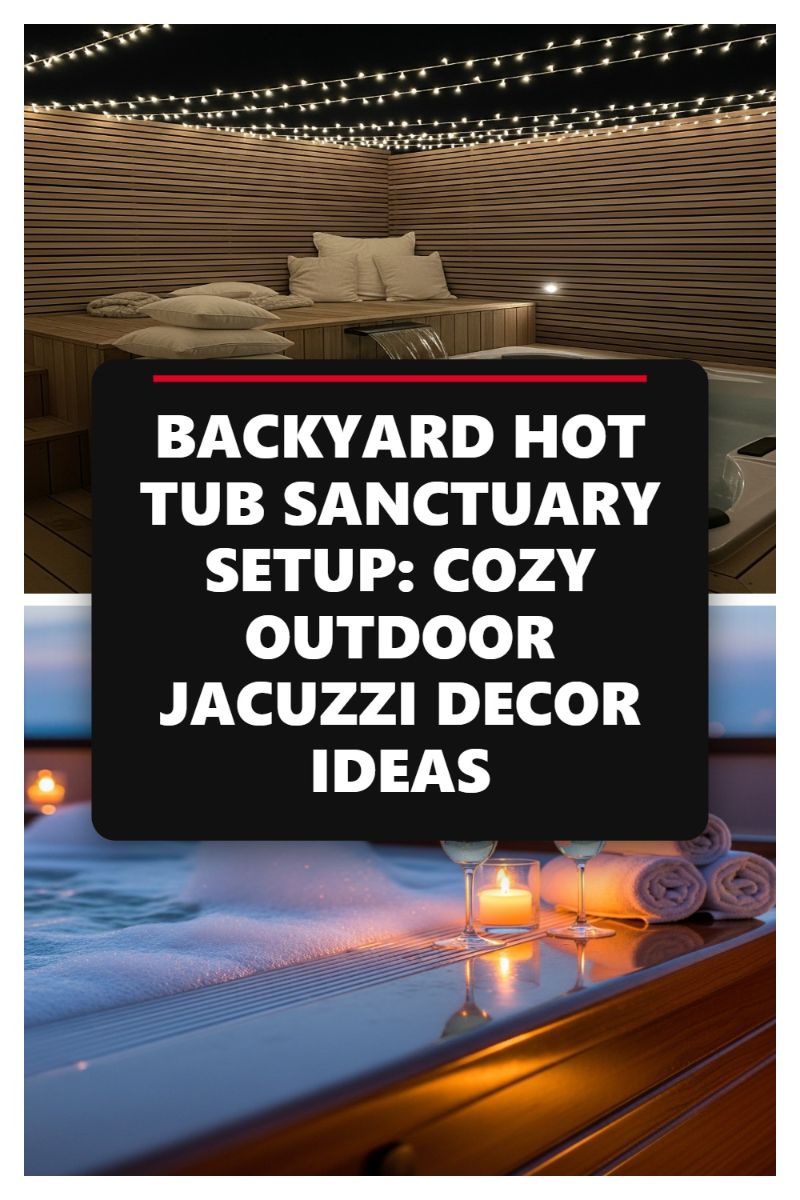
While the image showcases a luxurious outdoor sanctuary, the design principles used to create this expansive, resort-like atmosphere can be expertly applied to make a small, indoor bathroom feel massive and deeply comfortable. The first crucial element is layered lighting, directly inspired by the soft, draped string lights overhead. Harsh overhead lighting shrinks a room; instead, install dimmable recessed fixtures and supplement them with a lighted vanity mirror and low-level ambient lighting, perhaps via waterproof LED strips placed beneath a floating vanity or within shower niches. The slatted wood paneling in the image provides vertical texture which draws the eye upward, increasing perceived height—an excellent hack for tiny bathrooms. Mimic this effect using vertical subway tiles, narrow shiplap paneling, or floor-to-ceiling tiling in a lighter shade to create visual continuity and make the walls appear to stretch taller.
To translate the clean, built-in look of the hot tub deck into maximizing utility in a small bathroom, focus on floating and recessed elements. A floating vanity is essential as it exposes more floor space, visually tricking the eye into believing the room is larger than it is, unlike bulky pedestal sinks. Replace standard wall shelves with recessed storage niches, both in the shower and adjacent to the sink, to keep necessary items contained without intruding on the room’s footprint. The rolled white towels and soft pillows in the image emphasize comfort and luxury; introduce high-quality textiles and spa-like details into your bathroom through luxurious, neatly rolled towels, soft bathrobes hung on decorative hooks, and high-end materials like marble or teak wood accents to elevate the sensory experience, transforming a cramped space into a true retreat.
Finally, capitalize on visual depth and openness. The waterfall and bubbles in the hot tub area draw the eye through the space. In a tiny bathroom, the best way to achieve this fluidity is by eliminating visual barriers, particularly around the shower. Opt for a frameless glass shower enclosure instead of a curtain, as this maintains an unbroken sightline across the room. Use large format tiles (which minimize distracting grout lines) on the floor and even continue them into the shower to create a seamless, expansive feel. By adopting the light, neutral palette and prioritizing clean lines and soft, diffused light—key elements of this outdoor spa—you can harness these design hacks to make even the smallest bathroom feel open, luxurious, and massive.
VANITY GOALS: SHABBY CHIC BEAUTY ROOM DECOR IDEAS
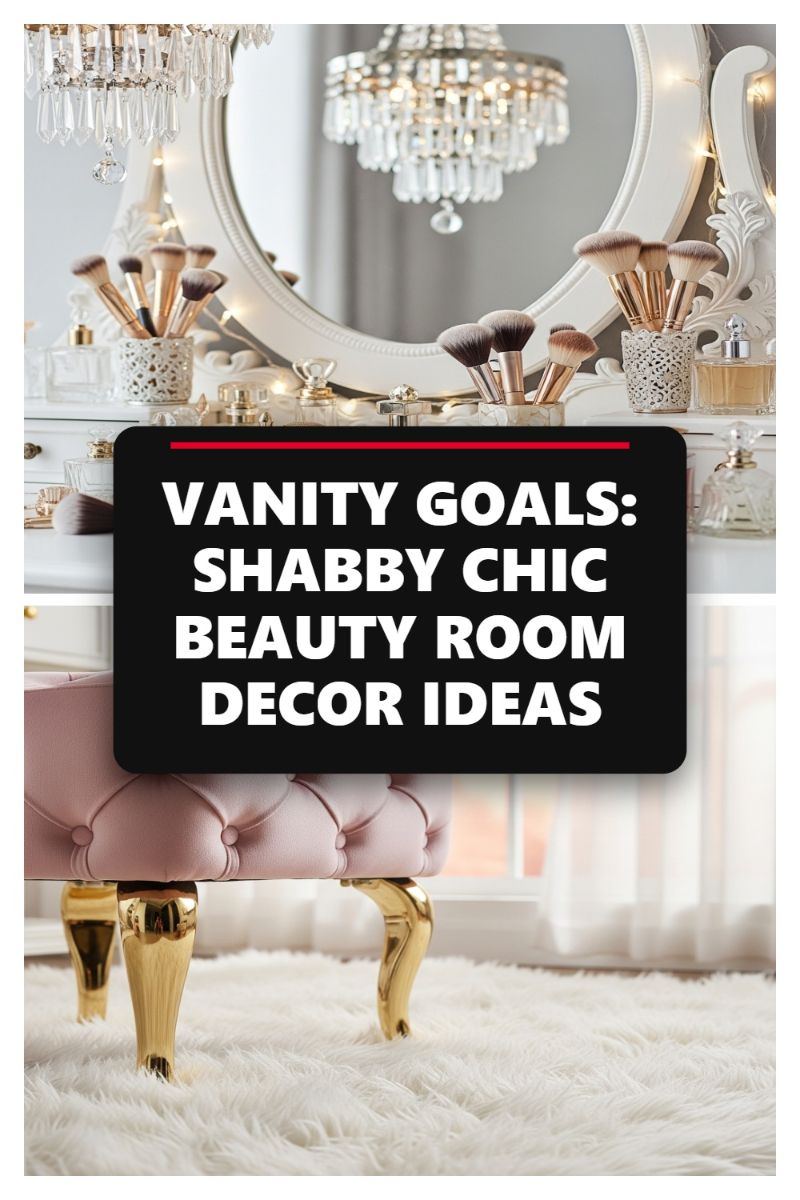
Recreating a glamorous vanity setup, even within a tiny bathroom or corner of a small bedroom, relies entirely on mastering light, reflection, and strategic color choice. The primary design hack here is the oversized, ornate mirror. In small spaces, traditional medicine cabinets or simple mirrors often fail to maximize impact; instead, selecting a statement mirror with a detailed frame, like the white carved piece shown, instantly doubles the visual depth of the room. Pair this reflective power with equally dazzling light sources. Crystal chandeliers or sconces, characteristic of the Shabby Chic style, not only provide task lighting but also scatter light dramatically across the room, eliminating shadows and creating an expansive, airy atmosphere that visually pushes back the walls. Always prioritize a pale or white color palette for the main fixtures and finishes, as these hues are essential for maximizing the perceived size of any compact area.
To prevent an all-white, light-filled space from feeling cold or stark, introduce depth and luxury through texture and scale, applied strategically. Note the pink tufted ottoman with glossy gold legs and the fluffy white shag rug. The rug serves to anchor the dressing area and provides a tactile element that draws the eye, distracting from the room’s limited square footage. Crucially, the ottoman utilizes exposed, high-shine legs, a vital tip for maximizing space in small rooms. Whenever furniture is elevated off the floor, allowing the flooring surface to continue underneath, it creates an uninterrupted sightline, fooling the brain into perceiving more open space. Furthermore, metallic accents—like the gold legs, perfume caps, and mirror trimmings—contribute to the overall reflective quality, bouncing light around and amplifying the airy, open feel.
Organization is the non-negotiable final step for making a small vanity area functional without succumbing to visual clutter. The key is elevated, decorative storage. Instead of letting brushes and products sprawl, group them in attractive, vertical containers (like the lace-patterned holders). For displaying perfumes or other essential items, use tiered trays or risers to utilize vertical height efficiently while keeping the main surface of the vanity clear. A meticulously organized vanity ensures that the glamorous Shabby Chic aesthetic remains curated and tidy, which is paramount in a small space; visual clutter quickly shrinks a room, whereas a thoughtful, beautiful display of essentials maintains the illusion of vastness and luxury.
ULTRA-FEMME GALENTINE’S NIGHT IN: 7 DECOR THEMES WE ARE OBSESSED WITH
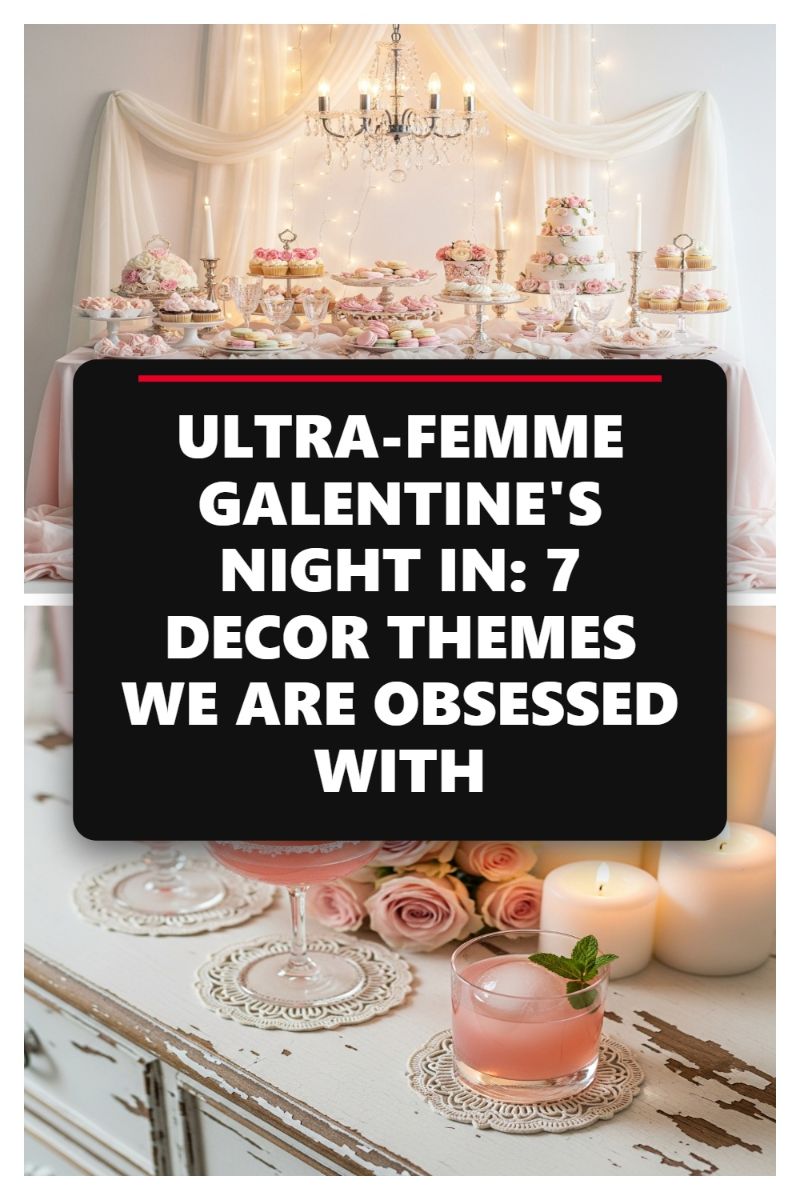
The ultra-femme aesthetic, characterized by light colors, sheer fabrics, and delicate arrangements seen here, is surprisingly effective when translated into strategies for expanding small spaces, particularly in tiny kitchens or bathrooms. Notice the dominant use of light, airy hues—creams, soft whites, and pastels—which are crucial for maximizing light reflection. In a small bathroom, opting for floor-to-ceiling white tiling or light-colored cabinetry mimics this effect, preventing walls from closing in. The sheer, draped background fabric provides volume without visual density; similarly, replacing heavy shower curtains or window treatments with translucent or sheer materials allows natural light to flow uninterruptedly, pushing the perceived boundaries of the room. Furthermore, the strategic inclusion of reflective surfaces, such as the crystal chandelier, the glossy plating, and the glassware, works overtime to capture and scatter light, making any cramped corner feel instantly brighter and more open.
To combat the claustrophobia often associated with small spaces, focus on verticality and “floating” elements, drawing inspiration from the display’s composition. The multi-tiered serving platters and the hanging chandelier immediately direct the gaze upward, a powerful trick for elongating ceilings. In a small kitchen, implementing open shelving or vertical spice racks, or in a bathroom, installing a tall, slender linen tower, achieves the same vertical pull, maximizing storage without occupying excessive floor area. Crucially, the elements placed on the table—the cakes and cocktails—are elevated and delicate. Adopt this principle by installing floating vanities or wall-mounted taps in the bathroom, or utilizing wall-mounted pot racks in the kitchen. By keeping the floor clear, you create uninterrupted sightlines across the room, which visually expands the footprint and significantly improves maneuverability in tight quarters.
Finally, effective lighting is the cornerstone of any small-space illusion. The setup features a combination of ambient lighting (the chandelier), accent lighting (the fairy lights), and task lighting (the candles). In a tiny kitchen or bath, replicate this layering effect: use recessed ceiling lights for ambient wash, under-cabinet LED strips for task lighting, and elegant sconces or small, glass-based pendant fixtures for accent. Avoid heavy, opaque light fixtures that create shadows or visual bulk. Instead, opt for clear glass or crystal finishes, echoing the sheer quality of the party decor, which appear to take up zero space while maximizing light dispersion. By adopting soft, delicate accessories, such as the small lace-like coasters shown, and prioritizing visual simplicity over heavy ornamentation, you maintain an uncluttered environment where every design choice contributes to the overall perception of spaciousness.
COZY BEDROOM MAKEOVER: 3 EASY STEPS TO ACHIEVE HYGGE HEAVEN

While the image showcases the quintessential Hygge bedroom, the principles of warm lighting, layered textures, and natural elements are genius design hacks for making minuscule kitchens and bathrooms feel surprisingly massive and inviting. The key to expanding these small, often utilitarian spaces lies in leveraging soft visual continuity and ambient warmth to minimize harsh boundaries. Step one involves adopting a unified, warm neutral palette—think soft taupes, ivory, or pale wood tones, mirroring the comforting colors in the bedding and throws. Apply this tone consistently across large surfaces like floor tiles, cabinet fronts, or shower walls. This strategy reduces visual breaks, allowing the eye to flow uninterruptedly across the room, thereby tricking the mind into perceiving greater depth and size. In a tiny kitchen, this means matching cabinet and wall colors; in a cramped bathroom, it means selecting large format, uniform tiles in a light, matte finish rather than small, busy patterns.
Step two focuses on mastering layered lighting, a technique crucial to the Hygge aesthetic shown by the abundant candles and soft lamps. In a small space where overhead light can create harsh shadows that emphasize corners and tight confines, strategically layered, warm (2700K) lighting is essential for creating the illusion of spaciousness. Replace cold, bright bulbs with warmer options. In a tiny bathroom, utilize vanity sconces or perimeter lighting instead of a central ceiling fixture to wash the walls with light, enhancing reflective surfaces and blurring edges. In a small kitchen, invest in seamless under-cabinet strip lighting to illuminate countertops and create depth, mirroring the soft glow of the candles in the image. This technique provides defined task areas while enveloping the room in an overall soft radiance that makes the space feel luxurious, not confined.
Step three is about integrating textural depth and organic shapes, mimicking the plush blankets and natural wood elements visible in the scene. Introducing natural materials like light woods, woven baskets, or even a small indoor plant prevents a minimalist small room from feeling sterile or flat. For a tiny kitchen, consider a single open shelf made of reclaimed wood or install handleless cabinets to reduce visual clutter, letting the natural grain serve as the primary texture. In a small bathroom, use a bathmat with a woven texture or store items in stylish, natural rattan baskets rather than plastic containers. When done correctly, this calculated use of texture and soft elements grounds the room and distracts the eye from its small footprint. These subtle additions provide the rich visual interest required to achieve that welcoming ‘Hygge Heaven’ feeling, transforming a tight space into a luxurious, spatially efficient retreat.
AESTHETIC DIY ROOM DECOR FOR THE VIBE CHECK (COZY BEDROOM EDITION)

Achieving the perfect ‘vibe check’ in a bedroom relies heavily on curated textures and functional, customized decor. The foundational element of this aesthetic is the Organic Modern gallery wall. To recreate this look, focus on mixing media while maintaining a cohesive color palette. Start by sourcing high-quality botanical prints (like ferns or dried flowers) in matching light wood frames. Pair these smaller framed pieces with one larger piece of contemporary line art and introduce texture with a woven wall hanging or small tapestry. The key instructional hack here is varying the size and shape of the frames and wall hangings (a large print, smaller grid of botanicals, and an asymmetrical textile) to prevent the arrangement from looking too stiff or sterile. Lay out your arrangement on the floor first, paying close attention to the negative space between pieces, aiming for roughly 2-3 inches of separation, which creates an intentional, clustered look that draws the eye upward and makes ceilings feel higher.
The ultimate functional DIY hack showcased here is the stacked crate nightstand. This highly affordable and customizable project is perfect for maximizing vertical storage in small sleeping spaces. To construct it, acquire two matching, sturdy wooden crates. Ensure they are lightly sanded and, ideally, treated with a clear matte sealant or a light stain to protect the wood and elevate the appearance beyond raw lumber. Stack the crates opening-side-out to create two distinct shelves. The bottom shelf is ideal for storing larger books or magazines, while the top shelf serves as the primary display area. This setup not only offers immediate, accessible storage but also provides a sturdy base for necessary bedside items like a lamp or, as shown, a low-maintenance succulent plant in a stylish pot. Style the shelves by horizontally stacking books, using bookends if necessary, and reserving one section for a small decorative item or charging station.
Finally, complete the cozy aesthetic by focusing on layered textiles and ambient lighting. The neutral palette of soft greys, taupes, and whites is essential for creating a calming environment, but without texture, it can fall flat. Layer the bed with different fabric weights—a smooth linen duvet cover, a textured waffle-knit quilt, and a chunky knit throw draped artfully at the foot or side of the bed. For the perfect ‘vibe check,’ lighting is non-negotiable. Avoid harsh overhead lights; instead, use low-wattage, warm-toned incandescent or LED bulbs (2700K is ideal) hidden within small lamps or placed to cast a soft, upward glow from the floor or within the nightstand opening. This soft, localized light highlights the textures of the wall art and bedding, ensuring the room feels intimate, warm, and inviting.
RUSTIC CHIC EASTER FRONT PORCH DECOR: EASY WEEKEND DIY
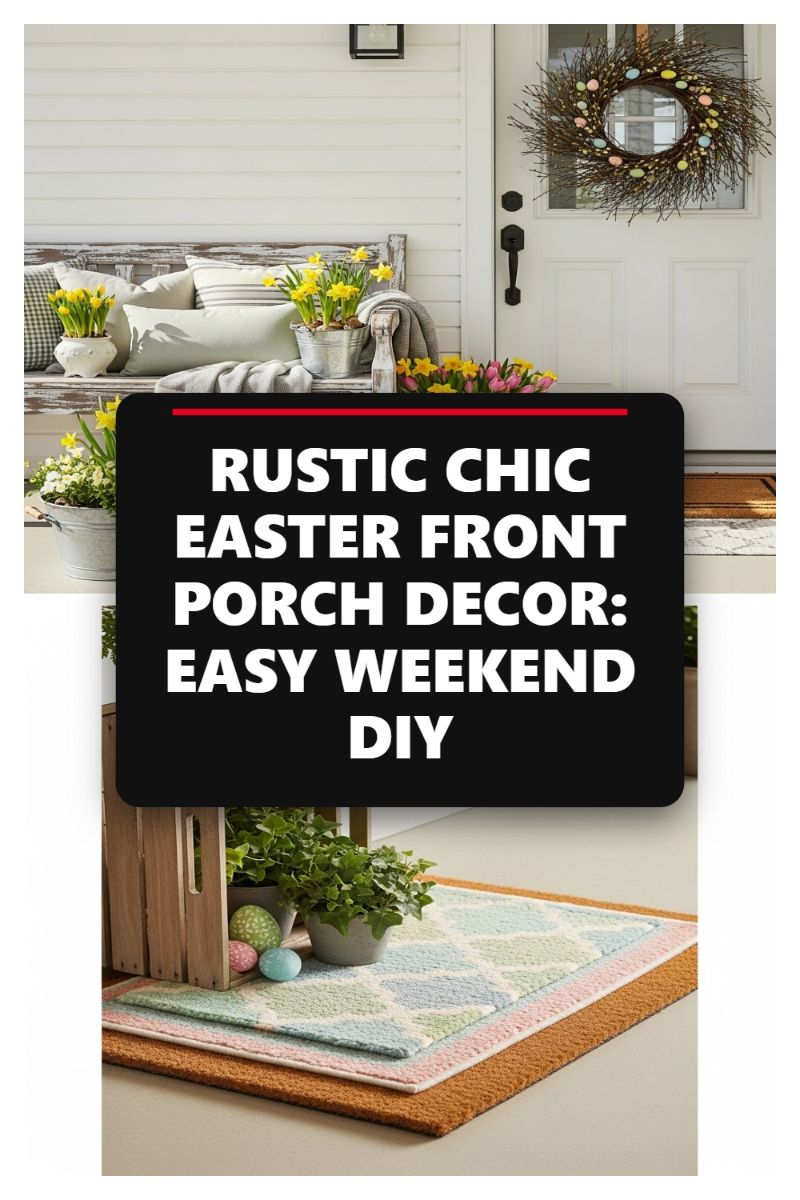
To make any small space, whether it’s a galley kitchen or a compact powder room, feel massive, you must master the art of strategic layering and texture utilization. Just as a layered doormat pairing creates depth and visual separation on a shallow porch, using varied textures and light-reflecting materials in a small room prevents the space from falling flat. Instead of relying solely on stark white walls, introduce dimension through subtle contrast, such as pairing glossy subway tile with matte stone flooring, or installing open shelving made of reclaimed wood against a neutral, high-gloss painted wall. The goal is to maximize visual interest without introducing clutter. Incorporate layered lighting—recessed overhead, under-cabinet strips, and small task lighting—to eliminate shadows, which tend to shrink a room. This weekend DIY involves curating a visual landscape where every element serves to increase perceived space, drawing the eye across and through the room rather than letting it settle on a single, cramped corner.
Secondly, leverage vertical space and light colors, mimicking the brightness and height of a front door entrance. In a kitchen, this means extending cabinetry to the ceiling, utilizing the highest shelves for seasonal or less-used items. In a bathroom, install tall mirrors that reflect light and expand the room’s perceived boundaries; if possible, opt for reflective finishes like chrome fixtures or high-shine cabinet pulls that subtly bounce ambient light. The dominance of light, earthy colors (like the distressed white bench and light-toned pillows shown) ensures that even with maximal storage, the room remains airy. Focus on creating one strong, high focal point—be it a striking pendant light centered over a small dining nook or a unique floor-to-ceiling tile stripe—that encourages a vertical gaze. This simple hack distracts from the room’s limited footprint and pulls the visual plane upward, maximizing the sense of ceiling height.
Finally, implement dual-purpose elements and hidden storage solutions to maintain a clean aesthetic, a critical factor in small room design. Just as a stylish wooden crate can hold plants (as seen here) or serve as discreet storage, every item in a tiny kitchen or bath must earn its place. Replace a standard vanity with a floating, wall-mounted unit to expose more floor space, making the room instantly feel larger. Use recessed medicine cabinets instead of surface-mounted ones to utilize the wall cavity for storage, saving precious inches. For DIY enthusiasts, creating toe-kick drawers in kitchen base cabinets or installing magnetic strips inside vanity doors for organizing small metal items are impactful weekend projects. These strategic storage additions keep countertops and sightlines clear, transforming even the smallest space into an efficient, clutter-free haven.
UPGRADE YOUR BATHROOM: ELEGANT BATHROOM TILES AND TROPICAL PLANTS

To maximize the perceived size of a small bathroom while achieving a high-end, bespoke feel, consider strategically using vibrant, small-scale mosaic tiles. As demonstrated in this layout, the seafoam or turquoise square mosaics covering the shower area and walls draw the eye immediately, creating a point of visual excitement and depth. Unlike large format tiles, which can sometimes emphasize the boundary lines of a compact space, small mosaics add texture and visual complexity, blurring the perception of size. Furthermore, opt for glossy finishes; the reflective surface of these tiles bounces light around the room, which is a fundamental technique for expanding any small area. Integrate the tiled feature wall with rich, natural materials, such as the dark wood framing shown here, to ground the vibrant color and lend a tropical, spa-like warmth.
Incorporating tropical greenery is a powerful design hack for injecting life and scale into a constrained bathroom layout. This biophilic design approach uses the height and lushness of plants, such as parlor palms or large-leafed monsteras, to draw the gaze upward, making the ceiling appear higher and the overall volume feel larger. Plants thrive in the humid microclimate of a bathroom, adding an organic, dynamic element that distracts from the room’s modest square footage. When designing, ensure your plants are positioned strategically—here, the plant sits within the shower area, transforming a utilitarian space into a tranquil retreat. Pair the greenery with minimalist, modern fixtures, like the wall-mounted faucet and the sleek, wide wooden vanity, whose strong horizontal lines visually stretch the room’s width.
For the ultimate space-maximizing touch, pay close attention to the vanity and sink choices. In small bathrooms, floating vanities or, as shown here, sleek, low-profile vanities with clean lines are crucial. The long, horizontal wood grain of the countertop establishes a continuous visual flow, while the stone vessel sink adds sculptural interest without consuming excessive counter space. The textured, speckled gray material of the sink creates a beautiful, natural contrast against the dark wood and bright tiles. Finally, implementing strategic backlighting, particularly along the vanity backsplash or beneath floating elements, is a genius hack. This lighting eliminates harsh shadows, highlights the textures of the materials, and creates a soft, ambient glow that instantly makes the entire room feel more open, elegant, and expansive.
DREAMY VALENTINE’S ROOM DECOR: THE SHABBY CHIC EDIT
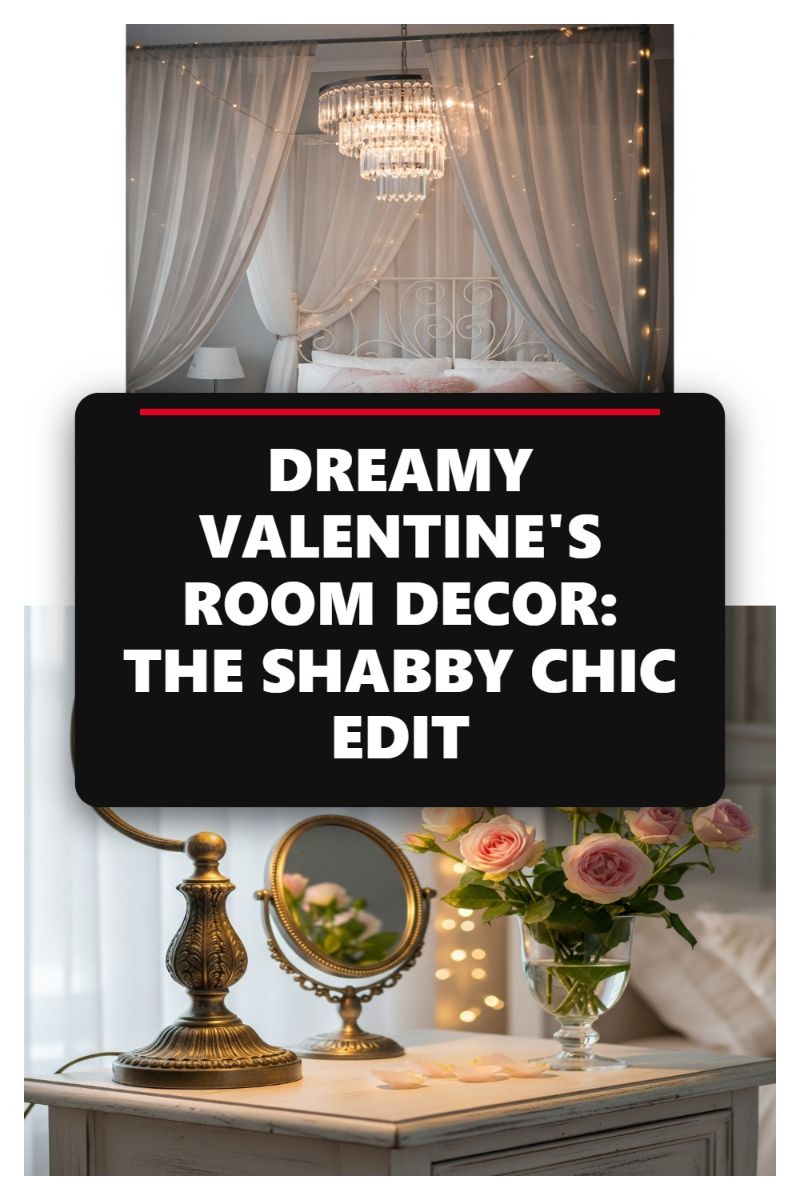
The core philosophy of Shabby Chic, as beautifully illustrated here with the sheer white draping and sparkling lighting, perfectly aligns with the crucial goal of expanding a small room’s footprint. In design, light, airy fabrics, and pale color palettes are essential tools for making cramped areas—whether a bedroom, a tiny bathroom, or a narrow kitchen—appear significantly larger than they are. To successfully replicate this expansive effect in a utility space, you must swap out heavy, dark cabinetry or window treatments for options that allow maximum light transmission. The sheer curtains enveloping the wrought iron bed create a soft, diffused glow; applying this to a minuscule bathroom, consider replacing a solid shower curtain with a semi-transparent or frosted glass door to maintain that light, unburdened aesthetic. For a kitchen, opting for open, floating shelves in light, distressed wood rather than deep, closed cabinets achieves the necessary visual relief, mirroring the airy quality of the fabric treatments seen in the image.
A key design takeaway from this romantic scene is the strategic use of reflective surfaces and vertical dimensioning—hacks essential for transforming a minuscule room. The tiered crystal chandelier immediately draws the eye upward, enhancing the room’s perceived height; this technique is easily transferable to a tiny kitchen using sleek, vertically oriented subway tile or tiered pendant lighting. Furthermore, the vintage-style mirror and glass vase on the distressed bedside table amplify ambient light and visually double the perceived space. For your small bathroom, incorporate large, frameless mirrors instead of small, decorative vanity mirrors to maximize light reflection. In the kitchen, use glossy backsplashes or highly polished hardware to achieve a similar light-bouncing effect. Even small, brass decorative pieces, like the lamp base and mirror frame seen here, should be chosen for their ability to add sparkle and depth without contributing visual weight.
While the image focuses on delicate pink roses and plush textures for a Valentine’s aesthetic, the Shabby Chic emphasis on subtle detail and graceful lines can be functionally integrated into small, utilitarian spaces to prevent them from feeling cramped. Instead of harsh, bulky modern hardware, choose delicate, vintage-inspired knobs or pulls for your kitchen cabinets or bathroom vanities; their smaller profile feels significantly less imposing. The light, distressed finish of the bedside table suggests using white or pale gray painted wood for shelving units, which adds texture and character without the heaviness of solid dark wood. Finally, layer your lighting (like the ambient fairy lights featured around the bed) instead of relying on a single overhead fixture. This ensures every corner of the small room is bright and welcoming, successfully distracting the eye from the room’s limited dimensions and creating a luxurious, expansive feel.
OUTDOOR MOVIE NIGHT: CHIC BACKYARD GRADUATION PARTY VIBES

While this image captures the height of outdoor luxury and celebration, the design principles used to create this spacious, flowing environment are actually genius hacks for making a tiny interior room feel expansive. Notice the extensive use of flowing, light-colored fabric and open-air structure. To translate this into a small bathroom or kitchen, designers utilize ‘Vertical Flow Draping’ or sheer partitions to maximize perceived height and minimize visual barriers. Instead of a solid, bulky shower curtain, opt for a light, sheer liner that allows light penetration and visual continuity through the room. Similarly, if your kitchen has an open pantry or laundry nook, use light linen curtains instead of a solid door to soften the transition and prevent the visual weight that chunky millwork adds. Always maximize your sight lines; just as the sheer canopy here allows the eye to travel across the horizon, use large, frameless mirrors (especially in bathrooms) or reflective backsplashes (in kitchens) to reflect natural or artificial light, tricking the eye into believing the space extends far beyond its physical confines.
The arrangement of low-profile, modular furniture here is key to the sense of openness. The small, wooden coffee tables are low to the ground and easily moved, and the seating keeps a consistent, low height. In a tiny room, maintaining a low visual horizon is critical for spaciousness. Avoid tall, bulky furniture that breaks up the wall space unnecessarily. For kitchens, opt for open shelving or low base cabinets over imposing upper cabinets. In bathrooms, choose floating vanities that expose the maximum amount of floor space. To apply the cozy layered textures seen in the image (pillows, throws) without adding clutter, introduce dimension through subtle monochromatic textures—think matte vs. glossy tiles, ribbed hand towels, or textured wallpaper. This adds sophistication and depth, preventing a small, white room from feeling sterile without compromising on clean lines.
Finally, the strategic use of ambient and focused lighting (the string lights and lanterns) defines zones and adds a magical, expansive atmosphere. In a small kitchen or bathroom, you must move beyond the single central ceiling fixture. Layer your lighting to mimic this depth. Use recessed ceiling lights to define the room’s perimeter and draw the eye upward, maximizing height. Employ under-cabinet lighting in the kitchen to eliminate shadows and highlight work surfaces. In the bathroom, install sidelights or sconces around the mirror to provide flattering, comprehensive illumination. Just as the projection screen serves as a focused visual anchor for the movie night, create one dominant focal point in your small room—a striking piece of art, a uniquely tiled shower wall, or a statement light fixture. This draws attention away from the room’s constraints and anchors the design, completing the illusion of a thoughtfully designed, large space.
COTTAGE CORE DECOR FOR A COZY HOME: 5 MUST-HAVE PIECES

While Cottagecore is often associated with sprawling homes and lush gardens, this aesthetic can be perfectly harnessed to bring warmth and perceived space to tiny rooms, especially small kitchens and bathrooms. The key is marrying the style’s inherent rustic charm with smart, scaled-down functionality. Instead of installing bulky modern cabinetry, integrate a multi-functional distressed antique dresser or console, similar to the one shown, as a key storage unit. In a small bathroom, a distressed console can be retrofitted as a vanity, offering ample closed storage for towels and toiletries while providing a unique, handcrafted focal point that draws attention away from the room’s small footprint. In a compact kitchen, this piece serves as a beautiful overflow pantry, coffee station, or display area for vintage cookware. Look for pieces with slim profiles but deep storage capacity, prioritizing vertical space usage to keep the floor clear and maximize the feeling of openness.
To ensure your cozy elements don’t make the small room feel cramped, focus on lightness and strategic use of pattern. Start with a neutral, airy backdrop—think white subway tile or light, chippy paint finishes seen on the cabinet, which reflect light beautifully. Introduce the signature floral and botanical prints (a hallmark of Cottagecore) through soft textiles that can be easily swapped out, such as linen hand towels, sink skirts, or window coverings. The sheer, light-filtering linen drapes featured in the image are essential; they maximize the diffusion of natural light, which is arguably the most effective tool for making any room feel massive. Avoid heavy velvet or dark, opaque fabrics. Furthermore, embrace brass and vintage metals, like the candelabras shown, not just for style, but for function. Placing reflective items high up or near the light source helps bounce light around the room, adding depth and visual interest that expands the perceived boundaries of the space.
To fully capture the five must-have pieces while adhering to small-space rules, prioritize items that offer high aesthetic return with a minimal physical footprint. First, the **Distressed Console** is vital for hidden storage. Second, incorporate **Light-Filtering Linen Curtains** to control and amplify natural light. Third, instead of large bouquets, use **Small, Potted Plants** (like the geraniums or tiny herbs) placed high on windowsills or open shelves, introducing color and life without cluttering countertops. Fourth, rely on **Layered Textures** (throws/pillows in seating areas or stacked, patterned towels) to bring warmth. Finally, integrate **Slim Brass Accents** like vertical candle holders or antique wall hooks to draw the eye upward. By selecting items with dual purpose and maintaining a light, bright base layer, you can create the warm, inviting Cottagecore atmosphere without sacrificing the essential feeling of expansive space needed in tiny kitchens and bathrooms.