Explore over 50 breathtaking spring nail designs, from delicate florals to vibrant gradients. Discover the hottest trends and find your perfect seasonal manicure to refresh your look this spring!
12 *Pretty* PINK SPRING NAILS
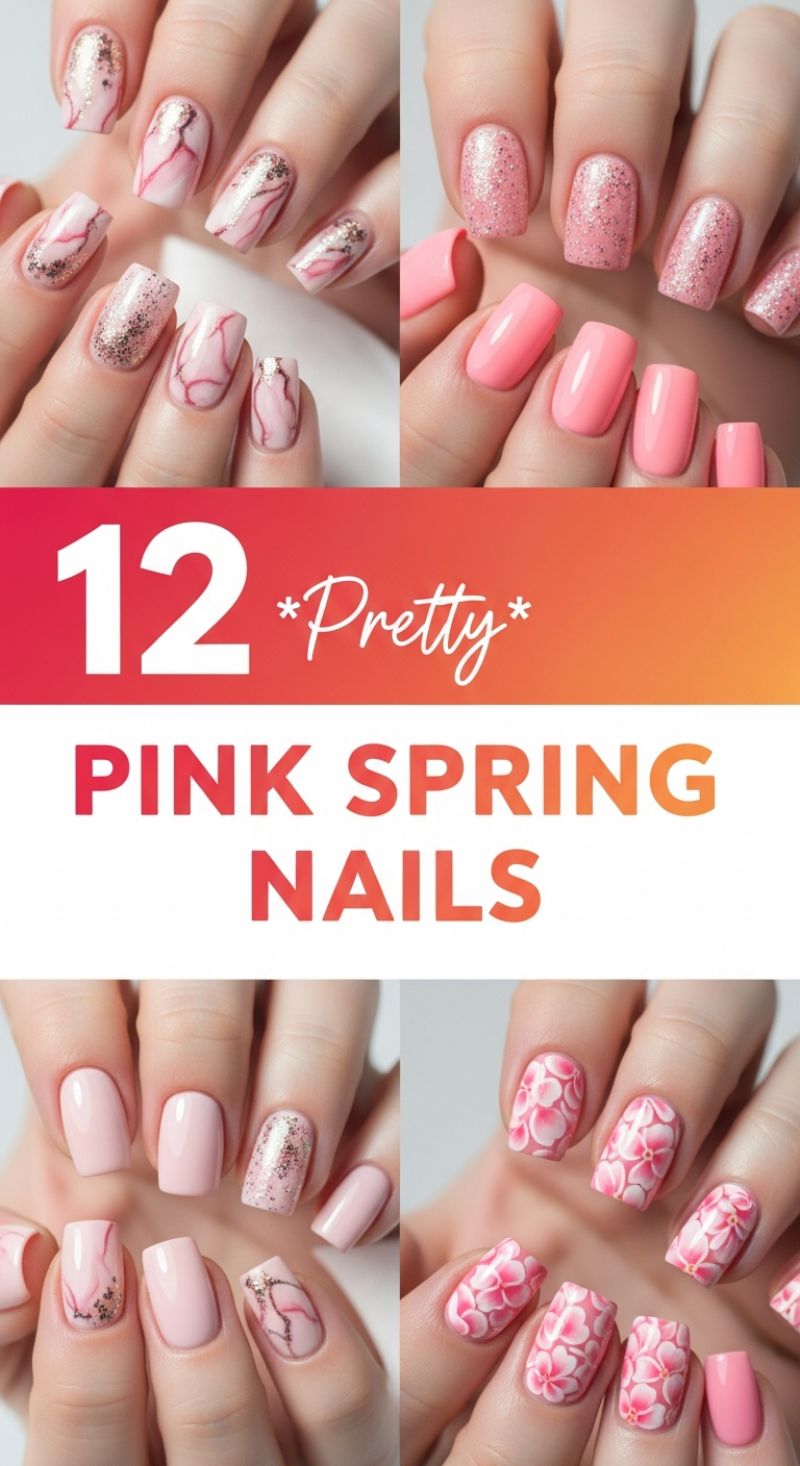
Embrace the delicate charm of spring with a stunning array of pink nail designs that are both vibrant and sophisticated. This collection showcases a versatile palette, from soft blushes to bolder fuchsias, incorporating trendy elements like shimmering glitter, elegant marble effects, and intricate floral patterns. Whether you prefer a subtle accent or a complete artistic statement, these pink spring nails offer endless inspiration to refresh your look for the new season. They are designed to be easily achievable, allowing you to transform your fingertips into a canvas of springtime beauty with expert techniques and creative flair.
To achieve the sophisticated marble and dazzling glitter looks, begin by preparing your nails with a gentle buffing and a clear base coat for longevity. For the marble effect, apply a light pink or nude base color and allow it to dry completely. Then, using a fine nail art brush, carefully draw thin, irregular lines with a darker pink, red, or even a contrasting metallic polish to mimic natural stone veins. You can slightly swirl these lines with a clean brush or dotting tool for a more diffused effect. For a touch of sparkle, consider adding a sprinkle of fine gold or rose gold glitter while the marble lines are still wet, or strategically place a glitter polish over a dry solid pink base. Seal these designs with a high-gloss top coat to protect the intricate details and enhance their shine, ensuring your marble and glitter nails truly stand out.
For those who adore classic simplicity or intricate artistry, solid pink and floral designs are perfect choices. For the clean, solid pink manicure, select your preferred shade, from a soft baby pink to a vibrant coral, and apply two even coats for opaque coverage, always finishing with a glossy top coat. For the exquisite floral patterns, such as the cherry blossom inspired designs, start with a light pink or white base. Using a small detail brush, create delicate petal shapes with a slightly darker pink, and then add subtle white highlights for dimension. You can use a dotting tool for the center of the flowers or to create small, uniform blossoms. Practice patience and precision for these designs. Regardless of the style you choose, always prioritize nail health by regularly moisturizing your cuticles and using a quality top coat to prevent chipping, ensuring your pretty pink spring nails remain flawless and captivating throughout the season.
Modern Square Spring Nails
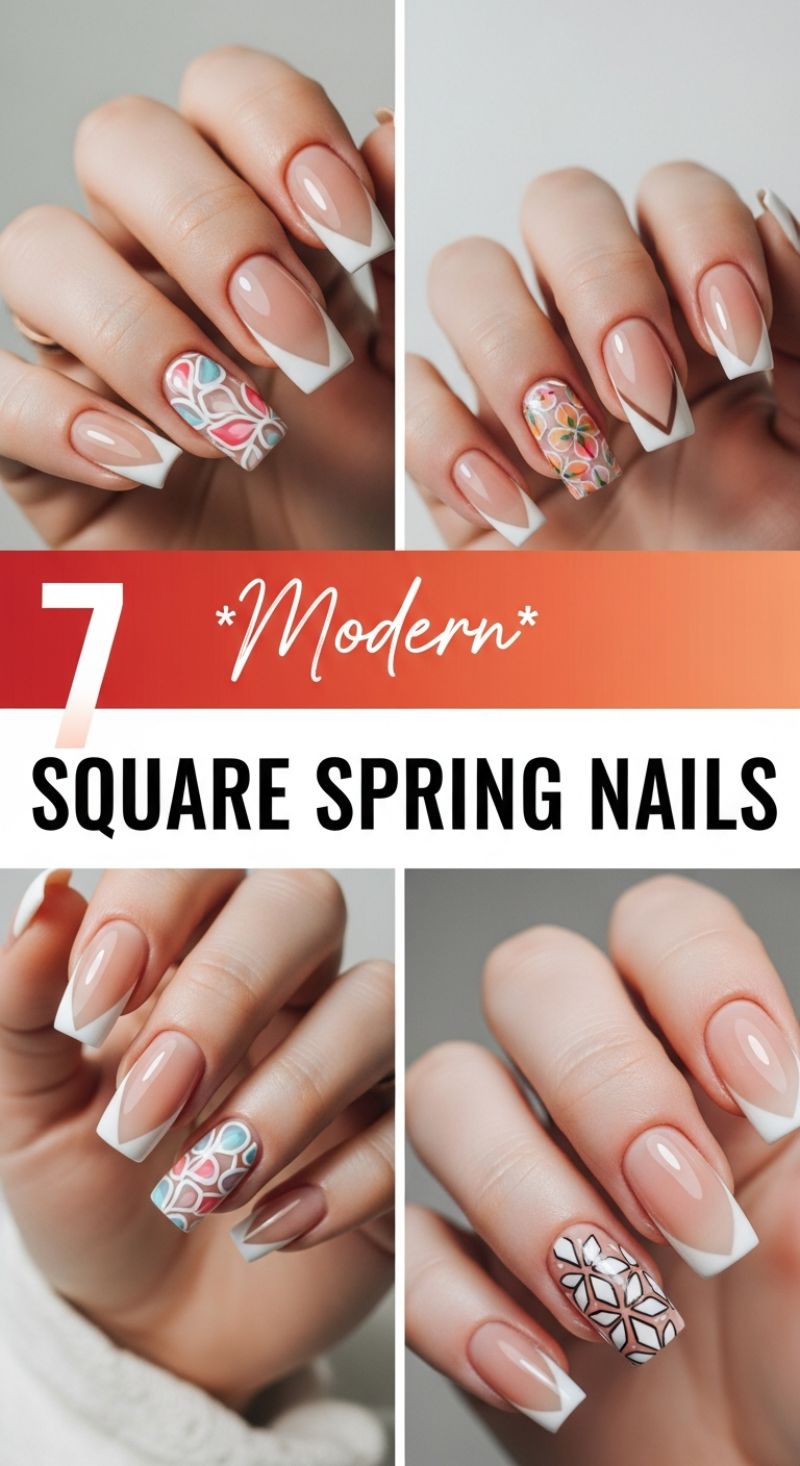
Step into spring with a chic twist on a timeless classic: Modern Square Spring Nails, as beautifully exemplified in this collection. This contemporary take on the French manicure revitalizes the traditional white tip with sharp, deep V-shaped or pointed square designs, moving away from the soft, rounded smile line. The base remains a pristine nude or sheer pink, offering a clean, elegant canvas that elongates the fingers and provides a sophisticated foundation. This style is not just an aesthetic upgrade; it’s a statement of refined modernity, perfect for those seeking a fresh, minimalist yet impactful look that transitions seamlessly from office to evening.The true artistry of this trend shines through its innovative accent nails. While the majority flaunt the stunning V-tip French design, one nail on each hand becomes a focal point for creative expression. As seen in the examples, options range from abstract, colorful patterns featuring interconnected shapes in serene blues and soft pinks, to delicate, multi-hued floral motifs that evoke the freshness of spring blooms, and even bold, geometric designs in striking black and white. To achieve these intricate details, expert advice suggests utilizing fine-tip brushes for freehand artistry, nail art pens for precision, or even stamping plates for flawless, consistent patterns. When selecting your accent design, consider spring-appropriate color palettes—think soft pastels, vibrant yet muted tones, or crisp contrasting shades—to ensure your nails truly reflect the season’s joyful essence.To maintain the impeccable look of your Modern Square Spring Nails, proper care is paramount. Regular filing is crucial to preserve the crisp, sharp edges of the square shape and prevent snagging or breakage, ensuring your manicure stays pristine. Furthermore, consistent cuticle care and moisturizing will keep your hands looking youthful and healthy, enhancing the overall elegance of the design. Always finish with a high-quality, long-lasting top coat to seal in your artwork, provide a brilliant shine, and extend the life of your manicure. This versatile style invites personalization; feel free to experiment with the depth and angle of your V-tip or explore other accent nail patterns that resonate with your personal style. Embrace this trend for a manicure that perfectly balances classic sophistication with cutting-edge spring fashion.
8 Trendy Spring Nail Designs
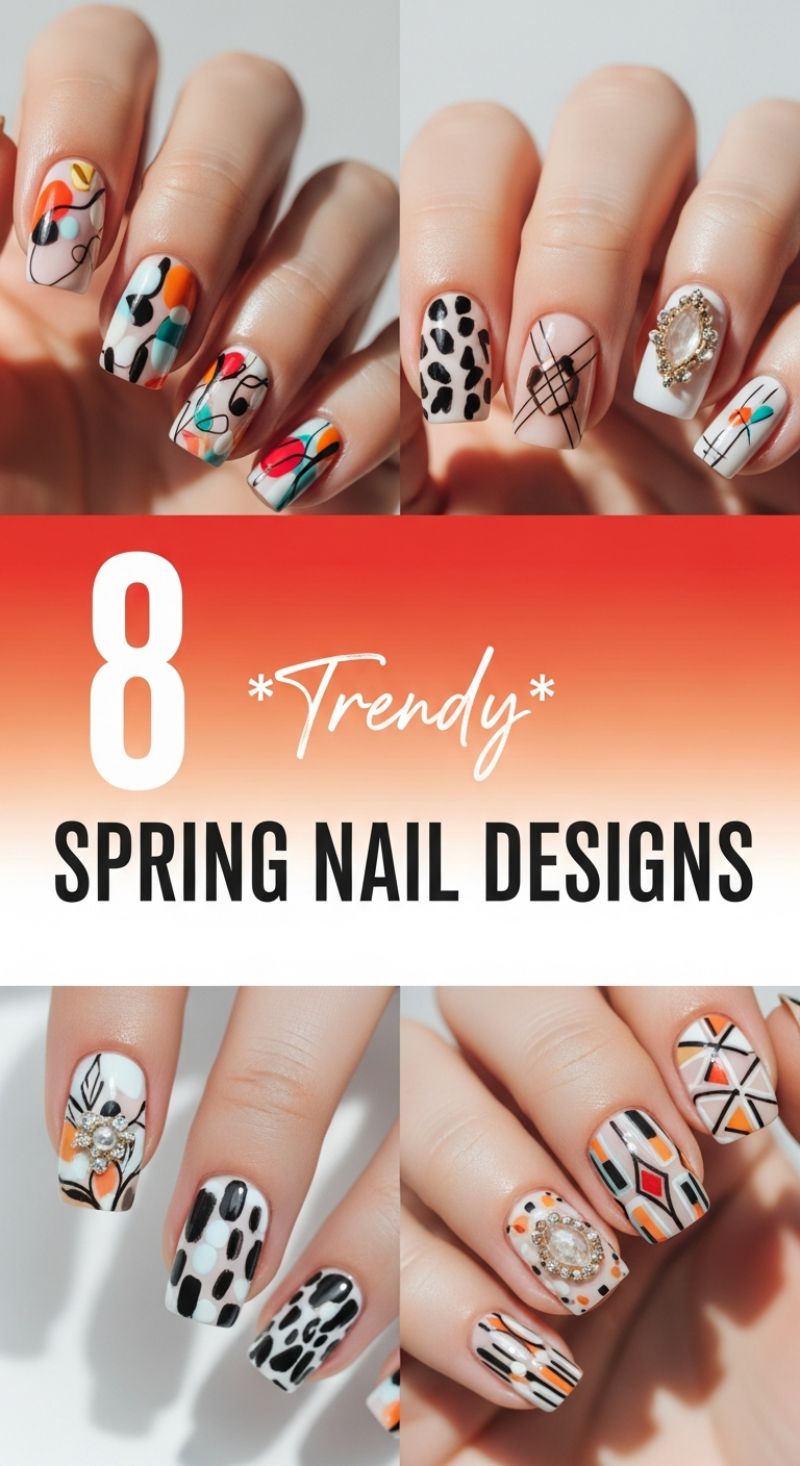
Embrace the freshness of the new season with these eight captivating and trendy spring nail designs, perfectly showcased in the image. From playful abstract art to chic animal prints, sophisticated geometrics, and dazzling embellishments, there’s a style to suit every preference. A common thread among these vibrant looks is the use of a clean, neutral base—crisp white, soft nude, or delicate pink—which acts as the perfect canvas, allowing the intricate details and lively spring colors to truly pop. Before diving into the artistry, ensure your nails are prepped: shape them as desired, care for your cuticles, gently buff the surface, and apply a quality base coat to protect your natural nails and enhance polish adhesion.
To recreate these stunning looks, let’s break down a few key styles. For the modern abstract designs, begin with a neutral base and use a fine detail brush to apply organic blobs or squiggles in your chosen spring hues, such as warm oranges, cool blues, and vibrant reds. Allow each color to dry slightly before adding thin, contrasting lines—black or white—to define shapes and create dynamic movement, perhaps even incorporating a tiny gold dot for an extra touch of dimension, as seen in the top-left design. If you’re drawn to the chic animal print, opt for a classic leopard or Dalmatian spot. On a light base, use a dotting tool or the tip of a fine brush to create irregular black or dark brown spots, varying their size and spacing for an authentic look. For geometric patterns, precision is paramount; after applying your base, use striping tape or a very fine brush to create crisp lines and angles, experimenting with grids, crisscross patterns, or bold linear blocks using contrasting colors like black on nude, or incorporating pops of orange and white for a truly spring-ready manicure.
To elevate your design with dazzling embellishments, select an accent nail for a statement gem or rhinestone cluster, as featured in several of these breathtaking designs. Apply a small bead of nail glue or a thick layer of top coat where you wish to place the embellishment, then carefully set the gem with tweezers, pressing gently to secure it. These additions instantly transform a simple design into something luxurious and eye-catching. For a durable and glossy finish that ensures your intricate spring manicure lasts, always seal your designs with one or two thin coats of a high-quality top coat. Don’t be afraid to mix and match different designs across your nails, as visually demonstrated, to create a unique and personalized expression of your style. Remember, the beauty of nail art lies in its ability to reflect your personality and embrace the vibrant energy of the season.
5 Elegant Almond Spring Nails
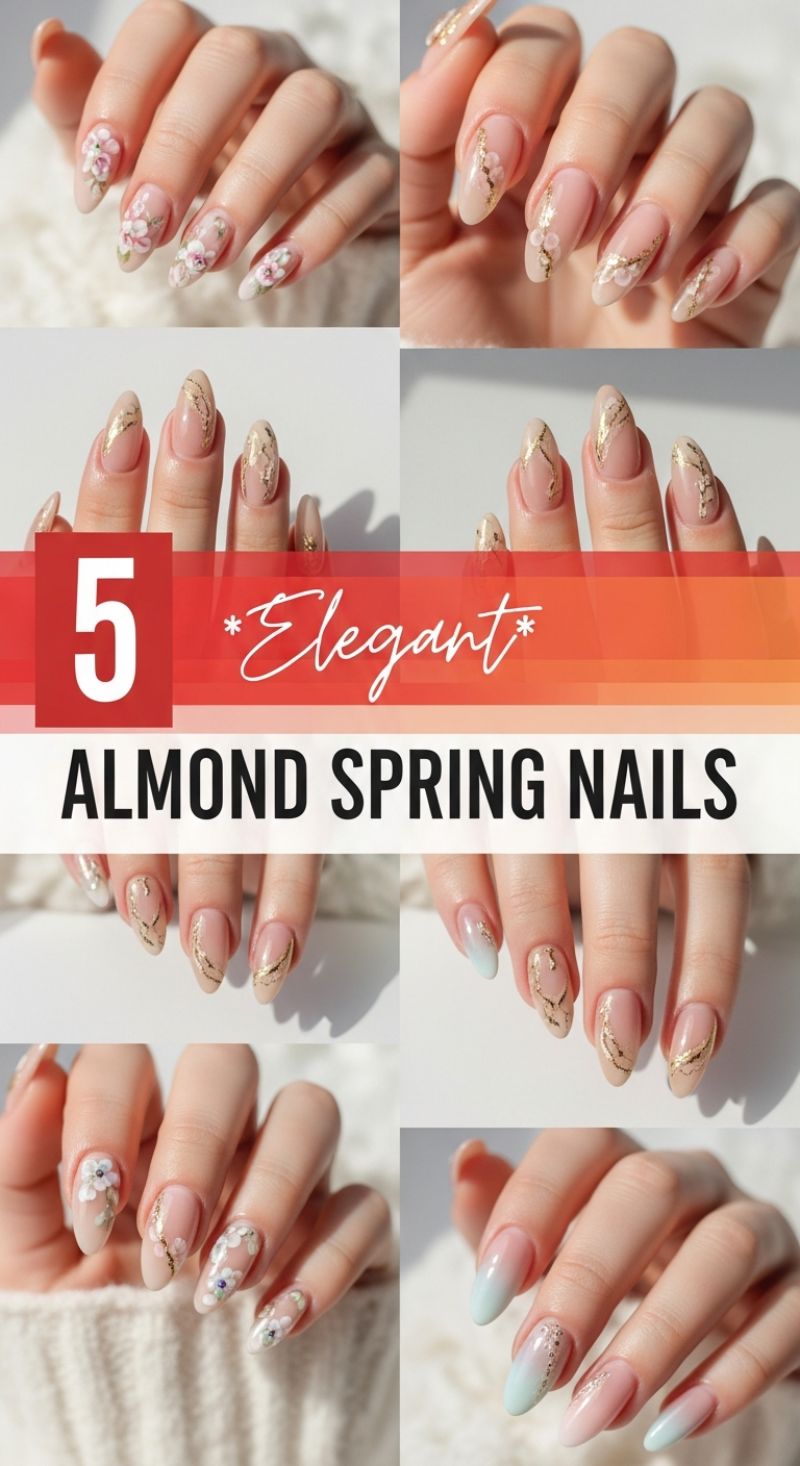
Step into spring with a touch of sophistication by embracing these five elegant almond nail designs that are perfect for the season. Almond-shaped nails offer a chic and elongating silhouette, serving as the ideal canvas for delicate spring-inspired artistry. The foundational element for many of these breathtaking designs is a soft, neutral base—think sheer nudes, delicate pale pinks, or light peachy tones. This allows the intricate details to truly shine, giving your nails a naturally polished and refined appearance. Begin your manicure by meticulously prepping your nails: shape them into a graceful almond, gently push back and trim cuticles, and apply a high-quality base coat to ensure longevity and prevent staining. A sheer, almost translucent base coat will enhance the natural beauty of your nails while providing a perfect backdrop for the embellishments to follow.
Elevate your spring manicure with a blend of shimmering gold accents and dainty floral motifs. For the opulent gold details, consider using gold foil for an organic, textured look—simply press small, irregular pieces onto a tacky layer of gel polish or a thin coat of clear polish, then seal. Alternatively, use a fine nail art brush to create elegant, swirling lines or abstract gold strokes with metallic gel paint for a more precise, hand-painted effect. When it comes to the floral designs, a steady hand and a detail brush are your best friends. Opt for pastel hues like soft pinks, whites, and light blues to paint tiny blossoms and delicate leaves. Layering slightly different shades within each petal adds depth and dimension, making the flowers appear more lifelike. Combine these elements by placing a subtle gold streak alongside a small floral cluster on an accent nail, or intersperse gold flakes around a larger bloom for a truly luxurious touch.
Beyond florals and foil, another stunning option highlighted is the gentle ombre effect, particularly the serene transition from a soft mint or baby blue to a natural pink. To achieve this, apply your base color, then use a small makeup sponge to dab on the two chosen colors, blending them seamlessly at the meeting point. Repeat this process a few times to build opacity and achieve a smooth gradient. Finish all your intricate designs with a durable, high-gloss top coat to encapsulate the artistry, protect against chips, and add a brilliant shine that makes your spring nails pop. Remember, these designs are versatile; feel free to mix and match elements, experiment with different pastel shades, or adjust the placement of details to personalize your look. Regularly moisturizing your cuticles with cuticle oil will also keep your hands looking pristine and ensure your elegant almond spring nails stay beautiful for longer.
10 Dreamy Spring Nails
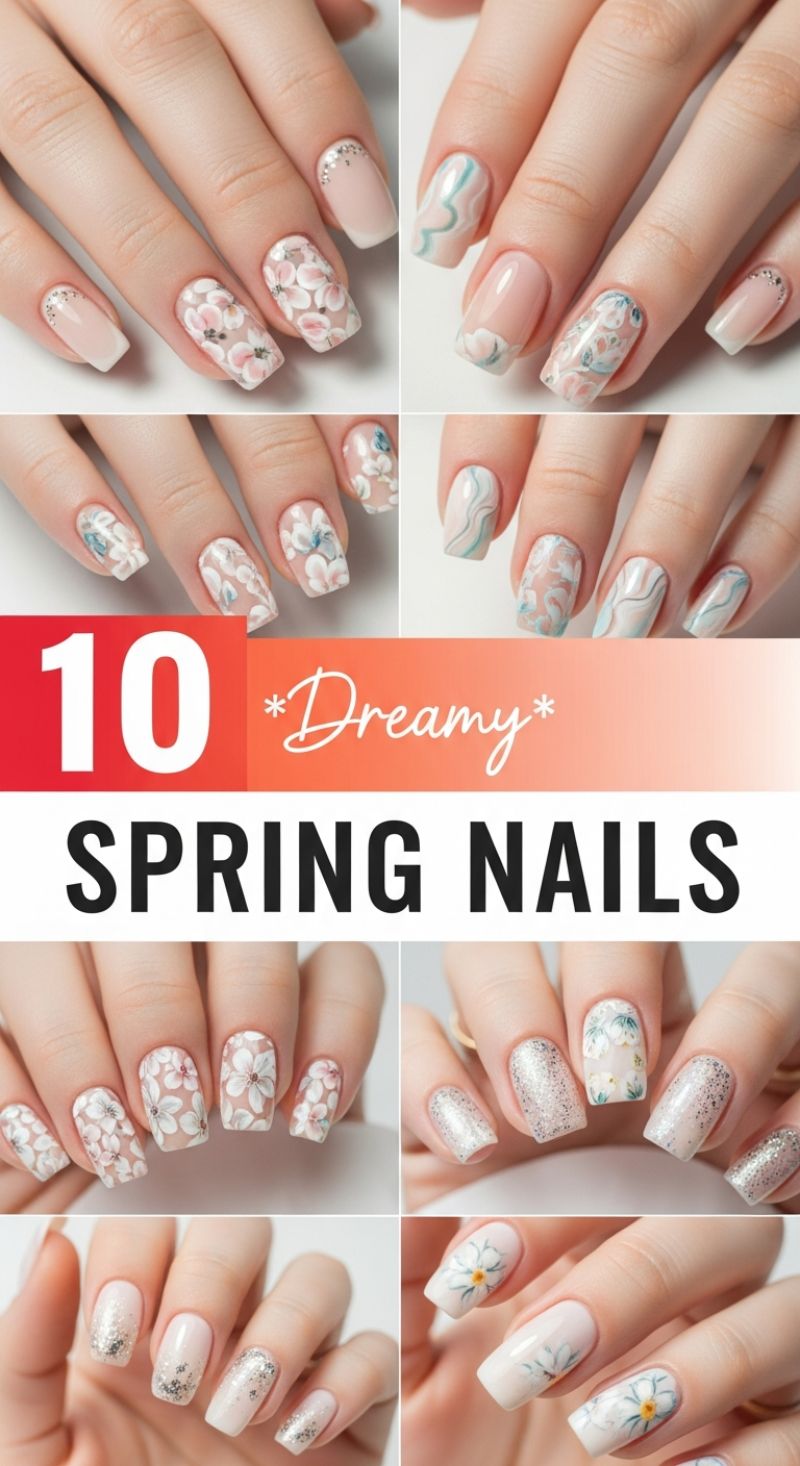
Embrace the delicate beauty of the season with these 10 dreamy spring nail designs, perfectly curated to add a touch of whimsy and elegance to your fingertips. The foundation of these looks lies in impeccably prepped nails, starting with a gentle cuticle push-back and meticulous shaping. Most of these designs feature a soft, inviting base – think sheer nude, milky white, or a delicate pale pink – chosen to mimic the natural flush of a blooming flower or a clear spring sky. For an optimal canvas, apply two thin, even coats of your chosen base color, allowing each to cure fully if using gel, or dry completely if using traditional polish. The universal nail shape seen across these enchanting styles is a soft square or squoval, providing a clean yet approachable canvas for the intricate artistry to unfold, making them versatile for various nail lengths, from short to medium.
Dive into the heart of spring with the captivating floral motifs that are a cornerstone of these dreamy designs. Achieve these exquisite patterns by either hand-painting with a fine detail brush or utilizing high-quality stamping plates. For hand-painting, start with a tiny dot for the flower’s center, then carefully draw five petals around it using white, soft pink, or a whisper of light blue polish. For added depth, consider a slightly darker shade for the petal outlines or a touch of yellow for the center. Delicate green leaves can be tucked around the flowers to complete the natural look. Some designs showcase full floral coverage, while others use a single accent nail to draw attention. Alternatively, explore the serene abstract swirls, typically rendered in harmonious shades of light blue, teal, and white over a nude base. These organic, flowing lines are best created with a very fine striping brush, allowing for a gentle, undulating pattern that evokes a sense of calm and movement, much like a gentle spring breeze.
To elevate your spring manicure, incorporate subtle yet impactful embellishments that catch the light beautifully. Several designs feature a dusting of fine silver glitter, applied either as a captivating ombré effect, graduating from the cuticle towards the tip, or as a full, sparkling coat on an accent nail. When applying glitter, ensure it’s evenly distributed for a smooth finish, and cap with a generous layer of top coat to prevent any gritty texture. For a touch of understated glamour, small, shimmering rhinestones are strategically placed at the base of select nude nails, creating a ‘barely there’ sparkle that’s utterly chic. Secure these tiny gems with a small dot of builder gel or strong nail glue, then encapsulate with a durable top coat for lasting wear. Finish every design with a high-shine top coat to seal in your artistry and provide a protective layer, ensuring your dreamy spring nails remain flawless for weeks. Applying a nourishing cuticle oil daily will also enhance the overall health and appearance of your manicure, keeping your hands looking as radiant as your nails.
10 Effortless Simple Spring Nails
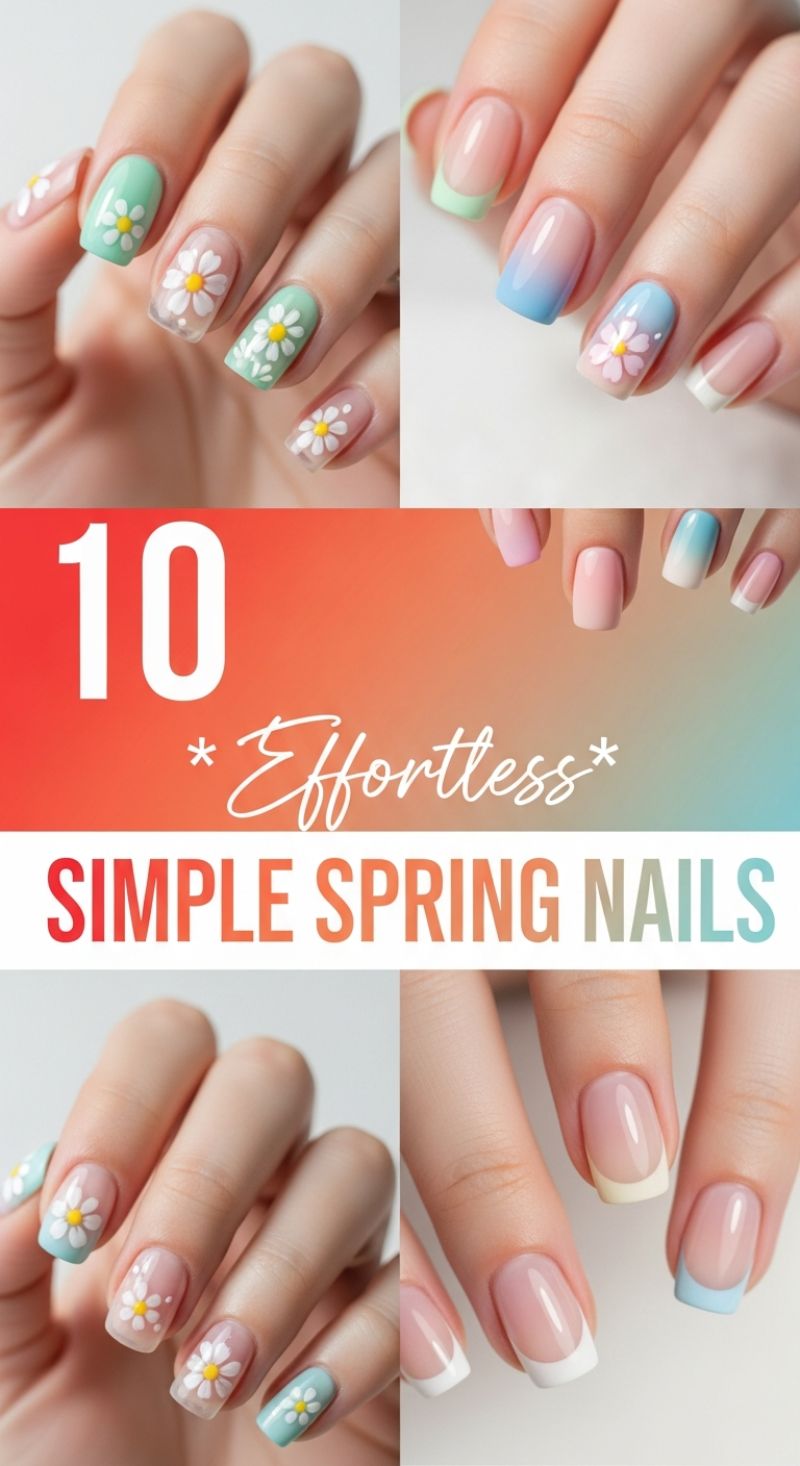
Embrace the refreshing spirit of spring with delightful daisy nail art, a truly *effortless* way to add a touch of whimsy to your look. As seen in the image, these designs beautifully combine soft pastel bases with charming white daisy accents. To achieve this look, begin by prepping your nails and applying a base coat. For the solid color nails, opt for a vibrant yet subtle mint green or a serene light blue. On other nails, a clear or sheer nude base allows the daisies to pop, creating a delicate, ‘barely there’ effect. For the daisies themselves, use a fine detail brush or a small dotting tool. Create five small white dots in a circle for the petals, then add a tiny yellow dot in the center for the pistil. This design is incredibly versatile; you can apply a single daisy to an accent nail or scatter smaller daisies across a full nail for a playful meadow-like finish. Always seal your intricate artwork with a high-quality top coat to protect the design and enhance its longevity, ensuring your floral nails stay fresh and flawless.
For those who prefer a modern twist on a classic, the image showcases an array of sophisticated pastel French tips and subtle ombre gradients, perfect for an *effortless* spring aesthetic. Reinvent the traditional French manicure by swapping the stark white tip for soft pastel hues like pale mint, baby blue, or buttery yellow. This subtle infusion of color at the tip adds a contemporary and playful edge without sacrificing elegance. Alternatively, delve into the world of ombre nails, where colors gracefully blend into one another. The image features stunning examples of pink fading into white, and baby blue transitioning seamlessly into a lighter shade or white. To create an ombre effect, apply your two chosen colors to a makeup sponge and gently dab onto the nail, building up the gradient until you achieve the desired blend. For crisp French tips, use nail guides or a steady hand with a fine brush. These techniques offer a chic and understated way to incorporate spring colors into your manicure, providing a refined yet *simple* statement.
Achieving these *effortless* spring nail designs is more accessible than you might think, making them ideal for both DIY enthusiasts and those seeking inspiration for their next salon visit. Regardless of the design you choose – be it the charming daisies, the pastel French tips, or the delicate ombres – proper nail preparation is paramount. Ensure your nails are clean, filed to your desired shape (square, oval, or squoval work beautifully for these styles), and your cuticles are gently pushed back. Investing in good quality polishes will not only make application smoother but also ensure a more vibrant and long-lasting finish. For the best results, always apply a clear base coat before your color to protect your natural nails and prevent staining, followed by at least two thin coats of color, and finally, a glossy top coat. These designs are perfect for adding a touch of seasonal cheer to your everyday look, proving that stunning spring nails don’t have to be complicated, they can truly be *effortless*.
7 Cute Spring Nail Ideas
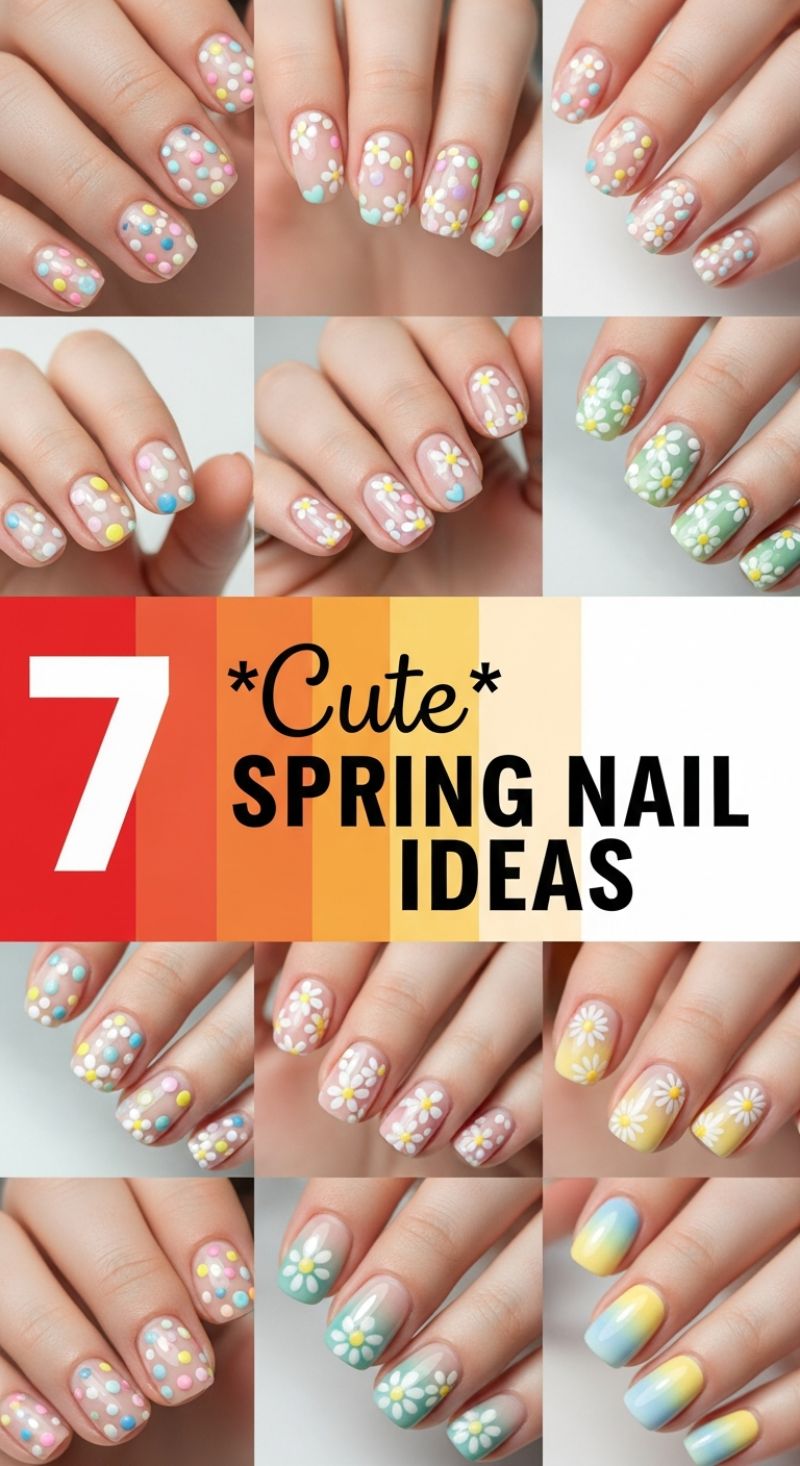
Embrace the freshness of spring with these seven adorable nail art ideas, perfect for adding a touch of whimsy to your look. One delightful option is the pastel polka dot design, which exudes a playful charm. To recreate this look, start with a clear or milky white base coat, allowing the natural nail bed to peek through for a soft, understated effect. Once dry, use a small dotting tool or the head of a pin to apply an array of pastel-colored dots – think baby pink, sky blue, butter yellow, and mint green. Experiment with various sizes and random placement for a dynamic, confetti-like appearance. For a refined finish, ensure each dot is relatively uniform in shape and allow ample drying time between colors to prevent smudging. A high-gloss top coat will seal in your design and provide a long-lasting, chip-resistant shine, making this an effortlessly chic choice for any spring occasion.
Daisies are a quintessential symbol of spring, and this collection offers several charming variations to adorn your fingertips. For a delicate touch, opt for a clear or light pink base, then carefully paint tiny white daisies with a fine-tipped brush or small dotting tool. Create five to six small white petals around a central pastel dot – use yellow for a classic look, or try light blue or pink for an unexpected twist. Some designs even incorporate small pastel hearts near the cuticle for an extra dose of sweetness. If you prefer more color, try a full coverage mint green or sunny yellow base, then overlay with white daisies and yellow centers for a vibrant, cheerful manicure. Another stunning daisy design features an ombre effect, transitioning from a clear base to a soft mint green tip, adorned with white daisies along the colored portion. The key to perfect daisies is precision: ensure petals are evenly spaced and colors are fully opaque. Layering a clear top coat will not only protect your art but also give it a professional, salon-quality finish.
For a softer, ethereal look, consider the captivating pastel gradient featured in this compilation, transitioning seamlessly from soft yellow to serene blue. Achieving a beautiful gradient involves a slightly different technique: after applying a base coat, paint stripes of your chosen pastel colors (yellow and blue) directly onto a makeup sponge. Gently dab the sponge onto your nail, rocking it slightly to blend the colors. Repeat this process two to three times, allowing each layer to dry completely, to build up the desired color intensity and smooth transition. Clean up any excess polish around your cuticles with a small brush dipped in nail polish remover. Finally, seal your masterpiece with a clear top coat, which will smooth out any texture from the sponging and add incredible shine. Whichever design you choose, remember that quality base and top coats are crucial for longevity, and patience is your best friend when creating intricate nail art. Don’t be afraid to experiment with different color combinations and techniques to truly make these spring nail ideas your own.
15 Must-Try Spring Nails 2025
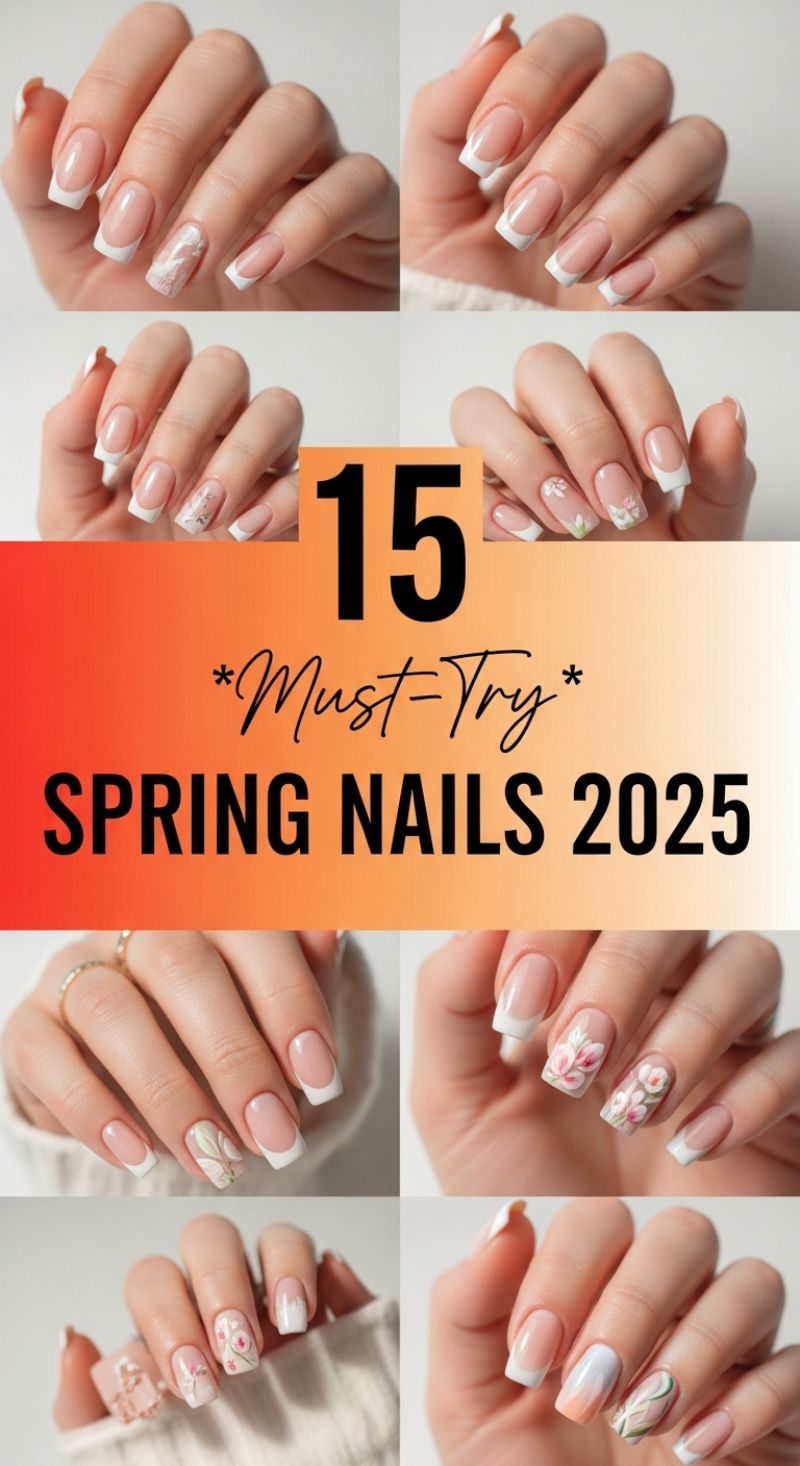
Embrace the freshness of the season with these 15 must-try spring nail designs for 2025, perfectly blending classic elegance with delicate seasonal motifs. The overarching theme features impeccably executed French manicures, providing a clean, sophisticated canvas that makes the subtle artistic embellishments truly pop. The base often showcases a natural, sheer pink or nude tone, allowing the health and natural beauty of the nail to shine through, complemented by crisp, clean white tips in various shapes, predominantly square or squoval. This foundation ensures versatility, making these designs suitable for both casual everyday wear and more formal spring events. The beauty lies in the thoughtful balance between simplicity and intricate detail, creating a look that is both understated and captivating.
The real artistry unfolds in the accent nails, where delicate spring-inspired designs come to life. You’ll observe intricate hand-painted floral patterns, featuring soft pink, white, and muted green blossoms and leaves that evoke a garden in full bloom. Other variations include elegant white marbling, abstract pastel ombré effects, or subtle metallic accents that add a touch of modern sophistication without overpowering the natural aesthetic. To achieve these looks, start with a high-quality base coat, follow with your chosen nude or sheer pink polish, and then carefully apply a crisp white tip using a steady hand or a French tip guide. For the accent designs, fine-tipped brushes are essential for painting delicate florals or swirls. Alternatively, nail stamping kits or high-quality decals can provide stunning results with less freehand work. Finish every manicure with a durable, high-gloss topcoat to seal in the design, prevent chipping, and add a professional, long-lasting shine.
To truly make these spring nails your own, consider personalizing the tip shape – from a sharp square to a soft almond or an elegant coffin – to best flatter your hand. Experiment with different pastel shades for your floral accents, perhaps incorporating lavenders, sky blues, or soft yellows for a broader spring palette. For those seeking a slightly bolder look, a single nail with a full floral pattern can be a stunning focal point, while more minimalist designs might feature just a delicate leaf or a hint of glitter at the cuticle. Regular moisturization of cuticles and hands is key to maintaining the overall beauty of your manicure. These designs are ideal for refreshing your look for spring holidays, garden parties, or simply to bring a touch of natural beauty and elegance into your daily routine, ensuring your hands are always perfectly polished and on-trend for 2025.
5 Glowy EARLY SPRING NAILS
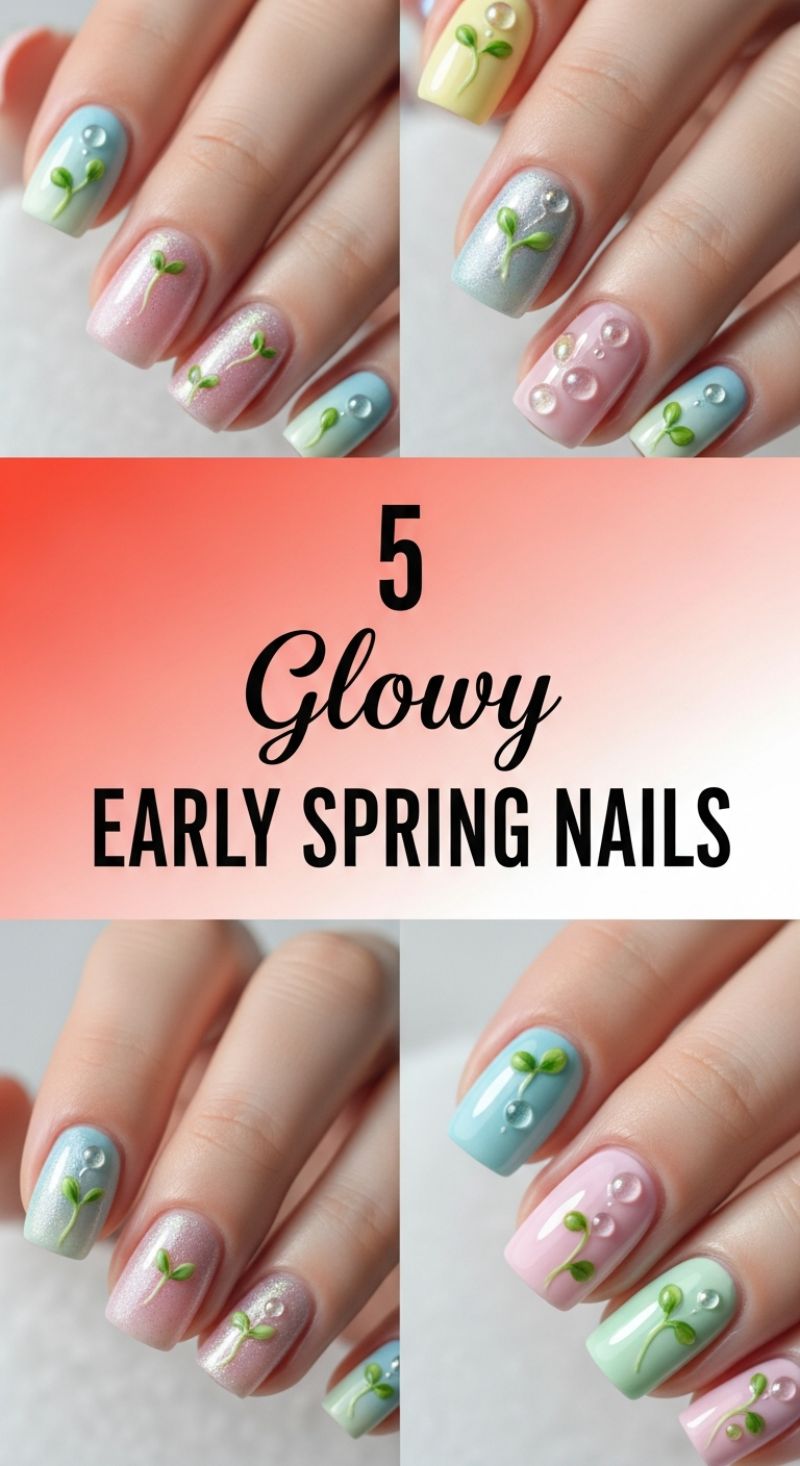
The “Glowy Early Spring Nails” featured here are a delightful ode to the season’s first bloom, perfectly capturing the essence of fresh beginnings and dewy mornings. This collection showcases a harmonious blend of soft pastel hues
think whisper-pink, baby blue, mint green, and a touch of sunny yellow
often enhanced with a delicate shimmer that truly embodies the “glowy” promise. Each nail typically features a charming, hand-painted green sprout, symbolizing new life and growth, frequently adorned with realistic, raised water droplets that give the impression of morning dew clinging to nascent foliage. The overall aesthetic is one of understated elegance and refreshing simplicity, making these designs ideal for welcoming spring with a touch of natural beauty. To recreate this enchanting look, begin by preparing your nails with a clear base coat for protection and longevity. Next, apply your chosen pastel shades, varying them across your nails for an eclectic yet coordinated appearance. For the “glowy” effect, opt for polishes with a subtle shimmer or apply a very fine iridescent glitter over your base color before the final steps. The key design element is the sprout: using a fine detail brush and a vibrant, yet natural, green polish, carefully paint a delicate stem with two small leaves emerging from it, usually positioned towards the cuticle or slightly off-center for a natural feel. Ensure the lines are clean and the leaves are organically shaped. Finally, for the signature water droplets, use a thicker clear gel or a specialized “bubble” gel. Apply small, varying-sized dots onto the nail surface using a dotting tool or the brush tip, allowing them to form distinct, raised domes. Cure these under a UV/LED lamp if using gel, or allow ample drying time if using a conventional topcoat. For a truly professional finish and extended wear, consider using gel polishes, which offer superior durability and a high-gloss sheen that enhances the “glowy” aspect. When applying the water droplets, work one nail at a time to prevent smudging and ensure precise placement; for an extra dimension, you can even apply tiny iridescent flakes beneath some of the droplets. To customize this design, experiment with gradient pastel bases, blending two colors on a single nail for a soft ombré effect. Alternatively, vary the type or placement of the green motif
perhaps a tiny vine or a single, larger leaf on an accent nail. Always seal your finished design with a high-quality, ultra-glossy top coat to protect the intricate artwork and amplify the glow. This will ensure your early spring nails remain breathtakingly beautiful, fresh, and resilient through all your seasonal adventures.
7 Vibrant Green Spring Nails
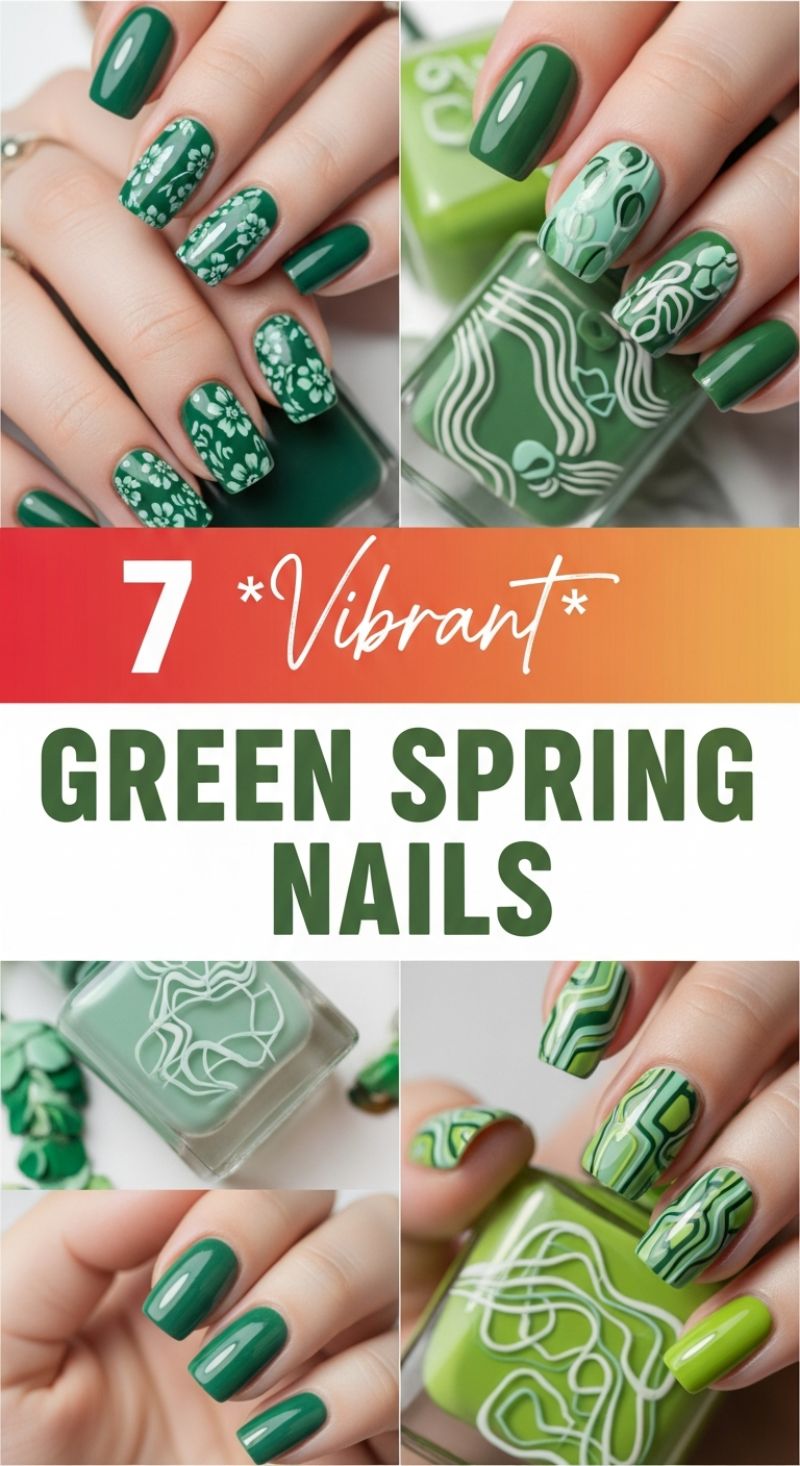
Embrace the rejuvenating spirit of spring with a kaleidoscope of green hues, as perfectly showcased in this vibrant collection of nail designs. Green, the quintessential color of renewal and growth, offers an incredibly versatile palette for your spring manicure, ranging from deep, luscious emeralds to playful, refreshing mints. Whether you’re drawn to intricate patterns or sophisticated solids, these designs promise to add a fresh, lively touch to your seasonal look, making your fingertips a true testament to spring’s blossoming beauty.
Dive into the art of creating these stunning green nail designs, starting with the elegantly intricate floral patterns seen in the top-left example. To achieve this look, begin with a high-quality base coat, followed by two smooth, opaque layers of a rich, deep forest green polish. Once fully dry, use a fine nail art brush or a stamping plate with crisp white polish to meticulously craft delicate flower and leaf designs across your nails. For those desiring the modern, artistic flair of the geometric and abstract patterns, as depicted in the top-right and bottom-right images, start with a lighter green base. Once dry, employ striping tape or a very thin nail art brush to apply varying shades of green – think lime, mint, and a slightly darker forest green – creating dynamic lines, swirls, and segmented blocks. The key to these multi-toned designs is patience and precision, allowing each layer to dry adequately to prevent smudging and achieve sharp, distinct patterns that truly pop.
Beyond the artistry of complex designs, remember the timeless elegance of a simple, solid green manicure, as beautifully demonstrated by the bottom-left image. A perfectly applied, rich green polish can be just as impactful and chic. For any of these looks, expert advice suggests prioritizing nail preparation: always start with clean, filed, and buffed nails, with cuticles neatly pushed back. A good quality base coat is non-negotiable for protecting your natural nails and extending the life of your polish, while a high-gloss top coat will seal your design, prevent chipping, and add a brilliant shine. Don’t shy away from mixing and matching different designs across your nails – perhaps a solid green on some fingers and an intricate pattern on others – to create a personalized, dynamic manicure that truly expresses your spring style. With these tips and a touch of creativity, your nails will be perfectly poised to celebrate the vibrant energy of the season.
8 Fun SPRING NAIL IDEAS

Spring is the perfect season to refresh your nail aesthetic with vibrant colors and playful designs, and this collection of 8 fun spring nail ideas offers a spectrum of styles to inspire your next manicure. Begin with charming Fruit-Inspired nails that evoke warmth and freshness. For the delightful Strawberry design, start with a clear or nude base. Using a fine detail brush, paint small red strawberry shapes, adding tiny white dots for seeds. Finish with a dab of green polish for the leaves at the top. Alternatively, embrace the Watermelon look by creating a vibrant pink-to-white ombre base, then adding a thin white line and a bold green tip. Tiny black dots strategically placed on the pink section will mimic realistic seeds. If you prefer a more abstract, joyful approach, the Playful Polka Dots are effortlessly chic. Apply a clear or nude base coat, then use a dotting tool or the tip of a bobby pin to create an array of multi-colored dots using bright polishes like pink, blue, yellow, green, and purple. Varying the size and spacing of the dots can add dynamic interest to this classic pattern.
For a zestier twist, consider the Citrus Slice Chic design, perfect for adding a touch of summer to your spring nails. Begin with a crisp white base. Once dry, use a sunny yellow polish to paint half-moon or full circle slices on each nail, then carefully draw white lines to segment the citrus fruit. A thin outline in black or a deeper yellow can enhance definition, and a small green accent could represent a leaf. For those who love fluid artistry, the Whimsical Swirls offer a mesmerizing look. On a light or nude base, use a fine nail art brush to create organic, wavy lines in two or three complementary bright colors such as pink, blue, and green. Let the lines flow naturally across the nail, overlapping slightly to create a dynamic, marble-like effect. These designs demonstrate how simple techniques can yield stunning, high-impact results.
Finally, dive into the captivating world of Gradient Ombre nails, a technique that seamlessly blends colors for a soft, artistic finish. Each of these designs can be achieved using a makeup sponge: apply your chosen polishes directly onto the sponge in adjacent stripes, then gently dab onto your nails, repeating until the colors are blended to your liking. For a Sunrise Gradient, transition from a vibrant sky blue at the cuticle to a sunny yellow and then a fiery orange at the tip, capturing the essence of dawn. The Tropical Ombre offers a refreshing blend, moving from a bright lime green to a cool aqua blue. For a warmer, Sunset Gradient, experiment with a hot pink fading into a rich orange and then a soft yellow. Lastly, the Rainbow Pastel Gradient provides a softer, ethereal look, blending delicate pink, lavender blue, and mint green across the nail. Always seal your gradient masterpieces with a high-shine top coat to smooth out any texture and ensure lasting vibrancy. Remember, a good base coat protects your natural nails and prepares them for these beautiful transformations.
10 Cute & Simple Short Spring Nails
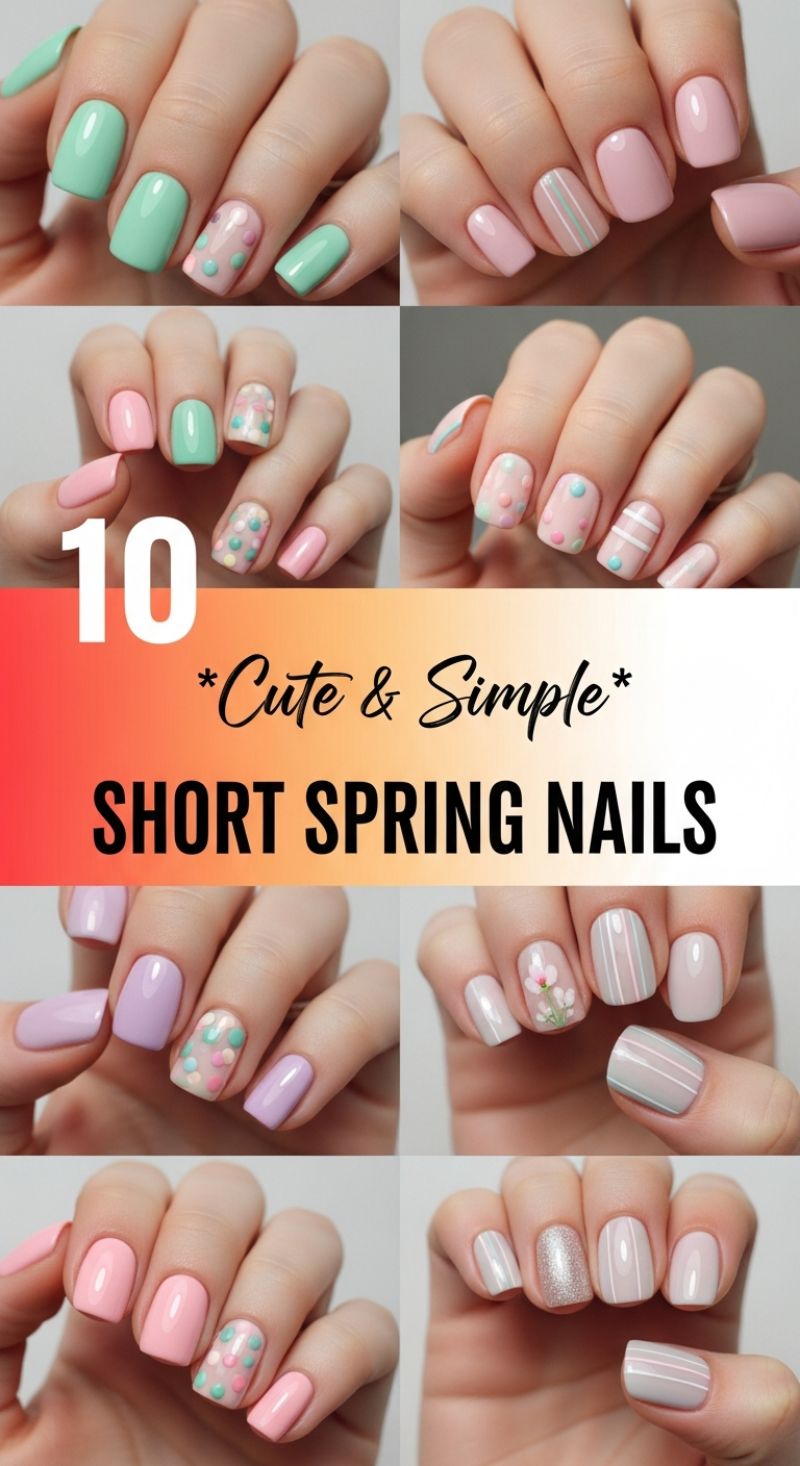
Embrace the delicate beauty of the season with these 10 cute and simple short spring nail designs, perfect for adding a touch of elegance without the fuss. This collection highlights the charm of pastel hues, predominantly featuring refreshing mint greens, soft blush pinks, gentle lavenders, and versatile nude tones. The aesthetic is clean, understated, and incredibly chic, making these designs ideal for everyday wear while perfectly capturing the lighthearted spirit of spring. Opting for shorter nails not only makes these intricate designs more manageable but also ensures greater durability and comfort as you transition into warmer weather activities.
Achieving these looks is surprisingly straightforward, making them perfect for DIY enthusiasts. For the charming polka dot patterns seen across multiple designs, start with a solid pastel base coat – perhaps a soft pink or a crisp mint. Once dry, use a fine dotting tool or even the tip of a toothpick to apply small, evenly spaced dots in a contrasting or complementary pastel shade. For instance, tiny mint and light blue dots on a pink base create a playful, Easter-egg inspired effect. Similarly, the minimalist stripe designs involve a steady hand and a thin striping brush. Apply clean, thin horizontal or vertical lines, often in white or a subtly darker pastel, over a solid light-colored base. Remember, an accent nail featuring a design while the others remain solid is a key trend, allowing for a creative pop without overwhelming the overall look.
To ensure your delightful spring manicure lasts, always begin with a quality base coat to protect your nails and prevent staining. After applying your chosen polish and designs, seal everything in with a high-shine top coat. This not only adds a glossy finish but also provides a protective layer, extending the life of your manicure and preventing chips. These short, simple designs are incredibly versatile, suitable for casual outings, office wear, or even special spring events. They are a testament to the fact that you don’t need elaborate extensions or intricate artistry to make a statement; sometimes, the most elegant looks are those that celebrate simplicity and fresh, seasonal colors.
20 Fresh Spring Nail Ideas
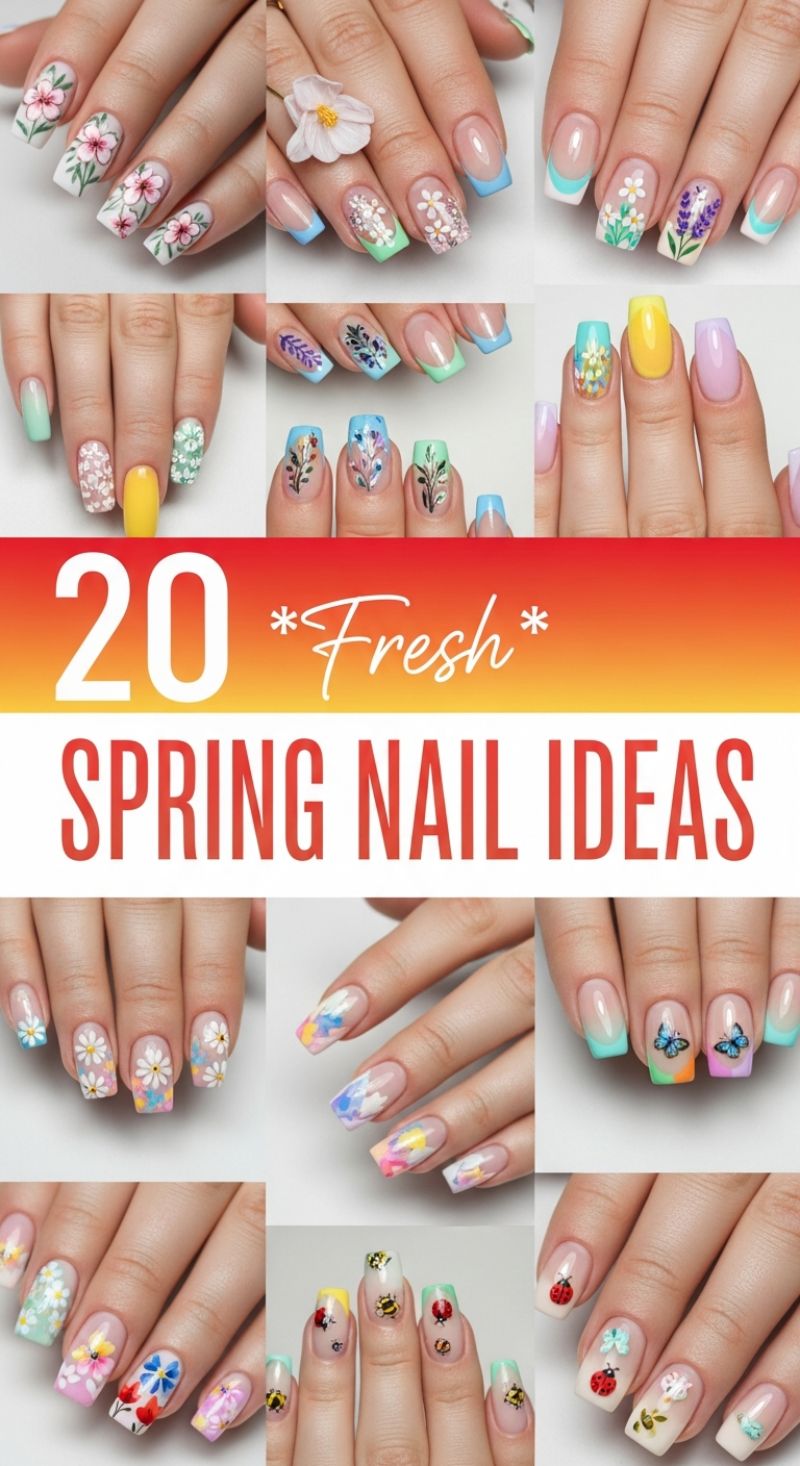
Welcome the vibrant spirit of spring with an array of fresh and enchanting nail designs that promise to elevate your manicure game. This collection celebrates the essence of the season, featuring a delightful spectrum of pastel hues, intricate floral motifs, and charming nature-inspired accents. To achieve these breathtaking looks, begin with a meticulously prepped nail canvas – a well-manicured base is key for any design. For many of the styles showcased, a clear or nude base provides a sophisticated foundation, allowing the delicate artistry to truly pop. Embrace the soft palettes of mint green, baby blue, lilac, and blush pink, which can be applied as full coverage or elegantly incorporated into modern French tips. Experiment with playful variations where traditional white tips are replaced with these cheerful pastels, creating a subtle yet impactful statement perfect for spring.
Delve into the art of floral design, a cornerstone of spring aesthetics. For those with a steady hand, fine-tipped brushes and acrylic paints will allow you to craft delicate cherry blossoms, charming daisies, or wild botanical sprigs with precision. If hand-painting feels daunting, high-quality nail decals or stamping plates offer an excellent alternative to replicate intricate patterns effortlessly. Observe the whimsical butterfly and ladybug designs – these can be expertly hand-painted for a personalized touch or applied using detailed stickers. For the abstract watercolor effects, consider dabbing diluted nail polish with a sponge or utilizing alcohol inks to create soft, artistic washes across your nails. Remember to work in thin layers and allow each layer to dry completely to prevent smudging and ensure crisp, clean lines for your nature-inspired masterpieces.
To ensure your fresh spring manicure lasts as long as the season, always finish your design with a high-quality, long-lasting top coat. This not only protects your intricate artwork from chipping and fading but also adds a brilliant, glossy sheen that enhances the vibrancy of your chosen colors. Don’t be afraid to mix and match designs across your nails – for instance, a floral accent nail paired with solid pastel colors on the others creates a cohesive yet dynamic look. For an extra touch of sparkle, subtle glitter or tiny rhinestones can be strategically placed without overpowering the delicate spring theme. These designs are versatile enough to suit various nail shapes and lengths, inviting you to personalize each look to reflect your unique style and truly make your nails blossom this spring.
5 *Chic* PINK SQUARE SPRING NAIL DESIGNS
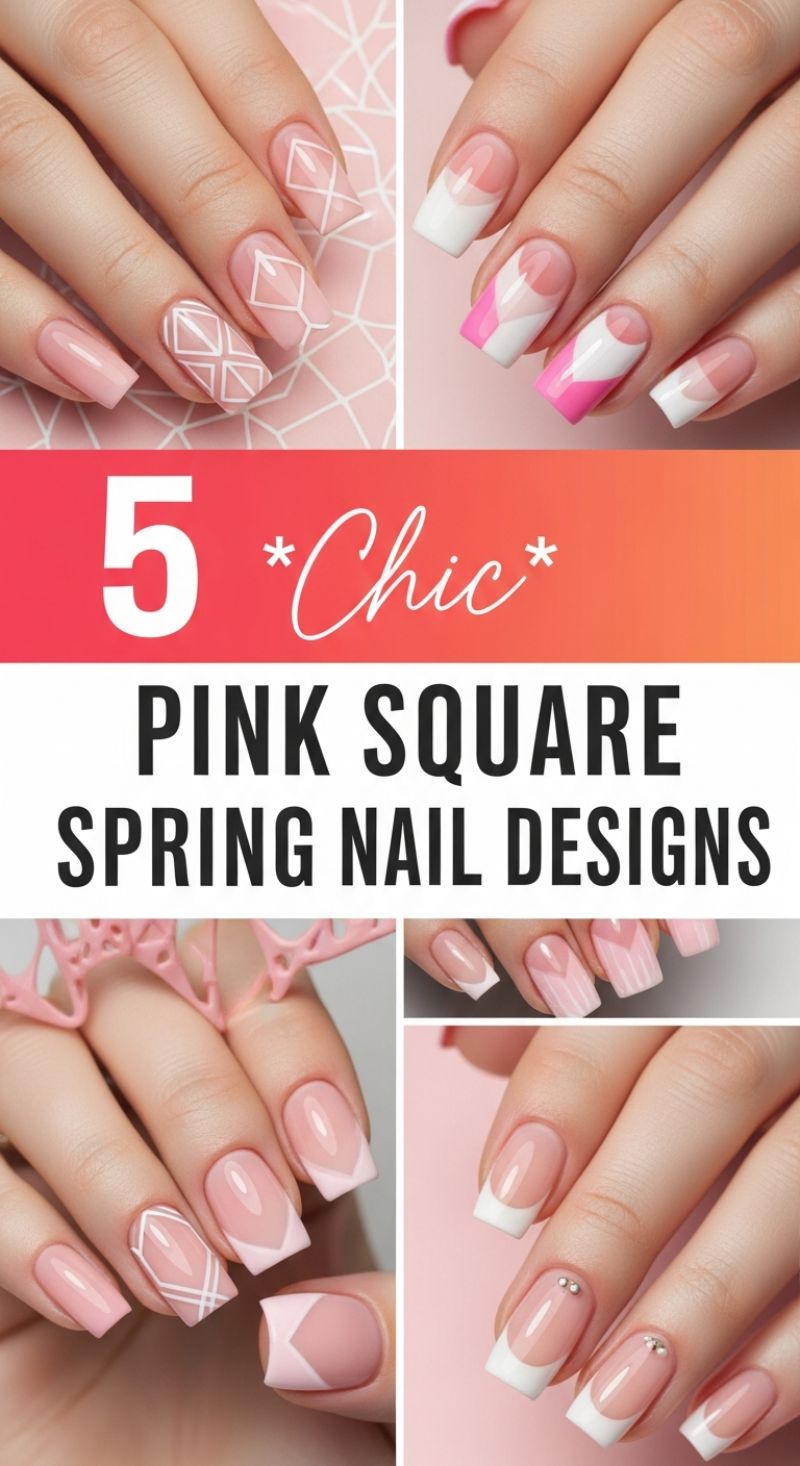
Embrace the freshness of spring with these five utterly chic pink square nail designs, perfect for adding a touch of elegance and playfulness to your seasonal look. The square nail shape provides a modern canvas for a variety of artistic expressions, and when paired with delicate pink hues, it creates a sophisticated yet vibrant aesthetic. This collection ranges from subtle geometric patterns to playful color-blocking and timeless French tips, offering inspiration for every style and occasion. Each design utilizes a harmonious blend of nude, soft pinks, and crisp white, ensuring your nails are not just beautiful but also perfectly on-trend for the spring season.
To recreate these stunning looks, start by shaping your nails into a clean square with gentle, straight filing, ensuring the edges are smooth but not rounded. For the geometric patterns, like the intricate diamond and criss-cross designs seen on some of the accent nails, apply a nude pink base coat and allow it to dry completely. Then, using a fine-tipped nail art brush and a pure white polish, meticulously draw the desired patterns. Precision is key here; for cleaner lines, use striping tape as a guide. The more abstract color-blocked tips, featuring a mix of white and vibrant pink, can be achieved using the same fine brush or even specialized nail art stencils for crisp divisions. For the updated French tips, whether V-shaped or traditional, apply your pink base, then carefully paint the white tips. The V-shape can be drawn freehand or by placing two pieces of tape diagonally to create the perfect inverted triangle. For an extra touch of glamour, as shown in one of the classic French tip designs, small rhinestones can be strategically placed at the base of the nail while the top coat is still wet, providing a subtle sparkle.
Achieving salon-quality results at home requires a few essential tips. Always begin with a high-quality base coat to protect your natural nails and ensure your polish adheres smoothly. After applying your chosen design, seal everything with a durable top coat for long-lasting shine and chip resistance – this is especially important for intricate designs to prevent smudging and fading. When selecting your pink shades, consider your skin tone; cooler undertones might suit dusty rose or lilac-pinks, while warmer tones can pull off peachier or coral-pinks beautifully. Experiment with different nail art brushes, dotting tools, and even sponges to achieve varied textures and effects. Remember, practice makes perfect, so don’t be afraid to experiment and customize these designs with your favorite spring colors or additional embellishments like glitter or foil to truly make them your own. Regular cuticle oil application will also keep your nails and cuticles healthy, ensuring your beautiful spring manicure always looks flawless.
Future-Forward Spring Nails 2026

Step into Spring 2026 with a nail aesthetic that’s truly ahead of its time, embracing a future-forward vision that blends high-tech finishes with artistic expression. This trend moves beyond conventional pastels, introducing a dynamic interplay of dazzling holographic and chrome finishes, bold abstract patterns, and sophisticated animal prints like zebra and cow print. The dominant nail shapes, primarily coffin and square, serve as the perfect canvas for these intricate designs, allowing for maximal impact and detail. Expect to see an exciting fusion of metallics, iridescence, and high-contrast graphics that are both edgy and elegantly chic, ensuring your fingertips are not just adorned, but are making a statement.
To recreate these captivating looks, particularly the radiant holographic and chrome finishes, we recommend using finely milled chrome powders applied over a no-wipe gel top coat, which, when buffed in, yields that coveted mirror-like shine. Alternatively, specialized holographic polishes offer a more straightforward application for a similar, though often less intense, effect. Precision in application is paramount; use a soft applicator for powders and ensure thin, even coats for polishes, always sealing your masterpiece with a high-quality, durable gel top coat to protect the iridescence and prevent chipping. For the artistic abstract and animal print designs, equip yourself with fine-tipped nail art brushes and highly pigmented gel polishes. These tools allow for the creation of sharp, clean lines and intricate patterns. Experiment with layering different textures—perhaps a matte base adorned with glossy abstract lines, or metallic accents over a neutral canvas—to introduce depth and sophisticated visual interest.
For an expert finish that lasts, begin every manicure with a high-quality base coat to shield your natural nails and provide a smooth, uniform surface. Apply two to three thin, even coats of your chosen color or design, allowing each layer to cure or dry completely before proceeding. Conclude with a robust, chip-resistant top coat; a gel top coat cured under a UV/LED lamp is highly recommended for unparalleled durability and a long-lasting, glossy sheen. To maintain the health and appearance of your manicure, regularly apply cuticle oil to keep your nails and surrounding skin hydrated. This not only promotes nail strength but also enhances the overall fresh look of your avant-garde designs. Don’t shy away from personalizing these trends—consider incorporating a subtle pastel into a chrome accent nail or adding a vibrant pop of color to an abstract pattern, allowing these futuristic styles to truly reflect your unique flair while remaining effortlessly chic for Spring 2026.
7 Gorgeous Spring Nail Transformations
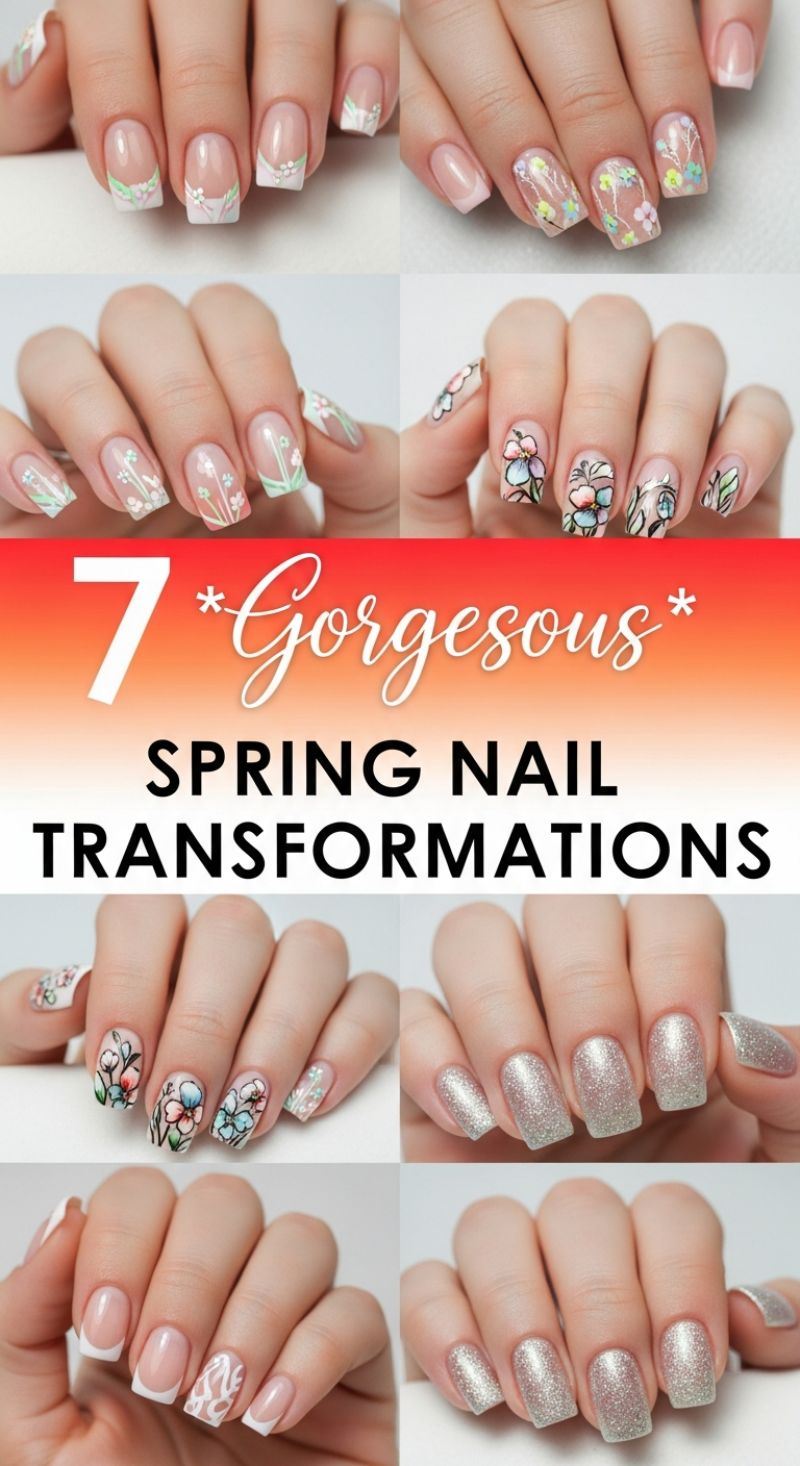
Step into spring with a collection of seven breathtaking nail transformations that promise to infuse your look with the season’s fresh, vibrant energy. This gallery showcases a delightful array of designs, primarily focusing on delicate and whimsical floral artistry, alongside sparkling glitter accents, perfect for anyone looking to embrace spring on their fingertips. From subtle French tip variations adorned with tiny blossoms to full-blown gardens painted across each nail, these designs offer a spectrum of styles to suit every preference, whether you favor understated elegance or a burst of colorful creativity. Each design is a testament to the versatility of spring nail art, inspiring you to experiment with various techniques and color palettes.
To recreate the delicate floral French tips seen in the collection, begin by shaping your nails into a soft square or oval, then apply a clear or sheer nude base coat to create a natural, healthy canvas. Once dry, carefully apply a crisp white polish to the tips, but instead of a traditional straight line, experiment with a gentle V-shape or a soft, undulating curve to add a unique twist. While the white is still slightly tacky, or after it has dried, use a fine detail brush to paint tiny leaves in pastel green and small white or light pink flowers along the border of your French tip. A dotting tool can be incredibly useful for creating perfectly round flower centers. For the more elaborate, whimsical full floral designs, opt for a sheer nude base to let the intricate artwork truly shine. Use a very fine brush to outline abstract floral shapes and leaves in black or a dark contrasting color. Then, fill these outlines with a playful mix of pastel shades like sky blue, soft pink, lavender, and mint green, ensuring each flower has its unique charm. Vary the size and placement of your blossoms across different nails to create a dynamic and visually interesting manicure.
Achieving these stunning spring transformations requires attention to detail and quality products. Always start with properly prepped nails, ensuring they are clean, filed, and free of oils for optimal polish adhesion. Invest in a good quality fine-tip brush for intricate floral details and a dependable top coat to seal your masterpiece, preventing chips and adding a high-shine finish that lasts. If freehand painting feels daunting, consider using nail art stickers or stamping plates featuring spring floral motifs as a fantastic alternative. For those days you crave sparkle, the glitter gradient seen in some of the transformations offers a chic alternative or complement to the florals; start with a dense application at the base and lightly fade it towards the tip for a subtle shimmer. Remember, practice makes perfect, so don’t be afraid to experiment with colors and techniques to find your perfect spring nail look. These designs are not just about aesthetics; they’re about embracing the joy and renewal that spring brings.
15 Vibrant Spring Nails You Need

Dive into the season of renewal with an explosion of color and creativity on your fingertips! This collection of 15 vibrant spring nail designs showcases an array of breathtaking styles, from delicate floral patterns to bold abstract swirls and mesmerizing rainbow gradients. Each design is a celebration of spring’s lively palette, featuring an abundance of cheerful yellows, brilliant blues, playful pinks, and fresh greens, often combined in intricate or flowing patterns. Whether you prefer a full set of coordinated art or a whimsical accent nail, these designs are curated to inspire joy and add a perfect pop of color to your spring look, embodying the energy and freshness of the season.
To recreate these stunning looks, start with proper nail preparation: clean, filed nails are crucial for a lasting manicure. For the intricate floral designs, a steady hand and fine-tipped brushes are your best friends. Begin with a light, neutral base coat, then use small dots and strokes to form petals and leaves in contrasting or complementary colors. Don’t be afraid to mix and match sizes and styles of flowers for a dynamic garden effect. For the striking rainbow gradient and ombre effects, a makeup sponge is an essential tool. Apply stripes of your chosen polish shades directly onto the sponge, then dab it onto your nail, gently rocking it side to side to blend the colors seamlessly. Multiple thin layers will build intensity. The abstract swirl and marble patterns can be achieved by applying dots or lines of various polishes onto a wet base coat and then gently swirling them together with a toothpick or a fine brush before they dry, creating unique, organic patterns.
Beyond the specific techniques, expert advice for mastering these vibrant designs includes investing in quality polishes with good pigmentation, which will ensure your colors pop. Always finish with a high-quality top coat to protect your intricate art, add shine, and extend the life of your manicure – a quick-dry top coat can also prevent smudges. Don’t shy away from experimenting with different color combinations; spring is the perfect time to embrace bold pairings. Consider using different finishes, like a matte top coat over a floral design for a unique velvety look, or glitter accents to add extra sparkle. Remember, practice makes perfect, and the most important tip is to have fun expressing your creativity and welcoming the spring season with beautifully adorned nails.
10 Chic SHORT SPRING NAILS
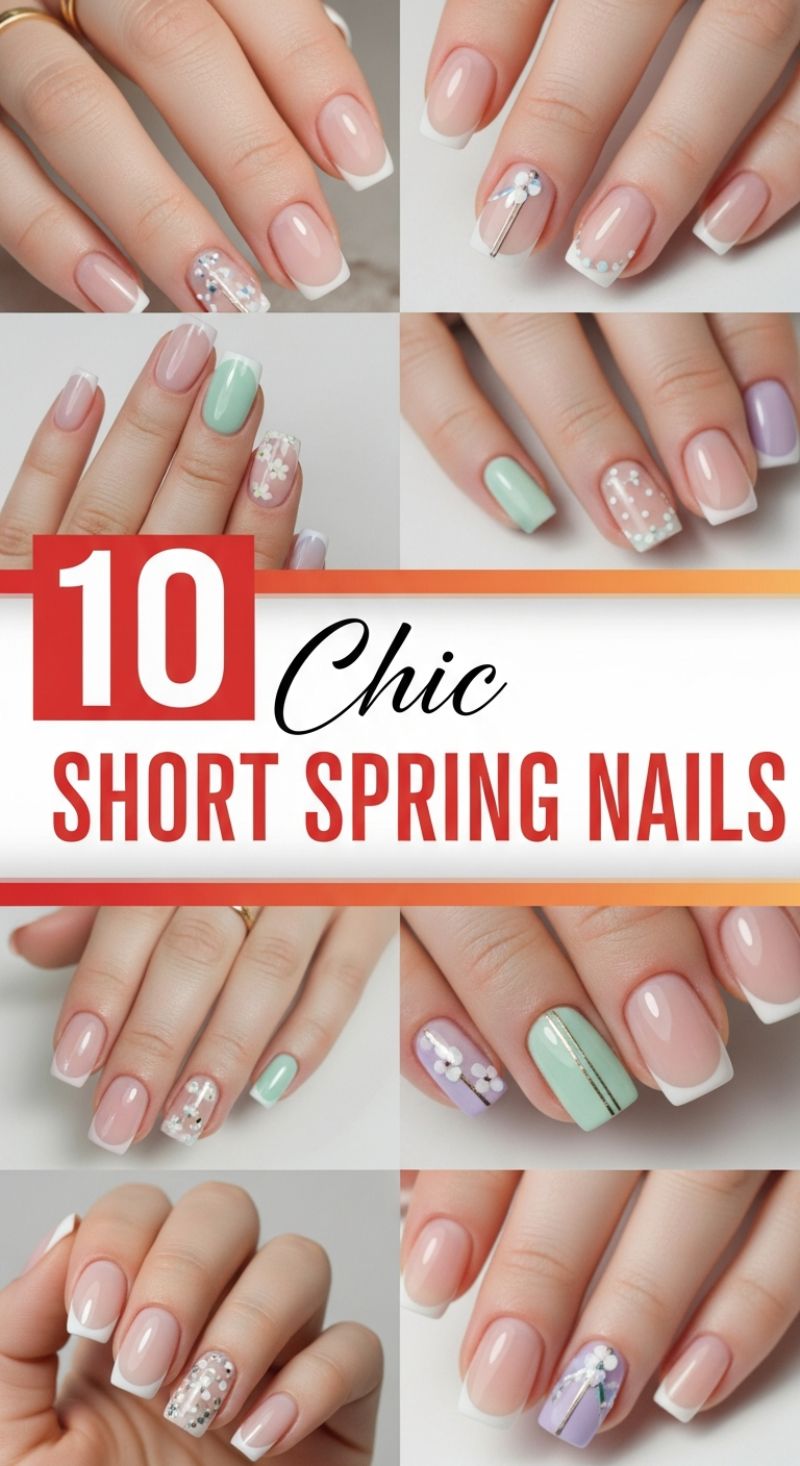
Embrace the freshness of spring with these 10 chic short nail designs, perfectly curated for an elegant yet playful aesthetic. This collection showcases the beauty of a natural base, often paired with classic French tips, elevated by delicate and artistic accents. The overall theme is understated sophistication, making these styles ideal for both everyday wear and special spring occasions. Short nails are not only practical and easy to maintain but also provide a clean canvas for intricate details without overwhelming the look. The subtle incorporation of pastel hues and floral motifs ensures these designs capture the essence of the season, offering a refreshing alternative to more dramatic styles while still making a stylish statement.
To recreate these stunning spring looks, begin with a meticulously prepared nail base. Most designs feature a clean, healthy-looking nail, often achieved with a sheer nude or light pink polish to enhance the natural nail bed. The classic French tip is a cornerstone, providing a crisp, clean edge with opaque white polish. For the accent nails, explore a variety of techniques: delicate floral patterns can be hand-painted using a fine-tip brush with white or light pastel polishes on a contrasting pastel base, such as mint green or soft lavender, or directly on a nude base. Alternatively, you can opt for subtle sparkle with glitter or tiny sequin applications on a single accent nail, creating a mesmerizing effect. Some designs incorporate minimalist metallic lines for a touch of modern sophistication, while others feature playful polka dots, easily achieved with a dotting tool. When selecting your spring palette, lean towards soft pastels like mint, lavender, baby blue, and blush pink, complemented by classic white and hints of gold.
Achieving these sophisticated looks requires precision and patience, but the results are well worth the effort. Always start with properly prepped nails: file, buff, and ensure cuticles are pushed back for a clean foundation. When applying the French tip, consistency is key; using a nail art brush or even a pre-made guide can help achieve a perfect curve. For hand-painted details, practice makes perfect; start with simpler designs and gradually work up to more intricate florals or patterns. Don’t shy away from mixing and matching elements from different designs shown here – for instance, pair a glitter accent with a floral one, or combine a pastel French tip with a minimalist line. Finish every manicure with a high-quality clear top coat to seal in your design, provide a glossy finish, and extend the longevity of your spring-ready nails. These designs are a beautiful way to welcome the season with style and grace, reflecting the delicate beauty of blooming flowers and fresh beginnings.
8 Delicate Pink Almond Spring Nails
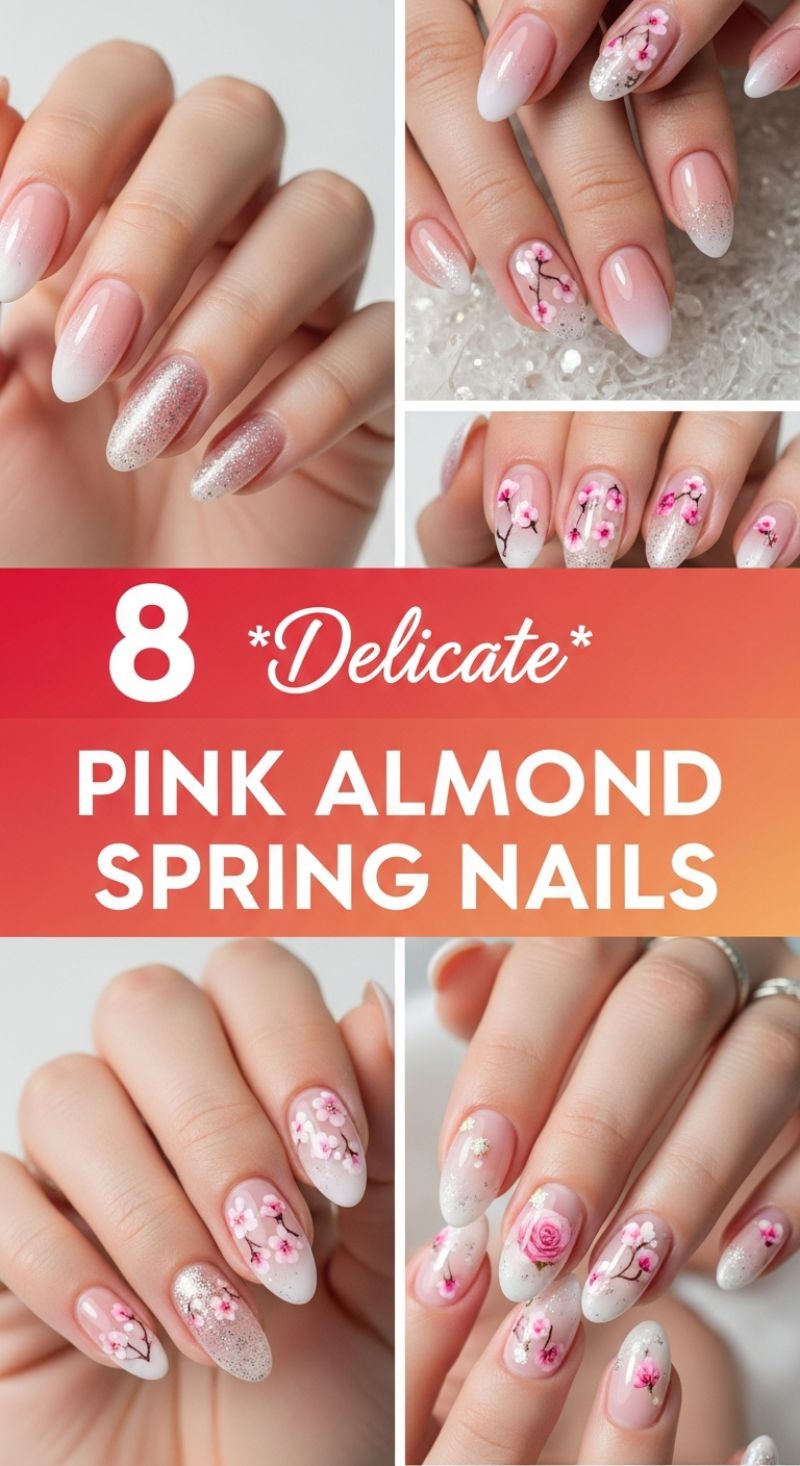
Embrace the essence of spring with these eight exquisite pink almond nail designs, perfectly capturing delicacy and fresh charm. This collection showcases a stunning array of light pink and nude bases, forming a soft canvas for intricate details. The almond shape provides an elegant and elongating effect, making these nails suitable for any hand size and adding a touch of sophistication. The overall aesthetic is one of subtle beauty, combining classic French ombré techniques with playful glitter accents and delicate floral artistry, ideal for ushering in the warmer months with style.
To recreate these captivating looks, start with a perfectly prepped almond-shaped nail. For the gradient effect, apply a sheer nude or light pink base, then gently sponge a soft white or lighter pink polish onto the tips, blending upwards for a seamless ombré. For the shimmering designs, either apply a full coat of fine silver glitter polish or strategically place glitter accents on the tips or around the cuticles for a ‘sugar’ effect. The standout feature across many of these designs is the exquisite floral artwork, predominantly cherry blossoms. These can be hand-painted using fine nail art brushes and pink, white, and brown polishes for the petals and branches. For added dimension, consider layering lighter and darker shades of pink within the petals, and a dotting tool can be used to create tiny white or yellow flower centers.
Expert tip: To achieve a truly professional finish, always apply a high-quality top coat, which not only adds incredible shine but also extends the longevity of your intricate designs. For a more unique touch, experiment with different placements of the floral elements – some nails can feature a full sprig, while others might have a single blossom near the tip or base. Don’t shy away from mixing and matching these elements; for instance, pair a glitter ombré on one nail with a detailed cherry blossom design on another. These designs are perfect for garden parties, bridal showers, or simply adding a touch of spring elegance to your everyday look, ensuring your hands always feel fresh and blooming.
12 Artistic Spring Nail Designs
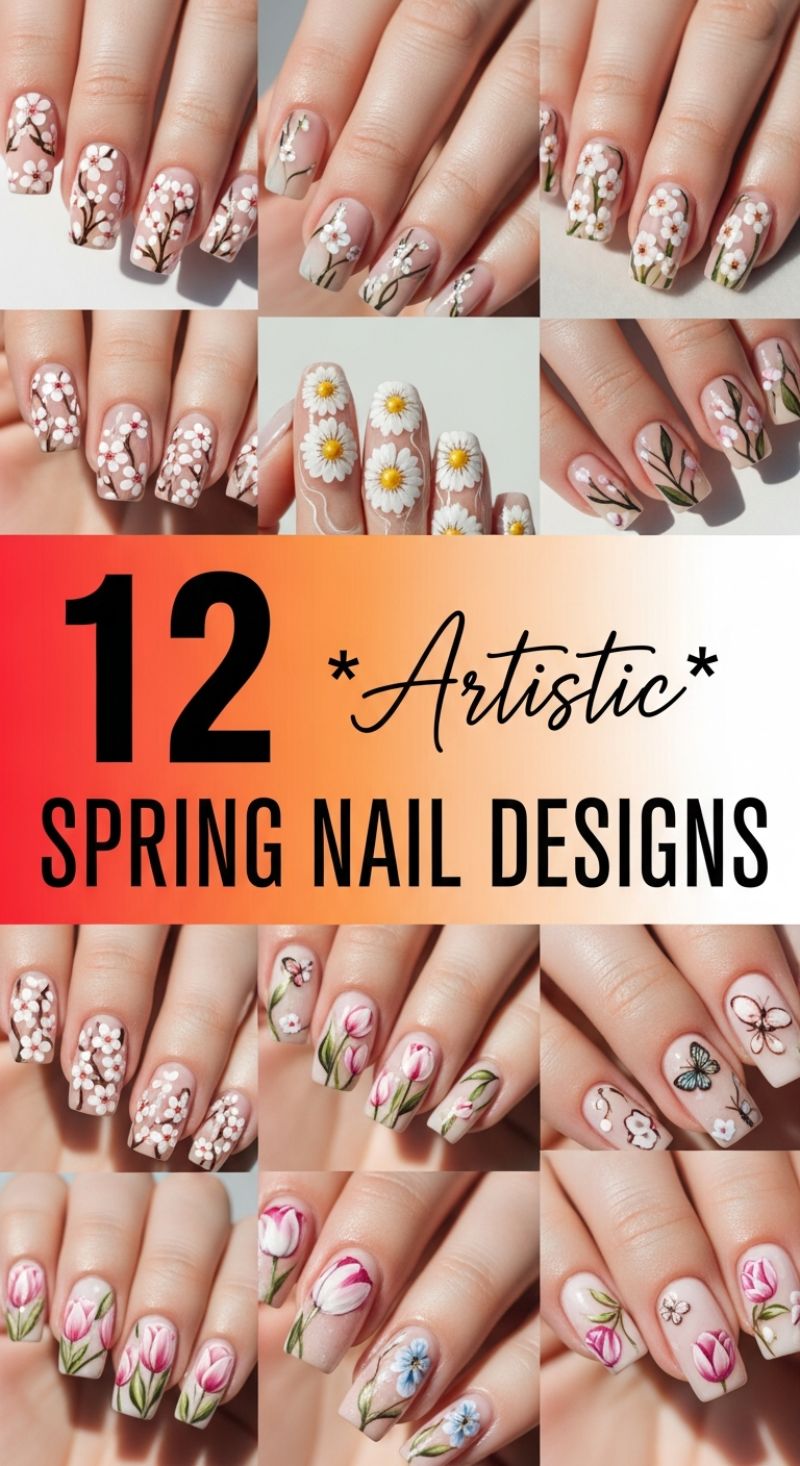
Embrace the freshness of the season with these exquisite spring nail designs that transform your fingertips into miniature canvases of nature’s beauty. The foundation for these looks typically begins with a well-manicured nail bed, prepped and polished with a sheer, natural, or nude base coat. This subtle backdrop allows the intricate floral and botanical elements to truly stand out, creating a delicate yet striking impression. From the soft blush of cherry blossoms to the cheerful simplicity of daisies and the elegant sway of tulips, each design offers a unique interpretation of spring’s awakening. These looks are perfect for adding a touch of artistry and sophistication to your seasonal style, suitable for any occasion where you wish to carry a piece of spring with you.
To recreate these intricate designs, precision and patience are key. For the delicate cherry blossoms or tiny white wildflowers, employ a fine detail brush or a small dotting tool. Create clusters of four or five small white dots to form petals, then add a tiny contrasting dot (red, yellow, or brown) in the center for depth. For the accompanying branches, a very thin liner brush dipped in brown or dark green polish can create fine, organic lines that mimic natural twigs. When crafting daisies, start with a white circle for the petals, ensuring each is distinct, and then add a vibrant yellow dot for the center. For the elegant tulips, use a small, flat brush to shape the petals, often blending two shades of pink or white to give a three-dimensional effect, then add slender green stems and leaves with a fine brush. Remember to allow each layer of polish to dry slightly before adding the next to prevent smudging and maintain crisp lines.
Elevate your spring nail art with these expert tips and finishing touches. Always invest in a good set of nail art brushes – including liner brushes for fine lines, detail brushes for petals, and dotting tools for perfect circles. Work with thin coats of polish to avoid a bulky look and ensure your designs dry thoroughly. If you’re new to nail art, practice on a nail wheel or even a piece of paper first to get a feel for the brushes and polish consistency. Once your designs are complete and fully dry, seal them with a high-quality, long-lasting top coat. A glossy finish will enhance the vibrancy of your floral hues, while a matte top coat can lend a more sophisticated, artistic feel. Don’t be afraid to customize these designs by experimenting with different color palettes, adding subtle glitter accents, or even incorporating small hand-painted butterflies as seen in some of the examples, making each manicure uniquely yours for the season.