Discover 50+ trending nail designs perfect for spring and summer! Get inspired by easy DIY manicures, bright neons, charming pastels, minimalist geometry, and cute florals.
7 Speedy Simple Summer Hacks
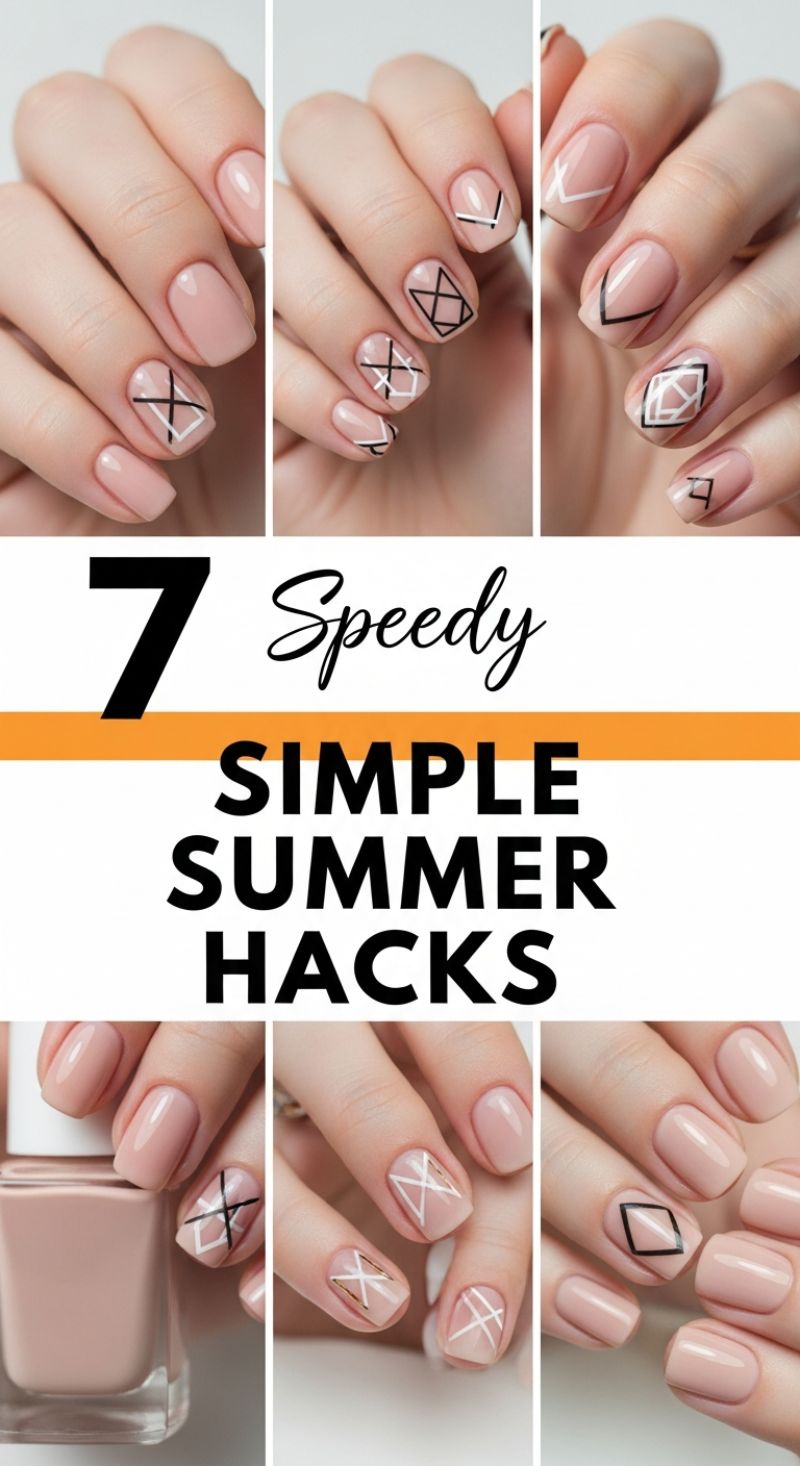
This trending minimalist manicure perfectly embodies the spirit of a “speedy simple summer hack.” The foundation for this look is the use of a neutral base coat—typically a sheer nude, blush pink, or milky white—which provides a clean canvas and enhances the trending ‘negative space’ effect without requiring perfect opacity. The designs themselves rely exclusively on crisp, fine geometric lines, executed primarily in high-contrast black and stark white lacquer. The appeal lies in the ability to create complex-looking art with surprisingly quick strokes. Notice the mix-and-match strategy demonstrated in the image: designs range from simple chevrons and single diamonds to intricate, overlapping crosshatch patterns. The trick to keeping this varied approach cohesive is maintaining the same color palette (nude base + black/white lines) across all fingers. You can opt for a central feature nail with the most detailed design, balancing it out with simpler patterns or leaving some nails solid nude for a balanced, modern look.
To successfully replicate these razor-sharp geometric patterns, proper tooling is essential. Start by applying your base polish and ensuring it is completely dry before beginning any art. The key tool here is a high-quality, long-tipped striper brush (often size 000 or a specialized nail art liner brush). When applying the contrasting polish (black or white), make sure your brush is loaded sparsely—too much polish will result in thick, blurry lines that ruin the minimalist aesthetic. For the straightest lines, anchor your hand against a stable surface and use controlled, fluid movements. If freehanding proves too difficult, professional-grade thin striping tape can be used as a stencil. Apply the tape in your desired pattern (e.g., forming a diamond or triangle), paint over it with your color, and crucially, peel the tape off immediately while the polish is still wet. This technique guarantees perfectly sharp edges, which is the hallmark of this geometric style.
The real time-saving hack inherent in this design is its reliance on small, contained elements rather than full coverage art, meaning less drying time and easier cleanup. However, because the designs are so precise, attention to detail is paramount. For added durability and shine, especially for summer activities, lock the entire design in place with a thin layer of a glossy, quick-dry gel-effect top coat. If you want to introduce a subtle level of complexity, incorporate thin metallic gold or rose gold striping tape pieces directly into the design, layering them alongside the painted black and white lines, as seen in some variations. Always keep an acetone cleanup brush handy; since the contrast is so high against the nude base, any errant polish around the cuticle needs immediate and precise correction to achieve that flawless, speedy, and simple summer finish.
10 Charming Cute Spring Nail Designs
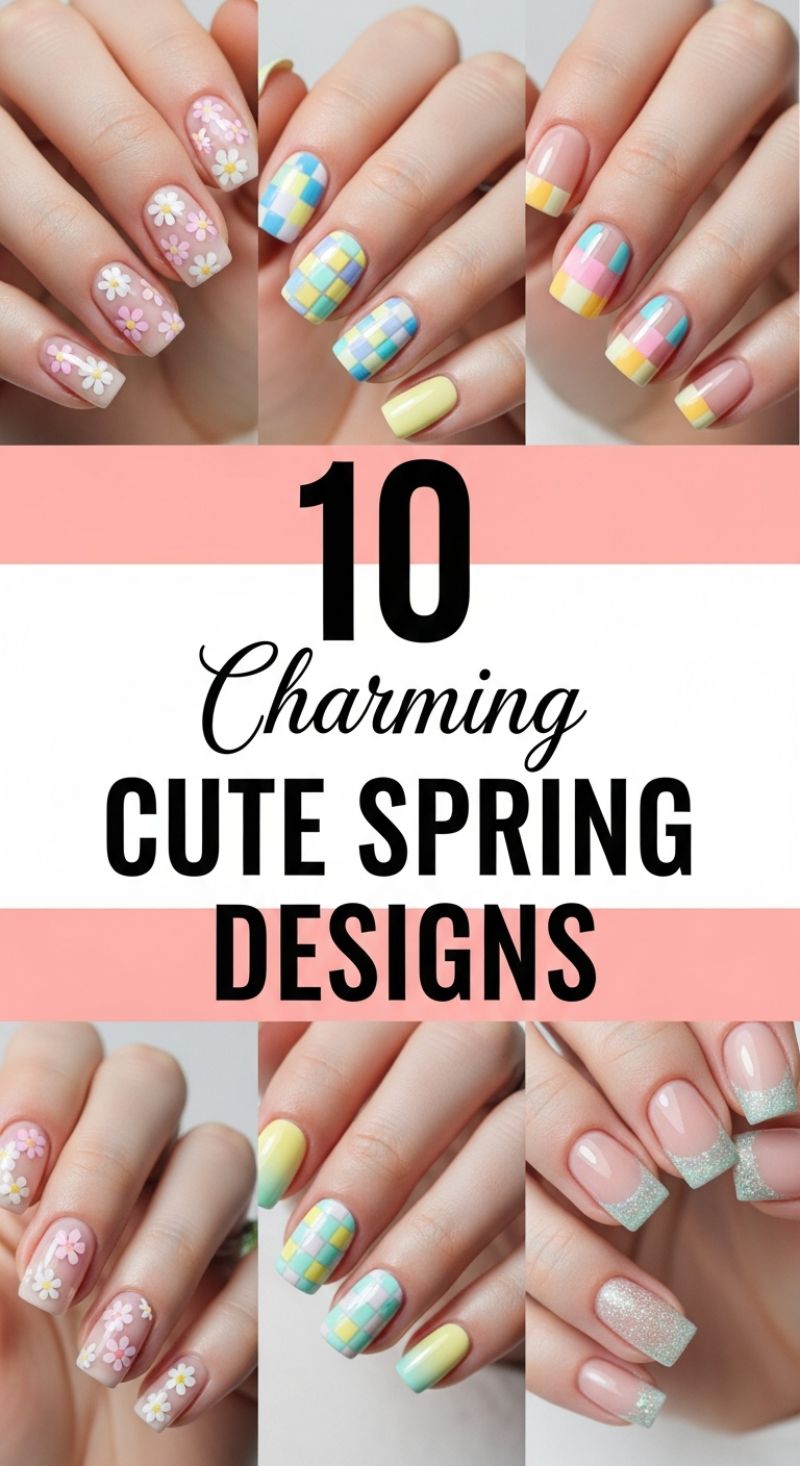
These ten charming designs perfectly encapsulate the fresh, lighthearted spirit of spring, focusing heavily on soft pastels like buttery yellow, robin’s egg blue, pale pink, and mint green. To achieve the delicate Floral Nail look (as seen in the top and bottom left panels), start by applying a sheer, milky pink or nude base coat—this creates a ‘jelly’ effect that keeps the focus on the flowers rather than a heavy color. Once cured, use a fine dotting tool or a small detail brush to create five dots in a circle for the petals (using white or light pink polish), adding a contrasting yellow or white dot in the center for the pistil. For maximum charm, apply these flowers randomly across the nail or concentrated near the cuticle, ensuring the design feels airy and whimsical. Expert tip: If you are new to freehand painting, use pre-made daisy nail decals for a flawless, symmetrical finish, then seal with a protective topcoat to blend them seamlessly into the polish.
For a trendy geometric approach, try the Pastel Plaid or Gingham look featured in the center panels. This style requires precision but delivers high impact. First, paint the base of the nail in a solid light pastel shade, such as white or light yellow. Once dry, use striping tape to map out a grid pattern. Apply the first contrasting color (e.g., blue) in vertical stripes, remove the tape, let it dry completely, and then reapply the striping tape horizontally before painting the second color (e.g., pink or mint). Alternatively, for the bold Color Block French Tips shown on the top right, paint the entire nail with a sheer nude base. Then, using a square-tipped brush or a piece of tape as a guide, create distinct horizontal stripes of three or four pastel colors across the free edge of the nail, treating it as a modern, chunky French manicure. The key to both geometric styles is allowing ample drying time between layers to prevent the colors from muddling or the lines from bleeding.
Finally, integrate simpler accent nails like the Ombre Gradient and Glitter French Tip for balance. The soft Ombre effect (visible on the thumb and pinky nails in the bottom row) is achieved by dabbing a small makeup sponge loaded with two complementary pastel shades (like yellow and mint) directly onto the nail until a seamless fade is achieved. For a touch of glamour, the Glitter French Tip offers a sophisticated spring update to a classic manicure. Instead of white, apply a light coat of mint or silver micro-glitter polish along the curve of the nail tip, either freehand or using French tip guides. If using loose glitter, paint the tip with clear polish first, dip the nail into the glitter, tap off the excess, and encapsulate it all with two thick layers of high-shine topcoat to ensure a smooth, durable finish that sparkles brilliantly in the springtime sun.
7 Pretty Pink Nail Looks
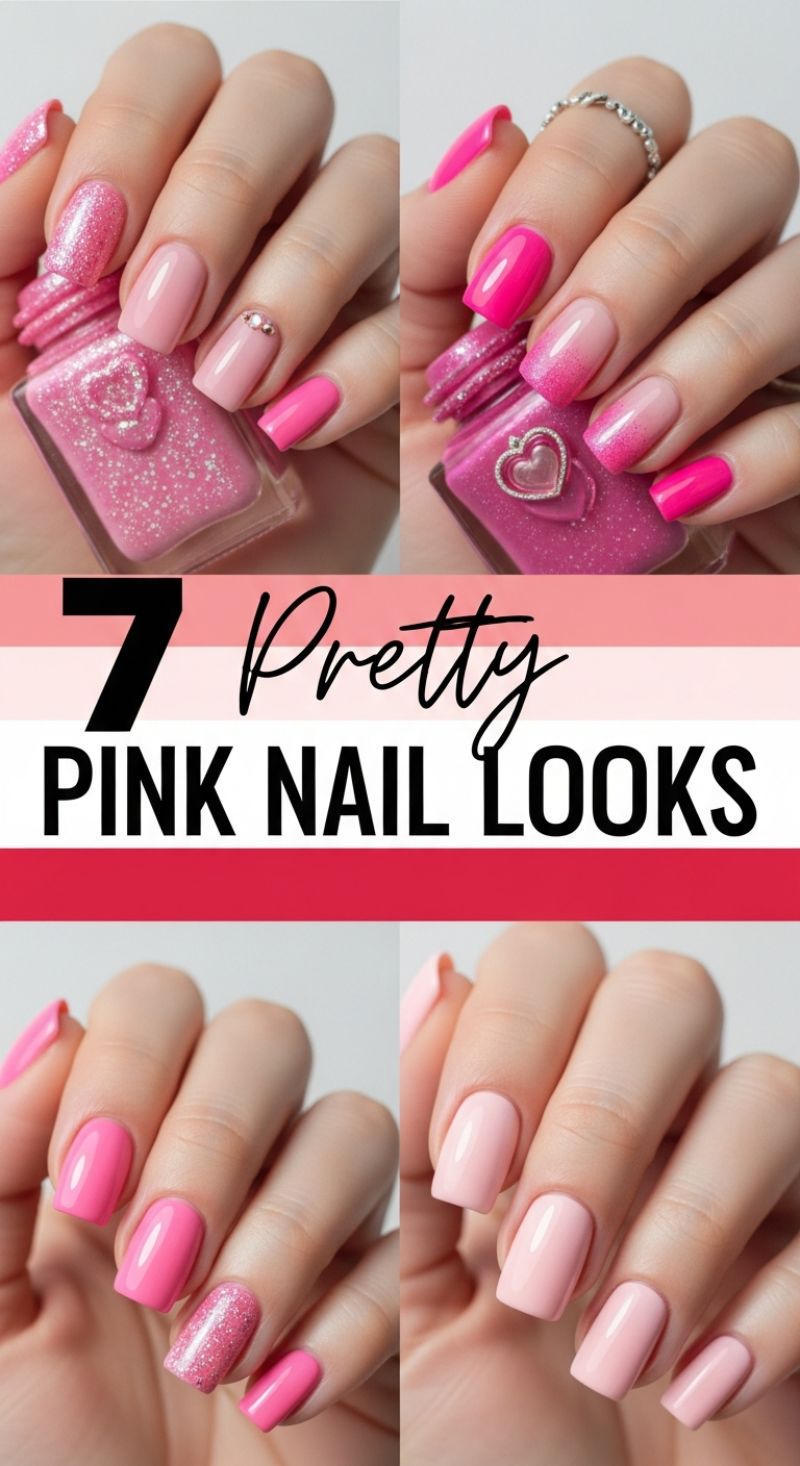
Pink is the quintessential color of spring and summer, offering unparalleled versatility whether you lean towards a soft, barely-there blush or a bold, vibrant fuchsia. To capture the multi-tonal trend demonstrated in these looks, start by selecting 3-4 complementary shades of pink that vary slightly in tone and finish. A successful pink multi-look often involves color blocking or using accent nails strategically. For example, pair two solid cream nails (like a light dusty rose and a warmer bubblegum pink) with a single nail coated in a dense, shimmering pink glitter. If you opt for the rhinestone accent seen here, ensure you apply a small dot of specialized jewelry glue or a thick builder gel exactly where you want the jewel to sit, pressing firmly before curing or drying. Always seal the entire nail with a resilient, high-shine top coat, taking care to cap the free edge and avoid coating the jewel directly, which can dull its sparkle.
Another highly trending technique featured is the glitter ombre, which creates a mesmerizing gradient from a solid base color. To achieve this look (seen top right), start with two coats of your chosen vibrant pink cream polish. Once fully dry, select a highly concentrated holographic or chunky pink glitter polish. Wipe most of the glitter polish off the brush, then apply a small amount directly to a makeup sponge. Lightly dab the sponge onto the top third of the nail, working down toward the center, applying slightly more glitter near the tip and feathering it out as you move toward the cuticle. This technique builds intensity at the tip while allowing the base color to show through near the nail bed. For a seamless finish, seal the entire design with two layers of a smoothing, quick-dry top coat; this is crucial as the chunky glitter texture can feel rough if not properly encapsulated.
Finally, the power of a single, perfectly executed monochromatic shade should not be underestimated. The pale pink look (bottom right) is achieved by selecting a highly pigmented, opaque cream polish that complements your skin tone—cooler pinks work best for warmer skin tones, and vice versa. Prep the nail meticulously by pushing back cuticles and gently buffing the surface to ensure a streak-free application. For all these looks, longevity is key for summer activities, so invest in a quality gel base coat to prevent chipping, especially when integrating textures like glitter or rhinestones. Applying thin, even coats, rather than two thick ones, guarantees a smooth, professional finish that will last well beyond your next vacation.
10 Chic Short Summer Nails: The Pastel French Micro-Tip Trend
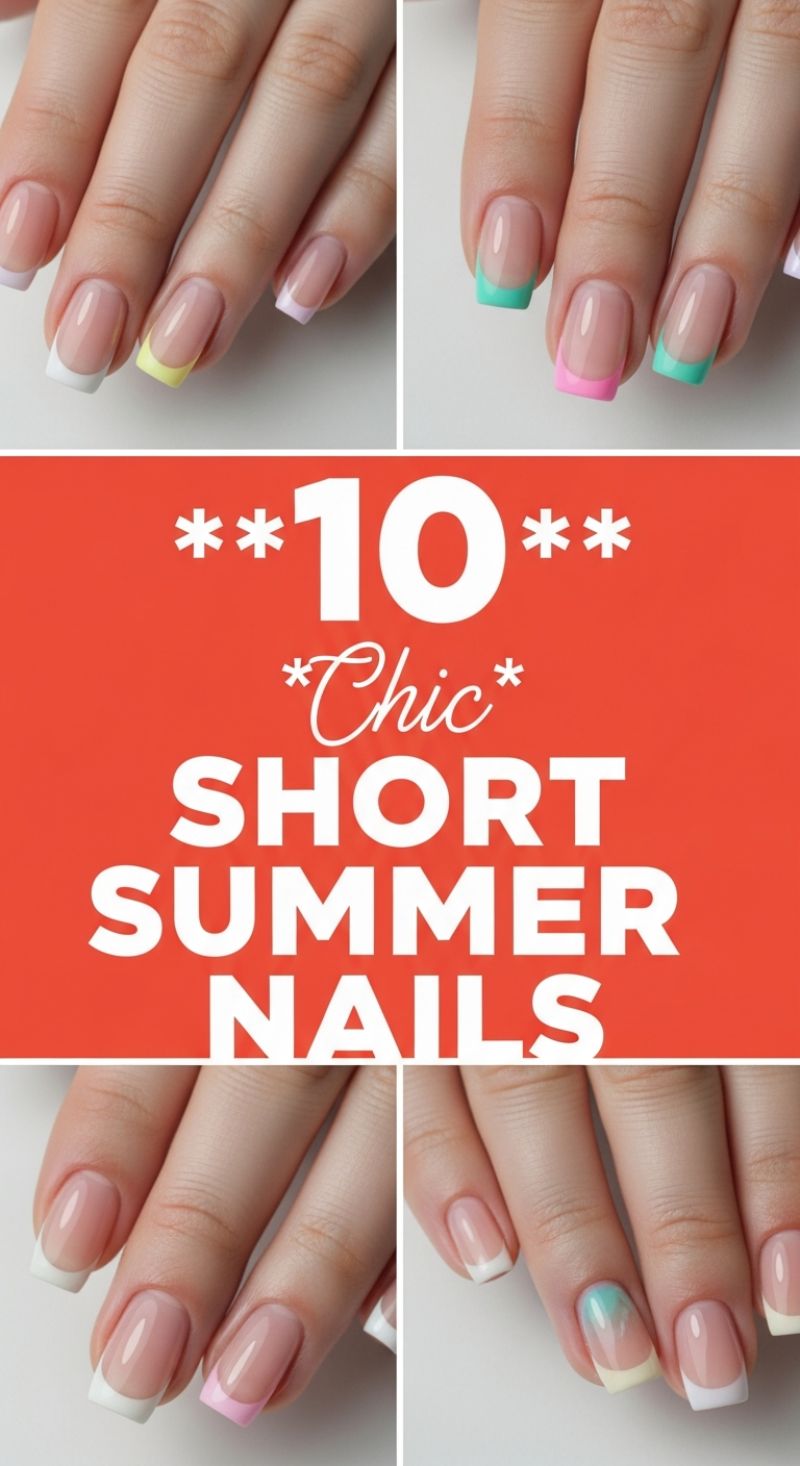
The image showcases one of the most effortlessly chic and trending designs for summer: the colorful French micro-tip manicure, perfectly suited for short, practical nail lengths. To achieve this modern take on the classic French, begin with meticulous nail preparation, ensuring your short nails are filed into a soft square or squoval shape. The key to this look is the base; apply one to two coats of a high-quality sheer nude or milky pink polish to create a healthy, natural foundation. The ‘micro-tip’ component means the colored line applied to the free edge should be much thinner than a traditional French manicure. For optimal precision, use a fine-tipped striping brush, dipping it into highly pigmented pastel shades like buttercup yellow, lavender, mint green, and hot coral pink. If you are struggling with freehand application, try using a silicone French tip stamper or placing a small piece of painter’s tape just below the free edge to create a crisp, clean line. For an updated aesthetic, utilize the mixed-and-matched technique shown here, where each nail features a different, complementary pastel shade to maximize the summery, playful vibe.
For a truly top-tier design, consider incorporating the subtle variations displayed in the samples, particularly the gradient accent nail. To recreate this delicate ombré effect near the cuticle line (often referred to as a ‘reverse ombré’ or ‘color pop’ accent), you will need two sheer or semi-sheer polish colors, such as a pale mint and a sheer yellow. Apply a small amount of both colors side-by-side onto a makeup sponge, then gently dab the sponge onto the nail base near the cuticle, blending the two shades where they meet. Immediately after the blend is achieved and before curing (if using gel), clean up the edges with a brush dipped in cleanser or acetone. This technique creates a beautiful, soft transition that elevates the entire set beyond a simple French tip. Expert tip: always ensure the polish used for the tips is opaque in one or two coats to prevent the natural nail line from showing through the color, which is crucial when working with soft pastels.
Finalizing your pastel micro-tip set requires attention to detail for maximum longevity and shine. Once all your tips are cured and dry, apply a high-gloss, non-wipe topcoat, making sure to ‘cap’ the free edge of the nail. Capping the edge involves running the topcoat brush along the very tip of the nail, sealing the layers of polish underneath. This prevents chipping and is particularly important for short nails that experience frequent use. Because this design is positioned close to the free edge, it offers excellent grow-out time, making it an ideal choice for a busy summer. The overall effect is refined yet youthful, making the colorful French micro-tip a must-try design that effortlessly transitions from the office to the beach.
Stylish Short French Manicure with Delicate Gold Accents
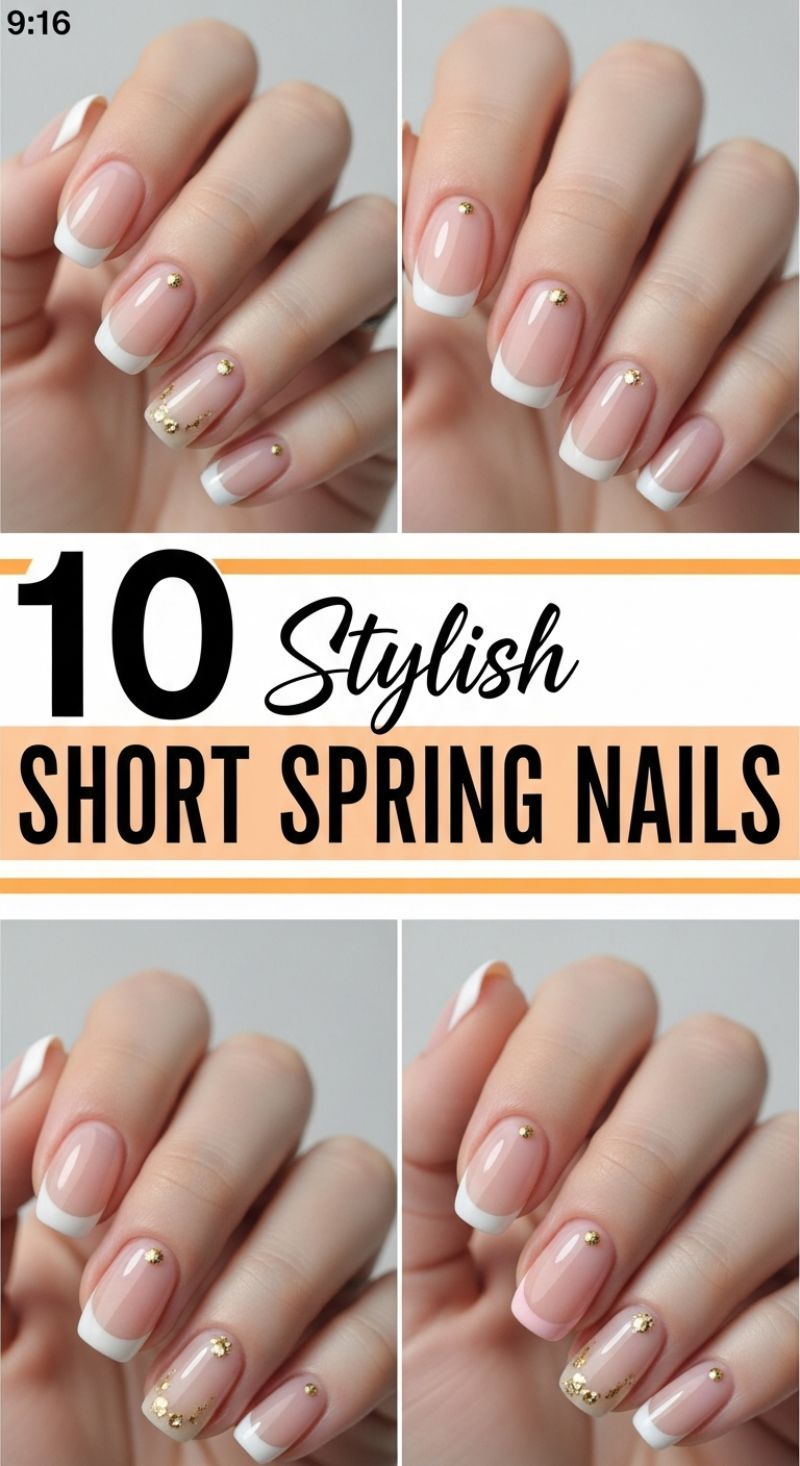
The traditional French manicure receives a modern, luxurious update perfect for short nails this spring and summer. This design hinges on clean lines and subtle sparkle, transforming the classic look from standard salon wear into a high-fashion statement. To begin, select a sheer base coat—a milky white, pale pink, or nude jelly polish works best to achieve that healthy, glossy, glass-like nail bed appearance. The beauty of this look is its focus on natural length, making it highly practical yet infinitely chic. Ensure your nail prep is impeccable, focusing on pushing back and hydrating the cuticles, as the minimal design draws direct attention to the base of the nail. The white tip should be crisp, utilizing a rounded or softly squared shape that complements the short length without overwhelming it. For maximum precision, use a fine striping brush or a dedicated French tip stencil to ensure a symmetrical, thin white smile line across the free edge of each nail.
Once the foundation is cured (if using gel) or dry (if using lacquer), the real magic begins with the gold embellishments. This design uses two distinct types of gold accenting: small metallic studs and gold foil/flakies. The small, spherical gold studs should be placed strategically near the cuticle line on multiple fingers, often centered just above the moon of the nail. Use a fine wax picker or dampened orange wood stick to carefully place these accents onto a small, uncured dot of builder gel or a layer of wet top coat, ensuring they are positioned identically across the hand for visual harmony. For the accent nail (typically the ring finger), apply scattered gold foil or flakies near the base. Place a thin coat of clear polish down, then lightly dab the foil onto the tacky layer, allowing it to sweep up toward the center of the nail bed, creating a delicate, almost organic crescent shape.
Expert application is crucial for the longevity of this detailed design. After all gold pieces are in place, they must be fully encapsulated. Apply a generous layer of high-shine, non-wipe top coat, taking care to float the brush over the gold studs without displacing them. For the studs, it’s often beneficial to apply a tiny bead of clear gel around the base of the metal piece before the final top coat to truly secure it and prevent hair or clothing fibers from snagging. This final sealant ensures the design remains flawless for weeks, resisting chipping even with heavy daily activity. The contrast between the minimalist nude base, the clean white tip, and the unexpected flash of gold creates a polished and sophisticated manicure that effortlessly transitions from a casual spring brunch to an elegant summer evening event.
15 Playful Fun Summer Vibes Nail Art
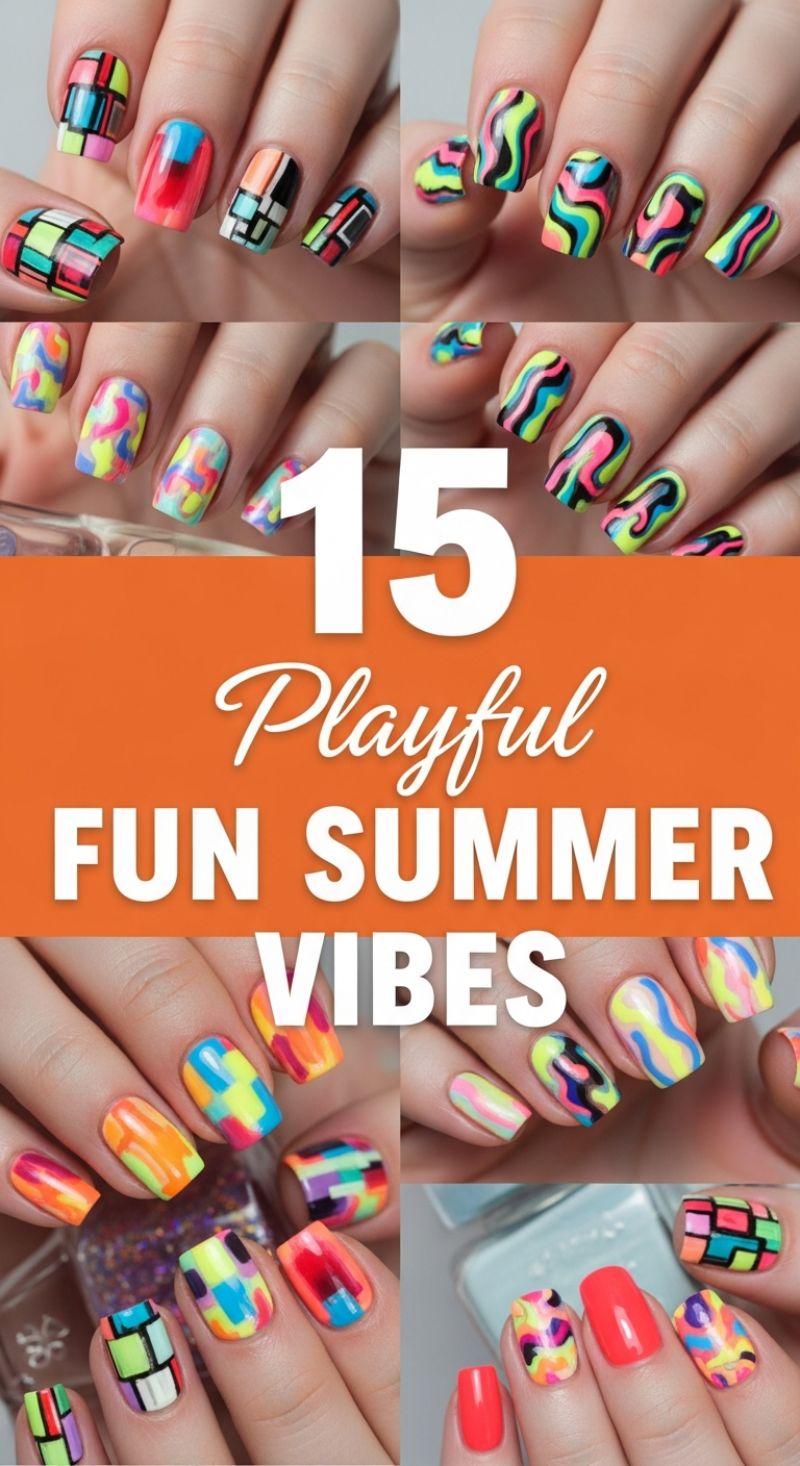
This section embodies the maximalist spirit of summer, trading subtle pastels for high-voltage neon shades and bold, graphic patterns. To recreate this ‘Summer Vibes’ look, you must first gather a collection of ultra-pigmented polishes in colors like electric lime green, hot pink, vivid orange, and turquoise blue. Success relies heavily on contrast; you’ll need opaque black or bright white polish to define your shapes. Prep your nails by applying a ridge-filling base coat, followed by a coat of white polish on every nail, which ensures the neon colors pop with maximum intensity rather than soaking into the natural nail tone. The beauty of this trend is the intentional mismatch—each nail can feature a unique pattern, turning your manicure into a wearable art gallery. Essential tools include a fine detail brush (000 size), a striping brush, and potentially a dotting tool, as precision is required even within the realm of abstract art.
The two most prominent techniques seen here are the Geometric Patchwork and the Psychedelic Swirl. For the bold Geometric Patchwork (often called ‘stained glass’ nails), begin by sketching a grid or rectangular blocks using either striping tape or a thin brush loaded with black polish. Allow these dividers to dry completely. Next, carefully fill in each small section with a different, vibrant neon color. It’s crucial to wipe your brush between colors to prevent muddiness. Once all sections are filled, go back in with your fine-tip brush and the black polish to re-trace and sharpen the dividing lines. This professional outlining step transforms simple blocks of color into sophisticated, defined art. Alternatively, the Psychedelic Swirl utilizes the fluid art or ‘lava lamp’ effect. Start with a solid neon base. While the final layer is still wet (or using a thick layer of quick-dry top coat as a medium), place blobs or thick, squiggly lines of various neon shades and black/white polish. Use a clean, fine brush or a toothpick to gently drag through the colors, blending them slightly but not muddying them, to create that wavy, abstract marbled finish.
Expert tip for maintaining this intricate design: layer management is critical. Since you are applying multiple colors and outlines, ensuring each layer is fully cured before the next application prevents smudging and pooling, especially when working with detail brushes. For the ultimate ‘fun summer vibe,’ don’t shy away from incorporating elements like abstract clouds or simple two-tone color blocking on accent nails to provide visual rest between the intricate patterns. Finish every manicure with a generous coat of high-gloss top coat. Not only does this protect the detailed artwork from chipping, but it also significantly enhances the luminosity and glow of the neon colors, making your summer manicure truly stand out.
5 Clean Minimalist Spring Nail Designs
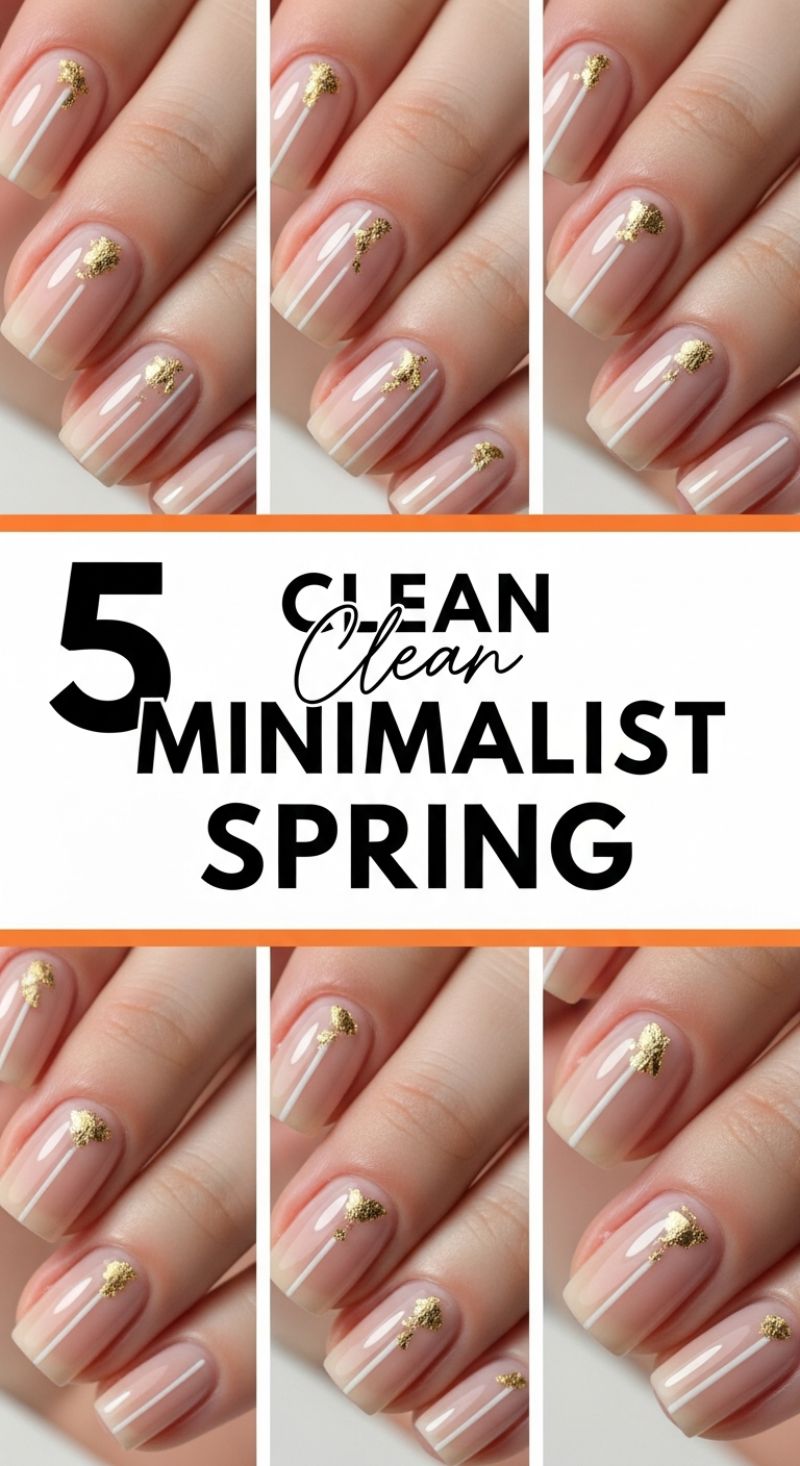
This design epitomizes the “clean girl” aesthetic, offering a sophisticated and effortless look perfect for transitioning into warmer months. The foundation is a flawless nude or sheer pink base coat—think jelly polishes or milky nudes—which allows the natural nail to peek through, enhancing the minimalist effect. Start by ensuring your nails are perfectly shaped (a soft squoval or short almond works best for this style) and meticulously prep the nail plate. Apply one to two thin coats of your chosen sheer base color. Achieving true minimalism means precision, so ensure that the edges and cuticles are clean before curing or drying, as this look highlights nail health and structure above all else.
The key design elements are the thin white striping and the subtle metallic accent. Using a very fine liner brush (00 or 000 size) and opaque white polish, carefully paint one or two thin, straight lines running from the tip toward the cuticle. For a classic look, position the line slightly off-center. Expert tip: if freehanding stripes is challenging, use thin striping tape as a guide or opt for pre-cut vinyl striping guides for razor-sharp results. Once the white lines are dry, introduce the gold element. This look uses shattered gold foil or leaf, applied sparingly to one section of the nail (often where the stripe ends or near the cuticle). Apply a small dab of clear adhesive or tacky top coat where you want the foil, then gently press small flakes onto the nail using an orange wood stick or silicone tool. Less is definitely more here; the aim is a delicate, almost accidental splash of gold.
To maximize the visual impact and longevity of this design, sealing the metallic foil is crucial, as it is a raised element. After applying the foil and ensuring the white lines are completely dry, use a non-wipe top coat, floating a generous layer over the entire design to fully encapsulate the gold leaf and prevent snagging or dulling. This elegant design is highly versatile; while white and gold are stunning for spring, you can easily adapt this trend using black lines for a bolder contrast or swapping the gold for holographic silver foil for a modern edge. This design maintains polish and professionalism while still showcasing a creative flair, making it an ideal choice for any spring or summer occasion.
Transitional Early Spring Nails: The Mocha Speckle
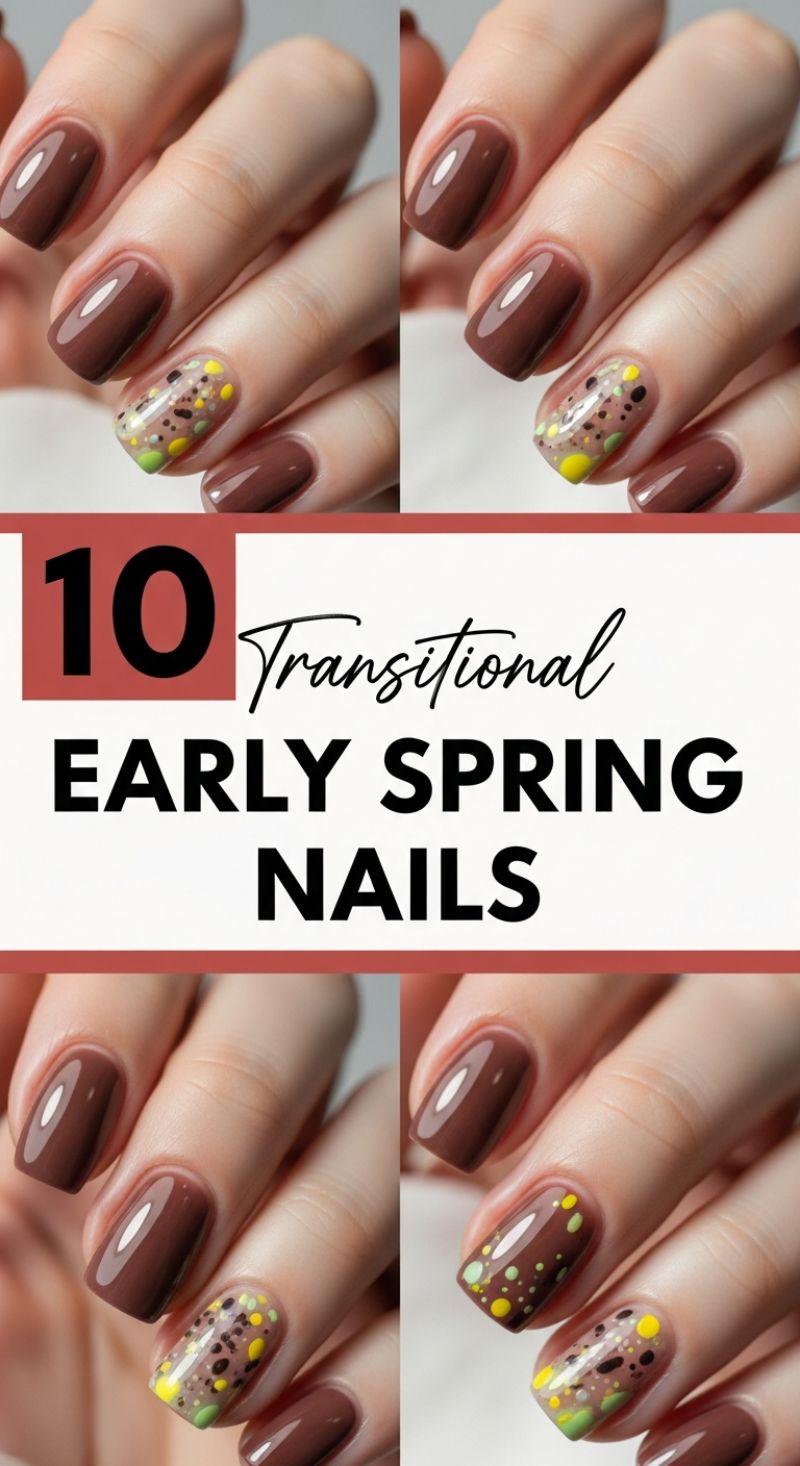
Transitioning from the deep, rich colors of winter into the bright palettes of spring can be tricky, but this mocha and speckled design offers the perfect bridge. This look expertly marries a sophisticated, warm base color—a glossy, medium-deep chocolate or mocha brown—with an accent nail featuring lively, abstract pops of spring color. The primary color anchors the design with a cozy feel, while the speckled ring finger introduces a playful, light element reminiscent of emerging flora or a modern interpretation of a quail egg design. The accent nail itself utilizes a sheer nude or clear base to let the speckles float, ensuring the design feels fresh and airy, rather than heavy. To achieve this high-gloss finish, start with a ridge-filling base coat, apply two smooth layers of your chosen brown lacquer to four fingers, and reserve the ring finger for the detailed work.
To master the speckled technique, begin by applying a single coat of a sheer, milky nude or clear polish over the accent nail, allowing it to fully dry. The key to an authentic speckled or confetti effect is the strategic use of a fine dotting tool and varying paint density. Dip the smallest end of your dotting tool into your darkest color (black or dark brown) and place a few scattered, random dots across the nail. Do not aim for symmetry. Next, move onto the brighter transitional shades—like chartreuse yellow, lime green, or light olive—using the same small dotting tool. Crucially, mix the sizes: use the larger end of the tool for 2-3 prominent spots, and the smaller end to fill in the surrounding space. Wipe the tool clean before switching colors to maintain crisp definition between the dots. Allow each color layer to set for a few moments before applying the next.
For expert execution, ensure the dots are concentrated primarily near the free edge and cuticle, gradually diminishing towards the center for a more organic effect. This design works best on a short to medium-length squoval nail shape, which complements the clean, glossy finish. Once your speckles are perfectly placed and dry, seal the entire manicure with a high-shine, UV-protective top coat. If you want to customize this look further for the early season, consider swapping the mocha base for a deep cranberry or a muted slate gray. The magic lies in contrasting the winter-appropriate base with the vibrant, unexpected spring spots, making this a truly perfect transitional trend.
5 Quick SHORT & SWEET
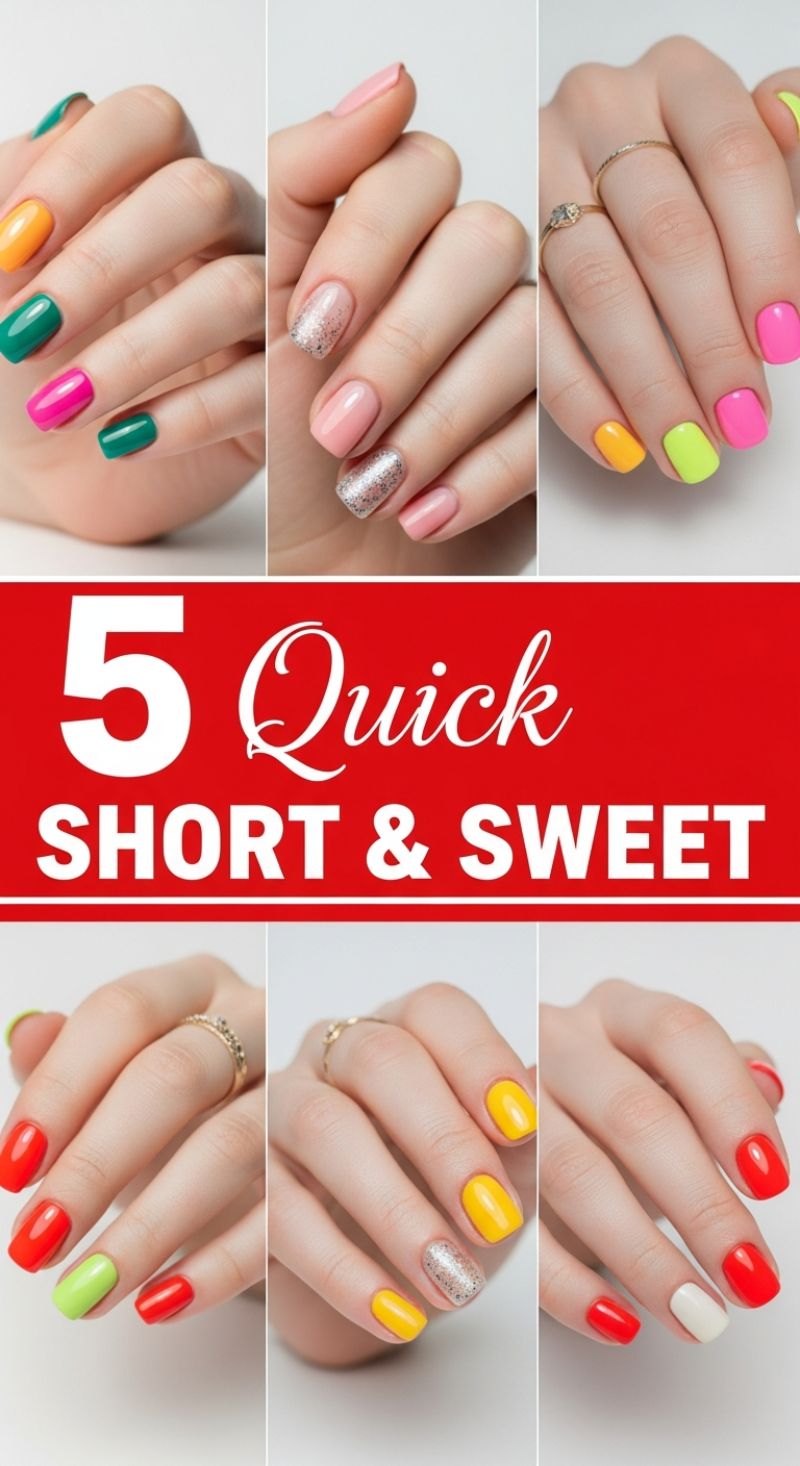
The ‘short and sweet’ manicure is the ultimate low-maintenance trend for spring and summer, proving that high impact doesn’t require excessive length or intricate detail. This collection highlights the power of pigment, focusing on clean lines and vibrant, opaque color payoff. To achieve this look, start with immaculate preparation; short nails draw immediate attention to the cuticles and the nail bed, so ensure they are perfectly groomed, pushed back, and moisturized before applying a ridge-filling base coat. The aesthetic relies heavily on pairing colors—mix hot neons (like lime green and shocking pink) with saturated jewel tones (emerald or teal), or embrace monochromatic simplicity with a single, bold shade across all fingers. The key is choosing polishes that are highly pigmented, allowing for full coverage in just one or two quick coats, drastically cutting down on application time.
Mastering the quick-change accent nail is central to the ‘sweet’ element of this design. Instead of dedicating time to complex line work or decals, use texture or a highly contrasting solid color to break up the manicure. Examples shown include pairing soft blush pink with a dazzling, chunky silver glitter accent finger, or combining bright primary reds with a crisp, matte white nail for a nautical or sporty feel. For the ultimate time saver, try the ‘mismatched primary’ design: select four to five distinct but complementary bright shades (e.g., orange, teal, magenta, and yellow) and apply them randomly to each finger, creating a playful, color-blocked effect. Regardless of the color combination chosen, ensure a uniform nail shape—a soft square or ‘squoval’ is ideal for short nails, providing a modern, clean look that resists chipping.
Expert application is crucial for longevity, especially with solid colors where flaws are easily visible. After applying two thin coats of color, allow adequate drying time before sealing the entire manicure with a high-shine, fast-drying top coat. Make sure to ‘cap the edge’ of every nail with both the color polish and the top coat; this wrapping technique seals the free edge, which is the most vulnerable area, preventing premature wear and extending the life of your quick mani. Given the focus on saturated color, seasonal maintenance is essential. Keep a bottle of high-quality cuticle oil handy, as perfectly manicured skin makes these short, punchy nail designs look polished and intentionally fashionable.
15 Vibrant Bright Color Palettes
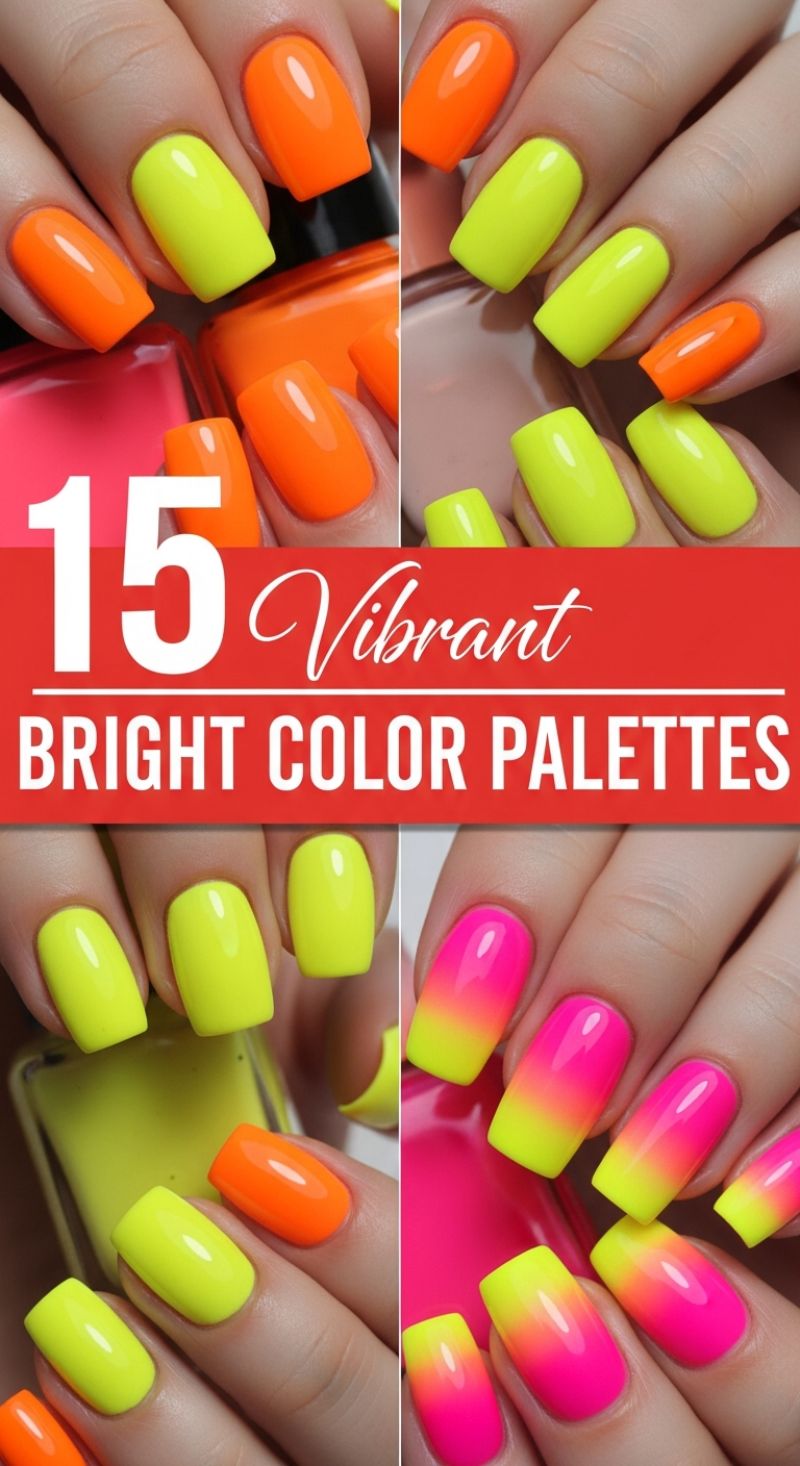
The “Vibrant Bright Color Palettes” trend is defined by its use of high-impact, fluorescent shades, delivering a perfect look for warm weather and tropical vacations. For the simplest yet striking style, embrace the alternating solid color block manicure, exemplified here by the stunning pairing of neon orange and electric lime green. To ensure these intense colors truly pop off the nail and maximize their fluorescence, always start your application with one thin, even layer of a high-quality white base polish. This crucial step prevents the neon pigments from becoming dull or sinking into the natural nail tone. Once the white base is dry, apply two thin, even coats of the neon colors, carefully alternating the shades between fingers to create maximum visual energy and contrast. Finish the solid look with a generous layer of high-shine top coat to lock in the intense pigment and give the nails a professional, long-lasting glossy finish.
To elevate this palette into a true statement design, incorporate the dynamic vertical gradient or ombré technique, as shown with the neon pink and electric yellow combination. Achieving this seamless blend requires a clean cosmetic sponge and a careful application process. After applying your base coat, paint thick strips of your chosen neon polishes (pink and yellow) directly onto the edge of the sponge, ensuring the colors slightly overlap where they meet to facilitate blending. Gently dab the sponge onto the nail surface, repeating the dabbing motion until the gradient transition is smooth and the color opacity is fully built up. It is highly recommended to apply liquid latex or painter’s tape around the perimeter of the cuticles before sponging to make the inevitable cleanup much quicker. This technique captures the vibrant essence of a tropical sunset, creating an unparalleled summery effect.
These intensely pigmented shades look spectacular on nails that are medium length and shaped either square or squoval, as the broad canvas allows the full brilliance of the neon colors and the complex blend of the ombré design to be displayed without distortion. Because fluorescent and neon polishes sometimes have a more challenging formula that can be prone to chipping, prioritize a long-wear formula or, ideally, seal the entire manicure with a UV-cured gel top coat for maximum durability and shine longevity. When transitioning between the solid block color application and the gradient work, always ensure the prior coats are completely set, as bright colors can smear easily. Embracing these specific neon palettes is the most immediate way to channel fun, energetic summer vibes.
7 Minimal Simple Summer Designs
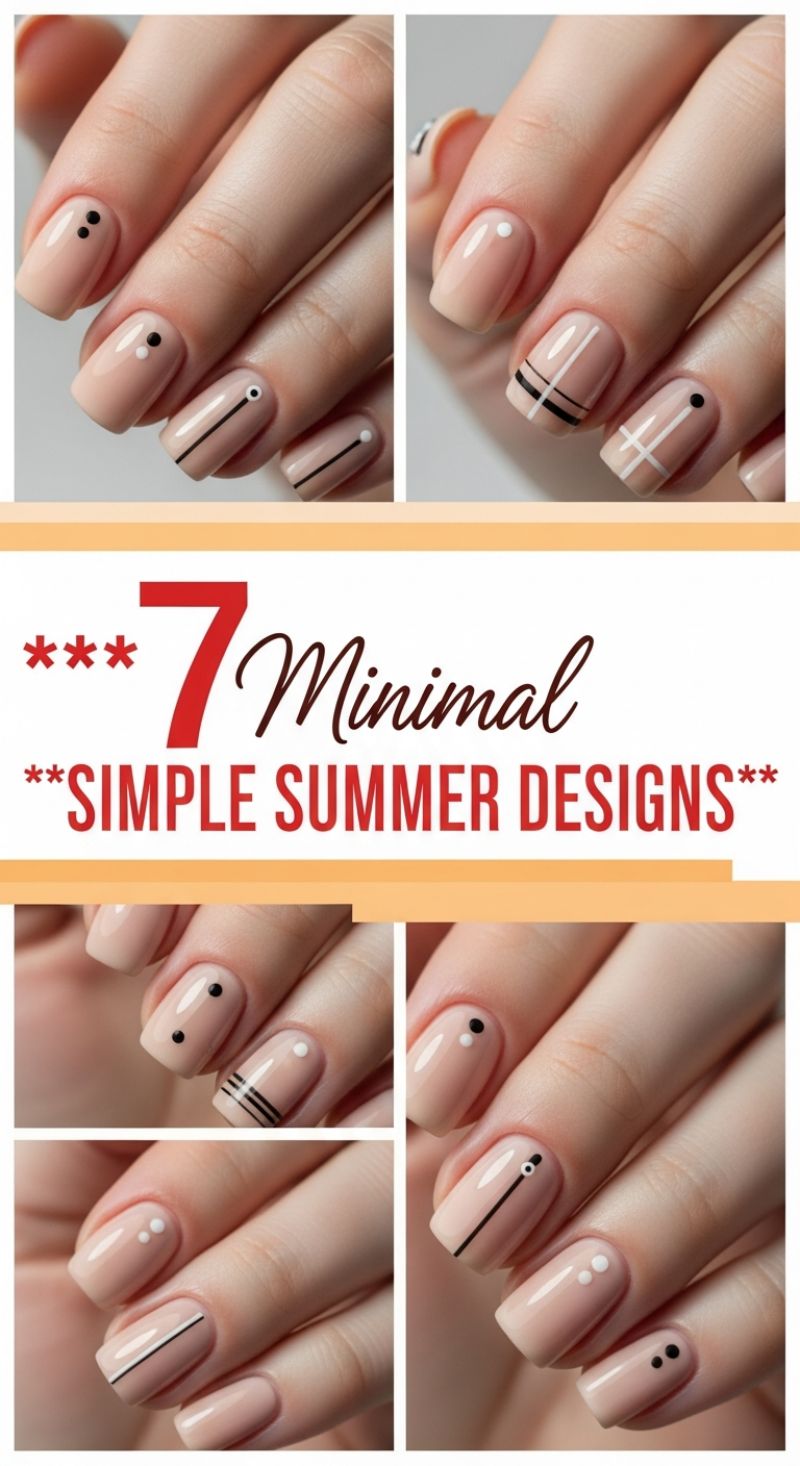
The rise of subtle, ‘clean girl’ aesthetics has permeated nail art, culminating in the trend of sophisticated minimalism perfectly captured in these simple summer designs. This look relies heavily on a flawlessly prepared nude canvas. To recreate this at home, start by shaping your nails into a short to medium squoval (square-oval) shape, which provides the neatest base for geometric patterns. The secret to this high-end finish is the base layer: opt for a sheer milky pink, creamy beige, or a soft nude polish that complements your skin tone. Apply two coats of your chosen base color, ensuring full cure time if using gel polish, before moving on to the artistry. This neutral foundation allows the contrasting black and white details to pop without looking busy, keeping the final result airy and refined.
Executing the fine details requires precision tools. For the ultra-thin lines, invest in a dedicated fine liner brush (000 or a short striping brush) or pre-cut striping tape. To create the vertical line design seen on the middle and ring fingers, load your brush with highly pigmented black or white polish, and steady your hand, drawing a single clean stroke from the nail bed toward the tip. For multi-line designs (like the horizontal triple-black stripe), ensure lines are evenly spaced and perfectly parallel. The dots, which are essential anchors for this look, should be applied using a metal dotting tool of varying sizes. Place single dots intentionally—either centered near the cuticle, at the free edge, or acting as a terminus for a drawn line. The key is strategic asymmetry; some nails might feature just two small black dots, while others showcase a complex interplay of white dots and lines.
What makes this collection of designs so popular is the intentional variation across the hands—each nail is unique, yet they all share the same color palette (nude, black, and white) and minimalist philosophy, creating visual cohesion. For maximum longevity, particularly during the active summer months, ensure all design elements are completely dry before applying a high-quality, high-shine top coat. We recommend ‘sandwiching’ the artwork; apply a thin layer of top coat, cure/dry, then apply a second, thicker layer to fully encapsulate the delicate lines and dots. This technique prevents premature chipping and guarantees a glossy, professional finish that will keep your chic, minimal manicure flawless for weeks.
5 Structured Square Summer Nail Designs
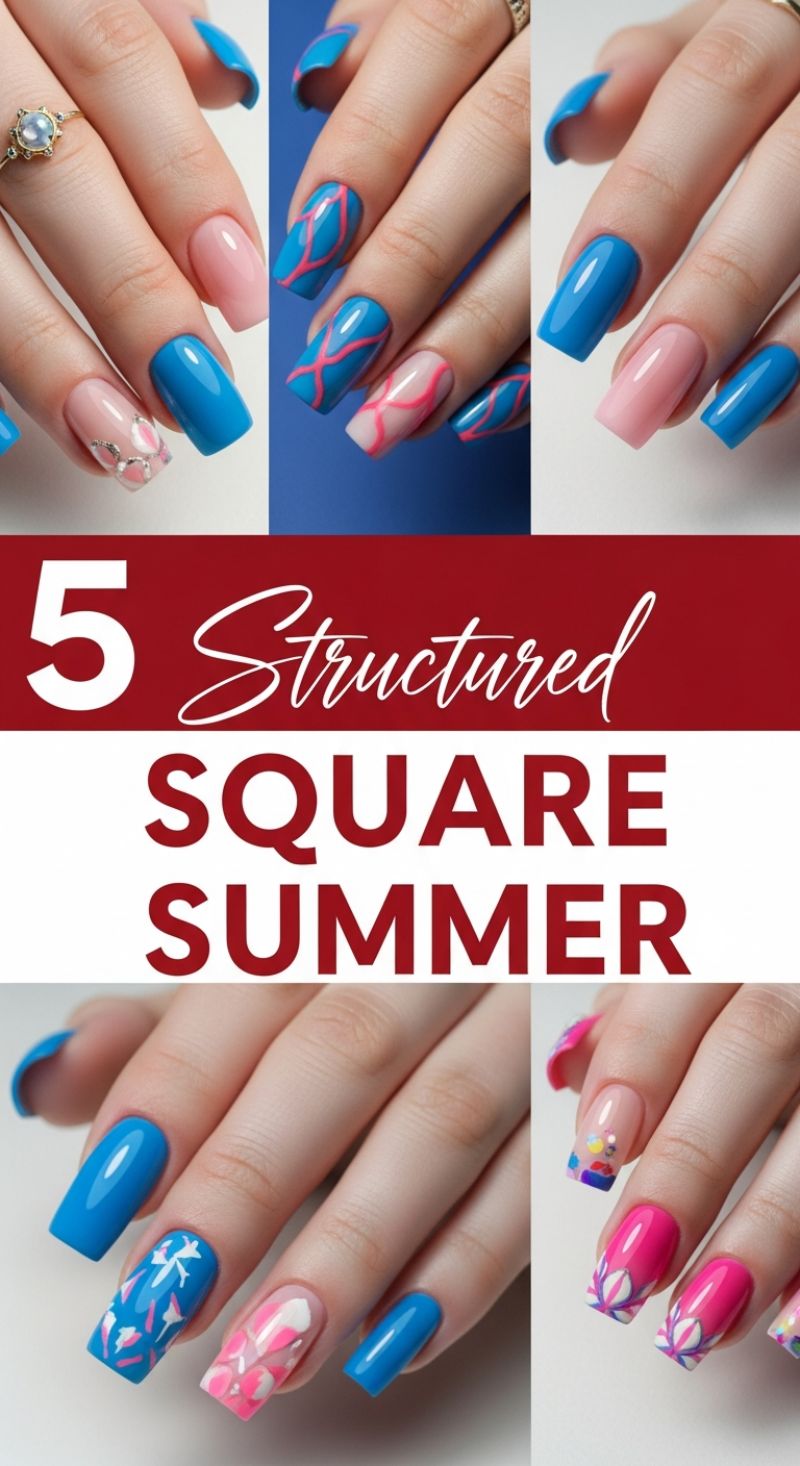
These vibrant designs celebrate summer with bold color blocking and intricate abstract art, all built upon the foundation of a durable, Structured Square nail shape. Achieving this high-impact look begins with meticulous nail preparation. For the sharp, clean lines and longevity displayed here, it is essential to utilize a builder gel or hard gel overlay, ensuring the apex is correctly structured to withstand daily wear while maintaining that dramatic length. The color palette focuses on high-pigment cobalt blue contrasted with soft milky pinks and vibrant neon accents. When applying the base colors, use two thin, even coats of highly pigmented gel polish, curing fully between each layer to ensure maximum color saturation and a flawless, streak-free surface. The juxtaposition of the solid blue nails against the sheer nude/pink accent nails is key to keeping this long look feeling fresh and summery, preventing the design from becoming too heavy.
The artistic elements showcased across these five looks require precision tools, primarily fine liner and striping brushes. For the abstract ‘vein’ designs featured on the accent nails, use a highly concentrated gel art paint (like neon pink) and a long, thin striping brush. Load the brush minimally and pull smooth, deliberate intersecting lines across both the blue and nude bases. This technique creates a dynamic, modern contrast. Alternatively, for the geometric floral patterns shown in the lower images, start with a white base and layer primary accent colors (hot pink, sky blue) using a short detail brush to create petal shapes and abstract blocks. Expert tip: When incorporating negative space (where the natural nail bed shows through the nude polish), ensure the cuticle prep is impeccable, as the focus is drawn directly to this area. Secure any larger embellishments, such as the rhinestones or glitter pieces, using a thick builder gel or dedicated nail glue before sealing the entire design with a durable, scratch-resistant top coat.
To ensure these detailed, structured nails last the full summer season, maintenance is paramount. Once the art is complete and sealed with a non-wipe top coat, remember that long square nails are prone to catching corners. Advise clients to apply cuticle oil daily to maintain nail bed health and flexibility. Furthermore, while the structured shape provides resilience, careful handling is always necessary. If using UV-reactive gel polishes for the bright colors, be mindful of direct sun exposure over extended periods, as this can sometimes lead to slight fading or yellowing, depending on the top coat quality. These designs offer immense versatility; the techniques used for the abstract lines and geometric flowers can easily be transposed onto other trending summer shades like tangerine orange, lime green, or sunny yellow, keeping the sharp, structured square shape as the anchor for the high-end finish.
15 Fresh Spring Nail Inspiration: The Delicate Pastel Floral
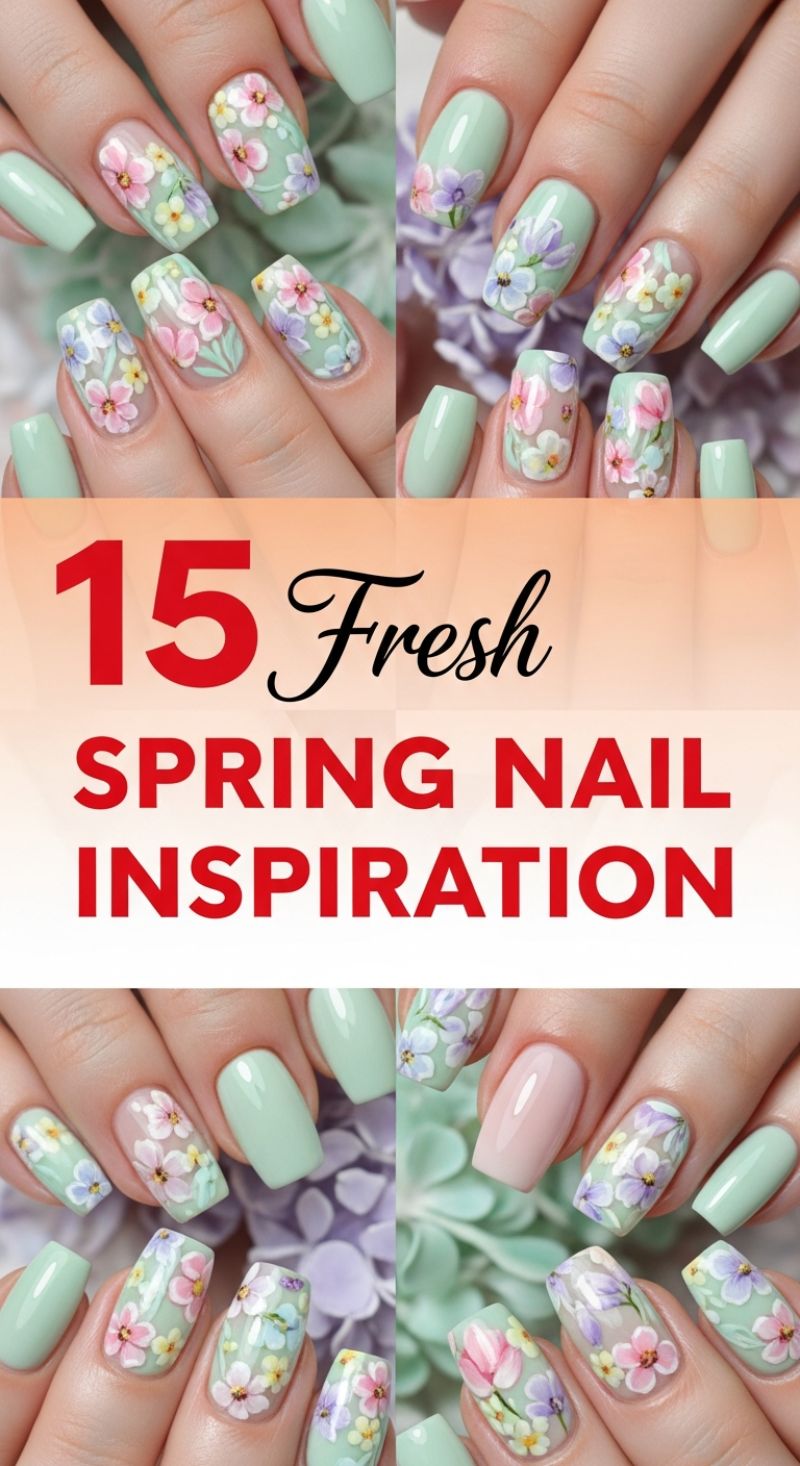
This trending look captures the essence of spring renewal through a sophisticated blend of soft pastels and delicate, watercolor-style florals. The foundation of this design is the juxtaposition of solid color nails against intricate accent nails. To recreate this effect, select two primary shades: a crisp, light mint green (or pistachio) for the solid nails, and a complementary pale nude or pink for the base of your accent nails. Start by prepping your nails and applying a base coat. Apply two coats of the mint shade to your pinky, index, and thumb nails. For the ring and middle fingers, you have two options: apply the nude/pink shade for a fully opaque background, or apply a sheer, milky white base to allow the natural nail bed to peek through, enhancing the ‘fresh’ aesthetic. Ensure each layer is completely cured or dry before moving to the detailed artistry step. The subtle color variations shown in the inspiration photo—using both opaque and sheer bases—is what makes this manicure visually dynamic.
The secret to achieving these soft, painterly florals lies in using highly pigmented gel polishes or acrylic paints with a fine detail brush (like a 00 or a ‘striper’ brush). Instead of aiming for sharp, defined edges, you want a blended, almost blurred effect reminiscent of real watercolor. Begin by creating the petal shapes using white or the lightest pastel shade (pale yellow or pink). While the first layer is still tacky or wet (if using gel or acrylic), lightly dab the edges with a secondary, slightly darker pastel shade, such as lavender or rose pink. This allows the colors to naturally bloom and blend together, creating dimension without harsh lines. Apply small, fine strokes of light green for leaves, tucking them beneath the flowers to create depth. Focus on varying the flower size and color placement across the accent nails to prevent them from looking uniform or stamped. Expert tip: If your polish tends to dry too quickly, try adding a drop of polish thinner to your mixing pallet to extend the working time and facilitate smoother blending.
To ensure your design reads as cohesive and not cluttered, the density of the florals is key. On the sheerer accent nails, opt for flowers that appear to float from the cuticle line or sides, leaving some negative space for a truly airy feel. For the nails featuring a solid mint base color, apply the floral design across the center or towards the tip, ensuring the background color still dominates the overall space. This curated placement prevents the manicure from looking too busy. Once all designs are complete and fully dry, seal the entire manicure with a high-shine, non-wipe top coat. Curing or drying the top coat thoroughly will lock in the intricate artistry and protect the soft pastels from chipping or fading, maintaining that fresh, vibrant spring look for weeks. This method ensures maximum longevity, making it an ideal choice for busy schedules or upcoming spring and summer events.
10 Easy Spring Nail Ideas: The Classic French Refresh

The perennial favorite French manicure gets several subtle yet striking updates in this collection, making it the perfect foundational look for spring and summer. To recreate this sophisticated style, start with meticulous nail preparation: buffing the surface, cleaning the cuticle area, and applying a protective base coat. The key to the modern French look is choosing the right nude base. Opt for a slightly milky pink or sheer beige polish to enhance the natural nail bed color, applying one or two thin coats for a flawless canvas. Once dry, execute the classic white tip. For short or medium squoval nails, ensure the ‘smile line’—the curved boundary between the nude base and the white tip—is crisp and symmetrical. For novice users, specialized French manicure vinyl guides can help achieve a clean edge; experts should use a thin striping brush dipped in highly pigmented white polish to hand-paint the tip, ensuring the curve is shallow and elegant rather than thick and blocky.
To elevate the look from simple classic to seasonal trend, incorporate strategic sparkle. The most straightforward accent shown here is the full-coverage glitter nail, typically reserved for the ring finger. To achieve this, after applying the nude base, paint the accent nail with two coats of a fine-grain, highly reflective silver or champagne glitter polish. For maximum impact and dimensional shine, use a specialized reflective glitter gel polish and cure it fully. Alternatively, for a subtle touch that highlights the design’s delicate nature, try the micro-glitter outline variation. This involves using a fine liner brush to trace the cuticle line (a reverse French detail) or applying a super-fine holographic shimmer just along the edge of the white tip, creating a sparkling transition line. Always seal glitter designs with two layers of a durable, glossy top coat to ensure the texture is completely smooth and prevent flaking.
For those seeking a touch of glamour without losing the design’s inherent elegance, integrate minimalist rhinestones. The featured look demonstrates the placement of a delicate horizontal row of tiny flat-back crystals applied near the tip of the ring finger. To apply gems successfully, use a strong adhesive, such as a thick builder gel or professional nail glue, placed directly where the crystal will rest. Using a wax-tipped dotting tool makes crystal pickup and precise placement effortless. Since this look is already polished and complete with the French tips and glitter accents on the other nails, keep the rhinestone cluster small and focused. This approach allows the design to remain sophisticated enough for professional settings while catching the light beautifully for those warmer, brighter days.
10 Effortless Summer Nails
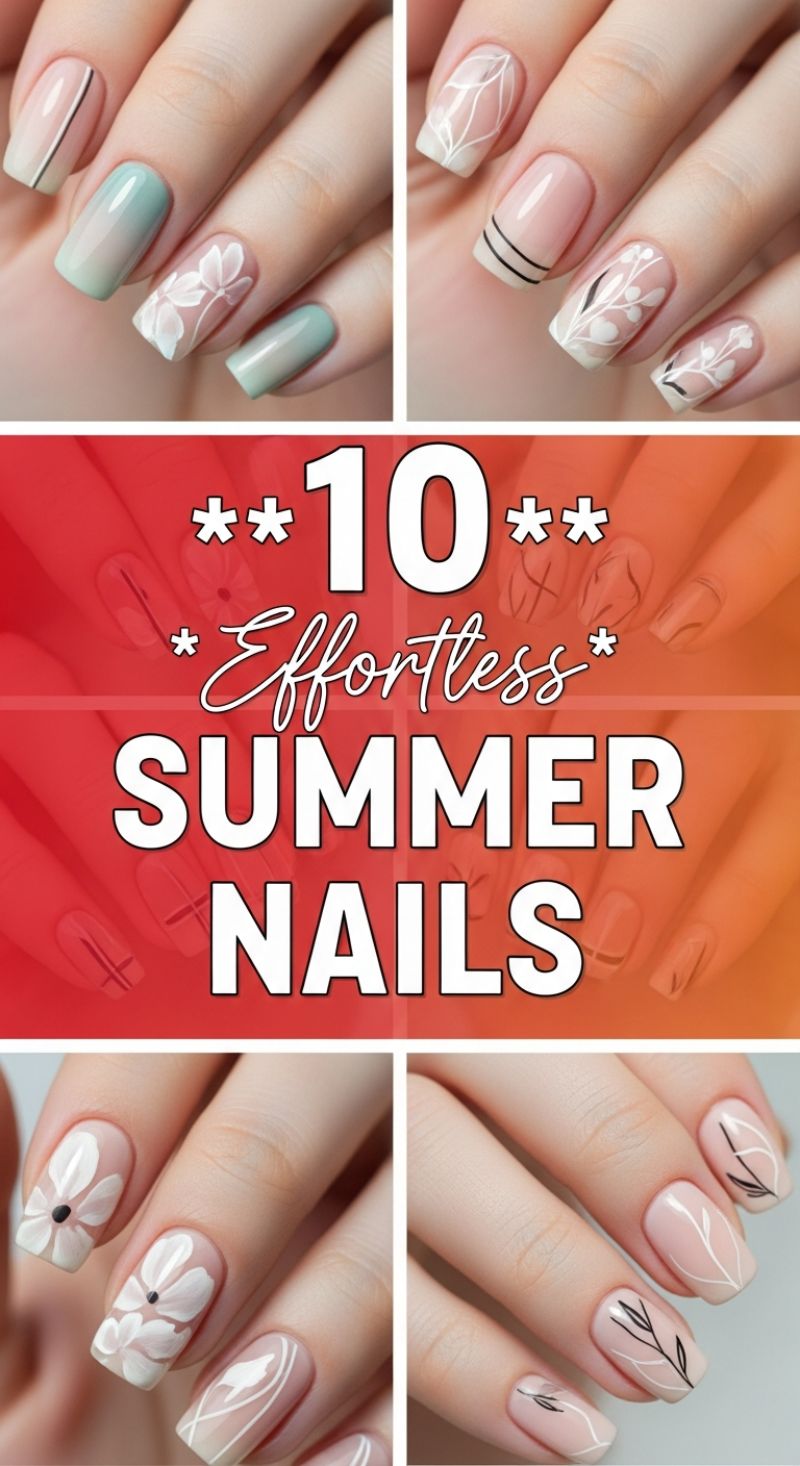
These “Effortless Summer Nails” perfectly capture the minimalist aesthetic currently dominating seasonal nail art. The designs prioritize delicate line work—often featuring floral, leaf, or thin geometric patterns—set against a natural, clean canvas. To replicate this look, start by selecting your base color: either a sheer milky pink or nude polish that enhances your natural nail bed, or a soft pastel like the light seafoam green shown in the image, often applied in a gentle ombré effect blending into the clear tip. The key to the “effortless” appeal is keeping the base polish subtle and well-manicured. For the ombré section, use a damp makeup sponge lightly dabbed with the pastel shade, building up the color near the cuticle and allowing it to fade toward the free edge. For a professional finish, ensure all nails are uniformly shaped, typically in a soft square or squoval style, which provides the best surface area for the intricate detailing.
Mastering the line art requires precision tools, specifically a thin, long-bristled striping brush (often labeled 000 or shorter) and highly pigmented white or black polish, depending on your chosen accent. The floral motifs seen throughout the design are created using simple stroke techniques. For the larger, opaque white flowers, load the brush lightly and use short, comma-like strokes to form the petals, ensuring they overlap slightly at the center. The darker black centers (if desired) can be added with a tiny dotting tool once the white polish is dry or cured. For the airy, abstract leaf and vine patterns, maintain a very light hand, utilizing the absolute tip of the striping brush to create fine, unbroken lines that mimic natural growth. If you prefer the geometric accents, use the same striping brush and pull two or three parallel lines across the nail plate in one continuous, swift motion. Expert tip: always stabilize your working hand by resting your elbow on a table and perhaps bracing your pinky finger against your opposite hand for maximum control.
To ensure these sophisticated designs withstand summer activities, quality control during the final steps is critical. Once all designs are completely dry or cured, seal the entire manicure with a high-shine, durable top coat. Applying a thick, even layer not only magnifies the depth of the line work against the sheer base but is essential for protecting the delicate art from chipping. Pay special attention to ‘capping the edge’—dragging the top coat brush horizontally across the free edge of the nail—which seals the entire polish structure and significantly extends the wear time. These techniques, while detailed, result in a refreshing and trending manicure that feels light, bright, and perfectly suited for the warm season.
10 Cool Blue Nail Trends for Aquatic Summer Style
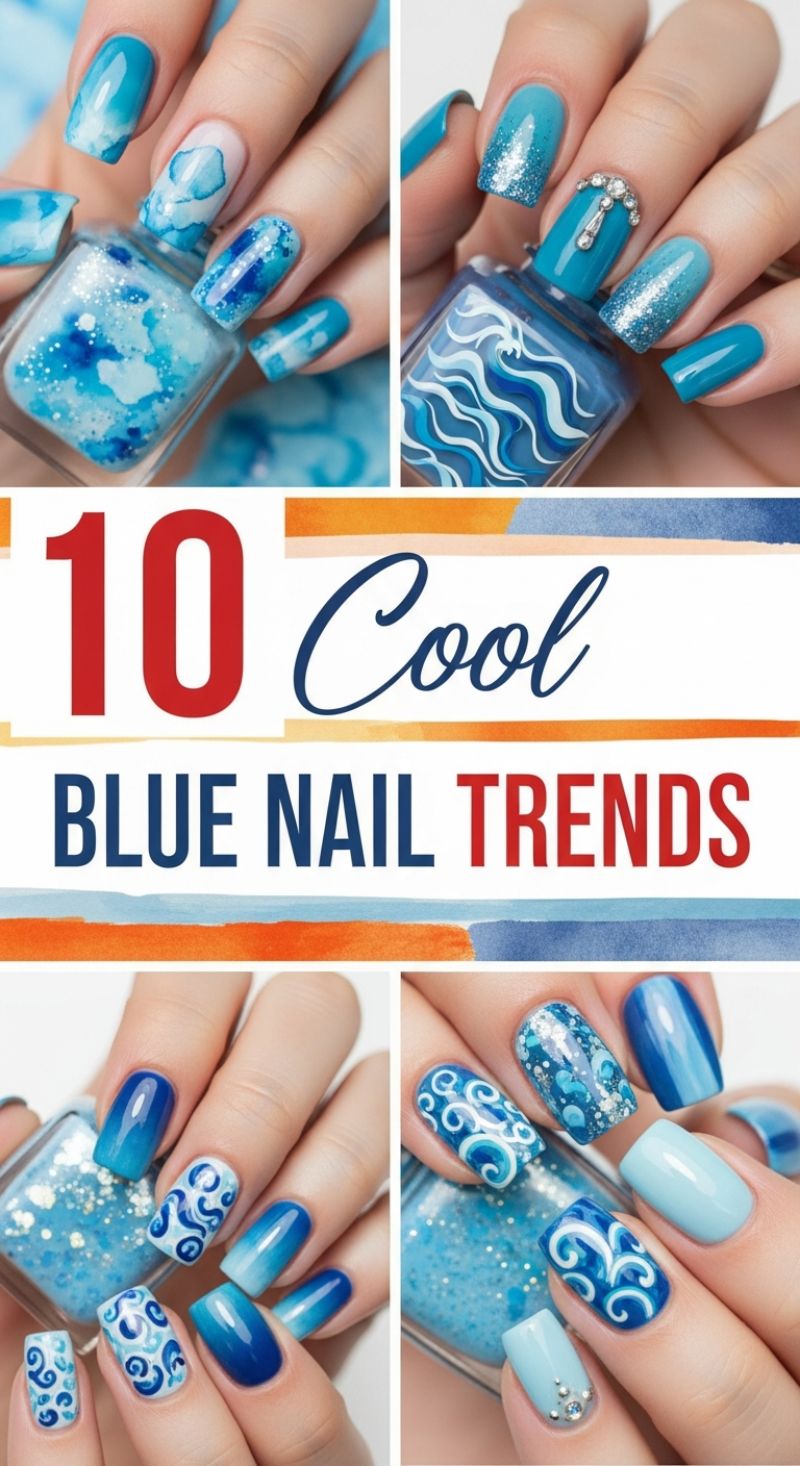
Blue is universally recognized as the essential color of summer, immediately evoking the ocean waves, clear skies, and a refreshing cool aesthetic. To replicate the stunning aquatic themes seen in this compilation, start by focusing on the foundational techniques of ombré and watercolor effects, which create depth and movement. For the seamless gradient look, apply a lighter shade of blue as your base coat. Once dry, lightly dab a cosmetic sponge loaded with two or three contrasting shades of blue (ranging from teal to deep sapphire) across the nail tip, blending toward the cuticle. This technique, often paired with a sparkly silver gradient at the tip, ensures a smooth transition that mimics sunlight reflecting off water. Alternatively, for the soft, cloud-like marble or watercolor nails, apply a base color (often white or light nude) and then drop small dots of contrasting wet blue polish. Immediately apply a blooming gel or blend the colors with a brush dipped in a specialized alcohol-based solution, allowing the polishes to spread naturally and create that diffused, painterly effect.
Once the foundational color work is complete, elevating the design requires intricate accent details. Many of these trending looks feature detailed scroll or wave patterns, perfect for capturing a truly maritime vibe. To achieve these, select a high-contrast polish (bright white works best against a darker blue base) and use a ultra-fine liner brush. Practice creating small, repetitive, and flowing curves—like miniature breaking waves—on one or two accent nails. For added dimension, integrate a chunky glitter polish over a solid base coat on another accent nail; the key here is to keep the glitter sparse and concentrated on one nail rather than cluttering the entire hand. This strategic use of texture (matte gradients next to high-shine glitter) is what gives these blue trends their professional and highly dimensional finish.
Finally, complete the high-fashion look by integrating strategic embellishments. Tiny rhinestone clusters placed near the cuticle of a solid-colored nail provide just enough sparkle without needing full-coverage jewelry. For a bolder statement, secure a vertical line or T-shaped arrangement of larger rhinestones down the center of an ombré nail using strong nail glue or a clear builder gel. Remember that the magic of this trend lies in mixing and matching different techniques across the five nails—no two nails should be identical. Finish the entire manicure with a high-gloss, UV-cured topcoat, ensuring that every layer, swirl, and rhinestone is sealed flawlessly, which provides maximum longevity and keeps the vibrant blue color story intact through the warmest months.
15 Hottest Spring Trends 2026

The collage presents a masterclass in spring nail artistry, showcasing 15 high-fashion nail trends that perfectly align with current seasonal aesthetics, blending joyful maximalism with delicate pastels. To recreate these looks, start by investing in a high-quality palette featuring mint green, blush pink, soft turquoise, creamy white, and butter yellow. One of the most dynamic styles showcased is the Abstract Swirl: this retro-inspired design involves painting thick, continuous wavy lines over a contrasting base. For example, use deep navy or hot pink swirls against a clean white base, or opt for a softer variation by swirling white over a pastel tone like mint or baby pink. Achieving the perfect swirl requires a thin striping brush, which allows for fluid, slightly imperfect lines that capture the modern, carefree vibe. For a mixed-media approach, combine a full swirl manicure on three nails with two solid pastel accent nails, ensuring the chosen colors harmonize across the hand for visual cohesion.
Another central pillar of this trend forecast is the Botanical Revival. These designs move beyond simple florals toward more structured, graphic leaf and flower patterns, often utilizing a watercolor technique. Look closely at the delicate leaf patterns over the mint green base; this is typically done using the stamping method or by painting a thin, sheer layer of white/cream polish and then adding translucent green details. For the full watercolor floral look (seen on the nude and cream bases), apply a sheer base color, then use rubbing alcohol or acetone mixed with highly pigmented polishes to create a blurred, painterly effect before detailing the edges with a thin brush. Expert tip: These detailed designs look most sophisticated when applied over a neutral background like nude, beige, or sheer white, which allows the intricate colors of the blooms—like muted rose, rust, and sage—to truly stand out without overwhelming the manicure.
Finally, the collection champions the concept of intentional mismatching and texture play. Don’t be afraid to combine a bold animal print (like the striking pink and black zebra pattern) with a sleek, solid nude nail. The key to making these contrasting elements work is consistency in shape (the square or squoval shape is dominant here) and polish finish. Consider finishing these detailed looks with a velvety matte topcoat for a modern edge, especially over the floral and geometric sections, or maintain high gloss for a fresh, candy-like appearance on the solid pastel nails. Other notable trends include mosaic-like geometric patterns (achieved using nail vinyls or intricate freehand painting) and subtle celestial motifs layered over sheer pink, offering versatile options for transitioning from spring into summer.
5 Elegant Almond Summer Shapes: The Luxe French Ombré Base

This sophisticated nail art compilation showcases how to elevate the classic French ombré (often called ‘baby boomer’ nails) into a luxury summer statement, all executed on the graceful and lengthening almond shape. The key to this look is the perfect base: a seamless gradient transition from a sheer, natural nude or soft pink near the cuticle to a crisp, milky white at the free edge. To achieve this polished foundation, apply a thin coat of soft pink builder gel, then use a sponge or a dedicated ombré brush to blend a highly pigmented white gel polish onto the tips before fully curing. The almond shape provides the ideal canvas, offering enough length to display the detailed artistry while maintaining an inherently elegant profile. This blend of classic French technique with modern metallic accents ensures the nails feel fresh, expensive, and perfectly suited for warm-weather soirées.
Once the flawless French ombré foundation is set, the artistry begins by incorporating high-shine metallic elements, primarily focusing on gold foil flakies and various silver chrome details. For the trending gold foil look, apply a thin layer of specialized foil glue or a tack-free topcoat over the cured base, allowing it to dry until tacky, or curing briefly (depending on the product). Randomly press small pieces of gold transfer foil onto the sticky layer. For the dramatic effect shown, concentrate the foil heavily near the tip and scatter a few pieces upwards for a naturally decayed or shimmering look. Alternatively, integrate solid metallic shapes: use gold striping tape or meticulously painted gold gel to create crescent-moon shapes near the cuticle, offering a high-contrast negative space effect that draws attention to the nail bed.
The most advanced and striking elements involve incorporating liquid metal or sculptural chrome accents. The dimensional, abstract silver shapes seen on the accent nails require specialized products, such as 3D molding gel or thick sculpting putty. After shaping the desired raised outline or solid shape (like the framed window effect), cure the gel. To achieve the mirror-like finish, apply a non-wipe top coat, cure partially (usually 15-30 seconds depending on the lamp), and then vigorously rub a silver chrome powder onto the surface until it achieves a high-shine, liquid metal appearance. Finish the entire manicure with a resilient, high-gloss structure topcoat to protect the delicate metallic layers and ensure maximum longevity throughout the summer months.
Refined Almond Ombre Nails with Pearl Accents
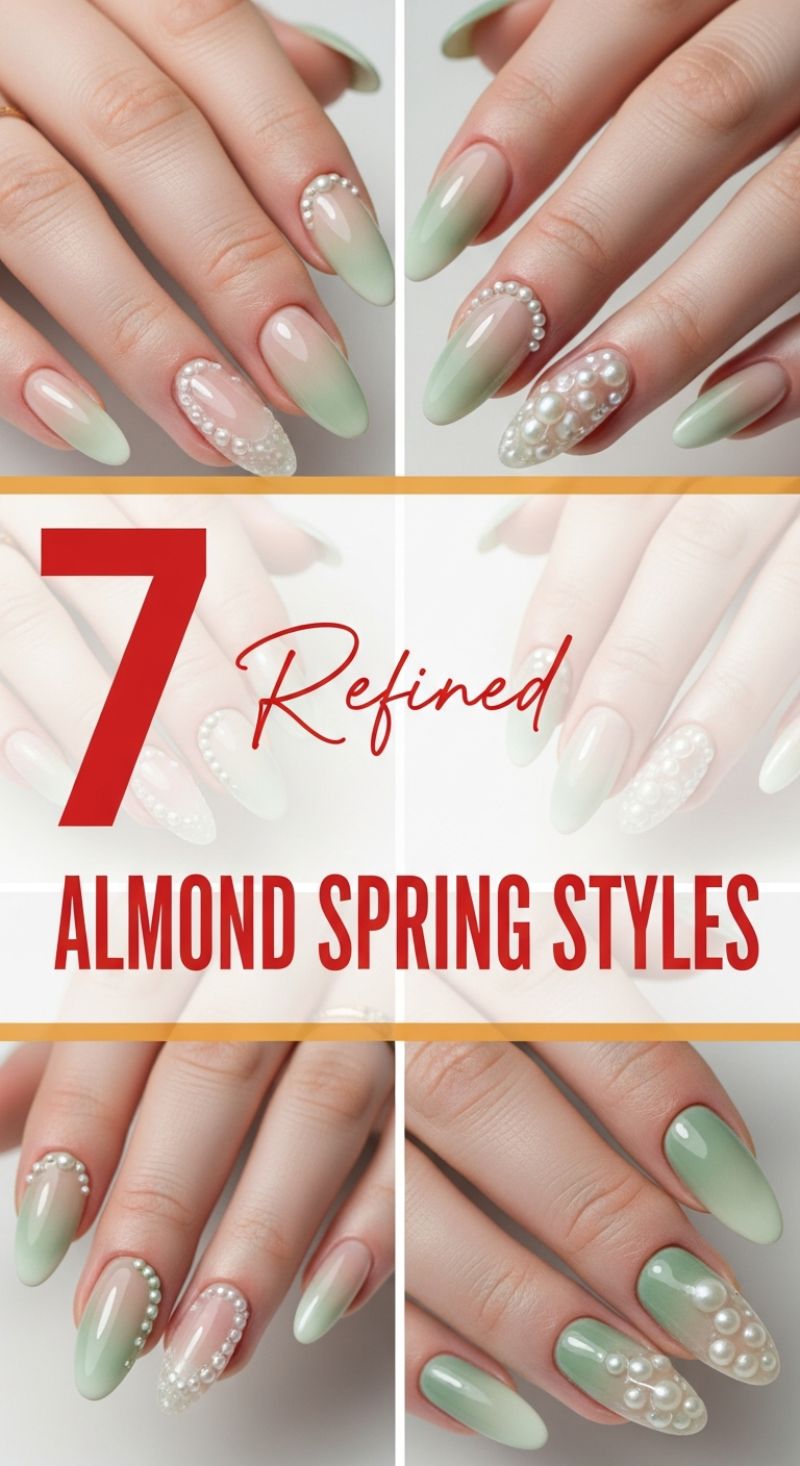
These “refined almond spring styles” capture pure elegance through sophisticated structure and delicate color work, making them a perfect statement piece for spring and summer events. To achieve this look, begin by shaping your nails into the classic almond silhouette, which naturally elongates the fingers and beautifully complements the soft nature of this design. The base is an elevated French fade (ombre), transitioning seamlessly from a natural, sheer pink or nude at the cuticle to a muted pastel green (like sage or seafoam) at the tip. For the best gradient, apply a thin layer of your nude shade across the entire nail. Then, use a makeup sponge or an ombre brush to gently apply the pastel green to the free edge, dabbing lightly upwards toward the center of the nail until the blend is flawless. Cure the base coats fully before moving on to the intricate detailing.
The true artistry and refinement of this manicure lie in the pearl embellishments. This design showcases two key application methods. For a sophisticated touch on surrounding nails (index and middle fingers), use tiny, uniform pearls to trace the half-moon shape around the cuticle line. Apply a small amount of strong nail resin or non-wipe builder gel where you want the design to sit, place the pearls individually using a wax pencil or dotting tool, and cure immediately to set them. For the dramatic accent nail (typically the ring finger), cluster various sizes of high-quality, flat-backed pearls and rhinestones across the nail body. Ensure these larger pieces are deeply embedded in a thick layer of builder gel for maximum hold and a stunning three-dimensional effect. The contrast between the smooth, fresh ombre and the rich, textural pearls elevates this style to bridal-level elegance.
To ensure your refined design lasts, always remember expert maintenance tips. After curing the embellished nails, apply a very thin, non-wipe top coat around the pearls, carefully sealing the edges of the design without coating the pearls themselves, as this can dull their luster. For the nails that only feature the ombre, apply a generous layer of high-gloss top coat, making sure to cap the free edges to prevent chipping. This luxurious style is versatile enough for daily wear yet sophisticated enough for weddings or garden parties. If you want a less dimensional look while retaining the elegance, substitute the large 3D pearls for smaller silver micro-beads or flat-back rhinestones to mimic the texture without the volume.
7 Adorable CUTE NAILS
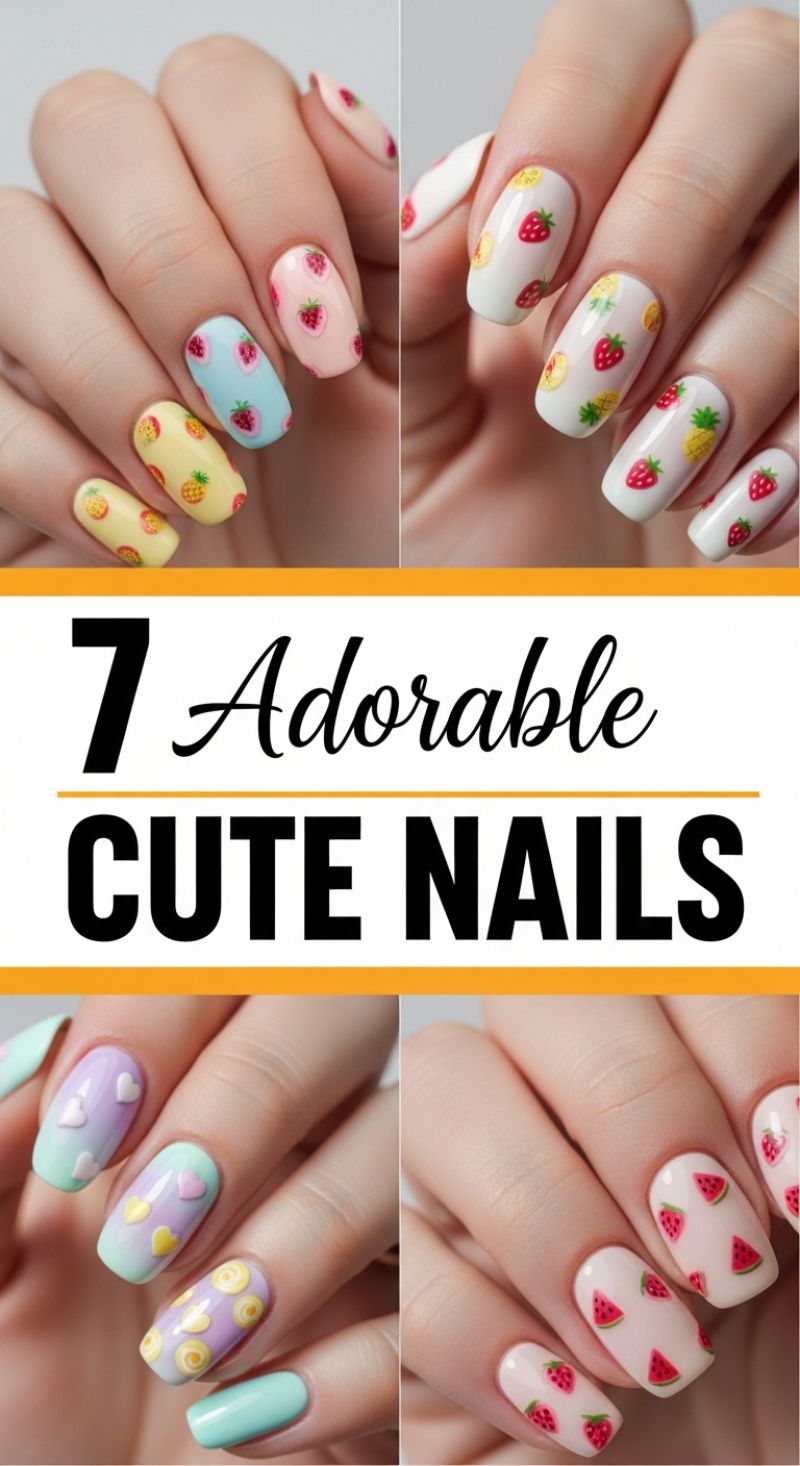
The “Adorable Cute Nails” aesthetic is defined by its playful, fruit-forward and pastel approach, making it an irresistible choice for cheerful spring and summer manicures. This look primarily pairs simple, bright base coats—such as soft pastels (baby blue, pale pink, buttercup yellow) or crisp white/nude bases—with miniature fruit motifs like strawberries, pineapples, lemons, and watermelons. For a visually cohesive yet varied appearance, dedicate one nail to a singular pattern (like the all-pineapple yellow nail) and mix complementary fruits on another finger (such as combining strawberries and lemon slices on a clean white base). This trend works exceptionally well for vacations or general summer vibrancy and is surprisingly accessible, easily achieved using waterslide decals, specialized stamping plates, or high-quality hand-painting techniques for those with a steady hand.
Achieving the detailed nature of these sweet designs requires careful application. If you opt for hand-painting the fruit, use a fine-tipped nail art brush (size 00 or 000) and highly pigmented polishes to ensure every line is crisp and sharp. For example, when painting strawberries, apply the red shape first, then use a tiny yellow dotting tool to mimic the seeds. Alternatively, the image also showcases beautiful pastel gradient nails (like the lavender and mint green design). To replicate this, use a makeup sponge to dab the two colors onto the nail, creating a seamless ombre effect before adding any dimension. The dimensional elements, such as the small hearts and swirls, should be created using a thick, builder-style gel or acrylic powder mixed with topcoat, built up in small layers and cured individually to achieve that prominent, raised texture.
To truly master this trending cute nail style, embrace the mix-and-match philosophy. It is crucial to balance highly detailed patterns with solid-color accent nails—like the single-color pinky finger shown—to prevent the overall look from becoming overwhelming or too busy. Finally, to ensure the longevity of these intricate designs, particularly those involving decals or dimensional art, always encapsulate the finished art with two generous layers of a durable, protective topcoat. While a high-gloss finish enhances the vibrant colors of the fruit, consider finishing the pastel gradient nails with a matte topcoat for a trendy, velvety effect that subtly highlights the texture of any 3D heart or swirl elements.