Unlock the ultimate compilation of 7 game-changing diet secrets and 5 must-try recipes designed to revolutionize your weekly meal prep, featuring high-protein snacks, lean chicken dinners, freezer-friendly comfort food, and quick kitchen hacks.
The Layered Gelatin Diet Hack: High-Volume, Low-Calorie Desserts
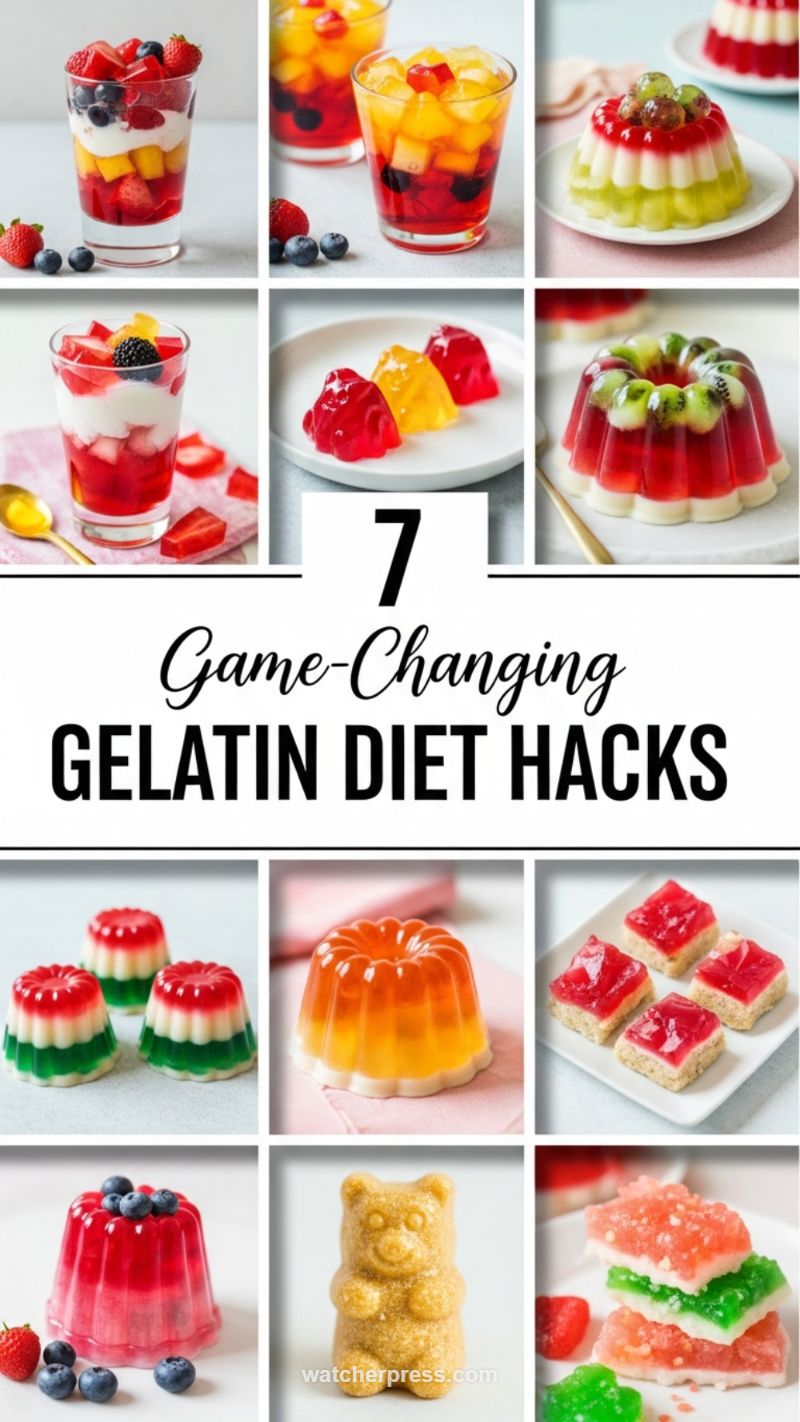
Why we love this: Gelatin is a fantastic, filling base for low-calorie desserts. By layering it with fresh or canned fruit (like mango, strawberries, and blueberries) and topping it with a dollop of Greek yogurt or sugar-free whipped cream, you create a beautiful, controlled portion that satisfies your sweet tooth without derailing your diet. Perfect for portion control!
What You’ll Need
- 1 packet sugar-free gelatin (any flavor)
- 1 cup hot water
- 1 cup cold water
- Assorted fresh berries and diced mango
- Non-fat Greek yogurt or light whipped topping (optional)
How to Make It
- Dissolve the gelatin powder completely in hot water. Stir in the cold water.
- Fill small glasses or containers about 1/3 full with the gelatin mixture. Refrigerate for 30 minutes until slightly set.
- Add a layer of mixed fruit over the set gelatin.
- Pour the remaining liquid gelatin over the fruit, ensuring the fruit is covered. Refrigerate for at least 4 hours, or until fully firm.
- Before serving, top with a spoonful of Greek yogurt or light whipped topping.
Bariatric-Friendly High-Protein Gelatin Molds
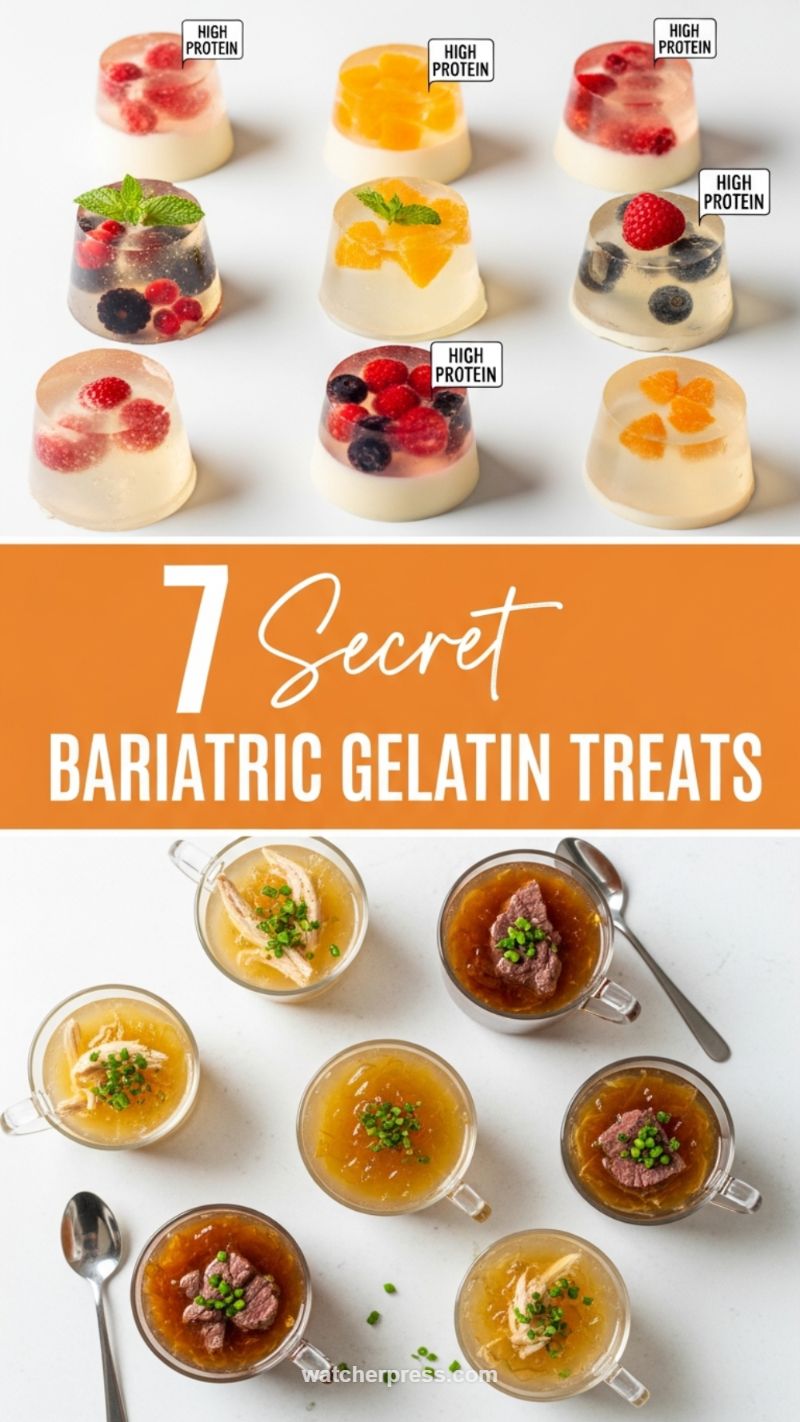
Why we love this: For those needing maximum protein in small, satisfying volumes, these protein-boosted gelatin treats are essential. They combine the texture of a traditional sweet treat with the vital macronutrients needed for recovery and satiety. Adding fruit gives natural sweetness without added sugar.
What You’ll Need
- 2 scoops unflavored collagen or protein powder
- 2 cups bone broth (or flavored, sugar-free beverage)
- 2 tablespoons unflavored gelatin powder
- Assorted berries (raspberries, blueberries, orange segments)
- Sweetener to taste (stevia or erythritol, optional)
How to Make It
- In a small saucepan, gently warm 1 cup of the broth/liquid (do not boil). Sprinkle the gelatin powder over the warm liquid and whisk until fully dissolved.
- Remove from heat. Whisk in the remaining cold liquid and the protein powder until smooth. Add sweetener if desired.
- Place a small amount of fruit at the bottom of silicone molds or small serving glasses.
- Pour the protein-gelatin mixture over the fruit.
- Refrigerate for 4–6 hours until completely firm.
The Ultimate High-Protein Low-Calorie Meal Prep Bowl
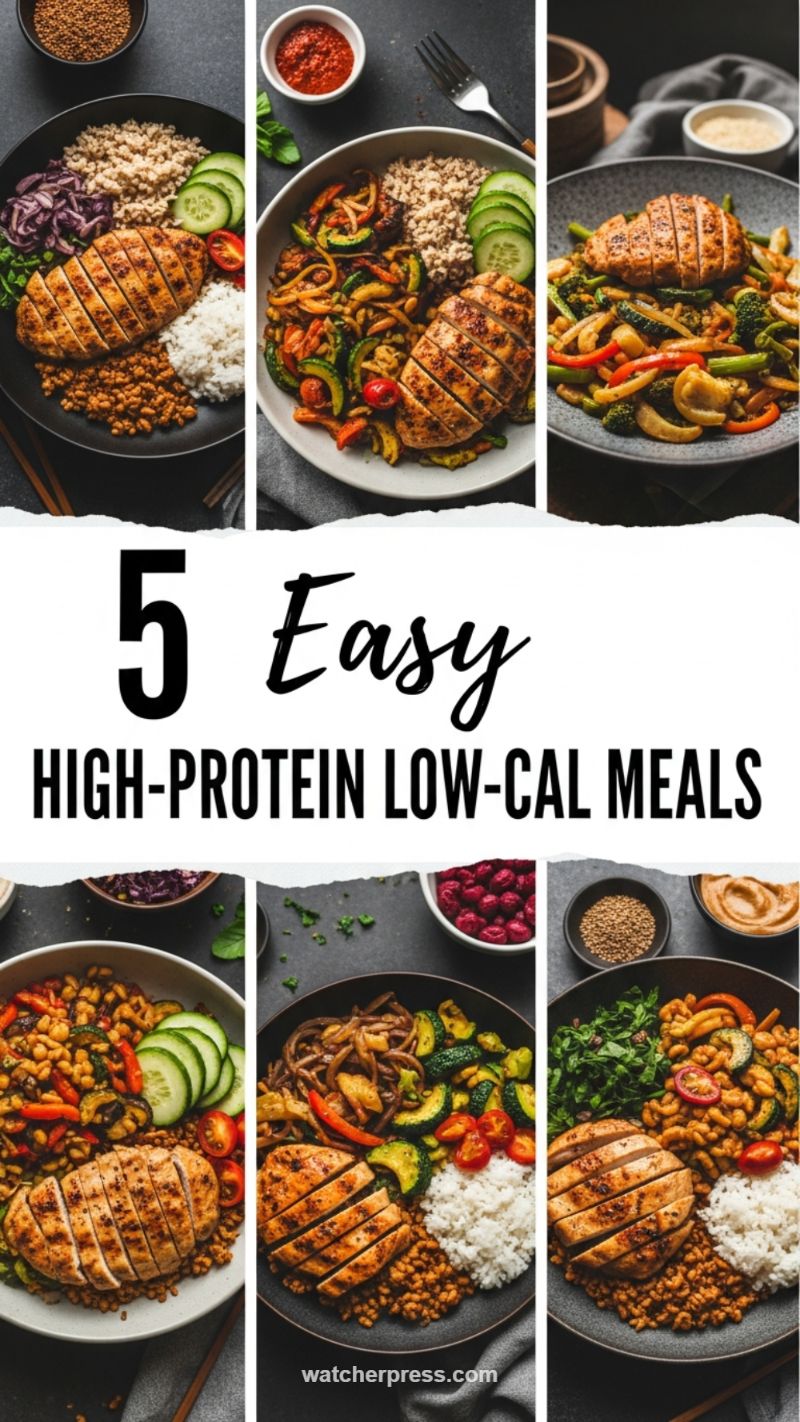
Why we love this: Meal prep bowls are the backbone of efficient eating. By balancing lean protein (chicken breast) with complex carbohydrates (quinoa or brown rice) and nutrient-dense vegetables, you create a customizable, macro-friendly lunch that’s ready to go. The key is separating the components until serving.
What You’ll Need
- 4 pre-portioned grilled chicken breasts
- 2 cups cooked brown rice or quinoa
- 1 cup roasted mixed vegetables (broccoli, bell peppers, zucchini)
- 1/2 cup cooked chickpeas or black beans (optional)
- A side of low-calorie dressing or salsa
How to Make It
- Grill or bake the chicken breasts, seasoning simply with salt, pepper, and paprika. Slice or dice them once cooled.
- Cook the grains (rice or quinoa) according to package directions.
- Roast the vegetables until tender-crisp.
- Assemble individual meal prep containers by placing grains on the bottom, followed by the roasted vegetables and beans/chickpeas.
- Top with the sliced chicken breast. Keep dressing or sauces on the side to prevent sogginess. Store refrigerated for up to 4 days.
Fabulous & Fast Weeknight Protein Dinners (Salmon, Steak, Chicken)
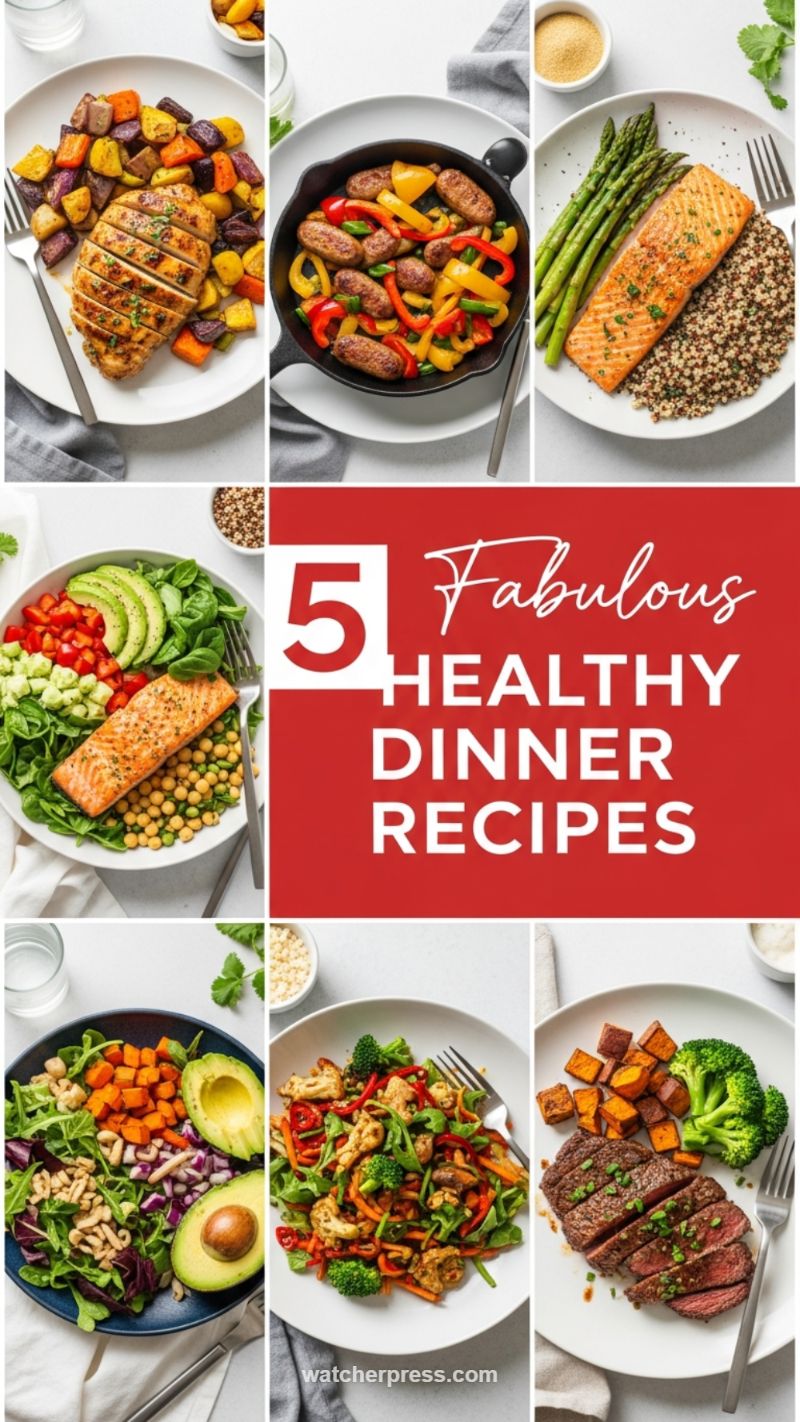
Why we love this: These simple recipes focus on high-quality protein and quick cooking methods. Whether it’s pan-seared salmon with quinoa or steak with roasted root vegetables, these meals are gourmet enough for dinner but fast enough for prep.
What You’ll Need
- 4 portions of protein (salmon fillets, chicken breasts, or steak)
- Assorted side vegetables (asparagus, bell peppers, broccoli, or sweet potatoes)
- Quinoa or barley
- Olive oil, salt, pepper, garlic powder
How to Make It
- Preheat oven to 400°F (200°C). Toss potatoes and carrots with olive oil and seasoning. Roast for 25 minutes.
- While vegetables roast, cook the grains.
- For salmon or chicken: Season well. Sear protein in a skillet for 3-5 minutes per side, finishing in the oven if needed.
- For steak: Pan-sear or grill until desired doneness (medium-rare is recommended).
- Plate the meal by combining the cooked protein, roasted vegetables, and grains.
The Refreshing Cucumber Salad Prep: 5 Ways
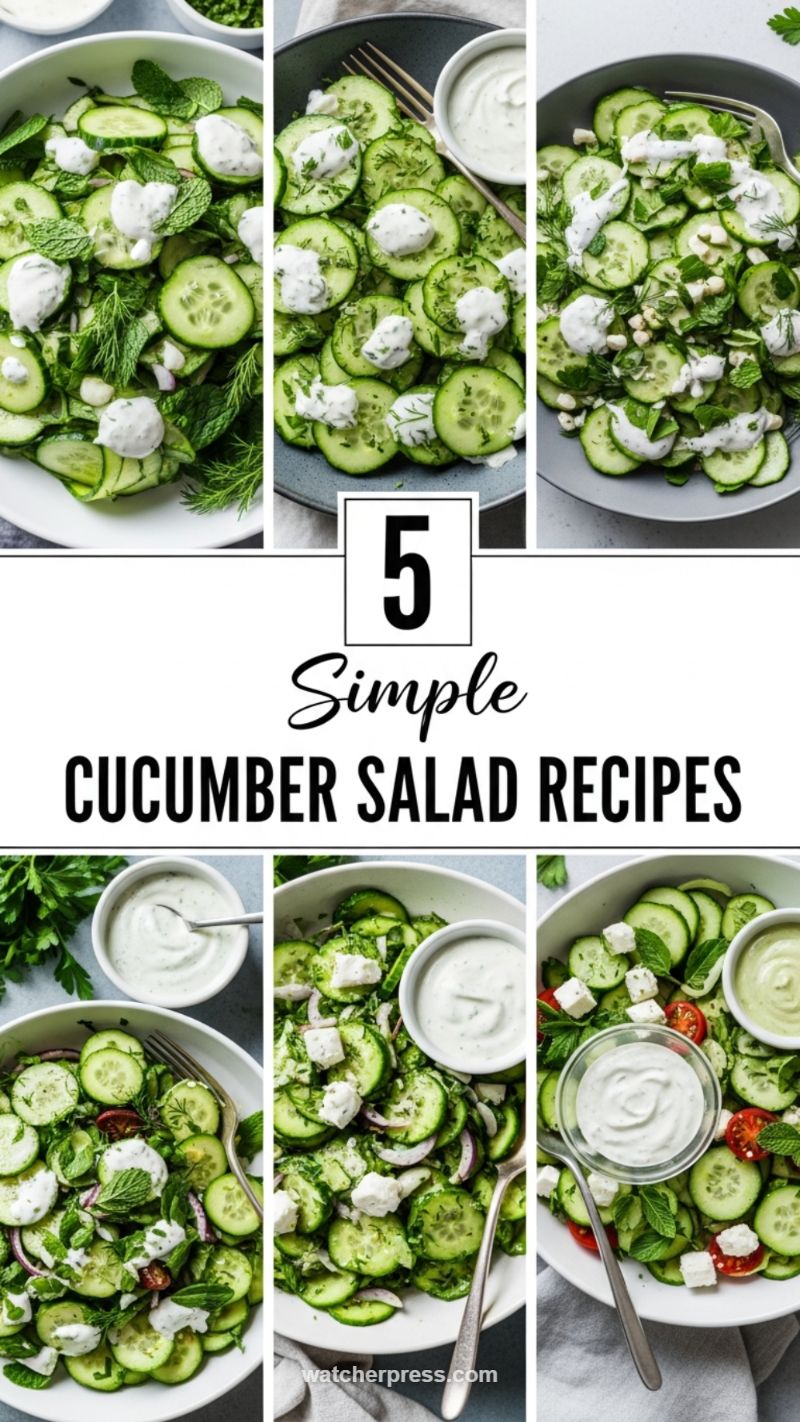
Why we love this: Cucumber salad is a light, cooling, and hydrating side dish perfect for pairing with heavier proteins. By prepping the cucumbers and keeping the dressing separate, you guarantee freshness all week long. The key flavors here are fresh dill, mint, and a creamy, tangy base.
What You’ll Need
- 3 English cucumbers, thinly sliced
- 1/4 cup finely chopped fresh dill or mint
- 1/2 red onion, thinly sliced (optional)
- Dressing Base: 1/2 cup Greek yogurt or sour cream, 2 tbsp white vinegar, 1 tsp sugar, salt, and pepper.
How to Make It
- Thinly slice the cucumbers and red onion. Place them in a bowl.
- In a separate small container, whisk together all the dressing ingredients (yogurt, vinegar, seasoning, herbs).
- To store for meal prep, keep the sliced vegetables and the dressing in separate airtight containers in the refrigerator.
- When ready to eat, combine the desired portion of vegetables with a spoonful of the dressing and toss immediately before serving.
Ultimate Prep Secret #1: Maintaining a Sourdough Starter
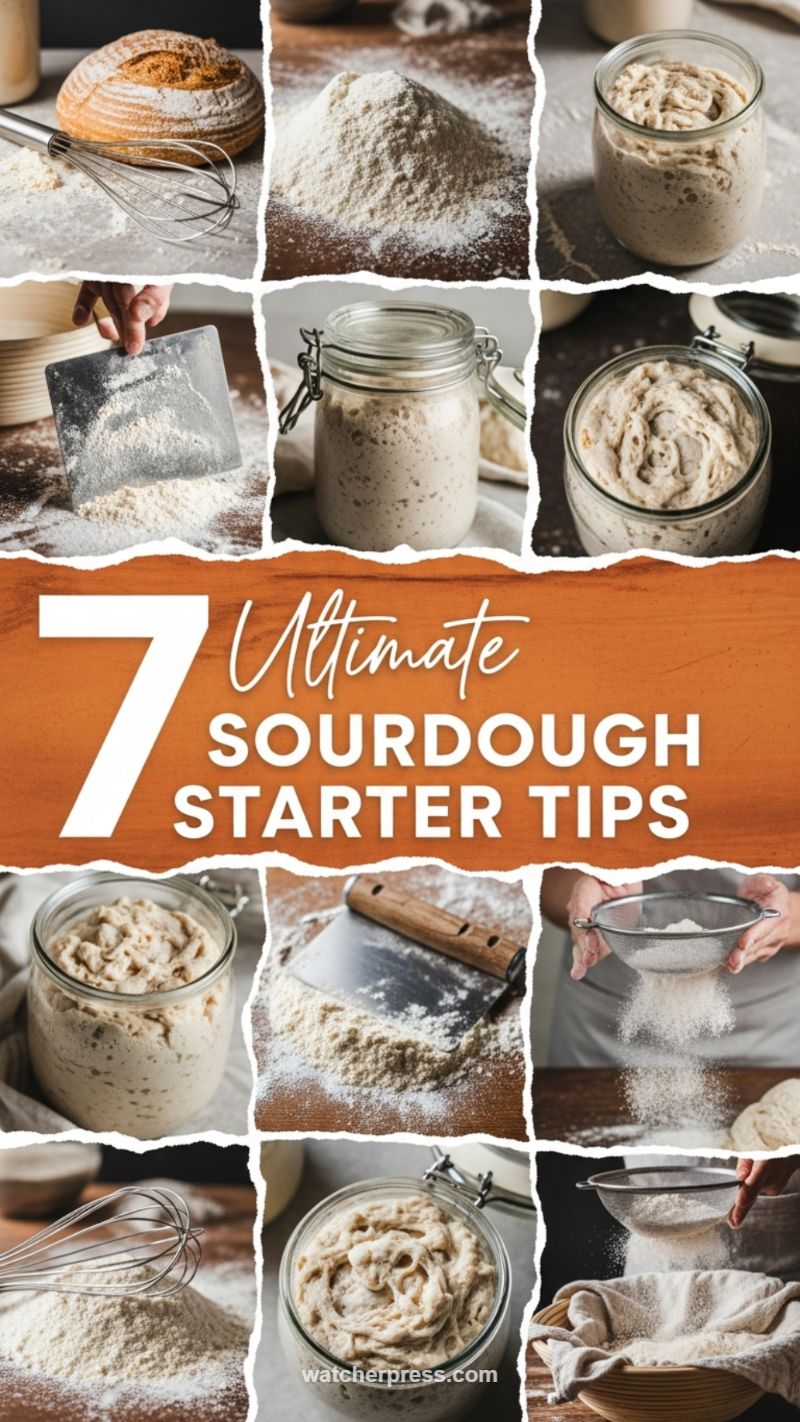
Why we love this: Having an active sourdough starter isn’t just for bread—it allows you to create high-fiber, fermented flatbreads, crackers, and crusts that are easier to digest. Consistent feeding and maintenance are the keys to successful sourdough baking.
What You’ll Need
- Active sourdough starter
- Equal parts (by weight) all-purpose flour and filtered water
- A clean glass jar with a breathable lid
How to Make It
- If storing in the fridge, take the starter out 12 hours before feeding.
- Discard about half of the starter from the jar. (This is essential for maintaining volume and activity.)
- Feed the remaining starter by adding 1:1:1 ratio of starter, fresh flour, and fresh water.
- Stir until smooth, scrape down the sides, and cover loosely.
- Allow the starter to rise and fall (approximately 4–12 hours, depending on ambient temperature) before using it for baking or returning it to the fridge.
Essential Recipe #1: Sourdough Tortillas and Pinwheels

Why we love this: Using sourdough discard or active starter creates incredibly tender, slightly tangy tortillas that roll perfectly for tacos, quesadillas, or quick wrap pinwheels. They freeze beautifully, making them ideal for bulk baking.
What You’ll Need
- 1 cup sourdough discard or active starter
- 1 1/2 cups all-purpose flour
- 1/4 cup olive oil or melted butter
- 1/2 tsp salt
How to Make It
- Combine the starter, flour, oil, and salt in a bowl. Mix until a shaggy dough forms.
- Knead for 5–7 minutes until smooth. Cover and let rest for 30 minutes.
- Divide the dough into 8 equal balls. Roll each ball very thin into a tortilla shape.
- Heat a dry skillet or griddle over medium-high heat. Cook each tortilla for 30–60 seconds per side, until light brown spots appear.
- Stack the tortillas and cover them with a towel to steam, keeping them soft. Store in an airtight bag or freeze.
Essential Recipe #2: The Viral 7-Ingredient Cottage Cheese Bread
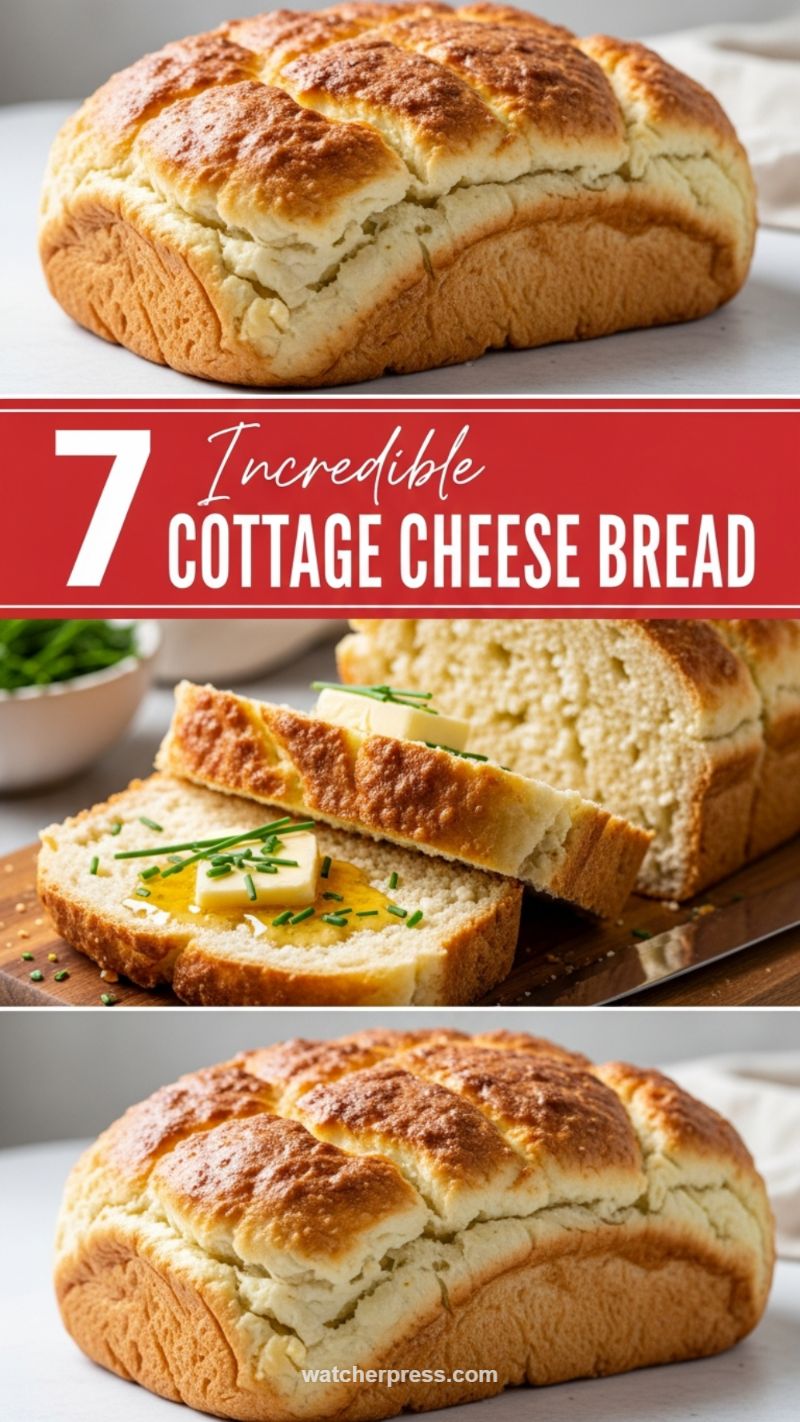
Why we love this: Cottage cheese bread delivers an incredibly soft texture and a hidden boost of protein without a strong cheese flavor. It’s an easy, high-protein alternative to traditional sandwich bread for healthier lunches.
What You’ll Need
- 2 cups cottage cheese (blended until smooth)
- 2 cups all-purpose flour
- 1 packet active dry yeast
- 1/4 cup warm water
- 2 tbsp honey or sugar
- 1 tsp salt
- 1 egg (for washing, optional)
How to Make It
- In a small bowl, proof the yeast by combining warm water, yeast, and honey/sugar. Let sit for 5 minutes until foamy.
- In a large bowl, mix the smooth, blended cottage cheese, flour, and salt. Add the yeast mixture.
- Knead until a soft dough forms. Place in a greased bowl, cover, and let rise for 1 hour.
- Shape into a loaf and place in a loaf pan. Allow a second rise (30 minutes).
- Bake at 375°F (190°C) for 30–35 minutes until golden brown.
Essential Recipe #3: 5-Minute Homemade Flatbreads
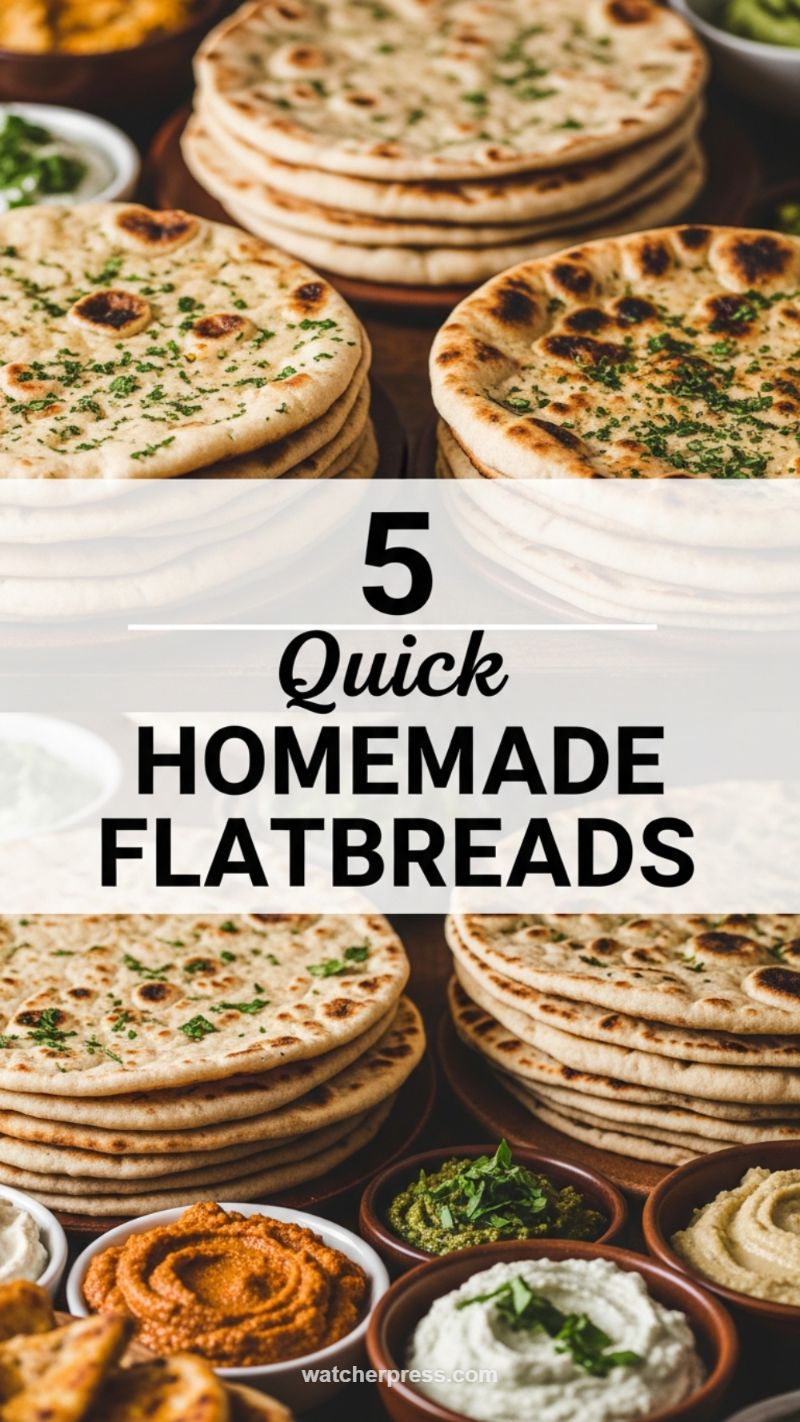
Why we love this: When you need a quick side dish or a base for wraps, these simple stovetop flatbreads are faster than driving to the store. They require minimal ingredients and are fantastic paired with hummus or used as pizza bases.
What You’ll Need
- 2 cups self-rising flour (or AP flour + baking powder/salt)
- 1 cup plain Greek yogurt
- 2 tbsp olive oil
- Garlic and fresh parsley (for topping)
How to Make It
- Mix flour and yogurt until a shaggy dough forms. Knead for 2–3 minutes until smooth.
- Divide into 5 equal portions and roll out thinly.
- Heat a dry cast-iron skillet over medium-high heat.
- Cook each flatbread for 1–2 minutes per side until puffed and slightly charred.
- Brush with melted garlic butter and chopped parsley immediately after removing from heat.
Specialized Prep Secret #2: Baking Ahead Your Hot Dog Buns

Why we love this: Homemade brioche-style buns are miles ahead of store-bought. Prepping these ensures your next backyard BBQ or weeknight hot dog dinner is truly exceptional. They are soft, slightly sweet, and freeze well.
What You’ll Need
- 2 1/4 tsp instant dry yeast
- 1 cup warm milk
- 3 cups bread flour
- 1/4 cup sugar
- 1 tsp salt
- 2 large eggs + 1 egg for wash
- 1/4 cup softened butter
How to Make It
- Combine yeast and warm milk; let stand 5 minutes.
- Mix dry ingredients, then add yeast mixture, eggs, and butter. Knead until smooth and elastic (about 8 minutes).
- Allow the dough to double in size (1–1.5 hours).
- Divide dough, shape into elongated bun shapes, and place them close together on a baking sheet. Let rise 30 minutes.
- Brush with egg wash and bake at 375°F (190°C) for 15–18 minutes until golden brown.
Essential Recipe #4: Classic Prep-Ahead Jambalaya

Why we love this: Jambalaya is the ultimate one-pot meal prep. It contains protein (shrimp, sausage, chicken), rice, and vegetables, and its flavor improves significantly overnight. It’s hearty, nutritious, and feeds a crowd efficiently.
What You’ll Need
- 1 lb smoked andouille sausage, sliced
- 1 lb chicken thighs, diced
- 1 lb peeled shrimp
- 1 onion, 1 bell pepper, 2 celery stalks (the ‘holy trinity’)
- 1 1/2 cups white rice
- 3 cups chicken broth
- Cajun seasoning, diced tomatoes
How to Make It
- In a large Dutch oven, brown the sausage and chicken. Remove protein and set aside, leaving fat in the pot.
- Sauté the holy trinity (onion, pepper, celery) until softened. Stir in the Cajun seasoning and rice.
- Pour in the broth and tomatoes. Bring to a boil, then reduce heat, cover, and simmer for 20 minutes.
- Stir in the cooked chicken/sausage mixture. Add the raw shrimp during the last 5 minutes of cooking.
- Garnish with green onions before dividing into meal prep containers.
Freezer Prep Secret #3: Mini Comfort Shepherd’s Pies

Why we love this: Shepherd’s pie is the definition of comfort food, but prepping it in individual ramekins or small containers makes it perfect for portion control and freezer storage. These can be reheated directly in the oven for a quick, wholesome dinner.
What You’ll Need
- 1 lb ground beef or lamb
- 1 bag frozen mixed vegetables
- Beef broth and Worcestershire sauce
- Mashed potato topping (cheesy or plain)
- Individual oven-safe ramekins
How to Make It
- Brown the ground meat. Drain excess fat.
- Stir in vegetables, broth, and seasoning. Simmer until the sauce thickens slightly.
- Spoon the meat mixture into the individual ramekins.
- Pipe or spoon a layer of mashed potatoes over the top, making sure the filling is completely covered. Sprinkle with cheese for a cheesy crust.
- Bake immediately until heated through, or cover tightly and freeze for future use.
Ultimate Prep Secret #4: Mastering 15-Minute Shrimp Dinners
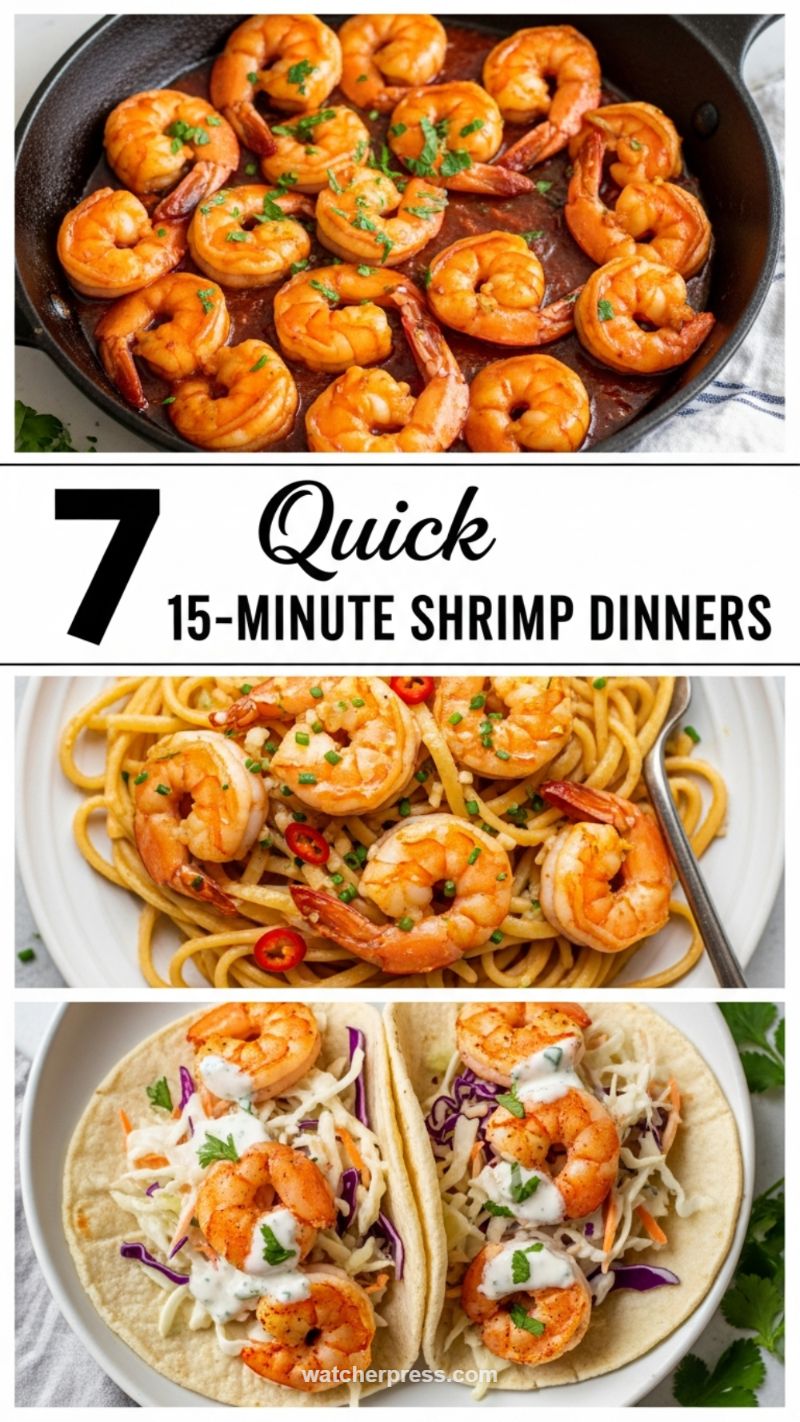
Why we love this: Shrimp cooks incredibly fast, making it the perfect protein for last-minute prep. The secret is having all components ready: frozen shrimp (thawed quickly), pre-cooked pasta/quinoa, and a prepared sauce base (like garlic butter or pesto).
What You’ll Need
- 1 lb raw, peeled, and deveined shrimp
- 1 tbsp olive oil, 2 tbsp butter
- Garlic, chili flakes, parsley
- Pre-cooked base (pasta, quinoa, or salad greens)
- Ingredients for tacos (slaw mix, cilantro-lime dressing)
How to Make It
- Heat oil and butter in a large skillet. Add garlic and chili flakes; cook until fragrant (30 seconds).
- Add the shrimp and cook for 2–3 minutes per side until pink and opaque.
- Option 1 (Tacos): Serve immediately in tortillas topped with fresh slaw and dressing.
- Option 2 (Pasta): Toss the shrimp directly with the pre-cooked pasta and sauce.
- These must be cooked fresh, but all base ingredients (grains, slaw, sauces) should be prepped in advance.
Essential Recipe #5: Lean & Fabulous Ground Chicken Meals
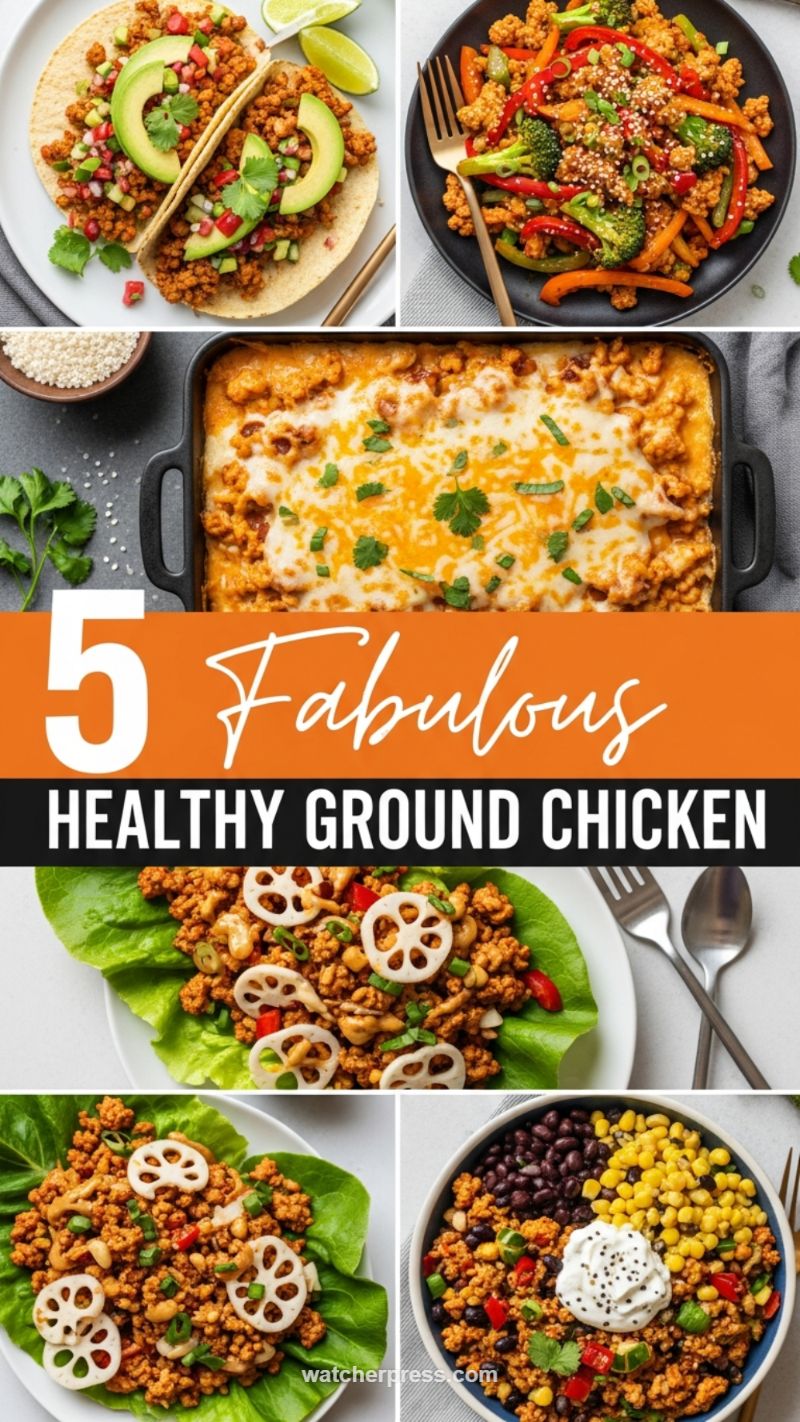
Why we love this: Ground chicken is an affordable, lean protein source that is incredibly versatile. It works well in everything from lettuce wraps to high-protein casseroles, offering variety while keeping macros in check.
What You’ll Need
- 1 lb ground chicken
- Various seasonings (Taco seasoning, Asian stir-fry sauce, Italian herbs)
- Chopped vegetables (onions, bell peppers, broccoli)
- Low-fat cheese/sour cream (for casseroles)
How to Make It
- Brown the ground chicken in a skillet, breaking it up as you go. Drain fat.
- For Taco Bowls: Add taco seasoning and serve with rice, corn, beans, and salsa.
- For Asian Stir Fry: Add ginger, garlic, soy sauce, and chopped stir-fry vegetables. Serve over rice.
- For Casseroles: Mix cooked chicken with cheese sauce and rice; bake in a rectangular dish until bubbly.
- Divide into prep containers. Ground chicken is excellent for reheating.
The Ultimate Prep Secret #5: Creamy ‘Marry Me’ Chicken Prep

Why we love this: This creamy, flavorful chicken dish uses rich ingredients (cream, sun-dried tomatoes, Parmesan) but can be lightened slightly with Greek yogurt or half-and-half for meal prep. The intense flavor profile holds up incredibly well when refrigerated, making it a favorite for lunch.
What You’ll Need
- 4 large chicken breasts
- 1/2 cup sun-dried tomatoes, diced
- 1/2 cup chicken broth
- 1/4 cup heavy cream or half-and-half
- Grated Parmesan cheese, garlic, Italian herbs
- Mashed potatoes or linguine (pre-cooked base)
How to Make It
- Season chicken breasts well. Sear the chicken in a pan until browned on both sides, then remove.
- In the same pan, sauté garlic, then add broth, sun-dried tomatoes, and herbs. Bring to a simmer.
- Stir in the cream and Parmesan until the sauce thickens.
- Return the chicken to the pan and let it simmer in the sauce until cooked through.
- Serve over or alongside pre-prepped mashed potatoes or pasta.
Game-Changing Beverage Prep Secret #6: Cold Brew Concentrate
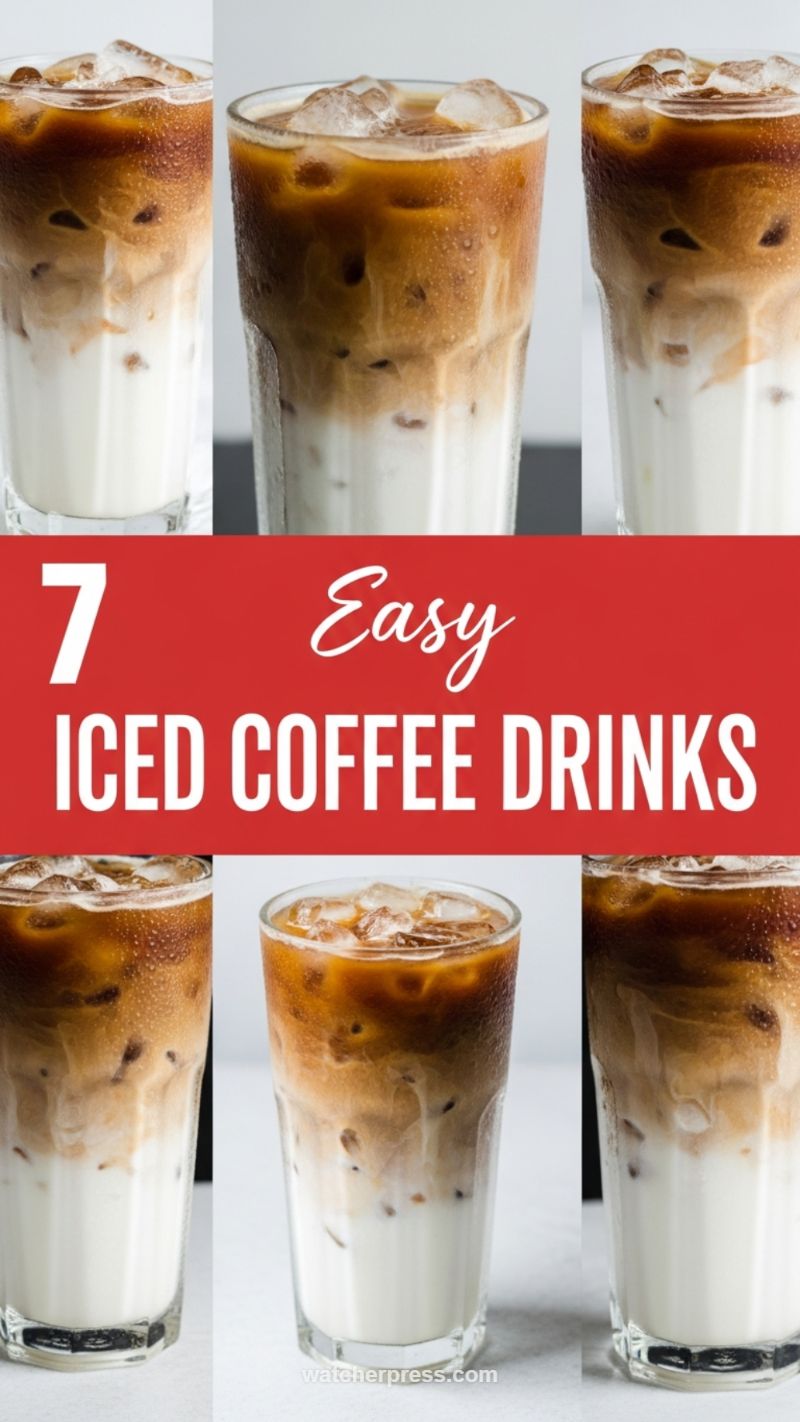
Why we love this: Pre-making iced coffee concentrate eliminates long waits and messy mornings. By having a large batch of concentrated cold brew, you can mix an easy, smooth iced latte in under a minute—saving time and money.
What You’ll Need
- 1 cup coarse ground coffee beans
- 4 cups cold filtered water
- Large mason jar or French press
- Milk/creamer and preferred sweetener
How to Make It
- Combine coffee grounds and water in a large container. Stir gently.
- Cover and let steep at room temperature or in the fridge for 12–18 hours.
- Strain the mixture using a fine mesh sieve lined with cheesecloth (or use a French press).
- Store the resulting dark concentrate in an airtight container in the refrigerator for up to 2 weeks.
- To serve, mix 1 part concentrate with 1 part milk or water over ice.
Simple Sweet Prep Secret #7: Must-Try Strawberry Desserts
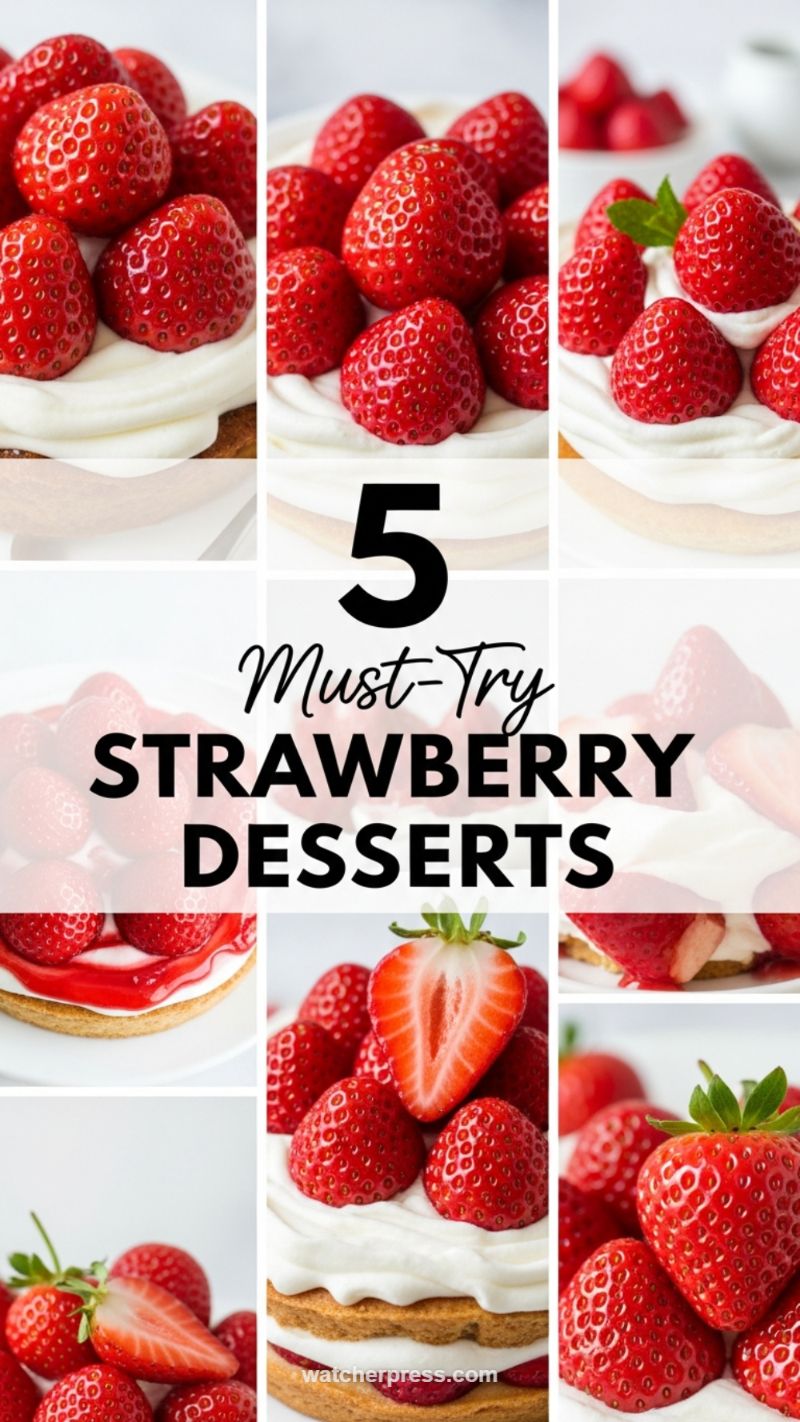
Why we love this: When the craving hits, having a fruit-focused, portion-controlled dessert ready is key to avoiding unhealthy bingeing. These showcase fresh, seasonal fruit with minimal added sugars, often utilizing whipped cream or yogurt as a light base.
What You’ll Need
- 2 cups fresh strawberries, sliced
- 1 cup heavy whipping cream or coconut cream
- Vanilla extract, sweetener (sugar or stevia)
- Small biscuit bases or meringue cookies
How to Make It
- Slice or mash half of the strawberries and set aside to macerate with a touch of sweetener.
- Whip the cream with vanilla and sweetener until stiff peaks form.
- Layer the small dessert cups or plates: biscuit/cookie base, a spoonful of whipped cream, and a generous topping of fresh and macerated strawberries.
- These are best assembled just before serving, but all components (whipped cream/yogurt, sliced berries) can be prepped 1 day ahead.
Prep-Ahead Holiday Treats: Mini Valentine’s Day Portions

Why we love this: Holidays shouldn’t break your diet goals. By prepping individual, beautiful mini desserts—like layered red velvet cakes or strawberry mousse parfaits—you control the calories while enjoying the celebration.
What You’ll Need
- Pre-made mini sponge cake rounds (red velvet or vanilla)
- Mousse or cream cheese frosting
- Fresh berries and rose petals (for garnish)
- Small glasses for layered parfaits
How to Make It
- Bake or buy small cake layers. Use a circular cookie cutter to ensure uniform size.
- Whip up a simple cream cheese or light mousse filling.
- For Mini Cakes: Layer cake, filling, and fresh berries. Drizzle with berry sauce.
- For Parfaits: Layer strawberry mousse, cream, and berries in a tall glass.
- Store covered in the refrigerator. These treats stay fresh for 2–3 days.
The Unique Dessert Hack: Game-Changing Snow Cream

Why we love this: Snow cream (or Korean bingsu/shaved ice) is a surprisingly low-fat, high-volume dessert base, perfect for diet hacking. By flavoring the base ice with low-sugar syrups, you get a huge serving for few calories.
What You’ll Need
- Shaved ice or finely crushed ice
- Sweetened condensed milk (or sugar-free alternative)
- Flavorings: chocolate syrup, salted caramel, fruit purees
- Whipped cream (optional)
How to Make It
- Ensure your ice is very finely shaved or crushed—almost fluffy.
- Pile the ice high into a bowl to create a snow mound.
- Drizzle a generous amount of sweetened condensed milk (or alternative) over the ice base.
- Add your chosen toppings: chocolate syrup, berry puree, or caramel.
- Top with a dollop of whipped cream for aesthetic appeal. Serve immediately.
Prep Secret #8: Master the 5 Best Coleslaw Dressings
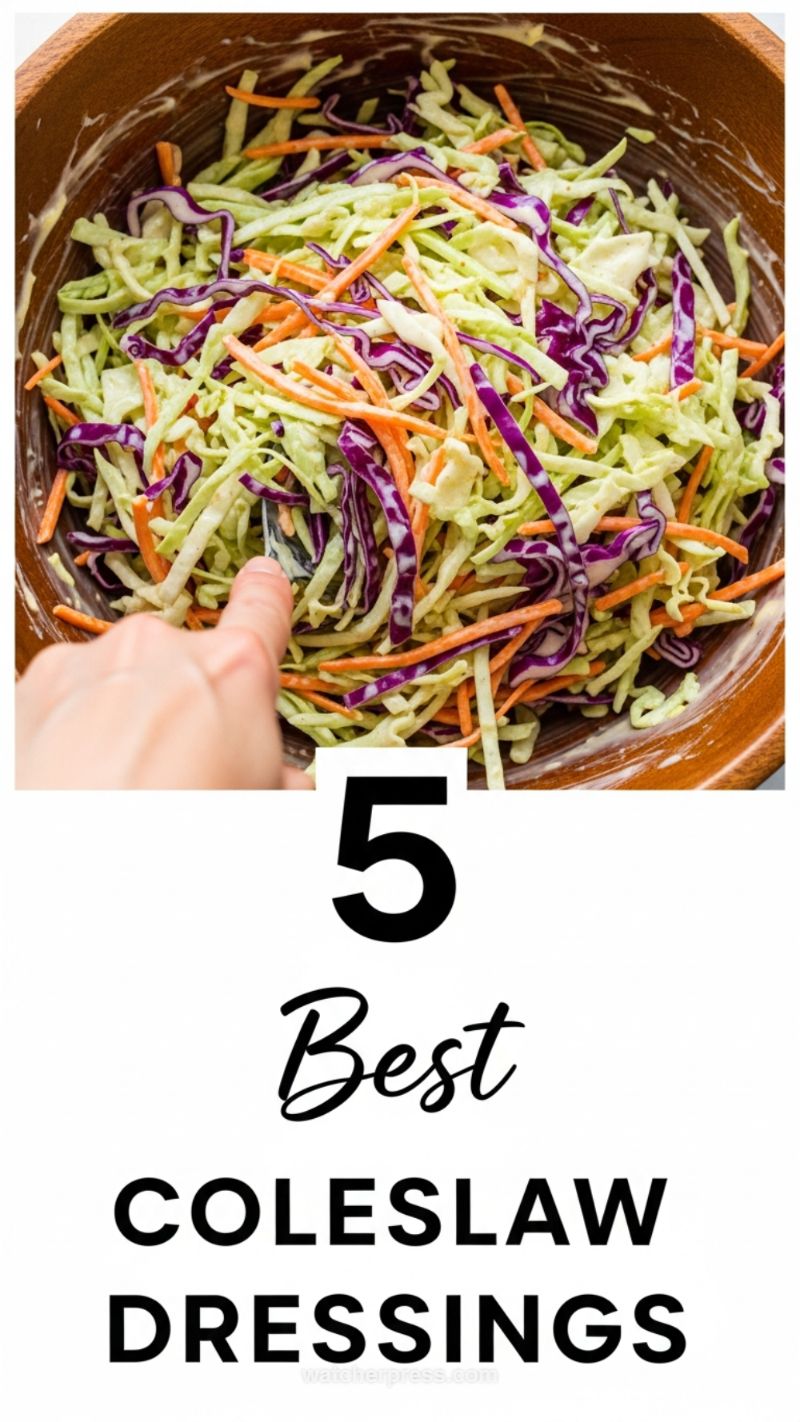
Why we love this: Coleslaw mix is cheap, crunchy, and lasts for days in the fridge. The game-changer is prepping several different dressings (creamy, vinegary, spicy peanut) to instantly change the flavor profile of the base mix, avoiding food boredom.
What You’ll Need
- 1 large bag pre-shredded cabbage and carrot mix
- Creamy Dressing: Mayo, cider vinegar, sugar, salt, pepper.
- Vinaigrette Dressing: Olive oil, lemon juice, Dijon mustard.
- Spicy Dressing: Yogurt, hot sauce, lime juice.
How to Make It
- Purchase or chop your coleslaw base. Store the dry mix in an airtight container.
- Prepare the three different dressings listed above. Store each dressing separately in small jars in the refrigerator.
- When ready to eat, scoop out a portion of the cabbage mix and toss it with 1–2 tablespoons of your desired dressing (e.g., creamy for BBQ, vinaigrette for fish tacos).
- This method keeps the slaw crunchy and prevents premature wilting.