Discover 7 simple and chic Valentine’s Day nail ideas you can recreate in under 10 minutes! Perfect for quick fixes, last-minute dates, or busy schedules. Get stunning red and pink manicures fast.
Valentine’s Day Heart Outline
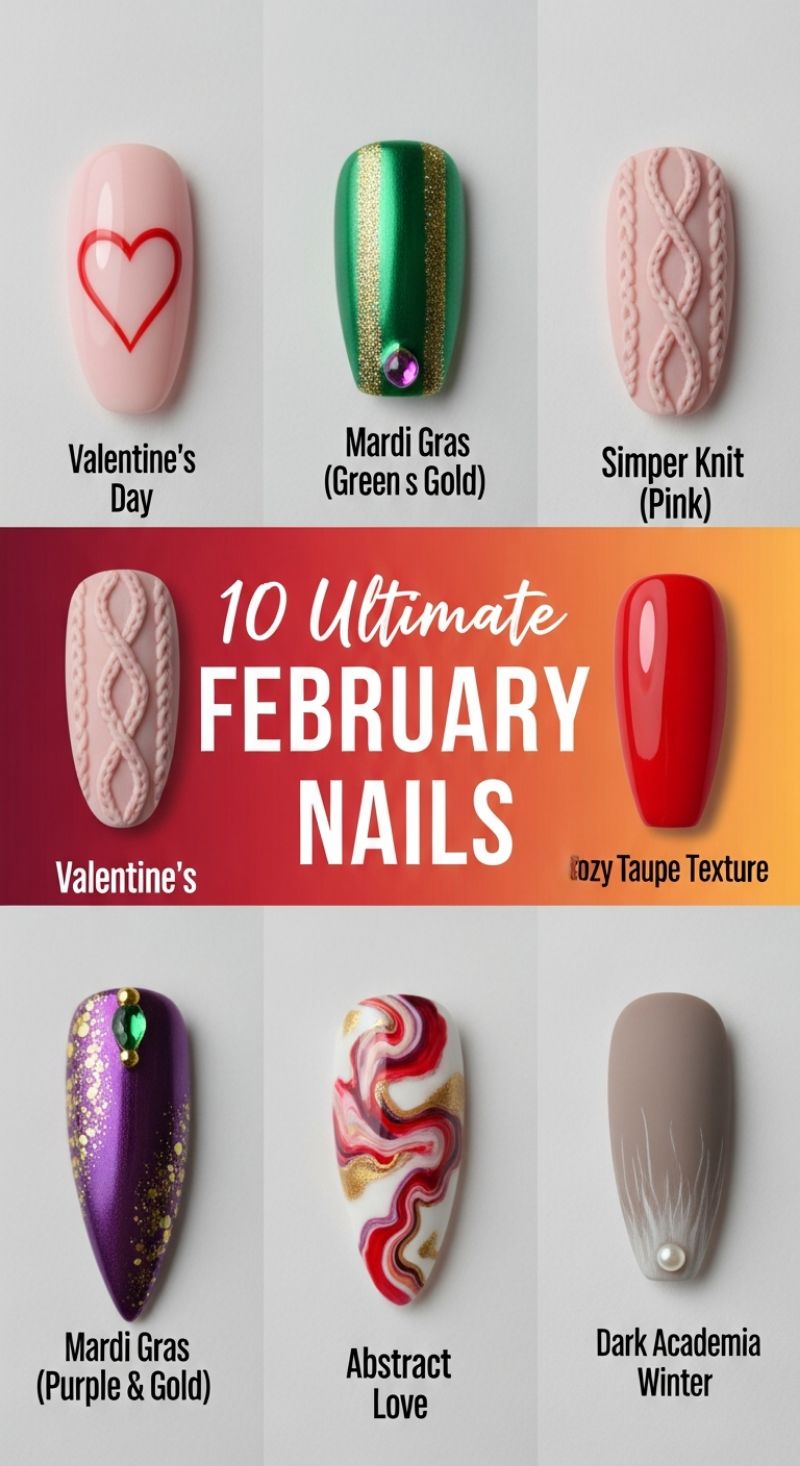
Achieving this minimalist and romantic heart design is surprisingly simple, making it perfect for our under-10-minute challenge. Start by ensuring your nails are prepped: clean, filed, and buffered. The foundation of this look is a soft, opaque pale pink base coat. Apply one to two smooth coats, aiming for full opacity that still maintains a delicate feel. If you are using regular lacquer, apply a fast-drying top coat immediately after the base color to drastically cut down on drying time before moving to the art phase; if you are using gel, cure completely. This light pink hue sets a sweet and subtle backdrop, allowing the bold red heart to truly stand out as the focal point without overwhelming the overall look.
Now for the main event: the red heart outline. Grab a vibrant true-red polish and the smallest detail brush you own (a liner brush works best, or failing that, a clean eyeliner brush or a fine-tipped dotting tool). To ensure symmetry, begin by placing two small, equidistant dots near the center top of the nail to mark the peaks of the heart. From these points, use light, controlled strokes to curve the lines downwards, meeting precisely in the center bottom to form the V-shape. The key to speed and elegance here is to keep the line weight thin and consistent. If you find freehand challenging, an expert trick is to use a small heart vinyl stencil, which you can lightly place on the dry base, paint over the cutout with red, and peel off immediately to reveal a perfect, quick outline. This method ensures perfection and significantly reduces the time spent on detailing.
Once the heart outline is complete and fully dry (a few seconds if using quick-dry lacquer or a quick flash cure for gel), seal the entire design with a high-gloss top coat. This step is non-negotiable as it protects the delicate artwork and provides that beautiful, finished shine, maximizing the longevity of your 10-minute manicure. To make the polish last even longer, remember to ‘wrap the tip’—brush the top coat slightly over the free edge of the nail. This chic, graphic heart is a timeless Valentine’s look that requires minimal polish colors and tools, proving that sometimes, less is truly more when expressing love on your fingertips.
10 Quick SHORT NAILS
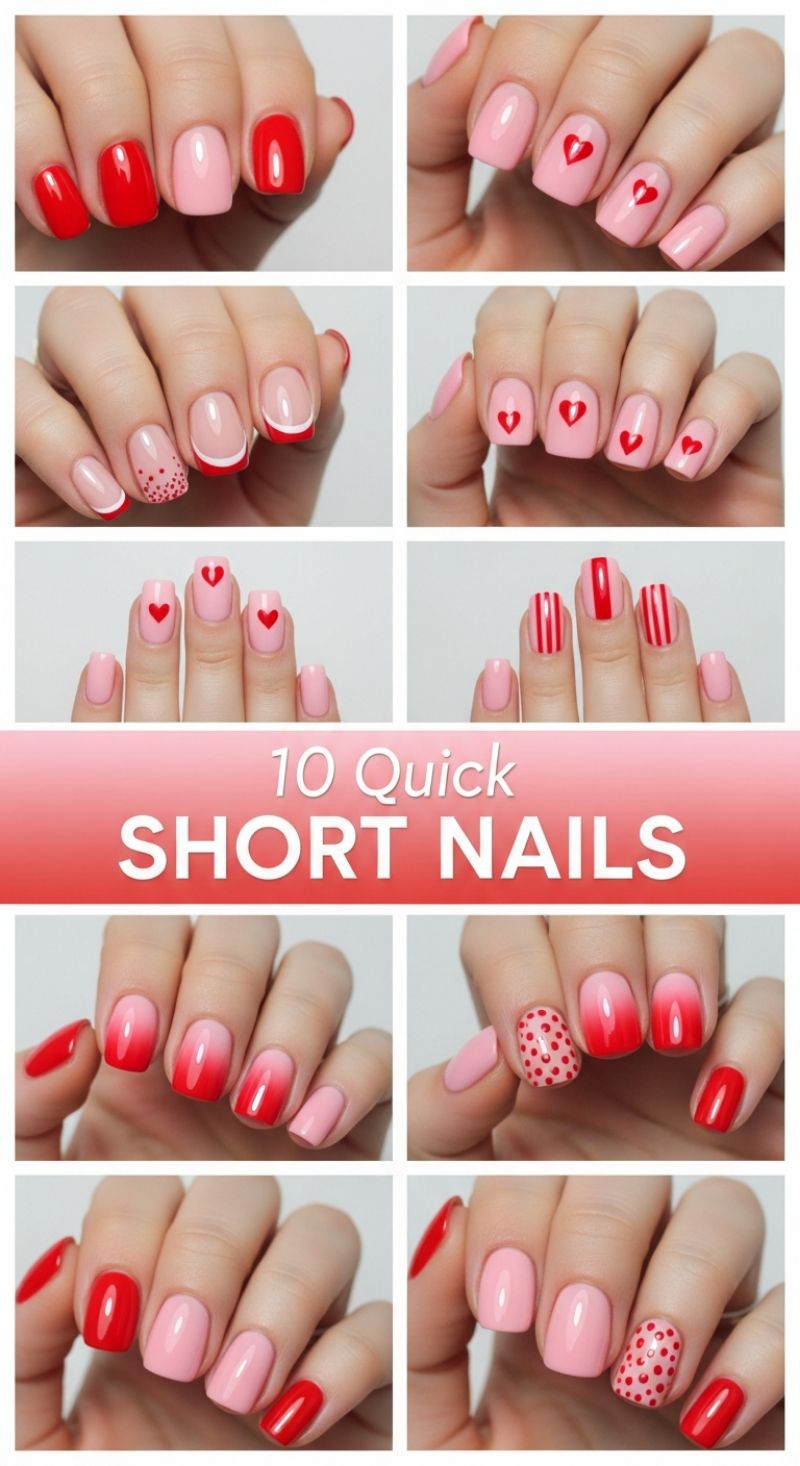
These 10 simple designs prove that short nails are the perfect canvas for chic, Valentine’s Day nail art, prioritizing bold red and soft pink tones. The quickest way to start is with simple color blocking or alternating solids. Apply a quality base coat, then alternate between a vibrant true red and a milky pastel pink on different fingers (for example, red on the index and pinky, pink on the middle and ring fingers). This instant classic look provides high impact with minimal effort. To elevate this, try the minimalist French tip variation shown, replacing the traditional white tip with a sharp red line. This can be achieved quickly using French tip guides or the rubber band technique, but for truly quick application, paint the tip freehand using a fine striping brush and clean up the edges with a cotton swab dipped in polish remover.
The key to achieving the darling heart motifs and polka dots quickly is leveraging the right tools—specifically, a set of fine dotting tools or even a bobby pin end. To create the small, flawless hearts seen throughout the examples, apply two adjacent dots of red polish onto the dried pink base coat. Immediately after, take a fine detail brush or a toothpick and drag a tiny amount of polish down from the center point between the two dots, forming the V shape at the base of the heart. This ‘two dots and a drag’ technique is surprisingly fast and perfect for adding one accent heart near the cuticle or three small hearts down the center of the nail. Alternatively, use a striping brush to create clean vertical lines on an accent nail, giving a classic, tailored look that breaks up the softer designs.
Finally, integrate texture and depth using simple patterns like polka dots and ombré gradients on accent nails. Polka dots are perhaps the fastest design element: simply use varying sizes of dotting tools dipped in the contrasting color (red dots on a pink base) to cover a single nail entirely. For the ombré look, which typically requires careful blending, speed up the process by using a small makeup sponge. Dab both the red and pink polish onto the sponge, then lightly stamp it onto the nail, concentrating the red on the tip to create a soft, fast gradient effect. Always finish every manicure with a high-shine, quick-dry top coat to seal the designs, prevent smudging, and ensure your Valentine’s look lasts long past your 10-minute application window.
7 Sweet Heart Designs
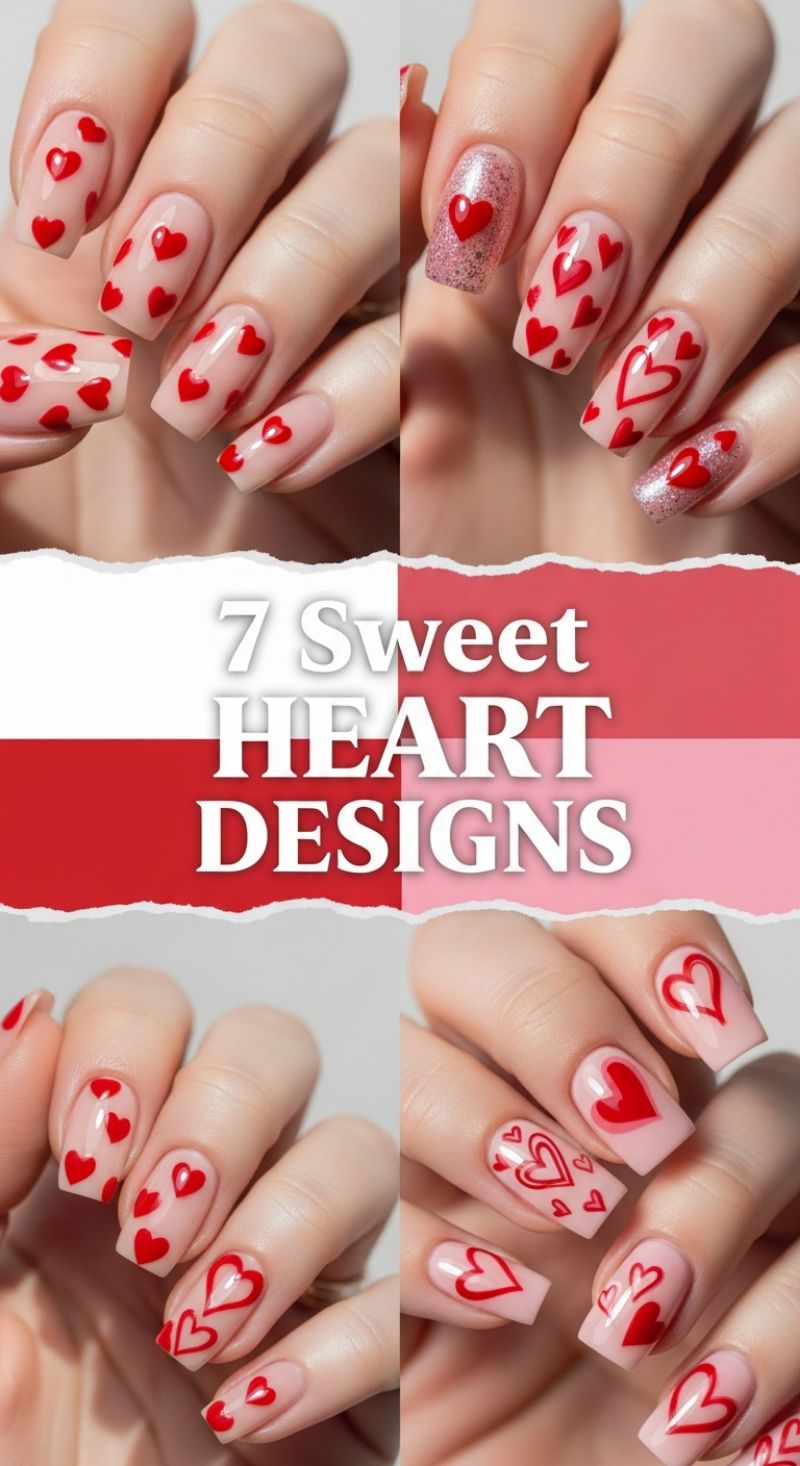
Achieving this versatile and romantic heart design is surprisingly simple and relies heavily on the correct tools and base color choice. Start with a neutral canvas: a sheer milky pink or translucent nude polish is essential, as this base enhances the vibrancy of the red while keeping the overall look elegant and modern. For the fastest application, rely on a dotting tool rather than a detail brush for your hearts. Dip the medium-sized end of the dotting tool into your highly pigmented red polish. To form a heart shape quickly, place two dots parallel to each other, slightly spaced. While the polish is still wet, use the tip of the tool to quickly drag the excess polish down and inward from the center space between the two dots, forming the perfect point. Scatter these solid hearts randomly across the nail, allowing some to be cut off by the edges of the nail for a more dynamic and less structured appearance.
To elevate this look, incorporate varied heart textures and sizes, which gives the design an expensive, customized feel, as seen in the bottom half of the image. On one or two accent nails, use a fine-tip liner brush to create outline hearts. A clever technique for perfectly shaped outlines is to use the dotting tool method first to define the heart’s shape, and then use your fine brush (dipped in a bit of base coat remover or cleaner) to gently swipe away the center of the solid heart, leaving only the thin red border. Play with layering these elements: place a small, solid heart nestled inside a larger outline heart, or let several outline hearts overlap. This variety of scale—mixing tiny hearts with larger, structural outlines—tricks the eye into seeing complex detail, yet the application remains incredibly fast since you are only working with one color of polish on a simple base.
The final trick for a high-impact Valentine’s look is the glitter accent nail. Select one nail (the ring finger is traditional) and apply a sheer, shimmery glitter polish in rose gold or light pink. Once cured or dry, place a single, perfectly centered solid red heart using the dotting tool method described previously. The contrast between the dense, opaque red and the sparkly backdrop is instantly eye-catching. For an expert finish that makes the red hearts appear slightly dimensional or ‘jelly-like,’ apply a small drop of clear top coat directly over the top of the solid red heart shape, before applying the final overall top coat. This adds a subtle dome effect, mimicking professional salon application. Finish all nails with a UV-cured top coat for maximum shine and chip resistance.
15 Stunning PINK DESIGNS
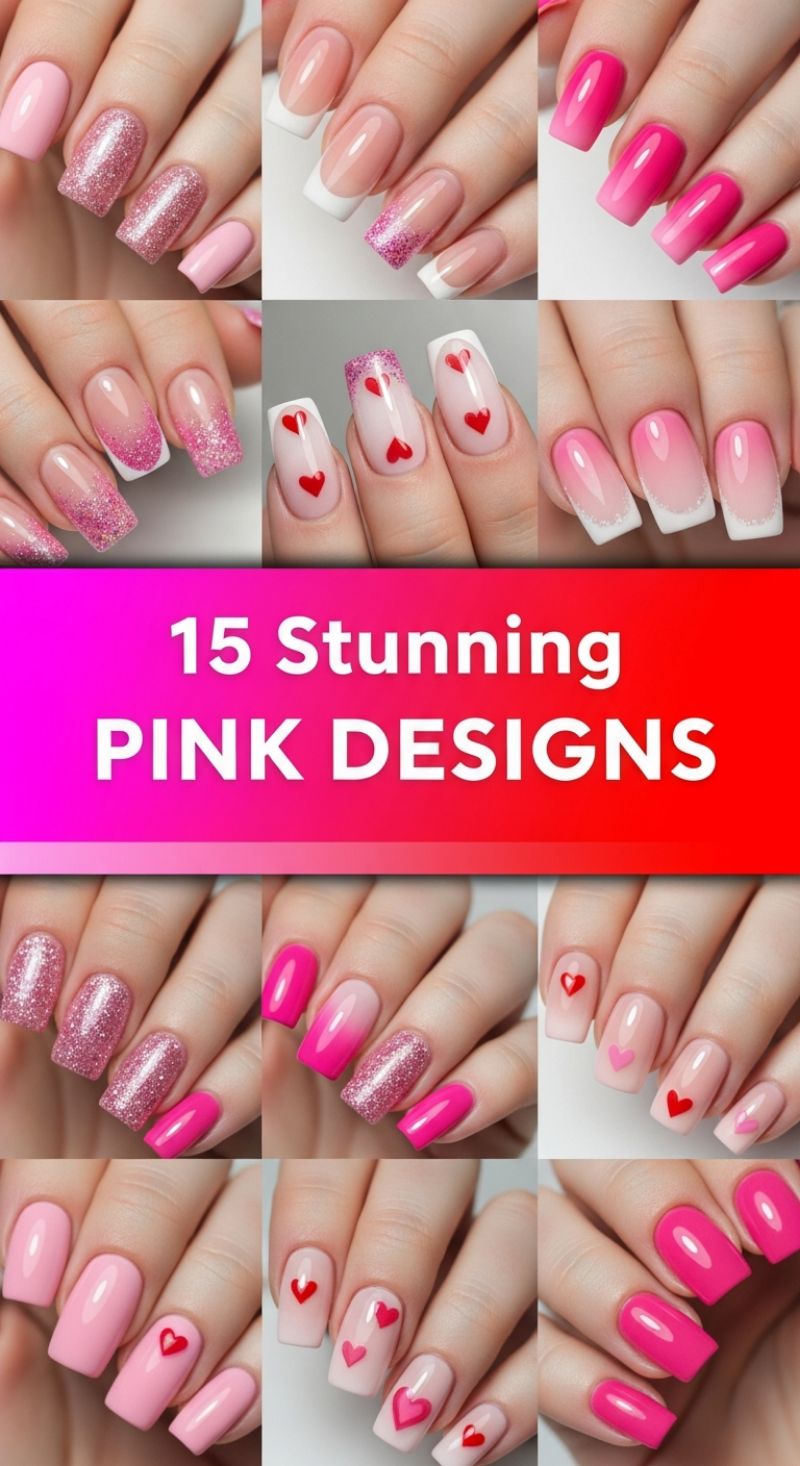
The quickest path to a festive Valentine’s Day manicure is leveraging a simple pink base and strategically using easy add-ons like decals and glitter accents. To achieve the beautiful, high-impact looks seen here while adhering to the ‘under 10 minutes’ rule, focus on the minimalist heart designs. Begin by applying a single, perfect coat of your chosen nude or pale pink polish, ensuring it’s a quick-dry formula. Once this foundational color is completely dry to the touch, the magic happens with red heart decals or stickers. Rather than attempting delicate freehand art, utilize adhesive or water-slide nail art for speed and precision. Choose accent nails—the ring and middle fingers are classic choices—and apply a single, perfectly centered red heart using tweezers. The stark contrast between the pale base and the bright, crisp red heart instantly creates a romantic, polished look that appears sophisticated yet takes mere seconds to execute. This strategy minimizes drying time and maximizes visual impact.
To infuse more depth and dimension into your express manicure, incorporate the stunning glitter effects shown throughout the collection. While a full set of dense glitter nails can be time-consuming, using a single accent nail dedicated entirely to sparkle is a fast, effective technique. After your base colors are applied on the other nails (perhaps a solid magenta or a soft pink), select a high-density, pre-mixed pink glitter top coat specifically formulated for one-coat coverage. Apply this sparkle polish to the designated accent nail. Expert tip: If you want maximum brilliance without multiple coats, choose a chunky, holographic glitter formula. This contrast—a smooth, creamy solid color next to a brilliant, textured glitter—is highly effective. Alternatively, for the simplest of French tips, choose a crisp white polish and apply it only to the tips of one or two accent nails, skipping the traditional full French set to save precious minutes, and finish that tip with a hint of fine pink glitter along the smile line.
For those drawn to the popular ombré or gradient looks, achieving a flawless blend quickly requires a smart cheat. Traditional sponge blending takes time and often results in messy cuticles. Instead, for a fast gradient effect, utilize two shades of pink (one medium, one bright) where the brighter shade is naturally sheer or semi-translucent. Apply the lighter shade across the entire nail as the base. While still slightly wet or after applying a thin layer of quick-dry topcoat, dab or lightly brush the brighter pink only onto the tip, allowing the colors to melt slightly where they meet. For a foolproof 10-minute finish, skip the blending entirely and instead use a white polish on the tip and top the entire nail with a clear jelly pink polish. The jelly coat will softly tint the white tips and fade naturally towards the cuticle, mimicking a dimensional gradient effortlessly. Finish all nails with a durable, high-gloss quick-dry top coat to seal in your speedy, stunning Valentine’s Day design.
12 Chic ALMOND SHAPES
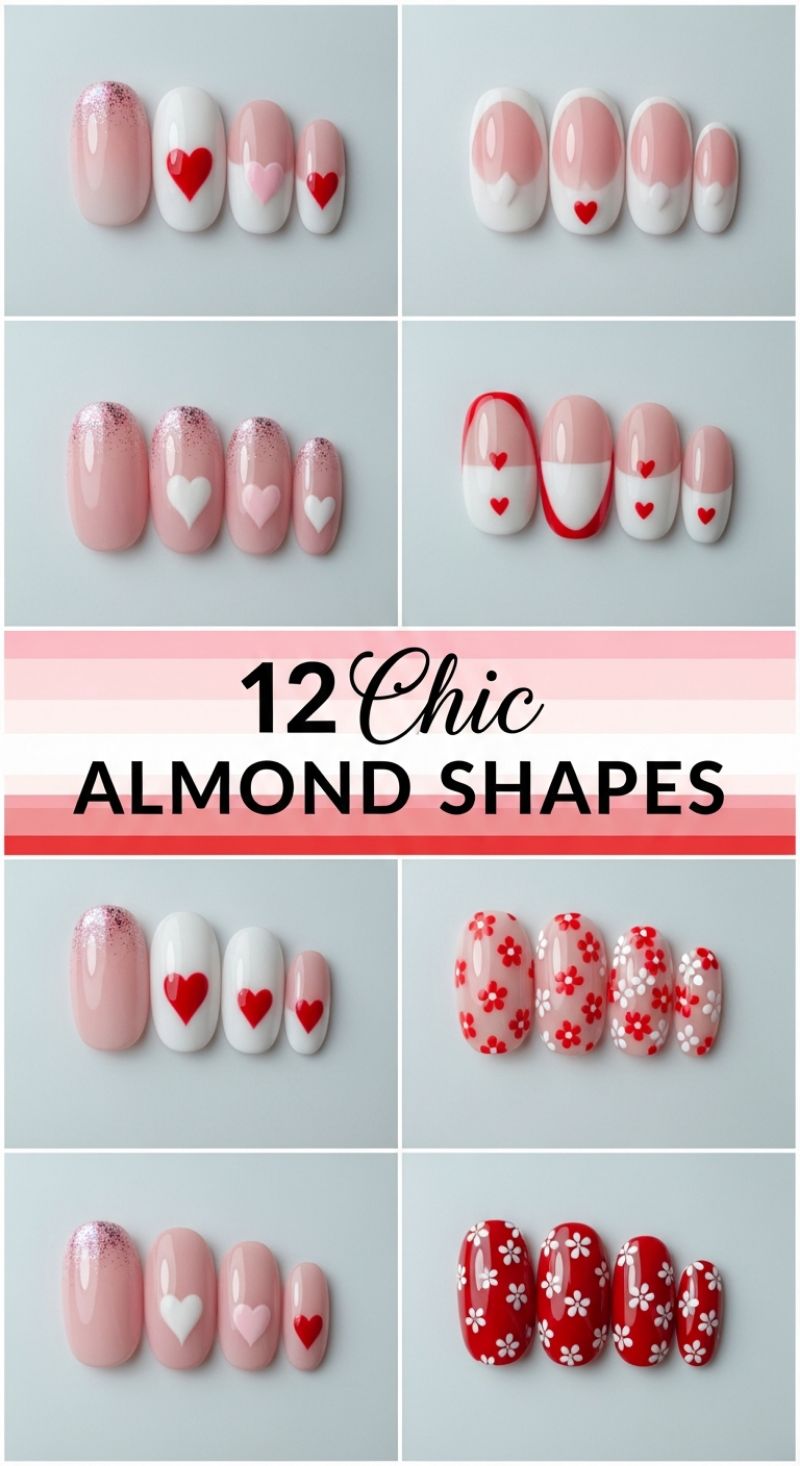
The “12 Chic ALMOND SHAPES” collection presents the ultimate in romantic nail artistry, focusing on elegant almond extensions dressed in classic Valentine’s hues: soft blush pinks, crisp white, and bold red. These designs masterfully integrate hearts—from large, solid color decals centered on white bases to delicate negative-space heart cutouts used in stylish French manicures, creating a “sweetheart” tip effect. The almond shape itself is an expert choice, as its tapered structure instantly elongates the fingers, making these romantic, detailed designs look mature and sophisticated rather than overly whimsical. The visual appeal is heightened by playful variation, incorporating everything from light pink glitter ombres to intricate full-coverage floral patterns in the same romantic palette, providing versatile options for any Valentine’s aesthetic. Since hand-painting these precise patterns is impossible in under ten minutes, the key to achieving this high-end, detailed look quickly lies in preparation and choosing the right application method, primarily relying on decals or quality press-ons. For the quickest application, high-quality press-on nails are the definitive solution. Start by thoroughly cleansing the natural nail bed with an alcohol swab to remove oils, which is crucial for adhesion. Next, select the appropriately sized press-on, apply the adhesive tab (faster and less messy than glue), and press firmly for 30 seconds. To replicate the detailed designs, such as the tiny heart French tips or the intricate floral arrangements, ensure your press-on set features these pre-designed accent nails. For DIY enthusiasts opting for the decal route, first apply and completely dry your chosen base color, whether it’s the sheer pink or solid red. Once the polish is set, use tweezers to carefully position the pre-cut heart or flower decals. For the soft glitter ombre effect shown, apply a sheer, glitter-infused polish only to the top third of the nail, using a makeup sponge to dab and diffuse the glitter downward slightly for a smooth, blended transition. Pro Tip: To make the 10-minute nail idea last, always seal your decals and any quick polish application with a thin layer of a high-shine, quick-dry top coat, ensuring the edges of the decals are fully encapsulated for maximum longevity and chip resistance. To capture the overall chic aesthetic shown here, avoid sticking to a single design across all fingers. Instead, strategically mix and match elements: pair a highly detailed floral or heart-focused nail (the accent nail) with simpler solid color nails, a minimalist glitter fade, or a classic French tip. This curated variation adds visual interest and depth, mimicking a custom, salon-quality set that looks complex but was achieved effortlessly.
10 Gorgeous ALMOND NAIL ART
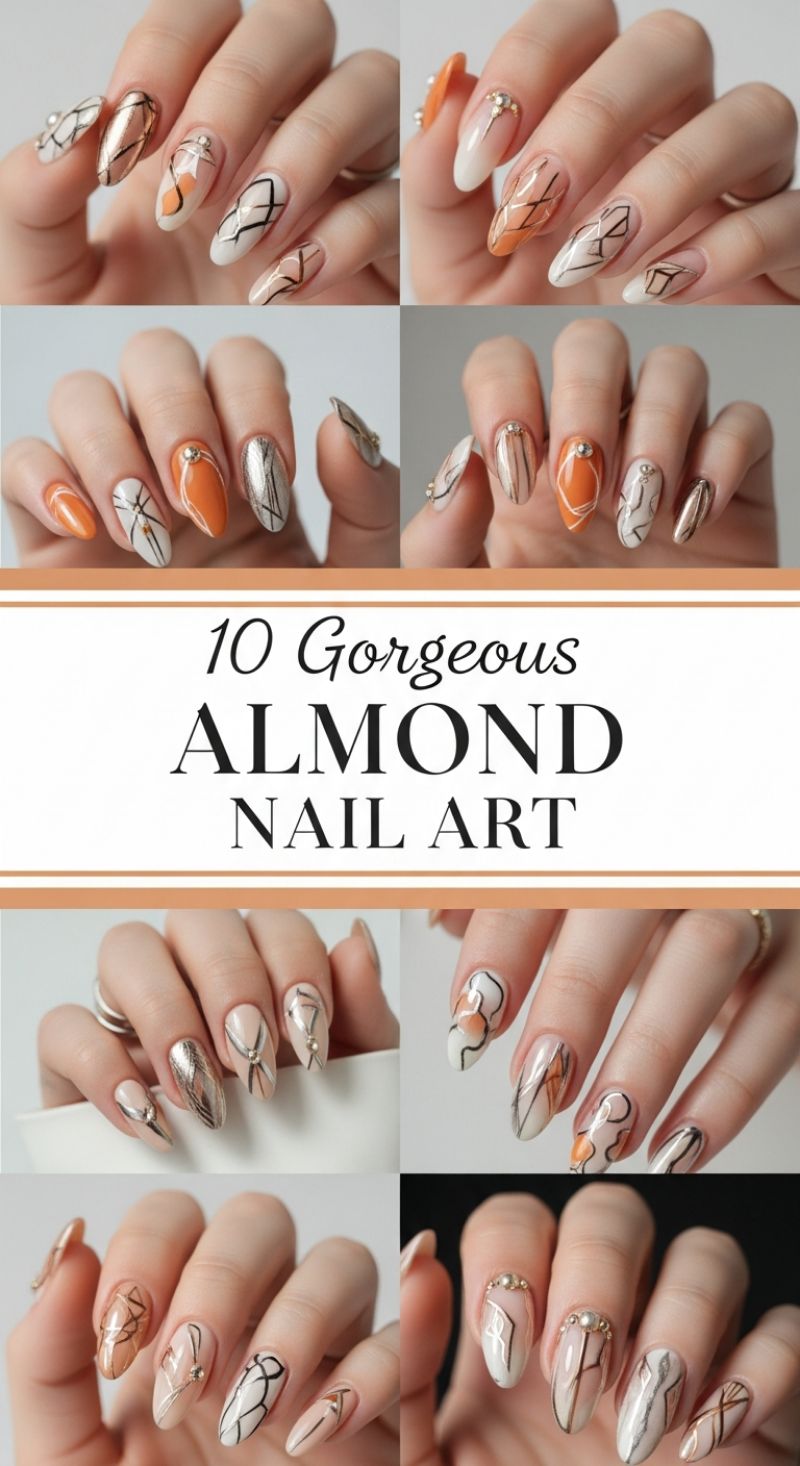
While the abstract geometric art featured here looks incredibly complex, the core technique can be simplified dramatically to achieve a high-end, gallery-worthy look in under ten minutes—perfect for a quick Valentine’s Day upgrade. This style relies on the sophisticated pairing of a sheer neutral base with metallic gold accents and warm pops of color (like burnt orange, which we’ll adapt to be a sultry V-Day terra cotta or deep rose). To manage this in a tight timeframe, you must choose two feature nails and keep the rest minimal. For the base, apply a sheer milky white or pale nude polish in one thin coat to all nails and allow it to dry completely. This sheer foundation provides the perfect canvas, masking imperfections while giving the intricate line work maximum contrast. Expert tip for speed: Skip elaborate freehand designs on all ten fingers. Instead, apply a single metallic vertical stripe using pre-cut striping tape on three nails per hand, focusing on the pinky and index fingers. This immediately elevates the manicure without requiring precise drying or drawing time.
Now, focus on your two primary feature nails (we recommend the middle and ring fingers). These are where you will introduce your V-Day warmth and abstract lines. Apply a quick, free-form swipe of deep rose or terra cotta gel polish to a small section of the nail, curing it immediately. This doesn’t need to be perfectly shaped; the beauty of this look is its deliberate abstraction. Next, using a highly pigmented metallic gold or silver striping gel and an ultra-fine 000 striping brush, execute your geometric design. The fastest method is creating two intersecting diagonal lines or drawing one abstract curve that outlines the edge of the color blob you just placed. Always pull the brush from cuticle to tip for the cleanest, longest lines. Remember, less is more; one or two sharp, well-placed lines provide a bigger visual impact than multiple messy attempts. If you lack the dexterity for freehand lines, opt for thin gold sticker strips, which you can trim to create sharp angles instantly.
To finish and lock in that luxe vibe, the details matter most. Apply a durable, high-shine top coat to all nails. While the top coat is still slightly tacky (or using a tiny dot of specialized gem glue), place a small cluster of rhinestones or a single pearl near the cuticle of your neutral nails. This placement draws attention to the clean shape of the almond nail and provides a touch of jewelry-like sparkle that is synonymous with Valentine’s Day elegance. The combination of warm color, sharp metallic lines, and the delicate glimmer of jewels creates a cohesive, modern manicure that looks like it took hours to perfect, but thanks to the strategic simplification of the abstract elements, it is easily achievable in just minutes.
Magical Disney-Inspired Valentine’s Nails
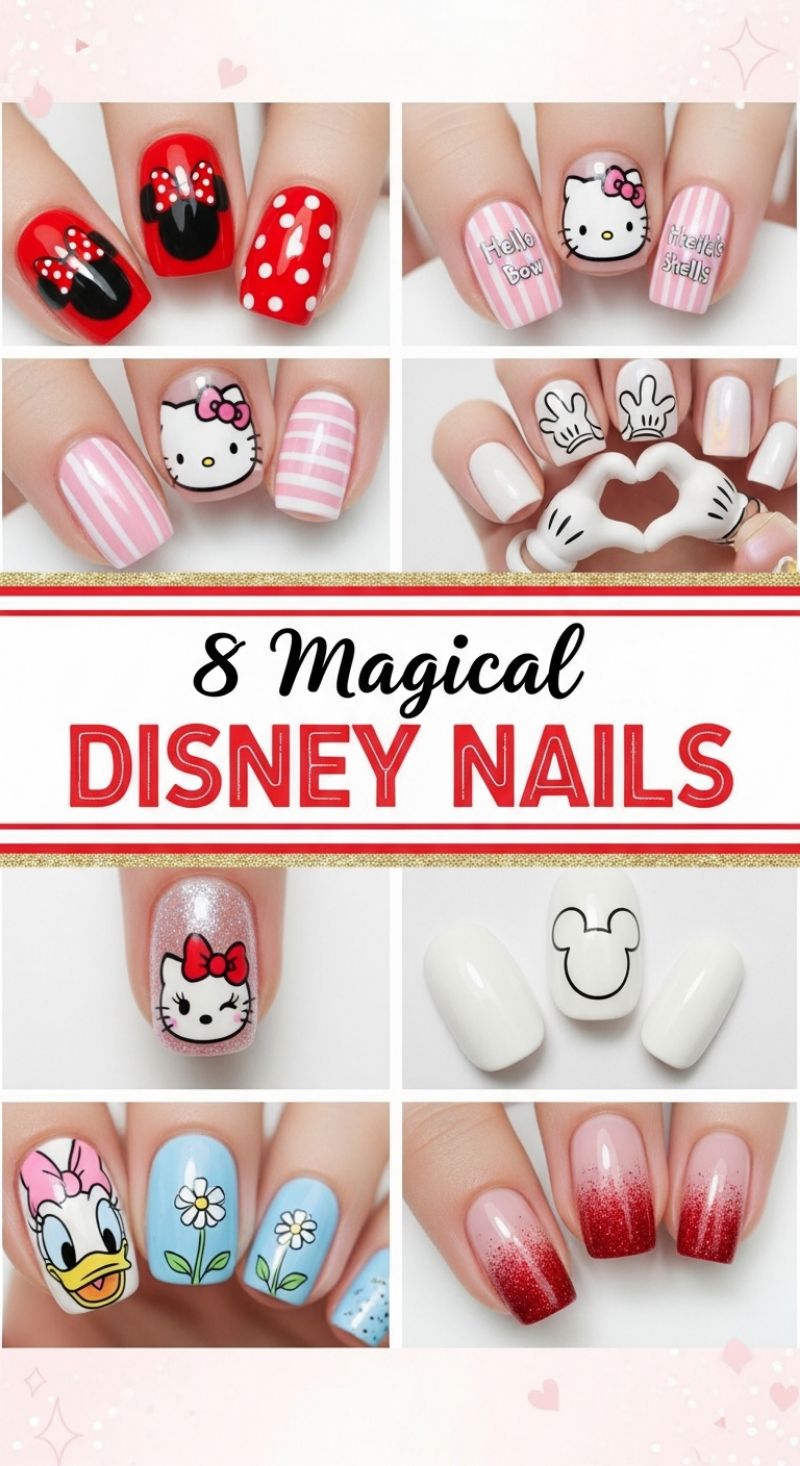
While the image showcases detailed character art, the core elements—bright reds, stark whites, polka dots, and glitter gradients—are perfectly suited for a romantic, quick Valentine’s Day manicure. To achieve the iconic Minnie Mouse aesthetic in under 10 minutes, start by selecting a vibrant cherry red polish for your base. Once the base is dry (using a quick-dry formula is essential here), focus on the polka dots. Instead of spending time on perfect placement, grab a small dotting tool (or the rounded end of a bobby pin or toothpick) and dip it into white polish. Quickly dot four of your nails, focusing on creating random, yet balanced, patterns. The timeless combination of red and white instantly reads as both classic Disney and deeply romantic, making this a high-impact look with minimal effort. This technique can be done and dried with a topcoat in about seven minutes.
For a truly glamorous, yet simple, finish, turn your attention to the shimmering red gradient shown in the bottom right of the image. This technique, often called a glitter ombre, provides a beautiful transition from nude to bold red sparkle, mirroring the feeling of romance blooming. Start with a pale nude or light pink base on all nails. Next, take a small cosmetic sponge and apply a rich red glitter polish directly to the edge of the sponge. Gently tap the sponge onto the tips of your nails, concentrating the glitter primarily at the free edge. As you move slightly upward toward the center of the nail, lift the pressure to create a seamless fade. This blending technique requires precision but very little time. Since the base coat is simple and the glitter polishes are often quick-drying, this gradient effect can be applied to all ten fingers in about five minutes. Always finish with a high-shine topcoat to lock the glitter in place and ensure a smooth, long-lasting finish.
To subtly incorporate the character theme without needing to freehand complex designs like Daisy Duck or Hello Kitty, consider using the simple outline technique featured with the Mickey Mouse hands or head. On one accent nail (typically the ring finger), apply a solid, opaque white polish. Using a very thin striping brush and black polish, quickly sketch the outline of the two curved ears and a head circle. This minimalist interpretation is fast, chic, and provides a sophisticated nod to the Disney theme while adhering strictly to the 10-minute time limit. Remember that speed in nail art relies heavily on utilizing quality quick-dry polishes and protecting your work immediately with a fast-setting topcoat to avoid smudging.
9 Trendy Valentine Manis That Take Minutes
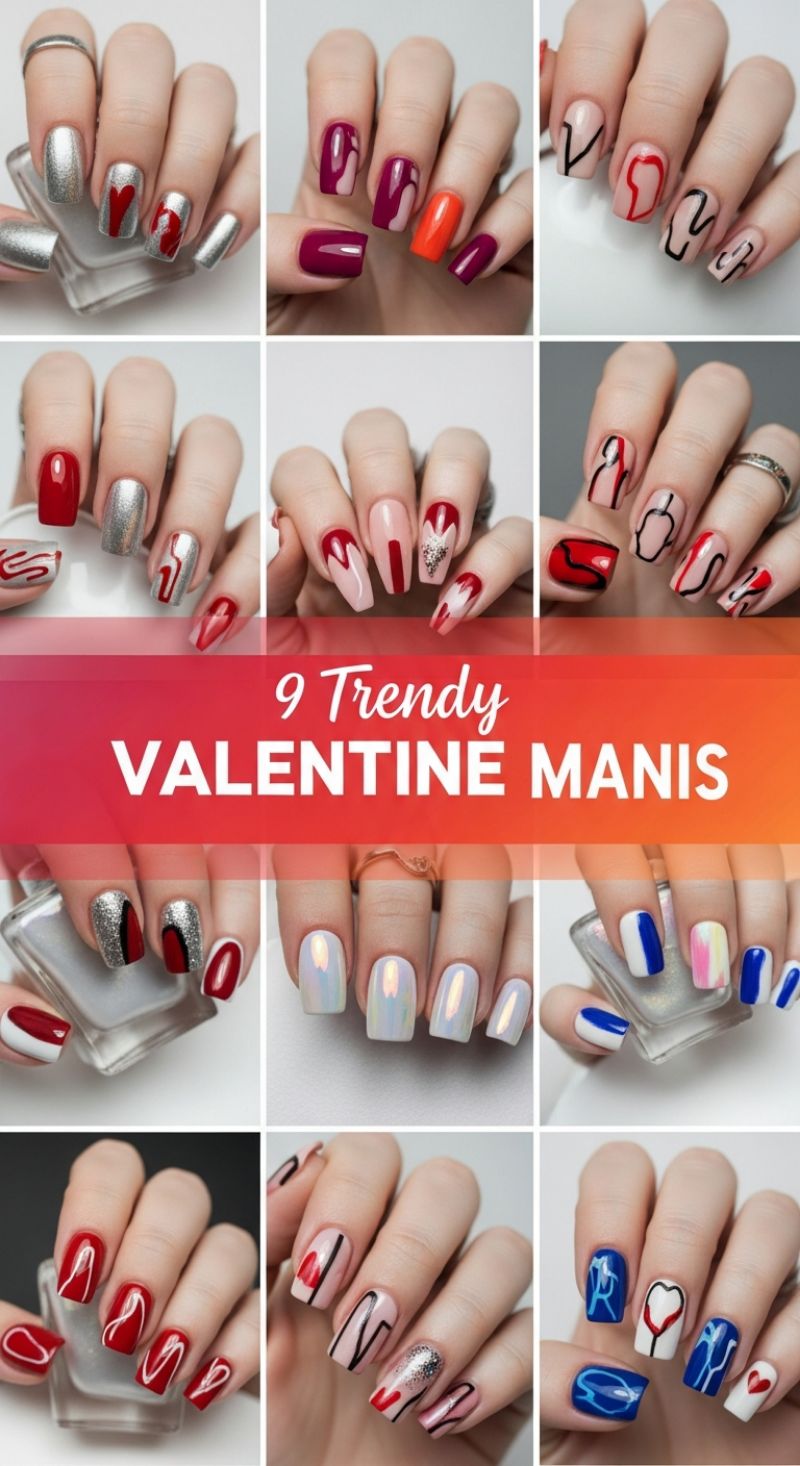
While the image showcases nine distinct and gorgeous manicure designs perfect for Valentine’s Day, many of these high-impact looks can be adapted into quick applications to fit your under-10-minute timeline. The key is isolating one simple, recognizable element—like a heart or a color block—and focusing it on an accent nail, keeping the rest of the hand simple. Take inspiration from the top-left design: start with a full coat of a shimmering silver polish, which offers great coverage and minimizes the need for precise application. Next, instead of attempting intricate designs on every finger, dedicate the ring finger to a bold red heart. You can easily create a simple heart shape by using a dotting tool to place two symmetrical dots near the cuticle line and then dragging a fine-tipped brush down to meet in a point. This technique, requiring minimal freehand skill, delivers maximum visual payoff, combining texture (shimmer) with a classic Valentine’s color (red) in a matter of seconds per hand.
For a more abstract or modern approach, look to the negative space and line art examples shown in the right column. These designs appear complex but are inherently quick because they prioritize graphic lines over full coverage. Apply a sheer nude or pale pink base coat—the ultimate time saver, as imperfections won’t show. Then, using an ultra-fine striping brush or a dedicated nail art pen in black or bold red, practice drawing continuous, winding lines that mimic the abstract shapes seen in the image. Focus on a maximum of two lines per nail, avoiding overlapping the same spot multiple times. A great trick for speed is to use liquid latex around the cuticles before starting the line work; this allows for messy application near the edges, and once the latex is peeled off, the look is perfectly crisp. Another quick option is the classic half-moon or deep French tip seen in the bottom row, which only requires painting the tips or the lower half of the nail in a contrasting color (like red over white) and sealing it quickly.
To ensure your entire manicure stays under the 10-minute mark, product selection is vital. Always utilize fast-drying top coats, such as those formulated specifically for quick-dry application, which will prevent smudging and drastically reduce your wait time. For the simplest heart designs, skip the brush altogether and utilize a heart-shaped sticker or stencil on a dry base coat; simply place the stencil, paint over it with your accent color, and remove it immediately while the polish is still wet for a sharp outline. If you choose the simple color-blocked look (like the clean primary colors in the center-right design), precision is less important than saturation. Ensure your polish is high quality and opaque in one or two coats, reducing the need for lengthy layering. By focusing on simple geometric shapes, high-contrast colors, and speed-optimized polishes and tools, you can achieve a runway-worthy Valentine’s look without sacrificing your time.
7 Simple Valentines Nail Ideas

Achieving maximum romantic impact with minimal effort is the goal for these 7 simple Valentine’s Day nail designs, all centered around a sophisticated palette of nude/sheer pink and vibrant, passionate red. The foundation for nearly every look here is a meticulously applied base coat followed by 1-2 coats of a sheer milky pink polish—think soft hues like ‘Bubble Bath’ or ‘Mod About You’ to provide a clean, elegant backdrop. For the quickest applications, focus on the two most straightforward concepts: the scattered hearts and the geometric stripes. The tiny hearts (as seen in the first design) are effortlessly created using a small dotting tool dipped in red polish; place two adjacent dots and lightly drag the tip of the tool down and through the center to form a perfect heart shape. For the intersecting geometric lines, speed is key—use ultra-thin red striping tape or a dedicated fine-line nail art brush. The beauty of this look lies in its imperfection; quick, angular strokes that criss-cross create an artistic, minimalist vibe that’s impossible to mess up, making it perfect for those under-10-minute time constraints.
To elevate your simple Valentine look, incorporate elements from the modern French manicure and abstract art shown in the middle and bottom rows. The red French tip variation (designs 3 and 5) is achieved rapidly using French tip guides or a silicone nail stamper. Apply the guide, paint the tip bright red, and lift immediately for a crisp smile line. For an accent nail, add a single small heart decal or draw a heart in the center, near the cuticle, to bridge the classic French look with seasonal charm. If you prefer a more artistic, flowing design (like the abstract swirls in the fourth design), load a liner brush with slightly thicker red polish and create continuous, curvy lines across the nude base. This technique, often called ‘watermarking’ or ‘wavy lines,’ requires minimal precision, allowing for a spontaneous, freehand application that looks expensive but takes seconds.
Finally, maximize impact through dedicated accent nails, showcasing designs like the ‘love’ script or the graphic half-moon and heart combo (Design 6). For script or intricate text, pre-cut vinyl stickers or specialized stamping plates are your secret weapon for speed and professional-level clarity. For the sharp, clean shapes of the crescent moon or the large heart, consider using circular or heart-shaped nail vinyls/stencils. Place the stencil, generously fill the cutout space with red polish, and immediately peel the stencil away before the polish sets. This ensures flawless edges and prevents smudging. Regardless of which of the 7 designs you choose, always finish with a high-shine, quick-drying top coat. This step is non-negotiable; it seals your delicate artwork, provides that coveted glossy finish, and prevents chipping, ensuring your simple, beautiful Valentine’s manicure lasts well beyond the holiday.
6 Bold DUCK NAILS
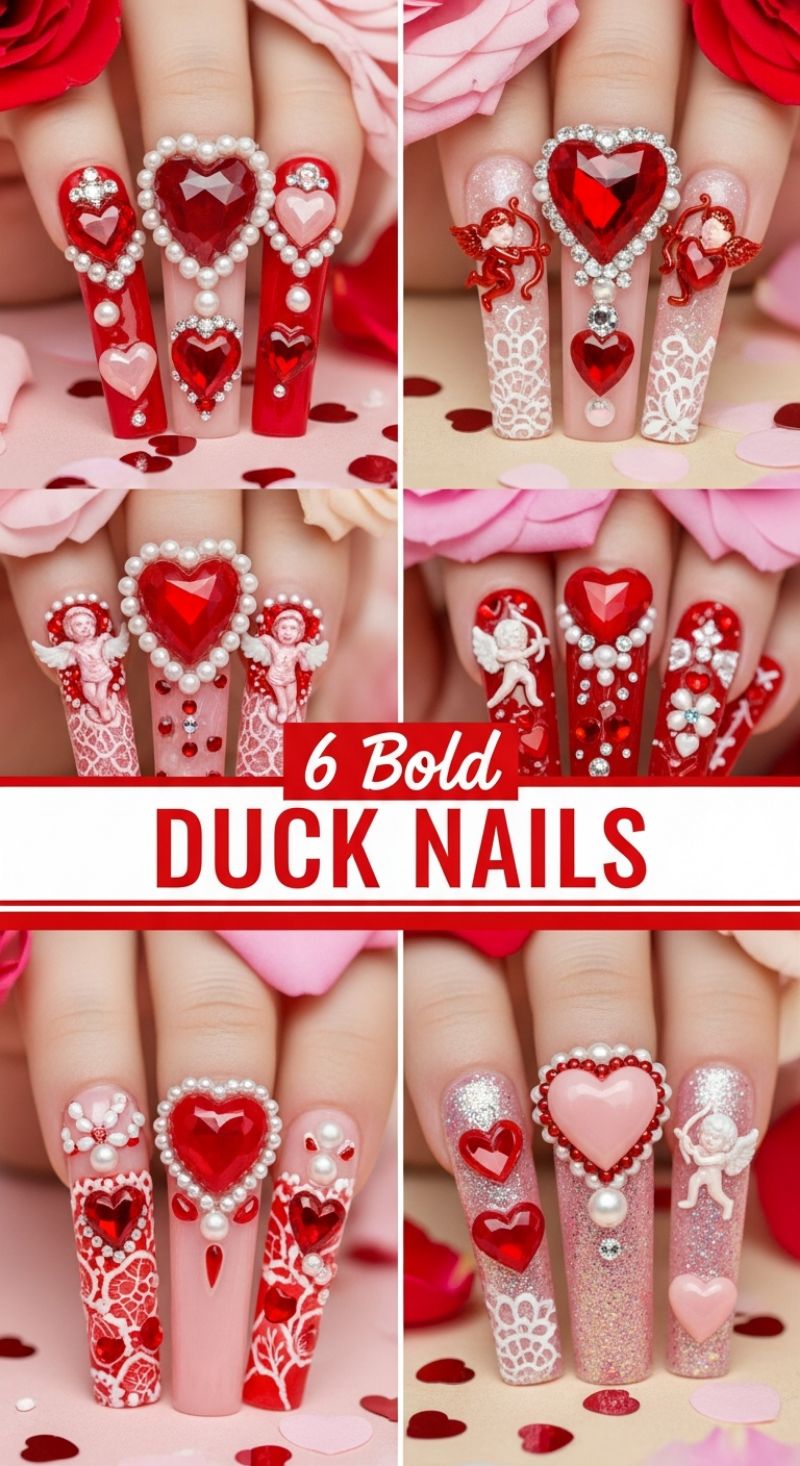
The extravagant inspiration image showcases the maximum level of Valentine’s Day drama, featuring the iconic ‘Duck Nail’ shape adorned with massive 3D heart gems, cascading pearls, intricate lace, and miniature Cupid sculptures. While achieving this exact look requires several hours and advanced techniques, we are simplifying the aesthetic to fit your under-10-minute schedule. The key to capturing the essence of this style quickly is focusing on a bold color palette and strategic flat embellishments. Start by prepping your nails and applying a base of highly pigmented cherry red or a shimmering pink glitter polish (like those featured in the image). These colors immediately set a vibrant, romantic foundation. For speed, use an instant-dry formula. If your nails are already coated, simply jump straight to the accent nail design.
To simulate the dramatic bling without the cure time, select two accent nails—perhaps the ring finger and the middle finger. Instead of large sculpted hearts, utilize flat-backed red or pink heart stickers or decals. Place one prominent heart near the tip or base of the nail. To mimic the surrounding pearl halo effect, use small, flat-backed rhinestones (size SS3 or SS5) and apply them using a dab of fast-setting nail glue or a very thick coat of topcoat. Arrange just three to five rhinestones around the heart decal, focusing on symmetry to suggest the framing seen in the original designs. Avoid trying to replicate the intricate 3D lace; instead, use a white striping brush to draw a single, jagged V-shape near the tip of a separate accent nail, or place a simple pre-cut lace decal if you have one on hand. This rapid application of contrasting elements is essential to maintain the “bold” energy of the look.
After applying your chosen flat embellishments, the most critical step for durability and finish is the topcoat. Use a high-shine, gel-effect topcoat, applying a generous layer over the entirety of the nail, paying special attention to sealing the edges of any stickers or small rhinestones. This helps lock everything into place and provides the high-gloss, expensive look that defines these styles. By focusing your detail work on just two nails and utilizing quick-fix flat elements in the signature red, pink, and white color scheme, you can achieve a maximalist, Valentine-ready manicure that looks labor-intensive but is ready in minutes. Remember, bold color and dramatic placement are your shortcuts to success.
9 Lasting PINK DIP NAILS

This stunning collection demonstrates the versatility of pink, moving seamlessly from delicate baby pinks and shimmering rose golds to vibrant magentas, all showcasing that coveted, high-shine finish characteristic of professional nail systems. To achieve this multi-shade pink aesthetic quickly for Valentine’s Day, focus on selecting three core pink tones: a pale, sheer shimmer for an accent nail, a soft ballet pink for a neutral base, and a deep, saturated magenta. The visual impact seen here relies heavily on the clean, elongated shape (coffin or tapered square), which maximizes the luxurious appearance of the opaque color. If you are aiming for this look in under ten minutes, bypass the time-consuming dip process and opt for high-pigment press-on nails or highly opaque, single-coat gel polishes. Expert tip: Arrange your chosen colors on the table beforehand, pairing the lighter solids and shimmers with the deeper magenta for visual balance, typically placing the glitter accent on the ring finger for a classic holiday touch.
To execute this glamorous manicure rapidly, application technique is key. Start by applying a strong nail adhesive to prepped nails if using press-ons, ensuring a secure bond by pressing firmly for five seconds per nail. If using a quick-cure gel, select a formula that requires only one coat for full opacity. Apply the gel color and cure immediately under an LED lamp (typically 30-60 seconds, which fits the time limit). The genius of this look lies in alternating textures—the smooth, flawless solid colors juxtaposed with the dazzling sparkle. To integrate the glitter effect swiftly, use a highly concentrated glitter polish or a fine metallic top coat over just one or two nails per hand, rather than applying messy glitter powder. This method minimizes cleanup and curing time while providing the necessary contrast to elevate the look from everyday polish to romantic holiday glamour.
While “lasting” typically refers to the multi-week durability of dip powder, you can ensure your quick 10-minute manicure has maximum staying power for the evening. After the color application is complete, immediately seal the entire set with an ultra-glossy, quick-dry top coat. For the most professional-looking finish, choose a top coat that is self-leveling, as this helps smooth out any inconsistencies, particularly over the glitter accents, mimicking the thick, glass-like coating of actual dip nails. Pay special attention to capping the free edge of the nail—this crucial step prevents premature chipping and drastically improves the lifespan of your quick Valentine’s Day creation, ensuring you can showcase those vibrant, perfectly manicured pink nails all night long.
5 Easy DIY Manicure
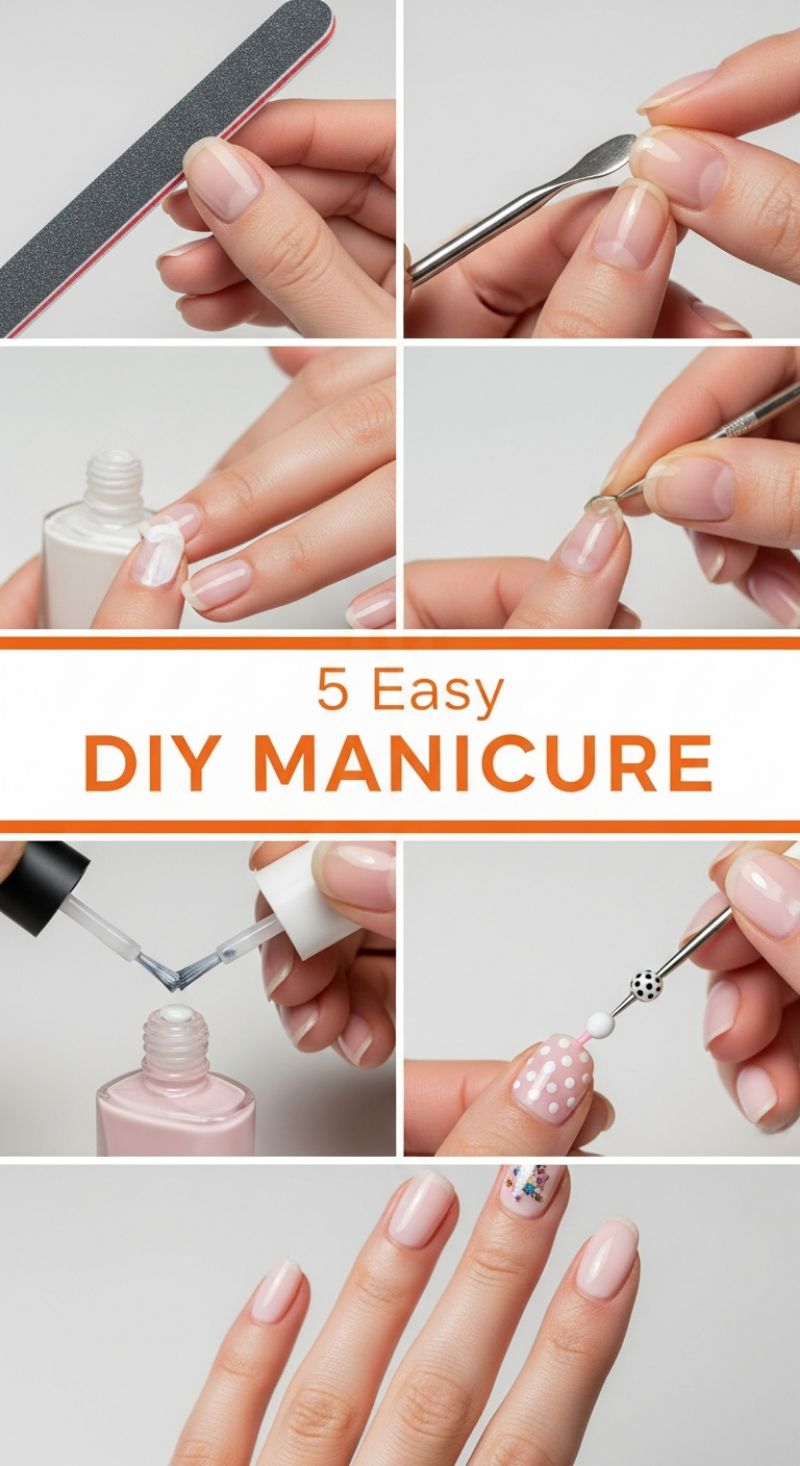
Achieving a professional-looking, subtle Valentine’s Day manicure doesn’t require complex tools or hours of time. The foundation of this quick look is proper preparation, ensuring your nails are a clean canvas. Start by shaping your nails (as seen in the first step) using a medium-grit file, moving in one direction to prevent splitting. An ideal shape for this soft, romantic aesthetic is a gentle squoval or oval. Next, focus on the cuticles; gently push them back using a metal pusher or orange wood stick, being careful not to scrape the nail bed. A common mistake that slows down the process is skipping the base coat. Applying a clear base coat not only protects your natural nail from staining (especially important if you choose a deep red later) but also provides the perfect tacky surface for optimal polish adhesion, making your application smoother and reducing the chances of needing a second, messy layer. Let the base coat dry for 30 seconds before moving on to color.
Once prepped, apply your chosen soft shade—the pale pink visible here is perfect for a chic, subtle Valentine’s vibe. For a flawless, quick application, use the three-stroke method: one stroke down the center, followed by one on each side. The trick to keeping this process under 10 minutes is integrating a simple yet impactful accent nail. Rather than attempting intricate freehand hearts, opt for the quick application of polka dots or glitter. For polka dots (as shown), invest in a simple dotting tool—it makes the process foolproof. Dip the smallest end into a contrasting color (like white or silver) and dot randomly or uniformly on one accent nail. Alternatively, apply a sheer layer of fine glitter polish to your ring finger to create a beautiful, effortless sparkle that catches the light and adds instant romance to the look.
Finally, seal the design and lock in the shine with a high-quality, quick-dry top coat. This step is non-negotiable for longevity and speed. A quick-dry formula prevents smudges and ensures your manicure is fully set within minutes, allowing you to get back to your routine without ruining your hard work. When applying the top coat, ensure you ‘cap’ the free edge of the nail (run the brush horizontally across the tip). This expert technique prevents chipping, extending the wear of your soft pink Valentine’s manicure. With minimal drying time and simple techniques like dotting and glitter application, this entire process can easily be completed in under 10 minutes.
5 Festive MARDI GRAS LOOKS
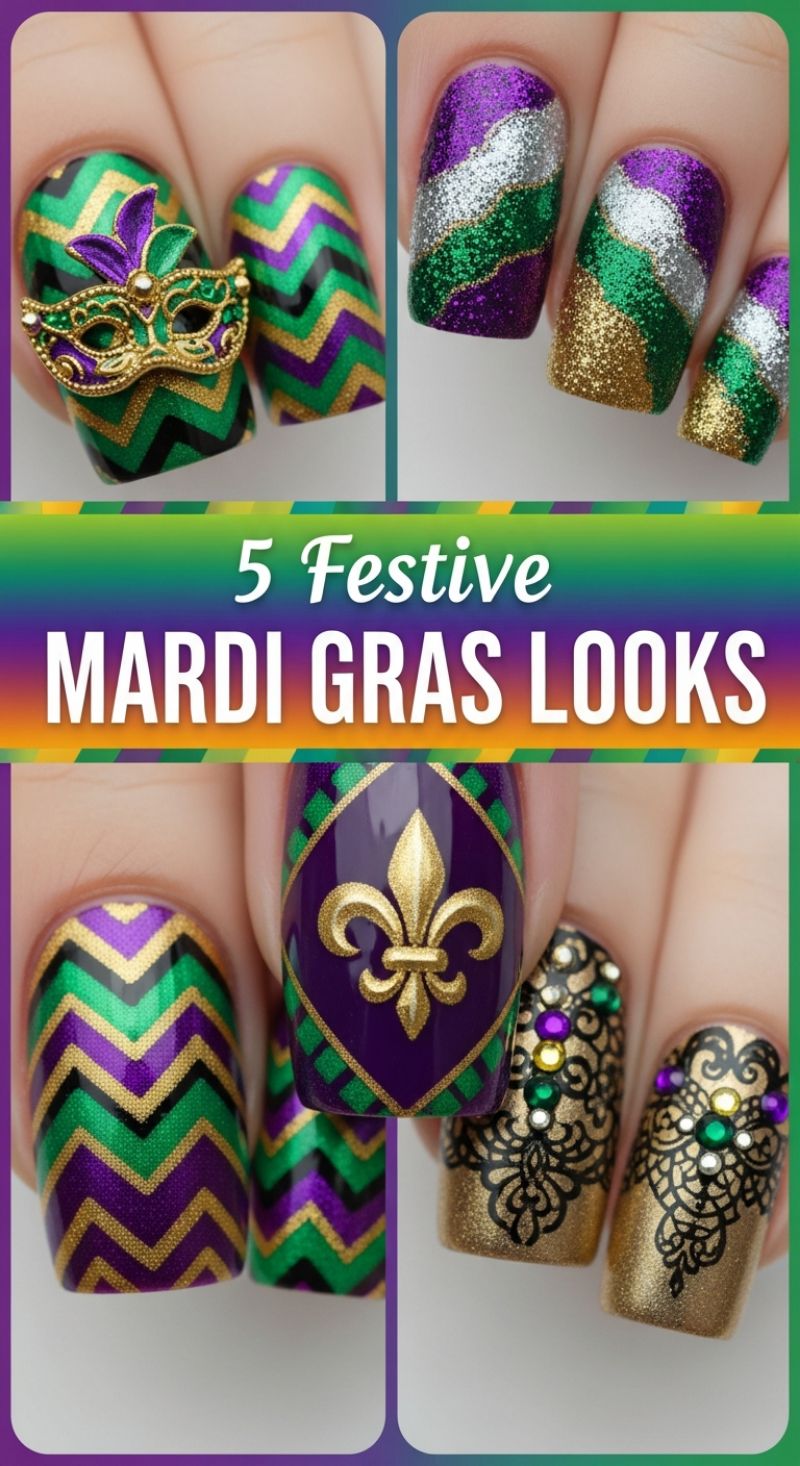
While the looks featured here showcase the traditional opulence of Mardi Gras—with deep purples, vibrant greens, and rich golds—the techniques used are perfectly transferable for creating a stunning, high-impact Valentine’s Day manicure in under 10 minutes. The key to speed is simplification and strategic glitter placement. Instead of attempting intricate chevrons or full multi-colored gradients, select two polishes: a deeply pigmented Valentine shade (like a ruby red or fuchsia pink) and a coordinating metallic glitter (silver or rose gold). To mimic the diagonal lines seen in the second look, simply apply two quick diagonal swipes of color. Start with your base coat, then paint the lower half of the nail with the solid color. Before it fully dries, use the glitter polish to draw a single, clean diagonal line that covers the seam between the naked nail and the solid color, creating an immediate visual break and the appearance of complex striping. This method avoids the time-consuming process of taping or layering multiple coats, achieving a festive sparkle almost instantly.
To capture the maximalist elegance of the accent nails without spending hours on detailed stamping or 3D masking, focus on high-impact speed elements. Look closely at the fourth nail in the bottom row, which features strategic rhinestones over a gold glitter base. For a 10-minute V-Day look, pre-select small, jewel-toned gems (pinks, reds, or clear crystals) and focus them exclusively near the cuticle. Apply a thick dot of top coat or specialized nail glue to the upper curve of the nail and use a wax pencil or dotting tool to place 3 to 5 stones in a quick crescent shape. This immediately adds dimension and mimics the complexity of detailed design work like the elaborate lace patterns shown, but only takes seconds per nail. The quick application means you achieve an ‘accent nail’ effect without having to freehand any delicate lines or wait for multiple layers to dry.
For an even faster nod to the complexity of the gold Fleur-de-lis shield, bypass stamping entirely and opt for a high-quality nail sticker or decal. Many brands offer intricate gold foil heart decals or simple silhouette stamps that can be placed over a single coat of solid color (such as a classic nude or white base) and sealed with a high-shine top coat. If you prefer to stay loyal to the glitter elements, apply a single coat of fine gold glitter polish to all nails, let it dry for one minute, and then apply a quick layer of fast-drying top coat. This singular, striking metallic finish serves as an excellent foundational color that looks complete and polished, delivering a festive, celebratory feel that rivals the elaborate layered looks, but remains well within your 10-minute time limit.
7 Glam ACRYLIC NAILS
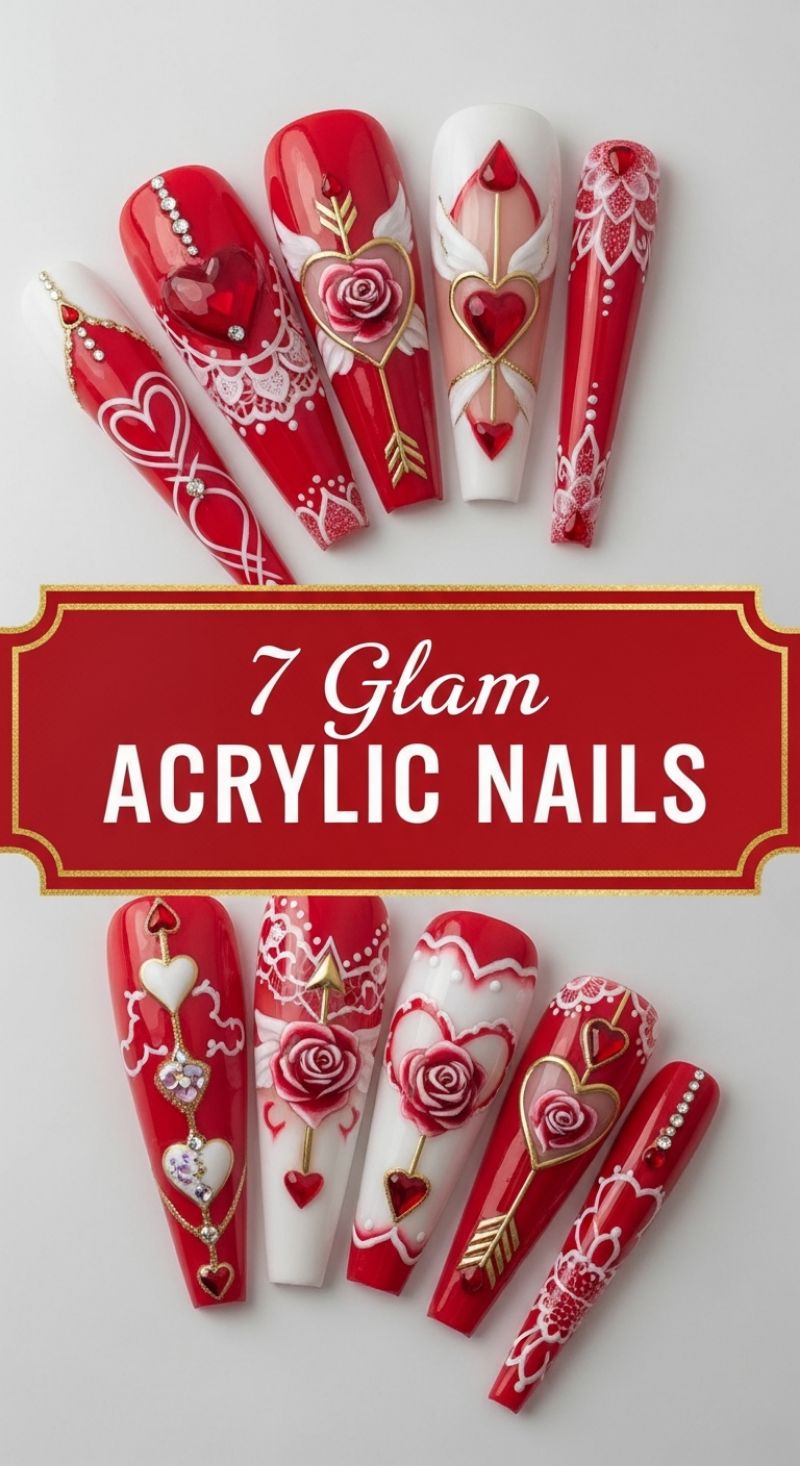
While the designs featured here are intricate, hand-sculpted acrylic masterpieces that take hours, you can achieve the same level of high-glam romance in under 10 minutes by leveraging smart shortcuts. The key elements to capture are the bold contrast of opaque red and crisp white, coupled with luxurious gold accents and heart motifs. To begin your simplified design, ensure your nails are filed and prepped. Apply a base coat, followed by one to two coats of an ultra-pigmented Valentine red polish on most fingers. Select two accent nails for a white or nude base, mimicking the reverse French tip and neutral backgrounds shown in the professional set. The entire essence of this look hinges on the swift application of pre-made embellishments rather than freehand painting or 3D sculpting.
To translate the complex lace and delicate patterns into a speedy application, invest in quality nail stamping plates featuring damask or lace designs. Using a white stamping polish, quickly transfer the intricate patterns onto your fully dry red nails—this instantly mimics the detailed white filigree seen across the base designs. For the dramatic heart centerpiece, skip embedding large 3D stones and opt instead for large, flat-back heart charms or high-quality vinyl heart decals, securing them with a strong nail glue or a drop of clear gel top coat cured briefly under an LED lamp. The goal is strategic placement: focus on one or two prominent elements (like the central gold arrow and rose/heart) rather than replicating the pattern across the entire surface. This targeted application saves significant time while still delivering maximum visual impact.
For the ultimate quick-glam finish, focus on the iconic Cupid’s Arrow design shown on the feature nails. Start with a nude or white accent nail. Instead of hand-painting the arrow shaft, use a thin, pre-cut gold striping sticker applied vertically down the center. Place a single red heart decal or small heart-shaped rhinestone at the top and bottom of the stripe line. To add the necessary sparkle, utilize small, crystal rhinestones (SS3 or SS5) and apply them quickly in a sparse line near the cuticle or down one side of the nail using a fine dotting tool dipped in wet top coat. Seal the entire look with a fast-drying, high-shine top coat to emulate the glossy, deep shine characteristic of professional acrylic nails, ensuring your opulent Valentine look is secured and ready in minutes.
Green with Envy: Sophisticated Jewel Tones
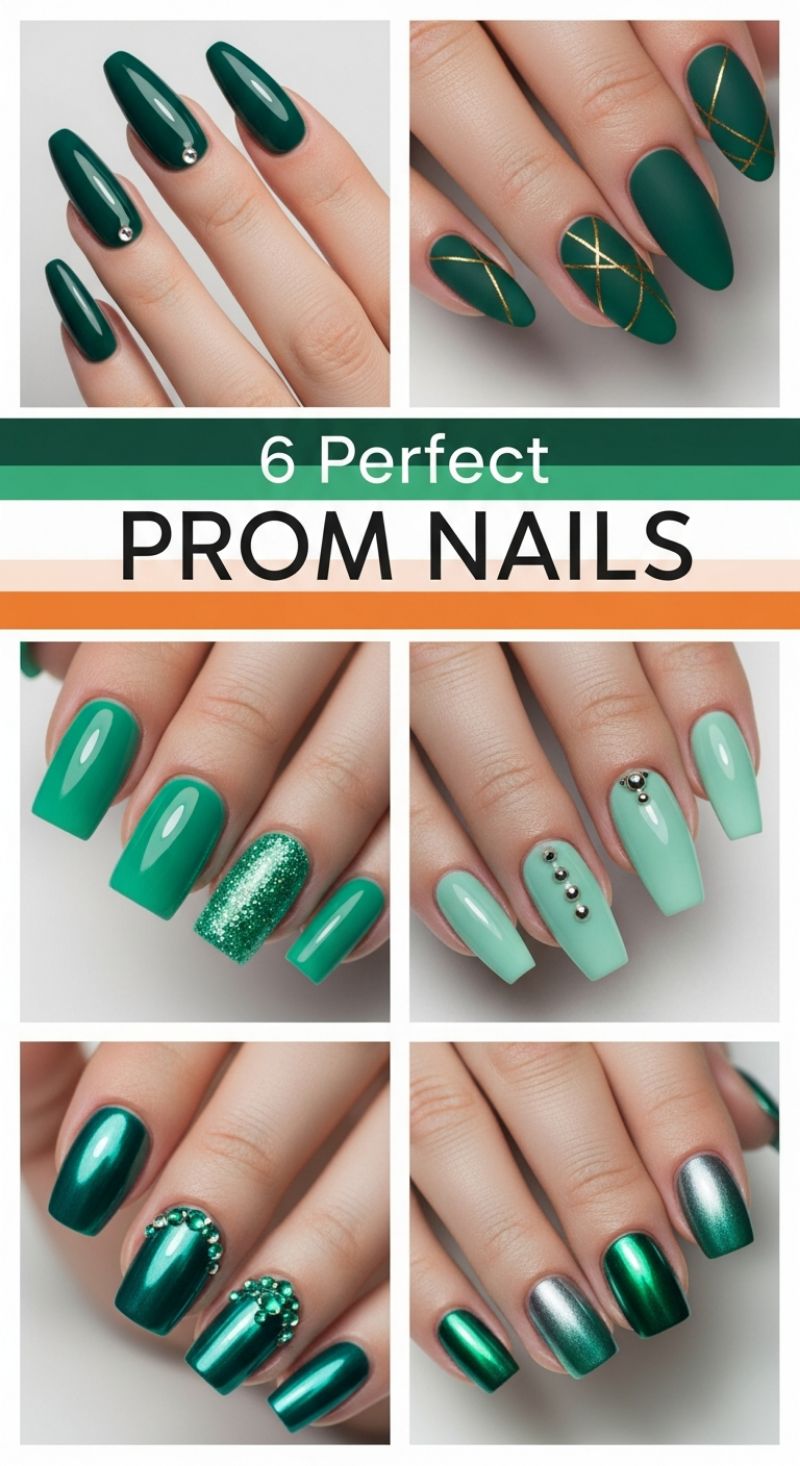
While Valentine’s Day typically calls for classic reds and pinks, an unexpected deep emerald green provides a sophisticated, jewel-toned alternative that looks luxurious and is incredibly fast to achieve. To replicate the streamlined look seen in the top left, start with a high-quality, opaque deep green polish. Apply two thin coats of color, allowing each coat to dry for sixty seconds. The key to keeping this look under the ten-minute mark is the minimal accent. Before your topcoat cures, use a wax pencil or specialized tool to pick up a single, small rhinestone and place it near the cuticle of your ring finger. Immediately seal everything with a fast-drying, high-gloss topcoat. If you prefer the dramatic matte finish and geometric lines seen in the top right, opt for gold striping tape instead of gems, applying it directly onto the fully dry matte polish before locking it in with a matte sealant. This technique eliminates complex freehand painting, making the intricate design simple and speedy.
For those who prefer brighter or lighter hues, the middle row offers quick, high-impact variations. The bright jade green look (middle left) utilizes a quick-drying polish base, substituting nail art with a single coat of chunky emerald glitter applied exclusively to the accent nail. This method saves time on precise application while delivering maximum sparkle. Similarly, the mint green style (middle right) maintains speed by relying on simple, linear application of silver nail studs. Instead of using liquid glue, source adhesive-backed metal studs or use a thick layer of topcoat as a temporary adhesive before curing. Arrange three to four studs vertically down the center of the nail—the uniformity of the studs provides a clean, modern look faster than scattered placement. Always ensure the studs are completely covered by a generous layer of clear topcoat to prevent snagging and premature loss.
To achieve the coveted chrome or metallic finish shown in the bottom examples, you can utilize pre-made metallic strips or, for a more intense mirrored effect, specialized chrome powder. If using powder, apply it gently with an eyeshadow applicator onto a fully cured, no-wipe gel topcoat. Rubbing gently creates the intense mirror effect, which is sealed with another layer of topcoat. This technique sounds complex but takes less than two minutes per hand. For added drama (bottom left), cluster jewel-toned rhinestones along the lower half of the nail using tweezers and nail glue specifically designed for crystals. The contrast between the rich green chrome and the sparkling gems offers an unforgettable, luxurious finish perfect for a romantic evening, all while maintaining speed by focusing the heaviest ornamentation on just one or two nails.
Moody Romance Nails
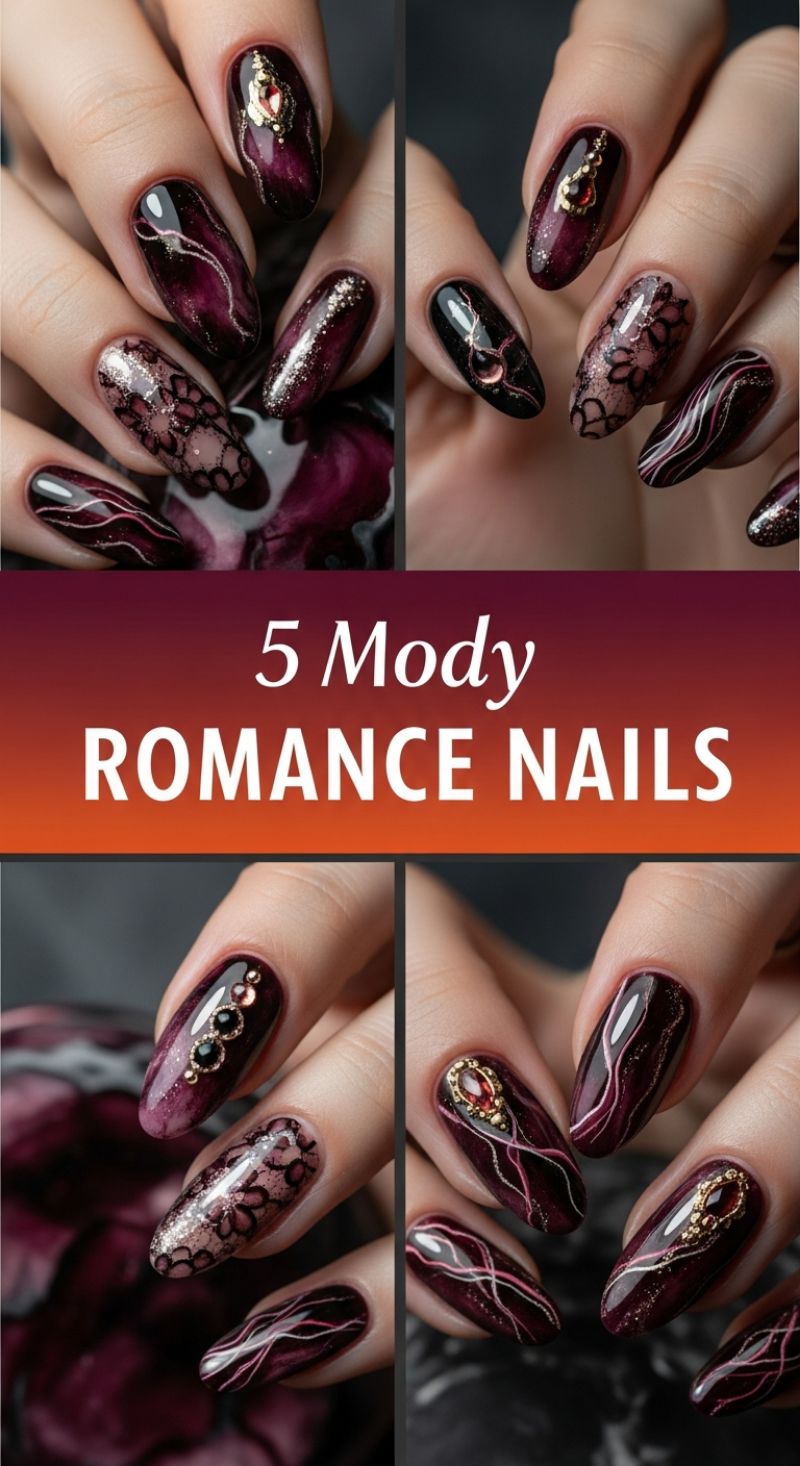
The “Moody Romance” look, inspired by dark velvet hues and intricate gothic lace, is the perfect sophisticated choice for Valentine’s Day. To achieve this stunning, deep burgundy aesthetic while sticking to the challenging 10-minute timeframe, you must prioritize highly pigmented products and efficient application techniques. Begin by selecting a deep wine or maroon gel polish, preferably one that already contains a fine shimmer or subtle magnetic pigment to mimic the deep, reflective dimension seen in the examples. Apply two thin coats of this base color, curing each layer thoroughly. This luxurious base layer provides the necessary depth and serves as the perfect backdrop for your quick detailing. Skip the full hand stamping or complex marble effects; instead, focus on creating the impression of luxury and intricacy with strategic placement.
For the quick detailing step, we are going to focus on the key elements that sell the “romance”—the flowing lines and soft glitter. On two accent nails (perhaps the ring finger and the thumb), use a very thin striping brush or a specialized nail art liner pen to create three or four delicate, wavy lines running diagonally across the nail. Use a contrasting color like metallic rose gold or shimmering white to ensure the lines pop against the dark base. The goal is flow, not precision; the speed of the line work is what keeps you under the time limit. If you love the glitter texture shown, apply a quick swipe of a loose micro-glitter (like iridescent pink or silver) onto the uncured top coat near the tip of one nail before curing, lightly tapping off the excess powder. This technique provides maximum sparkle with minimal effort and drying time, unlike dense, layered glitter polishes.
To emulate the look of the elaborate 3D jewelry embellishments in a flash, skip individual rhinestone setting entirely. Instead, use a single, pre-made gold nail sticker featuring a small gemstone shape, or apply a dab of specialized nail jewelry glue and set just three tiny metallic caviar beads in a vertical line near the cuticle of your main accent nail. This gives the high-end, bespoke feel without the required setting time of larger charms. Finish every nail with a single, quick-drying high-shine top coat. A thick, self-leveling top coat will help smooth any minor imperfections in your rushed line work and secure the glitter and any small metallic elements immediately. Remember that proper preparation—having all your tools and polishes open and ready—is the real secret to achieving this darkly romantic, high-impact look in under ten minutes.
12 Unique V-DAY DESIGNS

The sophisticated paper crafting seen in these designs—featuring intricate laser-cut lace, layered floral appliqués, and deep red color blocking—provides surprisingly accessible inspiration for achieving high-end Valentine’s Day nails in under ten minutes. The core principle to translate is contrast and texture. Start by applying a flawless coat of deep, saturated red polish, mimicking the rich background papers. To emulate the delicate white filigree and lace patterns found in several of the heart cutouts, use a fine detail brush or a stamping plate featuring a small floral or dot design. Dip the tool into an opaque white polish and focus the pattern application around the edges of the nail or near the cuticle, leaving the center of the nail solid red. This technique instantly mimics the look of layered, die-cut cardstock, giving your manicure a handcrafted, artisanal feel that looks complex but requires only minutes of steady detailing.
To achieve the striking 3D dimension and layered effect without spending hours sculpting acrylic, focus on integrating the rich red and soft blush pink palette visible in the floral arrangements. The fastest way to mimic the volumetric quality of the layered flowers and pop-up hearts is through strategic placement of simple decals or the use of a subtle color transition. For an accent nail, create a soft vertical ombre by blending a soft pink base coat with a deep burgundy shade near the tip, replicating the depth of the shadow boxes and layered heart forms. Since time is of the essence, avoid heavy hand painting of florals. Instead, opt for a small, singular heart decal in a metallic gold or silver—inspired by the elegant foil lettering on the cards—placing it directly over the layered gradient for maximum impact and quick application. This provides the visual complexity of the layered crafts with the simplicity required for a quick application.
Expert advice for pulling off this look revolves around the topcoat, which acts as the ‘finish’ on your papercraft-inspired design. Since paper often has a soft, non-reflective quality, consider finishing your manicure with a quick-drying matte topcoat. This will immediately make the white lace details pop dramatically against the deep red, lending the manicure the textural quality of true cardstock and separating it from a standard glossy finish. Conversely, if your design relied heavily on gold foil decals or features a clean, simple heart shape, a high-shine, extra-glossy topcoat will best replicate the look of glossy ribbon accents and polished card details seen in the imagery. Always ensure the base layers are completely dry before applying the detailing and topcoat to prevent smudging, guaranteeing a crisp, professional finish that lasts well beyond February 14th.
10 Hottest 2026 TRENDS

While the looks featured here showcase incredibly intricate, high-glamour nail extensions, we can distill the essence of these major 2026 trends into quick, simple Valentine’s Day designs achievable in under ten minutes. The core elements are high-shine metallics and passionate pops of red, perfect for a romantic holiday. To capture the dazzling chrome and glitter effects seen in the silver and gold nails, opt for highly pigmented metallic powder rubs or single-coat liquid chrome polishes. These specialized formulas dry rapidly and immediately deliver that mirror-like, futuristic finish without requiring complex layering. For a simple V-Day manicure, select one accent nail per hand—perhaps the ring finger—to feature the gold or silver chrome, leaving the remaining nails painted in a classic, fast-drying matte or glossy red. This contrast between the luxurious metal and the passionate solid color provides instant visual drama while keeping the application time minimal. Focus on thin, even coats of your primary colors to ensure speedy drying before moving to the next step, which is the embellishment.
The secret to adapting these elaborate, jeweled trends into a 10-minute task is strategic placement and simple application methods. Notice the powerful impact of the single, vertically placed line of rhinestones on many of the metallic nails. Instead of attempting intricate 3D sculpting or dozens of tiny jewels, purchase a set of pre-made nail charms or simple linear rhinestone strips. After your polish is dry, use a quick-setting nail glue or a clear, thick topcoat to affix a single, vertical line of small, round rhinestones down the center of your accent nail. If you choose red as your base, mimic the white flame patterns or swoops visible in the image using simple nail decals or a fine-tipped nail pen for quick, non-smudging artwork. Alternatively, leverage metallic nail wraps or adhesive tips. These wraps, often available in chrome or holographic finishes, require no drying time—simply file off the excess, and you’re instantly done, achieving that high-impact glamour in seconds.
Expert advice for beating the clock means prioritizing quality over quantity in your products and tools. Ensure your red polish is highly opaque so only one or two coats are needed. Always use a fast-drying topcoat immediately after painting (excluding the nail you plan to add the chrome rub to) to lock in the color and protect against smudges. If using nail glue for charms, apply a very small dot where the jewel will sit, press firmly for five seconds, and avoid flooding the area, which can lead to messy residue. By focusing on the powerful color combination of red, silver, and gold, and limiting detailed work to one or two nails using instant-application elements like pre-glued charms or decals, you can effortlessly achieve these major high-fashion trends in time for your romantic rendezvous.
Edgy Alternative Valentine’s Looks (Under 10 Minutes)

The stunning visuals in this collection—featuring intricate skeletal designs, blazing red flames, cracked hearts, and barbed wire accents—showcase the pinnacle of alternative nail art. While achieving the professional, hyper-detailed looks seen here often requires extensive time and expert freehand skills, you can capture this dramatic, edgy Valentine’s aesthetic quickly by leveraging modern speed techniques like stamping, decals, and targeted application. The key to hitting that under-10-minute mark is focusing on a maximum of two accent nails per hand and utilizing the core palette of deep black, vivid red, and stark white/silver. Start with a smooth, fully cured black base coat (ideally applied the night before). To imitate the popular flaming heart or plain flame designs, use pre-sized vinyl stencils or stamping plates. If opting for stencils, place them lightly, apply your bright red polish, and peel immediately while the polish is still wet to avoid stringing, then quickly seal the design with a thin layer of top coat on just those nails to prevent smudging while you finish the rest of your hand.
To incorporate the skull, skeleton, or barbed wire motifs efficiently, ditch the freehand brushwork and utilize high-quality nail stickers or water decals. These items are designed for rapid application; simply peel or soak and press onto the nail. For a quick adaptation of the white dripping skull design, apply a simple skull decal to the nail center. Then, take a white striping polish or a fine-tip brush dipped in white polish, and create 3–4 short, uneven lines extending down from the decal, giving the illusion of a melted or dripping effect without needing perfect control. Alternatively, for the bold, graphic broken heart design, use a piece of tape or a specialized vinyl guide to section off a diagonal line on the nail, paint the two halves red, and use a silver or white fine-tip pen to draw a single, quick zig-zag crack down the center. This mimics the drama of the image but reduces the complexity of 3D texture and shading.
Completing these alternative looks within the 10-minute constraint hinges entirely on rapid drying and immediate sealing. After applying any decals or quick stamped patterns, immediately coat the entire nail in a quick-dry top coat. Choosing the finish is crucial for achieving the desired vibe: a glossy top coat enhances the drama of the flames and blood drips, giving a high-shine vinyl look. Conversely, using a matte top coat over the skull or skeleton designs instantly lends a grungier, distressed texture, making the white elements pop against the black background. Remember, less is often more when aiming for speed; focusing your effort on just two perfectly executed statement nails will be far more effective than trying to freehand five complex designs in the time allocated.
8 Daring ANTI-LOVE MANIS
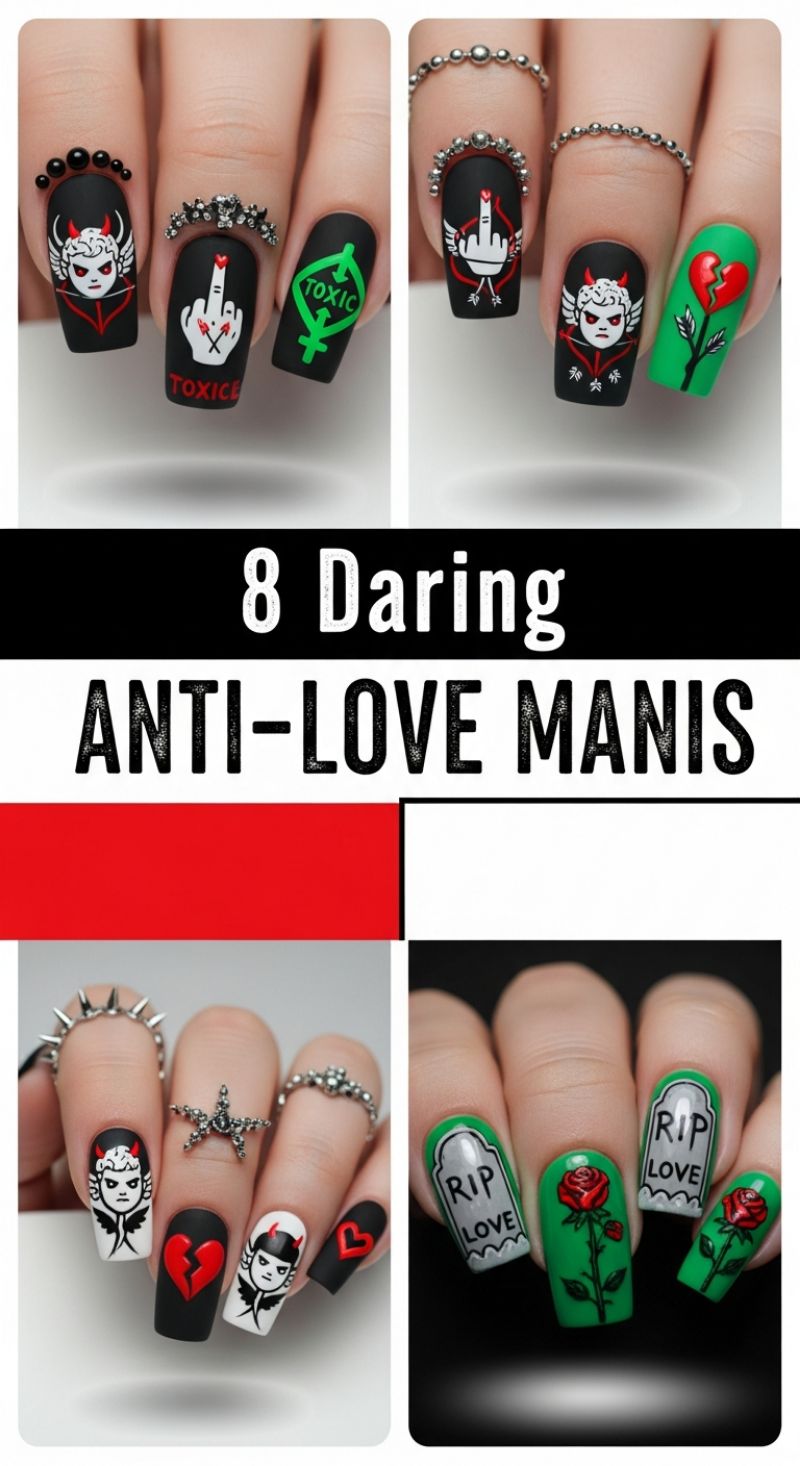
While the image displays intricate, professional-grade anti-Valentine’s designs involving detailed character work (devils/cupids), 3D elements, and precise lettering, the core themes are easily translatable into simple, quick nail art perfect for the “under 10 minutes” category. The key to achieving this edgy, dark aesthetic rapidly is the use of a matte black base coat and high-contrast vinyl stickers or stamping plates. Start by applying one thin coat of your chosen matte black polish (or standard black followed by a quick-dry matte topcoat). This foundation is quick, impactful, and instantly sets the mood. For designs like the “Broken Heart” or “Toxic” symbol, focus on pre-cut vinyl stencils or nail decals. For the broken heart look, apply a red heart decal over the black base and use a fine black liner brush or stamper to add a simple crack or separation line down the middle for that classic, yet simple, anti-love statement. This high-contrast approach minimizes drying time and maximizes visual impact, perfect for a fast execution.
The two main quick themes to emulate are the “Tombstone RIP Love” and the simplified iconic designs. For the RIP look, use a solid bright green base on one or two accent nails—a quick-drying neon green or emerald works best for maximum pop against the matte black nails. The tombstone shape itself can be applied using a large, light gray or white decal or stamping plate. If you don’t have a tombstone stamp, simplify: paint a rounded rectangle in gray on the green base. Once dry (utilizing quick-dry drops if available), use a fine-tipped black nail art pen or a very thin brush to quickly write “RIP LOVE.” This design is highly stylized but surprisingly fast. For the provocative “middle finger” design (seen paired with Cupid wings in the image), the quickest route is using a single white decal showing a simplified hand silhouette. Apply the decal and use a red polish to quickly dot a small heart shape or a simple ‘X’ near the cuticle line to integrate the anti-love narrative without complex freehand figure painting. Alternatively, using a white base on two fingers allows for the simple application of pre-made devil/cupid decals, instantly achieving a complex look.
To ensure your rapid anti-love mani looks professional and lasts, pay close attention to the final topcoat application. Given the dark, moody aesthetic, using a matte topcoat on all black nails is essential, as seen in the inspiration. A matte finish effectively hides minor imperfections often associated with rapid application and provides a sophisticated, high-end texture. However, if you incorporated bright colors like the green “RIP” nails or red broken hearts, applying a layer of high-shine glossy topcoat just over the colored decals can create a striking contrast that makes the graphics pop. For extra flair without added time, strategically place one or two simple black or silver studs (affixed with a dab of topcoat) near the cuticle line on the most straightforward nails, capturing that rebellious, spiked aesthetic quickly. Always remember the final professional touch: cleaning up any smudges or excess polish around the cuticles with a cotton swab dipped in remover before the final topcoat sets.