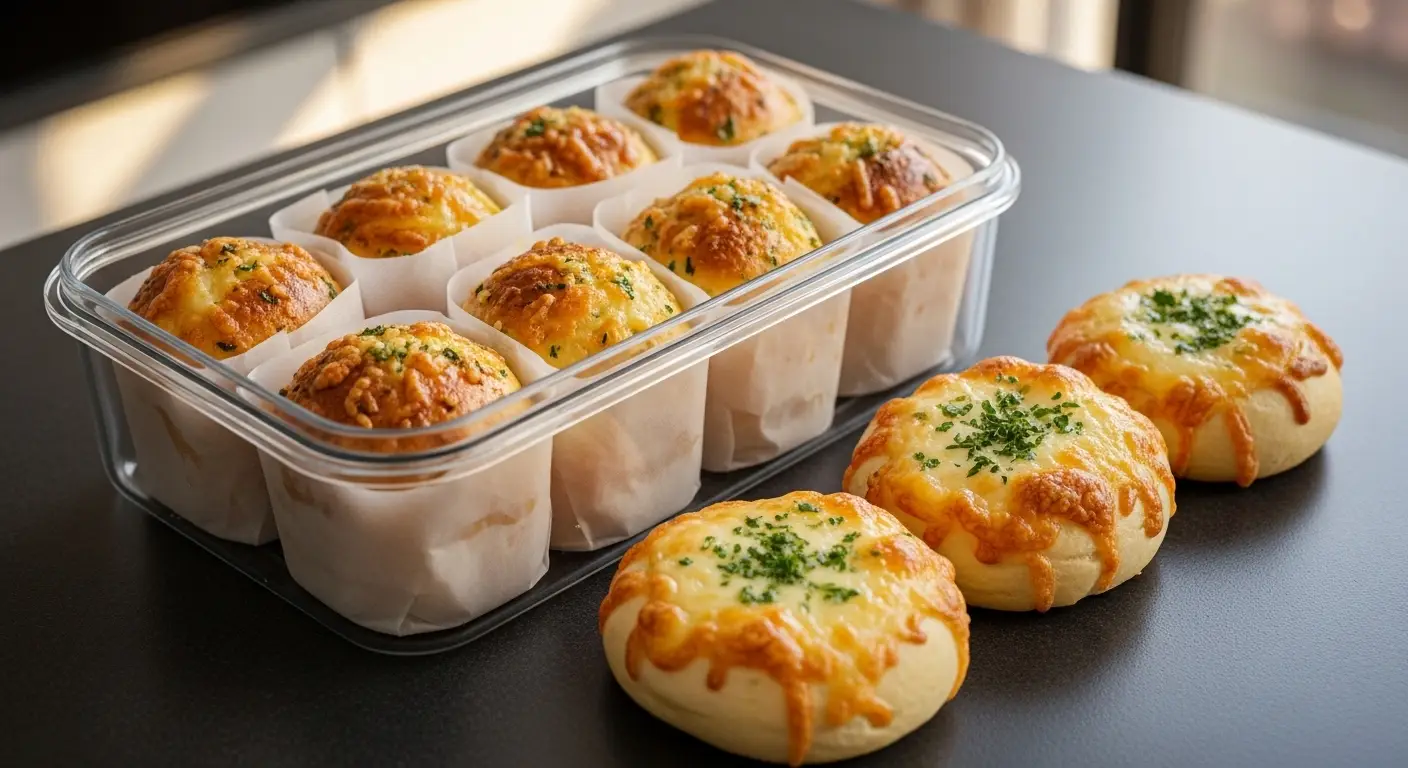
Garlic Cheese Rolls
Making your own bread at home feels like magic. There is nothing better than the smell of fresh dough baking in the oven. These garlic cheese rolls are my favorite thing to make when I want something warm and comforting. They are soft, full of melted cheese, and covered in a buttery garlic sauce that tastes amazing.
You do not need to be a pro baker to make these work. I will show you how to mix the dough, let it rise, and fill it with plenty of cheese. By the end of this guide, you will have a tray of golden-brown rolls that look like they came from a fancy bakery. Everyone in your house will run to the kitchen as soon as they smell the garlic hitting the air.
Check out the steps below to start your baking adventure!
Why You Will Love These Rolls
These rolls are the perfect mix of a soft donut and a savory garlic knot. I love how the cheese stays gooey in the middle even after they cool down a little bit. They work great as a side dish for pasta or just as a snack on their own. Most people find bread making scary, but this recipe is very simple and hard to mess up.
The Best Ingredients for Success

Getting the right items ready is the first step to great bread. You need high-quality flour and fresh yeast to make sure the dough rises high and stays fluffy. I always use bread flour because it has more strength, but all-purpose flour works fine too if that is what you have in your pantry. Using cold ingredients can slow down the yeast, so try to let your milk and egg sit out for a bit before you start.
The cheese is the star of the show here. I usually grab a big block of mozzarella and shred it myself because it melts much better than the bagged kind. Pre-shredded cheese has a dusty coating that can keep it from getting super stretchy. If you want a sharper taste, you can mix in some cheddar or parmesan. Just make sure you have enough to fill every single roll!
How to Prepare the Yeast

Yeast is a living thing, and it needs a warm bath to wake up. I learned the hard way that if the milk is too hot, it will kill the yeast, and your bread will stay flat like a pancake. It should feel like warm bath water on your wrist. Add a little bit of sugar to the milk because yeast loves to eat sugar. This helps it grow and make those tiny air bubbles that make bread light.
Wait about five to ten minutes until you see a thick foam on top of the liquid. If it does not foam up, your yeast might be old or dead. It is better to start over now than to waste all your flour on dough that won’t grow. FYI, keeping your yeast in the fridge helps it stay fresh for a much longer time.
Recipe Quick Info
- Prep Time: 2 hours (includes rising)
- Cook Time: 20 minutes
- Servings: 12 rolls
- Difficulty: Medium
Mixing Your Dough Perfectly

Once your yeast is bubbly, it is time to bring the dough together. Pour the yeast mix into a big bowl and add your flour, salt, and melted butter. I like to use a stand mixer because it saves my arms from getting tired, but you can totally do this by hand. Mix it until the flour disappears and you see a shaggy ball start to form.
The dough should feel tacky but not like glue sticking to your fingers. If it is too wet, add one spoonful of flour at a time until it cleans the sides of the bowl. Do not add too much flour, or your rolls will turn out heavy and dry. A soft dough is the secret to a soft roll. I once added way too much flour because I was in a rush, and the rolls ended up as hard as rocks!
The Art of Kneading

Kneading is how you build the structure of the bread. You want to push the dough away from you with the palms of your hands, fold it back, and turn it. Repeat this over and over for about eight minutes. This creates gluten, which acts like a net to hold in the air bubbles. You will know it is done when the dough looks smooth and bounces back when you poke it with a finger.
If you are using a mixer, just let it run on low speed for about five minutes. It is very relaxing to watch the dough spin around. Take your time with this part. If you stop too early, your rolls might fall apart or feel crumbly. Think of it as a little workout before you eat all that cheese and butter later.
Letting the Dough Rise

Now comes the hardest part: waiting. Put your dough ball into a greased bowl and cover it with a warm, damp cloth. It needs to sit in a warm spot away from any cold air. I often put mine inside the oven with the light turned on, but the oven turned off. The dough needs to grow until it is double its original size, which usually takes about an hour.
Rising time can change depending on how warm your house is. On a cold winter day, it might take much longer. Be patient and give it the time it needs. This first rise is where the flavor develops. While you wait, you can shred your cheese and mince your garlic so you are ready for the next step. I like to listen to a podcast or clean up the dishes during this break.
Filling and Shaping the Rolls

Once the dough has doubled, punch it down to let the air out. It feels funny but it is necessary! Divide the dough into twelve equal pieces. I use a kitchen scale to make sure they are all the same size so they cook evenly. Flatten each piece into a small circle, put a big pinch of cheese in the middle, and pinch the edges shut to make a ball.
Make sure the seal is very tight. If there is a hole, the cheese will leak out onto the pan and burn. Place them in a greased baking dish with the sealed side facing down. They should be close to each other but not touching yet. They will grow into each other during the second rise and the baking process, which creates those soft pull-apart edges we all love.
Pro Baking Tips
- Temperature: Keep your room warm to help the dough rise faster.
- Sealing: Pinch the dough hard so the cheese stays inside.
- Garlic: Use fresh garlic instead of powder for a better smell.
Making the Garlic Butter Topping

The topping is what makes these rolls famous in my house. Melt some butter in a small bowl and stir in freshly minced garlic and chopped parsley. Fresh garlic has a spicy kick that tastes much better than the stuff from a jar. I also like to add a tiny pinch of salt to the butter to bring out the flavors of the cheese inside.
Brush half of this mix over the rolls before they go into the oven. This helps them turn a beautiful golden color while they bake. Save the other half of the butter for when they come out hot. Double coating the rolls ensures every bite is soaked in garlic goodness. IMO, you can never have too much garlic butter on a bread roll.
Baking to Golden Perfection

Preheat your oven to 375 degrees. Put the rolls in and watch them carefully. They usually take about 15 to 20 minutes to finish. You are looking for a deep golden-brown top and a firm shape. If they look too pale, they might still be raw in the middle. If they get dark too fast, you can cover them with a piece of foil to stop the browning.
The smell while they bake is the best reward. It will fill your whole home and make everyone hungry. When you take them out, immediately brush on the rest of that garlic butter. The heat from the bread will soak up the butter and make the crust soft and flavorful. Let them sit for five minutes before eating so you do not burn your tongue on the melted cheese.
Serving Suggestions and Pairs

These rolls are best when they are served warm. I love to put a bowl of warm marinara sauce on the table for dipping. The red sauce and the cheesy bread taste like a homemade pizza. They also go perfectly with a big bowl of vegetable soup or a fresh green salad. If you are having a party, these will be the first things to disappear from the table.
You can even use these as slider buns. Cut them in half and put a little bit of ham or turkey inside for a great lunch. I once served these with a big plate of spaghetti and my friends talked about the bread more than the pasta! They are a crowd-pleaser for kids and adults alike because who can say no to bread and cheese?
Storing and Reheating Your Rolls

If you have leftovers, you are lucky! You can keep them in an airtight container at room temperature for about two days. If you want them to last longer, put them in the fridge for up to a week. Just keep in mind that bread can get a bit dry in the fridge, so wrapping them tightly is very important. You can also freeze them for a month if you want to save them for later.
To make them taste fresh again, do not use the microwave if you can help it. It can make the bread chewy and tough. Instead, put them in a toaster oven or a regular oven at 350 degrees for five minutes. This will melt the cheese again and make the crust crispy. It is almost as good as the first time they were baked. Trust me, a little extra heat makes a big difference.
Your Garlic Bread Questions Answered
Can I use frozen bread dough for this?
Yes, you can. Thaw the frozen dough first. Then follow the steps for filling and baking. It saves a lot of time on busy days!
What is the best cheese to use?
Mozzarella is the best for that long cheese pull. You can also use Monterey Jack or even a little bit of sharp cheddar for extra flavor.
Why didn’t my dough rise?
Your yeast might be old, or your milk was too hot and killed it. Make sure the milk is just warm, not boiling, next time you try.
Can I make these rolls ahead of time?
You can shape the rolls and put them in the fridge overnight. The next day, let them come to room temperature and rise before you bake them.
Do I have to use fresh garlic?
Fresh garlic gives the best taste. If you only have powder, use about half a teaspoon. It won’t be as strong, but it still works.
Happy Baking at Home
Baking these garlic cheese rolls is a great way to show love to your family and friends. There is nothing like a homemade gift that people can eat. I hope you enjoy the soft dough and the gooey cheese as much as I do every time I bake them. Just remember to take your time and have fun in the kitchen!