How to Make the Best Chicken Biryani at Home
I remember the first time I tried to cook biryani for my family. I was so excited to make something special, but I ended up with a big pot of mushy rice and dry meat. It was a total mess! I felt so sad because I spent hours in the kitchen and the food did not look like the photos at all. But I did not give up on my dream of making a great meal.
Since that day, I have cooked this dish dozens of times. I learned that biryani is not just about throwing rice and meat together. It is about layers, smells, and patience. In this guide, I will show you exactly how to make a plate of biryani that looks and tastes like it came from a fancy shop. You will learn the right way to soak rice and how to keep the chicken juicy.
Are you ready to make your house smell amazing? Let us get started on this cooking adventure together! Check out my favorite tips below to help you get started right away!
Getting Your Kitchen Ready for Biryani
Before you turn on the stove, you need to have everything in its place. This is a big recipe with many steps. If you start cutting onions while the rice is boiling, you might get confused or burn something. I like to clear my counter and put all my spices in small bowls first. This makes the whole process feel calm instead of scary.
You will need a large pot with a lid that fits very tight. This is important because the steam needs to stay inside to cook the rice perfectly. If your lid is loose, the steam will escape and your rice might stay hard. I sometimes use a heavy stone or a bowl of water on top of the lid to keep it down. It works like a charm!
Recipe Quick Info
- Prep Time: 45 minutes
- Cook Time: 60 minutes
- Servings: 4 people
- Difficulty: Medium
Gather Your Simple Ingredients

To make a great biryani, you need fresh things. I use chicken with the bone in because it stays more juicy than just breast meat. You will also need long-grain basmati rice. This is the king of rice for this dish. Do not use short rice or sushi rice because it will get too sticky and ruin the texture. IMO, the quality of the rice is the most important part of the whole list.
- 2 pounds of chicken pieces (legs and thighs are best)
- 3 cups of long-grain basmati rice
- 4 large onions, sliced very thin
- 1 cup of plain yogurt
- 2 tablespoons of ginger and garlic paste
- Fresh mint and cilantro leaves
- Spices: cinnamon, cardamom, cloves, and turmeric
- Oil or ghee for frying
The Secret to Perfect Basmati Rice

The biggest lesson I learned is that you must wash your rice. I used to skip this, and my rice always stuck together. Now, I wash it in cool water until the water is clear, not cloudy. This removes the extra starch. After washing, let the rice sit in water for at least 30 minutes. This helps the grains grow long and fluffy when they cook. It is a step you cannot skip if you want that restaurant look.
When you boil the rice, do not cook it all the way. This is a common mistake! You only want to cook it until it is about 70 percent done. It should still have a little bite in the middle. If you cook it fully now, it will turn into mush when you steam it with the chicken later. Think of it like pasta that is just a bit too hard to eat yet.
How to Marinate Your Chicken

The chicken needs time to soak up all the flavors. I mix the yogurt with ginger, garlic, and all the dry spices. Then I toss the chicken in and stir it well. If you have time, let it sit in the fridge for two hours. If you are in a rush, 30 minutes is okay, but more time is always better. The yogurt helps make the meat soft so it pulls right off the bone.
One mistake I made once was using flavored yogurt by accident. Make sure your yogurt is plain! Also, do not be afraid of the spices. Biryani is supposed to be bold and exciting. If the marinade looks a bit bright or dark, that is a good sign. It means your chicken will have plenty of taste after it cooks under the layers of rice.
Frying the Crispy Onions

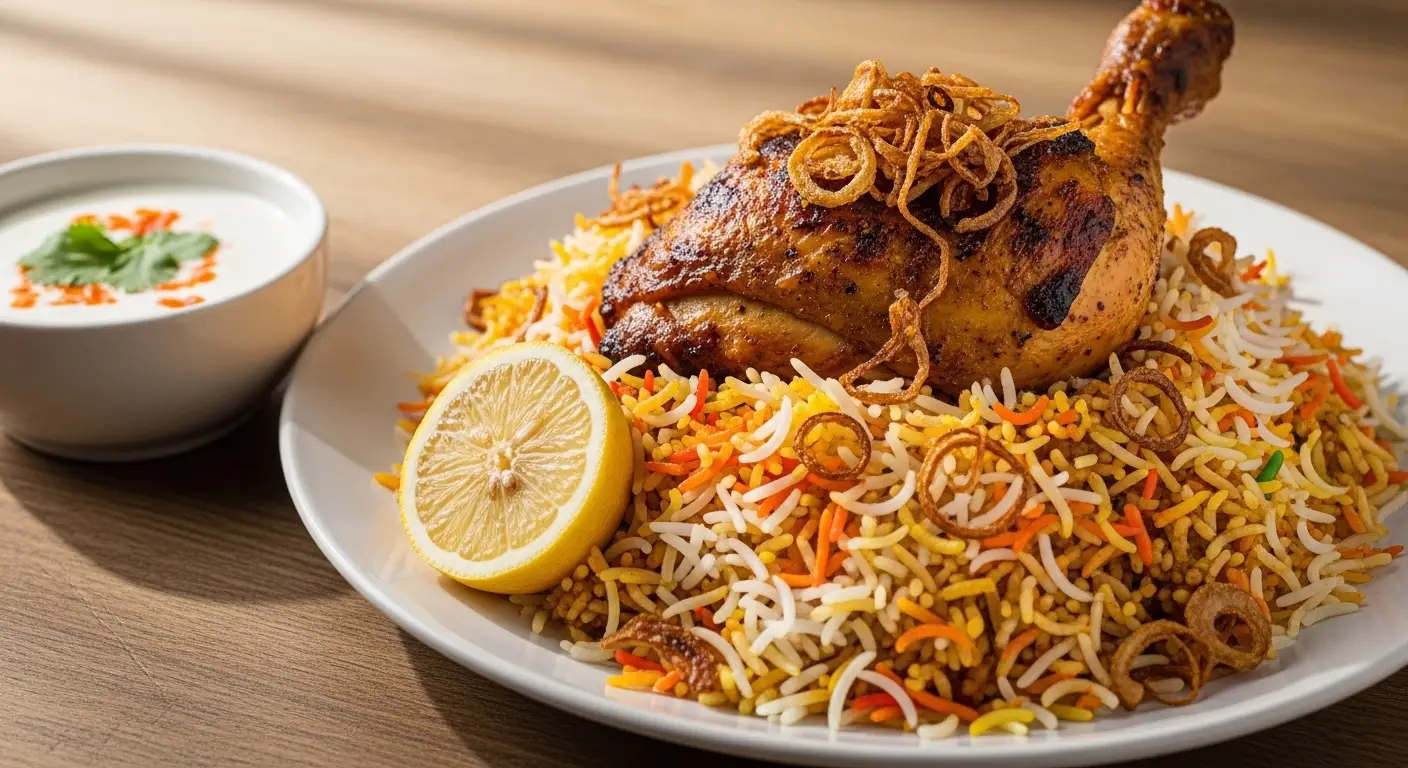
Fried onions are the soul of biryani. We call them ‘biryani onions’ or ‘barista.’ You need to slice them very thin so they fry evenly. I heat a good amount of oil and fry them until they are a deep golden brown. Be careful! They go from perfect to burnt very fast. I always take them out a few seconds before I think they are done because they keep cooking for a bit on the plate.
These onions add a sweet and smoky flavor that nothing else can replace. I save about half of them to mix into the meat and the other half to sprinkle on top at the very end. This gives you different textures in every bite. FYI, you can buy these at the store, but making them at home tastes much better and makes your kitchen smell like a dream.
Putting the Layers Together
Now comes the most fun part of the whole day. Layering is like building a tasty tower. You want to make sure the meat stays at the bottom so it gets the most heat and stays moist. The rice goes on top to catch all the steam and flavor rising from the chicken. This way, every grain of rice gets coated in the yummy juices from the meat.
I always feel like an artist when I do this. I sprinkle the green herbs and the fried onions between the layers. It looks so pretty before the lid even goes on. Make sure you have your saffron water or food coloring ready too. This gives the biryani those beautiful white and orange colors that make everyone want to eat it right away.
Pro Cooking Tip
- The Seal Trick: Use a piece of aluminum foil or a clean kitchen towel under the lid. This traps all the steam inside. This method is called ‘Dum’ cooking and it makes the rice extra soft.
Step by Step Assembly

First, put your marinated chicken at the bottom of the pot. Spread it out so it covers the whole base. Next, add a layer of your par-boiled rice. I like to add some fresh mint and cilantro on top of the first rice layer. Then, add the rest of the rice. Pour a little bit of melted ghee or oil over the top to keep everything moist and rich.
- Place the marinated chicken in the bottom of a heavy pot.
- Add half of the fried onions and some chopped mint.
- Spread the 70% cooked rice over the meat.
- Drizzle saffron-infused milk or yellow food color over the rice.
- Add the remaining fried onions and a spoonful of ghee.
- Cover with a tight lid and cook on low heat for 30 to 40 minutes.
The Magic of Saffron and Herbs

Saffron is a bit expensive, but it adds a smell that is truly special. I soak a few strands in warm milk for ten minutes until the milk turns bright yellow. When you pour this over the rice, it creates spots of color. Some rice stays white, and some turns yellow. This is how you get that classic biryani look. If you do not have saffron, a tiny bit of yellow food color works too.
I also love using plenty of fresh mint. It might seem strange to put mint in a savory dish, but it cuts through the heavy spices and makes the dish feel fresh. My grandmother always told me that fresh herbs are the secret to a happy stomach. I think she was right! Just make sure to chop them right before you use them so they do not turn brown or lose their scent.
Cooking on Low Heat (Dum)

This part requires the most patience. You must cook the biryani on very low heat. If the heat is too high, the chicken at the bottom will burn before the rice is finished. I often place a flat iron pan (like a tawa) under my pot. This spreads the heat evenly and prevents burning. This may not work if your pot is very thin, so try to use a heavy-bottomed pan if you can.
Do not open the lid! This is the hardest rule to follow. Every time you open the lid, the steam escapes and the cooking stops. I wait at least 30 minutes before I even think about checking it. The steam inside is what does all the work. It makes the chicken tender and the rice fluffy. When you finally open it, the smell will fill your whole house. It is the best reward for your hard work.
Serving Your Masterpiece

When you are ready to serve, do not just stir the pot like a soup. Use a large flat spoon and scoop from the bottom to the top. This keeps the rice grains from breaking and keeps the layers beautiful. I love seeing the steam rise from the plate. It is a meal that makes people stop talking and just start eating. It is truly a labor of love.
I usually serve my biryani with a simple side of raita. Raita is just plain yogurt mixed with some chopped cucumber, salt, and a little cumin. The cool yogurt feels great with the warm spices of the rice. A few slices of raw onion and a lemon wedge on the side also help balance the flavors. It is a full meal that does not need anything else to be perfect.
Common Biryani Questions
Cooking biryani can be tricky for beginners. I had so many questions when I first started, so I want to help you out. Here are some of the things people ask me most often when they try this recipe at home. Remember, even if it is not perfect the first time, it will still taste good!
Can I use boneless chicken for this recipe?
Yes, but bone-in chicken is better. Bone-in meat stays juicier and adds more flavor to the rice while it steams. If you use boneless, cook it for 5-10 minutes less.
What if my rice becomes too mushy?
This happens if you boil the rice for too long at the start. Next time, drain the rice when it still feels a bit firm. If it is already mushy, spread it on a flat tray to cool fast.
Do I have to use ghee?
You can use oil if you prefer. However, ghee gives a rich buttery taste and a great smell that oil cannot match. I suggest using at least a little bit for the best flavor.
How do I prevent the bottom from burning?
Use a heavy pot and keep the heat on the lowest setting. Putting a flat pan under your pot also helps protect the bottom from direct flames. It works like a heat shield.
How long can I store leftover biryani?
You can keep it in the fridge for up to 3 days in a sealed container. It actually tastes even better the next day! Just reheat it in the microwave with a splash of water.
Time to Enjoy Your Meal
You have done it! Making biryani is a big task, but you followed the steps and made something amazing. I hope your family loves this meal as much as mine does. It is the perfect dish for birthdays or just a Sunday treat. Take a big bite and enjoy all those wonderful flavors. You earned it!