Discover 15 elegant and edgy hair styles, from chic updos and stylish braids to modern accessories. Master these looks instantly to elevate your aesthetic for any occasion.
The Sleek Minimalist Bun: Geometric Pin Precision
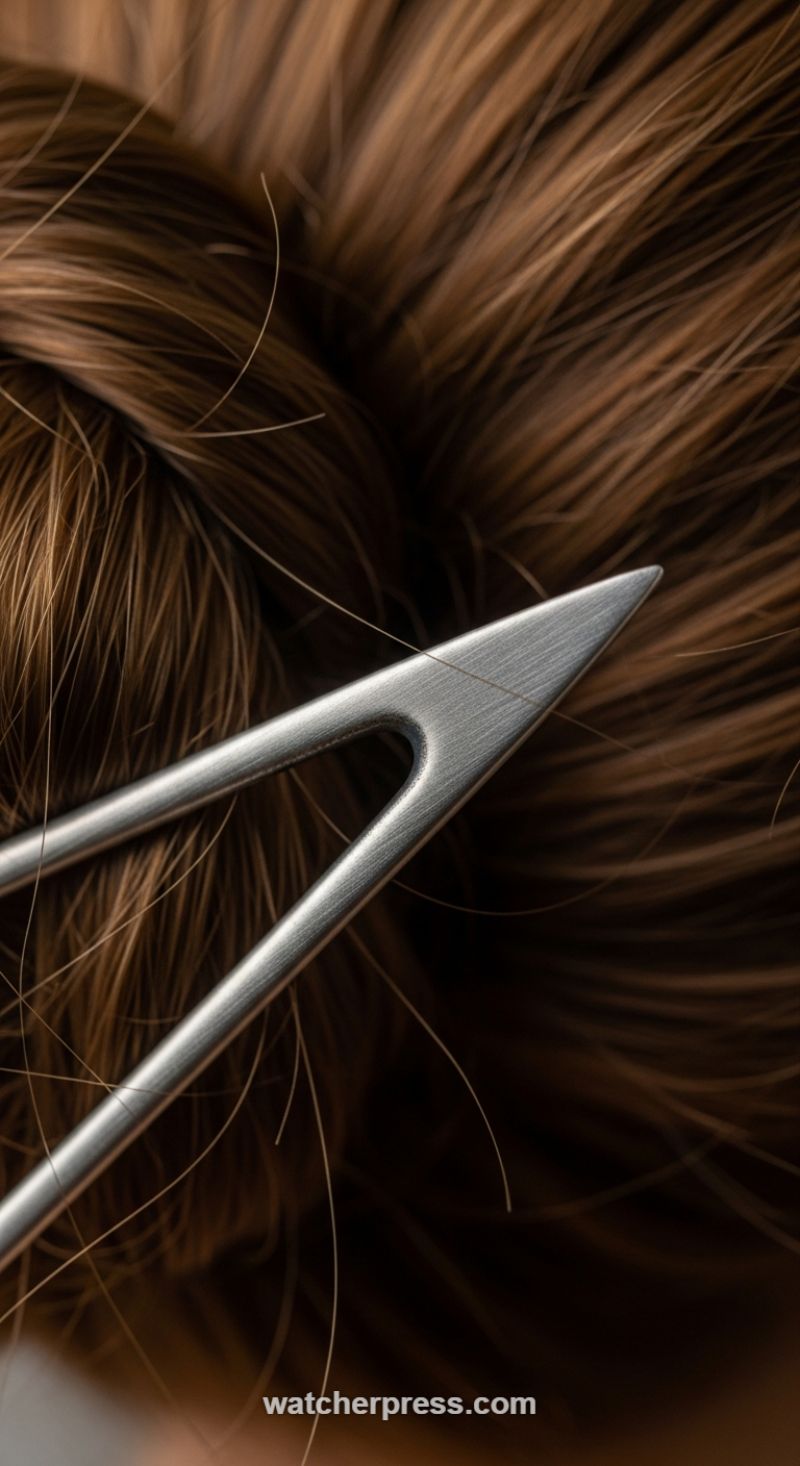
This style masterfully marries soft texture with sharp, modern lines, epitomizing elegant simplicity. The visual elements showcase a deep, multi-tonal brown updo, likely a tight bun or chignon, which serves as a luxurious backdrop for a single, statement accessory. The chosen hair pin is striking: a piece of brushed silver metal, featuring a precise, geometric point and a negative space cut-out that catches the light beautifully. This accessory choice instantly elevates the classic bun from functional to high fashion, providing an edgy, almost architectural contrast to the organic flow of the hair strands. Achieving this high-impact look hinges on the deliberate contrast between the secured volume of the hair and the striking precision of the metallic element.
To recreate this sleek foundation, start by prepping hair with a smoothing serum or lightweight oil, focusing on the mid-lengths and ends to ensure that desired light reflection seen in the image. Brush the hair back tightly toward the nape of the neck or the mid-crown—depending on whether you prefer a sophisticated low chignon or a lifted top knot. Collect the hair into a taut ponytail, then twist the length tightly until it coils naturally into a compact, robust bun. Expert advice for maintaining that high-gloss, flyaway-free finish is crucial: use a soft-bristle brush lightly misted with extra-hold hairspray or a strong pomade stick to gently sweep down all stray strands along the hairline and the body of the bun before securing the base with standard, color-matched bobby pins.
The final, defining step is the placement of your geometric pin. These modern accessories are typically U-shaped or structured for maximum grip and are designed to pierce and hold the core of the bun structure. Carefully insert the pin by first catching a secure section of the bun’s outer edge, and then rotating the tip back toward the scalp, pushing it firmly through the center of the twist. Ensure the decorative point is positioned symmetrically and prominently, drawing attention to the sleek metal finish. This sharp, minimalist aesthetic works best when paired with clean lines in your outfit and minimal jewelry; allow the single, sophisticated hair accessory to serve as the dominant focal point. This technique is an instant upgrade perfect for everything from high-level professional settings to gallery openings, requiring only minutes but yielding maximum visual impact.
The Polished Pearl Barrette Tuck
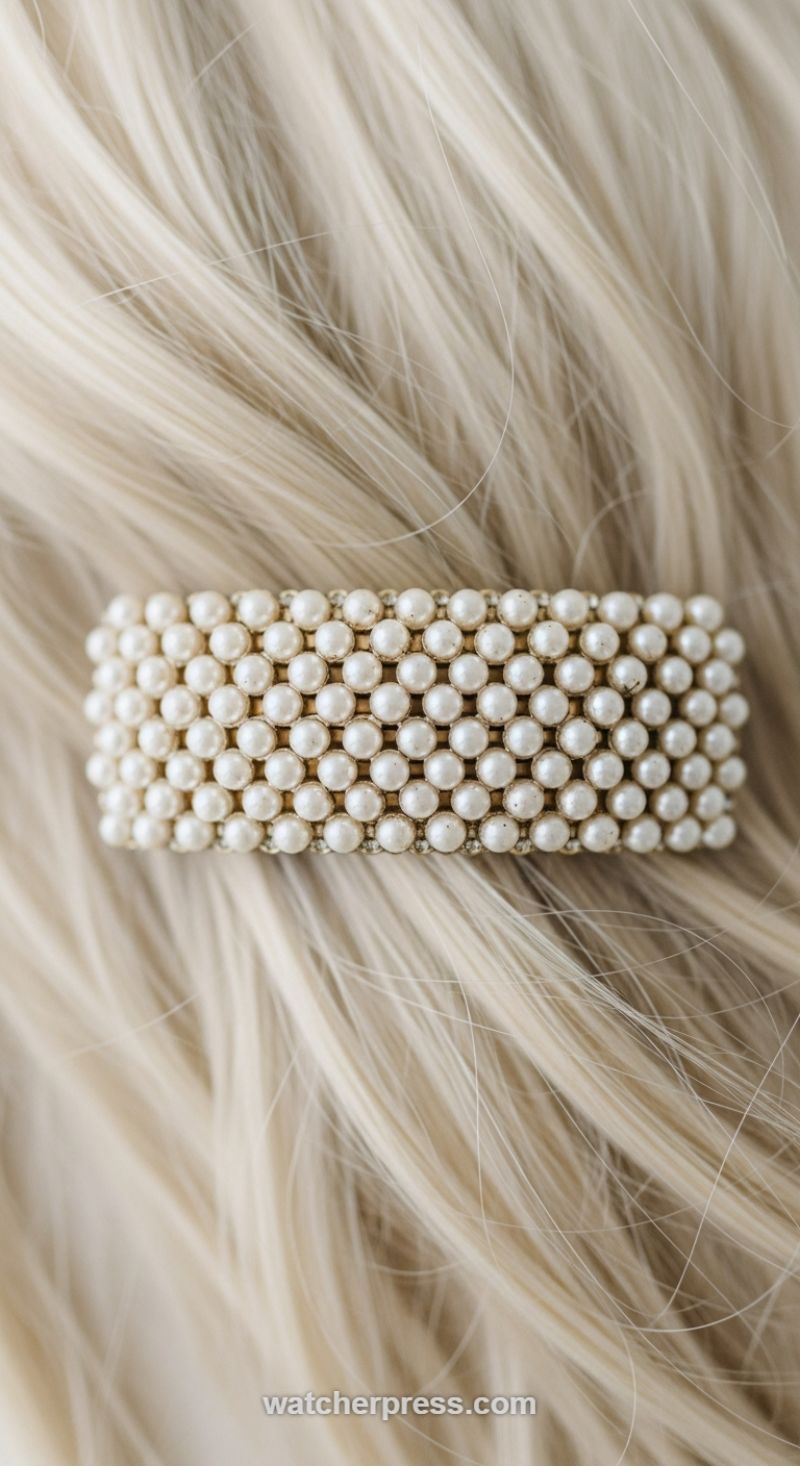
This elegant style elevates even the simplest straight hair with minimal effort, relying entirely on the visual impact of a statement accessory. The chosen barrette, covered completely in small, uniform pearls, offers a dense, luxurious texture that instantly suggests sophistication, making it ideal for formal occasions like weddings or upscale brunches. To replicate this ultra-polished look, start by prepping your hair. If your hair is naturally coarse or prone to frizz, use a heat protectant spray followed by a flat iron to achieve the flawless, sleek texture seen in the image. Finish with a small amount of high-shine serum or light oil, concentrating on the lengths, to ensure the blonde or platinum hair catches the light and contrasts beautifully with the matte, creamy finish of the pearls. The key visual element here is the stark contrast between the bright, flowing hair and the dense, structural shape of the accessory, so perfect smoothness is non-negotiable.
The essential technique for mastering this look is the half-up, half-down tuck. Begin by sectioning off the top third of your hair, starting from the temples and gathering it towards the back center of your head, just above the occipital bone (where the back of your head curves inward). Use a fine-tooth comb to ensure the gathered section is perfectly smooth and free of any bumps or flyaways. This is where precision matters; the lines leading to the clip must be clean. Before securing the hair with the pearl barrette, give the underside of the gathered section a quick, gentle backcombing session. This creates a hidden anchor that helps the weighty clip stay firmly in place throughout the day and provides a subtle lift for a more voluminous profile. Once the backcombing is complete, securely fasten the pearl barrette horizontally over the gathered section, ensuring the teeth or clasp of the barrette are completely covered by the hair and the pearls are the only visible element.
For expert longevity and adaptability, consider the context and finish. If you have very fine hair, misting the secured section with a texturizing spray before clipping will prevent the style from slipping. A crucial styling tip is to match the opulence of the hair accessory with a simple, modern ensemble to create an impactful ‘high-low’ style contrast—think a crisp white blouse or a structured suit. Alternatively, if this is intended for a bridal look, ensure the rest of your hair is either left flowing in soft, minimal waves or pulled into a smooth low ponytail for maximum elegance. The dense repetition of the small pearls draws attention, so lock in the final result with a flexible, medium-hold hairspray, focusing on the hair immediately surrounding the clip to maintain that sleek, pulled-back aesthetic without appearing stiff or helmet-like.
The Bold 90s Color-Block Statement Stack
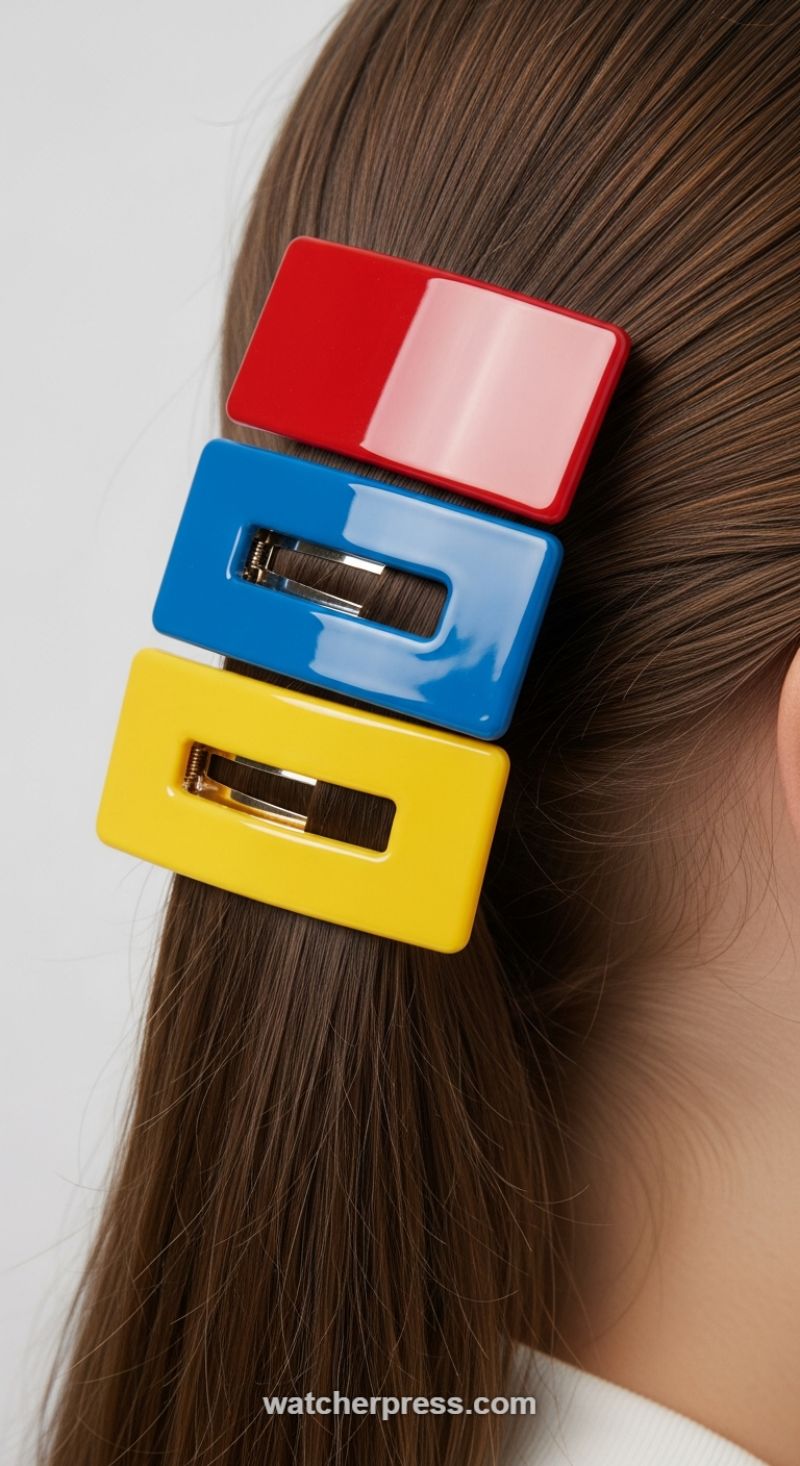
This style leverages the resurgence of 90s nostalgia, transforming simple hair clips into a powerful fashion statement. The key visual element is the strategic stacking of three highly saturated, rectangular barrettes in primary colors: red, blue, and yellow. This technique works exceptionally well against neutral hair colors (like the warm brown shown) as the high-gloss enamel finish provides maximum contrast and light reflection. To replicate this look, you will need three identical rectangular clips that offer strong closure. Ensure your clips are large enough to be easily visible and that the colors are pure and bright—avoiding muted or matte tones, which would diminish the intended ‘pop-art’ effect. Preparation is crucial: smooth the section of hair you plan to secure using a dime-sized amount of lightweight smoothing serum or anti-frizz product to ensure the final presentation is sleek and tidy, allowing the clips to be the sole focus of the visual interest. This look instantly injects an edgy, playful geometry into an otherwise simple hairstyle.
To achieve the perfect stacked arrangement, begin by isolating a small section of hair near the temple or just above the ear. This section should be pulled back tautly against the side of the head. Start with the bottom clip (in this case, the yellow one). Secure it firmly, ensuring it is positioned parallel to your jawline or slightly angled upward towards the crown for a lifting effect. Next, place the middle clip (blue), positioning it immediately above the first clip so that the edges are nearly touching or minimally overlapping. Finally, place the top clip (red). The instructional challenge here is maintaining perfect parallel alignment; if the clips are crooked or unevenly spaced, the geometric impact is lost. Expert tip: If your hair is particularly fine, secure the section first with a small, discreet bobby pin before applying the decorative clips over the top to ensure all-day hold without slippage. The metal mechanisms visible through the cut-out centers of the blue and yellow clips should face the same direction, confirming a unified, structured aesthetic.
This Color-Block Stack is best paired with sleek, straight hair or loose, minimalist waves, as defined curls might compete with the clean lines of the barrettes. While the image showcases primary colors for a true retro vibe, this method can be adapted using three different shades of a single color (e.g., light, medium, and dark pink) for a more elegant, monochromatic gradient. When dressing this look, keep your outfit simple—think solid colors, minimalist jewelry, or structured silhouettes—to prevent the colorful hair accessories from clashing with busy prints. This particular placement (securing the front section on one side) is ideal for accenting a deep side part or pulling back bangs, offering a sophisticated way to manage hair volume while making a bold, confident statement about your personal style.
The Architectural Wet Look: High-Gloss Side Part
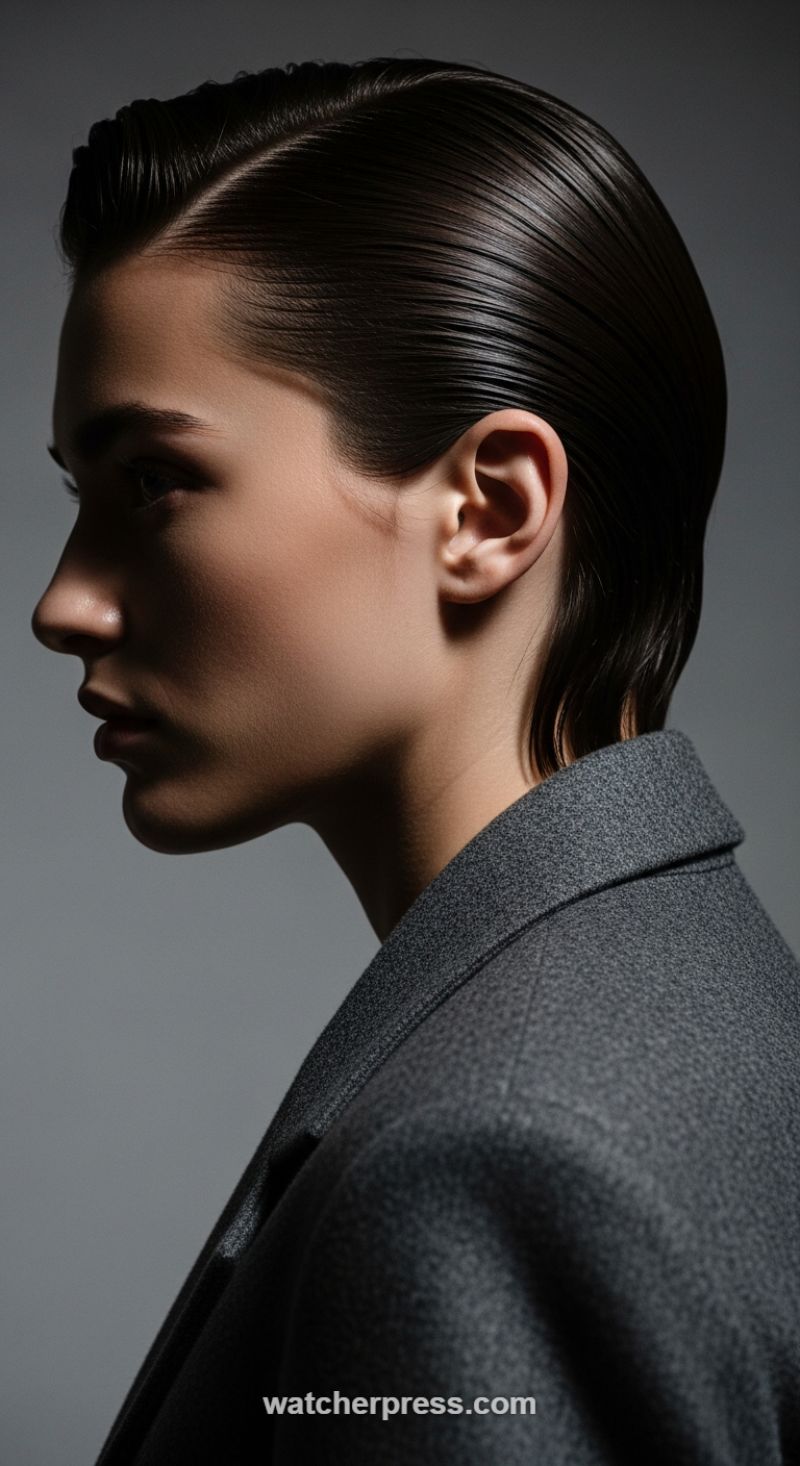
This iconic hairstyle, often seen gracing runways and high-fashion editorials, delivers an instant dose of androgynous elegance and fierce modernity. The Architectural Wet Look is defined by its deep, precise side part and its high-lacquer finish, presenting hair not just as a feature, but as a meticulously sculpted accessory. To achieve this level of sheen and control, begin with freshly washed, towel-dried hair. Establishing the part is paramount: use a rat-tail comb to draw a clean line, typically aligning the part with the arch of your brow for a flattering angle. Working in small sections, liberally apply a high-hold, water-based styling gel or a strong pomade from the root down to the nape of the neck. The key is saturation—the hair must be thoroughly coated to maintain the ‘wet’ appearance once dried. For maximum control and structure, aim to pull the hair back tight against the head, mimicking the sleek contour visible in the profile shot.
Execution relies heavily on the quality of your combing technique. Once the product is applied, use a fine-toothed comb, dragging it repeatedly through the hair along the established parting lines. This action not only distributes the product evenly but also creates the subtle, striated texture that characterizes this slicked-back style. Brush the hair firmly behind the ears, ensuring absolutely no loose strands or flyaways interrupt the seamless line. If your hair is shoulder-length or longer, you may secure the bulk of the hair at the back with a hidden elastic or bobby pins temporarily while the product sets. For shorter lengths, gently brush the ends down the nape of the neck, using a small amount of extra pomade on the tips to prevent them from flipping out, maintaining the severe, polished finish. Avoid using heat; let the gel air dry for the most durable hold and defined sheen.
For an expert finish, focus on optimizing the light reflection that gives this style its signature high-gloss appearance. Once the initial gel application has completely set and hardened, use a specialized shine spray or an ultra-light finishing oil, misting it lightly over the surface of the hair to enhance the reflective quality without adding frizz or weight. Pay close attention to the hairline and temples; use a clean spoolie brush or a toothbrush dipped in edge control gel to meticulously flatten any micro-fuzz or baby hairs. This look is inherently dramatic and demands confidence; pair it with structured garments, like the sharp collar seen in the image, and keep makeup focused on contouring and clean lines to balance the architectural precision of the hairstyle. This preparation ensures the look remains immaculate and high-impact throughout the day or night.
The Architectural Chignon: Mastering the Gold Wire Cage
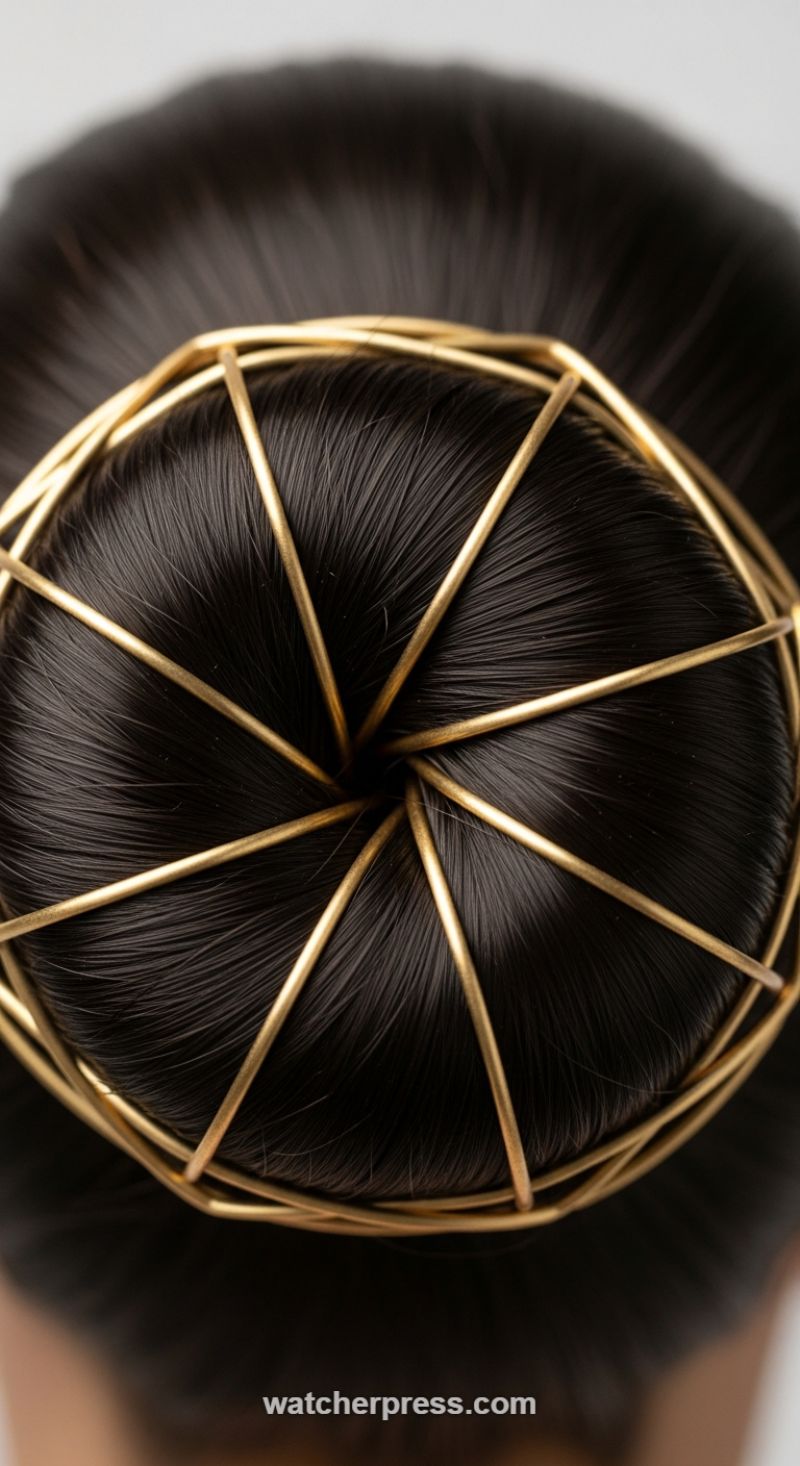
Achieving this high-impact, architectural style begins with a flawless foundation. The sleek contrast between the ultra-smooth, dark hair and the crisp metallic geometry is the core appeal of this look. To start, ensure your hair is impeccably straightened and treated with a shine serum or light pomade to eliminate any flyaways. Gather your hair into a very tight, centralized ponytail, positioning it either mid-head for maximum drama or low at the nape of the neck for classic elegance. For the perfect spherical silhouette seen here, utilize a small bun maker or hair doughnut, threading the ponytail through and wrapping the hair meticulously around it. If going freehand, twist the hair tightly into a smooth, compact chignon, securing every strand with U-shaped pins until the shape is solid and uniform. The key to the final elegance is absolute smoothness—any bumps or loose strands will detract from the sharp design of the accessory.
The transformative element of this style is the geometric wire cage accessory. This piece functions less as a traditional hair ornament and more as structural jewelry. The effectiveness relies heavily on precise placement. Carefully center the accessory over the bun, ensuring the radial gold wires perfectly bisect the hair mass and converge into the central ‘eye’ or vortex of the updo. This convergence creates a mesmerizing, iris-like effect, pulling the viewer’s gaze right into the styling detail. Expert Tip: Due to the high visibility of the cage, anchor the accessory using four small bobby pins that match your hair color, pushing them through the inner edges of the outermost gold ring and into the underlying bun. This guarantees the structure remains immovable, maintaining the clean lines and symmetry that define this look.
This highly polished style is ideally suited for modern formal occasions, high-profile professional events, or whenever you want your hairstyle to make a confident, cutting-edge statement. To finish, lock the style in place with a high-hold, anti-humidity finishing spray, followed by a light mist of gloss spray for that mirror-like sheen that highlights the smoothness of the hair fibers. Before stepping out, use the handle of a rat-tail comb and a dab of styling gel to smooth any tiny flyaways near the hairline, perfecting the silhouette. The stark sophistication of the dark hair against the bright metallic structure elevates this simple bun into a masterclass in modern hair sculpture.
Holographic Tinsel Strands: Mastering the Neon Cyberpunk Look
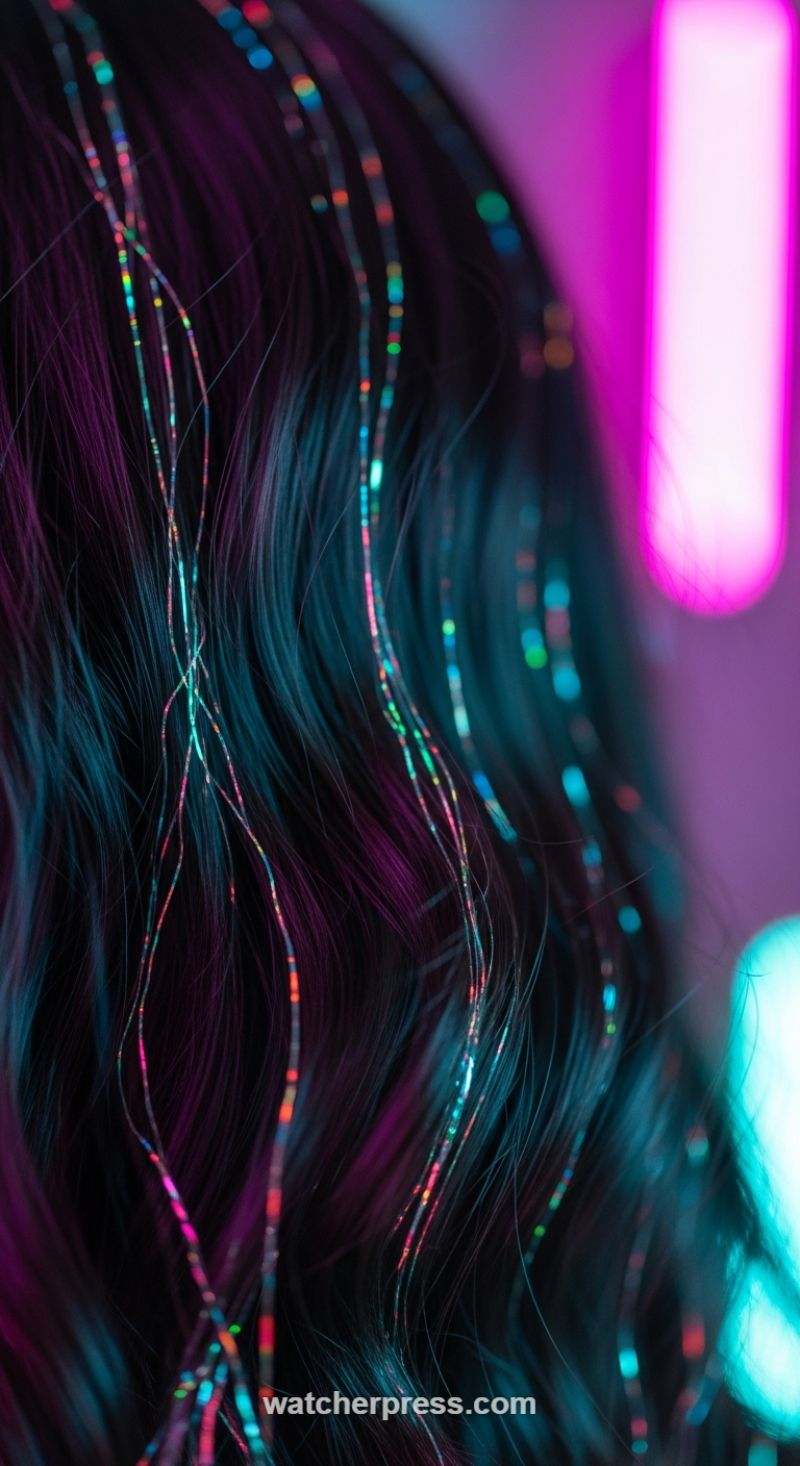
This style utilizes temporary hair tinsel, often called ‘fairy hair,’ to achieve a breathtaking, iridescent glow that immediately shifts a standard hairstyle into a futuristic, edgy statement piece. The visual success of this look hinges on high contrast: dark, rich hair (like the midnight blue/teal visible here) serves as the perfect backdrop for the fine, highly reflective holographic fibers. Note how the surrounding neon light—specifically the vibrant magenta and cool cyan—is captured and fragmented by the tinsel, creating thousands of micro-highlights that move dynamically with the hair. To replicate this dramatic effect, choose tinsel that shifts colors (often labeled iridescent or holographic) rather than solid metallic hues. For best results, ensure your base hair color is deep and saturated, allowing the lighting environment—whether natural sun or moody club lights—to be the sole source illuminating the dazzling strands.
Mastering the application requires securing the tinsel strands individually using a durable knot, ensuring longevity through multiple washes. The most effective method is the Lark’s Head Knot, often secured with a tiny slip knot tied directly to a single strand of natural hair near the root. Start by cutting tinsel approximately twice the desired finished length. Fold the tinsel in half, creating a loop. Place the loop around the single natural strand, push the ends through the loop (creating the Lark’s Head), and then carefully secure this knot with a second, tighter knot, ensuring it sits flush against the scalp. Expert advice dictates distributing these strands strategically—rather than clumping them—focus on the top layer and near the crown to maximize visibility when the hair moves. For a fuller effect like the image, aim for 15-25 strands evenly spaced across the side and back sections of the head.
For a top-tier look, focus on quality and maintenance. High-quality polyester tinsel is heat-resistant, meaning you can gently wash, brush, and even heat-style (up to 400°F, depending on the manufacturer) the hair without damaging the shine. When styling, opt for loose waves, as seen in the image, as this texture allows the reflective strands to peek out and catch light naturally. Avoid aggressively brushing directly over the knots, which can cause premature shedding. This style is incredibly versatile; while the image screams ‘neon rave,’ paired with subtle makeup, these iridescent accents offer a surprising shimmer suitable even for an elegant event, proving that fairy hair is the instant, low-commitment accessory your edgy look needs.
Effortless Elegance: Mastering the Polished Claw Clip Updo
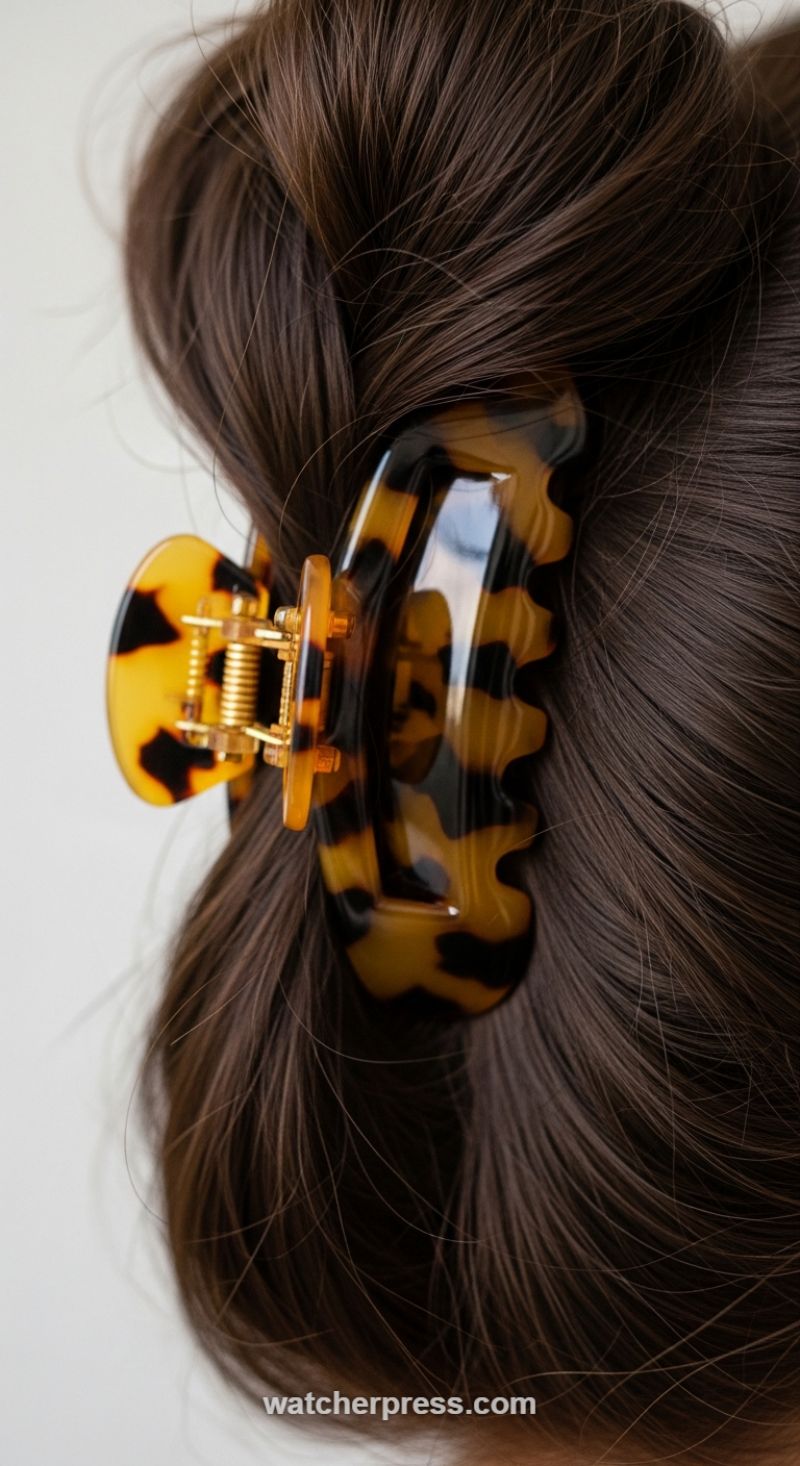
The sophisticated updo captured here demonstrates the powerful revival of the claw clip, transforming it from a casual accessory into a statement piece. The rich, dark brown hair provides a perfect contrast to the glossy, high-quality tortoiseshell clip, instantly elevating this look beyond a simple ponytail substitute. This technique is ideal for achieving maximum polish with minimal effort. To start, ensure your hair has enough grip; this style often works best on second-day hair or hair prepped with a light dry texture spray to prevent slippage. The visual emphasis is on sleekness at the crown and texture in the secured twist, making preparation key for a lasting hold that looks refined all day long.
To recreate this elegant twisted style, begin by gathering all of your hair into a low ponytail position at the nape of the neck or slightly higher, depending on where you want the final clip to sit. Keeping the hair taut, twist it tightly upward toward the crown of your head, creating a neat vertical coil (the base of a French twist). Once the twist reaches the desired height, fold the end section of the hair down, tucking it against the scalp inside the coil or beneath the twisted length. The key to a secure and professional finish is placement: use the large claw clip, like the high-shine one shown, to secure the vertical twist, ensuring the teeth bite into both the twisted hair mass and a section of the hair lying flat against your scalp. This dual-grip technique prevents the clip from sliding out.
Expert advice suggests customizing the volume post-clip application. If you desire a slightly softer, more romantic look, gently pull on small sections of the secured hair at the top of the twist or just above the clip to introduce volume and soften the silhouette. For ultimate sleekness, use a smoothing balm or light serum along the hairline and the sides before gathering the hair to minimize flyaways, mirroring the flawlessly groomed appearance in the image. Choosing the correct size clip is crucial; fine hair requires a medium-sized clip for proper security, while thick hair necessitates a larger, heavy-duty clip with a robust metal hinge, ensuring the accessory is both beautiful and functional for all-day wear.
The Architectural Segmented High Ponytail
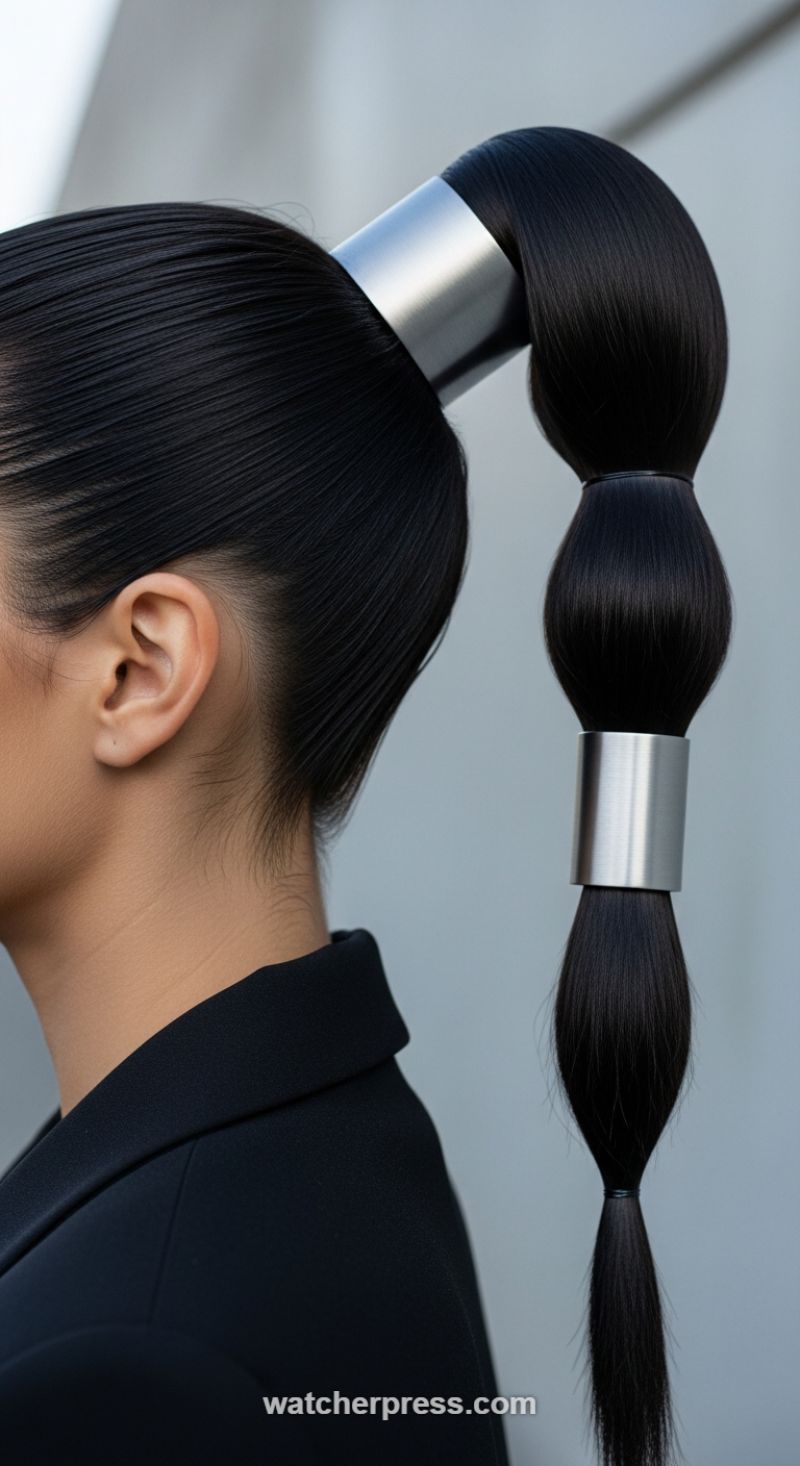
This style transforms the classic high ponytail into a piece of minimalist sculpture, perfect for conveying power and modern elegance. The key to mastering this look is preparation and precision. Begin by ensuring your hair is perfectly straight and ultra-smooth. This look requires maximum shine and zero frizz, so apply a heat protectant and shine serum before using a flat iron to achieve a glass-like finish. Next, gather all your hair into a sleek, high ponytail, placing the base precisely at the crown of your head. Secure it tightly with a strong elastic, pulling the hair back with tension to eliminate any bumps around the sides and nape. Expert tip: use a toothbrush lightly sprayed with strong-hold hairspray or edge control gel to lay down any flyaways near the hairline and behind the ears, ensuring a flawless foundation for this structured style.
Once the high ponytail is secured, the segmentation begins. The most striking element of this style is the use of structured, often metallic, hair cuffs, which must be perfectly cylindrical and brushed for a matte, modern look (as opposed to shiny or decorative pieces). If you don’t have cuffs, you can mimic the segments using thick, self-wrapped sections of hair secured with clear elastics. For the cuffed look, place the first large metal cuff directly over the elastic at the base of the ponytail. Measure down approximately three to five inches, depending on the length and density of your hair, and secure a thin elastic. Gently pull the hair between the base and this new elastic outward to create a smooth, rounded ‘bubble’ effect. This intentional volume gives the style its dramatic, architectural shape. Repeat this process down the length of the ponytail, ensuring each segment is consistent in size and shape.
Finish the look by placing the second large metal cuff strategically over the next elastic down the pony’s length. The uniformity and placement of these cuffs are critical to the overall success of the style, creating a high-fashion, polished aesthetic. This segmented ponytail pairs exceptionally well with tailored, crisp garments, such as blazers or modern necklines, as shown in the image, reinforcing the clean, structural lines of the hairstyle. Maintain the intense shine throughout the day with a light mist of shine spray that won’t compromise the structure. This hairstyle is not just a trend; it is a statement piece suitable for high-powered meetings, art openings, or any occasion where minimalist, sophisticated drama is desired.
The Velvet Bow Low Bun: Classic Elegance Reimagined
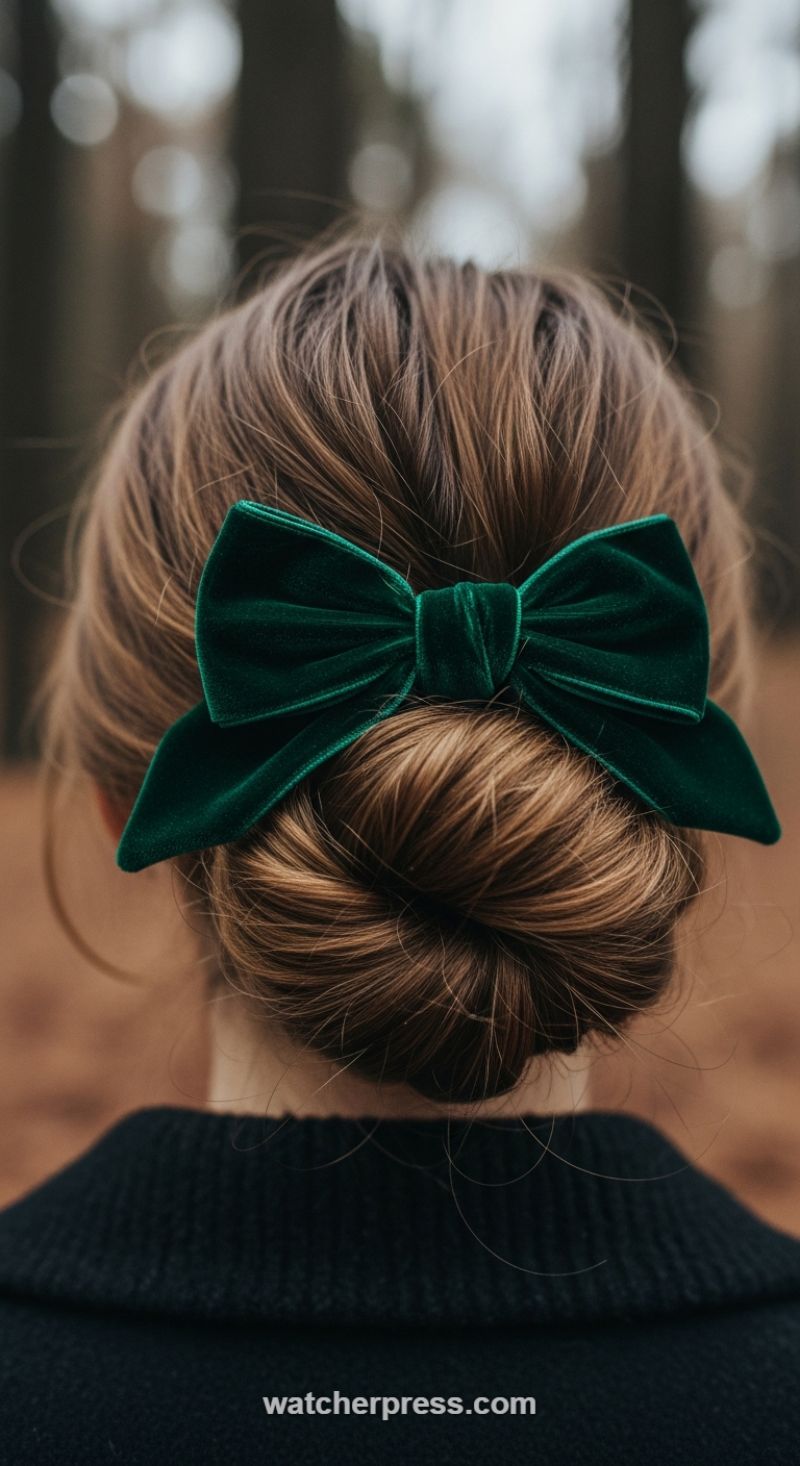
The Low Velvet Bow Bun is the epitome of effortless winter chic. This look combines the timeless, polished structure of a low chignon with the opulent texture of a deep emerald velvet accessory, instantly transforming a simple updo into a sophisticated statement suitable for any occasion, from an elegant dinner to a refined casual outing. The hair is pulled back cleanly, emphasizing the nape of the neck and allowing the eye to focus solely on the rich, light-catching qualities of the velvet. To prepare your hair for this style, work a smoothing serum or light oil through the mid-lengths and ends of medium-to-long hair. This ensures the sleek, frizz-free foundation necessary for the bun’s controlled and neat silhouette, providing the perfect dark canvas for the bright accessory.
To master this look, start by brushing all your hair back tightly from the face and securing it into a low, smooth ponytail placed directly at the occipital bone (the base of the skull). For maximum security and lasting smoothness, lightly mist the gathered hair with a flexible-hold hairspray or finishing spray before wrapping the elastic band. Next, execute your preferred low bun style—a simple twist bun or a classic spiral chignon works beautifully. To achieve the voluminous yet neat effect visible in this image, twist the ponytail firmly until it begins to coil, then wrap it tightly around the elastic base, securing the entire structure firmly with U-shaped hairpins (using bobby pins can sometimes create noticeable dents). The final, and most crucial, step is positioning the accessory. Place the large velvet bow directly above the finished bun, ensuring it is perfectly centered against the sleek backdrop of the head. Expertly conceal the bow clip or fastener within the hair just above the bun so that only the luxuriant velvet material is visible, allowing the bow’s tails to drape slightly over the top curve of the chignon for a cohesive and refined finish.
This style is incredibly versatile and transitions seamlessly between different wardrobe choices. To maintain its sleekness throughout the day, carry a small tin of clear pomade or wax to smooth down any emerging flyaways, particularly those around the hairline and the back of the neck. The choice of bow color is vital for achieving this rich visual impact; while deep emerald (as pictured) is phenomenal for winter and beautifully complements warm brown or auburn hair tones, alternative options like deep burgundy, navy blue, or classic black velvet also offer the necessary depth and texture. Pair this accessory-focused updo with high-collared knitwear, such as the dark turtleneck seen in the image, or with scoop-neck or V-neck dresses to effectively draw attention to the delicate neckline and the statement hair piece. For an added layer of sophistication, gently back-comb the hair at the crown before gathering it back—this subtle lift prevents the overall look from appearing too flat against the scalp, adding dimension and volume to the final elegant profile.
Instant Elegance: Mastering the Floating Pearl Look
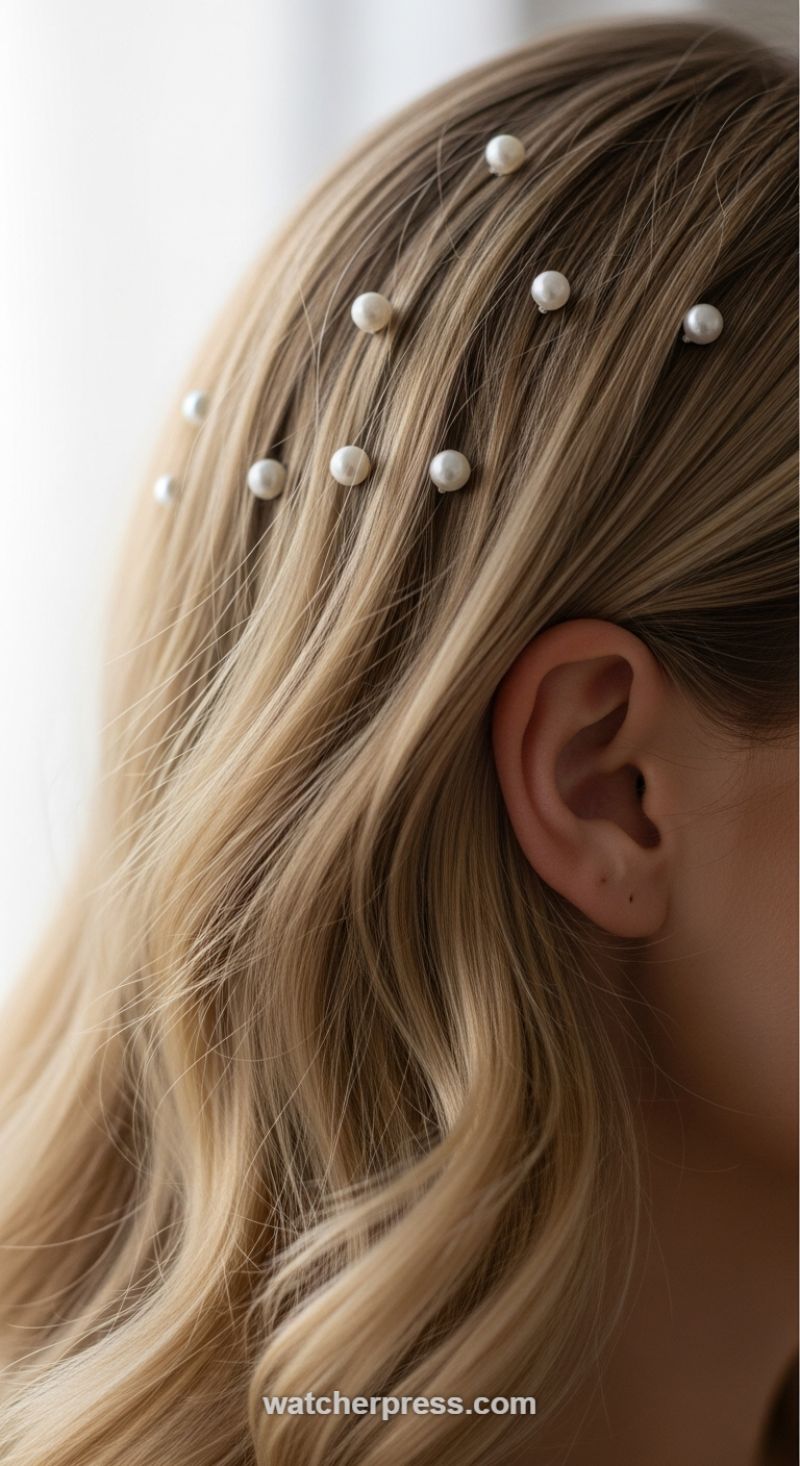
This style is the epitome of effortless glamour, proving that you don’t need a complicated updo to make a statement. The visual impact relies on scattering delicate pearl accessories across loose, flowing waves, creating an illusion of floating ornamentation. To achieve this high-end aesthetic, start with hair that has been properly prepped for volume. For the look pictured, the light blonde and highlighted strands are crucial, as the dimensional color catches the light beautifully, enhancing the subtle shimmer of the white pearls. Use a large barrel curling iron or natural air-drying methods to create soft, romantic waves that frame the face, ensuring the hair near the part has a slight lift. This style is incredibly versatile, transitioning seamlessly from a sophisticated bridal party look to an elegant choice for a formal dinner.
The secret to mastering the ‘floating’ effect lies entirely in the placement and the type of accessories used. you will need tiny, individual pearl hair pins or decorative hair forks—avoid using full clips or barrettes that are visible. The pins should be strategically inserted into the hair, concealing the metal mechanism completely so that only the luminous pearl remains exposed. Instead of lining them up in a precise row, intentionally scatter them across a small section above the temple or along the natural hair part, varying the distances between each pearl. Expert stylists recommend using an odd number of accessories, typically five to nine small pins, as uneven numbers tend to be more aesthetically pleasing and organic in composition.
For professional longevity and added polish, ensure you finish the look with the right products. Before applying the pins, mist a light-hold texturizing spray or hairspray over the area where the pearls will sit; this provides grip and helps the pins stay securely in place, preventing them from sliding down the hair shaft, especially if your hair is very sleek. While the look shines on lighter hair due to the soft contrast, incorporating these pins into dark hair creates a dramatic, starry night effect that is equally stunning. For a variation, you can sweep the front section of hair back into a half-up style and concentrate the pearls along the twist or braid, transforming this simple scattered arrangement into a more contained and formalized hairstyle.
The Delicate Floral Braid: Mastering the Boho Accent
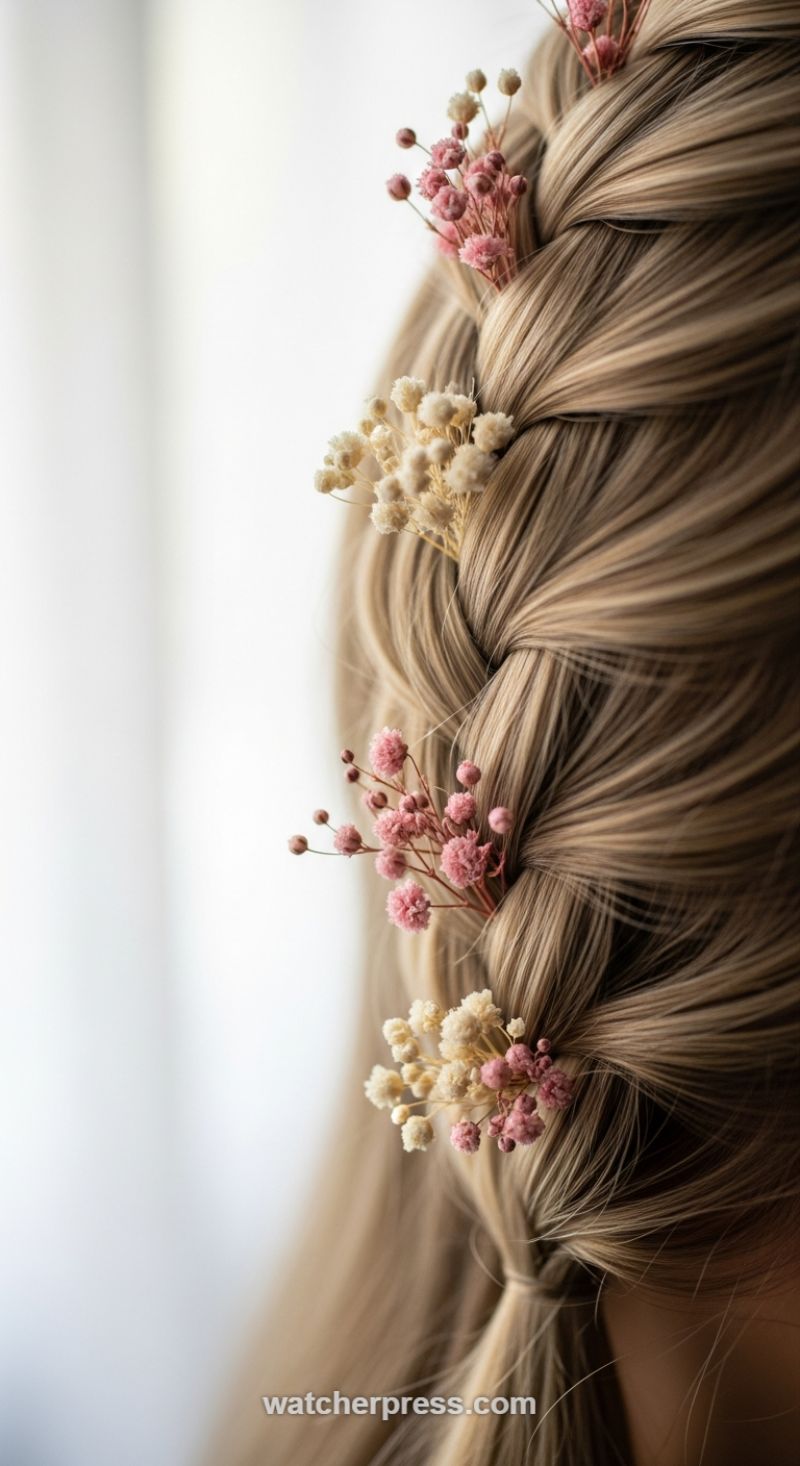
This hairstyle instantly elevates a simple braid into a romantic, bohemian masterpiece, perfect for weddings, festivals, or upscale date nights. The foundation is built upon medium-to-long hair, ideally with natural highlights or multi-tonal coloring, as the visual depth enhances the definition of the braid structure. Before beginning, ensure your hair has sufficient grip. If working with freshly washed hair, apply a volumizing mousse or a generous amount of dry shampoo or texturizing spray, focusing on the roots and mid-lengths. This crucial step prevents slippage and allows for the necessary manipulation (pancaking) later. The visible braid here appears to be a Dutch braid (where strands cross under, making the braid stand out) or a tight French braid woven along the side of the head. Begin by sectioning off hair near the temple and starting a traditional three-strand technique, gradually incorporating small, even sections of hair as you move down the scalp towards the back, ensuring tension is maintained throughout the weaving process.
The secret to transitioning this look from casual to elegant lies in the “pancaking” technique. Once the braid is complete and secured at the end (either merging into a ponytail or continuing the braid down the back), gently pull apart the outer loops of the braid using your thumb and forefinger. Start lightly at the top and work your way down. The goal is not to unravel the braid, but to widen and soften its appearance, giving the illusion of significantly thicker, more voluminous hair. This is particularly effective where the floral accents will be placed, as the widened loops offer a more natural resting spot for the blossoms. Expert tip: always pancake the hair *before* adding the delicate accessories; trying to loosen the braid after the flowers are inserted risks dislodging them or damaging the petals. The soft, multi-directional light in the image highlights how successful pancaking catches light and emphasizes the hair’s movement, a key element of elegance.
Finally, the artistic placement of the dried florals—in this case, clusters of pink and ivory baby’s breath (Gypsophila)—provides the ultimate finishing touch. You can purchase small floral hairpins, or, for a DIY approach, secure tiny bunches of dried flowers to thin bobby pins or small U-shaped pins using floral tape. Strategically place these tiny accents within the valleys and intersections of the pancaked braid, ensuring they are firmly anchored to the underlying hair strands, not just the outer loops. Alternate the colors (pink and white) sporadically to create a natural, effortless flow, mirroring the gentle contrast seen in the visual. Finish the entire style with a flexible-hold hairspray, misting lightly from a distance to keep the soft, voluminous texture intact while ensuring maximum longevity for your intricate, elevated braid, making this a durable style suitable for all-day events.
Regal Adornment: Coils Elevated with Wooden Beads and Gold Cuffs
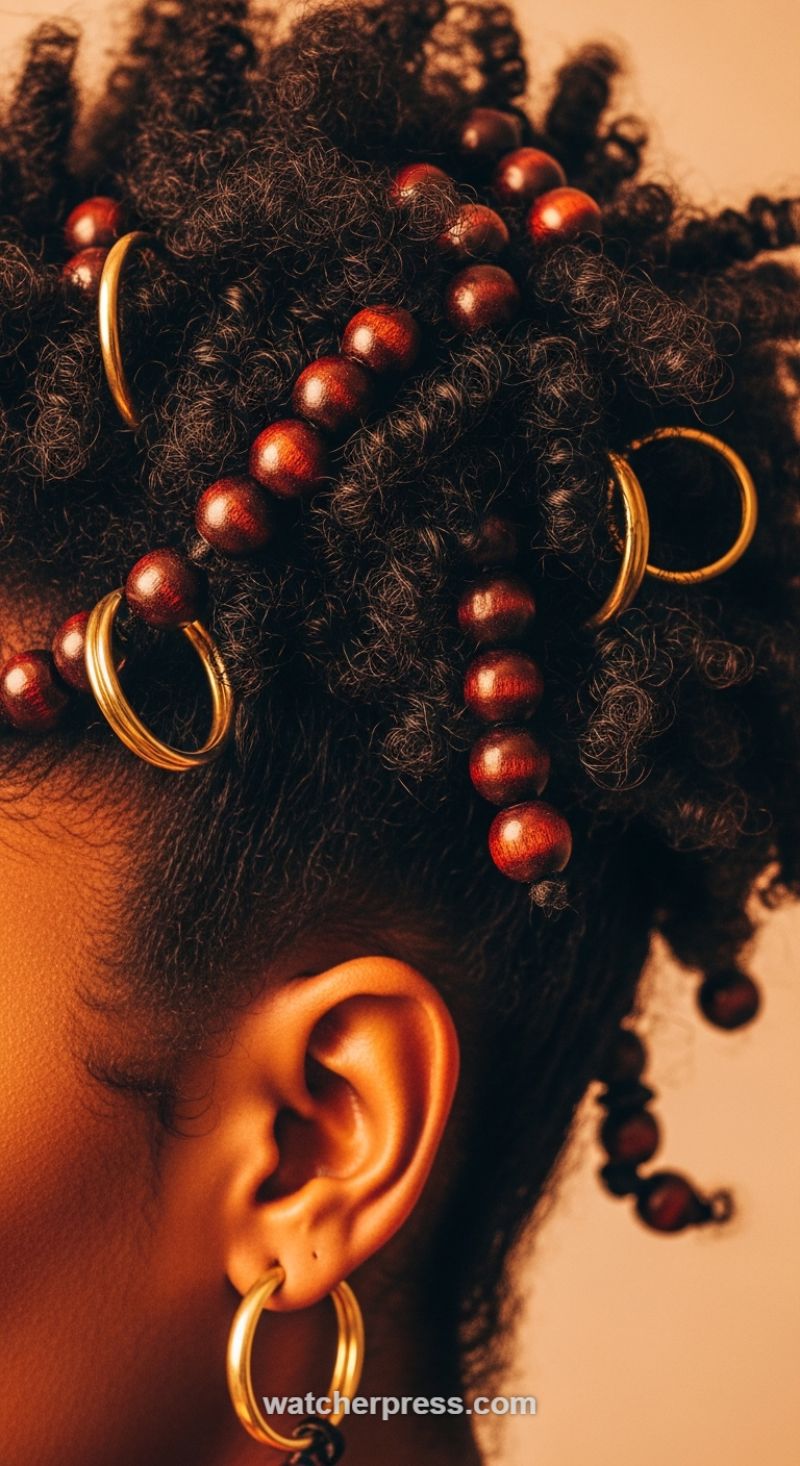
This stunning style masterfully merges protective styling with high-end accessorizing, turning everyday natural coils into a regal statement. The visual impact relies heavily on the rich contrast between the dark, densely textured hair and the warm, reflective tones of the reddish-brown wooden beads and bright gold hair cuffs. This technique is ideal for those with Type 4 hair textures (coily and kinky) who are looking to add an elegant, handcrafted element to their protective styles, such as individual twists or small Bantu knot outs. By focusing on small, defined sections, the beads and cuffs are allowed to drape beautifully, catching the light and emphasizing the carefully cultivated texture. The repetition of the spherical beads creates a sense of rhythm and structure, while the contrasting metallic cuffs introduce an edgy, modern flair, resulting in a look that is both deeply rooted in cultural tradition and perfectly suited for contemporary elegance. To achieve maximum definition and longevity, ensure your hair is freshly cleansed, deeply moisturized, and sectioned using a reliable butter or cream before braiding or twisting.
Mastering this look hinges on the proper application of the beads and cuffs. Start by creating small to medium-sized defined coils or two-strand twists that are securely tied off at the ends. To string the beads, the simplest and safest method is using a specialized beading needle or a thin wire loop threader. Carefully thread the desired number of wooden beads onto the tool, then gently slide them down onto the section of hair, pushing them close to the root or midway down the twist, depending on the desired visual density. Once the beads are in place, the end of the hair strand must be secured tightly—either by knotting the end of the twist/braid itself or using a small, clear elastic band to prevent the beads from sliding off. Next, apply the gold cuffs: these are typically open rings that can be gently pried open, slid onto a hair section, and then pinched closed using fingertips or a pair of smooth-jawed pliers. For the best aesthetic, place the cuffs strategically above, below, or between groupings of beads to break up the texture and highlight the metallic sheen.
For an elevated finish, pay close attention to the quality of your accessories and the preparation of your hair. When selecting beads, opt for smooth, polished wood or materials that won’t snag or cause friction damage to the hair cuticle. Choose seamless, non-tarnishing gold cuffs that are heavy enough to stay in place but light enough not to cause tension headaches. Expert tip: This style looks incredibly polished when paired with coordinating jewelry, such as the large, double hoop earrings seen in the image, balancing the ornamentation in the hair with statement pieces at the ear. To maintain the style, use a light oil sheen spray to keep the hair moisturized and reduce frizz around the base. At night, ensure the style is covered with a satin bonnet or scarf to protect the delicate coils and prevent the beads from catching on bedding, ensuring your regal adornment stays flawless for up to two weeks.
The Gilded Braid: Styling with Delicate Hair Chains
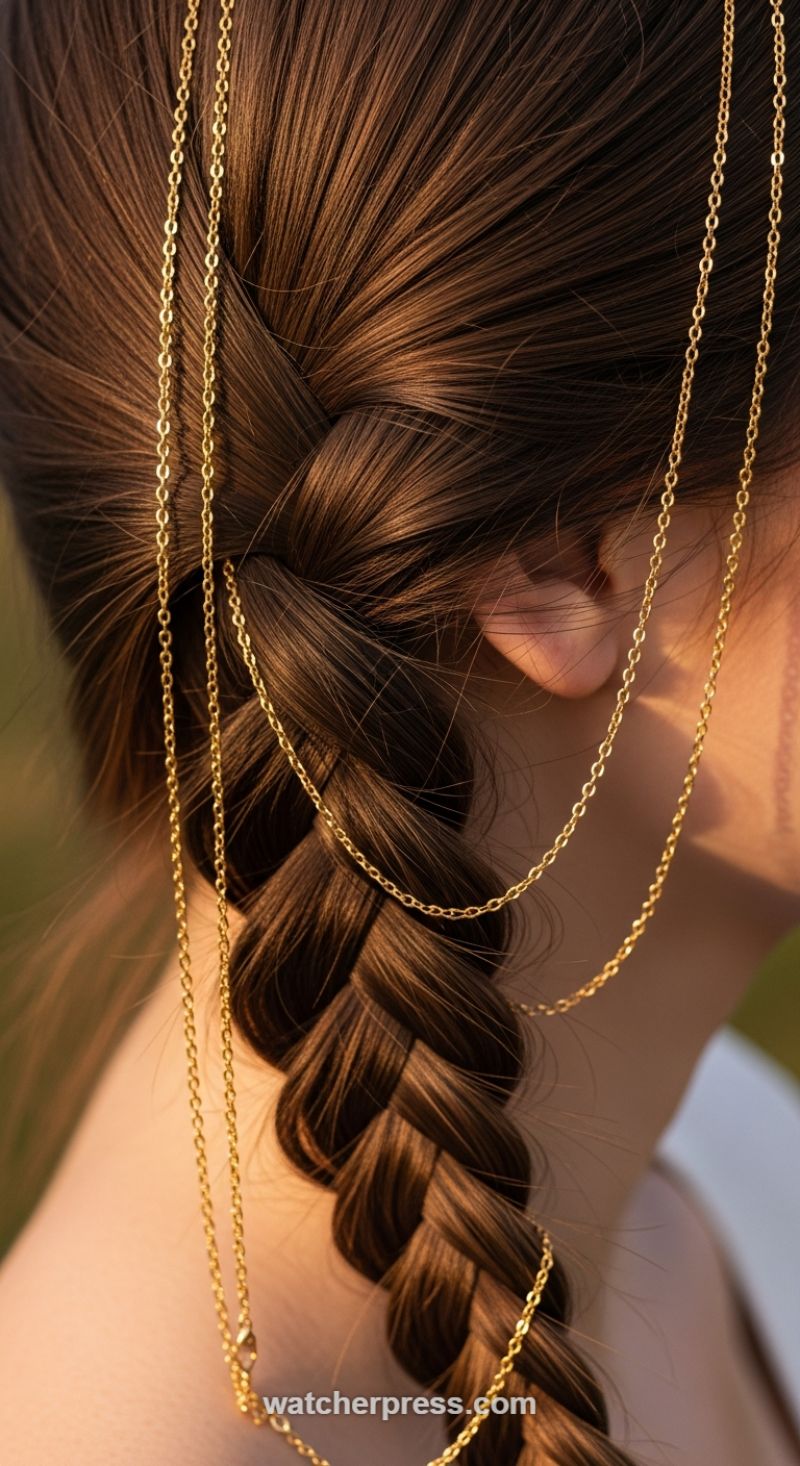
This style, which we call “The Gilded Braid,” instantly transforms a classic braided look into an ethereal, high-fashion statement. The foundation is a tightly woven French or Dutch braid (depending on whether you prefer the braid to sit on top of the hair or be woven underneath). For rich hair tones like the deep auburn shown, the contrast with delicate gold chains is stunning and highly dramatic. Before braiding, prep the hair with a high-shine smoothing serum or light oil to ensure flyaways are minimized, which is essential for giving the final look that enviable polished sheen. Ensure your part is clean and begin your braid securely at the crown, maintaining consistent tension throughout the process for a smooth, uniform texture that flows gracefully down the back of the neck.
The artistry of the Gilded Braid lies in the strategic placement and securing of the hair jewelry. Unlike heavy headbands or clips, delicate hair chains require careful anchoring. Opt for specialized multi-layered hair chains designed to drape, or if using thin necklaces, secure them with small, clear hair elastics or bobby pins discreetly hidden within the braid structure, typically around the area just behind the ear. Expert tip: The chain that crosses the top of the head/ear should be slightly shorter and anchored tighter, while the lower chains are allowed to hang more loosely, creating an appealing waterfall effect that catches the light and emphasizes the movement of the hair. The overall goal is flow; the chains should skim the hair, not pull it taut. If using multiple individual chains, attach them at slightly varying points in the braid to prevent them from tangling into one thick, unappealing strand.
This look is incredibly versatile, lending itself perfectly to both bohemian outdoor photoshoots and sophisticated evening events like formal dinners or weddings. To maintain the polished appearance, especially if wearing this style for several hours, use a flexible-hold finishing spray applied lightly over the completed braid to lock down any stray hairs without diminishing the natural luster and shine. The warm, golden light captured in this image highlights how crucial soft illumination is for this style; the metallic gleam of the chains should be allowed to reflect light dramatically. For maximum impact, consider pairing this hairstyle with an outfit that features a high, structured neckline or an open back, deliberately drawing attention downward to the elegant cascade of the braid and the sparkling jewelry.
Elegant V-Shape Cornrows: Precision Parting for High Definition Style
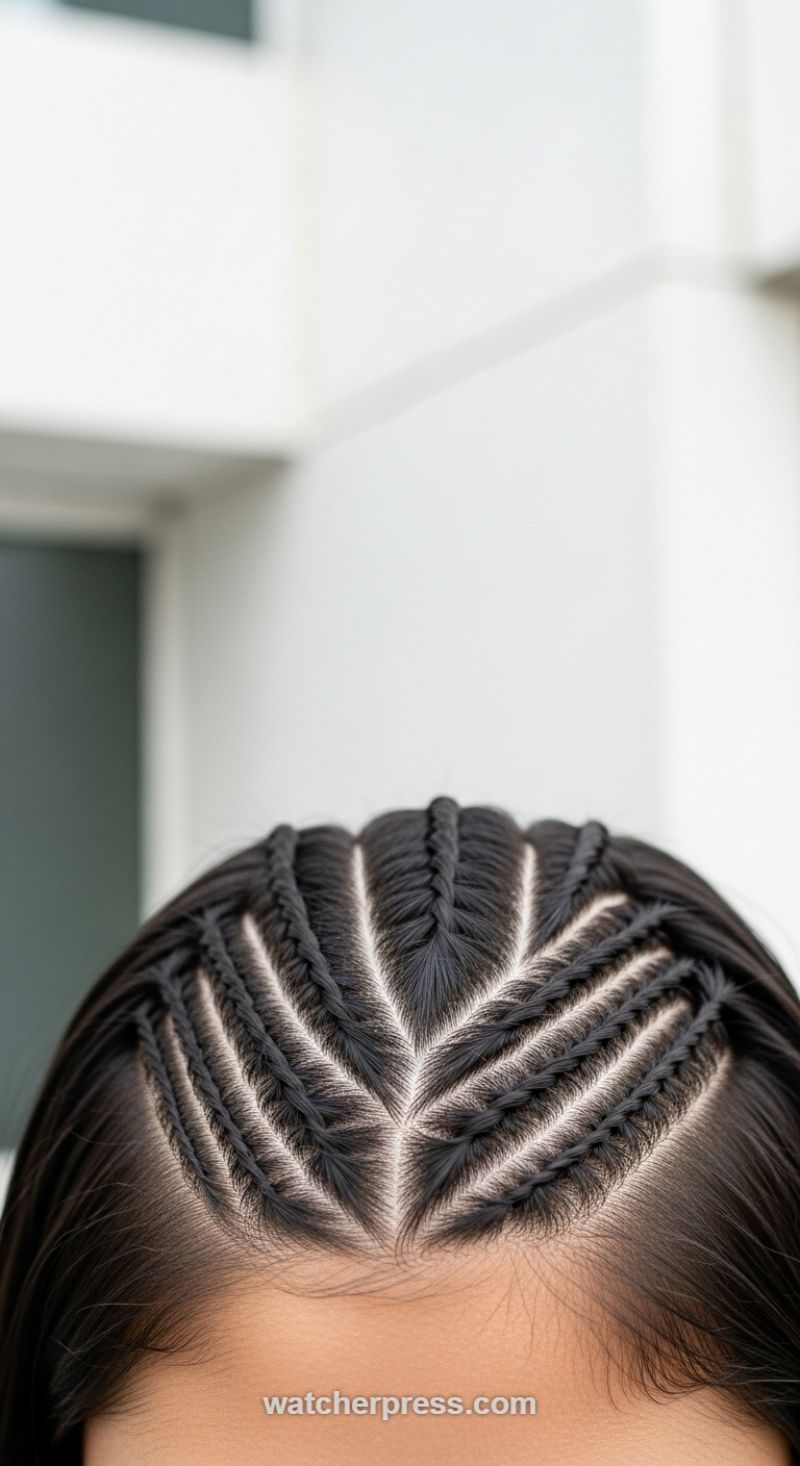
This intricate style, known as geometric frontal cornrows or V-pattern braids, offers an incredibly sleek and edgy aesthetic, perfect for those looking to elevate their look from simple to sculptural. The foundation of this design relies entirely on precision parting. To achieve this high-definition symmetry, begin by establishing a central point just above the forehead’s hairline. From this single vertex, use a rat-tail comb to meticulously section the hair outward in clean, sharp diagonals. The visual impact comes from the contrasting white scalp lines against the tightly braided dark hair, creating a striking fan or chevron effect. A key element of success is pre-treating the hair with a light holding gel or pomade applied directly along the intended part lines to ensure maximum smoothness and prevent flyaways. Expert stylists recommend partitioning the hair into six to eight equally sized triangular sections radiating from the center point, ensuring that the angle of the parting is perfectly mirrored on the left and right sides of the head. This style serves as a powerful testament to the skill involved in protective styling, offering both high fashion appeal and practicality.
Once the sections are established, the braiding process begins, utilizing the underhand technique essential for traditional cornrows (also known as inverted or Dutch braids when done off-scalp). Starting at the central point, begin feeding small, even sections of hair into the braid as you move outward toward the temples. Maintaining consistent tension is paramount; the braids should be firm against the scalp to ensure the pattern holds its shape without causing unnecessary pulling or stress on the hairline. The defining characteristic of the V-shape is the directionality—the braids must cleanly follow the sharp diagonal angle of the parted section, creating the signature tapered appearance. For those who cannot master this highly technical braiding style instantly, this is the perfect look to consult with a professional braid artist, providing them with this exact image for replication. To maintain the crisp definition, especially at the scalp, lightly mist the braids with braid spray and cover the hair with a silk or satin scarf nightly. This geometric style is incredibly versatile, adding a bold, architectural edge to casual outfits or pairing beautifully with high-neck formal wear, making it a powerful statement piece in your hairstyle arsenal.
Instant Glamour: Mastering the Jewel-Toned Satin Scrunchie Ponytail
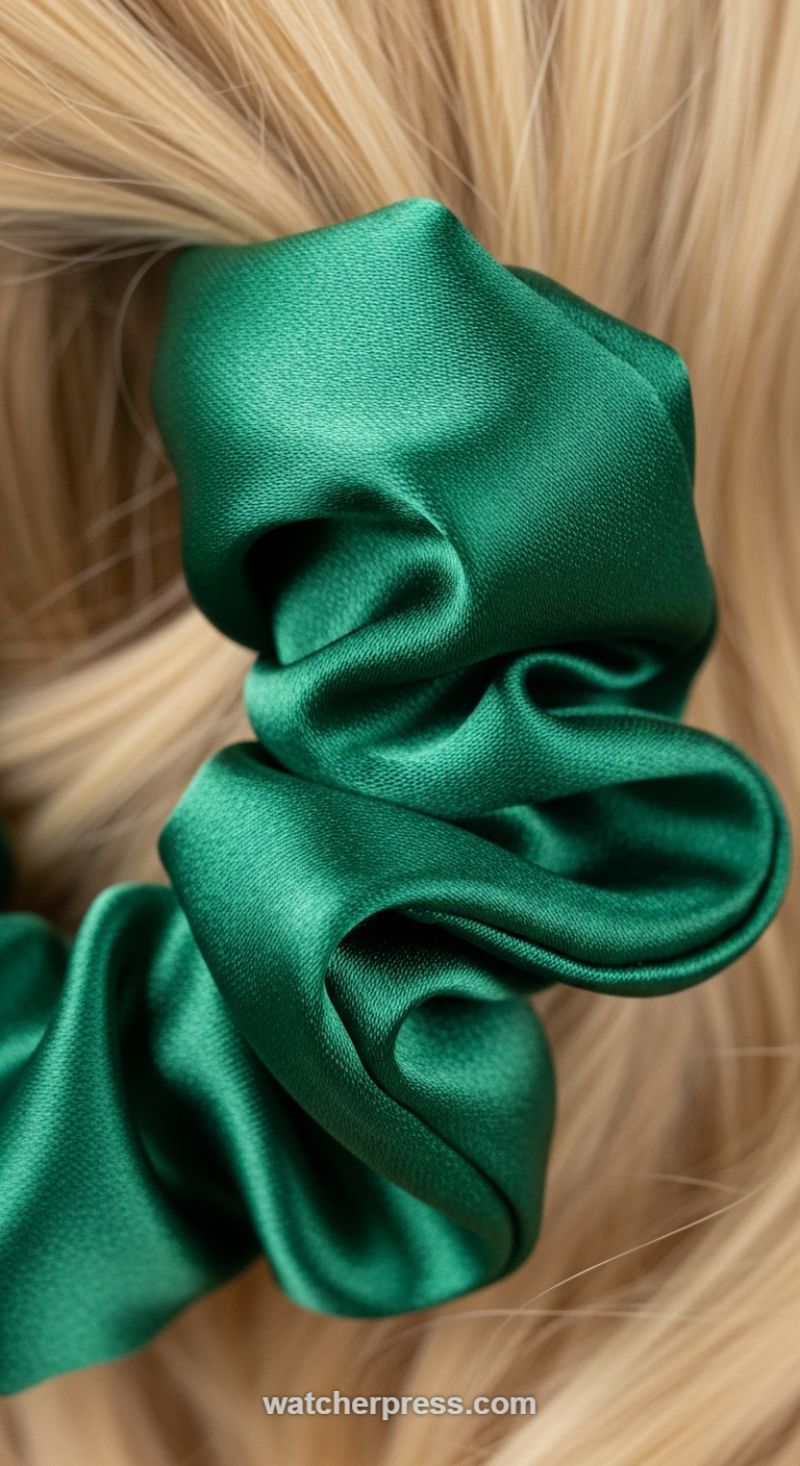
This look hinges entirely on the accessory. The featured image showcases a deep emerald green scrunchie crafted from lustrous satin or silk, providing an immediate injection of opulence to a simple blonde ponytail. To replicate this elevated style, begin by deciding on your hair texture. For maximum elegance, a smooth, sleek finish is ideal; apply a lightweight smoothing oil from mid-lengths to ends to maximize shine and control flyaways. If you prefer a softer, voluminous aesthetic, incorporate soft waves or a slight bend using a large-barrel curling iron before gathering the hair. The key visual impact here is the contrast between the rich, highly saturated jewel tone and the hair color—whether blonde, brunette, or red—which instantly transforms a basic updo into a sophisticated statement piece suitable for both office hours and evening events.
The execution is deceptively simple, but technique is vital for that professional finish. First, gather your hair into a mid-to-high ponytail, ensuring the placement flatters your profile. Secure the ponytail tightly using a thin, neutral-colored elastic band that matches your hair color. This initial tie guarantees lasting hold, preventing slippage later in the day, especially for thicker or longer hair. The scrunchie’s purpose is purely decorative. To achieve the perfect voluminous wrap seen in the close-up, gently twist the satin accessory only once or twice around the secured ponytail, ensuring the fabric ruffles are distributed evenly. Expert tip: Do not over-stretch the fabric with the wrap. Instead, pull the gathered material outward slightly after placing it to maximize the ‘scrunch’ and showcase the rich sheen of the fabric, effectively masking the hidden elastic beneath and allowing the emerald tone to catch the light.
To truly master this instant style, focus on the finishing touches that move it from casual to elegant. Once the scrunchie is perfectly positioned, lightly mist the surrounding hair with a flexible-hold hairspray, concentrating on the base to minimize frizz. For an added ‘edgy’ element or to soften the look, pull out a few fine strands around the temples and jawline—a technique that adds intentional effortlessness and frames the face beautifully. This style is also exceptionally protective, as the smooth, natural silk or satin fabric reduces friction compared to traditional elastic bands, minimizing breakage and creasing. While the featured emerald green offers stunning sophistication, experiment with other deep jewel tones like sapphire blue, ruby red, or amethyst purple to match seasonal outfits, ensuring this bold accessory always stands out as the focal point of your instantly mastered, elevated updo.
The Liquid-Shine Rope Braid Ponytail
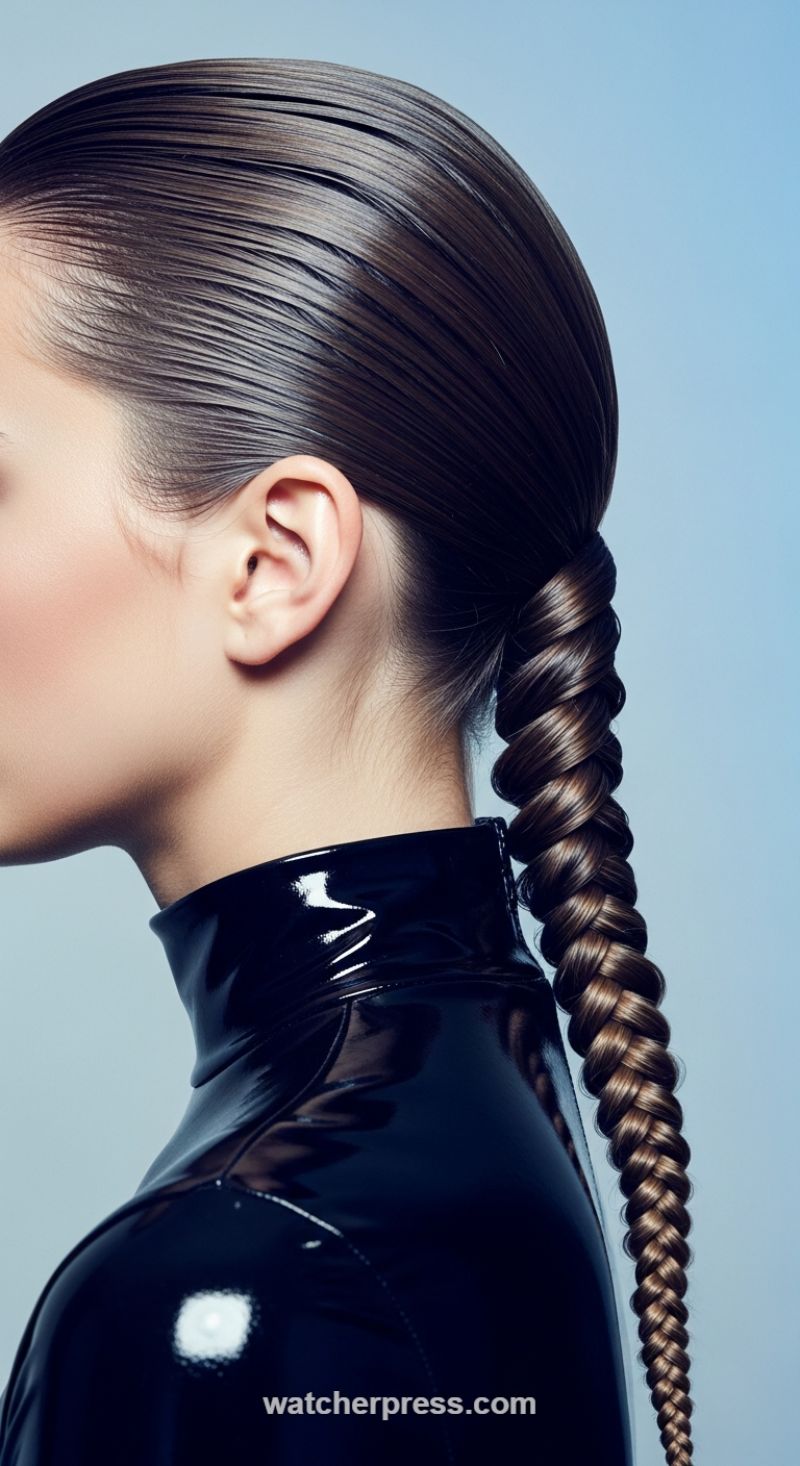
This style is the epitome of high-fashion severity, marrying the polished elegance of a classic slicked-back look with the edgy, futuristic appeal of a high-gloss finish and structural braiding. To master the liquid base, start with damp hair and apply a generous amount of strong-hold styling gel or high-shine pomade from the roots to the mid-lengths. Using a fine-tooth comb and a boar bristle brush, aggressively smooth the hair back, eliminating every single flyaway. The goal is a truly flat, painted-on effect, emphasizing the contrast between the smooth scalp and the texture of the braid. Pull the hair into a high ponytail, securing it tightly at the crown or the occipital bone (depending on the desired angle). Ensure the elastic is fully covered, either by wrapping a small section of hair around it and securing it with a pin or using a bungee cord for maximum tension.
Once the base is secured, the focus shifts to the rope braid, which gives this look its architectural quality. Divide the ponytail into two equal sections. This technique requires consistency: you must twist both sections *tightly* in the *same* direction (e.g., clockwise). Once both sections are individually twisted, you then cross them over each other in the *opposite* direction (counter-clockwise) to lock the structure in place. Maintaining extreme tension throughout the entire length is critical to achieving the tight, corkscrew pattern visible in the image. Continue this twisting and crossing pattern until you reach the ends, securing the braid with a clear, small elastic. For extra length or volume, high-quality, pre-styled extensions can be seamlessly incorporated into the ponytail before starting the rope braid.
Expert finishing touches are essential for transforming this look from neat to editorial. After the braid is complete, mist the entire style—including the roots and the braid itself—with a high-gloss finishing spray or clear shine serum to mimic the patent leather texture of the collar. If you are aiming for true durability, set the front hairline with a lightweight edge control product to battle humidity and movement. This powerful, sculpted aesthetic works best when paired with high-neck or structural garments, allowing the severity of the hairstyle to balance the outfit. It’s a severe, confidence-boosting look that requires commitment but delivers maximum impact, perfect for an evening event or a bold fashion statement.
The Iridescent Crown: Mastering the High-Impact Glitter Root

The ‘Iridescent Crown’ style, as showcased in this image, is the ultimate statement for elevating an otherwise simple updo into a runway-ready or festival-chic masterpiece. This style is characterized by the intense, multi-sized coverage of glitter concentrated heavily at the hairline and scalp area, extending into a sleek, high bun. To achieve this level of visual impact—especially the deep, vibrant sparkle contrasted against dark hair—preparation is paramount. First, style your hair into the desired updo (a tight bun or high ponytail works best, as it offers a smooth, defined surface). Next, you need a strong adhesive base. Expert stylists recommend mixing chunky, hexagonal cosmetic-grade glitter (focusing on iridescent pinks, blues, and golds) directly into a clear, high-shine styling gel or a thick pomade. This pre-mixed ‘glitter paste’ ensures that the application is dense and minimizes fallout, giving you the solid, almost jewel-encrusted appearance visible here.
Application must be deliberate and precise. Using a flat foundation brush or a wide, clean paint brush, scoop up the pre-mixed paste. Starting at the center part line or the crown (where the bun meets the scalp), press the mixture firmly onto the hair roots and the surrounding scalp area, working outwards toward the temples. For the dramatic density seen in the visual, multiple layers are necessary. Apply one solid layer of the chunky mix, allow it to set for 60 seconds, and then lightly dust a layer of ultra-fine holographic glitter powder over the top. This layering technique allows light to catch the fine particles while the chunky pieces reflect intense flashes of color, amplifying the iridescent effect under bright or stage lighting. Ensure the edges around the ears and the nape of the neck are blended subtly or kept slick and clean, reserving the heavy glitter concentration strictly for the crown for maximum dramatic effect.
To lock this sophisticated look in place and ensure it withstands hours of wear, finish the entire glitter-applied area with a flexible but strong-hold hairspray or a glitter sealant spray. The moody, magenta lighting featured in this image enhances the pink and purple hues within the glitter, so consider using warmer light sources for photography to maximize this ethereal glow. Crucially, when it comes time for removal, do not jump straight into the shower. Expert advice dictates dissolving the adhesive and lifting the glitter first. Massage a generous amount of clarifying oil (such as coconut or olive oil) directly into the glittered areas; the oil breaks down the styling gel, allowing the glitter to be gently wiped away with a paper towel, thus saving your plumbing and minimizing damage or residue in your hair.
High-Contrast Double Dutch Braids: Weaving in Electric Blue
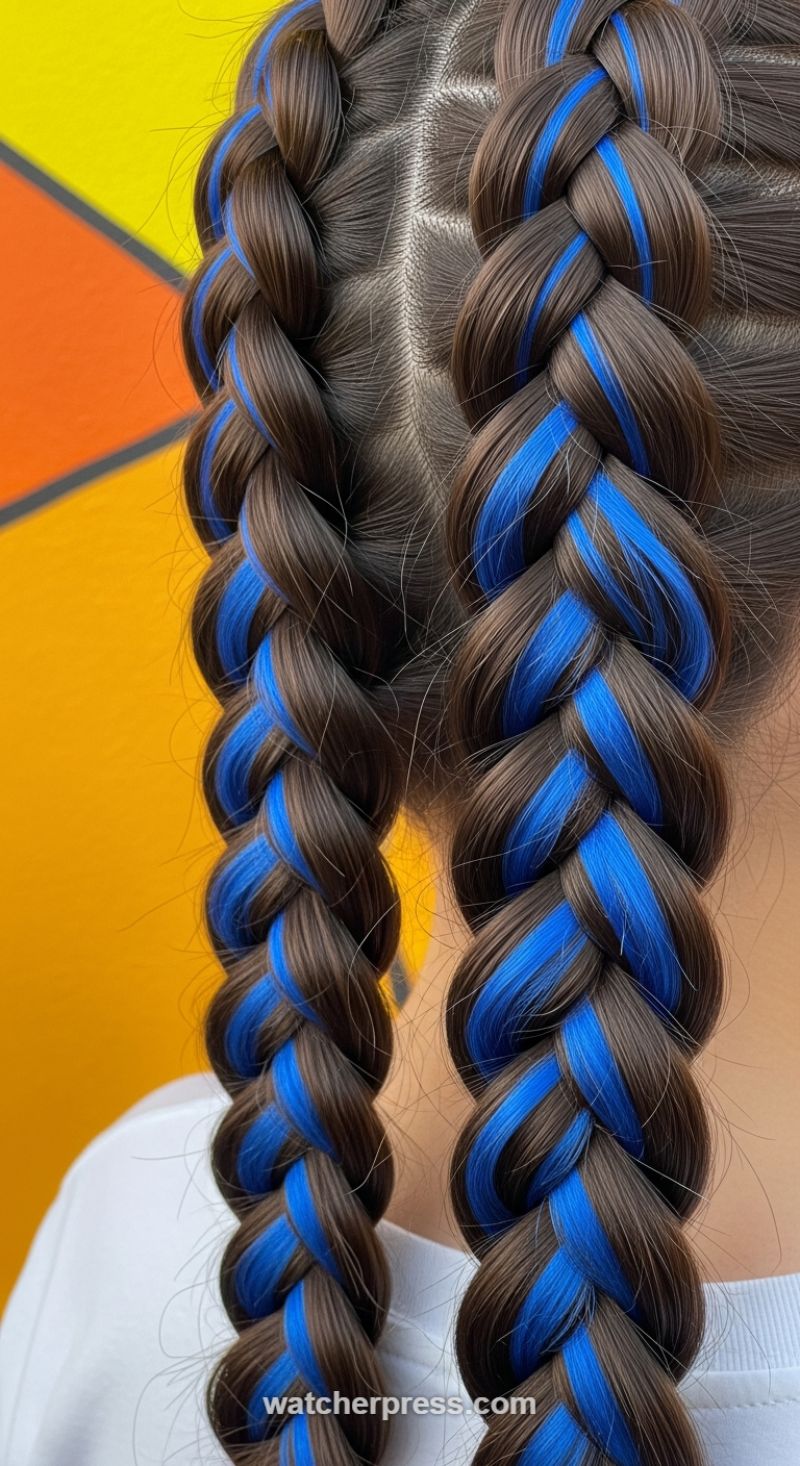
The featured look, “High-Contrast Double Dutch Braids,” transforms a sporty classic into an electrifying statement. The foundation relies on two perfectly executed Dutch braids running parallel down the head, achieved by parting the hair neatly down the center. What makes this style truly pop is the incorporation of saturated, electric blue strands against the deep, rich brown base. For maximum visual impact and uniform color distribution, integrating professional-grade synthetic braiding hair (like kanekalon) or brightly colored hair extensions is highly recommended, as this provides the robust, non-fading color density seen running consistently throughout the lengthy braids. Before starting, ensure the hair is meticulously brushed and slightly damp, and use a light application of styling mousse or edge control at the roots to minimize flyaways and achieve the sleek, tight tension necessary for this polished aesthetic.
To execute the Dutch braid technique, begin each braid high on the scalp, taking three equal sections. Unlike a traditional French braid, where strands cross over the center, the Dutch braid requires crossing strands *under* the center piece, which pulls the braid out from the head, creating a stunning, three-dimensional, raised effect. The critical step for achieving the striking color contrast is the strategic integration of the blue material: ensure that a significant portion of one of the three active braiding strands is composed of the colored extension hair, and feed in a consistent amount of the blue material into that specific segment as you braid and incorporate new hair from the scalp. Maintaining firm, even tension throughout the process is paramount; this not only holds the braid structure firmly but also highlights the clean, structured geometric parting at the crown. As you move past the nape of the neck, transition seamlessly into a standard three-strand braid once all the natural hair has been collected, continuing the tight tension down to the ends.
Longevity and high shine are crucial for a detailed, high-contrast style like this. Once the braids are finished, secure the ends firmly with small, high-quality hair elastics that match the hair color. To protect the finished look and enhance the sheen of both the natural hair and the extensions, lightly mist the completed braids with a shine spray or an anti-frizz serum—this is especially important as the tightly woven structure can sometimes emphasize slight frizz along the edges. This style is highly versatile for customization: while electric blue provides an edgy, comic-book pop against the brown, the technique works equally well with vibrant magenta, neon green, or even reflective silver for an athletic or festival-ready look. This style offers maximum visual impact and durability, making it perfect for events or prolonged wear.
Effortless Movement: The Sun-Kissed Tousled Lob
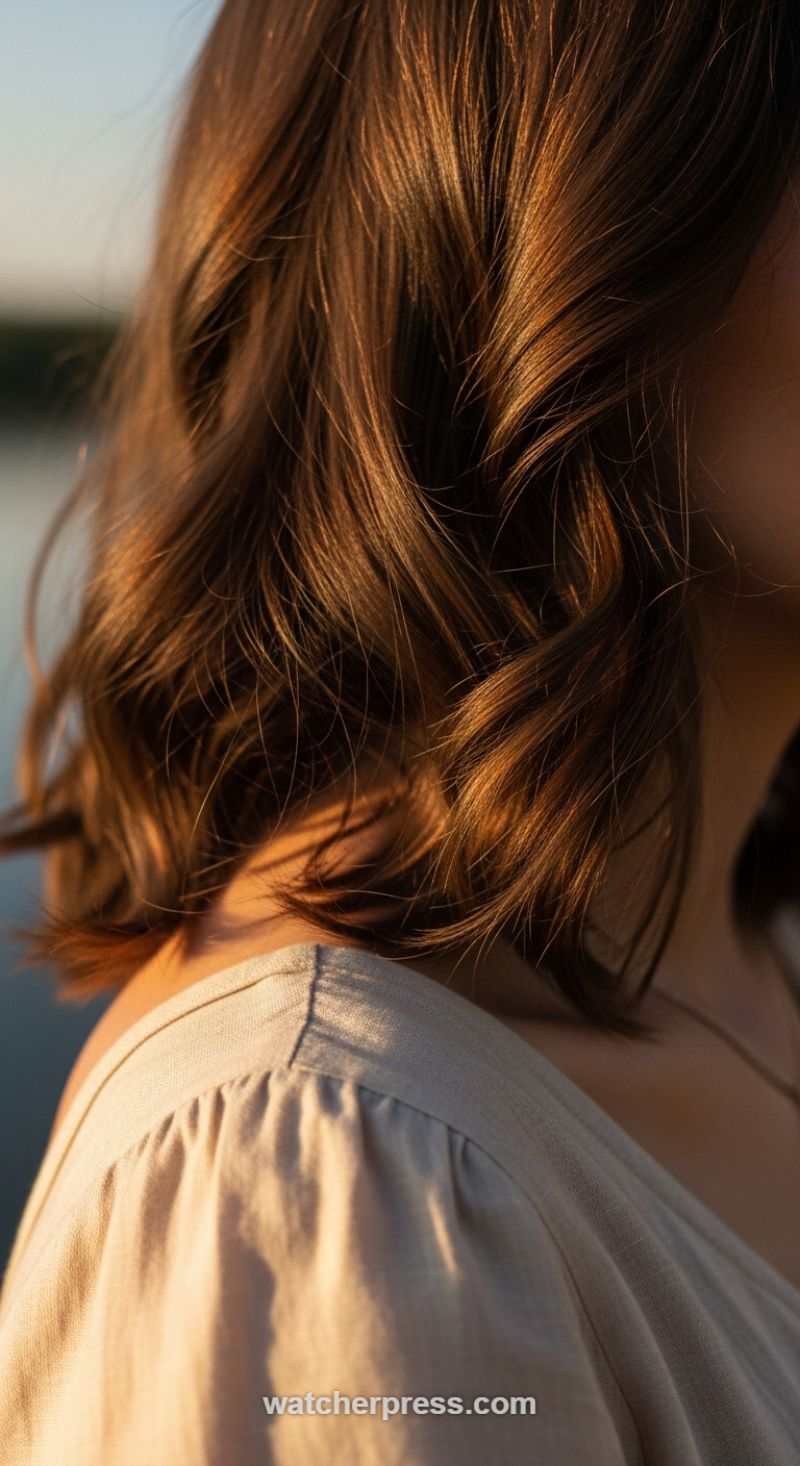
The ‘Tousled Lob’ (Long Bob) is the epitome of relaxed elegance, perfectly capturing a moment of natural beauty, as seen in this stunning close-up. This style works because it embraces soft, voluminous waves rather than tight curls, providing instant texture and lift without looking overly styled. The key visual element here is the incredible dimension of the rich, medium-brown color, which is illuminated by golden highlights that catch the light, mimicking the natural effect of the sun (often referred to as ‘golden hour’ hair color). This contrast between the deep base and the radiant tips is what gives the hair a healthy, glossy appearance and makes the waves truly pop. This particular length—hitting just above the shoulder—is universally flattering, maximizing volume at the crown and framing the neckline beautifully, making it an essential style to master for instant elevation.
To achieve this level of soft, defined wave pattern, start by applying a heat protectant and a lightweight volumizing mousse to damp hair. Blow dry the hair thoroughly, lifting the roots with your fingers or a round brush for initial volume. For the waving process, use a 1 to 1.25-inch curling iron or wand. The crucial instructional step is to section the hair horizontally and, when curling, hold the wand vertically. Wrap sections of hair around the wand, but *do not* curl the last inch or two of the hair ends; leaving them straight is what gives this look its modern, undone edge. Expert advice: Alternate the direction of your curls (one section toward the face, the next away) to prevent the waves from merging into a single, cohesive spiral, ensuring that messy, effortless separation is achieved.
Once the curls have been created across your entire head, let them cool completely—this sets the wave and improves longevity. Resist the urge to brush! Instead, flip your head upside down and use your fingertips to gently rake through the waves, breaking them up into softer, more natural bends. For an extra boost of volume and to maintain the piecey texture captured in the image, apply a dry texturizing spray or a root-lifting powder directly beneath the top layers of hair, focusing on the occipital bone area and the crown. Finally, if you want that high-shine ‘sun-kissed’ finish, rub a pea-sized amount of lightweight shine oil or serum between your palms and lightly scrunch it into the mid-lengths and ends only. This effortless technique ensures your waves look luxurious, bouncy, and perfectly elevated, ready for any occasion.
The Modern Scrunchie Half-Pony: Blending Retro Glamour with Golden Hour Texture
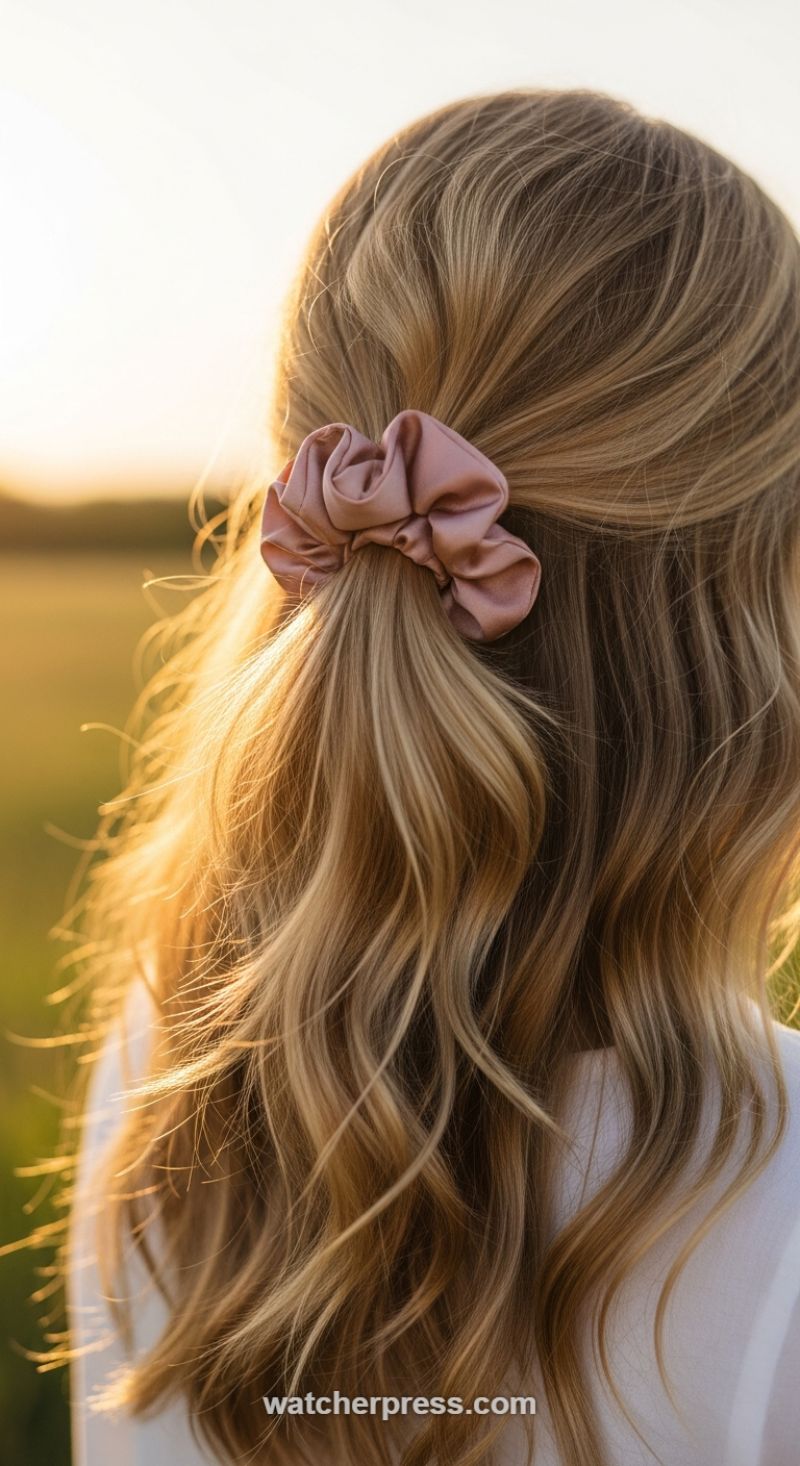
This revived classic, the half-up ponytail secured with a statement scrunchie, perfectly balances playful retro vibes with refined elegance. The visual key to mastering this look lies in embracing soft, natural texture and choosing a luxurious fabric for your accessory. As seen in the image, the hair maintains voluminous waves below the tie, achieved through a light application of texturizing spray or dry shampoo before styling. The placement of the half-pony is critical: situated high on the crown, it provides instant lift and opens up the face, preventing the style from looking flat or childlike. Furthermore, selecting a rich, dusty-hued satin or silk scrunchie—instead of a standard elastic—transforms this hairstyle into a chic focal point. This detail is essential for bridging the gap between casual and truly elegant, making it suitable for both a daytime event and a romantic evening look.
To recreate this effortlessly sophisticated style, begin by prepping your mid-to-ends with a heat protectant and a large barrel curling iron or wand, focusing only on loose, flowing waves. The next step involves precise sectioning. Using your index fingers, draw a horizontal line starting just above the temples or the tops of the ears, gathering the top third of your hair. This section should include the hair immediately surrounding your crown. Before securing, gently push the gathered hair slightly forward toward the forehead to create a soft ‘bump’ or volume at the roots; this prevents the half-pony from pulling tightly against the scalp. Secure the section with a clear elastic first for structure, and then wrap your chosen satin scrunchie around the base two to three times, ensuring the gathering of the fabric is prominently displayed. If your hair is highly layered or naturally fine, mist a lightweight flexible-hold hairspray directly onto the root area of the secured section and gently tease the hair in the ponytail itself for added fullness.
The finishing touches distinguish this master-level look. To achieve the soft, windswept aesthetic captured in the image, pull out a few wispy, face-framing strands around the ears and temples. For those seeking an edgier finish, consider pairing this soft hairstyle with strong, graphic makeup, such as a sharp winged eyeliner or a deep berry lip. Expert tip: This style looks best when the hair has contrasting tones, as the half-up separation and the texture of the waves allow highlights and lowlights to catch the light beautifully, especially during the flattering ‘golden hour.’ Always opt for silk or satin scrunchies, as they drastically reduce friction, preventing breakage and creasing, thus preserving the health and shine of the secured hair.