Elevate your manicure game! Discover 7 creative and stylish ways to refresh the classic colored French tip, from abstract waves to mismatched pastel hues, perfect for rocking this season’s biggest nail trend.
The French manicure is timeless, but this season, it’s getting a major upgrade with a splash of color! Moving beyond the basic white tip allows for endless creativity and self-expression. If you’re ready to embrace one of the biggest nail trends of the year but want to stand out from the crowd, these 7 expert-approved techniques are essential. We dive deep into innovative ways to utilize colored tips
—from geometric shapes and abstract swirls to mismatched shades and metallic finishes
—ensuring your next manicure is modern, unique, and absolutely show-stopping. Get ready to transform your hands with these essential creative colored French manicure ideas.
Groovy Swirls: The Retro Abstract French Manicure
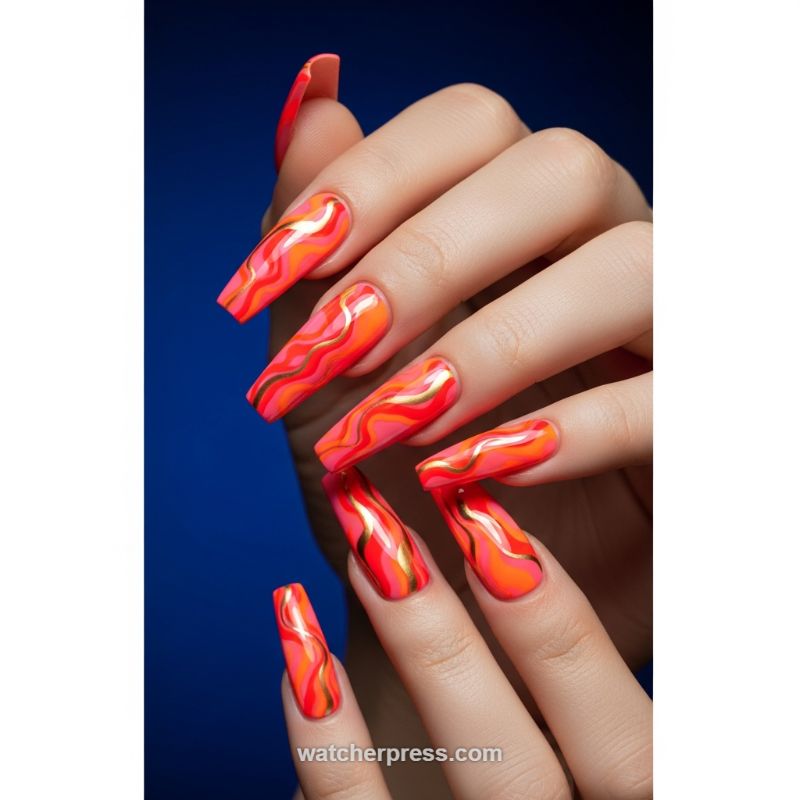
This dynamic nail art technique transforms the colored French into a fluid, abstract masterpiece, perfect for the client seeking maximal impact. By moving beyond the strict tip line, this method allows the contrasting colors to blend and flow across the entire nail bed, creating a mesmerizing, ’70s-inspired psychedelic effect. The foundational design utilizes a high-contrast palette of neon pink, fiery orange, and a deep crimson, all applied over a long, tapered nail shape (coffin or ballerina is ideal) to maximize the canvas for movement. The key to relating this back to the French concept is viewing the swirling colors as a blended, inverted tip that has melted down the nail plate, demanding a high-gloss finish to truly capture the depth and dimension of the mixed pigments. The result is a bold, artistic statement that looks incredibly complex but relies on simple, strategic color placement.
To achieve this polished swirling effect, you will need to utilize a wet-on-wet technique. After applying a base coat, place small, random patches of the three chosen colors onto the nail, ensuring none of the colors are fully cured. While the polish is still wet, take a clean, fine liner brush or a marbling tool and gently drag it through the borders where the colors meet. Use a light, S-shaped motion, allowing the pigments to naturally blend and create the organic, fluid patterns without fully muddying the shades. Once the base swirl is satisfactory, cure the gel polish completely. The final, crucial step is the application of the gold accents. Using a metallic gold liner gel or thin striping tape, trace wavy, undulating lines over the colored swirls. These gold accents serve as the defining structural element—the ‘new smile line’—adding a luxurious touch and separating this design from a simple marble technique, elevating it into a gilded, abstract French look.
Expert application requires careful control of the brush during the swirling phase; use minimal pressure to avoid pushing the colors too deeply, which can cause them to mix into a single, dark hue. For enhanced longevity and maximum shine, always finish with a thick, non-wipe high-gloss top coat, ensuring it smooths out any potential texture from the marbling. If neon colors feel too intense for your aesthetic, this technique is equally stunning using muted pastels (lilac, mint, peach) paired with silver or rose gold accents for a softer spring or bridal look. However, for true retro flair, stick to warm, saturated colors. This design works best on longer nails where the full movement and rhythm of the abstract French swirl can be appreciated, making it a powerful choice for clients who want their hands to turn heads.
The Pastel Split-Tip French Manicure
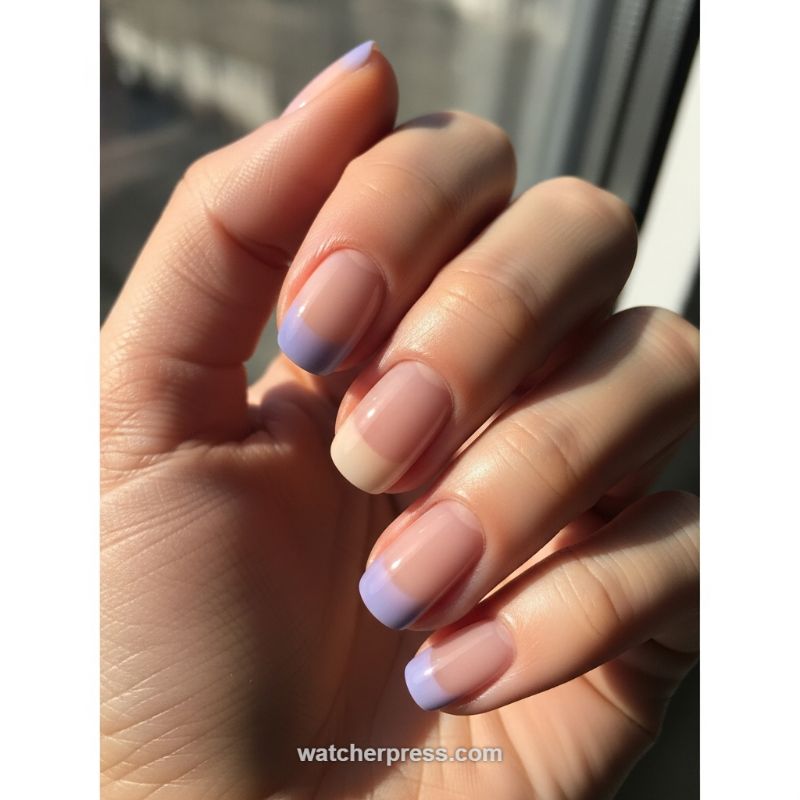
This look elevates the colored French manicure by introducing a subtle, curated contrast across the nail bed. Instead of committing to one tip shade, the “Pastel Split-Tip” design features alternating colors—in this example, a delicate lilac or lavender dominates, while a soft, creamy beige or pale yellow provides an unexpected anchor on a feature nail, typically the middle finger. The brilliance lies in keeping the base coat transparent or a sheer, milky pink. This transparency is crucial as it allows the pastel tips to truly pop and ensures the overall design remains clean, glossy, and refined, preventing the look from becoming overly busy or juvenile. This approach is perfect for those who want to introduce multiple complementary shades into their manicure without the visual weight of full coverage.
Achieving the perfect split-tip French requires precision and high-quality polishes. Start by applying one to two thin coats of your sheer nude base polish to create a luminous foundation that mimics the healthy natural nail. For the tips, the technical skill lies in drawing the perfect smile line. For shorter or medium-length square-oval nails like these, using a fine, angled striping brush dipped directly into the chosen pastel lacquer provides the most control for freehand application. If freehand is challenging, specialty French manicure guide stickers can be employed; however, ensure they are pressed down firmly before painting to prevent the vibrant pastel shades from bleeding under the sticker. Apply two thin coats of the tip color (allowing adequate dry time between coats) to ensure full opacity and depth before moving on to the final sealing layer.
This sophisticated manicure is ideal for the transition from spring into summer. When selecting your alternating colors, choose pastels that share the same lightness level and undertone (e.g., dusty cool tones paired together) to ensure they harmonize beautifully rather than clash. Expert tip: the middle finger is typically the best candidate for the contrasting accent color, as its central placement breaks up the visual line most effectively. To maintain the crisp definition and glossy finish, seal the entire manicure with an ultra-high shine, non-yellowing topcoat. Furthermore, since the sheer base exposes the nail bed and cuticles, rigorous cuticle oil application is essential to keep the surrounding skin supple and maximize the professional, clean aesthetic of this creative French twist.
The Abstract Wavy Color Block French Manicure
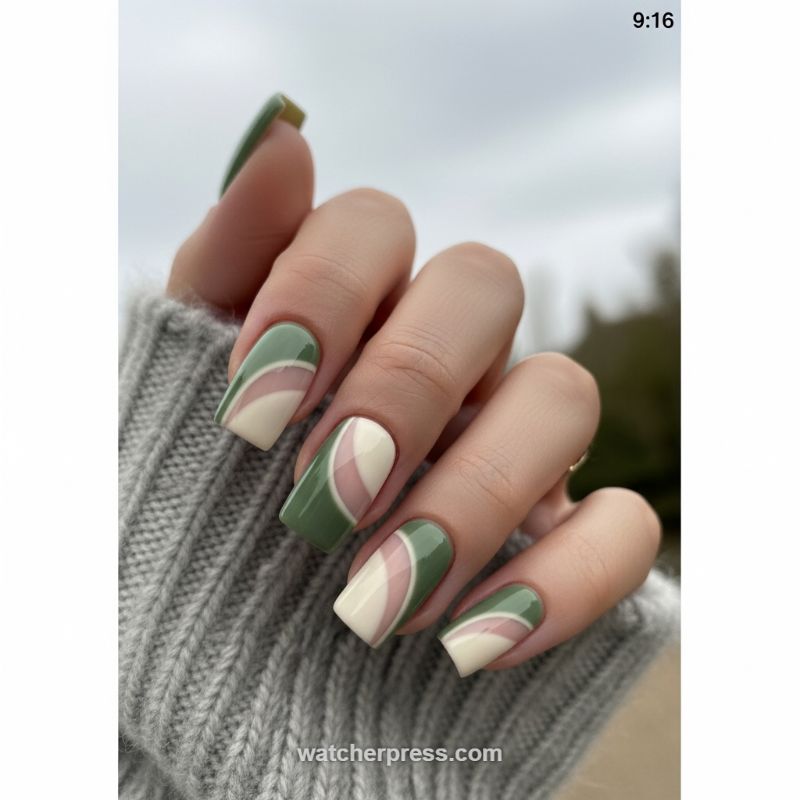
Taking the concept of the French boundary and turning it into a dynamic, full-coverage art piece is the ‘Wavy Block’ manicure. This design transforms the classic tip into a flowing abstract pattern that covers the entire nail plate, utilizing bold color blocking alongside strategic negative space. The visual appeal lies in the sophisticated use of three distinct fields: a muted sage green, a creamy off-white, and a sheer dusty rose. The wavy lines flow diagonally across the long, square-shaped nails, creating an optical illusion of movement. Crucially, the sheer pink stripe acts as the modern update to the traditional white French line, providing a subtle contrast against the opaque blocks and allowing the natural nail bed to peek through. This technique moves beyond just tipping the nail; it reimagines the entire surface as a canvas for color interaction, perfect for clients seeking an earthy, yet highly polished, artistic statement this season.
To recreate this high-precision design, execution must be flawless, starting with prepping and shaping the nails to a clean, medium-to-long square or squoval shape—the length is necessary to accommodate the full wavy pattern. Begin by applying a clear base coat. Next, use a fine-tipped liner brush (a 00 size is ideal) to map out the central wavy line that will define the boundaries. Apply the sheer rose polish first in this middle stripe. To ensure the opacity is correct, you may need to mix a highly pigmented sheer color with a clear top coat to achieve that translucent effect without being completely bare. Once cured, proceed to fill in the side sections with the opaque sage green and creamy beige polishes, ensuring you carefully brush up to the edge of the sheer line without overlapping. The key to a professional finish is curing each color field individually to maintain crisp, bleed-free boundaries. Precision is paramount; any unevenness in the lines will detract from the overall geometric flow of the design.
Expert application requires patience and the correct tools. For those who struggle with freehand waves, thin striping tape or flexible nail vinyls can be employed to block out the sheer central space before filling in the solid colors. Once all colors are applied and fully cured, the entire design should be sealed with a high-shine top coat to magnify the contrast between the glossy opaques and the subtle translucency of the sheer stripe. This design is highly versatile; while the earth tones (green and beige) lend themselves beautifully to transitional seasons like autumn and spring, you can easily adapt the palette to bold neons or soft pastels. Remember that for this style to truly pop, the color choices should have high contrast in value (light versus dark) or temperature (warm versus cool) while maintaining cohesive tonality. Offer this look to clients seeking a trendy, complex nail art that still feels grounded and universally flattering.
The Neon Sunset French: Alternating Matte Tips
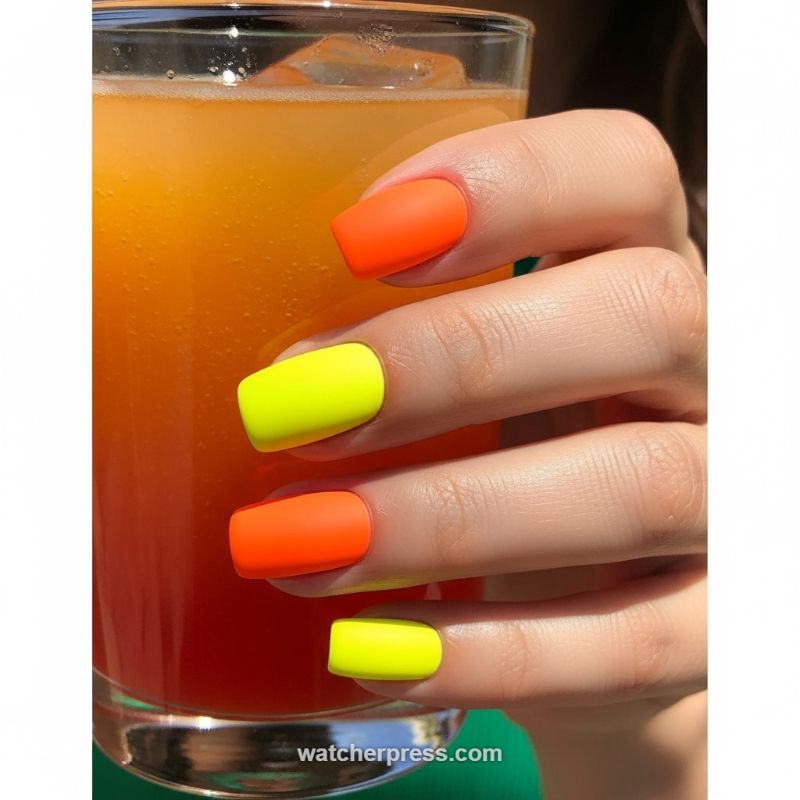
This look, inspired by tropical beverages and sun-drenched days, adapts the vibrancy of the image’s full-color neon hues into a modern French manicure technique. We call it the Neon Sunset French. To achieve this high-impact, vacation-ready style, start by selecting two highly contrasting, fluorescent shades—as seen here, a fiery matte orange and an electric chartreuse yellow work perfectly. Instead of applying a full color coat, you will use these shades to create alternating French tips across your nails. The brilliance of this adaptation lies in the finish: opting for a matte topcoat instantly elevates these traditionally glossy, 80s-inspired pigments, making the final look chic, textured, and incredibly current, while still maintaining the energetic summer vibe.
Proper execution requires careful preparation, especially when working with temperamental neon polish. To ensure the pigments truly pop and don’t appear patchy, first apply a sheer nude or clear base coat, followed by a layer of opaque white polish only on the nail bed. Once this base is cured or dry, begin applying the alternating tips. Use a fine-tip striping brush (or specialized French tip guide stickers for beginners) to apply the color. A clean, symmetric line is essential for a polished outcome. Alternate the neon orange and neon yellow-green across your fingers. A popular pattern involves orange on the index and ring fingers, and yellow on the middle and pinky fingers. Ensure the tip line is consistently shaped, opting for a soft square or squoval line that complements the boldness of the colors.
This daring manicure is ideal for summer travel or any event where you want your hands to make a statement. Due to the high visibility of these colors, flawless application and long-term maintenance are crucial. After the color tips have cured or dried, seal the entire design with a durable, high-quality matte topcoat, ensuring you carefully cap the free edge of the nail to maximize chip resistance. A common issue with matte finishes is oil and dirt transfer; keep a clean cloth or a quick-drying matte refresh topcoat handy to maintain that flawless velvet appearance throughout the wear cycle. This technique proves that the foundational French manicure concept can be endlessly reinvented through texture and high-contrast, daring color pairings.
Mirror Mirror: The Hot Pink Chrome French Tip
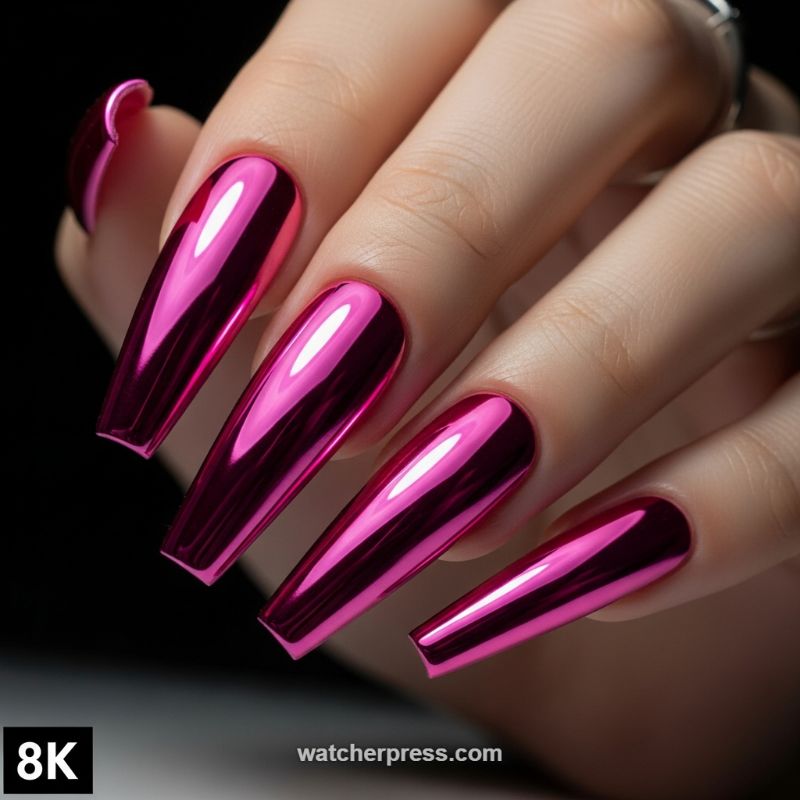
The secret to unlocking a truly futuristic and high-impact colored French manicure lies in integrating highly reflective metallic powders. While the image displays a dramatic, full-coverage chrome finish, this vibrant, liquid-metal hot pink is even more striking when confined to the classic French tip shape. This technique instantly upgrades the manicure from a standard polish job to a specialized nail art statement, offering a depth and brilliance that no regular lacquer can match. To achieve this extreme contrast, start with a perfectly neutral or clear base—a milky white or light beige nude works beautifully—to allow the maximum visual impact of the chrome’s reflectivity. The key visual element here is the flawless, mirror-like finish; ensure your base nail structure (whether natural or extension) is perfectly smooth before application, as chrome powder magnifies every imperfection on the surface.
Executing a pristine chrome French tip requires careful layering and specific products. After prepping the nail and applying your chosen nude base coat and color, the critical step involves the non-wipe top coat, which serves as the adhesive for the chrome powder. Instead of applying the top coat to the entire nail, meticulously brush a thin, controlled layer only onto the tip area where you want the chrome to appear, perfecting the smile line shape as you go. Cure this layer fully. Immediately after curing, use a dedicated sponge applicator or a clean fingertip (gloves recommended) to rub the magenta chrome powder firmly and quickly onto the treated, non-wipe surface. The result should be an instantaneous transformation into the deep, reflective pink seen in the example image. Expert tip: To ensure the crispest line possible, use a fine liner brush dipped in a slightly sticky base or matte top coat *before* applying the chrome powder; trace your desired smile line to create a barrier that prevents the powder from bleeding onto the nude base.
Once the chrome tip is flawlessly applied, the longevity of this technique depends entirely on the seal. Dust off all excess powder using a soft brush; residual powder left on the surrounding base coat can cause your final top coat to peel. Apply a thin layer of specialized chrome-friendly top coat (often an extra durable gel top coat) over the entire nail, paying close attention to capping the free edge and sealing all sides of the chrome tip to prevent chipping. This style is particularly effective on longer, structured shapes like the coffin or tapered square shown, as the increased surface area maximizes the light reflection, truly selling the ‘liquid metal’ illusion. For a variation, try pairing the high-shine chrome tip with a matte finish on the nude base, creating a highly textural contrast that is both modern and incredibly sophisticated.
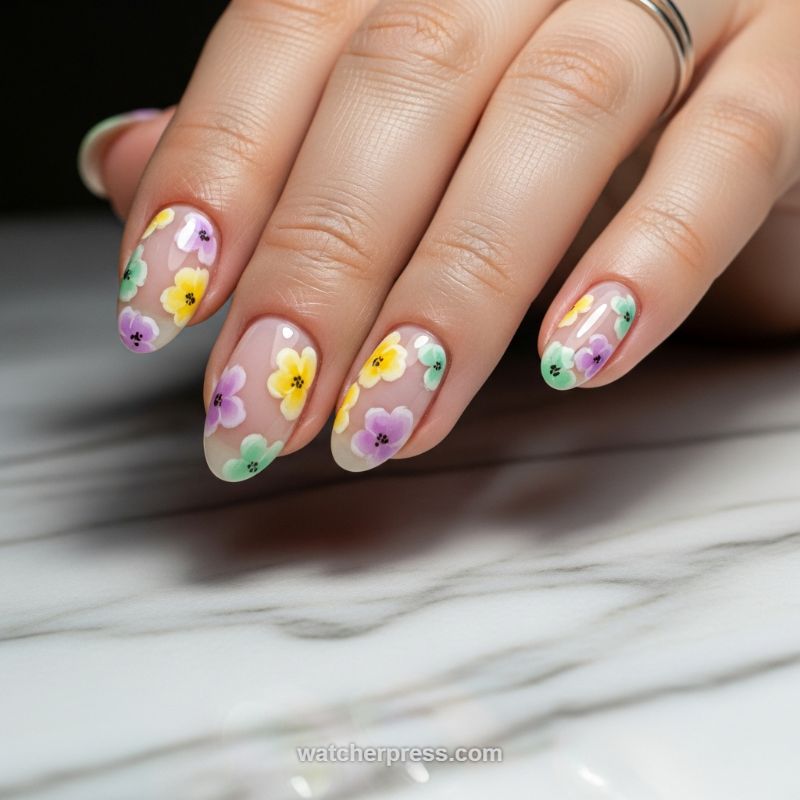
The Delicate Floral French Accent
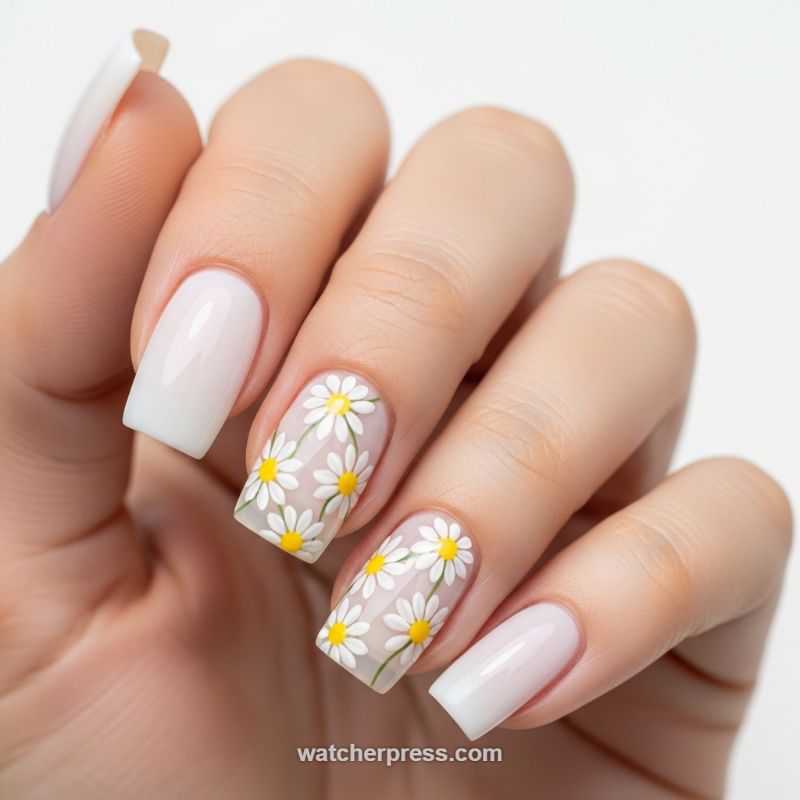
This technique offers a refreshing twist on the classic French by substituting the harsh white tip with intricate, delicate floral art, strategically placed on accent nails. To achieve this fresh, meadow-inspired look, begin with meticulous nail preparation, shaping the nails into a neat square or soft squoval shape. The foundation is key: skip the stark nude and opt instead for a milky white or sheer pink jelly polish. This translucent base allows the natural nail line to show through slightly, softening the overall appearance and providing the perfect canvas for the detailed art. For professional longevity, consider using a milky builder gel to achieve that desirable, diffused white gradient, followed by curing. Ensuring the remaining nails are perfectly coated in this subtle shade maintains elegance and prevents the final look from becoming too visually cluttered or juvenile.
Once the base layer is fully cured, the detailed daisy application begins on the accent fingers (typically the ring and middle fingers). Using a highly pigmented white gel polish and a fine detail brush (000 size is ideal), start painting the petals. Create five to six small, comma-shaped strokes radiating from a central point. The visual depth of this design comes from overlapping the flowers and allowing some to trail off the edges of the nail bed, giving an illusion of depth and a continuously blooming field. After curing the white petals, use a dotting tool and a bright, opaque yellow gel polish to place the centers of the daisies. For an ultra-realistic touch, subtly add thin strokes of light green or sage gel for sparse stems, grounding the flowers to the nail plate before sealing the design. Cure thoroughly after the art is complete to lock in the detail.
The true success of this style lies in its controlled maximalism; the intense detail on two nails is balanced by the clean, muted base on the others. This contrast elevates the look from simple nail stickers to true artistry, making it an excellent choice for late spring and summer months. Finish the entire manicure with a premium, high-shine, non-wipe top coat. This step is essential, not only for protecting the intricate artwork from chipping but also for giving the milky base that desirable, high-gloss, glass-like finish. Expert tip: This floral concept can easily be adapted; try substituting the daisies with delicate lavender sprigs or micro-cherry blossoms for a different seasonal effect while keeping the sheer French base intact.
The Cool Coastal Cure: Crisp Pastel Blue Tips
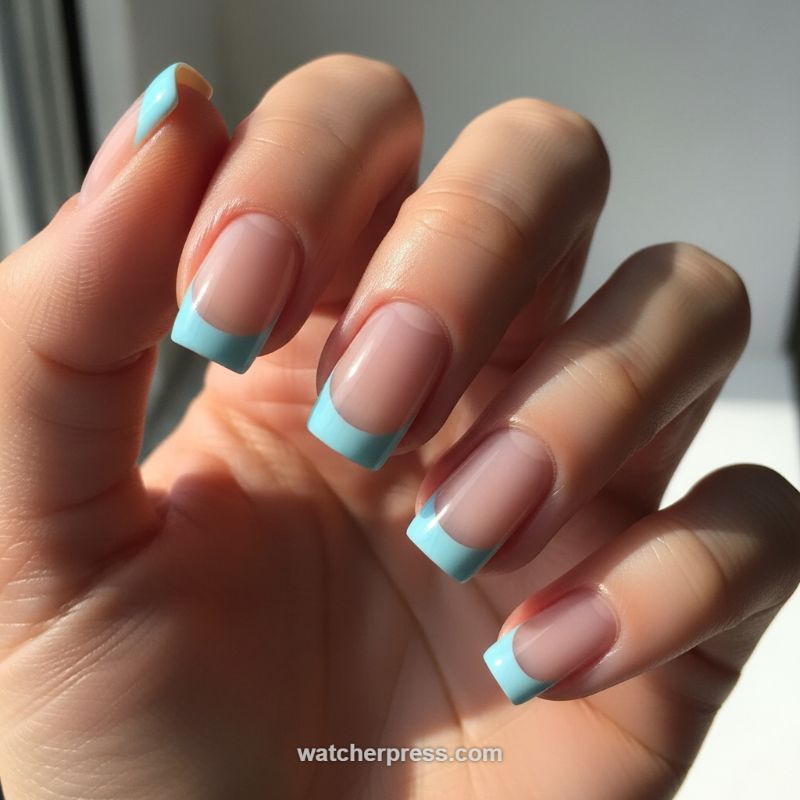
This variation elevates the classic French manicure by swapping stark white for a sophisticated, airy pastel blue—specifically, a robin’s egg or Tiffany hue. The effect is instantly refreshing and modern, perfectly capturing the lightness of spring and summer. To achieve this high-gloss, pristine finish, preparation is paramount. Begin with a sheer, milky nude or pale pink base coat applied in two thin layers over a properly prepped (lightly buffed and oil-free) nail plate. This creates the optimal canvas for the translucent look showcased in the image. The chosen nail shape here, a medium-length square or squoval, is essential; its defined corners provide a structural frame that makes the colored tip look deliberate, professional, and contemporary, preventing the vibrant shade from overwhelming the overall design. This specific cool tone serves as a chic anchor for the design, providing a playful twist without sacrificing the manicure’s inherently polished structure.
Mastering the smile line with a bold color requires impeccable precision. After your base is fully cured, use a thin, square-tipped striping brush (often called a ‘French manicure brush’) dipped minimally into your chosen pastel blue lacquer. Start by marking the two corner points of the smile line, then slowly connect them across the free edge in a smooth, consistent curve. Expert manicurists recommend applying the color in two very thin coats rather than one thick one; this prevents bubbling, ensures opacity, and reduces the chance of flooding the sidewalls. Crucially, ensure the curve’s depth is uniform across all fingers—usually about 1/4 to 1/3 of the visible free edge. If you struggle with a brush, use a high-quality French tip guide sticker, but peel it off immediately after applying the color coat to avoid disturbing the crisp line as the polish sets and ensuring that seamless transition between the nude base and the vivid tip.
To guarantee longevity and capture the brilliant wet-look shine visible in the photograph, invest in a premium, non-yellowing high-gloss top coat. Apply this final layer liberally, ensuring you ‘cap’ the free edge of the nail by brushing the polish horizontally across the tip. This seals the colored layer and drastically reduces premature chipping, which is a common issue with square nail shapes. For maintenance, keep your cuticles hydrated with daily oil application; healthy cuticles make the polish line appear cleaner and sharper. Style-wise, this cool blue tone is versatile, pairing flawlessly with gold or silver jewelry and offering a perfect pop of color against neutral outfits, making it an ideal choice for transitioning from day wear to a chic evening look.
Segmented Color-Block Tips: A Mondrian-Inspired Manicure
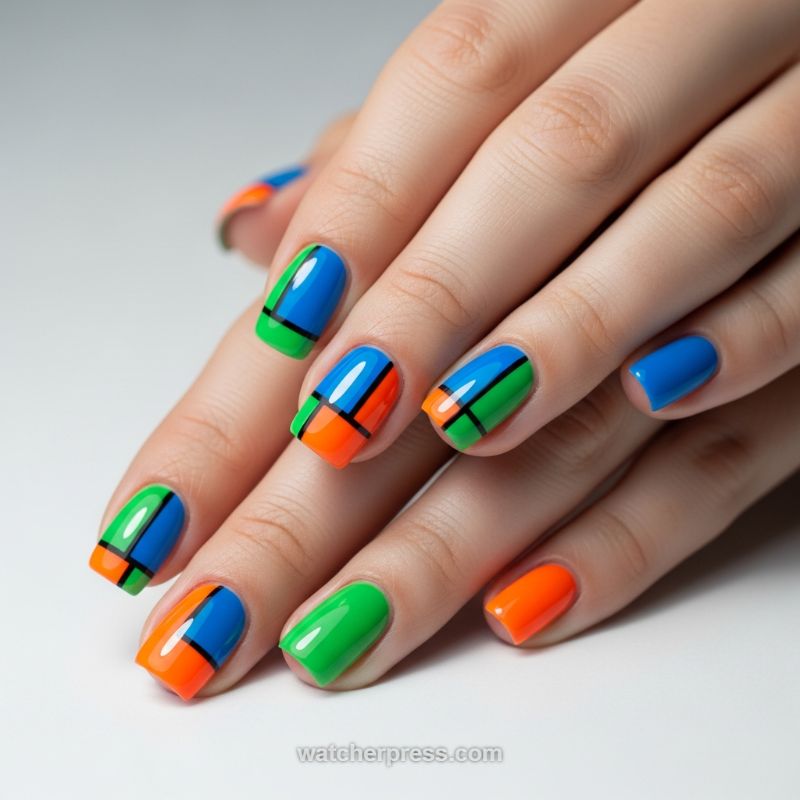
This striking design elevates the classic French technique by using bold primary and secondary hues segmented by stark black lines, transforming the nail into a miniature canvas of abstract art. To recreate this look, select three highly saturated, opaque shades—as seen here with a vibrant Cobalt Blue, a lush Grass Green, and a powerful Tangerine Orange. The key to making this style successful is high contrast and precision. Start by prepping your nails into a clean, slightly squared ‘squoval’ shape, which naturally complements the hard edges of the geometric design. For an intentional variation across the hands, designate certain nails for solid color application (like the green and orange nails shown), while saving the index, middle, and ring fingers for the segmented color blocking that creates the modern ‘tip’ effect. Ensure your chosen polishes are fully cured or dry before attempting the linear work, as any smudging will destroy the clean aesthetic.
The real craftsmanship in this manicure lies in executing the division lines. After applying your base coat and letting it dry completely, begin the color blocking by painting the largest segment first. For instance, on the nail that features blue, orange, and black, you might paint the entire nail orange first, ensuring the polish is perfectly level. Once dry, use a specialized fine-tipped nail art brush or a dedicated striping tool dipped in opaque black polish (or gel paint for easier manipulation) to meticulously draw the dividing lines. Focus first on a single horizontal line positioned approximately two-thirds of the way down the nail bed, mimicking where a traditional French tip begins. Next, add the vertical division, segmenting the remaining space. This careful partitioning defines the areas where the blue and green polishes will be placed, allowing you to fill in the remaining sections with precise, measured strokes. The thickness of the black line is paramount; it must be bold enough to separate the colors without overwhelming the nail surface, typically requiring two careful passes to achieve full opacity.
For an expert finish, maintaining crisp edges and achieving that high-gloss, almost enameled appearance is essential. After all color segments are fully dry or cured, seal the design with a thick, high-shine topcoat. This not only protects the intricate artwork from chipping but also provides a magnifying effect that enhances the vibrancy of the colors and smooths out any minor textural differences between the layers of polish. For those struggling with freehand lines, specialized nail art tape or pre-cut straight guides can be helpful, but remember to remove them immediately after drawing the black line, before the polish sets fully, to prevent drag or jagged edges. To adapt this look for different seasons, consider substituting the neons for deep jewel tones in the fall or soft pastels in the spring; the power of this geometric design rests entirely on the sharp contrast created by the defining black boundary.
Color-Block French Tips for Spring
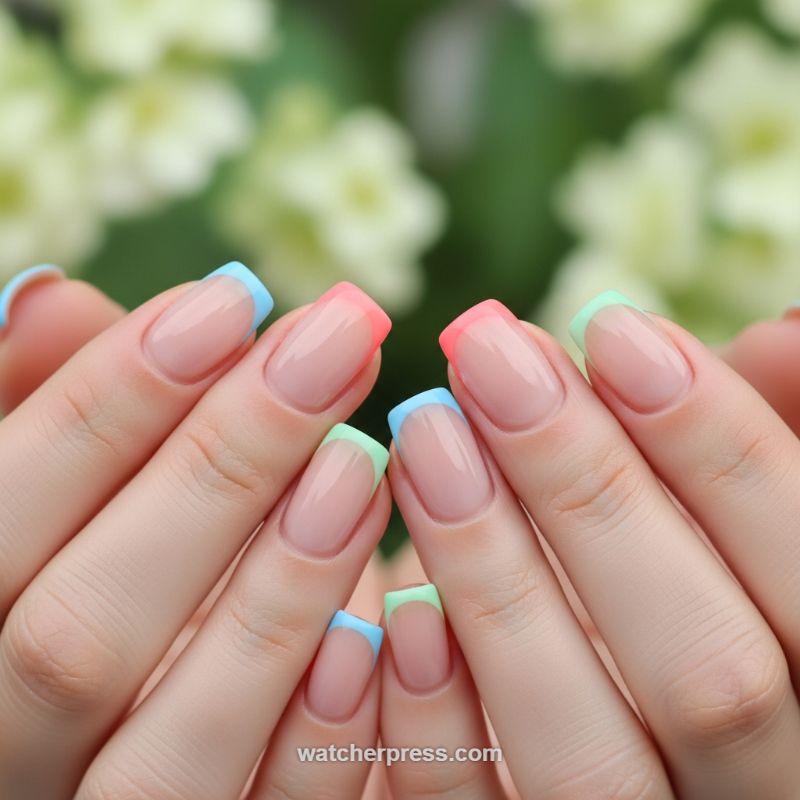
This look elevates the classic French tip by introducing a vibrant, tri-color pastel palette, transforming the traditional white line into a cheerful ‘color-block’ statement. To recreate this sunny aesthetic, start with a beautifully prepped nail bed and a sheer pink or nude base coat to mimic the natural, healthy look seen here. The true artistry lies in the perfect execution of the smile line using alternating shades of pastel coral, baby blue, and mint green. Precision is paramount here; utilize a fine-tipped striping brush or specialized French tip guides to ensure each curve is crisp, uniform in thickness, and perfectly mirrored across all fingers. The key to the high-impact finish is ensuring the colored lacquer is fully opaque right up to the line of demarcation from the natural base.
The success of this multi-hued manicure hinges on thoughtful color selection. For maximum visual harmony, choose three to four highly saturated pastel shades that exist within the same vibrancy family. Avoid mixing neon brights with muted dusties; the cohesive flow of this design comes from the playful yet balanced arrangement. Apply the colors strategically, rotating them across the ten fingers (e.g., thumb blue, index coral, middle mint, ring blue, pinky coral). This deliberate alternating pattern provides sophisticated visual interest without overwhelming the hands. This particular design pairs beautifully with breezy linen fabrics, light wash denim, and minimalist gold jewelry, making it the quintessential manicure for springtime garden parties or tropical getaways.
To ensure these perfectly painted tips withstand daily wear, proper sealing is crucial. After the colored tips have dried completely (or cured, if using gel polish), apply a high-gloss, UV-protectant topcoat. When working with square or squoval tips, which are prone to chipping at the sharp corners, ‘capping’ the free edge of the nail with the topcoat is essential for longevity. For those seeking maximum durability, consider executing the design using hard gel or acrylic powder overlays, which maintain the sharp lines and structure better than standard polish, allowing the vibrant color-blocking effect to last for weeks without fading or dulling. Remember to keep cuticles hydrated to complement the clean, high-shine finish.
The Ethereal Opalescent French Gradient
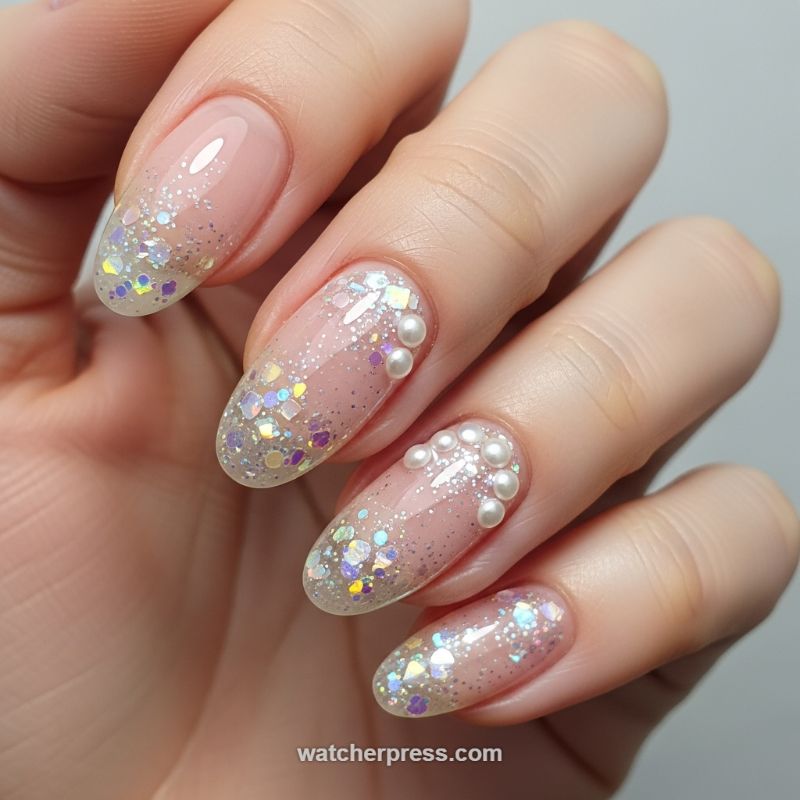
To achieve this sophisticated, ethereal take on the French manicure, the key lies in mastering the glitter application for a seamless gradient effect. Begin by shaping the nails into a gentle almond or oval shape, which complements the delicate nature of the design. Start with a sheer milky pink or nude builder gel base coat to mimic a healthy, natural nail bed—this provides the canvas for the gradient. Once cured, apply a layer of fine holographic silver glitter polish across the entire nail, focusing on higher density from the free edge down to the mid-nail. Before curing this layer, use a fine detail brush or a flat nail art tool to selectively pick up chunky, iridescent opalescent glitter pieces (often categorized as ‘mermaid scales’ or ‘holographic flakes’). Concentrate these larger pieces heavily at the tip, mimicking the structure of a classic French tip, then gently feather them upwards into the finer glitter layer, ensuring a soft, dispersed transition that blends smoothly before the cuticle.
Expert application of the embellishments is crucial for transforming this glitter gradient into a bridal or high-fashion look. This design strategically places 3D pearls near the cuticle line rather than the tip, which offers an unexpected balance to the heavy glitter focus at the free edge. For the middle and ring fingers, use a strong rhinestone adhesive or thick clear builder gel to affix small clusters of ivory or white pearls. It is essential to use varying sizes of pearls—mixing micro-pearls with slightly larger spheres creates depth and a natural, organic cluster appearance, similar to seafoam or dewdrops. Carefully cure the adhesive fully after placement. The placement should follow the curve of the eponychium (cuticle area) without crowding the nail bed, ensuring comfort and longevity. This intentional contrast between the cool, iridescent glitters and the warm, matte texture of the pearls elevates the entire design from basic sparkle to polished elegance.
For long-term wear, pay close attention to sealing the glitter and anchoring the pearls. After the base design is complete, apply a thin, high-gloss top coat over the entire nail, ensuring that all edges of the chunky glitter flakes are fully encapsulated to prevent snagging or chipping. However, when top-coating the nails with the 3D pearls, apply the top coat *around* the embellishments, but not directly over them, as coating the pearls dulls their matte luster and flattens the three-dimensional texture. For maximum durability, use a second, thicker layer of clear gel/adhesive specifically around the base of the pearl clusters to create a stable perimeter. This design is highly recommended for clients seeking a glamorous yet subtly colored manicure for occasions like weddings, holiday events, or winter celebrations, offering a creative twist that perfectly aligns with the ‘beyond basic’ French concept.
Creative French Twist: The Sheer ‘Floating Fruit’ Micro-Design
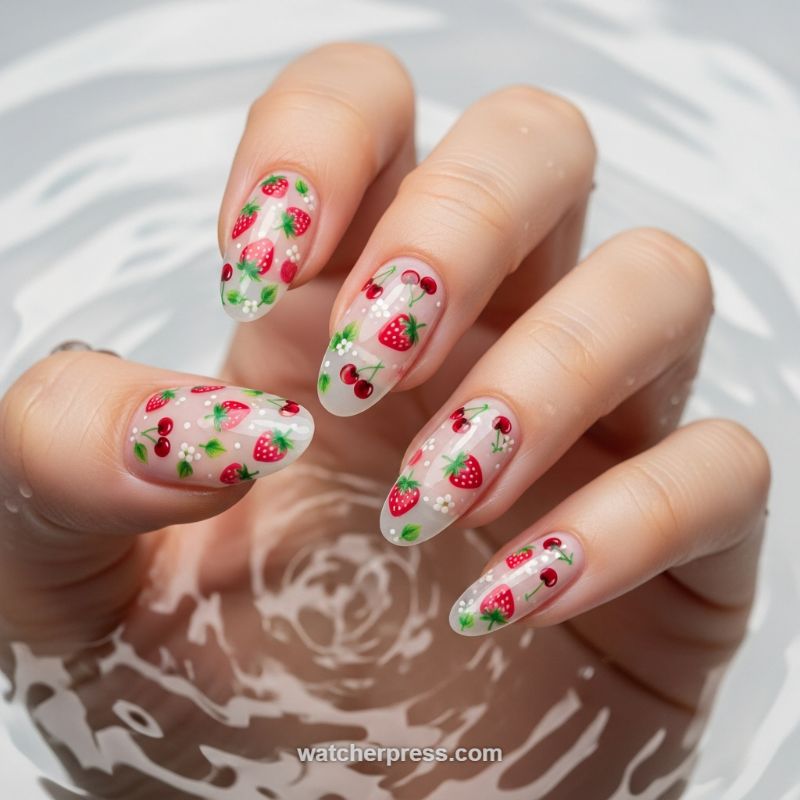
The ‘Floating Fruit’ design offers a masterful take on the colored French manicure by entirely prioritizing negative space and ultra-detailed micro-art. Unlike traditional French tips which block off the edge with opaque color, this look uses a sheer, milky-nude base coat to define the entire nail, framing intricate hand-painted fruit illustrations (like strawberries and cherries) that are scattered across the surface. This technique functions as a deconstructed French, where the detail replaces the definition line. The overall impression is incredibly fresh, delicate, and sophisticated, making it an ideal choice for the spring and summer seasons. The almond shape enhances the visual length and elegance, ensuring the focus remains on the detailed artwork floating weightlessly on the sheer canvas. This style demands precision and an understanding of scale, turning each nail into a tiny, wearable watercolor masterpiece.
To achieve this level of detail, professional application is highly recommended, whether utilizing high-quality, seamless water decals or meticulous hand-painting with gel polish. For the hand-painted route, begin with two thin coats of a translucent milky white or sheer pink polish to establish the base. Use an ultra-fine detail brush (size 000 or a liner brush) and highly pigmented gel colors. Start by blocking out the green leaves and stems; then, layer the red pigments for the fruits, paying close attention to slight variations in color for dimension. Expert tip: slightly dilute your gel colors with a clear top coat to achieve a soft, watercolor-like transparency before painting. For the strawberries, dots of white or lighter pink are applied last to mimic seeds and highlights, which gives the fruit a lifelike texture. Sealing the art properly is crucial—ensure every detail is fully encapsulated by a high-gloss, non-yellowing top coat to achieve the highly reflective, ‘wet’ appearance seen in the image.
One of the greatest functional benefits of the Sheer Micro-Design is its incredible longevity. Because the base is translucent and free of sharp, opaque lines, new nail growth becomes virtually invisible, extending the wear time significantly beyond that of traditional opaque manicures. Aesthetically, this manicure pairs perfectly with minimalist gold or silver jewelry and light, airy fabrics, leaning into a refined cottagecore or clean girl aesthetic. To maintain the crispness of the art, avoid prolonged exposure to harsh chemicals without gloves. When choosing your color palette, ensure the reds and greens contrast vividly against the milky base. For a slight variation, you can opt to concentrate the fruit pattern slightly heavier toward the free edge, subtly referencing the placement of a traditional French tip while maintaining the airy, scattered look.
Fluid French: Rose Gold Abstract Waves
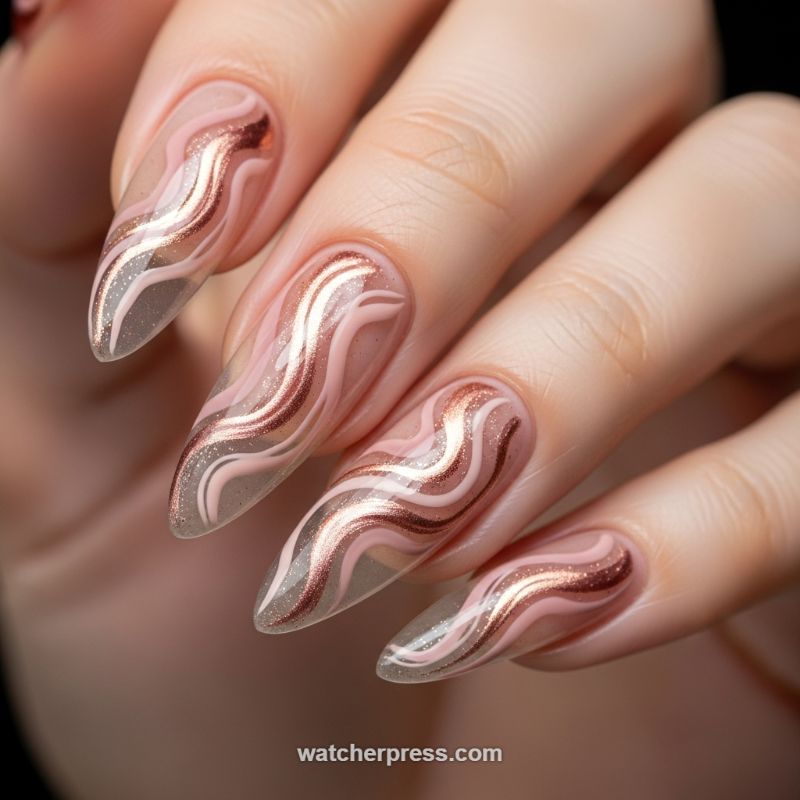
This sophisticated approach elevates the colored French manicure by abandoning the static tip in favor of dynamic, layered waves. The visual key to this design is the contrast between the sheer, neutral ‘jelly’ base and the highly pigmented, metallic accents. Start by ensuring the nail is shaped into a clean, tapered almond or stiletto, as the length is crucial for allowing the fluid lines to travel and create the maximum visual impact. Apply a base coat followed by 1-2 thin layers of a sheer, milky nude or light gray jelly polish; this transparent foundation is the modern replacement for the traditional opaque pink French base. The design features a trilogy of colors: a soft, dusty rose or nude pink for the primary thick waves, a thin opaque white or pale pink for contrast, and the show-stopping element—a highly reflective rose gold glitter or chrome polish that serves as the deconstructed ‘tip’ color.
To execute this technique, precision is paramount, requiring a steady hand and a very fine detail brush (often sized 000). Begin by mapping out the curves with the primary dusty rose shade. These lines should be organic, flowing from the cuticle area, widening slightly through the middle of the nail, and terminating near the point. Cure this layer completely. Next, use the thinnest liner brush dipped in the opaque white or pale pink to add delicate, trailing lines that run parallel to the main wave; this step provides dimension and prevents the metallic shade from bleeding. Finally, apply the rose gold metallic polish. For the most dazzling effect, ensure the metallic line is the thickest and most central wave within each grouping, making it the focal point. Because glitter and chrome polishes can be thick, apply this layer carefully to maintain the crisp edges of the wave pattern. Expert Tip: If using gel, flash cure after painting the metallic line on each nail to lock the shape in place before the final full cure.
Once all layers of the artistic waves are complete, seal the entire design with a thick, high-gloss topcoat. The high shine is essential to emphasize the ‘jelly’ effect of the base and enhance the reflectivity of the rose gold chrome. This style works best on longer nails, but if adapting for shorter lengths, reduce the number of individual waves to just two or three thick, bold strokes to avoid overwhelming the canvas. This manicure is essentially a moving French tip, where the focus color (rose gold) is strategically placed in swirling patterns across the nail plate instead of just on the free edge, creating a luxe, abstract marble effect that is perfectly on-trend for a modern, fashion-forward statement.
The Neon Matte Accent on a Classic French Ombre Base
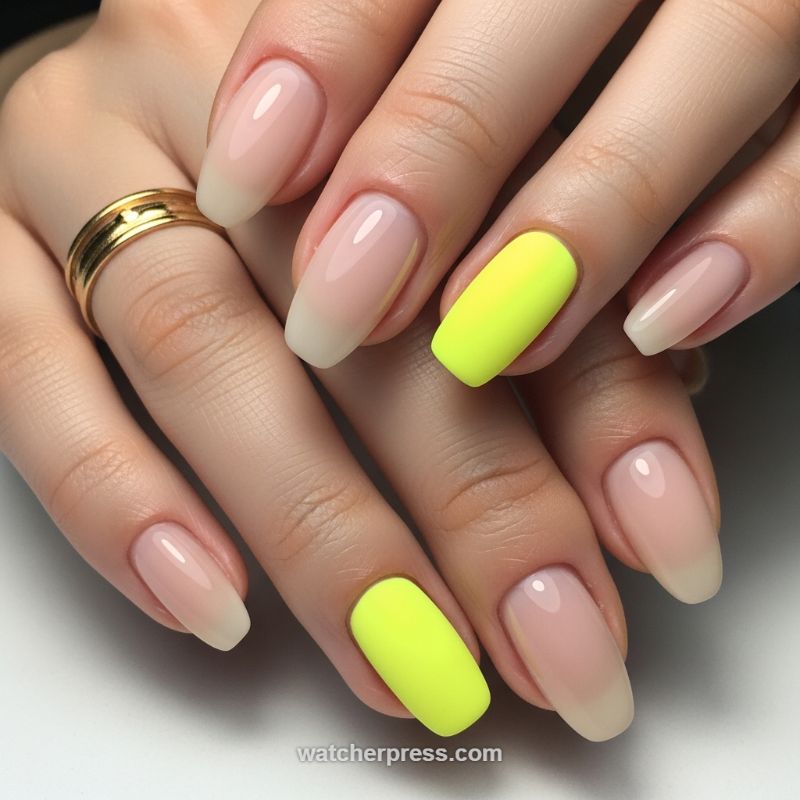
This style perfectly embodies the ‘Beyond Basic’ theme by taking the traditional French manicure and giving it a high-impact, modern twist through contrast in color, texture, and placement. The foundation of this look is a refined French Ombre (often called a Baby Boomer manicure), featuring long, slender, oval or soft coffin-shaped nails. The base is achieved using a milky, sheer pink or nude gel, meticulously faded into a soft, pale white tip, providing an extremely elegant and lengthened appearance. This soft, glossy base serves as the perfect canvas, highlighting flawless application and cuticle care. The key to the creative element, however, lies in the deliberate interruption of this classic uniformity with a striking accent nail on the ring finger.
To recreate this look, begin by perfecting the French Ombre foundation, curing the blended base and ensuring a smooth, high-shine topcoat is applied to all non-accent nails. For the accent finger, select a vibrant, heavily pigmented neon polish—fluorescent lime green or electric yellow is ideal for maximum visual punch. Apply two to three thin coats for complete, flawless opacity. The most crucial instructional step that elevates this design is the texture: while the surrounding nails remain ultra-glossy, the neon accent must be finished with a premium matte topcoat. This switch in sheen intensifies the neon pigment, giving it a velvety, chalky appearance that creates an immediate, satisfying visual contrast against the sleek, wet look of the neutral nails. This textural juxtaposition turns a simple color addition into a thoughtful, fashion-forward statement.
This mixed-media manicure is versatile, making it ideal for transitioning between seasons or elevating casual attire. Expertly, the shape of the nails keeps the overall presentation sophisticated, preventing the vibrant neon from appearing juvenile. For styling advice, consider keeping jewelry minimalist—like the simple gold band shown—to ensure the attention remains fixed on the complexity of the nails. If neon yellow feels too bold, the accent can be substituted for any high-saturation hue (like electric coral or cobalt blue), provided the matte finish is maintained to preserve that critical textural contrast. This technique offers a fresh, balanced approach to embracing bright color while honoring the timeless elegance of a natural-looking French base.
The Rainbow Swirl: A Candy-Coated French Tip Design
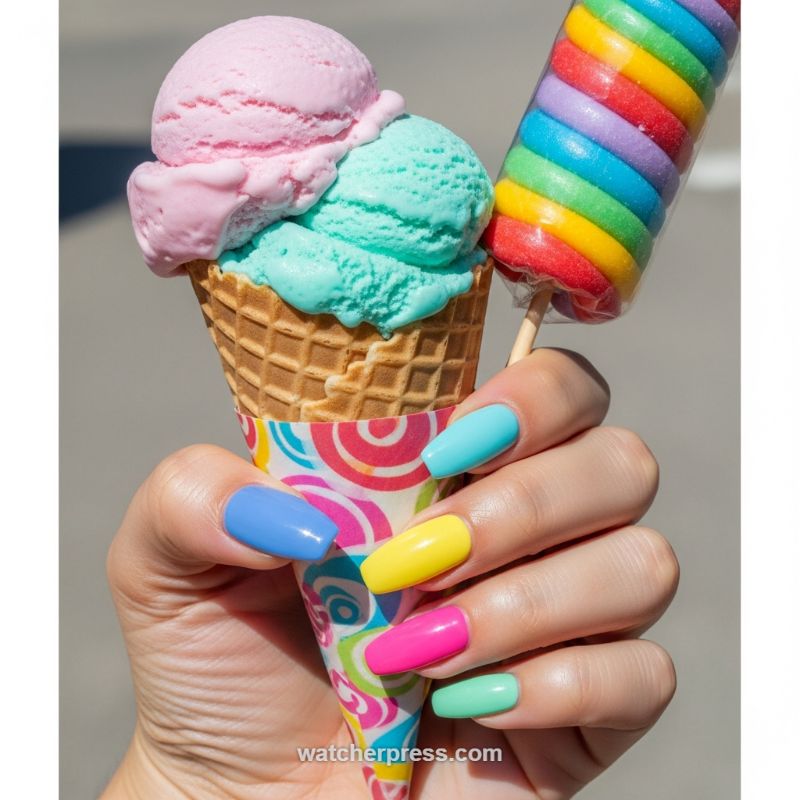
The vibrant imagery of this photo—juxtaposing pastel ice cream with a dazzling spiral rainbow candy—provides the perfect blueprint for a playful, maximalist approach to the colored French manicure. While the model sports five solid, highly saturated hues (sky blue, cobalt, lemon yellow, hot pink, and mint green), we translate this ‘Skittles’ aesthetic directly to the tips, creating a look that is both bold and exceptionally crisp. To achieve this, abandon the uniform tip color and dedicate a specific neon or highly pigmented pastel shade to the tip of each finger. The key to making this work successfully is consistency in shape and opacity; use professional-grade polishes that deliver full coverage in two thin coats, ensuring every color pops against a sheer nude or milky white base. This technique maximizes the impact of the rainbow gradient without requiring full coverage across the entire nail plate, keeping the overall look sophisticated and intentional.To execute this five-color French design, precision is paramount. Begin with a single coat of a blurring base color, such as a pale pink jelly or a sheer beige, to even out the nail bed while allowing the bright tips to be the focal point. Next, select your five colors, mirroring the spectrum shown: a bright magenta or hot pink, a vibrant yellow, a light teal or mint, a true blue, and a turquoise. When applying the tips, use a fine detail brush or a striping brush, rather than the bottle brush, to ensure the lines are thin and perfectly curved or straight, depending on your preferred tip style. An expert tip for achieving perfect symmetry when dealing with multiple colors is to use a silicone stamper. Apply the polish in a thin line across the stamper edge, then gently press the nail tip into the polish. Clean up any overflow with a fine brush dipped in acetone before curing.The nail shape displayed in the photo—a long, soft coffin or square—is ideal for a multi-colored French design as it offers a generous canvas to showcase the color variation. However, this look is equally stunning on a shorter almond or oval nail, provided the tip line is kept very thin and neat. Finish the entire design with a high-shine, UV-protective topcoat, which is absolutely crucial for maintaining the intensity and preventing fading in highly pigmented neon or bright shades. This candy-coated aesthetic is particularly popular for summer holidays or music festivals, offering a joyful and eye-catching alternative to traditional nail art. For a slightly softer take, consider alternating a bright color (like the yellow or pink) with a more grounding shade, such as a metallic silver or white, ensuring the design still feels coordinated and fun.
Oceanic Agate: The Abstract Wave French
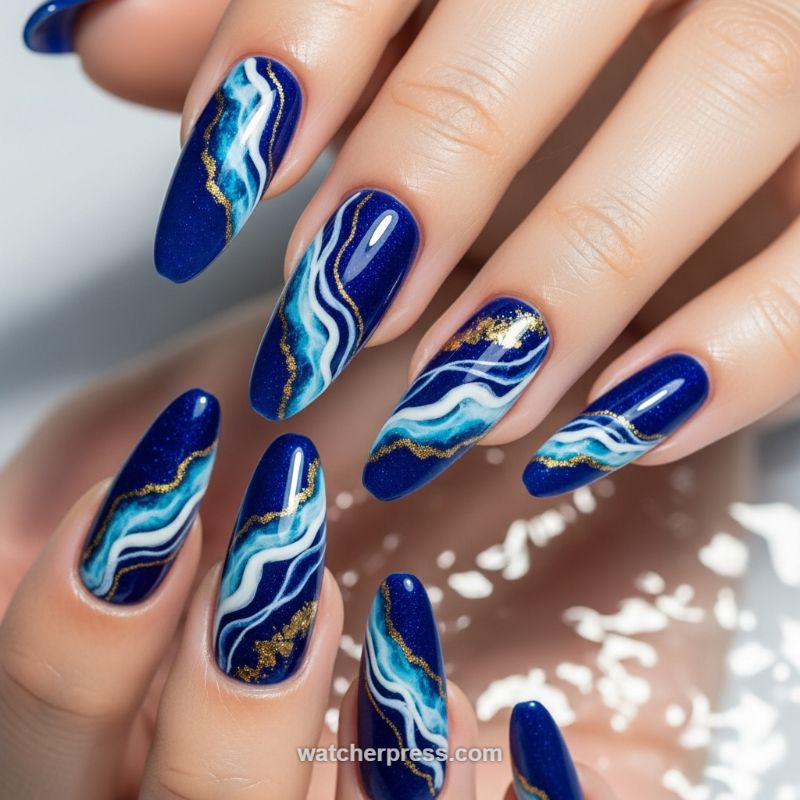
While the traditional French manicure relies on a crisp line defining the free edge, this mesmerizing design replaces that sharp divide with dynamic, flowing waves, transforming the nail into a deep-sea masterpiece. To achieve this look, start with a rich, highly pigmented cobalt or sapphire blue base coat, preferably one infused with subtle shimmer to mimic the depth of water. This deep color acts as the canvas, establishing a bold, luxurious tone that instantly elevates the look above basic nail art. The key to making this design an abstract French is allowing the wave pattern to dominate the central or free-edge portion of the nail, guiding the eye across the entire length rather than just focusing on the tip. After curing the base color, proceed to the marbling technique, which is essential for capturing the fluidity of waves or the natural lines found in agate stone.
The wave effect is best created using the ‘wet-on-wet’ technique or with a specialized blooming gel. After applying a layer of blooming gel or a non-curing clear coat over the cured blue base, immediately apply thin, irregular stripes of white, light blue, and turquoise gel polishes. Before curing, use a fine detail brush or a clean striping tool to gently swirl the colors, pulling them softly into the blue background. The goal is to create defined, sinuous lines—like whitecaps breaking over deep water—while maintaining distinct color separation; avoid over-mixing, which would result in a muddy blend. Ensure the pattern flows organically from the base toward the tip, creating asymmetrical movement on each nail for a truly personalized and high-end finish. The complexity and depth of this layering replace the simplicity of the standard French line, offering a creative, textured alternative.
The finishing details are what take this abstract design from artistic to opulent: the integration of gold accents. Once the wave pattern is cured, use a thin striping brush and a highly metallic gold gel liner to trace delicate, wavy lines that follow the curves of the white and blue marble. These gold threads should look like shimmering sea currents or vein inclusions found in natural stone. For added dimension and luxury, strategically place tiny flakes of gold leaf or foil near the cuticle or embedded within the darkest blue areas. This contrast between the deep, glittering blue and the warm, reflective gold is crucial. Finally, encapsulate the entire design with a non-yellowing, ultra-glossy top coat. Proper sealing ensures the intricate details are protected and provides that glass-like finish required to make the deep colors and metallic accents truly pop, guaranteeing durability for several weeks.
Neon Block: The Reverse French Accent Nail
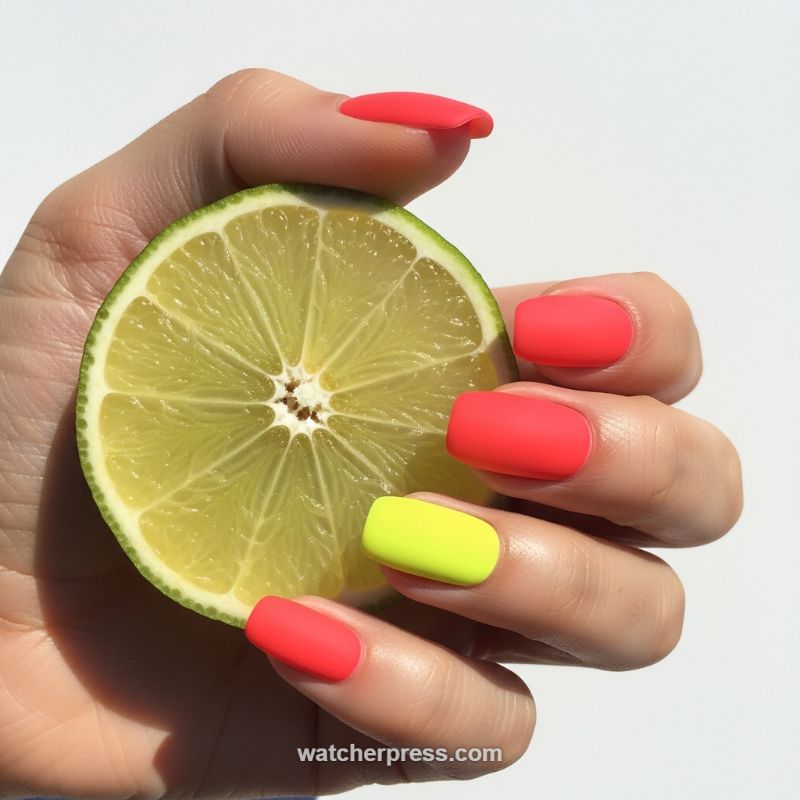
This look is the ultimate summer statement, utilizing high-voltage neon shades in a sophisticated matte finish to achieve a ‘Citrus Pop’ effect. To recreate this daring style, which acts as a bold, modern alternative to the subtle French tip, start by prepping your nails meticulously—any unevenness will be highly visible beneath the matte topcoat. The featured design uses a brilliant, almost fluorescent coral-red as the primary shade, dramatically punctuated by a single neon yellow-lime accent nail. While the image shows a full-coverage application, this technique translates perfectly into a creative thick-tipped French or a reverse French adaptation. Instead of applying a delicate white line, use the dazzling neon yellow shade for the thick, squared-off tips of your coral nails, or, for an even trendier approach, use the coral color to outline the cuticle area (the lunula) of the accent nail for a true Reverse French look. The key to success lies in the shocking, almost aggressive contrast between the two extreme shades, immediately invoking a playful, tropical aesthetic.
Achieving the perfect matte neon manicure requires absolute attention to detail during application. Neon polishes are notorious for applying streaky, so ensure you use at least two, preferably three, thin, well-cured coats of color to guarantee complete and vibrant opacity before moving on to the final step. For the high-end matte effect seen here, a top-tier matte top coat is essential; apply it generously and evenly over the entire cured or dried color layer. This unique finish immediately transforms the typically glossy, ‘poolside’ feel of neon polish into something unexpectedly chic and velvety smooth. When selecting your hues for this color-blocked French style, maximize the visual ‘pop’ by choosing shades that are complementary or high-contrast—for example, pairing this featured pink-red with its contrasting green/yellow counterpart, or substituting for electric cobalt blue paired with a hot fuschia, always ensuring that intense color blocking defines the manicure.
The short, clean, squoval shape prominently featured in the photo is highly recommended for maximizing the impact of such powerful colors. While longer nail lengths can certainly pull off this style, keeping the overall nail length moderate prevents the bright, bold colors from overwhelming the hand and helps maintain the sophisticated edge provided by the matte finish. Because matte polishes, particularly the lighter shades like neon yellow, are prone to showing oil buildup and discoloration easily, regular maintenance is crucial. Gently cleanse the nail surface daily with a soft brush and mild soap to keep the finish fresh. For extended longevity and to prevent premature chipping that is common with square shapes, be sure to meticulously seal the free edge (the very tip of the nail) with the matte topcoat. This playful, high-energy look is ideal for vacations, tropical getaways, or whenever you want your hands to serve as the definitive focal point of your summertime ensemble.
The Negative Space Blooming French
This design is the ultimate spring upgrade to the classic French, utilizing the negative space trend to create a floating floral garden effect. The secret lies in swapping out the traditional opaque pink base for a sheer, milky jelly polish (a nude or pale pink that mimics the natural nail). Prep your nails into a soft oval or almond shape, as the elongation of this shape complements the scattered floral pattern beautifully. Apply one to two very thin coats of the jelly base color and cure. This creates the foundational canvas—the ‘negative space’ that acts as the modern interpretation of the French manicure base color. This translucence is key, allowing the colorful flowers to pop while maintaining an airy, sophisticated feel across the nail bed, making the inevitable grow-out phase far less noticeable than with a solid manicure.
To execute the blooming design, select three complementary pastel gel polishes, such as butter yellow, lilac purple, and mint green. Using a fine detail brush or a specialized dotting tool, begin painting the five-petal flowers. The placement of these florals is crucial to connecting this look to the French manicure theme: focus the majority of the blooms along the free edge and gradually sparse them out towards the center of the nail plate. This concentration of color near the tip subtly nods to the defined line of a traditional French without requiring a strict, painted smile line. For the petals, dab small amounts of color and gently drag the brush slightly inward toward the center; this technique ensures the edges remain soft and diffused, achieving a charming, watercolor-like finish. Alternate the colors randomly across the nail for an organic, meadow-like appearance, ensuring no two adjacent flowers are the same hue.
Once the petals are fully cured, elevate the artistry by adding small black or dark brown dots to the center of each flower using a sharp detailing pen or brush. These tiny centers provide necessary contrast and definition against the soft pastels, anchoring the overall look. For a truly professional and long-lasting finish, choose a high-shine, non-wipe top coat. Apply generously, encapsulating the entire design to ensure a perfectly smooth surface and protect the delicate artwork from chipping. Expert advice: For beginners, start by practicing the five-dot flower technique on a palette first to master uniformity, then transfer that precision onto the nail. This playful yet elegant look is perfect for transitioning from late spring into early summer and offers the longevity benefits of a sheer base.
Aqua Brights: The High-Gloss Tropical French Tip
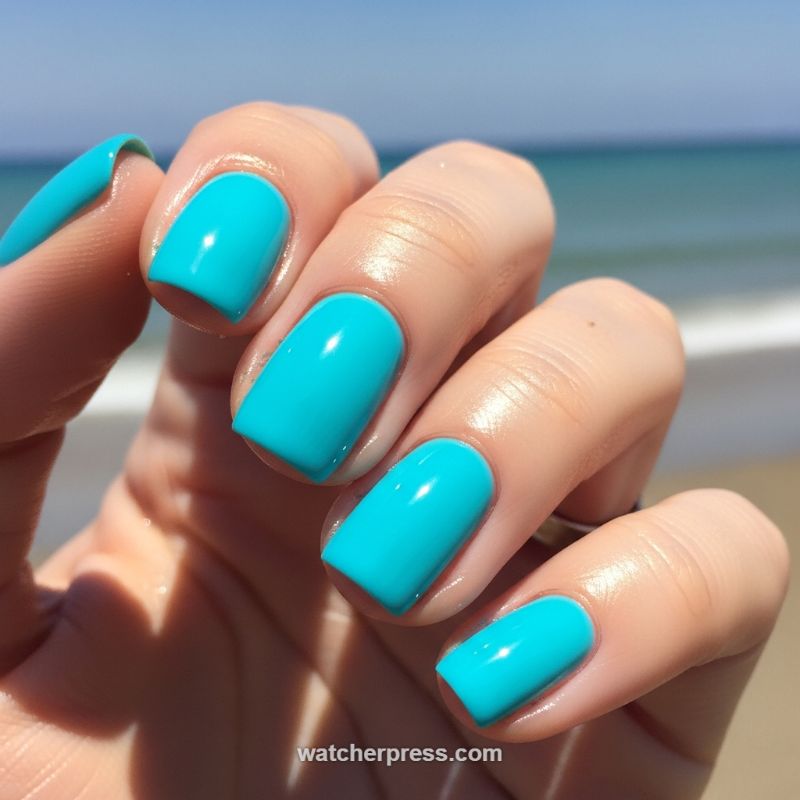
This captivating shade of electric turquoise, reminiscent of pristine Caribbean waters, is the perfect vibrant choice for anyone looking to ditch the standard white French tip this season. While the image displays a stunning, full-coverage manicure, the polish serves as inspiration for utilizing highly saturated creme formulas in a non-traditional French application. The high-gloss finish is critical to the success of this look, amplifying the neon-leaning brightness of the blue-green pigment. To achieve this modern tropical vibe, select a polish with excellent opacity in one to two coats. Start with a ridge-filling base coat to ensure a perfectly smooth surface, as any imperfections will be magnified by the intensity and shine of this particular hue. Since this color is the star, pairing it with a simple, sheer, milky nude base color will allow the turquoise tips to truly pop and keep the look sophisticated yet playful.
Mastering the application of such a highly pigmented color for a French tip requires precision. Because the polish is a creme (lacking shimmer or sparkle), the line of separation between the base and the tip must be impeccably crisp. For those with a steady hand, apply the turquoise color freehand, aiming for a medium-width smile line that follows the natural curve of the nail. However, for guaranteed symmetry and definition across all nails, we recommend using curved vinyl stencils or small painter’s tape strips. Apply the base color and allow it to dry fully before placing the stencil just below where you want the turquoise tip to begin. Apply two thin coats of the aqua polish over the exposed tip area, then carefully peel the stencil off while the second coat is still wet to prevent chipping or jagged edges. The squoval shape pictured complements the boldness of the color, offering a soft edge to an otherwise loud statement.
To elevate this vibrant look into a true luxury manicure, focus on the details that enhance the high-gloss effect. After the tips are dry, seal the entire look with a thick, quick-drying top coat that delivers maximum shine. The reflected light, evident in the accompanying image set against the sunny beach background, is what makes this manicure so dynamic. Furthermore, remember that bold colors draw attention to the surrounding skin; expert cuticle care is non-negotiable. Finish your manicure by massaging a rich cuticle oil into the nail beds and surrounding skin, mimicking the hydrated, healthy glow seen in the photo. This look is ideal for summer vacations, pairing perfectly with white linens and gold jewelry, demonstrating that a colored French manicure can be both extremely creative and utterly chic.
The Abstract Wavy Line French: Deconstructed and Dynamic

This sophisticated look reimagines the classic French tip by swapping the rigid, straight smile line for fluid, abstract waves that span the length of the nail. It starts with a foundation of a soft French ombré—a neutral, milky nude base seamlessly fading into a paler, semi-sheer white or beige at the free edge. This subtle gradient provides the perfect negative space canvas, allowing the line work to take center stage. The genius lies in the superimposed lines: two contrasting, ultra-thin lines (one stark black and one crisp white) are painted parallel to each other, winding sinuously from the cuticle to the tip. This dual-tone element ensures maximum contrast and depth, making the design appear almost three-dimensional. This style is particularly effective on long, tapered shapes like coffin or almond, where the visual movement created by the length and curvature of the lines can be fully appreciated.
Achieving the perfect “Wavy Line French” requires precision tools and meticulous application. Begin by successfully executing and curing your ombré base layers. To draw the lines, you must use a long, thin striping or detail brush (ideally 7mm or longer) and highly pigmented gel polishes to ensure smooth, consistent coverage without the need for multiple passes. Start with the black line first, dipping your brush lightly and ensuring it is loaded just enough to create a continuous line without dragging or breaking. Plot your wavy path across the nail plate in one fluid stroke, adjusting the curvature to ensure the line interacts dynamically with the boundaries of the nail. After flash curing the black line, repeat the process immediately adjacent to it with the contrasting white polish. Expert tip: the key to this design’s success is consistency; the two lines must maintain the same delicate thickness throughout their entire length and remain perfectly parallel to create a clean, modern aesthetic.
This abstract look is surprisingly versatile and can be adapted beyond the monochromatic pairing shown here. To truly make the design pop, a high-gloss top coat is non-negotiable, sealing the work and emphasizing the striking contrast between the line colors and the sheer base. For those looking to incorporate color into this trend, consider swapping the black for a deep emerald green or a rich terracotta for a warm, autumnal variation, or using two complementary neon shades for a high-impact summer style. For maintenance and longevity, particularly on extended lengths, ensure all edges and tips are thoroughly capped during the final top coat application. If you have shorter nails, simplify the design by using only one slightly thicker wavy line per finger to maintain the elegant, minimalist aesthetic without overcrowding the nail plate.
Jelly Nails & Tropical Greenery: The Negative Space French
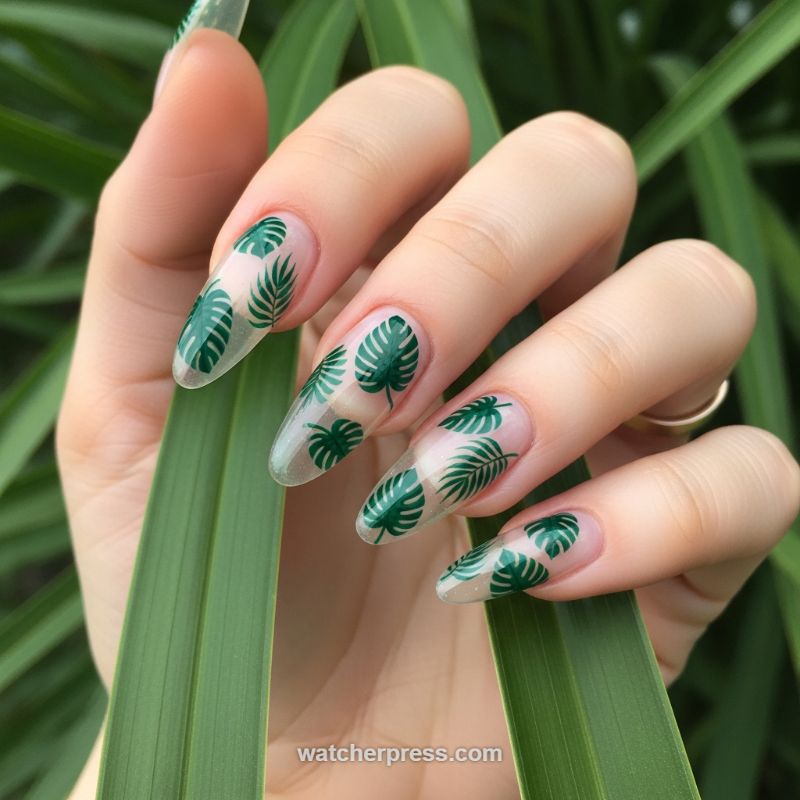
The ‘Jelly Nail’ trend provides a sophisticated update to the French manicure by embracing negative space and vibrant, transparent color. This technique, perfect for tropical escapes or summer months, utilizes a clear base (often achieved with specialized clear builder gel or clear tips) as the canvas. Instead of painting a traditional opaque tip, deep emerald green tropical motifs—such as Monstera leaves and delicate ferns—are strategically scattered across the entire nail length. The key to maintaining the French sensibility here is the overall lightness of the design; the clear acrylic or gel allows the natural nail bed to peek through, creating a breathable, high-impact look that feels far more ethereal than a full-coverage polish. This style works best on long, filed shapes like almond or soft coffin, as the extended length provides maximum area to showcase the layered leaf patterns.
To replicate this vibrant, jungle-inspired manicure, begin by shaping and priming your nails before applying clear extensions or a layer of clear builder gel. Once the base is cured and impeccably smooth, the green detailing can be added using stamping techniques or waterslide decals. For the most professional finish, select a highly pigmented stamping polish in a forest or emerald green shade. Apply the chosen leaf images (mixing larger Monstera designs with smaller, finer fern patterns adds visual depth) individually, varying the direction and overlap of the motifs across each nail. The visual success lies in leaving ample clear space between the designs—do not over-saturate the nail—to ensure the ‘jelly’ effect remains central to the look.
For an expert touch, consider finishing this design with a light dusting of subtle chrome powder or iridescent shimmer over the clear base before the final top coat; this adds a slight wet-look sheen that enhances the tropical, dewy aesthetic. This look is highly adaptable: while green provides an earthy foundation, the negative space concept can be applied with other graphic themes. Swap the leaves for bright yellow lemons or small pink hibiscus flowers to customize the theme, always anchoring the design in a deep, vibrant color against the crystal-clear base. Remember to use a high-quality, non-yellowing UV top coat to seal the design and maintain maximum transparency and shine for weeks.