Learn how to create 25 quick and simple DIY nail looks perfect for beginners. Achieve a flawless manicure at home with easy techniques and trendy designs.
30 Fresh March Nails: Beginner-Friendly Spring Floral Designs
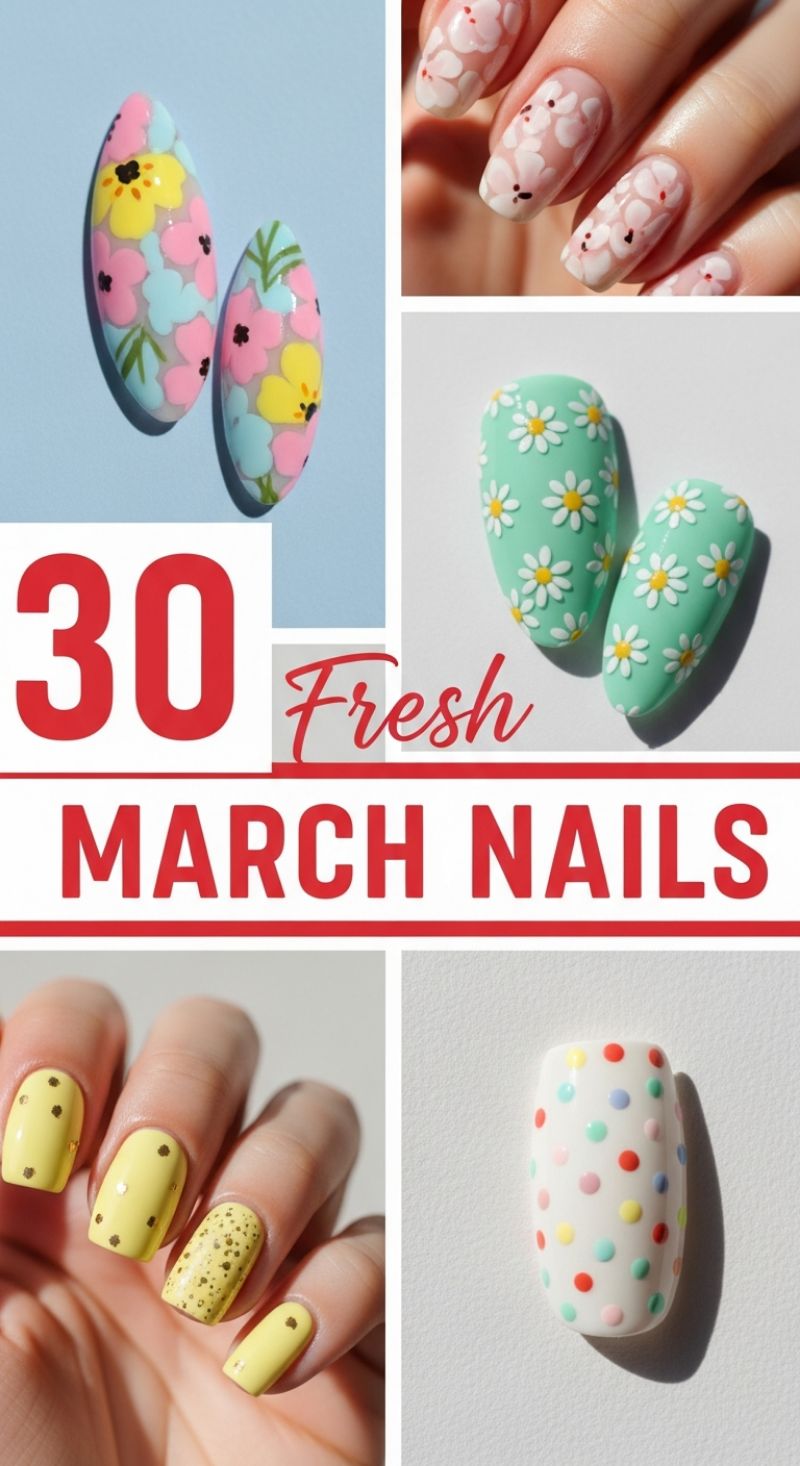
The image showcases an array of bright, optimistic nail art perfectly suited for a beginner tackling their first spring manicures. The simplest, yet highly effective, styles here rely heavily on the proper use of pastels and the indispensable dotting tool. To recreate the delightful mint green daisy nails or the playful multi-colored polka dot design, start with meticulous nail preparation, ensuring your base coat is fully dry. For the daisies, apply two smooth coats of a matte mint green polish. Once completely set, dip a small dotting tool into highly pigmented white polish (or acrylic paint for crisper lines). Instead of drawing petals, place five small white dots closely grouped in a circle to form the shape of the flower, then use a tiny yellow dot in the center. For the polka dots, use a creamy white or nude base, then choose 3-5 contrasting pastel shades (e.g., aqua, coral, yellow, red). Use varying sizes of dotting tools—or the blunt end of a toothpick or bobby pin—to randomly place dots across the nail surface. Remember to wipe your tool clean between colors to avoid muddying the shades, and dab excess polish off onto a paper towel before applying the dot to the nail for optimal, round definition.
For beginners looking for maximal impact with minimal freehand work, the solid yellow manicure featuring subtle gold accents is your best entry point. First, apply two coats of a vibrant, opaque lemon-yellow polish. This look combines simple solid color with two distinct accent techniques. For the index and ring fingers, use a fine-tipped brush or a very small dotting tool to strategically place 3–5 tiny gold metallic dots—aim for uneven, random placement rather than a strict pattern. For the contrasting accent nail (like the middle finger shown), use a gold glitter top coat that contains varying sizes of flecks, or try the popular ‘speckled egg’ look by flicking a brush loaded with a dense glitter top coat over the base color for a scattered, effortless finish. Expert tip: When working with textured elements like glitter or foil, always ensure you use a generous, high-quality top coat. Float the top coat brush gently over the design to avoid dragging the glitter, and apply two layers to ensure the surface is completely smooth, preventing snags and significantly extending the wear time of the manicure.
If you wish to progress to the slightly more detailed floral designs, such as the colorful, abstract pastel flowers or the delicate sheer cherry blossoms, consider the ‘wet-on-wet’ technique. For the bright abstract look, apply a sheer pink or clear base coat. While it is still slightly wet, use a fine brush or the tip of a toothpick to dab overlapping blobs of contrasting colors (pink, yellow, light blue). The wet polish will naturally bleed into the base coat and each other, creating a soft, watercolor-like effect without requiring perfect brush strokes. Immediately seal the design with a quick-dry top coat to freeze the soft edges in place. Whichever beginner technique you choose, the key to a flawless manicure is sealing the deal properly; always cap the free edge of your nail (running the top coat brush along the very tip) to prevent premature chipping and make your fresh March nails last well into the spring season.
13 Clean Minimal Looks: Geometric French Manicure Variations
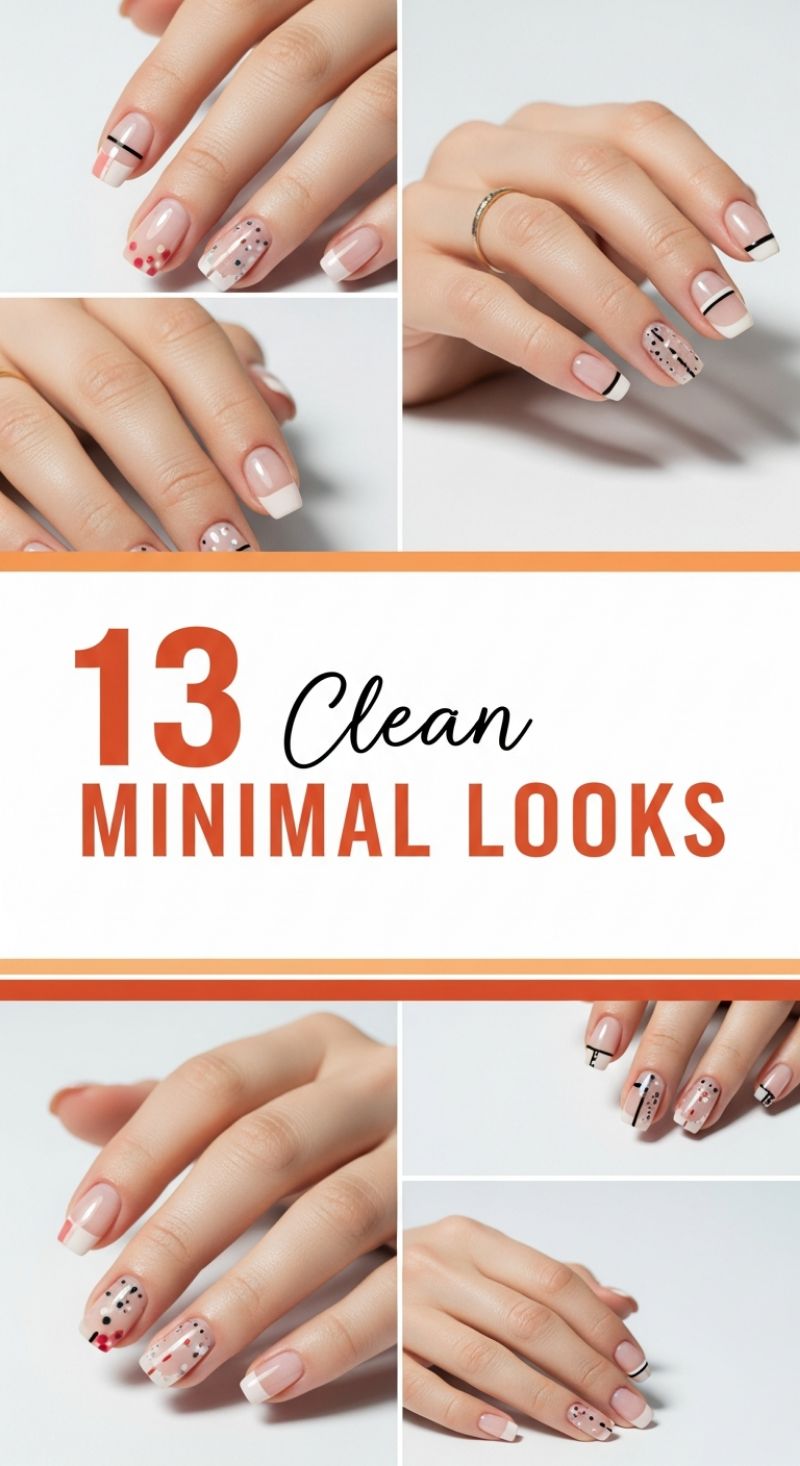
This sophisticated collection of minimalist nail art takes the classic French manicure and elevates it with clean lines and delicate details, making it an excellent starting point for beginners. To replicate these looks, begin with meticulous nail preparation: shape your nails into a short squoval or soft square, file gently, and apply a high-quality sheer nude or pink base coat. The foundation of these designs is a perfectly executed white tip. For a clean curve, consider using French manicure guides or a silicone stamper to press the white polish onto the tip. If you prefer the negative space or ‘half-tip’ designs shown, ensure the underlying nude polish is completely opaque and cured (if using gel) before moving on to the artistry. Remember, in minimalist nail art, precision is key; imperfections are much more noticeable against a clean background, so take your time during the base application.
The defining feature of these minimal looks is the use of thin, striking black lines. To achieve these geometric elements, you will need a fine detail or striping brush (00 or even finer) and a highly pigmented black polish or nail art gel. For the horizontal lines, as seen crossing the nail bed or demarcating the white tip, stabilize your dominant hand by resting your pinky finger on a surface. Draw the line smoothly and swiftly, ensuring the thickness is consistent. Some designs also incorporate small vertical or T-shaped lines over the nude base, mimicking abstract art. Expert tip: If you find liquid polish strings or drags, try using a highly pigmented black nail art gel and a precise brush; the viscosity makes straight lines easier to control before curing. Allow the lines to dry fully—a crucial step—before adding any top coat or further details.
To add complexity without sacrificing the minimalist aesthetic, incorporate small dots or metallic accents. Use a selection of dotting tools in varying sizes to apply small, precise circles in black, white, or pops of red/pink, mimicking confetti or abstract constellations. The designs in the image show both sparse, scattered patterns and more clustered groupings on accent nails. For added dimension, you can substitute the polish dots with tiny metallic studs or micro-rhinestones, securing them with a strong adhesive or a thick layer of clear top coat before curing. Once all design elements are completely dry, seal your masterpiece with a high-shine, durable top coat. Applying two thin layers will ensure the design is encased and protected, preventing chipping and maintaining that fresh, clean aesthetic for days.
11 Dreamy ALMOND SHAPES
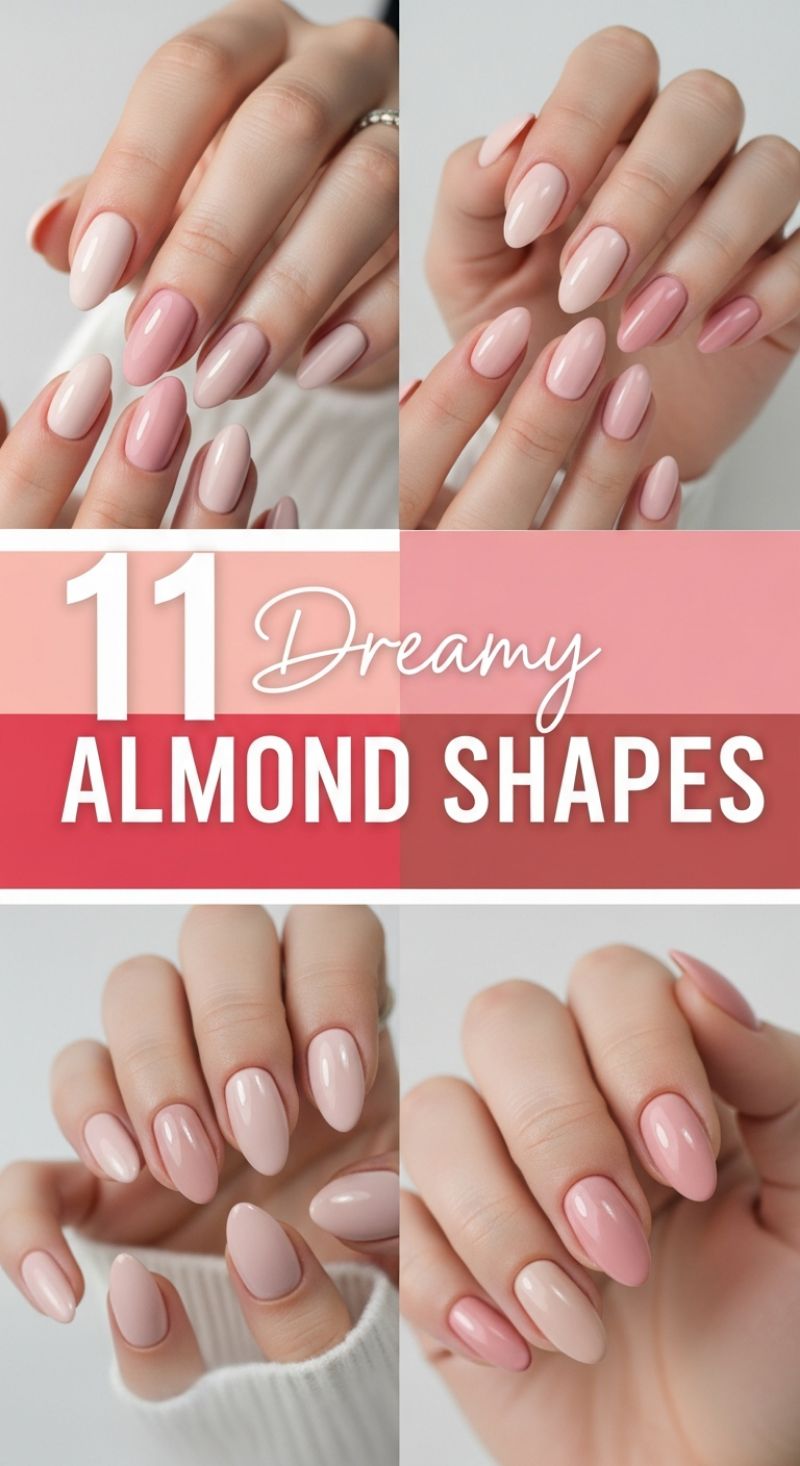
The “Dreamy Almond Shapes” showcased here highlight the most universally flattering nail silhouette. The almond shape is ideal for beginners because it naturally elongates the fingers and maintains strength better than sharper shapes like the stiletto, offering a soft, elegant, and timeless profile. This look pairs the classic shape with a sophisticated coordinated palette of neutral and blush tones—think pale cream, dusty rose, soft beige, and bubblegum pink. The key to replicating this aesthetic is meticulous shaping. Start by ensuring your natural nails have enough length past the fingertip. You must gradually round the corners and begin filing the sidewalls inward, aiming for a soft oval that gently tapers to a subtle, centralized point at the free edge. This look is perfect for showcasing subtle color variations.
To achieve the perfect symmetrical almond shape, hold your file flush against the side of your nail and file in smooth, deliberate motions towards the center point of the tip. Crucially, always file in one direction, avoiding the back-and-forth sawing motion, which weakens the nail plate and leads to premature splitting. Repeat this motion on the opposing side until the tip forms a symmetrical, slightly rounded peak—much like a true almond nut. Once shaping is finalized, proper base layer application is crucial. Apply a ridge-filling base coat to protect the natural nail and create a smooth canvas, especially important when using lighter, sheer shades that can highlight imperfections.
Since the charm of this specific look lies in its subtle color variation, select three to four complementary cream or sheer polishes within the pink/nude family. For instance, you might alternate between a pale pink and a warm beige, or use five different shades from lightest to darkest across the hand to achieve a dimensional gradient effect, as seen in the examples. Apply your chosen polish using the professional three-stroke method: one stroke down the center, followed by one on either side, ensuring the brush is completely dry between dips. Apply two thin, even coats, letting each dry fully. For a truly professional, lasting finish, seal your manicure with a high-shine top coat, making sure to “cap” the free edge by swiping the brush horizontally across the tip. This step seals the color and prevents chipping, maximizing the longevity of your stunning DIY almond manicure.
8 Effortless Simple Manis: Quick Looks for Beginners
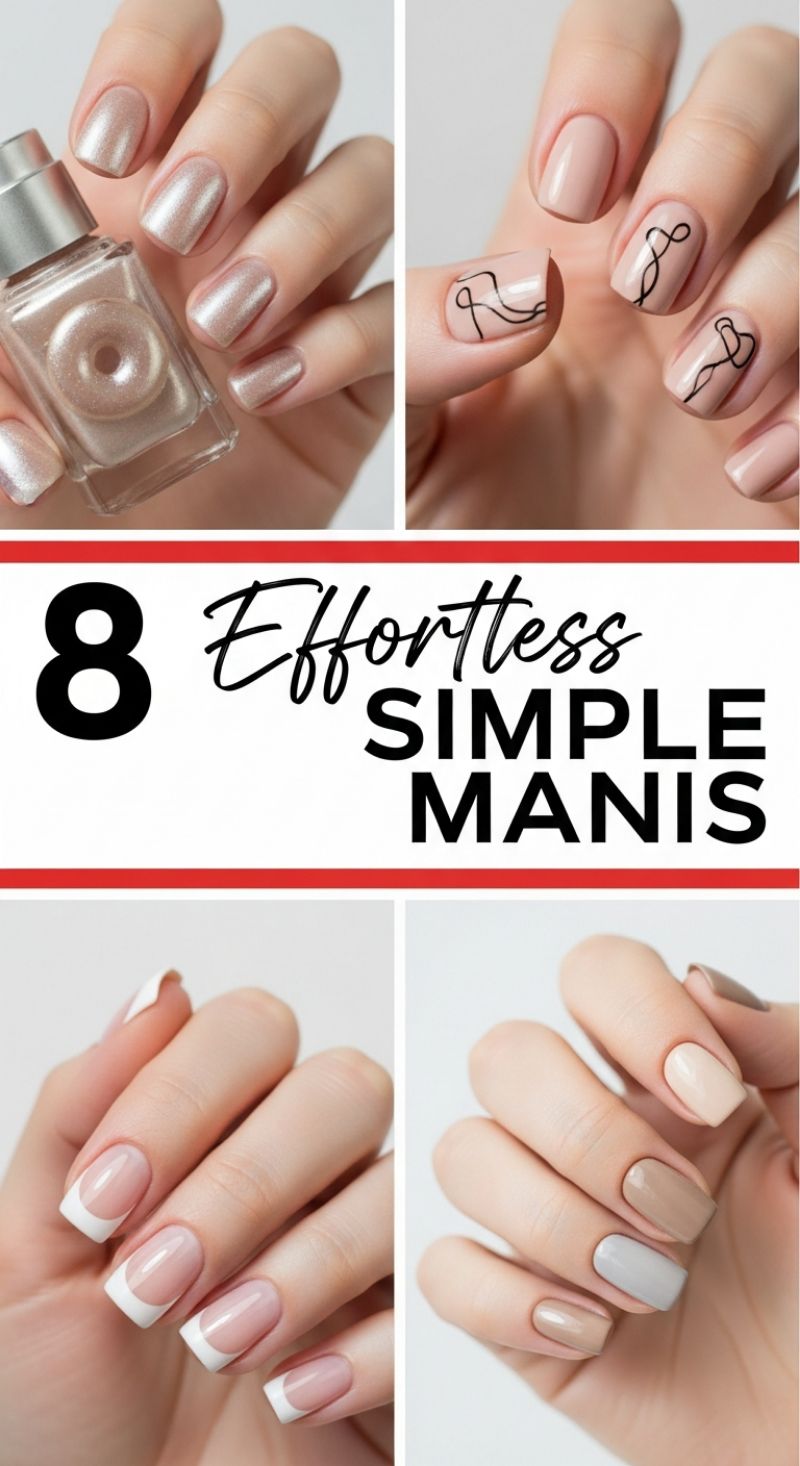
Mastering a professional-looking manicure doesn’t require complex tools or hours of time; the key is choosing chic yet forgiving designs, like the four looks demonstrated here. For truly zero-effort application, look to shimmering neutrals and coordinated solids. The pearlescent nude (top left) is ideal: it’s flattering on all skin tones and the soft shimmer helps camouflage any minor brush strokes or imperfections. To recreate this, prep your nails thoroughly, then apply two thin coats of your chosen metallic or pearl shade. Similarly, the multi-tonal neutral gradient (bottom right) is foolproof. Select 4–5 different, complementary shades within the same color family—think beige, taupe, soft gray, and light blush. Apply one distinct color to each finger. This technique provides visual interest without needing any intricate design work, delivering an instantly curated and sophisticated aesthetic that looks high-end but only requires careful polishing. Always allow adequate drying time between coats to ensure maximum shine and prevent bubbling.
For looks that incorporate simple design elements, focus on minimalism. The abstract line art (top right) is currently trending because its organic nature means flaws read as artistic expression. To achieve this, first apply a creamy, opaque nude base coat. Once completely dry, dip a fine striping brush or a toothpick into a heavily pigmented black polish. Instead of aiming for symmetry, practice drawing a continuous, fluid line or loop across the nail surface of 2-3 accent fingers. The line should be thin and deliberately simple. For the perennial favorite—the French Manicure (bottom left)—achieve that crisp, white tip by utilizing beginner-friendly tools. If you struggle with freehand painting, use French tip guides (stickers) placed just below where the white line should begin. Paint the white polish over the exposed tip, let it dry for 30 seconds, and then peel the guide away carefully to reveal a perfectly sharp line. Finish this look with a sheer pink or nude top coat to blend the tip into the natural nail bed.
Regardless of which simple manicure style you choose, the professional finish depends heavily on your final steps. After allowing your color coats to dry completely, seal your work with a high-gloss, quick-dry top coat. This is crucial not only for adding incredible shine but also for protecting the polish from chips. When applying the top coat, be sure to “cap the free edge”—this means sweeping the brush lightly across the very tip of your nail. This creates a seal that prevents water and everyday impact from lifting the polish, making your effortless manicure last significantly longer. By prioritizing clean application, quality polishes, and meticulous top-coating, these simple looks will elevate your DIY nail game immediately.
7 Darling Everyday Nails
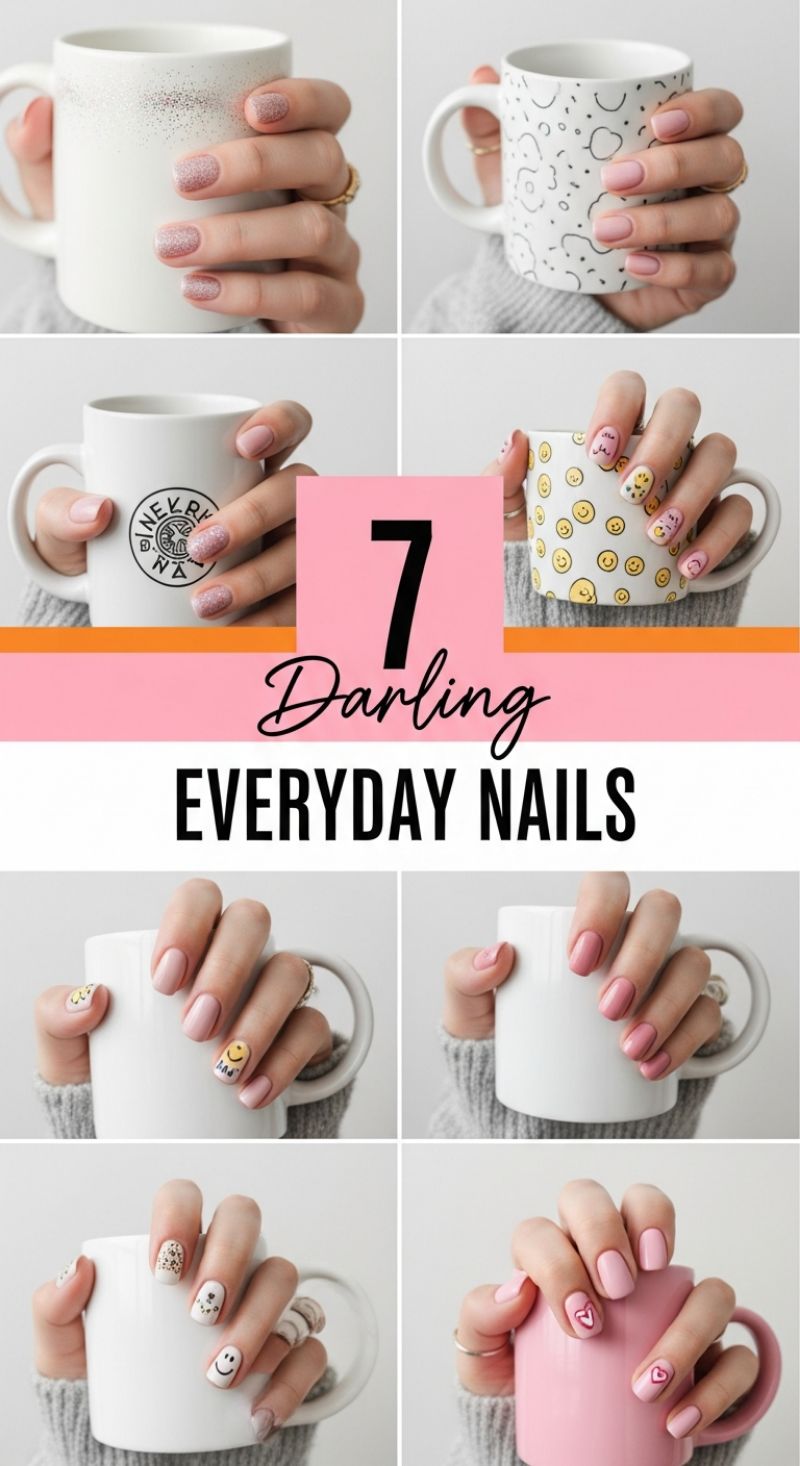
The “7 Darling Everyday Nails” collection proves that stunning manicures don’t require complex techniques or excessive time. This visual guide highlights the power of clean, short, squoval nails paired with classic, beginner-friendly color palettes—think soft pale pinks, sparkling rose golds, and crisp whites. For the easiest entry point, start with the single-color approach seen in several images. Apply two thin coats of a soft nude or a delicate shimmer polish (like the top left photo) for an effortless, chic finish. A crucial beginner tip: always use a high-quality ridge-filling base coat to ensure a smooth canvas, making polish application streak-free and boosting color vibrancy. This foundational work is essential for the longevity and professional appearance of all the subsequent looks shown here, ensuring your quick DIY manicure looks salon-fresh.
Elevate your simple manicure into standout nail art using minimalist accent designs. The key to making these intricate-looking patterns achievable for novices is focusing the complexity on only one or two accent nails. Notice how several looks feature cheerful yellow smiley faces, simple black outlines, or sweet tiny red hearts. To replicate these designs, you’ll need a contrasting color (like black, white, or bright yellow) and a very basic tool: a nail art dotting tool or even a fine-tipped toothpick. For the simple speckled look (bottom left), dip your brush into the accent color and gently dab it across the nail for an effortless, confetti effect. For more deliberate designs like smileys, start with a white base on the accent nail, let it dry completely, and then carefully place your pattern using minimal polish. The minimalist nature of the pattern ensures that any minor inconsistencies look charming and artsy, not messy.
To ensure your darling nails look professionally done and last through your busy week, focus on the final steps. After your design is completely dry—and this is critical, give it at least five full minutes—apply a generous, quick-drying top coat. Expert application involves “wrapping the tip” of the nail, meaning you brush the top coat horizontally along the free edge of your nail. This seals all the polish layers and the free edge, which is the point where chipping most frequently starts. This extra step is the secret to getting a week or more out of your DIY manicure. Feel free to mix and match the seven styles presented here: pair a solid pink nail with a smiley accent and a glitter thumb for a custom everyday look that is polished, playful, and entirely achievable in minutes.
15 Transitional Seasonal Shifts
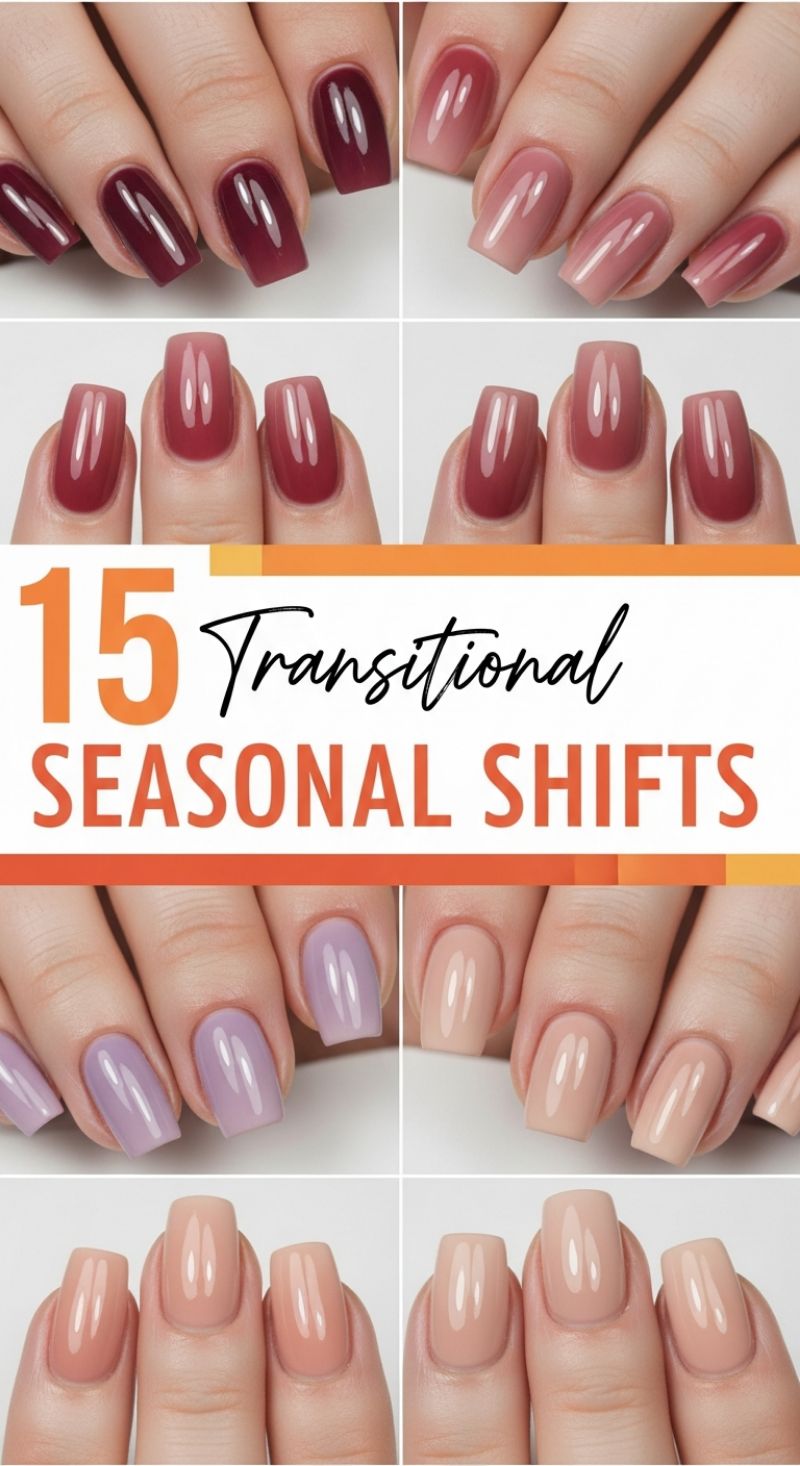
The secret to year-round impeccable manicures lies in mastering the ‘seasonal shift’—a cohesive transition of color palettes that flows effortlessly from one season to the next. This trend, perfectly illustrated here, is less about complicated nail art and more about thoughtful color curation, making it an excellent technique for beginners. The visual demonstrates a movement from deep, rich tones (like the burgundy and cranberry shades ideal for late fall/winter) through dusty, muted hues (mauve and dusty rose, perfect for early spring) and into soft pastels (lilac) and warm neutrals (creamy beige and nude, perfect for spring/summer). To adopt this look, focus on building a collection of polishes that have similar undertones (e.g., all warm or all cool) but vary significantly in depth and saturation. This allows you to create a smooth, sophisticated progression that keeps your hands looking stylish regardless of the time of year.
Achieving the flawless, high-gloss finish shown in these examples is essential for executing a polished transitional look. Start by properly preparing your nail bed: gently file and shape the nails, push back or trim cuticles, and wipe the nail plate with rubbing alcohol to ensure it is oil-free. Apply a quality base coat, especially when using deep, rich shades like burgundy, as this prevents pigment staining the natural nail. The key to the jelly-like, plump finish is applying two to three extremely thin coats of your chosen color, allowing each layer to dry almost completely before applying the next. Thick coats lead to bubbling and smudging, which ruins the glossy effect. Finally, lock in the color and maximize the shine with a high-quality, ‘plumping’ or ‘gel-effect’ top coat. Wait at least five minutes before sealing the manicure with a fast-drying coat to prevent dents.
For beginners looking to implement this shift immediately, try creating a gradient effect across one hand. Instead of painting all ten nails the same color, select three to five shades that naturally flow into one another (e.g., dark plum, raspberry, muted rose, pale pink, and nude beige). Paint the deepest shade on your thumb or pinky and transition sequentially to the lightest shade on the opposite end of the hand. This immediate, cohesive look elevates a simple manicure and acts as a foolproof guide for future seasonal palette choices. When moving from season to season, simply swap out the darkest and lightest ends of your current palette—for example, replacing the deep burgundy with a chocolate brown for autumn or switching the pale nude for a bright coral for summer. This method guarantees your manicures are always timely and incredibly chic.
16 Must-Have SPRING IDEAS
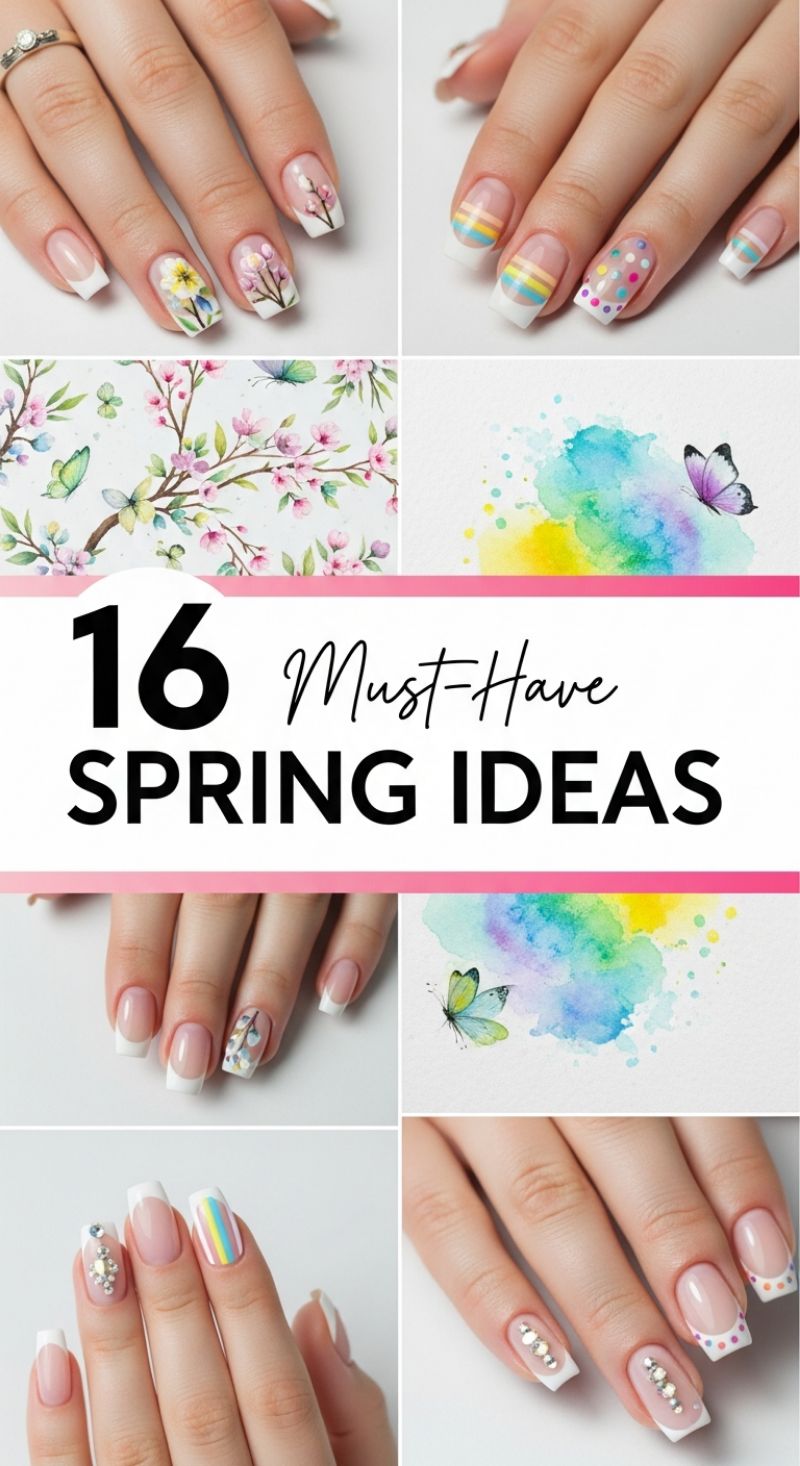
The foundation for these stunning spring designs is the timeless French manicure, utilizing a crisp white tip and a sheer nude or pink base. This provides the perfect canvas for beginner nail artists to add bursts of spring color and delicate motifs. To achieve the simplest looks shown, focus on the bright, playful Easter-inspired designs like the pastel stripes and multicolored polka dots. For the stripes, use specialized striping tape or a fine detail brush and three complementary pastel shades (such as robin’s egg blue, butter yellow, and blush pink). Apply these horizontal stripes just above the white tip line, ensuring they are thin and evenly spaced. For the polka dots, utilize a dotting tool (or the head of a pin) and select 3-4 vivid colors. Rather than covering the entire nail, concentrate the dots along the edge of the white tip for a confetti effect. Expert tip: Always allow each layer of polish to dry fully before applying the next, especially when working with stripes, to prevent colors from blending or smearing.
Once comfortable with linear and dotted designs, incorporate the beautiful floral motifs seen in the examples, such as the cherry blossoms and clustered daisies. These look intricate but can be simplified for the DIY artist. For the blossoms, use a thin detail brush and soft pink polish to paint delicate, fine branches extending from the nail tip. Then, use a small dotting tool and white or light pink polish to cluster tiny dots along the branch lines to represent budding flowers. For larger florals, like the accent daisy, use a dotting tool to place five small white dots in a circle for the petals, then finish with a contrasting yellow dot in the center. The key to making these beginner-friendly designs look professional is reserving the detailed artwork for just one or two accent nails (like the ring finger) and keeping the rest of the nails in the classic French finish. This technique ensures the manicure remains elegant and balanced.
Finally, elevate your spring look using simple embellishments like rhinestones or gems, which require zero painting skill. As demonstrated on several nails, placing clear, flat-backed rhinestones in strategic formations—such as a vertical cascade down the nail bed or a cluster near the cuticle—adds immediate glamour and texture. To apply, place a small drop of specialized nail glue or a thick layer of top coat where the gems are desired. Using a wax pencil or tweezers, carefully place the gems. Once satisfied with the placement of all designs, seal the entire manicure with two generous layers of high-shine top coat. This step is crucial for longevity, especially when using gems, as the top coat encapsulates the stones, preventing them from catching and falling off, ensuring your flawless spring manicure lasts for weeks.
19 Flawless Coffin Manicures
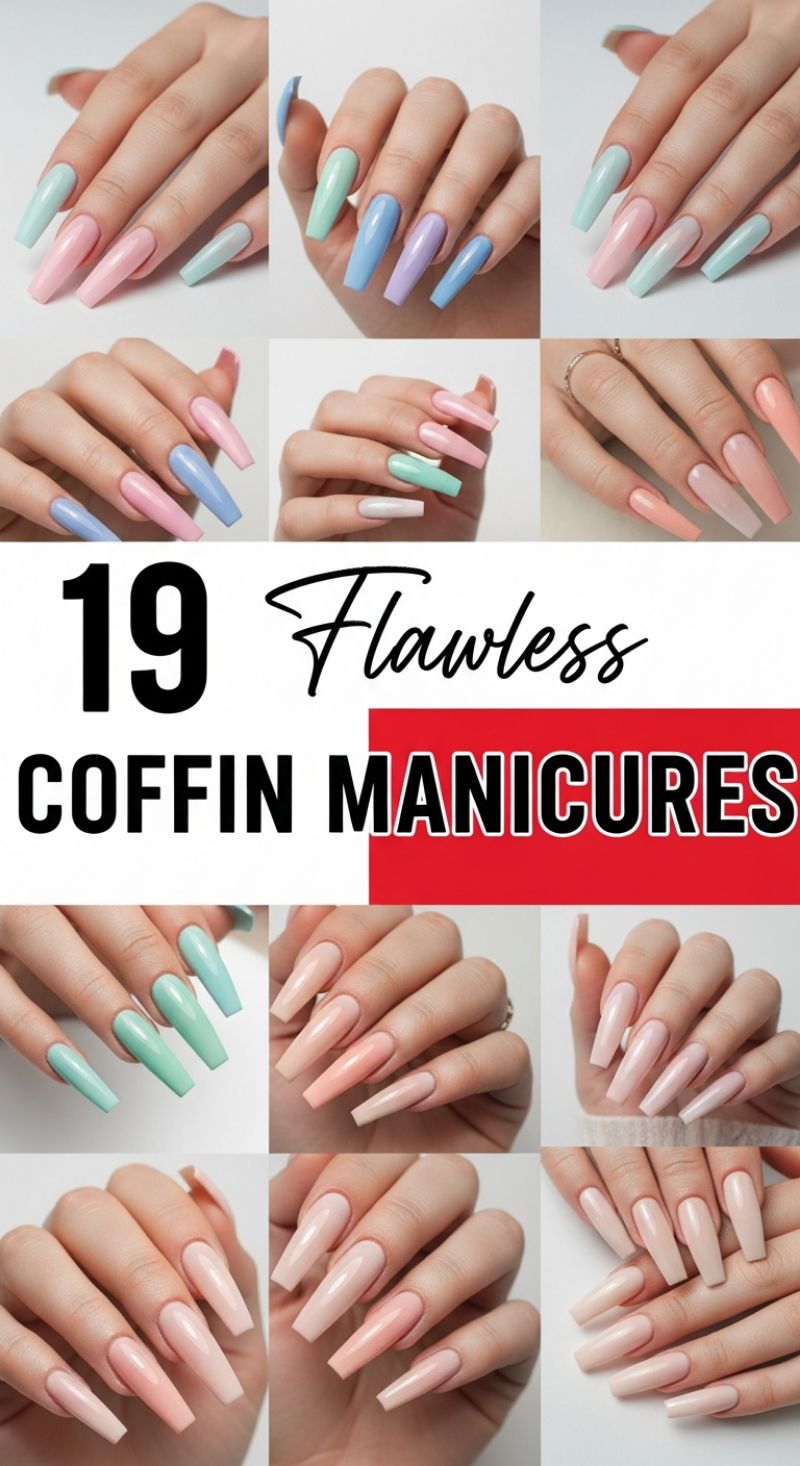
Achieving the coveted coffin shape might seem daunting for a beginner, but with the right technique—or a little help from modern nail products—this iconic look is perfectly within reach. The coffin (or ballerina) shape is characterized by its long, tapered sides that square off at the tip, giving a sleek, architectural finish. For those new to advanced shaping, we highly recommend starting with high-quality, pre-shaped press-on nails or nail tips, which eliminate the difficult filing process. If you are determined to file natural or acrylic enhancements, start by squaring the tip first, then file the side walls inward gradually, ensuring symmetry on all nails. Proper preparation is key to the “flawless” finish seen here: push back and gently trim your cuticles, lightly buff the nail surface, and always apply a ridge-filling base coat. This initial preparation ensures the polish adheres perfectly and prevents chipping, extending the life of your long, stunning manicure.
The image displays two distinct yet equally chic color strategies: vibrant pastels and sophisticated monochromatic nudes. To replicate the playful pastel solids (such as the mints, baby blues, lavenders, and soft pinks), choose highly pigmented creme polishes. Apply two thin, even coats, allowing each coat to fully dry before proceeding; thick coats lead to bubbling and streaking, ruining the smooth finish. For the sophisticated nude look, which dominates the lower half of the examples, focus on selecting shades that complement your skin tone, ranging from sheer blush to creamy peach and deep taupe. The secret to a truly dimensional nude manicure is to use slightly varying shades across your fingers or build up sheer layers for a translucent, plump effect. This subtle variation creates depth, mimicking the professional salon application and giving the manicure an effortlessly polished appearance.
To finalize your flawless coffin manicure, a high-shine, quick-dry top coat is non-negotiable. This layer locks in the color, adds durability to the long tips, and provides that glossy, mirror-like finish that defines a high-end look. Expert tip: “floating” the top coat over the nail—using minimal pressure and a generous bead of polish—helps prevent dragging the color underneath. After applying the top coat, immediately clean up any accidental slips onto the skin using an angled brush dipped in acetone; this meticulous clean-up is crucial for defining the edges. Since coffin nails are long, remember to apply cuticle oil daily to keep the nail bed hydrated and flexible, reducing the risk of breakage and ensuring your stunning, flawless manicure lasts as long as possible.
12 Chic Short Nail Looks for the Beginner Manicurist
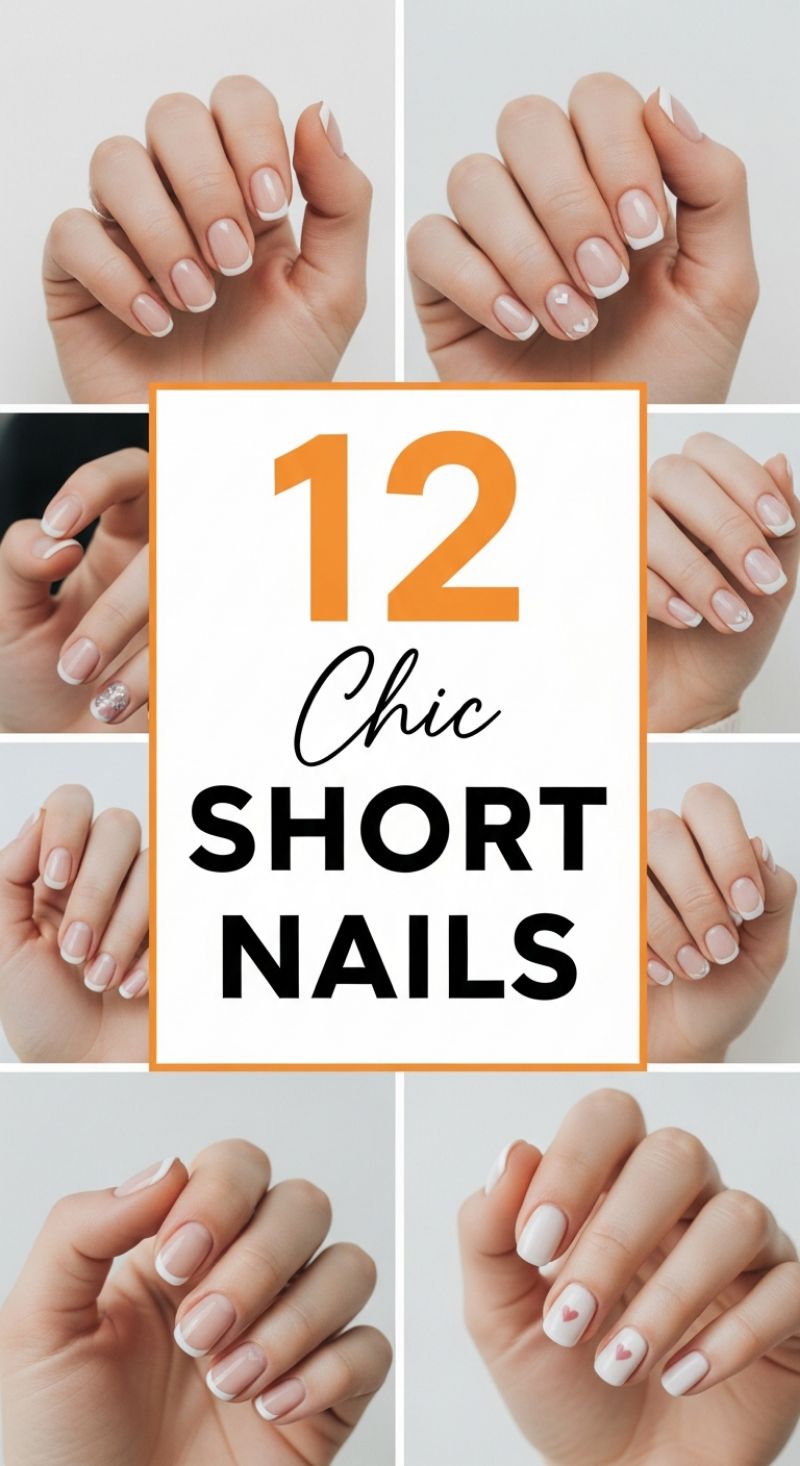
Short nails are the perfect canvas for beginners, as they require less extensive shaping and are far less prone to breakage than long extensions. The featured collection leans heavily on sophisticated French manicure variations, which are surprisingly achievable at home with the right tools. To recreate this classic look, start with meticulous nail prep: clean, file, and lightly buff your nails to achieve the smooth, rounded ‘squoval’ shape seen in the images. Apply a thin coat of a sheer nude or light pink polish as your base. The key challenge is applying the white tip. For short nails, the tip must be crisp and relatively thin to maintain an elegant balance. Expert trick: Use a dedicated thin striping brush (often sold as a liner brush) and steady your hand on a table, applying the white polish only to the very edge of the nail. If freehand is too daunting, invest in French manicure tip guides—small curved stickers that ensure a uniform smile line across all fingers. Remember, applying multiple thin coats is always better than one thick, gloppy coat, especially when dealing with contrasting colors like white on nude.
Once you have mastered the basic French tip, you can easily incorporate the subtle accent details shown in the collage. For a soft, romantic touch, focus on a single accent nail, like the ring finger. To create the tiny hearts or small dots, ditch the polish brush entirely and use a dotting tool, which is a budget-friendly essential for beginner nail art. If you don’t own a dotting tool, the head of a pin or a toothpick dipped lightly into the polish works effectively for minimalist shapes. The images also demonstrate subtle glitter accents, which can be achieved by applying a sheer coat of shimmering topcoat or placing small metallic decals onto the wet polish before sealing. The beauty of these short nail styles lies in their restrained elegance; keep the accents small and confined to one or two nails to maintain that clean, minimalist aesthetic.
To ensure your flawless short manicure lasts, proper sealing is paramount. After the color coats and accents are completely dry (this can take 5–10 minutes depending on the polish), apply a high-quality, high-shine top coat. This not only seals the design but also gives the entire manicure a durable, professionally finished look. For those seeking maximum longevity, a quick-cure gel top coat applied over regular polish (and cured with a small LED lamp) provides a chip-proof shield ideal for active hands. Remember this critical piece of beginner advice: always ‘cap the free edge’—brush the top coat along the very tip of the nail. This prevents premature tip wear and chipping, which is often the first sign of a manicure’s breakdown. By following these steps, you can achieve any of these 12 chic short nail looks right from your own home.
14 Sexy VALENTINE TIPS

This dramatic look, often dubbed the “Vampire Stiletto” manicure, leverages high-contrast colors and extreme gloss to create a seductive, unforgettable statement perfect for Valentine’s Day or any romantic evening. While the image showcases highly sculpted, extra-long stiletto extensions, beginners can easily capture this powerful aesthetic by focusing on the core color palette: a deep, vibrant primary red (like a blood red or classic true red) paired with a rich, opaque black. To adapt this for a quick DIY session, opt for a more manageable nail shape, such as a sharp almond or even a practical squoval, ensuring the edges are neatly filed and prepped. Before applying these intense pigments, always use a high-quality base coat; dark colors are prone to staining the natural nail, and a good foundation ensures chip resistance, which is vital when you are going for such a glossy, high-impact finish.
The visual complexity of this design comes from the seamless blend of red and black, often appearing as subtle ombres, striking contrasts, or delicate, vein-like marbling. The simplest adaptation for a beginner is the ‘Accent Contrast’ technique: paint four nails deep red, leaving the ring finger (or index finger) jet black for an immediate visual pop. To try a slightly more advanced but still achievable DIY design, attempt a ‘Bloody Ombre’ by using a makeup sponge to dab black polish onto the tips of your red nails, blending upwards slightly before sealing the entire look with a thick top coat. For the marbled, smoky effect seen on many of these nails, apply your red base, then paint a horizontal stripe of black near the tip. While the polish is still wet, use a fine detail brush or a toothpick dipped lightly in acetone to drag or swirl the colors together in a controlled motion, creating those organic, wispy lines that give the manicure its dynamic movement and depth.
Achieving that flawless, intimidating shine is non-negotiable for this particular style. Once you have perfected your color application and design, apply two generous coats of a high-gloss, quick-dry top coat. This not only protects the polish but also gives the surface a highly reflective, almost liquid finish, enhancing the drama of the deep reds and blacks. Remember that clean-up is particularly important with dark polishes; use a small brush dipped in nail polish remover to meticulously clean the cuticle line and sidewalls before the top coat sets. To elevate the final look, take inspiration from the imagery and incorporate simple silver rings. This deep, glossy red and black combination is inherently luxurious, and pairing it with metallic jewelry instantly transforms the manicure into a complete, sophisticated accessory perfect for a sensual Valentine’s date.
Adorable Beginner Nail Art: Hearts, Bows, and Sparkle
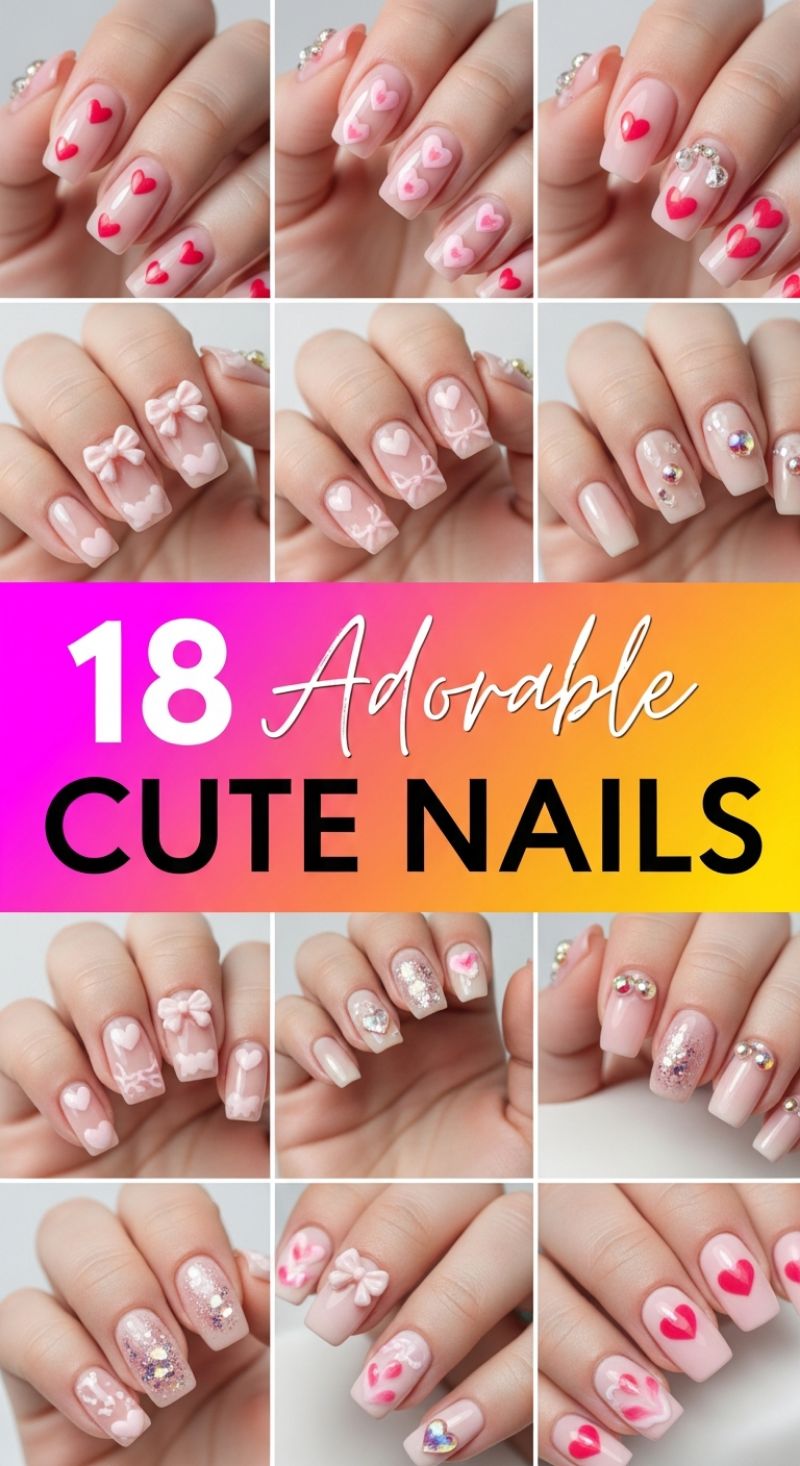
The ‘Adorable Cute Nails’ collection is perfect inspiration for beginners looking to capture a soft, feminine aesthetic, featuring sheer pink bases, playful hearts, sweet bows, and subtle sparkle. To replicate this look, start with meticulous nail preparation: shape your nails into a soft square or squoval, buff lightly, and ensure they are clean. The foundational element of this style is a sheer jelly or milky pink polish, which provides a natural, forgiving base that hides minor imperfections while allowing the subsequent designs to pop. For the simple heart designs, the easiest technique involves using a dotting tool and a highly pigmented color (like bright red or opaque pink). Dip the tool, place two small, adjacent dots where you want the top lobes of the heart, and then quickly drag the polish down and inward with a fine detail brush or a toothpick to form the point. Practice this on an accent nail until you feel confident, remembering that slight imperfections only enhance the hand-painted charm of these manicures.
To introduce the romantic 3D elements shown, like the textured bows and small crystal embellishments, focus on applying pre-made charms. This is the quickest way for beginners to achieve a dimensional look without mastering sculpting gel. For charms like the cute pink bows, apply a small, strategic dab of thick builder gel or professional nail glue where the charm will sit. Gently press the charm onto the adhesive, ensuring the edges are firmly secured, and cure/dry thoroughly. For the subtle, cloudy or lace-like details seen accompanying the bows and hearts, use a highly thinned white polish (a ‘water marbling’ consistency) and a thin striping brush. Draw light, gentle swirls and small outlines around the edges of the nail or the heart designs to achieve that soft, doll-like texture. When incorporating glitter, avoid full coverage for an easy application; instead, apply a clear polish mixed with fine iridescent glitter just to the tips or the base of an accent nail, keeping the overall effect diffused and airy.
The finishing process is crucial for longevity, especially when incorporating dimensional elements. After your designs are completely dry or cured, apply a quality glossy top coat over all non-3D areas. If you have applied gems or bows, carefully ‘cap’ the surrounding polish (apply the top coat right up to the edges of the charm without painting over it) to seal the base and prevent lifting. If using a UV/LED lamp, ensure the light hits the side of the 3D elements for a complete cure. The beauty of this adorable aesthetic lies in its soft color palette and variety—mix and match the designs, dedicating one nail to simple hearts, another to a tiny bow, and a third to just a few strategically placed rhinestones near the cuticle line. This keeps the entire manicure cohesive, quick to execute, and undeniably cute.
Trending Valentine’s Vibes: Mastering the Viral February Manicure

The visual mood board for February screams high-impact romance, utilizing a striking palette of deep reds, bright fuchsia, and soft bubblegum pinks, often juxtaposed with crisp black tailoring for a ‘short chic’ effect. To translate this viral trend onto your nails, begin by focusing on color blocking and intentional placement. Select two polishes that mirror the image’s vibrant hues: a classic, rich red (like the elegant handbag pictured) and a sophisticated light pink or fuchsia. For a beginner-friendly approach, choose either a traditional solid manicure with an accent nail (red on three fingers, pink on the ring finger) or try a simple half-and-half French tip design where the tip is painted in one color and the base in the other. Before applying any color, ensure meticulous nail prep—buffing the surface lightly and applying a ridge-filling base coat—as the sharp, chic aesthetic demands a flawlessly smooth foundation.
Incorporating texture is key to capturing the glamour displayed in the visual elements, particularly the heavily glittered hearts and sparkling pink stilettos. For beginners, the easiest way to add this required dimension is through specialized glitter polish. Instead of painting a standard coat, try the ‘glitter dabbing’ technique on your chosen accent nail: apply a small amount of chunky glitter polish onto a makeup sponge, then gently dab the sponge onto the nail. This method deposits maximum glitter pigment with minimal excess clear binder, resulting in a dense, opaque sparkle that mimics the intensity of the glitter heels. Expert advice for making the glitter truly pop is to use a matching crème polish underneath the glitter layer; for instance, applying a pink base before dabbing on the fuchsia glitter ensures the final result is dazzlingly vibrant and opaque.
Finally, achieve the overall ‘chic’ finish by paying attention to shape and topcoat. The fashion presented is polished and tailored, suggesting that the nails should be neatly maintained—avoiding extreme lengths. A short squoval or gently rounded almond shape best complements this clean, contemporary aesthetic. Lock in your intricate color and glitter work with a high-shine, protective topcoat. Apply the topcoat generously, especially over the textured glitter, to create a smooth, sealed surface that prevents chipping and elevates the look to a professional standard. For the ultimate polished look, dip a small, thin brush into acetone and carefully run it along the perimeter of your nails after the polish is set to clean up any stray polish, delivering the sharp, flawless edges demanded by this viral, fashion-forward trend.
15 Romantic Nail Looks
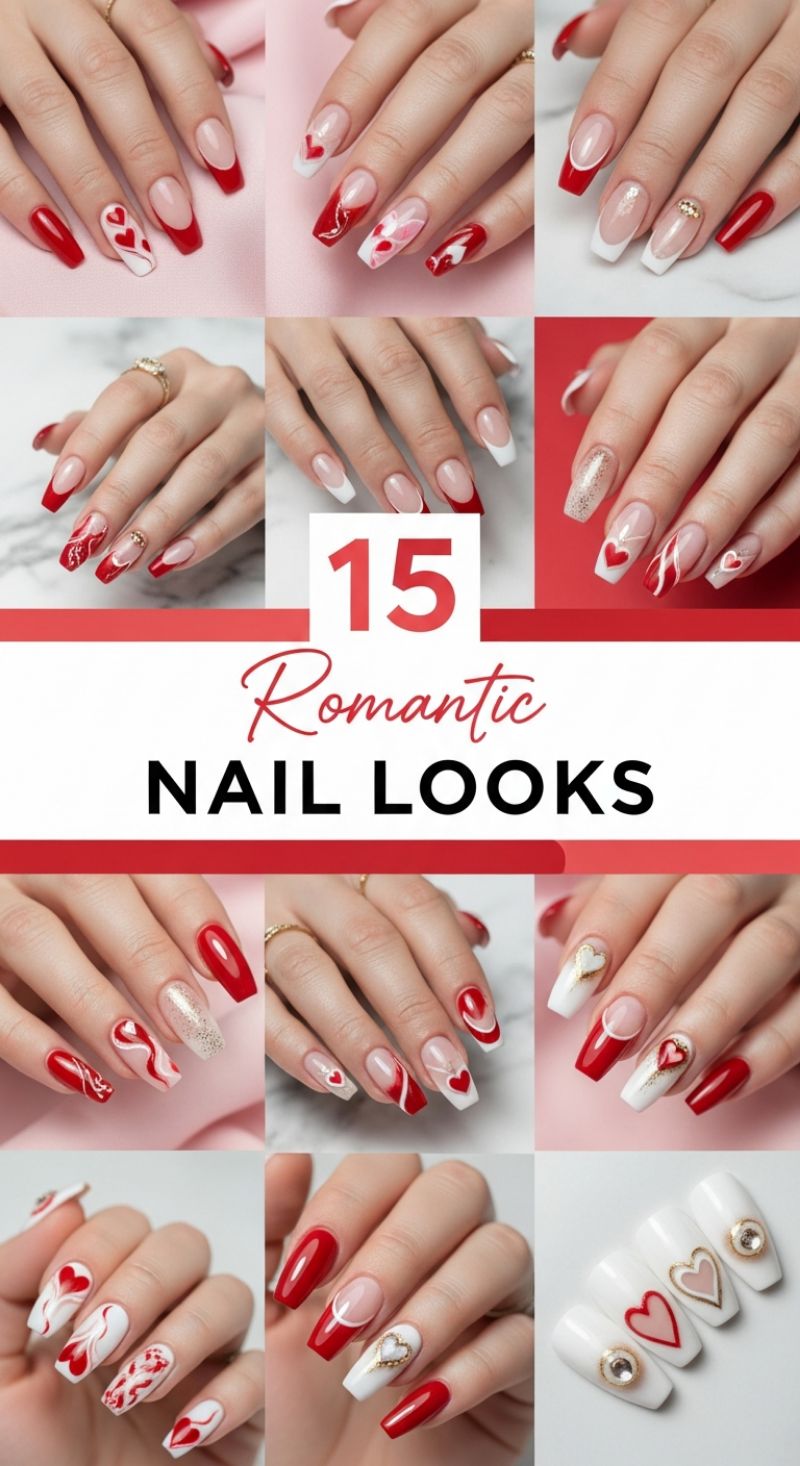
These stunning red and white manicures prove that complex-looking nail art can still be accessible to beginners. The vast majority of the 15 looks pictured here utilize variations of the French tip and simple dotting tool art. To achieve the popular V-cut or diagonal French tip designs that dominate the collection, start by prepping your nails with a high-quality base coat. Once dry, apply two thin coats of a sheer nude or clear polish for the base layer. For perfectly defined red tips, the secret weapon is a stencil or French tip guide stickers. Apply the guide just below where you want your color line to begin, paint the red tip, and immediately (but carefully) peel off the guide while the polish is still wet. For a sharp, curved line like the elegant design shown in the top row, if you opt for freehand, always use a dedicated cleanup brush dipped in pure acetone to refine the smile line after painting. This foundational technique alone will unlock half of the designs presented in this romantic set.
Once the French base is set, you can move on to the simple yet impactful heart art. The key to effortless heart shapes is using a small dotting tool. To create a simple heart, place two dots of white or red polish side-by-side, leaving a tiny space between them, and then use a fine detail brush or the tip of a toothpick to gently drag the polish from the center-bottom of the two dots down to meet at a single point. This forms the perfect, symmetrical heart shape instantly. For the more abstract, swirled red and white designs (visible in the middle and lower rows), you’ll utilize a wet-on-wet technique: apply a stripe of your base color (e.g., white) and while it is still wet, drop small amounts of the accent color (red) directly onto it, then use a clean fine brush to lightly swirl the colors together before they cure. This creates a quick, beautiful marbled effect that looks incredibly professional.
To ensure your DIY romantic manicure lasts, proper sealing and embellishment placement are crucial. If you choose to incorporate glitter accents, such as the delicate gold sparkle seen on several nails, apply a clear polish over the area first, dust the glitter on, and then gently press it down before sealing. If you decide to include small gems or gold charms (like the elegant heart decals in the bottom row), use a small bead of thick clear builder gel or specialized nail glue to anchor them firmly in place. Always finish your design with a durable, glossy top coat, making sure to fully encapsulate any nail art and drag the brush over the free edge of the nail. This final step seals all the layers, prevents chipping, and gives the entire look that high-shine, flawless salon finish.
Essential February Manicures: Reds, Pinks, and Winter Flair
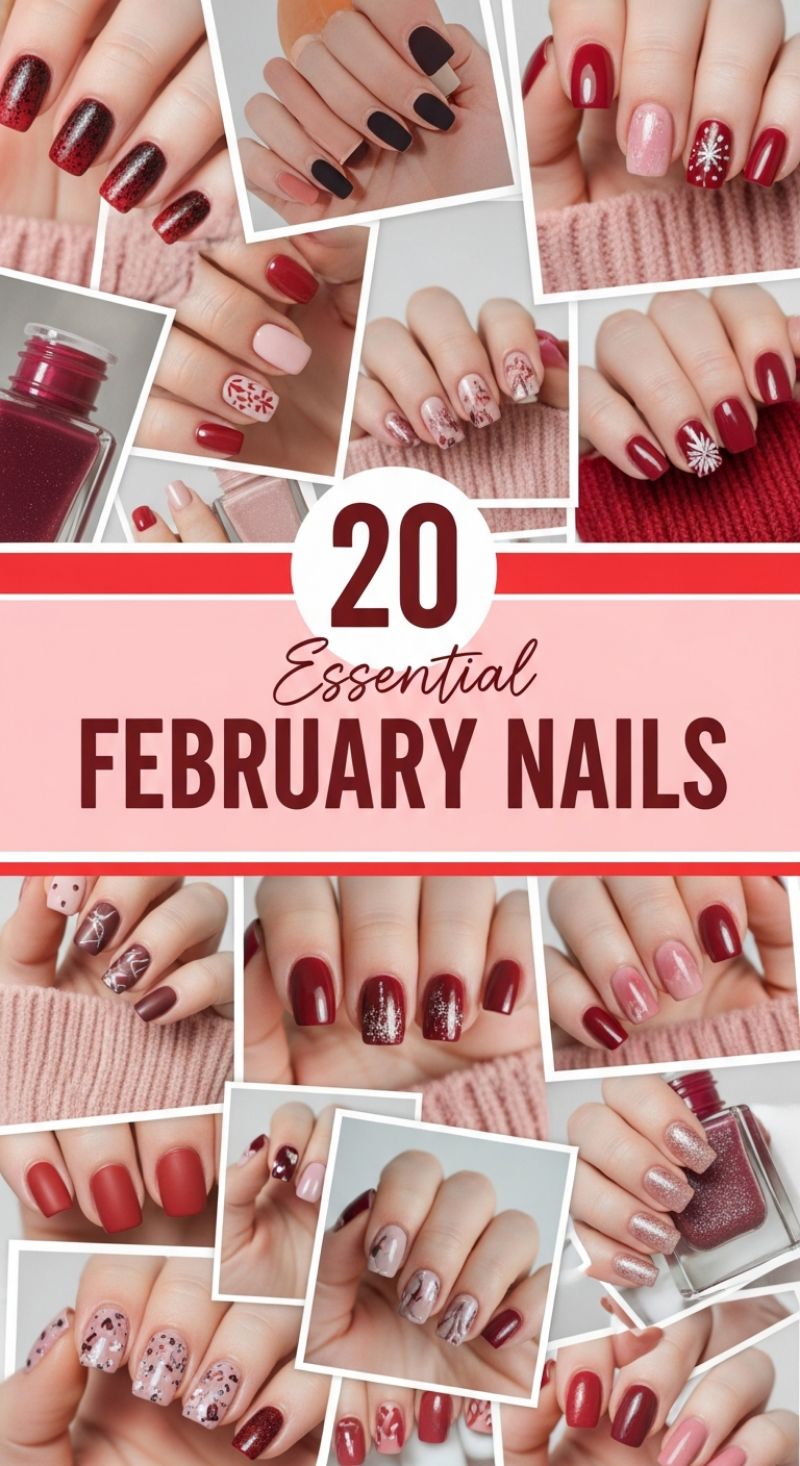
February nails are all about celebrating rich, romantic hues like deep burgundies, classic reds, and soft, ethereal pinks and nudes. This palette is incredibly versatile for the DIY beginner because a stunning, high-impact manicure can be achieved using solid colors alone. To replicate the core aesthetic seen here—perfect for Valentine’s Day or bridging the gap between winter and spring—start with meticulous nail preparation: buffing, shaping, and cleaning the nail plate with rubbing alcohol to ensure maximum polish adhesion. Apply a thin layer of base coat, followed by two thin, even coats of your primary color (like a glossy cherry red or a creamy matte burgundy). The key for beginners is patience; allowing each layer to fully dry prevents dragging and ensures a streak-free finish. For quick sophistication, select one accent finger (usually the ring or middle finger) and paint it a contrasting shade—a dusty rose paired with a vibrant red, or a chic matte black paired with a blush nude. This simple accent technique provides depth and variety without requiring intricate detail work, making it foolproof for those new to DIY manicures.
Elevating these looks into the featured ‘Essential February Nails’ requires just a few simple techniques beyond solid color application. One of the easiest methods is incorporating texture and sparkle. Notice how many of the featured manicures utilize glitter; this can be done effortlessly with a chunky glitter polish applied directly over a solid color, or by dabbing on loose glitter with a makeup sponge for a dense, professional glitter accent. Another beginner-friendly technique is adopting the matte finish seen on the rich reds and dark colors. Simply invest in a quality matte top coat—this single product instantly transforms any glossy polish into a modern, velvety look, adding visual complexity with zero extra effort. For the minimal abstract art elements, such as the marbled or speckled designs, beginners should rely on modern nail sticker sheets or small decals. These tools instantly provide complex-looking details like snowflakes or tiny hearts without the need for a steady hand or specialized brushes, turning a plain nail into an artistic statement in seconds.
To truly master the February flair without complex freehand painting, pay close attention to the dynamic color and finish pairings in the collage. Expert tip: The secret to a professional-looking manicure is combining finishes, such as pairing a solid matte nail next to a highly glossy, sparkling nail. For those attempting the soft pink/white marble look, start with a sheer base, drop small dots of contrasting polish (nude and white), and gently swirl them together with a thin toothpick or dotting tool before applying your top coat. Remember that flawless execution is more about technique than complex design; ensuring thin coats, wrapping the free edge of the nail with polish (to prevent chips), and finishing with a high-shine, quick-dry top coat will make your essential February manicure last long and look expertly done, even if the application took less than 30 minutes.
9 Vibrant Blooming Trends
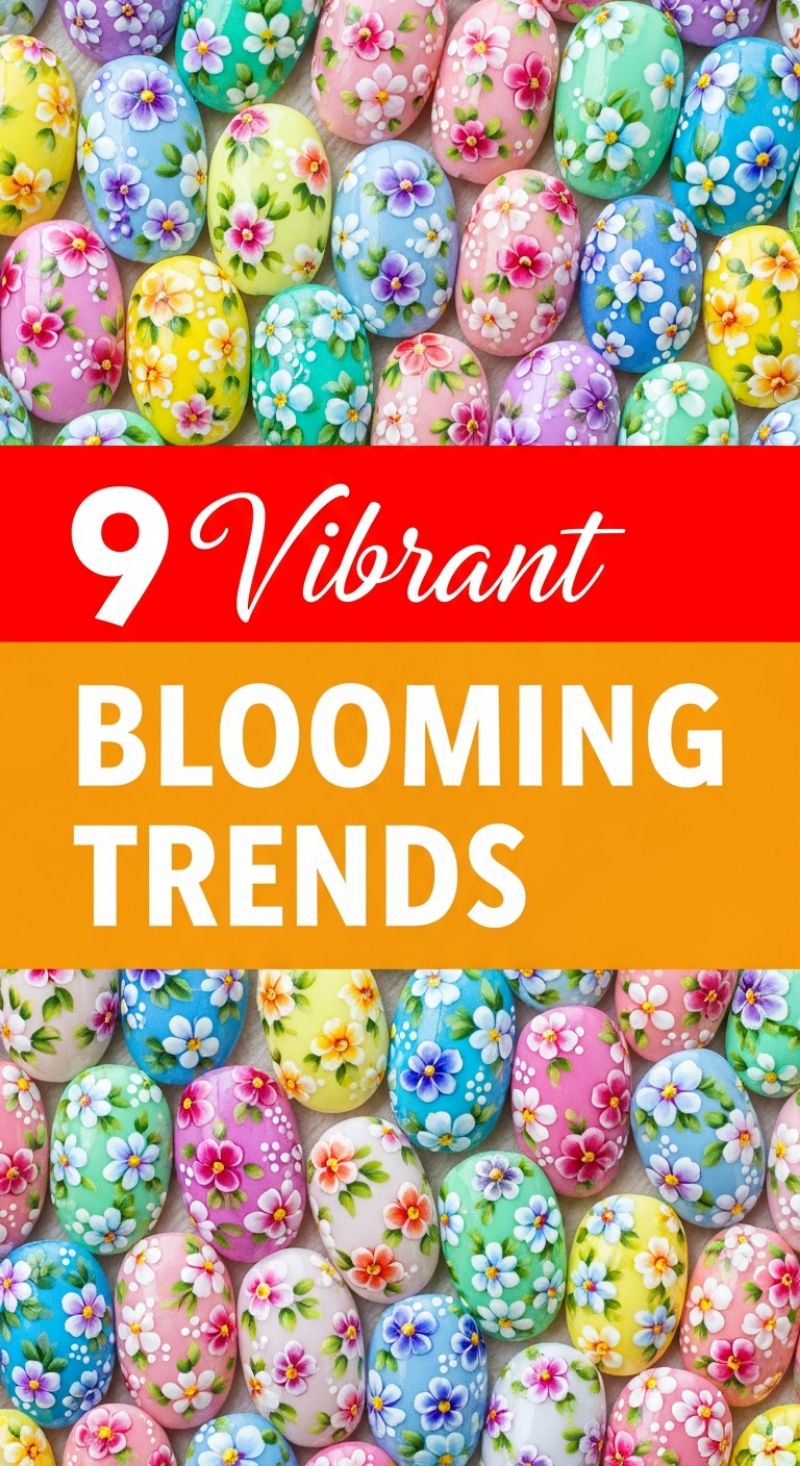
While the exquisite floral art seen here may look like it requires years of practice, you can easily replicate this high-impact, blooming aesthetic using simplified techniques perfect for beginners. The secret to achieving this style is mastering two elements: saturated pastel bases and clustered, multi-colored accents. Start by prepping your nails and selecting three to four base colors from the spectrum shown—think vibrant shades like mint green, sunny yellow, lavender, or bold blush pink. Apply a ridge-filling base coat, followed by two thin, even coats of your chosen polish to ensure full opacity and a smooth canvas. If you’re using this technique on all ten fingers, alternate your base colors between hands to create visual variety and truly lean into the maximalist spring look. Ensure each coat is fully cured or dry before moving onto the detail work, as smudging is the enemy of detailed floral designs.
To translate these intricate hand-painted blooms into a beginner-friendly manicure, we will rely on simple dotting tools or nail stickers rather than complex one-stroke painting. For the dotting technique, use a small or medium dotting tool and a highly opaque white polish. Instead of attempting shading, focus on creating simple five-petal flower shapes: place a central dot, then surround it with four equidistant dots to form the petals. Immediately after placing the petals, use a contrasting color (like neon pink or deep violet) and the smallest dotting tool to place a tiny dot of color in the center of the flower for the stamen. Cluster these simple flowers around the cuticle line or diagonally across the tip, leaving some negative space to let the vibrant base color shine through. For an even quicker method, invest in high-quality waterslide decals featuring small, scattered blossoms, which can be applied directly over your dry base color with flawless results.
To complete this ‘vibrant blooming’ look and add essential dimension, the final step involves adding tiny green accents and sealing the design. Use a thin striping brush or even a sharp toothpick dipped in forest green polish. Place very small, triangular strokes adjacent to your clustered flowers to simulate simple leaves. Remember, these are meant to be simple accents, not realistic foliage. Once all the art is dry to the touch (allow at least 15 minutes for dotting work), apply a generous layer of ultra-glossy topcoat. The high shine helps blur minor imperfections in the design and gives the overall manicure the plump, dimensional look characteristic of gel manicures and detailed salon work. A quality topcoat also prevents the lighter pastel polishes from staining or chipping quickly, ensuring your springtime bouquet lasts through the week.
Bold Spring Colors: Mastering Vibrant Abstract & Floral Designs
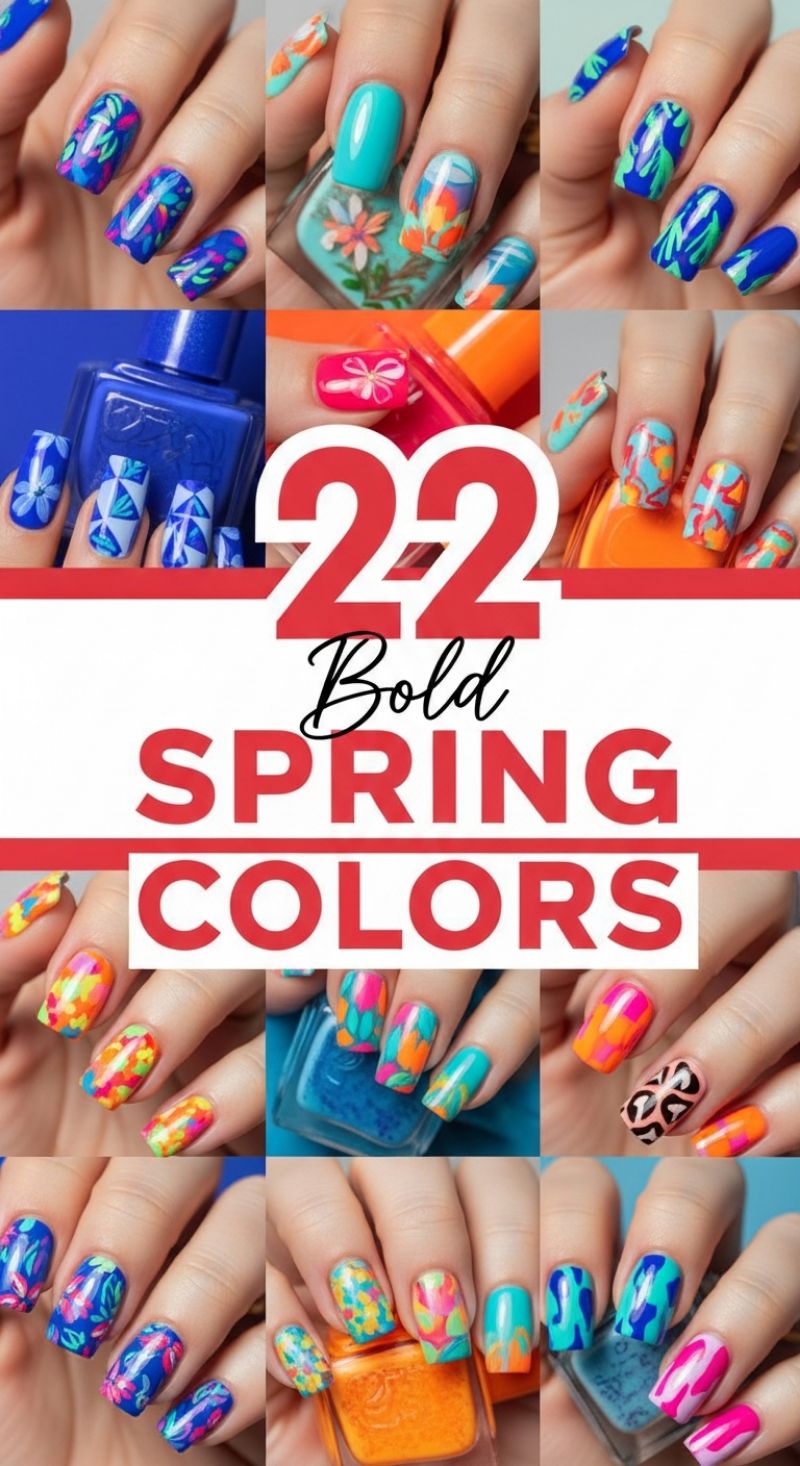
The vibrant designs showcased here, labeled as “22 Bold Spring Colors,” are the perfect inspiration for beginners looking to inject life and confidence into their manicures without requiring meticulous detail. The core of this style relies on highly pigmented polishes in electric blues, neon oranges, hot pinks, and tropical teals. To ensure maximum color payoff, always start with a clean, prepped nail and apply a white or very pale base coat, especially if you plan to use neons, as this prevents them from appearing dull or sheer. For the simplest abstract looks featured—like the scattered floral motifs or the multi-color splatters—you do not need steady hands for perfection. Instead, focus on juxtaposition: pair a deep cobalt blue base with contrasting splashes of neon pink and electric green, using a small dotting tool or even the head of a pin to randomly place color clusters. The beauty of abstract art is that every imperfection looks intentional, making this a truly foolproof technique for DIY nail novices.
To replicate the popular tropical leaf and wavy line designs seen throughout the collage, switch from dotting to a striping brush (or a thin toothpick for quick results). Start by painting your base coat, such as the bright turquoise or royal blue, and allowing it to dry completely. Next, dip your striping brush lightly into a contrasting color, like lime green or sunny yellow. Instead of trying to draw perfect leaves, utilize quick, slightly curved strokes to mimic the appearance of movement or foliage. Hold the brush parallel to the nail and let the tip drag the polish to create varying line thickness—this creates the dynamic, brushstroke effect without the difficulty of detailed drawing. Remember to keep the application light; too much polish on the brush will cause the lines to blob and blur, defeating the crisp, bold contrast that defines this aesthetic.
A crucial expert tip for sealing these bold, multi-layered manicures is the strategic use of a fast-drying top coat. Layering various colors, especially thick neons, increases the risk of smudging the intricate art when applying the final seal. Choose a quick-drying formula and apply it generously and swiftly, aiming to ‘float’ the brush over the design without pressing down. Furthermore, embrace the mix-and-match approach evident in these styles: select two or three different techniques—a solid color accent nail, a splattered abstract design, and a wavy pattern—and assign one technique to each hand, or even each finger, for a dynamic and highly fashionable look. Finishing with a quick cleanup around the cuticles using a clean brush dipped in acetone will sharpen the edges and instantly elevate your DIY spring manicure to salon quality.
21 Glamorous STILETTOS
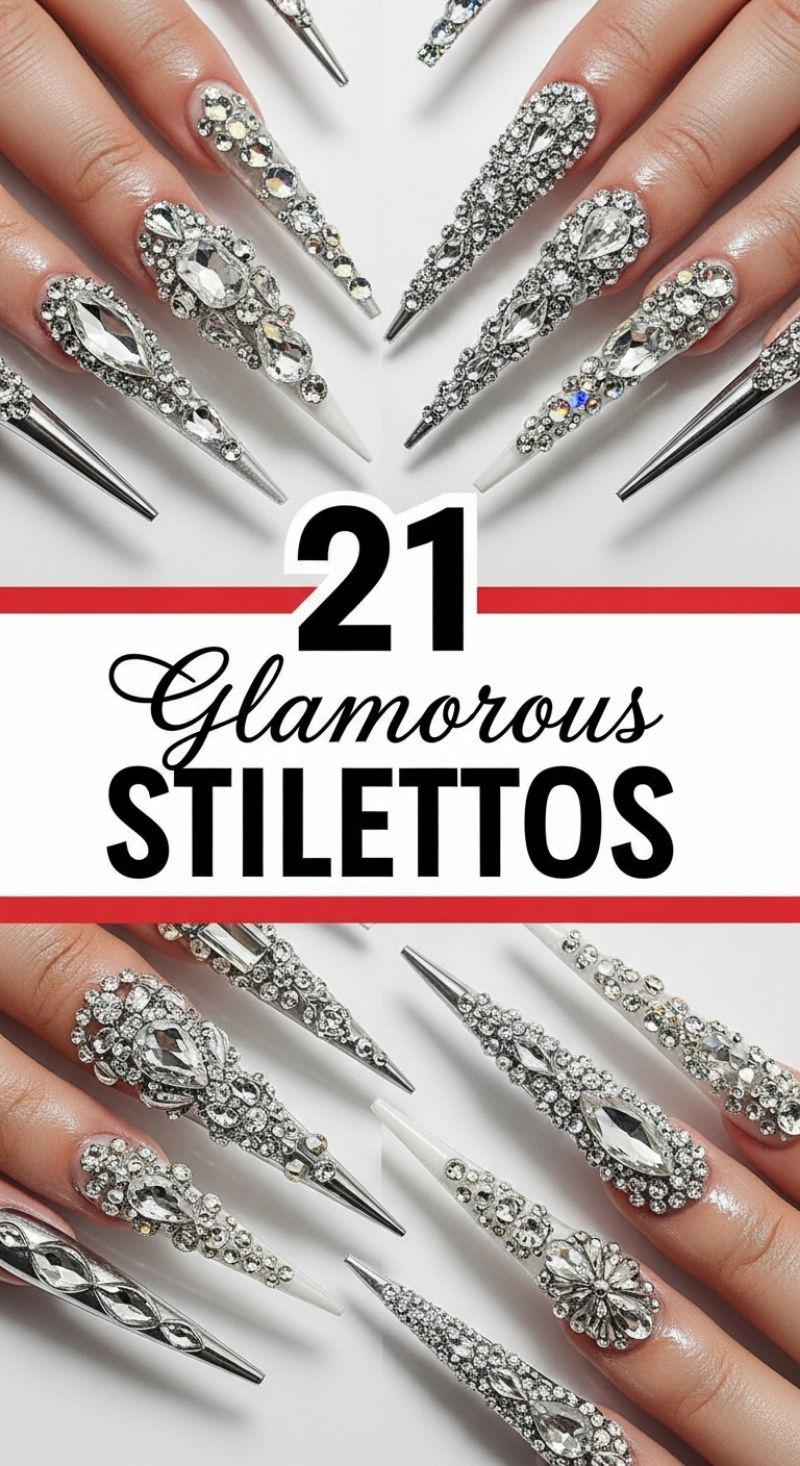
The visual appeal of this look is pure luxury, showcasing extraordinarily long, sharp stiletto nails completely encrusted with countless dazzling rhinestones and large statement gems. While the full, claw-like length and extreme density of crystal application seen in the image are highly advanced techniques best left to professional nail technicians using hard gel or acrylic extensions, beginners can easily capture the spirit of this high-glamour style through strategic adaptation. The key elements to mimic are the combination of various gem sizes and the sheer, milky base color that allows the sparkle to truly dominate the design. For a practical DIY version, opt for a shorter, more manageable nail shape like a medium almond or pointed coffin. Focus your gem application on two or three feature nails per hand, applying a dense cluster of crystals near the cuticle line or running a sparkling vertical stripe down the center of the nail, rather than attempting full coverage on every finger.
To execute your beginner-friendly adaptation, begin with a proper base coat and two thin coats of a sheer pink or milky white polish to establish a clean canvas. The biggest challenge for beginners is keeping the gems secure, so using a high-quality rhinestone adhesive or a thick builder gel is non-negotiable. Apply a small, precise dollop of adhesive only where the largest stone will sit. Place your central statement stone—perhaps a teardrop or oval shape—using a wax picker tool. Once the anchor stone is secure, surround it immediately with slightly smaller gems (SS10 or SS12) to build your cluster. The expert trick to achieving that seamless, encrusted look is filling any small gaps with the tiniest stones (SS6). This ensures the nail plate underneath is completely hidden within the design cluster, creating the illusion of heavy, opulent texture without requiring the full, intricate coverage seen in the original image.
Crucially, once all gems are placed and the adhesive is dry (or cured, if using gel), avoid brushing a regular top coat over the entire nail, as this dulls the brilliance and facet cuts of the crystals. Instead, use a fine detail brush dipped in non-wipe gel top coat to meticulously trace and seal around the base perimeter of each rhinestone, locking it firmly into place without coating the top of the stone itself. Cure thoroughly one final time. If you chose a shorter, rounded stiletto or almond shape, this design is surprisingly wearable for special occasions. Remember that maintenance is key for longevity; always wear gloves when washing dishes and avoid direct, long-term water exposure to maintain the integrity of the glue, ensuring your dazzling, glamorous manicure lasts as long as possible.
20 Top Winter Nail Art Designs
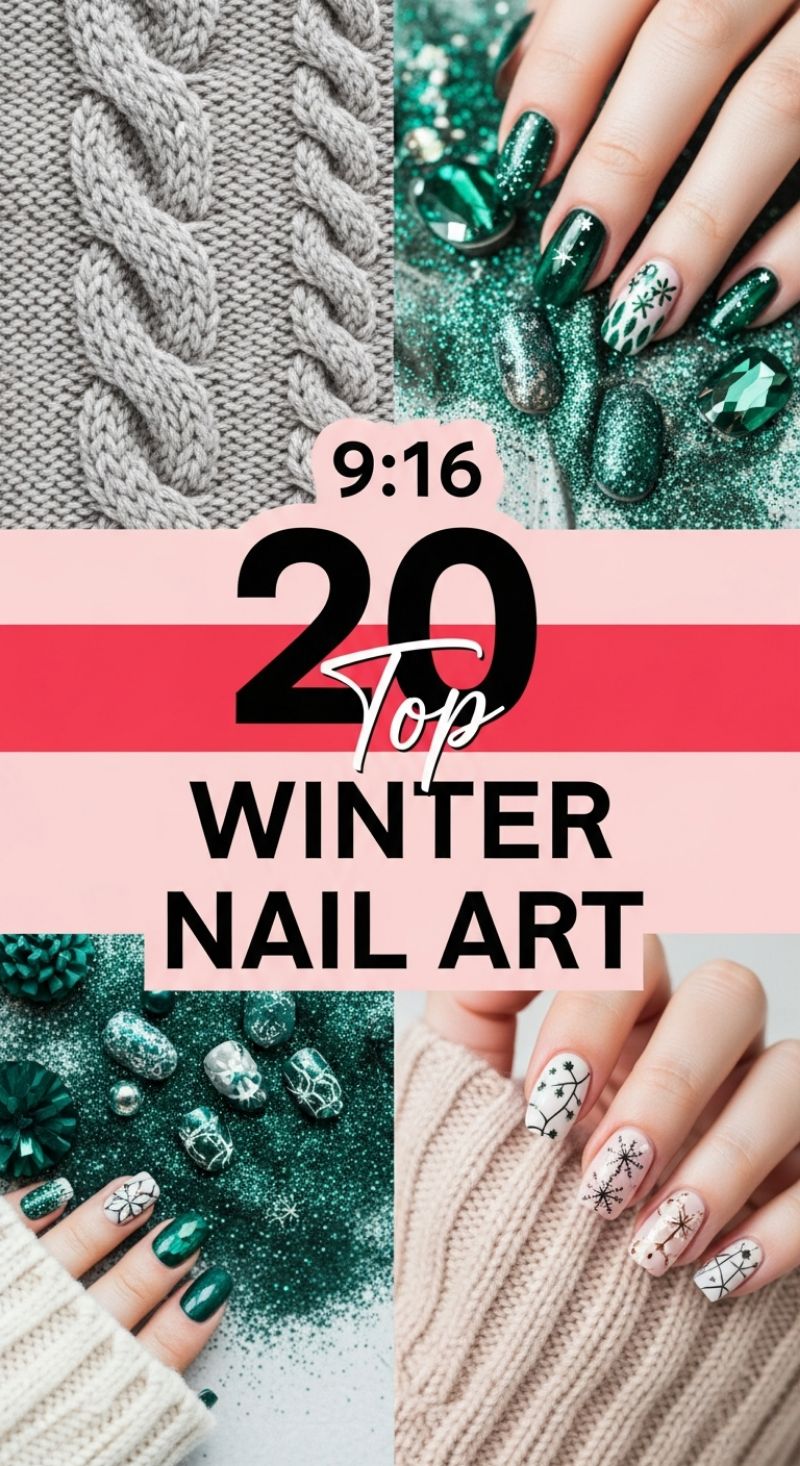
Winter manicures offer the perfect opportunity to indulge in textures and sparkle, combining cozy elements with holiday glamour. The featured designs present two excellent paths for beginners: the rich, deep Emerald Glitter look and the subtle, sophisticated Cozy Neutral look. To achieve the high-impact glitter design seen on the green nails, start with a solid base coat and two coats of opaque emerald green polish. For maximum sparkle without the mess, opt for highly pigmented glitter nail polish, layering it densely. If you want true professional-grade sparkle, apply a fine cosmetic glitter or chunky holographic flakes directly onto a wet layer of clear topcoat or thick builder gel before curing/drying. Once sealed, secure a few large, flat-back rhinestones (using strong nail glue or a dedicated gem topcoat) near the cuticle line of an accent nail for instant, high-end flair. This look is perfect for holiday parties and only requires patience with glitter application, not intricate painting skills.
The sophisticated neutral designs, featuring delicate snowflakes and winter branches, are entirely achievable even if you’ve never painted freehand before. The secret lies in stamping plates or simple nail decals. For the nude and blush-toned base seen in the image, apply two thin coats of your favorite sheer pink or beige polish. Once dry, use a black or metallic gold stamping polish with a beginner-friendly snowflake or branch plate, rolling the stamper across the nail to transfer the design. Alternatively, high-quality water-slide decals provide the exact pattern pictured with zero effort; simply soak, slide onto the nail, and seal. The contrast of the dark design against the light, soft base creates a minimalist elegance that instantly evokes the feeling of cozy sweaters (like the one shown in the photo). Pro tip: Finish this look with a matte topcoat instead of glossy. The matte finish enhances the ‘winter wool’ feel and makes the negative space patterns pop.
For a flawless finish, regardless of the complexity of your chosen design, always prioritize prep and proper sealing. Ensure your base coat is fully dry before starting your art, and allow the intricate designs (especially glitter or stamping) ample time to set before applying the final topcoat. When applying the final layer of polish, ‘cap the free edge’ by brushing the topcoat right over the tip of your nail. This prevents chipping, which is crucial for elaborate designs that you want to last. Remember that complex-looking nail art, like the stunning patterns shown here, often relies on tools—decals, striping tape, or stamping kits—rather than flawless steady hands, making these beautiful winter looks perfectly suited for the ambitious beginner.
25 Trending WINTER-SPRING SETS
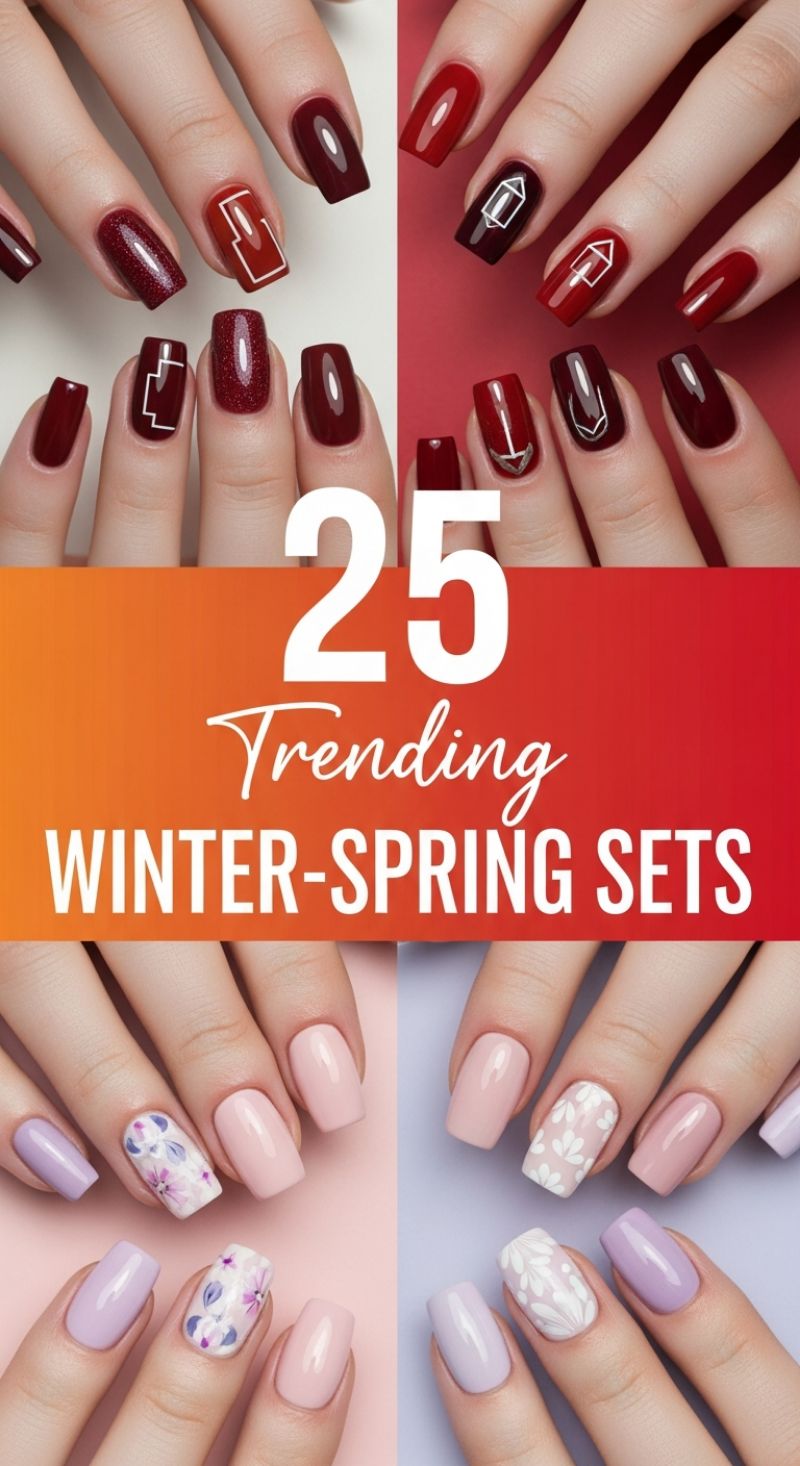
The transition from the deep richness of winter to the light, airy aesthetic of spring is perfectly encapsulated in these trending nail sets. For a beginner looking to master DIY manicures, this section offers two distinct yet simple approaches. The winter-inspired looks (top section) rely on sophisticated depth, utilizing rich oxblood, glossy merlot, and glittery burgundy polishes. To achieve the sharp, modern geometric accents, start with two coats of your chosen deep red shade. Once fully dry, the key to flawless line work is using either pre-cut vinyl nail stencils or thin metallic striping tape to define shapes like triangles, chevrons, or simple rectangular outlines. If attempting a freehand design, opt for a long, thin striping brush loaded with white or silver polish, ensuring you remove excess polish before drawing the lines. The contrast between the dark, sultry base and the crisp geometric outline elevates the manicure instantly, making it look complex while remaining fundamentally simple to execute with the right tools.
The spring looks (bottom section) focus on softness and freshness, utilizing a palette of muted pastels like lavender, blush pink, and nude. These colors provide the perfect canvas for simple floral nail art. For a truly beginner-friendly approach, bypass intricate hand-painting and utilize water-slide decals or tiny nail stickers for detailed floral designs, positioning them strategically on accent nails over a pale base coat. Alternatively, if you want a subtle hand-painted look, the ‘daisy chain’ technique is incredibly easy: use a small dotting tool dipped in white polish to create a cluster of five dots (the petals) around a tiny central yellow dot (the pistil). Spacing these simple flowers across the accent nail creates the delicate, airy effect seen in the images. Remember to keep the remaining nails polished in solid, complementary pastel shades to balance the design and maintain a chic, effortless appeal.
For maximum longevity and a professional finish across both styles, always prioritize proper nail preparation—buffing, cleaning the nail plate with rubbing alcohol, and applying a high-quality base coat. When applying the color coats, use thin, even layers; two thin coats cure and dry much better than one thick, gloopy layer, minimizing the risk of smudging or chipping. Finally, seal your masterpiece with a quick-dry top coat, paying special attention to capping the free edge of the nail. This technique seals the design and polish layers, preventing premature wear, ensuring your trending winter-spring set stays flawless for as long as possible.
10 Sweetest PINK DESIGNS
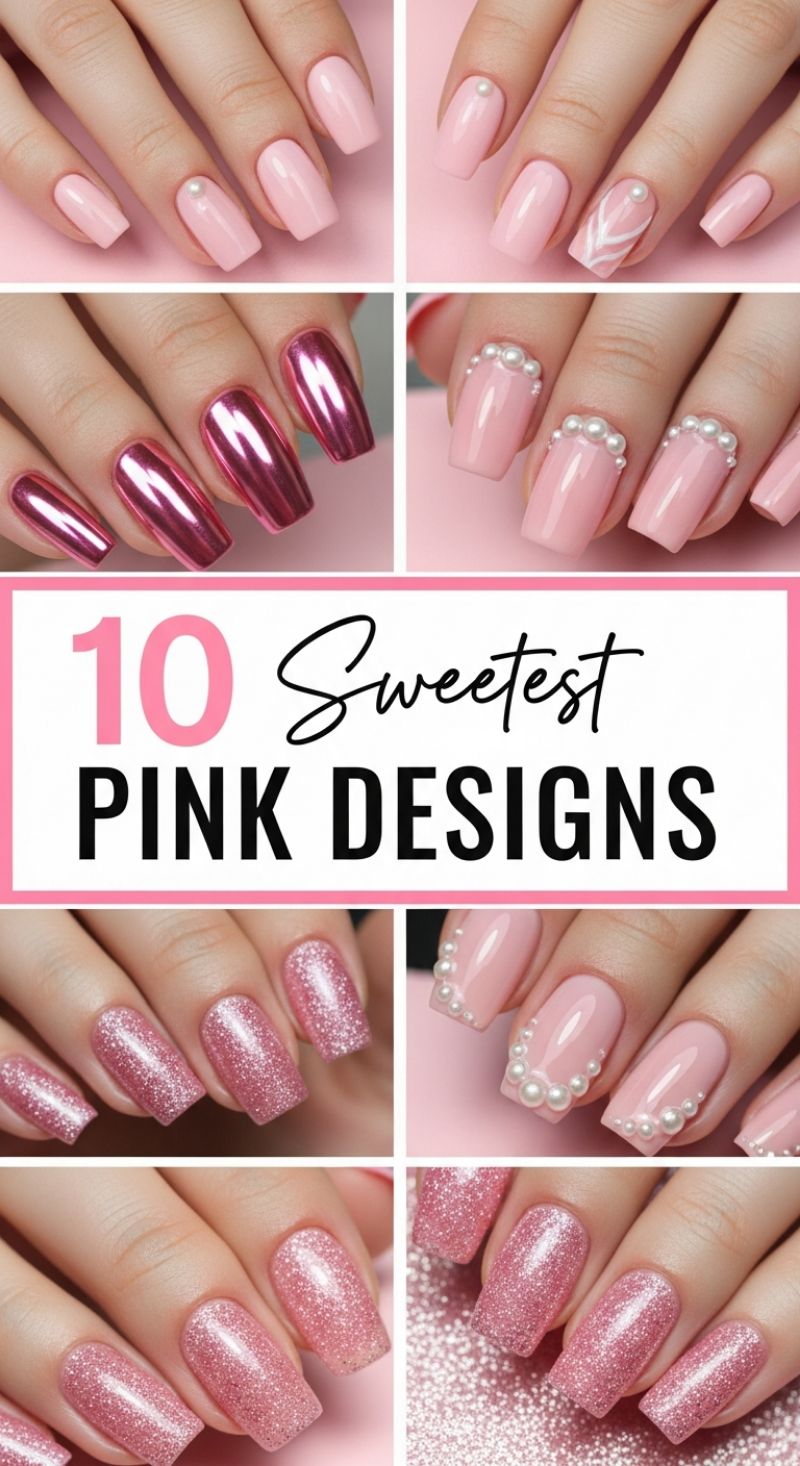
Pink manicures are timeless, and this collection demonstrates how easily a simple base color can be transformed using minimal effort—perfect for beginners targeting a glamorous yet achievable look. To master the foundational style shown throughout these images (top left panel), start with meticulous prep. Shape your nails into a soft square or squoval style, buff lightly, and ensure they are clean and dry. Apply a high-quality base coat, then follow with two thin coats of a dusty rose or ballet slipper pink polish. Thin coats are critical as they dry faster and prevent the bubbling and streaking that often frustrate DIY enthusiasts. Once the color is dry, apply a high-shine top coat, ensuring you “cap” the edge of the nail to seal the color and prevent premature chipping. For a quick touch of elegance, recreate the simple pearl accent shown (top right panel): after your color is dry, apply a small dot of nail glue or thick gel top coat near the cuticle line and carefully place a single, tiny half-pearl using a wax pencil or tweezers. This small detail instantly elevates a basic manicure to a sophisticated style.
For those ready to introduce texture, the sparkling glitter and clustered pearl looks (bottom rows) are highly beginner-friendly. To achieve the beautiful pink glitter effect, you have two main options: apply a fine glitter polish directly over your base color for 2–3 coats, or layer a sheer glitter polish over the soft pink color you just mastered. The latter technique adds depth and makes the manicure look more expensive. For maximum impact, ensure your top coat is ultra-glossy. Next, tackling the clustered pearls (middle and bottom panels) requires precision but not artistic skill. Using the same adhesive method (nail glue or thick top coat), plan your arrangement—a common technique is lining the cuticle edge or creating a small vertical stripe down the center of the nail. Working one pearl at a time, gently press them into the adhesive. The key expert trick here is allowing the adhesive to become tacky before placing the pearls; this ensures they grip instantly and don’t slide around. Once the pearls are placed, seal the entire nail with a top coat, making sure not to directly paint over the pearls, but rather around them to secure their edges.
While this image showcases some advanced techniques, such as the mirrored chrome finish, beginners can substitute these complex steps with simpler alternatives. For instance, instead of attempting chrome powder, use a high-shine metallic pink polish. Similarly, if you love the white feather accent (top right), opt for a simple white nail art sticker rather than freehand painting. The goal for a successful DIY manicure is longevity and a professional finish. After your polish and embellishments are fully dry, apply a drop of cuticle oil to all surrounding skin. This hydrates your hands and visually cleans up any minor polish mishaps near the edges, giving your flawless pink design a perfect salon-quality look.
6 Regal Purple V-Day Looks
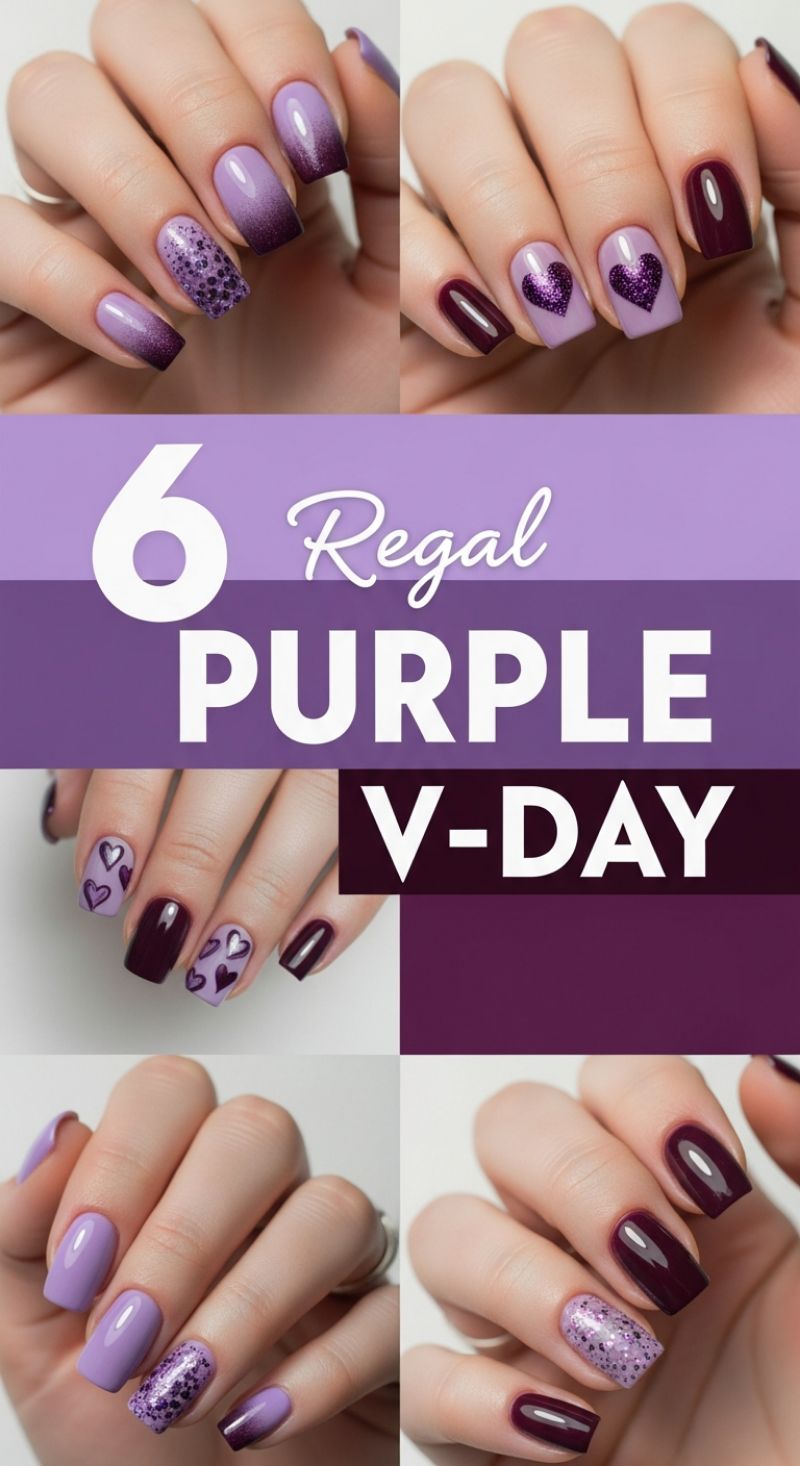
Purple, the color of royalty, is a sophisticated alternative to traditional reds and pinks for Valentine’s Day. This collection features six stunning looks utilizing a rich palette ranging from soft lavender to deep, almost-black plum. For beginners, the ombre technique (seen in the top-left image) offers the highest impact with minimal skill required. To achieve this smooth gradient, start with a light lavender base coat and let it fully cure. On a small cosmetic sponge, paint a stripe of the light color next to a stripe of the deep plum color. Lightly dab the sponge onto your nail multiple times until the transition from light at the cuticle to dark at the tip is seamless. Use a clean, small brush dipped in acetone to quickly clean up any excess polish from the skin surrounding the nail, then seal the entire look with a glossy top coat. For variation, use glitter polish on the accent finger before applying the top coat, concentrating the sparkle toward the nail tip for an abstract confetti effect.
To quickly introduce the classic V-Day motif, incorporate heart accents using decals or stamping techniques, which are far easier for beginners than freehand painting. The key to the heart accents (as shown in the top-right and middle-left looks) is choosing contrasting colors—a light lilac base makes metallic or deep purple hearts pop instantly. Ensure your base color is bone dry before placing any stickers or decals; if the base is tacky, the heart shape may deform or lift prematurely. For the deep plum nails in the set, focus on achieving a perfect, high-shine finish. Apply two thin coats of the dark polish, making sure to wrap the free edge of the nail with the brush to prevent chips. Finish with a glass-like top coat that intensifies the depth of the color, giving a truly luxurious, regal appearance.
The true beauty of this collection lies in its versatility: these six looks are designed to be mixed and matched across your ten fingers. Try combining a solid deep plum nail next to an ombre nail, or flanking a glitter accent nail with two solid lavender nails. The common element is the rich purple tone, which ensures cohesion across your entire manicure. For maximum longevity, always prep your nails by gently buffing the surface and wiping them down with rubbing alcohol before starting. This removes oils and ensures optimal adhesion, guaranteeing your regal purple V-Day manicure lasts well beyond February 14th.
Crisp Short Spring Florals: Pastel & Floral Accent Nails
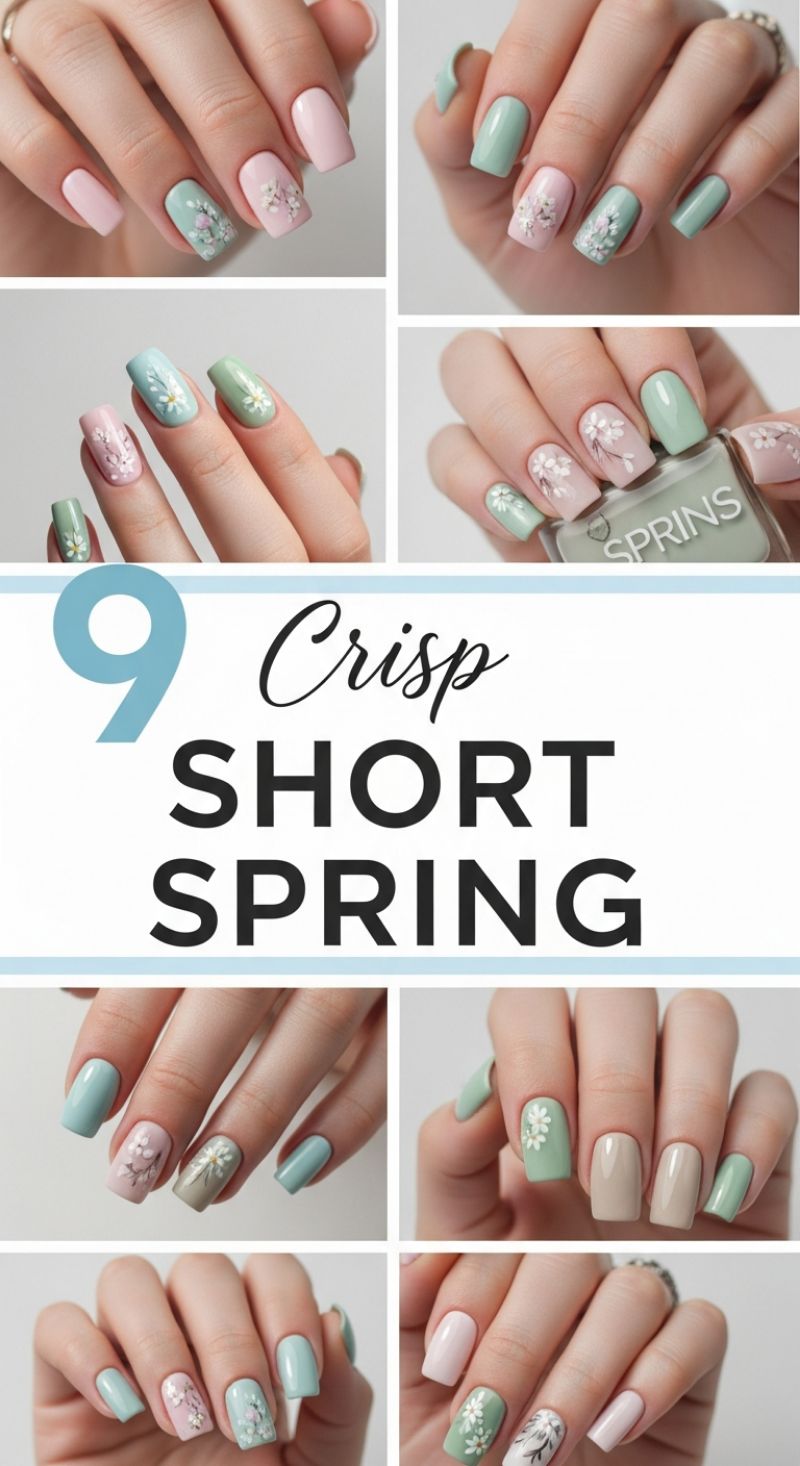
The “Crisp Short Spring” aesthetic is perfect for beginners, combining simple, saturated pastel blocks with delicate floral accents on a shorter, manageable nail length (typically square or squoval). This look utilizes a refreshing palette of soft colors like mint green, pale blush pink, light blue, and subtle nude taupe. To achieve the flawless foundation seen here, ensure your nails are evenly filed and prepped. Apply two thin, opaque coats of your chosen pastel colors, rotating the shades across your hands to create a harmonious visual flow. The key to making short nails look incredibly polished is ensuring the polish is applied perfectly to the edges and capped at the tip, maximizing the clean, professional lines that define this look.
The true charm of these manicures lies in the intricate, yet highly achievable, floral accents. Choose one or two nails per hand for the design (typically the ring or middle finger) to keep the overall appearance balanced. Using a contrasting base color (like the nude or pink), grab a fine liner brush and crisp white nail polish for the blossoms. The style here mimics delicate cherry blossoms or small meadow flowers. Start by painting tiny, delicate branches or stems using a brown or dark gray polish. Once this base is dry, use a small dotting tool or the very tip of your fine brush to create clusters of five-petal flowers in white. For added depth, layer the flowers slightly, sometimes overlapping them. Finish the flower centers with a tiny dot of yellow or deep pink polish for a realistic touch. For an even quicker technique, opt for the single daisy design (as seen on the sage green nails), requiring just five medium-sized white dots around a central yellow dot.
Successful execution of this trend relies heavily on intelligent color placement and overall balance. Notice how the designs consistently feature two solid colored nails next to a decorated accent nail, ensuring the manicure is cheerful but never cluttered. For expert results, consider this professional tip: apply a matte top coat over your base color before beginning the floral art; this provides a slightly textured surface that prevents the detailed white polish from bleeding or moving. Once the art is complete and thoroughly dry (allow at least 15 minutes for the detailing), seal the entire manicure with a high-shine, quick-dry top coat. Reapplying a clear top coat every two days will significantly extend the wear of your delicate spring art and protect those beautiful pastel colors from chipping.
5 Moody Black V-Day Manicures
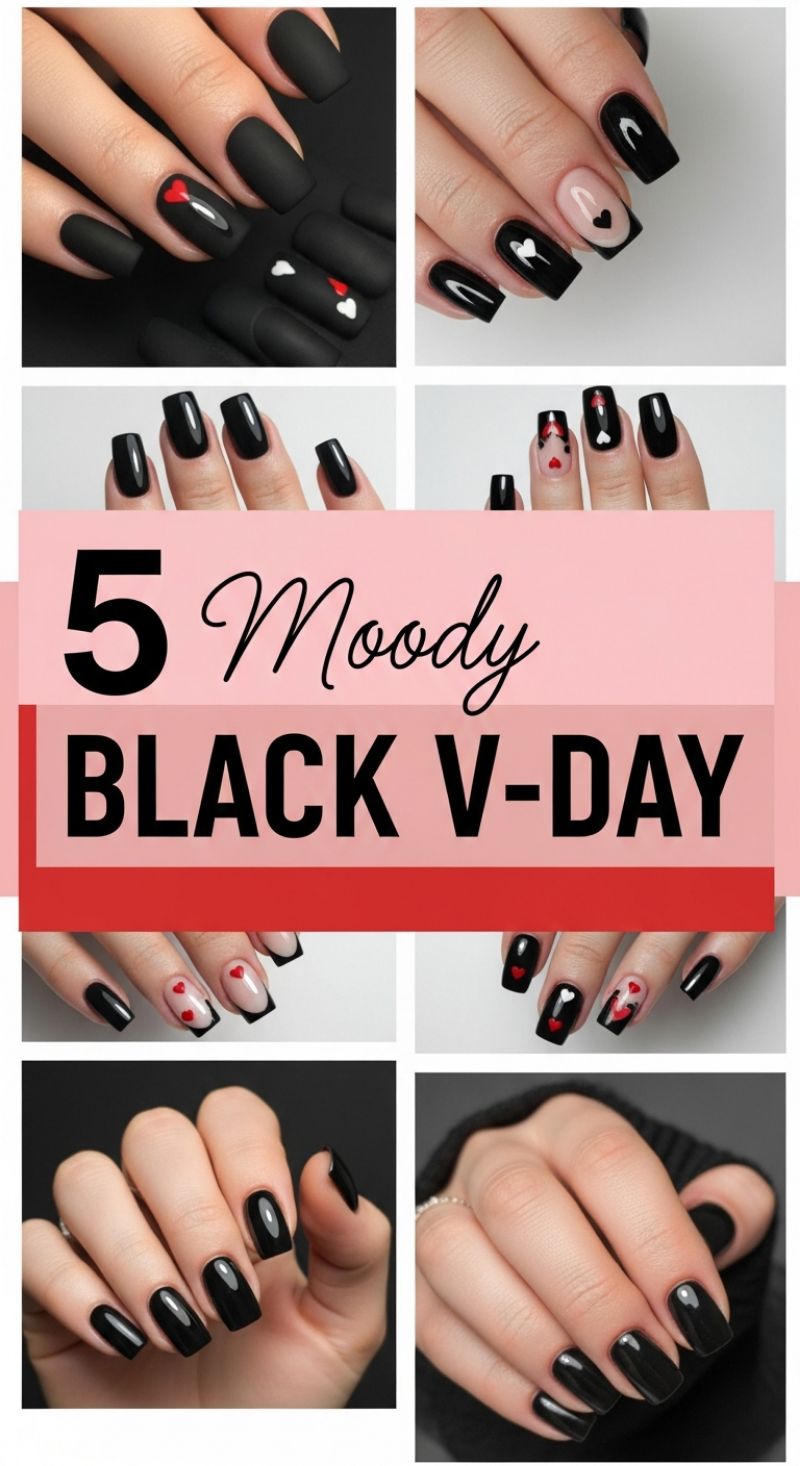
Black nail polish is a timeless statement, and pairing it with soft heart accents creates an edgy, moody romance perfect for any occasion, especially if you prefer a subtle gothic twist on Valentine’s Day. For beginners attempting this look, preparation is key. Start by applying a quality base coat to protect your natural nails and prevent dark polishes from staining. Once dry, apply two thin, even coats of opaque black polish. The featured images display two distinct yet equally impactful styles: intense, glossy black and velvety matte black. If you prefer the matte look, ensure you purchase a dedicated matte top coat, which will be applied as the final step. Achieving a smooth, streak-free black finish requires patience; always allow each layer to dry fully before proceeding to the next to prevent bubbling or thick application.
The true artistry of these manicures lies in the simple addition of small, contrasting heart designs. For precision and control, a small dotting tool or a fine-tipped striping brush is essential. To create a simple heart shape, use white or red polish and place two small dots next to each other, slightly above the desired center point. Immediately after, gently drag the polish down from the base of the dots to form a tiny, unified point, effectively closing the shape into a clean heart. Expert tip: Practice this movement on a piece of aluminum foil first! You can choose to feature a single large heart on one accent nail (such as the ring finger) or distribute tiny hearts across all nails for a playful yet dark effect. Note the negative space variations shown: some looks incorporate a nude or sheer pink base near the cuticle, using the black polish only for sharp French tips and reserving the nude space for the heart designs.
Once your delicate heart designs are completely dry—which is critical to prevent smudging—it is time to seal the look with a top coat. If you chose a standard glossy base, use a high-shine top coat to intensify the depth and reflection of the black. If you opted for the dramatic matte finish, switch to your specialty matte top coat, ensuring you apply it evenly across the entire nail for a seamless velvet effect. This final step protects your nail art from chipping and gives it professional longevity. For the cleanest possible results, use a small, angular brush dipped in acetone or polish remover to meticulously clean up any excess black polish from around your cuticles and sidewalls before the top coat fully cures. This dark, romantic aesthetic works beautifully on short to medium-length square or squoval nails, offering sophistication without demanding complex shaping techniques.
7 Quick Easy Nails
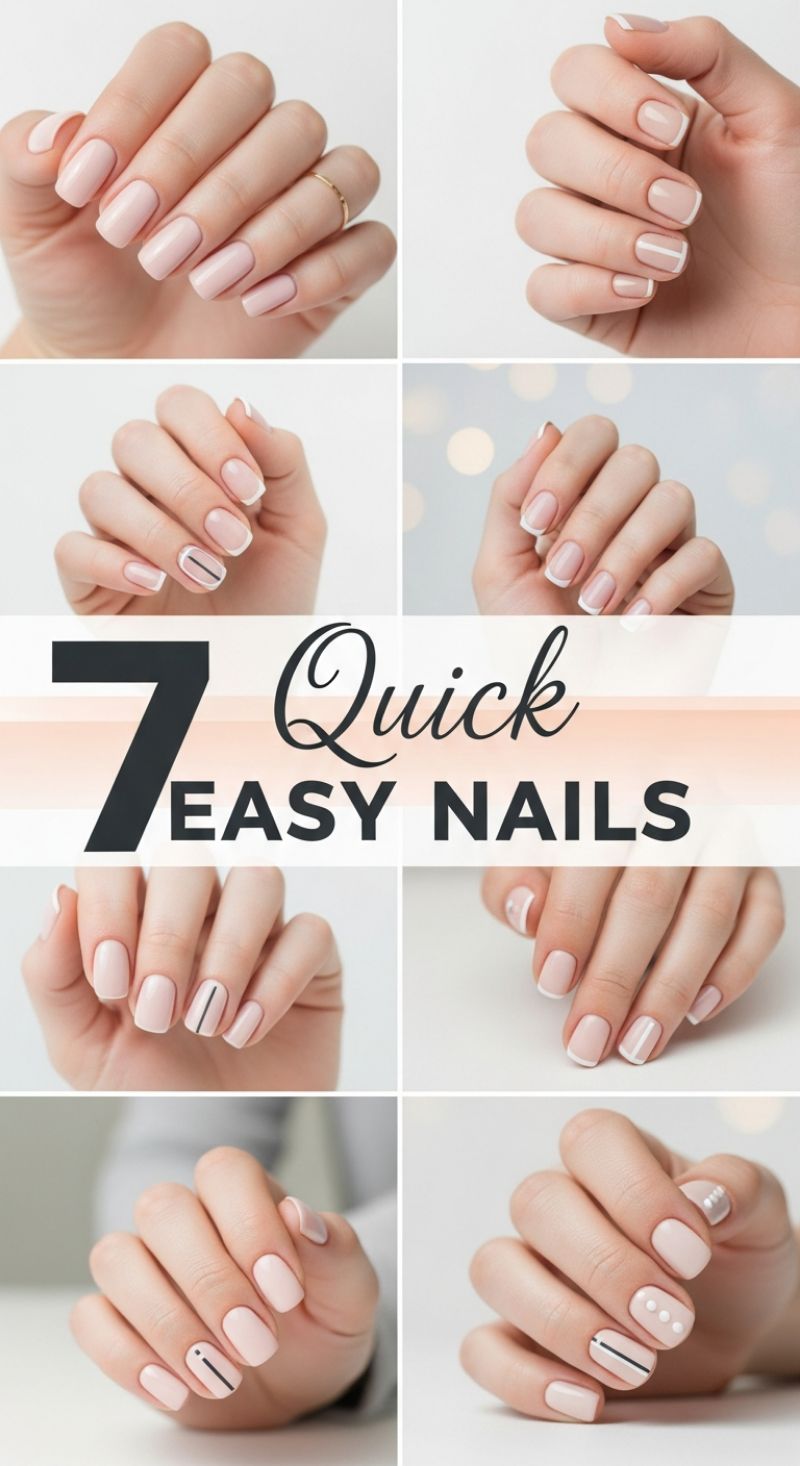
The beauty of these seven looks lies in their effortless sophistication, relying on a universally flattering nude or blush pink base paired with minimalistic accents. To master the foundation, begin by ensuring your nails are prepped—file them into a clean squoval shape (as seen in the majority of these examples) and push back the cuticles. Apply a sheer, milky pink or soft beige polish. For the classic French tip variations shown, precision is key. If you are new to French manicures, use specialized French tip guides or a small, rounded liner brush dipped in pure white polish to trace the free edge. Alternatively, for the ultra-minimalist white line look (like the one shown on the middle finger in the top right image), use a thin striping brush to create a delicate boundary between the natural nail bed and the tip, offering a modern twist on a timeless look. Always apply two thin coats of the base color before starting any detail work to ensure flawless coverage and prevent chipping.
The centerpiece of this collection is the use of simple, bold black lines for graphic contrast against the soft base. You’ll notice two primary design motifs: the single vertical line (often positioned slightly off-center) and the double parallel vertical lines. These are most effectively created using a very fine, long-bristled striping brush and a highly pigmented black polish or gel paint. Expert tip: steady your painting hand by resting your pinky finger on a flat surface or against the heel of your opposite hand. For the single line, start near the cuticle and drag the brush straight down toward the tip in one fluid motion. Ensure the line is thin and sharp; if it’s too thick, it loses its elegant, minimalist appeal. These designs work beautifully as accent nails, typically applied to the ring or middle finger, allowing the remaining nails to feature the solid nude base or the subtle French variation.
For those ready to slightly elevate the simple line work, experiment with incorporating dots, as demonstrated in the final look. This design features a black horizontal line across the center of the nail, paired with three small, perfectly placed white dots above it. To achieve uniform dots, invest in a set of dotting tools in various sizes. Dip the smallest tool into your white polish (or gel) and lightly press it onto the nail surface. Remember to reload your tool before each dot to maintain consistent size and shape. Once your lines and dots are completely dry or cured, seal the entire manicure with a high-shine, protective top coat. Drag the top coat brush over the free edge of the nail to ‘cap’ the manicure—this crucial step prevents premature chipping and guarantees that your quick, easy nail art lasts.
7 Easy DIY Nails
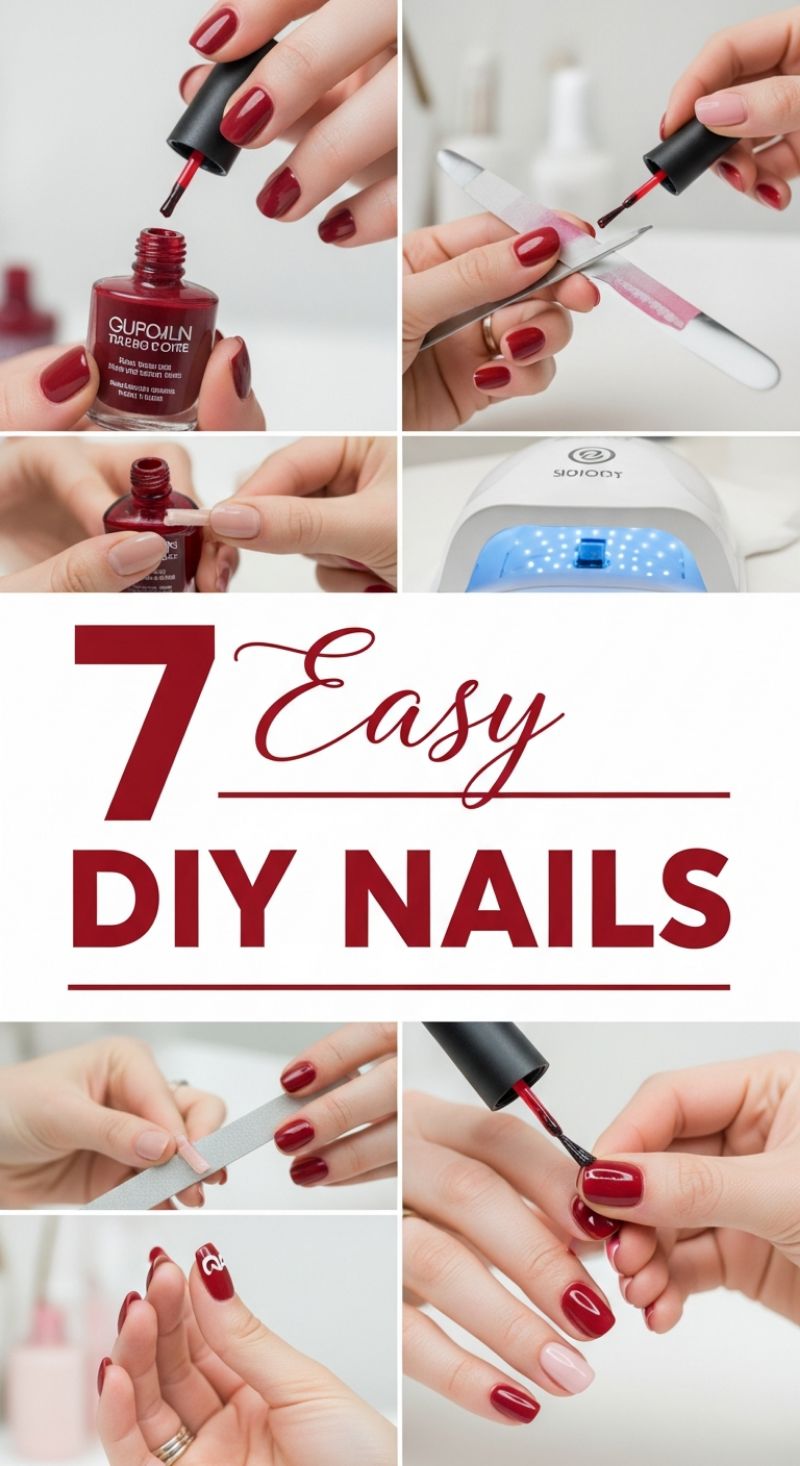
Achieving a professional, long-lasting manicure at home is entirely possible, especially when utilizing the durability and high shine of gel polish, as suggested by the UV curing lamp seen in this tutorial. The foundation of any successful DIY manicure begins with meticulous preparation. Start by filing (Step 5) and shaping your nails, paying close attention to achieving uniformity. Next, gently push back your cuticles and lightly buff the nail plate surface to remove natural oils, which ensures optimal adhesion. Apply a very thin, sheer coat of gel base coat (Step 3). This step is crucial for protecting the natural nail and maximizing the wear time. Be sure to ‘cap’ the free edge of the nail with the base coat brush to prevent chipping. Cure the base coat under your LED/UV lamp (Step 4) for the time specified by your product manufacturer, usually 30 to 60 seconds. The surface will remain tacky, which is normal and desirable for the next layer.
Now, move on to applying your chosen color. The image showcases a beautiful, rich oxblood red (Steps 1 & 6), complemented by a nude accent nail. When applying color, remember that thin, even coats are key. Thick coats tend to bubble or wrinkle during the curing process, compromising the manicure’s longevity and finish. Wipe excess polish off the brush before application and apply the color in three strokes: down the center, then on either side. Ensure the polish doesn’t pool near the cuticles or sidewalls. If you notice any errant polish (like the clean-up suggested in Step 2, possibly using a brush wrapped around a wooden stick), clean the edges thoroughly before curing. Apply the first color coat and cure. Repeat this process with a second thin coat to achieve true color depth and opacity, curing again immediately afterward.
The final steps involve the top coat and any desired nail art. After the color coats are fully cured, apply a layer of glossy, non-wipe gel top coat, taking care again to cap the free edge completely. Cure this final coat according to the product directions. If you wish to incorporate a simple design, such as the elegant white swirl seen on the accent nail (Step 7), use a very fine striping brush or dotting tool to create the motif *before* the top coat is applied. Once the design is finished and cured, apply the top coat over the entire nail to seal the design. Alternatively, if your top coat leaves an inhibition (sticky) layer, wipe it away using a lint-free wipe saturated with nail cleanser solution for a flawless, high-shine, and smudge-proof finish.
8 Bold FUNKY NAILS

This section dives into creating high-impact, geometric manicures that utilize stark contrast and playful asymmetry, perfect for the beginner looking to make a statement. The key to mastering this look, as showcased across these eight examples, is embracing clean lines and minimalist shapes like triangles, X-marks, and simple horizontal bars. Start by prepping your nails; short, neat square or oval shapes work best to maintain the modern, structured feel of these designs. Apply a sheer nude, light pink, or bright white base coat to three-quarters of your nails—these neutral canvases will allow the darker, bolder colors to truly pop. For the remaining accent nails, try solid blocks of color in deep teal, navy, or fiery red, ensuring you apply two thin, even coats for a flawless, streak-free finish before proceeding to the art.
The secret to achieving professional-looking geometric shapes is leveraging the right tools. For beginners, specialized nail art tape or even thin pieces of painter’s tape are indispensable for creating the perfectly crisp lines seen in these examples. To execute designs like the sharp triangles or defined color blocks, apply a fully dried base color, place the tape to mask the areas you wish to keep clean, and then paint over the exposed area with your accent color (such as black, yellow, or red). Wait just a few seconds, then carefully peel the tape off while the polish is still wet to reveal a flawlessly sharp edge. For the precise ‘X’ marks and straight lines, invest in a fine-tipped striping brush. Dip the brush lightly into a contrasting polish (black is always a great choice for maximal impact) and use minimal pressure, drawing the lines quickly but steadily across the nail.
To add an extra layer of ‘funk,’ don’t feel obligated to keep all designs identical across both hands. Notice how many of these looks use two or three colors strategically, often swapping the dominant color between the pinky and the index finger. Expert tip: If you find freehand detail work challenging, focus the most intricate design—like the abstract black and white pattern on the ring finger in the upper middle image—on only one accent nail per hand. Once all your geometric elements are dry to the touch (wait at least 10 minutes!), seal your artwork with a high-shine, fast-drying top coat. This step is critical not only for longevity but also for smoothing out the surface and ensuring that those intricate, sharp lines don’t smudge or lift, giving your bold, funky manicure a durable and professional-grade finish.
8 Whimsical Cute Nails: Mastering Pastel Garden Manicures
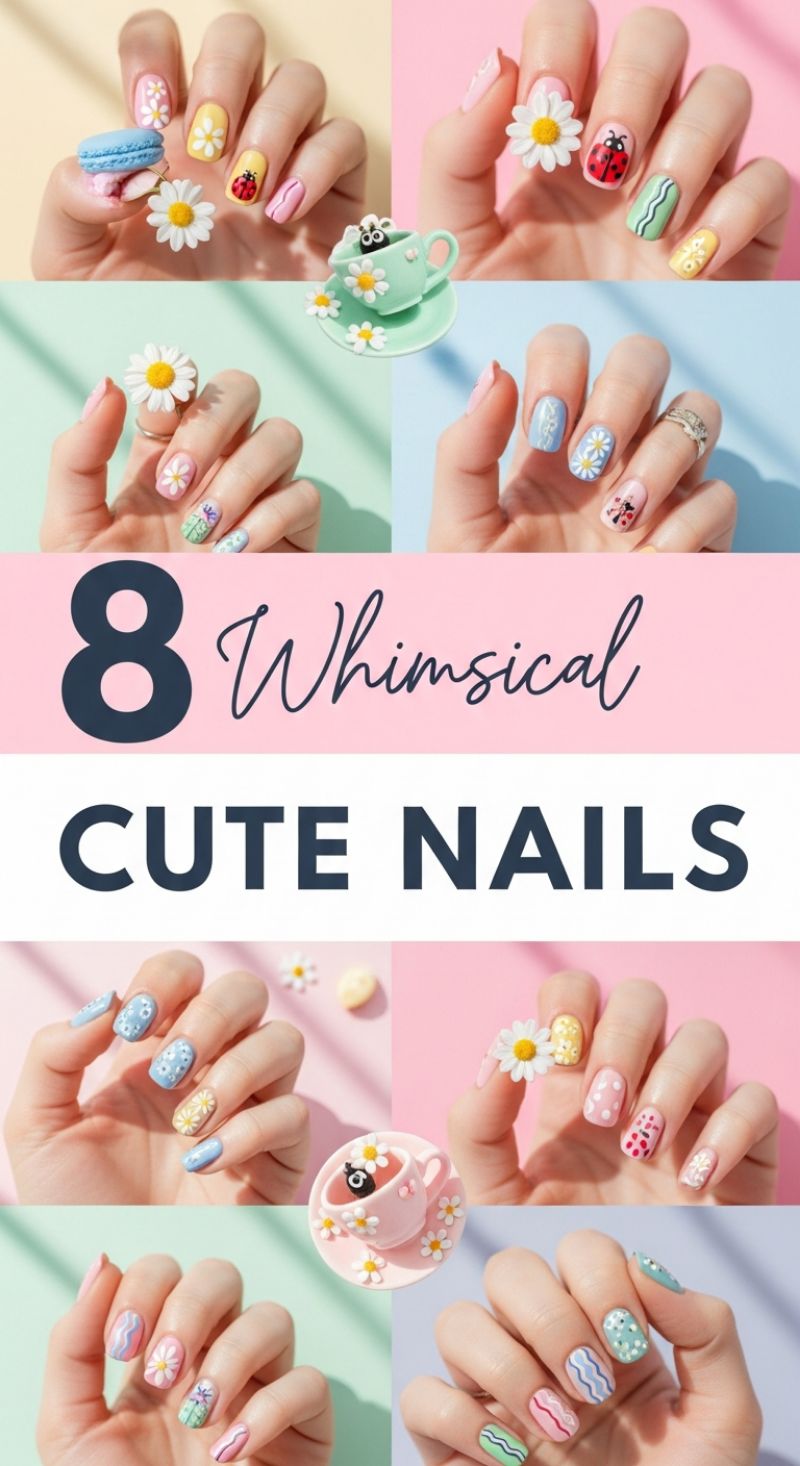
This collection of eight delightful manicures is the perfect starting point for any nail art novice, relying heavily on simple dotting and lining techniques to achieve maximum charm. The overarching theme is lighthearted spring and summer garden whimsy, utilizing a vibrant but soft pastel palette—think mint green, sky blue, pale yellow, and soft pink—accented by white and red. To replicate these looks, start by selecting 3-4 complementary pastel shades. The easiest elements to master are the iconic daisies and polka dots. For the daisies, apply your base color and let it dry completely. Then, using a dotting tool or the head of a bobby pin, apply five small white dots in a circle to form the petals, and finish with a contrasting yellow or black dot in the center. The key to the ladybug look is the perfect placement of two red dots (the body), followed by black detail work using a very fine striping brush or a toothpick for the head and center line. Remember that these designs look best when varied; aim for only one or two accent nails with intricate designs, keeping the others simple with solid colors or easy patterns.
The secret to achieving professional-looking patterns, even as a beginner, lies in patience and the right tools. For the wide range of polka dot variations seen here (some densely packed, some sparsely scattered), invest in a simple set of double-ended dotting tools. This allows you to effortlessly transition between large, medium, and tiny dots for visual interest. For the wavy designs—a common feature in this whimsical set—opt for a dedicated fine-tip striping brush. Load the brush minimally, anchor your elbow on a stable surface, and draw the line in one smooth, slow motion. If you don’t have a striping brush, a piece of painter’s tape can be utilized to block off sections, allowing you to paint the negative space and achieve sharp, clean lines for stripes or chevron patterns. The contrast between the freehand dots and the crisp geometric waves is what makes these styles so appealing and dynamic.
To ensure your cheerful designs last, proper preparation and finishing are non-negotiable. Always start with a clean nail base and a quality base coat to protect your nails and prevent staining from the brighter polishes. Once all of your artistic work is complete and completely dry (this is critical, especially when layering different colors), seal the manicure with a high-quality, high-shine top coat. If you are adding any 3D elements or charms, like those suggested by the images (though not strictly necessary for the DIY look), use a thicker gel-effect top coat to encapsulate the charm for extra security. Applying two thin coats of the top coat, making sure to “cap” the free edge of the nail, will significantly increase the wear time of your playful garden manicure, ensuring these whimsical looks stay flawless for days.
10 Chic February Nails
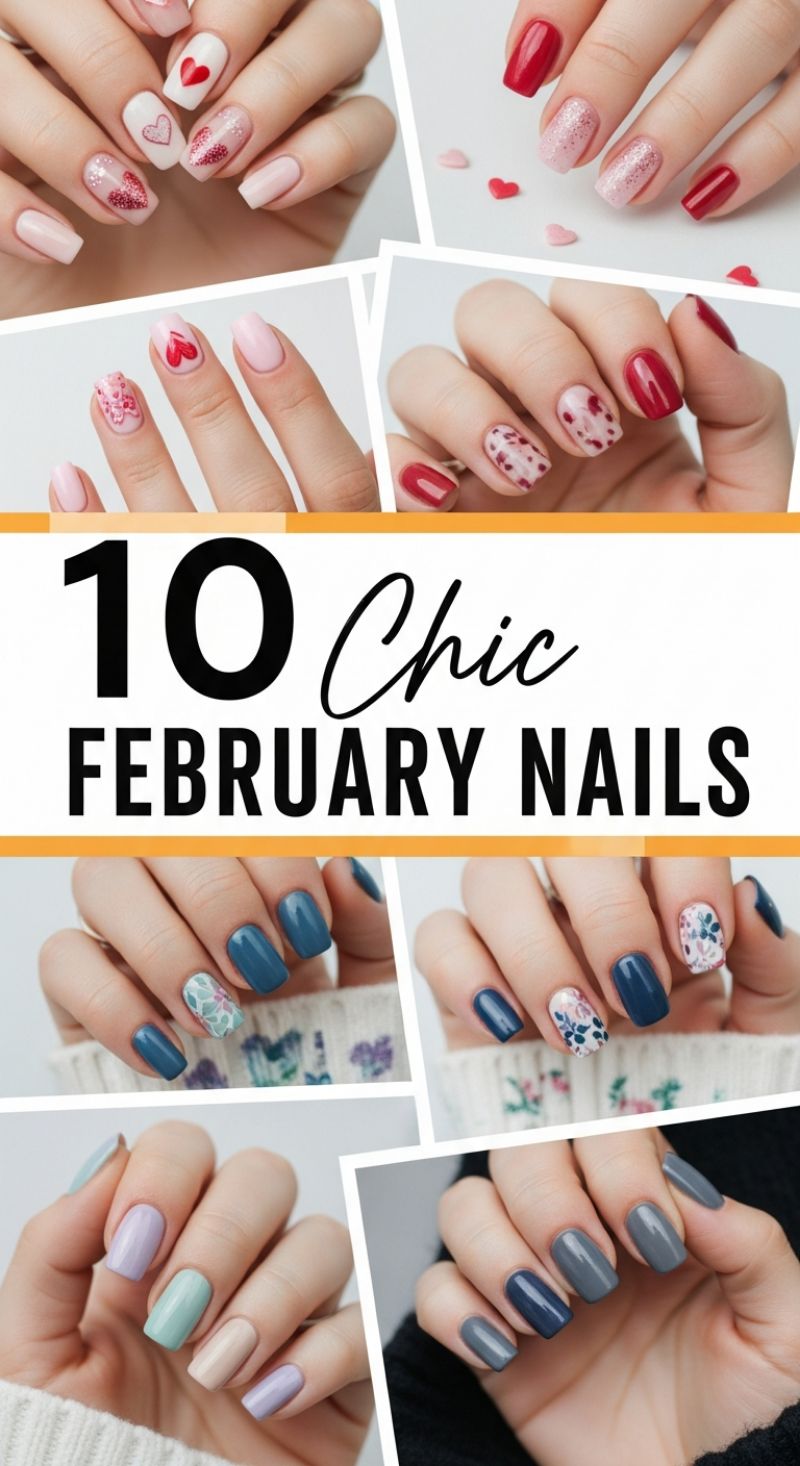
Replicating the chic February looks featured in the top panels is surprisingly simple for a beginner. The core palette revolves around soft nudes, brilliant white, and classic ruby red. To achieve the popular heart designs, start with a pristine base coat—a sheer pink or bright white provides the perfect canvas. For the accent nail featuring the larger, solid heart (often seen on the middle or ring finger), utilize a small, tapered dotting tool to place two symmetrical dots side-by-side, then gently drag the tip downwards to connect them into a point, forming a basic heart shape. Alternatively, for a quick and easy solution, use small vinyl heart decals or stamping plates. The look featuring glitter pink on the middle two fingers is achieved either by applying two coats of a sheer, sparkling pink polish or by creating a light glitter fade (ombré) using a makeup sponge tapped lightly near the cuticle line over a nude base. Always finish these delicate looks with a thick, quick-drying top coat to ensure the designs don’t chip, especially around the edges of any applied decals.
As February transitions from Valentine’s Day toward the anticipation of spring, the lower half of these designs introduces sophisticated, cool-toned manicures perfect for daily wear. These looks focus on deep, opaque blues (teal, navy) and subtle patterned accent nails. For the deep blue or gray solid looks, achieving an even, streak-free application is paramount; use two thin coats rather than one thick coat, allowing ample drying time in between. The key artistic element is the delicate floral accent nail paired with the solids. Beginners should rely heavily on pre-made nail wraps or small water slide decals featuring the depicted white and light pink/teal blossoms. Position the decal squarely on the ring or middle finger before sealing the entire nail with a robust top coat. This technique provides the illusion of complex artistry without requiring advanced freehand skill.
The remaining styles showcase simple, highly effective ways to incorporate multiple colors and textures easily. The pastel collection on the bottom left utilizes the highly trendy “Skittle” manicure technique, where each nail is painted a different complementary color (e.g., lilac, mint, beige, soft lavender). This is perhaps the easiest design variation for beginners, as it requires zero design elements—just flawless, single-color application across five different shades. The final look, displaying varying shades of slate gray and deep navy, uses a monochromatic color gradient. To recreate this, simply select four to five polishes within the same color family (from lightest gray to darkest blue/gray) and assign one distinct shade to each finger. This deliberate use of varying tones creates visual depth and polish, proving that simplicity often yields the most sophisticated results. Remember that perfect prep—filing the nails to a uniform squoval shape and pushing back cuticles—makes even the simplest color application look like a professional salon job.
6 Trendy Western Nails
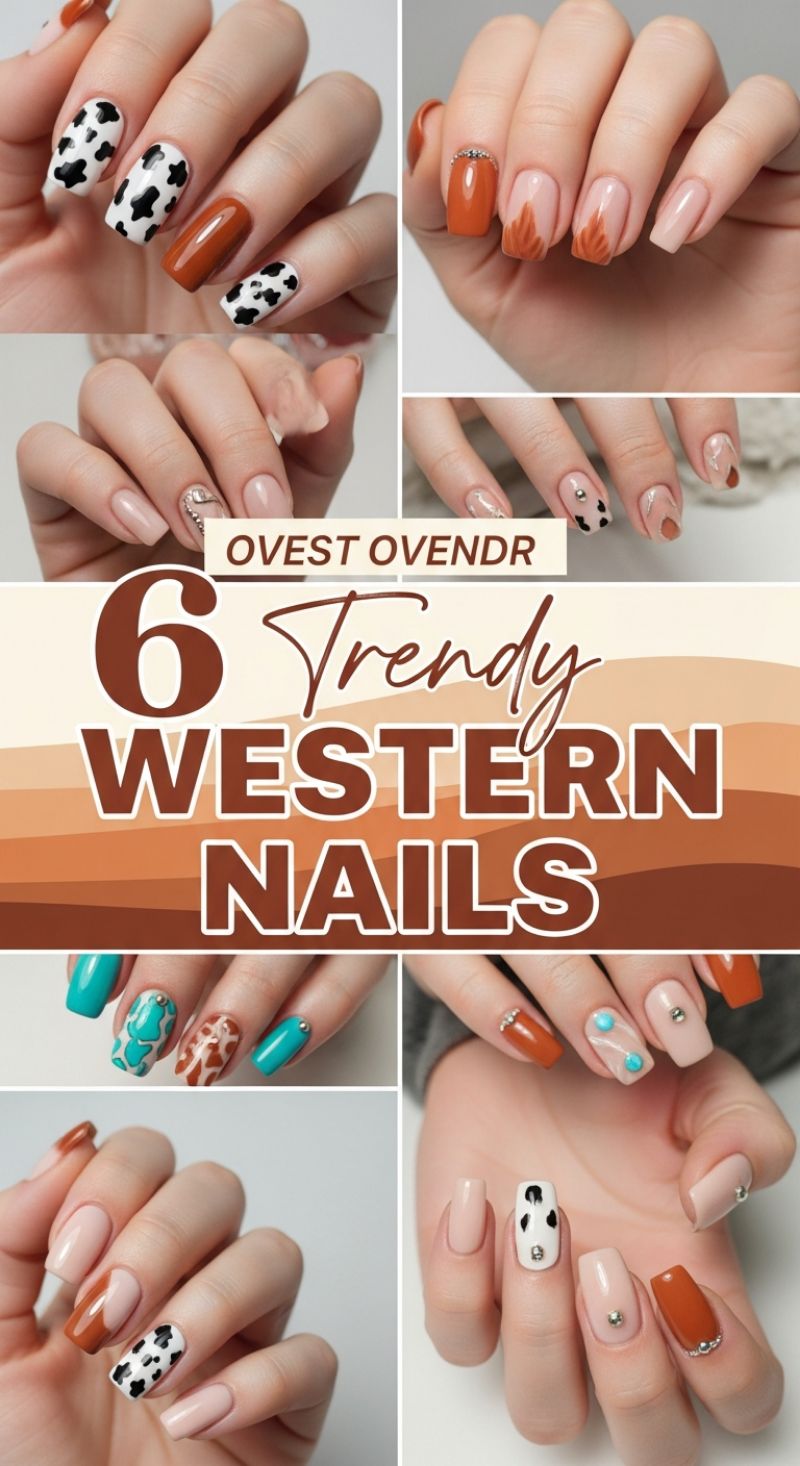
The Western aesthetic, often dubbed ‘Cowgirl Chic,’ translates beautifully into a simple yet impactful manicure, perfect for beginners looking to experiment beyond solid colors. The foundation of this trend lies in rich, earthy hues—think terracotta, burnt orange, and warm nude bases—interspersed with classic ranch-inspired patterns like cow print. To achieve the essential cow print look, start with a crisp white base coat on your chosen accent nails. Once dry, use a small detail brush or even the tip of a bobby pin dipped in black polish to create organic, irregular splotches. The key is imperfection; don’t aim for uniform shapes, as the natural look is far more authentic and easier to achieve. Complement these statement nails with two coats of a creamy nude polish on your remaining fingers, allowing the cow print to truly pop. This combination provides high contrast while maintaining a sophisticated, wearable color palette, making it a quick DIY win.
To elevate your Western set further, incorporate texture and complementary patterns seen in the image, such as abstract feather or flame designs. For the feather/flame effect, apply a nude base, and once cured, use a thin striping brush and a rich terracotta polish. Starting near the cuticle or halfway up the nail, create two or three simple, slightly curved strokes meeting at a point, mimicking the look of a stylized leaf or feather. This freehand technique requires minimal precision but adds significant visual flair. Alternatively, introduce a vibrant turquoise or teal accent nail; this pop of color instantly nods to Southwestern jewelry and rodeo culture. For a beginner-friendly turquoise accent, simply use a solid coat on one or two nails, and secure a single silver or turquoise rhinestone near the cuticle for instant ‘hardware’ effect, transforming a plain nail into a statement piece.
One of the best features of the trendy Western manicure is its inherent mix-and-match approach, making it forgiving for novice nail artists. Instead of mastering one complicated technique on all ten fingers, you can strategically blend patterns (like cow print, subtle animal print, and geometric lines) with solid colors and minimalist embellishments. Focus on keeping the color story cohesive (using the same three to four colors across the entire hand) even if the designs vary wildly from finger to finger. Always finish your design with a high-quality top coat, paying special attention to encapsulating any studs or rhinestones to ensure long wear. For an even more authentic rustic feel, try a matte top coat over the earthy tones and patterns, which mimics the texture of leather and suede, providing a final, professional touch to your DIY masterpiece.
Fresh Spring Nails: Pastel Power and Simple Daisy Accents
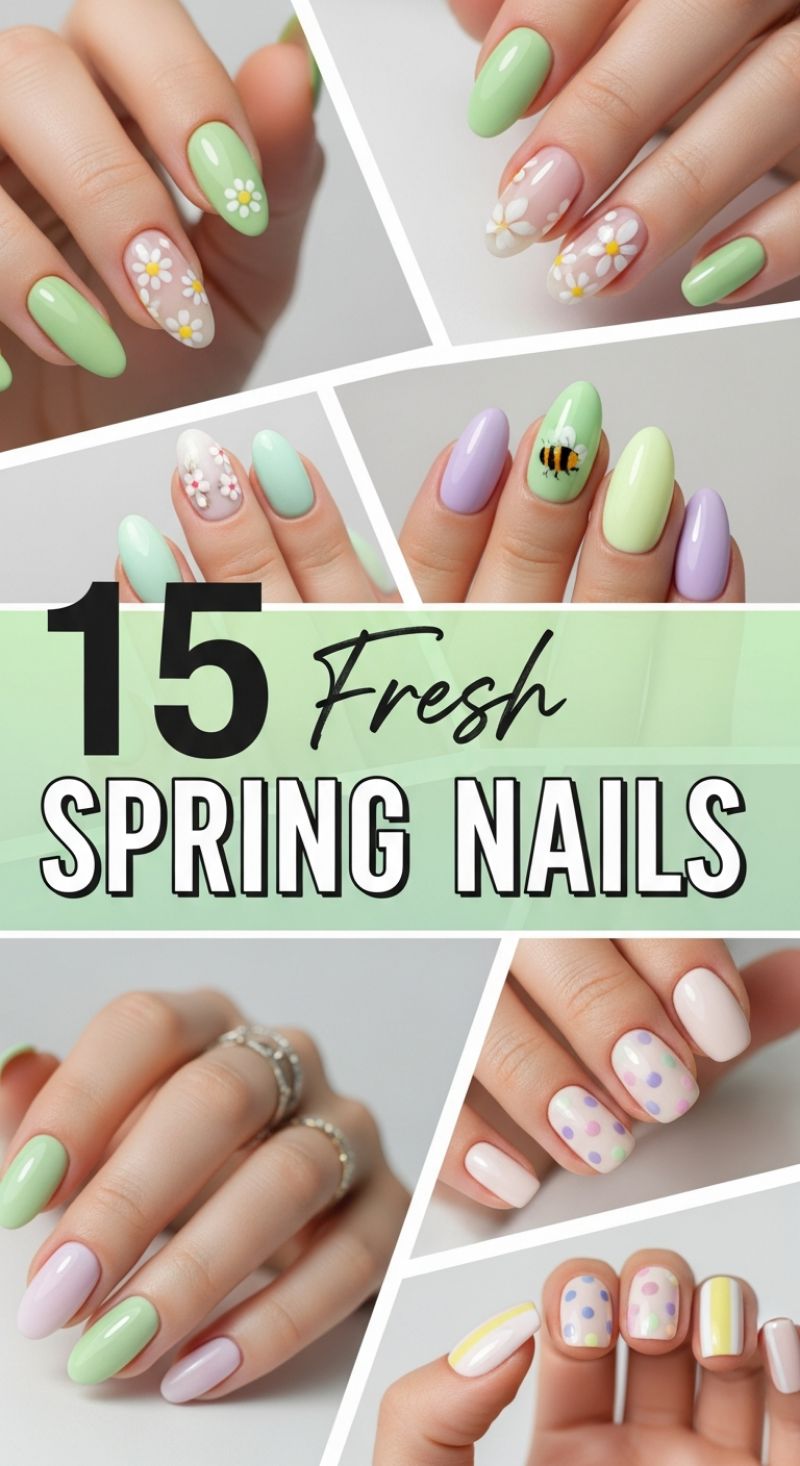
Welcome the warmer months with a collection of manicures centered around light, airy pastels, perfect for beginners looking to master simple nail art. This spring palette relies heavily on soft, opaque shades like mint green, lavender lilac, pale blush pink, and creamy white. To start any flawless manicure, ensure your nails are properly prepped: shape them uniformly, buff the surface lightly, and apply a high-quality base coat. For the quickest and most beginner-friendly look, try the solid pastel mix-and-match. Select three or four complementary colors (for example, mint, lilac, and blush) and alternate them across your nails. This technique instantly creates a vibrant, cohesive look without requiring any intricate design work. Always apply polish in two thin coats, allowing each to dry for 60 seconds, which minimizes bubbling and ensures a streak-free finish.
Once you’ve mastered solid colors, elevate your look with simple geometric or dotted designs. The playful polka-dot manicure, reminiscent of Easter eggs, is easily achieved using a basic nail art tool or even the blunt end of a bobby pin. Apply two coats of a sheer nude or pale pink base color. Once dry, dip your dotting tool into pastel shades (light blue, yellow, mint) and gently press onto the nail, creating random clusters of dots. For a clean, modern aesthetic, try the stripe design shown. Apply a solid white base, and once completely dry, use a thin striping brush or pre-cut striping tape to create delicate lines of contrasting colors, such as sunny yellow. The key to clean lines is patience and ensuring your base layer is fully cured before adding tape or painting the stripes.
For those ready to attempt delicate floral accents, the five-dot daisy technique is a beginner’s secret weapon. On an accent nail—try a light green or sheer nude base—use a small dotting tool and opaque white polish to create five small dots in a tight circle, forming the petals. Finish with a tiny dot of yellow polish in the center. This method creates beautiful, natural-looking daisies with minimal effort. If you want to incorporate more advanced elements like the cute bumblebee design, consider using nail decals for ease and precision. Always finish your intricate designs with a generous layer of quick-dry top coat. Sealing the edges of the nail is crucial, as this prevents chipping and keeps your gorgeous spring manicure looking fresh for days.
5 Edgy Baddie V-Day
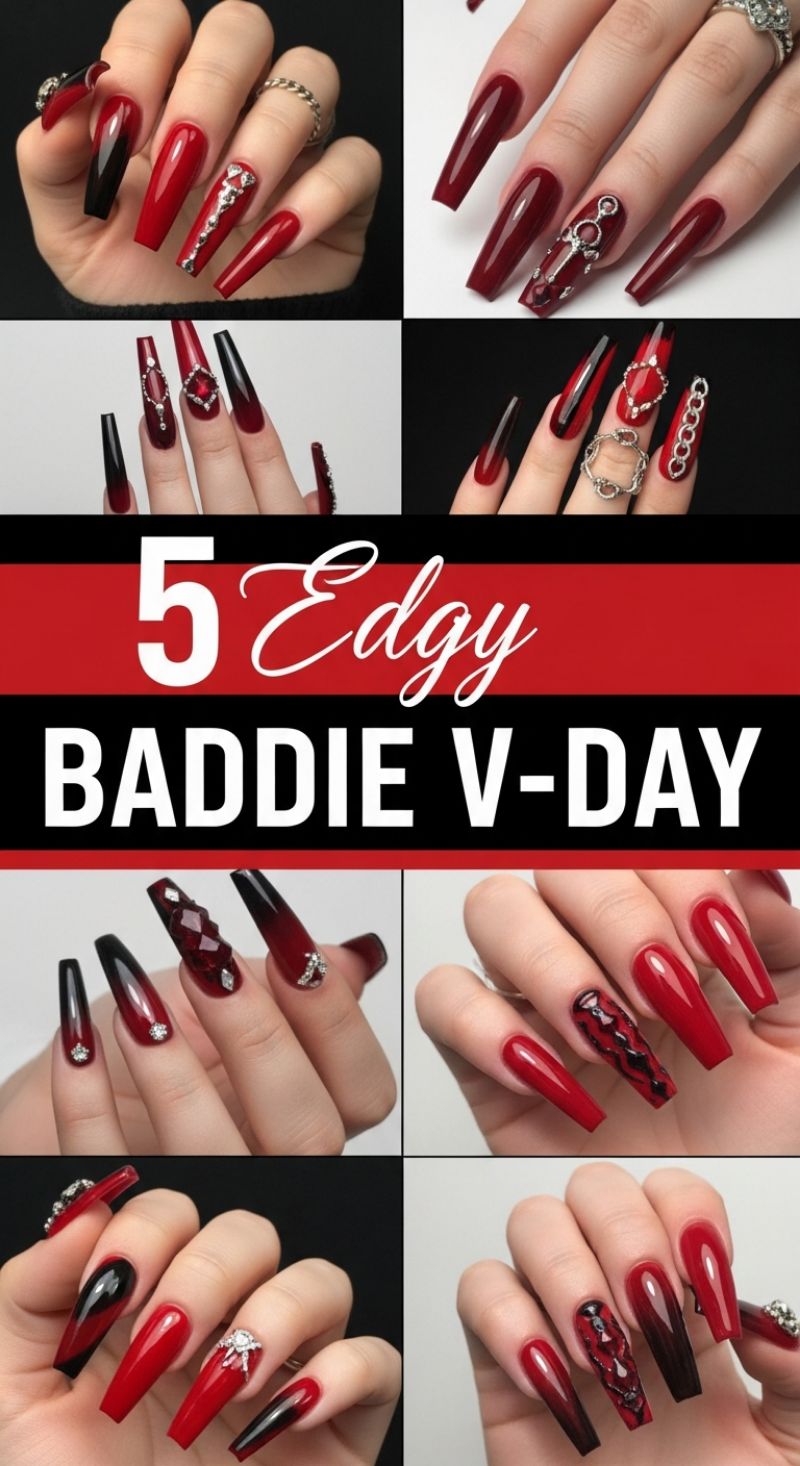
If your Valentine’s aesthetic leans more towards sophisticated gothic drama than pastel pink hearts, the “Edgy Baddie V-Day” look is perfect. While the images feature complex, elongated coffin shapes, beginners can capture the essence of this style by sticking to a medium length and using the iconic deep red and black color palette. Start with a smooth application of a rich, vampy red (like oxblood or burgundy) as your base. To simplify the striking ombré effect seen on many nails, apply a light coat of the red base, let it dry slightly, and then use a small makeup sponge dipped lightly in black polish. Dab the black polish onto the tip of the nail, blending it carefully toward the middle. Repeat until the black tip is saturated and the transition is soft. This sponge technique is the quickest way for newcomers to achieve a salon-quality gradient without needing specialized airbrush tools. Finish the base colors with a clear top coat to smooth out any texture from the sponging.
The defining feature of the “Baddie V-Day” aesthetic lies in the intricate silver and rhinestone embellishments. For beginners, tackling full-coverage chains or large, multifaceted gems can be challenging. Instead, focus on creating one high-impact accent nail on the ring or middle finger. Use small, flat-back silver rhinestones (in various sizes) and lay a simple, vertical line down the center of the nail, or cluster them strategically near the cuticle in a simple heart shape. Use a strong nail glue or specialized rhinestone gel to adhere the gems firmly, ensuring they won’t snag. For an extra touch of edginess, utilize metallic silver decals in the shape of simple crosses or tiny hearts, placing them over a solid black or deep red nail for contrast.
To bring the whole edgy vibe together, consider adding a subtle abstract detail, like the barbed wire or dripping designs shown in the sample images. For an easy DIY method, use a thin striping brush dipped in black polish and create a simple, wavy line or two down the length of a solid red nail. This adds texture and dimension without requiring advanced hand-painting skills. Once all details are dry, secure the entire manicure with a high-shine, durable top coat, making sure to carefully cap the free edge of the nails for longevity. This dramatic, two-toned look is perfect for showing off your fierce style on date night, proving that even beginners can master a complex, high-fashion aesthetic with strategic simplification.
8 Magical DISNEY V-DAY
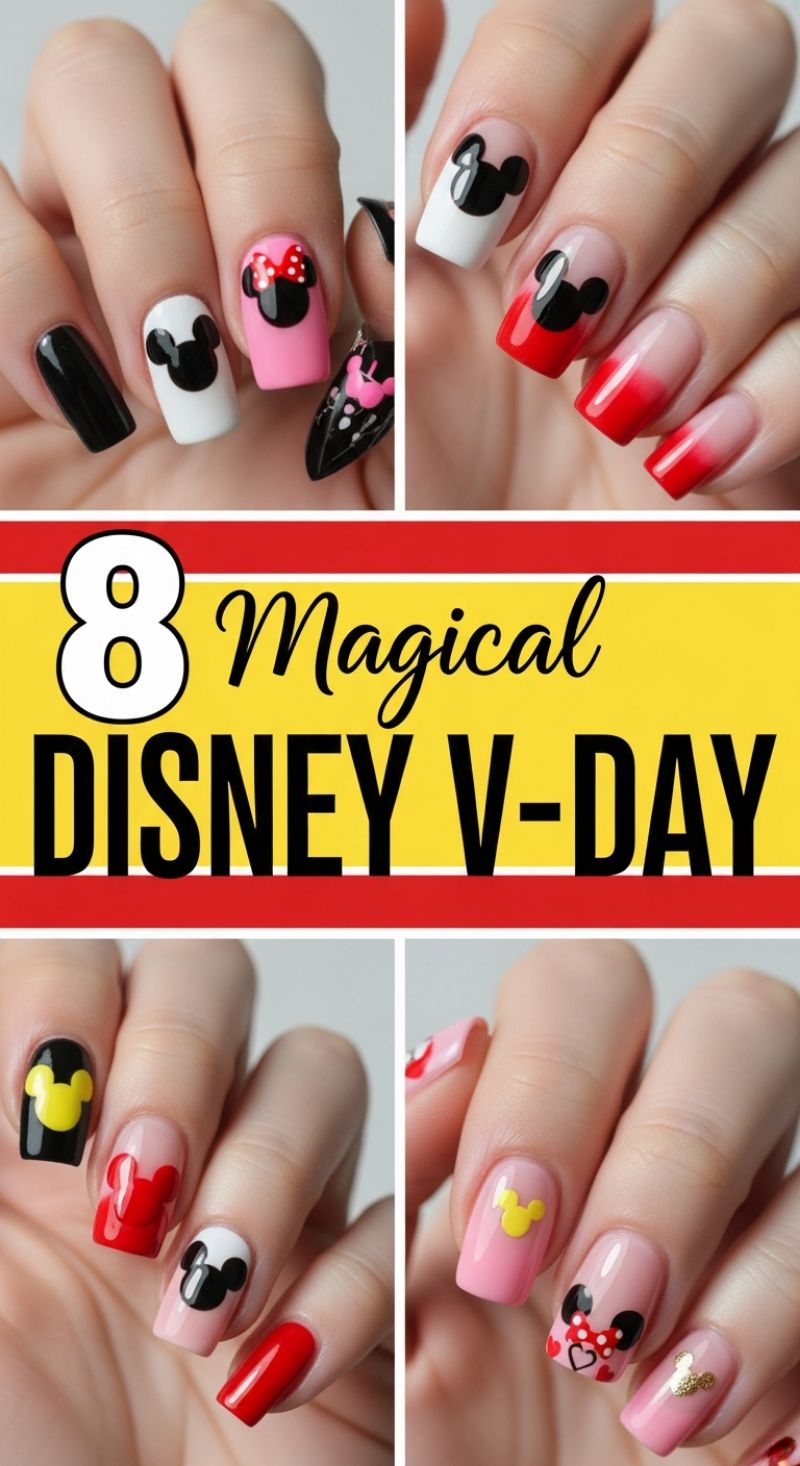
Capture the magic of Disney with these adorable Valentine’s Day-themed nail designs that are surprisingly simple for beginners. The key to mastering these looks is the use of proper tools and a limited, vibrant color palette (think classic Mickey/Minnie colors: red, black, white, and romantic shades of pink). Start by choosing your base coat and applying two even layers of your selected base color—be it a solid opaque black, a crisp white, or a soft nude pink. The most beginner-friendly design is the iconic Mickey silhouette. To achieve this perfect shape without complicated freehanding, invest in a set of inexpensive dotting tools. Apply one large dot for the head, and then, slightly overlapping the top edge, use a smaller dotting tool to place two symmetrical dots for the ears. This simple technique can be applied to any accent nail, instantly transforming a standard manicure into a themed masterpiece. For Minnie Mouse variations, paint the head first, then use a tiny detail brush or even a toothpick to draw a small red bow (or use a simple red decal) and add small white polka dots for her signature flair.
For those ready to slightly elevate their skills, try the gradient or the color-blocked tips displayed in the examples. The red ombre effect is created using a makeup sponge; paint stripes of clear coat, nude polish, and red polish onto the sponge, then quickly dab the sponge onto the nail, moving it slightly upward to blend the colors. Repeat until the red is saturated at the tip, creating a smooth transition towards the cuticle. Alternatively, the color-blocked French tip look (like the white tip with the black Mickey silhouette) is achieved by first applying a nude base and then using nail striping tape or a French tip guide sticker to section off the tip before filling it in with your color (e.g., white or red). Wait for this section to dry completely before peeling off the tape. Once your color blocking or gradient is complete, you can add the Mickey or Minnie silhouette directly over the color boundary for a cute, seamless design. Remember, patience is paramount when working with multiple layers and colors; ensure each layer is tacky or dry before applying the next.
To add extra sparkle and charm, incorporate small accents like metallic gold details or tiny hand-painted hearts. The gold Mickey head visible in some designs can be achieved using a small gold foil decal or a chunky gold glitter polish applied strategically with a small brush. The small hearts are easily created using the tip of a toothpick or the smallest dotting tool dipped in red or black polish, making two small, close dots and then slightly dragging the polish down to form a point. Once all your adorable Disney details are in place, the final and most crucial step for any beginner is sealing the deal with a glossy, high-quality top coat. Applying a thick, even layer of top coat not only adds incredible shine but also protects the design from smudging, chipping, and wear, ensuring your magical V-Day manicure lasts as long as possible.
12 Adorable Valentine’s Nails

This adorable Valentine’s Manicure showcases the perfect blend of romantic colors and classic shapes, ideal for beginners looking to create a statement look without excessive complexity. The core elements of this style are the almond nail shape, the contrasting colors of bright cherry red and blush pink, and the playful use of heart motifs and glitter accents. To start, ensure your nails are properly prepped and shaped. The almond shape—tapered at the tip but rounded—is particularly flattering for elongation and provides a beautiful canvas for the featured designs. Apply a quality base coat, followed by two opaque coats of your chosen primary base color (either the vibrant red or the soft blush pink). For a cohesive look like the one pictured, select a different accent color for the ring finger and optionally the middle finger, setting the stage for the artwork.
The secret to flawlessly executing these small heart patterns lies in utilizing simple tools, specifically a dotting tool or even the blunt end of a bobby pin, rather than attempting freehand drawing. To create the primary heart design (as seen on the pink nails), place two small dots of your contrasting color (e.g., red) close together near the center or tip of the nail. While the polish is still wet, use a thin detail brush or the point of the dotting tool to gently drag the polish down from the center point between the two dots, meeting them below in a V-shape. This quick technique forms a recognizable, symmetrical heart shape. For absolute beginners, another expert alternative is to use pre-cut nail vinyls or heart stickers, which you can apply directly onto your dried base color and then seal with a top coat. Focus on varying the size and placement of the hearts across the accent nails to achieve the dynamic, scatter-patterned effect seen in the collage.
To elevate the manicure and achieve the necessary visual texture, incorporate glitter polish into your design. The images feature two excellent options: a full accent nail covered in dense, metallic rose gold glitter, and a deep red nail coated in fine, shimmery red sparkles. For the glitter accent nail, apply two coats of a highly pigmented glitter polish directly over your base color for maximum impact. If you prefer a subtle sparkle over the heart designs, use a clear top coat mixed with a finely milled holographic shimmer, applying it sparingly over your finished artwork. Once all polish, art, and glitter are completely dry—wait at least 5 to 10 minutes—apply a generous layer of high-shine top coat to lock in the intricate designs, smooth out any texture from the glitter, and ensure your adorable Valentine’s mani lasts well beyond the holiday.
9 Dreamy April Nails: Mastering the Pastel Mixed Manicure

The “Dreamy April Nails” aesthetic showcased here is a perfect entry point for beginners, leveraging the hugely popular mixed-manicure trend (often called “skittle nails”) using soft spring pastels. This style requires zero freehand artistry, relying instead on a thoughtfully curated color palette of lavender, soft pink, mint green, and baby blue. Before starting, ensure your polishes are highly pigmented to achieve full opacity in two to three coats, as patchy pastel colors are the biggest giveaway of a hurried DIY job. Prep is paramount: file your nails into a clean, short square or gentle oval shape, apply a ridge-filling base coat, and then select four to five harmonious colors from the image’s palette. For the most balanced look, try to alternate warm and cool tones across your hand, such as pairing the delicate pink with the cool lavender on adjacent fingers, or the mint with the light blue, keeping the overall effect playful yet cohesive.
To execute this flawlessly, apply your chosen colors using the standard three-stroke technique: one down the center, followed by one on each side. The key challenge with pastels is avoiding streaks and gloppiness. Expert advice dictates using three extremely thin layers rather than two thick ones. Wait a full two minutes between each coat to allow the solvents to evaporate; this prevents bubbling and ensures the previous layer is completely dry, which is essential for a smooth finish, especially when layering light colors. For a professional-looking skittle effect, map out your colors before application—you can either repeat the full sequence on both hands (e.g., Pinky-Blue, Ring-Mint, Middle-Pink, Index-Lavender, Thumb-Pink) or slightly mix up the order, but always ensure the colors complement each other rather than clash. Because the focus is purely on the color, impeccable application and cuticle work are necessary to make this simple look shine.
Once your color coats are fully cured, seal the manicure with a high-gloss top coat to give the pastels the reflective, “dreamy” finish shown in the photos. Apply the top coat quickly, aiming to distribute it evenly without dragging the color underneath. A crucial step often overlooked by beginners is “capping” the free edge of the nail with the top coat; this means swiping the brush along the very tip of the nail to seal the color, which dramatically increases wear time and prevents premature chipping. Finally, clean up any stray polish around the cuticles using a small, stiff eyeliner brush dipped in acetone—this simple technique will instantly elevate your DIY job to salon quality. Finish with a hydrating cuticle oil to complete your beautiful, springtime-ready manicure.
11 Glam Barbie Nails
Achieving the iconic “Barbiecore” manicure starts with the perfect base. This glamorous look requires a highly pigmented, neon pink polish—opt for a quality gel or heavily saturated lacquer to ensure maximum vibrancy. After prepping your nails (shaping, buffing, and cleaning), apply a ridge-filling base coat. Once dry, apply your first thin layer of neon pink polish. For maximum color pop, especially against the vivid glitter, you’ll likely need 2-3 coats of the pink base, ensuring each layer cures or dries completely before moving on to the next. While the featured nails boast a long, coffin shape, beginners can adapt this style to a medium length or opt for simple square-off press-on nails pre-shaped for an instant glam effect.
The secret to this dazzling aesthetic is the speckled, scattered glitter overlay. You will need a sheer topcoat or polish base infused with medium to chunky hexagonal glitter pieces, predominantly silver or iridescent pink. Instead of painting a thick coat of glitter across the entire nail, wipe most of the polish off the brush and apply the glitter sparsely, dabbing gently to distribute the sparkle randomly across the nail bed. Focus on the central area of the nail, allowing the glitter density to vary slightly for a truly dynamic, homemade look. For a slight variation, as seen in the images, consider leaving one or two accent nails completely solid pink to break up the sparkle and highlight the richness of the base color.
Since this is a high-glam look, the finish must be exceptionally glossy. After your glitter layer is perfectly dry, seal the entire manicure with a thick, high-shine top coat. This step is critical not only for protecting the color and sparkle but also for smoothing out the texture created by the chunky glitter particles, ensuring a flawless, professional feel. Apply the top coat generously, “capping” the free edge of the nail to prevent chipping. Expert tip for beginners: If you notice the glitter dragging during the top coat application, let the glitter layer dry for an extra 10 minutes, or use two thin coats of top coat instead of one thick one. This ensures longevity and that blinding, plastic-perfect finish essential for the ultimate Barbie manicure.
5 Moody Gothic V-Day Manicure Designs
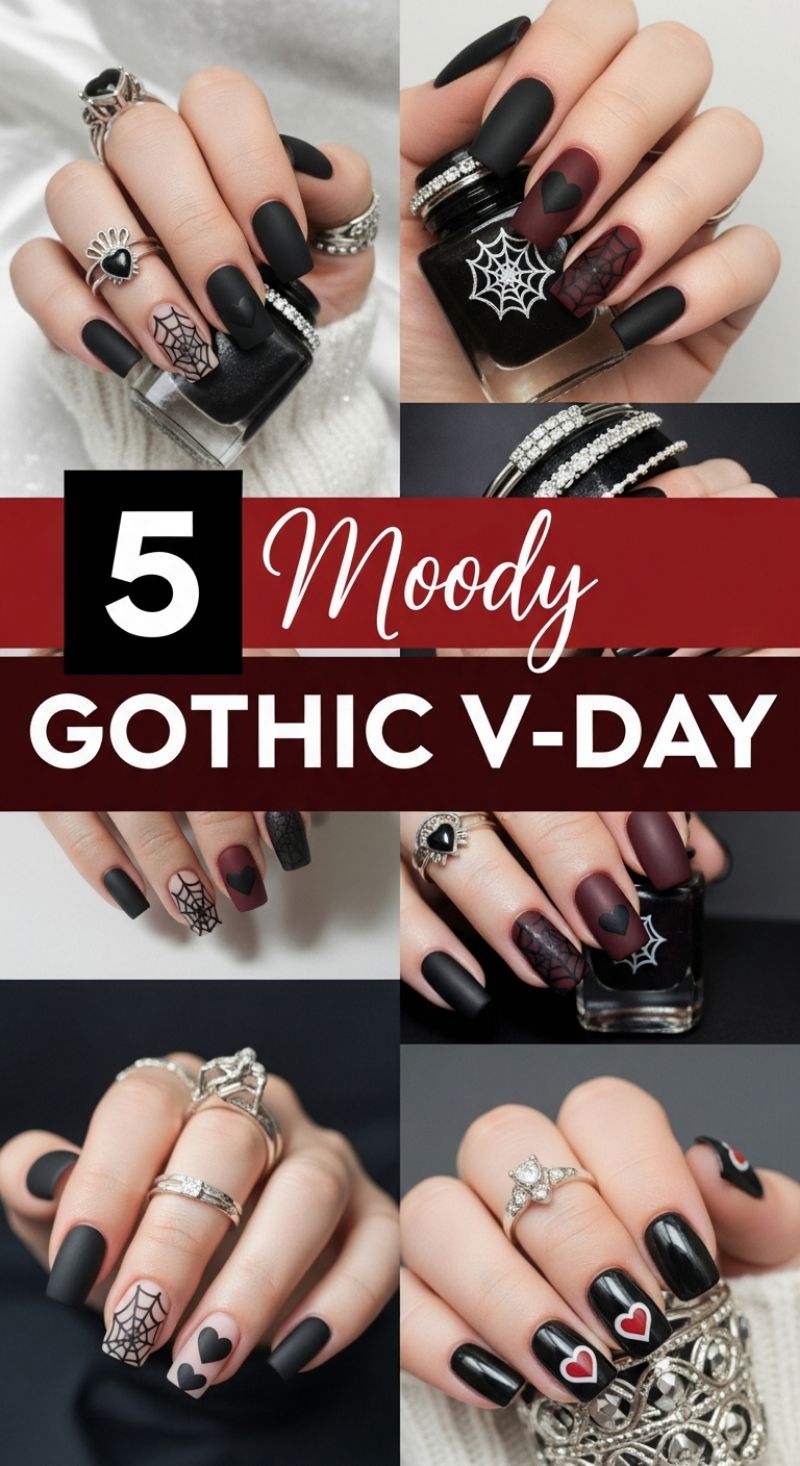
To achieve this stunningly moody and sophisticated look, the first step is perfecting the foundation, which relies heavily on a matte finish. For beginners, the quickest route is to start with a high-quality base coat, then apply two smooth, thin coats of matte black polish. If you only own regular black polish, purchase a dedicated matte top coat – this single product will transform any color in your collection and is far easier than buying dozens of matte shades. The gothic aesthetic is built on rich, dark tones, so ensure your accent color (like the deep burgundy or maroon shown) also receives the matte treatment. Proper application involves ‘capping’ the free edge of the nail with the polish brush to prevent premature chipping, ensuring your dark, dramatic look lasts through Valentine’s Day and beyond.
The real secret to making this V-Day look simple yet impactful lies in strategic accent application using easy tools. Instead of attempting complex freehand designs, focus on solid shapes and decals. The easiest design is the solid heart: use a fine-tipped dotting tool, dipped in the contrast color (e.g., black polish on the matte burgundy nail), to create two small dots side-by-side, then drag the polish down from the center point to form the heart tip. For the intricate spiderwebs, beginners should bypass freehand techniques entirely; invest in simple nail art stickers, stamping plates, or water decals. Place the decal on a nude or light pink accent nail before sealing the entire design with your matte top coat. This cheats the difficult artistry but maintains the edgy, dark romance theme perfectly.
Elevate this simple design by playing with textural contrast, which adds a professional, expert touch without adding complexity. Notice how some of the inspiration images feature glossy black nails next to matte black and burgundy ones. This mix of texture is key to depth. Try applying a glossy top coat to your base black nails, then painting matte black hearts over the top for a subtle, dimensional effect. Alternatively, apply a high-shine, clear top coat over the full nail, and only use the matte top coat on the accent nail featuring the heart or web. Always wait until the design elements are completely dry before applying your final top coat, and remember to swipe a small amount of rubbing alcohol around the cuticle line afterward if any dark polish has stained your skin. This ensures a clean, flawless finish worthy of a high-end salon.
10 Perfect V-Day Designs: Red, Pink, and White Heart Accents
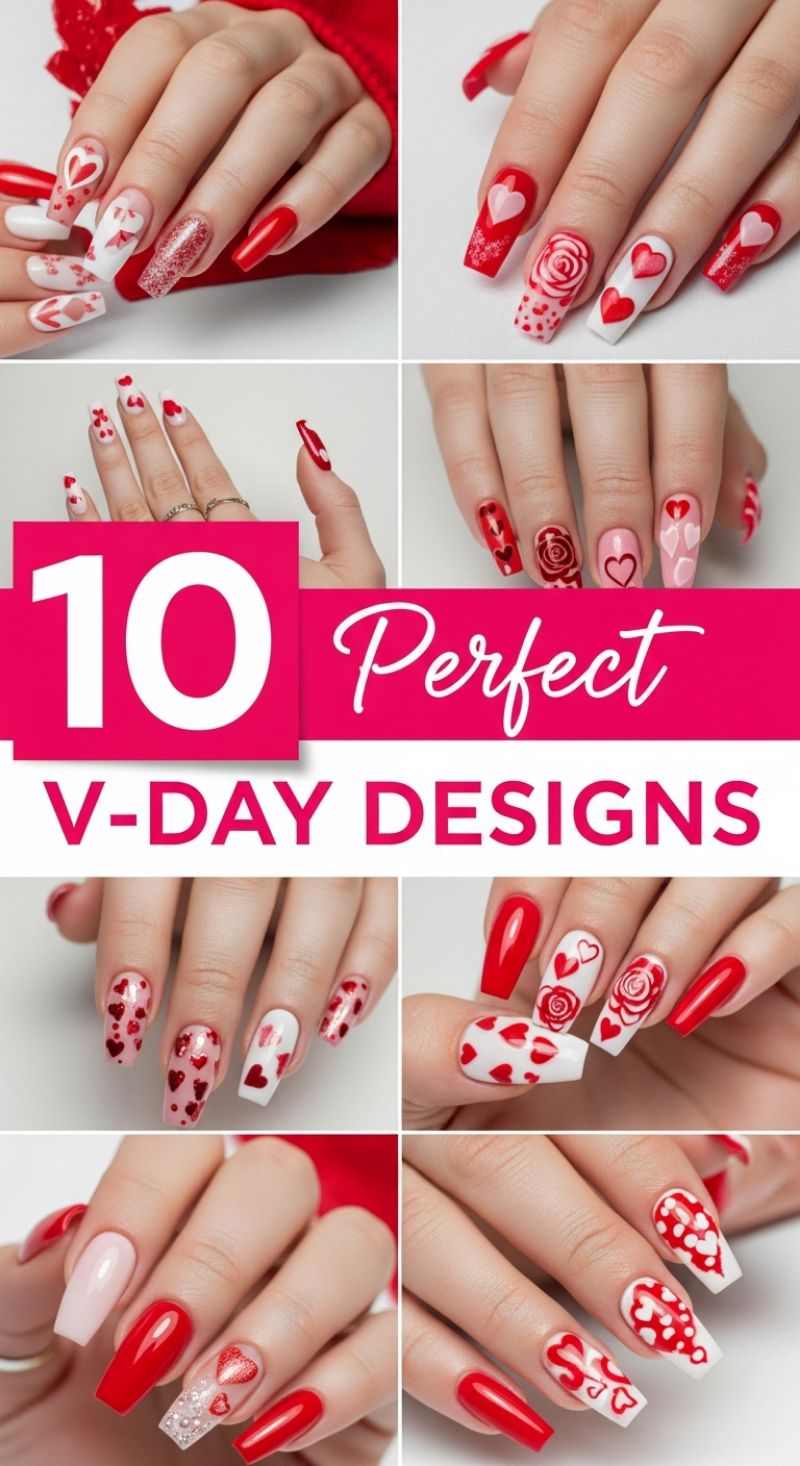
The Valentine’s Day collage showcases a stunning array of cohesive manicures primarily utilizing red, white, and soft pink/nude bases, providing ten distinct looks that are surprisingly adaptable for the DIY beginner. To achieve this look without advanced skill, start by perfecting your base coat and choosing your core color palette. Many designs feature solid, opaque coats of pillar box red or a creamy pale pink on most nails, reserving intricate detailing for one or two accent nails. The simplest way to incorporate the heart motif is using a dotting tool: place two small, adjacent dots of polish (for example, red polish over a white base), then use a fine toothpick or thin striping brush to gently drag the polish down from the center point between the dots, meeting at a V-point to form the bottom of the heart. For beginners looking to replicate the complex patterns shown—like the full-coverage red heart design on the white nail or the tiny dispersed pink hearts—utilize nail vinyls or high-quality nail decals. Applying these stickers after your base coat is fully dry and sealing them quickly under a glossy top coat is the fastest route to a flawless, complicated-looking finish.
To tackle the more ambitious designs, such as the swirling red roses or the dazzling glitter nails, focus on substituting painting for simpler methods. The rose look, while beautiful, requires steady hand painting; instead, source stamping plates featuring delicate rose patterns or use pre-made rose nail stickers. For the brilliant glitter accent nails, avoid the messy application of loose glitter by using a specialty glitter top coat, or by applying a thin layer of clear polish and gently pressing fine red or holographic glitter specifically onto the desired area (like the cuticle line) before sealing. When mixing and matching designs—which is key to these V-Day looks—ensure your polish texture is balanced. If you use a metallic glitter on one nail, pair it with a creamy, solid polish on the adjacent nail for contrast. Expert tip: After applying any intricate detail, always allow 3–5 minutes for the design to fully air dry before moving on to the top coat. Rushing this step is the number one cause of smeared patterns and messy designs.
Achieving the long-wear and high-gloss finish seen in these professional photos relies heavily on the final steps. After your creative details are dry, carefully apply a fast-drying, high-shine top coat. When applying the top coat over textured elements like decals, glitter, or painted accents, use the technique called “floating”: load your brush with a generous bead of top coat and apply it without pressing the brush down onto the nail, effectively floating the polish over the design to prevent the brush from dragging or pulling the colors. While the image displays long coffin or square shapes, these festive designs translate beautifully to shorter, natural nails. Remember that proper preparation—filing, buffing, and cleaning the nail plate—is essential for polish adherence, ensuring your stunning red and white manicure lasts well beyond Valentine’s Day. Finish the entire manicure by applying cuticle oil to keep the skin around your nails hydrated and picture-perfect.
10 Festive Mardi Gras Nails
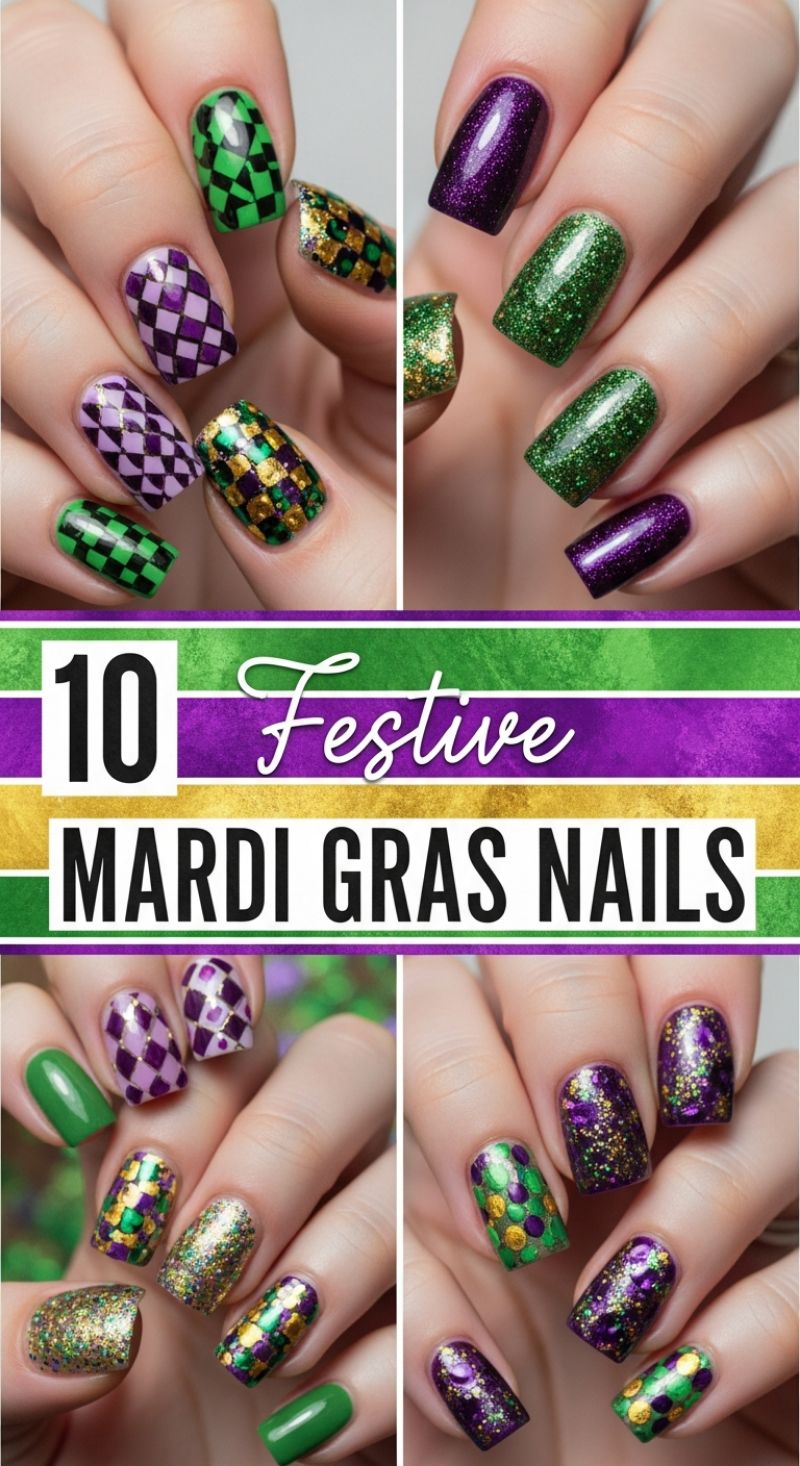
Achieving the vibrant, celebratory flair of a Mardi Gras manicure is surprisingly simple, even if the intricate checkerboards and geometric patterns shown here look daunting. The key to nailing this look as a beginner lies in mastering the traditional color palette—purple (power), green (faith), and gold (justice)—and focusing on high-impact texture rather than complex freehand art. To start, select two solid base colors (a creamy purple and a rich emerald green) and at least one dense gold glitter polish. For a streamlined, beginner-friendly approach, treat your hands as complementary sets. On your dominant hand, apply the purple base and use the green and gold polish for accents (perhaps a full nail of solid gold glitter on the ring finger). On your other hand, apply the green base, using purple and gold accents. This alternating method provides immediate visual complexity without requiring advanced skill, creating the celebratory ‘confetti’ appearance instantly with layered shine.
To recreate the patterned elements featured in the image without attempting tricky freehand lines, we turn to the easiest pattern technique: polka dots and confetti. Instead of trying to replicate the diamond checkerboard pattern, choose one or two accent nails to feature a random dot design. Using a simple dotting tool (or the rounded tip of a bobby pin), pick up a contrasting color (e.g., green on a purple base) and randomly place 5-7 dots of various sizes on the nail surface. Next, before the dots dry, dab a small amount of gold glitter or metallic polish over the green dots to layer the shine, mimicking the opulent, speckled look seen in the lower right image quadrant. This layered dot technique is quick, requires minimal steady-hand skill, and perfectly captures the random scattering of beads and sequins associated with carnival season. For flawless application, always ensure your base coat is completely dry before applying dots, which prevents the colors from dragging and blurring.
Finally, maximize the impact of your Mardi Gras manicure by focusing on texture and longevity. The gold glitter polish seen throughout the inspiration image is crucial; to ensure maximum sparkle, use the ‘glitter sponging’ method. Apply a small amount of the gold polish directly onto a makeup sponge wedge and lightly dab it onto the nail. This absorbs the clear suspension liquid and leaves behind a much higher concentration of glitter flakes, ensuring full opacity in fewer coats. Once all patterns and solid colors are complete, seal the entire design with a thick, high-shine top coat. This step is non-negotiable for beginners, as it smooths out any unevenness created by chunky glitter or dots, protects the underlying artwork from chipping, and provides that glossy, professional finish that makes any beginner look like an expert. Finish by applying a drop of cuticle oil to all the skin around the nail beds to complete your flawless manicure.
7 Luxe Chinese New Year Nail Looks

This stunning collection of manicures, ideal for celebrating the Lunar New Year, hinges on the powerful combination of vibrant red and opulent metallic gold. While the results look intricately expensive, achieving this high-end look is surprisingly simple for beginners if you leverage modern nail art tools. Start by preparing your nails—shape them into a comfortable short square or coffin shape, then apply a smooth base coat. The foundation of this design is a rich, highly pigmented cherry or true red polish (gel polish provides the deepest color payoff and durability). Apply two thin, even coats to every nail. For the solid gold accent nails visible in the photos, opt for a highly reflective metallic polish or, for truly luxe results, apply a thin coat of gold chrome powder rubbed onto a tack-free top coat before sealing. This contrast between the classic, shiny red and the dazzling, textural gold is what makes the design immediately eye-catching and festive. Ensure your base colors are completely dry or cured before moving on to the detailed artwork.
The secret to replicating the detailed gold graphics—like the Chinese characters (often ‘Fu’ for fortune) or the impressive dragons—without needing advanced freehand skills lies in high-quality stamping plates or waterslide decals. Look for specialized plates featuring traditional Asian motifs, and pair them with a highly opaque gold stamping polish for maximum visibility over the red base. If using stamping, quickly load the polish, scrape, roll the stamper, and immediately transfer the image onto the red nail. For easier application, waterslide decals are perfect: cut out the desired gold design, soak it in water, slide it onto the nail, and pat dry before applying a top coat. To emulate the dimensional, embossed look seen on the dragons and swirling patterns, use a thick layer of clear builder gel or specialized sculpting gel applied precisely over the cured gold design. This elevates the art, literally, giving it that magnificent 3D texture, often known as ‘embossed’ or ‘sweater’ effect.
To lock in your festive manicure and ensure it lasts throughout the celebrations, finish every nail with a durable, high-shine top coat. If you used sculpting gel for the 3D effects, make sure to apply the top coat carefully around the raised areas without pooling, then cure thoroughly. For an expert finish, consider incorporating small gold charms or micro-beads onto one or two nails using a tiny dot of gel or nail glue; this adds another layer of texture and brilliance without relying on complex gel sculpting techniques. Remember that nail art requires patience, especially when using stamping or delicate decals. Have a cleanup brush dipped in acetone nearby to perfect the edges before sealing the design. Once fully set, nourish your cuticles with oil, and enjoy your flawless, fortune-bringing Lunar New Year nails.
7 Cosmic Stellio Nails
This cosmic look transforms your manicure into a sparkling night sky, utilizing a dramatic yet simple palette of deep navy, stellar black, and dazzling silver. The ‘Stellio’ effect comes from the strategic placement of star decals or small metal studs, creating focal points that are surprisingly easy for beginners to master. To recreate this celestial design, gather three glitter polishes: a dense black/dark navy sparkle base, a vibrant royal blue glitter, and a highly reflective silver glitter. You will also need a fine detail brush (if painting stars), and either adhesive star decals or small, silver 3D star studs, plus a strong top coat or dedicated nail glue for securing the studs. Start with a reliable base coat and choose a placement strategy—the most striking approach is to alternate colors across the hand, such as black on the thumb and middle finger, silver on the index or ring finger, and blue on the pinky, ensuring two coats of color are applied for maximum opacity.
The key to achieving the sophisticated, high-impact look seen here is thoughtful color blocking. Apply your two coats of color, allowing ample drying time between layers. The silver nail should be chosen as a primary accent, as the bright metallic contrast provides the perfect backdrop for the featured 3D star stud. For a professional finish, ensure that the dark colors (black and deep blue) are applied flawlessly, as any unevenness will be noticeable against the shimmer. If you are struggling with the dense glitter formula, floating the second coat on gently, rather than brushing vigorously, can help distribute the shimmer evenly and prevent patchiness. Remember, glitter polish often appears thinner than cream polish, so taking your time to build the color payoff is essential before moving to the detail work.
Once your base colors are fully dry, it’s time to add the celestial elements. For absolute beginners, we recommend using flat star decals or simple painted white stars on the smaller, darker nails (like the thumb or pinky). For the main accent nail (typically the silver one), place a single, striking 3D metal star stud directly in the center. To secure this embellishment, apply a tiny dot of nail glue or a thick, specialized jewelry gel top coat to the nail surface where the star will sit. Gently press the stud into place using tweezers. Cure or allow to dry completely. Finally, seal the entire manicure with a brilliant, chip-resistant top coat. When applying the top coat, carefully sweep it over the polished nails, but avoid fully encapsulating the edges of the 3D stud; this keeps the stud’s metal shine intact and prevents the manicure from looking overly bulky, ensuring longevity and maximum cosmic glam.