Don’t book your next mani without this list! Discover 20+ essential February & March nail trends: Red French, dark romance, viral pink chrome, subtle spring greens, and minimalist looks.
BESTSELLING FEBRUARY NAILS: RED FRENCH MEETS MICRO-HEARTS

This trend perfectly marries classic elegance with a touch of whimsical romance, making it the undeniable star of early year manicures. To achieve this high-impact, yet refined, look, start with a perfectly prepped nail bed and a clean, milky-pink or nude base coat that enhances the natural tone of the nail rather than masking it entirely. The foundation of this design is the Red French tip, which should be applied using a vibrant, true red gel polish. For a modern take, the smile line—the curve of the French tip—should be deep and pronounced, offering an elongated, flattering effect, particularly on almond or subtle stiletto shapes seen in the inspiration image. Expert technicians advise using a fine-tipped striping brush and stabilizing your hand to ensure maximum symmetry and crisp edges along the smile line, curing each layer immediately to prevent bleeding or smudging into the nude base.
The key distinguishing feature is the introduction of micro-hearts. This delicate art is intentionally minimalist, typically reserved for one or two accent nails per hand, often the ring or index finger, preventing the overall design from looking overly busy. To execute the perfect micro-heart, you will need a highly pigmented red polish (matching the tip color) and the smallest possible dotting tool or a 00 detail brush. Begin by placing two tiny adjacent dots and then quickly drawing the tails down to meet at a precise point to form the heart shape. For added complexity, consider replicating the advanced variation shown, which involves a double French line: first, apply the thick red tip, and then, using a brilliant white polish and a very fine brush, trace a narrow secondary band just above the red curve. This technique adds depth and creates a stunning graphic pop that elevates the standard French manicure into a dimensional piece of art.
Maintenance is crucial for keeping this detailed design pristine for weeks. Once all polish and art elements are cured, seal the entire manicure with a high-shine, non-yellowing top coat. When booking this look, ask your technician for “Red French with precision micro-art.” If you want to transition this look slightly beyond Valentine’s Day, a sophisticated customization involves swapping the true red for a deep oxblood or a dusty rose pink, maintaining the contrast but softening the boldness. Regardless of the color permutation, the successful execution relies on the contrast between the milky base and the bold, graphic elements, delivering a chic and sophisticated finish that is both timely for February and fashionable well into March.
VAMPY FEBRUARY NAILS: DARK ROMANCE FOR ANTI-VALENTINE’S VIXENS

This dramatic manicure perfectly captures the “Dark Romance” sub-trend for February, moving away from conventional pinks and reds toward a moody, sophisticated aesthetic. The cornerstone of this look is the rich, highly pigmented shade of oxblood or deep cabernet, applied with a mirror-like glossy finish to long, statement shapes like coffin or almond. This depth of color immediately conveys luxury and a slightly rebellious “Anti-Valentine’s” sensibility, ideal for those who prefer drama over daintiness. The design is elevated by strategic metallic accents: note the full nail covered in jagged gold foil, which catches the light dramatically, and the tiny, precise gold studs tracing the cuticle line on another finger. This combination of deep, solid color and bright, shattered gold texture creates an undeniable vampy allure.
To replicate this high-impact look, start with meticulous nail preparation, as dark colors highlight any imperfections. For the base, use two to three thin coats of a quality deep burgundy gel polish to ensure complete opacity and richness before curing. The accent nails require specialized techniques. For the fractured gold look, apply a thin layer of foil adhesive or a non-wipe tacky base coat over the cured color, then press small pieces of gold transfer foil or delicate gold leaf onto the surface, gently rubbing them down for adhesion before sealing. For the contrasting heart design, utilize a sheer white or nude base coat. The pattern of small, black hearts should be applied using either a very fine detail brush for freehand accuracy or, more efficiently, a high-quality nail stamping plate designed for tiny motifs. Ensure the hearts are spaced consistently for a balanced pattern. Finish the studded nail by adhering micro gold spheres with a dot of builder gel near the cuticle line before a final cure, creating a customized, built-in jewelry effect.
When opting for such a bold, dark design, nail structure is key to success. Longer, tapered shapes like coffin or almond complement the dramatic color best, offering a sleek, sophisticated canvas. We recommend finishing this manicure with a non-wipe, ultra-high-shine top coat over the deep burgundy areas to maximize the wet look shine—this is crucial for elevating the vampy red and distinguishing it from a flat black. For longevity, especially where gold foil and studs are involved, fully encapsulate the entire design with the top coat, paying close attention to capping the free edge to prevent premature chipping or lifting. This Dark Romance trend provides incredible versatility; while it is a perfect statement for February, the deep hue also transitions seamlessly into early March, pairing beautifully with cool-weather wardrobe staples like structured blazers and dark denim.
PINK CHROME IS THE NEW PINK FEBRUARY NAILS (DON’T SLEEP ON THIS!)
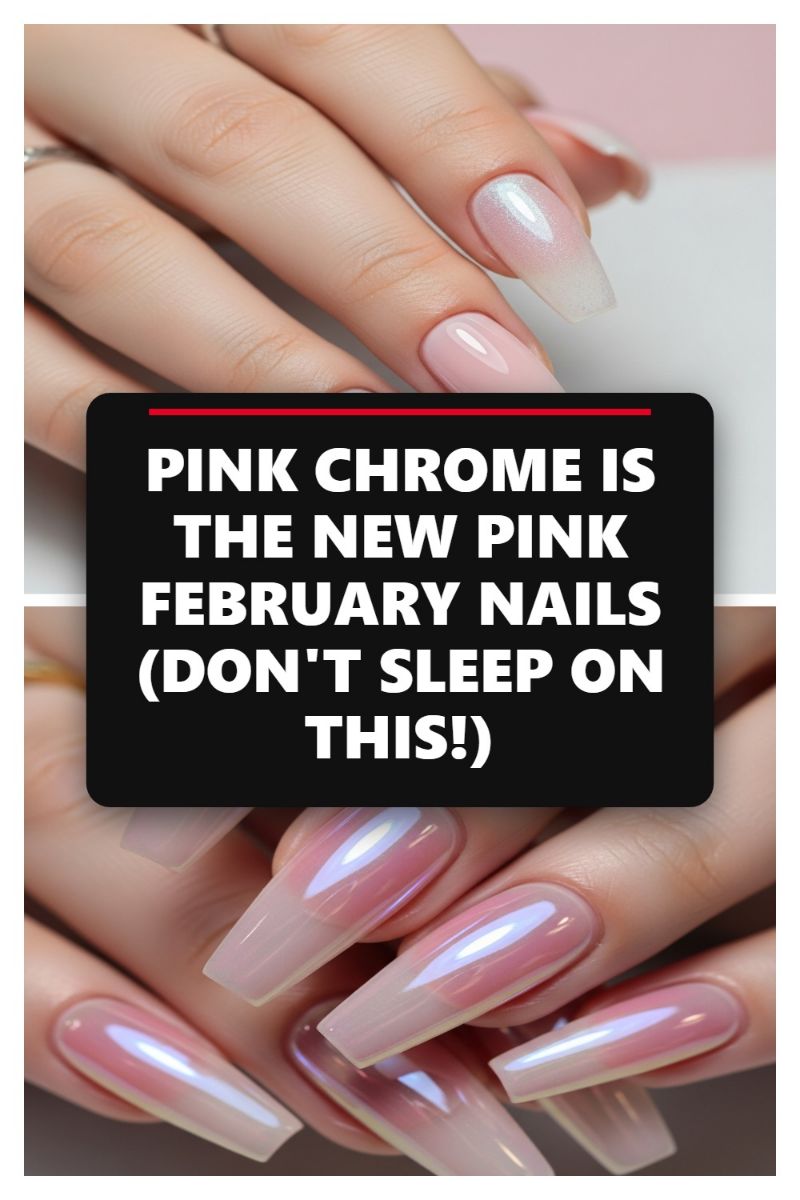
While solid pink manicures will always be a February staple, the modern approach elevates this classic hue with a dazzling, ethereal finish: pink chrome. This trend, often dubbed the ‘Glazed Pink Donut,’ takes a subtle, milky nude or blush base and layers it with an iridescent powder to create a stunning, pearl-like sheen that catches the light beautifully. As seen in this look, the key is the luminosity—the nails possess a soft, internal glow rather than a heavy metallic coating. The shape here is a structured coffin or tapered square, which maximizes the surface area for the chrome effect, allowing the light to travel along the length of the nail and highlight the subtle color shifts from baby pink to soft lavender and white.
To recreate this sophisticated look, start with meticulous preparation, as the reflective nature of the chrome emphasizes nail plate imperfections. Apply a sheer, milky pink or nude gel polish base coat; a jelly formulation works best to maintain transparency and depth. Once cured, apply a thin layer of non-wipe gel top coat—this is critical, as chrome powder adheres best to a fully cured, slightly tacky, non-wipe surface. Immediately after curing the top coat, use a small silicone applicator or a sponge eyeshadow tool to firmly buff the aurora or pearl chrome powder onto the nail surface. Use light pressure and continuous motion until the iridescent effect is flawlessly smooth and reflective. For a more intense effect, you may dust off the excess powder and repeat the non-wipe top coat and powder application, though usually one perfect layer is enough to achieve this delicate glaze.
The final, crucial step is encapsulation to lock in the shimmer and ensure chip resistance. Apply a second layer of non-wipe top coat, ensuring you ‘cap’ the free edge of the nail completely. Capping prevents premature wear and chipping of the chrome layer. Expert Tip: If you prefer a shorter, more natural nail shape, this trend translates beautifully by focusing the chrome powder over a short, rounded natural nail base, giving a clean, minimalist ‘quiet luxury’ aesthetic. For maintenance, avoid harsh chemicals or excessive filing on the edges, and always use cuticle oil daily to keep the surrounding skin hydrated, making the polished chrome finish pop even more.
The Only Short February Nails You Need to Save Immediately

If you’re seeking a Valentine’s or post-Valentine’s manicure that’s sophisticated, wearable, and perfectly suited for a shorter nail length, look no further than these delicate nude-and-heart designs. The power of this look lies in its contrast: a buttery, sheer nude or milky pink base paired with vibrant red details, avoiding the typical overly-sweet aesthetic often associated with February nail art. The short, squoval shape keeps the look modern and practical, proving that you don’t need excessive length to make a statement. Whether you opt for a scattering of micro-hearts across every nail or a single, intricate heart accent, the key to nailing this trend is maximizing the clarity and quality of your sheer base coat.
For the widely appealing minimalist heart design, achieving precision is paramount. Start with two thin coats of a sheer, blush-toned gel polish to create that natural, blurring effect. Once cured, use a fine dotting tool and a highly pigmented crimson or magenta polish. For the popular two-toned heart effect seen in the top image, place two adjacent dots, allowing them to slightly merge, then drag a fine liner brush slightly downward from the center of the merger to form the point. For maximum visual interest, use a deeper shade of red on the inner half of the heart and a brighter red on the outer half, then cure immediately after each placement. Placement is crucial: keeping the hearts small and positioned either near the cuticle or slightly off-center helps elongate the look of the short nail bed, making this a professional and polished option.
Alternatively, if you prefer the dramatic yet refined accent nail featured in the bottom example, you’ll focus all your artistic energy onto a single finger (typically the ring or middle finger). This intricate, layered heart is achieved using an ultra-fine, long-bristled liner brush. Ensure your red polish is fluid but not runny, and begin drawing a continuous, swirling heart outline, crossing the lines over themselves multiple times to build up a dimension that mimics modern abstract art. Because the base is opaque and neutral, the accent needs to be flawlessly executed. If you are applying this yourself at home, consider curing the base line of the heart before adding the subsequent swirls to prevent smudging. Finish the entire manicure with a high-shine, non-wipe top coat, taking care to perfectly cap the free edge of your short nails for a chip-proof, three-week wear time.
VIRAL V-DAY NAILS: THE MINIMALIST RED LOOK TAKING OVER PINTEREST
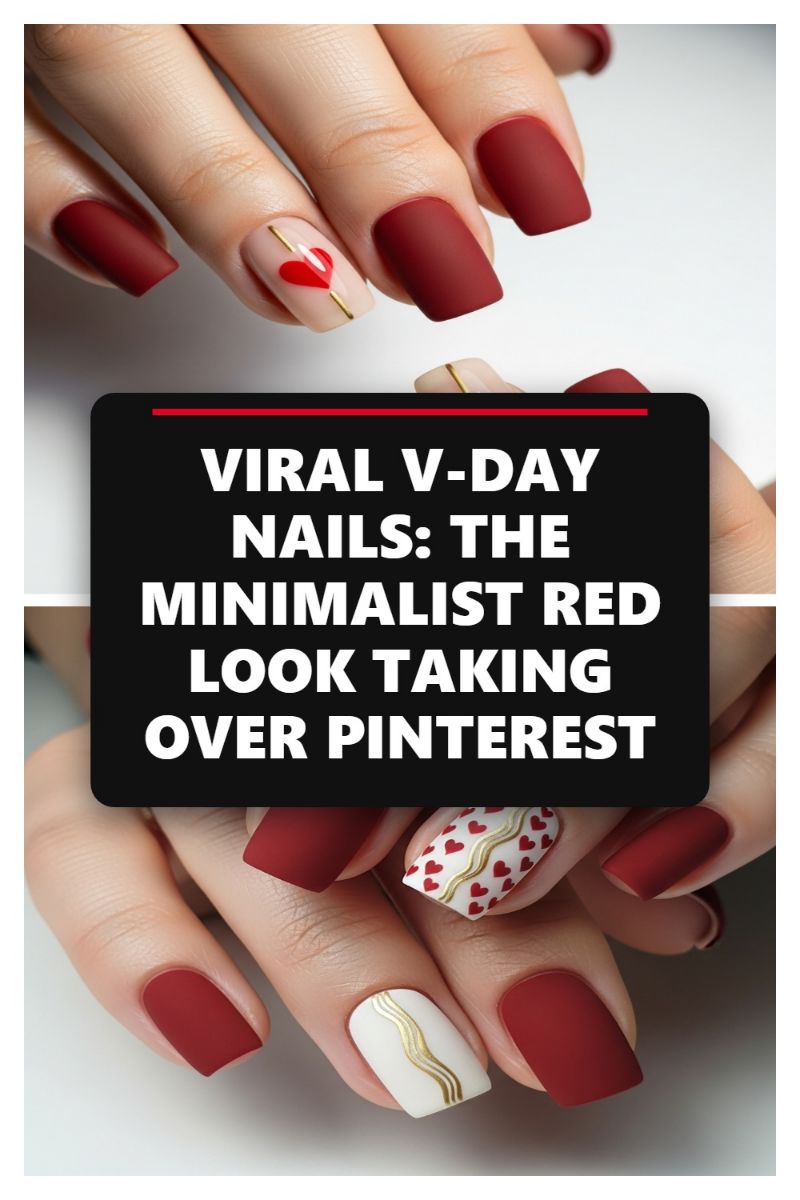
The era of overly elaborate, highly saturated Valentine’s Day nail art is yielding to a more sophisticated aesthetic: the Minimalist Red Look. This trend anchors itself in a rich, matte, deep crimson or oxblood shade applied uniformly to the majority of the nails, offering a luxurious, velvety finish that is far more ‘dark romance’ than bubblegum pink. The brilliance of this design lies in the juxtaposition of the heavy, saturated red with sparse, delicately executed accent nails. As seen in the image, the accent nails utilize neutral bases (nude or crisp white) to provide a stark contrast, transforming the simple red heart or micro-heart pattern from kitsch to chic. Crucially, the addition of ultra-fine metallic gold striping—whether bisecting a single heart or creating subtle vertical waves—elevates the design, lending it a jewelry-like precision that appeals deeply to the ‘quiet luxury’ sensibility dominating current trends.
To replicate this look successfully, precision and product choice are paramount. Start by selecting a high-pigment, cool-toned deep red gel polish, ensuring a flawlessly smooth application before sealing it with a premium non-yellowing matte topcoat. For the accent art, you must employ the proper tools: for the tiny hearts, a micro-dotting tool or the very tip of a fine detail brush (like a 000 liner) ensures uniformity and scale. When applying the gold detailing, avoid thick, painterly lines. Instead, use adhesive striping tape cut extremely thin, or liquid gold chrome gel applied with the utmost care, ensuring the lines are consistently straight or smoothly curved without pooling. This level of detail typically demands the expertise of a skilled nail technician, as the precision of the lines dictates whether the final look reads as minimalist masterpiece or a DIY attempt.
While labeled for Valentine’s Day, this deep red and gold aesthetic is perfectly positioned to transition effortlessly into the cooler months of March. To adapt the style for prolonged wear, consider reducing the density of the heart pattern; for instance, swap the micro-hearts for simple, negative-space heart silhouettes, or replace them entirely with the clean, modern gold vertical lines on a neutral base. This design is also highly adaptable to different nail shapes, looking particularly striking on medium-length squares or soft squoval shapes. When booking your appointment, specify that you are seeking intricate, hand-painted line work and a full matte finish, as these specialized techniques require both extra time and product knowledge from your salon professional.
MARCH NAILS: THE SUBTLE ST. PATRICK’S DAY HINT (AVOID CHEESY GREEN!)
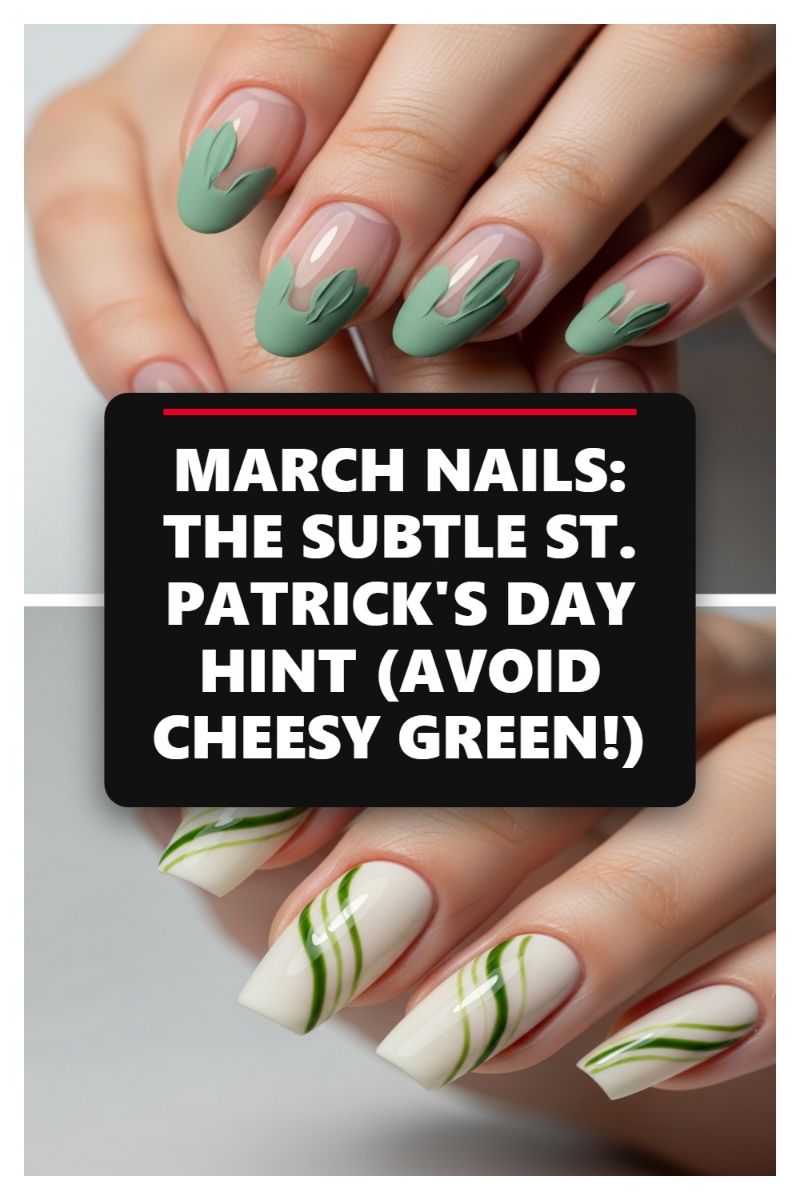
March signals the transition to spring, but it also brings the challenge of incorporating seasonal themes like St. Patrick’s Day without leaning too heavily on bright, basic green and overt, “cheesy” decals. The modern approach, as showcased here, is all about sophisticated subtlety. Instead of standard emerald or shamrock glitter, embrace muted, earthy tones like sage, moss, and deep olive. The image presents two distinct, chic ways to incorporate this trend: The first design utilizes a matte, dusty sage green for a modified French tip, incorporating a gorgeous 3D molded gel texture that resembles delicate leaves or petals—perfectly encapsulating the early spring feeling. The second design offers a dynamic, abstract take, featuring sweeping, fluid lines of dual-toned olive green layered over a creamy, opaque white base, providing artistic movement and high gloss for a fresh, elegant look.
To achieve the elegant 3D leaf French tip shown in the upper image, start by prepping the nail and applying a sheer, milky pink or nude base coat, mimicking the natural nail color for maximum contrast and elongation. The French tip shape itself is a key element; it’s less of a sharp crescent and more of a soft, rounded smile line. Apply the matte sage green shade to the tip, ensuring perfect coverage. The real artistry lies in the texture: using a thick, highly pigmented sculpting gel or 3D gel polish, the technician carefully places and molds small dollops of the same green onto the wet tip, shaping them with a fine dotting tool or detail brush into slightly raised, dimensional leaf silhouettes before curing. This adds depth and a beautiful tactile element that elevates the standard French manicure into wearable nail art. Expert tip: Ensure the initial green layer is fully cured before attempting the 3D work, and finish only with a matte top coat over the green sections to enhance the soft, velvety appearance of the dimensional leaves.
If abstract art is more your style, the wavy stripe design offers high impact with relative ease, provided you have a steady hand. Begin with two coats of a highly opaque, creamy white or soft ivory polish to ensure a crisp, clean canvas that makes the greens pop. For the stripes, select two shades of green—ideally a deeper forest or olive green and a slightly lighter, brighter moss green—both in a gel formula for better flow and control. Load a thin striping (or “liner”) brush with the darker shade first, creating flowing, parallel, S-curve lines across the nail plate. Before curing, immediately follow those dark lines with the lighter green using the same technique. This strategic layering allows the colors to slightly interact or meld together where they touch, creating a soft, dimensional depth and the illusion of continuous motion. Curing immediately after application preserves the crisp edges of the overall design. Finish with a durable, high-shine top coat to emphasize the fluid movement and rich color saturation, making this look a sophisticated interpretation of March greenery that lasts well beyond the holiday.
1,000% Surge! February Nails Ideas & Valentine’s Day Must-Haves

The ‘Sweetheart Stiletto’ trend is experiencing a monumental surge, merging the timeless elegance of the French manicure with the romantic drama of Valentine’s Day. This trend elevates the classic nude base and red tip by adopting sharp, pointed stiletto or sculpted almond shapes, emphasizing length and fierce femininity. To achieve this high-impact look, ensure the base is a flawless coverage nude or sheer pink builder gel. The red tip application is critical: rather than the standard rounded edge, use a fine detail brush to create an exaggerated, deep V-shape that mirrors the stiletto point. This sharp contouring gives the French tip a modern, luxurious feel. For the perfect polish application, opt for a highly pigmented, true crimson or candy apple red gel polish, ensuring crisp demarcation between the nude and red zones for a professional, expensive finish. The key to mastering this February must-have lies in the precision of that red line and the exaggerated pointed shape.
Elevating the basic red French is the integration of delicate 3D art, turning a simple accent nail into a piece of wearable jewelry. To replicate the elegant heart design seen near the tip, first complete your basic Sweetheart French base. Before applying the final top coat, use a specialized adhesive gel (or thick builder gel) to carefully map out the desired heart shape on the nude base near the cuticle or halfway down the nail bed. Instead of filling the heart with color, use gold micro-beads to trace the outline. Applying these tiny embellishments requires a wax picker or dotting tool and extreme patience; apply the beads to the tacky gel layer one by one. Once the heart is fully outlined, cure the nail to lock the design in place. For added dimensional effect, as shown on the index finger, a simple line of gold beads can trace the French tip itself, creating a luxurious border that catches the light.
For clients seeking maximum drama, focus on the statement accent nail featuring heavy ornamentation. This look requires a sturdy foundation, typically sculpted acrygel or builder gel, to support the weight of the embellishments. After shaping the sharp stiletto nail and applying the nude base, use a striping brush and highly viscous red gel to create the bold, hollow heart shape centrally located on the nail. Once cured, the real artistry begins: secure larger embellishments, such as pearls and sizeable gold spheres, using a strong jewelry glue or non-wipe top coat with a high viscosity. Expert tip: Always place the largest, central elements first. Build the surrounding cluster of smaller beads and pearls symmetrically around the base of the heart, ensuring each piece is fully encapsulated on the sides with the adhesive gel to prevent premature lifting. Cure the design thoroughly—sometimes multiple times—to ensure longevity. Finish by meticulously cleaning around the edges of the design, avoiding a top coat directly over the pearls to preserve their luster.
MARCH NAILS: THE #1 SPRING FLORAL TREND YOU NEED TO SCHEDULE

March marks the true transition into spring, and this micro-floral nail art perfectly captures that light, fresh energy. This specific trend, often referred to as “Ditsy Florals” or “Cottagecore Nails,” utilizes a sheer, milky base—think a soft, translucent white or a pale nude jelly polish—to give the effect of flowers floating just beneath the surface. The design is intentionally scattered and asymmetrical, featuring tiny, simple five-petal blooms. The color palette shown here is essential: sunny daffodil yellow and soft mint green, applied sparingly to maintain a delicate, rather than cluttered, appearance. This look is sophisticated, easy to wear, and serves as a subtle nod to springtime without being overwhelming, making it a professional yet playful choice for early spring appointments.
Achieving this high-end floral design relies on precision and thin application. Start by prepping the nails and applying one or two coats of a highly pigmented milky or jelly polish to create that soft focus base. The key tool for the flowers is either a small dotting tool or a fine-tipped detail brush (00 or 000 size). To create the petals, dip your tool into the chosen pastel shade and create five tiny dots in a circular arrangement, then use the very tip of the brush to gently drag the color inward slightly toward the center, forming a petal shape. Wipe your brush clean before switching colors (yellow to green). For the center of the flowers, use a contrasting color like pure white or a slightly deeper yellow dot. Expert tip: ensure the paint used for the flowers is thin enough not to create a raised texture, keeping the overall design flat and seamlessly integrated into the nail surface, which is crucial for achieving that desirable “floating” effect.
To ensure maximum longevity and visual impact, finish the design with a high-shine, UV-cured topcoat. The high gloss amplifies the translucent quality of the base and makes the pastel florals pop. While the featured design uses cheerful yellows and soft greens, this trend is highly adaptable; consider pale pinks and dusty blues for a different seasonal twist, or try mixing metallic gold accents for the flower centers for an added luxurious touch. For those with shorter nails, focus the flower placement near the cuticle or the free edge, using smaller dots to prevent the pattern from overwhelming the space. This soft design works beautifully on rounded shapes like almond or oval, as the curvature complements the organic flow of the floral pattern, creating an elegant and truly bespoke spring manicure.
THE CHICEST MARCH NAILS IDEAS FOR THE MINIMALIST
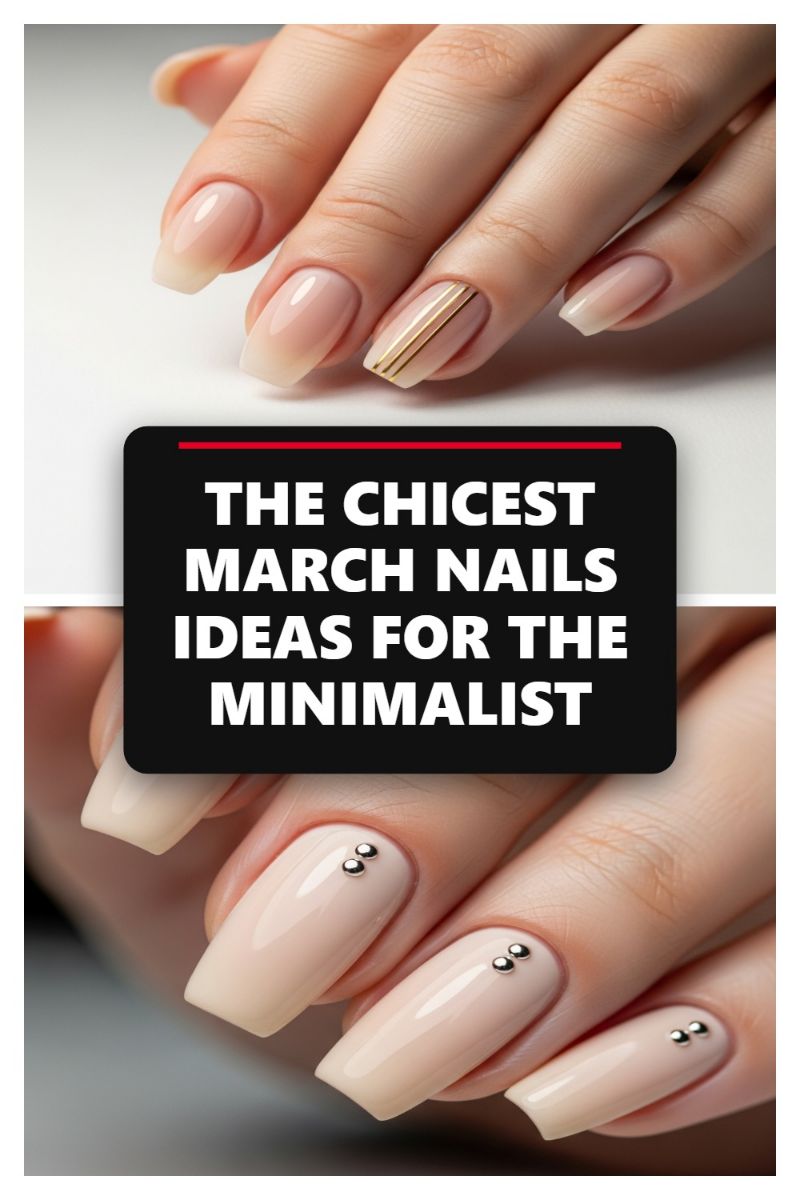
The “Chicest March Nails for the Minimalist” trend relies heavily on achieving a flawless, elevated nude foundation, perfectly bridging the transition from winter depth to spring lightness. This style offers versatility, utilizing both subtly sheer ‘lip gloss’ nail bases and solid, full-coverage opaque tones. For the sheer aesthetic, select a milky pink or translucent beige gel applied over a natural squoval shape, allowing the white free edge to peek through for an updated French look. Alternatively, the solid base requires an impeccable application of an opaque almond or blush tone, often paired with a medium-length square or tapered coffin shape for a modern, architectural feel. Expert application is paramount; ensure meticulous preparation, including precise cuticle work, and utilize a high-quality rubber base coat to build a perfect apex. This structural integrity guarantees that the final neutral shade appears rich, uniform, and incredibly sophisticated, setting the stage for the subtle embellishments.
The first key minimalist accent, as seen in the top look, involves strategic metallic detailing to create visual interest without overwhelming the canvas. This technique requires precision, often utilizing thin, fine striping tape or a dedicated ultra-thin liner brush (000 size) dipped in highly pigmented gold or silver gel paint. To recreate the three-line gold accent, ensure the lines are strictly parallel and spaced tightly. They should run vertically down the center of the nail bed, stopping short of both the tip and the cuticle. This intentional negative space around the lines keeps the design looking clean and airy, reinforcing the minimalist ethos. Cure the metallic paint thoroughly before applying a non-wipe top coat. Professional advice: When sealing, pay extra attention to capping the free edge to prevent the fine metallic detail from peeling, ensuring the crisp lines remain perfect for the duration of the wear.
The second distinct accent shown—the micro-stud embellishment—replaces complex artwork with thoughtful, tactile hardware. This technique adds a touch of luxe texture to the otherwise demure solid nude base. Select tiny, round chrome or silver caviar beads, ideally 0.8mm to 1.0mm in diameter. The placement is crucial for maximum impact: group them intentionally near the cuticle area rather than scattering them across the nail plate. The most popular arrangement, as pictured, involves grouping two or three beads slightly offset to one side of the nail. To ensure permanent adhesion, apply a small dab of clear builder gel or specialized gem adhesive to the exact placement spot, position the beads using a wax-tipped tool, and then flash cure. Finally, encapsulate the studs lightly with a topcoat, making sure the product flows around the base of the bead without fully submerging it. This preserves the sharp, metallic glint of the hardware, resulting in a durable and chic look perfect for welcoming early spring.
CUTE FEBRUARY NAILS: BOWS, LIPS, & EVERYTHING NICE!
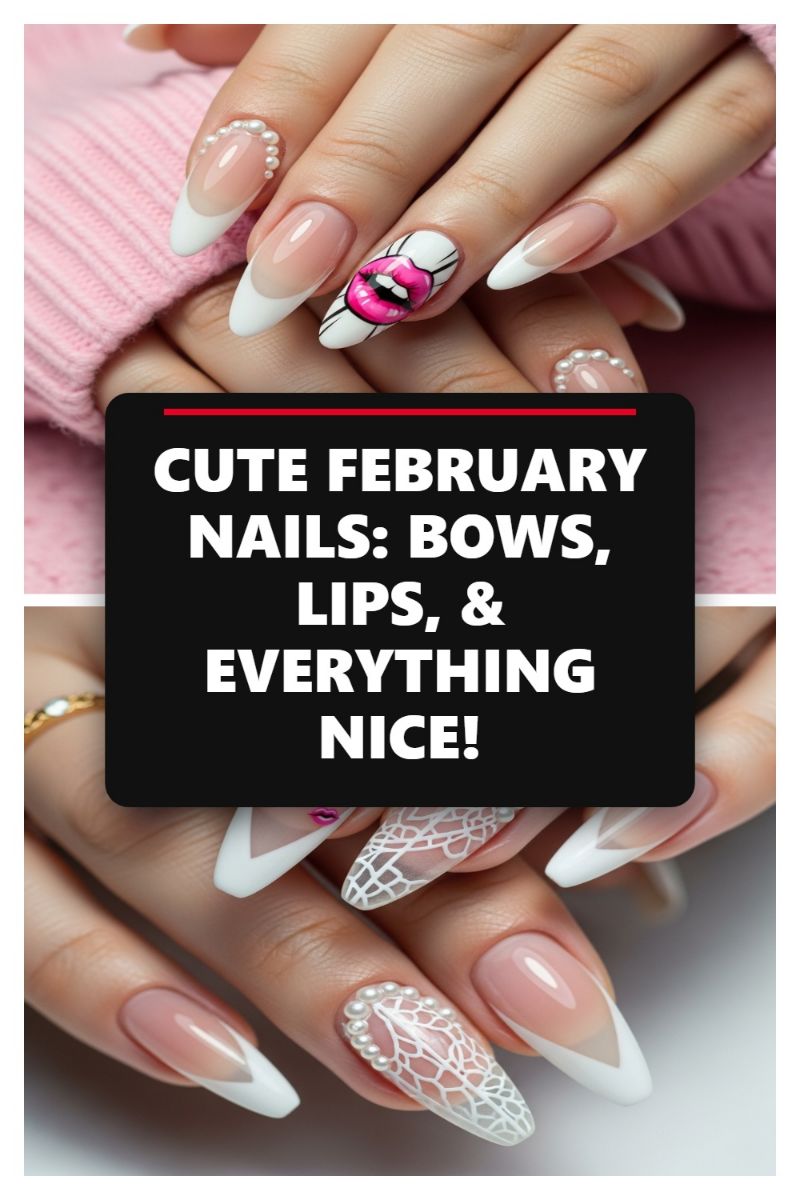
This look perfectly captures the playful yet sophisticated essence of February, moving beyond standard red and pink themes by utilizing intricate textures and bold pop-art accents against a classic French foundation. To recreate this delicate Valentine’s statement, start with a strong base, ideally using builder gel or acrylic, shaped into a long, dramatic stiletto or sharp almond. The critical element here is the duality of the French tip: notice the seamless blend of the soft, traditional curved tip contrasted with the edgy, geometric V-cut French tip. This variation keeps the long length dynamic and modern. For the base, select a high-quality, sheer milky pink or nude gel polish that offers full coverage of the nail bed while maintaining a natural, healthy glow before applying the crisp, opaque white tips. The deliberate contrast between the two French styles ensures the look feels less traditional and more high-fashion.
The true artistry lies in the intricate embellishments, which expertly blend ultra-feminine historical references (lace and pearls) with modern, cheeky flair (the lips). The lace effect, most visible on the ring finger, is best achieved using highly pigmented white gel paint applied via a fine detail brush or through advanced stamping techniques to mimic fine Venetian lace or a delicate doily pattern. This intricate texture demands patience and precision, ensuring the lines are thin and uniform. Complementing this texture are the pearl accents—tiny caviar beads or flat-backed half-pearls—meticulously placed along the cuticle line and used to frame the lace designs. Expert tip: always secure small three-dimensional embellishments with a specialized thick sealing gel or a focused bead of clear builder gel to ensure maximum wearability, prevent snags, and maintain a smooth profile, curing thoroughly after placement.
Finally, the unexpected inclusion of the graphic pop-art lips transforms this sophisticated manicure into a truly trendy February masterpiece. This accent nail, usually the index or middle finger, provides a vibrant shock of color against the otherwise neutral and white palette. Use highly pigmented gel colors—think electric pinks, ruby reds, and strong black outlines—to hand-paint a stylized, glossy lip design reminiscent of comic books. If hand-painting intricate graphics is too challenging, source high-quality nail decals or water transfers designed for pop-art motifs. This entire manicure serves as a highly adaptable transitional style: for the beginning of March, simply swap the lips accent for a delicate pastel bloom or a subtle green foil accent, maintaining the elegant lace and pearl framework for continued spring sophistication without losing the luxurious detailing.
STOP SCROLLING! THE 2026 FEBRUARY NAIL TREND YOU NEED TO TRY

This trend, perfectly capturing the essence of romantic sophistication, updates the classic French manicure by utilizing a dramatic almond or stiletto shape paired with a striking, deep-red polish. The foundation of this look begins with meticulous preparation of the natural nail and the application of a sheer, milky pink or nude builder gel, ensuring maximum length and structural integrity. Once the desired base shape is established, the tips are defined using a vibrant, true-red shade. Unlike the traditional curved French line, this trend features two distinct variations: a sharp, angular V-shape that dramatically elongates the fingers, and a playful heart-shaped tip. For the sharp V-tip, precision is paramount; use a long, thin striping brush (often referred to as a “liner brush”) dipped minimally in gel polish to paint two clean, straight lines meeting in a crisp point at the center of the tip. Cure this layer fully before moving on to sealing or detailing.
To elevate this romantic style, integrate strategic 3D embellishments, as showcased on the accent nail. This look utilizes delicate gold micro-beads and a single, coordinating rhinestone or pearl placed at the cuticle line. To securely affix these tiny elements, apply a small dot of thick clear builder gel or specialized jewelry glue where the design will sit. Using a wax picker tool or damp dotting tool, carefully place the gold beads along the border of the nail near the cuticle, forming a graceful arch. The single central gem provides a focal point. Curing immediately after placement prevents the beads from sinking or shifting. Expert advice suggests applying a thin layer of non-wipe top coat over the entire nail, carefully floating it over the 3D elements without completely submerging them, which maintains the texture while ensuring long wear and preventing snagging.
The whimsical heart-tip variation is slightly more intricate but offers a truly customized February look. After curing the nude base, use a small detail brush to outline the perimeter of the tip with the deep red polish, leaving a gap in the center. To form the heart shape, instead of connecting the lines straight across, draw two slight curves inward from the sides, meeting at a soft “V” in the center where the heart dips. Fill in the red area completely, ensuring the negative space remains clean and mimics a perfectly centered heart sitting on the nail bed. Alternatively, a simpler approach involves drawing a full red tip and then using a fine-tipped brush dipped in acetone or a nude polish to “swipe out” the heart shape while the red polish is still wet or uncured. This reverse technique requires swift execution but often results in softer edges. Finish all nails with a high-gloss top coat for maximum visual impact, creating the perfect look for any Valentine’s or early spring occasion.
THE ‘GLAZED HEART’ LOOK: NEW CUTE FEBRUARY NAILS OBSESSION
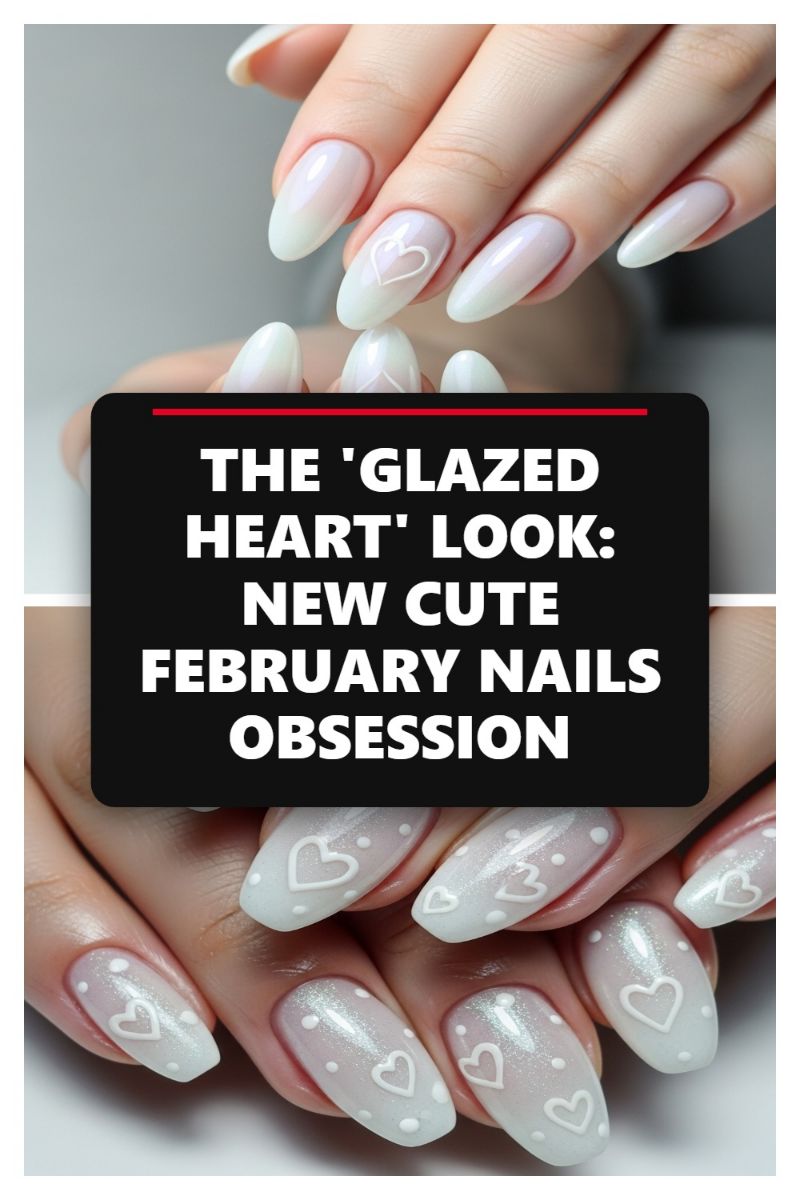
The ‘Glazed Heart’ look masterfully merges two major trends: the ethereal, pearlescent finish of the globally adored ‘glazed donut’ aesthetic with delicate, textured nail art perfect for the romantic season. This trend relies on contrast and subtlety. The base typically features a translucent milky white or sheer pale pink gel, which is then overlaid with an ultra-fine iridescent chrome powder—often referred to as pearl or aurora powder—to give it that signature luminous glow. The magic, however, lies in the artwork. Using a thick, highly pigmented white 3D art gel or structural gel, manicurists meticulously paint raised outlines of small hearts and accompanying micro-dots. The crucial element here is the texture: while the base shimmers brightly, the dimensional art is cured without an additional shiny topcoat, resulting in a beautiful matte or textured relief that pops dramatically against the slick, glossy background. This style is best executed on long almond or oval shapes, which accentuate the dreamy quality of the design.
To recreate this ethereal manicure, start by shaping the nails perfectly and prepping the cuticle area, as sheer designs leave no room for error. After applying your base coat, use a sheer jelly polish or a milky builder gel to create the soft, semi-transparent canvas. Cure this layer fully, then apply a non-wipe top coat and cure again. While the top coat is still warm, gently rub the pearl or chrome powder across the entire nail surface using a sponge applicator or silicone tool until the high sheen is achieved. Brush away the excess powder and seal the entire nail with a thin layer of topcoat to secure the glaze. Next, using a dedicated 3D or art-specific white gel that holds its shape, load a fine detail brush. Slowly and carefully draw the outlines of small hearts and place the polka dots, ensuring the gel is thick enough to create that coveted raised effect. It is essential not to use standard polish for the art; only specialized sculpting gels will maintain the necessary dimension.
For a professional finish, avoid applying any further topcoat over the raised art after it has been cured. This preservation of the matte or slightly textured finish on the hearts is what gives the look its depth and sophistication. Expert tip: if you want a slight variation, try applying a velvet or matte top coat *only* over the finished 3D art for a softer, more fabric-like texture, while maintaining the high-gloss chrome on the rest of the nail. This design is highly customizable; while white is the classic choice, swapping the 3D art for a soft rose gold or pale lavender gel can introduce subtle color variation without compromising the overall dreamy, high-fashion aesthetic. This is the ultimate February nail statement that moves seamlessly from day-to-day wear to special date nights.
SHORT NAILS, BIG IMPACT: PINK FEBRUARY NAILS EDITION
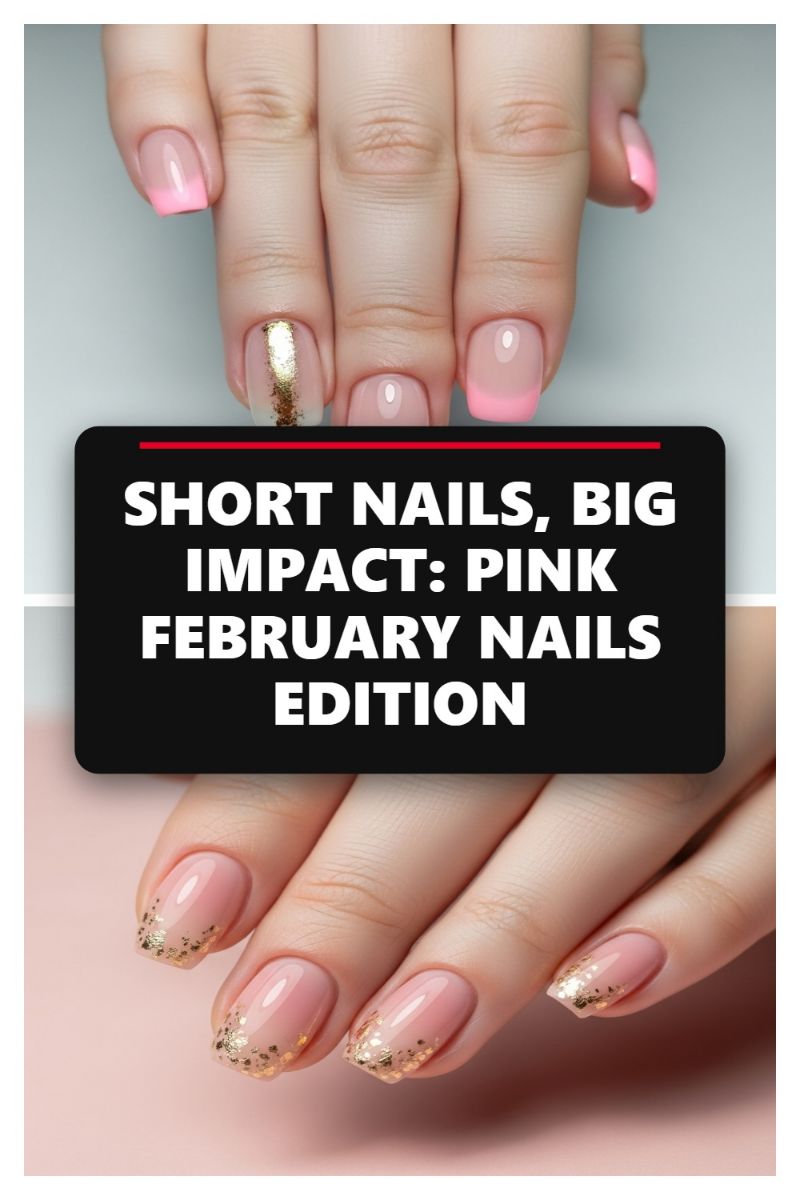
The belief that short nails limit creativity is officially debunked by this vibrant, yet sophisticated “Pink February Nails” look. Centered on short, perfectly manicured squoval shapes, this style relies on a soft, universally flattering base—a sheer milky blush or nude-pink that instantly cleanses and brightens the nail bed. This subtle foundation serves as the perfect canvas for high-impact accents. The power of this design lies in its duality: incorporating a bright, bubblegum pink French tip on some digits for a clean, graphic pop, while utilizing luxurious gold foil accents on others to elevate the overall aesthetic from simple to statement-making. This combination is ideal for clients seeking a look that whispers romance but shouts confidence, moving past traditional deep winter tones and into fresh, optimistic pink territory for the transition into spring.
Achieving the precise detailing of this dual-design manicure requires mastery of both classic French techniques and modern material application. For the bright pink tips, opt for a crisp application using a fine liner brush or a specialized French tip stamper if doing a traditional line. Alternatively, for a softer effect as seen in some featured nails, execute a delicate pink ombré blend using a sponge, ensuring the transition from nude to pink is seamless at the free edge. The gold accents, however, are the true focal point. For the dramatic vertical stripe, press loose gold leaf or specialized foil transfer onto a tacky layer of gel, running the foil brush down the center of the nail, then peeling away to leave a bold, irregular streak. For the scattered gold tip effect, adhere small pieces of gold flakies or larger glitter near the free edge before curing, then float a clear builder or top coat over them to fully encapsulate the texture, ensuring a smooth, long-lasting finish that won’t chip or snag.
To truly customize this trend for early March, consider shifting the balance of the elements; if the bright pink French feels too intense for daily wear, swap it for a softer rose gold tip or a delicate pale mauve. Expert application demands absolute attention to the cuticle line—a flawlessly executed prep is essential, as the sheer base color highlights any imperfections. Furthermore, regardless of whether you choose the vertical stripe or the scattered flake design, always finish with a high-shine, non-wipe gel top coat. This not only seals the design but enhances the glassy, domed effect crucial for making shorter nails appear perfectly structured and polished. This method proves that size is secondary to technique and well-placed, high-quality sparkle, making it a powerful statement look.
7500% GROWTH TREND: WHY PINK VALENTINE NAILS ARE DOMINATING
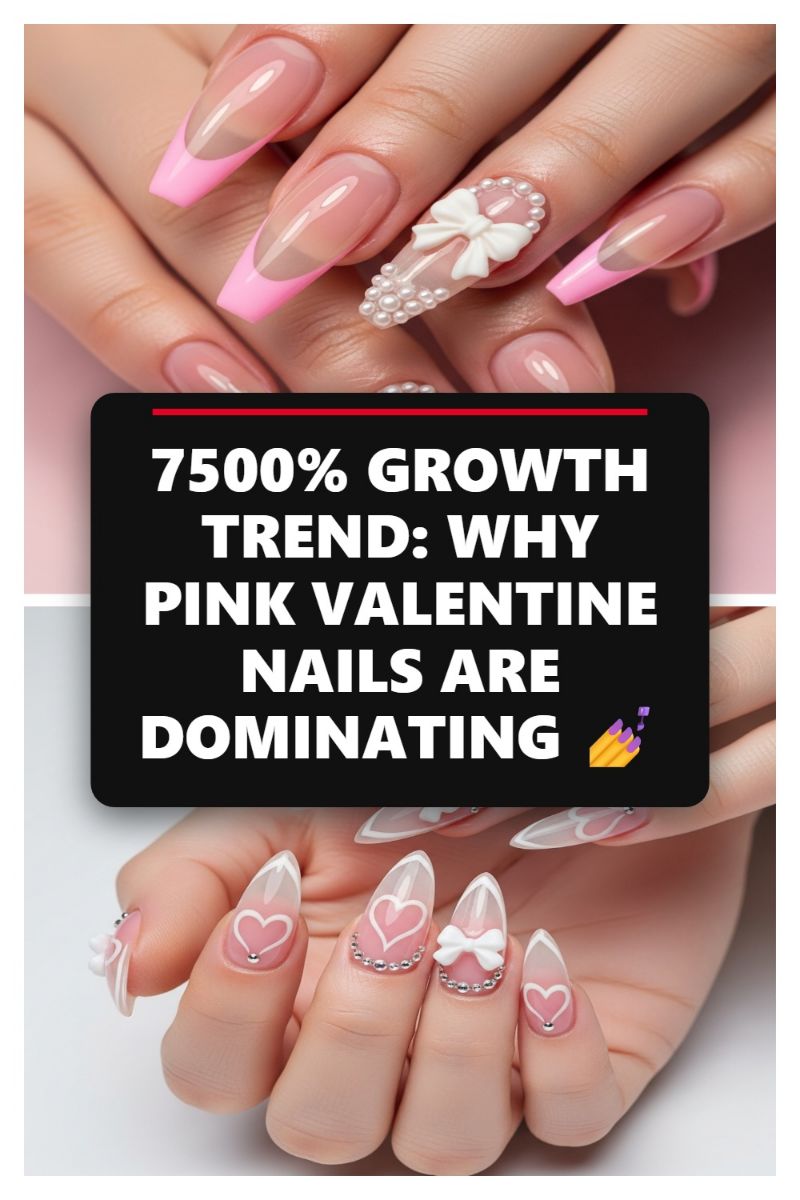
The reported 7500% surge in popularity for ‘Pink Valentine Nails’ confirms that this ultra-feminine, romantic aesthetic is defining the early months of the year. This trend blends elements of ‘Dollcore’ and ‘Coquette’ styles, characterized by structured, long silhouettes—typically coffin or almond shapes—paired with sheer, milky pink or nude bases. The foundation of this look is its deliberate softness, allowing the decorative accents to truly shine. To replicate the high-fashion pink French seen in the upper image, ensure the base coat is a high-quality sheer coverage pink gel. The tip requires an exceptionally opaque, bright bubblegum pink, applied with meticulous precision to create a deep, crisp smile line. For the full romantic effect, integrate prominent 3D elements, such as the matte white resin bows and bordering pearl accents, which elevate the manicure from simple art to wearable sculpture. These statement pieces are essential for capturing the dominating, maximalist spirit of this trend.
For a more stylized, abstract romantic approach, focus on the sheer heart and rhinestone detailing evident in the lower image. This variation uses a highly translucent jelly pink base to achieve a glass-like finish on the elongated almond shape. The heart outlines are drawn using an ultra-fine liner brush and crisp white gel polish, often leaving the center of the heart negative or filled with the sheer base, creating visual depth. To incorporate the detailed border work, small flat-back rhinestones or micro-beads should be applied along the perimeter of the nail or around the heart shape. For maximum sparkle and longevity, use a gem or rhinestone placement gel—a thicker, non-wipe formula—to anchor the stones firmly before curing. Ensure you ‘frame’ the rhinestones by carefully brushing top coat around, but not over, the gems, which maintains their sharp facets and brilliance.
The key to the structural integrity of these dominating pink designs, especially those involving significant 3D elements like large bows or dense pearl clusters, lies in proper adhesive application. Traditional top coats will not suffice. For heavy charms, utilize a clear builder gel or hard gel to create a robust mound where the charm will sit. Press the charm firmly into the uncured gel, flash cure to secure the position, and then complete the full cure cycle. This process prevents lifting and ensures the charm stays intact for weeks. Finishing the look requires a high-gloss, non-yellowing top coat everywhere except the 3D accents (which should ideally be matte or left unsealed if they are already resin), creating a striking contrast between the glossy base and the textured ornamentation that makes this trend so visually captivating.
FEB-TO-MARCH TRANSITION: GOLD LINES & RED HEARTS LAST CALL!

As we shift from the deep, sultry reds of Valentine’s Day into the lighter, refreshing palettes of early spring, this “Gold Lines & Red Hearts” design serves as the perfect transitional manicure. It masterfully balances residual commitment to romance (the subtle red hearts) with refreshing sophistication (the sheer nude base). The foundation utilizes a milky neutral or sheer pink gel polish, providing a clean, elongated base that minimizes the visual distraction of grow-out while allowing the intricate metallic details to truly pop. This design is highly sophisticated because it expertly utilizes negative space—the fine, geometric gold lines are not meant to fill the entire nail but rather to frame and segment the nude canvas, offering an abstract, almost architectural feel to longer shapes like coffin or ballerina.
Achieving the razor-sharp precision of the gold lines requires advanced technical skill. For a crisp, uniform appearance, professional nail technicians often rely on ultra-thin metallic stripping tape, applied directly to the cured base color before the final topcoat, and meticulously trimmed at the edges. Alternatively, the look can be hand-painted using a highly pigmented gold chrome gel liner and an ultra-fine detail brush (like a 000 or a specialized striping brush). The lines must be strategically placed—often diagonally, intersecting, or in symmetrical crossing patterns—to maintain a modern, elevated aesthetic without looking cluttered. For the final touch, the small, saturated red heart elements should be applied using a highly pigmented gel polish or even a slightly raised 3D effect (using builder gel) and placed intentionally on only a few accent nails (like the ring finger and middle finger) to keep the overall effect chic rather than overtly thematic.
This particular trend offers exceptional versatility for clients who want their manicure to last well into the beginning of March. The sheer nude base is incredibly forgiving, minimizing the visual effect of nail growth. Expert tip: if you want to adapt the look past mid-March without a full salon overhaul, the design transitions beautifully by simply removing the heart elements on the accent nails and replacing them with a small, minimalist spring motif like a tiny white dot, a chrome detail, or a small pearl. The combination of the neutral base and the durable metallic lines is engineered for maximum wearability, making it the ideal choice for those who want to bridge the seasonal gap with style and longevity.
COQUETTE PINK: THE VIRAL FEBRUARY AESTHETIC WE’RE OBSESSED WITH
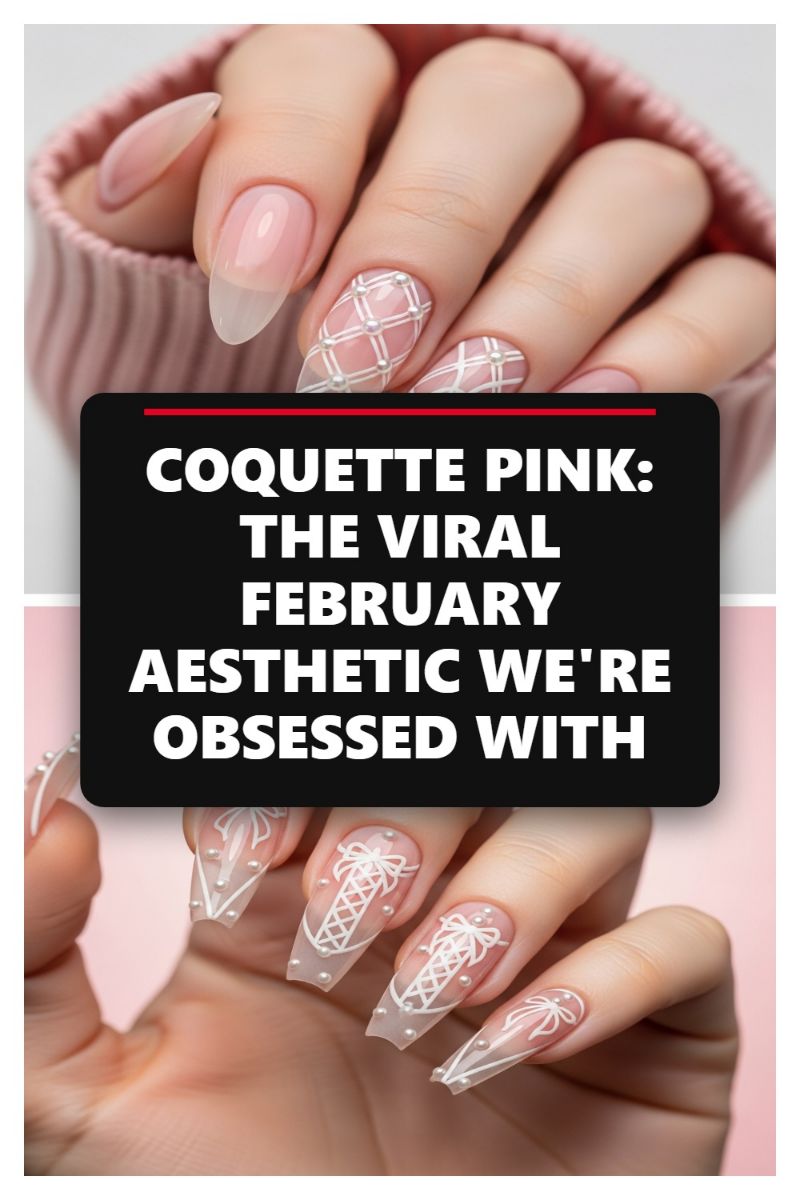
The Coquette Pink aesthetic is dominating the early spring season, offering a hyper-feminine, romantic counterpoint to the typical dark winter manicure. This trend is characterized by a soft, sheer pink or milky nude base, layered with delicate white artistry reminiscent of lace, bows, and corsetry, often accented by small pearl embellishments. As seen here, the trend translates beautifully across various nail shapes, ranging from sophisticated short almond nails featuring a precise quilted lattice pattern, to dramatic, long tapered square tips adorned with intricate white bows and elegant corset lacing designs. The visual appeal lies in its detailed texture and soft coloration, evoking a sense of dreamy, vintage elegance and luxury, making it the perfect manicure for Valentine’s Day celebrations and the transition into spring pastels. Achieving this highly detailed look requires precision and the right products to ensure lasting wear and maximum impact. Start by prepping the natural nail and applying a base of sheer pink builder gel or two coats of a highly translucent milky pink polish to create that healthy, diffused foundation—a key element of the aesthetic. Once cured, the white detailing must be executed using a highly pigmented white gel paint and a fine liner brush (00 or even thinner is recommended). For patterns like the quilted lattice, aim for perfect symmetry, using a light hand and steady pressure. The small pearls, which add that essential 3D element, should be carefully applied using either nail glue or a dab of thick clear builder gel at the intended intersection points of the design, ensuring they are securely fixed before the final top coat is applied. For those attempting the elaborate bow and lacing motifs, sketch out the central design in pencil on paper first to perfect your stroke work. When applying to the nail, start with the outer boundary of the lace design, then fill in the crisscross lines for the corset effect. To master the Coquette Pink look, focus on balance: if the design is intricate (like the corset), keep the remaining nails simple, perhaps featuring just one elegant bow or a plain French tip. The choice of nail shape, while flexible, greatly impacts the overall vibe; long coffin or stiletto shapes enhance the dramatic, doll-like quality, while squoval or almond shapes keep the aesthetic chic and wearable daily. Finally, use a resilient, non-wipe high-shine top coat, taking extra care to encapsulate the tiny pearls without dulling their luster, which is crucial for maintaining a flawless manicure that lasts for weeks.
MARCH NAILS ALERT: THE SPRING LOOK THAT JUMPS 800% IN SEARCH!
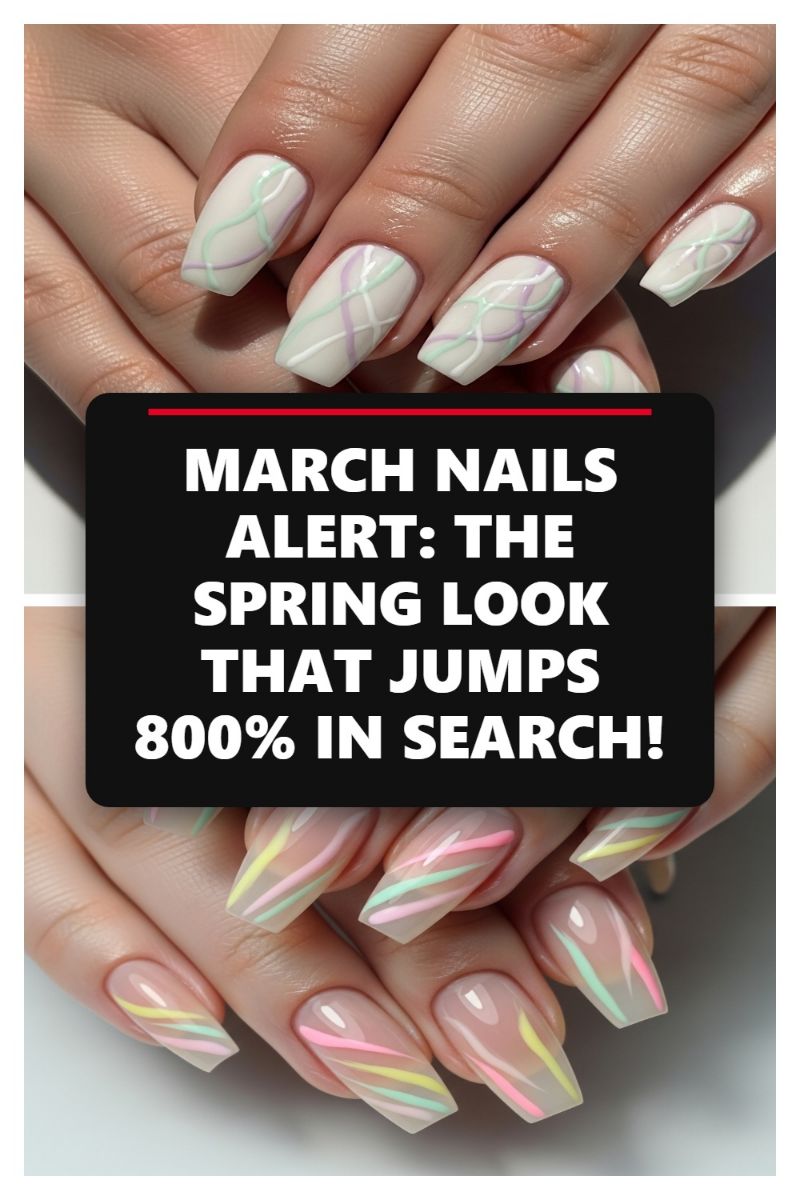
As the calendar flips to March, consumer search data confirms a massive 800% surge in interest for these abstract, pastel line designs, positioning this trend as the undisputed star of early spring nail art. This look beautifully bridges the gap between structured winter styles and the free-flowing creativity of warmer months. The versatility of the design is showcased in the image: it can be executed on a clean, opaque base (like the creamy white coffin nails pictured) using light, ethereal criss-cross patterns in colors like lavender and mint for maximum contrast and readability. Alternatively, the design thrives on a sheer, milky nude base, utilizing a ‘negative space’ technique with bolder, overlapping diagonal lines in brighter pastels (think lemon yellow, coral pink, and robin’s egg blue) for a subtle, glassy effect that looks effortlessly chic on longer, tapered shapes.
To perfectly execute this intricate line work, precision tools are non-negotiable. Swap out standard brushes for specialized long-bristle striping brushes—the longer the bristles, the smoother and more continuous your curve will be. When using highly pigmented gel art paints, ensure your brush is adequately but not excessively saturated to prevent the lines from bleeding or becoming too thick. For the multi-colored intersecting patterns, it is crucial to cure each color line individually, especially if they overlap. This locks the line in place before applying the next, ensuring the edges remain crisp and defined, preventing the colors from mixing into muddy hues. For the popular sheer base style, focus on placing the lines deliberately asymmetrical, perhaps starting thicker near the cuticle and tapering towards the free edge, which elongates the nail bed beautifully.
Expert nail technicians recommend choosing colors with similar undertones (cool pastels vs. warm pastels) to maintain cohesion, even with multiple colors involved. For an ultra-modern finish, consider adding a touch of silver or iridescent micro-glitter to just one of the intersecting lines—this subtle metallic element catches the light and adds dynamic movement to the overall design without overwhelming the delicate artistry. Finally, seal your masterpiece with a high-quality, non-wipe top coat. Because this design relies on layered product applied over the base, a professional seal is vital to protect the delicate lines from chipping and maintain that coveted high-gloss spring shine for up to four weeks. This sophisticated, yet playful, abstract look is the essential trend to debut this March.
THE MARCH NAILS IDEAS SPRING TREND THAT IS INSTANTLY REFRESHING

The traditional French manicure receives a powerful springtime update with this ‘Aqua Splash’ rendition, perfect for transitioning from winter’s deep hues to March’s brighter palette. To recreate this instantly refreshing look, begin by shaping your nails into a sharp almond or tapered oval, which naturally enhances the elegance of the color-blocked tip. The foundational step is paramount: apply a sheer, milky pink or nude builder gel/polish base. This semi-transparent layer must be cured/dried completely, as it provides the essential contrast against the vibrant tip color, giving the illusion of extended, healthy nail beds. The core technique involves replacing the standard white tip with a creamy, bright aqua or robin’s egg blue polish. Using a thin nail art brush or a French tip guide sticker, meticulously paint the smile line deep and pronounced. Consistency is key; aim for an opaque finish on the blue tip while maintaining perfect symmetry across all nails. This foundational design alone offers a chic, clean spring aesthetic, but the variation shown in the image elevates the trend considerably.
To move into the advanced ‘Speckled Confetti’ variation—which adds texture and modern depth—you will need a specialized topcoat or a mix of black and silver glitter suspended in clear polish. After your base aqua French tip is fully cured, focus the speckled application primarily on the natural nail bed area, slightly blending it down towards the brightly colored tip without obscuring it completely. The goal is an organic, scattered appearance, mimicking a chic quail egg effect or fine metallic sprinkles. If you are mixing your own speckle polish, use ultra-fine black dust and iridescent silver flakes, ensuring the particles are randomly distributed for a more abstract look. For controlled placement, dip a small dotting tool into black polish and randomly stamp tiny, imperfect dots across the nude section. Follow this with a few strategically placed silver flakes to catch the light. The deliberate scattering of dark and light particles against the sheer nude base makes this design feel artisanal and unexpected, steering clear of overly symmetrical patterns.
To ensure this vibrant and detailed manicure lasts through the month, finish the look with a high-quality, non-yellowing UV/LED gel topcoat. Brush the topcoat over the entire nail, paying special attention to capping the free edge (the very tip of the nail) to seal in the colored polish and prevent chipping. Expert advice suggests keeping this specific design color-focused and minimalist in terms of additional embellishments; the texture from the speckles provides enough interest. If aqua isn’t your hue, try swapping it for a soft, pastel pistachio green or a light lavender. This trend is versatile and looks particularly striking when paired with simple silver or gold jewelry, allowing the fresh blue and textural details to remain the undeniable focal point of your spring styling.
FORGET RED, HELLO PURPLE! FEBRUARY NAILS THAT ARE UNFORGETTABLE
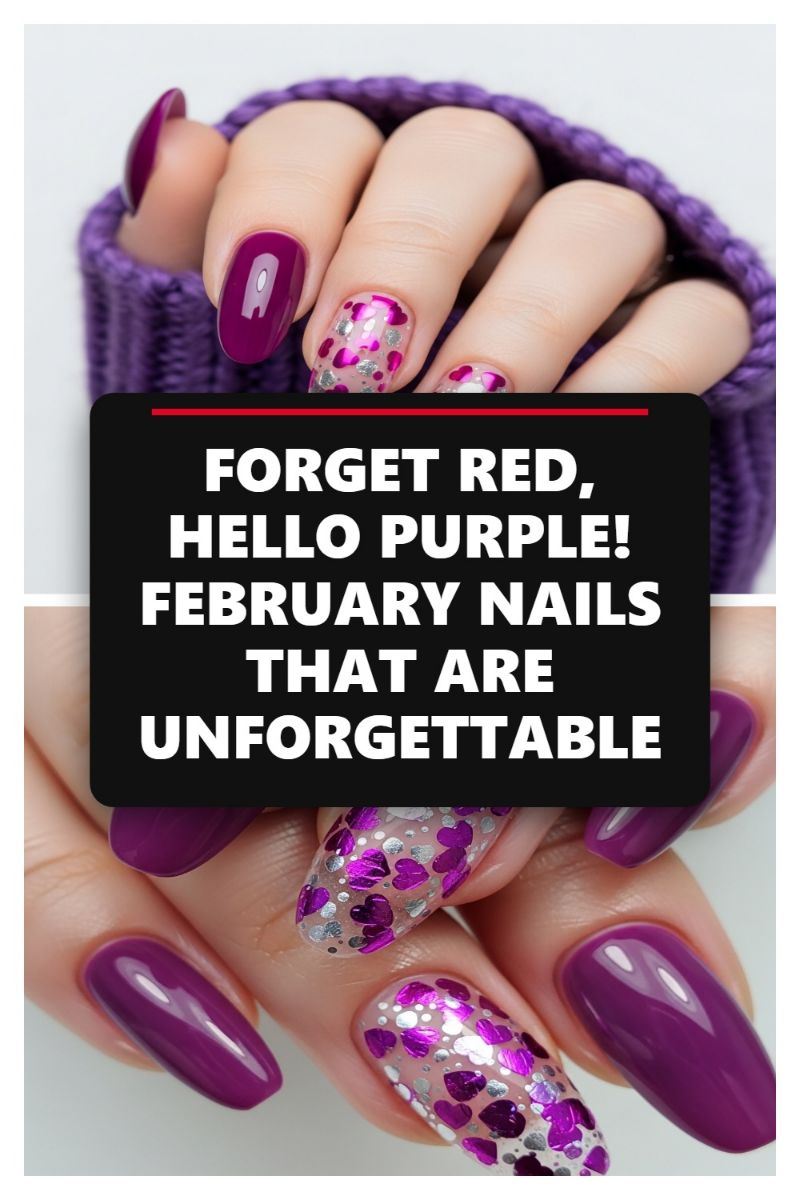
While February often defaults to bright reds and classic pinks, the modern romantic opts for a deeper, more sophisticated palette. This design anchors itself in a highly pigmented, glossy aubergine or plum shade, offering a luxurious contrast to the typical Valentine’s aesthetic. To achieve this rich depth, preparation is key: ensure your nails are perfectly shaped (the image shows a medium-to-long rounded oval/almond shape which enhances the elegance of the dark color) and apply a high-quality, opaque UV-cure gel. We recommend applying three thin coats of the purple shade rather than two thick ones; this ensures even color payoff and prevents premature chipping or bubbling. The high-shine finish is essential to this look, requiring a non-wipe, scratch-resistant top coat cured for the maximum recommended time to maintain that mirror-like gleam for weeks.
The true ‘wow’ factor of this manicure lies in the statement accent nails. The technique requires careful encapsulation of holographic confetti over a clear or sheer nude base. For the accent nail, start with a single layer of clear builder gel or a slightly thicker top coat. Using tweezers or a fine dotting tool, carefully pick up the large, vibrant purple heart confettis and strategically place them, ensuring they overlap slightly with the smaller silver holographic flecks to create maximum visual depth. The key is to achieve high density without clustering the pieces on the edges. Once the desired coverage is met, apply a final, generous layer of builder or thick clear gel to completely seal and smooth the surface. This crucial step prevents the edges of the glitter pieces from catching or lifting, transforming a chunky confetti into a high-end, durable piece of nail art.
To ensure this stunning purple statement transitions smoothly from a festive February look into a chic early March trend, consider the overall balance. If you prefer a shorter nail shape, stick to the deepest purples, as long shapes naturally carry off high-shine color better. For expert longevity, always cap the free edge meticulously with both the color coats and the final top coat—especially on the accent nails where the encapsulation process demands a perfect seal. Maintain the vibrancy by applying high-quality cuticle oil daily, which keeps the surrounding skin healthy and minimizes the appearance of grow-out. If purple isn’t your primary tone, this look can be easily adapted using deep sapphire blues or rich forest greens, keeping the contrasting heart-shaped confetti for that playful yet sophisticated romantic touch.
SIMPLE FEBRUARY NAILS: ELEGANCE OVER EXCESS (THE MINIMALIST GUIDE)
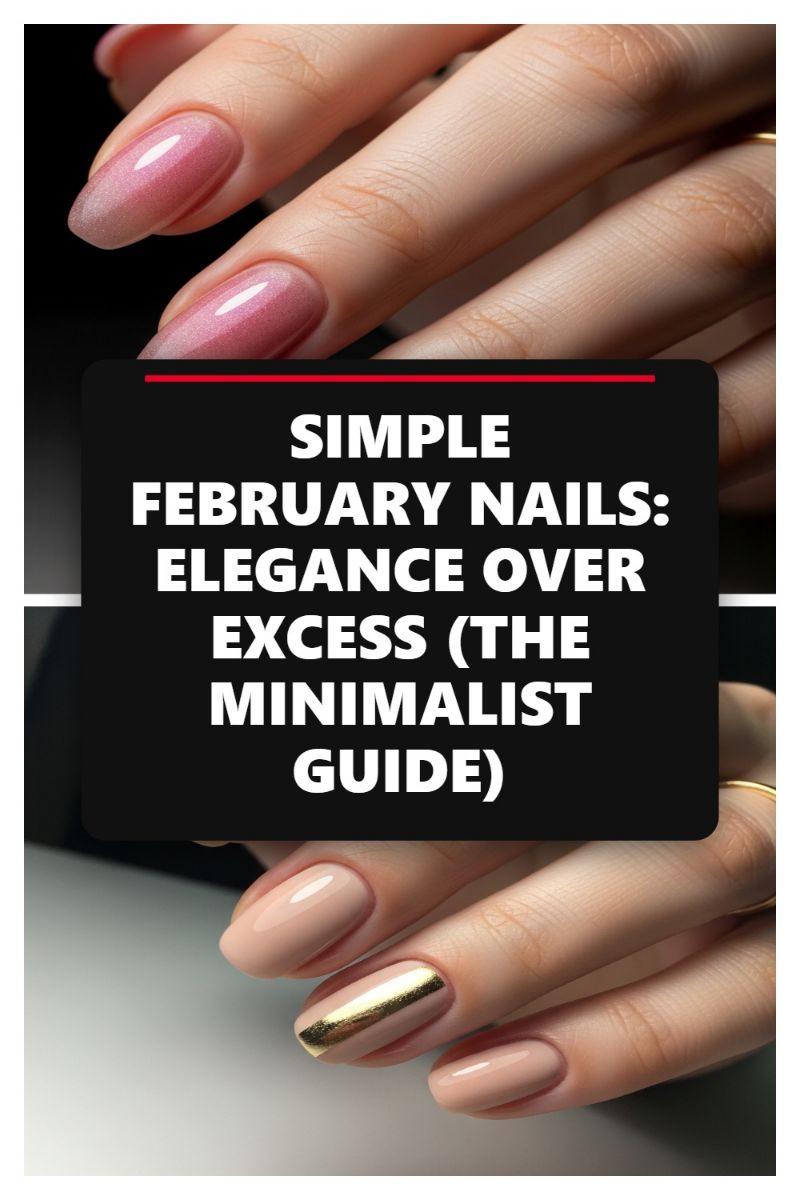
February often dictates a turn toward romantic reds and bold pinks, but the modern trend pivots toward a quieter, more sophisticated approach: the minimalist mani. This movement, encapsulated perfectly in the principle of ‘Elegance Over Excess,’ centers on impeccable execution, subtle color palettes, and one carefully placed, high-impact detail. To achieve this look, start with a perfectly manicured nail bed. The ideal base is a warm, dusty nude or greige—a shade that complements the natural tone of the skin without drawing undue attention. Shape is critical here; a refined oval or soft almond shape provides the necessary canvas for elegance. The key element in this style is the single accent nail, exemplified by a crisp horizontal band of gold foil applied over the nude base, typically placed on the ring finger. This metallic accent should be a block of color, not glitter or overly textured, ensuring the design remains clean, architectural, and strikingly modern.
For those seeking a subtle nod to classic February romance, the minimalist guide suggests incorporating sheer, iridescent pinks rather than opaque creams. The upper manicure in this design demonstrates a masterclass in this technique: a sheer rosy pink base infused with a fine, reflective shimmer or an ultra-subtle magnetic/cat-eye effect. To recreate this depth, begin with a sheer pink builder gel or a milky base coat. Follow with a thin layer of specialized shimmer gel or finely milled chrome powder lightly dusted and burnished onto a non-wipe topcoat layer. The objective is to create an effect that catches the light like quartz or opalescent silk—a glossy, glowing finish that adds dimension without clutter. Expert application requires careful attention to the apex and cuticle line, ensuring the transparency of the base perfectly blends with the natural nail for that flawless, grown-out-free aesthetic.
Maintaining the integrity of the minimalist trend requires superior finishing techniques. Always seal the manicure with a high-gloss, UV-cured topcoat formulated for maximum shine and resistance to chipping. For the metallic accent, consider encapsulating the gold foil within a structured gel layer to prevent lifting and maintain its razor-sharp edge. This style is not about complexity of design but quality of finish; therefore, hydration is paramount—recommend your clients regularly apply cuticle oil to emphasize the health and cleanliness of the nail bed, making the polish appear even more luxurious. This simple yet effective approach is perfectly positioned for the transition months, offering a refined polish that feels polished and intentional, providing a timeless alternative to fleeting seasonal trends.