Discover 20+ stunning DIY Valentine’s Day decor ideas, ranging from chic minimalist setups to vibrant maximalist displays. Find easy hacks for every room, including budget-friendly crafts, romantic table settings, and personalized gifts.
MINIMALIST V-DAY: HOW TO DECORATE WITHOUT THE CLUTTER

The core principle of a minimalist Valentine’s Day approach is maximizing impact through intentional scarcity. If the thought of streamers and heart-shaped pillows makes you shudder, look no further than strategic placement and quality over quantity. Begin by completely clearing the space you intend to decorate—a clean slate is essential for the minimalist aesthetic, as evidenced by the bright white surfaces in the inspiration image. Next, introduce color through natural elements. Instead of relying on cheap plastic garlands, select a single, striking element like fresh red tulips or roses placed in a simple, neutral vase. This brings the necessary warmth and romance (the vibrant red) without introducing visual noise. Ensure the rest of the setting remains starkly neutral, utilizing white, gray, or wood tones, allowing the deep red to become the undeniable focal point. For a workspace or console, focus on vertically oriented items, like a stack of white books or the clean lines of a simple vase, to draw the eye upwards and maintain an organized structure.
To successfully integrate the theme without sacrificing modern sophistication, experts recommend leveraging functional items that double as decor. Notice how the image subtly weaves in romantic elements at the desk level. The small, heart-shaped objects—a coaster and a tiny decoration next to a notebook—serve as subtle, high-impact nods to the holiday. This is far more effective than cluttering the space with non-essential trinkets. Choose everyday items in your holiday palette: maybe swap your standard mug for a patterned one with a subtle red accent, or use a red pen exclusively during February. A practical ‘how-to’ involves limiting your romantic color palette (usually red or pink) to just 5-10% of the visual surface area in the decorated zone. By focusing on accessories that are already part of your daily routine—like a coaster beneath your morning coffee or a clean notebook for jotting down thoughts—you celebrate the holiday efficiently and without the post-V-Day cleanup headache associated with traditional maximalist decor.
Finally, establish a balanced vignette that highlights simplicity and symmetry. On the upper shelf, the two tulips break perfect symmetry slightly, giving the arrangement an organic, lived-in feel, while the lower desk area maintains a clean horizontal line. When composing your own vignette, place functional electronics (like a sleek laptop) as grounding elements. Then, offset the metal or plastic surfaces with soft textures, such as a velvety heart ornament or a natural ceramic coffee cup. This contrast prevents the minimalist setup from feeling cold. The key is curating small, high-quality, emotionally resonant items. Look for subtle details—a red tab on a journal or a small heart paperweight. These deliberate details convey romance and effort, proving that elegance and feeling do not require overwhelming volume, making for a truly clutter-free, chic Valentine’s display.
DITCH THE RED! CHIC PINK & GOLD THEME FOR A SOPHISTICATED V-DAY
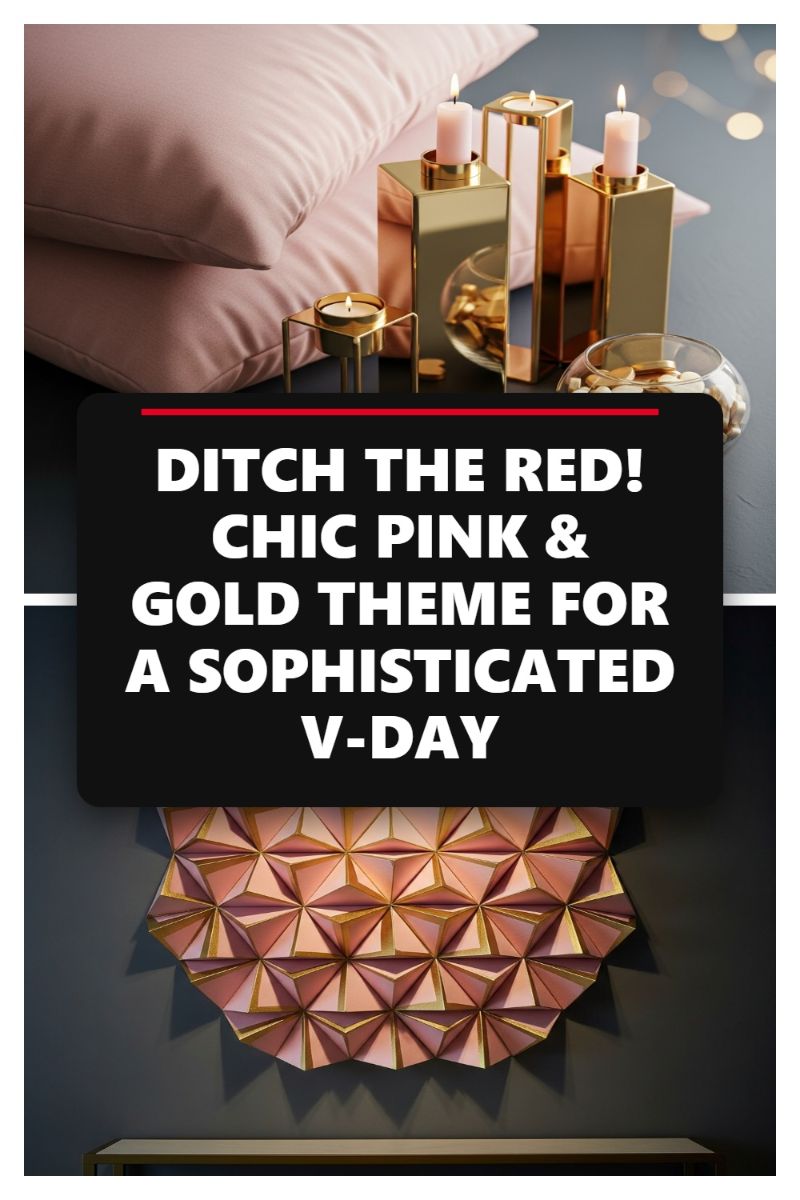
Ditch the predictable crimson and embrace a palette that whispers romance rather than shouts it. The key to achieving a truly sophisticated Valentine’s ambiance is swapping traditional red for a chic combination of blush pink and polished gold. Start with your foundational textures. Layering soft, dusty pink textiles, like plush velvet or linen pillows, instantly injects warmth and subtle color into a space. This softer hue pairs exquisitely against a deep, dramatic backdrop—think charcoal gray, slate, or even navy blue walls—creating a high-contrast yet elegant foundation. By grounding the decor with subdued textiles, you ensure the metallic accents that follow truly pop and reflect light beautifully, setting the stage for an elevated V-Day celebration.
The magic of this theme lies in the strategic use of reflective gold and rose gold metallics. Instead of using scattered confetti, incorporate structural gold elements that serve both form and function. Invest in sleek, geometric candle holders finished in polished gold. These mirrored surfaces not only anchor the decor arrangement but also multiply the glow of ambient candlelight, dramatically enhancing the romantic atmosphere. To achieve a layered look, vary the size and height of these metallic pieces. Introduce smaller, more delicate gold accents, such as a minimalist tealight holder or a glass bowl filled with gold-painted pebbles or metallic foil hearts. Expert tip: Ensure your gold pieces are uniform in tone (either warm brass or cool rose gold) to maintain a cohesive and expensive-looking aesthetic.
To elevate the entire installation from simple vignette to gallery-worthy display, integrate a dimensional focal piece, as seen with the striking pink and gold geometric wall art. This sculptural element adds incredible texture and modern flair. While sourcing such a piece commercially is an option, it is also a fantastic DIY opportunity. You can create similar 3D origami or paper-fold art using thick cardstock in varying shades of pink, carefully highlighting the edges with metallic gold paint or foil tape. When mounted against the dark wall, this piece acts as a breathtaking backdrop, synthesizing the color story: the soft pinks provide warmth, the gold outlines provide structure, and the angular design offers a contemporary twist on traditional Valentine’s hearts. This focus on dimension and refined finish ensures your V-Day decor is unforgettable.
WINDOW MAKEOVER: INSTANT V-DAY VIBES USING DOLLAR STORE HACKS!
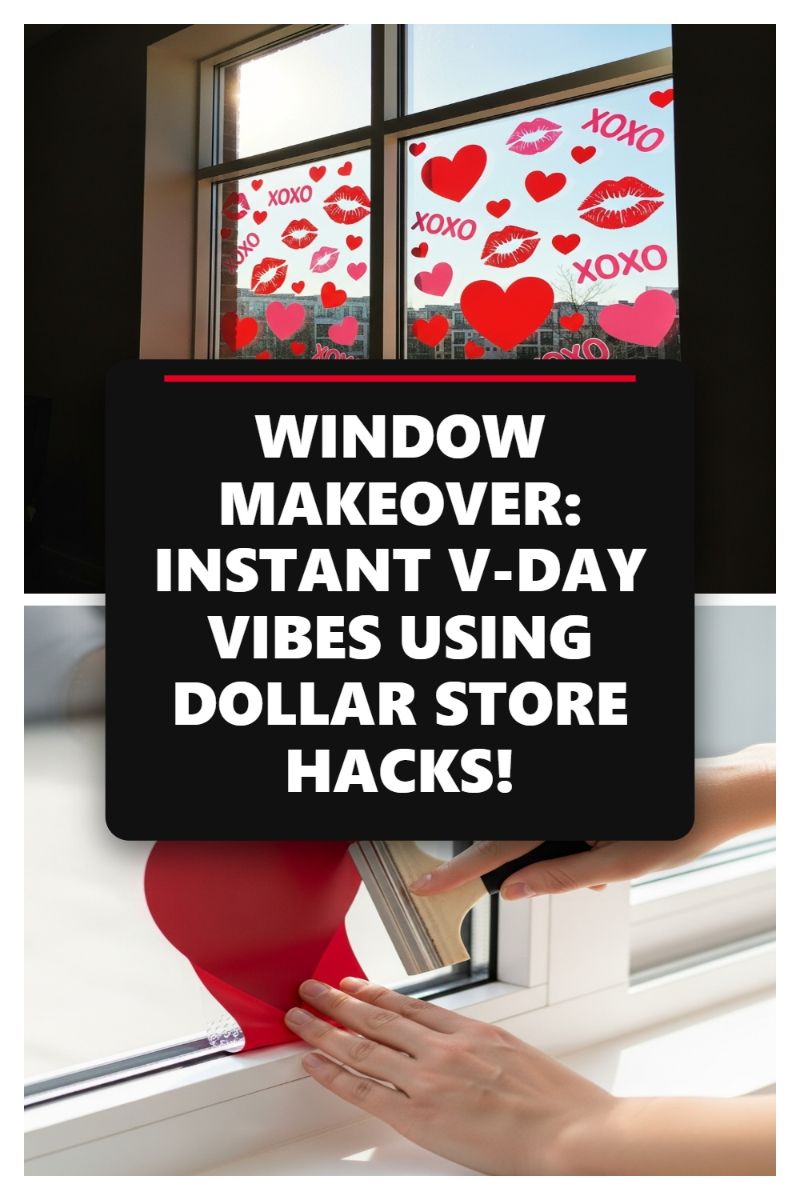
For an immediate, dramatic transformation that screams Valentine’s Day without breaking the bank, look no further than your windows and a roll of cheap contact paper or adhesive vinyl. This clever dollar store hack allows you to mimic expensive custom window decals using materials often found in the kitchen or organizational aisles. The key to achieving this maximalist look, featuring large hearts, kisses, and playful text like “XOXO,” is leveraging high-contrast colors—vibrant reds and deep pinks against the clear glass. Unlike paint, these vinyl applications are temporary and leave zero residue, making them perfect for rental properties or temporary seasonal decorating. To start, gather 2-3 rolls of colored adhesive film and ensure your window glass is meticulously cleaned before beginning any application.
The DIY success of this project hinges on meticulous cutting. While small stickers can be bought pre-made, creating large, impactful shapes like the oversized hearts seen in the image requires manual effort. We recommend creating simple stencils first. Print out templates for various sizes of hearts and lips, or for a truly customized look, draw the shapes directly onto the paper backing of the adhesive vinyl. For clean, professional edges, use a sharp craft knife or an X-Acto blade, rather than scissors, especially for intricate elements like the lip outlines and the letters in “XOXO.” If you want depth, cut your largest pieces in the brightest red, and then layer smaller, lighter pink shapes on top of the glass after the main decals are in place, giving the illusion of scattered romantic confetti.
Application is crucial for a smooth, bubble-free finish. For larger cutouts, utilize a technique often used for professional vinyl application: the wet method. Lightly mist the cleaned glass with a solution of water and a drop of dish soap. This prevents the strong adhesive from bonding instantly, allowing you precious seconds to slide the cutout into the perfect position before squeegeeing. Once positioned, use a smoothing tool—like the wooden handled squeegee shown, or even a credit card wrapped in a soft cloth—to press the water and air bubbles out, working from the center of the decal outward to the edges. Ensure all edges are firmly adhered, particularly in cold temperatures. This instant window makeover provides stunning curb appeal and broadcasts festive V-Day vibes to both the inside and outside world.
LEVEL UP YOUR DECOR: HOW TO MAKE THESE STUNNING 3D HEART ORNAMENTS
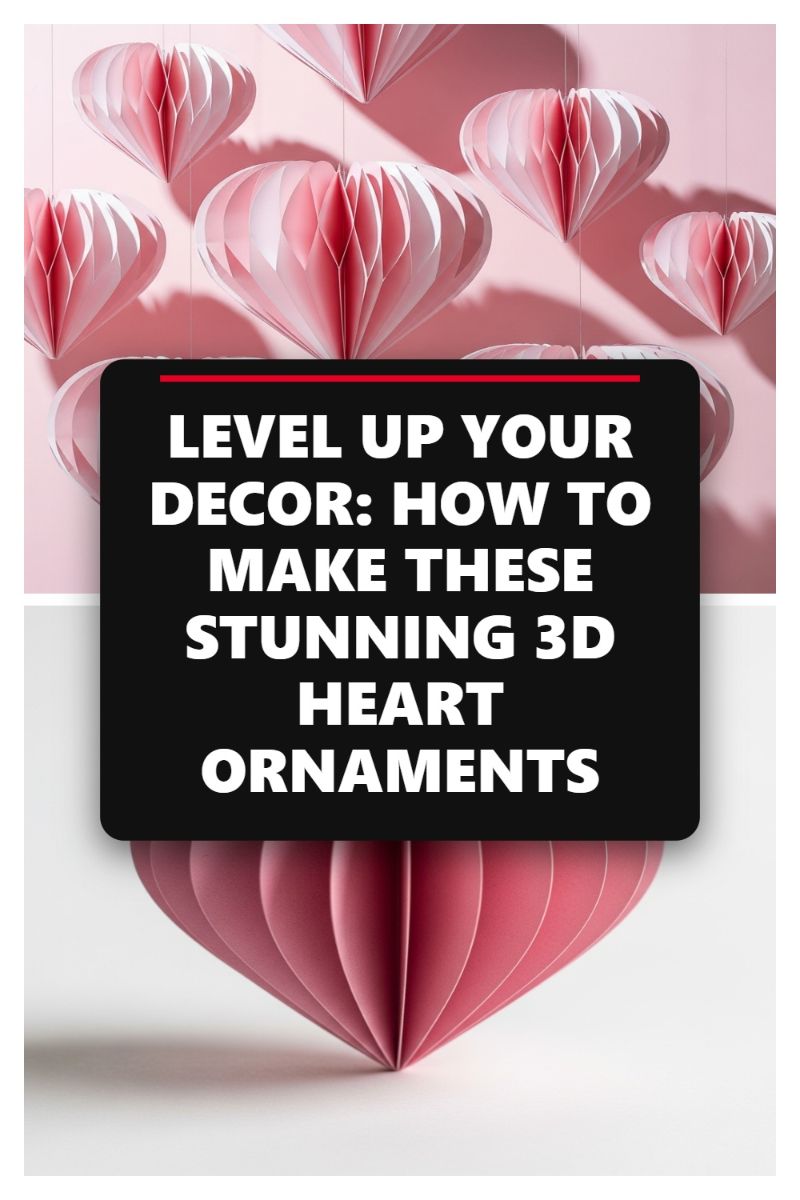
The secret to this stunning, multi-layered look is the simple, yet impactful, honeycomb paper technique. These ornaments offer beautiful texture and depth, making them far superior to standard flat cutouts. To begin this project, precision in cutting is paramount. You will need 20-30 identical half-heart profiles per ornament, cut from medium-weight cardstock (65-80 lb is ideal for flexibility and structure). For the visual effect pictured, vary your cardstock colors from pale blush pinks to deep magenta reds, reserving the deepest tones for the center layers and the lightest for the exterior. While you can meticulously hand-cut these with a craft knife and template, using a digital cutting machine (like a Cricut or Silhouette) is highly recommended for achieving perfectly consistent shapes, which is critical for a uniform and flawless final assembly. Before starting the gluing process, ensure all your shapes are perfectly stacked and aligned. This preparation phase is the foundation for creating ornaments that open smoothly into a full 360-degree sphere.
Assembly requires a strong, fast-drying craft glue and careful pattern repetition. Lay the first half-heart shape down with the flat edge facing you. Mark three vertical gluing guides on this piece: Guide A down the exact center line (the spine of the heart), Guide B near the top curve, and Guide C near the bottom point. When gluing, the core of the technique is alternating where the glue is applied on each layer. On the first sheet, apply glue only to Guides A. Take the next sheet and press it down firmly. On this second sheet, apply glue only to Guides B and C. Continue this process throughout your entire stack: Sheet 3 uses Guide A; Sheet 4 uses Guides B and C. This strict, alternating pattern is what creates the negative space and the accordion folds that allow the finished piece to fan out beautifully. Maintain firm pressure after each application to prevent sliding, especially if using quick-set glue.
Once all 20 to 30 sheets are stacked, glued, and fully dry, the ornament is ready for expansion. Before joining the first and last sheets, insert a loop of fine, clear fishing line or decorative thread along the center crease for hanging. Gently fold the entire stack to find the front and back outer faces. Apply a line of strong adhesive to the outermost edges of the first sheet and the last sheet, then carefully bring the two faces together and press firmly, holding until the bond is secure. The resulting ornament should pop open into a dimensional, structured heart shape. Expert decorating tip: Hang these at staggered heights to mimic the floating effect seen in the image. Use subtle spotlights to enhance the shadows created by the honeycomb folds, adding a layer of sophisticated drama to your Valentine’s display, whether it’s above your dining table or framing a bright window. This maximalist approach, utilizing depth and volume, transforms simple paper into stunning architectural decor.
AESTHETIC SHELFIE! The Cutest V-Day Vignette Under $10
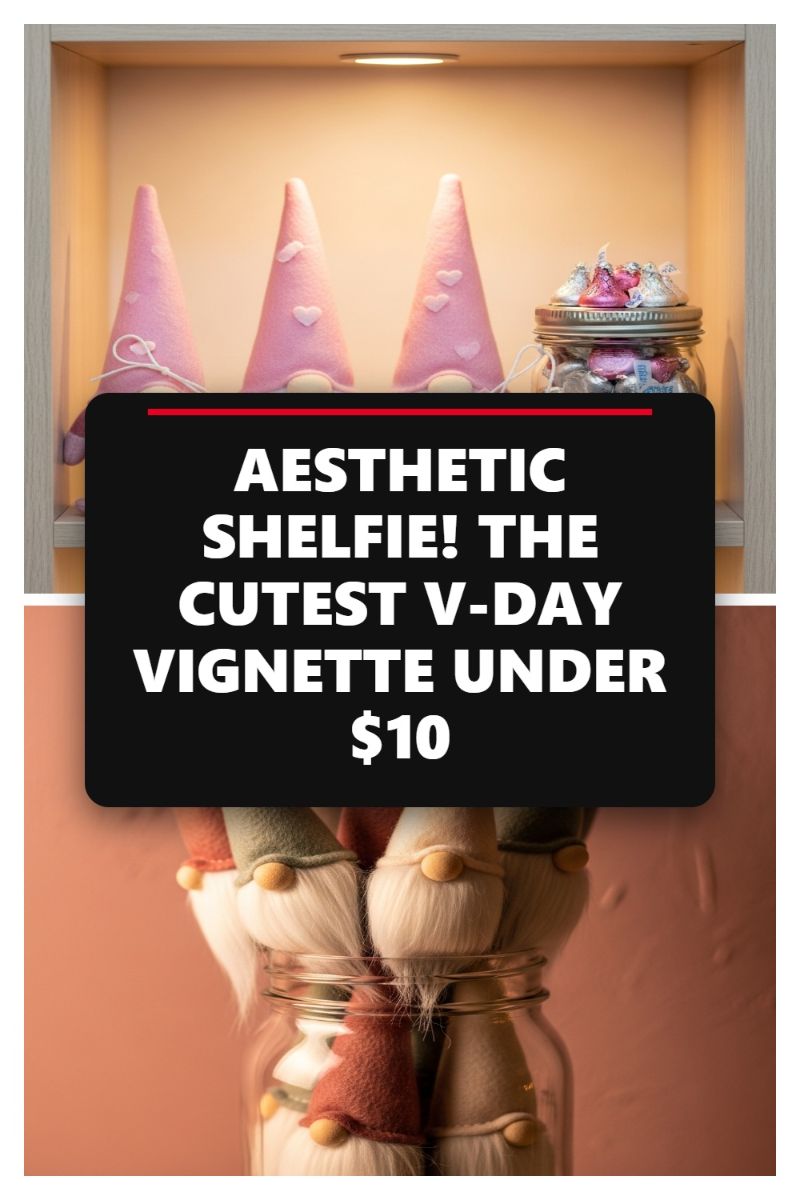
This budget-friendly decor hack transforms any small, built-in shelving unit into a cozy, heartwarming Valentine’s display. The primary visual relies on symmetry, soft lighting, and a blend of texture and color pops. To achieve the aesthetic shelfie shown, start with three identical, small Valentine’s gnomes (often available for less than $2 each at craft stores or dollar spots) in a cohesive color, such as soft pink felt accented with small white hearts. Place them centered on the shelf. The magic of this vignette comes from the contrast provided by the second element: a simple, clear mason jar filled with shimmering metallic foil candies, like Hershey’s Kisses. The metallic shine and the slight height variation of the candy jar break the textile monotony of the gnomes. Expert Tip: Elevate this display with subtle undershelf lighting (a battery-operated puck light works perfectly) to cast a warm, inviting glow, highlighting the vignette and giving it a professional, curated feel that belies the low cost.
To build upon this concept and achieve a slightly more maximalist interpretation, consider the “Gnome Bouquet” technique illustrated in the bottom visual. This is an excellent way to consolidate numerous small gnomes and make a large impact. Gather several mini-gnomes in various muted colors (sage green, rusty terracotta, cream, or beige) and place them nose-up into a large, wide-mouth glass jar, such as a large pickle jar or storage canister. The key instructional step is arranging the gnomes so that the faux fur beards spill over the rim of the jar, creating an overflow of soft texture. Unlike the symmetrical shelf display, this approach thrives on abundance and textural density, giving a hearty, hygge element perfect for a rustic or Scandinavian-inspired V-Day look.
These compact vignettes are perfect for small spaces and high-traffic areas, offering maximum seasonal impact with minimal effort and financial outlay. Place the shelfie on a kitchen coffee bar or bedroom nightstand, ensuring the backdrop is neutral to allow the pink and metallic accents to truly stand out. The jar of gnomes makes a fantastic centerpiece for a small dining table or entryway console. This DIY project proves that high-end holiday style doesn’t require a significant investment; focus instead on clever grouping, complementary textures, and strategic lighting to create stunning visual depth.
BRIGHTEN YOUR CUBICLE: FESTIVE & WORK-APPROPRIATE V-DAY DECOR
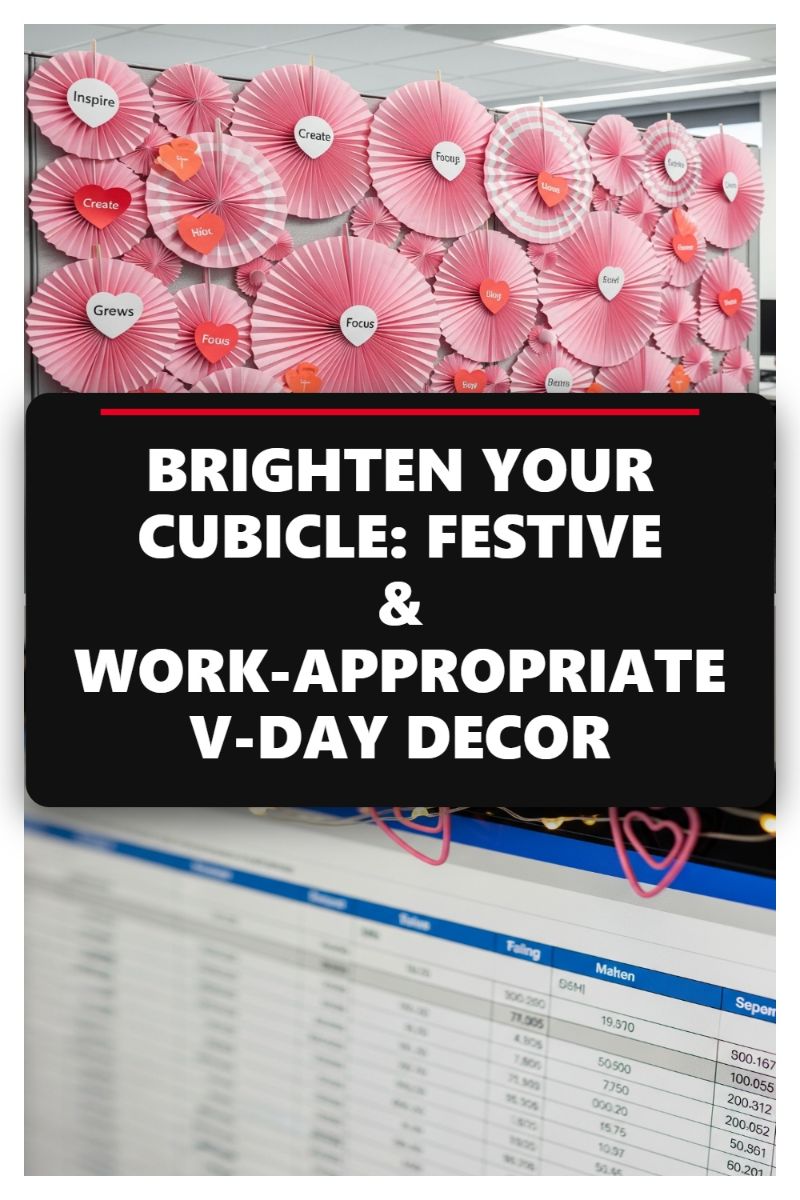
Transforming a drab cubicle wall into a Valentine’s Day celebration requires a delicate balance of festive cheer and professional decorum. The key to this stunning visual display is the massing of DIY paper rosettes, creating a three-dimensional tapestry of texture and color. By utilizing a monochromatic palette of blush pinks and soft reds, you achieve high impact without being overly garish or distracting. To replicate this look, start by making paper fan medallions in various sizes (small, medium, and large). Fold strips of durable cardstock accordion-style, securing the ends together to form a cylinder, and then gently press down the top edge to flatten and secure the center with a circular cutout. This layering technique adds immediate depth, making the flat cubicle wall feel vibrant. Expert Tip: Always use non-damaging adhesives like poster putty or removable mounting squares to protect office property when affixing your fans to the fabric wall.
The genius of this work-appropriate V-Day display lies in its substitution of traditional romantic hearts with motivational accents. Once the rosettes are mounted, elevate them by adding small heart cutouts to the center of many fans. Instead of printing ‘Be Mine’ or ‘Love You,’ opt for empowering words like ‘Inspire,’ ‘Focus,’ ‘Create,’ ‘Bloom,’ and ‘Grow.’ This subtly aligns the festive decor with office goals and productivity, ensuring your display is welcomed by management. For the heart accents, use a stark white cardstock to make the text pop against the pink background. Secure these small hearts with a tiny dab of hot glue or craft adhesive, ensuring they are perfectly centered. Varying the size and positioning of the rosettes—clustering some tightly and giving others space—prevents the arrangement from looking monotonous and adds dynamic flow.
To perfect the look, consider scaling the display to the size of your partition. For a maximalist approach, cover the entire back wall as shown, but if your space is shared, a smaller, symmetrical cluster can be equally effective. Finish the theme with subtle desk accessories, such as heart-shaped paperclips or a small vase of pink silk flowers, keeping everything contained within your designated area. Crucially, remember that while this project is easy to execute, the materials used must be robust enough to maintain their structure for the duration of the holiday without wilting or falling off. Opt for heavier paper stock (65lb or higher) to ensure your vibrant, motivational V-Day cubicle stays picture-perfect until it’s time to take it down.
MOVE OVER FLOWERS! THE GIANT DIY CANDY BOUQUET THEY DESERVE
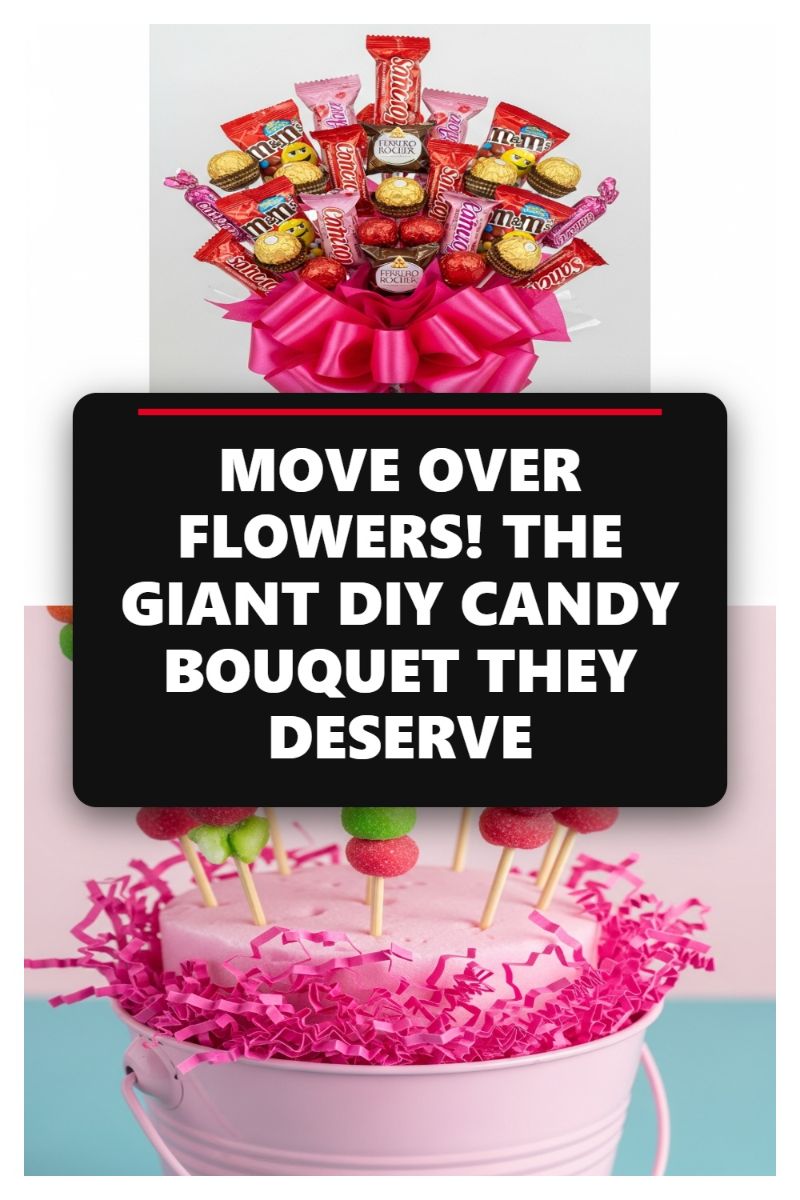
This maximalist DIY candy bouquet is the ultimate celebratory centerpiece, combining the charm of a floral arrangement with the delight of gourmet treats. To start this project, you will need to gather your essential structural components: a sturdy container (a painted pink metal bucket works perfectly, as seen here), a block of dry floral foam or Styrofoam that fits snugly inside, and wooden skewers or thin dowels. The key to the visual impact lies in the candy selection; aim for a mix of sizes, shapes, and colors, maintaining a strong Valentine’s palette of reds, pinks, and golds (think Ferrero Rocher, small M&M bags, mini chocolate bars, and various foil-wrapped truffles). Ensure you have a hot glue gun and clear packaging tape on hand, as well as a generous amount of crinkle-cut paper shred filler, ideally in a vibrant contrasting shade of pink or magenta, to conceal the base and add volume. Expert advice: Before constructing, sort your candy by size to plan your arrangement structure effectively, reserving the largest pieces for the central anchor points.
Begin the assembly process by securing the foam base into the bucket—you may need to trim the foam slightly for a tight fit so it doesn’t wobble. Next, prepare your candy ‘stems.’ For lighter items like small bags or single pieces, a thin line of hot glue applied discreetly to the back of the wrapper, adhering it to a skewer, works well. For heavier items, such as multi-piece chocolate bundles, use strong, clear packaging tape to securely affix them to the dowel, ensuring the weight is centered. As you build the bouquet, insert the longest skewers into the center of the foam first to establish height. Gradually work outward, using shorter skewers to create a rounded, cascading shape reminiscent of a traditional dome-shaped bouquet. Strive for visual balance, distributing different candy types and colors evenly across the arrangement. The dense placement not only makes the bouquet appear lush and abundant but also helps hide any visible gaps in the structure.
Once all the candy stems are secured and the arrangement feels balanced, it is time for the final aesthetic enhancements that elevate this from a simple craft project to a professional-looking gift or decor piece. The first crucial step is hiding the exposed foam base. Take large handfuls of the pink crinkle-cut paper shreds and gently tuck them around the base of the candy stems, creating a voluminous collar that completely obscures the Styrofoam. This also adds a delightful textural contrast. The finishing touch is the bow: use a wide, satin or grosgrain ribbon (the brighter the pink, the better) and tie a large, luxurious, multi-looped bow around the neck of the container or directly beneath the bottom layer of candy. Place this decadent arrangement on a kitchen counter or dining room table—it’s a dramatic focal point that satisfies both the eye and the sweet tooth, offering a much longer-lasting centerpiece than traditional fresh flowers.
GLOWING HEART DECOR: THE AFFORDABLE WAY TO GET THAT EXPENSIVE LOOK
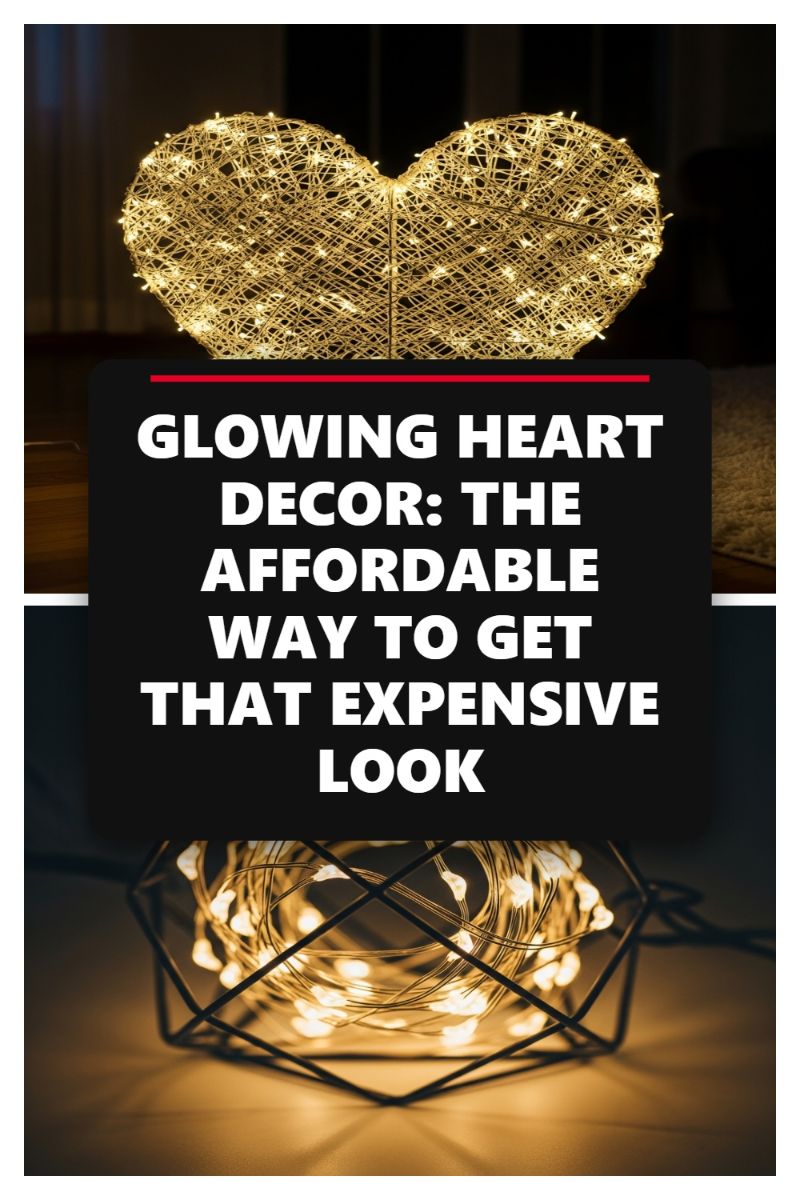
Achieving a warm, luxurious glow typically reserved for high-end boutique lighting installations doesn’t require a significant investment; it simply requires strategic use of micro-LED fairy lights. This project capitalizes on the rich, textured look of a woven frame combined with the delicate twinkle of warm white string lights to create a centerpiece that feels both rustic and incredibly sophisticated. To replicate the glowing heart, you will need approximately 15-20 feet of battery-operated fairy lights (the kind with thin copper wire), a pre-made wire heart frame, or simple materials like heavy gauge wire and twine/sisal rope if you prefer to build the frame from scratch. The key to the ‘expensive look’ is uniformity in the light color—stick strictly to warm white or soft gold tones—and density in the application. Ensure the lights are evenly spread, hiding the battery pack neatly behind the piece or within a small decorative box.
To construct the heart centerpiece, start by ensuring your frame is sturdy. If using twine or sisal, wrap the entire perimeter of the wire frame tightly to create a thick, organic texture, mimicking the woven look seen in the visual. Once the frame is textured, begin wrapping the micro-LED string lights. Do not just wrap horizontally; crisscross the lights both vertically and diagonally, ensuring that light points appear throughout the entire volume of the heart structure. For maximum impact and to avoid the lights looking sparse, wrap the string back and forth several times, doubling up on the light density. This intricate weaving not only maximizes the glow but also creates depth and visual interest, making the piece feel substantial and handcrafted rather than merely a holiday novelty. Once wrapped, gently adjust any exposed wires so they are mostly obscured by the texture or the light points themselves.
To further elevate this concept beyond the traditional heart, incorporate the second element seen in the visual: string lights housed within a minimalist geometric cage. This is expert advice for transitioning seasonal decor into year-round accent lighting. By placing a tightly coiled bundle of the same warm micro-LEDs inside a small, black geometric metal vessel (easily found at home goods stores), you instantly create a modern lantern effect that complements the rustic glow of the heart. Use the heart as a focal point on a mantelpiece or entryway table, and flank it with one or two of these geometric light cages. This layering of light sources and textures is a hallmark of high-end design, creating depth and a curated ambiance that makes the entire display look professionally styled, proving that achieving that coveted ‘expensive look’ is less about cost and more about thoughtful execution and arrangement.
VIRAL GIFT ALERT: CUSTOM DIY MUG THAT LOOKS STORE-BOUGHT!
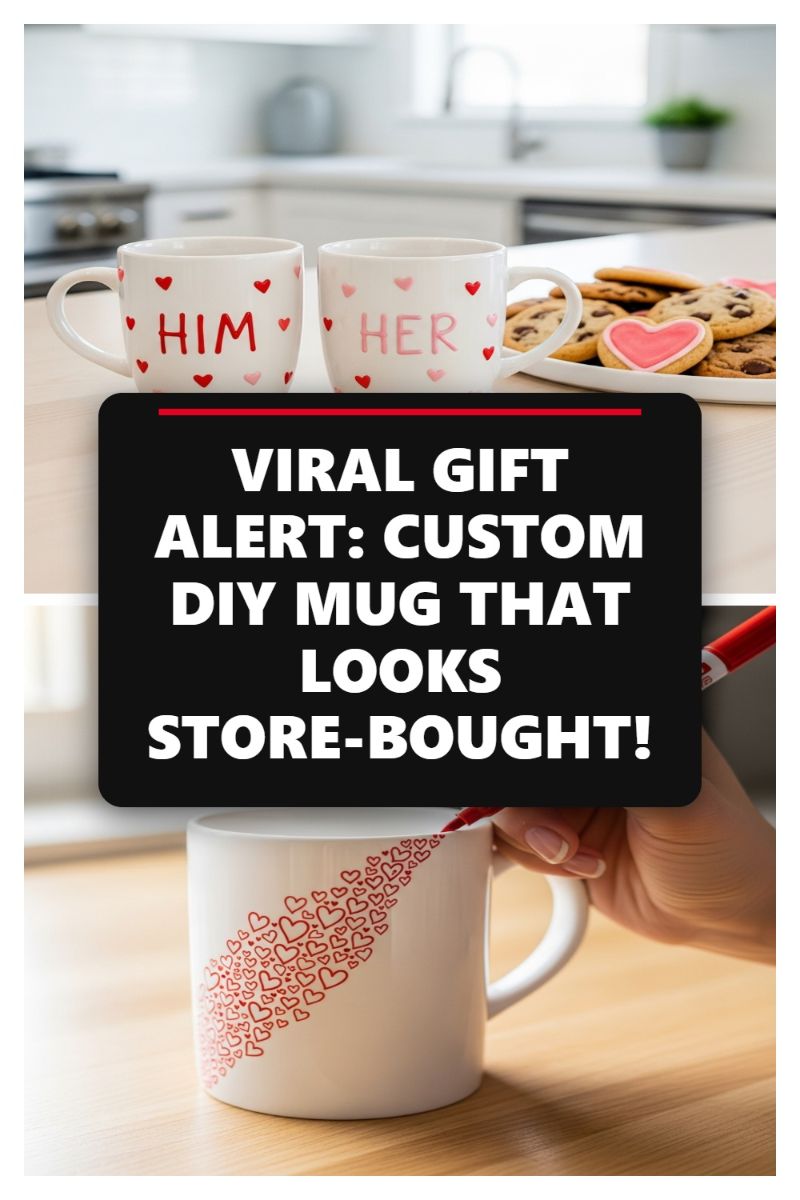
The kitchen and coffee bar are often overlooked spaces for holiday decor, but they offer the perfect canvas for functional, heartwarming Valentine’s additions. This DIY custom mug project is a viral sensation for a reason: it’s incredibly easy yet yields a sophisticated, store-bought aesthetic. To begin this project, you will need plain white ceramic mugs (check your local dollar store or craft retailer for affordable options) and high-quality, oil-based paint pens specifically formulated for ceramics or porcelain. Do not substitute these with standard permanent markers, as they will wash off. For a paired look, like the ‘HIM’ and ‘HER’ mugs displayed, ensure you have markers in complementary colors, such as classic Valentine’s red and delicate dusty rose pink. Lay out all your materials and ensure your mugs are perfectly clean and dry before starting the design process; any residue will compromise paint adherence.
The customization technique depends entirely on your design complexity. For precise lettering, such as the bold ‘HIM’ and ‘HER’ labels, use stencils or painter’s tape to mark out the outlines, allowing you to fill in the letters cleanly. For a more maximalist, freehand look, like the captivating cascade of tiny red hearts shown on the second mug, start at the rim and progressively draw smaller hearts as you move down and across the diagonal path. Expert tip: Practice your design on paper first to establish your pattern consistency. Once satisfied with the design, allow the paint to dry completely (usually 1-3 hours, depending on the brand). The critical step to making these look ‘store-bought’ and ensuring they are dishwasher-safe is proper curing. Place the dried mugs into a cold oven, turn the temperature up to the manufacturer’s recommended curing heat (usually 300-350°F), and bake for 30 minutes. Turn the oven off and let the mugs cool completely inside the oven to prevent thermal shock and cracking. This process sets the paint permanently.
These personalized mugs serve as excellent decor pieces when not in use. Style them on an open shelf or dedicate a small vignette in your kitchen. Pair the finished mugs with homemade treats, like the chocolate chip and heart-shaped sugar cookies seen in the image, or set them up on a tiered tray next to your coffee maker for a romantic morning display. If you’re going for a minimalist look, stick to just the ‘HIM’/’HER’ design with small, strategically placed hearts. If you prefer maximalism, embrace the intricate heart cascade or cover the entire surface with playful red and pink polka dots. Remember, personalized decor always adds the most warmth, turning a functional item into a cherished Valentine’s keepsake.
DATE NIGHT READY: THE ULTIMATE DIY ROMANTIC TABLE SETTING
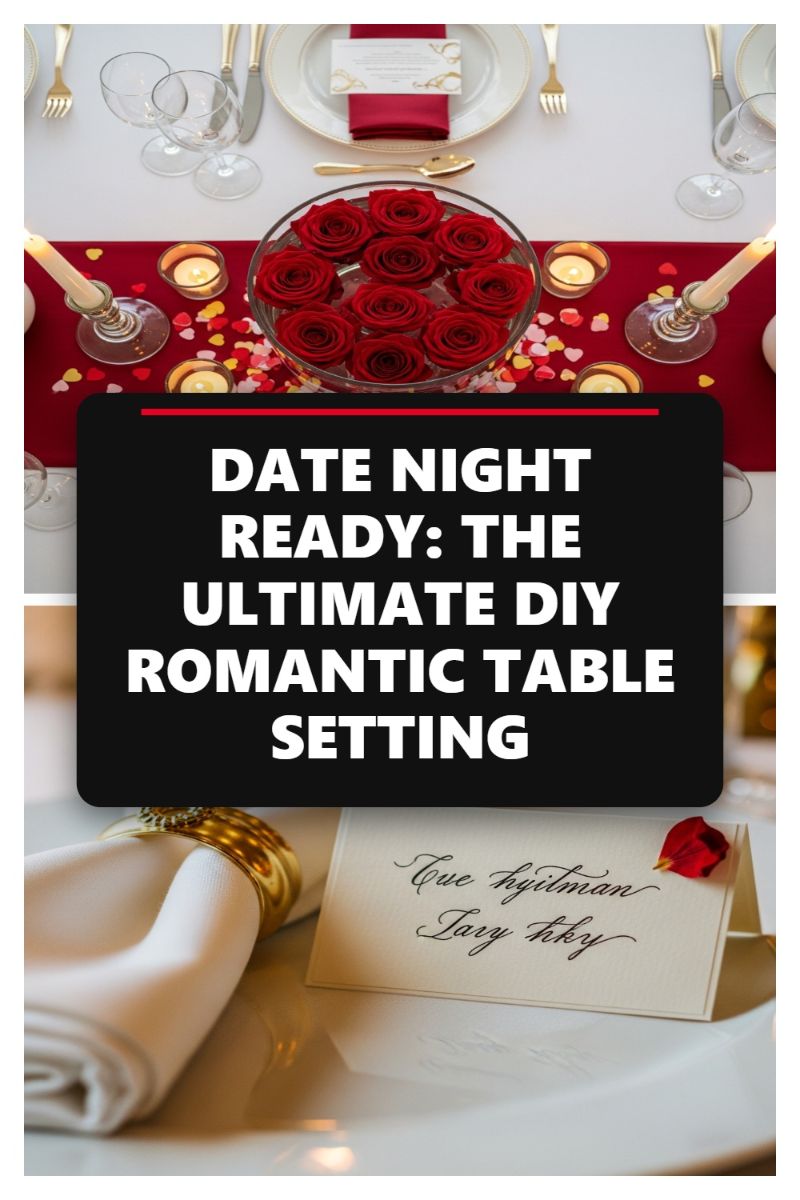
Achieving this ultimate romantic tablescape starts with a classic, sophisticated foundation. Begin with a crisp white or cream tablecloth as your base to make the richer colors pop. Lay a deep crimson or burgundy table runner down the center to establish the primary theme color. The key to elevating the look is intentional layering; use formal white china, ideally featuring a subtle gold rim, paired with matching gold flatware. The gold immediately introduces a luxurious warmth that complements the fiery red accents, signaling that this is a truly special occasion. When selecting your linens and tableware, remember that lighting and color saturation are crucial: choose solid, rich colors over busy patterns to maintain an elegant, intimate atmosphere suitable for a formal date night at home.
The star of this setup is the simple yet stunning DIY floating rose centerpiece. To replicate this, select 9-12 full, deep red rose blooms and gently trim the stems almost completely off, leaving just the flower head. Fill a clear, wide glass bowl with water and carefully float the roses on the surface, arranging them tightly for maximum visual impact. Flank this centerpiece with varied candlelight for maximum ambiance. Use elegant glass taper candle holders to introduce height to the setting, along with several scattered tea lights or votives placed directly on the red runner. For a whimsical, thematic touch, scatter a small amount of heart-shaped confetti or tiny faux rose petals around the candles, ensuring the colors (red, pink, or gold) harmonize with the central theme without overcrowding the space.
Finish the setting with meticulous attention to detail, which is what truly signals effort and love. Use high-quality white linen napkins secured with chunky, ornate gold napkin rings—this reinforces the metallic motif established by the flatware. For an intimate, bespoke feel, include personalized place cards. Write the names in an elegant script or faux calligraphy on neutral cardstock (cream or ivory), perhaps adding a single loose rose petal or a subtle gold foil accent to the corner, mimicking the example shown. Ensure the plate setup includes all necessary glasses, setting the stage for a luxurious, curated dining experience designed exclusively for two.
STOP BUYING OVERPRICED DECOR! DIY HEART BALLOON WALL TUTORIAL
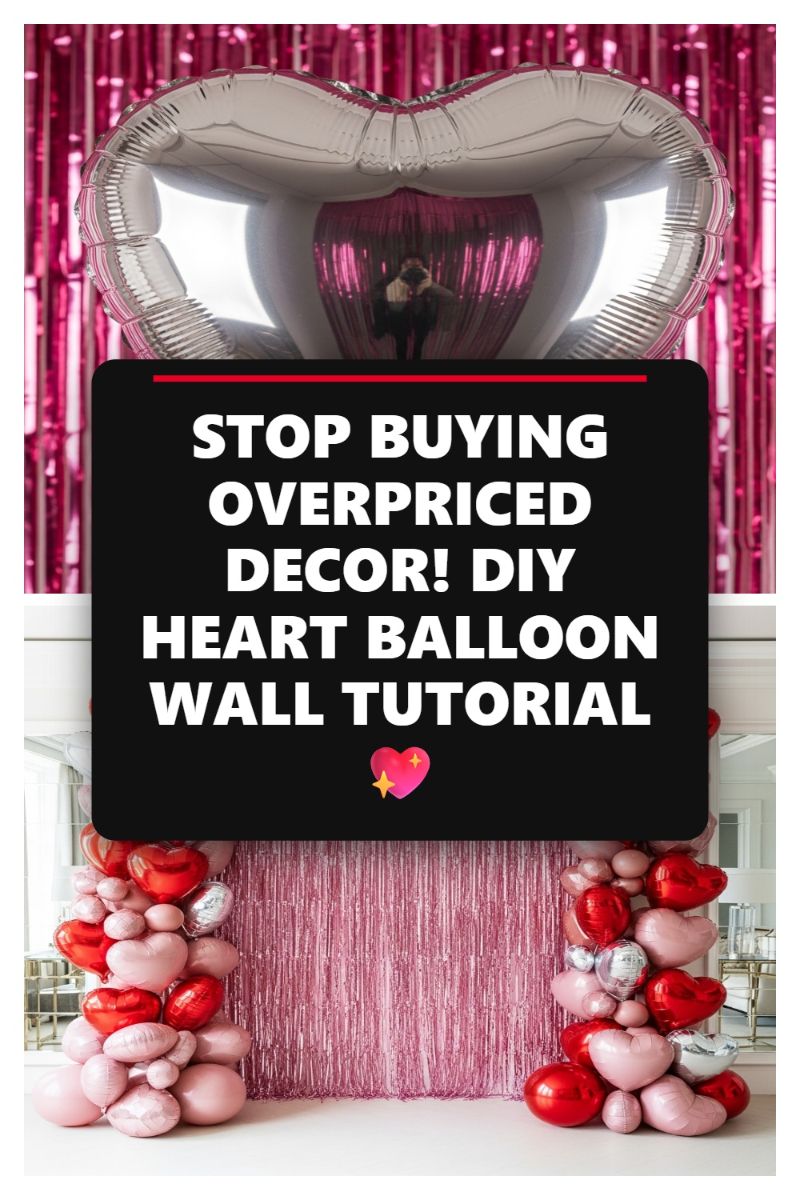
This stunning DIY heart balloon wall offers the ultimate maximalist statement for Valentine’s Day, perfect for a photo backdrop or a dramatic focal point in any room. The visual success of this project lies in the sophisticated layering of textures: the sleek, reflective quality of the metallic fringe curtain juxtaposed with the varied dimensions of the heart-shaped foil and latex balloons. To replicate this, you must prioritize material selection. Source an array of balloons in varying sizes (5-inch, 12-inch, 18-inch) and materials (matte latex, shiny foil) focusing on a curated color palette of soft blush pinks, deep metallic reds, and high-shine silvers. You will need a minimum of 100 balloons for the two dense columns, several meters of a balloon strip tape, and a low-temperature glue gun or high-tack glue dots for securing accent pieces. Starting with the backdrop, hang your vibrant pink foil curtain, ensuring it is secured taut and straight, covering the full width of your intended display area.
Construction begins with the two symmetrical balloon columns flanking the fringe curtain. The key to achieving this organic, sprawling effect, rather than a rigid arch, is utilizing balloon strip tape, which allows you to easily thread the tied necks of the balloons, locking them into position. Begin inflating your largest, roundest balloons first (the reds and deepest pinks) and position these near the base to give the columns necessary visual weight and grounding. As you work your way up, integrate the smaller foil heart shapes and matte latex balloons, ensuring you vary the color and size with every few insertions to create depth and texture. Expert tip: Do not inflate all your balloons to their absolute maximum capacity; slightly under-inflating the heart foils will maintain their characteristic rounded shape better and prevent potential bursting. Secure the columns to the wall or existing frame using strong Command hooks or robust tie wire, checking frequently to ensure the structure is stable.
The final element is the crowning large, silver foil heart that frames the top center, drawing the eye upward and providing a defined centerpiece. Anchor this piece securely, potentially using clear fishing line tied directly to the structural elements of the side columns. Once the main structure is complete, assess the overall wall for any noticeable gaps. Use the smallest 5-inch balloons and high-shine glue dots to fill these spaces, tucking them deep into the existing arrangement for a professional, seamless finish. Remember that lighting is paramount for this display; aim a soft, flattering light source directly at the metallic fringe and foil balloons to maximize their reflective qualities, ensuring your DIY photo backdrop is ready for its close-up.
NEVER WILT! DIY PAPER ROSE BOUQUET THAT LASTS FOREVER

For an everlasting symbol of affection that brightens your home beyond February 14th, this DIY paper rose bouquet is the perfect statement piece. Unlike fresh flowers, these archival-quality paper blooms offer vibrant color and dimensional texture without the fear of wilting, making them an excellent investment in permanent romantic decor. To achieve the luxurious, multi-hued look showcased in the visual, gather high-quality Italian crepe paper or heavy cardstock in shades of deep burgundy, rich red, hot pink, and delicate blush/cream. The key to replicating this stunning visual is variation: ensure you have at least four distinct colors to create contrast and depth. You will also need floral wire (18-20 gauge is ideal), floral tape, precision scissors, and a hot glue gun. Begin by creating templates for at least three different petal sizes (small, medium, and large) and a separate leaf template. The textural quality of crepe paper is essential here, as the slight stretch allows you to manipulate the paper into realistic, soft curves, mimicking the velvet finish of a natural rose.
Crafting the individual roses requires precision and patience. Start by cutting approximately 6-8 small center petals, 10-12 medium petals, and 8-10 large outer petals per rose, always cutting across the grain of the crepe paper to allow for shaping. The secret to realistic paper roses lies in shaping each petal individually. Using a tool like a wooden dowel or even the blunt edge of your scissors, gently cup the center of each petal and curl the edges outwards. This gives the necessary dimensional depth and prevents the flowers from looking flat. For the tight bud center, take a small rectangle of paper, secure it to the top of your floral wire with glue, and tightly wrap the smallest petals around this core, securing each layer as you go. Expert tip: slightly tint the edges of your petals with chalk pastels (a slightly deeper red or pink) before assembly to add natural-looking gradient shading and truly elevate the artisanal finish of your blooms.
Once you have created enough individual blooms (the photo suggests 20-25 for a maximalist bouquet), the final step is careful assembly and arrangement. Begin securing the medium and large petals around the bud core, overlapping them sequentially and slightly rotating each layer to create a natural spiral pattern. Secure the base of the rose tightly to the floral wire using hot glue, and then meticulously wrap the entire length of the wire with green floral tape to create the stem, covering all visible glue and paper ends. For the bouquet arrangement, follow the visual guidance: distribute the darkest colors (burgundy and deep red) throughout the center and lower sections to anchor the piece, and use the lighter pinks and creams towards the periphery and top to add luminosity. Grouping colors slightly rather than scattering them uniformly will create pockets of vibrant saturation, resulting in a cohesive and breathtaking centerpiece that will serve as a romantic focal point in any living area or entryway for years to come.
INSTANTLY TRANSFORM YOUR CEILING WITH THIS ROMANTIC HEART SHOWER!
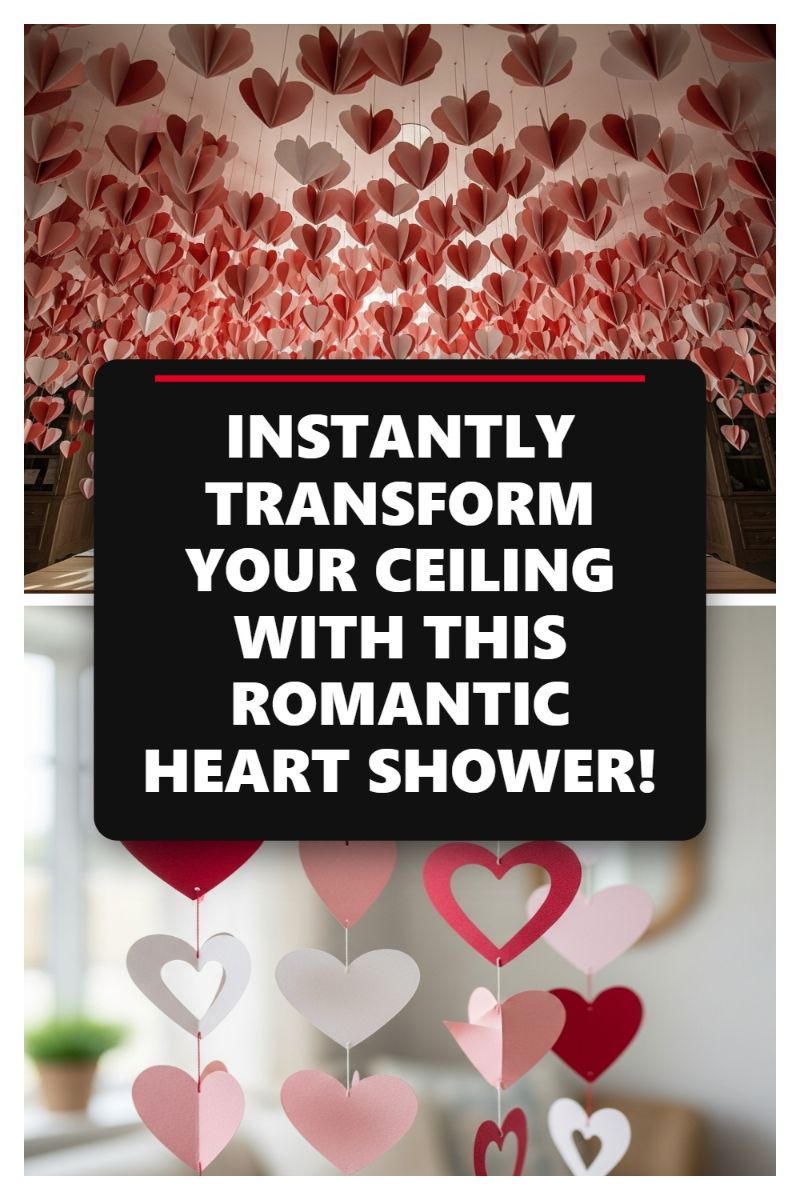
This breathtaking ceiling installation transforms an ordinary room into an enveloping canopy of love, making it the ultimate maximalist DIY statement for Valentine’s Day or any romantic occasion. To recreate this dramatic ‘heart shower,’ volume and variation are key. Begin by selecting high-quality cardstock or heavy craft paper in a complementary palette of deep reds, soft pinks, and crisp whites. For the impressive, plump 3D effect visible in the canopy, you will need to cut multiple identical heart shapes for each hanging unit (typically 3 to 6 hearts). Fold each cutout directly down the center vertically, then apply a thin line of hot glue or strong double-sided tape along the folded edge to join them together, creating a voluminous, spherical heart. Vary the size of your hearts—mix small (2-inch), medium (4-inch), and large (6-inch) units—to ensure visual depth and prevent the display from looking flat or uniform. You will need hundreds of hearts to achieve the true ‘shower’ density shown in the image, so plan this craft session accordingly.
Achieving the cascading effect requires strategic, randomized placement rather than neat rows. Use strong, clear fishing line or thin jewelry wire for suspension, as the transparency ensures the focus remains solely on the floating hearts. Cut your hanging lines into a wide range of lengths, from short strands that barely drop below the ceiling (1 foot) to long strands that dangle much lower (up to 4-6 feet), depending on your ceiling height. Attach one end of the line securely to the top point of your assembled 3D heart unit. For the ceiling attachment, use clear, removable adhesive hooks (like robust Command hooks) or small screw-in eye hooks if the installation is permanent. Expertly map out your installation area, ensuring the hooks are placed close enough together that the finished hearts slightly overlap when viewed from below. This high density is non-negotiable for achieving the lush, enveloping atmosphere of a true heart shower. Consider starting the densest placement directly over a focal point, such as a bed or a dining area, and allow the density to fade subtly toward the edges of the room.
The final, and arguably most important, element is lighting. Paper installations like this truly come alive under soft, ambient conditions. Since paper is somewhat translucent, position a few uplights or floor lamps aimed toward the ceiling to cast a warm, diffused glow through the paper hearts. This technique enhances the red and pink tones and adds an ethereal quality to the entire room. If a full ceiling covering is too much commitment, you can scale this project back to a powerful mobile effect by concentrating the hanging hearts within a smaller, three-foot circular area. For a contemporary touch, introduce materials like metallic foil paper or textured cardstock. Remember that the lightweight nature of the hearts means they will shift and rotate with the slightest air current, creating dynamic movement and ensuring the installation feels constantly alive and romantic.
5-MINUTE DECOR HACK: THE EASIEST GARLAND YOU’LL EVER MAKE!

The traditional paper chain garland gets a sophisticated, speed-demon upgrade in this 5-minute decor hack. Perfect for adding a burst of romance and color, this DIY project leverages simplicity for maximum visual effect. To replicate the stunning ombre look seen here, start by selecting high-quality cardstock or construction paper in three to five gradient shades, ranging from deep magenta and fuchsia to soft blush pink and pale salmon. The variation in color density is key to achieving depth and dimension when the chains are hung. We recommend using strips that are approximately 1 inch wide and 8 to 10 inches long—this length ensures substantial, easy-to-handle loops that drape beautifully. Gather your strips, a pair of sharp scissors or a paper trimmer (highly recommended for efficiency), and your adhesive of choice (stapler, glue stick, or double-sided tape).
This project lives up to its “5-Minute Hack” promise, provided you prep your materials beforehand. If you use a paper cutter to create all your strips simultaneously, the assembly process becomes incredibly fast. To begin, take the first strip, curl it into a loop, and secure the ends using a single staple or a dot of hot glue for a nearly invisible bond. Before securing the second strip, thread it through the first loop. Repeat this process, interlinking each subsequent strip until you reach your desired length. For a complex, multi-toned effect like the swooping window display, pre-sort your strips and follow a repeating color pattern (e.g., Light, Medium, Dark, Darker, Medium, Light) to ensure the colors transition smoothly throughout the entire length of the chain.
The versatility of the paper chain is its greatest asset. For a classic, neat look, drape a single, long strand across a mantelpiece, bookshelf, or headboard, allowing the loops to gently cascade over the edge. For a more dramatic, maximalist display perfect for framing a window (as shown), create three or four chains of slightly varying lengths. Secure the ends of these chains to the top corners of the window frame, allowing them to hang loosely and create overlapping swags. This layered technique adds visual weight and texture, beautifully obscuring harsh window lines while allowing light to filter through the varying colors of the paper. As expert advice, ensure the chains are hung with enough slack so the loops are distinct and not pulled taut—the goal is flowing movement and romantic curves. This budget-friendly project is the ultimate low-commitment, high-impact Valentine’s decor, easily customized for any room’s aesthetic.
BEDROOM GLOW UP: SURPRISE YOUR LOVE WITH THIS SIMPLE SETUP!

Creating a luxurious, romantic atmosphere in the bedroom doesn’t require a complete overhaul; it relies on strategic lighting and personalized details. To achieve this intimate ‘glow up,’ begin by focusing on soft, ambient illumination. Drape warm-toned fairy lights (LED string lights) above the headboard or along the curtains. This indirect lighting casts a flattering, golden hue across the room, instantly transforming the mood from everyday comfort to special occasion romance. Next, set the stage with high-contrast decor. If you have crisp white or neutral bedding, scatter deep red rose petals across the surface. For maximum visual impact, concentrate the petals along the center axis of the bed, trailing toward the pillows, and consider adding a single, statement item like a heart-shaped pillow to anchor the design. Expert Tip: If using real petals, ensure they are fresh but dry to prevent staining delicate white linens. Alternatively, high-quality silk petals offer the same look with zero cleanup hassle.
The true secret to this simple surprise lies in the bedside presentation. Prepare a small tray (or use the bedding surface itself for a relaxed feel) featuring a curated selection of indulgences. The visual impact is instantly heightened by two glasses of chilled sparkling wine or champagne, reflecting the ambient light beautifully. Pair the bubbly with aphrodisiac-friendly fresh fruit, such as a bowl of vibrant, red strawberries. Crucially, integrate a personal touch: a simple, handwritten note expressing your feelings, like the classic “I Love You” message shown here. This element elevates the setup from just decoration to a meaningful, intentional gesture, demonstrating thoughtfulness that is far more valuable than any expensive gift.
To execute this surprise flawlessly, ensure the setup is complete just before your partner enters the room. Turn off all harsh overhead lighting, allowing only the fairy lights and perhaps a couple of low-set candles (placed safely away from textiles) to illuminate the space. The combination of the visually stunning petal-covered bed and the inviting tray of treats communicates immediate romance and effort. This DIY approach proves that focusing on sensory details—soft lighting, beautiful textures, a celebratory drink, and a heartfelt message—is the most effective way to turn your bedroom into an unforgettable Valentine’s retreat.
BOYFRIEND APPROVED! THE PERSONALIZED V-DAY GIFT HE’LL ACTUALLY KEEP
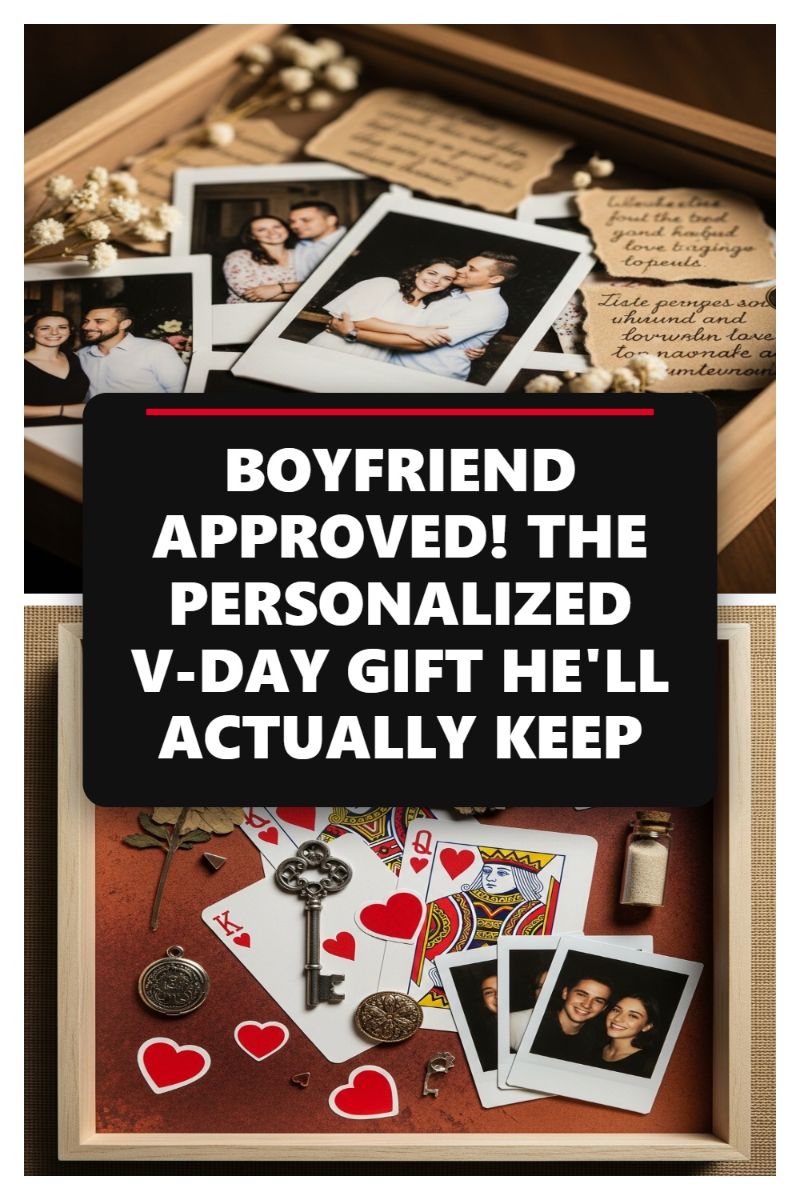
This memory box transforms cherished keepsakes into stunning, personalized Valentine’s decor, making it a gift that serves a dual purpose as a sentimental focal point. To begin, source a shallow wooden shadow box with a natural finish, opting for one deep enough to hold layered items without distortion. The key to making this decor pop is the background: choose a warm, textured material like a rich terracotta velvet, burlap, or heavy cardstock in an earthy tone (as pictured) to provide depth and contrast against the white photo borders and metallic trinkets. Before affixing anything, map out your composition, ensuring the design feels balanced. Expert tip: Treat the shadow box interior like a small canvas, focusing the main arrangement slightly off-center—the golden ratio suggests placing primary items near one of the intersecting points.
Next, gather your most sentimental items. The centerpiece should consist of instantly printed photographs (Instax or Polaroid style work best for the vintage aesthetic). Layer these photos diagonally across the background to create movement. Incorporate symbolic elements like the King and Queen of Hearts playing cards, which provide immediate visual recognition of a couple’s theme, and a vintage skeleton key, symbolizing the “key to my heart.” These larger elements should anchor the display. Fill in the surrounding space with smaller, highly personal trinkets: miniature medallions, metallic heart stickers, small sprigs of dried botanicals (like baby’s breath) for delicate texture, and hand-ripped notes with short, handwritten sentiments. The variance in size and material—paper, metal, fabric—is crucial for maximizing visual interest.
For the finishing touches, consider micro-details that elevate the decor piece beyond a simple storage box. The image shows a tiny corked vial filled with sand or glitter, which could represent sand from a memorable beach trip or a pinch of celebratory confetti. Secure all items using acid-free mounting putty or small dots of archival glue to ensure longevity. Once complete, this piece is ideal for display on a bedroom dresser, a living room bookshelf, or a hallway console table where its meaningful contents can be admired daily. Unlike temporary garlands or bouquets, this personalized memory shadow box is built to last, serving as meaningful decor long after Valentine’s Day has passed.
KEEP THEM BUSY! SETUP THE ULTIMATE KIDS V-DAY CRAFT CORNER
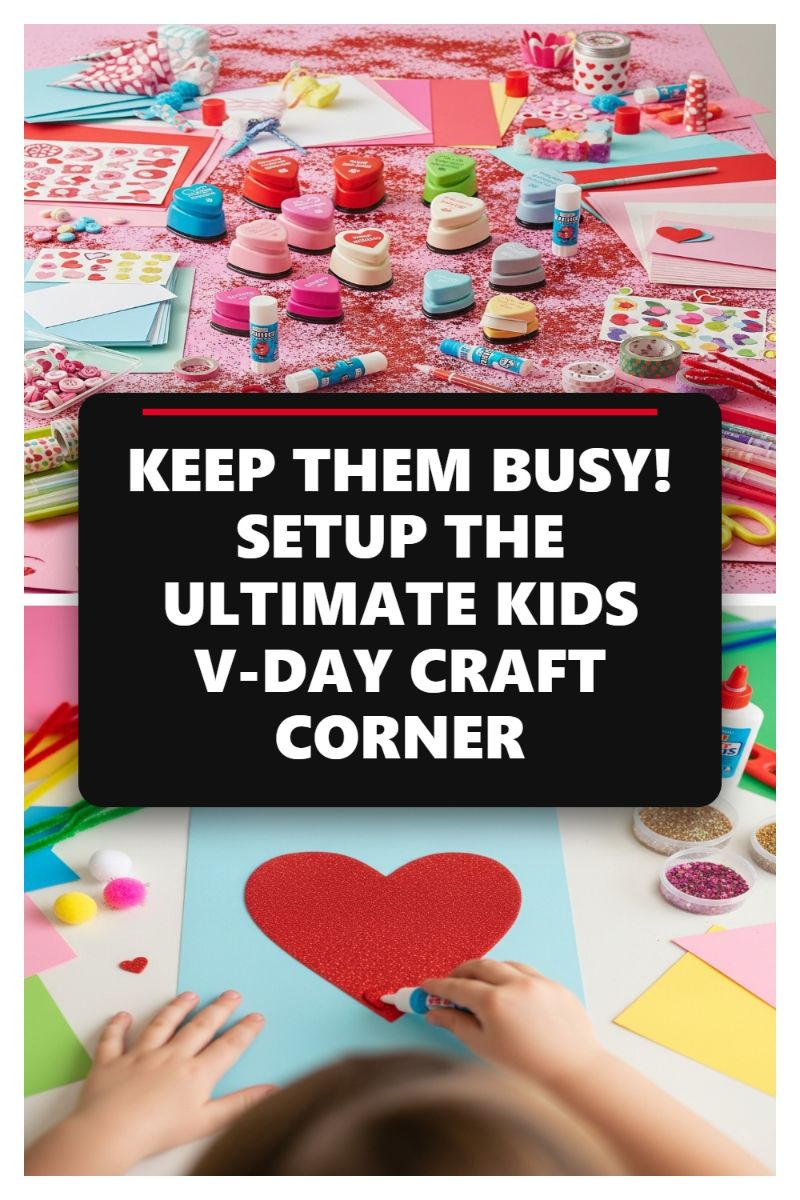
To transition from high-style Valentine’s decorating for adults to keeping the youngest members of the house entertained, dedicate a space to a maximalist, hands-on craft corner. The key to the “Ultimate V-Day Craft Corner,” as shown in the image, is providing both abundance and inviting color coordination. Start by securing a large table in a low-traffic area and protect it with craft paper or a vinyl tablecloth to manage potential spills and, crucially, glitter fallout. Gather your core supplies: construction paper in classic V-Day hues (shades of pink, red, and white, contrasted with light blue and green) and an arsenal of textural embellishments. The visual appeal comes from organizing small containers of accessories, such as colorful heart buttons, fluffy pom-poms, various rolls of decorative washi tape, and shakers filled with glitter. Ensure all glue is easily accessible; a mix of quick-drying glue sticks and precision liquid glue allows children to tackle different project types. Expert Tip: Keep wet ingredients separate from dry papers until the child is actively ready to use them to prevent accidental material damage.
The heart-shaped paper punches visible throughout the display are non-negotiable for maximizing independent creative flow. These accessible tools allow children to easily produce perfect decorative elements without constantly relying on adult supervision or scissors, making the setup suitable for a range of ages. Arrange the punches (in various sizes and colors) within easy reach, encouraging children to create small confetti pieces or decorative borders. The primary project should center on card-making or creating large heart collages, as demonstrated by the child carefully applying glue to a large, glittery red heart cutout placed on a sky-blue background. Encourage layering: start with a sturdy card base, add a primary shape (like the large heart), and then meticulously decorate the borders and interior with smaller punched hearts, stickers, or glitter accents. To prevent overwhelming the child or the space, introduce the activity in clear stages: first cutting/punching, then gluing the main elements, and finally, adding sparkle.
To truly achieve a successful maximalist setup without succumbing to immediate chaos, employ smart containment strategies throughout the process. Utilize shallow trays or baking sheets underneath all areas where glitter and small buttons are being handled; this simplifies cleanup immensely by catching stray materials before they spread. When the crafting session concludes, integrate the finished masterpieces into your existing Valentine’s decor scheme. Simple handmade cards can be strung onto ribbon garlands and draped across mantels, while larger paper collages look fantastic taped directly onto kitchen cabinets or hallway walls, instantly transforming everyday surfaces into vibrant, festive displays. Remember, the goal of this corner is not only to keep them engaged but also to create a fun, temporary installation that celebrates the joy and sometimes messy process of handmade love, ensuring the kids feel fully integrated into the home’s DIY decorating effort.
VIRAL CHARCUTERIE BOARD: THE ULTIMATE VALENTINE’S DAY TREAT SPREAD

The ultimate Valentine’s Day centerpiece isn’t a floral arrangement—it’s an abundant, strategically designed treat spread. To recreate this viral charcuterie board, begin by selecting your base, ideally a natural wood board for warmth, or a white marble slab (as pictured) for a high-contrast, elegant look. The instructional core of this design is maximizing both visual impact and accessibility. Start by placing anchor items: small white ramekins are essential for containing vibrant, smaller elements like fresh raspberries or pomegranate arils, preventing color bleed and adding vertical dimension. Next, introduce the largest, darkest components—in this case, heart-shaped chocolate brownies. These rich, dark pieces ground the arrangement and provide a necessary textural contrast to lighter, softer elements. Ensure your layout follows the principles of ‘maximalist’ design; eliminate all negative space by positioning items closely together, allowing the sheer abundance itself to serve as the dominant decorative statement.
Achieving aesthetic perfection requires careful consideration of shape and color variation. For the perfect Valentine’s theme, heart shapes must dominate. Source or bake a variety of heart-shaped treats, such as red velvet cookies, strawberry shortcakes, and the central chocolate brownies. Expert tip: utilize varying shades of pink and red (e.g., deep burgundy cookies, bright magenta macarons) to build visual depth and complexity. Interspersed throughout the main sweets, integrate neutral elements like white chocolate-dipped pretzels or soft, heart-shaped marshmallows (as seen in the accompanying dish) to provide visual breaks and prevent the arrangement from becoming overwhelming. The strategic scattering of loose berries and small candies fills tiny gaps, creating a fully integrated, seamless design that looks professionally styled and highly inviting.
Finally, integrate this edible decor piece into your overall room setup. If the charcuterie board is your maximalist focal point, keep surrounding decorations soft and complementary—perhaps just subtle candlelight and simple white linens. For a more expansive DIY scene, frame the board with adjacent decor, such as blush pink paper fans or cascading faux roses, amplifying the theme. The lasting appeal of this spread is its dual function: it serves as a stunning, fragrant decoration throughout your celebration while providing a convenient, self-serve dessert option. Remember to allow for slight organic deviations in the arrangement; a little imperfection adds charm and reinforces the handmade, heartfelt origin. When complete, this curated spread transforms a simple platter into a true statement piece of Valentine’s Day art.
NO GLUE REQUIRED! EASY DIY PAPER FAN WREATH TUTORIAL
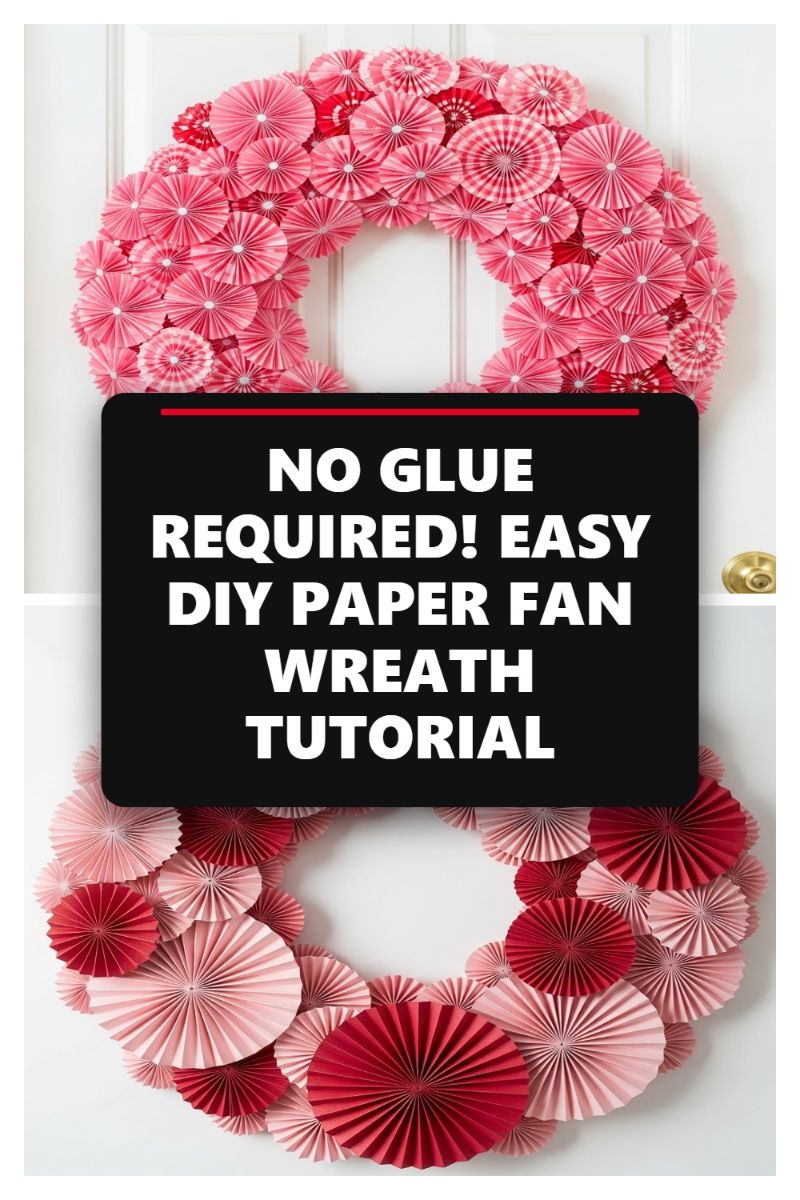
This stunning paper fan wreath provides a vibrant, maximalist focal point perfect for Valentine’s Day or any festive occasion, and best of all, the construction relies on clever attachment methods rather than messy glue. To begin this project, gather heavy-weight cardstock in your chosen color palette – the image suggests a beautiful mix of light pink, vibrant fuchsia, and deep crimson. Cut your paper into uniform strips, varying the length and width to create fans of different diameters (e.g., 2-inch, 4-inch, and 6-inch finished fans). The core technique involves accordion folding each strip precisely. To maintain the ‘no glue’ integrity of the rosettes, secure the ends of the folded strips by stapling them together tightly or using small, interlocking paper tabs if the weight of the paper allows. Once the strip is stapled into a circle, gently press the circle flat to create the signature paper rosette or medallion shape, ensuring all folds are crisp for a professional finish.
For the wreath base, a simple foam ring or even a sturdy, custom-cut cardboard ring works well. The true secret to the ‘no glue’ assembly lies in securing the hundreds of rosettes using straight pins or T-pins directly into the foam. Start by pre-planning your color distribution—the example image showcases a lovely transition from vibrant pinks at the top to deeper reds and pale pinks at the bottom, offering an ombre or layered effect. Begin attaching the largest fans first, placing them strategically around the circumference. Push a pearl-headed pin directly through the center back fold of the rosette and into the foam base. These large fans serve as your structural anchors. Ensure a slight tilt to some fans to catch the light and create natural shadow play, adding significant texture and dimension to the final piece.
To achieve the full, lush look seen here, density is key. Overlap the fans significantly, filling in any gaps with smaller rosettes. As you layer, the fans themselves will help hold each other in place, creating structural integrity without requiring adhesive. This technique allows for easy disassembly if you wish to reuse the base or store the delicate paper decorations flat. Expert tip: if using a wire wreath frame instead of foam, floral wire can be threaded through the back folds of the paper fans and twisted securely around the frame. This highly reusable and customizable DIY offers flexibility; simply change the paper colors to transition this beautiful wreath to Easter pastels, autumn hues, or winter whites, making it a sustainable choice for year-round seasonal decorating.
COZY V-DAY MANTEL: UNDERSTATED ELEGANCE ON A BUDGET

Achieving an elegant Valentine’s display without resorting to excessive reds and glitter is simple by focusing on soft textures and natural elements. The foundation for this look is a rustic wood mantel, which provides a warm, grounded backdrop. Begin by incorporating varying heights of neutral pillar candles. Using three or five (odd numbers are key for visual interest) oversized, creamy white candles immediately establishes a cozy, glowing ambiance. For budget elegance, opt for high-quality battery-operated LED candles that offer a realistic flicker without the hazard. Flanking the central candlelight are petite arrangements of faux roses in soft pinks and whites. Placing these mini bouquets in clear, cube vases keeps the look clean and modern. Finally, drape a simple, natural-looking garland along the front edge, incorporating deep green foliage dotted sparingly with small, velvet or felt red hearts. This DIY element introduces the required romantic pop of color without overwhelming the natural aesthetic.
The success of this “understated” look relies heavily on symmetrical balance and textural contrast. Notice how the floral elements mirror each other on either side of the candles, creating a sense of sophisticated order. The contrast between the rough, aged wood of the mantel and the smooth, matte finish of the candles, combined with the delicate petals of the flowers, prevents the setup from feeling flat. To maximize the impact of the candlelight (even if LED), ensure the wall behind the mantel is a light, neutral color, allowing the soft glow to reflect and expand the perceived warmth of the room. By limiting the color scheme primarily to neutrals, wood tones, and soft pink, and using the deep red hearts only as small accents, this setup speaks to a mature, minimalist approach to holiday decorating, focusing on quality elements rather than quantity.
To fully flesh out the aesthetic, extend the theme to nearby surfaces, such as a side table or hearth. The image features a perfect example: a stack of three books wrapped uniformly in blush pink paper and tied neatly with rustic jute twine. This subtle nod to Valentine’s color palette is refined and acts as sculptural art. To replicate this on a budget, gather any old hardback books, wrap them carefully in inexpensive blush or mauve craft paper, ensuring the spines are neatly covered, and use natural twine for binding. Top the stack with a small, vintage-style element, like an ornate, gilded picture frame (even without a photo, the frame adds metallic texture and height). This cohesive styling choice reinforces the cozy, slightly rustic, yet undeniably romantic theme established on the mantel, linking the entire space together effortlessly.