Achieve your perfect look! Explore the must-see styles for long, medium, and naturally coiled hair. Featuring trending layers, bold colors, elegant updos, and stunning cuts.
Long Hair: Maximizing Volume with the Feathered Layer Cut
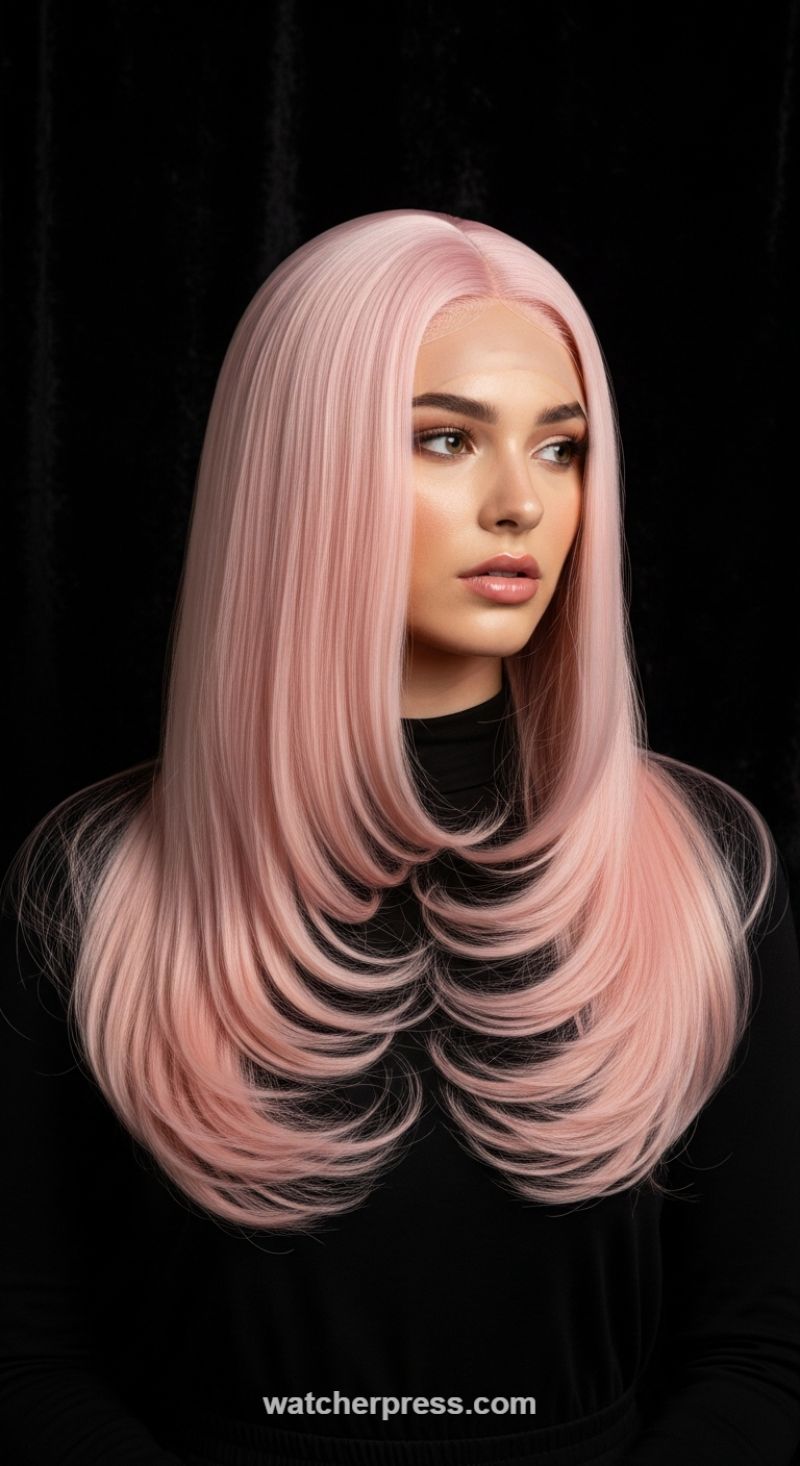
This striking look is the perfect demonstration of how strategic layering can transform long, straight hair from sleek to supremely voluminous. The style, often referred to as a modern feathered cut or a ‘butterfly’ cut, maintains the dramatic length while introducing multiple distinct layers that curve inward toward the chest and shoulders. The effect is bouncy, soft movement that appears incredibly high-density. Notice how the layers are cut in ascending steps, starting around the chin and cascading down to the ends. This technique is crucial for weight distribution, lifting the top sections and preventing long hair from looking flat or heavy. Paired with the vibrant, uniform pastel pink color and the stark contrast of the black turtleneck, this styling choice elevates the entire silhouette, making it an ideal choice for those who want dramatic visual impact while retaining their length.
To achieve this level of defined volume, the styling process is paramount. After shampooing and conditioning, apply a heat protectant and a lightweight volumizing mousse to the root area. When blow-drying, use a large round brush (2-3 inch barrel) to lift the roots and smooth the shafts. The secret to the perfectly curved ‘flip’ seen here is in the final step: directing the heat. As you dry each layer, wrap the hair tightly around the round brush and pull it inward and slightly upward, holding the heat on the curve for a few seconds before releasing. For long-lasting hold, immediately pin the curled layer with a large clip or secure it in a Velcro roller while it cools completely. Focus on ensuring the middle layers have the most defined curl, as they are responsible for creating the visible structure of the feathering.
While the layered structure works brilliantly on any hair color, if you opt for a vibrant fantasy color like this soft pink, maintenance is a priority. Use high-quality, sulfate-free shampoos and specialized color-depositing conditioners to prolong the vibrancy and prevent rapid fading. When trimming, be precise; this cut relies on geometric accuracy, so finding a stylist proficient in long-layer blending is essential. Schedule trims every 6 to 8 weeks to maintain the crisp, stacked appearance of the layers, ensuring the ends remain healthy and capable of holding the inward curve. This cut is perfect for adding life and dimension to otherwise monolithic long hair, giving an illusion of incredible fullness and bounce.
The Peekaboo Pop: Mastering Vibrant Magenta Hidden Highlights
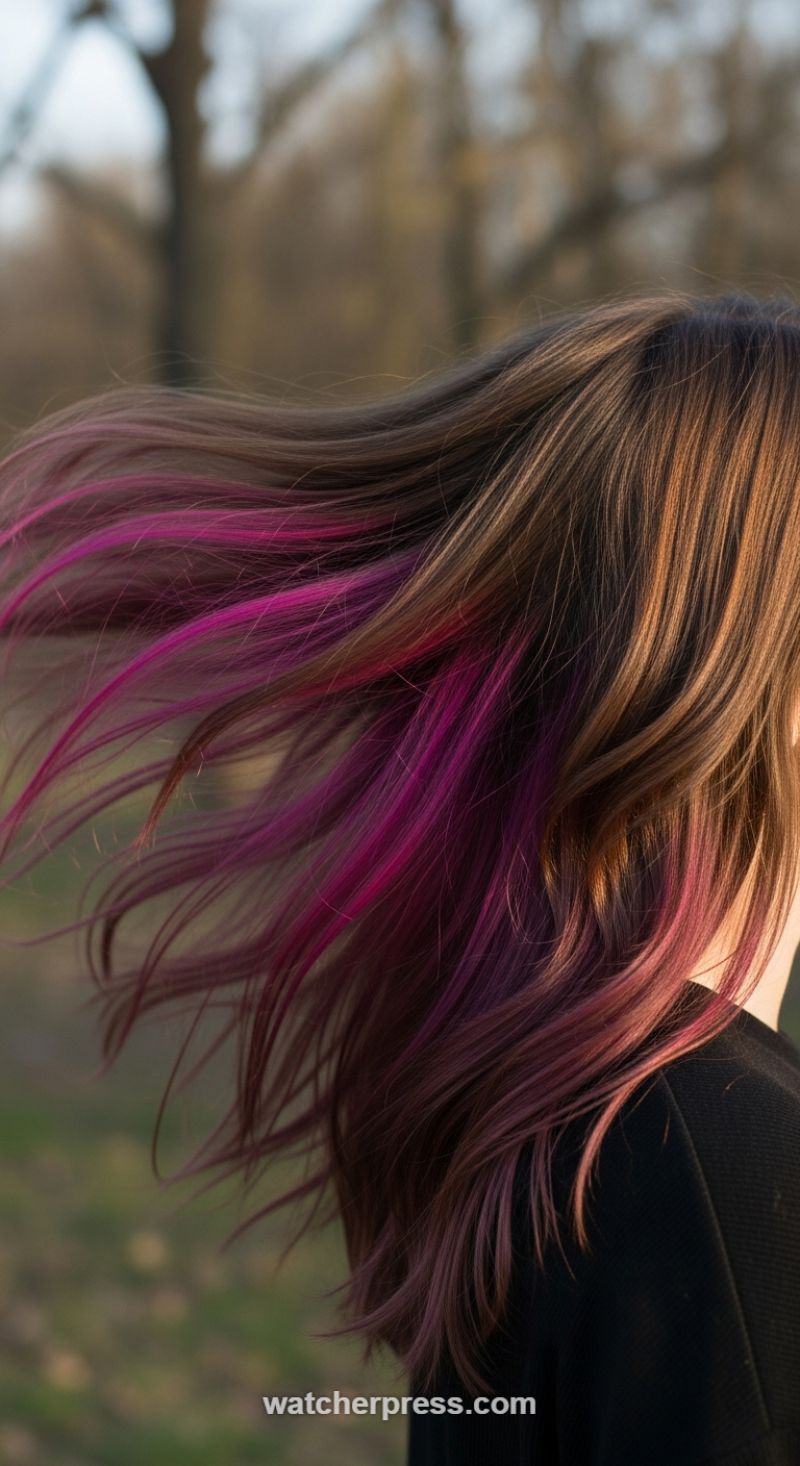
This image perfectly captures the allure of the “peekaboo” color trend, featuring luxurious long brown hair accented by breathtaking strokes of vibrant magenta and deep fuchsia. The strategic placement of these bold colors on the inner layers of the hair creates a dazzling contrast with the natural base. When the hair catches the wind, as shown here, the bright tones burst forth, revealing a dynamic and dimensional look. This technique is ideal for those who desire a high-impact color transformation without the constant commitment or requirement for a fully unconventional palette visible in a professional setting. The natural brown hair acts as a stunning curtain, only allowing glimpses of the intense artistry beneath, making the revelation of the pink and purple shades a striking style statement that shifts beautifully with movement and light.
Achieving this level of vivid color payoff on darker hair requires precision pre-lightening. The areas intended for the magenta and purple must be lifted to at least a level 8 or 9 blonde to ensure the fashion colors are truly vibrant and not muddy. For the signature peekaboo effect, your stylist should isolate the bottom two-thirds of the hair, focusing primarily on the interior layers and the lower perimeter. This placement ensures that the natural brown color drapes over the fashion shades when the hair is still. Using high-quality semi-permanent or direct-dye pigments is crucial for saturation and longevity. Notice the blend in the image: there are streaks of bright pink fading into deeper violet tones, suggesting a masterful melting technique where multiple complementary vivid shades are applied side-by-side to maximize dimension and movement, preventing a monolithic block of color and ensuring a soft transition.
To preserve the breathtaking vibrancy of these magenta and fuchsia tones, dedicated aftercare is non-negotiable. Fantasy colors are notoriously prone to fading, so advise clients to switch to a sulfate-free, color-depositing shampoo and conditioner, washing hair less frequently and always using the coldest water tolerable. Integrating a custom-mixed color mask or pigmented conditioner weekly will help refresh the vibrancy between salon visits. Styling is key to showcasing the peekaboo effect; while a windswept look like the one pictured highlights the movement, thermal styling should be done with extreme care using potent heat protectants. Simple movement (such as soft waves, braids, or a high ponytail) are the best ways to manipulate the hair to playfully reveal the hidden colors, transforming a subtle style into an instant showstopper.
Sleek & Straight Perfection: Maximizing Length and Luster
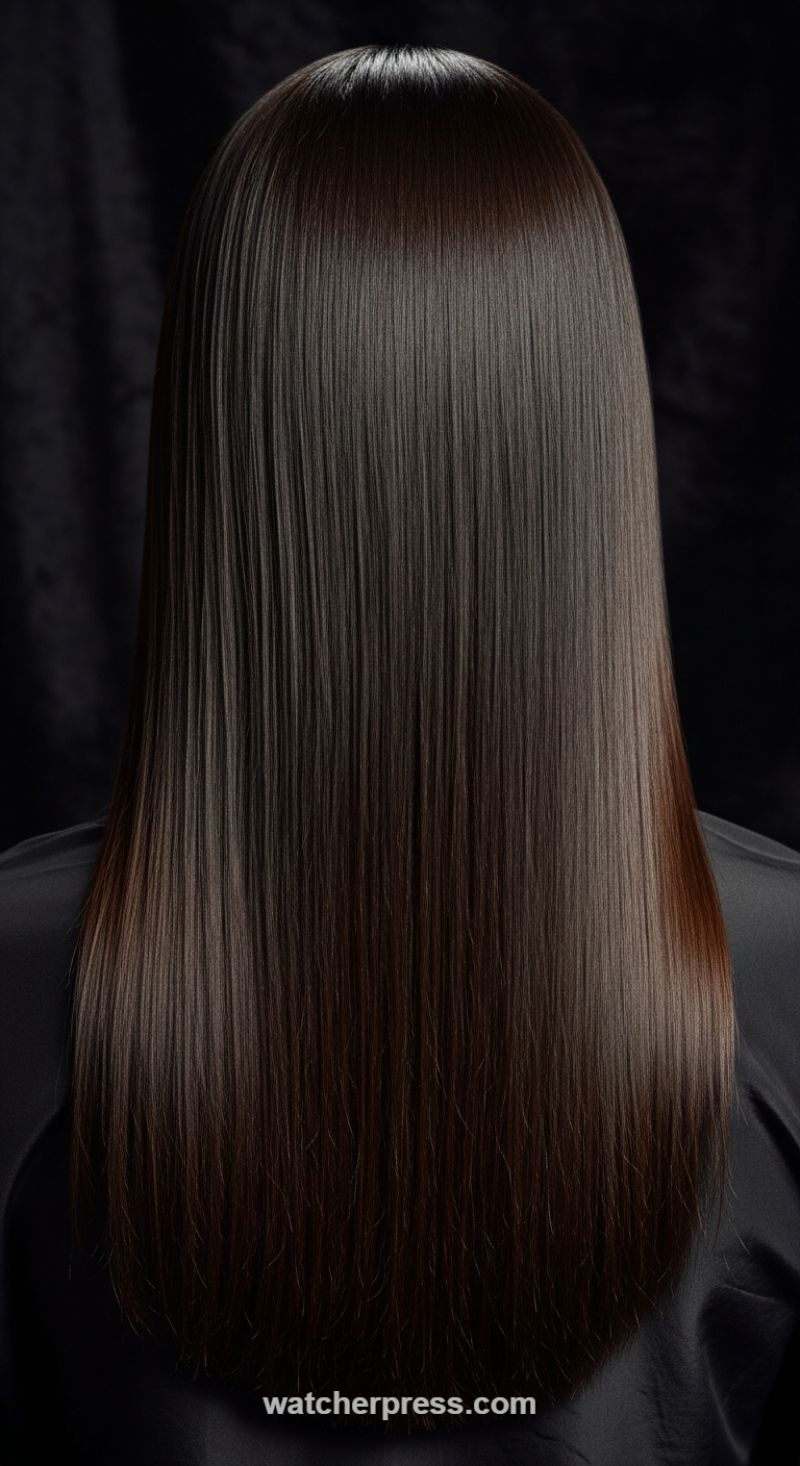
The hair displayed here represents the zenith of long hair goals, characterized by intense mirror-like shine, uniform dark color, and absolute zero frizz. This level of sleekness is achieved only when the hair cuticle is perfectly smooth and sealed, allowing light to reflect flawlessly. To begin achieving this look, the focus must be on foundational health. Incorporate bond-building or protein treatments weekly, as long hair is susceptible to damage and breakage, which disrupts the smooth surface. Switch to highly hydrating, sulfate-free shampoos and conditioners, and integrate a pre-shampoo oil treatment once a month to saturate the hair shaft with moisture. Before any heat is applied, a heavy dose of lightweight, liquid heat protectant containing silicones or natural oils (like argan or marula) is crucial. These products not only shield the hair but also help fill microscopic imperfections on the hair surface, preparing it for the seamless finish.
Achieving this laser-straight appearance requires precision styling. After the hair is about 80% dry, switch to a large paddle brush and a blow dryer fitted with a concentrator nozzle. Apply firm tension while directing the airflow downward from the root to the tip—this is the fundamental step for aligning the cuticle. For the ultimate glass-like finish, use a high-quality flat iron (titanium or ceramic plates are recommended) set to the lowest effective temperature (360°F–380°F typically suffices). The critical technique is working in extremely thin, vertical sections, no wider than the iron itself. Use a fine-tooth comb, placed just ahead of the flat iron, to ensure every strand is taut and perfectly aligned before the heat pass. This slow, deliberate process is what eliminates residual texture and creates the liquid movement seen in the image.
To maintain the intense, rich espresso color and maximize the high-gloss effect, weekly color-depositing glosses can prevent fading and add a dimension of deep reflection. The finished style should be sealed with a lightweight, micro-fine shine mist, applied from at least a foot away to avoid weighing down the strands. For expert longevity, protect this masterpiece overnight. Friction is the enemy of shine and smoothness; therefore, always sleep on a silk or satin pillowcase or wrap the hair in a silk bonnet. Avoid touching or running your hands through the hair repeatedly, which can transfer oils and disrupt the perfect cuticle alignment. When cared for properly, this sleek and straight style can maintain its flawless appearance for several days, requiring only minor touch-ups.
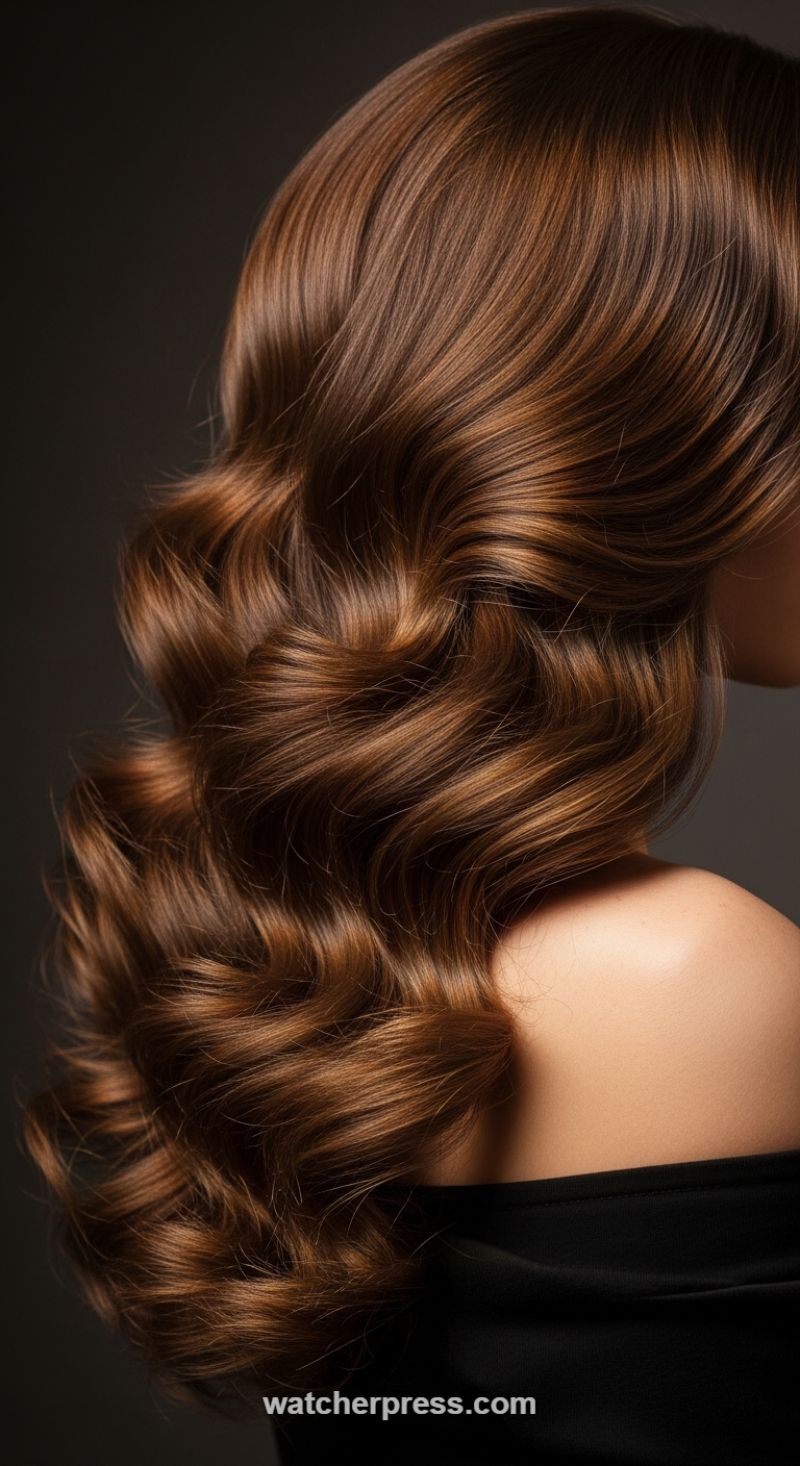
The Luxe V-Cut: Mastering High-Shine Dark Chocolate Waves

This breathtaking style is the pinnacle of hair health and sophisticated styling, showcasing immense density, a rich, dark color palette, and a high-shine finish that catches the light beautifully. The foundation for this look is a long cut, shaped into a subtle V or deep U at the ends, which encourages the volume and movement seen in the lower half of the hair. The color is a deep espresso or dark chocolate brown, skillfully applied to maintain a cohesive yet dimensional tone. Note how the light reflects warmer, almost mahogany hints along the curves, preventing the dark color from appearing flat or dull. Achieving this mirror-like smoothness starts with excellent hair health: deep conditioning treatments, regular trims to eliminate split ends that dull shine, and the application of a high-quality smoothing oil or serum to lock down the cuticle before any heat styling begins.
To recreate these voluminous, polished waves, you must work strategically. After applying a heat protectant and a light smoothing balm to damp hair, blow-dry using a paddle brush to ensure maximum smoothness from root to mid-shaft. Once dry, separate the hair into medium-sized sections. Using a large barrel curling iron (ideally 1.5 to 2 inches) or a waving iron, wrap each section away from the face, making sure the hair is laid flat across the iron for a cohesive, ribbon-like curl. After releasing each curl, immediately secure it with a duckbill clip while the hair is still warm. This crucial step allows the curl to set, guaranteeing longevity and volume. Once all the hair is clipped, allow it to cool completely—at least 15 to 20 minutes, or use a cool shot setting on your blow dryer.
The defining characteristic of this style is the brushed-out finish, which transforms tight ringlets into soft, cascading waves. Release all the clips, then gently mist the hair with a flexible hold setting spray. Using a wide-tooth comb or a soft paddle brush, slowly brush through the entire head of hair. This action merges the individual curls into the integrated, undulating wave pattern showcased in the image. For maximum depth and shine, consider incorporating a professional gloss treatment or a colored glaze (like mahogany or red-brown) during your color appointments. To maintain the dark vibrancy and reduce frizz, always use sulfate-free, color-safe products and minimize exposure to high heat, opting for low-to-medium heat settings during both drying and styling.
The Sculpted & Voluminous Hollywood Bob
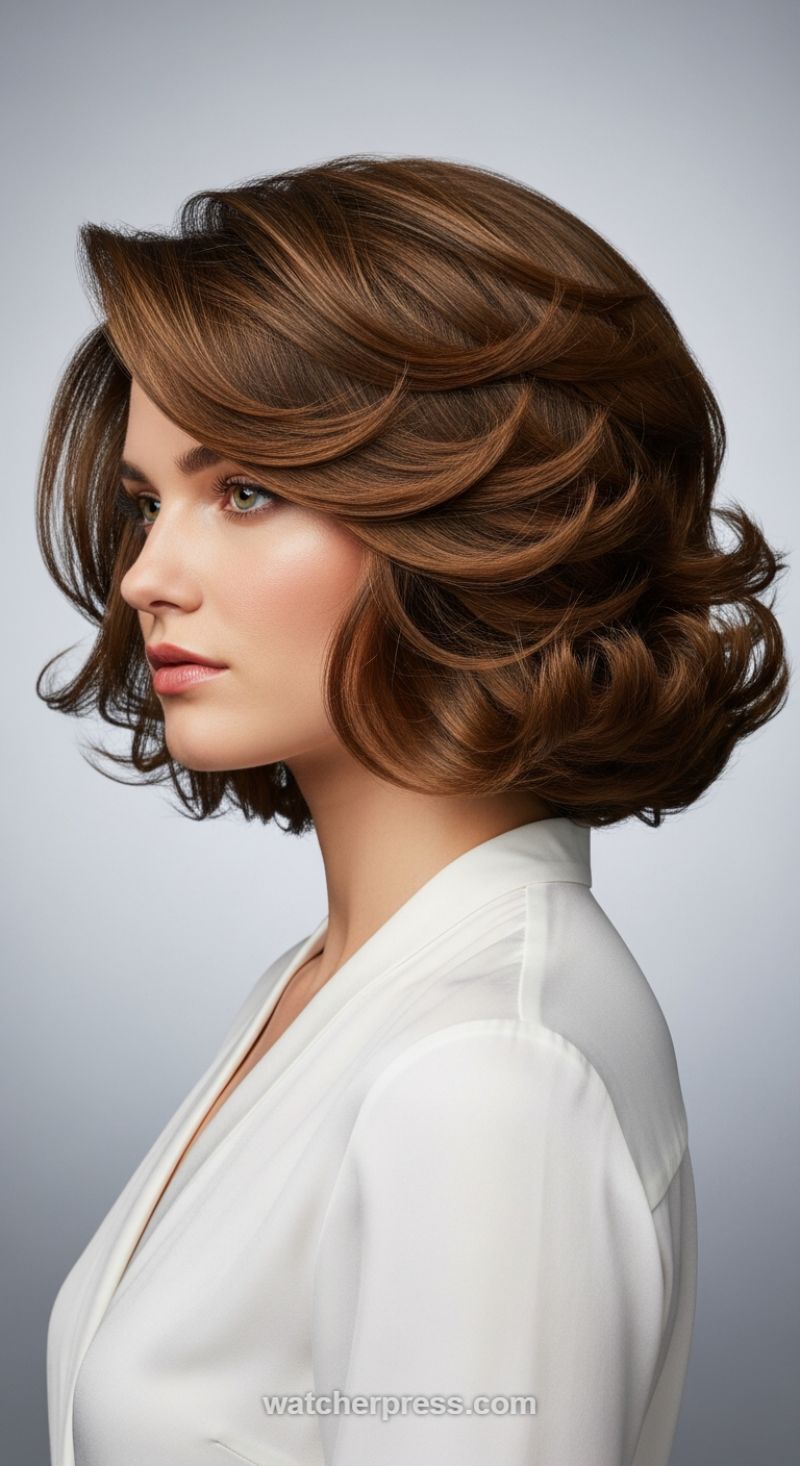
This look is the epitome of sophisticated glamour, taking the classic medium-length bob and transforming it into a cascade of high-shine, voluminous waves. The key to achieving this style is maximum root lift and meticulously sculpted layers that stack elegantly around the jawline and nape. The cut itself is crucial—a slightly layered bob or long bob (lob) that hits just above or at the collarbone—allowing the hair to hold shape without becoming too heavy while maximizing bounce. The rich, multi-tonal brown base color, accentuated by subtle, warm highlights, further enhances the depth and movement, making the large, defined curls truly pop. This style is perfect for those with medium to thick hair density looking for a polished, structured finish that radiates timeless elegance.
Achieving this level of luxurious volume requires a detailed blend of product application and heat technique. Begin with damp hair, applying a generous amount of professional-grade volumizing mousse and root lift spray directly at the crown and sides to build the foundation. Blow dry the hair using a large round brush, focusing on lifting the roots upward and backward to build maximum height, ensuring the hair is 100% dry before moving to the setting phase. The true magic happens here: use either extra-large hot rollers (2 inches or larger) or a large-barrel curling iron (1.5 inches minimum). Roll or curl large sections of hair, setting all sections away from the face. For the ends, ensure the bottom layers are rolled or curled smoothly under, creating those signature flipped, rounded ends. Crucially, allow the hair to cool completely—this setting time is non-negotiable for locking in the definition, structure, and incredible longevity of the style.
Once the hair is completely cooled, gently remove the rollers or pins and lightly brush the waves using a soft boar bristle brush. This step is essential to marry the individual curls into smooth, coherent, flowing layers rather than leaving them as tight ringlets. For the ultimate smooth and glossy finish, work a tiny amount of high-shine serum through the mid-lengths and ends, being careful not to weigh down the volume at the roots. Finish with a flexible-hold hairspray that provides support without stiffness. Expert advice suggests ensuring your colorist incorporates warm, dimensional glosses or subtle balayage, such as the caramel highlights visible here, as the varied tone catches the light beautifully and visually amplifies the dramatic volume of the set. To maintain the look, always sleep on a silk pillowcase or wrap your hair gently in a silk scarf.
The Voluminous Medium-Length Butterfly Cut
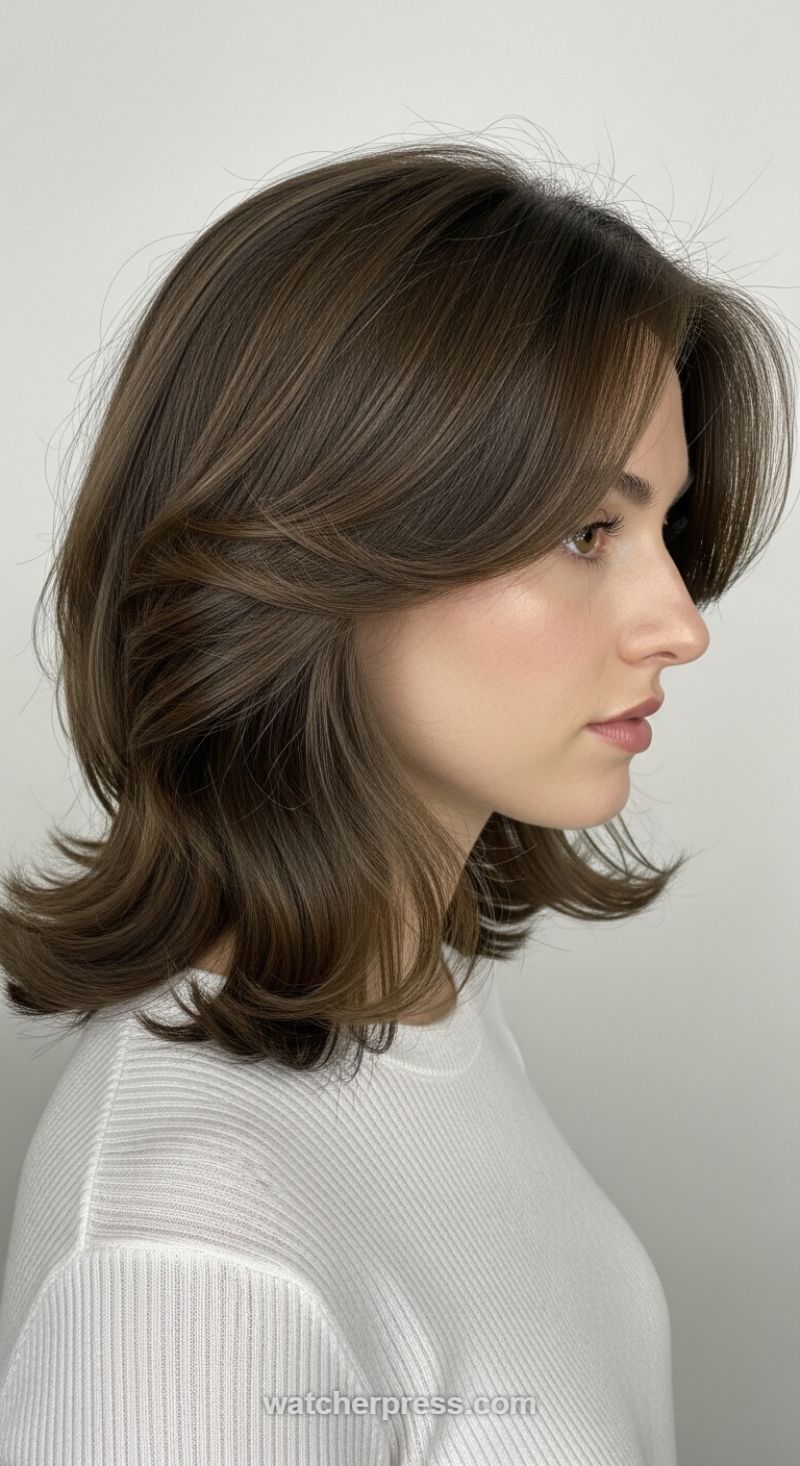
This style perfectly captures the coveted mid-length transformation, characterized by its dramatic, buoyant volume and seamless movement. Known often as a modernized ‘butterfly cut’ adapted for hair that hits just below the collarbone, the visual appeal relies heavily on strategic layering designed to maximize lift. The critical element is the heavy, soft layers that start around the chin or cheekbones and blend smoothly into the longer perimeter, creating the illusion of shape and density without sacrificing overall length. When requesting this cut, ask your stylist for sweeping, elongated curtain bangs that curve away from the face, paired with internal layering throughout the mid-shaft. This technique removes weight, allowing the hair to lift effortlessly during styling, resulting in that iconic feathered, 90s-inspired bounce. The rich, glossy medium brown color enhances the overall look, as its high shine reflects light beautifully off the curved and sculpted ends, making the movement even more apparent.
Achieving this specific high-volume finish is entirely dependent on proper blowout technique. Start by prepping damp hair with a volume-enhancing mousse applied directly to the roots and a lightweight heat protectant used throughout the mid-lengths and ends. Section the hair horizontally, starting at the nape. Using a large round brush (2-inch diameter or larger is ideal), focus first on the face-framing sections. Overdirect these layers forward while blowing dry, and then roll the brush back and up, holding the hair tight to set the outward curve that flows away from the jawline. For the ends of the overall length, ensure you are curling or rolling them consistently out—away from the neck—to achieve that distinctive flipped effect. For maximum longevity and lift, an expert trick is to set the hair by clipping the newly curled sections in place (using large velcro rollers or pin curls) immediately after heat application and allowing them to cool completely before shaking them out.
Maintenance for this layered medium style is surprisingly manageable, requiring shape-keeping trims every 8 to 10 weeks to keep the ends healthy and the layers sharp and effective. This style is particularly flattering for those with medium to thick hair density, as the heavy layering prevents the look from appearing weighed down or triangular at the bottom. For individuals with finer hair, your stylist should focus the layering heavily in the front to maximize the face-framing volume while keeping the perimeter thicker to create the illusion of fullness. This voluminous cut beautifully frames the cheekbones and jawline, making it a sophisticated, high-impact choice for anyone seeking a bouncy and eternally chic update.
The Sleek Braided Chignon: A Timeless Updo for Dimensional Hair

This image presents the “Braided Crown Chignon,” a masterclass in combining sleek texture with intricate detailing, making it an ideal choice for formal events or bridal styling. The foundation of this hairstyle is an impeccably smooth, low bun, offset beautifully by the dimensional color achieved through finely woven caramel highlights against a rich chestnut base. To replicate this level of polish, start with hair that has been professionally prepared for smoothness and shine, utilizing a flat iron and a lightweight heat protectant spray. Section off a substantial amount of hair surrounding the perimeter of the head (from temple to temple, wrapping behind the ears)—this reserved section will form the elegant accent braid. Gather the remaining bulk of the hair into a tight, low ponytail positioned precisely at the nape of the neck, ensuring the top layers are brushed meticulously to eliminate any bumps or flyaways. Twist the ponytail tightly into a simple, dense chignon or use a bun maker/donut to achieve the voluminous, rounded silhouette seen here, securing the structure firmly with robust bobby pins.
Once the smooth base bun is secured, attention shifts entirely to the defining braided element. Take the hair sectioned off earlier and begin a tight, three-strand braid (a traditional or a Dutch braid works exceptionally well for this style, offering better definition and lift against the head) starting just above the ear. The critical technique here is maintaining consistent, firm tension as you braid, guiding the rope of hair across the back of the head, and wrapping it snugly around the entire circumference of the pre-formed low bun. This creates the illusion of a continuous, woven crown framing the base of the updo. As the braid completes its circuit, the tail must be carefully transitioned and discreetly tucked underneath the structure of the main bun. Use small, color-matched bobby pins to anchor the braid’s end points and its underside, ensuring maximum longevity and structural integrity.
Finishing this elegant updo requires careful attention to detail for maximum impact and hold. Lightly mist the entire style with a medium-hold, flexible hairspray; avoid high-shine sprays on the braid itself, which can diminish the textile look, but use a focused shine serum on the surface of the smooth bun to enhance the hair’s natural sheen and highlight the dimensional color. For clients with fine hair, use texturizing powder at the roots of the braided section before beginning the weave to give the strands extra grip. Expert advice suggests crossing small pins in an ‘X’ formation at the points where the braid meets the bun to prevent slippage throughout the day. This classic yet modern style pairs perfectly with open-back or high-neck gowns, allowing the updo and any decorative earrings to take center stage.
The Midnight Blue Dimension: Achieving Depth and Shine
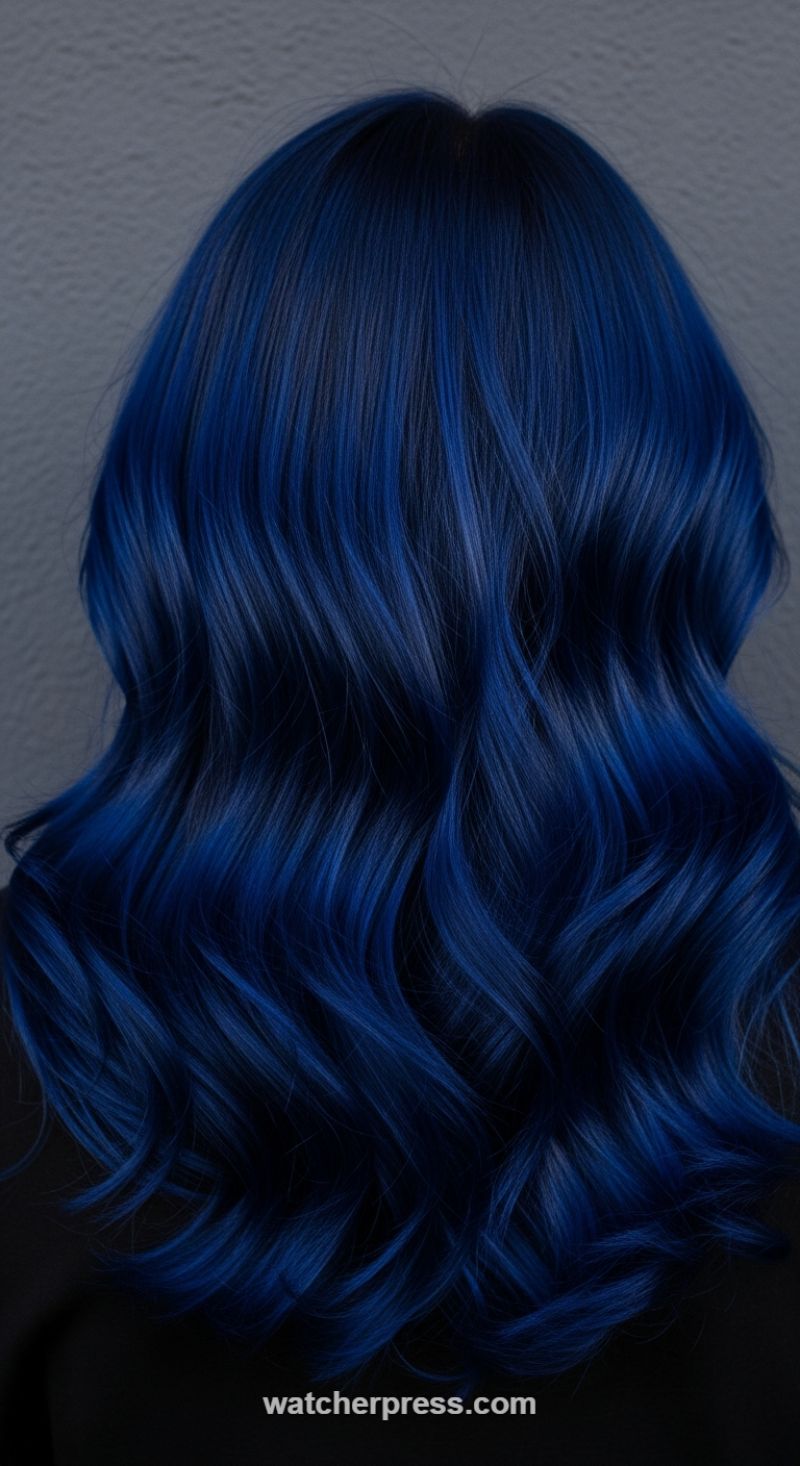
This striking hairstyle features cascading long hair styled in luxurious, soft waves, but its defining characteristic is the rich, dimensional color: a deep midnight or sapphire blue. Achieving this complex hue requires more than just a simple application of blue dye; it relies heavily on strategic color placement and depth management. Note the subtle, dark shadow root, which is crucial for a natural grow-out transition and provides an essential anchor for the intense color below. The depth visible in the strands suggests a technique utilizing at least two shades of blue—a dark indigo or navy for lowlights and a brighter, truer cobalt blue for the sections designed to catch the light. This multi-tonal approach creates visible movement and prevents the overall color from appearing flat, a common pitfall when attempting highly saturated, dark fashion colors. To successfully achieve this level of pigment saturation, the hair must first be pre-lightened evenly to the appropriate level (usually a level 8 or 9) to ensure the blue tone is crisp and vibrant, not muddy or dull.
For professional execution of the Midnight Blue Dimension, the stylist must meticulously blend the colors during the application process. Start by applying a permanent or semi-permanent indigo/black mix to the root area, extending only about one inch down to create the shadow root. Immediately following, apply the primary vibrant blue shade (cobalt or royal blue) through the mid-lengths and ends, feathering the color meticulously where the two shades meet to eliminate harsh demarcation lines. The true challenge with high-pigment blue tones is longevity, as these colors wash out more rapidly than traditional shades. Maintenance is paramount: advise clients to invest in high-quality, professional-grade, sulfate-free shampoos and specifically formulated color-depositing masks for blue tones, using them weekly to replenish pigment. Furthermore, clients must commit to washing hair with cool or lukewarm water, avoiding prolonged sun exposure, and minimizing chlorine exposure, all of which aggressively strip fashion colors.
The final element that transforms this look from merely colorful to truly aspirational is the high-gloss finish and polished texture. The soft, defined waves dramatically enhance the dimensional depth of the blue tones, providing essential contrast as the hair moves. To replicate this stunning style, begin with a thorough heat protectant and a professional blowout using a round brush to ensure a perfectly smooth cuticle layer; a smooth surface is essential for light reflection and maximizing color vibrancy. Next, use a large barrel curling iron (1.25 to 1.5 inches) or hot rollers, taking vertical sections and curling away from the face, ensuring you leave the last inch of the ends uncurled for a relaxed, modern wave pattern. Once cooled, gently rake your fingers through the curls—avoiding brushing, which can cause frizz—to merge them into flowing, defined waves. Finish the style with a high-shine serum or glossing spray, focusing on the mid-lengths and ends, to maximize the light reflection and brilliantly showcase the sapphire dimension.
Silken Strands: Mastering High-Definition Straight Hair

The captured texture showcases the ultimate goal for straight hair: seamless alignment and high luminosity. Notice how the dark ash-brown strands reflect light almost uniformly, indicating minimal cuticle damage or frizz. Achieving this “silken strands” finish requires rigorous heat protection and moisture retention. Before styling, apply a lightweight, silicone-based serum or oil (like argan or marula) to damp hair, focusing mid-shaft to ends. Use a wide-tooth comb to distribute the product thoroughly, ensuring every strand is coated and separated before introducing any heat, which is the primary enemy of this sleek finish. This foundational prep guarantees the glossy, zero-frizz base.
When blow-drying, utilize a high-quality nozzle and a boar-bristle brush, directing the airflow down the hair shaft to encourage cuticle closure—this is crucial for maximizing natural shine. For the final straightening step, section the hair into thin, manageable 1-inch pieces. Set your flat iron between 3000F and 3500F (lower temperatures are essential for finer textures like those pictured, to prevent burning the delicate outer layer). Pass the iron over each section slowly and consistently, only once or twice, rather than multiple rapid passes. The goal is to smooth, not fry. Always check that the hair cools completely before manipulation; applying a final mist of shine spray or a light coat of conditioning oil seals the style and locks in the flawless alignment demonstrated in this texture study.
Longevity depends heavily on the nighttime routine. To preserve this sleek, high-definition look, gently wrap the hair and secure it with a silk scarf or use a silk/satin pillowcase (mirroring the luxurious, texture-protecting surface seen in the image background). This drastically reduces friction, which is the main cause of breakage, dullness, and those frustrating tiny flyaways. Furthermore, to maintain the rich, nuanced color (the deep ash tone), incorporate color-depositing masks or gloss treatments every 4-6 weeks. Healthy hair holds style better and naturally exhibits more shine, making consistent deep conditioning treatments—applied weekly—non-negotiable for anyone aspiring to this level of silky perfection.
The Sculpted Cascade Updo: Achieving High-Gloss, Vertical Volume
The Sculpted Cascade Updo is a true statement style, perfect for formal events where drama and polish are paramount. This look requires intense control and impeccable shine, starting with thorough preparation. Begin by applying a high-quality heat protectant and a smoothing serum to freshly blow-dried hair to maximize luster and minimize flyaways. Use a boar bristle brush to tightly gather all hair into a clean, high ponytail positioned at the occipital bone (the prominent bump at the back of your skull). The sides and crown must be perfectly sleek and secured with a fine mist of strong-hold hairspray. For maximum longevity and a flawless finish, it is crucial to lay the groundwork with a firm foundation, ensuring not a single strand disrupts the smooth transition from the scalp to the voluminous body of the style.
Achieving the signature stacked, voluminous tiers requires careful construction, often utilizing subtle internal supports. Separate the ponytail into three equal sections. For each section, lightly backcomb the underside to build volume and shape, then smooth the top layer meticulously. For an easier approach, consider using hair inserts (like small styling doughnuts or mesh forms) to maintain the uniform, rounded shape seen in the image. Wrap the smoothed hair around the form, securing it tightly against the scalp and to the ponytail base using U-shaped pins or bobby pins, ensuring all pins are completely hidden beneath the hair’s surface. Repeat this process for the second and third tiers, stacking them tightly one above the other to create the vertical, gravity-defying structure. Expert Tip: Work in thin, smooth layers when wrapping, and use a paddle brush dipped in hairspray to press down any stray hairs, maintaining the style’s glass-like finish and ensuring the bulbous shapes are symmetrical and evenly tensioned.
The final element is the elegant, soft cascade at the nape. Take the remaining tail of hair after forming the tiers and apply a light setting spray. Using a medium-barrel curling iron, create deep, defined, S-shaped waves, reminiscent of classic Hollywood glamour. Once cooled, gently brush these waves out with a wide-tooth comb or fingers to maintain the structure while softening the texture, allowing them to gently rest against the nape and shoulder. Finish the entire style with a generous application of flexible but firm hairspray to lock in the shape, followed by a high-shine glossing spray to enhance the rich color and mimic the polished surface seen throughout the style. This structured, architectural updo is an exquisite choice for those with long hair seeking a highly sophisticated and memorable aesthetic.
Dimensional Golden Blonde Balayage Waves: The Ultimate Long Hair Enhancement

The defining feature of this look is the breathtaking dimensional color, a masterclass in modern golden blonde balayage. Unlike harsh traditional highlights, this technique uses hand-painted strands, often enhanced by foilyage for extra lift, creating a seamless transition from a deeper, natural root smudge to luminous, sun-kissed ends. The varying levels of brightness
—ranging from rich caramel undertones to buttery blonde ribbons
—provide incredible tonal depth and prevent the overall color from looking flat. This multi-tonal approach is highly flattering as it mimics natural sun exposure and allows for a soft grow-out, minimizing frequent salon visits and making it an ideal, low-maintenance choice for maintaining hair health on long strands without sacrificing impact or brilliance. The careful placement ensures that every wave catches the light, maximizing the appearance of volume and movement.
To recreate these soft, voluminous waves, the preparation and styling technique are crucial for longevity and definition. Start by applying a heat protectant and a volume-boosting mousse or texturizing spray to damp hair before a thorough blow-dry. The key to achieving this specific loose curl pattern lies in using a large-barrel curling iron or wand (1.25 inches or larger). Divide the hair into 2-inch sections. Wrap each section around the wand, holding vertically, and alternate the direction of the curl (forward and reverse) for a natural, un-uniform finish, paying special attention to curling the face-framing pieces away from the face. Once all sections are curled, allow them to cool completely—this step is vital for setting the waves and locking in the shape. Finish by lightly running a wide-tooth comb or paddle brush through the curls to blend them into these effortless, flowing S-waves, securing the luxurious bounce with a flexible-hold finishing spray.
Long, highlighted hair requires diligent care to maintain this level of shine and prevent color degradation over time. Expert maintenance centers heavily on moisturizing and effective toning. Incorporate a high-quality, sulfate-free shampoo and conditioner specifically formulated for color-treated hair to prevent premature fading. Since golden blondes are prone to turning brassy, use a purple or blue toning mask once a week, focusing the application primarily on the lightest sections, to strategically neutralize unwanted yellow or orange hues. Furthermore, long hair can easily become dry and brittle at the ends; thus, deep conditioning treatments or nourishing overnight hair masks should be a non-negotiable part of your weekly routine to replenish moisture and seal the cuticles, ensuring that radiant, luminous finish remains intact from root to tip.
The Voluminous, Backlit Shag: Mastering the Textured Halo Effect
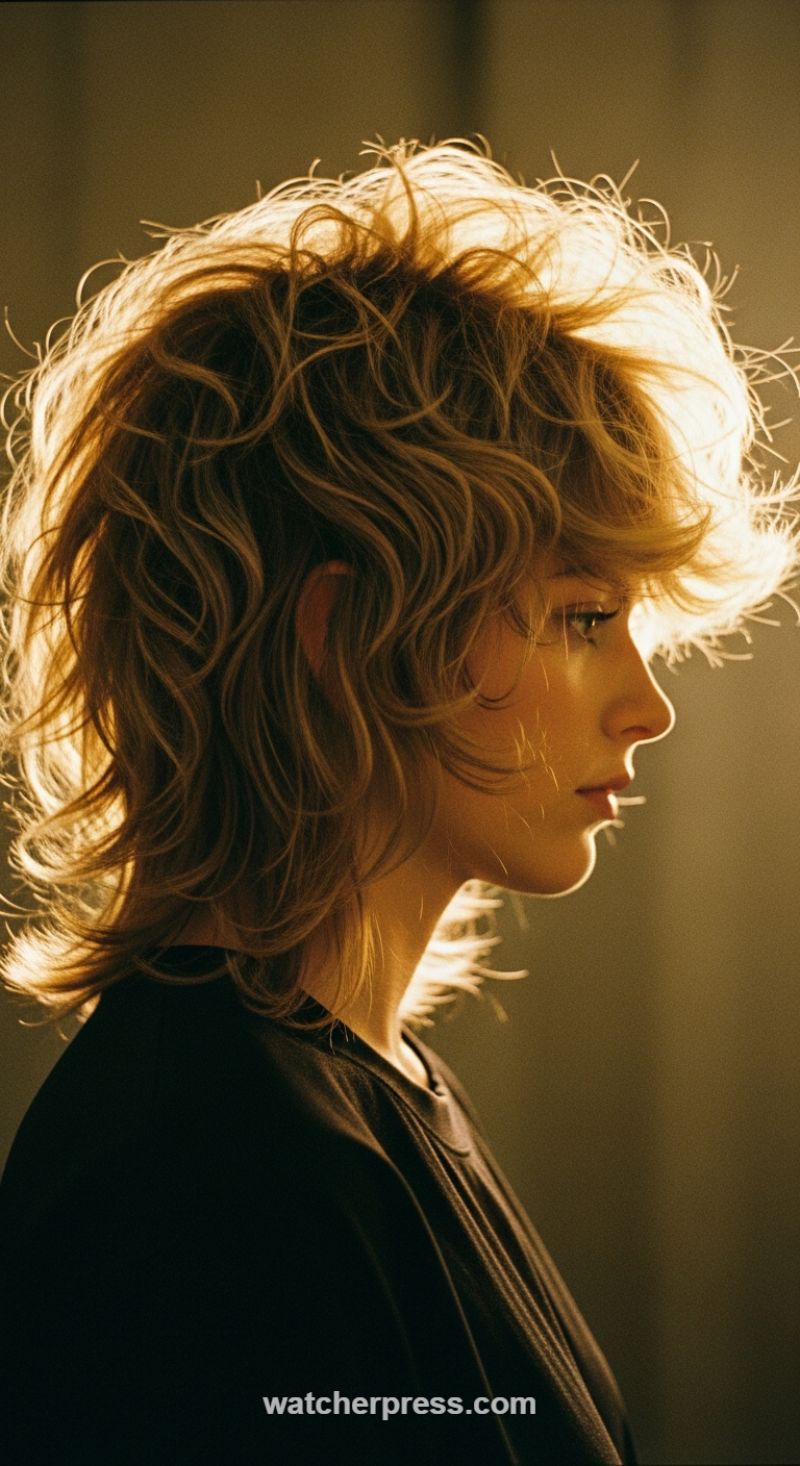
The image captures the quintessential modern shag cut, demonstrating how strategic layering can transform medium-length hair into a dynamic, high-volume statement. This style, often referred to as the ‘Wolf Cut’ or a heavily layered shag, relies on an abundance of choppy, graduated layers, particularly around the crown and framing the face. For those with natural waves or curls, this cut is a game-changer as it removes weight, allowing the natural texture to spring up and achieve maximum lift, creating the characteristic airy volume seen here. The front layers are expertly blended into soft curtain-like bangs, which fall just below the eyebrows and seamlessly integrate with the rest of the style, ensuring softness while maintaining structure. To truly pull off this look, regular trims are necessary to maintain the shape and keep the ends light and pliable, preventing the volume from collapsing.
Achieving this level of tousled texture and explosive volume requires specific styling techniques tailored to enhance curl definition without sacrificing lift. Start by applying a volumizing mousse or a lightweight curl-defining cream to soaking wet hair. The key implement here is the diffuser attachment on your blow dryer. Instead of brushing or harsh towel drying, gently scrunch the hair and use the diffuser on a low-to-medium heat setting, aiming the nozzle upward toward the roots. For the ultimate volume boost, dry the hair while flipping your head upside down or leaning side to side; this encourages root lift and the formation of that spectacular ‘halo’ shape. Once fully dry, resist the urge to brush. Instead, use your fingers to break up the curls and mist a dry texture spray or sea salt spray throughout the mid-lengths and ends to lock in that tousled, undone finish.
Beyond the cut and product, the dramatic beauty of this photo lies in the intentional use of light, which expertly showcases the style’s texture. The subject is bathed in intense backlighting, creating a glowing ‘rim light’ that outlines every curve and flyaway, amplifying the sense of volume. To replicate this cinematic glow in your own photos, position yourself directly opposite a strong light source (like a window at golden hour or a softbox studio light). As a finishing touch for wearability, use a fine mist of lightweight shine spray to add dimension without weighing down the freshly inflated volume. This final step enhances the golden tones of the hair and provides a healthy sheen, making every individual curl and wave stand out against the shadowed profile, elevating the look from simple waves to a truly radiant, high-fashion statement.
Subtle Shock: Achieving the Hidden Blonde Underlayer
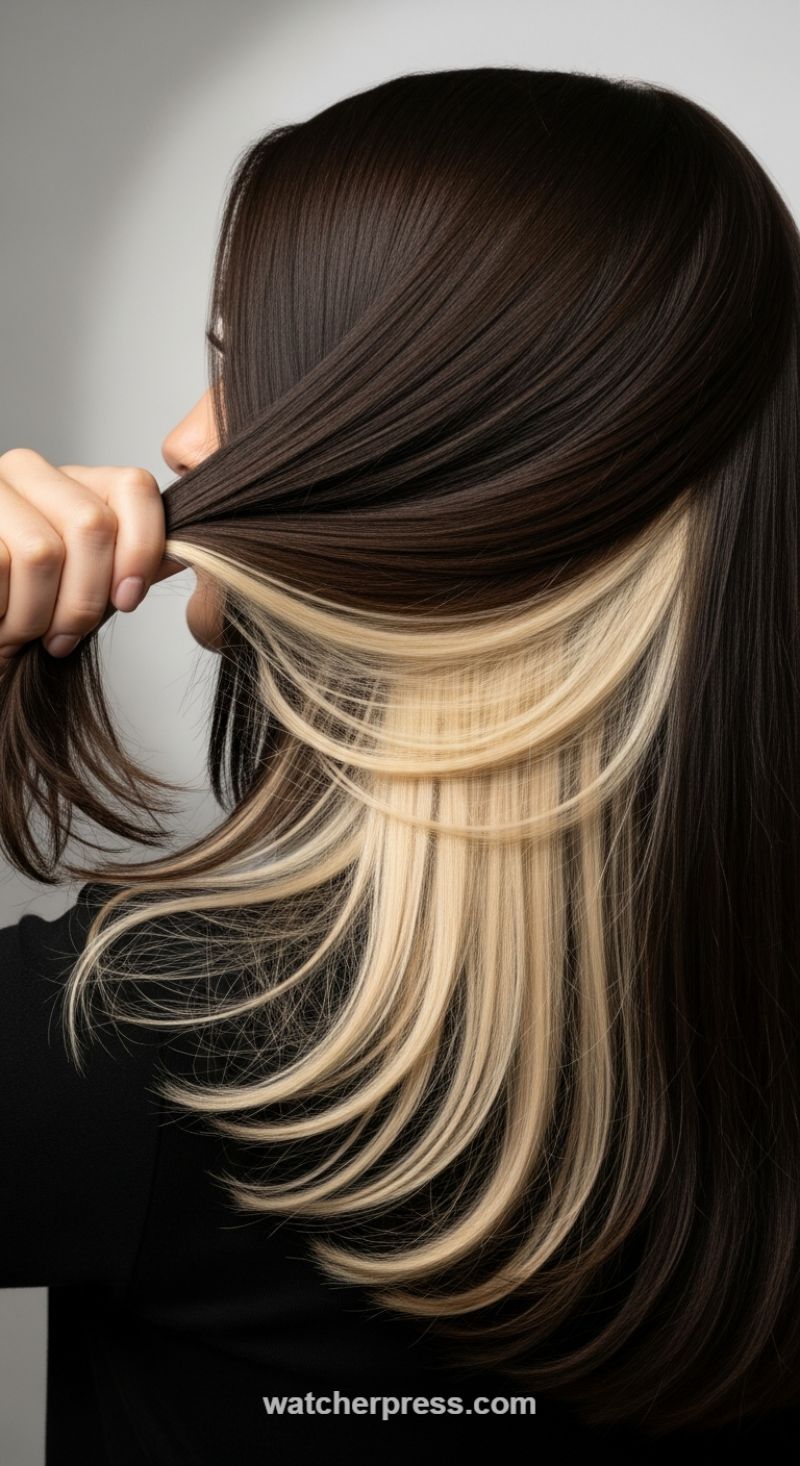
The ‘Hidden Blonde Underlayer,’ often referred to as peek-a-boo color, is a powerhouse trend perfect for long, straight hair, offering maximum drama with minimal commitment to a full color change. This technique uses extreme contrast—in this visual, a deep, rich brunette serves as the canvas while a vibrant, almost platinum blonde swath runs through the lower layers. The visual impact lies in its versatility; when the hair hangs loose, the blonde is mostly concealed, hinting at depth, but when the hair is tossed, pulled back, or styled in a half-up look, the bright color is revealed in a stunning flash. For those hesitant about committing to highlights or balayage across the whole head, this style provides an immediate, edgy transformation that maintains the natural color dominance on the top layers, minimizing root maintenance and potential damage to the most visible strands.
Achieving this striking high-contrast look requires precision and often multiple lifting sessions, making professional application strongly recommended, especially on naturally dark hair. The stylist must isolate a clean, horizontal panel of hair, typically extending from ear to ear across the nape of the neck and sometimes slightly above, depending on the desired reveal level. This isolated section needs to be lifted significantly, usually 6 to 8 levels, to achieve the desired pale blonde tone. Due to the aggressive nature of the required bleach work, the stylist should use protective bond-building additives during the lightening process. After achieving the pale yellow stage, the hair must be carefully toned. The desired blonde hue (whether icy platinum, soft beige, or golden buttery blonde, as seen here) depends entirely on the toner selection and processing time. The success of the style hinges on maintaining crisp separation between the dark base color and the light underlayer; precision foiling or careful hand-painting is crucial to prevent bleed marks.
Maintenance for this style focuses heavily on preserving the health and color purity of the fragile blonde sections. The exposed underlayer is highly susceptible to heat damage and brassiness (yellow/orange tones). Expert advice dictates using sulfate-free shampoos and incorporating a dedicated purple or blue toning shampoo once a week to counteract unwanted warmth. Furthermore, regular use of deep conditioning masks and professional bond-repair treatments is mandatory to prevent breakage and maintain the smooth, glossy texture displayed in this image. Since the top dark layer hides root growth, full color touch-ups are usually only needed every 10–12 weeks. However, the blonde section will require toner refreshers and professional assessment every 6–8 weeks to ensure it remains bright and vibrant against the dark canvas.
Timeless Elegance: Crafting the Perfect Hollywood Wave
The image captures the quintessential Hollywood Glamour wave—a style defined by its incredible volume, reflective shine, and consistently smooth ‘S’ pattern. Achieving this level of luxurious texture begins with meticulous preparation. First, ensure hair is deeply conditioned and primed with a high-quality heat protectant and a smoothing cream, particularly if your hair has natural texture. The key visual element here is the richness of the auburn tone and the flawless light reflection; this demands perfectly smooth cuticles. Blow-dry the hair using a large round brush, focusing on achieving maximum root lift and directional drying, pulling the hair taut to ensure smoothness from root to tip. Before styling, a lightweight shine serum applied sparingly through the mid-lengths and ends will dramatically enhance the finished gloss.
To execute the signature large, uniform waves, you will need a large-barrel curling iron, preferably 1.5 to 2 inches. Work in clean, manageable sections, ensuring each section is no wider than the diameter of your iron. Crucially, every single curl must be wound in the same direction (either all toward the back or all away from the face) to ensure the waves connect seamlessly when brushed out. After releasing each curl from the iron, gently roll it back up and secure it tightly to the scalp using a duckbill clip or pin curl clip. This step is non-negotiable for achieving longevity and the deeply defined set. Allow the entire head of pinned curls to cool completely—ideally 20 to 30 minutes—as the hair sets its shape as it cools, not while it’s heating.
Once cooled, gently remove all pins. The curls will be very tight initially. This is where the magic happens: use a soft-bristle paddle brush or a wide-tooth comb to slowly and deliberately brush out the curls. Start near the ends and work your way up, continuously shaping the hair until the individual curls merge into fluid, continuous waves. This technique transforms the tight ringlets into the soft, undulating pattern shown. Finish the look with a flexible-hold hairspray applied strategically to the underside of the waves and a final mist of high-gloss spray over the top layer. Expert advice: This style truly shines when paired with rich, dimensional colors, as the smooth surface acts as a mirror, amplifying the depth and warmth of chestnut, copper, and auburn tones.
Geometric Flat Twist Updo with Voluminous Coiled Bun
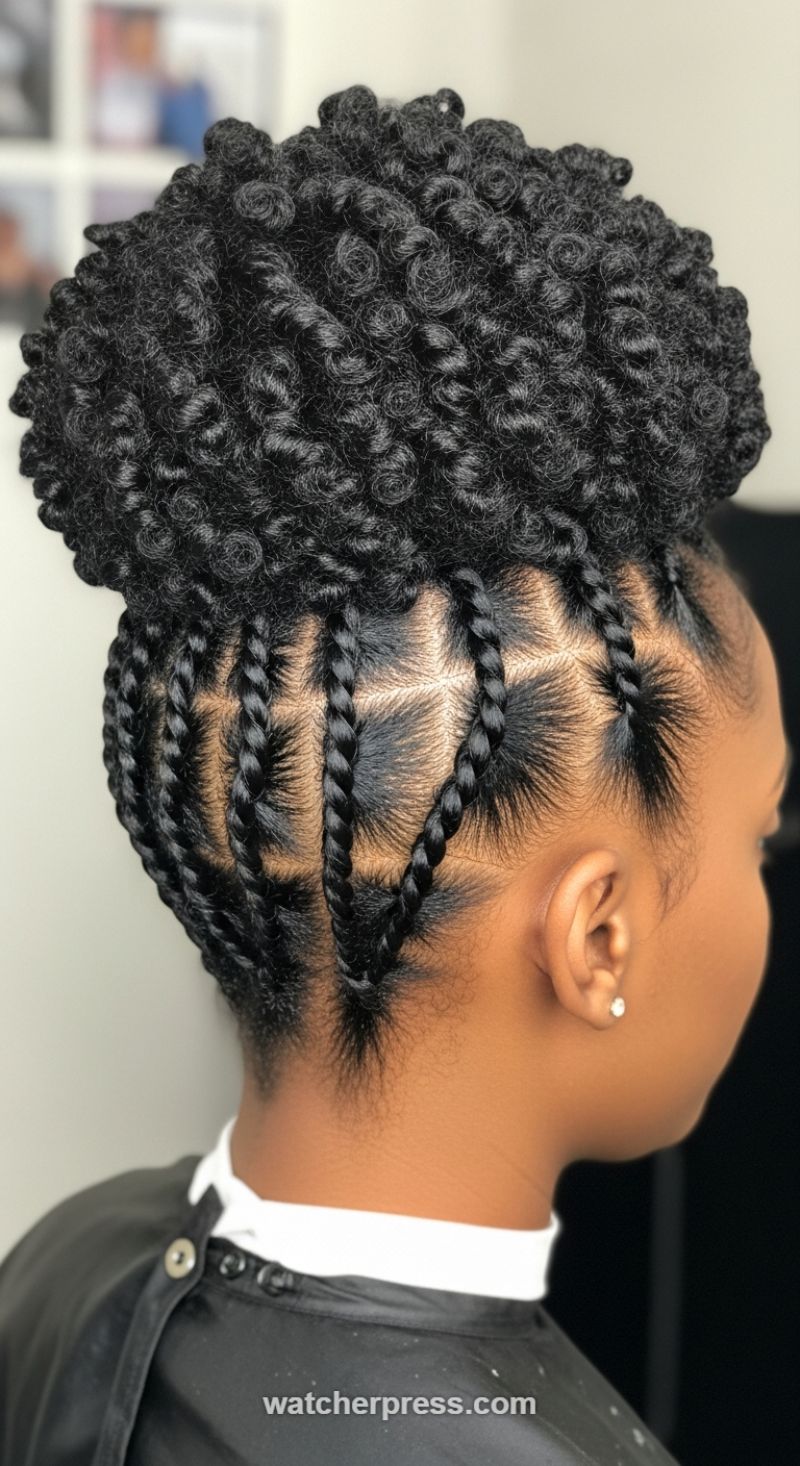
This intricate updo is the epitome of protective styling meets high fashion, featuring a dramatic contrast between a sleek, geometrically parted base and a voluminous crown of tight, springy coils. The foundation involves expertly executing two-strand flat twists across the back and sides, drawing the hair upward into a high bun placement. The key visual appeal lies in the deliberate, sharp geometric parting—typically squares or diamonds—which creates a sophisticated grid effect across the scalp. To achieve this level of precision, sections must be perfectly squared off and moisturized with a styling gel or edge control before twisting, ensuring maximum definition and a smooth, polished finish that anchors the entire look.
To recreate the stunning coiled crown, gather the flat twists at the apex of the head and secure them into a tight ponytail base. Since natural hair alone often lacks the volume required for this expansive look, hair extensions—such as Marley hair, kinky twist hair, or pre-curled crochet bundles—are essential. The characteristic texture of this updo features tightly defined, springy curls, achieved by twisting or looping the extension hair into a voluminous mass before securing it around the ponytail base. For maximum impact, build the sphere shape evenly, using strong bobby pins to hold the structure firm. Gently pull apart the coils for added fluff and density, ensuring the hair fully covers the base for a seamless, gravity-defying effect.
As a superior protective style, this look minimizes manipulation of your natural hair, promoting length retention and health. Maintenance is crucial for preserving the sharpness of the geometric parts and the sleekness of the twists. Expert advice suggests lightly applying a lightweight styling mousse or setting spray to the twisted sections daily to maintain definition, followed by tying a silk scarf tightly around the edges and twists before bedtime. Avoid saturating the coiled bun with water or heavy products, which can lead to frizz and weigh down the structure. With diligent care, this dynamic, elegant style can last up to four weeks, offering a sophisticated and practical hair solution for naturally coiled textures.
Maximum Moisture and Defined Volume for Natural Coils

The stunning natural coil pattern showcased here is the result of a rigorous moisture regimen, making this style the ultimate achievement for Type 3C and 4A textures. To replicate this level of healthy sheen and definition, the foundation must be deep hydration. Begin by ensuring your hair is soaking wet, preferably fresh from a sulfate-free cleansing and conditioning process. Coiled hair thrives on consistency, so incorporate a weekly deep conditioning treatment rich in humectants and proteins to strengthen the curl structure from the inside out. Once conditioned, employ the L.O.C. (Liquid, Oil, Cream) method—using water as your liquid, sealing with a light natural oil like grapeseed or jojoba, and finishing with a moisturizing cream—while the hair is still saturated to ensure every strand is encapsulated in moisture before styling begins. This crucial pre-styling step combats the frizz inherent in coiled patterns and promotes the uniform clumping necessary for high definition.
Achieving the tight, uniform coil definition visible in this image requires methodical product application and proper sectioning. Divide your hair into four to six manageable sections. For each section, use a strong-hold styling agent, such as a moisturizing curl jelly or gel, applying it with the ‘shingling’ technique. Shingling involves separating very small strands of hair and smoothing the product onto each cluster individually from root to tip, allowing the natural curl pattern to form tightly defined spirals. This painstaking process guarantees maximum curl separation and definition. For the curls around the perimeter and nape (which are highly visible and prone to separation), consider finger coiling these specific clusters after the shingling is complete. This extra step ensures those delicate coils are perfectly shaped, contributing to the overall polished and defined look.
Once the product is distributed and the coils are defined, the drying process is paramount to achieving volume without sacrificing definition. While air drying is acceptable, using a diffuser is essential for lift at the roots. Tilt your head forward or side-to-side and use the ‘hover diffusing’ method first (holding the diffuser near the hair without touching) to set the cast, followed by cupping sections of the hair into the diffuser bowl, focusing on low heat and low speed. This prevents unnecessary disruption of the curl clumps. Once the hair is 80-90% dry and a hard cast has formed from the gel, gently ‘scrunch out the crunch’ (SOTC) using a few drops of lightweight oil rubbed between your palms. Tilt your head back and gently scrunch upward to break the gel cast, releasing the soft, touchable volume and brilliant shine while maintaining the tight coil definition achieved through the styling process.
The Romantic Braided Crown Half-Up: An Ethereal, Elven-Inspired Look

This intricate half-up, half-down style beautifully balances sophisticated detail with natural, flowing texture, making it an ideal choice for long hair attending formal events, weddings, or high-end casual gatherings. The visual impact is greatly enhanced by the hair’s multi-dimensional blonde hue, which allows the interwoven strands of the braid work to truly stand out against the soft waves below. For this style to succeed, texture is paramount; professional hairstylists consistently advise starting with day-old hair or generously applying dry shampoo or a thickening texturizing spray from the roots to the mid-shaft. This provides the necessary grip and friction, ensuring that the elaborate braided crown holds its shape securely and the final central knot doesn’t slip, creating that desirable, slightly undone romantic softness visible in the image.
To recreate the signature braided element, begin by creating a soft center or deep side part. On each side, start a three-strand Dutch braid (where strands are crossed under the center piece instead of over) just above the ear, angling it gently toward the back of the head. For maximum fullness, only incorporate new sections of hair from the upper, crown portion—this technique, sometimes called a half-Dutch braid, keeps the remaining hair flowing freely beneath the braid line. As both braids reach the center point at the occipital bone (the base of the skull), momentarily secure the ends with a clear elastic. Before proceeding, gently ‘pancake’ the outer loops of both braids by lightly pulling on them. This expansion step is crucial for achieving the thick, voluminous, crown-like effect that distinguishes this look from a basic braid.
The finished style relies on a secure yet soft central knot. Instead of simply pinning the braids, release the temporary elastics and cross the two braided tails over one another, tying them into a simple, single half-knot (as if executing the first step of tying a shoelace). Pull the strands taut enough to hold the gathered hair but maintain the overall softness, then discretely pin the remaining braided ends and loose strands underneath the knot, using bobby pins that match the hair color. For the remaining loose hair, use a large-barrel curling iron to introduce very soft, loose waves, and brush them out completely for the effortless, natural finish seen here. A final application of a flexible hold hairspray will stabilize the crown while preserving the movement and organic, slightly wispy texture of the lower half.
The Art of Dimensional Brunette: Copper Balayage on Long Waves

This stunning look exemplifies the perfect execution of dimensional balayage on long, dark hair. The foundation is a rich, cool-toned brunette, which provides a dramatic contrast for the seamless transition into the vibrant, warm highlights. The colorist utilized a freehand painting technique (balayage) to strategically place strokes of bright copper and caramel, concentrating the saturation from the mid-shaft down to the ends. This gradient approach ensures a soft grow-out phase and maximum visual impact, creating the illusion of volume and movement. Expertly placed ribbons of lighter color catch the light, enhancing the natural ripple of the waves and preventing the overall look from appearing too blocky or striping. Achieving this level of dimension requires a skilled application where the dark base remains visible beneath the highlights, allowing the various tones—from deep mocha to fiery auburn—to blend harmoniously.
To truly showcase this multi-tonal color, the hair must be styled in defined yet loose waves, granting the highlights maximum visibility and fluidity. To replicate this style, begin by applying a heat protectant and a light volumizing mousse to damp hair. After drying, section the hair and use a 1.5-inch to 2-inch barrel curling iron, ensuring the larger size creates soft bends rather than tight coils. Always curl sections away from the face, holding the curl for a few seconds before gently releasing it into your hand. After the entire head is curled, allow the hair to cool completely—this step is vital for longevity. Then, gently brush through the curls with a wide-tooth comb or a soft paddle brush to meld them into the cohesive, cascading waves seen here. Finish with a light holding spray and a shine serum focused on the ends, amplifying the health and sheen necessary for warm tones to look luxurious, not dry.
Maintaining the vibrancy of rich copper and caramel tones is paramount, as warm colors tend to fade or turn brassy quickly, especially on pre-lightened hair. For expert upkeep, switch to a professional, sulfate-free shampoo and conditioner formulated specifically for color-treated hair. To combat potential brassiness (unwanted yellow/orange hues), incorporate a blue or purple toning mask into your routine every two weeks, focusing primarily on the highlighted sections. Between full coloring appointments, visit your stylist for a gloss or toner refresh. This quick, low-commitment service will saturate the highlights with fresh pigment, restoring their richness and shine without requiring extensive lifting. Always prioritize deep conditioning treatments once a week to maintain the hair’s integrity, ensuring the cuticles are sealed and the color molecules are locked in, preserving that salon-fresh glow.
The Romantic Half-Up Braided Flower
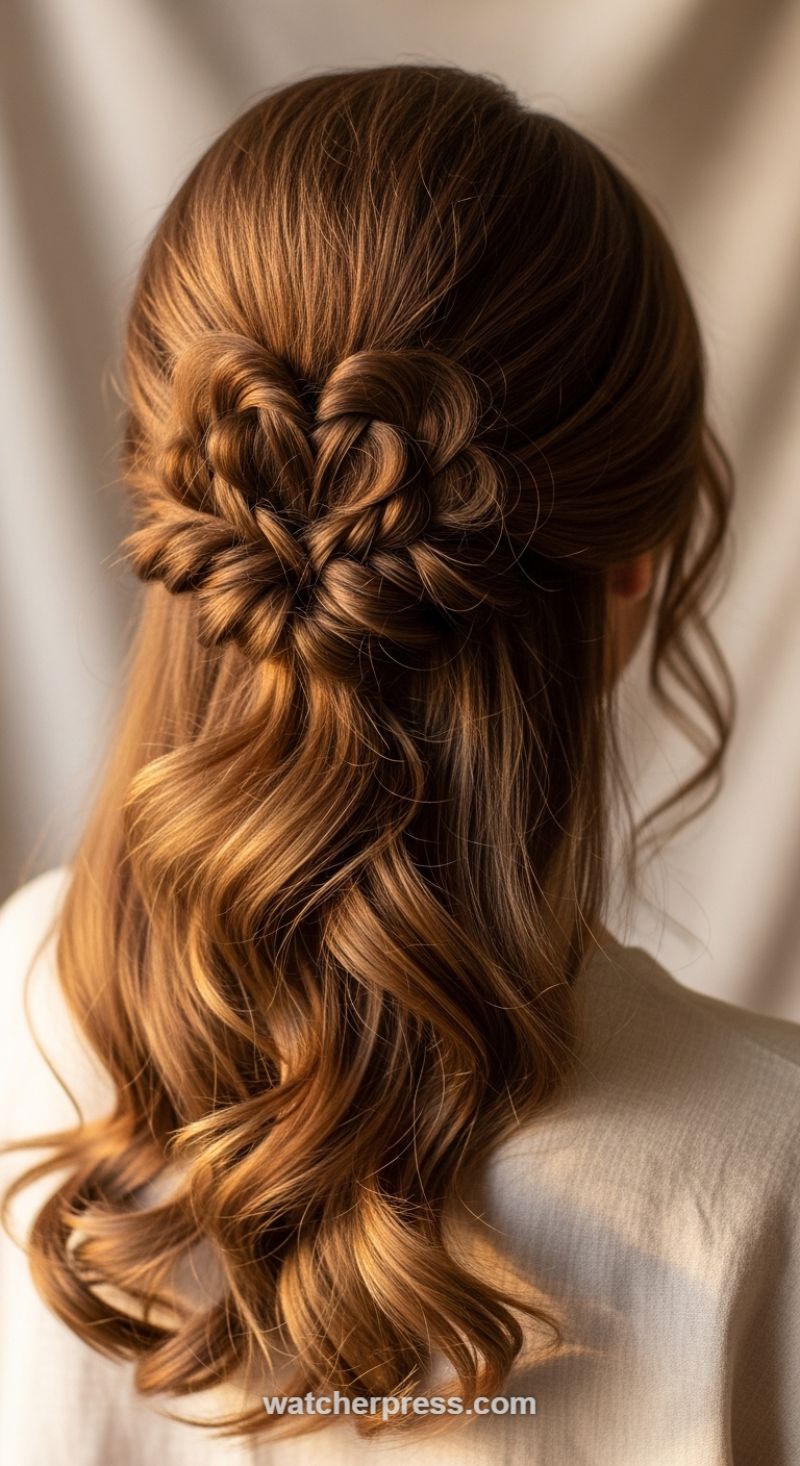
Achieving this level of intricate half-up style begins with meticulous preparation, ensuring the hair is prepped for volume, smoothness, and lasting hold. This style is ideally suited for long or medium-long hair, especially those with dimensional color, as the highlights beautifully catch the light and accentuate the woven patterns. First, apply a volumizing mousse to the roots and a heat protectant throughout the lengths. Use a large barrel curling iron (1.5 to 2 inches) to create soft, defined waves in the bottom section of the hair that will cascade down the back. These waves should be brushed out gently once cool to form uniform, glamorous loose curls, providing the perfect contrast to the detailed work at the crown. Expert tip: Before braiding, lightly texturize the mid-lengths of the hair to be included in the updo; this grip is essential for maintaining the integrity and structure of the intricate weaving.
The centerpiece of this look is the elegant braided bloom, which requires patience and precision. Begin by sectioning off the hair from ear to ear, ensuring the top section has enough volume. Divide this pulled-back hair into three equal vertical sections. The core technique involves creating three separate, loose, and ‘pancaked’ braids (where the edges are gently pulled out to look fuller). Instead of continuing as a standard three-strand braid, take the two outer braids and coil each one inwards towards the secured middle section. Secure these coils tightly against the head using clear elastics and bobby pins tucked underneath the braided structure. The goal is to create a symmetrical, layered, three-lobed flower shape that sits beautifully at the occipital bone. The delicate pulling technique is crucial here; ensure the ‘petals’ are soft and uniform, creating the dimension seen in the visual example.
To finalize this exquisite hairstyle, focus on longevity and sheen. Once the flower is perfectly pinned and secured, gently mist the entire style with a high-quality, flexible-hold hairspray. Avoid sprays that leave a visible residue, as they will detract from the soft texture. For the loose, flowing lengths, apply a lightweight shine serum to the ends to enhance the natural movement and luminosity of the waves. This combination of sleek braiding and voluminous flow makes this style perfect for upscale events such as bridal parties, black-tie affairs, or any occasion demanding a refined, sophisticated aesthetic. Periodically check the security of the bobby pins, particularly around the coiled sections, throughout the event to ensure the stunning structure remains intact.
The Dynamic Duo: Mastering the Peekaboo Underlayer Color
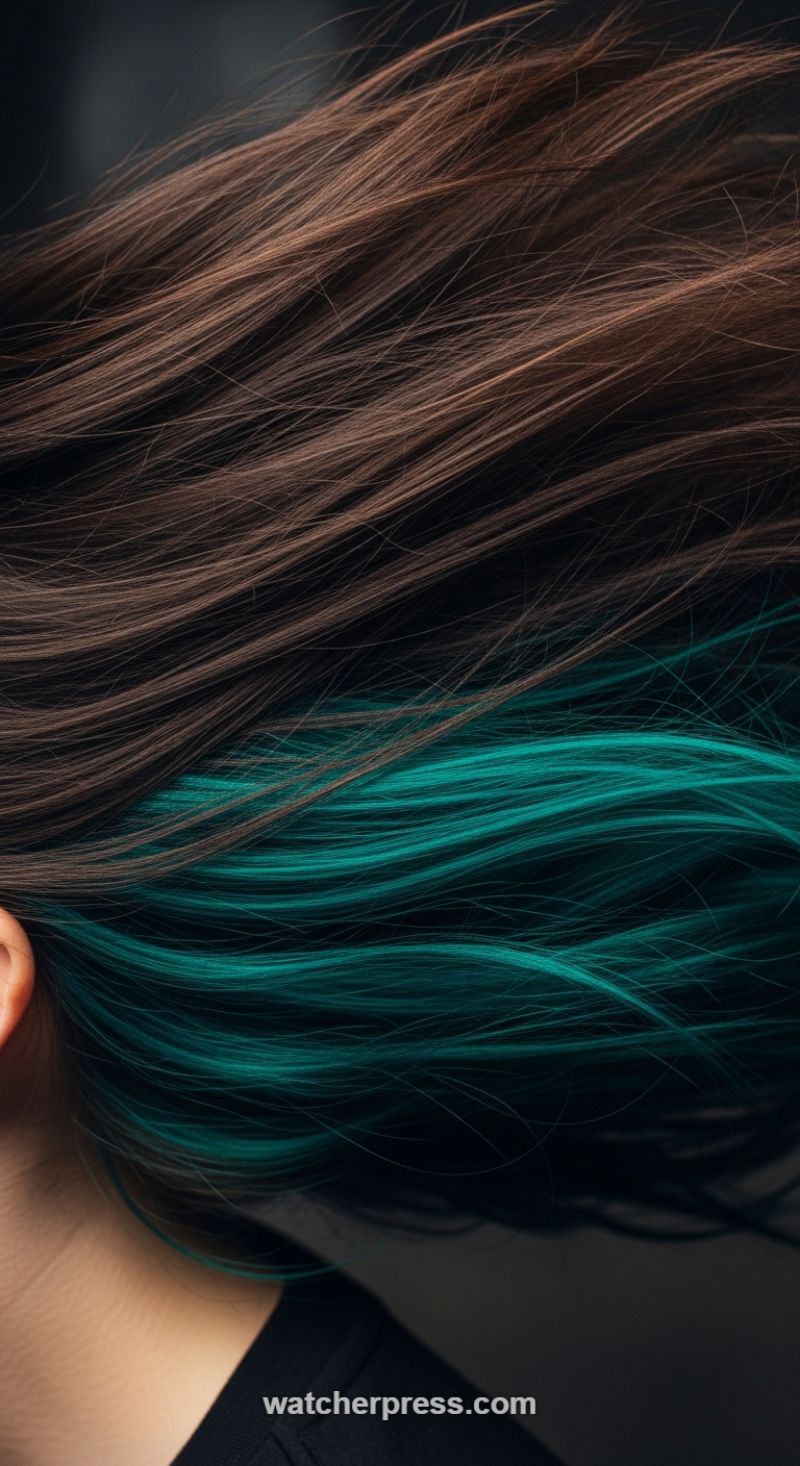
The image captures one of the most exciting trends for long hair: the ‘peekaboo’ or underlayer color technique. This look is perfect for those who want a dramatic splash of unconventional color—in this case, a vibrant, deep teal—without committing to an all-over transformation. The visual impact lies in the stunning contrast between the rich, healthy natural brown tones sweeping across the top and the intense, jewel-toned layer beneath. When the hair is still or worn down, the teal is subtly hidden, offering a professional or understated appearance. However, as demonstrated by the dynamic movement captured in the photograph, any subtle toss or shift reveals the electric underlayer, creating an instant, eye-catching focal point. This approach showcases the versatility and health of the hair, requiring smooth, well-conditioned strands to ensure both colors reflect light beautifully and maintain their distinction.
Achieving this contrasting, vibrant look requires meticulous execution, particularly in the coloring process. The first instructional step involves precise sectioning: typically separating the hair from the parietal ridge down, isolating the bottom third or quarter where the colorful transformation will occur. For a shade as brilliant as the teal seen here, the underlayer of natural dark hair must be pre-lightened to a level 8 or higher to ensure the semi-permanent dye adheres true-to-tone and achieves maximum saturation. Expert colorists advise using high-quality protective lighteners to preserve the integrity of the hair shaft during this process. Once the desired base lightness is achieved, the teal dye is applied consistently throughout the isolated section. Meanwhile, the top, natural layer should be treated with a color gloss or deep conditioning treatment to enhance its shine and ensure the brown tones look rich and dimensional, preventing them from appearing dull next to the vivid secondary color.
Maintenance is crucial for keeping a dual-toned style looking fresh, especially when dealing with vibrant fantasy colors like teal, which are prone to fading. To prolong the life of the underlayer color, always use sulfate-free, color-safe shampoos and wash hair using cool water; heat opens the cuticle and allows color molecules to escape rapidly. Weekly deep-conditioning masks specifically formulated for colored hair will help seal the cuticle and keep both the natural and dyed sections healthy and smooth, minimizing damage from the necessary pre-lightening process. Stylistically, the peekaboo color offers numerous creative options. For a high-impact reveal, style the hair in a half-up ponytail, a side braid, or twist it into an updo, allowing the full expanse of the hidden teal to be showcased. Conversely, wearing the hair straight and down provides a controlled, sophisticated appearance where the color merely offers a subtle, intriguing flash beneath the surface.