Transform your home instantly! Discover 25 chic decor secrets and smart organization hacks that interior design professionals and organizers use to create stylish, functional spaces.
9 Clever Kitchen Storage Hacks

The key to a high-end, clutter-free kitchen is utilizing every inch, especially the often-overlooked tight or vertical spaces. Look at the innovative pull-out storage solutions demonstrated here: narrow base cabinets transform into essential spice racks, perfect for storing jarred goods easily accessible yet completely hidden. Similarly, maximizing the depth of your cabinets is paramount; implement sliding metal units under the sink for easy access to cleaning cloths or supplies, overcoming the challenge of deep, dark cabinet corners. For items that need to be readily available but shouldn’t crowd the counter, adopt vertical solutions like a magnetic knife strip or a stylish, modern pegboard system for hanging large utensils. A pegboard offers flexible organization for frequently used tools, creating a dedicated visual zone that is both functional and decorative, allowing you to ditch bulky utensil crocks and reclaim valuable countertop real estate.
Professional organizers understand that internal drawer refinement is crucial for sustainable organization. Start by upgrading your drawers using customized or modular inserts. The images showcase effective use of clear acrylic and tiered wooden dividers within deep drawers. Tiered inserts are an expert-level solution for cutlery, knives, and smaller utensils, allowing you to double or even triple your drawer capacity by layering items safely and accessibly while maintaining clear sightlines. For specialized areas, such as awkward corner spaces or areas beneath the sink, opt for tiered, non-slip corner shelving or pull-out caddies designed to house cleaning supplies. This prevents items from being lost or jumbled, ensuring every product is instantly retrievable and maintaining a visually quiet and sophisticated kitchen aesthetic.
Finally, elevate your pantry and conquer any remaining awkward gaps with structured solutions. Achieving a high-impact pantry requires uniformity and efficiency. Invest in quality, airtight, stackable containers for all your dry goods, maximizing vertical shelf height while keeping food fresher and visually cohesive. This organized approach instantly elevates the look of your storage area. For those inevitable narrow gaps (like the space between a cabinet run and the refrigerator), deploy a slim, wheeled utility cart. This cart offers versatile, mobile storage for anything from bulk cleaning products to overflow items, easily tucking away when not in use. Implementing these tailored solutions—from specialized pull-outs and deep drawer dividers to uniform pantry systems—elevates the kitchen from merely functional to a streamlined, professional-grade workspace.
10 Vintage Thrift Hauls

Achieving a truly chic and personalized interior often bypasses high-end retail in favor of unique vintage finds. As showcased in these “10 Vintage Thrift Hauls,” the professional secret lies in strategically mixing epochs and textures. Notice the immediate juxtaposition: sleek, modern ceramic vases (like the matte terracotta and the glossy turquoise sculptural piece) sit comfortably beside highly detailed, ornate brass lamps and timeless botanical prints. This intentional contrast—pairing the simple, clean lines of a functional mid-century desk lamp with the speckled, textural base of a traditional table lamp—is what elevates a space from merely decorated to deeply curated. By selecting items with inherent character, whether it’s the patina of aged brass or the unique crackle glaze of an old vase, every piece instantly adds depth and a compelling narrative that new, mass-produced items often lack.
Successful thrifting requires a keen eye and strategic patience. Professionals hunt not just for aesthetically pleasing items, but for quality materials that are built to last. When sourcing, look specifically for weighty brass hardware (the heavier the better, as seen in the adjustable desk lamp bases), durable, richly colored ceramic glazes, and quality paper/printing on artwork. When scoring lighting, don’t be deterred by outdated or damaged shades; the base is the true investment. You can easily re-wire and replace a shade with a modern drum or simple cylinder (like the speckled fabric shade shown), instantly transforming the piece into a contemporary classic. Similarly, if you find promising art, focus on the image quality and ignore poor framing; a simple re-frame in a clean gold or walnut wood can unlock its full, upscale potential, ensuring your haul looks expensive, not just old.
Integrating these eclectic hauls provides an immediate, noticeable upgrade to any room. Use unique, sculptural vessels, such as the matte terracotta or the vibrant teal vases, as intentional focal points on bookshelves or console tables, treating them as independent art objects rather than just flower holders. Vintage lighting is absolutely crucial for setting a professional mood; the warm, layered light provided by aged lamps with opaque or detailed shades (like the mosaic or pleated shades) creates a comforting, low-level ambient light essential for high-end design. Finally, create sophisticated vignettes by grouping framed art of varying sizes and subjects (mixing botanicals and abstract prints is highly effective) and ground these displays with small ceramic catch-alls or darker, sculptural accent pieces to provide visual weight and draw the eye across a beautifully composed display.
Maximizing Space: Mastering the 8 Most Efficient Small Kitchen Layouts
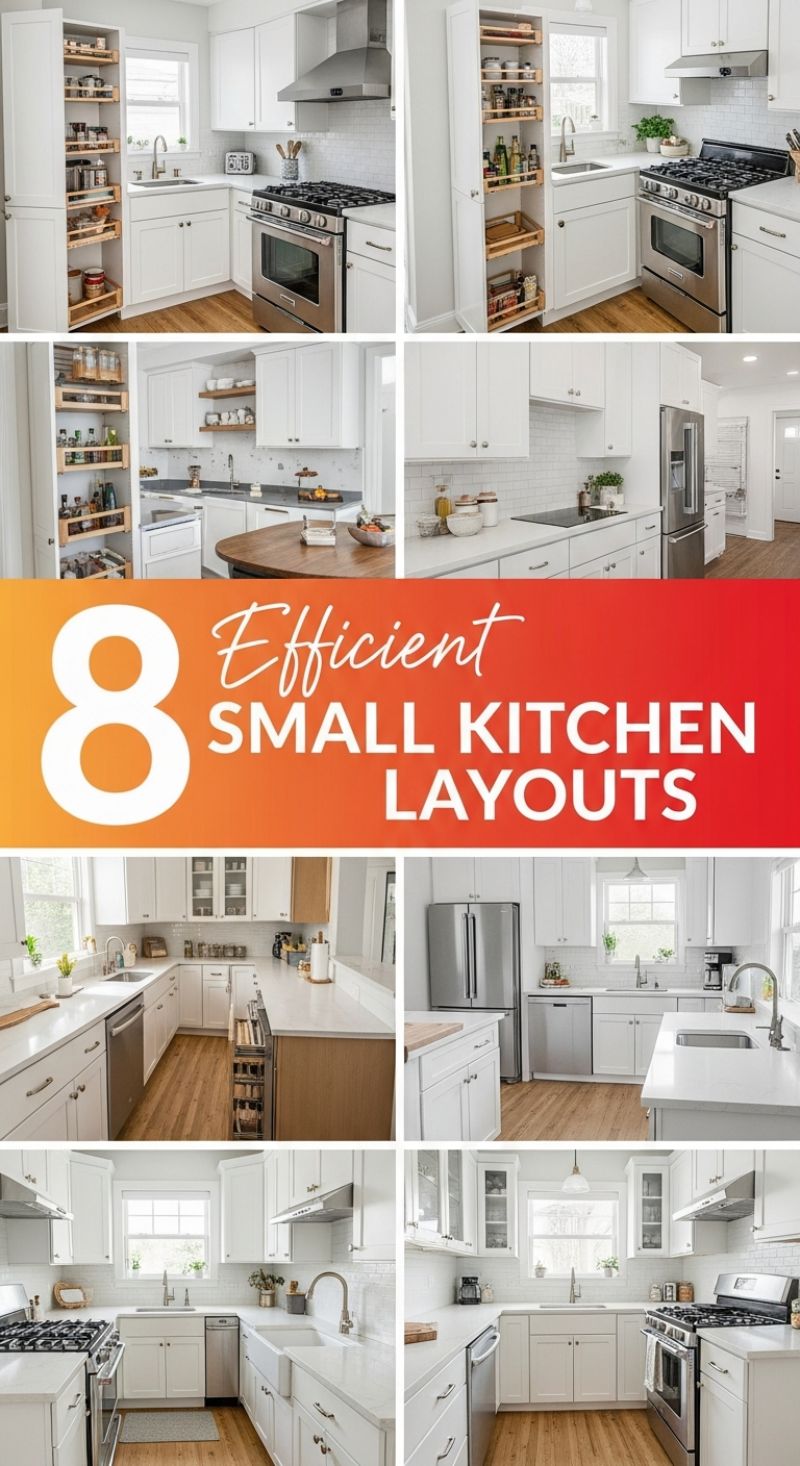
Professionals understand that in a small kitchen, every square foot must justify its existence. The key to efficiency is mastering the foundational layout, whether you opt for an L-shape, U-shape, or compact Galley setup. In these examples, the continuity of the countertop surfaces and the clean, white palette prevent visual fragmentation, which is a common pitfall in confined areas. To replicate this effect, ensure your appliances—particularly the refrigerator and stove—are positioned logically relative to the sink to maintain an unobstructed ‘work triangle.’ Notice how many of these layouts incorporate a corner sink or utilize a recessed window area above the sink, drawing the eye outside and increasing the perceived depth of the room. When choosing materials, opt for reflective, light surfaces, like the white subway tile backsplashes and polished quartz countertops seen here, which bounce light and contribute significantly to the expansive, airy feel.
Organization hacks are paramount in small layouts. The most impactful secret revealed here is the utilization of vertical storage through floor-to-ceiling cabinetry and, most critically, integrated pull-out organizational systems. Instead of conventional, wide shelves that necessitate deep reaching and lead to clutter, integrate narrow, specialized pull-out pantries (like the ones shown flanking the main workspace). These customized units ensure that spices, oils, and small appliances are immediately accessible while hiding them completely when not in use, maintaining a sleek facade. Furthermore, utilize the tops of cabinets for long-term or seasonal storage, or install glass-front cabinets (as seen in the lower right image) to lighten the upper visual mass while allowing for decorative display space. When designing cabinet doors, choose simple profiles, such as the classic Shaker style featured, as overly ornate detailing can make a small room feel unnecessarily busy and cluttered.
Achieving a professional, chic finish requires careful consideration of appliance scale and finishing details. In compact spaces, consider slightly smaller or counter-depth refrigerators to prevent them from jutting out into the traffic path. When selecting sinks, a deep farmhouse or single-bowl stainless steel option maximizes working space within the footprint. Don’t underestimate the power of subtle textural contrast; the warm wood flooring and small wooden chopping blocks or serving boards introduce necessary warmth against the dominant cool white palette. Finally, lighting is crucial: layer your illumination with functional under-cabinet lighting (to eliminate shadows on the workspace) and a delicate pendant light over the sink area (as seen in some examples) to provide a decorative focal point without consuming valuable real estate.
10 Cozy Fire Pit Areas
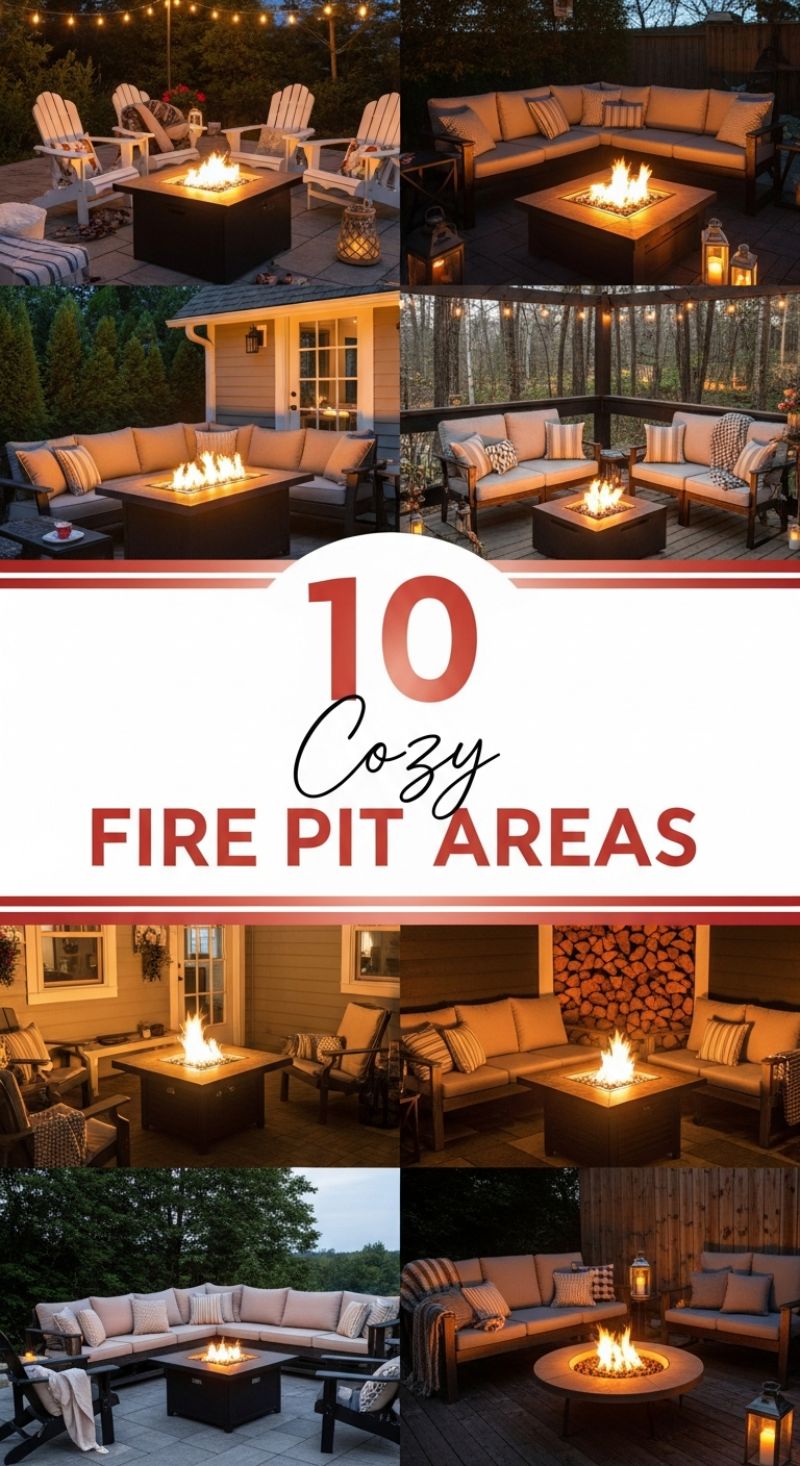
Professional designers know that extending your living area outdoors is one of the quickest ways to maximize your home’s footprint and perceived value. The foundation of a chic outdoor living room is the fire pit area, which acts as the anchor point, expertly mimicking an indoor coffee table or fireplace. When installing this immediate upgrade, you must first define the perimeter, whether through paved stone, composite decking, or a simple gravel border, to delineate the space as a dedicated ‘room.’ Choose a fire pit style that complements your home’s architecture—for modern homes, a clean-lined square or rectangular gas table works best (offering a practical edge for drinks), while a traditional aesthetic might benefit from a rounded, wood-burning bowl. Positioning is key; ensure the fire pit is central and easily accessible from all seating, establishing clear circulation paths around the zone to prevent crowding and promote flow.
To achieve true coziness, mimic the comfort level of an indoor sofa. Opt for deep-seated sectional seating, as displayed in the majority of these arrangements, to facilitate communal conversation and provide ample space for genuine lounging. Avoid sparse, mismatched arrangements and instead create a cohesive circle or L-shape that encourages intimacy and gathering. The real secret to professional-level comfort lies in layering textiles. Invest in high-quality, quick-drying, weather-resistant cushions with UV protection, and then build upon that foundation by adding plush throw pillows in varied patterns (stripes, solids, and textures) for sophisticated visual interest. Keep thick, soft outdoor throws draped strategically over the backs of chairs or neatly folded in storage bins; these not only offer instant warmth on chilly evenings but immediately communicate a welcoming, luxury aesthetic, instantly transforming plain patio furniture into an irresistible outdoor retreat.
The final, and arguably most important, secret to a successful, chic fire pit area is mastering the ambient lighting design. Skip harsh overhead floodlights entirely, as they destroy the cozy atmosphere. Instead, create depth and warmth using multiple low-level light sources. Install overhead bistro string lights (Edison bulbs are universally popular for their soft, warm glow) spanning the seating area or surrounding trees to softly define the ceiling of your outdoor room. Supplement this ambient layer with varying sizes of decorative lanterns—gas, candle, or battery-operated—placed directly on the ground, on side tables, and along ledges. This layered approach ensures adequate visibility while casting flattering, romantic shadows. Furthermore, ensure the surrounding area, like walls or fences, is utilized; a neatly stacked wall of firewood, as seen in some designs, or well-placed planters add texture and an essential organic element that significantly enhances the overall custom-designed feel.
Chic Decor Secrets: Mastering the Professional Look

Achieving a professional, high-end interior look hinges on mastering tactile elements and lighting. Start by embracing Layered Textures, a foundational technique where designers combine varying weights and finishes—think woven baskets paired with plush velvet pillows, linen drapery, and a chunky knit throw atop a textured area rug. This multi-sensory approach instantly adds depth and prevents a room from feeling flat or sterile. Next, pivot to light: Statement Lighting should be treated as functional sculpture. Whether it’s an oversized sculptural pendant in the living room or a dramatic chandelier above the bed, these fixtures draw the eye upward and anchor the space. Complement this with strategic use of Bold Accent Walls or dynamic Pattern Play, using textured wallpaper or geometric rugs to establish clear visual boundaries and inject personality without overwhelming the room’s elegant foundation.
Beyond basic aesthetics, professional decor relies on intelligent spatial planning and intentional curation. Elevate your space by moving past generic decoration toward a Curated Art Collection. This involves carefully selecting pieces that speak to you and arranging them thoughtfully, perhaps in a balanced gallery wall, ensuring framing complements the overall palette. Functionality must seamlessly blend with form; utilize techniques like Open Shelving and integrated Smart Storage to keep clutter hidden while allowing beautiful or meaningful items to serve as decor. In the kitchen or study, clear, labeled storage and built-in solutions maintain clean lines. For living areas, create an inviting sanctuary with a Cozy Nook, maximizing comfort through deep seating and soft lighting. Furthermore, strategically introduce Mirrored Surfaces to amplify natural light and visually expand smaller areas, making sure the reflection catches a desirable view or key decorative element.
Finally, the finishing details are what transform a decorated space into a designed home. Introduce depth and warmth by pairing Metallic Accents—such as brushed brass cabinet pulls, steel table legs, or an antique gold mirror—with rich, Warm Wood Accents found in flooring, furniture, or exposed beams. The juxtaposition of cool metal and natural wood tones adds instant sophistication. Ensure the space breathes by incorporating abundant Greenery; large indoor plants, sculptural trees, or small potted herbs provide vital organic texture and color, combating the rigidity of structural elements. The final, essential layer is injecting genuine character through Vintage Finds and Personal Touches. Mix inherited items or unique flea market scores alongside travel mementos and meaningful photographs. These elements tell the homeowner’s story, ensuring the chic design feels lived-in, authentic, and truly bespoke rather than merely staged.
5 Heartfelt Welcome Home Decor: Mastering the Art of the Organized Entryway
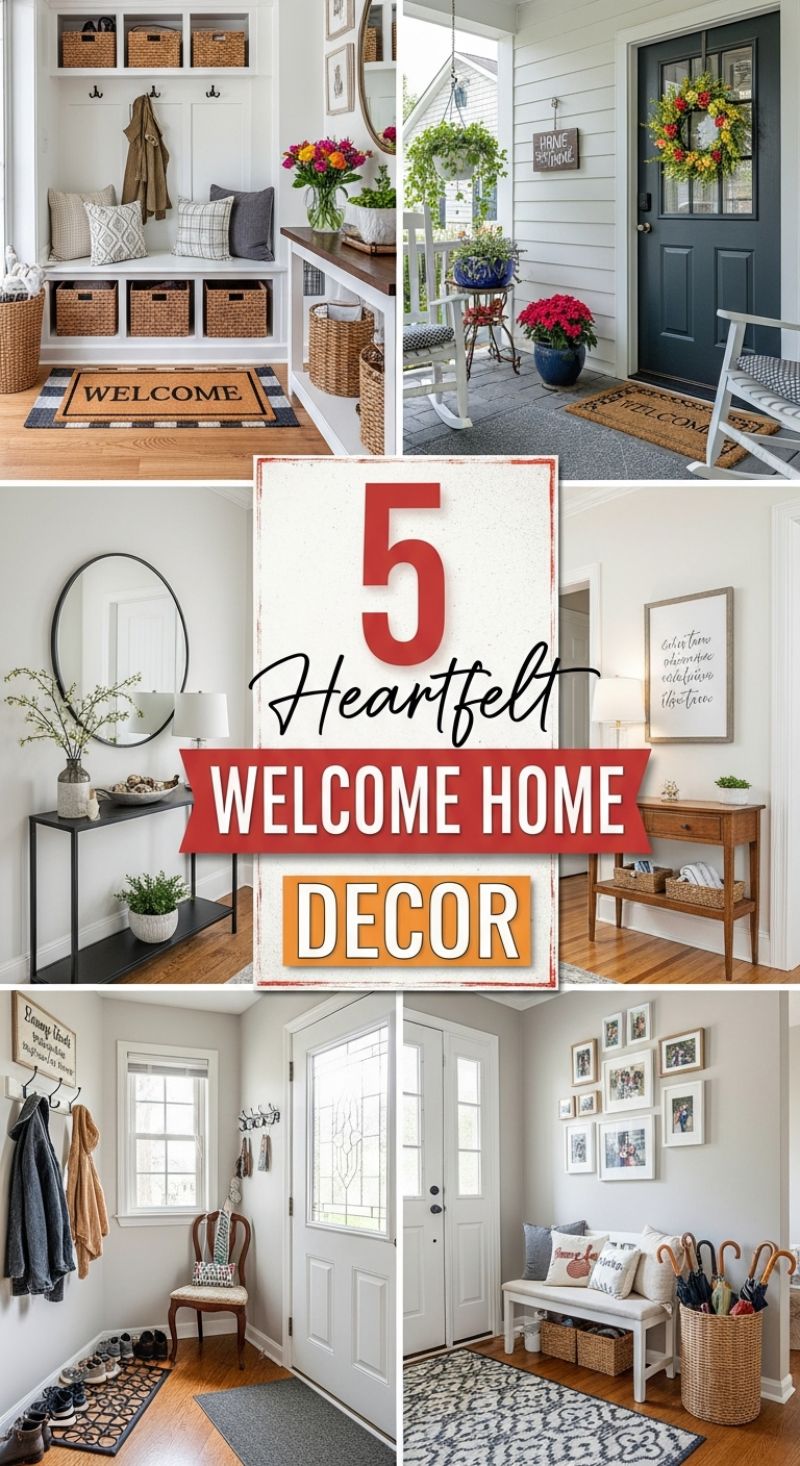
The entryway serves as the first impression of your home’s interior style, and professional designers emphasize that function must perfectly merge with flair here. To achieve the sophisticated, clutter-free look seen in these examples, prioritize strategic organization. Start by implementing dedicated ‘drop zones’ for immediate necessities, such as the built-in cubbies or benches shown in the visuals. Wicker or woven storage baskets are non-negotiable, acting as stylish catch-alls for shoes, gloves, and mail—the key is contained chaos. When space is limited (like the narrow mudroom example), maximize vertical storage using multi-hook racks for coats and keys, paired with a low-profile shoe mat to define the boundary for footwear. If you have the luxury of space, a tailored entry bench, preferably with hidden storage or open shelving beneath, provides a crucial spot for sitting while also offering a foundation for welcoming decor elements like throw pillows and layered welcome mats.
Elevating the aesthetic appeal involves focusing on key focal points and utilizing reflective surfaces to enhance light and perceived space. Incorporate a stylish console table, which acts as the main stage for decorative display. Balance the height with elements like lamps (essential for warm, inviting illumination) and structural greenery in a sleek vase. A large, well-placed mirror, particularly the dramatic round shape seen in one example, serves dual purposes: allowing for a last-minute check before heading out and reflecting natural light to expand the entryway visually. Furthermore, personalize the space using intentional art. Whether it’s a large, framed inspirational quote or a meticulously arranged gallery wall of family photos, ensuring the framing is consistent (e.g., all white frames, as shown) guarantees a high-end, cohesive appearance that speaks volumes about the home’s inhabitants.
Don’t overlook the critical role of the threshold—the front door and porch area. This is your initial welcoming handshake to the world. Ensure your front door itself is well-maintained and accented by layered rugs that add texture and definition. Seasonal elements, such as a vibrant wreath or strategically placed planters overflowing with life, inject instant warmth and color. For porches, introduce comfortable, classic seating, like the white rocking chairs pictured, creating a pause point that makes the home feel genuinely lived-in and inviting. Remember that every element, from the finish of the coat hooks to the pattern on the area rug, contributes to a curated, heartfelt welcome; selecting durable materials and maintaining symmetry ensures the look remains chic and professional year-round.
11 Seamless Open-Concept Designs
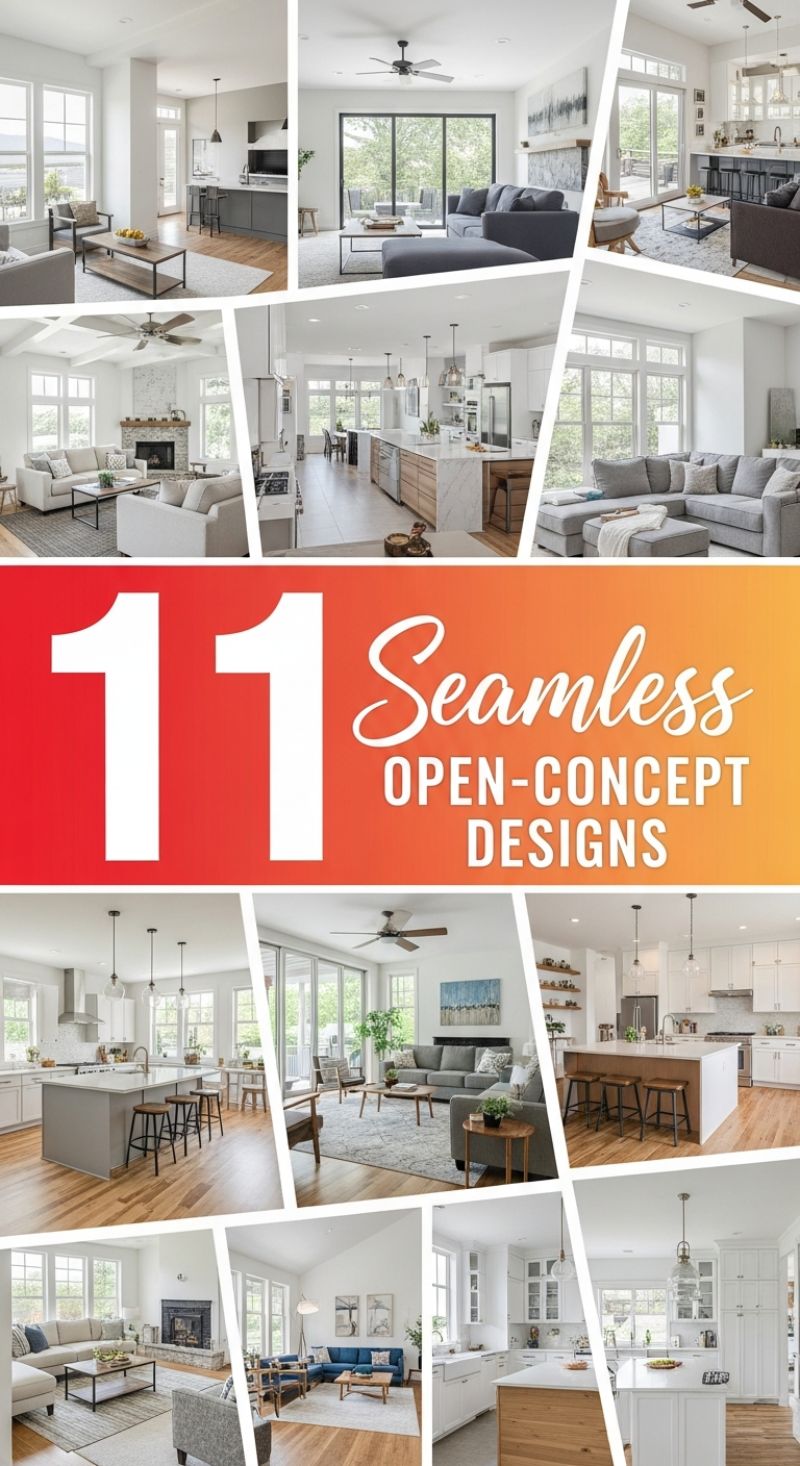
The seamless open-concept designs showcased here offer invaluable inspiration for maximizing flow and light, a critical component of any instant home upgrade. The professional secret to achieving this level of visual fluidity starts with architectural continuity and maximizing natural light. Note the pervasive use of large, unobstructed windows and expansive glass doors that visually extend the interior space outward, a key hack for making any home feel larger and more organized. To ensure true ‘seamlessness,’ designers almost universally employ consistent flooring across the main living areas, typically favoring light-toned hardwoods or wide-plank flooring. Furthermore, anchoring the design with a neutral, bright color palette—using whites, light grays, and creams on walls and fixed elements—maintains an airy foundation, preventing the large, connected area from feeling heavy, dark, or cluttered.
A crucial challenge in open-concept layouts is maintaining definition and avoiding an overwhelming sense of chaos. The organizational hack professionals employ is strategic zoning using large decorative elements. Utilize substantial area rugs to perfectly anchor the seating arrangements in the living area, clearly delineating the relaxation zone from the main traffic path. Similarly, oversized kitchen islands, often featuring contrasting materials or colors, serve as robust central boundaries between the cooking space and the entertaining space. To reinforce these boundaries, lighting is key: install statement pendant lights over the island or dining area to draw the eye and define function, while relying on unified, consistent recessed lighting throughout the rest of the space to maintain that crucial sense of flow and cohesion. For organizational integrity, all storage must be maximized and hidden—opt for floor-to-ceiling cabinetry and built-in media units that minimize exposed clutter.
Finally, the ultimate decor secret for integrating these diverse spaces is deliberate material repetition. The design hack involves creating a visual thread by repeating wood tones, metal finishes, or specific textures across the adjacent rooms. For example, ensure the wood finish on your kitchen island stools closely matches the finish of the coffee table or accent chairs in the living room, or that the metal hardware in the kitchen echoes the finishes on the lighting fixtures. This technique subtly ties the functional zones together, transforming disparate areas into a singular, well-curated environment. When selecting furniture, professionals prefer pieces with clean lines and scale appropriate for the large room, while strictly limiting decorative knick-knacks to avoid visual noise. This attention to cohesive material language is what elevates a simple open floor plan into a professionally organized, seamless design statement.
Tropical Outdoor Showers: A Spa-Worthy Home Upgrade

Creating a truly luxurious outdoor shower is one of the most transformative home upgrades, effectively turning a simple necessity into a private, tropical spa retreat. As professionals know, the secret lies in harmonizing durable, natural materials. Use the surrounding landscape as your muse, integrating rich, vertical wood paneling—such as naturally resistant cedar, teak, or ipe—for a backdrop that offers warmth and essential privacy. The samples shown illustrate powerful material pairings: smooth wood juxtaposed against highly textured surfaces like stacked slate, river stones, or rough-hewn brick. This contrast provides visual depth and anchors the space. When selecting wood, ensure it is properly sealed or allowed to weather naturally (like teak) to withstand the elements, creating a seamless transition between architectural structure and wild environment.
The functional aspects require expert attention to detail. For hardware, always opt for marine-grade or solid brass fixtures with chrome or brushed nickel finishes, as standard indoor plumbing will quickly degrade when exposed to constant humidity and UV light. Positioning the rainfall showerhead overhead, often extended from a high mounting point, mimics the feel of natural rain, maximizing the spa ambiance. Drainage is paramount for longevity and cleanliness. Professionals often swear by pebble mosaic flooring or large flat stones set into a bed of small black river rock. These surfaces provide excellent foot traction and facilitate superior water percolation. If building on a deck, ensure proper grading and install a slatted wood floor over an underlying drainage system (like a French drain or gravel bed) to prevent standing water and structural decay.
To achieve the ‘tropical’ effect, meticulous landscaping is the final step. Think of the shower enclosure as an true extension of the garden. Utilize large-leaf, humidity-loving tropical plants like ferns, bamboo, or large-leaf philodendrons immediately outside the walls to soften the structure and enhance the feeling of seclusion. For nighttime use, which truly elevates the experience, integrate discreet, low-voltage landscape lighting. Uplights hidden among the foliage or subtle strip lighting beneath benches or on the stone wall texture will create a dramatic, resort-like glow without compromising privacy. This combination of material quality, robust function, and strategic lighting transforms the outdoor shower from a simple novelty into a high-utility, breathtaking feature that instantly boosts home appeal.
6 Compact Kitchenette Designs
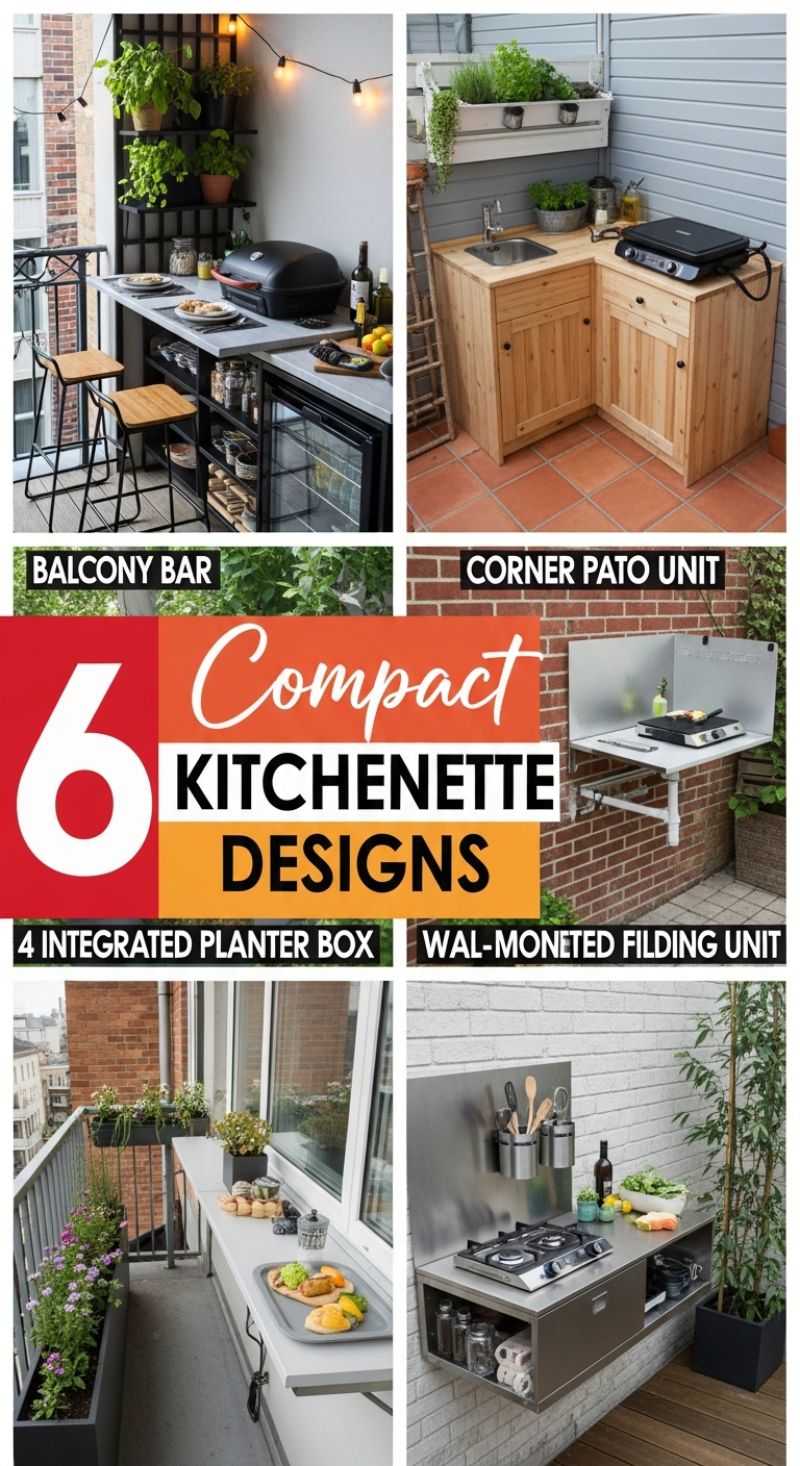
When outdoor square footage is limited, the secret to creating a functional and stylish entertaining space lies in smart, compact organization. Professionals swear by multi-functional units that maximize vertical space and integrate storage seamlessly. Consider the sleek ‘Balcony Bar’ concept, which transforms a narrow balcony into a sophisticated hub. This design utilizes a high bar counter for dining or prep, often featuring integrated under-counter shelving for essentials like glassware, condiments, and even a compact refrigerator or cooler. The key organizational hack here is verticality: installing tiered plant shelves or a trellis system above the counter not only provides a lush backdrop (integrating biophilic design) but also uses wall space that would otherwise be wasted. Choose durable, weather-resistant materials like stone-look countertops and powder-coated steel frames to ensure longevity and maintain a clean, organized aesthetic, essential for maximizing impact in small areas.
For more awkward or constrained layouts, specialized modular units provide a tailored fit without custom pricing. The ‘Corner Patio Unit’ exemplifies this, capitalizing on often-ignored corner space by combining essential elements—a sink for quick clean-up and a dedicated counter area for cooking appliances like a griddle or portable cooktop—within robust, appealing wooden cabinetry. The enclosed cabinetry is critical for organization, providing hidden storage for plumbing lines and supplies, keeping the visual clutter minimal. Alternatively, if floor space is a complete non-starter, deploy wall-mounted solutions. Designs like the ‘Wall-Mounted Folding Unit’ or a permanent stainless steel gas hob unit are prime examples. These units literally pull the kitchen off the ground, clearing valuable floor space. For the ultimate space-saving maneuver, a folding unit can be collapsed flat against the brickwork when not in use, a superior organizational hack that instantly restores the spacious feeling of the patio.
Finally, elevate your organization through functional decor by integrating greenery, as seen in the ‘Integrated Planter Box’ approach. This design often utilizes a deep, narrow planter along the railing or window ledge, with a counter extension running parallel. The planter box serves two roles: a beautiful focal point and a structural anchor for the serving/prep surface. Expert advice dictates using herbs (like basil or mint) in these planters, turning a decorative element into a culinary asset right next to the prep area. This hack keeps often-used items within easy reach without cluttering the main counter. By embracing these compact and multi-functional designs, you ensure every inch of your outdoor area is both highly practical and impeccably styled, making your kitchenette a seamless extension of your chic indoor living space.
9 Moody Gothic Western
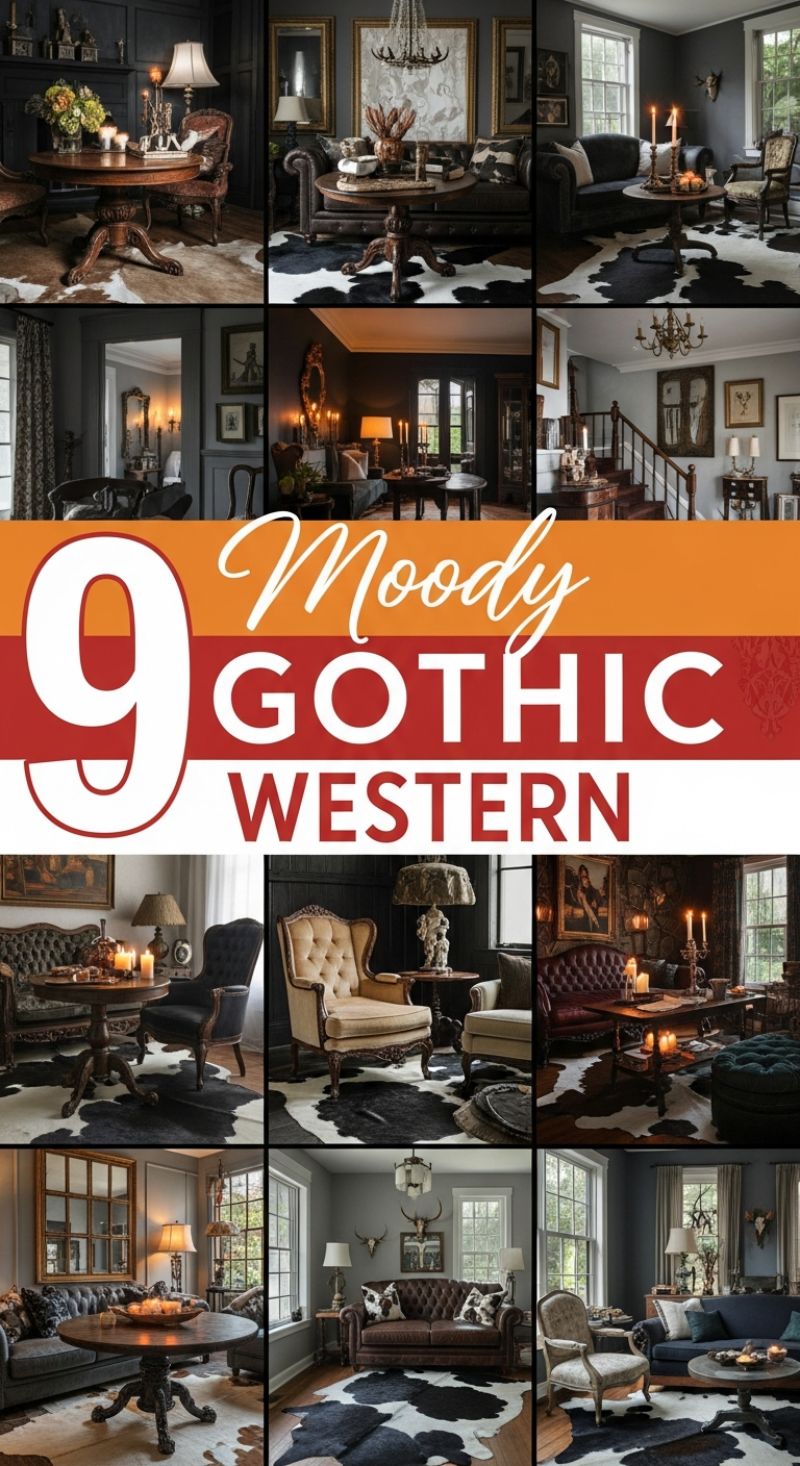
To successfully execute the “Moody Gothic Western” aesthetic, the foundation must be set with a dramatic, enveloping color palette. Professionals lean heavily into deep, matte neutrals—think charcoal, true black, or deep midnight blue—for wall colors, often accentuated with dark, paneled wainscoting or trim to enhance the architectural weight and Victorian-era feel. This darkness provides the essential backdrop for contrast. The critical element defining the Western half of this style is the use of natural, organic textures, primarily focusing on large, striking cowhide rugs. These rugs, whether black and white, tri-color, or deep brown, ground the space, adding immediate visual interest and breaking up the uniformity of dark flooring. Pair these large statement pieces with heavy, textured fabrics like velvet, tweed, or distressed leather on throws and pillows to create layers of tactile richness that invite intimacy and counteract the formality of the dark walls.
Achieving the signature Gothic drama requires meticulous attention to furniture selection and lighting. Opt for substantial, heirloom-quality pieces, such as button-tufted Chesterfield sofas, wingback chairs upholstered in deep jewel tones (like oxblood or deep sapphire), and heavily carved wooden pedestal tables. The key is solidity; furniture should feel weighty and permanent, often featuring dark, ornate wood finishes typical of Gothic or Victorian revival styles. Lighting must be moody and atmospheric, relying less on overhead brightness and more on layered, localized sources. Utilize antique brass or wrought iron floor and table lamps topped with warm, opaque shades to cast pools of golden light. Crucially, incorporate candlesticks—large, dramatic candelabras or simple tapers—to provide a soft, flickering glow that maximizes shadows, instantly creating the intimate, slightly mysterious ambiance central to this design secret.
Finally, the finishing touches must skillfully blend the opulent Gothic elements with rugged Western artifacts. Curate vignettes by mixing framed dark, moody portraiture (often with gilded, heavy frames) and oversized, ornately detailed mirrors with rustic Western accents. Display elements like polished cow skulls, preserved antlers, or rustic leather accessories sparingly to provide the necessary thematic nod without overwhelming the space. On coffee and side tables, layer accessories such as stacks of antique books, dark metal objects, and deep, muted floral arrangements (think dried hydrangeas or dark greenery). The expert trick is ensuring every element looks collected and intentional, fostering a sophisticated narrative where rugged frontier elegance meets historic European grandeur. The overall effect should be rich, textured, and deeply evocative, feeling less like a theme and more like a carefully curated period home.
Mastering the Vibrant Afro Chic Style
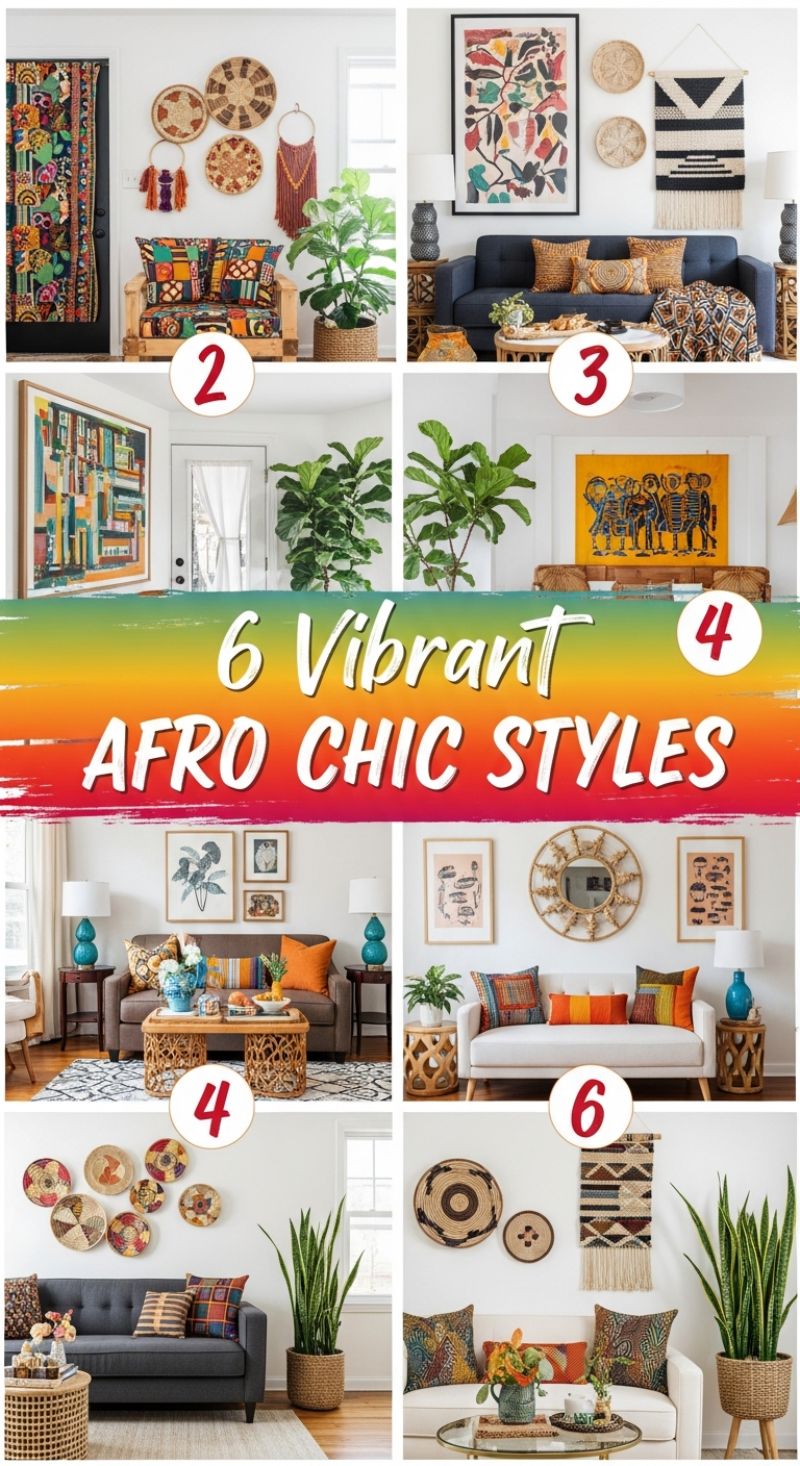
The Afro Chic style is a masterclass in layering texture and saturated color, providing an instant infusion of global warmth and sophistication into any space. To successfully implement this look, start with a foundation of curated textiles. Professionals recommend grounding the room with large, neutral pieces—such as a dark gray, navy, or crisp white sofa—then introducing African-inspired patterns through throw pillows and blankets. Key fabrics include traditional wax prints, geometric mudcloth, or bold kente patterns. The secret is intentional mixing; combine small, intricate prints with large, abstract color blocks, ensuring all the chosen pieces share a common color thread (such as terracotta orange or deep indigo) to maintain visual harmony. Incorporate natural, hand-woven textures via rugs, poufs, and oversized baskets to enhance the authentic, earthy feel, immediately elevating the design beyond simple color.
Elevate your walls by utilizing sculptural and handcrafted art forms that are characteristic of this style. One of the most effective techniques seen here is the use of woven baskets as dimensional wall hangings. When creating a basket gallery wall, vary the size, depth, pattern, and color of the pieces, clustering them tightly to form a single impactful focal point above a sofa or console table. Supplement this textural display with significant artwork—choose pieces that feature bold figurative designs or intense abstract color palettes, often framed simply in natural wood or black to let the art truly speak. Additionally, swap out standard metal or glass coffee tables for robust, carved wooden pieces or intricate rattan designs. These organic forms not only add necessary visual weight but also highlight the handcrafted, artisanal core of the Afro Chic aesthetic.
Finally, integrate lush, oversized greenery to complete the look and inject refreshing life. Large indoor plants, such as Fiddle Leaf Figs or towering Snake Plants (Sansevieria), are indispensable for their verticality and sculptural quality. Always place these plants in woven floor baskets or simple terracotta pots to echo the natural textures elsewhere in the room. The ‘Chic’ component of this style relies heavily on a thoughtful balance between rustic elements and modern furniture silhouettes. Introduce pops of unexpected color, like the vivid teal lamp bases, to contrast the earth tones and tie the patterned fabrics together. By balancing the vibrancy of the textiles with the clean lines of modern furniture and the grounded simplicity of natural materials, you create an interior that is both energetic and flawlessly curated.
10 Festive Mexican Home Decor Secrets

Achieving the vibrant, collected look of festive Mexican decor is less about accumulation and more about intentional color blocking and textural layering. The fundamental secret to this style lies in embracing high-saturation colors on large surfaces. Professionals recommend selecting two dominant, contrasting colors—often a cool tone like deep turquoise or bright teal, paired with a warm tone like marigold yellow or intense terracotta red—for your walls or main furniture pieces. For instance, a bright yellow wall instantly becomes a warm backdrop for dark, rustic wooden furniture, while a teal wall is perfectly complemented by bedding in fiery orange and red stripes. To avoid the room feeling overwhelming, ensure ceilings and trim remain crisp white, providing visual rest and allowing the intense colors to pop with clarity. This bold approach to color provides an instant, dramatic home upgrade, relying on courage in paint selection rather than expensive structural changes.
To lend depth and authenticity to your space, focus heavily on rich, layered textiles. The hallmark of Mexican interior design is the strategic use of woven materials, particularly brightly colored serapes, striped throws, and patterned rugs. The instructional key here is mixing patterns with varying scales. Pair a large, repeating floral or geometric pattern on the rug with smaller, more tightly woven stripes or checks on throw pillows and blankets. Don’t shy away from mixing materials; combine heavy wood furniture and rustic leather with soft cottons and woven natural fibers like jute or wicker. Expertly drape a serape across a sofa or bed, letting the fringe add movement and texture, and anchor the arrangement with terracotta or Talavera pottery. This layering technique is crucial for transforming a merely colorful room into one that feels warm, inviting, and historically authentic.
The final step in mastering this chic decor style involves curating decorative elements for maximum impact without inducing clutter. Rather than spreading small items randomly, group collections cohesively to create powerful focal points. Use open shelving above a fireplace or console table to display a curated collection of painted ceramic plates or small earthenware vessels. Another organization hack involves utilizing wall space for textural display; professionals often create gallery walls using varied sizes of woven baskets, circular macrame hangings, or framed folk art rather than traditional pictures. For furniture, prioritize pieces with character, such as a hand-painted chest or a chair upholstered in an ethnic print. Incorporating rustic mirrors with dark wood or hammered metal frames also helps to reflect the room’s vibrant colors, making the space feel larger and more luminous, thus proving that even the boldest decor can benefit from thoughtful organization and display.
10 Essential Outdoor Bars
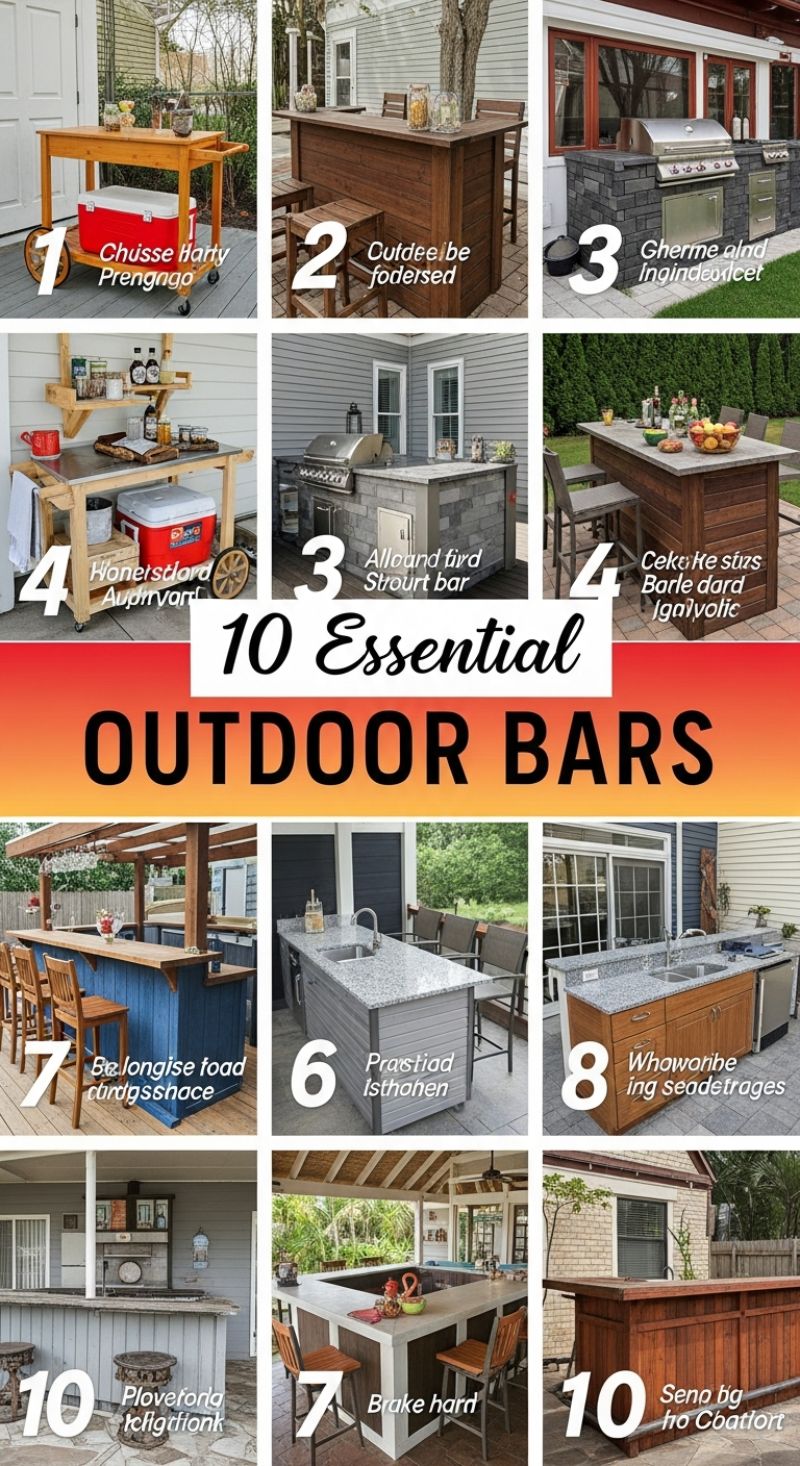
Integrating an outdoor bar is arguably the most effective way to elevate backyard entertaining, transforming a simple patio into a functional, upscale gathering space. The critical first step in this home upgrade is defining your bar’s purpose and permanence. If mobility and simplicity are paramount, expert advice leans toward choosing a rolling bar cart (such as the wooden trolley in #1) or a highly functional serving station (#4). These portable options often incorporate essential elements like integrated ice chests and shelving, offering maximum flexibility with minimal commitment. For those aiming for a permanent installation, however, the structure must be zoned for utility access. A built-in bar, like the elaborate masonry kitchen in #3, requires pre-planning for gas lines (for the grill), electrical outlets (for refrigeration), and drainage (for a sink). Determining whether your bar will be purely for mixing and socializing (a dry bar) or a full food prep zone (a wet bar) will dictate about 80% of your project’s complexity and cost.
The durability and aesthetic appeal of your outdoor bar are fundamentally determined by material selection. While natural wood structures (#2, #7) offer classic warmth, they require diligent maintenance, including sealing and protection from UV rays and moisture. For superior resilience, professionals recommend composite materials or durable masonry paired with weather-resistant countertops, such as the granite-topped islands shown in #6 and #8. These materials are built to house critical appliances. A true outdoor wet bar (as seen in #8, featuring a sink and cabinets) significantly enhances functionality by allowing easy rinsing and disposal, minimizing the need for trips inside the house. When designing the layout, ensure the bar top provides adequate overhang (12-18 inches) for comfortable seating and that the height accommodates standard outdoor bar stools (30 to 34 inches), creating a seamless counterpoint between the serving area and the guest space.
To maximize the bar’s appeal as a social hub, optimize the layout for interaction. Designs like the U-shape or horseshoe bar shown in #7 (Brake hard) allow the host to operate appliances efficiently while maintaining a clear line of sight and conversation with guests. Ambience is key: incorporate smart lighting solutions, such as under-bar LED strips or attractive overhead pendant lights if the structure is covered by a pergola or pavilion. Finally, never underestimate the need for weatherproof storage. Even the most simple setups benefit from secure, dedicated cabinetry (#10, Senp bg) for storing glassware, napkins, and mixers. This dedication to practical storage ensures that the bar area remains clutter-free and instantly ready for impromptu entertaining, transforming a basic backyard into a high-end destination.
12 Essential Patio Decor Finds
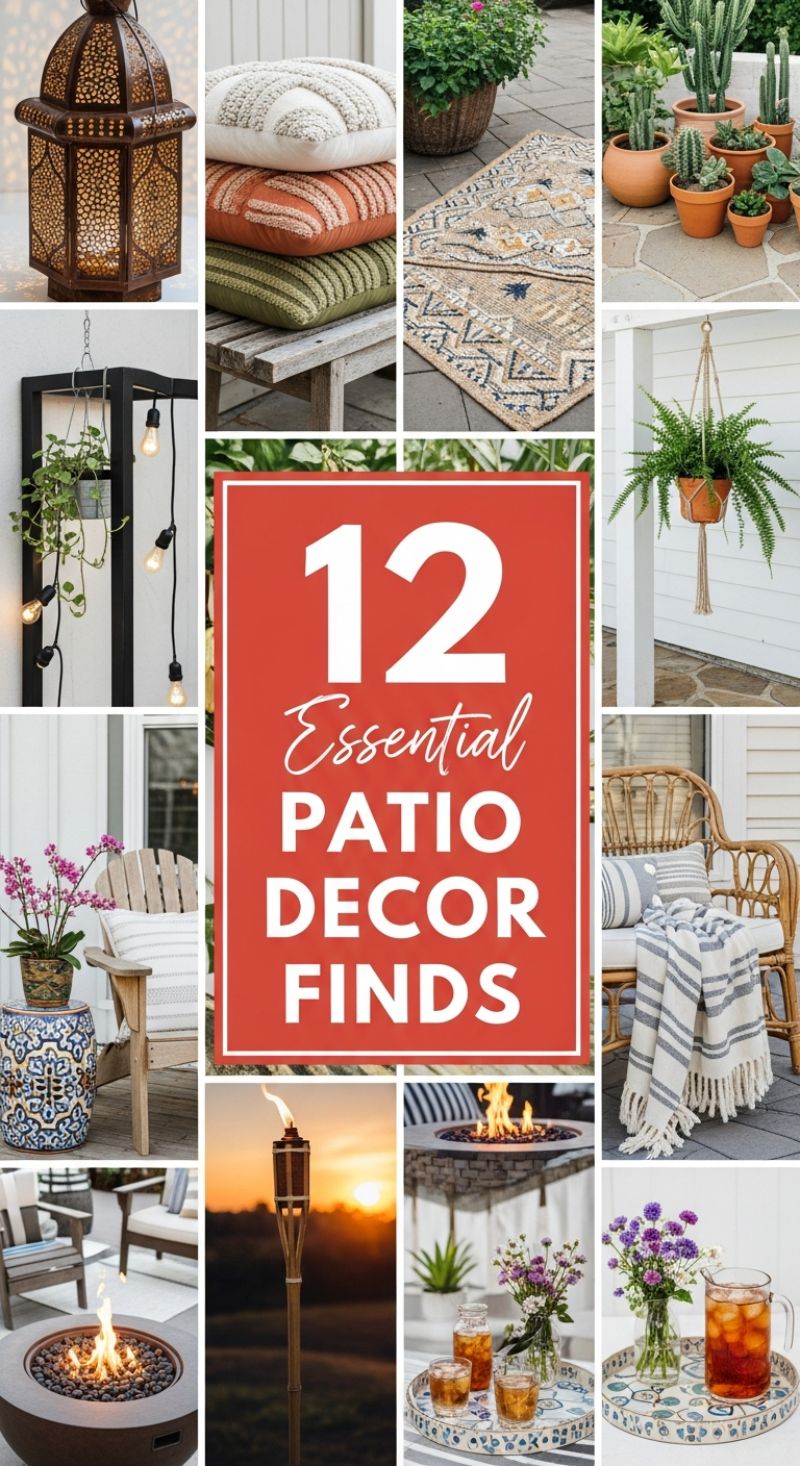
Transforming your patio into a true extension of your interior living space is the ultimate professional secret for instant home upgrade, relying heavily on intentional layering of textiles, lighting, and texture. Begin by establishing a cozy, atmospheric environment. Utilize high-quality, weather-resistant outdoor pillows and throws to inject immediate comfort and style, treating them as you would accent pieces in a formal living room. Notice in the visual guide how different textures—like chunky knits, tufted patterns, and smooth canvas—are stacked in complementing color palettes (creams, terracotta, and olive greens) to add depth to basic furniture like wooden benches or rattan chairs. Beyond comfort, strategic lighting is paramount for evening ambiance. Incorporate varied sources: string lights draped overhead create a warm, festival-like ambient glow, while ornate metal lanterns (like the featured Moroccan style) or rustic bamboo tiki torches serve as essential accent lighting and focal points. Experts advise combining these elements to ensure the space remains functional and inviting well after sunset, dramatically elevating the perceived value and luxury of your outdoor area.
To properly define and anchor the outdoor room, deploy a durable, stylish area rug. Jute, sisal, or synthetic performance rugs with geometric patterns, like the one illustrated, immediately ground the furniture grouping and introduce an architectural layer that complements both natural elements and modern seating. Once the foundation is set, integrate life and height through diverse greenery. Move beyond simple potted plants by utilizing varying planter materials and scales: large woven baskets for structural plantings, classic terracotta for desert-style cacti and succulents, and decorative, patterned ceramic garden stools used as pedestals for blooming orchids or flexible side tables. Professionals maximize visual interest by embracing verticality; incorporating elements such as stylish macrame hanging planters for lush ferns draws the eye upward and makes the entire space feel fuller and more deliberate. This blend of natural elements and sophisticated accessories prevents the area from feeling sparse or overly temporary.
Finally, focus on functionality and luxury through focal points and entertaining essentials. A contemporary gas or propane fire pit acts as an invaluable gathering point, providing warmth, light, and an undeniable ‘wow’ factor that encourages socializing. When setting up seating around this core element, ensure there are ample surfaces for drinks and small items. Flexible pieces are key: decorative garden stools are far chicer than plastic side tables, and when paired with a coordinating patterned serving tray, they elevate even simple refreshments like iced tea into an elegant presentation. By meticulously selecting these ‘essential finds’—from layered textiles and mixed lighting to structured greenery and functional, beautiful accessories—you achieve a cohesive, designer-level patio that maximizes both comfort and aesthetic appeal, effortlessly transitioning your indoor style to the outdoors.
10 Affordable Outdoor Kitchens

Creating a luxurious, built-in outdoor kitchen doesn’t require the custom masonry budgets typically associated with high-end landscaping projects. The secret, frequently employed by professional designers, lies in leveraging accessible, modular materials to achieve the look of permanent construction. To replicate the rustic chic style showcased in these designs, start by constructing a robust internal frame (usually wood or cinder block). Instead of expensive full stone slabs, clad this frame entirely in natural stone veneer or stacked ledger stone panels. This immediately gives the substantial, permanent aesthetic of a traditional outdoor cooking station without the structural weight or cost. Pair this neutral, textural stonework with warm, oil-rubbed natural wood cabinetry—such as cedar or reclaimed lumber—for the cabinet faces. The juxtaposition of the rough, cool stone and the smooth, warm wood is a key decor secret that instantly elevates the space, making the entire setup feel custom and architect-designed. Ensure all wood is treated or naturally resistant (like cedar) to withstand the elements, maximizing longevity and minimizing maintenance.
Professional organizational hacks dictate that the kitchen design must flow around the primary cooking appliance. For a sophisticated look, integrate a standard stainless steel gas grill by cutting an exact opening into the countertop, making it appear seamless and built-in. If you prefer a kamado-style cooker (like the large black dome grills pictured), expert advice suggests placing it within a dedicated, lowered wood block or island section. This allows for safe access to the top lid and ensures the necessary heat clearance, often requiring a non-combustible surface (like stone or concrete) directly surrounding the cooker base. Crucially, maximize the space beneath the cooking surface by incorporating functional storage. Opt for sturdy wood doors fitted with rustic matte black hardware (hinges and pulls) which acts as a powerful design element, adding depth and contrast. These storage compartments are essential for keeping grilling accessories, propane tanks, or charcoal neatly hidden, maintaining the clean lines and organized flow critical to any chic outdoor space.
To ensure your new outdoor kitchen functions as efficiently as its indoor counterpart, focus on the details that define a professional space. Countertops should be chosen for extreme durability; poured concrete, sealed granite, or honed soapstone are excellent, affordable options that require minimal upkeep. For a truly high-end feel, mimic the layout of the top-right examples by incorporating a simple prep sink area with a minimalist faucet and a tiled backsplash. This upgrade transforms the space from a simple grill station into a fully functional secondary kitchen, enhancing both usability and home value. Finally, complete the organizational scheme by adding thoughtful accessories: a small shelving unit for herbs, high-top seating adjacent to a prep area for interaction, and strategic low-voltage lighting to highlight the stone texture at night. These finishing touches are the ultimate secret to upgrading a functional outdoor area into an instant, chic extension of your home.
20 Dreamy Outdoor Spaces

Creating a truly luxurious outdoor space, as exemplified by these 20 stunning examples, relies on professional-grade zoning and architectural definition. The key organizational hack is to stop treating your patio as just a landing pad and start viewing it as a dedicated room—or multiple rooms. Notice how the most successful designs utilize architectural anchors like pergolas, covered porches, or sunrooms to define separate functional areas, such as an outdoor dining zone and a distinct lounging area. When implementing this, anchor your furniture layout with purpose: use large, statement pieces, such as deep-seated sectionals or solid teak dining sets, which are inherently organizing elements because they establish boundaries. Professionals often advise using weather-resistant flooring, like large-format stone pavers or low-maintenance composite decking, laid symmetrically to visually extend the interior aesthetic outward, ensuring the transition is seamless and the space feels intentional and permanent, not temporary or cluttered.
To achieve the ‘chic decor’ factor, focus on layering high-quality, durable materials that introduce texture and softness. The secret lies in selecting performance fabrics (like Sunbrella or similar marine-grade options) for cushions, throw pillows, and even outdoor rugs, mimicking the plushness of indoor textiles while offering resilience against the elements—this is a critical maintenance hack. For an organized, cohesive look, limit your color palette to neutrals (grays, whites, browns) and introduce color strategically through plants and accessories. Effective lighting is non-negotiable for ambiance and security; experts recommend layering light sources, including subtle landscape lighting, functional ceiling fans/lights under covered areas, and decorative string lights or lanterns for a soft glow. Remember that storage is decor; choose dual-purpose furniture, such as coffee tables or benches with integrated storage compartments, to neatly stow away cushions, blankets, and dining essentials, keeping the space perpetually clutter-free.
Finally, master the art of maximizing your location and view, a fundamental professional secret for creating a ‘dreamy’ space. If you have an impressive vista, orient all major seating arrangements toward it, using glass railings or low-profile planters to maintain unobstructed sightlines. If a pool or water feature is present, treat it as the primary focal point, ensuring lounge chairs and surrounding decor enhance the resort-like atmosphere. For properties without sweeping views or pools, strategically place lush, layered landscaping and tall privacy screens or trellises to create a curated, intimate backdrop, fostering a sense of secluded luxury. The ultimate organizational hack for outdoor living is choosing pieces that require minimal seasonal effort; invest in furniture that can withstand year-round exposure or that is easily stored, ensuring your dreamy outdoor oasis remains a source of relaxation, not a chore.
Creating a Paw-fect Pet Zone: Expert Outdoor Organization Hacks

A professional-grade home environment extends beyond the interior; organizing your outdoor space, particularly dedicated pet areas, is a high-impact upgrade. The key to a functional and aesthetically pleasing dog zone is strategic zoning and robust material selection. As demonstrated in these five examples, using different surfacing materials—such as artificial turf, pea gravel, and pavers—not only creates visual interest but serves distinct purposes. Artificial turf offers a clean, soft play surface that stands up to heavy use and muddy paws, while gravel provides excellent drainage, essential for hygiene in designated relief areas. When combining materials, use crisp, defined edges (like landscape timbers or paver borders) to prevent blending and maintain a chic, organized appearance. Furthermore, integrating structures like shade sails or large patio umbrellas is non-negotiable for sun safety, transforming a harsh kennel into a comfortable, all-day retreat.
To elevate the space from a mere enclosure to an enriching activity center, incorporate elements that cater to your dog’s natural instincts—this is a top organization hack for preventing destructive behaviors in the rest of your yard. A designated digging area, constructed simply from raised landscape timbers filled with sand or fine gravel (as shown in the middle right), provides an acceptable outlet for tunneling instincts. Similarly, integrating basic agility equipment, whether permanent weave poles set in concrete or a portable tunnel, encourages mental and physical exercise, which contributes significantly to a calmer, better-behaved pet indoors. When designing these zones, use durable, sleek fencing, such as black welded wire panels, which offer secure containment without the visual bulk of traditional wood kennels, making the boundary feel more integrated and less institutional.
Final organizational details focus on hydration and toy management. Incorporate a functional water source, such as a tiered circulating fountain, which doubles as a sophisticated landscape feature while providing fresh, flowing water. This is far cleaner and more appealing than stagnant bowls. For managing clutter, designate a specific ‘toy zone’ using a distinct patch of low-maintenance turf or a large mat. As seen in the bottom images, concentrating all play items in one area makes clean-up quick and keeps the rest of the patio organized and ready for human use. These organizational principles—durability, designated zoning, and integrated functionality—ensure your pet area is an organized, beautiful extension of your home décor.
8 Tranquil Backyard Oasis

Transforming your backyard into a tranquil oasis, as depicted in these stunning visuals, is one of the most effective ways to upgrade your entire home aesthetic and lifestyle. The professional secret to achieving this look lies in treating the outdoor space as an extension of your interior architecture. Start with foundational elements: integrate water features, such as a shimmering pool or a bubbling spa, and prioritize hardscaping materials that reflect light and warmth, like light-toned travertine pavers or cool gray tiling. Notice how the designs utilize large, seamless expanses of these materials to maximize the footprint and create an airy, resort-like feel. If a full pool installation isn’t feasible, mimic the visual effect of cascading water by installing a stylish wall fountain or using a reflecting pool element. Expert decorators swear by this strategy because the sensory elements—the sound of water and the bright, consistent flooring—instantly elevate the perception of luxury and spaciousness, blurring the lines between the built environment and nature.
Next, focus on strategic furnishing and zone creation, adopting the modular, high-impact pieces favored by luxury resorts. The outdoor furniture selection here is key: large, deeply cushioned sectionals and oversized double chaise lounges instantly convert a simple patio into an exterior living room. Opt for durable, weather-resistant materials like woven resin rattan or sustainable teak with thick, neutral-toned cushions (creams, grays, whites). This provides a clean, elegant base, which is the organizational hack of outdoor decor. Introduce visual interest and easy flexibility using colorful, patterned throw pillows or blankets, which can be swapped seasonally for a fresh look without replacing major investment pieces. Install shaded structures, like modern white pergolas or streamlined umbrellas, not just for sun protection, but also to define distinct areas—such as a dedicated dining zone or a covered lounging area—making the space feel curated and intentional, rather than simply populated with furniture.
Finally, master the art of lush tropical landscaping and atmospheric lighting to seal the “tranquil oasis” deal. Professionals emphasize incorporating large, structural plants, such as various palms and vibrant bromeliads (as seen in the central images), into the design to provide height, texture, and natural privacy screens. Planting in large, stylish ceramic or stone planters offers the added organization benefit of easily rearranging the greenery to suit different social events or seasonal changes. For ambiance, forget harsh spotlights; instead, rely on layered, soft lighting. Install low-voltage landscape lighting along walkways and in planting beds to highlight key features, and use string lights or discreet sconces within pergolas to cast a warm, inviting glow over seating areas. This careful orchestration of light, sound (water), and texture (plants and textiles) is the ultimate decor secret for transforming any backyard into a genuine, highly organized, and aesthetically superior retreat.
7 Genius Pallet Projects
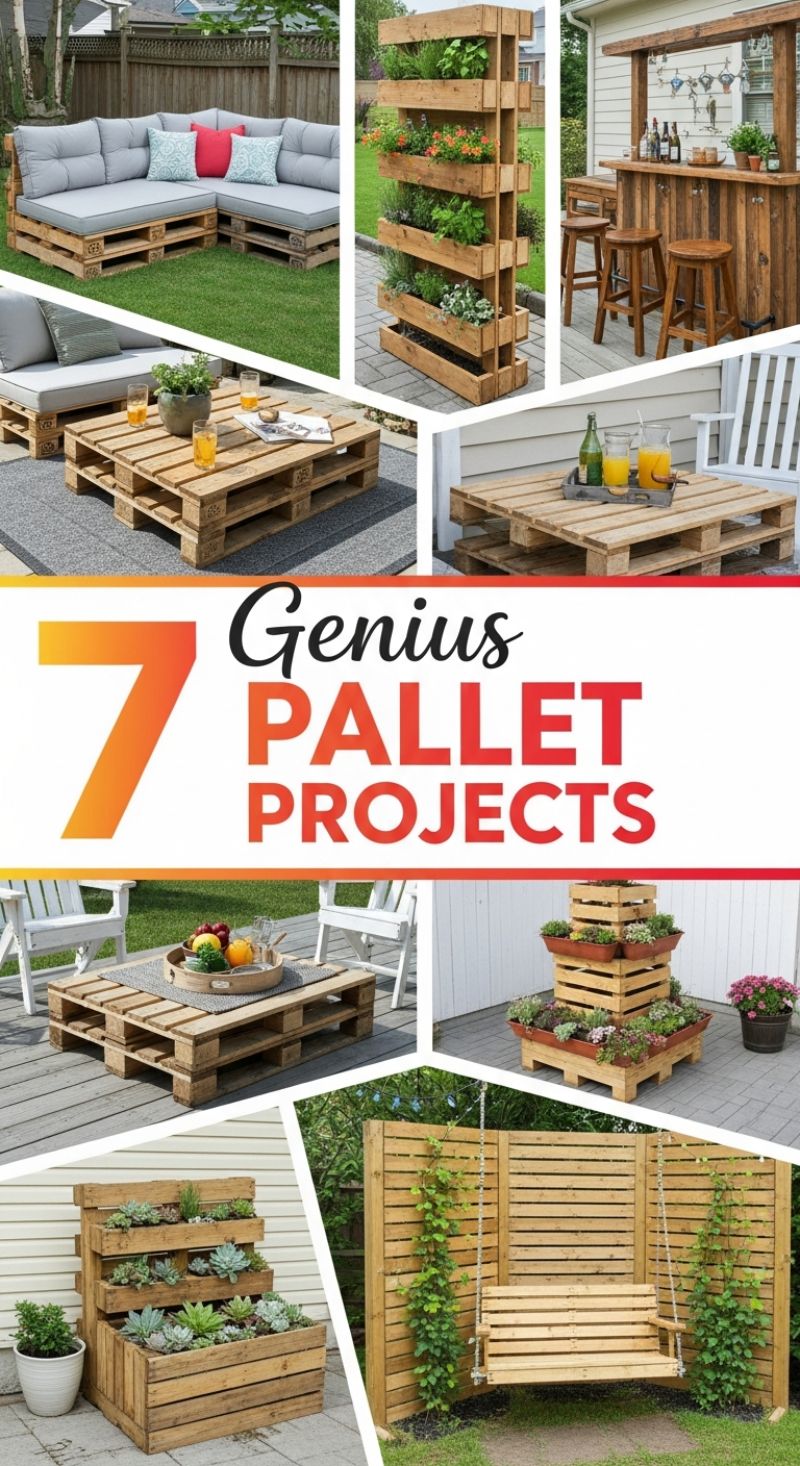
Reclaimed wood pallets offer an unbeatable foundation for instant home upgrades, transforming inexpensive, readily available materials into high-impact furniture and organizational solutions. The key to successfully integrating pallets into your chic decor scheme lies in preparation and stacking strategy. For foundational outdoor pieces, like the pictured L-shaped sectional sofa and dual coffee tables, always begin by thoroughly cleaning and sanding the wood to remove splinters and contaminants. For seating, stack two or three pallets high to achieve comfortable seating height (approx. 15-18 inches), secure them together using heavy-duty L-brackets or long screws, and then top with custom or store-bought outdoor cushions. The beauty of pallet seating is its modularity; you can easily rearrange the sections to fit any patio space. For coffee tables, one or two stacked pallets provide the perfect height and surface area. An expert tip for longevity: always apply a marine-grade sealant or exterior stain to prevent weather damage and ensure your DIY furniture withstands the elements, instantly elevating a budget build to a professional-grade fixture.
The versatility of pallet wood extends far beyond seating, making it an excellent secret weapon for sophisticated organization and entertaining. The vertical planter (or herb garden) and tiered succulent display are superb hacks for maximizing small spaces. To replicate the vertical garden, deconstruct pallets to create long, narrow planter boxes, affixing them securely to a vertical pallet frame. Ensure proper drainage holes are drilled in the bottom of each box. For more ambitious structural upgrades, the outdoor bar demonstrates how deconstructed pallet planks can be used as rustic cladding to build a functional, stylish entertaining space. Professionals swear by the visual trick of cladding to hide the rough edges of structural components, lending a polished, bespoke appearance. This allows you to achieve a high-end, rustic bar aesthetic without the corresponding custom price tag, creating an inviting focal point for backyard gatherings.
Finally, use pallets to create high-impact decorative features that define specific areas of your yard, turning basic outdoor space into an extension of your home. The garden swing, built into a substantial horizontal privacy fence, serves both a functional and aesthetic purpose. When building structures intended for weight-bearing use (like swings or benches), use only structurally sound, heat-treated (HT stamped) pallets, and reinforce all joints with carriage bolts and construction adhesive for maximum safety. The slatted fence structure itself, built from pallet planks, adds instant architectural interest and acts as a chic backdrop, enabling climbing plants to integrate the structure into the natural landscape. Whether staining the wood dark to achieve a modern contrast or using a light wash to maintain a bright, coastal feel, the finishing choices are crucial—they are the final step that turns raw pallet materials into an intentional, sophisticated decor element for your instant home upgrade.
5 Stunning Landscaping Tricks
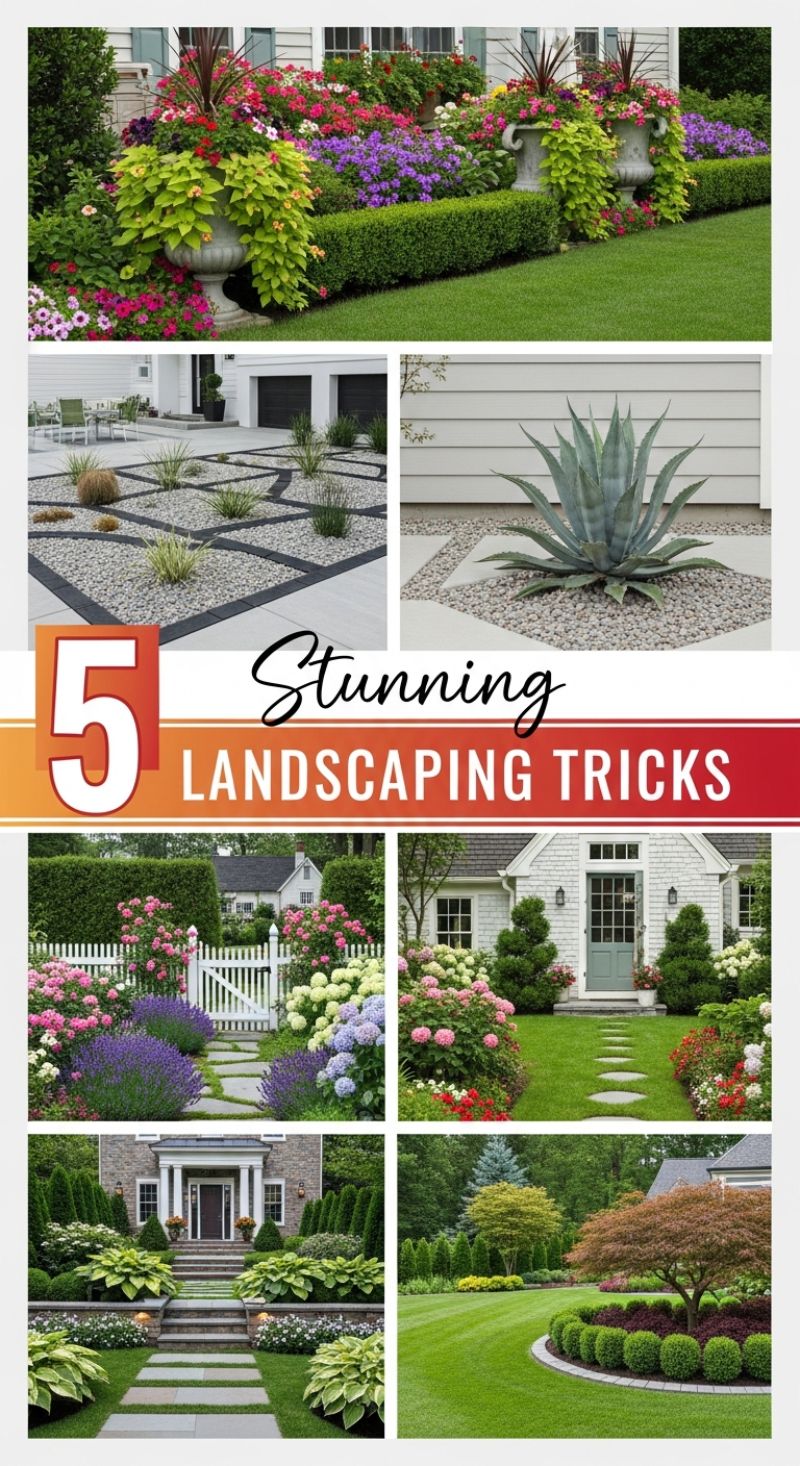
Transforming your home’s exterior is the ultimate, instant upgrade, dramatically boosting curb appeal and setting a sophisticated tone before guests even step inside. Professional landscapers rely on key visual tricks to achieve instant structure and elegance. To mimic the formal, high-end look, focus first on creating defined borders and utilizing classic focal points. As seen in the top and bottom images, sharp-edged boxwood hedges paired with well-maintained, lush lawns provide a foundational framework. Introduce dramatic vertical interest using large, classical urns or planters overflowing with cascading annuals like sweet potato vines and vibrant upright flowers such as geraniums. Grouping these containers near entrances or along structured hedge lines instantly elevates the planting scheme from standard flower bed to sophisticated garden architecture. For stepping stone paths, ensure symmetry in planting (like the hostas or hydrangeas framing the walk-up) and use square-cut pavers embedded in the lawn or set into finely graded gravel to create a clean, intentional walkway that guides the eye directly to the entry point.
For a sleek, modern, or water-wise approach, adopt the principles of hardscaping and geometric planting (often referred to as xeriscaping). This technique, visible in the middle image panels, involves using high-contrast materials to define zones. Lay large-format pavers or concrete slabs surrounded by light-colored decorative gravel (like pea gravel or crushed granite) instead of traditional mulch. The key trick here is using dark, linear edging (such as metal borders or basalt strips) to carve clean, precise geometric patterns into the gravel, turning the groundcover itself into a design element. Within these defined sections, place architectural, low-maintenance plants like Agave, Yucca, or various ornamental grasses. This method offers extreme durability, requires minimal water, and provides a gallery-like setting for individual specimen plants. Conversely, for a charming cottage feel, use soft-edged mass plantings—such as large mounds of purple lavender or billowing hydrangeas—to soften the lines of picket fences and stone paths, ensuring the space feels inviting and abundant with color throughout the blooming season.
Finally, maximize the impact of your lawn area by strategically employing accent plantings and tree islands. In expansive grassy areas, avoid scattering small beds; instead, create a single, curving, dramatically defined island (bottom right image) focused on a specimen tree (like a Japanese maple). Use a solid curb or edging material to separate the lawn from the planting bed, fill the area with a richly colored groundcover or low shrub (e.g., burgundy ninebark or dwarf globe boxwood) to contrast with the green grass, and ensure the edge is meticulously maintained. This trick creates depth, provides an immediate focal point, and simplifies mowing, resulting in a manicured appearance that looks professionally installed.