Unlock the secret to the ultimate year-round manicure! Discover how to perfectly mix pink, red, and glitter for nail designs that are trendy, romantic, and vibrant in any season.
10 Vibrant EASY SUMMER NAILS
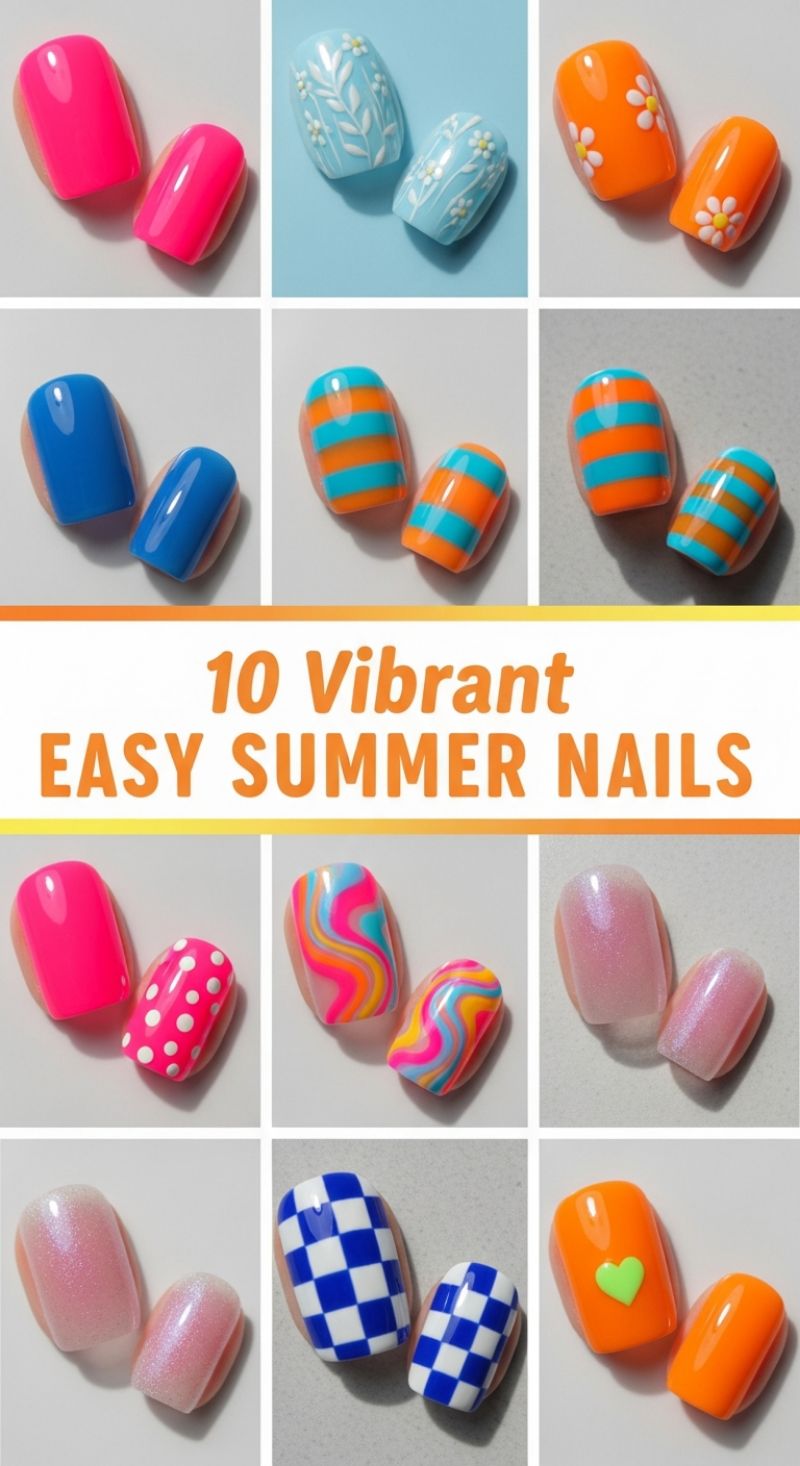
While our main focus is often on the sophisticated blending of pinks, reds, and glitters, the foundation of year-round manicure success lies in mastering color vibrancy and adaptable techniques, perfectly exemplified by these ten dynamic summer looks. To achieve the saturated, opaque finish seen in designs like the neon pink solids (top left) and the electric blue squares (second row, left), the key is layering. For any truly bright or fluorescent shade, always apply a foundational coat of highly pigmented white polish first; this prevents the color from looking muddy or translucent. When tackling geometric patterns, such as the bold orange and turquoise stripes or the crisp blue checkerboard, precision tools are non-negotiable. Utilize professional striping tape for flawlessly straight lines, removing the tape immediately after applying the contrasting shade but before curing (if using gel), or invest in ultra-fine liner brushes (000 size) for hand-painted detail work.
Moving beyond simple blocks, these visuals offer inspiration for integrating intricate patterns seamlessly. The psychedelic swirl design (third row, center) can be recreated using a marbling or ‘wet-on-wet’ technique: applying contrasting dots or lines of uncured gel polish (like neon pink, yellow, and blue) onto a neutral base, then dragging a fine stylus or needle through the colors to create the flowing, groovy effect. Similarly, delicate detailing, like the white florals on the light blue and bright orange nails, requires a steady hand and specialized tools. Utilize a dotting tool for the perfect circular centers and petal shapes, and a very thin detail brush loaded lightly with highly pigmented 3D gel polish for raised, textural elements, giving the design depth and longevity. Remember that consistency is crucial; thin coats prevent bubbling and ensure the art cures completely.
Finally, we address the integration of shimmer and high shine, tying these vibrant concepts back to our core theme of mixing glitter into everyday looks. The sheer, pearlescent pink nails (bottom row, center-left) serve as a reminder that not all glitter needs to be overt. This effect is achieved using a fine shifting mica or chrome powder gently buffed onto a tacky, cured layer of clear or pale pink polish, then sealed with a thick, glossy topcoat. For expert durability, especially when dealing with high-contrast or layered artwork like the checkered pattern or the bright green heart accent, ensure every design element is fully encapsulated under two layers of high-quality, non-yellowing top coat. Always “cap the free edge” by dragging the topcoat brush over the tip of the nail; this essential step prevents shrinkage and premature chipping, ensuring your vibrant, complex manicure lasts for weeks.
8 Chic Almond Nails: The Romantic Red French and Studded Designs
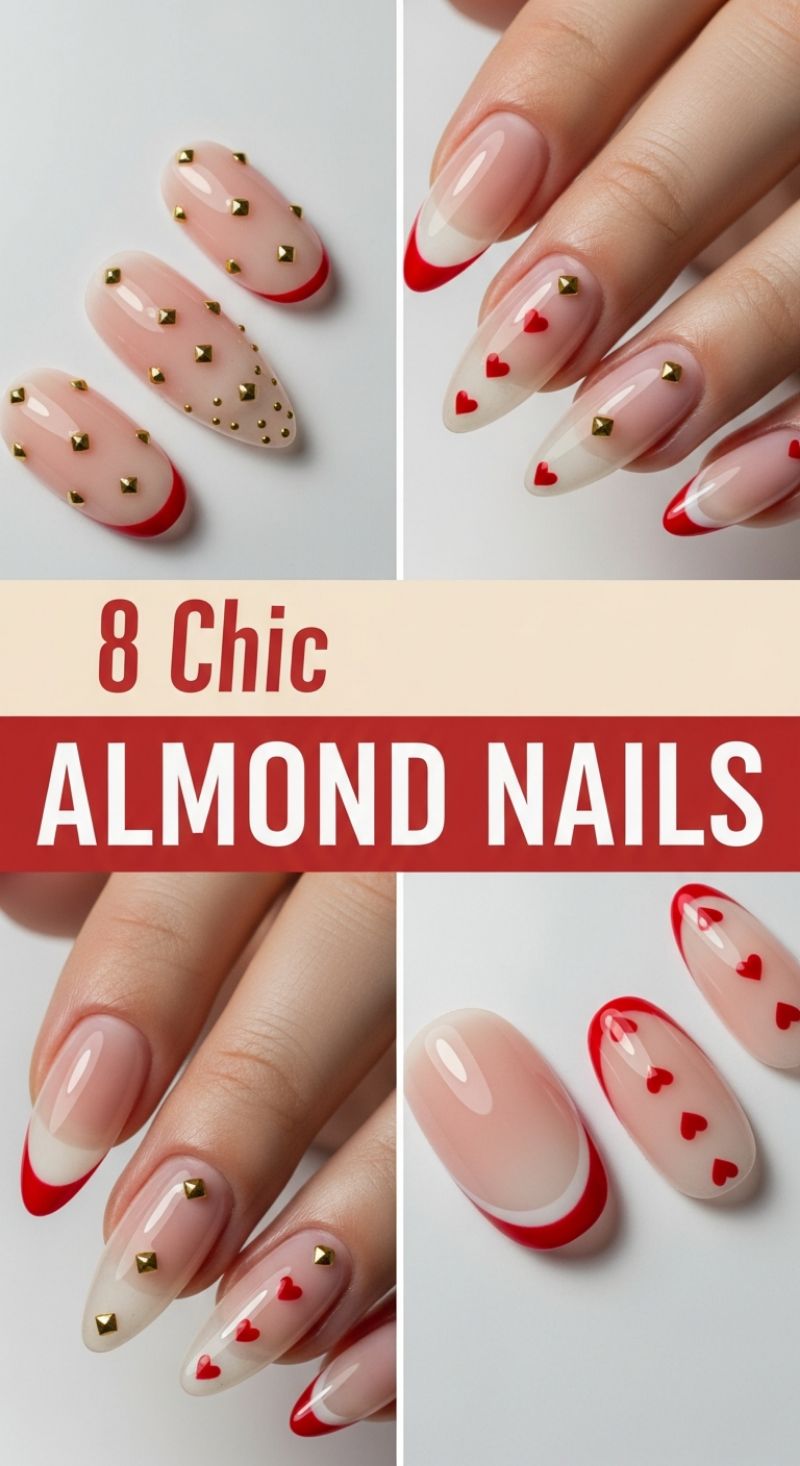
The foundation of these eight chic almond nail looks relies heavily on perfecting the shape and the base color. Achieving the perfect almond shape is the first step; file the side walls straight and gently taper the tip to a soft point, ensuring symmetry. The base should be a luminous, sheer milky-pink or jelly nude polish—this provides the clean canvas necessary for the high-contrast red and gold elements to truly pop, giving the nails a sleek, high-gloss finish. For the French tips, move beyond traditional white and embrace a bold, rich red. Technique is key on almond tips: either apply a clean, curved line just along the free edge (the classic French), or experiment with the trending ‘reverse French’ or outlines, where the red polishes hugs the entire perimeter of the nail tip, offering a modern, sophisticated border that elegantly frames the negative space. Always ensure the red lacquer is applied smoothly and allowed to fully cure before moving on to detailing.
To introduce the romantic and metallic elements, focus on two core embellishments: delicate red hearts and striking gold studs. For the heart design, use a fine-tipped dotting tool or pre-cut decals to place small, symmetrical red hearts floating across the nude base of the nail. Place them down the center line of the nail bed for visual elongation. The ‘glitter’ component is cleverly substituted here by dimensional gold square or pyramid studs. These should be strategically placed to add a jewelry-like element. On solid-color nails, cluster smaller studs near the cuticle or scatter larger studs down the center to create a gradient effect. For nails featuring the heart art, use single studs as focal points, perhaps near the base of the nail or resting just above the apex. Always secure studs using a strong nail glue or a thick layer of builder gel or top coat, ensuring the surrounding area of the stud is encapsulated to prevent snagging.
Expert tip for maximizing the impact of this mixed manicure is to utilize the ‘8 Chic Nails’ concept by mixing and matching designs across your hands. For instance, paint the thumb, index, and pinky nails with the bold red French tip, while dedicating the middle and ring fingers to the intricate nude/heart/stud combination. This alternation prevents the look from becoming visually overwhelming while demonstrating mastery over different techniques. Finish the entire design with two layers of a high-shine, non-yellowing top coat. When sealing the nails with studs, float a thicker layer of top coat over the base of each stud to lock it securely in place without dulling the metallic shine. This luxurious combination of feminine nude, powerful red, and chic gold elevates the look beyond holiday wear, making it a sophisticated, on-trend choice suitable for any season.
10 Effortless SIMPLE V-DAY NAILS
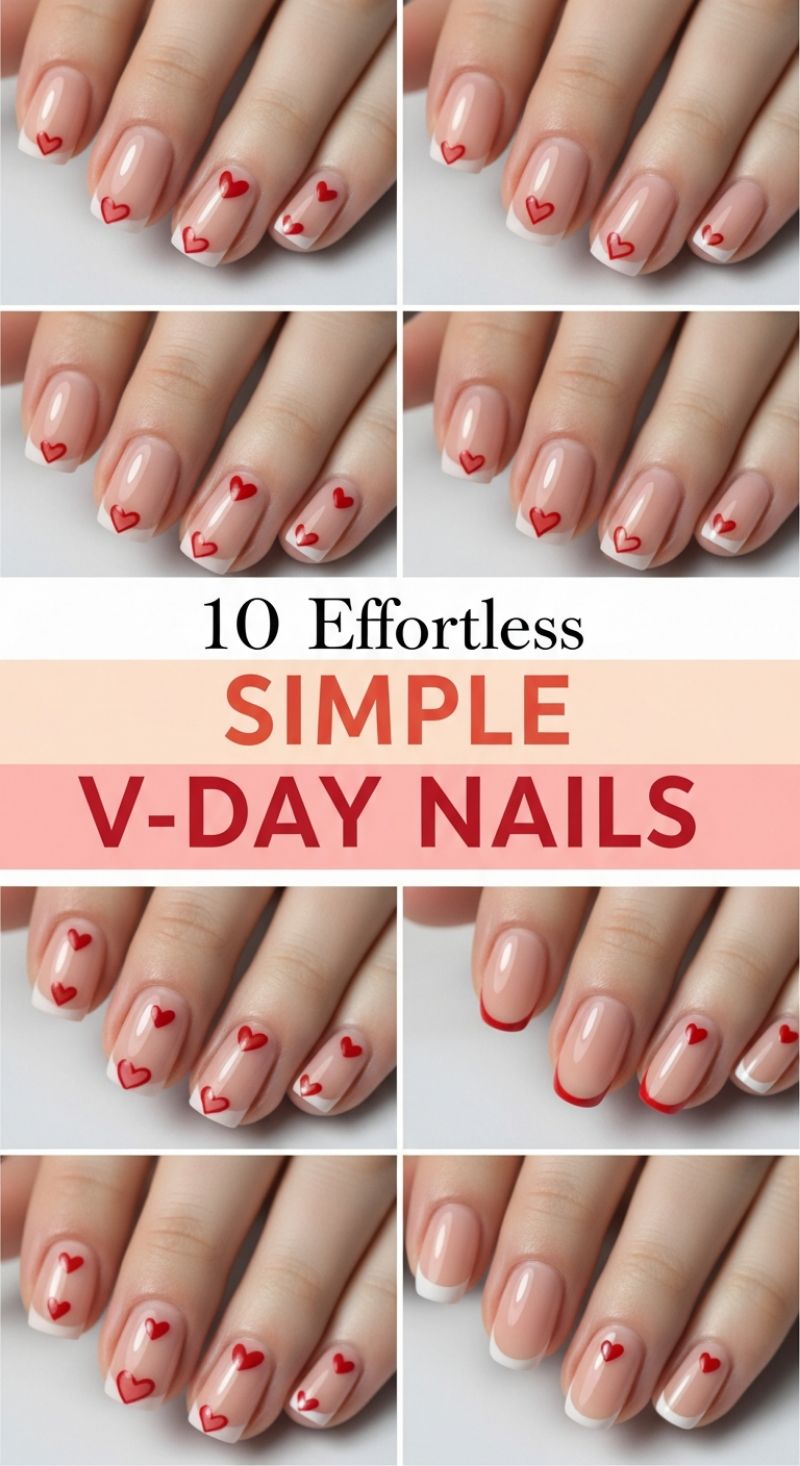
While the heading suggests a seasonal focus, these stunning manicures showcase the perfect year-round application of pink and red, establishing a sophisticated yet playful aesthetic that fits any occasion. The foundation of this look is a sheer nude or delicate pink base coat, essential for achieving that clean, elongated nail bed appearance popularized by the ‘naked manicure’ trend. Notice how the designs utilize classic elements—primarily the French tip, executed in both traditional bright white and an unexpected, bold red variation—allowing the simple red heart motif to act as the primary accent. The success of this look lies in its minimalist approach; by restricting the artwork to small, crisp hearts, the design avoids looking busy and instead maintains an air of refined charm. To adapt this look for any season, always start with a high-quality sheer pink builder gel or jelly polish to ensure a glossy, resilient base that supports the delicate art.
Achieving these precise heart designs is surprisingly simple and requires only a very fine detail brush or a small-tipped dotting tool. For a perfectly symmetrical heart, begin by placing two small, closely spaced dots of vibrant red polish where you want the top curves of the heart to be. While the polish is still wet, use the detail brush to swiftly drag the color from the center point between the two dots down towards a single converging point, creating the bottom apex of the heart. Precision is key here; use minimal polish to ensure the heart remains small and crisp, preventing it from bleeding or spreading. If you opt for the French manicure base, ensure the white or red tip is completely cured and non-tacky before applying the heart decal to maintain sharp contrast and clean lines. For longevity, apply a thin layer of top coat over the cured design, making sure to ‘cap’ the free edge of the nail to seal in the manicure and prevent premature chipping.
To fully integrate this look into our overall trend alert, we can easily introduce the requested ‘glitter’ element without sacrificing the clean aesthetic. Instead of using a solid sheer base coat, try substituting it with a subtle micro-shimmer pink polish, giving the overall nail a luminous glow beneath the red art. Alternatively, for those who prefer high-impact sparkle, use the finest tip of your detail brush to trace a micro-thin outline of silver or iridescent glitter around one or two of the red hearts on each hand, turning the small motif into a delicate jewel. The image displays several placement ideas—from a single heart nestled at the center of the tip or cuticle, to scattered sets of hearts across the entire nail plate—all of which benefit from strategic placement that doesn’t overwhelm the natural nail shape. Remember to cure all layers thoroughly, especially when mixing polishes and design elements, to guarantee a flawless, salon-quality finish that lasts well beyond the initial V-Day inspiration.
10 Cute SHORT V-DAY NAILS
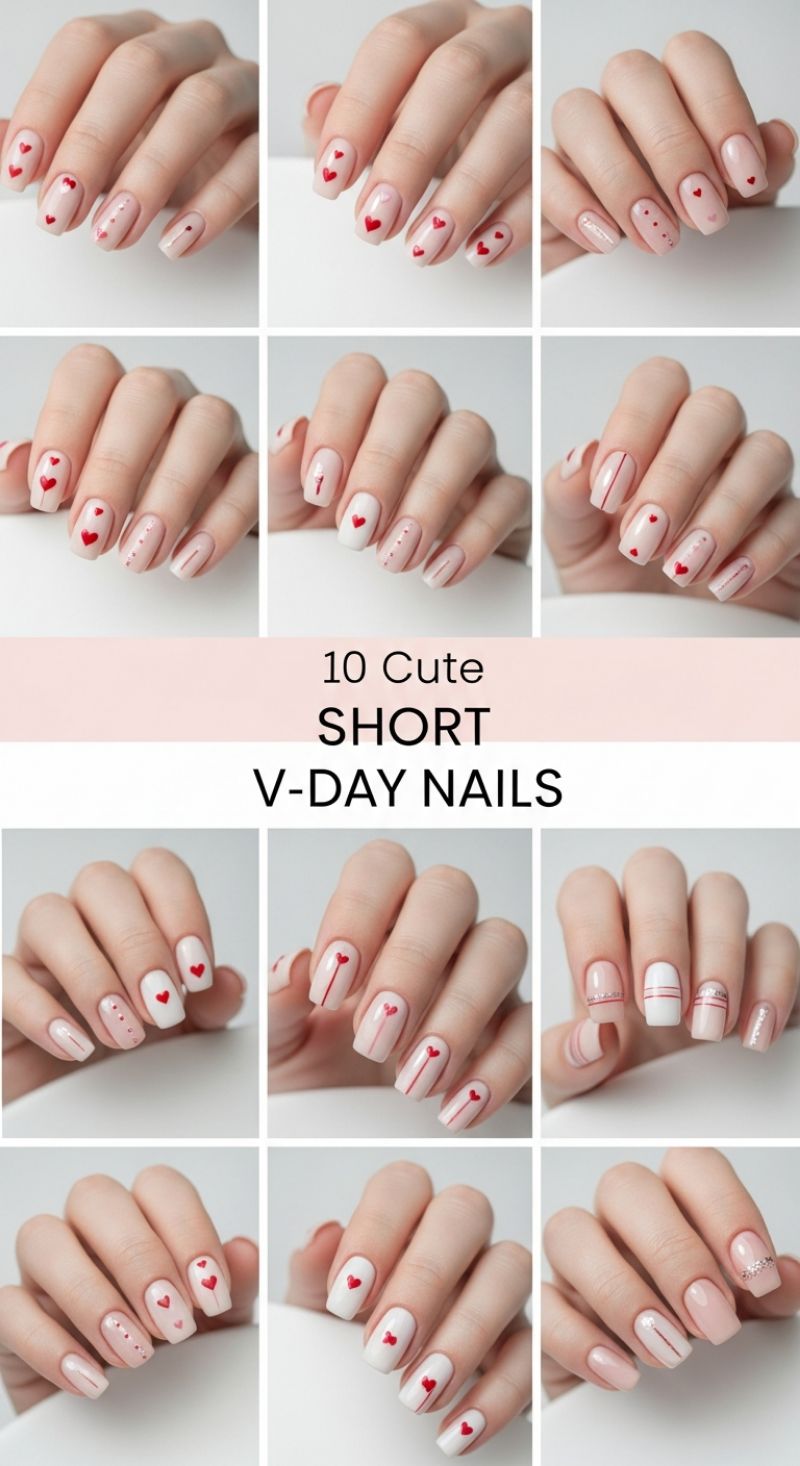
This collection of 10 short, curated designs demonstrates the perfect balance between playful romance and minimalist chic, proving that short nails are ideal canvases for intricate yet subtle nail art. The foundational palette utilizes soft, milky nudes and pale pinks, occasionally transitioning to crisp white accent nails, providing a neutral backdrop that allows the bold red designs to truly stand out. Notice how these manicures expertly utilize negative space and minimalist detailing—small, perfectly placed red hearts, delicate vertical stripes, and fine rows of tiny pink or red dots. This approach ensures the designs are impactful without overwhelming the shorter nail length. Furthermore, a few designs subtly introduce silver or rose-gold micro-glitter bands, demonstrating how shimmer can be seamlessly integrated as an elegant divider or accent, adding texture and dimension without appearing heavy. Achieving these looks requires precision, making them staples for those who prefer clean, sophisticated styling year-round, not just for Valentine’s Day.
To replicate these high-end, short-nail looks, start with meticulous cuticle prep and perfect shaping (soft square or squoval is recommended). For the base, apply two thin coats of a sheer, milky pink or nude gel polish. Once cured, the art phase begins. For the small hearts, use a fine detail brush or the head of a small dotting tool dipped in opaque red polish. Create two adjacent dots, then gently drag the tool downwards from the center of those dots to form the point of the heart. For the popular vertical lines, utilize a striping brush to ensure absolute straightness, running the line from the cuticle toward the tip, stopping short of the edge for a contemporary look. The dotted designs are easily executed with varying sizes of dotting tools. Expert advice: when applying glitter, use ultra-fine holographic or silver glitter polish exclusively for thin horizontal bands across the nail bed or near the cuticle, ensuring the glitter acts as a delicate accessory rather than the main feature. Always finish with a non-wipe, high-gloss topcoat to lock in the detail and maximize shine.
While categorized as V-Day nails, the techniques showcased here—the strategic use of contrast, the power of fine lines, and the tasteful incorporation of glitter—are essential tools for the perfect manicure throughout the year. To transition these designs beyond February, consider adapting the color scheme: swap the bright red for a deep oxblood or rich emerald green while maintaining the minimalist line or dot patterns. For a subtle, everyday look, focus on the sheer nude base paired with a single, ultra-thin glitter band on the ring finger, or substitute the red hearts with tiny black or white dots for a modern, architectural feel. The key takeaway is scale; keeping the artwork small and centered, especially on shorter nails, elongates the fingers and ensures the manicure remains refined, professional, and endlessly wearable, proving that the combination of pale pink, bold accents, and subtle shimmer is truly a versatile, year-long trend.
15 Sultry Dark Nails
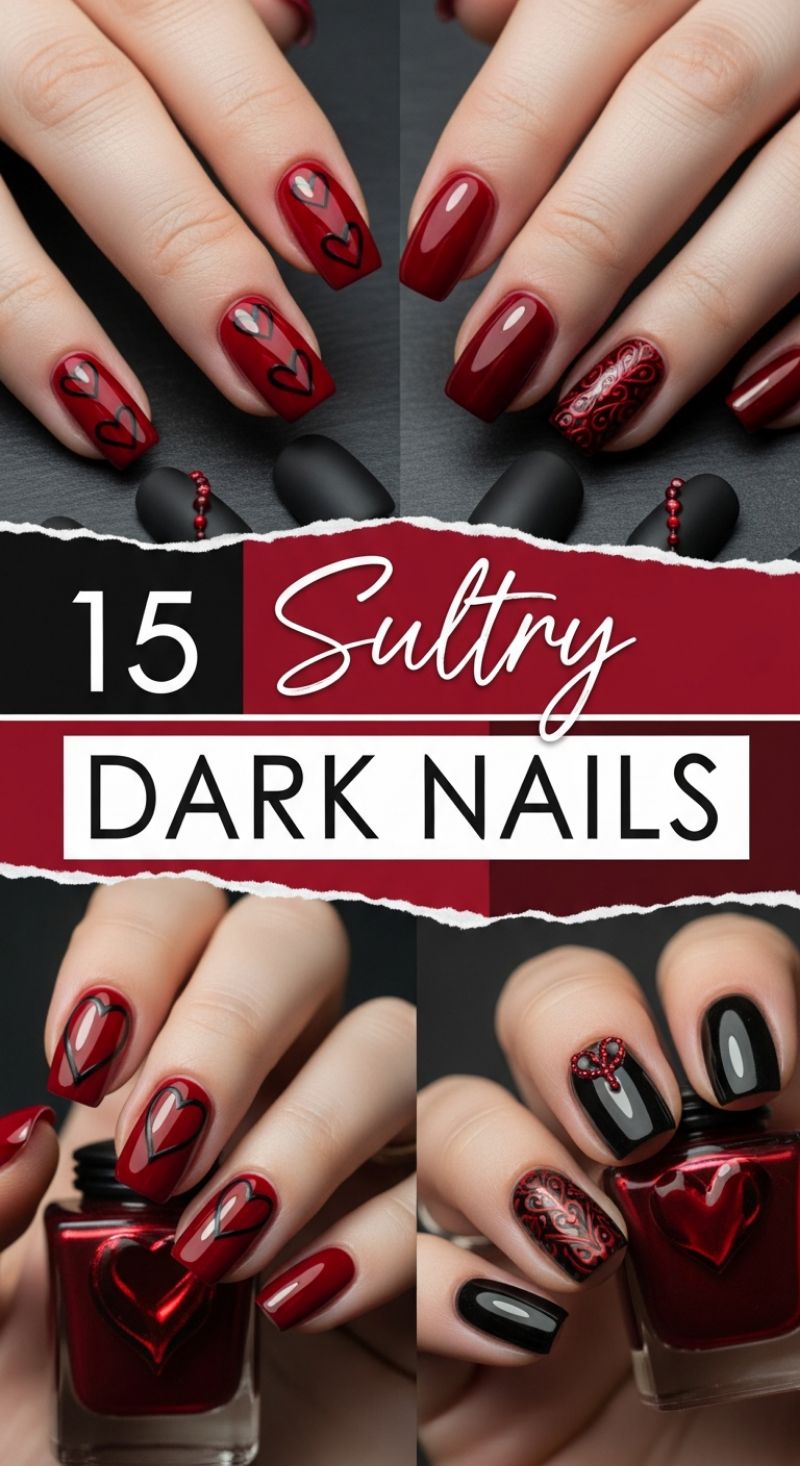
The juxtaposition of deep oxblood red and jet black creates an instantly captivating manicure that screams gothic romance and high sophistication. This look pivots away from bubblegum pinks and incorporates the moodier end of the red spectrum, making it an ideal choice for transitioning into cooler seasons or making a bold statement year-round. To achieve this sultry foundation, begin with meticulously prepared nails, filed into a medium-length squoval shape for modern structure. Apply a rich, opaque burgundy or deep cherry polish, ensuring two coats are completely uniform and glossy. The expert tip for this depth of color is using a ridge-filling base coat, which prevents the dark pigments from settling into imperfections and maintains that high-gloss mirror finish crucial for maximizing the intensity of the red hue. The contrasting black elements, whether solid lacquer or decorative matte pieces, anchor the design and add an element of powerful duality to the overall aesthetic.
For the intricate detailing, focus on high contrast. The red nails often feature simple, stylized outlines of hearts executed in a fine-tipped black nail art pen or brush. Achieving this perfect outline requires steady hands and patience; start with a single, elongated V-shape near the center of the nail, then curve the lines outward to complete the heart structure, ensuring the black line is thin and sharp. For the accent nail shown, a highly detailed filigree or damask pattern in a slightly darker metallic red or black matte finish offers stunning dimension. If freehand painting is daunting, utilize a high-quality stamping plate featuring baroque or scroll designs. Stamp the pattern using black or a shimmering deep red polish over a solid base. This technique elevates the manicure from simple color-blocking to couture nail art, providing the complexity required for a high-end finish.
To integrate this dark look into the larger ‘pink, red, and glitter’ trend, consider how finishes can substitute for traditional sparkle. While this design is inherently glossy, incorporating a subtle shimmer topcoat over the black nails can catch the light without overpowering the dramatic effect. Alternatively, applying tiny red or black micro-rhinestones (a sophisticated form of ‘glitter’) strategically—perhaps at the cuticle line of the accent nails or nestled within the point of the heart design—provides dimension and reflective pop. Seal the entire manicure with a long-wear, ultra-shine topcoat, paying special attention to wrapping the free edge to prevent chips. This ensures the intense dark colors maintain their depth and longevity, keeping your sultry statement impeccable for weeks.
Sweet Pink V-Day Nails
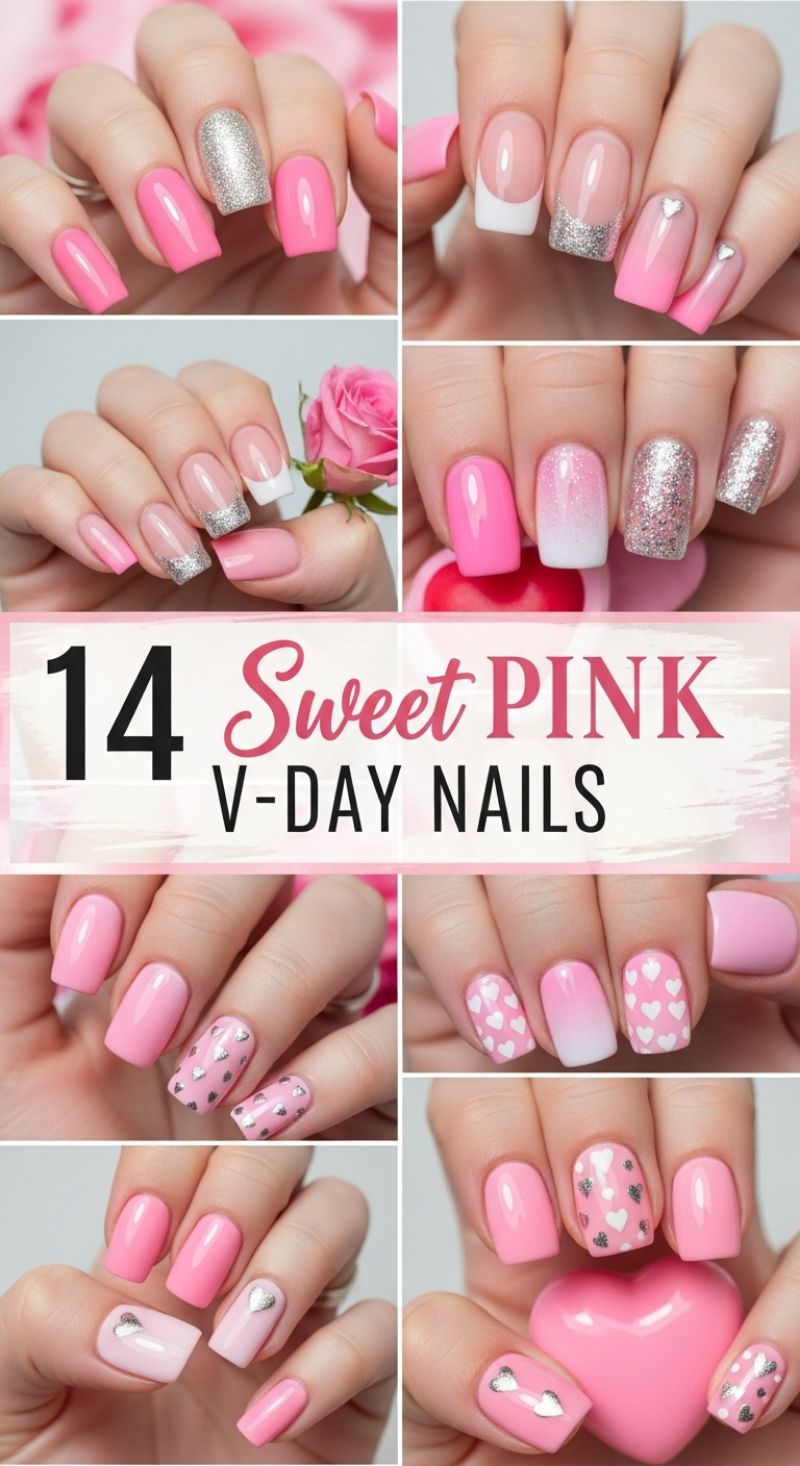
This collection exemplifies how sweet pink serves as the ideal canvas for playful, yet sophisticated, manicures suitable for celebrating love or adding a dose of romance to any season. To achieve the foundational look seen in many of these designs, begin with a meticulously prepped nail bed and a durable base coat. The key to the vibrant solid pink nails is achieving opacity and saturation in two to three thin coats of polish. For the signature high-impact glitter accent nail—often a chunky silver metallic shown on the ring finger—ensure you use a specialized dense glitter polish or carefully layer loose cosmetic glitter over a sticky layer of gel or clear polish. Expert tip: when applying dense glitter, dab it onto the nail rather than brushing, allowing the formula to build density quickly without streaks. Pair the solid color with various neutral pinks and sheers for a cohesive, multi-textured manicure that remains visually interesting across all ten fingers, ensuring the sparkle doesn’t overpower the soft femininity of the base color.
Elevating the basic pink manicure involves integrating complex techniques like French tips and ombre gradients. For the modern twist on the French manicure, instead of a stark white tip, use silver glitter to create a captivating crescent design at the smile line, either freehanding with a fine striping brush or using a specialized stencil. Alternatively, use a sheer pink base and apply a clean, bright white tip, but then define the smile line with a thin application of silver glitter, offering a subtle border between the pink and white. Achieving the perfect pink-to-white ombre is paramount for a delicate look. Apply a coat of bright pink to the free edge and a white or sheer nude near the cuticle, using a makeup sponge or ombre brush to gently blend where the two colors meet. This technique requires patience and light dabbing to ensure a soft, flawless gradient, avoiding harsh lines while maintaining color vibrancy.
Finally, incorporate themed detailing to truly personalize the look. The featured designs heavily utilize heart motifs, which can be applied via stamping plates, vinyl decals, or intricate freehand painting. For small, consistent white hearts on a pink background, stamping is the quickest and most precise method. If opting for the sleek, metallic hearts—either small flat decals or tiny heart-shaped rhinestones—placement is crucial. Position single metallic hearts near the cuticle or the center of the nail bed on a solid or gradient design to serve as an elegant focal point. Always finish any manicure featuring glitter, decals, or gems with a robust, high-shine top coat. For 3D elements, use a thicker builder gel or gem adhesive to secure them, curing fully, and then capping the entire nail edge. This not only locks in the shine but also ensures the longevity of the intricate designs, protecting your sweet V-Day nails for weeks to come.
11 Flirty PINK & RED DESIGNS

These playful pink and red heart designs offer a masterclass in controlled color contrast, providing a romantic yet chic look that transcends seasonal boundaries. To replicate this aesthetic, begin with the perfect foundation: a creamy, highly opaque bubblegum or baby pink base coat. The key to making the bright red details pop is ensuring the pink is flawless and fully cured or dried, typically requiring two thin coats. For those looking to incorporate the trend’s glitter element, an advanced technique is to swap the standard pink base for a sheer, iridescent pink polish containing micro-fine shimmer, adding depth without cluttering the canvas for the forthcoming heart art. Achieving professional results also requires meticulous nail preparation; ensure the nail surface is lightly buffed and prepped with a dehydrator to prevent polish shrinking and guarantee the ultra-glossy finish seen in these examples.
Mastering the variety of heart shapes displayed here demands precision and the right tools. For the charming, scattered micro-hearts, utilize a small-tipped dotting tool (or the head of a pin). To create a symmetrical heart, place two small dots close together near the top center of the design, and then drag the product quickly downwards from the meeting point using the same tool to shape the point. For the bolder, centralized hearts, a fine detail brush (size 00 or smaller) is indispensable. Sketch the rounded upper lobes first, ensuring a clean cleft, and then fill the shape in with a highly pigmented, true red polish. The most intricate design, the concentric or outlined heart (as seen on the ring finger in the bottom-right image), requires maximum control. After the first layer of red polish is dry, use an even finer brush dipped in the pink base color or a crisp white accent shade to meticulously outline the shape, ensuring lines are thin, even, and consistent across the curve.
To lock in the intricate details and maximize the glossy finish, a thick, non-yellowing top coat is essential. Apply a generous, floating coat (meaning the brush barely touches the design) to avoid smearing the red artwork underneath. This final seal ensures longevity and high shine, elevating the simple pattern into a sophisticated, eye-catching manicure. While these designs are intrinsically linked to Valentine’s Day, the combination of soft pink and vibrant red is highly adaptable for year-round wear. For fall, opt for a dusty rose pink and a deep cherry red; for summer, try neon versions of both shades. By treating the hearts as abstract color blocks rather than strictly seasonal motifs, this flirtatious design remains at the forefront of the pink and red trend.
9 Savage ANTI-V-DAY DESIGNS
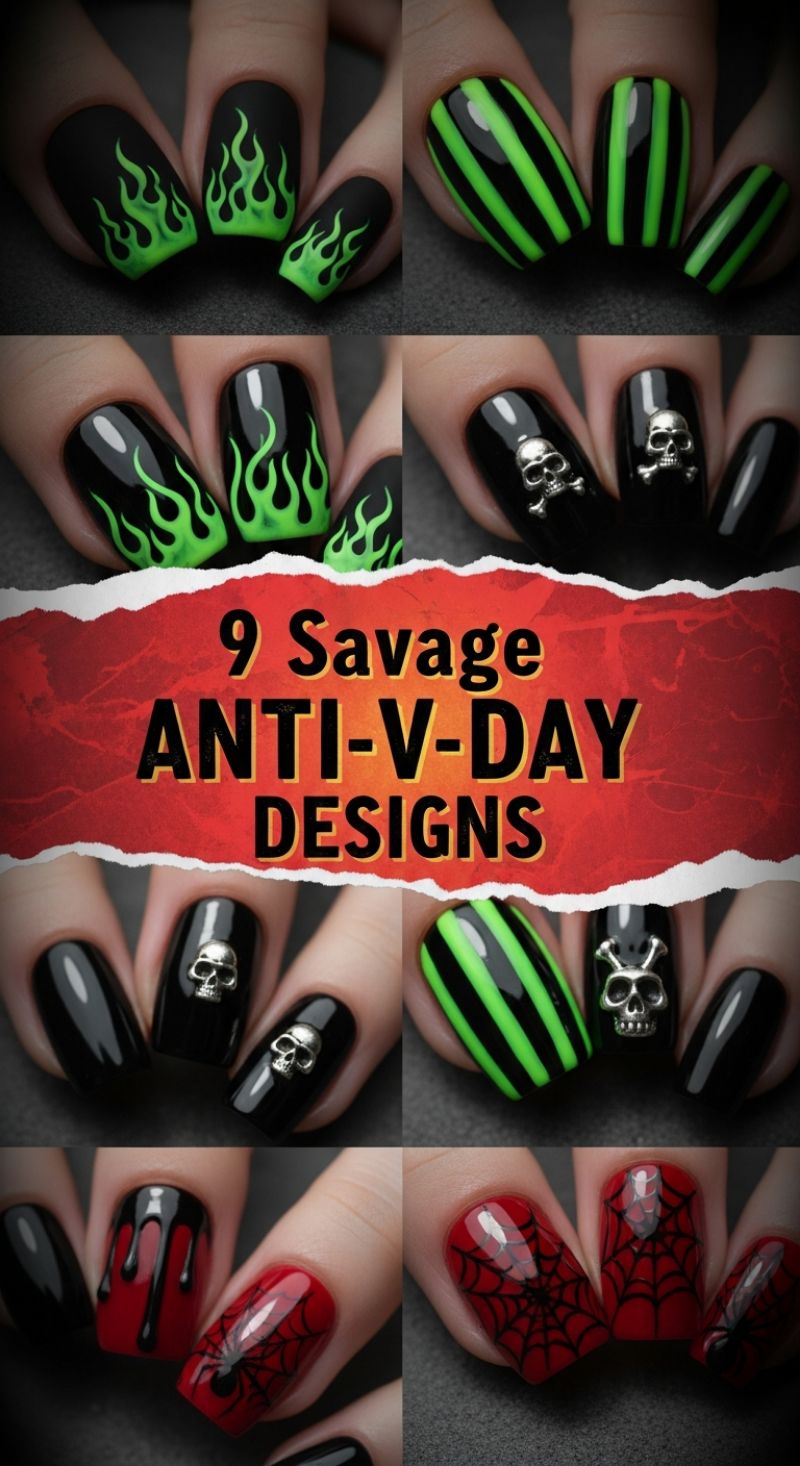
While our main focus is often on sweet, shimmering pinks and romantic glitter accents, true nail artistry requires mastery of stark contrasts and bold statements. This collection, aptly titled the “Anti-V-Day” series, showcases advanced technical skills in line work, texture variance, and 3D embellishment that can be seamlessly applied when creating your perfect pink, red, and glitter manicure. Examine the phenomenal use of texture in the flame designs: the neon green flames pop dramatically because they are painted over a deep, non-reflective matte black base. To recreate this high-contrast intensity, whether with flames or heart shapes, apply your chosen bold shade (like a vivid, hot pink) over a solid base color, and then seal the base layer with a matte topcoat before adding the accent color and finishing that specific accent with a high-shine topcoat. Precision is paramount here; utilize a high-quality, very fine-tipped striping brush for the clean edges of the flames and the perfectly spaced, uniform lines seen in the black and neon green striped sets. Achieving symmetry and consistency across multiple nails elevates this look from casual DIY to salon-level execution.
Moving beyond foundational line work, these savage designs demonstrate the striking effect of dimensional accessories and detailed freehand work. The inclusion of metallic skull and crossbones decals requires a specific adhesive technique; typically, a strong builder gel or thick clear resin is used to secure such weighty 3D charms, followed by careful sealing around the base of the charm to prevent snagging or lifting. For those focused on the ‘red’ aspect of the trend, the dripping and spiderweb designs provide excellent instructional blueprints. The dripping effect is achieved by gently pulling thick black gel polish down from the cuticle line, allowing it to self-level slightly before curing, resulting in that organic, slightly viscous appearance. The spiderweb, on the other hand, demands incredible control. Use a stamping plate or fine detail brush to lay down the radial lines first, followed by the concentric connecting lines, making sure to vary the line thickness for a realistic, hand-drawn finish. Remember, the key to integrating dark, dramatic elements like these into a traditionally soft palette is careful placement—perhaps using a single matte black accent nail with a shiny red spiderweb amidst an otherwise glittery pink set.
To successfully transpose these “savage” techniques onto your year-round pink, red, and glitter manicures, focus on adapting the structural lessons learned here. Instead of neon green stripes, try alternating high-pigment red with shimmering holographic glitter stripes. Use the 3D embellishment technique to affix small, oversized acrylic hearts or custom initial charms. The dramatic matte-versus-gloss contrast, a central feature of the flame designs, can be applied beautifully to a Valentine’s Day-inspired manicure: use a matte red base with a glossy, glittery pink freehand design on top. The bold, all-over aesthetic of these examples proves that high-impact nail art is about more than just color choice; it’s about utilizing finish, dimension, and meticulous technique to tell a compelling, visually arresting story on the nail bed, regardless of whether your theme is sweet romance or rebellious punk rock.
10 Angelcore CUPID NAILS
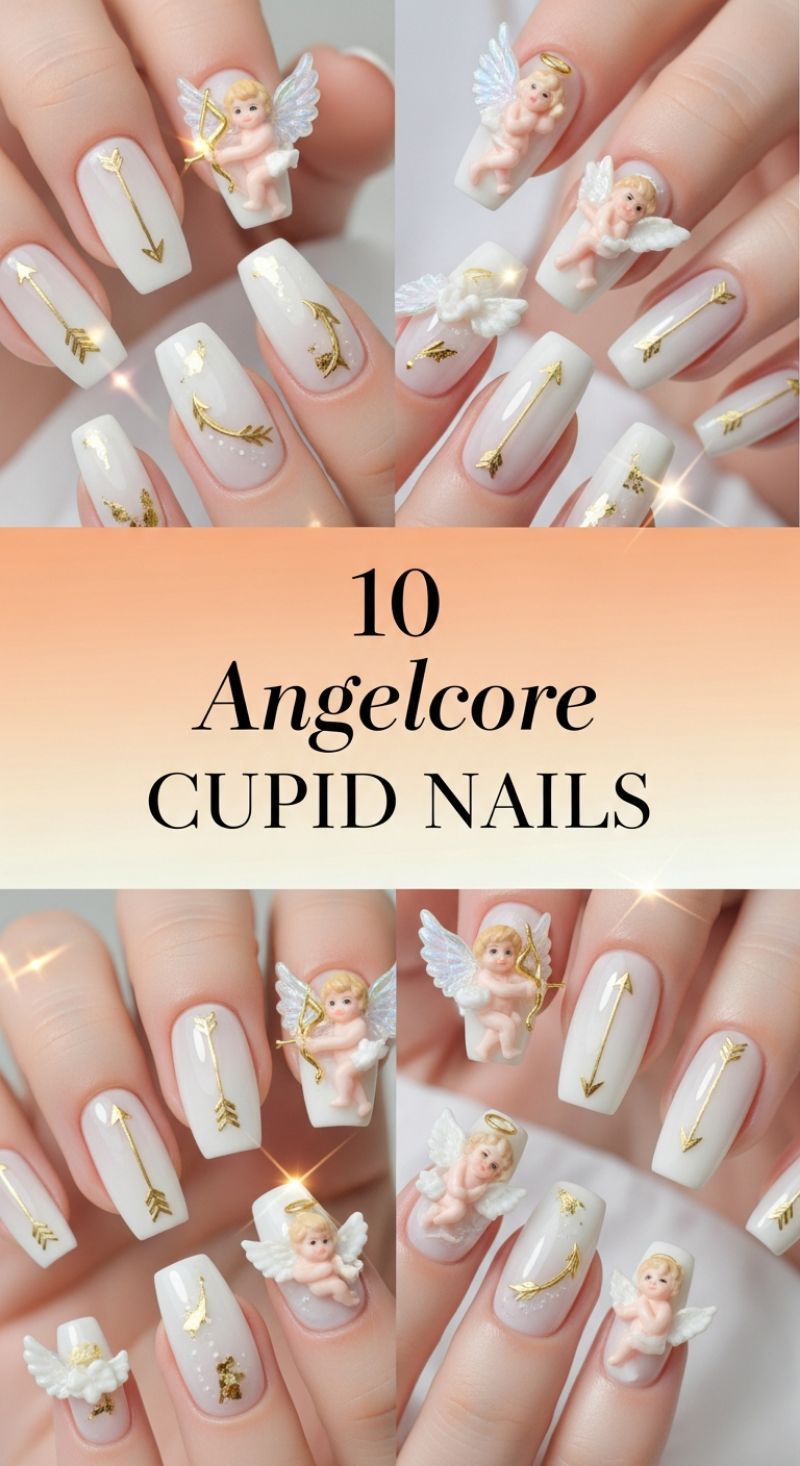
This “Angelcore” interpretation of romantic nail art offers an ethereal, sophisticated alternative to the classic red and pink palette, seamlessly fitting into a year-round trend of elevated manicures. To master this look, you begin with a clean, elongated base—the coffin or tapered square shape beautifully complements the detailed artwork. The foundation is typically a milky white or a sheer nude-pink polish, providing a soft, heavenly backdrop that allows the intricate embellishments, particularly the striking 3D cherub charms, to take center stage. Examine the visuals closely: the design utilizes delicate gold decals, predominantly straight and curved arrow motifs, referencing Cupid’s legendary weapon. These decals are strategically placed on the supporting nails, often alongside small flakes of gold foil for an added shimmer that mimics gentle light reflection. The careful blend of textures—smooth base, flat metallic decals, and sculptural 3D elements—elevates this manicure beyond a simple design to true wearable nail art.
The application technique requires precision, especially when layering the elements. Start by shaping your nails and applying a base coat, followed by two thin, even coats of your chosen milky neutral polish (a sheer blush or pearl white works best). Once cured, apply the gold arrow decals. For professional-grade longevity, use fine-tipped tweezers to place the decals exactly where desired—we recommend vertical alignment on the longer nails, or following the slight curve near the cuticle on shorter nails for variation. To secure the flatter elements and provide a smooth, fortified surface for the subsequent 3D charms, apply a thin layer of rubber base gel or builder gel over the entire nail and cure it. This encapsulation layer is crucial for preventing the sharp edges of the foil or decals from snagging or lifting prematurely, ensuring a durable and flawlessly smooth finish underneath the dimensional accents.
Securing the robust 3D Cupid charm is the most critical step, as these resin or acrylic figurines require specialized techniques to stay firmly attached. Expert nail technicians recommend using a thick, non-flowing clear adhesive gel or a solid sculpting gel. Apply a substantial bead of this adhesive directly to the accent nail (typically the ring or middle finger) where the charm will rest. Gently press the charm into the gel, ensuring full contact, then fully cure according to the specific gel’s instructions, usually 60-90 seconds. A final, crucial step is perimeter sealing: use a fine liner brush to trace meticulously around the entire base of the charm with a high-quality non-wipe top coat, then fully cure one last time. This creates a durable seal that locks the charm against the nail plate, guaranteeing longevity and allowing you to enjoy this divine, dimensional look for weeks without worrying about damage.
15 Cool MODERN V-DAY LOOKS
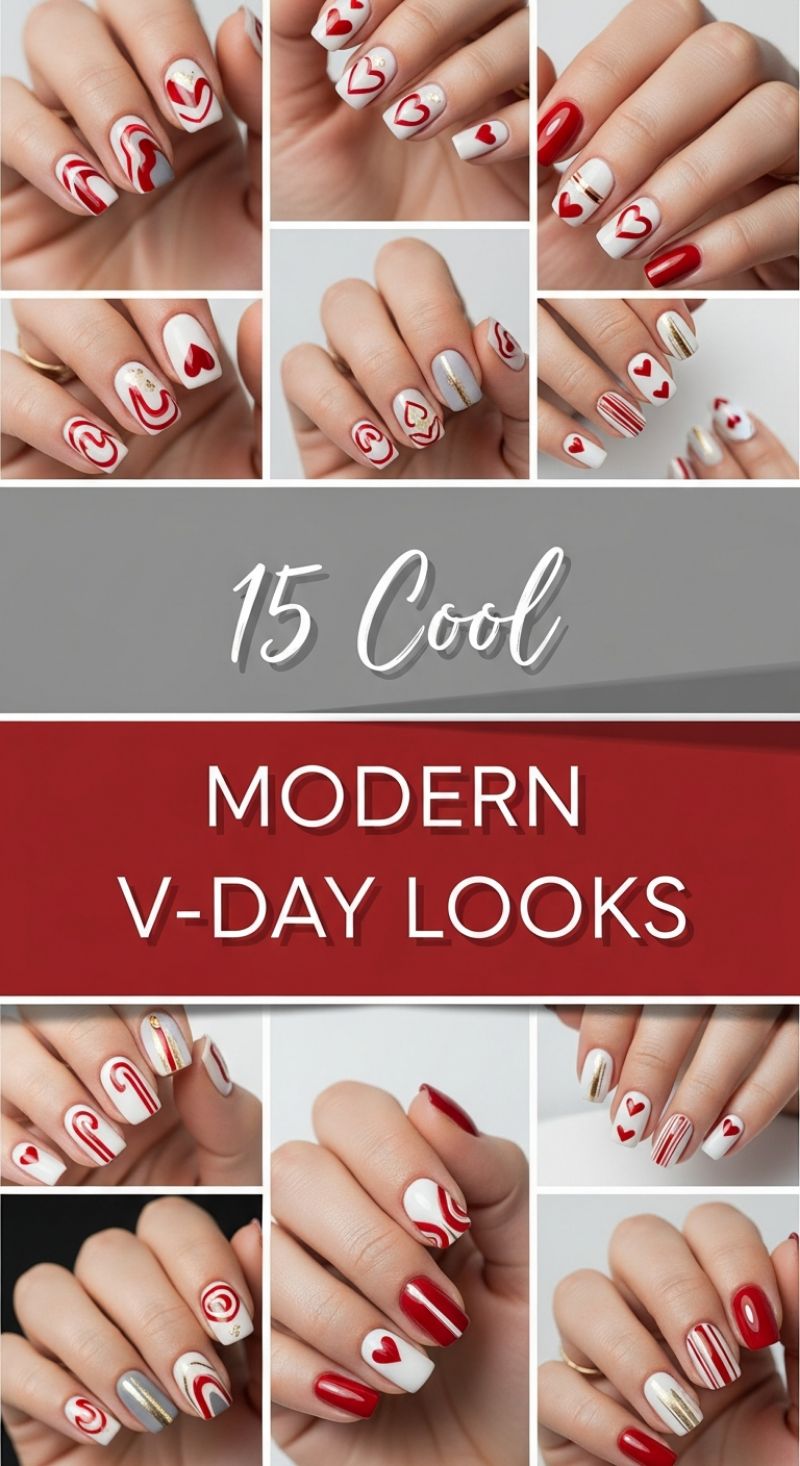
The collection titled “15 Cool MODERN V-DAY LOOKS” demonstrates how to elevate traditional romantic motifs using a clean, graphic approach. The visual impact relies heavily on the stark contrast between a brilliant, true red and a crisp, opaque white. This juxtaposition moves the design away from cliché sweetness towards high-fashion boldness. Key design elements showcased include abstract swirling lines, reminiscent of modern art or melted candy canes, classic geometric stripes, and beautifully rendered full and half-hearts. Note the sophisticated inclusion of a soft, pale gray or nude base in several looks, which acts as a grounding neutral and provides crucial negative space, ensuring the overall look remains uncluttered and wearable beyond the holiday itself.
To recreate these striking graphic elements, precision is paramount. For the abstract swirls, begin with a smooth white base. Use a fine-tipped striping brush, loaded lightly with the red polish, to create sweeping, continuous curves. For advanced texture, try the “wet-on-wet” technique by dropping red polish onto a wet white layer and gently dragging a stylus to create a marbleized swirl effect. Heart shapes are easily achieved using a medium-sized dotting tool; apply two close-set dots and then drag the tool downwards to meet at a point. To incorporate the necessary sparkle from the overall trend theme, utilize gold foil pieces pressed into the tacky polish layer or fine metallic striping tape applied across accent nails. These metallic details are crucial for catching the light and adding dimension without overpowering the bold graphic patterns.
Mastering this modern aesthetic requires attention to finish and structural integrity. Always seal these intricate designs with a high-gloss, UV-cured topcoat to protect the crisp edges and prevent smudging, ensuring your V-Day look lasts. For year-round wear, these techniques are highly adaptable; simply substitute the stark white base with a soft blush pink—integrating the ‘Pink’ element of the current trend—or switch the bright red for a deeper oxblood. If glitter is your preference over foil accents, opt for a micro-fine red or gold shimmer polish over a single accent nail to maintain the clean, graphic integrity of the collection. The key takeaway is pairing saturated color with precise, minimalist lines, regardless of the specific hue, to achieve a manicure that is undeniably cool and contemporary.
8 Magical DISNEY NAILS
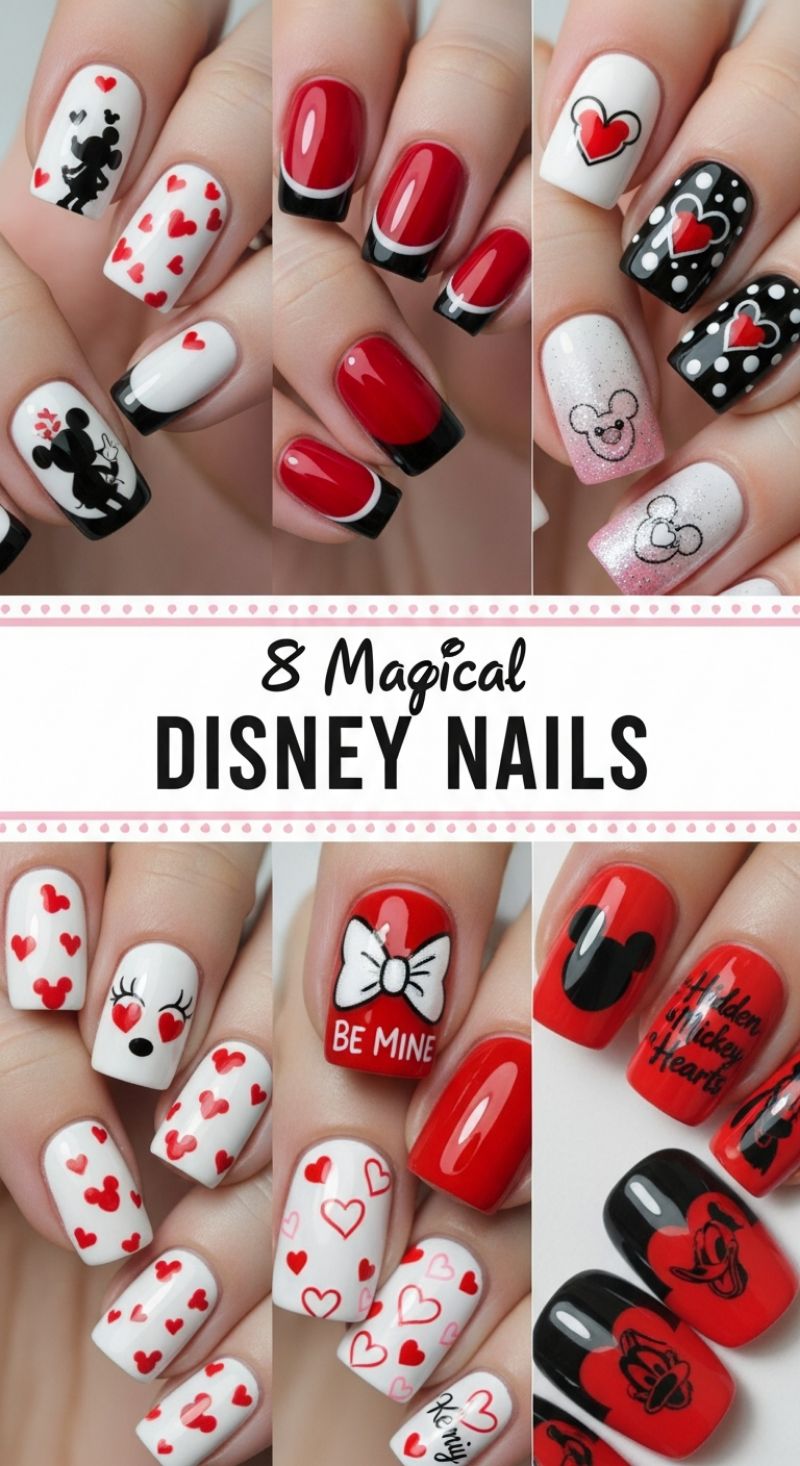
This collection of 8 Magical Disney Nails provides stunning inspiration for incorporating bold colors and playful designs into your year-round manicure, perfectly blending the core colors of red and black with white accents. To achieve the classic Mickey or Minnie looks seen here, start with high-pigment opaque base coats. For the timeless red French manicure variation (top center), apply a bright, true red polish across the entire nail surface. Once cured or dried, use a thin striper brush and a crisp black polish to paint a deep curve along the tip, followed by a super-thin white line just above the black to separate it from the red base. Expert tip for achieving perfect curves: rest your dominant hand’s elbow on a stable surface and rotate your finger slowly against the brush rather than trying to move the brush across the nail. For the striking white bases featuring black silhouettes (top left and bottom left), ensure your white base is fully cured and streak-free before using a dotting tool and fine liner brush to meticulously paint the character shapes, such as the kissing silhouettes or the adorable heart-eyed Minnie face, finishing each layer with a clear topcoat to add dimension and protect the intricate artwork. To truly align this look with the trendy mix of pink, red, and glitter, draw inspiration from the designs in the top right section. The use of glitter gradient offers a fantastic texture shift that elevates the typical flat design. To create the sparkly Mickey head design, apply a sheer, light pink or soft nude base, then use a sponge to dab a fine pink or holographic glitter polish only onto the lower half of the nail, building up density at the tip and fading towards the cuticle. Once set, use a fine black stamping plate or liner brush to sketch the iconic Mickey head outline over the glitter layer. If you prefer a full coverage sparkle, consider using a high-quality, dense pink glitter polish as the base for accent nails, contrasting with the solid red or black nails. The brilliance of these Disney designs is their versatility; you can swap the vibrant red for a softer ruby pink cream or even use a subtle pink shimmer topcoat over the white heart designs (like those seen on the bottom left) to maintain the romantic theme while adhering to the pink/red/glitter trend. Beyond the character motifs, pay close attention to the use of visual textures and patterns, which adds depth to the overall set. The black nails covered in crisp white polka dots (top right) provide essential visual interest and contrast beautifully with the solid colors. For perfect polka dots, utilize various sizes of dotting tools for a uniform appearance, ensuring the polish isn’t too thick to avoid bubbling. For the romantic heart patterns (seen across the middle and bottom sections), practice consistency in heart size and spacing; the “Hidden Mickey Hearts” (bottom right) are a clever twist, achieved by creating two small dots placed close together above a larger dot. Finally, when applying decals or fine text elements like the “BE MINE” or “Hidden Mickey Hearts,” use a thin layer of topcoat to seal them immediately after placement to prevent lifting, followed by a final, durable high-shine topcoat over the entire manicure. Remember, proper cuticle oil application after curing/drying is key to making these vibrant colors pop and ensuring your magical manicure lasts.
Adorable Heart Nail Art Inspirations
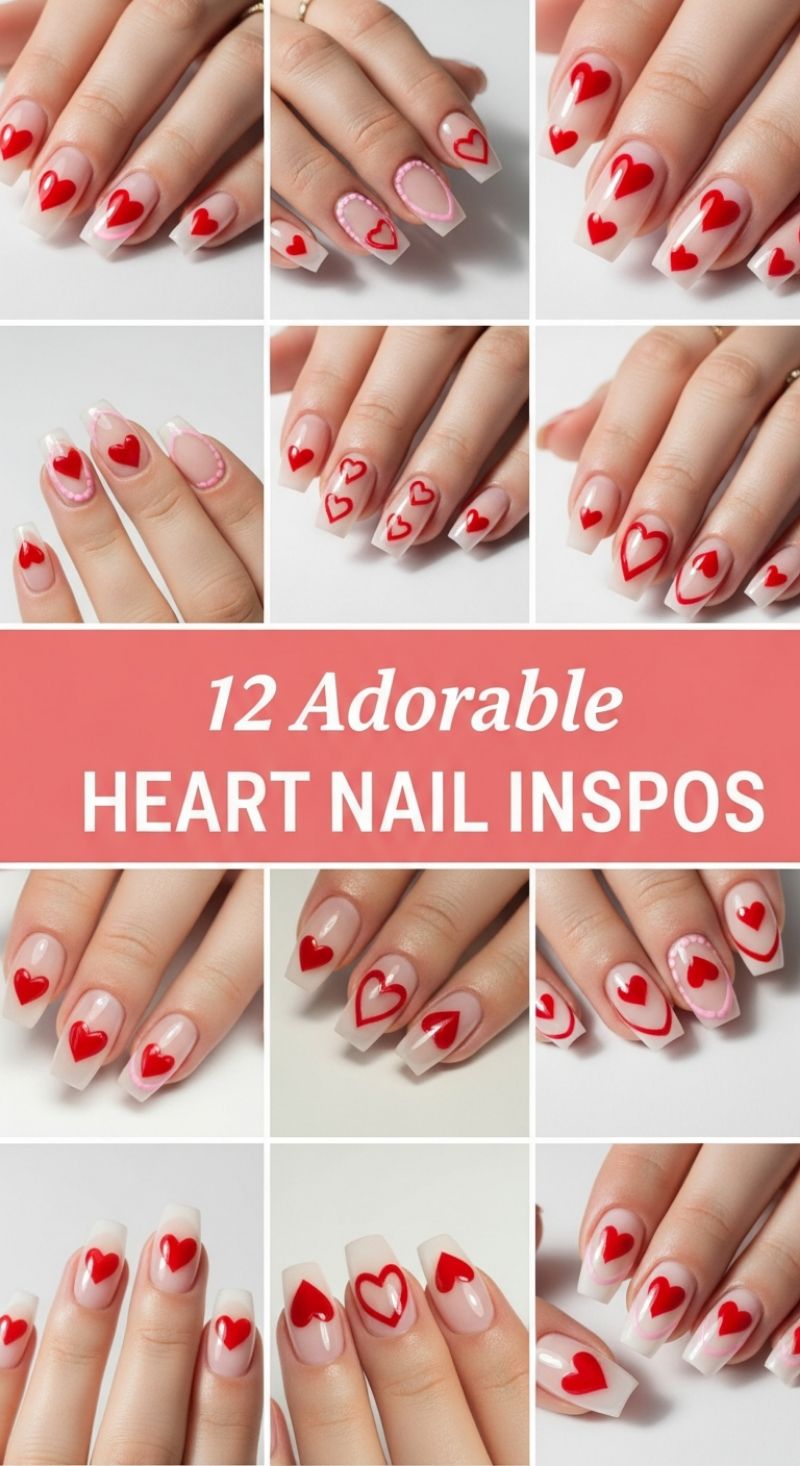
The sophisticated collection of heart nail designs pictured here moves beyond typical Valentine’s Day fare, transforming the romantic motif into a chic, year-round nail staple suitable for any occasion. To successfully replicate this look, start with the perfect sheer base—this is the foundation that elevates the red elements. Opt for a milky pink or sheer nude builder gel or polish, ensuring the color is translucent enough to let the natural nail bed show through while providing a clean, subtle glow. This ‘jelly nail’ effect, coupled with a medium square or tapered coffin shape, provides the optimal canvas for bold artwork. Before applying the art, ensure the base layer is completely cured and gently buffed if necessary. For those designs featuring a subtle French tip or perimeter outline, use a thin, flexible liner brush dipped in either white or a light pink polish to define the edge, taking care to maintain symmetry and crisp lines across all ten nails for a polished, professional outcome.
Once the base is set, the bold red hearts become the focal point. The image demonstrates impressive versatility, ranging from large, centered statement hearts to scattered fields of micro-hearts and delicate heart outlines. To create a flawless full heart, use a fine detail brush or a medium-sized dotting tool. Place two adjacent dots of highly pigmented true-red polish near the cuticle or center of the nail, then use the detail brush to gently drag the polish down from the center cleft of the dots to form a sharp, unified point. For the intricate heart outline designs shown—a key trend in negative space manicures—dip the very tip of your detail brush into the red polish, removing excess to prevent bleeding, and trace the heart shape carefully, ensuring uniform thickness. Expertly mixing these design styles—such as pairing one finger with a large outline heart and the adjacent finger with several small solid hearts—adds depth and visual interest, keeping the manicure dynamic and modern.
To seamlessly integrate the pink elements relevant to this season’s trends, look closely at the designs that utilize subtle pink accents. While the dominant color is red, soft pink can be introduced through fine detailing: think delicate pink outlines around the heart art or the use of minuscule pink dots (or microbeads for a 3D effect) placed strategically along the nail perimeter. This blending of red passion and soft pink femininity is essential for making this romantic look wearable all year. Finish the manicure by applying a thick, durable, non-yellowing top coat. Encapsulating the artwork ensures longevity and provides the high-shine, plump finish characteristic of high-end gel manicures. Cure the top coat completely, and treat the surrounding skin with cuticle oil for a clean, salon-quality result.
5 Trendy DUCK NAILS
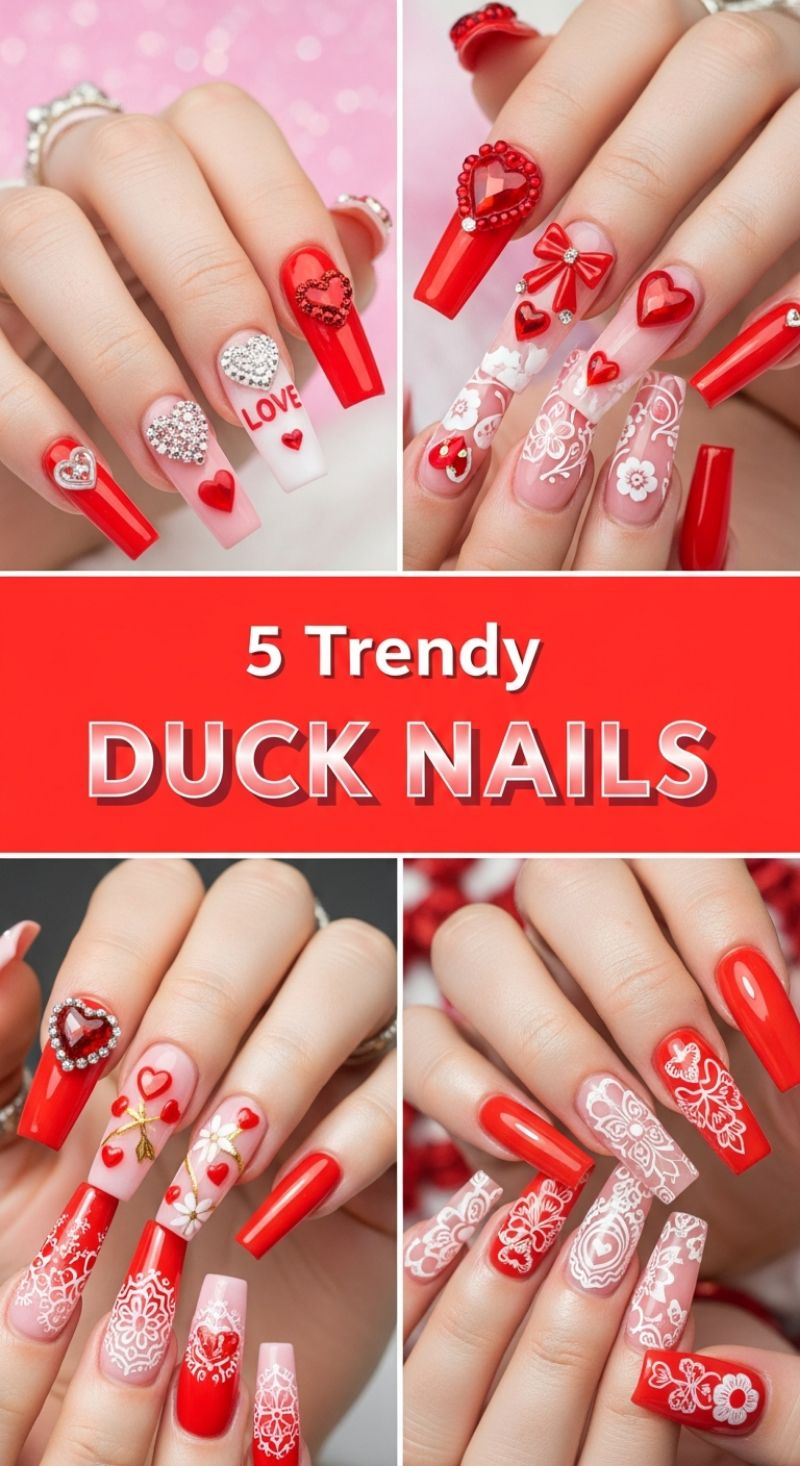
The fusion of red and pink, elevated by intense glitter and dramatic 3D embellishments, creates a maximalist aesthetic perfect for those seeking high-impact nail art. This look utilizes extra-long extensions, typically in a coffin or square shape, to provide the ample canvas necessary for layering textures and intricate designs. To recreate this style, begin with a strong foundation—using a hard gel or acrylic system is crucial for durability, given the length and weight of the subsequent decorations. The color palette focuses on vivid, opaque red paired strategically with softer, sheer pink or nude bases. Expertly transition between these colors using French tips, deep-set ombres, or by designating solid color nails (like the thumb and pinky) as anchors, while reserving the middle nails for complex art. The visual contrast is further amplified by incorporating crisp white details, often applied via high-definition stamping plates or meticulous freehand lace work, which provides a delicate, baroque feel against the bold reds.
The essence of this trend lies in the elaborate use of structural, three-dimensional charms and rhinestones. Unlike standard flat decals, these designs feature large, multi-faceted elements—such as giant heart rhinestones framed in micro-beads, detailed acrylic bows, and dense clusters of diamond-cut stones. Secure application is paramount for maintaining this look. For large charms, always utilize a thick viscosity builder gel or specialized jewelry adhesive, curing it around the base of the charm for maximum grip and longevity. Placement strategy is key to avoiding a cluttered look; designate a single statement nail (usually the ring or index finger) for the largest piece, and use smaller, coordinated elements (like tiny heart accents or simple rhinestone paths) on adjacent nails to create visual flow. When designing the accent nails, consider adding encapsulated elements, such as gold micro-flakes or red foil pieces layered under a clear coat, to add depth beneath the heavy top-surface adornments.
To achieve the delicate lace and mandala patterns visible in this style, highly pigmented white gel polish and precise stamping techniques are recommended. For an ideal result, invest in quality stamping plates featuring intricate filigree or floral motifs. After stamping the design onto the nail, a clean-up step is essential before sealing it with a high-shine, non-wipe topcoat. Professional advice suggests using a topcoat formulated for encapsulating 3D art, ensuring the edges of the rhinestones and charms are fully sealed without dulling their shine. While the specific motif shown here leans heavily into Valentine’s Day themes (hearts, ‘LOVE’ scripts), the technique—mixing solid red and pink bases with high-contrast white lace and heavy bling—is versatile. By swapping the hearts for baroque florals or geometric patterns, this luxurious, high-glamour style can easily transition from a winter statement piece into a dazzling year-round manicure.
7 UNIQUE V-DAY DESIGNS
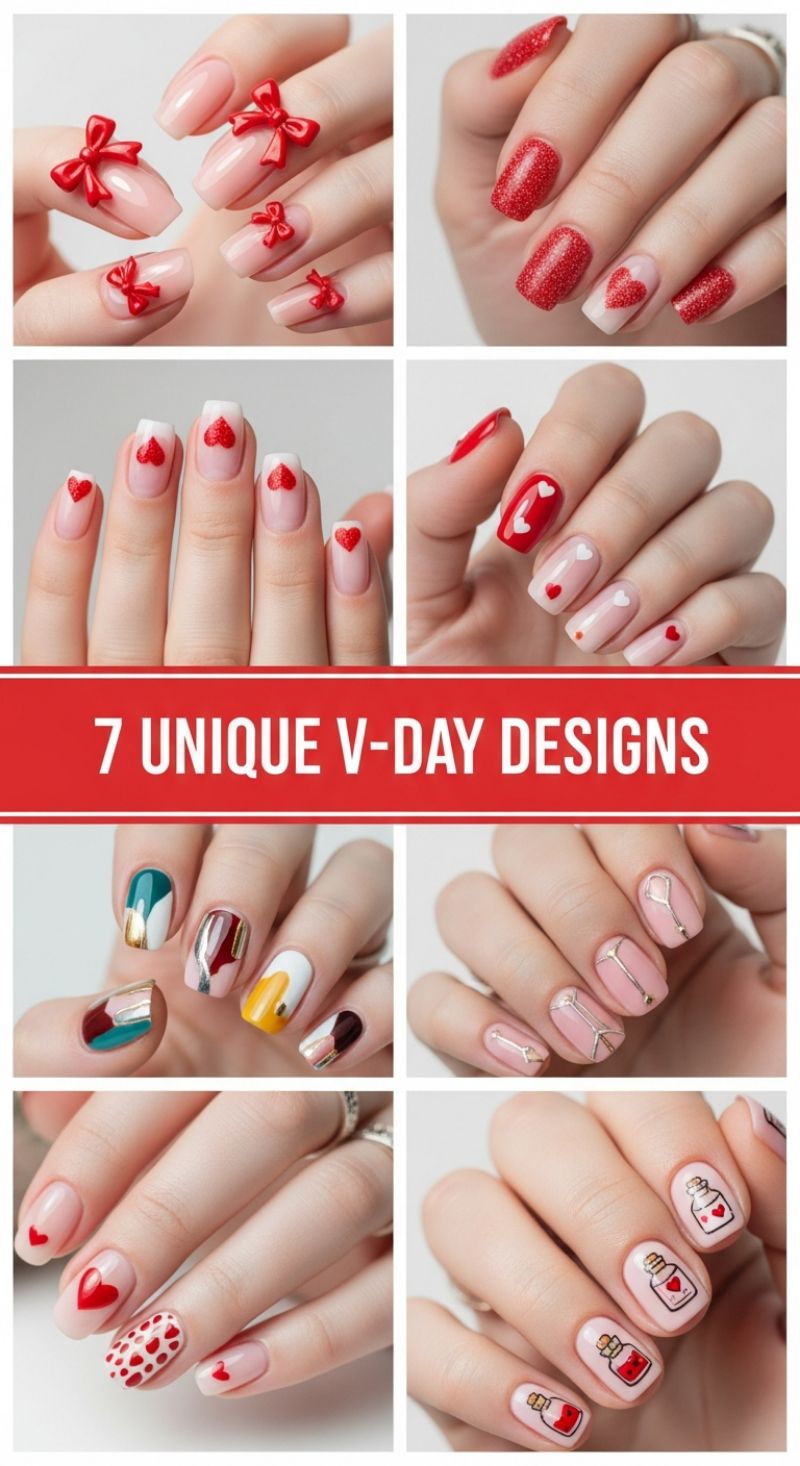
This collage of romantic nail art provides essential inspiration for expertly combining pink, red, and glitter—elements that easily transcend Valentine’s Day to create stylish manicures year-round. To master this trend, start with the base and texture. Designs like the top right demonstrate the impact of full-coverage red glitter, suggesting that integrating high-shimmer polish on one or two accent nails is key for contrast. Balance this intensity with sheer, milky pink bases, as seen in the heart-tipped design (mid-left). This technique, which features a glitter-infused red heart positioned near the cuticle line and framed by a crisp white tip, offers a sophisticated inversion of the classic French manicure. For those seeking bold dimension, incorporate 3D elements, such as the high-gloss red bows (top left), placed strategically over a nude or soft pink overlay. The goal is to layer different levels of opacity and texture (matte, shimmer, 3D) to prevent the manicure from looking flat or overly simplistic.
For maximum visual engagement, learn to mix patterns and placements across a single hand. Instead of uniformity, create a cohesive story using varied heart applications. For instance, combine a nail featuring a large, solid red heart with a neighboring nail displaying an intricate micro-dot heart pattern (bottom left). This variation prevents the design from becoming monotonous. Expert application also involves utilizing specialty techniques like detailed illustration, as shown by the adorable love potion bottle decals on a pale pink base (bottom right). When using decals or hand-painted designs, ensure the light pink or sheer nude base is perfectly cured before application, and seal the design with two thin layers of high-gloss topcoat to protect the intricate lines and prevent chipping. Additionally, incorporate solid, opaque red nails (mid-right) to anchor the more whimsical designs, providing necessary weight and color depth.
To ensure these looks feel contemporary and not strictly seasonal, introduce minimalist elements. The geometric designs featuring slender gold arrows or modern framing (bottom right, middle) illustrate how metallic accents (like rose gold or copper, which complement the red and pink palette) can elevate a love-themed manicure into a high-fashion statement. When replicating designs that involve multiple colors or abstract shapes (like the color-blocked nails pictured, which can be adapted using shades of burgundy and soft rose), use fine detail brushes and painter’s tape to achieve clean lines and defined edges. The true secret to this trend is selecting the perfect shade of pink—a shade that acts as a subtle canvas, allowing the vibrant reds and dazzling glitter effects to truly pop, making the entire look polished and appropriate for any season.
6 Viral STELLIO NAIL TRENDS
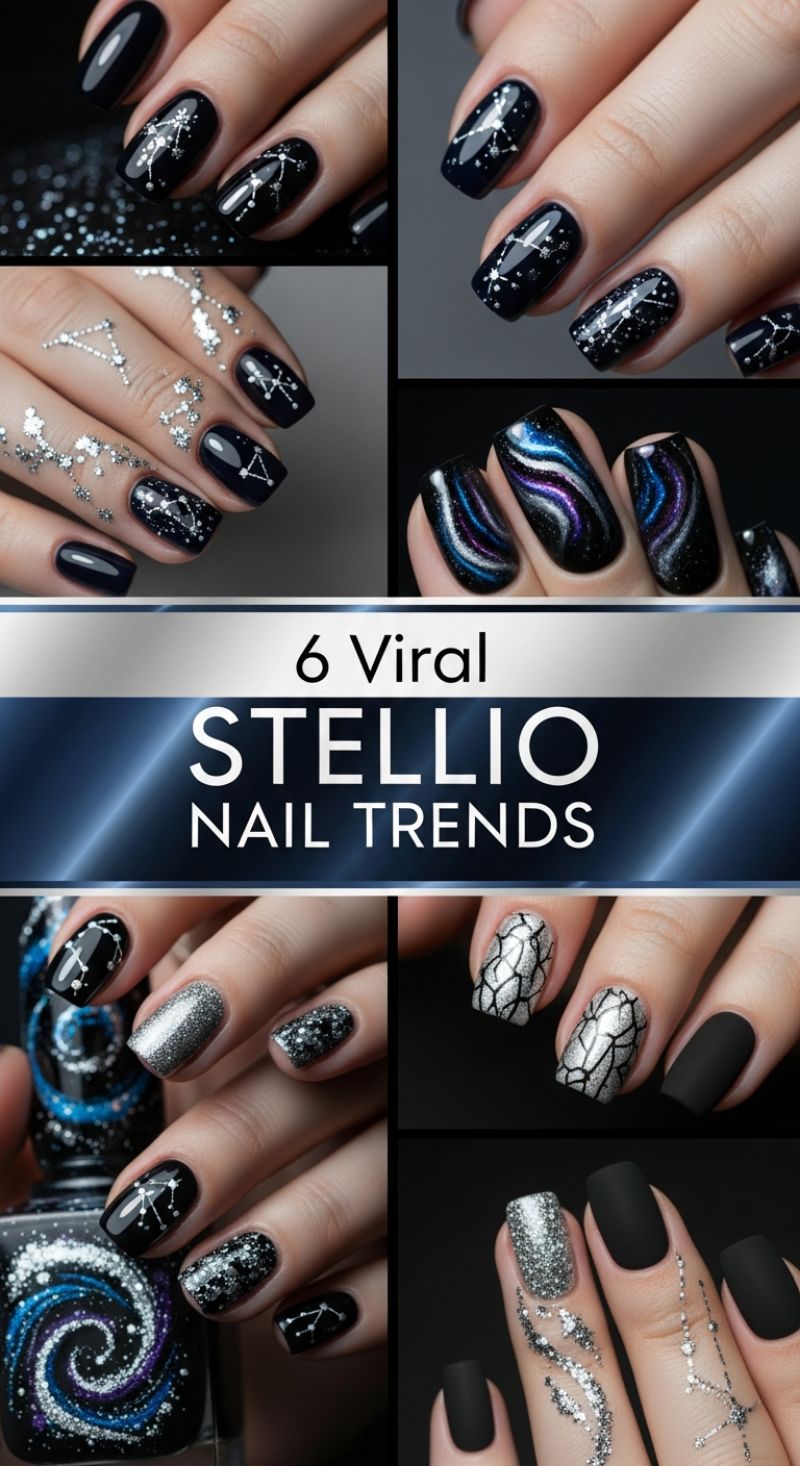
The Stellio trend, derived from the celestial theme evident in these manicures, is a masterclass in high-contrast artistry and strategic glitter application. While the visuals here showcase a striking palette of deep midnight black and shimmering cosmic silver—a fantastic winter or evening look—the complex techniques are perfectly adaptable to the warm pink and vibrant red glitter palette central to this article. To recreate this sophisticated, trendsetting look using your chosen colors, focus first on meticulous preparation. Select a very dark base color (like a deep oxblood red or dark magenta) to substitute for the black/dark blue seen here. The key design element, the constellation mapping, requires a fine detail brush and a highly pigmented metallic polish, such as rose gold or bright iridescent pink glitter, to stand out against the dark backdrop. Expert advice dictates using stamping plates for precision on complex star charts, followed by meticulously placing individual glitter particles or rhinestones to emphasize key ‘stars,’ ensuring a polished, professional finish.
Beyond simple constellations, Stellio trends incorporate complex swirling textures, like the dramatic galaxy effect seen on the accent nails. This is achieved by layering two or three highly pigmented, often magnetic, polishes (think ruby red, bright fuchsia, and holographic silver) over the dark base, carefully blended with a thin brush or a magnet to create that signature nebulous swirl effect. For those seeking a bolder, faster texture, the silver crackle or shattered glass look, prominent in one of the featured designs, can be achieved using specialty foil polish or specific stamping plates that mimic a web-like pattern. To balance these visually busy elements, always include solid nails in contrasting finishes. Notice the use of stark matte black nails alongside the shimmer. When translating this to your pink/red manicure, pair a super glossy, high-glitter accent nail with two adjacent nails finished in a velvety smooth matte red or deep berry for a contemporary, textural contrast that elevates the entire look.
To truly embody the viral nature of the Stellio trend and make your manicure a year-round statement, consider the full hand styling. This trend encourages accessorizing the skin around the nails with temporary metallic tattoos or loose, cosmetic-grade glitter dust, creating a fluid transition between the nail art and the skin. When applying this loose glitter (which can be a stunning iridescent pink or red shade), use a sticky nail glue or body adhesive applied with a fine liner brush for precise, artistic placement, just as you would apply the star map details. Ensure every layer of the nail design—whether it’s the thin constellation lines or the dense galaxy swirls—is protected with a high-quality UV-cured topcoat. This not only provides a mirror-like shine (except where matte is specifically desired) but ensures the intricate detail work remains flawless, allowing you to showcase this high-impact, customizable look for weeks.
18 Cozy FEBRUARY NAILS
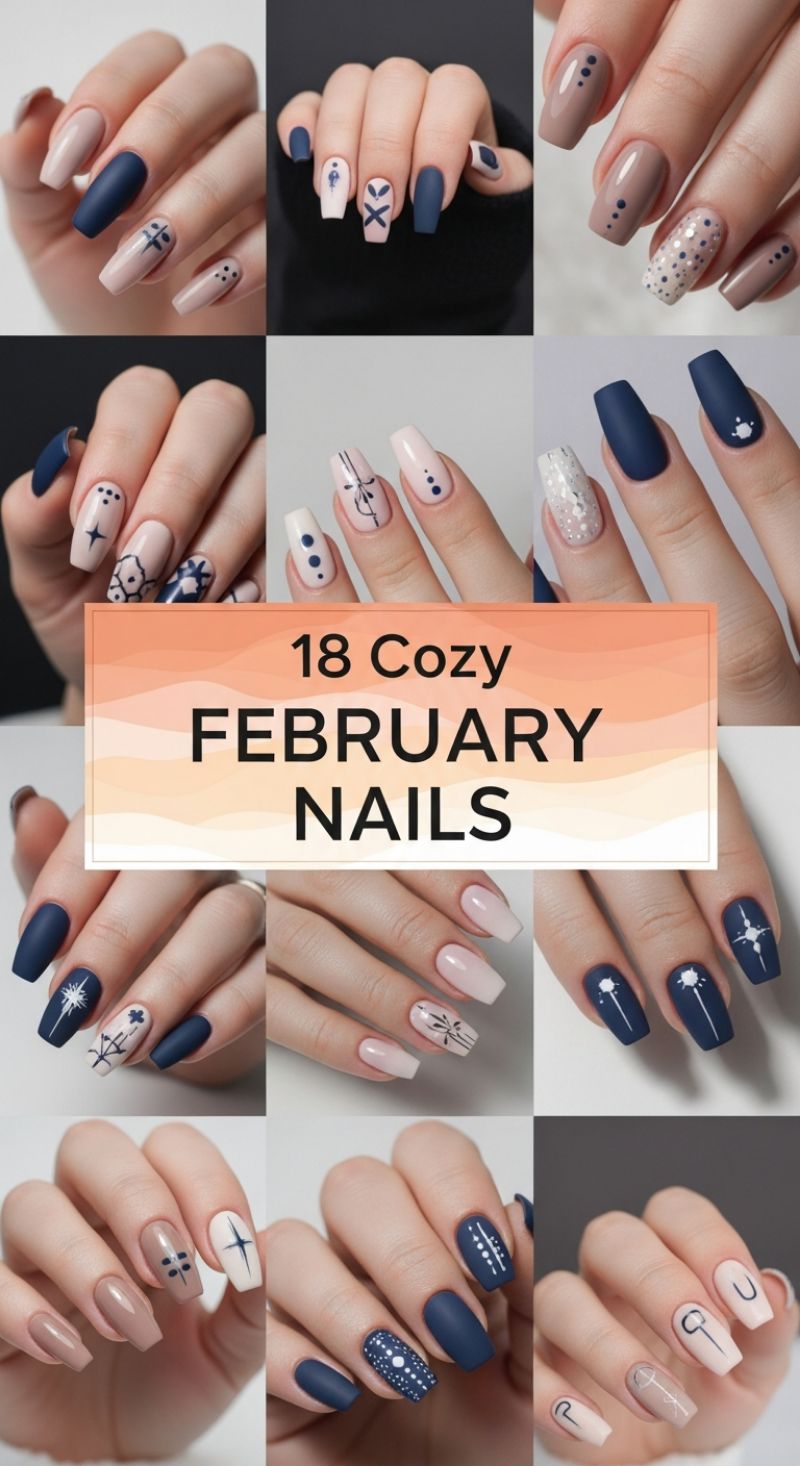
This collection, tagged “18 Cozy February Nails,” offers a masterclass in seasonal sophistication, perfectly integrating neutral dusty pinks and taupes with a striking matte navy blue. While the overarching trend of mixing pink, red, and glitter often leans vibrant, this particular palette provides a cooler, more grounded interpretation ideal for late winter. The key to this cozy aesthetic lies in the contrast between the dark, velvety matte finish of the navy blue and the creamy, soft matte neutrals. Notice how the designs cleverly alternate between these shades, using the lightest colors (off-white, pale pink) as the base for dark, geometric art, and conversely, using dark blue as the backdrop for celestial white accents. This careful balance prevents the dark blue from feeling heavy and allows the nude shades to feel intentionally wintry rather than simply transitional. The inclusion of speckled white glitter on accent nails adds necessary dimension, linking this palette back to the larger glitter trend.
Achieving these high-impact, minimalist designs requires precision and the right tools. To replicate the look, start by preparing your nails—most of these designs feature a medium-length coffin or squoval shape. Apply your base colors (navy and nude) and cure them completely; a matte finish is crucial for achieving the velvety depth seen here. The art itself is executed using ultra-fine striping brushes and professional dotting tools. For the celestial patterns—like the sharp stars or dandelion-like bursts—load a thin brush with highly pigmented white gel or lacquer and create your lines with minimal pressure, ensuring each line is sharp and symmetrical against the matte navy background. For the abstract geometric symbols found on the nude nails (crosses, arrows, loops), black or navy polish works best to maintain high contrast. Expert tip: If you struggle with freehand lines, consider investing in specialized nail stamping plates for geometric patterns, or strategically place a few clustered dots using different sized tools to mimic the speckled glitter effect seen on some accent nails, applying them over the base color before the final matte top coat.
Although these designs are curated for February, the technique of combining a deep grounding color (navy) with a soft neutral (nude/pink) and a textural element (glitter/speckles) is easily adaptable for year-round wear within the pink, red, and glitter trend. To transition this cozy look into warmer months or integrate more red, simply swap the matte navy for a deep oxblood or raspberry red. The dusty taupe could be brightened to a vibrant coral or bubblegum pink. Retaining the minimalist art style—perhaps using metallic or gold accents instead of white—will maintain the sophistication. Always finish any matte art with a high-quality matte top coat to protect the intricate details and preserve the desired velvety texture, while reserving high-gloss or speckled glitter top coats specifically for designated accent nails to maximize visual dimension. This strategic use of texture is what elevates these simple color block manicures into high-fashion statements.
12 Unexpected Alternative Nail Designs: Adapting High-Contrast Concepts for Year-Round Trends
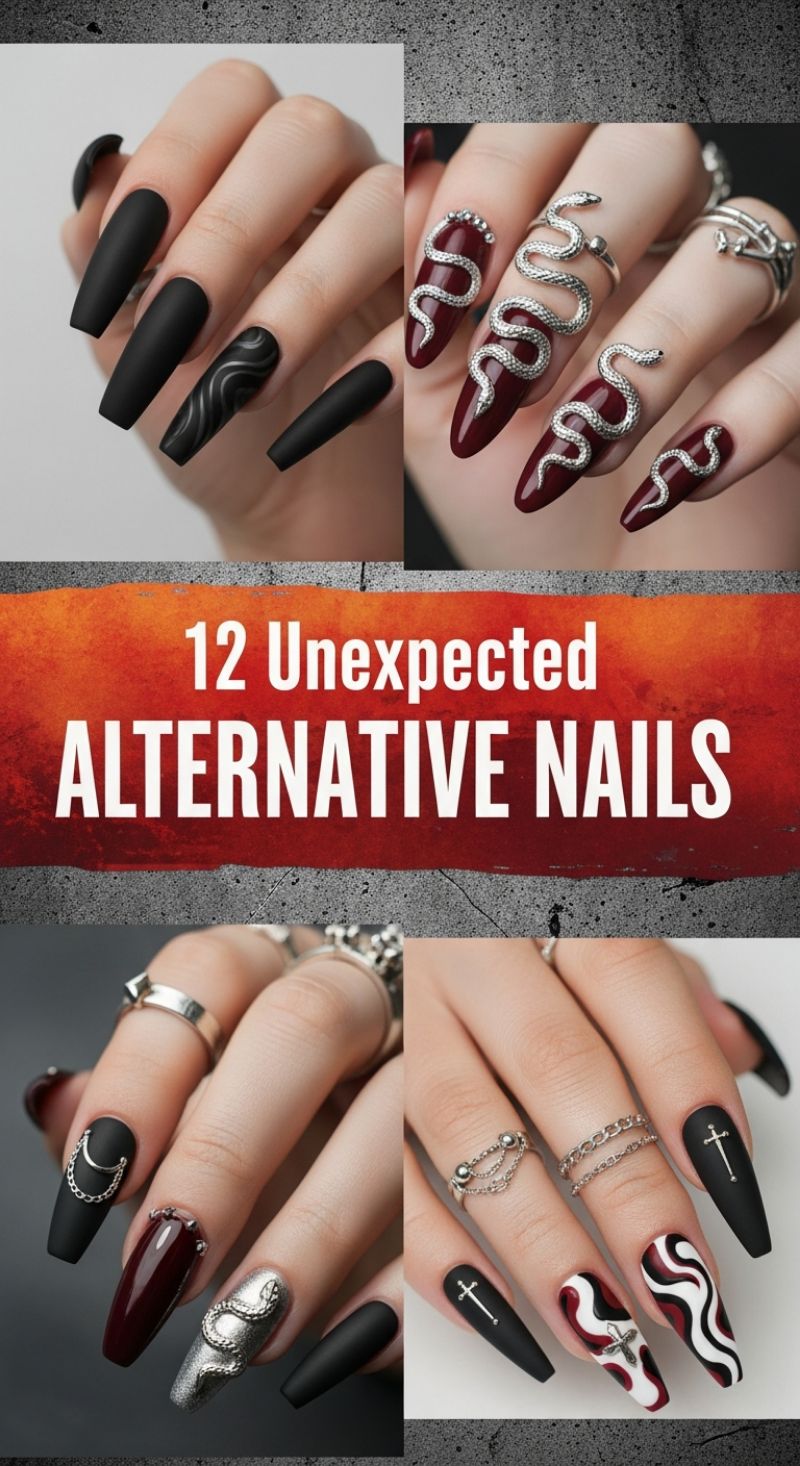
This striking collection of ‘alternative’ nail art, characterized by long, sculpted coffin shapes, offers invaluable lessons in high-contrast design, which can be elegantly translated into the pink, red, and glitter trend. The foundation of these looks relies heavily on deep, saturated base colors, such as the rich, glossy burgundy and velvety matte black showcased here. To adapt this drama for a year-round romantic aesthetic, start by substituting the matte black with a sophisticated dusty rose or a bold magenta, allowing the deep red to remain as your grounding power shade. The key to capturing this visual impact lies in mixing textures—juxtapose a high-gloss finish on your accent nail (perhaps the deep red) with a luxurious matte topcoat on the majority of the nails (the substituted pink or magenta). This textural play creates immediate depth and interest, ensuring the manicure feels polished and dimensional. Focus on achieving precise cuticle work and using two to three smooth coats of highly pigmented polish for flawless, opaque color application, especially vital for such defined shapes.
The ‘alternative’ element in these designs often relies on elaborate 3D metal hardware—snakes, chains, and crosses—but we can achieve a similar level of statement-making complexity using strategic glitter and chrome placement. Instead of bulky charms, focus on detailed line art, mimicking the intricate wavy patterns seen in the image, but execute them using fine gold or silver glitter dust suspended in a clear gel topcoat, or utilize reflective chrome powders that shift from pink to gold. For instance, the fierce red nail adorned with a snake can be reinterpreted by applying a holographic red glitter polish over the base, finished with a precise strip of silver metallic lacquer to simulate the chain or snake silhouette. When adding glitter accents, always encapsulate the particles fully with two layers of non-wipe topcoat to prevent snagging and ensure maximum longevity and shine. For complex patterns like the marbled or wavy accents, use a striping brush and cure each color layer briefly before adding the next to prevent blending and maintain crisp definition.
Expert application of these sophisticated designs demands attention to both shape maintenance and adhesive technique. Because these designs utilize long, structured shapes (coffin or stiletto), maintaining filing symmetry is critical. For durability, especially when mixing base colors and applying detailed art, use a high-quality rubber or builder gel base coat to reinforce the natural nail. When incorporating glitter or foil accents, use a specialized foil or gem adhesive gel, curing completely before sealing. To keep the deep reds looking vibrant and prevent yellowing, use a UV-protective topcoat. This approach allows you to borrow the bold, complex layout of the alternative aesthetic—such as the high contrast of a solid base against a patterned accent nail—while softening the color palette and replacing harsh metal accents with glittering, feminine embellishments perfectly suited for the contemporary pink and red trend.
25 Breathtaking Pink, Red, and Glitter Nail Combinations
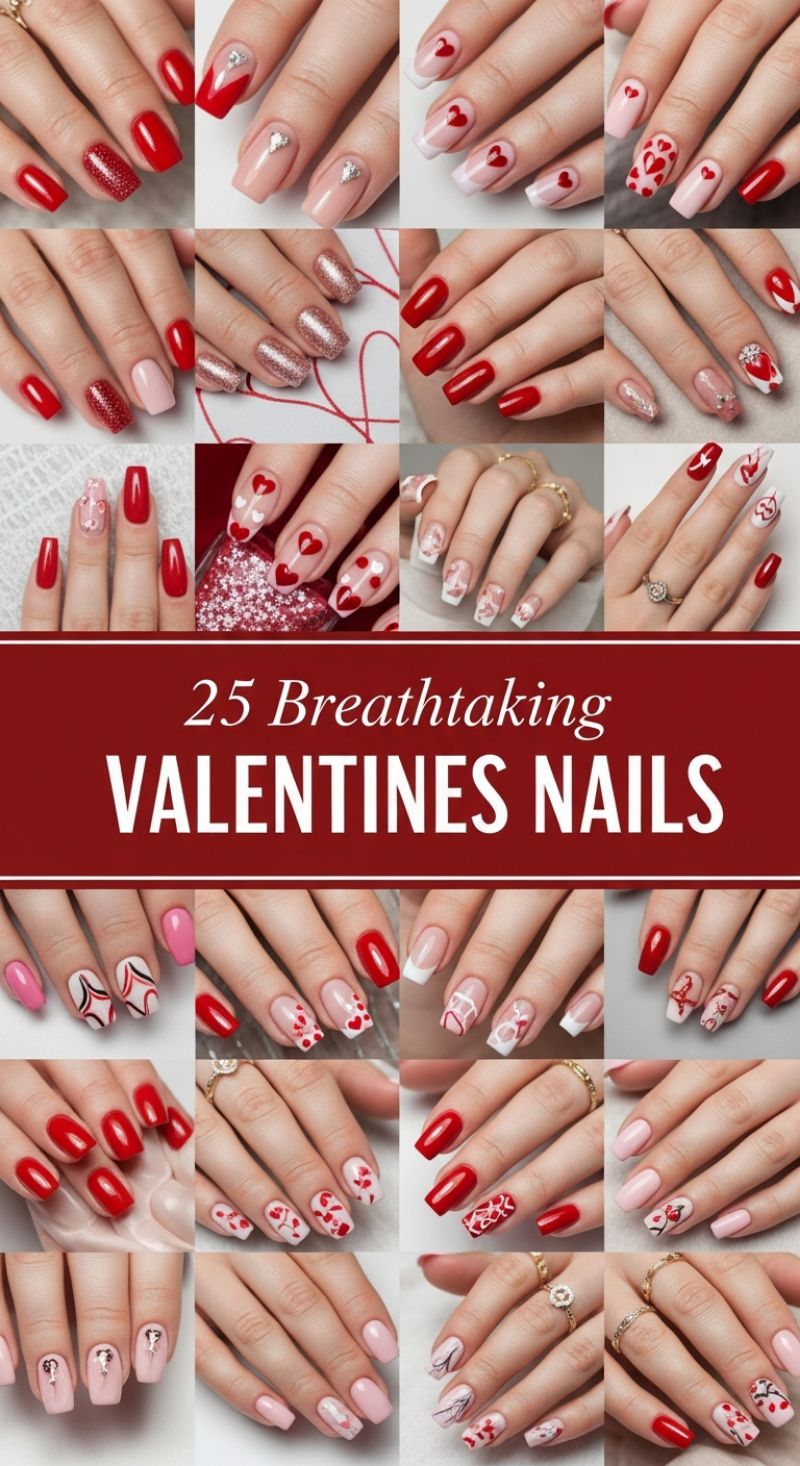
The striking visual collection of 25 manicures showcases the unparalleled versatility of combining pink, red, and glitter, elevating a simple color palette into a complex, multi-textured masterpiece. The foundation of nearly all these successful looks is a soft, neutral base—typically a sheer pink or nude—which acts as the perfect canvas to make the vibrant reds and dynamic glitters truly pop. To replicate this level of sophistication, focus on strategic color blocking: alternate between solid, glossy red nails (like a deep cherry or crimson) and soft pink accent nails. For instance, try applying a nude base and using a precise fine-liner brush to create delicate red French tips, then incorporate small, strategically placed red or white hearts floating on the natural nail line. This contrast between the highly saturated red and the subtle nude/pink provides depth and prevents the overall look from becoming overwhelming, maintaining an elegant, year-round appeal far beyond the holiday season. Experiment with shapes like square or soft coffin, which are highly featured in this compilation, as they provide an excellent surface area for detailed art.
Mastering the interplay of texture is crucial for achieving these breathtaking designs. Note how the collection expertly integrates sparkle: some examples feature a full-coverage, fine rose-gold or champagne glitter on two accent nails, while others incorporate delicate silver rhinestones (often in the shape of a miniature heart or as a cluster near the cuticle) over a solid red tip. For a precise glitter application, use a builder gel or a thick topcoat to adhere larger flakes or densely packed shimmers, ensuring the edges are sealed seamlessly. When executing the smaller art designs, such as the numerous heart motifs, utilize a quality dotting tool for perfect circles and then drag a fine-tipped brush down the center to form the iconic shape; practicing placement is key. For advanced patterns, like the white abstract swirls or the broken-heart design, ensure your polish is thinned slightly to allow for clean, non-clumping lines. Always cure or dry each layer of detail work before moving to the next to prevent smudging, especially when layering white designs over highly pigmented red polish.
To translate this collection from a seasonal statement into a versatile, contemporary trend suitable for any occasion, focus on minimizing overtly romantic symbols while maintaining the color story. For instance, replace some of the smaller hearts with minimalist geometric patterns, or utilize the red and pink polish for a chic, abstract marble effect over a nude base. The combination of deep red and soft pink naturally evokes a sense of boldness tempered by femininity, making it an ideal palette for spring or autumn. Expert advice for longevity dictates using a highly durable, high-gloss top coat over all embellished nails, ensuring that the rhinestones and glitter accents remain sealed and chip-free. Furthermore, regardless of the complexity of the design chosen, maintaining immaculate cuticle health—which is clearly visible in all featured hands—is essential for making any intricate manicure look professionally finished and sophisticated.
20 Ultimate Nail Ideas: Mastering the Pink, Red, and Glitter Manicure

The collage, dubbed “20 Ultimate Nail Ideas,” showcases a diverse masterclass in combining high-contrast colors—namely pink, red, black, and dazzling silver glitter—using popular shapes like coffin and long square. To achieve this sophisticated balance, start with your foundation. Many featured designs rely on a neutral, elongated base, often utilizing sheer milky pink or nude tones that extend the length of the nail bed, providing a perfect canvas for darker accents. The most striking element is the frequent use of French tips, which range from classic white tips (often adorned with subtle gold or silver studs/charms, like the delicate heart accents) to dramatic, deep V-shaped tips rendered in solid black or intense red. For a DIY application of these tips, ensure your base is fully cured and use a thin striping brush or specialized French tip guides to maintain uniformity, remembering to always cap the free edge with your base color before moving to the tips for maximum durability. Expertly achieving a clean line is crucial, especially when pairing these crisp tips with the heavy embellishment seen on accent nails.
Moving into the core color combinations, this trend thrives on intentional contrast and strategic placement of sparkle. Observe how solid, high-shine red nails are frequently paired with intricate pink designs featuring whimsical motifs like hearts and bows, preventing the look from becoming monotonous. When integrating glitter, consider both texture and placement: the image displays fine, holographic silver glitter used in ombre fades near the cuticle line, as well as chunky, reflective glitter applied densely on full accent nails for maximum impact. For a seamless application of chunky glitter, apply a layer of builder gel or thick clear polish before scattering the glitter, tapping off the excess, and then sealing with two layers of non-wipe top coat to ensure a smooth finish. Alternatively, the darker, edgier looks incorporate solid black polish broken up by striking red accents, often applied as sharp V-lines or geometric negative space designs, requiring extreme precision with a detail brush to keep the lines crisp and symmetrical across all fingers.
Finally, expert execution of this trend involves balancing the maximalist elements with understated elegance. If you choose a bold design on one hand—such as the black nails with red lightning streaks—pair it with a softer, perhaps solely French manicure on the other, or reserve the boldest designs for just one or two accent fingers. The tiny heart decals and 3D silver embellishments seen throughout the examples offer a practical way to infuse romance without overwhelming the design; these are best applied using a touch of clear builder gel or rhinestone glue and cured immediately. For year-round wearability, swap the overtly romantic hearts and bows for geometric stripes or abstract swirls in the same color palette (pink, red, black, and glitter). Remember that proper cuticle care is essential when showcasing such dramatic length and contrast; always finish the manicure with a quality cuticle oil to highlight the precision of your application and extend the life of your beautiful, trendy nails.
10 Festive Mardi Gras Nails
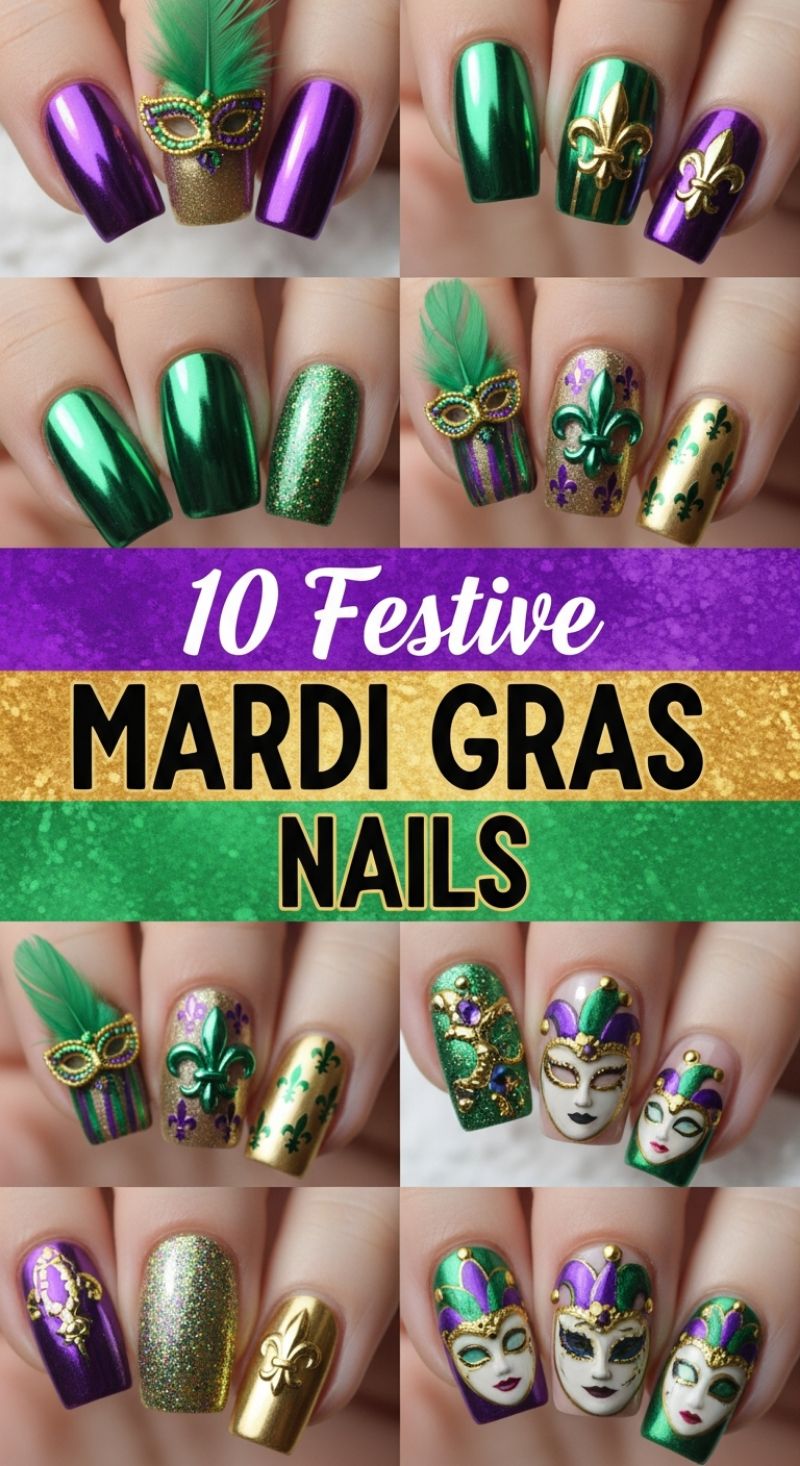
Dive into the lavish, celebratory spirit of Carnival with a manicure inspired by the iconic colors of Mardi Gras: brilliant purple (justice), vibrant green (faith), and shimmering gold (power). This trend focuses on high-impact finishes, heavy ornamentation, and maximalist artistry. To recreate this look, start by establishing your base coats. The image demonstrates the power of metallic and chrome finishes; for a true mirror-like shine, apply specialized chrome powder over a cured no-wipe gel topcoat in either royal purple or emerald green. Alternate these high-shine nails with densely pigmented glitter polishes—either a chunky gold or a fine-particle green glitter—to add texture and sparkle without overwhelming the detailed artwork. Achieving balance is crucial in such an intricate look; aim for three to four chrome or glitter accent nails per hand, leaving the remaining nails available for detailed 3D application.
The hallmark of these festive designs is the incorporation of symbolic elements like the fleur-de-lis and intricate Venetian-style masks. For the fleur-de-lis designs, apply a rich gold or glitter base and then affix a gold or green 3D charm using thick builder gel for maximum hold. If you prefer a flatter design, use stamping plates with purple ink over a gold background. The truly expert-level nails feature miniature, detailed carnival masks, some even adorned with small green feathers. These detailed masks require either advanced freehand painting techniques using white and black acrylic paint over a neutral base, or the precise application of pre-formed mask decals or miniature acrylic pieces. When attaching large pieces like the mask charms, ensure the edges are sealed well with a second layer of builder gel to prevent snagging and lifting, especially if the charm extends beyond the nail plate.
To ensure a cohesive, celebratory look, maintain the strict color palette across all ten nails, even if every nail features a unique design. The key is to mix the techniques—metallic finishes, dense glitter, hand-painted art, and 3D charms—so that each nail tells a piece of the story. For example, pair a full metallic green nail with a highly detailed, striped mask nail (alternating purple and green stripes with a gold border). Finish the manicure with a durable, high-gloss topcoat, applying two layers over any glitter or textured art. When sealing 3D charms, be mindful to coat around the base without completely dulling the metallic shine of the embellishment itself. This ensures the intricate artwork lasts throughout the revelry.