Learn the 15 essential design secrets for patio perfection. Instantly transform your outdoor space with tips on furniture, lighting, layout, and decor to create a functional, beautiful oasis.
PATIO PRIVACY SOLVED! STYLISH PRIVACY SCREENS FOR YOUR OUTDOOR SPACE
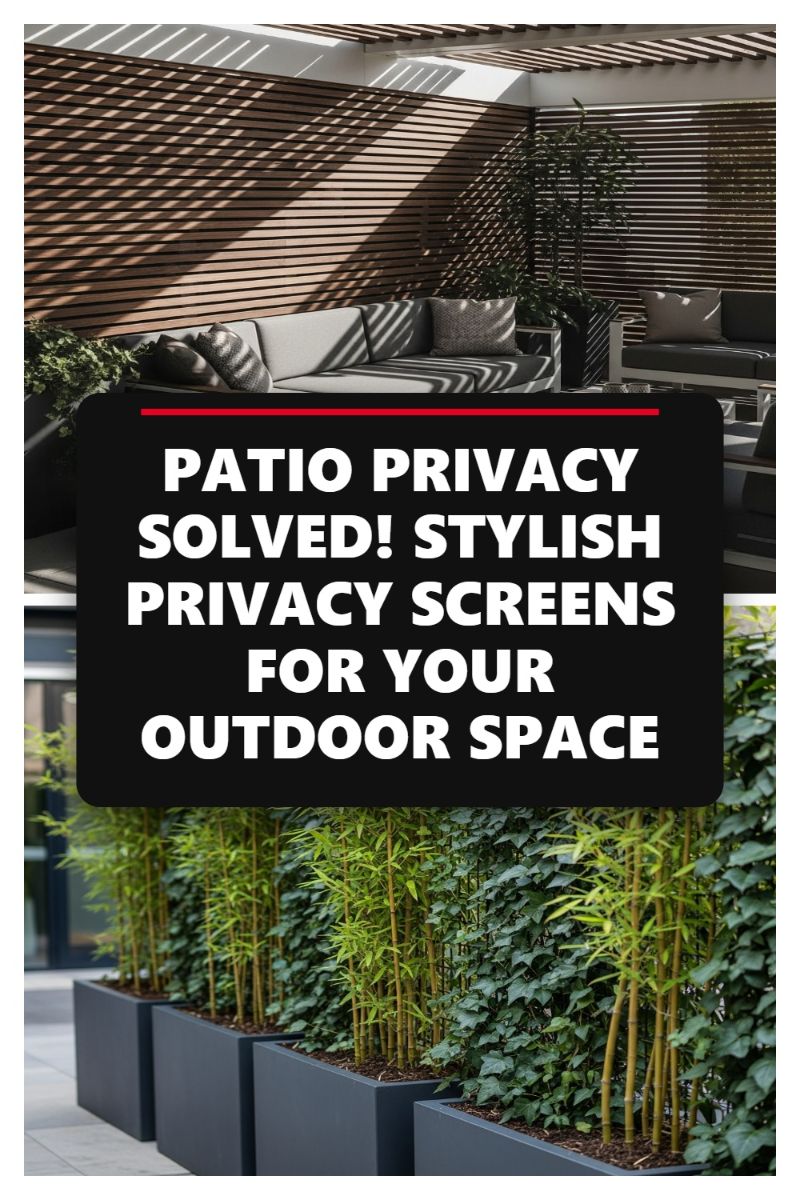
Achieving seclusion without sacrificing style involves utilizing architectural privacy screens as definitive design features. As seen in the upper portion of the image, horizontally slatted wooden screens offer superb visual obstruction while allowing air circulation and fascinating light play (note the dramatic shadows cast on the seating area). When installing a structural screen, ensure the slats are spaced optimally—a slight gap (e.g., 1/4 to 1/2 inch) maintains visual interest and light filtering without compromising personal privacy. These permanent screens are often integrated directly into a patio cover or pergola system, utilizing weather-resistant materials like treated cedar, composite wood, or powder-coated aluminum, ensuring maximum longevity and minimal maintenance. This approach is paramount for defining outdoor “rooms” and shielding elevated patios or decks from direct lines of sight from adjacent buildings.
For homeowners or renters seeking flexible, movable barriers, living screens housed in modern planters are the definitive solution shown in the lower visual. This method instantly adds texture, color, and life while providing an excellent temporary or repositionable screen. Select deep, wide planters (like the dark geometric ones pictured) to give roots ample space, which is crucial for supporting tall screening plants. Fast-growing, vertical options like non-invasive clumping bamboo varieties provide height and density quickly. Pair these with dense, climbing foliage like ivy or espaliered hedges grown along hidden trellises within the containers for a complete, lush vertical wall. Expert advice suggests grouping several large planters together to create a robust, seamless green barrier that effectively absorbs sound, a significant benefit in noisy urban settings.
The most successful patio privacy solutions blend seamlessly with the existing architectural and decorative aesthetic. To ensure coherence, avoid implementing screens that feel like an afterthought; instead, match the screen material (wood tone, metal finish) to other elements like decking or furniture frames. Furthermore, strategic placement is key: rather than fencing the entire perimeter, target areas where neighbors or foot traffic pose the greatest privacy concern. Use varying heights and densities—a fixed, tall wooden screen for the main seating area paired with lower, mobile plant barriers—to create layers of seclusion and visual depth, ensuring your outdoor haven remains both an inviting and private sanctuary.
VIRAL PALLET HACKS: 5 DIY PROJECTS TO TRANSFORM YOUR PATIO!
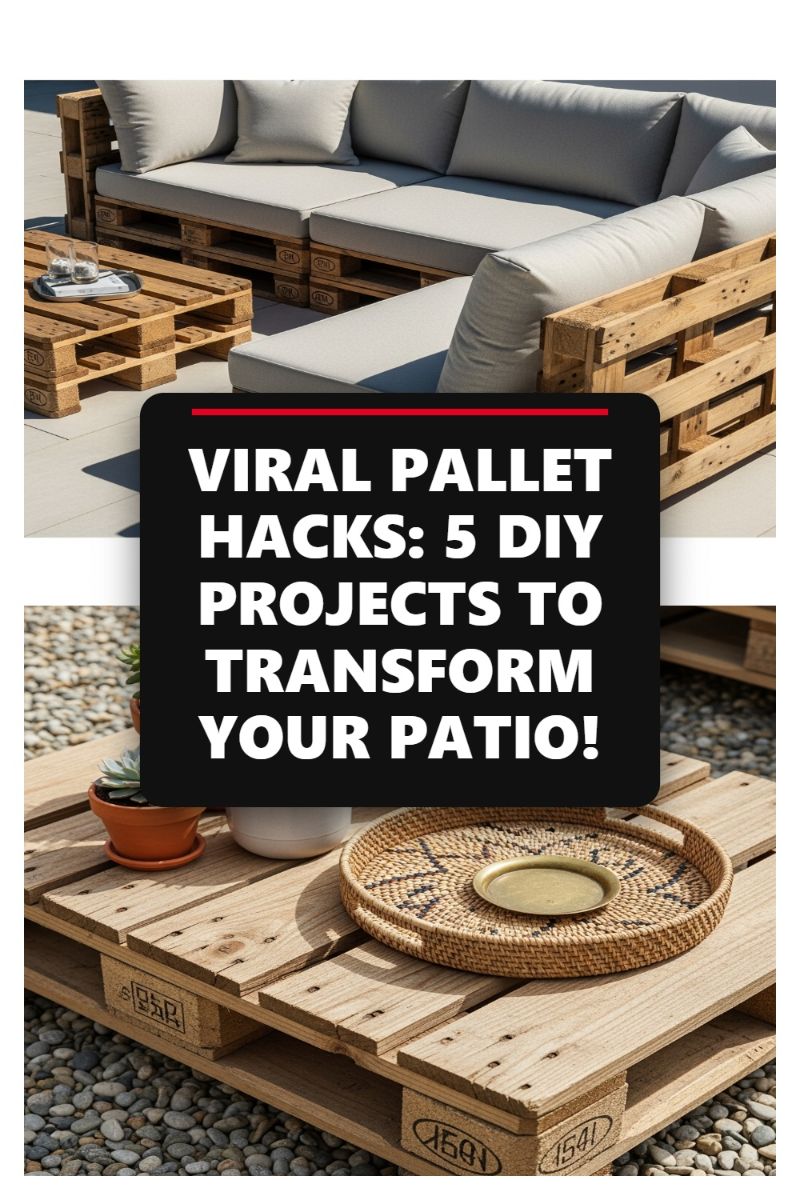
Pallet furniture is a highly effective, budget-friendly design secret for instant patio transformation, offering a customizable and trendy aesthetic that resonates with modern minimalism and rustic charm. As seen in the image, standard wooden shipping pallets (ideally heat-treated or HT stamped, avoiding chemically treated MB pallets) can be stacked and arranged to create sophisticated, modular outdoor seating and cohesive coffee tables. Before construction begins, proper preparation is critical for safety and longevity. Thoroughly clean the wood to remove dirt and debris, and then dedicate time to sanding all surfaces smooth to prevent painful splinters. Once smooth, apply a high-quality exterior wood sealant, paint, or stain. This step is non-negotiable; it protects the wood from moisture, UV rays, and mildew, ensuring your new furniture withstands the elements and maintains a polished, finished look, elevating the project from raw material to durable design centerpiece.
Constructing the modular seating unit begins with determining your desired layout—an L-shape, as depicted, is excellent for maximizing conversational space and utilizing corner areas efficiently. For the sofa base, stack two to three pallets high to achieve standard seating height (roughly 14 to 18 inches), securing each layer firmly together using long decking screws or heavy-duty metal brackets to ensure stability. To create the sofa backrest, attach one pallet vertically to the rear edge of the stacked base using sturdy L-brackets or carriage bolts. The key to the final high-end aesthetic lies in the cushions: invest in thick, weather-resistant outdoor foam and durable covers in neutral tones, such as the light gray shown. These cushions provide essential comfort and maintain the contemporary, minimalist style. For added functionality, install heavy-duty, locking casters on the bottom layer of pallets; this allows the entire sectional to be easily rearranged for different social settings or rolled away for cleaning.
The accompanying pallet coffee table is typically the simplest component of the set, often requiring just a single or double-stacked pallet secured together. To achieve a functional tabletop surface that won’t allow items to tip through the gaps, as subtly smoothed in the visual, you may need to secure a cut piece of plywood or additional, closely fitted pallet slats across the top. Sand this surface flush. For an expert touch, consider staining the table in a color that either matches the seating or provides a sophisticated contrast. Accessorizing completes the transformation: use practical and decorative items like the large woven tray shown to corral drinks and reading material, complemented by textural elements like potted succulents or outdoor candles. These thoughtful details transform the raw DIY structure into an inviting, polished outdoor lounge area, successfully proving that patio perfection is attainable on a minimal budget.
5 OUTDOOR PATIO DECOR TRENDS THAT WILL GO VIRAL IN 2026!
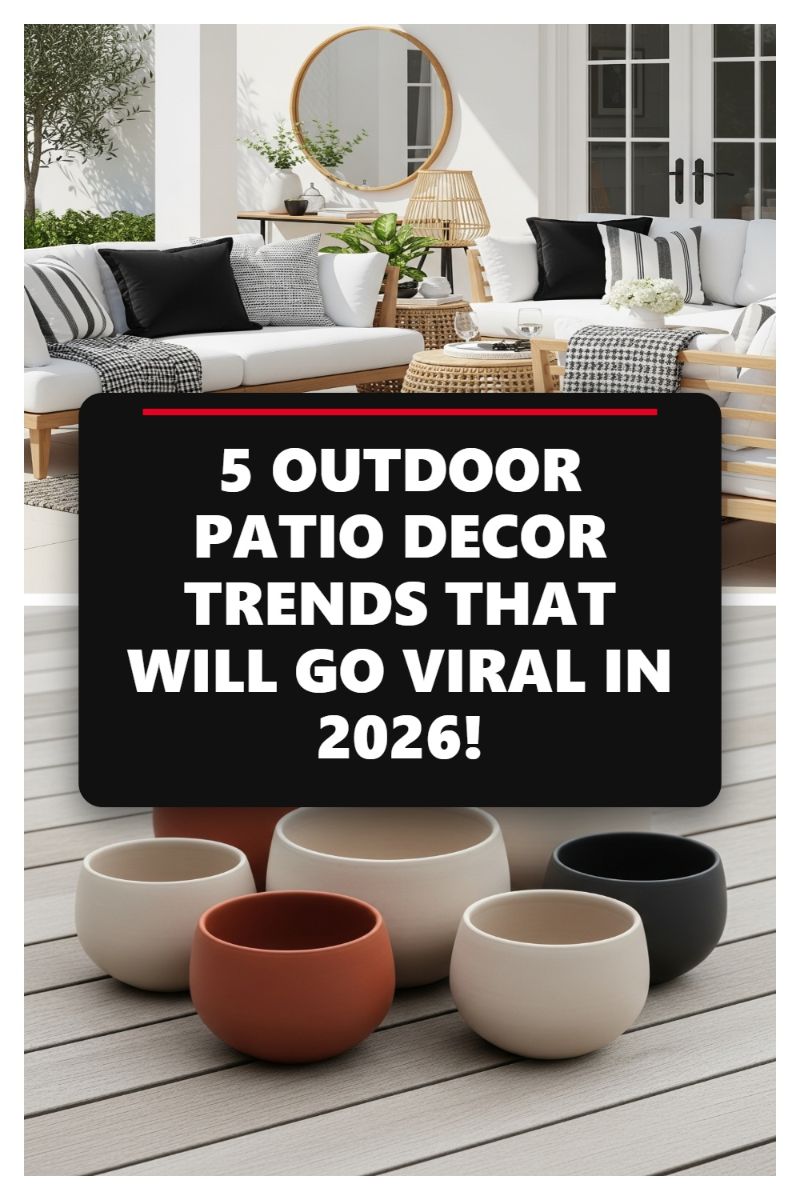
The secret to elevating your patio from a basic outdoor area to a polished extension of your home lies in mastering high-contrast minimalism and layered natural textures—a trend set to dominate outdoor design. Start by establishing a refined, monochrome base, pairing crisp white upholstery with deep charcoal or black accents in your throw pillows and blankets. This high-contrast palette is instantly sophisticated, but it risks feeling cold unless balanced by organic materials. Incorporate raw, natural elements like light-toned teak wood furniture frames and textured woven pieces, such as rattan side tables and pendant light shades. This layering technique—mixing soft fabrics, hard surfaces, and natural weaves—creates visual depth and warmth, ensuring the space feels inviting and curated rather than sterile. Expert tip: Opt for geometric patterns (stripes, checks) in your textiles to maintain visual interest while strictly adhering to the two-color scheme.
To maximize the feel of an “outdoor room” and add essential ambiance, focus on reflective surfaces and strategic vertical elements. As seen in top designs, incorporating a large, round wooden mirror on an exterior wall is a highly effective way to expand the perceived size of the patio by reflecting light and capturing views of surrounding greenery. This technique not only enhances natural brightness but also reinforces the circular motifs often found in natural woven accessories. For evening use, lighting is paramount. Move away from harsh overhead fixtures; instead, rely on soft, ambient light sources such as sculptural woven lamps or candle lanterns placed on side tables. Finally, introduce height and life by placing substantial trees or tall, slender plants (like the popular olive tree) in large, simple planters, defining the corners of the seating arrangement and integrating the space with the natural environment.
Another viral trend involves curating sculptural planting collections that act as modern art installations. Instead of standard terracotta pots, invest in high-quality, matte-finished planters in contemporary shapes, favoring smooth, rounded silhouettes over angular designs. The power of this trend lies in thoughtful grouping: collect planters in coordinating, grounding colors such as rust, deep black, cream, and warm taupe, and arrange them in odd numbers (three or five) on the decking or along the edges of the patio. Vary the sizes slightly within the collection to provide visual flow. These smaller, bowl-like vessels are perfect for low-profile plantings like succulents, moss, or even used as vessels for floating candles, providing a grounded, minimalist focal point that contrasts beautifully with the light texture of composite decking or concrete flooring. This attention to detail transforms practical elements into artistic design statements.
GOTHIC WESTERN HOME DECOR: THE MOODIEST TREND YOU NEED TO TRY

While the Gothic Western aesthetic is traditionally associated with moody interiors—featuring black tufted sofas, dark walls, and antique brass fixtures, as seen in the image—this dramatic style can be masterfully translated into your outdoor space, providing a deeply layered and sophisticated patio environment. To achieve this moodiest of trends outdoors, start with a foundation of deep, non-reflective colors. Substitute interior black paint for matte charcoal or slate-colored exterior stains on wooden decking or fences, or opt for dark, textured stone pavers. All functional elements, like pergolas, railings, or structural supports, should be rendered in heavy gauge matte black metal or distressed iron. The key is eliminating brightness and maximizing textural depth. Invest in industrial or architectural outdoor lighting: think large, aged brass lanterns, low-hung filament bulbs, or heavy iron sconces that cast shadows rather than flood the area with light, enhancing the dramatic ambiance for evening gatherings.
Translate the cozy, heavy textures of the interior Gothic style to your patio furnishings using weather-resistant materials that mimic luxury. Replace the iconic leather Chesterfield with outdoor-grade seating featuring deep black or oxblood red Sunbrella fabrics. Layer these with throws made of heavy, dark wool or faux sheepskin (brought inside during rain) to replicate the cozy, indulgent feel of the aesthetic. For rustic Western accents, choose oversized, weighty planters made of dark, textured terracotta or corten steel, allowing them to patina naturally. Instead of the typical bright, coastal decor, incorporate sculptural, natural elements—like polished dark river stones, driftwood, or even a statement piece of reclaimed barn wood serving as a robust coffee table. These heavy, grounded elements prevent the dark color palette from feeling sparse, giving the space an anchored, storied quality.
Finally, the successful execution of Gothic Western patio decor relies on strategic, contrasting greenery and atmospheric styling. Avoid overly bright or tropical flora; instead, use deep, saturated greens like ferns, dark hostas, or boxwoods in geometric black planters. If you want a floral element, choose dried arrangements or hardy perennials in muted tones like dusty purple, deep cranberry, or aged ivory, displayed in rugged ceramic or stoneware vases that look handmade and historical. Complete the look by incorporating elements that hint at the Western influence without being cliché: consider a small, portable fire pit (allowing the raw steel to rust slightly) and use vintage or distressed metal trays for serving drinks. This style demands attention to detail and layering, ensuring that the patio becomes less of an afterthought and more of a deeply atmospheric extension of your home’s most dramatic interior spaces.
LUXURIOUS OUTDOOR SHOWER DESIGNS THAT WILL CHANGE YOUR LIFE
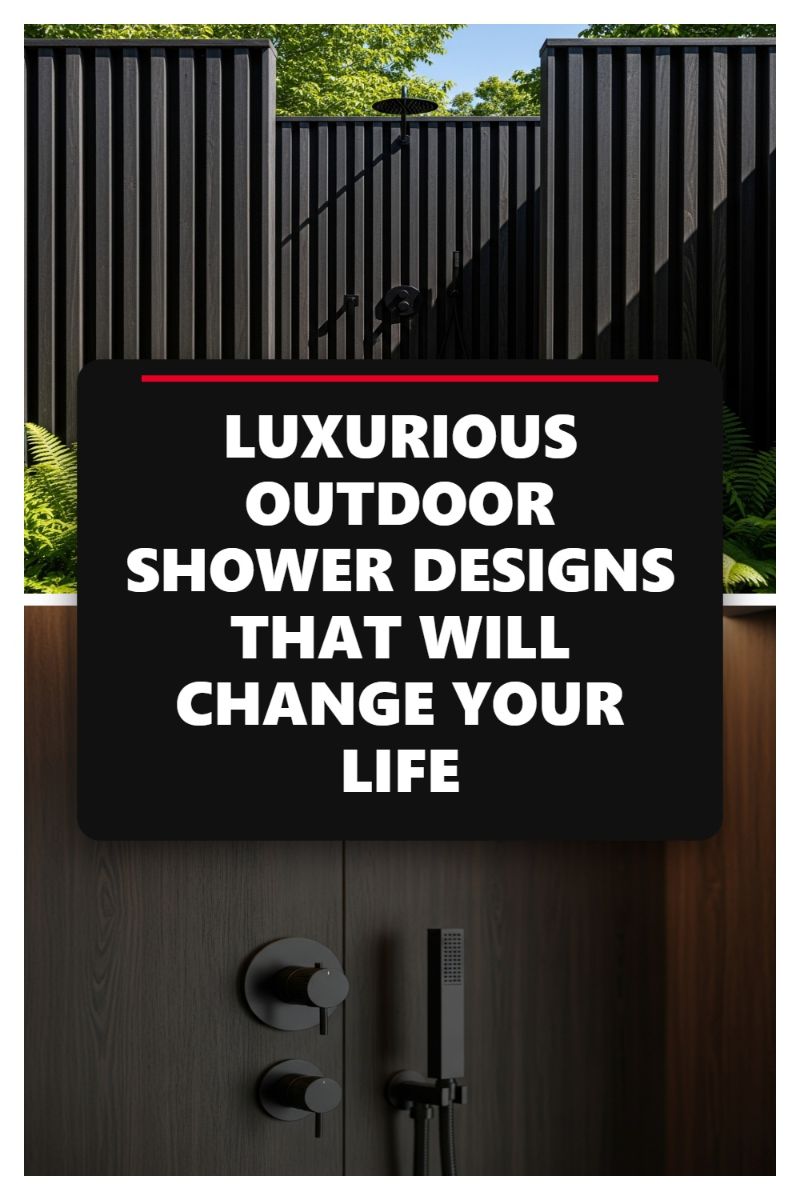
To truly elevate your patio into a five-star retreat, integrate a luxurious outdoor shower that blends utmost privacy with stunning architectural design, as exemplified by this sleek, modern setup. The key design secret here is the use of vertical charcoal-stained wood slats for the enclosure. This structure provides excellent ventilation and drainage while offering absolute privacy, allowing light and subtle views of the surrounding natural elements (like the vibrant green ferns and tree canopy). When designing your own outdoor wash station, opt for robust, weather-resistant materials like heat-treated ThermoWood, stained cedar, or high-quality composite paneling that can withstand continuous exposure to the elements without warping or fading. Ensure the privacy walls are tall enough (ideally 8 feet or more) and positioned strategically to block sightlines from neighbors or the main house, focusing the user’s view upward toward the open sky for a truly immersive, spa-like experience. The juxtaposition of the sleek, dark architecture against the lush greenery is what creates this high-end, contemporary ambiance.
The hardware selection is paramount in establishing this high-end aesthetic and ensuring longevity. Move beyond standard polished chrome, which often shows water spots instantly outdoors, and choose marine-grade matte black fixtures, as shown here. Black offers a sophisticated, dramatic contrast against the dark wood background and blends seamlessly into the structure. Functionality is crucial: always install separate wall-mounted controls for both a large overhead rainfall showerhead (for a luxurious, full-body wash) and a versatile handheld sprayer attachment. The handheld unit is invaluable for quick rinsing, washing off sandy feet after the pool or beach, or even bathing pets before they come indoors. For installation, always utilize plumbing components specifically rated for outdoor use, such as PEX piping, and integrate the valves subtly into the wall structure. Remember that proper, code-compliant drainage is non-negotiable; your chosen flooring—whether it’s slatted wood decking, smooth river stone, or non-slip tile—must efficiently channel water away from the structure and safely into a runoff system or French drain.
Positioning your outdoor shower should maximize both convenience and visual impact relative to your overall patio layout. While proximity to existing water and drainage lines is practical, also consider sun exposure; morning sun can feel invigorating, while dappled afternoon shade might feel more serene. For placement within your patio design, this feature acts as a perfect transition zone, allowing family and guests to cleanse before entering the main house after swimming, gardening, or outdoor exercise. It fundamentally changes the way you interact with your yard, turning a routine chore into a moment of self-care. By defining this space with high-quality architectural elements—like the seamless blend of the upper dark slatting and the lower smooth wood-grained paneling—you are not just installing a utility, but creating a dedicated outdoor room that dramatically enhances the utility, comfort, and luxury of your entire outdoor space.
MY BEST GOODWILL FINDS! HOW I STYLE THRIFTED DECOR LIKE A PRO
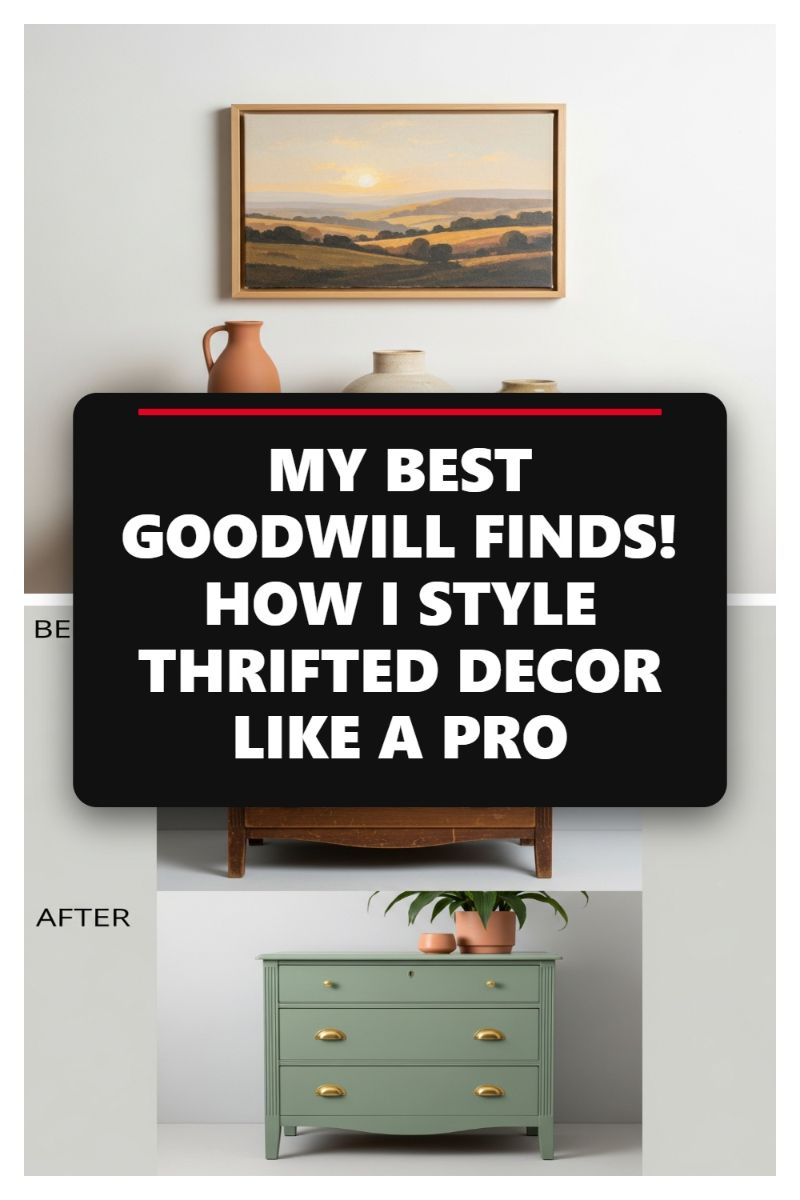
Thrifting isn’t just for interior spaces; applying the professional upcycling approach to your patio or deck can unlock major design potential without breaking the bank. The core principle demonstrated here—taking an outdated wooden piece and transforming it with paint and hardware—is highly effective for creating bespoke outdoor furniture. When hunting for patio potential, look beyond traditional outdoor sets. Seek out sturdy vintage dressers, robust sideboards, or even solid wooden kitchen carts that can be repurposed as stylish potting benches, outdoor buffet stations, or weather-protected storage. Inspect prospective pieces carefully for structural integrity, favoring hard materials like solid wood over veneer or particleboard, which deteriorate rapidly when exposed to moisture. The key is to see the potential in the frame, knowing that surface imperfections are simply opportunities for personalized, high-impact restoration.
To achieve a high-end “after” look for outdoor use, specialized preparation is mandatory for weatherproofing. Once you secure your thrifted score, sand down any peeling or degraded finish, clean the piece thoroughly, and apply a high-quality exterior primer designed to block tannins and prevent mold or mildew growth. For the final coat, you must choose an exterior-grade paint—such as an oil-based enamel or a durable latex specifically formulated for outdoor environments—in a shade that complements your patio landscaping. Shades like the trendy sage or muted mint green pictured can blend beautifully with natural greenery. Furthermore, do not underestimate the power of hardware transformation. Just as the new gold pulls elevate the dresser in the example, swapping out rusty or dated knobs for stainless steel, brass, or oil-rubbed bronze outdoor-safe hardware instantly modernizes the piece and drastically improves its resistance to the elements.
Integrating your freshly upcycled furniture into your patio design requires careful styling to ensure it looks intentional, not makeshift. Use your refinished piece as the anchor for a cohesive outdoor vignette. If the piece is functioning as a potting bench, ensure the top is styled functionally with attractive terra cotta pots (like those shown), durable gardening tools, and vibrant succulents or herbs. If it serves as an outdoor bar or serving station, style it with weather-resistant serving ware, perhaps a decorative lantern, and a robust outdoor beverage chiller. Always use varying heights and textures in your styling, combining hard materials (metal lanterns, ceramic planters) with soft elements (a rolled-up throw blanket or lush, flowing plants). This professional layer of styling ensures your thrifted finds feel elevated and purposeful, contributing seamlessly to true patio perfection.
Essential Design Secrets for Small Outdoor Kitchens
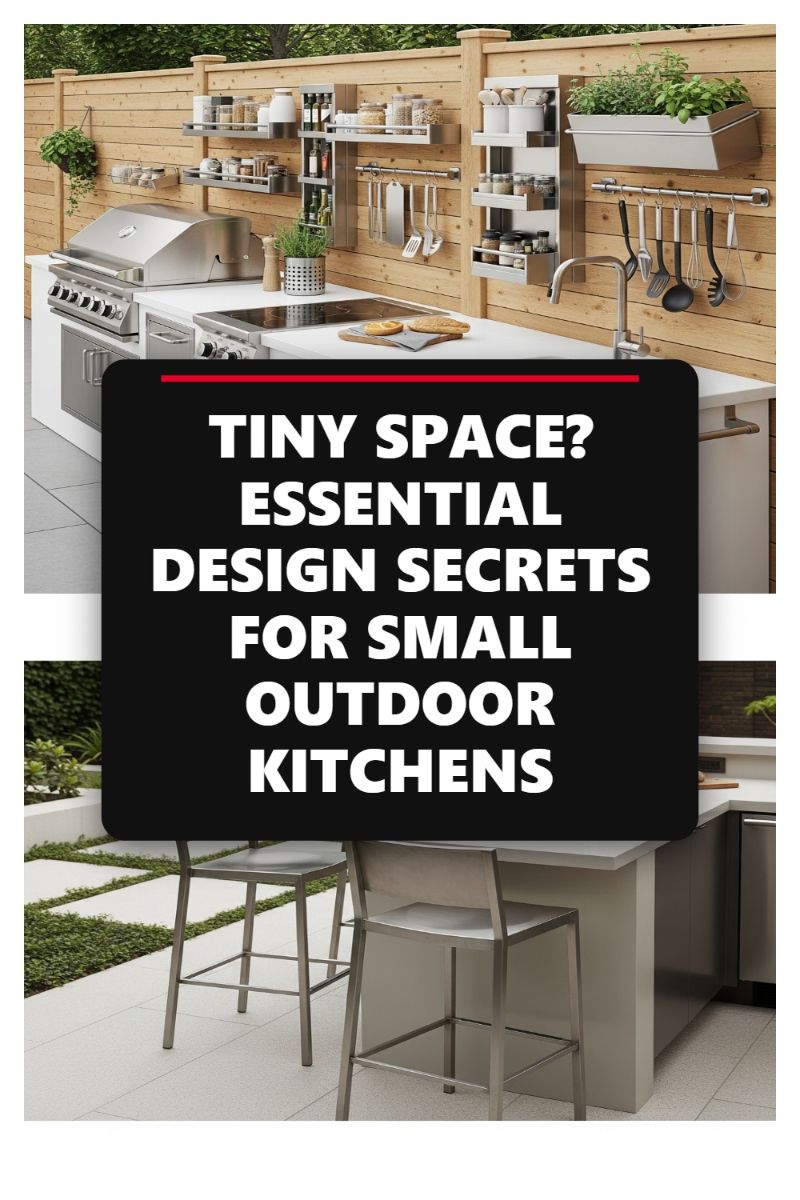
When faced with a “tiny space” challenge, the key to a functional outdoor kitchen lies in utilizing vertical real estate and integrating high-efficiency, multi-functional components. As demonstrated by this sleek setup, the perimeter wall is not just a backdrop; it is the primary storage hub. Install modular, wall-mounted systems that include tiered shelving, magnetic knife racks, and rail systems for hanging utensils. This approach frees up precious counter space, which is often the biggest constraint in compact designs. Look for stainless steel systems—they are inherently weatherproof and offer a clean, reflective surface that helps the area feel open and bright. Integrate fresh herbs directly into the vertical storage with small, cantilevered planters to add greenery and function without sacrificing prep area.
Strategic appliance selection is critical to avoiding overcrowding. Instead of bulky, standalone grills, choose integrated, built-in units that sit flush with the cabinetry. This installation provides a streamlined look and necessary countertop continuity. For cooking surfaces, consider incorporating a single-burner induction or electric cooktop alongside the grill, which is safer and easier to integrate than full gas ranges in minimal spaces. Furthermore, every square inch must pull double duty: install a deep, functional sink, but ensure it has a custom cutting board or cover that transforms the basin into extra prep or serving space when not in use. This commitment to integration and compact, streamlined equipment ensures that the kitchen remains functional and aesthetically pleasing.
Finally, focus on maximizing flow and social interaction by integrating dining into the kitchen’s footprint. The addition of a narrow, extended counter section transforms the end of the prep area into a small bar suitable for seating two or three people, making the kitchen a social gathering spot rather than just a workspace. Choose materials that enhance the perception of space and durability; light-colored countertops and patio tiles, like those pictured, bounce light and make the area feel expansive. Pair these light tones with durable, natural elements, such as the wood fencing, to add warmth and definition. By prioritizing vertical storage, selecting compact appliances, and incorporating integrated seating, even the smallest patio can host a comprehensive, high-end outdoor kitchen.
CHEAP OUTDOOR KITCHENS: 10 GENIUS IDEAS UNDER $500!

While the dream outdoor kitchen often features custom masonry and integrated high-end appliances, achieving functional patio perfection doesn’t require five figures. The secret lies in leveraging readily available, structurally sound materials like Concrete Masonry Units (CMUs), commonly known as cinder blocks, paired with durable, cost-effective countertops. The image clearly demonstrates this concept, contrasting a high-end built-in setup with a brilliant DIY utility island constructed from stacked CMUs and a thick, sealed wooden butcher block. To replicate this look, start by leveling the foundation; a compacted gravel base or existing concrete slab is ideal. Dry stack the blocks (without mortar) if you plan to utilize the hollow centers for storage or wiring, or secure them with exterior-grade construction adhesive for maximum stability. For a truly professional finish, choose CMUs that have a consistent texture and paint them with an exterior masonry paint or apply a thin layer of stucco or stone veneer to instantly elevate the structure, making it indistinguishable from custom work.
Selecting the right countertop material is crucial for longevity and aesthetics in this budget build. Avoid standard kitchen laminate and instead opt for materials designed to withstand the elements, such as pressure-treated wood butcher block (which must be heavily sealed with marine-grade oil or spar varnish), pre-cast concrete slabs, or large format exterior tiles set upon cement board. When installing the top, ensure it is firmly secured to the CMU base using L-brackets or construction adhesive designed for heavy load-bearing applications. The visual appeal of this budget solution is maximized by focusing on smart organization, as seen with the simple, yet effective, hanging utensil hooks drilled directly into the underside of the wooden counter. This maximizes vertical storage, keeps cooking tools handy, and avoids cluttering the precious prep space.
Finally, integrate your new DIY kitchen island seamlessly into your patio design by focusing on lighting and accessories. If your setup is under a pergola, like the background image suggests, consider adding industrial-style hanging pendants to illuminate the work area. If uncovered, invest in solar-powered task lighting or LED strip lighting installed beneath the counter overhang. Finish the area with small details that add sophistication, such as potted herbs (like the basil shown), stylish cutting boards, and high-quality stainless steel grilling accessories. By focusing labor efforts on structural integrity and dedicating the majority of your $500 budget to quality finishing materials and accessories, you can create a highly functional, beautiful outdoor cooking station that achieves patio perfection without the custom price tag.
DESIGN HACKS: Making Your Small Layout Feel Double the Size
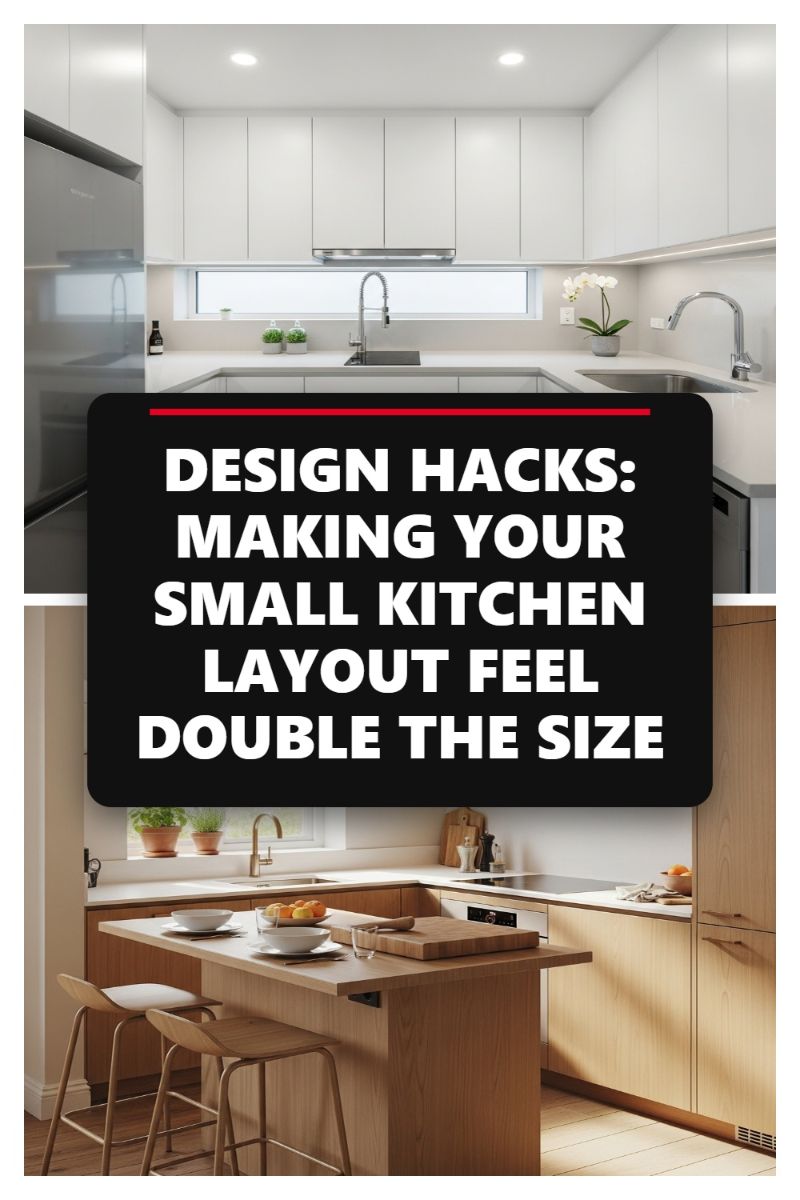
When transforming a compact patio, the fundamental design goal is to visually expand the space, mimicking the successful strategies used in small interior layouts, such as those shown in streamlined kitchens. To achieve this, adopt a pale and reflective color palette. Just as white cabinetry and quartz countertops bounce light, selecting light-colored outdoor materials—like natural stone pavers, white or light gray composite decking, and furniture with light-toned upholstery—will minimize visual weight and make the area feel airy and expansive. Furthermore, avoid large, obstructive items. Opt for streamlined, minimalist furniture with thin frames (metal or light wood) and prioritize pieces that float slightly above the ground, allowing sight lines to continue beneath them. This principle of visual continuity is crucial for tricking the eye into perceiving greater depth than physically exists.
Maximizing functional space requires intelligent layout and integration. Small patios benefit immensely from built-in or custom seating, such as perimeter benches that double as storage, eliminating the need for bulky, individual chairs and maximizing floor area. If your space allows for a corner layout, utilize it fully, similar to the L- or U-shaped kitchen configurations that maximize counter space. Instead of traditional tables, consider drop-leaf or console tables that can fold away when not in use. Integrate planters and water features directly into the structure (e.g., hanging them on walls or using integrated railing planters) to keep the central floor space clear and promote fluid movement. Remember that clarity is key; every item should serve a purpose and excessive ornamentation should be avoided, maintaining the uncluttered, clean-line aesthetic of a premium, efficient design.
Finally, exploit the vertical dimension and use strategic lighting to define the scale of the space. Drawing the eye upward is the most effective hack for small areas. Install vertical gardens or slender shelving units to utilize wall space for greenery and storage, effectively creating ‘upper cabinets’ for the patio. When choosing plants, select tall, narrow varieties over wide, sprawling ones. For illumination, ditch heavy, ground-based lamps. Instead, layer your lighting: install subtle, recessed uplights to wash walls or architectural plants with light, use low-profile LED strip lighting under benches or railings, and drape minimalist string lights overhead. This diffused, layered approach ensures that the light source is hidden, while the illuminated space is expansive, giving the impression that the patio stretches further into the evening atmosphere.
Outdoor Fire Pit Areas: Cozy Designs for Perfect Winter Nights

To achieve this level of ‘patio perfection,’ the fire pit must be treated as a permanent architectural anchor, not merely an accessory. The most effective designs, like the circular stone pit shown here, utilize built-in, curved seating to maximize intimacy and encourage conversation. When planning your layout, determine the necessary setback (usually 3-10 feet from structures or flammable materials, depending on local codes) and select robust, weather-resistant materials such as concrete blocks, natural stone veneer, or durable pavers that harmonize with your existing home architecture. Expert design mandates deep, comfortable seating—ensure the bench depth is adequate (around 18-24 inches) and specify marine-grade foam cushions wrapped in fade-resistant, performance fabrics to ensure longevity and year-round usability. This integrated approach creates a dedicated, resort-quality outdoor room, rather than just placing furniture around a heat source.Layered lighting is critical for transforming a patio into a safe and inviting space after dark. Beyond the glow of the fire itself, incorporate strategic, low-voltage illumination to define the space and prevent trip hazards. Notice the subtle ‘toe-kick’ lighting installed beneath the stone bench and the rim of the fire pit bowl; this ambient feature softly highlights the materials without creating glare. Additionally, use accent lighting (like uplights on surrounding trees or feature lanterns) to add vertical interest and depth to the landscape beyond the immediate seating area, creating a sense of enclosure. For ultimate ease and elegance, opt for a gas or propane fire pit, which provides instant heat and clean operation—a significant advantage over messy wood burning, especially for frequent use.Finally, tailor the aesthetic of the fire feature to your overall patio design. While the curved stone structure offers a classic, earthy feel, a rectangular or linear pit constructed from modern materials (like powder-coated steel or honed concrete) provides a sleek, contemporary look, often resting closer to the ground, as evidenced by the lower photo in the visual. Regardless of the material, always ensure proper infrastructure, including a level, non-combustible base, and adequate drainage. Proper scaling is paramount: a large patio can accommodate a significant feature (48-60 inches in diameter), while smaller courtyards benefit from streamlined designs (36-40 inches), ensuring the feature enhances, rather than overwhelms, the outdoor living area.
UPGRADE YOUR EXTERIOR: ESSENTIAL TIPS FOR CHOOSING OUTDOOR FURNITURE
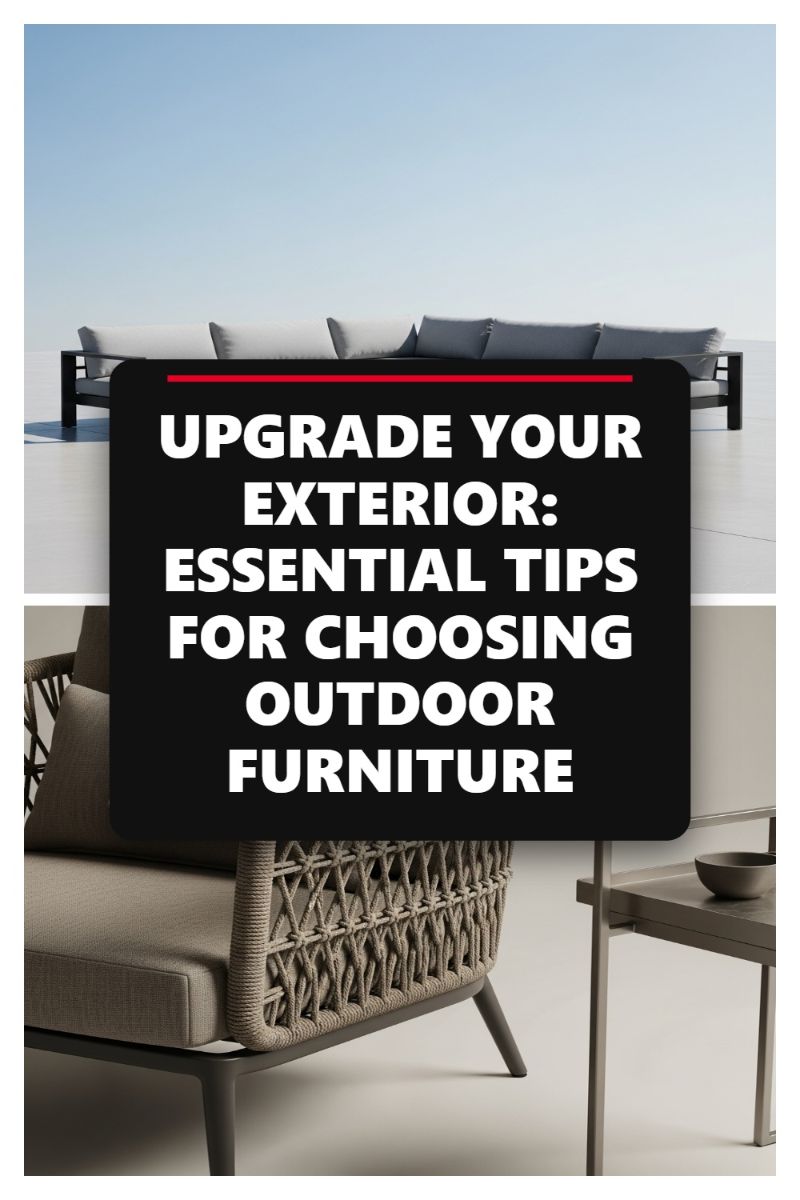
When upgrading your exterior, the foundation of a perfect patio lies in the quality and longevity of your furniture. Unlike interior pieces, outdoor items must withstand UV rays, moisture, temperature fluctuations, and sometimes even corrosive elements like salt air. Prioritize high-performance materials such as powder-coated aluminum (as suggested by the sleek frames in the image) for superior rust resistance and minimal weight, or opt for marine-grade stainless steel for maximum durability in coastal environments. For seating, consider materials that offer both comfort and resilience; the trending woven resin or rope seen on modern chairs provides sophisticated texture while remaining highly weather-resistant and requiring little maintenance. Crucially, invest in performance fabrics like Sunbrella or similar solution-dyed acrylic blends for all cushions and pillows; these fabrics are engineered to resist fading, mold, and mildew, drastically extending the life of your investment and ensuring color stability year after year. This focus on material science guarantees your patio remains luxurious without constant upkeep. Before purchasing, meticulously map out your space and define distinct functional zones—whether it’s an intimate lounging area or a full outdoor dining setup for entertaining. Scale is critical: Oversized furniture can overwhelm a small balcony, while too-small pieces look adrift on a sprawling deck. Use painter’s tape or physical mock-ups to mark the exact placement of potential furniture items on your patio surface to ensure adequate flow and clearance, aiming for at least three feet of walk space around main seating areas. For deep-seating options, like the sleek sectional shown in the photo, ensure the depth accommodates your preferred level of comfort while allowing enough surrounding room for accompanying side tables or ottomans. Furthermore, think about modularity; flexible, lightweight pieces that can be rearranged easily—such as sectional components or stacking chairs—offer the most versatility for transforming your space to suit any spontaneous gathering or event. Integrating your outdoor furniture seamlessly into your home’s aesthetic is the final step toward achieving true patio perfection. Use color palettes that complement your home’s exterior finishes—the image demonstrates a sophisticated, neutral approach using light gray cushions and dark frames, which offers versatile elegance. While durability is paramount, comfort should never be compromised; always test deep-seated cushions for appropriate density and choose pieces with supportive back heights to encourage long periods of relaxation. Enhance the visual appeal and overall coziness by thoughtfully layering textures. Introduce soft elements through durable outdoor throws, woven area rugs (specifically rated for exterior use), and decorative pillows. These touches soften the sometimes stark lines of contemporary metal furniture and invite guests to settle in. Remember that small functional details, such as durable, weather-proof side tables for drinks and snacks and a cohesive outdoor lighting strategy, elevate a simple furniture placement into a truly luxurious outdoor room.
CURB APPEAL SECRETS: OUTDOOR LANDSCAPING IDEAS THAT WOW EVERY TIME

Achieving immediate “wow” factor begins with robust, well-defined structural landscaping, as demonstrated in the layered planting bed. The key here is textural contrast and mass planting. Instead of scattered individual plants, group similar species (like varying junipers or boxwoods) to create impactful masses of color and shape. Combine this softscape with large, strategically placed natural hardscape elements, such as boulders or river rocks, which anchor the design and provide permanent visual weight. Crucially, utilize a high-contrast ground cover, such as dark black mulch or fine lava rock, to make the foliage colors pop and establish clean, crisp edges between the lawn and the beds. This disciplined approach ensures that the landscaping looks intentional, sophisticated, and polished year-round, forming the basis of exceptional curb appeal and providing a beautiful backdrop to your patio.
A truly transformative outdoor space must function equally well after sunset, and this is where strategic illumination becomes paramount. The pathway shown utilizes contemporary hardscape elements—symmetrical, oversized planters—integrated with subtle, directional lighting. This technique is far superior to traditional path lights, as it embeds the light source directly into the architecture of the space. To replicate this effect on your patio, opt for low-voltage LED strip lighting or integrated square fixtures placed low to the ground or within risers and retaining walls. The goal is to create pools of warm light that define the walkway and highlight vertical features, such as trees or architectural walls, while minimizing glare. Symmetrical placement, where lights are mirrored down a path, guides the eye and generates a luxurious, immersive tunnel effect, instantly elevating the evening ambiance of your patio.
The most successful outdoor designs seamlessly blend structured hardscaping with carefully chosen softscaping. Use modern, clean-lined elements—like the dark, geometric planters depicted—to impose order and symmetry onto your space. Repetition of these elements, whether planters, outdoor furniture, or patio modules, creates rhythm and coherence, lending a high-end, architectural feel to the area. Ensure that your chosen pavement material (large format tiles, stamped concrete, or aggregate) offers a smooth transition from the interior of the home to the exterior, avoiding visual clutter. By prioritizing durable, quality materials and arranging them symmetrically along defined axis points, you create an extension of your living space that feels intentional and highly designed, marrying the structural elegance of the hardscape with the organic beauty of the surrounding softscape.
SHABBY CHIC VALENTINE DECOR: ROMANTIC TOUCHES FOR A DREAMY HOME

While the essence of shabby chic often centers around interior comfort, translating this soft, vintage romance to your patio offers an unparalleled level of outdoor intimacy. To achieve this look, focus on layering soft textiles and embracing a deliberately weathered aesthetic. Begin with your main seating areas—select French bistro chairs, wrought iron sets, or simple white painted wooden furniture that mimics the distressed finish seen on the side table in the image. Crucially, integrate textiles in creams, blush pinks, and muted florals. Instead of standard outdoor cushions, seek out ruffled or quilted pillows in sun-fade resistant fabrics. Drape a chunky knit throw (ensure it is stored away from rain) or a light, sheer outdoor curtain around a pergola or porch railing to create a soft, diffusing light and define the space, instantly evoking the dreamy, airy quality of the bedroom environment.
The secret to successful outdoor shabby chic lies in mastering the distressed details and incorporating vintage elements suitable for the elements. If your existing outdoor furniture is modern, you can transform it by utilizing a chalk paint technique that allows for strategic sanding and ‘chipping’ to mimic that beautiful, timeworn patina. When setting an outdoor entertaining area, forego heavy, structured placemats and instead use delicate, weatherproof lace or crocheted runners across your patio table, echoing the elegance of the indoor tablescape. Introduce antique-inspired accessories: galvanized metal buckets can serve as planters, or mismatched floral ceramic dishes (secured in a china cabinet when not in use) can add the crucial patterned touch seen in the teacups. Lighting is key to sustaining the romantic mood; opt for string lights, candle-filled lanterns (often distressed white or bronze), or crystal-cut glass vases used as candleholders, ensuring the overall ambiance remains soft and glowing as dusk settles.
Finally, personalize the patio space with gentle seasonal touches that reflect the aesthetic’s emphasis on heartfelt detail, much like the paper heart garland. Instead of flimsy paper, craft or purchase weather-resistant bunting made of fabric scraps, burlap, or lightweight metal in soft pastel shades, hanging it across your porch eaves or between decorative trees. The shabby chic style relies heavily on romantic flora; populate your patio with lush, heavily flowering plants like climbing roses, hydrangeas, or peonies in antique-looking terra cotta or purposefully chipped porcelain planters. Group these arrangements at varying heights to maximize the visual impact and complement the floral motifs on your chosen textiles. By focusing on pale colors, aged finishes, and an abundance of soft, touchable textures, you successfully transform your functional patio into a romantic, vintage-inspired outdoor retreat that is both shabby and undeniably chic.
BRING THE HEAT! VIBRANT MEXICAN HOME DECOR THAT POPS

To successfully transform your patio into a visually stunning, vibrant Mexican or Southwestern retreat, you must start with durable, high-impact foundational elements. Mimic the dramatic Talavera wall tiles seen in the image by applying weather-resistant porcelain or ceramic tiles to an outdoor bar backsplash, a built-in bench, or as a striking mosaic tabletop insert. If a permanent tile installation is too complex, introduce this rich pattern through heavy, fade-resistant outdoor rugs or strategically placed garden screens featuring similar geometric or floral motifs in deep cobalt blues, saffron yellows, and terracotta reds. Complement these vibrant surfaces by grouping traditional terra cotta or clay pottery. These pieces, whether utilized as large planters for drought-tolerant plants (like agave or prickly pear cactus) or smaller decorative vessels, anchor the space, introducing natural texture and a historical sense of place that is essential to this style. Ensure all chosen materials are outdoor-rated to withstand intense sunlight and seasonal humidity.
The next crucial layer involves high-contrast textiles, which instantly soften and personalize the hardscape elements of your patio. Drawing inspiration from the colorful serape blanket pictured, seek out outdoor cushions and throws featuring bold stripes or traditional Aztec patterns. When selecting fabrics for an exterior space, durability is non-negotiable; choose solution-dyed acrylics (like Sunbrella) or UV-treated polyester, which resist fading and mildew, yet maintain the desired saturated color palette of reds, oranges, and turquoise. Layer these textiles—a large striped outdoor rug defines the seating area, while generously stuffed pillows and a folded throw blanket draped over an outdoor lounge chair invite relaxation and provide a dynamic pop against neutral furniture frames (like wicker, light wood, or white powder-coated aluminum).
Finally, integrate authentic, handcrafted accessories and strategic lighting to elevate the space from simply decorated to deeply personalized. Look for hand-pounded copper accents, punched tin lanterns, or wrought iron features, which provide contrast and depth against the bright textiles and tiles. Lighting is key to setting the vibrant evening mood; forgo standard fixtures for warm-toned string lights or colorful paper lanterns strung overhead. For a complete look, fill your terra cotta pots not only with greenery but also with flowering plants that echo the chosen color scheme—marigolds, hibiscus, and bougainvillea thrive outdoors and enhance the overall warmth and vibrancy of your newly perfected Mexican-inspired patio haven. Remember, less isn’t always more in this style; embrace maximalism by grouping items and textures for a truly festive, energetic atmosphere.
PAWSOME PATIOS: CREATING THE ULTIMATE OUTDOOR DOG AREA
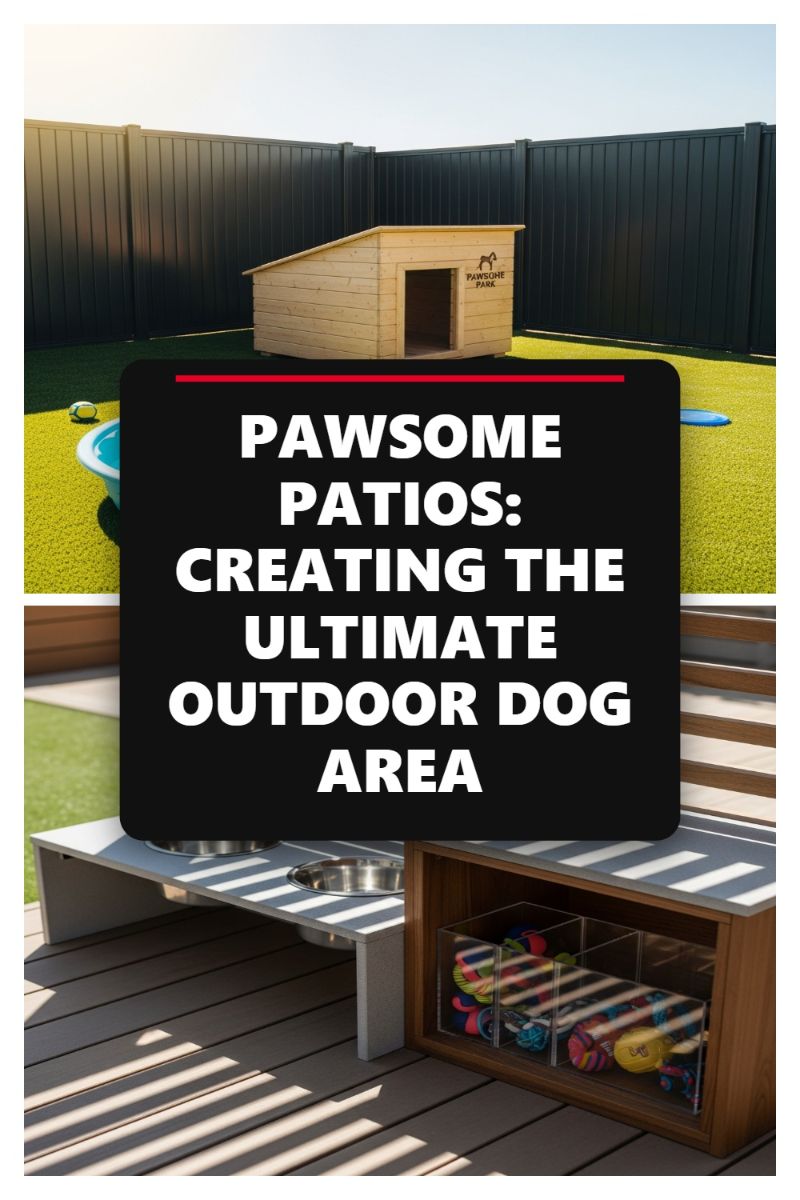
While transforming your patio, dedicating a safe, comfortable, and aesthetically pleasing zone for your dog is a crucial design secret often overlooked. The key is creating defined zones using materials that meet both human and canine needs. As illustrated here, incorporating high-quality artificial turf provides a durable, easy-to-clean surface perfect for play and potty breaks, preventing the wear and tear traditional grass suffers. Use modern, secure perimeter fencing (like the dark, vertical panels shown) to ensure safety without sacrificing contemporary style. Strategically placing the dog house – a comfortable, elevated resting spot – on the turf minimizes mud tracking and provides essential shelter from sun and rain, integrating comfort seamlessly into the landscape design. Elevating the pet area through functional design ensures convenience and cleanliness. Move beyond standard floor bowls by integrating a raised feeding and watering station directly into your patio furniture or decking structure. Raised feeders, like the gray composite unit pictured, are not only easier on your dog’s joints, especially for larger or senior breeds, but they also keep the dining area neat and contained. When selecting materials for this built-in, opt for weather-resistant, non-porous surfaces that are easy to wipe down. Furthermore, ensure permanent access to fresh water. If space allows, a shallow, hard-sided wading pool provides a fun cooling option during warmer months, which is much safer and more durable than typical inflatable alternatives. To maintain “Patio Perfection,” effective clutter management is essential, especially when dealing with pet paraphernalia. Implement clever, hidden storage solutions that align with the rest of your outdoor decor. The example showcases a brilliant strategy: incorporating open shelving units made of matching wood or composite material directly beneath a bench or near the feeding station. Utilize clear, stackable acrylic bins within these shelves to organize toys, leashes, and grooming supplies, allowing you to quickly assess contents while keeping everything tidy and protected from the elements. By using coordinated materials (decking, fencing, and furniture finishes), you ensure the dog’s space feels like a thoughtful extension of your living area, rather than an afterthought, achieving a polished and unified outdoor retreat for the entire family.
SMALL KITCHEN STORAGE IDEAS THAT ARE ABSOLUTELY REVOLUTIONARY

While the heading references kitchen ingenuity, the principles of revolutionary small-space storage are perhaps most crucial when applied to transforming a constrained outdoor area. Small patios, balconies, and decks require the utmost efficiency, turning every cubic inch into a functional space. The goal is to eliminate clutter—the number one enemy of a serene outdoor environment—by integrating highly specialized and often hidden storage solutions. Think vertically, modularly, and dual-purposely. Look at your patio perimeter: traditional outdoor furniture often wastes space beneath seating or along railings. To truly revolutionize your small patio, you must design custom or semi-custom units that utilize these overlooked zones, ensuring that items like grilling accessories, cushions, throws, or gardening supplies are accessible yet completely out of sight.
To mimic the hyper-efficient organization seen in modern kitchen cabinetry, implement tiered and pull-out systems into your outdoor design. For instance, shallow drawers integrated into the base of a built-in bench can utilize tiered dividers, much like a spice drawer, to neatly organize smaller items such as matches, citronella candles, or specialized cleaning tools. For taller storage needs, replicating the idea of a narrow, floor-to-ceiling pull-out pantry (as often seen next to a refrigerator) is a game-changer. These slender, vertical units can be disguised within a faux wall or decorative screen, offering deep shelving for gardening supplies, beverage storage, or even a hidden bar setup. Always ensure the materials used are marine-grade or specifically treated wood to withstand moisture and temperature fluctuations, preserving the functionality and longevity of these hidden systems.
Expert patio design leverages organization as an aesthetic tool. A cluttered patio, regardless of its size, feels cramped and unfinished. By adopting this “revolutionary” approach to storage, you maintain clean sightlines, making the space feel instantly larger and more luxurious. Consider multi-functional pieces as standard: storage ottomans that serve as extra seating, console tables that double as subtle potting stations, or railing systems that hold planters while simultaneously incorporating hidden hooks for drying towels or tools. The ultimate secret is making the functional elements of your patio—the items necessary for enjoyment—virtually disappear. When organization is invisible, your small outdoor space transforms from a utility area into a meticulously curated, expansive retreat, achieving true patio perfection.
OPEN CONCEPT MASTERY: KITCHEN AND LIVING ROOM FLOW SECRETS
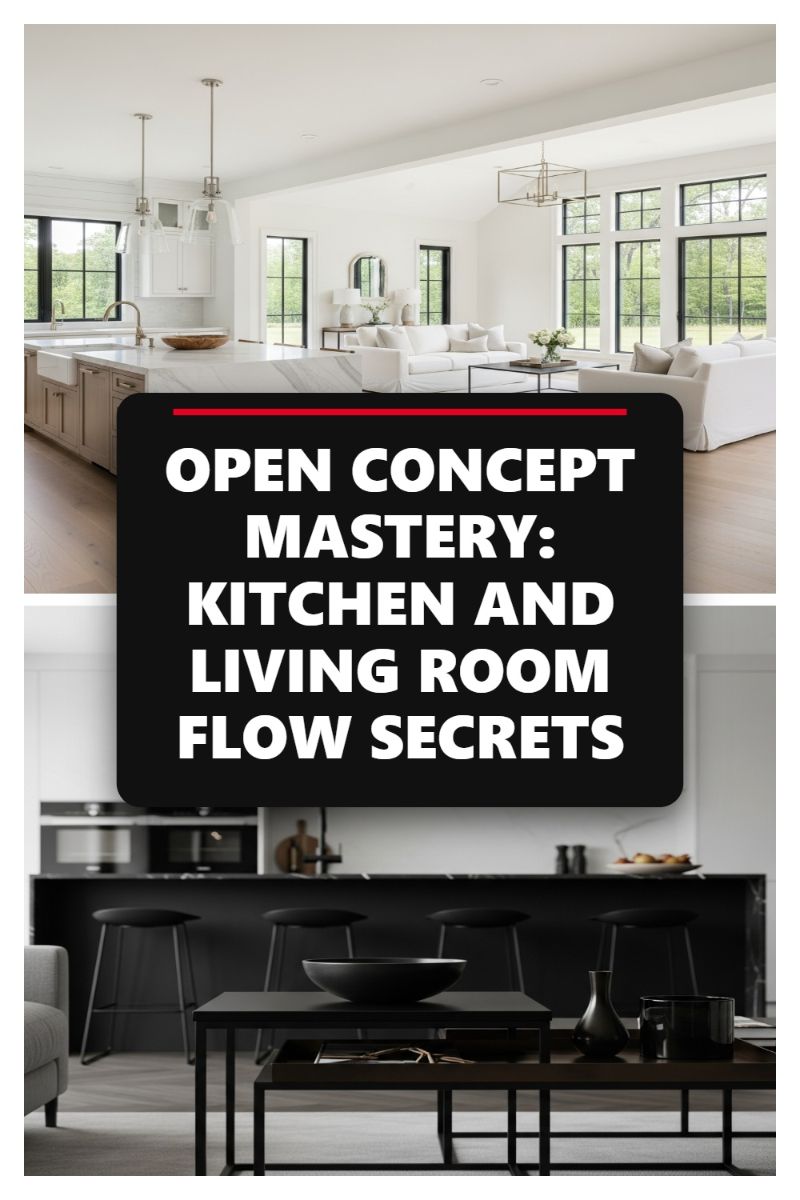
While traditionally focused on interior spaces, true open-concept mastery involves dissolving the boundary between your kitchen, living room, and the outdoor patio. Achieving this flow starts with visual continuity. For the patio to feel like a natural extension, utilize coordinating materials across the threshold. If your indoor flooring is a light wood tone or marble-look tile (as suggested by the upscale design shown), find an exterior paver or composite decking material that echoes the color and texture. This seamless transition tricks the eye into perceiving one large, continuous space. Furthermore, invest in large-format sliding or bi-fold doors that maximize the opening, allowing light and air to move freely, and minimizing the visual interruption of the frame itself. The goal is to make stepping onto the patio feel like simply walking across the room, not entering a separate environment.
The next crucial secret to outdoor flow is establishing complementary functional zones and coordinating aesthetics. Analyze how your interior open concept is zoned: is there a comfortable seating area adjacent to a dining nook? Mirror this structure on your patio. If the living room features contemporary, low-profile furniture, ensure your outdoor pieces share a similar silhouette and scale. Pay close attention to color palettes; if the interior relies on a clean, modern contrast (like the white walls and black accents seen in the reference images), carry those dark, grounding tones into your outdoor planters, railing, and cushion fabrics. This deliberate coordination solidifies the connection, making the outdoor space feel purposefully integrated rather than an isolated after-thought. Strategically positioning outdoor anchor pieces, such as an architectural pergola or a statement outdoor fireplace, so they are clearly visible from inside the living area, also helps draw the eye outward.
Finally, integrate lighting and sightlines to ensure the flow is maintained long after the sun sets. When designing the patio lighting scheme, ensure it complements the warmth and intensity of the interior lighting. Avoid jarring differences in color temperature; if your living room uses soft white 3000K bulbs, replicate that warmth outdoors with layered illumination—using subtle uplighting on plants, pendant fixtures over an outdoor bar, and ambient string lights for atmosphere. The windows and doors themselves (especially large, black-framed units) serve as powerful visual conduits. Keep window coverings minimal or non-existent in the area leading to the patio to maximize the view. By treating the patio as the final, most essential zone of your open-concept layout, you unlock its potential for both daily living and large-scale entertaining, blurring the lines between indoor and alfresco lifestyles.
BACKYARD OASIS REVEAL: THE ULTIMATE GUIDE TO CREATING A RELAXING VIBE

To transform your basic patio into a lush, secluded oasis like the one pictured, the key is maximizing vertical greenery and achieving dense, layered planting. Start by establishing boundaries using tall, rapid-growing plants such as privacy bamboo or large, dramatic tropical foliage like Bird of Paradise or Musa (banana plants). These elements provide an immediate sense of seclusion and height, mimicking a dense canopy. Next, layer the planting vertically and horizontally: introduce climbers (like Monstera or Philodendron) to wrap around pergolas or railings, and fill the base layer with shade-tolerant, richly textured plants like ferns and hostas. The goal is to obscure hard lines and structures entirely, making the patio feel deeply embedded within nature. Use large, rustic containers to group plants, allowing flexibility for rearranging or moving temperature-sensitive tropicals indoors during colder seasons, ensuring year-round success for this jungle aesthetic.
Once the foundational greenery is established, focus on selecting furniture that broadcasts pure relaxation and indulgence. The iconic woven hanging egg chair shown here is the quintessential piece for a luxury retreat, offering a sense of weightlessness and cocoon-like comfort. When choosing seating for your oasis, prioritize natural materials—rattan, teak, and stained cedar—which seamlessly blend with the tropical backdrop. Ensure all seating is outfitted with deep, plush, weather-resistant cushions, preferably in calming neutrals like cream or linen, which enhance the resort feel. Designate this area strictly for unwinding; unlike dining or grilling areas, an oasis should be a dedicated space for quiet contemplation and comfort. Position the key relaxation piece (the hanging chair or a chaise lounge) under the densest canopy or structure to provide soft, dappled light throughout the day.
The final, crucial step is perfecting the ambient atmosphere, especially for nighttime enjoyment. The subtle glow seen in the canopy is achieved through the strategic placement of string lights (Edison bulbs or fairy lights) with a warm color temperature (2200K–2700K). Weave these lights through the existing foliage or pergola structure to create a soft, non-intrusive ceiling of light that extends the space’s usability well after sunset. Supplement this with discreet uplighting focused on the large feature plants to highlight their texture and create dramatic shadows, adding depth to the perimeter. For the ultimate sensory experience, incorporate the element of sound; a small recirculating fountain provides the relaxing white noise of running water, masking urban sounds and truly completing the illusion of a remote, tranquil getaway.
HOME DECOR INSPIRATION: THE 5 PIECES THAT INSTANTLY UPGRADE YOUR LIVING ROOM

Bringing the upscale comfort of your living room onto your patio is the ultimate design secret for achieving ‘patio perfection.’ To instantly upgrade your outdoor space, focus on five key categories, starting with the foundation: comfortable seating. Mimic the plush, tailored look of the indoor sofa seen here by investing in deep-seating outdoor furniture featuring high-quality, slipcovered cushions. Choose neutral performance fabrics, such as Sunbrella in crisp white, ivory, or pale taupe, to create that airy, clean aesthetic while ensuring resistance to fading and mildew. Pair this seating with a durable outdoor area rug (Piece 2), utilizing natural textures like polypropylene weaves that resemble sisal or jute to define the seating area and add warmth underfoot, effectively turning your patio into an open-air extension of your home. This use of bright, foundational colors and layered texture immediately elevates the space from basic patio set to sophisticated outdoor lounge.
The next two essential upgrades involve layering for instant polish and coziness: throw pillows (Piece 3) and blankets (Piece 4). Just as inside, outdoor pillows are the quickest way to introduce visual interest and comfort. Select weather-resistant pillows in muted earth tones—soft beiges, pale grays, and oatmeal—to complement the white seating while maintaining a serene, sophisticated palette. Vary the sizes and materials, incorporating texture through chunky weaves or subtle patterns in the fabric. Drape an oversized, tightly woven outdoor throw (made from performance acrylic or quick-dry fibers) over the arm of your sofa or chair. This addition softens the edges of the furniture and provides a necessary element of warmth for cooler evenings, inviting guests to truly relax. These textile choices are crucial for successfully bridging the gap between indoor luxury and outdoor resilience.
Finally, focus on the central anchor and ambiance to complete your high-end look. A functional coffee table (Piece 5) is non-negotiable for grounding the arrangement and providing practical space for drinks and decor. Opt for sturdy materials like teak, cedar, or concrete that withstand the elements. Style the table sparingly, mirroring the calming vignette in the image: a simple, sculptural white vase filled with low-maintenance succulents or fresh-cut greenery. To replicate the warm, layered lighting essential for an indoor feel, integrate outdoor-rated floor lamps, decorative lanterns, or strategically strung bistro lights. This subtle vertical lighting element not only extends the usability of your patio after dusk but also casts a soft glow that accentuates the neutral textures and finishes, sealing the impression of a thoughtfully curated, instantly upgraded outdoor living room.
OUTDOOR SPACE GOALS: TRANSFORM YOUR YARD INTO AN EXTENSION OF YOUR HOME
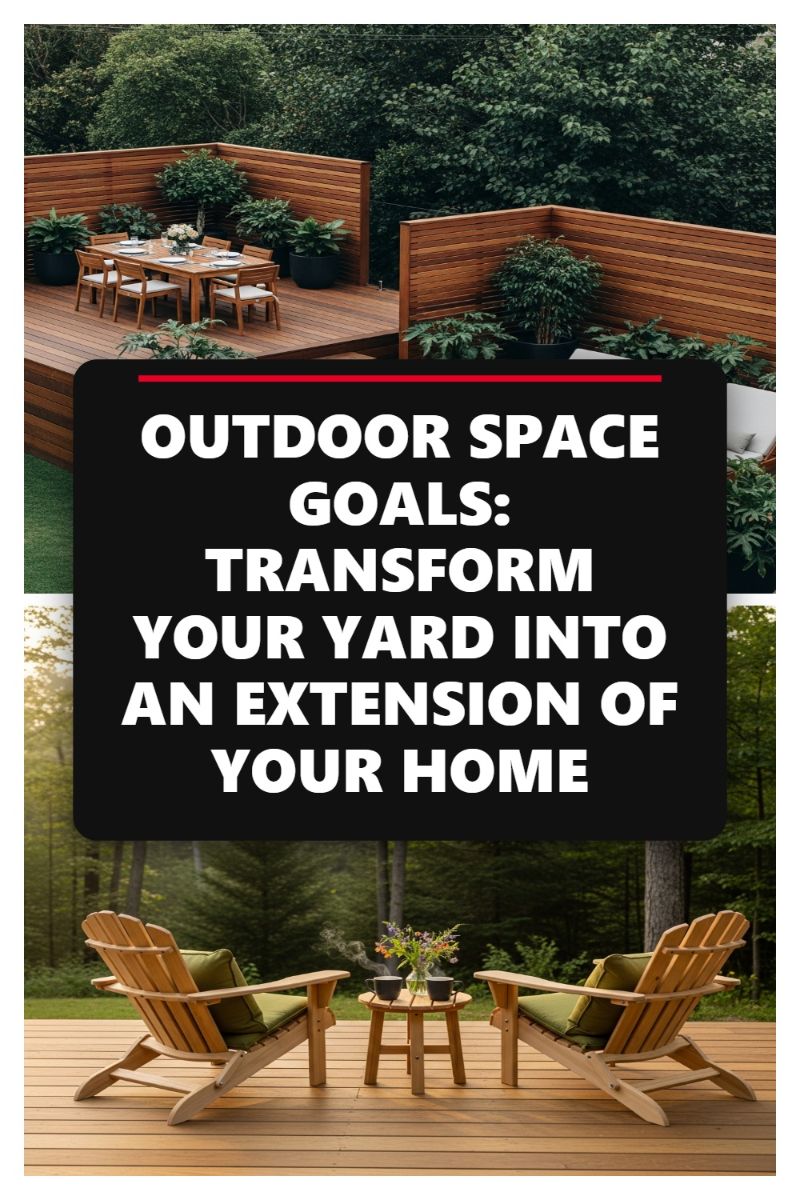
The single most impactful design shift you can make is viewing your patio, deck, or yard as an authentic extension of your interior living space, rather than just an afterthought. This requires designing with the same level of intentionality you would apply to a kitchen or family room. Begin by defining distinct functional zones. As the visual illustrates, even a modest space can accommodate dedicated areas for relaxation (the two Adirondack chairs) and formal dining (the large table setting). Crucially, achieve seamless integration through material consistency. The pervasive use of warm, high-quality wood—for the flooring, the furniture, and the surrounding structures—creates an immediate sense of continuity and sophistication, effectively blurring the line between inside and out. Always invest in materials that are not only durable but also visually rich, ensuring they reflect the aesthetic standards maintained within your home.
To truly replicate the feeling of an interior room, focus heavily on establishing privacy and structure. The use of slatted, horizontal wooden screens in the dining area serves multiple purposes: it defines the boundary of the space, shields the area from neighbors, and acts as a sophisticated vertical backdrop. When incorporating structure, ensure it is softened by greenery. Use large, potted plants to strategically layer the space, providing visual depth and integrating the surrounding landscape with the curated patio environment. These potted specimens should be chosen for their architectural shape and lush texture, acting as natural, movable pieces of décor. Furthermore, elevate the atmosphere with layered lighting—think integrated deck lighting, subtle uplighting for plants, and overhead sconces—to make the space fully functional and inviting long after the sun sets.
Finally, the devil is in the details, particularly those that inject undeniable comfort and domesticity. The lounging area, featuring cushioned wooden chairs and a simple side table, demonstrates how purposeful accessorizing creates warmth. Treat outdoor furniture not as camping gear, but as high-end pieces, using resilient textiles for plush cushions and throws. The inclusion of decorative elements typically reserved for indoors—such as a small floral arrangement, ceramic mugs, or a stylish serving tray—sends a subconscious message that this space is meant for dwelling and enjoyment, not just incidental use. By prioritizing comfort, sophisticated finishes, and clear functional purpose, your yard instantly transitions from a simple outdoor area into a luxurious, fully realized wing of your home.
you now possess the definitive blueprint
15 expert design secrets
needed to instantly transform your patio from overlooked to outstanding. Remember that true perfection lies not in expense, but in thoughtful execution. Start small by integrating just a few of these essential elements, and watch your outdoor space evolve into the personal sanctuary you deserve. Don’t let these ideas remain on the screen; take the first step toward building your dream retreat today. Ready to move beyond the patio? Explore our full collection of outdoor living guides for more inspiration, or share your newly perfected space with us in the comments below!