Ready for an extreme home makeover? Find the best transformation ideas for every room, including kitchens, bathrooms, patios, and stylish teen bedrooms. Refresh your entire space now!
NEED KITCHEN INSPO? 10 MUST-SEE KITCHENS THAT DEFINED 2025

The defining kitchens of 2025 master the art of sophisticated contrast and seamless indoor-outdoor integration. To achieve this look, begin with a balanced two-tone cabinetry scheme. Employ minimalist white slab or sleek shaker-style cabinets for the upper areas—this maximizes perceived ceiling height and brightness. Counterbalance this airiness with warm, grounding materials for the base cabinets, utilizing rich natural wood veneers or textured finishes. The crucial step is unifying these contrasts through high-impact surfacing; select a continuous piece of heavily veined marble or a premium quartz composite for the backsplash and countertops that features both light tones and subtle hints of the wood undertones. This layered approach creates depth and ensures the overall aesthetic remains clean, luxurious, and highly functional for the modern homeowner.
The second key element in defining this trend is strategic lighting and hardware placement. The kitchen’s ‘jewelry’ elevates it from utilitarian to architectural statement. Opt for elongated, matte black bar pulls and knobs on all cabinetry, providing a strong contemporary line against lighter finishes. Simultaneously, integrate dramatic, sculptural pendant lighting. The image showcases geometric, open-cage fixtures grouped over a central area; these pendants are not just ambient lights but focal points. Expert tip: Ensure these fixtures are on dimmers and use warm-toned bulbs (around 2700K) to transform the space from bright task environment to a moody, entertaining hub instantly. Place lighting to highlight specific textures, such as the veining in the stone or the natural grain of the wood.
Finally, the modern kitchen is characterized by its dedication to nature. The trend moves away from closed-off spaces toward environments that blur the line between interior and exterior. Invest in maximizing natural light and outdoor views. If possible, utilize floor-to-ceiling glass doors or vast windows to visually extend the kitchen into the garden, making the external landscape an intrinsic part of the room’s décor. To facilitate this seamless transition, keep window treatments minimal and ensure your kitchen’s palette—especially the natural wood tones—feels harmonious with the surrounding greenery. This dedication to natural light and restorative views transforms the kitchen from merely a cooking area into a bright, airy, and expansive living space.
9 Bridal Shower Table Decorations So Pretty They Look Expensive

Recreating the look of an expensive, professionally styled event in your own home for gatherings starts with layering texture and focusing on abundant details. To achieve the luxurious dining setting visible in the image, begin with quality foundation elements. Choose crisp white or cream linens for a timeless base, then introduce metallic accents through gold-rimmed chargers, silverware, or candle holders. The secret to the abundant, rich floral centerpiece is using varying heights and densities. Rather than scattering a few flowers, cluster tight arrangements of high-impact blooms like peonies, roses, and hydrangeas down the length of the table. Mix in tall taper candles to add verticality and warm, soft lighting, which instantly elevates the ambiance. Finally, perfect the place setting by using layered china (a dinner plate, a contrasting salad plate, and a napkin secured with a ribbon and a sprig of fresh greenery or a small bloom) to communicate thoughtful attention to detail—a hallmark of high-end events.
Transform your kitchen island or countertop into a high-impact functional centerpiece by setting up a visually stunning beverage station. The key to making the drink bar look upscale is ditching disposable containers and prioritizing presentation. Invest in a set of large, multi-tiered glass dispensers, ideally set on elegant copper or gold metal stands for added height and luxury. Fill these with vibrant, fruit-infused water, lemonade, or iced tea. The “expensive” aesthetic comes from the visual abundance of fresh, colorful citrus—load the dispensers with sliced lemons, limes, blood oranges, and grapefruits. Arrange these same cut fruits in neat rows and small white bowls alongside the dispensers. This strategy not only makes the drinks instantly appealing and easy to access but turns simple hydration into a focal point of decor, signaling sophistication and freshness that guests will appreciate.
Beyond the primary dining surface, integrate decorative vignettes and soft materials to enhance the overall luxurious feel. Ambient elements like lighting and fabric are critical to success. Use sheer fabrics, such as tulle or chiffon (seen draped over the antique chair in the image), to soften harsh lines, filter natural light, or define a specific photo-op corner. This styling technique works beautifully draped over a hallway console table or even as a temporary curtain accent. Furthermore, ensure consistency in your floral and greenery choices across the space. If you used roses and eucalyptus on the main dining table, incorporate those same elements into a small arrangement next to the guest book or on the mantelpiece. By treating every corner as an opportunity for cohesive, detailed styling—even just one or two signature pieces—you dramatically increase the perceived effort and budget, making the entire home feel professionally styled and incredibly welcoming.
STOP MAKING THESE 5 MISTAKES WITH KITCHEN COUNTER DECOR
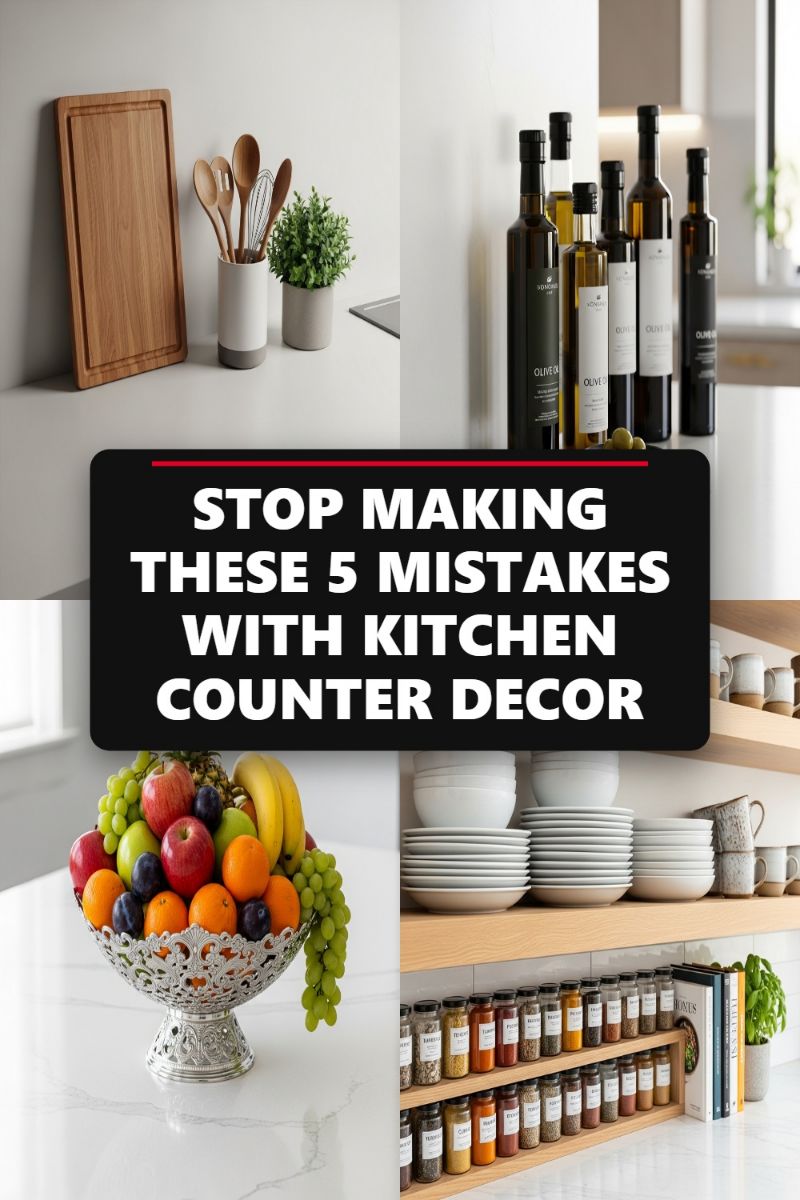
The biggest sin in kitchen design is allowing counter surfaces—which are prime visual and working real estate—to become cluttered and chaotic. To execute a successful counter makeover, you must transition from accidental clutter to intentional, functional vignettes. Begin by grouping essential items: implement the ‘Rule of Three’ or odd numbers to create visually pleasing displays, such as the arrangement of stylish wooden utensils beside a small, hardy potted plant and a sleek cutting board. These functional accessories, when chosen for their aesthetic quality, instantly elevate the space. Furthermore, eliminate visual noise by decanting items like oils and vinegars. As illustrated, a collection of uniform, dark glass bottles housing olive oil transforms a necessity into a deliberate design moment, adding symmetry and a professional, chef-inspired look. Always ensure that the items you keep on display are ones you use regularly, making your decor truly functional and easy to maintain.
To ground your counter display and introduce vital organic texture, incorporate a vibrant centerpiece that serves a purpose. The image perfectly demonstrates this concept with a large, ornate silver bowl overflowing with colorful fresh fruit. This approach avoids the mistake of static, lifeless decor. The fruit bowl adds immediate color, varying textures, and a sense of inviting energy, while the vessel itself—whether a classic metal serving dish, a simple ceramic bowl, or a woven basket—acts as a substantial anchor piece that complements the surrounding materials, such as a cool marble countertop. This singular, impactful piece instantly elevates the kitchen from purely functional to beautifully styled. By focusing on organic elements like fruit or a small vase of flowers, you ensure the centerpiece is dynamic and changes with the seasons.
Finally, overcome the mistake of horizontal sprawl by embracing vertical organization, turning storage into decoration. The use of tiered shelving, as seen with the spice rack, maximizes counter space while creating visual rhythm and uniformity. The key to making storage decorative is consistency: transfer spices into matching, labeled jars to create a cohesive collection that reads as a purposeful display rather than just everyday supplies. This principle extends to open shelving above the counters; stacks of simple, matching white dishware or mugs provide clean lines and textural contrast against warm wood shelves. Conclude your styling with layers of functional accessories like aesthetically pleasing cookbooks and a thriving potted herb—such as basil—to inject life, varying heights, and a final nod to culinary function. Remember: when organized effectively, your tools and ingredients become your primary decorative elements.
FROM DRAB TO FAB: EXTREME BEAUTY ROOM MAKEOVER
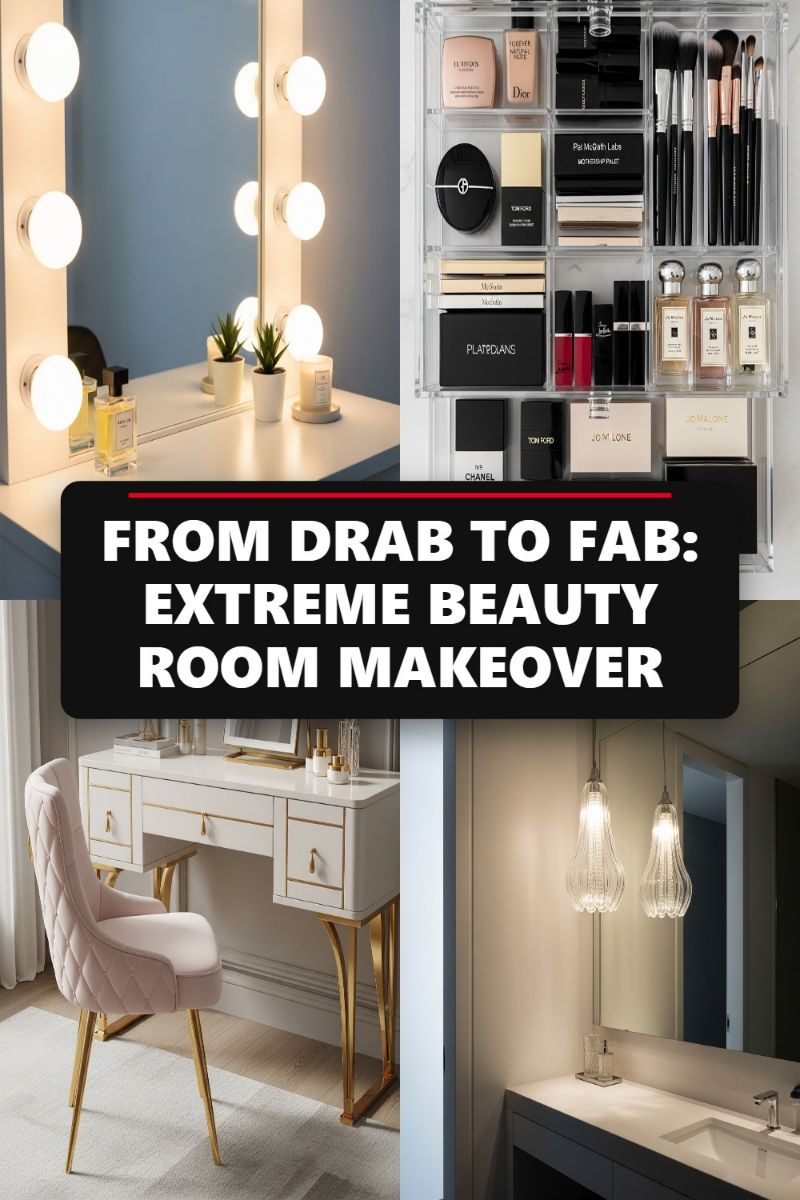
Achieving an “extreme beauty room makeover” starts with laying a foundation of functional glamour. Begin by selecting key furniture pieces that blend high style with necessary storage, as demonstrated by the chic white and gold-accented vanity desk. Opt for materials like glossy lacquer or marble to enhance light reflection, making the room feel larger and brighter. Pair this centerpiece with a comfortable, yet elegant seating option, such as a quilted velvet chair in a soft hue like blush pink. Crucially, address lighting first: uniform, shadow-free illumination is mandatory for accurate makeup application. The classic Hollywood-style mirror, featuring exposed globe bulbs, is the gold standard for this task. Position the light source evenly around the perimeter of the mirror rather than solely overhead, ensuring every angle is perfectly lit. Expertly integrating storage drawers into the vanity itself keeps essentials close while maintaining the room’s sleek, clean lines.
The secret to transitioning from “drab” to “fab” lies in meticulous organization and display. Rather than tucking away all products, utilize transparent, tiered acrylic storage units to elevate your cosmetic collection into an accessible, decorative feature. This “storefront” approach not only ensures visibility—making your routine more efficient—but also showcases your high-end products, giving the space a boutique feel. Organize vertically, grouping items logically: reserve separate compartments for brushes, lip colors, and face palettes. For smaller, valuable items like perfumes, display them in elegant groupings on small mirrored trays adjacent to the primary workspace. The visual continuity provided by clear storage minimizes visual clutter, even when fully stocked, transforming what could be chaotic storage into a curated museum display.
Finally, amplify the luxury through thoughtful finishing touches and ambient design elements. Introduce soft textures, such as a plush, light-colored area rug beneath the vanity, which adds sound dampening and a layer of physical comfort underfoot. Incorporate subtle natural elements, like small potted succulents or a scented candle on the vanity, to inject life and a sophisticated aroma into the space. Furthermore, ensure the aesthetic flows seamlessly into adjacent dressing or bathroom areas. If the room connects to a secondary counter space, maintain the luxurious material palette and use statement fixtures, such as artistic glass pendant lighting, to replace generic overhead illumination. This holistic approach ensures every glance, whether at the vanity or the surrounding environment, reinforces the room’s transformation into an ultimate, fully functional retreat.
THIS IS THE BEST BATHROOM DECOR HACK FOR SMALL SPACES

The secret to conquering cramped quarters lies in visual expansion and hyper-efficient, tailored storage, making small bathrooms feel luxurious rather than constrained. To immediately increase the perceived size, ditch heavy vanities and square mirrors for sleek, backlit oval mirrors, as seen here. Backlighting casts a soft, even glow, eliminating harsh shadows and adding significant depth to the wall, while the reflective surface bounces light across the room. Complement this with large-format, light-colored tiling and, crucially, frameless glass shower enclosures. The transparency of the glass keeps sightlines unbroken—a key strategy for spatial illusion—unlike opaque shower curtains or bulky framed doors that visually truncate the room. To further enhance this effect, install minimalist, floating vanities that expose maximum floor area, providing a foundation for an open, airy atmosphere.
Vertical organization is paramount when floor space is limited, and the use of open shelving offers the perfect blend of functionality and display opportunity. Unlike deep, closed cabinets that can feel heavy, the light wooden shelving shown utilizes the full height of the wall while maintaining a delicate profile. The key is strict curation: utilize uniform containers or, as demonstrated, tightly rolled white towels and beautifully packaged soaps. When everything is organized and aesthetically pleasing, storage transforms into decor. Furthermore, always integrate storage within the structure itself whenever possible. The recessed shower niche is a non-negotiable hack, eliminating the need for dangling caddies or clutter on the shower floor, ensuring a seamless, high-end finish that prioritizes every square inch.
Finally, the overall material and color palette must support the goal of spaciousness. Stick to a monochromatic or very light neutral palette (whites, pale grays, natural wood tones) to maintain continuity and brightness. Introducing warmth via texture, rather than heavy color, prevents the space from becoming sterile. Notice the strategic use of natural elements: a woven storage basket and a soft, textured bath mat. These elements inject coziness and tactile interest without overwhelming the minimalist design. When selecting fixtures, opt for sleek, simple designs and consistently apply finishes (such as matte black or brushed steel) to create cohesion, proving that small spaces, when cleverly designed, can deliver the ultimate spa experience.
I’m Already Planning My Summer Decor: Here’s What I Bought

The secret to a successful room transformation for summer lies in shifting your focus from cozy weight to airy lightness, emphasizing natural textures, and maximizing the ingress of light. To achieve the breezy, retreat-like feel suggested by these design concepts, start by addressing your heaviest elements: the textiles. Swap out dark colors and heavy, velvet or wool materials for crisp, breathable fabrics like linen and high-quality cotton, focusing on a dominant white or off-white base, as seen in the bedding ensemble. Expert designers know that a neutral base acts as a blank canvas that reflects light, making the room feel larger and cooler. For immediate impact, introduce soft, aqueous accent colors—such as the soothing mint green used in the throw and pillows—which mimic the shades of the ocean and sky without overwhelming the tranquility of the space. Simultaneously, assess your window treatments; heavy drapes should be replaced with light, sheer panels that diffuse natural light rather than blocking it, creating a soft, sunlit glow that is essential for a summer aesthetic.
Next, ground your spaces using textural elements derived directly from nature. The close-up of the tightly woven natural fiber rug (likely jute, sisal, or coir) demonstrates the importance of adding rough, organic materials to contrast with smooth walls and sleek furniture. A large natural-fiber area rug not only defines zones within an open floor plan but also brings an inherent, earthy warmth that prevents the minimalist design from feeling cold. This focus on natural texture extends to decor: introduce elements like rattan, light-toned oak, and dried botanicals. The elegant display of pampas grass and cat-tails in a simple glass vase is a perfect example of low-maintenance styling that adds significant height, volume, and an on-trend bohemian touch. These neutral, wheat-colored tones pair beautifully with both coastal and minimalist contemporary styles, offering visual interest without competing with any potential views.
Finally, maximize your connection to the outdoor environment, treating your landscape as a dynamic piece of wall art. If you are fortunate enough to have expansive views, like the breathtaking ocean vista featured, arrange your furniture—such as a thoughtfully placed armchair—to create dedicated focal points that draw the eye toward the scenery. Ensure that your flooring is polished or reflective, allowing light to bounce deep into the interior, enhancing the sense of open space and flow between indoors and outdoors. This integration is crucial; it’s not enough to simply have large windows—you must structure the room around the viewing potential. By focusing on light textiles, authentic natural textures, and a seamless visual connection to the external world, you transform your room into a genuine summer sanctuary that feels restorative and perpetually sun-kissed.
5 REASONS WHY YOUR GRAD PARTY DECOR IS BORING (AND HOW TO FIX IT)

The transformation of a standard home space into a luxurious, memorable event venue hinges on strategic design decisions that move beyond generic themed party supplies. To achieve the sophisticated look demonstrated here—ideal for a high-impact graduation celebration—start by committing to an elevated color palette, such as the timeless combination of black, white, and gold. This scheme instantly reads as mature and chic, moving far beyond standard collegiate colors. Create an immersive focal point, which acts as a backdrop for both the dining table and future photo opportunities. The image utilizes a striking black and white striped background accented with geometric gold shapes, which provides depth and visual interest far surpassing simple balloon arches. On the tablescape, layer contrasting textures: use black tablecloths with white runners, incorporating gold geometric centerpieces, metallic flatware, and fresh white florals for necessary softness. This ensures every surface contributes to the overall aesthetic, signaling a cohesive and deliberately designed event rather than a last-minute setup.
A key element often missing in “boring” party decor is genuine personalization and tailored ambiance. To fix this, integrate personal history into the environment. The memory photo garland strung across a wall is a perfect example: simple string lights and printed photos instantly transform a plain wall into a heartwarming “memory lane,” creating a highly engaging conversation piece that celebrates the graduate. Furthermore, strategic lighting is crucial for setting a sophisticated mood. Utilize ambient lighting sources such as fairy lights, modern candlesticks, and even temporary uplighting directed towards floral arrangements or focal walls. This layered illumination smooths harsh lines and adds a warm glow, ensuring the space feels intimate and celebratory once the sun sets. Moving past basic overhead lighting is essential for taking the decor from a simple room setting to a professionally styled event.
Finally, elevate functional areas, particularly the dessert bar, into decorative anchors. Instead of simply placing food on a counter, utilize varied heights with tiered serving trays, pedestals, and cake stands to give the display structure and visual volume. As seen in the image, elegant arrangements of macarons, tarts, and cupcakes become part of the decor itself, rather than just sustenance. Ensure seamless guest flow by activating all viable entertaining areas of your home. If you have an outdoor patio or deck, treat it as an extension of the main party area, connecting the two with similar decor elements, lush floral arrangements (like the striking deep red and burgundy bouquets visible), and comfortable seating vignettes. This indoor-outdoor approach prevents bottlenecks and offers guests multiple styled environments to enjoy, making your temporary home transformation feel grand and expertly executed.
TEENS ARE OBSESSED WITH THESE 4 VIRAL DIY ROOM DECOR IDEAS
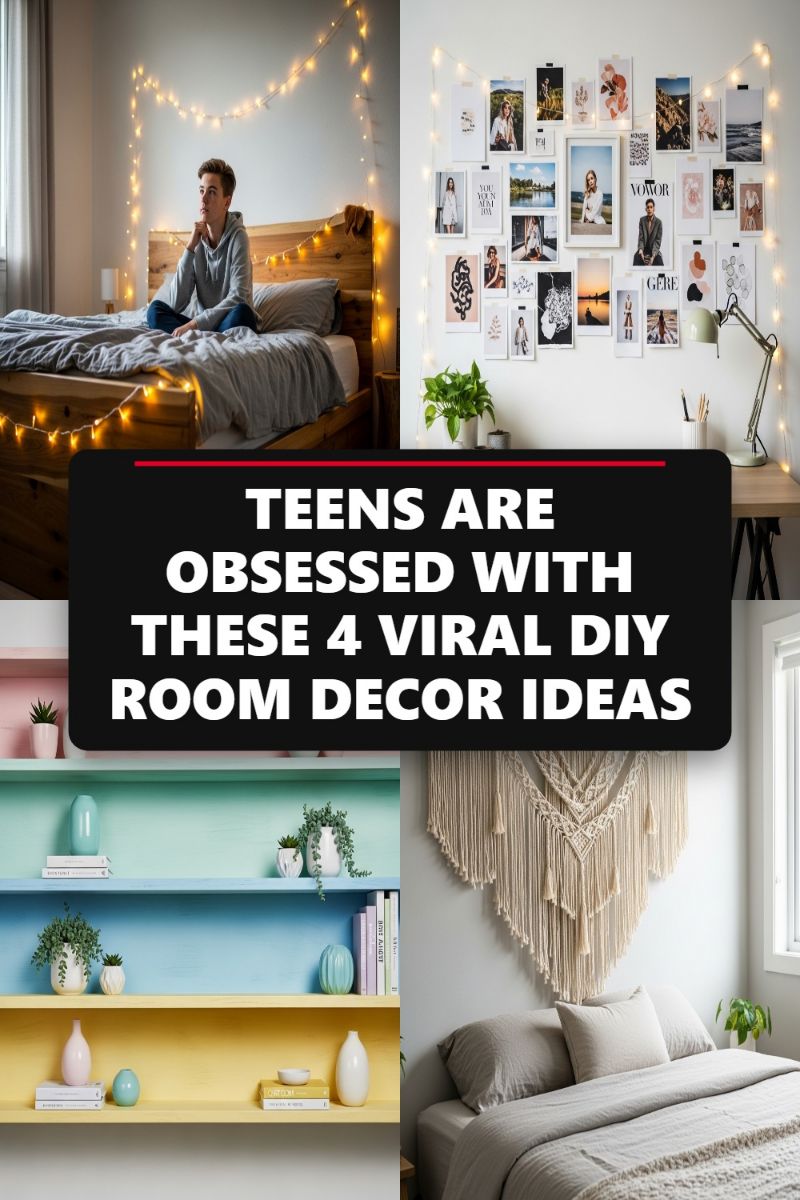
Creating a cozy, personalized sanctuary is paramount in teen room design, and the most immediate impact comes from layered lighting and curated wall art. The viral string light trend, often featuring warm LED ‘fairy lights,’ moves beyond seasonal decoration to serve as essential ambient lighting. To replicate the popular draped look seen here, secure strings loosely along the ceiling line or frame architectural elements like window casings and headboards. This technique, known as light sculpting, adds depth without harsh overhead glare. Simultaneously, develop a high-impact, low-cost gallery wall. Avoid matching frames; instead, opt for a cohesive, mixed-media arrangement using uniform sizes of printed photos, postcards, and small abstract prints. Use black washi tape or tiny binder clips to secure prints directly to the wall, lending an effortless, evolving aesthetic. Expert tip: Ensure the center of your gallery collage aligns roughly with eye level (about 57 inches from the floor) for optimal viewing balance.
Functional décor takes center stage with the rise of customized shelving. If you have built-in or recessed shelving, transform it into a focal point using strategic color blocking. The goal is to make the storage structure itself feel like art. Select three to four complementary pastel or saturated colors (such as mint, sky blue, and butter yellow, as depicted). Instead of painting the entire unit one shade, dedicate a distinct color to the back panel or interior side walls of each shelf level. This color segmentation draws the eye and makes items placed on the shelves pop. When styling, practice the ‘Rule of Threes’—grouping items in odd numbers—and balance vertical elements (books) with organic forms (small potted succulents or simple ceramic vases). Maintain negative space to prevent the colorful structure from feeling cluttered; remember, the paint is the primary decorative element.
To ground the space and introduce essential texture, large-scale fiber art, particularly macrame wall hangings, remains a vital DIY trend. Position a substantial macrame piece directly above the headboard; this replaces the need for a traditional textile headboard and adds immediate bohemian warmth. When selecting or crafting your piece, prioritize natural fibers (like unbleached cotton rope) and a palette of creams, beiges, or light terracottas, which complement nearly any bedding color scheme. Scale is crucial: the macrame should ideally span at least two-thirds the width of the bed to act as an effective anchor. The cascading, intricate knots provide a soft visual counterpart to the hard lines of furniture, promoting a calm, restful atmosphere essential for a successful bedroom makeover.
7 Spring Decor Ideas That Will Refresh Your Entire Home
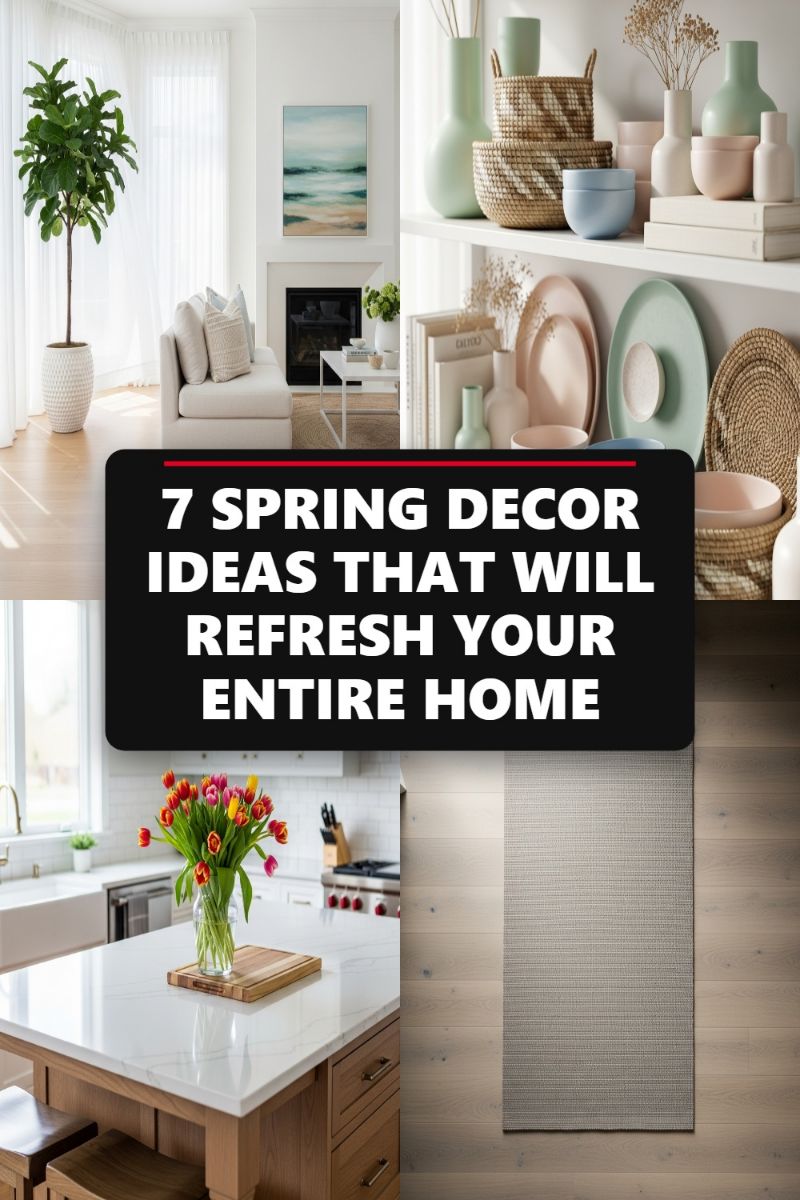
The arrival of spring is the perfect prompt for a holistic home refresh, moving away from heavy, cozy winter textures toward lighter, more invigorating atmospheres. To start, focus on maximizing natural light and integrating foundational elements that speak to renewal. As demonstrated in the bright living space, this involves swapping out heavy window treatments for sheer, translucent curtains that diffuse sunlight beautifully and make the room feel significantly more expansive. Complement this airy foundation by bringing in large, impactful greenery, such as a potted fiddle-leaf fig tree, which instantly adds life, height, and a natural, organic feel. For furniture and foundational textiles like rugs and large seating pieces, stick to light, neutral tones (creams, linen white, pale taupe). This neutral palette serves as a calming canvas, allowing seasonal accents to shine without overwhelming the eye, ensuring the space feels effortlessly chic and clean.
Once the room’s foundation is set, turn your attention to seasonal styling, particularly on open shelving and display surfaces. Spring calls for a specific, gentle color palette: think soft pastels like mint green, blush pink, and pale robin’s egg blue. The key to successful styling is marrying these soft colors with varying textures. Expertly curated shelves should feature smooth, matte ceramics alongside rustic, hand-woven baskets and natural elements like dried grasses or simple, clean vases. Utilize the principle of contrast and layering; for example, stack books to create height, anchor the display with a textured basket, and then introduce pops of color with ceramic bowls or plates leaning against the back wall. This strategy allows for a high-impact, low-commitment transformation that can easily be updated as the seasons change, providing instant visual rejuvenation to any area of the home.
Finally, execute micro-makeovers in high-traffic areas like the kitchen to complete the home-wide transition. The easiest and most effective way to introduce seasonal vibrancy is through fresh florals. Place a striking arrangement of colorful tulips or daffodils on the main kitchen island or countertop, creating an immediate focal point that bursts with spring energy. Ensure the surrounding kitchen surfaces, like the pristine marble countertops and light wood cabinetry, remain uncluttered and bright to enhance the effect of the fresh flowers. Don’t forget the floor; a light-toned wood floor paired with a textured, neutral runner rug helps maintain that airy, grounded aesthetic while providing subtle warmth and defining the space. By strategically integrating light textiles, soft pastels, and abundant greenery across multiple rooms, you achieve a cohesive and deeply refreshing spring transformation.
DON’T BUY CHEAP ST. PATRICK’S DECOR – TRY THESE CHIC ALTERNATIVES
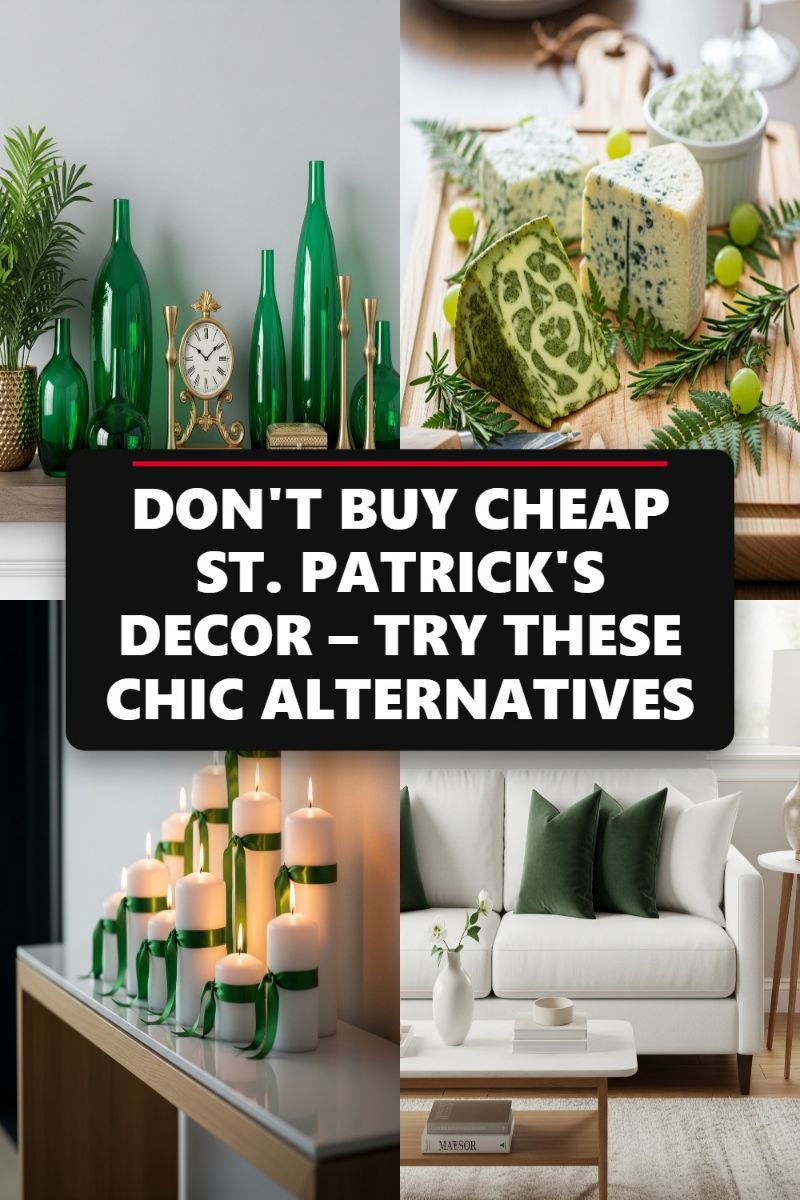
When approaching holiday or seasonal decorating, the key to a sophisticated home makeover is using permanent, high-quality pieces that can be easily repurposed, rather than relying on disposable novelty items. To integrate the iconic deep greens of St. Patrick’s Day in a way that elevates your interior design, focus on textural accents and layered displays. Start by curating vignettes using colored glass and rich fabrics. As seen in the visuals, grouping various sizes and shapes of emerald green glass vases or bottles on a shelf creates dramatic visual impact. The depth of the green glass adds an instant layer of luxury and can be beautifully complemented by metallic accents like brass or gold, such as an antique clock or slender candlesticks. In living spaces, substitute typical throw pillows for deep forest or hunter green velvet cushions, instantly adding warmth and texture while pairing perfectly with neutral sofas and rugs. These pieces maintain their value and look timeless long after the holiday passes, proving that festive decorating can still adhere to expert design principles.
For temporary holiday flair that feels elevated, turn your attention to subtle, integrated styling elements centered around lighting and entertaining. Rather than relying on blinking shamrock lights, create a striking centerpiece by clustering white pillar candles of varying heights and tying a simple, rich satin or grosgrain green ribbon around the center of each. This technique is incredibly easy, cost-effective, and lends a warm, elegant glow to a console or dining table. Furthermore, leverage the concept of edible decor. Hosting sophisticated gatherings means using food and drink to enhance the aesthetic. Create a luxurious cheeseboard featuring naturally green elements, such as artisanal marbled Pesto or Sage Derby cheese, vibrant green grapes, and plenty of fresh rosemary or fern sprigs as garnish. These natural elements provide the necessary color pop without resorting to synthetic decorations, transforming your entertaining spread into a beautiful, integrated piece of art.
Remember that green is inherently a grounding, natural color that signals sophistication and renewal in interior design. To successfully execute this chic green alternative aesthetic, commit to deep, saturated shades—think bottle green, malachite, or pine—and avoid loud, synthetic lime or kelly greens typically found in seasonal aisles. Ensure the green elements you introduce are balanced by neutral textures like crisp white linens, light woods, or matte white ceramics, preventing the color from overwhelming the room. By treating these rich greens as powerful neutrals, you achieve a stylish seasonal makeover that feels intentional and high-end. This approach ensures your home remains refined while still fully embracing the festive spirit.
MY FAVORITE CORNER OF THE KITCHEN: CORNER DECOR HACKS!
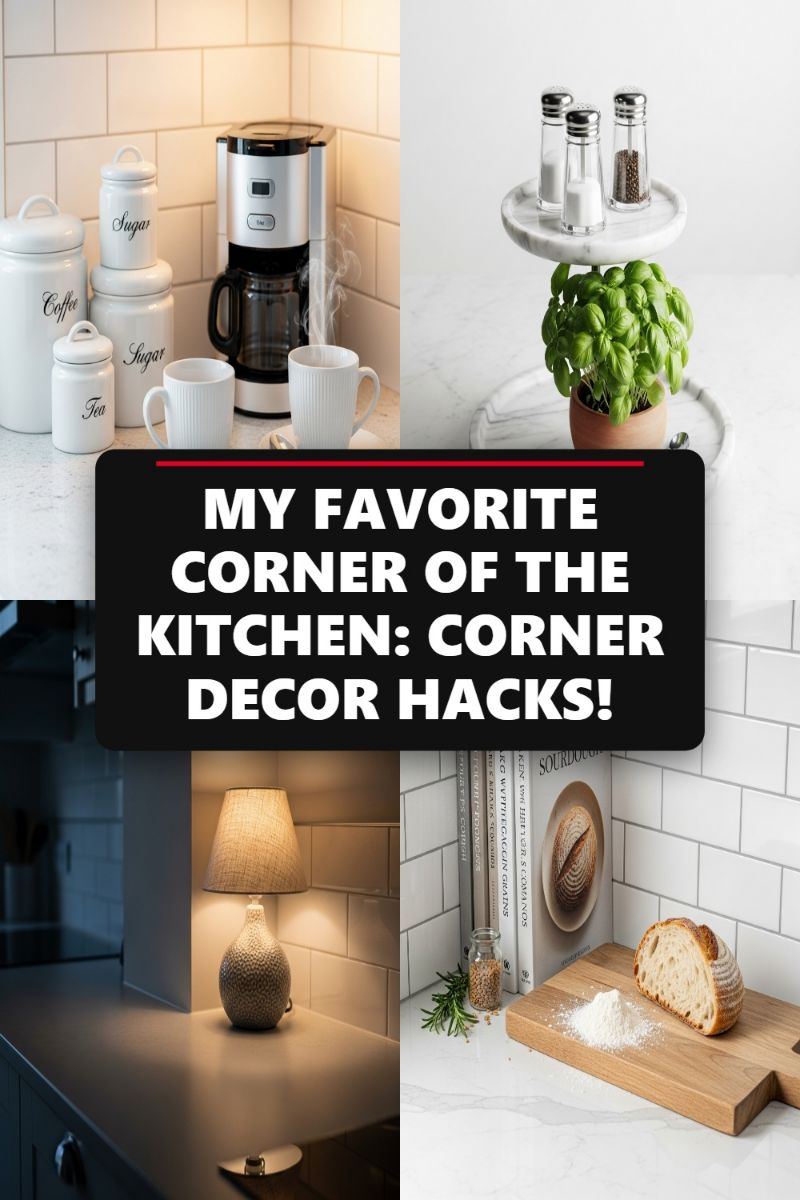
Kitchen corners are notorious for becoming cluttered dead zones, but with strategic planning, they can easily transform into stylish, high-utility stations. The first rule of corner decor is leveraging vertical space, as demonstrated by the curated coffee station featuring stacked ceramic canisters (for coffee, sugar, and tea) next to the brewing machine. This setup keeps essential items close at hand while maintaining a clean, cohesive look. To truly elevate the space, incorporate intentional lighting, even in a kitchen environment. A soft, textured table lamp placed in a darker corner or niche instantly casts a warm, inviting glow, turning a typically sterile spot into a design focal point. The right illumination not only enhances visibility but also introduces depth and ambiance, making the kitchen feel cozy and lived-in, especially during evening hours.
Beyond basic organization, inject sophisticated staging techniques using elevated displays and natural elements. Tiered stands, particularly those made of luxurious materials like marble, are excellent for maximizing a small footprint while adding visual height and interest. Utilize them to display frequently used items that are also attractive, such as stylish salt and pepper shakers, or to house a small potted herb like basil. Fresh greenery adds a vital pop of color and life, combating the often rigid geometry of kitchen cabinetry and tile work. When styling, think in layers: start with a base material (like the marble countertop or tile backsplash), add a textured element (the tiered stand), and finish with functional beauty (the herbs and shakers).
Finally, integrate items that speak to the heart of the kitchen and your personal style. Lean several beautiful, neutral-toned cookbooks against the backsplash to add texture and personality without permanent commitment. Pair these with high-quality, functional accessories, such as a thick wooden cutting board and artisan bread, which double as elegant decor when not in use. Small glass jars containing spices or grains can be clustered nearby to complete the vignette, grounding the setup in culinary purpose. By treating your kitchen corner as a miniature stage, mixing high-end materials (marble, wood) with practical elements (canisters, books), you transform an overlooked space into a showcase of effortless utility and design.
THE BACHELORETTE DECOR THAT WILL MAKE EVERYONE TAKE PHOTOS

While often categorized specifically for bridal events, the principles used in creating stunning bachelorette decor can be seamlessly adapted for any high-impact, temporary ‘Room Rewind’ when entertaining. To execute a visual transformation that guarantees social media-worthy moments, focus first on establishing defined atmospheric zones. As seen in the top left, a rustic, intimate backdrop is easily achieved by hanging a custom textile banner—such as the “I Said Yes” statement piece—and layering it with warm, ambient lighting, like simple hanging string lights. This pairing utilizes existing architectural elements (like exposed wood or windows) and inexpensive lighting to create depth and warmth instantly. For a dedicated photo booth or lounge area (bottom left), invest in a contemporary organic balloon arch using muted, sophisticated colors (creams, blushes, and deep mauves). Position this arch to frame a comfortable seating arrangement, anchored by neutral-toned furniture, highly textured throws, and natural materials like jute poufs, ensuring the setup feels luxurious and inviting rather than just purely functional.
Elevate the guest experience by focusing on cohesive, personalized details that double as memorable favors. The visual impact of matching, customized items—from the pastel tumblers with individual names and playful graphics (unicorns, hot air balloons) to the folded, personalized pajamas—cannot be overstated. For the drinkware, choose reusable, insulated vessels in a unified, soft color palette; these items serve as immediate visual decor on a bar cart while offering a lasting, practical souvenir. When setting up welcome gifts, utilize the principle of attractive display: arrange curated baskets containing high-end snacks, small celebratory bottles, and self-care items, flanked by the matching party attire. This careful presentation, as demonstrated on the wooden bench, turns a necessary logistical item into an aesthetic focal point, signaling luxury and thoughtfulness right from the moment guests arrive.
Expert event designers understand that the key to viral decor is maximizing visual density and textural contrast in defined areas. When planning your temporary room transformation, ensure all elements align with a singular color story, even if the elements themselves are diverse (textiles, balloons, gift packaging). Focus the most elaborate setups—like the balloon arch or the gift display—in high-traffic areas where people naturally congregate or pose for photos. This strategic placement ensures that the investment in temporary decor yields the maximum visual return. Furthermore, always utilize layers of lighting (candles, string lights, lamps) alongside natural light to create soft focus, which is universally flattering and essential for producing high-quality phone photography, truly making everyone want to capture the moment.
MY FAVORITE 3 PIECES OF SPRING PORCH DECOR UNDER $50
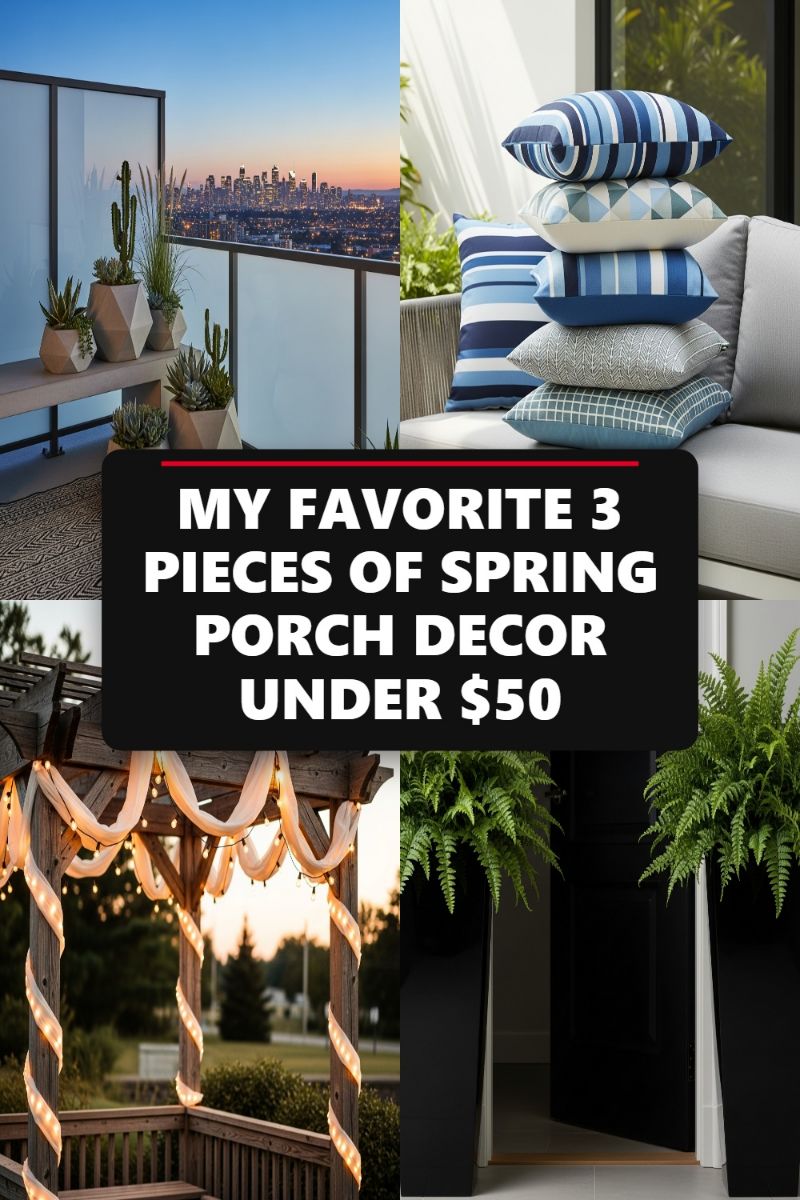
The quickest and most affordable way to execute a seasonal porch or patio makeover is to focus on three key decor elements that deliver maximum visual impact without needing to replace costly furniture: textiles, strategic greenery, and ambient lighting. Start with outdoor textiles, which are your primary vehicle for injecting color and seasonality, as seen with the vibrant stack of blue and white pillows. To ensure longevity and high-end appeal, never skimp on choosing UV-resistant and weather-proof fabrics, which prevent fading and mildew. For a dynamic look, select a primary color palette (like the nautical blues shown) and mix at least three different patterns—for instance, wide stripes, a small geometric print, and a solid color—to build dimension and interest on your seating area. Expert tip: While new outdoor furniture can be costly, simply refreshing existing cushions with new, structured pillow covers and quality polyfill inserts can dramatically change the feel of your space, instantly achieving that polished, resort-like comfort seen in the image’s top-right quadrant, often for less than the cost of a single new chair.
Next, focus on transforming your space with greenery using statement planters. Whether you have a sprawling deck or a small urban balcony, the containers you choose dictate the overall aesthetic. If you are decorating a large entrance, mimic the drama of the bottom-right image by investing in tall, narrow, monolithic planters—often available affordably in durable resin or lightweight fiberglass that mimics polished stone—and place them symmetrically around a doorway or focal point. Fill these with lush, high-impact plants like ferns or tall grasses to add verticality and richness. For smaller areas, like the contemporary balcony shown in the top-left, opt for low-profile, geometric concrete or ceramic pots filled with low-maintenance succulents or cacti. The key here is grouping containers in odd numbers (3 or 5) and varying their heights to create an intentional, curated garden look that costs significantly less than buying large, fully mature landscaping plants; remember to use the “thriller, filler, spiller” method to guarantee stunning container arrangements.
Finally, nothing defines an outdoor “room” like carefully executed ambient lighting. A few carefully placed lighting elements constitute the third essential budget piece, capable of transforming a harsh daylight setting into a magical evening retreat. Drawing inspiration from the cozy pergola setting (bottom-left), abandon harsh overhead lighting and wrap warm-toned LED string lights or rope lights around structural features, railings, or architectural elements. For a truly elevated look, pair these lights with light, breezy outdoor fabric—even inexpensive sheer curtain panels—draped strategically across beams or along the perimeter to diffuse the light, adding a romantic softness and texture that suggests an expensive design installation. Always utilize solar-powered options where feasible to avoid cumbersome extension cords, keeping the setup clean, easy, and completely energy-free, allowing your outdoor makeover to transition beautifully and effortlessly from day to night while ensuring the entire upgrade remains firmly within a sustainable, low-cost budget.
THE PATIO GLOW UP I DID IN A WEEKEND (BEFORE & AFTER)
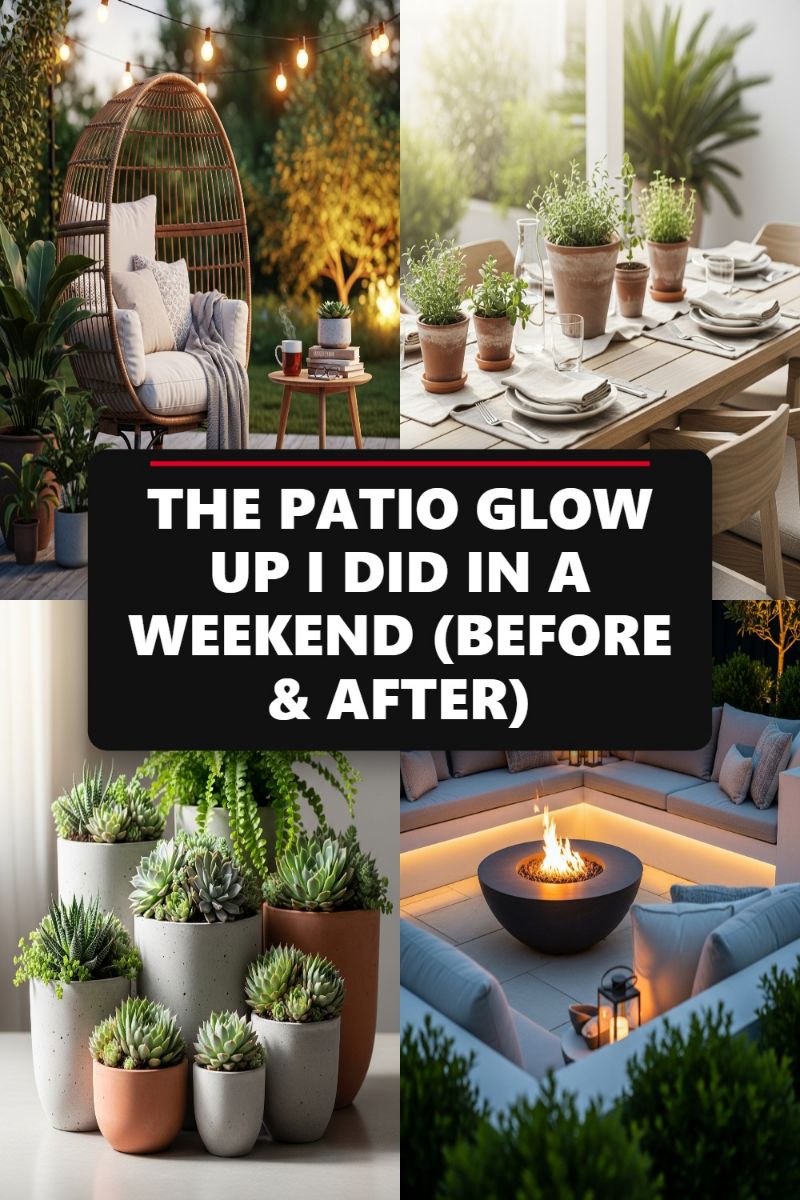
Executing a dramatic patio transformation in a single weekend hinges on strategic, high-impact changes, primarily focusing on lighting and defining functional zones. To replicate this elevated look, start by establishing the ambiance using layered illumination. Install overhead bistro string lights to instantly deliver a warm, social glow across the entire space. For a true luxury upgrade, mimic the recessed linear LED lighting shown under the built-in seating; this subtle architectural lighting defines the perimeter, enhances safety, and provides a sophisticated nighttime silhouette. Next, delineate your areas—the image successfully separates a cozy reading nook (the rattan egg chair), a formal dining space, and a dedicated lounge around the fire pit. If you don’t have existing built-in seating, invest in modular outdoor sectionals that allow you to customize the layout to fit your space while retaining a structured, permanent feel, ensuring all major furniture pieces are weather-resistant and proportional to the area.
Focusing on comfort and natural integration is paramount once the structure is defined. For the seating areas, choose plush, deep-seating cushions, using a neutral palette (like creams, greys, and linens) for timeless appeal. Layer with texture via throw blankets and varying sizes of toss pillows for an inviting look. Expert advice for the dining area involves transforming a simple wooden table into a gourmet setting by using nature as the centerpiece; instead of fleeting flowers, arrange small terra cotta pots of culinary herbs (thyme, oregano, rosemary). This detail is both practical and visually enriching, lending a rustic, organic feel to the modern setting. When selecting accent planters, use groupings of pots with varied heights and materials (mixing rough concrete with smooth terracotta) to add dynamic texture to groupings of succulents and ferns.
The crowning jewel of a patio glow-up is the focal point, exemplified here by the modern, low-slung fire pit bowl. Incorporating a gas or propane fire element creates an immediate social anchor and extends the usability of your outdoor room well into the evening and cooler seasons. When installing a fire pit, always ensure proper distance from flammable materials and maintain appropriate ventilation. Finally, polish the design with thoughtful accessories. Introduce portable lanterns (battery-operated or citronella) to create scattered pools of light on side tables and pathways, reinforcing the layered lighting effect. Use small, minimalist wooden side tables for function beside lounge chairs, and keep tabletop décor simple—think stoneware plates, linen napkins, and clear glass pitchers—to maintain the clean, contemporary aesthetic seen throughout this successful weekend transformation.
MY SECRET STRATEGY FOR VIRAL SPRING DECOR (MINIMALIST APPROVED)
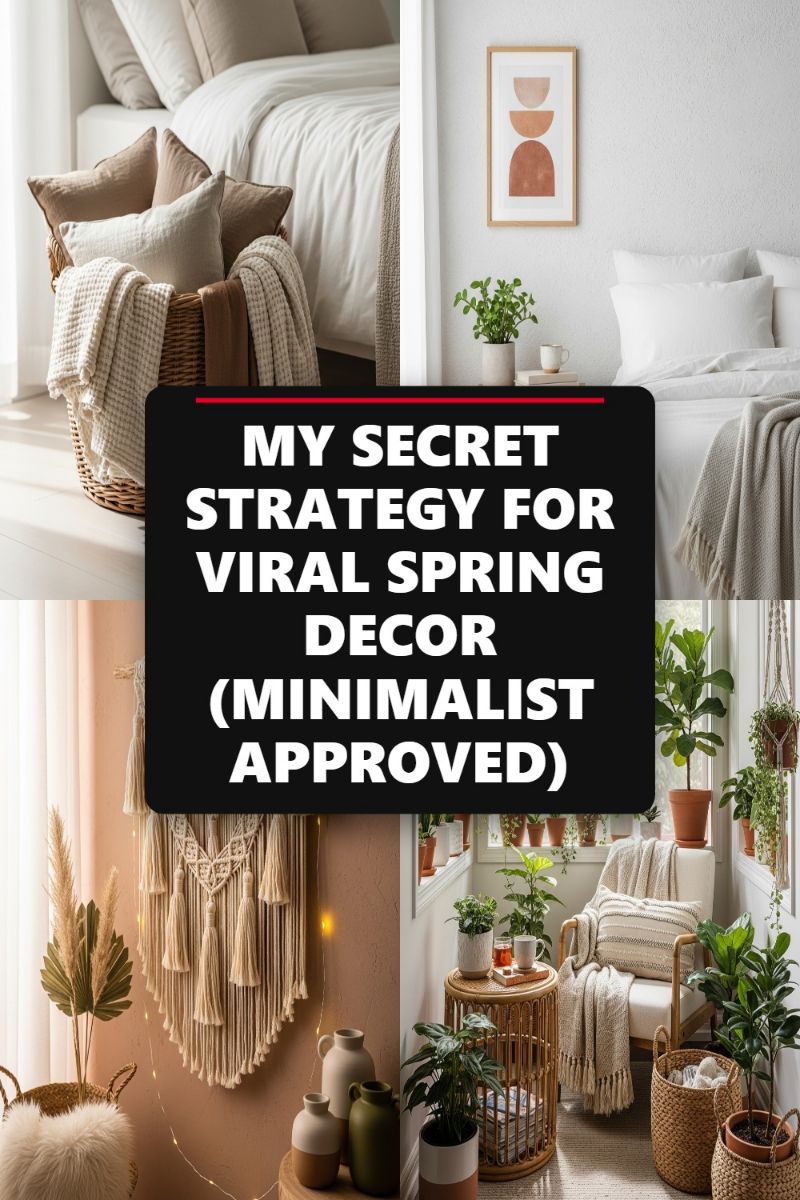
Achieving a viral, high-impact spring refresh doesn’t require drastic color changes or maximalist clutter; the secret lies in mastering the art of textured neutrals and organic layering, perfectly suited for a minimalist ethos. To capture the serene, light-filled look displayed here, start by establishing a crisp, neutral canvas. This means prioritizing walls and foundational furniture (like bedding or large seating) in whites, creams, or pale linens. The crucial step is moving away from flat color blocks and focusing entirely on material variations. Select chunky waffle knits, nubby cottons, smooth sateen linens, and woven wool throws. By keeping the color palette monochromatic—taupe, oatmeal, ivory, and biscuit—you allow the depth and shadow created by the different textures to become the primary visual interest. This strategy provides warmth and softness without introducing distracting elements, ensuring the final result feels both cozy and highly curated.
Next, integrate natural woven elements to provide structure and bohemian flair. The image collage showcases the power of rattan and wicker, which are essential for grounding the airy neutral palette. When selecting storage or accent pieces, opt for large, substantial items like oversized wicker baskets—used here for storing extra pillows and throws—to double as practical décor. For furniture, a lightweight rattan side table or chair adds an organic, resort-like feel perfect for spring. Instructionally, look for opportunities to replace standard metal or plastic items with natural fibers: swap out framed canvas art for a textured macrame wall hanging to introduce soft dimension, or use jute and seagrass rugs to define zones within the room. This focus on natural materiality is the key to making the space feel alive and connected to nature, which is central to a popular spring aesthetic.
Finally, the addition of abundant greenery is non-negotiable for bringing the “Spring Decor” theme to life while keeping the look minimalist approved. Introduce a variety of houseplants, utilizing both floor space (Fiddle Leaf Figs or small trees in large terracotta pots) and vertical space (hanging planters for trailing plants like Pothos or string of pearls). To maintain the cohesive, earthy palette, house the plants in simple, unglazed terracotta or two-tone ceramic planters that echo the neutrals in the textiles. Avoid overly bright or ornate containers. For final styling, create small, intentional vignettes—like the reading nook corner—using only essential items: a mug, a small stack of books, and a single small potted plant on a woven side table. The goal is to provide visual interest and a sense of life without creating visual noise, ensuring every element is functional, textural, or natural.
I TRIED VIRAL DIY VALENTINES DECOR & IT WORKED! (CHEAP + EASY)

Temporary seasonal decor offers one of the fastest and most budget-friendly ways to execute a room rewind, transforming common areas like living rooms and kitchens with high-impact visuals. The key to a successful seasonal overhaul is focusing on simple, viral-ready DIYs that require minimal skill but deliver maximum charm. Take, for instance, the popular pom-pom garland seen adorning the bookshelf. To recreate this look, gather yarn in contrasting seasonal colors (like blush pink and cream), and use either a specialized pom-pom maker or the simple cardboard cutout method. We recommend creating poms in two distinct sizes to add visual depth and stringing them onto twine, looping them slightly to form a gentle heart shape on display. Expert advice for styling a seasonal shelf involves layering: start with foundational items (books, succulents) and then introduce the decorative element (the garland), ensuring the garland complements, rather than obscures, key items like a flickering candle or a ceramic bird figurine.
Moving the cozy atmosphere into the kitchen or dining area involves personalized, functional items. The heart-decorated mugs pictured are a fantastic DIY project that can be completed in an afternoon. Purchase plain ceramic mugs in bulk and use oil-based paint markers (often called ceramic Sharpies) to draw simple, solid hearts. Once dry, baking the mugs according to the paint marker instructions ensures the design is permanent and dishwasher safe, making them perfect for daily use or gifting. To complete the vignette, always incorporate fresh or high-quality silk florals. A large, lush arrangement of pink and red roses not only introduces immediate color but also elevates the rustic textures of the handmade decor. Choose a vase with character—such as the distressed, crackle-glaze style shown—to counterbalance the softness of the petals, adding an aged, sophisticated touch to the countertop.
Finally, integrate a piece of rustic artistry to unify the aesthetic, such as the personalized wooden plaque being crafted. To achieve this look, start with a pre-cut wooden shape (a heart or circle) and apply a light whitewash or stain to bring out the natural wood grain. Use stencils or freehand lettering to apply a simple word or phrase using black permanent marker or paint. The final step involves securing natural embellishments—small bunches of preserved lavender, dried baby’s breath, or small silk flowers—to the base using a hot glue gun. This creates a dimensional piece that works equally well as a table centerpiece or a wall hanging in an entryway. By combining these three core DIY strategies—textural garlands, personalized functional items, and rustic accents—you create a cohesive, heartfelt atmosphere that feels curated and luxurious, proving that an extreme room makeover doesn’t always require construction, just clever crafting.
THIS IS HOW I GET COMPLIMENTS ON MY SPRING PORCH DECOR
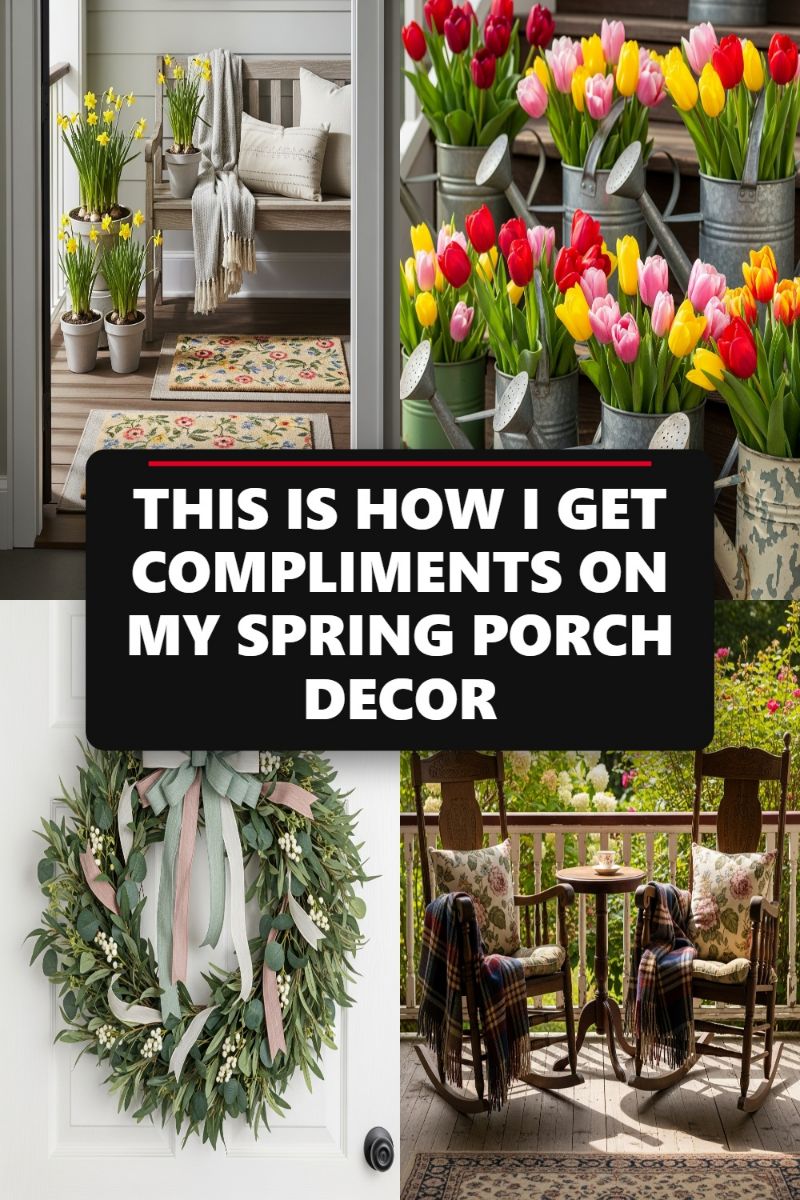
The secret to an award-winning spring porch lies in maximizing comfort, layering textures, and strategically deploying vibrant seasonal flora. To recreate this welcoming environment, begin by defining your floor space. Anchor the seating area, whether a full porch or a small landing, with an outdoor rug—or better yet, two, as seen with the layered doormats. Start with a neutral, slightly larger base rug (like jute or a simple patterned outdoor weave) and place a smaller, highly patterned or seasonal mat centered on top. Next, focus on creating an intimate seating vignette. If space allows, incorporate classic pieces like rocking chairs or a small wooden bench. Dress these pieces up with weatherproof cushions featuring subtle floral or botanical prints to evoke spring without overwhelming the space. Finish the seating arrangement with cozy, woven or plaid throws draped over the arms. While these blankets add warmth on chilly evenings, their primary function is visual—they signal comfort and invite guests to settle in, instantly elevating the perceived design quality.
Injecting living elements is paramount to achieving that fresh spring appeal. Focus on mass planting and creative container choices to maximize visual impact. Instead of using traditional ceramic pots exclusively, integrate rustic, unconventional vessels like the galvanized metal watering cans shown, which provide a charming, farmhouse-inspired contrast to the soft beauty of the flowers. Group these containers in varying heights and sizes, filling them with early-season blooms like potted tulips, daffodils, or hyacinths. The goal is lush saturation—don’t skimp on the quantity of bulbs! For the main entryway, a beautiful, full wreath serves as the essential focal point. Choose a base of robust greenery, such as olive leaves or eucalyptus, and accent it with delicate white berries and ribbons in soft, muted spring tones like dusty rose, sage green, and cream. When hanging the wreath, ensure the ribbons are long and flowy, adding an element of movement and sophisticated color that immediately draws the eye.
Finally, the key to tying this entire look together is thoughtful placement and symmetry. Notice how the designs utilize vertical space; the daffodils are often arranged on tiered stands or risers, drawing the eye up and creating a sense of dimension, which is crucial for small porches. If you have two seating elements (like the rocking chairs), use visual symmetry to balance the composition. This could mean placing matching throws and cushions on each chair or flanking the front door with identical potted arrangements. Ensure that all the materials—from the bench wood to the metal containers—work within a cohesive color palette of natural textures (wood, fiber), soft pastels (flowers, ribbons), and muted neutrals (pottery, throws). By focusing on layered textiles, abundant but carefully curated florals, and balanced design, your spring porch will undoubtedly become the envy of the neighborhood.
Home Bar Makeover: The Detail Guests Actually Notice
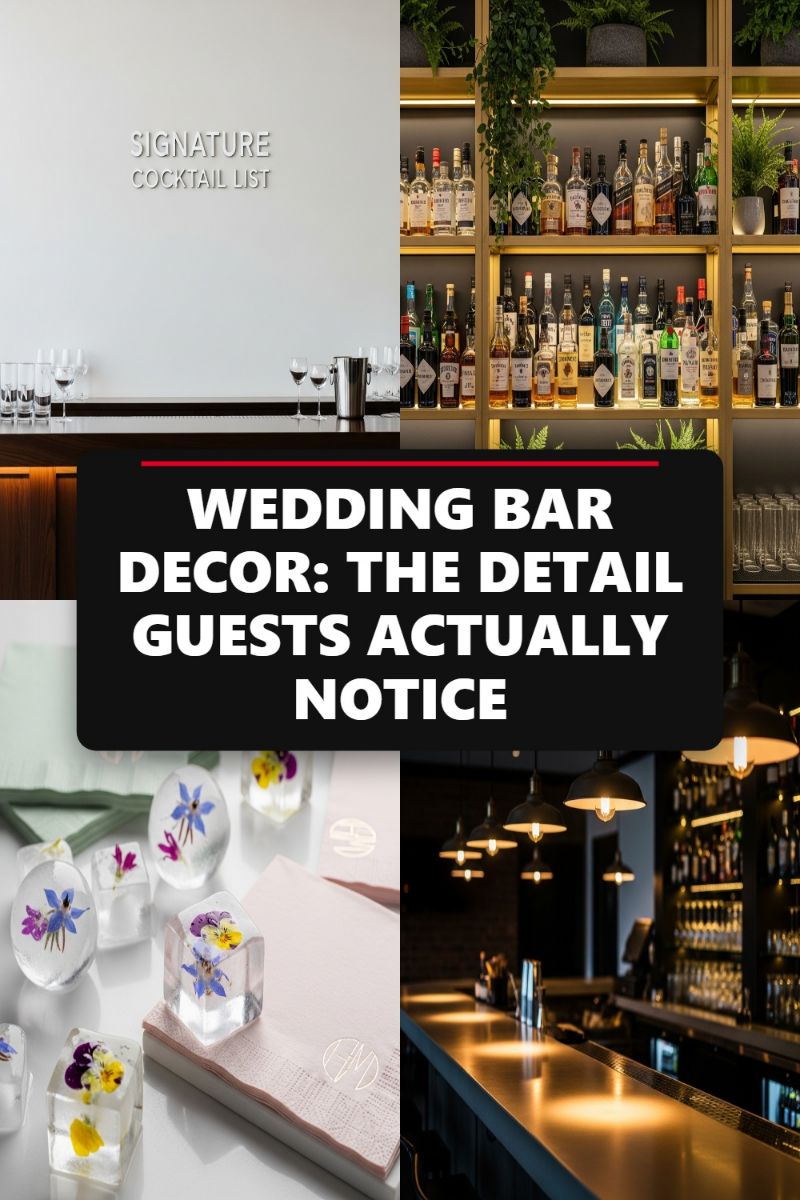
Transforming a home bar area from basic storage to a luxurious focal point requires meticulous attention to both structure and ambiance. Start with the backbone of the bar: storage and lighting. Emulate the look of high-end establishments by installing open, compartmentalized shelving—preferably in a warm metallic or dark wood finish—and integrating LED strip lighting. Ensure this lighting is warm-toned (2700K-3000K) to give the bottles a golden glow and enhance the overall luxurious feel, rather than stark white light which feels sterile. Vertical organization is key; arrange bottles by type and height, ensuring your premium spirits are showcased prominently. Expert tip: Introduce high-quality faux or real trailing greenery on the top shelves, mimicking the image, to soften the hard lines of the shelving and inject an organic, inviting texture into the space. A sleek, well-maintained countertop, illuminated by task lighting from above (like the industrial pendants shown), anchors the entire setup and invites interaction.
Once the structure is refined, focus on highly personal, yet functional, details. Custom signage, even for a home bar, elevates the experience instantly. Consider mounting 3D lettering or creating a framed print for a “Signature Cocktail List,” as depicted in the image, featuring two perfectly curated recipes. This not only streamlines service but also adds a professional, personalized element. Equally important are the accessories that guests handle directly. Invest in high-quality cocktail napkins and coasters that feature a subtle monogram or logo (perhaps your initials or a family crest), lending a five-star hotel feel to every drink served. These small, tactile touches convey a level of thoughtful preparation that guests immediately register and appreciate, signaling that no detail was overlooked.
Finally, the ultimate detail that sets an ordinary bar apart from an extraordinary one is the ice. High-quality, clear ice ensures slower melt rates, preserving the integrity and flavor of carefully crafted cocktails. Take this a step further by embracing decorative ice cubes, like the floral-infused examples shown. These are easily achieved at home using distilled or twice-boiled water and specialized molds (spheres or large cubes), embedding edible flowers (like pansies or violas) or fresh herbs (rosemary, mint) before freezing. This simple, instructional step adds vibrant color, texture, and a high-end, bespoke element to every drink. Remember to also keep your tools—shakers, jiggers, and strainers—displayed cleanly on the bar top; not only are they necessary, but their polished metallic surfaces contribute to the overall glimmer and sophistication of your newly overhauled home entertaining station.
YOU HAVEN’T SEEN EASTER DECOR LIKE THIS! (NON-CHEESY IDEAS)
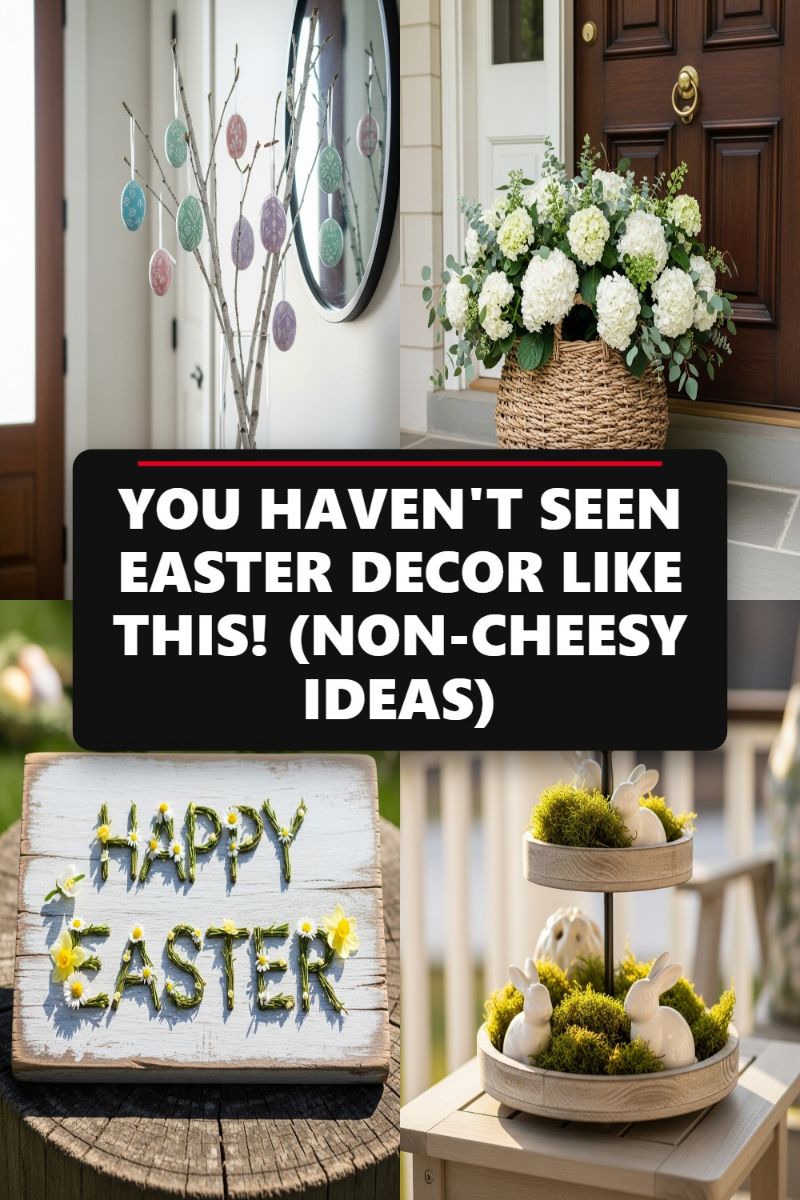
When executing a seasonal refresh, the key to avoiding a “cheesy” look is prioritizing natural textures, intentional placement, and a muted, sophisticated color palette. Start your spring makeover at the entry point by crafting a stunning visual display. Inside your foyer, move beyond a standard bouquet by creating a minimalist Easter tree. Source tall, stripped branches—birch or curly willow work best—and anchor them securely in a clear glass vessel filled with small stones or clear vase filler. The ornaments should be light and textural; choose flat, wooden, or papier-mâché eggs in subtle pastel shades (think sage green, dusty rose, and lavender) featuring delicate geometric patterns. Hang these with thin ribbon or twine, ensuring they are spaced unevenly for a natural, asymmetrical look. This centerpiece introduces vertical height and understated color without cluttering the space. For the front door, swap out typical holiday signage for a lush, high-impact floral arrangement. Use a wide, natural wicker or woven basket and fill it with voluminous white flowers, such as hydrangeas or garden roses, interspersed with soft green fillers like eucalyptus or ferns. This adds immediate curb appeal and offers an elegant, long-lasting display that carries through the entire spring season.
Extend this refined sensibility to your outdoor living spaces by focusing on curated vignettes that elevate your patio furniture. The modern Easter centerpiece utilizes a two-tiered wooden tray, moving away from clutter and toward defined layers. The instruction here is simple yet highly effective: fill each tier with rich, preserved chartreuse moss, mimicking the vibrant first burst of spring growth. Integrate small, high-quality ceramic figurines, such as matte white bunnies or smooth speckled eggs. Place the bunnies thoughtfully within the moss, not just resting on top, to create a sense of depth and scene. This method turns a common serving tray into a sculptural focal point for a side table or outdoor coffee table. When selecting materials, opt for neutral wood tones that contrast sharply with the bright moss and ceramic pieces, ensuring the vignette feels artisanal rather than mass-produced.
Finally, incorporate texture and nature through sophisticated signage, transforming rough materials into delicate decor. To replicate the rustic “Happy Easter” sign seen here, acquire a piece of salvaged or distressed wood and whitewash it lightly to allow the grain texture to show through. The lettering itself should be formed using natural materials for a true DIY touch. Carefully bend thin twigs or green florist wire to form the letters, securing them with discreet hot glue. Embellish the resulting foliage letters with small, fresh-cut or faux blooms, like miniature daisies and yellow buttercups, ensuring the flowers are small enough not to overwhelm the textual design. Positioning this sign on a natural tree stump or a weathered bench creates a beautiful juxtaposition between rough and soft textures, proving that holiday decor can be seamlessly integrated into a chic, overall home aesthetic rather than competing with it.
STOP SCROLLING: THE VIRAL GALENTINE’S PARTY DECOR YOU NEED

Transforming a living room or communal space into a show-stopping Galentine’s Day haven hinges on layering high-impact, romantic decor elements. Start by creating an unforgettable photo backdrop, which is crucial for viral appeal. The look showcased here utilizes a dynamic blend of two-tone streamer curtains—alternating pale pink and vibrant red—to add texture and vertical interest. Above this, construct an asymmetrical balloon garland using varying sizes of pink and crimson balloons to give it a sophisticated, organic shape rather than a uniform arch. Ambient lighting completes this focal point; drape warm, micro LED string lights through dried elements like pampas grass or dried rose garlands positioned near the backdrop or on nearby surfaces to cast a soft, flattering glow across the entire setting. This ensures the space feels intimate and ready for celebration, moving beyond simple holiday decorations into true event design.
Next, reimagine your seating arrangement for maximum comfort and luxurious relaxation. Ditch traditional dining chairs and embrace the cozy ‘floor lounge’ trend seen here. The key is volume and texture: pile up a collection of oversized, tufted floor cushions, poufs, and plush throw pillows in muted pinks, creams, and off-whites. Mix materials like soft chenille, sherpa, and velvet for an inviting, tactile experience. Scatter coordinating chunky-knit throws strategically across the cushions, inviting guests to settle in. For a sophisticated tabletop, ensure small details stand out: personalize champagne flutes with initials or cute sayings, and use miniature bowls filled with aesthetically pleasing accents, such as dried rosebuds or high-quality truffles, to elevate the visual appeal of even the simplest surfaces.
Finally, elevate your culinary offerings by treating your charcuterie board as a work of art and the ultimate centerpiece. This viral-worthy spread focuses heavily on themed shapes and color coordination. Use heart-shaped cookie cutters on soft cheeses (like Monterey Jack or cheddar) and even fruits (like thick strawberry slices) to integrate the Galentine’s theme seamlessly. Arrange ingredients by color: group reds (raspberries, strawberries, cured meats) and pinks (frosted cookies, pink candies) adjacent to whites and neutrals (crackers, hard cheeses, nuts). Expert tip: Incorporate edible flowers or small, pesticide-free decorative blooms, like mini carnations or spray roses, interspersed between the snacks to fill gaps and add a professional, feminine flourish. This level of attention to detail ensures the snack board is as much a decor piece as it is a delicious offering.