Need a weekend refresh? Discover 19 viral DIY home decor projects trending across social media that are quick, easy, and affordable. Transform your space now!
12 Meaningful Black History Month Door Decor Projects

Creating a powerful, visually striking front door tribute for Black History Month is a rewarding DIY project that can easily be accomplished in a single weekend. The core technique seen across many of these successful designs involves utilizing high-contrast silhouettes, often leveraging the door’s existing color (such as bright red, blue, or yellow) as a backdrop for bold black cutouts. To replicate this look, start by sourcing large rolls of matte black poster paper or lightweight foam core. You can enlarge historical images or powerful symbols (like the Pan-African flag, an African continent outline, or a prominent profile) using a digital projector aimed at the paper, tracing the outline quickly with a marker. If a projector is unavailable, the classic grid method works well for scaling up complex images. Once cut, secure the silhouettes using high-quality painter’s tape (which holds strong but won’t damage paint) or adhesive tack. The goal is clarity and immediate recognition, ensuring the tribute is readable from the curb, so opt for large, simple shapes over intricate details.
For those ready to incorporate more advanced techniques and symbolism, focus on the deliberate use of the Pan-African color palette: red (representing the blood shed for liberation), black (the people), and green (the natural wealth of Africa). This color scheme can be used in geometric designs, such as the vibrant vertical stripes seen on some doors, or woven into elaborate wreaths. The multicolored wreath featured in the collection is a perfect example of a dimensional piece that adds texture. To create this, cut concentric circles out of foam core, then attach smaller, brightly colored squares or triangles around the perimeter to form a radial pattern, focusing on primary and secondary colors alongside the Pan-African triad. When incorporating text, like ‘BLACK HISTORY MONTH,’ use metallic gold or silver vinyl lettering for a clean, professional finish, or hand-paint using stencils for a more rustic feel. Always ensure the text is large enough and placed against a contrasting color so it doesn’t get lost in the overall design.
Executing these projects over a weekend requires efficient material selection and proper planning for durability. Since many doors are exposed to the elements, professional decorators recommend using weather-resistant materials where possible. For paper cutouts, a quick coat of clear, matte acrylic spray sealant will significantly increase longevity against moisture and sun fade. If you attempt a large-scale portrait, as seen on the red door featuring an artistic rendering of a historical figure, consider printing the image onto durable matte fabric or white banner material rather than attempting a quick, full-door paint job. Dedicate Saturday to design, tracing, and cutting all the elements, and Sunday to assembly, installation, and final touch-ups. These DIY decorations not only serve as a meaningful tribute but also transform your entrance into a powerful, educational statement that celebrates Black culture and heritage.
Luxurious Beauty Room Decor: The DIY Hollywood Vanity
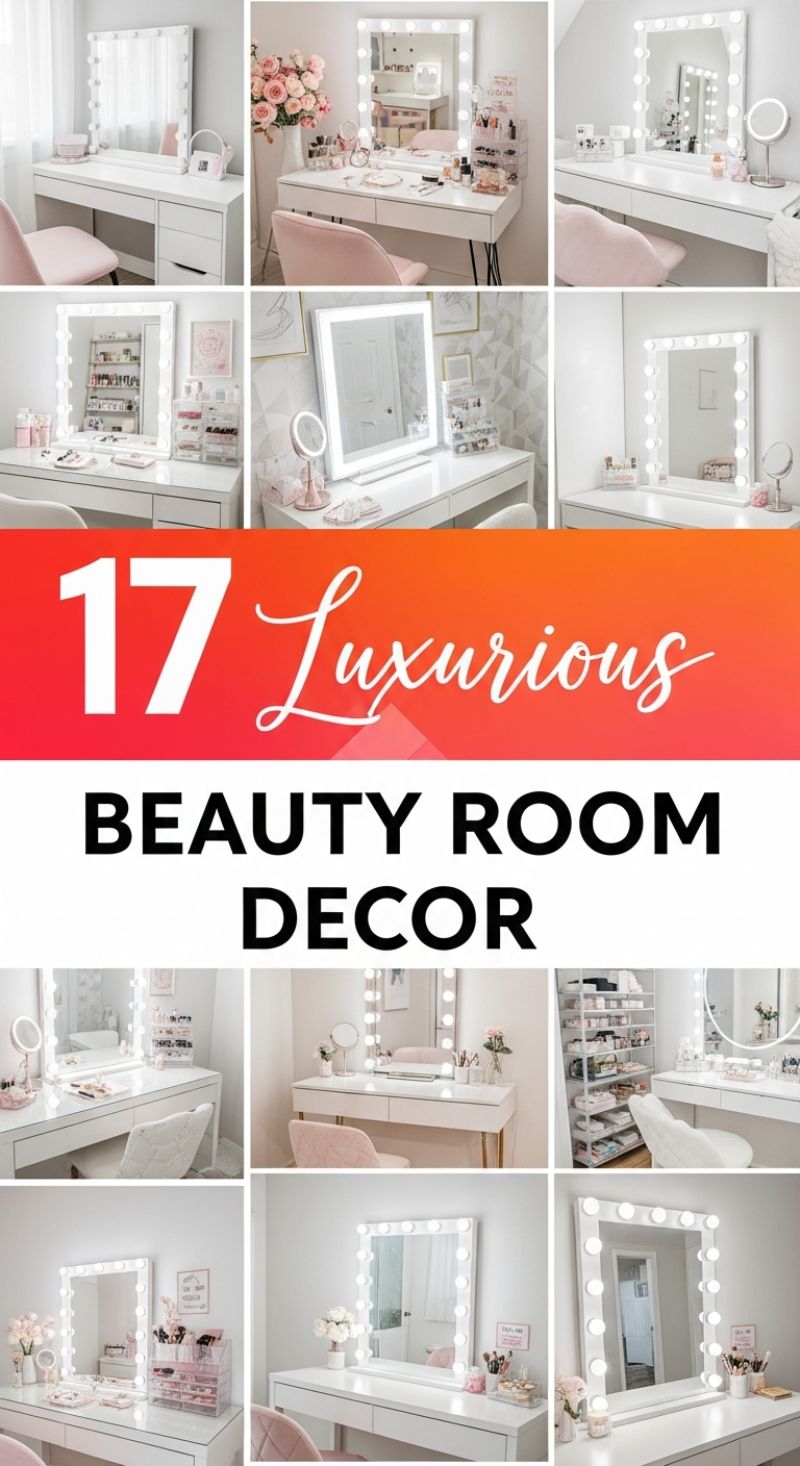
Achieving the pristine, glamorous vanity setup seen in these images is surprisingly feasible as a weekend DIY project, primarily focusing on creating that signature illuminated mirror. Start by sourcing a large, simple rectangular mirror and a set of professional vanity light strips or individual globe-style LED bulb kits. If you opt for individual lights, you will need to construct a sturdy frame from MDF or lightweight lumber, pre-drilling holes for the electrical sockets and wiring system. The secret to professional lighting is using bulbs rated between 5000K and 6000K (daylight white), ensuring the light source provides optimal, shadow-free illumination necessary for precise makeup application. Once the mirror is mounted and wired—a step often simplified by purchasing adhesive, plug-in lighting kits—paint the entire frame crisp white to match the bright, clean aesthetic of the vanity base. This bold light feature immediately transforms a standard desk into a luxurious beauty station, mirroring the high-end look achieved in professional studios.
The base of this luxurious setup is often a clean, white desk or dresser, frequently utilizing affordable modular furniture (such as simple drawer units) to maximize storage while maintaining a minimalist facade. To elevate the look from basic storage to opulent design, introduce textural contrasts and soft colors. The images predominantly feature blush pink velvet or faux fur seating, providing a cozy, glamorous touch. If you are refurbishing an existing desk, consider giving it a fresh coat of high-gloss white paint and swapping out the drawer pulls for elegant hardware, perhaps in polished gold or crystal, to introduce subtle luxury. Crucially, integrate clear acrylic organizers on the desktop. These transparent containers are essential for displaying makeup brushes and frequently used items beautifully, maintaining the visual organization and airy feel, preventing the space from looking cluttered despite the abundance of products.
Finishing touches are what truly seal the “luxurious” element of this decor style. Beyond the main Hollywood mirror, incorporate secondary lighting, such as a small, freestanding magnifying mirror with its own integrated LED ring, or a minimalist table lamp with a soft glow. Accessorizing should be deliberate: add fresh or high-quality faux florals (peonies or roses work well) in clear or white vases, and scatter small decorative trays for jewelry or perfume bottles. Remember that functionality underpins luxury; dedicate specific drawers for different product categories (e.g., skin care, eyeshadow palettes) to ensure everything has a designated place. By focusing on clean lines, abundant bright light, and soft, feminine accents like blush and gold, you can successfully replicate this sophisticated beauty room decor in just one weekend.
30 Fresh SUMMER DECOR TRENDS
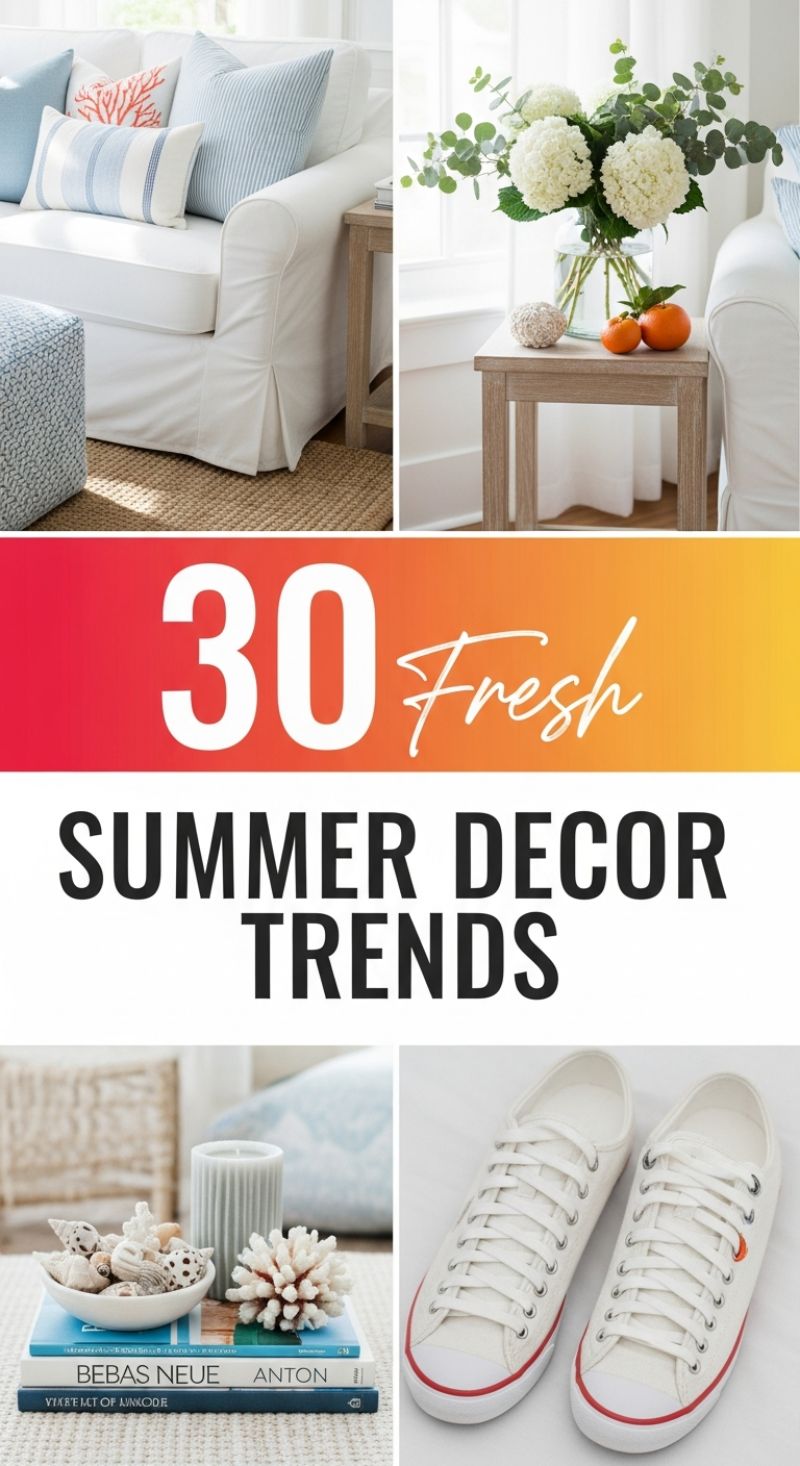
Recreating the airy, relaxed aesthetic of classic summer styling—often referred to as Coastal or Hamptons Chic—is highly achievable through simple weekend DIY projects focused on textiles and natural elements. Start by refreshing your seating area using simple slipcovers and customized pillows. The core of this trend is pristine white upholstery (easily achieved with a washable cotton duck slipcover, sewn with a basic skirted bottom and pinch pleats for structure, as shown), paired with nautical accent pillows. Instead of buying expensive throws, source affordable plain canvas or linen fabric and customize it. For the striped pillows, use fabric tape or painter’s tape to mask off stripes and apply indigo or pale blue fabric paint. For the standout coral pillow, use a specialized stencil or practice freehand drawing the coral pattern onto pre-dyed salmon fabric using a white fabric marker or bleach pen for a high-contrast, beachy look. Remember to mix textures—pair soft cottons with heavier weaves and tactile elements like the textured blue ottoman shown—to avoid a sterile appearance.
Next, focus on mastering the coastal vignette, which is the cornerstone of effective summer styling. The goal is to bring the outside in using found objects and fresh greenery. For the perfect coffee table centerpiece, stack a few design books (choosing jackets in coordinating colors like navy and teal) and anchor the display with a textured, ribbed candle. The DIY element here is the seashell bowl filler: collect or buy assorted small shells, then clean and whiten them by soaking them in a diluted bleach and water solution overnight for a pristine, uniform appearance. Arrange these in a shallow, simple white bowl alongside a decorative piece of bleached faux coral. For the side table, create a simple, fresh arrangement using hardy summer blooms like hydrangeas and natural filler greenery such as eucalyptus. Use a clear, simple glass vessel to highlight the stems. To complete the rustic, natural look, accessorize the table base with small, natural elements—a textured woven ball or a few pieces of brightly colored seasonal fruit (like the persimmons or small oranges pictured) for a pop of warmth against the cool whites and blues.
Finally, the foundation of this ‘fresh’ trend relies heavily on texture and light. If your room lacks the bright, airy feel, consider a DIY solution for flooring. An oversized area rug made from natural fibers—jute, sisal, or seagrass—is highly affordable, durable, and instantly introduces the sandy texture characteristic of coastal decor, while grounding the white furniture. For the wooden side tables, if they look too dark, you can easily achieve the light, weathered finish shown by striping the wood and applying a light gray or beige stain followed by a white washing technique (diluted white paint wiped across the grain). This easy treatment instantly lightens heavy wood furniture, making it feel less formal and more appropriate for a breezy, casual summer retreat.
The Essential Countertop Organization Transformation

While major renovations require weeks, creating a beautifully organized and functional kitchen counter is a weekend project focused on smart staging and personalized storage. The goal is to maximize vertical space while adding curated decorative elements that reflect your style. To replicate the stunning organization seen here, start with a tiered tray system. If you are handy, you can easily DIY one using two small circular wooden plaques and a metal spindle kit, then painting the entire structure with a waterproof, semi-gloss enamel paint. This system is perfect for corralling daily essentials—think coffee pods, salt and pepper grinders, and a small, functional indoor herb garden. Choose low-maintenance herbs like mint or thyme for the kitchen, potting them in matching gray or concrete-look containers to maintain a cohesive, sophisticated aesthetic. The uniform color palette ensures that even utilitarian items look like intentional decor.
Next, tackle your utensils. Clutter is the number one enemy of counter aesthetics, so centralizing your most-used cooking tools is crucial. The visual impact relies heavily on choosing uniform containers, such as the sleek stainless steel crocks shown. If you prefer a rustic or personalized look, start with inexpensive ceramic canisters and paint or stencil them using matte black or metallic spray paint suitable for ceramics. The expert trick here is segmentation: Dedicate one crock entirely to warm wooden tools (spoons, spatulas, stirrers) and the second to cooler metal tools (whisks, tongs, strainers). This separation provides a visually pleasing contrast in texture and color while making tools easier to grab mid-cooking session. Remember, the items you display should be both essential and beautiful; anything less should be relegated to a drawer to ensure the counter remains pristine and functional.
Finally, elevate your appliance corner by creating a styled vignette around your daily workhorse, such as a stand mixer or coffee machine. Treat this section like a small bookshelf. Stack 2-3 cookbooks or food-related decorative books that feature aesthetically pleasing spine colors that coordinate with your kitchen’s palette (e.g., pale blues, neutrals, or black). Use these books as risers to add height and dimension to smaller decorative items, like a small, textured white vase holding a simple, fresh flower or sprig of eucalyptus. This styling technique ensures that even large appliances feel integrated into the decor scheme rather than merely placed on the counter. Finishing touches, like coordinating cutting boards leaning against the backsplash, complete the curated look, proving that highly functional elements can double as high-impact decor.
Create the Ultimate Teen Room Vibe: Gallery Walls, LED Lights, and Geometric Paint Hacks
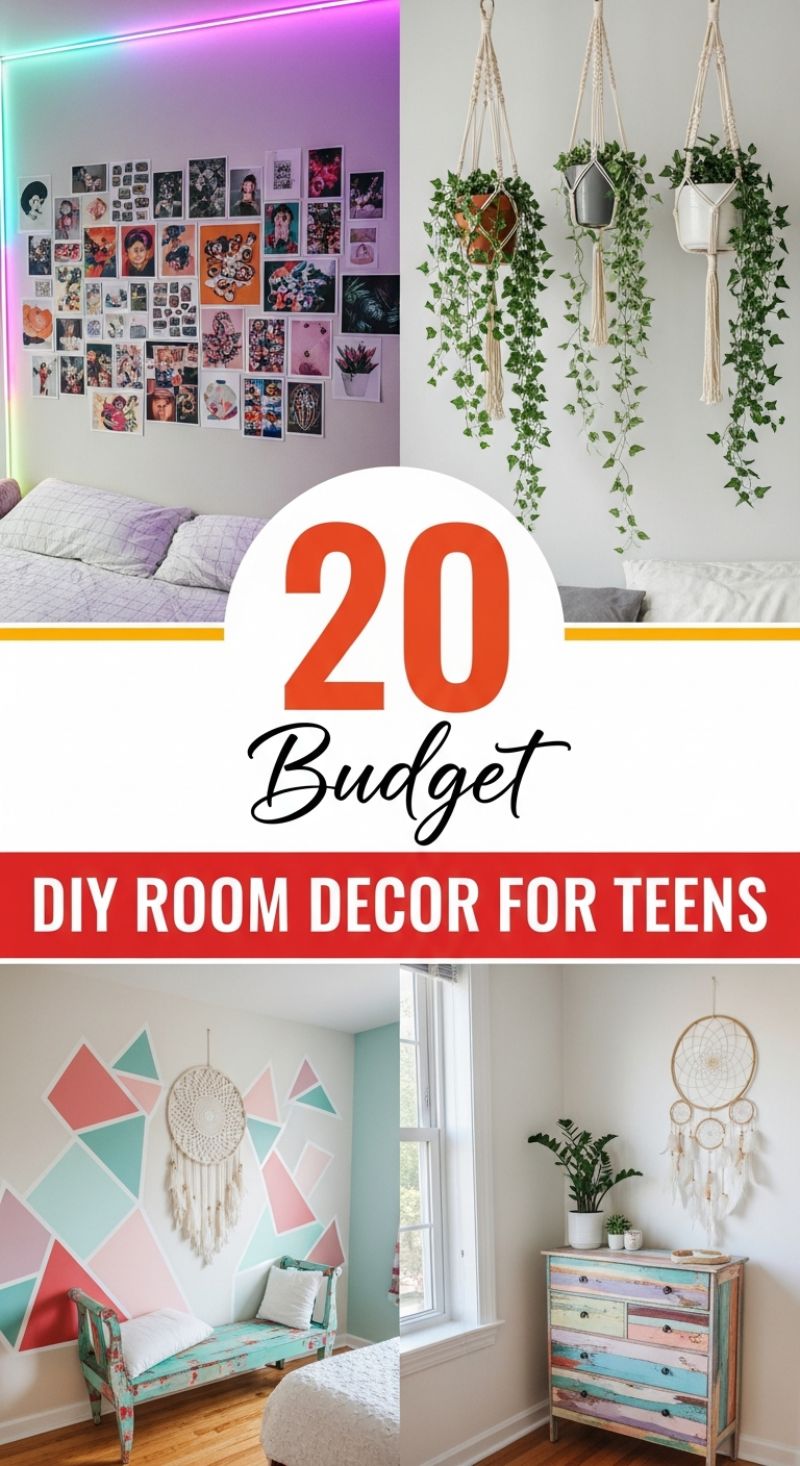
The core visual components of a stylish, modern teen room rely heavily on curated personalization and clever architectural enhancements. The photo collage wall paired with ambient LED lighting is perhaps the most defining and easiest budget DIY project. To execute this look flawlessly, first, curate your prints: mix photography, abstract art, and printed text in various sizes. The key to a visually cohesive gallery wall is planning the layout on the floor first, creating a dense cluster in the center and working outwards. Use removable mounting putty or double-sided poster tape instead of nails, which allows for frequent updates and protects rental walls. For the lighting, install RGB LED strip lights along the perimeter where the wall meets the ceiling, or frame a focal point, like the gallery wall itself. Expert tip: Ensure the wall surface is clean and dry before adhering the strips, and when turning corners, avoid harsh folds by using solderless corner connectors for a seamless, professional glow that changes the entire mood of the space.
To add structural interest without heavy renovation costs, tackle a statement geometric accent wall, as seen in the bottom left image. This project requires high-quality painter’s tape (like FrogTape), a level, and 3-4 contrasting yet complementary colors (e.g., mint, coral, blush, and white). Begin by sketching random, intersecting lines lightly in pencil. Apply the tape firmly, ensuring the edges are sealed tight, especially where the tape meets the wall texture. You will need to paint sections in separate phases, allowing drying time in between so the tape from one color doesn’t lift the paint of an adjacent color. For the sharpest lines, wait until the paint is still tacky—not soaking wet, but not fully cured—before slowly pulling the tape away at a 45-degree angle. Pair this bold backdrop with salvaged or thrifted furniture, like the multicolored dresser, which you can transform by sanding, layering various chalk or milk paint colors, and then lightly distressing the edges with sandpaper for a highly textured, bohemian look.
Finally, incorporate natural elements and texture using simple decor additions like macrame plant hangers and dreamcatchers. Macrame hangers (either handmade using basic square and spiral knots or purchased affordably online) are perfect for housing trailing faux ivy or Pothos, adding vertical interest and softening the harsh angles of the room. When hanging these, always use secure mounting hardware—a toggle bolt or robust drywall anchor—especially if using heavy ceramic pots, as this prevents accidents. By focusing on these four core concepts—personalized wall art, ambient lighting, architectural paint hacks, and textural accents—you can create a high-impact, high-style room transformation that is entirely achievable in a single weekend and adheres strictly to a DIY budget.
DIY Decor: Serene Neutral Master Suite Transformation
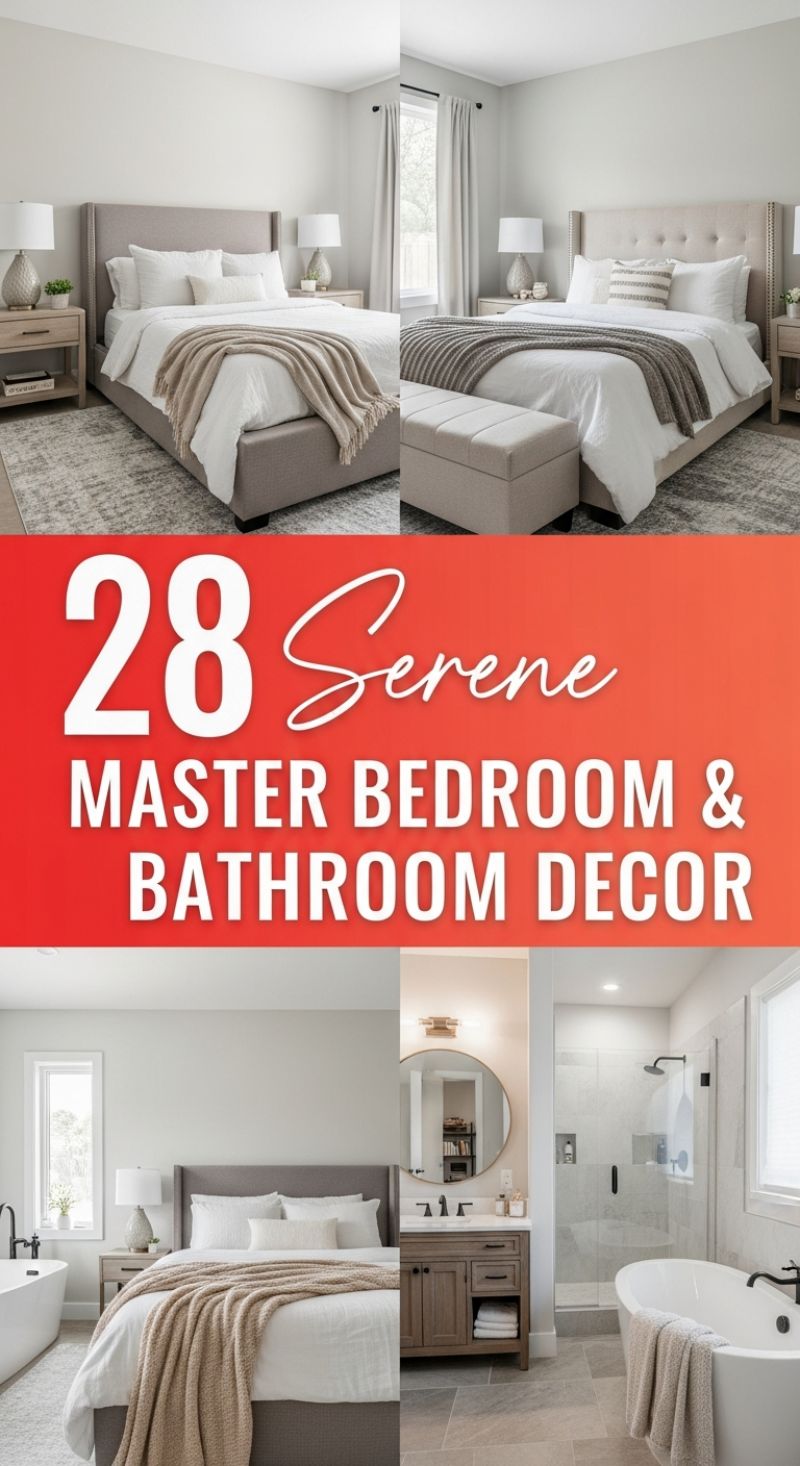
The sophisticated aesthetic demonstrated in this master suite relies heavily on cohesive color theory and meticulous layering, proving that a high-end look is achievable in a single weekend through strategic DIY textile and accessory swaps. To capture this calm, serene style, the crucial first step is to establish a strict monochromatic foundation. Focus on a blend of three main tones: pure white (for bedding), soft light gray/greige (for walls and rugs), and natural taupe/camel (for accent blankets and throws). Your weekend mission should be to declutter and standardize all visible textiles. Start with the bed: swap any patterned sheets or colorful duvets for crisp, solid white cotton. The luxury comes from the layering—drape a heavy, textured knit throw (like the taupe one pictured) diagonally across the foot of the bed, and introduce a single decorative lumbar pillow in a muted stripe or textured solid to prevent the look from falling flat. This focus on texture—from the upholstery of the bed frame to the plush area rug—is the secret ingredient that adds depth to the otherwise simple color scheme.
Once the foundational textiles are set, move onto the bedside vignettes. The subtle elegance of the nightstand setup provides a huge opportunity for a weekend DIY project. If your existing nightstands don’t match the light, natural wood tone shown, consider sanding and restaining them with a light Danish oil or, for a quicker fix, using chalk paint in an off-white or light gray hue. The most transformative DIY element here is the lighting. Swap out dated lamps for tall, weighty bases made of textured ceramic or seeded glass, ensuring the shades are simple white linen to diffuse the light softly. This instantly elevates the room’s ambiance. Expert advice for achieving maximum serenity: maintain visual simplicity on the surfaces. Limit accessories to a small stack of books, a subtle green plant for a touch of life, and a decorative box to hide clutter. If space allows, repurpose or DIY a simple end-of-bed bench by reupholstering an existing piece with a tufted, neutral fabric, adding both function and visual completeness.
To bridge the serene bedroom look into a cohesive, spa-like master bath, focus on high-impact accessory swaps that unify the spaces. While installing a freestanding tub or new tile is beyond a weekend scope, updating the mirror and hardware is not. Replicate the chic, modern look by replacing a standard rectangular mirror with a large, circular, brass- or gold-rimmed mirror above the vanity. This single change brings instant visual softness and glamour. Furthermore, swap out existing vanity hardware (pulls and knobs) and towel racks for unified matte black or oil-rubbed bronze finishes, mirroring the dark plumbing fixtures seen around the tub and shower. Finally, integrate the textile palette by adding rolled white or light beige towels to an open shelf or basket near the vanity, ensuring the bath area feels like a continuation of the bedroom’s neutral, layered design rather than a separate zone. This attention to detail creates a harmonious, custom-designed master suite.
10 Genius Valentine’s Cookies Decorated

While traditionally edible, these exquisitely decorated sugar cookies transition seamlessly into high-end DIY Valentine’s décor, perfect for a weekend project that culminates in stunning party favors or a lavish centerpiece display. The key to achieving this look lies in mastering royal icing consistency and embracing a soft, romantic color palette—think dusty rose, mint green, robin’s egg blue, and pale lavender. Begin by preparing a sturdy, flat-top sugar cookie base cut into various shapes, predominantly hearts and rounds. The most critical step is the flood layer: use a royal icing consistency that holds its shape for about 15 seconds after being drizzled. Once the base color (the soft pastel) is flooded and perfectly dry (allow 8–12 hours), you can move on to the intricate piping. For the delicate filigree, lace, and scrollwork seen across these designs, use a slightly stiffer white royal icing with a PME tip 00 or 1. If you are attempting the intricate damask or floral patterns, ensure your hand pressure is consistent and fluid, allowing the icing to trace continuous lines rather than broken dots.
To achieve the sophisticated ornamentation shown here, several key techniques are employed. For the wet-on-wet marbling effects (seen on the pale pink heart and the light green round cookie), you must work quickly after flooding the base layer. Immediately after covering the cookie with your main color, drop contrasting dots or lines of wet icing onto the surface and use a scribe tool or toothpick to gently drag through the colors to create swirls, hearts, or feathering effects before the icing sets. For the fine lacework and crocheted look visible on the pink heart, outline your design and then pipe a grid or mesh pattern, allowing the edges to dry before filling in the smaller sections with tiny dots or shell borders. Expert tip: Utilize edible metallic details, like gold dust mixed with a drop of vodka or lemon extract, to paint accent lines or cover small bead sprinkles, adding a touch of luxe glamour as seen on the mint heart and the diagonal stripe on the blue heart.
This project truly shines in the variety of designs achievable. Notice the dimensionality added by piping rosettes and small leaves (like the bottom right pink cookie), which requires a thick, stiff icing consistency. Similarly, the ‘beaded’ borders and garlands are achieved using simple dot techniques with stiff icing, ensuring each bead stands high and retains its circular shape. Once fully dry (ideally another 12-24 hours), these cookies are ready to be displayed. Arrange them on a white tiered tray or nestle them into a bowl as part of your table settings. For party favors, use clear cellophane bags tied with silk ribbon in coordinating colors. The level of detail and customization allows these edible crafts to elevate your holiday decor far beyond simple store-bought items, proving that sometimes, the best weekend DIY decor projects are those you can also enjoy eating.
Ultimate Super Bowl Party Decorations: Creating a Game Day Feastscape

Transforming your dining area into a championship-worthy viewing station is the perfect DIY project for a high-impact weekend refresh. The core strategy for these viral Super Bowl setups is centered on aggressive color coordination and utilizing food as a central decorative element. Begin by locking down your color palette—whether you choose generic football colors (green, brown, white) or specific team hues (like the prominent red and yellow seen here). A crucial DIY centerpiece is the ‘Field Goal’ runner, easily created by purchasing a length of inexpensive green felt or artificial grass remnants. Use thin white masking or electrical tape to quickly lay down the 50-yard line and hash marks. This simple detail anchors the theme and elevates a standard white tablecloth instantly. Flank this runner with genuine or replica sports equipment, such as football helmets or a regulation football used as a trophy centerpiece, clustered alongside vibrant, theme-matching florals (sunflowers for yellow, red tulips for deep reds) to soften the athletic edge and add height.
Next, focus on maximizing visual appeal and spatial efficiency by leveraging vertical serving solutions. Tiered serving platters are essential for a Super Bowl spread; they allow you to display appetizers, fruit, or desserts in an organized and aesthetically pleasing manner, saving valuable table real estate for large bowls of chips and wings. To integrate the food itself into the decor, arrange snacks by color and texture. For example, use a large, striking blue serving bowl for a popcorn centerpiece, surrounding it with smaller bowls holding vividly colored items like bright red cherry tomatoes, green grapes, and yellow cheese cubes. This meticulous arrangement ensures that even casual finger foods contribute to the overall color story and look intentional, providing an abundant, celebratory feel without extensive effort. Remember that repetition—using matching colorful plates, napkins, and plastic ware—is key to achieving a professional, cohesive party look.
The final decorative layer is the surrounding ambiance, which provides the quickest weekend DIY win. Utilizing inexpensive elements like balloons and custom pennant banners dramatically increases the festive atmosphere. Select latex balloons in your chosen team or accent colors (e.g., primary blue, bright red, and sunny yellow) and group them dynamically, securing them near key focal points like the food buffet or the television area. For a DIY banner, cut triangles from colored construction paper or felt and string them across the room using twine or ribbon, mimicking the traditional stadium look. For expert polish, ensure your lighting complements the colors; avoid harsh overhead lights and opt for warmer lamps or even small string lights placed subtly behind the buffet display. These final touches guarantee a high-energy environment that guests will remember long after the final whistle blows.
BESTIE BASH: Galentine’s Day Decor Setup

Achieving this vibrant and celebratory “Bestie Bash” setup is surprisingly simple, relying heavily on glitter cardstock, felt cutouts, and a strictly defined color palette of hot pink, pale pink, red, and gold. Begin your DIY project with the focal point: the signature banner. To recreate the chunky, glittering letters, acquire heavy-duty glitter cardstock (100lb or more) in a bright magenta shade. Print large block letter templates for “BESTIE BASH” and carefully trace and cut them out. Expert tip: use double-sided adhesive sheets on the back of plain cardstock before dipping in high-quality craft glitter for a more three-dimensional, textured look that minimizes glitter fallout. Once the letters are ready, punch small holes in the upper corners and string them onto a rustic twine or white cotton string, separating the words with festive felt or glitter flower shapes to add a playful touch. Ensure the banner is hung tautly above your designated drinks station or photo wall for maximum visual impact.
The next crucial step involves mastering the texture and scatter elements that unify the scene. The image showcases a beautiful blend of materials: soft felt hearts (in pale pink and magenta), rough, dense glitter hearts (in red and gold), and detailed paper confetti. To achieve the textural contrast seen here, focus on creating large, dimensional paper pom-poms or spheres. These are constructed by punching hundreds of uniform circles (using varying shades of pink paper) and painstakingly gluing them, overlapping, onto a foam ball base until fully covered—this provides a rich, almost floral texture unlike standard tissue paper poms. Scatter smaller felt and glitter hearts liberally across your white backdrop. This intentional clutter ensures every corner of the display is activated, transforming simple white space into a dynamic, party-ready landscape. Remember, the key to successful scatter décor is layering different materials and sizes, allowing light to catch the varied textures of felt, gloss, and sparkle.
Finally, elevate the atmosphere with specialized photo props and glamorous beverage displays. The signature glittering champagne bottles are easily DIY-ed: start with clean bottles (whether containing sparkling wine or cider) and coat them entirely with a strong adhesive spray. Immediately roll the bottles in ultra-fine, metallic glitter—one in opulent gold and the other in vibrant magenta—then finish with a clear, glossy sealant spray to lock the sparkle in place. For the decorative champagne flutes, skip the actual drink and fill them entirely with heart-shaped candy sprinkles or tiny confetti pieces for a highly photogenic and fun visual element. Complete your “Galentine’s Day Bash” theme with DIY photo booth props. Print out fun phrases or use sturdy cardstock to cut out oversized heart glasses shapes and small heart cutouts, affixing them to wooden skewers or lollipop sticks. Displaying these alongside the central Galentine’s Day sign (also easily created using layered cardstock mounted on sticks) invites immediate interaction and ensures memorable photos of your ultimate bestie celebration.
14 Lucky St. Patrick’s Day Decorations: Mastering the Monochromatic Green Mantel
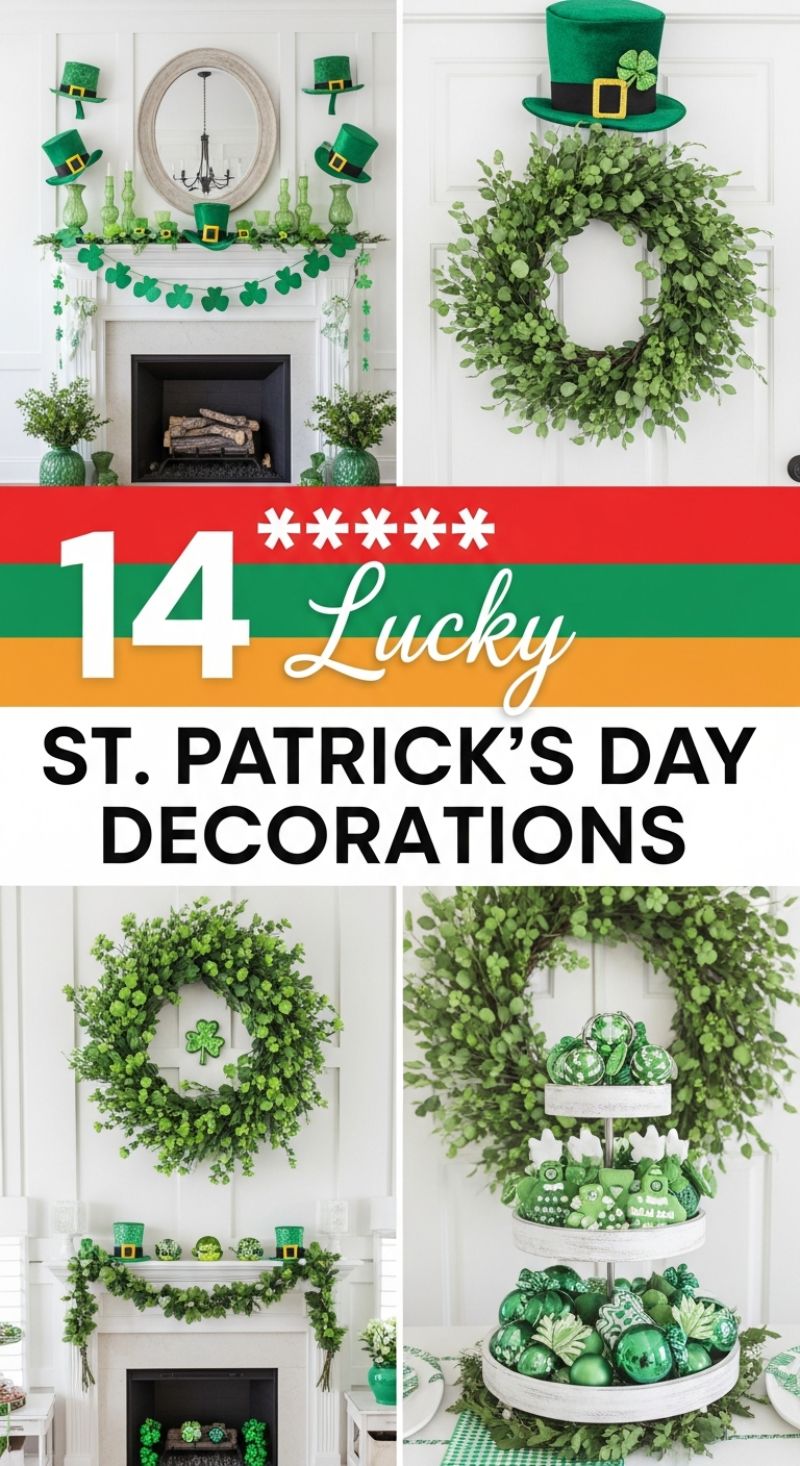
Creating a sophisticated, high-impact St. Patrick’s Day display doesn’t require complex crafting, but rather strategic use of monochromatic elements and lush greenery. The centerpiece of this look is the mantle arrangement, which utilizes vertical space and layered textiles. Start by installing a dense faux greenery garland—opt for boxwood or eucalyptus for maximum texture—draping it loosely across the mantle edge to soften the hard lines. Above the mantel, ditch the typical banner for a bold, three-dimensional arrangement of leprechaun top hats, varying their tilt and height to add visual interest. These can be secured using removable adhesive strips or small finishing nails hidden behind the rim. Flanking your central focal point (like a mirror or art piece), arrange a collection of green glass bottles and candle holders in varying heights and shades. The key here is repetition; using only green creates a cohesive, refined look, contrasting beautifully with the white millwork.
To complement the interior focal point, the use of large, simple wreaths offers instant curb appeal and decorative versatility. For the door or a large wall above a secondary mantel, select a large, high-quality, dense greenery wreath (eucalyptus is perfect for year-round use). For St. Patrick’s Day, simply personalize it with a quick accessory. This might be a festive leprechaun top hat secured at the top of the door wreath, or a chunky, glittered shamrock cutout hung slightly off-center inside the wreath ring for an interior accent. When decorating the wreath, ensure the embellishment is easily removable so the base greenery can transition seamlessly into spring and summer décor. If using a secondary display, like a tiered tray (as seen in the bottom images), fill it almost exclusively with green objects, such as metallic holiday ornaments, small potted shamrocks, or custom-made green frosted cookies for a festive and edible display.
Expert tip for achieving this vibrant look: focus on mixing matte and glossy textures within your color palette. The contrast between the matte, fluffy faux greenery and the reflective, glossy green glass or metallic ornaments prevents the monochromatic scheme from falling flat. Also, pay attention to symmetry and scale around the fireplace opening. Use identical planters or vases filled with small green shrubs (like boxwood topiaries or baby tears) on the hearth or floor to anchor the display, drawing the eye down and adding depth. This layered approach ensures that the resulting décor is festive, visually rich, and can be assembled entirely in a single weekend using mostly store-bought components adapted with minimal DIY effort.
19 Effortless DIY Boho Decor
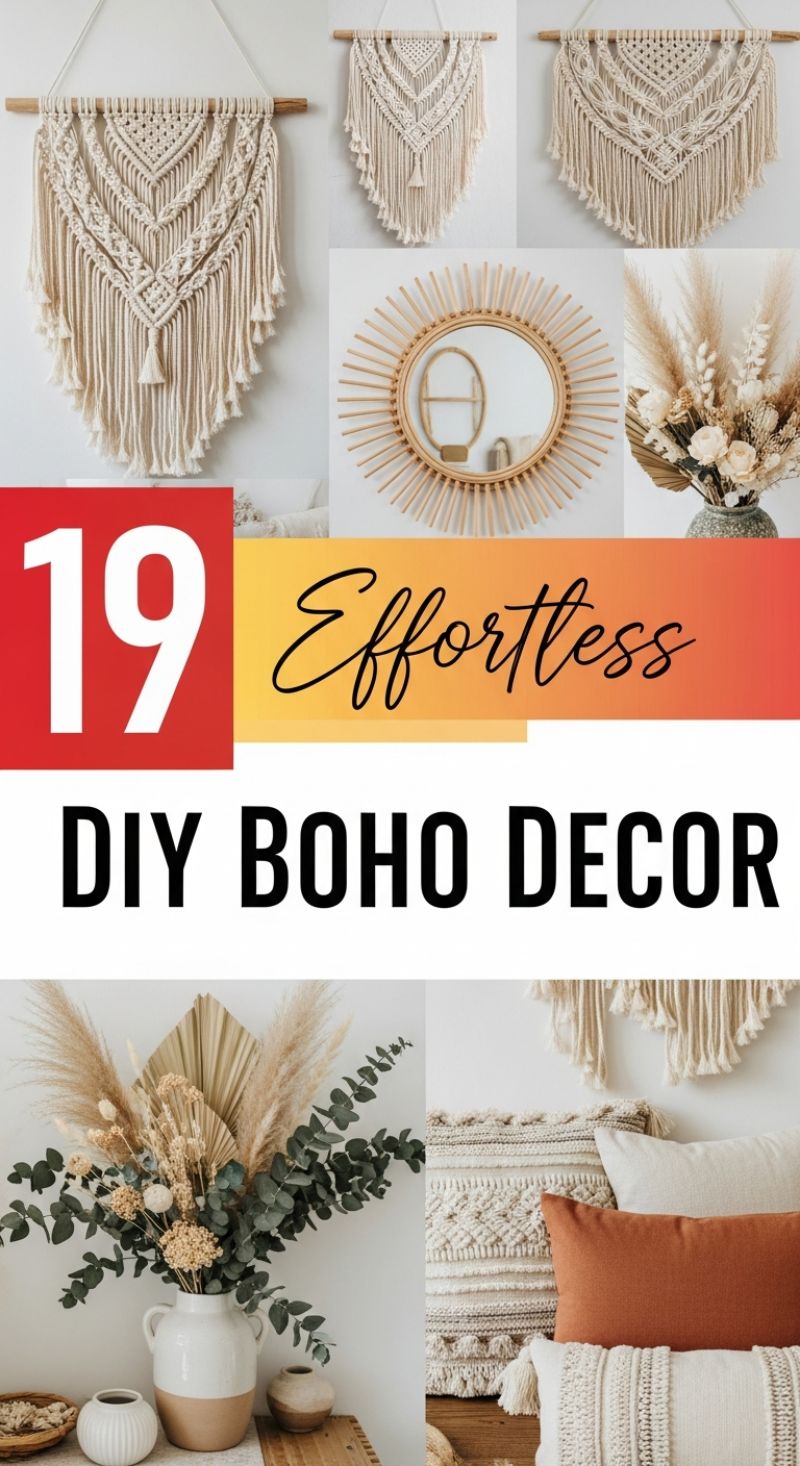
The current obsession with Bohemian decor centers on organic materials, neutral palettes, and high texture—all of which are perfectly showcased in these DIY projects. The core elements visible here include intricate macrame wall hangings, rattan-inspired accents, and lush dried floral arrangements. To replicate the iconic layered wall art, you will need a wooden dowel rod and high-quality three-ply cotton rope or cording (3-5mm thickness works best). Begin by attaching your cords to the dowel using the foundational Lark’s Head knot. The visual centerpiece of these designs is the large, inverted ‘V’ shape, which is achieved by alternating between two fundamental techniques: the Square Knot for dense, textured blocks, and the Double Half Hitch Knot for the precise, diagonal lines that frame the pattern. Expert advice suggests drawing your intended design on paper first and marking the cord count to ensure symmetry. By staggering the length of your cords and finishing the ends with simple overhand knots or brushing them out for a feathered fringe, you create that dramatic, flowing effect signature to Boho textile art.
To complete the relaxed, earthy aesthetic, focus on easy-to-create accents like the stunning sunburst mirror and permanent floral installations. The sunburst mirror, often associated with rattan, can be easily DIYed using a circular mirror base and varying lengths of thin wooden dowels or bamboo skewers. Ensure you use an industrial-strength adhesive (like E6000 or strong hot glue) to attach the dowels radially to the back perimeter of the mirror, overlapping them slightly to create depth. For the dried arrangement, select materials that offer contrast in texture and height, such as feathery pampas grass, stiff dried palm spears, and soft, cascading eucalyptus branches. The trick to achieving a voluminous look like the one pictured is to use floral foam secured inside a wide-mouthed, two-toned ceramic vase. Start by placing the largest, most structured elements (like the palms) centrally, then layer the tall pampas for height, and finish by allowing the greenery (eucalyptus) to drape naturally over the vase lip, creating an effortlessly abundant centerpiece that requires zero maintenance.
15 Clever Thrift Finds Decor Transformations
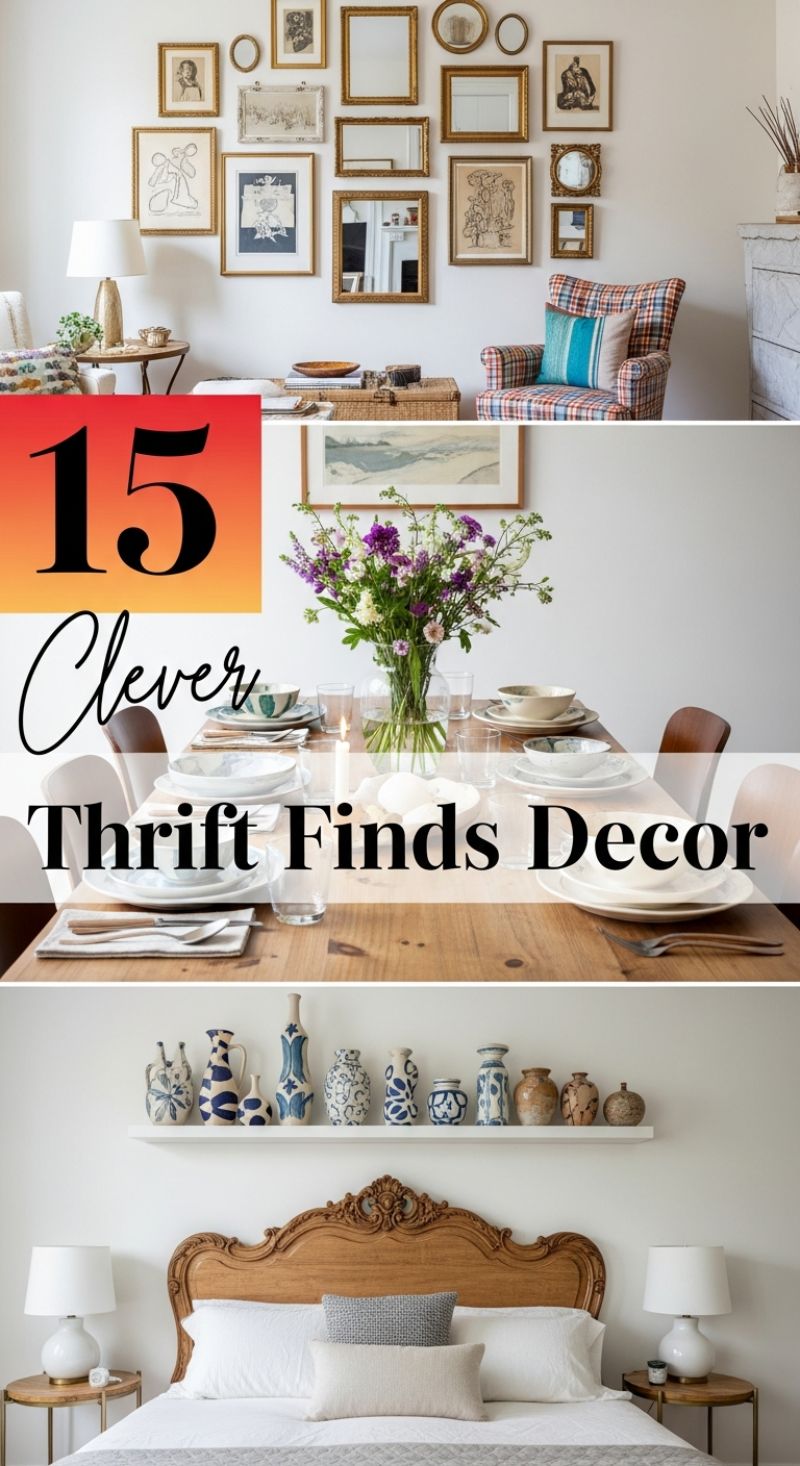
The secret to achieving a high-end, bespoke look on a budget lies not in buying new, but in knowing how to hunt for and strategically unify thrifted treasures. This look leverages the history and character found in pre-owned pieces, making the finished result feel curated over time. To emulate the successful projects shown here, start your thrifting journey with a focus on three key areas: ornate framing, high-quality wood furniture structure (like the carved headboard), and ceramic collections. Look past dated colors or minor flaws; a solid wood piece or a uniquely shaped frame can always be transformed with simple sanding, staining, or a quick coat of spray paint. The goal is to collect disparate elements that share an underlying theme—be it a color (like the unified gold frames in the gallery wall) or a material (like the mixture of wood textures on the dining table).
To execute the stunning gallery wall showcased in the top panel, focus on collecting antique-style frames, especially those with rococo or detailed edging. Do not worry if the frames are currently silver, brown, or tacky plastic; the DIY magic happens when you unify them. Purchase a high-quality metallic gold or brass spray paint and repaint every single frame the exact same hue. This simple step instantly elevates the collection from a chaotic jumble into a cohesive, intentional installation. When hanging, lay your framed pieces out on the floor first to determine the optimal arrangement, then use paper templates on the wall to map out the placement before drilling. Interspersing antique artwork with small, detailed mirrors (also easy thrift finds) adds reflection and visual depth, ensuring the wall feels dynamic rather than static.
For smaller, quicker weekend projects, focus on shelf styling and table setting, which rely heavily on collected ceramics and glassware. The stunning blue and white vase collection shown above the bed is a masterclass in cohesive collecting. The patterns, shapes, and sizes vary wildly, yet the exclusive use of blue and white creates instant harmony and a luxurious, collected feel. Begin collecting vases and pitchers in your chosen color palette (or simply paint them if you prefer a solid tone). Display them on a clean, simple floating shelf to let the collection be the undisputed focal point. Similarly, elevating your dining experience (middle panel) can be done by layering thrifted plates of slightly different patterns and sizes, paired with linen runners and simple, mismatched glassware, transforming a basic wooden table into a warm, inviting setting fit for any high-end magazine shoot.
DIY Rustic Chic Onesie Decorating Station

To integrate this highly engaging craft into your weekend DIY lineup, begin by setting up a visually stunning, rustic-chic station that serves both as an activity center and a key piece of event decor. The secret to the appeal of this setup lies in its organization and natural aesthetic. Drape your table in a crisp, white linen tablecloth to create a clean foundation. Utilize natural wood elements—specifically, tiered risers, small crates, and wooden trays—to elevate and organize your crafting supplies. Notice how the image uses wooden crates to separate fabric paints from fabric markers, adding height and ensuring an organized flow for guests. Enhance the backdrop with trendy boho decor like macrame wall hangings or jute tassel garlands, ensuring the station is photogenic and inviting. Fresh flowers in white pitchers or neutral vases are the perfect finishing touch, transforming a simple craft area into an elegant focal point for any baby shower or party.
Stocking the station requires quality, purpose-specific materials. Provide a generous supply of plain white 100% cotton onesies in various sizes (typically newborn to 12 months). The core decorating materials should include both permanent fabric markers and specialized textile paints in an array of colors. Expert organization is vital here: place fabric markers tip-up in attractive containers (like the small rustic wooden crates pictured) grouped by color or tip size. For the paints, display small bottles neatly on tiered risers, accompanied by a variety of brushes—fine tips for detail work and foam dabbers for larger coverage. Crucially, include a piece of cardboard or freezer paper to insert inside each onesie during decoration; this prevents paint or marker bleed-through onto the back layer of the garment, ensuring a professional finish.
To ensure a successful and user-friendly DIY experience, provide visual cues and necessary finishing tools. Place pre-stenciled or inspiringly decorated example onesies (like the heart and floral designs seen) on miniature wooden easels to spark guest creativity. Offer stencils, tracing paper, or printable iron-on transfers as options for those who prefer guidance. The final step of this project involves setting the artwork to ensure permanence during washing. As indicated by the presence of an iron in the image, ensure a dedicated area is available for heat-setting. Provide clear, concise instructions for guests on the required drying time and the appropriate temperature for curing the design, or provide small instruction tags to accompany the finished onesie if they plan to take it home. A successful DIY station is not just about the craft, but the thoughtful presentation of materials and the clear path to a high-quality, lasting result.
13 Viral Lighter Decoration Ideas
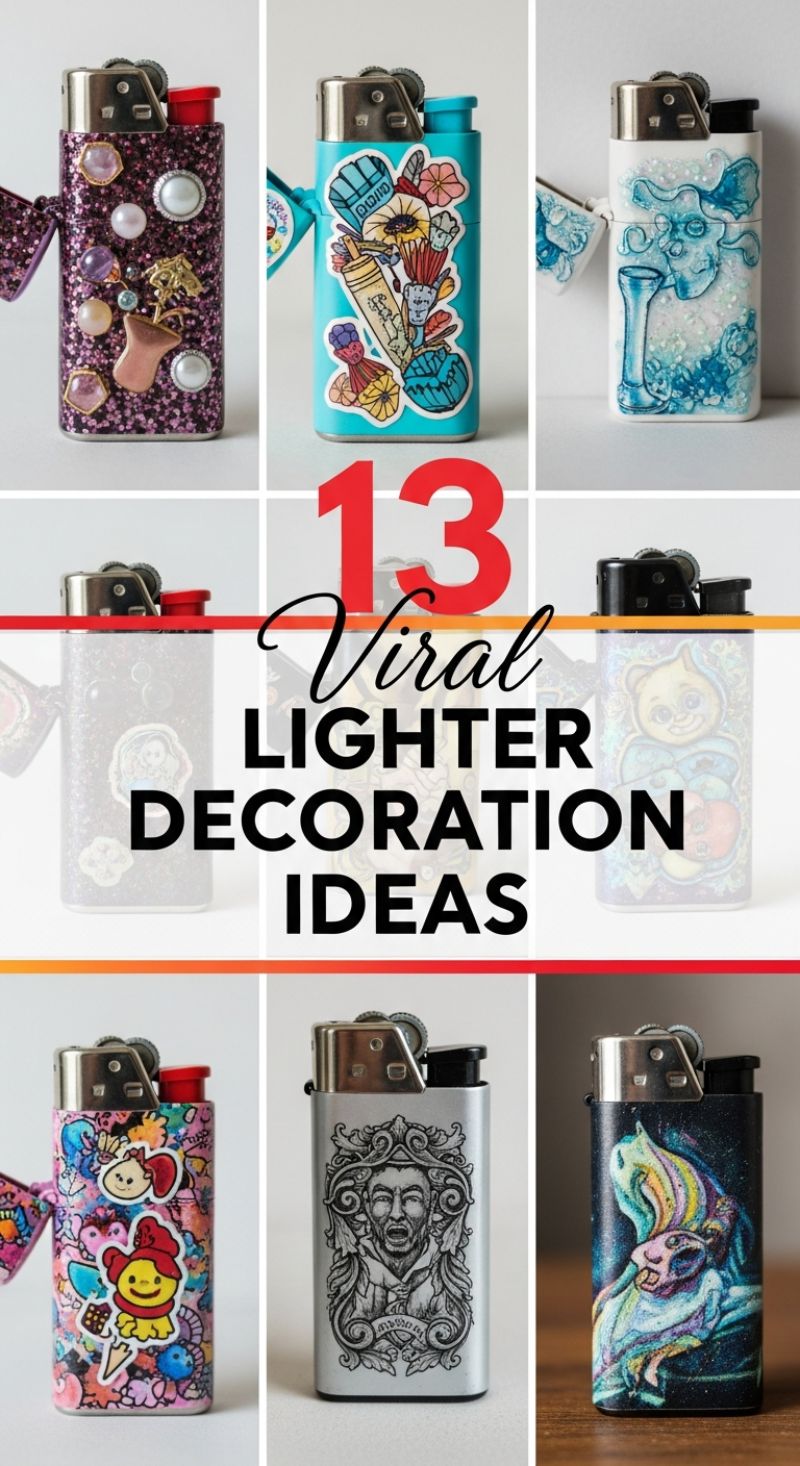
Customizing utility items is one of the most popular DIY trends, and transforming a plain lighter into a miniature work of art is an incredibly quick project you can execute in less than an hour of active crafting time. To achieve the maximalist, high-glam look seen in the top left corner—featuring chunky glitter, pearls, and decorative charms—you will need a durable adhesive. First, prep the entire surface of the lighter by wiping it down with isopropyl alcohol to ensure proper adhesion. Then, using a strong liquid adhesive like clear resin or specialty craft glue, coat the lighter and immediately dip it into fine glitter, repeating the step until the coverage is completely opaque. After the base is dry, use a potent industrial-strength glue (like E6000) to carefully affix faux gems, small pearls, or metallic flatback charms. For added durability and a truly polished finish, seal the entire decorated surface with a layer of clear UV resin, which cures quickly under a UV light and provides a hard, glossy, professional-grade protective shell.
For those who prefer a vibrant, street-art aesthetic, the stickerbomb technique is the fastest path to customization, as demonstrated by the teal and pink lighters. This method involves overlapping several small, high-quality, waterproof vinyl stickers. The key to a successful stickerbomb is density and visual flow—try to cover the entire surface, trimming stickers at the edges and ensuring no original lighter color peeks through the gaps. If you are aiming for a more graphic, minimalist look, like the engraved silver lighter, utilize permanent vinyl cutouts or specialty waterslide decals featuring intricate line art. After applying any decal or sticker pattern, it is absolutely essential to seal the design. Constant handling, coupled with the heat generated by the lighter, will cause stickers and decals to lift and peel prematurely. A thin, even coat of high-gloss acrylic sealant spray or, ideally, UV resin will lock the decorations in place, dramatically extending the life of your finished piece.
More advanced DIYers can experiment with texture and sophisticated artistic applications. The blue and white lighter, for instance, suggests a textured epoxy or resin pour combined with fine micro-glitter to create a dynamic, ethereal effect. You can achieve this by mixing tinted resin with glitter and using a small brush or toothpick to build up dimensional swirls and droplets. Similarly, the cosmic rabbit design requires highly detailed acrylic painting, which must be executed on a clean, primed surface (such as matte black spray paint) and then sealed with multiple coats of clear varnish. No matter the method, always ensure the moving metal parts and the gas nozzle are kept free of glue and resin, and allow all materials to cure fully—typically 24 to 72 hours for adhesives and glues—before using the lighter. This meticulous finishing process ensures your viral DIY project is safe, durable, and ready to show off.
Enchanted Birdcage Floral Centerpiece
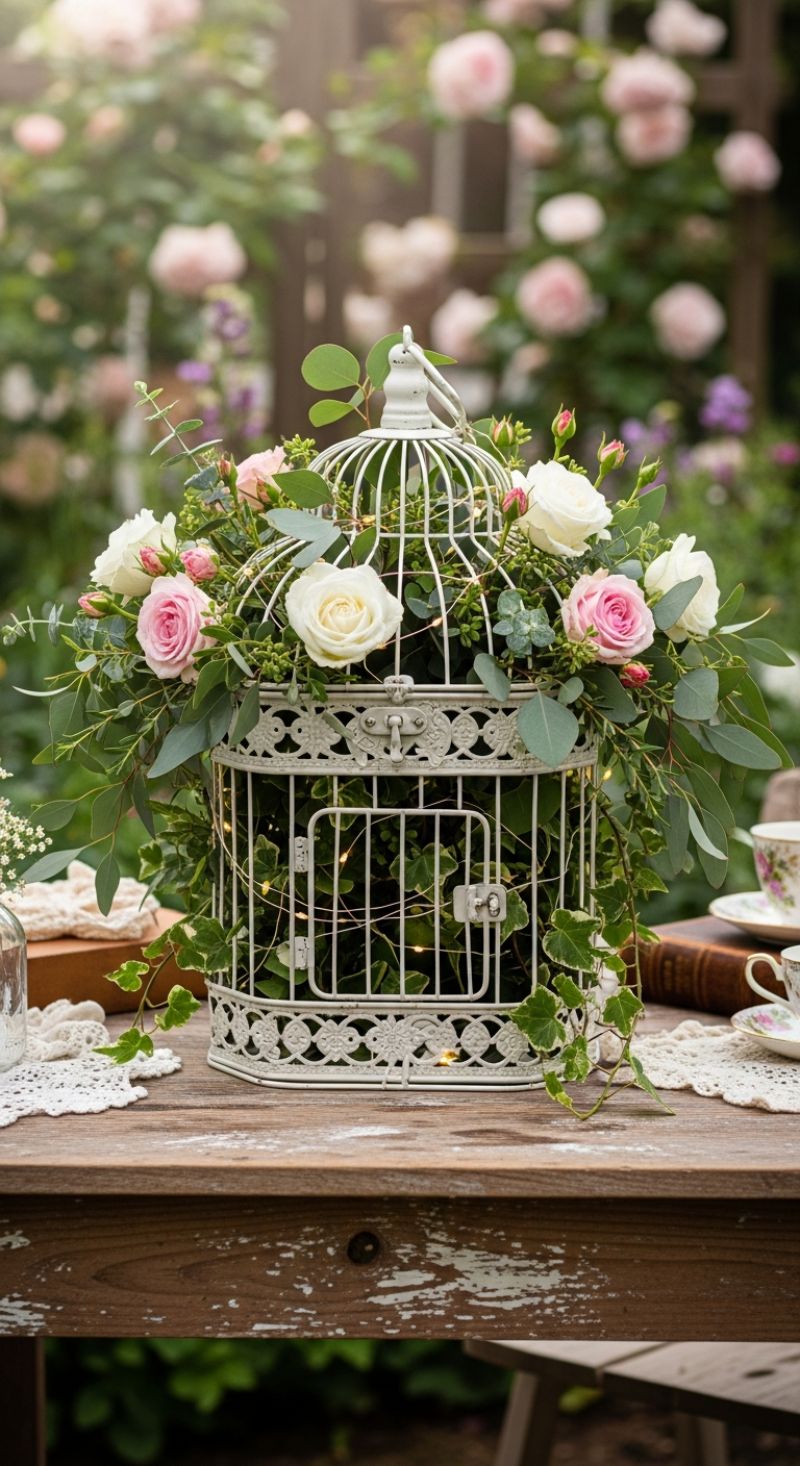
This stunning centerpiece captures the timeless romance of an English garden, making it the perfect DIY project to elevate your outdoor or indoor decor. The key to replicating this viral look is starting with the right materials. Source a decorative birdcage—the distressed, antique white finish shown here is ideal, suggesting age and charm. If your cage is too glossy, a quick application of chalk paint followed by light sanding will achieve that rustic, shabby-chic aesthetic. Once prepped, the next step involves preparing the base for your florals. If using real flowers, you will need wet floral foam secured firmly inside the top opening or base of the cage; for high-quality faux florals, dry foam will suffice. The true magic lies in the dense, overflowing appearance, so ensure your foam extends slightly beyond the cage opening to allow the greenery to spill outward naturally.
Creating the lush arrangement requires layering diverse textures, contrasting the sharp geometry of the cage with soft, organic forms. Begin with the foundational greenery: use voluminous elements like silver-dollar or seeded eucalyptus, tucking them deep into the foam to establish height and width. This acts as the crown of the arrangement. Next, introduce trailing elements, most notably English ivy (as seen cascading down the sides), which connects the upper floral arrangement to the tabletop, creating visual movement. Now, integrate your focal flowers. The image uses a mix of creamy white and soft blush pink roses. Expert advice dictates using roses of varying bloom sizes and stages (buds and full blooms) and cutting the stems at staggered lengths. Place the largest blooms asymmetrically, ensuring the arrangement looks balanced from all angles but avoiding rigid symmetry. The goal is to make the entire piece look like a beautiful tangle, thriving wildly on its own.
The final, essential touch is the incorporation of warm lighting, which transforms the centerpiece from day to night. Use ultra-thin copper wire string lights (fairy lights) that are battery-operated. Weave these delicate lights subtly throughout the greenery, focusing on draping them both around the exterior perimeter of the floral arrangement and slightly inside the birdcage bars. This illuminates the ivy and casts a gentle, ethereal glow onto the tabletop. To fully emulate the romantic styling seen in the image, present your completed birdcage on a rustic wooden surface, perhaps topped with vintage lace doilies, and pair it with other antique touches like stacked books or patterned teacups. This detail-oriented staging ensures the centerpiece feels like a cherished piece of garden history.
Dreamy Prom Decorations & Ideas: DIY Opulent Drapery and Lighting

The visuals in this inspiration board capture the ultimate fantasy aesthetic—a luxurious, dramatically draped, and crystal-lit event space perfect for a gala, wedding, or high-school prom. Replicating this opulence on a DIY budget requires smart material choices and strategic layering. Start by sourcing fabric in deep, jewel-toned colors like the rich burgundy and teal velvet shown here. Since genuine velvet is expensive and heavy, opt for lightweight poly-velvet or heavy crushed taffeta. The key to achieving the dramatic ‘swag’ is proper installation. Use temporary ceiling rigging (like sturdy tension rods, ceiling-mounted removable hooks, or carefully placed wire support systems) to suspend your fabric. Measure the length generously—you need 1.5 to 2 times the actual span to create deep, romantic folds. Instead of professionally sewn tassels, hot-glue decorative fringe or gold ribbon along the edges of the swags to simulate expensive trim. This dramatic drapery serves as the anchor, immediately transforming a standard venue into a regal ballroom.
The real magic of this aesthetic lies in the sparkling, diffused light. While replicating those massive crystal chandeliers is challenging, you can recreate the *effect* of glittering light sources. Purchase several sets of LED curtain string lights. These come in long, vertical strands and are the perfect substitute for elaborate hanging crystals. Install these lights behind a layer of sheer, white chiffon or organza fabric, especially in the central walkway area (as seen in the bottom panels). The sheer fabric diffuses the bright LEDs, giving off a soft, ethereal glow that mimics expensive backlighting and hides the fixture structure. To achieve the ceiling canopy effect shown in the bottom right, use dozens of standard fairy light strands running crisscrossed across the ceiling, secured with painter’s tape or removable mounting clips. The dense layering of these tiny warm-white lights creates a ‘starry night’ effect that is essential for maximizing the romantic, dreamy atmosphere.
Finally, focus on a stunning focal point, like the floral archway and shimmering walkway. A DIY arch can be constructed easily using PVC piping or lightweight metal conduit bent into a semi-circle and anchored in decorative pots filled with concrete or heavy rocks. Wrap this structure densely with high-quality faux floral garlands—look for roses, hydrangeas, or peonies in creams and whites to contrast the deep jewel-toned drapes. Complete the walkway using a simple white or dark runner, flanking it with tiered pillar candle holders. To maintain safety and budget, utilize battery-operated LED pillar candles in varying heights. The combination of the deep, rich fabrics, the layered, diffused curtain lighting, and the elegant, illuminated entrance point will successfully replicate this high-end, dreamy decor scheme, ready for a weekend unveiling.
12 Adorable Ways to Decorate Your Car

Transforming your car interior into a plush, pastel sanctuary is entirely achievable this weekend, blending soft textures with playful, kawaii elements. The foundation of this viral aesthetic relies on luxurious, tactile materials. Start with the major surface areas: the seats and floors. Instead of costly full upholstery swaps, achieve this cozy look by purchasing or customizing thick, fluffy seat covers—faux sheepskin or high-pile shag covers work best, ensuring they are universal fit and do not obstruct side airbags (if applicable). Choose complementary colors like creamy white, blush pink, or muted beige to maintain a cohesive, tranquil atmosphere. For the floors and console area, utilize small, non-slip fuzzy mats or quilted pads placed strategically over the center console or passenger floorboard, instantly elevating the feel from functional rubber to plush comfort. The key instruction here is security: every added textile, especially mats, must have a strong non-slip backing to ensure it stays firmly in place and does not interfere with the pedals or driver controls.
The next step involves adding personalized details that bring character and charm. Focus on decorative items that stay secured during movement. The image showcases small faux plants or succulents housed in adorable character-faced pots; these can easily be created via a DIY project using plain ceramic pots and acrylic paint. To ensure these details don’t become projectiles, utilize museum putty or strong double-sided mounting adhesive to affix the pots (and any small decorative shelves) to the dashboard or console. Extend the soft texture theme to contact points like the steering wheel, where a padded, pastel steering wheel cover not only introduces a pop of color but also improves grip and comfort—just ensure it is snug-fitting and safe. Furthermore, incorporate textured throw pillows in matching shades. If you are handy with a sewing machine, creating textured pillow covers (e.g., using chunky knitted yarn or soft faux fur remnants) is a simple weekend task that provides high visual impact and contrast against the smooth upholstery.
Finally, elevate the ambiance with subtle lighting and ensure functional décor longevity. Battery-operated LED string lights (fairy lights) are an indispensable part of this aesthetic, providing a warm, inviting glow. Safely thread these lights along the perimeter of the door panels, console edges, or along the ceiling liner, ensuring that wires are tucked away and the light source never interferes with the driver’s sightlines or mirrors. When dealing with such light-colored, plush materials in a high-traffic area like a car, expert maintenance is crucial. To keep your vehicle looking top-tier, plan for weekly spot cleaning and bi-weekly vacuuming of the fuzzy textiles. Avoid excessive exposure to direct sun if possible, as pastel colors can fade quickly. By combining functional coziness with secured, personalized accessories, you achieve a stylish, ‘hygge meets kawaii’ car interior ready for its social media close-up.
Edgy Grunge Room Decor DIY
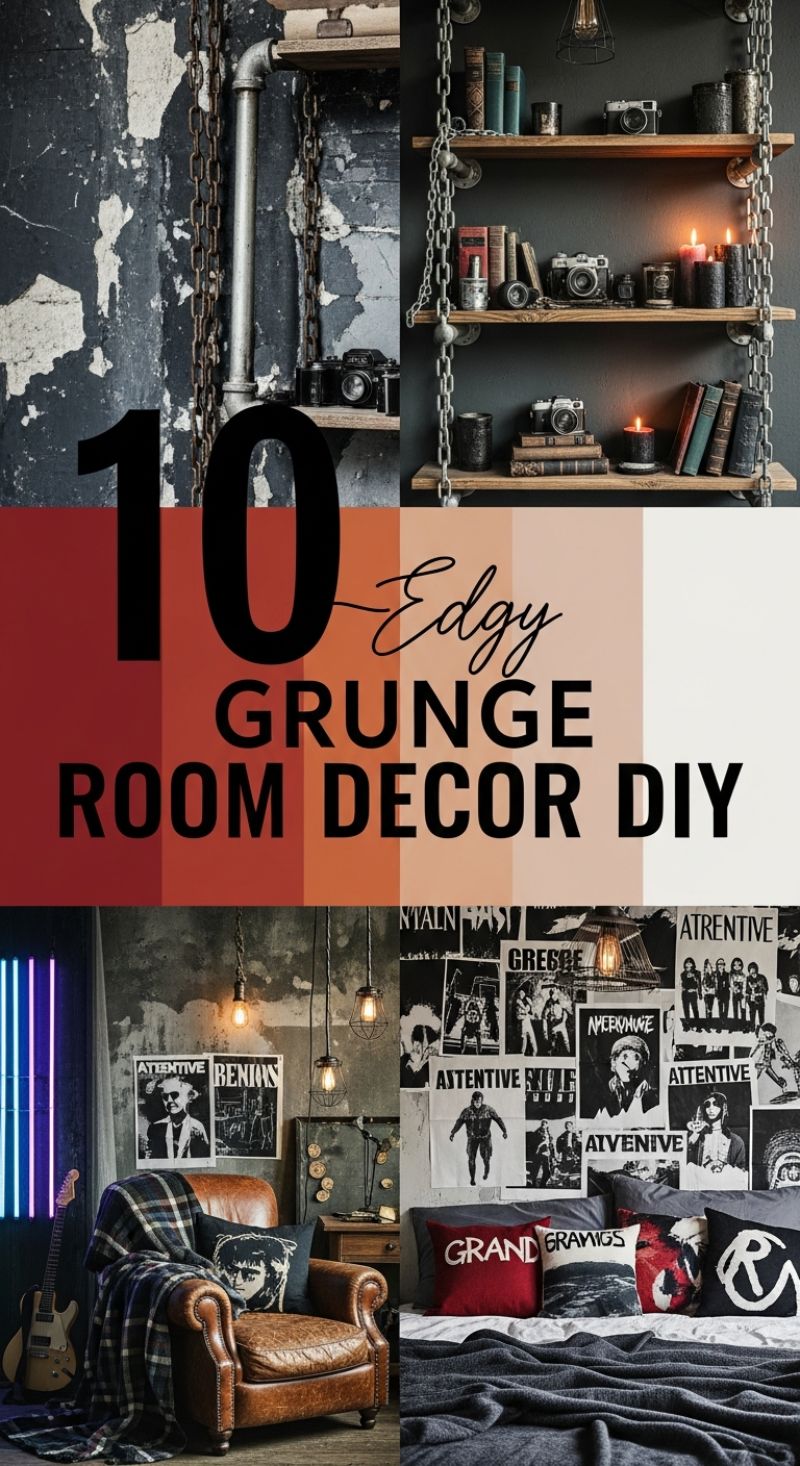
The ‘Edgy Grunge’ aesthetic is characterized by a strong mix of industrial components, distressed textures, and raw, rock-and-roll influences. You can achieve this look quickly by focusing on two high-impact DIY projects: the industrial chain shelving and the distressed accent wall. For the shelving, skip standard brackets and opt for heavy-duty galvanized pipe fittings or thick, rusty metal chains to suspend reclaimed wood planks. Begin by installing the pipe flange fittings securely into the wall studs, or, if using chains, utilize strong eye bolts attached to ceiling joists. The shelves themselves should be darkly stained or naturally aged to complement the heavy metal supports. This rugged system not only provides storage but acts as a major structural design element. To mimic the distressed wall seen in the upper panel, use a dark base coat (charcoal or deep navy) and, once dry, use a dry-brush or chipping technique with a contrasting lighter gray or off-white paint to simulate peeling plaster, adding immediate character and age to a new space.
The second centerpiece of the grunge room is the high-density poster wall, which requires commitment but minimal skill. Source black and white prints of vintage band flyers, abstract art, or stylized portraits, aiming for a variety of sizes and visual textures. The key is total coverage; start from the baseboard and work your way up, overlapping prints slightly and tearing or distressing the edges of the paper before affixing them to the wall using matte craft glue or double-sided tape. This technique immediately gives the impression of layers of history accumulated over time. To balance the dark walls and maximalist artwork, integrate warm industrial lighting. Suspend simple light sockets using thick hemp rope or braided electrical cords, and consider utilizing wire cage pendants to protect exposed Edison bulbs, which provide that necessary warm, amber glow.
To complete the DIY decor, focus on texture in your furnishings and accessories. The leather armchair, often a vintage find or a DIY distressing project itself, should be draped with a dark plaid or chunky knit blanket. Accent pillows should follow the monochrome or deep earth-tone palette, featuring graphic prints or bold text. Finally, accessorize the new shelving unit with objects that tell a story: vintage film cameras, stacks of bound, aged books (bonus points if the spine titles are worn), and dark, heavily textured candles. The overall mood should be moody and intentional, avoiding perfection and celebrating the raw, unfinished nature of industrial design. Consider adding a subtle, modern touch—like the vertical neon light fixture—to juxtapose the vintage elements and make the space feel intentionally designed rather than simply abandoned.
Stunning Valentine’s Room Decor: Mastering Romantic Lighting & Rose Petals
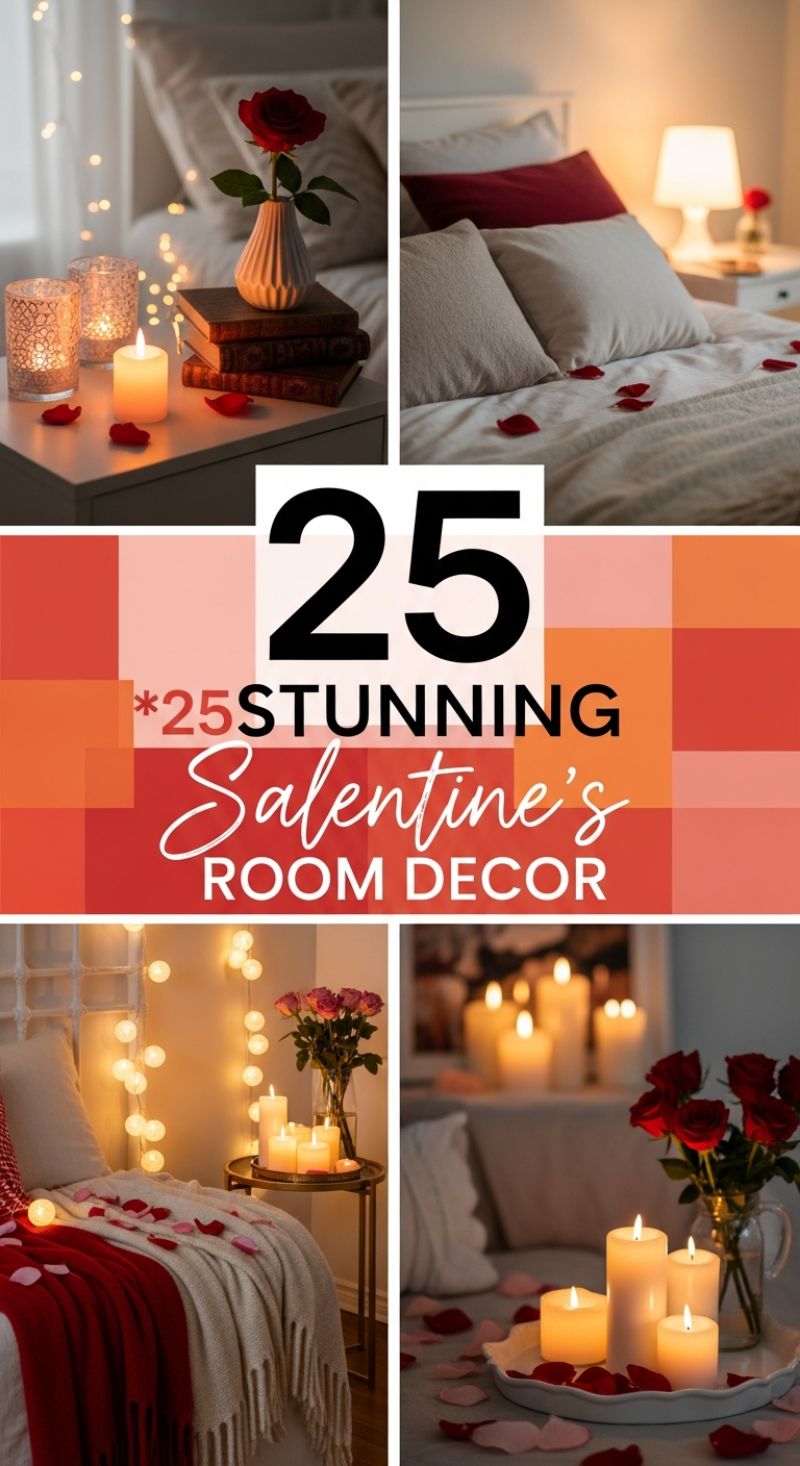
This breathtaking romantic setup is highly achievable over a weekend and relies entirely on mastering two key elements: layered ambient lighting and strategic floral accents. To replicate this stunning effect, begin by establishing a warm, diffused base layer of light. The images demonstrate the power of layering illumination, combining decorative string lights with multiple tabletop sources. For a safe and low-maintenance DIY, we highly recommend investing in high-quality battery-operated LED pillar candles. Group these in odd numbers (three or five) and place them on low surfaces like nightstands, coffee tables, or serving trays. Using a decorative tray, such as the ruffled white platter seen in the lower right, helps contain the arrangement and allows for a beautiful cluster of surrounding rose petals. Crucially, supplement these tabletop elements with vertical lighting. Drape battery-operated fairy lights or cotton ball globe lights along the headboard or the edge of a sheer curtain. This vertical element diffuses light upwards and outwards, successfully mimicking the soft glow of sunset and transforming the entire mood of the room without relying on harsh overhead fixtures.
Once the foundational lighting is set, focus on implementing the classic romantic accents: roses and petals. The secret to making scattered petals look luxurious rather than messy is strategic placement and restraint. Instead of using them ubiquitously, define specific ‘landing zones’: the immediate area surrounding the candle groupings, a concentrated scattering across the center of the bedspread, and perhaps a subtle trail leading to the bed. Use a mix of colors—deep red for dramatic intensity, and lighter pink or blush tones to add softness and depth, mirroring the varied examples shown. For the roses themselves, use simple, elegant vases. If you have multiple arrangements, vary the height and vessel style to create visual vignettes; for example, place a single striking red rose in a small, textured ceramic vase stacked atop a few antique books for a highly focused, romantic moment, as seen in the upper left quadrant. Ensure your flower arrangements are clean and prominently displayed alongside the primary light sources to maximize their visual impact.
The final touch involves utilizing textiles to ground the color palette and maximize coziness. This decor style thrives on the contrast between soft neutrals and saturated reds. Use existing white or cream bedding as a clean canvas and then introduce the theme through strategic injections of deep red and burgundy accents. Lay a richly colored, textured throw blanket—such as a fringed or chunky knit style—across the foot of the bed or draped over an armchair. This single, saturated color block draws the eye and complements the roses and petals without overwhelming the otherwise serene space. Ensure all accent textiles are high in texture, like faux fur or soft flannel, to maximize the feeling of warmth and intimacy, perfectly completing your stunning weekend room transformation.
Class of 2026: Black and Gold Graduation Celebration
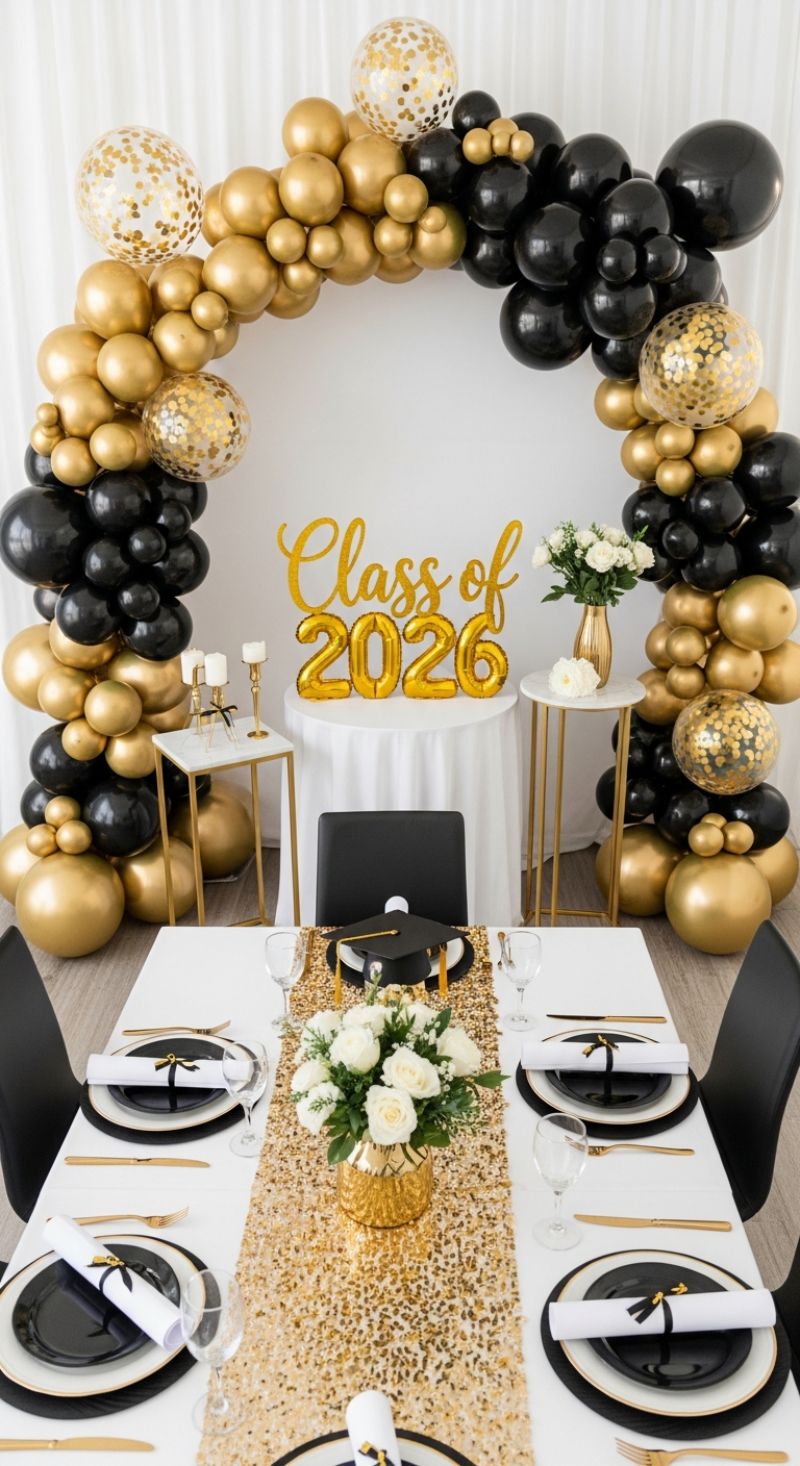
This sophisticated graduation setup masters the art of high-contrast drama, utilizing a timeless palette of matte black, brilliant metallic gold, and crisp white. The centerpiece and most significant DIY project is the colossal organic balloon garland, which frames the celebratory text against a simple white backdrop. To achieve this professional density, you must use a variety of balloon sizes (ranging from 5-inch accents up to 18-inch spheres) and multiple finishes, including standard black, chrome gold, and transparent confetti-filled balloons. Start by inflating your balloons using an electric pump to save time, ensuring you vary the size of the air pockets to achieve the desirable ‘organic’ shape—leaving them slightly underinflated prevents a rigid, uniform look. Using a specialized balloon decorating strip or strong fishing line, cluster the balloons in groups of four (quads) and twist them onto the strip randomly, focusing on layering small balloons next to large ones to eliminate gaps and build fullness quickly.
Once the arch is constructed, focus on the central focal elements that elevate the display beyond a simple backdrop. The gold foil ‘Class of 2026’ text, easily created using standard air-filled foil numbers and script letters, is strategically placed on a linen-draped table. This table is flanked by two slender, marble-topped side tables with gold frames. These accent tables are critical for adding essential vertical dimension to the overall display. On one, place tiered candlesticks to add height and a warm glow; on the other, a gold vase with simple white flowers—like roses or hydrangeas—serves as a fresh counterbalance to the heavy black and gold. Expert advice suggests anchoring the base of the balloon columns with the largest, heaviest balloons (like 24-inch) and using removable wall hooks at the peak to ensure the arch remains stable and symmetrical throughout the event.
To complete the aesthetic, the dining table must reflect the same dramatic elegance. Layering is key to achieving this luxurious feel on a budget. Start with a white tablecloth and run a glittering, heavy sequined gold runner down the center—the texture catches the light and instantly transforms the surface. The place settings maintain the theme: utilize black woven placemats, layered with white dinner plates, topped with smaller glossy black salad plates, and finished with sleek gold cutlery. A rolled white napkin, secured with a black ribbon to mimic a diploma scroll, adds a charming thematic touch. Use a coordinating gold vase for a simple white floral centerpiece, and add subtle graduation motifs, such as a miniature graduation cap, to tie the whole celebration together seamlessly.
You’ve absorbed the inspiration—now it’s time for the application. The 19 viral DIY projects we’ve curated prove that a truly custom, high-impact home doesn’t require weeks of labor or a designer budget, only a dedicated weekend and a willingness to create. This is your official permission slip to stop passively scrolling through decor envy and start actively building a space you genuinely love.
### Final Thoughts and Encouragement
Remember, the goal isn’t just a finished product; it’s the profound satisfaction of personalizing your environment with your own hands. Don’t strive for perfection; embrace the process and the unique character that your handmade items bring. Even completing just one of these weekend-ready projects will infuse your room with fresh energy and give you major bragging rights.
### Your Call to Action
**Stop Scrolling and Start Stacking!** Choose the project that resonates most with your style, gather your materials tonight, and commit to completing it by Sunday evening. We want to see your results! Share your completed weekend transformations by tagging us on social media, and subscribe to our newsletter below for weekly inspiration, supply checklists, and advanced DIY guides delivered straight to your inbox.