Stop scrolling! Get the ultimate list of viral DIY decor projects you can craft tonight for any holiday. Fast, easy, and stunning decorations.
GENIUS KITCHEN COUNTER CORNER DECOR IDEAS TO MAXIMIZE SPACE

Start by addressing the biggest challenge in any kitchen: the awkward corner. Instead of letting this area become cluttered or bare, use height and natural textures to create a functional vignette. As seen in the image, leaning a collection of varied wooden cutting boards against the backsplash is a brilliant space-saving technique. To execute this DIY decor idea, utilize the vertical plane of the backsplash. Gather three to four boards of differing sizes (round and rectangular shapes add depth) and materials (acacia, bamboo, or maple look best). Stand the largest board at the back, followed by the others in decreasing size, slightly overlapping them. This method, which uses vertical storage instead of horizontal spreading, not only keeps essential tools easily accessible but also serves as warm, natural art against a cool, tiled backdrop, maximizing what is often considered ‘dead space’.
The opposite side of the counter demonstrates how to combine functionality with decorative flair by establishing a designated ‘zone,’ such as a coffee or baking station. The corner space is anchored by a necessary appliance, like the stainless steel espresso machine shown. To soften the harsh lines of the metal and maximize the remaining surface, introduce elements with visual continuity. For this look, utilize matching white ceramic canisters with sealed wooden lids (ideal for storing coffee, sugar, or flour). Group these canisters tightly together in the corner area to maintain a unified look and minimize visual clutter. Expert tip: Ensure your functional items are also aesthetic; stack simple, matching white mugs next to the appliance to keep them handy while reinforcing a clean, cohesive design palette that makes the area feel purposeful and elegant.
Finally, no corner vignette is complete without organic elements and strategic lighting. Introducing a small, low-maintenance potted plant (like a succulent or faux greenery, as pictured) adds a necessary pop of color and life without demanding extensive counter real estate. Place this item near the front edge or between appliances. Crucially, the image reveals the impact of under-cabinet lighting. If your kitchen lacks this feature, installing a simple, adhesive LED strip beneath the upper cabinets is a quick DIY project that dramatically transforms the ambiance. This warm glow highlights the textures of the wood and tile, making the curated display look intentional and expansive, rather than dark and cramped.
THE SECRET TO THE MOST ROMANTIC VALENTINE’S TABLE EVER

Achieving this level of intimate romance relies heavily on strategic lighting and color saturation, making it a perfect last-minute DIY project. To replicate the dramatic, moody aesthetic seen here, start with a dark base—a black or deep charcoal tablecloth—and layer a vibrant, narrow satin or velvet runner down the center. This crimson red runner serves as a visual anchor and instantly signals Valentine’s Day. The most crucial element, however, is the lighting. Abandon overhead lights entirely. Instead, use multiple sources of warm, soft candlelight. For maximum impact, group varying heights of unscented pillar candles (or high-quality LED alternatives for safety) along the runner. Aim for odd numbers (7, 9, or 11) arranged closely together to create a central column of glowing light that casts flattering shadows across the dining space, instantly transforming the atmosphere from casual to deeply intimate.
The centerpiece, while minimalist in structure, is rich in texture due to the clustered candles and reflective glassware. Notice how the candles are interspersed with wine glasses and tumblers, maximizing the light’s sparkle. To execute this efficiently, select your heaviest, most luxurious-looking glassware, preferably cut crystal patterns to refract the candlelight. The place settings themselves follow a simple, elegant restaurant style: dark plates (black or deep burgundy) sitting atop the runner, contrasted by the folded white cloth napkins placed neatly to the side or standing upright in a formal fold. A critical DIY detail is the cutlery: choose gold or brass utensils, as their metallic finish catches the candlelight beautifully, adding a hidden layer of warmth and luxury without the need for expensive silver.
To truly elevate this DIY table setup, focus on the details that enhance the tactile and sensory experience. If time allows, incorporate a small, lush floral element, such as a tight bunch of deep red roses or rich green foliage, placed near the end of the table to avoid cluttering the candle area. Expert tip for achieving this rich look quickly: layering textiles is key. If you don’t have a satin runner, use a deep red scarf or even a wide ribbon. Finally, ensure your table is balanced. If your centerpiece is highly vertical (like the tall pillar candles shown), maintain low profile items elsewhere. Always use a stable base for the candles and ensure they are well clear of the cloth napkins and glassware rims to keep the romantic ambiance focused and safe.
THROW A GALENTINE’S PARTY THAT LOOKS STRAIGHT OUT OF A MAGAZINE
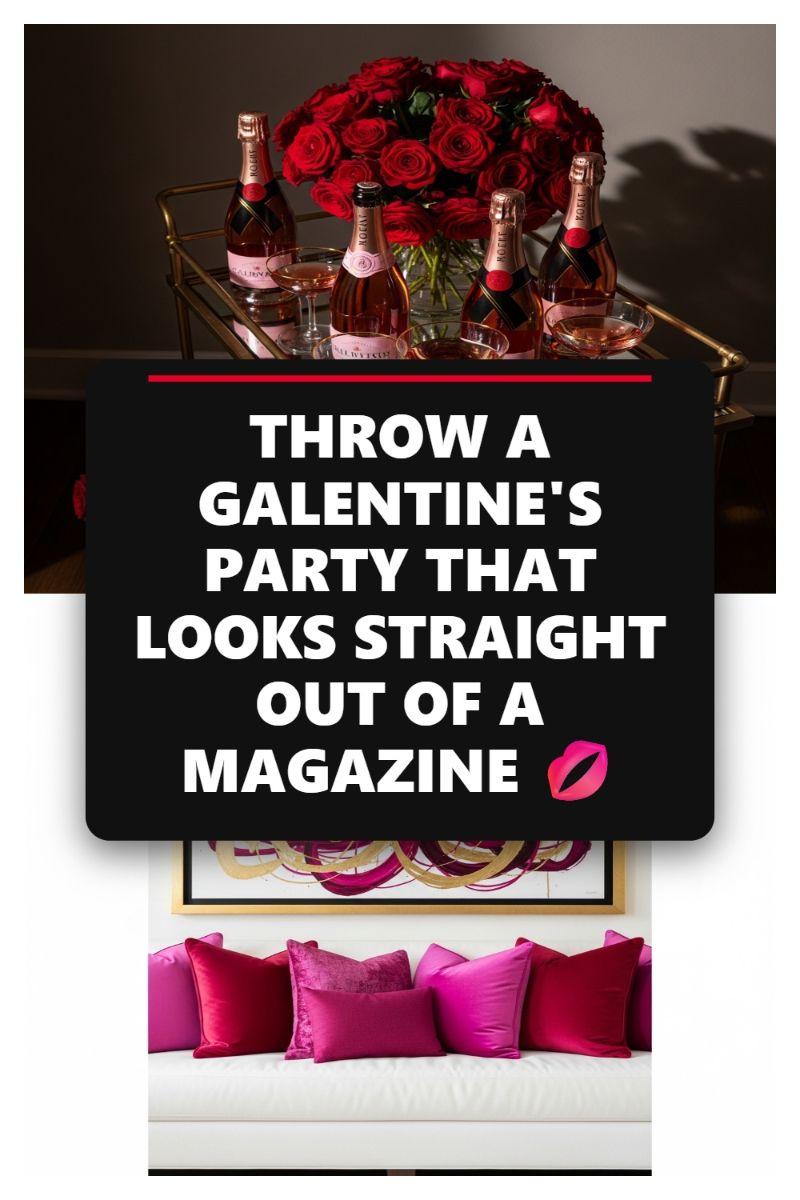
To achieve a truly magazine-worthy Galentine’s setup, start with the most photographed element: the cocktail station. Instead of a chaotic array of liquors, focus on a curated, high-impact display, grounding the look in monochromatic color density. The essential DIY element here is the floral centerpiece: opt for a dense arrangement of deep, velvety red roses. Do not skimp on quantity; the sheer volume of high-quality blooms is what creates the “straight out of a magazine” effect. Arrange them tightly in a simple glass vase to let the color speak for itself. If you’re using a bar cart, choose a metallic finish, like brass or gold, and use it to showcase rosé champagne or sparkling cider bottles. Flank the centerpiece symmetrically with the bottles, ensuring labels are facing forward for visual organization, reinforcing the elegant pink and red palette. For a final touch of vintage glamour, swap standard flutes for elegant, wide-mouthed coupe glasses.
Next, elevate your seating area into a decadent lounge worthy of your closest friends. The simplest and most budget-friendly DIY trick for instant luxury is the power of coordinated throw pillows. Start with a neutral foundation (a white or cream sofa, as pictured, is ideal) and layer cushions in rich textures—think velvet, crushed velvet, or matte satin—all strictly adhering to the Galentine’s palette of magenta, fuchsia, and deep berry red. The juxtaposition of these jewel tones against a crisp white background makes the colors pop. Mix various pillow sizes (squares and lumbar rectangles) to add dimension and visual interest, aiming for an odd number (5 or 7) for a sophisticated designer arrangement. This technique is entirely DIY if you purchase pre-made slipcovers, transforming the look of basic pillows instantly.
Professional styling dictates that every element must feel intentional. To tie the entire room together, look for wall art that integrates your core color scheme. Notice how the image features abstract art using gold swirls and vibrant magenta/fuchsia lines; this immediately echoes the brass bar cart, the rosy beverages, and the seating area textiles. By repeating colors and textures across different surfaces—from the soft velvet pillows to the glossy champagne bottles and the art on the wall—you create a cohesive narrative that makes the entire space feel professionally staged. This careful coordination transforms standard holiday decor into an aspirational, editorial environment.
30-MINUTE DIY VALENTINE’S DECOR THAT LOOKS EXPENSIVE

The secret to transforming quick DIY holiday pieces into decor that looks designer lies entirely in texture and muted color palettes. This 30-minute Valentine’s Day garland, draped beautifully over a mantlepiece or headboard, uses easily accessible items to achieve a sophisticated, rustic-chic aesthetic. To replicate this look, start with unfinished wooden heart cutouts. Instead of bright reds and synthetic finishes, paint them in subtle shades like dusty rose, antique white, or pale sage green, allowing the wood grain to peek through for a weathered, expensive feel. String these hearts onto thick jute or natural cotton twine, staggering their sizes and colors. The ‘expensive’ element is achieved by layering: weave a strand of faux eucalyptus or simple greenery throughout the garland, followed by a set of delicate, warm-toned micro fairy lights (battery-operated lights are best for clean installation). This three-part layering (hearts, greenery, light) adds depth and complexity, making the final product appear thoughtfully curated rather than hastily crafted.
For an extra touch of vertical interest, incorporate the layered heart mobile seen hanging below the shelf. This piece requires five to seven hearts, painted in complementary earthy tones (think terracotta, muted maroon, or deep taupe) and connected using small screw eyes or wire loops and twine. Hang this mobile from a tension rod or hidden nail near a light source. Expert advice for visual impact: placement is key. Notice how the entire setup is bathed in warm, soft lighting, often from a nearby lamp or the fairy lights themselves. This indirect, golden light immediately softens the materials and elevates the entire scene, masking any imperfections inherent in quick DIY projects. Furthermore, pairing the wooden decor with textured, natural backdrops—such as macrame wall hangings or chunky knitted throws—anchors the look firmly within the high-end, contemporary boho style.
To ensure your quick project lasts beyond the holiday—and maintains its expensive appearance—focus on high-quality finish applications. If you choose to stain the wooden hearts instead of painting them, opt for a dark walnut or gray wash for maximum depth. If painting, always seal the finished piece with a clear, matte sealant spray; this prevents chips and gives the paint a professional, durable finish. Remember that the ’30-minute’ constraint relies on efficient material sourcing. Have your wooden pieces pre-sanded, and utilize a hot glue gun for instant bonds when attaching greenery or lights, minimizing drying time. This project is a perfect example of how incorporating natural elements and focusing on understated color tones can elevate holiday decor from basic craft store fare to magazine-worthy interior styling.
BATHROOM DECOR IDEAS THAT MAKE EVERY DAY FEEL LIKE A SPA
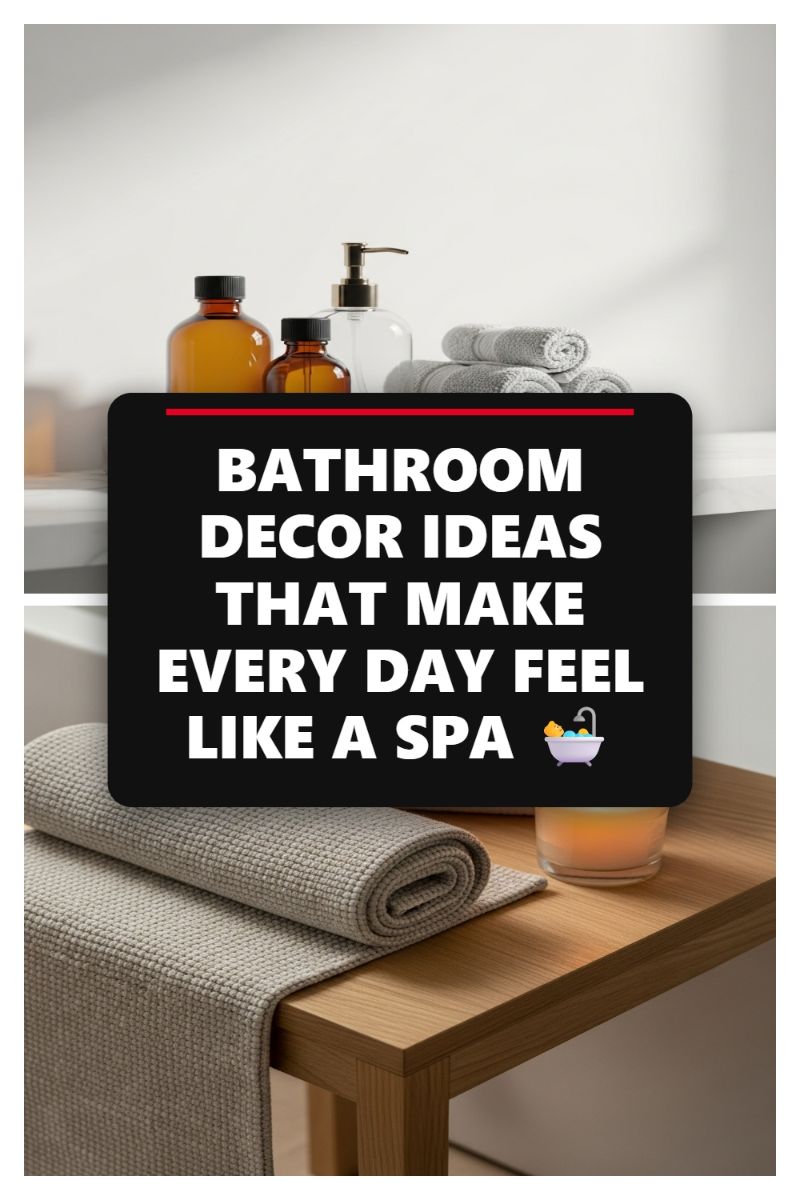
While our main focus is often on seasonal and holiday decor, self-care is an essential year-round priority, and there’s no better ‘staycation’ project than transforming your utilitarian bathroom into a serene, spa-like escape. To achieve the minimalist, luxurious look seen here, the primary DIY step is mastering textile uniformity and clean organization. Start by swapping out mismatched towels and bathmats for a cohesive collection in a neutral, calming tone, like the soft grey waffle-weave textile shown on the wooden bench. Avoid folding; rolling your towels (both large bath sheets and small hand towels) creates instant texture and elevates the look, mimicking the presentation you’d find at a high-end retreat. If you have open shelving, ensure all accessories that aren’t aesthetically pleasing are stored away. Introduce natural materials like the light wood side table or bamboo accents, as these elements ground the space and add the necessary warmth to balance out cold tile and porcelain.
The real secret to achieving an elevated spa feel lies in the apothecary aesthetic—a simple, high-impact DIY project you can complete in minutes. Decant all your mismatched shampoos, body washes, and hand soaps into uniform glass dispensers. As pictured, amber or dark brown glass bottles protect essential oils and products from light while lending an expensive, cohesive look to your vanity or shower shelf. Clear pump dispensers are perfect for daily hand soap. To fully engage the senses, integrate aromatherapy. Instead of relying on overpowering synthetic air fresheners, invest in pure essential oil diffusers or soy-based candles, focusing on calming scents like eucalyptus, peppermint, or lavender. The soft glow of a single candle (as shown) adds immediate ambiance and signals that the space is dedicated to relaxation, instantly turning an everyday routine into a meditative ritual.
Completing your transformation means focusing on subtle lighting and functional finishing touches. If permanent fixture changes aren’t in the cards tonight, install smart bulbs that allow you to adjust the color temperature to a warm, soft white (around 2700K), drastically improving the room’s atmosphere. For quick, temporary decor, curate a small styling moment on your shelving: include the decanted bottles, a small dish for jewelry, and perhaps a small potted succulent or fern to bring in organic life. Remember, a spa environment is fundamentally decluttered. By investing in attractive, functional storage solutions and adhering to a strict ‘everything has a place’ policy, you ensure that the tranquility you create tonight lasts long after the project is finished, making every day feel like a refreshing holiday.
VIRAL DIY VALENTINES DECORATIONS YOU CAN MAKE TONIGHT!
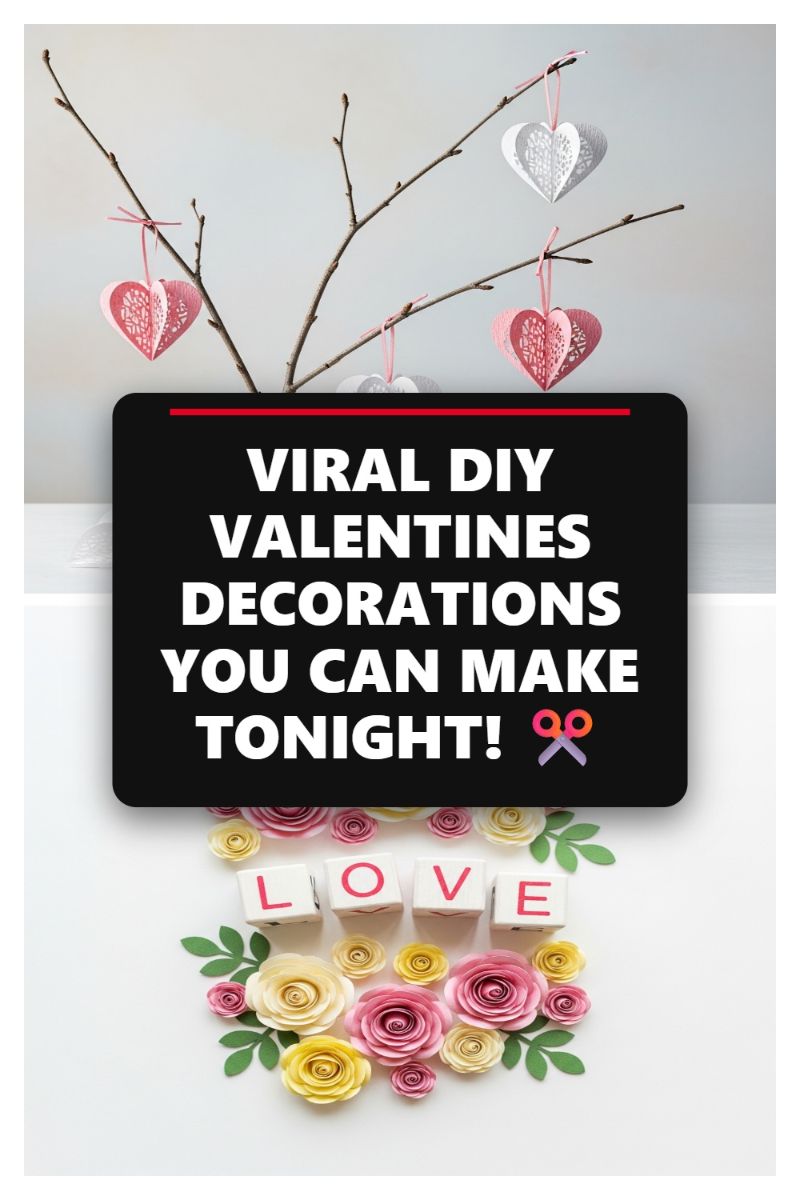
These stunning, lightweight paper ornaments and the accompanying “LOVE” centerpiece are the perfect last-minute addition to your Valentine’s décor, designed to be executed quickly enough to enjoy tonight. This project marries intricate paper cutting with simple natural elements, transforming simple cardstock into elegant, lacy heart decorations. To replicate this viral look, you will primarily need medium-weight cardstock in various shades of pink, white, and yellow, along with some green paper for the foliage. Essential tools include precision cutting tools (a craft machine like a Cricut or Silhouette is ideal for the intricate heart patterns, though a sharp hobby knife works for diligent crafters), strong adhesive, and thin string or ribbon for hanging the ornaments. The finished display captures romance and whimsy, centered around delicate 3D paper hearts suspended from natural, bare branches, complemented by a ground cover of vibrant, handcrafted paper flowers surrounding wooden letter blocks.
Achieving the volumetric, latticework effect on the hanging hearts requires careful construction. Start by selecting 6 to 8 matching heart shapes (two for the front, two for the back, and 2-4 internal support pieces) cut with a symmetrical, intricate design—think paisley or delicate geometric lacework. Stack these pieces together, ensuring perfect alignment, and fold the entire stack directly down the center line. Before sealing, use a small dot of glue along the spine of each adjacent piece to open the structure into a full 3D orb. Expert tip: Using varied shades of the same color (e.g., pale pink and bright pink) for alternating layers adds depth and complexity, making the final ornament appear even more professional. Attach a loop of thin ribbon or twine through the top fold before the final seal. Display these by placing several bare branches (found outdoors or purchased faux twigs) into a tall vase and suspending the finished hearts at varying heights. The bare branches emphasize the fragile beauty of the papercraft against a stark, wintery backdrop.
The base display provides texture and color contrast. The foundation consists of simple wooden blocks spelling “LOVE,” which can be DIY painted or purchased ready-made. The real craft element here is the arrangement of the paper flowers. Use a spiral-cut technique on the cardstock to create the rolled roses—starting at the outer edge of the spiral, tightly roll the paper inward toward the center circle tab, securing the finished bloom with hot glue on the underside. Create various sizes and shades (pinks and yellows mimic the classic Valentine palette) for a natural, abundant look. For optimal presentation, arrange the flowers and leaves densely around the letter blocks, ensuring the foliage (simple green paper cutouts) peeks out to anchor the arrangement. Let the flowers “climb” slightly around the corners of the blocks, creating a soft, romantic border that visually grounds the entire decoration set, making it perfect for a mantel or entryway table.
AESTHETIC VALENTINES ROOM DECOR IDEAS FOR A COZY VIBE
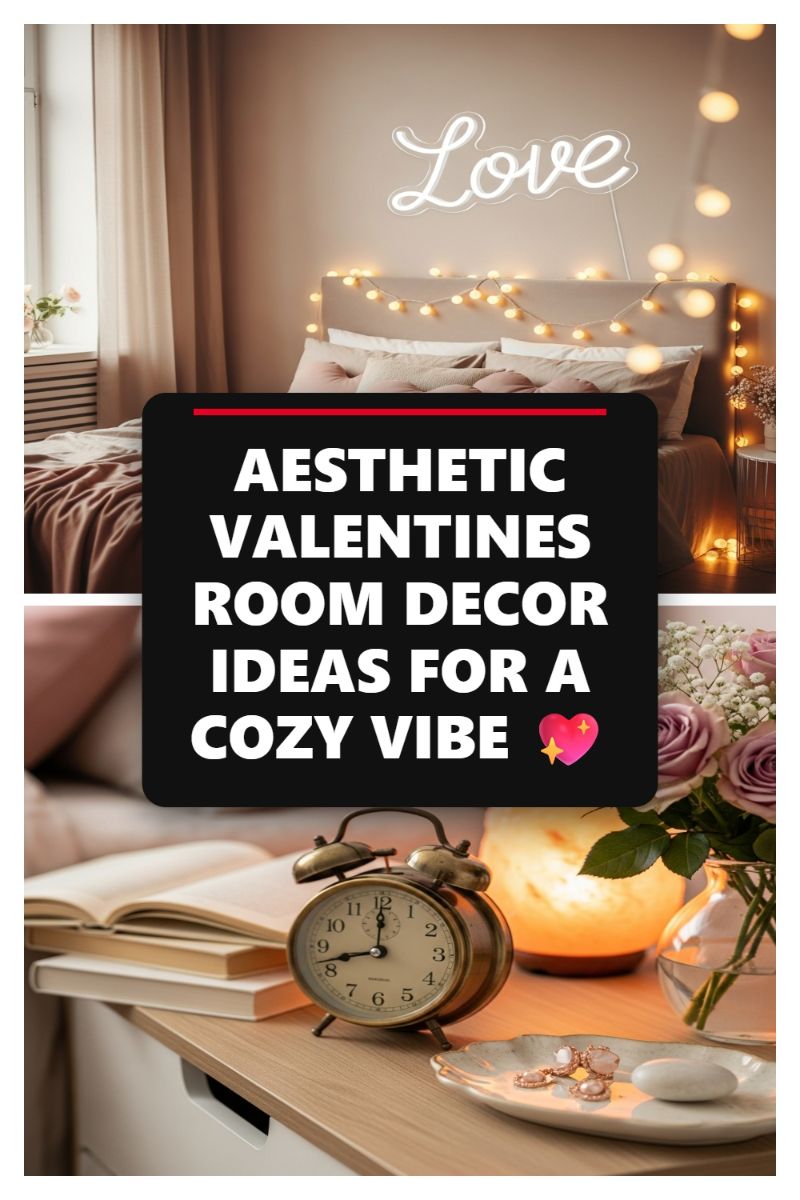
The foundation of any cozy Valentine’s aesthetic lies in layered, warm lighting. Ditch the harsh overhead fixture and embrace the diffused glow provided by multiple ambient sources. The most viral element in this look is the string light garland draped over the headboard—a simple DIY project that transforms the space instantly. Use warm white fairy lights or large globe bulbs and secure them with command hooks or clear mounting clips, ensuring the cord is neatly hidden behind the bed frame. Above this, a neon sign provides a crisp, modern focal point. If purchasing a neon sign isn’t an option, you can achieve a similar illuminated script effect by shaping battery-operated LED wire or flexible LED strip lighting into your desired word on a painted wooden board for a budget-friendly project. Expert Tip: Place your primary lighting sources at varying heights (such as floor lamps, bedside lamps, and wall features) to eliminate harsh shadows and create genuine depth and warmth throughout the room.
The aesthetic relies heavily on a soft, monochromatic color scheme dominated by blush, mauve, and warm neutrals like cream and taupe. This palette screams subtle romance without being overtly cliché red, offering a chic, sophisticated take on holiday decor. To maximize the ‘cozy vibe,’ focus intensely on textile layering. Start with luxurious bedding, perhaps a weighty linen duvet or a soft velvet throw in a rosy hue. Layer three to five pillows in varying sizes and textures—incorporate elements like textured bouclé, soft cotton, or silk for maximum impact. The goal is to make the bed look instantly inviting and plush. This simple switch of bedding color or addition of a statement throw for the holiday provides maximum impact with minimal effort, making it a perfect, non-permanent DIY refresh that appeals directly to the cozycore trend.
Finishing touches are what elevate the room from merely decorated to truly ‘aesthetic,’ and the nightstand is crucial. Curate this small surface as a shrine to comfort and romance. A Himalayan salt lamp (or any dim, warm accent lamp) is crucial for maintaining the soft, atmospheric lighting effect. Pair this functional glow with fresh, living elements, such as a simple arrangement of dusty rose or lavender roses in a clear glass vase, balanced by sprigs of baby’s breath for texture. For a DIY organizational element, use a small, decorative ceramic dish (often easily found at thrift stores) to display simple jewelry or crystals, bringing a personal, curated feel. Finally, stack a few thick, neutral-covered books to provide foundational height for the alarm clock or lamp, completing a vignette that is both practical and deeply romantic.
YOUR FRONT PORCH NEEDS THIS SPRING GLOW UP (EASY STEPS!)
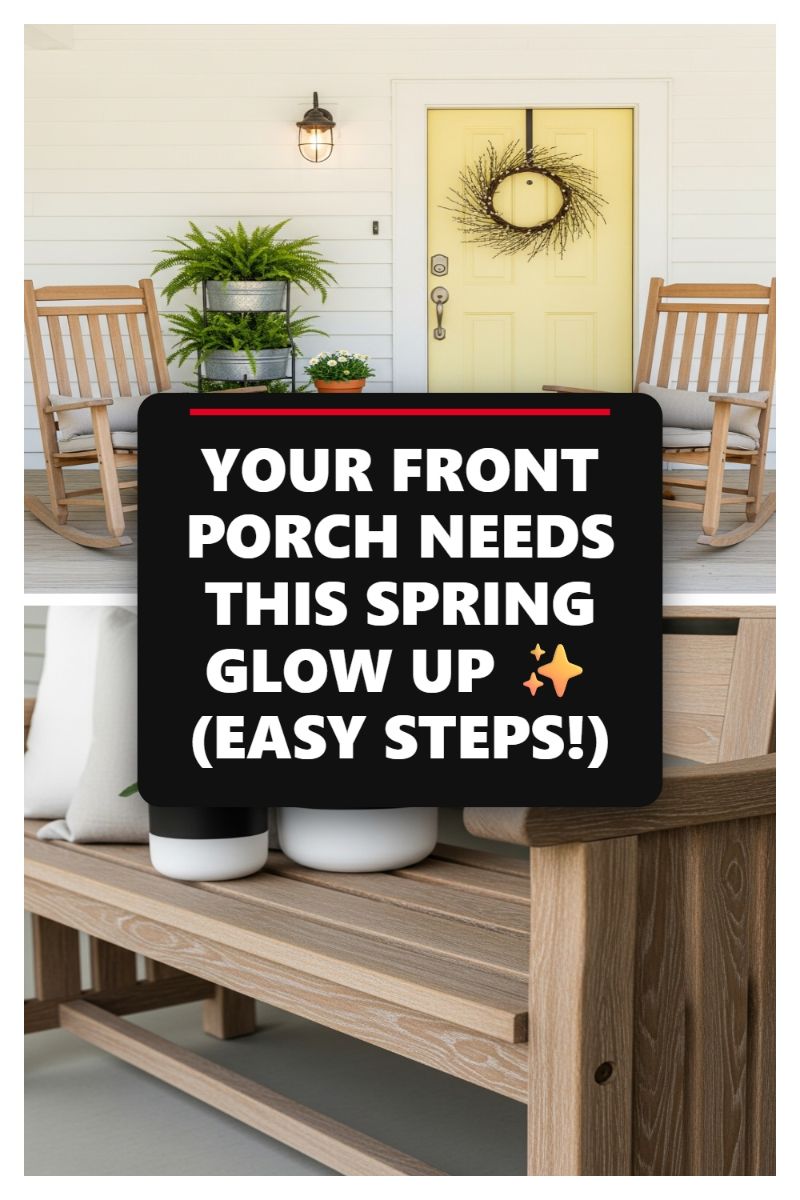
The key to a successful seasonal porch refresh is establishing a clean, neutral canvas that can be easily customized for any upcoming holiday. This beautiful porch design showcases light-toned wood rocking chairs and a matching bench, providing essential seating while maintaining an airy, welcoming feel. Start your glow-up by thoroughly cleaning and prepping any existing outdoor furniture. If your pieces are wood, consider applying a fresh coat of outdoor sealant or a light stain to protect them from spring rains and bring out the natural grain, similar to the inviting texture seen here. The accompanying seat cushions are intentionally neutral, acting as the perfect base layer. For quick holiday swaps—a necessity for the viral DIY decorator—you only need to change out inexpensive, themed throw pillows or small blankets. This strategy instantly transforms the space from Easter pastels to patriotic red and blue or autumnal harvest tones, all resting comfortably on this versatile, charming foundation.
Elevate your curb appeal—literally—with a DIY vertical gardening solution that maximizes visual impact. The multi-tiered galvanized metal planter is a brilliant, space-saving hack that adds immediate lush texture and rustic character. You can recreate this look affordably by stacking varying sizes of metal pails or containers on a wrought-iron stand, or repurpose a small ladder for a unique display. Fill the containers with resilient, texture-rich plants like Boston ferns, as shown, or opt for colorful, trailing annuals that reflect the current holiday. This vertical element serves as a powerful focal point between your seating areas. Complement this greenery with a striking front door color; this vibrant, soft yellow instantly signals warmth and welcome, perfectly offsetting the natural wood and white siding. For holiday transitioning, the main effort required is swapping out the simple door wreath for something more thematic, such as a floral bouquet for Mother’s Day or faux pine boughs for winter.
Success is ultimately found in the small details and contrasting elements that can be effortlessly managed for any celebration. Notice the pops of modern contrast provided by the black and white planters on the bench—a simple DIY trick is painting plain terracotta pots in high-contrast matte shades for a quick upgrade. Ensure your lighting complements the overall aesthetic; the caged, industrial-style sconce provides warm, functional illumination that enhances the homey feel without being overly decorative, making it suitable year-round. Remember that the goal is an instant glow-up: by keeping your main furniture, wall color, and lighting permanent, you can achieve a complete holiday transformation in under an hour simply by refreshing your planter inserts, swapping a wreath, and changing your accent pillows. This durable, stylish spring base is the perfect starting point for all your future viral seasonal porch projects!
STOP SCROLLING! THE ULTIMATE GALENTINE’S PARTY DECOR CHECKLIST
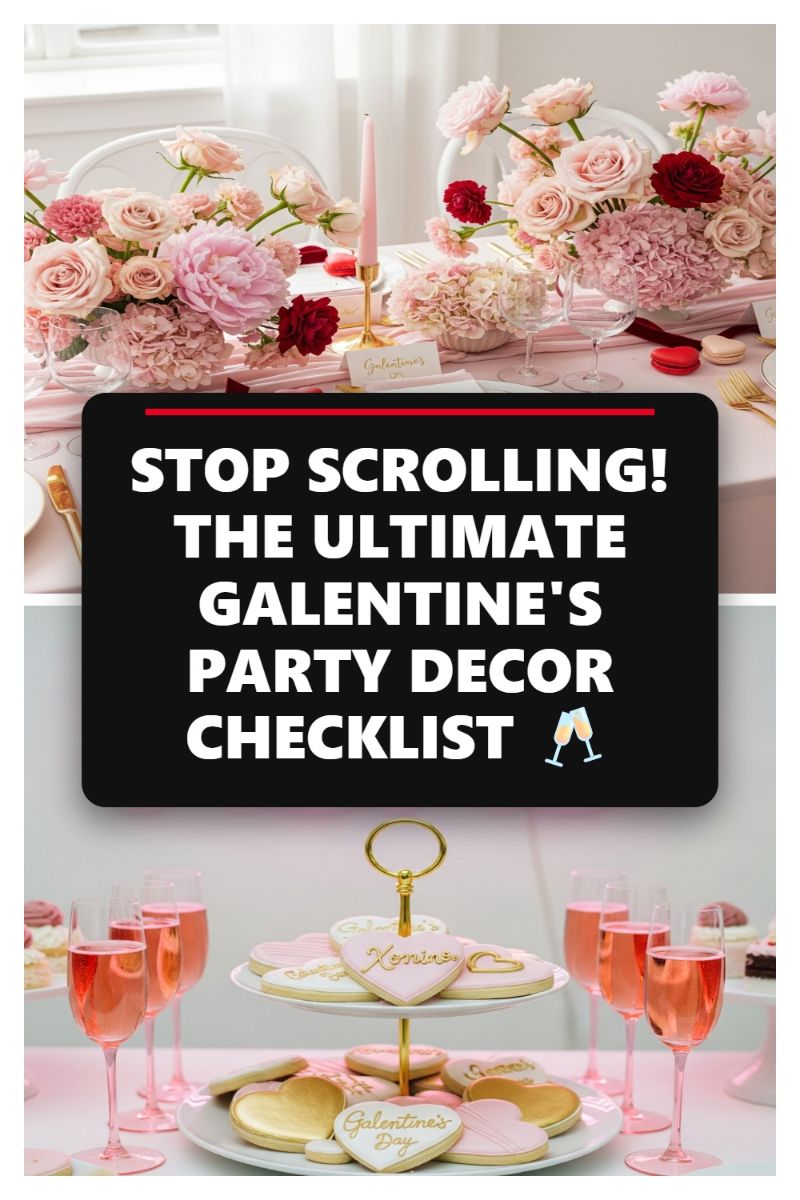
The foundation of a successful Galentine’s party lies in creating an atmosphere of soft romance and cherished friendship, a look that is far simpler to achieve than it appears. Start with your tablescape, anchoring the look with a blush pink table runner or simple pink and white stripes to instantly inject warmth. For the show-stopping floral centerpieces, move beyond expensive arrangements by adopting a DIY clustered method. Gather varying shades of pink and red florals—think lush pink peonies, deep red roses, and textured pink hydrangeas—and place them in small, varying-sized white or light pink ceramic vessels down the length of the table. This technique maximizes visual impact while requiring fewer high-cost stems. Incorporate slender, tapered pink candles in minimalist gold holders, which not only adhere to the color theme but also introduce crucial height and soft, flattering ambient light once the guests arrive. Finish the place setting with subtle gold accents, such as gold flatware or small, heart-shaped macarons positioned near the plates, to elevate the overall sophisticated aesthetic.
Next, focus on transforming your dessert station into a feast for the eyes, which doubles as significant decor. Replicate the tiered display seen here using a simple white or gold cake stand. The key DIY element is personalization: decorate store-bought sugar cookies with royal icing in pale pink and white, then use edible gold luster dust or food-safe markers to write personalized names (“XO, Mine”) or festive phrases (“Galentine’s Day”) on heart-shaped cookies. This small, customized effort instantly transitions generic sweets into bespoke party favors and decorative treats. Surround the stand with delicate glassware—pink-stemmed champagne flutes filled with rosé or a sparkling pink beverage—to reinforce the luxurious, feminine mood. Remember that presentation is paramount; arranging these elements in varying heights prevents the display from looking flat and draws the eye across the entire spread.
For a final touch that brings the entire Galentine’s theme together effortlessly tonight, look to quick, high-impact DIY details. Utilize simple name card holders—even small gold photo clips—to display handwritten “Galentine’s” cards, as seen in the central display. This minor detail serves dual purposes: clarifying seating and reinforcing the personalized nature of the celebration. The overarching expert advice for this quick setup is to commit fully to the color scheme (pinks, reds, and golds) and keep the lighting soft and multi-layered. By clustering your floral arrangements, personalizing your dessert stand with easy edible decorations, and focusing on elegant presentation, you can execute this ultimate Galentine’s decor checklist without stress, ensuring a stunning and memorable celebration that looks professionally styled yet was entirely DIY-ed in just a few hours.
SMALL PORCH, BIG IMPACT: MODERN SPRING PORCH DECOR IDEAS
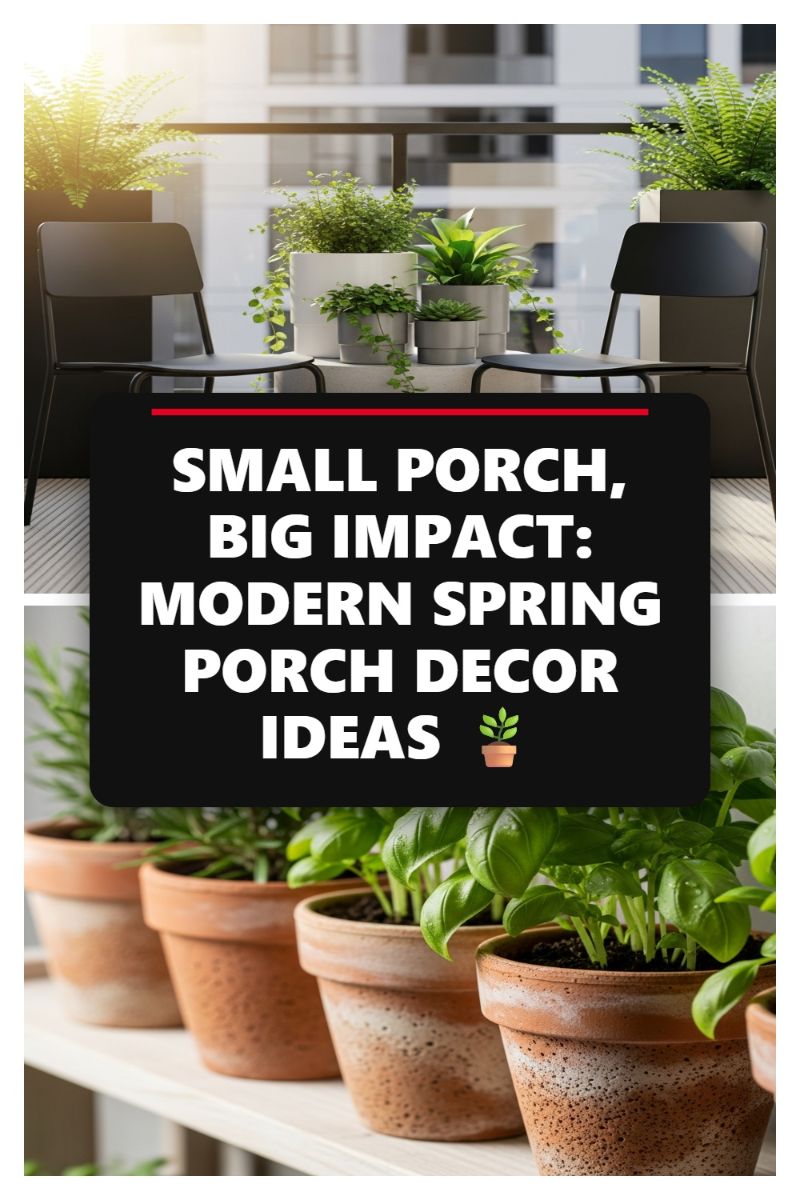
Revitalizing a small outdoor space for spring is one of the most rewarding DIY projects, transforming even the smallest balcony or entry into a lush, modern retreat. The key to achieving this “big impact” look is strategic layering, beginning with a clean, cohesive foundation. Start by clearing your porch completely and defining distinct functional zones—a small area for seating and a dedicated area for greenery display. To replicate the chic, contemporary aesthetic seen here, swap out mismatched plastic pots for planters in a curated, monochromatic palette (think matte black, charcoal grey, and crisp white). This provides a visually calming backdrop against which the greenery can truly pop. For maximizing vertical space, utilize simple wooden crates or concrete pedestals (easily DIYed using concrete mix or spray-painted budget finds) to elevate select large planters, instantly drawing the eye upward and making the space feel expansive.
Once the foundational containers are set, focus on creating dynamic greenery displays through texture and height variation. This project is essentially a living collage. For height, incorporate large structural plants like ferns or bamboo in the tallest planters. For mid-level depth, use mounding plants or small trees. The most critical DIY element for maximizing utility on a small porch is creating tiered shelving for smaller plants, like the functional herb garden pictured below. Construct a simple tiered shelf using reclaimed pallet wood or inexpensive shelving units painted white or black to match your modern theme. This setup is perfect for edible gardening—plant aromatic spring favorites like basil, rosemary, and thyme in matching terracotta pots. Placing them on an accessible tiered stand not only looks charming but keeps your porch functional as a convenient living pantry, perfect for grabbing fresh ingredients right before dinner.
To complete this high-impact transformation, the final DIY touches focus on minimalist furniture and ambiance. Choose sleek, space-saving seating, such as the matte black bistro chairs shown, which offer comfort without crowding the area. For a project that can be done tonight, focus on DIY lighting. Install solar-powered stake lights within the largest planters or drape simple LED string lights along the railing to create a warm, inviting glow. This lighting strategy adds an element of sophistication that extends the usability of your porch well into the evening. Finally, ensure the success of your spring decor by implementing a consistent watering and pruning schedule; maintaining the lushness of the greenery is essential to keeping the space looking intentional and high-end, proving that even the smallest balcony can become a stylish extension of your indoor living area.
IF YOU ONLY BUY ONE DECOR ITEM THIS SPRING, MAKE IT THIS WOVEN PIECE
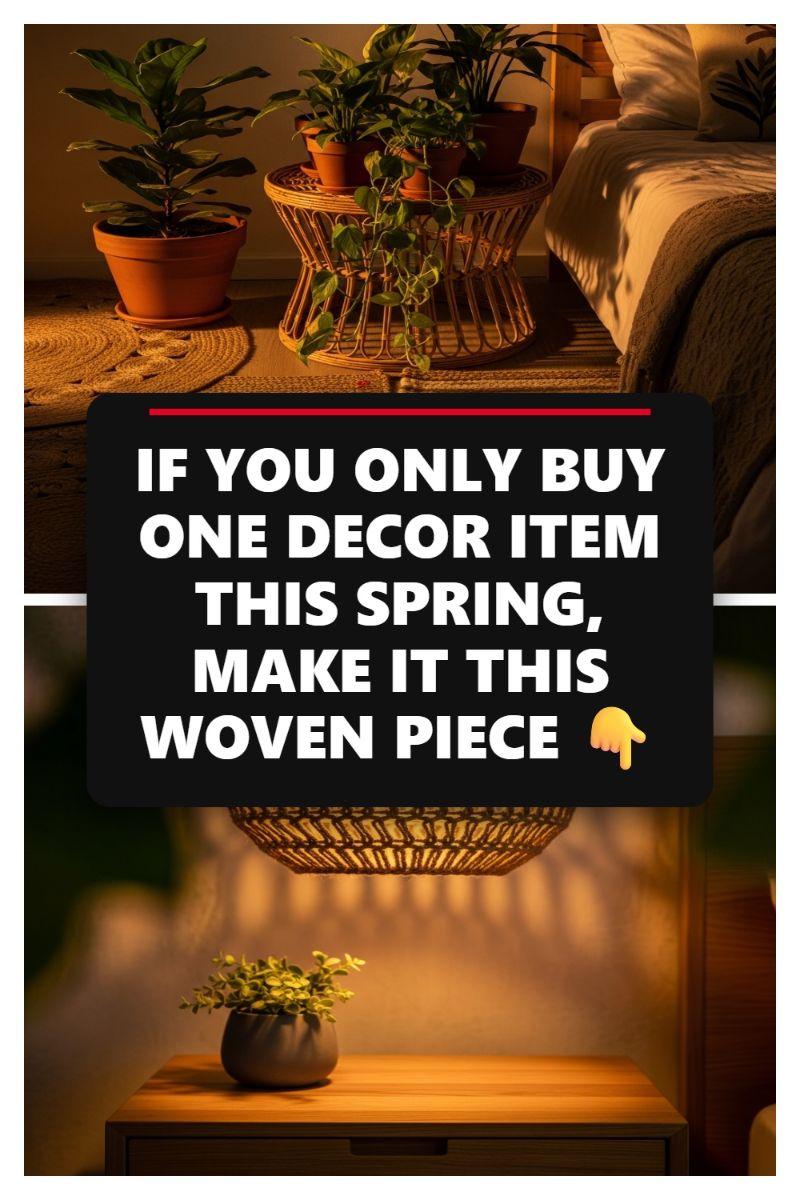
The enduring appeal of natural texture is undeniable, and this spring, the woven piece—whether a side table, accent chair, or light fixture—reigns supreme. This particular setup showcases the power of a single, highly textural item to instantly elevate a corner. The intricate wicker or rattan plant stand serves as a central anchor, contrasting beautifully against the simplicity of terracotta pots and the lush greenery of house plants. Notice how the open weave prevents the structure from feeling visually heavy, maintaining an airy, biophilic atmosphere perfect for transitioning into warmer months. This look expertly marries bohemian warmth with minimalist structure, making the woven item a versatile cornerstone for almost any interior style, from Scandi to traditional. Expert tip: Ensure your chosen piece features a tight, high-quality weave to guarantee longevity and a high-end feel.
While acquiring a perfectly crafted piece can be expensive, the beauty of this trend lies in thoughtful sourcing and simple DIY styling. To recreate this textured vignette affordably, scour local flea markets and vintage stores for cane or rattan accents—often, a quick cleaning or coat of natural oil is all they need to look refreshed. If you find a solid piece (like a wooden nightstand), you can easily add the woven element through a minor DIY project: try incorporating a raffia or seagrass lamp shade, or updating existing furniture by replacing plain cabinet door panels with a sheet of affordable cane webbing. To achieve the layered effect seen here, focus on varying heights and textures: ground your main woven item on a large, neutral jute rug and use trailing plants, like Pothos or string of pearls, allowing them to spill over the edges, emphasizing the dimensional craftsmanship of the stand itself.
A crucial, yet often overlooked, component of styling natural materials is lighting. The warm, low light in this image highlights the texture of the woven goods, casting captivating, dynamic shadows that add depth and movement to the room, especially after sundown. For a simple weekend project, replace a standard plastic or fabric lamp shade with a wide-brimmed macrame or loosely woven pendant, mirroring the texture of the furniture piece below. This simple swap instantly diffuses light softly and creates that instantly cozy, organic atmosphere. This piece isn’t just decor; it’s a foundational element for a naturally-inspired space, proving that sometimes, the simplest, most textured items have the biggest design impact.
THE MOST PINNED BRIDAL SHOWER TABLE DECORATIONS OF THE SEASON
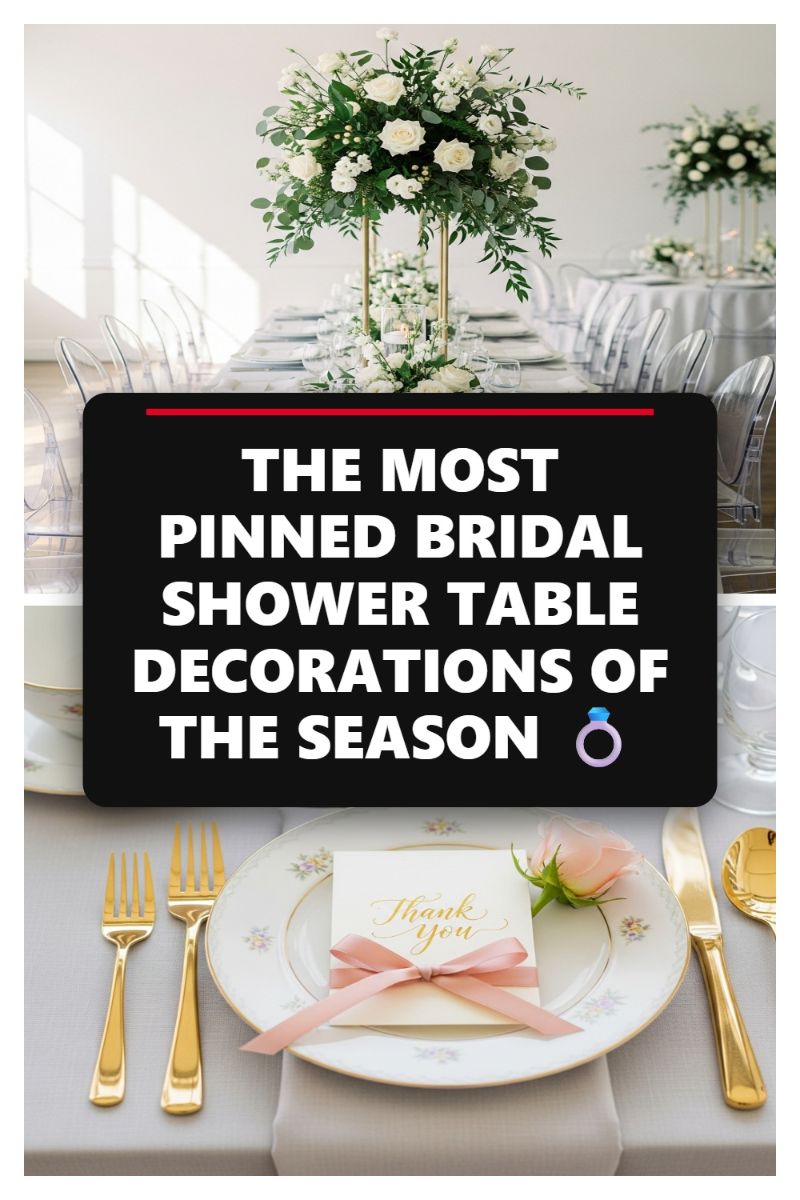
Recreating this breathtakingly elegant table scape, often found on Pinterest’s top searches for bridal decor, is far more achievable than you might think. The key to this look lies in the elevated white and green floral centerpiece. To DIY this high-impact decoration without hiring an expensive florist, focus on volume and height. Start by sourcing inexpensive geometric gold stands (often available in bulk online craft stores or event supply rental sites for low cost). For the arrangement itself, professional designers achieve this lush look by mixing high-quality faux white blooms (like roses and hydrangeas) with abundant, realistic-looking greenery such as faux Italian Ruscus and eucalyptus. This strategy ensures the flowers look vibrant and full for hours without wilting, drastically cutting down on cost. When arranging, concentrate the bulk of the greenery around the base and allow tendrils to cascade down, filling the negative space between the table and the floral topper. This creates visual weight and makes the arrangement appear much larger and more luxurious than if you only used fresh, high-cost stems.
Achieving the look of opulence at the place setting is all about strategic details and budgeting hacks. The stunning gold flatware is a signature element, but purchasing an entire set can be prohibitive. A fantastic DIY trick is to source inexpensive stainless steel cutlery from a discount store and use high-quality gold metallic spray paint specifically designed for metal (ensure it’s food-safe or only applied to the handles, away from the eating surfaces). Pair this with thrifted or rented patterned china—the soft pink and gold detailing adds a vintage romance touch that instantly elevates the table beyond standard white plates. For the favor, as pictured, a simple white card tied with a blush pink satin ribbon and a small, delicate rose placed on the plate adds immediate sophistication. Print your own ‘Thank You’ cards or favor tags using elegant script fonts and metallic ink to maximize customization and minimize printing costs. The cohesive use of blush pink and gold across the china, ribbon, and cutlery pulls the entire setting together.
Finally, focus on the overall ambiance. This celebrated decor theme utilizes clear ‘ghost’ chairs and a bright, airy venue to maximize light. If purchasing or renting ghost chairs isn’t feasible, you can mimic the effect by ensuring your seating is minimalist and light-colored (e.g., inexpensive white resin chairs). Crucially, utilize lighting to enhance the sophisticated feel. Set up the table near large windows to maximize natural light during the day. For evening events, supplement the large centerpiece with small clusters of battery-operated white LED tea lights nestled among small sprigs of greenery down the length of the table. This soft, flickering light provides the warm, romantic glow essential to this popular bridal aesthetic without the hazards or complexity of real candles. By focusing on elevated focal points (the centerpieces) and budget-friendly detail hacks (the flatware and favors), you can easily replicate this viral Pinterest look.
ST. PATRICK’S DAY DECORATIONS THAT ARE ACTUALLY CHIC (NO CLOWNS ALLOWED)
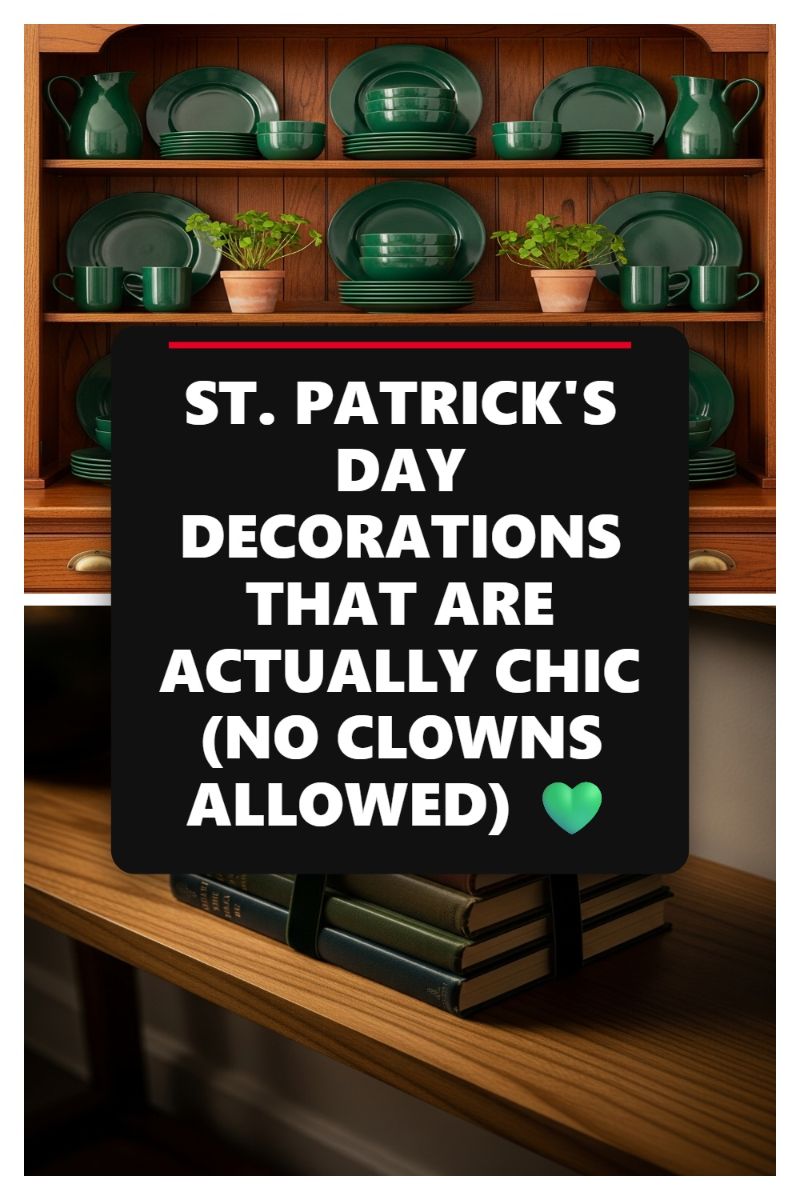
Achieving sophisticated holiday decor is often about curation rather than clutter. For St. Patrick’s Day, ditch the plastic shamrocks and leprechaun hats and opt for an elegant, color-driven display like the hutch showcase pictured here. The core “DIY” component is the styling and selective use of existing household items. To replicate this look tonight, start by “shopping” your own kitchen and storage for anything monochromatic green. This could be an old set of emerald dinnerware, deep forest green mugs, or even glassware. If you don’t have a full set, gather whatever green items you do have and group them together. Clear off an open shelf unit, china cabinet, or buffet surface completely. The instructional magic lies in transforming a functional storage space into a styled holiday vignette simply by color-coding the contents. Expert tip: Using deep, saturated greens (like hunter or forest green) reads as chic and timeless, successfully avoiding the bright, often garish tones associated with cheap holiday novelty items.
Proper styling makes this look instantly elevated. Notice the visual balance in the example: the dark green ceramics pop beautifully against the warm, natural wood tones of the hutch. To achieve this contrast, ensure your backdrop (shelves, mantlepiece, or console) is relatively neutral. Arrange your gathered green items in symmetrical stacks and groupings for a deliberate, curated feel. Plates should be stacked neatly, mugs nested, and pitchers placed strategically on the ends to frame the display. The absolute key to making this look “chic” is the integration of living elements. Find small potted plants like shamrocks (Oxalis regnellii) or simple herbs in terra cotta pots; these natural textures and shapes soften the hard lines of the ceramics and add authentic Irish charm without being overtly seasonal. Place these small plants symmetrically within the display to break up the color block and add necessary dimension.
If a full set of deep green dinnerware is simply unattainable by tonight, you can achieve the same sophisticated St. Patrick’s vibe through smaller, targeted swaps. This project is infinitely scalable. Focus on smaller accents that can be introduced quickly: replace your current tea towels with moss green linen ones; stack a few antique books with dark green bindings on a coffee table (as subtly hinted at in the image); or fill a clear vase with fresh green hydrangeas or simple greenery clippings. The most impactful quick-change hack is to incorporate green ribbon. Use velvet emerald ribbon to tie together a stack of existing neutral books, or wrap it around candle holders. The objective is to strategically place high-quality, rich green textures throughout your main living space to celebrate the holiday subtly and elegantly, proving that festive decor doesn’t have to sacrifice sophisticated design principles.
Obsessed with This ‘Baby in Bloom’ Shower Table Setting
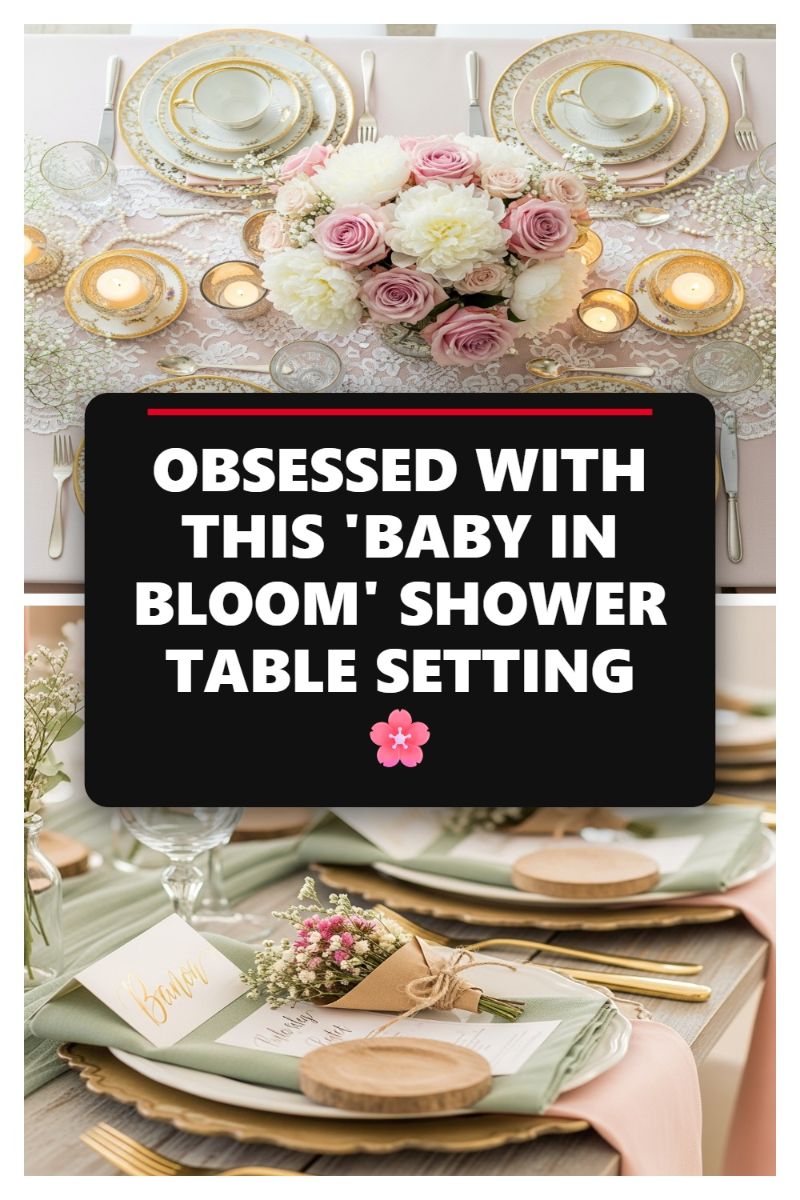
This section provides a gorgeous dual-inspiration for creating a spectacular floral-themed shower table setting, perfect for an elegant baby celebration, spring luncheon, or even a sophisticated Mother’s Day brunch. The overall aesthetic, coined “Baby in Bloom,” hinges on layering soft textiles and abundant florals. To capture the vintage elegance seen in the top vignette, begin your DIY by selecting a neutral linen or blush pink tablecloth. The crucial element here is the delicate, white lace overlay—scour thrift shops or fabric stores for a large piece of ornate lace to instantly elevate the setting. Use gold-rimmed chargers beneath vintage-style china (often found affordably at estate sales or via party rental services) and forgo modern glassware for cut-crystal alternatives. The centerpiece must be low and lush to encourage conversation; DIY the arrangement using soft-focus blooms like white and pink peonies, garden roses, and wispy baby’s breath, ensuring the stems are tightly packed for that opulent, full look. Scatter a few low, gold votives directly on the lace runner to catch the light and add warmth.
For a contemporary and rustic interpretation, focus on the grounding elements shown in the bottom setup. Swap the lace for matte linens, using a pale sage green as your main napkin color, paired with accents of light blush or earthy tones in a runner. The DIY centerpiece here shifts from dense floral arrangements to simple, natural accents. Start with gold or galvanized metal chargers to add structure, then layer the plates with the sage napkin. The true DIY genius lies in the place setting: source small, thin wood slices (often available at craft stores) to act as natural coasters or name card anchors. Pair these with handwritten place cards featuring elegant gold calligraphy. As a stunning, take-home favor, create tiny, personalized wildflower bouquets, wrapping the base in kraft paper secured with simple twine, placing them directly on the plate.
Expert advice for mastering either style is all about texture and intentional contrast. If you lean toward the rustic look, ensure your gold flatware is brushed or matte to complement the wood elements, avoiding highly polished mirror finishes. If you opt for the vintage look, don’t be afraid to mix and match slightly different china patterns for a truly authentic, heirloom feel. Remember that textiles should feel soft and inviting; using pre-washed linen or brushed cotton for your DIY runners and napkins will soften the overall look, providing a comfortable counterpoint to the refined gold and china elements, resulting in a cohesive, viral-worthy table setting.
500% GROWTH! THE ST. PATRICK’S DAY DECOR TREND YOU NEED TO PIN NOW 🍀

The massive surge in St. Patrick’s Day decor reflects a shift toward holiday-specific tiered trays and seasonal vignettes that can be pulled together quickly. To recreate the abundant green centerpiece shown here, start by sourcing a tiered tray (painting it white or lime green instantly elevates the look). The key DIY element involves crafting the miniature leprechaun hats and signage. For the hats, use green felt or glitter foam cones glued to small circular bases, adding a simple gold foil or cardstock rectangle for the buckle. For the small signs like “Happy St. Patrick’s Day,” print your festive phrases onto cardstock and mount them onto small, painted wooden blocks, keeping the text crisp white against vibrant green. Integrate texture by clustering faux greenery, like clover or boxwood sprigs, alongside dimensional elements such as glittery gold or solid green spheres to fill in any gaps, creating that sought-after lush, curated look.
Next, focus on transforming your mantle or shelf into an equally charming display. A high-impact DIY project is the custom-stacked books. Instead of hunting for specific titles, take old hardback books from a thrift store and cover them entirely in green craft paper, or spray-paint the spines various shades of green. Once dry, use white vinyl lettering, stencils, or even a white paint marker to label the spines with clever phrases like “Irish Tales,” “Pinch Proof,” or “Leprechaun Lore.” This grounds the display and ties into the overall theme perfectly. The decorative signs, such as the large “Lucky” shamrock and the framed “Kiss Me, I’m Irish,” can be fabricated from inexpensive blank wooden signs and customized using cutting machines for precise vinyl lettering or by hand-painting details, ensuring the borders are outlined with consistent shamrock motifs.
Expert advice for styling this holiday display emphasizes contrast and scale. Stick rigorously to a color palette of emerald green, lime green, black, white, and metallic gold to ensure a cohesive yet vibrant appearance. When placing items, vary the height dramatically; use small leprechaun figures or miniature cauldrons (like the one holding gold coins) at the base of the book stacks, and ensure the signs lean against the wall or other objects rather than just lying flat. Use inexpensive filler items strategically—scatter plastic gold coins or shamrock confetti lightly across the surface, and thread battery-operated fairy lights (as shown along the bottom edge) to add warmth and sparkle, which is especially important for evening ambiance. By layering DIY elements with inexpensive store-bought trinkets, you achieve a professional, viral-worthy display that looks far more complex than the few hours it takes to complete.
MANTLE GOALS: ELEGANT EASTER DECOR YOU NEED TO COPY RIGHT NOW 🐰

This stunning Easter mantle display perfectly blends fresh spring florals with vintage charm, achieving an aesthetic that is both luxurious and approachable. The key to this “Mantle Goals” look is balanced symmetry and thoughtful layering. Visually, the display is anchored by three robust arrangements of pink and white tulips, spaced evenly across the mantlepiece. Below this fresh vertical element, the centerpiece features a collection of crisp white ceramic bunnies varying in size, resting upon a reflective surface (likely a mirror or mirrored tray) and delicate, pastel-colored lace doilies. This combination creates high contrast and reflectivity, maximizing the light and drawing the eye to the details. The overall effect is sophisticated Easter décor that moves beyond simple baskets and plastic eggs, favoring subtle textures and a soft, cohesive color palette of blush pinks, sky blues, creams, and clean white.
To replicate this elegant mantle display tonight, start by establishing your symmetrical foundation. The three identical floral arrangements are crucial for balance. If fresh tulips aren’t feasible, high-quality faux tulips (ensure they have realistic stems and leaves) can be clustered tightly into three simple glass cylindrical vases. Place these vases equidistant across your surface. Next, focus on the layering base. Acquire a mirrored tray or silver serving platter—this acts as the reflective stage. On top of the mirror, arrange a mix of vintage or crocheted lace doilies in pale pink, blue, and cream. For a quick DIY alternative, purchase inexpensive cotton lace trim and cut it into various-sized squares or circles to mimic the doily shapes, securing frayed edges with fabric glue. Layering these textiles softens the look and provides necessary texture against the hard, shiny surfaces of the mirror and ceramics.
The finishing touch involves placing the white ceramic bunnies strategically on the layered doilies. Expert tip: Grouping objects in odd numbers (like the three main tulip arrangements) and creating “families” of décor (like the mother and baby bunnies shown) feels more organic and appealing than scattered individual items. Use various sizes of bunnies to add dimension. If you don’t own ceramic bunnies, try painting inexpensive plaster or resin figures pure white, applying a glossy top coat for that pristine, elegant finish. Finally, integrate subtle Easter accents like a few pastel-colored eggs placed sparsely around the base of the vases and small sprigs of faux cherry blossoms to tie the floral elements down to the mantle surface. Maintaining the soft pink/blue/cream palette ensures the look remains cohesive, elevated, and perfect for spring, achieving true mantle goals right before Easter weekend.
THIS OUTDOOR PATIO DECOR TRANSFORMATION COST LESS THAN $100
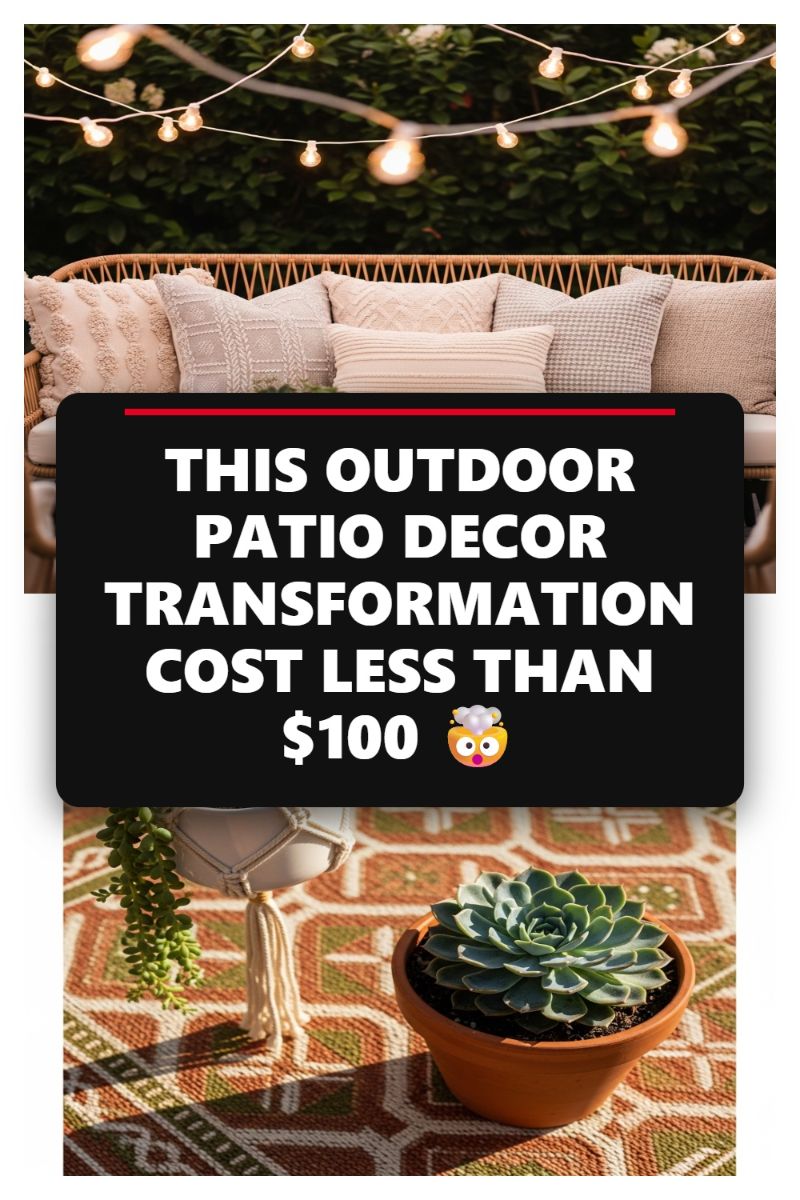
The key to achieving a lush, high-end outdoor space without breaking the bank is strategic layering, focusing on high-impact texture and lighting. To emulate this inviting bohemian patio retreat, begin by defining your zone with an outdoor rug. The geometric, rust-toned rug pictured instantly grounds the area and serves as the visual anchor. Look for durable, weather-resistant polypropylene rugs during clearance sales—they often offer the largest area of visual coverage for the smallest investment. Next, tackle lighting. String lights are mandatory for creating that sought-after bistro ambiance. Purchase warm-toned LED filament bulbs, which provide the cozy glow of vintage Edison bulbs while significantly reducing energy costs. Install the strands by crisscrossing them above the seating area using simple cup hooks or outdoor-rated adhesive clips, ensuring the height is sufficient to avoid obstructing sightlines but low enough to feel intimate and enclosed.
Once the foundation is set, turn your attention to the seating area to maximize comfort and visual appeal. The wicker sofa is transformed purely through the strategic use of neutral textiles. The secret to making a budget pillow collection look expensive is focusing on diverse textures within a singular color family (beige, cream, off-white, and pale grey). Source affordable, outdoor-rated pillow *covers* in materials like chunky cable knit, tufted cotton, and faux sheepskin. By purchasing covers instead of full inserts, you drastically reduce cost and storage volume. Ensure you use quality, oversized inserts (20×20 or larger) to give the pillows that plump, designer look. The monochromatic approach keeps the busy textures from overwhelming the space, creating a serene, sophisticated palette that pairs perfectly with the natural rattan.
Finally, inject life into the space with low-maintenance greenery. Plants are a vital component of any high-tier decor transformation, and they are incredibly budget-friendly. Utilize affordable terracotta pots, like the one holding the large succulent, which adds a beautiful rustic warmth that contrasts with the woven rug pattern. For added dimension, incorporate hanging elements, such as the macrame planter holding the String of Pearls. When selecting plants, choose resilient varieties like succulents, cacti, or hardy ferns that require minimal fuss. Remember to shop for your pottery and plants at local nurseries or hardware store garden centers during late summer sales to hit that ambitious under $100 budget goal. Layering these elements—rug, lighting, textiles, and greenery—provides immediate depth and warmth, making your patio feel less like an outdoor area and more like a carefully styled extension of your home.
SPRING DECOR SECRETS: THE 3 COLORS INTERIOR DESIGNERS ARE OBSESSED WITH
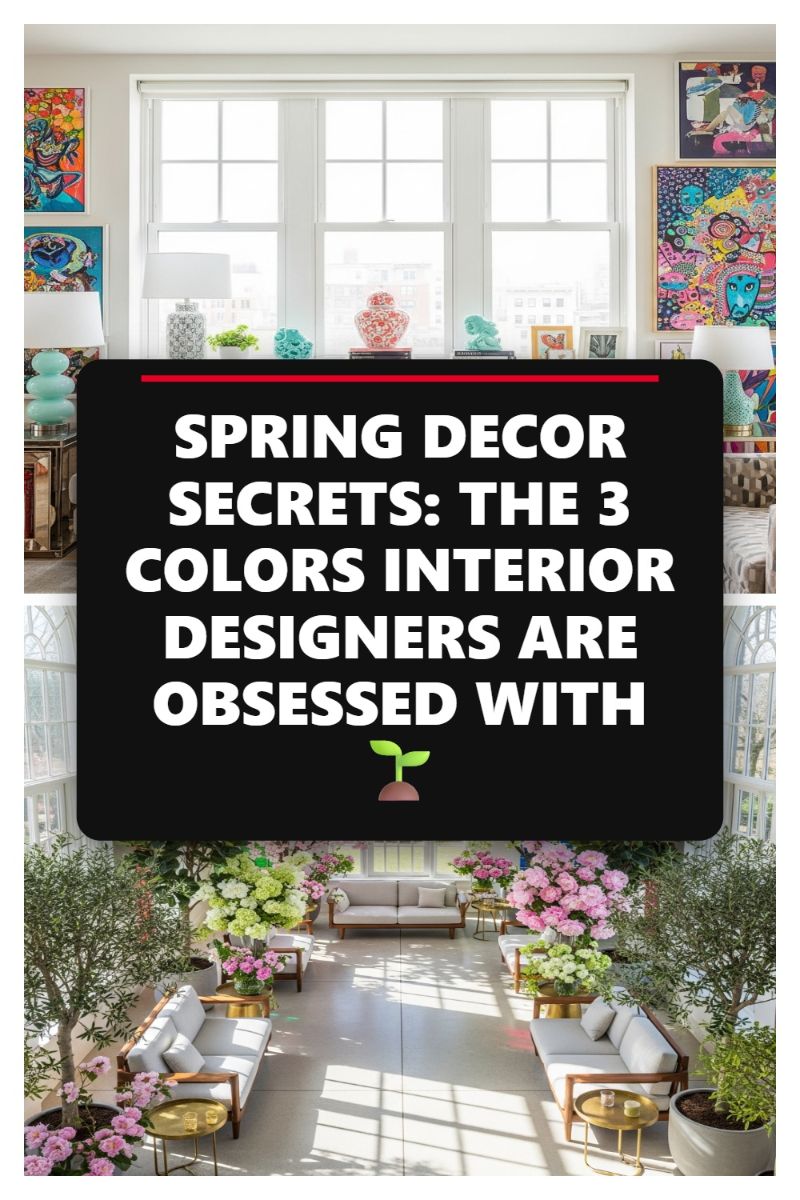
Recreating the ethereal, light-drenched atmosphere shown in this image is the ultimate goal for spring decor, providing a beautiful visual lift after the long winter months. Interior designers are currently obsessed with three key color groups that achieve this effect: vibrant greens, soft blush pinks, and crisp neutrals (whites/creams). The foundation of this look, as seen in the airy sunroom space, is the abundance of natural light and light-reflecting surfaces, which emphasize the neutral palette of the furniture and flooring. To DIY this foundation, focus on maximizing light—clean your windows, remove heavy curtains, and use reflective elements like mirrors or metallic side tables (as shown in the brass/gold accents). Introduce the critical neutral element by swapping out dark winter textiles for linen or cotton slipcovers in cream or bone white. This stark, clean backdrop allows the vital, energetic spring colors to truly pop.
To bring in the first essential designer color—vibrant green—without renovating a full conservatory, the secret lies in scale and texture. Instead of small potted plants, emulate the look of mature foliage (like the potted olive trees featured here) using tall faux trees such as Ficus or Olive varieties; placing them in large, concrete-look planters adds immediate architectural weight. For an inexpensive yet effective DIY, create a ‘living wall’ effect behind a seating area using faux moss panels or affordable fern garlands draped across sheer curtains. Complement this with the second trending color, blush pink, which should be introduced through massed floral arrangements. Rather than scattering small vases, group large, fluffy blooms (peonies or hydrangeas) in clusters on side tables or in floor vases to create dramatic visual impact. The sheer volume of the flowers makes the color feel intentional and luxurious.
Finally, integrate the third element—the bright, unexpected pops of color seen in the artwork in the upper portion of the image. This is where you connect the natural, soft lower space with high-energy design. For a quick DIY solution, create abstract “designer art” using large canvases (available cheaply at craft stores) and affordable acrylic paints in trending coral, teal, and magenta. You don’t need artistic skill; the goal is color saturation and dynamic composition to mimic the modern, eclectic gallery wall aesthetic. Alternatively, frame large sheets of high-quality, abstract patterned wrapping paper or wallpaper samples. By blending this vibrant color theory (bright accents on a neutral base, surrounded by fresh green and pink life) you can achieve a professional, spring-ready space that interior designers currently adore.
The Classroom Door Decor That Wins Every Time (Valentine’s Edition)

Capture hearts and attention with this universally appealing “Love Bugs” classroom door or bulletin board theme, perfect for the Valentine’s season. This design leverages bold primary colors—primarily red, blue, and yellow/orange—to create maximum visual impact, ensuring it stands out in any school hallway. To replicate this look, start with a solid bright blue backdrop for the sky and frame it with a contrasting red border. The foundational element is the construction of the titular “love bugs.” These creatures are formed from simple large, colorful paper circles for the bodies (think red, orange, teal) paired with layered, semicircular wings in bright, contrasting patterns or solid colors. The key to their cheerful expression lies in adding oversized googly eyes and distinctive antennae, which are crafted from small red heart cutouts attached to thin paper strips, cementing the Valentine’s theme without being overly sentimental. This DIY project is accessible, requiring minimal crafting skills but yielding impressive, gallery-worthy results.
Once your colorful bugs are constructed, begin positioning them strategically across the blue backdrop. Vary their size and orientation to give the scene movement and life. Ensure the centerpiece, the “LOVE BUGS” lettering, is prominent. We recommend using chunky, red die-cut letters (or printed and cut out) outlined in a pale color like white or light blue to ensure they pop against the background. Don’t forget the supplemental elements: small, multi-colored heart shapes scattered across the background fill negative space and enhance the romantic, playful atmosphere. For expert integration, extend the theme beyond the door frame, as seen in the image, by adding smaller, patterned bugs along the adjacent wall space. This technique, known as “breaking the frame,” makes the display feel larger and more immersive, transforming a simple door decoration into a complete hallway installation.
To elevate this display from simple decor to an interactive classroom feature, incorporate personalized elements referencing the smaller heart shapes and worksheets visible below the main theme. Use foam glitter hearts (red, silver, pink) as 3D accents or use them as bases for student writing projects. For example, students can write a brief response to a “What I Love About Our Class” prompt on a small sheet of paper, which is then attached to the back of a large glitter heart and secured to the door. This not only adds texture and dimension but also fosters a sense of ownership and community among students. This DIY is exceptionally popular because it allows for easy personalization, meaning no two doors will look exactly alike, making your creation truly unique and competition-winning.
DON’T FORGET THESE 5 ESSENTIALS FOR YOUR EASTER FRONT PORCH DECOR

The front porch is the ultimate canvas for welcoming spring, and this Easter setup is built on five key principles that are easily executed tonight. The first essential is the statement wreath, which acts as the visual anchor. Instead of traditional floral hoops, embrace a lush, nature-forward look by crafting a dense fern or boxwood wreath base. This provides a rich green backdrop that makes the pastel accents pop. For a high-impact, low-effort DIY, secure miniature speckled Easter eggs (found easily at craft stores) onto the wreath using hot glue or fine floral wire, ensuring they are evenly distributed. Expert advice dictates sticking to a cohesive color story—pastel yellow, mint green, and blush pink—to create a sophisticated, yet festive, introduction to your home. Complement the wreath with the second essential: fresh greenery or bright, seasonal blooms, like the daffodils shown, placed in matching planters to flank the door.
The third and fourth essentials involve creating an eye-catching, layered vignette near the entryway. The focus here is on figurines and texture. Repurpose a rustic element, such as a weathered wooden crate or a painted bushel basket, and line it with straw or raffia to build a foundation. This provides instant farmhouse texture. The figurines—in this case, charming, hand-painted ceramic bunnies—should be grouped closely for maximum impact. If you can’t find uniquely patterned bunnies, an easy DIY is to purchase plain ceramic or plaster rabbits from a thrift store and paint them yourself using chalk paint and a delicate floral stencil for that custom, vintage look. Grouping elements like this prevents them from looking scattered and elevates the display from mere yard decor to a curated installation.
Finally, the fifth essential is the injection of unexpected, vibrant color, often achieved through faux accents like those colorful carrots. These elements break up the softer pastel tones and provide visual excitement. Use faux root vegetables in non-traditional colors—like the deep purple and bright orange shown—scattered among the bunnies to imply a recent harvest or gathering. When styling your porch tonight, remember that vertical interest is crucial; layer your doormat, use varying heights in your planters, and ensure your wreath is proportional to the door itself. This layered approach ensures that your porch offers a multi-dimensional, picture-perfect welcome that is ready for its close-up.