Get obsessed with the 20 hottest Valentine’s Day nail designs! We curated the best ideas, including subtle hearts, fierce reds, and glamorous coffin shapes.
Glossy Alternating Pink & Red Statement Nails
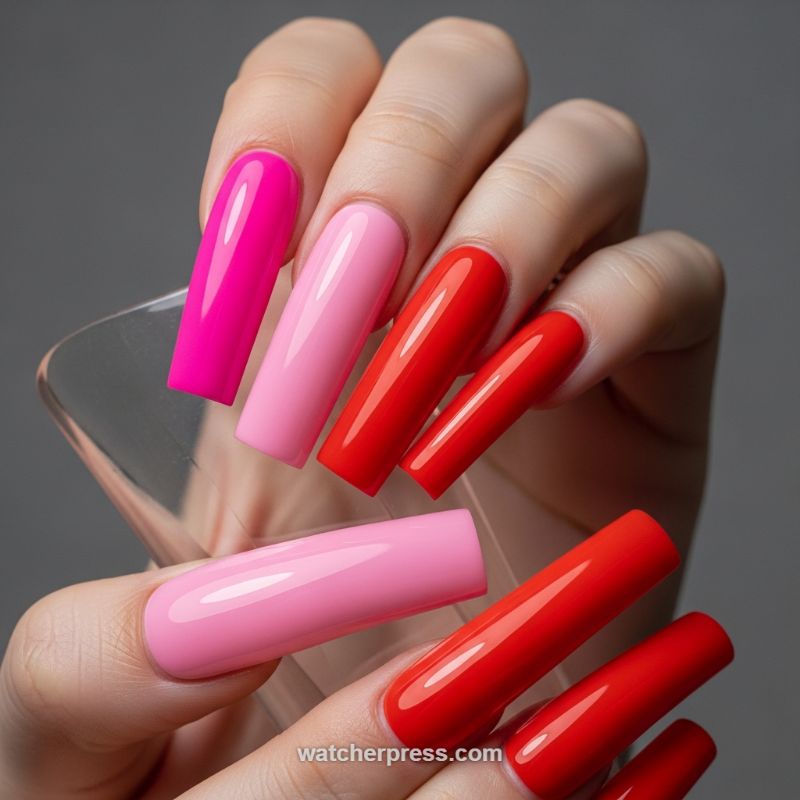
For those who believe Valentine’s Day calls for a bold, show-stopping manicure, the alternating pink and red block design is your perfect match. This look takes the holiday’s traditional color palette—vibrant reds and soft pinks—and elevates it through intentional placement and extreme gloss. The visual impact relies heavily on two factors: the perfectly sculpted extra-long square or coffin shape, which provides a large canvas for the saturated colors, and the flawless high-shine finish. The design uses three distinct shades: a deep, near-fluorescent magenta, a creamy bubblegum pink, and a fiery primary red. When planning this look, ensure your polishes are opaque creams; sheer formulas will not achieve the desired color-block density. The choice to place the colors strategically—often alternating between the lightest pink, the darkest pink, and the red—creates movement and modern sophistication that avoids the cliché V-Day heart motifs, appealing instead to a high-fashion sensibility.
To replicate this immaculate look, precision is non-negotiable, particularly if working with extreme lengths. Start by building your structure (if using tips or builder gel) to achieve a precise, straight barrel and sharp edges, as any deviation will distort the color line. Apply a single, assigned color to each nail bed. For example, you might follow the sequence seen here: Index (Hot Pink), Middle (Light Pink), Ring (Bright Red). Apply 2-3 thin, even coats of your highly pigmented gel or lacquer, ensuring complete coverage and rich color saturation. Curing or drying between coats is essential to prevent pooling or streaking, especially with such dense formulas. Once the color is set, use a thin brush dipped in acetone or cleanser to perfect the cuticle line and sidewalls before moving to the top coat phase.
The defining feature of this manicure is its mirror-like shine. Invest in an exceptional ultra-glossy, non-wipe top coat that is specifically designed to resist scratching and maintain luster. Apply a generous, floating coat, ensuring it caps the free edge completely to prevent chipping, which is crucial for maximizing the life of such long nails. Expert advice suggests balancing the colors across both hands; if one hand features more red, ensure the other hand carries the balance of the pinks for a cohesive look. If the extreme length is too intimidating, this color combination translates beautifully onto a medium almond or squoval shape. Alternatively, for a subtle textural contrast, consider finishing the bright red nails with a matte top coat while keeping the pink shades glossy, adding depth without sacrificing the bold color statement.
Valentine’s Day Color Block: The Graphic Red and Pink Split
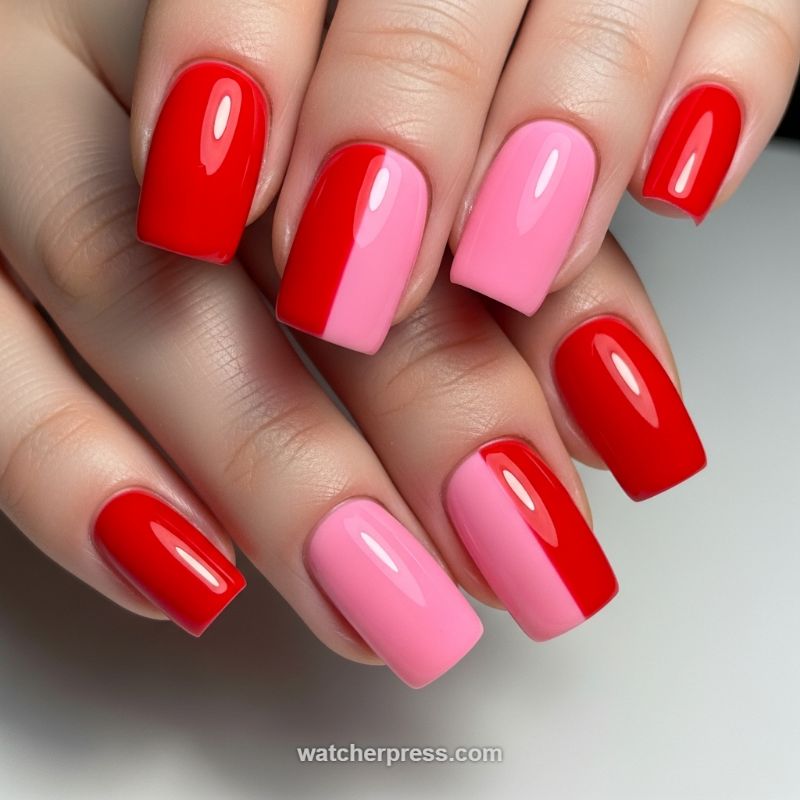
This graphic design elevates the classic Valentine’s Day palette of red and pink into a sophisticated, modern statement. Unlike traditional hearts and glitter, this look relies purely on bold color theory and precise geometry. The manicure features medium-length, perfectly shaped squoval nails, all finished with a high-shine gel top coat for a luxurious, plump look. The key visual element is the strategic color placement: some nails are painted completely in a vibrant, true red, while the accent nails utilize a striking vertical split, dividing the nail plate exactly in half between the intense red and a delicate, creamy bubblegum pink. This alternating rhythm—solid red on the index, thumb, and pinky, contrasted with the color-blocked middle and ring fingers—ensures the design is eye-catching without being overwhelming, offering a balanced yet asymmetrical display of romance and boldness.
To recreate this impeccable split design, precision is paramount. Begin by prepping the nail and applying a clear base coat. Once cured, apply two coats of the pink shade across the entire nail you intend to split, curing after each layer to ensure full opacity. This technique allows the pink, often the lighter and less opaque color, to serve as the perfect foundation. Next, use a high-quality, fine-tipped striping brush dipped in the vibrant red polish. Start by drawing a thin, clean vertical line precisely down the center of the nail, from the cuticle to the free edge. Once the guiding line is set, fill in the half of the nail destined for red, painting carefully up to the dividing line. For the best result, hold the striping brush almost vertically to prevent the color from bleeding under the brush hairs and blurring the boundary. Cure thoroughly before moving to the top coat.
The success of this design hinges entirely on the crispness of the dividing line. Expert tip: if you struggle with freehand application, use a very narrow strip of nail vinyl or painter’s tape to block off the pink side after it is fully cured and wiped clean of its inhibition layer. This provides a temporary stencil for painting the red side, guaranteeing a razor-sharp division. It is essential to choose highly pigmented polishes, as thin coats build depth and reduce the risk of flooding the side walls, which is crucial when working with such high-contrast colors. Always finish with a thick, self-leveling non-wipe top coat to encapsulate the design and achieve that signature mirror-like high gloss, which enhances the vibrancy of the red and the smooth creaminess of the pink, ensuring your graphic, romantic manicure lasts well beyond Valentine’s Day.
The Luxe Valentine: Winter White Nails with a Gilded Gift Bow

For those seeking a sophisticated departure from classic pink and red this Valentine’s Day, the “Gilded Gift Bow” design offers unparalleled elegance. This look features a clean, glossy Winter White base on a trendy medium-length, soft square nail shape. The brilliant white canvas ensures the intricate gold detailing on the accent nail truly pops. This design cleverly evokes the joy of receiving a perfect gift, making it romantically resonant without being overly cliché. The uniformity of the bright white across all fingers provides a modern, clean foundation, elevating the single decorative element to a centerpiece of luxury, making it ideal for a polished and refined holiday look.
Begin by prepping your nails, ensuring the desired soft square shape is perfectly filed and cuticles are neat. Apply a high-quality base coat for structure, followed by two smooth, opaque coats of your chosen bright white gel polish. Cure fully after each layer. The magic happens on the ring finger accent nail. Using a fine nail art liner brush and a highly pigmented gold glitter or metallic gel paint, draw the vertical “ribbons” or wrapping lines first. These should be thin, curving gracefully across the nail plate. Next, focus on the central bow: draw the outline of the two loops and the central knot. If you desire a highly dimensional look, you can use a small 3D gold bow charm, or carefully layer the glitter paint to build up the texture of the bow itself, ensuring it stands out against the flat white background and the drawn ribbons.
Precision is paramount when working with metallic accents. To maintain crispness, ensure your liner brush is nearly dry and use a very light touch, especially when creating the thin wrapping lines. If using a 3D charm, secure it with a small bead of builder gel or adhesive before applying the top coat. For all other nails and the entire accent nail, float a generous layer of non-wipe top coat, ensuring it encapsulates the gold design completely for protection and smoothness. This white and gold combination is exceptionally striking when paired with delicate gold jewelry, such as stacking rings or a subtle bracelet. The clean lines and monochromatic base make this look versatile enough to transition seamlessly from Valentine’s Day celebrations to any formal spring or winter event, demonstrating a timeless, high-fashion aesthetic.
Romantic Flow: Wet-on-Wet Heart Swirls
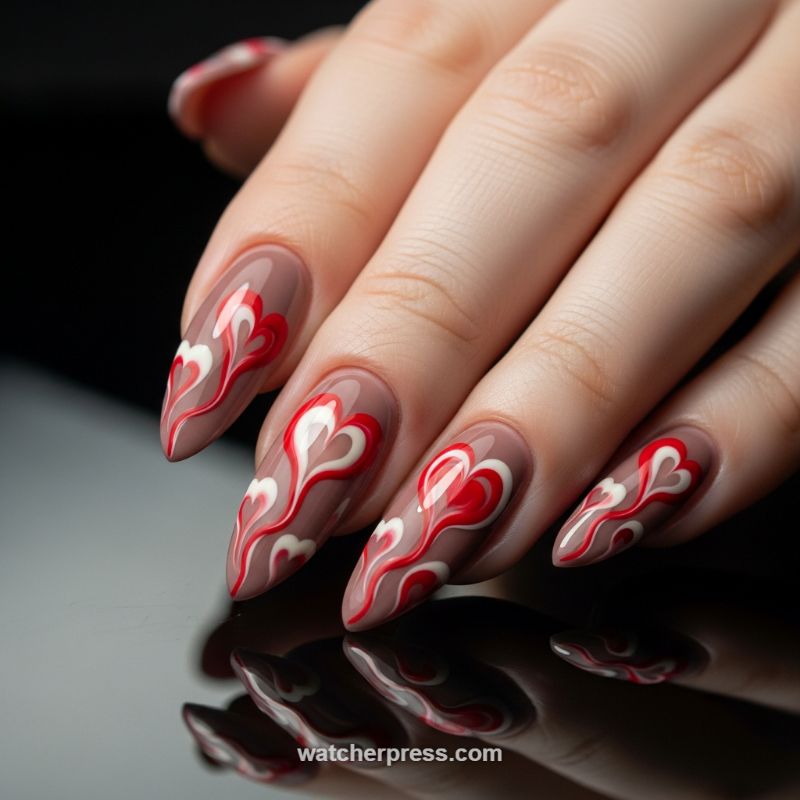
This design elevates the traditional Valentine’s heart motif using a highly sophisticated wet-on-wet technique, often referred to as ‘blooming’ or marbling. The foundation is a gorgeous, muted taupe or mauve nude base, which provides a chic contrast to the vibrant red and crisp white used for the flowing artwork. To recreate this look, begin by prepping the nails into a long almond or stiletto shape, as the vertical movement of the design requires significant length to truly shine. After applying a gel base coat and fully curing, apply two thin, even coats of your selected opaque nude polish, curing between each layer. The key to the design’s high-gloss finish is a perfectly smooth base, so ensure the color coats are level before proceeding to the art application. Expert tip: Using high-pigment gel polishes specifically designed for nail art will provide the necessary opacity and stability for the subsequent wet-on-wet steps.
The magic of this design lies in the precise application and dragging of the wet polishes. To create the ‘wet’ surface, apply a medium-thick layer of a clear topcoat (or a dedicated blooming gel) over the nude color, but do NOT cure it. Working quickly, use a dotting tool or fine detail brush to place three sets of two large, adjacent dots down the center of the nail—these will form the curves of the hearts. Use vibrant red for the primary dots, and immediately place a smaller white dot directly beneath or inside the curve of the red dots. Without hesitation, take a fine liner brush, toothpick, or specialized striping tool and quickly drag the center of the dots downward, creating a sharp point and blending the red and white polishes into the characteristic elongated swirl and heart shape. The surrounding wet polish will cause the colors to slightly spread or ‘bloom,’ softening the edges and resulting in the ethereal, layered effect seen here.
Controlling the density and speed is crucial; the design must be executed while the underlying topcoat remains completely wet. If you desire multiple hearts down the nail, as shown in the image, you must repeat the dotting and dragging process quickly for each one, ensuring your drag lines connect seamlessly to maintain the flowing, vine-like aesthetic. Once you achieve the desired heart swirl (which may take a moment as the gel blooms), immediately flash-cure the design for 10-15 seconds to freeze the movement instantly. Finish the entire manicure with a generous coat of high-shine, non-wipe top coat, ensuring you seal the free edge thoroughly. This glossy, encapsulated finish not only protects the intricate design but emphasizes the watery, dynamic nature of the blooming technique, making it a show-stopping design ideal for a modern, romantic Valentine’s look.
Regal Lattice: Mastering the Geometric Negative Space Design
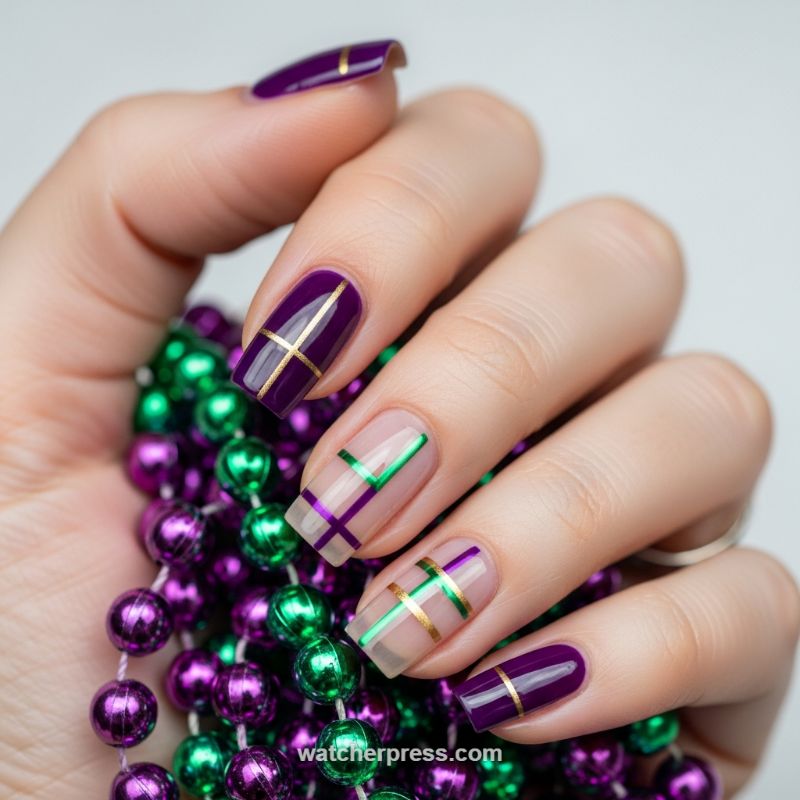
This design offers a fresh, modern take on Valentine’s elegance, moving beyond hearts and glitter with a sophisticated geometric lattice pattern utilizing negative space. The high contrast between the deep, glossy purple (easily substitutable for oxblood or a rich magenta for V-Day) and the nude base creates an artistic, window-pane effect. To recreate this look, begin by prepping your nails thoroughly: buffing, shaping into a neat square or coffin shape, and applying a high-quality base coat. You will need three key elements: a rich primary polish (like the featured royal purple), a metallic accent striping tape (gold is essential for luxury), and a secondary contrasting metallic striping tape (here shown in emerald green, but easily swapped for a bright chrome pink or red). Start by painting your thumb, pointer, and pinky full coverage with the primary purple shade, ensuring two smooth, opaque coats. On these solid nails, apply a single vertical strip of gold tape down the center (or across the tip of the pointer finger, as shown) for a subtle, elongated enhancement before top-coating.
The true artistry lies in the middle two nails, which utilize the negative space technique. On the ring and middle fingers, apply only the clear base coat and allow it to dry completely. For the crosshatch pattern, the key is precision in placing the striping tape. Begin by cutting your metallic tapes slightly longer than needed. We recommend starting with the vertical line first. On the pointer finger, place a vertical strip of purple tape and a horizontal strip of green tape, creating an off-center ‘plus’ sign or lattice intersection. On the middle finger, use the metallic gold tape for the horizontal line and the green tape for the vertical line. Ensure that the lines are perfectly straight and taut; using fine-tipped tweezers is highly recommended for accurate placement. Once all tapes are firmly adhered and the geometric design is satisfying, carefully trim any excess tape edges flush with the nail sides.
Expert advice for mastering this design involves correct top coat application to ensure maximum longevity and a smooth finish. Always use a generous, ‘floating’ coat of top coat, meaning you apply it without dragging the brush too hard, which can easily catch and pull up the edges of the metallic striping tape. For an ultra-glossy, durable finish suitable for a special occasion like Valentine’s Day, consider using a high-shine, quick-dry or gel-effect top coat. If you wish to fully customize this look for a classic V-Day palette, swap the deep purple for a velvety red or dusty rose polish and exchange the green striping tape for a vibrant chrome pink or rose gold. The underlying geometric structure remains timeless and chic, proving that modern romance doesn’t always require literal motifs—sometimes, simple, precise lines speak volumes about sophisticated style.
Ethereal Frosted Glitter French Tips
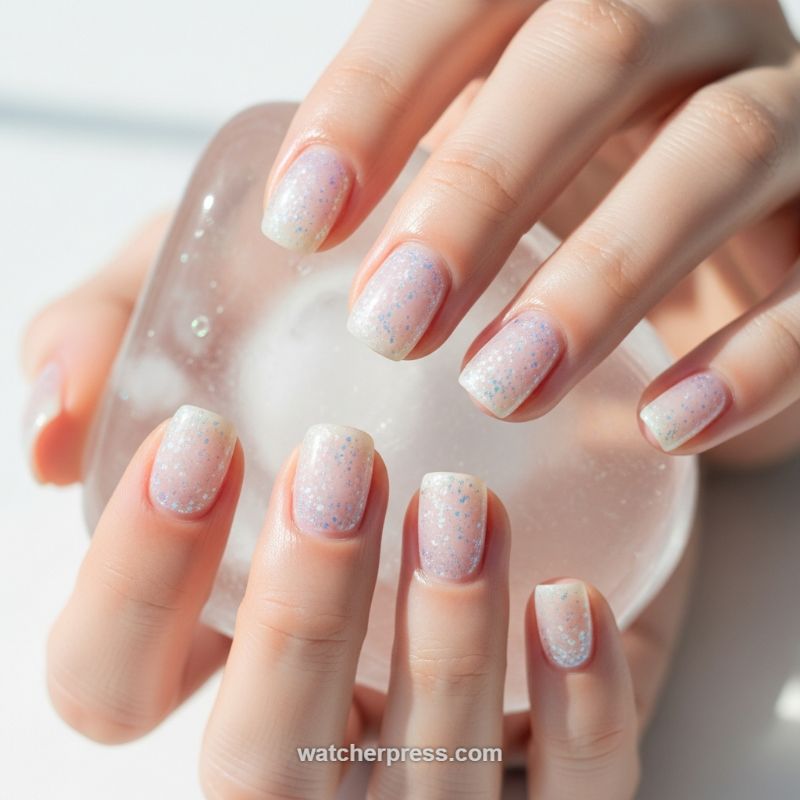
If you are aiming for a romantic, sophisticated manicure this Valentine’s Day that whispers ‘enchantment’ rather than shouting ‘hearts and roses,’ this ethereal frosted glitter design is your perfect match. This look uses a sheer, milky pink or soft lavender jelly base polish, allowing the natural nail bed to peek through for a healthy, polished appearance. The magic lies in the application of iridescent micro-glitter, strategically placed to create a soft, gradient French tip effect. The glitter mixture often contains holographic flakes of white, pale blue, and soft pink, mimicking the look of freshly fallen snow or fairy dust catching the light. The shape shown is a softly rounded square (squoval), which keeps the delicate sparkle grounded and wearable for any occasion, making this design versatile enough to last well beyond February 14th.
To recreate this subtle shimmer, start with meticulously prepped nails and a strong base coat. Apply 1-2 thin coats of your chosen sheer, milky base color—ensure the coats are thin to maintain that sought-after jelly depth. Once the base is cured or dry, select an iridescent glitter topper that features extremely fine particles. The technique here is crucial: instead of applying the glitter evenly across the whole nail, use the brush to float a generous amount onto the free edge of the nail, then gently feather the brush upward towards the mid-nail, stopping approximately two-thirds of the way down. You want the highest density of sparkle concentrated at the tip, gradually dispersing towards the cuticle line to achieve that gentle ombre effect, avoiding any harsh lines or overly thick application spots.
Expert advice for mastering this look centers on product selection and sealing. For maximum opulence, opt for gel polish, as it allows for better control during the glitter layering process and provides superior shine. If you are using standard lacquer, ensure each layer is completely dry before applying the glitter polish to prevent dragging the base color. To truly make the sparkle pop and ensure longevity, encapsulate the finished glitter gradient with a thin layer of builder or structuring gel, followed by a non-wipe, high-gloss topcoat. This final sealing step ensures the fine glitter is locked in place, providing a smooth, durable surface that enhances the delicate shimmer and protects your dreamy Valentine’s Day manicure for weeks to come.
Dramatic Oxblood Stilettos with Negative Space Hearts
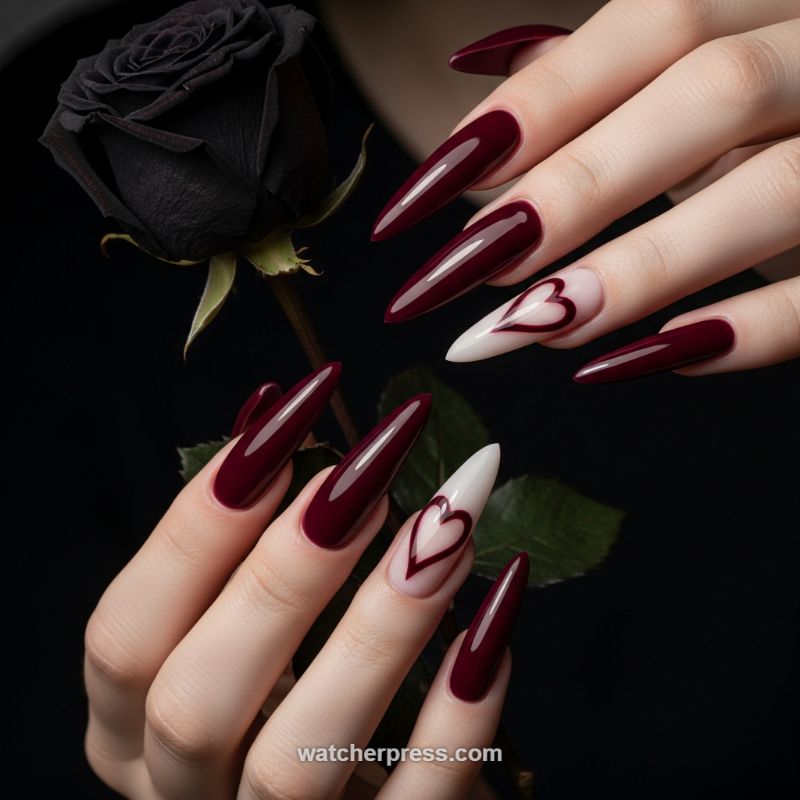
This sophisticated yet edgy manicure design takes traditional Valentine’s romance and elevates it with high drama, replacing standard pinks and reds with a deep, vampy oxblood burgundy. The foundation of this look is the extreme stiletto or sharp almond shape, which is essential for conveying the fierce, gothic-glam aesthetic. To achieve the intense, reflective depth of the main color, start by ensuring all ten nails are perfectly sculpted and uniform in length. Apply a highly pigmented, glossy oxblood gel polish in two to three thin coats on eight of the nails, curing thoroughly between each layer. This level of dark, monochromatic polish demands flawless execution, so pay close attention to the cuticle line and side walls to prevent flooding. This powerful color choice conveys luxury and confidence, setting a moody, romantic tone for the entire design.
The real artistry lies in the accent nails, typically placed on the ring finger, which utilize a smart variation of the French tip technique. Begin the accent nails with a sheer nude or milky pink base coat near the cuticle, allowing a subtle natural or ‘negative space’ effect. Next, paint the tip in a solid, opaque white, ensuring the white area covers roughly the top half to two-thirds of the nail bed, forming a clean canvas for the detail work. Once the base is cured, retrieve the same deep oxblood color used on the solid nails and prepare a very fine, long-bristled detail brush (a ‘striper’ or ‘liner’ brush is ideal). Dip the brush lightly, removing any excess product to prevent blobs.
Now, carefully outline a symmetrical heart shape directly onto the white section of the nail, using the deep red polish. The heart should be large and centered, filling the white area but leaving a crisp border around its edges. The key to making this design pop is maintaining a consistent, thin line weight for the outline, ensuring the heart shape is sharp and balanced on both sides. After completing the heart outline on both accent nails, flash cure them quickly to lock the design in place before applying the final top coat. Finish the entire manicure with a premium, non-wipe high-gloss top coat, sealing the edges for maximum durability. This provides a sleek, glossy finish that makes the sharp tips and dramatic colors stand out, offering a perfect, non-traditional statement for Valentine’s Day.
Fuchsia Ombre with 3D Pearl Trimming
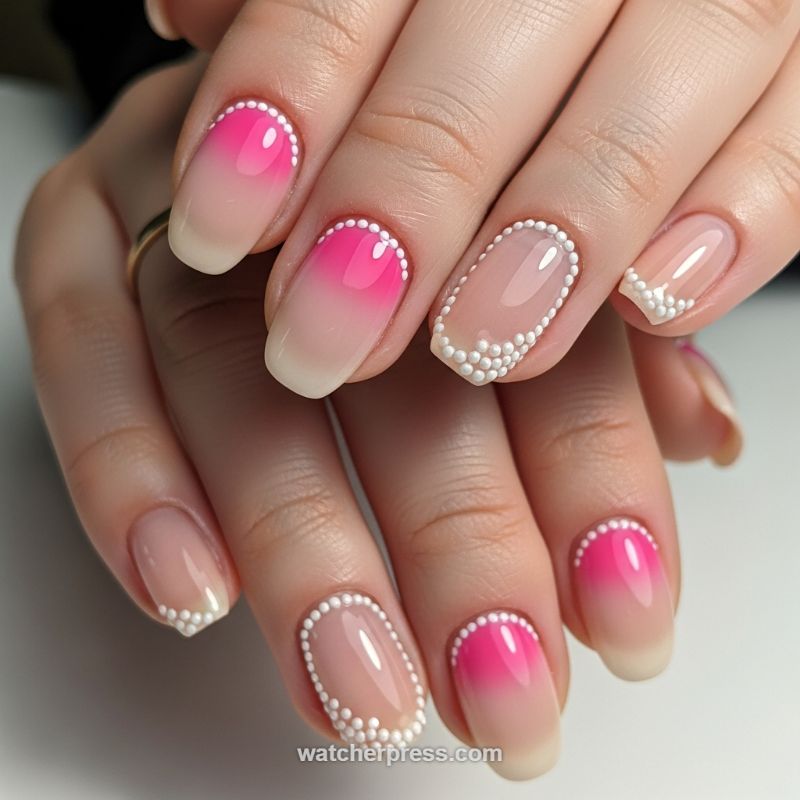
This stunning design elevates the classic French fade with a vibrant pop of color perfect for Valentine’s Day romance. The core technique involves a flawless ombre transition, starting with a bold, rich fuchsia or hot pink near the cuticle, seamlessly fading into a milky white or sheer nude base toward the free edge. Unlike a standard French manicure, this ‘baby boomer’ style uses the color gradient across the entire nail bed, lengthening the appearance of the fingers. Achieving this smooth blend requires precision—often using a makeup sponge or an ombre brush to gently stipple the two colors together while they are still wet, ensuring no harsh lines remain before curing. The high-gloss top coat seals the look, giving the entire nail a luxurious, smooth finish.
What truly makes this manicure stand out is the exquisite 3D pearl or dot detailing, which adds texture and elegance. For the nails featuring the ombre (typically the index, middle, and thumb), use a fine dotting tool and thick white gel polish or specialized micro-beading paste to create a perfectly aligned string of tiny white dots tracing the curve of the eponychium (cuticle line). The dots must be uniform in size and placed precisely to act as a delicate crown for the color block. For the accent nails (usually the ring finger and pinky), the design shifts to a negative space approach, highlighting the natural nail color beneath a sheer nude polish. These accent nails feature the white dots used to create a delicate frame—either a full oval border around the periphery of the nail bed, or concentrated at the free edge to form a textured, dotted French tip. Curing the 3D elements carefully and separately from the main color ensures they retain their spherical shape and adhere firmly.
To ensure this intricate, delicate design lasts through all your Valentine’s festivities, start with a high-quality builder gel or structured base coat to provide durability to the natural nail, especially if maintaining a longer oval shape. When applying the final top coat, be strategic. While you want the main gradient sections to be glossy, avoid drowning the 3D dots in excessive top coat, as this will flatten their appearance and diminish the dimension. Instead, apply the top coat around the dots, leaving the spheres themselves exposed or coated very lightly with a non-wipe formula. This contrast in textures—high-gloss shine meeting matte 3D dots—is key to achieving a professional finish. For personalization, you can swap the hot pink for a soft blush or a deep raspberry, but maintaining the crisp white dots is essential for maximizing the design’s romantic and elegant impact.
Vibrant Red Gloss with 3D Sweetheart Bow Accent
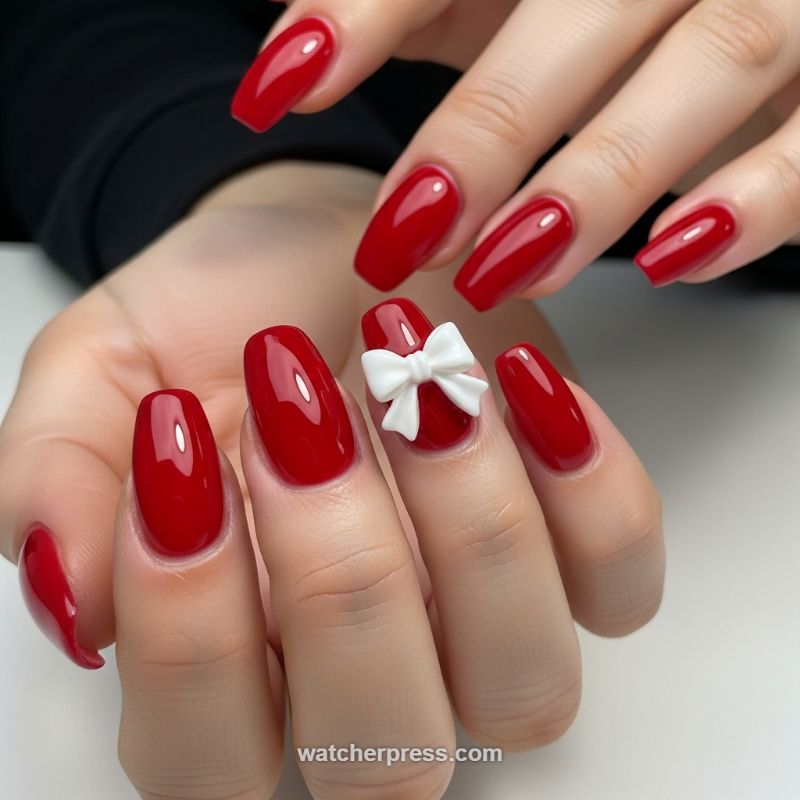
This design epitomizes classic romance and holiday flair, making it an undeniable choice for Valentine’s Day. The foundation is a rich, high-shine, true-red gel that covers every nail except for the accent finger. To replicate this ultra-glossy look, begin by perfecting your nail shape—a refined medium-length soft coffin or squoval works best to maintain elegance without sacrificing impact. Apply a protein or rubber base coat to build subtle structure and ensure durability, followed by two thin, perfectly leveled coats of the chosen deep red shade. The crucial step for achieving that signature mirror finish is the final seal: use a non-wipe, high-quality diamond top coat, ensuring you cure it completely and cap the free edge meticulously. This flawless, reflective canvas is what elevates the simple red manicure into a luxurious statement piece.
The undeniable showstopper is the three-dimensional white bow, strategically placed on the ring finger. This technique requires specialized skill in 3D nail art, typically executed using thick-viscosity white sculpting gel or soft white acrylic powder. If you are sculpting the bow freehand, create the individual loops and center knot directly onto the fully cured red nail, flash curing each piece sequentially to prevent the gel from running. Ensure the bow is centered and symmetrical for a refined appearance. A pro tip for textural contrast: while the base manicure is glossy, the 3D element should be left un-top-coated or finished with a dedicated matte or velvet top coat. This subtle textural shift makes the bow look like a genuine piece of fabric or sugar-spun candy, sharply contrasting with the slick, wet-look red backdrop and emphasizing its dimensional quality.
While this design screams Valentine’s Day, its construction is highly durable if done correctly. If freehand sculpting is beyond your expertise, quality pre-made resin bows are widely available. Secure any charm firmly by applying a small bead of strong nail glue or a clear sculpting gel (like Gem Gel) to the back of the bow, pressing it onto the nail, and curing thoroughly. This manicure is already a bold accessory, so when styling, keep hand jewelry minimal, perhaps opting for simple, delicate gold or silver bands that won’t compete with the prominent 3D accent. For an evening twist, consider adding a subtle dusting of iridescent shimmer to the red base, providing depth without sacrificing the primary impact of the classic red and white color scheme.
Regal Jewel-Toned Marble with Gold Accents
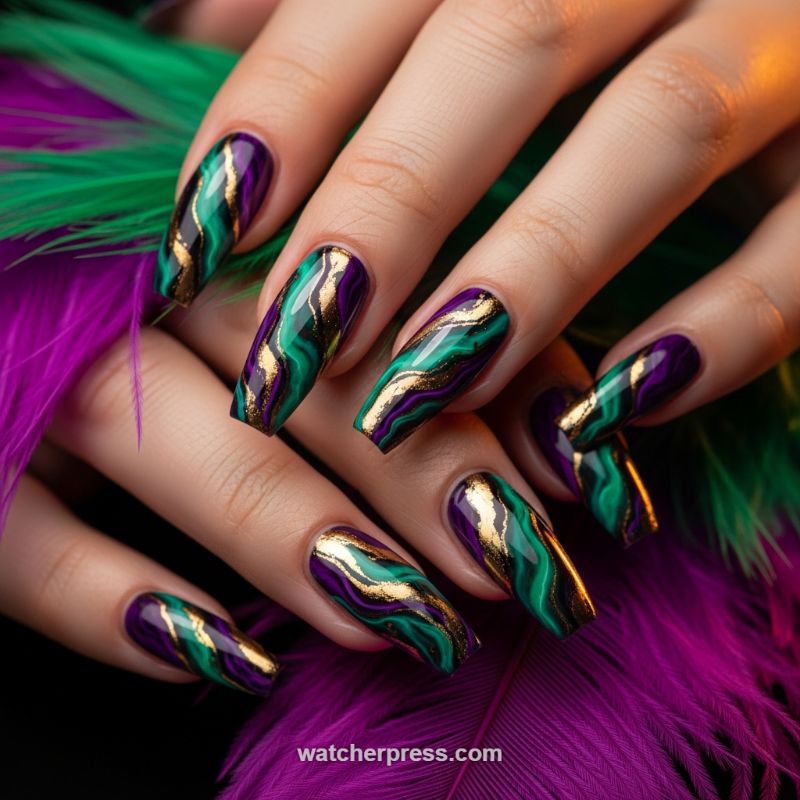
This opulent design transforms the nail into a piece of wearable jewelry, utilizing the stunning contrast of deep emerald green and rich amethyst purple, beautifully delineated by shimmering metallic gold. While many associate Valentine’s Day with pink and red, these deep jewel tones offer a sophisticated and luxurious alternative, perfect for a high-end date night. This specific design thrives on a long, sculpted canvas, such as the trendy coffin or ballerina shape, which allows the intricate, flowing patterns to fully express themselves. To recreate this agate-inspired look, begin with meticulous nail preparation, ensuring the surface is smooth and the chosen shape is perfectly symmetrical. Apply a standard gel base coat and cure. The magic of this design happens when working wet-on-wet with high-pigment gel polish, ensuring you have ample working time to manipulate the colors before curing.
To execute the flawless marble effect, apply a generous, thick layer of your darkest base color (the deep purple) across the entire nail, but do not cure it yet. While the purple is still wet, use a striping brush or dotting tool to strategically drop streaks and pools of the second color (the emerald green) onto the wet surface. Immediately take a clean, dry marbling brush or a very fine detail brush and gently drag it through the intersecting colors. The key is to create fluid, wavy lines that mimic natural stone veining—do not over-blend, or the colors will turn muddy. You want distinct, swirling ribbons of color. Once you are satisfied with the natural flow and balance of the green and purple, cure the nail completely under the lamp. This step sets the foundation for the crucial gold detailing.
Expert advice for elevating this design centers entirely on the metallic gold accents. These lines should not be applied haphazardly; they must follow and enhance the natural divides created during the swirling process, adding depth and dimension. Use gold transfer foil for the most reflective, metallic finish. Apply a thin line of foil adhesive or specialty gold striping gel along the boundaries where the purple and green meet, tracing the most dramatic curves of the swirl. If using adhesive, cure it until it is tacky, press the gold transfer foil firmly onto the tacky surface, and quickly peel it back to leave behind perfectly rendered, reflective gold lines. Finish the entire manicure with a high-shine, non-wipe topcoat. Because this design is so intricate, a resilient topcoat is essential to seal the design and prevent chipping, ensuring your regal, jewel-toned manicure lasts well beyond Valentine’s Day.
Fierce Fuchsia Heart Foil Statement Nails
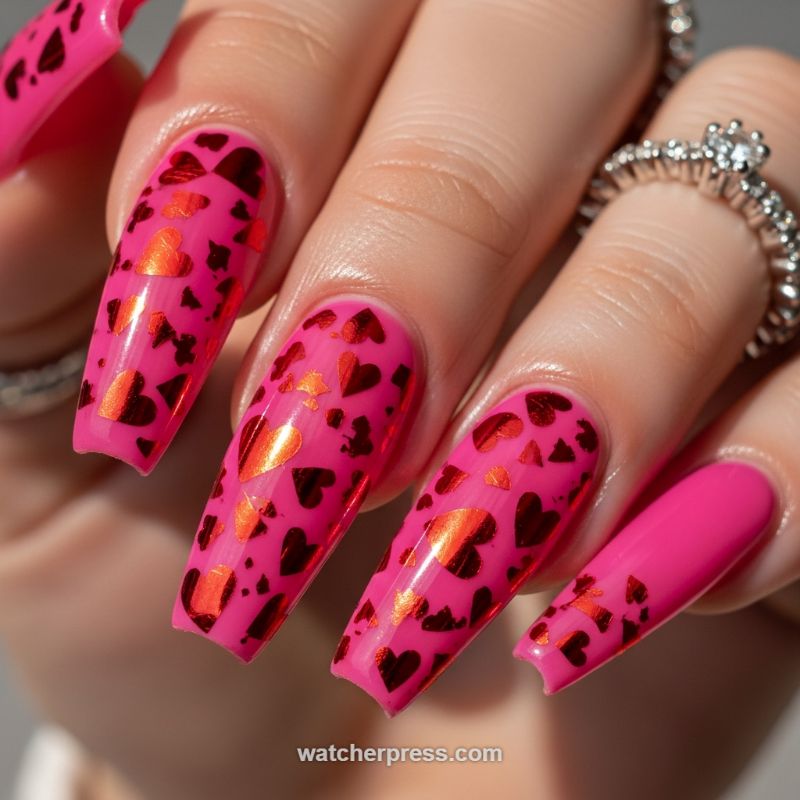
This design offers a modern, high-voltage take on classic Valentine’s romance, opting for a shocking fuchsia base instead of traditional soft pinks or deep reds. The key to the vibrancy of this manicure is the intense, glossy pigment, best achieved using a professional gel polish system. The striking visual element is the dense, scattered application of metallic hearts. Notice the dimensionality created by using two distinct tones of foil: a brilliant, reflective copper-red or orange-red and a deeper, less reflective burgundy or maroon. This dual-tone application is what truly elevates the look from a simple decal mani to a dimensional, textural work of art. To begin, select a highly saturated hot pink polish and ensure your nails are meticulously prepped and shaped (a coffin or squoval shape is ideal for showcasing the decal density). Apply your base color and two coats of polish, ensuring each layer is fully cured or dried to prevent bubbling under the foil layer.
Achieving this densely packed, multi-tonal heart pattern relies on the correct application of specialized nail transfer foil. After your base color is fully set, apply a thin, even layer of dedicated foil transfer glue. If you are using standard lacquer, apply a specialized sticky base polish. Wait for the glue to cure (for gel) or to transform from white/milky to clear and tacky (for standard glue). This perfect tacky surface is essential for successful foil transfer. Next, using pre-cut heart-shaped foils or simple red transfer foil sheets, cut small, varied fragments, ensuring you have both the bright metallic shade and the darker contrast shade readily available. The secret to the natural, scattered appearance is to randomly press the metallic side of the foil piece against the tacky surface, rubbing firmly before quickly peeling it away. Overlap the applications of the two different colored foils to mimic the depth and irregularity seen in the finished design. Expert tip: Focus the densest application in the center of the nail plate, allowing the pattern to thin out naturally toward the cuticles and free edges for a more organic, textured appearance.
Sealing this type of foiled design requires careful consideration, as metallic foils are highly susceptible to lifting and wrinkling when they come into contact with certain solvents. Immediately after the foil transfer is complete, avoid applying traditional quick-dry top coats, as they often contain agents that can crinkle the delicate foil. Instead, opt for a high-quality, non-wipe UV gel top coat or a water-based top coat formulated specifically for decals and foils. Apply a generous layer, taking special care to ‘cap’ the free edge of the nail thoroughly—this is the most critical step for preventing premature chipping and protecting the metallic edges. For maximum plumpness and shine, apply a second, thicker layer of high-gloss top coat once the first layer is cured or dry. This careful sealing process ensures the high-shine, durable finish required for this bold and glamorous Valentine’s statement, perfect for anyone looking to embrace fierce romance this year.
Lip Gloss Nails with Floating Red Hearts
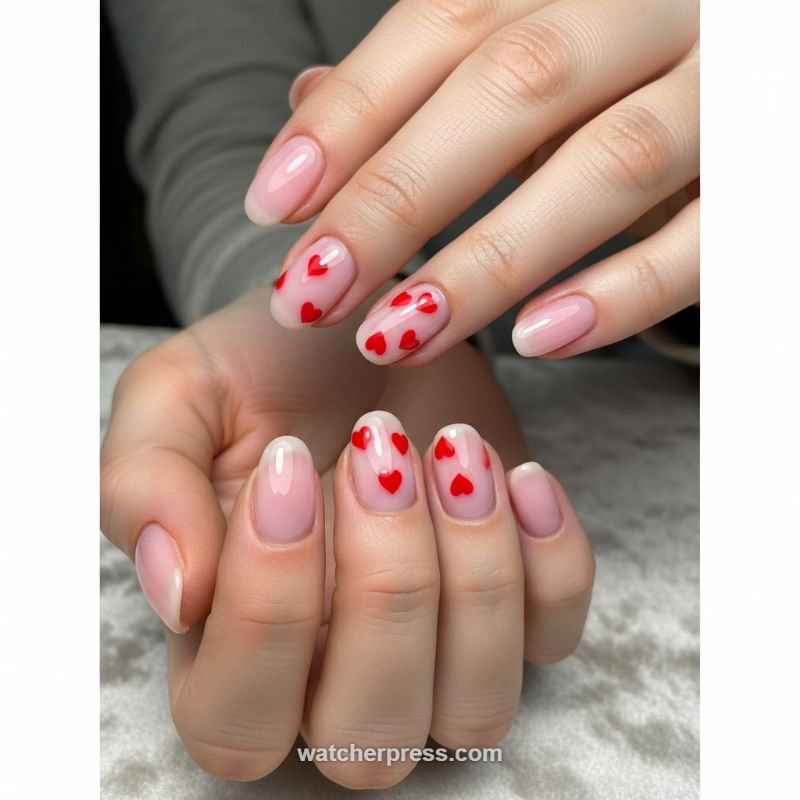
This design masterfully blends two of the year’s biggest trends—the sheer, healthy glow of ‘Lip Gloss Nails’ and the playful sophistication of minimalist nail art. The foundation of this look is key: achieving a translucent, milky blush base that mimics healthy, hydrated nails. To recreate this at home, start by shaping your nails into a soft oval or almond shape. After meticulous cuticle prep, apply one or two thin coats of a sheer pink, nude jelly, or builder gel. The goal is depth and shine, allowing the natural nail white edge to peek through subtly, giving a polished but not fully opaque appearance. Note how the surrounding fingers feature a clean, classic French tip using the same sheer base and a crisp white line—if attempting the French detail, ensure the white tip is subtle and perfectly curved to maintain the delicate aesthetic, avoiding a thick or harsh line that would compete with the accent nails.
Now, for the focal point: the floating red hearts. This design utilizes primary red, a highly saturated shade that pops dramatically against the sheer background. The hearts are strategically placed on the middle and ring fingers, creating a balanced, non-overwhelming accent. To execute the hearts, you will need a fine detail brush or a dual-ended dotting tool. Using a highly pigmented gel polish, the trick is to create two small, adjacent dots that form the top curves of the heart. Then, while the gel is wet, quickly drag the brush down from the center point between the dots to form the clean, sharp bottom point. Professional tip: work quickly and cure immediately (flash cure for 10-15 seconds) after painting each heart cluster to prevent the red polish from bleeding into the wet sheer base coat, which would ruin the clean edges of the design. Aim for 3 to 5 hearts per nail, scattering them organically rather than lining them up perfectly.
Once the accent nails are cured and flawless, seal the entire manicure with a premium, high-shine, non-wipe top coat. This final layer is essential as it locks in the art and amplifies the ‘wet’ or ‘glazed’ look inherent in the Lip Gloss trend. The sheer base reflects light beautifully, making the encapsulated red hearts appear three-dimensional and truly ‘floating’ beneath the surface. For longevity and a truly premium finish, make sure to cap the free edge of every nail with the top coat to prevent chipping. This design is the epitome of sweet sophistication—perfect for Valentine’s Day without relying on overly complex or bulky nail embellishments, making it accessible for nearly every nail length and shape.
The Unexpected Valentine: Deep Emerald Green & Gold Hearts
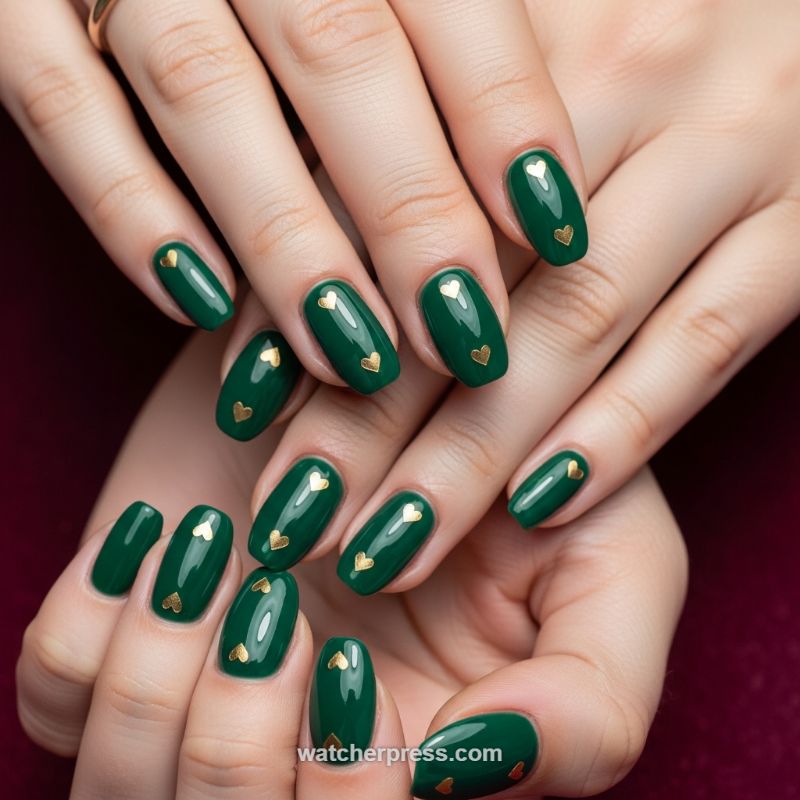
Move beyond the traditional pinks and reds this year and embrace a sophisticated, jewel-toned manicure perfect for Valentine’s Day. This design utilizes a deep, high-gloss emerald or hunter green polish as a rich backdrop, offering a luxurious and unexpected twist on romantic nail art. The medium-length oval or softly rounded almond shape of the nails enhances the polished aesthetic. The secret to the look’s success lies in the contrast: the dark, glossy green creates depth, while the tiny, metallic gold heart decals provide a shimmering, minimalist pop of romance. This design proves that Valentine’s Day nails can be both festive and incredibly chic, making it an ideal choice for dinner dates or formal outings where subtlety is key.
To recreate this stunning, high-impact manicure, begin by prepping the nail plate thoroughly, ensuring a smooth surface for the dark polish. Apply two to three thin, even coats of your chosen deep green gel or lacquer, curing or allowing dry time between each layer until the color is fully opaque and rich. Once your final color coat is cured (or mostly dry), the decal placement is critical. Use a wax pencil or tweezers to pick up small, gold heart nail charms or stickers. Apply a thin layer of top coat (or adhesive gel) only where the hearts will be placed. Carefully position the hearts—some nails feature one heart centered toward the middle, while others have two hearts stacked vertically—to achieve that balanced, curated look seen in the image. Ensure the hearts lay perfectly flat against the nail surface to prevent snagging.
For an expert finish that guarantees longevity and shine, always seal the design with a high-quality, ultra-glossy top coat, paying close attention to capping the free edge to prevent chipping. If using delicate metal charms, make sure the top coat flows completely around the edges of the heart without creating too much bulk, which can dull the appearance. For a look this dark and defined, expert advice dictates meticulous cuticle care; hydration is crucial, as moisturized cuticles make the rich color stand out even more. If gold heart decals aren’t available, you can substitute them with tiny gold foil specks or even hand-paint the hearts using a very fine detail brush and metallic gold polish, although pre-made decals offer the cleanest, most uniform shape.
Romantic Baby Boomer Ombre with Diamond Accents
The Baby Boomer manicure—a sophisticated gradient take on the classic French tip—is arguably the most elegant nail trend to choose for Valentine’s Day. This design moves seamlessly from a sheer, milky pink or soft nude base near the cuticle into a pristine white tip, creating a soft, airbrushed effect. Unlike the stark line of a traditional French manicure, the ombre blend here is universally flattering, visually elongating the nail bed and providing a delicate, romantic aesthetic that perfectly complements the soft themes of Valentine’s. The nails are shaped into a medium-length almond form, which enhances the overall grace and femininity of the look, making it suitable for both casual dates and formal evening celebrations.
Achieving this flawless transition, often done using high-quality builder gels or gel polishes, is all about perfecting the blending technique. Start by applying your sheer base color and curing it. The key to the fade is utilizing a dedicated ombre brush or a dense makeup sponge cut into a wedge. Apply the white polish only to the tip of the sponge and gently dab it onto the free edge of the nail, feathering the color upward toward the center. This dabbing motion must be light and precise to avoid creating harsh lines. Cure the nail between thin layers of white, repeating the process two to three times until the desired opacity is built up at the tip, ensuring the transition zone remains perfectly diffused and soft. Finish this foundational step with a layer of clear builder gel or a self-leveling top coat to encapsulate the blend and smooth out any sponge textures before the final cure.
To elevate this soft ombre from everyday chic to date-night glamour, the addition of minimalist embellishments is crucial. As seen in the image, a small cluster of micro-rhinestones is strategically placed near the cuticle area of the ring finger. This subtle application of ‘diamond accents’ provides the perfect touch of sparkle without overpowering the delicate gradient. For the best V-Day durability, secure these small crystals using a thick rhinestone glue or builder gel, curing them fully before sealing the entire nail with a non-wipe top coat. Expert tip: While silver rhinestones offer a cool, crisp sparkle, consider using tiny rose gold or iridescent crystals if you prefer a warmer, more overtly romantic finish. This design proves that sometimes, the most sophisticated statements are made through subtle, perfectly executed artistry.
Rocker Romance: The Studded Black French Mani
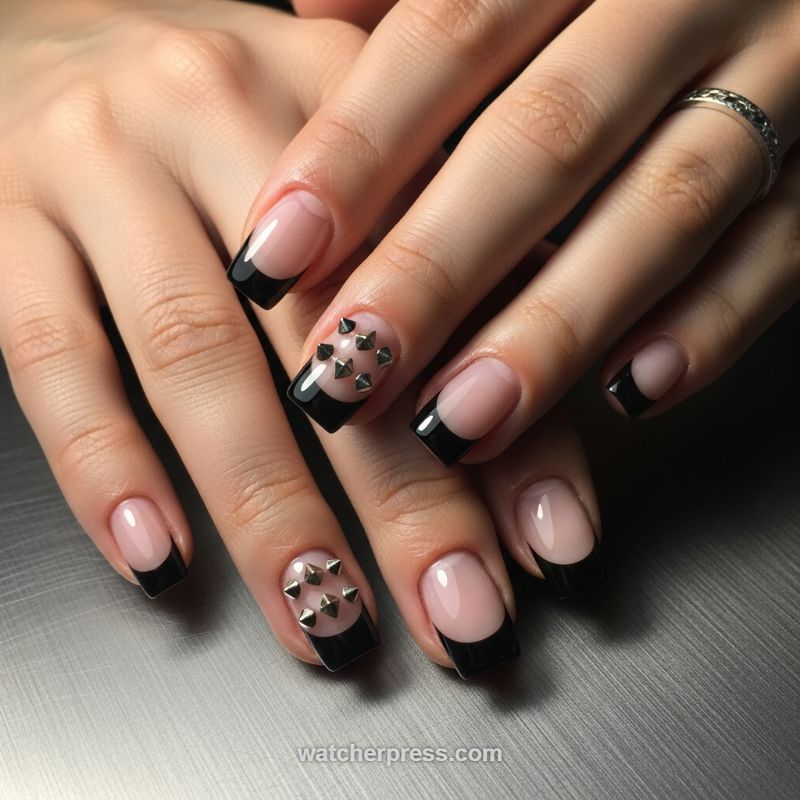
For those seeking a Valentine’s Day look that eschews traditional soft pinks and reds for a bold, high-fashion edge, this studded black French manicure is the ultimate statement. Start by perfecting your base: the shape should be a structured squoval or soft square to complement the graphic nature of the tips. Apply two coats of a sheer milky pink or nude gel polish across all nails, ensuring the coverage is smooth and natural-looking, mimicking a healthy nail bed. The key to the sophisticated look is the application of the black tip. Instead of a shallow French line, aim for a deep, exaggerated curve—a true half-moon shape that covers nearly the bottom third of the nail. Use a highly pigmented black polish and a fine-tipped striping brush to carefully etch out the smile line before filling in the tip. Precision is paramount here; a wobbly line ruins the sharp contrast of this edgy design. Finish the non-accent nails with a high-shine, durable topcoat.
The punk-glam element is introduced via the metallic studs strategically placed on the middle and ring fingers. To achieve this dimensional, clustered effect, you will need approximately six to seven small, pyramid-shaped silver studs per accent nail. After applying the nude base but before the final topcoat, use a dotting tool to place a small bead of thick clear builder gel or specialized nail jewelry adhesive where you want the studs to anchor. Carefully pick up the studs using wax pencil or tweezers and arrange them in a slightly scattered, centered cluster, ensuring they do not touch the cuticle line or the black tip. This positioning keeps the design visually balanced. Cure the gel thoroughly to secure the hardware. Expert tip: When applying the final topcoat, coat the entire nail and go around the bases of the studs, but avoid painting directly over the peaks of the studs. This prevents dulling the metal and preserves the distinct, three-dimensional texture that makes this design pop.
This look transforms the classic French manicure into a goth-glam masterpiece, perfect for a confident, fierce date night ensemble. While traditional Valentine’s designs whisper sweet romance, the Rocker Romance mani shouts bold desire, pairing perfectly with sleek leather, structural silver jewelry, or a chic velvet dress. To maximize the longevity of your hardware-heavy manicure, always seal the edges of your topcoat, and be mindful of snagging the studs on clothing. If a stud feels loose, apply a tiny additional dot of builder gel at the base and cure immediately. This detailed, contrasting design offers durability and unparalleled style, ensuring your nails remain the fiercest accessory long after February 14th.
Liquid Metal Heartbreak Drip
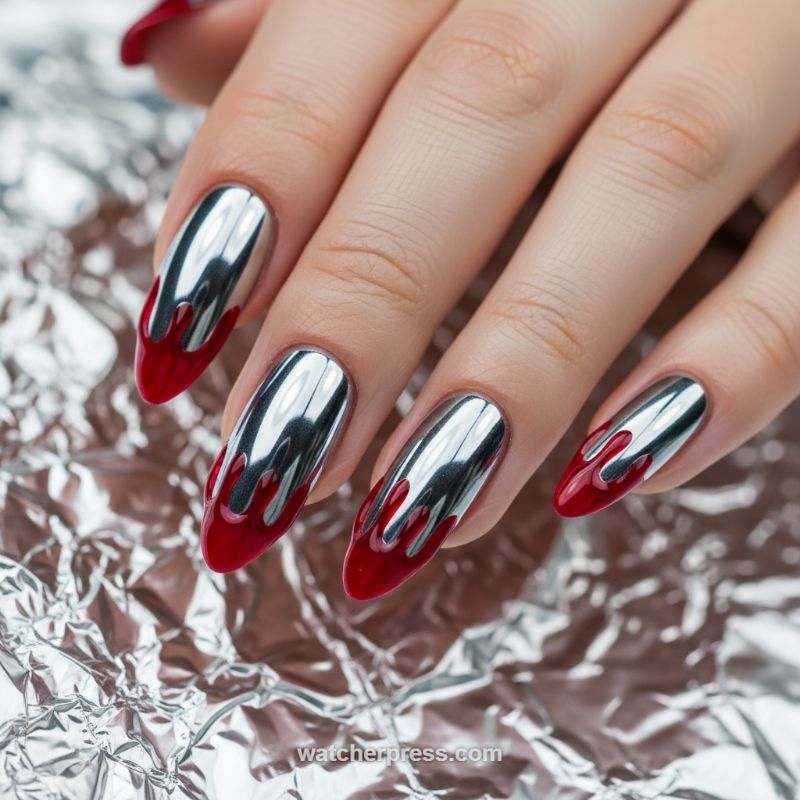
This high-impact nail design perfectly marries edgy glamour with passionate color, offering a stunning alternative to typical pink and heart motifs for Valentine’s Day. The foundation of this look is a flawless, mirror-like chrome finish achieved in metallic silver, giving the nails a sleek, almost futuristic armor effect. Contrasting sharply, a vibrant, rich crimson red is applied at the tip, expertly shaped to resemble melting wax or dripping blood—a nod to passion, intensity, or a dramatic “bleeding heart” aesthetic. This style demands an almond or stiletto shape to maximize the visual length and dramatic flair of the drips, ensuring the transition from silver to red is dynamic and eye-catching. To pull off the luxurious appearance seen here, ensure your nail shape is perfectly symmetrical and the surface is buffed smooth before product application, as the reflective chrome finish will mercilessly expose any imperfection or bump in the structure.
Achieving the perfect chrome drip requires precise layering and specialized products. Start with structured gel or acrylic enhancements to provide a smooth, durable canvas. Apply your base color (black or a dark gray gel works best to amplify the chrome shine) and cure. Next, apply a layer of no-wipe top coat, cure partially to the manufacturer’s specification, and then meticulously rub the silver chrome powder onto the nail surface until a perfect mirror sheen is achieved. Ensure all excess powder is gently brushed off. Seal this chrome layer with another thin layer of no-wipe top coat, curing fully. For the dramatic red drip, use a highly pigmented, slightly thicker gel polish or mix standard gel with a clear builder gel to give it viscosity and dimension. Using a thin detail brush, start near the tip and draw up the individual drips, varying their length and width naturally to give it that organic, melted look. Cure the red layer thoroughly.
To ensure this dazzling design lasts through your romantic outings, focus heavily on preparation and sealing. Expert nail techs advise ensuring the chrome powder is thoroughly burnished into the no-wipe layer, as poor adhesion can lead to premature chipping or dulling. When drawing the red drips, use minimal product on your detail brush for the initial outline, then fill in the base to avoid flooding the side walls. Once the design is complete, encapsulate the entire nail with a final, high-quality, high-shine top coat, making sure to “cap the free edge” to prevent premature wear. For a softer Valentine’s approach, swap the harsh silver chrome for a subtle rose gold chrome, or change the red to a sheer, shimmering ruby color. This design pairs flawlessly with dark, structured apparel and metallic jewelry, making it the ultimate accessory for those who prefer their romance served with a dose of bold sophistication.
Edgy Matte Black Coffin Nails with Holographic Broken Hearts
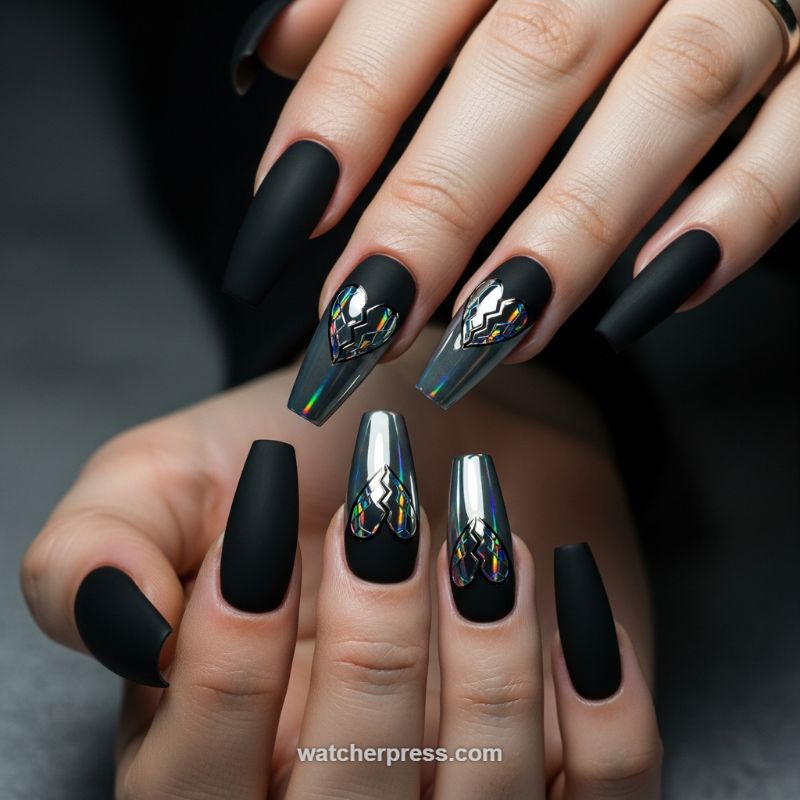
This design redefines Valentine’s Day romance with a fierce, edgy twist, moving beyond traditional pinks and reds. It pairs the timeless elegance of matte black with the futuristic allure of holographic chrome accents, creating a high-impact, goth-chic statement. The foundation of this look is the sleek coffin or ballerina shape, filed to a sharp, symmetrical finish. All nails are coated in a velvety, true matte black polish, except for the middle and ring fingers which feature a dramatic transition. On these accent nails, the matte black covers the lunar area, tapering into a highly reflective, mirror-like chrome finish that dominates the rest of the nail length. The centerpiece is the ‘broken heart’ decal—a shimmering, faceted holographic motif placed strategically at the border of the matte and metallic sections. This shattered element introduces a complex layer of iridescence, catching the light in a rainbow of colors and contrasting starkly with the somber black backdrop, suggesting a sophisticated, bittersweet approach to romance.
To recreate this bold, dual-textured masterpiece, start by shaping and preparing the nail beds meticulously. Apply a durable base coat, followed by two even coats of highly pigmented black gel polish. Before curing the second coat on the accent nails, carefully apply a thin layer of matte top coat only to the half-moon area near the cuticle, ensuring the tip remains uncoated. Cure the matte section completely. Now, apply a thin layer of non-wipe top coat only to the unprotected (tip) area of the accent nails and cure briefly (just enough for it to be tacky, typically 30 seconds). Immediately rub a silver chrome powder vigorously into this sticky layer using a silicone tool or sponge applicator to achieve that seamless mirror finish. Brush away any excess powder carefully, particularly ensuring no chrome residue dulls the matte section. The precision required in separating the two finishes—matte black near the cuticle and mirror chrome on the tip—is crucial for the design’s professional appearance.
The final, essential step is placing the holographic broken heart decal. Choose a decal that is appropriately sized for the nail width to ensure it looks proportionate and centered. Before applying, ensure the decal area is free of any powder residue. If using a sticker decal, carefully peel and place it precisely where the matte black meets the chrome, pressing down gently to secure it. Alternatively, for a more permanent look, embed the decal in a clear builder gel. Expert tip: use two different topcoats to lock in the textures—a glossy non-wipe top coat over the chrome tips and the decals (to enhance the shine and protect the holo effect), and a final coat of matte top coat only on the fully matte nails. This meticulous layering of textures—matte, chrome, and prismatic shine—is what elevates this design from simple black polish to an editorial-level nail art statement, perfect for those who embrace the darker side of romance.
Sophisticated Square Red French Manicure
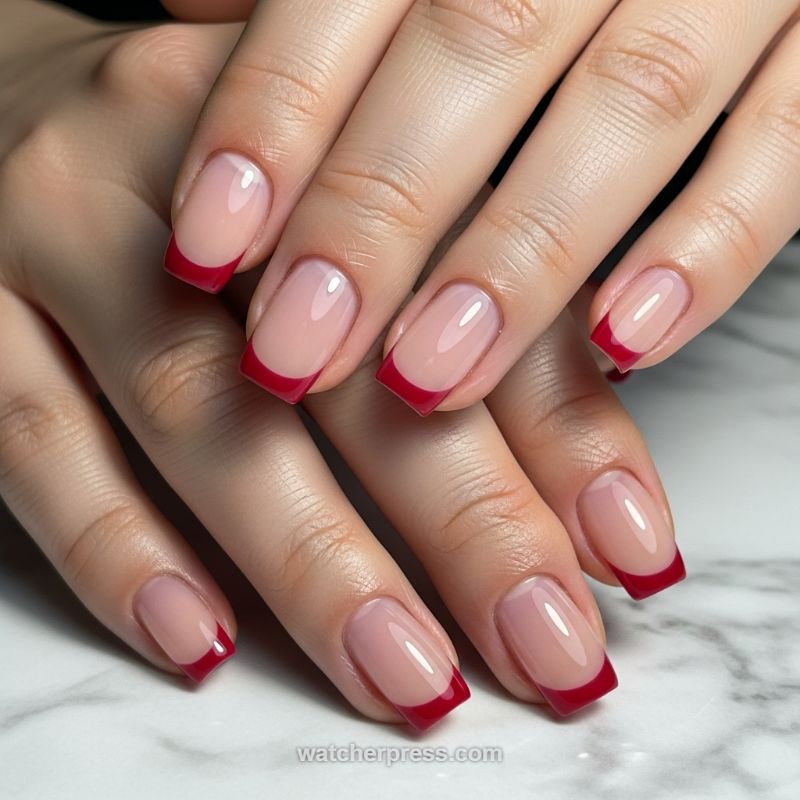
This design elevates the timeless French manicure into a Valentine’s Day masterpiece by swapping the traditional stark white tip for a passionate, deep red shade. The look features neatly shaped square or squoval nails, utilizing a sheer, milky pink or nude base coat that allows the natural nail bed to peek through, creating a soft, healthy glow. The visual power of this design lies in the sharp contrast between the subtle base and the intensely pigmented, glossy red tip. This style communicates elegance and passion without needing overt hearts or glitter, making it perfect for a romantic dinner or a chic celebratory event. Ensure your cuticle work is meticulous, as the clean, minimalist nature of the base coat draws attention to the entire nail plate and surrounding skin.
To recreate this sophisticated look at home or guide your nail technician, precision is paramount, especially when creating the smile line. After prepping the nails and applying 1-2 coats of your sheer base color (make sure this is fully cured/dried), select a highly pigmented, true red polish or gel. Instead of attempting a freehand application, which can be challenging, utilize a dedicated striping brush or a specialized French tip guide. For the cleanest curve, load the brush sparingly and paint the deep curve from the side walls, meeting in the center. An expert technique involves applying a thin line of red across the entire free edge first, and then using a smaller brush dipped in acetone or cleanser to carefully ‘scoop’ out the perfect, symmetrical smile line curve. Patience is key here; take your time to ensure the tip is opaque and perfectly aligned across all ten fingers.
For maximum longevity and that high-end, glossy finish, always seal the design with a robust, non-wipe top coat. This step locks in the vibrant red hue and protects the crisp smile line from chipping or dulling. Expert tip: If you struggle with the square shape chipping on the corners, slightly soften the edges into a ‘squoval’ shape; this provides the structure of a square while minimizing breakage potential. For those looking to subtly customize this design, consider using a rich, oxblood or wine red instead of a brighter true red, or perhaps adding a subtle shimmer top coat over the red tip only for a textural variation. This red French tip is a versatile choice that pairs seamlessly with any Valentine’s Day ensemble, from formal wear to casual chic.
Iridescent Pink & Liquid Red Ribbon Nails
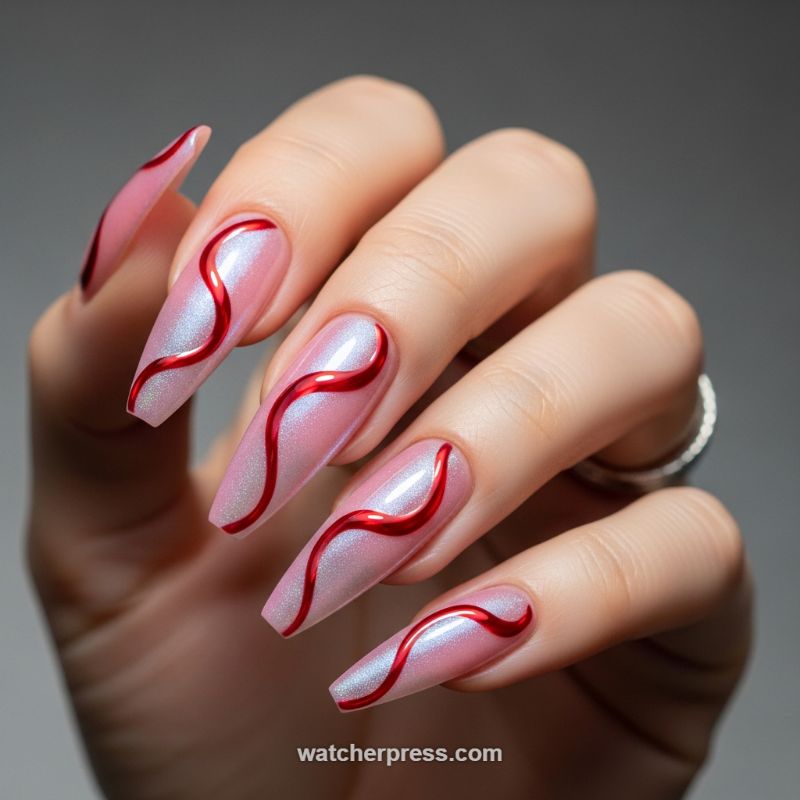
This design masterfully blends soft romanticism with bold modern flair, making it an undeniable choice for a statement Valentine’s Day manicure. The foundation of this look is a luminous, pearlescent base achieved by layering a sheer, milky pink gel polish with a fine white or aurora chrome powder. This technique gives the nails a highly sought-after ‘glazed donut’ effect, but with a subtle pink warmth that complements the holiday theme. The shape, a long, clean coffin, provides the perfect canvas, allowing the dramatic, continuous wave design to flow gracefully from the cuticle to the tip on all four fingers. The iridescent base creates depth, ensuring that even under low light, the nails maintain a soft, glowing sheen, contrasting sharply with the main design element.
Achieving the signature ‘liquid red ribbon’ requires precision and specific materials to create the pronounced, raised effect seen in the image. Begin by applying a thick, self-leveling red liner gel or a specialized 3D sculpting gel. The line should be executed freehand, mimicking an organic, continuous sine wave pattern down the center of the nail bed, ensuring the width remains consistent throughout the curve. Once the basic structure of the wave is cured, the crucial step for achieving the high-shine metallic finish is the use of chrome powder. A highly pigmented red chrome powder must be lightly rubbed over the cured, tacky line. The line must be thoroughly covered, then gently brushed clean to reveal the stunning, sculptural, highly reflective texture that makes these abstract ribbons look almost wet.
For expert longevity and a flawless finish, focus on proper capping. After applying the chrome, seal the red line and the entire nail with two layers of a durable, non-wipe top coat, paying close attention to the edges of the red design. This prevents the metallic powder from rubbing off or chipping prematurely. This particular design is incredibly versatile; while shown on a long coffin shape, it translates beautifully to medium-length almond nails, though the wave pattern may need to be tightened slightly. For those seeking a simpler version, you can substitute the 3D gel and chrome powder process with thick, pre-made metallic red striping tape, though the dimensional height will be sacrificed. This look is perfect for the wearer who appreciates abstract art and wants to move beyond traditional hearts and glitter this February.
Deep Romance: Gold Leaf and Teal Gemstone Accent
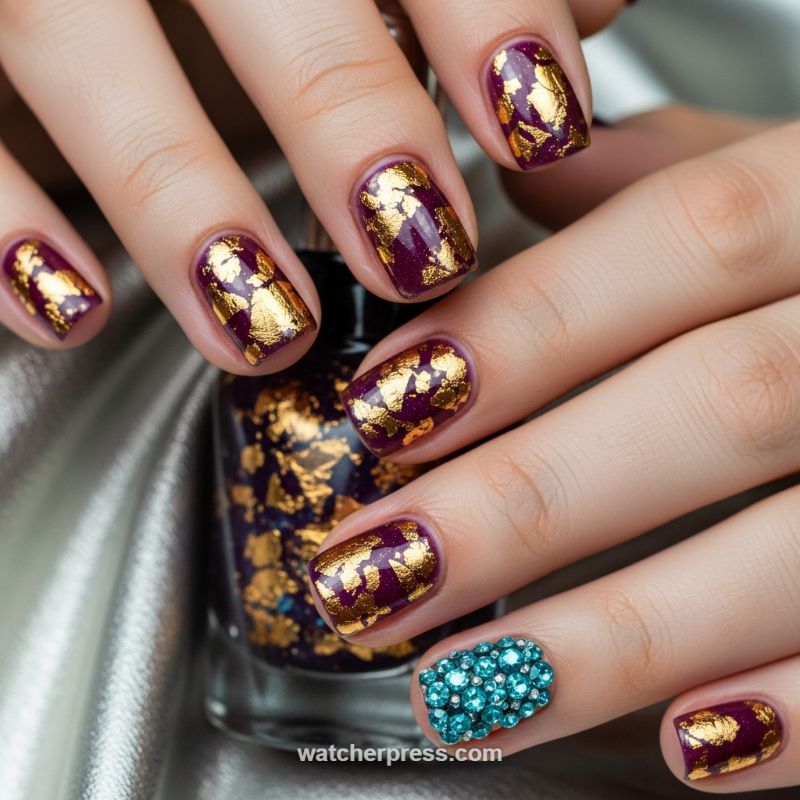
For those seeking an opulent, dramatic look this Valentine’s Day that transcends the usual pinks and reds, this deep burgundy and gold leaf manicure is the ultimate sophisticated statement. To replicate this rich, luxurious effect, start with a flawless application of a dark, highly pigmented plum or wine-colored polish; two thin coats usually suffice to achieve the desired depth. The key visual element is the randomly placed gold foil or flakie topper, which mimics scattered pieces of precious metal, adding texture and intense shine. If using true transfer foil, you will need a specific foil adhesive polish, allowing it to dry until tacky before pressing the foil onto the nail and peeling it away to leave irregular patches. If using a large flakie topcoat (often labeled ‘shredded’ or ‘gold leaf’ topper), apply a generous coat, focusing on making the flakes unevenly distributed for that artisan, hand-placed look. Seal this design with a high-quality, ultra-glossy topcoat to magnify the reflection of the gold and the richness of the wine base color.
The striking focal point of this entire design is the unexpected, full coverage gemstone accent nail. While the rest of the manicure features deep, warm tones, the accent nail utilizes small, uniformly sized teal or turquoise rhinestones, creating a powerful, cool-toned contrast that prevents the look from feeling too heavy or traditional. To achieve this densely packed, 3D effect, you must use a strong adhesive—either specialized nail glue for 3D elements or a clear builder gel/resin. Apply a layer of the adhesive to the entire nail bed of your chosen accent finger. Using a wax pencil or dotting tool, carefully pick up and place the rhinestones edge-to-edge, ensuring no part of the base nail is visible. Work quickly, especially with faster-setting adhesives, and apply gentle pressure to secure each gem. This meticulous placement is essential for the high-end, mosaic effect shown here. For maximum durability, if you are using gel, cure the nail well before proceeding.
Expert advice for maintaining this dazzling yet complex design focuses primarily on protecting the 3D elements. Avoid coating the top of the rhinestones with a final topcoat, as this dulls their brilliance; instead, carefully seal only the edges around the gems where they meet the natural nail and cuticle area. Because of the bold, jewel-toned color palette, this manicure pairs exceptionally well with evening wear or formal attire, making it perfect for a romantic, high-stakes Valentine’s dinner. To customize the look without sacrificing drama, you could swap the teal gems for emerald green or deep sapphire blue, maintaining the opulent contrast against the rich burgundy base. With proper care, this dramatic gold leaf and gemstone design will ensure your nails are the centerpiece of your romantic evening.