Discover the 8 most viral nail colors dominating this season, expertly ranked by top manicure professionals. Find your next must-try shade and stay ahead of the nail trend curve!
6 Dramatic BLACK & WHITE Looks
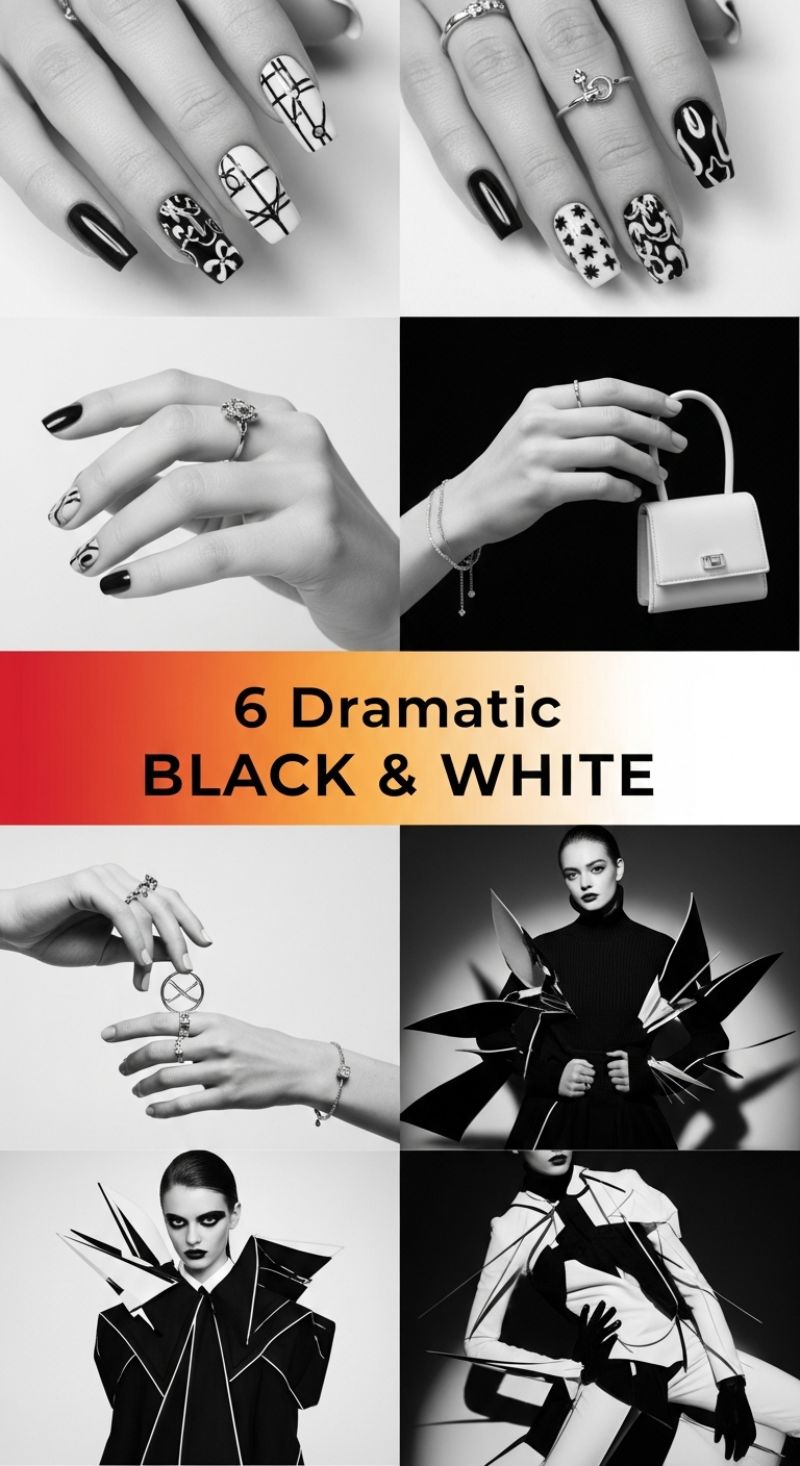
The black and white manicure is the ultimate power move this season, vaulting past basic neutrals to become a dramatic viral sensation. Far from being simplistic, this high-contrast palette offers infinite opportunities for artistic expression, transforming your nails into miniature canvases for striking, graphic design. As seen in these editorial-inspired looks, the trend leans heavily into both intricate patterning and bold negative space. We see highly detailed scrollwork and floral-inspired elements juxtaposed against sharp, modern geometric grids and abstract linear art. The key to mastering this look is selecting one primary design element per hand—such as using a complex pattern on two accent nails and solid black on the rest—to ensure the overall effect remains cohesive and high-fashion, rather than cluttered.
Achieving the razor-sharp precision required for these viral B&W designs demands high-quality tools and technique. Start with a hyper-pigmented white base coat; absolute opacity is crucial for making the black lines pop. For the intricate patterns like the baroque swirls or small stars, utilize a fine-tipped dotting tool and a long striper brush (often called a detail or liner brush) dipped in ultra-black gel polish or lacquer. When recreating the negative space looks, first apply a clear base coat, then use the striper brush to outline the desired pattern directly onto the natural nail before filling in the black or white sections. Expert tip: always allow each layer of design to fully dry or cure if using gel, to prevent bleeding and maintain those critical crisp edges.
To truly elevate your black and white manicure to editorial status, consider the full aesthetic. The dramatic impact of this color scheme is best complemented by structural nail shapes like long coffin or sharp almond, which provide an ample surface area for the complex patterns. Accessorizing is essential: mirror the monochromatic drama with minimalist silver jewelry—thin stacking rings and delicate chain bracelets, as showcased here—to add sparkle without distracting from the graphic nail art. Finally, finish every look with a non-yellowing, high-gloss top coat. This not only protects the intricate design but adds a glass-like sheen that enhances the depth and contrast, keeping your dramatic black and white mani looking fresh and flawless for weeks.
15 Absolute PROM NAILS CHECKLIST
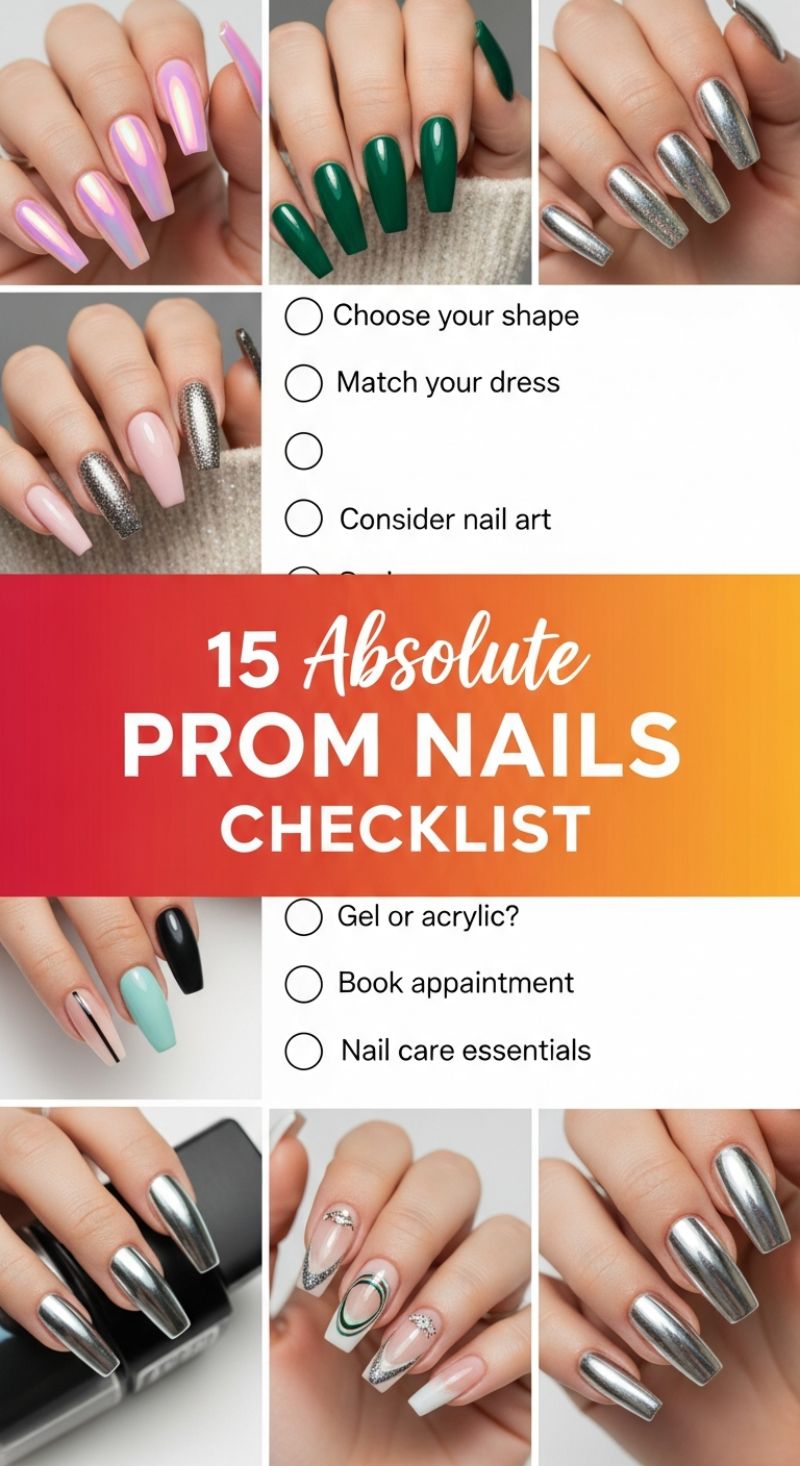
Executing the perfect viral nail look for a significant event like prom requires thoughtful planning, starting with two critical decisions: the structural foundation and the chromatic finish. First, determine your base – will you choose Gel or Acrylic? If you are aiming for extreme lengths, dramatic shapes (like the coffin or almond shapes shown), or need robust structural integrity, acrylics may be necessary. However, for most natural nail beds seeking high-gloss depth and several weeks of chip-free wear, a structured gel application is ideal. Next, select your shape, ensuring it complements the length of your fingers and hands. As seen in the stunning examples here, the trendiest colors, such as deep emerald green solids, iridescent shimmers, and full chrome metallics, truly pop on a clean, sculpted canvas like the medium-to-long coffin shape. These trending colors offer high visual impact and immediately elevate your ensemble beyond traditional neutrals.
The next step involves integrating trending nail art and mastering the crucial balance between your manicure and your formal wear. While matching your dress color exactly is a classic approach (as demonstrated by the rich green or blush pink nails), expert manicurists often advise pursuing a complementary or contrasting texture for maximum visual interest. For instance, pairing a jewel-toned dress with a reflective finish, such as the full silver mirror chrome seen above, or selecting an opalescent pink chrome creates dynamic contrast. When considering nail art, remember that minimalist details are key this season. Incorporate negative space designs, delicate striping (like the single black line featured), or strategically placed rhinestones near the cuticle. Alternatively, if your color choice is muted, lean into maximalist accents, such as the glamorous silver sparkle French tips paired with geometric line work, offering complexity and depth without overwhelming the look.
Finally, ensuring longevity and impeccable presentation requires logistical foresight and diligent prep work. The key item on your checklist should always be to Book Appointment well in advance, especially during busy prom season, to secure time with a technician who specializes in the advanced finishes (like chrome powder application) you desire. Before your appointment, focus on Nail Care Essentials: hydrate cuticles and hands daily leading up to the event to ensure the polish adheres smoothly and the skin surrounding the nail is flawless. Discuss the durability of your chosen medium with your manicurist; structured manicures require a precise curing process to guarantee they withstand the dancing and activity of the entire night. A flawless manicure isn’t just about the color; it’s about preparation, execution, and expert-level finishing that ensures your nails look exceptional in every photograph.
Edgy Black Art: Mastering the Textured Matte Finish
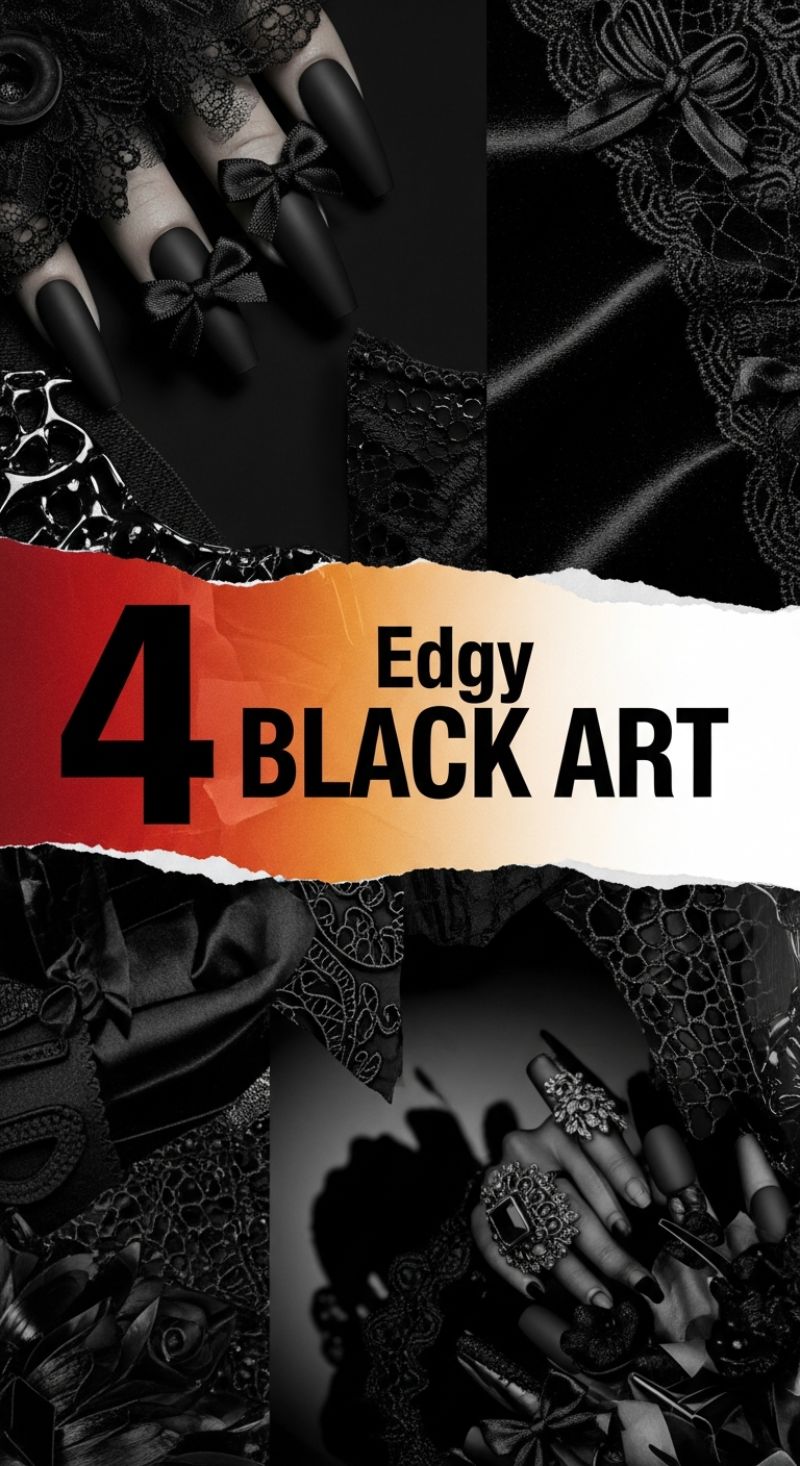
The ‘Edgy Black Art’ trend, heavily inspired by Gothcore fashion and dark romanticism, elevates the classic black manicure into a theatrical statement piece defined by texture, dimension, and precise detailing. This look is fundamentally built upon achieving a flawless, intensely saturated base color. To replicate the luxurious, deep finish seen here, manicurists must start with a jet-black lacquer, ensuring two thin, even coats for maximum opacity. The key differentiator is the finish: a velvety, non-streaking matte topcoat is essential for that coveted flat appearance. Expert application requires curing the matte topcoat fully and avoiding any contact with cuticle oil or hand lotion for at least 30 minutes, as residue can dull the matte effect and create unwanted shiny patches. The most impactful shapes for this trend are long and sculpted, such as the coffin, stiletto, or tapered square, providing the necessary canvas for the subsequent art details.
The complexity of the Edgy Black Art look comes from the layered textures and three-dimensional elements. The matte foundation serves as a backdrop for high-contrast accents, often utilizing glossy black details to mimic lace, silk, or patent leather. To apply the 3D satin bows featured prominently in this style, you can use pre-made soft fabric decals or, for enhanced durability, sculpt bows directly onto the nail using high-viscosity black hard gel or acrylic. If sculpting, ensure the bow is fully cured and then apply a thin layer of non-wipe topcoat to give it that glossy ‘silk’ finish, contrasting sharply against the matte nail plate. For the intricate lace patterns, professional stamping plates or fine-tipped detail brushes loaded with glossy black polish are recommended. This contrast between the plush, light-absorbing matte base and the reflective, structured accents is what transforms a simple black nail into a piece of wearable art.
For a top-tier execution of this trend, attention must be paid to holistic styling. The manicure is meant to be highly dramatic and is often paired with heavy, ornate jewelry, as evidenced by the large, gothic-inspired rings in the image. When advising clients on maintenance, emphasize that while matte finishes are beautiful, they can be delicate. Recommend carrying a buffer block to gently refresh the matte surface if it becomes oily or smudged. For 3D embellishments like the bows, secure them with a bead of builder gel at the base to prevent lifting. This look thrives on being opulent and slightly sinister, making it a perfect viral choice for the cooler months and evening occasions when a minimalist shade simply won’t suffice.
9 Statement ALMOND SHAPES
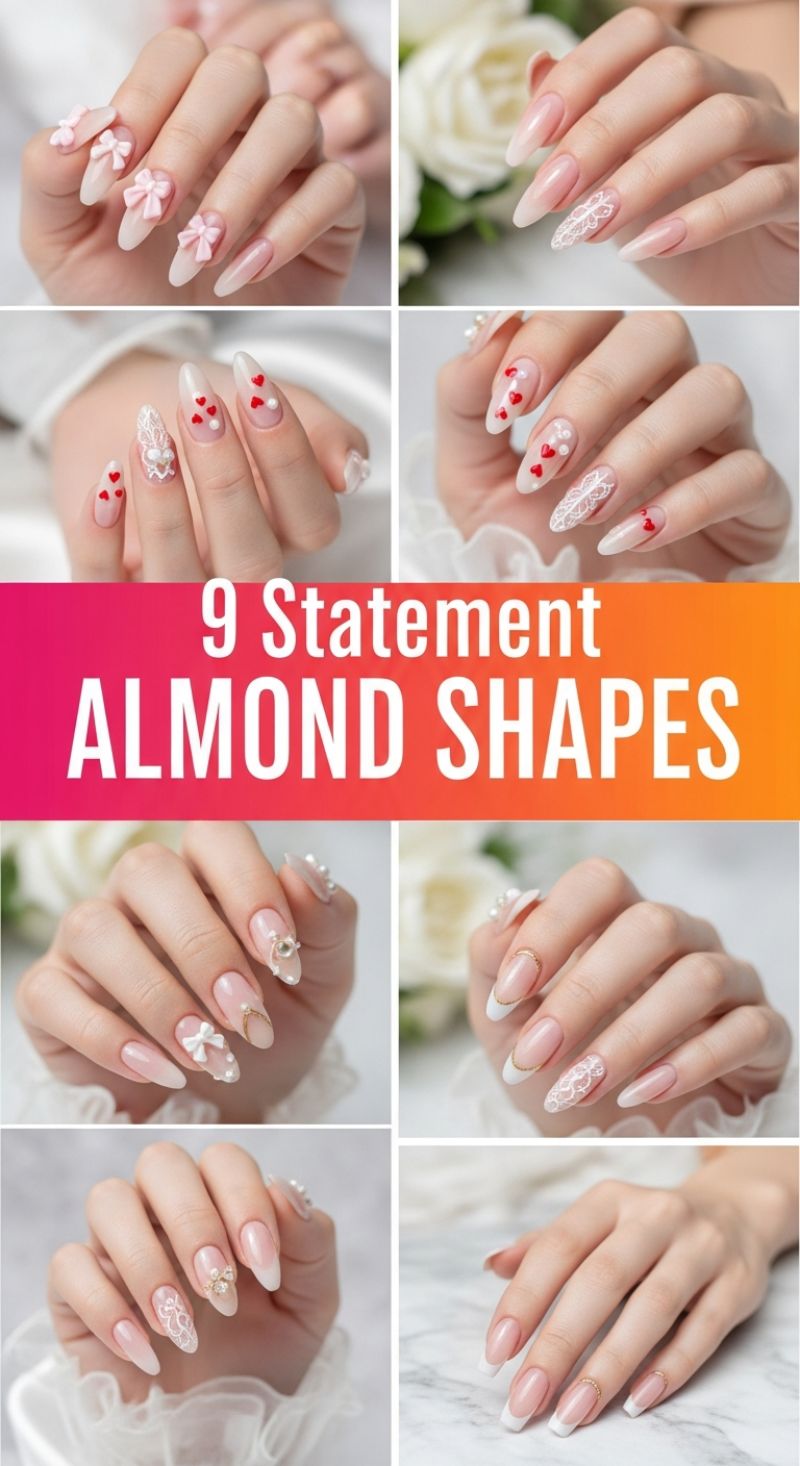
While vibrant, saturated polishes grab attention, the true viral star this season is the sheer, natural base coat, often associated with the ‘Balletcore’ or ‘Clean Girl’ aesthetic. This collection demonstrates how to elevate these subtle hues—milky whites, translucent pinks, and soft nudes—by pairing them with the elegant, universally flattering almond shape. The almond structure provides maximum visual length and serves as the ideal elongated canvas for delicate, romantic nail art. To achieve this trending foundation, start with a highly pigmented builder gel or sheer jelly polish in a cool-toned pink or creamy white. The key is translucency near the cuticle, gradually building opacity toward the tip to create a healthy, brightened nail bed look. Expert tip: Ensure the apex of the almond shape is perfectly centered and the side walls are evenly tapered to maintain the sophisticated structure that makes these looks feel high-end.
The transformative element here is the application of intricate, high-relief detailing, turning a simple manicure into a sculptural statement. We see a mastery of textures, combining delicate white lace designs (achieved through stamping or meticulous hand-painting with a fine liner brush) alongside trending 3D elements. These dimensional accents include molded pink bows, perfectly placed pearls, and gold-framed charms, which must be secured with a strong structure gel or specialized adhesive to ensure durability. Notice the strategic use of color contrast, such as the tiny red hearts peppered across a few designs; this is a brilliant technique to inject playful romance into a neutral palette without overpowering the base color. For clients worried about texture, suggest flat decals or reverse French tips with subtle metallic accents, like the fine gold lines visible near the cuticle, which provide structure and shine without bulky embellishments.
Achieving and maintaining this flawless, ornate look requires precision and maintenance. When attempting French tips on almond nails, modernizing the look is crucial; opt for a micro-French line rather than a thick band, or try the reversed French (or ‘moon’) manicure outlined in gold for a modern twist. For the most demanding designs involving multiple charms and pearls, proper encapsulation is essential. After securing the 3D element, apply a thin layer of top coat around the base and sides, curing completely to lock it in place and prevent snagging. Finally, instruct clients to maintain the delicate curve of the almond shape by performing light filing every 1-2 weeks, keeping the tip sharp and centered, which will prolong the wearability and preserve the intentional elegance of these truly statement-making manicures.
8 Viral NAIL COLORS RANKED
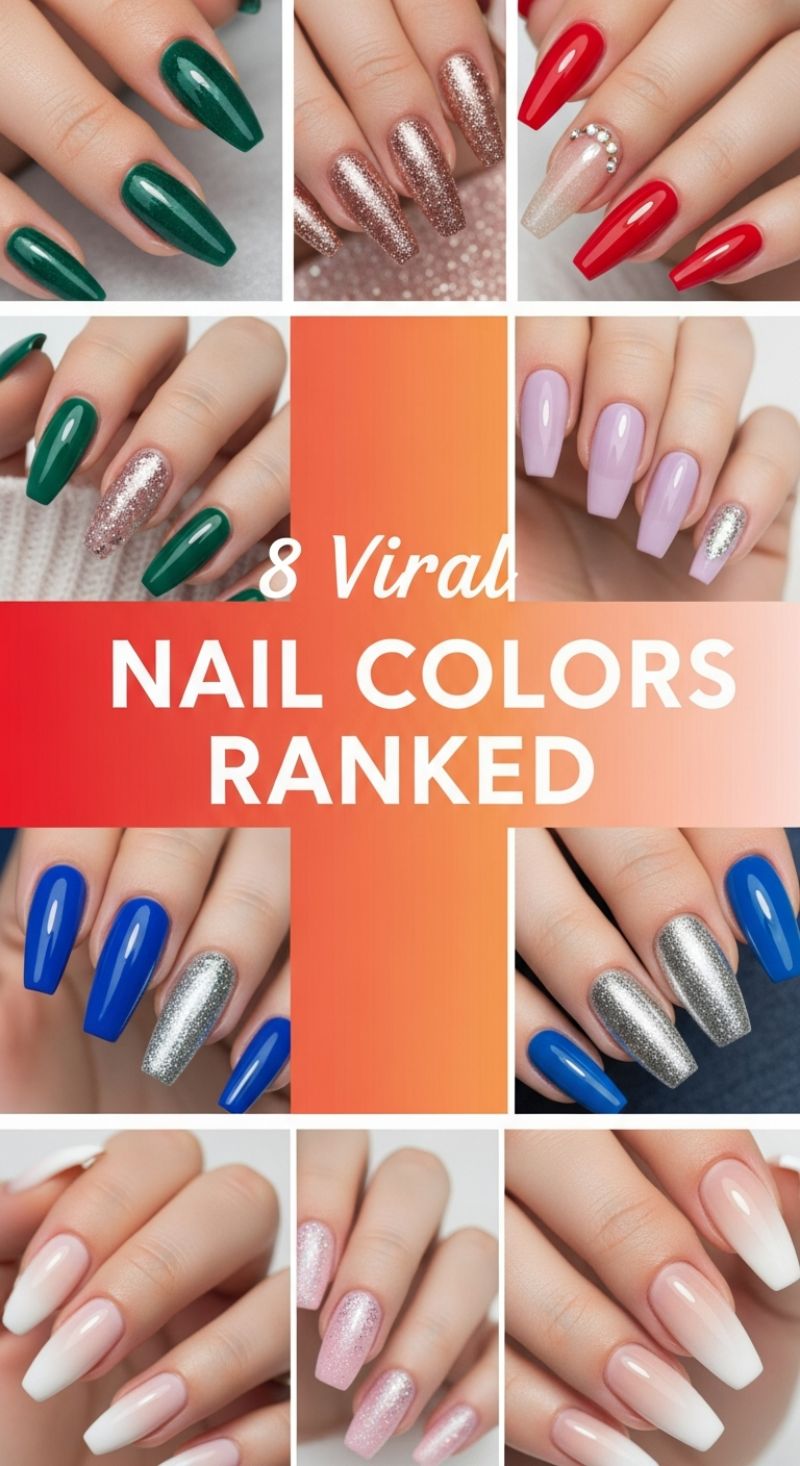
This visually dynamic collage showcases the season’s eight most influential nail trends, blending timeless classics with bold modern finishes across various popular shapes, primarily focusing on long coffin or ballerina tips. The selection is grouped into three main categories: rich, high-pigment cremes (like the deep emerald green and fiery red), dazzling metallics and glitters (rose gold, silver), and sophisticated, subtle techniques (French ombre and pale pink sparkle). For those looking to replicate the high-impact creme looks, proper technique is essential: always apply two thin, even coats over a ridge-filling base coat to prevent streaks and maximize opacity, followed by a high-shine UV topcoat to lock in the color and gloss for up to two weeks. The rich, jewel-toned greens and reds featured here are perfect transitional colors, commanding attention while remaining effortlessly elegant. These solid colors look particularly striking when paired with contrasting accent nails, as demonstrated by the mix-and-match panels.
Mastering the application of the highly viral metallic and glitter finishes requires specific handling. The rose gold and silver glitters featured are best applied by gently dabbing or patting the polish onto the nail surface rather than brushing vigorously. This ensures the maximum flake density is achieved and prevents the glitter particles from dragging, which can lead to sparse patches. Expert manicure artists often recommend ‘sandwiching’ glitter polishes: applying a thin layer of clear topcoat over the dry color coat, then applying the glitter, and finally sealing it with a specialized glitter-smooth topcoat to eliminate the gritty texture. Notice how these glitters are cleverly integrated as statement accent nails alongside vivid colors like lavender and royal blue—this technique is key to balancing an edgy metallic finish with a wearable daily palette. The royal blue and silver combination, in particular, offers a high-contrast, electric energy that is currently trending across social media.
Finally, the bottom row highlights the enduring popularity of subtle, sophisticated styles. The French Ombre, or faded French manicure, remains a staple for its clean, elongated appearance and minimal upkeep. To achieve this smooth gradient effect (the transition from the nude base to the crisp white tip), manicurists use an airbrush technique or the specialized makeup sponge method. If using a sponge, ensure the two colors are blended slightly on the sponge before dabbing onto the nail, building the color slowly and sealing the nail immediately with a generous layer of topcoat to blur any stamping lines. The complementary pale pink shimmer nails offer a softer version of the metallic trend, providing depth and dimension while maintaining a neutral appearance suitable for professional environments. These polished, light-toned looks are ideal for maximizing longevity, as regrowth is less noticeable compared to deep cremes.
3 Top-Tier COLOR FIGHT
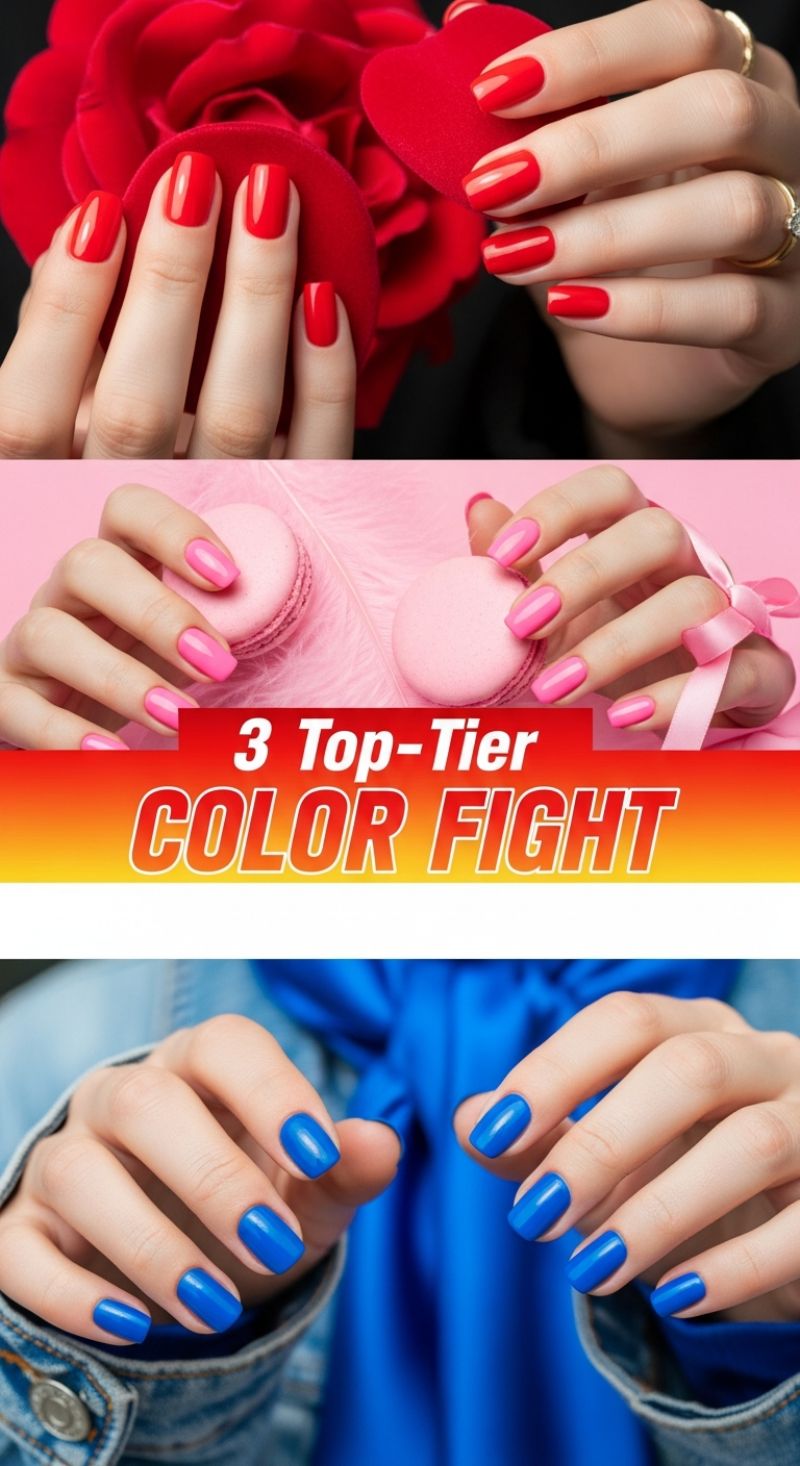
The centerpiece of this season’s viral nail trends is undoubtedly the clash of primary brights, exemplified by this ‘3 Top-Tier Color Fight’ featuring classic red, playful hot pink, and bold cobalt blue. To master the perennial appeal of the rich red (as seen paired with the velvet rose and heart motif), precision is paramount. Expert application requires a meticulously prepared nail bed, utilizing a professional ridge-filling base coat to ensure the surface is perfectly smooth before laying down color. For maximum impact and longevity, apply two thin, even coats of lacquer, wiping the brush almost entirely flat before sweeping from base to tip. This classic hue is elevated by a clean, squoval shape, which provides a modern yet sophisticated frame for the color, making it universally flattering and perfect for both formal events and everyday elegance. Ensure cuticles are pushed back and clean, as smudges are most noticeable against the high contrast of a deep crimson.
Shifting gears to the effervescent pink, this bright, bubblegum shade captures the joyful spirit of current playful aesthetics, perfectly complemented by the sugary visual elements like macarons and soft feathers. If you are attempting to replicate this vibrant hue at home, the ‘how-to’ secret to achieving such an electric, opaque look is employing a thin layer of stark white nail polish as your initial base coat, applied over your regular clear base. This technique effectively neutralizes the natural tint of the nail, allowing the true brilliance of the hot pink pigment to shine through without dullness. The shape here favors a slightly softer, more rounded or oval finish, enhancing the feminine and youthful feel of the color. For extended wear, especially with bright pigments that tend to chip visually faster, always cap the free edge of the nail meticulously with every coat, sealing the manicure for a flawless, chip-resistant finish.
Finally, the dramatic entry of this high-gloss cobalt blue offers a powerful, contemporary statement, contrasting beautifully with textural pairings like satin and denim. When working with intense blues, the most critical step is diligent protection against staining: never skip a quality base coat, as blue pigments are notorious for leaving residual discoloration. To achieve this high-shine, saturated depth, opt for gel-like formulas and ensure your final topcoat is a quick-dry, high-UV resistant formulation to prevent yellowing and enhance the reflective quality. This bold shade looks exceptionally chic on shorter, neat nails with a square or soft-square profile, giving it an edgy, deliberate appearance. For personalized advice, remember that cooler skin tones harmonize exceptionally well with true cobalt and royal blues, while warmer tones might find navy or deep teal blues slightly more flattering. Embrace the maximalist trend by keeping this shade strictly opaque and impeccably glossy.
The Bold Statement: Vibrant Red Coffin Nails
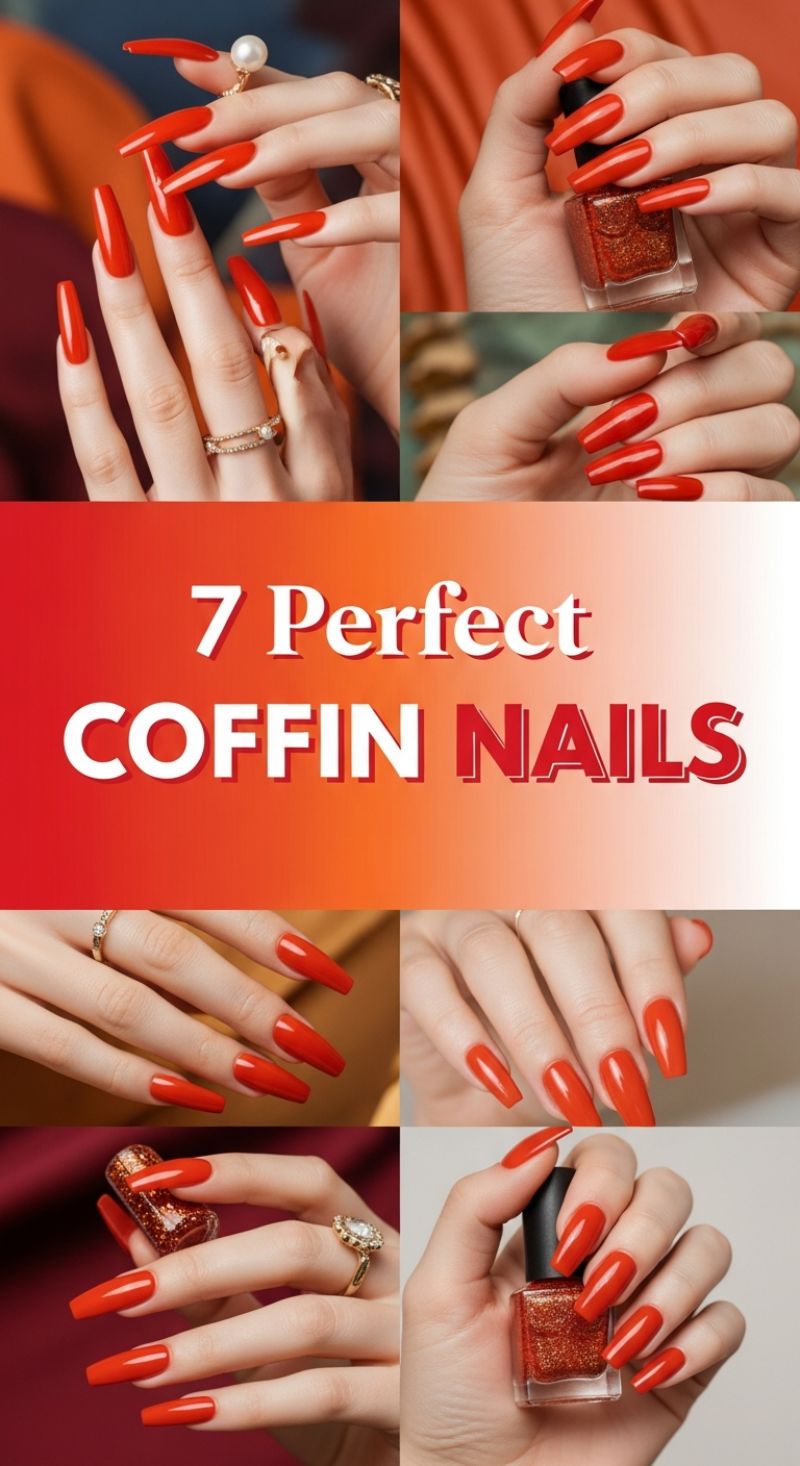
This striking, high-impact red is the ultimate power color of the season, consistently ranking among expert favorites for its dramatic flair and timeless elegance. The viral shade depicted here is a vibrant, opaque crimson with subtle warm undertones, demanding attention without being overly flashy. To achieve this level of saturated color, manicure experts recommend two or three thin, fully cured coats of a highly pigmented gel or lacquer. When selecting your polish, look for formulations marketed as ‘true red’ or ‘siren red’ to ensure that intense, glossy finish. This particular hue works exceptionally well across various skin tones, offering a stunning contrast that makes the hands appear instantly more polished and refined. Crucially, the longevity of such a bold shade relies heavily on proper base coat application to prevent staining and a flawless top coat to maximize shine.
The defining feature of this look is the dramatic length paired with the sought-after coffin shape, also known as the ballerina shape. Achieving this precise geometry requires careful attention during filing. Start by ensuring the side walls of the nail are perfectly straight and parallel; any tapering too soon will result in an almond or stiletto shape instead. The key to the coffin shape is the free edge, which must be filed completely square and flat after the sides are narrowed slightly toward the tip. This creates the boxy, truncated end resembling a coffin—or a ballerina slipper—that provides modern edge. Due to the extreme length visible in the images, this style is often best achieved using high-quality tips or sculpted acrylic/hard gel enhancements to provide the necessary structural support against breakage.
To elevate this vibrant monochrome further, focus on the finish and subtle accents. The manicure boasts an enviable, glass-like shine, which requires a non-wipe, ultra-glossy gel top coat that is cured to perfection. If using traditional polish, ensure you use a quick-dry top coat specifically formulated for high shine and resistance to chipping. For added visual interest, integrate an accent nail, mirroring the coppery-gold shimmer polish shown in several visuals. Apply this glitter polish strategically to the ring finger to catch the light and break up the solid red. Finally, remember that styling enhances the manicure: as shown, warm metals like gold rings, especially those featuring white accents like pearls or diamonds, perfectly complement the fiery undertones of the red polish, cementing this as a truly luxurious, viral nail statement.
7 Dreamy Pink Colors
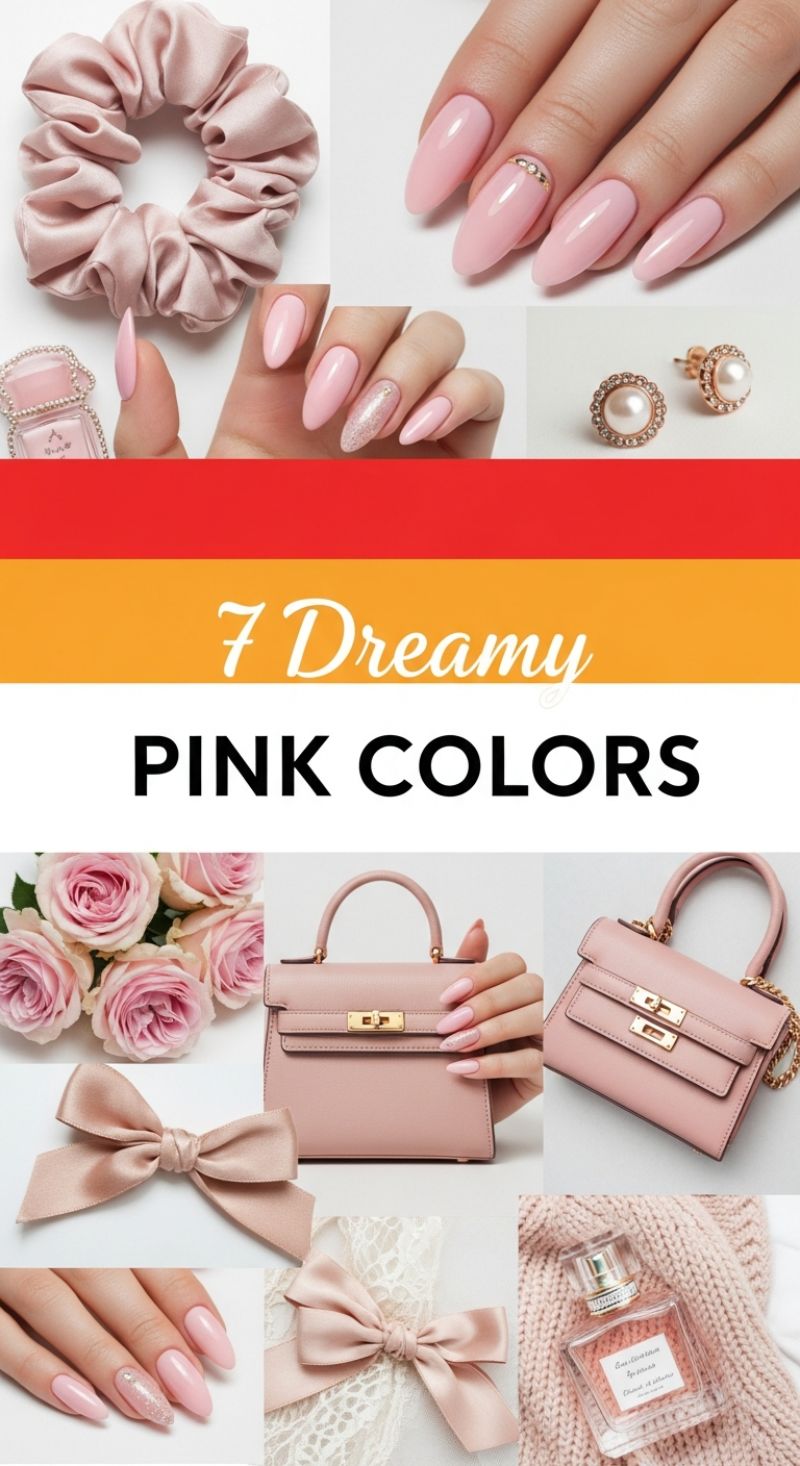
The ‘Dreamy Pink’ trend captures the essence of soft luxury, moving beyond basic neutrals to embrace a sophisticated, ballet-slipper hue that is exceptionally flattering. This viral color leans heavily toward blush and dusty rose tones, integrating seamlessly into the popular coquette and feminine aesthetics of the season, as showcased by the satin accessories, pearl earrings, and luxury leather goods pictured. Manicure experts rank this shade highly not just for its elegance, but for its incredible versatility; it provides the clean, manicured look of a neutral while injecting a subtle warmth and romantic softness that elevates the entire ensemble. Unlike vibrant hot pinks, these muted, milky shades offer depth, making them look richer and more expensive, especially when applied as a creamy, opaque gel overlay. The key to nailing this trend is ensuring the selected lacquer has a slight translucency or a perfect, bubblegum-smooth opacity that avoids any harsh streaks or chalkiness, delivering a polished, high-gloss finish reminiscent of glazed porcelain.
To perfectly execute the Dreamy Pink manicure, consider the shape first: the almond or stiletto tip, as seen in the examples, maximizes the color’s elongation effect and contributes significantly to the overall luxurious appeal. For the actual application, expert technique involves two to three thin coats of color, followed by a durable, ultra-shiny top coat—the reflectivity is crucial to achieving that ‘dreamy’ quality. If you wish to incorporate accents, avoid heavy design work. Instead, opt for minimalist embellishments like micro-glitter on a single accent nail, or a strategically placed crystal band near the cuticle line. The rhinestone detail shown in the image, often implemented using gold foil or a delicate thin strip of metallic gel before curing, should serve as an elegant punctuation mark, not a distraction. For maximum longevity and wear, particularly with these paler shades which can show wear faster, manicurists recommend using a Builder in a Bottle (BIAB) or a structured gel base coat to ensure the nail bed remains strong and the color stays chip-free for weeks.
Selecting your ideal dreamy pink requires attention to your skin’s undertone. Those with cooler undertones will benefit from a pink leaning slightly purple or mauve, while warmer undertones should look for shades with a peachy or muted coral base, ensuring the hand looks bright and healthy rather than sallow. This color trend truly shines because it pairs effortlessly with gold jewelry and soft textures, elevating simple wardrobe staples into a cohesive, high-fashion look—the color acts as a quiet accessory itself. Given its adaptability across all skin tones, seasonal relevance, and inherent elegance, the Dreamy Pink family earns a definitive top-three ranking among this season’s viral colors, serving as the ultimate sophisticated upgrade to the classic nude manicure.
Dazzling Metallic Manis
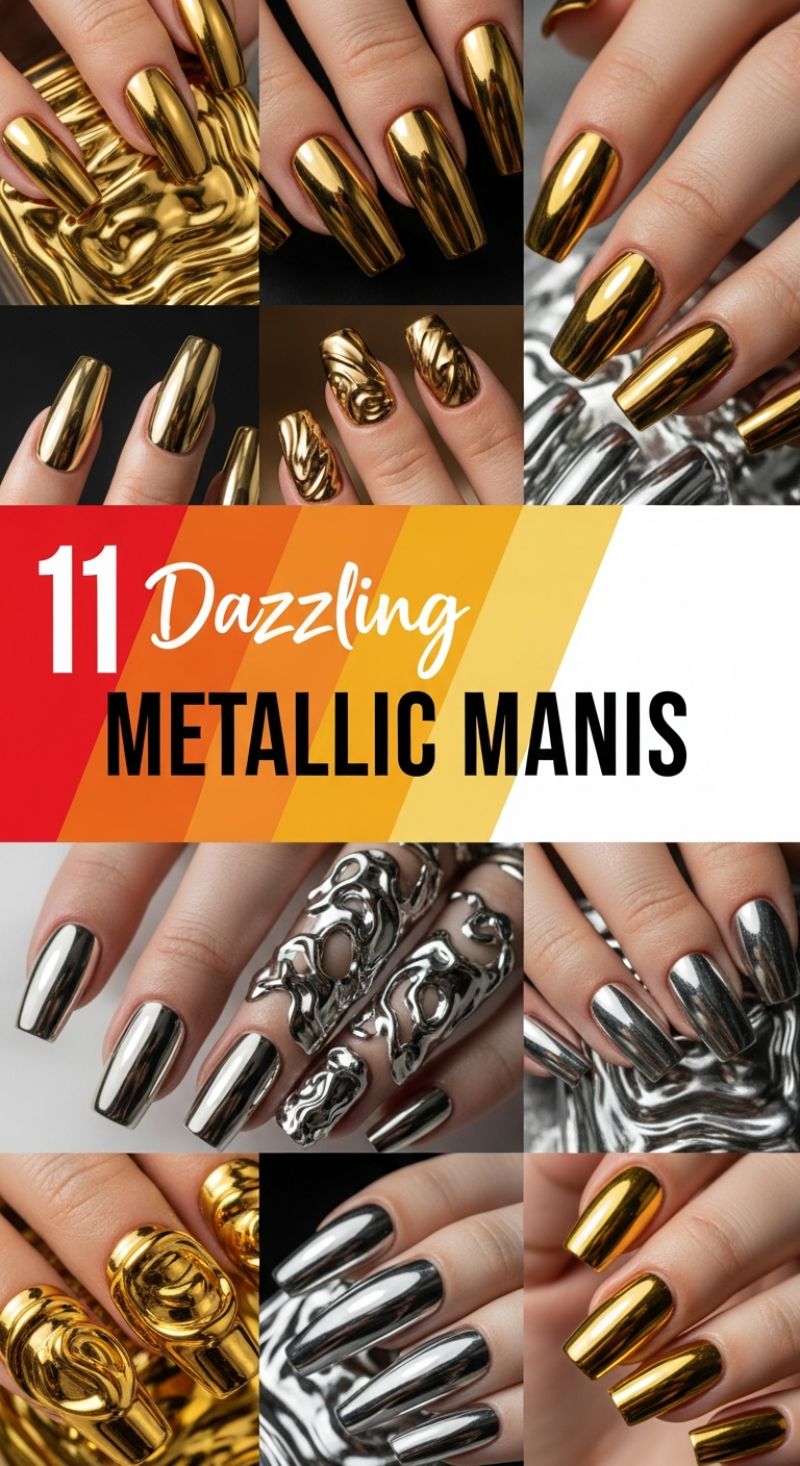
The metallic mani trend, often dubbed the “liquid metal” look, transcends traditional glitter and shimmer polishes, offering a flawless, mirror-like reflection in gold and silver. This viral finish requires specialized application techniques, as standard metallic polish cannot achieve this high-octane chrome effect. To master the basic mirror look—as seen on the majority of the nails here—start with a fully cured black gel base coat (which maximizes the reflectivity and depth of the chrome pigment). The crucial next step involves applying a non-wipe gel top coat, curing it for only half the recommended time, which leaves a perfectly smooth but slightly tacky surface. Immediately buff the chosen chrome powder—whether rich, warm gold or sleek, futuristic silver—onto the surface using a silicone tool or a dedicated eyeshadow applicator. Buffing firmly and consistently ensures the powder adheres evenly, transforming the nail into a true mirror. Experts stress the importance of sealing the entire look with two layers of a durable non-wipe top coat, capping the free edge meticulously to prevent chipping and protect the delicate chrome surface.
While a smooth chrome finish is striking, the experts are pushing the boundaries with sculptural, 3D elements, turning manicures into high-fashion jewelry statements, as vividly demonstrated by the featured accent nails. To achieve these dramatic melted or textured looks, you must utilize specialized builder gels or thick structure gels. After the base color is cured, carefully sculpt the desired swirls, drips, or wave patterns onto the nail plate using a fine liner brush and then cure this dimensional structure fully. Once the raised design is hard, apply a thin layer of non-wipe top coat just over the sculpted areas, lightly cure, and then buff the chrome powder directly over the texture. This contrast—the sharp, reflective powder against the organic, liquid-like shapes—adds unparalleled depth and movement, making the nail appear as if it was dipped in molten precious metal. Manicure experts recommend reserving this intricate detail for one or two accent nails per hand, such as the ring finger and thumb, ensuring the overall look remains sophisticated rather than visually overwhelming.
Beyond the application process, styling these metallic shades correctly elevates the mani from a novelty to a luxury accessory. The choice between gold and silver depends largely on skin undertone and desired mood; gold offers opulent warmth ideal for evening events and warmer seasons, while silver provides a cool, edgy, and futuristic appeal that aligns perfectly with modern street style. For optimal visual impact, the mirror finish thrives on well-maintained nail structures—medium to long lengths in tapered square, coffin, or even subtle almond shapes enhance the reflective surface area and maximize the light return. Longevity requires attention: avoid using cuticle oil immediately after application, as some oils can dull the chrome shine. If you notice any micro-scratches over time, a quick, very light buff with a clean, dry piece of lint-free cloth can often revive the mirror effect without disrupting the underlying gel.
5 Boldest GLITTER TIPS
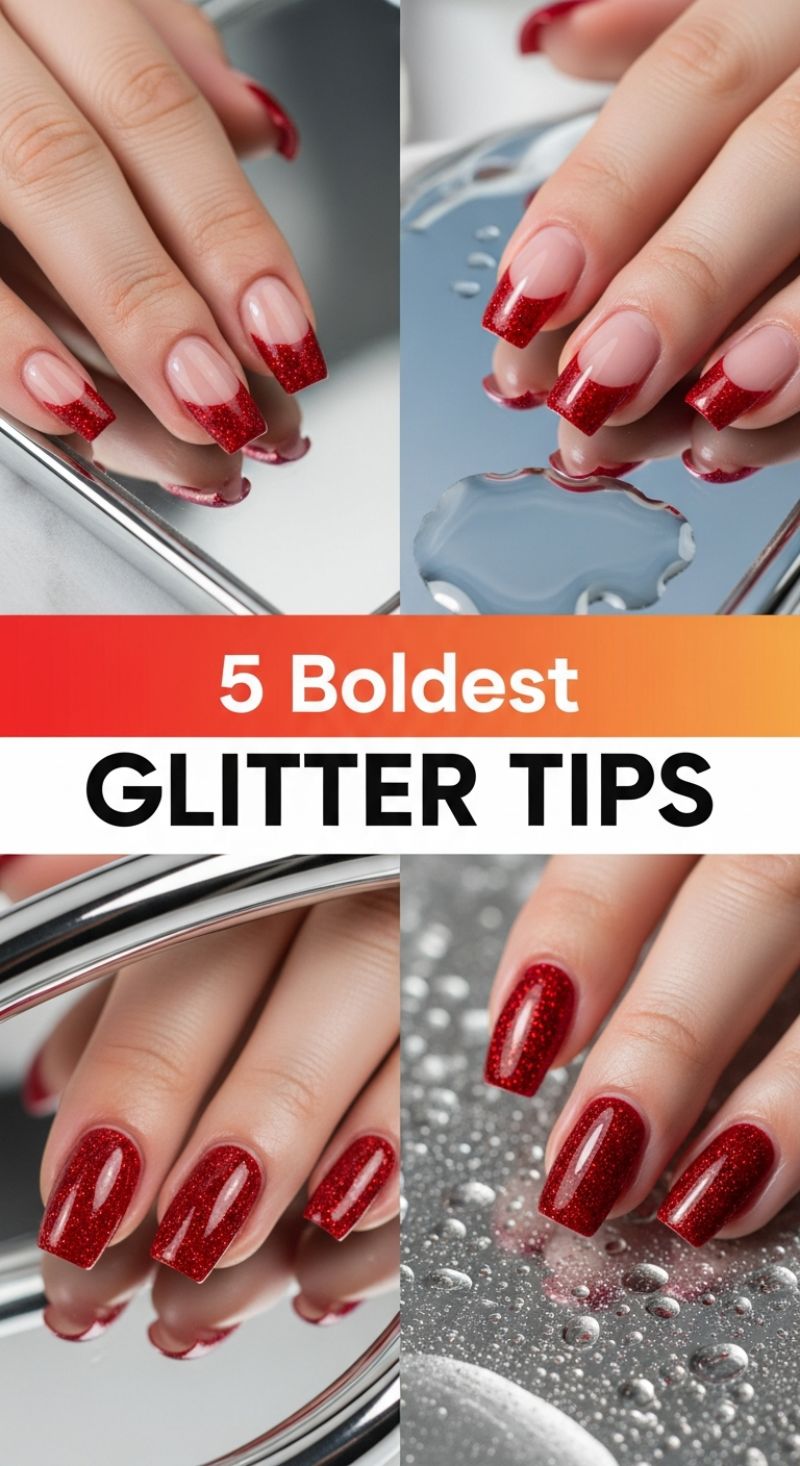
This season, glitter isn’t just an accent—it’s the main event. The “Boldest Glitter Tips” trend elevates classic manicures by trading subtle shimmer for high-density sparkle, specifically focusing on a show-stopping ruby red hue. This deep, luxurious red is packed with microscopic reflective particles, delivering an unmatched visual depth that catches the light from every angle. As showcased in the visuals, the preferred canvas for this bold application is a structured, medium-length square or squoval shape, which provides the perfect surface area for the intensity of the glitter. Whether applied as a modern, updated French tip or covering the entire nail plate, this color choice exudes confidence and glamour, immediately positioning the manicure as a statement accessory.For those looking to master the updated French tip, start with a flawless base. After prepping the nail, apply two coats of a sheer, milky pink or nude polish to create the healthy, natural-looking foundation seen in the image. Once fully dry, achieving the perfect glitter tip requires precision. Use a fine-tipped nail art brush to trace the smile line (the curve separating the tip from the bed) with the dense red glitter polish, ensuring the line is crisp and symmetrical. For an easier approach, dip a makeup sponge lightly into the glitter polish and gently dab it onto the free edge of the nail, building up the sparkle until it reaches maximum opacity without flooding the natural pink base. Seal this look with a high-gloss top coat, paying special attention to capping the free edge to prevent chipping and ensure a mirror-like finish over the textured glitter.If full-coverage intensity is your goal, the application method shifts slightly to maximize depth. Due to the high concentration of glitter pigment, achieving perfect opacity often requires three thin coats, rather than the standard two. Allow each coat to dry thoroughly to prevent clumping and maintain an even sparkle distribution. Expert manicurists advise that a quality peel-off base coat can be a lifesaver when working with dense glitters, dramatically simplifying the notoriously difficult removal process. When it’s time to change the color, the foil method—soaking cotton pads in acetone, placing them on the nail, and wrapping the fingertips in foil for five minutes—is essential for a clean lift. This high-impact, full-glitter look is perfect for festive occasions or when you want your hands to truly command attention.
4 Essential NAIL PREP SECRETS
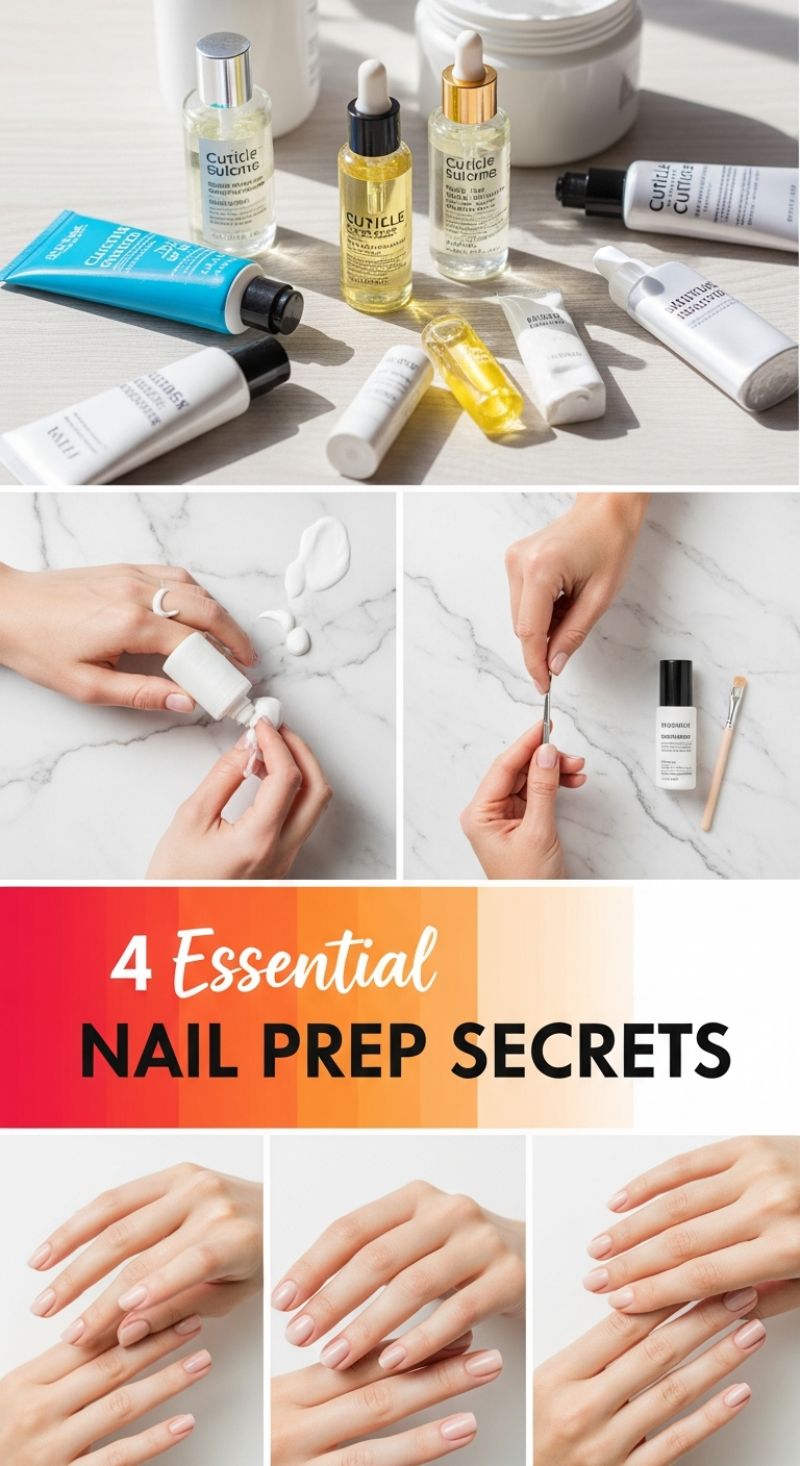
Before diving into the season’s hottest viral colors, the longevity and flawless finish of your manicure depend entirely on your prep. Expert manicurists agree that even the most expensive lacquer will chip quickly if the canvas is neglected. As shown in the images, proper preparation involves several steps designed to clean, hydrate, and perfect the nail plate and surrounding skin. Start by thoroughly removing any old polish residue and ensuring your nails are dry. Next, shape your nails gently using a fine-grit file, moving in one direction to prevent splitting. The goal is to create a clean, uniform foundation that allows the vibrant, on-trend colors we discussed to adhere beautifully and prevent uneven application.
The most critical phase of preparation involves meticulous cuticle care, which is visually emphasized by the array of specialized cuticle products (oils, creams, and removers) seen above. Begin by applying a dedicated cuticle remover or a rich cuticle cream (as depicted in the middle-left image) around the nail bed to soften the tissue. After a minute, gently use a stainless steel pusher (like the tool shown in the middle-right panel) to push back the non-living tissue. Remember: the key is gentle pressure; never aggressively cut or tear the eponychium (the living skin at the base of your nail). Following this, lightly buff the surface of your nail plate using a fine buffer to remove any invisible surface oils or ridges, creating a perfectly smooth texture that grips the color coat.
After all shaping and cuticle work is complete, the final secret to ensuring your viral manicure lasts is proper dehydration and priming. Since you’ve likely used moisturizing creams or cuticle oils during the prep process, you must now clean the nail surface thoroughly with a lint-free wipe soaked in rubbing alcohol or a specialized nail dehydrator (often seen labeled as ‘prep’ or ‘smoother’ in professional kits). This step strips away residual oils, allowing your base coat—which is the final step before color—to form a maximum bond. Applying a high-quality base coat prevents staining (crucial when working with highly pigmented viral colors) and fills in microscopic imperfections. Once your base coat is tacky and dry, you are perfectly prepped for applying those trending shades with confidence.
5 Must-Try Dipping Powder
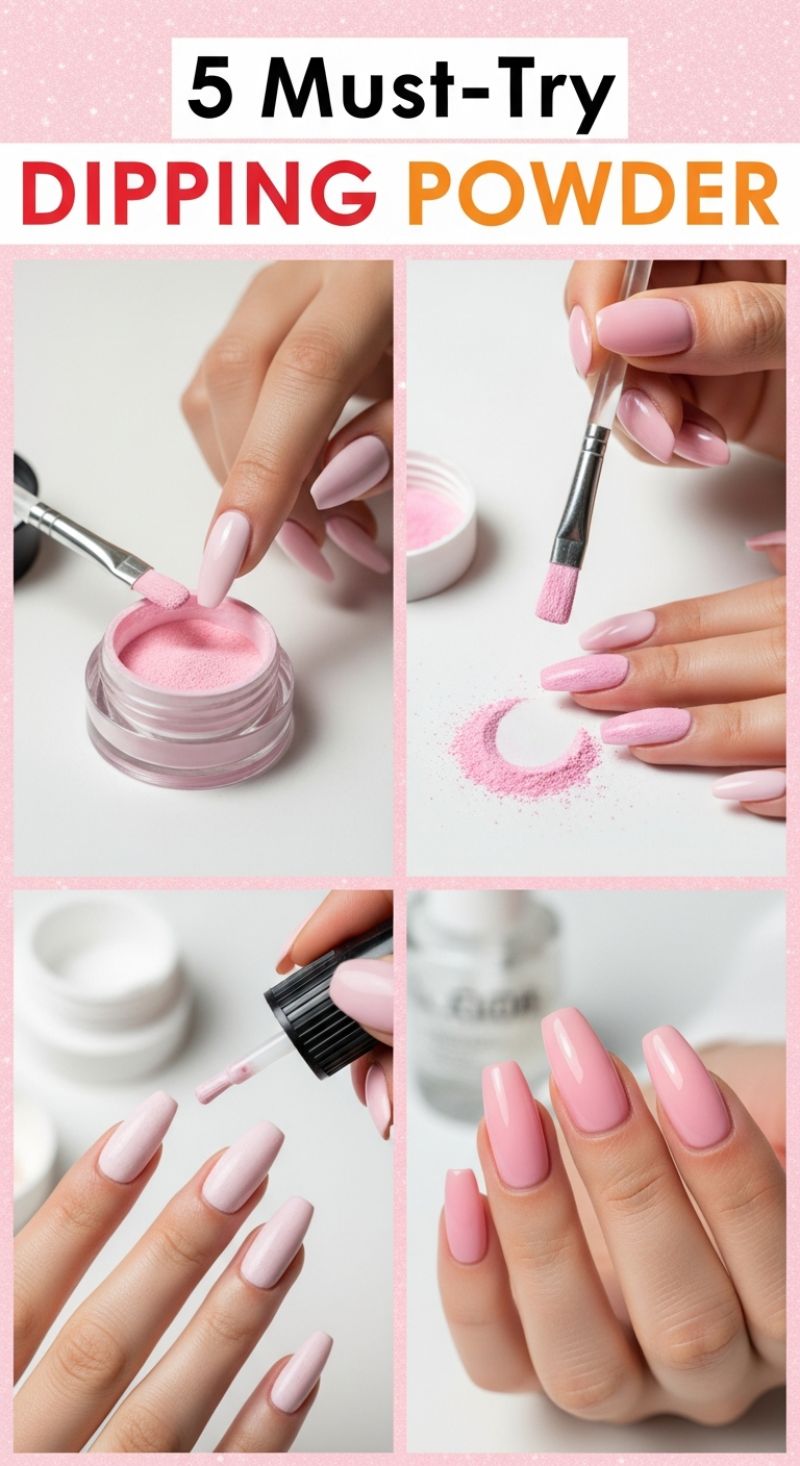
While traditional gel manicures remain popular, the hottest technique making waves this season is the dipping powder method. This process, beautifully captured in the initial application stages seen above, combines the durability of acrylic with a lighter, easier application process, often lasting three to four weeks without chipping. To achieve the perfect soft pink hue shown here—a creamy, opaque shade that leans towards ‘Ballet Slipper’—the first critical step is preparation. After applying a thin layer of the base resin (as demonstrated by the brush reaching into the pink powder pot), the nail is dipped into the pigmented powder. Manicure experts stress the importance of maintaining a slight gap around the cuticle line during the base application; this prevents lifting and ensures the final result looks seamless, not thick or bulky. You should always brush off any excess powder immediately (as shown in the top right visual) to keep the surface clean and ready for the next coat.
Layering is essential for achieving the rich, uniform color seen in the final result. Most professionals recommend two to three dips to build full opacity, allowing the activator liquid to fully cure the powder after each layer. The beauty of dip powder is its ability to build strength quickly, transforming the fine pigment into a robust protective shell. Once the desired color depth is reached, the nail must be filed and buffed extensively to eliminate any residual granular texture. This buffing process—a step often overlooked by home users—is what creates the smooth, even canvas necessary for a high-gloss finish. Expert advice dictates spending ample time smoothing the apex and side walls, ensuring the nail shape is flawless before moving onto the final sealant steps.
The crowning glory of any viral dip manicure is the top coat application, which locks in the color and provides that striking, lasting shine (visible in the bottom right frame). For this pale pink color trend, the glossy finish elevates the shade from simple neutral to a statement of clean elegance. Unlike traditional polish that requires UV curing or extended air drying, the dip system’s top coat sets almost instantly when applied over the cured powder and activator. This quick-drying property is a major reason why dip powder is becoming a favorite for both professionals and those looking for a speedy yet incredibly resilient manicure. When trying this technique, remember that the quality of your activator and top coat is paramount, as they determine both the longevity and the mirror-like shine of your final, stunning pink nails.
10 Fiery RED DESIGNS

Red is not just a color; it’s a statement, and this season’s viral trend is taking this classic hue to new, maximalist heights. Achieving this fiery look starts with the perfect base: a highly pigmented, true red lacquer. Before application, ensure your nails are meticulously prepped—red unforgivingly highlights imperfections. Begin with a smoothing base coat to prevent staining and create a flawless canvas. When applying the color, use three strokes: one down the center, followed by one on either side, ensuring you float the brush just above the cuticle line for that clean, professional edge. For a brilliant, photo-ready finish, opt for a high-gloss top coat. Experts recommend choosing a cool-toned red (with blue undertones) if you have fair skin, or a warmer, orange-based red if your skin is deeper or olive-toned, ensuring the final manicure complements your overall look, much like the dazzling variety of gowns seen here, ranging from deep sequined crimson to vibrant satin scarlet.
To elevate your fiery red manicure into one of the featured viral designs, mastering accent nails is key. The image showcases several standout techniques. For a subtle sparkle, apply a sheer red or silver glitter polish over one or two nails, focusing either on full coverage for an intense metallic foil effect, or attempting a delicate ombré by concentrating the glitter near the tip or cuticle. If you’re opting for the glamorous rhinestone design, precise placement is critical. After applying your final color coat, but before the top coat, use a dotting tool or a wax pencil to place flat-backed gems onto the wet polish. For a lasting hold, encapsulate the stones by painting a thick layer of specialized rhinestone adhesive or clear builder gel around the edges, avoiding painting directly over the facets to maintain their sparkle. Alternatively, replicate the subtle texture seen in some designs by blending a deep black or burgundy micro-glitter over your red base while the final coat is still tacky, using a sponge for a textured, diffused look.
Longevity is essential for such a high-impact color. Red polish is notoriously prone to chipping, which immediately detracts from its luxurious appeal. To maximize wear, remember to ‘cap the free edge’ by running the polish brush lightly across the very tip of your nail with each coat (base, color, and top coat). This seal is the barrier against premature wear. For maintenance, regularly apply cuticle oil to keep the surrounding skin hydrated and prevent the polish from lifting. Furthermore, consider coordinating your nail design with your event attire—a classic, unadorned bright red is perfect for everyday elegance, while the rhinestone and glitter accents are ideal for formal occasions like prom or Valentine’s Day, echoing the dazzling formalwear displayed. By combining precise technique with bold design choices, you can easily replicate these 10 fiery red looks and keep this timeless shade ranking high among the season’s hottest viral colors.
Luxurious Gold: The Crushed Foil Manicure

The undeniable allure of gold has made the metallic manicure one of the hottest viral looks this season, moving beyond simple shimmer into full-blown opulent territory. The image showcases a highly saturated, crushed gold foil finish—a complex texture that reflects light dynamically, giving the nails the appearance of liquid precious metal. This isn’t just a holiday trend; experts note that this particular shade of vibrant, almost 24-karat gold offers an instant upgrade to any look, perfectly mirroring the luxurious accessories and celebratory ambiance depicted. Achieving this high-impact, true-gold shade requires selecting a formula that is deeply pigmented and features micro-flecks designed to mimic hammered or crumbled gold leaf, offering depth and texture rather than just a flat sheen.
To perfectly replicate this viral, textured gold effect, start with meticulous nail preparation. Ensure nails are shaped into a classic oval or almond silhouette, as these shapes best complement the elegant drama of a metallic finish. For application, professional manicurists recommend using a specialized metallic flake polish or opting for the “chrome powder” method over a pigmented base coat (like a vibrant yellow or mustard shade) to maximize the gold’s warmth and reflectivity. Apply two thin coats of the chosen gold lacquer, allowing each layer to fully dry before proceeding. Crucially, seal the manicure with a non-yellowing, high-gloss top coat—preferably one designed to protect specialty finishes—to lock in the textural depth and prevent chipping, ensuring the nails maintain their high-wattage shine for weeks.
The beauty of this luxurious gold nail color lies in its ability to anchor an entire ensemble. As evidenced by the surrounding elements—classic gold watches, diamond rings, and celebratory champagne—this manicure is designed for maximalist styling. When wearing this look, lean into timeless luxury by pairing it with delicate gold jewelry. Expert advice suggests keeping clothing silhouettes clean and classic, allowing the hands to serve as the main focal point of opulence. This shade is particularly stunning for evening events, weddings, or any occasion where glamour is paramount, proving that a truly magnificent gold manicure is not just a seasonal choice, but a permanent staple in the luxury nail catalog.
Cute Short Nails: 7 Designs That Prove Minimalist Manicures Reign
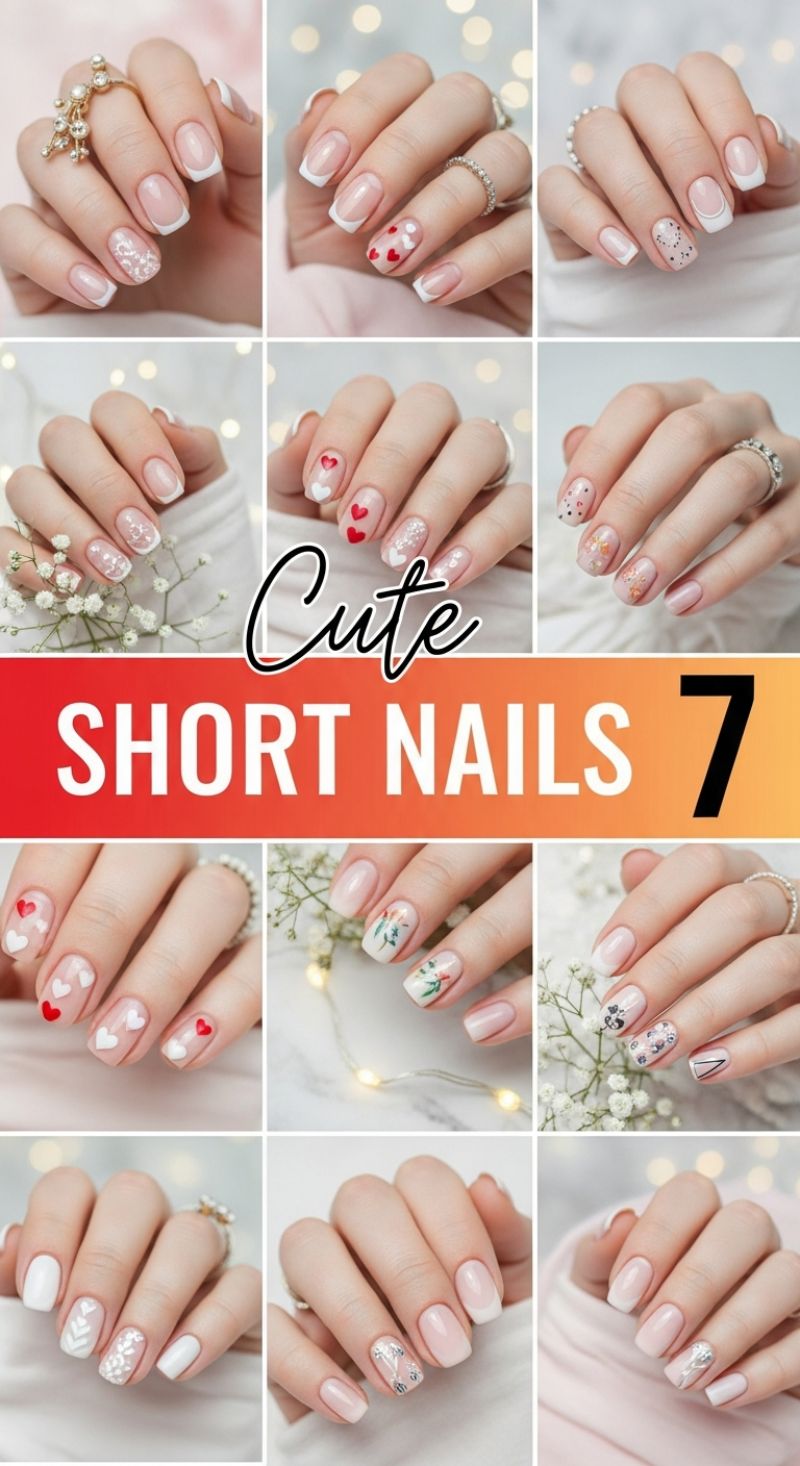
While our core focus remains on the hottest viral colors of the season, these short-nail examples demonstrate how the trending hues—especially milky whites, sheer blushes, and soft nudes—act as the perfect canvas for elevated nail art. The foundation of this trend is the ‘natural overlay,’ achieved using a high-quality sheer gel or builder gel base to provide strength and a healthy, plump look to the nail bed. Notice how almost every example incorporates a variation of the French manicure, but modernized: the tips are softer, often blurred (a ‘micro-French’ or ‘baby boomer’ fade), rather than a stark, traditional white line. This subtlety is crucial for maintaining a polished aesthetic on a shorter nail length. To recreate this look, ensure your nail shape is a soft squoval—this shape maximizes strength while keeping the length practical and elegant, which is essential for showcasing delicate art.
These visual examples fall into three primary design themes: subtle romance (hearts and confetti dots), sophisticated botanicals (delicate florals), and minimalist geometric accents. For the romantic looks, precision is key. Use a fine-tipped nail art brush and a dotting tool to create the small hearts and confetti effects on 1-2 accent nails; keeping the design contained ensures it remains chic rather than childlike. When tackling the botanical designs, which often feature small leaves and flowers, opt for water-slide decals if you lack advanced freehand painting skills. Alternatively, a skilled technician can use highly pigmented gel paint for maximum control. Expert tip: Metallics add instant complexity. In the geometric designs shown, thin metallic silver or gold foil stripes, applied with tweezers and sealed under a topcoat, elevate the sheer base and draw the eye without overwhelming the overall look.
The durability and grace of these short-nail designs are unmatched, particularly for those with demanding lifestyles or professional careers. Because the designs typically cover only a small portion of the nail plate, often concentrated near the tip or middle, the natural nail growth is far less noticeable than with a full-coverage color. This translates directly to a longer-lasting, low-maintenance manicure—often extending the wear time comfortably to three or four weeks. When advising clients on nail art placement, suggest keeping the most intricate design on the ring or middle finger. This technique draws attention to the hand jewelry, as seen in the image, completing the sophisticated, viral ‘clean girl’ aesthetic that continues to dominate the manicure landscape.
5 Unexpected GREEN STYLES
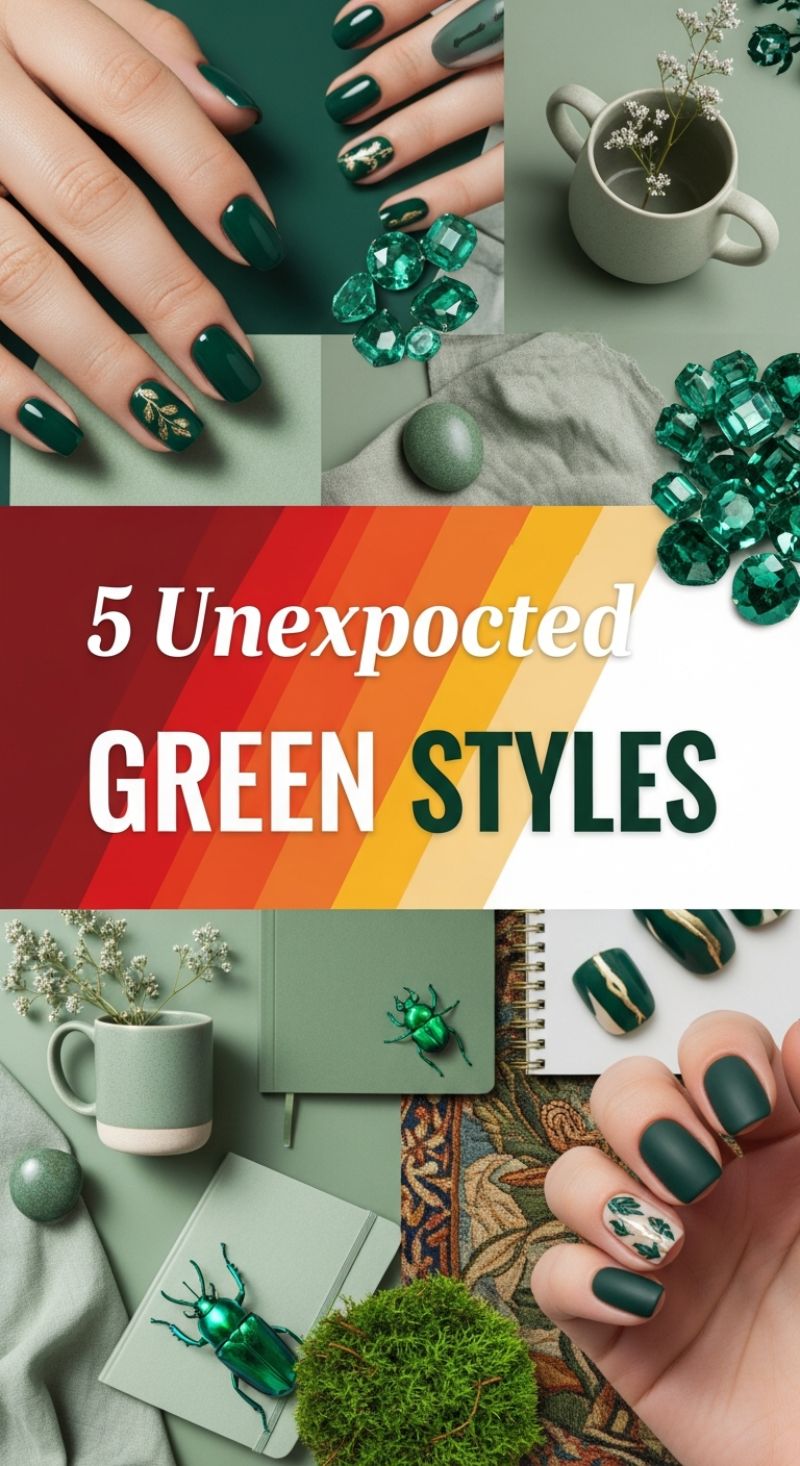
The current viral trend centers on the profound depth and versatility of green, shifting the focus from simple festive colors to sophisticated, jewel-toned saturation. This “Unexpected Green Style” demands dual textures and rich pigmentation, blending luxurious, deep Emerald or Forest Green with muted, dusty Sage accents. For the base, select a highly pigmented deep green polish—this rich shade is exceptionally sophisticated and mirrors the opulent faceted gems shown in the imagery. Preparation is paramount: deep greens can easily reveal nail imperfections, so experts strongly advise applying a ridge-filling base coat to ensure a glass-like, smooth surface before applying two uniform coats of color.
Mastering this look hinges on experimenting with contrasting finishes. The visual spread offers both a classic high-gloss look, perfect for catching light and echoing the shine of the emerald stones, and a velvety matte finish, which lends a contemporary, organic feel reminiscent of moss and natural textures. To achieve the perfect matte manicure, apply your deep green color, cure fully, and finish with a premium matte top coat, ensuring the edge of the nail is capped for longevity. The featured accents should be applied strategically: for the glossy look, add metallic gold foil or simple gold leaf decals applied with precision over a tacky layer; for the matte look, use opaque stamping polish (such as a creamy off-white or tan) to create subtle botanical prints, contrasting sharply against the deep matte base.
Manicure experts recommend using this palette for dimensional styling rather than flat application. Try incorporating the softer, muted sage shade (inspired by the notebooks and ceramic mug) as a complementary full-nail accent, perhaps on the ring or pinky finger, while reserving the deep emerald for the remaining nails. This technique adds depth and softens the overall aesthetic. Furthermore, because these rich colors draw intense attention to the hands, flawless application is key: ensure cuticles are meticulously prepared and oiled, and that the chosen nail shape—be it short and square for the matte version, or medium almond for the glossy style—is perfectly symmetrical. This deep green offers an opulent, nature-inspired statement that translates flawlessly across any outfit or season.
Regal Purple Trends
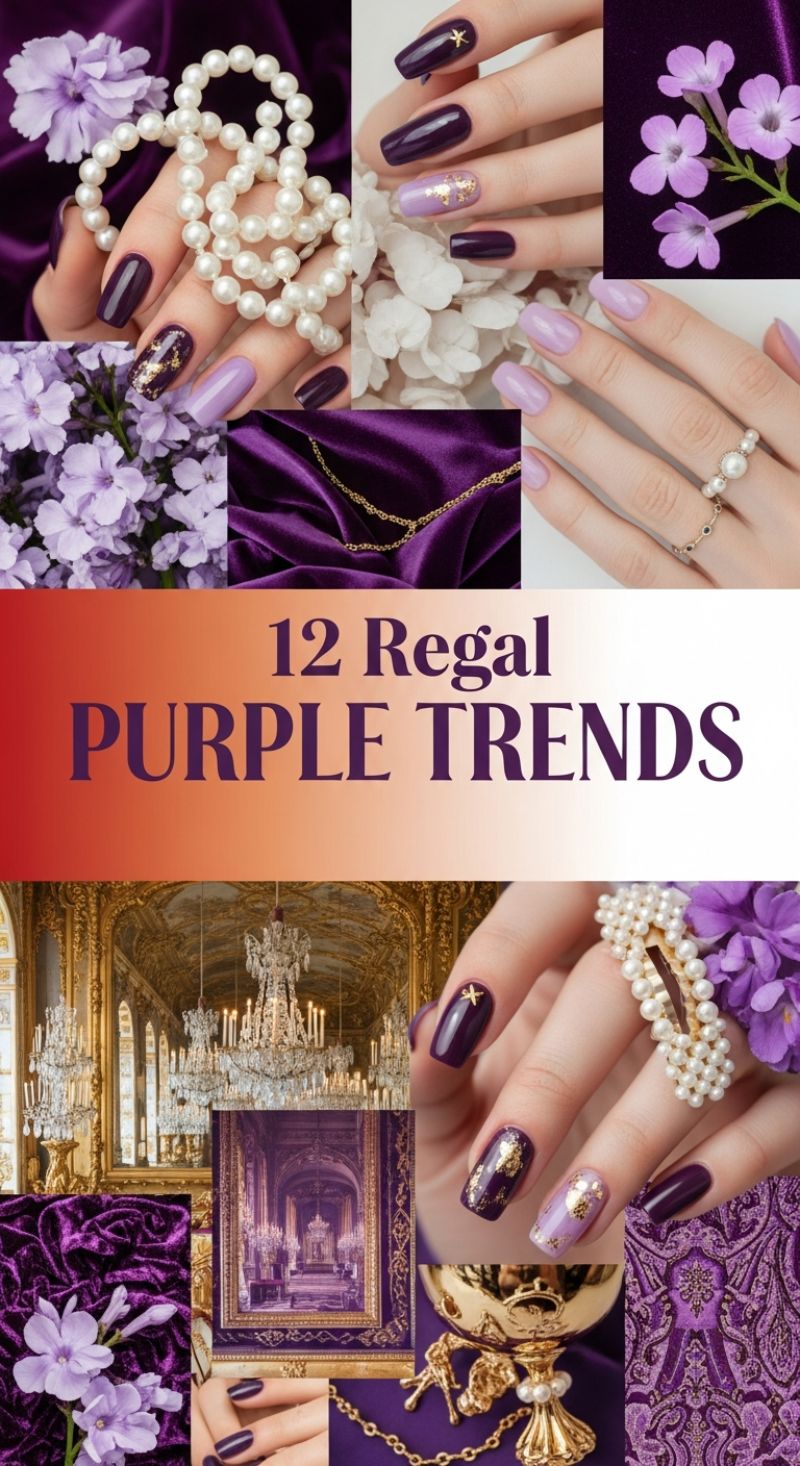
The “Regal Purple Trend” elevates the classic dark manicure by incorporating light, opulent accents and high-gloss finishes. This look is defined by a dramatic yet harmonious dichotomy of deep, saturated eggplant and plum shades contrasted with airy, milky lavender and lilac pastels. To achieve this sophisticated balance, choose two polishes: a near-black, high-gloss purple creme, and a soft, slightly grayed-out lavender that leans towards grey for sophistication rather than bubblegum pink. Manicure experts recommend using the darker shade as the foundation for most fingers, grounding the look with an air of traditional luxury. This trend, inspired by royal velvet textures and gilded baroque interiors seen in the image, works perfectly because the cool undertones of both shades harmonize while the drastic difference in depth provides maximum visual impact, ensuring the manicure is striking yet seasonless and incredibly elegant. This style transitions seamlessly from formal events to everyday luxury.
The instructional element of this viral trend centers on the strategic application of gold foil and micro-decals to achieve that signature opulent shimmer. To replicate the featured mixed-manicure accent nails, begin with a medium-length, squared-off coffin or almond shape for optimal real estate, as seen in the examples. On one or two nails (typically the ring or middle finger), use the lighter lavender shade as a base. After curing the color layer, apply a thin layer of topcoat or foiling gel, and before curing, gently dab irregular flakes of gold leaf onto the surface using a silicone tool or an orange wood stick. The random, organic placement of the gold is key—it should look rich and slightly textured, mimicking aged gilding. For the deeper plum nails, opt for minimalist accents, such as a single metallic star, cross, or small geometric decal near the cuticle or tip, securing it meticulously under two layers of high-shine topcoat to prevent snagging and chipping, ensuring a professional, long-lasting finish.
Completing the Regal Purple look requires attention to pairing and finish to truly capture the luxurious mood. Given the opulent inspiration—heavy pearls, crushed velvet, and intricate gold jewelry—it is crucial that the nails reflect this high-gloss texture. Always seal the entire manicure with a mirror-finish topcoat, essential for making the dark purple look like liquid silk and ensuring the gold foil catches the light perfectly. Expert styling advice suggests accessorizing with delicate jewelry that mirrors the elegance of the nails; for instance, stack subtle gold bands alongside a single pearl accent ring, rather than opting for chunky accessories, to maintain the refined palace aesthetic. This combination of deep, royal color, precious metallic accents, and pristine polish makes the Regal Purple trend a guaranteed standout for the season.
10 Official SPRING TRENDS
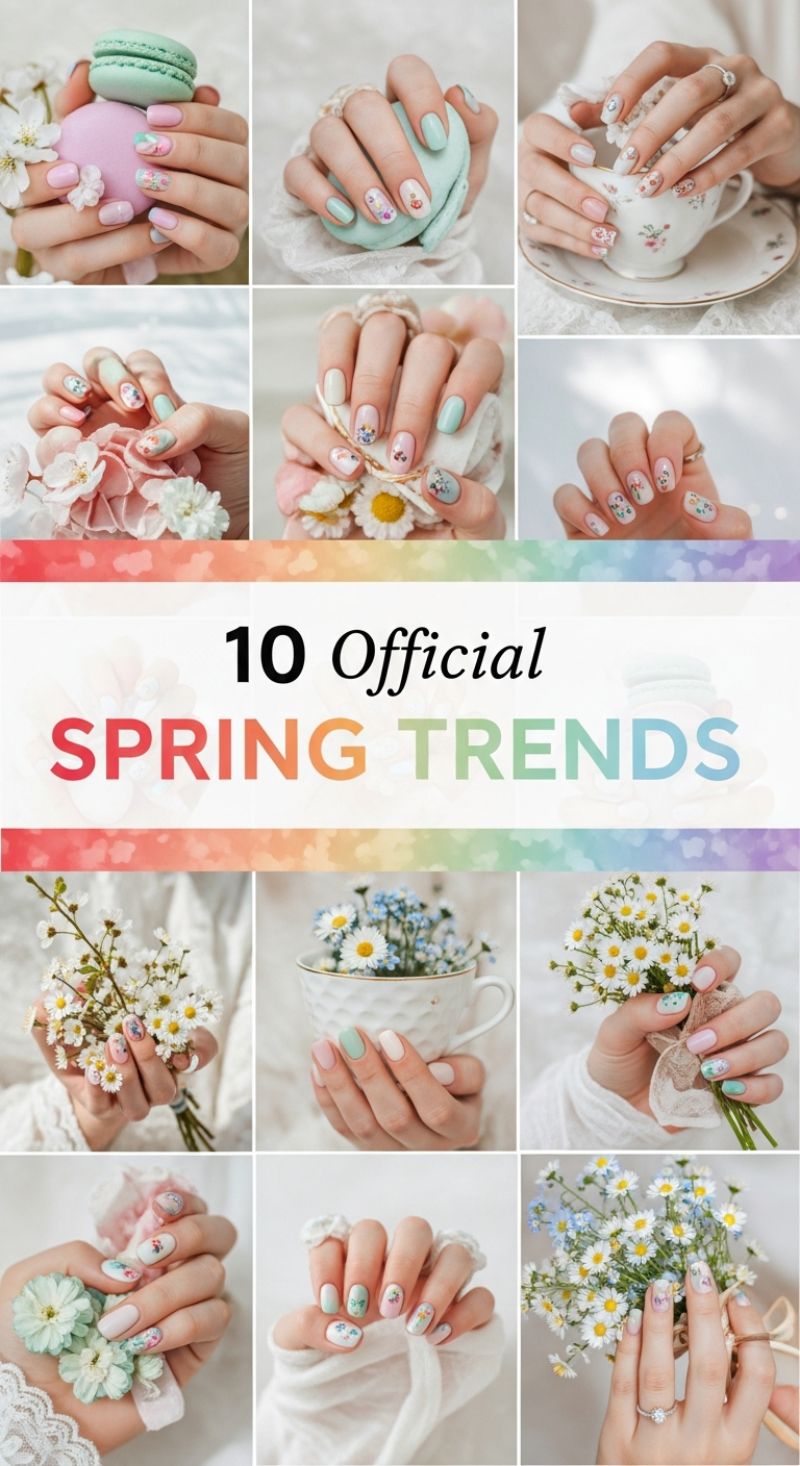
The “10 Official SPRING TRENDS” manicure palette focuses on an ultra-soft, whimsical aesthetic defined by diffused pastels. Forget bold statements; this look hinges on sophisticated subtlety, combining shades like pistachio cream, pale lavender, ballet slipper pink, and a sheer milky white. The core concept is interchangeability: select three or four complementary pastels and use them as solid colors on most nails, reserving a couple of fingers (usually the ring and middle) for the intricate art. This curated palette ensures that the detailed designs, which are the hallmark of this trend, do not overwhelm the overall hand but instead bloom delicately against the natural skin tone, giving an immediate, airy lift perfect for the warming weather. The key is using highly opaque yet light-reflecting polishes to achieve that creamy, decadent finish often associated with macarons and tea settings, making the hands look instantly refreshed and youthful.
Replicating the delicate floral artistry seen in this trend requires precision and patience, often best achieved using gel polishes for maximum control and stability. Start with a thin layer of sheer nude or clear base coat over the pastel base color of your accent nails. The floral motifs—primarily tiny daisies, forget-me-nots, and soft abstract bouquets—are applied using an ultra-fine detail brush (000 size) and a small dotting tool. For the daisies, use a yellow or muted gold center dot, then pull small, radial strokes of white outwards using the fine brush tip. The art should be scattered rather than covering the entire nail plate; think of small clusters placed near the cuticle or off-center towards the tip. Expert tip: Dilute the colored polish slightly with clear topcoat before application to create a watercolor effect, which lends a softer, less graphic finish characteristic of high-end spring nail art. This technique gives the illusion of petals floating on the nail surface, capturing the natural light and enhancing the ethereal vibe.
To truly master the viral “Spring Trends” aesthetic, pay attention to dimension and sheen. After the floral art is complete, experts often recommend adding a minute touch of sparkle—a microscopic silver glitter dust applied selectively over the floral elements, or the inclusion of one or two tiny, flat-backed rhinestones near the base of an accent nail to mimic dew drops. Crucially, the preferred shape for this detailed work is short or medium-length, filed into a soft oval or squoval shape, as extreme lengths can detract from the delicate nature of the design. Finish the entire manicure with a thick layer of high-gloss, non-wipe topcoat. This seals the intricate design, enhances the pastel depth, and ensures longevity, allowing the whimsical garden to flourish on your fingertips for weeks. This highly detailed, romantic manicure trend is designed to be the perfect accompaniment to soft lace and delicate gold or rose-gold jewelry.
Sparkling Silver: The Ultimate Metallic Manicure Trend
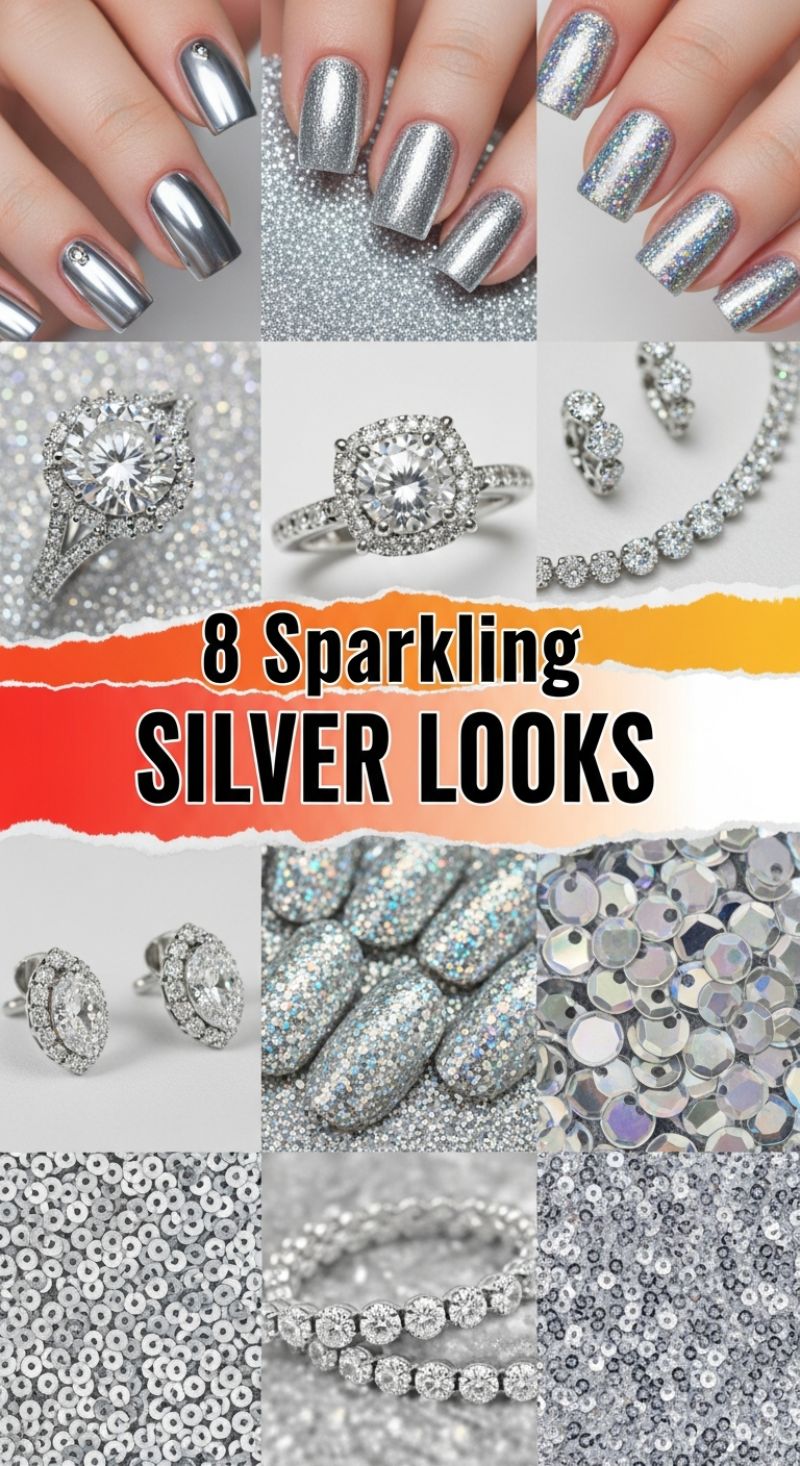
Silver is not just a color; it’s a finish, and this season, experts agree it dominates the viral nail color charts due to its versatility and high-impact shine. The image showcases three key silver techniques that are trending. To achieve the coveted Mirror Chrome Look, which provides that liquid metal, highly reflective surface seen in the top left, start with a rich black or silver gel polish base, cure it fully, and apply a non-wipe top coat. Crucially, before curing the final top coat, use a specialized chrome pigment powder and rub it onto the tacky surface using a silicone tool or a sponge applicator until the mirror effect is fully realized. Seal this with another layer of non-wipe top coat. For a subtle yet luxurious approach, consider integrating a single rhinestone accent on the base of the nail, mimicking the diamond jewelry featured, to elevate the overall glamour quotient without overcrowding the design.
The second and equally popular method involves high-density glitter, ranging from ultra-fine shimmer to chunky holographic particles. For a solid, opaque sparkle like the middle example, manicure experts recommend using the ‘sponging’ technique. Instead of brushing on a sheer glitter polish, apply a small amount to a makeup sponge and lightly dab it onto the nail. This method builds pigment density quickly, eliminating transparency and achieving that fully saturated, twinkling effect reminiscent of fine silver dust. To replicate the holographic or multi-chromatic shimmer seen on the right, look for polishes specifically labeled ‘holographic.’ These contain micro-glitter that refracts light into a spectrum of colors—a perfect pairing with the iridescent sequins and crystals displayed in the image. When working with coarse or chunky glitter, always ensure you encapsulate the surface with a thick, self-leveling top coat to prevent chipping and maintain a smooth finish.
Silver is inherently timeless, and its current viral status stems from its ability to transition seamlessly from everyday wear to formal events, pairing impeccably with both warm and cool-toned jewelry, such as the brilliant tennis bracelet and diamond cluster earrings shown. For maximum longevity with these high-shine finishes, proper prep is essential: gently buff the nail plate and ensure all cuticle oils are removed with rubbing alcohol before starting. Since glitter and chrome finishes can sometimes be challenging to remove, consider using a peel-off base coat if you enjoy changing your polish frequently. For a truly professional look, ensure the edges and tips are perfectly capped with the final top coat layer to prevent shrinkage and tip wear, keeping your sparkling silver manicure flawless for weeks.
9 Stunning BLUE SETS

This season, the viral nail shade is not just any blue, but a deep, luxurious “Glacial Sapphire” or “Winter Cobalt.” The rich, saturated navy hues featured in these stunning sets contrast sharply with the cool, icy blue backgrounds and the ethereal, light sky-blue gowns, immediately emphasizing their depth and elegance. Expert manicurists recognize this shade as a powerful, flattering choice across all skin tones and nail shapes. This color choice elevates the typical darker palettes of the cold weather months by injecting vibrancy and sophistication, making it the perfect statement accessory whether complementing formal wear, as suggested by the flowy dresses, or simply enhancing an everyday look. This depth of blue ensures that the manicure feels high-end and intentional.
To replicate these dramatic manicure styles, start with meticulous nail preparation, shaping the nail into a long coffin or ballerina style to maximize the canvas for the deep color. For the solid blue and glitter accent look (Set 1), apply two even coats of high-pigment navy or cobalt gel polish. After curing the base color, apply a finely milled sapphire glitter pigment or a holographic blue topcoat liberally to the ring finger to capture that sparkling, icy texture seen in the image background. The key to maximizing shine is using a non-wipe, high-gloss top coat applied over all nails, ensuring you float the coat lightly so as not to drag the glitter. For the festive, winter-themed set (Set 2), use a fine-tipped nail art brush and pure white gel paint to meticulously draw delicate snowflake designs or scattered dots near the cuticle and tips for a “frost dusting” effect. For stability when executing fine details, always stabilize your dominant hand by resting your pinky finger on the table.
Maintaining such a deep, dramatic color requires careful sealing and routine maintenance. Dark colors show chips and wear immediately, so always cap the free edge of the nail thoroughly with your topcoat to prevent premature peeling, extending the manicure’s life up to three weeks with gel products. If using regular lacquer instead of gel, ensure two very thin coats are applied rather than one thick coat to prevent bubbling and ensure rapid, flawless drying. For styling, these intense blue nails pair exceptionally well with cool-toned jewelry, particularly silver or white gold, beautifully mirroring the icy theme captured in the surrounding visuals. To integrate this shade seamlessly into your wardrobe, stick to cool neutrals, blacks, whites, and varying shades of blue, allowing this vibrant manicure to truly stand out as the focal point of your seasonal ensemble.