Discover the best holiday manicures! Get inspired with festive nail art ideas perfect for celebrating Mardi Gras, Chinese New Year (CNY), and cozy February trends.
8 Really Easy NAIL HACKS
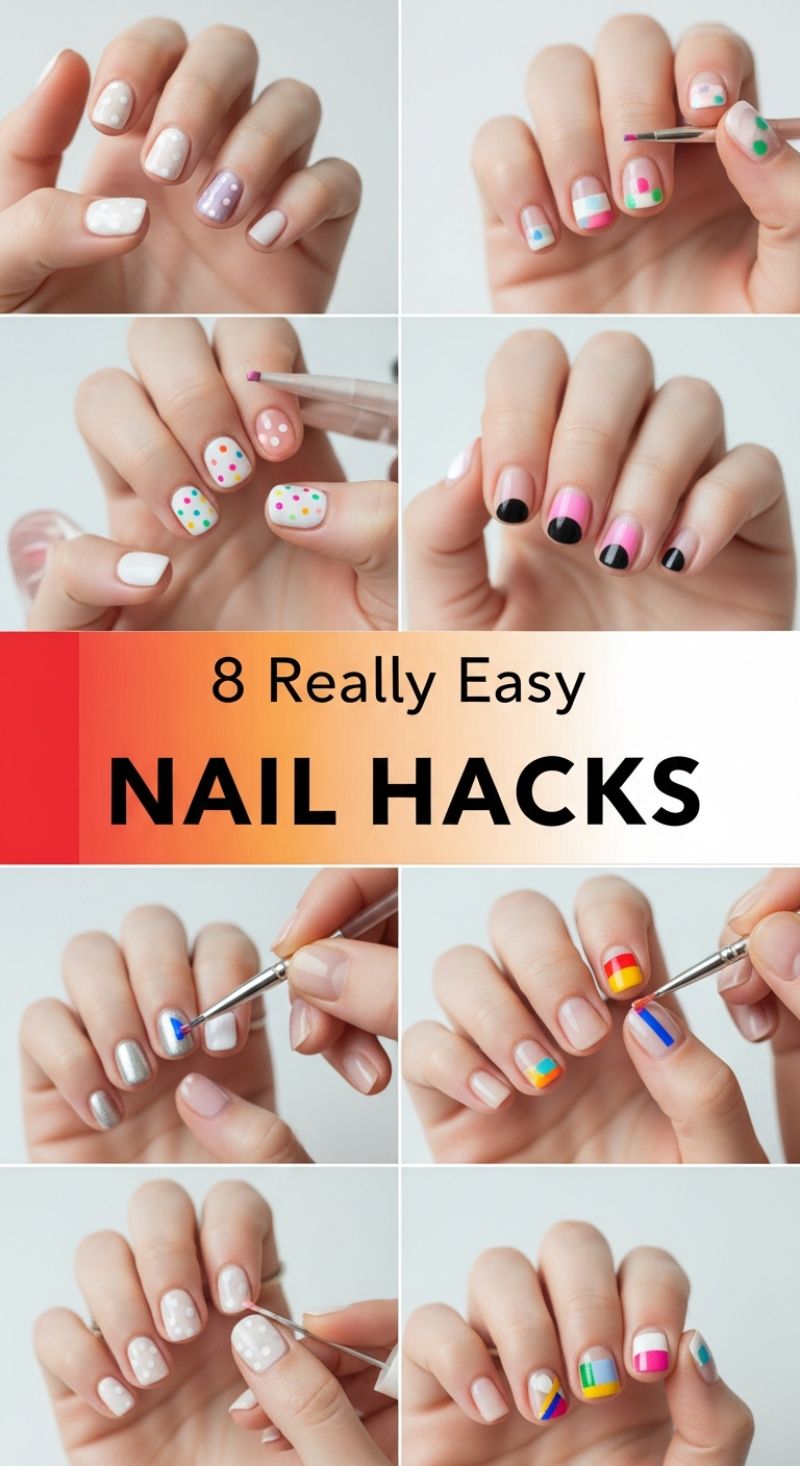
This section introduces eight straightforward techniques that elevate standard manicures into custom art, perfect for adding flair during the festive season, whether you are celebrating Mardi Gras or opting for cozy February pastels. The most accessible designs involve the use of dotting tools, as seen in the first and third rows of the visual guide. For a sophisticated, subtle look, opt for delicate white dots over a sheer nude or soft pastel base, varying the base color on accent nails (like the lilac accent shown) to add depth. For high-impact, celebratory nails (ideal for a vibrant theme), use a crisp white background and layer multiple vibrant dots (pink, yellow, blue, green). Expert tip: When using a dotting tool, ensure the paint consistency is medium—not too thick to glob, but not too thin to run—and reload the tool frequently to maintain perfectly round shapes. These simple techniques require minimal precision but deliver maximum visual impact with contrasting color placement.
Beyond dots, these hacks showcase highly graphic designs achievable with simple implements like fine brushes or even household items used as stencils. The striking half-moon manicure—a modern take on the traditional French tip—is featured prominently. To recreate this look, paint your entire nail with the base color (nude or light pink), allow it to dry completely, and then place a circular guide (like a cut-out sticker or binder reinforcement) near the cuticle. Apply your second color, such as the dramatic black or bold pink shown, over the exposed tip and remove the guide immediately while the polish is still wet for a sharp, clean line. For the linear designs, invest in a quality striping brush. The visual instructions demonstrate both simple single stripes (like the blue line on the yellow/red blocked nail) and more complex geometric blocking. Achieving crisp lines depends on using quick-drying, opaque polish and applying thin, even coats, ensuring each base layer is fully cured before attempting the next overlay to prevent dragging.
The final set of examples moves into contemporary abstract and color-blocking techniques, providing inspiration for bespoke, artistic nails. These designs, often resembling miniature pieces of modern art, utilize small, clean segments of contrasting colors—yellows, reds, blues, and bright pinks—set against a minimal nude or white base. When attempting intricate blocks or abstract shapes, rely on a very fine detail brush (000 size is recommended). Start with the largest color block first, cure/dry it, and then meticulously place the smaller shapes and lines around it. The key to successful color blocking is contrast; pair opaque shades next to sheer or metallic bases (as seen with the silver nail receiving a blue stripe) to make the design pop. Finish all these hacks, especially the complex geometric patterns, with a high-shine, fast-drying top coat to encapsulate the art, smooth out any ridges, and guarantee long-lasting wear throughout your holiday events.
8 Dark Academia V-DAY NAILS

The Dark Academia aesthetic offers a sophisticated, moody alternative to traditional pink-and-red Valentine’s Day manicures, perfectly capturing the cozy, contemplative atmosphere of February. To achieve this look, begin by prepping the nails into a classic shape—either a neat, slightly rounded square (squoval) or a short, elegant almond, ensuring uniformity across all fingers. The core of this style relies on a rich, highly pigmented color palette consisting of deep oxblood red (a near-black burgundy) and true jet black. For application, apply a high-quality base coat to protect the nail and prevent staining, followed by two to three thin, even coats of your chosen polishes, alternating colors thoughtfully across your hands to create visual depth. For example, using the oxblood on the index and pinky fingers, and the black on the middle and ring fingers, creates a balanced distribution. The key to the Dark Academia aesthetic is achieving an intense depth and mirror-like shine; invest in polishes that offer excellent self-leveling and finish the base application with a durable, high-gloss top coat.
The defining element of this festive yet refined manicure is the subtle, shimmering heart accent. This design is intentionally minimalist, ensuring the look remains more elegant and less overtly playful. For the easiest application, secure a small, silvery heart-shaped decal onto the accent nail (typically the ring finger or middle finger, chosen to contrast the base color—e.g., silver heart on a black nail). If you prefer a hand-painted approach, use a highly metallic silver or holographic glitter polish and a fine detail brush (or a dotting tool for initial shaping). Start by painting two small, connected dots, then carefully drag the polish down and inward to form the point of the heart. Precision is paramount here; the heart should remain small, occupying the lower half of the nail bed without reaching the cuticle. Once the design is completely dry, seal it immediately with a layer of fast-drying clear top coat to lock the intricate detail in place and prevent any smudging.
Expert manicurists suggest a few modifications to fully customize this Dark Academia V-Day style. For added textural interest, consider switching to a velvet finish polish for the base colors, or apply a matte top coat over the oxblood nails while keeping the black nails glossy for a striking contrast. Alternatively, to lean further into the vintage charm, swap the silver glitter hearts for tarnished gold metallic decals. For maximizing the longevity of this sophisticated mani throughout the month, always cap the free edge of your nail with both the color polish and the final top coat; this crucial step prevents premature chipping. This finished look pairs beautifully with chunky silver or gold rings and complements textiles like velvet, tweed, or deep lace, making it the perfect refined holiday statement for your February celebrations.
7 Simple V-DAY NAIL ART
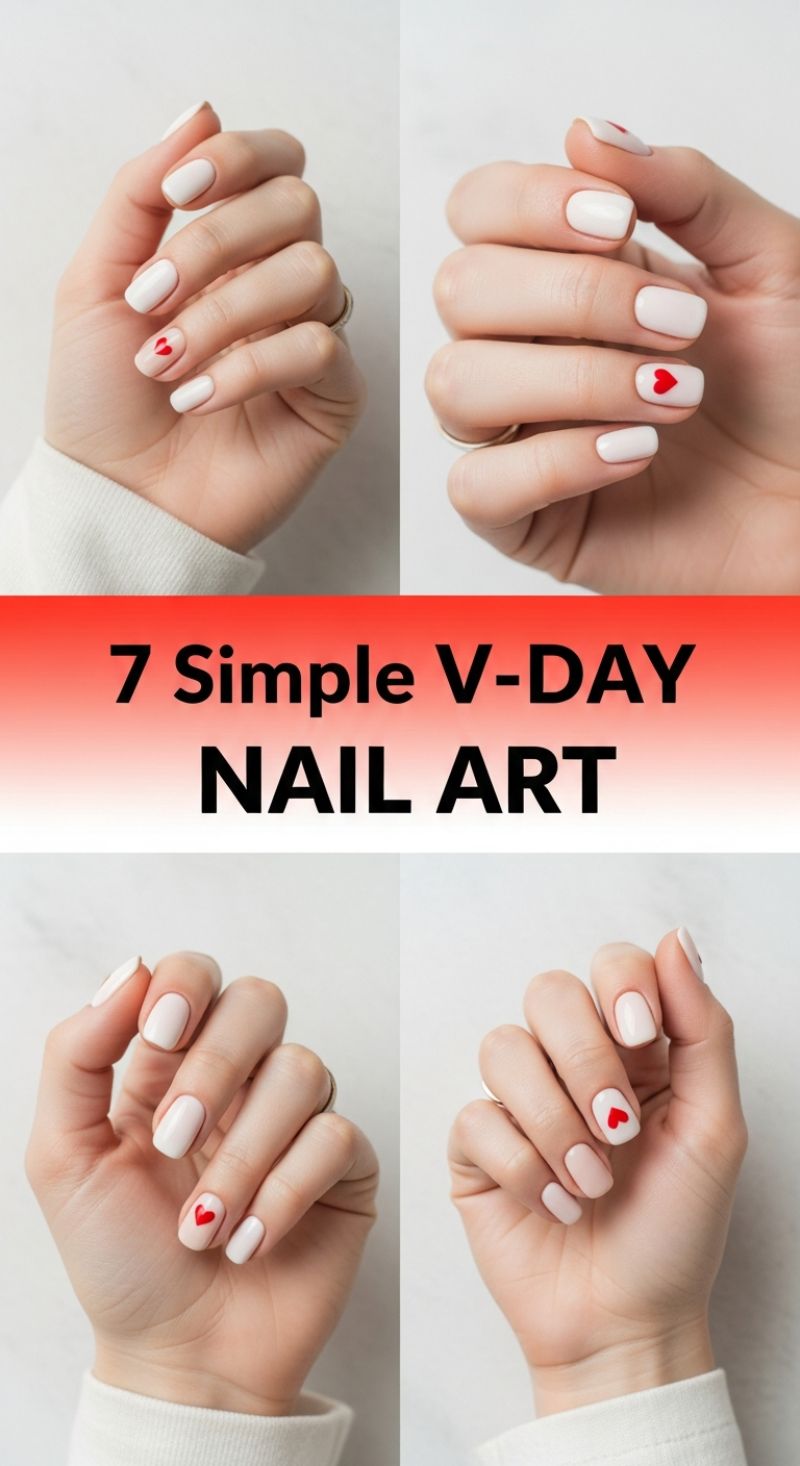
Begin by ensuring proper nail preparation; a clean, buffed canvas is essential for achieving professional-level results, especially with a minimalist design like this. The short, neatly filed squoval shape featured in this design is universally flattering and keeps the overall aesthetic crisp, preventing the simple artwork from looking cluttered. For the base color, select a highly pigmented, creamy polish in either a soft, bright white or an ethereal off-white/nude tone. Apply two thin coats of your chosen base, allowing each layer to fully cure or dry before proceeding. The goal is complete opacity without adding excessive bulk, as this luminous base color is vital for maximizing the visual impact of the small red accent and achieving that clean, modern ‘minimalist sweetheart’ look.
The simplicity of this manicure hinges entirely on the precise execution and perfect placement of the single red heart accent on the ring finger. To create this small, symmetrical design, professional manicurists highly recommend utilizing a fine-point dotting tool rather than attempting freehand painting with a traditional brush. Dip the tool into a highly pigmented, true-red polish. Start by placing two small, close-together dots near the center of the nail bed, positioning them slightly higher than the final desired placement. Then, gently drag the dotting tool downwards from the bottom inner edge of each dot, meeting them precisely at a central point to form the heart’s bottom tip. Once the basic outline is established, carefully fill in the internal shape using the same dotting tool or a very thin liner brush, ensuring the edges are sharp and the red color is fully saturated. Precision is key; for the intended minimalist effect, the heart should occupy only the central quarter of the nail.
After confirming that the red heart is flawlessly dry—a critical step that prevents color bleed or smearing—seal the entire design with a high-quality top coat. For this particular interpretation, a high-shine glossy finish enhances the fresh, polished feel, making the white base appear even brighter and the red pop. However, for those seeking a more sophisticated or subdued Valentine’s look, switching to a velvety matte top coat can instantly transform the manicure into something moodier and exceptionally elegant. To maximize the life of your manicure, ensure you ‘wrap the edge’ of the nail with the top coat, brushing it slightly under the free edge. For easy variations, try swapping the classic true red for a subtle holographic shimmer, a rose gold, or even a deep black for an edgier interpretation, always maintaining the low-effort, high-impact single accent nail principle.
10 BADDIE V-DAY NAIL LOOKS
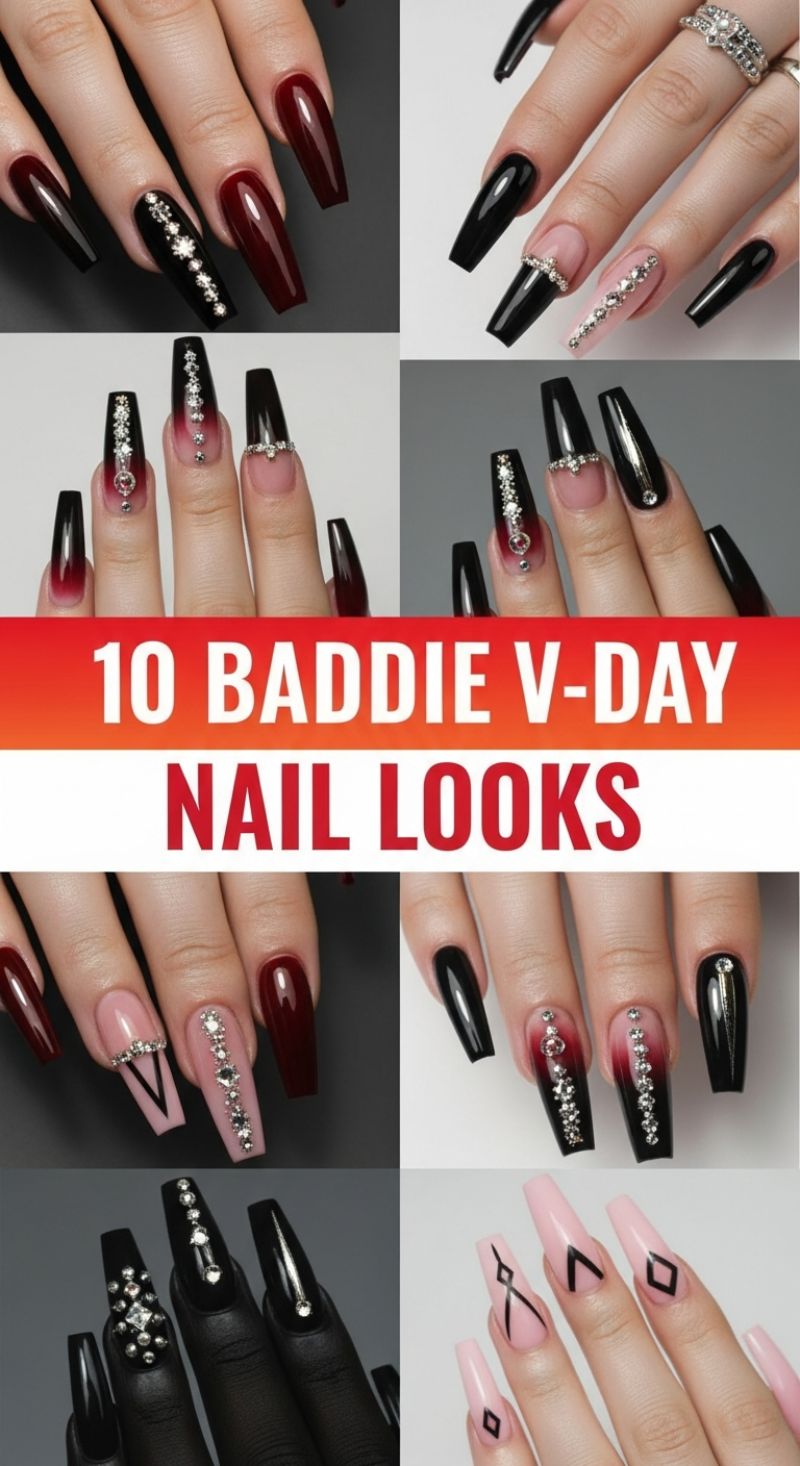
Ditch the traditional baby pink hearts and opt for a dramatic, high-impact manicure this February with the “Baddie V-Day” aesthetic. This look is defined by long, structured coffin or tapered square shapes, a fierce color palette centered on jet black and deep vampy burgundy, and an abundance of high-quality crystal embellishments. To achieve this glamorous edge, start by preparing your extensions, ensuring the shape is crisp and uniform. For the base colors, alternate between a full-coverage glossy black and a rich, saturated maroon or oxblood. The key to making this style feel cohesive is integrating a sheer nude or blush pink on accent nails, providing a neutral canvas that allows the darker colors and heavy bling to truly pop. This high-contrast mix of dark saturation and nude delicacy is what gives the look its complex, confident appeal.
The most signature element of the Baddie V-Day manicure is the strategic application of rhinestones. For maximum durability and shine, always adhere your crystals using a builder gel or thick rhinestone resin, curing it properly to secure the gems. Focus on creating vertical cascading lines of varying stone sizes (SS6 to SS12) down the center of the nail, or forming a precise, geometric V-shape near the cuticle line on nude nails. Another crucial technique seen here is the sophisticated black ombre: blend your glossy black into either a deep cherry red or the sheer nude base using a dedicated sponge or a precise blending brush before curing. Ensure the transition is smooth and flawless, mimicking a dark, smoky gradient. For an extra touch of luxury, incorporate metallic accents, such as thin vertical lines of silver striping gel or gold foil, especially on solid black nails to catch the light and add depth.
Beyond the heavily embellished looks, you can adapt this aesthetic with clean, geometric accents perfect for a slightly toned-down yet still edgy vibe. On a pale pink base, use a fine liner brush and black gel polish to create bold, sharp lines, V-tips, or outline elongated diamond shapes. These designs maintain the sharp contrast of the look without the weight of heavy crystals. Regardless of whether you choose the full-bling application or the minimalist geometric approach, proper sealing is essential for longevity. After all design work is cured, use a high-shine, non-wipe top coat, carefully floating it over the nail surface but avoiding direct coverage over the top facet of the crystals themselves. This technique, called ‘framing the stone,’ ensures the rhinestones retain their optimal sparkle and keeps your fierce Valentine’s mani flawless for weeks.
20 Fresh Spring Manis
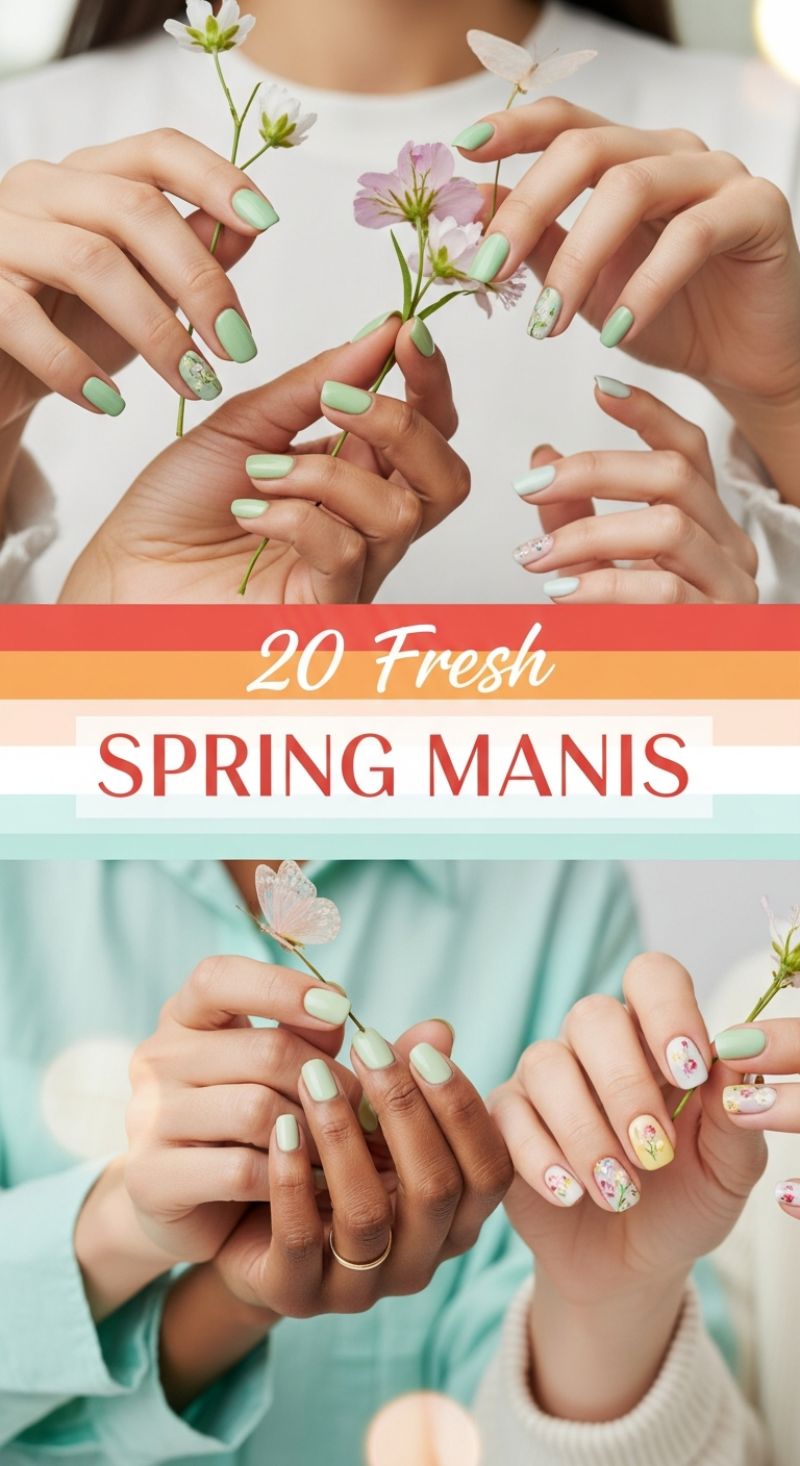
The “Fresh Spring Manis” aesthetic featured here offers the perfect transition from deep winter colors into the renewed energy of early spring, making it ideal for brightening up a cozy February or celebrating the subtle shift towards March. This look is defined by a commitment to soft, nature-inspired pastels. The foundational shade seen across the hands is a light sage or mint green, often beautifully offset by accent nails painted in pale sky blue or soft buttery yellow. To replicate this foundation, ensure your nails are filed into a clean, short squoval or square shape, as the intricate artwork tends to look most elegant on a moderate length. When working with pastel polishes, which are notorious for streaking, utilize three very thin coats of highly pigmented lacquer instead of two thick ones, or opt for a soak-off gel system to ensure opaque, streak-free coverage. The consistent use of a solid pastel base on the majority of the nails creates a sophisticated canvas that prevents the final look from becoming overly busy or juvenile.
The artistry of these manicures truly shines through the strategic placement of floral designs. Notice how the majority of the nails maintain the solid, calming green, while only one or two fingers—typically the middle or ring finger—showcase the detailed motifs. For those attempting a DIY approach, you have two options: intricate hand-painting or high-quality decals. If painting, start by setting a background color (like white or pale yellow) on the accent nail. Then, using a fine-liner brush and highly opaque white, pink, and red polishes, create tiny layered petals, utilizing a dotting tool for the center stamen. Expert advice dictates using a highly contrasting color, like white, as the initial layer for the flowers, as this allows the subsequent colors to pop vividly against the pastel base. For a faster, professional-grade finish, invest in water-slide floral decals, which can be applied and sealed seamlessly, capturing the whimsical details like the tiny butterflies shown in the images.
Because these designs incorporate delicate layering and fine-point detail, proper sealing is essential for longevity. After all design elements are completely dry or cured, apply a non-smear, high-shine top coat. To prevent the brush from dragging the detailed artwork, employ the “float” technique: load a generous bead of topcoat onto the brush and gently float it over the nail surface in minimal strokes, avoiding heavy pressure. This protects the detailed blooms and scattered glitter specs from premature chipping. This fresh, airy style is a wonderful mood booster and pairs beautifully with lighter wardrobes, signaling a definitive move away from the heavier textures and darker palettes of winter.
15 Stunning Valentine’s Nails
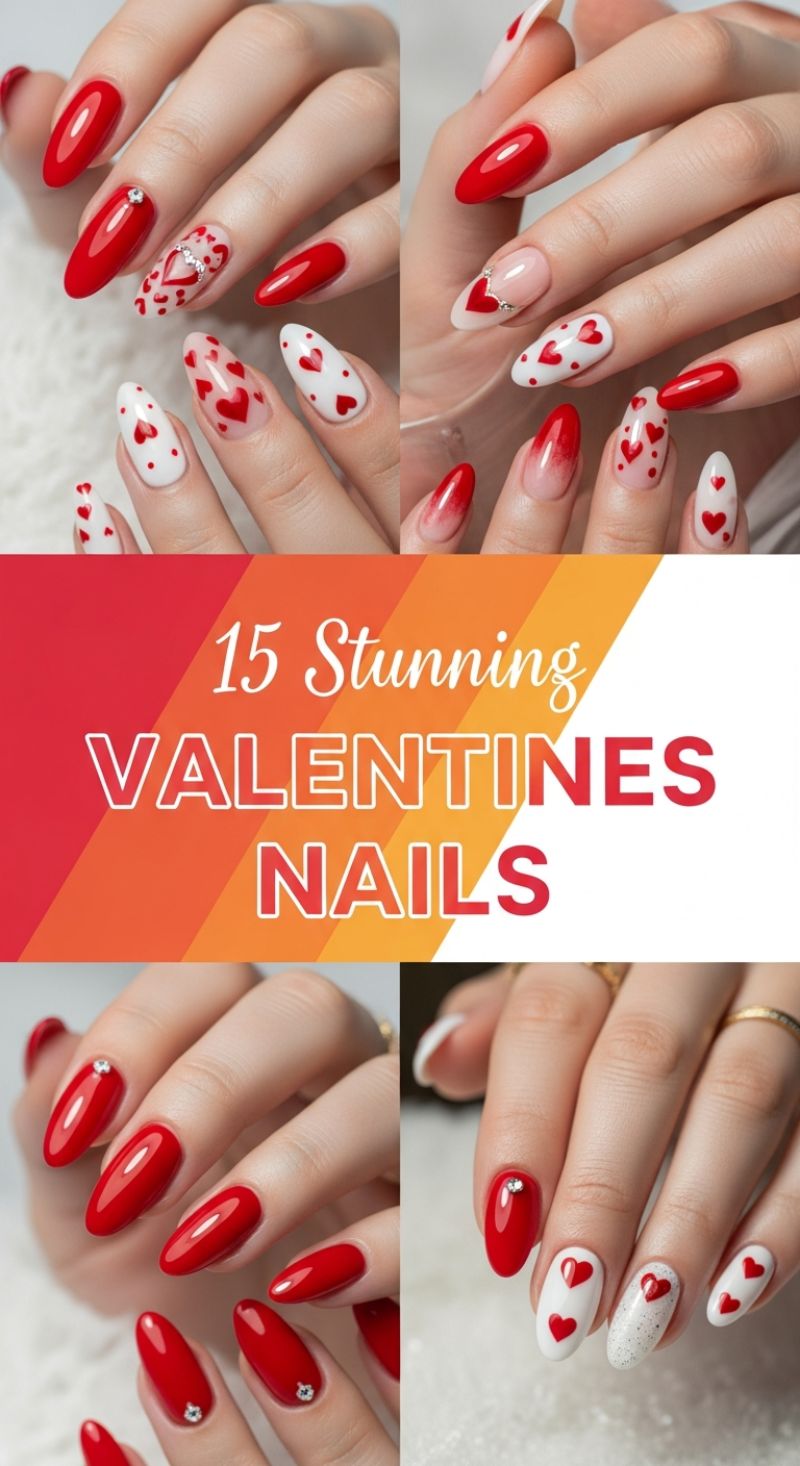
The vibrant collage of Valentine’s Day nail art showcased here provides incredible inspiration for a romantic February manicure, moving past simple solid colors toward intricate, yet achievable, designs. The foundation of these looks relies on a classic high-gloss palette of true cherry red, crisp white, and translucent nude or pink bases, often applied to a flattering almond or oval nail shape. To recreate the all-over heart designs seen on the accent nails, start by applying two thin coats of your base color (white or nude). Once fully cured, use a fine-tipped dotting tool and the vibrant red polish to create two adjacent dots near the tip of the nail. Using a thin striping brush, gently pull the polish down from the center point between the dots to form the bottom point of the heart. For beginners, staggering the size and placement of the hearts across the nail adds a playful, forgiving touch. Remember that precision is key when working with detailed art; cure each layer of hearts briefly before adding the next element to prevent colors from bleeding or shifting.
To achieve the more advanced and elegant looks featured, such as the subtle ombre and detailed French tips, specific techniques are required. The reddish-pink gradient effect, popular on the middle and ring fingers in the top right image, is created by starting with a sheer pink or nude base and sponging the red polish onto the tips, blending upwards until the transition is seamless. For a sharper, contemporary Valentine’s French tip, use the sheer nude as the base and apply a clean, curved white or red tip. Elevate this design by adding heart accents right at the curve of the tip, often secured with delicate silver or gold micro-beads or rhinestones, which should be set firmly in a layer of clear builder gel before the final top coat to ensure longevity. The use of clear or sheer glitter polish on an accent nail, as seen paired with the solid red heart designs, adds texture and dimension without overwhelming the design.
For a cohesive, salon-quality finish, the key is balance and proper sealing. Pair highly detailed accent nails (like the heart scatter patterns) with solid, high-shine red nails adorned only with a single, perfectly placed cuticle rhinestone. This ensures the look is sophisticated rather than cluttered. Once all designs are complete and fully cured, apply a durable, non-wipe top coat over the entire manicure, paying extra attention to capping the free edge of the nail to prevent chipping. The brilliant shine provided by a high-quality top coat is essential for making the deep reds and tiny rhinestones truly pop, guaranteeing a stunning manicure that lasts well through the entire month of February.
5 Pro-Level DIY Nails at Home
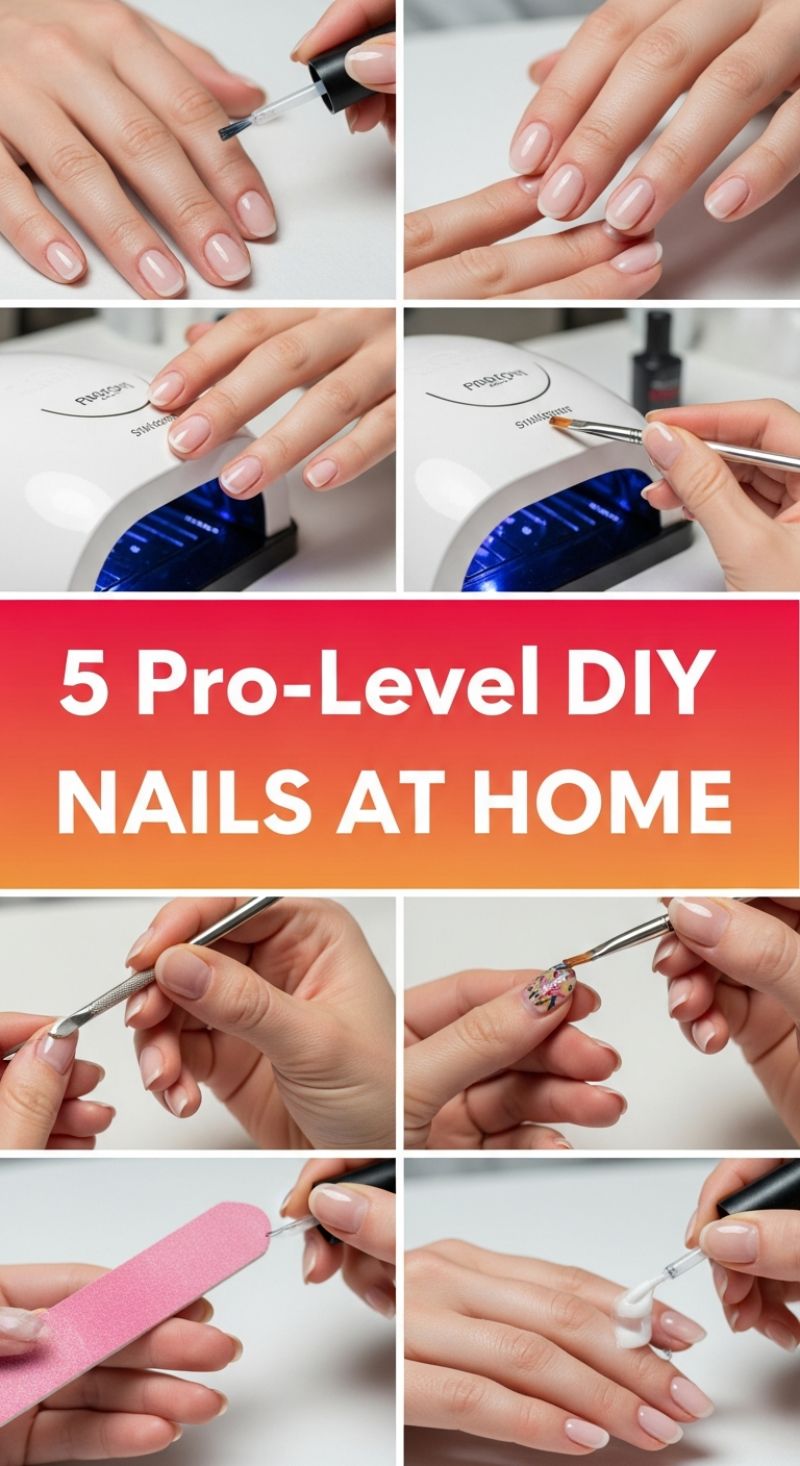
Achieving salon-quality gel nails at home, essential for holding those intricate holiday designs like festive reds for CNY or glittering purples for Mardi Gras, requires meticulous preparation and technique. Start by prioritizing nail plate health, as demonstrated by the use of the pink file and metal cuticle pusher in the visuals. Use the file to gently shape the nails, ensuring all are consistent in length and form. Next, gently push back your cuticles using a sanitized pusher; never aggressively cut them unless you are a licensed professional, as this can lead to infection. After shaping, lightly buff the nail surface to remove shine and oils, then wipe the nail clean with a cleanser or isopropyl alcohol. This crucial prep step ensures maximum adhesion of your gel products. Once prepped, apply a thin layer of gel base coat, making sure to avoid flooding the cuticles, and cure immediately under a UV/LED lamp as depicted in the central images. This foundation is the secret to a chip-free holiday manicure that lasts weeks.
Now, move on to flawless color application and curing. The sequential images emphasize the necessity of the UV/LED lamp for setting the gel polish. When applying color, remember that two or three thin coats are infinitely superior to one thick, gloppy coat. Thick application often leads to wrinkling during the curing process and poor adhesion, causing premature lifting. Cure each color layer fully according to your lamp’s specifications (usually 30-60 seconds). Crucially, notice the visual showing a fine brush being used near the cuticle area while the hand is under the lamp. This technique—using a small, specialized brush dipped in polish remover or base coat to ‘clean up’ and perfect the perimeter of the color coat *before* final curing—is the hallmark of a professional manicure. It prevents the gel from touching the skin, which is the primary cause of lifting and early chipping.
Finally, the art and finishing touches transform a basic coat into a pro-level statement, perfect for those festive designs. If you are adding intricate details—like the small floral or patterned design shown on the ring finger—use specialized fine liner or dotting tools and cure immediately after the art is complete. Seal the entire look with a high-shine top coat, taking care to ‘cap the free edge’ (brushing polish across the very tip of the nail) to seal the layers and prevent shrinkage or chipping. Cure the top coat for the maximum recommended time to ensure durability. The very last step, often visualized as applying a liquid with a small brush, involves either wiping off the sticky inhibition layer (if using a traditional gel top coat) or applying high-quality cuticle oil to the surrounding skin. Nourishing the skin post-cure prevents dryness and cracking, lending a clean, hydrated finish that truly makes your DIY holiday nails look fresh out of the salon.
15 Perfect Prom Nails 2026

While these exquisite designs are titled for prom, the highly refined aesthetic makes them an ideal choice for sophisticated February occasions, such as Valentine’s Day celebrations or high-end winter events that demand understated elegance. The foundational look featured here is a modern take on the classic French manicure, utilizing the elongated coffin or tapered square shape to maximize canvas space for intricate details. To recreate this look, begin with meticulous nail prep and shaping. The base layer should be a milky pink or sheer nude builder gel to provide strength and the perfect neutral canvas. You have two primary options for the tip: the crisp, traditional French tip requires a steady hand and a highly opaque white gel to create a sharp smile line; alternatively, the softer, ‘baby boomer’ ombre effect is achieved by gently blending a sheer white polish into the nude base using a soft brush or sponge, creating a flawless gradient that elongates the fingers.
The true artistry lies in the subtle addition of shimmer and dimension. Many of the featured designs incorporate delicate silver accents, primarily in the form of fine holographic glitter or carefully placed rhinestones. For the glitter effects, expert nail techs often employ the ‘sugar dusting’ or ‘fading’ technique. To execute a controlled fade, apply a thin layer of topcoat or structure gel where you want the glitter to adhere (usually near the cuticle or transitioning from the white tip), and then gently tap or sprinkle ultra-fine silver glitter onto the uncured gel before sealing and curing. For securing rhinestones, precision is key. Use a specialized rhinestone glue or a dense clear builder gel to place small, high-quality cubic zirconia or crystals. Placement often follows a linear pattern down the center of the ring finger or clustered near the smile line, ensuring the sparkle catches the light without overwhelming the sophisticated base.
To achieve the top-tier finish seen in this collection, consistency across all ten nails is paramount—especially concerning the shape and length. Ensure your chosen style (coffin or square-coffin) is tapered correctly for a flattering silhouette. Once all embellishments are cured and secured, apply a high-shine, non-wipe top coat that fully encapsulates the design, protecting the intricate art and adding a luxurious mirror finish. For an elevated presentation, mimic the styling shown in the image by moisturizing the hands thoroughly and adding elegant silver or gold rings, which complement the sparkle and enhance the overall bridal or formal aesthetic. This refined manicure ensures that your hands are as glamorous and polished as any February holiday outfit.
5 Purple VALENTINES NAILS
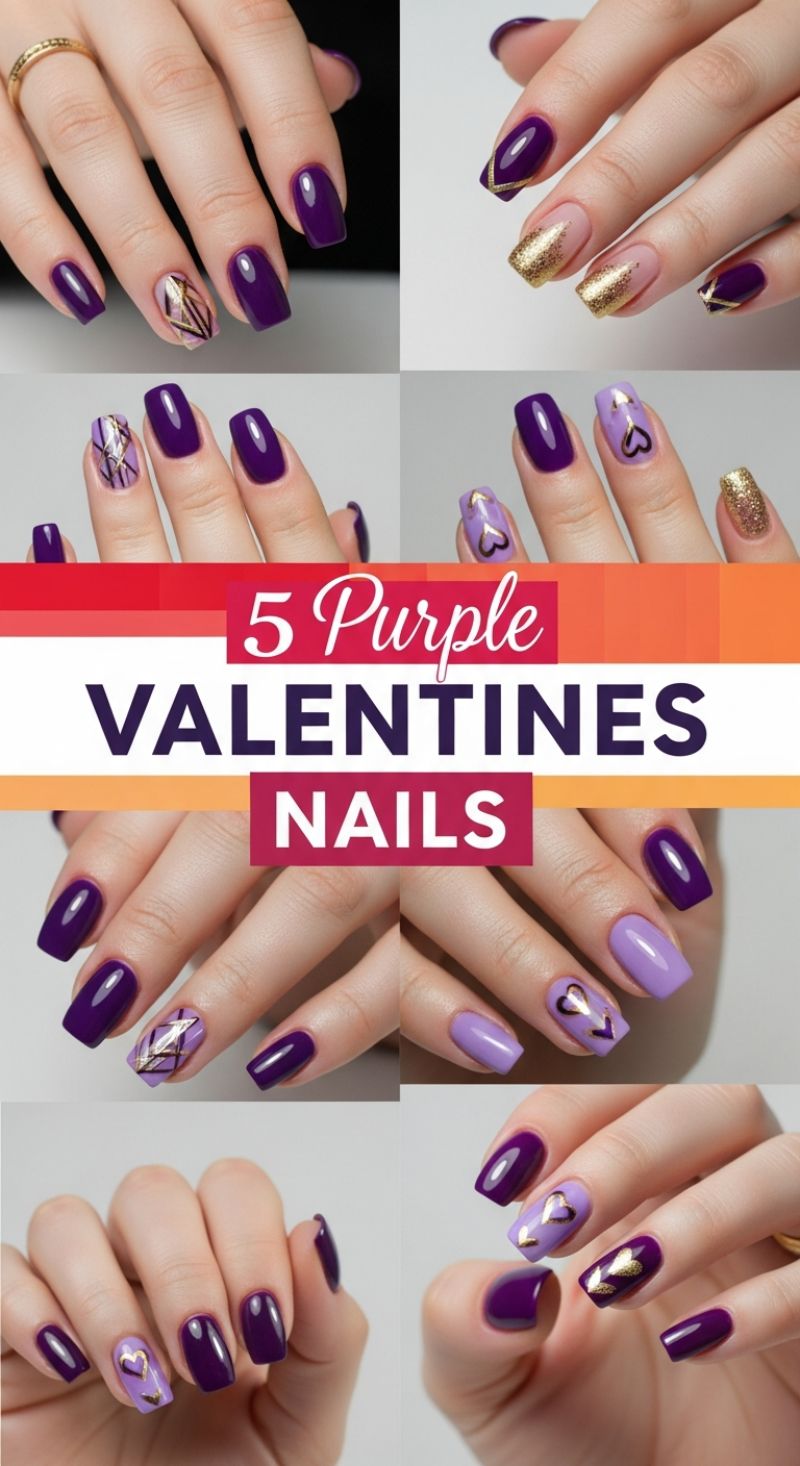
While Valentine’s Day typically conjures images of vibrant reds and soft pinks, elevating your festive manicure with rich, luxurious purples offers a chic and unexpected twist. This collection demonstrates the perfect harmony between deep, royal purple (a sophisticated alternative to red) and soft, dreamy lavender. To start this look, ensure your nails are prepped with a strengthening base coat. Apply two thin, even coats of the deep purple polish, curing completely if using gel, as this shade forms the foundation for most nails. The lighter lavender should be reserved for accent nails—often the ring or middle finger—providing a necessary contrast that allows the metallic embellishments to truly pop. Achieving this dual-tone look requires careful planning on which nail receives which color to maintain a balanced, cohesive flow across both hands, strategically alternating the dark and light purples to maximize visual interest.
The secret to transforming this purple palette into a high-fashion Valentine’s statement lies in the precise incorporation of gold metallic elements. For the geometric designs shown, start with a lavender base and use a fine striping brush and gold metallic polish (or gold transfer foil for a cleaner look). Create overlapping, abstract lines on the accent nail, focusing on asymmetrical placement for a modern art feel. Alternatively, mimic the elegant V-shaped design by using striping tape to mask off a clean diagonal line near the tip before painting the deep purple polish, resulting in a sharp, refined effect when the tape is removed. For those preferring high glamour, dedicate one nail to full gold glitter coverage. For maximum sparkle and minimal texture, apply a dense, chunky glitter polish over a layer of clear coat, gently dabbing the glitter onto the nail rather than brushing it on to ensure maximum particle density.
No Valentine’s manicure is complete without a hint of romance, perfectly executed here with delicate gold hearts. On the lighter lavender nails, these hearts are either applied as simple, solid metallic decals or freehand using a small dotting tool (creating two overlapping dots and dragging the polish down to form the point). To ensure durability, apply the decal or draw the design onto a fully cured color coat before applying any final layer. Expert tip: Contrast the heart accent nail (lavender base) with an adjacent nail done in the deep purple shade, creating a dramatic focal point. Once all designs—stripes, glitter, and hearts—are complete, it is crucial to seal the artwork. Apply a high-shine, non-yellowing top coat, ensuring you “cap” the free edge of every nail. If you utilized detailed line work or decals, float the top coat over the design lightly to avoid disturbing the fine lines, guaranteeing your festive, purple-and-gold manicure lasts well beyond February 14th.
9 Simple Funky NAIL DESIGNS
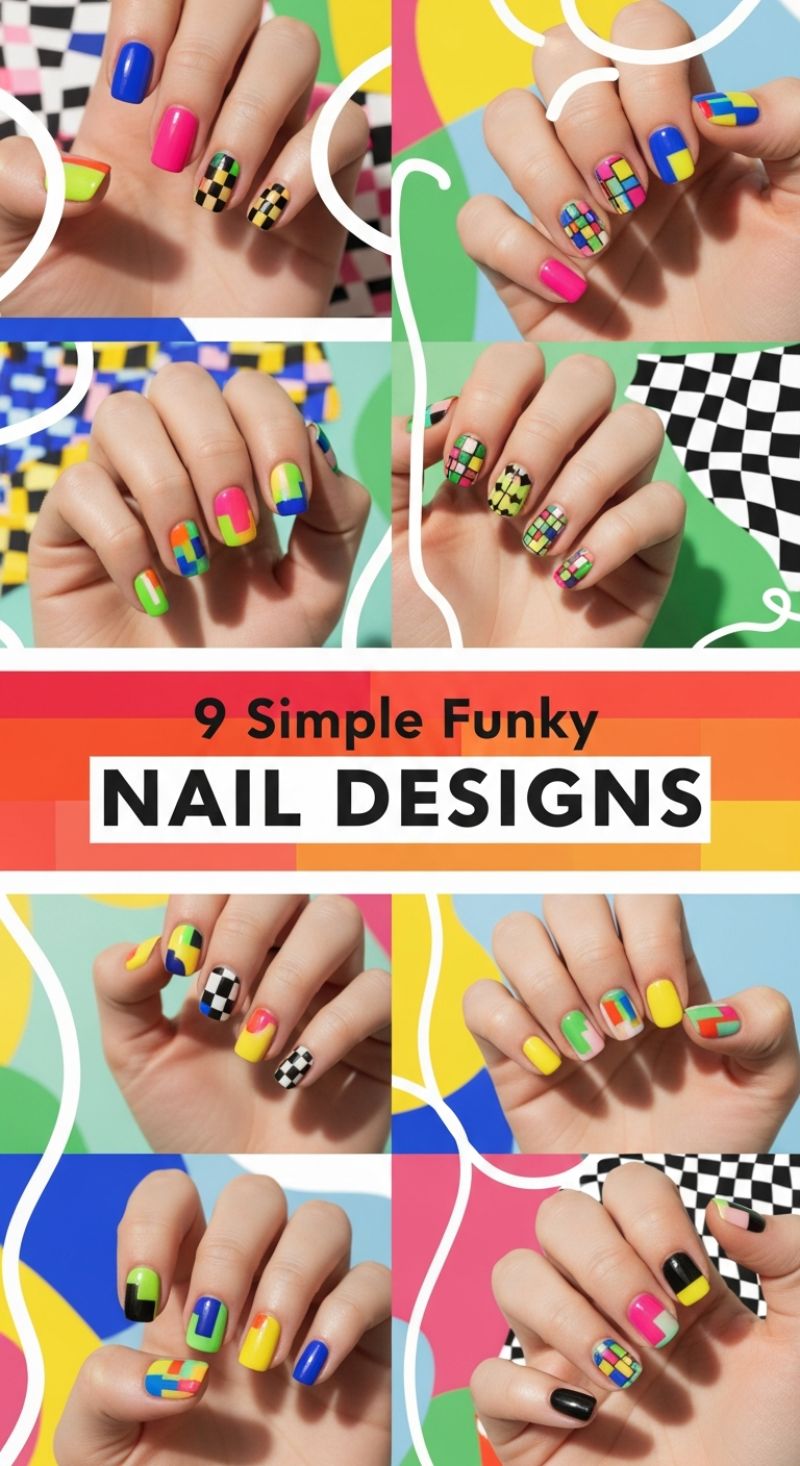
If your holiday celebration calls for unapologetic maximalism, this collection of 9 funky nail designs, inspired by 80s Pop Art and the bold geometry of the Memphis Group, is the perfect choice for a high-energy look like Mardi Gras. The key to pulling off this vibrant style is utilizing a tightly curated palette of high-saturation polishes: think neon lime green, electric fuchsia, cobalt blue, primary yellow, black, and white. To begin, ensure your polishes are highly opaque to prevent colors from bleeding or requiring excessive layering. Expert application requires a fine striping brush (often called a detail brush) and perhaps a small dotting tool. Before starting the intricate patterns, select which nails will serve as solid color anchors (like the bright blue or pink seen in the samples) to provide visual rest and simplify the overall manicure.
Focusing on the complex geometric designs, the most popular patterns here are the Color Block and the Checkerboard. For the Checkerboard, start with a high-contrast base, typically white or bright yellow. Use your detail brush dipped in black polish to paint four evenly spaced vertical stripes. Wait until these are dry before creating the horizontal lines, ensuring you lift the brush cleanly to avoid dragging the polish. For the abstract Color Block look, begin with a sheer nude or solid white base. Using the detail brush, block off sections of the nail using two to four complementary neon shades. For a sophisticated touch, incorporate negative space or subtle half-moon detailing near the cuticle line, allowing the natural nail bed to act as a design element. Maintaining straight, crisp lines is crucial for the graphic impact of this style, so take your time and clean up any edges with a cotton swab dipped in acetone before the design sets.
To achieve the coveted ‘Rubik’s Cube’ effect seen on the ring fingers, divide the nail into a grid (perhaps three squares wide by four squares tall) using the black detail polish. Once the grid is dry, randomly fill in the small squares with your full spectrum of neon colors. This design works best over a white or pale yellow base. Finally, the finishing layer is paramount for locking in the detail and maximizing the fun aesthetic. While a high-gloss topcoat provides the ultimate shine and depth for these saturated colors, opting for a matte topcoat will give the whole look a retro, sticker-like finish that heightens the 80s vibe. Always allow each design layer adequate curing time (especially when working with multiple colors) to prevent smudging when applying the topcoat.
5 Trendy WESTERN NAILS
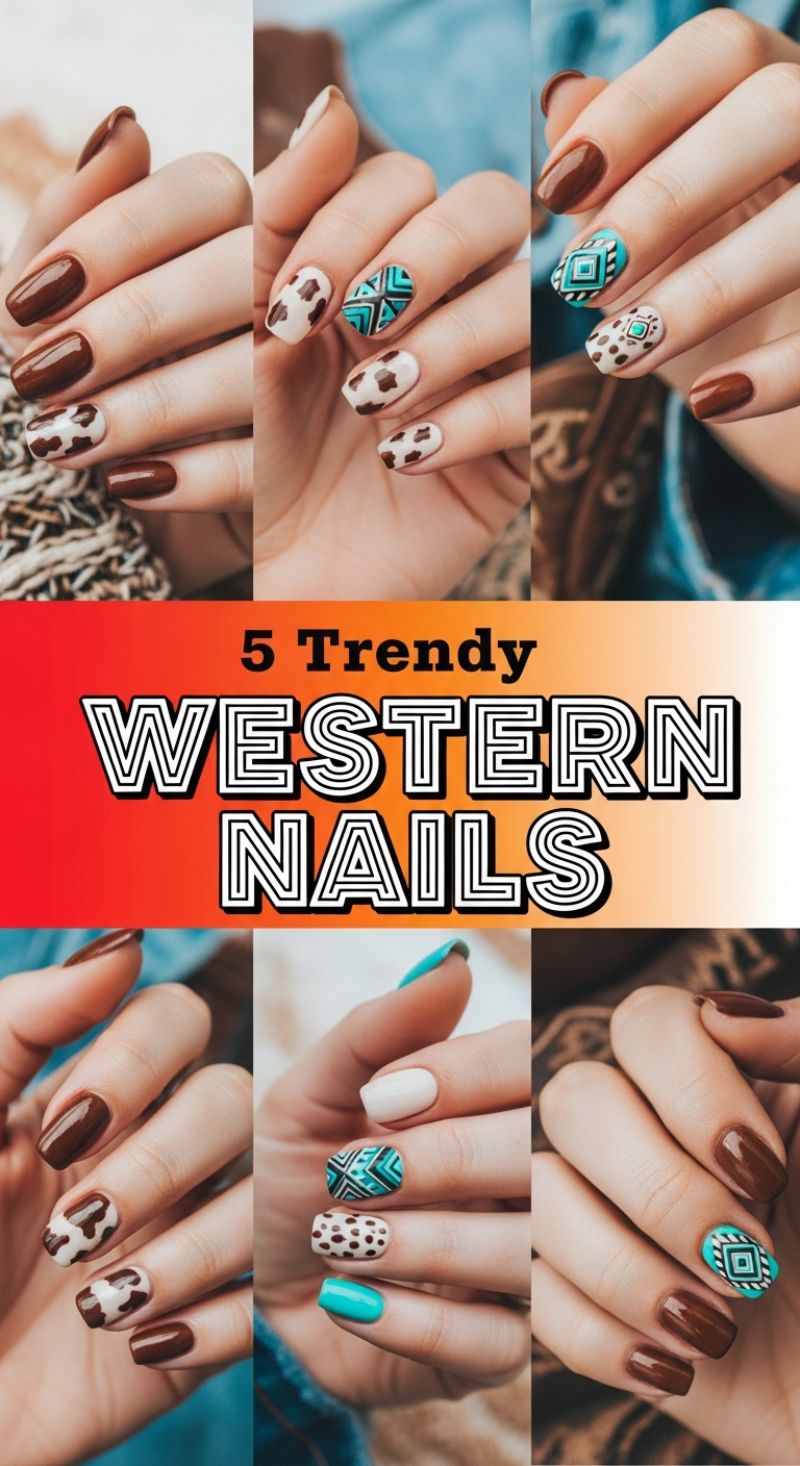
While major holidays like Mardi Gras and CNY dominate the beginning of the year, February often calls for cozy, rustic looks, making the Western-themed manicure a perfect choice for your ‘Cozy February’ nail art. This trending aesthetic expertly blends earthy tones, animal prints, and vibrant Southwestern geometric designs. To recreate the foundational look displayed here, start by selecting two primary colors: a deep, rich chocolate brown (mimicking leather or saddle tones) and a creamy off-white or bone color (ideal for the base of the cow print). For the cow print technique, apply the creamy base coat to your desired accent nails. Using a fine-tipped detail brush and the dark brown polish, randomly place uneven, organic ‘blob’ shapes. The key to authentic cow print is avoiding uniformity; the spots should vary in size, shape, and density across the nail surface. Remember to cure or dry thoroughly, sealing the design with a durable high-shine topcoat to enhance the rich color depth.
To incorporate the sophisticated Southwestern element, focus on a vibrant accent color like teal or turquoise, referencing the stone jewelry common in this style. This geometric design typically requires precision. After applying the turquoise base, use a striping brush and black polish to outline a central diamond or square shape. Within this outline, use white polish and black lines to create concentric patterns, triangles, and small, precise strokes that mimic woven patterns or tile work. Expert Tip: If freehand geometric work is too challenging, invest in high-quality vinyl stencils or stamping plates designed for tribal or Aztec patterns. Notice how the designs in the image utilize contrast—a single turquoise nail is balanced by solid brown nails, while the other accent nails feature much simpler dot patterns or the classic cow print, preventing the overall look from becoming overwhelming or too busy.
When styling your full Western manicure set, the art of mixing and matching is crucial. Aim for balance: assign the intricate geometric pattern to only one or two accent nails per hand (such as the ring or middle finger). The remaining nails should feature the solid brown or white polish, or the fun, imperfect cow print. Ensure all your colors are opaque and richly pigmented, as the Western aesthetic relies on deep, saturated hues. Utilizing a quality gel system will maintain the vibrancy of the turquoise and the depth of the brown for maximum wear. This rugged yet stylish manicure perfectly complements textures like denim, chunky knitwear, and suede, making it the definitive nail choice for embracing rustic elegance during the colder winter months.
11 Adorable SPRING NAIL IDEAS
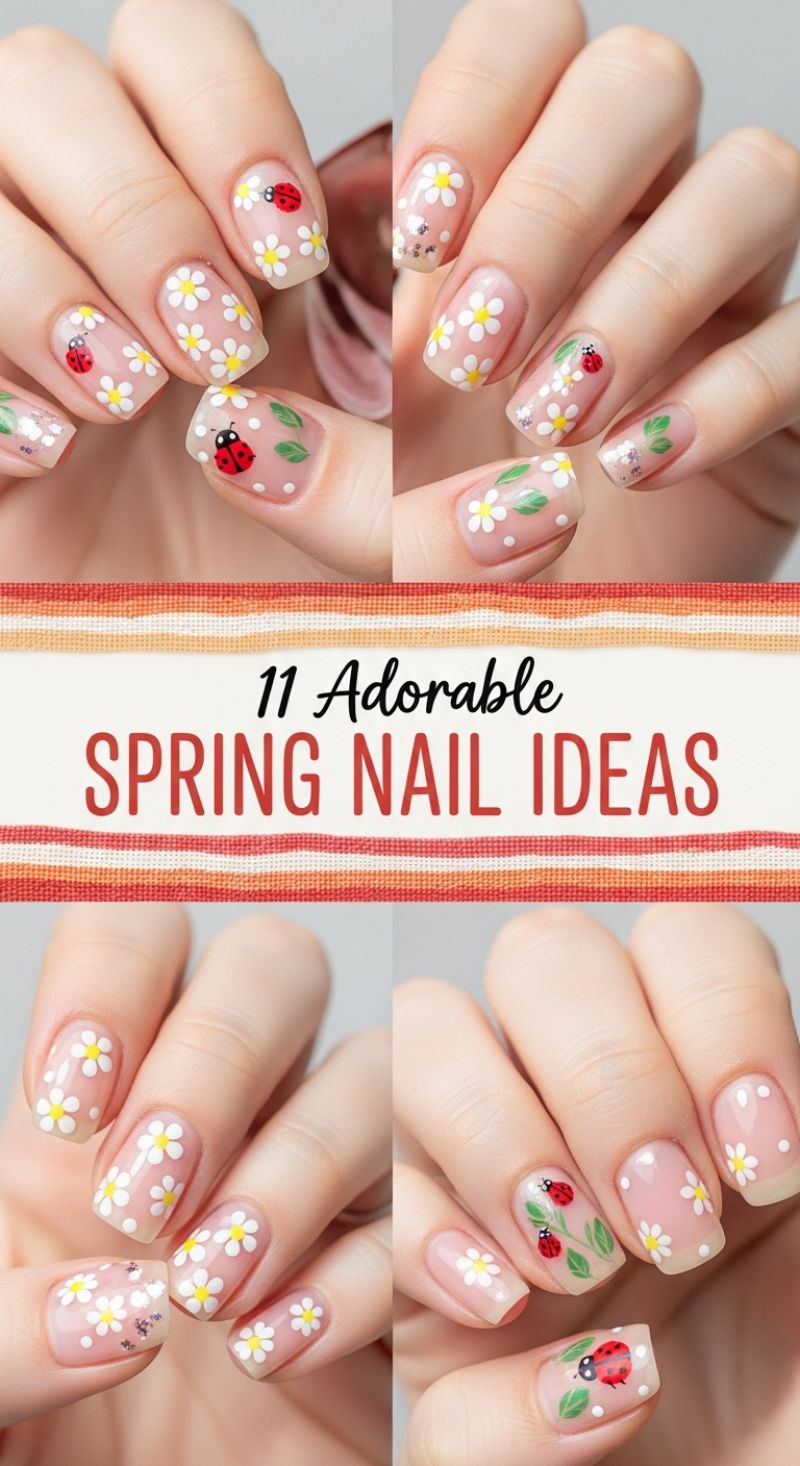
This delightful manicure encapsulates the essence of springtime, featuring a sophisticated balance of negative space and intricate, nature-inspired decals. To achieve this fresh and delicate look, begin with a sheer, milky nude or pale pink base coat. This step is crucial, as it mimics the natural nail while providing a clean canvas for the designs, offering that highly sought-after ‘jelly’ effect. The cornerstone of this art is the classic daisy. Use a fine-tipped dotting tool or a small brush to place a tiny dot of bright yellow polish in the center of the nail, followed by five or six slightly larger, evenly spaced white dots around it to form the petals. Expert tip: Ensure your polish consistency is thin enough to create crisp dots but thick enough that the white color is opaque in a single application. Focus on staggering the flowers across the nail bed to create depth and visual movement, rather than arranging them in rigid rows. For added texture on accent nails, incorporate fine, iridescent silver glitter scatter applied lightly over the sheer base before sealing.
To elevate the design from simply floral to a full garden scene, introduce the charming ladybug and delicate foliage. Ladybugs serve as excellent focal points, typically placed on the ring or thumb finger. Start with a solid red oval body, use black polish for the head, and then add a thin black line down the center of the body. The characteristic spots are created using a very fine dotting tool and black polish. For the leaves, use an emerald or bright lime green polish applied with a detail brush, employing soft, curving strokes to suggest movement. Vary the size and shape of the leaves (some full, some just emerging) to enhance the organic feel. To unify the look and fill in empty spaces without feeling cluttered, strategically place small, precise white polka dots around the major designs. This delicate use of negative space ensures the overall manicure remains clean, light, and airy, preventing the detailed art from becoming too heavy.
Once all the intricate details have dried completely, seal the entire manicure with a high-shine, protective top coat—a thick gel top coat is highly recommended for longevity and depth, giving the daisies and ladybugs a glossy, domed appearance. This particular design, featuring the soft squoval shape shown, is ideal for transitioning your nail wardrobe from the rich tones of late February holidays into the bright vibrancy of early spring. For customization, you could swap the red ladybug for a bumblebee design or change the white petals to soft pastels like lavender or baby blue. Remember that precision and patience are key for nail art of this caliber; work slowly, cure thoroughly between layers if using gel, and always maintain clean tools to achieve this professional-level, nature-inspired masterpiece.
7 Auspicious CNY Nail Art
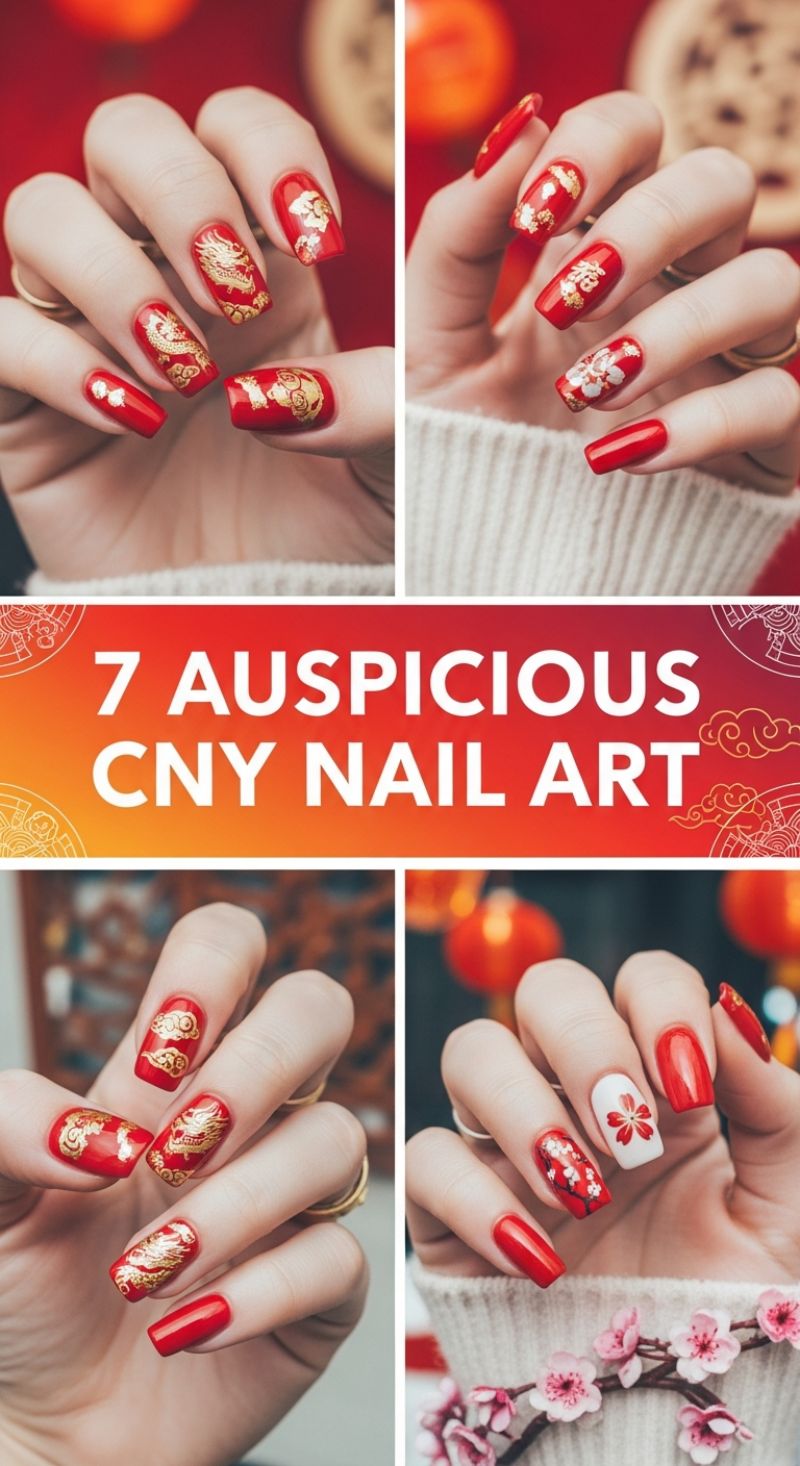
Chinese New Year (CNY) calls for nail art that embodies luck, prosperity, and joy, making the combination of vibrant red and opulent gold the undisputed standard. This collection of auspicious designs centers around a rich, glossy red lacquer base, which symbolizes happiness and is believed to ward off evil spirits. To recreate this powerful festive look, start with meticulous nail preparation—shaping the nails into a neat squoval or square shape, which provides a classic canvas for intricate designs. Apply two coats of a highly pigmented true red polish or gel. The gold elements, essential for capturing the wealth and prosperity theme, are achieved using two primary techniques: metallic transfer foil and detailed stamping. For a quick yet dazzling effect, adhere small, random pieces of gold foil over a slightly tacky top coat, concentrating the placement near the cuticle or tip. For the more elaborate designs, like the classic Chinese characters (such as ‘Fu’ for fortune) or abstract cloud swirls, high-definition gold stamping polish and plates are necessary to ensure the delicate lines remain crisp against the solid red background.
The most compelling designs in this selection feature powerful traditional motifs, primarily the imperial dragon and delicate plum blossoms. The dragon design, symbolizing power, strength, and good fortune, requires precision. If you are not using a stamping plate for the dragon, use gold gel paint and a fine liner brush, or high-quality dragon water decals for maximum impact. To balance the intensity of the metallic dragons, introduce floral motifs, specifically the plum blossom, which signifies perseverance and renewal. These flowers are often rendered in contrasting white on a solid red nail, or in a deep, detailed red on an accent nail painted entirely white (as seen on the ring and middle fingers in the bottom right panel). Using white as a background color allows the red cherry blossom details to pop, providing visual rest while keeping the manicure firmly rooted in festive colors.
Expert application is key to making these complex designs last throughout the holiday celebrations. Once all gold foil, decals, and stamped elements are cured or dry, seal the entire manicure with two layers of high-gloss, durable top coat. Using a gel top coat is highly recommended as it provides a thick, protective layer that prevents chipping and maintains the high-shine finish essential for this opulent look. When applying the top coat over dimensional elements like foil or delicate line work, float the top coat gently over the surface to avoid dragging the design or leaving air bubbles. For an extra touch of longevity, ensure you cap the free edge of every nail with the top coat. This technique reinforces the edges, allowing your auspicious CNY manicure to shine brightly from the New Year’s Eve dinner right through the Lantern Festival.
6 Must-Try STELLIO NAILS

Stellio nails, as showcased here, are the ultimate expression of maximalist, futuristic nail art, perfect for making a bold statement during high-energy events like Mardi Gras or even a cutting-edge Lunar New Year celebration. This style is characterized by its intense metallic shine, typically achieved using chrome powders or highly reflective gel polishes in silver, holographic, and gold tones. The visual impact relies heavily on the juxtaposition of these gleaming bases with intricate 3D architectural elements. Notice the diverse designs: some nails feature complex wiring mimicking cages or armor plates, others incorporate embedded studs, pearls, or tiny geometric plates (like the silver shield/coffin shape seen on the middle finger). The key to mastering this look is variety; ensure that no two nails are exactly alike, creating a curated gallery of metallic sculptures across the hand.
To achieve the intense, mirror-like chrome finish fundamental to Stellio nails, start by applying a non-wipe black or white gel topcoat over your cured color base, then immediately buffing in a high-quality chrome powder with a silicone applicator or sponge. Seal this layer with another non-wipe topcoat. The instructional core of this technique lies in building the structural 3D elements. For the geometric wiring and caging, use flexible, thin metallic wire (often sold as jewelry wire for nails) secured with builder gel, or alternatively, use thick, highly pigmented metallic gel paint (like spider gel) to draw raised lines that are cured immediately. For the embedded details (like the simulated gems or holographic pieces encased in the “armor”), use clear builder gel or polygel to encapsulate tiny foils, glitters, or even small charms before shaping and filing the structure. Expert tip: Due to the weight and thickness of these heavy 3D accents, ensure you are using strong foundation layers (like structure gel or acrylic) to prevent premature lifting or chipping.
While Stellio nails offer unparalleled glamour, maintenance is crucial. These lengthy, highly embellished designs require diligent sealing. After all 3D components and chrome layers are complete, apply a final, durable topcoat, ensuring it fully covers the edges and seals around the bases of all charms and metalwork. For styling, these nails pair stunningly with monochromatic outfits or accessories that play into the futuristic, metallic theme. Given the complexity, this is not a quick application; allocate ample time for the creation process, especially if attempting the intricate gold and silver mix seen on the lower hands. Embrace the maximalist nature of this trend—it’s meant to be eye-catching and sculptural, making it the perfect statement piece for any major winter or spring celebration where standard festive sparkle just won’t cut it.
12 Easy Beachy Summer Nails
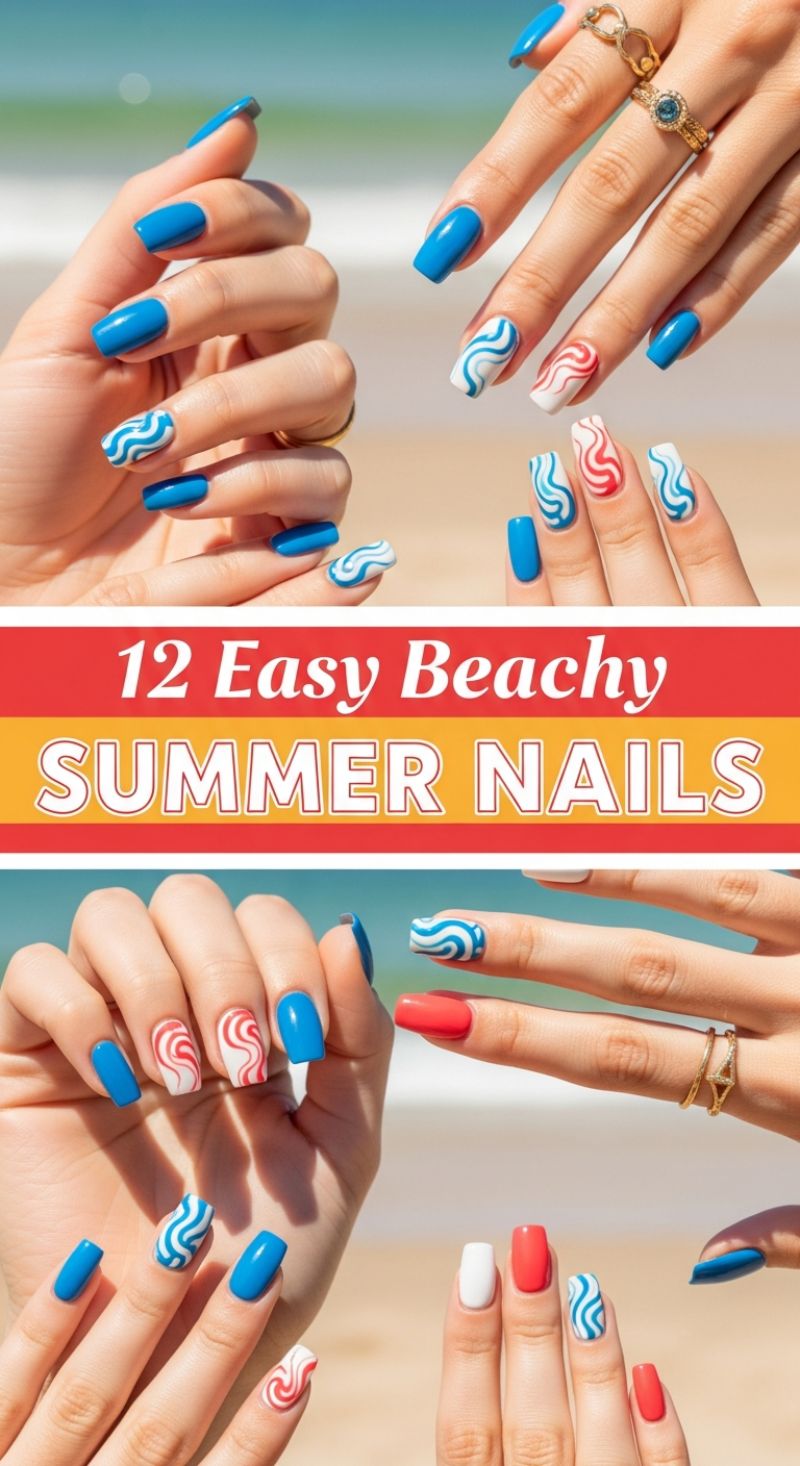
While February often calls for muted or deep tones, this vibrant nautical-inspired design is the perfect way to inject some tropical energy into your manicure routine, especially if you are celebrating a holiday somewhere warm or just battling the winter blues with a vacation state of mind. This look utilizes a striking palette of rich cobalt blue, crisp optic white, and vibrant cherry red, making it versatile enough for any festive getaway. The foundation of this design relies on a chic mix-and-match approach, combining solid, bright color blocks with detailed accent nails. To recreate this, start by applying a base coat and curing or drying thoroughly. The solid nails should feature the brilliant blue or red pigments. For the accent nails, apply two flawless coats of pure white polish as the clean, stark canvas for the fluid art.
The mesmerizing wave or “swirly” effect is the highlight of this entire manicure and is achieved using a fine detail brush or a specialized nail art striper tool. After the white base is completely dry and cured, load your brush with either the cobalt blue or cherry red polish. Rather than precise geometric lines, aim for a fluid, abstract S-shape or a flowing wave motif that travels the length of the nail. For a dynamic look like the one pictured, create 2-3 distinct, slightly overlapping swirls on a single accent nail. Alternate the colors of the swirls across your hands—for instance, doing a blue wave on the index finger and a red wave on the ring finger. If you lack fine tools, a carefully maneuvered toothpick or a thin dotting tool can also achieve this effect. The key to making this look sophisticated is ensuring the lines are consistently thin and possess that desirable wet, glossy appearance.
To truly elevate this look for a festive context, consider incorporating subtle metallic accents, perhaps using a fine gold shimmer mixed into your white base on one or two nails, or utilizing bold gold jewelry accessories, as shown, to draw attention to the art. The square or squoval shape seen here complements the bold, graphic nature of the design, providing a clean frame for the abstract art. This manicure is highly durable, but because bright, vibrant pigments like these blues and reds can sometimes fade or chip quickly, ensure you “wrap the tip” when applying both the color and the final top coat. This meticulous sealing process is crucial for maximizing wear time, keeping your celebratory beachy waves perfectly intact through any holiday gathering or tropical retreat.
10 Chic Short Spring Nails: The Perfect Pastel Manicure for Cozy February
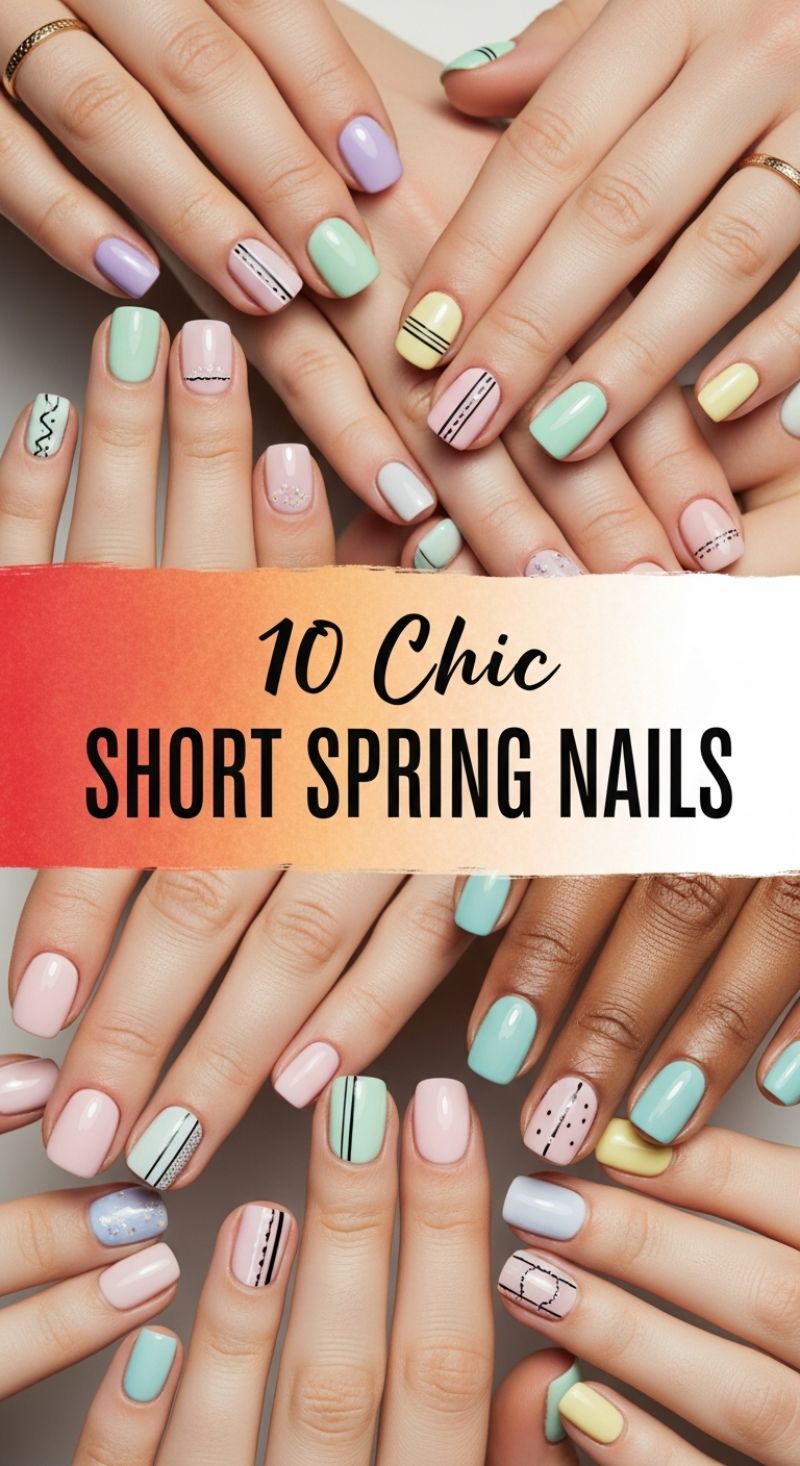
As the heart of winter begins to soften, trading deep burgundies and icy blues for a palette of fresh pastels is the perfect way to welcome the approaching spring, making this manicure ideal for a chic February refresh. This collection showcases the beauty of short, well-kept nails using a harmonious blend of confectionery colors: lavender, pale mint green, buttercup yellow, and blush pink. The expert appeal of this look lies in its cohesive but varied approach; instead of painting every nail the same, the design employs a delightful rotation of colors, often incorporating white or a sheer neutral pink as a base for subtle art. The key to achieving this polished aesthetic is ensuring the base colors are fully opaque, utilizing high-quality creme polishes that deliver maximum pigmentation even in these soft hues, topped with a high-shine protective coat to give that perfectly manicured, ‘fresh from the salon’ look.
To recreate the delicate nail art featured, precision and restraint are paramount. The designs are intentionally minimalist, utilizing fine line work in stark black to create contrast against the soft pastel bases. To execute this, you will need a specialized striping brush, which is extremely thin, or a dedicated nail art pen for maximum control. Focus the intricate designs on just one or two accent nails per hand; popular patterns seen here include simple horizontal dash lines across the middle of the nail plate, bold vertical stripes (often doubled or tripled), or charming, minimalist squiggles and polka dots. For those who prefer a touch of sparkle, utilize a clear polish with micro-glitter or place 2-3 tiny, iridescent rhinestones near the cuticle, keeping the embellishment small enough to remain sophisticated. Always allow your base color to dry completely before attempting any line work, as smudging fine lines can compromise the entire manicure’s clean appearance.
Opting for a short, square, or ‘squoval’ (slightly rounded square) shape, as depicted in these looks, is not only inherently chic but also highly practical and durable for everyday wear. Short nails are less prone to breaking and chipping, ensuring your sophisticated art lasts longer. Maintenance is crucial for keeping this fresh spring look impeccable: invest in a fast-drying, non-yellowing top coat and reapply a thin layer every two to three days to maintain maximum shine and seal the art beneath. Additionally, daily application of cuticle oil will keep the skin around the nail nourished and healthy, further enhancing the clean, polished finish that makes this short, pastel style the quintessential sophisticated early spring manicure.
6 Extreme ACRYLIC NAILS
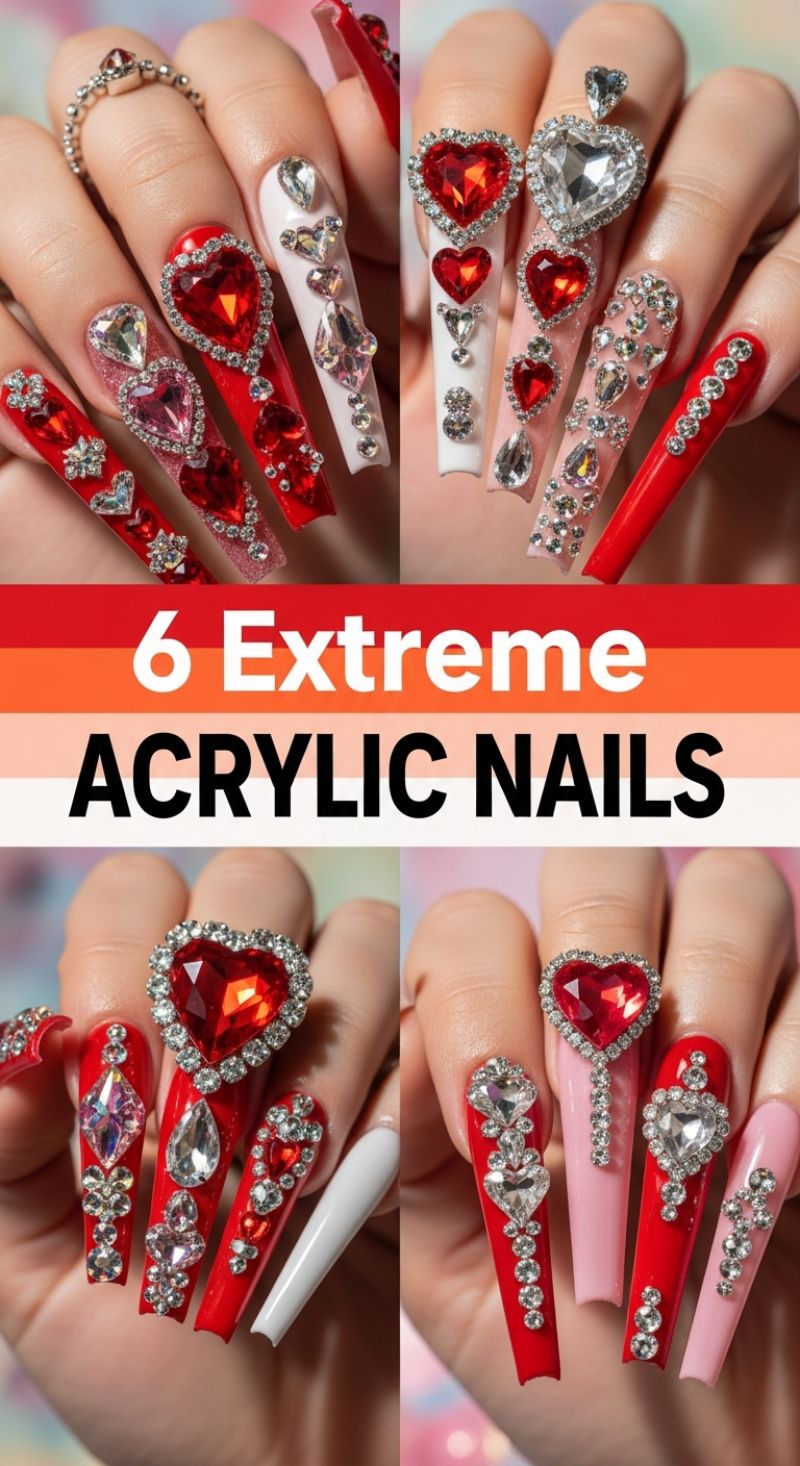
Dive into the maximalist nail trend with these breathtaking, high-glamour acrylic designs, perfectly suited for a show-stopping Valentine’s or cozy February celebration. Achieving this level of length and extreme ornamentation requires professional-grade foundation work, ideally using reinforced acrylic or strong hard gel extensions. The canvas must be flawless, featuring high-pigment primary colors like ruby red, crisp opaque white, and soft ballet-slipper pink or nude bases. The elongated coffin or tapered square shape is critical, as it provides the extensive surface area necessary to support the weighty 3D elements and intricate cascading rhinestone arrangements. Ensure all base colors are fully cured or dry, and the foundation structure is built robustly to handle the sheer volume of embellishment that follows, guaranteeing durability for the duration of the holiday period.
The focal point of this look centers around the application of large, multi-faceted heart-shaped rhinestones, utilizing both deep ruby red and brilliant clear or AB crystals for maximum sparkle. To execute this design, designate one or two nails per hand (typically the ring or middle finger) for the massive centerpiece heart, surrounding it with tiny micro-beads or smaller, uniform rhinestones to create a luxurious bezel effect. The remaining nails utilize a dramatic cascading technique, where various smaller gems—tear-drop, oval, and tiny hearts—are meticulously placed, often starting near the cuticle and flowing down the nail’s length. Expert application is paramount; use a high-viscosity builder gel or a specialized, industrial-strength rhinestone adhesive, applied generously beneath the gem base. Once the crystals are set, utilize a fine detail brush dipped in topcoat to carefully seal the edges of the smaller stones, being cautious not to coat the facets of the larger gems, which would dull their shine.
While the featured image brilliantly captures the romance of Valentine’s Day with its quintessential red and pink palette, the extreme structure and methodology can be adapted for other early-year festivities. If transitioning this look for the Lunar New Year (CNY), substitute the pink and white with deep golds and imperial reds, perhaps swapping the hearts for small intricate Chinese knots or coin decals. Alternatively, for a maximalist Mardi Gras manicure, swap the base colors for vibrant purples, emerald greens, and golds, focusing on large cabochons and elaborate cluster arrangements rather than strictly heart motifs. Regardless of the color change, remember that these highly structured, extreme nails require special maintenance; advise on minimizing aggressive contact and suggest at-home topcoat touch-ups around the edges of the largest 3D elements to ensure maximum wear time and prevent premature loss of the extravagant ornamentation.
12 Festive Mardi Gras Nails
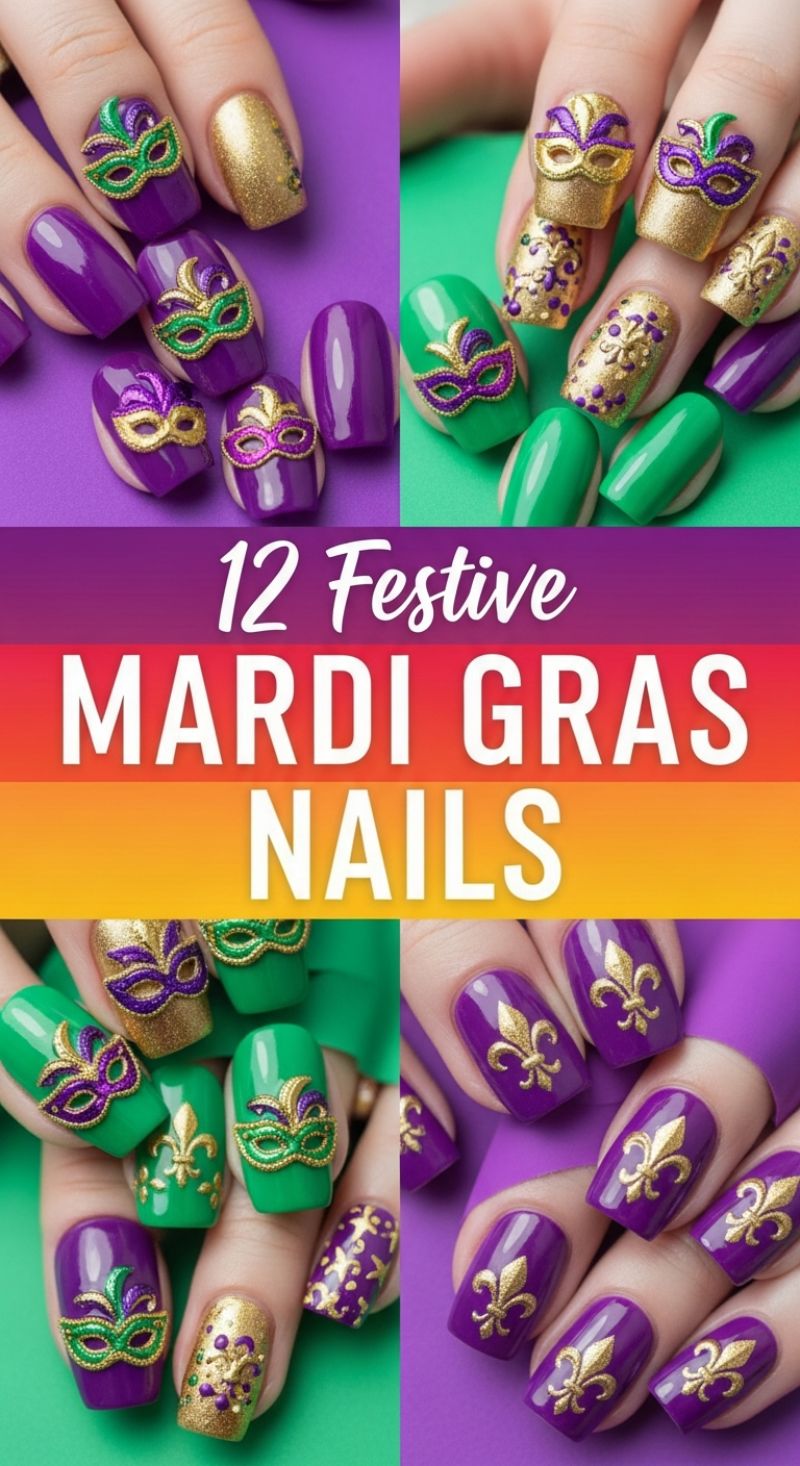
Capture the spirit of Fat Tuesday with a high-impact manicure steeped in the traditional colors of New Orleans: Purple (representing justice), Green (faith), and Gold (power). This design requires meticulous planning to alternate colors and textures effectively across both hands. Start by selecting three highly pigmented polishes—a rich, creamy violet, an emerald green, and an extremely dense, metallic gold glitter or foil shade. The key to achieving the festive look seen here is balancing solid color nails with complex artistic accents. We recommend establishing a core pattern, such as painting the thumb and ring finger solid purple, the middle and pinky solid green, and saving the index finger for the statement gold glitter. Ensure each base coat is perfectly cured and opaque before moving on to the intricate details, as this sets the foundation for a professional, durable finish that lasts through the celebrations.
The iconic masquerade mask serves as the central 3D element in this festive manicure. To replicate this look, source small, intricately detailed mask charms or decals, ideally in a mix of green, purple, and gold variations. Placement is crucial: affixing the charms onto solid-colored nails (a green mask on a purple nail, or a purple mask on a gold glitter nail) ensures maximum visual contrast. Secure these charms using a strong nail glue or a dab of thick builder gel, curing them thoroughly to prevent lifting. Supplement the mask nails with traditional French symbols, such as the Fleur-de-lis, which can be applied using thin gold decals or a high-quality stamping plate on the solid purple nails. When stamping, use a highly metallic gold polish and ensure the design is clean before transferring it to the cured base coat. This combination of 3D elements and classic iconography instantly evokes the pomp and spectacle of the Carnival season.
To add depth and prevent the look from becoming too flat, incorporate textured accent nails using various techniques. On a few remaining gold nails, use a fine liner brush and purple or green polish to add intricate scrolling or dotted patterns, mimicking confetti or beads tossed from a parade float. Alternatively, on a solid green or purple nail, use a dotting tool and the gold polish to create symmetrical, clustered dots near the cuticle. Once all designs are complete, the final step involves carefully top-coating. For nails without 3D elements, apply a high-shine, durable top coat, ensuring you cap the free edge for longevity. For nails bearing the mask charms, apply top coat around the edges of the charm to seal it to the nail without covering the raised details, which would diminish their three-dimensional effect. Finishing with a hydrating cuticle oil will complete this celebratory, parade-ready manicure.
10 Cozy February Nails

The transition from holiday sparkle to deep winter chic requires a manicure that is both warm and sophisticated. The ‘Cozy February Nails’ aesthetic perfectly captures this mood by utilizing a rich, deeply saturated color palette grounded by minimalist artistry. The foundation of this look lies in pairing deep oxblood or cabernet shades with soft, creamy neutrals like blush pink and off-white. To recreate this cozy vibe, ensure your base application is flawless. For the dark nails, apply two coats of the deep maroon polish. For the accent nails, use a sheer, milky pink base. A key expert tip for achieving that true ‘cozy’ texture often associated with winter fashion is to consider finishing the solid-color nails with a high-quality matte or satin top coat, which mimics the texture of cashmere or wool, though a high-shine finish also works beautifully to enhance the depth of the burgundy.
The core design element here is abstract, minimalist line art. These designs appear almost runic or symbolic, adding an intellectual and modern edge without being overly busy. To execute this pattern, you will need a specialized fine-liner brush, typically size 00 or 01. Dip the brush into the contrasting polish (for example, using the dark maroon for lines on the pale pink base). Keep the lines fluid and intentional, focusing on single-stroke symbols, open circles, or vertical and horizontal intersecting lines that emphasize negative space. It is crucial that the base color is completely dry and cured before attempting the line work to prevent drag or mixing. Practice consistency: while the patterns can vary from finger to finger (a vertical line on the index finger, a simple symbol on the ring finger), they must share the same color and line weight to maintain cohesion across the entire manicure.
To achieve the full mixed-media effect pictured, balance the abstract designs with more traditional geometric patterns and solids. Incorporate stripes (using a striping brush or tape for precision) or small, repetitive shapes like the subtle checkerboard or diamond pattern seen on some accent nails. The trick to making a mixed-pattern manicure look cohesive, rather than chaotic, is adhering strictly to the two main color families (dark red and light neutral). Ensure that approximately half the nails are painted solid to provide visual resting points. When combining these elements, think about weight distribution; if one hand features more detailed art, the other should mirror the intensity of the art-to-solid ratio. Finish every nail with a durable, non-yellowing topcoat, curing thoroughly to lock in the complex details and ensure your cozy February mani lasts through the rest of the cold snap.
14 Gorgeous Pink Nail Designs
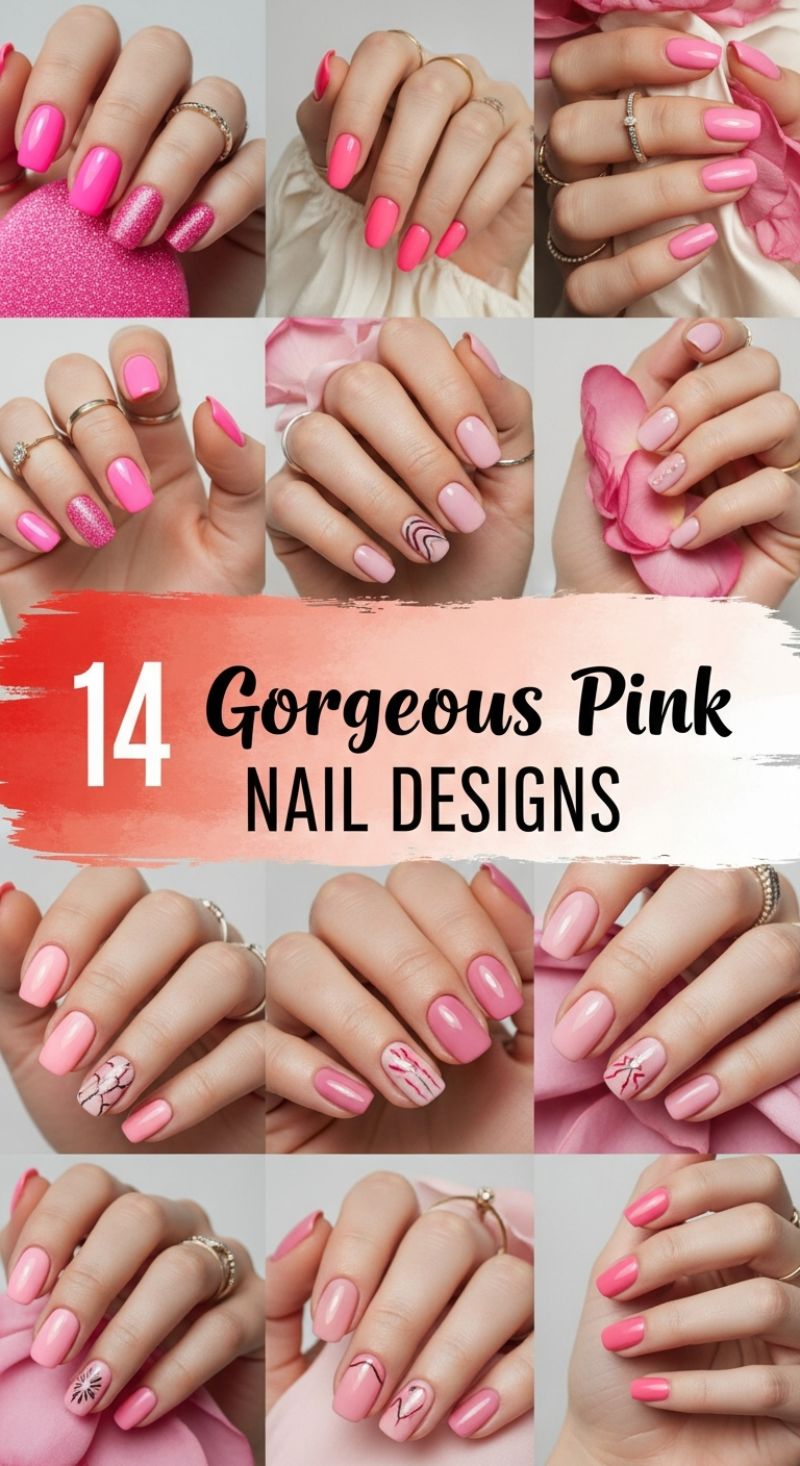
Pink reigns supreme when embracing a cozy February aesthetic, especially around Valentine’s Day, and this collection of 14 designs offers a full spectrum of inspiration. The key to mastering this trend is utilizing varied tones and textures across your manicure. Start by selecting your core pink—whether it’s a vibrant, eye-catching fuchsia or a muted, sophisticated dusty rose. Notice how many designs successfully pair a strong glossy creme color with a dazzling glitter accent nail, typically on the ring or middle finger. When working with bright pigments, always ensure your base application is smooth and streak-free; for maximum opacity and glow, two thin coats are always better than one thick coat, sealed with a high-shine topcoat to enhance that juicy pop of color. The variety shown proves that pink is far from monolithic; mixing a bubblegum pink with a delicate blush provides a complex and dynamic visual story.
To elevate the look beyond simple solids, incorporate the subtle, minimalist abstract elements demonstrated throughout these examples. The most striking art designs utilize pale pink or nude bases, serving as a clean canvas for dark, delicate artistry. Use an ultra-fine striping brush (often called a detail brush) and a highly pigmented gel polish in black, dark brown, or maroon to create organic, flowing lines, abstract swooshes, or simple heart outlines. For the more elaborate, marbled effects, gently float a second color onto a still-wet base coat and swirl lightly with a pin or dotting tool before curing. When applying subtle embellishments like micro-rhinestones, remember that less is more; place three small jewels diagonally along the cuticle line or centered on the nail for an understated sparkle, securing them firmly with a layer of builder gel or specialized rhinestone glue for maximum longevity.
Expert manicurists often recommend mixing finishes to give the manicure depth and visual interest—consider using a matte topcoat over your accent nails while keeping the solid pink nails high-gloss for a striking contrast. Furthermore, note the consistently flattering squoval or soft square shape used across these looks; this shape is universally chic and provides optimal durability for natural nails. When attempting these lighter pinks and nudes, meticulous cuticle preparation is non-negotiable, as flawless skin around the nail plate is essential to making subtle colors look polished and intentional rather than washed out. By balancing bold hues with delicate, negative-space artwork, these pink designs transition seamlessly from a festive celebration to a refined, cozy everyday look throughout the cool month of February.