Discover the hottest nail art designs you need to see, featuring stunning glossy finishes, chic matte textures, and dazzling metallic and glitter accents. Screenshot your next manicure inspiration now!
Abstract Neon Wave French Tips
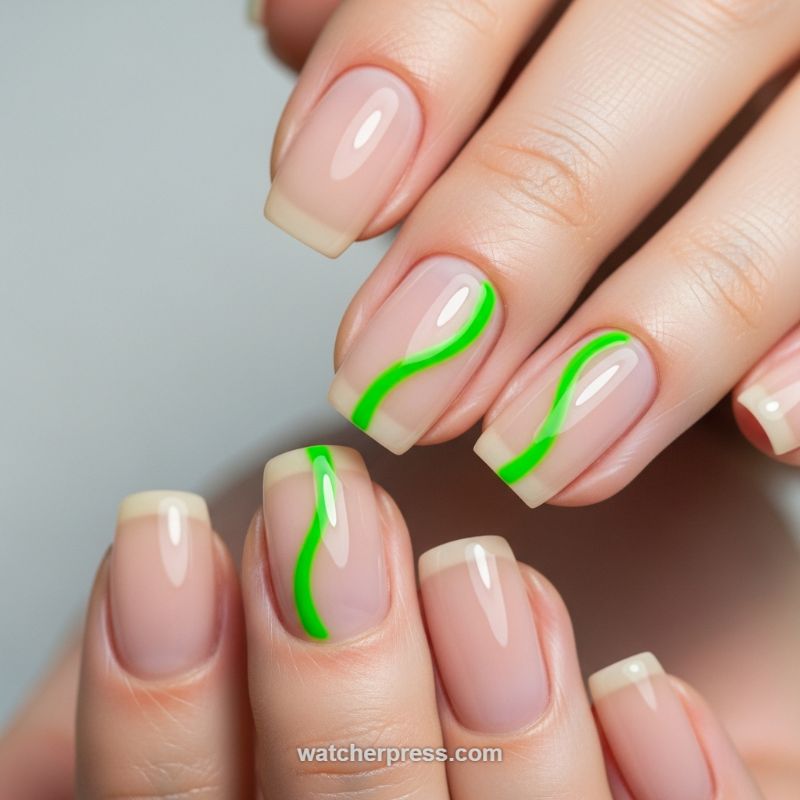
This design seamlessly marries the timeless elegance of the French manicure with a burst of contemporary, high-voltage color. Featuring a soft, sheer nude base, the foundation of this look is incredibly sophisticated and wearable. Instead of stark white, the tips employ a subtle, creamy off-white or beige shade, often applied slightly thicker than a traditional French line, creating a modern, slightly ‘milk bath’ effect while maintaining a refined square or squoval shape. This polished backdrop sets the stage for the true focal point: the abstract neon wave accent. A single, thick, meandering line of electrifying bright green traces the length of select nails (such as the middle and ring fingers), delivering a surprising pop of vibrancy that prevents the overall manicure from feeling too conventional. The high-gloss finish enhances both the subtle base colors and the saturated pigment of the neon element, ensuring maximum shine and visual impact.
To recreate this striking style at home, begin by prepping your nails and shaping them into a neat square or squoval form. Apply two coats of a milky nude or sheer pink base polish for that healthy, natural look. For the modern tip, use an opaque, yet creamy off-white or beige gel polish and paint a slightly curved, thicker band across the free edge; curing after each step is essential if using gel to maintain definition. The most critical step is executing the neon wave. Using a highly pigmented neon green polish and a fine-tipped, medium-length striping brush, draw a fluid, vertical S-curve down the center of your chosen accent nails. Start near the cuticle and ensure the line maintains a consistent thickness throughout its journey to the tip. Success hinges on a steady hand and polish consistency—if the polish drags, thin it slightly, but maintain enough viscosity to hold the crisp edge of the line. Cure the design once perfect.
Expert advice for elevating this design centers on precision and thoughtful contrast. Since the sheer base exposes the natural nail bed, ensure your cuticles are flawlessly manicured for the cleanest look possible. While the neon green offers a vibrant, spring/summer feel, you can easily swap this shade for other bold hues like electric orange, deep cobalt blue, or metallic gold to suit the season or occasion. For those who prefer minimalist detail, try applying the wave only to the ring finger. Regardless of the color choice, always finish with a high-quality, high-shine top coat, ensuring you wrap the free edge of the nail to seal in the intricate line work and maximize the longevity and gloss of this chic, abstract masterpiece.
The Muted Terracotta Gloss Manicure
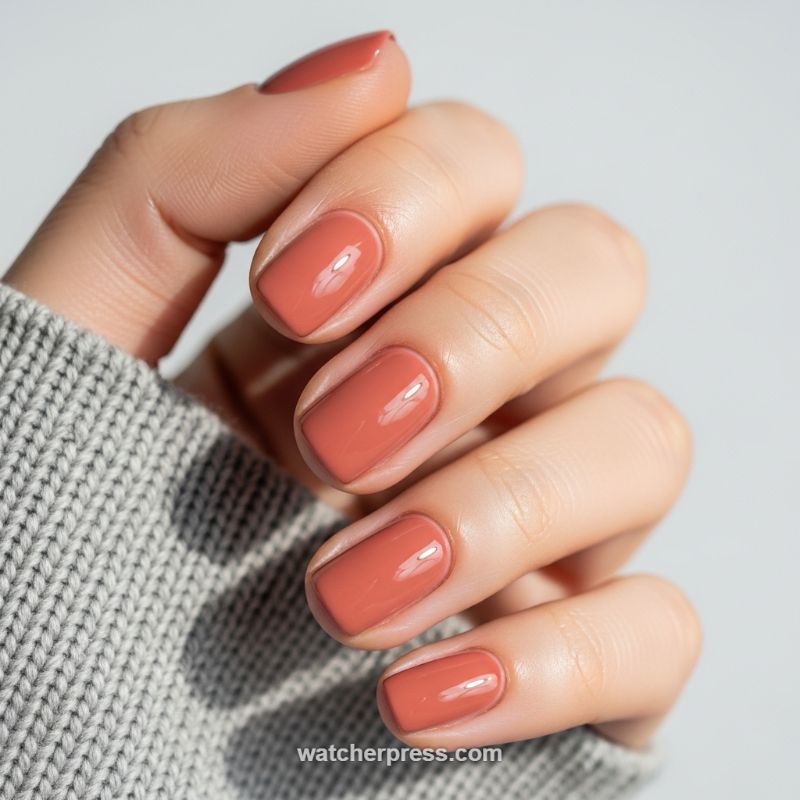
This design proves that sometimes the most dramatic statement is simply flawless execution of a solid color. The ‘Muted Terracotta Gloss Manicure’ featured here taps into the demand for sophisticated, warm neutrals that transcend seasonal trends. The color itself is a dusty rose blended with terracotta—a perfect halfway point between nude and vibrant coral, making it universally flattering across various skin undertones. Visually, the design relies entirely on opacity and an exceptionally high-gloss finish. Notice how the light reflects off the perfectly smooth surface, creating a glazed, almost wet look. This style is the epitome of the ‘clean girl’ aesthetic, focusing on healthy nails, meticulously pushed-back cuticles, and a timeless squoval shape that maintains integrity even at a shorter length.
To replicate this high-end finish, nail preparation is non-negotiable. Start with a rigorous cuticle cleanup and gentle buffing to ensure the nail plate is smooth and free of oils. Apply a quality ridge-filling base coat to create a flawless canvas. The key to achieving this specific level of saturated color without bulk is applying 2-3 thin coats of the terracotta polish, allowing each layer to dry thoroughly before proceeding. Thin coats ensure even pigmentation and prevent bubbling. The magic, however, lies in the topcoat. Select a high-shine, self-leveling topcoat (many technicians prefer a gel-effect formula) and apply it using the ‘floating’ technique—use a generous bead of product and avoid pressing the brush directly onto the nail color, allowing the topcoat to smooth out any potential imperfections beneath it and maximize that mirror-like sheen. Ensure you ‘cap the free edge’ on every coat to prevent chipping.
Expert application advice centers on precision near the cuticle line; the polish should be applied as close as possible without flooding the skin, ensuring that coveted polished appearance. For maintenance, invest in a rapid-dry topcoat and reapply it every two to three days to keep the lacquer looking freshly glazed. This specific terracotta hue pairs beautifully with cozy textures, as seen here with the soft gray knit, making it an excellent transitional color from summer warmth into fall richness. If you opt for a long-wear gel version, remember to treat your cuticles daily with oil to maintain the healthy, hydrated look that elevates this simple color choice into a stunning, high-fashion manicure.
Glossy Indigo and Blush Pink Heart Manicure
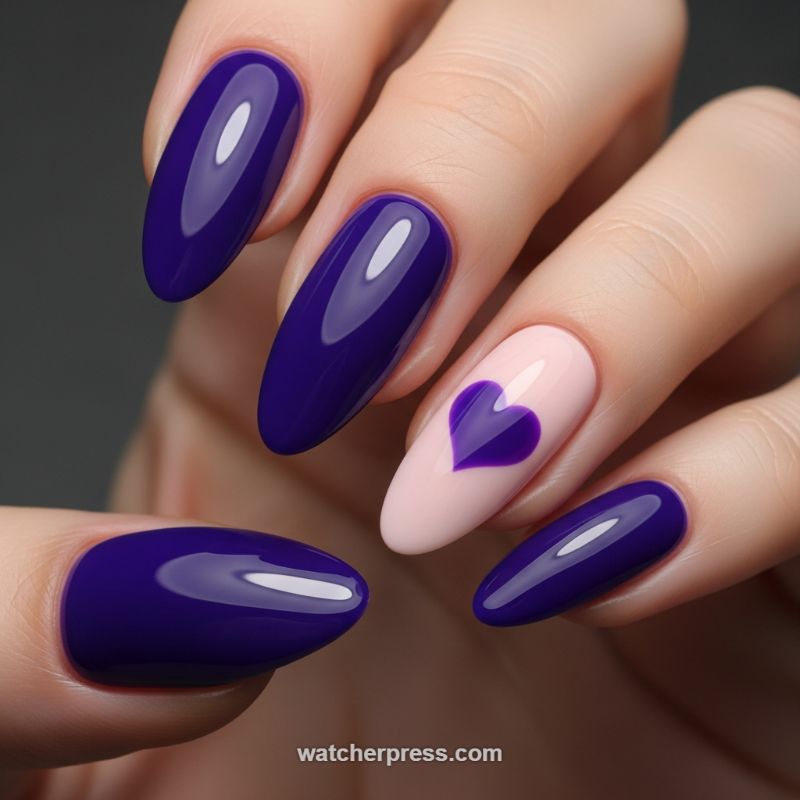
This design effortlessly marries intense sophistication with playful romance, making it a truly screenshot-worthy manicure. The foundation of this look is a rich, high-gloss indigo or deep royal purple that provides a luxurious, saturated color base for most of the nails. The striking intensity of the purple is perfectly balanced by the choice of a single accent nail painted in a creamy, pale blush pink. This soft nude provides an elegant canvas for the centerpiece: a perfectly proportioned heart motif executed in the matching deep purple shade. The overall silhouette is a classic, elongated almond shape, which enhances the regal feel of the dark color while keeping the entire look modern and streamlined. The exceptionally glossy finish catches the light beautifully, adding dimension and a professional, polished quality that elevates this from simple polish to high-end nail art.
To recreate this impeccable finish, proper application technique is crucial. Start by shaping your natural nails or applying extensions into the desired medium-to-long almond shape, ensuring symmetry across all fingers. For the deepest color saturation, apply two to three thin coats of a high-pigment gel polish in indigo or deep violet to the thumb, index, and pinky fingers, curing between each layer. For the ring finger, apply the pale blush base coat. The heart design requires precision; for crisp edges, we recommend using a heart-shaped nail vinyl or stencil applied over the cured pink base. Paint the deep purple color over the stencil, peel it off while the polish is still wet (if using regular lacquer) or immediately after curing (if using gel), and then fully cure the design. Finish every nail with a non-wipe, high-shine top coat, capping the free edge to prevent chipping and locking in that mirror-like gloss that defines this style.
While the deep purple and blush combination is stunning, this design is easily adaptable. For those seeking a moodier aesthetic, try swapping the blush pink base for a rich charcoal gray or even black, allowing the purple heart to truly pop. Alternatively, if you want to dial up the texture, consider painting the main purple nails in a matte finish while keeping the heart accent nail glossy, or vice versa—this contrast adds visual interest and depth. This color palette is particularly flattering for cooler and neutral skin tones, enhancing the natural pink undertones of the hand. If you prefer warmer shades, try substituting the indigo with a rich burgundy or eggplant. This manicure is versatile enough for year-round wear, serving as a chic Valentine’s statement or a sophisticated update to your cold-weather nail wardrobe.
Juicy Cherry Nude Nails
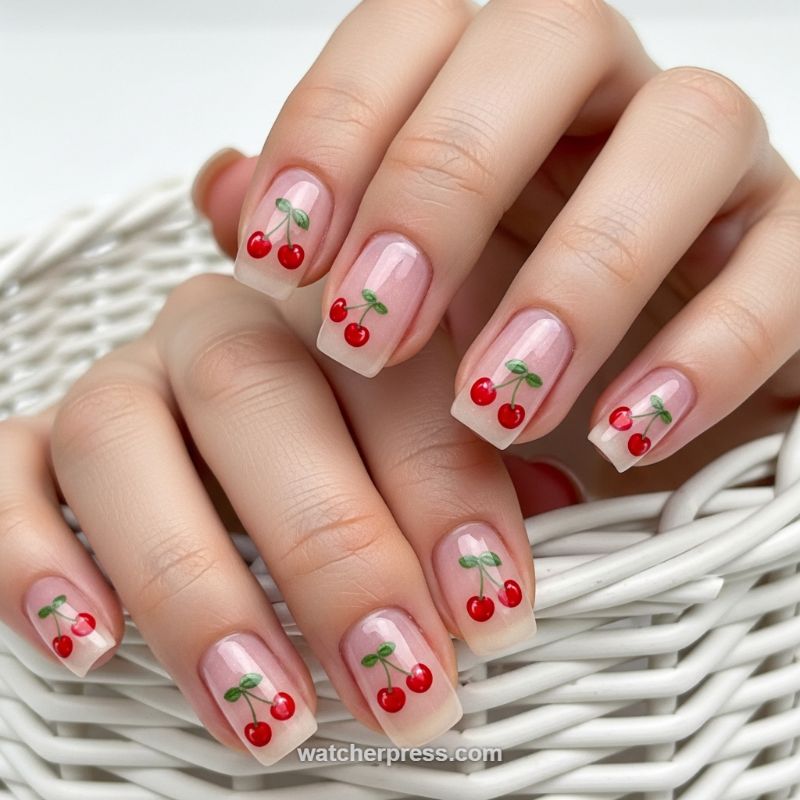
This design, which we’ll call “Juicy Cherry Nude,” perfectly captures the whimsical, fruity nail art trend while maintaining a sophisticated, minimalist base. The key aesthetic is the clever juxtaposition of a detailed motif against a clean, translucent canvas. This look utilizes a sheer, milky pink or nude base coat, often referred to as a “jelly” finish. This translucent canvas allows the natural nail bed to peek through, giving a clean, healthy appearance and ensuring the bright red cherry motif truly pops. The cherries themselves are small, highly pigmented accents, typically painted as clustered pairs with delicate green stems and tiny leaves connecting them. The placement is central—designed to leave generous space around the cuticle and tip—which is essential for maintaining that sought-after clean, negative-space aesthetic. The overall effect is incredibly fresh, making it an ideal choice for a fun yet polished manicure.
To recreate this sweet design at home, start with meticulous nail preparation: clean, buff, and file your nails into the desired square or squoval shape. Next, apply 1-2 coats of your chosen milky pink or sheer nude jelly polish to establish the base; cure thoroughly if using gel. Using a fine-tipped nail art brush (a detail or liner brush is ideal) and highly pigmented red polish, create two small, slightly asymmetrical circles for the cherries. Achieving perfectly rounded shapes isn’t necessary; a slightly oblong shape adds to the hand-painted charm. Cure the red. For the stems and leaves, switch to a vibrant, medium-toned green polish. Use the liner brush to draw extremely thin, connecting stems that meet at a central point, then lightly dab or sweep the brush to create two small, simple leaf shapes above the cherries. Precision is paramount here; the thinness of the line work is what separates a chic look from a clumsy one. If hand-painting feels too challenging, high-quality cherry water decals are an excellent, time-saving alternative.
For an expert-level touch, add a tiny, reflective white or pale pink dot to the upper curve of each red cherry using a dotting tool or the tip of your liner brush; this mimics a highlight, significantly increasing the dimensional, ‘juicy’ effect. This design works exceptionally well on square or squoval shapes, as shown, because they offer maximum canvas space for the central art. Since the primary art is concentrated in the middle of the nail, regrowth is far less noticeable than with a full-color manicure, effectively extending the life of the design. Once all the art is complete and fully cured, apply a generous layer of high-gloss top coat. This final step is crucial for magnifying the transparent base effect and ensuring the tiny red details look wet, reflective, and utterly delicious. Remember to seal the free edge well to prevent premature chipping or peeling.
Minimalist Glossy Nude Nails with 3D Heart Accents
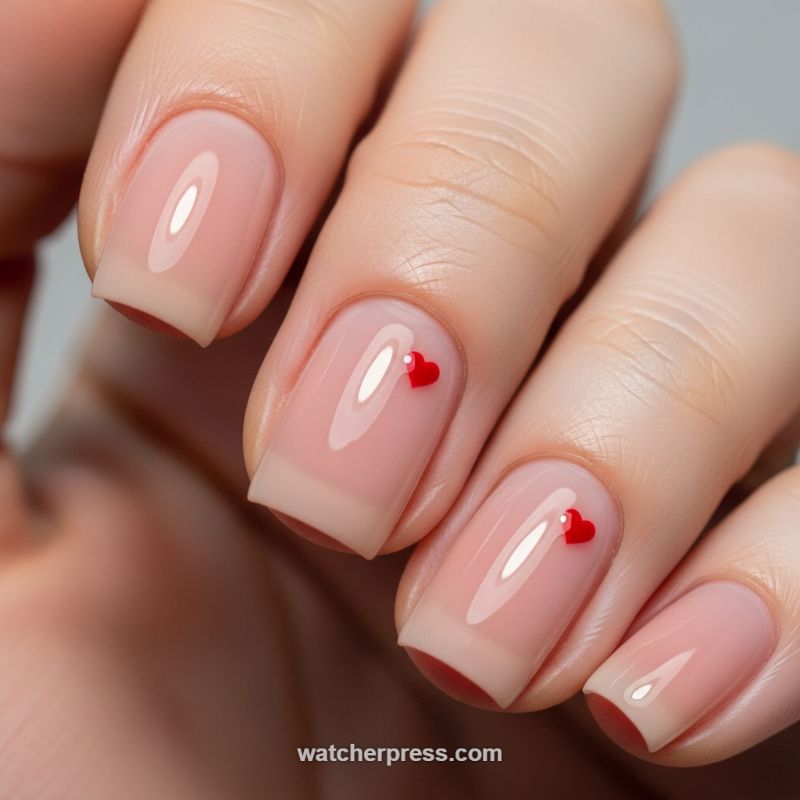
This design masterfully blends the trending ‘milky bath’ manicure technique with a subtle, romantic accent, resulting in a look that is both highly sophisticated and playful. To replicate this ultra-glossy foundation, begin with meticulous nail preparation, ensuring the nails are shaped into a soft square or squoval style, which complements the shorter length perfectly. The base color should be a sheer builder gel or a milky pink-nude jelly polish, applied in two thin coats to achieve that translucent, depth-of-color effect where the natural nail line subtly peeks through the polish. Achieving the perfect high-gloss finish, visible by the oblong reflection of light (known as the ‘hot spot’), requires leveling the product correctly, often best accomplished with a self-leveling rubber base or top coat before the final cure. This technique ensures a plump, glass-like surface that elevates the entire aesthetic.
Once your glossy foundation is perfectly cured, it’s time to add the charming accent details. The tiny red hearts visible here appear to be either small, pre-made 3D decals or meticulously created with a highly-pigmented red solid gel, which holds its shape without spreading. If opting for a decal, place it strategically on one or two accent nails (such as the index and middle fingers) near the center or slightly toward the cuticle area, securing it with a small amount of clear builder gel or specialized nail glue before curing. For those preferring to hand-paint, use a very fine detail brush and a thick red gel polish: place two tiny dots side-by-side, then gently drag the brush from the center base of those dots down to meet at a single, sharp point, forming the bottom of the heart. The key to the design’s success is restraint; limiting the hearts to a few nails maintains the minimalist integrity of the manicure.
Finally, seal the deal with a high-shine, non-wipe top coat, taking special care to completely encapsulate the heart design if you used a 3D element. Encapsulation is crucial for longevity and preventing the small charm from catching on clothing or lifting prematurely. Expert advice for this design is to maintain symmetry in size and placement of the hearts across the accent nails; inconsistency can break the delicate balance of the minimalist style. This nude heart manicure is ideal for clients seeking a chic everyday look that subtly incorporates seasonal romance—whether for Valentine’s Day, a wedding, or simply adding a sweet touch to their professional wardrobe. The glossy finish ensures this look catches the light and demands attention without being overtly loud or complicated.
The Matte Black & Molten Silver Foil Contrast Manicure
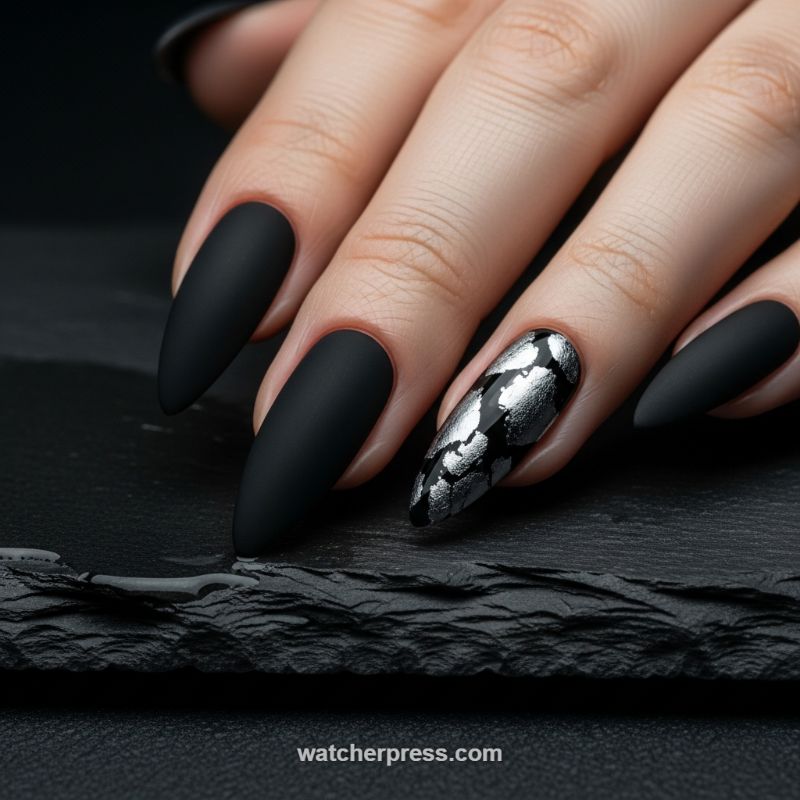
This design expertly fuses the best elements of the “Glossy, Matte, and Metallic” trifecta, offering a sophisticated and dramatic statement perfect for evening wear or adding an edge to your everyday look. The foundation relies on a deep, opaque black polish finished with a luxurious matte top coat, which instantly elevates the color from simple black to an haute couture texture. The contrast is delivered through a single accent nail, typically the ring finger, where a glossy black base is layered with fragments of reflective silver foil. This deliberate juxtaposition of texture—flat and absorbing light (matte) versus high-shine and scattering light (glossy/metallic)—is what makes this look so compelling and modern. The sleek, long almond or stiletto shape further enhances the dramatic, predatory elegance of the design.
To replicate this high-end finish, nail preparation is paramount. Start with perfectly shaped and buffed nails, ensuring uniformity across the four primary fingers. Apply two opaque coats of true black gel or lacquer. The key to the design’s success lies in the top coat: instead of a standard sealer, apply a high-quality matte top coat specifically designed for durability. Cure or allow to dry completely. Expert tip: Ensure your matte top coat application is smooth and even; any pooling or streaks will be magnified by the lack of shine. Once dried, use a lint-free wipe dampened with alcohol to remove any residual tackiness if necessary, ensuring the finish is velvet-smooth to the touch.
The dazzling silver accent requires precision. Start the accent nail with a glossy black base coat and finish with a non-wipe glossy top coat, or simply leave the tacky layer of the color coat intact. Using a specialized foil adhesive gel (cured for the specified time, often resulting in a strong sticky surface) or a layer of clear tacky builder gel, gently press irregular pieces of transfer foil or silver leaf onto the sticky area using an orange wood stick or silicone tool. Focus on creating organic, fractured shapes rather than covering the entire nail uniformly, allowing the glossy black underneath to peek through and provide depth. Once satisfied with the placement, seal the accent nail with a high-shine, durable clear top coat to encapsulate the foil and maximize its reflective, ‘molten’ appearance, thus completing the powerful textural dialogue between the nails.
The Dimensional Retro Wave Mani (High-Gloss)
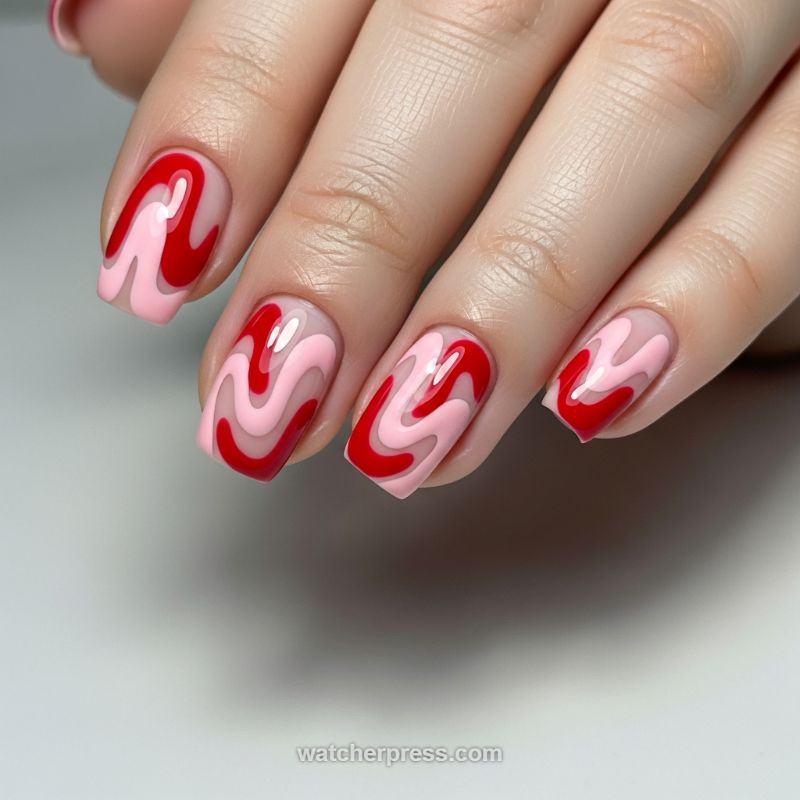
This striking nail art design offers a contemporary take on the groovy, psychedelic aesthetics of the 1960s and 70s, making it a must-have screenshot for anyone aiming for a bold yet artistic look. The power of this mani lies in its strategic layering and high-shine finish, which combine to create a stunning optical illusion of movement and depth. Unlike standard flat designs, these ‘liquid lines’ utilize a sheer base (clear or nude pink) as negative space, allowing the pigmented colors—a vivid cherry red and a creamy light pink—to look dimensional, almost as if they are floating above the nail bed. The squoval shape provides the perfect vertical canvas for these sweeping, undulating curves, maximizing the visual flow and drama of the pattern. This design is perfect for those who want a dramatic color contrast but still appreciate the precision and cleanliness of abstract art.
Achieving this intricate, layered wave effect requires patience and precise brushwork, typically utilizing gel polish for its control and high-gloss potential. Begin by prepping the nail and applying a clear or sheer base coat. Once cured, select your lightest opaque color (the baby pink) and, using a fine-tipped striping brush, carefully map out the initial, wider wavy lines. The key here is consistency; ensure the curves are smooth and flow rhythmically across the nail without jagged edges. Cure the pink layer completely. Next, introduce the darkest color (the vibrant red). This layer is the shadow and the anchor. With the same striping brush, meticulously trace the inside contours of the pink wave, ensuring the red line slightly overlaps the pink to create that crucial dimensional effect. This technique ensures the depth perception is maximized, giving the impression that the red waves are slightly recessed or flowing underneath the pink. This step is critical; a steady hand and medium-viscosity polish are essential to prevent colors from pooling or bleeding.
Expert advice for mastering this look centers on product selection and sealing. Because the design relies heavily on light reflection to emphasize its liquid nature, choosing an ultra-high-shine, non-wipe topcoat is non-negotiable. Apply a generous layer over the completed art, ensuring you float the topcoat over the design to avoid dragging the colors, and remember to cap the free edge of the nail to prevent chipping and seal the artistry. Furthermore, if you are tackling this design freehand, sketch the wave pattern on paper first to establish the rhythmic flow you want across all four fingers—a successful wave mani maintains a visual dialogue between each nail. While this style is shown here in a striking red and pink, experiment with other contrasting color pairs like deep sapphire and baby blue, or emerald green and mint, to customize the retro vibe to any season or outfit.
Vampy Black and Red Glitter Ombre Nails (Magnetic Cat-Eye Effect)
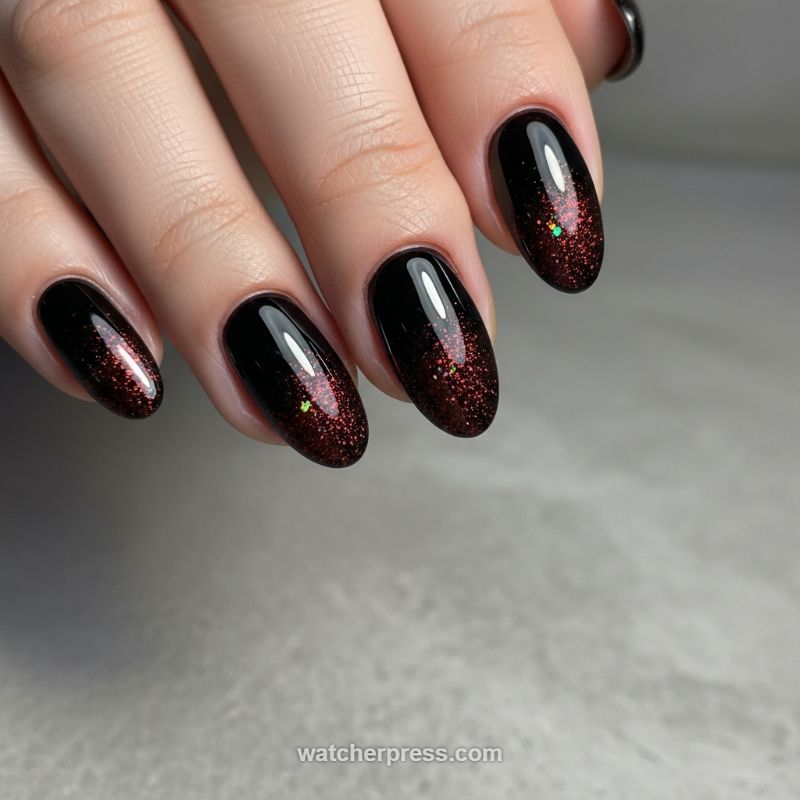
This stunning manicure perfectly captures the essence of sophisticated glamour, pairing a deep, high-gloss black with a fiery, shimmering red-to-burgundy glitter gradient. To recreate this coveted ‘Vampy Ombre’ look, start by shaping your nails into a graceful oval or almond shape, which naturally complements the elongated gradient effect. The base should be a pristine, highly pigmented black or a very deep oxblood gel polish applied in two thin coats, ensuring full coverage near the cuticle line. Before curing the second coat (or immediately after applying a sheer layer of builder gel over the base), meticulously apply a fine, metallic red glitter—ideally a magnetic “cat-eye” formula—concentrating the density at the free edge and delicately fading it toward the center of the nail. Use a fine-tipped brush to blend the glitter line seamlessly into the black, creating that soft, ethereal fade that defines a perfect ombre.
The key to achieving the dazzling depth seen in this design lies in the choice of glitter and the application of specialized effects. For the ultimate dimensional shine, opt for a magnetic glitter polish. After applying the glitter layer, hold a magnetic wand over the wet polish for about 10-15 seconds, positioning the wand near the tip of the nail to pull the metallic particles into a concentrated, shimmering band or ‘sliver’ effect that shifts in the light. Notice the subtle detail of scattered green or iridescent micro-flakies mixed into the red glitter on the ring finger—this tiny addition elevates the look by introducing a holographic element that catches different light frequencies, preventing the design from looking flat. Finish the application with a high-shine, self-leveling top coat. Since darker colors and heavy glitter can sometimes appear bumpy, ensure the top coat is thick enough to encapsulate all the glitter perfectly, providing that highly sought-after, flawless mirror-like reflection.
For expert longevity and wearability, preparation is paramount. Ensure all layers, particularly the glitter gradient, are cured thoroughly to prevent lifting or dulling of the shine. When applying the high-gloss top coat, float a slightly thicker bead of product over the nail to achieve the optimal ‘plump’ look without flooding the sidewalls, which maximizes the visual curve and light reflection. This design is exceptionally versatile for formal events, holiday parties, or as a powerful everyday statement during the cooler months. If you wish to customize the look, swap the deep red for an emerald green or deep sapphire blue glitter for a similar high-impact, jewel-toned gradient that maintains the luxurious, dark aesthetic.
The Ultimate Glossy Pastel Skittle Manicure
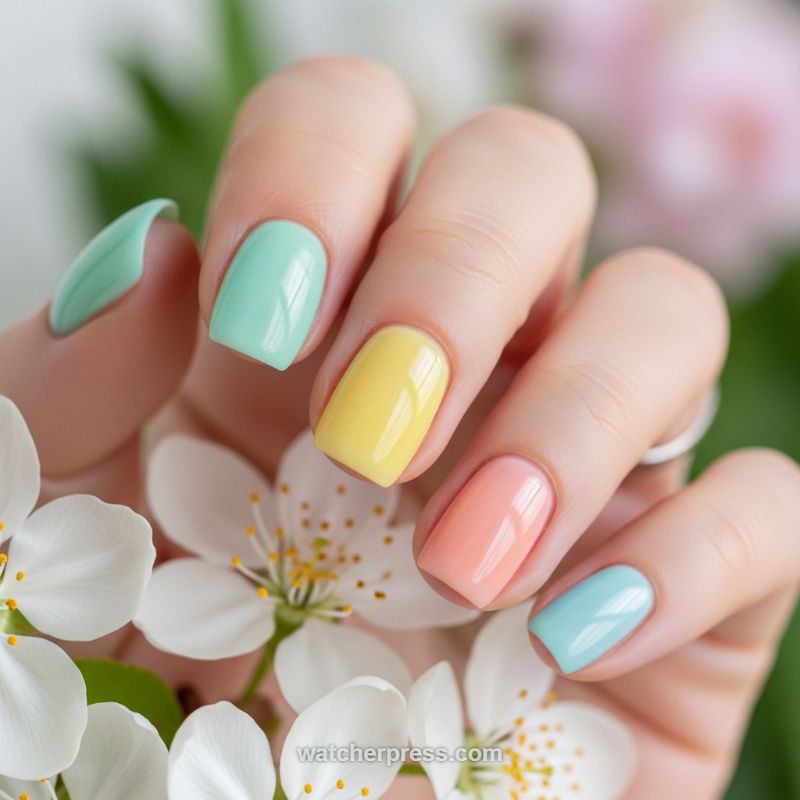
This stunning look captures the essence of springtime optimism, utilizing the popular “Skittle” technique—where each nail features a different but coordinating color. Here, the palette is exclusively soft pastel shades: a refreshing mint green, sunny pale yellow, delicate peach, and cool sky blue. The genius of this design lies not just in the playful color variation but in the flawless application and high-shine, glossy finish. Notice how the light perfectly reflects off the surface of each nail, making the colors pop and giving the manicure a luxurious, plump appearance. This style is incredibly versatile, working beautifully on short, medium, or slightly longer squoval shapes, as demonstrated in the image, perfectly complementing fresh floral backdrops.
To replicate this vibrant, multi-hued manicure, meticulous preparation is key. Start by shaping your nails identically, ensuring the edges are smooth, and cuticles are neatly pushed back and moisturized—a clean nail bed is essential for a high-end finish. Apply a quality base coat to guarantee a smooth canvas and prevent staining. When applying your chosen pastel shades, remember that light colors often require extra care to achieve opacity without streaks. Use two thin, even coats of each color, allowing adequate drying time between applications to minimize bubbles. For the “Skittle” placement, consider balance; avoid grouping all warm or all cool tones together. The pictured arrangement—alternating between cool (mint, blue) and warm (yellow, peach) tones—provides maximum visual interest and harmony across the hand.
The final, and most crucial, step is locking in the luster with a premium top coat. To achieve that mirror-like reflection seen here, invest in an ultra-glossy, fast-drying formula. Apply a generous layer, taking care to “cap” the free edge of the nail—running the brush slightly along the tip—to seal the color and drastically extend wear time, preventing chips. Expert tip: If you want to customize this design further, you could select shades from the same tonal family (e.g., all icy pastels) or introduce a single metallic accent shade on one nail (like a soft gold shimmer) to nod to the metallic trend while maintaining the core pastel theme. This mix-and-match approach is the perfect way to revitalize your look for spring and summer.
Dimensional Cartoon Glam: The Modern Black & Nude Character Set
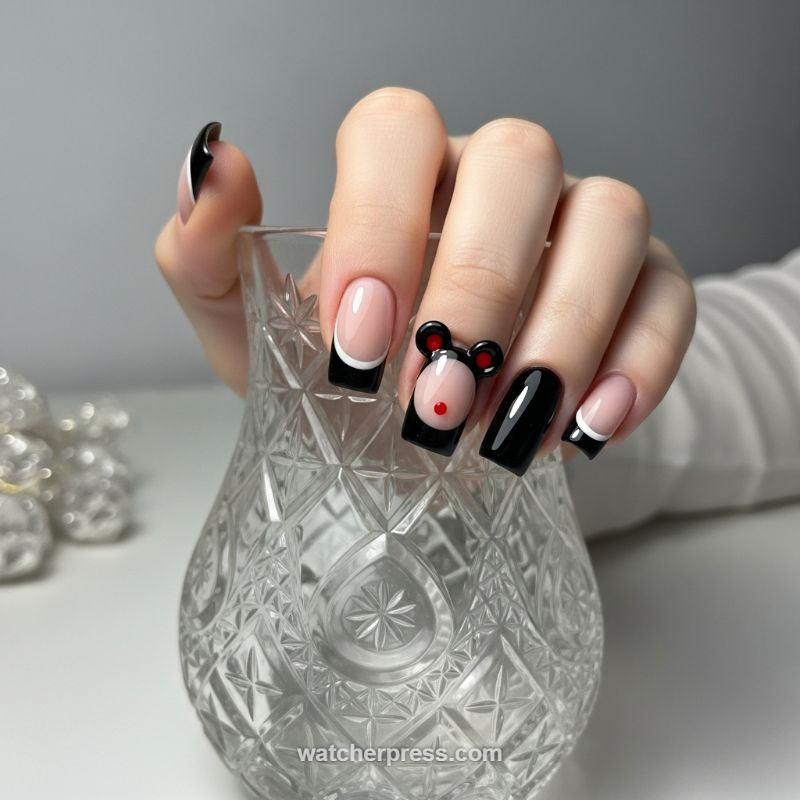
This manicure perfectly balances playful character art with sophisticated, modern nail techniques, making it an absolute must-screenshot look. To replicate this chic design, start by prepping your nails into a crisp square or squoval shape—this defined edge is crucial for showcasing the bold geometry. Apply a sheer milky pink or nude base coat across all nails. The surrounding nails (thumb, index, and pinky) feature a deep reverse French manicure variation. Instead of a traditional white tip, apply a high-gloss, highly pigmented black polish, ensuring the smile line is crisp and dramatically deep. For that extra pop of contrast and refinement, use a fine-liner brush and highly pigmented white polish or gel to trace a thin, sharp border exactly where the black tip meets the nude base. Seal these nails with a high-shine top coat to emphasize the lacquer’s rich, deep black gloss.
The showstopper, the dimensional character nail, requires a specialized approach, typically involving structural or 3D nail art gel for the elevated features. On the middle finger, start by curing a solid black base coat. Next, using the same sheer nude/milky pink shade, carefully paint a large oval shape occupying the upper portion of the nail to form the face. Once the nude layer is cured, you will build the 3D elements: the ears and the nose. Using black 3D sculpting gel (or highly viscous builder gel), create two small, perfect hemispheres near the top edge of the nail to form the ears and cure them. Ensure these elements are applied thickly enough to achieve a true dimensional lift off the nail surface. Then, add the details: place tiny red dots of gel polish in the center of the black ears and a slightly larger, defined red dot near the bottom of the nude oval for the nose. If you desire the subtle contouring seen in the image, apply a second, slightly thicker layer of the nude polish to create a smooth dome effect on the face area before adding the nose detail.
For maximum impact and longevity, ensure every layer of gel is fully cured, especially when working with thick 3D gels which often require a longer cure time. Expert tip: the high-gloss finish is non-negotiable for this design—it enhances the richness of the black and dramatically highlights the dimensional quality of the mouse character. This combination of glossy black tips and playful 3D nude elements provides a striking contrast that is both fun and elegant. To maintain the crisp definition of the white lines and the high shine, refresh the top coat every week, paying special attention to fully encapsulating the 3D elements to prevent snagging or breakage.
Bold Primary Palette: High-Gloss and Dimensional Art
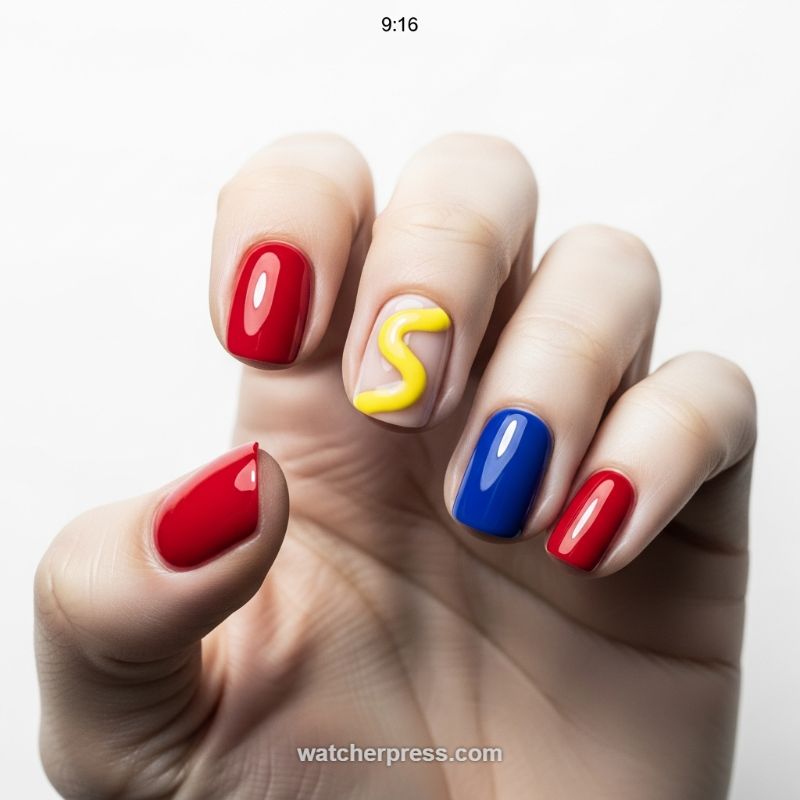
This design masterfully uses a classic primary color trio (vibrant red, deep cobalt blue, and sunny yellow) to create a high-impact, graphic look that feels both retro and avant-garde. The key to this manicure’s success is the flawless, mirror-like gloss achieved on the solid color nails—the thumb, index, ring, and pinky—which must be perfectly shaped (squoval or short square recommended) to allow the saturated polish to shine. The distribution of color is strategic, preventing the design from looking overwhelming, while the clean contrast against the hand’s natural skin tone enhances the modern aesthetic. This style is perfect for those who want to make a bold statement without resorting to intricate patterns or glitter, relying instead on pure, saturated color and dimensional texture.
Recreating the dimensional ‘S’ accent nail is the most technical part of this design. Start with a sheer nude or milky white base coat on the accent nail to provide a subtle backdrop that makes the 3D yellow pop. The dimensional element requires a highly pigmented, self-leveling builder gel or sculpting gel, preferably applied using a dotting tool or a fine liner brush to carefully build the thickness of the letter. To achieve the signature thick, uniform ‘piping’ look seen here, the gel must be applied generously but controlled, ensuring the edges remain smooth and rounded before curing under a UV/LED lamp. Expert tip: Do not topcoat the dimensional element with a regular high-shine topcoat, as this can flatten the edges; instead, use a specialty non-wipe sculpting topcoat or ensure the initial colored gel is formulated to cure with a high-gloss finish on its own.
For maximum longevity and shine on the primary color nails, invest in a high-quality gel polish system and a separate, ultra-glossy topcoat that resists scratching and dulling. After applying two thin, even coats of red and blue, float the glossy topcoat over each nail, ensuring you cap the free edge to prevent premature chipping. Maintenance for 3D art requires a little extra care; avoid rough handling and prolonged soaking, as this can weaken the structure of the builder gel. This technique can easily be adapted beyond a simple letter—try utilizing the dimensional gel for thick abstract squiggles, simple stripes, or framing the edges of the nail for a truly customized, runway-ready manicure that showcases textural contrast alongside vivid color.
Glossy Romantic Heart Accent Nails (Almond Shape)
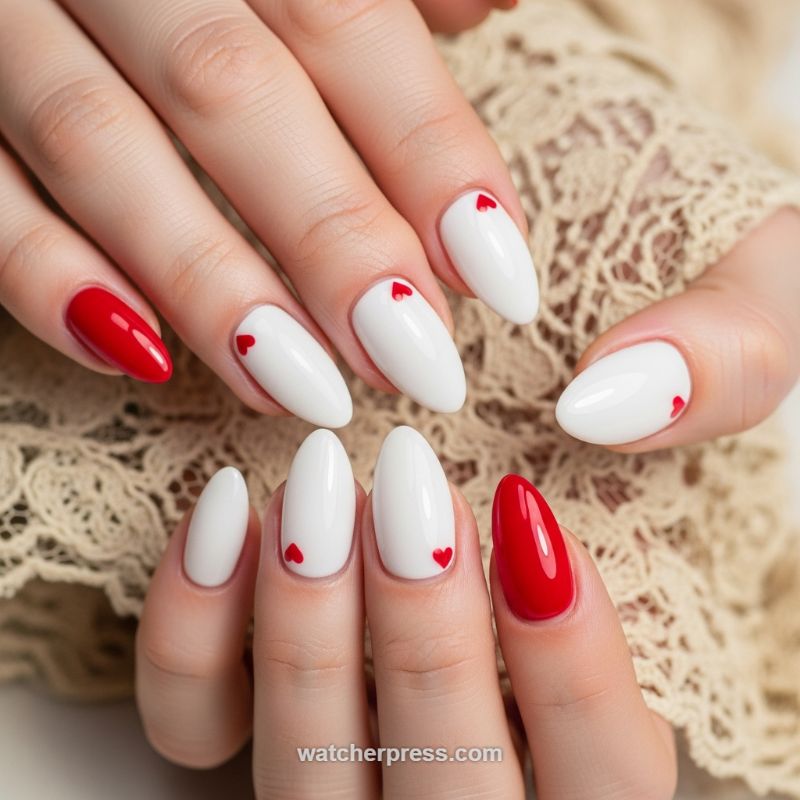
This design masterfully pairs high-shine white with rich, glossy cherry red accents, creating a look that is both playful and incredibly sophisticated. The foundation of this manicure is the uniform almond nail shape, which provides an elegant canvas for the artwork. To replicate this, ensure your nails are filed symmetrically to a smooth, tapered oval, avoiding overly sharp points. The primary application features a crisp, opaque white gel polish applied evenly across most nails, requiring two to three thin coats for perfect coverage. The solid accent nails—typically the index or pinky on one hand, and the thumb or ring finger on the other—are coated in the vibrant, true-red shade. This uneven distribution of the solid red color provides visual interest and keeps the look balanced, preventing it from appearing too symmetrical or overwhelming.
The key to the iconic charm of this look lies in the delicate placement and execution of the micro heart design. After curing the white base coat, you will need a precision tool, either a fine detail brush (size 00 or 000) or a very small dotting tool. Using the vibrant red polish, carefully place the heart motif centered just above the cuticle line (the proximal nail fold). A useful technique for creating tiny, uniform hearts is to place two very small dots side-by-side using the dotting tool, and then using the fine brush, gently drag the polish from the lower edge of the dots down toward the center to form the ‘V’ point of the heart. It is crucial that the hearts are small and consistently sized across all nails to maintain a refined aesthetic. Once all the hearts are painted and cured, inspect them closely under direct light to ensure all edges are sharp and clean.
To achieve the perfect high-gloss finish seen here, a thick, non-wipe, high-shine top coat is essential. Apply a generous layer over the entire design, ensuring you cap the free edge of every nail to prevent chipping and seal in the color and art. For an extra dimension of professional polish, experts recommend incorporating a builder gel or a structure base coat beneath the color application, especially for longer almond shapes, as this adds durability and creates that sought-after plump, smooth surface. To transition this design beyond seasonal wear, consider swapping the cherry red for deep oxblood or even a metallic silver, keeping the crisp white base and micro-heart pattern intact for a versatile yet striking statement manicure.
Edgy Elegance: The Matte, Glossy, and Chrome Stud Mix
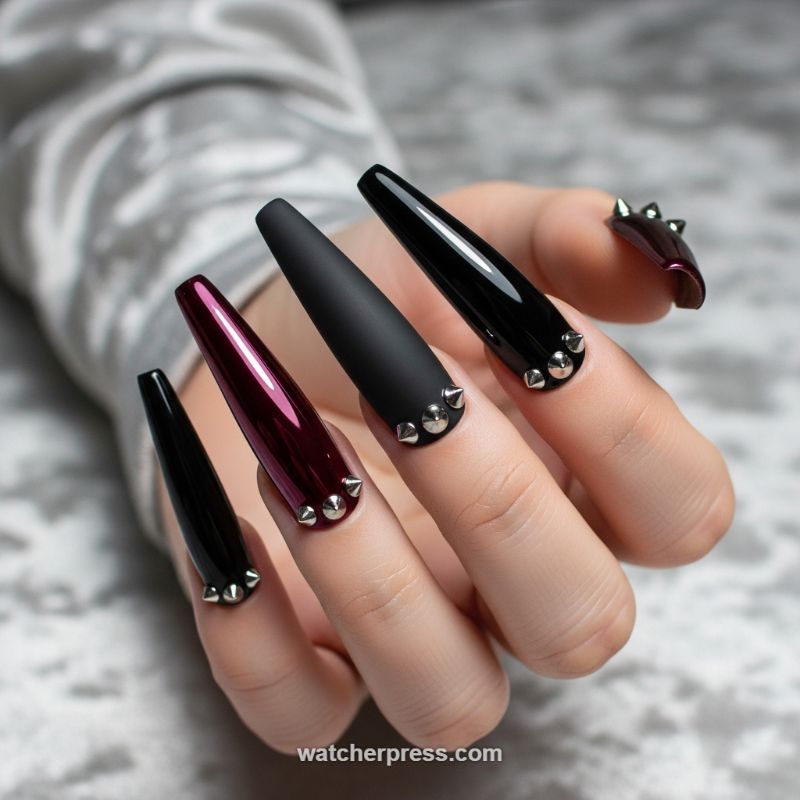
This striking nail art design brilliantly demonstrates how to incorporate multiple textures and finishes into one cohesive, high-impact aesthetic. Moving beyond a simple monochromatic manicure, this look utilizes extreme coffin-shaped nails painted in jet black (both matte and high-gloss) and a deep, reflective metallic burgundy. To recreate this visual symphony, start by shaping the nails into a long, dramatic coffin shape. Apply your primary black shade. For the matte look (often featured on the middle finger), use a specialized velvet top coat, ensuring it is fully cured and streak-free to achieve that light-absorbing, velvety finish. For the glossy black nails, opt for a highly pigmented black polish sealed with a thick, glass-like non-wipe top coat to maximize shine and light reflection. The key to the design’s success lies in juxtaposing these opposites—the matte provides depth and shadow, while the glossy finishes add sharp highlights.
The anchor of this design, and the third texture element, is the metallic or chrome burgundy nail. Achieving this mirror-like finish requires specialty products, typically chrome powder applied over a cured, non-wipe gel base layer (often a deep red or even black base to intensify the chrome’s richness). Once the powder is rubbed onto the tacky surface until a flawless shine is achieved, it must be sealed carefully with another non-wipe top coat. The final and most crucial step is the hardware application: silver cone studs. For a modern, clustered look, place 3-4 small studs symmetrically near the cuticle line on each finger, creating a cohesive, studded cuff effect. Apply these embellishments using a strong builder gel or specialized nail glue, curing them firmly in place. Expert tip: Ensure you apply the top coat *around* the base of the studs to secure them without dulling their metallic surface, which would ruin the mixed-texture effect.
While this design is bold and undeniably rock-inspired, it remains wearable due to the careful attention to symmetry and the uniform placement of the embellishments. To maintain this high-fashion, high-maintenance look, remember that extreme coffin nails require diligent care. Regularly moisturize the cuticles and underside of the nails to prevent breakage, and refresh the matte top coat every few weeks if you notice it beginning to buff or shine. This look is perfect for those who want to merge alternative fashion elements with nail art sophistication, proving that matte, glossy, and metallic finishes aren’t just trends—they are essential tools for creative expression.
High-Shine Nautical Blue Gradient and Color Block Nails
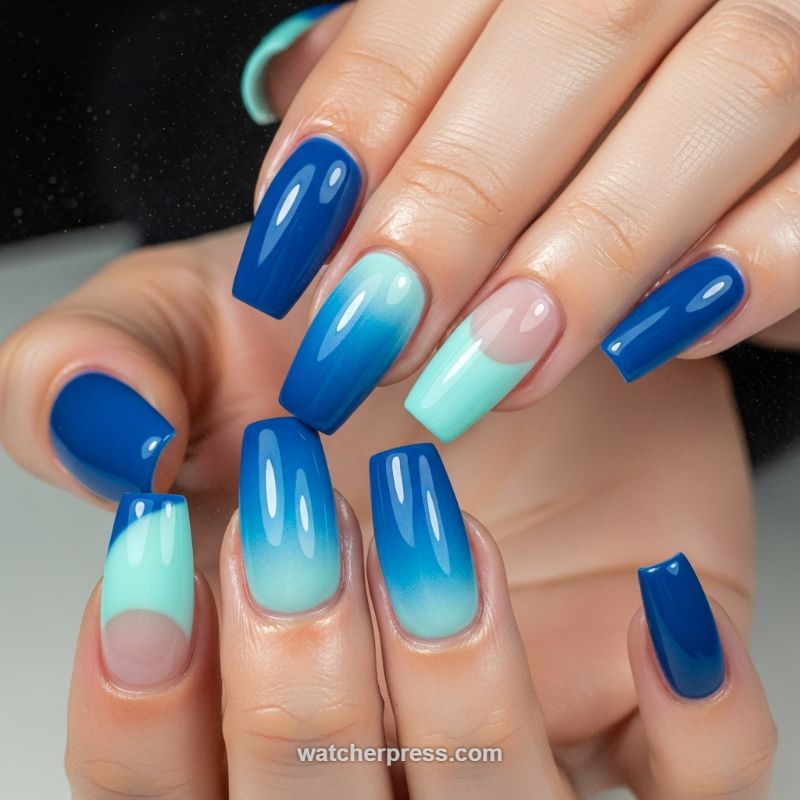
This breathtaking look masterfully combines several high-level techniques—solid color, smooth ombre, and structured negative space—all bound together by a highly reflective, glossy top coat. The color palette is the key to its success: a rich, deep sapphire or royal blue is seamlessly blended with a vibrant mint or turquoise, grounded by a clean, sheer nude base near the cuticle on the accent nails. To replicate this, start by ensuring your chosen nail shape (the elongated coffin or tapered square is ideal here) is perfectly sculpted, as the high-gloss finish will magnify any imperfections. Apply two coats of the solid deep blue gel polish on the non-accent nails, curing fully between layers to achieve that intense, opaque depth.
Mastering the gradient (seen prominently on the middle and ring fingers) requires precise color placement. Begin with a sheer nude base and apply the pale mint color near the cuticle line. Then, using a small cosmetic sponge, tap a line of the pale mint and the deep blue directly onto the sponge, ensuring a slight overlap where they meet. Gently dab the sponge onto the nail, moving slightly up and down until the colors transition smoothly from the deep blue tip to the lighter mint base. For maximum gloss and depth, apply a clear magnetic/cat-eye top coat over the gradient for an added layer of dimension before finalizing the look with an ultra-high-shine, non-wipe top coat. Professional tip: Clean the edges immediately after applying the gradient with a small brush dipped in acetone to keep the transition crisp and flawless.
The accent nails, featuring the crisp reverse French or half-moon design, provide a welcome structural break from the softness of the ombre. To achieve this defined color block, apply the sheer nude base coat, leaving a clean half-moon shape near the cuticle. Once cured, use a fine striping brush or a specialized crescent sticker/stencil to outline the desired curve, filling the remainder of the nail plate with the mint turquoise polish. Ensure the dividing line between the nude base and the colored tip is perfectly symmetrical and sharp. This design is perfect for those seeking a vibrant, luxurious aesthetic that transitions beautifully from a summer vacation setting to year-round sophistication, proving that a mix-and-match manicure can be both complex and incredibly chic.
The Modern Fuchsia-Tipped French Manicure
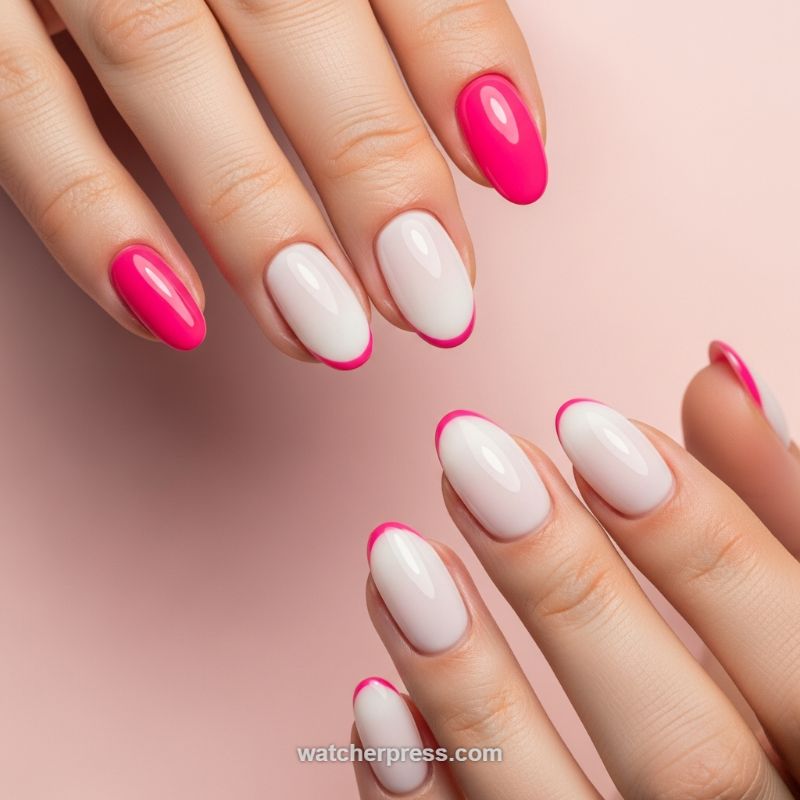
This stunning nail art design successfully marries timeless elegance with electric, contemporary color, making it a must-try trend for the season. The foundation of this look is a beautifully shaped almond or oval nail, coated in a soft, milky white or sheer pink polish, giving a nod to the classic French base. The genius lies in the ‘micro-French’ technique, where the traditional white tip is replaced by a razor-thin, vibrantly pigmented line of hot pink or fuchsia. This intense contrast is elevated by a high-gloss finish, which catches the light perfectly and emphasizes the smoothness of the application. Crucially, the design incorporates strategic accent nails—typically the thumb and ring finger—painted in a solid, full saturation of the hot pink hue. This asymmetrical balance prevents the overall manicure from feeling overly traditional, injecting a playful yet sophisticated edge that makes it ideal for transitioning from a business setting to a weekend getaway.
To recreate this precise look, start with meticulous nail preparation, ensuring the nails are evenly shaped and prepped for maximum polish adhesion. Apply two coats of your chosen sheer or milky base color, curing or drying each layer completely. The fuchsia tip demands precision; ditch the striping tape or stamping plates, and opt for a high-quality, ultra-fine liner brush, often called a ‘striper’ or ‘detailer’ brush. Dip the brush sparingly into the hot pink polish and stabilize your working hand, using your pinky finger as a guide against the tabletop. Carefully trace the natural curve of the nail tip, maintaining a consistent, hair-thin width across all nails designated for the micro-tip. For the solid accent nails, apply two to three thin coats of the fuchsia, ensuring full opacity and minimizing bulkiness, allowing for full color saturation without compromising the smooth surface.
Longevity and shine are paramount for this glossy look. Once all layers are dry or cured, apply a thick, self-leveling, high-shine topcoat. For gel systems, ensure a minimum 60-second cure time under the lamp to lock in the shine. For traditional polish users, invest in a quick-dry topcoat that minimizes streaking. Expert advice suggests maintaining this manicure with daily cuticle oil application to keep the nail beds moisturized and a fresh layer of clear topcoat every 2-3 days to restore the brilliant gloss and protect the fine fuchsia line from chipping or fading. Because this design is inherently bold, it pairs beautifully with minimalist jewelry, allowing the manicure itself to serve as the primary accessory. This design is versatile but truly shines during the warmer months when neon and bright tones are naturally favored.
Regal Rhinestone Cuticle Nails: Emerald, Gold, and Amethyst Maximalism
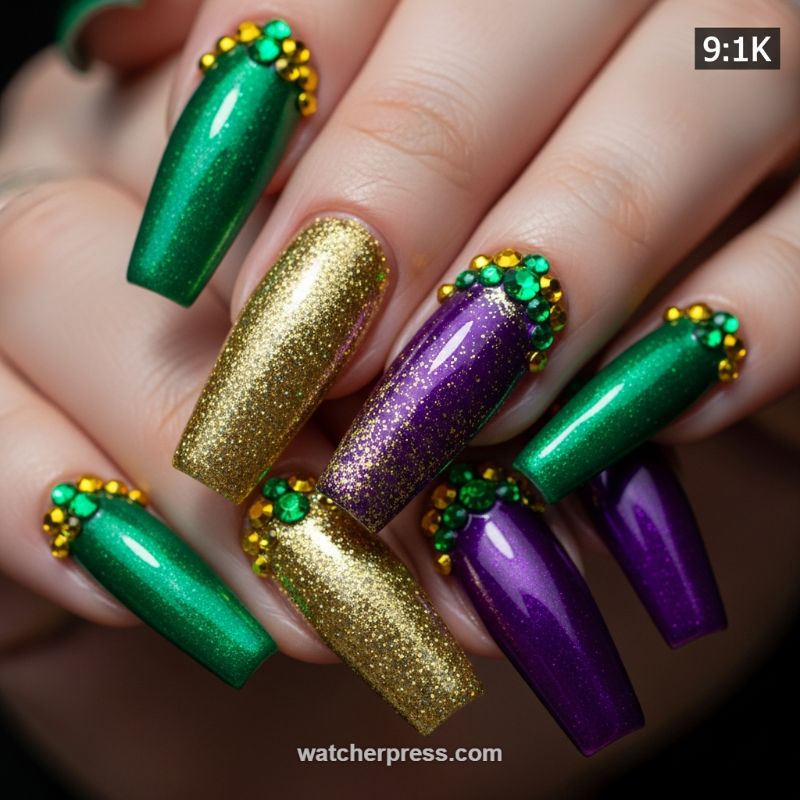
This design is the definition of maximalist luxury, perfectly blending three vibrant, high-gloss finishes with striking gemstone embellishments. Inspired by the classic Mardi Gras palette, this look utilizes long, tapered coffin or ballerina-shaped nails to maximize the visual impact. To replicate the base colors, you will need a highly pigmented, shimmering emerald green, a dense, fine-milled brilliant gold glitter polish, and a deep metallic royal purple (amethyst). The key variation lies in the finish application: the green nails feature a pure, high-metallic sheen, while the gold nails rely on ultra-dense glitter coverage for maximum sparkle. The royal purple nails showcase a nuanced technique, often featuring a subtle gradient or dusting of the gold glitter concentrated around the cuticle area, fading slightly toward the free edge, which adds depth and continuity between the neighboring colors. Ensure all base coats are applied smoothly and cured fully before moving to the detailed embellishment phase to guarantee a pristine canvas.
Achieving the unique glitter fade on the purple nails requires precision. After applying and curing the metallic purple base color, lightly dab or sponge on a small amount of fine gold glitter pigment or a heavy glitter gel polish directly along the cuticle line. Feather the application down just a few millimeters toward the middle of the nail to create a sparkling transition, avoiding a harsh line. For the fully gold and green nails, two to three thin coats of polish will be necessary to achieve the opulence seen here. Expert tip: Due to the high surface area of these long nails, using a builder gel or structured base coat beneath your colors is recommended to prevent breaking and ensure the longevity of the extension, especially when supporting heavy rhinestone work.
The crowning jewel of this design is the elaborate cuticle line embellishment. This look foregoes traditional accent nails, instead treating every nail with a cluster of small, multicolored rhinestones (typically size SS4 to SS8). Focus on small, round stones in coordinating colors: rich emerald green and bright yellow/gold. The stones must be applied meticulously along the eponychium in an arching crown pattern. Use a high-viscosity gem adhesive gel or a thick, non-wipe top coat specifically designed for securing embellishments. Place the stones using a wax-tipped tool, alternating the green and gold gems to create texture and contrast. Once all stones are placed, flash cure to secure the arrangement, then finish the entire nail—carefully sealing the edges around the rhinestone cluster without coating the tops of the gems themselves—with a final layer of high-shine, durable top coat for a breathtaking, regal finish.
Metallic Candy Stripe & 3D Glazed Heart Nails
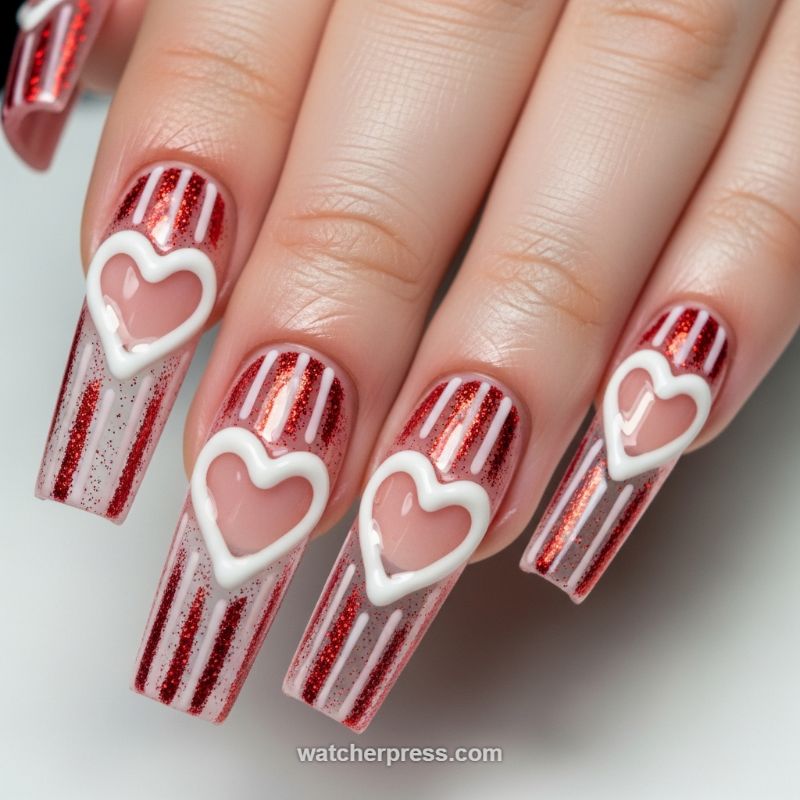
This design perfectly blends the “Metallic” and “Glossy” categories of nail art with a sweet, romantic aesthetic, often referred to as ‘glazed’ or ‘jelly heart’ nails. To achieve this elongated, dramatic look, start with well-prepped, square or coffin-shaped extensions, ensuring they are perfectly sculpted for uniform length. Apply a sheer, slightly milky pink or clear nude base coat to mimic a healthy natural nail underneath. The intricate foundation of this look is the vertical striping: alternate thin lines of opaque white polish or striping gel with highly pigmented, fine red metallic or glitter polish. Expert tip: utilize a specialized thin detail brush (size 00 or shorter) and a steady hand to ensure your lines are perfectly straight and evenly spaced from the cuticle to the free edge, establishing a clean, uniform “candy cane” effect that elongates the nail bed.
The defining feature is the central 3D heart, which requires meticulous application of sculpting material. Before curing your striped base completely, locate the exact center point. Using a dotting tool or a fine silicone sculpting brush, carefully ‘pipe’ a thick outline of opaque white 3D sculpting gel or a high-viscosity builder gel directly onto the center of the striped design. The goal is to create a raised, palpable border that stands proud of the surface, leaving the clear/nude base exposed inside the heart shape. This use of negative space is crucial, as it gives the heart a glossy, ‘glazed window’ appearance. Work one nail at a time and flash-cure the outline after each application to prevent the gel from spreading. This technique creates textural depth, elevating the design beyond a standard flat decal.
Once all 3D elements are fully cured, seal the entire nail with a durable, non-yellowing, high-shine top coat. Apply the top coat carefully over the striped background, around the base of the 3D heart, but avoid applying it heavily over the raised white outline itself if you wish to maintain the highest level of textural contrast between the matte-like 3D element and the super-glossy background. For maximum impact and longevity (especially important for long, square shapes), ensure the free edge is fully capped to prevent chipping. This striking design is perfect for Valentine’s Day or any time you wish to combine highly detailed line work with a standout sculptural element.
Ethereal Watercolor Florals with Gold Leaf Accents
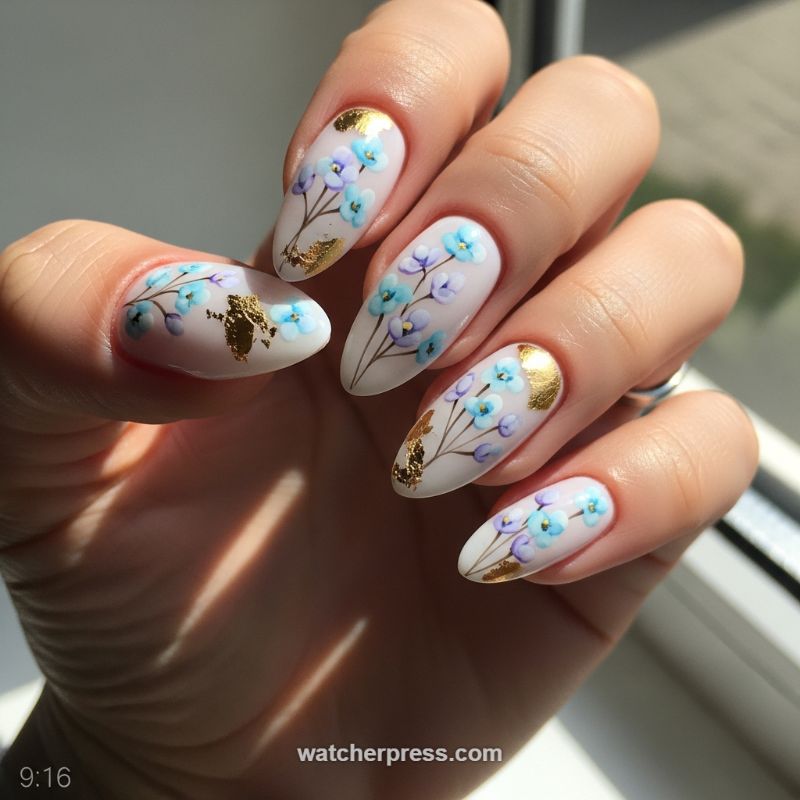
Achieving this delicate, springtime look starts with the perfect canvas. Begin by shaping your nails into a graceful almond or oval silhouette. Apply a few coats of a sheer milky-white or pale nude gel polish to provide a soft, semi-transparent base that enhances the ethereal quality of the subsequent artwork. The key to the florals here is a ‘watercolor’ or blending technique. Using a fine detail brush and highly pigmented polishes or art gels, lightly dot and blend shades of sky blue and soft lilac to form small, clustered flowers. Immediately after placing the color, use a clean, dampened brush to gently diffuse the edges, mimicking the look of traditional watercolor. Repeat this layering process until the desired depth is achieved, focusing on the center of the nail bed for a natural, bouquet-like effect.
Once the flowers are cured or dry, use a highly precise, long striping brush and a deep brown or black polish to paint the delicate, thin stems connecting the clusters. These stems provide necessary structure and grounding to the soft florals. Next comes the ‘Metallic’ element: gold foil. Instead of standard gold polish, use metallic flakies or gold leaf for a truly organic texture. Apply a thin layer of foil adhesive or a non-wipe tack coat only where you want the foil to stick—usually near the free edge or in a partial crescent shape near the cuticle. Gently press the gold flakies onto the tacky surface, using an orange stick or silicone tool to break them up into random, abstract shapes. This strategic, scattered placement ensures the design remains sophisticated and catches the light beautifully without overpowering the delicate floral artwork.
To ensure the longevity and glossy perfection seen in the image, seal the entire design with a high-shine, durable topcoat. This step is crucial not only for protection but also for deepening the colors and giving the gold foil maximum gleam. Expert tip: When placing the gold foil, vary the application slightly on each nail; notice how some nails feature foil at the tip while others have it at the base. This asymmetry keeps the set dynamic and modern. For maximum visual impact, keep the floral density higher in the center of the nail and allow the stems to fan out gracefully toward the edges, following the natural curve of the almond shape. This is the ultimate design for those who love intricate detail combined with luxurious metallic accents.
Mesmerizing Duochrome Metallic Nails
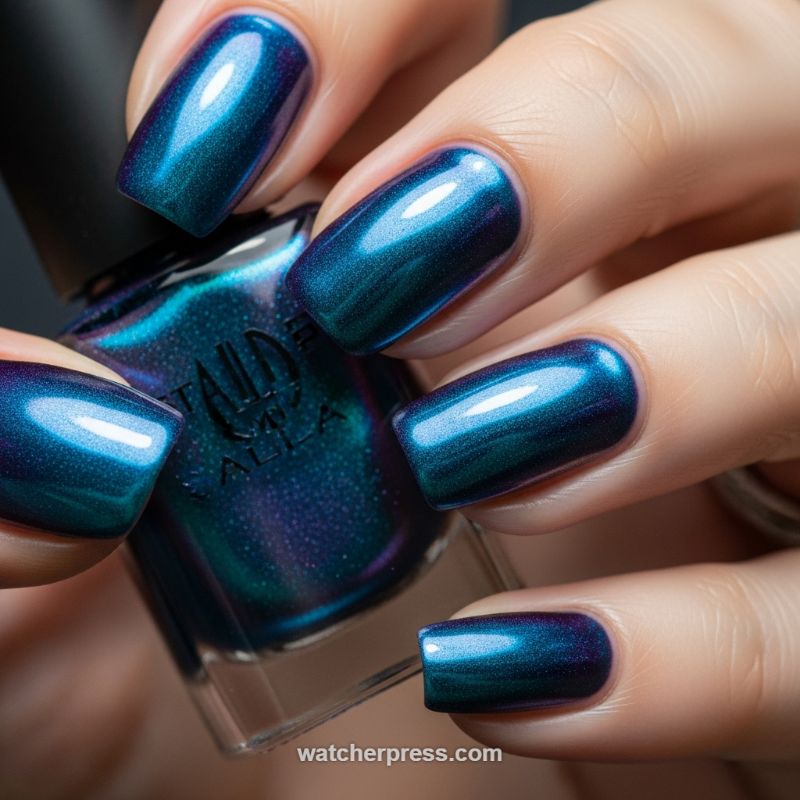
This breathtaking manicure showcases the dramatic appeal of a multichrome metallic finish, which is one of the most high-impact designs trending right now. The visual focal point is the intense color shift: a vibrant, reflective deep teal and aqua blue that seamlessly morphs into a rich violet or magenta purple when viewed at different angles or as the light hits the edges. Unlike traditional shimmer or glitter polishes, this look achieves an almost liquid, oil-slick effect thanks to ultra-fine pigment particles that create the duochrome illusion. The nails are kept in a clean, slightly squared oval shape, allowing the polish itself to be the sole statement. The combination of the jewel tones—the deep blue contrasting with the subtle purple flash—makes this a luxurious and sophisticated choice, ideal for transitioning into cooler weather or for a show-stopping evening event. For maximum effect, ensure your nails are perfectly buffed and shaped before application, as the high-gloss finish will magnify any imperfections.
To recreate this stunning, dimensional look, expert application is key, especially concerning the base layer. While some multichrome polishes are opaque on their own, the deepest color shifts are often achieved by starting with a dark base coat. We recommend applying one thin layer of a black or opaque navy blue cream polish first; this provides a shadowy foundation that makes the metallic shift pigments ‘pop’ and enhances the color saturation of the duochrome. Once the dark base is dry, apply two thin coats of your chosen multichrome or duochrome lacquer. Apply each layer smoothly and quickly to prevent streaking, as metallic polishes can be less forgiving than creams. After the color layers are fully dry, seal the design with a high-quality, ultra-glossy top coat. A thick, self-leveling top coat will not only protect the manicure but also maximize the reflective quality, giving you that sought-after, highly polished, mirrored effect seen in the image. Remember to ‘cap the free edge’ with every coat—base, color, and top coat—to minimize chipping and extend the wear of this high-effort look.
Maintaining the immaculate, glossy appearance requires attention to detail post-application. Because this design is so reflective, healthy cuticles are essential; dry, ragged skin will distract from the flawless finish. Incorporate a nourishing cuticle oil into your daily routine, focusing on the area around the nail bed. Additionally, when choosing a metallic or multichrome polish, invest in a formula known for quality pigmentation; cheaper versions often look dusty or streaky rather than liquid and reflective. This vibrant blue-to-purple shift pairs beautifully with silver jewelry or metallic accents in your wardrobe. When styling, treat this manicure as the primary accessory—its complexity and depth mean you can keep the rest of your outfit minimal and chic, letting your fingertips command the spotlight.
Vibrant Fuchsia Glitter Bomb: The Maximum Sparkle Overlay
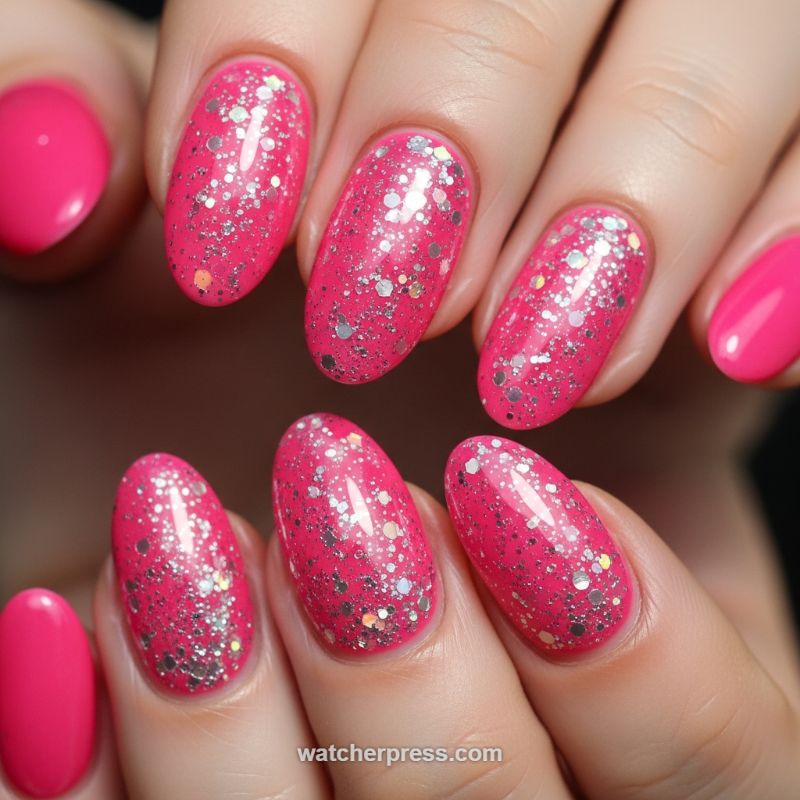
This dazzling design, which we’re calling the ‘Glitter Bomb Overlay,’ pairs an electrifying, glossy fuchsia base with a generous layer of mixed-size holographic silver glitter. The secret to achieving this depth and luminosity lies in the base polish choice. Opt for a vibrant crelly (creme-jelly hybrid) polish rather than a traditional opaque creme formula; the slight translucency of a crelly allows the light to penetrate the layers of glitter, amplifying the overall sparkle effect. Apply two to three thin, even coats of your chosen hot pink polish, ensuring full opacity and allowing complete dry time before moving to the glitter application. This foundational stage sets the foundation for maximum visual impact, providing the perfect canvas for the shimmering overlay. To execute the perfect glitter overlay, you need a highly saturated topper featuring both fine micro-glitter and medium-to-large holographic hexagonal pieces for textural variation. For maximum density in just one coat, bypass the standard brush application and utilize the ‘sponge method.’ Paint a thick layer of the glitter polish onto a makeup sponge wedge, then gently dab the sponge directly onto the nail plate. This method absorbs the clear base polish, depositing a much higher concentration of glitter particles onto the nail surface quickly. Repeat this light dabbing motion until the desired coverage is achieved—in this case, nearly full, opaque glitter saturation across the fuchsia base. The final and most crucial step for this high-shine look is the top coat. Glitter polishes inherently create a slightly textured, uneven surface, which requires a specialized thick, glossy top coat (often marketed as a ‘glitter smoothing’ or ‘gel-effect’ formula) to achieve that flawless, high-gloss dome finish seen in the image. Apply two generous coats of topcoat, allowing ample drying time between layers, to completely encapsulate the glitter and create a glass-like smoothness. This not only enhances the reflective quality of the holographic particles but also significantly increases the manicure’s longevity. This particular design pairs beautifully with medium-length oval or almond shapes, as the elongated silhouette balances the boldness of the color and the intensity of the sparkle.