Unlock the ultimate nail inspiration for any formal event. Discover the top trends, perfect shapes (coffin, almond), and colors (glitter, metallic, red, black) you need for a stunning look.
Modern French Tip Variations: 12 Ways to Elevate the Classic
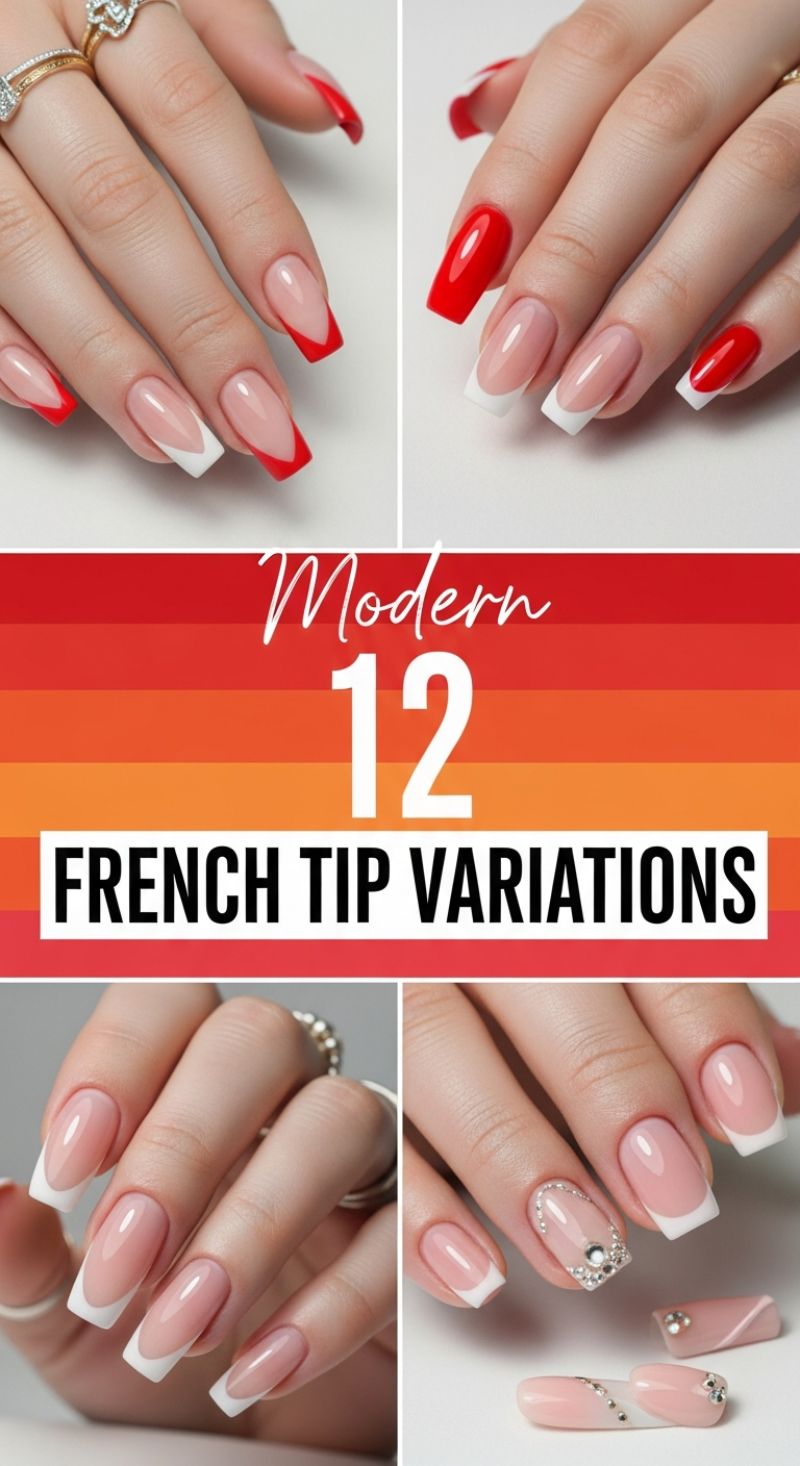
The French manicure is the epitome of elegance, but for a modern formal event, a slight deviation from the standard white tip is necessary. This collection showcases how dynamic shifts in color, contour, and shape can reinvent this timeless style. To achieve the high-impact looks featured here, consider experimenting with contrasting primary colors like the vibrant red seen in the top variations. One striking method is the “V-cut” or chevron French tip, which elongates the nail bed and adds an edgy geometric precision suitable for coffin or tapered square shapes. For those hesitant about full color, integrating a solid color accent nail alongside traditional French tips (as demonstrated by the solid red index nail) provides a dramatic pop without sacrificing sophistication. Expert tip: Ensure the base nude or pink polish is perfectly matched to your skin tone to make the contrasting tip color truly stand out, offering a clean boundary between the nail bed and the bold tip.
Perfect execution hinges on the precision of the smile line and the chosen nail shape. For a classic yet bold statement, opt for a sharp square shape with a deep, curved smile line, making the white tip thicker and more pronounced—a technique that adds visual strength to longer nails. For high-end formal occasions, incorporating subtle bling is key. The modern French tip seamlessly accommodates embellishments. To recreate the jeweled look, focus on tracing the natural curve of the smile line with micro rhinestones or small silver beads. Use a high-viscosity builder gel or strong gem adhesive to secure medium-sized statement jewels near the cuticle or apex, providing both dazzling light refraction and long-lasting adherence throughout the event. This technique transforms a simple nude nail into bespoke jewelry for your fingertips.
When selecting your variation, match the energy of the style to the formality of your event. For a black-tie affair requiring maximum glamour, the embellished French (bottom right) is ideal, offering shimmer that complements evening wear and jewelry. For a sophisticated cocktail event, the bold red geometric tips (top left) offer a fashion-forward edge that feels fresh and powerful. To perfect the execution of intricate lines like the V-tip, utilize a long, fine-bristled striping brush and cure each line segment individually to prevent the polish from bleeding into the base coat. Regardless of the chosen tip style—be it classic white, bold red, or jeweled—always finish with a thick, non-wipe, high-gloss top coat to maximize the light reflection, giving the nails that coveted wet, glass-like finish essential for a polished, formal look.
9 Textured 3D NAIL ART
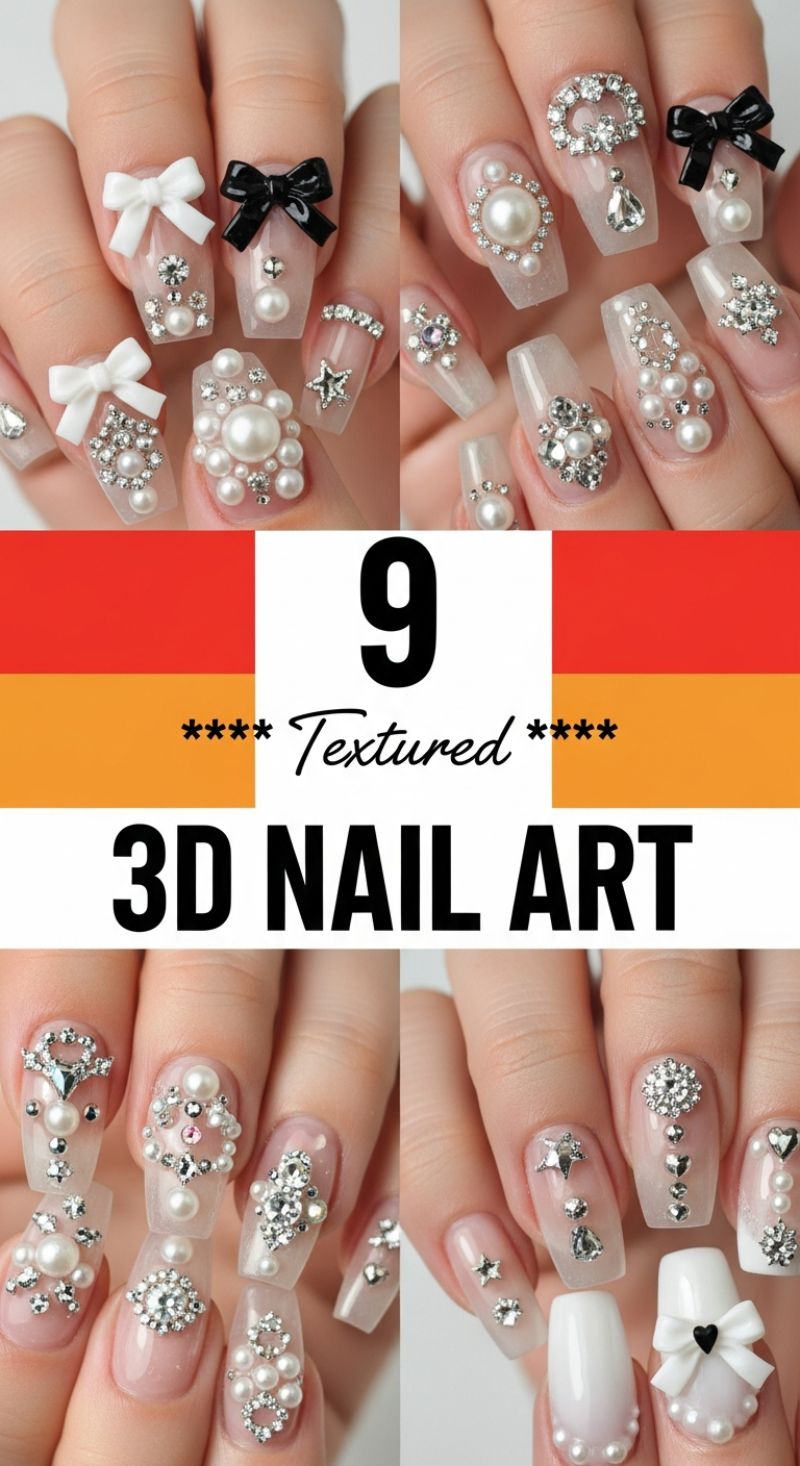
These opulent, dimensional designs elevate the classic French manicure aesthetic into true statement art, perfect for any high-profile formal event or bridal moment. To achieve this level of luxurious texture, the foundation is crucial: begin with well-shaped nails—coffin or tapered square are ideal—and apply a milky white or sheer pink gel polish. This translucent base provides a soft, diffused glow that allows the detailed 3D elements to stand out without looking cluttered. Before curing the final color coat, ensure you have gathered a variety of high-quality components, including flat-back pearls (in multiple sizes, such as 2mm to 6mm), dazzling clear rhinestones, and structured acrylic charms like the small black and white bows featured here. The key to the sophisticated look is the intentional curation of these pieces, transforming the nail bed into a miniature piece of jewelry, rather than just a simple embellishment.
The instructional core of this style lies in the precise application and securement of the textured elements. Use a thick, specialized nail glue gel or builder gel to anchor the larger pieces, such as the centerpiece pearl clusters or the sculpted bows. Apply a small bead of glue and gently press the charm into place using a wax picker tool, ensuring the edges are firmly seated. For creating detailed medallions or ‘brooch’ designs, start with a central, large pearl or rhinestone, then surround it symmetrically with smaller pearls and crystals. For maximum sparkle, use foil-backed rhinestones and avoid getting top coat directly onto the facets, as this dulls the shine. Once all elements are placed, flash cure the design to set the positioning, then meticulously ‘tuck’ a thin layer of builder gel around the bases of all edges and larger charms. This encapsulation step is vital for ensuring longevity and preventing snagging on delicate fabrics.
While this nail art is inherently glamorous, it requires careful maintenance to last through an extended formal engagement. The complexity of these 3D designs means they are best suited for events where heavy manual labor is minimal. For expert advice on durability, consider sealing the entire design (excluding the top surfaces of the largest, clearest rhinestones) with a non-wipe gel top coat specifically formulated for durability. This look is exceptionally versatile for formal wear; the incorporation of small, contrasting black bows introduces an element of chic drama, ideal for a black-tie event, while the white pearls and bows remain the epitome of bridal elegance. Remember that the design doesn’t need to be uniform across all fingers; mixing a heavy cluster design on the ring finger with minimalist pearl accents on the pinky and index finger creates an appealing visual balance.
10 Sizzling Red Prom Nails
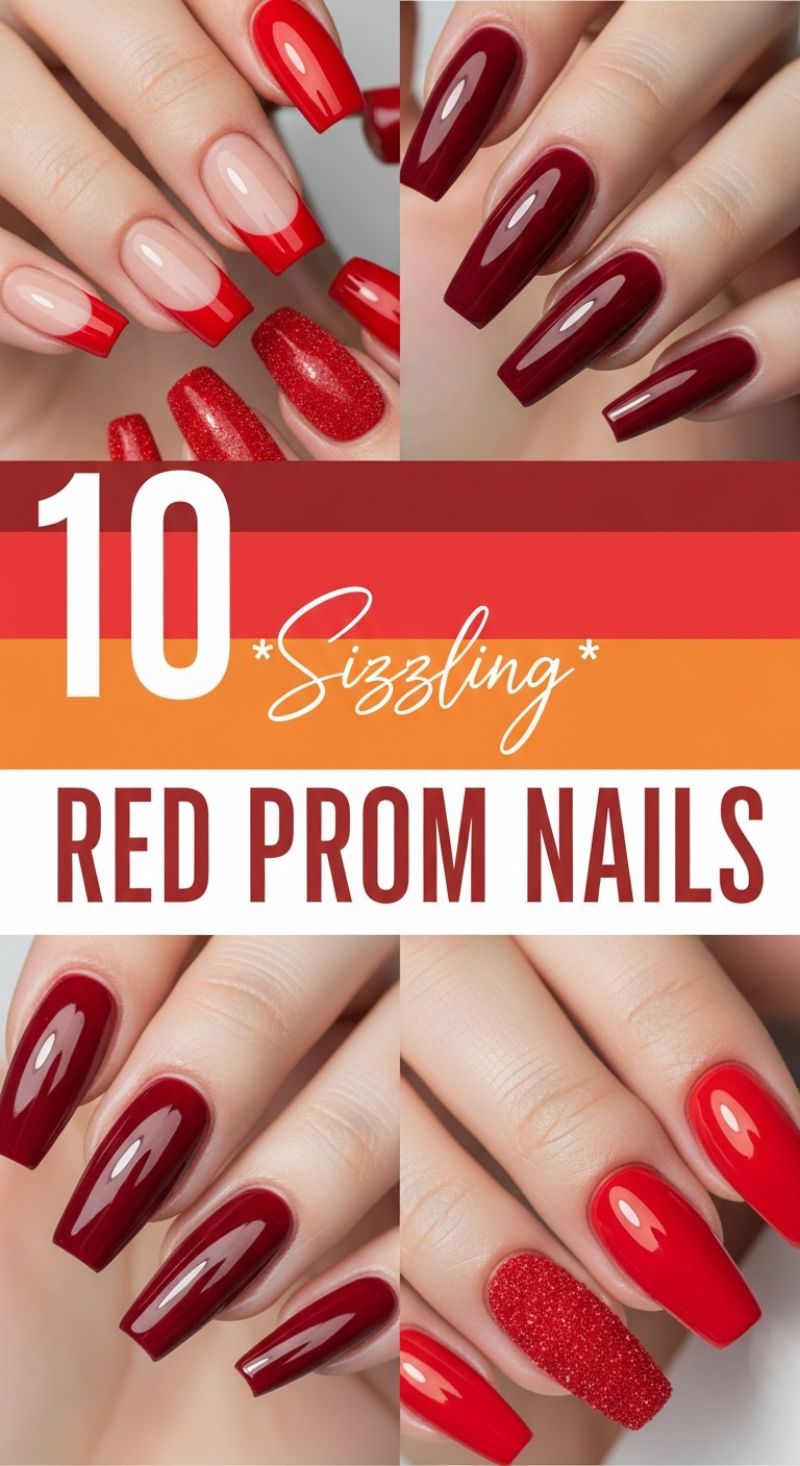
Red nails are the quintessential statement of confidence, glamour, and timeless elegance, making them an ideal choice for any formal event, especially prom. To recreate the high-impact looks featured here, start by selecting your perfect shade. The collection showcases two powerful options: the brilliant, classic fire-engine red, which is bold and universally flattering, and the deep, sultry high-gloss burgundy, perfect for achieving a sophisticated, vampy aesthetic. For optimal shine, ensure a thorough nail prep: buff the nail plate lightly, apply a quality ridge-filling base coat, and then use two thin, even coats of your chosen lacquer or gel. The secret to that glass-like finish lies in the topcoat; opt for a non-wipe, high-shine gel topcoat, curing it fully to lock in depth and brilliance that will last all night long. The longer, structural shape shown—a hybrid between coffin and square—magnifies the dramatic effect of the rich color, demanding attention with every gesture.
To introduce texture and complexity, incorporate accent nails using specialized techniques. The shimmering texture seen on the ring finger is achieved through the ‘sugar glitter’ method, offering a dimensional, slightly rough finish unlike standard glossy glitter. To execute this, first apply your base color and topcoat, but do not cure it. Instead, apply a thick layer of fine red or iridescent glitter directly over the uncured topcoat or a dedicated adhesive gel, ensuring complete saturation. Gently press the glitter down, cure the nail, and then carefully brush away any excess powder without applying another topcoat layer, which would dampen the texture. If you prefer the classic elegance of the red French tip, use a nude or blush base that complements your natural nail bed, then meticulously apply the red tip using a fine striping brush or a specialized stamp/guide to ensure the smile line is perfectly crisp and symmetrical across all nails. This inverted or deeply curved French design provides a modern twist on the iconic style.
For expert maintenance and longevity, particularly for an evening of dancing and celebration, focus on sealing the entire nail structure. Always ‘cap the free edge’ by running your topcoat brush along the very tip of the nail to prevent chips from starting at the edge. If you are using professional gel polish, ensure proper curing times for both the color coats and the topcoat, as under-cured polish is prone to lifting and dulling quickly. Finish the manicure by moisturizing the cuticles with a rich oil, which keeps the skin surrounding the bold red color healthy and further accentuates the flawless finish of your striking, formal nail art. Red nails are a statement in themselves, requiring minimal additional ornamentation to stand out.
8 Unexpected GREEN NAIL LOOKS
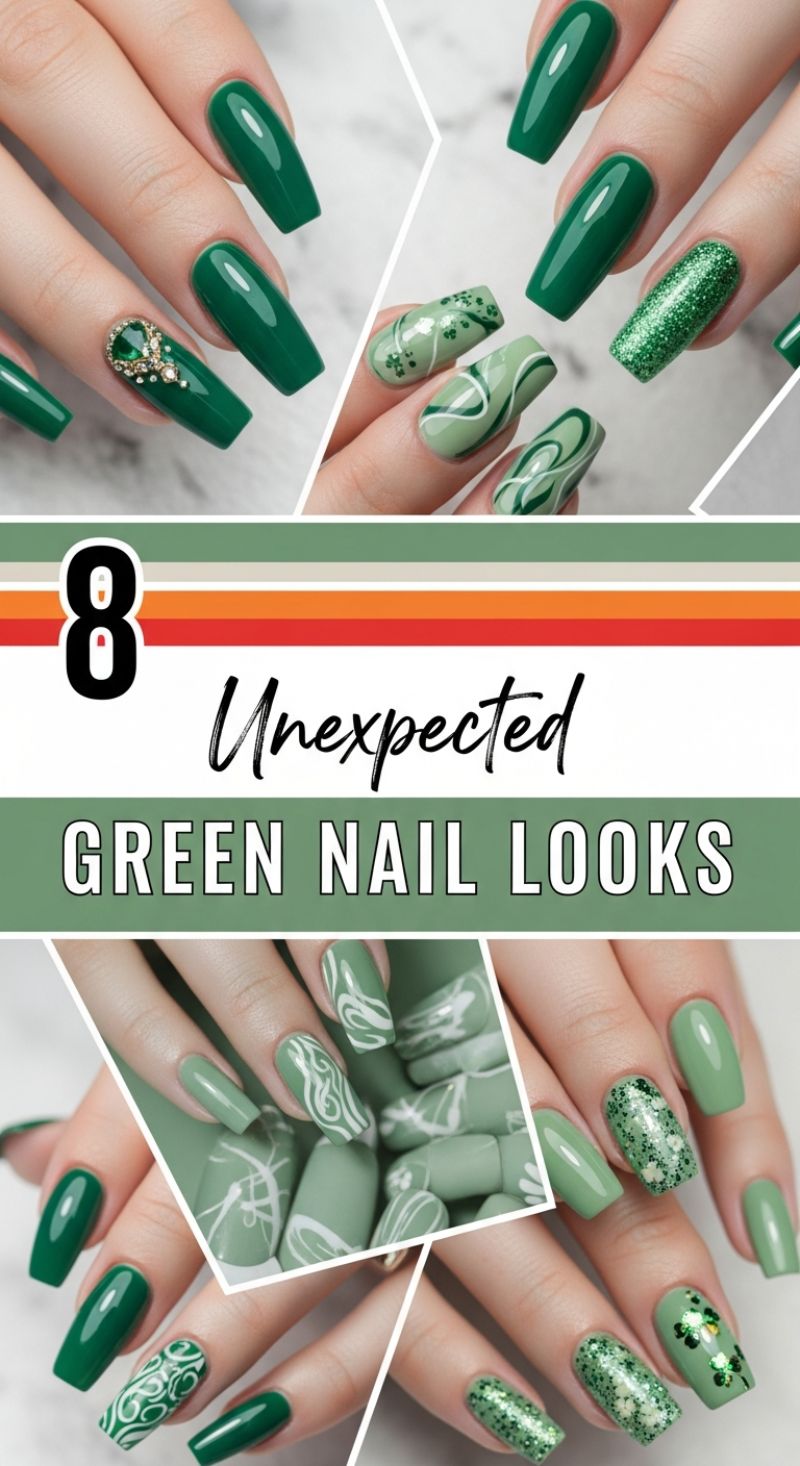
While red and nude polishes often dominate the formal event scene, choosing a sophisticated green hue offers an element of surprise and luxury that is unmatched. To recreate the deep, striking emerald green look featured here, opt for a high-gloss, opaque formula applied to a medium-to-long coffin or ballerina shape, which naturally elongates the fingers. For high-stakes events, elevating a single accent nail with substantial embellishments is crucial. Secure large gemstones or elaborate clusters (like the teardrop design shown) using a robust builder gel or specialized rhinestone glue. To ensure maximum brilliance, carefully seal the perimeter of the stones with a non-wipe top coat, taking care not to brush over the facets of the gem itself, which can dull the sparkle. This classic deep green, when polished and perfectly shaped, serves as a sophisticated anchor for any evening gown.
For a more modern, yet equally refined approach, explore the unexpected world of sage and moss greens. These softer tones pair exceptionally well with abstract, flowing nail art. To execute the trendy swirl or marble effect, start with two to three coats of a light sage base. Once cured, use a highly pigmented contrasting color (such as crisp white or a deeper forest green) loaded onto a fine detail brush. The key is to create fluid, non-uniform lines that mimic natural patterns—avoiding straight or symmetrical strokes. For added depth, try the ‘wet-on-wet’ technique where a second color is dragged through the first before curing, blending the edges softly. Pairing these detailed nails with solid, matte sage nails provides a perfect balance of texture, which is an advanced technique guaranteed to catch an expert eye.
Don’t underestimate the power of glitter in formal nail design. A full, dense coverage of holographic or chunky green glitter on an accent nail reflects ambient light beautifully, adding dimension without overpowering the look. To ensure the glitter lay flat and remains durable throughout the night, encapsulate it thoroughly with at least two layers of clear top coat, focusing on smoothing out any rough edges at the cuticle and free edge. For designers utilizing decals, such as the delicate white florals or classic clovers, make sure the decals are thin and flexible. Apply them to the tacky layer of a cured gel coat and seal immediately with a resilient gel top coat. Final expert tip for formal durability: always opt for gel or dip systems over traditional lacquer for long wear, especially when dealing with extended lengths and heavy embellishments, ensuring your flawless look lasts from the red carpet to the after-party.
12 Dreamy Pink Prom Nail Ideas: Mastering Manicures in Rose and Fuchsia
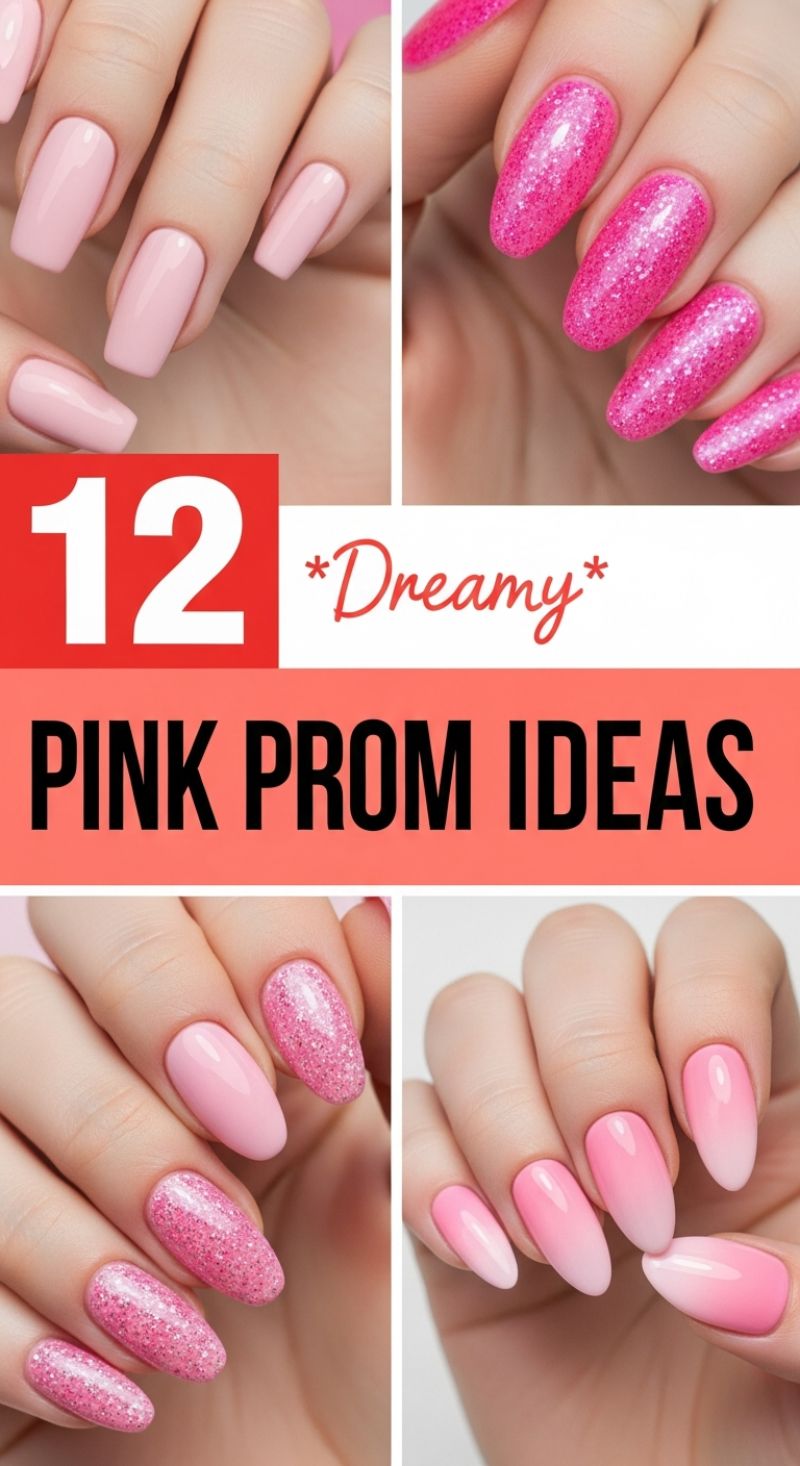
Pink remains an undisputed classic for formal events, offering endless versatility from demure sophistication to bold, celebratory glamour. The examples here showcase four essential ways to incorporate this beloved color into your next formal look. The simplest yet most elegant option is the solid pale pink (top left), a creamy opaque lacquer that elongates the fingers and acts as a neutral canvas, perfectly complementing intricate dresses or bright accessories. For high-impact sparkle, try the full-coverage fuchsia glitter design (top right). To achieve this intense, multi-dimensional effect, start with a matching opaque base coat, then apply two thin layers of high-density glitter polish. Ensure even distribution by gently dabbing the polish rather than heavily brushing it on. Expert tip: Using a clear builder gel over the glitter prior to the top coat will smooth the texture and prevent snagging, giving you a flawless, glass-like finish that lasts all night.
For those who want to blend classic elegance with modern flair, consider two popular trending techniques: the mixed-texture manicure and the pink ombre. The mixed-texture look (bottom left) balances the simplicity of a solid cream finish with the vibrancy of full glitter coverage, typically alternating colors or textures on every other finger. This approach prevents either style from dominating and creates visual interest. To achieve the perfect pink gradient (bottom right), known as a pink ombre or ‘baby boomer’ nail, you will need at least two shades of pink and a makeup sponge. Apply both the darker and lighter polish stripes directly onto the sponge, lightly dab onto the nail, and repeat until the blend is seamless. Immediately apply a high-shine top coat to melt the colors together and smooth any sponge texture, creating a beautiful transition from a deep rose at the tips to a soft blush near the cuticle.
Beyond color and texture, the shape of your nail is crucial for a polished formal look. The majority of these styles are featured on almond or oval shapes, which are inherently elegant and lend themselves well to gradients and high-shine finishes. If you prefer the durability and width of a squoval shape (as seen in the pale pink example), ensure the corners are slightly rounded to avoid a harsh, boxy appearance. For maximum longevity during a night of dancing and celebration, always use a gel system—whether soft or hard gel—as opposed to traditional lacquer. Prep your cuticles meticulously and seal the free edge of every nail with the top coat; this crucial step prevents chipping and guarantees your dreamy pink nails look perfect until the last dance.
TEXT OVER ON TEXT NAIL

This visual inspiration palette perfectly captures the two main routes for formal event nails: High-Impact Glamour versus Understated Luxury. The collage showcases the importance of shape, featuring sharp, dramatic silhouettes like the stiletto and tapered coffin, which inherently elevate any look. The glossy true red and deep oxblood selections offer maximum impact, drawing immediate attention and signaling confidence. Conversely, the soft pinks and neutral nudes—often utilizing the French fade or ombré technique—provide a sophisticated foundation that complements any gown without competing. Expert advice dictates that the shape should align with the event’s formality and your comfort level; longer, sharper nails are best reserved for black-tie affairs where dramatic elegance is paramount, while a classic almond or squoval shape offers enduring versatility. Pay close attention to the finish: high-shine gloss enhances bold colors, while a smooth matte finish elevates subtle neutrals.
To replicate the stunning bold looks featured, focus intensely on polish quality and application precision. For the classic red or deep burgundy stiletto, two thin, perfectly leveled coats of a highly pigmented lacquer are essential to achieving that rich, even color payoff, especially along the sharp edges of the nail extensions. When incorporating a glitter or metallic accent nail, such as the featured gold shimmer or gold leaf flake, choose a chunky particulate glitter or delicate foil for optimal visibility and sparkle under event lighting. How-to Tip: Ensure the accent nail is strategically placed—usually the ring finger or middle finger—maintaining symmetry within the dramatic color block. If opting for a matte finish in red (as shown in the coffin shape), always apply a high-quality matte top coat over a standard high-pigment gel color to ensure longevity and prevent the color from appearing dull or chalky, which is critical for maintaining an immaculate appearance throughout the evening.
For attendees prioritizing timeless elegance, the neutral and soft pink styles offer exquisite refinement, often requiring more nuanced technique than a simple block color. The key technique here is the French Fade (or baby boomer ombré), where a sheer base transitions seamlessly into a soft white or beige tip, requiring meticulous blending with a sponge or fine brush for a flawless, airbrushed effect. To personalize this look for a formal setting, integrate subtle luxurious elements. Use a fine-grade holographic or pearl shimmer top coat over one or two nails, or apply delicate 3D embellishments, such as the small pearl clusters featured, near the cuticle or base of the nail. When selecting your nude base, always hold the polish bottle against your skin tone; cool-toned skin looks best with pink-based nudes, while warm-toned skin is complemented by peach or beige nudes. This thoughtful selection ensures the nails elongate the fingers beautifully and perfectly harmonize with any formal attire.
8 Edgy Coffin Nail Designs
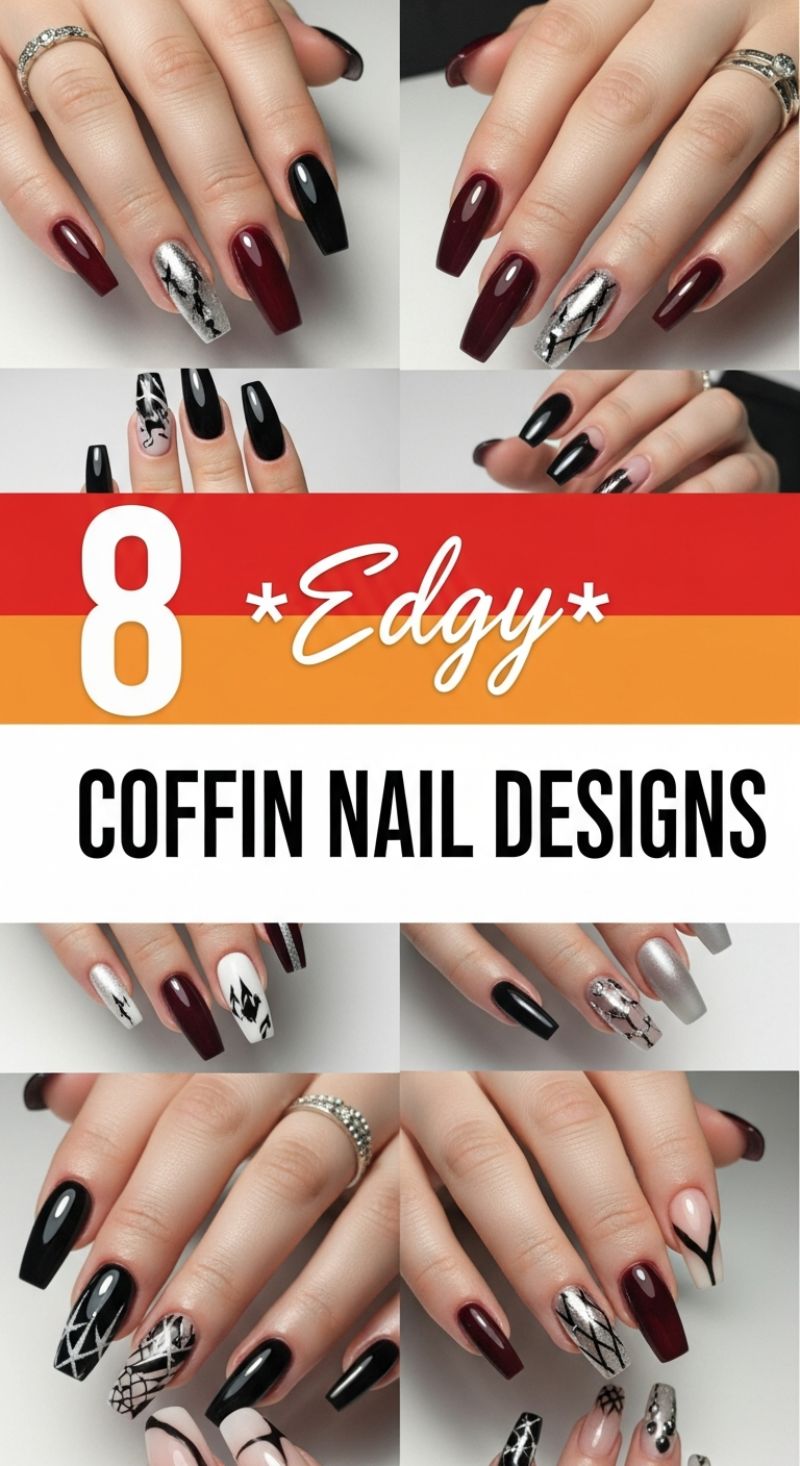
The coffin or ballerina shape is inherently dramatic, making it the perfect canvas for an edgy yet sophisticated manicure destined for a formal affair. The designs featured here masterfully utilize a high-contrast palette of jet black, rich, glossy deep burgundy (almost maroon), and striking metallic silver or chrome. This combination elevates the classic dark nail into a statement piece. To achieve this level of high-fashion drama, ensure the base colors are fully opaque and finished with an ultra-glossy topcoat. The coffin shape requires precise filing—straight side walls meeting a crisp, blunt tip—which maximizes the nail plate, allowing the dark colors to appear even more saturated and luxurious. For a cohesive formal look, ensure the length across all fingers is consistent, as the impact of this shape relies heavily on uniformity.
Integrating the intricate accent designs is where the ‘edgy’ factor truly shines. For the geometric patterns, such as the spiderwebs or sharp criss-cross lines, precision is paramount. Use a high-pigment black or white gel paint with a fine detail brush (a liner or ’00’ brush) to draw clean, crisp lines over a contrasting base (nude, white, or silver). The striking silver accent nails can be achieved using various techniques: for a liquid metal or cracked foil effect, use metallic nail foil adhesive and silver transfer foil; alternatively, for a solid chrome finish, use fine silver chrome powder buffed into a no-wipe topcoat. The key to keeping these looks event-appropriate is strategic placement—limit the detailed artwork to one or two accent nails (like the ring finger and pointer finger) and keep the remainder solid deep colors. This technique prevents the design from looking chaotic and maintains an air of refined, gothic elegance.
When preparing these dramatic coffin nails for a formal event, consider the maintenance and styling. Given the length and dark colors, chips are highly noticeable, so professional application of hard gel or acrylic is recommended for durability and longevity. Expert advice suggests using the metallic silver accents to tie the manicure directly into your accessories—if you are wearing silver or diamond jewelry, this creates a perfectly coordinated ensemble that looks intentional and high-end. Similarly, the deep burgundy shade pairs exquisitely with black gowns or jewel-toned fabrics, lending a vampy sophistication. These designs are intended to be statement pieces, so maintain the health of the surrounding skin with daily cuticle oil application; immaculate cuticles frame the bold manicure and finalize the high-end appearance necessary for any formal event.
Elegant Almond Nail Inspiration
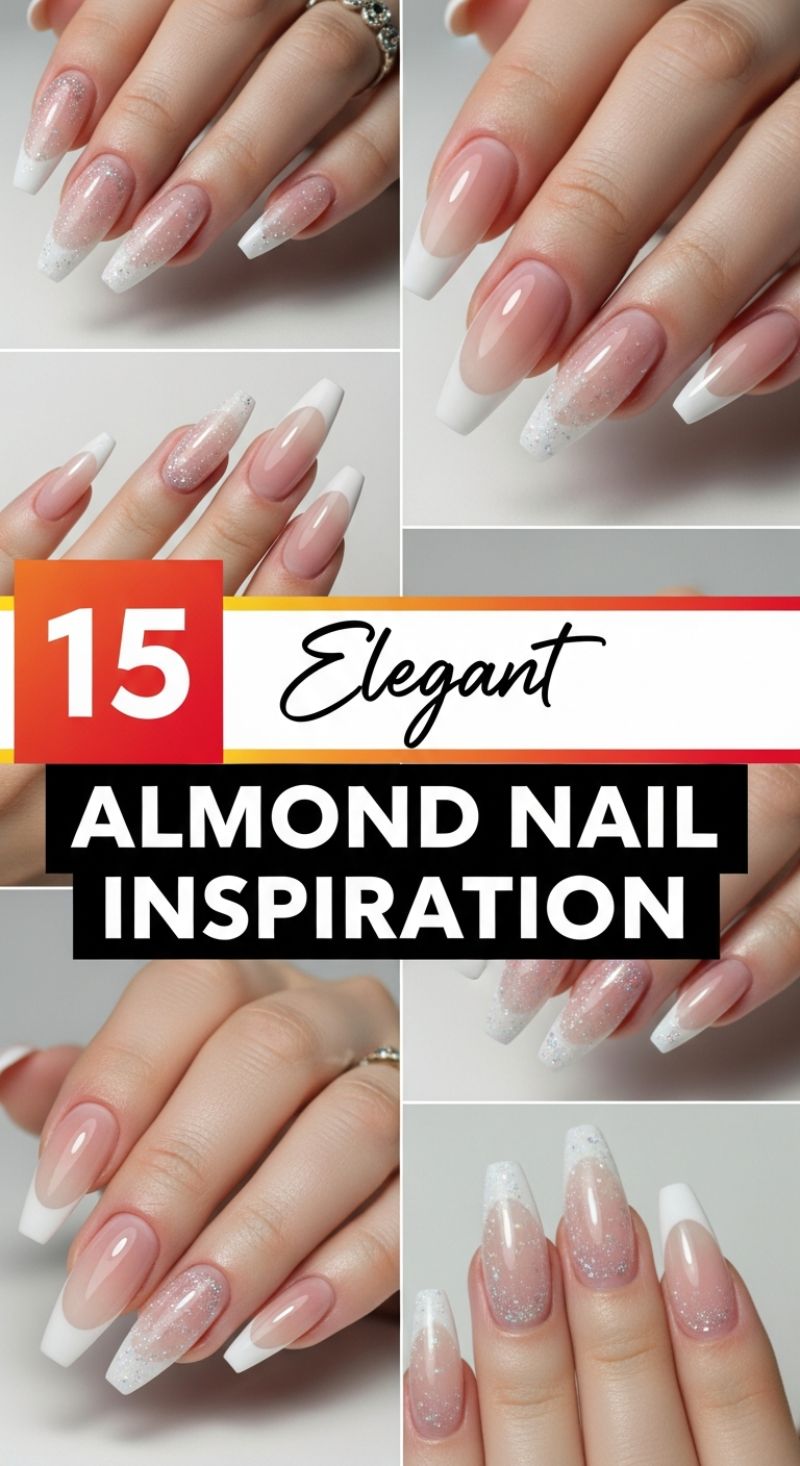
The almond shape is the ultimate choice for formal events, offering a classic elegance that visually lengthens the fingers and provides a sophisticated canvas for intricate designs. This particular inspiration elevates the timeless French manicure by incorporating a subtle, yet dazzling glitter fade, perfect for complementing diamond jewelry or catching the light under formal venue lighting. To achieve this look, start with a well-structured base, typically utilizing a sheer pink or nude builder gel to provide the requisite strength and the natural appearance of a healthy nail bed. The critical technique involves shaping the nail to a perfect, symmetrical almond—tapered and rounded at the apex, avoiding the sharpness of a stiletto or the bluntness of a coffin shape—ensuring durability while maintaining a sleek silhouette.
Achieving the perfect glitter French Ombre requires precision and the right products. Begin by establishing the crisp, white French tip. While traditional methods use liquid monomer and powder, for modern application, a highly pigmented white gel paint is often preferred for a cleaner smile line. Immediately following the creation of the white tip (or before curing if using a technique that relies on tackiness), apply a high-quality, ultra-fine holographic or silver glitter. The trick is to concentrate the glitter heavily at the transition point—the smile line—and use a dry brush or specialized dusting tool to gently sweep and fade the remaining particles down toward the nail bed, ensuring the glitter becomes sparse and seamless about one-third of the way up the nail. This gradient is what transforms a standard French tip into a delicate, ethereal ombre.
For a polished, high-end finish suitable for a formal setting, encapsulation is key. Once the glitter layer is cured, apply a medium-viscosity clear builder gel or a self-leveling top coat over the entire nail structure. This step serves two purposes: it locks the glitter securely in place, preventing any rough texture, and provides that deep, glossy magnification that makes the color and glitter truly pop. Expert advice suggests two thin coats of the final top coat for maximum durability, especially given the length of these almond nails. This design is exceptionally versatile, making it ideal for bridal looks, black-tie galas, or any event where refinement and subtle glamour are paramount.
5 Affordable DIY Nail Hacks
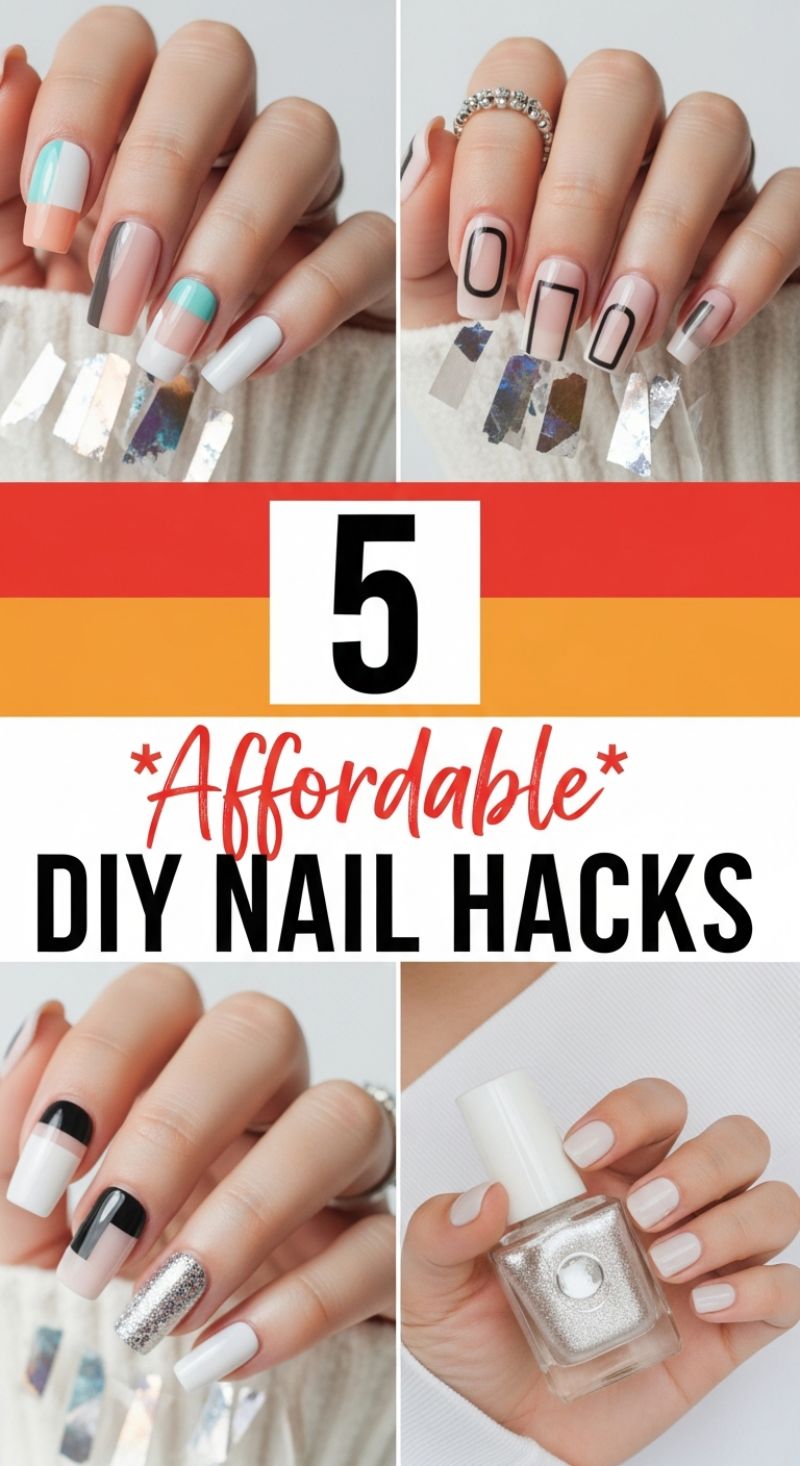
Achieving highly sophisticated, salon-quality nail art for a formal event doesn’t require a hefty price tag or an appointment. The foundation of these modern, upscale looks lies in maximizing negative space and utilizing high-contrast geometric shapes. To replicate the abstract, color-blocked manicure (top left), begin with a sheer nude base coat on all nails to ensure a professional, clean canvas. The hack involves precision; use fine-tipped striping brushes or even small pieces of painter’s tape to segment the nail plate before applying opaque colors like white, peach, mint, and charcoal grey. For the sharpest lines, wait until the color is *almost* dry, then gently peel the tape away in a slow, continuous motion. This technique minimizes bleeding and creates the defined divisions necessary for this graphic, architectural aesthetic that pairs perfectly with modern formal wear.
The minimalist, outline-based design (top right) is perhaps the easiest hack to master for a truly chic formal look. After a sheer nude base coat, use a thin, flexible striping brush dipped in black polish to freehand simple squares or rounded rectangles on the nail surface, embracing the negative space inside the shape. Alternatively, a great hack for perfect symmetry is using specialized circular vinyl stencils or even the sticky outer rings of hole punch reinforcements; apply the stencil, paint the black outline around the edge, and remove. This bold yet understated graphic style provides immediate elegance and is highly favored in high-fashion nail artistry. For added flair, as shown in the accompanying visuals, incorporating holographic foil accents (applied using specialized nail glue or a tacky base coat and pressing the foil onto the nail) adds dimension and sparkle, catching the light beautifully during an evening event.
For a look that merges geometry with traditional glam (bottom left), focus on the statement finger, typically the ring finger. To achieve this intense, multi-dimensional glitter finish, don’t just use a standard glitter polish; instead, apply a clear top coat and immediately pour or dab loose micro-glitter over the wet polish. Once dry, seal aggressively with two thick layers of a durable, gel-like top coat to prevent shedding—this is essential for event longevity. For the color-blocked nails in this style, you can combine a classic white French tip with black segments, using pre-cut French tip guides or even the curved edge of a band-aid for a crisp, curved line near the cuticle. Remember, the ultimate hack for any DIY manicure, especially for a formal event, is patience and a high-quality, quick-drying top coat applied generously over every design to ensure chip-free wear throughout the night.
9 Dramatic BLUE MANICURES
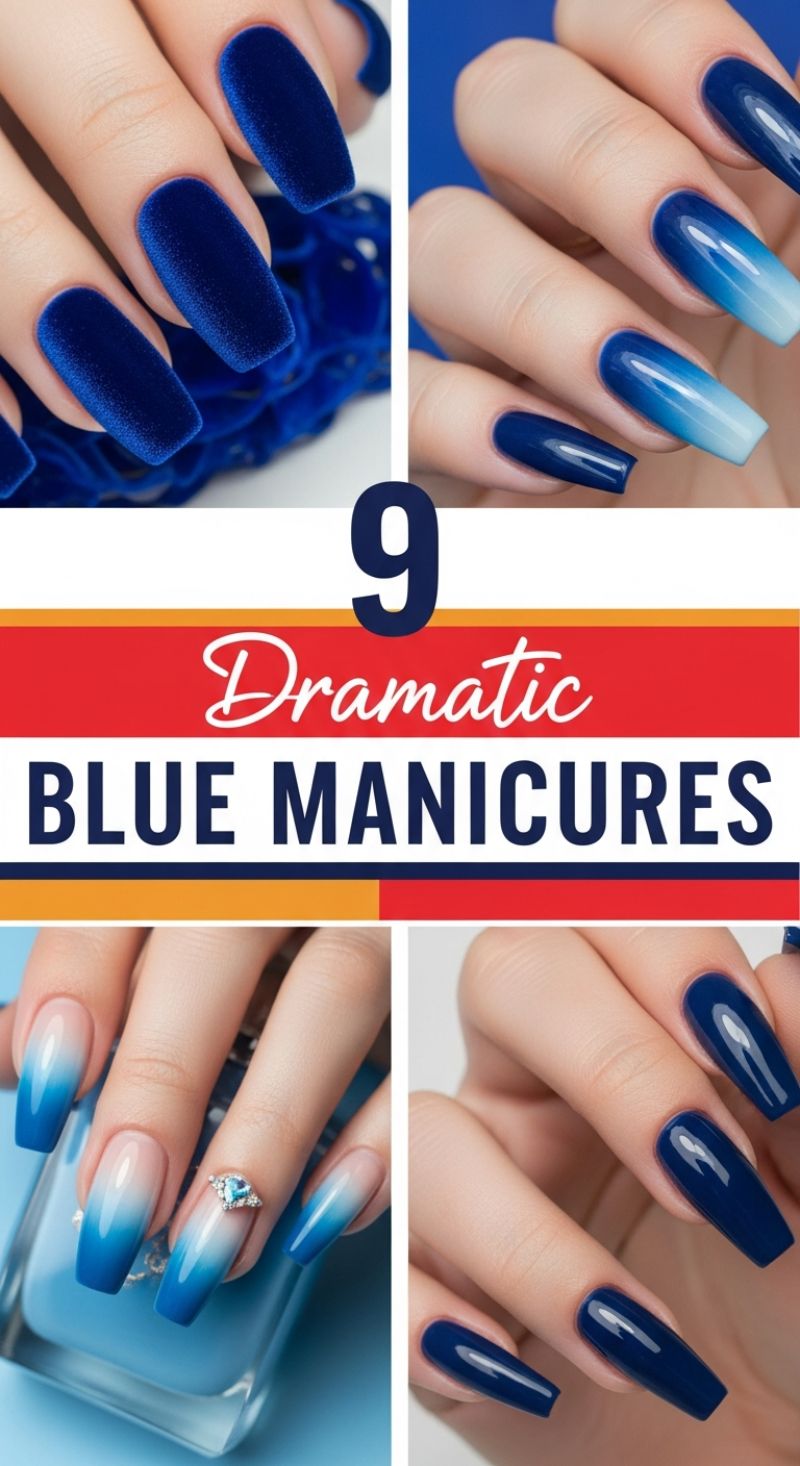
Deep blue is inherently dramatic, making it a perfect statement color for any formal gala or event, often replacing traditional black for a richer, more unique look. The core element of drama in these styles is the length and shape, universally showcased as a sleek, long coffin cut that provides a large canvas for detail and contrast. For instant sophistication, consider the high-gloss navy shown in the bottom right—this deep, reflective shade catches the light beautifully and pairs flawlessly with silver or gold accessories. Alternatively, for a truly opulent effect, the velvet blue manicure (top left) offers a luxurious, textured finish. This style is typically achieved using magnetic polish, which utilizes microscopic metallic particles that, when drawn by a magnet, create ridges resembling plush fabric under directional lighting, resulting in an unforgettable, tactile dimension.
To achieve the striking visual complexity seen in the ombre examples, a blending technique using a dense makeup sponge is essential for a seamless gradient. The process begins with applying two or three shades of blue polish directly onto the sponge—from dark to light—and gently tapping the color onto the nail, ensuring the colors overlap and merge in the transition zone. The top right image demonstrates a classic dark-to-light gradient, where the color concentration is heaviest at the cuticle. The bottom left variation, however, offers a refined twist, blending a natural pink or nude base into a vibrant blue tip, giving a sophisticated nod to the French ombre style (often called “baby boomer” nails). The key to making these gradients look high-end is applying a thin layer of clear topcoat between color coats to smooth out any sponge texture before applying the final, glossy seal.
For elevated formal flair, integrating strategic embellishments is the perfect finishing touch, as exemplified by the aquamarine heart charm placed near the cuticle on the ring finger. When applying 3D nail art for a formal event, security and longevity are paramount. We recommend using a strong professional adhesive or non-wipe builder gel to anchor the stone, ensuring it is thoroughly cured under a UV lamp. Placement near the cuticle is often favored as it protects the jewel from daily activities and reduces snagging. Finally, regardless of whether you choose solid shine or intricate ombre, always ensure the final step is a high-quality, non-yellowing topcoat. This not only enhances the drama—making glossy nails appear liquid and velvet nails deeply matte—but also provides the crucial protection needed for these elaborate manicures to last throughout your entire event.
10 Chic Black Prom Designs
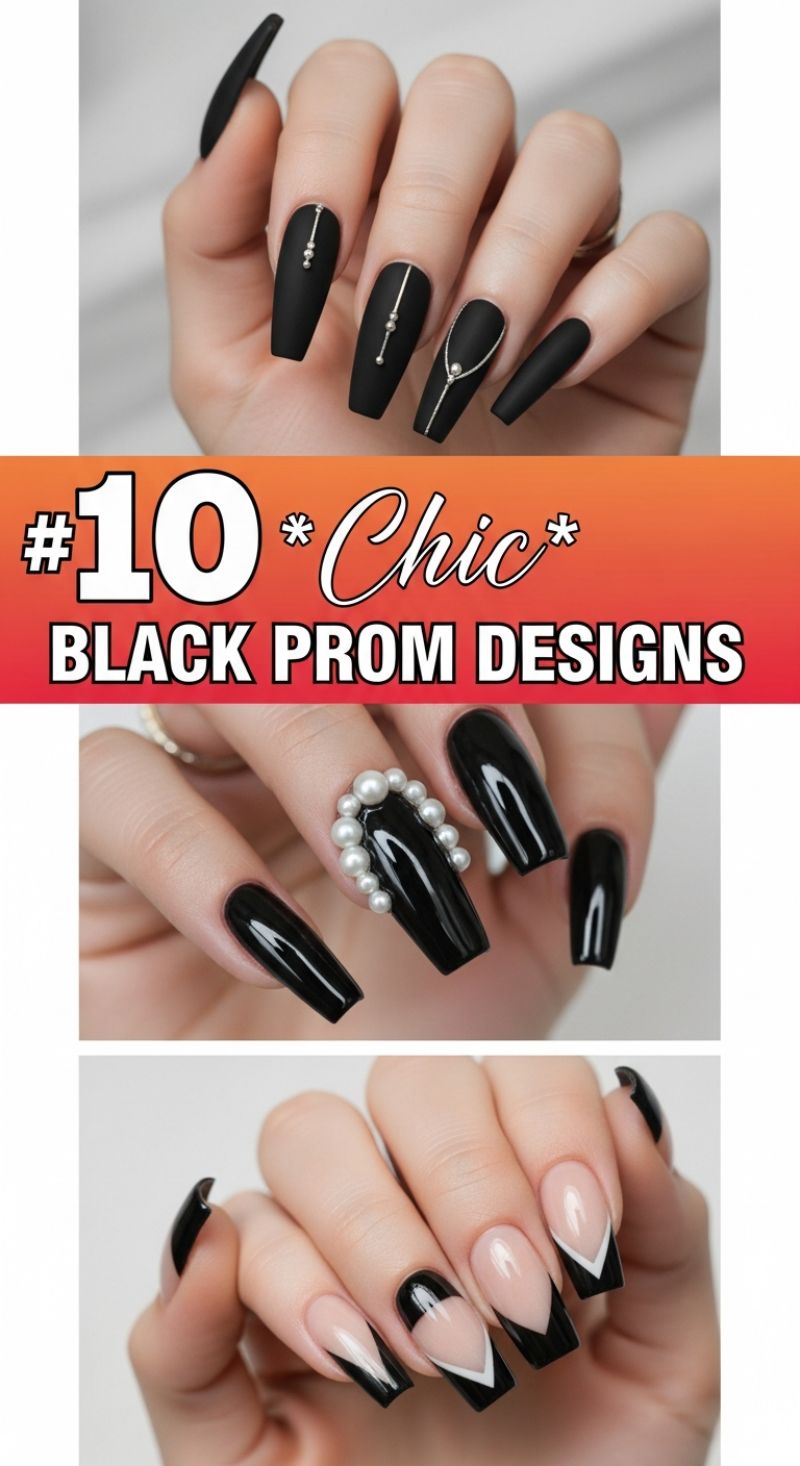
Black nails are the epitome of chic sophistication, offering a bold yet timeless choice for any formal event, especially prom. This collection showcases the incredible versatility of deep black, moving beyond a simple solid coat into high-fashion territory. The first look masterfully contrasts a matte black finish on long coffin nails with delicate metallic accents. To recreate this sophisticated style, start with a perfectly shaped long coffin tip and apply a rich, pigmented black polish, followed by a matte top coat. The key to the design lies in the minimal, vertical striping: use ultra-thin silver striping tape or a fine detail brush with chrome polish to draw precise vertical lines down the center of the nail bed. Finish by strategically placing two to three micro-rhinestones or silver microbeads along the line to mimic delicate jewelry, ensuring symmetry and keeping the design clean and minimal for maximum elegance.
The second design elevates traditional glamour using a high-gloss black finish paired with dramatic, three-dimensional pearl embellishments. This look is best achieved on strong, sculpted nails (like the glossy coffin shown) to support the weight of the adornment. Select one accent nail—often the ring or middle finger—and meticulously apply small to medium-sized white pearls in a crescent or halo shape around the cuticle area. For durable application, use a strong nail adhesive or a thick layer of builder gel to anchor the pearls securely, curing thoroughly if using gel. The arrangement should be dense near the base and slightly taper off along the side walls, creating a stunning, sculptural crown effect. Expert tip: Do not apply a top coat over the pearls; leave them bare to maximize their texture and milky luster against the high-shine black polish.
Finally, for those who love the classic French manicure but desire an edgy upgrade, consider the geometric black tip variations. Instead of the typical soft crescent, this style employs sharp angles—V-tips, chevron designs, and sweetheart curves—set against a translucent nude base. This technique requires precision: after shaping the coffin or square tip, apply a sheer nude polish. Using a very fine angled brush, paint the black polish onto the free edge, ensuring the lines are crisp and symmetrical, especially in the deep V-shape, which visually lengthens the nail bed. For extra definition, an optional thin white line can be used to outline the geometric black area, providing a stark contrast (a reverse outline technique). These modern geometric tips offer a fresh, architectural look that is infinitely more fashionable than a traditional white French tip, making them perfectly suited for a contemporary formal ensemble.
10 *Perfect* ACRYLIC PROM SHAPES
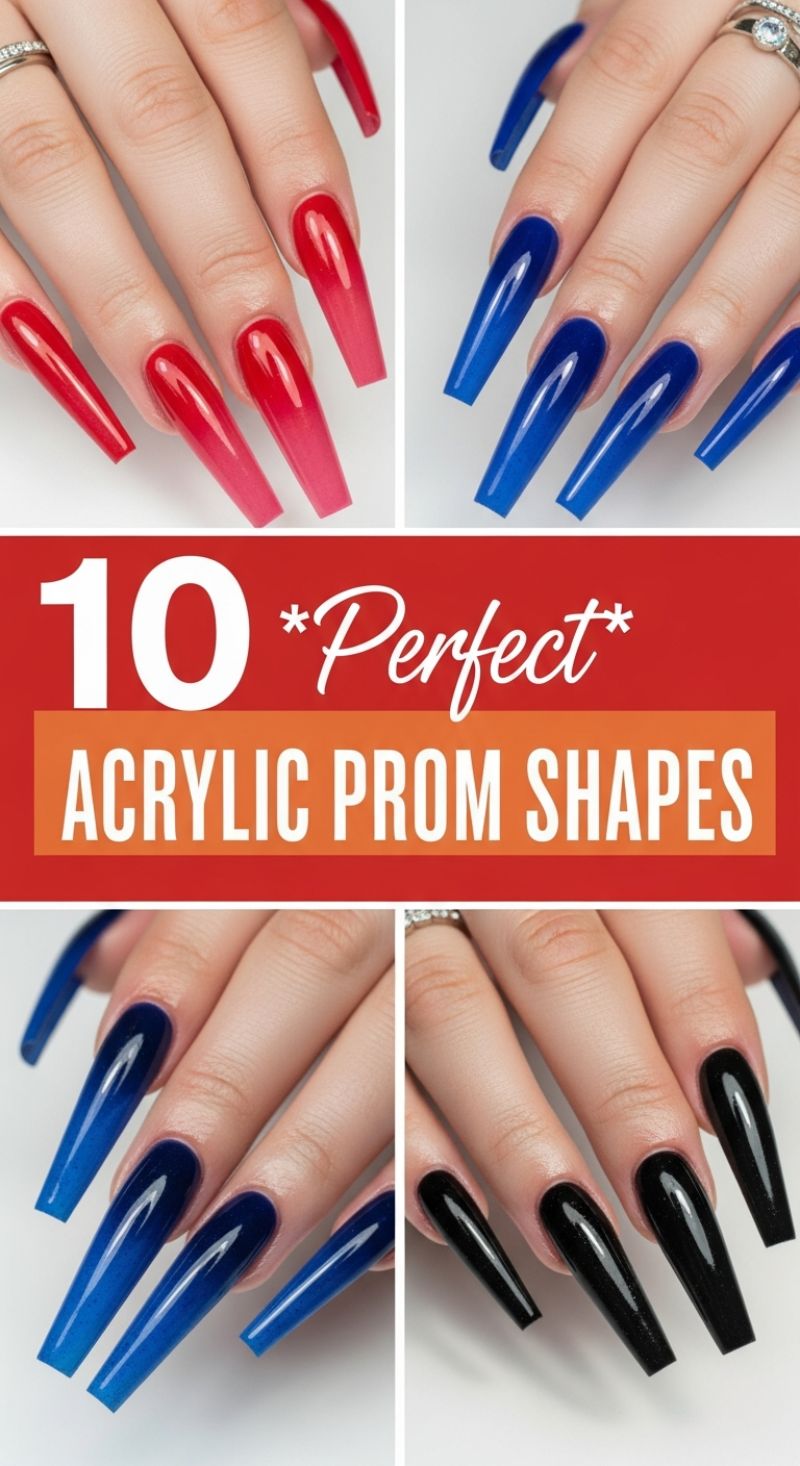
The coffin or “ballerina” nail shape is undeniably the reigning champion of formal event manicures, offering dramatic length and a flattering silhouette that elongates the fingers. This stunning compilation of acrylic styles showcases how to master this shape across various impactful color trends. The coffin shape is achieved by ensuring the sidewalls are parallel and then gently tapered toward the tip before the final free edge is squared off. Because this shape is often worn at extreme lengths, as demonstrated by the featured sapphire blue and high-gloss black sets, using durable enhancements like high-quality acrylic powder or hard gel is essential. These materials provide the structural integrity required to prevent breaking or cracking, ensuring your show-stopping nails last through the entire formal event. For maximum impact, maintain a sleek, high-shine finish, which reflects light beautifully and highlights the precise filing and sculpting work.
To replicate the sophisticated gradient effect seen in the red/pink and blue sets, you must employ careful ombre blending techniques. For an acrylic application, apply the darker powder (like the rich primary colors seen here) near the cuticle and transition seamlessly into the lighter shade toward the tip, using a damp brush to tap and blend the two color edges together while the product is still workable. If using gel polish, use a dense sponge or a dedicated ombre brush, applying thin layers and curing after each pass until the desired fade intensity is achieved. Crucially, the transition should be soft and almost liquid, avoiding any harsh lines. When choosing your colors, consider the lighting of your event; deep, glossy jewel tones like the featured black and navy are stunning under flash photography, while the red-to-pink fade offers a softer, more vibrant pop that works well with romantic or sheer fabrics.
Expert advice for wearing these high-drama nails centers on preparation and maintenance. Schedule your appointment to have this full set or fill completed within 48 hours of your event to guarantee peak shine, fresh cuticle work, and flawless edges. When styling, coordinate the nail color with your accessories or shoes, rather than trying to perfectly match a patterned dress; for example, the deep blue nails beautifully complement silver jewelry or a bold blue accent in an otherwise neutral outfit. Because of the length, it is vital to protect the tips from excessive force. Invest in a hydrating cuticle oil and apply it daily leading up to the event to keep the surrounding skin healthy and flexible, ensuring the entire hand looks polished and ready for its close-up. These nails aren’t just an accessory; they are the ultimate statement piece for a formal night.
11 Luxurious Gold Accent Nails
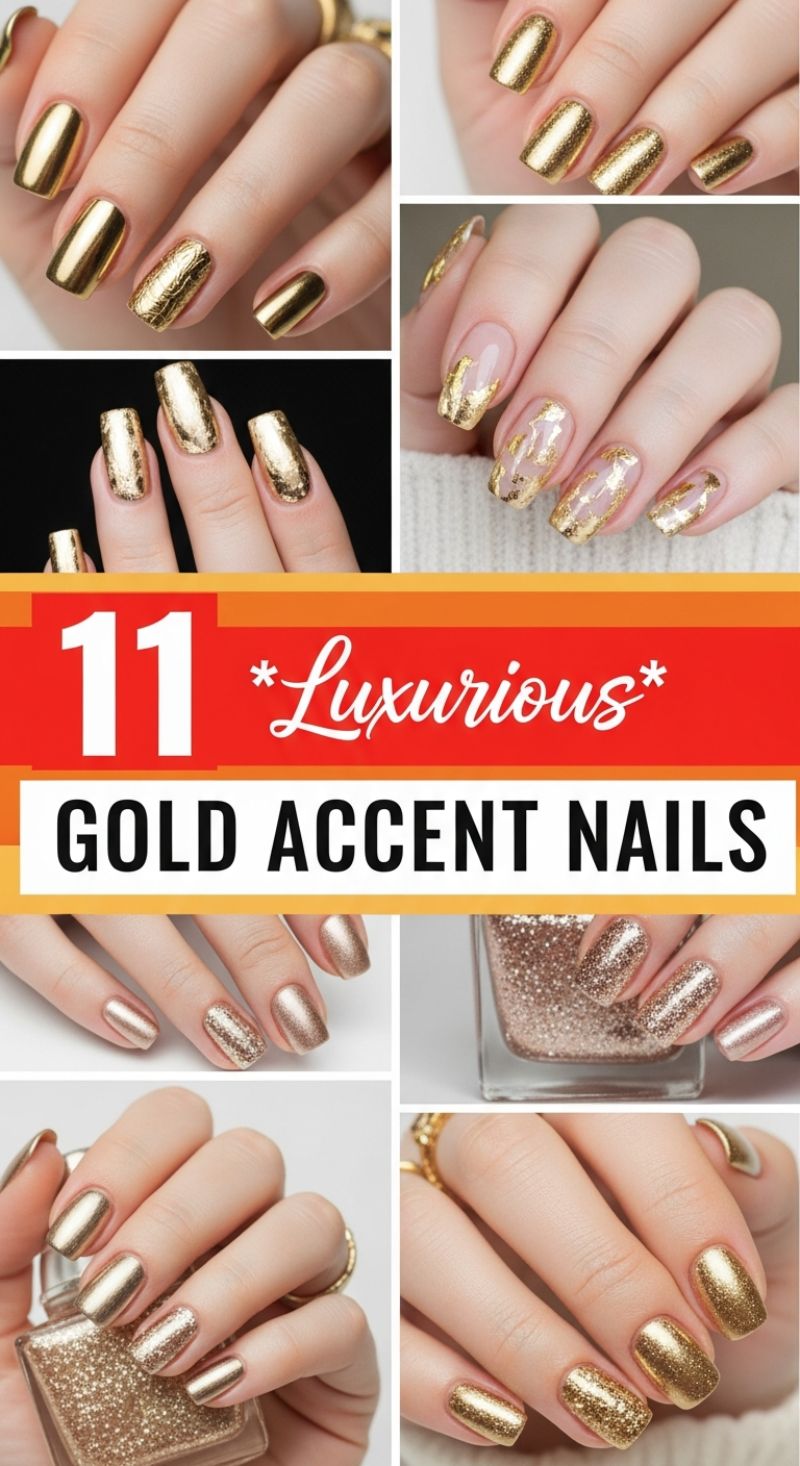
Gold accent nails are the epitome of formal glamour, offering unparalleled sophistication for galas, weddings, and high-end events. The key to mastering this trend, as showcased in these 11 examples, is integrating various textures of gold—from high-shine mirror finishes to chunky glitters and delicate foils—within a cohesive manicure. To replicate the most striking looks, start by selecting your primary gold finish. For a modern, futuristic vibe, opt for a solid, opaque chrome polish or a true mirrored pigment applied over a cured base coat, ensuring every nail, save for the accent, is flawlessly reflective. If you prefer a classic, textured opulence, select a finely milled glitter polish or a flaked top coat. The crucial instructional step is placement: choose one or two accent nails (typically the ring or middle finger) to bear the most intricate design, using the remaining digits to anchor the look with a solid, complementary gold.
One particularly elegant style visible here involves using gold leaf or transfer foil over a nude or clear base for a “shattered glass” or negative space effect. To achieve this, apply a foundational layer of clear or sheer pink polish, followed by a non-wipe tack coat (if using gel) or a specialized foil adhesive. Once tacky, press small, uneven pieces of gold transfer foil onto the designated nail beds. The beauty of this look lies in the imperfection; avoid full coverage, allowing the natural nail or sheer nude base to peek through, creating contrast and lightness. For those opting for a full-coverage accent nail, such as the intense, chunky glitter seen on several hands, ensure thorough coverage by applying two to three thin coats, allowing adequate drying time between each if using traditional lacquer, or curing meticulously if using gel.
To ensure your luxurious gold manicure survives the rigors of a formal event, technique and product quality are paramount. Expert manicurists recommend using a high-quality rubberized base coat to prevent chipping, especially under heavy metallic or glitter polishes. When selecting your gold, consider your skin tone: warmer skin tones often thrive with rich, yellow gold, while cooler undertones are complemented by paler champagne or rose golds (though all gold tones work well with this trend). Finally, the top coat is non-negotiable for locking in that mirror shine or glitter texture. For true metallics, use a non-yellowing, high-gloss top coat, applying two layers and “capping the edge” of the nail tip on the final coat to seal the polish and provide maximum durability against edge wear and tear.
Glamorous Silver Chrome Styles for Ultimate Formal Impact
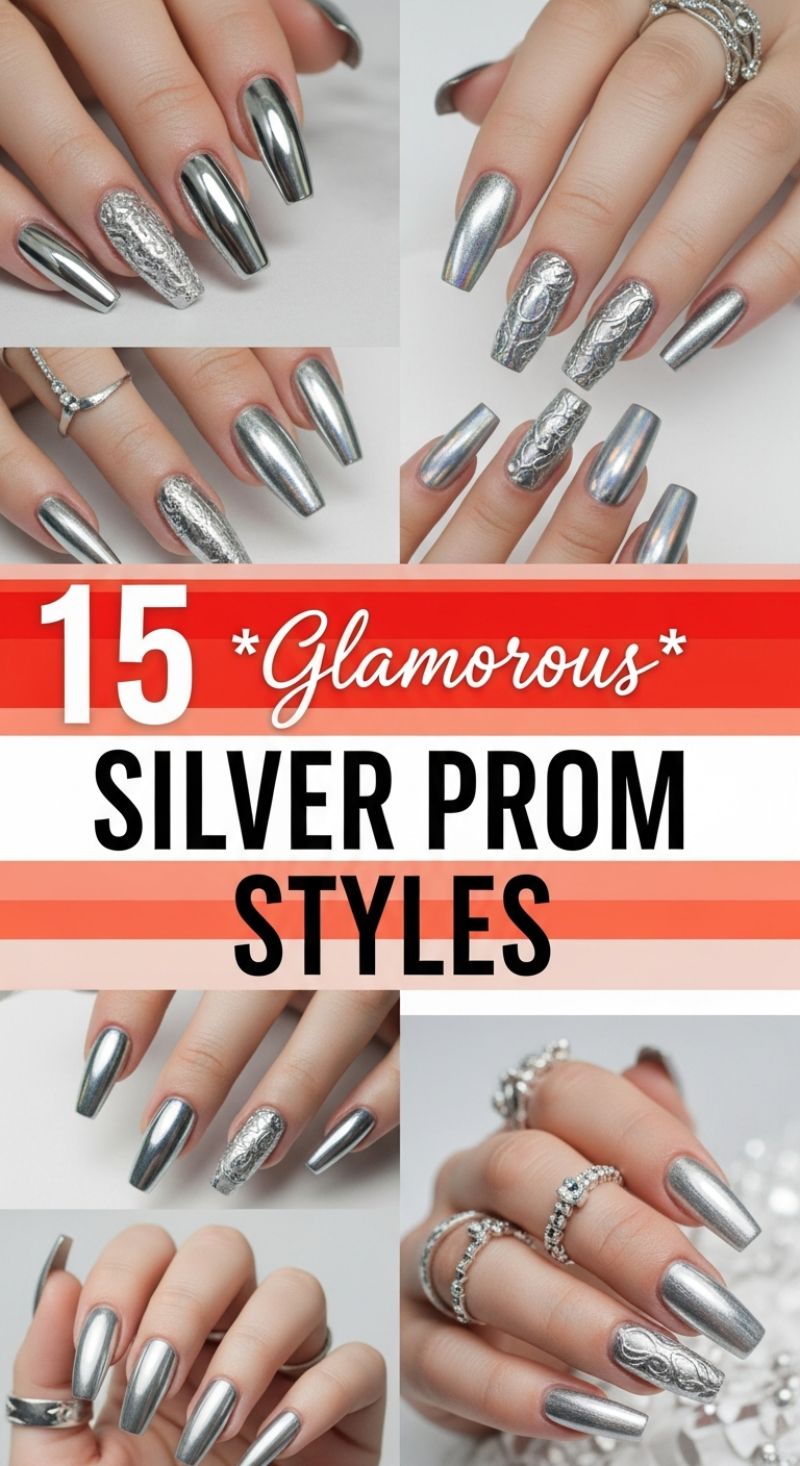
The mirror-like finish of silver chrome nails elevates any formal look, transforming a classic metallic manicure into an ultra-modern statement. To achieve this high-octane shine, start with a well-prepped, structured nail base—long coffin or square shapes are ideal as they maximize the reflective surface area. For the perfect chrome effect, apply a base color (often black for maximum depth, or a matching metallic silver) and cure. The key step is utilizing a high-quality, non-wipe top coat, curing it, and immediately rubbing in ultra-fine silver chrome powder using a silicone tool or sponge applicator. The friction buffs the powder into the non-wipe layer, creating that true liquid metal effect. Ensure you thoroughly dust off any excess powder before proceeding to the crucial sealing stage, as remaining loose pigment can dull the final top coat application.
What truly distinguishes this glamorous style are the intricate, textured accent nails. These designs provide a stunning contrast between the slick, futuristic chrome and opulent, almost baroque detailing. To recreate the embossed look seen here, utilize a thick-consistency 3D sculpting gel or dedicated piping gel. Using a fine detail brush or a specialized metal tip tool, carefully pipe or sculpt patterns—such as the elegant cable knit/sweater design or elaborate filigree—onto the chosen accent nails (the ring finger and sometimes the middle finger work best). Once the pattern is cured, lightly dust it with the same silver chrome powder used for the base nails. This method maintains the pattern’s tactile texture while integrating it seamlessly into the overall metallic theme. Expert tip: Due to the complexity of 3D designs, ensure each element is fully cured and sealed individually before applying the final global top coat.
This silver style is incredibly versatile for formal events, acting as a powerful neutral that complements deep jewel tones, classic black, or even bright, bold gowns. To ensure maximum longevity and protect the delicate mirror finish, seal the entire nail with two thin layers of a resilient, high-shine hard gel top coat, paying special attention to wrapping the free edge. For a truly cohesive and opulent ensemble, take inspiration from the imagery and incorporate coordinating sterling silver jewelry. Stacking rhinestone or detailed silver rings not only draws attention to the stunning nail art but also fully embraces the glamorous, maximalist aesthetic required for prom or any grand evening affair.
10 Trending PINTEREST PROM NAILS

The ultimate inspiration for any formal event, the trending Pinterest prom nail selection shown here emphasizes high-impact glamour, bold shapes, and dazzling finishes. The dominant canvas across all these looks is the long, tapered shape—either coffin or slender ballerina—which allows maximum surface area for intricate art and intense color saturation. To master this trend, focus on saturation; whether you choose the timeless, glossy crimson red or venture into the vibrant, metallic emerald greens and golds, the color must be flawless and opaque. A key instructional takeaway is the power of mixed media: note how the green manicure combines a deep glitter texture on some nails, a glossy solid light green on others, and a smooth chrome silver accent, proving that maximalism works when executed with sharp precision and a cohesive color palette.
Updating classics is another vital technique demonstrated here. The traditional French manicure is completely transformed by substituting the classic white tip with a vibrant, acid neon green (top right), often paired with abstract line work or a textured glitter fade near the smile line to modernize the look. For those leaning into metallics, the mirror-like gold and silver chrome finishes are achieved using specialized chrome powder applied over a no-wipe gel top coat, creating a reflective, liquid-metal appearance that is unparalleled for capturing attention under formal lighting. If your event dress features strong jewelry elements, ensure your chosen metallic hue (silver or gold) matches your accessories for a refined, expert presentation.
Finally, significant embellishment is mandatory for a Pinterest-trending look. Many of these styles feature heavy rhinestone and crystal application, often placed strategically near the cuticle line or running down the center of the nail bed, as seen in the silver crystal examples. When applying rhinestones, use high-quality nail glue or a specialized rhinestone adhesive gel, curing it thoroughly to ensure longevity—a critical step since these nails are designed for long-wear during a high-activity event. For a softer but equally glamorous touch, emulate the milky, sheer base with delicate white line work and sparse glitter (bottom left), proving that high glam doesn’t always require full coverage, but always demands flawless structure and shine.
Regal Purple Nail Inspiration
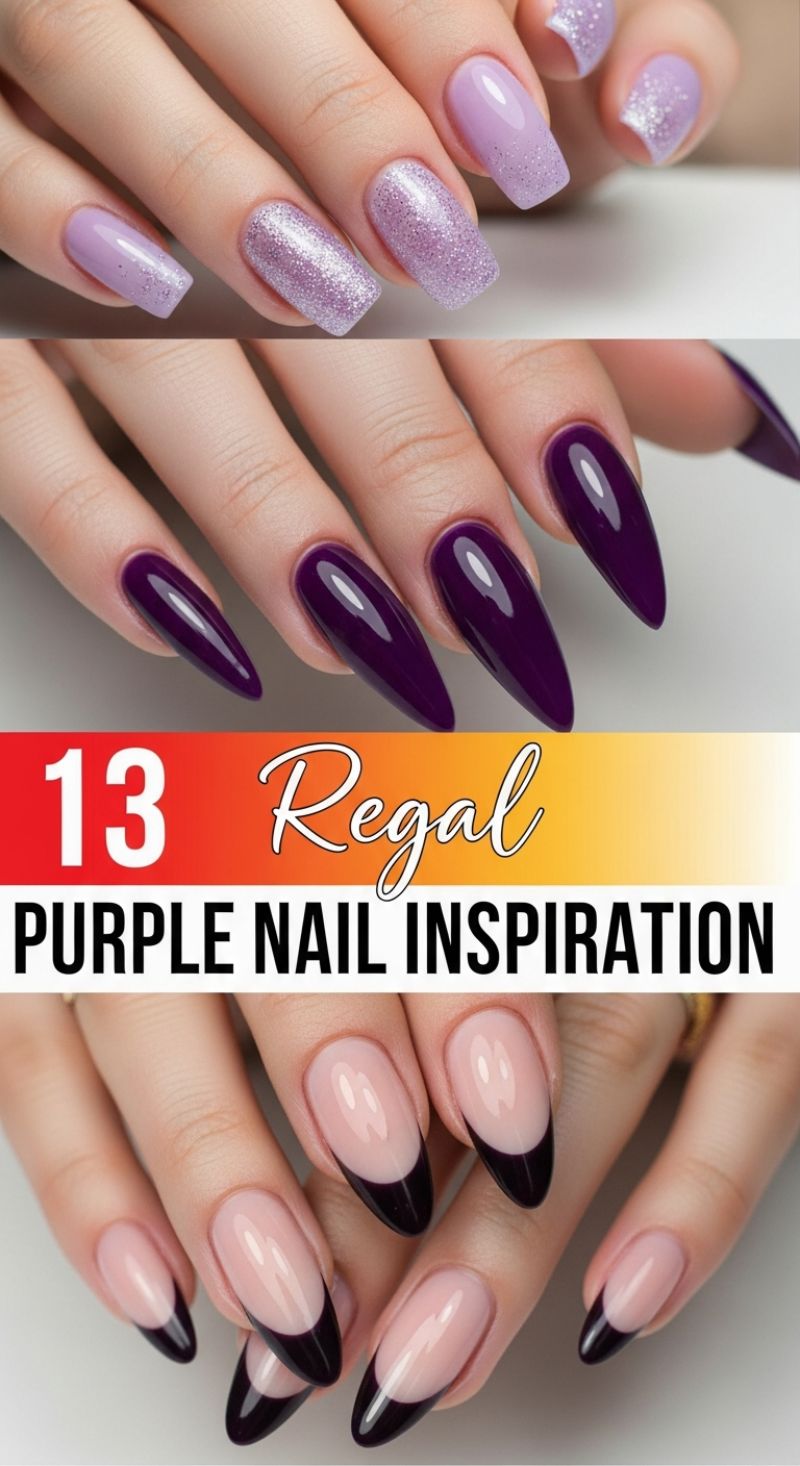
Purple, the color historically associated with royalty, power, and luxury, is the definitive choice for elevating your manicure at any formal affair. This color palette spans from soft, ethereal lavenders to commanding, high-gloss plums, offering a sophisticated alternative to traditional reds or nudes. For a delicate, yet luminous formal look, consider the soft lilac square manicure paired with a complementary shimmer gradient. To execute this technique, start with two coats of a light purple crème polish. While the final coat is still tacky (if using traditional polish) or before curing (if using gel), use a fine applicator brush to dust a holographic or silver micro-glitter over the free edge of the nail, blending it seamlessly backward toward the center to create a diffused ombré effect. This gradient finish maximizes light reflection, adding an element of dimensional sparkle that is elegant and restrained, perfect for afternoon events or spring galas.
For black-tie events requiring maximum drama and impact, a saturated, deep royal purple in a stiletto or sharp almond shape provides an undeniably powerful statement. Achieving this level of depth and mirror-like shine is crucial. Use a highly pigmented gel formula in aubergine or indigo-purple, ensuring complete, streak-free coverage. The key to high-gloss perfection is constructing a proper apex using builder gel if necessary, followed by a thick, non-wipe topcoat cured perfectly under LED light to guarantee a glass-smooth finish. When wearing such a dramatic shape and color, cuticle care must be impeccable; push back and hydrate the cuticles fully to ensure the flawless polish application meets the skin cleanly. This long, sharp, deeply saturated look serves as a powerful accessory on its own, demanding attention and conveying sophisticated confidence.
Alternatively, blend timeless elegance with modern edge by opting for the dark, structured French tip. This variation showcases a natural, sheer pink or nude base, allowing for nail bed elongation, contrasted sharply by a meticulously painted deep purple or plum crescent on the tips. For the most formal execution, choose an almond or oval shape, which complements the curved line work. Use a thin striping brush to apply the saturated purple polish, focusing on creating a sharp, crisp ‘smile line’ that dips slightly lower than a traditional French tip for a chic, modern V-shape. Expertly executed dark French tips provide the sophistication of a classic manicure with a bold, contemporary color choice, making them versatile enough for any formal setting while demonstrating a refined attention to detail. Ensure the base layers are perfectly smoothed with a builder gel for lasting durability through the duration of your event.
14 Shining Metallic Nail Trends for High Glamour

For any formal event, nothing elevates a look quite like a statement metallic manicure. The trend showcased here features a striking combination of highly reflective silver chrome and richly textured gold foil, providing a high-octane dose of glamour perfect for pairing with evening wear. Achieving the pristine, mirror-like silver effect requires specialized technique, typically involving fine chrome powder applied over a cured, no-wipe gel top coat. To execute this look flawlessly, begin with rigorous nail preparation, followed by a durable gel base coat. Apply a base color (black works best under chrome for maximum reflection, but silver gel can also enhance the metallic finish) and cure fully. Next, apply a thin layer of no-wipe top coat, cure only for the specified time, and immediately use a soft silicone applicator or finger to vigorously rub the chrome powder onto the nail surface until the desired mirror finish is achieved. This crucial step creates the liquid metal effect that is essential for a truly show-stopping, formal nail design.
Beyond the smooth, mirrored chrome, the contrast provided by the accompanying gold application is key to the design’s success. This gold polish appears to utilize a foil-like finish, offering a textured, slightly uneven surface that catches the light differently than the smooth silver. This look can be achieved either through a heavily pigmented gold metallic polish that dries with a subtle texture or, more accurately, by embedding thin flakes of gold leaf or special gold foil gel during the final stages of the manicure. When styling this trend, take inspiration from the imagery and incorporate alternating colors. Consider using silver chrome as the dominant shade on the index, middle, and pinky fingers, reserving the textured gold for the ring and thumb nails. The nail shape chosen here—long, straight-edged square or coffin shapes—maximizes the surface area for reflection, ensuring the metallic finish has maximum visual impact. For those who prefer a slightly softer look, an almond or oval shape can still carry this trend beautifully while maintaining elegance.
Integrating these dazzling metallic nails into your formal ensemble is straightforward and impactful. Use your manicure to coordinate your jewelry; if you choose an alternating pattern, you are instantly styled to wear both silver and gold accessories without clash. This manicure inherently reads as high-end and sophisticated, making it suitable for galas, weddings, and black-tie events. To ensure this high-shine look lasts through the entire event and beyond, the final step involves carefully sealing the metallic finish. Apply two layers of high-quality, non-yellowing gel top coat, ensuring that you cap the free edge of the nail meticulously to prevent chipping or premature wear, which can dull the reflective quality. Proper sealing not only maintains the metallic luster but also protects the complex texture of the gold foil, ensuring your hands remain polished and glamorous throughout the occasion.
11 Coordinated Dress & Nail Pairs
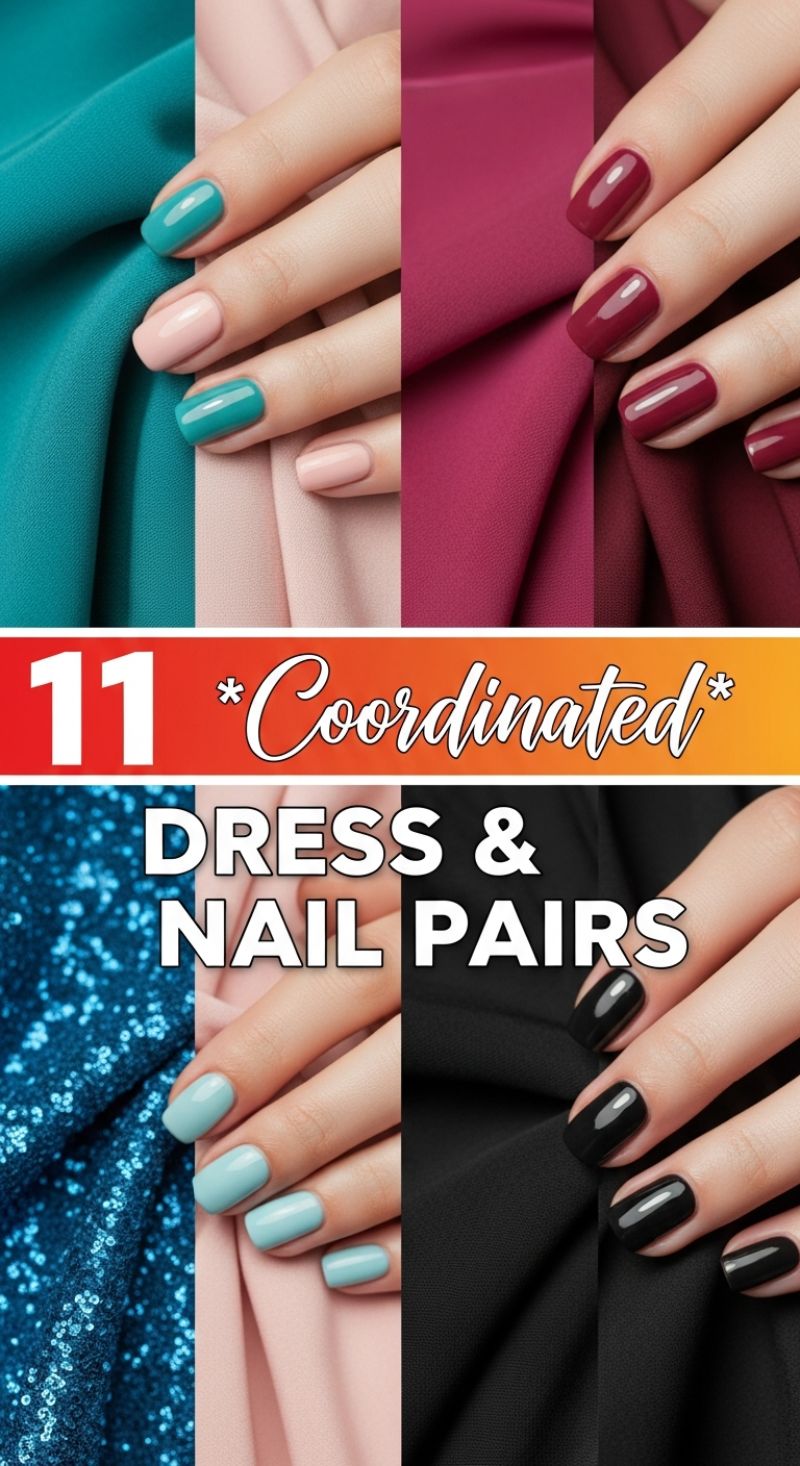
Achieving a flawless formal look involves careful consideration of every detail, and your manicure is the ultimate accessory. The visual guide demonstrates 11 sophisticated ways to pair your nail color with your dress fabric, illustrating that coordination doesn’t always mean a perfect match. Instead, it’s about creating harmony across the ensemble. Notice the intentional use of color families: the rich jewel tones like teal and deep berry are grounded by soft, dusty pink nudes, while the luxurious fabrics—from the shimmering blue sequin to the classic matte black—demand polishes that complement their texture and depth. This curated collection showcases how a subtle shift in tone or the introduction of a smart neutral can elevate a potentially dull pairing into a truly cohesive, high-fashion statement.
When planning your manicure for a formal event, decide whether you want to match, complement, or subtly contrast your attire. For a powerful, monochromatic statement, adopt the strategy shown with the deep magenta fabric paired with a perfectly matched maroon gloss, or the sleek black fabric paired with a highly reflective, jet-black nail polish. This technique is inherently elegant and foolproof, signaling sophistication and intentional styling. Conversely, embracing contrast or complementary tones adds visual interest. For instance, the striking teal fabric is beautifully balanced by a soft ballet-slipper pink nail—a neutral pairing that allows the dress color to truly pop without competing. Similarly, when dealing with highly textured or sequined fabrics, such as the vibrant blue sparkle shown, opt for a softer, slightly desaturated shade (like the delicate robin’s egg blue) to prevent the overall look from becoming overwhelming or too busy. Expert advice dictates that if your dress is the focal point, your nails should provide a quiet, harmonious base.
The finish of your nail polish is just as critical as the shade itself. For formal gowns, high-gloss is typically preferred, as seen in the examples, offering a luxurious sheen that mirrors the richness of high-quality fabrics like satin or silk. When working with darker shades like the deep berry or glossy black, ensure a faultless application with two thin coats of color and a durable, non-yellowing topcoat to maximize shine and longevity, masking any imperfections. For those utilizing nude or pale shades, professional application is paramount; the short, clean, squoval shape displayed throughout the examples lends an air of timeless sophistication. If your dress is multi-toned or features a subtle print, avoid trying to match the main color exactly. Instead, select the least dominant, most subtle shade from the fabric pattern to use on your nails for an unexpected yet refined connection that ties the entire look together.
16 Intentional Glitter Prom Looks
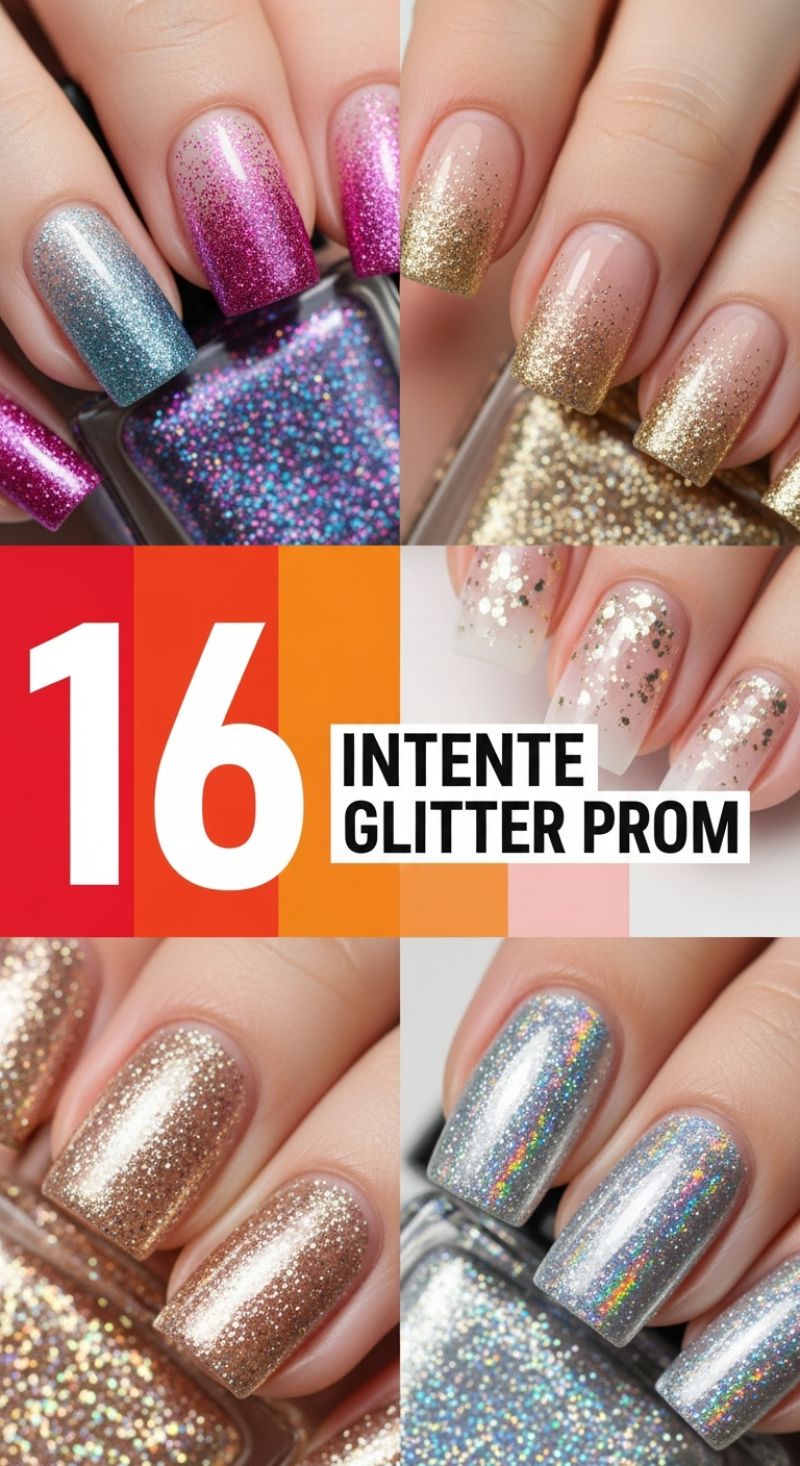
Glitter is the quintessential accessory for any formal event, and these looks demonstrate how to wear it beyond simple full coverage, elevating it into true nail artistry. The ombre or gradient technique is particularly sophisticated for a high-end occasion. To achieve the flawless transition seen in both the vivid magenta-to-teal look and the subtle gold-to-nude effect, you must use a makeup sponge. Apply stripes of your chosen glitter shades directly onto the sponge, then quickly dab the sponge onto the nail. For a softer blend, apply the glitter sparingly near the cuticle and build density towards the free edge. For the nude-base look, select a fine, micro-glitter polish that allows the natural nail or sheer base color to peek through near the cuticle. Always seal your gradient work with a high-shine top coat to smooth out any texture created by the sponging technique, ensuring a professional, glass-like finish that catches the light beautifully.
For those preferring maximum impact and full glamour, focus on the quality and type of glitter particle. A solid, opaque coverage in metallics like gold, rose gold, or silver (as shown in the bottom quadrants) provides timeless elegance. However, for a modern twist that shines brilliantly under party lights, opt for holographic glitter. Holographic particles refract light into a rainbow spectrum, adding unmatched depth and dimension compared to standard shimmer. To achieve full opacity with micro-glitter polishes, apply 2 to 3 thin coats, allowing adequate drying time between each. Since glitter polish tends to feel slightly gritty, expert advice suggests using a specialized glitter-smoothing topcoat, which is thicker and designed to level the surface before applying your final layer of high-gloss protection. This ensures the manicures last through dancing and mingling without snagging or dulling.
Another chic option for a formal setting is the artistic placement of chunky flake or foil glitter, as demonstrated in the scattered gold design. This technique offers a delicate, abstract feel that works especially well on longer, square, or coffin-shaped nails. Instead of attempting full coverage, apply a sheer, milky white or nude base coat. While the base is tacky, use a small detail brush or a wooden cuticle pusher to strategically place individual flakes or small clusters of glitter towards the tip of the nail, letting them fade organically toward the nail bed. This negative-space design is modern and prevents the look from becoming too heavy. Regardless of the glitter technique chosen, ensure longevity by wrapping the free edge of the nail with your top coat. For prom or wedding events, using a UV-cured gel top coat is highly recommended, as it locks the glitter securely and provides superior chip resistance that will endure the entire celebration.
Cute Short Prom Manicures: Elegant Styles for Shorter Lengths
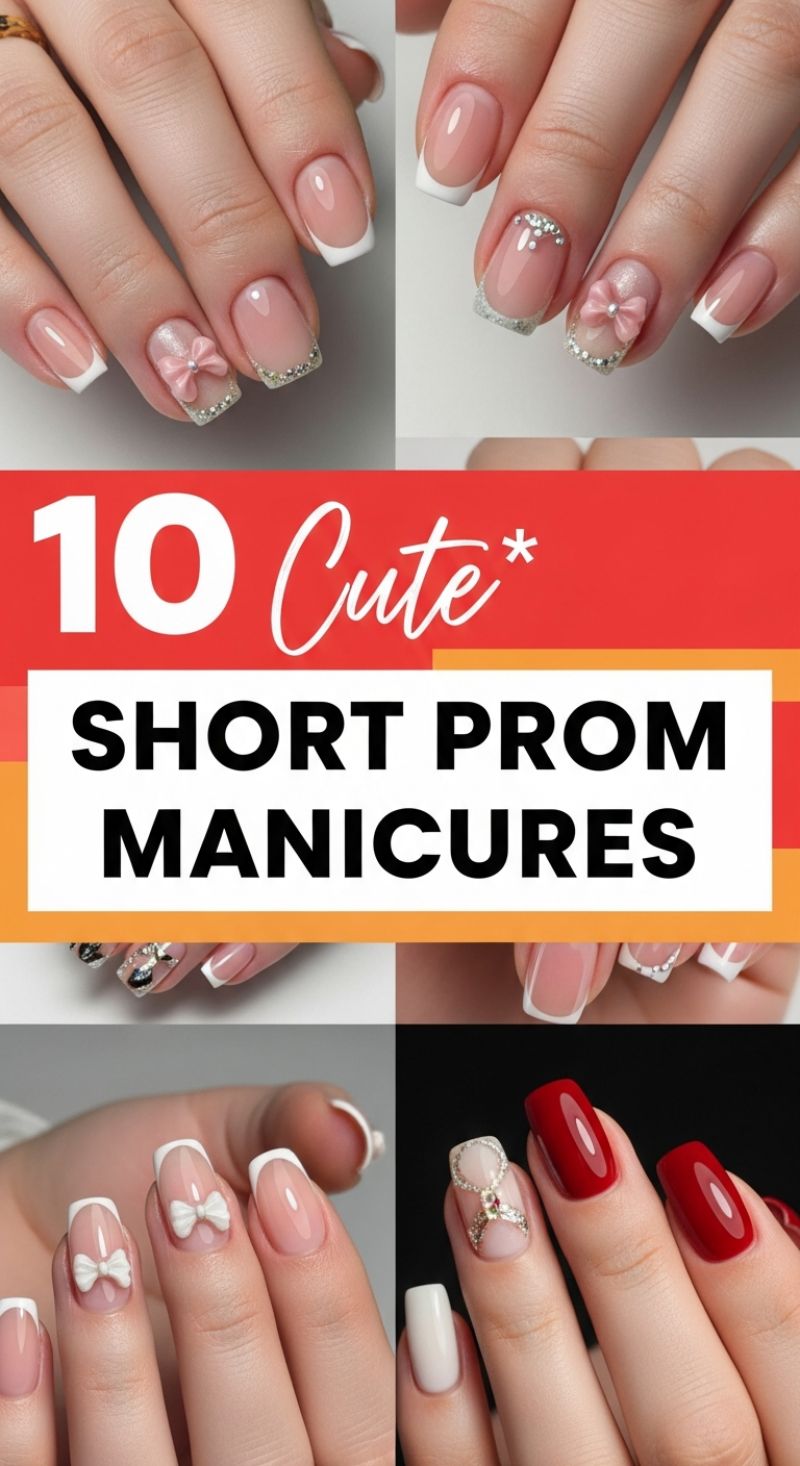
While long acrylics often dominate formal event inspiration, these looks prove that short nails are equally sophisticated and glamorous, perfect for dancing the night away without worry. The foundation of this trend is the impeccably executed French manicure, universally flattering on a shorter, rounded-square (squoval) nail shape. To replicate this, start with meticulous cuticle care and file the nails into a soft, slightly tapered shape—avoiding sharp corners that can look chunky on short nails. Apply a milky pink or nude base coat to create the perfect blush undertone, ensuring a healthy, natural-looking foundation. For the white tip, use a highly pigmented crisp white gel and a fine liner brush or a specialized stamp tool to create a precise, shallow smile line that follows the natural curve of the free edge. For a modern twist, consider replacing the bright white tip with a fine silver or iridescent glitter tip, applying rhinestones or micro-beads along the smile line to transition seamlessly between the nude base and the decorative tip, adding subtle sparkle without overwhelming the nail bed.
The key to elevating short nails for a formal event lies in strategic embellishment on the accent finger. This compilation features delicate 3D elements, such as molded pink or white bows, which should be secured firmly using builder gel or strong jewelry adhesive, then carefully sealed around the edges with a no-wipe top coat, taking care not to dull the bow itself. For a more sophisticated ‘jewelry’ effect, mimic the detailed looks seen on the ring fingers by placing larger crystals (Swarovski or similar) in structured patterns, such as a semi-circle around the cuticle or vertically down the center of the nail, creating the illusion of a delicate ring. Expert tip: Before placing the crystals, lay down a clear layer of rubber base gel (don’t cure it yet). Place your crystals, then cure. This ensures maximum hold and prevents slippage, which is crucial for 3D art longevity.
Beyond the classic French style, short nails can handle bold color contrast beautifully. The striking crimson red and stark white example demonstrates the power of pairing a solid, high-gloss shade with a highly detailed accent nail. When choosing a bold shade like red, keep the shape perfectly symmetrical and the surface flawlessly smooth to maximize elegance. Reserve one or two accent nails for intricate designs or contrasting colors (like the full-coverage white nail) to break up the intensity. Shorter nails naturally command attention to high-quality polishes and meticulous shaping, making them the most practical yet stunning choice for anyone looking for durable, chic, and on-trend manicure inspiration for their next formal occasion, be it prom, a wedding, or a gala.