Unlock 50+ stunning decor ideas for every space and occasion! Transform your home interiors, patios, and parties with expert tips on lighting, furniture, seasonal flair, and theme planning.
8 Luxe Bathroom Decor Secrets

Transforming a functional bathroom into a private, luxe sanctuary relies on strategic material choices, intentional organization, and layered sensory design. To achieve the sophisticated look shown, start by auditing your storage. Replace bulky, closed cabinetry with sleek, floating wood shelves. This architectural detail not only provides warmth against hard surfaces but also forces you to display only beautiful, high-quality items. Invest in thick, highly-textured towels (waffle weave or pique patterns work beautifully) and roll or fold them uniformly for a resort-like presentation. For the vanity area, move away from plastic packaging; transfer items like bath salts, cotton swabs, and soaps into minimalist glass jars or ceramic vessels. Finally, introduce aromatherapy via essential oil diffusers or quality oil bottles displayed alongside natural, low-maintenance greenery like succulents or aloe, instantly lending a calming, spa-like atmosphere to the space.nnElevating the lighting is perhaps the most critical secret to a luxury bathroom. Standard overhead illumination creates harsh shadows and kills ambiance. Instead, focus on layered lighting, pairing both functional and mood elements. Install a round, backlit LED mirror, which provides excellent, shadow-free illumination essential for grooming tasks. Complement this modern light source with warmer accent fixtures. The vintage Edison bulb sconce featured in the image serves as perfect mood lighting. Opt for bulbs with a low Kelvin temperature (around 2700K) and an amber glow, set on a dimmer switch, to create a relaxing, flattering warmth that instantly elevates the room from utilitarian to opulent. The blend of modern task lighting and traditional atmospheric lighting is key to designing a highly functional yet indulgent space.nnThe final step involves choosing permanent fixtures and materials that speak of timeless quality. The use of natural stone, such as the white marble pictured, provides a foundational sense of luxury and texture. When incorporating natural elements, seek balance: the smooth, cool surface of the marble is contrasted by the organic softness of the wood shelves and the living plants. Furthermore, pay attention to metal finishes. Choosing a sophisticated finish like antique brass or dark bronze for light fixtures and hardware adds depth and a bespoke feel that elevates the overall design, ensuring every detail contributes to the overarching atmosphere of refined elegance. This meticulous attention to material and texture is the ultimate secret to achieving a truly luxe bathroom.
9 Charming Spring Decor Ideas
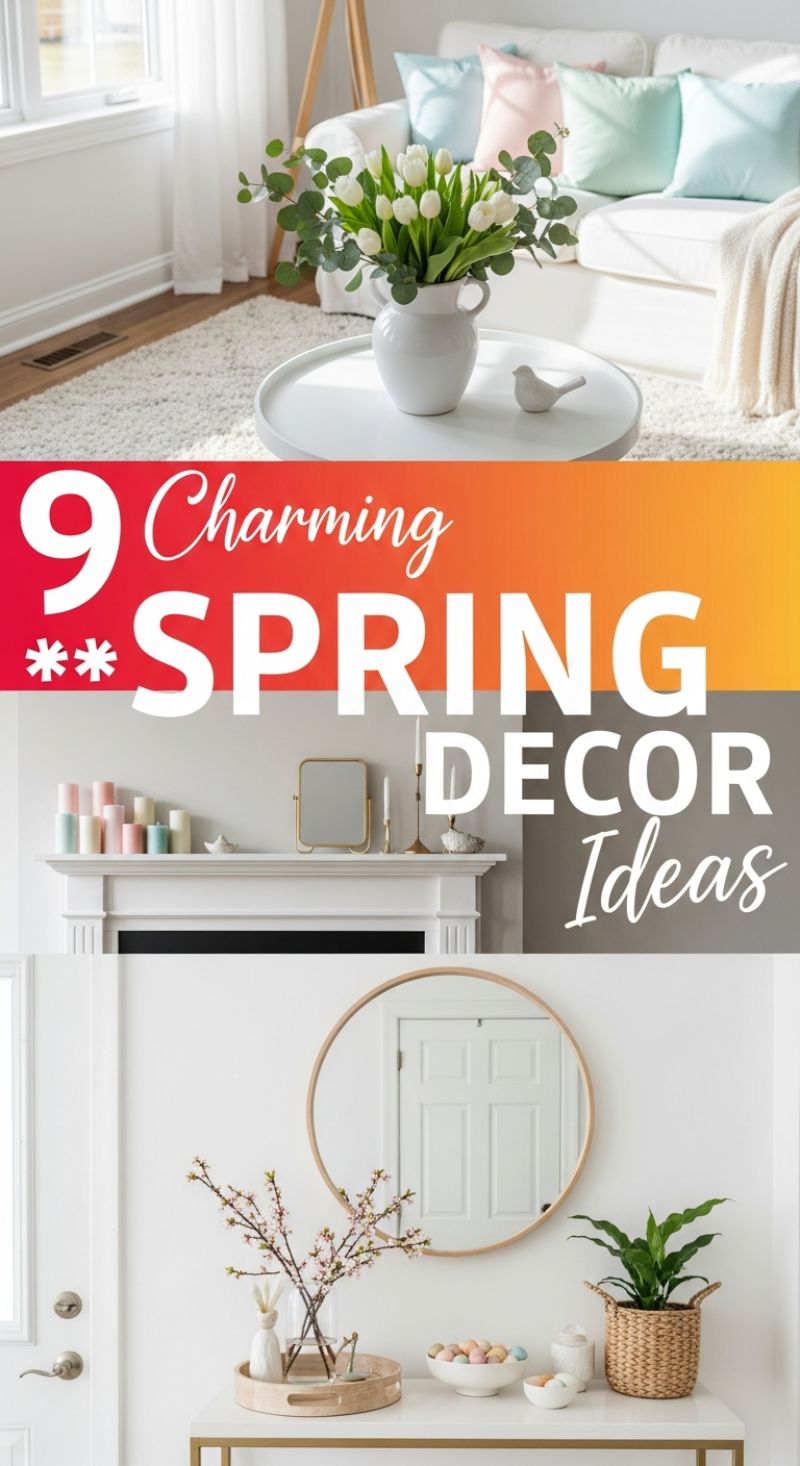
Achieving a charming spring look starts with lightening your foundation. Transition your space from winter coziness by opting for light, airy textiles. In the living room vignette shown, the combination of a plush white rug and a slipcovered white sofa creates an instant sense of cleanliness and brightness. Introduce color through soft, muted pastels—think mint green, sky blue, and pale blush pink throw pillows. These hues mimic the fresh colors found in nature during early spring. The most crucial element, however, is the addition of fresh flowers. A simple white pitcher filled with classic white tulips and accented with verdant eucalyptus branches serves as an elegant centerpiece. Expert Tip: Choose a simple, solid-colored vase to let the natural beauty of the blossoms shine, and always incorporate a bit of greenery (like eucalyptus) to add depth and organic structure.
Spring decorating is also about creating curated moments and utilizing vertical space. The fireplace mantle is an ideal location for a seasonal display. Grouping items of varying heights, such as the assortment of pastel pillar candles seen here, draws the eye up and creates dynamic texture. Balance the look with grounding elements like a small, gold-framed mirror and metallic accents (candlesticks). For high-traffic areas like entryways, focus on functional beauty. A console table topped with a reflective surface, like the large round wooden-framed mirror, maximizes light and makes the space feel larger. Use natural textures extensively here: a woven basket housing a vibrant green plant and a wooden serving tray keep essential items organized while adding warmth. Incorporate seasonal motifs, such as delicate cherry blossom branches and bowls filled with colorful decorative eggs, to instantly signal the change of season.
To fully capture the “charming” aesthetic, focus on mixing materials. Notice how the spaces seamlessly blend soft fabrics (rugs, throws), polished ceramics (vases, bird figurines), reflective glass and metal (mirrors, console legs), and organic elements (rattan basket, wood tray). This layered approach prevents the all-white backdrop from feeling cold or sterile. Furthermore, maximize natural light. Sheer curtains allow sunlight to flood the rooms, enhancing the light color palette. By focusing on these three elements—a light base, natural textures, and seasonal organic accents—you can successfully execute a sophisticated and inviting spring refresh across multiple areas of your home.
10 Genius Kitchen Counter Corner Solutions

Kitchen corners often become dead zones or clutter magnets simply because their angular nature makes typical decor challenging. However, treating the corner as a prime focal point, rather than an obstruction, unlocks valuable real estate. The primary strategy for maximizing counter corners is to embrace verticality. Solutions like multi-tiered trays are highly effective, providing dedicated spaces for organization while adding significant visual height. Choose trays made of complementary materials, such as polished marble for a sleek look or raw wood for rustic texture, depending on your kitchen’s style. These trays can serve a dual purpose: practical organization for fruit, baked goods, or small spice jars, or purely decorative display for small potted succulents or candles. Always ensure the items chosen are easily accessible but fit neatly within the corner’s footprint, preventing the arrangement from spilling onto active prep areas, thus maintaining flow and functionality in your high-traffic kitchen space.
To create warmth and depth, mastering the art of textural layering is key. Lean various sizes and shapes of cutting boards against the corner wall or backsplash. Mixing materials—such as a large, dark-grained wooden board layered with a smaller, bright white marble board—introduces dynamic contrast, breaking up monolithic surfaces. This arrangement is visually interesting, occupies minimal counter depth, and keeps functional items immediately available. Crucially, integrate living elements. A snake plant (Sansevieria) or other vertical-growing succulent is perfect for corners as they thrive in lower light, add a necessary touch of organic color, and draw the eye upward, reinforcing the vertical movement started by the tiered trays and layered boards. Remember that the scale of the plant container should match the available corner space; a pot that is too large will quickly feel overwhelming and sacrifice valuable counter real estate, so opt for streamlined, tall planters where possible.
For those seeking to fully integrate the corner into the architectural design, installing floating corner shelves offers the most expansive display potential. These shelves, often made of thick, natural wood for a grounding, warm effect, elevate the decor entirely off the countertop, freeing up the prep surface below while establishing a strong visual anchor point. On the shelves, focus on balanced vignettes: frameable art pieces (like subtle botanical prints), stacked cookbooks used as risers, and small grouping of jars or canisters. When styling any counter corner, remember the principle of odd numbers and varying heights—grouping objects in sets of three or five creates a sense of casual elegance and movement. Finally, pay attention to practical details: ensure all electrical outlets near the corner remain functional and accessible, and use color palettes that complement the surrounding backsplash and cabinetry to achieve a cohesive, designer-quality look that feels intentional and stunning.
5 Charming Tea Party Must-Haves: Mastering the Art of Afternoon Tea Decor

To recreate this quintessential high tea aesthetic, focus on building layers of delicacy and detail, starting with your foundational elements. The ultimate charming tea party begins with the textiles: select crisp white or blush linens, preferably overlaid with fine lace or embroidered runner for textural interest. Next, elevate the table setting by curating mismatched yet harmonious china. Steer clear of modern, plain crockery; instead, source vintage teacups, saucers, and dessert plates featuring intricate floral patterns and classic gold gilt edging. As seen in the images, the combination of light pink, green, and gold tones on white porcelain instantly imparts an air of historic elegance. Ensure that each setting includes polished silverware—a simple dessert fork and spoon are often sufficient—to complement the formality of the china. This meticulous attention to textile and tableware detail sets a refined, welcoming tone for your entire event.
The centerpiece of any effective tea service is the tiered stand, which serves both a functional and highly decorative purpose. Invest in a stand with ornate gold or silver hardware and crisp white or scalloped plates. This vertical presentation is crucial for maximizing visual impact while conserving table space. Traditionally, food is arranged by tier: place hearty items like scones and finger sandwiches on the bottom plate, transition to smaller savory tarts and heavier sweets (like macaroons or cupcakes) on the middle plate, and reserve the top plate for delicate, bite-sized pastries or garnishes. The visual arrangement should be abundant and colorful, celebrating the variety of the treats offered. Ensure that the stand is flanked by essential serving accessories like small pitchers of cream and sugar bowls, all matching or complementing the delicate nature of the primary china pattern.
Finally, the atmosphere is perfected through thoughtful floral and lighting choices. Fresh flowers are non-negotiable; they infuse the setting with life, fragrance, and color. Opt for soft, feminine blooms such as plush pink roses, delicate baby’s breath, and voluminous hydrangeas, using soft pastels (pinks, blues, creams) to harmonize with the china. Rather than a single large arrangement, create multiple intimate floral vignettes in smaller, clear glass or crystal vases scattered across the table. This allows guests to converse easily while enjoying beauty at every turn. Natural, soft daylight is the ideal illumination for a tea party, but if hosting later, use warm, gentle lighting from lamps or small, low candles (safely placed) to maintain the dreamy, soft focus characteristic of this charming style.
15 Trendy Grad Party Looks: Essential Decoration Themes

A memorable graduation party successfully blends heartfelt personalization with high-impact, celebratory design. To achieve a modern and stylish aesthetic, focus on creating defined zones for memory sharing and dessert display, as illustrated by these trending setups. For the personalization zone, prioritize a photo display that celebrates the graduate’s journey. Instead of a traditional photo board, create oversized numbers corresponding to the graduation year (e.g., 2024) and completely cover them using small, printed photos in a collage or mosaic style. This technique provides a significant visual punch and serves as a fantastic conversation starter. Complement these large numbers with string lights and a simple display of loose photo prints hung via miniature clothespins on twine, adding warmth and a rustic, nostalgic ambiance. The use of a vibrant tissue paper tassel garland in colors contrasting with the school theme (like teal, orange, gold, and black) introduces texture and movement without overwhelming the personalized focal points.
For the main event, the dessert table and accompanying backdrop should serve as the party’s centerpiece and primary photo booth. The secret to an elevated dessert display is height and uniformity. Utilize tiered white stands to showcase treats like cupcakes and macarons, ensuring that the toppers (such as miniature graduation caps or custom sayings) are consistent across all items. The graduation cake should feature simple, clean lines with metallic accents (gold) and thematic elements placed strategically, allowing the surrounding decorations to provide the majority of the color. The ultimate modern statement piece is an organic balloon garland, which must incorporate varied sizes of balloons (ranging from tiny bubbles to large orbs) to create a sophisticated, cloud-like texture. Choosing a sophisticated palette—like the rich gradients of blues and deep forest greens shown—instead of typical school colors elevates the entire look from juvenile to contemporary chic. Anchor this structure with a sleek, monochromatic backdrop and minimalist wooden numbers spelling out the graduation year.
To execute these looks flawlessly, remember that lighting and balance are paramount. The personalized photo zone benefits from soft, diffused lighting (like string lights), while the dessert area requires bright, even lighting to showcase the food and the vibrant balloon arch properly. When choosing materials, don’t be afraid to mix textures: matte foam numbers paired with glossy photos, or sturdy wood accents against flowing tissue tassels. Expertly combining one major decor investment (such as the professional balloon arch or custom cake) with several high-impact DIY elements (like the photo numbers and simple banners) ensures a cohesive, budget-smart, and unforgettable celebration that truly honors the graduate’s achievement.
DIY Decor Hacks: Retro Walls and Upcycled Storage
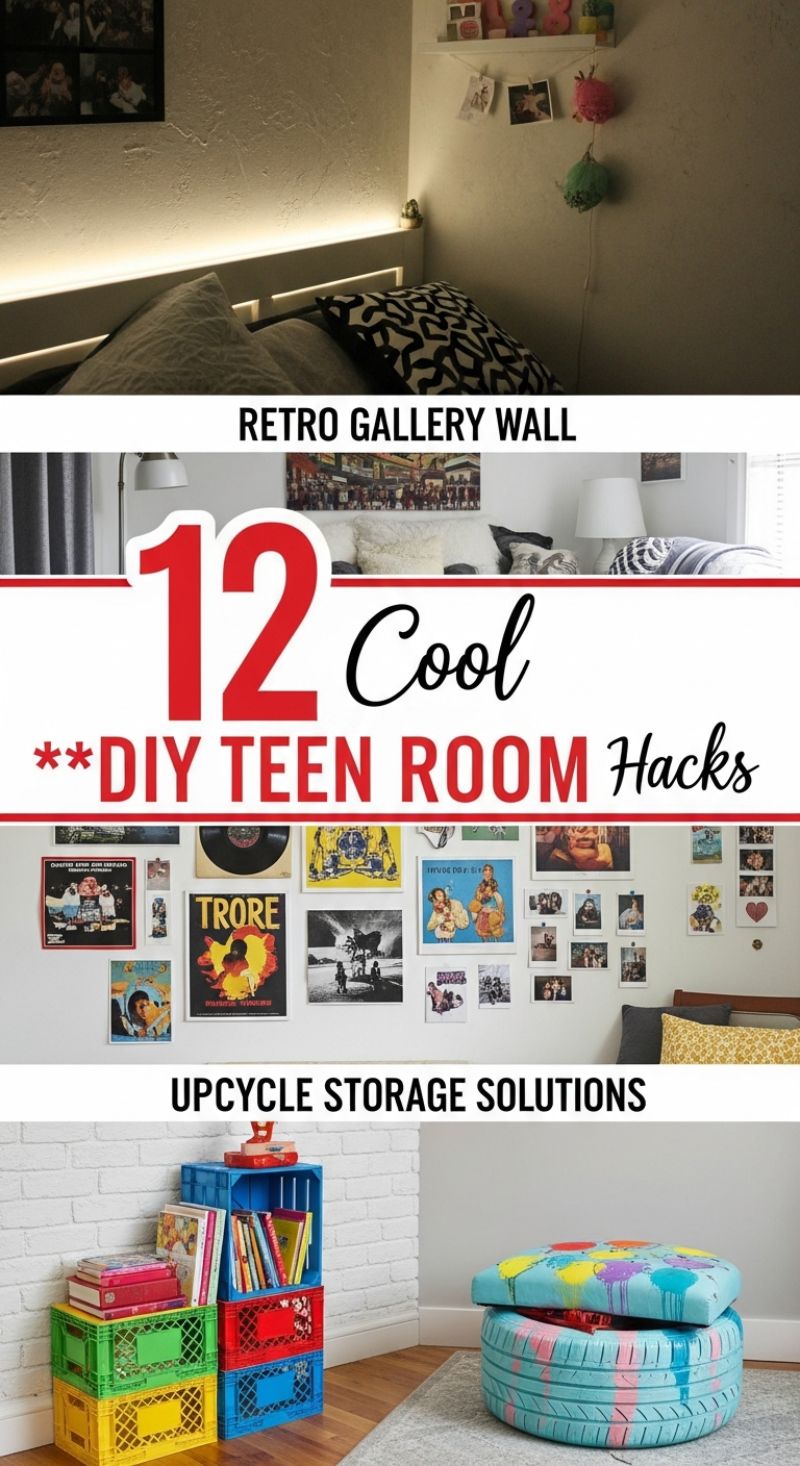
Transforming a plain room into a personalized haven doesn’t require a massive budget; it simply demands creativity and a willingness to embrace DIY hacks, focusing particularly on maximizing wall space and repurposing common items. To achieve the dynamic visual impact seen in the ‘Retro Gallery Wall’ section, start by curating a mix of large album covers, vintage posters, and small, informal photographs. The key to this eclectic look is non-uniformity: avoid matching frames. Instead, use simple mounting techniques like sticky tack, washi tape, or colored push pins. This casual approach allows for easy swapping and creates that authentic, lived-in feel. Lay out your arrangement on the floor first, mixing the media (e.g., place a large graphic vinyl cover next to a cluster of smaller polaroid-style photos) to ensure visual balance and flow before committing to placement on the wall.
Functional upcycling is crucial for maximizing space, especially in smaller rooms. The ‘Upcycle Storage Solutions’ demonstrate two brilliant ways to turn trash into treasure. For the colorful storage unit, utilize sturdy plastic crates (often available cheaply or free from markets). Stack and secure them using heavy-duty zip ties or small brackets to prevent shifting, creating vibrant, modular shelving perfect for books, supplies, and decorative items. For the innovative tire ottoman, thoroughly clean and dry an old car tire, then prime and paint it with exterior-grade, durable spray paint in bright, fun colors, adding splatters or patterns for personality. Cut a circular piece of plywood slightly larger than the tire opening for the base, attach a thick layer of foam, and cover it with durable upholstery fabric to create a functional, comfortable seat that doubles as hidden storage.
Finally, enhance the atmosphere with smart, inexpensive lighting hacks. The ambient glow visible in the upper section of the image is achieved using hidden LED strip lighting. This is an essential touch for transforming any DIY space. Install adhesive LED strips along the back edge of a headboard, shelf, or desk—anywhere the light source itself is concealed but can bounce off the wall. Opt for warm white light for a cozy effect, or use color-changing strips for added versatility. Ensure the power cord and transformer are neatly tucked away (perhaps behind the headboard or secured under the bed frame) to maintain a clean, high-end finish. These elements—art, organization, and lighting—work together to create a cohesive and personality-driven space.
7 Luxurious Bridal Tables

Achieving the timeless elegance displayed in these luxurious bridal tables hinges on mastering a sophisticated, layered approach to your place settings and palette. Start with a foundational color scheme dominated by soft neutrals—creams, whites, and pale pastels like blush pink or powder blue—accented heavily by polished metallic finishes, predominantly silver or rose gold. Instructionally, elevate the standard setting by utilizing charge plates (ornate silver or detailed white ones are visible here) beneath classic, high-quality china. Layered textiles are crucial; instead of basic folding, use thick, luxurious linen napkins, sometimes secured with a personalized name card or a small sprig of floral detailing, and allow them to drape naturally over the plate or hang slightly off the table edge. The use of crystal glassware and heavy, intricate silverware is non-negotiable; these reflective surfaces catch the light and multiply the sense of opulence, transforming a simple meal setup into a grand event display.
The floral centerpiece is the anchor of this opulent look, demanding voluminous, lush arrangements set in weighty, classical containers. Ditch standard glass vases in favor of large, ornate silver urns or footed bowls, which instantly lend an air of historical grandeur and heft. The arrangements themselves should feature densely packed, romantic flowers like roses and hydrangeas in varying shades of pink, peach, and white, ensuring the blooms appear overflowing and abundant. Expert tip for achieving this visual richness: vary the height and scale of the floral elements. While the main centerpiece provides vertical drama, incorporate smaller, matching bouquets or single bud vases near individual place settings or alongside dessert tiers. This dispersal of flowers maintains visual continuity across the entire tablescape and prevents the central element from feeling isolated.
Finally, integrate the dessert display directly into the tablescape to create a cohesive sensory experience. The presentation of treats—such as mini cupcakes, macarons, and delicate fruit tarts—must mirror the aesthetic precision of the place settings. Utilize tiered serving stands, often matching the metallic finish of the floral urns, to lift the desserts and create vertical interest among the lower settings and flowers. When selecting treats, ensure the colors align perfectly with the overall palette; notice the use of blush pink frosting, cream filling, and fresh, colorful berries as natural accents. This technique turns the confections into intentional decorative elements rather than a simple food station. The key takeaway is layering textures—from the soft petals and linens to the hard shine of the silver and crystal—to achieve a dynamic yet harmonious sense of luxury.
6 Stunning Prom Send-Off Backdrops
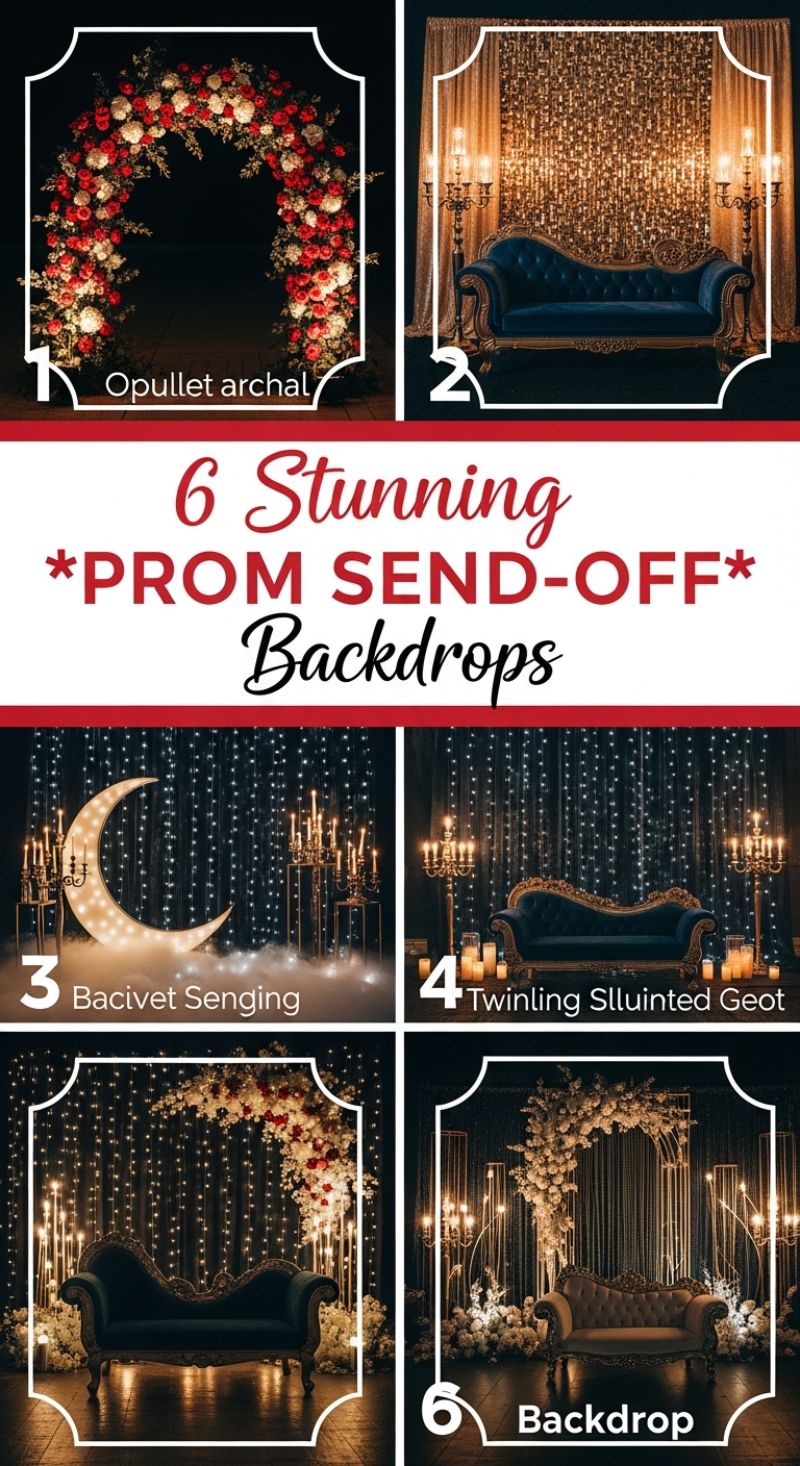
Creating an opulent and memorable prom send-off backdrop requires careful layering of textures, dramatic lighting, and intentional focal points. The foundation of a successful backdrop, as illustrated in examples 2, 4, 5, and 6, lies in the textile choice and lighting scheme. To replicate the luxe aesthetic, start with a solid, dark floor and select either a vibrant, high-sheen sequin drape (ideal for golden Hollywood glamour, like #2) or sheer, dark fabric layered beneath cascading fairy light curtains (perfect for a romantic, starry night effect, seen in #3, 4, 5, and 6). Position a statement piece of furniture—typically a velvet or suede chaise lounge or loveseat—centrally. Choose deep jewel tones like sapphire blue or emerald green for the furniture, as these colors contrast beautifully against both the warm gold sequins and the cool white fairy lights. Ensure all lighting used is warm-toned (around 2700K to 3000K) to avoid harsh shadows and flatter the subjects being photographed, enhancing the magical bokeh effect created by the background lights.
The next crucial step is incorporating impressive structural elements that define the theme, such as a floral arch or a celestial motif. For the lush, natural look (like #1, #5, and #6), build or rent a sturdy metal arch and cover it densely with high-quality faux florals. For the most dramatic effect, mix deep reds and burgundies with white or cream flowers, ensuring the greenery provides depth without overpowering the blossoms. If opting for a celestial theme, the illuminated crescent moon from #3 serves as an unforgettable centerpiece. This requires a custom-built frame lit internally with soft LED strip lighting. Flank either the floral arch or the moon with tall, ornate candelabras placed on either side of the seating area. These items must be significantly taller than the seated subjects to frame them effectively. For added elevation and elegance (like #6), integrate sleek gold geometric pedestals varying in height, scattering small clusters of white flowers and pillar candles at their base.
To elevate the overall composition from a simple photo booth to a luxury photography set, focus on symmetry and ground detail. Arrange secondary elements—such as groups of large pillar candles inside glass cylinders or small, low floral arrangements—at ground level directly in front of and around the main seating area. This adds foreground interest, balancing the height of the backdrop and candelabras. For an ultimate dreamy, cinematic finish (particularly effective with the star curtain backdrop), consider using a subtle, low-lying fog machine or strategically placed dry ice to create a slight haze near the floor, enhancing the soft, romantic glow of the lighting. Ensure the focal point (the couch) is placed slightly forward from the curtain backdrop to allow depth of field, which helps the background lights blur into soft, perfect orbs, achieving a truly professional and stunning photo finish.
5 Elegant Spring Tables You Need

To truly capture the essence of spring elegance in your home or party setting, focus on adopting a layered, romantic aesthetic built upon soft pastels and lush florals. The foundation begins with your linen choices; move beyond stark white and introduce sophisticated hues like pale blue, blush pink, or soft gray/taupe. Expertly layer your place settings, typically starting with a textural charger, followed by a dinner plate, and topped with a patterned salad plate—vintage floral china is particularly effective for evoking a timeless, delicate spring feel. The mix-and-match approach, combining detailed china with simple solid napkins and high-quality silver flatware, ensures the setting feels curated rather than overly formal. Remember that the glassware is also key; utilizing textured crystal stemware adds a necessary element of sparkle and formality, catching the light and enhancing the overall luxurious ambiance of the table.
The centerpiece is the undisputed star of a spring table, demanding large, generous arrangements of classic blooms like peonies, dahlias, garden roses, and tulips. When planning your arrangement, ensure the colors complement the table linens—for example, if using a light blue cloth, incorporate white and blush florals to create visual contrast without competition. The vessel choice significantly influences the style; heavy, antique-style urns (silver or stone) lend a traditional, grand air, while simple clear glass vases provide a contemporary balance that lets the flowers speak for themselves. For conversational dining, keep the arrangements at or below ten inches in height, or opt for multiple smaller bud vases clustered along the table’s length. Always condition your flowers properly before arranging them by removing lower leaves and giving the stems a fresh cut under water to ensure maximum longevity and freshness throughout your event.
Finally, elevate the table with detailed finishing touches that communicate high-end style. Napkin presentation is an easy area to personalize; try wrapping napkins simply with ribbon or twine, or folding them neatly beneath the top plate, allowing the pastel color to pop against the china. Incorporate subtle lighting, even for daytime events, through slender white taper candles set in antique candelabras or simple mercury glass votives. These small touches add warmth and a beautiful soft glow, vital for transforming the table as natural light fades. By adhering to a consistent palette and combining rich textures with the visual softness of abundant blooms, you can successfully recreate these five distinct yet uniformly elegant spring table settings, perfect for any sophisticated gathering.
5 Festive St. Patrick’s Decor Tips
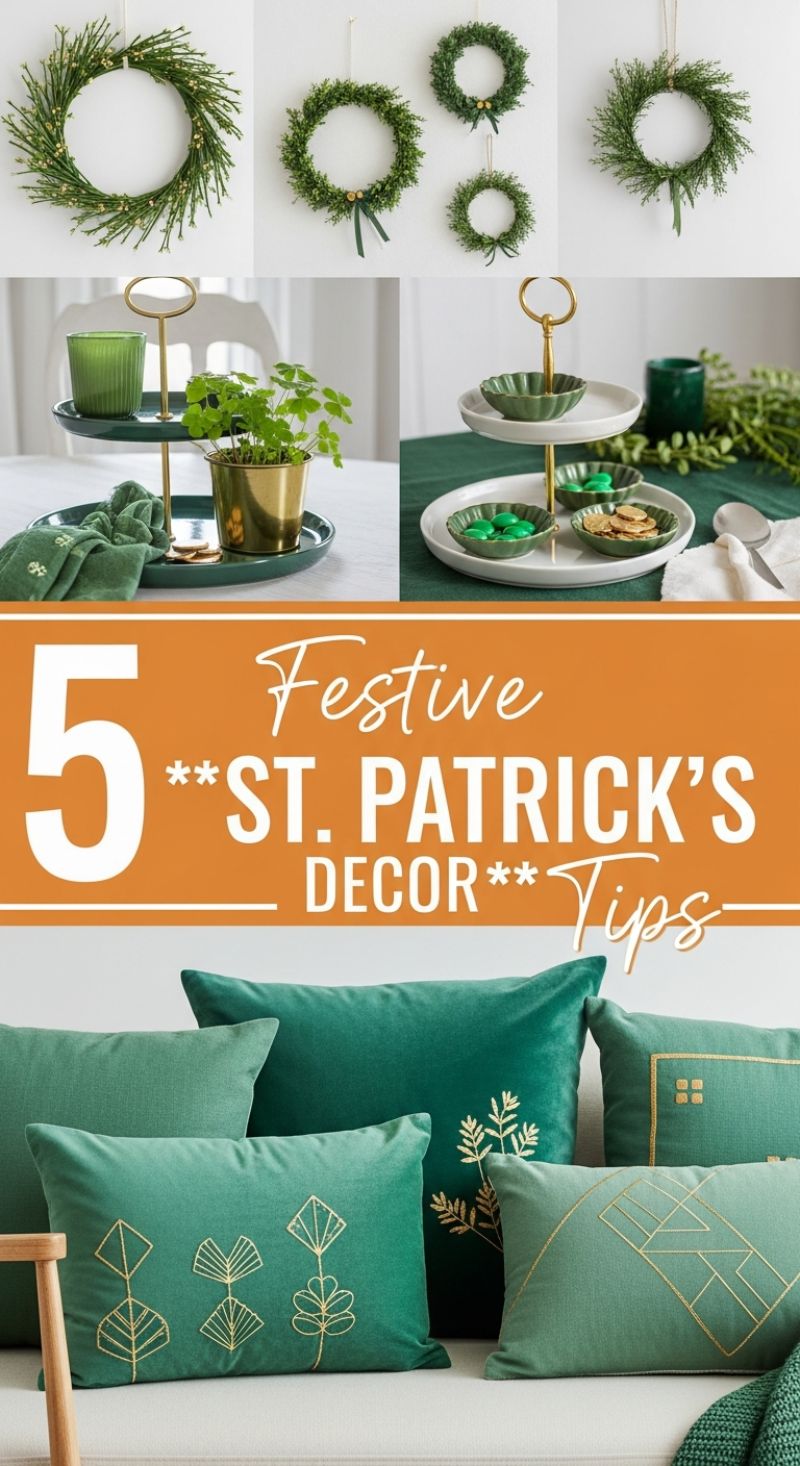
Elevating your St. Patrick’s Day decor goes far beyond shamrocks and leprechauns; it’s about utilizing lush greens and luxurious textures to create an atmosphere of sophisticated festivity. Start with integrating natural or faux greenery prominently. For your walls and doors, select deep green wreaths in varied textures, like faux boxwood or loose cypress styles, as seen in the examples. Hang them at differing heights for visual interest, perhaps adorning one with a simple emerald velvet ribbon or micro fairy lights for a subtle sparkle. Inside, bring the greenery to your tabletops. Instead of relying solely on cut flowers, opt for living plants like oxalis (false shamrocks) potted in metallic gold containers. This immediately ties into the ‘pot of gold’ theme while adding life and vibrancy to your space, maintaining an air of subtle elegance.
The key to a high-end St. Patrick’s look lies in mixing textures and shades of green. Forget neon hues and embrace rich tones like forest green, emerald, and muted sage. Apply this principle heavily in your textiles. On the sofa, layer throw pillows crafted from luxurious materials like velvet or heavy linen. The inclusion of subtle gold embroidery—geometric patterns, stylized florals, or minimal accents—provides the necessary festive contrast and gleam. When layering pillows, mix sizes and shapes, ensuring that a few solid deep emerald pieces anchor the brighter or more patterned sage pillows. This combination creates depth and visual warmth, transforming your living space into a cozy yet sophisticated haven that celebrates the season without feeling overly thematic or cartoonish.
For entertaining and presenting snacks, utilize functional decor like a tiered serving tray as a stunning centerpiece. Style the tiers by mixing thematic treats with elegant serveware. On the top tier, place a simple, deep green glass or a small dish of green-hued almonds. On the lower tier, use small white or scalloped dishes to hold color-coordinated items: green foil-wrapped chocolates and small, shiny gold coins or crackers, referencing a classic celebratory treasure. Complement this display by using deep emerald linen napkins or a table runner to ground the entire arrangement. The contrast between the rich green linens, the shiny gold metallic accents (tray handle, planter), and the clean white of the serveware creates a dynamic and inviting vignette that is both practical for guests and incredibly stylish, ensuring your festive gathering is memorable.
5 Elegant Easter Mantle Styles
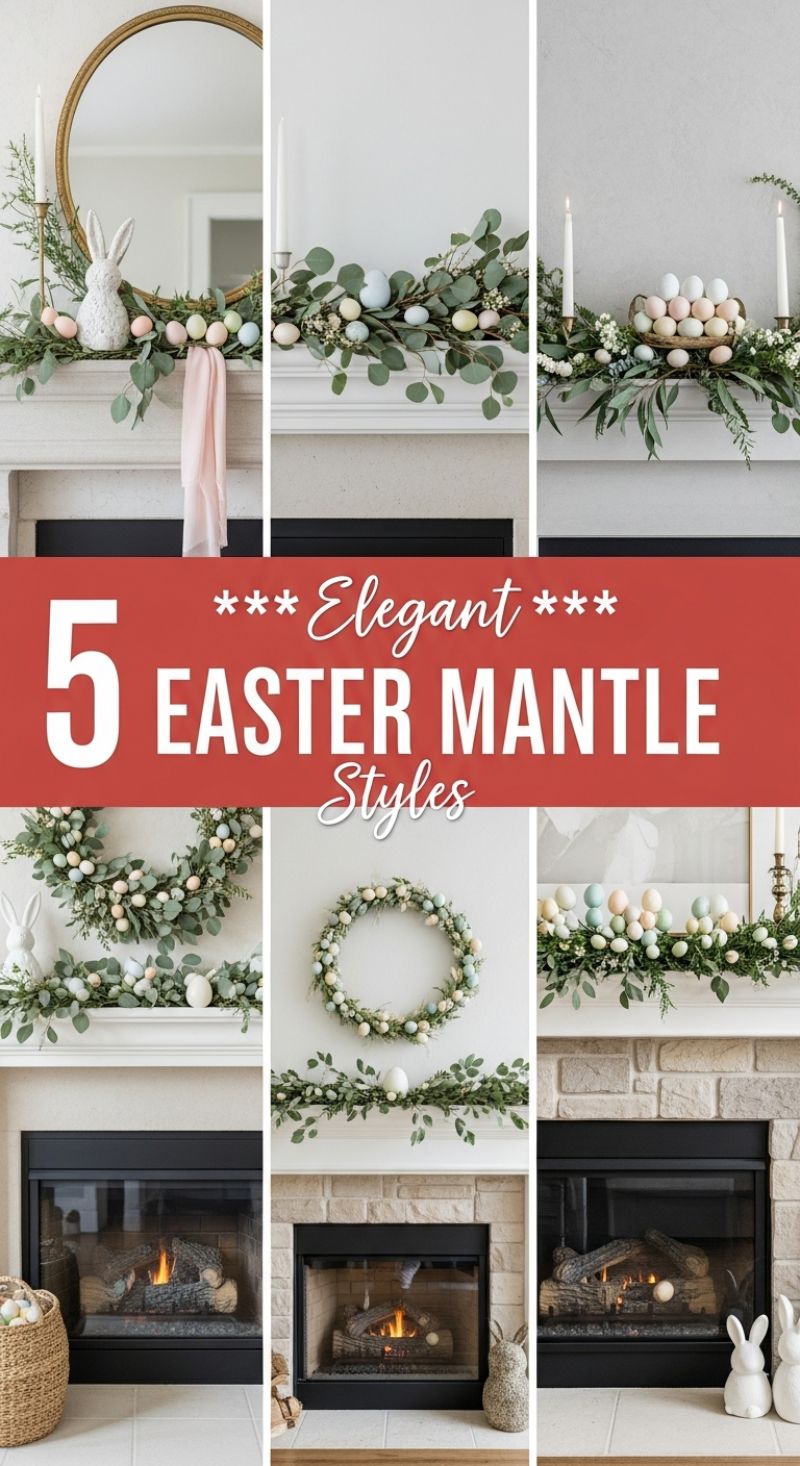
Achieving an elegant Easter mantle relies on a sophisticated mix of natural textures, soft pastels, and refined symmetry, moving beyond overly bright or childish themes. The foundational element across all five styles shown is the lush, layered greenery garland. To recreate this professional look, start by draping a high-quality faux garland, preferably featuring varied textures like silver dollar eucalyptus and wispy stems like baby’s breath or small ferns. This mix provides depth and volume, preventing the display from looking flat. For true elegance, ensure your garland extends slightly past the edge of the mantle on both sides, creating a relaxed, cascading effect. Once the greenery is secure, introduce the pastel eggs. Scatter them deliberately among the leaves, focusing on subtle color variations (pale blue, soft pink, mint green, and cream) rather than vibrant hues. The goal is to make the garland appear naturally overgrown and blooming with spring color, distributing the eggs unevenly to maintain an organic flow.
To differentiate your style, consider the central focal point and vertical elements. The first style uses a large, round mirror with a thin gold frame to anchor the design and amplify light, offset by a decorative white ceramic bunny and a simple blush pink ribbon draped off the side. This adds height and romantic softness. For a symmetrical arrangement, as seen in the third style, use matching brass or gold candlesticks on either side, flanking a central element like a small woven basket overflowing with eggs. This creates classic balance. If you prefer a more dynamic, layered approach, integrate wreaths. The styles displayed showcase both a full garland mantle topped by a large, coordinating wreath hung above the fireplace, and a style where a smaller, intricate egg-covered wreath serves as the main artwork, complemented by a simpler egg garland underneath. When mixing elements, ensure the egg colors and greenery types are consistent across all pieces for a cohesive and high-end finish.
Expert execution demands attention to scale and contrast. If your fireplace surround is white (be it painted wood or light stone), introduce contrasting texture via metallic accents (brass candlesticks) or natural materials (woven baskets, textured ceramic bunnies) to ensure the decor stands out. For depth, layer objects towards the back of the mantle and bring key focal pieces slightly forward. Ensure all candles are unscented and properly secured, especially if the fireplace is in use. Finally, evaluate the entire hearth area; keep accessories minimal and coordinated. Use simple white or pale gray accents on the hearth, like small ceramic bunnies, or incorporate large woven baskets for subtle texture, making sure the mantle remains the star of your sophisticated Easter display.
10 Fun Galentine’s Party Essentials
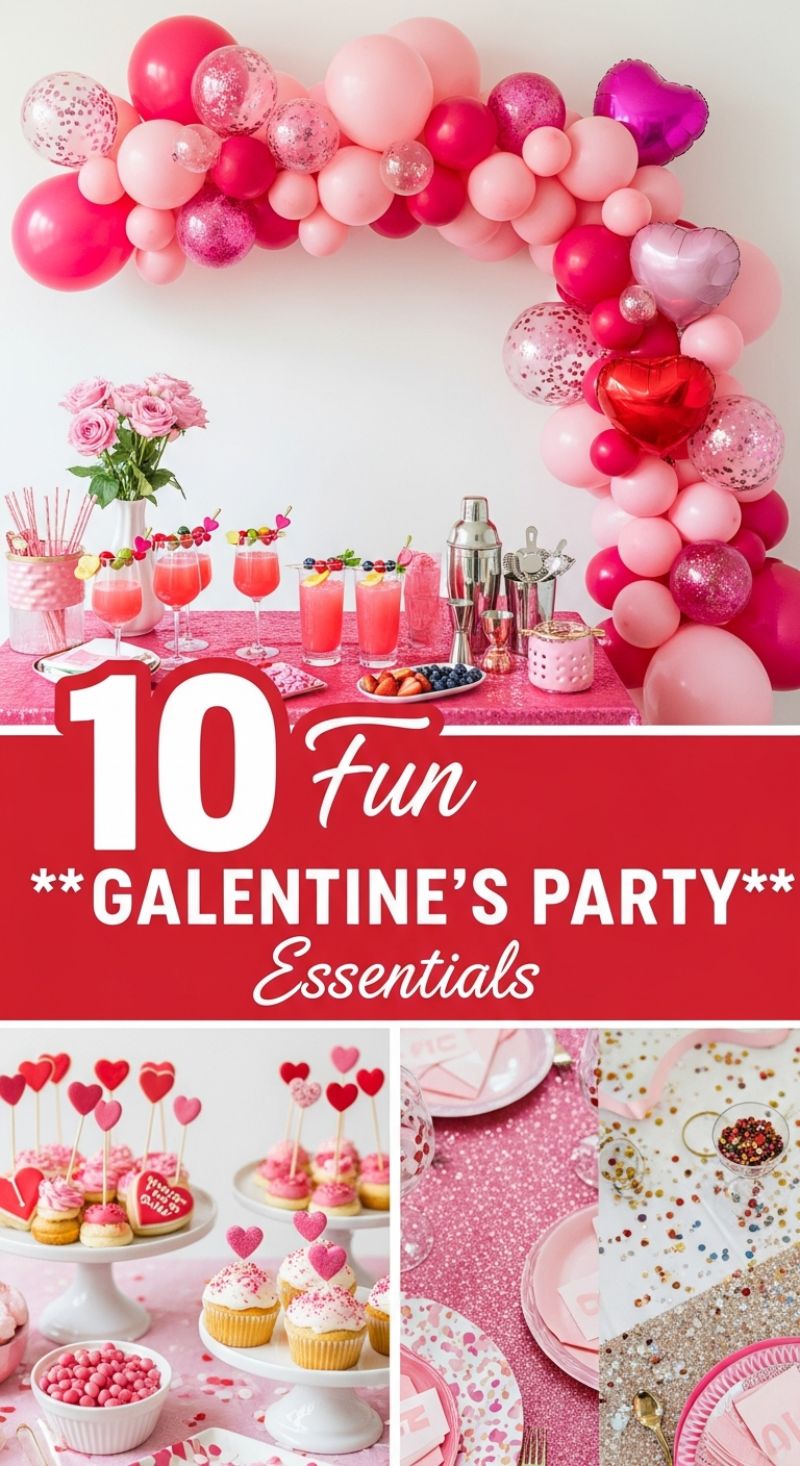
The key to mastering an iconic Galentine’s celebration lies in establishing a dramatic, cohesive color narrative, primarily utilizing the power of pink, magenta, and festive metallics. Begin by constructing a visually arresting focal point, such as the elaborate organic balloon garland shown. To replicate this expert-level look, you must incorporate a variety of balloon sizes (from 5-inch fillers up to 36-inch statement pieces) and textures, including standard matte latex, clear balloons filled with chunky confetti, high-shine glitter balloons, and metallic foil accents like the signature heart shapes. Arrange the garland in a meandering, organic fashion, using varying shades of light pink, rose, and deep fuchsia to create depth and movement. Once the main arch is established, ensure the table settings below reinforce this color story, setting the stage for the intimate gathering. This visual anchor immediately transforms any standard room into a celebratory haven, ensuring every photo opportunity is maximized.
For the tablescape and dessert presentation, focus on layered texture and purposeful height variation. Start with a high-impact foundation, such as a pink sequined or glitter tablecloth, which instantly communicates a fun, luxurious vibe. Next, utilize white cake stands of differing heights to elevate cupcakes, mini cheesecakes, and themed sugar cookies decorated with heart toppers and pink sprinkles. Presenting desserts at different levels not only makes the spread look more abundant but also guides the viewer’s eye across the entire buffet. When setting the individual places, layer your dinnerware: use a large, solid pink charger or plate topped with a smaller, patterned accent plate featuring complimentary colors. Finish the look by scattering loose confetti (a mix of gold, red, and pink) directly onto the table surface around the serving dishes and place settings, connecting the overall decor elements into one seamless festive design.
Finally, no Galentine’s party is complete without a dedicated and well-stocked beverage station. Whether serving cocktails or mocktails, the presentation must align with the theme. Use elegant bar tools, like a stainless steel shaker and jiggers, displayed openly as part of the decor. The drinks themselves should echo the pink palette; for example, cranberry or raspberry-infused beverages work perfectly. The true secret to an elevated bar setup, however, lies in the garnishes. Use themed cocktail skewers (like tiny plastic hearts) to hold fresh fruit—such as blueberries, raspberries, and lemon wedges—adding necessary contrast and a refreshing visual pop against the pink liquids. Ensure that essentials like decorative straws and napkins are easily accessible in stylish containers to maintain the polished, high-end aesthetic throughout the event.
Dreamy Beauty Room: 6 Essentials for an Opulent Vanity Space
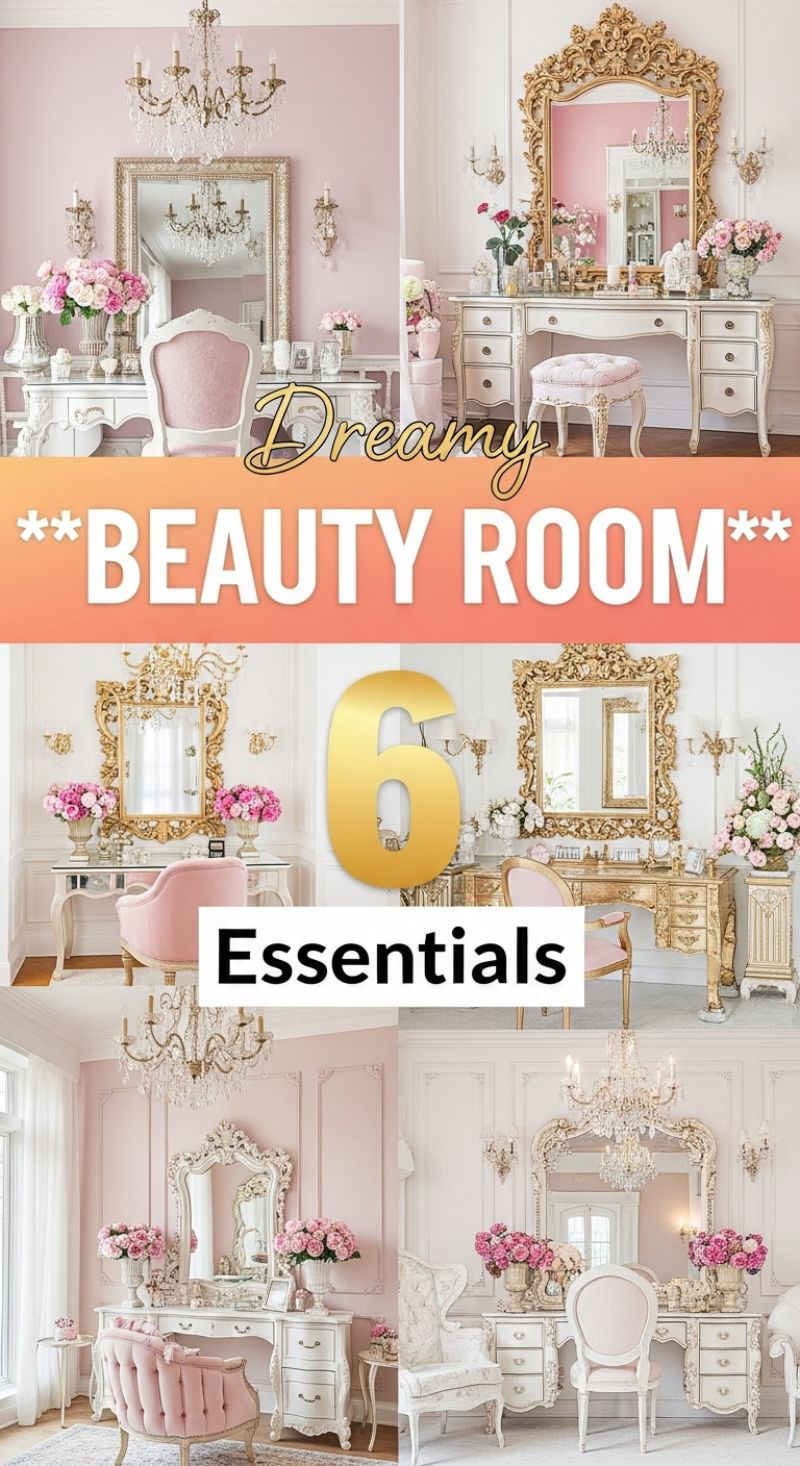
Creating a truly dreamy beauty room, as pictured in this collage of luxurious vanities, requires blending Neo-Classical European opulence with soft, feminine accents. The foundation of this aesthetic lies in the refined color palette and architectural detailing. Begin by setting the scene with delicate pastels—blush pink, dusty rose, or pale lavender walls—balanced against crisp white or cream wainscoting and elaborate molding. This textured backdrop instantly elevates the room, lending it a historic, French provincial feel. For the metallic accents, choose distressed gold or antique brass, which provides the necessary warmth and glamour without feeling harshly modern. These colors and textures form the essential stage for your centerpiece, ensuring the room feels soft, ethereal, and utterly devoted to self-care.
The centerpiece of any opulent beauty room is the vanity and its accompanying mirror. Invest in a substantial dressing table featuring highly decorative carving, cabriole legs, and ample drawer storage; materials like distressed ivory wood or, for ultimate glamour, gilded gold finishes work best. The mirror, however, is non-negotiable for achieving this aesthetic. It must be oversized, commanding attention, and encased in a highly ornate, Baroque or Rococo-style frame. Position the mirror so it captures and magnifies the room’s light. Crucial for functionality and ambiance is professional lighting: forgo modern strip lights in favor of an elegant crystal chandelier and flanking wall sconces. Sconces placed roughly at face height on either side of the mirror provide the most flattering, shadow-free illumination necessary for precise makeup application. Complete the functional setup with a plush, upholstered seat, such as a velvet slipper chair or tufted stool, ensuring comfort marries perfectly with luxury.
To transform the vanity from mere furniture into a true beauty boudoir, focus on the styling essentials. These finishing touches elevate the space and fulfill the ‘dreamy’ mandate. Incorporate lush, voluminous florals; large arrangements of peonies, hydrangeas, or roses in antique urns are mandatory for conveying abundance and femininity. Secondly, utilize decorative vessels to organize and display your cosmetics and tools: think crystal jars for brushes, antique mirrored trays for perfume bottles, and delicate porcelain boxes for jewelry. Avoid clutter by ensuring only the most visually appealing items remain on the surface, while everyday essentials are neatly tucked away in the vanity drawers. By integrating sumptuous textiles, such as a sheepskin rug or a silk runner, and ensuring every single element—from the chair’s fabric to the mirror’s sheen—exudes quality and softness, you successfully create a retreat that is both functional and decadently beautiful.
7 Unique Birdcage Decor Transformations

Birdcages, once functional, have evolved into one of the most romantic and versatile pieces of shabby-chic décor, perfect for elevating both home interiors and special events. For elegant event décor and sophisticated tablescapes, utilize the cage as a vessel for dramatic illumination. As shown, they can hold warm fairy lights nestled on a delicate lace doily, or serve as a secure centerpiece for groupings of pillar candles displayed along a dining runner. The open wire structure is ideal for diffusing light softly, creating an intimate, inviting atmosphere. When using real candles, ensure they are placed safely away from the wire bars, or opt for high-quality LED candles for worry-free ambient lighting. Alternatively, for a fresh centerpiece, simply place a dense, colorful bouquet inside or secure the top dome to hold a vase of wildflowers, allowing the wire frame to serve as a vintage structure around the arrangement.
Birdcages are exceptionally suited for innovative botanical transformations, offering both hanging and tabletop planter solutions. The succulent arrangement provides a stunning, low-maintenance indoor display; to recreate this, ensure proper drainage by lining the base with gravel or perlite before adding specialized succulent potting mix. Pack the succulents tightly for that dense, vibrant look. For the outdoor aesthetic, the cages instantly convert into charming vertical garden accents. To prevent soil washout and ensure the plants thrive, always line the bottom interior of the cage with a sheet of coco coir or moss liner. This is critical for retaining moisture when using trailing varieties like ivy, petunias, or impatiens in a hanging display, which introduces an immediate touch of rustic elegance to any garden or patio space.
Beyond traditional planting and lighting, birdcages offer a unique opportunity for creating thematic vignettes and miniature, enchanting scenes. The examples demonstrating the inclusion of preserved moss, small sprigs of faux flowers, and delicate bird figurines transform the cage into a sophisticated ‘faux nest’ or mini aviary exhibit. This approach is perfect for indoor styling on mantels or side tables and is highly adaptable for seasonal decorating. For instance, switch the spring moss for mini gourds and colorful leaves in autumn, or use white faux snow and pinecones during the winter months. To maximize the vintage charm, opt for cages with a distressed white or wrought iron finish, and remember to coordinate the cage size with the intended viewing distance—larger cages work best as floor or table centerpieces, while smaller ones are ideal for grouping or shelf styling.
9 Cozy Outdoor Patio Upgrades

To achieve the luxurious, “cozy” outdoor patio look shown, start by meticulously defining your seating zones. This design relies on distinct, contemporary outdoor furniture featuring sleek black metal frames and light gray cushions, providing a modern yet comfortable foundation. The key instructional element here is layering and defining space. Even on wooden decking or paved stone, anchor your setup with specialized outdoor rugs. Notice how the images utilize high-contrast geometric patterns (black and white diamonds) and softer, abstract gray patterns to delineate separate functional areas—a conversation nook versus a relaxed lounging area. Ensure your rug material is specifically rated for outdoor use to withstand moisture and UV exposure, extending its life and vibrancy. The furniture placement should always encourage conversation, typically framing the space around a central coffee table, ensuring accessibility to beverages and snacks.
Ambience is paramount for transforming an ordinary patio into an evening retreat. Overhead string lighting, typically warm Edison bulb style, is an essential upgrade for casting that inviting, golden glow. Strategically string these lights above the main seating area, attaching them securely to fences, trellises, or the house structure. Complement this essential lighting with soft, layered textiles. While the core furniture is sleek and modern, the coziness is introduced through throws, and a variety of plush throw pillows in knit, stripe, and subtle geometric patterns. The textural diversity—from the smooth cushion fabric to the woven structure of the accent chairs (like the modern Acapulco-style chair)—prevents the neutral palette from feeling flat. Additionally, integrate vertical elements using tall, dark, modern planters filled with lush greenery and seasonal flowers. These planters not only add life and color but also serve as stylish dividers, enhancing privacy and beautifully framing the seating space.
The final step is perfecting the functional styling elements. Select durable coffee tables that offer utility, such as slatted wood or dark wicker storage options, providing both a surface and hidden capacity for storing blankets or extra pillows. Accessories should focus on low-level ambient light: pillar candles in glass hurricane holders, small lanterns, and perhaps tabletop planters for added natural freshness. When curating your space, maintain a cohesive neutral color story (grays, charcoals, creams, and natural wood tones) to ensure a sophisticated, timeless look. Expert advice for long-term enjoyment: Opt for furniture with removable, washable covers to simplify maintenance, and always bring delicate textile items inside during harsh weather. By treating your outdoor patio as an extension of your indoor living room—focusing equally on comfort, defined zones, and strategic illumination—you ensure a functional and beautiful all-weather entertaining area.
7 Gorgeous FRONT PORCH Decor Hacks
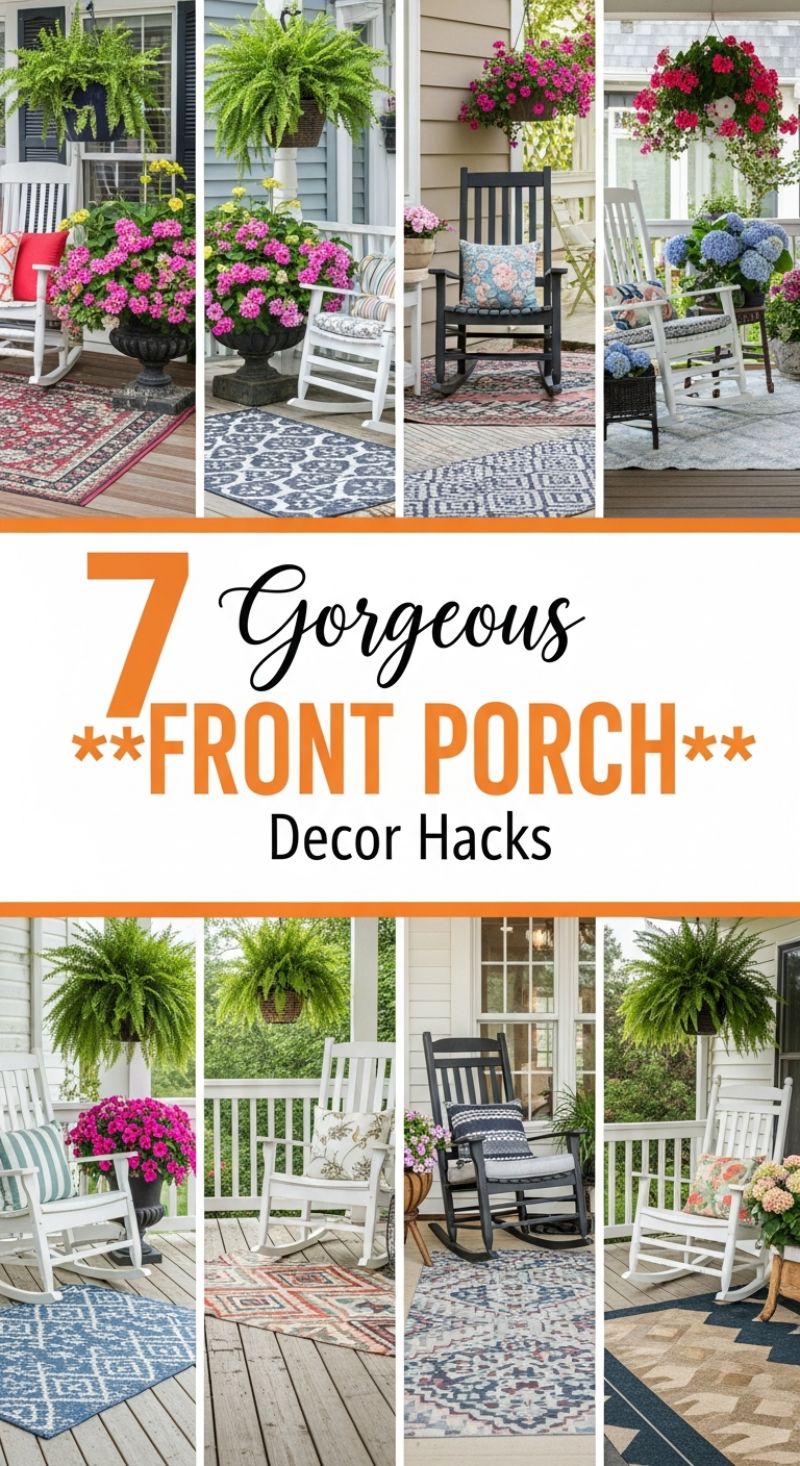
The key to a welcoming front porch, as demonstrated by these vibrant examples, lies in establishing a foundational sense of comfort and definition. Begin by selecting iconic, durable seating—the classic rocking chair serves perfectly, offering both traditional charm and relaxation while standing up to the elements. When choosing foundational furniture, ensure materials are rated for outdoor use to withstand sun exposure and moisture. The next crucial step is grounding your seating arrangement with a strategic outdoor area rug. This element is not just decorative; it functions as a highly effective “hack” for defining the space, much like in an interior living room. Select rugs with bold, graphic patterns (such as traditional medallion, ikat, or sharp geometrics seen here) and deep colors that can mask high traffic wear and provide a stark contrast to lighter wooden or vinyl flooring, instantly elevating the porch from a simple landing space to a truly inviting outdoor lounge.
Once the seating is anchored, focus on layered textiles to inject personality and plushness. Cushions and throw pillows are essential for transforming hard seating surfaces into cozy havens. Use this opportunity to introduce your seasonal color palette; these designs expertly leverage vibrant pinks, striking blues (like those found in large hydrangea pots), and rich fern greens set against neutral chair frames (white or classic black). When mixing patterns, aim for coordination, not matchiness. Try combining a geometric rug with striped seat cushions and a floral throw pillow for visual depth and sophistication. To complete the sensory experience, incorporate generous amounts of lush, living greenery. Hanging Boston ferns or other large, trailing plants offer immediate vertical texture and natural shade, instantly making the porch feel cooler and more established. Pair these with large urns or classic planters overflowing with blooming annuals placed strategically beside the chairs or at entrance points.
For maximum impact, pay careful attention to symmetry and scale, which instantly creates a formal, balanced, and intrinsically welcoming look. Notice how often these layouts utilize two matching chairs and balanced greenery on either side of the grouping. The true genius of these decor hacks lies in their flexibility; the foundation (chairs and rug) remains stable while the decorative layers allow for easy seasonal transitions. You can easily swap bright summer textiles for textured wool or harvest-toned pillows in the fall, or trade annuals for potted evergreens in the winter, refreshing the look without costly replacements. A final expert tip involves extending the ambiance into the evening: ensure your porch is well-lit. Adding soft string bistro lights or installing stylish outdoor lanterns complements the cozy feeling established by the textiles and plants, making your front porch a gorgeous and functional extension of your home day and night.
Iconic Bachelorette Party Decor Themes: A How-To Guide

Bachelorette parties are the perfect opportunity to fully immerse guests in a cohesive decorative theme. Achieving a high-impact look starts with selecting a visual concept and committing fully to the color palette and textures shown here. For softer, nature-inspired themes like Coastal or Boho Chic, focus on organic textures and light fabrics. The Coastal theme, for example, is executed using sandy neutrals, turquoise accents, and authentic props like starfish and seashells, often paired with light linens or striped fabrics for a breezy, Hamptons-inspired feel. Conversely, the Desert theme leans into rich earth tones—terracotta, blush, and warm taupe—executed through layered geometric paper cutouts that mimic Southwestern landscapes. Introduce iconic elements like a large faux cactus and wooden directional signs to ground the theme. For high-energy themes like Last Rodeo, the focus shifts to saturated colors, primarily hot pink. Integrate signature pieces such as personalized pink cowboy hats and thematic drinkware, ensuring the execution is playful by balancing classic Western motifs (like boots and fringe) with modern, glittering elements.
Elevating the theme requires integrating high-impact focal points and personalized details, especially for experiential concepts like Hollywood Glam and Paparazzi. The Paparazzi theme demands a celebratory entrance; deploy a luxurious red carpet flanked by gold stanchions and velvet ropes to instantly transport guests to a premiere. Decorate the space with black backdrops accented by metallic gold stars and filmstrip motifs. Complement this with Hollywood Glam elements, utilizing customized champagne flutes that sparkle, ensuring every toast is photo-ready. For a global vacation feel, the Tropical Fiesta theme marries lush island greenery with vibrant Mexican fiesta elements. Use large, dramatic palm fronds and bright, intricately cut papel picado banners (shown in a rainbow of colors) to create an immediate sense of celebration. Expert advice for this theme is to scatter colorful floral arrangements and ensure personalized drink vessels, such as the agave-themed mason jars, are easily accessible.
Finally, the increasingly popular Boho Chic aesthetic provides a softer, more romantic approach centered on texture and natural fiber art. To recreate this look successfully, invest in macramé pieces, such as large dreamcatchers or wall hangings, decorated with dried flowers, feathers, and gentle floral accents in cream and blush tones. The key is layering—mixing chunky knits with delicate lace and soft faux fur throws to create a cozy, ethereal atmosphere. Across all eight iconic themes—from the dazzling disco balls of a Glam Party to the earthy tones of the Desert—consistency in personalized details is paramount. Utilizing custom drinkware and small, theme-specific favors not only ties the decor together but also provides guests with a memorable keepsake of the celebration.
7 Spectacular Quinceañera Themes
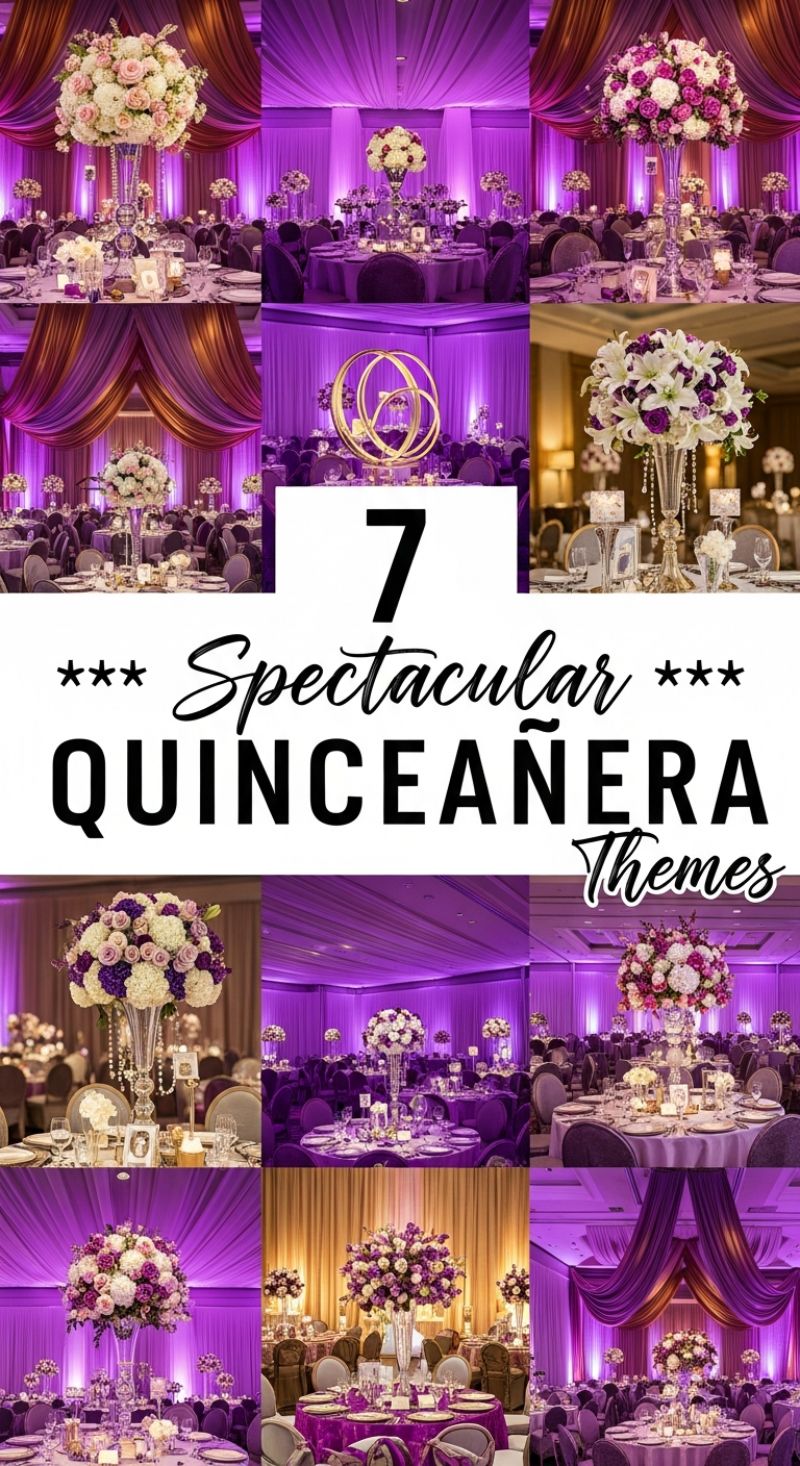
Creating an atmosphere of regal elegance hinges on mastering lighting and structural design, as demonstrated by these stunning examples of violet and gold themes. To replicate this opulent look for a formal celebration, start with a powerful, saturated color palette. Deep violet, royal purple, and magenta should dominate the room, achieved primarily through controlled LED uplighting. Wash the walls and ceiling drapes in these rich hues to instantly transform the venue into a luxurious ballroom. Crucially, contrast the cool purples with warm metallic accents—specifically gold, brass, or bronze—used in charger plates, centerpiece bases, and decorative signage. This interplay of cool primary lighting and warm secondary accents provides depth and prevents the monochromatic purple from feeling overwhelming, adding a necessary touch of vintage grandeur.
Elevating the tablescape requires substantial, vertical elements that draw the eye upward while maintaining open sightlines. Focus on oversized, densely packed floral arrangements featuring voluminous blooms like hydrangeas, large roses, and lilies, typically resting on tall, clear glass trumpet vases (at least 24 inches high). The height is essential for visibility and drama. For textural interest, incorporate shimmering fabrics. Beyond standard tablecloths, use ceiling and wall draping liberally. Sheer organza or chiffon drapes, illuminated by the colored uplighting, soften the sharp angles of the room and create a flowing, canopy-like effect, lending a magical quality. For the tables themselves, consider using crushed velvet or sequined linens in deep purple or complementary gray to further enhance the rich texture profile of the setting.
Expert execution of this theme involves meticulous attention to layering and focal points. Beyond the standard centerpieces, strategically place smaller accents, such as floating candles in crystal holders, bejeweled votives, and small gold-framed pictures, throughout the tablescape to add shimmer at eye level. If budget allows, consider a dramatic entrance piece, like the large, circular gold motif shown, serving as a photo backdrop or a structural feature behind the main table. While these examples are centered around Quinceañera celebrations, the decorating principles—dramatic lighting control, rich fabric layering, and high-impact floral structure—are universally applicable for any high-end party, whether it’s a milestone birthday, an anniversary, or a lavish wedding reception.
10 Magical Garden Party Details: Crafting an Enchanted Outdoor Setting
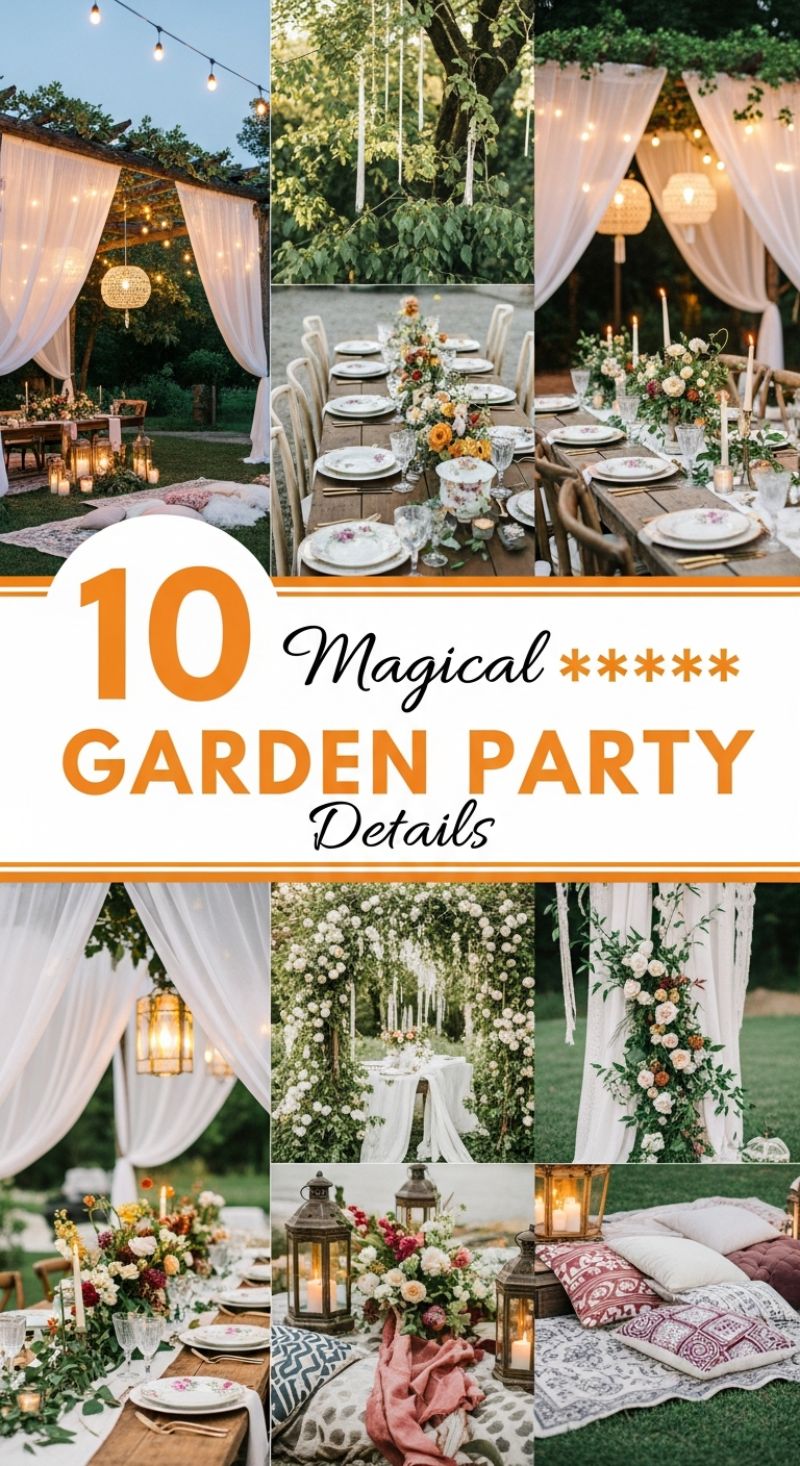
Transforming your garden into a magical party setting hinges on layering atmospheric elements, focusing primarily on lighting, draping, and textural comfort. Begin by defining your event space using architectural structure, such as a pergola, or even large tree limbs. Drape sheer, voluminous white fabric (chiffon or voile) around these structures to instantly create a soft, ethereal canopy that diffuses light beautifully. For illumination, string market or café lights overhead for essential brightness, then supplement this foundation with warmer, mood-setting candlelight. Incorporate elegant hanging elements, such as long, slender pillar candles suspended safely from branches, which add a stunning vertical dimension and a whimsical flair. The strategic placement of ambient lighting, whether through soft string lights woven through foliage or large woven lanterns, ensures the space feels intimate and deeply enchanting as dusk settles.
Next, focus on establishing a rustic yet refined tablescape that grounds the scene. A long, natural wood table is ideal, providing an organic, timeless base. Elevate the dining experience by foregoing a heavy tablecloth in favor of a narrow linen or gauze runner, allowing the wood grain to shine. Centerpieces should be lush, overflowing with varied florals and greenery, embracing rich textures and warm color palettes (such as cream, dusty rose, and deep burgundy) to contrast beautifully against the natural backdrop. Expert tip: utilize mismatched or vintage floral china to introduce character and a sense of effortless charm to each place setting. Integrate continuous candlelight down the length of the table using varied heights of taper candles and metallic lanterns to maximize reflectivity and create a cozy, flickering glow that highlights the natural materials and deep floral tones.
Finally, create inviting pockets for relaxation and conversation beyond the main dining area, emphasizing bohemian comfort. Set up low lounge areas, using materials like large, flat cushions, layered rugs (think Persian or Moroccan patterns), and oversized throw pillows in textured fabrics (velvet, linen, cotton). Choose patterns and colors that harmonize with your floral scheme but offer greater saturation and depth. These low setups encourage relaxed seating and interaction. Anchor these lounge areas with large, antique-style lanterns—bronze or black metal works best—clustered together to define the space and provide soft, directional lighting. This mix of soft textiles, warm light, and rich natural elements creates a cohesive, high-end garden party aesthetic that truly feels luxurious and magically immersive for your guests.
6 Vibrant Talavera Wedding Styles

Implementing a Talavera wedding style is an exercise in joyous maximalism, anchored by the iconic color palette of rich indigo blue, sunny yellow, and crisp white. To successfully execute this look, begin with the tablescape. Source authentic or high-quality replica Talavera dinnerware, focusing on intricate geometric and floral patterns. The key to balancing this visual intensity is layering: utilize simple, clean white linens as the foundation, allowing the patterned charger plates and salad plates to be the stars. Expert advice suggests confining the primary patterns to the plates and using solid white for the surrounding elements, such as napkins and water glasses, to prevent the setting from feeling overwhelmingly busy. Introduce subtle Talavera accents, such as small patterned tiles used as coasters, place card holders, or embedded into the table runner design, ensuring that the cohesive motif is present without saturating every surface. This vibrant pattern strategy is perfect for turning a standard banquet hall or outdoor venue into a spectacular destination-style celebration.
The centerpiece design is crucial for elevating the Talavera theme. The vases themselves should be elaborately patterned Talavera ceramic vessels, acting as artistic sculptures even before the florals are added. The corresponding floral arrangements must be equally exuberant, pulling saturated colors that complement and contrast the blue and yellow ceramics. For a truly authentic and vibrant look, combine deep cobalt blue hydrangeas, fiery marigolds (orange), bold fuchsia stock or bougainvillea, and bright sunflowers, using classic white roses sparingly to provide visual structure and elegance. When positioning centerpieces, remember that Talavera works beautifully with height; use stately, elongated vases to draw the eye up. For secondary decorative areas, such as the guest book table or cocktail bar, use smaller, coordinated arrangements to maintain consistency, always ensuring the base vessel showcases the distinctive blue and white patterning.
Extend the vibrant motif to key focal points like the wedding cake and stationery suite for a complete design experience. The wedding cake should emulate the ceramic artistry, utilizing intricate hand-painted designs in royal blue and yellow frosting on a tiered white fondant canvas, making it a stunning, edible masterpiece. For the stationery, incorporate the detailed tile borders and signature color scheme (as demonstrated by the invitation suite) onto invitations, menus, and programs. This provides an immediate, cohesive visual introduction to the wedding theme for your guests. Lastly, integrate atmospheric lighting that complements the celebratory, rustic essence of Talavera. Warm, exposed bulb lighting, such as large marquee signs spelling out “MR & MRS,” adds a playful, modern touch that grounds the traditional ceramics in a contemporary wedding context, perfect for outdoor receptions and ensuring a cozy, festive ambiance as the evening progresses.