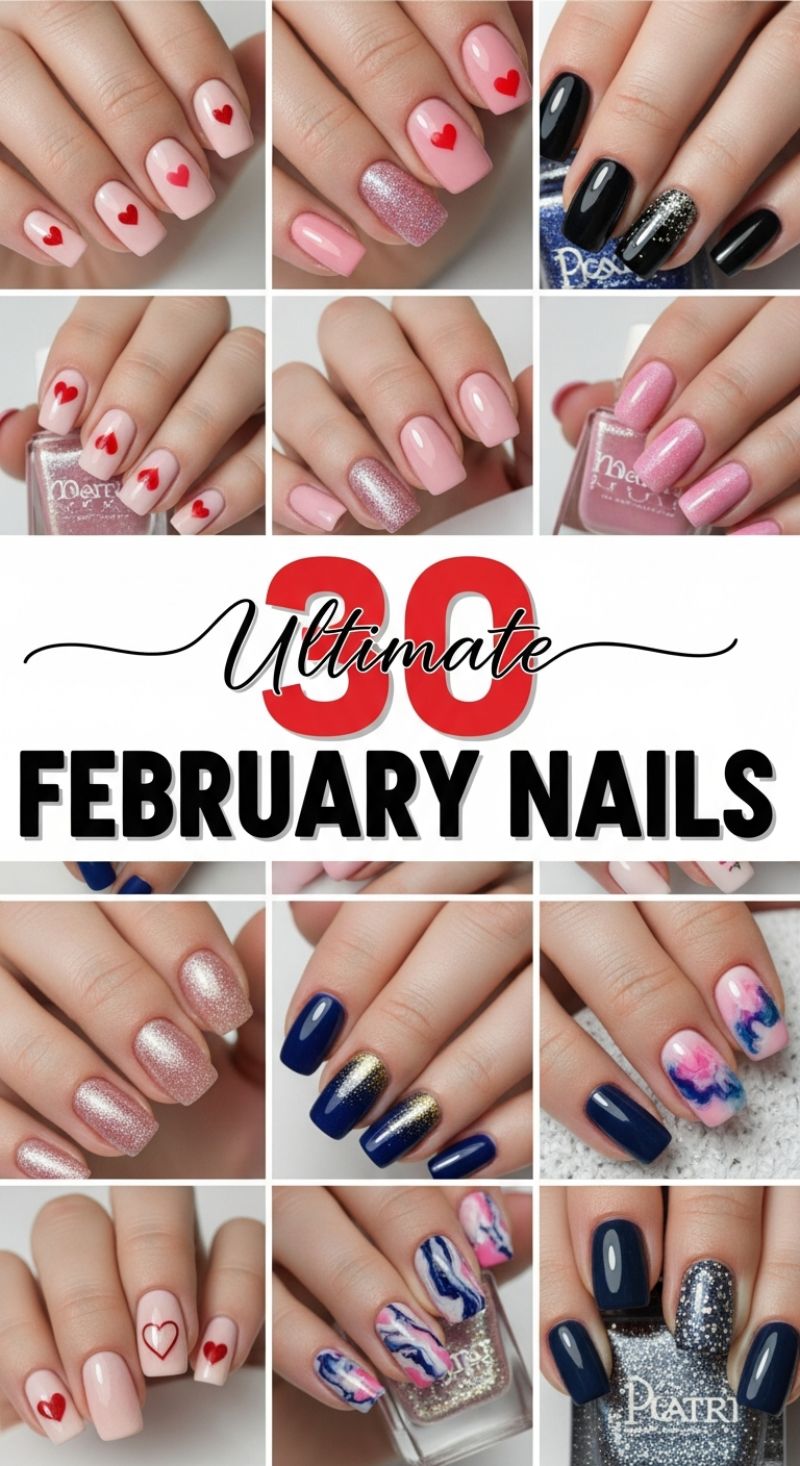
Get ready for February! Discover over 100 stunning nail ideas, from sweet Valentine hearts and romantic Cupid designs to glamorous Prom manicures and bold dark looks. Your ultimate guide is here.
10 Effortless Simple Heart Designs for Minimalists
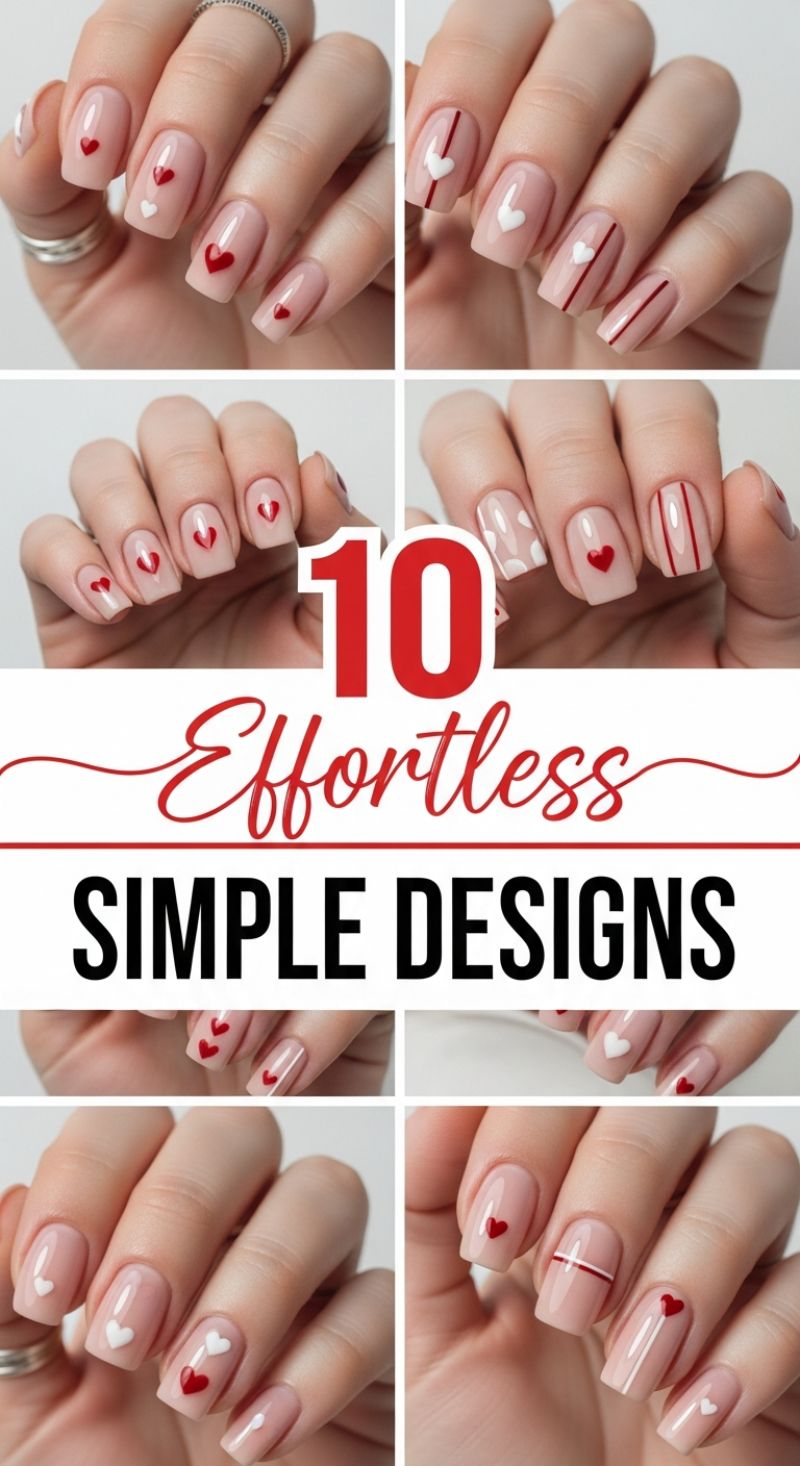
The foundation of achieving these beautifully subtle looks lies in selecting the perfect sheer base coat. To replicate the airy, minimalist aesthetic shown, start with thoroughly prepped nails shaped into a soft square or squoval. Apply one or two coats of a milky pink or nude jelly polish; the goal is coverage that is just translucent enough to let the natural nail bed peek through, giving that expensive ‘glazed donut’ appearance. For the detailing, you will need two highly pigmented polishes—classic Valentine’s red and crisp white—alongside specialized tools: a fine detail brush (often called a striping brush) for the lines, and a small-tipped dotting tool for the hearts. Ensure your base polish is completely cured or dry before moving on to the art, as dragging the brush through a tacky base will ruin the clean lines.
Mastering the tiny, uniform heart shape is surprisingly easy and forms the cornerstone of these designs. The most efficient technique involves the dotting tool: dip the tool into your chosen polish (red or white) and place two small dots close together on the nail plate where you want the heart to sit, ensuring they are slightly touching. Immediately use the fine detail brush to gently drag the polish down from the center point between the two dots, meeting them below to form the pointed bottom of the heart. This creates the classic V-shape and tip instantly. Experiment with placement; some designs feature a single centered heart (like the ring finger), while others showcase mismatched colors (red on the middle finger, white on the index) or even multiple smaller hearts cascading down the nail, offering a playful, asymmetrical touch without looking busy. The smaller you keep the hearts, the more chic and effortless the overall result will be.
To introduce variation, incorporate the simple geometric elements seen in the examples, specifically the thin vertical lines and subtle polka dots. For the linework, load your striping brush very sparingly, ensuring the polish is not thick enough to flood the line, and execute the stroke quickly and decisively from the cuticle to the free edge. White lines often accompany white hearts, while red lines complement the bolder red hearts, creating a balanced visual flow. For the polka dots (as seen in the top middle image), use an even smaller dotting tool to place white dots strategically near the cuticle line or along the edge. The key to maintaining the minimalist integrity of these 10 designs is restraint; choose one accent element (a line, a cluster of hearts, or dots) per nail, rather than combining all motifs. Once all designs are dry, seal with a high-shine, durable top coat, making sure to wrap the polish around the free edge to prevent chipping, ensuring your effortless February manicure lasts well past Valentine’s Day.
25 Stunning Valentine Nails
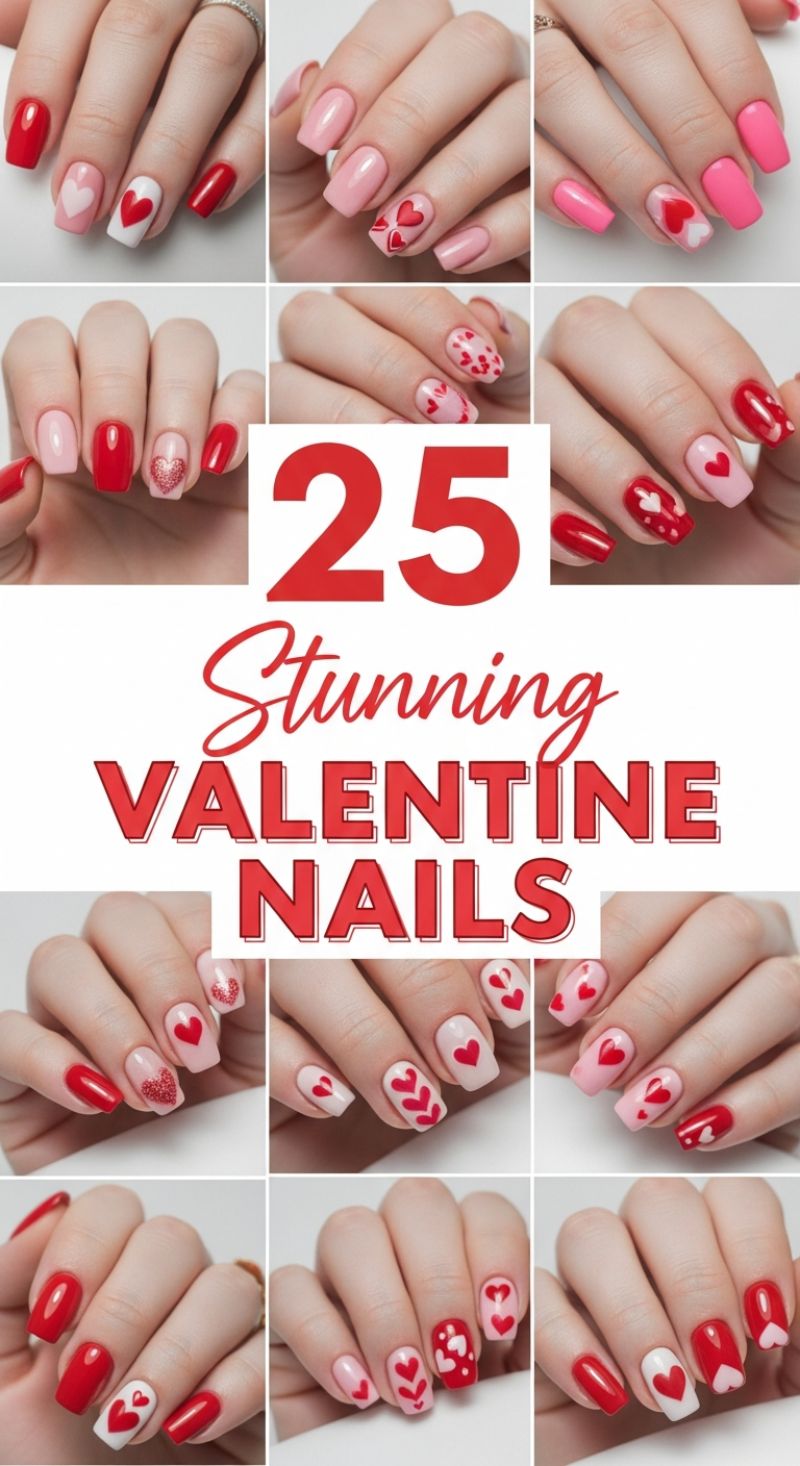
The curated collection of 25 Valentine’s Day nail designs perfectly captures the spirit of romance using the classic palette of vibrant reds, feminine pinks, and crisp white accents. To recreate these stunning looks, start by establishing a foundational color scheme. Many of the designs incorporate a mix of solid red nails alongside base coats of pale pink or nude, offering a sophisticated balance that prevents the look from becoming overwhelming. For the essential accent nail—like the popular design featuring a large red heart centered on a white base (top left)—precision is key. Achieve a flawless heart shape by using a fine-tipped detail brush, drawing two distinct arcs that meet at a point, or simplify the process by starting with two large dots placed side-by-side and then dragging the polish down to connect them into the point of the heart. For beginners, utilizing heart-shaped vinyl stencils or simple decal transfers on cured polish layers can ensure perfect symmetry before sealing the design with a robust topcoat.
To move into the more advanced patterns featured throughout the grid, such as the scattering of miniature hearts or the repeating heart rows, mastering the dotting tool is essential. The repeating heart designs, often seen vertically stacked on a single nail (as shown in the middle row), require a consistent hand and progressively smaller dotting tools to maintain scale. For the all-over scattered heart patterns, apply a thin coat of clear or pale pink polish, then use the smallest available dotting tool to create randomized heart shapes in alternating shades of red and hot pink. An expert trick for adding dimension is to utilize a subtle shimmer or glitter polish for one of the heart accents, specifically the glitter heart seen in the lower left section, achieved by painting the heart shape using a thick glitter polish and encapsulating it with two layers of clear gel topcoat for maximum sparkle and durability. Always remember to cure each color layer fully before applying the next design element to prevent bleeding and ensure clean, sharp lines.
Achieving this professional level of finish relies heavily on preparation and sealant. Ensure your nail shape is uniformly medium square or squoval, as these shapes best showcase the geometric heart designs. When working with such bold pigments like deep reds, apply very thin coats to prevent wrinkling during the curing process, which is often the downfall of high-saturation polishes. After completing your intricate heart artwork, apply a generous layer of high-shine, non-wipe topcoat, ensuring you cap the free edge of every nail. This not only provides that coveted mirror-like sheen that makes reds pop but also protects the delicate art underneath from chips, ensuring your beautiful February manicure lasts well past Valentine’s Day. These versatile designs can easily be adjusted for different nail lengths or for a subtle twist, substitute the classic white base for a light grey or gold shimmer.
Trendy 14 Prom Manicures
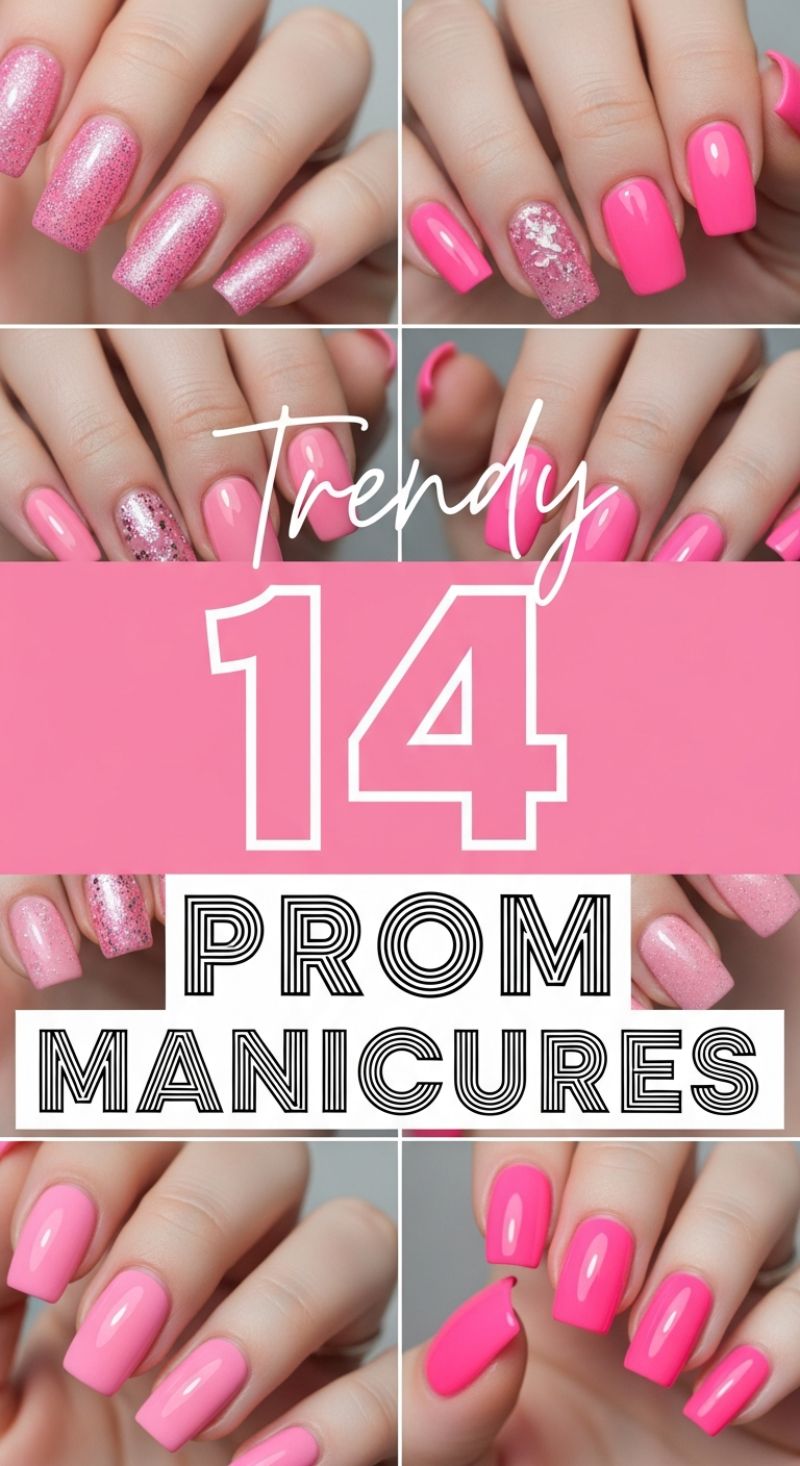
The centerpiece of this inspiration board is the vibrant and versatile use of pink, making it a perfect, high-impact choice for any prom night ensemble. This collage showcases both opaque, high-gloss creme finishes (like the vivid fuchsia and bubblegum shades) and highly textured, light-reflecting glitter looks. When selecting your perfect prom pink, consider your dress and skin tone. For cooler undertones, lean into the bright, almost neon pinks or true bubblegum shades. If your skin has warmer, golden undertones, opt for soft corals or dusty rose pinks that provide a delicate contrast. To achieve the saturated, streak-free creme look seen throughout the image, always apply two thin coats, ensuring the first coat is completely dry before moving to the second, and seal immediately with a high-shine topcoat for maximum reflection under the dance floor lights. Mastering the glitter accent nail is key to elevating these looks from everyday wear to formal glamour. The image clearly demonstrates two main glitter techniques: full coverage, dense shimmer on all nails, and targeted accent nails contrasting with solid colors. To achieve the high-density sparkle shown, you’ll need either a highly pigmented, densely packed glitter polish or the preferred ‘sponge method.’ For the sponge technique, apply a base color, then dab the glitter polish onto a small makeup sponge and press it directly onto the nail; this removes excess clear lacquer, allowing you to deposit a thick layer of sparkle for an intense, uniform coverage. Note the subtle, almost lace-like white floral design overlaying the glitter on some accent nails; this detailed element can be replicated using a fine detail brush and white gel polish or specialized stamping plate designs, adding a touch of sophisticated texture perfect for a romantic prom theme. Beyond the color application, the longevity and shape of the manicure are crucial for a busy prom night. The featured style favors a slightly rounded square (squoval) or medium-length square shape, which is highly flattering and less prone to chipping than sharp almond or stiletto styles when dancing. Before applying any polish, proper prepping of the nail plate is non-negotiable; this includes buffing the surface and wiping it down thoroughly with isopropyl alcohol to remove natural oils that interfere with adhesion. For optimal durability, especially when using glitter (which can sometimes drag the polish), finish every manicure with a generous layer of quick-dry, protective topcoat. Always focus on ‘capping the free edge’ – painting the polish slightly under the tip of the nail – to properly seal the color and prevent premature tip wear, ensuring your trendy prom manicure lasts well past the last dance.
Iconic 13 Barbie Nails
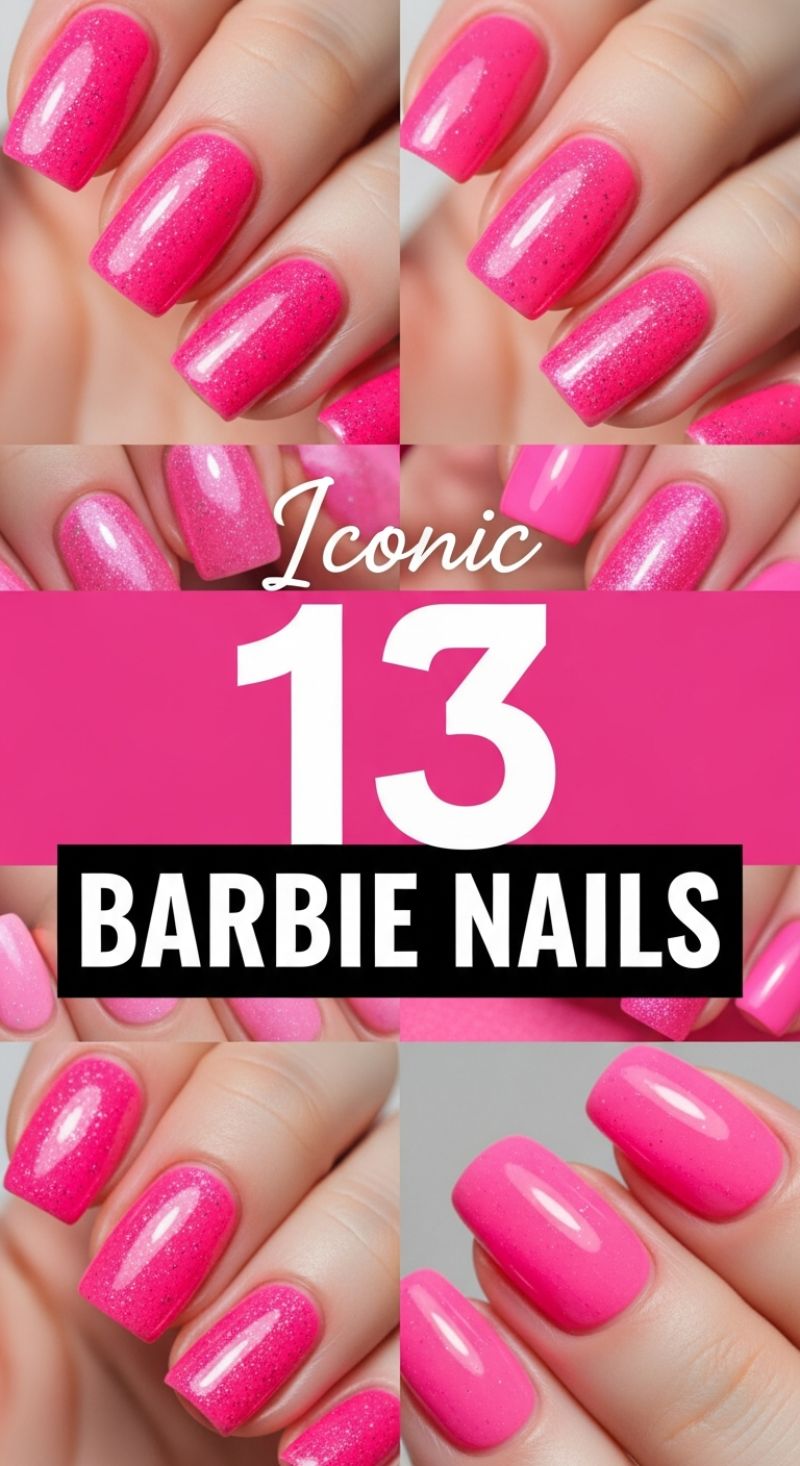
The “Barbiecore” aesthetic is currently dominating fashion and beauty, and these 13 iconic pink nail ideas perfectly encapsulate the bold, playful spirit of the trend. This look centers entirely on an ultra-vibrant, highly saturated hot pink—think electric fuchsia or neon rose—making it a phenomenal choice for those seeking a “Bold Color” statement, ideal for February’s mood or a memorable Prom look. The image showcases the versatility of this singular color, presenting two distinct finishes: a high-impact, flawlessly glossy creme polish that provides intense pigmentation and a clean, sophisticated pop, and a dynamic, densely packed glitter polish. The glitter variation incorporates micro-fine silver or holographic flakes suspended in the bright pink base, catching the light dramatically for a sparkling, multidimensional effect that truly stands out and elevates the classic pink shade.
To recreate this vibrant look, achieving true opacity and high shine is crucial. Start with a ridge-filling base coat to ensure the bright color applies smoothly and prevents the strong pink pigment from staining the nail plate. For the solid creme look, apply two to three thin coats of your chosen hot pink polish, waiting approximately two minutes between layers to minimize streaks and fully build up color saturation. The key to a professional finish lies in the top coat; use a thick, ultra-glossy quick-dry top coat to amplify the shine and deepen the color. If you opt for the glitter style, which tends to dry slightly rougher, you may need an extra step. Apply two coats of the glitter polish for maximum sparkle coverage. Since glitter can absorb light and feel textured, consider using a specialized smoothing top coat before applying your final layer of high-shine top coat to ensure a glass-like finish, rather than a textured, bumpy appearance.
While this bold pink is striking on all nail shapes, it particularly shines on short to medium-length squoval or square shapes, mirroring the classic elegance associated with the style. For a subtle nod to the trend, consider mixing the two finishes showcased here: use the solid creme pink on four fingers and reserve the glitter pink for an accent nail on the ring finger. To maximize longevity, make sure your nail tips are thoroughly capped with both the color and the top coat, as neon and highly pigmented polishes are notorious for chipping quickly at the free edge. Furthermore, to keep the hot pink looking fresh and prevent fading, always apply a UV-protective top coat; this is crucial because neon pigments can be highly sensitive to sunlight exposure. This iconic pink is more than just a color; it’s a confident fashion statement ready for any bold occasion.
Chic Almond Nails Featuring Romantic Red Heart Designs
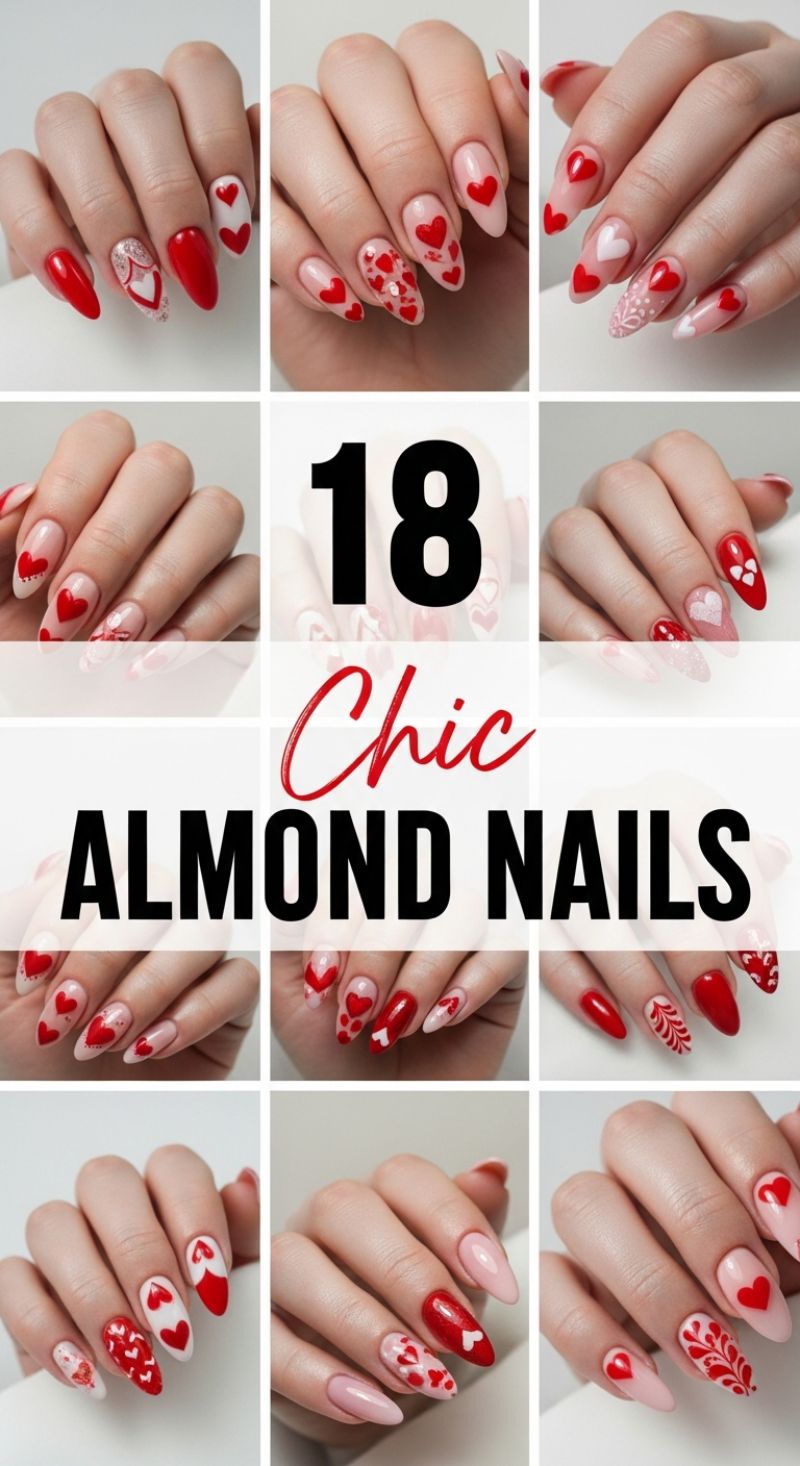
The almond nail shape provides the perfect canvas for February’s favorite motifs, offering an elongated, sophisticated silhouette that makes any design look instantly chic. This collection focuses on maximizing the impact of the classic Valentine’s palette: rich, vibrant red, soft milky white, and subtle nude or pale pink bases. To replicate this look, start by achieving a flawless almond shape—file the sides to a gentle slope meeting at a rounded peak, ensuring symmetry on every finger. The most effective designs here utilize negative space; apply a sheer builder gel or a translucent milky pink polish as your base coat. This translucent layer allows the bold red hearts to truly pop without looking cluttered. Try staggering your designs: pair a full-coverage red nail on the ring finger with three nails featuring floating hearts on a nude base, and a simple white accent on the pinky, incorporating fine glitter for extra sparkle. Achieving contrast and balancing visual weight across the hands is key to making this style look cohesive and high-end.
Executing the heart design requires precision, which can be easily achieved with the right tools. For perfectly uniform small hearts, use a fine dotting tool. Begin by placing two dots side-by-side, then use a striping brush to gently drag the polish down from the center point between the dots, creating the iconic pointed bottom. For larger, bolder hearts, such as those that cover the entire tip (creating a heart-shaped French manicure effect) or those applied over a solid red background, use a small detail brush dipped in highly pigmented gel polish. A popular technique showcased here is the ‘scattered heart’ look, where hearts of varying sizes (from micro to medium) are liberally applied across a single nail, often slightly overlapping, giving a whimsical, confetti-like appearance. Conversely, for a more structured style, dedicate a full nail to a deep, solid red polish, and then use white polish and a detail brush to create delicate lace or floral vine patterns along the edges.
To ensure your romantic manicure lasts through the holiday and beyond, proper application and finishing are essential. Once all heart designs are fully cured, seal the look with a high-shine, non-wipe top coat—the reflectivity will intensify the vibrancy of the red polish. For a subtle variation, you can opt for a velvety matte top coat on your solid color accent nails, providing a textural contrast to the glossy heart designs. Remember, while these designs are perfect for Valentine’s Day, they are highly adaptable; swap out the primary red for soft pastels or deep burgundy to transition the look seamlessly into early spring. The versatility of the almond shape, coupled with a well-executed heart motif, proves that romantic designs can be incredibly chic and sophisticated.
Hello Kitty & Heart Designs: Valentine’s Day Nail Art Inspiration
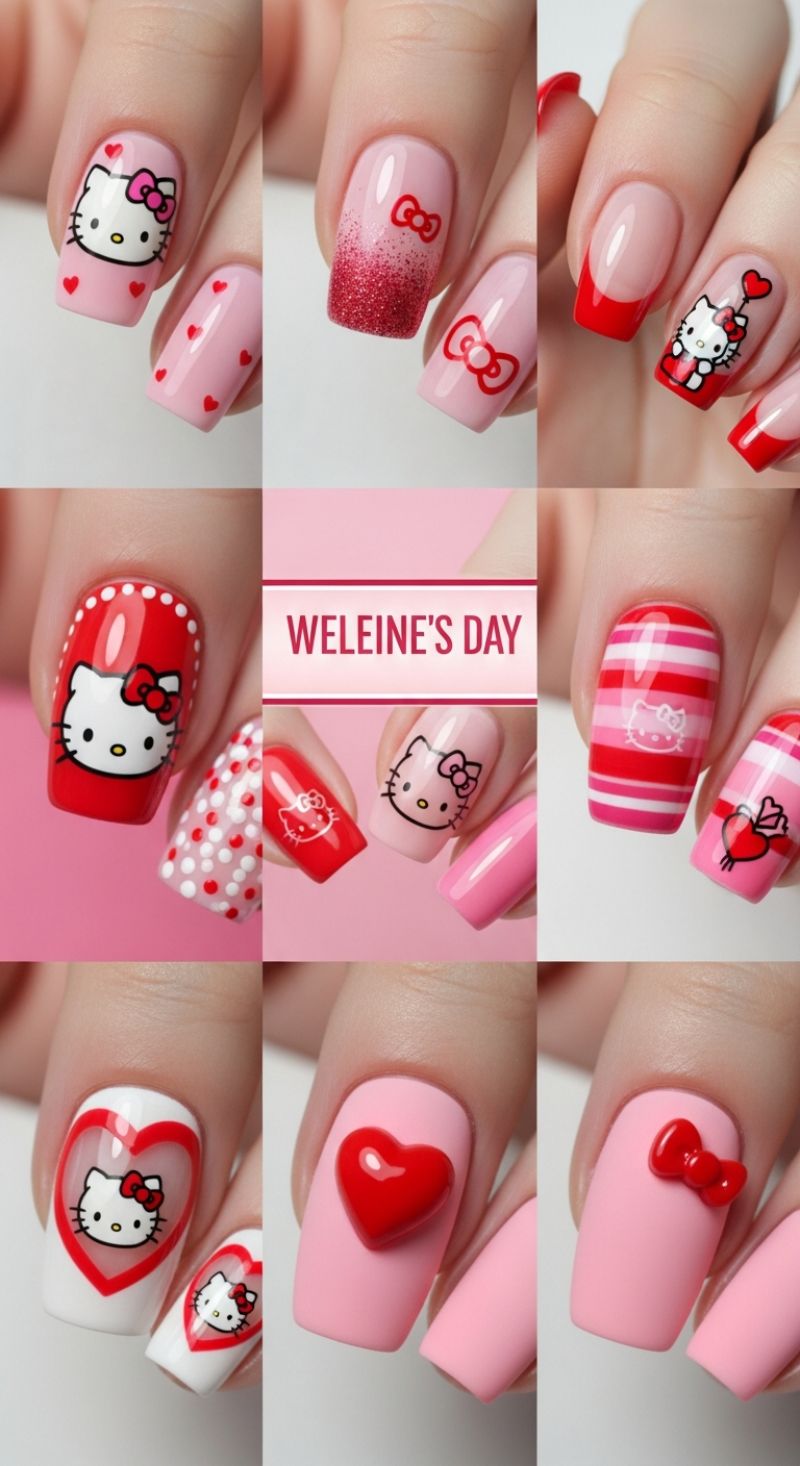
This stunning collection offers highly detailed, sweet, and romantic nail inspiration centered around the beloved Hello Kitty character, perfect for February’s Valentine’s Day celebrations. To recreate these elaborate looks, start by selecting your core palette of reds, pale pinks, and crisp white. For the detailed character nails—like the full-face portraits seen on the red or pale pink accent nails—invest in high-quality nail stamping plates or detailed decals. If using stamping, ensure your polish is opaque and sticky enough to transfer the fine lines of Hello Kitty’s outline and features perfectly. For a faster application, apply pre-made decals to a fully cured base coat, then use precision tweezers to place them. Expert tip: Decals adhere best when encapsulated between two layers of clear, high-shine top coat to prevent peeling, particularly around the free edge and sidewalls. Notice the clever use of small heart elements (top left) that serve as simple filler art on surrounding nails, tying the complex character nail into a cohesive set.
Beyond the character art, this compilation showcases several essential Valentine’s Day techniques. To achieve the vibrant red glitter gradient (top center), start with a nude or pale pink base. Use a makeup sponge dabbed with a highly pigmented, fine red glitter polish. Apply the glitter heavily near the cuticle and lightly dab upwards towards the center of the nail, creating a soft fade. For sharp looks like the red French tips or the bold horizontal stripes, precision is key. Use specialized striping brushes or striping tape to ensure clean, crisp lines, alternating between two or three shades of pink and red. The key difference in finish is illustrated by the bottom row: the smooth, matte pale pink base provides a sophisticated contrast to the glossy, dimensional accents. After applying all color and design layers, use a high-quality matte top coat for the base nails, allowing the 3D elements to truly pop.
Finally, the most dimensional designs feature advanced 3D embellishments, such as the large, glossy red heart and the tiny red bow accents. These elements are usually sculpted using soft builder gel or secured with specialized nail jewelry adhesive gel. Once the 3D piece is positioned, cure it under a UV/LED lamp according to the product instructions, ensuring the adhesive surrounds the base of the charm for maximum hold without covering the glossy surface of the heart or bow itself. For the striking white design featuring the clear/red heart outline (bottom left), use clear builder gel and a thin detailing brush to draw the shape of the heart over the white base. Fill the heart outline with sheer red polish or highly pigmented jelly polish to create that stunning, see-through depth before sealing the entire design with a final, durable glossy top coat.
Gorgeous Pink VDay Nails
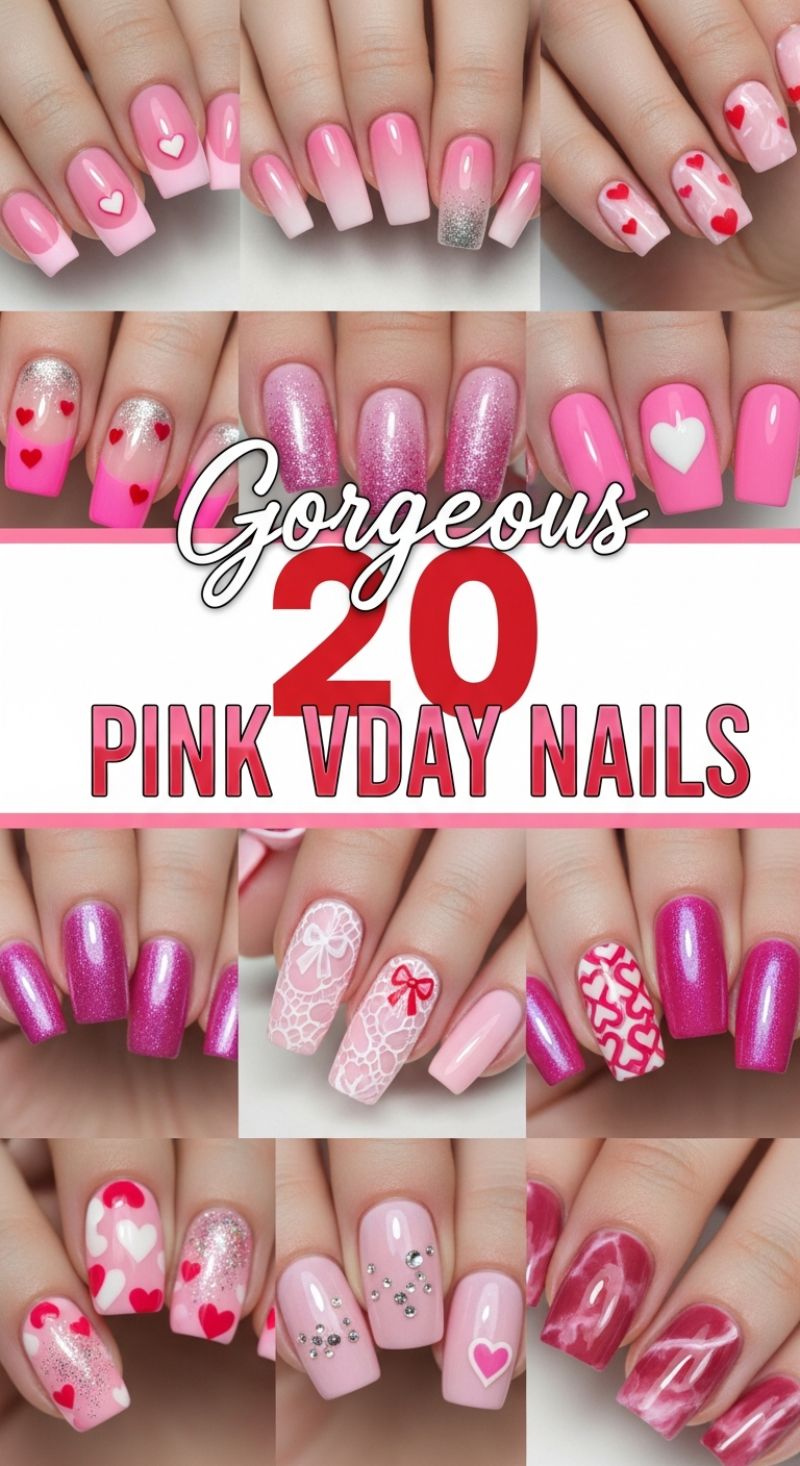
Pink, the quintessential color of romance, takes center stage in this collection of stunning Valentine’s Day nail designs. For those seeking soft sophistication, mastering the pink-to-white gradient (often called the ‘baby boomer’ effect) is essential. To achieve this seamless transition, start with a light pink base and use a makeup sponge dabbed with white polish, lightly bouncing it near the nail tip, blending upward. For a bolder, more contemporary look, swap the soft white for sparkling micro-glitter in silver or holographic pink, applying it heavily near the tip and feathering it down toward the nail bed. Alternatively, go for full glitter coverage, ensuring even distribution by floating a slightly thicker coat of specialized glitter polish or gently pressing cosmetic glitter onto a tacky base layer before sealing with two durable topcoats to prevent chipping and ensure a smooth surface texture. The versatility of pink allows for everything from soft blush tones to electric, shimmering magenta finishes.
Heart motifs are mandatory for V-Day, but execution matters. Move beyond simple decal placement by experimenting with negative space and contrast. Try the French manicure heart tip, where the line of the tip curves inward to form the upper half of a heart, utilizing crisp white or deep red against a medium pink base. For smaller, scattered hearts, utilize a fine detail brush or stamping plate for precise placement. A particularly elaborate look featured here is the detailed white lace and bow pattern, which requires specialized stamping tools or high-quality water decals placed over a solid pink base for a beautiful, intricate texture. When attempting complex patterns, ensure your base coat is fully dry and cured before applying the design layer to prevent smudging. For maximum impact, select one feature nail per hand for these complex designs, keeping the others a solid matching color.
To elevate your manicure, incorporate structural elements and specialty finishes. Rhinestones add immediate dimension; apply them strategically in clusters near the cuticle or scattered along an ombre line, securing them with a strong nail adhesive or a thick layer of topcoat gel cured completely to encapsulate the jewels. Beyond basic solids, explore advanced techniques such as marbling, seen here in rich shades of raspberry and white. The wet-on-wet technique, commonly used with gel polish, involves applying streaks of a contrasting color (like white) onto an uncured base and lightly swirling the colors together using a fine tool or brush before curing, resulting in that sophisticated, smoky appearance. Whether you opt for a sleek, highly pigmented shimmer or a soft, opaque cream, these pink designs offer inspiration for every romantic occasion this February.
10 Viral DUCK NAILS
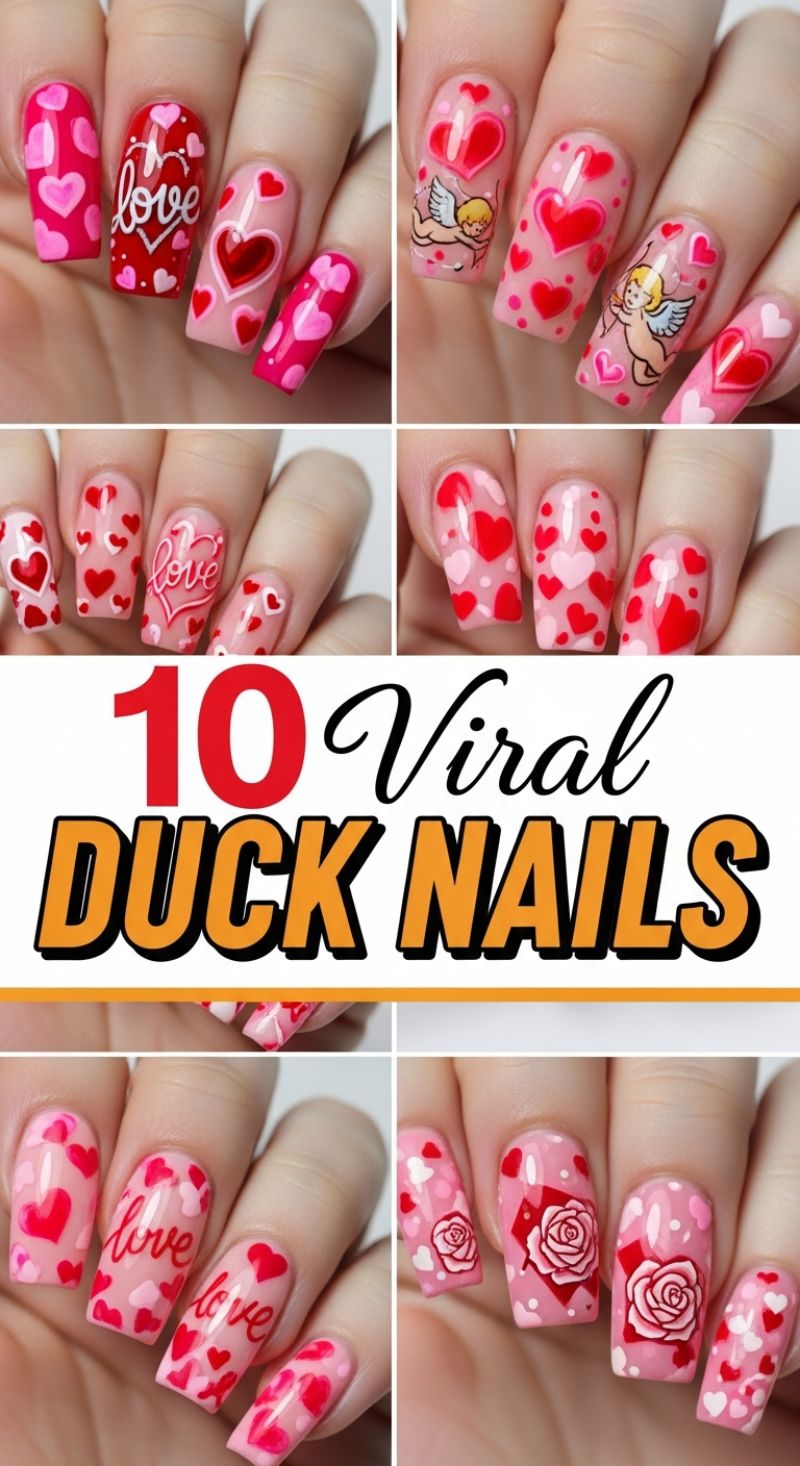
While the name might suggest an entirely different style, this compilation showcases the quintessential Valentine’s Day nail art, utilizing a vibrant palette of cherry reds, hot pinks, and baby pinks across various designs. To achieve the popular ‘floating heart’ look seen across several panels, start with a sheer milky pink or nude base coat. Once cured, use a medium-sized dotting tool or a fine brush to apply the primary heart shapes. For dimensional depth, employ two distinct shades of red or pink. Apply the lighter shade first, allowing it to dry slightly, and then outline or layer a smaller, darker heart (like the brilliant cherry red) directly on top. This subtle layering creates a convex, jelly-like effect that mimics the look of suspended decals. For the nails featuring dense, smaller hearts, a careful placement strategy is essential; use varying sizes of dotting tools and mix opaque white hearts with translucent pink hearts over a clear or light pink base to create a whimsical, confetti-like dispersion.
Moving to the more intricate designs, mastering the art of the detailed nail—such as the romantic white roses or the playful Cupids—requires either advanced precision or the intelligent use of decals. For the stunning white rose design (bottom right), begin with a solid, opaque pink base. Create a geometric focal point, like the red square or diamond, to anchor the rose. Using highly pigmented white polish and a detail brush (size 0 or 00), draw a loose spiral starting from the center, gradually adding short, curved strokes outward to mimic petals. The key here is not perfection but movement; slightly imperfect curves give the rose a realistic, hand-painted texture. For the Cupid nails, achieving such delicate detail freehand is challenging; professional decals (waterslide stickers) are the recommended alternative, placed carefully over a cured sheer base and sealed exceptionally well with a thick top coat to prevent lifting.
Successful execution of this romantic inspiration relies heavily on contrasting opacities and the final sealing layer. Notice how some designs integrate opaque full-coverage manicures (like the red nail featuring the white ‘love’ script) alongside highly translucent, glossy finishes. When adding script or detailed freehand lines, ensure your polish is thinned just slightly to prevent dragging, allowing for smooth, fluid application. Always finish these detailed February manicures with a substantial layer of high-shine UV top coat. This not only protects the intricate artwork from chips but significantly magnifies the dimension of the layered hearts and gives the entire look that high-end, professionally executed shine essential for viral-worthy nail art.
15 Sweet Heart Nails
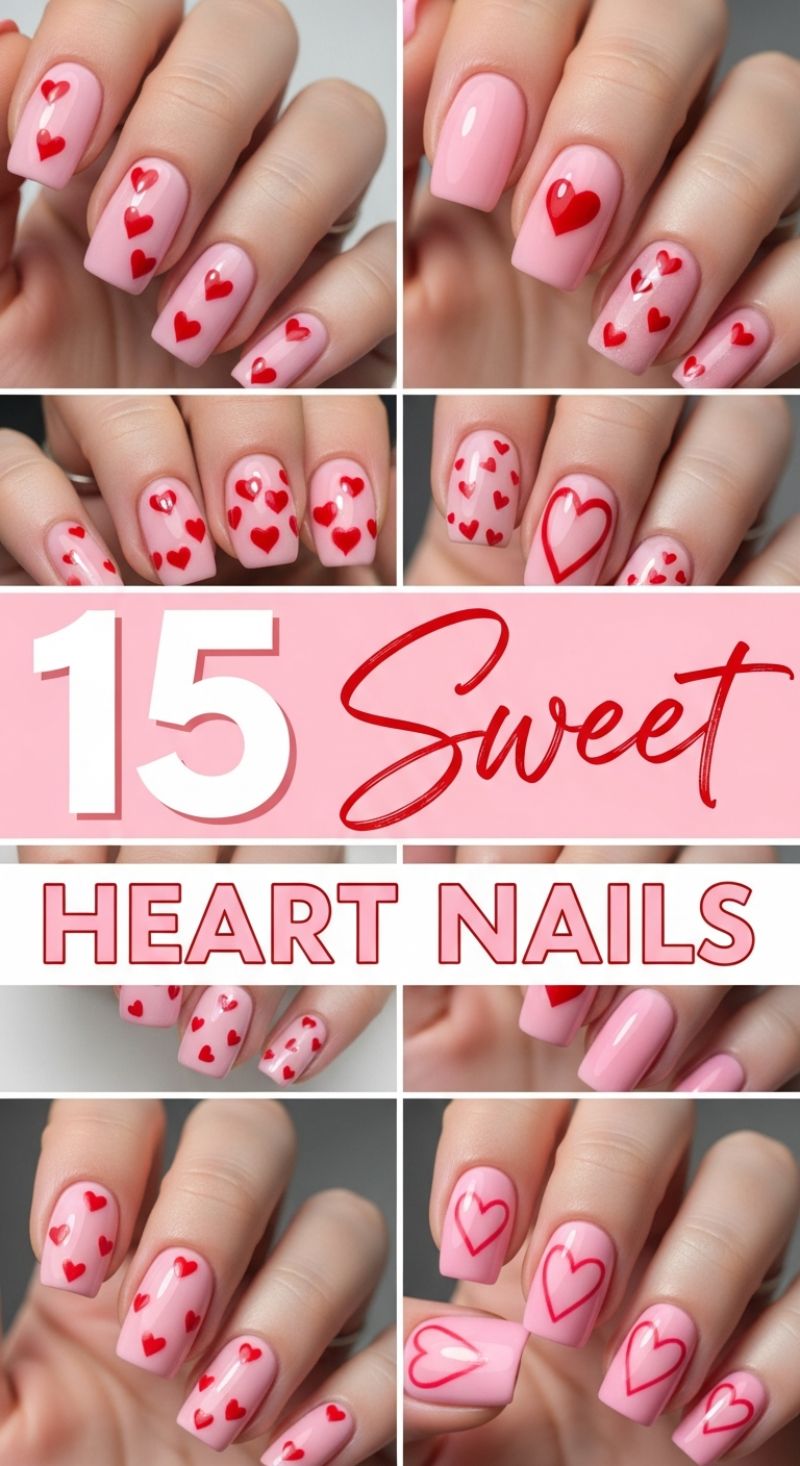
Achieving these ‘sweet heart nails’ requires a foundation of pristine nail preparation and precise application, making these looks perfect for Valentine’s Day or any romantic occasion. Start by shaping the nails into a soft square or squoval, ensuring a smooth, buffed surface. The foundational element of almost every design featured here is an ultra-creamy, opaque pale pink base coat. Apply two coats of this delicate hue, curing or drying thoroughly before moving on to the artistry. For the simplest and most universally flattering look—the scattered mini-hearts—you will need a high-quality dotting tool set and a primary, highly pigmented red polish. Expert tip: Ensure your red polish is relatively thick, as runny polishes will bleed when forming the heart shape, ruining the crisp lines. Once the pink base is completely set, you are ready to apply the decorative elements.
The easiest technique for creating small, solid hearts utilizes the dotting tool method. Dip a medium-sized dotting tool into the red polish and place two adjacent dots near the desired position on the nail, leaving a minimal gap between them. Before the polish sets, use a fine detail brush (or the tip of a smaller dotting tool) to gently drag the polish downward from the gap, connecting the two dots into a sharp point at the bottom—this immediately forms the classic heart shape. Repeat this process across the nails, varying the size of the heart slightly and experimenting with placement; some nails look best with vertical rows of hearts, while others shine with a dense, all-over scatter. For the standout designs, such as the single, large statement heart seen on the ring finger in the top right image, use a larger dotting tool to build the shape, ensuring symmetry is maintained through gentle corrections with a clean brush.
For those seeking a more graphic, modern interpretation, focus on the outlined heart designs seen in the bottom row. This technique demands a steady hand and a very thin liner brush (00 or 000 size). Instead of dots, begin by freehanding the outline. Start with a small ‘V’ at the bottom center of the heart’s planned position, defining the point. Then, draw two smooth, symmetric curved lines upwards from the ‘V’ to meet at the center top. Unlike the solid hearts, which rely on volume, the outlined hearts rely on clean, thin lines. If you are attempting the large outline heart that runs off the nail tip (seen on the thumb in the bottom right), ensure the curve that meets the edge is continuous and perfectly parallel to the nail’s cuticle line for a professional finish. Regardless of the design chosen, always finish your manicure with a high-gloss, protective topcoat, encapsulating the red hearts to prevent premature wear and enhancing the overall depth and shine of these sweet designs.
Bold Dark Nail Ideas: Edgy Romance for February
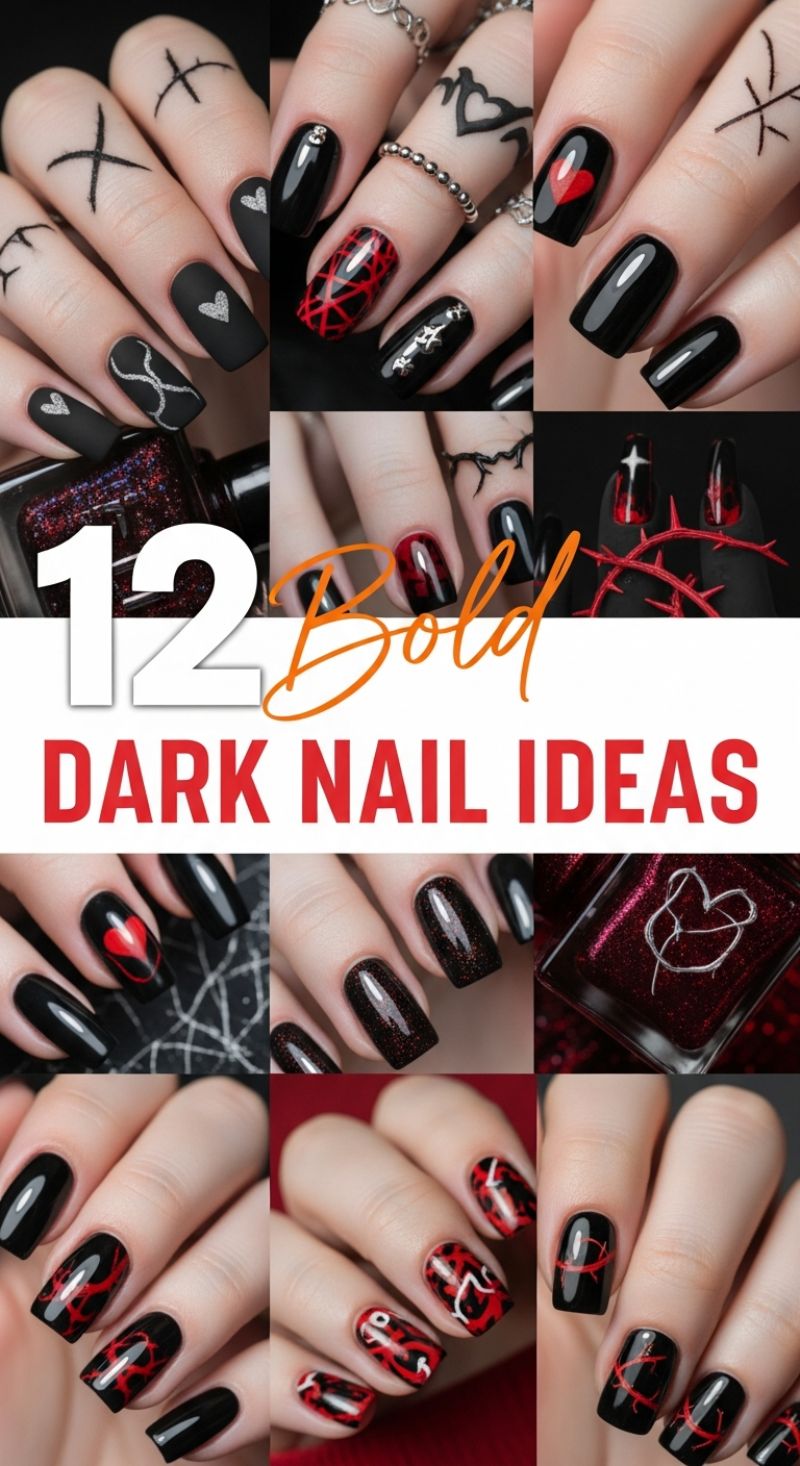
If your February aesthetic leans more toward gothic glamour than pastel pinks, these bold dark nail ideas provide the perfect inspiration. The foundational palette centers on rich, opaque black—utilized in both high-gloss and velvet matte finishes—contrasted sharply with vibrant, highly pigmented reds. To achieve the dimensional looks seen in the top row, begin by applying a high-quality base coat to protect the natural nail from the deep pigments. Alternate between a matte top coat on some nails for a subdued, velvety texture (perfect for silver accent hearts or subtle Xs) and a glass-like glossy finish on others. This intentional variation in texture is key to elevating simple dark shades into a sophisticated, dimensional manicure. Ensure your black polish is fully cured and perfectly smooth before moving to accent details, as dark colors highlight every flaw.
Precision and high contrast are paramount for recreating the graphic red designs. For the intricate spiderweb, scratch mark, or abstract flame patterns, you will require a fine-tipped striping brush and a crisp, opaque red lacquer. Apply the red designs directly onto the cured black base. When executing the line work, load your brush sparingly and maintain a steady hand to create thin, crisp lines that look deliberate rather than smeared. For the popular ‘blood drip’ or deep ombré effects (as seen in the middle row), consider using the blooming gel technique or a subtle wet-on-wet application where a few dots of red are placed onto a semi-cured black layer and gently swirled before being fully cured. For those seeking simpler accent art, a classic high-gloss black nail featuring a single, perfect red heart or a white cross symbol can deliver maximum visual impact with minimal effort.
Beyond simple creams, the image showcases the dramatic effect of deep shimmer and textural polishes. To achieve the intensely sparkling burgundy and black nails, opt for a highly dense black holographic or flakie polish that shifts color in the light, moving from black to deep cherry red or maroon. Layering a jelly red polish over a black base can also give a beautiful, stained-glass depth. When incorporating elements like the symbolic crosses or thorny vine accents, remember that these looks pair exceptionally well with the addition of silver jewelry, such as stacking rings and knuckle bands, which complement the edgy aesthetic. Always finish your intricate artwork with a high-quality, durable top coat to lock the designs in place and prevent chipping, ensuring your dark, romantic manicure lasts well through the shortest month of the year.
20 Unique Color Combos
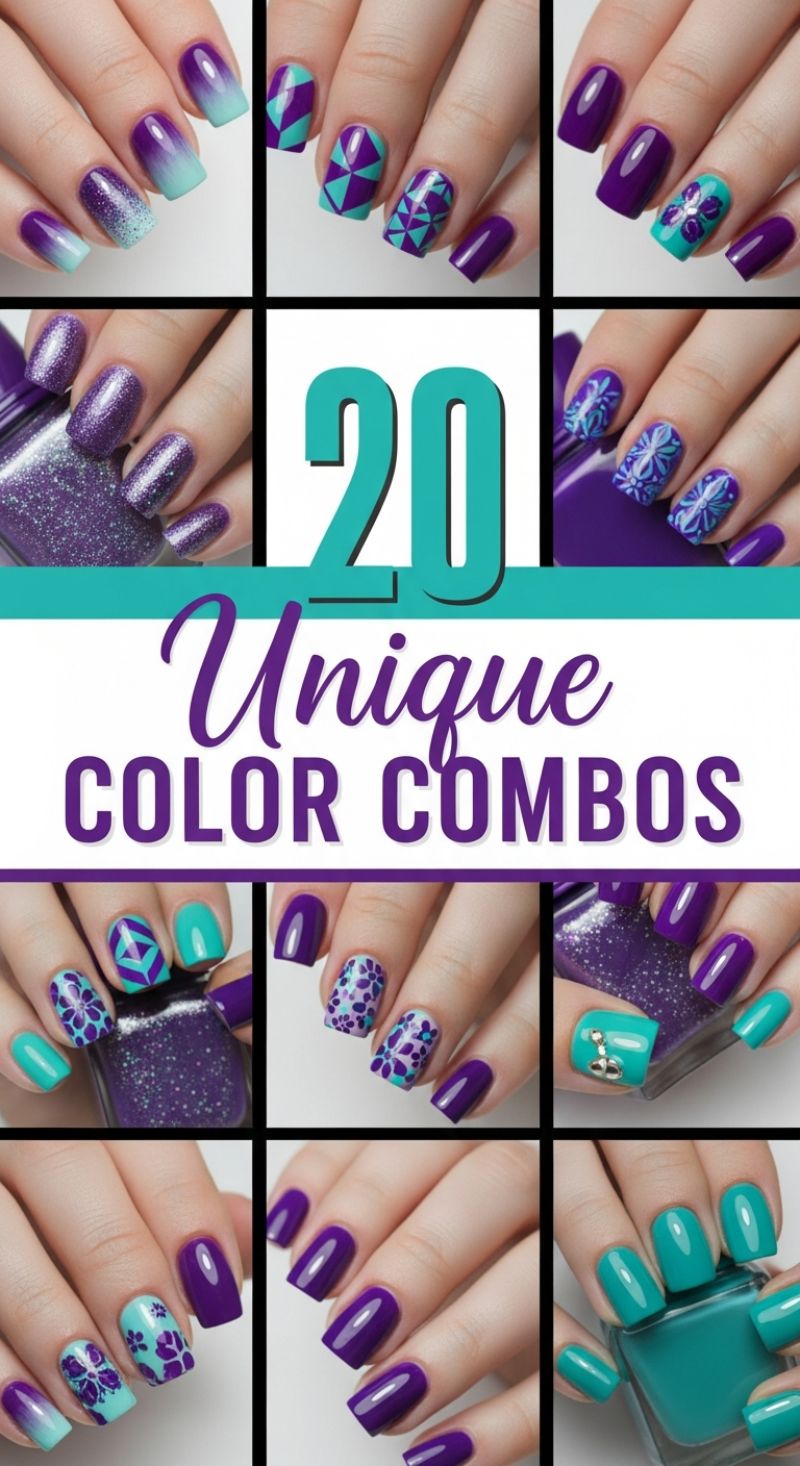
The juxtaposition of deep, regal purple and electrifying aquatic teal creates one of the most stunningly bold and dynamic color pairings for any manicure, perfectly aligning with the spirit of the ‘Bold Colors’ movement. To recreate this high-impact aesthetic, start by selecting true jewel-toned lacquers; the richer the pigment, the greater the contrast. The image showcases several methods, but the easiest entry point is the ombre technique. Begin with a base coat, followed by a layer of the lighter shade (teal). Once dry, apply both the purple and teal polishes side-by-side onto a makeup sponge, mist lightly with water to slightly blend (optional), and then gently dab the sponge onto the nail, moving back and forth until the blend is smooth. For an added textural dimension, like the looks featured on the top left and middle right, choose a fine holographic or scattered-glitter top coat in the complementary color (often silver or a slightly darker purple shimmer) and sponge it solely onto the transition area or the tips, ensuring the rest of the nail maintains its glossy, high-pigment finish. Mastering the sponge application is key to avoiding a chunky texture, so always use thin coats and allow adequate drying time between dabs.
Achieving the intricate geometric and floral patterns showcased in this collection requires precision tools like stamping plates or nail vinyls. For the crisp, multi-toned geometric designs (like the triangles and chevrons), nail vinyls are your best friend. Paint the entire nail with your chosen base color (e.g., teal), allow it to dry completely, and then carefully adhere the geometric vinyl stencil. Immediately paint the contrasting purple over the stencil and remove the stencil while the polish is still wet to ensure razor-sharp edges. Alternatively, for the detailed floral or medallion patterns, invest in a high-quality stamping plate and dedicated stamping polish. The deep purple works exceptionally well stamped over the bright teal, or use a lighter lavender shade stamped over the dark purple base to create a subtle yet dimensional monochromatic pattern. Remember to keep the accent nails balanced; if you choose three nails for intense patterning, anchor the look with two solid nails in the deep purple to prevent the overall design from appearing too busy.
This purple and teal combination is remarkably versatile, allowing seamless transition from playful graphic designs to sophisticated solid blocks of color. For long-lasting wear, especially when dealing with vibrant, high-pigment colors and complex layered patterns, the final step is crucial. Apply a thick layer of quick-dry top coat, making sure to ‘cap’ the free edge of the nail to seal in the color and prevent chipping—a vital step for designs that incorporate sponging or stamping. For February events, you can adapt this bold palette by adding subtle metallic accents, such as a tiny silver stud placed on the teal accent nail or swapping one of the patterned nails for a full foil-wrapped gold finger. The richness of the purple provides a luxurious foundation, while the teal keeps the look fresh and unexpected, making it a perfect standout manicure for any spring formal or date night.
Romantic Cupid Nails: Heavenly Charms and Arrows of Love
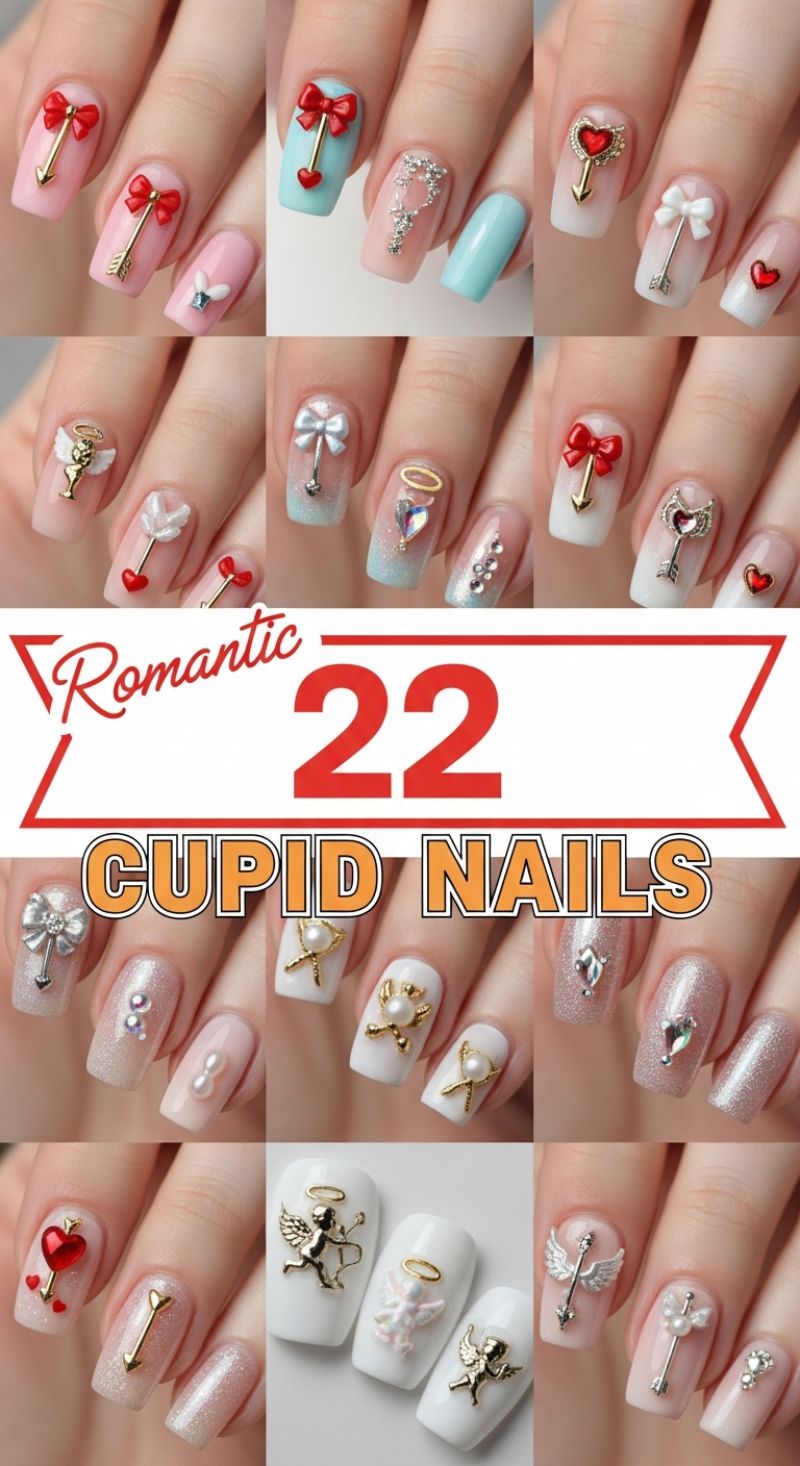
For February, move beyond simple painted hearts and embrace the maximalist trend with dimensional Cupid and arrow nail art. This aesthetic centers around soft, romantic base colors—think milky white, blush pink, nude, or soft robin’s egg blue—which serve as the perfect canvas for intricate 3D hardware. Before applying any charms, ensure your base color is fully cured and tacky (if using gel) or completely dry (if using lacquer). The key to this look is balance; typically, one or two feature nails per hand hold the largest, most detailed elements (like the full cupid figure or a substantial winged arrow), while the remaining nails are adorned with complementary accents such as micro-glitter ombré, scattered single pearls, or simple vertical lines of rhinestones. Achieving a perfect, seamless base is non-negotiable, as the focus will immediately be drawn to the detailed 3D application.
Executing the dimensional designs, particularly the iconic arrow motif, requires precision and the right adhesive. To secure heavy metal charms, standard top coat is insufficient; you must use a strong medium like thick builder gel, rhinestone glue, or nail art resin. Apply a generous, but not flooding, dot of adhesive where the charm will rest, press the charm firmly into place, and then cure (if using UV/LED gel). The most common design seen here is the stylized arrow, often represented by a long metallic shaft that connects two decorative pieces: a large bow (in red, white, or silver) or a jeweled heart at the top, and a pointed metallic tip at the bottom. When placing these vertically, ensure the shaft runs straight down the center of the nail, as this technique cleverly creates the illusion of longer, more slender nail beds. For the most impact, consider pairing golden arrows and angels with milky white bases, creating a striking, luxurious contrast reminiscent of fine jewelry.
To ensure maximum wearability and durability for these high-relief designs, expert sealing is critical. After the main charms are secured and cured, use a fine detail brush dipped in top coat or clear builder gel to meticulously outline the base of each charm, ‘capping’ the edges where the metal meets the nail plate. This prevents hair, fabric, or other items from snagging the exposed edges, which is the primary cause of charm loss. Furthermore, explore the variety within the Cupid theme: simpler styles utilize small, red plastic heart cabochons and dainty metal bows, while the most advanced designs feature full metallic angels or molded white acrylic cherubs, often completed with a tiny gold halo decal. Remember that heavily textured nails benefit greatly from cuticle oil application; nourished cuticles elevate the entire high-end, romantic aesthetic of these stunning Valentine’s Day nails.
16 Vibrant BLUE NAIL ART
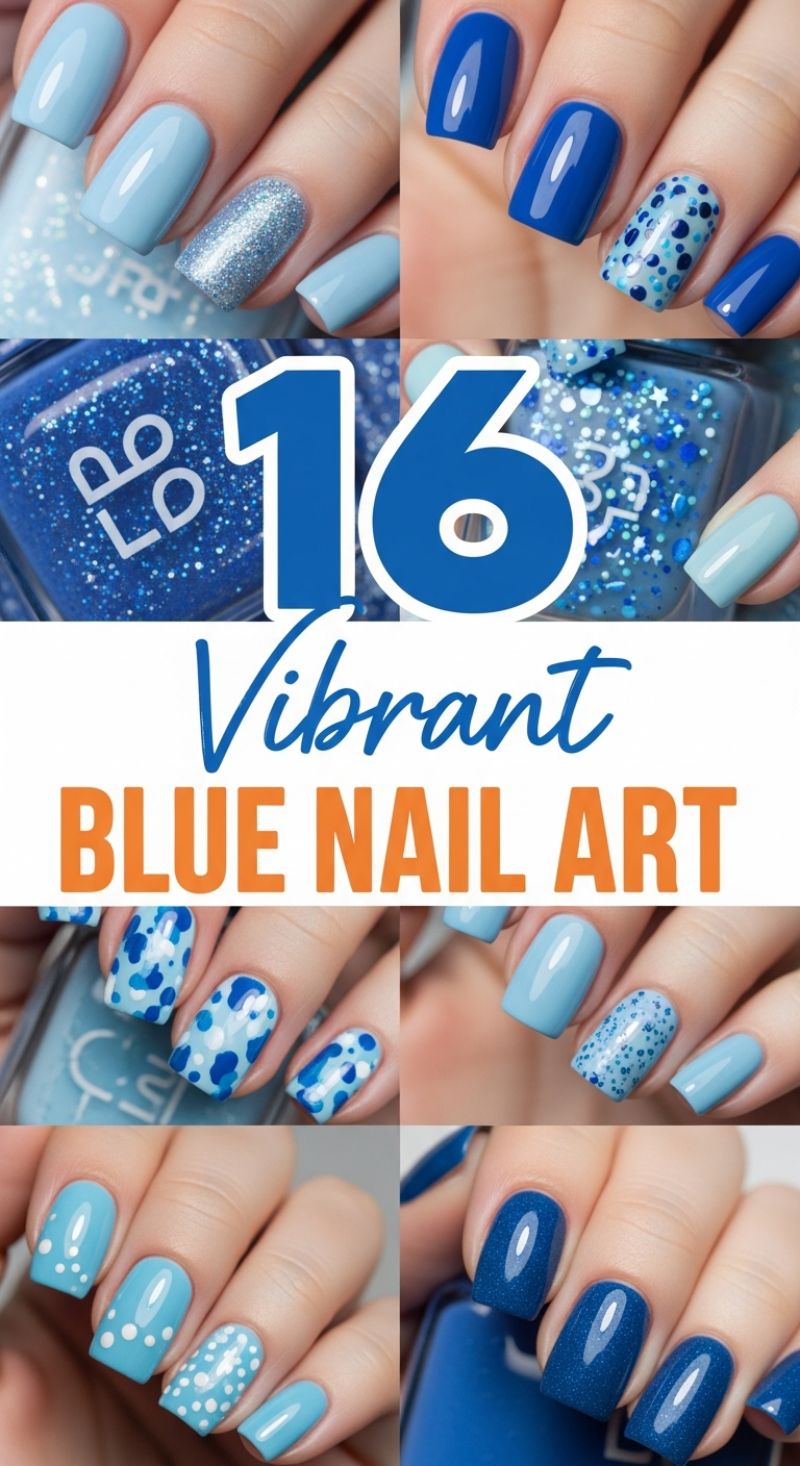
These 16 blue manicures showcase how versatile the color blue can be, shifting from icy pastels suitable for a winter atmosphere to deep, vibrant cobalt perfect for a bold February statement. To achieve the sleek, solid looks featured, start by prepping the nail with a quality ridge-filling base coat, especially crucial when using highly pigmented shades like the deep royal blue or the lighter cerulean featured prominently in the collage. For optimal depth and color payoff, apply two smooth coats of your chosen polish, ensuring each layer is thin and fully dried before applying the next. If you are mixing shades, as demonstrated in several groupings where light blue nails are paired with a single vibrant accent nail, maintain a consistent nail shape and high-gloss finish across all fingers to unify the look, making the transition between the bright and soft blues feel deliberate and harmonious.
Incorporating texture is key to elevating a basic blue manicure, transforming simple color blocking into art. The collection features several examples, from dense silver holographic glitters used as a striking accent nail to chunky blue glitter flakes layered over a cobalt base. When working with ultra-dense glitters, paint the accent nail first using a slow, even stroke. If the glitter is sparsely distributed (like a confetti or flakie topper seen layered over the base), use a sponge application technique: apply the polish directly to a makeup sponge and then gently dab it onto the nail. This method efficiently deposits the glitter pieces while minimizing the amount of clear base polish, resulting in maximum sparkle and coverage. Always follow up highly textured manicures with two layers of a glossy or quick-dry top coat to thoroughly encapsulate the glitter, smoothing the surface and preventing any rough edges from snagging.
To recreate the delicate and geometric nail art patterns seen here, precision tools are essential. The sweet, scattered white dots on the baby blue base (bottom left) can be achieved using various sizes of dotting tools. For a gradient dot effect—where the dots cluster near the cuticle and then trail off—load your dotting tool and place the first dot, then continue re-dotting a few more times without reloading; the dot size will naturally diminish, creating a flawless fade. For the more abstract, camouflage-inspired spotting (top right and middle row), select two to three contrasting shades (e.g., light blue, medium blue, and deep navy). Use the flat tip of a small striping brush or the large end of a dotting tool to randomly place organic, slightly overlapping blobs of color, ensuring the shapes are irregular and varied to mimic a modern abstract pattern rather than a uniform polka dot. Once dry, seal your artwork immediately with a protective, non-smearing top coat.
Solid Color Swatches & Accent Designs: Mastering the Perfect Pink Palette
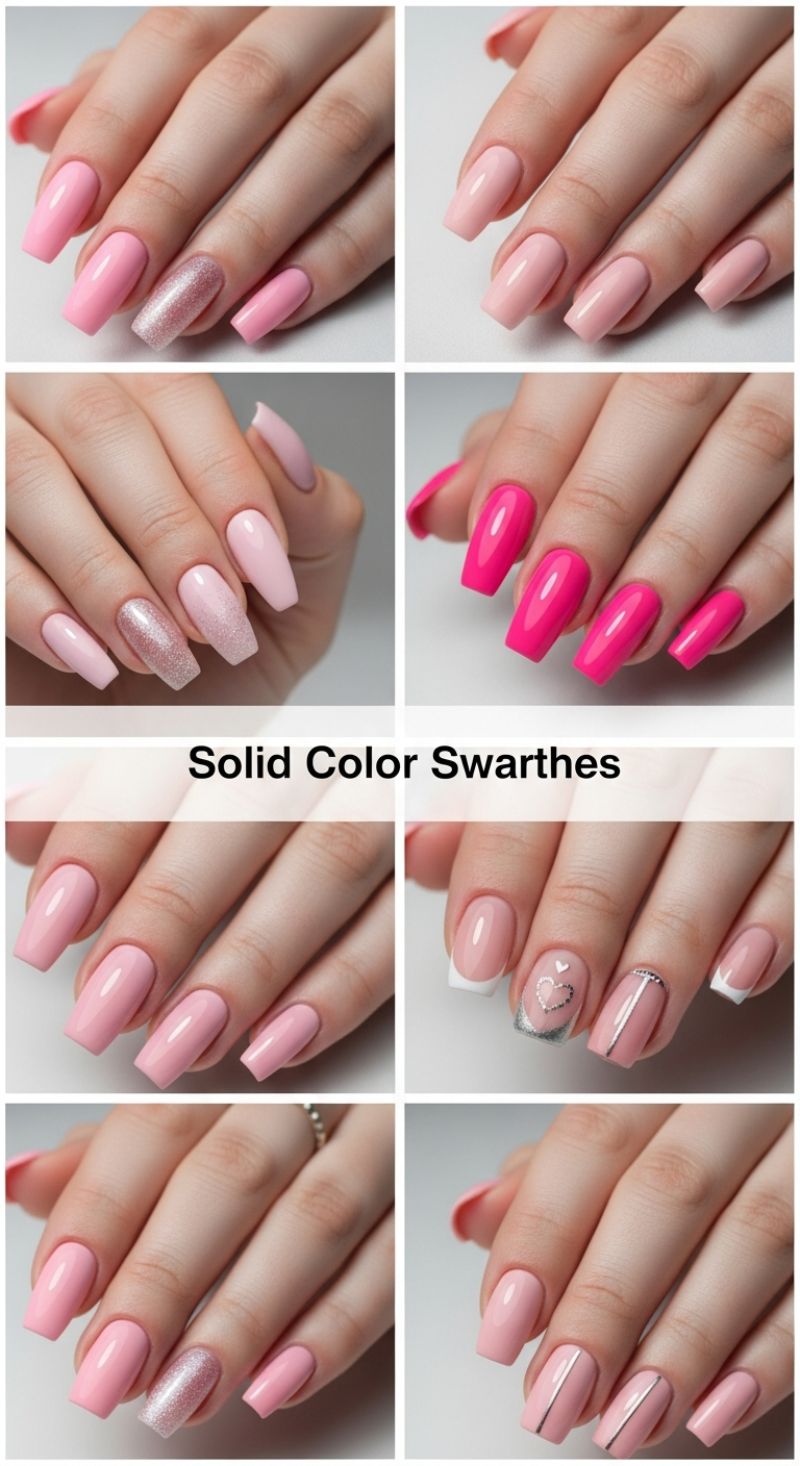
The foundation of stunning nail art, especially for Valentine’s-themed looks or Prom, is a flawless, high-pigment solid color application. The swatches showcased here illustrate the powerful versatility of the pink spectrum, ranging from demure nude blush and soft dusty rose to electrifying, high-gloss fuchsia. To achieve this level of color saturation and uniformity, preparation is key: ensure the nail plate is buffed smooth and thoroughly cleansed of oils before applying a quality rubber base coat. When working with opaque colors, two thin coats are always superior to one thick coat; this technique prevents bubbling, ensures even curing (if using gel), and offers a deeply saturated finish. For the pale pinks, like the subtle rose and creamy nude featured, select a shade that complements your skin’s undertone—cooler undertones pair beautifully with blue-based pinks, while warmer undertones shine with coral-based hues. Expert tip for maintaining that flawless shine: always ‘cap the free edge’ with both the color polish and the top coat, sealing the tip to prevent chipping and premature wear.
Elevating the solid color base into a personalized look requires strategic use of accents, as perfectly demonstrated by the glitter, French tip, and striping tape designs. To replicate the full-coverage, shimmering glitter accent nail (seen on the ring finger in several swatches), first apply the base pink color to all nails. For the accent, apply a thin layer of glitter glue or a clear adhesive gel, then use a dry makeup sponge or a specialized fan brush to densely pack the holographic or iridescent pigment onto the nail plate, ensuring maximum opacity. Once dry and dusted off, seal immediately with a thick, high-shine top coat. For the delicate French tips and negative space heart designs, precision is paramount. Use a fine-tipped striping brush for the crisp white line on the French tip, or utilize a small, pliable stencil for the elegant silver-outlined heart. For the modern vertical metallic lines, use thin nail striping tape. To ensure the tape adheres securely and doesn’t lift, place it carefully over the cured color coat, press firmly, and then immediately seal the entire nail surface, paying close attention to covering the tape’s ends, with a non-wipe UV topcoat.
These samples also serve as excellent inspiration for incorporating structure and subtle details into romantic designs. Note the clean, medium-length coffin and rounded-square shapes, which provide the ideal canvas for these looks. When transitioning between different accent techniques—like the minimalist silver striping and the detailed heart design—ensure your overall look maintains balance. If one nail is heavily detailed (like the heart), keep the adjacent nails simpler (like the solid rose or simple striping) to maintain sophistication. For maximum longevity, especially for event nails like Prom looks, consider utilizing hard gel or acrylic products to create the shape, followed by highly pigmented gel polish for the color swatches. Finish every look with a cuticle oil application to hydrate the surrounding skin, which instantly elevates the entire manicure from amateur effort to professional-grade perfection, ensuring your February or special event nails look immaculate for weeks.
Ultimate February Nails
Embrace the quintessential Valentine’s aesthetic by starting with a flawless base of soft blush pink or creamy nude. For the iconic heart design, precision is key. Use a fine-tipped nail art brush or a small dotting tool dipped in opaque red polish; for a simple heart, place two small dots side-by-side and then drag the brush downward to meet them into a point. Alternatively, you can opt for the sophisticated look by adding a rose gold or iridescent pink glitter accent nail—typically the ring finger—to catch the light and add romantic shimmer without overwhelming the sophisticated base color. Ensure your base coats are fully cured before applying any artwork to prevent smudging, and seal everything with a durable, high-shine glossy topcoat for maximum longevity, which is especially important for detailed designs.
While pastels dominate typical holiday imagery, deep jewel tones like navy blue and glossy black offer a stunningly chic and glamorous alternative for sophisticated February events and date nights. These bold shades provide a dramatic contrast, especially when paired with metallic accents. To recreate the featured dark looks, apply two smooth coats of a highly pigmented navy or black crème polish. For the accent nail, experiment with advanced glitter placement techniques: try full coverage silver or holographic glitter for a high-impact statement, or achieve a luxurious reverse French fade by using gold metallic flakes, concentrating them heavily near the cuticle and lightly brushing them out toward the middle of the nail. This subtle gradient effect adds movement and sophistication, expertly balancing the intensity of the deep base colors.
For those preferring abstract artistry, the featured pink, blue, and white marbled designs are essential viewing. This look is often achieved using a ‘wet-on-wet’ technique: quickly layering small drops of contrasting polish onto a damp base coat and gently swirling them together using a toothpick or fine needle before the polish fully sets. Aim for fluid, organic lines rather than perfect patterns for an authentic watercolor effect. The combination of cool navy and warm bubblegum pink is unexpected yet striking for a modern February look. Alternatively, if you prefer textural contrast, pair smooth crème finishes with heavily textured flake polishes. Always ensure a quality thick topcoat is applied over any highly textured elements to smooth the finish and prevent snagging or chipping, protecting your intricate design throughout the month.
19 Dramatic Acrylic Nails
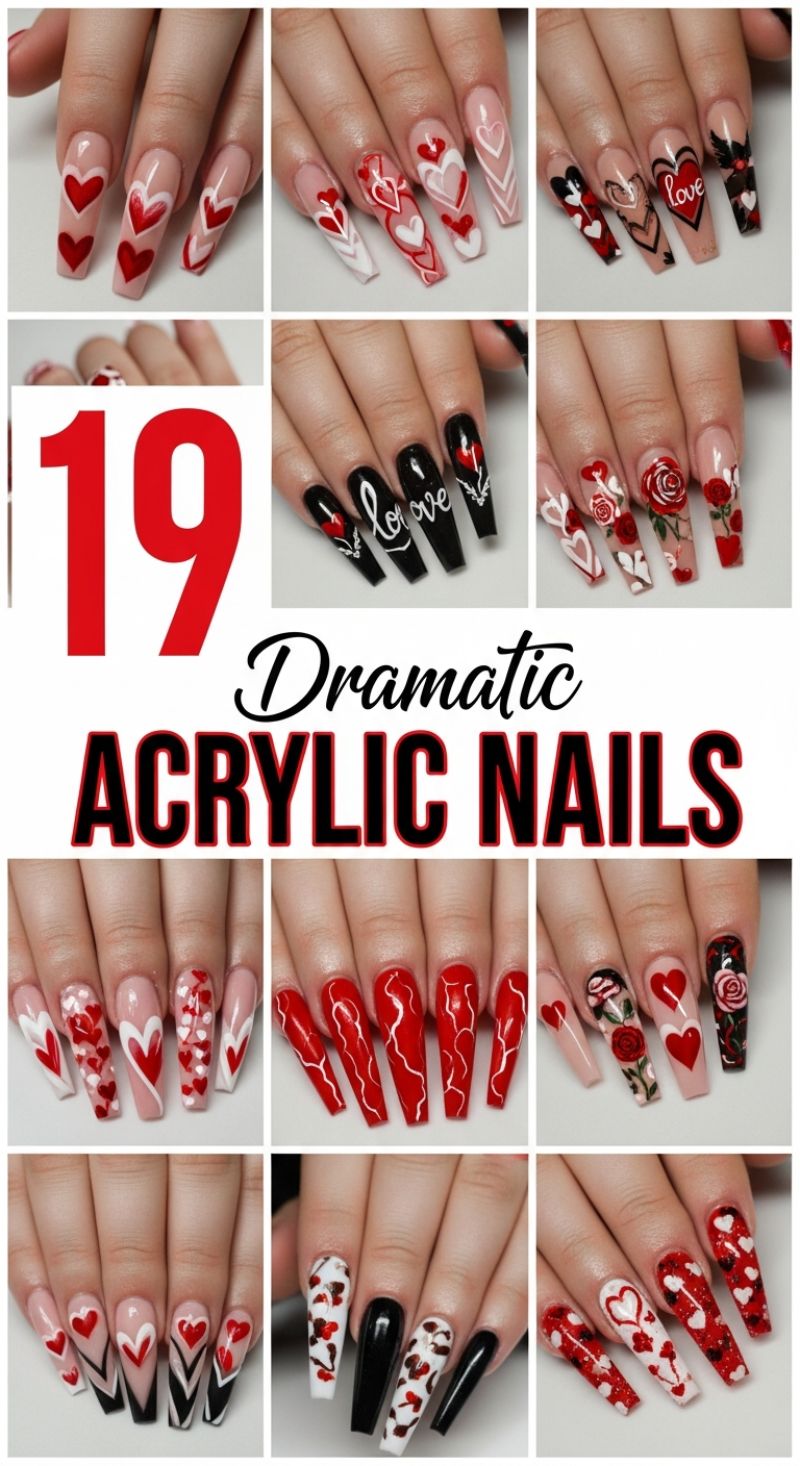
These ‘Dramatic Acrylic Nails’ showcase the ultimate high-contrast approach to February nail art, utilizing the length and strength of the acrylic canvas to maximize visual impact. The primary focus is the masterful manipulation of the classic Valentine’s palette—bold red, crisp white, and deep black—set against a sophisticated nude or sheer pink base. To recreate the layered heart looks, start by sculpting a durable, long coffin or ballerina shape, ensuring a perfectly symmetrical structure. Once the base is cured, use highly pigmented gel polish and a fine-tip liner brush to map out the heart geometry. The drama comes from layering: for example, applying a solid red heart, then outlining it with white, and perhaps adding a sheer pink or clear heart overlay to create depth and movement. Expert advice for this style is precision; every line must be sharp and intentional, especially when executing detailed patterns like the white chevron tips or the intricate repeating mini-heart designs.
To elevate the aesthetic from playful to truly dramatic, incorporate the edgy elements of black and script detailing. Designs featuring full black coverage, particularly matte black, provide a powerful backdrop for contrasting white elements. The “Love” script featured on several sets requires a steady hand and non-smearing white gel paint; if freehand proves challenging, using a quality decal or stamping plate for the lettering can ensure a clean, professional finish. Furthermore, the inclusion of photo-realistic roses injects romance and sophistication. Achieving these detailed floral elements often involves advanced techniques like using thick gel paint or even 3D gel/acrylic powder to build up the petals, giving the roses a lifelike, textured appearance. Ensure that the red used for the roses matches the red used for the hearts across the hand for visual cohesion, even when mixing different artistic styles.
The most striking feature of this collection is the mix-and-match strategy and the experimental use of texture and movement. Notice the full-coverage bright red nails featuring chaotic white streaks, mimicking a dramatic marble or ‘cracked’ effect. This can be achieved using the wet-on-wet technique with contrasting colors or a marbling gel. Similarly, the hands that blend solid black nails with patterned white and glitter-dusted red heart nails succeed because the overall color scheme remains tightly controlled. When attempting these contrasting sets, dedicate one or two nails per hand to a complex, dramatic design (like the script or roses) and balance the rest with simpler yet complementary patterns (like the solid color or the white outlined hearts). Finish every set with a high-shine, non-wipe topcoat to lock in the intensity of the reds and blacks and provide a glass-like finish that emphasizes the luxurious length of the acrylic structure.
Rebellious Romance: Edgy Nail Art for the Anti-Valentine Vibe
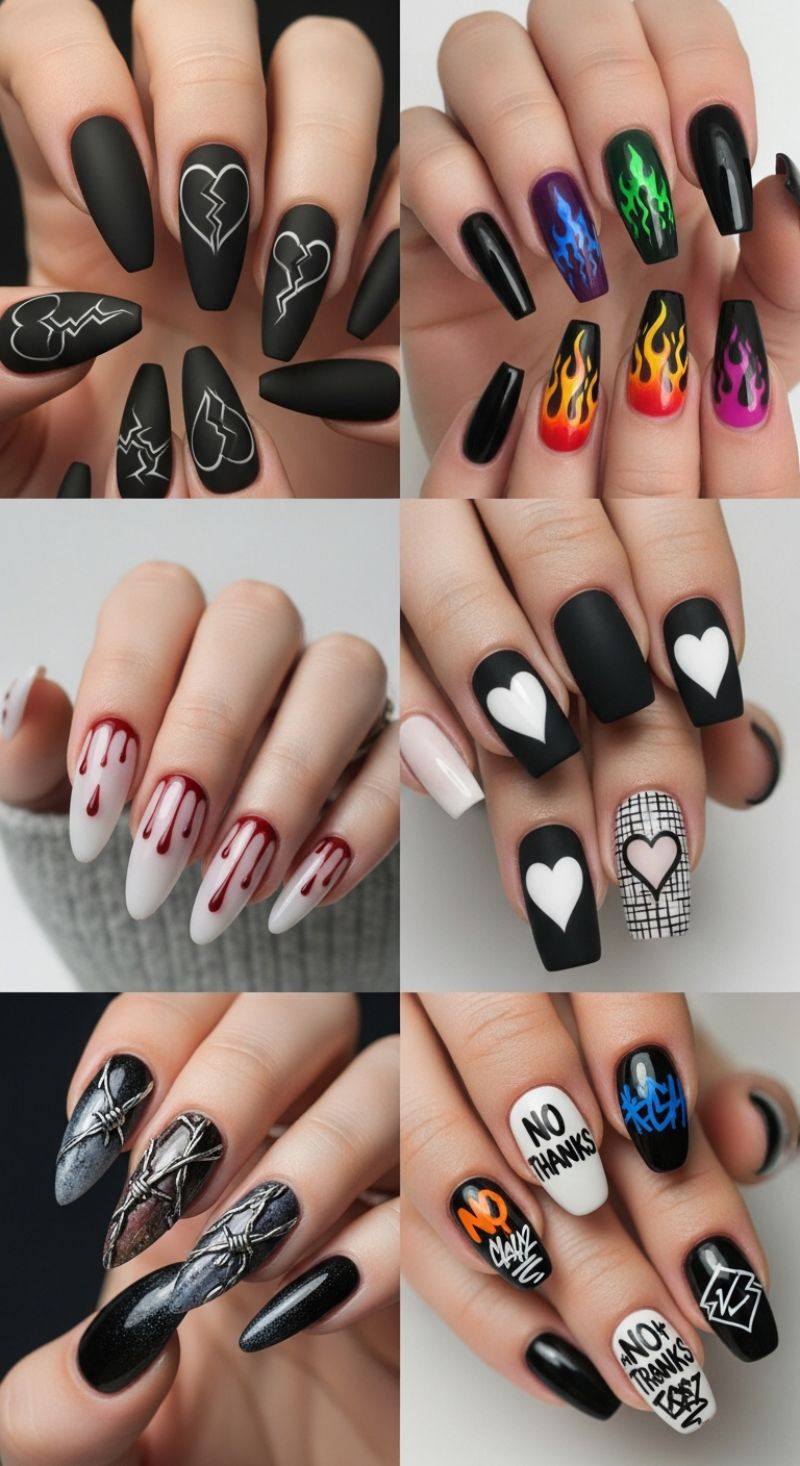
While February is often synonymous with soft pinks and traditional romance, this collection of edgy designs proves that fierce style and high contrast can deliver an equally stunning statement. To master the gothic glam aesthetic showcased here, the key is texture and contrast, primarily utilizing matte black bases paired with crisp white accents or vibrant pops of saturated color. For the highly popular broken heart and lightning designs (top left), start with a perfectly smooth, matte black coffin or almond shape. Use a highly pigmented white gel paint and a ultra-fine detail brush (like a 00 or striper brush) to achieve the delicate, precise outlines of the cracks and hearts. For those exploring the geometric heart looks (middle right), the complexity lies in the accent nail: successfully executing a clean black and white plaid or tartan pattern requires a steady hand and thin striping tape or a very long, thin brush. Always ensure the base layers are completely cured before attempting detailed linework, and finish matte designs with a specialized matte topcoat to maintain that velvety, non-reflective finish.
Expanding beyond simple linework, these looks incorporate advanced graphic techniques such as blood drips, metallic textures, and vibrant flames. The notorious blood drip nails (middle left) require specialized technique to achieve a realistic, weighty appearance. After applying a crisp white base, use a thick, highly pigmented deep red gel polish, applying small dots near the cuticle line and then gently dragging the color downward with a fine brush or dotting tool, creating varied lengths of ‘drips.’ Cure this layer quickly to ensure the polish stays in place without spreading flat. For the striking flame designs (top right), the base is often black, allowing the neon colors (electric green, fiery orange, vibrant magenta) to truly pop. Create the flame shape first with the base color (e.g., orange or green), then use a slightly lighter shade (yellow or neon green) to add depth before outlining the entire flame in black polish, which gives it that comic-book, stylized intensity.
The most intricate and heavy-metal inspired looks involve 3D elements and street-art precision. The barbed wire design (bottom left) is achieved by using highly structured builder gel or acrylic to sculpt the raised wire pattern directly onto an ombre or glitter base. Once sculpted and cured, the texture is sealed with chrome powder or metallic silver/gunmetal polish to give it a realistic, industrial look. Meanwhile, the graffiti-inspired set (bottom right) demands opaque, colorful nail art paints (not sheer polishes) and excellent brush control. Use a fine-tipped calligraphy brush for the expressive ‘tagging’ words like “NO THANKS” and ensure the paint is properly thinned for smooth application but pigmented enough for full coverage over the black or white bases. As an expert tip, because these dark and matte nails are prone to showing smudges and accumulating dust, always cleanse the finished nail with alcohol after curing the topcoat for the cleanest, most professional finish.
Glamorous Red and Gold Prom Nail Looks
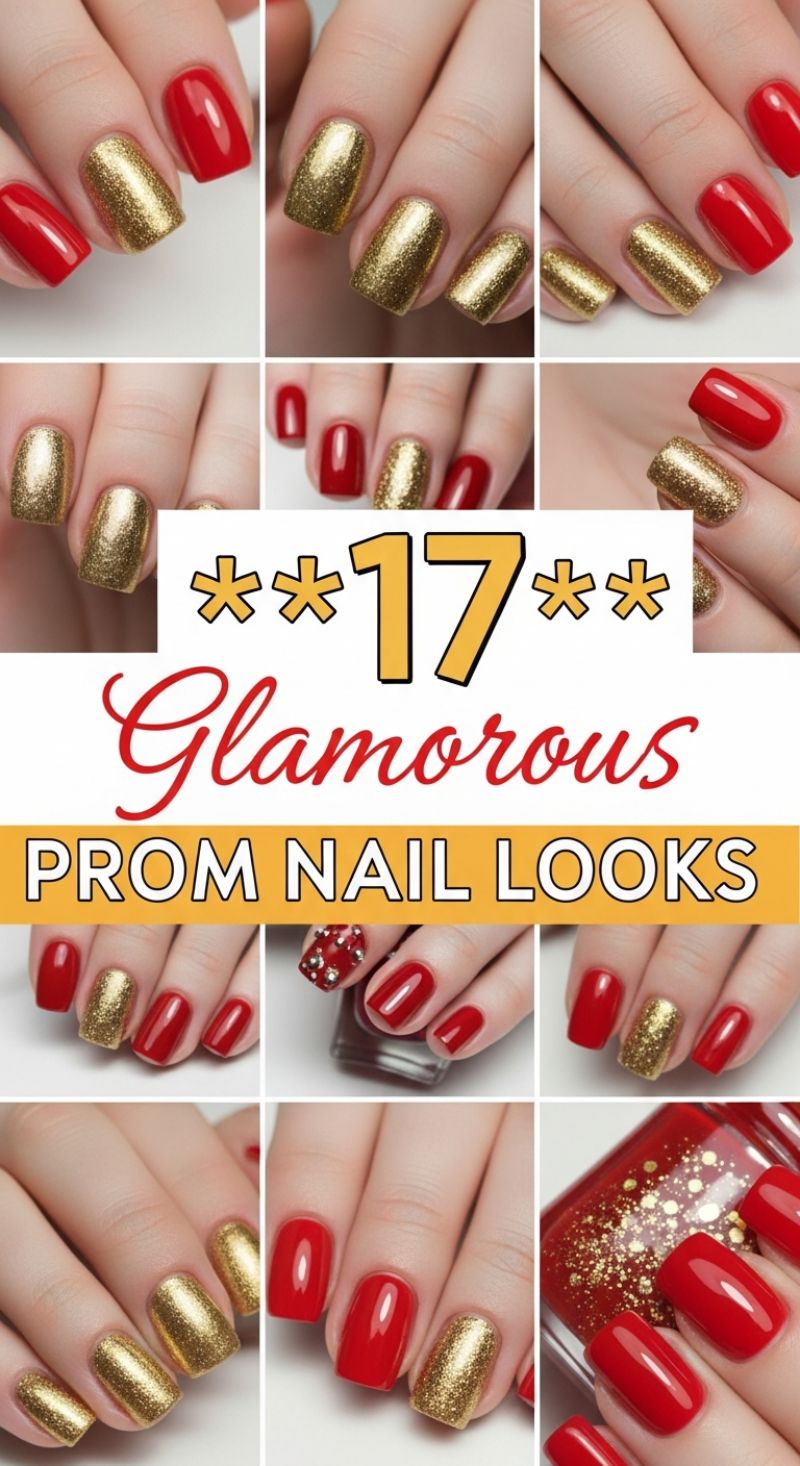
The combination of vibrant, glossy red and highly saturated gold glitter is the quintessential glamorous prom look, guaranteed to stand out on the dance floor. To recreate this sophisticated style, start with meticulous nail preparation: shaping the nails into a neat squoval or soft square, buffing the surface, and applying a robust base coat to protect the natural nail and prevent staining from the deep red pigment. The key contrast in this design lies in the finishes, so selecting the right polishes is critical—opt for a true cherry red creme polish that achieves full opacity in two coats, and an intense, densely packed metallic gold glitter polish, rather than a sparse topcoat shimmer. Once your base is dry, designate your accent nail (the ring finger is the classic choice) and ensure all hands are clean and ready for color application.
The strategic application of the two distinct polishes is what elevates this look. Apply two to three thin, even coats of the cherry red creme polish to all non-accent nails, ensuring each layer dries sufficiently before the next to prevent bubbling. For the gold accent nail, aim for maximum sparkle payoff. If your glitter polish is less dense, consider applying it using a makeup sponge; paint the polish onto the sponge, then dab the sponge directly onto the nail. This technique absorbs the excess clear base, leaving behind a highly concentrated layer of glitter. If you want to replicate the extra-sparkly variant seen in the image, apply a thick layer of topcoat or specialized rhinestone glue to the red accent nail and use a wax pencil or tweezers to strategically place small, red or clear rhinestones before the adhesive cures. Proper application of these heavy textures ensures they adhere securely throughout the evening.
Longevity is essential for a prom look that lasts from the pre-party photos to the after-party. Once the colors and any embellishments are completely dry, seal the design with a high-shine, chip-resistant topcoat. Since glitter polishes often have texture, applying two layers of topcoat—curing the first fully before applying the second—will result in a smoother, glass-like finish. Expert tip: Always “cap the free edge” by running the topcoat brush along the very tip of the nail to seal the color and prevent premature chipping, especially important when dealing with glitter. This vibrant red and gold combination is highly versatile; if red isn’t your primary dress color, swap it out for navy, emerald green, or classic black while keeping the opulent gold glitter for a similar high-glam impact.
Practical Short Nail Designs for February: 18 Ways to Wear Love
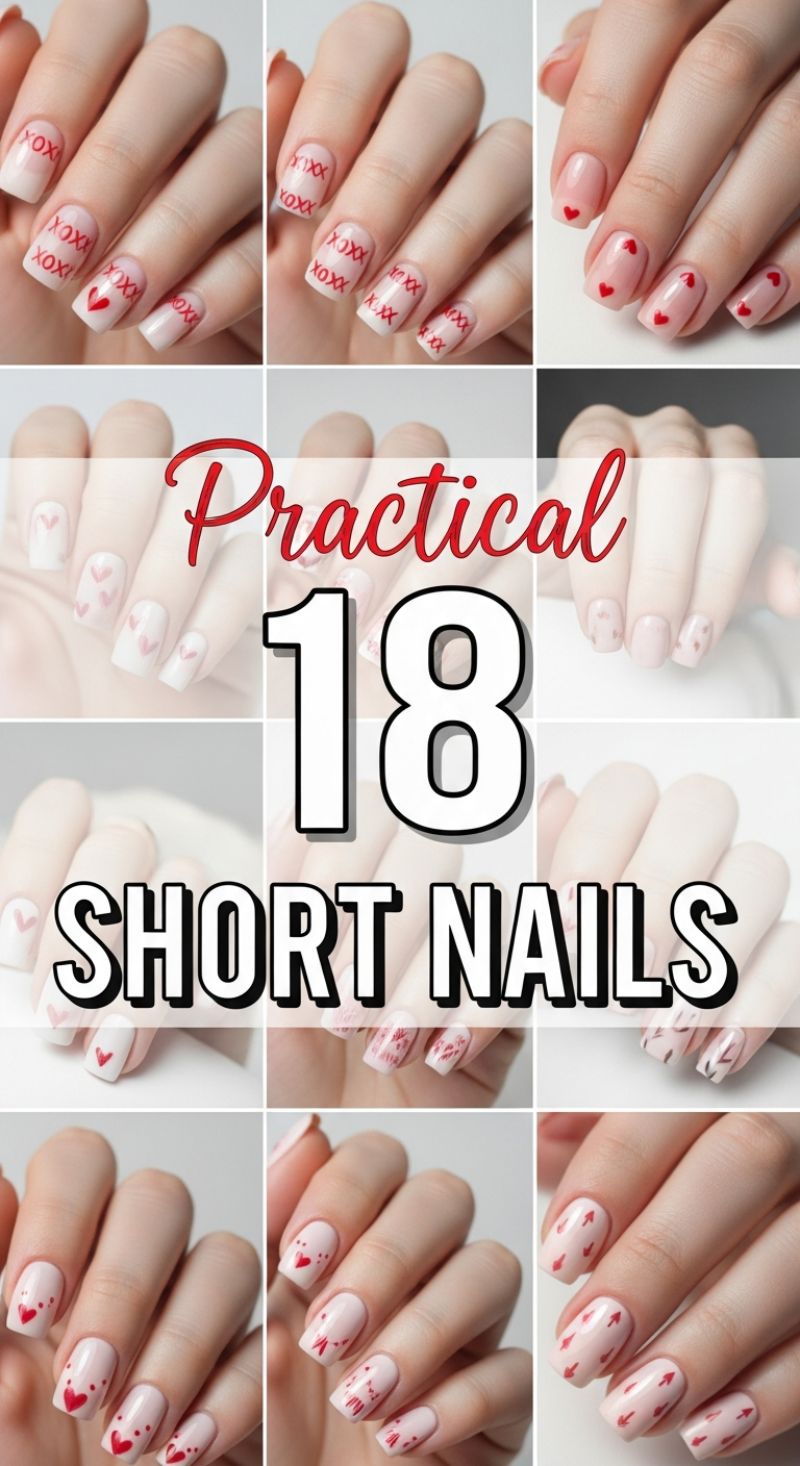
Short nails are the perfect canvas for achieving sophisticated, subtle February nail art, as demonstrated by the collection of designs featuring tiny hearts and romantic patterns on sheer nude bases. To recreate this universally flattering look, begin by shaping your short nails into a gentle square or squoval shape. Apply 1-2 thin coats of a milky white or sheer pale pink polish to achieve a natural, ‘jelly’ effect. The key to the minimalist heart look (as seen in the top right and middle row) is precision and scale. Using a very fine dotting tool and highly pigmented red polish, place two adjacent dots where the top lobes of the heart will sit, then slightly drag the tip of the tool down to form the point. On shorter nail beds, keeping the design small and slightly elevated near the cuticle prevents the pattern from looking cramped while visually elongating the nail plate. This precise technique is fast, easy to maintain, and exceptionally versatile for daily wear.
For those seeking a more graphic, playful approach, designs incorporating text like ‘XOXO’ or dense, repeating patterns offer striking results on short lengths. The ‘XOXO’ design requires meticulous execution, best achieved either with a specialized fine-line nail art brush (size 000) or, more practically, using a precise nail stamping plate designed for small motifs. When applying lines of text horizontally across a short nail, ensure the lines are evenly spaced and perfectly straight to maximize the visual appeal. Alternatively, experiment with repeating vertical motifs, such as the Cupid’s arrow design (bottom right). Create the arrow points using small, angled swipes of red polish, extending them vertically to draw the eye upwards. For maximum impact, use a high-contrast palette—a vibrant cherry red against an opaque white or neutral blush base—and always finish with a high-shine topcoat to lock in the detailed artwork and provide depth and longevity.
The beauty of these 18 short nail inspirations lies in their practicality and durability; shorter lengths are far less prone to chipping, allowing detailed artwork to last longer. Expert advice for maximizing wear time involves meticulous capping of the free edge of the nail with every layer of polish, especially the final topcoat. When choosing among the designs, consider using the denser patterns (like XOXO or multiple hearts) on one or two accent nails (often the ring finger and thumb) while keeping the others simple with one centralized heart. This strategy draws attention without overwhelming the small surface area. If attempting any layered or semi-transparent heart designs (middle rows), ensure each layer is fully cured or completely dry before applying the next to guarantee a crisp, professional finish, perfect for showcasing your love for February’s romantic nail trends.
Festive 15 Mardi Gras Looks
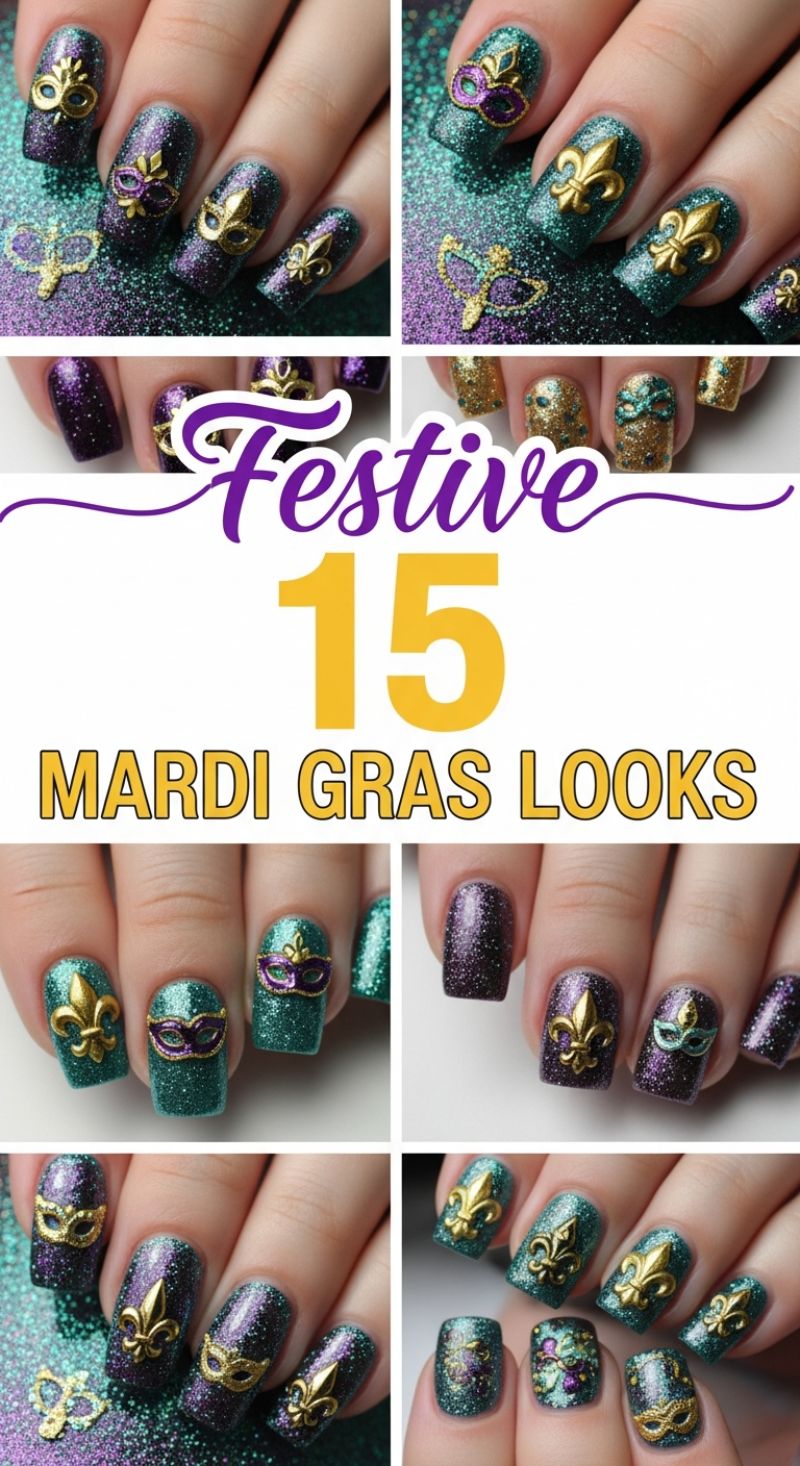
This elaborate set captures the essence of carnival celebration using the traditional Mardi Gras palette: regal purple, vibrant emerald green, and shimmering gold. To replicate this high-impact, shimmering look, start with highly pigmented holographic or micro-glitter polishes in deep plum purple and teal/emerald green. For an authentic duochrome effect visible in many of the images (where the glitter appears to shift colors based on the light), opt for magnetic cat-eye polish or a multi-chrome flakie topcoat applied over a contrasting base color. Apply two coats of your chosen glitter polish, ensuring the application is even and fully opaque. The slight texture inherent in glitter finishes provides an excellent, grippy foundation necessary for securing the heavy 3D metal elements without excessive slipping.
The main attraction of these “Festive 15” looks is the strategic placement of gold 3D charms, specifically the ornate masquerade masks and the iconic fleur-de-lis. These charms must be applied using either specialized nail jewelry glue or a thick clear builder gel for maximum, long-lasting hold, especially considering their size and three-dimensional curvature. After curing or drying the base color, apply a small dot of the chosen adhesive precisely where the charm will rest. Using tweezers, gently press the charm onto the nail and hold securely for the recommended set time. Expertly mix and match the base color and charm combination to ensure high contrast and visibility: place the masks featuring purple or teal accents on the contrasting base color, and use the solid gold masks or fleurs-de-lis on both the purple and green nails for cohesive glamour.
Since these stunning 3D charms are inherently prone to catching or lifting, proper encapsulation is crucial for design longevity. Do not attempt to brush a thin topcoat over the entire charm, as this will only dull the metallic finish and fail to secure the edges adequately. Instead, use a fine-tipped liner brush to meticulously apply a thick, non-wipe gel top coat specifically around the base and exposed edges of each charm, effectively creating a sturdy bezel that anchors it to the nail plate without covering the decorative centerpieces. Cure this encapsulating layer thoroughly. For those seeking a slightly less dimensional, but equally festive look, you can substitute the charms with gold stamping plates featuring mask and fleur-de-lis designs, or press gold foil flakes into a tacky layer for a beautiful, shimmering, and wearable flat accent.