Discover the ultimate collection of 50+ viral nail art trends! Find inspiration for every occasion, from romantic V-Day hearts and flirty Cupid designs to glamorous, bold metallic prom looks, Barbie pink styles, and easy DIY tips.
10 Chic Valentines Day Nails
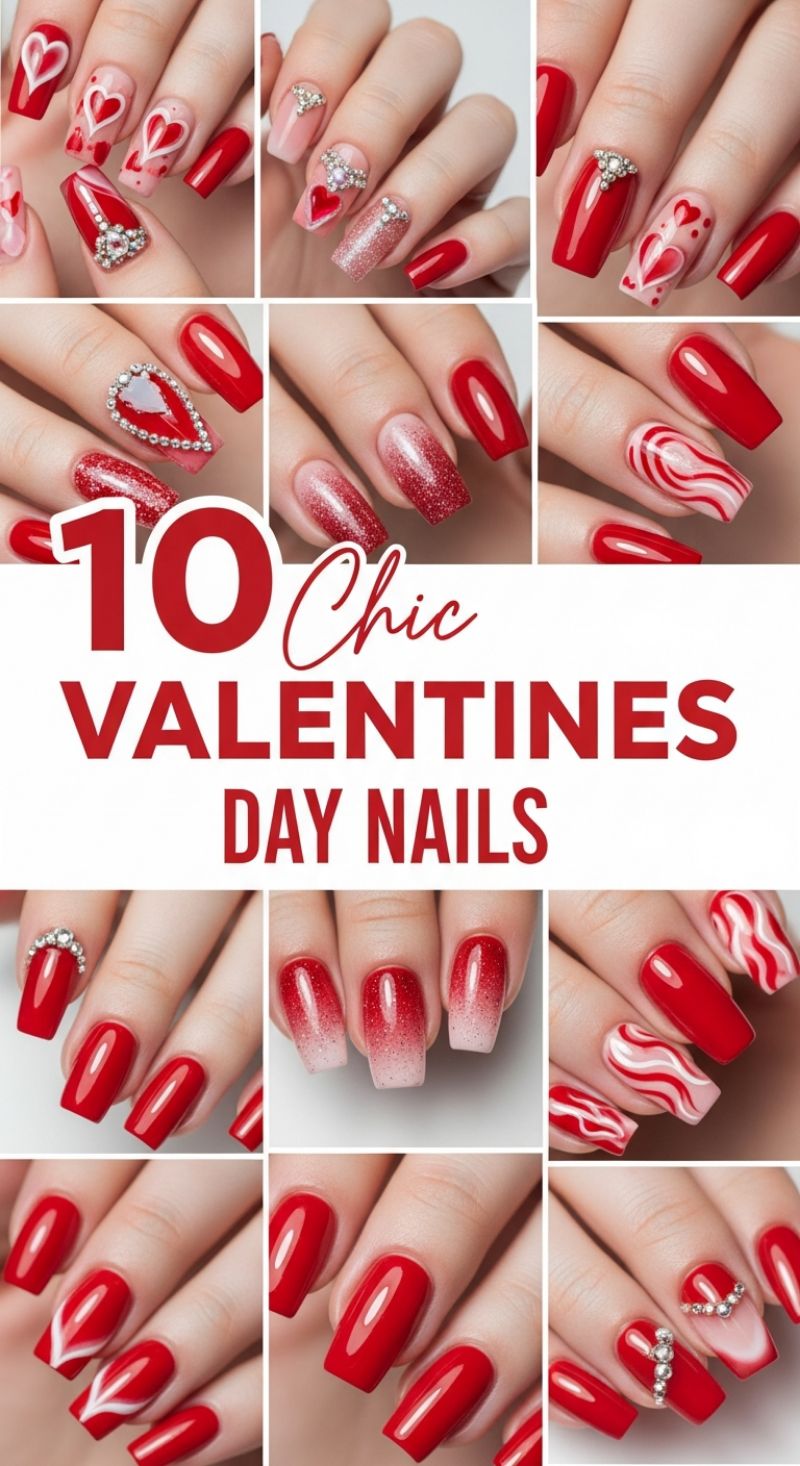
The image showcases the ultimate gallery of Valentine’s Day manicures, focusing heavily on high-gloss reds, soft pinks, and dazzling rhinestone accents. To recreate this collection, start with high-quality pigmented polishes in classic cherry red and creamy nude or milky pink. For the simpler, yet impactful designs, apply two smooth coats of the vibrant red. To achieve the popular heart designs, utilize a fine-tip nail art brush or a dotting tool. For instance, the soft-focus hearts visible on the nude base require applying two small dots of red polish close together, then dragging the tip downward slightly to form the point. For the gorgeous glitter ombré effects, select a densely pigmented rose-gold or red glitter polish. Using a makeup sponge wedge, dab the polish onto the nail, concentrating the product heavily near the cuticle or the tip (depending on the desired fade direction) and lightly tapping towards the center to create a seamless gradient transition. Always seal with a non-wipe high-shine top coat to lock in the color and maximize the reflective properties.
Elevating these looks to “chic” status relies heavily on meticulous accent work. Several featured designs incorporate dynamic linear patterns, such as the white and red swirling stripes. To master this, apply the base color and cure fully. Then, using a specialized striping brush, load a contrasting color and draw controlled, sweeping curves across the nail plate. Maintain consistent pressure and avoid overloading the brush to ensure the lines remain sharp and crisp. The most glamorous looks in this set, however, are defined by their elaborate rhinestone placement. For secure application, especially with the large, dramatic heart-shaped clusters or the tiara-like border along the cuticle, you must use a strong jewelry or builder gel. Apply a small bead of gel where the rhinestone will sit, firmly press the stone into place using a wax picker tool, and immediately cure under the UV/LED lamp. Expert tip: Outline the main rhinestone structure with tiny metallic microbeads or smaller clear crystals to hide any gaps in the cluster and give the design a professionally finished edge.
To ensure maximum longevity and visual impact, remember the principles of balance. If you opt for a heavily embellished nail—such as the one featuring the large, pave-set heart—keep the surrounding nails relatively simple, utilizing solid color or a soft ombré. The most common nail shape displayed here is a medium-length coffin or squoval, which provides an ideal canvas for intricate art and large embellishments. For clients wanting to transition from these highly decorative looks, ensure proper removal. For glitter or heavy gems, wrap the nails in acetone-soaked cotton (using the foil method) for 10–15 minutes to prevent scraping, which can damage the natural nail plate. These 10 designs offer versatile inspiration, ranging from playful and sweet to elegant and bold, ensuring a perfect V-Day match for any style preference.
7 Flirty Cupid Nails
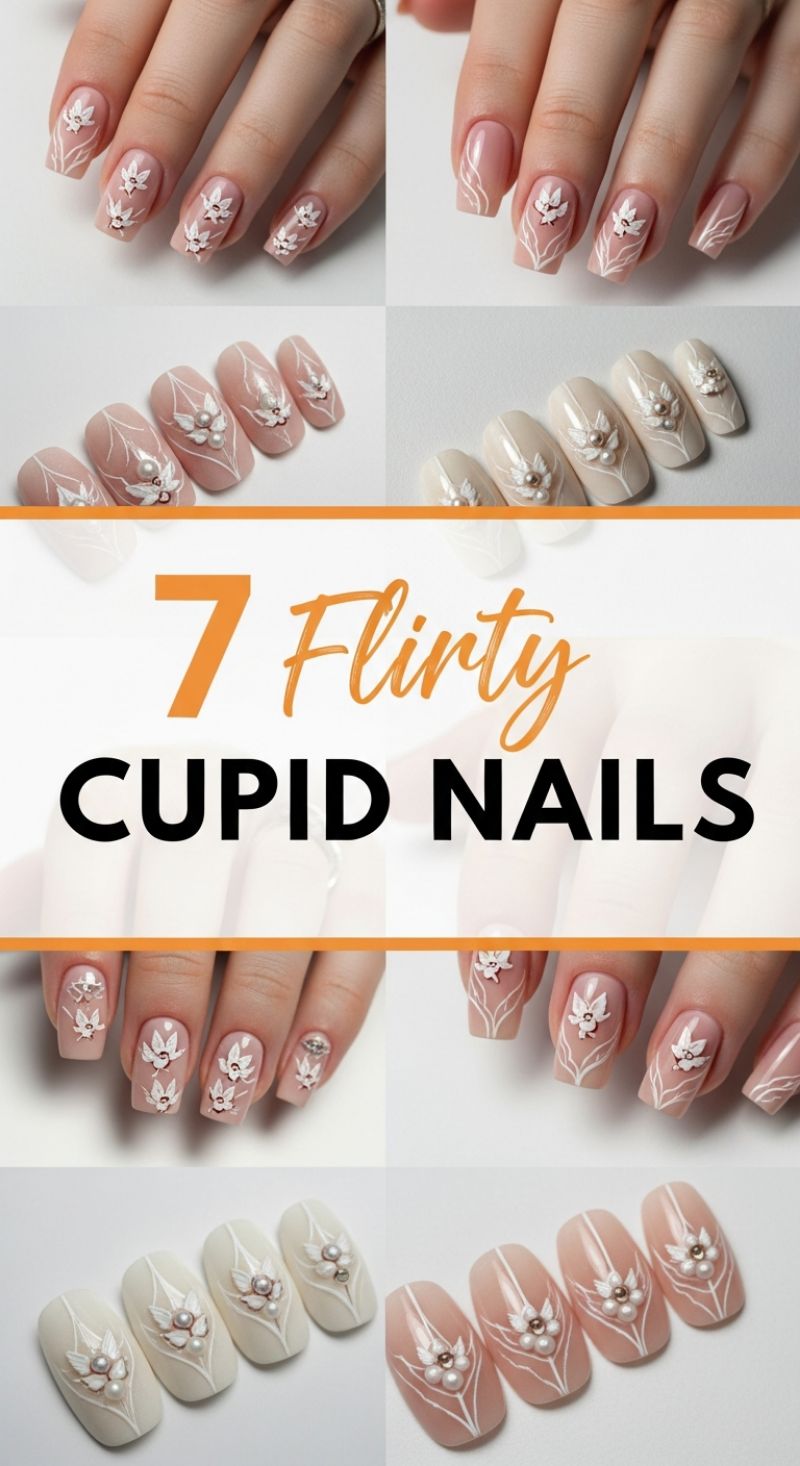
The ‘Cupid Nails’ trend elevates the classic nude manicure into a realm of ethereal romance, perfect for Valentine’s Day or as sophisticated wedding nails. The foundation of this look is a perfectly balanced neutral base, typically a sheer milky pink, soft blush, or pale beige that enhances the natural nail color without being opaque. To recreate this delicate aesthetic, begin by shaping your nails into a soft squoval or medium almond shape, ensuring uniformity across all fingers. The core technique involves highly pigmented white polish and a specialized fine detail brush (often 00 or 000). The white designs typically stem from the cuticle line, creating flowing, symmetrical lines that frame the center of the nail, acting as the backdrop for the primary motif. Expert application requires a steady hand to maintain thin, crisp lines that resemble delicate vines or abstract lace, giving the overall design a sense of movement and depth.
Once the intricate linework is cured, the next step is introducing the signature 3D elements. The ‘Cupid’ motif is often represented by stylized wings or abstract heart-shaped leaves, sculpted using thick builder gel or a specialized 3D art gel. This sculpting should be done carefully to give a raised, palpable texture to the design. A critical step is the placement of the luxurious embellishments. The image showcases small pearls—ranging from micro beads to larger accent spheres—clustered centrally within the white design. To achieve maximum impact, nestle the pearls and small gold or silver metallic beads right into the center of the sculpted design, mimicking the stamen of a delicate flower or the focal point of a heart. Use a strong resin or specialized gem adhesive gel to ensure these 3D elements are securely attached before curing.
For an extra touch of celestial glamour, consider gently dusting the white sculpted elements with an iridescent chrome powder (such as a subtle white shift or opal) before applying the final top coat. This adds a luminous, airy quality to the wings, making them look even more angelic. Seal the entire look with two layers of high-shine, non-wipe top coat, paying extra attention to encapsulating the edges of the 3D pearls to prevent snagging and prolong the wear time. This ensures a glossy finish that emphasizes the contrast between the soft neutral base and the sharp, bright white artistry, making the Cupid Nails a truly elegant and flirty statement piece.
5 LARGE & BOLD Gothic Lace Nail Art
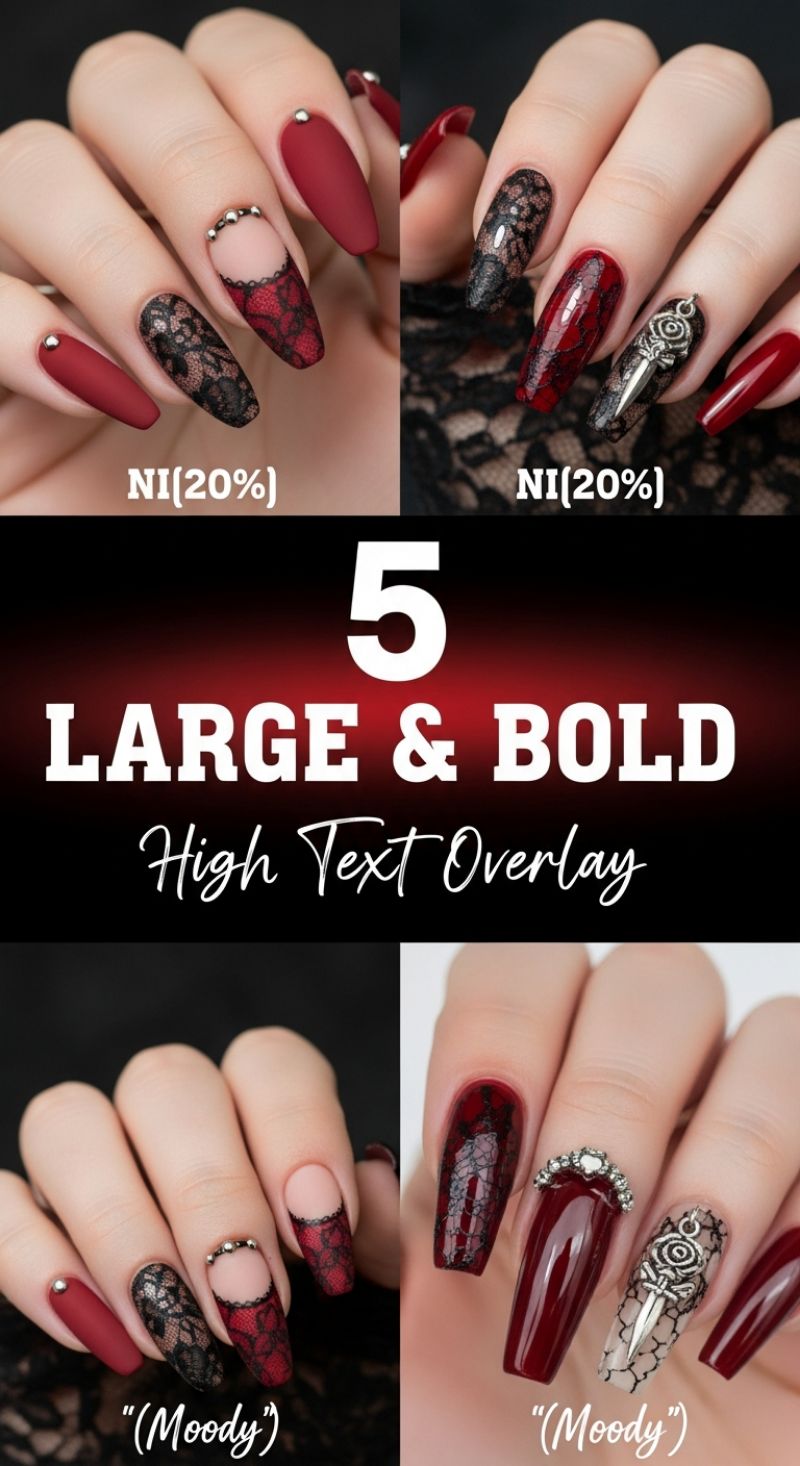
The “Large & Bold” aesthetic showcased here masters dark romance through an intricate blend of texture and pattern. This highly stylized look, often referred to as gothic lace or boudoir nails, relies heavily on deep, saturated colors like matte oxblood red and glossy jet black. The central technical challenge is executing the lace pattern, which provides incredible detail. For salon-quality results, utilize high-definition nail stamping plates featuring delicate, web-like patterns, or opt for pre-designed full-coverage lace decals, ensuring they lie smoothly over a perfectly shaped long coffin or ballerina base. Notice the striking variation where the lace is applied selectively, creating a modified French or half-moon manicure at the cuticle, often outlined with precise micro-beads for added structure and sparkle against the negative space.
Expert application hinges on the deliberate contrast in finishes. This design achieves visual depth by juxtaposing velvety matte solid nails against high-shine, glossy, jelly-like finishes applied over the lace. When recreating this duality, apply and cure your deep matte topcoat first on the designated accent nails (like the ring finger and pinky shown). Ensure the matte surface is completely impervious before proceeding. For the nails featuring the lace stamping or decal, use a clear or translucent deep red jelly polish underneath the black lace pattern to give the finished look a dimensional, almost wet, appearance. Sealing these intricate designs with a durable, non-yellowing high-gloss topcoat is essential to prevent chipping and maintain the luxurious shine.
To truly elevate this bold style, incorporating 3D hardware and metal embellishments is non-negotiable. The featured looks utilize silver accents, including small metallic beads lining the cuticle line for a subtle crown effect, and larger statement charms like the prominent rose-and-dagger pendant. Securing these larger pieces requires advanced technique; eschew standard topcoat and instead use a small bead of strong, clear builder gel or specialized jewelry resin. Place the charm, cure it thoroughly, and then use a fine liner brush to thinly outline the base of the charm with the gel again for maximum structural integrity. For customization, experiment with black lace over nude or light grey bases to shift the mood, or swap out the deep red for emerald green or sapphire blue while maintaining the matte/gloss contrast for an equally powerful, dramatic manicure.
10 Glam STELLIO NAILS
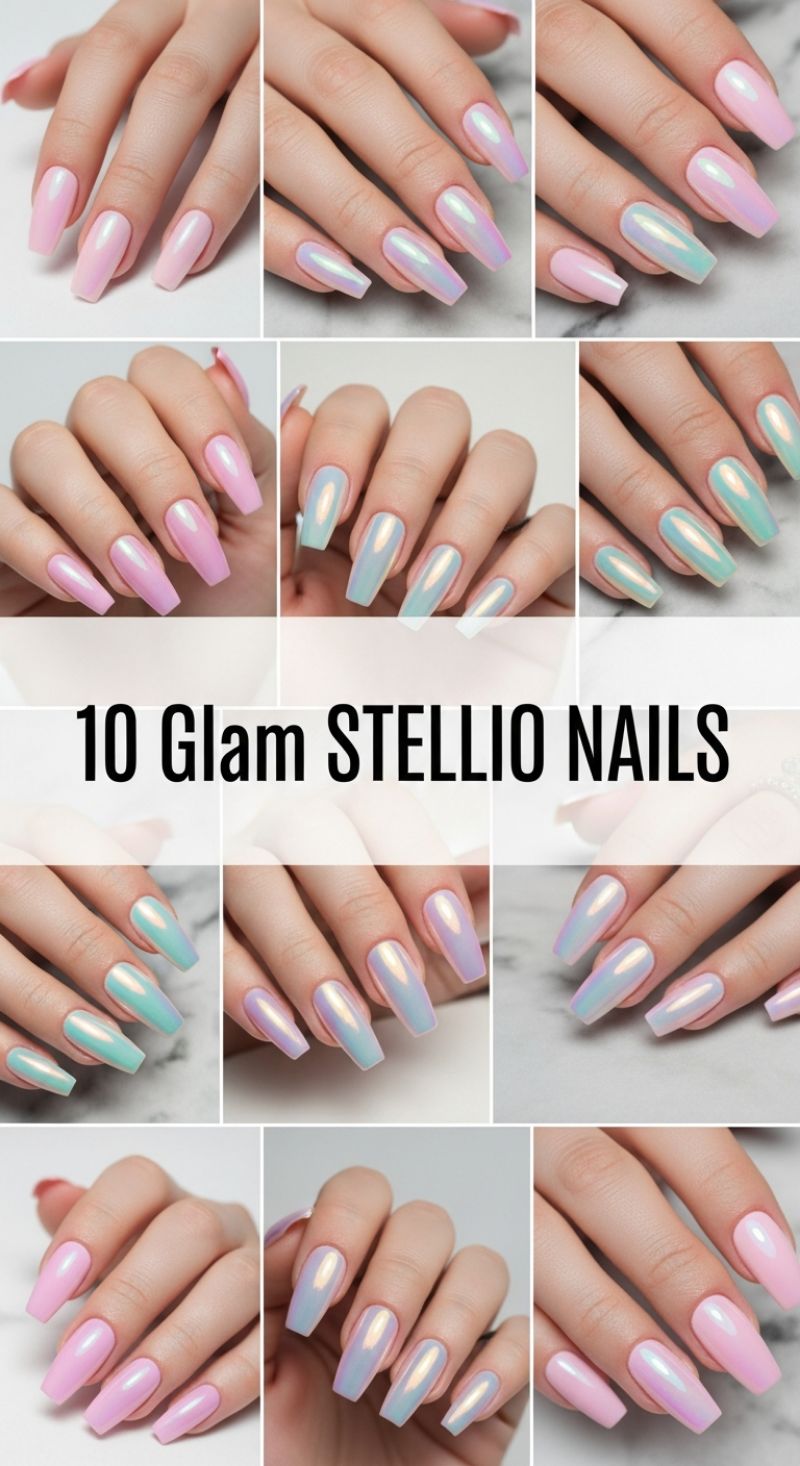
The “Glam Stellio Nail” look epitomizes the high-shine, ethereal trends dominating viral nail art, serving as a perfect choice for bold prom statements or sophisticated celebratory events. This style relies on the striking juxtaposition of a soft, creamy pastel base—seen here in delicate pinks, lavenders, and mint blues—with a dazzling, light-reflective, iridescent top layer. The visual effect is intensely glamorous and luxurious, mimicking the opalescence of a pearl or a deep sea shell catching the sunlight. To successfully execute this glamorous trend, length and structure are crucial; the long coffin or ballerina shape, as consistently demonstrated across these images, provides the perfect extended canvas. The long, tapered edges ensure maximum surface area for the specialized chrome powder to interact with ambient light, resulting in a dramatic, shifting aura that ensures the manicure remains the focal point of any ensemble.
Achieving this deep, color-shifting shimmer requires mastering the precise application of aurora or unicorn chrome powder over a cured gel foundation. Start with a carefully manicured structure and apply two smooth coats of your chosen pastel gel color (e.g., a milky pink or soft lavender) and cure fully. The crucial technical step follows: apply a high-quality, No-Wipe Gel Top Coat. Unlike traditional chrome application methods, the perfect “Stellio” sheen requires the top coat to be cured precisely according to the powder manufacturer’s instructions—often slightly under-cured (a quick flash cure) to leave a tacky enough, yet firm, surface for the ultra-fine pigment to adhere without clumping or showing texture. Using a dense silicone applicator, a dedicated eye shadow brush, or a makeup sponge, vigorously rub the iridescent powder onto the still-warm nail surface until the pigment transforms the base color into a flawless, mirror-like holographic shine.
For professional results and maximum longevity, particularly when creating long-wearing enhancements like these, pay close attention to meticulously sealing the edges and the free edge of the nail after applying the pigment. Chrome powders are notoriously susceptible to early chipping if they are not properly encapsulated. An expert tip for enhancing durability is to apply a very thin layer of flexible builder gel or rubber base coat over the finished, rubbed-in pigment *before* the final layer of glossy gel top coat. This sealing technique adds an extra layer of durable protection, effectively sandwiching the fragile pigment layer. While the showcased examples feature soft, dreamy pastels, you can adapt this technique for a bolder, more dramatic look by applying the same iridescent pigment over a rich teal, deep magenta, or even a true black base coat. This dramatically alters the resulting shift, transforming the nail into an even more complex, multi-faceted jewel tone, making the trend highly versatile for any major style statement.
8 Pretty ALMOND VDAY NAILS
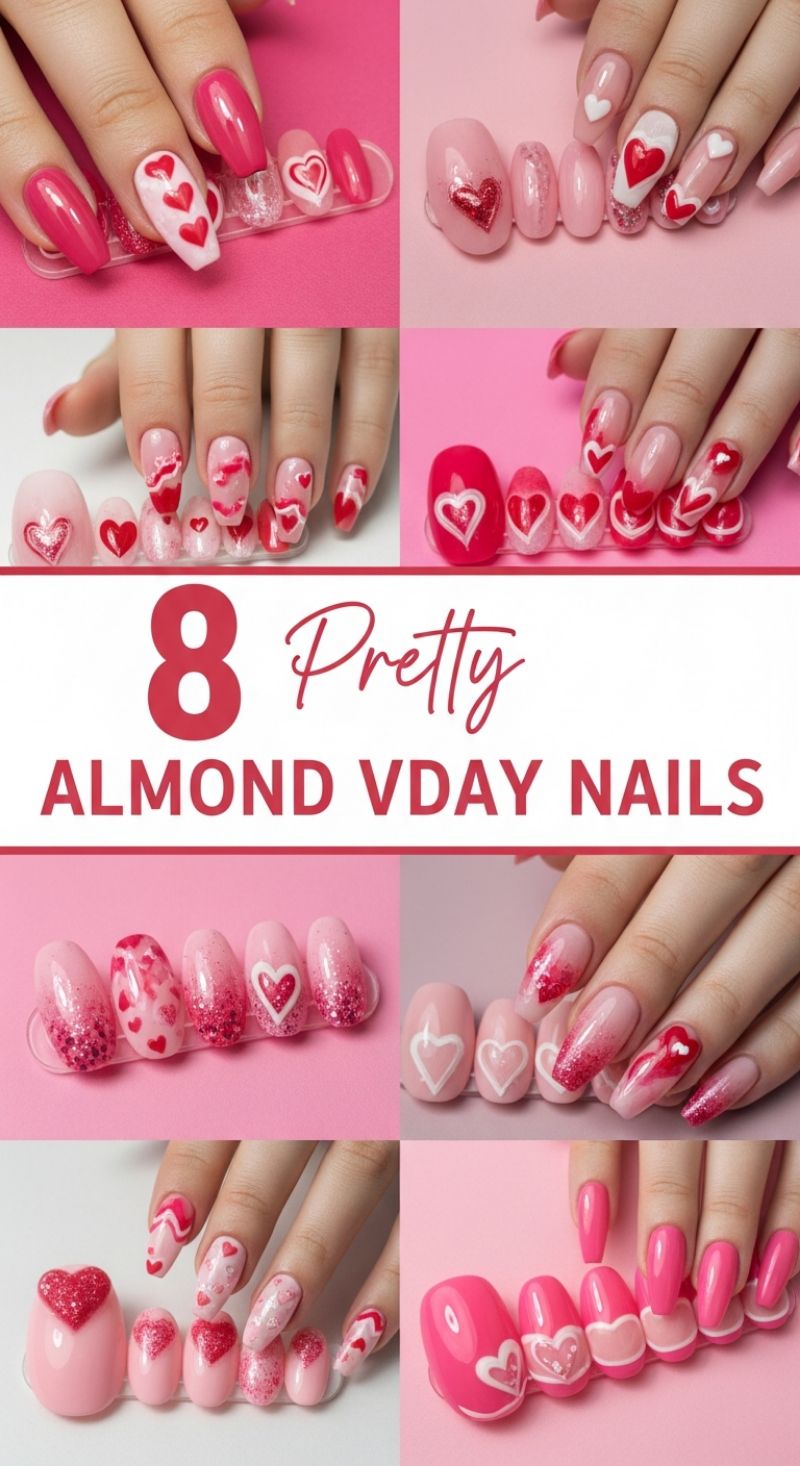
The almond shape offers a naturally sophisticated canvas for festive nail art, and these eight variations of Valentine’s Day designs maximize that elegance using a quintessential palette of bold reds, hot pinks, soft blushes, and crisp whites. To achieve this viral look, start by perfecting your base; the almond shape demands flawless shaping, so ensure the sides taper evenly to a soft, rounded point. Most of these designs utilize either a sheer milky pink or a nude base coat to create negative space, which keeps the busy heart designs from looking cluttered. For the more subtle looks, like the glitter ombre (bottom row, left) or the abstract swirled hearts (middle row, left), apply a thin layer of a shimmery pale pink base before gently blending fine pink or red glitter onto the free edge using a sponge or a fan brush, concentrating the density at the tip and fading towards the center. The key to making the vibrant designs pop is selecting high-pigment polishes for the solid colors, such as the classic cherry red and the fuchsia pink shown on the full-coverage nails.
Mastering the various heart motifs is crucial for replicating these trending styles. For crisp, outlined hearts (visible in nearly every style), utilize a specialized thin liner brush (00 or shorter). Dip the brush lightly in white or red polish and sketch the two curves of the heart starting from the top center point, connecting them at the base. These outlines are often used to create a stylish French tip alternative, where the free edge is replaced by a V-shaped curve that forms the top half of a heart shape. This technique adds an element of subtle romance without requiring a full coverage design. For 3D or textured hearts, such as the oversized glitter heart shown on the thumb nail (bottom row, left), apply a clear builder gel in the desired shape, cure partially, then generously sprinkle ultrafine holographic red glitter over the tacky layer before fully curing and sealing the edges with a thick top coat to secure the dimension. Alternatively, for the bold graphic hearts (bottom right), paint the full design onto a bright pink base and use a contrasting white for the outline to make the design stand out.
To ensure maximum longevity and professional quality, always finish these detailed designs with two layers of a high-shine topcoat, paying special attention to capping the free edge of the nail to prevent chipping. Consider mixing finishes; for example, applying a matte topcoat over a solid pink base but leaving the individual heart details glossy, which adds depth and visual interest. When attempting the abstract marbled look (middle left), use a dotting tool to place small drops of red, pink, and white polish onto the wet nude base coat and gently swirl them together with a clean brush or needle before curing. These viral almond V-Day styles are perfect not only for February but also for adapting throughout the year simply by swapping the red and pink shades for pastels in spring or deep plums in fall, proving that heart art is truly timeless.
The Essential Guide to the Milky Pink “Clean Girl” Manicure
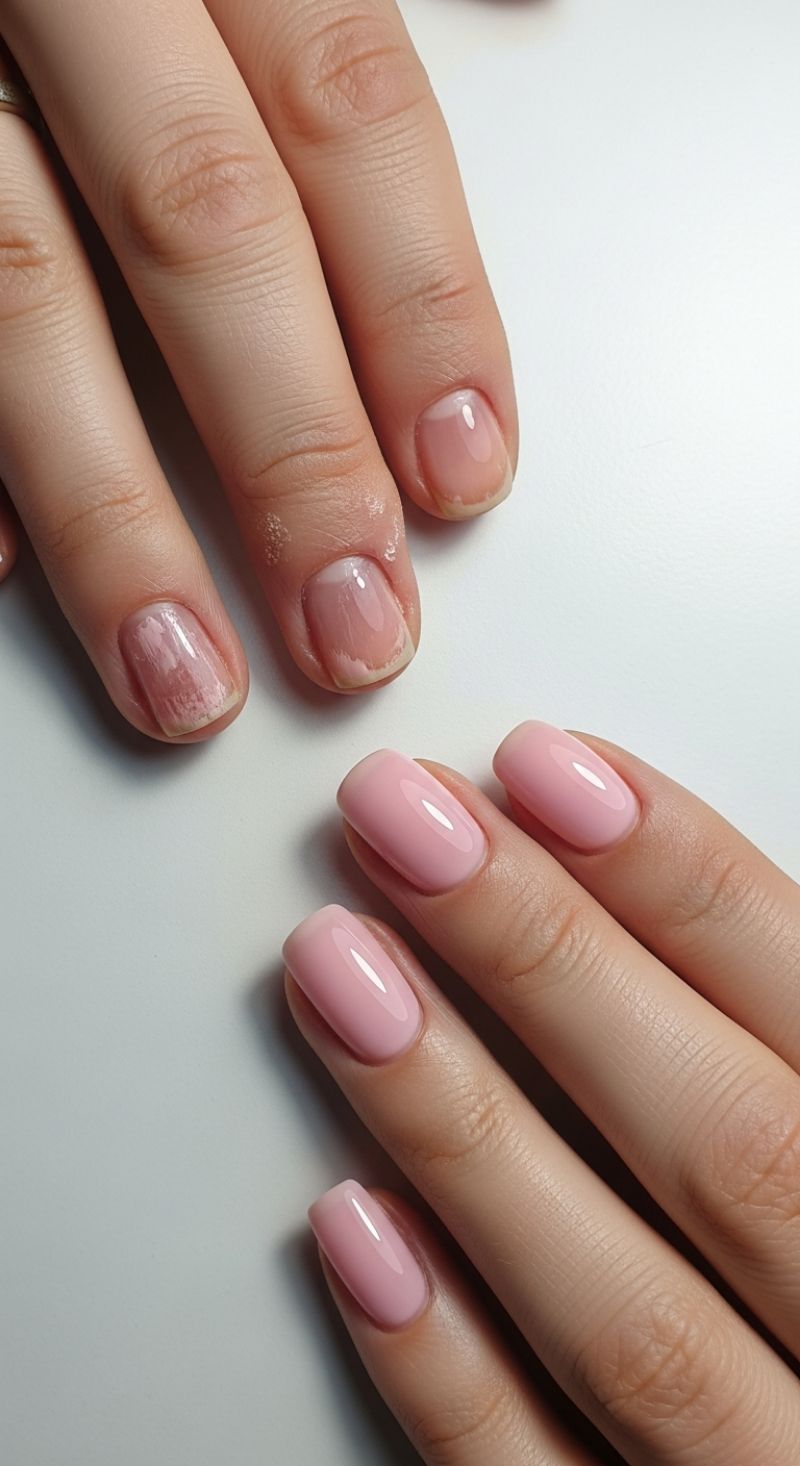
The milky pink manicure, as showcased in this stunning before-and-after, embodies the highly popular “clean girl” aesthetic—simple, polished, and effortlessly chic. Achieving this flawless, high-gloss look starts long before the color is applied. Notice the stark difference in the upper and lower hands; the upper hand displays the damage that occurs from improper removal, particularly peeling off old gel or polish, which significantly harms the nail plate. To transition from a damaged state to this perfect, bubblegum-pink finish, begin with meticulous prep. Gently file the existing product down without damaging the underlying nail bed. Push back and professionally trim the cuticles to create a clean, uniform frame for the polish. Shape the nails into a soft, symmetrical oval or squoval (as seen here) to complement the medium length. The health of the nail plate dictates the longevity and smoothness of the final product, so apply a reinforcing rubber base coat to fill in any imperfections or ridges left behind from prior damage, ensuring a perfectly level canvas before introducing the signature color.
Once the foundation is solid, the technique for applying the milky pink shade is crucial for that sought-after opaque yet translucent effect. Milky pinks require careful layering to avoid streaking and to achieve a saturated color that still allows some light to pass through. Apply the chosen color (a soft, cool-toned pink is ideal for this look) in two or three extremely thin coats. The goal is self-leveling—apply a bead of polish near the cuticle and gently float it down to the free edge, minimizing brush strokes. After curing the color coats, the real magic lies in achieving that glossy “wet look.” If you are using a builder gel or structured base, confirm the apex (the highest point of the nail) is smooth and centrally positioned for durability and that reflective shine. Cure the final color layer completely, and then seal the look with a high-quality, non-wipe top coat. Ensure this top coat is applied generously enough to create a thick, glass-like reflection, paying special attention to capping the free edge to prevent chipping and seal the look.
This manicure is a staple for a reason: its versatility allows it to transition seamlessly across any seasonal trend, making it a perfect base for subtle accents relevant to our guide. For a V-Day twist, consider adding a single, tiny red or metallic heart decal near the base of one accent nail before the top coat. For a sophisticated Prom look, the milky pink acts as an ideal backdrop for micro French tips in silver chrome or holographic glitter along the free edge. To maintain the professional finish and keep the cuticles looking clean and hydrated (a must for the “clean girl” aesthetic), advise clients to apply cuticle oil twice daily. This simple maintenance ritual keeps the nail surrounding supple, maximizing the illusion of fresh, flawless nails and protecting the product from lifting or dulling, ensuring the mirror-like shine lasts until the next appointment.
7 Bold PROM NAIL TRENDS
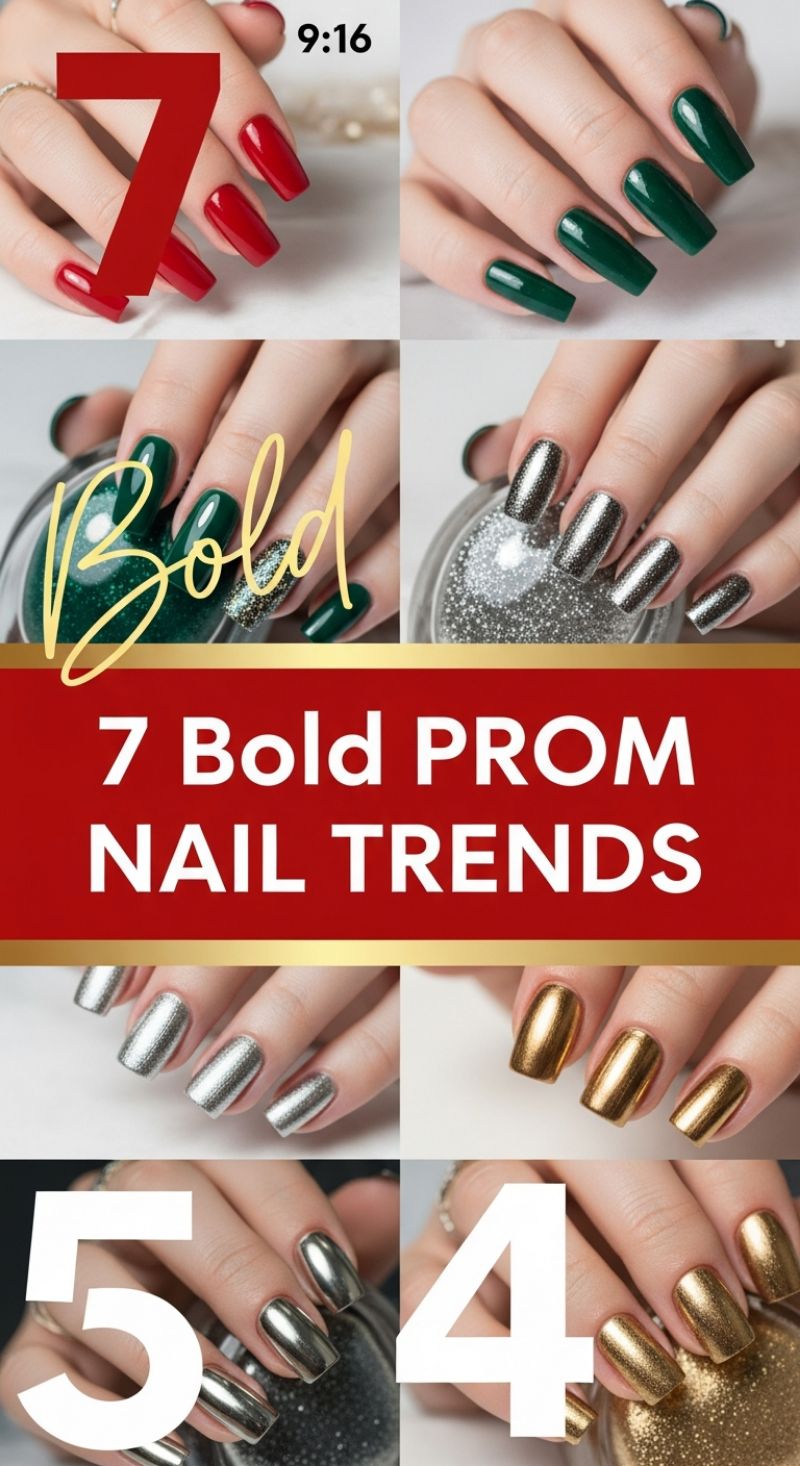
These seven trends zero in on high-impact, statement-making manicures perfect for an unforgettable night like prom, prioritizing saturated color, deep jewel tones, and highly reflective metallic finishes. To achieve the stunning depth seen in the classic red and deep emerald green looks, preparation is key. Start by shaping your nails into a uniform medium-length square or tapered coffin shape, as these silhouettes beautifully carry a bold color. For flawless coverage, apply two to three thin coats of your chosen polish, ensuring each coat is fully dry before the next. Expert tip: A non-wipe glossy top coat is essential for maximizing the ‘wet-look’ shine inherent in these classic colors. Alternatively, integrate a jewel-tone glitter or shimmery accent nail, as demonstrated with the dark green look, by applying a chunky iridescent topper over the base color before sealing it. This technique adds dimension and catches the light beautifully, maintaining the sophisticated feel while offering a playful twist.
The most dominant trend featured here is the rise of powerful, luminous metallics, ranging from gunmetal gray to brilliant gold and silver chrome. Achieving that mirror-like finish requires precision, often utilizing chrome powders rubbed directly into a cured, no-wipe gel topcoat for maximum reflection. If you prefer traditional lacquer, look for polishes specifically labeled “mirror” or “liquid metal,” which provide intense reflectivity, though typically less flawless than powder chrome. When choosing your metallic shade, consider the jewelry or hardware on your dress: warm golds complement rose gold or bronze accessories, while bright silver and charcoal metallics pair perfectly with platinum, silver, or cool-toned accents. Remember that these highly reflective polishes accentuate any unevenness, so invest time in buffing the nail plate smooth before application for a truly flawless, high-shine result that will stand up to close-up photos.
To ensure your bold prom manicure lasts all night long, start with a high-quality base coat to prevent staining and chipping. Given the intensity of these pigments, especially the deep reds and greens, a protective layer is non-negotiable. For maximal longevity, wrap the tips of your nails with both the color coats and the final top coat; this crucial step seals the free edge, significantly reducing wear and tear while you dance the night away. Whether you opt for the regal depth of ruby red or the futuristic flash of liquid silver chrome, these trends are designed to make your hands a sophisticated accessory, ensuring every selfie showcases your carefully curated prom look.
10 Simple V-Day Nails
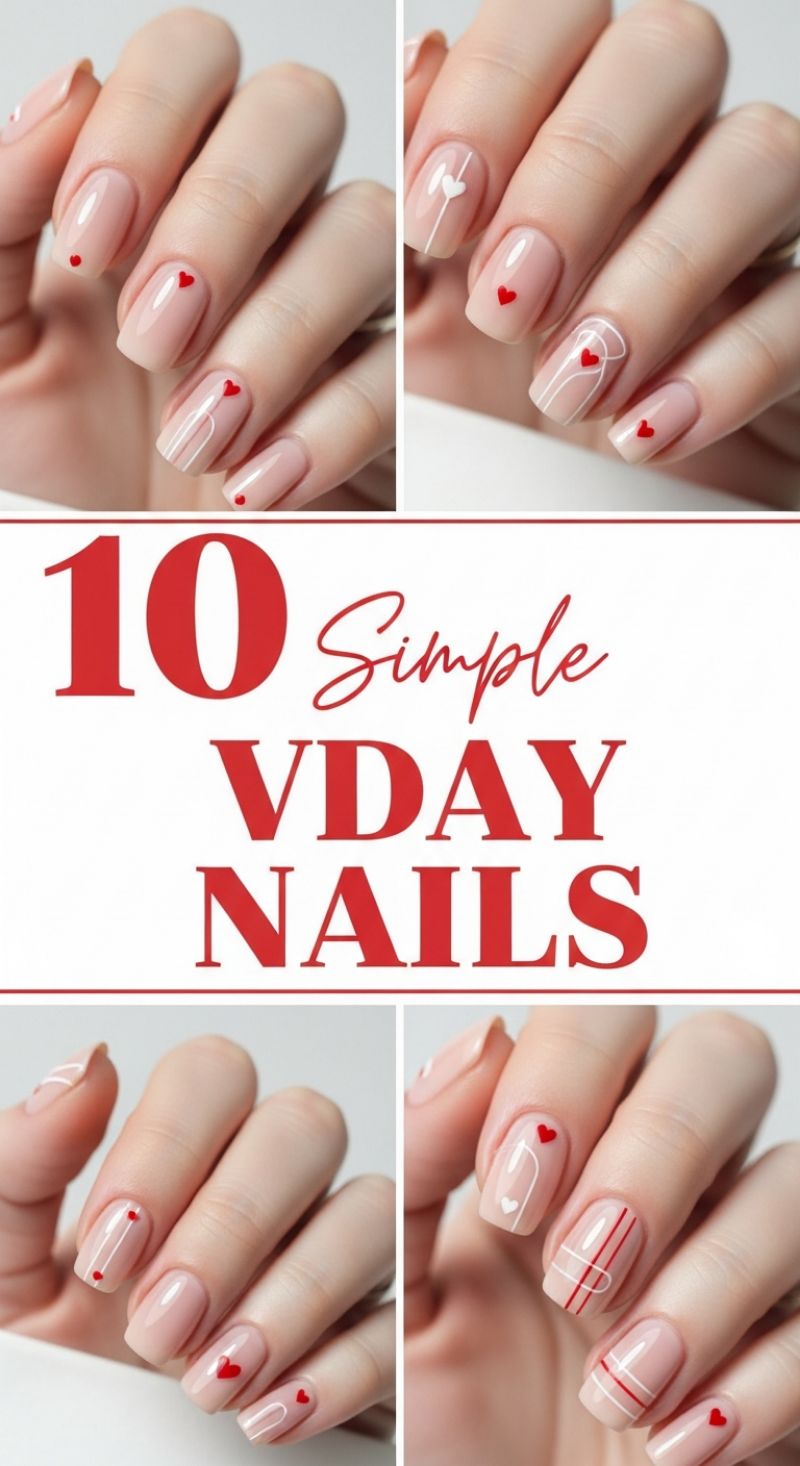
To achieve the coveted “10 Simple V-Day Nails” look, the foundation is absolutely crucial. Start with a carefully manicured nail bed and apply a sheer, milky pink or nude base coat. This translucent canvas elevates the simple designs, making them appear sophisticated rather than juvenile. For professional results, apply two thin coats of your preferred nude shade, ensuring full cure between layers if using gel polish. The key to this trend is utilizing negative space, allowing the natural nail color to peek through and keep the overall aesthetic airy and clean. This light base provides the perfect contrast for the delicate red and white accents, ensuring the minimalist line work stands out without overwhelming the overall appearance.
The beauty of these designs lies in their deliberate minimalism, achieved through precise application of white and red lacquer. For the signature look featuring straight vertical lines, use a fine-tipped striping brush. Dip the brush lightly into opaque white or red polish and draw a single, continuous line down the center or slightly off-center of the nail plate. For the playful abstract swirls (as seen in the top right image), load your brush minimally and create free-form, organic curves that interact gently with the edges of the nail. The tiny hearts, which serve as the primary V-Day accent, should be applied strategically using a small dotting tool. Start with two adjacent dots and gently drag the tool down and inward to form the point of the heart shape, keeping the size uniform and miniature for maximum elegance and restraint.
An expert trick for maintaining symmetry in this mixed-design approach is to limit the complex designs to two or three nails per hand, balancing them out with a single, simple heart or dot on the remaining fingers. Notice how these examples cleverly utilize color contrast, pairing white hearts with red lines or solid red accents with white curves; this provides maximum visual interest without clutter. For instance, pair a solid white heart centered above a vertical line on one nail with a cluster of small red hearts on another. Once all designs are cured and perfectly dry, seal the look with a durable, high-shine top coat. This step is essential as it locks in the fine line work and prevents the delicate geometric patterns from chipping prematurely, ensuring your chic Valentine’s manicure lasts for weeks. This geometric, negative-space approach is universally flattering, working beautifully on short to medium squoval or almond nail shapes.
Dive into the Deep End: Mastering the Aquatic & Fluid Blue Nail Trend
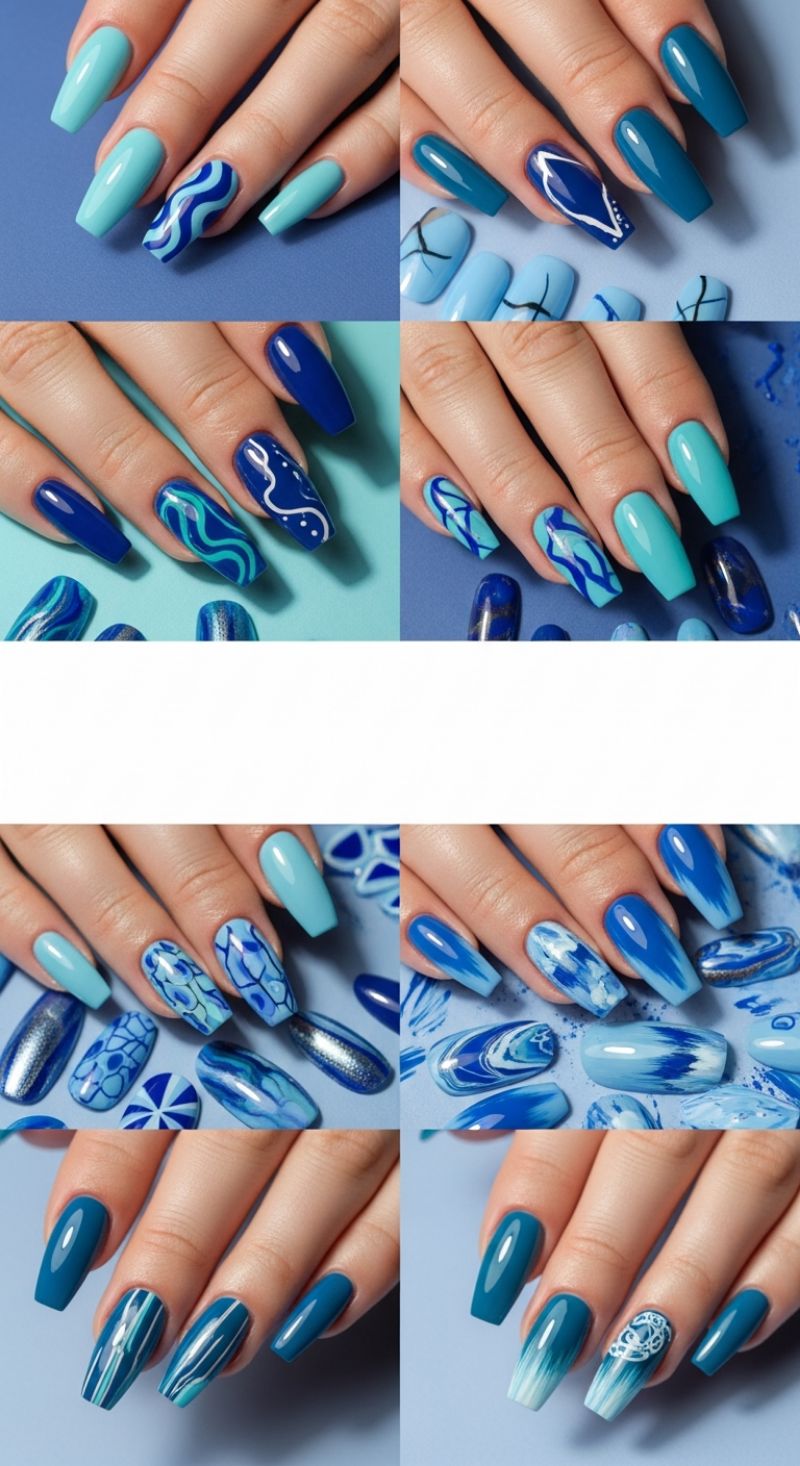
The ‘Fluid Blue’ trend transforms the nail bed into a mesmerizing seascape, utilizing a spectrum of cool tones—from deep sapphire and teal to bright turquoise and pale cerulean—to mimic the dynamic movement of water. To achieve the signature swirling, marbled looks seen here, you must master the ‘wet-on-wet’ technique, often aided by specialized blooming or marbleizing gels. Start by applying a base coat of your lightest shade. While this layer is still wet or tacky (if using blooming gel), strategically drop small amounts of two or three contrasting darker blues and white polish onto the nail surface. Before curing, gently drag a thin dotting tool or detail brush through the colors to create organic, overlapping swirls. For a truly professional finish, ensure that the colors maintain separation rather than blending into a muddy mess; this is achieved by using highly pigmented polishes and working quickly. The result should look like miniature, complex eddies and tides captured under a glossy top coat. For visual cohesion across both hands, try assigning the complex swirl pattern to the index and ring fingers, leaving the remaining nails in solid, high-gloss shades of the deepest teal or brightest turquoise from your palette.
Beyond the marbling, this trend also heavily relies on precise line work and sophisticated gradient application. For the sharp, clean wave patterns (like the royal blue and white designs), utilize an extra-fine striping brush and highly opaque polish. Dip the brush lightly and ensure it is almost completely dry to prevent bleeding. Steady your hand by bracing your elbow on a flat surface, and execute the curves or abstract squiggles in one fluid motion. Alternatively, if you prefer the smooth ombre look—fading from white tips into a deep blue base—the sponge technique is essential. Apply your chosen shades directly onto a cosmetic sponge, dab it lightly onto the nail surface, and repeat the process three to four times until the gradient is seamless and opaque. Expert tip: always apply a peel-off barrier around the cuticle before sponging to minimize cleanup and keep your finished look crisp.
Achieving the structural integrity of this trend requires attention to nail shape and final sealing. The long, tapered coffin or ballerina shape is the canvas of choice, as it maximizes the space for intricate liquid designs. Before applying any color, ensure the nail plate is perfectly prepped, buffed, and dehydrated, which is crucial for maximizing adhesion, especially when layering multiple polishes or gels. Once the art is complete and cured, sealing the design is non-negotiable. Use a high-quality, non-wipe gel top coat to encapsulate the complex layers, which will not only enhance the gloss and depth of the blues but also provide a durable, chip-resistant shield, keeping your vibrant aquatic masterpiece looking fresh for weeks.
7 Hot Pink & Red Nail Designs: The Ultimate V-Day Combination
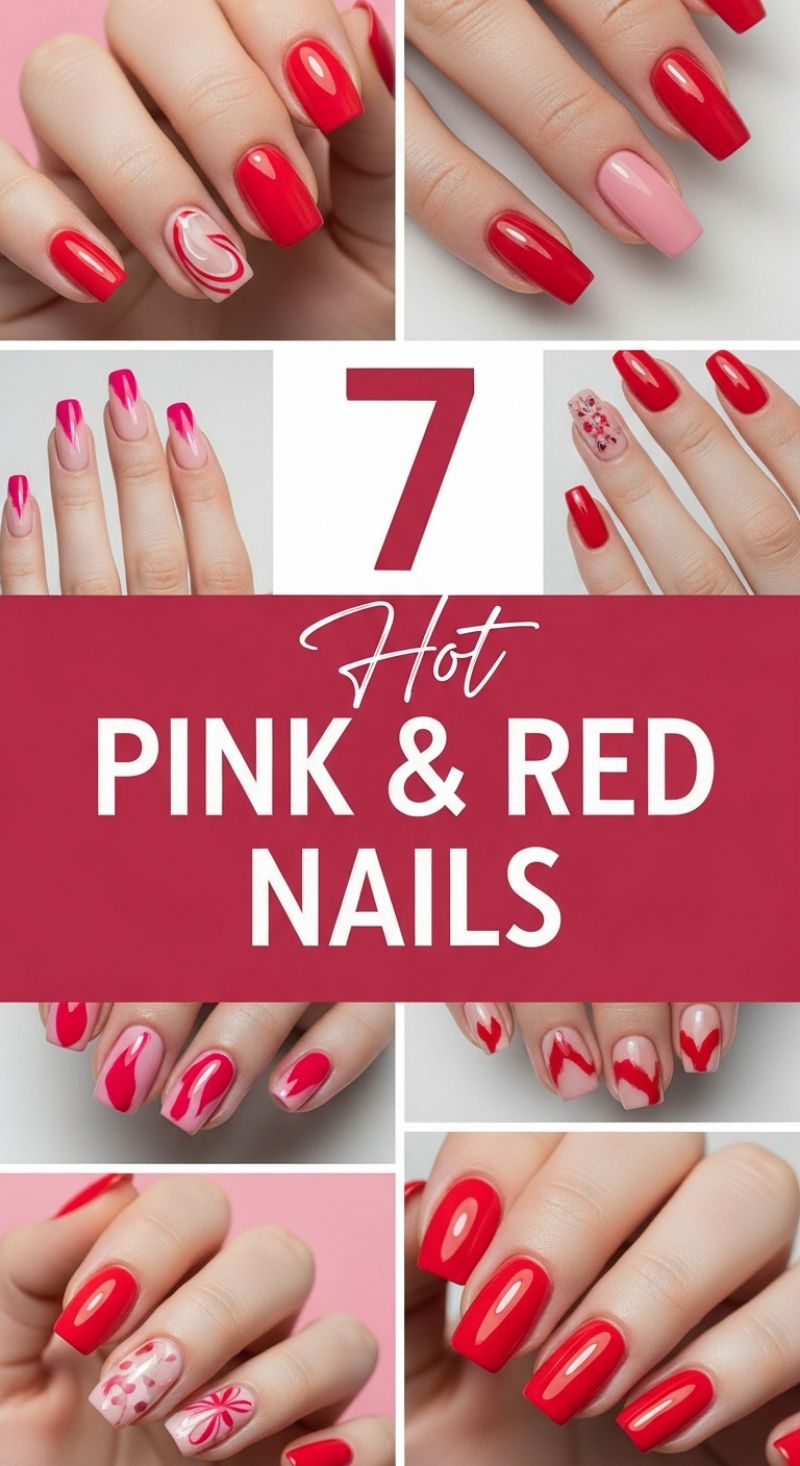
The dynamic duo of hot pink and classic red polish is a timeless choice, especially when celebrating themes of love or simply desiring a bold, attention-grabbing manicure. To master these looks, begin by selecting high-quality polishes; you’ll need a vibrant, true red (opaque in 1-2 coats), a rich fuchsia or hot pink, and a creamy, neutral nude or pale pink for the base of your accent nails. Start with the simpler designs featured, such as the classic solid red manicure, or integrate a single pale pink accent nail to break up the intensity—this variation is incredibly chic and easy to execute. Alternatively, the updated V-French tip design uses a clear or nude base with a sharply defined pink or red ‘V’ shape applied to the tip. This popular variation demands a steady hand and a thin striping brush to ensure symmetry and precision across all nails, creating a modern twist on a classic technique before sealing with a high-shine topcoat.
Elevate your pink and red manicure by incorporating abstract art techniques, such as the swirling patterns and stylized, wavy designs pictured. These looks rely heavily on negative space provided by a nude or clear base coat. For the heart-like swirls, apply a medium-density nude base and cure completely. Next, use a fine liner brush dipped in contrasting red and pink polishes to create overlapping, meandering lines, allowing the colors to slightly merge for a fluid, painterly effect before curing the art layer. For the dramatic, abstract ‘wave’ or ‘blob’ design—often called a ‘fluid’ manicure—paint an organic shape of one color (e.g., pink) directly onto the nude base, then quickly paint an abstract outline or inner shape of the contrasting color (red) before curing. This technique is highly adaptable, encouraging slight inconsistencies for a truly unique, artistic finish that appears spontaneous and contemporary.
For those seeking more intricate accent nails, mastering the tiny heart or floral/geometric patterns requires precision tools. Use a fine dotting tool or the very tip of a thin brush to apply small, clustered hearts in red and pink against a neutral background; spacing and grouping the hearts irregularly adds depth. The complexity of the floral or starburst designs demands patience; if using gel, sketch the pattern lightly in white polish first to refine the shape, then meticulously fill and outline with your primary red and pink shades. Expert tip: always ensure your base coat is fully cured before applying any art to prevent colors from blurring or bleeding into one another. To extend the wear time of these vibrant, demanding designs, always “cap the free edge” with every coat—base, color, and top coat. Finally, finishing with either a high-gloss top coat to enhance the fiery saturation of the red, or a soft matte finish for a velvety, contemporary look, will perfect your intricate, love-themed manicure.
Regal Mardi Gras Mania: Mastering Purple, Green, and Gold Chrome
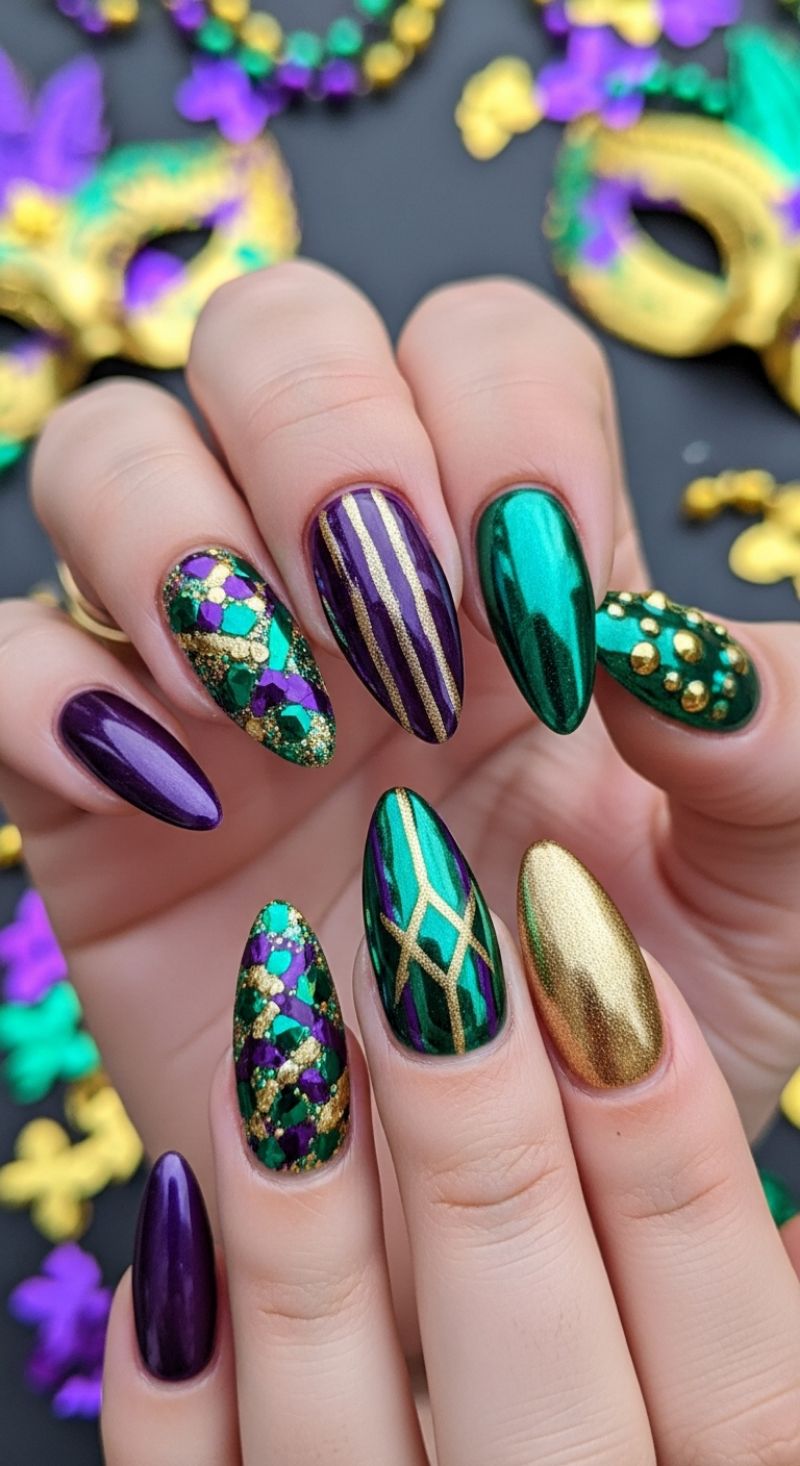
This opulent nail design is the ultimate expression of Carnival spirit, utilizing the traditional Mardi Gras colors—deep metallic purple (Justice), vibrant emerald green (Faith), and reflective gold (Power)—to create a cohesive yet diverse set of statement nails. Achieving this high-impact, reflective finish requires specialized products, primarily high-quality chrome powder and metallic gel polishes. Start by prepping the nails into a sharp almond or stiletto shape, which best showcases the length and angularity of the geometric patterns. The key to successful chrome application is ensuring a smooth base color (either purple or green) and curing it completely before applying a non-wipe top coat. Once the top coat is partially cured (still slightly tacky but firm), use a silicone applicator or sponge to rub the chrome powder into the surface until a true mirror finish is achieved. This foundation allows the complex detailing and bold striping work to truly pop.
The design features several distinct techniques that should be balanced across the ten nails. For the striped nails, apply the deep purple chrome base first. To create crisp, vertical lines, use fine gold striping tape placed before the final top coat cure, or, for an even flatter finish, use a highly pigmented gold liner gel to hand-paint the lines over the cured purple chrome. For the geometric green design, utilize the same technique, creating diagonal and cross-hatch patterns that mimic vintage masquerade motifs. The contrasting texture is introduced through the confetti nail, a highly textured design built using a clear builder gel to embed large flakes or shards of purple, green, and gold foil/glitter. This method ensures the glitter pieces are fully encapsulated, creating a multi-dimensional mosaic effect that catches the light from every angle.
To complete the full look, integrate solid metallic nails (such as the index finger’s solid gold chrome and the pinky’s solid purple chrome) to give the eye a resting point between the more intricate designs. The final detail involves embellishments, seen here on the green chrome nail decorated with small gold caviar beads or flatback rhinestones near the cuticle area. For these 3D elements, use a strong jewelry resin or specialized nail glue, placing the studs carefully with a dotting tool. Expert tip: Due to the varying textures (smooth chrome, raised glitter, raised studs), you must use two layers of a durable, glossy top coat to seal everything. Apply a thin layer carefully around the studs and over the chrome designs, avoiding coating the chunky glitter too heavily, which can dull its sparkle. Cure completely to ensure longevity and maximum brilliance.
10 Dreamy LONG VDAY NAILS
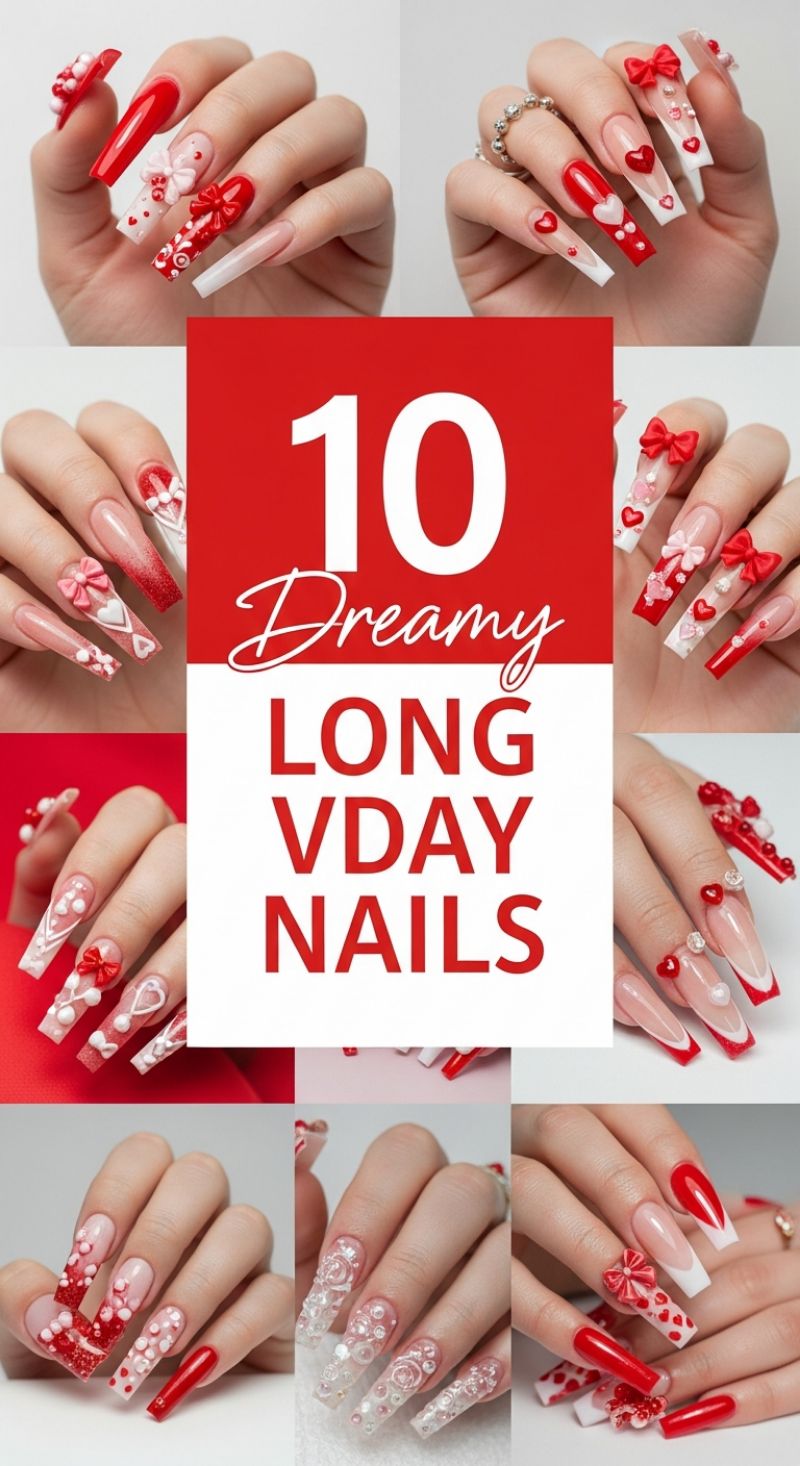
The ‘Dreamy V-Day Nails’ trend elevates classic Valentine’s manicures from simple hearts to maximalist, sculptural artistry, perfectly suited for the long, bold canvas of a coffin or square nail shape. To replicate this viral look, start by establishing a core color trinity: rich, highly pigmented red, stark white for detailing and French tips, and a sheer nude or milky pink base to elongate the nail bed. The foundation often utilizes structured base products, like builder gel or dip powder, necessary to support the extreme length and the weight of the subsequent 3D embellishments. Focus on creating varied textures across the hands—some nails should feature a classic sharp French tip (often executed with a dramatic ‘V’ shape at the cuticle line), while others are fully coated in deep red cream polish or a vibrant red glitter polish. For the more intricate ombre nails, blend a sheer nude down to a concentrated red glitter at the tip, ensuring a smooth, airbrushed transition that adds depth before any charms are applied. Consistency in the base color and the precise geometry of the French tips are paramount to achieving a professional, high-end result that contrasts beautifully with the romantic chaos of the 3D art.
Mastering the dimensional elements is the key to unlocking this aesthetic. The defining characteristics are the prominent 3D resin bows (usually in vivid red or soft pink) and scattered multi-sized pearls and hearts. For application, first identify your accent nails—typically the ring and middle fingers. Using a thick, highly adhesive gel or specialized nail glue, secure the largest centerpiece charm (the bow or large structured heart) and cure it fully. Next, utilize sculpting gel or thick art gel to create smaller, white, raised details such as hearts, swirls, or embossed flowers, curing each layer to maintain crisp definition. The final step involves strategically applying flat-back pearls and micro-beads, varying the sizes to create a dense, cascading effect that frames the central charms. Expert advice for longevity dictates using a fine-tipped brush dipped in adhesive to secure the underside edges of the larger charms, ensuring zero gap between the element and the nail surface, thus preventing snagging and premature loss of the design.
To ensure the final manicure remains chic and wearable despite its complexity, balancing the heavy 3D nails with simpler, polished surfaces is crucial. For example, if the middle finger is covered in 3D pearls and a large bow, the neighboring pointer finger should be a solid, immaculate high-shine red or a perfectly clean French tip. Pay close attention to the hearts—they appear not just as charms but also as delicate outlines painted in white, or as inverted hearts defining the French tip line. For the finishing touch, apply a high-gloss top coat to all nails, but take care to only apply a matte or velvet top coat directly surrounding the 3D charms. This technique enhances the contrast between the shiny backdrop and the sculptural elements, while the non-tacky finish around the gems helps prevent lint and dust from adhering to the intricate crevices, keeping your dreamy V-Day look flawlessly glamorous for weeks.
6 Charming Hello Kitty Nails
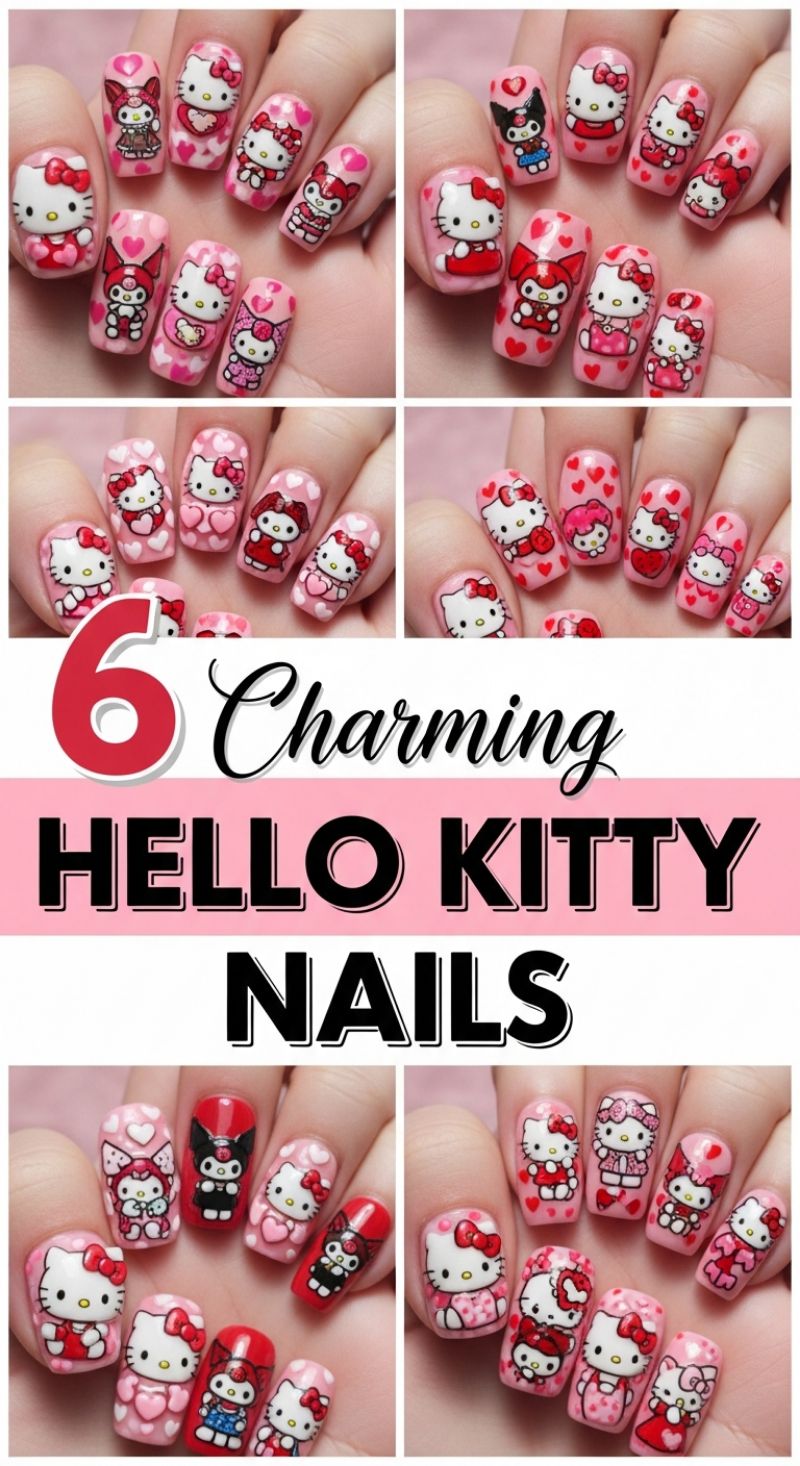
The enduring charm of Hello Kitty transcends generations, making these Sanrio-inspired nails a continuously viral trend, especially for those seeking a playful and sweet aesthetic. The image showcases six distinct variations, all centering around a harmonious palette of baby pink, deep magenta, and crisp white, often accented with classic red bows and black details (like Kuromi). These designs expertly blend full-coverage character portraits with subtle, romantic elements like floating heart patterns and polka dots, proving that themed nails can be sophisticated yet undeniably cute. The aesthetic is heavily geared towards romance and sweetness, making it a perfect fit for Valentine’s Day or even a whimsical prom look, offering a delightful pop of personality without sacrificing chic style. Notice how the designs utilize varying textures, with some characters appearing slightly raised or sculpted for a premium, three-dimensional effect.
Recreating these elaborate Hello Kitty designs requires precision and patience, especially for the intricate details. For the base, start with a vibrant bubblegum or sheer milky pink polish. The character designs can be achieved in two main ways: using high-quality nail stickers or decals for quick application, or detailed hand-painting for a truly custom and often dimensional finish. If opting for hand-painting, use highly pigmented gel polish and ultra-fine detail brushes (000 size). Begin by blocking out the pure white oval head, followed by the ears, and then meticulously adding the tiny black eyes, yellow nose, and signature red or pink bow. A crucial element in replicating these professional looks is incorporating dimension; use a thick sculpting gel or clear builder gel to outline or slightly raise the characters and decorative hearts, giving them a slight 3D “pop” that is characteristic of professional Korean and Japanese nail art styles.
To ensure your Charming Hello Kitty nails look sharp and last, proper sealing is crucial. Because of the intricate layers and potential 3D elements, apply two thin layers of a high-quality, glossy, non-wipe topcoat, making sure you fully wrap the free edge of the nail and seal around the base of any dimensional elements. Expert advice suggests varying the character placements across your hands; dedicate the largest nail (thumb or middle finger) to a main character pose, and use the remaining nails for coordinating patterns or supporting characters (such as My Melody or Kuromi). For a modern update, consider swapping the traditional glossy finish for a velvety matte topcoat on the background sections, allowing the sculpted, glossy characters to truly stand out. This juxtaposition elevates the look from simple cartoon art to high-fashion nail couture, perfect for any major event.
5 Perfect DIP NAIL SECRETS
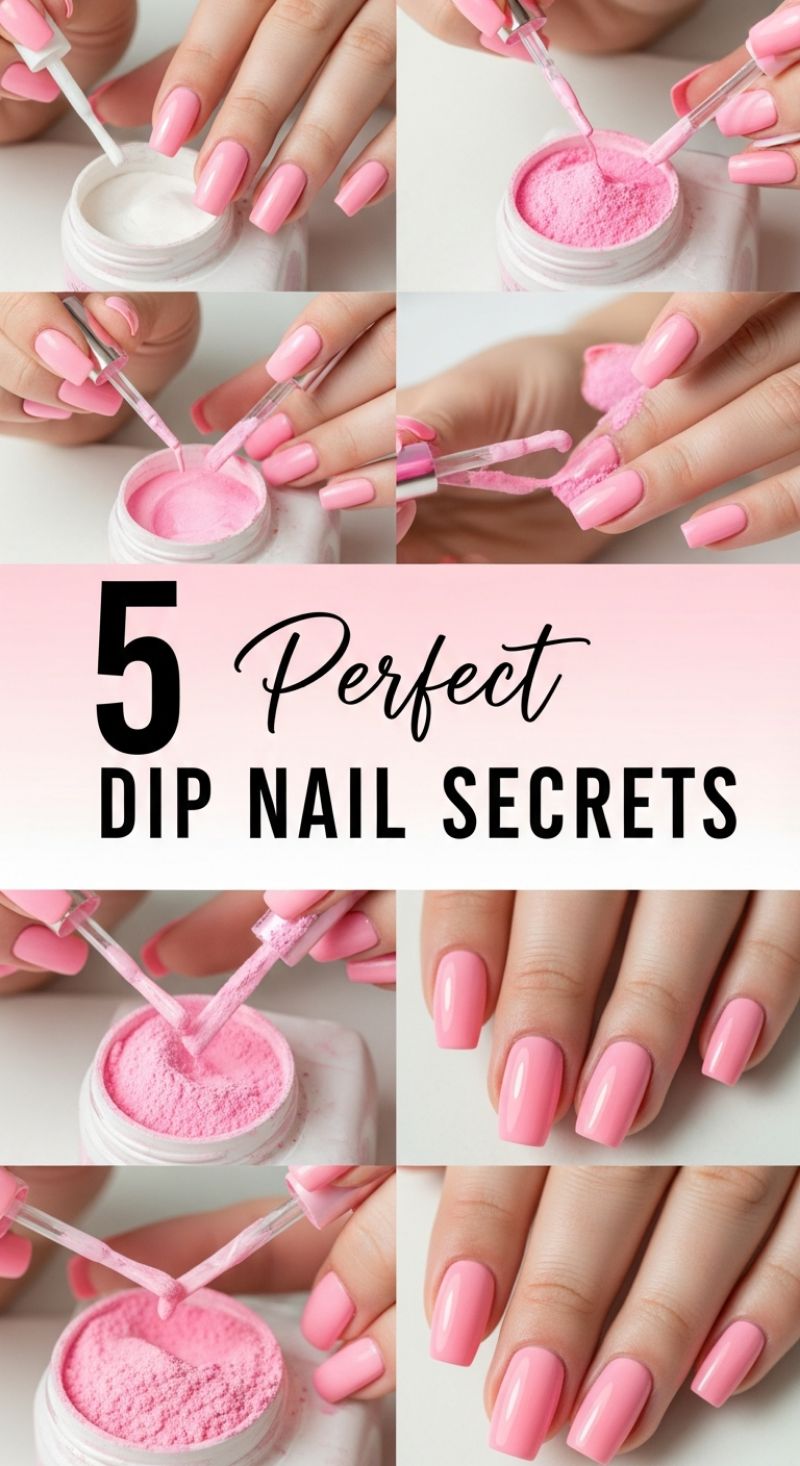
Achieving the pristine, high-gloss finish of dip powder nails—as showcased by the vibrant pink set in the visuals—requires precision and knowledge of key application secrets. The foundation of a perfect dip manicure lies in impeccable preparation, starting with the first coat shown in the top left panel (the white jar). Before touching the nail with any product, ensure the nail plate is clean, dry, and lightly buffed to eliminate natural oils and create mechanical grip. When applying the initial base liquid (the bonding agent), keep the layer thin and carefully float the brush over the nail, maintaining a slight margin around the cuticle area. This is the ultimate secret to preventing the thick, unnatural ridge near the skin that often leads to premature lifting. The goal is to build strength in the center and tip, not bulk at the edges.
The image collage heavily features the application of the colored powder—in this case, a bright, bubblegum pink. Once the base coat is applied, the nail must be immediately dipped into the powder or dusted/poured over, which is a technique often favored by professionals to keep the powder jar sanitary (as seen in the lower left panels). For uniform coverage and maximum strength, you will typically need two to three layers of color powder. For the first layer, dip only three-quarters of the nail bed, leaving space near the cuticle. For the second layer, dip the entire nail. This staggering technique ensures the apex (the high point of the nail) is correctly built up, giving the nails their gorgeous, durable curve and preventing a flat, weak appearance. Always ensure you thoroughly dust off all excess powder between coats, using a stiff, clean brush, before applying the next layer of liquid sealant or activator.
The final ‘secret’ to achieving the smooth, flawless look of the finished nails pictured on the right is in the activation and sealing process. After the final layer of powder is applied and dusted, the activator liquid is critical; it cures the powder instantly, transforming it from a fine dust into the hard, acrylic-like finish. Once dry, the nails must be buffed and filed to perfect the shape and smooth out any bumps. This shaping step is non-negotiable for that professional, sleek aesthetic. Finally, apply a non-wipe dip top coat, ensuring you ‘cap the free edge’ (brushing the top coat along the very tip of the nail). Capping the edge seals all the layers together, protecting them from chips and water exposure, guaranteeing that your perfect pink dip set lasts for weeks with stunning shine and minimal wear.
7 Stunning Heart Nail Looks
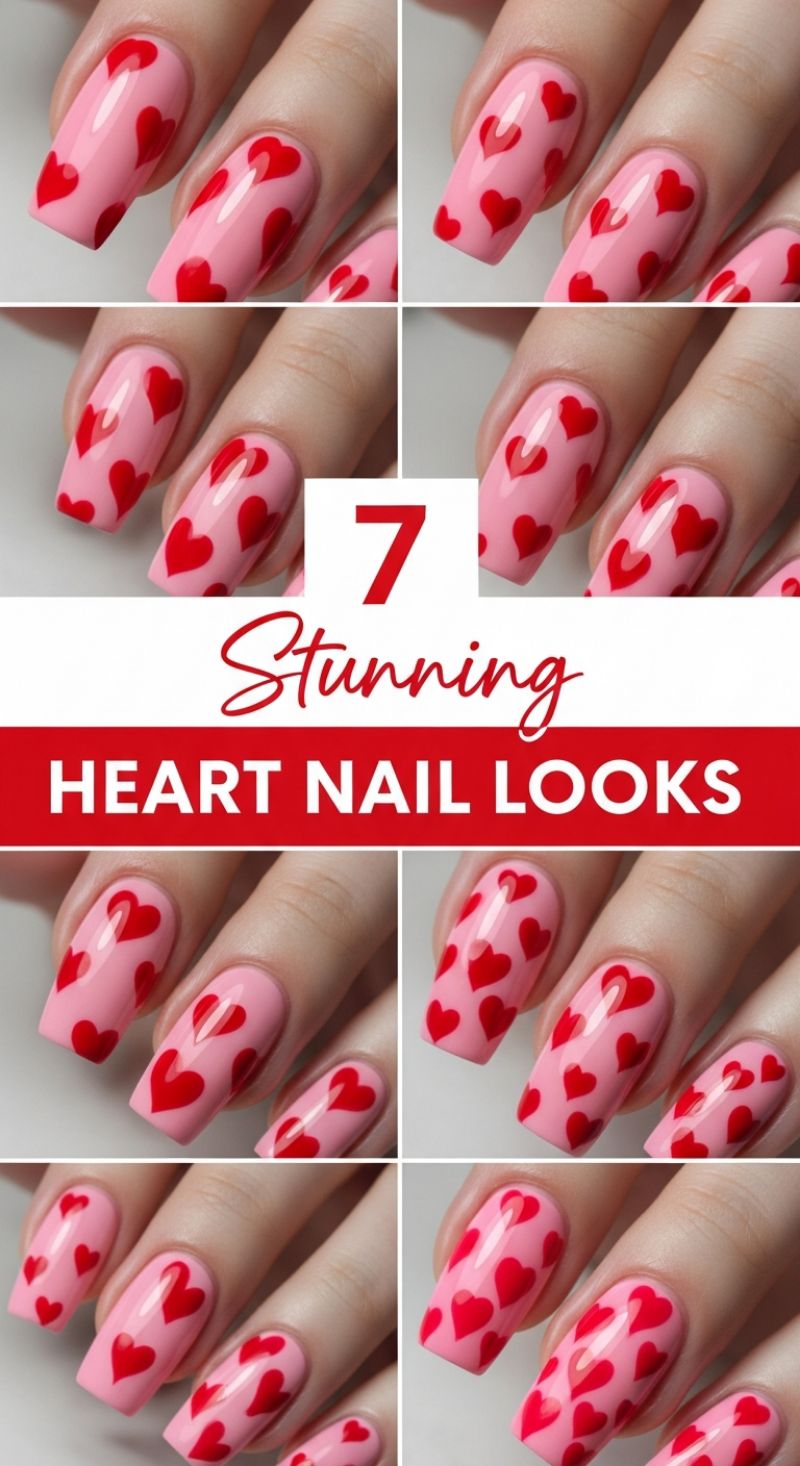
This iconic, feminine design captures the essence of romance and playful elegance, making it a perfect staple for Valentine’s Day, date nights, or simply celebrating love year-round. To achieve this viral look—characterized by a soft pink base and vibrant red scattered hearts—start by ensuring your nails are perfectly shaped (the coffin or squoval shape shown provides an excellent canvas). Apply a smooth layer of protective base coat, followed by two thin, opaque coats of a milky pink or bubblegum lacquer. The key to a professional finish is patience; allow each layer of pink polish ample time to fully dry before moving on to the intricate heart detailing. For materials, you’ll need a highly pigmented, true red polish and a fine-tipped detail brush or a dual-ended dotting tool, which offers superior control for creating uniform shapes.
The technique for painting these tiny, glossy hearts is simpler than it looks, relying heavily on precision placement rather than complicated freehand drawing. Dip your dotting tool (or the tip of your detail brush) into the red polish and create two small, adjacent dots slightly angled toward the center of the nail. While the polish is still wet, use the detail brush to gently pull the polish down from the bottom edge of the two dots, meeting in a delicate V shape to form the bottom point of the heart. Vary the size and placement of the hearts across each nail—some fully visible, others partially cut off by the nail edges—to achieve that trendy, scattered, wallpaper-like effect seen in the images. This randomness adds dynamic interest and prevents the design from looking too stiff or manufactured.
Once all your hearts are flawlessly placed and completely dry—a crucial step to prevent smearing—seal the entire masterpiece with a generous layer of high-shine top coat. Expert Tip: For maximum contrast and longevity, choose a cream-finish red polish; glitter or metallic finishes can sometimes look messy when attempting small details. If you struggle with freehand, consider using a heart-shaped vinyl stencil for the first few attempts, though the charm of this specific look lies in the slightly imperfect, hand-painted feel. This design is incredibly versatile; you can swap out the classic red for deeper burgundies, brilliant whites, or even neon hues for a modern twist, but the soft pink and classic red combination remains the undisputed champion of romantic nail art trends.
10 Darling Short V-Day Nails: The Ultimate French Tip Heart Collection
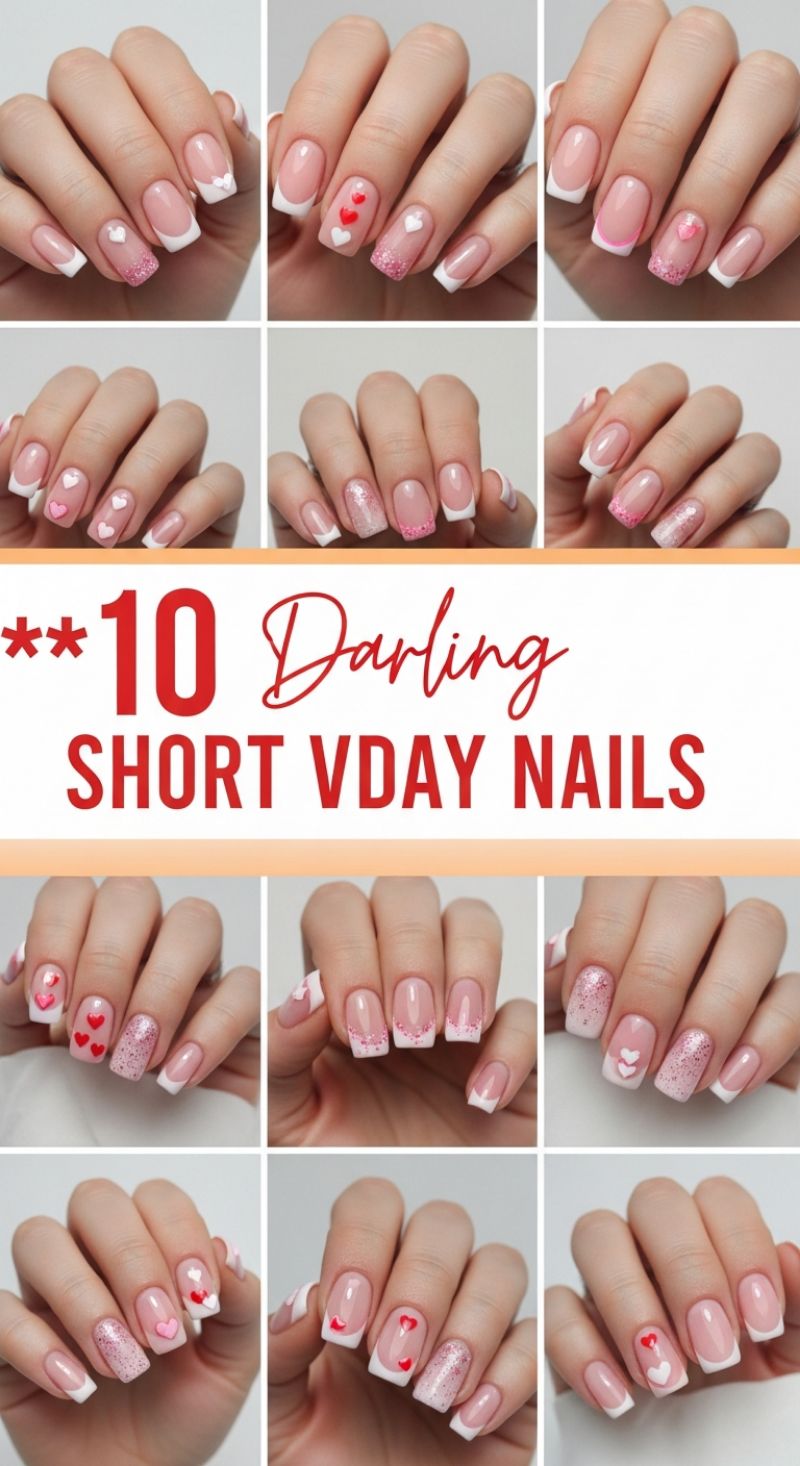
These lovely designs prove that short nails are perfectly suited for complex, detailed nail art, especially when leveraging the universally chic aesthetic of the French manicure. The core technique involves a natural, milky-pink or nude base coat followed by a crisp white tip. The true artistry comes from integrating Valentine’s Day elements—hearts and subtle shimmer—into this classic foundation. For precise application, ensure your white tip, or ‘smile line,’ is perfectly symmetrical and clean; using a thin striping brush dipped in highly pigmented white polish will help define the shape, even on a short, squoval edge. The heart elements themselves are varied, ranging from tiny, minimalist red or pink heart accents placed near the cuticle or tip, to larger 3D-effect white or blush pink hearts sculpted out of builder gel for an elevated, dimensional look. When planning your set, follow the example shown here by balancing plain French tips with one or two detailed accent nails to keep the overall look cohesive yet dynamic.
To achieve the popular gradient effect seen in several of these examples, you will need a fine-milled pink or iridescent glitter polish. This is typically applied using an ombré or blending technique, starting heavily at the white tip line and gently dusting downwards toward the center of the nail bed. For a softer look, apply a small amount of glitter polish to a cosmetic sponge and lightly dab the polish onto the desired area, allowing the concentration of glitter to naturally decrease as you move away from the tip. Alternatively, some designs feature a solid glitter coating on accent nails, providing a vibrant contrast to the sheer base. Expert advice for maximum sparkle longevity: use a fine glitter encapsulated in a clear or pale pink builder gel over the base coat before applying your final top coat. This technique ensures the glitter remains smooth and prevents the texture from catching or flaking prematurely.
Mastering these short V-Day looks relies heavily on precision tool usage and proper finishing. For hand-painted hearts, utilize a dual-sided dotting tool; the smaller end is perfect for creating miniature hearts (two dots placed close together, then dragged slightly down to meet at a point), while the larger end can be used for solid circular placements. If hand-painting seems daunting, high-quality vinyl decals or stickers are a fantastic shortcut for achieving perfect symmetry. Because short nails are prone to breakage or chipping if not properly sealed, always finish your detailed artwork with a high-shine, durable gel top coat. Ensure the top coat fully wraps around the free edge of the nail—a crucial step known as ‘capping the edge’—to lock the design in place, providing necessary structural support and guaranteeing your darling V-Day manicure lasts well beyond February 14th.
7 Sparkly Barbie Pink Nails
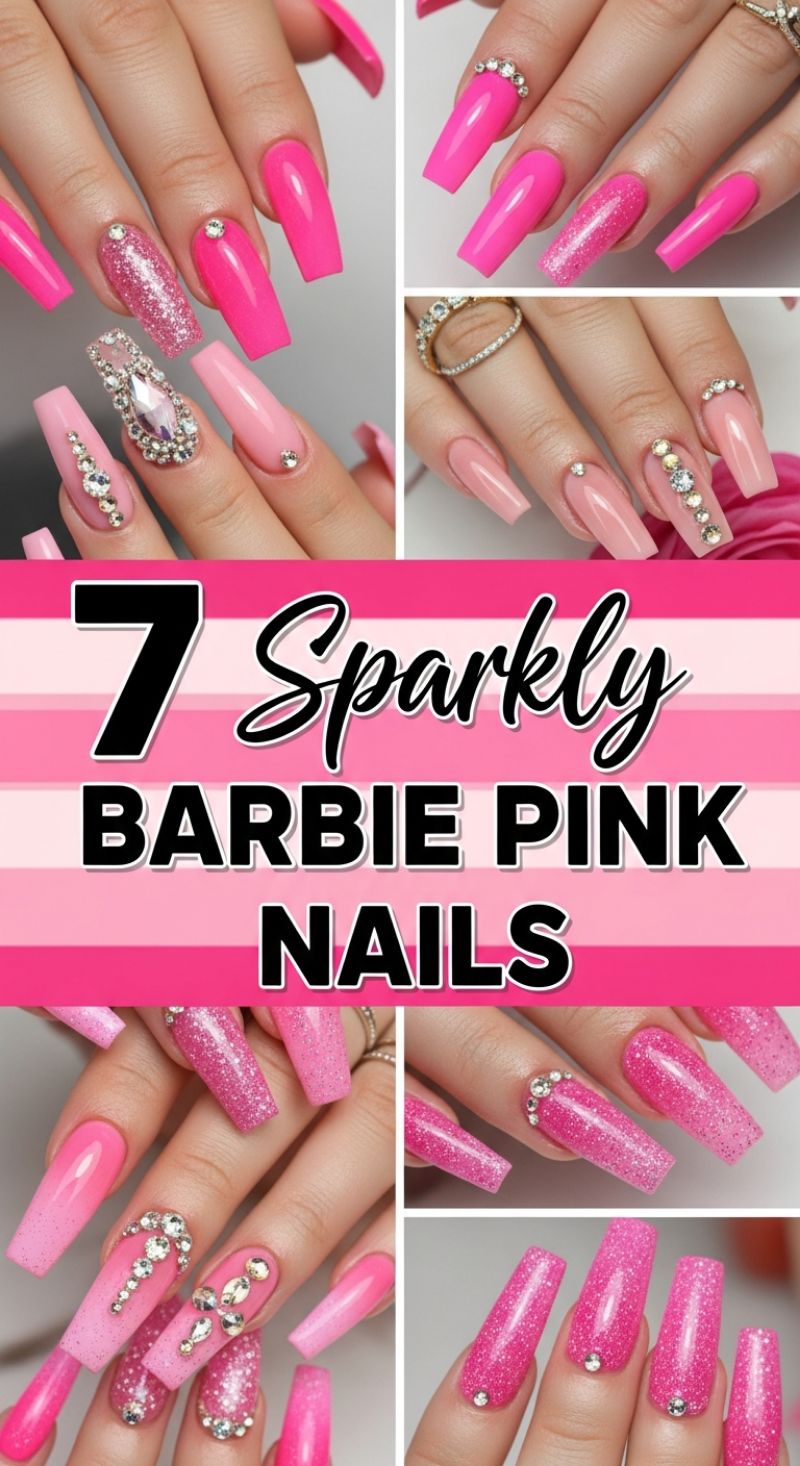
The ‘Barbiecore’ aesthetic demands drama, and nothing delivers it quite like these ultra-long, heavily embellished pink nails. To replicate this viral trend, start by selecting the perfect canvas: long coffin or tapered square shapes are essential, as they provide maximum surface area for the intricate gemstone work and allow the gradient effects to shine. The color palette requires a duality, combining highly pigmented, solid neon fuchsia or true Barbie pink for maximum impact, alongside softer, pale baby pink or nude tones. For a professional finish, ensure that the solid color nails (often the thumb, middle, and pinky) receive at least two highly opaque coats, cured perfectly straight to a glossy, mirror-like sheen. This foundational contrast—bold solid color against a softer, embellished base—is the secret sauce that elevates this look from simple pink nails to a glamorous, photogenic statement perfect for a bold prom look or a high-fashion summer event.
Achieving the signature sparkle involves a strategic combination of glitter polish and 3D embellishments. For the accent nails, consider applying a vibrant holographic or chunky-cut pink glitter polish, either full-coverage for a saturated look or blended downward from the cuticle into a subtle ombré. The most crucial step is the expert placement of rhinestones. For major crystal clusters (like the oversized teardrop formations seen on the ring finger), you must use a strong medium, such as a thick viscosity builder gel or dedicated rhinestone adhesive, rather than standard topcoat. Lay the base medium, gently press the largest centerpiece gem into place, and then strategically surround it with smaller crystals, working outward to create a dome-like, multidimensional effect. Once the placement is perfect, flash cure the design to lock the gems in place before applying a sealant topcoat around (but not directly over) the stones to maintain their brilliance.
For the remaining accent nails, utilize single, small studs placed near the cuticle, or line the base of the nail with a careful row of micro-beads for a subtle tiara effect. For added complexity, integrate a pink ombré effect on one or two nails, blending the vivid pink color from the cuticle line seamlessly into a shimmering pale pink tip before applying rhinestones down the center. The key to making this elaborate design look intentional, rather than cluttered, is balancing the intensity; let the glitter and gemstone nails be the indisputable focal point, while the solid nails provide structure. Finally, seal the entire manicure with a premium, non-wipe high-gloss topcoat. This ensures the neon pink maintains its electrifying vibrancy and protects the intricate work, guaranteeing longevity and maximum shine.
5 Fresh DUCK NAIL DESIGNS
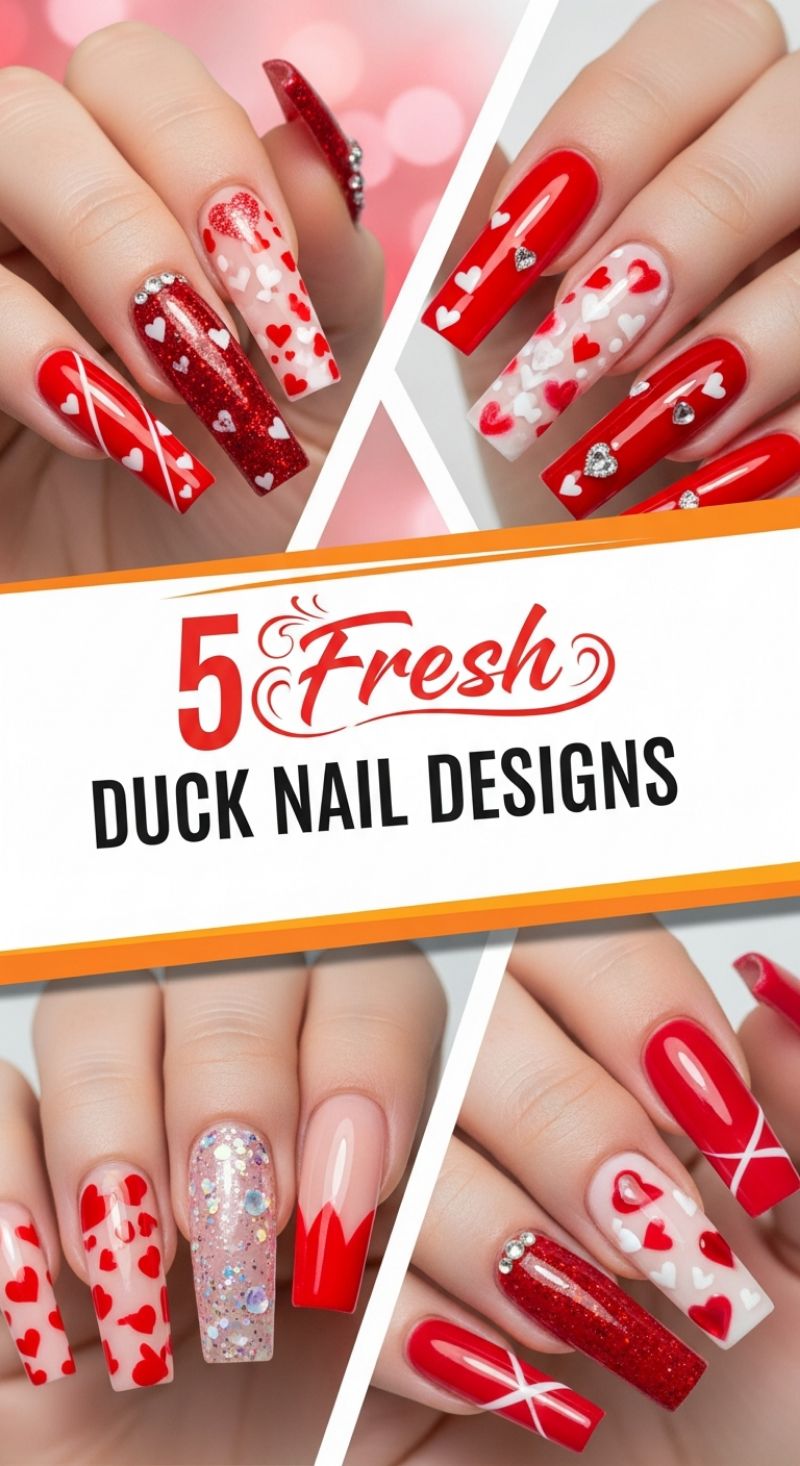
This visual compilation showcases an ultra-glam interpretation of Valentine’s Day nail art, featuring a striking contrast of cherry red and crisp white across long, sculpted coffin tips. The core of this look is variety, employing a multi-design approach where each nail acts as a unique canvas. Key elements include: sheer, milky-white bases overlaid with floating red and white heart decals or hand-painted art; solid, high-shine red accent nails, often finished with precise white linework (like the subtle X-pattern or sharp V-French tips); and full-coverage, hyper-reflective red glitter nails. This bold, multi-faceted design elevates the classic V-Day manicure from simple polish to high-fashion statement art, perfect for those seeking maximum visual impact and versatility in a strong, lengthy silhouette. This design proves that complex artistry doesn’t require uniform repetition.
To recreate the layered heart effect, begin by applying a sheer pink or nude base coat or builder gel. Once cured, use a fine dotting tool or a specialized detail brush to place hearts, alternating between opaque white and vibrant red gel polish. For the most depth and the signature floating effect, cure the white hearts first, apply a thin layer of clear top coat, and then add the red hearts on top before the final cure. This technique makes the hearts appear to float at different levels beneath the surface. Expert tip: ensure all lines are crisp; for the deep V-cut French tip seen on the ring finger, use striping tape to achieve a perfectly clean demarcation line between the nude base and the solid red tip. Alternatively, utilize high-quality vinyl stencils to ensure geometric precision on the crisscross patterns and heart shapes.
The longevity of this dramatic look relies heavily on proper application of accent materials. For the full glitter nail, choose a chunky holographic red glitter mixed into a clear gel, and fully encapsulate it with a strong top coat or a thin layer of clear acrylic to prevent shedding and dulling. Crucially, securing the dimensional embellishments—such as the heart-shaped rhinestones and the cuticle bands—requires more than just a standard topcoat. Use a small dab of thick, non-wipe builder gel (or specialized rhinestone adhesive) at the placement site, set the jewel firmly, and cure thoroughly. Always “frame” the base of larger stones with a detail brush and top coat, being careful not to coat the facet of the stone itself, which would diminish its sparkle. This meticulous reinforcement ensures the manicure remains flawless for weeks, even with such long, detailed extensions.
8 Amazing SUMMER NAILS
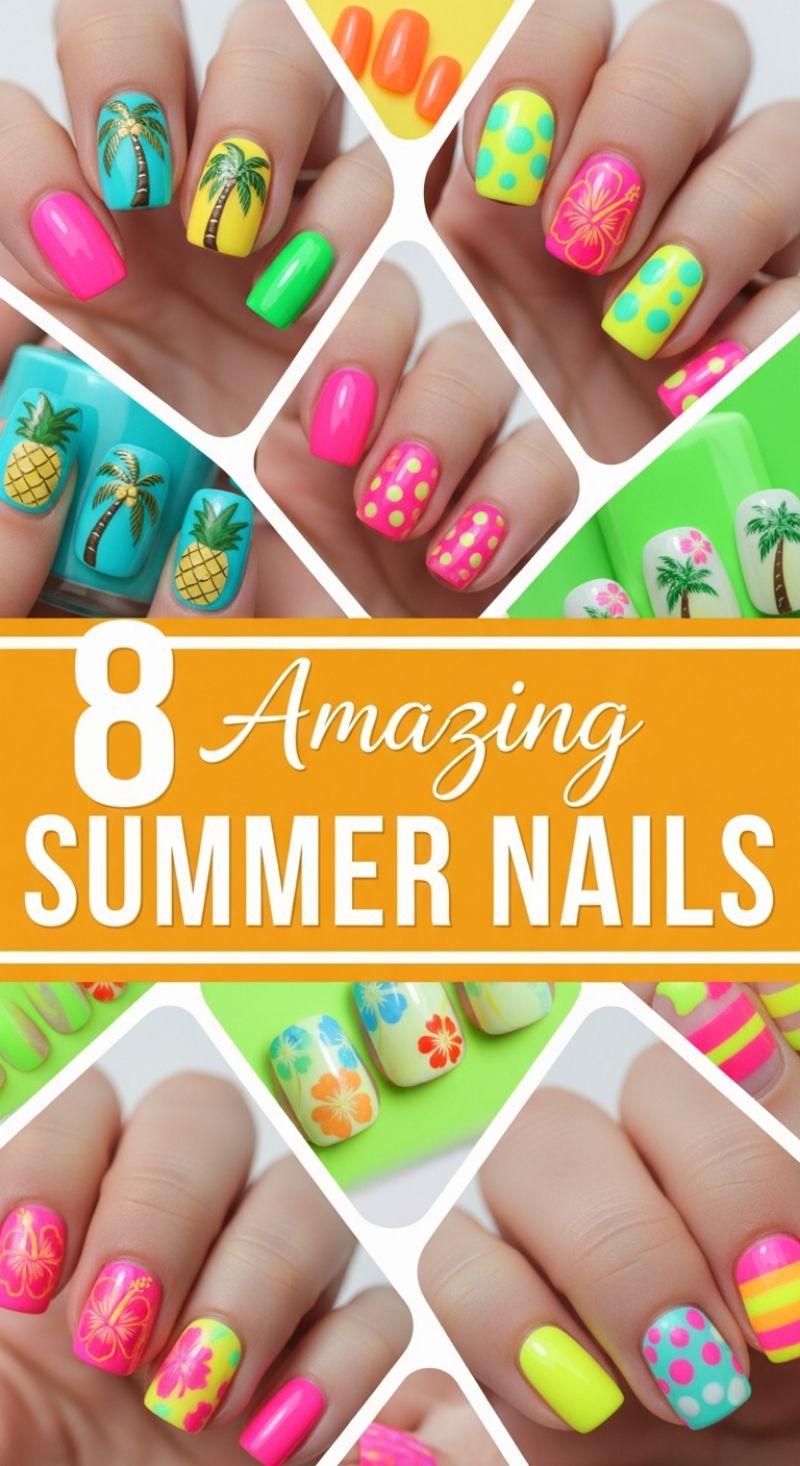
The “Amazing Summer Nails” compilation captures the essence of tropical vacation glamour using hyper-saturated, neon shades. This trend isn’t subtle; it’s all about maximum impact with electric pinks, blinding yellows, vibrant lime greens, and dazzling turquoises. To perfectly execute this look, the foundational key is achieving true color opacity and brightness. Expert Tip: Always begin with a layer of pure white polish cured underneath your neon shades. This prevents the neon pigment from sinking into the natural nail bed and ensures that colors like neon yellow or lime green pop with their intended intensity. Once your base is fully cured and flawlessly applied, you can move on to mixing solid accent nails (like the bright pink or neon green showcased) with more intricate, vacation-inspired artwork. The use of different shades of neon across adjacent fingers—such as neon yellow next to hot pink—maximizes the vibrant, energetic appeal inherent in this summer aesthetic.
To recreate the iconic tropical designs featured, such as the detailed palm trees and pineapples, you’ll need precision tools and patience. The palm trees, often set against a contrasting turquoise or bright yellow base, can be meticulously applied using fine detail brushes and brown and deep green polish. Start with the trunk, creating a slim, slightly curved line, and then use short, light strokes for the fronds. Alternatively, for speed and consistency, invest in a quality tropical-themed stamping plate—this method is highly recommended for achieving those perfectly symmetrical pineapples and clean hibiscus outlines shown in the collection. The polka dot design is the simplest and most essential accent nail for this trend. Select two high-contrast neon shades (e.g., hot pink base with lime green dots, or neon yellow with light blue dots) and use a simple dotting tool. Ensure the dots are evenly spaced and cured completely before applying the top coat to prevent any smudging or color bleeding, maintaining crisp lines.
nThis vibrant style thrives on the “more is more” philosophy, encouraging a mix-and-match approach where every nail serves as a vibrant canvas. Don’t feel restricted to just one design per hand; the ultimate summer nail look incorporates solids, dots, and tropical iconography across the fingers, as evidenced by the collage. For longevity and that perfect pool-side sheen, finish your entire manicure with two layers of high-gloss, UV-protectant top coat. This crucial step protects the intricate artwork and makes the neon colors appear even more dazzling under the sun. For a sophisticated variation, consider adding texture by isolating a few elements—such as the simple neon stripes—and applying a velvety matte top coat over just those nails, while leaving the rest glossy. This dynamic contrast elevates the playful neon trend to a highly dimensional, high-fashion statement perfect for any summer event.
7 Unique V-Day Nail Designs

This curated selection demonstrates how to elevate typical Valentine’s Day nail art beyond simple pink and glitter, focusing instead on modern abstract art, pattern mixing, and high-contrast color palettes. To achieve the sophisticated Abstract Flow design (top left), begin with a semi-sheer nude or beige base coat to provide a clean, contemporary canvas. Next, using a thin striping brush, map out fluid, interlocking shapes in opaque white, bold red, and true black. The key to this look is maintaining negative space and using a very fine liner brush to outline the shapes in black, giving them a graphic, comic-book quality. Expert advice for abstract manicures is to let the shapes be imperfect and organic—this intentional randomness is what gives the design its artistic merit. Ensure each color segment cures fully before applying the black detailing to prevent smudging and maintain sharp lines.
For a playful yet polished V-Day look, combine the classic Scattered Hearts design (top right and bottom left) with complex textural patterns. The scattered hearts are easily created using various sizes of dotting tools on a crisp white or bright red base. For the fun ‘dripping’ heart variation (bottom left), use a slightly thicker consistency red polish; after applying the main heart shape with a dotting tool, use a fine liner brush to gently pull the polish down from the point of the heart, mimicking a melted effect. To integrate sophistication, dedicate an accent nail (like the ring finger) to an intricate stamped design, such as a black-on-white damask or mandala pattern. This mix of whimsical hearts and elegant filigree elevates the overall manicure from sweet to chic.
Finally, if maximalist, high-impact style is your goal, embrace bold pattern clashing as seen in the bottom right quadrant. Here, we see a fusion of the popular ‘cow print’ trend—reimagined in red and white hearts—juxtaposed with graphic, floral line work and solid, glossy red nails. When mixing three or more distinct patterns, maintaining a consistent color scheme (red, black, and white/nude) is crucial for cohesion. For the heart-cow print, apply uneven, asymmetrical heart shapes onto a solid white base, ensuring the shapes are organically spaced. Finish this high-energy look with a durable, ultra-glossy top coat to give the intricate designs depth and shine. These seven designs offer blueprints for customizing your perfect Valentine’s look, proving that romantic nail art can be edgy and unique.