The ultimate guide featuring 60+ stunning nail art designs! Find inspiration for every season, mood, and holiday, from chic French tips and glittery pinks to bold grunge styles and DIY Valentine’s manis.
7 Must-Have FEBRUARY MANIS

February manicures call for a romantic, yet sophisticated palette, typically blending soft blushes, creamy whites, and delicate accents of shimmer or line art. To achieve this signature winter-to-spring transition look, begin by perfecting your base. The foundation of these designs relies heavily on the ‘Baby Boomer’ French style—a soft, subtle ombré fade from a sheer pink near the cuticle into a milky white tip. This gradient technique requires blending two colors while wet, often achieved with a sponge or a specialized ombré brush, ensuring no harsh lines. For designs requiring full coverage, alternate between a solid, opaque baby pink and a crisp, glossy white across different fingers to create visual balance. Expert advice for this aesthetic is to prioritize cuticle care; since many of these designs utilize sheer bases or negative space, a well-hydrated nail bed is essential for a polished, high-end finish. Always cure your base coat thoroughly before adding art to prevent color dragging.
The key to elevating these soft colors lies in strategic, minimalist nail art. Focus on accent nails, particularly the ring and middle fingers, to introduce complexity without overpowering the look. Popular designs include geometric inverted V-tips in crisp white over a nude base, creating a modern take on the French manicure. Utilize a fine-tipped striping brush (size 00 or 000) to execute delicate elements like thin white curves, abstract swirls, or single botanical stems in gold or white. If incorporating glitter, choose a fine, rose-gold or champagne sparkle and apply it sparingly. For a truly luxurious touch, concentrate the glitter at the tip and lightly fade it toward the center of the nail, or dedicate one nail entirely to a full coverage glitter to add textural contrast against the smooth pinks and whites. Precision is paramount; use acetone on an angled brush to clean up any lines for a professional, sharp edge.
To ensure your February manicure lasts and maintains its elegance, focus on structure and finishing. The rectangular or soft coffin shape seen in these designs complements the length and enhances the modern feel of the art. When applying the top coat, choose a high-shine formula unless you specifically want the matte texture featured on the soft pink solids; matte can beautifully contrast a glossy white art detail. For those who want to extend this look beyond Valentine’s Day, simply swap the blush pink for a sheer lilac or peach base while maintaining the white geometric art. Finally, always seal the free edge of the nail with your topcoat to prevent chipping, guaranteeing your romantic mani remains flawless for up to three weeks.
10 Hottest VALENTINES NAILS

These extravagant nail designs elevate the classic Valentine’s look by combining romantic, sheer pink bases with intensely detailed 3D crystal embellishments. To achieve this high-end aesthetic, start by preparing the nail bed and applying tips or sculpting extensions into a long, tapered square or coffin shape, as the length is essential for accommodating the large gems central to designs like “Ruby Radiance” and “Candy Heart Dreams.” For the base color, utilize a milky pink or soft translucent nude gel polish to give a delicate, clean foundation that contrasts beautifully with the rich red crystals. Cure the base color thoroughly, ensuring the structure is robust enough to handle the weight of the ornamentation. Expert tip: If you plan on adding a delicate layer of glitter or a subtle shimmer gradient (as seen in designs like “Sparkling Romance”), apply a very thin coat of clear builder gel over the cured color, dust with fine holographic or diamond dust powder, cure, and then wipe clean before beginning the 3D work.
The centerpiece of this trend is the precise application of oversized, faceted red rhinestones, primarily in heart and geometric diamond shapes. For large, heavy embellishments, do not rely solely on standard top coat; you must use a specialized, high-viscosity rhinestone adhesive gel or a thick builder gel. Apply a generous bead of this adhesive exactly where the main gem will sit. Carefully place the largest red heart or diamond stone using a wax pickup tool, pressing down gently to seat it firmly. Follow this by framing the large stone with smaller accent crystals, often in clear or AB finishes, creating a dazzling halo or ‘bezel’ effect which also helps secure the centerpiece. Ensure your design balances negative space—for instance, placing the heaviest cluster on the ring and middle fingers, and keeping the pinky or pointer finger simpler, perhaps with just a single large stone or a glitter French tip variation as seen in “Mysut Flarg.”
For maximum sparkle and longevity, precision in the finishing steps is critical. Once all the rhinestones are positioned, cure the adhesive gel completely, often requiring a full 60 to 90 seconds under a high-powered UV/LED lamp (48W or higher) due to the thickness of the gel. Next, using a fine detail brush dipped in non-wipe top coat, carefully seal all the surrounding base color and the edges of the gems, ensuring the top coat flows around the crystal base without pooling over the facets themselves—coating the top of the stones will dull their brilliance. This meticulous sealing process prevents snagging and lifting, which is common with heavy 3D art. For clients who want a slightly more wearable version of this trend, advise scaling down the size of the heart gems or utilizing flat-back metal heart decals instead of thick, faceted crystals. This technique guarantees a dazzling, highly durable set of nails ready for any romantic occasion.
5 Quick VDAY DIY: Charming Valentine’s Day Nail Art
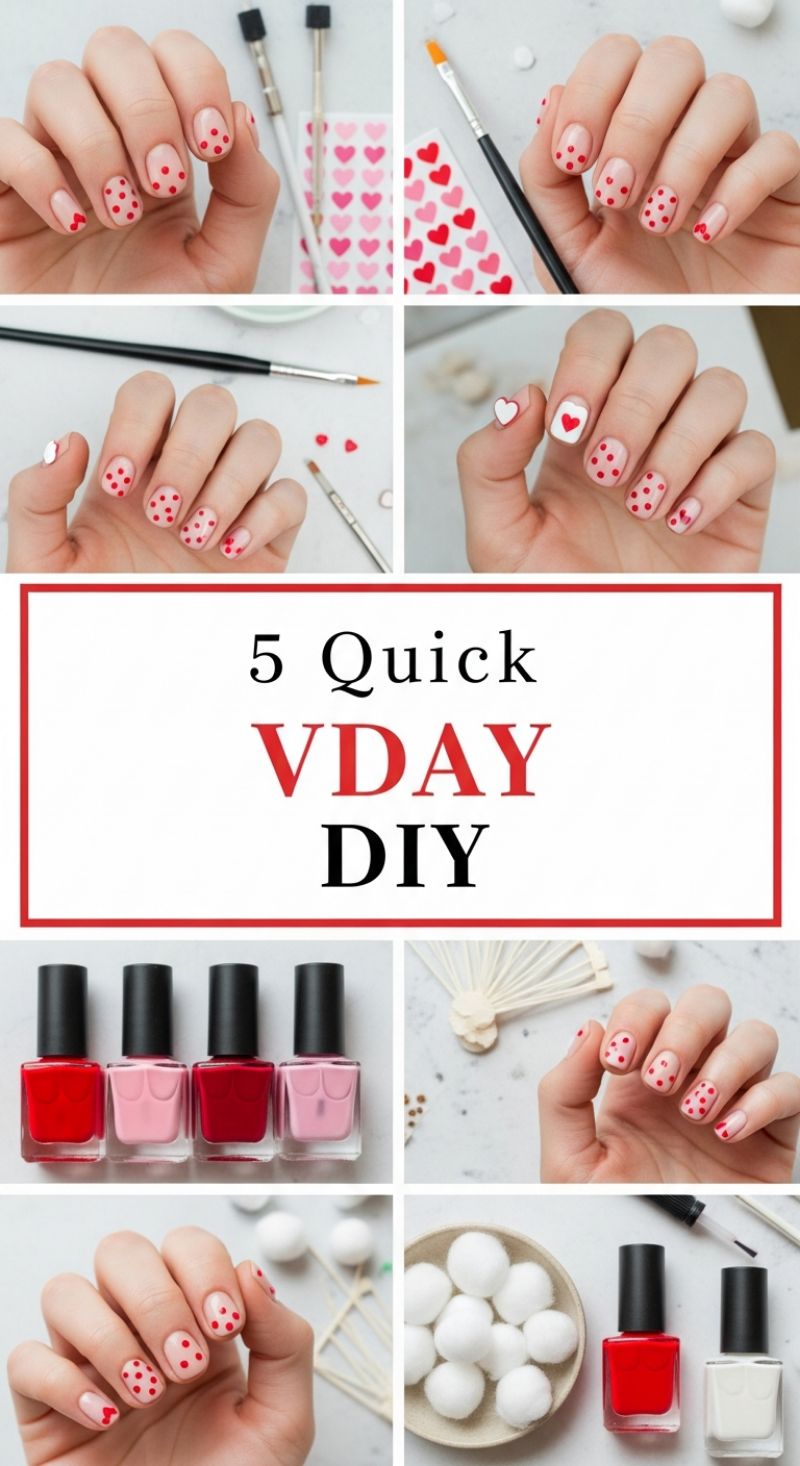
This delightful design showcases how to achieve maximum romantic impact with minimal effort, perfect for a quick, charming Valentine’s Day look. The foundation of this style relies on a sheer, neutral base—a nude or pale pink polish that complements your skin tone, providing a clean canvas that makes the bright red and pink details pop. Begin by ensuring your nails are prepped: filed, buffed, and cleaned. Apply a quality base coat, followed by one or two thin layers of your chosen sheer polish. Gather your tools, which should include fine detailing brushes, a dotting tool (or substitutes like the blunt end of a bobby pin or a toothpick), and your essential polishes: vibrant red, soft pink, and opaque white for potential accent nails. The beauty of this DIY is its quick application, making it ideal even if you’re short on time. Expert tip: Ensure your base color is fully dry before moving on to the detailing to prevent dragging and blurring.
The core element of this VDAY DIY is the classic polka dot pattern. Using your dotting tool, dip it into your chosen red polish, ensuring you remove any excess before applying it to the nail. Start by creating a symmetrical pattern of dots across the main nails (excluding the accent nail). Aim for uniform size and spacing; typically, three to four dots per nail, placed near the tip or scattered strategically, offer an elegant look without appearing too busy. Experiment with different shades of red and pink, as seen in the collection of polishes provided, to add subtle dimension. For a cohesive flow, maintain the same dotting size across all patterned nails. If you desire a slightly more intricate look on one or two fingers, use a fine brush to carefully place a small, singular heart near the cuticle or tip, achieved easily by placing two small dots and dragging a fine brush down from the center point to create the V-shape of the heart’s bottom.
To elevate the design, incorporate a bold accent nail, typically the ring finger. As demonstrated, opting for a full-coverage opaque white base on this nail provides a striking contrast to the sheer background of the others. Once the white polish is dry, this is the perfect spot for a large heart decal or a carefully drawn heart design using red or pink polish. If using pre-cut decals (like the ones shown), use tweezers to carefully position them before pressing them gently onto the dry polish. For those free-handing, remember the two-dot technique: place two adjacent dots and pull the polish downwards to form the point of the heart. Once all your dots and hearts are placed and fully dry—this step is crucial—seal the entire design with a high-shine, long-lasting top coat. A good top coat will protect your intricate art from chipping and provide a professional, glossy finish, making this quick DIY last well beyond Valentine’s Day.
Playful Pinks and Reds: The Mickey & Minnie Valentine’s Day Mani
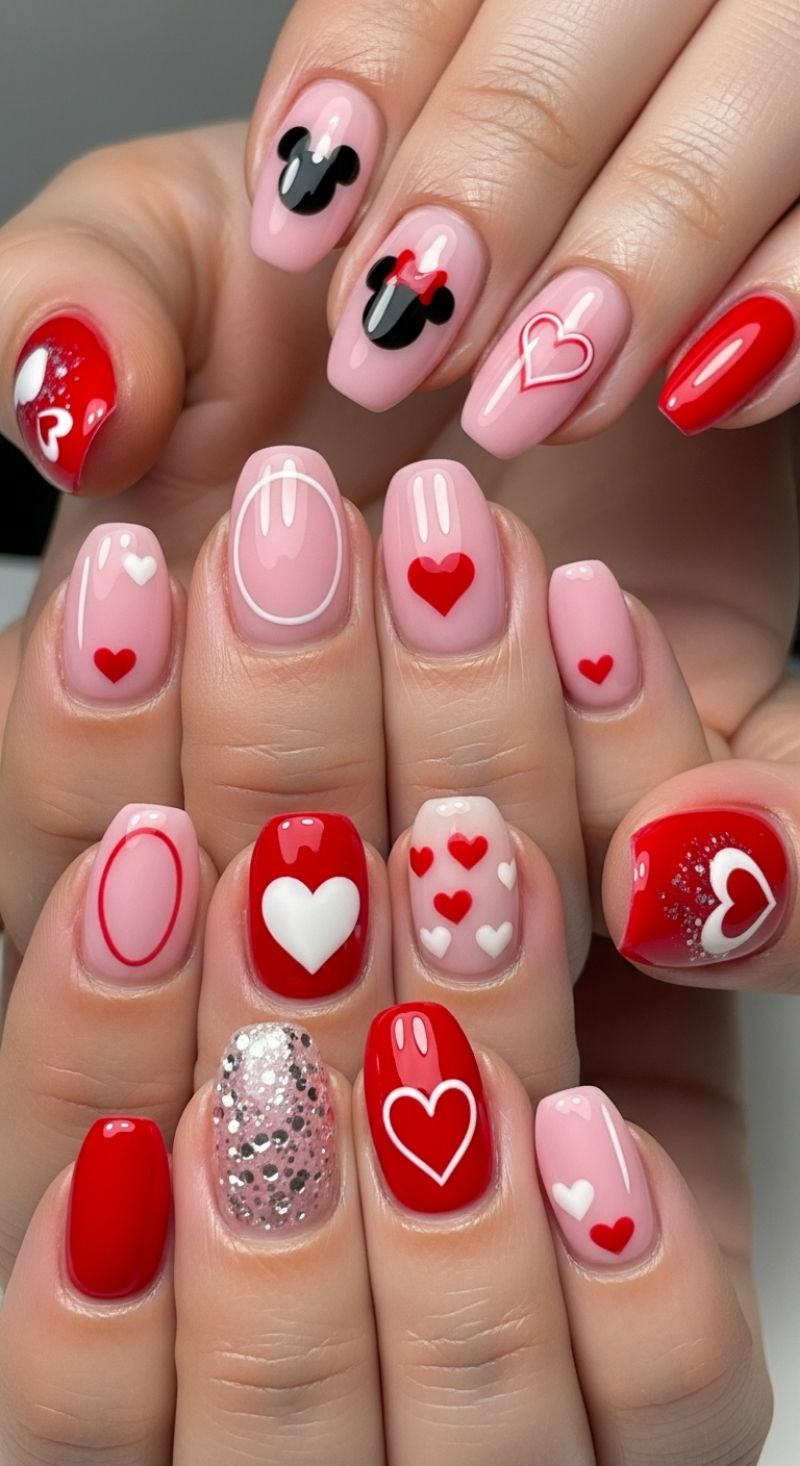
This intricate design masterfully combines the sweetness of a classic pink and red palette with playful Disney iconography, resulting in a look that is perfect for Valentine’s Day, a Disney trip, or simply celebrating romance. Achieving this highly detailed manicure requires precision and a strategic mix of design elements. Start with a carefully prepared canvas: ensure nails are cleanly shaped (the image shows a soft, short oval/almond shape) and apply a uniform base coat. The key to the design’s soft aesthetic is the base color—a sheer, milky, or jelly light pink provides the perfect backdrop, allowing the brighter red and black accents to pop without being harsh. The dominant colors you’ll need are this milky pink base, a vibrant siren red, opaque white, and jet black.
To tackle the core character elements, reserve two prominent nails (typically the ring and middle fingers of one hand, or both index fingers) for the Mickey and Minnie Mouse silhouettes. Use a medium-sized dotting tool to create the main head shape in black polish, followed immediately by two smaller dots placed strategically at the top corners for the ears. The Minnie design requires an extra step: once the black polish is cured, use a fine liner brush and red polish to create a small bow between the ears. Move on to the assorted heart designs, which introduce variety. For solid hearts, use a dotting tool to place two closely aligned dots, then use the tip of a fine brush to pull the polish down from the center base of those dots to form the point of the heart. Contrast is vital: place small red hearts on the pink base and opaque white hearts on the solid red nails. Additionally, incorporate outlined hearts (using a fine liner brush and white or red polish) to add negative space and graphic interest, as seen on the thumb or index fingers.
Balance the art-heavy nails with complementary accents. The perfect celebratory accent nail, typically the ring finger of the opposite hand, features a heavy coverage of silver or holographic chunky glitter set over the pink base, providing a necessary textural break from the glossy creams. For balance and sophistication, include a few nails fully coated in the bright, glossy red. Finally, look closely at the abstract elements—the simple white or red oval outlines on the pink nails are a creative way to reference the mouse silhouette structure without depicting the character, adding a refined, modern twist. Once all designs are cured, float a thick, high-shine gel top coat over every nail. This step is non-negotiable, as it encapsulates the detailed art, smooths any texture from the glitter, and provides the coveted high-gloss, ‘candy coat’ finish that makes this manicure look truly professional and lasting.
Grunge Dark Nails: Edgy Designs Featuring Chains, Spikes, and Matte Black
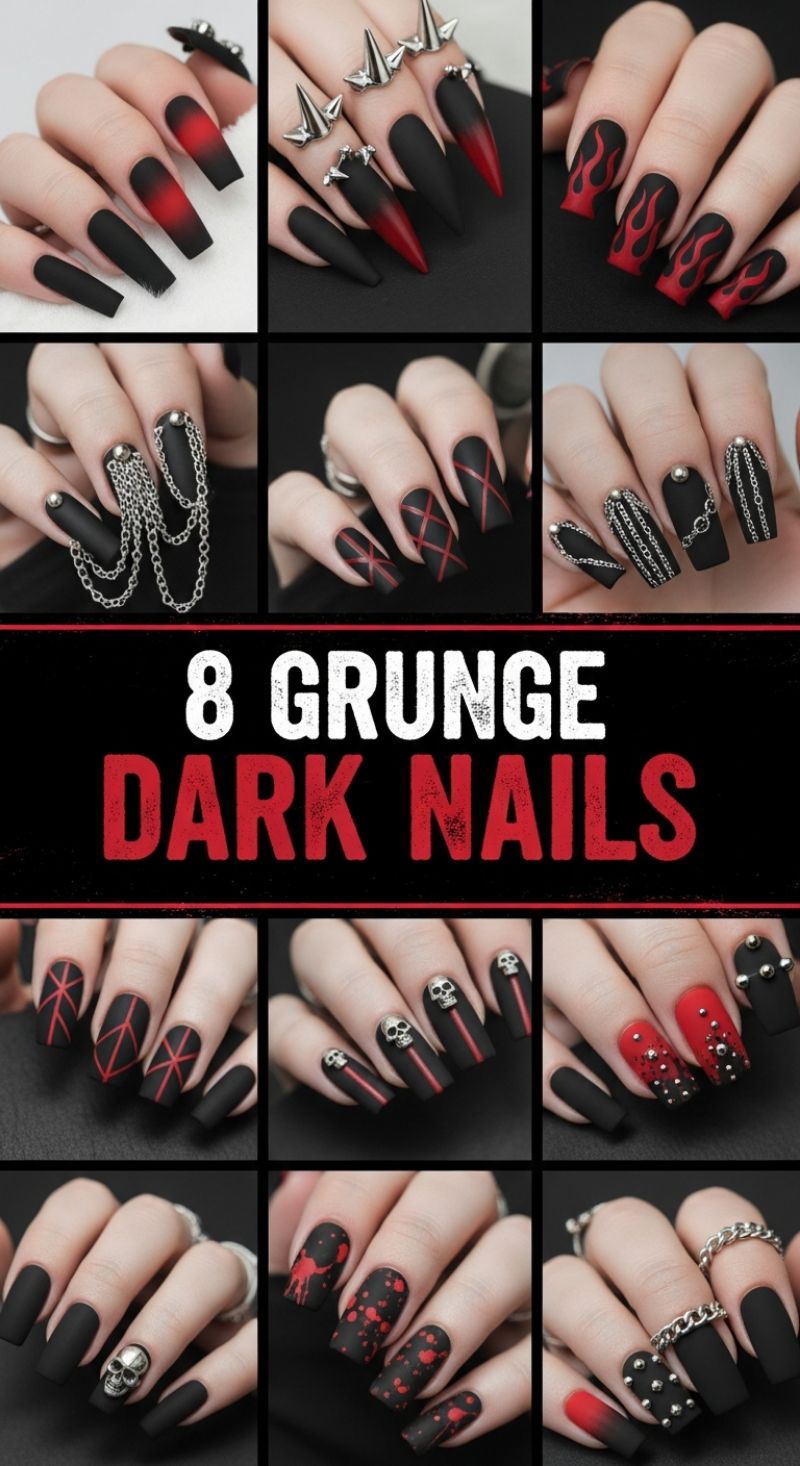
The grunge dark nail aesthetic is defined by its deep, brooding color palette—primarily matte black and striking red accents—and heavy use of 3D hardware. To begin recreating these fierce looks, first ensure your nails are filed into a dramatic shape, such as a long coffin or sharp stiletto, as the length enhances the edgy impact. The foundation for nearly all these designs is a flawless, velvety matte black polish. For designs incorporating the signature red gradient (ombre), apply the matte black base and then use a sponge to softly blend a vibrant, deep red onto the tips before sealing the entire nail with a matte topcoat. This soft fade from red to black is foundational to several gothic and punk styles showcased here, providing intensity without relying solely on embellishments. Ensure your cuticle prep is meticulous, as the severity of the black color draws attention to the entire nail bed, demanding a clean canvas.
The defining feature of true grunge nails is the incorporation of heavy metal accessories. This requires specialized products like flat-backed studs, spikes, miniature chains, and skull charms, typically applied using a professional-grade nail glue or strong resin gel for longevity. For looks featuring draped chains, secure a small metal ring or ball stud near the cuticle or sidewall, and then carefully affix the chain links, allowing them to hang naturally across the nail or connect them to another anchor point. When applying larger embellishments like cone spikes or detailed skulls, strategically reserve these pieces for accent nails (like the ring finger or index finger) to prevent the overall look from feeling overwhelming, ensuring visual balance across the set. Expert advice: To maximize adhesion and prevent hardware loss, slightly roughen the application area on the nail plate before applying a dab of thick builder gel or resin, pressing the charm firmly into place and curing.
Beyond the hardware, master the technique for detailed painted elements such as flames, geometric patterns, and blood splatters. For the iconic matte red flame design, use a fine striping brush and vibrant matte red polish to carefully paint organic, upward-flickering shapes against the black canvas, focusing on fluid movement. The crisscross or lattice patterns seen in some designs require precision; use a very thin brush or nail art pen to create sharp, consistent lines that maintain perfect symmetry. For a chaotic, blood-splatter effect, load a stiff brush or a specialized splatter tool with red polish and gently flick it onto the cured black nail, creating random dots and streaks that resemble gore or damage. Due to the complexity and 3D nature of these designs, maintenance is key: always apply cuticle oil daily to nourish the skin around the dramatic edges, and wear protective gloves during heavy manual tasks to preserve the metallic accents and prevent premature chipping.
10 Chic SHORT NAILS: Sweetheart French Manicure Design
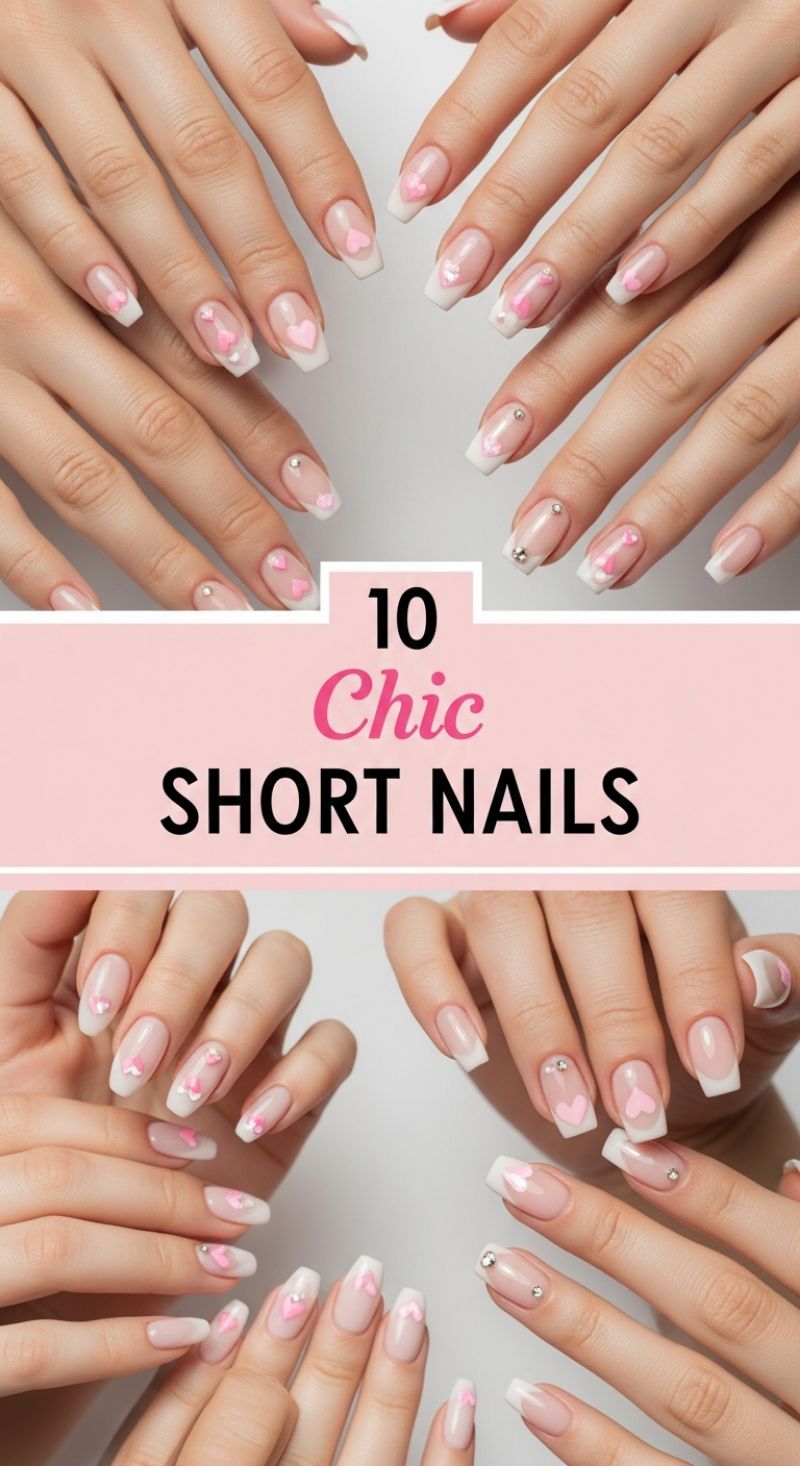
This design masterfully blends the timeless elegance of a French manicure with playful, romantic accents, proving that short nails can be just as glamorous as long ones. To achieve this look, begin by shaping your natural nails into a soft squoval or short square shape, which provides the ideal canvas for a neat French tip. The foundation is critical: apply two thin coats of a sheer, milky pink or nude ‘jelly’ polish. This translucent base enhances the natural appearance of the nail bed while providing contrast for the white tips and pink heart art. Ensure the base is fully cured or dry before moving on to the detailed work, as any smudging will compromise the clean aesthetic.
Next, apply the delicate white French tip. On short nails, precision is paramount; keep the smile line shallow and the tip thin to visually elongate the fingers rather than shorten them. Using a fine detail brush and crisp white polish, carefully define the tips. The standout feature is the soft pink heart art. Using a dotting tool or a fine brush, create varying sizes of hearts on the sheer portion of the nail—some centered beautifully above the tip line, and others smaller, serving as delicate accents near the cuticle area. Utilizing a pastel or dusty rose pink keeps the overall look sophisticated and prevents the design from appearing childish. For added dimension, you may choose to use a slightly thicker gel consistency for the hearts to create a subtle raised effect.
To elevate this design from sweet to chic, incorporate minimal bling. Small, clear or silver rhinestones should be strategically placed—for example, at the base of the thumb or ring finger nail, or nestled slightly into the curve of a heart. Use a bead of thick top coat or professional nail glue to secure these gems for long wear. Finish the entire manicure with a high-shine, protective top coat to lock in the artistry and prevent chipping. Expert tip: this design is perfect for transitioning seasons. You can easily adapt the heart color from pale pink (Spring) to deep burgundy (Fall) while maintaining the sophisticated structure of the French base, ensuring your short nails remain effortlessly on-trend regardless of the time of year.
15 Ultra PINK NAILS

This “Ultra Pink Nails” design is the epitome of maximalist glamour, combining dramatic length with blinding sparkle. To recreate this look, start by focusing on the foundational structure and shape. This style is best executed on long nails, typically sculpted into a clean coffin or ballerina shape, which provides an expansive canvas for the heavy glitter coverage. Whether you are using tips or sculpting builder gel, ensure the nail bed is perfectly prepped and shaped. For the base color, select an extremely vibrant, opaque hot pink or bubblegum pink gel polish. Apply two meticulous coats, curing completely after each application, making sure the color is streak-free and fully saturated. A solid, uniform pink base is essential as it makes the subsequent glitter layer appear denser and more vivid, offering that intense, saturated glow.
The secret to this look lies in the intense, multi-dimensional sparkle. This is achieved by using a high concentration of glitter featuring varied particle sizes—specifically a mix of fine dust and larger, light-reflecting hex pieces, ideally with holographic properties for maximum flash. Professional nail technicians should incorporate the glitter directly into a layer of clear or pink-tinted builder gel or resin, allowing them to sculpt the glitter evenly across the nail surface without adding excessive bulk. Alternatively, for those using traditional gel polish, apply a generous layer of clear top coat (do not cure yet) and immediately sprinkle loose glitter over the entire nail, gently pressing the particles down with a small brush to ensure full adhesion. Cure thoroughly once the glitter is perfectly positioned, paying extra attention to the free edges to prevent chipping or lifting.
For the finishing touch, encapsulate the entire glitter layer with a thick, high-quality, non-yellowing glossy top coat. This final layer serves several critical functions: it smooths out the texture of the chunky glitter, prevents the glitter from flaking or shedding, and dramatically enhances the overall shine, giving the manicure that coveted wet, mirror-like finish. Because this design utilizes long nails and heavy product, structural integrity is vital. Recommend a strong base system (like dip powder or hard gel) for longevity. This powerful, glamorous pink glitter manicure is perfect for statement looks, celebratory events, or any time a client wants to fully embrace a bold, feminine, and eye-catching aesthetic, fitting seamlessly into party season or vibrant summer styles.
7 Flirty Cupid Nails
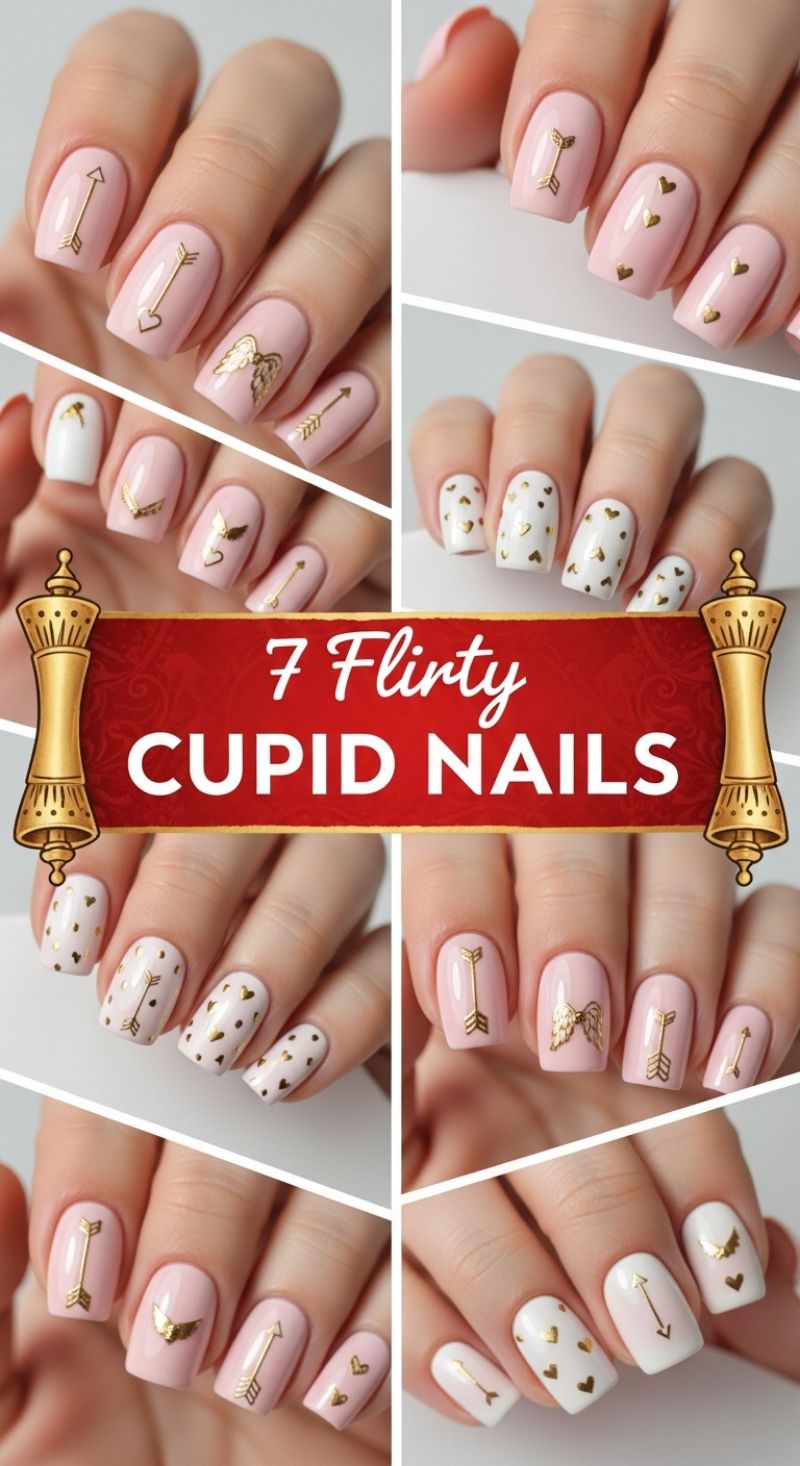
The ‘Cupid Nails’ trend offers a sophisticated yet playful way to celebrate romance, utilizing soft, complementary colors and delicate metallic accents. To recreate this look, start by prepping your nails thoroughly: file them into a clean square or squoval shape, buff lightly, and apply a high-quality base coat. The core palette features soft blush pink and crisp white—ensure these polishes are highly pigmented and fully opaque in two coats. The visual interest comes from the mixed manicure approach; dedicate some nails entirely to the soft pink base (perfect for showcasing singular, large decals like the arrow or wings), and others to the white base (ideal for scattering small metallic heart accents). For a truly seamless and long-lasting finish, allow each layer of base color to dry completely before moving on to the intricate details. Expert tip: Using vinyl stencils or high-quality water slide decals is crucial for achieving the sharp, detailed lines seen on the gold arrows and delicate wings, far superior to attempting freehand application of such tiny elements.
Once the base colors are dry, introduce the metallic gold elements using finely detailed stickers or stamping plates. The key to mastering the ‘Cupid’ look is strategic placement and variety. On the pink nails, position the gold cupid arrow vertically down the center of the nail plate, ensuring the tip points toward the free edge or the cuticle (either orientation works, but consistency is key). Use the wings motif sparingly, perhaps as an accent on the ring or middle finger, slightly elevated from the cuticle line. For the white nails, use small gold heart decals or a fine dotting tool dipped in metallic polish to create a dense, randomized polka-dot pattern. If you choose to mix motifs, a beautiful combination is pairing a single gold arrow on the index finger with a cascade of gold hearts on the middle finger. Apply decals carefully using fine-tipped tweezers, pressing down firmly to adhere completely to the polish. For maximum decal adherence, lightly brush a thin layer of clear polish over the decal immediately after placement, essentially ‘sandwiching’ it before the final top coat application.
To lock in the design and ensure professional longevity, apply a thick, glossy top coat. For a high-shine, plump effect reminiscent of gel manicures, use a specialized quick-dry formula. When applying the top coat, make sure to ‘cap’ the free edge of the nail, sealing the tip to prevent chips and shrinkage, especially crucial when dealing with decals whose edges can lift. This look is versatile, but truly shines on short to medium-length nails where the vertical elements (the arrows) remain clearly visible. If you wish to adapt this for other holidays or seasons, consider swapping the blush pink for a deep burgundy or dusty rose, or changing the metallic gold for reflective rose gold or silver, maintaining the romantic arrow and heart elements for a personalized touch. Finish the manicure by moisturizing the cuticles with oil to highlight the clean edges and brilliant shine of the finished design.
6 Bold Anti-V-Day Nail Art Designs
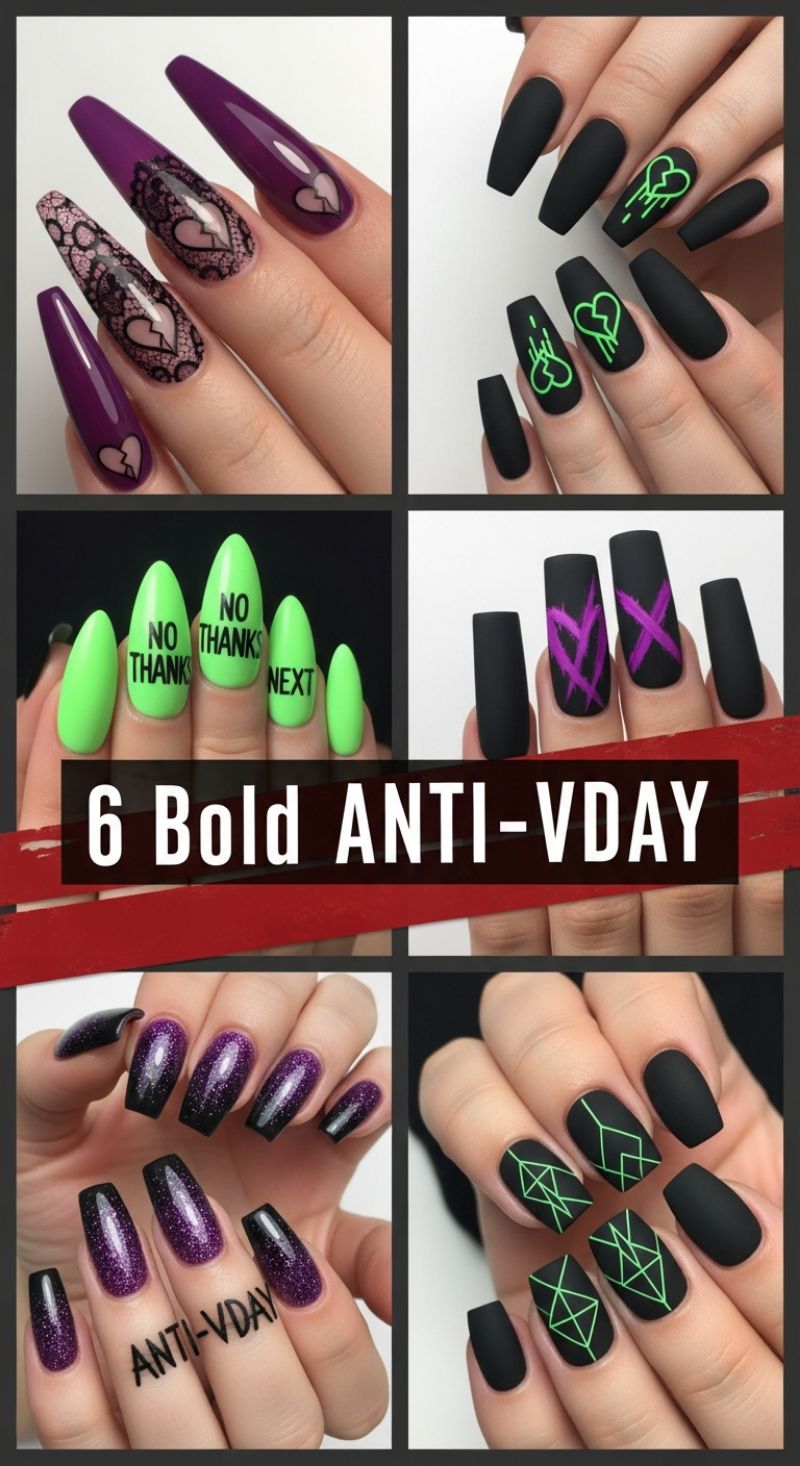
When traditional pink and red hearts feel too sweet, these six bold, anti-Valentine’s Day designs offer the perfect blend of rebellion and high-impact style. The core aesthetic relies heavily on high contrast, utilizing saturated jewel tones, vibrant neons, and grounding matte black finishes. To recreate the edgy looks, begin by selecting your base color—matte black is paramount for maximum drama (as seen in designs 2, 4, and 6). For the neon geometric look (Design 6), apply two coats of matte black and cure. Using a fine detail brush and highly pigmented neon green polish, create sharp, angular lines and abstract polyhedral shapes. Precision is key; use a striping tape guide if necessary to ensure crisp edges before finishing with a high-quality matte top coat. Similarly, the ‘scratched X’ design (Design 4) requires a vibrant contrast color, like magenta or electric purple, aggressively painted over the matte black using dry-brush strokes to mimic a distressed, heavily crossed-out look. These designs rely on perfect execution of the base layer and precise linework for that coveted professional finish.
Statement nails and text-based designs are central to the Anti-V-Day theme. The lime green stiletto nails (Design 3) make a literal statement, using an ultra-bright neon base to highlight bold black lettering (“NO THANKS,” “NEXT”). To achieve this, apply the neon polish and use black vinyl stencils or specialized nail lettering kits for clean, legible text. Alternatively, the glitter ombre look (Design 5) offers a moody sparkle. Start with a solid black base and use a makeup sponge to dab a deep purple holographic or metallic glitter from the cuticle toward the tip, allowing the black to peek through at the base for a dramatic gradient effect. Expert tip: When transitioning from a dark matte base (Designs 1 and 5) to a textured detail, use an ultra-fine layer of glossy topcoat only where the design will be placed to prevent glitter or decals from lifting prematurely.
The most intricate design involves the gothic purple lace and broken hearts (Design 1). After applying the glossy deep purple base, use black stamping plates or decals to apply a delicate lace pattern over the nail bed, paying special attention to the middle fingers. On the remaining nails, use a soft pink or nude base color to draw the silhouette of a heart before splitting it down the center with a thin black line, emphasizing the ‘broken’ motif. The key to mastering these designs is commitment to the high-contrast color palette (black, purple, neon green, and electric magenta) and choosing a dramatic nail shape, such as stiletto, coffin, or long square, to give the artwork the necessary canvas to truly stand out.
9 Genius Nail Ideas: Master the Art of Dimensional and Detailed Designs

Achieving the high-impact looks featured here, such as the 3D floral accents or the gilded chains, requires careful layering and secure adhesion. For the elaborate three-dimensional flower designs—a blend of romantic and structural art—utilize specialized techniques like sculpted polymer clay or thick gel paste to build petals before curing. Affix micro-pearls and beads using a strong jewelry adhesive gel to ensure longevity. If you prefer the vibrant Neon Geometric patterns, precision is paramount: use fine-tipped striping brushes or specialized vinyl stencils (nail tapes) to ensure crisp, clean lines and sharp corners for the intricate diamond and zigzag motifs. For the opulent Gilded Chain look, select lightweight, non-tarnishing nail charms and use a structural gel adhesive to anchor them securely to the nail plate, focusing placement along the perimeter or creating draped effects across the nail. Always seal dimensional elements with a non-wipe top coat, taking care not to obscure the details, but ensuring all edges are fully encapsulated to prevent snagging and lifting.
Several designs in this collection emphasize delicate artistry and soft transitions, perfect for a refined or ethereal aesthetic. The Full Coverage White Lace is a standout and is typically achieved using advanced nail stamping plates that capture ultra-fine details. For superior, bespoke results, this look can be achieved by hand-painting the design using a highly pigmented white polish and an extra-fine detail brush on a sheer nude base. For the Abstract Plaid and Tartan nails, begin with a sheer colored base, then use contrasting colors to lay down vertical and horizontal lines, often blurring or blending them slightly at the intersections for an artistic, softened effect rather than a harsh, traditional grid. Similarly, the Nude Floral Sketch nails embody the trending “line art” style; use highly diluted polish or gel paint in a pale brown or sepia hue to create minimalist, single-line drawings of flowers or leaves. This soft, negative-space approach ensures the nail remains inherently elegant while incorporating subtle artistic expression.
For those seeking bold creative expression, the final array of ideas incorporates texture and playful prints. The popular Cow Print or Animal Spot designs are surprisingly simple to execute: apply uneven, irregular blobs of brown or black polish onto a creamy base using a dotting tool, intentionally leaving the edges organic and slightly messy for a natural look. For the Whimsical Seasonal Art (such as the fruit and harvest depictions), use cheerful, opaque colors on a stark white base, keeping the illustrations cartoonish and bright—ideal for transitioning between playful summer vibes and cozy autumn themes. Finally, achieving the deep Textured Finishes, like the white shell structure or the black/blue shattered scale effect, requires experimentation. For the shell texture, apply clear builder gel or acrylic powder mixed with clear polish unevenly, then cure. For the reptilian skin or shattered look, layer colors and utilize foil transfer techniques or a crackle topcoat applied over a base of mixed metallics to mimic the complex, multifaceted texture. These statement designs benefit greatly from a high-gloss top coat to maximize the depth and visual contrast.
5 Sweetest KITTY NAILS
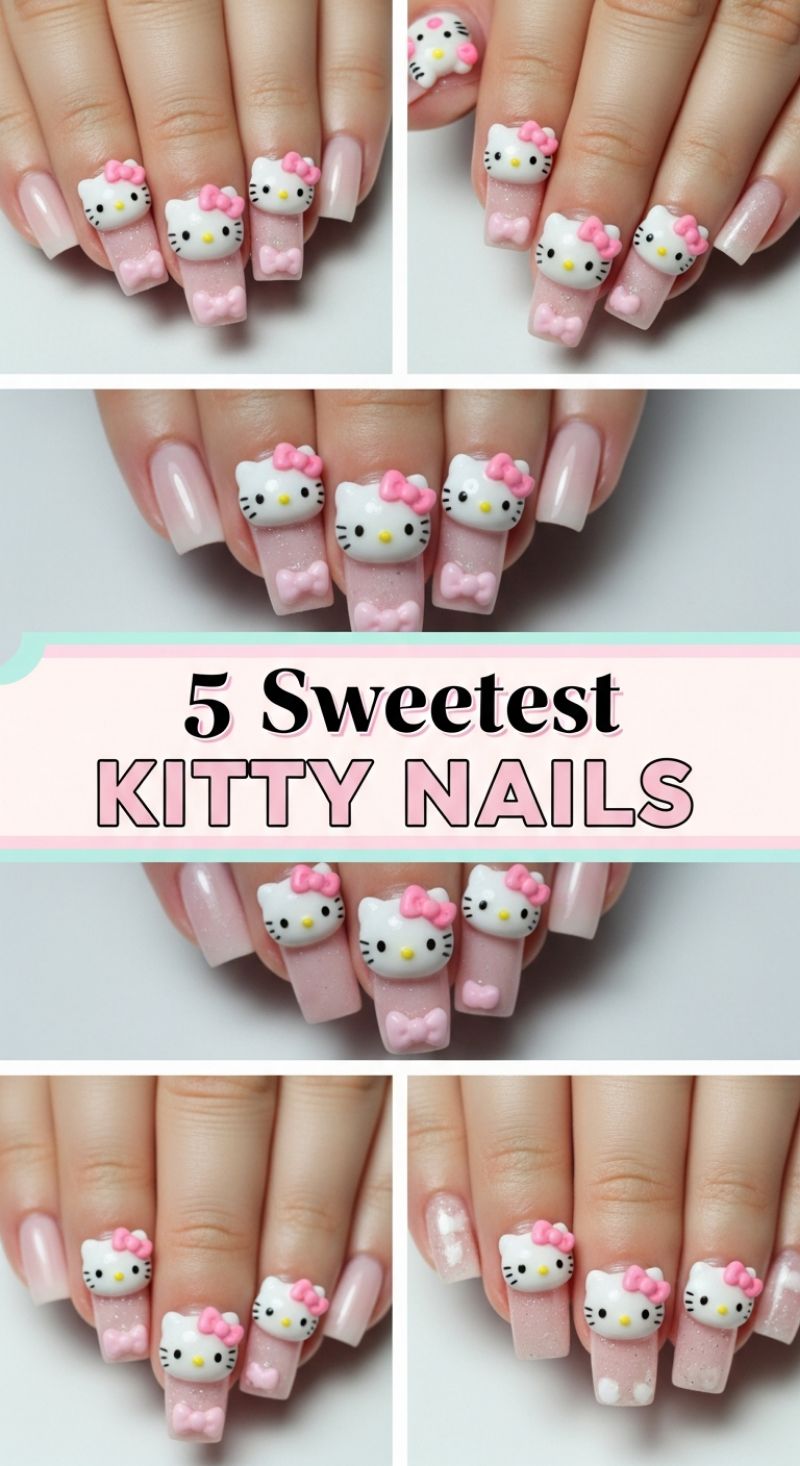
This ultra-feminine, maximalist design is an absolute showstopper, blending soft, delicate pink bases with eye-catching 3D character art. To achieve this signature ‘Kawaii’ (cute) style, start with a strong, foundational base. Given the weight and size of the 3D elements, long structured shapes like soft coffin or squared acrylics are necessary. Apply a milky, sheer nude pink or a soft bubblegum pink gel polish. For an added layer of whimsy, incorporate a fine pink micro-glitter or shimmer gel over the base color—this ensures the undercarriage of the design catches the light beautifully. If you are using tips, ensure the length is uniform. Before moving to the charm placement, seal and cure your base and color layers with a non-wipe top coat, ensuring the surface is perfectly smooth and ready to support the heavy embellishments.
The defining feature of this look is the use of high-relief 3D charms, specifically the iconic white cat faces, complete with pink bows. While incredibly skilled artists can sculpt these tiny heads freehand using white and colored 3D acrylic powder, the most durable and accessible method involves purchasing high-quality resin or pre-molded acrylic charms. Attachment requires robust adhesive. Do not rely on standard nail glue; instead, use either a dedicated resin adhesive or a thick layer of non-wipe builder gel (hard gel). Apply a small, generous bead of the adhesive where the charm will rest, firmly press the charm onto the nail plate, and then cure it thoroughly under an LED/UV lamp to solidify the bond. Expert advice dictates strategically placing the Kitty charms on the index, middle, and ring fingers, positioned slightly higher toward the cuticle, leaving the thumb and pinky nail simpler to balance the extreme dimensionality.
To complete the sweet, dimensional effect, focus on the supporting 3D details. Below the character heads, small, coordinating pink bows are sculpted directly onto the nail base. Use a monomer and pink 3D acrylic powder with the standard wet bead technique to form small, puffy bows that match the charm’s aesthetic. Once cured, apply a thin layer of high-shine top coat to all areas of the nail *excluding* the 3D elements themselves. This keeps the Kitty heads and sculpted bows matte or semi-matte, providing a crucial contrast that makes the design truly pop off the nail. Due to the high-profile nature of 3D nail art, this design requires careful daily wear and maintenance; it is best reserved for special occasions, themed trips, or short-term bursts of maximalist self-expression.
10 Classic HEART NAILS
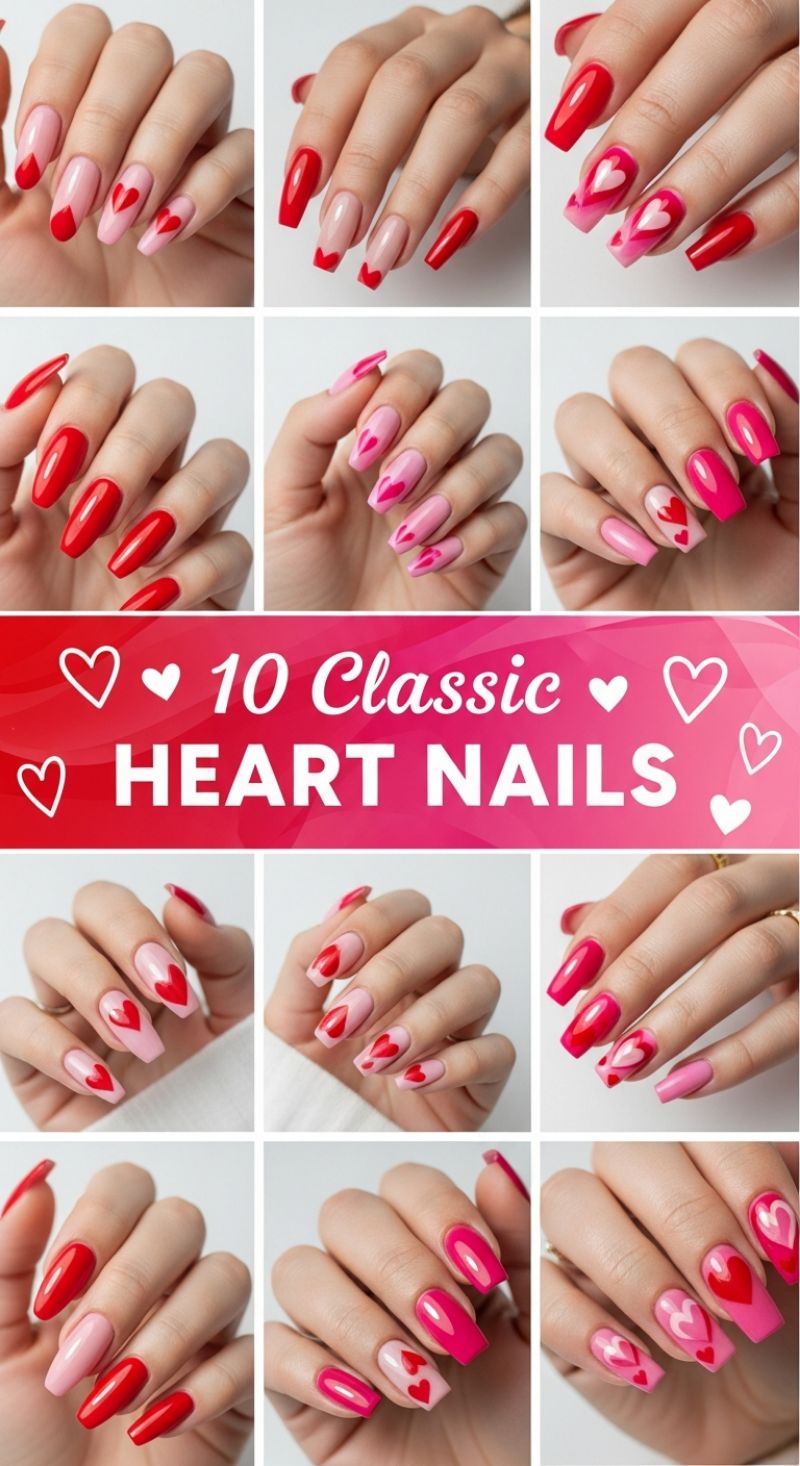
The ’10 Classic Heart Nails’ collection serves as the ultimate inspiration for anyone looking to infuse their manicure with romance and sweet femininity, making it perfect for Valentine’s Day or any time you desire a vibrant, expressive look. This style predominantly utilizes a bold, high-contrast palette of passionate reds, playful light pinks, and deep magenta hues. What makes this design so versatile is the variety of techniques employed across the hands: some nails feature full, glossy coverage in solid colors (such as the vibrant red or deep pink), while others act as canvases for the heart motif. Key designs include the sophisticated heart French tip, where the curved, iconic heart shape replaces the traditional straight or curved smile line at the nail’s free edge, typically executed in red over a sheer nude or light pink base. Other nails showcase floating hearts, either centered or scattered, utilizing contrasting colors like red on soft pink or light pink on fuchsia for maximum visual pop.
To recreate these designs, mastering the art of the tiny heart is essential. For the trendy Heart French Tip, start with a cured neutral base coat. Using a fine detail brush or a specialized striper brush, load it with your tip color (e.g., bright red). Instead of painting a standard curve, create the two distinct, rounded lobes of the heart near the corners of the nail tip, then smoothly pull the polish down to meet precisely in the center point of the free edge. For the floating heart designs, begin with two adjacent dots using a small dotting tool dipped in the accent color. While the polish is still wet, use a clean, fine detail brush or the sharp tip of the dotting tool to gently drag the polish from the center space between the dots downwards until they meet, forming the bottom point of the heart. Expert tip: For symmetry and clean lines, always allow your base color to fully cure before adding the heart details, and use specialized nail art brushes for precision rather than relying solely on the polish brush.
Achieving a professional finish with this theme involves strategic nail placement and product selection. To prevent the look from becoming overwhelming, alternate between solid accent nails and pattern nails, as demonstrated in the image. Consider varying the size and position of the hearts; some nails might have one large, centered heart, while others feature two smaller, offset hearts to add dynamic movement. For high-impact colors like the shown reds and magentas, always ensure you use at least two thin coats to achieve full opacity without bubbling. Finally, since the heart designs rely heavily on precise lines, investing in a high-quality, durable topcoat is crucial. For an extra modern twist, try applying a matte topcoat over the pattern nails while keeping the solid color nails glossy—this mix of textures elevates the overall aesthetic and ensures your beautiful, classic heart nails last as long as possible.
7 Trendy STELLIO MANIS
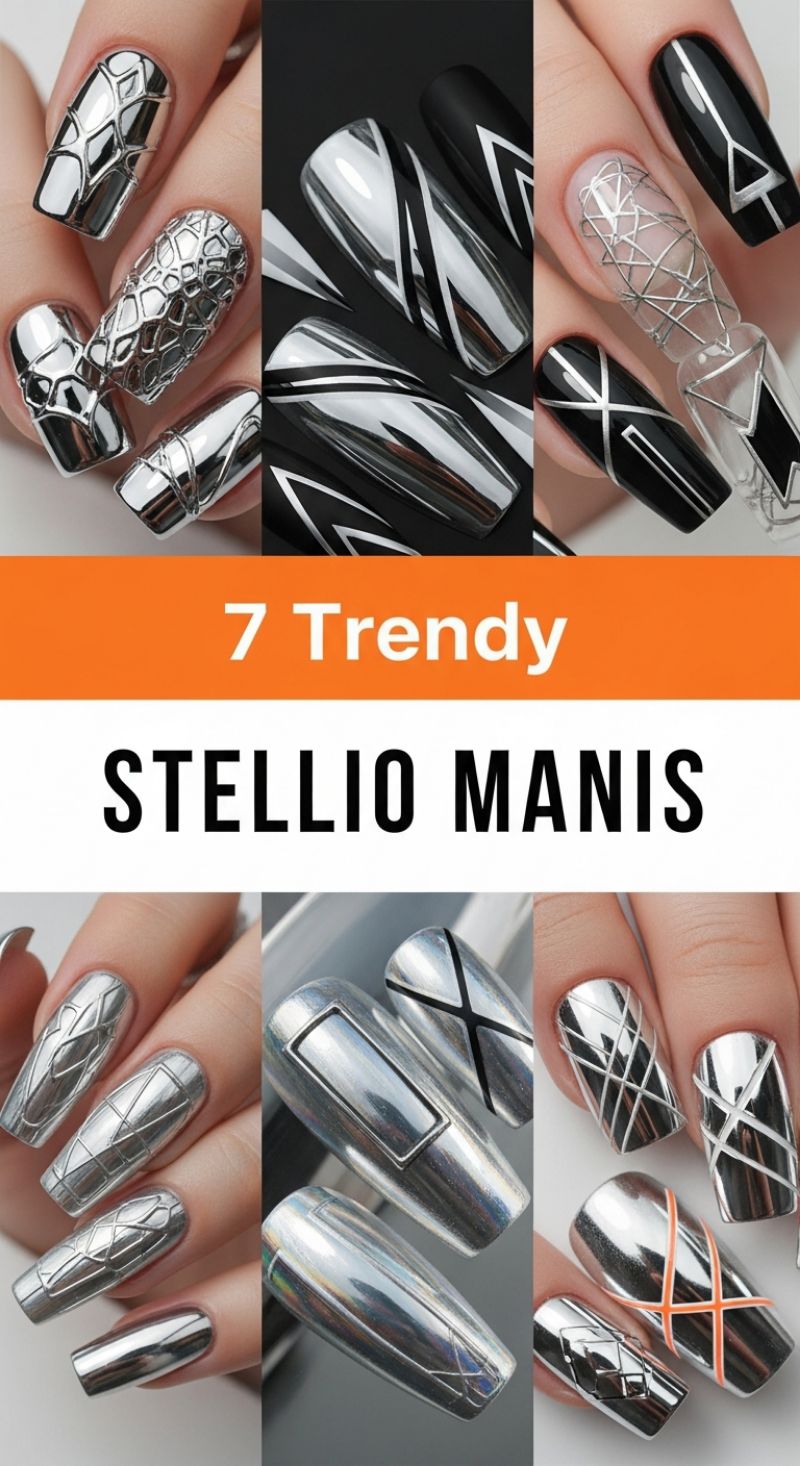
The Stellio Mani, often characterized by its stunning metallic chrome finish and structural, futuristic elements, is the epitome of high-fashion nail design. To achieve this signature mirror effect, the foundation is crucial: start with a cured black gel polish base, followed by a non-wipe gel top coat. This non-wipe layer is essential as it provides the perfect tacky surface without being too sticky. Immediately after curing the non-wipe top coat, use a silicone applicator or a sponge eyeshadow brush to vigorously rub the silver chrome powder onto the nail plate until a perfect, seamless mirror effect is achieved. Once the entire surface is gleaming, dust away any excess powder using a soft, clean fan brush. For designs that incorporate both matte black and chrome, ensure the matte black areas are meticulously outlined and protected before applying the chrome powder, or use a careful reverse technique where the chrome is sealed first, and the matte black patterns are painted on top using a fine liner brush and then sealed with a specific matte top coat.
The key visual appeal of the Stellio Mani lies in its structural and geometric complexity. Replicating the sharp, architectural lines, Xs, and chevrons seen in these looks requires precision tools such as ultra-fine liner brushes (000 size) or specialized striping tape. For designs that involve deep contrast—like the popular chrome-over-matte-black styles—first apply the base chrome layer. Then, using highly pigmented black gel, carefully paint the geometric shapes or striping patterns. If you are aiming for the dramatic 3D, embossed texture (the reptilian or quilted look), this requires an extra step before the chrome application. Use a thick sculpting gel or builder gel to pipe the 3D patterns onto the cured base color. Cure this sculpted pattern, then proceed with the non-wipe top coat and chrome powder application. The metallic powder will adhere to both the flat nail bed and the raised sculpture, transforming the structure into solid, mirror-like metal.
Longevity is often a challenge with chrome manicures, as the powder particles rest on the surface and are prone to flaking. To maximize wear, the sealing process must be meticulous. After brushing off the excess chrome powder, very gently apply a thin layer of a high-quality, hard gel or builder gel top coat, ensuring you ‘cap’ the free edge of the nail to seal in the chrome from all angles. Do not drag the brush too heavily across the surface, which can disrupt the mirror finish. Cure this final top coat thoroughly. For advanced variations, consider introducing a pop of neon or pastel color (like the subtle orange lines shown) by adding those elements with fine detail brushes between the chrome base and the final top coat. This provides an exciting, modern twist to the otherwise monochrome metallic armor, making the Stellio Mani truly customizable for any fashion statement.
5 Unexpected DUCK NAILS
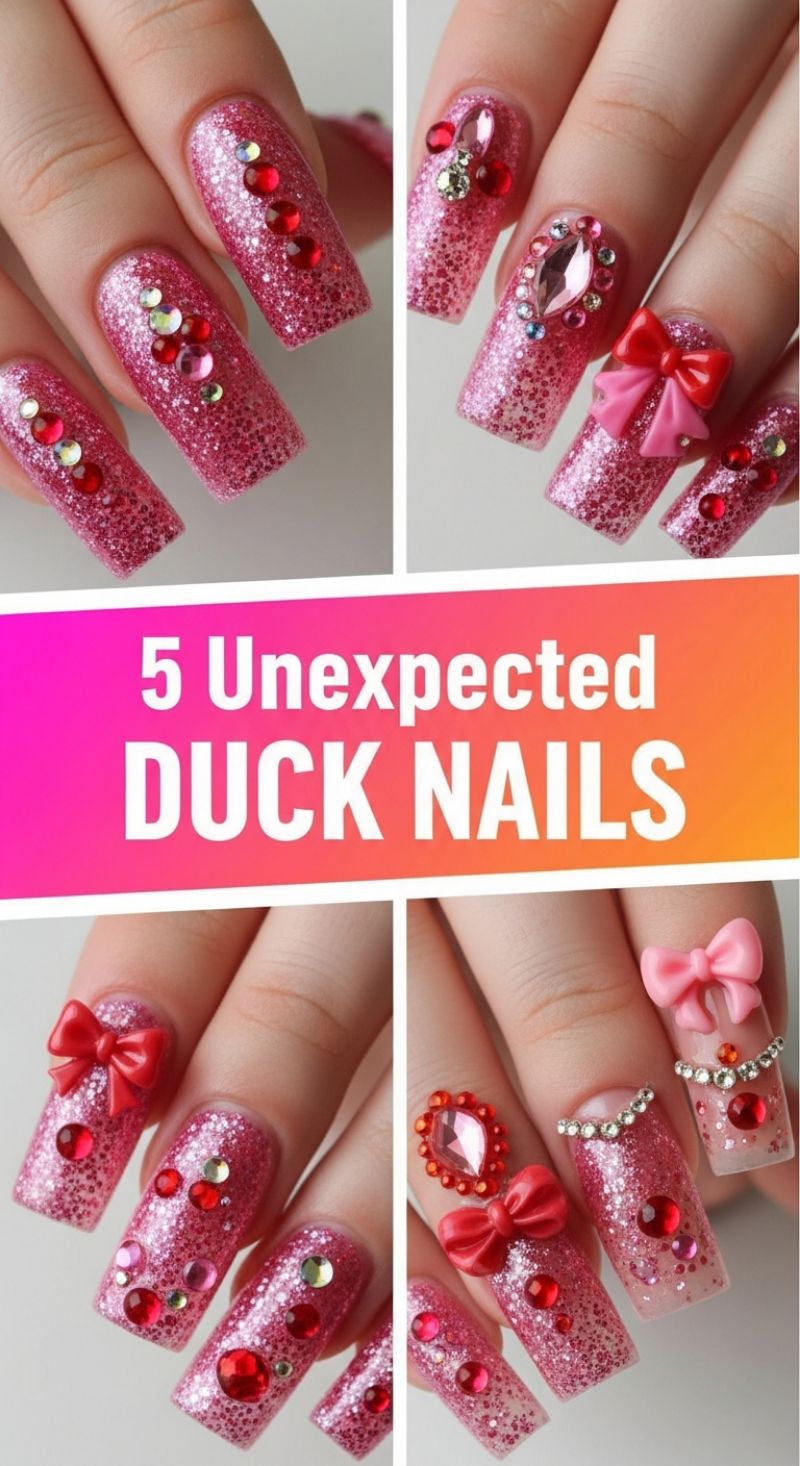
While the term ‘Duck Nails’ often refers to a distinct, wide, flared nail shape, this stunning interpretation focuses on the maximalist, high-impact aesthetic often associated with the trend, executed on a more traditional long, squared or coffin canvas. The foundation of this look is an intensely glittering pink base. To replicate this, start by prepping the natural nail and applying a clear base coat. If using traditional polish, you’ll need a heavily pigmented, chunky pink glitter coat—multiple layers may be required for full opacity. For a professional, durable finish seen here, encapsulating pink loose glitter within clear builder gel or acrylic provides the best depth and sparkle. Ensure the nail shape is perfectly filed and buffed before moving to embellishments; the precision of the square edges enhances the glamour of the densely packed glitter. Once your glitter layer is cured and filed smooth, apply a thin layer of top coat but do not cure it yet, or use a specific rhinestone glue/thick builder gel to prepare for the heavy 3D applications.
The key to achieving this extravagant look lies in strategic and symmetrical placement of high-quality rhinestones and 3D charms. Note how the embellishments are clustered—they are either arranged in vertical lines down the center of the nail bed, or centered around a large focal point, like the oversized pink teardrop gem. For clustering, start with the largest central element first, adhering it with a strong nail adhesive gel (or thick builder gel), then frame it tightly with progressively smaller gems in contrasting shades (ruby red, clear iridescent, and solid pink). On the accent nails, the 3D bows demand the most robust adhesive; use a small bead of strong gel or acrylic to secure the base of the bow, holding it firmly until it sets to ensure longevity. Distribute the embellishments across the hand, making sure to vary the composition on each nail, perhaps leaving one or two nails purely glittered for contrast, or adding a delicate ‘curtain’ of rhinestones along the cuticle line of an accent finger.
When sealing your manicure, be meticulous to avoid dulling the shine of the gems. Apply a non-wipe gel top coat around the edges of the rhinestones and over the exposed glitter areas, but try not to brush directly over the facets of the larger gems or the 3D charms, as this can cloud their clarity and diminish their sparkle. Cure thoroughly. For maintenance of these high-texture nails, carry a small tube of specialized nail glue, as the large 3D components are prone to catching on fabrics or surfaces. This design is perfect for celebratory events, embracing a vibrant, maximalist aesthetic that ensures your hands are the center of attention. Expert Tip: Opt for flat-backed rhinestones whenever possible, as they adhere more securely and create a lower profile than pointed-back gems.
11 Vibrant BLUE NAILS: Oceanic and Celestial Designs
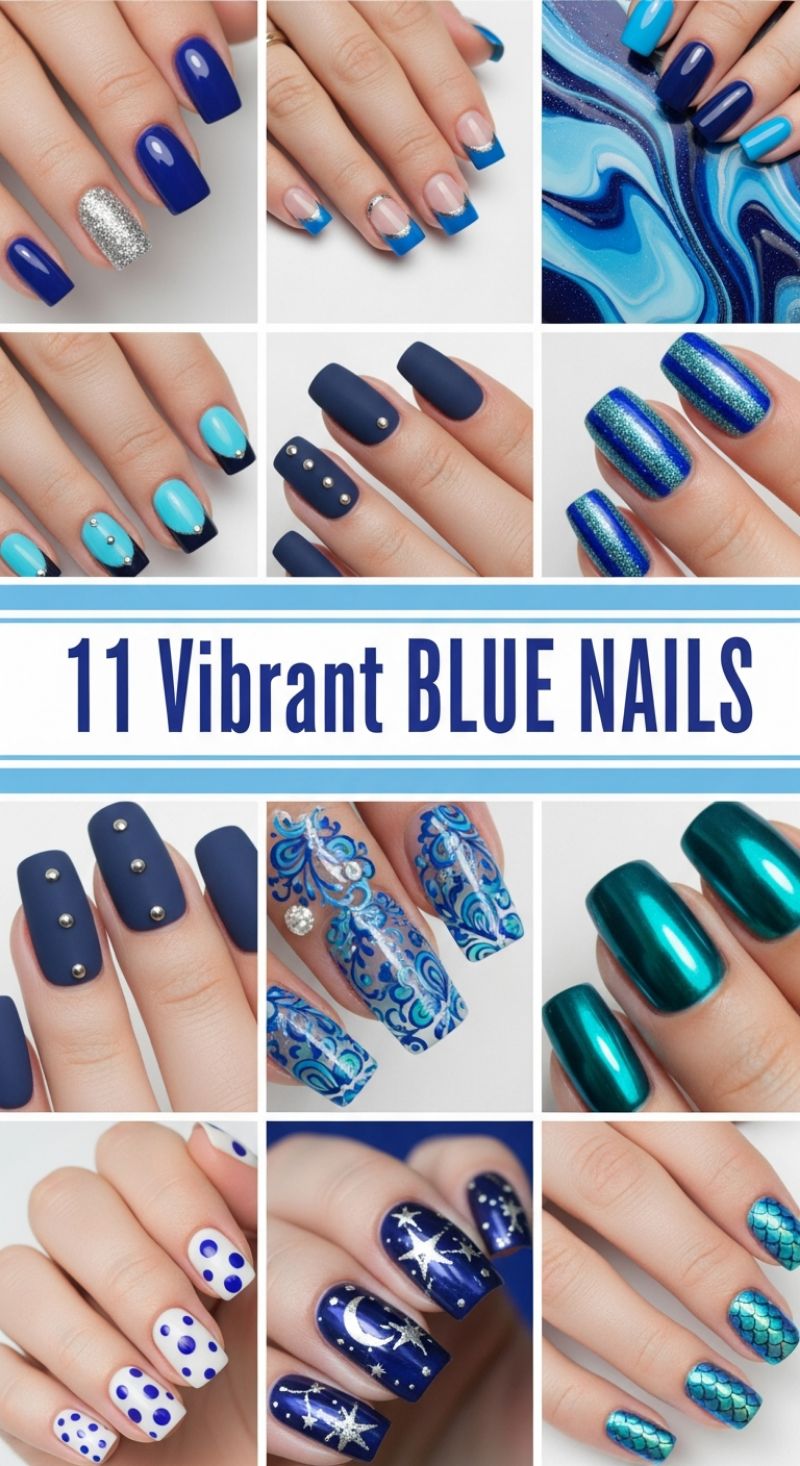
Blue nail art offers an incredible spectrum of possibilities, ranging from sophisticated deep navy to vibrant, playful turquoise, perfect for any season or mood. To master these looks, begin by selecting your dominant shade and finish. The image showcases classic high-gloss royal blue (achieved with two smooth coats and a high-shine top coat) contrasted effectively with a bold, matte navy. For the matte look, ensure your base color is fully cured before applying a quality matte top coat for that velvety texture; accenting this with simple metallic studs adds depth and an edgy touch. For a twist on the traditional French manicure, try using a bright cobalt blue tip and outlining the smile line with a thin, precise line of silver polish or fine glitter, giving a modern ‘reverse’ look that frames the nail bed beautifully. Furthermore, integrating a single silver glitter accent nail among solid colors provides necessary sparkle and breaks up the monochrome effectively.
Moving into more detailed designs, blue is the perfect foundation for celestial, aquatic, and detailed damask patterns. The mesmerizing deep blue celestial design, featuring stamped or freehanded silver stars and moons, requires a deep, almost indigo base and precision metallic silver polish, ideal for nighttime or holiday events. Achieving the stunning teal chrome or ‘mermaid’ effect involves specialized techniques: apply your colored gel base, cure it, apply a non-wipe top coat (crucial for adhesion), then vigorously rub a chrome pigment powder onto the surface using a silicone or sponge applicator before sealing everything with another top coat. The accompanying scale design uses a similar chrome gradient over an ombré base, often requiring a stencil or stamping plate to perfectly replicate the delicate fish-scale pattern. For intricate patterns like the swirling white and blue damask, high-quality stamping plates or water decals are the quickest route to achieving flawless, professional-looking details.
Finally, for a cheerful, year-round option, replicate the classic blue and white polka dot design using a simple dotting tool. Start with a crisp white base, then dip your dotting tool into royal blue polish, varying the pressure and size for dimension. This collection demonstrates that mixing various blue shades—from deep indigo to pale sky blue and vibrant aqua—creates dynamic, cohesive manicures. Always ensure longevity by preparing the nail plate properly (filing, buffing, and cleaning), using a protective base coat to prevent staining, and finishing with a durable top coat tailored to your desired finish, whether that’s high-gloss, ultra-matte, or shimmering chrome.
Mardi Gras Magic: Intricate Purple, Green, and Gold Carnival Nail Designs

This elaborate style captures the spirit and opulence of Mardi Gras, relying heavily on the traditional color trifecta of purple (justice), green (faith), and gold (power). To achieve this luxurious look, begin by applying a highly saturated, glitter-packed base coat in purple or emerald green. Many designs in this collage utilize a mixed media approach, pairing a full coverage glitter polish with gold foil accents. For the perfect foiled look, apply a specialized foil transfer gel over the cured base color, allow it to cure until it reaches a tacky state, and then gently press gold transfer foil or gold leaf onto the nail surface, randomly covering about 50-70% of the area for a chipped, distressed, high-end texture. Expert advice dictates that for maximum visual impact, use a coffin or long square nail shape, as the expansive canvas is necessary to host the complex, multi-layered details required for this carnival theme.
The true artistry lies in the intricate embellishments, primarily focusing on the masquerade mask motif and statement jewels. For the mask designs (seen prominently on the middle or ring fingers), utilize a highly opaque gold gel paint and a ultra-fine detailing brush (size 000 or a liner brush) to freehand the delicate outlines, swirls, and filigree. Alternatively, high-quality gold stamping plates featuring lace or mask patterns can save significant time while maintaining precision. Secure large, emerald-cut or cabochon rhinestones—either deep purple or vivid green—using a heavy-duty gem adhesive or builder gel to create a secure setting, mimicking expensive jewelry. These large gems often serve as the focal point, surrounded by smaller, complementary colored microbeads or pearls that simulate strings of Mardi Gras beads draped across the nail, adding essential three-dimensional depth and sparkle. Don’t forget the symbolic Fleur-de-lis, which can be applied as a gold decal or sculpted element on an accent nail, often against a contrasting white or glittery background.
To ensure these show-stopping designs last through the duration of Carnival celebrations, proper sealing is paramount, especially when working with heavy 3D elements. After securing the gems and completing all line work, float a high-quality, non-yellowing, no-wipe gel top coat over the entire design, being meticulous about capping the free edges and smoothing over the gold foil to prevent lifting. For the large, bezel-set jewels, carefully apply the top coat around the base of the setting without coating the top of the stone itself, which could dull its brilliance. When dealing with micro-beads or pearls, a second, thicker layer of top coat can help encapsulate them fully. This complex, rich style is not just nail art; it is wearable jewelry that commands attention and perfectly fits any celebratory or luxurious occasion.
10 Glam PROM NAILS
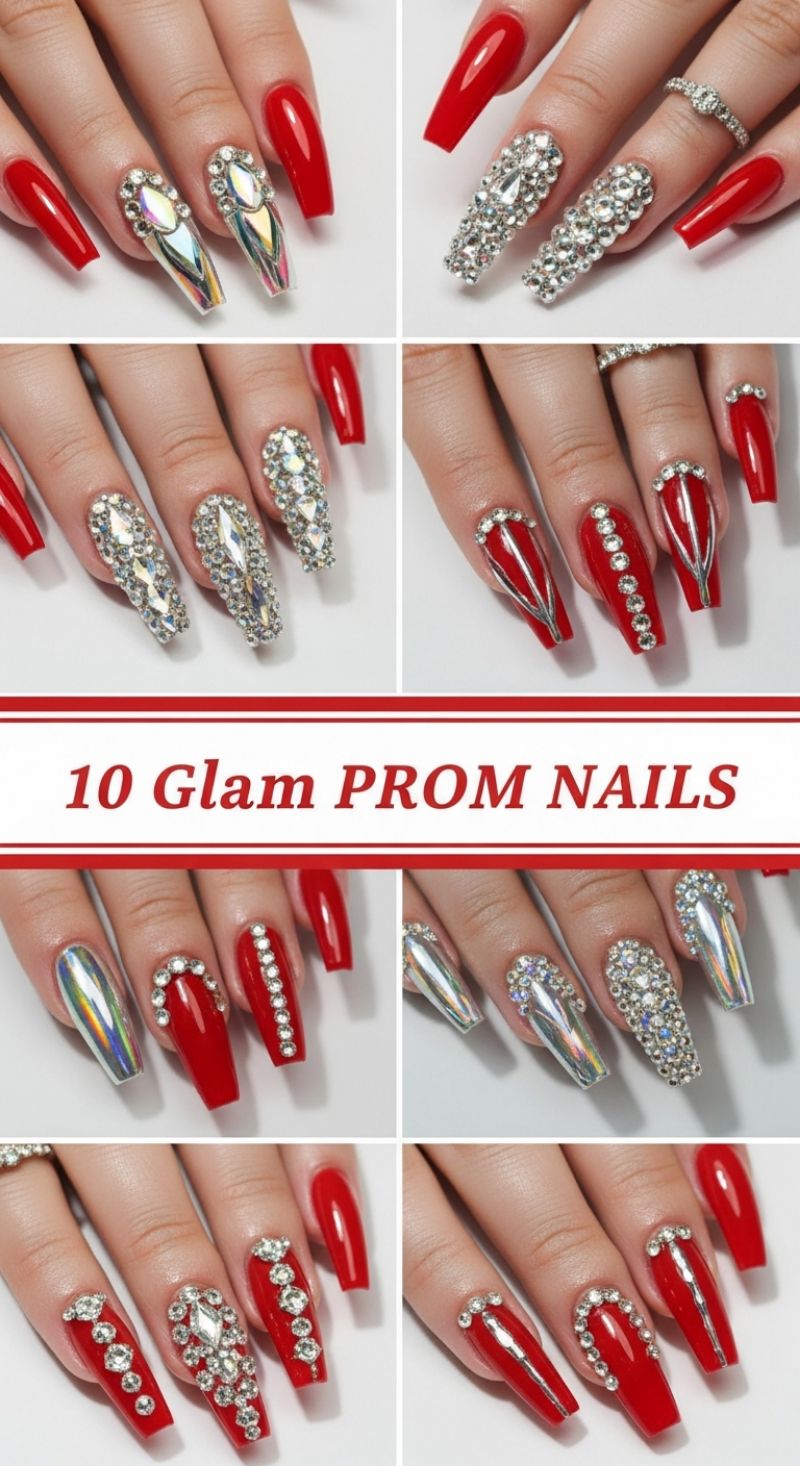
When a major formal event like prom, a wedding, or a gala demands show-stopping glamour, the ultimate accessory is a set of highly embellished, long coffin nails. This collection showcases ten variations of the ‘Glam Prom Nail,’ characterized by a bold, saturated red base color paired with copious amounts of clear and iridescent rhinestones, often complemented by striking metallic accents. To achieve this high-impact look, start with a solid foundation—either sculpted acrylic or hard gel extensions—to ensure the extreme length and coffin shape are durable. The visual elements vary from full-coverage pavé (where the entire nail is blanketed in multi-sized crystals) to structured linear designs, such as vertical gem columns or striking V-shapes outlined in silver stones. Expert advice for this design centers on symmetry and balance; typically, only two to three nails per hand carry the heavy embellishment, leaving the remaining nails in a high-gloss, solid red to prevent the look from becoming overly cluttered.
Mastering the application of 3D rhinestones is essential for longevity and sparkle. After preparing the nails and applying a cured, highly pigmented red base coat, use a specialized rhinestone adhesive gel (or high-strength builder gel) for setting the crystals. For large accent gems, like the elongated, multi-faceted AB (Aurora Borealis) stones featured in several designs, create a small, thick mound of adhesive on the nail surface before gently pressing the gem into place. For the smaller pavé technique, apply a thin layer of gem glue over the designated area, then use a wax-tipped pencil or dotting tool to pick up and strategically nest the stones, ensuring there are no gaps between them. Additionally, integrate metallic accents by using chrome powder—either silver or holographic—on an accent nail before applying any gems. This technique creates a mirror-like sheen that dramatically contrasts with the deep red base and amplifies the overall dazzling effect.
Finalizing and maintaining these highly dimensional nails requires careful technique. After all gems are firmly secured and cured, the most crucial step is sealing without dulling the crystals. Use a non-wipe top coat and a thin liner brush to meticulously seal around the base and edges of every single rhinestone, creating a border to lock them in place. Avoid brushing the top coat directly over the facets of the stones, as this will mute their reflection and sparkle. Because this design utilizes extreme length and 3D elements, gentle handling is necessary. To keep the look fresh, advise clients that while these nails are highly durable, daily activities that involve excessive impact (like rigorous cleaning or opening heavy doors) should be approached with caution to prevent gem loss or structural damage. For year-round adaptability, swap the classic prom red for seasonally appropriate hues like deep sapphire blue, emerald green, or classic midnight black, maintaining the same level of over-the-top crystal glamour.
9 Dreamy PROM SETS
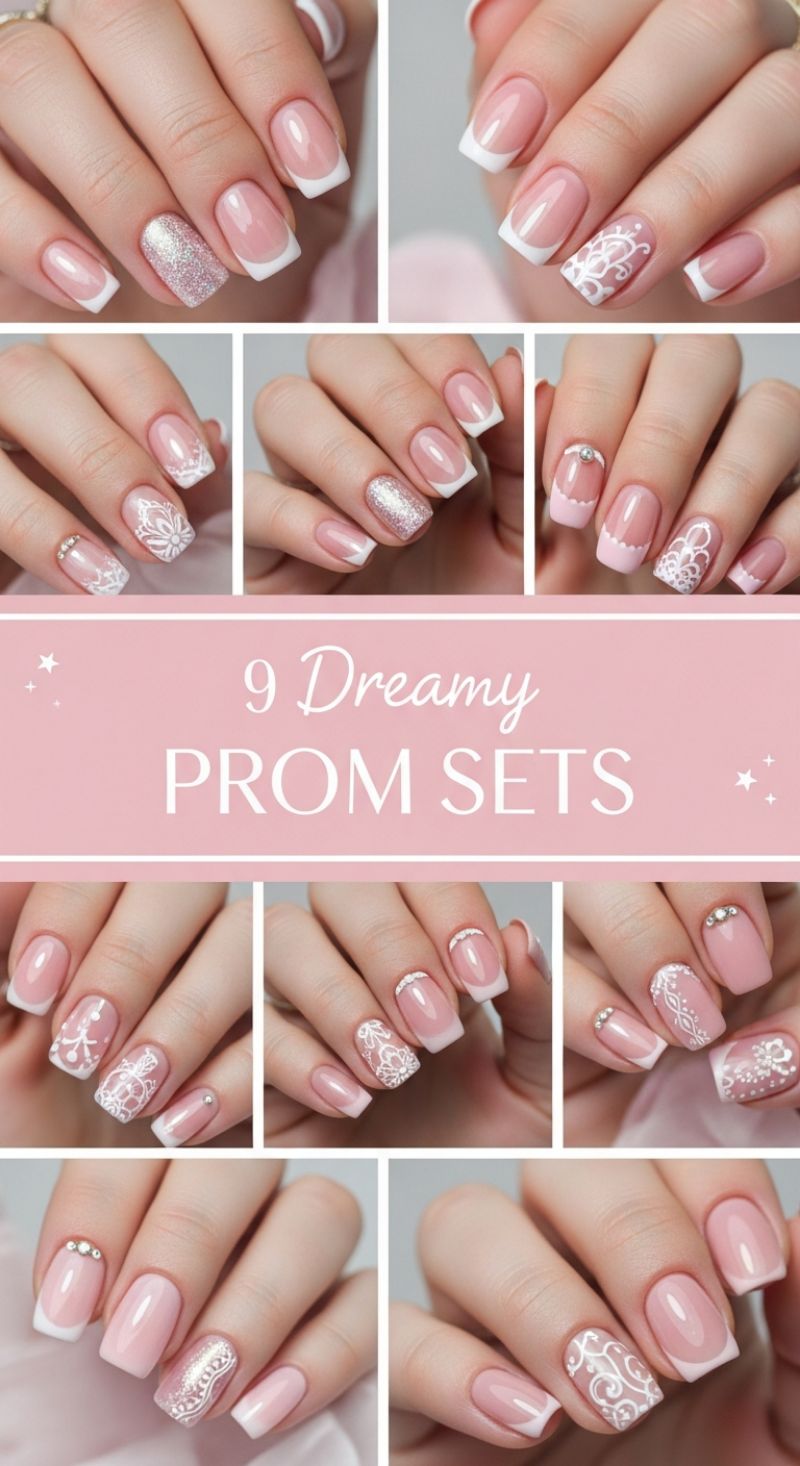
These nine dreamy prom sets offer a sophisticated, romantic take on the classic French manicure, blending soft pink and nude bases with intricate white lace detailing and subtle sparkle. To recreate this elegant foundation, begin by perfecting your canvas: shape the nails into a soft squoval or medium square shape, providing enough surface area for the detailed art without being overly dramatic. Apply a sheer, milky pink or nude builder gel to the entire nail plate to establish a structurally sound and glossy base—this ensures the delicate designs pop against a healthy, glowing nail bed. The key to the ‘dreamy’ look is achieving a flawless smile line for the French tips; use a highly pigmented, crisp white gel polish and a steady hand or a specialized French tip stamper to create clean, medium-sized tips. Ensure the sheer base color remains prominent, as the subtle contrast is vital to this feminine aesthetic. Cure thoroughly before moving on to the intricate artwork, making sure the overall look is balanced and not too opaque.
The artistry in these designs centers heavily on fine, white filigree and strategic placement of glitter accents. For the lace look, you will need a pot of thick, ultra-pigmented white gel paint and a fine detail brush (000 or a striping brush). Whether you choose to freehand delicate scrolls, floral patterns, or opt for precision stamping plates, the design should be concentrated on one or two accent nails, such as the ring finger and occasionally the index finger. Start with thin lines, building up the design carefully rather than applying thick paint, which can flood the details or fail to cure properly. For the glamorous sparkle featured in several sets, replace one entire nail application with a fine silver or holographic glitter gel polish, applying two coats for dense coverage. Expert tip: If freehanding lace feels daunting, consider using white nail decals; seal them meticulously with a thin layer of base coat before applying the final top coat to prevent lifting.
Completing these prom-ready looks involves adding dimension and secure embellishments. Many of these sets incorporate small rhinestones or pearl accents placed either at the base of the nail near the cuticle (a ‘reverse moon’ effect) or strategically along the French smile line. To ensure these gems stay put through a night of dancing, place a small, clear bead of thick builder gel or specialized rhinestone glue where the gem will sit, press the rhinestone into the gel, and flash cure. Once all elements are in place—the sheer base, the crisp tips, the detailed lace, and the secure gems—encapsulate the entire design with a high-quality, non-wipe top coat. Pay extra attention to ‘capping’ the free edge and sealing around the base of any applied rhinestones. A glossy, durable top coat is essential for magnifying the sheer base and ensuring the intricate white art maintains its sharp contrast and shine throughout the event, making this the perfect sophisticated design for any formal occasion.
Expert 5 SALON NAILS
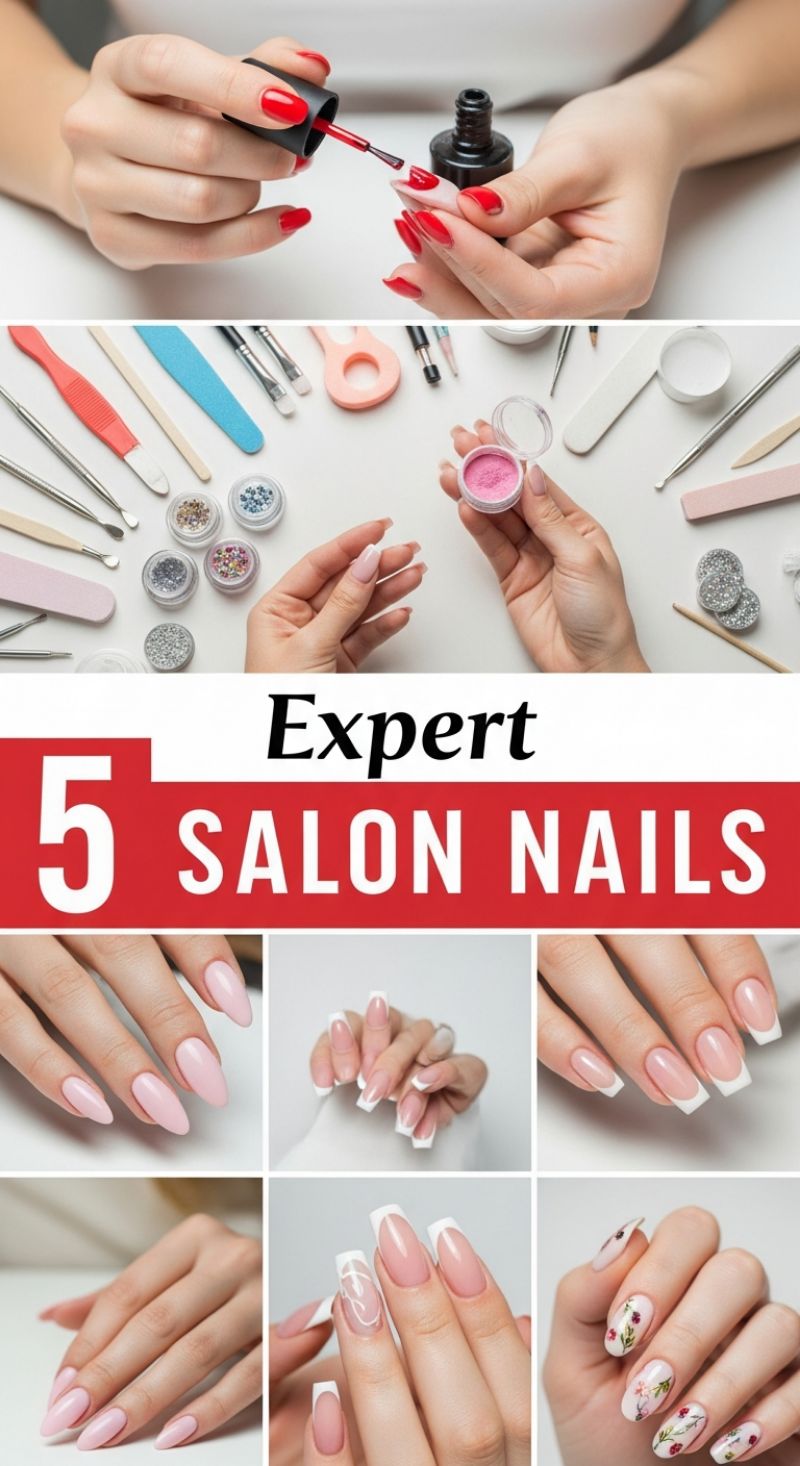
Achieving truly professional, salon-quality nails requires not only artistry but also meticulous preparation and the right tools, as demonstrated by the array of implements shown. To replicate the flawless finishes seen here, begin with essential nail preparation: use buffers and files to establish your desired shape—such as the elegant, elongating almond shape or the structured square tip prominent in the featured designs. Thorough cuticle care, utilizing pusher tools and nippers, ensures a clean canvas, which is crucial for preventing lifting and extending the life of your manicure. For any enhancement, whether using traditional gel polish (like the vivid red application shown) or dip/acrylic systems (suggested by the pink powder and glitters), proper foundation application—including dehydration and bonding agents—is non-negotiable. Expert advice suggests always applying polish in thin, even layers, curing fully between coats, and capping the free edge to seal the color, ensuring maximum durability and a high-gloss finish.
One of the most classic and sought-after looks showcased is the French Manicure, presented in multiple forms from crisp, squared tips to softer, rounded edges. Mastering the French tip relies on perfect symmetry and a clean ‘smile line.’ To execute this at home, start with a sheer nude or pink base coat (which mimics the natural nail bed color) over the entire nail. For the white tip, use a fine liner brush for precision, guiding the brush to create a consistent, curved line from one side wall to the other. Alternatively, for speed, specialized French tip guides or a steady hand dipped in white polish can be used. For an advanced variation, like the one featuring subtle white line art or swirls over the nude bed, utilize a detail brush and highly pigmented white gel polish. Cure each step meticulously before sealing the entire design with a non-wipe top coat, which elevates the manicure to salon-level brilliance.
Beyond the classic enhancements, this guide highlights elegant monochromatic and intricate art designs. The sleek, almond-shaped nails coated in soft nude pink illustrate how simple elegance can be achieved by focusing purely on shape and color consistency. When choosing a nude shade, select one that complements your skin tone—cooler tones often benefit from dusty rose shades, while warmer tones pair well with peachy nudes. Finally, the delicate floral design offers a fantastic opportunity to integrate seasonal flair. These tiny, watercolor-like flowers are often created using the ‘one-stroke’ painting technique or by dabbing acrylic paint onto the nail with a fine detail brush and dotting tool, building petals layer by layer. For beginners, high-quality, thin floral decals applied over a cured base layer, then sealed, can yield equally stunning and intricate results, transforming your manicure into wearable art.
12 Simple Summer Manis
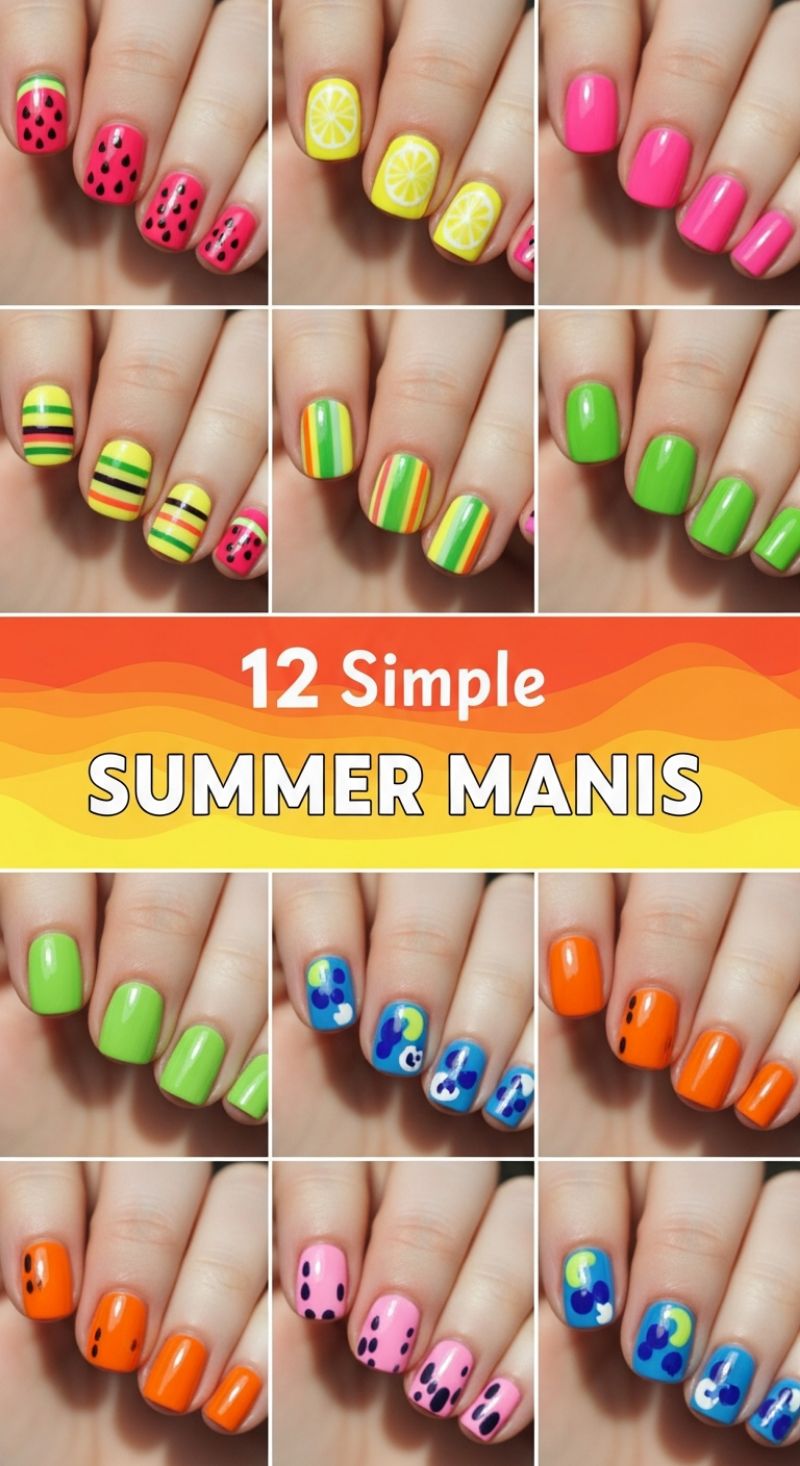
These vibrant designs capture the playful spirit of summer, ranging from crisp fruit motifs to bold color blocking and abstract dot work. To recreate the iconic fruity looks, start with the Watermelon mani: apply a hot pink base, and once dry, use a small dotting tool dipped in black polish to create irregular seeds. For the rind, apply a coat of bright green at the tip, followed by a thin arc of deeper green or white for separation. Similarly, the Lemon Slices require a sunny yellow base; use a thin nail art brush and white polish to paint the circular slice outline and the internal segments radiating from the center. For the high-impact solid colors—the brilliant Neon Pink and the Glossy Lime Green—ensure flawless coverage by applying two to three thin coats over a sticky base coat, allowing full drying time between layers to maximize color depth and avoid streaks. Always finish these clean looks with a super-glossy top coat to enhance the vibrancy and protect the edge.
Mastering the perfect stripe requires precision tools. For the horizontal multicolored look (yellow base with thin red, green, and black stripes), use specialized striping tape to block off areas, or utilize an ultra-fine detail brush. Apply one color stripe at a time, ensuring each is dry before moving on to the next. The thicker vertical stripes (featuring lime green, orange, and yellow) offer a slightly easier application; if using striping tape, apply the base color (e.g., lime green) first, place the tape where you want the color dividers, and then brush the contrasting colors (orange, yellow) between the tape lines. Remove the tape immediately while the polish is still slightly tacky to guarantee a clean break, preventing the polish from peeling upon removal. This technique is crucial for maintaining the crisp, graphic lines that make these designs so visually appealing for the season.
For a more abstract and whimsical approach, focus on the various spot and blob designs. The playful orange mani, accented with small black dots, or the bright pink nails featuring large, irregular dark purple/black spots, are effortlessly achieved using various sizes of dotting tools. The key here is randomness: aim for varying sizes and uneven distribution to mimic animal prints or organic fruit seeds. For the detailed Abstract Blue Blob design, layer your colors for dimension. Start with a light blue base, use a medium dotting tool to add larger, darker blue or purple organic shapes, and then finish with small, strategically placed white or neon yellow/green blobs to suggest movement and contrast. Seal all intricate designs by floating a generous coat of quick-dry top coat over the entire nail, ensuring you “cap” the free edge to lock in the artwork and extend the life of your fresh summer manicure.