Find the ultimate Valentine’s Day nail designs for 2024! Browse 65+ iconic looks, from classic red hearts and subtle pink ombre to edgy black styles and fun Disney art. Get inspired now!
10 Chic Valentine Designs
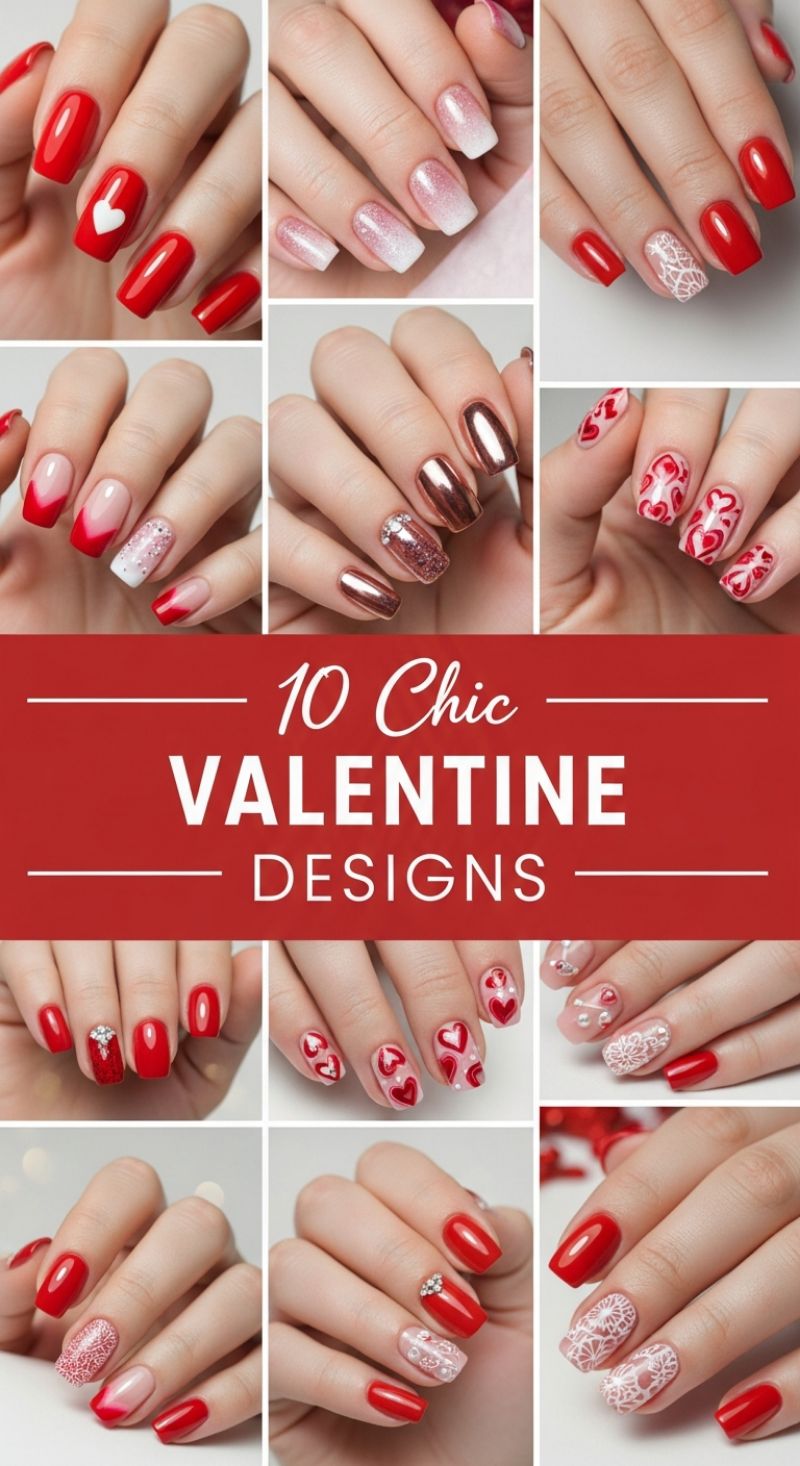
This curated collection highlights ten stunning and romantic designs perfect for Valentine’s Day, utilizing a classic palette of vibrant red, soft white, nude pinks, and trendy rose gold accents. The foundational element of most of these looks is the high-gloss, passionate red polish, which sets the mood. For the simplest yet most striking design, choose a classic full-coverage red manicure, reserving one nail for a crisp, white heart accent. To achieve this, after curing your red base coat, use a fine detail brush or a specialized dotting tool to carefully paint the heart shape. For those favoring a more subtle yet chic approach, explore the modern French manicure variations, such as the sharp red V-tips applied over a natural nude base, or the elegant white and pink glitter ombré that fades flawlessly from the cuticle to the tip, giving a soft, angelic shimmer. Expert application requires careful blending with a makeup sponge for the ombré technique, ensuring no harsh lines, followed by a durable topcoat to encapsulate the glitter and maintain a smooth finish.
To elevate your manicure, incorporate intricate patterns and bold metallics. The collection features sophisticated white lace and mandala designs, which are best achieved using high-quality stamping plates and highly pigmented white stamping polish over a nude or deep red background. This delicate detailing instantly adds a vintage, romantic texture. Alternatively, embrace the playful side of the holiday with all-over heart patterns. These designs layer various shades of red and pink hearts, some solid and some outlined, against a sheer, milky-pink base. When recreating this look, use multiple sizes of dotting tools for variety and precision, ensuring each heart is fully cured before attempting the next layer to prevent smudging. For the ultimate statement, the metallic chrome design utilizes a highly reflective rose gold powder, typically rubbed onto a cured no-wipe top coat. This mirror-like finish is often paired with an accent nail covered entirely in coordinating rose gold or holographic glitter, secured by carefully placed mini-rhinestones or crystal detailing at the base of the nail using specialized builder gel for longevity.
Regardless of the design complexity, meticulous preparation is key to ensuring your Valentine’s manicure lasts. Start with a clean, prepped nail bed and use quality base and color coats. When applying rhinestones, utilize a strong adhesive or a drop of clear builder gel to secure the embellishment firmly before curing, preventing premature loss. These designs offer immense versatility; if you prefer a cooler tone, swap the vibrant red for a rich burgundy or deep wine shade. Conversely, lighten the look by replacing red with pale pinks or soft mauves. Whether you choose the striking simplicity of the chrome finish, the romance of the lace detailing, or the classic charm of the heart motifs, sealing your final masterpiece with a resilient, high-shine UV topcoat will ensure your manicure remains flawless and chip-free throughout your romantic celebrations.
15 Fresh FEB Nail Inspo
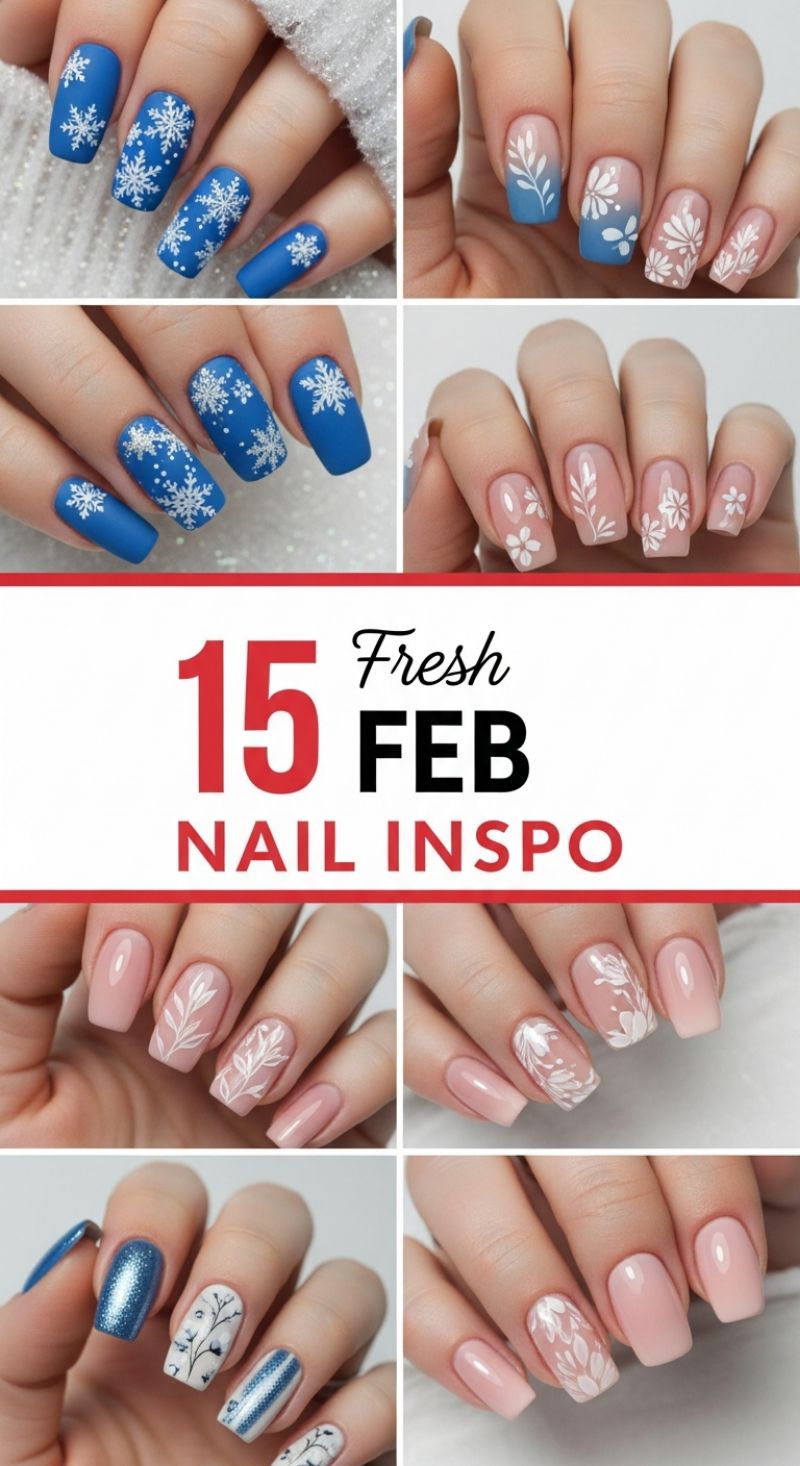
The designs featured here capture the perfect aesthetic for the late winter and early spring transition, offering a beautiful blend of frosty cool tones and budding romantic florals, ideal for a refined Valentine’s Day look that moves beyond traditional hearts and reds. The primary focus is on sophisticated simplicity, achieved through delicate, hand-painted white botanical elements layered over a sheer, natural nude or blush pink base. These white patterns—ranging from subtle leafy vines running along the cuticle to clusters of small, five-petaled flowers—are masterful examples of utilizing negative space to create dimension. To recreate the elegant floral look, ensure your base coat is a high-quality milky pink or sheer jelly polish, which mimics the natural nail tone. Use a finely-tipped striping brush (00 or 000 size) and a highly pigmented white polish or specialized gel paint. The key to success is applying minimal pressure and allowing the pattern to look airy and translucent rather than dense, which creates an elegant, lace-like, and distinctly romantic effect.
For those preferring a slight pop of cool-weather color while maintaining the soft, romantic feel, incorporate the element of muted blue as seen in the collage. In some examples, a soft cornflower blue is used as an accent nail, often blended into the nude base via an ombre or gradient effect before the white floral details are added. This blue provides a chic contrast, especially when paired with a highly metallic silver or subtle holographic shimmer on another accent finger, adding seasonal complexity. When executing the white artwork, you can practice freehand detailing, or for perfect consistency, utilize high-quality stamping plates featuring fine line-art floral patterns. A highly recommended technique involves applying a matte topcoat *before* painting the white design, then carefully sealing only the white details with a glossy topcoat; this subtle dimensional contrast elevates the nail art, giving the appearance of textured lace appliqués.
While the soft florals define the romantic aesthetic, the inclusion of the bold, matte cobalt blue nails adorned with crisp white snowflakes provides a striking alternative for those celebrating Valentine’s Day in colder climates or preferring a statement winter look. If choosing this palette, the matte finish is crucial for achieving that velvety, sophisticated texture. Regardless of the design chosen, the overall structure here favors a medium-length, square-oval (squoval) shape, which provides an updated, soft canvas for both the botanicals and the snowflakes. Final expert advice: intricate nail art demands impeccable preparation. Prior to applying the base color, ensure cuticles are flawlessly manicured and hydrated, as these detailed designs draw the eye directly to the health of the entire nail bed. Investing in a quick-drying cuticle oil will help maintain the fresh, polished appearance of these intricate designs throughout the month of February.
8 Chic Short Nail Designs for Valentine’s Day
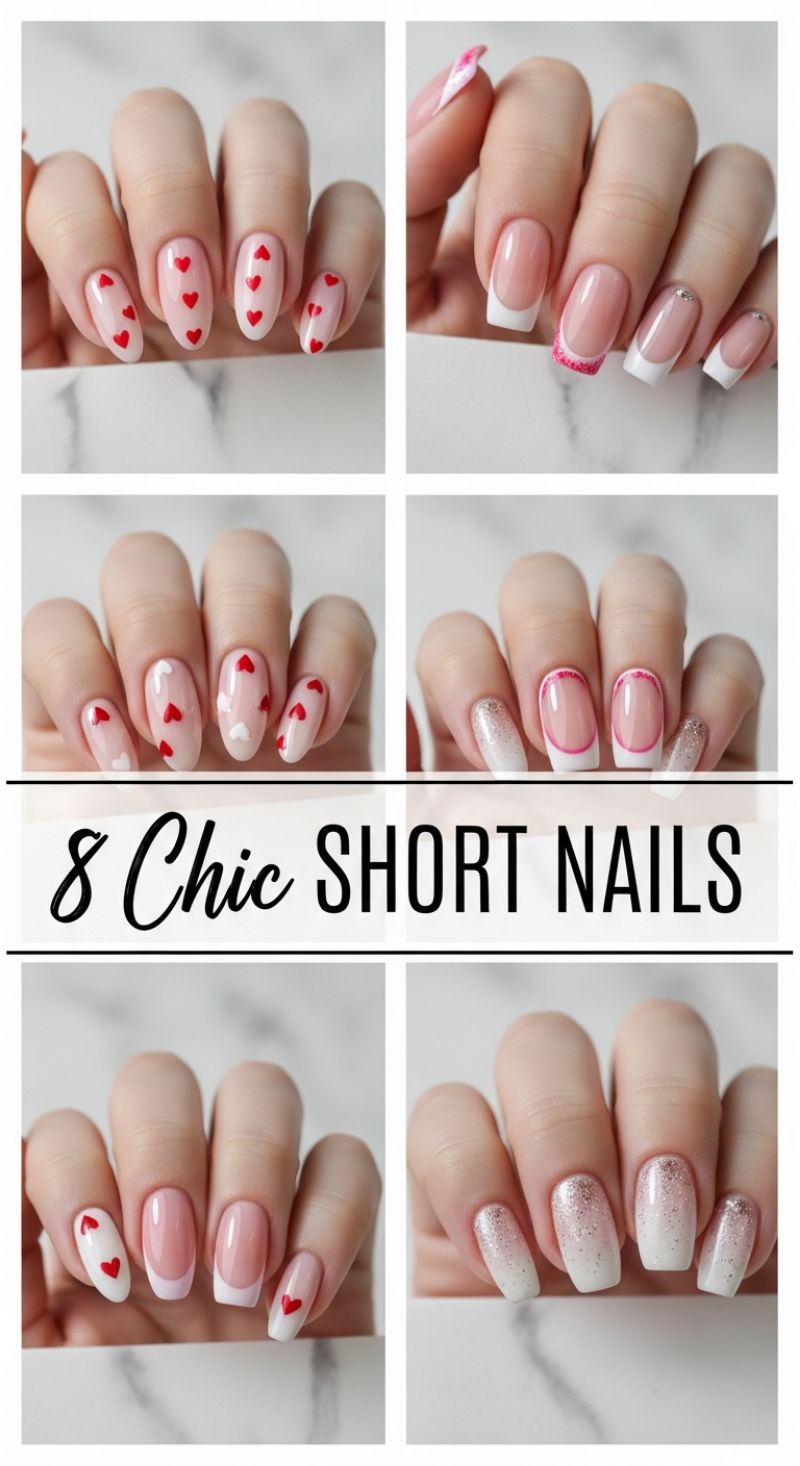
Don’t let the assumption that complex nail art requires lengthy extensions limit your Valentine’s Day glamour. This collection focuses on eight distinct, highly chic designs tailored specifically for short to mid-length nails, prioritizing classic shapes like the soft almond and tailored squoval. The aesthetic successfully merges traditional romantic motifs—hearts and varying shades of pink and red—with elevated, clean techniques, ensuring the overall look remains sophisticated and manageable. These styles are built upon sheer nude or pale pink bases, offering a clean canvas that makes the small, precise details stand out without overwhelming the natural nail, making them perfect for professional settings or everyday wear leading up to the holiday. The versatility across these designs means you can mix and match techniques, such as pairing the full coverage red heart pattern (Top Left) on one hand with a subtle glitter ombré accent nail (Bottom Right) on the other, creating a personalized, curated look.
To recreate the popular heart-themed looks, precision is key. For the scattered heart patterns (Top Left, Mid Left), use a fine-tipped dotting tool or an ultra-thin striping brush. Apply two small dots of color (red or white) next to each other, and then drag the brush down quickly through the center point to form the bottom tip of the heart shape. For the simplest approach, featured in the bottom left, focus on placing just one small, perfectly centered heart near the tip or cuticle of an accent nail, typically the ring or index finger, leaving the rest of the nails in a flawlessly executed French manicure. For the French styles, we see several contemporary twists on the classic white tip. Experiment with the ‘reverse’ or ‘floating’ French look (Mid Right), where a delicate, vibrant pink or red line traces the border of the nail bed, offering a playful yet precise pop of color where the nude base meets the skin. Alternatively, modernize a traditional tip by incorporating a metallic silver or pink glitter tracing line just above the white tip (Top Right), adding texture and sparkle without compromising the elegant structure of the French design.
If you prefer high-impact sparkle over intricate artwork, the glitter gradient or ombré design (Bottom Right) is an ideal choice. To achieve this smooth transition, start with a white or highly pigmented white glitter polish concentrated at the tip. While the polish is still tacky or wet, use a makeup sponge to lightly dab a soft pink or champagne micro-glitter polish, starting from the cuticle line and fading it downwards. This technique ensures a seamless fade, avoiding any harsh lines. The final step for all these short nail designs is a high-quality, high-shine top coat. Since short nails require less structural reinforcement than long extensions, focusing on a rapid-cure, non-yellowing topcoat will maximize the visual depth of the nude base and seal the delicate artwork, ensuring your Valentine’s Day manicure lasts well beyond the 14th.
7 Romantic LOOKS
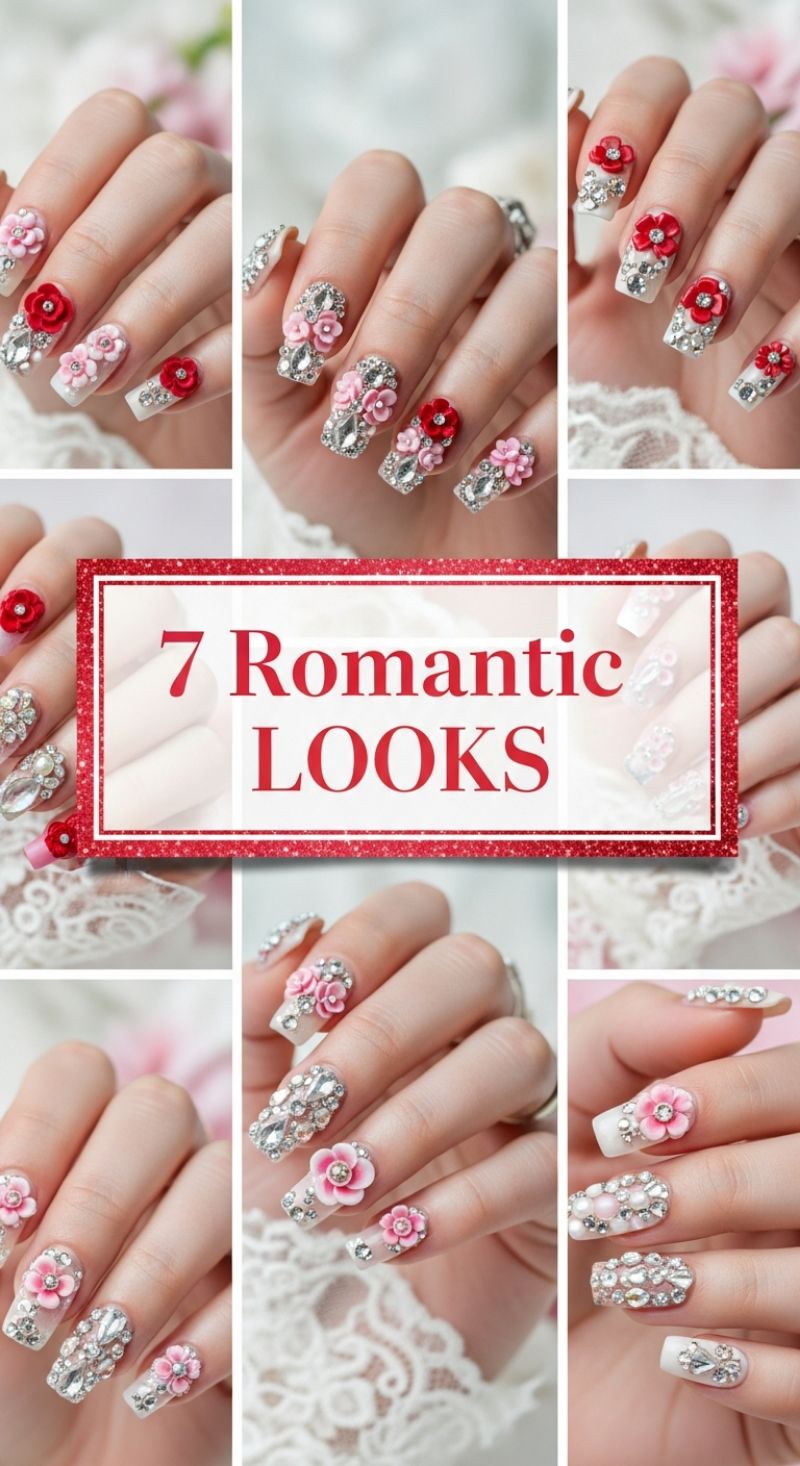
The “7 Romantic Looks” showcased here are the epitome of Valentine’s Day glamour, transforming nails into dazzling, dimensional works of art. This style elevates the classic romantic manicure by incorporating intense 3D elements, primarily sculpted flowers in vibrant reds and soft pinks, contrasted against a crisp white or sheer nude base. The foundation of these looks is maximalist crystal application. Instead of subtle accents, these designs feature full coverage or clustered arrangements of large, faceted rhinestones and often teardrop or marquise-shaped gems, creating a luxurious, almost bridal effect. This level of ornamentation requires a sturdy nail platform, making medium to long square or coffin shapes ideal for balancing the heavy embellishments. The combination of delicate florals and brilliant crystals ensures a head-turning finish perfect for a spectacular Valentine’s date night.
Achieving this high-relief, dimensional look starts with selecting the right materials. The key to the prominent floral features is 3D acrylic sculpting. Using a specialized 3D acrylic powder (available in various shades of pink and red) and monomer, sculpt small, layered petals directly onto the cured base color. Alternatively, for less experienced users, pre-made 3D flower decals can be adhered using strong resin glue. For the extensive crystal coverage, proper adhesion is critical for durability. Skip standard nail glue; professionals use thick builder gel or specialized rhinestone glue, curing the entire design under a UV/LED lamp after all gems are placed. For a secure setting, use small dots of gel around the base of the larger crystals (known as “capping” or “embedding”) to lock them in place without dulling their shine. Remember to vary the size and shape of the crystals—mixing rounds, squares, and large statement stones—to achieve that high-impact, clustered diamond appearance.
While undeniably stunning, these highly embellished manicures require thoughtful maintenance. Due to the raised elements, they are prone to snagging, so sealing the edges and ensuring every stone is fully secured is paramount. For daily wear, applying a thin coat of topcoat around the base of the design (avoiding the facet tops of the largest stones) can enhance longevity. For customization, if the full-set crystal approach feels too intense, reserve the heaviest embellishment for one or two accent nails (such as the ring and middle fingers) and use simple, large 3D flowers on the remaining nails. Expert tip: Ensure the base polish underneath the crystals is completely opaque, especially white, to maximize the light reflection and overall sparkle of the gems, giving the design maximum impact against any romantic backdrop.
12 Pretty Pink Nails
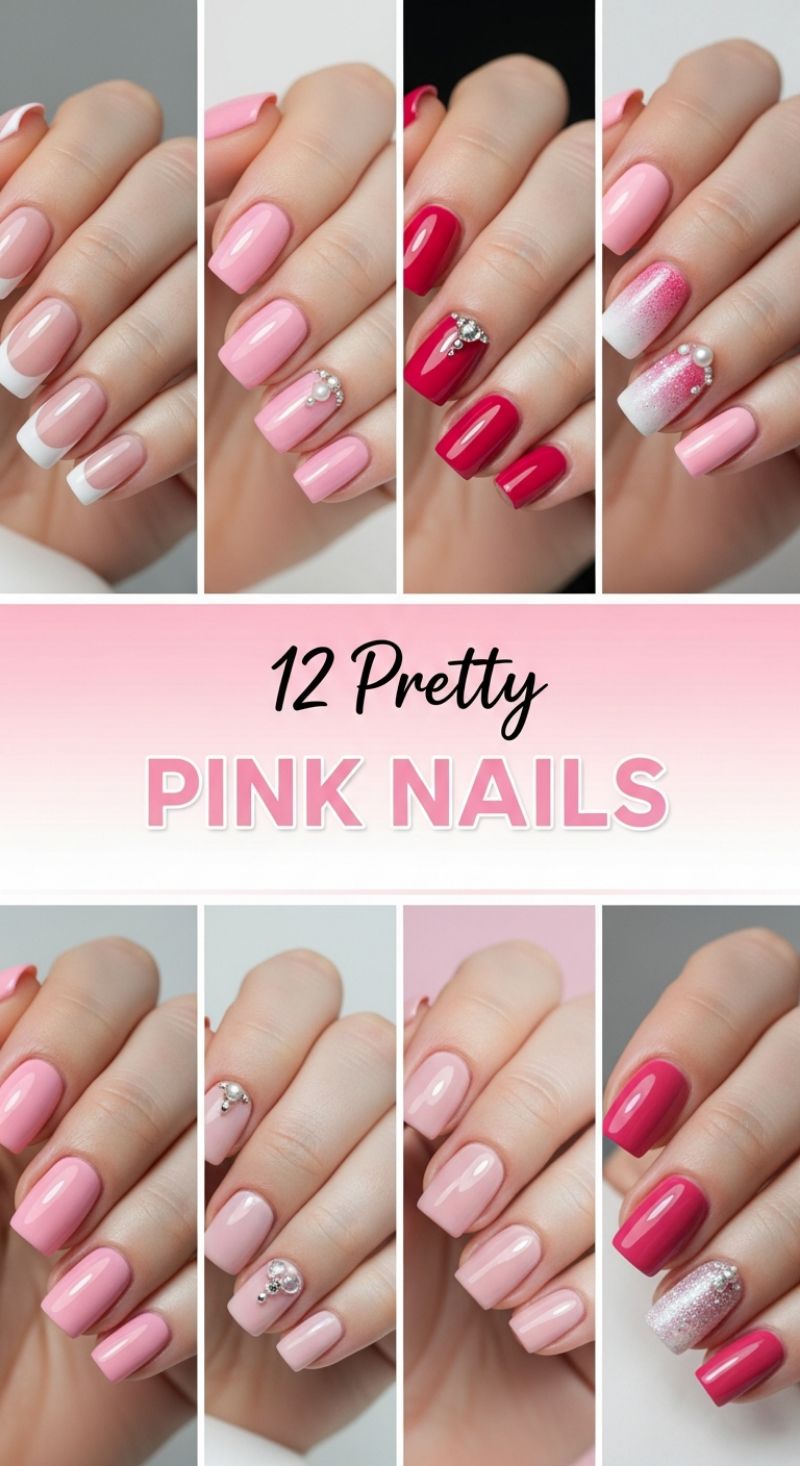
Pink is the undisputed champion of Valentine’s Day manicures, symbolizing sweetness, romance, and soft femininity. This gallery of 12 looks offers a spectrum of pink possibilities, ranging from subtle nude pinks perfect for a classic aesthetic to dazzling fuchsia tones ready for a dramatic evening out. To recreate the foundational looks seen here, start by selecting your core pink shade—whether it’s a sheer, milky polish for a natural look or a bubblegum pink for high impact. For the classic French tip variation displayed, apply a sheer pink or clear nude base coat, then use a striping brush or French tip guides to carefully paint crisp white tips, ensuring a perfect smile line. For added sophistication, choose a glossy top coat to enhance the depth and shine of the solid colors, making sure to “cap” the free edge of the nail to prevent premature chipping, a vital step for any flawless, long-lasting manicure.
To move beyond the solids and incorporate stunning visual complexity, focus on the accent techniques featured, such as ombre, glitter, and precise bling placement. The delicate pink and white ombré gradient is achieved by lightly sponging two colors onto the nail, starting with white at the tip and blending pink down toward the cuticle. For the vibrant hot pink designs, incorporate a striking glitter accent nail (like the silver sparkle seen) by applying a layer of topcoat or builder gel and then sprinkling or laying a fine glitter over the wet product before curing. When applying rhinestones or pearls—a quintessential romantic detail—use a professional-grade nail glue or a small dot of thick gel top coat on the desired placement area. Secure the gems using wax pencil or tweezers, setting them firmly before applying a top coat around the base of the jewel (avoiding covering the facet) to lock the sparkle in place without dulling its shine.
Expert advice dictates that color choice can define the romantic tone of your holiday look. If you seek a soft, angelic vibe, opt for the pale blush and nude pinks shown in the center columns, often accented with simple pearl embellishments. If your Valentine’s plan involves high glamour, lean into the bold, deeply saturated fuchsia and cherry pinks. When working with these brighter, heavily pigmented polishes, two thin coats are always superior to one thick coat to prevent bubbling and ensure a smooth, even application. Finalize every design with a high-quality, UV-protective top coat to shield the intricate artwork and maintain the manicure’s vibrancy, guaranteeing that your gorgeous pink nails stay picture-perfect throughout all your Valentine’s Day festivities and beyond.
9 Fun Disney V-Day Sets
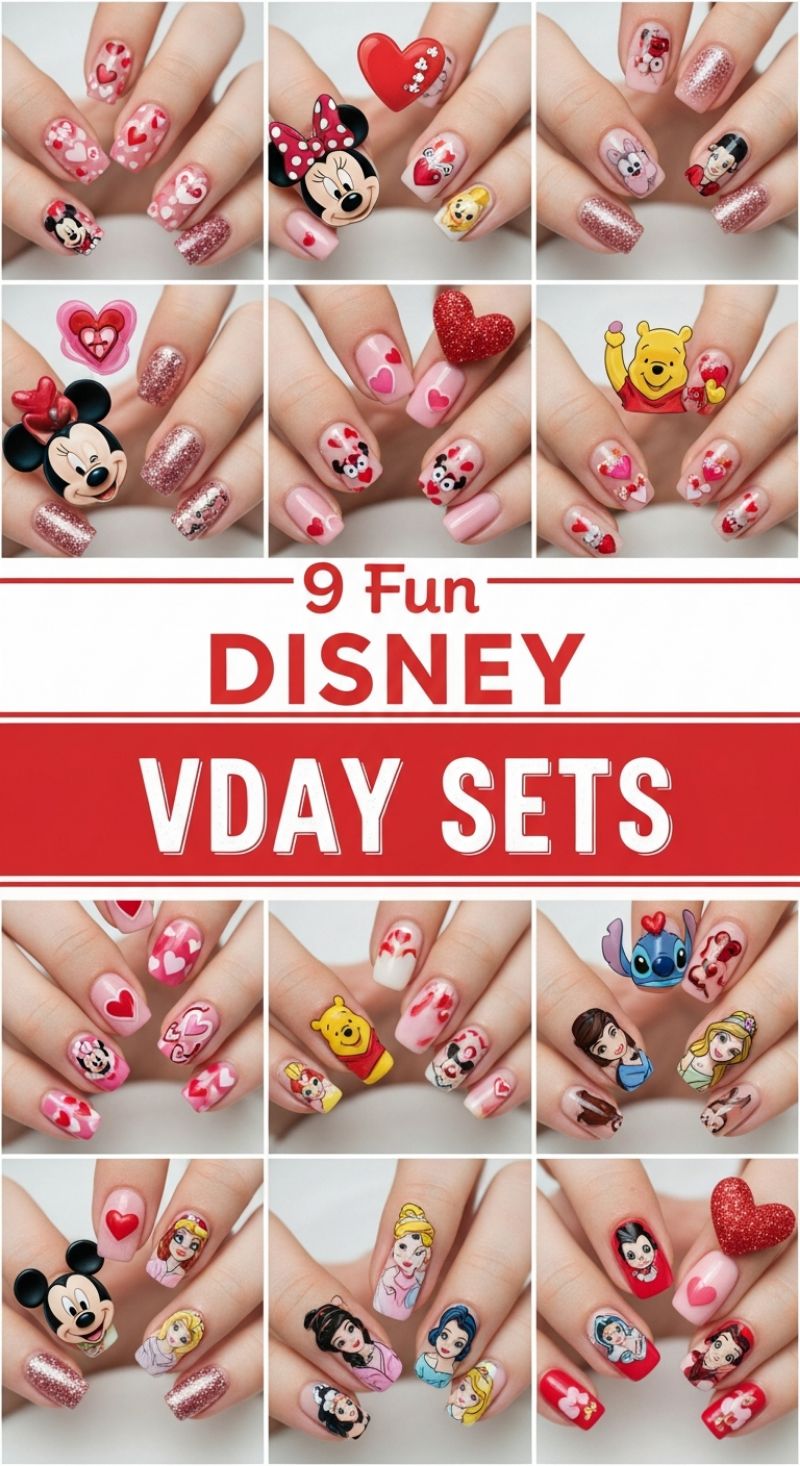
Incorporating beloved Disney characters into your Valentine’s Day manicure adds a whimsical, personalized touch to traditional V-Day reds and pinks. To achieve the intricate artistry seen in these 9 sets, precision is paramount. For complex character portraits, such as the detailed faces of the Disney Princesses (Cinderella, Snow White, Belle) or the vibrant Stitch and Winnie the Pooh designs, most nail enthusiasts will find success using high-quality waterslide decals or stamping plates specifically designed for these characters. If you choose the freehand route, utilize a fine-detail brush and highly pigmented acrylic paint over your cured gel polish for sharp, clean lines. The background base typically involves soft pastels like milky pinks and sheer nudes, allowing the colorful character art and vibrant heart accents to truly pop. Always start with a perfectly prepped nail and ensure all base layers are fully cured before applying any decals or heavy artwork to guarantee longevity.
Integrating the classic Valentine’s motifs—hearts and glitter—is essential for tying the design together. Notice how the glitter is often reserved for accent nails, typically the ring or pinky finger, using a finely milled rose gold or ruby red sparkle to balance the complexity of the character nails. For the heart designs, simple techniques like dotting tools can create small, symmetrical hearts, while vinyl stencils or specialized heart-shaped embellishments (as seen in the 3D Minnie Mouse and glitter heart sets) elevate the texture. When applying large 3D charms, like the oversized Minnie or Pooh figures, secure them firmly using a thick layer of builder gel or specialized charm adhesive, curing thoroughly beneath the UV lamp. This prevents snagging and ensures the heavy accessory stays put throughout the holiday celebrations. When using clear transfer gels for decals, be meticulous in ensuring a bubble-free application before sealing.
The beauty of these Disney V-Day sets lies in their customizable nature. While classic pairs like Mickey and Minnie are a default favorite, don’t hesitate to select your personal Disney champion and build the color scheme around them. For example, if you choose Snow White, incorporate touches of deep primary red alongside the soft pink V-Day background. The most successful sets coordinate two main elements: the intricate character face (usually on the accent nail) and a corresponding character motif (like Minnie’s bow or Pooh’s honey pot) distributed among the remaining fingers, alternating with simple hearts or glitter. Finish every nail with a durable, high-shine gel topcoat, paying special attention to fully encapsulating the edges of all decals and surrounding the base of any 3D elements to protect your intricate, iconic Valentine’s artwork from chipping.
6 Clean DIP POWDER TRENDS
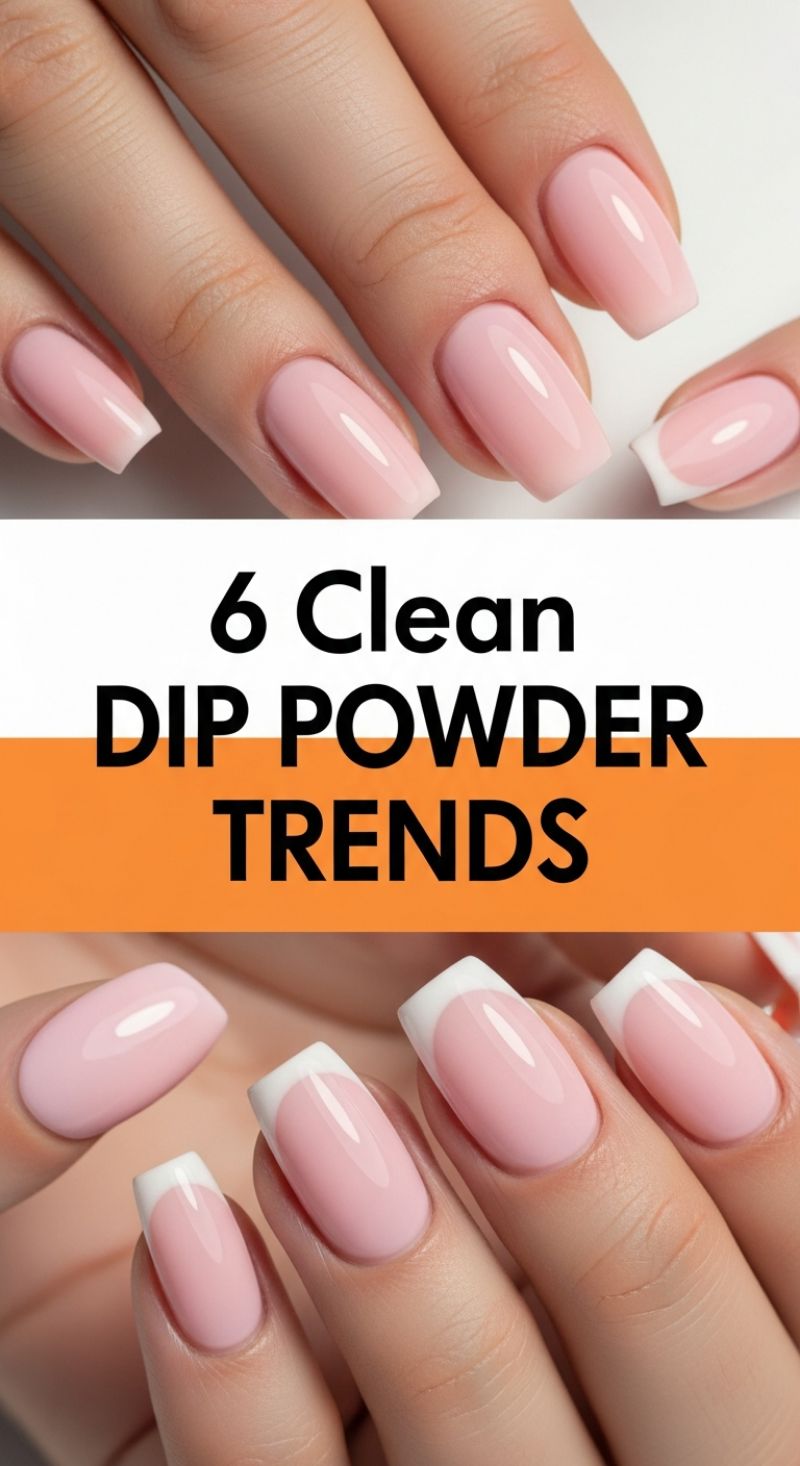
Clean dip powder manicures are the epitome of effortless elegance, making them a perfect, durable choice for Valentine’s Day celebrations. The image showcases two essential “clean” looks achievable with dipping powder: the soft, sheer nude/pink ombré effect (often called a ‘French Fade’ or ‘Baby Boomer’ nail) and the sharply defined classic French tip. Both styles rely on a high-quality, milky pink or blush nude base color that mimics the natural nail bed while providing superior coverage and strength. Achieving this immaculate look is centered on precision application and selecting the right products. For Valentine’s Day, these designs offer a subtle yet sophisticated alternative to bold reds and hearts, allowing the focus to remain on a flawless, high-gloss finish that lasts well beyond the holiday.
Executing the perfect Dip Powder French Tip, as seen in the bottom half of the image, requires meticulous technique and preparation. After applying the initial base coat and dipping into the sheer pink base powder (typically 2-3 coats are necessary for optimal opacity and structure), the crucial step is defining the crisp white smile line. For a square or squoval shape like those pictured, nail technicians often utilize a specialized French dip tray, which allows you to angle the finger to capture a crisp, uniform white tip. You must paint the tip of the nail with the base coat, and then gently dip the free edge into the white powder, ensuring the curve is symmetrical and clean. For DIY enthusiasts, using a silicone French dip mold can guarantee a perfect, consistent arc across all nails. Remember that proper sealing and filing after the final activation are paramount; the filing process is what truly sharpens the white tip and transforms the raw powder application into a professional, glassy finish.
To achieve the softer, diffused ombré effect—a romantic favorite seen on the top hands—the powder layering technique must be modified to create a seamless gradient. Start with 1-2 coats of the pink base across the entire nail. Next, instead of dipping the entire tip, use a fluffy brush to gently tap or dust the white powder onto just the free edge, blending upwards toward the center of the nail bed while the base coat is still tacky. Repeat this dusting technique twice, moving the white powder slightly higher each time to build the gradient. After the colors are set, dip the entire nail into a layer of clear powder; this step is critical as it protects the delicate color blend from being filed away during the shaping process. Expert advice for maximum longevity is to ensure you apply a liberal amount of activator (Step 2) to fully harden the powder, buff the surface until perfectly smooth, and always ‘cap’ the free edge with every layer of the base and top coat to prevent premature chipping.
10 Vibrant BLUE IDEAS

While Valentine’s Day often features a sea of passionate reds and soft pinks, choosing blue offers a striking, sophisticated contrast that symbolizes depth, trust, and commitment—a perfect non-traditional nod to romance. This collection showcases how to master the blue spectrum, moving seamlessly from the luxurious depth of navy and velvet cobalt to the refreshing pop of bright cerulean and aqua. To achieve this level of visual impact, focus on mixing rich solid colors with high-texture finishes. For example, the deep navy velvet look (top left) requires a specialized flocking powder or a suede-finish top coat applied over a dark base to create that tactile, dimensional look. Alternatively, for the high-gloss dark blue styles, utilize a resilient gel polish base and add metallic or gold accents to the ring finger. Apply these small charms (like the subtle hearts or bow details shown) using a strong gem gel, ensuring they are sealed securely along the edges with a thin topcoat layer before final curing. The success of these designs lies in thoughtful color pairing, such as utilizing a true royal blue as a high-impact base complemented by lighter, almost neon blue lines for geometric designs.
To replicate the striking geometric and patterned designs seen here, precision tools are essential. Start by preparing your base coat in the darkest shade of blue you desire (e.g., royal blue or deep teal). For designs like the sharp, crisscrossed patterns or the diamond lattice, you must use a specialized extra-fine liner brush, often 5mm or smaller. Dip the brush sparingly into a highly pigmented, contrasting blue (or white) polish. To maintain clean lines, ensure the brush is wiped nearly dry; overloading it will cause the lines to bleed or appear chunky. If attempting the ombré technique (middle left), select two complementary shades—such as the transition from vibrant aqua to electric blue—and utilize a makeup sponge to dab the colors onto the nail, blurring the gradient line quickly before curing. Work in thin layers, building the opacity of the blend over two or three applications to achieve a seamless, airbrushed effect. The goal is symmetry and cleanliness, so practice the line placement on a nail swatch before moving to the actual application.
Expert application of glitter and shimmer polishes is key to elevating these blue looks from simple manicures to show-stopping art. For chunky glitter accents, as seen on the light blue nails, use a dense glitter polish formulated specifically for full coverage, rather than a top coat glitter. Apply two to three layers, pressing the glitter particles gently into place before sealing with a high-shine topcoat. For a more sophisticated sparkle, consider using metallic or chrome powders over a cured matte top coat; gently rub the powder onto the nail to create a reflective, almost liquid metal finish, which pairs exceptionally well with the dark navy designs. When integrating multiple visual elements—like the glossy base, geometric lines, and glitter accents—limit the complexity to one or two accent nails per hand to avoid visual overload. Blue nails for Valentine’s Day are a power move, offering a chic, unexpected twist on holiday glam that looks fantastic in any light.
5 Angelic Cupid Nails

This stunning design elevates Valentine’s nails to a level of Baroque chic, focusing on intricate 3D elements and luxurious embellishments. The foundation requires a flawlessly executed white manicure. Opt for a highly pigmented, opaque white gel polish to create a solid canvasthis crisp background ensures the detailed gold Cupid decals truly pop. The long, squoval or tapered square shape seen here is ideal, providing ample surface area for the elaborate artwork. Achieve two coats of color saturation and cure thoroughly before moving to the structural application of the charms. For a seamless, high-end look, the white polish must be perfectly smooth and chip-free before proceeding with the heavy ornamentation.
The centerpiece of this look is the three-dimensional cherub or Cupid relief decal. These delicate metallic charms, often gold-toned brass or resin, should be affixed using a strong adhesive, such as specialized gem glue or a thick layer of builder gel cured only after placement. Position the Cupids centrally on the nail, ensuring the design is balanced. Once the main charms are secured, the design is framed by glittering rhinestones. Mimic the elegant look by placing a cascade of gold studs and clear or pink-tinged rhinestones (amethyst or rose quartz shades work well) flowing from the cuticle line down the center of the nail, or clustering them around the base of the Cupid decal for an angelic halo effect. The careful selection of rhinestone sizes, transitioning from larger stones near the cuticle to smaller micro-beads towards the tip, creates a sophisticated, dimensional flow.
For the mandatory accent nail, switch up the base entirely. Here, a gorgeous milky-pink sheer base is utilized, heavily dusted with chunky pink and holographic glitters, giving a delicate, diffused sparkle. This glitter base is then further enhanced with a heart-shaped or flower-shaped arrangement of larger pink and clear rhinestones. To finalize this luxurious look, apply a durable, non-yellowing top coat, ensuring you carefully seal all edges of the base color and polish. For the 3D decals, avoid coating the entire charm (which dulls the metallic finish); instead, use a fine detail brush to trace clear gem glue or top coat around the edges of the base of the decal to lock it securely to the nail plate, ensuring maximum longevity and wearability throughout your Valentine’s celebrations.
14 Elegant Almond Shape V-Day Nail Designs
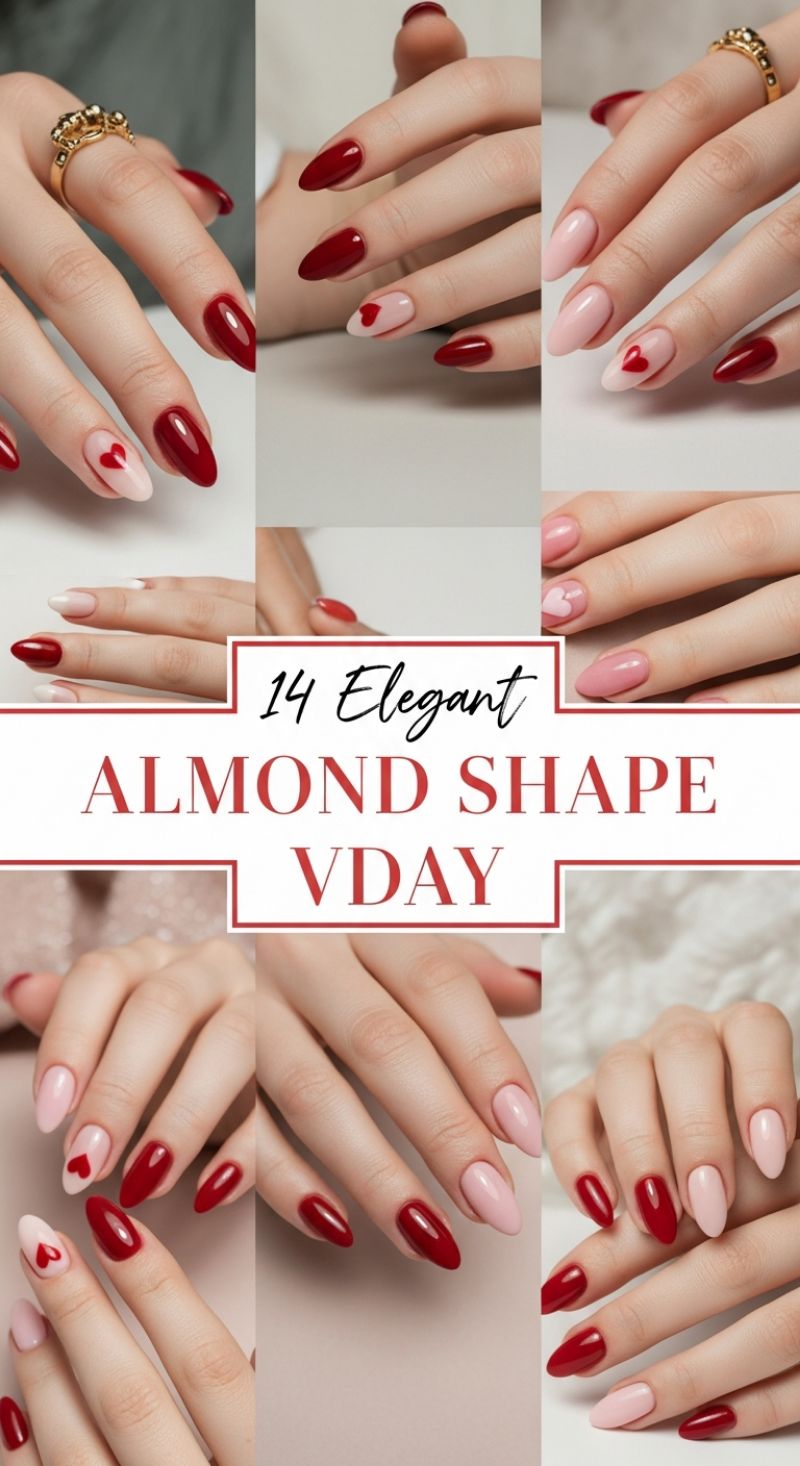
The sophisticated almond shape serves as the perfect canvas for these romantic, yet refined, Valentine’s Day looks. This curated collection highlights the timeless elegance achieved by pairing two foundational V-Day shades: a deep, luscious cherry red or burgundy, and a soft, muted blush pink or nude. The key to replicating this aesthetic is strategic color blocking on medium to long almond tips, ensuring the nails appear elongated and graceful. Start by establishing an alternating pattern, often reserving the dominant red for the pointer and middle fingers, and the softer pink/nude for the ring and pinky fingers. This intentional alternation prevents the design from becoming too uniform and allows the accent heart designs, which are the focal point, to truly pop against the neutral base. For professional results, ensure the base coats are fully cured and perfectly smooth before moving to the artistry step.
To create the iconic heart accents featured prominently in these designs, precision is paramount. We recommend utilizing a specialized fine-tipped nail art brush or a small dotting tool. When applying the heart, select the contrasting color (usually the deep red polish on the blush pink nail). A simple technique involves placing two small, closely set dots near the cuticle or halfway up the nail bed. Then, using the fine brush, gently drag the polish down and inward from the dots to connect them at a sharp point, forming the classic heart shape. Keep the heart size subtle and centralized—these designs rely on minimalism rather than overwhelming detail. For a modern twist, consider reversing the pattern on one nail, placing a nude or light pink heart on a glossy red base. Sealing the design with a high-quality, high-shine top coat is crucial for locking in the artistry and delivering the highly polished, almost liquid-like finish visible in these examples.
Expert tip for maximizing the lifespan and elegance of this almond-shaped style involves product selection and maintenance. Because the almond shape requires structure at the apex, using gel or hard gel polish is ideal to prevent breakage and maintain the beautiful curvature. When applying the final top coat, ensure you cap the free edge completely, especially on the solid red nails, to prevent premature chipping. For those seeking variation, try adding a sheer, subtle pink or holographic shimmer layer over the solid blush nails to catch the light, or incorporate a barely-there micro-glitter to the red for added depth. This approach ensures your V-Day manicure remains sophisticated, luxurious, and perfectly poised for the entire holiday season.
Dramatic Dripping Hearts and Luxurious Marble Swirls
This ultimate Valentine’s Day manicure captures intensity and romance through dynamic movement and a rich color palette. The foundation of this design relies on the long, architectural coffin shape, which provides an ideal canvas for the complex art. To replicate this look, begin by prepping your nails and applying a highly opaque base coat in the chosen solid shades: classic cherry red and electric fuchsia pink. For the accent nails, alternate between a pristine white or a soft, neutral nude base, ensuring perfect opacity before moving to the art phase. The effectiveness of this design hinges on the crisp contrast between the primary colors (red, white, and pink) and the metallic gold accents, demanding high-quality, deeply pigmented gel polishes. Apply thin, even layers for the base colors and cure fully before attempting the intricate line work.
To achieve the stunning abstract and dripping designs, you will employ a combination of wet-on-wet marbling and careful freehand artistry. For the ‘dripping heart’ or ‘lava love’ effect, apply a layer of base color (red or white) and then, using a fine liner brush, trace thick, uneven lines from the cuticle down the nail bed with the contrasting color. While the polish is still wet, use the tip of the brush to drag small, fine streaks downward, creating the illusion of melting polish or liquid hearts. For the luxurious marble swirl nails, apply a non-cured layer of blooming gel or clear polish over your white base. Then, gently drop small spots of red, pink, and white polish onto the nail and use a thin striping brush or dotting tool to lightly feather and swirl the colors together. Before curing, strategically place tiny shards of gold foil or gold leaf into the wet marble mixture to create the elegant metallic veins seen throughout the collection, adding instant depth and luxury.
Finalizing this vibrant manicure requires precise detailing and a high-gloss finish. The graphic hearts featured on several nails should be executed using a small dotting tool, creating two perfect dots side-by-side near the free edge, then pulling the polish down slightly to form the point of the heart. For the gold accent lines and minimalist cuffs (especially visible near the cuticle on the solid red nails), use a specialized gold striping gel or metallic chrome polish applied with a microscopic detail brush for flawless precision. Finish the entire design with a thick, durable, ultra-shine top coat to lock in the art and enhance the ‘wet’ look of the dripping polish. This ensures maximum impact and longevity, making your complex Valentine’s set last well beyond the holiday.
Regal Jewel-Toned Nails: The Opulent Gold Standard of Love
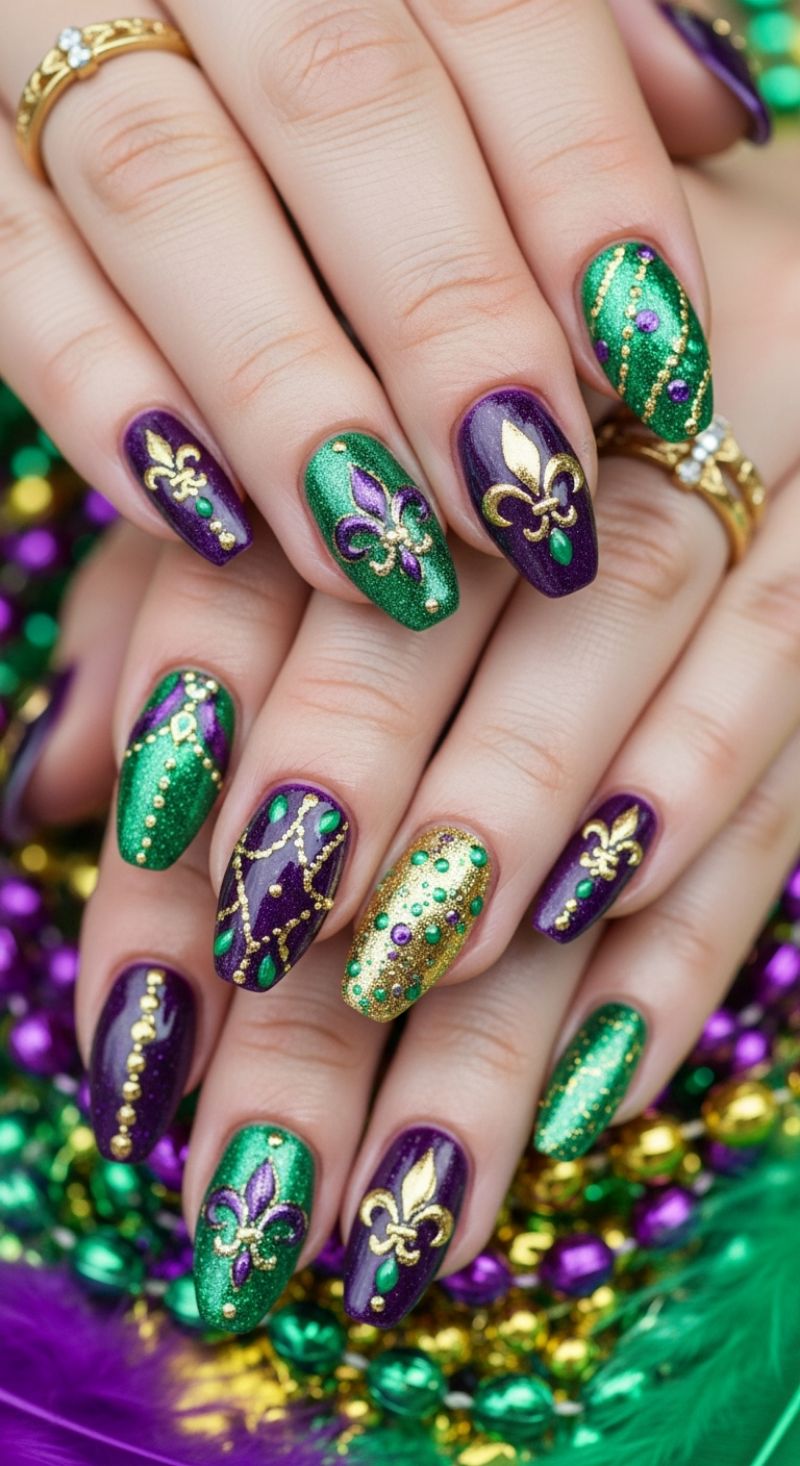
While traditional Valentine’s Day designs lean heavily into reds and pinks, this luxurious jewel-toned manicure offers a stunning, unexpected path to romantic elegance. Drawing inspiration from royal court colors and majestic detailing, this design utilizes shimmering emerald green, deep amethyst purple, and dazzling metallic gold. The visual elements work together to create an extremely textured and high-impact look, perfect for a grand February celebration. The design features alternating base colors—a scintillating, fine-glitter green and a glossy, deep-shimmer purple—providing a rich canvas. The key to the opulence lies in the intricate gold linework, which is applied using a detailed striping technique, often mimicking decorative gold chains, draped swags, and centered royal crests. Expert advice suggests using a highly pigmented metallic gel paint or gold chrome powder mixed with topcoat for the line art, ensuring that the gold stands out sharply against the dark backgrounds. This level of detailing requires patience and a steady hand, but the resulting look is unparalleled in its depth and dimension, signaling a love that is both powerful and precious.
To recreate this lavish look, start by shaping the nails into a sleek almond or oval style, which best complements the intricate patterns. After applying and curing your alternating base colors (purple and green shimmer gels), focus on the detailed ornamentation. For the primary motif, such as the regal crest (like the fleur-de-lis seen here), utilize a silicone stamper or a fine-tipped detail brush to carefully paint the symbol onto the feature nails. Next, turn your attention to the chain and drip effects. For the dangling patterns, use a dotting tool and the gold metallic gel to create small, uniform dots in a curved line, which effectively simulates a delicate chain of pearls or micro-beads. On accent nails, experiment with solid coverage, such as the all-gold glitter nail, which provides a dramatic contrast and adds necessary light to the overall design. Remember that precision is vital; curing the gold details immediately after painting each section prevents blurring and ensures crisp lines, which is the hallmark of professional-level nail art.
Elevate the manicure further by strategically placing miniature rhinestones and studs in coordinating colors. This design incorporates tiny purple and green rhinestones, typically placed at the nexus points of the gold lines or at the base of the nail near the cuticle to simulate dangling jewels. For maximum longevity and a true 3D effect, secure these small embellishments using a specialized jeweler’s glue or by embedding them in a small dollop of builder gel before curing. Finish the entire look with two layers of high-shine, non-wipe top coat, taking care not to drag the brush over the raised gold details or rhinestones. For the ultimate expert touch, consider incorporating tiny gold caviar beads along the vertical lines of the purple nails instead of simple dots; this instantly transforms the linear design into a truly tactile, textural experience. This regal manicure provides a stunning declaration of passion that goes far beyond the standard Valentine’s clichés, making it a luxurious statement piece for 2024.
Chic Valentine’s Plaid and Micro-Heart Almond Nails

This design masterfully blends high-fashion graphic elements with sweet, subtle romantic accents, perfect for the modern Valentine’s celebration. To replicate this look, begin with meticulous nail preparation, shaping the nails into a smooth, medium-length almond or oval. The foundation is critical: apply a milky white or sheer pale pink builder gel or long-wear polish to achieve that translucent, ‘jelly’ base coat, curing fully. The core of this look involves the French tip combined with horizontal striping. Apply a crisp, opaque white polish to the tips, ensuring the smile line is clean. Once cured, use a very thin liner brush (00 or 000) or specialty striping tape to create the horizontal bands. Alternate between vibrant pink, classic red, and deep black stripes just above the white tip. The variation—some nails featuring double pink bands, others a black and red duo—adds a custom, bespoke feel to the overall manicure. Ensure each stripe is completely cured before applying the next layer to maintain ultra-crisp edges, which is the hallmark of a high-end graphic design.The micro-heart accent nails provide the necessary softness to balance the bold lines. On the nails designated for hearts (usually the ring or index finger), skip the white tip. Instead, use a dotting tool and the tip of a fine liner brush to delicately paint tiny hearts in alternating black and soft white or pale pink polish directly onto the sheer base. The hearts should be scattered sparsely, clustered slightly toward the center of the nail bed, leaving plenty of negative space around the cuticles and tips. Expert advice for this step is to utilize highly pigmented gel polish for the hearts; because they are so small, even the slightest transparency will make them look blurry. Applying a high-shine, non-wipe top coat will encapsulate the design, magnifying the glossy, ‘wet’ appearance of the sheer base and enhancing the contrast between the graphic details and the negative space.For the final accent nail, typically the thumb or middle finger, introduce the intricate plaid or grid pattern. Over the sheer base, use the fine liner brush and bold red polish to draw two or three vertical lines. Allow these to cure, then draw two horizontal lines, creating a delicate, open grid pattern. For an elevated touch, incorporate a thin band of metallic gold striping tape or gold chrome gel horizontally across the center of the grid, mimicking a chic belt detail. The juxtaposition of the structured red plaid, the soft pink stripes, and the sweet micro-hearts makes this manicure versatile and striking, providing an elegant alternative to traditional bold red Valentine’s nails.
5 Cute Kitty Nails: The Ultimate 3D Kawaii Look for Valentine’s Day
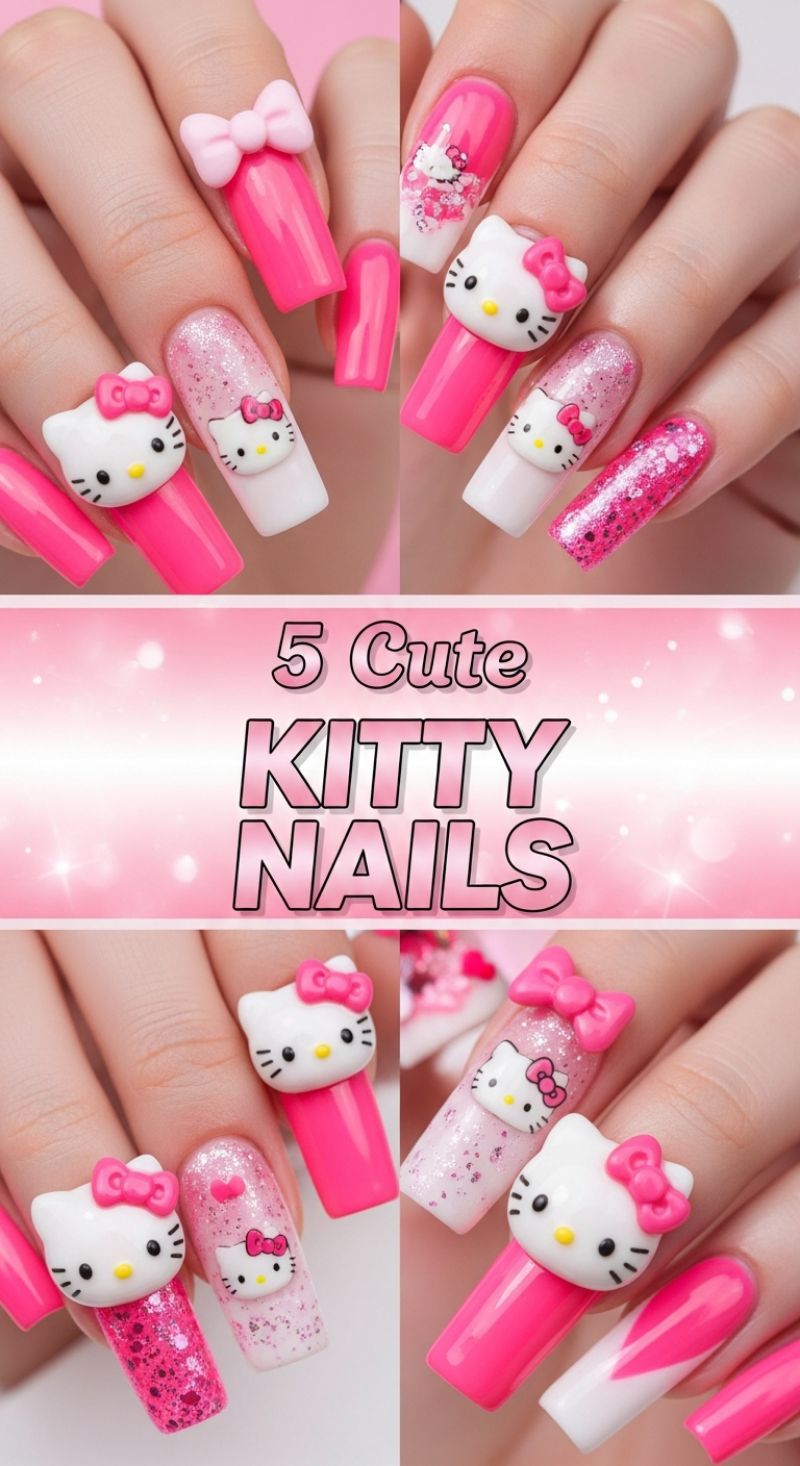
This iconic nail design brings a vibrant, playful, and maximalist approach to your Valentine’s Day manicure, leaning heavily into the popular ‘kawaii’ aesthetic. Achieving this look starts with building a structurally sound, long base, ideally using sculpted gel or acrylic in a square or coffin shape, as these shapes best support the heavy 3D ornamentation. The primary palette requires two high-pigment shades: an ultra-bright fuchsia or hot pink and a clean, crisp white. Begin by establishing your accent nails—for a true copy of this style, alternate between solid hot pink (a high-shine crème finish) and a white base. For the sparkling accent nails, apply a sheer white or clear base coat and then embed two types of glitter: a fine, iridescent pink glitter dust across the entire surface and a chunkier, holographic pink glitter concentrated toward the tip for a deep, dimensional sparkle effect. Cure each layer thoroughly, ensuring the surface remains smooth enough to overlay the subsequent 3D elements.
The signature component of this style is the application of large, sculpted 3D cat head charms and oversized bows. Because these charms are substantial, standard topcoat or even regular nail glue will not hold them securely; professional application requires a thick, non-wipe builder gel or specialized jewelry adhesive gel. To apply the 3D Kitty, first lightly etch the back of the charm for better adhesion. Apply a generous dollop of the builder gel directly to the prepared nail plate where the charm will sit—typically centered, covering the entire nail width. Gently press the charm into the gel, ensuring minimal leakage around the edges, and flash cure for 10-15 seconds to set the position before completing a full cure under an LED lamp. Expert tip: use a small detail brush dipped in rubbing alcohol to clean up any excess gel before the final cure. On surrounding nails, smaller 3D bows can be adhered using the same method, or you may choose to use intricate waterslide decals of the kitty character for a less dimensional, but equally cute, accent.
To ensure this maximalist design lasts through all your Valentine’s Day activities, pay close attention to sealing and maintenance. After curing all 3D pieces, apply a high-quality, ultra-gloss topcoat to all non-charmed nails, avoiding brushing the topcoat over the matte finish of the 3D plastic charms themselves to maintain their texture. For the nails featuring the glitter fades or the white tips, consider a final encapsulation layer of clear builder gel before the topcoat to lock down every particle of sparkle and guarantee a smooth finish. Due to the high profile of the 3D elements, advise clients to be mindful of catching the charms on clothing or hair. This intricate, candy-colored look perfectly captures a youthful, over-the-top expression of love and whimsy, making it a show-stopping choice for February 14th.
8 Edgy V-DAY LOOKS
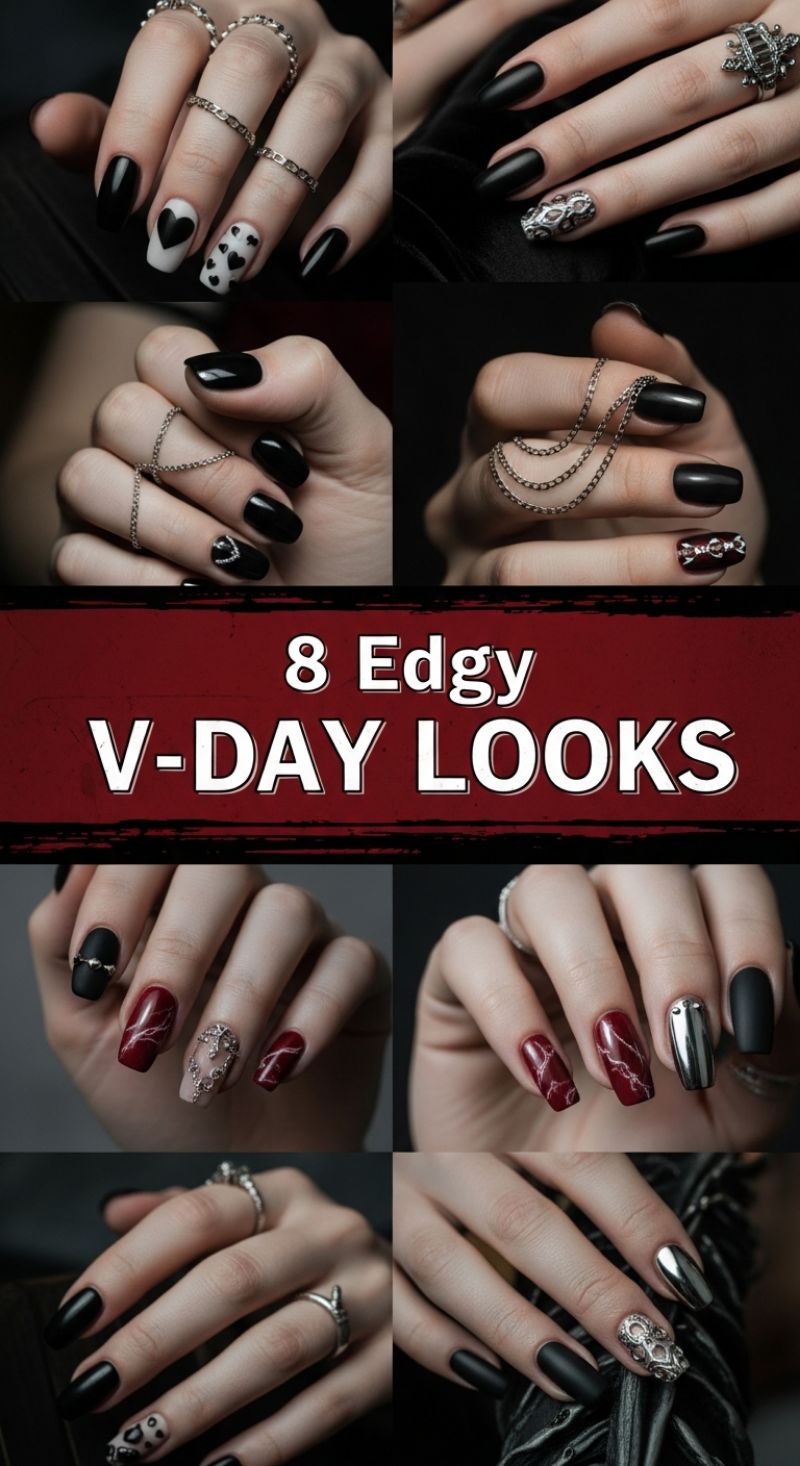
For those who find traditional pastel pinks and glitter hearts too sweet, these edgy V-Day looks offer a dramatic, gothic alternative. The core of this aesthetic relies on a dominant palette of matte black, high-gloss obsidian, deep blood-red marbling, and striking silver chrome. To recreate the foundation, start with a perfectly cured, rich black base. If opting for the matte finish seen in most of the designs, ensure you apply a high-quality matte top coat over your cured color and cure thoroughly, as any unevenness will be highly visible. The simplest accent involves the inverted heart motif: choose a single nail for a white base and paint small black hearts using a fine detail brush or dotting tool, or reverse the color for a bold single white heart against a glossy black tip. The juxtaposition of sophisticated matte textures with high-shine accents is key to achieving this modern, rebellious V-Day vibe.
Elevate the look by integrating the high-impact elements like deep red marble and mirror chrome. The maroon nails, often resembling fractured lightning or ‘blood splatter’ patterns, are achieved using a thin lining brush to draw jagged lines in white or silver over a deeply pigmented oxblood gel, then slightly blurring the edges while the polish is still wet before curing. This provides the sophisticated, marbled appearance. For the highly reflective silver nails, a true mirror finish requires using a quality chrome powder. Apply your black base coat, then a non-wipe glossy top coat. Before fully curing, or immediately after, gently rub the chrome powder onto the nail surface using a silicon tool or applicator until it achieves a perfect metallic sheen. Seal this chrome layer with another layer of non-wipe top coat, taking care to cap the free edge to prevent chipping, and reserving these metallic colors solely for accent nails.
Completing the gothic romance aesthetic involves calculated use of 3D embellishments and heavy accessorizing. Note how several nails incorporate small silver studs, tiny rhinestones, or even miniature chains draped across the cuticle or mid-finger. To secure these, place a small bead of builder gel or strong nail glue where the charm will rest. For larger, intricate pieces—like the ornate silver charm or the bow-tie accents—a thicker layer of gel is necessary to encapsulate the base of the design fully, ensuring it doesn’t snag or fall off. Finally, the true impact of these edgy designs is amplified by chunky sterling silver jewelry. Pair your manicure with layered midi rings, detailed claw rings, or chain mail wraps, mimicking the hardware elements already present in the nail art, to create a cohesive and unapologetically bold look perfect for an anti-Valentine’s Day statement.
7 Trendy Barbie Sets
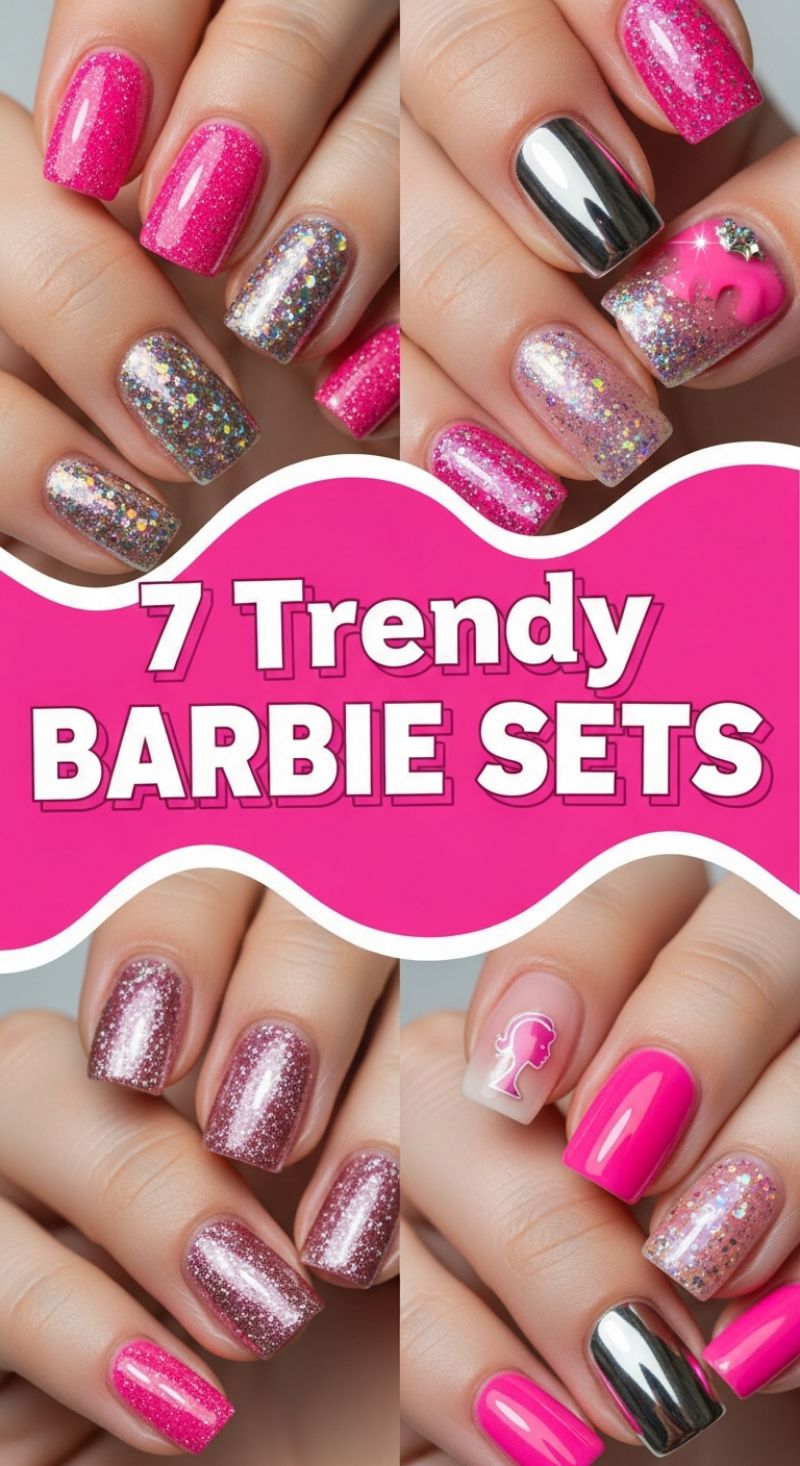
The Barbiecore aesthetic, characterized by its unapologetic embrace of vibrant fuchsia, dazzling glitter, and high-shine accents, transitions perfectly into a maximalist and playful Valentine’s Day statement. To recreate this iconic look, begin by focusing on the core colors: an intensely pigmented, shimmering hot pink and a holographic, chunky silver glitter. For the base nails—typically the thumb, middle, and pinky—apply two thin, even coats of your shimmery hot pink gel polish, ensuring full opacity. The accent nails, often the index and ring fingers, should feature a spectacular glitter bomb effect. Choose a clear or pale pink base coat before layering on a loose or highly dense holographic silver and rose-gold glitter polish. Expert tip: To achieve maximum dimension with chunky glitter, dab the polish on rather than brushing, and use a specialized topcoat or thin builder gel layer to encapsulate the texture completely, preventing snagging and ensuring a smooth, glassy finish.
To elevate this set beyond simple sparkle, integrate high-contrast metallic and dimensional elements as seen in the collection. The mirror-finish chrome nail—applied typically to one finger per hand—provides a modern, edgy counterpoint to the saccharine pink. Achieve this by applying a non-wipe black or white gel base, curing fully, and then rubbing a silver chrome powder vigorously onto the surface with a silicone applicator or eyeshadow brush until a true mirror reflection is achieved, sealing it immediately with a protective topcoat. For the quintessential Barbie Valentine look, incorporate custom 3D art. The image showcases a melted or drip heart element created using a thick sculpting gel (builder gel or specific 3D gel) colored with the exact shade of hot pink used on the base nails. Build the shape in small, controlled layers, curing each one for structural integrity before adding a final flourish like a tiny rhinestone accent where the 3D element meets the nail bed. Alternatively, for a more subtle touch, utilize a transparent nude base on one nail and apply a hot pink Barbie silhouette decal.
This look is best suited for medium-length nails shaped into a soft squoval or almond, allowing enough canvas for the intricate art without appearing cumbersome. The key to the longevity of this high-impact set is flawless finishing. After all colors, chrome, and art elements are completely cured, apply a durable, ultra-glossy hard gel topcoat over the entire design. Pay special attention to capping the free edge of every nail, which is crucial for preventing water infiltration and subsequent chipping, especially around the encapsulated glitter and 3D embellishments. This vibrant, joyful set offers a fun deviation from traditional red manicures, positioning your nails as the ultimate accessory for any festive Valentine’s Day outing, whether it’s a glamorous night out or a sparkling Galentine’s brunch.
10 Classy PINK PROM
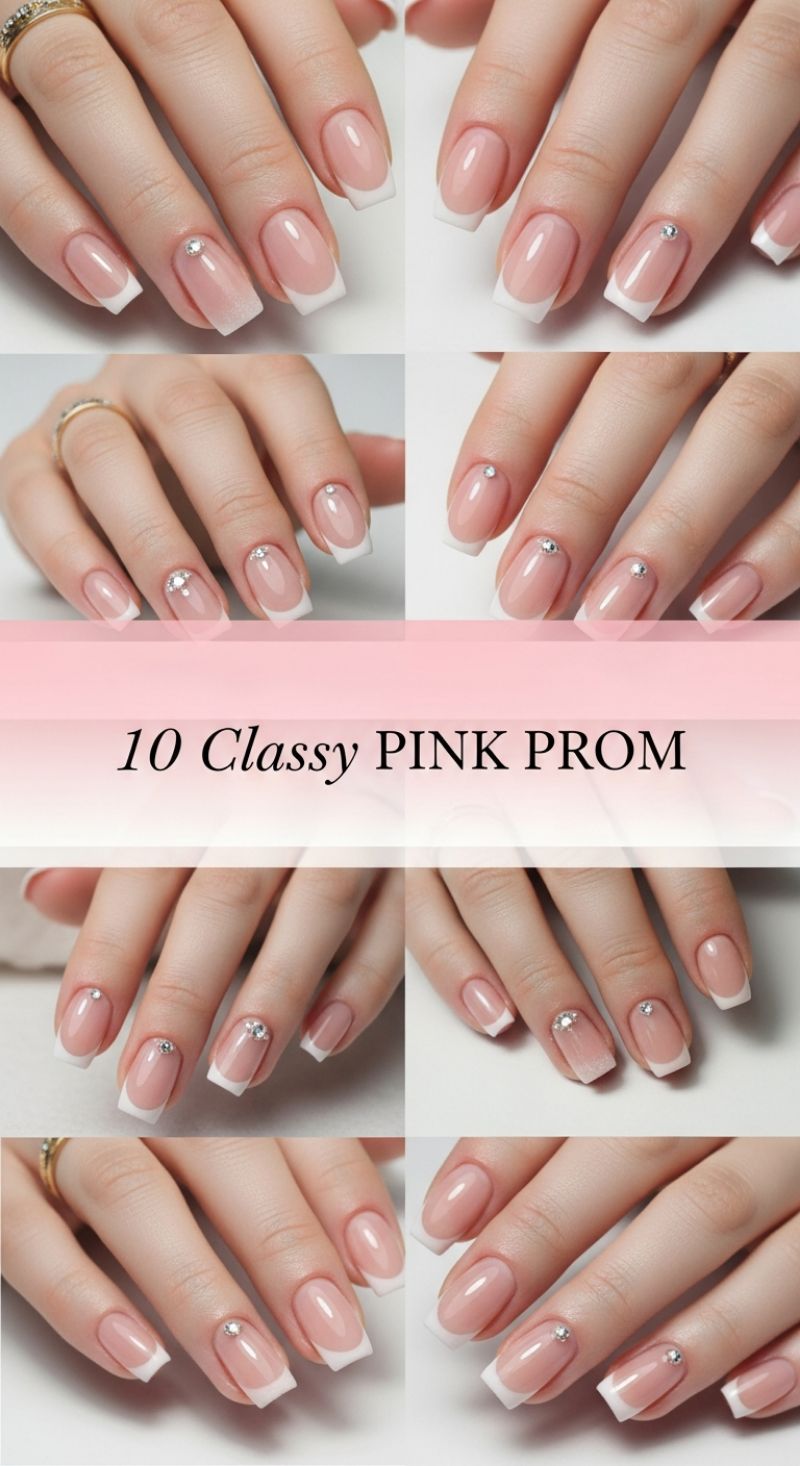
The “Classy Pink Prom” style easily translates into a timeless Valentine’s Day look, favoring elegance over overt novelty. This design is built on the popular French ombré technique (often called the Baby Boomer style), which softens the stark white line of a traditional French tip into a seamless, milky gradient. Begin by shaping the natural nail or extension into a gentle squoval or soft square shape—the medium length pictured here is ideal for maximizing the visual flow of the fade. The base color should be a sheer, milky pink or soft nude that mimics the natural nail bed. This transparency is crucial for the “clean girl” aesthetic and allows the hand to look naturally elongated and polished, perfect for holding a glass of Champagne during a romantic night out. This style is the epitome of subtle luxury, pairing beautifully with delicate gold jewelry.
To achieve the perfect ombré, use a dense nail sponge or a specialized gradient brush to gently feather the white polish from the tip upwards, blending it into the wet pink base coat. The key is to apply the white in very thin, sheer layers, curing each one, until the desired opacity is met at the free edge, ensuring there are no harsh lines where the colors meet. For the accent pieces, notice the strategic placement of single, round, clear rhinestones. These gems are applied either right at the base (near the cuticle crescent) or slightly up the nail bed on the ring and middle fingers, acting as a delicate focal point. Expert application requires using a thin layer of specialized gem glue or a thick non-wipe top coat, placing the gem with a wax pencil, and then carefully capping the sides of the stone with a detailed brush and top coat to prevent snagging and maximize retention.
This design’s strength lies in its sophistication and versatility. While it boasts a delicate shimmer, the overall neutral palette ensures it complements any Valentine’s Day outfit, from a little black dress to a bold red ensemble. For an extra V-Day touch without compromising class, consider using a sheer pink polish that contains a micro-fine iridescent shimmer in the base layer, adding depth when the light hits it. Maintenance is straightforward: always finish the design with a high-shine, UV-protective topcoat to seal the ombré and the gems. Avoid prolonged soaking in hot water immediately after application, and moisturize the cuticles daily to keep the overall look fresh, ensuring these iconic nails last well past February 14th.
8 Unique GREEN PROM
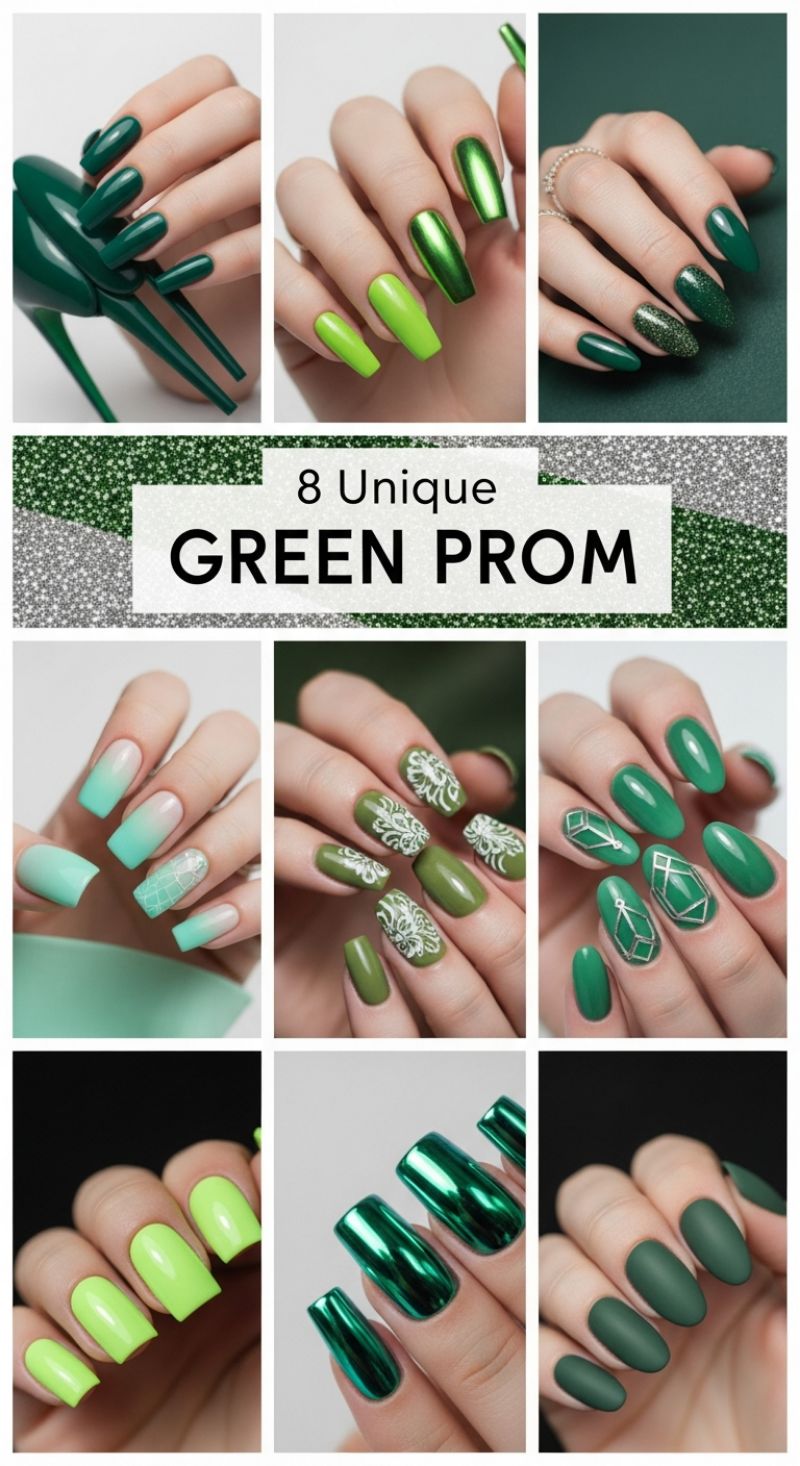
While traditionally prom nails might conjure images of elaborate ballgowns, the stunning range of greens presented here offers an unexpected, high-fashion alternative perfect for a luxurious Valentine’s Day date night. To achieve the dramatic depth of these looks, begin by selecting your base shade. The deep, glossy emerald and forest greens are sophisticated, especially when paired with a coordinating glitter accent nail, achieved by using a highly pigmented glitter polish or by gently tapping loose green shimmer powder onto a wet topcoat before curing/drying. For the eye-catching chrome finish, ensure your nail is perfectly smooth; apply a deep green or black base color, cure, apply a thin layer of non-wipe top coat, cure for a short period (usually 30 seconds), and then gently rub the green chrome powder onto the surface using a silicone tool or sponge applicator. This metallic sheen instantly elevates the look, making it ideal for a show-stopping evening ensemble. Remember that dark colors require precise application—use a fine brush dipped in nail polish remover to clean up the edges before the polish sets.
For a softer, more intricate V-Day look, consider combining lighter greens with detailed artistry. The mint green ombre fade transitioning into a sheer white base provides a romantic, delicate effect; this is best accomplished using a blending sponge to tap the two colors together on the nail surface. Intricate patterns, whether floral lace over olive green or sharp silver geometric lines over bright kelly green, add texture and interest. To recreate the white lace detail, use a high-quality stamping plate and opaque white stamping polish. Ensure you work quickly to transfer the design cleanly onto the olive base. For the modern geometric style, utilize thin striping tape to block out your desired shapes before applying the silver or metallic gold line art polish with a fine detail brush. For maximum visual impact, ensure your base coat is completely dry and cured before applying any decals or art to prevent smearing and lifting.
Finally, the choice of finish dictates the mood of the design. The deep forest green matte look offers a velvet-like texture that exudes quiet luxury and works exceptionally well on shorter almond or oval shapes for an understated elegance. In contrast, the vibrant neon lime green provides a playful pop of color perfect for a fun, casual Valentine’s celebration. When working with matte top coats, ensure the polish underneath is entirely dry or cured before application, as uneven surfaces can lead to a patchy final appearance. No matter the shade, maintain meticulous cuticle care, as the richness of these greens draws the eye straight to the nail bed, ensuring a flawless, professional result.
Dramatic Red Designs for a Romantic Valentine’s Look

The crimson manicure is the epitome of Valentine’s Day romance, offering a bold and sophisticated alternative to traditional pastel pinks. To recreate this dramatic, high-gloss look, start with meticulous nail preparation. Achieve the pictured length and structure by shaping nails into a refined medium coffin or softened squoval shape, ensuring all edges are uniformly smooth. For the base, select a deeply pigmented, high-shine classic red gel polish—a true crimson with cool undertones will deliver the most luxurious finish. Apply two thin, precise coats, ensuring each layer is cured fully to prevent color shifting or bubbling. The key to achieving this mirror-like depth is sealing the entire nail, including ‘capping the free edge,’ with a scratch-resistant, UV-cured topcoat. This foundational step provides the perfect canvas for the intricate accent designs while maximizing the wear time for your holiday celebration.
The real artistry lies in mixing and matching the accent nails, creating a cohesive yet varied look that showcases texture and metallic sparkle. The collage demonstrates four primary accent styles: full-coverage glitter, delicate gold foil abstract lines, embedded rhinestones, and detailed white or silver micro-art. For the glitter accent (often seen on the ring finger or index finger), opt for a holographic silver or champagne gold polish applied over the red base. If you prefer the delicate foil design, apply a layer of transfer foil glue or a sticky base coat, then press gold or silver metallic foil onto the tacky surface, focusing on achieving irregular, abstract streaks rather than full coverage. For the intricate scrollwork accents, use a highly pigmented white or metallic gel paint and a fine 000 liner brush. Keep the design simple—a single swirl, a delicate lace pattern, or tiny clustered dots near the cuticle—to maintain elegance without overcrowding the nail. Remember to cure each accent design thoroughly before applying the final topcoat to lock in the detail.
Expert application of these embellishments ensures longevity, which is crucial for a special event like Valentine’s Day. When placing rhinestones, use a professional jewel bond or a very thick builder gel to anchor them securely to the cured polish. To achieve the refined, barely-there look seen in some panels, use micro-sized crystals and place only two or three along the center line of the nail. After all artwork is complete, apply a final layer of non-wipe topcoat, carefully flowing it around (but not directly over) larger crystals or heavily textured areas to prevent dulling the sparkle. This collection of designs is ideal because it allows for personalization; you can opt for 80% solid red drama with a single subtle accent on each hand, or embrace maximalist glamour by incorporating foil, glitter, and scrollwork across three separate fingers. The end result is a polished, romantic, and unquestionably iconic manicure ready for any date night.
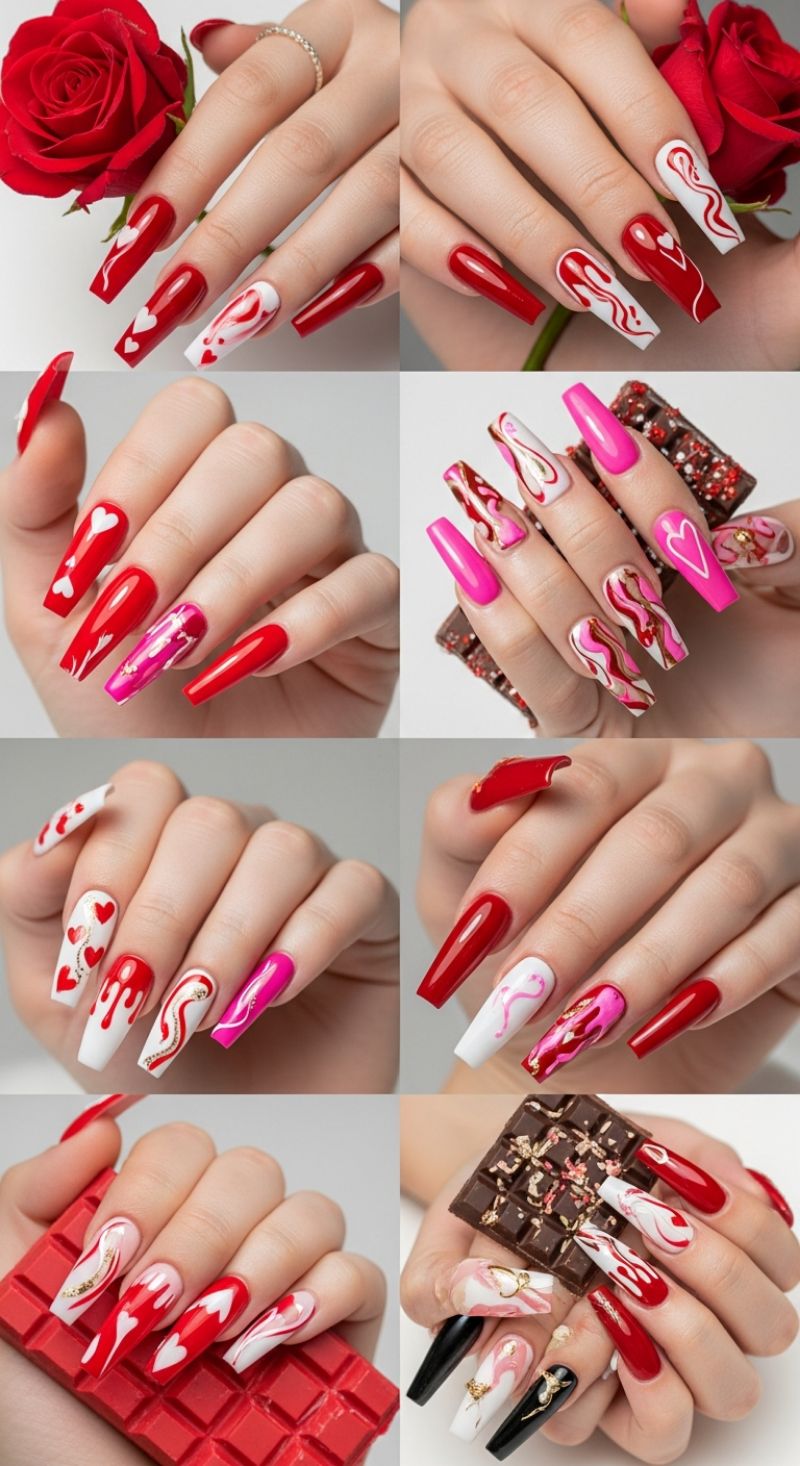
15 Iconic RED & PINK Nail Designs
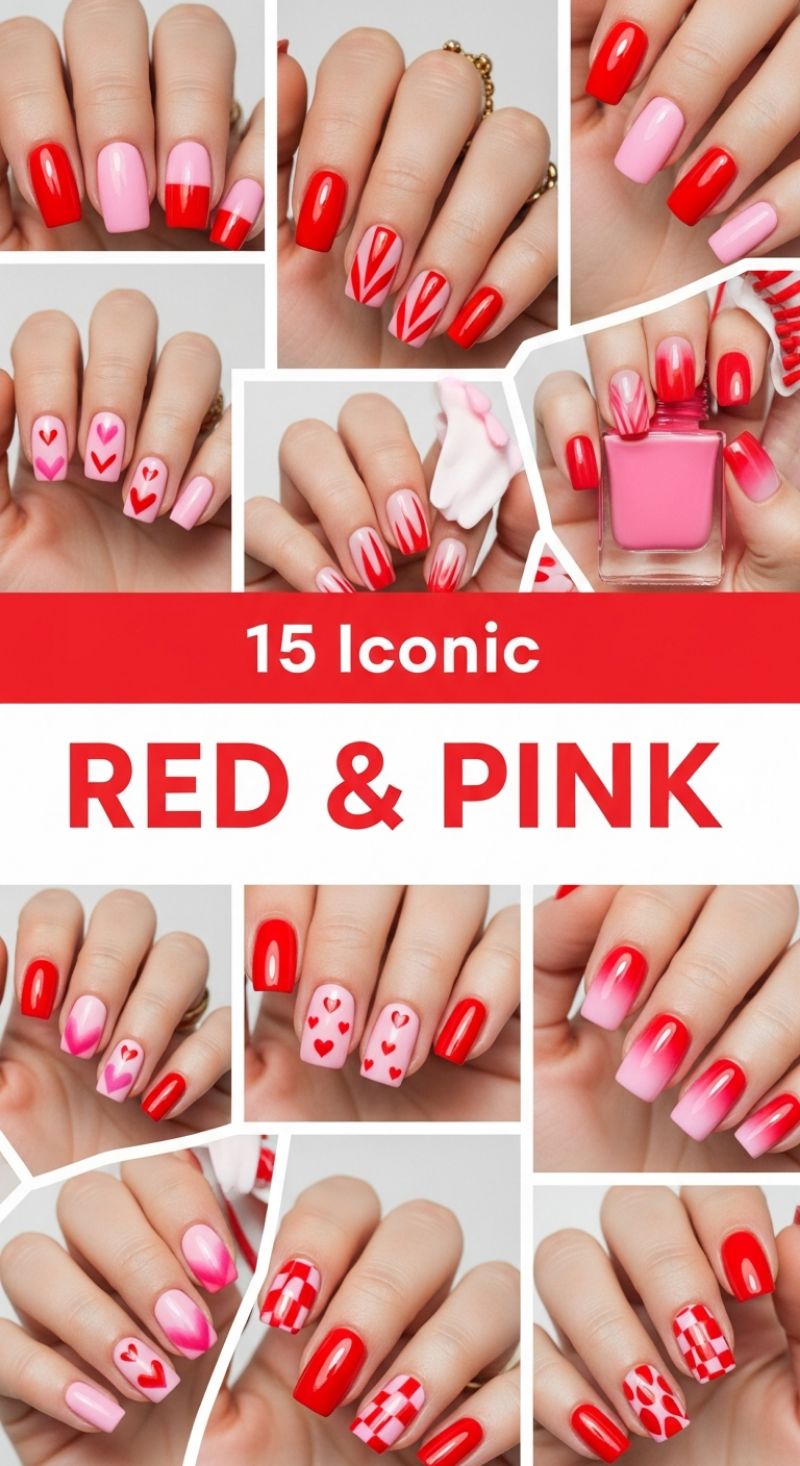
The combination of vibrant red and delicate pink is the quintessential Valentine’s Day palette, offering versatility ranging from bold and passionate to sweetly romantic. To master this iconic look, begin with meticulous nail preparation, ensuring your chosen shades of red (preferably a deep, true primary red) and pink (a soft ballet or bubblegum hue) are highly pigmented for maximum contrast. Start with the foundation designs seen here, such as solid color blocking or alternating nails. For a sophisticated half-and-half design, apply the base coat (e.g., pink) and let it fully cure. Use a piece of straight striping tape placed diagonally or horizontally across the nail plate to create a clean demarcation line. Apply the contrasting color (red) over the exposed portion. Expert advice for crisp lines involves pressing the tape down firmly right before polish application and removing the tape immediately after the second coat, before the polish sets completely, to avoid chipping or dragging.
Moving into more complex designs, the ombré and abstract chevron patterns demand slightly different tools. To achieve the seamless Red-to-Pink gradient, start with a white base for maximum color pop. Apply stripes of both the red and pink polish side-by-side directly onto a cosmetic sponge. Lightly dab the sponge onto the nail, repeating the process 2-3 times until the desired opacity is reached. The crucial step is applying a quick-dry top coat immediately afterward to smooth out the sponge texture. For the sharp, symmetrical V-shapes or ‘flame’ designs, rely on a very fine-tipped liner brush. Map out the design in a thin layer of the primary color (e.g., red on a pink base) and build up the thickness slowly, ensuring each color layer is cured or dry before starting the next adjacent line to prevent the colors from bleeding into one another, which is a common pitfall in dual-tone artistry.
The playful Valentine motifs, particularly the scattered hearts and the graphic checkerboard patterns, require precision tooling. For the popular heart designs, the simplest method is utilizing a small dotting tool. Place two adjacent dots close to the cuticle area, then use the tip of the tool to gently pull the polish down from the center base of the dots, shaping the point of the heart. For the graphic patterns, such as the red and pink gingham or checkerboard, you can employ pre-cut vinyl stencils or utilize the striping tape technique again to section off alternating squares. Paint the first set of squares, allow them to fully dry, remove the tape, and then apply tape perpendicularly to define the remaining squares before filling them with the second color. Finalize any intricate design with a durable, high-shine UV top coat to encapsulate the artistry and ensure these iconic red and pink nails last well beyond Valentine’s Day.