Transform your space without breaking the bank! Discover the ultimate guide to DIY decor hacks and budget-friendly tips that will completely upgrade your home.
Lighter Decoration Ideas You Haven’t Seen
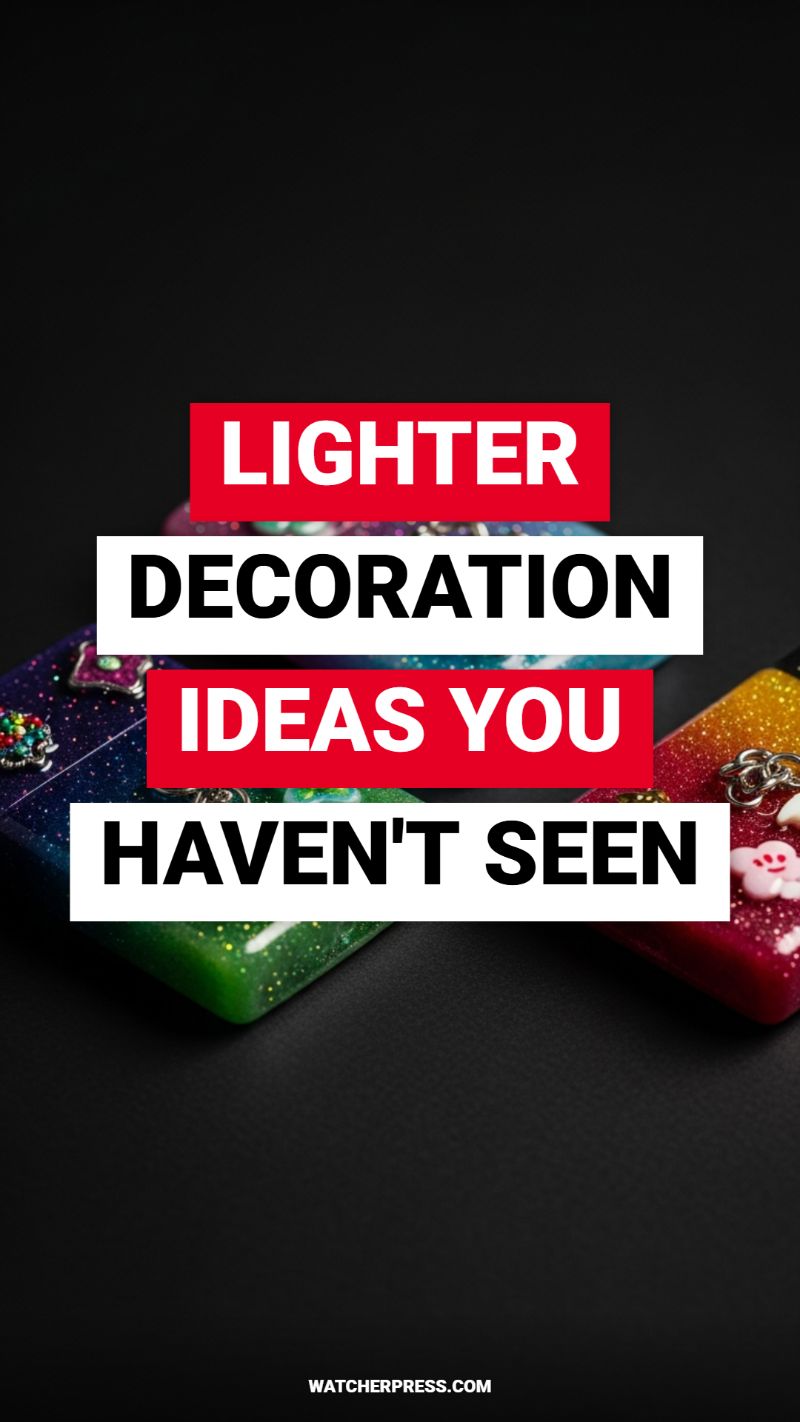
While often overlooked, the humble disposable lighter, which sits exposed on coffee tables, mantles, and patio settings, can quickly ruin a meticulously curated decor scheme. This simple DIY hack transforms these utilitarian objects into sparkling, personalized accessories that seamlessly integrate into your home aesthetic. The technique demonstrated here involves creating custom resin or epoxy sleeves, turning cheap plastic bodies into durable, jewel-toned statement pieces, often featuring rich colors, glitter, and attached charms as seen in the accompanying image. To achieve this high-end look on a budget, you will need clear casting epoxy or UV resin, various mica powders or fine glitters for coloring, small craft charms (flatbacks work best), and blank lighter sleeves (easily found online). Safety first: ensure you are working in a well-ventilated area and protecting your work surface.
Start by preparing your lighter sleeve. It must be clean and free of oils for the resin to adhere correctly. If you are using standard two-part epoxy, mix it according to the manufacturer’s instructions, ensuring the mixture is bubble-free. Divide the resin into small cups and incorporate your chosen coloring agent—glitter provides the brilliant sparkle visible in the samples, while mica powder delivers an opaque, pearlescent finish. Using a brush or a fine wooden dowel, carefully apply the colored resin in a thin, even coat over the entire plastic surface of the sleeve, taking extreme care to avoid coating the metal top piece or the ignition mechanism. For a layered effect, allow the first coat to cure completely before applying a second layer, perhaps adding a contrasting color or more dense glitter. This technique allows for stunning depth and vibrancy, far surpassing simple painted or wrapped designs.
Once your final colored coat is applied and still wet (or just flash-cured if using UV resin), this is the optimal moment to set your decorative embellishments. Small metal charms, miniature plastic elements like the cute smiley face seen in the image, or tiny rhinestones should be strategically pressed into the surface. The key expert tip here is to ensure the charm placement is secure but does not obstruct the sleeve’s functionality or create uncomfortable bumps. After setting the charms, apply a final, thin topcoat of clear resin to encapsulate the entire design. This seals in the glitter and ensures a perfectly glossy, durable, and scratch-resistant finish that feels high quality to the touch. Once cured, these customized lighters are not merely fire-starters; they are now sophisticated decor accents that can be matched to seasonal color palettes or styled perfectly within a decorative tray, proving that even the smallest details contribute significantly to your overall home design.
STOP USING CHEESY VALENTINES ROOM DECOR
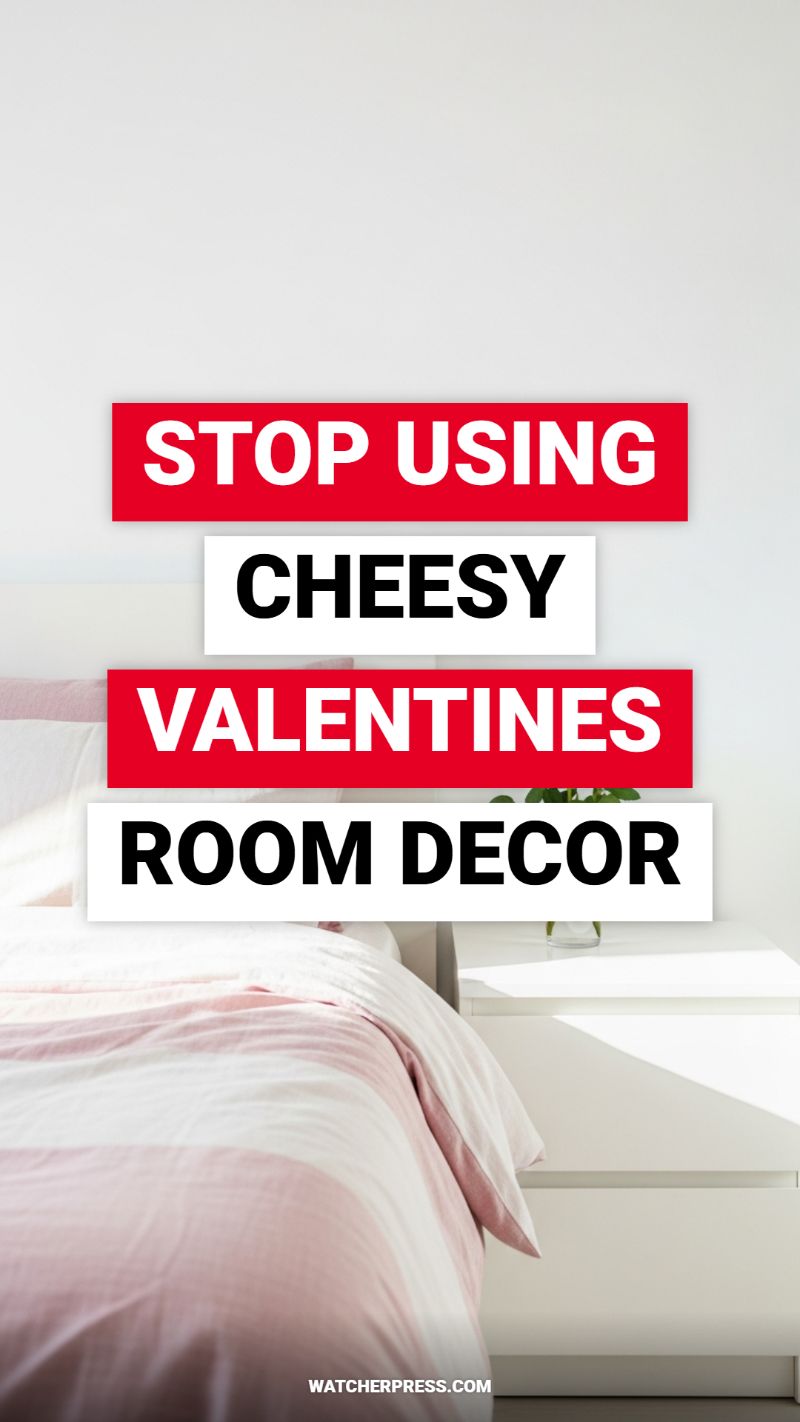
While celebrating holidays is fun, many seasonal decor items—especially those for Valentine’s Day—can feel cheap, overly bright, and clash severely with an existing sophisticated home aesthetic. Instead of grabbing plastic heart garlands and foil balloons, the key to successful seasonal transformation lies in adopting subtle, luxurious accents that focus on texture and depth rather than overt symbolism. The image provided illustrates this perfectly: a bright, minimalist bedroom utilizes a soft, wide pink and white stripe in the duvet, achieving a romantic feel without screaming ‘Valentine.’ To replicate this high-end look on a budget, focus your DIY efforts on textiles and controlled color palettes. Swap out gaudy decorations for elements that enhance existing comfort, such as adding a faux fur throw in cream or blush, or subtly incorporating muted cranberry or rose velvet ribbon into curtain tie-backs or small ornamental vases. This approach ensures your decor feels timelessly romantic, not temporarily tacky.
Executing this sophisticated seasonal shift requires strategic, budget-friendly DIY projects. If purchasing new bedding is out of the question, use inexpensive white cotton sheets and perform a simple gradient fabric dye job using natural dyes like beetroot or avocado pits to achieve soft, rosy hues seen in the visual inspiration. For lighting, ditch the flashing novelty lights and instead focus on creating soft, diffused ambiance. Repurpose old glass jars or wine bottles into sleek candle holders or small bud vases for single stem flowers. Place small battery-operated fairy lights (which are cheap in bulk) inside these repurposed vessels, or along the headboard, to cast a warm, inviting glow. This technique not only elevates the mood but also reinforces the minimalist structure of the room, drawing attention to texture and light, which are far more romantic than bright red plastic.
The final instructional element involves managing scale and placement to avoid clutter. The essence of anti-cheesy decor is restraint. Look at the image: the only visible ornamentation is a small, quiet green plant on the nightstand, which acts as a refreshing counterpoint to the pink bedding. Apply this principle by limiting your accent colors (pink, white, cream, and a single muted shade like burgundy or slate gray) and ensuring they are distributed unevenly across the room. Instead of scattering dozens of small hearts, choose one large, high-impact item—such as a large piece of minimalist abstract art featuring soft reds and pinks (easily DIY-ed with canvas and acrylic paint)—as the focal point. By investing time into subtle, reusable décor hacks, you create an atmosphere of permanent elegance that simply leans into the romantic season, ensuring your budget-friendly transformation is worthy of a top-tier design blog.
STOP WASTING CORNER SPACE: KITCHEN DECOR HACKS
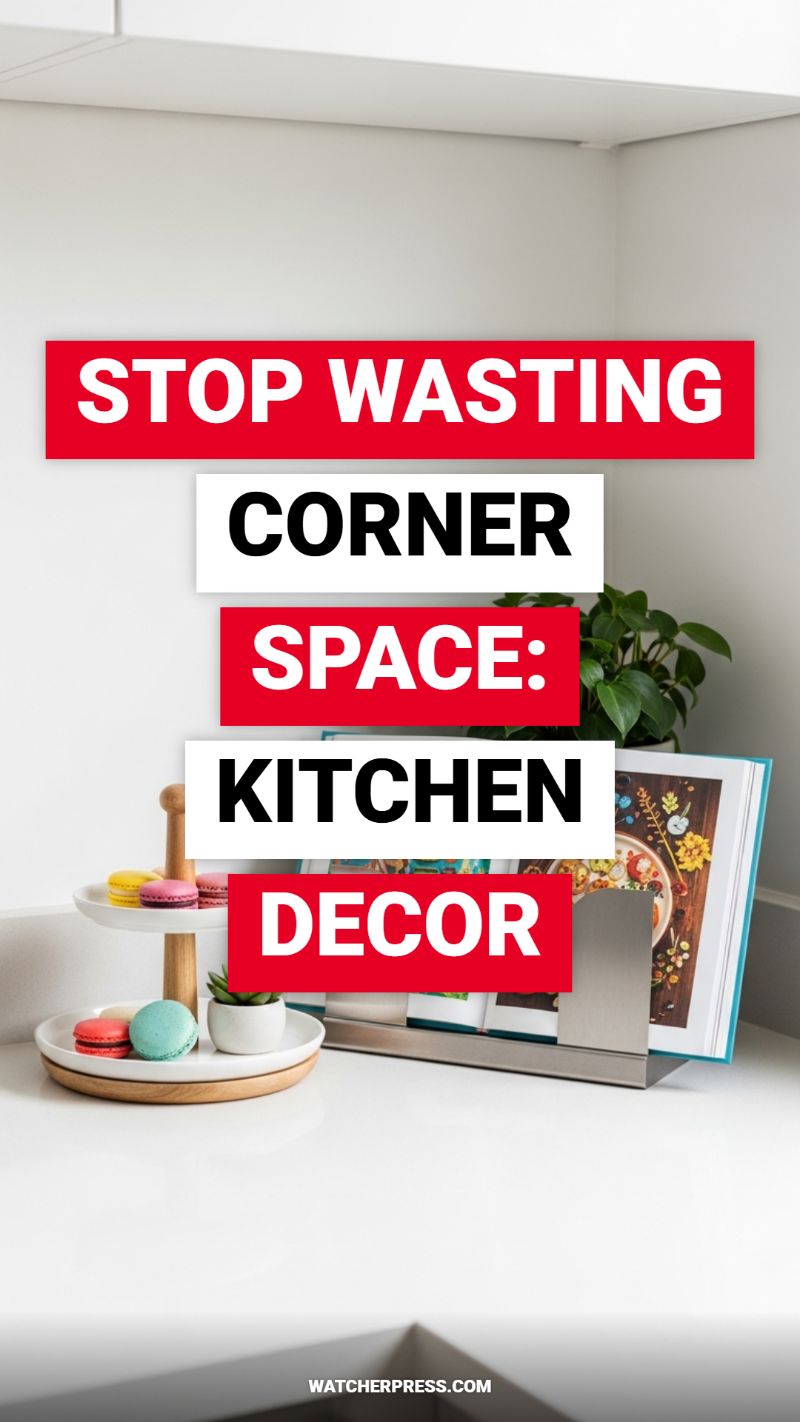
The kitchen corner is notoriously one of the most underutilized and visually challenging spaces in any home. Instead of letting this area become a graveyard for scattered mail or random utensils, transform it into a highly functional and beautiful focal point. The key strategy here is implementing vertical storage to maximize the footprint without sacrificing valuable countertop real estate. Start with a tiered display stand, as seen in this setup. A two- or three-tier wooden and ceramic stand instantly elevates small items, saving precious horizontal space while creating an attractive display. Use the stand to house quick-grab items like frequently used spice blends, a small sugar dispenser, fruit, or, for an aesthetic touch, small colorful treats like macarons and tiny succulents, as demonstrated here. The mix of function (food access) and flair (decorative items) ensures the corner feels curated, not cluttered. When selecting your stand, choose materials—like light wood and clean white ceramic—that offer a contrasting texture but a complementary color palette to your existing counters and cabinetry.
Next, integrate elements that combine practicality with visual warmth. The corner is the perfect spot for essential working materials, such as cookbooks or tablets used for following recipes. Using a minimalist, sleek stainless steel book stand not only protects your book from spills but holds it open at a comfortable reading angle, turning the corner into an efficient recipe station. Placing the stand slightly further back allows the focus to remain on the task at hand, while the reflective metal adds a modern, clean line to the display. To soften the harsh 90-degree angle inherent in the corner, always introduce a natural element. A small, robust houseplant—like a Peperomia or small Pothos—tucked neatly behind the stand brings organic shape and life into the space, offsetting the rigid lines of the kitchen architecture. This layered approach ensures that the corner is both inviting and incredibly productive.
To execute this DIY decor hack successfully on a budget, focus on achieving visual balance and symmetry. Place the tallest items (the plant and the open cookbook) deep into the corner to establish a backdrop, and bring the mid-sized dynamic piece (the tiered stand) slightly forward. This layering creates depth and prevents the entire display from appearing flat. For sourcing, look for tiered serving trays at thrift stores or home goods clearance sections; they are often marketed for entertaining but work perfectly as permanent countertop organizers. Similarly, minimalist metal stands can often be found repurposed from office supplies. When budgeting, invest in one quality piece (like the tiered tray) and then accessorize around it with low-cost elements like small potted succulents or vibrant, budget-friendly covers for your cookbooks. This strategic approach turns an overlooked void into a perfectly organized and eye-catching section of your kitchen.
EASY GALENTINES PARTY DECORATIONS DIY
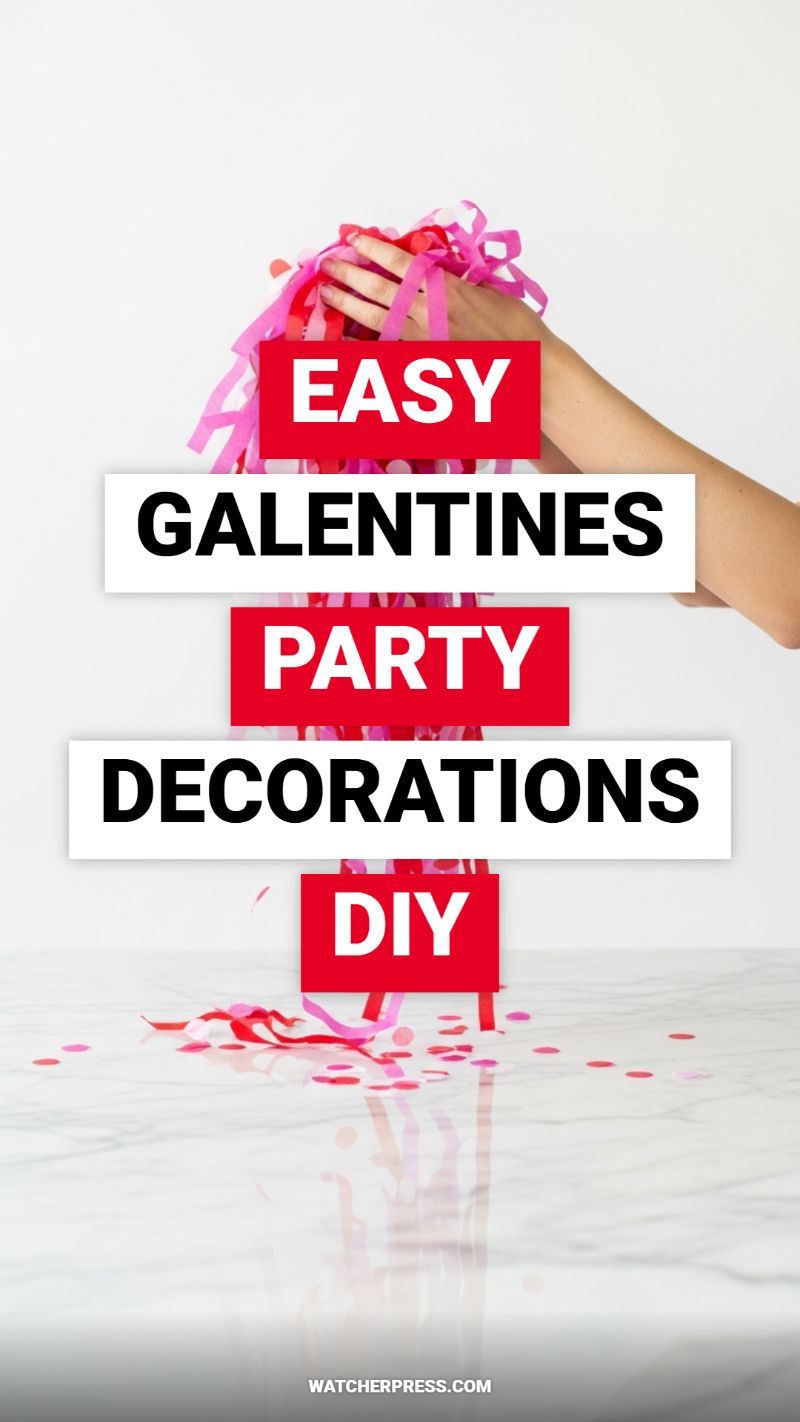
Galentine’s Day calls for vibrant, celebratory decor, and nothing achieves high visual impact on a low budget like simple crepe paper and custom-cut confetti. The hack pictured above utilizes inexpensive materials—streamers and small confetti pieces in striking shades of fuchsia, bubblegum pink, and cherry red—to create dynamic visual energy against a stark white backdrop. Instead of buying pre-made, pricey decor kits, we leverage the power of volume and texture. This DIY focuses on crafting lightweight, vibrant components that can be used multifunctionally—as dramatic table scatter, textural backdrops, or even celebratory tossables. We recommend sourcing budget-friendly paper, prioritizing rich, saturated colors for the greatest contrast against neutral home surfaces like white walls or marble countertops, effectively transforming the space with minimal cost.
To replicate this specific textural look, start with large rolls of budget-friendly crepe or tissue paper. For the elongated streamers shown, cut the paper into strips roughly 1 inch wide and varying lengths (18-24 inches works best for dramatic draping and scattering). The key to achieving the voluminous bundle seen in the hand is layering: tightly gather about 20-30 strips together at the center point, creating a full pom-pom or tassel effect. For the custom confetti, avoid expensive store-bought mixes; instead, use a standard hole punch on assorted paper scraps—think metallic foil, thick cardstock, and patterned tissue paper—to create bespoke shapes. Expert advice suggests mixing matte paper strips with glossy or metallic confetti circles; this interplay of textures maximizes the reflection of ambient light, giving even basic materials a high-end sparkle that instantly elevates your home decor for the event.
Maximizing the display of these DIY elements is crucial for transforming your space on a budget. These colorful streamer bundles can be taped together onto twine to create an instant, textured garland or hung individually from the ceiling for a floating installation that adds depth to the room. For table styling, utilize the reflective qualities of your existing furniture. As demonstrated in the image, strategically scattering the loose confetti and draping the longer, unbound streamer strips down the center of a reflective surface, like a marble table or glass console, allows the colors to double their impact. Use the larger, secured bundles as focal points at place settings or nestled inside clear vases. This entire decorative setup—the confetti, the tassels, and the dynamic scatter—can be achieved for less than $10, proving that luxurious, festive decor is entirely accessible through strategic DIY execution and intelligent material choice.
SECRET TO PERFECT KITCHEN COUNTERTOP DECOR
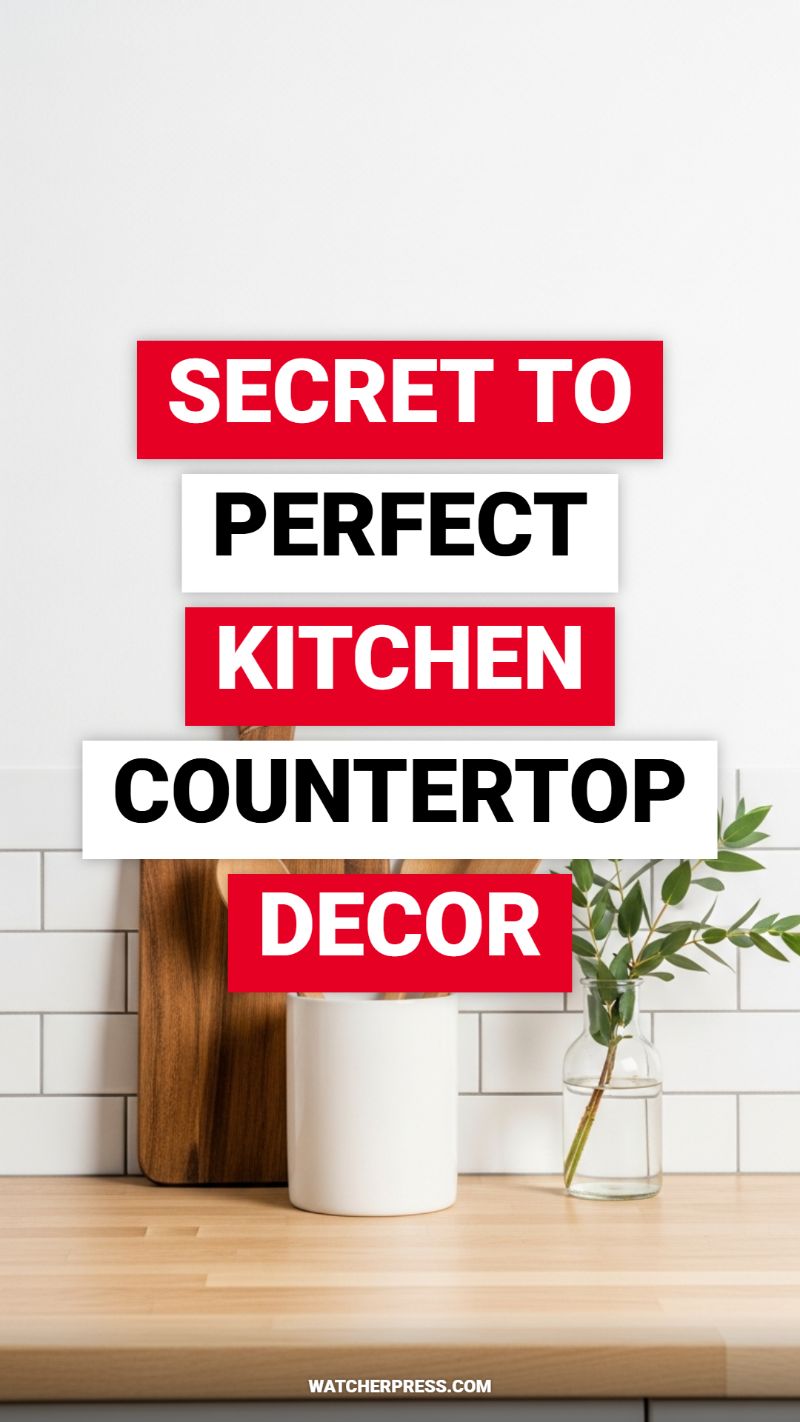
The secret to achieving perfectly styled kitchen countertops is mastering the balance between aesthetics and utility, typically through the strategic use of vignettes and the foundational Rule of Three. Begin your transformation by strictly decluttering your surface, leaving only the essentials you want to showcase. Next, implement the visual strategy seen here: group items in odd numbers (triads are most appealing) and ensure they exhibit varied heights and textures. In the image, we see a masterful triad composed of a warm wood cutting board, a smooth white ceramic utensil holder, and a delicate glass vase with greenery. This grouping works because the items contrast beautifully—the organic, rough texture of the wood offsets the clean, manufactured finish of the ceramic and glass. When selecting vessels for your own display, prioritize materials like natural wood (butcher block, bamboo), matte ceramics, and clear glass. These materials add visual depth and sophisticated contrast without introducing overwhelming color, allowing the focus to remain on the clean lines of your kitchen space. Remember that proper layering is crucial; position the tallest item (the cutting board, often leaning against the backsplash) toward the rear, gradually decreasing height toward the front of the counter to create a dynamic visual slope.
To ensure your decor is functional rather than frivolous, choose items that serve a dual purpose. The wooden cutting board in this setting is not merely decoration; it is ready to be used, and its natural patina contributes warmth to the sterile white backsplash. Similarly, the white ceramic holder is perfect for storing frequently used wooden spoons or spatulas, keeping clutter off the drawers and within easy reach. When building these functional vignettes, focus on scale and proportion relative to your overall counter space. If your countertops are shallow, opt for tall, narrow pieces, like the glass vase pictured, which draw the eye upward without taking up too much precious horizontal real estate. A key expert tip for DIY decor is using height to your advantage; leaning objects, like the oversized cutting board, effectively utilizes the vertical space of the backsplash, providing structure and anchoring the entire grouping. This approach immediately elevates the look from simple storage to intentional design.
Finally, the element that truly brings life and completeness to any countertop display is organic material, represented here by the simple sprig of eucalyptus. Introducing living or faux greenery instantly softens the hard, clean lines often found in kitchens and provides a crucial pop of natural color that contrasts beautifully with neutral palettes. To maintain a budget-friendly approach consistent with DIY hacks, avoid expensive floral arrangements. Instead, opt for cuttings from your yard or purchase an inexpensive bunch of eucalyptus, which lasts weeks in water and offers a lovely fragrance. If you prefer low-maintenance, a small, potted herb (like basil or mint) works perfectly in the ceramic vessel, merging function, fragrance, and aesthetics. By focusing on layered materials, practical functionality, and the essential injection of life through greenery, you can easily replicate this high-end, professionally styled countertop decor using affordable items you likely already own or can thrift store-shop for.
MUST-HAVE ST PATRICK’S DAY DECORATIONS

Transforming your space for seasonal holidays like St. Patrick’s Day doesn’t require purchasing overpriced novelty items. The ultimate budget decor hack is to utilize existing elements and introduce color strategically. As seen in this chic mantel display, the foundational style relies on a clean, neutral canvas (the white painted brick and mantelpiece) which allows the core color palette—green and gold—to pop. To replicate this minimal yet festive look, start by sourcing simple, uniform planters. Thrift stores often carry small terra cotta or ceramic pots; a quick coat of matte moss-green spray paint instantly ties them together. Instead of buying specific shamrock plants, opt for easy-to-care-for indoor herbs like parsley or even small faux boxwood bushes, ensuring they are identical in size for a cohesive, symmetrical look. The goal here is high impact with low effort, relying on repetition and color consistency rather than elaborate, expensive items.
Next, focus on creating visual weight and textural depth using repurposed items. The key element adding sophistication to this display is the stack of vintage-style books. If you don’t own beautifully bound green and gold volumes, this is where the DIY hack comes in. Gather three old books of similar size (paperbacks work fine) and use heavy green construction paper or felt to create custom dust jackets. To replicate the elegant gold detailing, use gold leaf vinyl or a fine-tip gold paint pen to trace simple patterns or lines along the spine seams. Stack them neatly in the center of your display to act as a pedestal, grounding the arrangement. This provides necessary height variation, drawing the eye vertically. Expert styling dictates that decor should be arranged in odd numbers, and the five equally-spaced green plants flanking the three stacked books achieves perfect visual balance while still adhering to a minimalist aesthetic.
To elevate this decor hack, focus on lighting and placement. Ensure that any metal elements in the vicinity (like the black fireplace grate shown) are clean and crisp, enhancing the contrast with the bright white background. For maximum budget impact, avoid buying new lighting; instead, use a small, battery-operated candle or a tiny string of fairy lights tucked behind the central books for a warm evening glow. By focusing on simple color blocks (the red banners in the image serve as a strong visual cue but can be translated into simple green banners or bunting for the mantle), you create a sophisticated seasonal statement. Remember, successful budget decorating means making modular choices; once the holiday passes, the uniform green pots can be easily repurposed for everyday greenery, and the customized book jackets can be slipped off to reveal the original volumes, making this DIY transformation truly temporary and efficient.
ULTIMATE GRUNGE ROOM DECOR DIY WALL ART
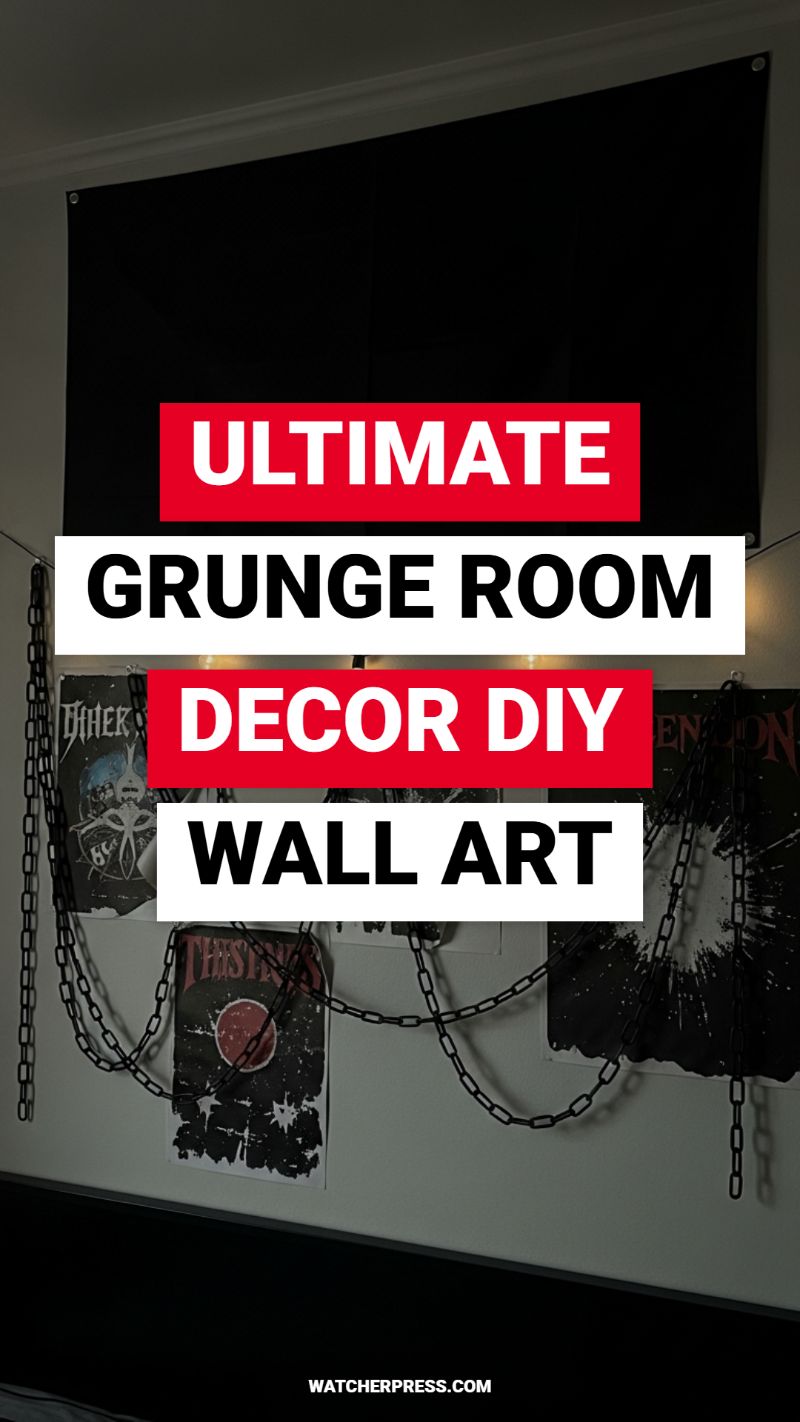
To achieve this high-impact, low-cost grunge wall art installation, the first critical step is establishing a moody backdrop that draws the eye upward. As seen in the example, a large, matte black canvas acts as the foundation, swallowing excess light and providing the necessary contrast for the elements below. You don’t need an expensive tapestry; a twin-sized black sheet, inexpensive black vinyl fabric from a craft store, or a blackout curtain panel secured near the ceiling molding will suffice. Use minimal, discreet mounting hardware—such as grommets and tiny finish nails or strong, removable Command Hooks—to keep the lines clean and taut across the top edge. The height is intentional: hanging the fabric close to the ceiling adds visual verticality, making the room feel grander, while the darkness anchors the installation. For added atmospheric depth, consider stringing a very dim set of warm white fairy lights behind the top edge of the backdrop, allowing a subtle, ethereal glow to escape and highlight the crown molding, which offsets the heavy, industrial feel.
The actual ‘art’ component is found in the layered, distressed posters hung irregularly below the backdrop. The key here is quantity and texture, not perfection. Print several high-contrast, black-and-white designs—think abstract patterns, graphic band logos, or heavily photocopied text—onto basic printer paper. For an authentic grunge look, actively distress the paper before mounting: crumple the posters, tear the edges slightly, or even use a very dilute black tea or coffee wash to give the paper an aged, brownish tint. Crucially, avoid symmetrical placement; overlap the posters, mount them at slightly different heights, and let them hang a bit imperfectly. Use black thumbtacks or mounting putty to secure them, ensuring the arrangement feels haphazard and raw. This collection of layered, seemingly random posters achieves the cluttered, deeply personal aesthetic signature to grunge culture.
Finally, the industrial hardware—the black chains—is what transforms simple wall hangings into a unified art piece. Do not use heavy, expensive metal chains; instead, opt for lightweight, budget-friendly plastic chains (often found in Halloween or party supply sections). These are easy to hang, won’t damage the wall structure, and provide the same visual weight as real metal. Drape the chains loosely across the entire installation, securing them at high points with small, clear pushpins or staple guns (if using drywall). Allow them to hang in dramatic, deep loops that cross over the edges of the posters and connect the various visual elements. The chains add crucial textural dimension, creating shadow and movement, and solidifying the ultimate DIY grunge aesthetic by mimicking the look of heavy, found-object decor without the logistical difficulty or cost.
3 DIY VALENTINES DECORATIONS UNDER $10

Valentine’s Day decor doesn’t have to break the bank. This specific project—the stacked 3D paper heart garland—is a prime example of transforming minimal supplies into a high-impact, dimensional visual feature that costs less than five dollars per strand. The key to achieving this refined, professional appearance is material selection. You will need thick, vibrant red cardstock (at least 65 lb weight is recommended so the hearts hold their shape when suspended), fine matching embroidery floss or thread, a sharp craft knife or heart-shaped punch/die-cutter, and strong paper adhesive, such as double-sided tape or a precise glue pen. By focusing on uniform cuts and deep, clean folds, you elevate what could be a simple paper chain into a sophisticated vertical banner, perfect for adorning doorways, windows, or creating a dynamic photo backdrop.
To construct the stunning 3D effect demonstrated in the image, you must first create your heart cutouts. For a single segment of the garland (about 8-10 inches long), you will need 12-15 individual 3D heart units, and each unit requires four separate heart shapes. This means cutting out approximately 50-60 identical hearts. Next, take each heart and fold it precisely in half along the vertical center line. Working one unit at a time, stack four folded hearts together, ensuring all the folded edges align perfectly. Apply a thin, even bead of glue or tape along the outside back-half of the first heart, and press the back-half of the second heart onto it. Continue this process, securing the units sequentially until all four are joined. When the adhesive is dry, carefully fan the four segments open; the unit should create a beautiful, full, three-dimensional orb when viewed from the side.
Once all your individual 3D heart units are complete, assembly of the vertical garland is straightforward yet requires patience. Use a long, fine needle to thread the embroidery floss through the central crease of the first heart unit, ensuring the string passes through the exact center top and bottom of the structure. Tie a small, tight knot immediately below the first heart to lock its position and prevent it from sliding down. Leave a minimal gap—about 1/8 to 1/4 inch—before threading the next heart unit. This small separation is essential, as it allows each heart unit its own space to rotate slightly and catch the light, enhancing the overall dimension of the decoration. Finish the top with a secure loop, as shown by the hands in the image, allowing for easy hanging from a hook or tack. For maximum visual impact, create a set of three to five garlands hung at varying, staggered heights.”
GALENTINES PARTY DECOR MUST-HAVES
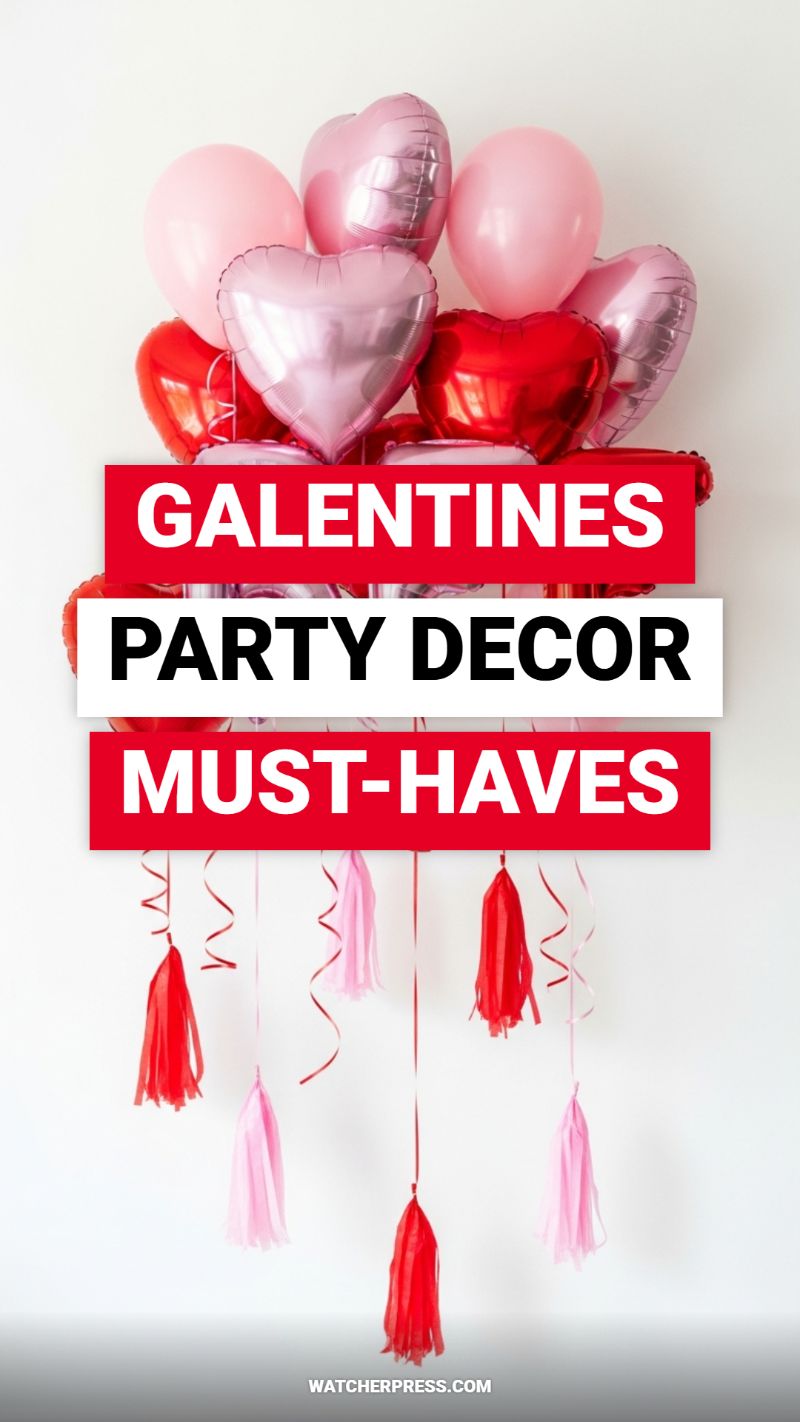
Transforming your space for Galentine’s or Valentine’s Day doesn’t require complex or expensive installations; it simply requires leveraging high-impact, low-cost materials like balloons and tissue paper. The visual power of this decor hack relies entirely on volume and color blocking. To replicate the lush balloon bouquet centerpiece affordably, ditch expensive helium for most of your balloons. Purchase large, air-filled latex balloons in your primary color (light pink) for volume, and secure them using lightweight dowels or balloon sticks taped together into a hidden structure. The true visual hack is incorporating just a few high-shine elements, like the metallic pink and red heart foil balloons, placed strategically at the front of the display. This technique provides the expensive, custom look of a professionally arranged display while keeping costs drastically low, relying on the contrast between matte latex and glossy foil to create dimension.
To complete the romantic, festive look shown, the essential budget hack is the DIY tissue paper tassel and ribbon hangings. These vertical elements are crucial for drawing the eye down from the ceiling or balloon arrangement, adding softness and movement to the decor. To create these budget-friendly streamers, purchase red and pink tissue paper in bulk. Fold the tissue paper into quarters, cut thin vertical fringe lines, then unroll and carefully twist the center to form a durable loop for hanging. Vary the lengths of the tassels and mix them with inexpensive curling ribbons (red and pink) to achieve the layered, whimsical effect. This DIY solution costs mere cents per tassel, offering a massive visual return on investment compared to store-bought garlands.
For a top-tier blog presentation, focus on the overall staging and lighting, which transforms simple craft supplies into elegant party decor. Strategically place the decorations against a clean, white wall—this negative space makes the bold red and pink colors pop intensely, maximizing their visual weight. Furthermore, ambient lighting is key: position a subtle uplight or place a string of warm white fairy lights behind or beneath the tassels. The light will catch the metallic foil of the balloons and the glossy shine of the curling ribbons, adding depth and a celebratory glimmer. This entire setup emphasizes that effective, memorable party decor is less about spending money and more about mastering strategic placement and the interplay of color, texture, and light.
7 Elevated Baby in Bloom Table Decor
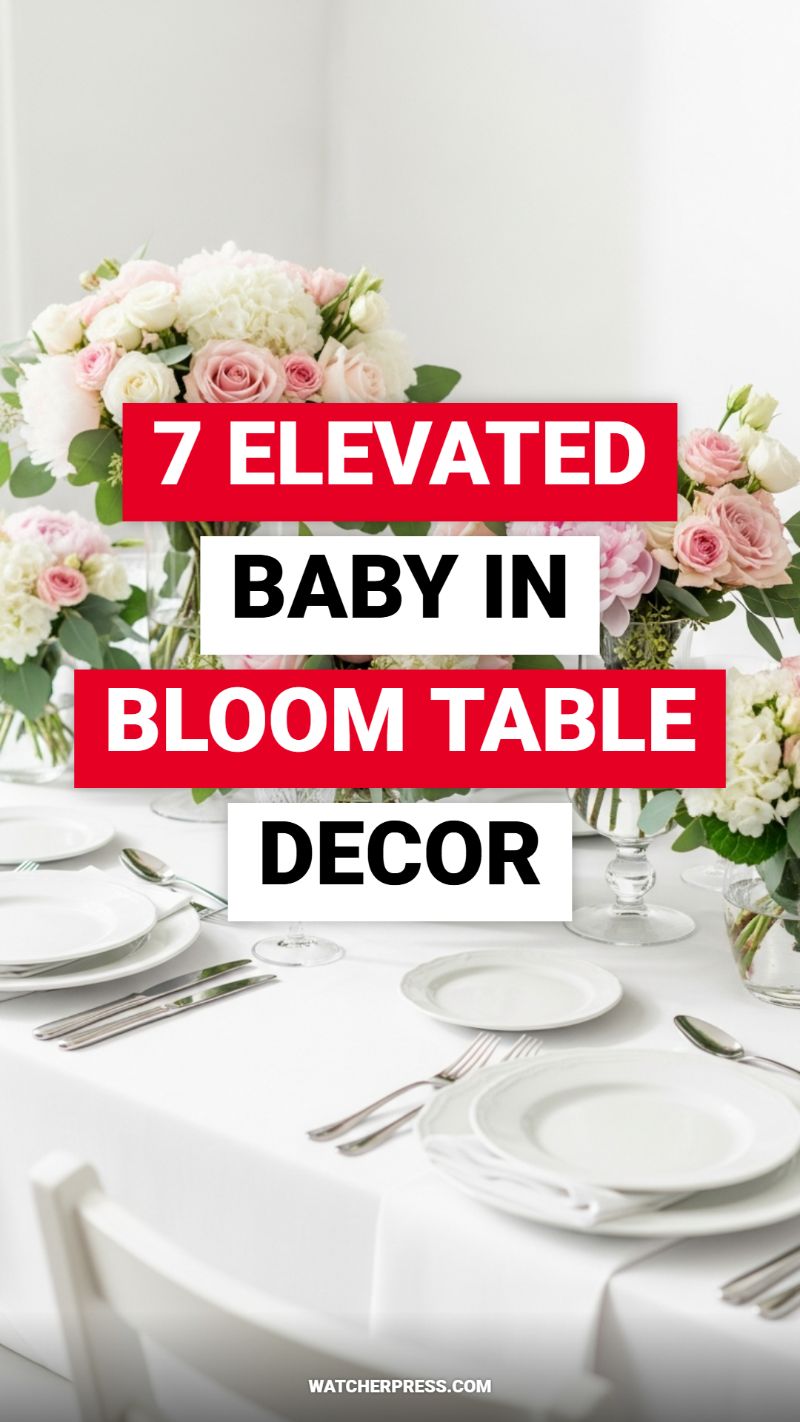
Achieving an ‘elevated’ look for event decor doesn’t require a professional floral budget; it relies entirely on mastering foundation elements and maximizing inexpensive blooms. The visual impact of the setup shown is rooted in its crisp, monochromatic base. To replicate this, start by prioritizing high-quality white textiles. A starched, wrinkle-free white tablecloth instantly elevates the setting—if purchasing new linens is too costly, invest in heavy-duty white cotton sheets from a thrift store and dedicate time to ironing them perfectly, using spray starch for maximum crispness. The white-on-white plating reinforces this luxury aesthetic. Expertly arranging the settings means stacking plates of different sizes (a charger, dinner plate, and dessert plate) to create visual depth. If you don’t own matching sets, thrift shops often yield uniform collections of white porcelain, or you can intentionally mix simple white patterns for an elegant, eclectic look, ensuring all silverware is polished and placed according to formal setting rules, which adds a layer of professional polish to your DIY effort.
The ‘Bloom’ element requires strategic use of florals to achieve volume and luxury on a budget. Notice the centerpieces utilize soft colors (pinks and whites) and lush, full flowers like hydrangeas, which are excellent for filling space affordably. Instead of buying a few dozen expensive roses, focus your investment on one or two high-impact varieties (like the pink roses shown) and supplement them heavily with inexpensive, voluminous fillers such as white hydrangeas, baby’s breath, or carnations. A critical budget hack is utilizing multiple small glass vases instead of one large, expensive centerpiece. Scatter these small vessels down the table’s length, grouping two or three together in the center and spacing singles near the place settings. This technique makes the flowers appear more abundant and allows the arrangements to look dense and professional from every angle. For maintenance, ensure the vases are meticulously clean and use the ‘tape grid’ trick (applying clear tape across the top of the vase in a tic-tac-toe pattern) to keep each stem precisely placed, giving that professionally structured, rounded bouquet look.
Beyond the flowers, focus on the details that enhance the light and airy atmosphere. The use of clear glass vessels and simple, refined glassware reflects light beautifully and reinforces the clean aesthetic. Incorporate plenty of lush greenery, such as eucalyptus, which is highly cost-effective and lasts longer than many florals. Use excess sprigs not just in the vases, but subtly woven along the base of the centerpieces, running down the middle of the table like a natural runner. If the event stretches into the evening, avoid harsh lighting. Instead, introduce soft ambient light by tucking small, battery-operated warm-toned fairy lights beneath the greenery runner or placing small tea lights in clear votives among the floral groupings. This careful layering of textures (crisp linen, soft petals, metallic silverware) and light sources is the DIY key to transforming a simple white table setup into a truly ‘elevated’ décor experience.
VALENTINES COOKIES DECORATED IDEAS: BEGINNERS
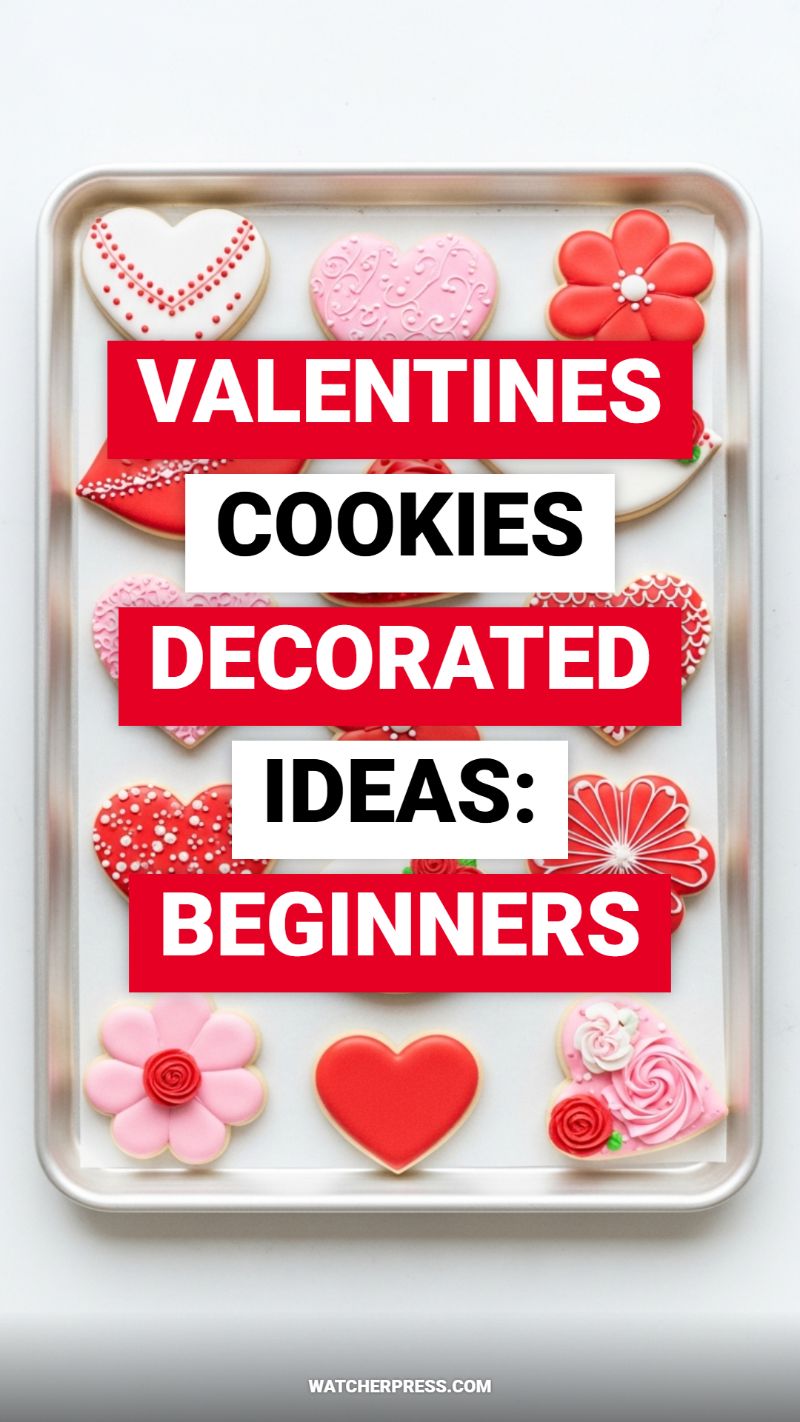
Creating edible decorative accents, such as the beautifully iced cookies displayed here, is one of the most cost-effective and personal ways to transform your home for seasonal holidays like Valentine’s Day. The goal is to produce polished, high-impact visuals using minimal tools and mastering just two foundational techniques: outlining and flooding. As evidenced by the variety on the baking sheet—ranging from the glossy solid red heart to the intricate piped dots and the delicately scrolled pink heart—all these looks are achievable with royal icing and basic piping bags. To start, you must prepare your royal icing in at least three key consistencies: piping consistency (stiff, holds sharp peaks, used for outlines and detailing), flood consistency (thin enough to spread smoothly but thick enough not to run off the edge), and medium consistency (for simple dimensional elements like the raised roses or swirls). The vibrant colors seen in the display require high-quality gel food coloring, which ensures deep saturation without adding excessive liquid that could compromise the icing’s structural integrity.
The instructional core lies in executing the ‘outline and flood’ method successfully. Begin by outlining your cooled, baked cookie with the piping consistency icing, creating a precise border that acts as a dam. Allow this outline to set for approximately 10 to 15 minutes. Next, use the flood consistency icing, applying it carefully inside the set border. Utilize a scribe tool or a toothpick to gently guide the icing to the corners and smooth the surface, ensuring there are no air bubbles, which is crucial for achieving the flawless, glass-like finish visible on the solid red heart. For designs requiring contrasting colors or subtle texture, like the pink cookies with the faint swirl pattern, the ‘wet-on-wet’ technique is employed: immediately after flooding the base color, drop small dots or lines of the secondary color onto the still-wet surface and drag a clean scribe tool through them to create soft, blending effects before the icing sets. This technique is faster and simpler than waiting for layers to dry, making it ideal for beginners seeking impressive results.
Once the flooded base layers have completely dried—a process that can take anywhere from four to eight hours, depending on humidity—you can move onto detailing, which elevates these simple shapes into sophisticated decor. Use the stiff piping consistency icing to add three-dimensional elements and fine lines. Look at the white heart with the red dotted border: this requires consistent pressure and practiced spacing, using a small round tip (like a PME 1.5 or Wilton 1). For the dimensional flowers and rosettes featured on the pink cookies, use medium consistency icing and a star tip (Wilton 1M or equivalent) for quick, impressive volume. These decorated cookies shouldn’t just be viewed as a snack; they are temporary, edible decor. Strategically arrange them on tiered trays, use them as edible place cards for a dinner party, or display them in a glass jar centerpiece to inject immediate, personalized charm into your home’s seasonal arrangement, proving that budget DIY decor can be both beautiful and delicious.
VIRAL SUPER BOWL PARTY DECORATIONS

When planning a game day gathering, your appetizers aren’t just food—they are edible decorations that set the mood without breaking the bank. The ultimate hack for Super Bowl décor is transforming everyday snacks into thematic visual centerpieces. Start with mini sliders, which are easily converted into iconic footballs. Use a small squeeze bottle filled with mayonnaise, ranch dressing, or even softened cream cheese to pipe three vertical dashes down the middle of the bun tops, centered between two small dashes on either end. This simple addition instantly elevates generic mini-burgers into festive, thematic treats. Ensure you use sleek, rectangular white serving platters, as seen in the visual, to create a sophisticated, modern backdrop that contrasts sharply with the rich, thematic browns and greens of the food. For your dip stations, don’t overlook the power of simple garnishes. A bowl of creamy guacamole or spinach dip becomes game-day ready by simply placing a small, edible football cutout (made from a piece of carved olive or even a dark tortilla chip) right in the center, or resting one on a spoon.
To achieve maximum visual impact, focus on arranging your snacks symmetrically to create a cohesive presentation that resembles a stylish charcuterie board or a perfectly maintained football field. The deviled eggs shown offer a brilliant example of functional, decorative presentation. By arranging them on a grid-patterned plate, you create the look of a segmented scoreboard or field. The yellow filling provides the base ‘field,’ and you can use thinly sliced chives, small strips of bacon, or olive pieces to create the ‘laces’ or ‘goalposts’ on top of each egg half. For larger baked items, like soft pretzels or bread bowls, the same lace technique applies; use a thin application of cream cheese, icing, or even melted white cheese to draw the football stripes, ensuring they stand out boldly against the brown surface. This consistent application of the football ‘lace’ motif across multiple food items ties the entire spread together, making the overall presentation feel deliberately curated and expensive.
Expert party planners understand that successful DIY décor is about optimizing presentation without excess expenditure on disposable items. Use fresh, inexpensive herbs, like rosemary sprigs (as seen framing the salsa and appetizers), to add bursts of natural color and texture to the platters, mimicking the look of fresh turf and breaking up the uniformity of the white plates. Focus on height and depth; use small risers or inverted bowls under linen cloths to elevate certain platters, adding visual dynamism to your buffet. By treating your food as your primary decorative element, you maximize the impact of every component while keeping your budget focused entirely on consumable goods. This approach not only provides high-impact visuals but also ensures quick, zero-waste cleanup once the game is over.
MASTER BEDROOM DECOR THAT FEELS LUXURIOUS
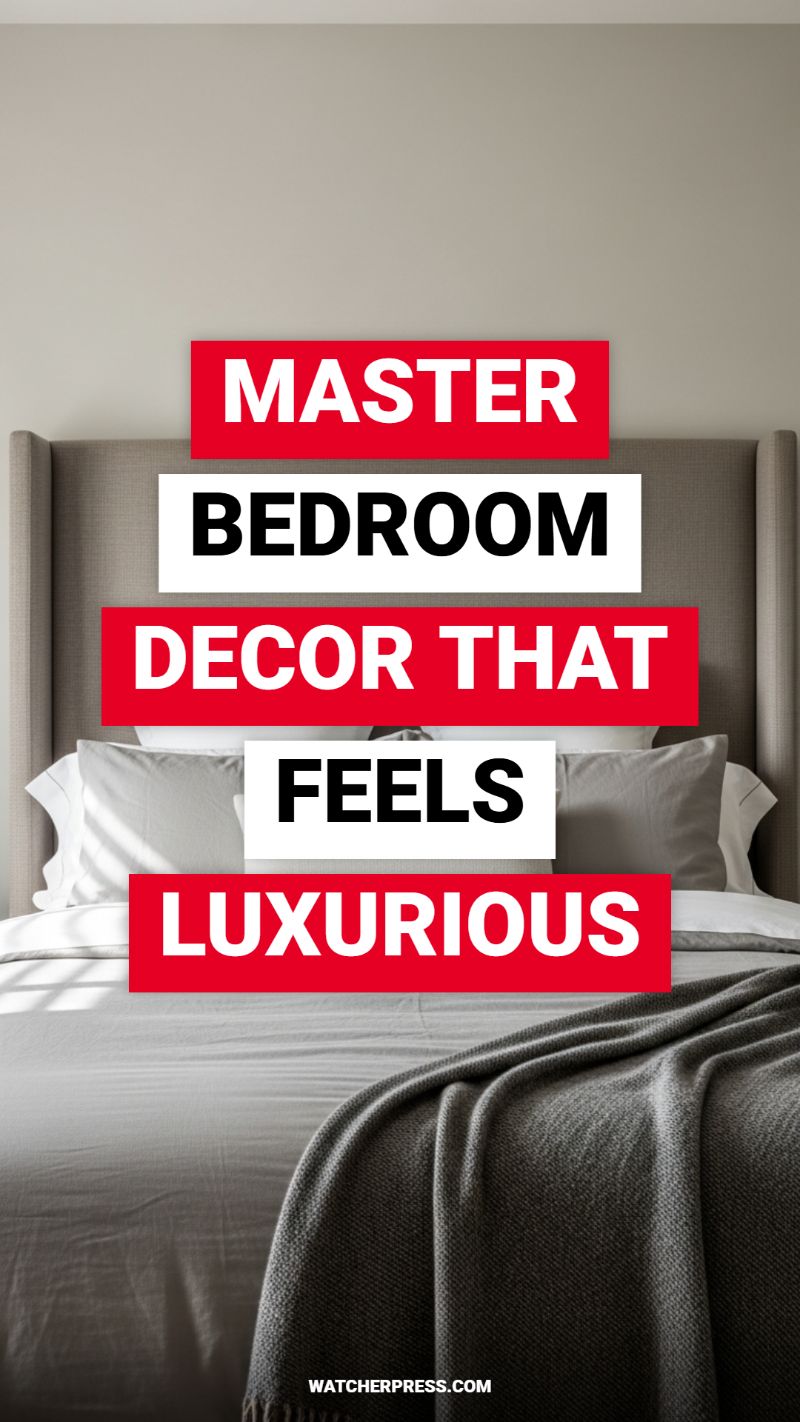
Achieving a luxurious master retreat, reminiscent of a five-star hotel, is often perceived as prohibitively expensive, but the key lies in mastering texture, scale, and a restrained color palette—all achievable through smart DIY hacks. The foundation of this look is the anchor piece: the bed frame and headboard. The image showcases a grand, upholstered, wingback headboard in a sophisticated taupe linen. To replicate this grandeur affordably, consider a DIY headboard project. Use inexpensive plywood or MDF cut to an exaggerated height and width (going significantly taller than standard instantly elevates the space). Instead of costly designer fabric, source a budget-friendly linen blend or textured faux suede in a warm neutral gray or greige. Pad heavily with batting and use a staple gun to stretch the fabric taut for a professional, tailored finish. Focusing on the vertical scale and clean lines ensures the bed becomes an architectural focal point, instantly lending high-end drama to an otherwise standard bedroom.
Once the headboard sets the stage, the bedding becomes the centerpiece of attainable luxury. The visual cues in the photo rely heavily on contrasting textures within a tight, tonal color spectrum (white, light gray, medium gray). Start with crisp, white cotton sheets—these are generally affordable and signal cleanliness and quality. The secret to elevating budget sheets is proper maintenance; iron or use spray starch on pillowcases to achieve that taut, hotel-style envelope look. Layer next with a duvet cover or coverlet in a soft neutral (like the light gray pictured). The essential final touch is the textured throw blanket. A thick, chunky knit throw in a deep charcoal or dark gray, strategically draped across the foot of the bed, adds immense visual weight and tactile interest. If buying an expensive knit is out of budget, look for thrifted or clearance knit blankets that can be easily dyed to a cohesive neutral shade, or even consider a large, reversible tapestry fabric hemmed as a quick, weighty bed scarf. The contrast between the crisp, smooth sheets and the heavy, casual knit is what defines this high-end layering technique.
Finally, the surrounding ambiance should support the elegant bedding design through simplicity and strategic lighting. Note the wall color in the image: a calming, warm neutral ‘greige’ that acts as a subtle, sophisticated backdrop. A fresh coat of paint in a deeply saturated, yet neutral, color is one of the cheapest ways to radically transform a room’s mood. Eliminate visual clutter; luxury often equates to curated simplicity. Ensure you maximize ambient light, whether natural or artificial, as soft, diffused light highlights the textures and layers you’ve worked hard to create. If overhead lighting is harsh, swap out fixtures for a secondhand chandelier or DIY pendant light using an inexpensive drum shade covered in a textured linen fabric. By prioritizing quality fabrics (even if budget), mastering scale, and committing to a monochromatic palette, you can achieve this breathtaking level of master bedroom decor without the hefty price tag.
BHM DOOR DECORATION THAT MAKES A STATEMENT
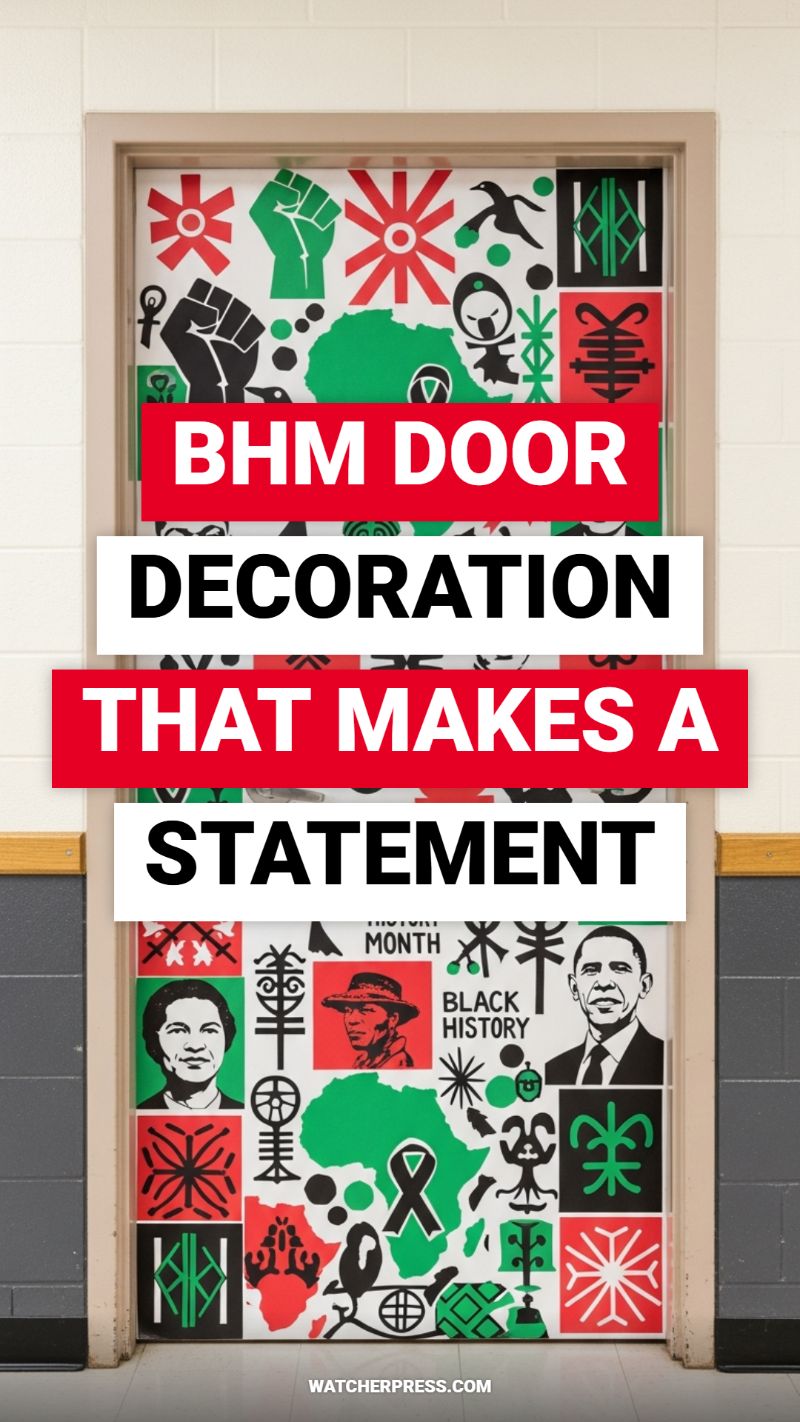
This dramatic door transformation is a masterclass in utilizing high-impact, temporary graphic design to celebrate heritage and history—a perfect, budget-friendly hack for educators, community centers, or homeowners looking for impactful seasonal decor. The key to replicating this look lies in leveraging the power of contrast and symbolic imagery using the Pan-African colors: black (representing the people), red (for the blood shed for liberation), and green (for the natural wealth and fertility of Africa). To start your DIY project, you must first design your collage. Since printing a single, door-sized poster can be expensive, utilize desktop publishing software like Canva or Google Slides to design the artwork in tiled segments (e.g., eight 8.5×11 sheets). Source high-contrast, graphic public domain images—specifically Adinkra symbols (such as *Sankofa* or *Gye Nyame*), stylized historical portraits, and universal symbols like the clenched fist and the map of Africa. Maintain a consistent aesthetic by converting all elements into silhouettes or bold, solid color blocks, which saves ink and ensures a powerful, clean visual presentation. Print these segments on standard paper and carefully trim the borders, preparing them for assembly.
Once printed, the execution relies heavily on precise alignment to achieve the seamless, professional mural effect shown here. Before application, lightly lay out your design on a clean floor to ensure the tiles match up perfectly. We recommend using a non-damaging, removable adhesive, such as low-tack mounting spray or poster putty, especially if applying this to a painted or varnished door surface, guaranteeing you leave no residue upon removal. Start the installation from the top center tile and work outward and downward, meticulously smoothing each segment as you go to avoid wrinkles or air bubbles. Expert tip: By integrating geometric patterns and gridlines, as seen in the central vertical strip of Adinkra symbols and the square blocks framing the historical figures, you naturally simplify the alignment process. The dense arrangement of images ensures that the viewer’s eye is overwhelmed by the collective power of the message rather than focusing on the individual seams between the paper tiles, making this large-scale project manageable and budget-friendly.
Beyond Black History Month, the strategic genius of this DIY hack is its complete adaptability for any theme or season, making it a sustainable decor investment. You are establishing a template: a high-contrast door wrap that replaces paint or expensive wallpaper. For instance, to transition this door wrap for spring, swap the Pan-African colors for pastels and replace the political symbols with floral or seasonal imagery, maintaining the same collage layout structure. This technique transforms a mundane door surface into an immediate focal point, elevating the entire space without requiring architectural changes or costly supplies. The final polish for this BHM statement piece is ensuring the bold text title—if you choose to add one—is centered and uses blocky, high-impact font set against a contrasting background (like the white text on the red block shown) to finalize the authoritative and educational feel of the display.
CHIC VALENTINES PARTY DECOR IDEAS
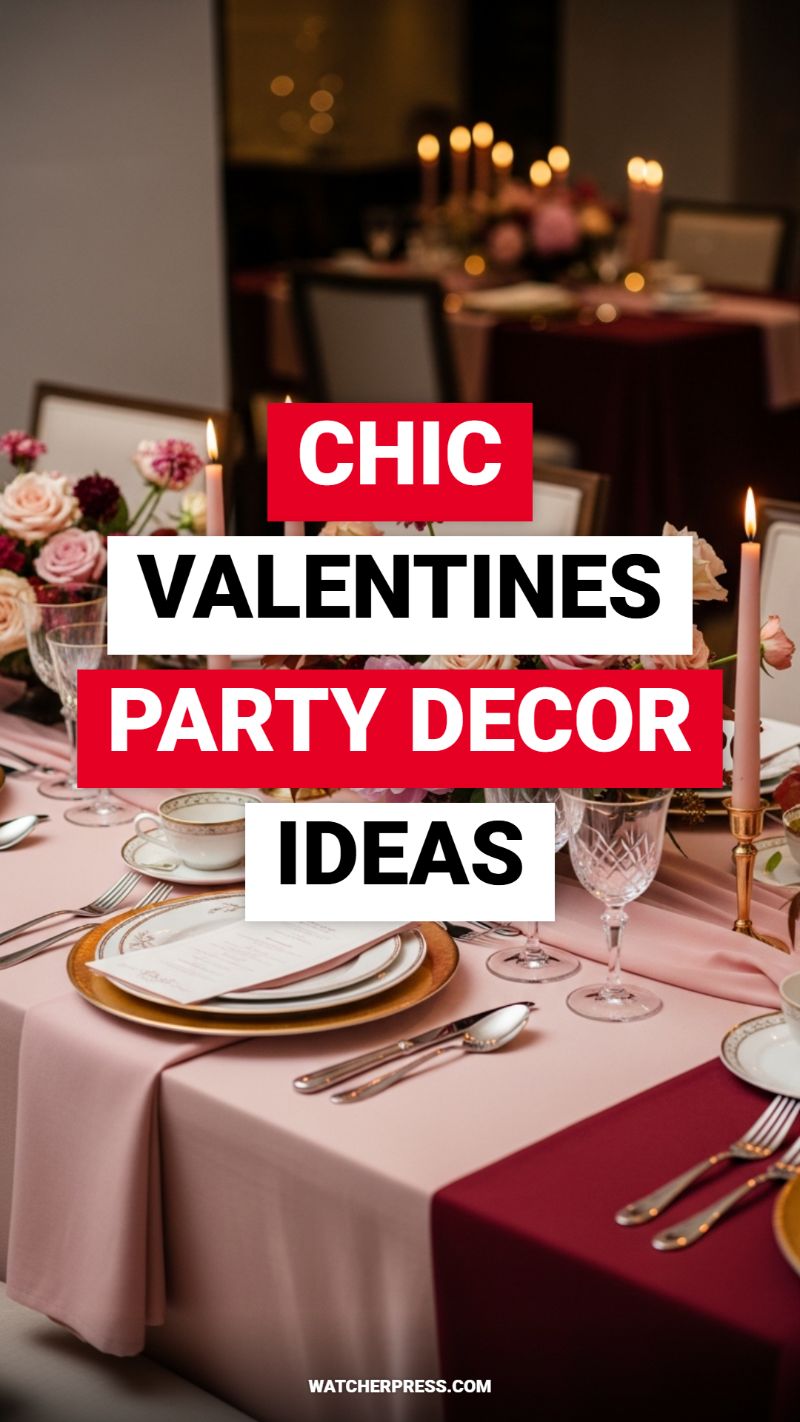
Achieving this level of intimate, sophisticated dining ambiance for a Valentine’s celebration doesn’t require a high-end event budget; it relies on strategic color blocking and texture layering. The visual appeal here is driven by the contrast between deep burgundy and soft blush pink, anchored by metallic gold accents. To replicate this on a budget, start with your linens. Instead of renting specialized tablecloths, use a neutral base (white or cream) that you already own. Purchase inexpensive fabric (like broadcloth or muslin) in deep crimson or burgundy and cut a wide runner that drapes dramatically over the edges. Next, introduce the blush tone using strategically placed napkins or an overlay of sheer pink fabric down the center. For the crucial gold element, bypass expensive china. Purchase plastic charger plates cheaply and give them two coats of metallic gold spray paint. This layering trick instantly elevates basic dinnerware and is the most effective DIY hack for replicating a high-end tablescape.
Ambiance is primarily created through lighting, making candles your most crucial budget tool. Notice how the image uses tall taper candles, which provide vertical height and a warm, flattering glow. You can mimic this elegance by visiting thrift stores for mismatched brass or silver candlesticks. A quick coat of matte black or shimmering gold spray paint will unify these finds into a cohesive, expensive-looking set. Always group the candles in clusters of three or five to avoid a sparse look, ensuring the candles themselves are either white or in a complementary dusty rose shade. For the floral centerpieces, focus on volume and color over expensive varietals. To achieve the deep, lush look seen here, utilize affordable filler flowers like carnations or baby’s breath and mix them with a handful of high-impact burgundy and blush roses. Arrange the flowers in smaller, clustered vessels (even mason jars painted pink or wrapped in ribbon) rather than one large centerpiece; this disperses the romantic color story down the length of the table for greater visual impact.
The final tier of DIY chic involves the details on the place setting, which personalize the experience without spending a fortune. The crisp, layered place settings are made formal by the presence of a menu card. Design simple, elegant menu inserts in a complementary light pink or ivory font, printed on quality cardstock, and place them centered on the plate. Tie them with a thin burgundy velvet ribbon for an instant textural upgrade. For glassware, if you lack matching crystal, don’t worry—mix and matching different styles of clear wine and water glasses can look deliberately curated and bohemian chic. The key is to ensure every piece of silverware is perfectly polished, as these small metallic touches catch the warm candlelight and communicate a high level of intentional hosting. Remember, a chic Valentine’s setting prioritizes dim, intimate lighting and rich color layering over costly items.
CLASSROOM DOOR WINS: VALENTINES EDITION
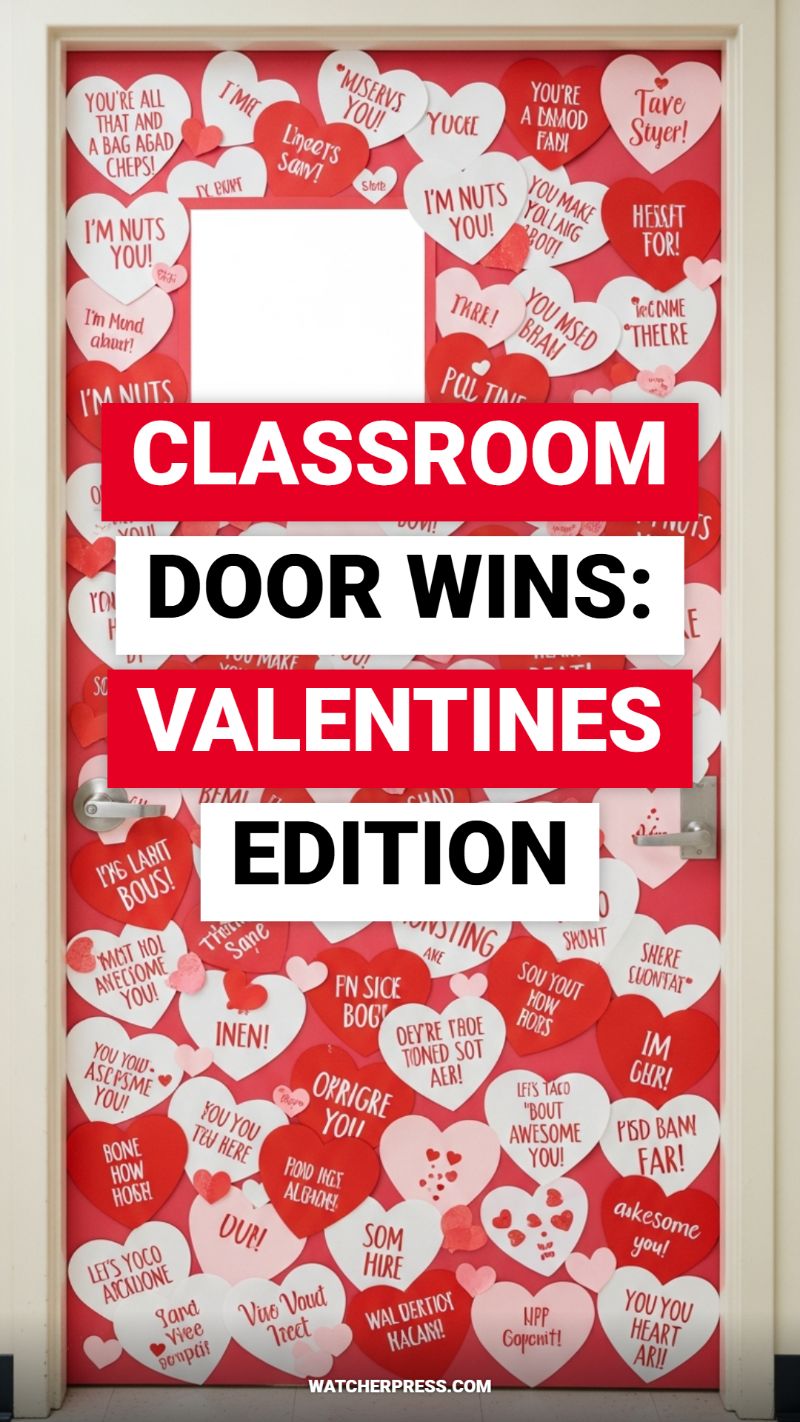
This decorative hack—easily adaptable from a classroom entrance to a high-impact home entryway—is the epitome of budget-friendly transformation. The key visual element is the dense, layered application of customized paper hearts, mimicking the iconic look of conversation candies, but with a humorous, intentionally phonetic twist (like “I’m nuts you!” or “You make youlaug bout”). To execute this transformation, begin by sourcing cardstock in three complementary colors: typically bright red, white, and a pale pink accent. Measure your door space, paying special attention to the window opening, which can act as a natural frame. Cut the main volume of hearts in various sizes—aim for three distinct dimensions (large, medium, and small accent hearts). For professional results, print several heart templates before cutting to maintain uniformity, or use a craft cutting machine if available. Expert advice: Use thick cardstock (65lb minimum) to prevent curling and ensure the design holds its structure once applied.
The real impact of this decor comes from the customized text application and strategic layering. Before attaching anything, use a fine-tip permanent marker to write out your phrases. If adapting the ‘misspelled’ meme style, plan out your funniest phrases first to ensure a good mix of humor and traditional sentiment. For a modern home aesthetic, you might replace the phonetic spelling with inside jokes or minimalist text. The application process should start from the center and work outward, maintaining visual depth by overlapping the hearts significantly—you want nearly every piece touching or resting on another to achieve that satisfying, dense collage effect. Utilize the smaller pink hearts to fill in any awkward gaps around the frame or door handle, guaranteeing a wall-to-wall textile effect. Use removable mounting putty or low-tack double-sided tape for installation, which allows for easy removal without damaging your door paint.
While featured here as a Valentine’s spectacular, the genius of this hack lies in its extreme versatility and low cost. The technique—mass production of a simple shape combined with customized, repetitive text—can be adapted for any season or occasion. Imagine using green shamrocks and Irish blessings for March, or orange and black bats for Halloween. By transforming the repetitive shape and color palette, you gain a high-impact display that instantly changes the mood of a room or entryway for less than $10. This technique is a powerful way to inject personality and seasonal flair into a space that often remains overlooked, proving that truly transformative decor is often about clever repetition and strategic, personalized messaging rather than expensive furnishings.
EASY DIY ROOM DECOR FOR TEENS!
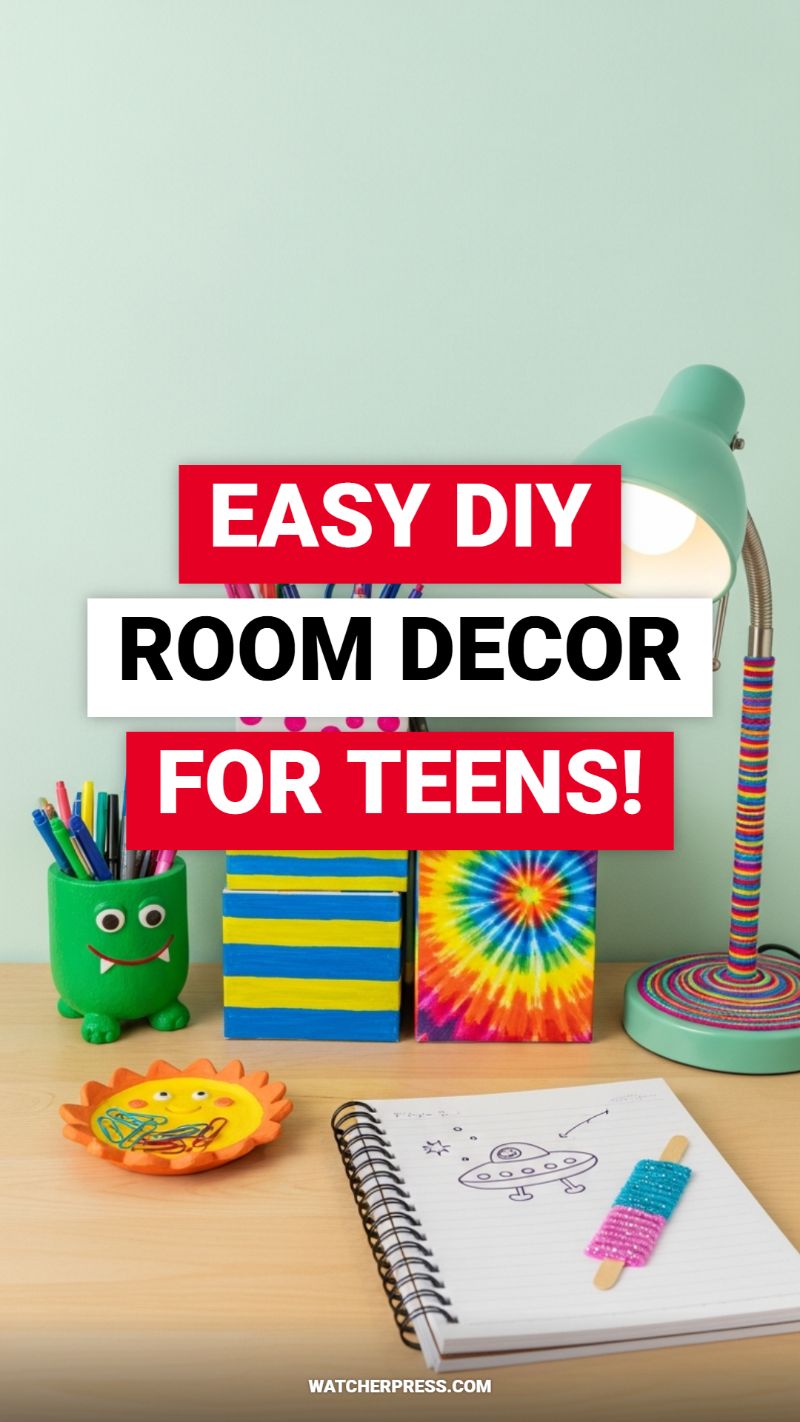
Creating a personalized, vibrant bedroom doesn’t require a massive budget, just a willingness to transform everyday items into functional art. This collection of DIY projects showcases the power of color, pattern, and upcycling, making them perfect for teens looking to inject personality into their space, whether it’s a bedroom or a dorm room. Start with simple accent pieces like the decorative blocks and canvases shown here. The secret is contrast: pair a clean, graphic pattern (like the bright yellow and blue horizontal stripes on wood blocks) with a bold, organic texture (like the psychedelic tie-dye swirl canvas). These pieces are incredibly easy to execute—the striped blocks can be created using painter’s tape to achieve clean lines on inexpensive wood scraps, while the tie-dye effect can be achieved on a miniature canvas using specialized fabric spray paint or watered-down acrylics applied with a sponge. Grouping these contrasting visual elements adds instant depth and artistic flair to any shelf or desk.
Next, elevate your organization game by tackling functional pieces that need a colorful upgrade. The desk lamp is a prime example of a budget hack that provides maximum visual impact. To replicate this look, secure colorful yarn or thread—preferably inexpensive acrylic yarn—to the base of the lamp pole using a dab of hot glue, then tightly wrap the yarn up the length of the pole, using intermittent glue spots only as necessary to prevent slipping. This technique adds texture and customization, instantly changing a standard metal lamp into a decorative centerpiece. Pair this texture with fun, upcycled storage solutions, such as the cheerful green monster pen holder, which appears to be a painted and decorated tin can or bottle, personalized with googly eyes and painted fangs. For smaller items like paperclips or jewelry, crafting a custom catch-all dish using oven-bake polymer clay is an ideal solution. Mold the clay into a fun shape, like the sun shown, bake it according to package directions, and finish it with bright acrylic paint and a protective sealant.
These projects are designed to be quick, inexpensive, and highly customizable, allowing young decorators to express their unique style without commitment or high cost. Remember to focus on utilizing materials you already have, like transforming a simple notebook into a personalized journal by adding a glittery, beaded bookmark made from yarn scraps and a popsicle stick. The key to successful teen decor is playful personalization and maximizing limited space. By mixing textures (smooth paint, fuzzy yarn, rough canvas) and vibrant color schemes, you achieve a layered, maximalist look that feels energetic and inviting. These hacks prove that budget decor doesn’t mean sacrificing style; it simply means embracing creativity.
VIRAL ONESIE DECORATING STATION SETUP
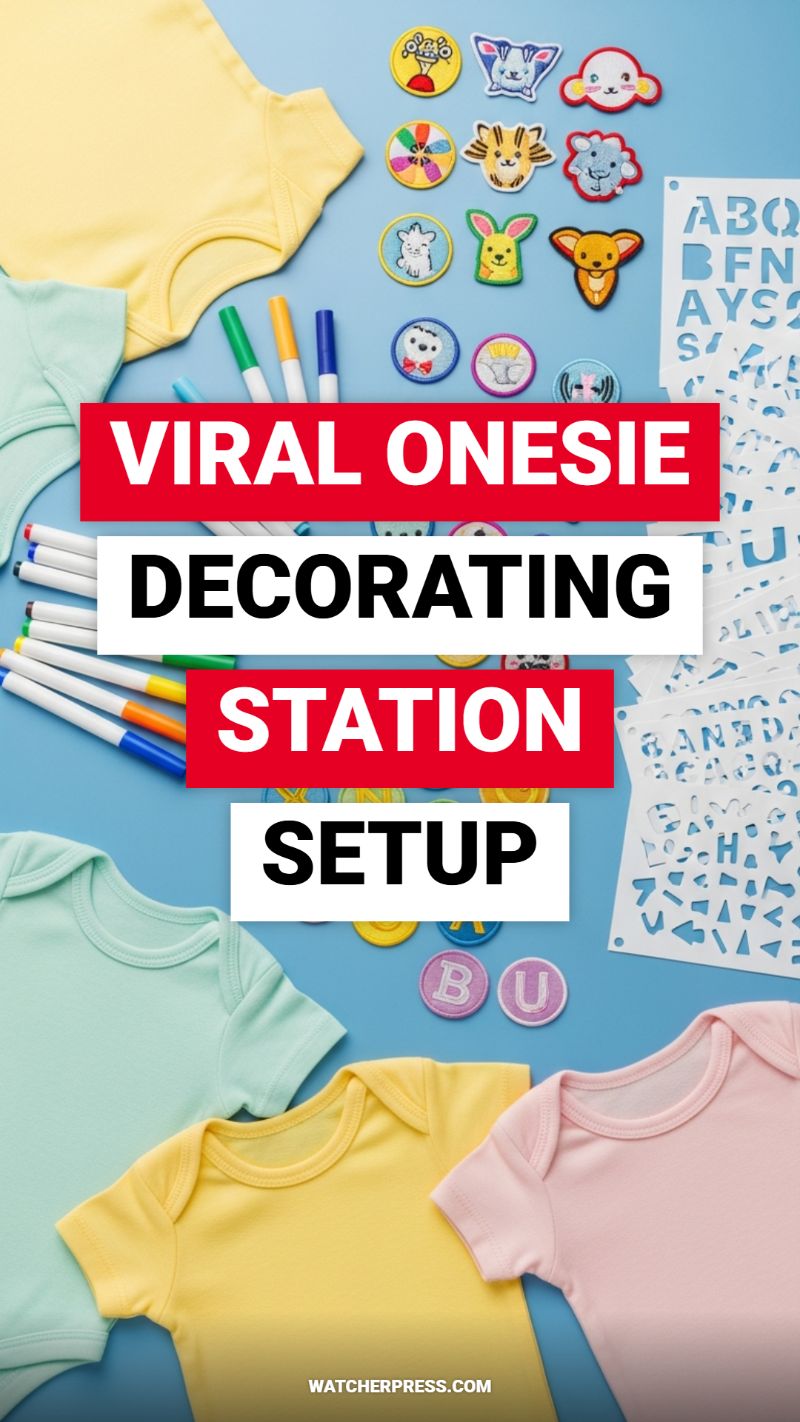
This hack takes textile customization and turns it into a high-impact, interactive decor element perfect for social events like baby showers, transforming simple craft materials into personalized, treasured keepsakes. To replicate the station seen in the image, begin by gathering your foundational elements: a variety of blank, pre-washed baby onesies in appealing, trend-forward pastel hues (such as the mint, blush pink, and pale yellow shown), a vibrant selection of high-quality, non-toxic fabric markers or paint pens, and an assortment of decorative elements. The visual appeal lies in the organization and color coordination, so arrange your materials neatly on a flat, contrasting surface—the bright blue background here makes the colorful markers and patches pop. Crucially, acquire multiple sets of fabric patches (we see cute embroidered animals and abstract shapes) and detailed alphabet stencils, ensuring participants have options for both freehand design and structured personalization. For optimal results, include an inner barrier, such as a piece of cardboard or plastic cutting mat placed inside each onesie, to prevent markers from bleeding through the fabric layers.
Once the materials are prepped, focus on the execution of the decoration techniques. For marker customization using the included alphabet stencils, advise crafters to secure the stencil firmly using painter’s tape to avoid shifting, which is the key to crisp, professional lettering. When applying the fabric markers, gentle, even pressure is essential; multiple light coats are always better than a single heavy application that could saturate the material. For those opting for embellishment, the patches seen in the image are typically iron-on, offering a quick and permanent decorative solution. While the initial creation can happen at the main station, it is expert practice to designate a separate, supervised area for the final step: heat-setting. Fabric markers require heat (often 3-5 minutes in a low-heat dryer or pressed with an iron) to ensure permanence and washability, and iron-on patches require firm heat application. Clearly label the required heat-setting instructions for each medium used.
Integrating this station into your overall home decor theme requires thoughtful presentation. The finished onesies are miniature canvases that instantly reflect the love and creativity of the participants, and they should be immediately put on display. Stringing the decorated onesies onto a simple clothesline or hanging them on a miniature garment rack transforms them from simple crafts into an engaging and sentimental focal point for the event, effectively doubling as temporary event decor. This DIY hack is supremely budget-friendly—you are turning inexpensive, basic clothing items into priceless, personalized gifts. By offering high-quality tools and structured guidance, you ensure every participant, regardless of their artistic skill level, leaves with a successful and cherished piece of wearable art that will find a meaningful place within the new home’s nursery aesthetic.
BEST THRIFT FINDS DECOR HAUL EVER!
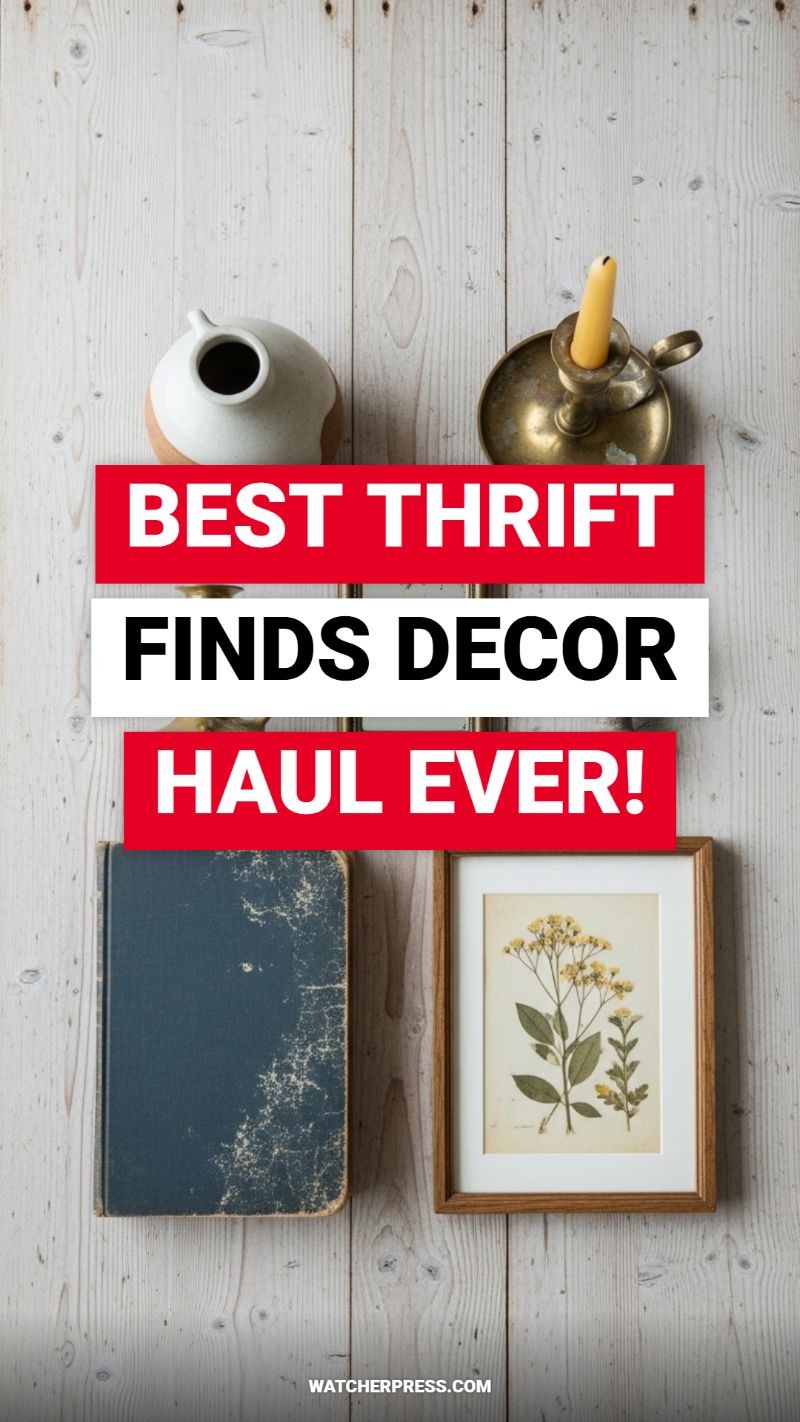
One of the most effective and budget-friendly ways to achieve a high-end, curated look is by mastering the art of the thrifted vignette. The aesthetic captured here relies on a mix of materials—aged brass, distressed textile, raw ceramic, and natural wood—all sourced for pennies on the dollar. When hunting at flea markets or secondhand stores, look past the grime and focus on shape, texture, and potential. Start by seeking out items that offer natural contrast. For instance, the small, contemporary-style pitcher and the heavily patinated brass candlestick holder create a compelling juxtaposition of old and new, smooth and rough. These small decorative items are frequently overlooked by other buyers and can often be purchased for under five dollars each. The key is seeking foundational pieces: aged books provide a grounding, textural element; small ceramic or clay vessels add organic shape; and antique metals introduce necessary warmth and weight. These elements, when combined, tell a story far richer than anything you could buy new from a big-box retailer.
Creating a balanced visual arrangement, or ‘vignette,’ involves careful consideration of height, scale, and placement. Notice how the items are positioned in pairs or groupings of varying heights to avoid a flat, static look. The candlestick provides verticality and drama, while the small, round-bodied ceramic jug stabilizes the upper left corner. The bottom half of the display is anchored by two larger, rectangular items: the heavily distressed navy book and the framed botanical print. Expertly arranging these requires using some items as risers; the old book, for instance, can be slightly elevated or used as a base for a smaller item if needed. The botanical print is a genius hack—vintage prints can be expensive, but you can achieve this exact look by purchasing a low-cost, simple wood frame and inserting a free downloadable high-resolution image of a historic botanical drawing, printed on slightly textured paper stock. This instantly adds a touch of sophistication and color, tying the entire setup together with its muted, natural palette. Always remember the rule of layering: place the tallest and largest objects toward the back, and the smaller, more detailed items in the front.
The final, crucial step in this DIY hack is preparing your thrift finds for display. Nothing ruins a curated look faster than visible dust or tarnish, unless that tarnish is intentionally part of the aesthetic. For brass items like the candlestick, decide if you prefer a bright shine or a rustic patina. If polishing, use a simple homemade solution of salt and white vinegar to clean off superficial dirt without stripping the historical finish entirely. For textiles, like the distressed book cover, the chipped, worn appearance is the prized characteristic—gently dust the item but avoid aggressive cleaning that might ruin the aged texture. The backdrop, too, plays a critical role: the light, distressed wood planking shown here (easily mimicked with inexpensive shiplap or painted MDF board) ensures that the richly textured decor pieces stand out prominently. By investing time, not money, in sourcing and styling these elements, you transform cheap thrift finds into luxury-level home accents.
7 Ways to Repurpose Old Birdcage Decor
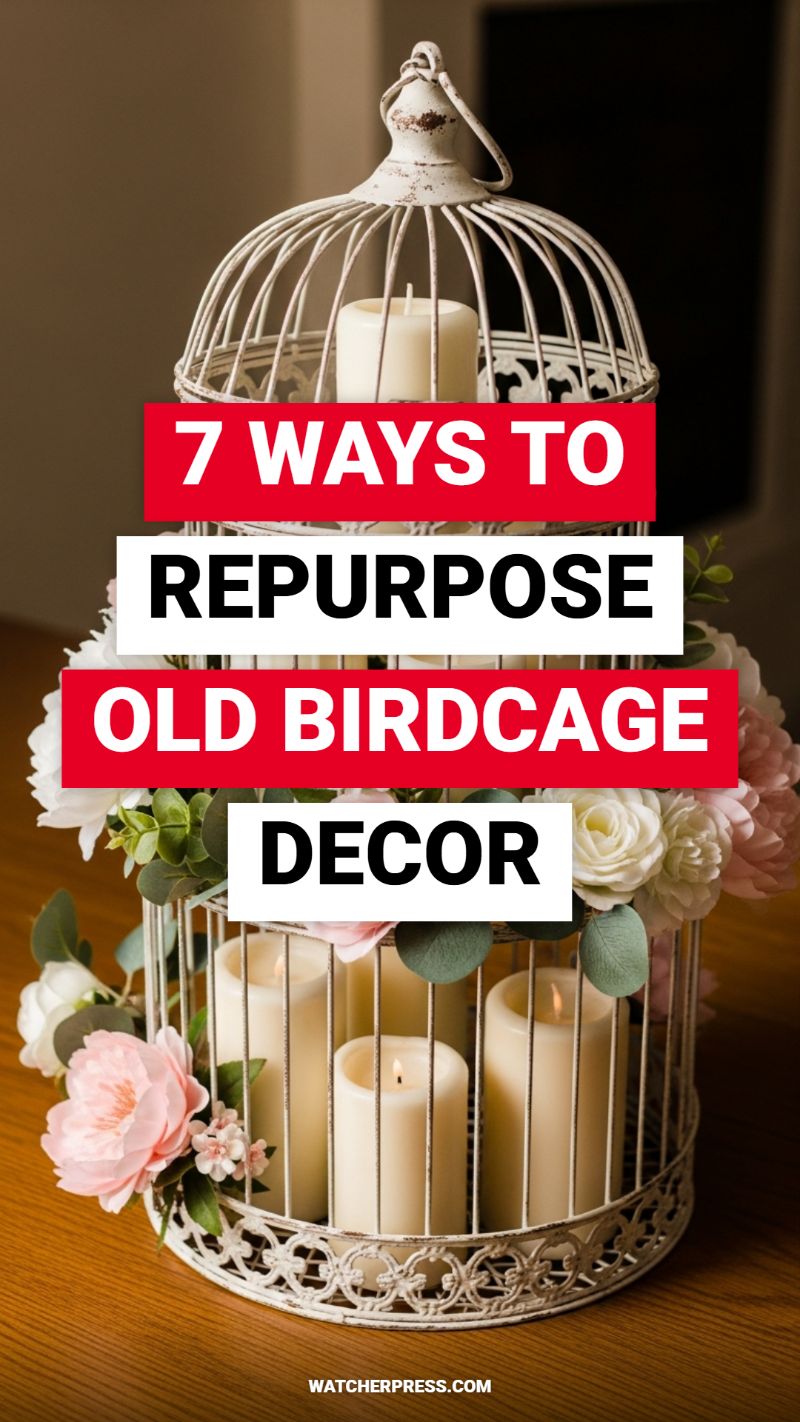
The classic, often overlooked birdcage, particularly those with a distressed or antique finish like the one pictured, offers an incredible opportunity for high-end, budget-friendly decor. To recreate this stunning shabby-chic centerpiece, begin by ensuring your birdcage is thoroughly cleaned. The key visual element here is transforming the cage into an elegant lantern and floral display. We recommend using several flameless LED pillar candles of varying heights (adhering to the rule of odds—three or five looks best) to fill the interior space. This provides the warm glow of candlelight without the associated fire risk, making it a perfect year-round display. If the cage is currently a dull color, a quick coat of matte white or cream spray paint, followed by light sanding on the edges to achieve a deliberately distressed, antique patina, will instantly elevate the piece to designer status.
Once the internal lighting is established, the next crucial step is incorporating high-quality faux greenery and blooms. For a romantic, vintage feel—as demonstrated by the soft pink peonies, white roses, and trailing eucalyptus pictured—secure these elements to the exterior wirework. Start by weaving the greenery (like eucalyptus garlands) through the cage bars, establishing a lush foundation. Then, using small pieces of floral wire or dabs of hot glue, attach the larger blooms strategically around the base and mid-section of the cage. Ensure the arrangement looks organic and balanced, allowing some flowers to appear as if they are growing out of the base. This method not only hides any imperfections on an older cage but also softens the industrial metal texture, making it an ideal centerpiece for dining tables, entryways, or even as wedding reception decor.
While the lantern centerpiece is a magnificent transformation, the inherent structure of a birdcage allows for multiple creative uses, aligning perfectly with DIY budget transformation goals. Beyond using it as a floral/candle display, consider repurposing it as a sophisticated tiered serving tray by securing small, circular wooden planks or plates inside, making sure the planks rest on the cross supports. Alternatively, remove the bottom tray and use a larger cage as a unique miniature greenhouse or terrarium, filling the base with moss, gravel, and succulents. Smaller cages make excellent jewelry holders when hooks are added, or unique wedding/party card collection boxes. Seek out vintage or unwanted cages at thrift stores and flea markets; their aged appearance is not a flaw, but rather a desirable feature that lends character and charm to your finished decorative project.
You’ve reached the end of “The Ultimate Guide to DIY Decor Hacks,” and we hope you feel not just informed, but profoundly empowered. This guide confirms a powerful truth: a beautifully transformed, personalized home does not require an endless budget, only strategic creativity and effort. We’ve walked through dozens of techniques—from mastering paint effects to sophisticated upcycling and smart spatial planning—all designed to maximize aesthetic impact while minimizing financial outlay.
Helpful Final Thoughts: As you embark on your first project, remember two key things: first, **start small** to build confidence and momentum; second, **embrace imperfection**, as the unique character of a DIY piece is often its greatest asset. The resources and knowledge are now in your hands; the only thing left is action.
Stop scrolling and start creating! Choose one hack that resonated most with you and commit to bringing it to life this week. We absolutely love seeing these ideas realized, so please share your newly transformed spaces and before-and-after photos with our community using the hashtag **#BudgetDecorHacks**. For continuous inspiration, advanced tutorials, and exclusive project outlines delivered weekly, don’t forget to subscribe to our newsletter below.