Discover the ultimate collection of 50+ trending nail designs! Find stunning manicures perfect for every season, style, and occasion, from minimalist chic to luxury glam.
10 Dainty Simple Nails
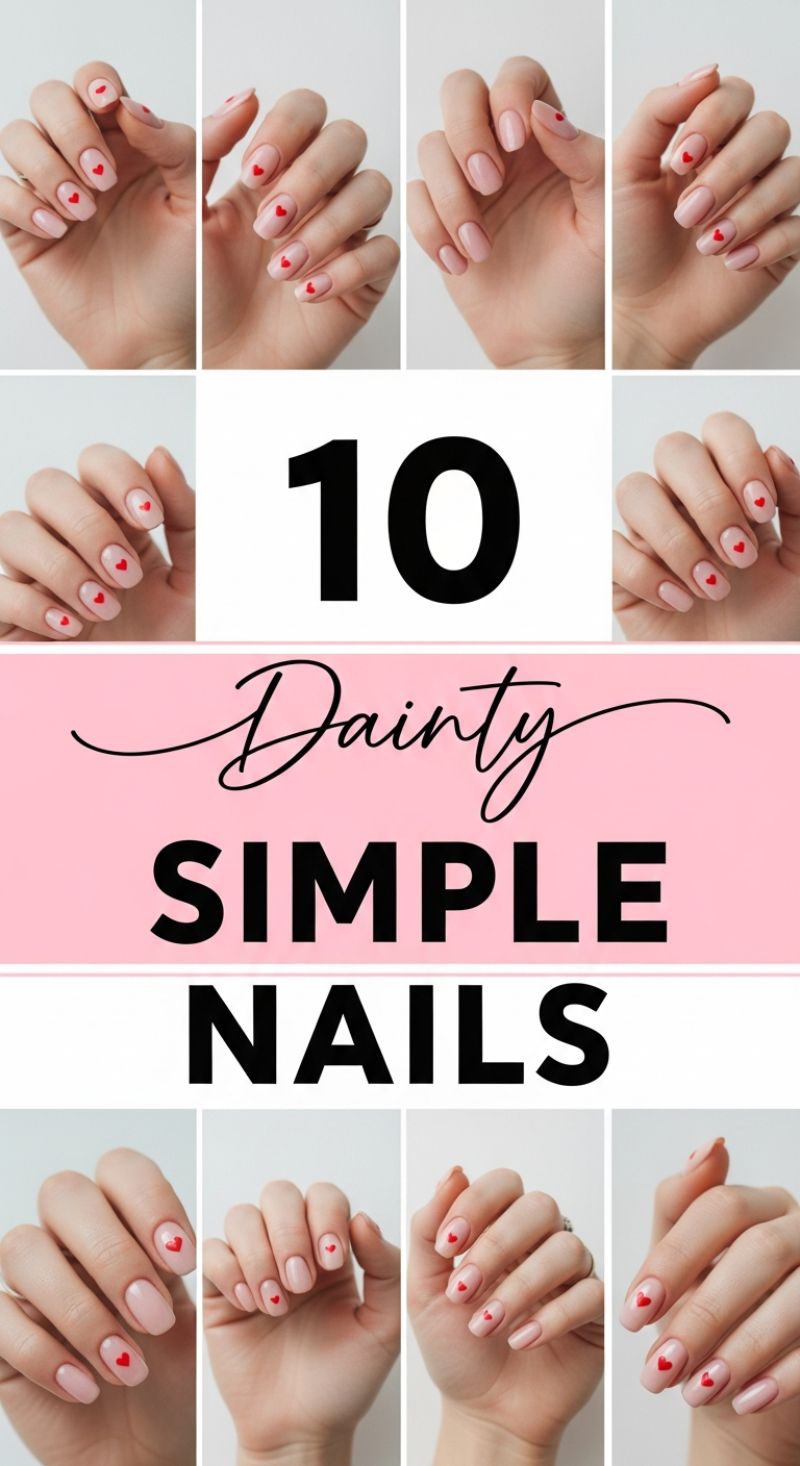
The appeal of the “dainty simple nail” look featured here lies in its understated elegance and accessibility. This style perfectly captures the minimalist aesthetic by utilizing a milky, sheer nude or pale pink base—a crucial step for establishing that clean, ‘your nails but better’ foundation. To achieve this level of sophistication, begin with meticulous nail preparation. Ensure cuticles are pushed back, and the nail plate is lightly buffed smooth. Apply two coats of a high-quality, sheer polish. The goal is transparency and soft color, rather than stark opacity, which allows the natural tone of your nail bed to show through slightly. This technique keeps the look modern, fresh, and ensures that the tiny heart detail truly pops against a flawless canvas.
The iconic small heart accent is the star of this simple yet stunning design. For precision, you have two primary methods: professional-grade nail decals or precise hand-painting. If opting for hand-painting, select a highly pigmented true red or deep red gel polish. The most effective tool for creating these tiny shapes is a fine-tipped detail brush or a thin dotting tool. To form the heart, place two small, perfectly aligned dots side-by-side where you want the top of the heart to be. While the polish is still wet, use the fine brush to lightly drag polish downwards and inwards from the base of the two dots, meeting them in a slight ‘V’ shape to form the heart’s bottom point. For the subtle, uniform look demonstrated, the heart should be placed consistently near the center or just above the cuticle line on each finger. Remember, consistency in size and placement across all ten nails is absolutely vital to maintain the delicate, cohesive aesthetic.
This minimalist nail art pairs best with a short, neatly maintained shape, such as a rounded or squoval cut, which enhances the softness of the heart motif. Once the red hearts are completely dry or cured (if using gel), the final step is crucial: sealing the entire design with a high-gloss, durable top coat. Applying two thin layers of top coat will maximize shine and, more importantly, fully encapsulate the tiny artwork, significantly preventing premature chipping and extending the life of your manicure. This design is incredibly versatile, translating flawlessly from a professional environment to a playful weekend setting, proving that statement nails don’t require complexity—sometimes, the simplest, daintiest details make the biggest impact.
5 Expensive Luxury Nails: High-End Pearl & Gold Embellishments
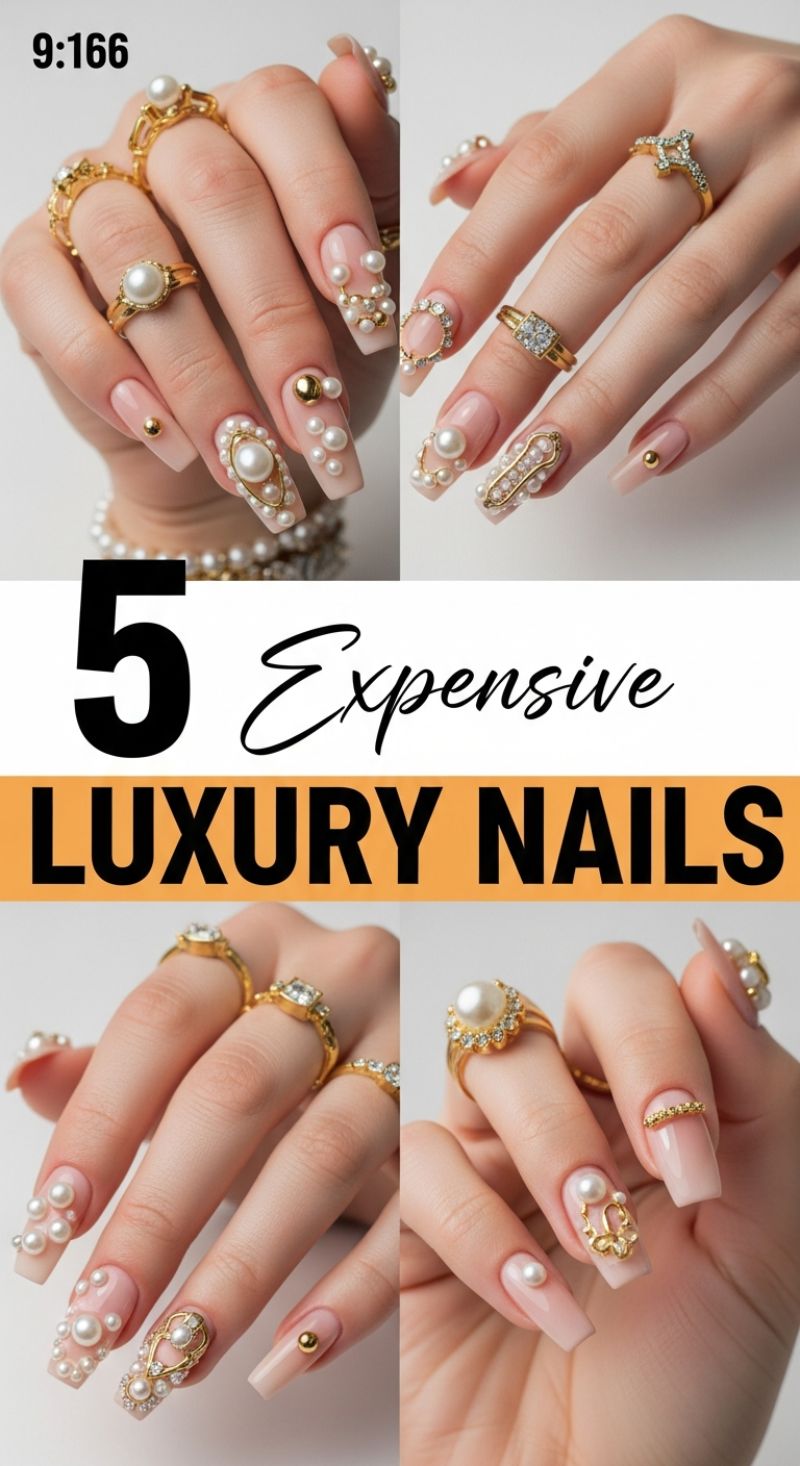
The ‘Expensive Luxury Nail’ look centers on creating an illusion of opulent, priceless jewelry directly on the nails. To achieve this high-end aesthetic, start with the perfect canvas: a long, sculpted coffin or tapered square shape. The base color must be flawless—opt for a sheer, milky nude or a blush pink jelly shade, applied using builder gel or structure gel for maximum durability and thickness, which is essential to support the heavy 3D accents. After curing the base color, ensure the surface is perfectly smooth. The most critical step in preparation is selecting high-quality materials; cheap plastic pearls or dull gold decals will ruin the intended luxurious effect. Invest in Swarovski pearls, high-shine gold micro-beads, and detailed, weighty gold charms. This is not a look where minimalism reigns; the goal is lavish, intentional saturation of ornamentation.
Application of the luxury elements requires precision and the correct adhesive. For the weightier pieces, like the large focal pearls and gold charms, standard top coat will not suffice. Use a thick layer of clear sculpture gel or a specialized jewelry adhesive gel, applying it generously to the specific areas where the charms will rest. Start by placing the largest accent pieces first—often a single, oversized pearl or a complex gold filigree charm—on the ring or middle finger. Then, build out the design using varying sizes of pearls (from 2mm to 4mm) to create intricate patterns, such as halos around the focal point or trails flowing down the nail bed. Expertly fill in any gaps with tiny gold metallic beads and micro-rhinestones to ensure no bare space remains, mimicking the setting of fine jewelry. Cure thoroughly after placement, often requiring a longer cure time than standard polish to fully set the heavy gems.
Longevity and finish are paramount for a true luxury look. Once all elements are securely attached, carefully encapsulate the base of all 3D accents using a non-wipe top coat, ensuring the polish flows around the sides of the pearls and charms without dulling their surfaces. Avoid brushing the top coat directly over the pearls, as this can instantly reduce their luster. Because this design is exceptionally textural and thick, maintenance is key. Advise that these nails are inherently high-profile and require careful handling during daily tasks. For clients, recommend a structure fill every 2-3 weeks, using hard gel to maintain the architecture and prevent lifting, ensuring the nails remain pristine and worthy of a high-fashion runway or exclusive gala event.
5 Chic SHORT NAILS
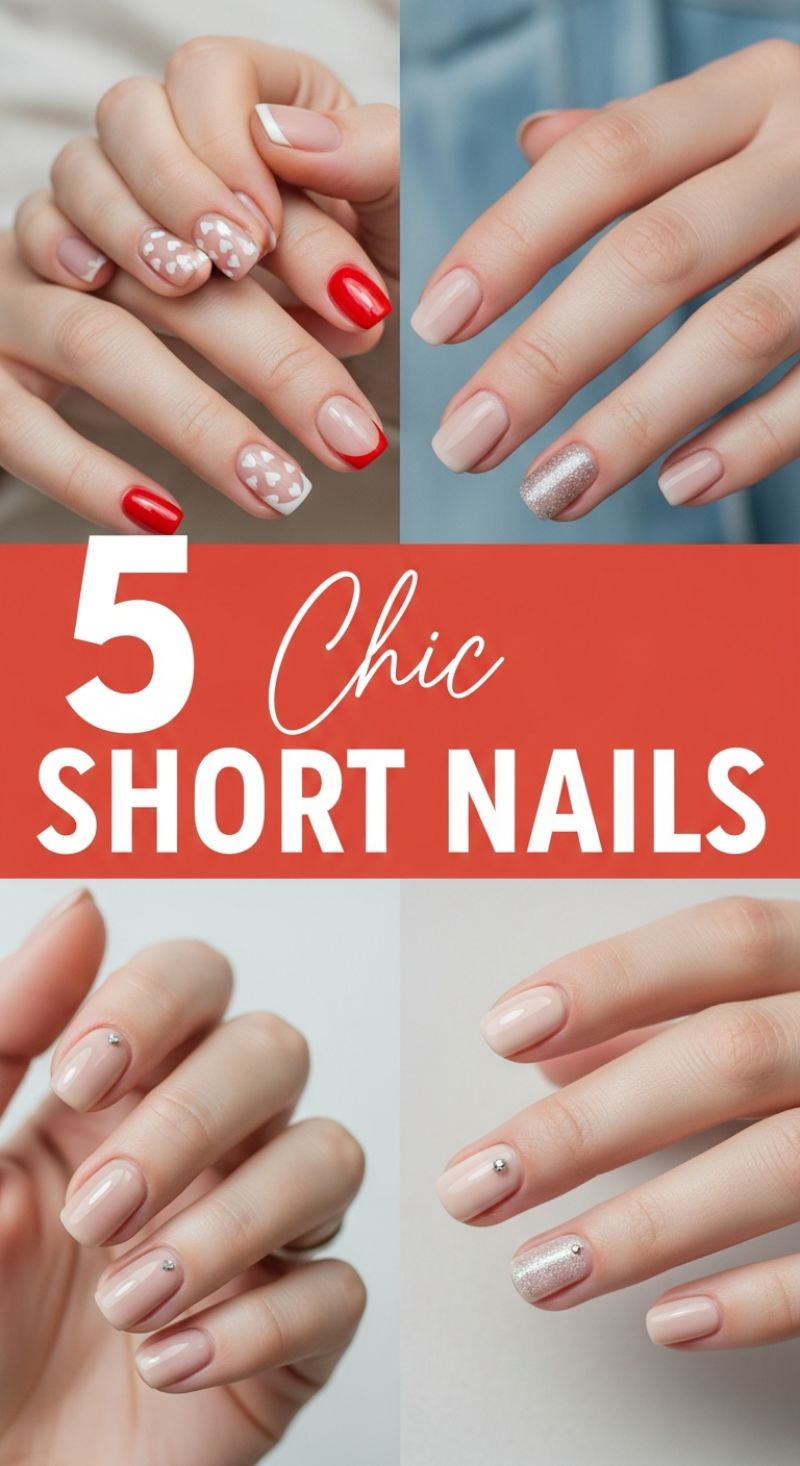
Short nails are the epitome of practical elegance, offering a sophisticated canvas that remains effortlessly manageable for daily life. To achieve this trending ‘chic short nail’ aesthetic, start with impeccable preparation. Proper shaping is key; opt for a gently rounded square or squoval shape to complement the natural curve of the fingertip, making the nail bed appear slightly elongated. The foundation is almost always a neutral sheer or cream polish—think milky white, dusty pale pink, or nude beige—which acts as the perfect backdrop for minimalist art. Ensure cuticles are pushed back and moisturized, as clean margins are non-negotiable for a polished, top-tier finish. Apply two thin coats of your base color to achieve smooth, streak-free opacity before moving on to the detailing.
Integrating art into short nails requires precision and restraint, as demonstrated by the featured designs. For the playful yet sophisticated look (top left), use a thin dotting tool or a fine liner brush to create delicate white hearts over a nude base on one or two accent nails. The key is to keep the pattern sparse, ensuring the design doesn’t overwhelm the small nail surface. Contrast this whimsy with bold solid colors, like the brilliant red shown, or a modern French tip. When executing French tips on shorter lengths, use a curved striping guide or a very fine brush to create a shallow, well-defined line at the very tip, or flip the design to a ‘deep French’ or ‘reverse French’ using color (like the red half-moon tip) to frame the nail bed instead. For instant glamour without length, substitute a solid polish on the ring finger with a fine-milled silver or champagne glitter polish, providing a brilliant, sophisticated sparkle that catches the light beautifully.
For a final touch of understated luxury, consider subtle embellishments, such as tiny silver or clear rhinestones. The professional way to apply these is strategically near the cuticle area (the proximal matrix) or slightly off-center on the nail bed, often atop a solid nude shade or even the glitter accent nail. Use specialized tools like a wax pencil or fine-tipped tweezers to carefully place the rhinestone, securing it firmly with a small drop of specialized nail glue or a thick gel top coat. Expert tip: always finish the entire manicure with a high-shine, non-yellowing top coat, ensuring you ‘cap’ the free edge of every nail. This seals the polish and any art, protecting against chipping and dramatically extending the wear time of your chic, short design, ensuring your minimalist masterpiece stays flawless for weeks.
7 Effortless Simple Nails
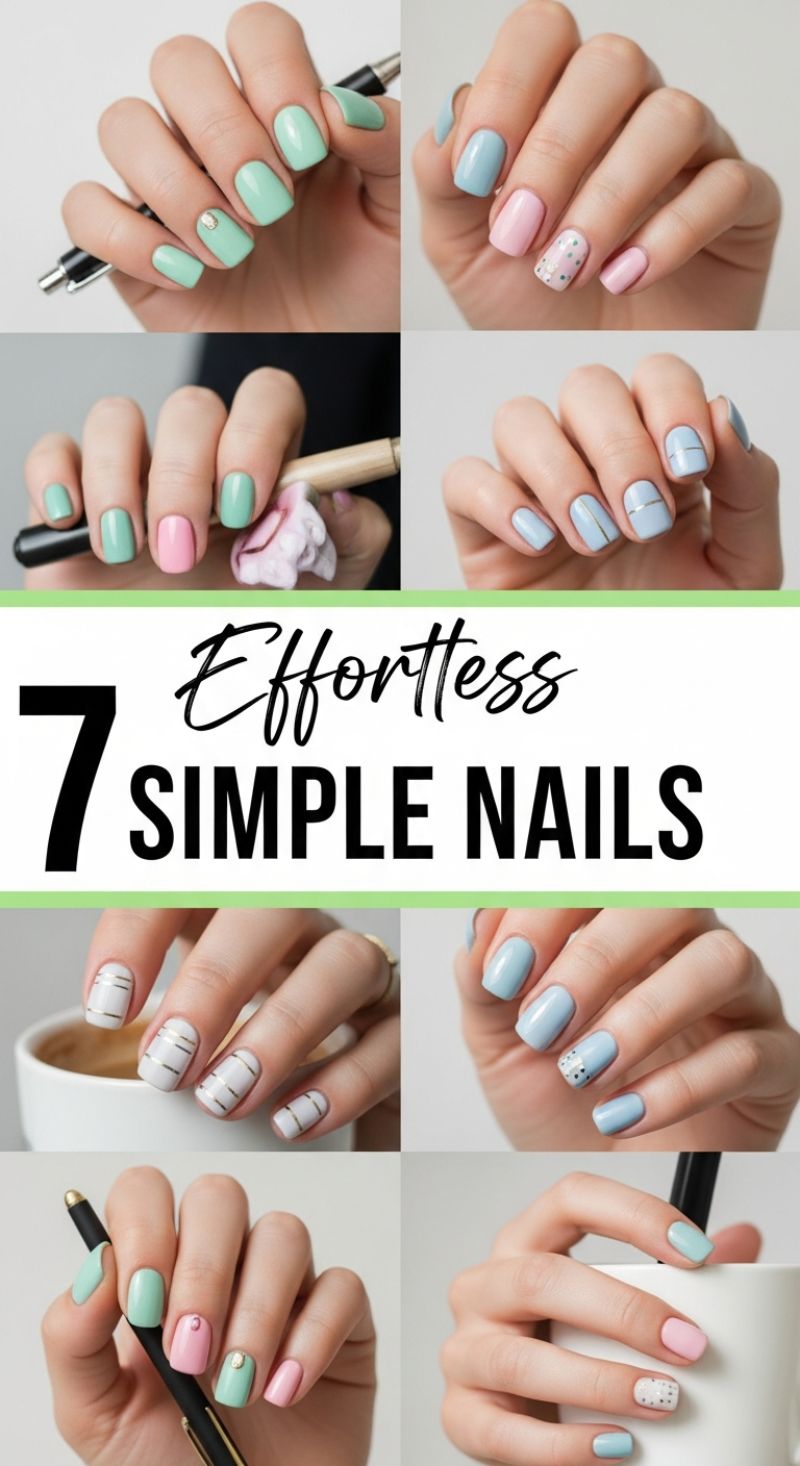
The secret to truly effortless and chic nails lies in mastering the pastel palette and utilizing minimalist accent techniques. This collection showcases designs based heavily on color blocking and strategic placement of metallic elements or micro-dots, making them ideal for office wear or a sophisticated daily look. To replicate this style, start by prepping the nail with a careful cuticle pushback and a smooth base coat. Choose two to three opaque pastel shades—such as robin’s egg blue, seafoam green, or blush pink—and ensure you apply two thin, even coats of each color to achieve complete opacity. The core strategy here is selective application: alternate colors across different nails, or use one main color and choose a single accent nail for the art.
The art featured in these designs is achievable even for beginners, relying primarily on dotting tools and thin striping tape. For the geometric metallic look, apply your base color (light blue or white work beautifully), allow it to dry fully, and then carefully place ultra-thin gold or silver striping tape horizontally across the nail bed. Two parallel lines positioned slightly off-center create a modern, balanced look. Ensure the tape ends do not touch the skin; trim them slightly shorter than the nail width if necessary. For the dotted accent nail, use a dotting tool dipped in a contrasting color (like mint dots on a white base, or white dots on a pink base). Focus the dots either along the cuticle line or evenly scattered across the nail for a playful, textured effect. Alternatively, opt for small 3D studs (gold or silver) placed near the cuticle of the ring finger for a tiny spark of glamour.
The longevity of these simple designs hinges on the quality of the topcoat application. After placing any striping tape or studs, apply a thick, high-shine topcoat, ensuring it completely seals the edges of the metallic elements to prevent lifting. For the final touch of professionalism, make sure all colors and accents are applied neatly to squoval or softly rounded nail shapes—this geometry perfectly complements the minimalist aesthetic. A clean finish is non-negotiable for simple nail art, so always clean up any excess polish around the cuticles using an angled brush dipped in nail polish remover before sealing the look. This ensures that the ‘effortless’ appearance truly looks polished and intentional.
10 Blooming FLOWER NAILS
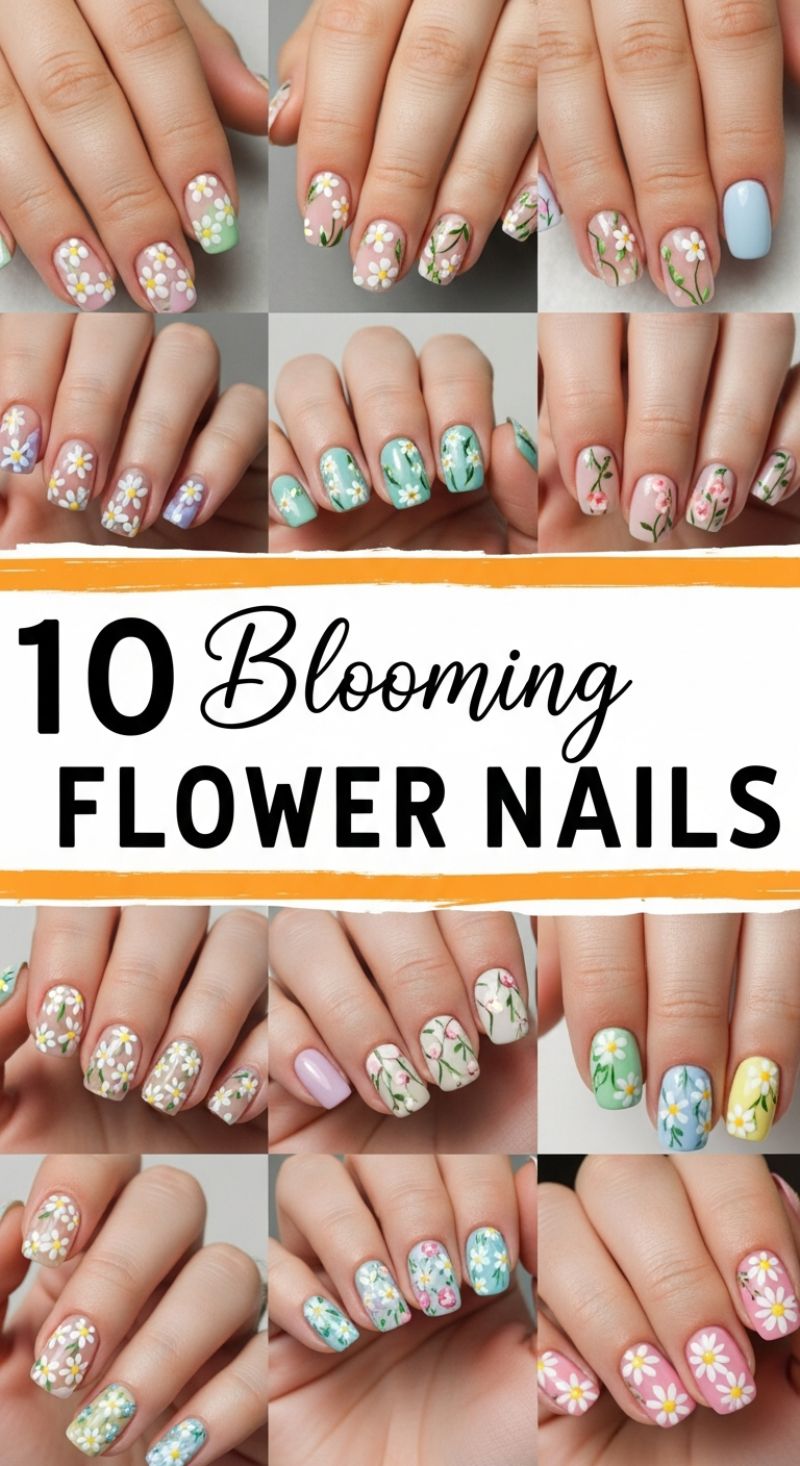
This stunning collection of nail designs showcases the perfect spring aesthetic, utilizing delicate hand-painted florals, primarily daisies, set against sheer or soft pastel bases. To recreate this look, the foundation is everything. Begin by prepping the nail surface and applying a quality base coat. The key visual element here is the contrast between the intricate white and yellow flowers and the background, which ranges from a nearly nude, translucent pink (negative space manicures) to clean, fully opaque pastel shades like mint green, baby blue, or soft lilac. For the sheer looks, apply one coat of a milky white or sheer pink polish. For the full coverage pastel designs, ensure two coats are applied for an even, streak-free finish before proceeding to the art phase. Having the right tools—a fine-tipped liner brush (size 00 or 000) and a set of varying sizes of dotting tools—is crucial for achieving this level of delicate detail and professional execution.
Creating the signature daisy requires precision and patience. Once your base color is completely dry, use a medium-sized dotting tool dipped in highly pigmented white polish to create the petals. Position five to six small dots in a tight circle, leaving a tiny gap in the center. The slight drag as you pull the dotting tool away will naturally form a slightly pointed, petal-like shape. For variation, as seen in the examples with pink or green florals, utilize your fine liner brush to paint small, sweeping green stems or leaves first. Allow the white petals to dry for at least 60 seconds before moving to the center. Using a smaller dotting tool and a vibrant yellow or soft gold polish, place a single dot precisely in the center of the white circle. For a modern twist, mix techniques: paint solid pastel accent nails (like the baby blue thumb shown) while dedicating the remaining nails to intricate floral art, ensuring the design feels balanced and doesn’t overwhelm the hand.
Expert tip for maximum impact and longevity: these delicate designs look best on shorter, well-maintained nails with a rounded or squoval shape, which enhances their sweet, natural quality. Once all the artwork is complete and fully dry, seal the design with a non-yellowing, high-gloss top coat. Apply the top coat carefully, ensuring you float the product over the design without dragging the brush too hard, which could smear the tiny details. If the design features raised elements (due to multiple layers of paint), apply a second, thicker coat of glossy top coat (or a gel top coat cured under a lamp) to fully encapsulate the art, giving the manicure a smooth, professional, glass-like finish that will protect your blooming nails for weeks.
5 Must-Have TRANSITION NAILS
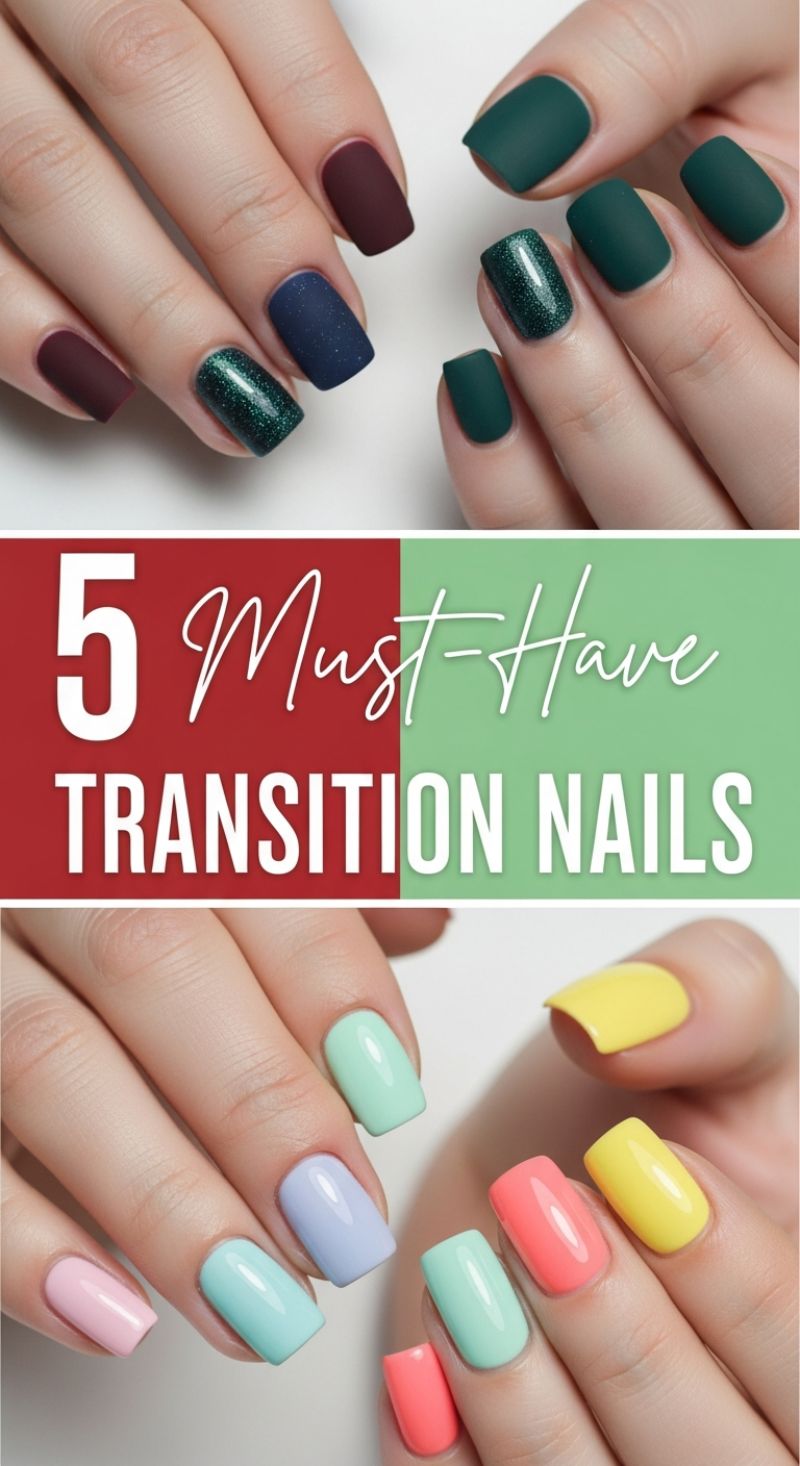
Transition nails are essential for bridging the gap between seasons, allowing your manicure to feel current and appropriate regardless of the fluctuating weather. This concept features two major aesthetic shifts: the deep, rich palette ideal for moving into cooler months, and the bright, glossy palette that welcomes warmth and light. The upper design utilizes saturated jewel tones like matte burgundy, deep navy blue, and hunter green, juxtaposed with a single, highly pigmented glitter accent. This look instantly signals sophistication and depth, making it perfect for the late summer-to-fall or winter-to-spring shift when cooler temperatures still prevail. To replicate this, ensure your nails are perfectly filed into a crisp square or squoval shape, apply two thin coats of your chosen base colors, and seal the entire look with a quality matte topcoat. The matte finish is key, as it mutes the intensity just enough to give these classic cold-weather colors a modern, velvety texture, while the sparkling accent keeps the design dynamic and fresh.
Conversely, the lower design offers a vibrant, sun-drenched approach ideal for transitioning into spring and summer. This look swaps the deep mattes for high-shine gloss and a medley of delectable pastels and cheerful pops of color. Shades include delicate baby pink, soft lavender, mint green, punchy coral, and brilliant yellow. The execution here relies on high-quality, self-leveling polishes that offer opaque coverage in light shades, which can often be tricky. Start with a ridge-filling base coat to ensure a perfectly smooth surface, crucial for glossy finishes that tend to magnify imperfections. The colors are applied in a cohesive, mismatched manner, allowing each finger to display a complementary, yet distinct, hue. For optimal brilliance, invest in an ultra-glossy topcoat that enhances the light-reflecting properties of the polish, giving your nails that sought-after jelly or glass-like effect. This cheerful medley is the ultimate fashion statement for brightening dreary days and effortlessly pivoting your style towards the lighter side of the calendar.
When choosing your own five must-have transition shades, the crucial step is balance. For the cooler transition, aim for 3-4 deep solids and one textured or metallic accent. For the warmer transition, select a blend of 2-3 soft pastels and 2 high-impact, bordering-on-neon colors to keep the overall look balanced between subtle and electric. Always remember that application precision is paramount with highly contrasting or light colors; clean up the cuticle line meticulously with a small brush dipped in acetone before curing or setting the final topcoat to ensure a professional, salon-worthy finish.
12 Fresh MARCH NAILS
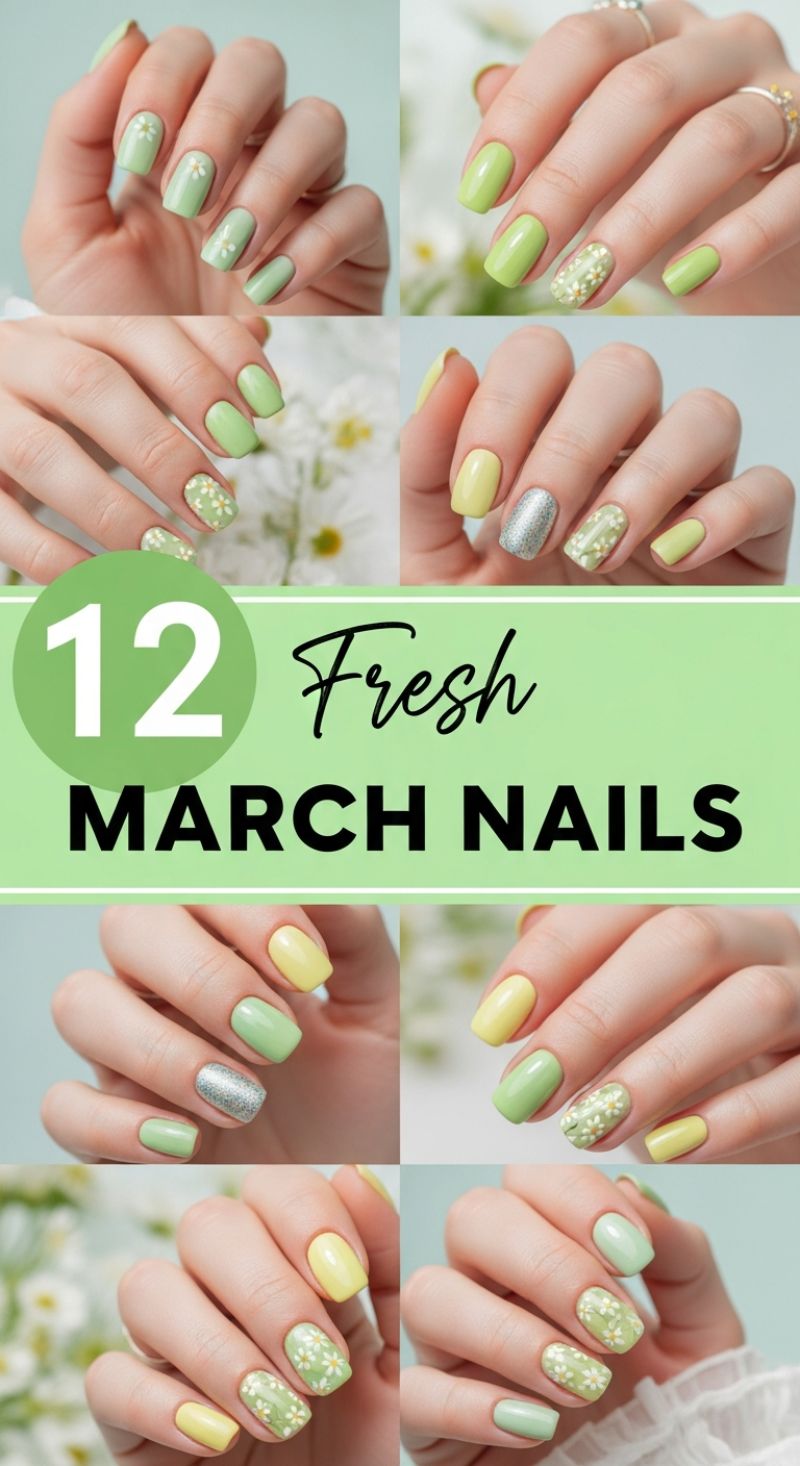
The arrival of March heralds the transition from dreary winter palettes to revitalizing spring aesthetics, and this collection of ‘Fresh March Nails’ perfectly captures that optimistic shift. The design features a masterful interplay between soft, nature-inspired hues: a creamy, almost buttery pastel yellow and a crisp, light lime green, reminiscent of fresh spring shoots. For those attempting this look, begin by ensuring proper nail shaping—a neat, slightly rounded square or squoval shape complements these designs beautifully. Apply two thin, highly pigmented coats of your chosen base colors, alternating the primary color placement across your hands for visual interest; for example, setting yellow on the thumb and pinky, and green on the index, middle, and ring fingers. The essential element to elevate this look is the strategic use of high-impact accent nails, utilizing both a vibrant silver or holographic glitter polish and intricate floral detailing.
To achieve the delicate meadow-inspired floral accent, which is typically applied over the lime green base, you will need a precision dotting tool or an ultra-fine liner brush and an opaque white polish. Once your green base is fully cured and wiped clean, use the dotting tool to place five small white dots in a circular cluster, forming the petals of a small daisy. Repeat this technique across the accent nail, varying the size and position of the flowers to give a natural, scattered appearance, allowing some to drift off the edges of the nail plate. After curing the white petals, use a contrasting dot of pastel yellow or light gold polish right in the center of each flower to complete the stamen detail, ensuring true dimensionality. If you prefer less density, place a single, larger daisy near the cuticle line on one accent finger, leaving the rest of the nail space clear.
Expert application requires careful balancing of the elements across both hands to maintain harmony. We recommend reserving the busiest design elements—the full floral pattern and the sparkling glitter accent—for the ring and index fingers, as these areas draw the most attention. When selecting your glitter, opt for a fine-grain silver or a subtle holographic finish; a chunky glitter might overwhelm the gentle spring pastels. Finally, seal every layer with a high-shine, non-wipe top coat, taking extra care to cap the free edge of the nail, which is crucial for protecting the intricate nail art and extending the wear of your manicure throughout the month. This combination offers a fresh, vibrant, yet utterly wearable manicure suitable for welcoming the season of renewal.
6 Timeless FRENCH TIPS
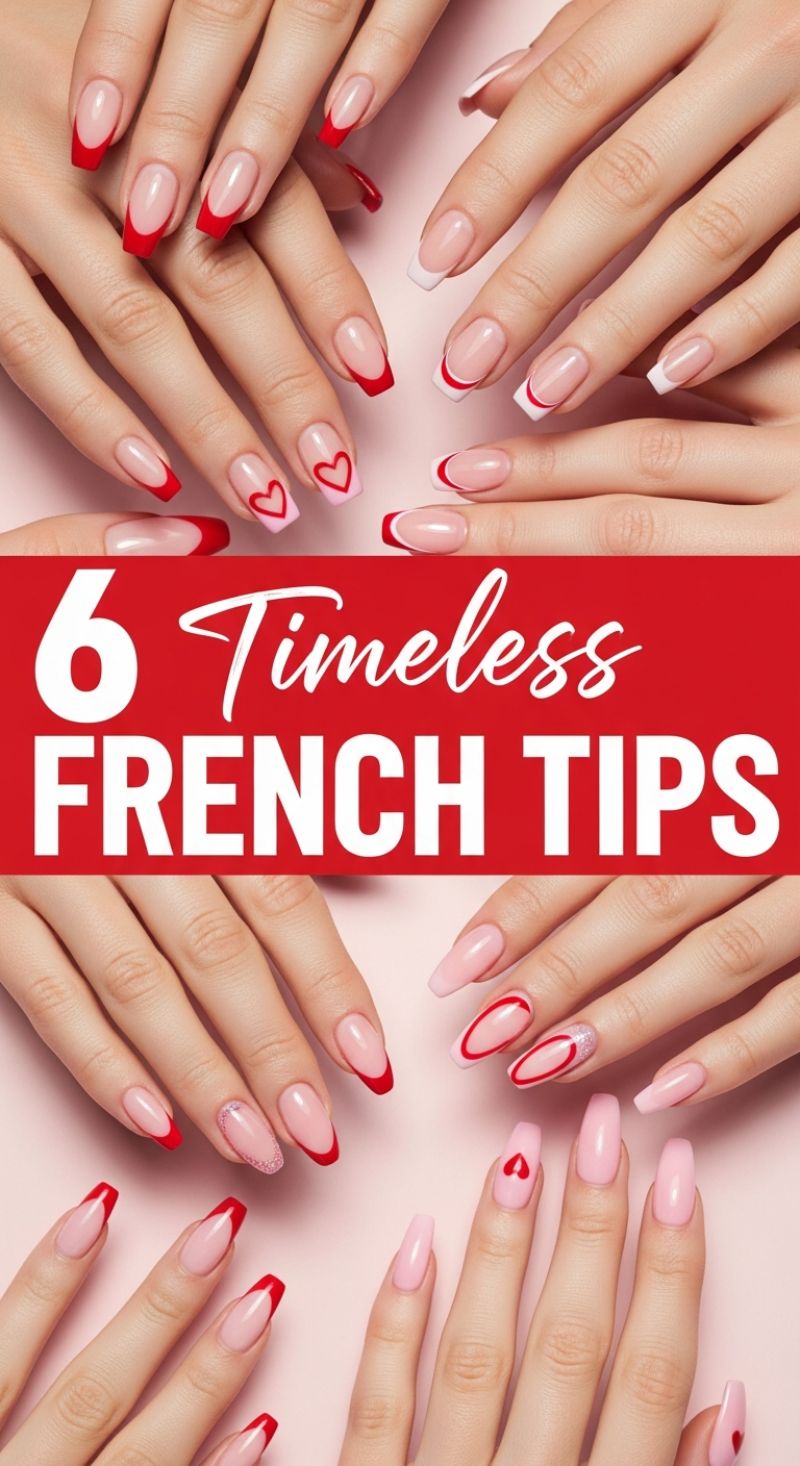
The traditional French manicure is eternally chic, but this collection demonstrates how to elevate the look with romantic colors and intricate details, making it perfect for year-round elegance or a standout seasonal statement. To recreate these stunning tips, start by selecting your base. A translucent milky white or a sheer pale pink base is crucial for achieving that healthy, natural nail bed appearance. Once cured, the first technique is the classic colored tip: using a vibrant shade like deep red, carefully paint the smile line. For almond or oval shapes, ensure the curve is soft and deepens towards the sidewalls to elongate the finger. For a bolder, trendier look, try the “double-line” French tip, where a thick red line is painted, followed immediately below by a thin, crisp white accent line, adding depth and visual interest without overwhelming the design.
The true artistry in these designs lies in the incorporation of delicate heart motifs and negative space techniques. To execute the small, solid hearts (like those seen on the ring finger), use a small dotting tool dipped in polish. Place two dots close together near the center of the nail, then drag the polish downwards from the center point of the dots to create the tapered bottom of the heart shape. For the ‘floating’ or outlined French tip design, which frames the natural nail line rather than tipping the free edge, use a fine detail brush and a contrasting color (such as red) to trace the curve of the cuticle and the side walls, leaving the center of the nail bed and the free edge nude. Incorporating subtle textures, like a delicate shimmer or pink glitter polish on a single accent nail, offers an unexpected dimensional break from the high-gloss solids.
Expert execution demands precision. For perfectly crisp smile lines, especially when working with deep colors like red, which can bleed easily, ensure your detail brush is lightly saturated and use an acetone-dipped clean-up brush immediately after application to sharpen the curve. If freehand application proves challenging, specialized French tip stencils or silicone stamp tools can assist in creating a flawless boundary. Remember to “cap” the free edgeapply a layer of top coat across the very tip of the nailafter applying your colored polish and again after the final top coat. This vital step seals the design and prevents premature chipping, ensuring your timeless French tips remain flawless for up to three weeks. These designs prove that sophistication and romance can coexist beautifully on your fingertips.
10 Trending Coffin Nails

The coffin (or ballerina) nail shape remains one of the most requested styles due to its flattering length and durable, squared-off tip. This visual showcases the quintessential spring and summer interpretation of the coffin nail, emphasizing a ‘Pastel Power Mix’ palette. The trend relies heavily on saturated, yet light, candy-colored lacquers—such as mint green, soft lavender, sky blue, and vibrant coral—applied in a harmonious, non-matching arrangement across both hands. This style is not about uniform application; it’s about thoughtful mixing and matching that ensures every nail is a standalone feature, while the overall look remains cohesive and seasonally appropriate. The key to pulling off this maximalist pastel aesthetic is maintaining a high-gloss, pristine finish on every solid-colored nail, making the smooth, flawless surface reflect light beautifully.
To recreate this high-detail mixed-media look, focus your instructional efforts on the accent nails. The most prominent design featured is the delicate daisy pattern, perfect for adding a feminine, whimsical touch. To execute the daisies, first apply your chosen base color (a sheer nude or soft pastel like mint green works best) and cure. Using a fine dotting tool or a detail brush loaded with bright white polish, create five small, evenly spaced dots in a circular formation to form the petals. Immediately follow up with a tiny dot of yellow polish placed directly in the center to mimic the stamen. For the trendy psychedelic swirl effect seen on the thumb nail, apply two or three contrasting polish shades (e.g., coral, lavender, and white) in adjacent stripes while the polish is still wet. Use a thin stylus or marbling tool to gently drag the colors into a swirling pattern before curing. The contrast between the detailed patterns and the monochromatic nails provides visual depth, preventing the overall manicure from feeling too busy.
Professional application and maintenance are vital when dealing with longer coffin nails and light colors. Due to the defined edge of the coffin shape, precision in filing is mandatory to achieve that signature tapered look that avoids the bulkiness of a square nail. For longevity, especially with intricate designs and extended length, ensure you are utilizing a structured base coat and properly building the nail’s apex (the highest point of the curve) to absorb daily stress and prevent snapping. Because this manicure utilizes such a vibrant and light palette, a non-yellowing, high-shine UV top coat is essential for sealing the colors and protecting them from sun exposure. When advising clients, recommend cuticle oil daily, as healthy cuticles enhance the sleek, clean aesthetic required to make these colorful, long nails look polished and expensive.
10 Dreamy February Nails

This collection, perfect for Valentine’s Day and the romantic month of February, showcases the striking contrast between classic bright red and crisp white, utilizing medium-length square or squoval nail shapes as a canvas. To recreate these dreamy designs, start with impeccable prep and choose highly pigmented polishes for maximum impact. The most fundamental technique is precise color blocking to achieve the foundational heart shape. For solid hearts on a contrasting base (e.g., red heart on white nail), apply two coats of the base color and cure fully. Using a fine-tipped striping brush or a specialized heart stencil, carefully map out the heart outline with the opposing color, then fill it in slowly to ensure clean, crisp edges. For a delicate look, experiment with sheer pink or nude bases, leaving a small, clean area of negative space near the cuticle or free edge before placing a small heart decal or using a dotting tool to create perfect mini-hearts. The success of this look hinges on symmetry and a glossy, streak-free top coat.
To elevate the designs and incorporate texture, focus on intricate white lace detailing and 3D embellishments. The elaborate white floral and lace patterns seen on the red accent nails require either advanced freehand painting techniques using highly viscous white gel paint or the assistance of a delicate stamping plate designed for lace or baroque motifs. If freehanding, use an ultra-fine detail brush (000 size) to apply the pattern thinly, curing in sections to prevent bleeding. For the stunning 3D gemstone and pearl accents—particularly the framed hearts—select quality rhinestones and half-pearls. Apply these elements after the color and primary artwork are complete, securing them with a dedicated gem adhesive or a clear builder gel placed directly on the nail bed where the stone will sit. Place the gems carefully, ensuring the base is fully submerged in the adhesive. Once the arrangement is perfect, flash cure the nail to lock the stones in place before applying a no-wipe top coat around, but not over, the stones to maintain their facets and sparkle.
For a curated yet varied look, dedicate the most complex design (like the full lace pattern or the elaborate pearl frame) to a single feature nail—typically the ring finger. Maintain balance by keeping the remaining nails simple, such as a solid red, a solid white, or a single, perfect heart detail. When working with 3D elements like pearls, ensure they are secured robustly, as they can snag or pop off easily. After curing the final top coat, gently run a cuticle oil around the nail and skin to hydrate the area. These February nails offer versatility, allowing you to mix classic glamour with playful romantic artistry, creating a sophisticated manicure that radiates love and charm.
Adorable February Nails: 6 Romantic Designs for Valentine’s Season
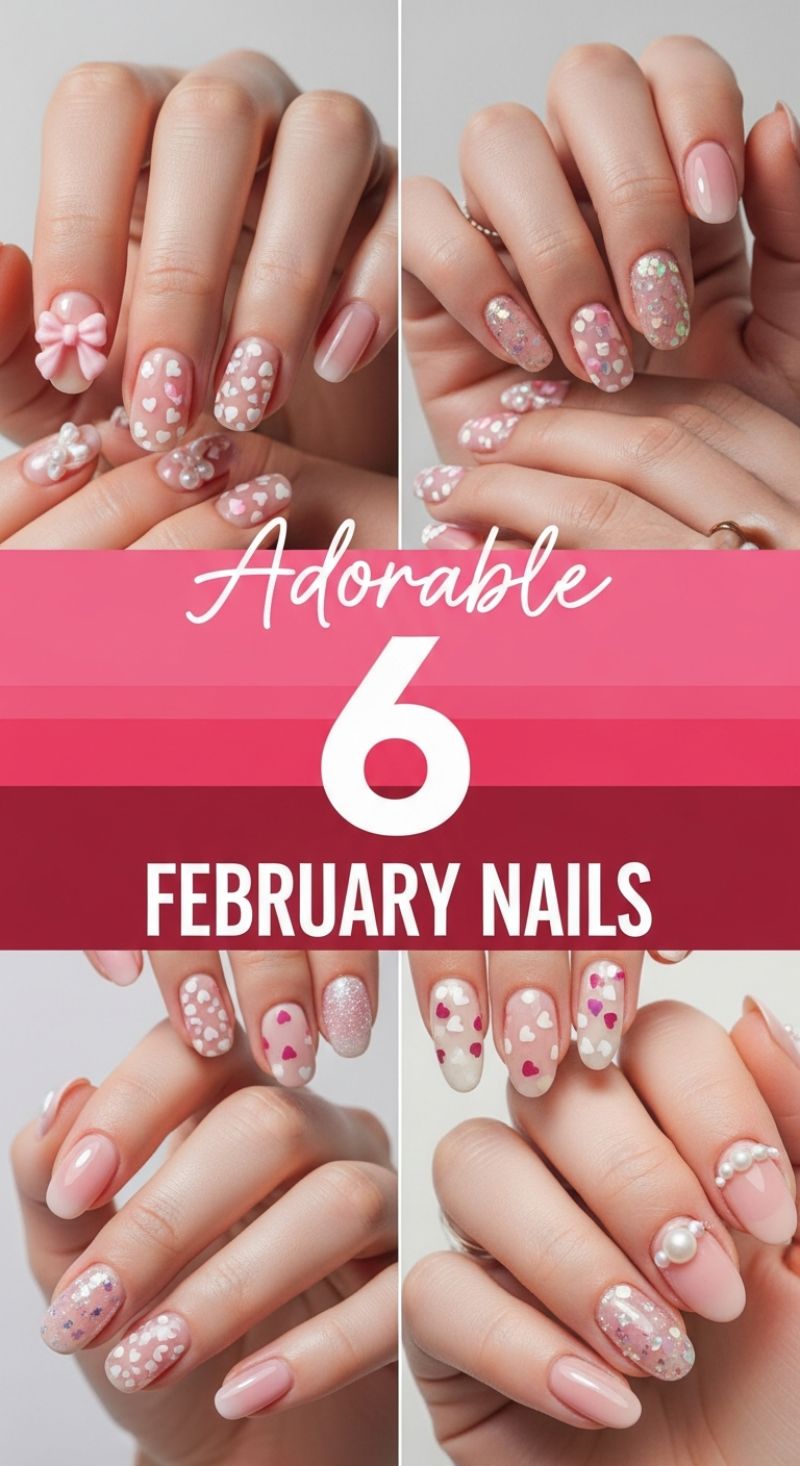
To recreate this set of adorable February nails, start with a perfectly manicured nail bed and apply a sheer, milky pink or nude base coat. This “milk bath” effect provides a soft, romantic canvas that is crucial for these designs. Once the base is cured (if using gel) or dry, the key technique involves adding various heart patterns. For the dense, scattered look seen on many of these fingers, utilize a fine dotting tool and white or soft pink polish. Dip the tool, gently press two dots close together, and then drag the polish downwards to form the V-shape of the heart. For beginners, high-quality nail decals offer an efficient alternative to freehanding dozens of tiny hearts. To achieve the beautiful gradient of colors, try layering a sheer nude jelly polish first, followed by a lighter pink polish just on the tips, giving a soft, natural ombre effect beneath the heart and glitter designs. Expert tip: Consistency in heart size, even when scattered randomly, helps maintain a cohesive, sophisticated look rather than appearing cluttered. Focusing the hearts around the cuticle or the center of the nail, leaving the very tip clear, adds a subtle contemporary edge.
Texture and dimension are what elevate these romantic designs. Incorporate dazzling accent nails using chunky, iridescent glitter or confetti-style flakes. These specialized polishes should be applied in one to two coats over the pink base, ensuring the flakes lay flat before sealing them with a thick, glossy top coat. For dramatic, high-impact looks like the 3D bows and pearl borders, proper application is essential for durability. Use builder gel or specialized adhesive to anchor heavier embellishments. For instance, creating the elegant pearl French tip requires placing small spherical pearls along the natural smile line, setting them into a blob of thick top coat or uncured adhesive gel, and curing immediately under a UV/LED lamp. When applying 3D molded elements like the pink bow, use a small amount of strong nail glue or a non-wipe top coat, pressing firmly and allowing ample cure time to prevent it from catching or peeling prematurely. These dimensional elements transform a simple manicure into a work of art, perfect for special occasions.
The versatility of these six looks lies in their modular nature, allowing you to mix and match elements across your hands seamlessly. Consider pairing a fully textured heart nail (like the ring finger variations) with a simple ombre pink nail (like the index finger in the top quadrant) to balance the complexity. For a truly unique design, try the negative space heart pattern shown on the almond-shaped nails, where the hearts are painted onto a sheer or light pink base, but the surrounding area is kept neutral, enhancing the depth of the manicure. Maintenance is straightforward: always finish with a high-shine, chip-resistant top coat, paying extra attention to encapsulating the decorative elements and capping the free edge of the nail to prevent premature wear, especially when dealing with delicate layered designs and 3D features. These soft, feminine designs are undeniably charming for celebrating Valentine’s Day, but their subtle elegance makes them equally appropriate for adding a touch of romance to everyday winter wear.
7 Elegant Pink Nails
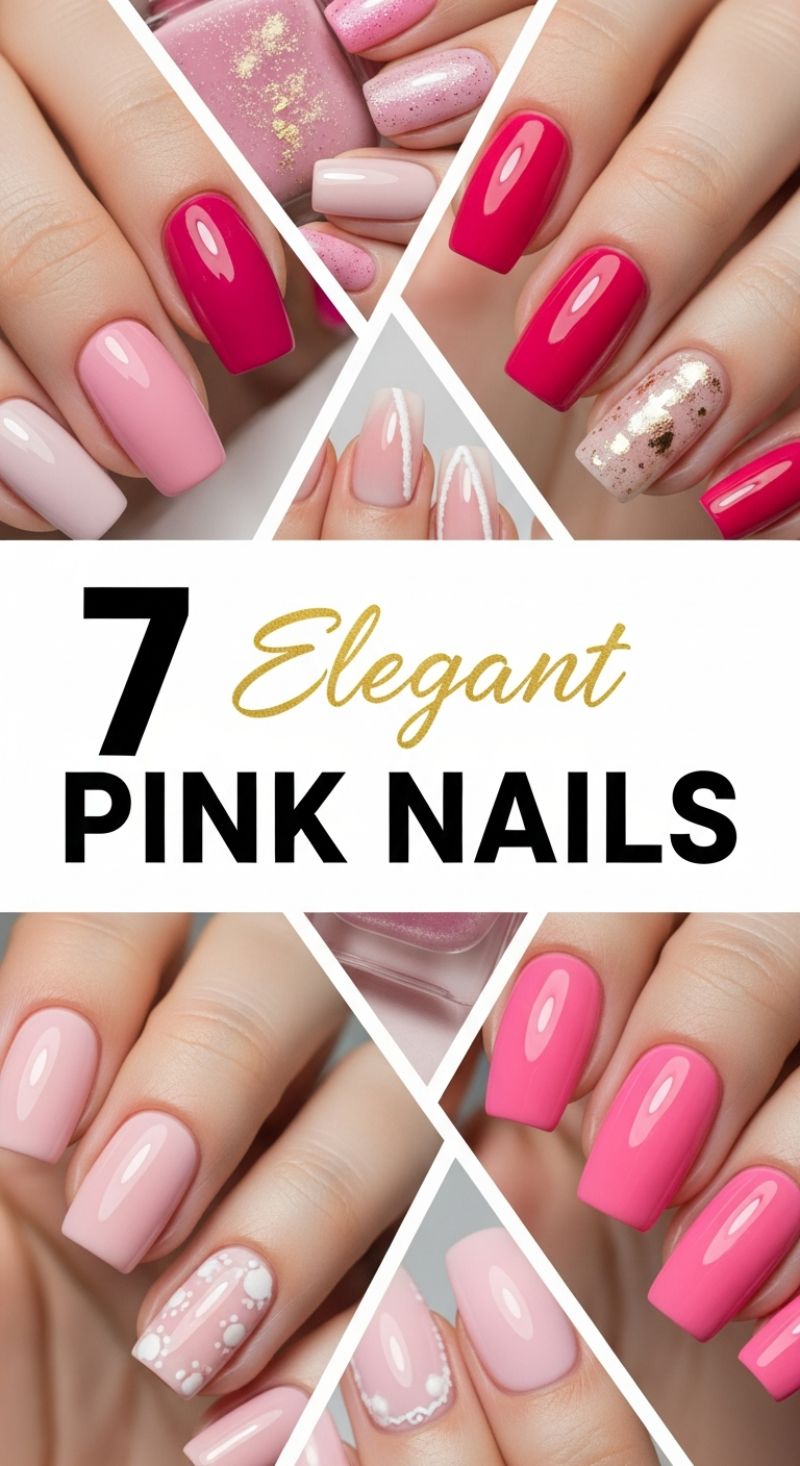
The foundation of elegant pink nails lies in mastering the perfect shade and finish, as demonstrated by the diverse palette showcased here, ranging from deep, glossy fuchsia to soft, milky blush. To replicate the high-shine solid looks, begin by selecting a highly pigmented gel or polish. For the vibrant hot pinks, ensure two smooth, thin coats are applied to prevent bubbling and guarantee full opacity. The secret to achieving that deep, glass-like reflection lies in the top coat—opt for a non-wipe, high-gloss gel topcoat cured correctly under a UV/LED lamp. For the softer, ballet-slipper pinks, precision is key, as these lighter shades can reveal flaws easily; ensure meticulous cuticle prep and perfect leveling of the polish. These monochrome looks are instantly elevated by their flawless application and brilliant shine, making them timeless for any season.
Elevating the solid pink base often involves incorporating sophisticated accent techniques like foil, glitter, or subtle line work. The collage highlights a stunning use of gold foil over a neutral, nude-pink base—a highly sought-after technique. To achieve this, apply a thin layer of foil adhesive (or a specific tacky layer) over your cured base color, press a small piece of transfer foil (or broken gold leaf flakes) onto the nail, and then seal immediately with two layers of topcoat to secure the texture and prevent chipping. Furthermore, the modern, geometric V-shapes utilize a contrasting white striping polish on a sheer pink background, mimicking a sleek French tip upgrade. This requires a fine, long-bristled striping brush; load the brush minimally and use steady, straight strokes, ensuring the lines meet at a sharp point toward the center of the nail for that chic, elongated effect.
For a truly feminine and soft aesthetic, focus on the intricate detailing seen in the floral and lace-inspired designs. The polka dot pattern, which mimics small white flowers or delicate bubbles, is effortlessly created using a small-to-medium sized dotting tool. After curing the base pink, dip the dotting tool into white polish and stamp lightly and evenly across the accent nail, varying the placement for a whimsical, random effect, or keeping them symmetrical for a classic look. Similarly, the lace detailing, seen at the base of the nail, requires precision striping for the scalloped edge combined with tiny dots to create the illusion of delicate stitching or pearls. These designs are best executed with highly contrasting white polish against a soft, sheer pink, providing depth without appearing heavy. By utilizing these varied techniques—from bold solids to subtle texture and fine detailing—these elegant pink designs offer versatile options perfect for professional settings, weddings, or everyday glamour.
8 Next-Level Manicures for a Bold March Transition

March marks the official transition into spring, and these next-level manicure designs perfectly capture the blend of winter sophistication and nascent spring energy. To achieve the looks displayed, focus on mastering two key techniques: high-shine metallics and detailed abstract artistry. For the stunning chrome and mirror finishes (seen prominently in the silver and deep emerald green sets), the key is using a quality chrome powder rubbed onto a tack-free gel top coat, followed by another layer of top coat for sealing and durability. When attempting the abstract designs, utilize a fine-tip liner brush and contrasting gel polishes—black, white, and primary colors—to create dynamic swirls and asymmetrical lines. Start with a clean white or nude base, curing each color layer briefly before adding the next, allowing the colors to maintain their sharp distinction rather than blending into mud. These complex designs require patience, but the striking, gallery-worthy results are well worth the effort.
Beyond the abstract art, this collection grounds itself in rich seasonal hues. The glossy black manicure offers timeless elegance, which can be easily elevated by adding a subtle reflective top coat or a single crystal accent near the cuticle. The deep emerald green, especially when rendered in a metallic finish, provides a sophisticated anchor for early spring style. To replicate the mixed-media sets, embrace the ‘maximalist’ approach by pairing solid, glossy nails with highly decorated feature nails. For example, combine a dark solid color on three fingers with a graphic abstract design and a bright gradient tip on the remaining two. This method allows you to experiment with bold color pops—like fiery reds, bright blues, and sunny yellows—while maintaining an overall chic, coordinated aesthetic. Remember that nail shape plays a vital role in these dramatic looks; most designs are showcased on long, squared, or soft coffin shapes, which provide an ideal canvas for intricate patterns.
Expert tip for maintaining these elaborate manicures: always cap the free edge of your nail with your top coat to prevent chipping, especially with detailed artwork. If you are applying these complex designs at home, invest in durable gel polishes and an LED lamp, as traditional lacquer often lacks the opacity and longevity required for multi-layered nail art. Lastly, take a cue from the presentation itself; these manicures are frequently paired with chunky, sculptural silver rings. Integrating bold jewelry with your elaborate nail art transforms the look from a simple beauty treatment into a cohesive fashion statement. Don’t be afraid to mix high-contrast colors and varying textures (chrome next to matte, solid next to abstract) to truly achieve a next-level finish ready for March and beyond.
7 Perfect Almond Nails: Mastering the Vibrant Summer Manicure
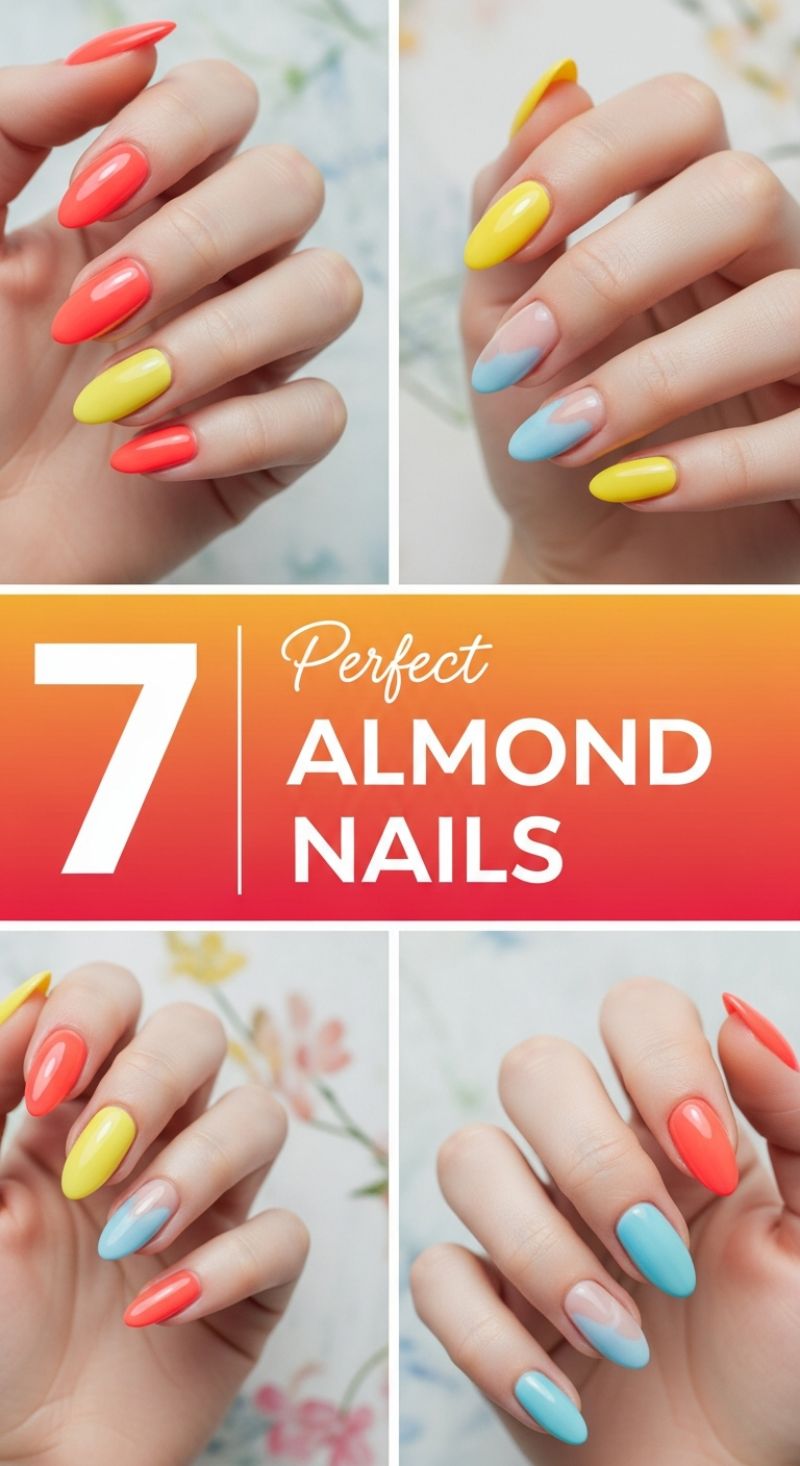
The almond shape is universally flattering, offering an elegant, elongating effect that instantly elevates any manicure. To achieve the perfect almond silhouette, start by ensuring your nails are of adequate length—this shape works best on medium to long nails. File the side walls straight until they begin to converge just before the tip. Unlike an oval, the almond shape tapers slightly more dramatically, coming to a soft, rounded point that mimics the nut. Consistency is key; take your time matching the curves of each nail. Once the shape is established, proper preparation is crucial for these vibrant looks. Push back and gently buff the cuticles, cleanse the nail plate with rubbing alcohol, and apply a high-quality rubberized base coat. This step provides a smooth canvas, prevents staining from highly pigmented colors like neon yellow and coral, and ensures your chic new design lasts for weeks without chipping.
This collection showcases the power of strategic color blocking using bright, high-saturation lacquers. The featured combination of neon coral-orange and brilliant sunshine yellow is a quintessential summer trend, requiring expert application to maximize impact. For solid coverage, always apply two thin, even coats rather than one thick coat; this prevents bubbling and ensures the polish cures fully (especially critical for gel). If working with highly opaque neons, sometimes a white base layer can help the color pop even more vibrantly against your natural nail bed. The placement of the colors is deliberate here, often alternating on adjacent fingers for maximum visual contrast. When selecting your hues, consider your skin’s undertone: warm brights like coral and yellow tend to complement olive and warmer skin tones beautifully, while the cool sky blue works stunningly on cooler undertones. Keep the finish glossy with a resilient topcoat to enhance the vibrancy and protect the sharp, almond edges.
For a truly fashion-forward twist, incorporate the negative space design demonstrated with the pastel blue. This technique gives the classic French manicure a modern update by utilizing the natural or nude nail bed as part of the design. Begin with a sheer nude base coat across all nails. For the gradient effect, apply the sky blue polish to a cosmetic sponge, concentrating the color near the tip. Gently dab the sponge onto the nail, moving slightly upward towards the center of the nail plate, allowing the clear base to show through near the cuticle. To achieve the delicate ‘V’ shape visible on some of the nails, use a thin striping brush dipped in the blue polish to carefully trace the desired outline before filling in the rest of the tip. This blending technique creates a soft ombré effect where the color meets the natural nail, offering a sophisticated, airy finish that perfectly balances the boldness of the neighboring solid bright colors.
8 Practical Short Nails
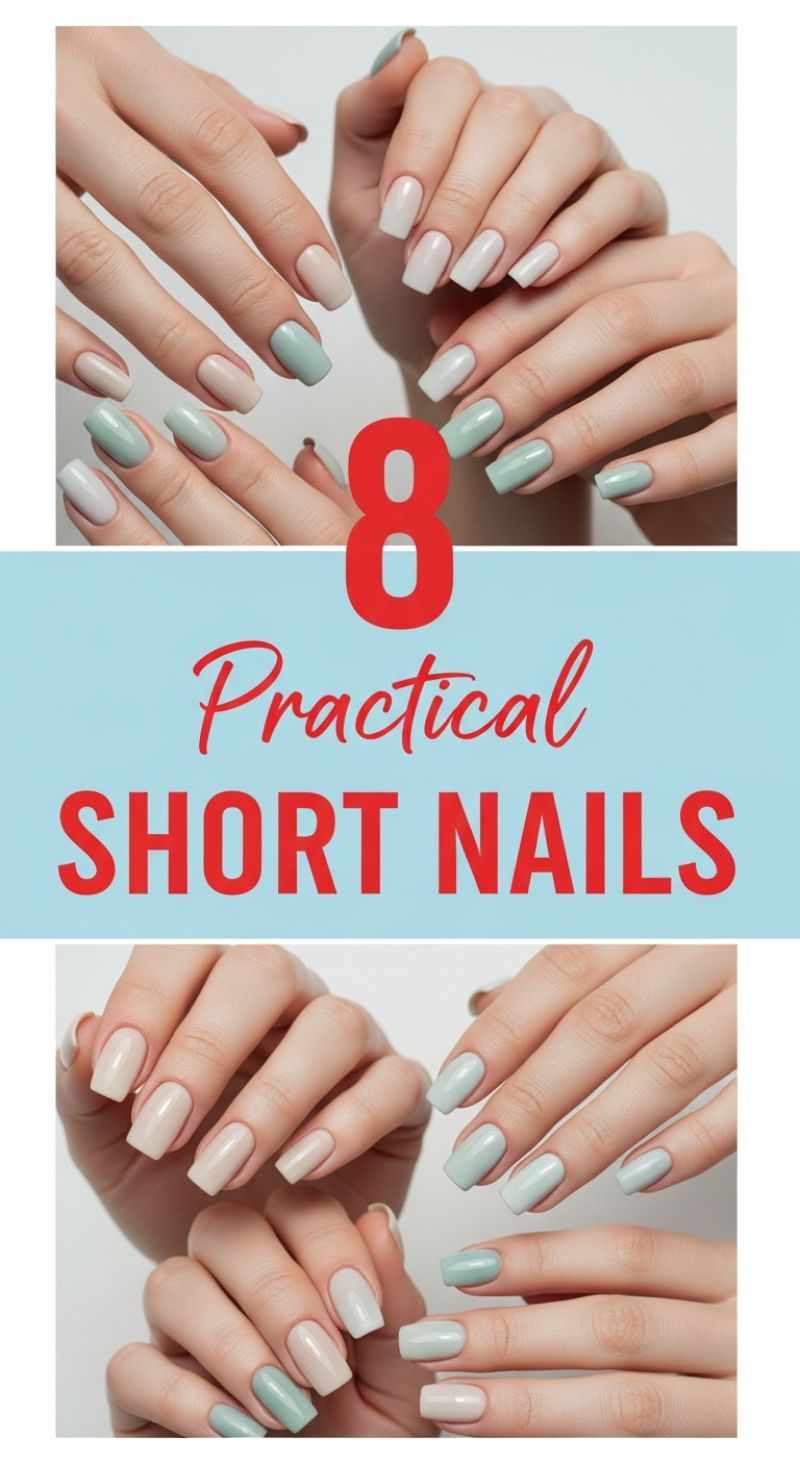
This particular style exemplifies how short nails can be both practical and chic, leveraging clean lines and a soft, alternating color palette. To achieve this polished, modern square shape, begin by trimming the nail plates to a uniform, short length, ensuring the free edge barely extends past the fingertip. The “squoval” or softly squared shape is ideal for durability; file the nail straight across, then gently smooth the sharp corners to prevent snagging and breakagea crucial step for practical wear. For shorter nails, proper cuticle care is paramount as it maximizes the visual length of the nail bed; push back and gently trim any excess cuticle tissue after softening them, creating a neat frame for the polish. Always prep the nail surface thoroughly by buffing lightly and wiping with rubbing alcohol to ensure maximum adhesion, which is vital for extending the wear time of polish on active hands.
The visual appeal of this design lies in the sophisticated use of alternating colors: a soft, muted neutral (like a creamy beige or light nude) paired with a contemporary pastel accent (here, a pale sage or mint green). This dual-tone application technique requires precision. After applying a fortifying base coatessential for preventing staining and adding strengthapply the first thin, even layer of color, starting slightly away from the cuticle line and guiding the brush toward the tip. On short nails, avoid overloading the brush, as thick coats are more prone to bubbling and chipping. Apply two to three thin coats for opaque coverage, ensuring each layer is fully dry before proceeding. When executing the color block, maintain a strict pattern (e.g., nude, green, nude, green, nude) across both hands for a balanced, deliberate aesthetic, which transforms simple colors into a high-fashion look suitable for any professional or casual setting.
To elevate this practical manicure, focus on high-gloss finishing and regular maintenance. Once your color layers are perfected, seal the look with a high-quality, quick-drying top coat, making sure to “wrap the tip”brushing the top coat along the very edge of the nailto lock the color in and significantly increase chip resistance. Because short nails are highly functional, daily upkeep is easier but still necessary; applying a quality cuticle oil morning and night keeps the surrounding skin hydrated and makes the manicure look freshly done. For versatility, this style can be adapted seasonally by simply swapping the accent color; try a pale lavender in the spring or a dusty rose in the fall, always maintaining the neutral base. This design proves that durability and style do not have to be mutually exclusive, offering a clean, elegant solution for anyone prioritizing low-maintenance beauty.
9 Vibrant March Nails
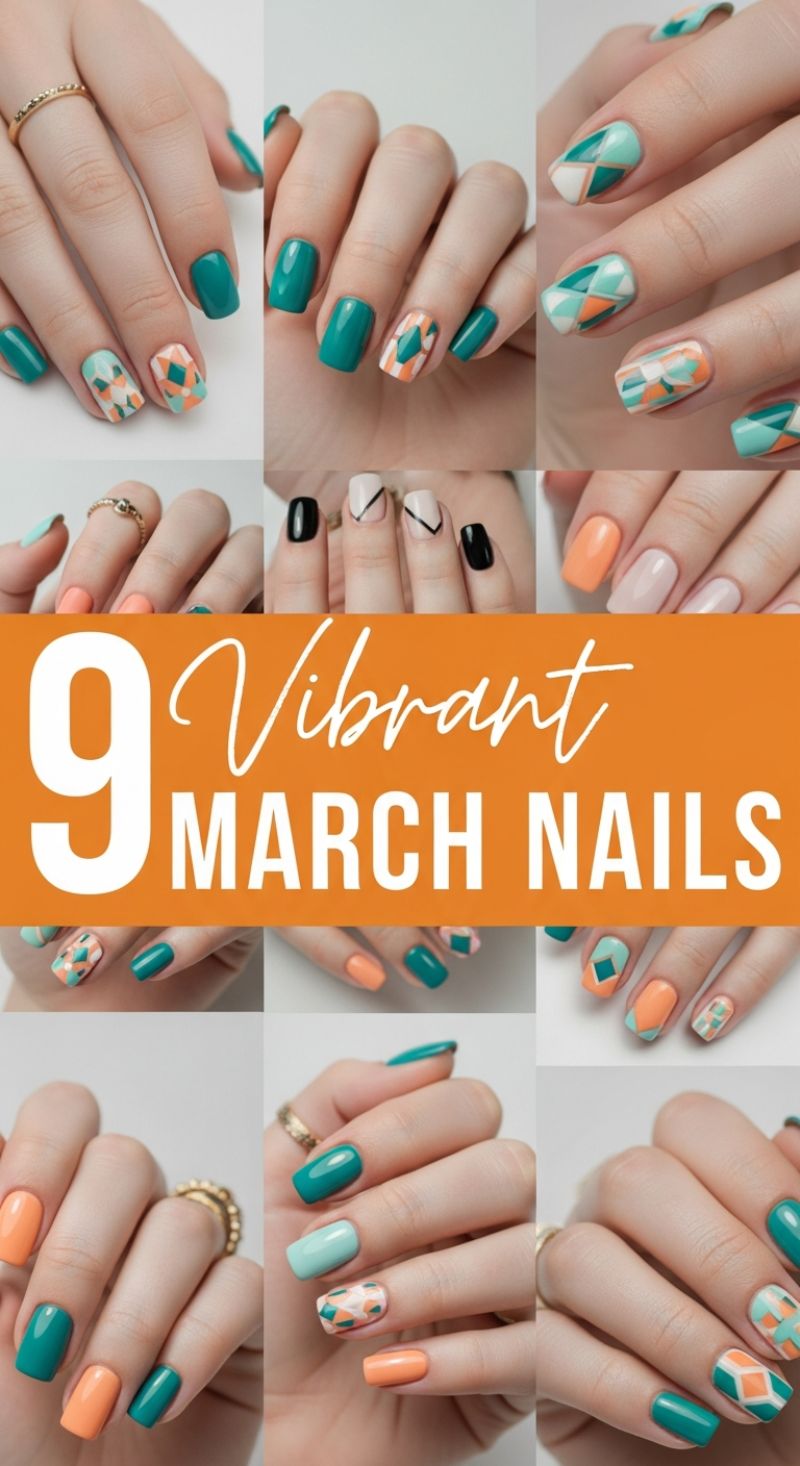
The shift into March signals a perfect time to inject vibrant color and sophisticated geometry into your manicure routine, moving away from deep winter tones. This collection of nine designs centers around a striking, spring-ready palette: rich teal/deep turquoise, cheerful peach/coral, and refreshing mint green, all meticulously balanced with crisp white or pale nude bases. To achieve this high-impact look, selection of high-pigment polishes is crucial. Start every manicure with a flawless application of the base color, ensuring two opaque coats are completely dry before moving to the intricate patterns. The inherent vibrancy of these colors makes the resulting design feel fresh and modern, perfectly capturing the hopeful energy of the spring season and establishing a polished, playful style.
Mastering the signature geometric patterns seen across these hands requires precision tools. For the sharp, clean lines that form the diamond and chevron motifs, invest in quality striping tape or vinyl nail stencils. Begin by applying your lightest background shade (white or nude) as the foundation for the accent nail. Once dry, place the striping tape or stencils to block out the desired shapes—often dividing the nail into quadrants or creating stacked rhombus structures. Carefully fill in the exposed sections using the teal, peach, and mint polishes, working swiftly and removing the tape immediately after applying the color to prevent color bleed. Expert tip: ensure the design is visually balanced by keeping the neighboring nails solid colors (e.g., solid teal on the index and pinky, solid peach on the thumb), allowing the complex accent nail to truly shine without overwhelming the overall aesthetic.
Beyond the standard geometric looks, you can adapt these principles for various styles. For a softer take, incorporate the black and nude minimalist design shown (center variation)—using a thin brush to create sharp V-lines or abstract boundaries on a nude base for a negative space effect. For optimal longevity and a professional, salon-quality finish, seal all designs with a high-shine, quick-dry top coat. This step not only protects the intricate line work but also intensifies the color saturation of the vibrant shades. For a more fashion-forward interpretation, consider applying a matte top coat over the solid color nails, while reserving the glossy top coat for the patterned accent nail to create a subtle textural contrast that immediately elevates the design from cheerful to chic.
11 Barbiecore Pink Nails

The Barbiecore aesthetic has exploded, bringing hyper-feminine, vibrant hot pink to the forefront of nail fashion. This particular look showcases a shocking, nearly neon pink hue that is instantly eye-catching. To replicate this high-impact shade, start with meticulous nail preparation: buffing the surface and pushing back cuticles ensures a smooth canvas. Applying a high-quality base coat is crucial to prevent the rich pigment from staining your natural nail plate and to promote optimal polish adhesion. The key to achieving the dense, opaque color visible here is applying the polish in two very thin, even layers. Thicker coats tend to pool, wrinkle, or chip prematurely. If using gel polish, ensure each layer is fully cured under a UV or LED lamp before moving to the next step. For standard lacquer, allow 5–10 minutes of drying time between coats to effectively build depth and vibrancy without streaking.
The versatility of the Barbiecore pink trend is evident in the variety of nail shapes and lengths featured in this compilation. Most nails are styled in wearable, slightly elongated shapes—primarily squoval (a square nail with rounded corners) or a short, softly rounded almond. These mid-length, practical shapes perfectly balance the intensity of the color, making the manicure suitable for both casual wear and making a bold fashion statement. While the majority of the hands rely on the solid, high-gloss pink finish, a few manicures cleverly incorporate accent nails, typically on the ring finger, featuring a matching pink shade infused with fine holographic or iridescent glitter. This minor sparkle variation breaks up the solid color, adding dimension and a playful texture without overwhelming the design. When creating the glitter accent, use a specialized dense glitter polish or employ a sponge technique to ensure maximum coverage and brilliant sparkle.
To maximize the impact and ensure the longevity of your high-voltage Barbiecore manicure, proper finishing techniques are essential. Once your color layers are completely dry or fully cured, apply a durable, high-shine, chip-resistant top coat. For this specific look, a super glossy finish is preferred to truly emulate the smooth, plastic sheen associated with the classic Barbie aesthetic. Expert tip: make sure to “cap” the free edge of the nail with the top coat, as this seals the manicure and is the number one defense against premature chipping, especially on longer nails. Maintenance is also key; consistently apply cuticle oil to the surrounding skin to keep the nail plate flexible and hydrated, which helps prevent the polish from cracking. This vibrant pink shade pairs exceptionally well with statement jewelry, such as the silver rings and the ornate pearl-and-petal cocktail ring shown in the images, complementing the fun, maximalist spirit of the entire trend.
9 Shimmering GLITTER NAILS
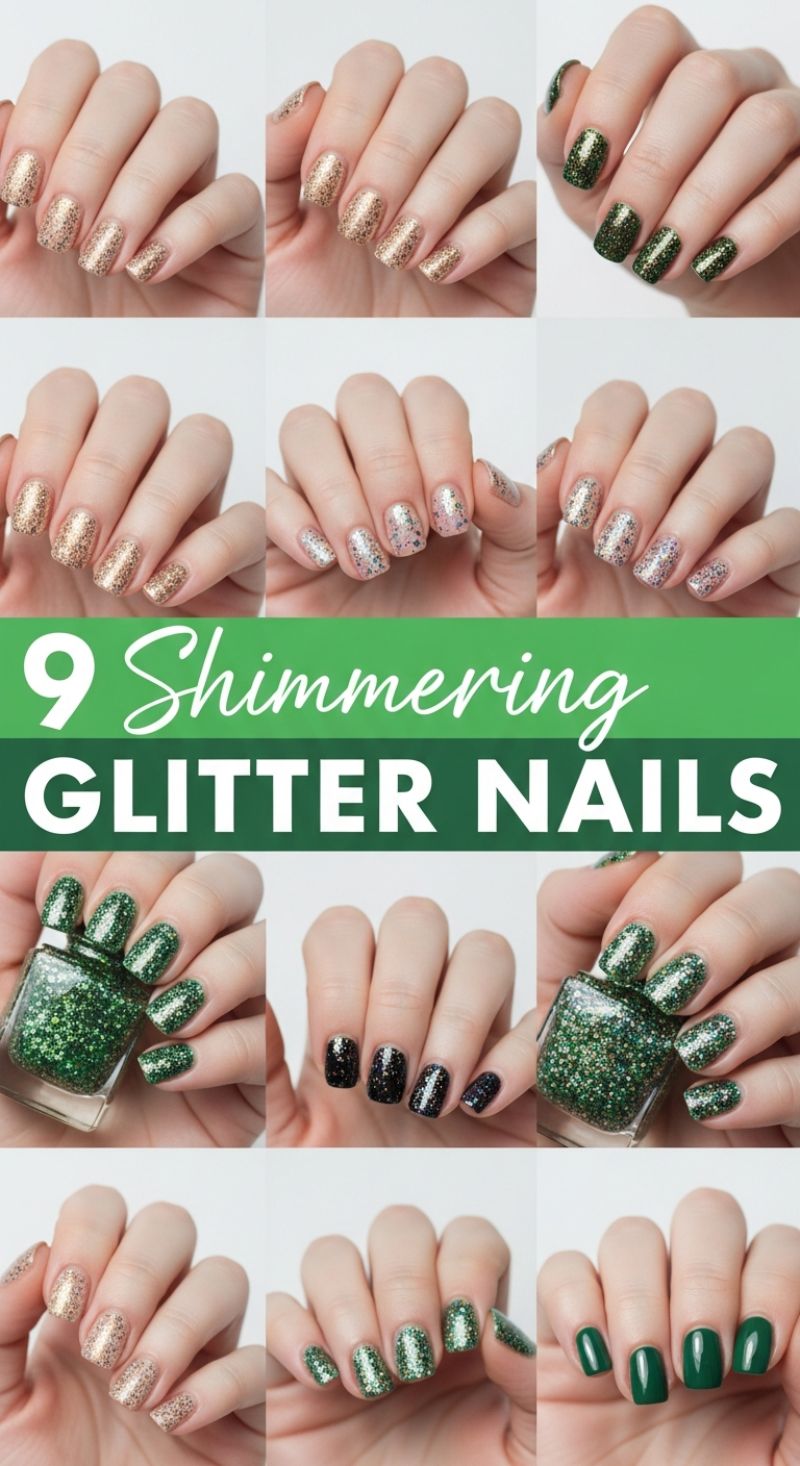
Glitter nails are a timeless statement, offering unparalleled shimmer and dimension that works year-round, especially when incorporating rich metallics like gold and seasonal jewel tones like emerald green. The key to mastering full-coverage glitter, as seen in the dense opaque gold and deep green applications, lies in strategic layering and application technique. For maximum impact and minimal streaking, avoid applying a single thick coat. Instead, apply a thin layer of glitter polish, wait 60 seconds, and then press (rather than brush) the second and third coats onto the nail bed. This pressing motion ensures the glitter particles are evenly distributed and build up density faster. Expert tip: If your chosen glitter polish has a sheer or jelly base (like some of the champagne shades shown), use a base coat matched to the glitter’s primary color (e.g., a solid nude or matching cream shade) to reduce the number of required coats and ensure a fully opaque finish without unnecessary bulk.
The versatility of glitter extends beyond simple opaque coverage; utilizing glitter toppers allows for sophisticated dimensional looks. Observe the black nails with scattered specks or the sheer iridescent silver applications: these looks utilize polishes where the ratio of binder to glitter is higher, creating a translucent effect perfect for layering. To replicate this, choose a clear-based glitter polish and layer it over a contrasting cream color. A deep black or navy base creates stellar depth for scattered metallic specks, turning the manicure into a galaxy effect, while applying glitter over a solid cream color, such as the matte dark green pictured, instantly elevates it for a festive appearance. For a subtle, office-appropriate shimmer, apply just 1-2 thin coats of a sheer, finely milled glitter over a nude or light pink base, letting the natural nail peek through for a delicate, twinkling finish.
When finalizing your manicure, the topcoat choice dramatically impacts the outcome and longevity. Glitter naturally looks striking under a high-shine glossy topcoat, which amplifies the light reflection and ensures the edges of the glitter particles are smoothed down for comfortable, snag-free wear. However, for an unexpected, modern texture, apply a matte topcoat over the glitter application. This transformation mutes the individual sparkle but highlights the gritty texture, giving the manicure a sophisticated sugar-spun or frosted effect, perfect for a high-fashion winter look. Finally, remember that heavy glitter removal requires patience; the foil method—soaking cotton pads in acetone and placing them on the nails under foil wraps for five minutes—is the most effective way to lift heavy glitter particles without damaging the nail bed or cuticle.
15 Romantic Valentine Nails
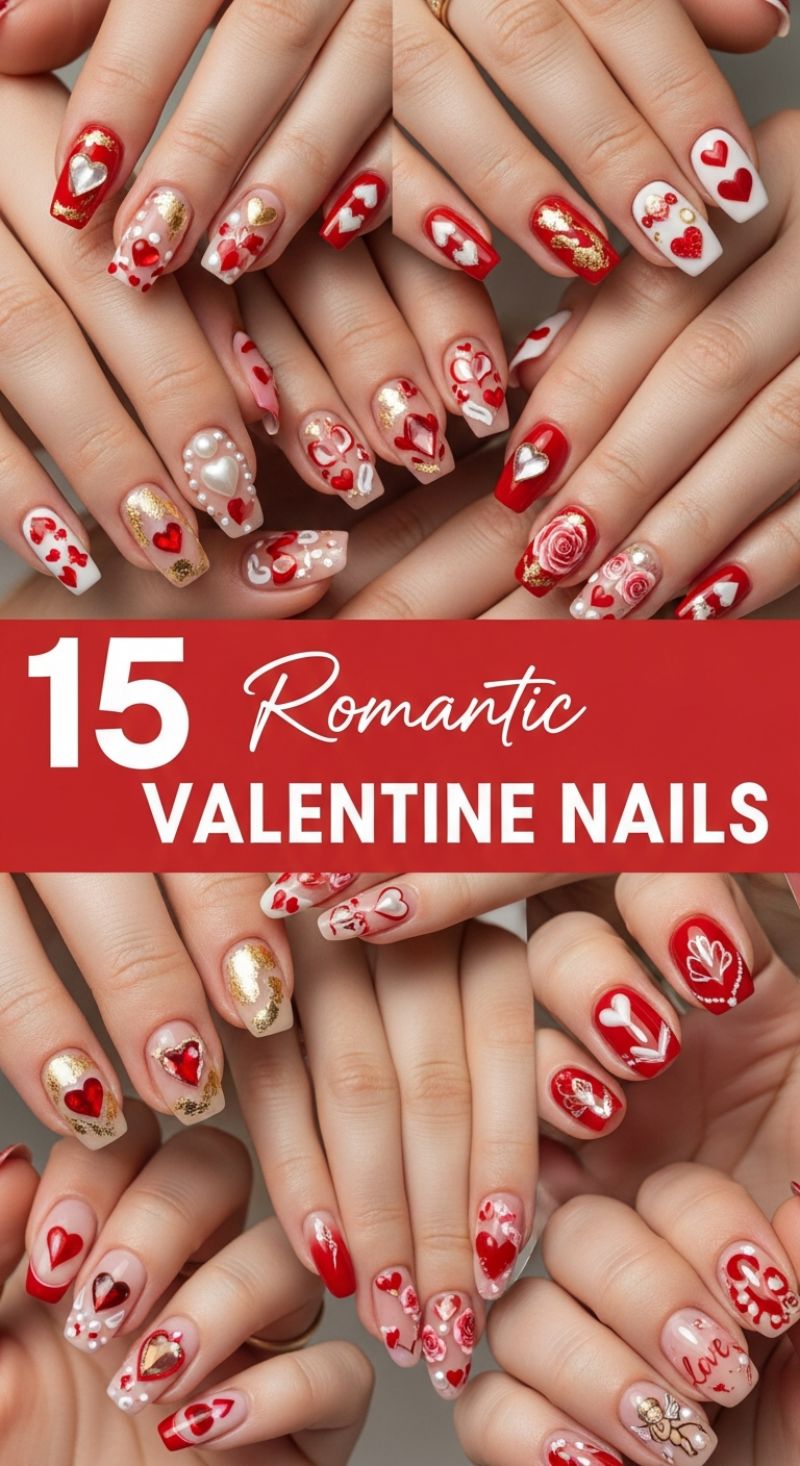
To capture the essence of romance and passion, the Valentine’s nail aesthetic relies on a strategic blend of classic colors and varied textures. The core palette features rich cherry red, crisp white, and delicate nude or sheer pink bases, elevated by shimmering gold accents. The key to successfully executing this trending design is diversification across the ten nails. Start by selecting your base style: alternate between a bold, opaque full coverage red (perfect for featuring a single, high-impact 3D heart) and a sophisticated sheer nude or white base, which serves as a canvas for floating heart patterns and intricate lace details. When working with red and white polishes, ensure each layer is thin and fully cured to prevent bubbling or smudging, allowing the contrasting colors to maintain their vibrant pop. Utilizing a dotting tool is ideal for creating uniformed mini hearts or clean clusters of dots that add a bubbly, playful texture to the overall look.
Achieving the more complex, textural elements—like the gilded finish or dimensional accents—requires specific techniques. For the glamorous gold shimmer, use gold foil or flakes applied with a dedicated foil adhesive; paint the adhesive thinly onto the target area (often near the cuticle or randomly across a nude base), allow it to dry until tacky, press the foil onto the nail, and peel it off for an organic, distressed gold effect. For true show-stopping detail, incorporate 3D elements. The prominent pearl hearts seen here are constructed using solid carving gel or large pearl decals, carefully set into a base layer of clear gel or top coat before curing. Similarly, raised gel hearts, achieved by piping a thick line of self-leveling builder gel and curing, provide depth that a standard flat decal cannot match. Use a very fine liner brush (a 000 brush is recommended) for precision work like delicate roses or outlining the heart shapes.
For an expert finish that ensures longevity, particularly with heavily embellished designs, attention to the top coat is critical. After completing all detailing, including the intricate hand-painted script like the word “love” or small Cupid motifs, apply a high-quality non-wipe top coat. Because this style features varying levels of dimension, apply the top coat in two thin, careful layers. The first layer seals the intricate flat art, and the second layer is crucial for fully encapsulating all 3D elements—making sure to completely cover the edges of foils, pearls, and raised gel details. This encapsulation prevents snagging, chipping, and ensures that your romantic manicure remains flawless throughout the holiday. Always remember to ‘cap the free edge’ of every nail, regardless of the design, to lock in the manicure and prevent premature tip wear.
8 Minimal Simple Nails
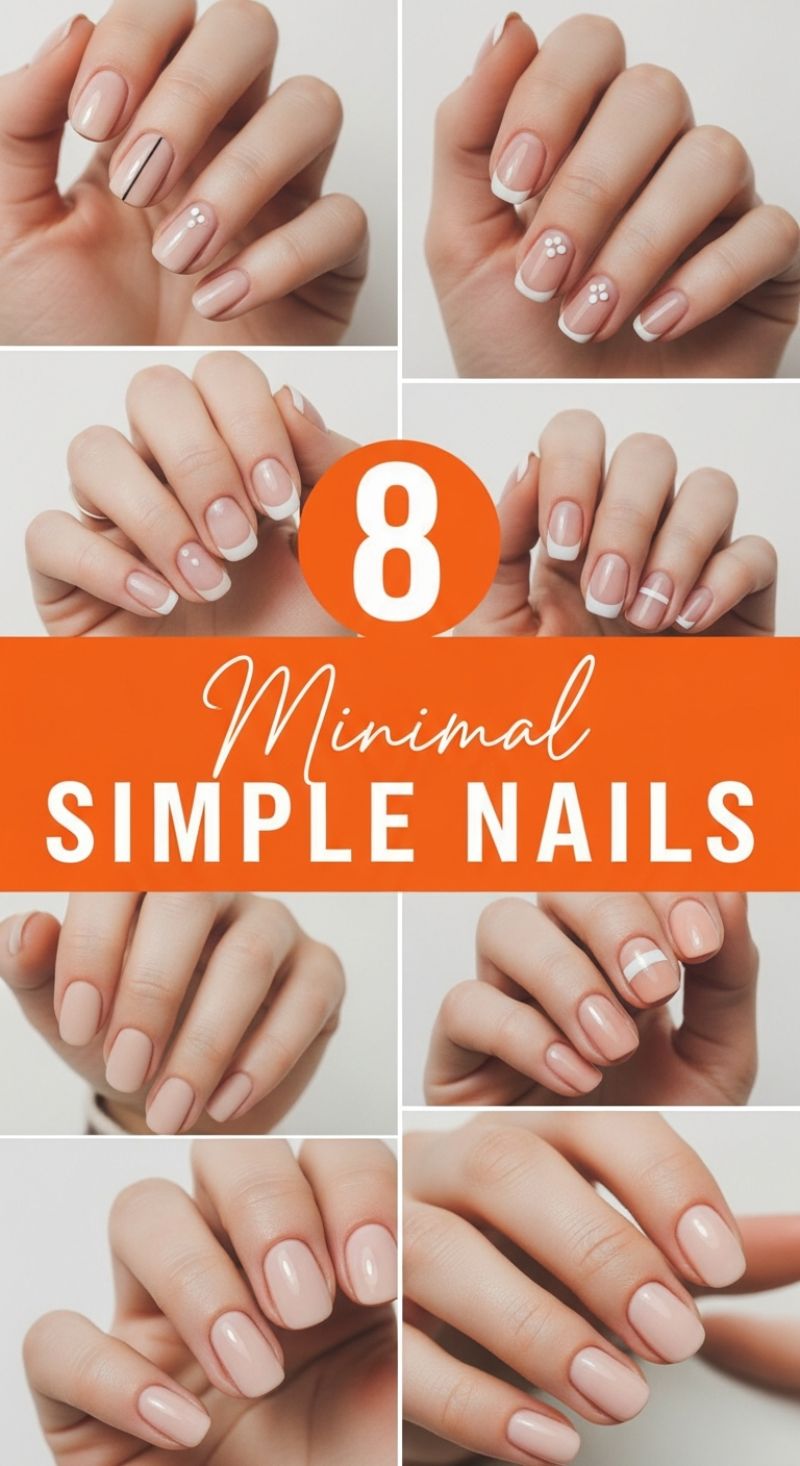
The minimalist nail trend epitomizes sophistication and is the backbone of the ‘clean girl’ aesthetic. These eight simple designs showcase how minor adjustments to a classic neutral palette can yield drastically different, yet universally chic, results. The foundation for all these looks is immaculate nail preparation: nails should be shaped uniformly, typically short to medium length with a squoval or soft rounded edge, and cuticles must be pristine. Start with a high-quality, sheer nude or pale pink base coat. To replicate the looks in the top row, which combine sheer bases with precise details, select an opaque white or matte black polish for the accent work. For designs featuring vertical lines or thin horizontal bands (like the top left or middle right examples), use a precision striping brush (000 or 00 size) and ensure the polish is slightly thinned for a crisp, non-clumpy application. When executing the dot patterns, such as the subtle floral cluster seen in the second design, a fine dotting tool is essential, allowing you to create perfectly uniform mini-circles near the cuticle or along the tip.
Approximately half of these styles are variations on the timeless French manicure, demonstrating its endless adaptability. To master the classic French tip, ensure a smooth, crescent shape that mirrors the natural curve of the nail. For a softer, more modern interpretation, slightly thin the white polish and apply a very shallow curve across the free edge. When adding complexity to the French base, as seen with the white geometric cross design, allow the white tip polish to fully cure before layering the linear details. Alternatively, if you prefer a solid, color-blocked minimalist manicure, choose an opaque nude or beige that flatters your skin tone (Designs 5, 7, and 8). To achieve the horizontal color block shown in Design 6, apply your solid base coat, then use a striping tape or a fine brush to paint a clean, thick white band across the center of the nail plate, utilizing the surrounding nude polish as negative space.
To ensure these minimal looks last, finishing strong is crucial. After your designs are completely dry, apply a high-shine, quick-dry top coat, sealing over the free edge to prevent chipping. For designs featuring dot work or thicker linear elements, two thinner layers of top coat are better than one thick layer, which can distort the art. If you opt for gel polish, ensure each layer, including the art and the top coat, is fully cured under a UV/LED lamp according to manufacturer instructions. These simple, understated manicures are perfect for professional settings, weddings, or anyone seeking a clean, elevated everyday aesthetic that effortlessly transitions through all seasons.