Discover 100+ trendy hairstyles for every length, season, and occasion! This ultimate guide features updos, ponytails, retro looks, prom styles, vacation hair, and essential tutorials to transform your look.
6 Barbiecore PINK WIGS
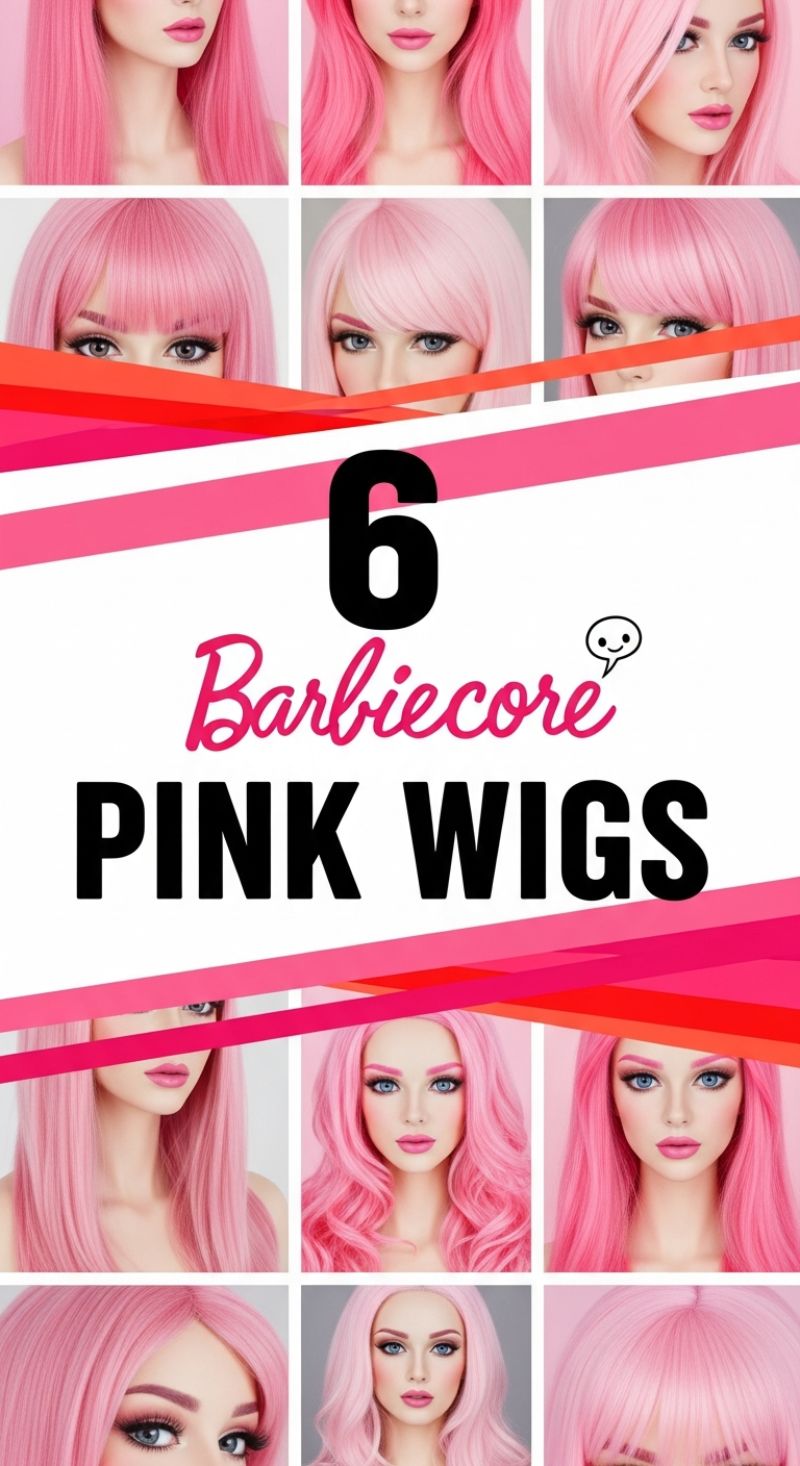
The ‘Barbiecore’ aesthetic, driven by nostalgia and unapologetic maximalism, finds its ultimate expression through vibrant pink hair. As evidenced by the six distinct styles displayed here—ranging from sleek, pin-straight looks to voluminous, loose curls and waves—the foundation of this trend is a high-impact, bubblegum hue. When choosing your pink wig, consider both the shade depth and the style finish. Pastel pinks offer a softer, more romantic take, excellent for everyday fashion statements, while bolder magenta or neon pinks deliver the high-octane drama necessary for events, costumes, or festival looks. For longevity and a natural appearance, especially with the long, straight styles that demand movement, opt for high-quality heat-resistant synthetic fibers or professionally colored human hair. Pay close attention to the hairline finish; lace front options are paramount for achieving the seamless, ‘real hair’ appearance required when pairing these looks with heavier makeup, as seen on the models with perfectly sculpted brows and flawless complexion.
Achieving the perfect Barbie style requires intentional styling beyond just putting the wig on. If you select a straight wig, use a low-heat flat iron (if the fiber is heat-safe) or specialized steam settings to ensure razor-sharp straightness, paying particular attention to smoothing the ends. For curly or wavy textures, use wide-tooth combs or fingers only to maintain definition and volume, preventing frizz, which can quickly degrade the synthetic texture. Regarding fit, proper preparation is key: ensure your natural hair is braided or pinned flat under a wig cap to minimize bulk and create a smooth base. Secure the wig using clips, combs, or adhesive (for lace fronts). Expert advice for creating that signature polished look involves customizing the bangs. Whether you choose the blunt, full fringe or the soft, sweeping side bangs, use scissors or thinning shears carefully to frame your face precisely, ensuring the length hits just above the lash line for maximum eye-opening effect, mirroring the dolls’ iconic gaze.
Maintaining the electrifying vibrancy of these pink shades is essential for the Barbiecore look’s success. For synthetic wigs, always wash in cold water using specialized wig shampoos, avoiding hot water and harsh chemical treatments which can strip color or damage fibers. Air drying on a wig stand is mandatory to retain the style and volume. To truly embody the aesthetic, integrate your hair choice with corresponding makeup and wardrobe. The visual component here strongly suggests bold, defined eye makeup (heavy lashes and sharp eyeliner) paired with a matte or glossy pink lip that either matches or complements the wig’s hue. Couple this dramatic hair transformation with structured, hyper-feminine fashion—think vibrant matching sets, statement accessories, and anything that screams ‘Dopamine Dressing.’ This hair trend is not subtle; it’s about embracing fun, confidence, and highly stylized perfection from head to toe.
15 Retro HAIRSTYLES
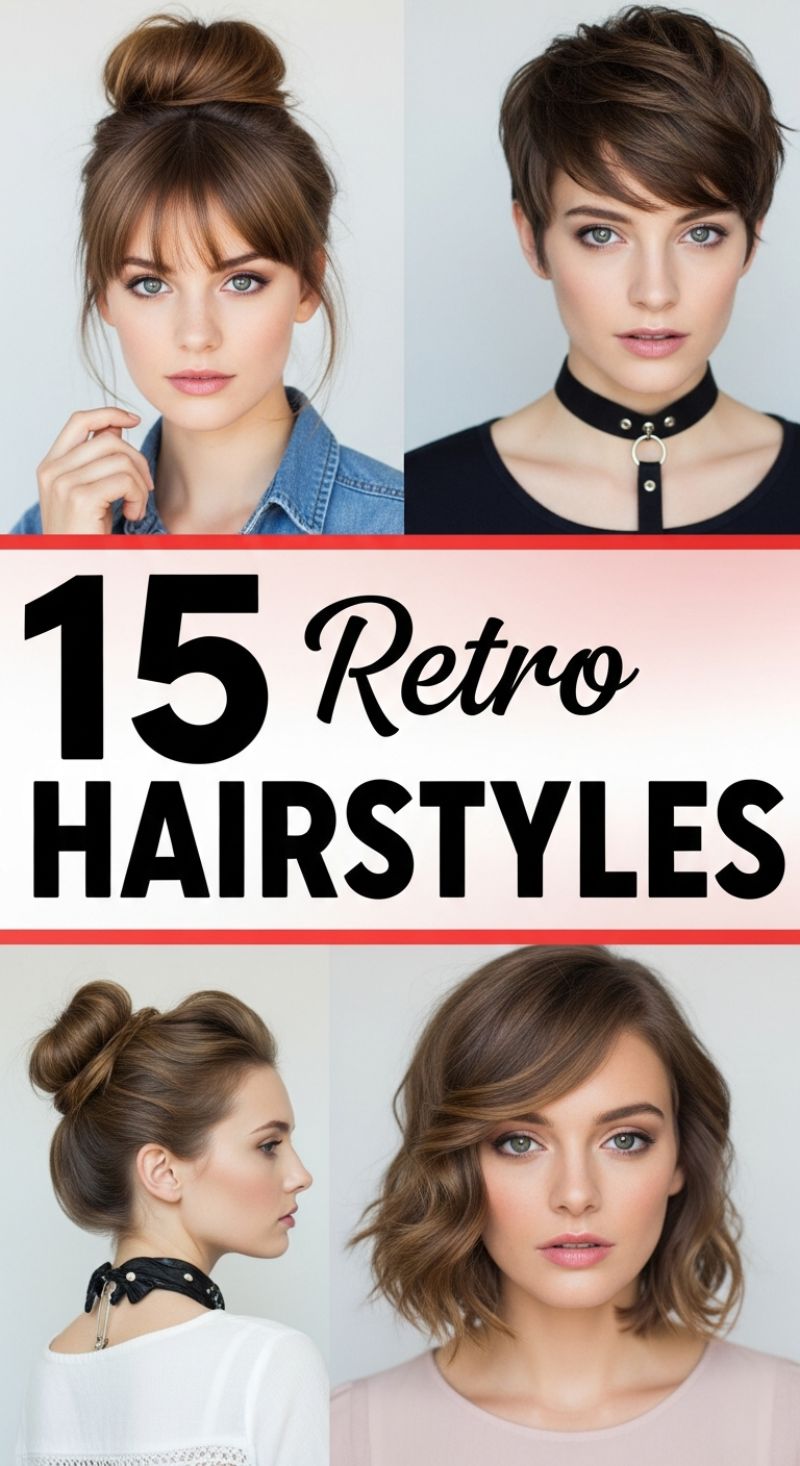
Retro hairstyles are defined by their reliance on texture, structure, and distinctive silhouettes from past decades, and these looks are perpetually trendy. To master the softly waved retro bob (bottom right), start by prepping damp hair with a volume-boosting mousse, concentrating on the roots and mid-lengths. Blow-dry the hair using a round brush to create maximum lift, especially around the face and the side part. Once dry, use a wide-barrel curling iron (1.5 inches or larger) or hot rollers to create loose, soft waves. The key here is not tight curls but gentle bends. Curl away from the face, setting each wave with a light mist of flexible hold hairspray. After the curls cool completely, brush them out gently with a wide-tooth comb to merge them into a seamless, voluminous wave pattern that frames the jawline—a perfect nod to 1940s glamour or 1970s disco chic. For the high, voluminous bun with soft fringe (top left), the retro element is delivered by the heavy, face-framing bangs; ensure the bun is slightly messy but high on the crown for a casual yet styled finish.
For structured retro elegance, the refined high-volume bun (bottom left) is the ideal choice. This look requires a clean foundation and heavy-duty hold. First, create a sleek ponytail at the height you desire the bun to sit. To achieve the voluminous, rolled effect seen here, backcomb the ponytail lightly or use a hair donut/sock bun tool. Carefully wrap the hair around the base, ensuring the strands are smooth and tucked. The volume at the sides often requires gentle teasing around the temples and nape before pulling the hair back; this creates the clean, lifted side profile. Lock the entire updo into place with U-pins and a strong-hold, high-shine hairspray. Conversely, the textured pixie cut (top right) brings a 1990s or Mod 1960s energy. If your hair is naturally straight, use a volumizing powder at the roots. For definition, work a small amount of pliable styling wax or texturizing paste through the ends. Direct the short layers forward and across the forehead, creating that signature piecey fringe. This style thrives on movement and a slightly tousled, ‘just rolled out of bed’ polish, contrasting sharply with the structured updo.
Expert tip for maintaining any retro look: The right products are essential for longevity. For updos, invest in strong finishing spray and shine serum to control flyaways and add polish. For shorter, textured cuts like the pixie, dry shampoo is your best friend for boosting root volume on day two, and a good matte clay wax provides definition without looking greasy. When choosing accessories, consider the era you are channeling; delicate silk scarves or large headbands pair beautifully with buns, while minimalist leather chokers (as seen in the pixie model) enhance the edgier, modern-retro styles. Always finish your style with a cold shot of air from the hairdryer to seal the cuticle and enhance the natural shine of your hair, regardless of the length or complexity of the look.
14 Classic Pin Up Looks: Mastering Vintage Glamour
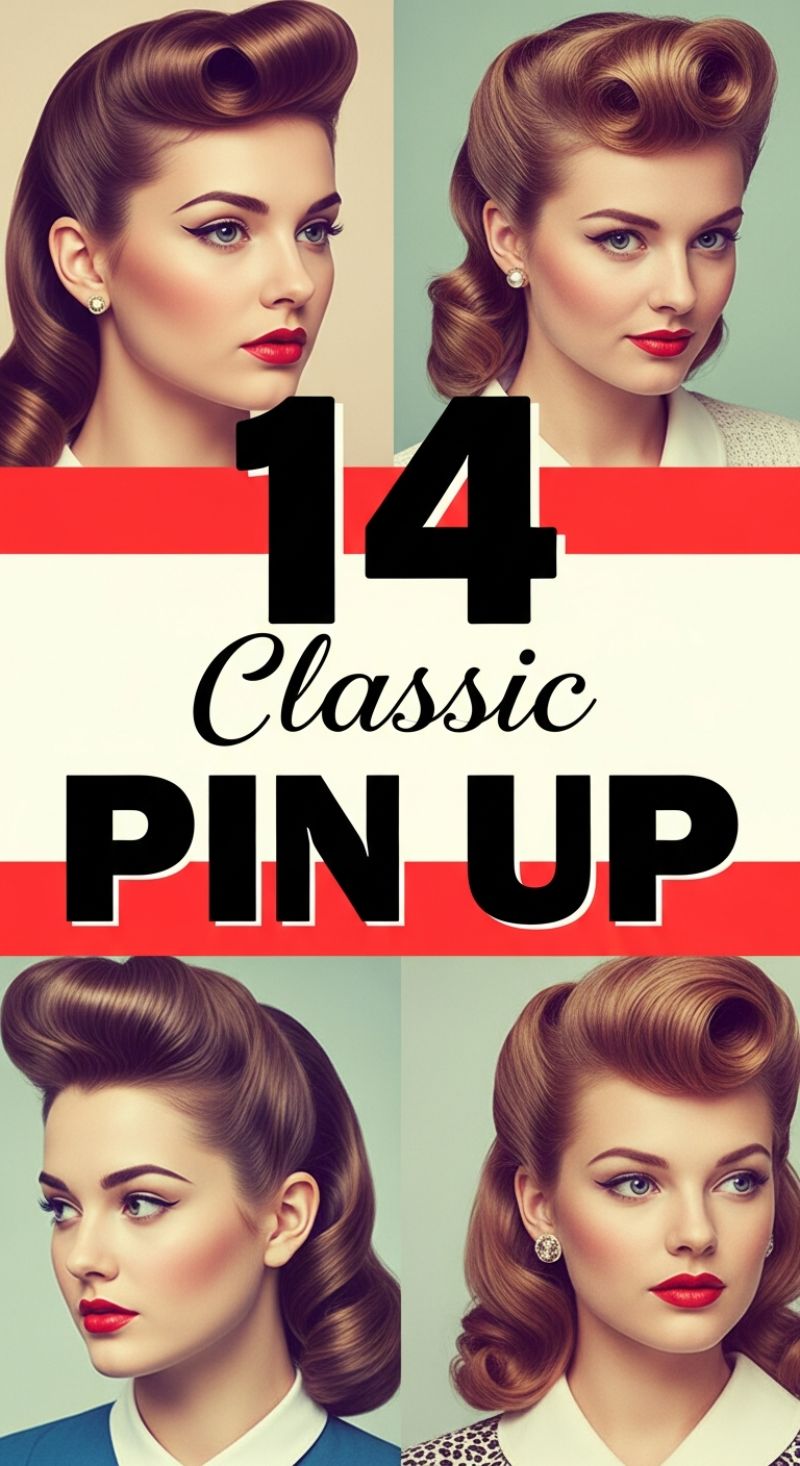
The Pin-Up style is the quintessential embodiment of 1940s and 1950s allure, combining structured elegance with playful femininity. The featured looks illustrate the core components of this vintage aesthetic: impeccably structured volume, deep side parts, and polished, controlled waves. Key visual elements include the signature ‘Victory Rolls’ (seen prominently in the top right and bottom right examples), where sections of hair are carefully rolled and pinned to create high loops near the temple or crown, and the high-volume pompadour-style lift (bottom left) which emphasizes a strong profile. Achieving this level of definition requires meticulous setting and preparation, making the pin-up look perfect for formal events, photoshoots, or any occasion demanding serious old-school glamour. The uniform quality and polished finish of these styles require dedication and the right tools.
To successfully execute a classic pin-up hairstyle, preparation is paramount. Start with freshly washed hair and apply a strong-hold setting lotion or mousse before heat styling. The most effective technique involves setting the entire head, section by section, using either hot rollers or a small to medium barrel curling iron (ensuring uniform curl direction). For the iconic Victory Roll or the high frontal lift, isolate a triangular or rectangular section of hair at the front hairline. Backcomb the underside of this section vigorously for internal support and structure, then smooth the top layer before carefully rolling the hair inward toward the scalp, securing the resulting cylinder with bobby pins hidden inside the roll. The direction and height of these rolls define the look, so use ample hairspray to freeze the shape immediately upon completion.
Once the structural elements (rolls or front volume) are secured, focus on refining the remaining lengths to create those controlled, soft waves. Allow the initial curl set to cool completely before gently brushing the curls out using a soft bristle brush. This step is crucial; it transforms tight coils into seamless, continuous waves that maintain volume without appearing fluffy or frizzy. Finish the look by smoothing any remaining flyaways with a light pomade or shine spray to enhance the polished effect. Remember that the Pin-Up aesthetic is holistic: pair your sculpted hairstyle with sharp, winged eyeliner, perfectly defined brows, and the mandatory matte red lipstick to capture the full spirit of retro elegance. This style is an ideal choice for medium to long hair lengths, providing enough canvas to create substantial rolls and flowing waves.
9 Effortless Down Looks
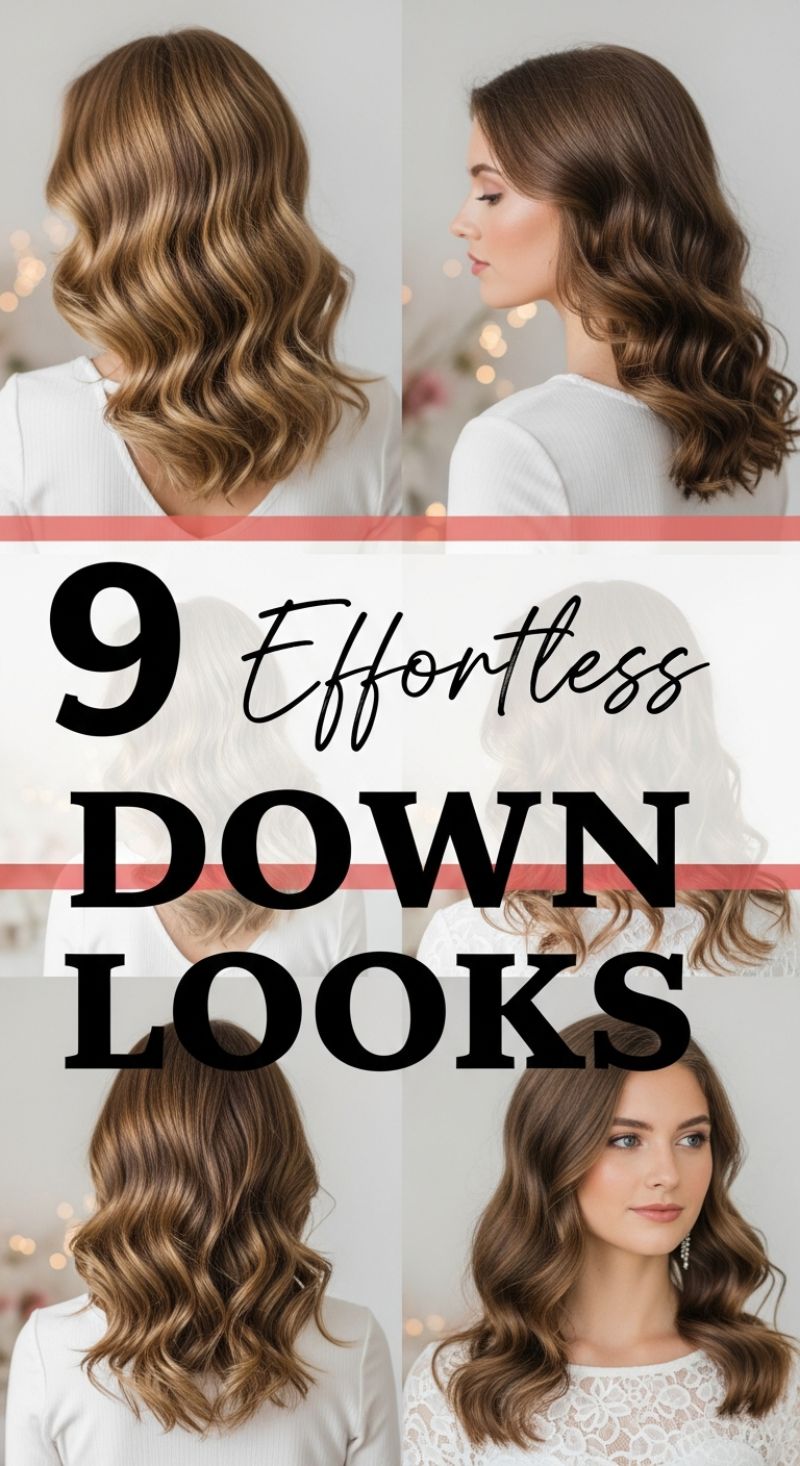
The “effortless down look” is a universally flattering hairstyle characterized by soft, voluminous, and highly textured waves. Unlike rigid or tightly wound spirals, these looks feature relaxed, medium-to-large-barrel waves that cascade naturally, offering movement and polish without appearing overly structured. This style works beautifully on medium to long hair lengths, and its impact is often enhanced by dimensional hair color techniques like balayage or subtle highlights, which catch the light and accentuate the curves of the waves. Because of its balance between undone texture and sophisticated form, this look serves as a perfect go-to for nearly any occasion, from sophisticated wedding guest attire and formal events to elevated everyday wear, embodying approachable glamour.
Achieving these refined yet relaxed waves starts with proper preparation. Begin by applying a heat protectant and a root-lifting mousse or volumizing spray to damp hair, focusing on the roots and mid-lengths, then blow-dry until fully dry, lifting at the crown for maximum height. To create the soft, flowing waves seen here, utilize a 1.25-inch to 1.5-inch curling iron or wand. Section the hair horizontally, starting from the nape of the neck. For the most flattering outcome, ensure that all sections framing the face are curled directly away from the face. When wrapping the hair around the barrel, keep the very ends—the last inch or so—outside the heat source. This slight straightness at the tips is crucial for achieving the modern, “effortless” finish, preventing the look from becoming too retro or uniformly curled. After releasing each curl, gently hold it in the palm of your hand for a few seconds before dropping it, allowing it to cool and set the wave pattern.
Once all sections have been curled and the hair is fully cooled, the key to transforming individual curls into cohesive waves is in the finishing technique. Resist the urge to aggressively rake through them with your fingers. Instead, apply a small amount of lightweight shine serum or dry texturizing spray for grip, then use a soft-bristled paddle brush or a wide-tooth comb to gently brush through the curls entirely. This action merges the separate curls into one continuous, flowing wave pattern, resulting in that signature soft, voluminous shape. Expert tip: For longevity, particularly if your hair struggles to hold a curl, mist with a flexible-hold hairspray both before and after brushing. For added visual interest and movement, ensure your haircut incorporates subtle long layers or a V-cut shape, which naturally enhance the flow and separation of these gorgeous down styles.
12 Elegant UPDOS: Mastering the Textured Chignon
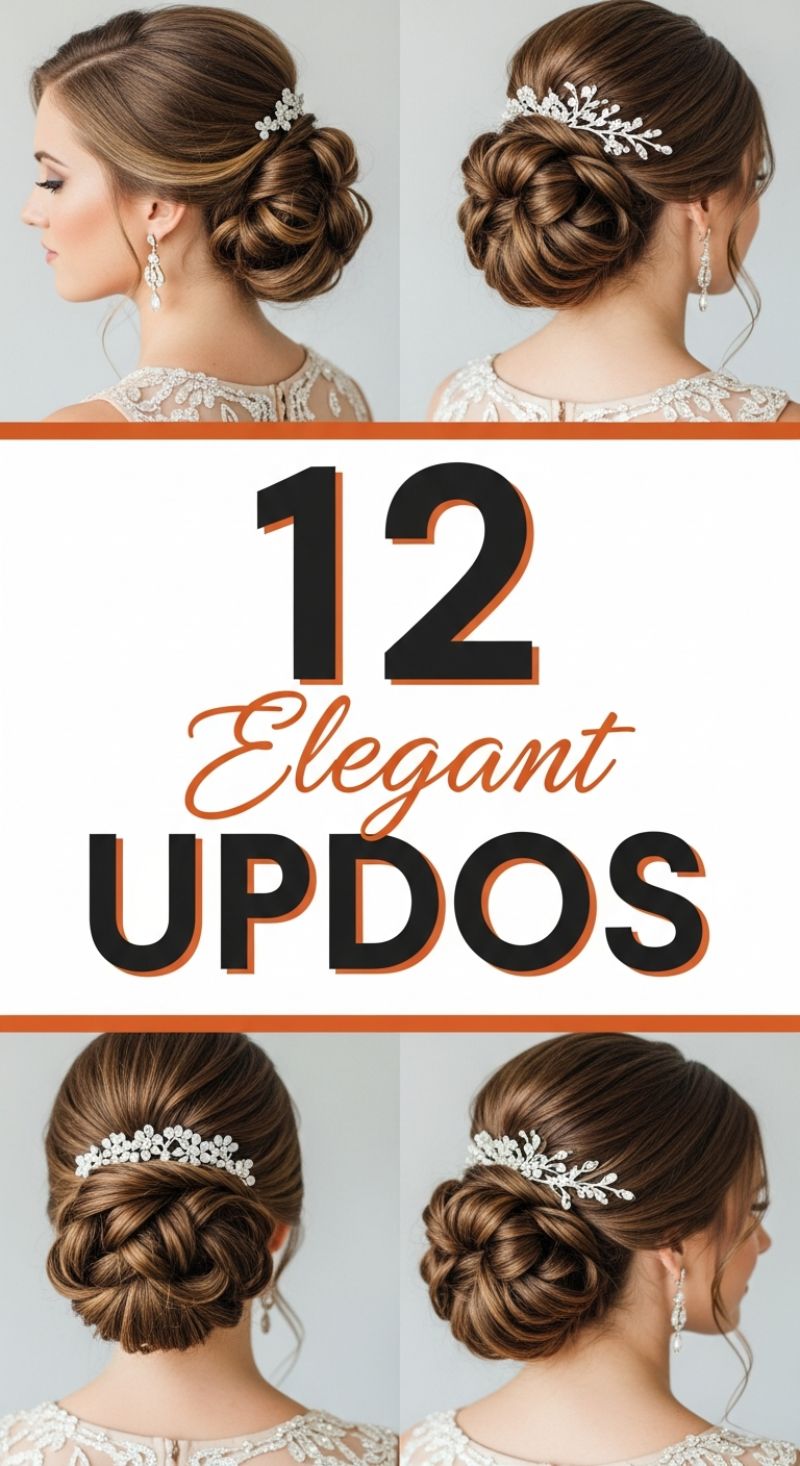
The textured chignon, often seen in bridal and red carpet contexts, is the epitome of sophisticated elegance. Achieving this look requires a balance of volume, strategic pinning, and foundational texture. To begin, prep your hair by applying a heat protectant and then curling the entire head with a large-barrel iron (1.5-inch or larger). The goal is soft waves, not tight ringlets; this initial curl provides the necessary body and grip needed for the voluminous twists seen in this style. Next, decide on your part (deep side part is classic for this look) and gather the hair loosely at the nape of the neck. Before securing, use a dry texturizing spray heavily on the mid-lengths and ends, then gently backcomb the entire section gathered at the nape. This crucial step ensures the final bun is not flat but has the desired luxurious, cloud-like volume. Secure this prepped hair into a very loose, low ponytail base using a clear elastic, keeping it situated right at the bottom curve of the hairline.
To construct the woven texture, divide the prepared ponytail into 3 to 5 separate, equally sized sections. Starting with the first section, twist it loosely—avoiding excessive tightness that would pull the style flat—and sweep it horizontally across the base of the elastic, pinning the ends securely into the scalp near the opposite side of the chignon. Repeat this process with the subsequent sections, strategically overlapping the twists to cover the elastic and create the illusion of a complex, interwoven knot or braided structure. The artistry lies in maintaining the airy quality of the twists; lightly pull apart the edges of each twisted section before pinning to exaggerate the texture and volume. For maximum hold and to keep the shape soft, use long, open-ended U-pins rather than standard bobby pins, focusing on anchoring the hair into the base established at the scalp.
This low-set, voluminous updo is ideally suited for formal events as it beautifully showcases the neckline and shoulders. To finish the style, mist the entire chignon with a strong-hold, flexible hairspray, keeping the aerosol canister at least 10 inches away to avoid saturating the hair and collapsing the texture. The finishing touch, as demonstrated in all variations, is the placement of an elegant hair accessory. Crystal or pearl combs, pins, or delicate floral sprays should be inserted just above the highest point of the bun, acting as an elegant crown detail. Expert advice: If you have fine hair, consider using a hair donut or bun shaper hidden within the center before you begin the twisting process; this ensures the essential volume and structure needed to achieve this rich, multifaceted look.
1 Iconic RUMI TUTORIAL
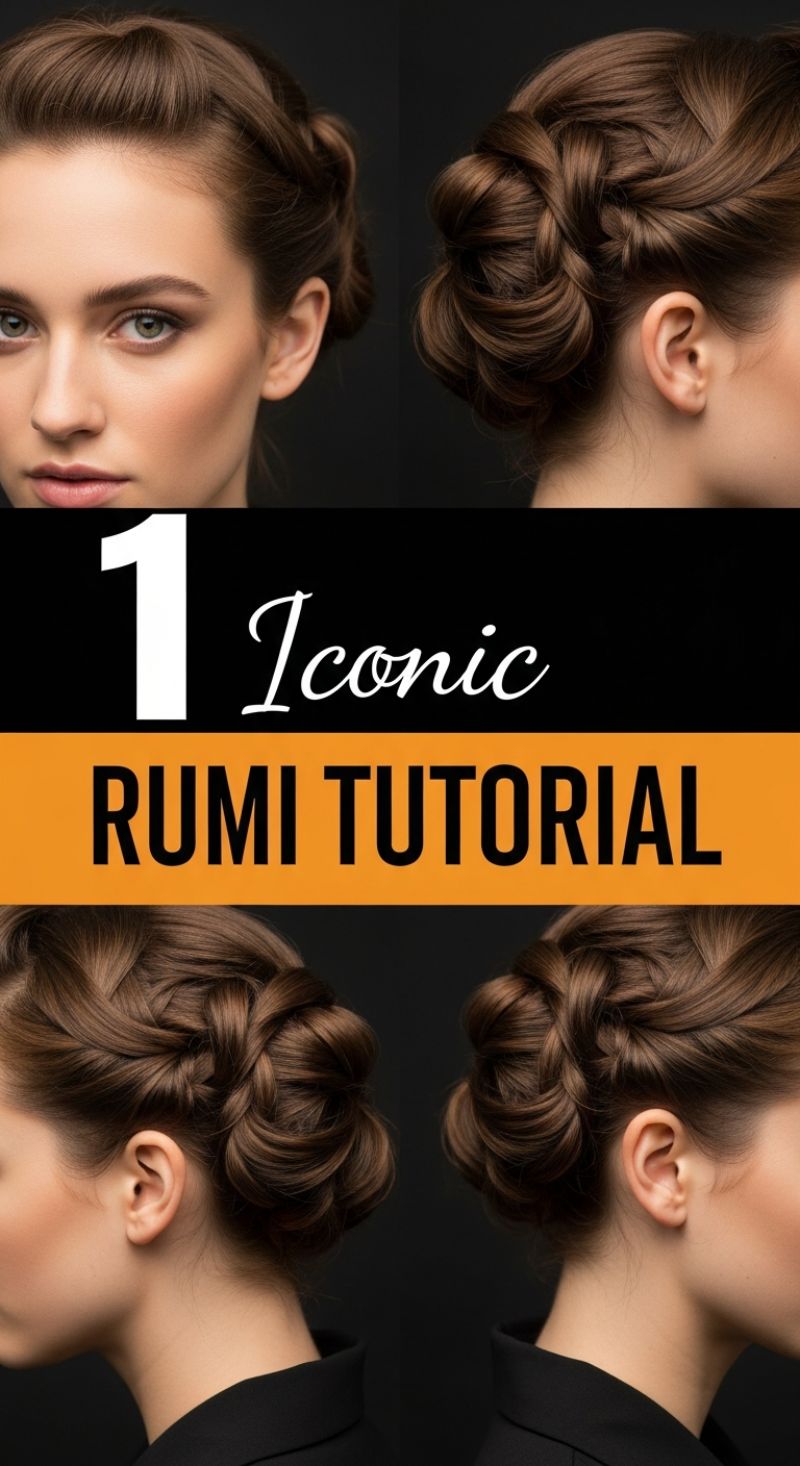
This Iconic Rumi Updo is a testament to timeless elegance, combining sleek framing with intricate texture, making it perfect for formal events, bridal wear, or sophisticated corporate occasions. To begin, preparation is key: ensure your hair is smooth and well-prepped by applying a heat protectant and a light smoothing balm, which helps control flyaways necessary for the clean, polished look. Section the hair by creating a deep, clean center or slightly side part at the front, and then isolate the main weaving sections. The key to this style’s substantial foundation is building volume at the nape; lightly tease the hair designated for the final bun (the central back section) to provide an internal cushion before you begin incorporating the woven pieces.
The artistry of the Rumi Updo lies in its dimensional weaving, which gives the appearance of a complex basket-weave structure leading into the chignon. Focus on the two isolated side sections, beginning the intricate braiding just above the temple or ear line. The technique depicted here resembles a combination of a flattened Dutch (inverse French) braid and a ribbon weave, where strands are kept wide and flat rather than round and tight. Guide the weave tightly along the contours of the head, incorporating new small sections of hair as you travel backward toward the central point where the bun will rest. Once the braids reach the center back, stop adding hair and transition into a standard three-strand braid or twist for the remaining length, securing them temporarily. It is crucial to repeat this process identically on the opposite side, ensuring symmetry in tension and volume.
To complete the look, gently combine the tails of the two woven strands with the remaining hair at the nape. Before forming the final shape, take a moment to gently pancake or pull apart the woven sections to enhance their width and dimension—this gives the updo its signature intricate appearance. Gather the entire mass and begin twisting and coiling it into a substantial, low chignon. This style is characterized by soft, overlapping loops rather than a tight, flat knot. Secure the entire structure meticulously using U-shaped pins, pushing them inward and upward into the base to ensure stability. The professional finish requires a high-hold, flexible hairspray applied lightly across the entire style, followed by a mist of shine spray specifically aimed at the woven elements and the smooth crown to highlight the definition and achieve that coveted glossy appearance.
Romantic Date Night Updos: 10 Styles to Sweep Them Off Their Feet
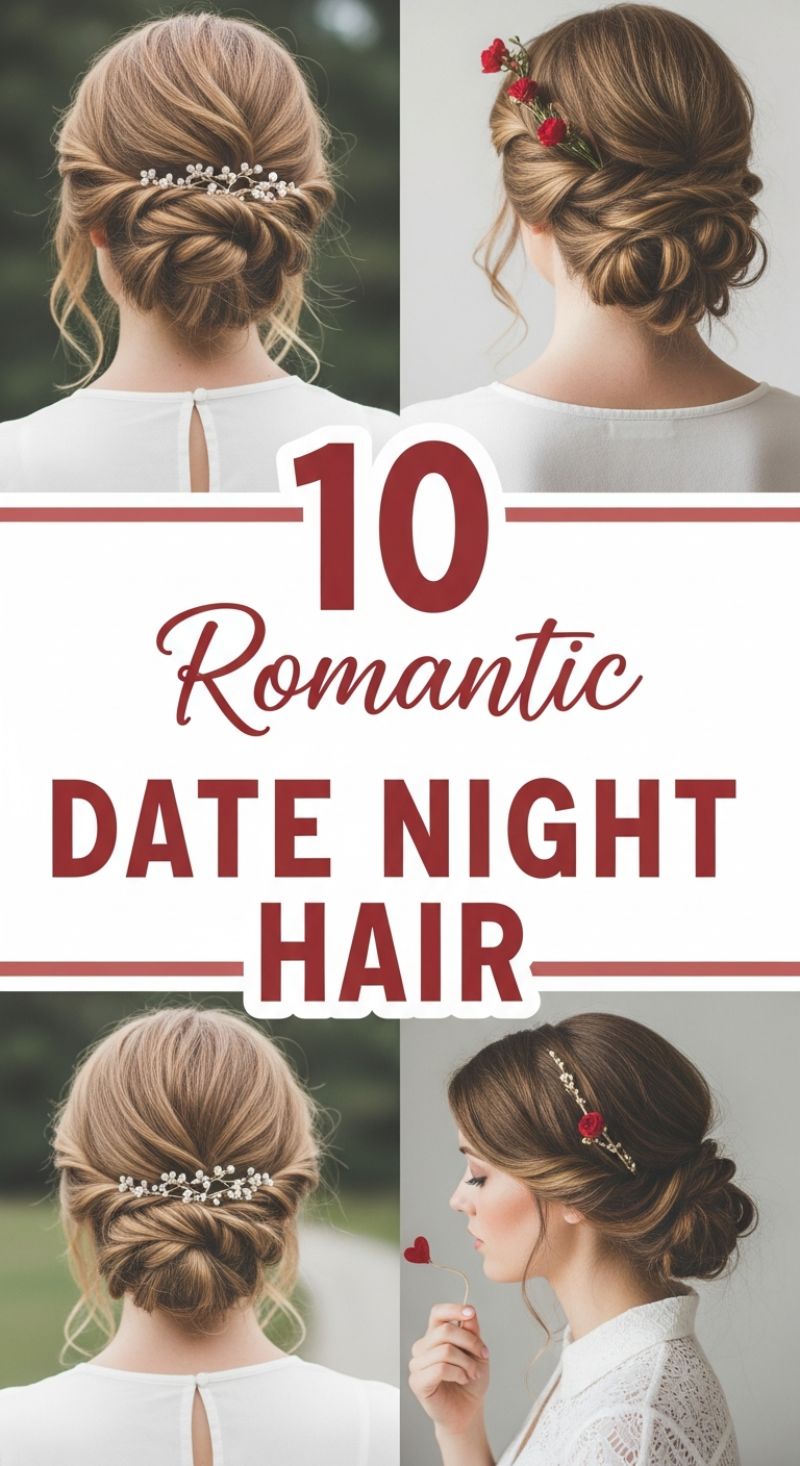
The quintessential romantic date night hairstyle revolves around the soft, low updo, perfectly captured in these four stunning examples. To achieve this look, the key is maximizing texture and volume before you even begin pinning. Start by prepping dry hair with a volumizing mousse or dry texture spray, focusing on the mid-lengths and ends to give the hair grip—this prevents the finished style from falling flat or looking too sleek. If your hair is naturally straight, use a large-barrel curling iron to introduce soft waves, ensuring that the curls are relaxed and brushed out rather than tight spirals. The goal is to create a plush, malleable foundation that allows the final bun or twisted chignon to appear effortless, loose, and incredibly soft, contrasting with the structured, rigid updos of decades past.
The central technique for these styles involves constructing a voluminous, asymmetrical chignon situated just above the nape of the neck. Begin by sectioning off the front pieces you wish to leave out to frame the face. Next, loosely gather the remaining hair into a low ponytail base, but do not secure it with an elastic. Instead, employ gentle twisting or braiding techniques—such as an inward loop chignon or a loose rope braid—that gather the hair towards the center point. Once the shape is formed, strategically use large U-shaped hairpins to secure the mass, tucking the ends discreetly into the base. For a truly professional finish, resist the urge to over-tighten; the beauty of the date night updo is its undone quality. Expert tip: After pinning, gently tug on sections around the perimeter of the bun to enhance the soft texture and ensure a flattering, voluminous silhouette from all angles.
Accessories are what elevate these romantic updos from simple buns to show-stopping date night looks. Notice the variety in the featured images, ranging from the delicate sparkle of a crystal or pearl vine tucked horizontally into the twist, to the vibrant pop of small red roses placed subtly above the ear or within the structure of the chignon. When choosing an accessory, consider the formality of the occasion: subtle bling works well for an upscale dinner, while fresh or silk flowers add a whimsical, earthy touch perfect for a garden date. Complete the look by paying attention to the face-framing tendrils; these pieces should be loosely curled away from the face and set with a light-hold hairspray. This softness around the jawline and temples ensures the style feels approachable and flirtatious, rather than overly severe, cementing its status as the ultimate romantic hairstyle.
20 Essential PROM STYLES
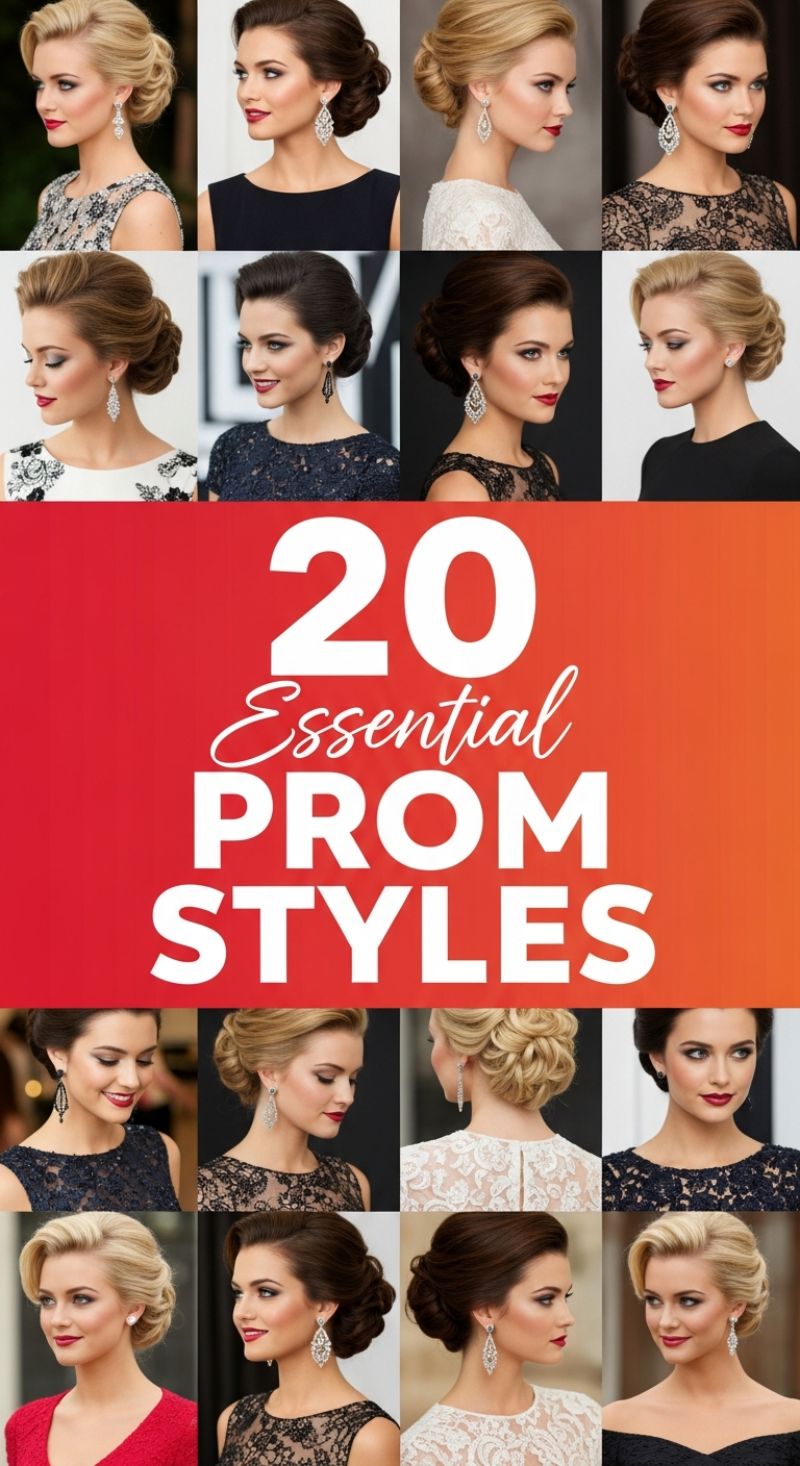
The sophisticated updo is the cornerstone of formal hairstyling, and the collection showcased here highlights the most timeless and flattering versions suitable for prom, weddings, or black-tie affairs. These looks, predominantly variations of the classic low chignon and voluminous bun, rely on creating a soft, structured silhouette. Key features include deep side parts, smoothly swept front sections that offer subtle volume at the crown, and a meticulously crafted bun secured at the nape of the neck. The visual impact is one of polished glamour, perfectly framing the face to draw attention to statement earrings and highlighting the elegance of a high-neckline or strapless gown. Achieving this level of sleekness while maintaining volume requires careful preparation, especially for those with fine hair; mousse applied to damp hair, followed by a root-lifting spray and a thorough blowout directed away from the face, provides the essential foundation for these enduring styles.
To recreate the signature voluminous low bun, begin by prepping hair with texture spray or dry shampoo to ensure grip. Create your desired part (a deep side part offers the most drama) and section off the front fringe area, securing it separately for later styling. Next, gather the remaining hair into a very smooth, low ponytail at the nape. If volume is lacking, utilize a hair donut or hair padding around the ponytail base. The magic lies in the wrapping technique: take the ponytail, gently tease the length, and then either twist it into a tight knot for a traditional chignon or loosely loop sections around the base for the textured, voluminous finish seen in the collage. Secure all wrapped sections with interlocking bobby pins, making sure to hide them within the structure. Finally, address the front section; curl it away from the face using a large barrel iron and then gently sweep it back over the ear and secure it seamlessly into the existing bun structure, ensuring that soft volume over the temples is maintained.
Longevity is paramount for a style intended to last through hours of dancing and photos. Once the structure is set, lock the entire look in place with a firm-hold hairspray, applying an additional layer of humidity shield, particularly around the hairline. For a softer, more romantic finish, pull out a few wispy strands around the face and use a curling iron to give them a slight bend. A crucial expert tip for maximum staying power is to use the “hooking” technique with bobby pins, where the pin is pushed in, hooked to the underlying scalp hair, and then pushed back into the bun. This ensures a secure anchor without causing slippage. These updos serve as the ultimate complement to formal attire, providing a perfect canvas to showcase jewelry, making them a truly essential style for any formal occasion.
The Elegant Half-Up Twist: 10 Luxurious Proms Looks
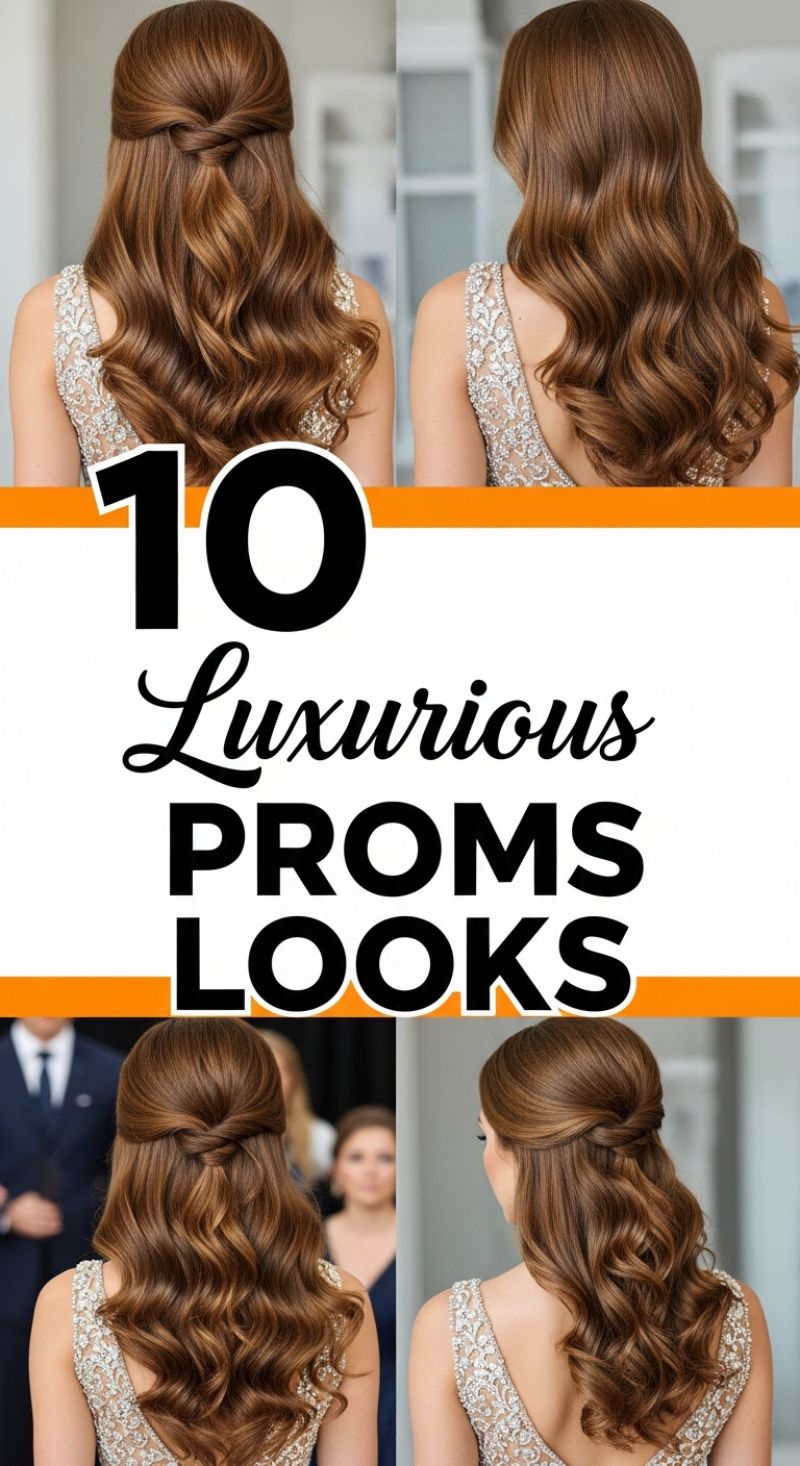
Achieving a truly luxurious prom look starts with voluminous, high-shine hair. This half-up style is perfect for showing off long locks while keeping strands neatly managed for a night of dancing. Begin by preparing your hair with a heat protectant and a generous root-lifting product. For the signature soft, cascading waves, use a large-barrel curling iron—ideally 1.5 to 2 inches—to curl the entire length of the hair away from the face. Once the curls have cooled, gently brush them out using a wide-tooth comb or paddle brush. This critical step transforms defined ringlets into the smooth, Old Hollywood-style waves essential for this glamorous finish. Ensure your volume is focused primarily in the lower lengths, keeping the crown area smooth for the upcoming detail work.
Now, focus on creating the sophisticated half-up section. Using the high point of your eyebrows as a guide, section off the top portion of hair, securing the remaining length out of the way. Gather the top section neatly and aim for the twist to sit just above the occipital bone for maximum lift and visibility. To create the knotted detail seen here, split the gathered section into two equal strands. You can either cross and loop them through like a simple tie or perform a flat, horizontal twist (sometimes called a infinity twist) and then pin it securely underneath the detail work using U-pins and bobby pins matched to your hair color. The key is pinning in a criss-cross pattern from the bottom up to ensure the knot remains flat and tight against the head.
To perfect this look, attention to detail is paramount. After securing the twist, gently pull a few small strands near the face to soften the look, allowing them to frame the jawline. For longevity, mist the entire style with a flexible hold hairspray before stepping out. If you anticipate humidity, incorporate an anti-frizz serum into your prep routine. This classic, polished style pairs beautifully with low-backed or intricate-neckline dresses, as it draws attention to the shoulders and décolletage without competing with the gown’s details. It’s an ideal choice for anyone seeking a timeless, elegant aesthetic for their special event.
10 Perfect Medium Hair Styles
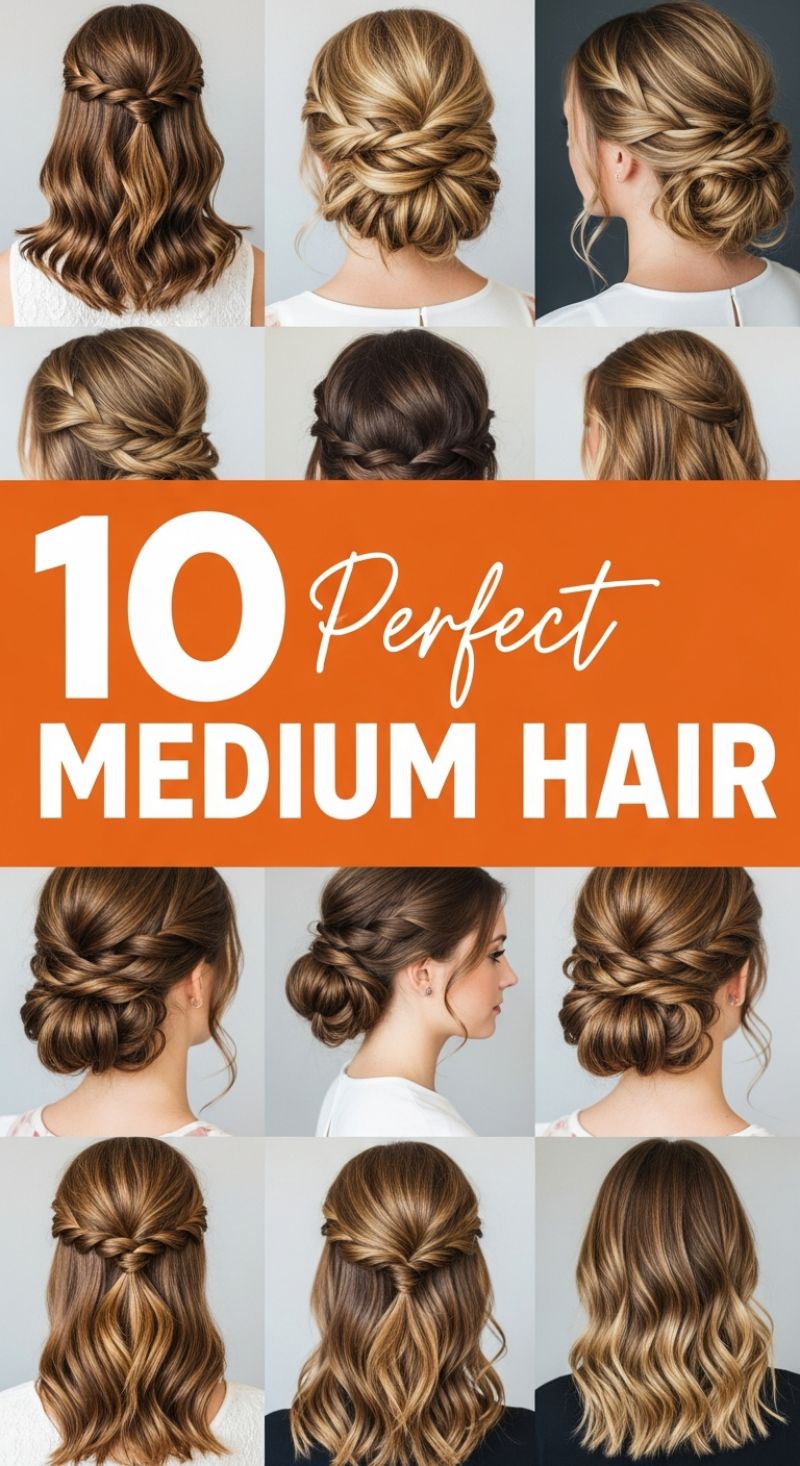
The versatility of medium hair shines through in this collection of 10 perfectly curated styles, ranging from relaxed half-up looks to intricate, elegant updos. To successfully recreate the polished half-up, half-down styles featured in the top left and bottom rows, start by prepping the hair with soft, defined waves using a 1.25-inch curling iron. A foundational step is applying a texturizing spray or mousse to give the hair necessary grip and volume—crucial for securing twists and braids on medium lengths without slippage. For the twisted or braided crown looks, section off the top half of the hair above the ears. Either create two simple braids or twist two sections back, meeting them at the center back of the head. Secure the join with a clear elastic, then wrap a small strand of hair around the elastic and pin it, concealing the band for a seamless, professional finish. This technique lifts the hair off the face while allowing the soft, voluminous waves to cascade down the shoulders, offering both structure and movement.
Medium hair is ideally suited for the sophisticated, low-slung updos, providing enough substance for a full bun without the excessive weight of very long hair. The intricate chignons and braided buns shown in the middle section are achieved through careful pinning and layering rather than tight construction. To begin, gather the hair into a low ponytail at the nape of the neck. For the dimensional, interwoven look, lightly tease the ponytail for volume, then divide it into multiple sections (3 to 5 works well). Take each section, loosely twist it or create a simple three-strand braid, and then wrap these segments individually around the base of the ponytail, pinning them securely close to the scalp in a criss-cross fashion. The key to these styles is the intentional ‘undone’ finish; avoid pulling the hair too tightly. Gently tug on the finished bun to soften its edges and pull out small, face-framing strands around the hairline to soften the overall silhouette. Expert Tip: Highlights like balayage (as seen in the blonde styles) significantly enhance the visual depth, emphasizing the beautiful twists and folds of the updo.
Achieving these high-end looks requires strategic planning; second-day hair often holds styles better than freshly washed hair due to natural oils providing better texture and grip. If starting with clean hair, heavy application of dry shampoo or a thickening powder at the roots is highly recommended. For any formal event, ensure the style lasts by using two types of hold products: a flexible working spray while constructing the style (allowing for adjustments) and a firm-hold finishing spray once the look is completely finalized. Always insert bobby pins with the ridged side facing down, gripping the scalp for maximum hold. Whether you choose a relaxed, half-up wave for daily chic or a tightly constructed chignon for a bridal or formal occasion, these medium-length styles provide the perfect blend of trendiness and timeless elegance.
8 Sleekest Ponytails: High Volume Glamour
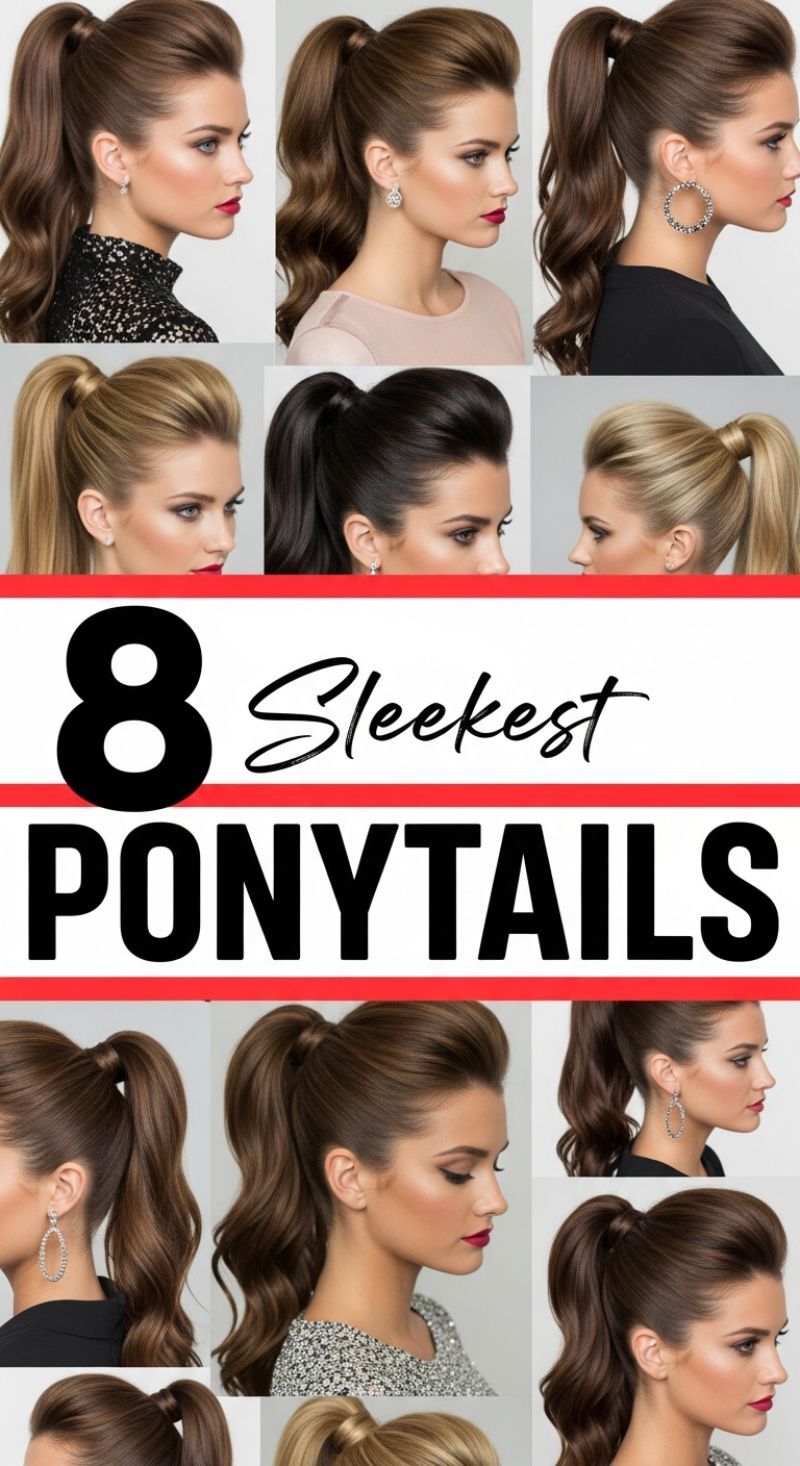
Achieving the look of a perfectly plumped and polished ponytail, as showcased in these examples, hinges entirely on proper preparation and volume creation at the crown. Start by applying a heat protectant and volume mousse evenly throughout dry hair. For the signature elevated crown (“the pouf”), isolate a horseshoe section of hair from temple to temple. Using a fine-toothed teasing comb, backcomb the underside of this section vigorously, focusing on the roots, then gently smooth the top layer over the teasing with a soft brush, carefully pushing the hair upward and slightly backward to create a seamless, voluminous dome. Next, brush the hair on the sides back towards the center occipital bone (the highest point where the pony should sit). This sleek transition from the hairline to the voluminous crown is essential for that glamorous, red-carpet finish. If your natural hair lacks the density shown, clip-in hair extensions or a wrap-around ponytail piece can instantly provide that enviable fullness and length.
Once the crown volume is set, gather all of your hair firmly into a high ponytail. The ideal placement is just below the crown or at the point where your head begins to curve down. Secure the pony tightly with a strong elastic band. For a truly “sleek” finish, take a small half-inch section of hair from the underside of the secured ponytail and wrap it tightly around the elastic, pinning it underneath with a small bobby pin. This technique conceals the hardware and gives a refined, salon-quality touch. For the tail itself, use a large barrel curling iron (1.5 inches or larger) to create soft, cascading waves, or keep it straight for a sharper, more contemporary look.
These voluminous ponytails are ideal for upscale occasions, whether it’s a wedding, a formal dinner, or a chic date night, as they beautifully elevate the neck and highlight jewelry. To lock in the look, generously mist the sleek sides and crown with a firm-hold hairspray, paying close attention to any flyaways along the hairline—a precise application of an edge control product or a light layer of gel can ensure the edges remain perfectly smooth throughout the event. For added shine and dimension, finish the tail with a serum or glossing spray. To maintain the volume at the crown, gently tuck the teased section under a hair net while traveling or sleeping, helping to preserve the lift for a second day of wear. The key to making this style successful is tightness—the base must be secure enough to withstand movement without slipping or losing elevation.
5 Sweetest Heart Buns
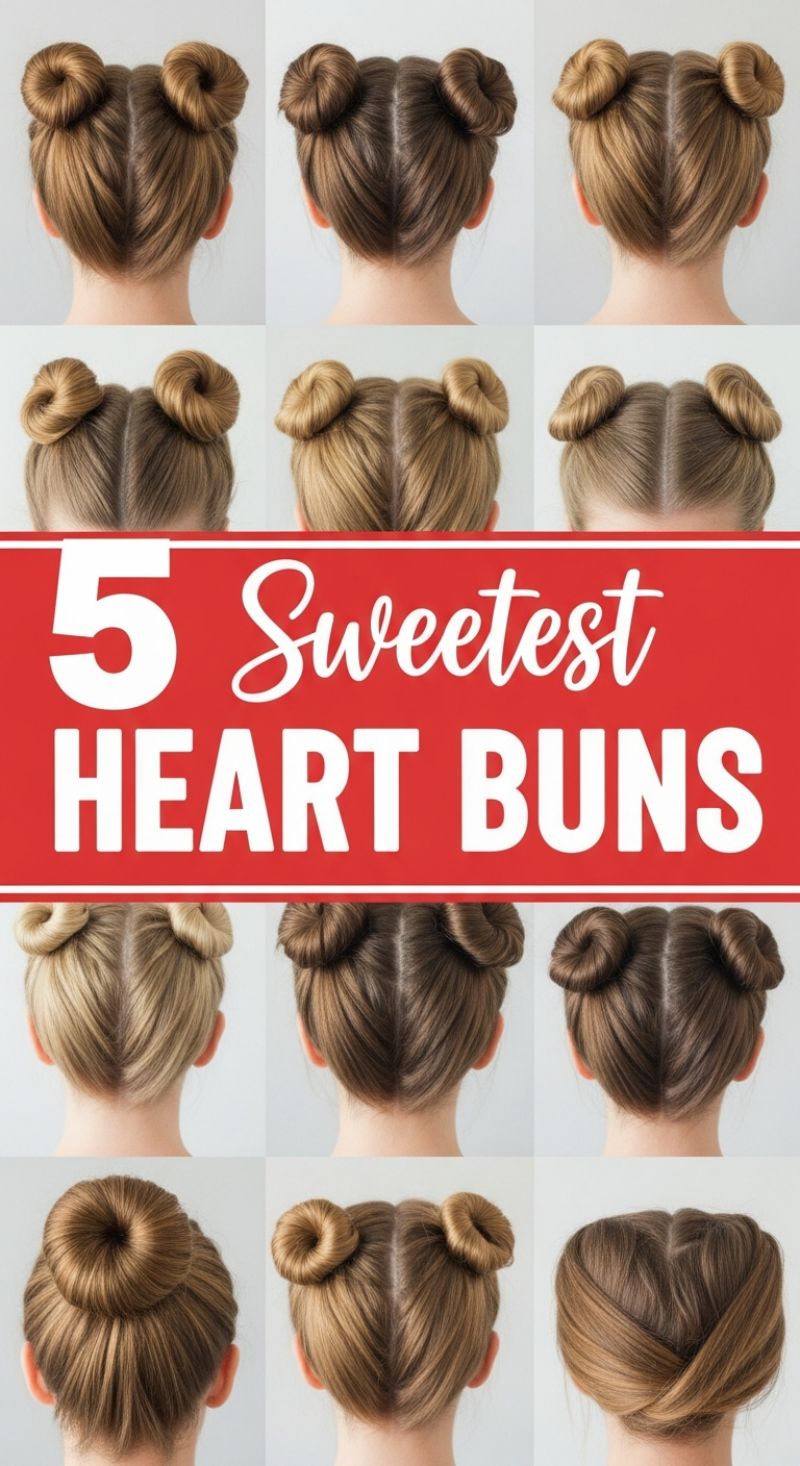
The Heart Bun, a beloved variation of the trending Space Bun look, offers a playful yet highly polished aesthetic, perfect for festivals, weekend outings, or adding a touch of whimsy to any occasion. To achieve the sleek precision shown in these visual examples, start with clean, well-detangled hair. The foundation of this style lies in the parting: use a thin-toothed comb to draw a razor-sharp center part from the forehead back to the crown. The key visual element, and what often gives this style its ‘Heart Bun’ moniker, is the careful sectioning of the hair below the crown, pulling the hair up into the two high ponytails in a manner that creates smooth, upward-sweeping lines, often forming a distinct, neat V-shape or slightly rounded ‘heart’ silhouette at the back of the neck. Ensure both ponytails are perfectly symmetrical in height and tension before proceeding, securing them firmly with high-quality elastic ties that match your hair color.
Once the two high ponytails are secured, the styling process begins. For the tightly coiled, smooth bun look displayed in the majority of the images, you will want to avoid simple knotting. Instead, apply a light-hold styling gel or mousse to the length of the ponytail to smooth down flyaways and increase pliability. Tightly twist the ponytail into a neat, rope-like structure. Then, coil this twisted rope securely around the base of the ponytail, flattening it against the head as you wrap to maintain a low profile. Secure the finished bun firmly by inserting bobby pins around the circumference, aiming them toward the center of the coil to ensure they are fully hidden. Achieving uniform tension on both sides is paramount for a professional finish; compare the size and shape of the buns frequently as you pin them into place. If you prefer a larger, fuller bun (like the one demonstrated in the bottom left corner), use a donut sponge or hair filler accessory before wrapping the hair around it.
Expert tip: This style looks exceptional on multi-tonal hair, as the twisting action enhances the dimension and contrast, as seen in the blonde and brown variations. To guarantee maximum longevity, lightly mist the finished buns and the smoothed scalp areas with a strong-hold hairspray. For those with shorter layers or fine hair that struggles to hold a tight bun, prep the hair with a texture spray or dry shampoo, which adds the necessary grip and bulk. While these images focus on a very sleek, tight aesthetic, you can easily soften the look by gently pulling on the edges of the coiled bun for a slightly deconstructed, messy space bun effect. The heart bun structure is highly adaptable, transitioning flawlessly from a day look to a fun evening hairstyle.
Genius Dirty Hair Hacks: Stylish Looks for Unwashed Tresses
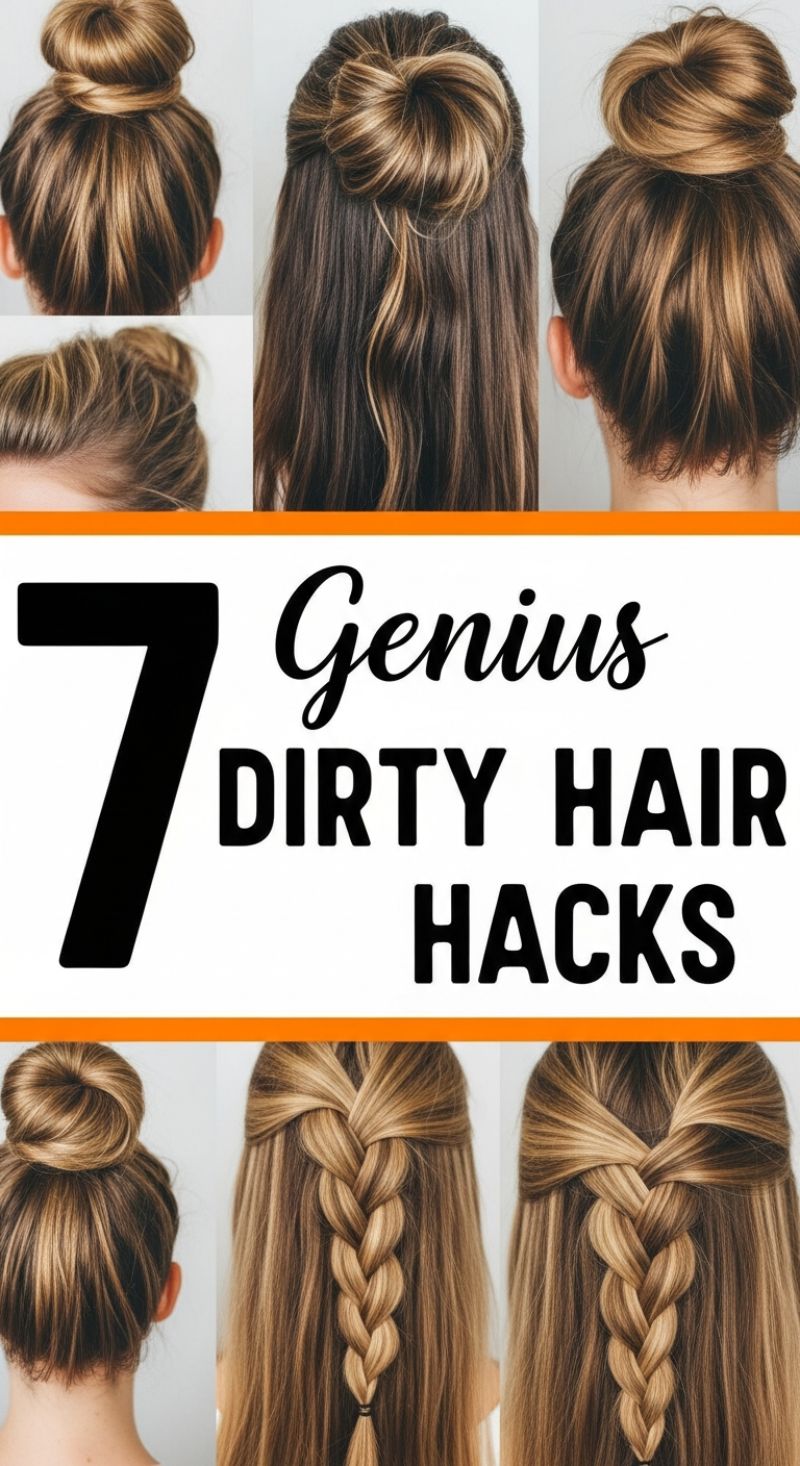
Day-old (or even day-three) hair is often considered a styling challenge, but in reality, it’s the perfect canvas for achieving intricate updos and braids. The natural buildup of sebum and residual product gives the hair excellent grip and texture that clean, slippery strands lack. The styles featured here—ranging from voluminous high buns to chic half-up braids and casual top-knots—are specifically designed to disguise oily roots while capitalizing on the hair’s added texture for maximum hold and longevity. Before starting any of these styles, always prep the root area with a high-quality dry shampoo. Apply liberally, let it sit for a few minutes to absorb the oil, and then massage it in thoroughly. This creates a matte, refreshed base and adds instant lift at the crown, which is essential for preventing the hair from looking limp and heavy.
For the quickest and most effective fix, master the classic high bun or the half-up top knot. The full high bun (as shown in the top and bottom left panels) pulls all the hair up and away from the neck and scalp, immediately resolving any oiliness concerns. To achieve the voluminous look depicted, gather hair into a high ponytail, twist it loosely, and wrap it around the base, securing with bobby pins. For extra fullness, gently tug on the edges of the bun (a technique called “pancaking”) to loosen the structure. The half-up bun is ideal for balancing root coverage with length display. Section the hair horizontally from ear to ear, pull the upper portion into a small ponytail, and then twist it into a relaxed knot at the crown. Leaving the rest of the hair down helps frame the face, and the natural oils in the lower sections will actually enhance shine and minimize frizz, providing a sleek contrast to the textured bun.
The most elegant way to utilize day-old hair is through intricate half-up braids, as seen in the central images. The slightly slicker texture of unwashed hair makes it incredibly easy to manage during braiding, reducing frustrating flyaways. Begin by taking two sections of hair from above the temples, French or Dutch braiding them toward the center back of the head. Once they meet, secure them into a single three-strand braid (a pull-through braid also works beautifully here). The visual key to these styles is volume, so after securing the braid, gently pull on the loops of the woven hair. This expert technique, known as ‘loosening’ or ‘pancaking’ the braid, makes the style look thicker, softer, and more romantic, ensuring that even on a busy hair day, your look remains polished and intentional.
15 Versatile HALF-UP HALF-DOWN
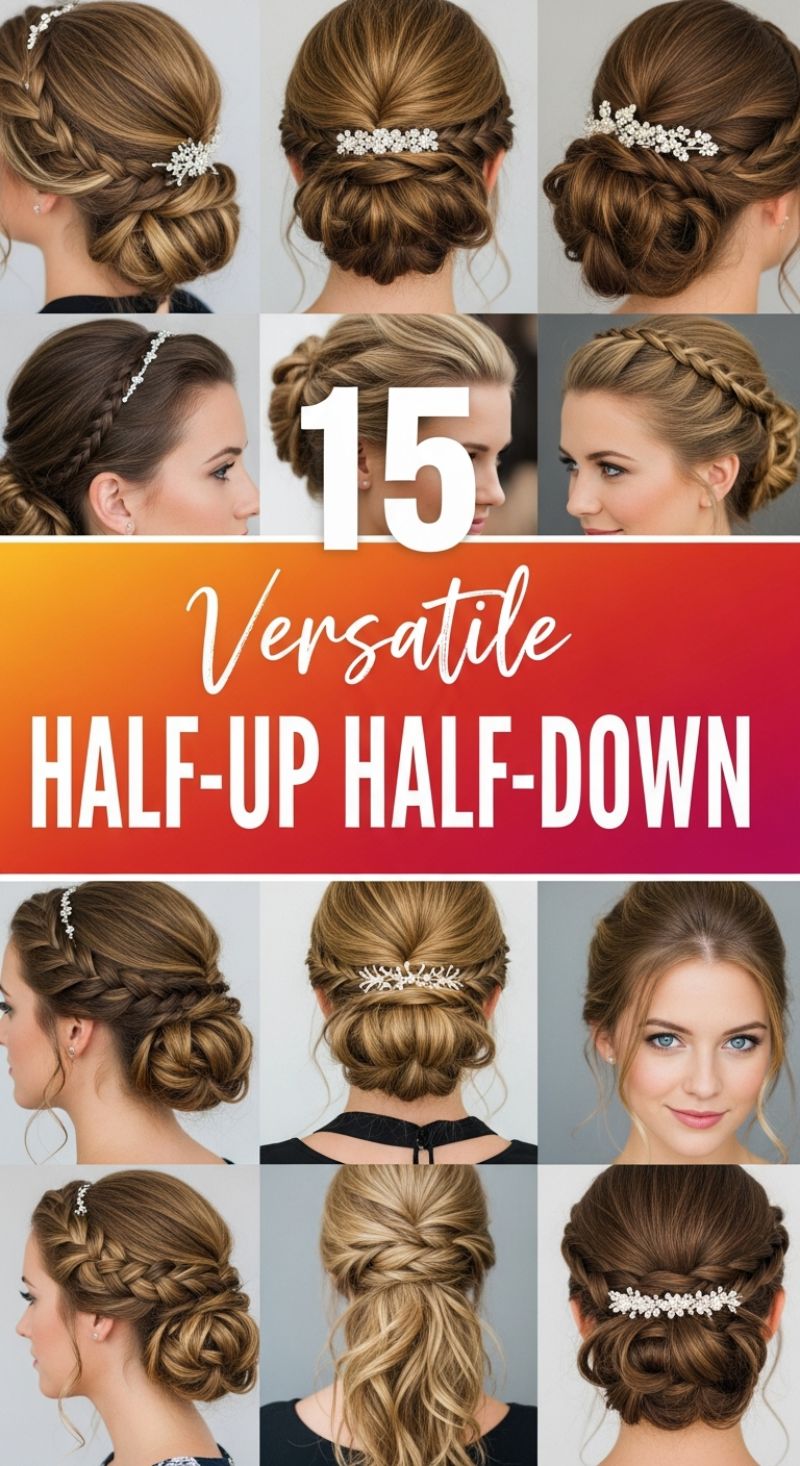
The half-up half-down hairstyle remains a powerhouse of versatility, seamlessly blending the elegance of an updo with the romantic flow of loose locks. To achieve the elevated, polished versions showcased in these images, start with proper hair preparation. Begin by prepping your roots with a volumizing mousse or dry texture spray to ensure lift at the crown—this is essential for creating the soft, rounded silhouette characteristic of these sophisticated looks. Next, isolate the top section of hair, generally from the top of the ear forward, and dedicate these strands to your braided accent. The visual interest here comes from incorporating French or Dutch braids along the hairline or diagonally across the temples, sweeping them smoothly towards the back center of the head. For optimal softness, use the ‘pancaking’ technique—gently pulling apart the loops of the braid—before securing the ends with a clear elastic, ensuring the final look is romantic and dimensional rather than stiff and tight. This foundation allows the style to transition effortlessly from daytime chic to formal evening wear.
The true beauty of this style lies in the treatment of the gathered section and the loose length. Once your braided elements converge at the back, you have several options for securing the half-up portion. For maximum versatility, gently twist the gathered hair into a low, relaxed knot or a looped half-bun, keeping the tension soft and pinning securely into the underlying braid structure. Critically, ensure that the remaining bottom half of the hair is styled beautifully. Whether you opt for cascading curls, defined waves, or a sleek, straight finish, the texture of the half-down section must complement the volume above. The subtle inclusion of high-shine accessories, such as the rhinestone floral combs seen throughout these examples, is the ultimate expert trick. Placing a delicate hair clip directly over the secured knot instantly elevates the look, catching the light and designating the style suitable for weddings, proms, or black-tie events.
To adapt this style for different hair lengths and occasions, consider where you place your focus. If you have medium-length hair, emphasize the braided halo and keep the half-bun small and tight to ensure the bottom section still feels abundant. For very long hair, maximize the loose waves for a dramatic effect. For all versions, finishing is key: set the entire style with a flexible hold hairspray that maintains movement, particularly in the lower section. Focus a stronger mist primarily near the crown and braided areas to combat flyaways and maintain volume throughout a long event. This structural balance of controlled volume up top and free-flowing texture below ensures the hairstyle is both practical and effortlessly glamorous, making it a reliable choice regardless of the formality or season.
10 Breathtaking Vacation Hair
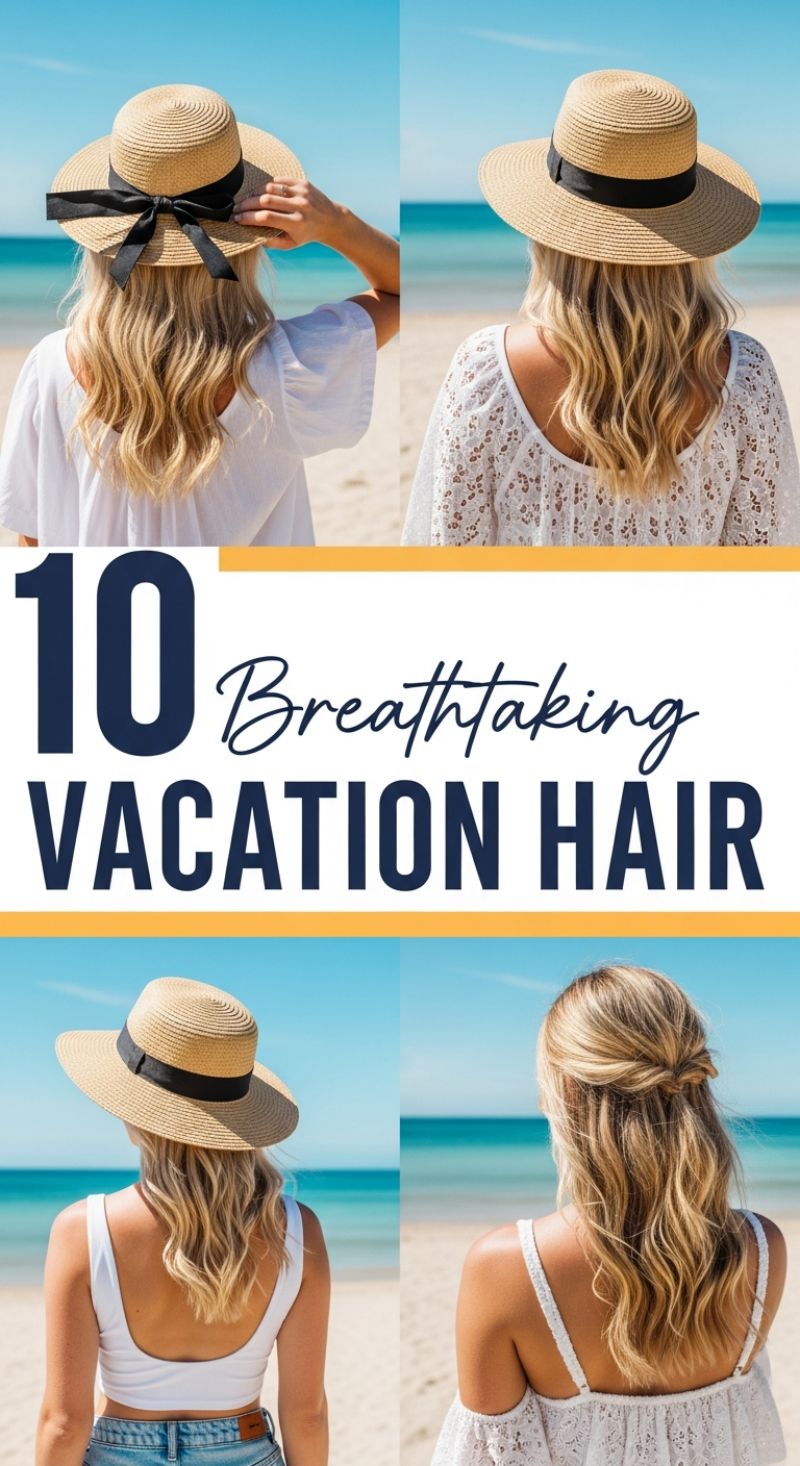
The core of enviable vacation hair, as showcased in these four idyllic beach looks, is the effortlessly relaxed wave pattern. Achieving this coveted “I just came from the ocean” texture starts with minimal heat styling and strategic product use. Begin by applying a quality sea salt spray or texturizing mist to damp hair, scrunching the product into your lengths. If using heat, opt for a large-barrel curling wand to create soft, loose bends rather than defined curls, ensuring you leave the last two inches of the ends straight for an authentic, sun-kissed finish. Crucially, protect your strands from the elements; before stepping out, apply a UV-protectant oil or spray to prevent damage from the summer sun, salt, and wind, maintaining natural brightness and shine. This foundational wave is versatile enough for all the styles featured here.
Hats are not merely accessories on vacation—they are your primary styling and protective tool. The straw hat styles featured here (from the delicate black ribbon bow to the simple banded brim) instantly elevate a simple wavy look while shielding your scalp and face. When styling hair to wear under a hat, focus the volume primarily on the lower sections. Before placing the hat on, gently backcomb the hair at the nape of your neck and just above your shoulders to ensure the hair doesn’t fall flat and cling to your back. If your hat has a tighter fit, secure the crown section with a small clip or elastic at the base of the skull underneath the hat to prevent slippage and maintain a sleek, pulled-together silhouette, allowing only soft waves to cascade down your shoulders for maximum beachy elegance.
For occasions requiring a slightly more refined look—like a sunset dinner or island excursion—the relaxed half-up twist offers a perfect balance of polish and casualness. To recreate the style shown, section off the hair above the ears, treating the crown area gently to maintain natural volume. Instead of securing it with a simple elastic, try a soft knot or twist: take the two sections, cross them over, twist them once or twice toward the center, and secure the small bun or twist with bobby pins hidden inside the knot. This technique results in that beautiful, voluminous, and slightly undone look, avoiding the schoolgirl ponytail effect. To combat humidity, which is rampant in coastal environments, finalize the style by applying a tiny amount of lightweight anti-frizz serum smoothed over the top layers, focusing on flyaways without weighing down the volume of the waves.
7 Stunning V-Day Hair
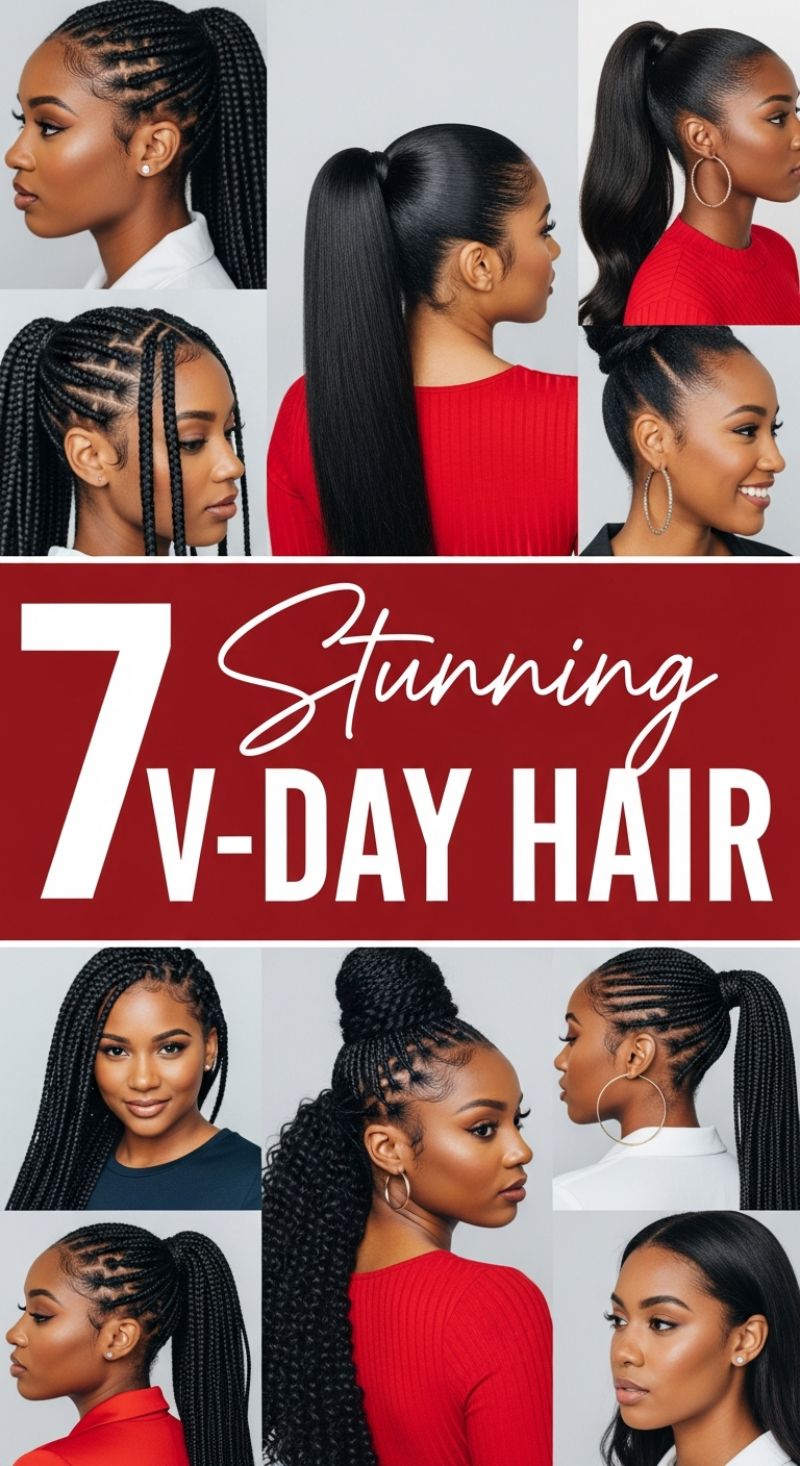
This collection of seven looks showcases the power of the polished updo, particularly focusing on styles that keep hair securely and elegantly away from the face—perfect for any romantic or formal event. The most striking element featured is the ultra-sleek, high ponytail. To recreate this classic, polished look, start by thoroughly washing and deep conditioning your hair. While damp, apply a strong-hold gel or mousse (ensure it’s non-flaking) and brush the hair up tightly to the crown. Use a boar bristle brush to ensure every strand is laid flat, paying extra attention to the nape and sides to achieve that mirror-smooth finish. Once the ponytail is secured with a sturdy elastic, take a small section of hair from the tail, wrap it tightly around the base to conceal the band, and secure it with a bobby pin for a seamless, high-fashion look. For the added length and incredible volume seen in the image, seamlessly integrate a high-quality hair extension or wrap-around ponytail piece, choosing a texture that matches your desired finish, whether bone straight or lightly waved.
For those seeking a protective yet highly stylized option, the image provides excellent inspiration with intricate braiding patterns. Notice the various cornrow designs that flow gracefully into a high braided or weave ponytail, as well as the dynamic styles incorporating texture, such as the high bun paired with cascading kinky curls. When attempting cornrows that transition into an updo, precision is paramount. Use a rattail comb to create clean, sharp parts (straight, geometric, or diagonal) along the scalp. Expert tip: apply a small amount of pomade or edge control directly along the parts before braiding to minimize frizz and maximize definition, ensuring the foundation of the style looks pristine. The braided ponytail variation offers security, longevity, and stunning visual texture, while the high, textured bun is a dramatic choice that adds height and draws attention to the neckline and shoulders.
These versatile styles are not only beautiful but are designed to last throughout your entire evening, minimizing styling stress during a special occasion. To maintain the sharp, laid edges that flawlessly define these updos, invest in a robust, non-flaking edge control product and religiously tie your hair down with a silk scarf or bonnet before sleeping. If opting for a wet look or a sleek straight finish, a light mist of shine serum or setting spray after styling will lock in the finish, protect against humidity, and add a luminous sheen. These hairstyles elegantly frame the face and highlight facial features and bold jewelry (note the prominent hoop earrings featured throughout the visuals), making them the optimal choice for occasions where you desire maximum impact with minimal maintenance once styled.
12 Dreamy Pink Shades
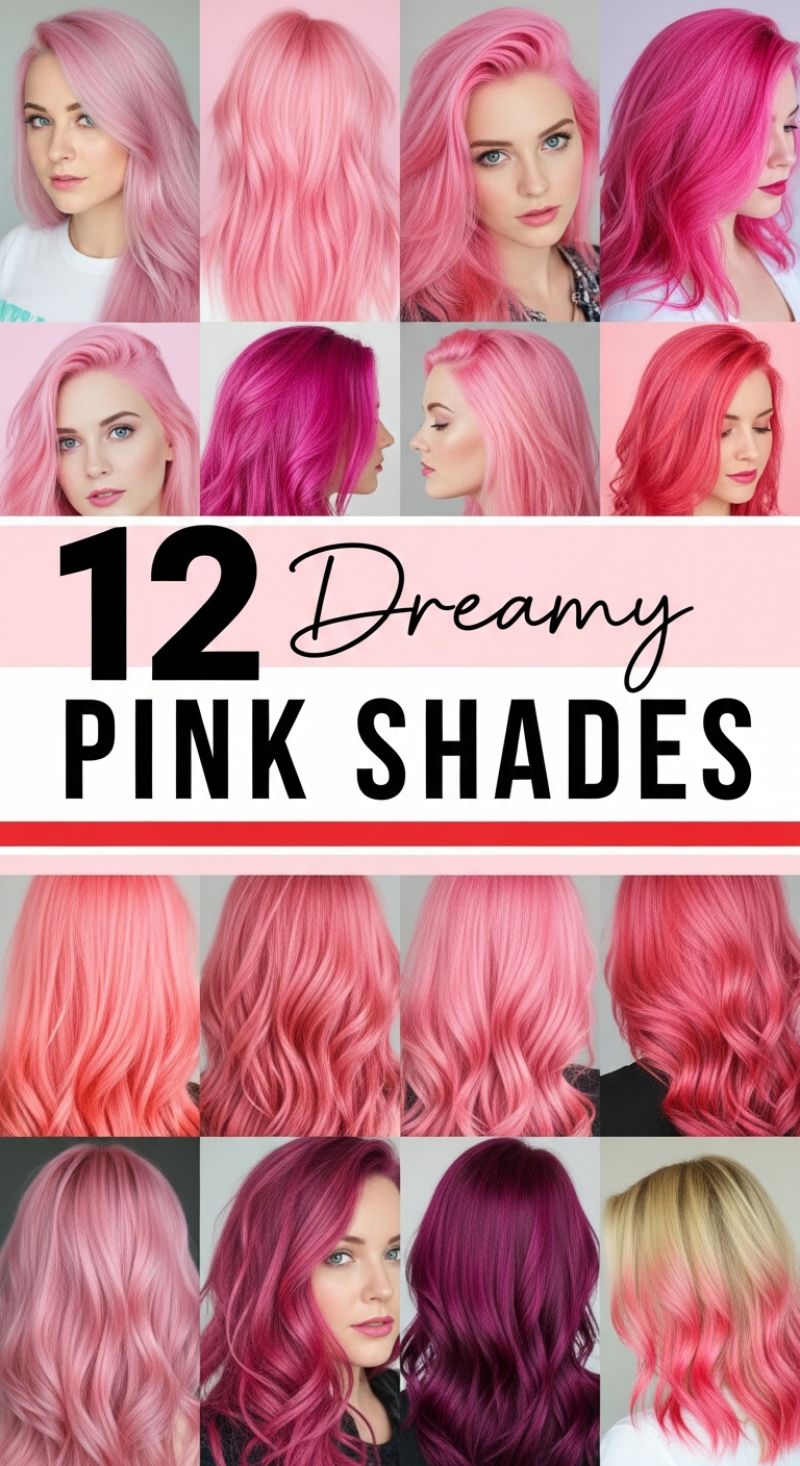
The image showcases the incredible versatility of pink hair color, ranging from subtle pastels to electric, saturated hues. Achieving these “dreamy pink shades” requires careful consideration of your base color and the desired intensity. For soft, pale shades like rose quartz or baby pink (top left samples), your hair must be pre-lightened to at least a level 9 or 10 (pale yellow). Any remaining brassiness will neutralize the cool pink pigments, resulting in a muted or peachy tone. Expert advice dictates using a quality bleach kit and perhaps a toner beforehand to ensure a clean canvas, as even minor yellow tones can drastically alter the final color. Conversely, achieving vibrant, electric magentas or hot pinks (center row, second from left) allows for slightly warmer base levels (8-9), as the saturation of the dye can often overcome minor yellow tones. The application must be even and thorough, saturating every strand to ensure maximum depth and longevity.
The application technique varies significantly depending on the chosen look. Solid, all-over coverage (like the rich raspberry or magenta shades in the bottom row) requires meticulous sectioning and a thorough bowl-and-brush application, ensuring the dye is worked into the roots first, then distributed evenly through the mid-lengths and ends. For multi-tonal or dimensional looks, such as the blended pinks visible in many of the samples, a stylist might employ advanced techniques like color melting or balayage, using slightly different formulations (e.g., a lighter pink on the ends, a deeper pink at the root) to create natural movement and depth. Longevity is the biggest challenge with pinks, as they are typically semi-permanent colors that fade quickly. To maintain vibrancy, strictly limit hair washing frequency, use only sulfate-free, color-safe shampoos, and wash with cool water. Incorporating a custom-mixed color-depositing conditioner (mixing the dye into a white conditioner base) once a week will drastically extend the life of these whimsical shades.
Selecting the perfect pink shade should always harmonize with your skin tone and lifestyle. Cooler shades of pink (like dusty rose or lilac-pink) often complement cooler complexions with blue or pink undertones, while warmer shades (such as coral or neon pink) look stunning on warmer, golden complexions. The darkest shades shown, like the deep wine or berry pinks (bottom center), are excellent choices for those who want a dramatic, rich color without the constant upkeep of pastels, as these deeper pigments fade more gracefully. Always consult with a professional colorist when undertaking such a transformative shade. They can accurately assess your hair’s current condition, calculate the necessary lifting process, and formulate a custom shade that achieves the precise look seen in these “dreamy shades” while prioritizing overall hair health. Remember that multiple lightening sessions may be required to reach the extremely pale base necessary for true pastel pinks.
13 Hot Summer Hair Styles
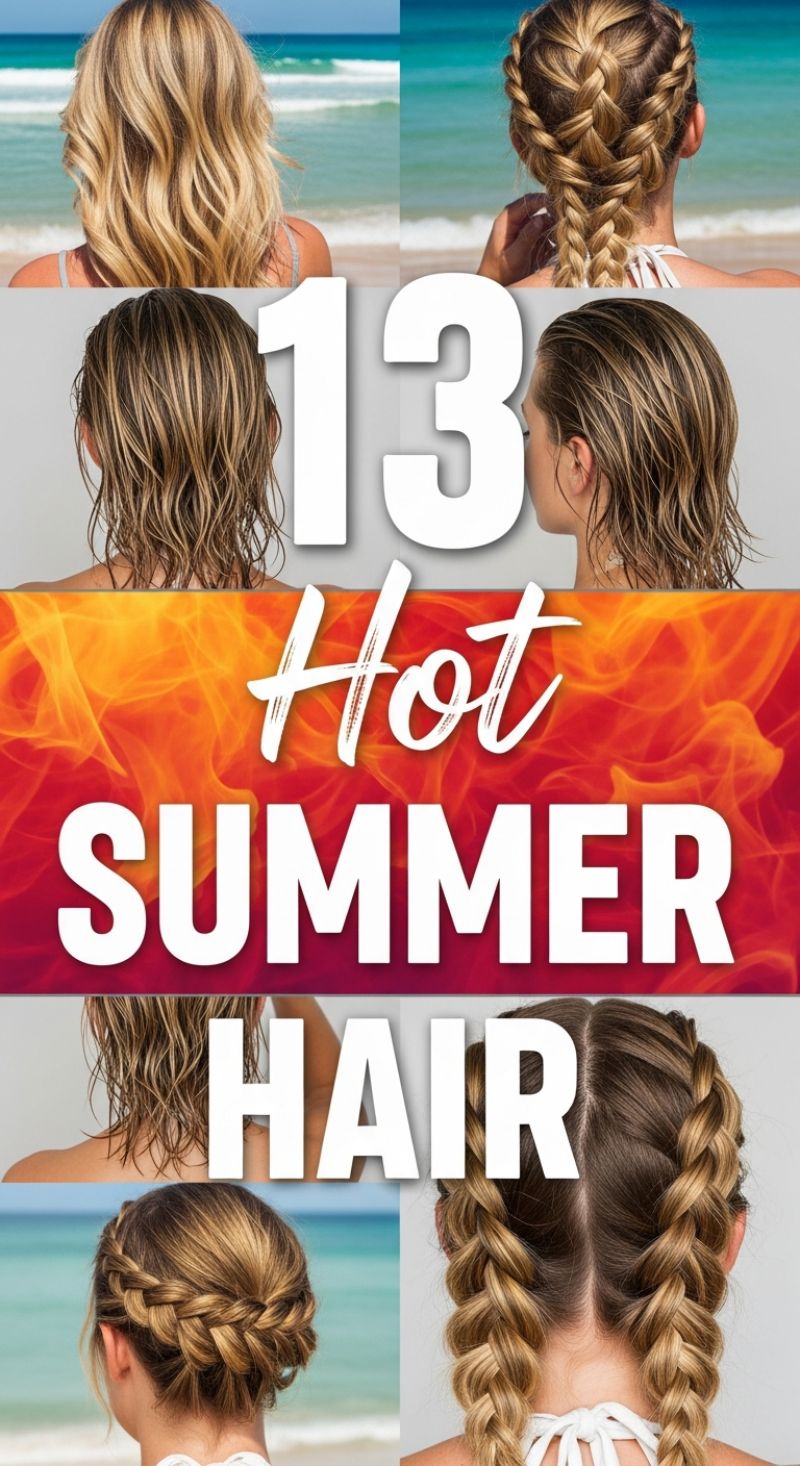
When temperatures rise, your hair demands styles that are both protective and practical. The summer season calls for looks that minimize heat styling while maximizing wearability, whether you are spending the day at the beach, lounging poolside, or attending a humid outdoor event. The key themes for hot weather hair are securing the hair off the neck and embracing natural texture. The styles shown here—from intricate double braids to effortless, damp-look waves—are all about longevity and keeping cool. For the featured secured styles, focus on masterfully executed Dutch braids, which pull the hair tightly to the scalp, offering maximum neck relief. To achieve the dramatic French or Dutch crown braid seen, start braiding near the temple, feeding small sections of hair into the braid as you circle the head, ensuring consistent tension. This protective style keeps hair damage to a minimum and provides a beautiful wavy texture when released the next day. Alternatively, dividing hair down the center and creating dual Dutch braids offers a chic, athletic look perfect for high-activity days, reliably managing flyaways and minimizing heat exposure.
The iconic “beach waves” and wet-look styles are essential summer staples, as they eliminate the need for high heat appliances that can cause damage in already stressful weather. To recreate the effortless, damp look seen in the center image, start with freshly washed, towel-dried hair. Instead of relying on a curling iron, use a high-quality salt spray or texturizing mousse mixed with a leave-in conditioner to combat dryness. Apply the product liberally from mid-shaft to ends, scrunching the hair upward toward the scalp. Allow the hair to air dry completely, resisting the urge to touch it while drying, which can induce frizz. If you have thicker hair, you can speed up the process by gently diffusing the roots on a low-heat setting. This method not only preserves the health of your hair but also provides a relaxed, sun-kissed finish that is perfectly appropriate for the casual vibe of summer.
Expert summer hair care involves more than just styling; it requires strategic maintenance against environmental stressors like chlorine, salt, and intense UV rays. Always apply a UV protectant spray to your hair before prolonged sun exposure, particularly if you have color-treated strands. For those sporting braids, occasionally mist the scalp with a lightweight clarifying spray to refresh roots without disrupting the intricate weave. After swimming, the most crucial step is rinsing your hair immediately with fresh water to remove damaging salt or chemical residue before shampooing. To transition the secured braided styles into a second or third-day look, gently undo the braids, flip your head over, and apply a light dry shampoo or texturizing powder at the roots. Run a wide-tooth comb through the resulting waves only once, then finish with an anti-humidity serum on the ends to seal moisture and control frizz throughout the hottest hours of the day.
8 Voluminous Deep Waves
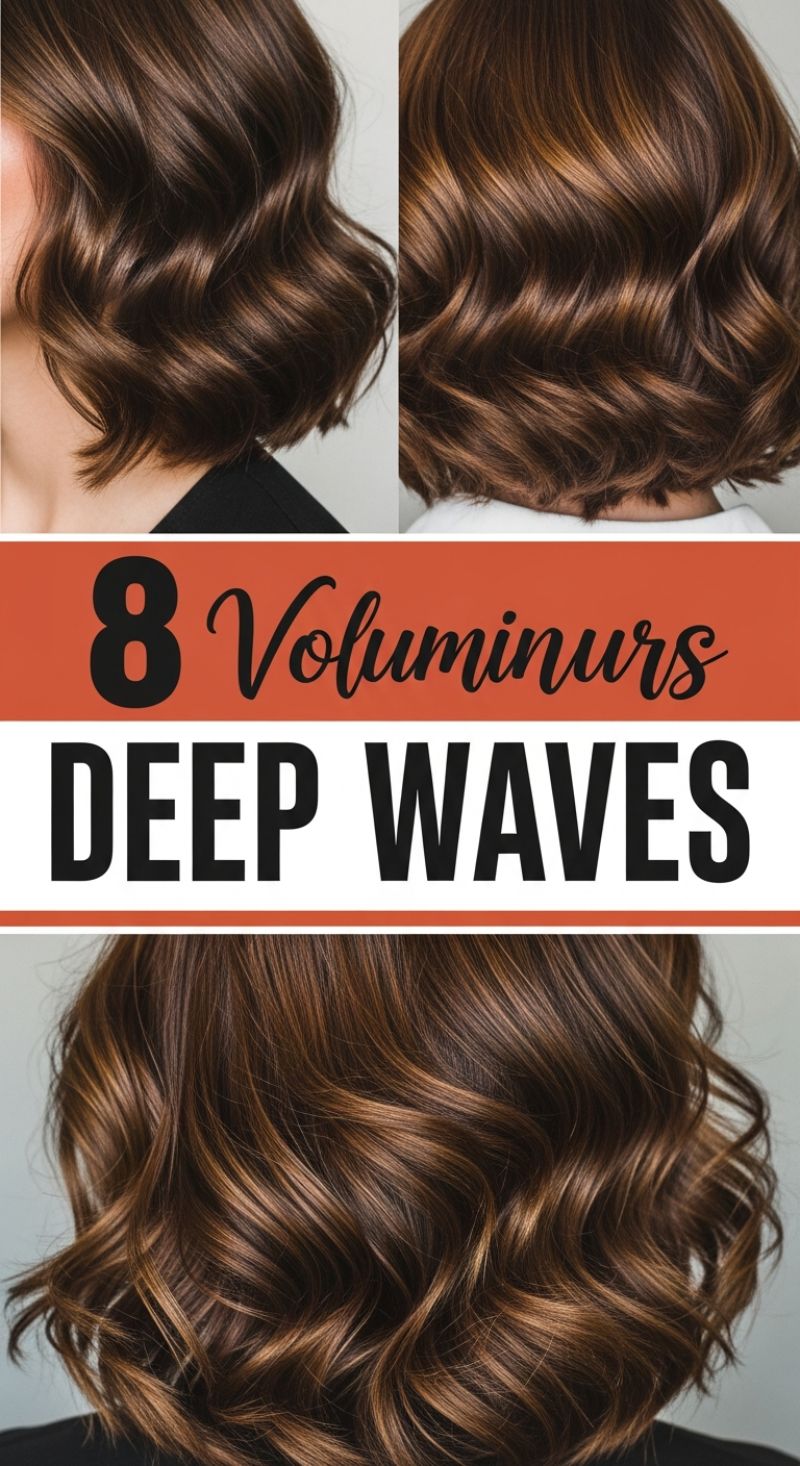
The ‘Deep Wave’ style, often seen on medium-length bobs or lobs, is defined by its smooth, uniform S-bends and incredible shine. Unlike beach waves that are often tousled and messy, these waves are intentionally structured and glossy, maximizing the dimension of the hair color. To achieve this look, proper preparation is key. Begin with damp hair treated with a heat protectant and a generous root-lifting mousse or volumizing spray, especially if your hair tends to fall flat. Blow dry the hair straight using a round brush just at the roots to maintain lift, ensuring the mid-lengths and ends are smooth before styling. This foundation of volume and sleekness allows the resulting waves to reflect light beautifully, emphasizing the rich brown base and subtle caramel highlights seen in the example image. Always section the hair precisely (starting at the nape) before applying heat, ensuring manageable thickness for even wave distribution.
To create the signature deep wave pattern, you have two primary tool options: a three-barrel deep waver or a large-barrel curling iron (1.5 inches or larger). If using a deep waver, clamp the tool horizontally onto the hair section, hold for a few seconds, release, and move down the strand, overlapping the last wave to ensure continuity. If using a large curling iron, avoid twisting the hair into tight spirals. Instead, focus on creating large, smooth bends. Wrap a section around the barrel for the first curve, and then, rather than continuing the wrap, gently slide the iron down and wrap the next portion in the opposite direction (a method often called the ribbon curl or S-wave technique). The trick is consistency; ensure all sections are waved in the same direction or alternate direction only by alternating the starting point (forward/backward) rather than alternating within the same strand.
Once all the hair has been waved, the most crucial step is cooling. Allow the waves to cool completely for at least five minutes without touching them—this sets the style and ensures maximum longevity. Once cool, lightly mist the style with a flexible hold hairspray. To soften the structured look into the voluminous, blended result shown, use a wide-tooth comb or a soft paddle brush to gently comb through the waves, melding them together into soft, cascading ribbons. Finish the look with a high-shine serum or oil applied lightly to the surface of the hair, focusing on the ends, to boost gloss and definition. This look is perfect for evening events or when you desire a polished, Hollywood-glam aesthetic that beautifully showcases hair dimension and depth.
11 Fresh SPRING VIBES
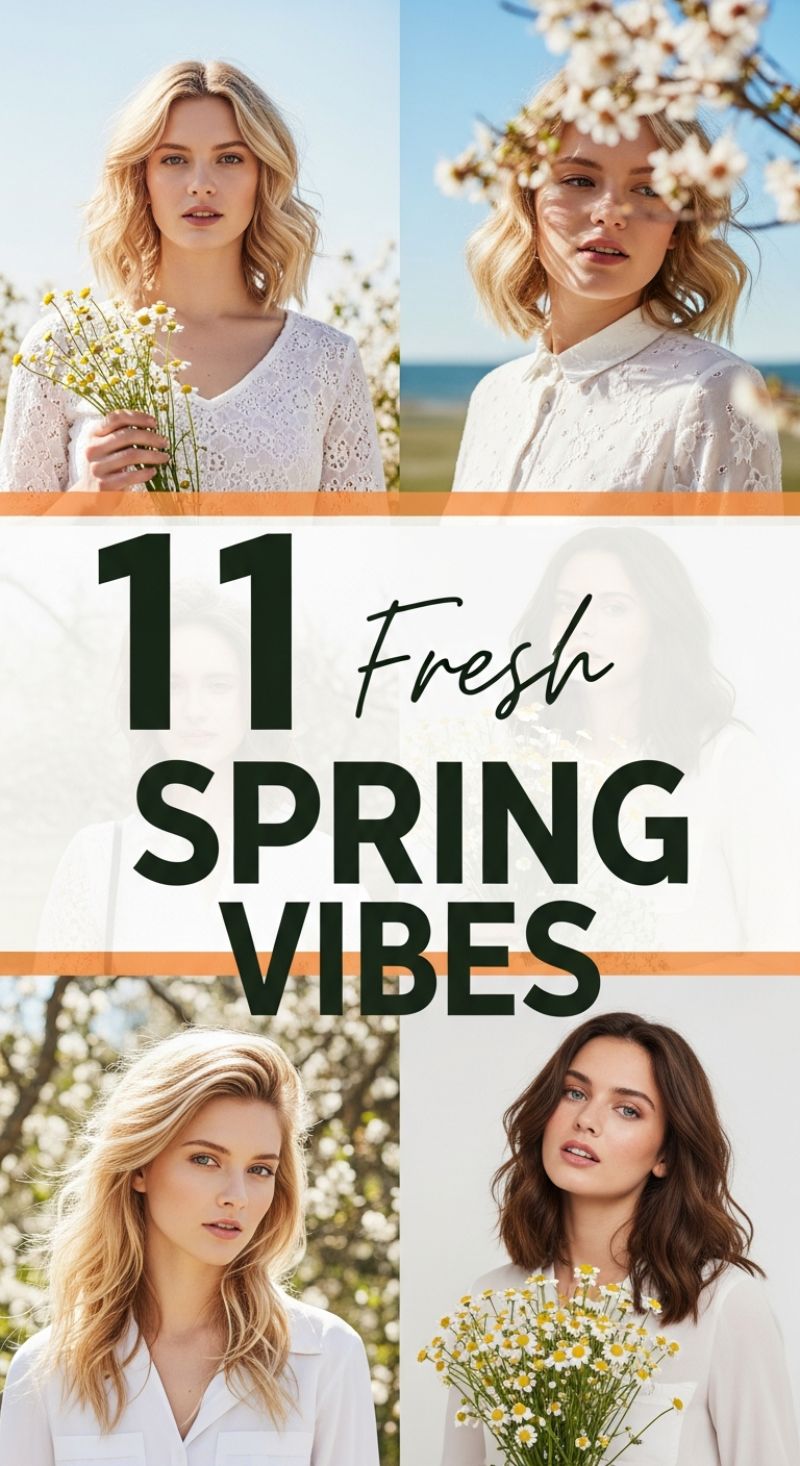
The essence of “Spring Vibes” in hair styling is effortless movement and natural luminosity, perfectly encapsulated by the soft waves and radiant textures displayed here. This season, the focus shifts away from polished, rigid looks towards styles that suggest a recent encounter with a gentle breeze. The defining characteristic across all lengths shown—from the chin-grazing bob to the flowing lob—is the soft, lived-in wave pattern. To achieve this foundation, preparation is key: opt for weightless volume-boosting shampoos and conditioners. Before drying, apply a lightweight texturizing spray or mousse, scrunching the hair lightly to encourage natural bends. This technique ensures that whether your hair is sun-kissed blonde or rich, deep brunette, the texture remains airy and never crunchy, providing the perfect frame for the natural light of the outdoors.
Mastering the “fresh wave” requires subtlety in technique. Avoid tight, uniform curls. Instead, use a 1.25-inch or larger curling iron, focusing on creating soft bends rather than full rotations. The critical trick is to leave the last inch or two of the hair ends completely uncurled and slightly straightened. This modern detail prevents the look from appearing too retro and adds to the overall relaxed, natural appeal seen on these models. For the face-framing sections, curl away from the face to create lift and open up the features, enhancing the breezy feel. Once cooled, gently rake through the waves with your fingers—not a brush—to break up the pattern and introduce subtle separation. If you require extra root lift, especially for the shorter styles, dust a small amount of volumizing powder directly at the crown and massage it in for invisible hold and body.
Spring also necessitates a shift in hair health and color maintenance to truly capture this vibe. Dimensional color, whether bright highlights woven into blonde strands or reflective gloss enhancing brunette depth, catches the spring light beautifully. Ensure your routine includes UV protective sprays, as sun exposure can quickly dull these fresh tones. For finishing the look, a non-greasy shine serum applied sparingly to the mid-lengths and ends will mimic the healthy luster displayed in the photographs. Finally, embrace the natural elements associated with spring by incorporating subtle accessories: think delicate floral pins tucked behind the ear or simple silk scarves tied around a half-up style, completing the cohesive, joyful aesthetic of the season.