Discover the ultimate hair style playbook! Explore 150+ trendy cuts, elegant updos, and beautiful braids for every hair length and texture, from short pixie cuts to flowing long waves and natural curls.
10 Romantic V-Day Looks
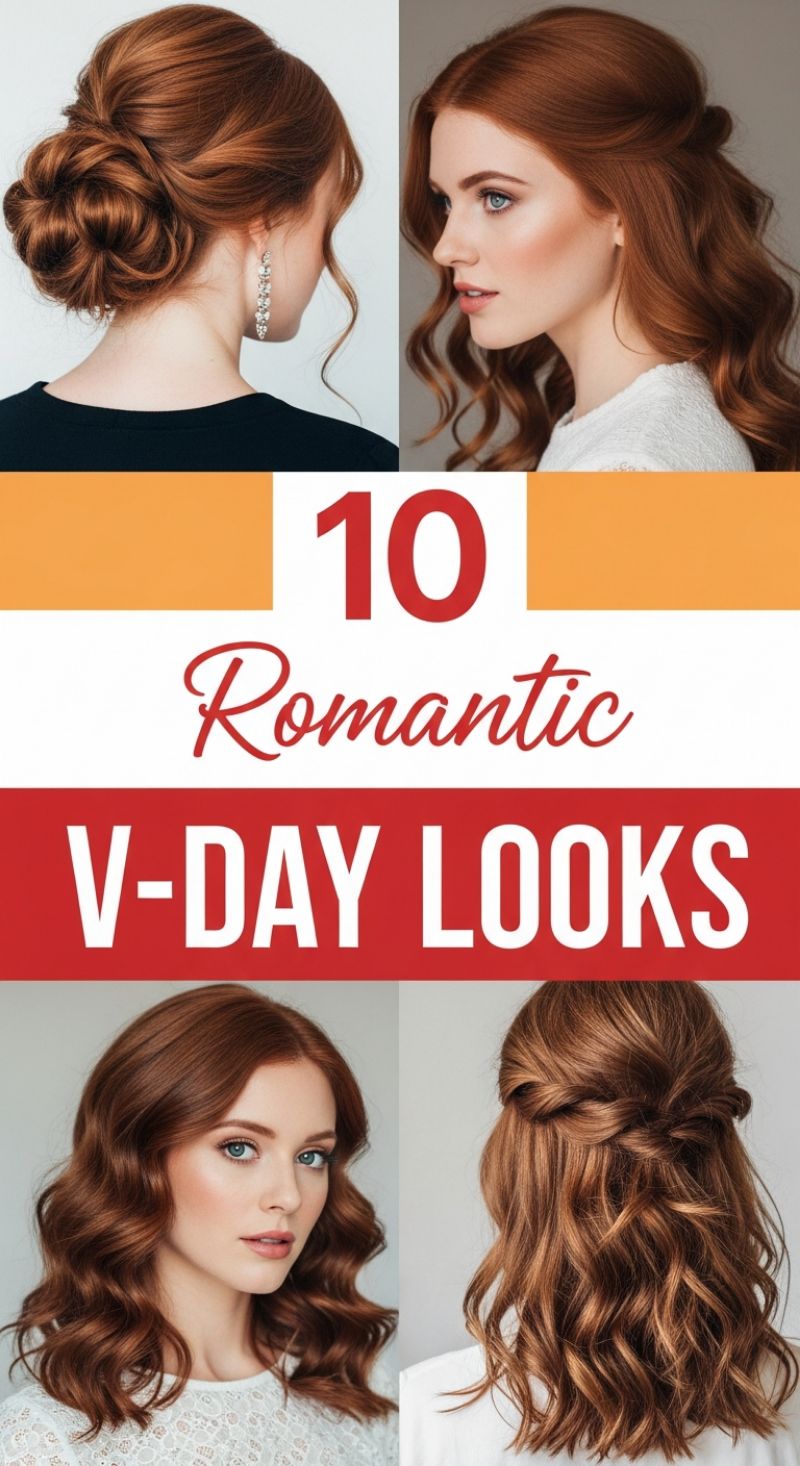
The foundation of a truly romantic hairstyle lies in soft texture, rich color, and voluminous waves, elements beautifully showcased across these four inspirational looks. To recreate the elegant, low chignon (Top Left), begin by prepping your hair with a texturizing mousse and curling the entire length using a 1-inch barrel iron, focusing on loose, irregular waves. This initial curl is crucial for creating the voluminous, seemingly effortless structure of the bun. Secure your hair into a low ponytail at the nape of the neck. Instead of a standard twist, gently loop, pin, and cross sections of the ponytail over and around the base, keeping the pins hidden and allowing some face-framing pieces to soften the profile. This style pairs perfectly with dramatic statement jewelry, such as the dangling crystal earrings depicted, to elevate the look for a formal evening event. The key to this updo is maintaining a soft, slightly undone finish—avoiding tightness ensures the style remains romantic rather than rigid. Expert tip: If your hair lacks volume, incorporate a small hair donut or sock bun base underneath the wrapped sections for added fullness.
For those preferring a half-up style, two compelling options are presented. The profile shot (Top Right) illustrates a simple yet stunning half-up with significant crown volume. To achieve this lift, take the top section of your hair (from temple to temple), backcomb the underside heavily at the roots, and smooth the top layer before gently twisting or pinning it at the back of the head. Use a lightweight setting spray and a boar-bristle brush to polish the surface without sacrificing volume. The back view (Bottom Right) features a more intricate, twisted half-up. After establishing your base curls, isolate two sections above the ears. Twist each section away from the face, then bring them together at the back of the head, securing them with a clear elastic or twisting them into a small knot before pinning. The beauty of this look is the visual interest the twisting creates, drawing the eye toward the cascading, medium-length waves.
Finally, the all-down look (Bottom Left) is the ultimate expression of effortless romance and serves as the perfect styling base. Start with clean, dry hair and apply a quality heat protectant. Using a large-barrel curling iron (1.25 to 1.5 inches), curl large sections of hair, ensuring you curl away from the face on both sides. Once all hair is curled and cooled completely, brush through the curls with a wide-tooth comb or your fingers to break them up into those soft, flowing, voluminous waves. The final touch for any of these styles—especially on richly colored hair like the auburn/ginger tone shown—is a high-shine serum applied lightly to the mid-lengths and ends, ensuring maximum luminescence and movement. This collection emphasizes classic texture and careful pinning to achieve looks that are undeniably chic and perfectly suited for any date night or special romantic occasion.
15 Stunning Prom Updos: The Art of the Woven Chignon

This comprehensive collection showcases 15 variations on the classic low updo, emphasizing intricate weaving, braids, and dimensional coil work perfectly suited for formal events like prom or a wedding. These styles rely heavily on creating internal texture and utilizing the hair’s natural highlights to maximize visual depth. To successfully recreate these looks, begin by prepping the hair with a volumizing mousse and thermal protection spray. Crucially, the hair must be curled entirely first—whether using a 1-inch curling iron or hot rollers—to give the strands the necessary bend and structure. If your hair is fine, apply a dry texturizing spray or dry shampoo to the roots and mid-lengths to ensure maximum grip before attempting any braiding or pinning. The base of these chignons rests low at the nape, offering an elegant, romantic profile that complements high necklines or statement jewelry.
The core technique for most of these stunning styles is the coiled or ‘rosebud’ chignon, combined with various braided accents. To execute the woven chignon, gather the pre-curled hair into a loose low ponytail, then divide it into 4-6 sections. Take each section, gently twist it once or twice, loop it back toward the head to create a soft coil, and secure it firmly against the nape using bobby pins, ensuring the pins disappear inside the loop’s folds. Repeat this process, overlapping the coils slightly to build the voluminous, detailed bun structure seen in the bottom rows. For variations incorporating braids (like the profile shots), create a Dutch or French braid along the hairline or side part, ensuring you gently ‘pancake’ or loosen the braid before incorporating its tail into the main chignon mass. This softening technique is essential for achieving the modern, undone elegance visible in these examples.
Expert artistry is required to make these intricate updos last through a night of dancing. Once the structure is complete, lock the style in place with a strong-hold hairspray or a hair lacquer, focusing on the pinned areas. For a softer finish, lightly pull out two small tendrils of hair near the ears or the nape of the neck to frame the face and soften the look. This adds a touch of romantic imperfection contrasting with the tight structure of the bun. Finally, finish the surface with a light application of shine serum along the crown—applied sparingly—to combat flyaways without weighing down the volume or making the woven elements look greasy. Double-check all anchor points to guarantee stability, allowing you to confidently display this head-turning formal hairstyle.
8 Elegant Medium Hair Styles
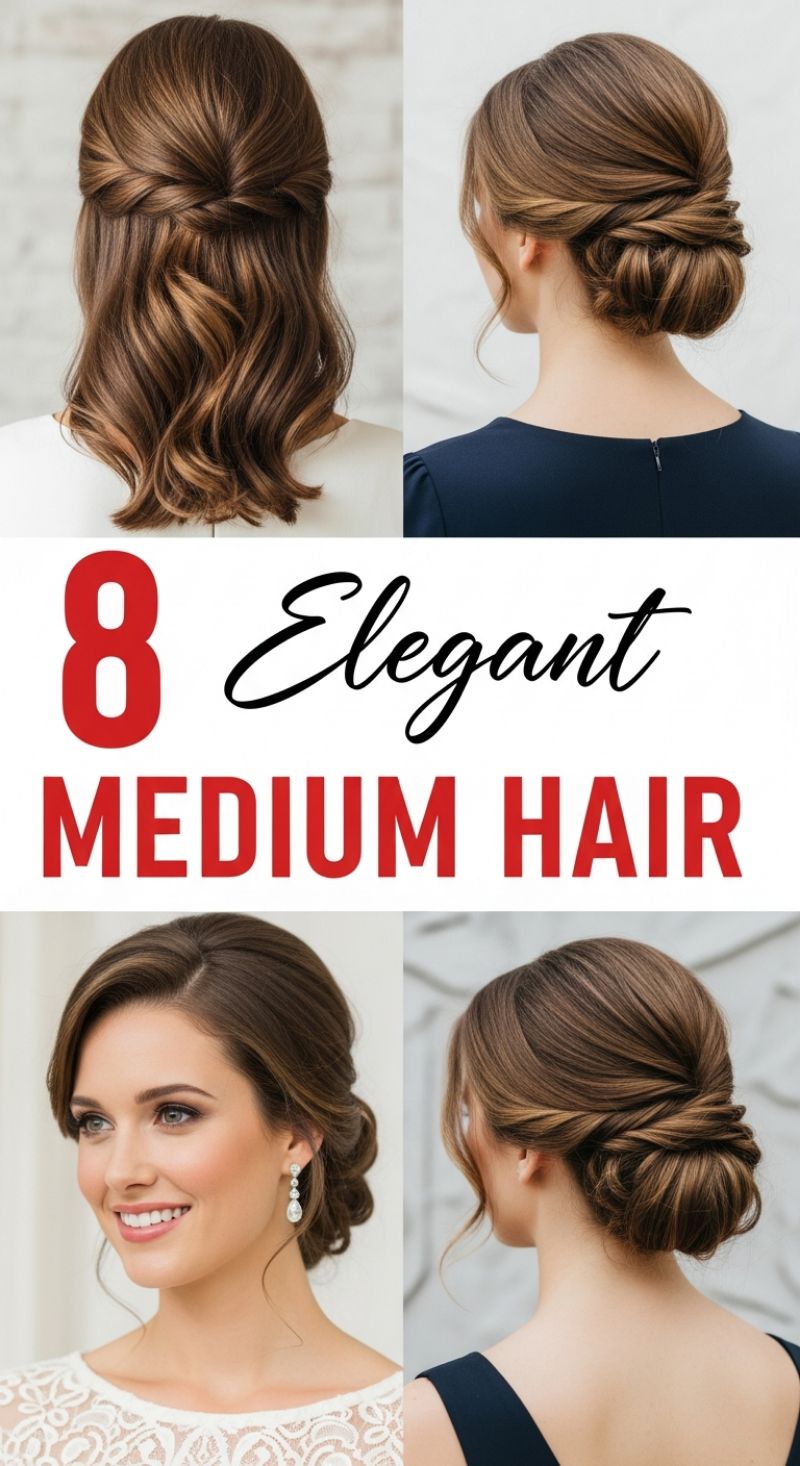
Medium length is arguably the most versatile for elegant styling, offering enough length for sophisticated updos while maintaining manageability for flowing half-styles. The first essential look for medium hair is the polished Half-Up Twisted style, perfect for showcasing texture and volume. To recreate this look (as seen in the top-left quadrant), begin by applying a volumizing mousse or salt spray to damp hair before blow-drying, then use a 1.25-inch curling iron to create soft, defined waves from mid-shaft to ends. Next, take a two-inch section of hair just above the ear on both sides, twist each section gently towards the back of the head, and secure them together discreetly at the occipital bone (the back bump of the skull) using bobby pins or a clear elastic concealed by crossing the remaining twisted ends over the top. The key to this style is maintaining softness around the face and ensuring the waves below are defined yet brushable, giving the overall look a romantic and effortless appeal suitable for both daytime events and semi-formal gatherings.
For more formal occasions, the intricately twisted Low Chignon is a quintessential choice that looks complex but is relatively straightforward to master. This style (demonstrated in the top and bottom right quadrants) requires smooth preparation; use a shine serum before styling to ensure flyaways are minimized. Gather the hair into a low ponytail at the nape of the neck. Instead of a simple coil, this look relies on crossing and tucking sections. Divide the ponytail into two or three segments. Take the first segment, twist it loosely, and wrap it around the base, securing it tightly with pins. For the second segment, twist it in the opposite direction and lay it across the existing bun, ensuring the ends are tucked inside the center structure to build dimension. Expert tip: Pull out tiny loops of hair from the finished bun to introduce texture and width, which prevents the chignon from looking too tight or dated. The goal is a dimensional, woven structure that elegantly sits just above the collarbone line, offering a sophisticated frame for the neck and shoulders.
Achieving the final, polished appearance, especially the soft front framing seen in the bottom-left example, requires attention to detail. When crafting any updo, ensure a side part is created before gathering the hair, allowing a soft sweep across the forehead. Pull out a few deliberate, soft pieces around the temples and jawline—these should be lightly curled or waved to prevent them from looking stiff. For medium hair, using texturizing powder at the roots before starting the updo provides the necessary grip for bobby pins to hold securely. Finish the entire look with a strong-hold, flexible hairspray, misting it lightly to lock in the twists and waves without sacrificing movement. This collection of elegant styles proves that medium hair provides the perfect balance for creating formal, timeless looks with enviable volume and grace.
12 Effortless Protective Styles

Protective styles are fundamental to any successful hair care regimen focused on length retention and minimizing daily manipulation. These 12 examples showcase the versatility of techniques ranging from braids and twists to sleek, polished updos, all designed to safeguard the delicate ends of your hair from environmental stress. The key to successful protective styling is preparation: always begin with freshly washed, deep-conditioned hair, ensuring it is thoroughly moisturized with a leave-in conditioner and sealing oil before installation. Styles like box braids, as seen in the examples, offer incredible longevity and can be customized with color (like the auburn ends shown) or worn in versatile up/down configurations. When installing individual braids or twists, it is crucial to maintain uniform sectioning for a balanced look and, most importantly, manage tension. Too much tightness, especially around the hairline, can lead to traction alopecia; ensure your stylist is using the ‘finger test’ to confirm comfort and flexibility.
Visible techniques include both single-strand twists (like Senegalese twists or faux locs) and the popular cornrow base, which serves as the foundation for elegant updos. For styles involving cornrows, such as the full-head or the half-up/half-down look with a braided bun on top, the instruction focuses on creating clean, defined parts—this is what elevates the look from casual to high-end. Use a rattail comb for precise parting and smooth the sections with a light styling gel or edge control before braiding. The sleek, short bob shown, whether it utilizes medium box braids or Marley twists, is an ideal option for those seeking a lighter style with movement, typically requiring less installation time than longer alternatives. Remember that even though the hair is ‘protected,’ moisture cannot be forgotten. Lightly spritz your scalp and the length of the style with a hydrating mist or rose water blend every few days to prevent dryness and itching.
Finally, for the elegant, low-manipulation updos displayed, such as the tightly coiled buns and the perfectly smooth, slicked-back low chignon, edge control and a firm hold pomade are essential. To achieve that mirror-like shine and hold, apply the product to the edges and perimeter, brush thoroughly with a dense boar bristle brush, and then tie down the area with a silk or satin scarf for 10-15 minutes while the style sets. Even when the base of the hair is braided, as seen in the cornrowed low bun, the edges must be flawlessly blended. When maintaining these styles, always sleep with a silk or satin bonnet or scarf to prevent friction damage, and aim to keep the style installed for a maximum of 6 to 8 weeks before taking them down, deep conditioning, trimming ends, and giving your hair a resting period.
25 Quick Daily Hairstyles
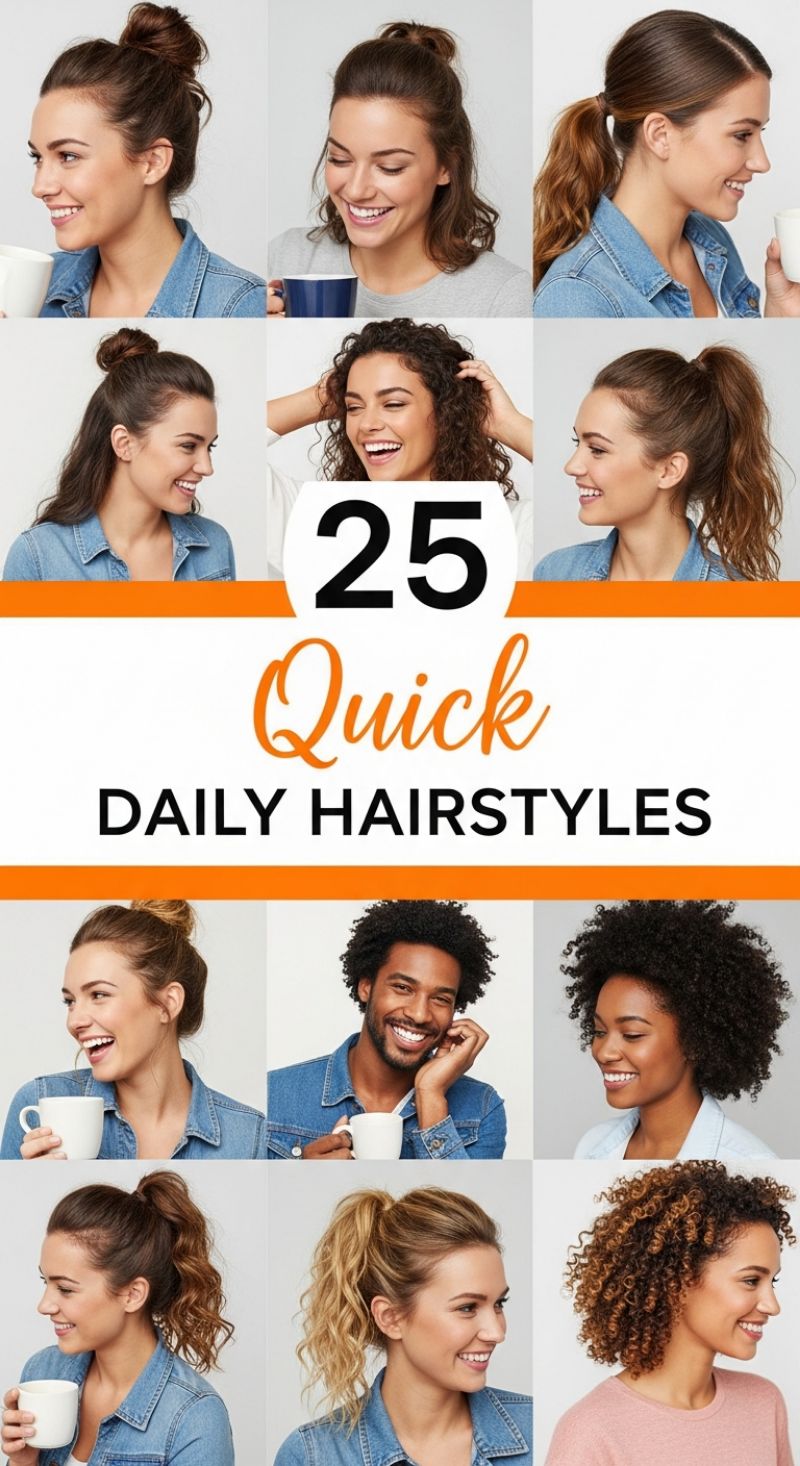
This selection of 25 Quick Daily Hairstyles centers around versatile, universally flattering styles that can be achieved in under ten minutes, making them perfect for navigating a busy morning schedule. The core styles featured prominently in this playbook include the polished High Bun, the relaxed Half-Up Bun, the sleek High Ponytail, and various iterations that intentionally embrace natural texture and movement. For the classic High Bun, the key to success is preparation; starting with second-day hair or utilizing a texturizing powder provides the necessary grit and grip. Gather hair high on the crown, secure firmly with a thick elastic, twist the remaining length tightly, and coil it neatly around the base. Secure the structure with strategically placed bobby pins—using three or four in a crisscross pattern offers maximum security. For the High Ponytail, elevate the look by dividing the hair into two sections (a lower base and an upper lift section) before combining them, or by wrapping a small section of hair around the elastic to conceal it, instantly transforming the style from functional to polished.
Integrating natural texture is crucial for maximizing speed and minimizing reliance on heat tools. As shown in the visuals featuring voluminous curls and defined coils, sometimes the quickest daily style is simply enhancing what you already have. Use a light defining cream or leave-in conditioner to refresh curls, focusing the product on mid-lengths to ends to revitalize shape and fight frizz. For those with straighter or wavier hair aiming for the immensely popular Half-Up Bun or Half-Up Pony, achieving lift at the crown is essential for a flattering silhouette. Section off the top portion of hair, from the ears forward, ensuring a clean part line. Before securing the section, lightly backcomb the under layers of the top section near the roots to create internal structure and fullness. The Half-Up Bun should be intentionally messy and effortless; achieve this by looping the hair through the elastic only halfway on the last pass. This technique works brilliantly on medium to long hair and effectively keeps strands away from the face while showcasing length.
To ensure these quick hairstyles look intentional and hold up flawlessly throughout a long day, the right products and techniques are non-negotiable. For sleek ponytails and tight updos, use a fine-toothed brush and a small amount of lightweight pomade or edge control product along the hairline to smooth flyaways without leaving a greasy residue. For enhanced volume in buns and wavy ponytails, a dry shampoo or volumizing texturizing spray applied directly to the roots before styling provides crucial grit and staying power, especially useful for finer hair types. Expert tip for achieving that high, bouncy ponytail featured in the examples: after securing the pony with an elastic, insert two bobby pins horizontally into the base, pushing them firmly downward toward the scalp. This creates an invisible shelf that lifts the ponytail and prevents sagging, maintaining that voluminous, lifted appearance regardless of hair thickness.
10 Beautiful Curly Hair Styles

The vibrant volume and defined texture displayed across these styles highlight the incredible versatility of natural curls. Achieving this level of definition requires careful attention during your wash and styling routine. Begin by ensuring your hair is fully saturated. After applying a quality moisturizing leave-in conditioner, use the ‘praying hands’ method to gently seal in the moisture, followed by a strong-hold gel or defining cream. The key to creating intact curl clumps, as seen here, is minimizing manipulation while the hair is wet. Avoid rubbing with a towel; instead, scrunch the excess water out with a microfiber towel or an old cotton T-shirt. For maximum volume and lift at the root, the final step involves drying the hair using a diffuser on a low heat and low speed setting, directing the heat upwards toward the scalp. Make sure the hair is 80-90% dry before breaking the gel cast (scrunching out the crunch) to lock in the definition and prevent frizz.
This collection demonstrates how varying lengths and strategic cuts can completely transform the aesthetic of curly hair. For those with longer curls, like the top row, incorporating long, cascading layers is essential to prevent the bottom from looking heavy or triangular. Ask your stylist for a dry cut, where the hair is shaped while fully dry, allowing them to see how the curls naturally fall and stack. For the medium-length styles, such as the trendy curly bob, defined layers around the face create a beautiful, voluminous silhouette that doesn’t sacrifice bounce. Furthermore, integrate simple accessories, such as the featured modern snap clips, to instantly elevate the look. These are perfect for pulling back the front sections to create a small half-up style, adding lift and showcasing the facial structure, or simply securing curls on day two or three hair when you need a quick refresh.
Maintaining these radiant curls between wash days is crucial for hair health and style longevity. To preserve the definition overnight, utilize the ‘pineapple’ method: gather your hair loosely atop your head and secure it with a soft scrunchie, ensuring minimal tension. Sleeping on a silk or satin pillowcase or using a bonnet is non-negotiable, as cotton can rough up the cuticle, leading to frizz and moisture loss. For mid-week refreshing, mix water with a small amount of leave-in conditioner in a spray bottle and lightly mist the areas that have lost their definition. Gently re-scrunch those sections and allow them to air dry. Finally, regardless of your curl pattern, weekly deep conditioning or protein treatments are vital for maintaining the elasticity, shine, and overall resilience necessary to achieve and sustain these beautifully defined and healthy looks.
15 Chic Mid-Length Cuts
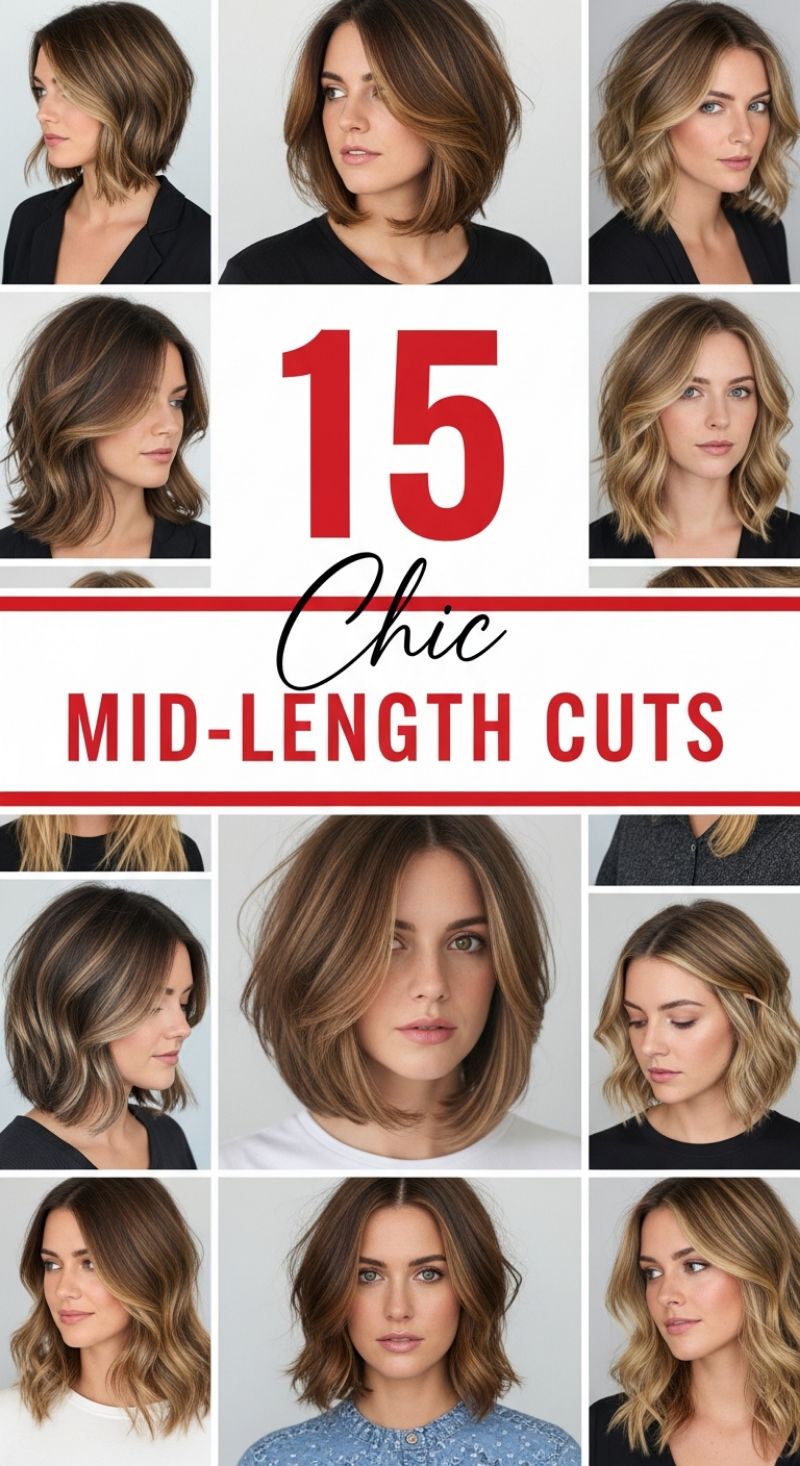
The mid-length haircut, universally known as the “Lob” (Long Bob), is showcased here as the pinnacle of versatility and chic styling. Hitting anywhere from the chin to just above the collarbone, this length offers the polish of a short cut without sacrificing essential styling options. What ties these 15 looks together is the emphasis on subtle movement and dimension. Notice how the cuts are rarely blunt; instead, they utilize internal or diffused layering—often referred to as ‘ghost layers’—to remove bulk, add bounce, and allow the ends to softly curve under or kick out naturally. The visual appeal is further maximized by color strategy; most models feature intricate highlighting techniques like balayage or foilayage, which strategically frame the face and emphasize the hair’s flow, making the style look fuller and more complex than a single-process color ever could.
Achieving this signature mid-length movement requires precise communication with your stylist. Request a perimeter that is slightly A-line (longer in the front than the back) or uniformly straight, depending on the desired shape, but crucially, ask for face-framing layers that begin around the cheekbone or jawline. These layers should seamlessly blend into the main length, avoiding any harsh, visible steps. The layering technique should prioritize weight removal through graduation or point-cutting on the ends, which encourages that soft, lived-in texture seen in the images. For fine hair, keep the base line thick and focus internal layering only on the last two inches to maintain density; for thick or coarse hair, ask for deep point cutting or slicing throughout the mid-lengths to reduce puffiness and ensure the hair drapes beautifully with natural movement. The goal is a cut that looks intentional and voluminous even before you apply heat styling.
The effortless, voluminous wave pattern featured across these cuts is achieved through specific heat styling techniques, starting with proper foundational products. After applying a root booster or voluminous mousse to damp hair, blow-dry the hair with a medium round brush, concentrating on lifting the roots perpendicular to the head to build maximum height and volume, ensuring the ends are polished and smooth. Once dry, use a large barrel curling iron (1.25 to 1.5 inches) or a flat iron to create soft, bendy waves rather than tight spirals. The key to this modern look is to take medium sections, wrap the hair around the iron but leave the last inch of the ends straight, which provides that relaxed, undone aesthetic. Alternate the direction of the curl (towards the face, then away from the face) to enhance the messy, yet sophisticated, texture. Finish with a spritz of dry texturizing spray or sea salt spray worked into the mid-lengths and ends to maximize separation, hold the movement, and maintain the dynamic, fresh appearance of your chic mid-length cut.
20 Inspiring Hair Ideas: Cuts, Color, and Styling Mastery

The visual gallery provided is a masterclass in modern hair color and structural contrast, offering inspiration across the spectrum from subtle elegance to high-impact vibrancy. The featured color stories highlight three major trends: soft pastels, dramatic high-contrast dimension, and vivid fantasy hues. Achieving the gradient look seen in the blue/green mermaid waves requires professional color placement—usually starting with balayage or ombré techniques on pre-lightened hair—to ensure smooth transitions between the emerald and sapphire tones. For those drawn to the high-contrast streaks, exemplified by the striking silver woven into a thick, black braid, consider careful placement of cool-toned highlights against a deep base; this technique maximizes depth and volume perception, particularly when styled in intricate braids or twists, but demands regular toner application to maintain the icy tone and prevent brassiness. Conversely, the delicate rose-pink wavy lob proves that high impact can be achieved with softer hues, perfect for adding an element of youthful movement to shorter cuts.
This section also presents a comprehensive range of cuts suitable for varying textures and lengths. From the precision-cut, deep copper pixie that highlights sharp features, to the natural volume of the expertly styled Afro, the key is customizing the cut to the client’s unique texture profile. The short, wavy bob demonstrates how internal layering can boost movement in mid-length hair, often best achieved with a sea salt spray or texturizing mousse applied to damp hair and diffused. For longer, smoother textures, mastering the effortlessly polished look is crucial. The sleek, voluminous platinum ponytail requires careful backcombing at the crown for lift and using a soft-hold spray or a silk scrunchie (as shown) to maintain polish without sacrificing the soft wave pattern. Similarly, the high, loose chignon shown—a classic formal style—benefits greatly from day-old hair or the application of dry shampoo for enhanced grip before twisting and pinning the bun securely.
For elevated formal looks, the featured styles offer excellent instruction on advanced braiding and sophisticated updos. The rustic crown braid, beautifully incorporating warm red and copper tones, is achieved using the Dutch braiding technique (crossing strands under rather than over) along the perimeter of the head. Once the braid is complete, gently pulling apart the loops (often called “pancaking”) creates the desirable thickness and soft, romantic texture. The half-up style adorned with delicate floral pins is a timeless choice for bridal or formal events; this look is built on soft, large-barrel curls and secured loosely at the back, allowing the hair’s length and natural movement to take center stage. When attempting these complex styles, always ensure the hair is prepared with a heat protectant and a texture spray, which is vital for providing the necessary hold and friction to prevent intricate styles from slipping throughout the day.
10 Modern Men’s Styles

These two exemplary looks encapsulate the essence of modern men’s grooming: high contrast, sharp lines, and expertly controlled volume. The top style features a dramatic, high-volume Quiff or Pompadour paired with an aggressive High Skin Fade. To achieve this level of definition, your barber must establish a sharp disconnect, keeping the hair significantly longer on top (at least 4-6 inches) and fading down rapidly to the skin, typically starting the fade high on the parietal ridge. Crucially, specify a clean line-up around the temples and forehead—this crisp edge contrasts beautifully with the soft blend of the fade, giving the entire cut a polished, architectural quality. The long top allows for the hair to be swept back and slightly to the side, showcasing the multidimensional color (often featuring subtle bronde or ash highlights) that adds depth and texture to the voluminous shape.
The key to styling this elevated look is using pre-styling products and directional blow-drying. Start with damp hair and apply a volumizing mousse or thickening tonic directly to the roots. Using a round brush or a vent brush, blow-dry the hair upward and backward, focusing heat at the roots to maximize lift and ensuring the front section rolls back without drooping. Once the hair is completely dry and set in shape, apply a moderate-hold product—a matte clay or paste is ideal for maintaining the texture and height without excessive shine. Work the product from back to front, using your fingers or a comb to define the final sweep. For maximum longevity, a light spritz of flexible-hold hairspray will lock the structure in place, especially beneficial if you have finer hair that struggles to maintain volume throughout the day.
Alternatively, the bottom style presents a more refined, classic swept-back approach, relying on a clean taper or low fade instead of the high contrast skin fade. This look prioritizes sleekness and control over towering height. When requesting this cut, ask for adequate length on top (3-5 inches) and a clearly defined soft side part, seamlessly blending the sides while retaining enough density for a smooth finish over the ear. For styling this sophisticated look, switch from matte products to traditional oil- or water-based pomades. Apply the pomade evenly to slightly damp or dry hair, comb the part precisely, and then sweep the bulk of the hair back and diagonally across the head. The desired result is a high-shine, controlled flow that sits close to the scalp, perfect for professional or formal settings. Regardless of which style you choose, remember that the foundation of a great fade is frequent maintenance; schedule a trim every three to four weeks to keep the lines sharp and the fade graduated perfectly.
8 Adorable Kids Braids
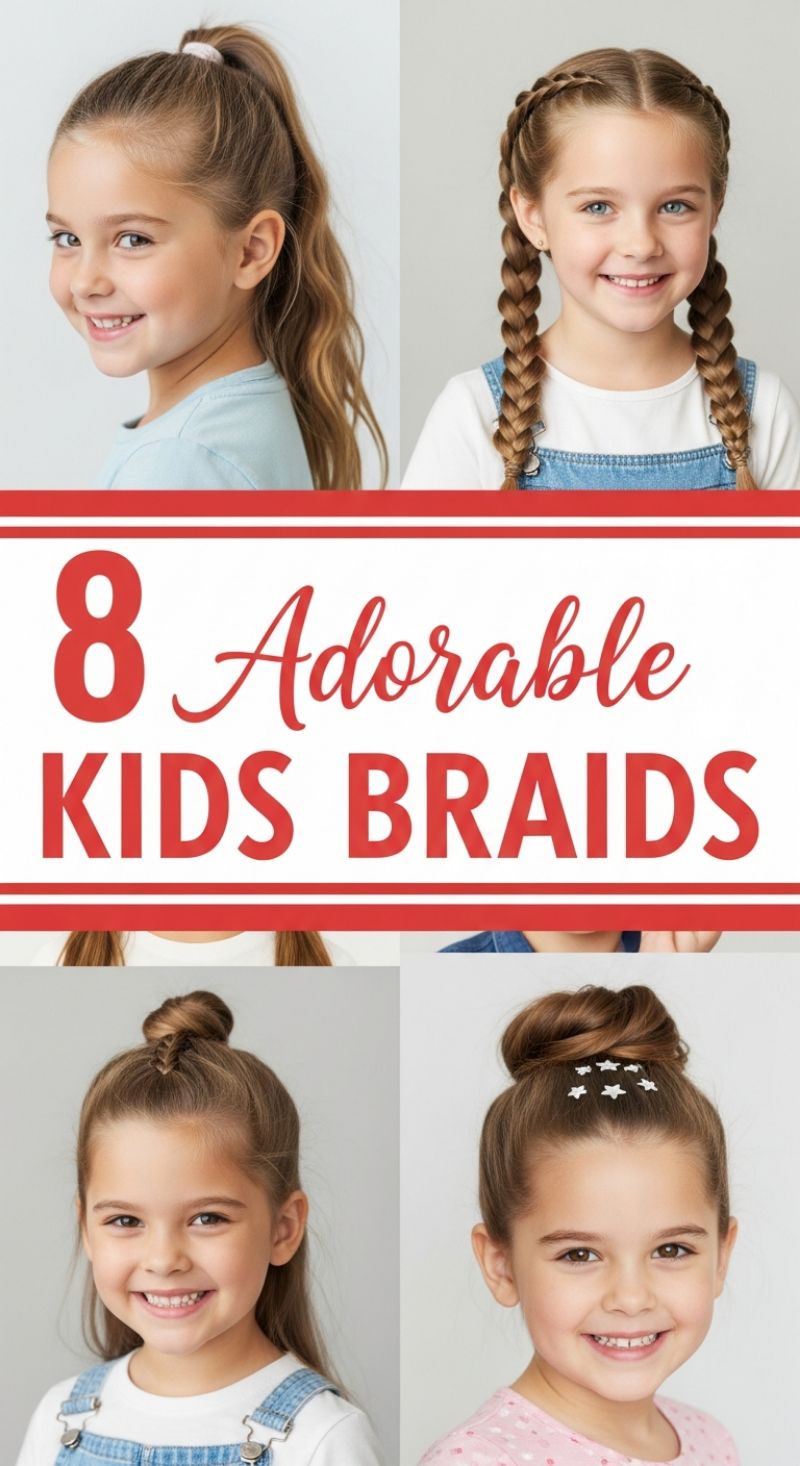
Braids are the ultimate solution for active kids, offering durability, style, and effective management of long hair. The classic and most enduring style featured here is the double Dutch or French braid pigtail (top right). To recreate this look, begin by drawing a sharp center part from the forehead all the way to the nape of the neck. Secure one side temporarily. On the working side, start a Dutch braid (crossing sections *under* the middle strand instead of over, which makes the braid pop up) near the hairline, incorporating small sections of hair as you move down the side of the head. Maintain tight, even tension throughout the process to ensure the braids last all day through play and school. Once you reach the nape, finish the remaining length with a standard three-strand braid and secure with a durable elastic. Repeat on the opposite side, ensuring symmetry is maintained for a polished finish.
The braided half-up top knot (bottom left) is a modern twist that keeps hair away from the face while allowing the length to flow freely. To achieve this look, isolate a rectangular section of hair from the temples up to the crown. Flip the head forward slightly, and starting from the top of the forehead, begin a tight Dutch braid moving backward toward the crown. The key is to stop gathering hair just before the point where you want the bun to sit. Secure the braid temporarily with an elastic. Next, take the remaining ponytail and twist it tightly, wrapping it around the base into a small, neat top knot. Secure the bun with small bobby pins that match the hair color, ensuring the braided section feeds smoothly into the base of the knot for a seamless appearance.
For high bun styles that require extra security and flair, consider incorporating a braided wrap or a full braided coil. The style shown (bottom right) is an elegant high bun, easily enhanced by starting with a high ponytail, braiding the entire length of the ponytail, and then coiling that thick braid around the base to form a sophisticated, textured bun. Alternatively, secure a regular bun first, then take a thin section from underneath the ponytail, braid it separately, and wrap it around the bun’s base for definition. Expert tip: Always prep the hair with a light mousse or texturizing spray before braiding to maximize grip and control, minimizing flyaways. Finish any braided updo with fun accessories like decorative clips or small jewels, which add a personal touch and hide any stray ends, making the style school-ready or perfect for a party.
12 Flawless Natural Braids
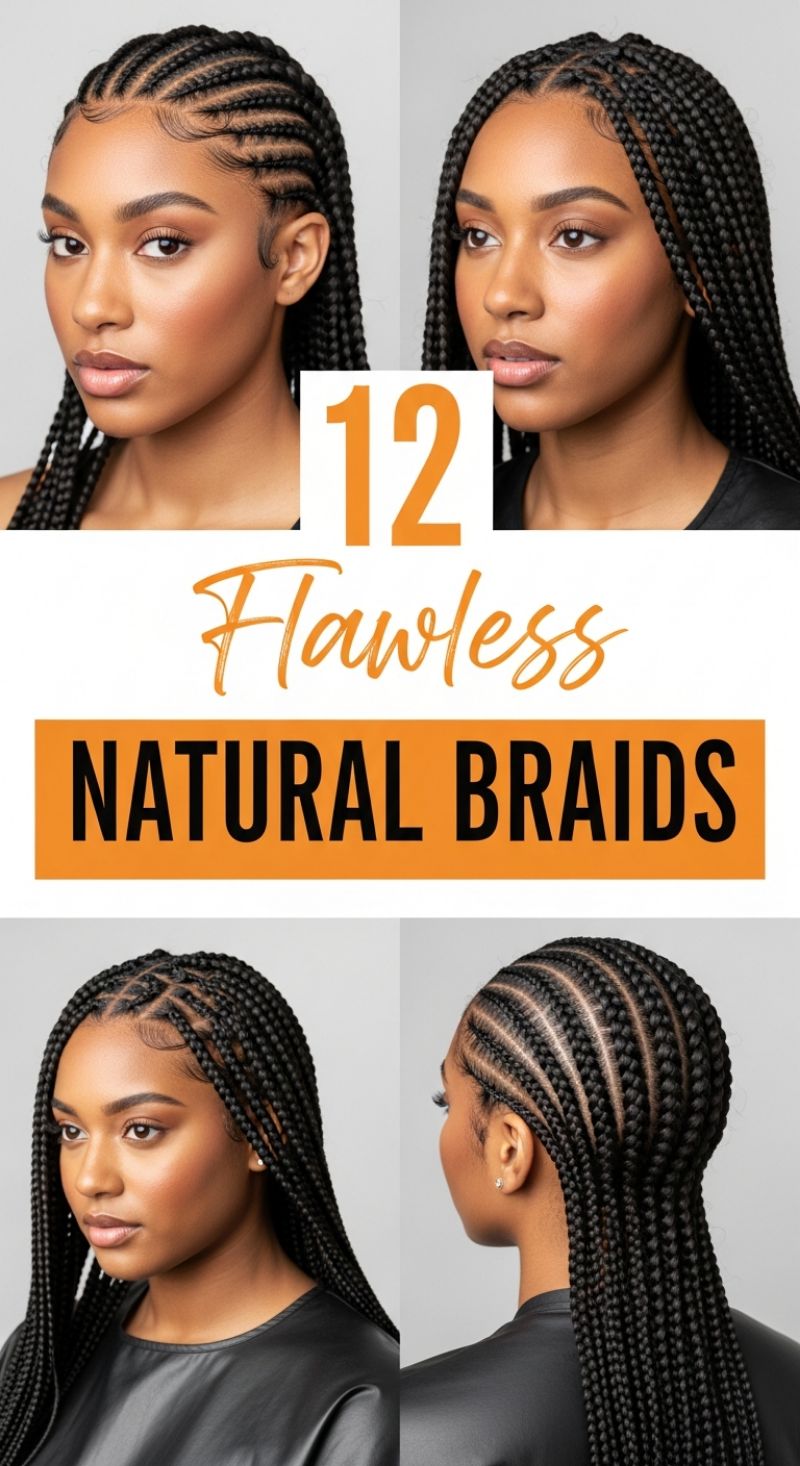
Achieving the look of “Flawless Natural Braids,” as showcased in these styles, relies heavily on meticulous parting, proper tension, and expert edge control. The image displays two primary techniques: sleek cornrows (bottom right) and neat individual braids, likely knotless box braids (top and bottom left). To master the cornrow look, begin with freshly washed and deep-conditioned hair. Using a rat-tail comb, create sharp, clean parts along the desired curve or direction; precision here is paramount as the parts form the foundation of the style. Use the “feed-in” method, starting with the natural hair and gradually adding braiding hair, to ensure the braids lie flat against the scalp without visible knots or excessive tension at the roots. Maintaining consistent tension throughout the length of each cornrow is essential for a polished, durable finish that lasts for several weeks.
For the individual styles, such as box braids or the increasingly popular knotless braids, the focus shifts slightly to the neatness of the sections and the blend of extension hair. To replicate the clean look seen here, use square or diamond-shaped parting for the individual sections, ensuring all sections are uniform in size for a balanced look. Knotless braids, which start with your natural hair before adding extensions, provide a lighter feel and less stress on the hairline. Once the braids are installed, setting the style is key. Apply a generous amount of braiding mousse or setting foam over the entire length of the braids to minimize frizz and add a high-shine finish. Allow the hair to dry completely, preferably under a hooded dryer, to lock in the definition and structure.
The final, essential step for achieving this level of flawlessness is mastering the edges. The beautifully laid baby hairs frame the face and transition seamlessly into the braids. Use a strong-hold, non-flaking edge control product and a specialized edge brush (or a clean toothbrush) to sculpt the delicate baby hairs into smooth, elegant swoops along the hairline. After styling the edges, cover them with a silk scarf for 10-15 minutes to set the product firmly against the skin, guaranteeing a clean finish that withstands the day. To maintain these protective styles, always sleep on a satin pillowcase or wear a silk bonnet, and lightly oil your scalp every few days to keep the skin moisturized and prevent buildup. When washing, focus on diluting your shampoo and gently cleansing the scalp with a cotton swab or applicator bottle, avoiding excessive manipulation of the braid roots.
15 Trendy Medium Hair Styles: Mastering Layers, Bangs, and Volume

Medium-length hair, typically falling between the collarbone and the shoulder blades, is the ultimate canvas for versatile styling, and this collection demonstrates the range achievable through strategic layering and texturing. The core principle behind these 15 looks is using internal movement to create shape without sacrificing the illusion of thickness. For a highly polished result, such as the rounded, voluminous styles seen in the top and middle rows, ask your stylist for blended, face-framing layers that begin around the chin. These layers require a commitment to heat styling, using a large barrel round brush during blow-drying to lift the crown and bevel the ends under. Conversely, if you desire a modern shag or a more effortless, undone appearance (like the heavily textured looks in the center row), request choppier, more distinct layers throughout the interior. This technique removes weight and allows the hair to settle with maximum natural bounce, pairing exceptionally well with the popular fringe or curtain bangs that sweep softly away from the face.
Achieving the right texture is paramount for these trending medium cuts. For the straight, sleek styles, use a smoothing serum and flat iron to ensure a glassy finish, making sure the ends are either blunt-cut for density or lightly feathered to prevent a severe line. If you are leaning toward the natural waves or defined curls showcased in the bottom row, preparation is key: apply a quality curl defining cream or mousse to damp hair, scrunch thoroughly, and either air dry or use a diffuser on low heat. The advantage of a medium cut is that the hair isn’t weighed down, allowing natural texture to spring up beautifully. To maintain the volume and separation in layered cuts, focus product application (such as sea salt spray or texturizing powder) at the roots and mid-shaft, avoiding heavy oils on the ends which can flatten the style.
Customizing the fringe is essential to optimizing a medium layered haircut. The collection features everything from deep, side-swept bangs that blend seamlessly into face-framing layers (universally flattering for most face shapes) to full, soft blunt bangs that graze the eyebrows, adding a youthful edge and drawing attention to the eyes. For those opting for curtain bangs, remember the maintenance required: these must be styled daily by directing them forward with a round brush or flat iron, then sweeping them outward once dry to achieve that signature peek-a-boo split. Regardless of the style chosen, regular trims every six to eight weeks are non-negotiable for medium hair; this length is particularly susceptible to losing its intended shape quickly, especially when layers and texture are involved. Consult with your stylist about your hair density—thinner hair should prioritize longer layers for maximum body, while thick hair will benefit from heavy internal layering to prevent puffiness.
10 Sleek STRAIGHT LOOKS
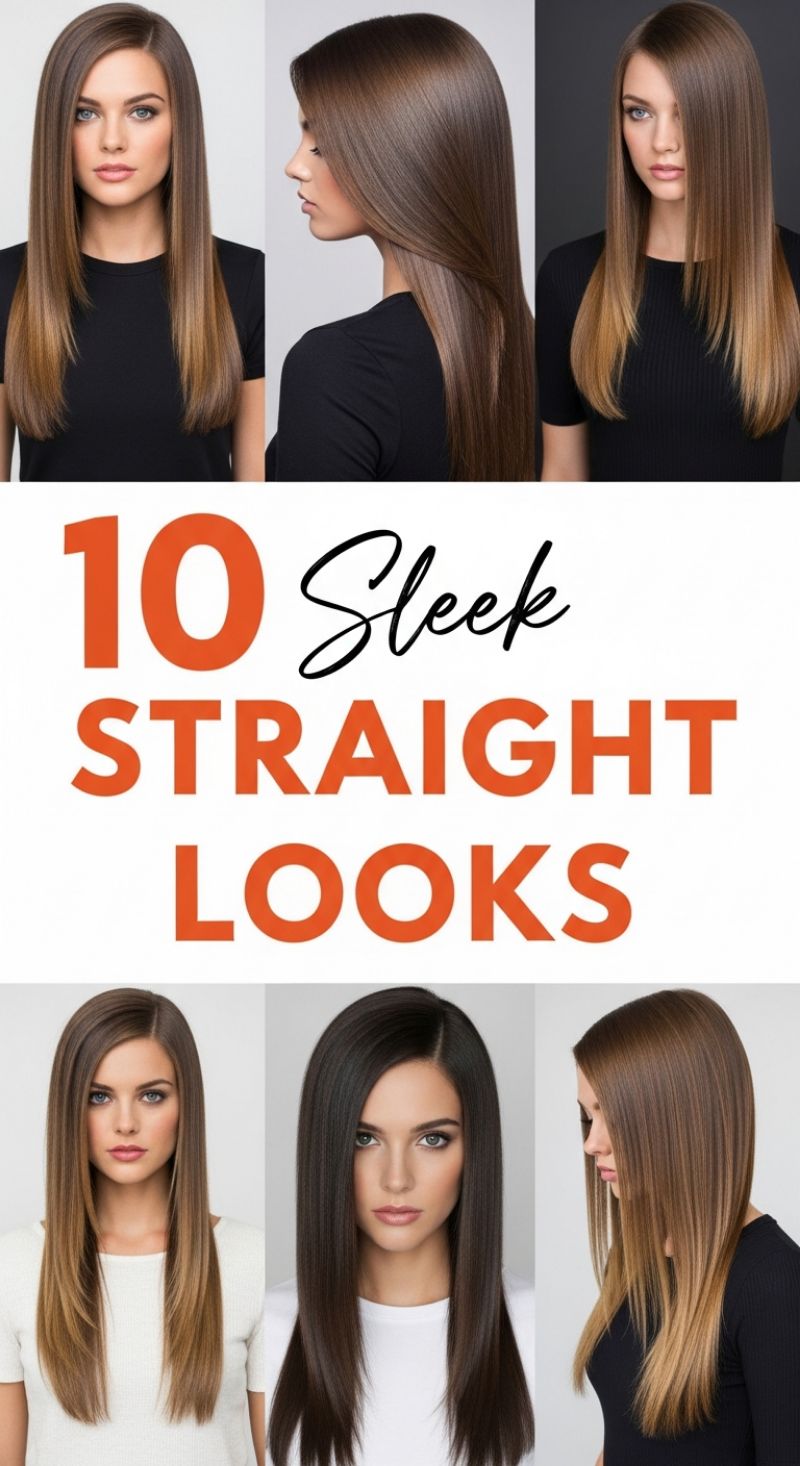
Achieving truly sleek, straight hair starts long before the flat iron comes out. The key is thorough preparation. Begin with a smoothing or anti-frizz shampoo and conditioner system specifically designed to flatten the cuticle layer, which is essential for maximizing shine. Towel-dry gently, apply a generous heat protectant spray or cream—this is non-negotiable for high-shine looks—and follow up with a smoothing balm or oil, concentrating the product from the mid-shaft down. When blow-drying, use a nozzle attachment and a large, flat paddle brush to pull the hair taut downwards, ensuring every section is completely dry before moving on to heat styling. For the ultimate polished finish seen in these beautiful examples, section the hair meticulously (no wider than an inch) and pass a quality flat iron (ceramic or tourmaline are excellent choices) over each section slowly, from root to tip. For fine hair, keep the heat setting moderate (around 300-350°F); for thick or coarse hair, you may increase it up to 400°F, but always prioritize a single, slow pass over multiple quick passes to minimize heat exposure and maximize smoothness.
While the overall aesthetic is defined by its flawless texture, the beauty of these straight looks lies in the subtle variations in cut and color that add dimension and movement. Notice how some styles utilize soft, face-framing layers beginning around the jawline or collarbone, giving the hair shape and preventing the long length from appearing heavy or monolithic. Conversely, the blunt cut (as seen in the darker styles) maximizes thickness and creates a sharp, modern line at the bottom, contributing significantly to the luxurious density. To replicate this ultra-reflective quality, incorporate subtle balayage or ombré, where lighter tones are strategically placed toward the ends. This variation in pigment catches the light differently and dramatically enhances the perceived glossiness of the hair. Once styling is complete, precisely define your parting; a deep side part adds volume and dramatic lift at the crown, while a classic center part emphasizes symmetry and refined elegance, both requiring precise division for a truly ‘sleek’ finish.
The final step is sealing the look and ensuring longevity, especially against humidity, which is the nemesis of straight hair. Use a lightweight, non-greasy finishing oil or serum—applied sparingly to the palms and gently run over the surface of the hair—to tame any remaining flyaways and boost the mirror-like shine without weighing down the length. For hold without stiffness, a flexible hold hairspray can be misted lightly from a distance. To maintain this level of sleekness overnight, switch to a silk or satin pillowcase, which drastically reduces friction and prevents the hair cuticle from roughening up or creating frizz. If you need a quick touch-up on day two or three, use dry shampoo at the roots and run the flat iron lightly over the mid-lengths and ends again. Crucially, commit to regular dusting or trimming every 6-8 weeks to eliminate split ends, as damaged ends not only look ragged but also prevent light from reflecting properly, dulling the essential sleek effect.
8 Bold PIXIE CUTS
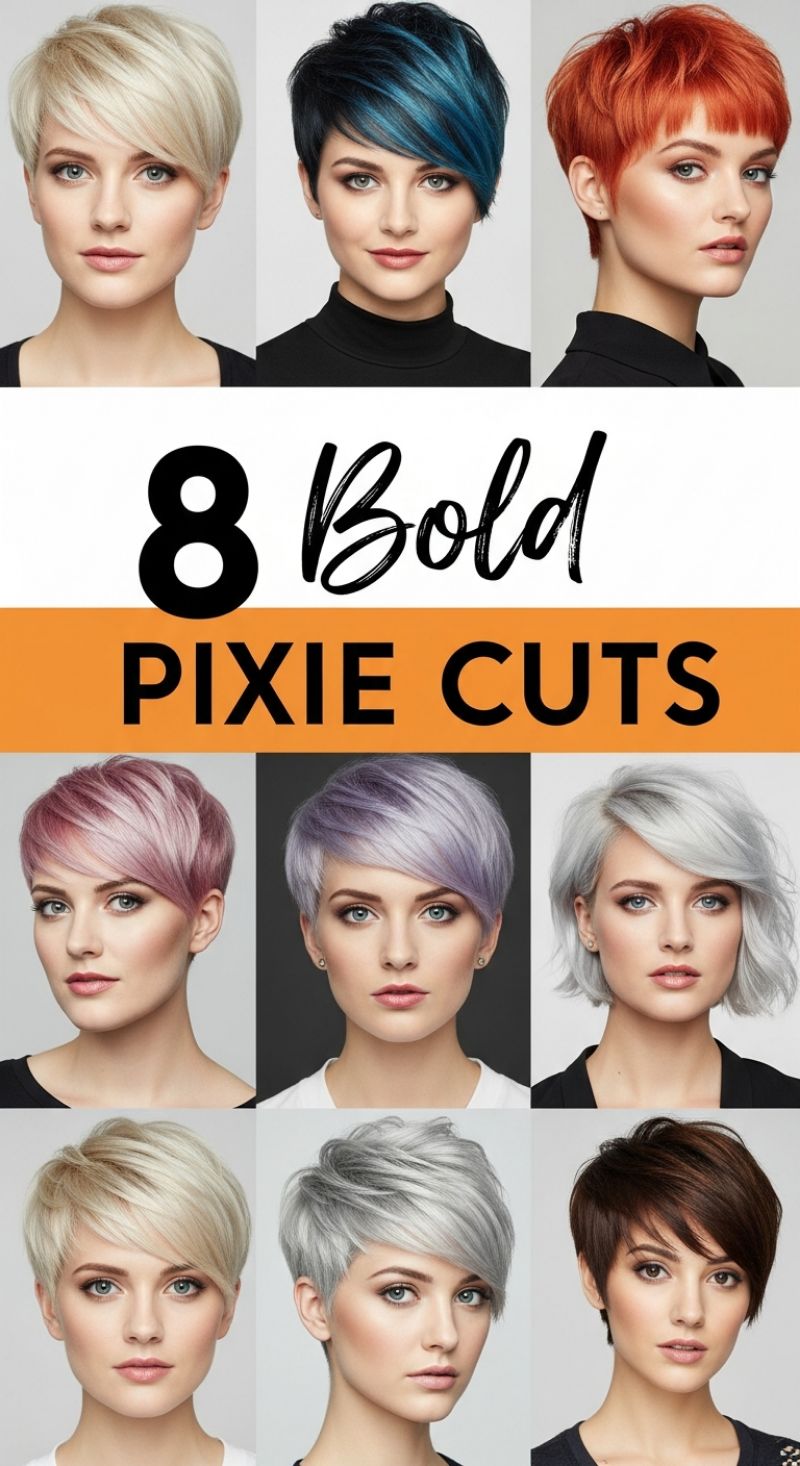
The pixie cut is the ultimate canvas for showcasing texture, asymmetry, and vibrant color, moving far beyond its traditional demure reputation. Achieving these ‘bold’ looks hinges on strategic layering and product application that maximizes volume and definition. Notice the variation in lengths—from the tightly cropped copper fringe to the dramatic, face-framing length of the platinum blonde and deep teal styles. When consulting with your stylist, emphasize the desired contrast between the short sides (often tapered or undercut for modern appeal) and the longer top layers. To style, start with damp hair, applying a volumizing mousse or root-lift spray, focusing the product heavily near the crown. Blow-dry the hair directionally, using your fingers to lift the roots and create movement, particularly in the bangs. For the sleek, side-swept looks, a flat iron can be used on the fringe to smooth and guide the hair across the forehead, finishing with a light-hold texturizing spray or pomade applied to the ends for piecey separation.
The striking color palette displayed—including fiery copper, smoky lavender, icy platinum, and rich teal highlights—is integral to the ‘bold’ aesthetic of these cuts. To attain shades like rose gold or pastel violet, the hair often requires pre-lightening to a level 9 or 10 blonde, making professional consultation essential to preserve hair integrity, especially given the shorter length where damage is immediately visible. Expert advice for maintaining these vivid or light colors includes utilizing sulfate-free, color-safe shampoos and washing hair in cold water to minimize color bleed and fading. For high-maintenance shades, incorporating a custom-pigmented color-depositing conditioner once or twice a week is crucial for refreshing the tone and extending the life of the dye. Furthermore, the short length demands more frequent trims (every 4-6 weeks) to maintain the sharp structural integrity of the style and prevent the color from looking dull at the ends.
Customization ensures that a bold pixie cut flatters any face shape. For those with a rounder face, opt for the longer, diagonal bangs seen in the dark teal or silver styles, as the sweeping angle elongates the face. For heart or oval shapes, the shorter, slightly choppy styles (like the copper or voluminous lavender) work perfectly by adding height and texture at the crown. When finishing the look, dry wax or styling paste is your best friend. Rub a small amount between your palms and work it into the mid-lengths and ends, defining individual layers. Avoid heavy gels, which can weigh down the texture. For extra edginess, consider tucking one side behind the ear while leaving the other side full, playing up the asymmetry inherent in a modern, bold pixie cut.
10 Quick Natural Styles
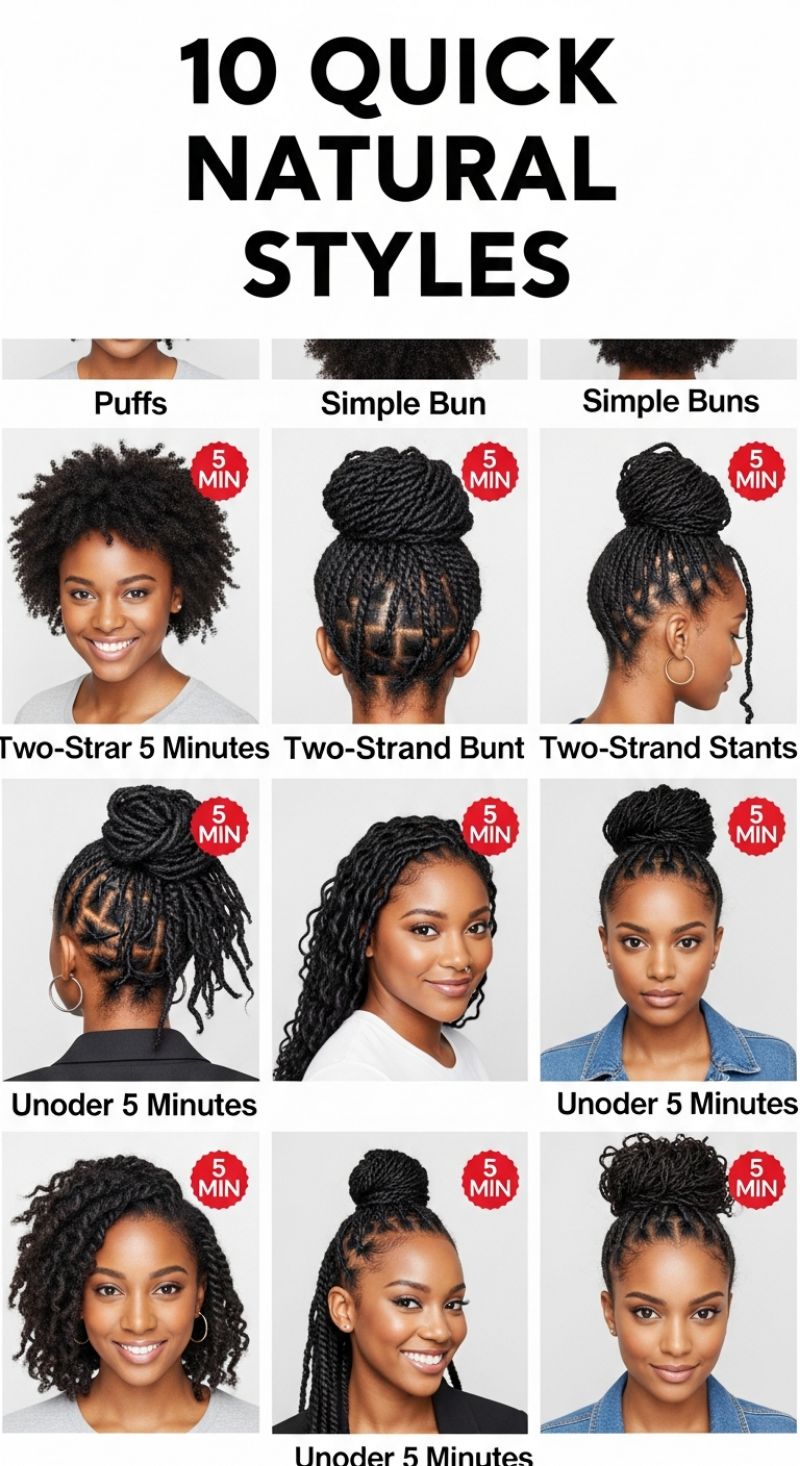
Natural hair styling doesn’t have to be a lengthy ordeal. The 5-minute styles shown here offer high impact with minimal effort, making them perfect for busy mornings or unexpected video calls. These styles rely heavily on a foundation of either freshly fluffed natural hair or, more commonly, pre-installed protective styles like faux locs, twists, or braids. For a true wash-and-go look, the simple Afro Puff (Style 1) is key: apply a moisturizing curl cream and define your hair using the rake-and-shake method, then use a hair tie or scarf to pull the sides back, leaving the maximum volume on top. The magic of the other eight styles, however, lies in manipulating existing texture. Focus on clean, geometric parting (squares or triangles, visible in Styles 2, 3, 4, 6, and 9) around the perimeter of the head. Use strong edge control gel to lay these parts flat, ensuring a polished base before gathering the bulk of the hair.
The most dominant quick style presented is the High Bun or Top Knot, often requiring less than five minutes when working with twists or locs. To achieve this look, first, separate the hair into two sections: the crown area, where the protective styles are clearly parted and secured; and the length, which will form the bun. Smooth down the edges and use a durable elastic band to pull the length into a high ponytail. Next, coil the entire ponytail around the base, pinning it securely with large hairpins (avoiding snagging your scalp). For variety, experiment with leaving some twists loose around the nape or sides (Style 4), creating a looser, cascading low bun effect, or opt for the half-up, half-down look (Style 8), where the top half is secured in a smaller top knot, allowing the length to fall freely. This not only showcases the beautiful texture of your protective style but also provides a stylish transition as your installation ages.
To ensure these quick styles last throughout the day, preparation and product choice are essential. For the updos, a firm-hold mousse or setting spray applied after the bun is secured will keep flyaways contained. For styles that showcase the full length (like Style 5, loose wavy faux locs, or Style 7, large side twists), refreshing the strands with a light oil sheen can restore vibrancy without weighing the hair down. The key to the ‘Under 5 Minutes’ promise is practicing the motion—knowing exactly where to place your hands and pins. Always protect your hairstyle at night using a silk bonnet or pillowcase to maintain the sharp partings and preserve the shape of your coils or bun, allowing for quick restyling the next morning without needing a full manipulation session.
Stylish Short Natural: The Undercut Faux Hawk
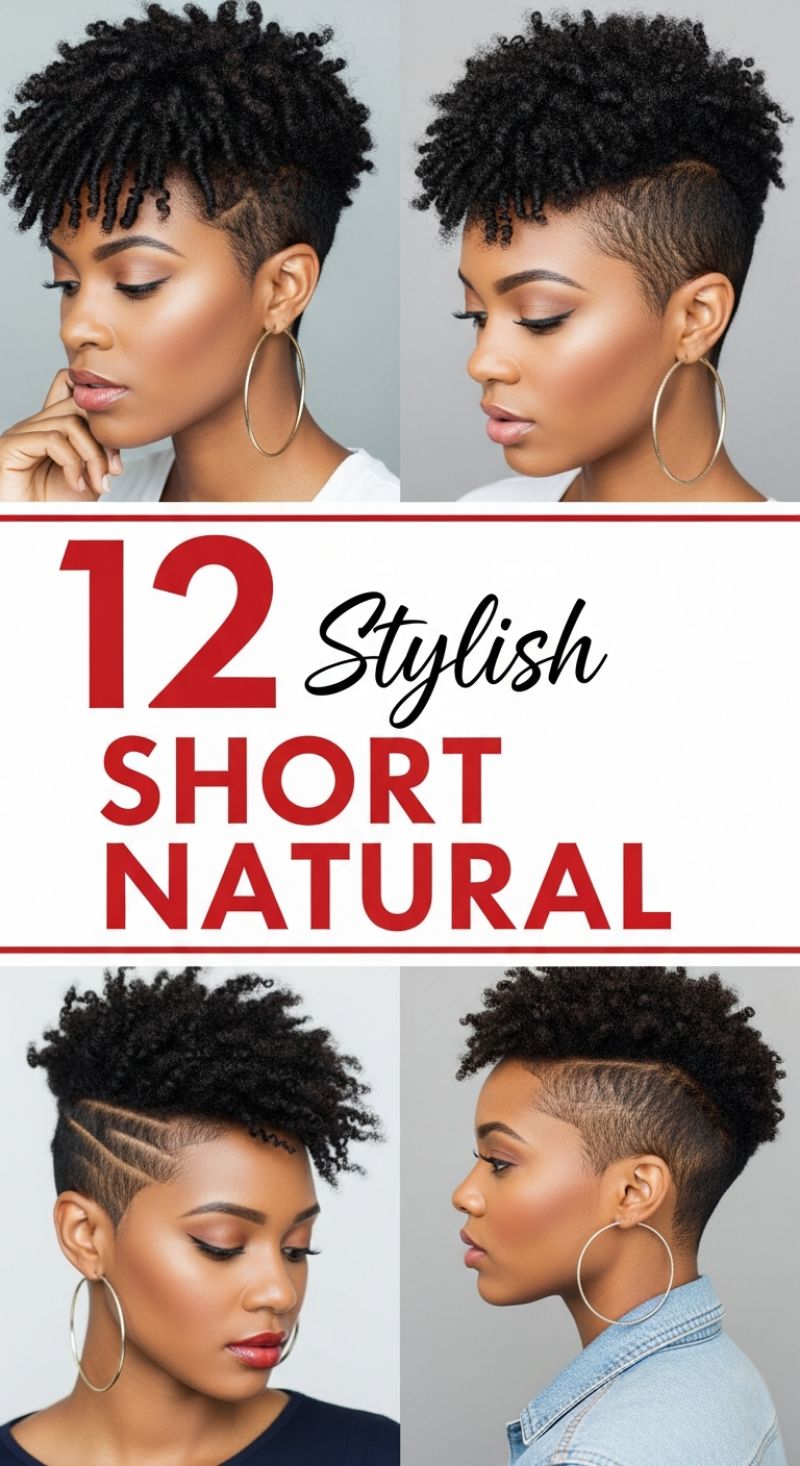
This dynamic short natural style, often dubbed the curly undercut or faux hawk, masterfully blends feminine texture with sharp, masculine structure. The core technique involves creating an extreme contrast between the top length and the sides. To achieve the initial cut, instruct your stylist to execute a high, sharp undercut or a close skin fade, starting near the parietal ridge (the curve of the head) and fading down to the nape and ear. For added artistic flair, as seen in the bottom images, consider incorporating precision hair art—diagonal lines, geometric patterns, or crisp stripes shaved into the faded area near the temple. This styling choice demands exceptional precision and regular maintenance (a weekly line-up is essential) to keep the contrast fresh and the lines razor-sharp. The visual impact of this cut lies in the juxtaposition of the tightly coiffed sides against the natural volume and definition of the crown, instantly creating lift and emphasizing the cheekbones and jawline.
Achieving the optimal definition for the top section is crucial for this style’s success. The texture shown here is typically created using a finger coiling or small two-strand twisting technique on freshly washed and conditioned hair. While the hair is still damp, generously apply a moisturizing defining cream, a strong-hold gel, or a foaming mousse to lock in the curl pattern and minimize frizz. For finger coils, take small sections, apply product, and twist the hair tightly around your index finger from root to tip. For a less time-intensive look, small two-strand twists can be unraveled once completely dry to create voluminous, springy spirals. Once the coils or twists are set, allow the hair to air dry completely or use a diffuser on a low setting. The key to the faux hawk height is to fluff the roots gently with your fingers or a pick after drying, pulling the hair upward and forward over the forehead for maximum volume and shaping it toward the center of the head. Avoid excessive manipulation, which can lead to frizz.
Expert maintenance for this look involves protecting the texture overnight using a satin bonnet or scarf to prevent crushing the coils. When refreshing the look between washes, a light spritz of water mixed with a leave-in conditioner can re-energize the curls without disrupting the definition. For the shaved areas, daily application of light oil helps prevent dryness and irritation, while regular visits to the barber—ideally every one to two weeks—will ensure the fade remains clean and the customized lines stay defined. This look is exceptionally flattering across a wide range of natural curl types (3C to 4C) and offers a powerful, low-manipulation styling option that remains stylish and bold.
10 Perfect Bun Updoes
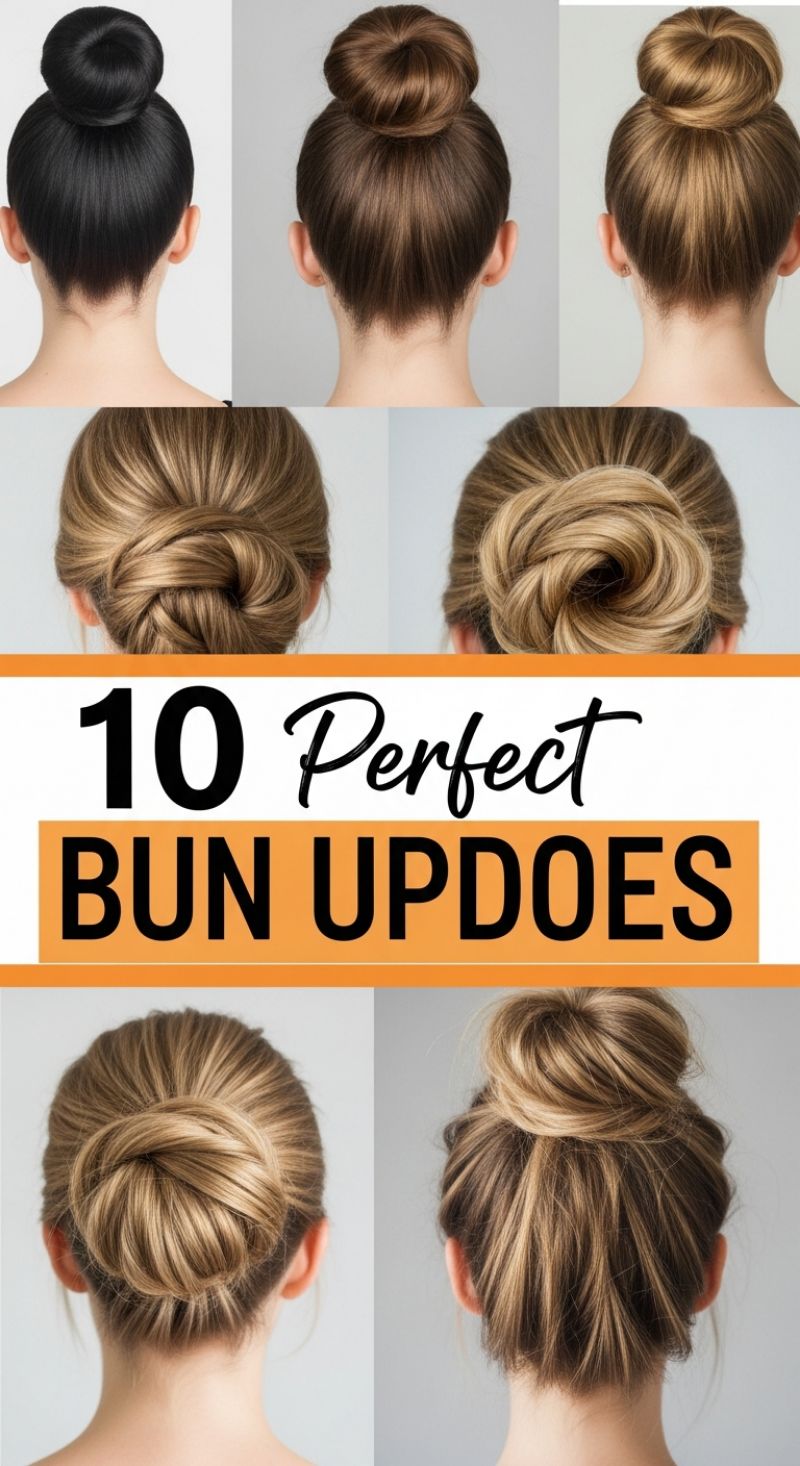
The bun updo is a timeless hairstyle, adaptable for everything from a rigorous workout to a black-tie gala. This collection highlights nine essential variations (plus a bonus tenth!) focusing on strategic placement, texture, and volume to flatter any face shape and hair density. To master the ultra-sleek, polished high bun seen in the top row, the key is preparation. Begin with straight, well-smoothed hair, using a dime-sized amount of smoothing serum or light pomade before gathering the hair high on the crown. Secure the ponytail tightly, then utilize a hair donut or careful, taut wrapping and pinning to create a perfectly symmetrical sphere. This clean look is ideal for formal occasions, auditions, or situations where absolute neatness is required. For longevity, finish generously with a strong-hold hairspray, paying special attention to securing any short hairs at the nape and around the hairline. This style works best on medium to thick hair lengths that hold shape easily.
For a softer, more intricate aesthetic, consider the mid-level twisted or knotted buns showcased in the middle and bottom-left panels. These styles derive their visual appeal from movement and depth, making them perfect for hair with highlights or lowlights. To achieve the refined, intertwined look, gather the hair at the occipital bone (mid-nape). Instead of a standard coil, try separating the ponytail into two or three sections. Twist each section individually before weaving them together into a figure-eight pattern or a horizontal knot structure. This technique prevents the bun from looking heavy or flat. Expert advice suggests slightly teasing the roots of the ponytail before twisting; this provides internal scaffolding, allowing you to use fewer pins while maintaining maximum volume. Secure the structure firmly with U-shaped hairpins, anchoring them to the scalp rather than just the bun itself. These detailed styles provide a sophisticated alternative to the high bun, suitable for professional environments or bridal looks.
If effortless elegance is the goal, embrace the high, textured, or ‘messy’ bun shown in the bottom-right corner. This look is about maximizing volume and minimizing effort, making it the perfect casual weekend or second-day hair solution. Start by liberally applying a dry shampoo or texturizing spray to the roots and lengths—this grit is essential for the structure to hold loosely. Gather the hair high on the crown, but instead of pulling it taut, keep a loose tension. Twist the hair casually, wrap it around the base, and secure it with an elastic and a few scattered bobby pins. The crucial finishing step is deconstruction: gently pull small loops of the bun looser to create dimension, and deliberately release soft strands around the temples and nape. The varied color dimension in highlighted hair shines in this style, emphasizing the movement of the pulled-out pieces. This quick-change style is universally flattering and highly effective for adding height and lift to finer hair textures.
15 Flowing Long Hair Styles
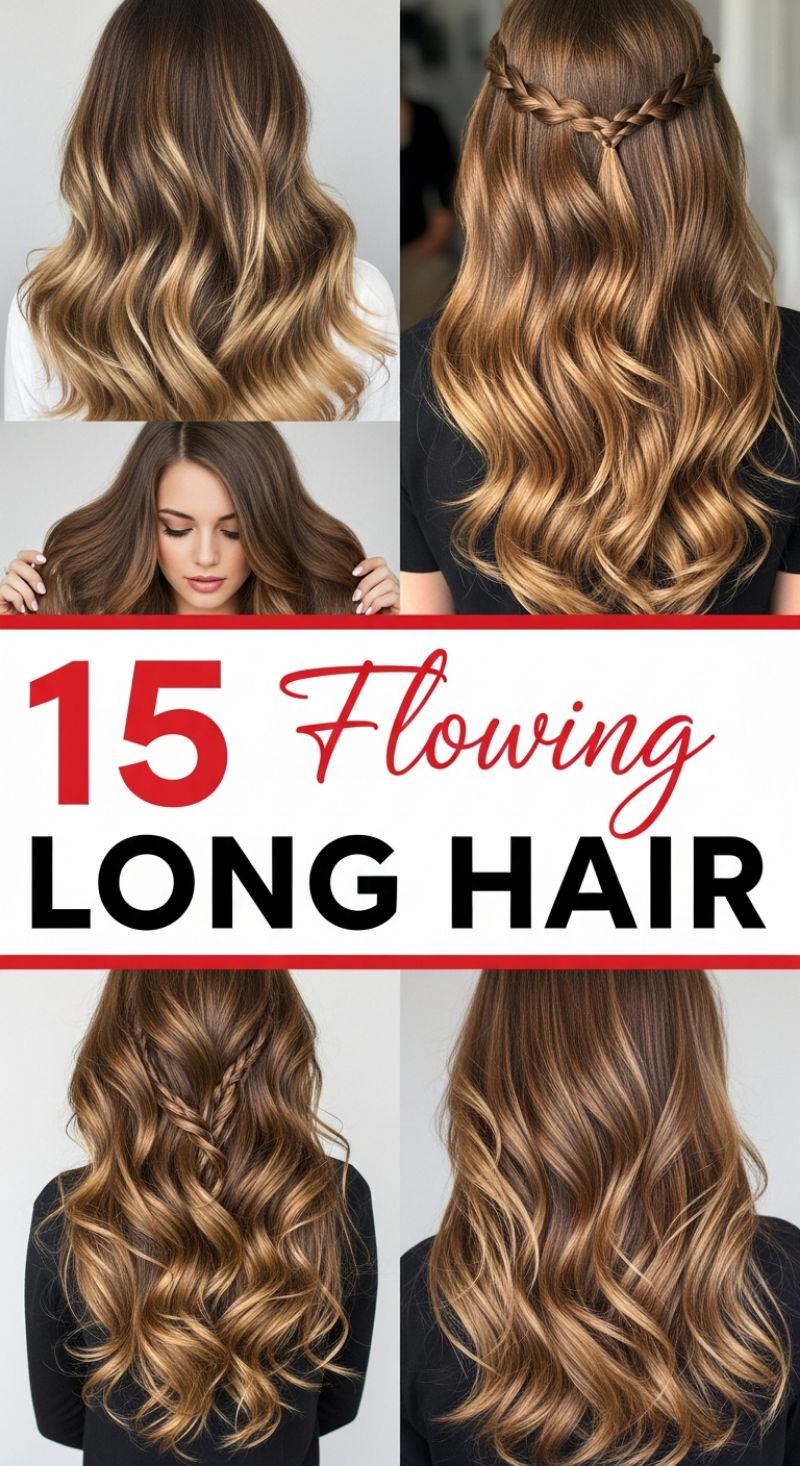
The foundation of the “flowing long hair” aesthetic lies in achieving luxurious length and dynamic color dimension, primarily through balayage or ombré techniques. The look pictured utilizes a deep, warm brown base that melts seamlessly into honey and golden blonde mid-shafts and ends, creating incredible movement and depth. To recreate these soft, voluminous waves, start with clean, blow-dried hair protected by a high-quality heat spray. Using a 1.25-inch curling iron or wand, curl sections away from the face, ensuring the movement is soft rather than tight. The crucial step is to run your fingers or a wide-tooth comb through the curls once they have completely cooled down; this breaks them up, creating that characteristic natural ‘flow’ and maximizing the visual impact of the highlights, making the hair appear thicker and more reflective. For best results, curl the hair in alternating directions (known as ribbon curling) to prevent the waves from merging into one solid mass.
Once the base waves are set, these long styles can be effortlessly transitioned with simple braided accents, perfect for adding bohemian charm or subtle formality. Two prominent variations shown include the delicate half-up crown braid and the central, vertical twist braid. For the half-up crown braid, take two small sections of hair from above the temples, execute a three-strand braid (a Dutch or French braid works well for more definition), and secure them together at the back of the head, often forming a gentle V-shape just above the occipital bone. The central twist, ideal for a focal point, involves taking two small sections near the crown, twisting them gently downwards, and letting the tails blend back into the cascading waves. These half-up styles are brilliant because they pull the hair off the face without sacrificing length or volume, providing subtle structure while keeping the focus on the beautiful flow of the curls and the intricate highlights.
Maintaining this level of length and color requires diligent professional care and at-home maintenance to prevent dryness and brassiness. Experts recommend using sulfate-free, color-safe shampoos and deep conditioning or bond-building treatments weekly, especially focusing on the lighter ends which are more prone to environmental and heat damage. To finalize the flowing style, always apply a lightweight finishing oil to the mid-lengths and ends for enhanced shine and frizz reduction, followed by a flexible hold hairspray to lock in the volume and wave structure. This style is exceptionally versatile: worn down and wavy, it is ideal for everyday chic or romantic events; adding a simple braid or twist elevates it instantly for weddings, festivals, or professional settings where controlled, dimensional elegance is desired.
8 Textured Curly Men
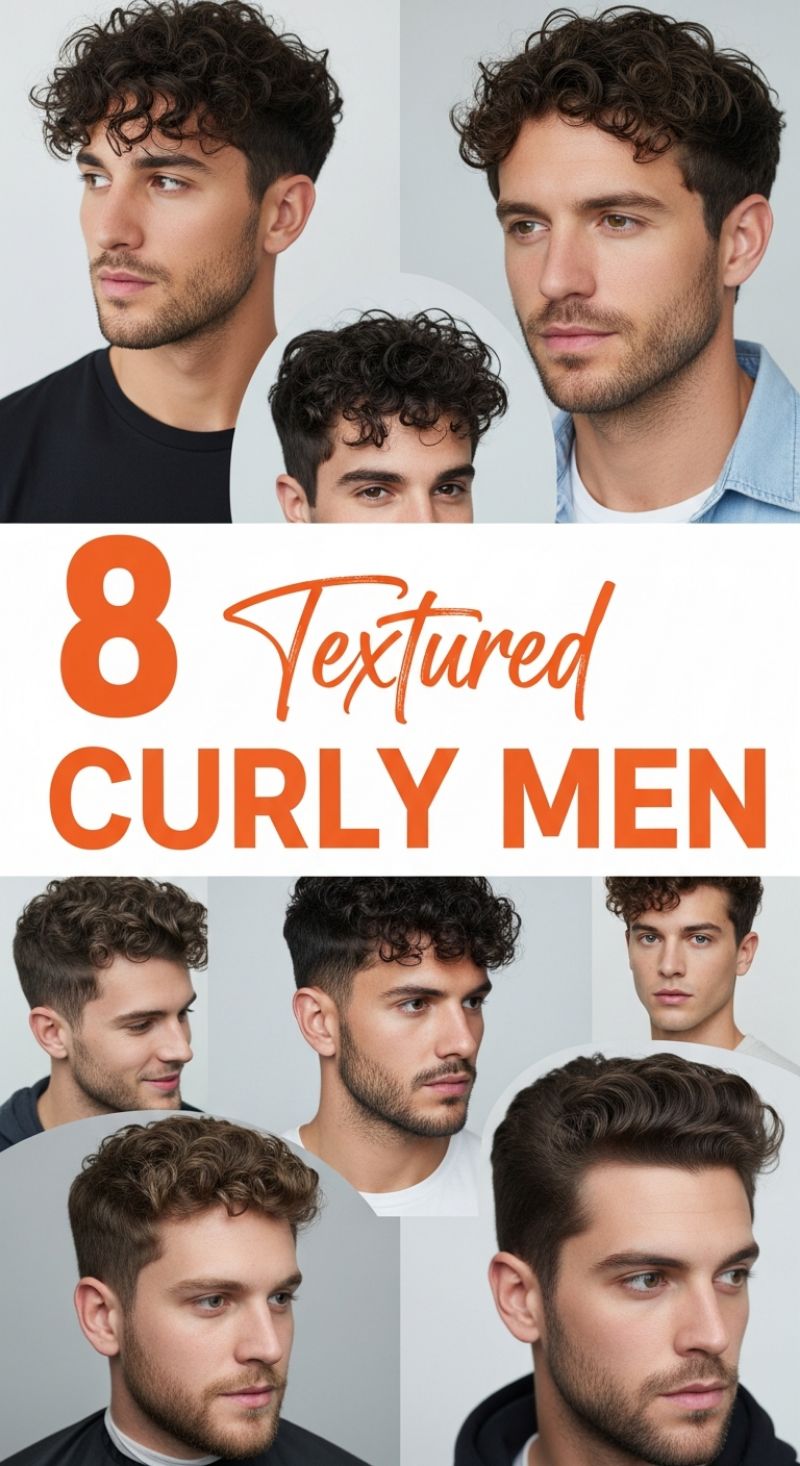
The foundation of the modern textured curly look lies in high-contrast cutting, emphasizing shape and definition. These versatile styles typically pair a sharp, graduated side section—ranging from a tight skin fade to a high taper—with significant length left on the crown. To achieve maximum visual separation and bounce, the top section should ideally maintain 2 to 4 inches of length, although some variants allow for slightly longer, looser curls. Request your barber or stylist to implement strategic layering and texturizing throughout the top; this essential process removes internal bulk, prevents the hair from looking helmet-like, and allows individual curls to coil more naturally and uniformly. The choice of fade customization is paramount: a high and tight skin fade creates an edgy, clean aesthetic, while a softer mid or low taper maintains more tradition and fullness around the temple and ear line, providing greater blending flexibility for professional environments.
Styling textured curls demands a strict moisture-first approach, as dryness is the primary cause of frizz and loss of definition. Immediately after washing, while the hair is still soaking wet, apply a quality leave-in conditioner or a lightweight curl-defining cream. This provides the necessary hydration to seal the cuticle and enhance the hair’s natural coil pattern. Follow this with a strong-hold product, such as a medium-to-strong hold gel or mousse, applied by raking it gently through the hair from root to tip. The crucial technique for activating and setting the definition is “scrunching”—gently squeezing the saturated hair upwards toward the scalp to encourage the natural curl patterns to coil. For drying, either allow the hair to air-dry completely or use a blow dryer fitted with a diffuser attachment on a low-heat setting. The diffuser is vital for maintaining maximum volume and shape without disturbing the defined curl structure. Crucially, avoid touching the hair entirely until it is 100% dry to prevent disturbing the gel cast and generating frizz.
Maintaining these highly structured, short-side curly styles requires disciplined upkeep to preserve the intentional contrast. The close-cut side and back sections will typically need trimming every 2 to 3 weeks to keep the fade sharp and clean, while the length on top can be reshaped every 4 to 6 weeks to manage weight and prevent droopiness. For overall hair health, minimize washing with harsh sulfates; instead, opt for co-washing (conditioner-only washing) or a low-poo shampoo to retain essential natural oils. Curly hair fundamentally thrives on moisture, making the incorporation of a deep conditioning mask or oil treatment (such as argan or jojoba oil) weekly non-negotiable. Expert tip: To preserve definition overnight and extend the life of your style, consider sleeping on a satin or silk pillowcase, which significantly minimizes friction and prevents the curls from flattening or frizzing, ensuring the texture remains vibrant and voluminous across several days between full washes.
10 Bridal Wedding Looks: Textured Updos and Ethereal Accents
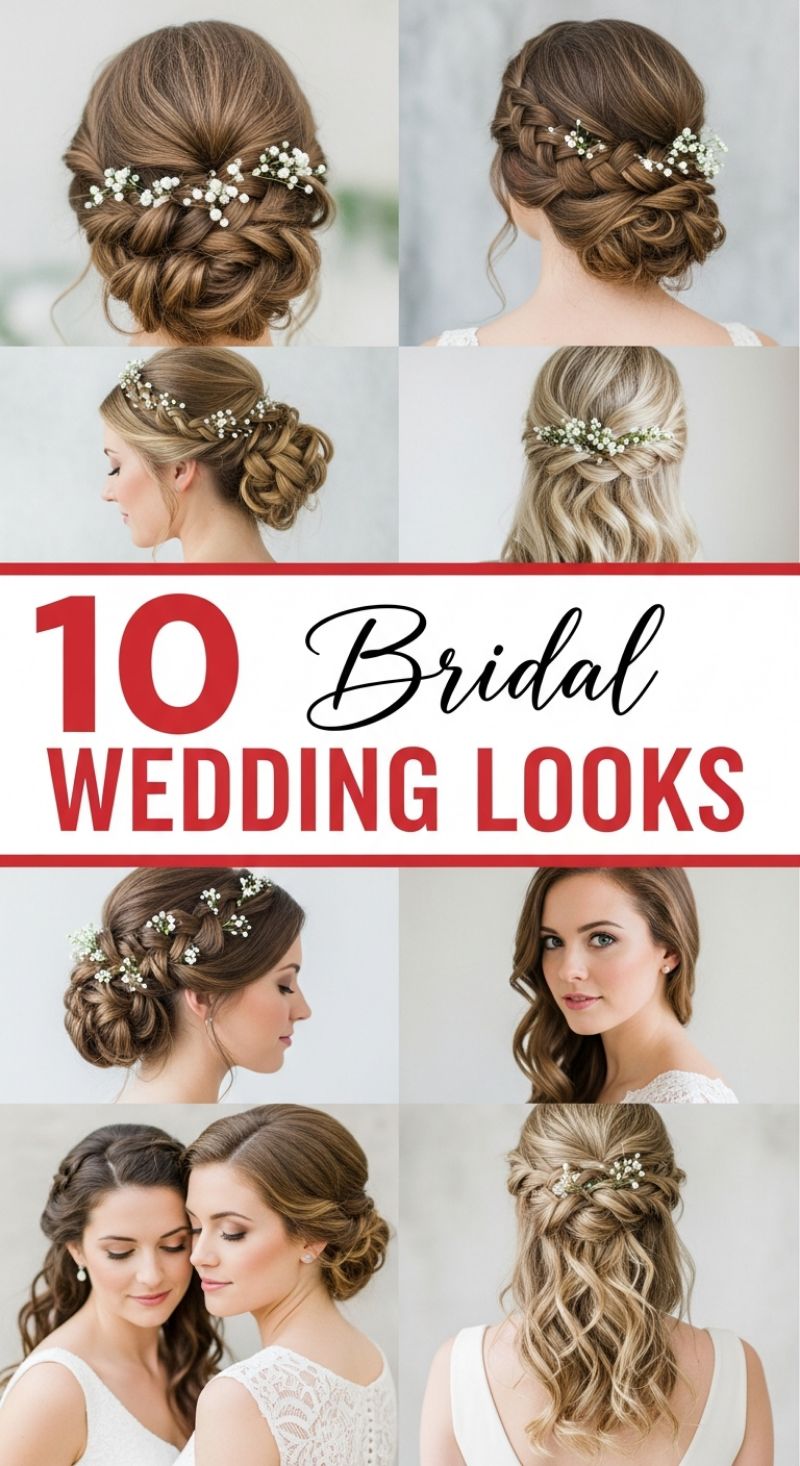
The foundation of many elegant bridal looks lies in a skillfully executed, textured updo. These styles often begin with loose curls or waves to maximize volume and create the illusion of density before pinning. For the intricate braided chignons shown, the technique involves creating large, loose braids (often Dutch or French braids, meticulously ‘pancaked’ for width) that wrap around the back of the head, culminating in a low, voluminous bun or nest of twists at the nape of the neck. Achieving this level of visual dimension requires strategic product preparation; start by prepping hair with a dry texture spray or volumizing mousse to ensure superior grip and longevity. When constructing the chignon, focus on pulling apart the braid segments gently to give it a soft, slightly undone finish before securing the final shape with U-pins, prioritizing structure and balance over absolute tightness to maintain that romantic, ethereal appeal.
For brides seeking a balance between formal styling and movement, the half-up, half-down look is a timeless choice, especially for medium to long hair. The showcased styles typically feature soft, yet defined, loose curls or beach waves through the lengths, contrasting beautifully with the tightly controlled top section. The structural element usually involves a small crown braid or a series of crisscrossed twists meeting centrally at the back of the head. This secured section acts as the perfect anchor for delicate hair accessories. The most defining feature of these 10 looks is the consistent use of small white florals, such as baby’s breath (Gypsophila) or jeweled sprigs. These accents should be meticulously tucked into the braids or twists, rather than placed flat, to organically enhance the romantic, garden-party aesthetic. Ensure the curls are set with a light-hold hairspray to maintain movement while guaranteeing the pinned sections remain firmly in place throughout the event.
Whether opting for a full updo or a flowing half-style, the overall aesthetic remains softly romantic and polished, ideal for complementing lace, sheer, or open-back wedding gowns. To replicate the subtle sophistication seen in the models, ensure the hairline remains soft—pulling out a few wispy face-framing pieces around the temples and ears prevents the look from appearing too severe or dated. For darker hair colors, utilizing existing highlights or carefully placed balayage will significantly amplify the visual texture of the braids and twists, giving depth to the complexity of the style. When pairing these elaborate hairstyles with makeup, opt for a classic bridal palette: luminous skin, a soft contour, and perhaps a defined brow, allowing the intricate detail and floral accents of the hair to remain the undisputed focal point of the wedding ensemble.