Discover the Ultimate Hairstyle Bible featuring 100+ stunning looks. Get essential inspiration and step-by-step ideas for every hair length, texture, and occasion, from protective styles to wedding updos.
VALENTINE’S DAY: Romantic Hairstyles Featuring Heart Accessories

Transforming your look for a romantic occasion is often as simple as integrating thematic accessories, and the heart-shaped clips shown here offer stunning inspiration for intricate styles. For long hair, embrace the ‘braided cascade’ visible in the top left image. Start with a side-swept French braid along the hairline, feeding into a loose, voluminous fishtail braid extending down the back. The secret to this ultra-romantic style lies in the placement of small, crystal heart pins: strategically scatter them along the ridge of the French braid and throughout the woven sections of the fishtail. This technique adds shimmer and visual interest without disrupting the complexity of the braid itself. For formal events, consider the structured updo shown bottom right, which utilizes intertwined Dutch braids pulled back into a neat chignon, anchored by a central, multi-heart jeweled barrette positioned horizontally across the base of the updo for maximum impact and stability. Achieving this level of detail requires proper hair preparation; always apply a texturizing spray or mousse before braiding to ensure grip and minimize slippage.
These looks prove that accessories are not reserved solely for elaborate updos; they are essential for elevating simple, everyday styles across all hair lengths. If you prefer keeping your hair down, emulate the radiant look in the top right: curl the ends for soft, flowing waves, then pull the front sections back into a half-up style, securing it with a single, oversized statement clip, such as the elegant pearl heart design. This placement instantly frames the face and highlights the jawline. For those with shorter hair, like the voluminous curled bob in the bottom left, select a smaller, more delicate heart pin. Position the clip near your part or just above the ear—this prevents the accessory from looking disproportionately large against shorter strands while adding a subtle sparkle that complements the natural bounce of the curls.
When inserting the hair accessories, ensure they are securely fastened into a portion of the hair that is either pinned or tightly woven, not just loose strands, to maintain the style’s longevity throughout the day or evening. These heart-themed accents, while perfect for Valentine’s Day, are universally romantic and can easily transition into bridal shower, engagement photo, or summer wedding looks simply by adjusting the accessory material—opting for pearls for timeless elegance or rhinestones for high glamour. Regardless of your chosen style, finishing with a flexible hold setting spray ensures that both your intricate braids and soft curls stay perfectly in place, letting your chosen accessories be the star of the show.
8 Stunning Prom Hairstyles: Updos, Braids, and Half-Up Styles
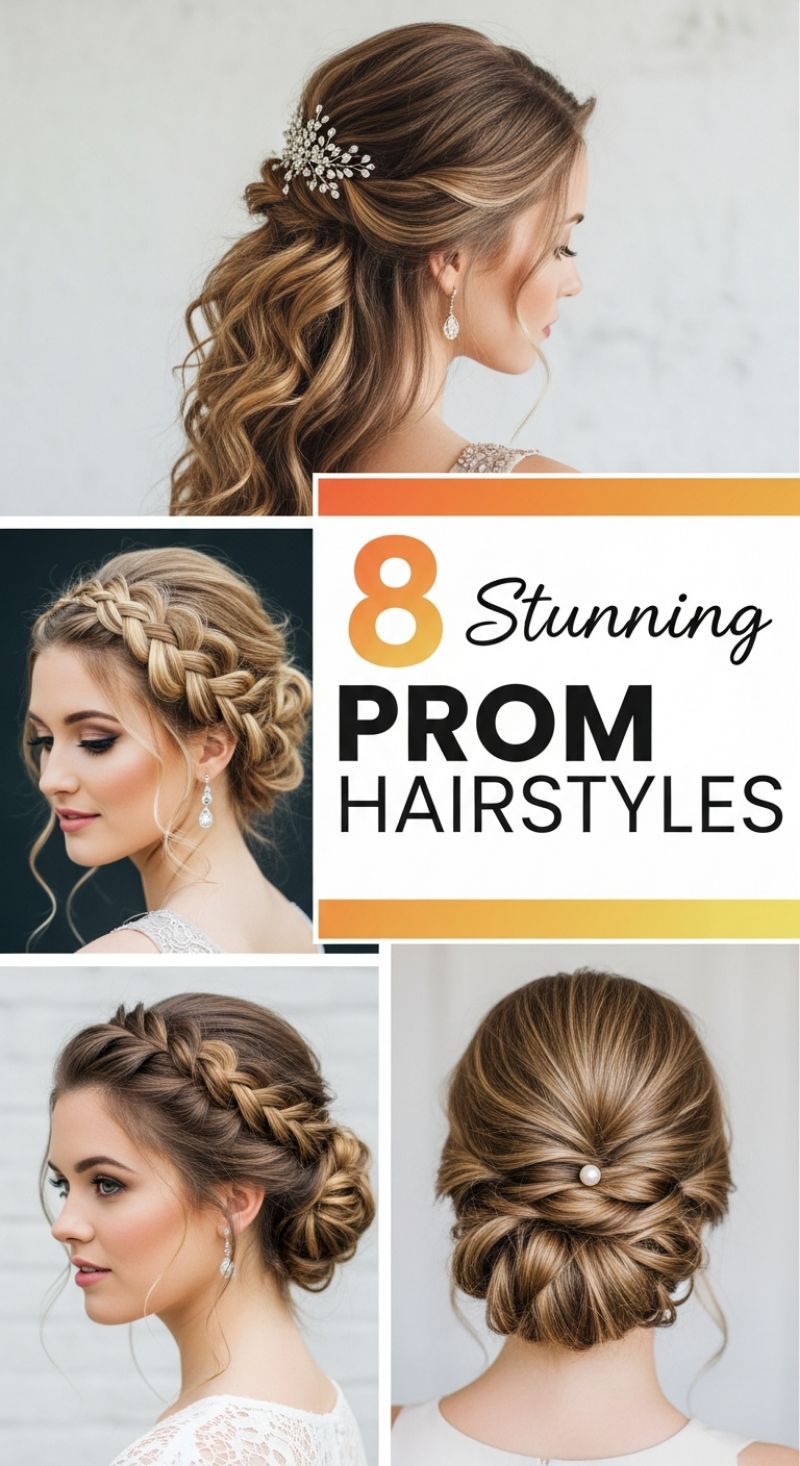
For a milestone event like prom, the goal is a hairstyle that is both elegant and durable, lasting through hours of dancing and photos. The styles showcased here offer versatility, ranging from ethereal half-up looks to intricate, romantic updos. The loose, curled half-up style, exemplified by the look featuring a delicate crystal accessory, is perfect for those who want to maintain their hair length while adding formal flair. To recreate this, begin by applying a volumizing mousse and curling the entire head with a 1.5-inch barrel iron, focusing on uniform, soft waves. The key structural element is the secured crown section: softly tease the hair at the crown before smoothing the top layer back and securing it with bobby pins, or better yet, a decorative comb just above the occipital bone. Allow generous face-framing pieces to fall naturally, and finish with a light-reflecting shine spray to maximize the luminosity of the curls.
The braided updos featured demonstrate the ultimate romantic aesthetic. To achieve the voluminous, crown-braid look, divide the hair into a deep side part. Start a large Dutch braid (where strands are crossed under the middle strand instead of over) near the front hairline, following the curve of the head toward the nape. It is crucial to ‘pancake’ the braid—gently tugging on the loops to loosen and thicken it—before securing the ends. The remaining length should then be twisted and tucked into a voluminous, low chignon or messy bun, hiding all pins within the texture. This technique ensures a stunning profile view and adds incredible visual interest. For hair that struggles with grip, prep the strands with texturizing powder before braiding to provide the necessary friction and hold, preventing the braid from slipping or unraveling throughout the evening.
Alternatively, for a look that exudes classic sophistication, the neatly twisted low updo is timeless. This chignon style relies on clean sections and meticulous pinning, making it an excellent choice for showing off intricate dress details or statement jewelry. Start by pulling the hair into a sleek, low ponytail at the nape of the neck. Split the ponytail into two or three sections, depending on hair thickness. Twist each section tightly, then loop and cross them, tucking the ends inward to form a compact, multi-layered bun. Secure each twist with U-shaped hairpins, anchoring them tightly against the scalp. Unlike the romantic braided styles, this polished look requires smoothness; use a strong-hold hairspray and a fine-toothed comb or boar bristle brush to tame any flyaways around the hairline. Finish the look with a single, elegant accessory, such as the pearl pin shown, placed strategically within the center of the twist to elevate this chic and enduring formal style.
Medium Length Volume Boost for Thin Hair (Easy Style)
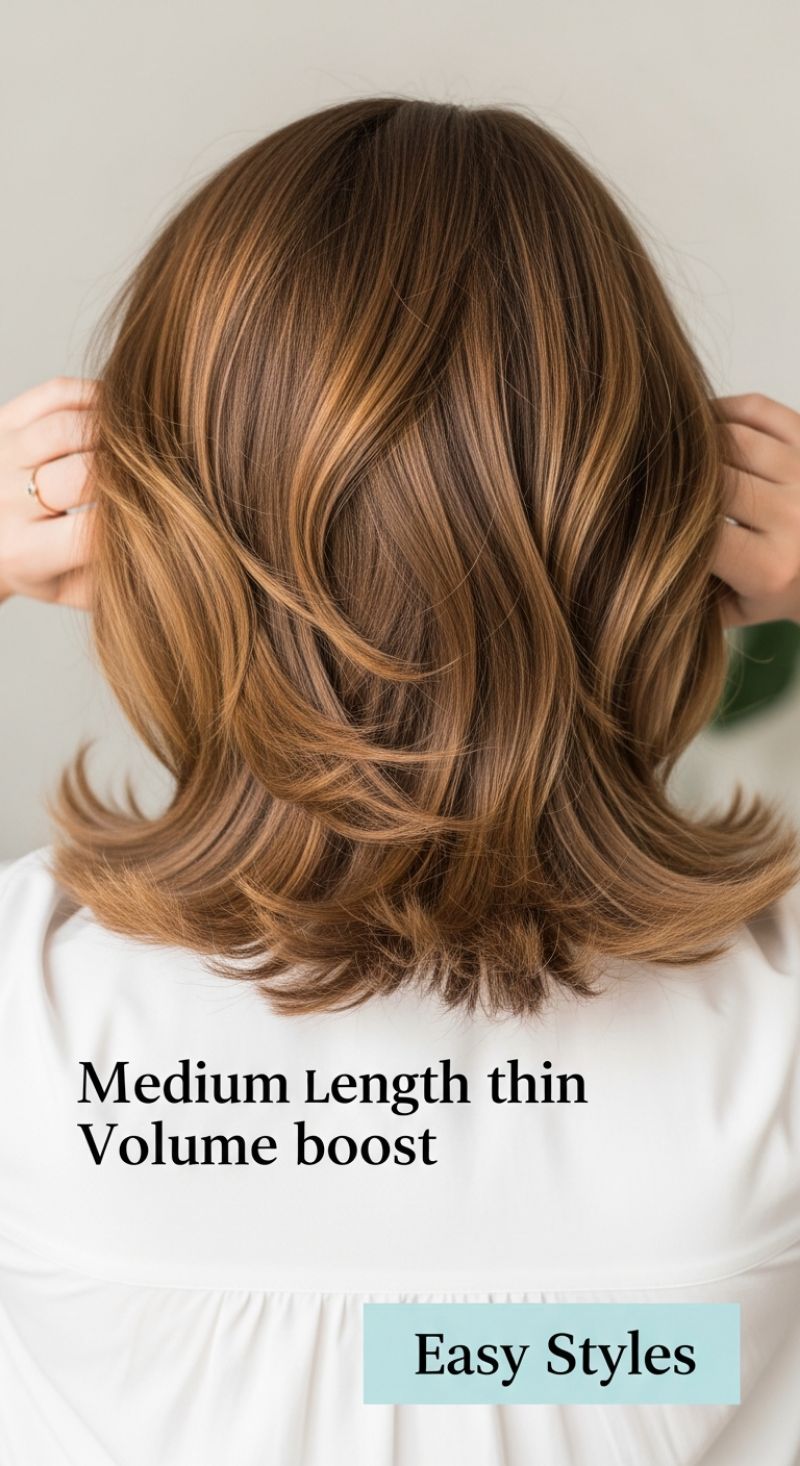
This stunning look, which falls into the “Easy Styles” category, is the ultimate solution for anyone with fine or thin hair desiring significant volume and bounce at a manageable medium length. The hairstyle features a strategic layered lob (long bob), cut just above the shoulders, utilizing internal layering to maximize movement and lightness without compromising the perceived thickness of the perimeter. Notice how the dimensional hair color a blend of rich chestnut brown base interwoven with warm honey and caramel highlights plays a crucial role. This multi-tonal approach creates an optical illusion of depth and density, making the hair appear much fuller than a solid color would. The cut is designed to work with gravity, allowing the natural curve and lift of the layers to stack upon themselves, resulting in the soft, flowing texture visible here, perfectly demonstrating how strategic cutting can revolutionize fine hair’s appearance and styling potential. The soft, defined curves at the bottom give the cut polish and structure without feeling heavy or dated.
To recreate this iconic voluminous blowout at home, start with freshly washed, towel-dried hair. Preparation is paramount: liberally apply a volumizing mousse or thickening spray from the roots through the mid-shafts, followed by a lightweight heat protectant to shield against damage. Using a large-barrel round brush and a powerful blow dryer, focus on lifting the hair directly at the root area, directing the airflow upwards to lock in maximum height. For the signature soft, flipped ends shown in the image, take horizontal sections of hair, wrap them around the brush, and roll slightly under or outwards (depending on the desired final direction). Apply heat, then allow the section to cool completely while still wrapped around the brush (or use a ‘cool shot’ button) before gently releasing. This cooling step sets the curve pattern and ensures the flipped shape holds throughout the day. Concentrate on building shape in the top layers to achieve that desired feathered effect around the back and sides, ensuring lift near the crown for a truly elevated silhouette.
Maintaining this level of volume requires a thoughtful finishing routine. Once dried, lightly mist a dry texturizing spray or fine-grain dry shampoo directly onto the roots and lightly scrunch or rake through with your fingers; this provides grip and lift without weighing the hair down like heavier oils or creams might. Avoid over-brushing throughout the day, as this can quickly flatten the voluminous shape created during the blowout. For style longevity, refresh the roots daily with dry shampoo to absorb oil and re-establish texture. As this look relies heavily on precise, stacked layering, professional trims every six to eight weeks are essential to keep the ends healthy, maintain the clean line of the perimeter, and ensure the internal layers continue to promote that beautiful, airy volume. This style is customizable; for more relaxed days, simply air-dry with a light wave spray for a natural, effortless texture.
5 Quickest Hairstyles for School Mornings
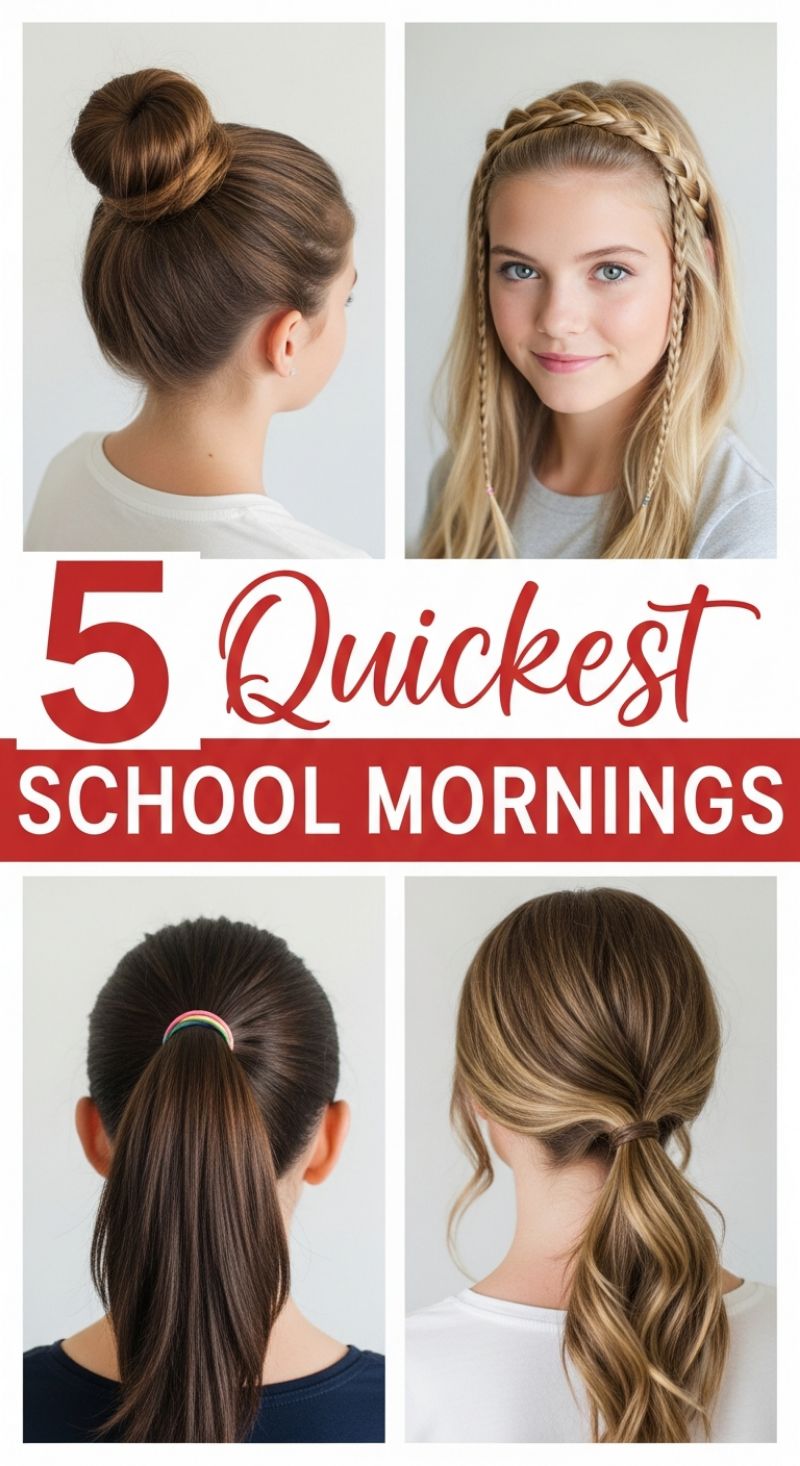
When the alarm clock offers zero mercy, mastering fast, polished hairstyles becomes essential. This collection highlights four of the most reliable, time-saving looks, perfect for getting out the door quickly while still looking put-together. For maximum speed, the high, tight bun (top left) reigns supreme. To execute this look, gather all hair into a high ponytail, ensuring maximum smoothness using a boar bristle brush and a small amount of smoothing serum or gel near the crown. Twist the ponytail tightly and wrap it around the base, securing it firmly with several bobby pins or a hair net for a professional, immovable finish. Alternatively, the classic sleek high ponytail (bottom left) is an instant win; the key here is elevation. Aim for a position directly above the occipital bone (the prominent bump at the back of the skull) and use a multicolored or decorative elastic to add a subtle pop of color. Expert tip for both updos: If you are dealing with second-day hair, use dry shampoo at the roots before styling to add grip and volume, making the updo last longer without sagging.
For those seeking a touch more detail without sacrificing time, the braided headband and the low textured ponytail offer excellent solutions. The braided headband (top right) is achieved by starting a Dutch or French braid along the hairline, moving from one side of the head to the other, creating a halo effect. This style is fantastic for controlling bangs or framing the face beautifully. As shown, adding small, delicate single-strand braids that hang loose on either side provides a bohemian, youthful accent. Keep the rest of the hair down and gently waved or straightened. If your hair is already wavy or holds a curl well, opt for the low, wrapped ponytail (bottom right). Secure the hair loosely at the nape of the neck. The transformative element here is concealing the elastic: take a half-inch section of hair from the underside of the ponytail, wrap it around the hair tie until it is completely hidden, and secure the end underneath with a pin. This simple technique instantly elevates a basic ponytail into a sophisticated hairstyle.
The beauty of these styles lies in their adaptability across various hair textures and lengths (medium to long). If time allows, curling the ends of the low ponytail with a large-barrel iron adds significant bounce and movement, but if you’re truly racing the clock, simply securing the hair and allowing natural texture to take over is perfectly acceptable. To achieve consistently quick mornings, focus on preparation: ensure your hair is detangled the night before, and keep a small caddy containing your essentials (hair ties, smoothing cream, bobby pins, and a brush) ready to grab. These four looks prove that functional school styles do not have to be boring—they just need to be fast, secure, and ready for a full day of activity.
12 Protective Natural Styles
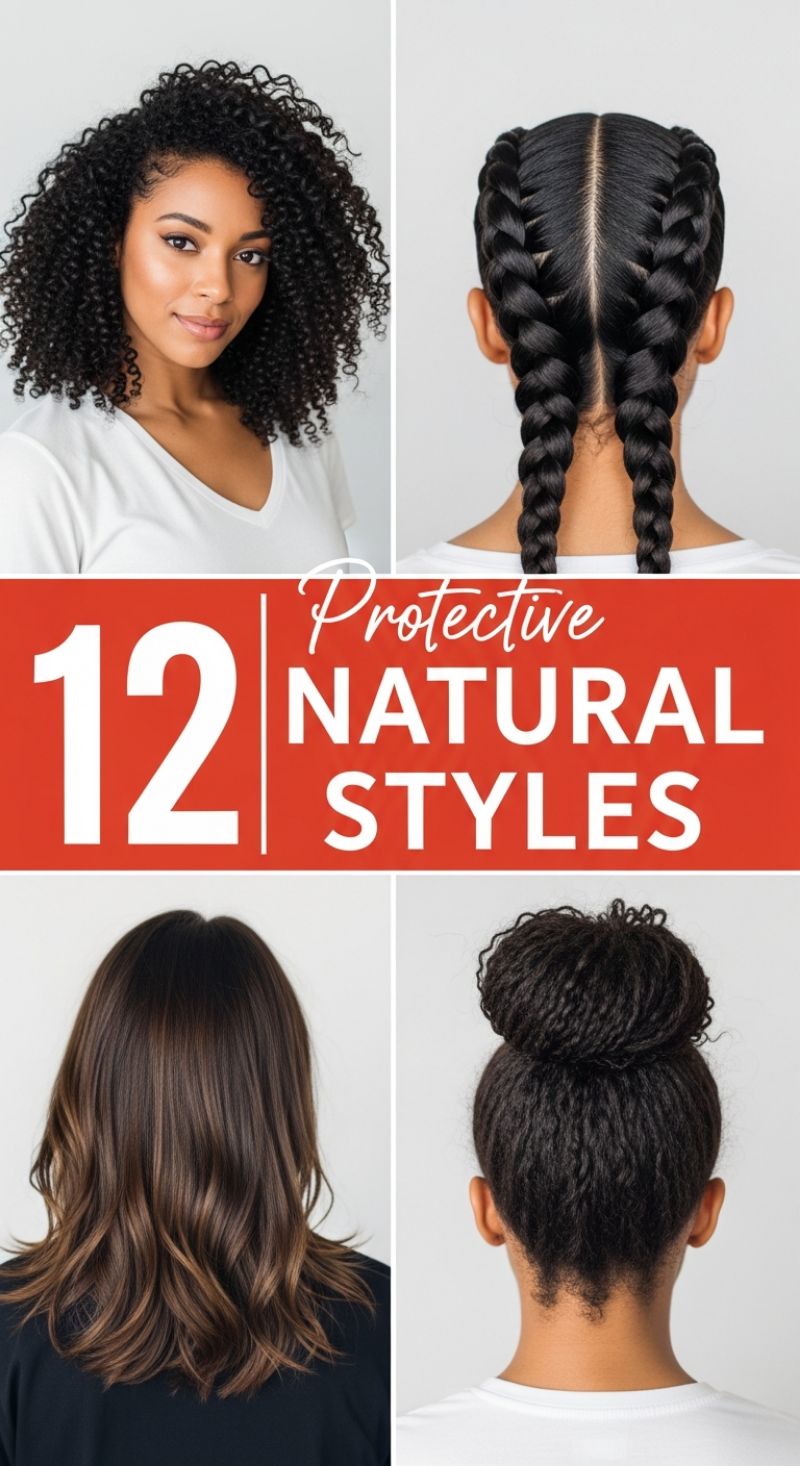
Protective styling is the cornerstone of a healthy natural hair journey, specifically designed to minimize manipulation, lock in moisture, and shield fragile ends from environmental damage. This practice is key for length retention and maintaining hair health, especially for highly coiled or kinky textures. While styles like a well-executed wash-and-go (as seen in the top left, prioritizing defined curls) offer temporary protection, the most effective methods involve tucking the hair away entirely. The featured styles—sleek braids and secure updos—demonstrate the versatility and elegance achievable when prioritizing hair health over daily styling stress. To begin any protective style, ensure hair is freshly washed, deep-conditioned, and thoroughly moisturized using a leave-in conditioner and a heavy sealing butter or oil, following the L.O.C. (liquid, oil, cream) method to maximize hydration before the hair is put away for days or weeks.
For maximum elegance and durability, mastering the art of the cornrow or Dutch braid is essential. The example in the top right showcases two impeccably sleek Dutch braids, created by braiding the hair underneath the preceding strands rather than over, which makes the braid stand out from the scalp. Achieving this level of neatness requires meticulous sectioning; use a rattail comb to create a sharp, clean center part, and apply a strong-hold edge control or natural styling gel along the part and perimeter before beginning the braid. The tension is critical: the braid must be firm enough to last but never tight enough to cause discomfort or stress the scalp, which can lead to traction alopecia. These types of cornrows are fantastic for exercising, can last up to two weeks, and transition beautifully into soft waves (a braid-out) once taken down, offering a second style without any additional heat.
Alternatively, for immediate length retention and low manipulation, the high top knot or bun, like the one pictured on the bottom right, is unmatched. This style completely hides the delicate ends and is perfect for hair that needs a break from constant handling. To create this updo, first detangle the hair completely, apply a moisturizing cream, and gather the hair tightly at the crown. Use a quality natural-hair gel to smooth down the perimeter, minimizing flyaways. Twist the length of the hair tightly and wrap it around the base to form a secure bun, pinning it in place with minimal hairpins. Expert advice dictates that any protective style, including buns and braids, must be protected at night; always sleep on a silk or satin pillowcase or wear a silk bonnet to prevent moisture loss and friction. Furthermore, avoid leaving these styles in for excessively long periods (over 3 weeks), and ensure that you are lightly moisturizing the scalp and exposed hair strands with a light oil a few times a week while the style is installed.
9 Fresh Style Ideas
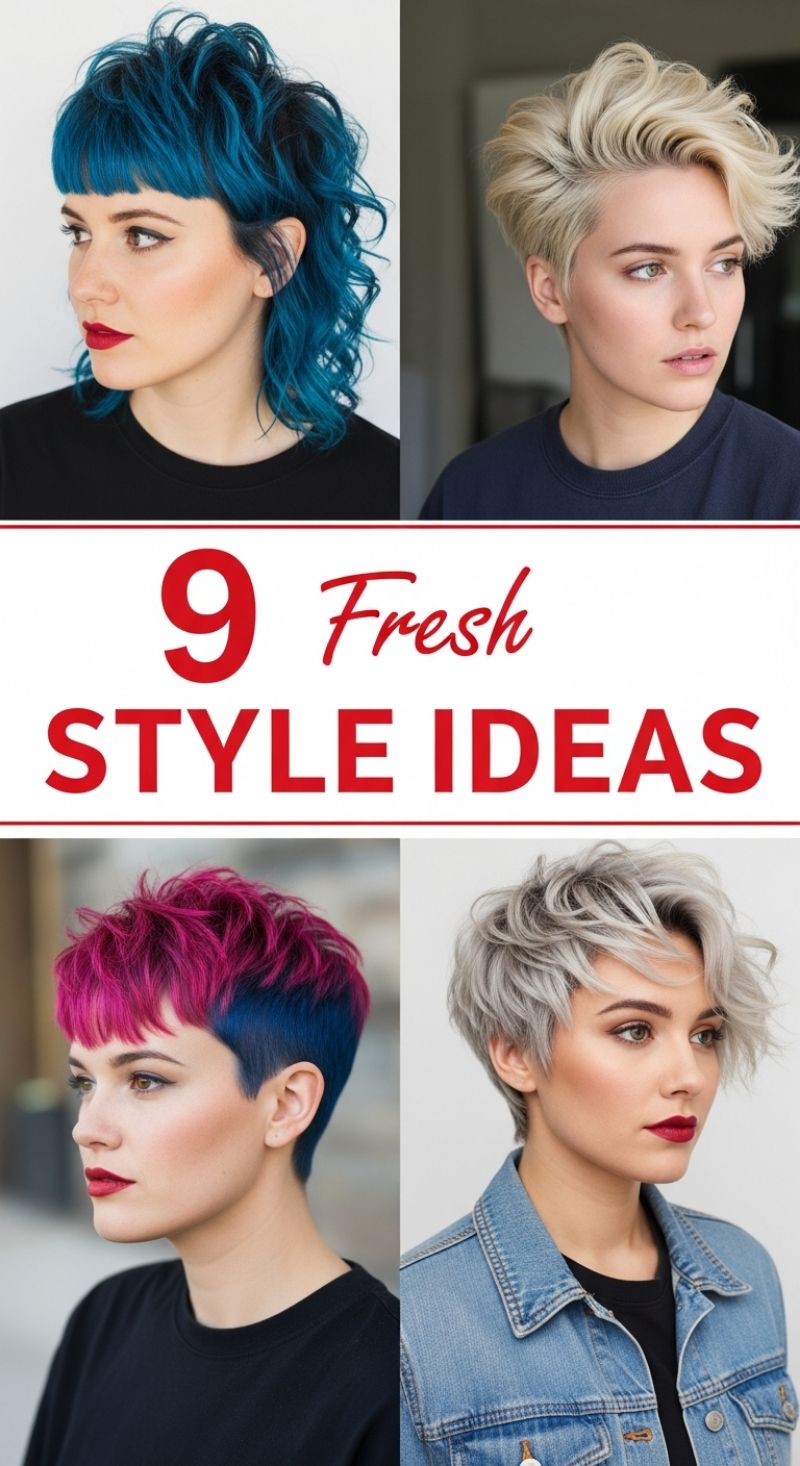
This curated collection of short hairstyles demonstrates the power of texture, strategic color placement, and customized length in creating truly contemporary looks. Moving far beyond the simple pixie cut, these styles integrate elements of the modern shag, the undercut, and extreme lift to provide volume and unique architectural definition. When considering one of these fresh ideas, consultation is key; you must discuss your natural hair texture and growth patterns with your stylist to ensure the short sides or defined bangs complement your facial structure and lifestyle. For example, the voluminous, textured pixie (Top Right) relies heavily on internal layering and meticulous tapering at the nape to allow the top sections to be swept back and held high, requiring a strong foundation cut.
Achieving the striking color transformations showcased here, particularly the vibrant teal (Top Left) and the intense pink and blue color-blocking (Bottom Left), requires specialized chemical processing. For any of these fantasy colors or high-lift blondes (platinum or silvery-grey), the hair must typically be lifted to a very light pale yellow stage. This intense lightening necessitates a robust at-home maintenance routine focused on hydration and color preservation. Use sulfate-free shampoos and specialized conditioning masks weekly. For dual-toned or neon styles, minimize wash frequency and always rinse with cold water to lock in the pigment and reduce bleed between contrasting colors. The silvery-grey look (Bottom Right) is particularly high-maintenance, requiring regular toning sessions to counteract brassiness and maintain that cool, chic ash tone.
Daily styling for these cuts is centered on maximizing volume and defining individual pieces. For the voluminous styles (Top Right and Bottom Right), begin by blow-drying the hair forward or upward using a round brush or your fingers, utilizing a root-lifting mousse for maximum base volume. Once dry, work a matte styling clay or a texturizing paste through the mid-lengths and ends, twisting small sections to create piecey definition and structured messiness. For the wavy, curly texture like the teal shag (Top Left), ditch the brush and utilize a diffuser attachment with a curl cream or wave spray to encourage natural movement, ensuring the bangs remain smooth but piecey. These looks thrive on dimension; avoid heavy serums that can weigh down the carefully crafted texture.
10 Effortless Medium Length Looks
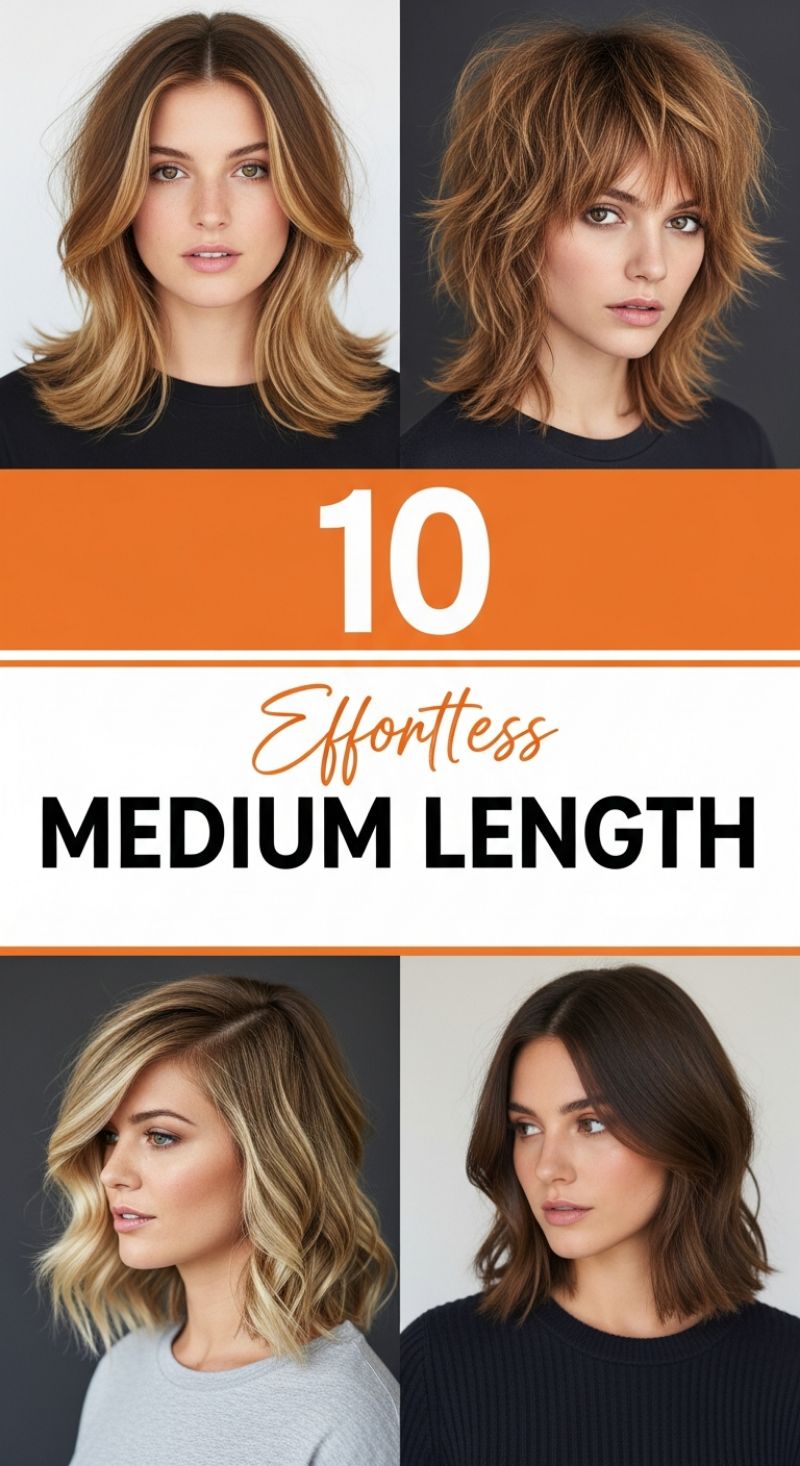
Medium length hair, often falling between the collarbone and the shoulder, is perhaps the most versatile and low-maintenance length, offering endless styling opportunities that retain volume and movement without the commitment or weight of long tresses. The key to achieving an truly ‘effortless’ medium look lies in the cut’s structure. As demonstrated by the diverse styles here, you can opt for high structure (like the retro, heavily layered shag cut with a piecey fringe seen top right) or tailored softness (the sleek center-parted lob with subtle face-framing layers on the top left). For the popular shag approach, success depends on texturizing shears and internal layering, allowing the hair to naturally fall into voluminous waves. To style this look, bypass the round brush; instead, scrunch in a salt spray or texturizing mousse and either air-dry or diffuse with the head inverted to maximize root lift and ensure that desirable, undone finish.
For those seeking polished sophistication with minimal fuss, focus on the Long Bob (Lob) variations showcased in the bottom half of the image. The side-parted wavy lob (bottom left) uses a deep side sweep to instantly boost volume at the crown. To replicate these defined yet soft waves, use a 1.25-inch curling iron, wrapping the hair away from the face but crucially leaving the last inch or two of the ends straight—this modern technique prevents the hair from looking too ‘done’ or dated. In contrast, the deep brunette blunt cut (bottom right) proves that medium hair looks incredibly chic when kept healthy and shiny. If opting for a blunt perimeter, styling efforts should focus on smoothing the cuticle using a heat protectant balm before a quick pass with a flat iron, adding only a very slight bend at the ends to prevent stiffness. This minimal movement enhances the rich color and requires far less daily effort than highly layered cuts.
Expert advice for maintaining these effortless styles centers on strategic color placement and routine trims. Medium-length cuts thrive when they have dimension; consider a sun-kissed balayage or bright face-framing highlights (like the ‘money piece’ visible in the top left) to add depth and movement without requiring heavy styling products. Furthermore, while medium hair can sustain shape longer than short hair, regular dusting or trimming every 8-10 weeks is essential to keep the perimeter sharp and layers lively. Tailor your cut based on your density: thinner hair benefits from blunt cuts to maximize volume retention, while thick hair needs internal layers to remove bulk and allow for that airy, tousled finish seen in the shaggy styles.
7 Simple Curly Hairstyles for Effortless Chic
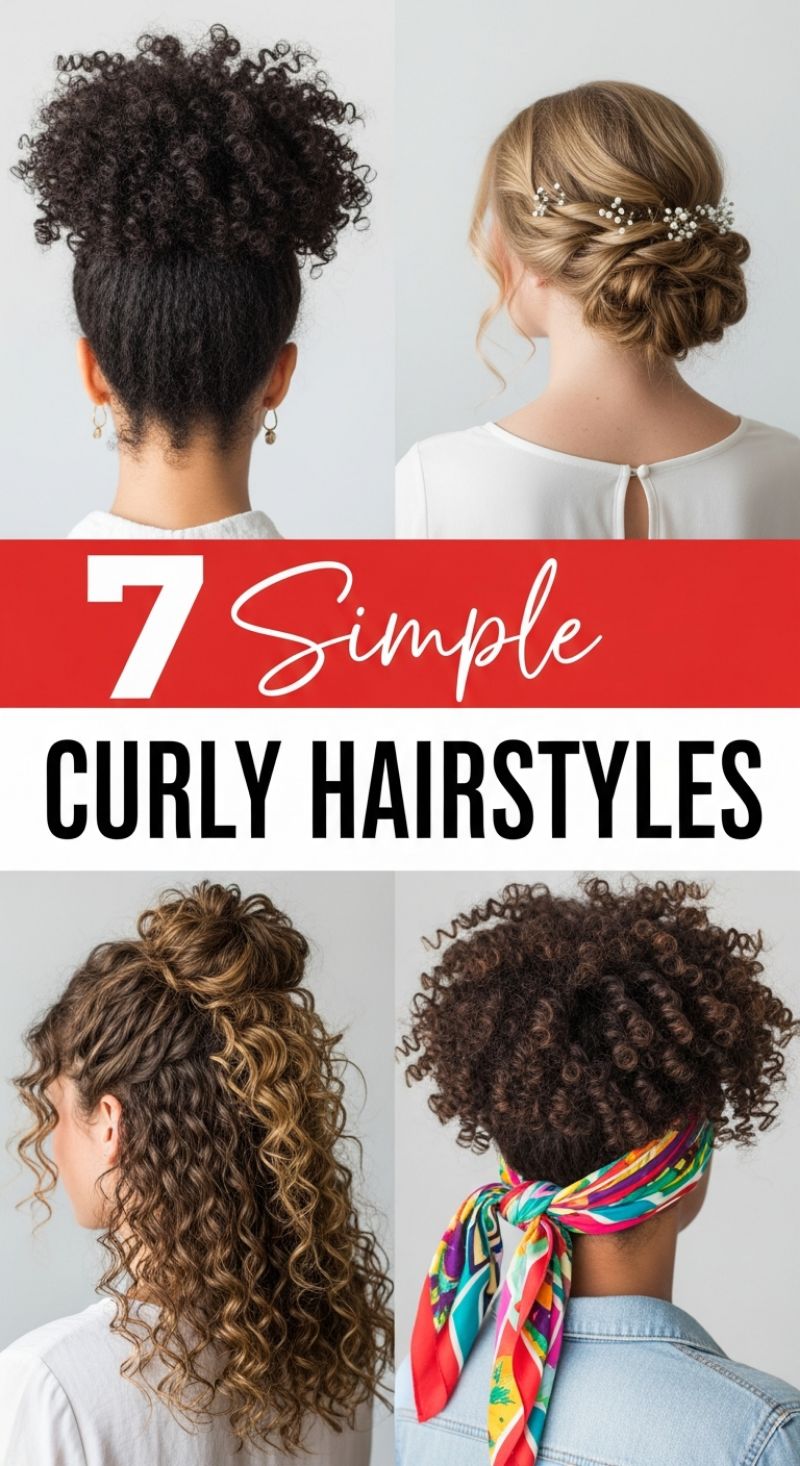
Achieving stunning looks with curly hair doesn’t require complex braiding or extensive heat styling. The foundation of these simple styles lies in well-moisturized, defined curls. Start with the versatile High Puff, a fantastic choice for tight coils seeking maximum volume and lift while protecting the ends. To execute this look, gather all your hair high on your crown, using a moisturizing gel or edge control product to smooth the perimeter and nape area. Secure the base tightly with a sturdy elastic or a drawstring band. Fluff the resulting ‘puff’ gently to maximize volume without disrupting the natural curl pattern. For medium to long, looser curls, the Half-Up, Half-Down Top Knot provides a casual yet polished look. Section the top half of your hair (from ear to ear) and twist it into a messy bun or top knot, securing it loosely with bobby pins. This style keeps hair away from the face while allowing your natural length and highlights to cascade down your back, emphasizing definition.
When seeking elegance or simply needing a quick fix, focusing on low styles and smart accessories is key. The Low Curly Updo, often mistaken for complex formal styling, can be simplified by focusing on soft twists and pinning. For this look, gather your curls loosely at the nape of your neck. Instead of a tight bun, twist sections of your hair and gently pin them across the back of your head, creating an organic, textured chignon. Adding delicate accessories, like sprigs of baby’s breath or pearl pins, instantly elevates this style for weddings or formal events. Alternatively, for a vibrant, casual approach, incorporate a scarf or bandana. Pull your curls back into a low, loose ponytail or secure them near the nape. Wrap a colorful silk scarf around the head, knotting it strategically at the back base of the neck, covering the secured hair. This not only adds a striking element of color but is also an excellent protective style, minimizing frizz and hair friction against clothing.
Regardless of the chosen style, maintaining the health and definition of your curls is paramount for these looks to succeed. Expert advice suggests always starting on dry or slightly damp hair for updos to prevent shrinkage and ensure long-lasting hold. When smoothing edges or the perimeter (as needed for the High Puff), use non-flaking edge control specifically formulated for your hair type. To combat frizz in the main body of the hair, finish with a light mist of flexible hold hairspray or a few drops of anti-frizz serum, gently smoothing it over the surface. Remember that the beauty of a simple curly style is the texture—avoid over-manipulation. When taking these styles down, remember to deep condition regularly to replenish moisture lost during styling and ensure your curls remain resilient and defined for the next stunning look.
6 Flowing Long Hair Updos
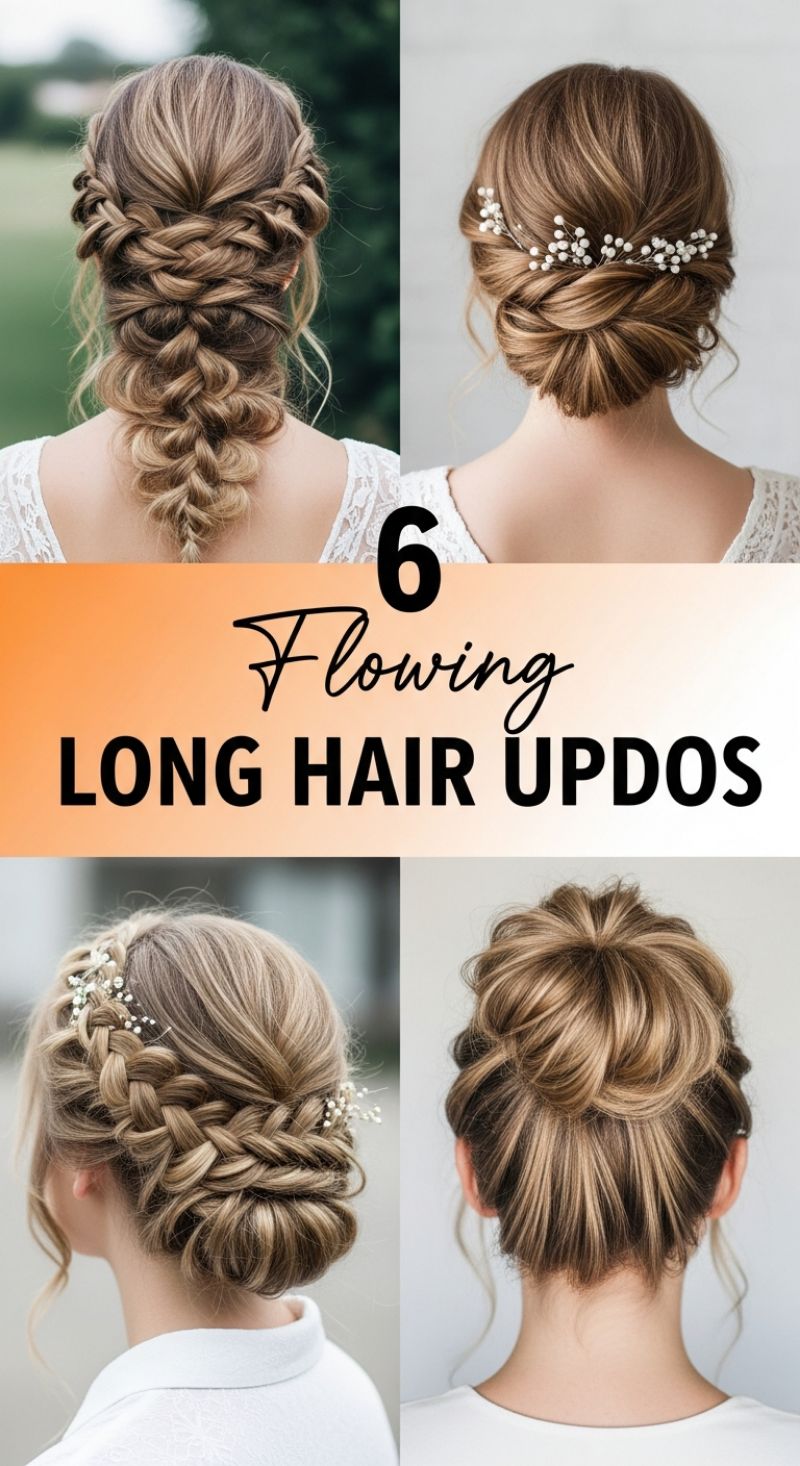
Achieving a truly “flowing” updo requires a blend of structure and softness, especially when working with long, heavy hair. The intricate styles showcased here perfectly balance elaborate technique with a relaxed, romantic finish. To replicate the bohemian braided styles (like the top left and bottom left examples), start by prepping the hair with a heat protectant and large barrel curling iron to create soft waves; this is crucial for adding necessary grip and volume. For the top left look, execute a series of overlapping Dutch or French braids diagonally across the crown, feeding hair from the sides and loosening (pancaking) each section immediately after securing it. This technique allows the braids to look full and wide, rather than tight and severe. Collect the ends into a loose, low braid or woven knot at the nape. The bottom left style utilizes a similar approach but incorporates thicker, looser braids wrapped horizontally around the head, culminating in a large, textured bun, often requiring supportive padding (like a hair donut or bun maker) hidden within the twists to maintain its robust shape. Always use U-pins to secure the woven layers of these intricate looks, directing the pins into the base for optimal hidden support.The remaining styles offer variations on elegance and casual volume. The top right style is a timeless twisted chignon, ideal for formal occasions. To create this, gather the hair into a low ponytail, then divide it into two or three sections. Twist each section individually, then wrap and overlap them tightly against the head, securing with U-pins or bobby pins that are inserted across the twist for maximum hold. Finish this classic look with a delicate, wired accessory, such as a pearl vine, which follows the curve of the twist. Conversely, the high, voluminous bun (bottom right) is achieved by embracing texture and lift. After pulling the hair into a high ponytail, backcomb the entire pony heavily to build maximum bulk. Then, loosely wrap the teased hair around the base, pinning it selectively while pulling out small, strategic strands around the bun and nape. This creates the coveted undone, wispy aesthetic, perfectly highlighting dimension in multi-tonal hair.For all long hair updos, product application is paramount to longevity. Before styling, utilize a texture spray or dry shampoo near the roots to add friction and prevent slipping. When pinning, adopt the ‘X’ technique by sliding two bobby pins across each other to anchor larger sections securely. The secret to maintaining the ‘flowing’ appearance, where the style looks soft and effortless, is to mist a flexible hold hairspray from a distance once the style is complete, rather than saturating it upfront. Finally, ensure you leave out loose face-framing pieces to fall naturally, which softens the look and ensures the final result feels less stiff and more organic, making these long hair styles both stunning and wearable for hours.
5 Speedy Natural Hair Styles
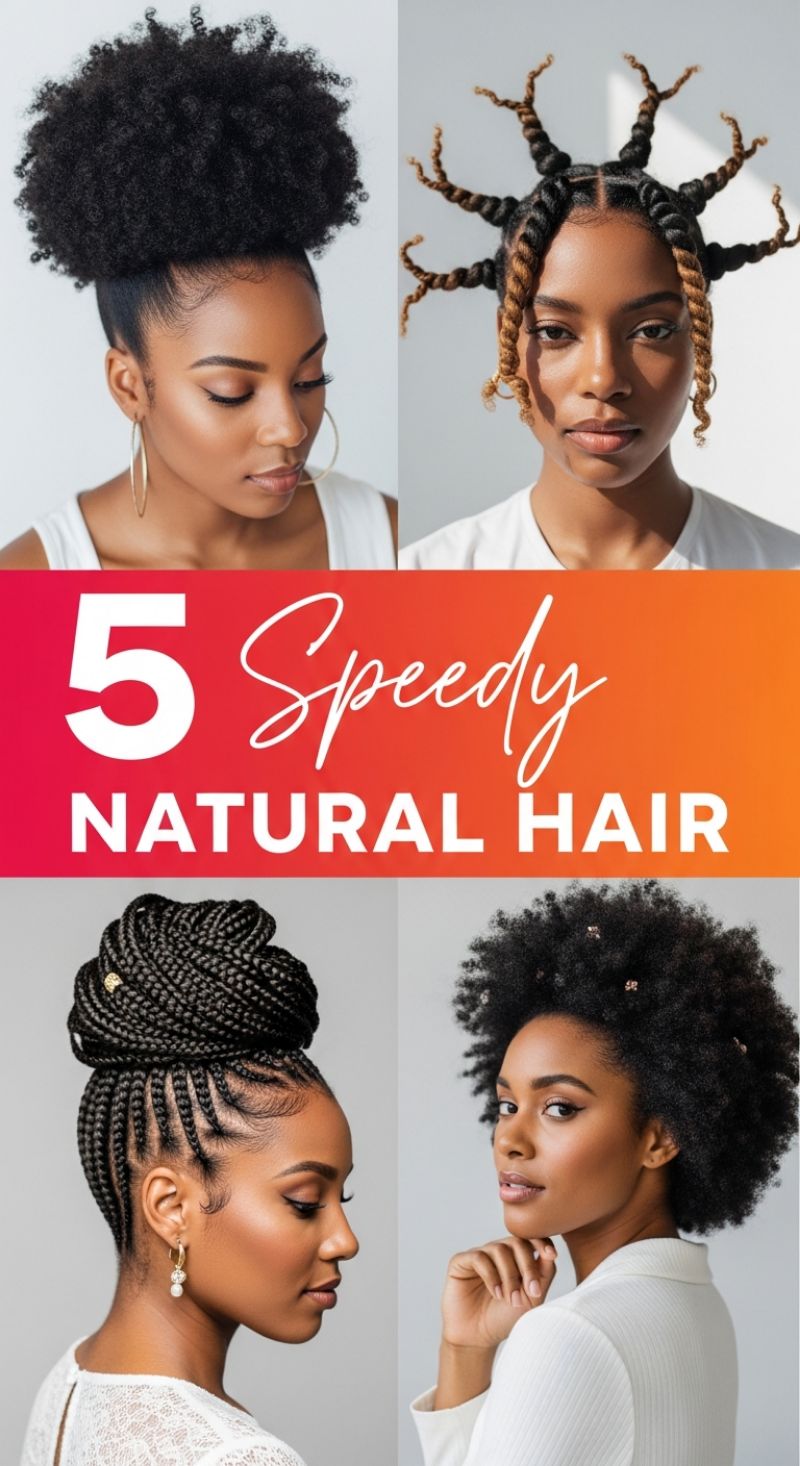
This collection highlights four diverse and effective ways to style natural hair quickly, emphasizing protective and high-impact looks. The first look, featured in the top left, is the classic High Puff—a timeless, sleek updo that showcases volume and minimizes daily manipulation. To achieve this look, first ensure your hair is adequately moisturized, as sleekness depends on hydrated strands. Use a durable brush and a strong-hold gel or edge control to smooth the perimeter (back and sides) of your hair toward the crown. Once slicked, use a thick elastic band, stocking, or a dedicated puff cuff (which is often gentler on delicate edges) to gather the hair tightly at the desired height. Fluff the gathered afro-textured hair for maximum volume and shape, ensuring the base remains smooth and flawless. This style is an ideal solution for quickly transitioning from wash day to a polished, refined look and is particularly effective in minimizing frizz in humid conditions by keeping hair off the neck. Accessorize with bold jewelry, like the large hoop earrings seen in the image, to complete the sophisticated aesthetic.
For those seeking a bolder, more artistic statement, the style in the top right showcases a unique architectural twist design. This look typically involves sectioning the hair, often starting with neat, symmetrical box sections across the crown, and then performing chunky two-strand or three-strand twists that are manipulated into gravity-defying, free-standing shapes, secured with minimal pins at the tips. Incorporating pops of color, such as the honey-blonde strands highlighting the facial features in the image, adds significant dimension and emphasizes the intricate twisting technique. This creative method functions as an excellent temporary protective style, offering notable elongation and curl definition upon careful unraveling later on. Conversely, the bottom right image presents a beautiful, uniformly shaped Mini Afro, a low-maintenance style that passionately celebrates natural texture. The key to a healthy mini afro is regular deep conditioning, careful nightly wrapping, and mindful shaping. Use a wide-tooth comb or pick to gently lift the roots for optimal volume and structure, taking care to avoid excessive pulling. Small metallic or pearl hair accessories can be strategically placed throughout the coils to add subtle sparkle and visual interest, effortlessly elevating this everyday style to a special occasion look.
The final look, seen in the bottom left, is a highly refined and highly protective Braided Updo. This commanding style, often achieved using feed-in cornrows that seamlessly transition into a large, intricate braided bun or coil, is the epitome of elegance, durability, and versatility. To replicate this look, hair is tightly cornrowed following uniform lines vertically from the nape and sides, curving smoothly toward the crown. The remaining loose hair is then meticulously braided (usually incorporating extensions for necessary density, length, and shape) and wrapped into a large, structured, sculptural bun. Expert advice for this long-lasting style includes ensuring all cornrows are executed with uniform size and consistent tension to prevent scalp strain or potential breakage, while maintaining finely detailed baby hairs with precise application of edge control for the ultimate polished finish. A statement accessory, such as the single gold bead or cuff woven into the braided bun, adds a luxurious, textural touch. While this style requires a significant initial time commitment compared to the High Puff, its durability means it’s a highly valuable “speedy” option for long-term daily styling once installed, ultimately saving hours of effort over several weeks.
8 Chic Short Hair Cuts
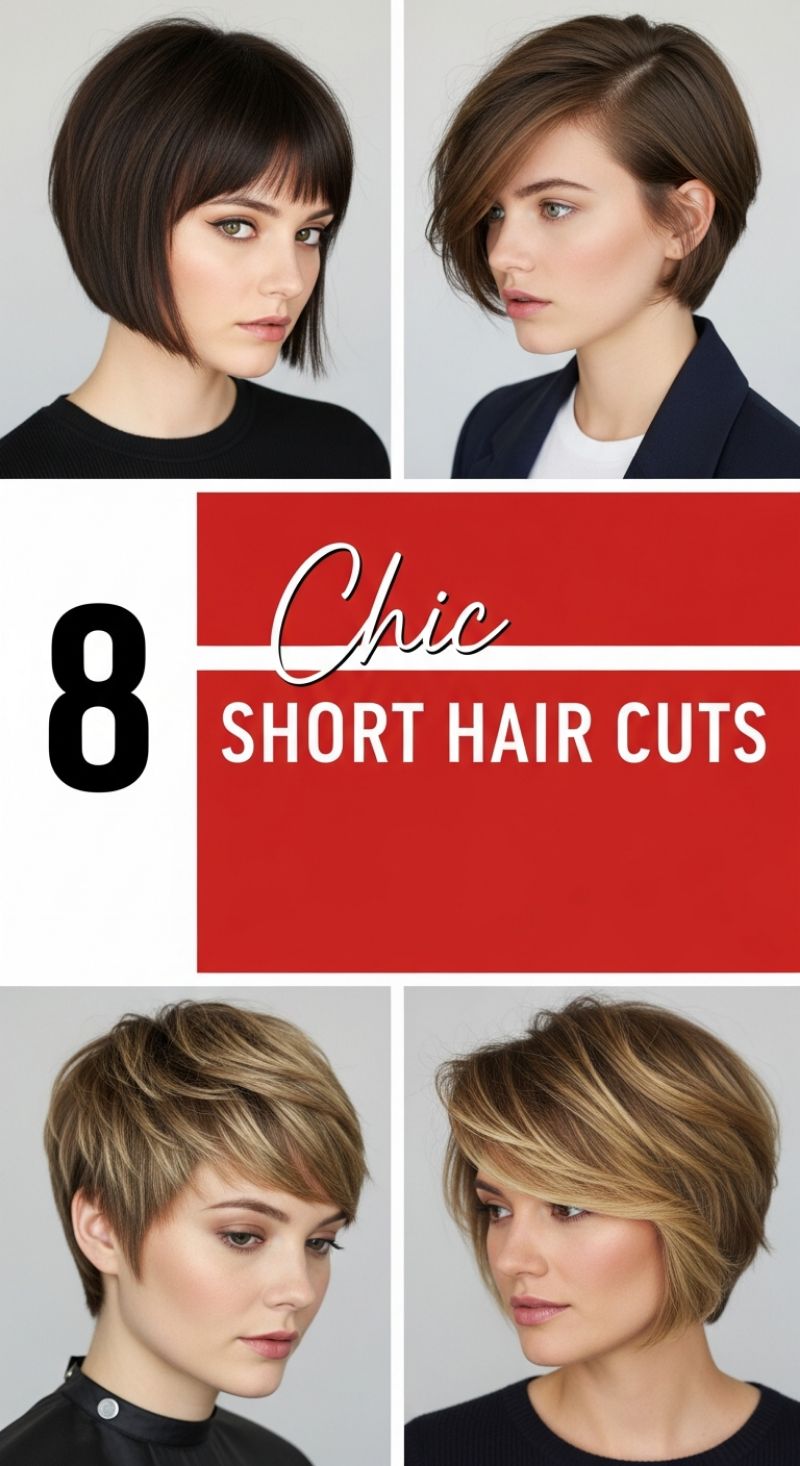
The realm of short hairstyles offers incredible versatility, blending precision, texture, and volume to create truly transformative looks. When aiming for a chic, structured style like the modern chin-length bob (exemplified by the sleek, dark cut shown), the foundation is precision. To achieve that sharp, almost architectural line and the perfectly defined fringe, request a blunt cut with internal weight removal only if necessary for movement, ensuring the perimeter remains strong. Styling requires thorough smoothing: apply a heat protectant and straightening balm to damp hair, then use a quality blow dryer paired with a paddle brush, guiding the hair straight down. For maximum mirror-like shine, finish with a dime-sized amount of high-gloss serum applied sparingly from mid-shaft to ends. Alternatively, if preferring the asymmetric elegance of the longer side-parted bob, concentrate on maximizing volume at the crown and sweeping the front section across the forehead for a dramatic, elongated effect, often achieved best with a deep side part and minimal layering around the face.
Moving toward high-texture styles, mastering the layered pixie cut or the voluminous stacked bob relies on strategic product use and technique. For the piecey, modern pixie, the cut should incorporate significant internal layers and skillful point cutting, which allows the hair to fall naturally into defined sections. To style this short cut, skip the brushes. After towel-drying, apply a matte texturizing clay or paste. Work the product through the hair using your fingertips, lifting the roots and defining individual pieces to achieve that effortless, tousled movement. For the softer, layered bob that features impressive lift and body, preparation is key; apply a volumizing mousse or thickening spray directly to the roots before blow-drying. Utilize a medium-sized round brush to lift the hair up and back, focusing on creating curves at the ends and height at the crown. This technique is crucial for achieving that stacked appearance and the soft, sweeping motion of the face-framing layers.
Expert maintenance is non-negotiable for these sophisticated short looks. Unlike long hair, which can tolerate longer intervals between salon visits, a structured bob or textured pixie loses its intended shape quickly; plan for a trim every four to six weeks. Furthermore, use color strategically to amplify the cut’s features. A deep, solid color, like the dark hue on the blunt bob, emphasizes clean lines and gloss. Conversely, subtle balayage or dimensional highlights, as seen in the textured blonde styles, draw the eye to the layers and movement, making the hair appear thicker and more dynamic. Remember to tailor the style to your bone structure: sleek, precise bobs often suit oval or heart-shaped faces, while voluminous, layered styles can brilliantly balance wider or rounder face shapes by adding vertical lift.
7 Messy Fun Hairstyles
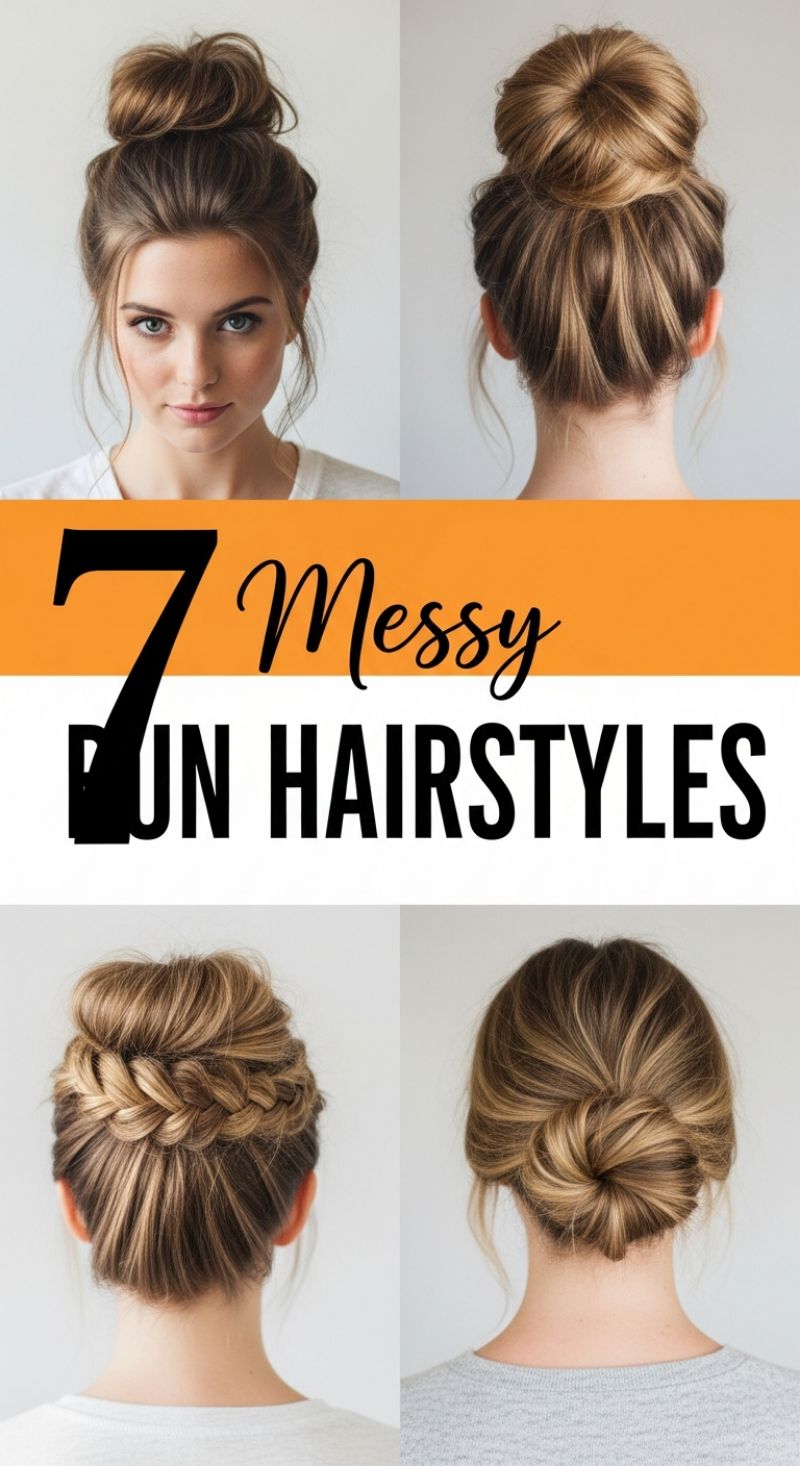
The ‘messy fun’ updo is a cornerstone of effortless chic, offering a perfect blend of casual comfort and stylish appeal. To achieve the iconic high messy bun, as seen in the top images, the key is texture and preparation. Begin by applying dry shampoo or a texturizing spray to the roots and lengths—this creates necessary grip and volume, preventing the bun from looking flat or sliding down. Gather the hair into a high ponytail, positioning it near the crown. Instead of coiling the hair tightly, loop the hair through the elastic halfway, creating a loose loop. Then, loosely wrap the remaining tail around the base and secure with multiple bobby pins, focusing on anchoring the bun structure to the scalp. The final and most crucial step is to strategically loosen the look: gently tug at the edges of the bun and slightly pull out strands around the hairline, particularly face-framing pieces, to soften the silhouette and achieve that highly sought-after, intentionally undone appearance. This technique ensures the style remains relaxed, breathable, and never too severe.
For a more intricate, yet equally relaxed aesthetic, consider integrating braids into the updo, as demonstrated by the braided bun example. This style works beautifully on second-day hair, where natural oils aid in creating definition. Start by executing a Dutch or French braid, beginning either low at the nape and braiding upwards (an inverted French braid) or braiding two side sections towards the back center. Once the braid reaches the desired height (usually mid-back or just above the nape), gather the remaining hair—including the end of the braid—into a simple, voluminous bun. Before securing the final bun, a crucial expert technique is ‘pancaking’ the braid: gently pulling the loops of the braid outward to make it appear thicker, softer, and significantly more voluminous. This added texture contrasts beautifully with the smoothness of the secured bun and adds depth, transitioning this look from a basic updo into an elevated, statement hairstyle suitable for any casual or semi-formal daytime event.
Alternatively, for a sleek-but-soft finish perfect for professional settings or evening wear, the low twisted chignon (as pictured in the bottom right) is your ideal choice. This look requires slightly smoother hair, so a light serum application is helpful. Start by creating a smooth, low ponytail at the nape of the neck. Twist the ponytail tightly, then coil the twisted hair inward against the head until it forms a tight, snail-shell shape. Secure the coil meticulously with U-shaped pins or hair grips, ensuring the base is completely hidden. While this is a neater style than the messy bun, it benefits from a touch of softness; avoid slicking back the hairline too severely. Instead, use a toothbrush with a light layer of hairspray to lightly tame flyaways, maintaining the structure while allowing a slight, natural movement. This low knot provides an air of timeless sophistication while remaining exceptionally quick and easy to execute.
5 Sharp MEN’S STYLES
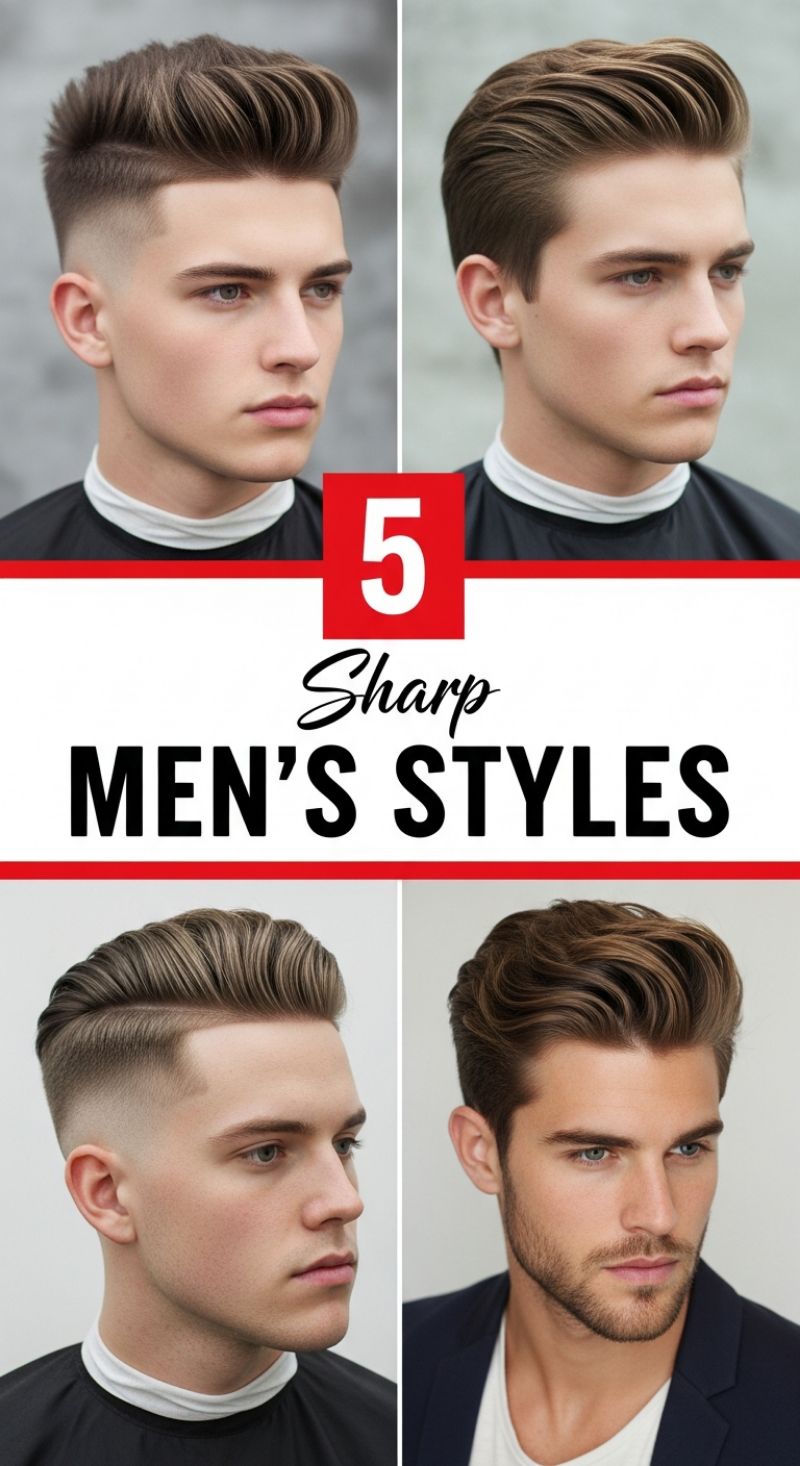
The hallmark of these contemporary men’s styles is high contrast, achieved through precise fading techniques on the sides coupled with significant length and structure on top. To achieve this level of sharp definition, start with a professional cut that utilizes a high or mid skin fade, ensuring a flawless blend up into the crest of the head. The key styles showcased here range from the voluminous modern Quiff (top left), requiring substantial lift and forward direction, to the deeply structured Side-Part Comb Over with a definitive razor line (bottom left). For maximum sharpness, particularly for the more structured slick-back or comb-over variations, regular maintenance is mandatory. You should plan for a neck taper and fade cleanup every 2-3 weeks to maintain the ultra-clean lines that define these looks. When requesting the cut, specify the desired fade level (e.g., zero guard to #3) and the length you wish to retain on top, typically 3 to 6 inches, depending on the volume desired.
Achieving the necessary volume and hold requires meticulous styling preparation. Begin with wet hair and apply a quality pre-styling product, such as sea salt spray or a volumizing mousse, focusing heavily on the root area. Using a blow dryer set to medium heat and a vented brush, aggressively dry the hair up and back (for slick backs) or up and forward (for quiffs), lifting the hair away from the scalp to build the foundational height. Once 90% dry, switch to a cool setting to lock the volume in place. The choice of finishing product dictates the final aesthetic: for the high-shine, polished finish seen in the slicked-back styles, a traditional oil-based or water-based pomade is essential. For the more textured, natural wave (bottom right), a matte clay or high-hold texturizing cream will provide robust structure without the glossy sheen. Ensure the product is warmed thoroughly in your hands before raking it evenly through the roots to the ends, shaping the final style with your fingers or a wide-tooth comb.
These looks are highly adaptable but thrive best on hair that has medium to high density. If your hair is particularly thick, ask your barber to use texturizing shears on the internal layers to reduce bulk, allowing the hair to lift higher and sit lighter. Conversely, if your hair is fine, maximizing the blow-dry technique and using an ultra-lightweight root boosting powder before the final styling product will create the illusion of density. For face shapes like oblong or diamond, be cautious about too much height, which can elongate the face; try reducing the height of the quiff while maintaining the side fade. Ultimately, the success of these ‘sharp’ styles hinges on the contrast between precision-cut sides and meticulously styled, directional flow on top, making them the ultimate statement of modern male grooming.
9 Trendy Braid Inspiration
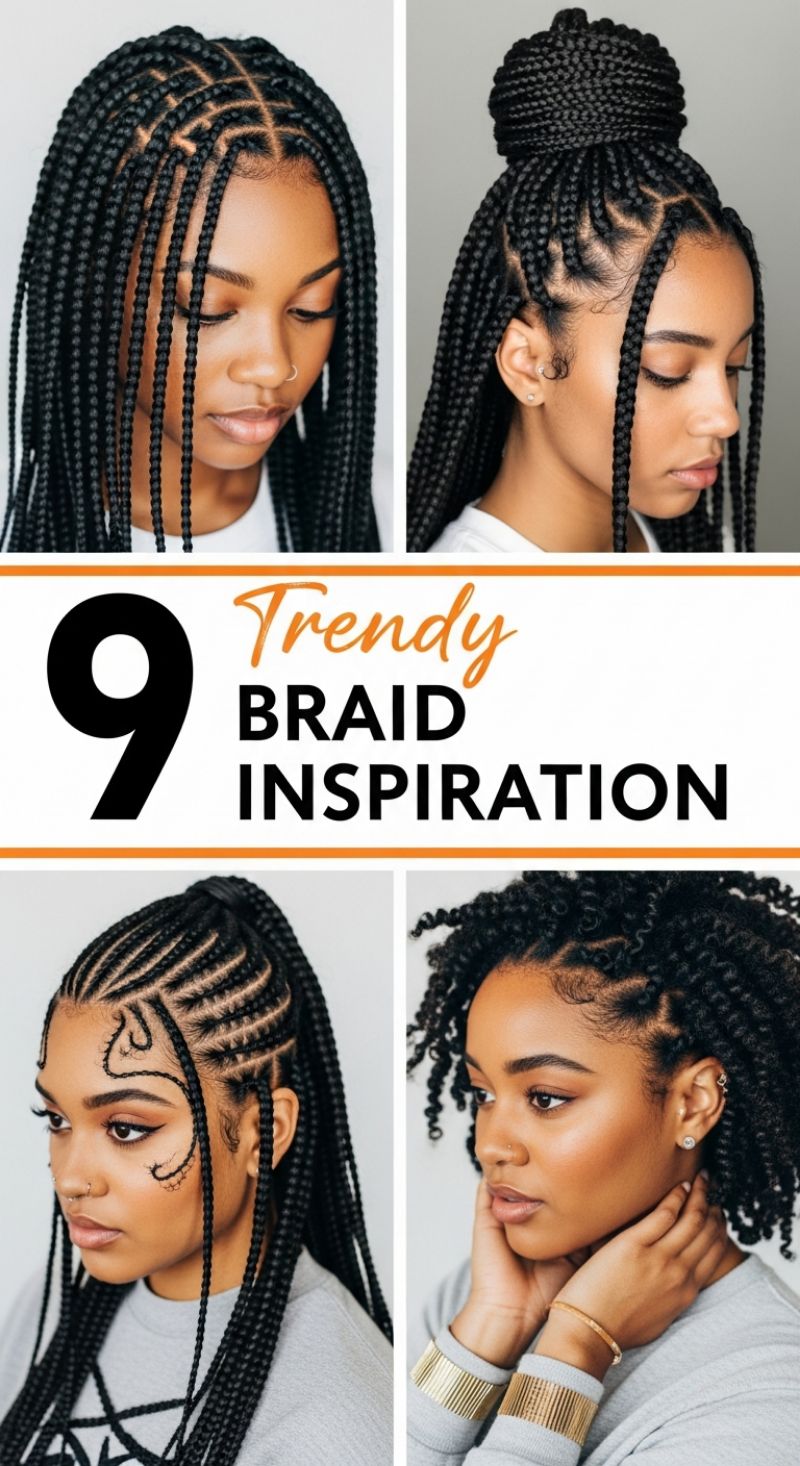
Protective styles are a cornerstone of natural hair care, offering both versatility and preservation, and the styles featured here showcase the pinnacle of modern braiding artistry. The classic box braid, demonstrated in the upper quadrant, serves as a foundation for countless looks. To achieve the sleek, free-hanging medium box braids (top left), precision parting is paramount; utilize a rat-tail comb to ensure perfectly square or diamond-shaped sections across the scalp, applying edge control or a light gel to keep the base neat and reduce slippage. For the top right style, the same medium braids are masterfully gathered into an elegant, voluminous high bun, but the look is elevated by creative geometric parting (like zigzags or triangles) just above the ears and temples. This technique draws attention to the hairline and adds dynamic movement to the transition zone before the hair is secured. Expert Tip: When styling into an updo, use a lightweight finishing mousse over the length of the braids before wrapping to minimize flyaways and enhance shine without adding heavy product buildup.
The bottom left presentation shifts focus to cornrow mastery, featuring sleek feed-in braids pulled into a polished, high ponytail. This style demands meticulous sectioning and the skilled use of the ‘feed-in’ technique, where hair extensions are gradually added to the natural hair as you braid, creating a smooth, seamless transition from the scalp without bulky knots. The true artistry, however, lies in the elaborate ‘swooping’ designs or custom cornrow patterns sculpted near the temples and forehead. These intricate lines, often finished with carefully laid baby hairs, require a strong-hold, non-flaking edge control product and patience. When attempting these intricate curves, map out the design with the comb handle first, ensuring symmetry and sharpness. This blend of structured cornrows and expressive hairline detail creates a bold, fashion-forward statement.
Finally, the bottom right style offers inspiration for shorter, high-texture protective looks, specifically chunky two-strand twists or springy corkscrew coils. Unlike the lengthy box braids and cornrows, this style prioritizes natural volume and dimension. To recreate this look, section hair while damp, applying a rich twist-and-lock gel or defining cream thoroughly to each section before executing the two-strand twist or coil. The key to lasting definition is ensuring the twist is uniform and tight from root to tip. Maintenance for this voluminous texture style is simple: refresh daily using a light oil sheen or a hydrating mist, and sleep with a satin bonnet to prevent frizz and preserve the integrity of the twists. This option is ideal for those seeking a highly protective style that requires minimal manipulation and beautifully showcases natural curl patterns.
6 Bold Pixie Cuts
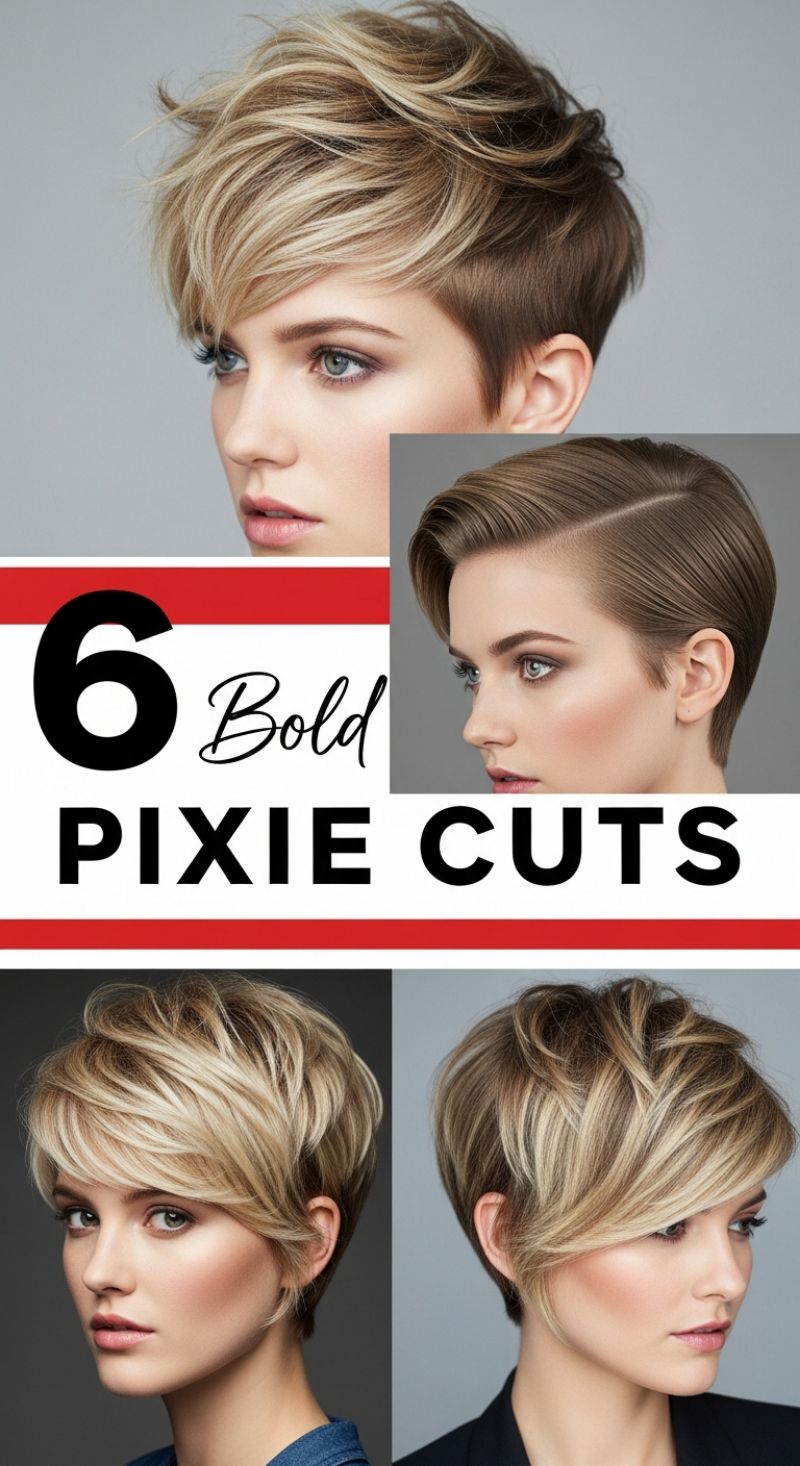
The pixie cut is the ultimate power statement in short hair, offering immense versatility that ranges from edgy texture to polished sophistication. To achieve the bold, tousled look seen in the top and bottom left examples, the secret lies in strategic layering and color dimension. Request a heavily feathered cut with long layers on top—the key is creating internal movement that prevents the hair from lying flat. For styling, start with damp hair and apply a volume-boosting mousse or sea salt spray, focusing on lifting the roots. Blow-dry the hair directionally, pushing the top forward and upward. Once dry, use a matte texturizing paste or wax, warming a small amount between your fingertips, and piece out the layers. This technique defines the distinct blonde highlights against the darker base, making the texture visually pop. This style is fantastic for those with fine to medium hair who crave volume and a dynamic, carefree finish that still looks deliberate.
In sharp contrast, the image on the top right showcases a sleek, structured approach to the short cut, often referred to as a side-parted polished pixie. This look demands precision—the cut features closely cropped sides that smoothly transition into a longer top section, defined by a deep, crisp side part. To recreate this sharp, gubernatorial style, apply a strong-hold pomade or high-shine gel to wet hair and comb it meticulously into place, ensuring every strand is smooth and flat against the head. For the softer, side-swept aesthetic illustrated in the bottom right, you need significant length in the fringe area. This styling requires a large round brush during the blow-dry process to create a dramatic swoop over one eye, adding a touch of mystery and softness. This variant is especially flattering for those who want to balance out sharp jawlines or high cheekbones, as the soft curve of the fringe beautifully frames the face.
Regardless of which bold pixie variation you choose, upkeep is essential for maintaining the sharp silhouette; plan for a trim every four to six weeks. Product choice is crucial: opt for low-shine, pliable products like clay or paste for styles emphasizing texture and height, or high-shine gels and serums for the sleek, refined looks. For colored pixies, especially those featuring bold contrast like highlights or balayage, invest in color-safe shampoos and deep conditioning treatments to prevent fading and maintain hair health. Experiment with moving the part—a deep side part offers instant drama, while a slightly off-center part can provide natural lift and volume without requiring heavy styling products. The beauty of these bold cuts lies in their minimal time commitment combined with maximum visual impact, making them a perfect choice for the modern, confident woman.
5 Sleek Ponytail Hacks
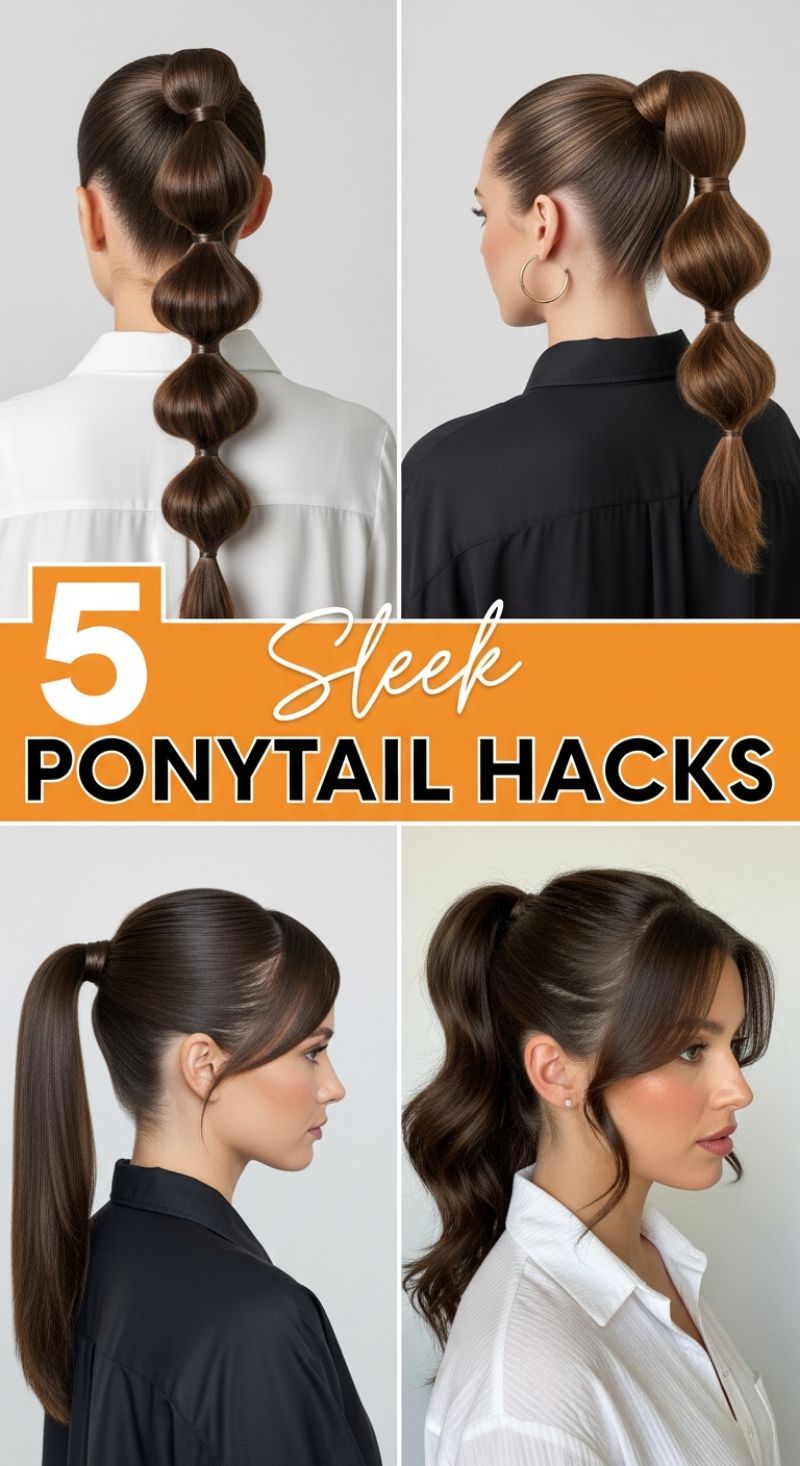
Mastering the sleek ponytail starts with the foundation: a flawless, high-gloss base. Whether you opt for the classic straight pony or a dramatic bubble effect, preparation is key. Begin by treating your hair with a high-shine serum or smoothing balm to eliminate flyaways and provide heat protection. Use a boar-bristle brush to pull the hair tightly back, aiming for placement at the crown of the head or slightly higher for maximum lift. To ensure the pony remains immovable and lifted throughout the day, utilize two elastic bands or, for an undetectable finish, secure the first elastic and then wrap a small section of hair from the underside of the ponytail around the band, securing it with a bobby pin tucked neatly underneath. This foundational technique instantly elevates the classic ponytail, providing the sleek, polished canvas seen in the lower left image, which pairs perfectly with subtly structured, face-framing bangs.
For a truly architectural and high-fashion look, emulate the striking Bubble Ponytail featured in the top panels. Once your sleek high ponytail base is established, this technique requires minimal effort but delivers maximum impact. Gather small, clear elastic bands (or bands matching your hair color). Starting approximately two to three inches below the initial base elastic, place the first secondary band. Measure another equal distance down and place the third band, repeating this process until you reach your desired length, leaving a small tail at the bottom. The magic happens in the ‘puffing’ phase: gently grasp the sides of the hair between two of the segmented elastics and lightly tug outward. This creates the voluminous, rounded ‘bubble’ effect. This hack works exceptionally well on longer hair or when using clip-in extensions for added length and density, transforming a simple style into a runway-ready statement piece.
Alternatively, if you prefer high volume and movement over structural form, transition from the sleek base into the Bouncy, Wavy Ponytail (bottom right). After securing the high base, use a large-barrel curling iron (1.5 to 2 inches) to create soft, defined waves throughout the length of the pony. Ensure you curl all sections in the same direction for a cohesive, flowing look. For an extra boost of height at the crown, gently backcomb the underside of the ponytail just below the base elastic before curling, and set the roots with a light-hold hairspray. Remember to style the face-framing layers or curtain bangs separately, curling them away from the face to create a soft, cheekbone-grazing sweep that maintains the overall glamorous, bouncy silhouette while keeping the roots perfectly smooth and defined.
8 Amazing 4C Textures
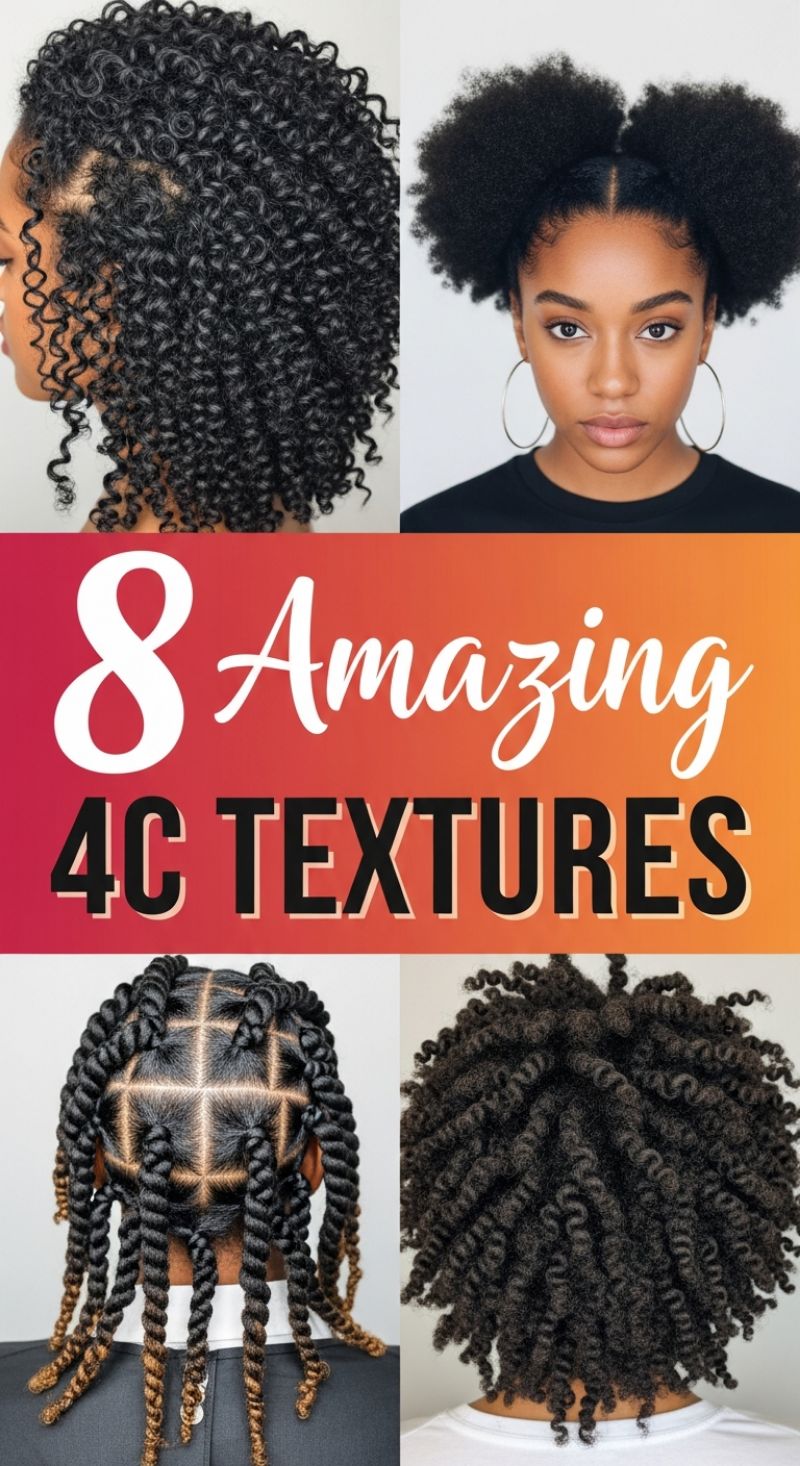
Achieving highly defined coils and structured styles on 4C hair, as demonstrated in this visual guide, requires precision in product application and technique. For the short, bouncy defined look (top left), a successful wash-and-go technique is key. Start on soaking wet, freshly cleansed hair. Use a high-quality curl defining cream or gel specifically formulated for high-porosity hair, applying it generously from root to tip in small sections. The shingling method—where you manually define each coil or small clump of hair—will maximize definition and minimize frizz. For the voluminous twist-out appearance (bottom right), chunky two-strand twists are set on moisturized hair and allowed to dry completely before unraveling. Ensure your base is layered with a leave-in conditioner, a sealant oil, and then a rich butter or cream for maximum elongation and moisture retention before twisting.
The featured protective and structured styles offer both flair and low-manipulation benefits crucial for 4C hair health. The chunky twists (bottom left) utilize geometric grid parting, which ensures a neat, professional appearance. To recreate this look, section the hair into precise squares or rectangles using a rattail comb, applying edge control or holding gel to the perimeter of each section before initiating the two-strand twist. This is an excellent low-manipulation style that not only protects the ends but also minimizes tension on the scalp. The fun double puff or space bun style (top right) is perfect for stretching 4C hair and creating instant volume. After moisturizing and brushing the hair up into two high ponytails, use a strong but non-flaking gel to sleek down the perimeter and edges. Once secured, gently pick the puffs using an afro pick to increase volume and shape, taking care not to disturb the smooth, defined edges.
Regardless of the style chosen, maintaining 4C texture requires an unwavering focus on moisture and protection. To preserve the definition of coils or the tightness of twists overnight, always wear a satin bonnet or use a satin pillowcase. Twists and braided styles can last several weeks; refresh the scalp every few days using a light moisturizing spray or a dilution of witch hazel and essential oils to clean and hydrate without disrupting the style. For all 4C textures, incorporating deep conditioning treatments (with heat, if possible) into your weekly routine is crucial. Protein treatments every 4-6 weeks help maintain the structural strength needed to support these intricate and voluminous styles, ensuring elasticity and reducing breakage while promoting healthy growth.
10 Dreamy Wedding Hair
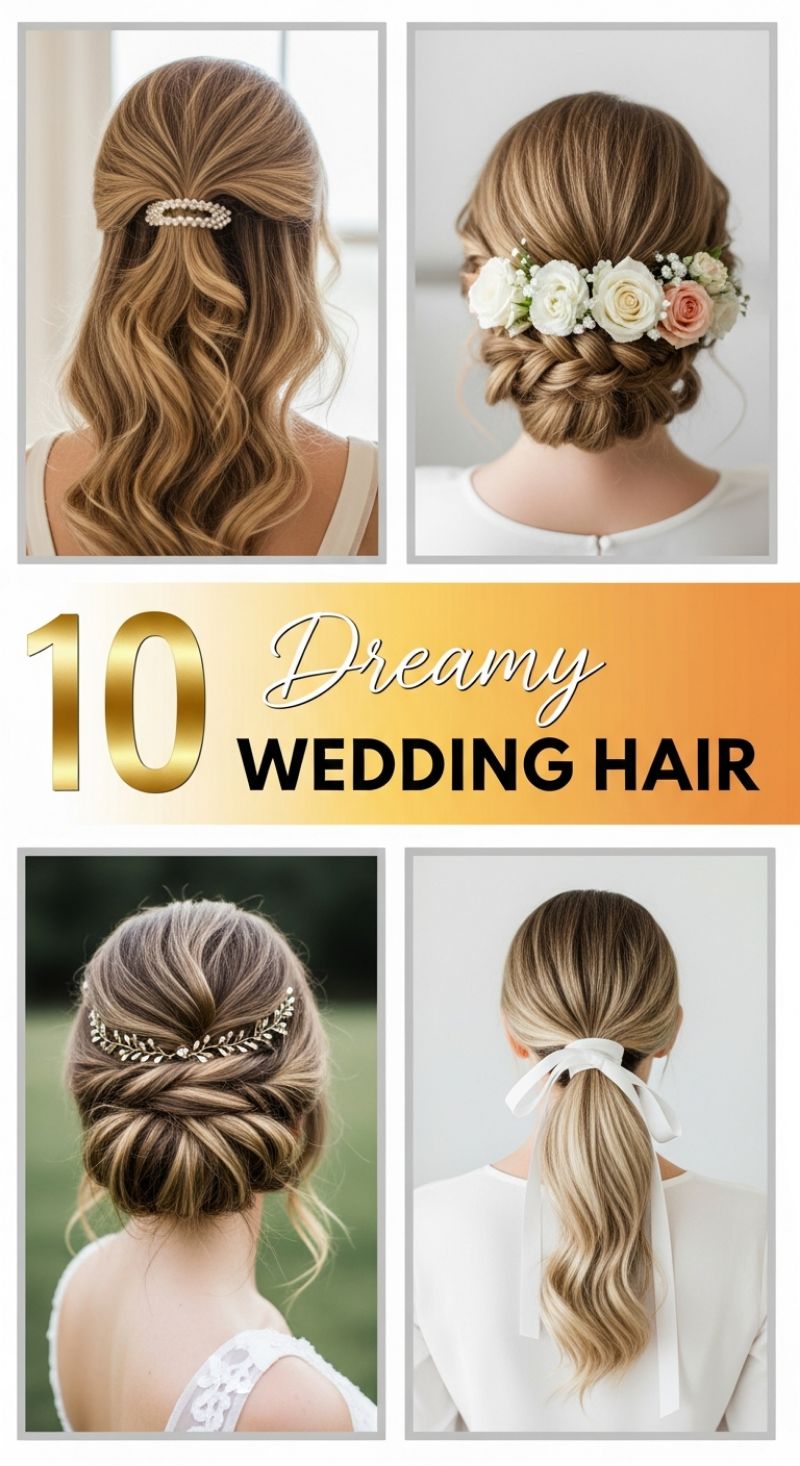
The cornerstone of any unforgettable bridal look is a perfectly executed hairstyle, and these ‘Dreamy Wedding Hair’ options provide sophisticated inspiration ranging from romantic flow to intricate structure. For those desiring a timeless elegance that keeps hair away from the face while maintaining length, the polished half-up, half-down style (top left) is ideal. To achieve this look, start with a voluminous blowout, then use a large barrel curling iron to create soft, cascading waves below the crown. Secure the top sections by twisting them back gently, ensuring the hair at the crown maintains lift, and finish the look with a statement accessory like the featured oversized pearl clip, placed centrally to draw the eye to the sophisticated detail. Alternatively, the sleek, high-volume low ponytail (bottom right) offers a modern twist on formality. This style demands smooth roots and significant texture throughout the tail; use dry shampoo or texturizing spray on the length before loosely curling. The defining feature is the crisp white satin ribbon, used to conceal the elastic and left long for a stunning, minimalist bridal flourish that complements a clean, modern gown.
For brides seeking classic updos, texture and accessories are paramount to preventing the style from looking severe. The romantic, low woven bun (top right) is created by incorporating a loose braid or series of twisted sections into the base of the chignon. The secret to this style’s dreamy appeal is intentional messiness—once the updo is pinned securely, gently pull apart sections of the braid and twists to soften the shape and maximize volume. This soft backdrop is perfect for showcasing natural, organic elements like fresh floral crowns or garlands, using a mixture of sizes and colors (such as the delicate white and blush roses shown) to create depth. Similarly, the sculpted low chignon (bottom left) relies on strategic twisting to create its dimension. This updo often involves pinning hair sections in an overlapping ‘S’ pattern, which provides a beautiful, reflective surface for highlights. To elevate this style, incorporate a delicate metal hair vine or comb—ensure the accessory is placed slightly above the main knot to highlight the interwoven textures of the hair structure itself.
Executing these highly stylized looks requires careful preparation and expert finishing techniques. Regardless of the chosen style, all hair should be prepped with a volumizing mousse at the root and a heat protectant through the ends. For updos, a thorough application of texturizing spray prior to pinning will provide the necessary grip and longevity, especially for outdoor weddings. Always finish with a flexible but strong-hold hairspray, concentrating on the areas around the hairline and any loose sections. When opting for fresh flowers, ensure they are wired and handled by a florist or stylist to maintain their freshness throughout the day. While the ponytail and half-up styles are often manageable DIY options for those with strong styling skills, the complex woven updos are best left to a professional stylist who can ensure structural integrity and flawless execution for a worry-free wedding day.
7 Sweet Headband Looks
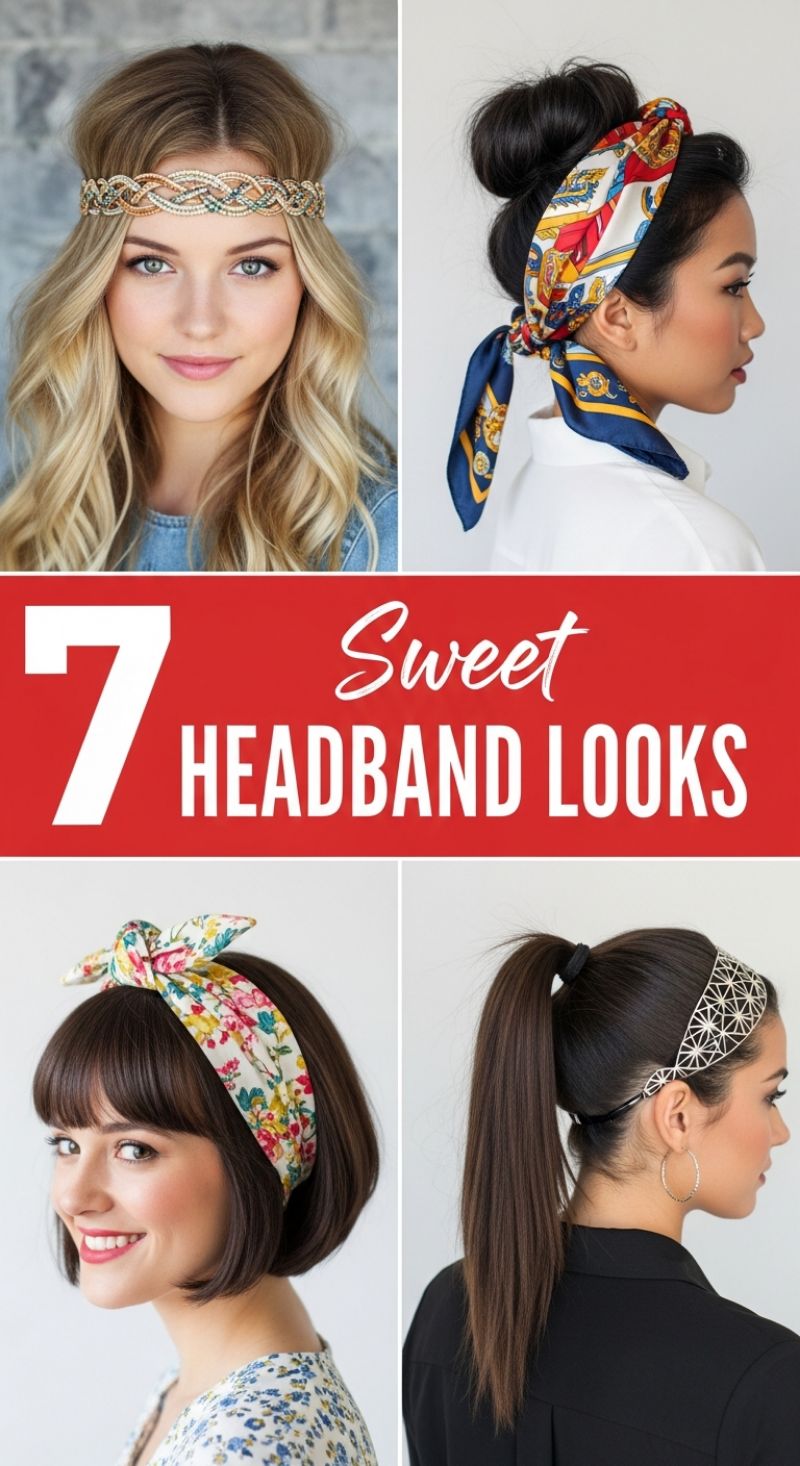
Headbands offer unparalleled versatility, instantly transforming any basic hairstyle into a statement piece. The collection showcases diverse approaches, starting with the relaxed, festival-ready aesthetic seen in the top left. This look features a dazzling, wide headband with an intricate braided or woven design, often embellished with small jewels or metallic threads. The key to achieving this specific bohemian or hippie chic look is wearing the accessory across the forehead rather than pushed back onto the hairline, letting the natural part define the front framing. Pair it with soft, dimensional waves; the slightly tousled texture prevents the look from feeling too formal. In contrast, the top right corner showcases a sophisticated use of a printed silk scarf. Here, the scarf is wrapped neatly around the head and tied at the nape or side, effectively integrating it with a voluminous high bun or top knot. This method not only secures the updo but introduces rich texture and color via the scarf’s intricate pattern, transforming a simple high bun into an elegant, polished style suitable for work or evening events. Ensure the scarf’s knot is secure and positioned prominently to act as the primary decorative accent.
Moving to sweeter, shorter looks, the bottom left presents a delightful retro-inspired style perfect for medium-length hair or bobs with bangs. This look utilizes a wide fabric headband—often a scarf folded neatly—featuring a bright, cheerful floral print and finished with a distinct bow or knot centered on top of the head. This technique works best when hair is smooth and styled, such as a sleek A-line bob paired with blunt fringe, which frames the face beautifully and allows the playful accessory to truly stand out. For a completely different, contemporary vibe, the bottom right illustrates how a sleek, pulled-back ponytail can be dramatically enhanced by a sculptural headband. This specific piece features a wide, geometric, metallic design that wraps around the head, pushing the hair back sharply. The contrast between the rigid, modern structure of the headband and the glossy, high ponytail creates a sharp, high-fashion effect. When attempting this style, focus on achieving maximum sleekness at the crown using a smoothing serum or light pomade, and ensure the ponytail itself is voluminous and defined for maximum visual impact.
Mastering the headband trend is all about appropriate placement and knowing your desired aesthetic. For structured, elastic-backed headbands, like the metallic geometric style, pulling them back just behind the ears and ensuring they sit snugly ensures they stay put through the day, especially vital when paired with a high-tension style like a high pony. For fabric scarves or headbands with adjustable knots, experimenting with the knot placement—side, top, or nape—can drastically alter the final presentation. Expert application tip: If your hair is fine, lightly tease the hair directly behind where the headband will sit (especially for looks where the hair is worn down, like the boho style) to create lift and prevent the hair from looking flat or pushed down. Headbands are a fantastic tool for disguising oily roots or stretching the time between washes, offering instant color and polish with minimal effort, making them an essential and versatile staple for all hair lengths and textures.
6 Voluminous THICK HAIR TIPS
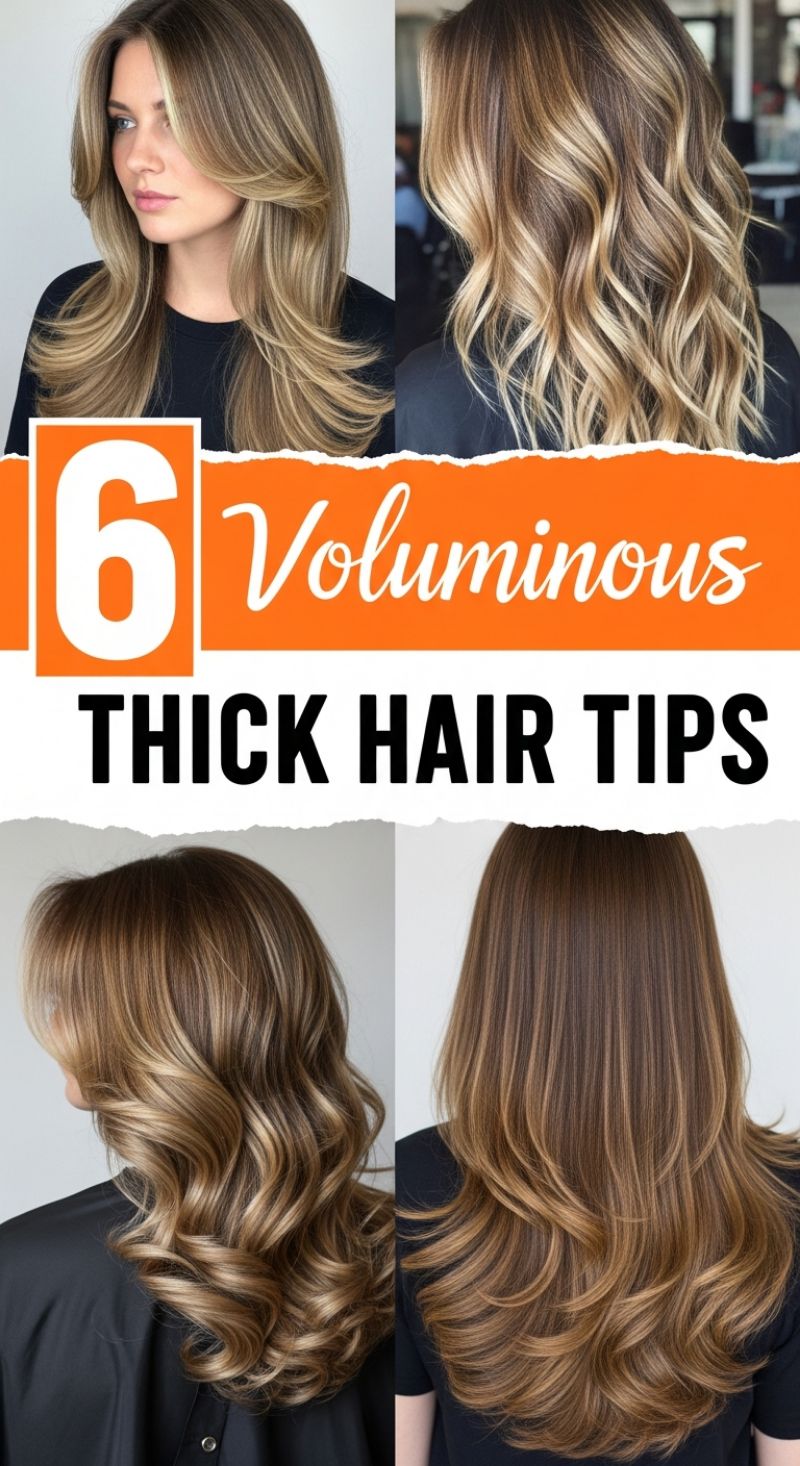
Managing thick hair while maximizing volume requires a strategic approach focused on weight reduction and dynamic styling. To achieve the beautiful bounce and movement seen in these examples, start with the cut. Thick hair benefits immensely from long, graduated layers throughout the mid-lengths and ends. This technique removes internal weight, preventing the hair from forming a heavy, triangular shape while still retaining density and thickness. Request face-framing layers or modern curtain bangs, as showcased in the top-left image; these are essential for providing lift and movement around the face, stopping the front sections from looking overly bulky. For those with extremely high density, discuss internal texturizing or specialized thinning shears with your stylist. Used correctly on the lower layers, this can discreetly manage bulk, significantly speeding up drying time and making home styling far more manageable.
Beyond the cut, color plays a critical role in enhancing visual volume and dimension. All four featured looks utilize contrasting highlights, often applied using balayage or foilayage techniques, which create the illusion of movement and lightness. By incorporating ribbons of brighter blonde or caramel tones against a deeper base, the light is reflected differently across the hair shaft, adding depth and texture, particularly noticeable in the highly waved styles (top right and bottom left). This dimension softens the overall visual weight of the hair, making it appear bouncy and dynamic rather than solid and heavy. Strategically placed highlights closer to the crown and temples further amplify the appearance of lift, ensuring the hair doesn’t look flat at the root.
Finally, expert styling techniques are necessary to lock in volume against the natural weight of thick hair. Begin with root-lifting products—a lightweight mousse or volume spray applied directly to the damp roots. When blow-drying, utilize a large barrel round brush, ensuring you lift sections upwards and away from the scalp. For ultimate root lift, try flipping your head upside down during the initial drying phase. Once fully dry, setting is key: use large hot rollers or pin-curl sections of hair immediately after using a curling iron. Allow these sets to cool completely before brushing out; this critical cooling period sets the curl pattern and reinforces the volume against gravity. Finish with a flexible-hold hairspray applied lightly underneath the layers to preserve the bounce, ensuring you apply shine serums only to the very ends to maintain brilliance without compromising the lift at the crown.