Discover the ultimate collection of 75+ trendy nail art ideas, perfect for every season, holiday, and special occasion. Get inspired by stunning manicures for spring, summer, Valentine’s Day, Mardi Gras, and beyond!
Heart-Stopping Ombre & Scattered Heart Nail Art
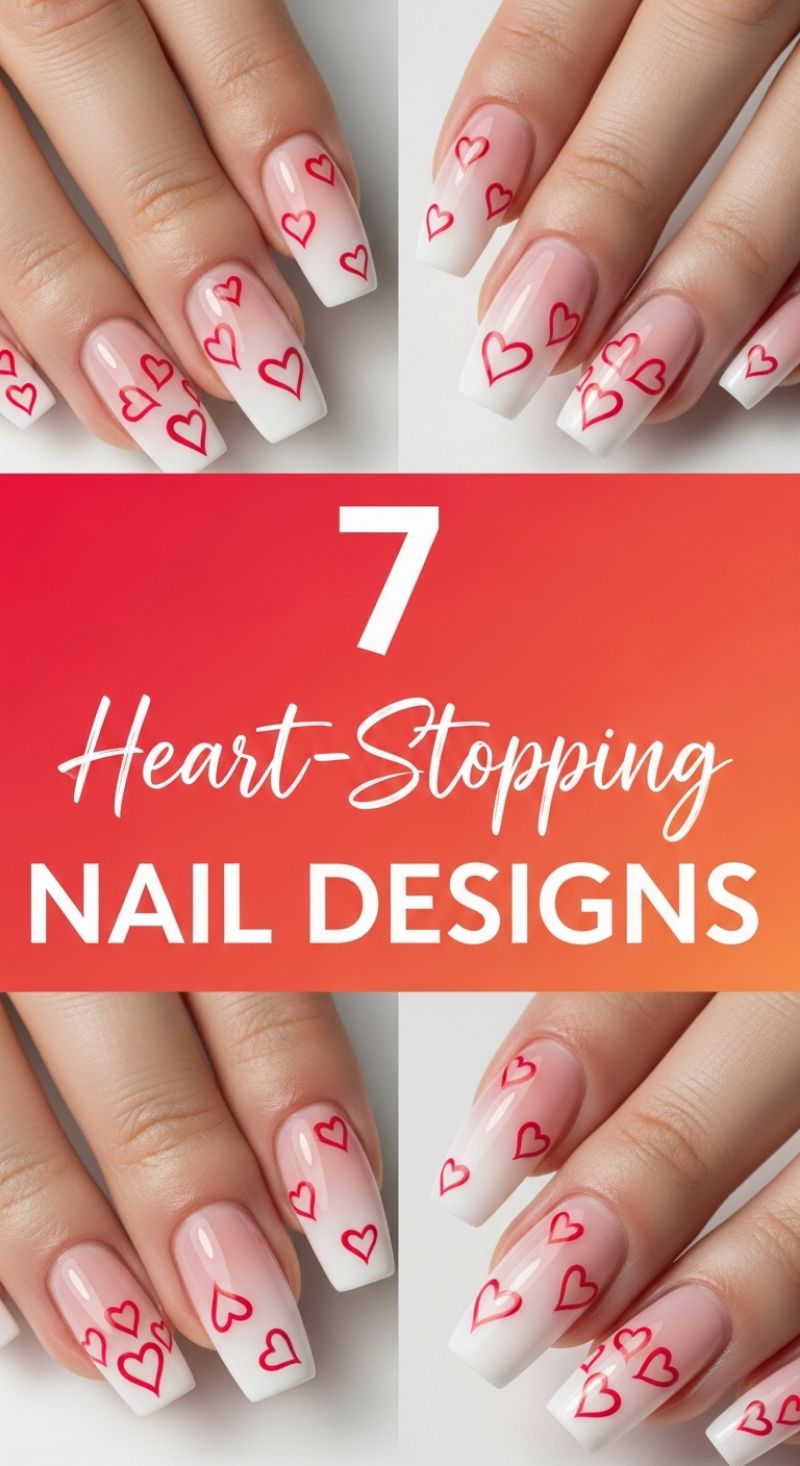
This stunning design marries the sophisticated ‘Baby Boomer’ or French Ombre technique with whimsical hand-painted details, creating a manicure that is both romantic and modern. To replicate this look, begin by perfecting your gradient base. Apply a sheer, milky pink or nude gel polish near the cuticle area, feathering it down to the mid-nail. Then, apply a crisp white gel polish only to the free edge. The critical step is blending the transition zone using a dedicated ombre brush or a makeup sponge, ensuring there are no harsh lines where the pink and white meet. Cure this base layer completely. Expert tip: For the most seamless blend, apply a thin layer of clear builder gel or base coat between your pink and white layers before blending; this provides slip for the colors to merge effortlessly. The resulting base should be a soft, diffused gradient that provides the perfect canvas for the heart detailing, emphasizing the elegance of the coffin or squareletto shape shown here.
Once the ombre base is fully cured and wiped clean, move on to the delicate heart placement. Using a highly pigmented red gel paint and a ultra-fine detail brush (such as a 000 liner brush), begin painting small, open-outline heart shapes. The key to the design’s success is the scattered, seemingly random placement across the nail plate; they should vary slightly in size and orientation, mimicking falling confetti or floating bubbles. Avoid placing them in perfectly straight lines or making them too large, as this will compromise the subtle, airy feel of the design. Utilize the ‘dot and drag’ technique: place two small, adjacent dots of paint and then, starting from the center of those dots, drag the brush down to meet at a single point, forming the heart’s tip. Ensure the lines remain thin and clean.
After all the hearts are meticulously placed and cured (typically 30–60 seconds, depending on your lamp and paint), seal the entire manicure with a high-shine glossy top coat. Apply the top coat evenly, making sure to ‘cap the free edge’ to lock the design in place and prevent premature chipping. Cure the top coat for the full recommended time. This style is exceptional because it utilizes negative space (the sheer base color) and dynamic placement to create interest without overwhelming the overall look. Paired with the elongated nail shape, this manicure is ideal for seasonal celebrations like Valentine’s Day, bridal events, or simply adding a touch of feminine charm to everyday wear, providing longevity and visual impact.
9 Fresh Spring Nails
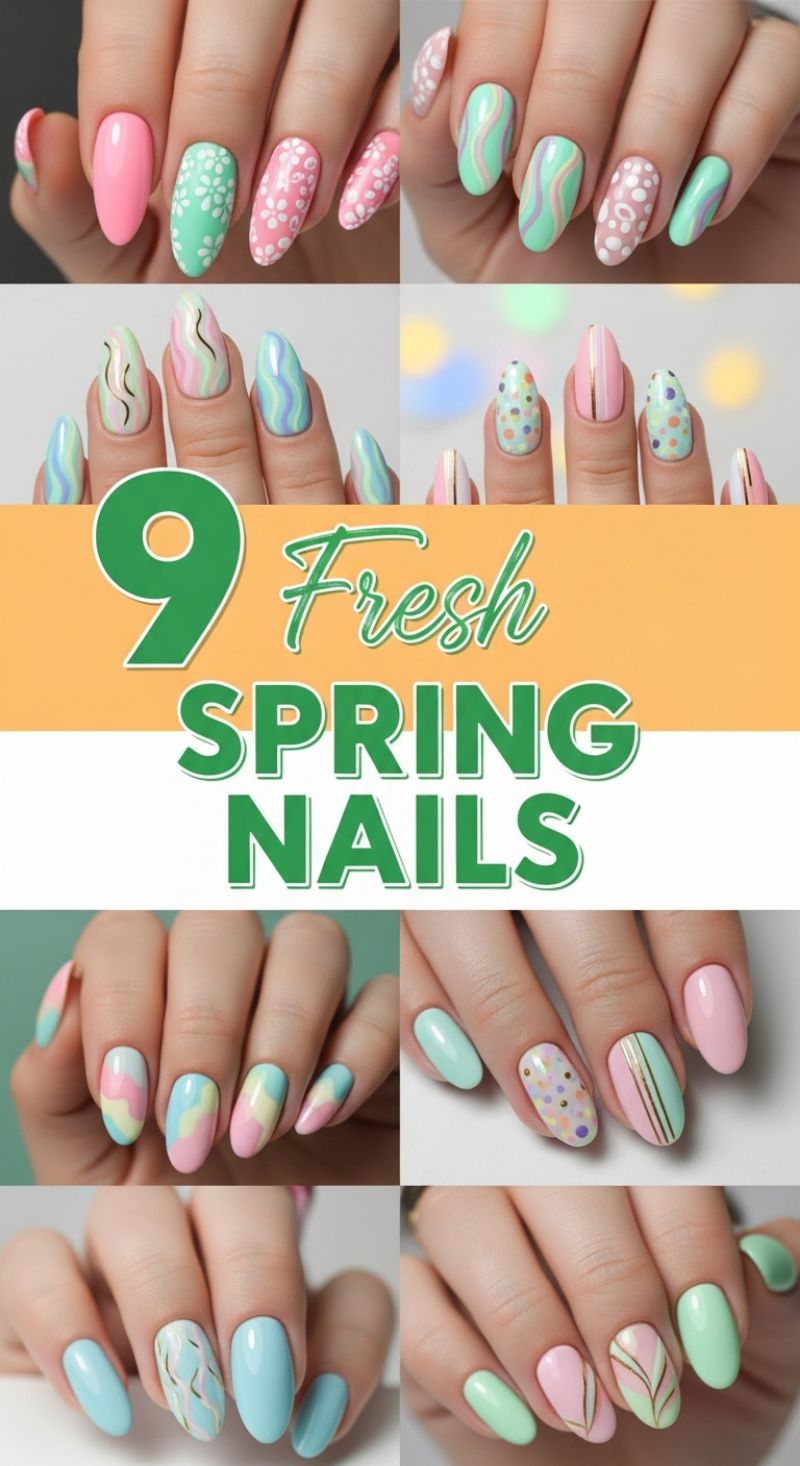
The transition from winter depth to spring lightness demands a shift in your manicure palette, moving toward airy pastels and playful, organic designs. This collection of nine fresh spring looks centers around the core pastel trinity: soft mint green, blush pink, and pale sky blue, executed primarily on a flattering almond or oval nail shape. To successfully recreate these cheerful styles, start with meticulous preparation. Since pastels are prone to streaking, apply a high-quality ridge-filling base coat, followed by three thin, even coats of your chosen base color to ensure full opacity and a smooth finish. Expertly executed solid color nails in shades like mint or baby pink provide the perfect canvas, while incorporating contrasting white allows the intricate patterns—like the delicate florals and graphic polka dots—to truly pop. Whether opting for a subtle accent nail or transforming all ten fingers, the key to this trend is maintaining a clean, glossy finish that enhances the light-catching qualities of the springtime hues.
To achieve the dynamic, movement-filled looks featured in the collage, focus on mastering fine line work. The wavy, multicolored swirls, reminiscent of abstract art or melted ice cream, require precision using a thin detail brush or a dedicated striping tool. Load the brush with two or three complementary pastel shades (e.g., pink, blue, and white) and gently drag the paint across the nail in continuous, sweeping motions, keeping the lines parallel yet slightly separated to create depth. For the sweet white daisy patterns, a simple dotting tool is your best asset. Dip the smallest end of the tool into white polish to create five tiny dots arranged in a circle for the petals, then use a slightly larger dot of pale yellow or gold in the center. Alternatively, the speckled Easter egg look is created by using a fan brush or an old toothbrush lightly dipped in multiple colors (yellow, lilac, pink) and gently flicked over a solid white or neutral base, creating an intentional, fine splatter effect. Cure or dry each layer thoroughly before moving to the next design to prevent colors from muddying.
Elevating these pastel designs often involves the strategic use of metallic accents, providing structure and sophistication to the otherwise soft color scheme. Notice how multiple designs incorporate gold striping tape or hand-painted gold details. For the vertically striped designs, apply your pastel base and topcoat first. Once fully cured, adhere ultra-thin gold striping tape precisely down the center or slightly off-center of the nail, trimming the ends flush with the nail edges before sealing the entire manicure with a generous layer of high-shine top coat. This technique ensures the line remains crisp and prevents the metallic element from peeling prematurely. For the abstract marble and geometric chevron designs, use a fine art brush and metallic gel polish to paint delicate outlines that mimic natural veins or sharp angles over the colored background. Finalizing every manicure with a generous layer of cuticle oil not only nourishes the skin but adds a necessary touch of professional brilliance, making the fresh spring colors truly shine.
5 Effortless AT HOME NAILS

Achieving salon-quality nails in the comfort of your own home doesn’t require complex techniques or intricate nail art; it hinges on meticulous preparation and smart product choices. To start your effortless manicure, focus on creating a clean, uniform canvas. Gently shape your nails with a fine-grit file, ensuring all edges are smooth and the length is even. Next, address the cuticles, which is critical for a professional finish. Use a metal cuticle pusher (as depicted in the visual) to carefully push back the skin around the nail plate. Avoid aggressive cutting, as the goal is merely to tidy the area. Once shaped, lightly buff the nail surface to remove any natural oils or ridges, then wipe down each nail with a cotton pad soaked in rubbing alcohol or non-acetone remover. This cleansing step is non-negotiable, as it removes residue that can cause premature chipping and ensures maximum adhesion for the polish.
For an “effortless” manicure, speed is essential, which is why quick-drying polish formulas—like the one advertised in the image—are highly recommended. When applying the color, think thin, even layers. Load the brush moderately and use the classic three-stroke technique: one stroke down the center, followed by one stroke on either side. Ensure you leave a tiny margin around the cuticle line and sidewalls; this prevents polish pooling and makes your nails look professionally groomed. Allowing the first thin coat to fully dry (a process expedited by quick-dry formulas) before applying the second thin coat is key to avoiding bubbling and ensuring a rich, streak-free color payoff. Two thin coats will always outlast one thick, gloppy coat.
Finally, selecting the right colors will elevate the effortlessness of the look. The featured palettes—soft blush pinks, versatile nude beiges, and warm corals—are universally flattering and require minimal effort to look polished. These subtle shades are also forgiving if a minor mistake occurs during application. To truly seal the deal, always finish your manicure with a quick-drying top coat. This step locks in the color, adds brilliant shine, and acts as a protective shield against dings and chips. For busy enthusiasts, an all-in-one base and top coat product can streamline the routine even further, cutting down the overall layering process while maximizing the wear time of your beautifully simple, at-home manicure.
8 Festive Mardi Gras Tips
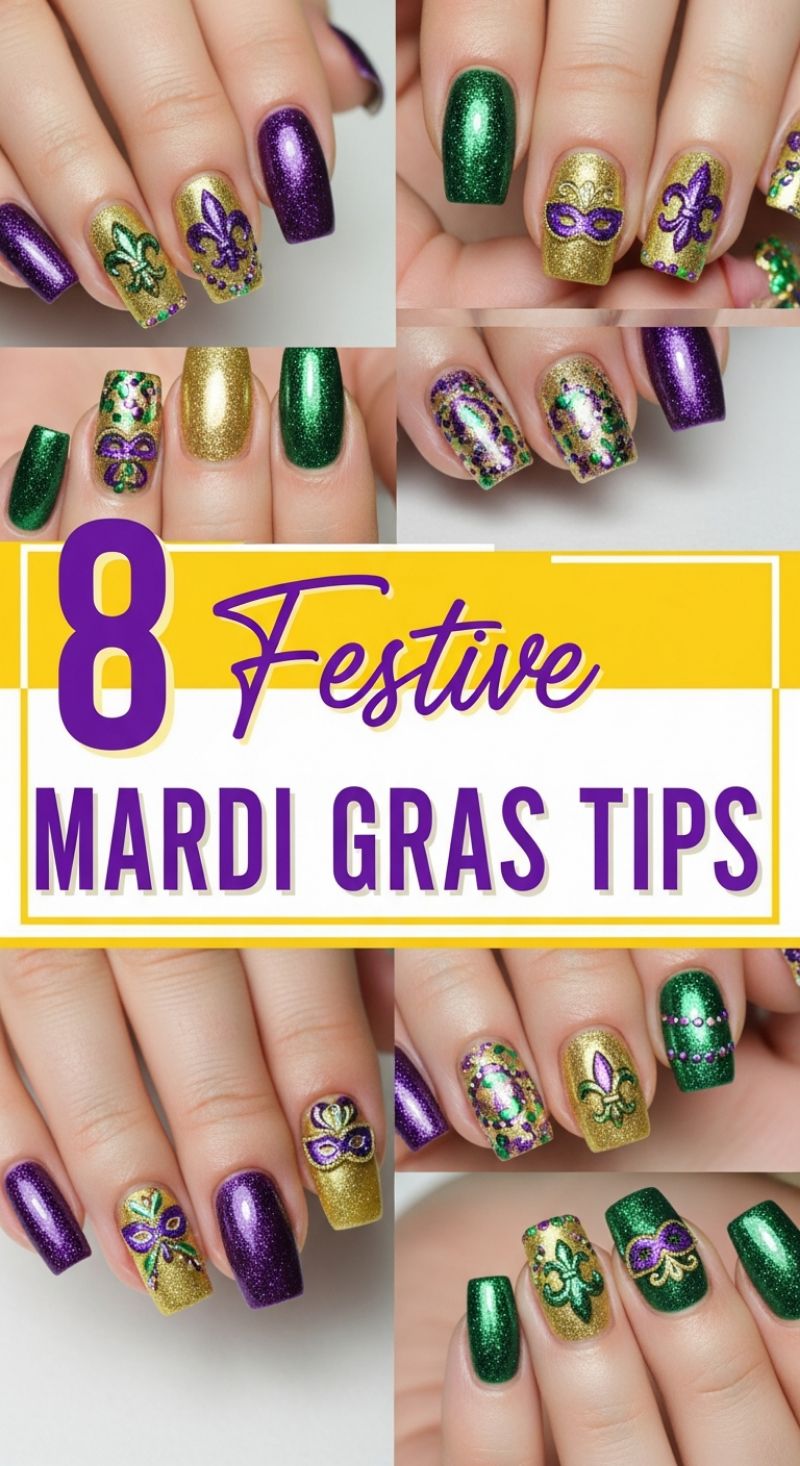
Mardi Gras manicures are an absolute must for capturing the celebratory spirit of Carnival, utilizing the traditional colors of purple (justice), green (faith), and gold (power). This collection demonstrates how to perfectly blend high-shine glitter polishes with intricate detailing to create a show-stopping look. To begin, select your base coats, focusing on achieving full opacity with highly reflective glitter or metallic formulas. Apply two coats of gold glitter polish to your accent nails (typically the ring and middle fingers) and use the vibrant purple and shimmering green on the remaining nails. A critical expert tip for working with glitter polishes is to apply a peel-off base coat first, which makes removal significantly easier after the festivities, or, alternatively, use the ‘sponge method’ for applying the base color to maximize glitter payoff and minimize brush strokes.
Once your base colors are completely dry, move on to the detailing for the truly iconic designs. For the classic Fleur-de-Lis, you can either use a detailed stamping plate or freehand the design onto the gold base using a thin striping brush and contrasting polish, like a rich purple or deep emerald green. Ensure the design is centered and crisp. For the masquerade mask design, which often graces the ring finger, use a thin brush to carefully outline the mask shape in black or a deep contrast color, then fill it in with another coordinating Mardi Gras shade. Elevate the mask by placing tiny rhinestones or metallic microbeads along the eye openings or the crown of the mask—use a dab of top coat or specialized nail glue for secure placement. If freehand detailing seems too daunting, opt for specialized water decals or vinyl stencils tailored to Carnival themes.
Finally, incorporate variety into your set by including simple yet effective designs. One hand features a beautiful example of a bead-string effect, achieved by using a fine dotting tool to place small, evenly spaced dots of gold or purple polish vertically down a green nail. Another popular design incorporates a swirling or speckled confetti pattern, achieved by lightly dabbing or swirling multiple colors (gold, green, and purple) using a clean makeup sponge or fan brush over a single accent nail for a textured, abstract effect. Remember, glitter is highly prone to chipping, so seal every design, no matter how simple or complex, with two generous layers of a glossy, quick-drying top coat. This not only adds protection and longevity but also amplifies the sparkle, making your festive manicure ready to catch the light during any parade or celebration.
Quirky Funky Nail Art
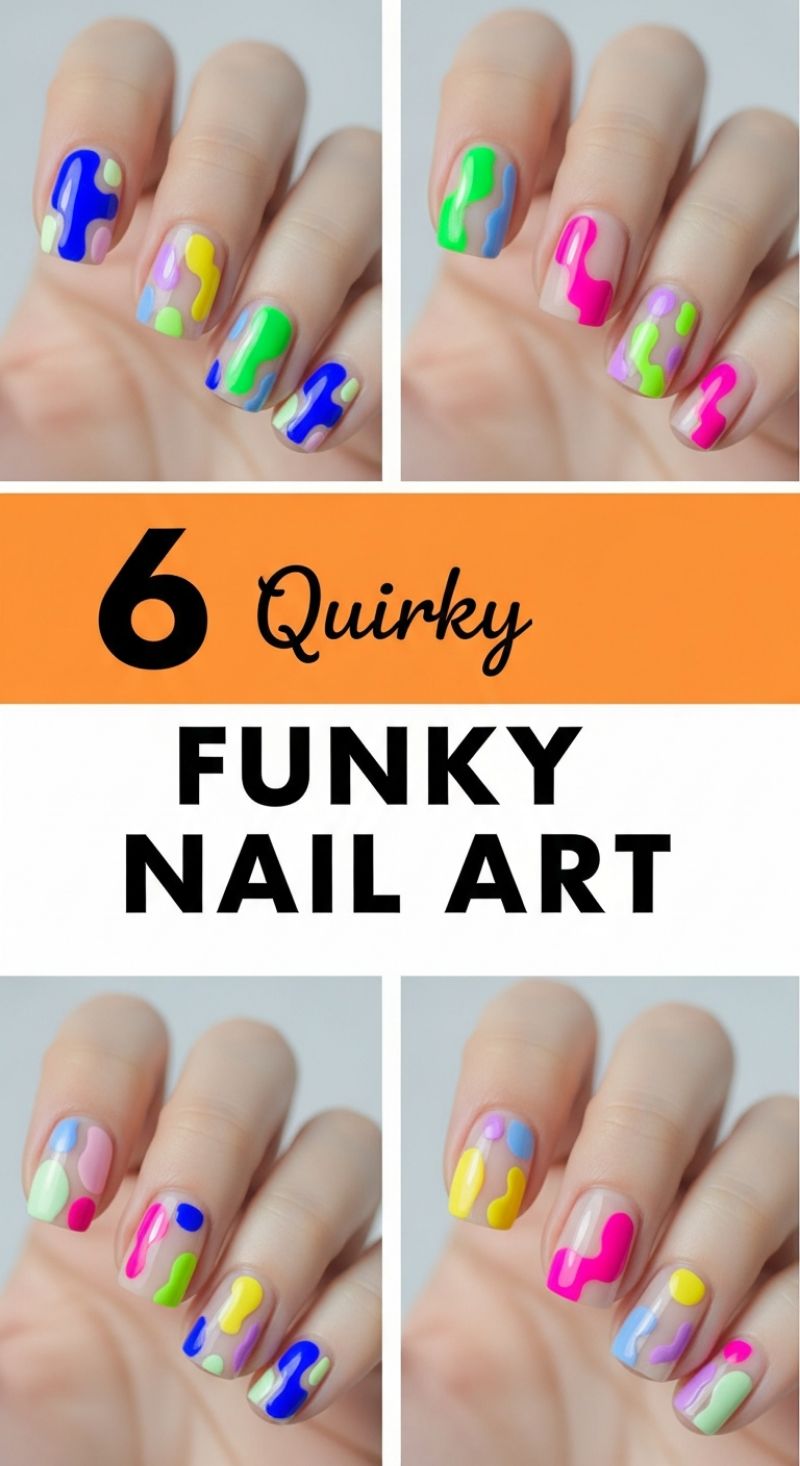
The ‘Quirky Funky Nail Art’ trend featured here is a modern abstract take on classic 70s aesthetics, often referred to as ‘abstract blob art’ or ‘melting art.’ This style thrives on high contrast and a deliberately irregular, freehand application, making it surprisingly accessible even for nail art beginners. To achieve this vibrant look, begin by prepping your nails meticulously: file them into a square or squoval shape, buff the surface gently, and apply a high-quality base coat. The foundation is crucial—for this specific design, a sheer, clear, or milky nude base coat is essential. This sheer layer allows the skin tone to peek through, creating a negative space effect that makes the colorful blobs appear to float or melt across the nail plate. Allow this foundation layer to cure completely before moving on to the color application.
Creating the signature organic shapes requires minimal specialized tools, usually just a small detail brush or a fine-tipped dotting tool. Select a palette of 3 to 5 highly pigmented, contrasting colors—the success of the ‘funky’ element relies on bold pairings, such as neon green with electric blue, or hot pink with sunny yellow. Start by dipping your brush lightly into your first chosen color and painting an irregular, organic shape onto the nail. These shapes should vary in size and coverage, avoiding perfect symmetry. Cure this first color layer fully. Next, introduce your second and third colors, strategically placing the new shapes so that they abut or slightly overlap the first ones. Expert advice for maximum visual impact is to ensure at least one shape on each nail runs toward the cuticle or the free edge, mimicking a flowing or liquid effect. Remember to maintain the negative space—the clear area should remain visible around and between the colored blobs.
Once all the shapes are cured, inspect the design for consistency. The beauty of this style lies in its irregularity, but ensure that the color saturation is opaque for that true pop art feel. The final, critical step is sealing the manicure with a high-shine, thick top coat. A plump, glossy top coat not only protects the intricate layers of polish but also enhances the three-dimensional, melted quality of the blob shapes. This glossy finish is non-negotiable for achieving the modern, sophisticated look that elevates this funky design beyond simple splatters. This manicure is the perfect statement piece for summer festivals, vacations, or whenever you want to inject a truly joyful and artistic energy into your personal style.
12 Flirty Purple V-Day Looks
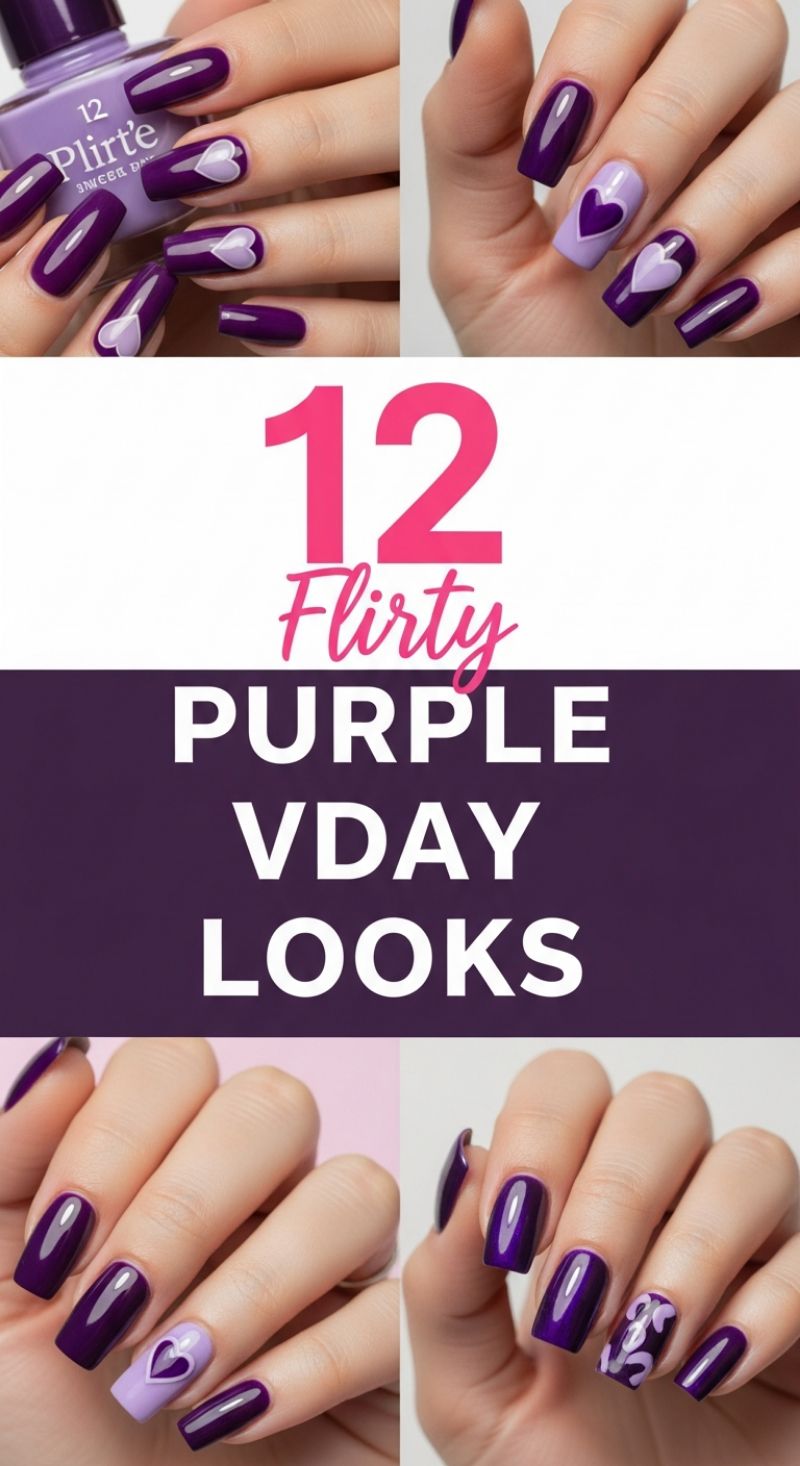
This sophisticated purple palette offers a vibrant and unexpected twist on traditional romantic nail art, making it the perfect choice for Valentine’s Day. The key to achieving this luxe look is leveraging the striking contrast between a deep, rich, glossy royal purple and a soft, creamy lilac or lavender accent. Ensure both polishes are highly pigmented and applied in thin, even coats to achieve maximum color payoff and a flawless, smooth surface. The high-gloss finish is crucial here; it enhances the depth of the dark purple and gives the manicure an expensive, polished appearance, making the subtle heart designs truly shine.
To recreate the featured heart motif, proper placement and clean lines are essential. Begin by applying your deep purple base coat across all nails, reserving the ring or middle finger for the accent color. Apply two coats of the lighter lilac shade to the accent nail. Once fully dry, use a fine-tipped precision brush or a small dotting tool dipped in the dark purple polish. To form a perfect heart, place two adjacent dots near the center of the nail, then gently drag the polish down from the base of those dots to meet at a sharp point. For the reverse look (lilac heart on a purple base), simply switch the colors. Expert tip: If you struggle with freehand drawing, consider using thin vinyl heart stencils to achieve professional-grade crisp edges, remembering to peel the stencil off immediately while the top color is still wet to prevent smudging.
Beyond the central heart design, incorporate variety with playful abstract elements to elevate the look. The abstract marble or swirl technique, often featured on the thumb or pinky, is achieved by applying the dark purple base and, before it cures, dropping small amounts of the lilac polish and using a toothpick or marbling tool to gently swirl the colors together. Alternatively, layer solid purple nails with subtle heart-shaped glitter or small rhinestones for added dimension. Regardless of the design choice, always finish with a high-quality, durable top coat. Apply generously, ensuring you ‘cap the free edge’ of the nail to seal the design and prevent chipping, guaranteeing these stunning purple V-Day manicures remain impeccable for over a week.
15 Iconic PINK GLITTER SETS
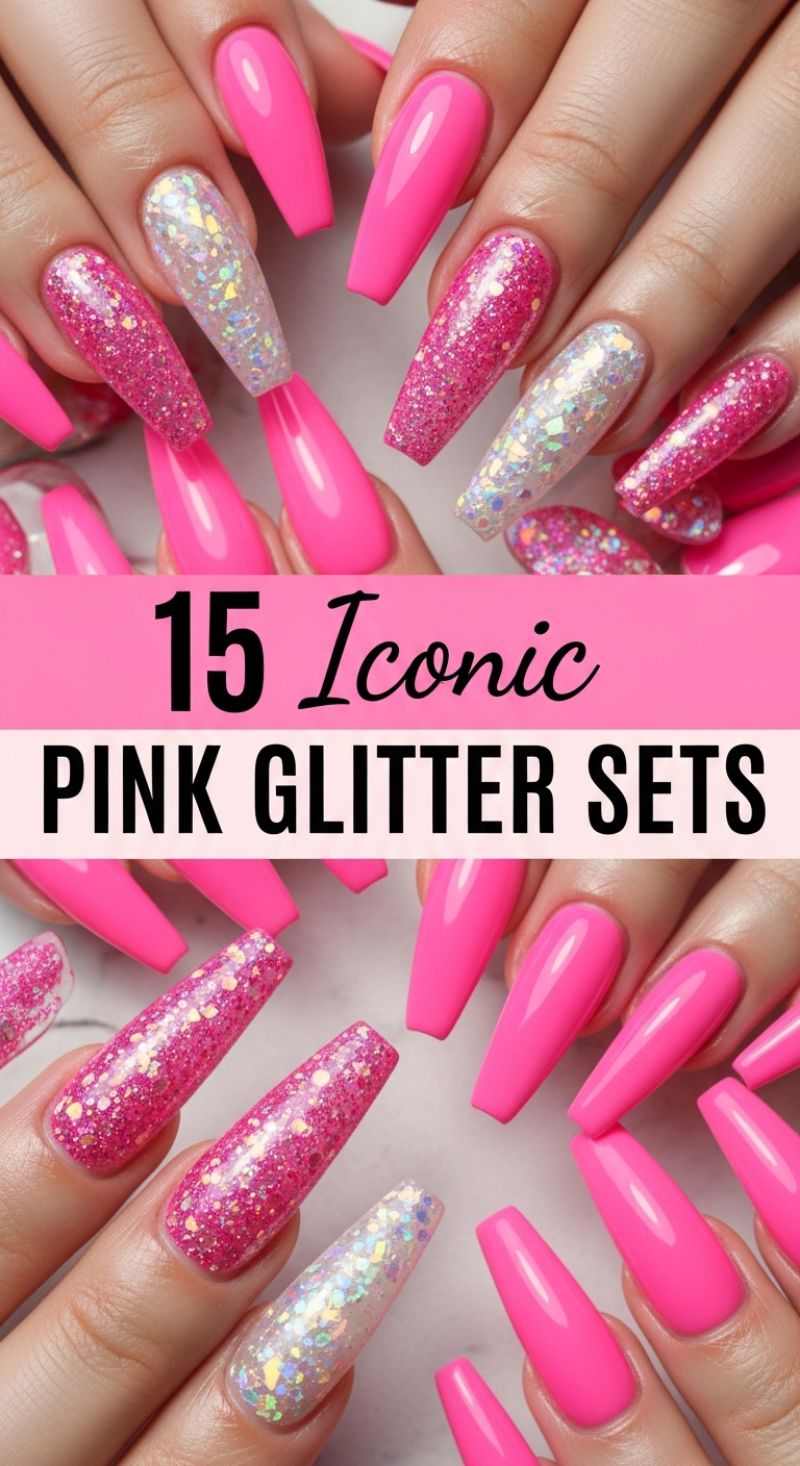
This vibrant manicure captures the essence of bold, high-impact nail art, making it a perfect selection for parties, summer events, or any occasion requiring a statement. The set primarily features long, tapered coffin-shaped nails utilizing a high-pigment, solid neon or hot pink shade, complemented by two distinctive types of glitter accent nails. To recreate this look successfully, start with meticulous nail preparation: file all nails into the desired coffin shape, ensuring symmetry and sharpness. For the foundation, apply a robust base coat, especially critical when using bright colors to prevent staining. The key to the flawless, opaque pink is using a high-quality gel polish and applying three thin, even coats, curing thoroughly between each layer. For the glitter nails, decide on the placement (often ring and middle fingers) and ensure the base color is fully cured before transitioning to the glitter application.
The signature of this set lies in the masterful combination of micro-glitter and large holographic flakes. For the pink glitter nails, achieve this dense sparkle by either applying a highly pigmented pink glitter gel polish or by mixing fine-grain hot pink holographic glitter into a clear builder or top coat for maximum control and opacity. Apply this mixture in two thin layers, ensuring the glitter is evenly distributed from cuticle to tip. The structural challenge of such long nails demands attention to the C-curve and apex, especially when using extensions or tips; embedding the glitter within a slightly built structure coat will ensure durability and prevent chipping at the free edge. After curing the glitter layer, always check for rough or uneven surfaces and gently buff smooth before applying the top coat to guarantee that professional, glass-like finish.
The contrasting accent nail, featuring large iridescent or holographic flakes on a sheer or milky base, provides a stunning textural break. To execute this, apply a thin layer of milky white gel polish, then strategically place the chunky, reflective flakes using a dotting tool or a silicone brush while the base layer is still slightly tacky (or use a dedicated flake suspension gel). The flakes must be completely flat to prevent them from catching or lifting. Once all color and glitter layers are cured, encapsulate the entire design with a thick, high-shine, non-wipe top coat, ensuring the edges and tips are perfectly sealed. Cure the final layer for the recommended time to maximize gloss retention, and finish by moisturizing the cuticles with a nourishing oil. This technique delivers a durable, dazzling, and truly iconic pink glitter manicure that demands attention.
11 Trendy February Nail Inspiration Designs
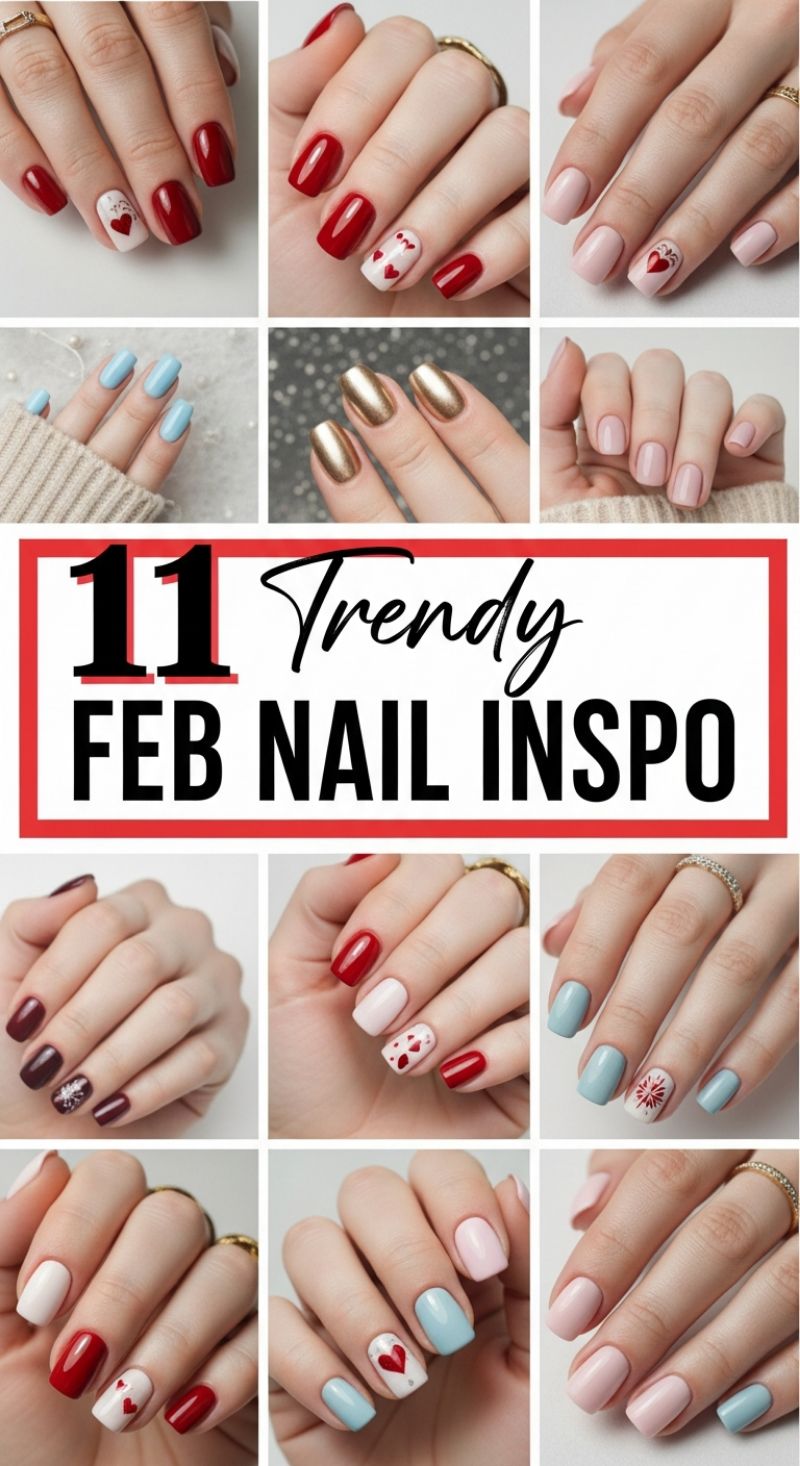
February often centers around romance and warmth, translating into a beautiful array of nail art dominated by classic reds, soft pinks, and playful heart motifs. To recreate the iconic Valentine’s look shown here, start with a meticulous preparation of the nail bed to ensure a smooth, long-lasting finish. For the vibrant red and white designs, opt for a highly pigmented cherry red polish, applying two thin, even coats for maximum richness. The key element is the accent nail, typically painted white or a pale pink to serve as a canvas for heart art. Use a thin detail brush or a fine dotting tool dipped in red polish to create perfectly symmetrical hearts. For a simple, single heart, place two small dots adjacent to each other and then drag the brush down and connect the points. For the scattering of smaller hearts, ensure they are placed randomly across the nail bed for a whimsical effect. Always seal the design with a high-shine, quick-drying top coat, paying close attention to ‘capping the free edge’ to prevent chipping.
Beyond the traditional romantic palette, February allows for a mix of winter-appropriate tones and metallic glamour. The images showcase sophisticated alternatives like deep maroon/burgundy nails, which provide a luxurious, grounded look, often paired with a subtle shimmer or snowflake accent for a chic late-winter vibe. For those transitioning into lighter spring colors, the soft powder blue manicure is an excellent choice. This color pairs beautifully with the white base coat and a red heart decal or hand-painted design, offering a refreshing twist on the classic Valentine’s theme. The striking metallic gold look requires specialized application: ensure the base coat is perfectly smooth, as mirrored polishes tend to magnify any imperfections. Apply two thin coats of the metallic shade for an intense, chrome-like shine, emphasizing a modern, bold aesthetic.
To elevate these seasonal designs, focus on integrating different textures and ensuring impeccable cuticle care, which is vital for any professional-grade manicure. The majority of these designs feature a clean, medium-length squoval or rounded square shape, which provides an ideal canvas for intricate detailing without being overly cumbersome. Experiment with combining these inspirations—for instance, pair the soft nude pinks with a single accent nail featuring the blue and red heart motif, or mix the deep maroon with the metallic gold for an evening look. Remember that longevity starts with proper curing (for gel polishes) or ensuring each layer is completely dry (for traditional lacquer). Finish with nourishing cuticle oil daily to keep your hands looking flawless and your trendy February nails standing out.
Edgy Black V-Day Nails: Gothic Glamour Meets Romantic Chic
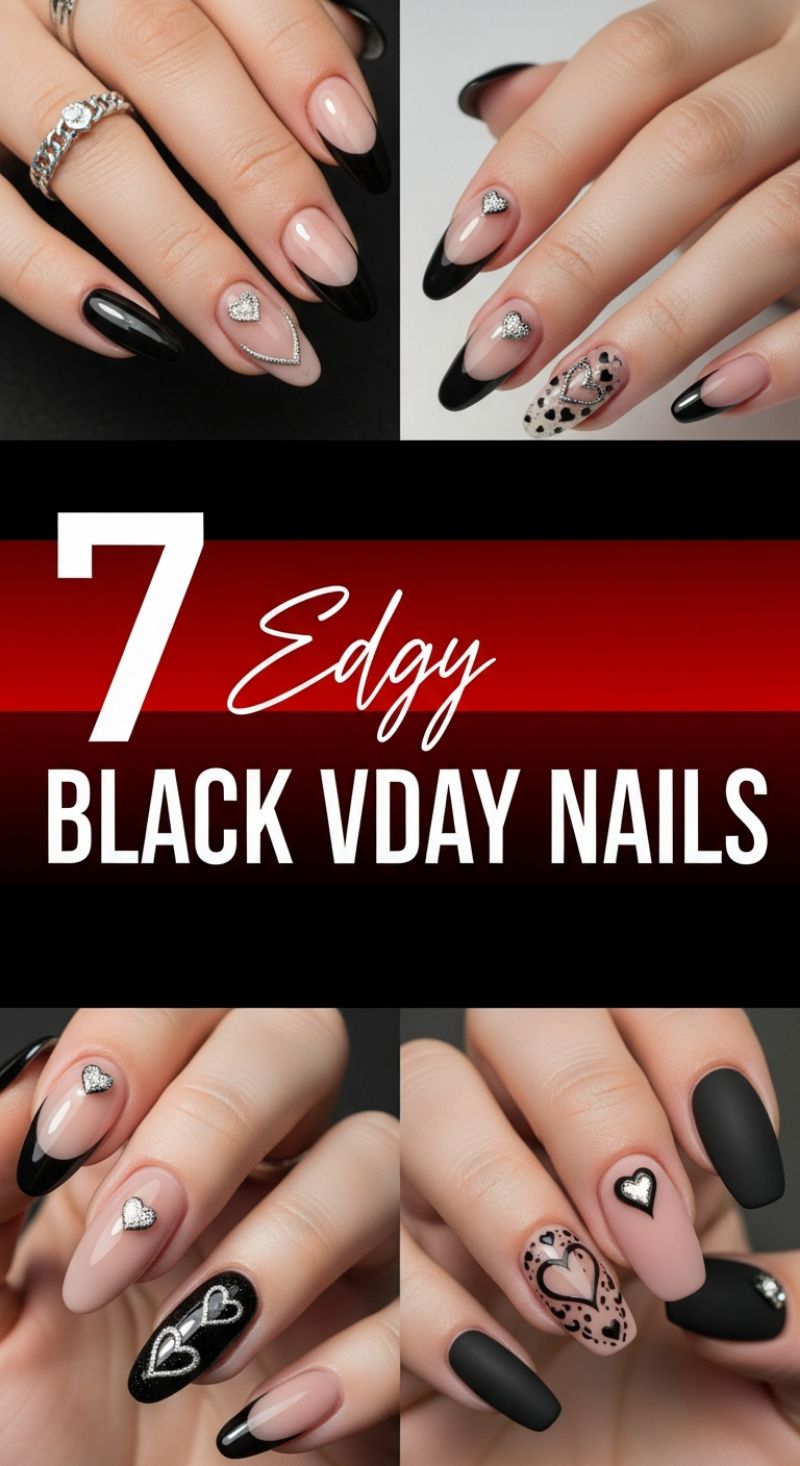
Subvert the traditional Valentine’s color palette with these stunningly dramatic, edgy black nail designs that perfectly blend gothic sophistication with romantic heart motifs. This look relies on sharp shape and high contrast, making the almond and stiletto profiles the perfect canvas. To achieve this anti-Valentine’s romance, begin with a perfectly prepped nail bed and a sheer, milky pink or nude base coat to create a healthy foundation. The hallmark of this style is the sharp, deep black French manicure, often implemented as a striking V-tip rather than a traditional curve. Use a highly pigmented black gel polish and a thin striping brush to define the edges of the tip, ensuring symmetry across all ten fingers. For a truly elevated look, consider incorporating negative space, using a fine metallic line to trace a heart shape near the cuticle of the ring finger before filling the rest of the nail with the base color, creating a striking visual drop.
Once the foundational black tips are cured, the true artistry lies in the embellishments and accent nails. The key romantic element is the incorporation of silver or crystal rhinestone hearts, typically placed strategically near the apex or the cuticle line. To securely affix these 3D charms, use a small dot of builder gel or a high-viscosity nail glue, curing thoroughly once the placement is finalized, then carefully sealing around the edges of the charm with a non-wipe top coat without dulling the stone’s facets. Vary the textures to add depth: introduce an accent nail covered entirely in a rich, matte black for a modern, velvety feel, juxtaposed against the high-gloss shine of the French tips. Another effective accent is combining hand-painted elements, such as delicate black leopard spots or tiny freehand heart patterns over the nude base, anchored by a prominent, larger outlined heart, offering an intricate point of interest.
For professional execution, maintaining impeccable precision is paramount, especially when working with high-contrast colors like black and nude. Ensure all layers, particularly the black tips, are thin to prevent bulkiness and guarantee a smooth finish. Always cap the free edge of every nail layer (base, color, and top coat) to significantly improve wear time and prevent premature chipping, which is particularly visible on sharp black tips. If opting for a full matte finish on accent nails, select a quality matte top coat that truly dulls the shine without changing the underlying black hue. This collection of designs proves that Valentine’s Day nails don’t need to be bubblegum pink; they can be bold, dramatic, and intensely stylish while still celebrating love in the most fashionable way.
10 Blooming April Nail Trends
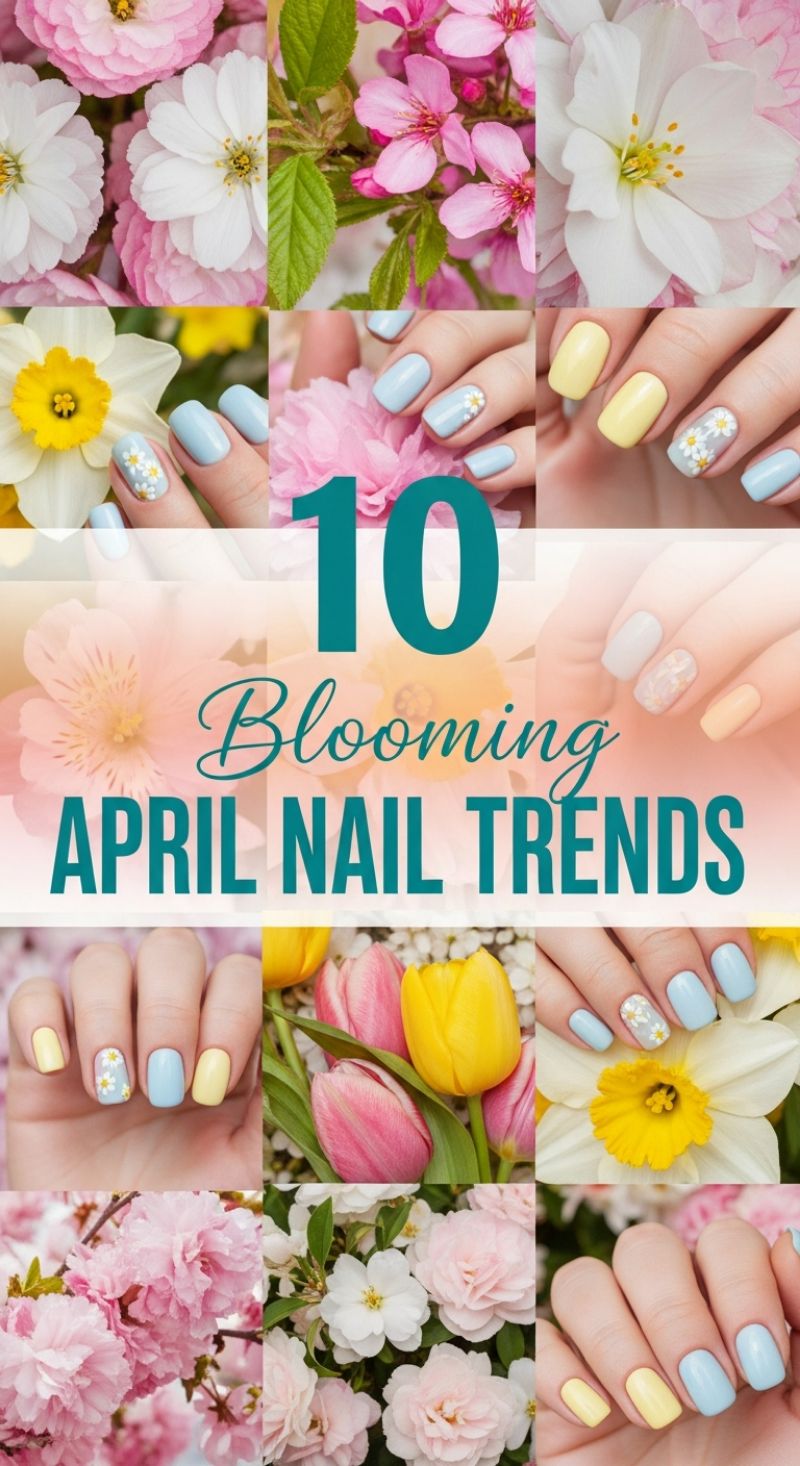
April is the peak of the spring bloom, and this nail trend captures that ephemeral freshness perfectly, moving away from heavy winter hues. The key to mastering this look lies in embracing a soft, yet vibrant, pastel palette, primarily featuring light, airy shades inspired by early spring flowers. As shown in the inspiration collage, the foundation colors are a crisp robin’s egg blue and a cheerful buttercup yellow. These shades can be worn individually or, for a more dynamic and trendy appearance, alternated across the nails of a single hand. Expert tip: Ensure your chosen pastels are highly pigmented to avoid streaking; applying two thin coats over a milky white base layer can dramatically enhance the color payoff and prevent dullness. The overall aesthetic should feel light, delicate, and reminiscent of a freshly opened garden, complementing the transition to lighter fabrics and warmer weather.
The defining feature of this April trend is the effortless daisy accent nail, providing a touch of playful sophistication. To recreate this delicate floral design, you will need a small dotting tool (or a fine detail brush), opaque white polish, and a small amount of yellow polish for the center. Start by painting the base nail (most typically the ring or middle finger) with one of your chosen pastels, often the blue, for maximum visual pop. Once the base coat is fully dry, dip your dotting tool into the white polish and carefully create five small, slightly overlapping dots in a circular pattern to form the petals of the daisy. Repeat this process until you have 1-3 daisies on the accent nail, scaling the size to fit your nail plate. For the final touch, use a much smaller dotting tool to place a tiny dot of yellow polish directly in the center of the white petals. Precision is paramount here; if the dots are too large, the design will look messy rather than delicate.
While the blue and yellow combination with daisy accents is a celebrated April classic, the trend is surprisingly versatile. For a sophisticated alternative suitable for professional settings, swap the bright yellow for a pale peach or neutral beige, offering a softer, more muted spring look while still retaining the floral essence. Another option is to use the pastel colors in geometric patterns or simple color-block designs if freehand flowers feel intimidating. To ensure your blooming manicure lasts through unpredictable spring weather, always prioritize a high-quality base and top coat. Reapply a clear top coat every two to three days to maintain maximum shine and prevent chipping at the tips. Finally, keep the hands well-hydrated, focusing particularly on the cuticles, as healthy skin dramatically enhances the polished, professional finish of this beautiful, seasonal nail art.
5 Celestial STELLIO Nail Hacks
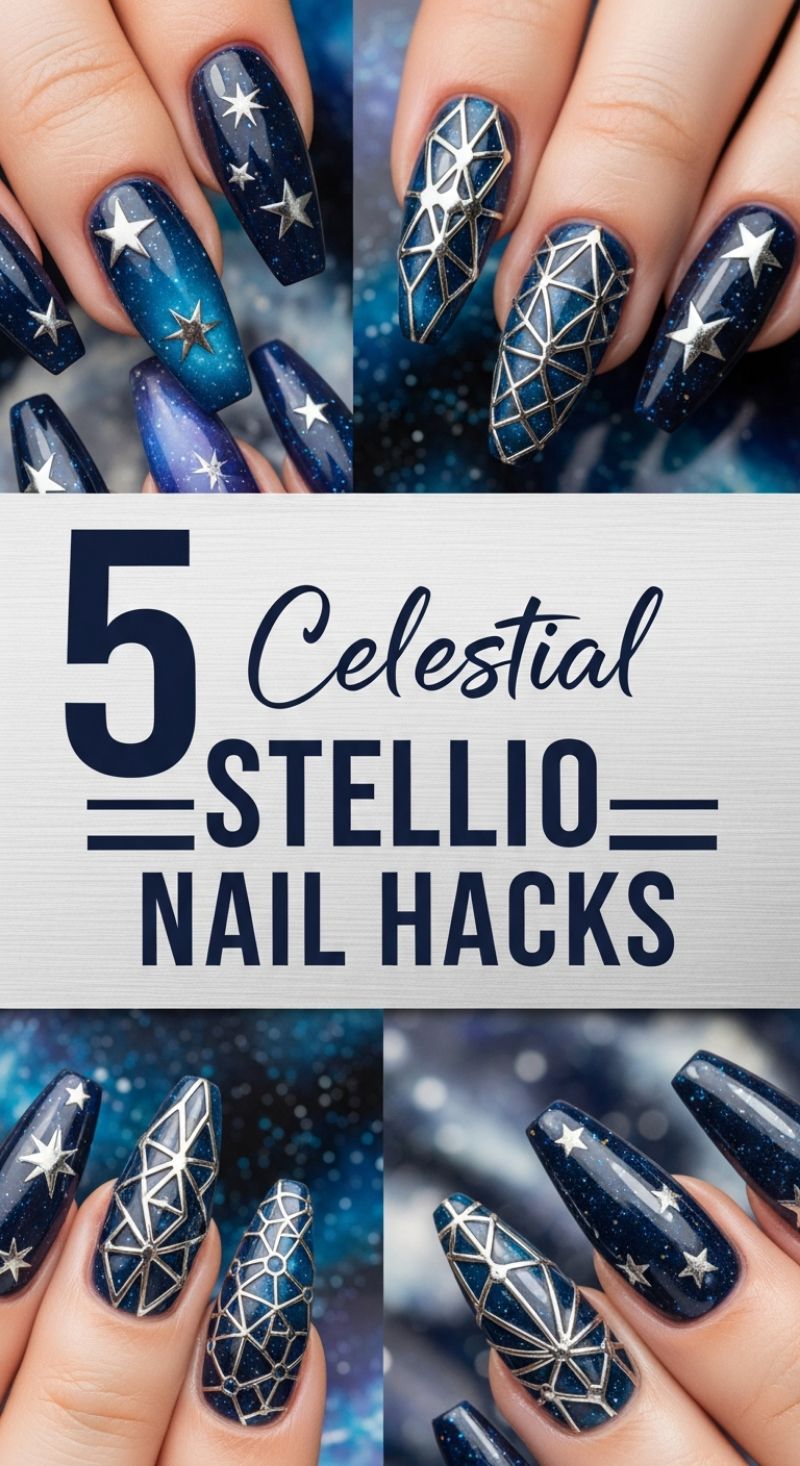
Achieving this dramatic, deep-space manicure requires mastering a multi-layered galaxy base before adding the signature metallic accents. Start with long, sculpted nails—coffin or stiletto shapes best complement the cosmic theme. The foundational step is the nebula effect: apply a coat of deep indigo or black polish, then utilize a sponge or fan brush with shimmering blue, violet, and turquoise shades to softly blend and create depth. For an authentic starlit effect, dip a thin brush into white polish (or use fine silver micro-glitter) and lightly splatter it across the wet base coat, creating hundreds of tiny stars, or use a sheer, holographic topcoat for an all-over shimmer. Expert advice suggests using a magnetic cat-eye polish as your primary blue layer; using the magnet post-application will draw the metallic particles into dramatic streaks, perfectly mimicking the look of the Milky Way across your nails before sealing with a glossy topcoat.
The ‘Stellio’ component introduces the stunning three-dimensional hardware that elevates this look from simple night sky art to high-fashion constellation chic. On the nails dedicated to star placement (often the thumb, pointer, and pinky), carefully apply silver star-shaped charms using a strong adhesive like nail glue or a thick clear builder gel. Vary the size and orientation of the stars for a dynamic, non-uniform look, simulating actual constellations. To ensure longevity and prevent snags, position the charms centrally on the nail bed, making sure they sit flush to the curve of your nail. Once positioned and cured (if using gel adhesive), apply a small ring of top coat around the base of the charm to securely seal the edges, being careful not to obscure the metallic sheen of the hardware itself.
For the complex geometric focal nails (typically the ring and middle fingers), the Stellio hack involves intricate constellation mapping. This effect is achieved either through precision application of metallic silver gel paint using a thin liner brush, or by affixing pre-made metallic constellation stickers or fine striping tape. If drawing the design freehand, sketch out a loose geometric pattern—think of stylized star maps or interconnected geodesic lines—on a matte layer, then trace over the design with highly pigmented chrome gel. Alternatively, high-quality, flexible metallic decals offer a faster application with uniform results. Once the constellation framework is complete, finish the entire nail with a resilient, non-yellowing top coat. This final layer is critical for locking in the 3D hardware and protecting the meticulous geometry, ensuring your celestial manicure remains brilliant and chip-free.
9 Glamorous Acrylic V-Day Sets: Rhinestones, Hearts, and 3D Bows

The ultimate expression of romantic luxury for your fingertips, these nine featured acrylic sets define high-end Valentine’s Day nail art. This style requires long, structured shapes—typically coffin or tapered square—to accommodate the density of the designs and embellishments. The palette is dominated by passionate reds, sweet bubblegum pinks, and sheer milky nudes, providing the perfect canvas for love-themed motifs. To replicate the base of these glamorous looks, focus on foundational structure: use quality pink acrylic powder for strength, ensuring a perfect apex. For the stunning glitter sets shown, incorporate chunky iridescent and pink glitters encapsulated deep within the clear or pink acrylic during construction. This technique not only adds incredible depth but ensures the glitter lasts the entire wear time without chipping or lifting.
Achieving the intricate detailing requires precision tools and expert layering. For the hand-painted elements, such as the numerous red and pink hearts, use a fine liner brush (000 size or similar) and highly pigmented gel paint. Vary the size and style of the hearts—some sets feature uniform, repeating micro-hearts, while others showcase large, abstract heart shapes created using the wet-on-wet technique or careful freehand painting. The dynamic swirl patterns seen in many examples can be achieved by blending two colors of gel or utilizing blooming gel to allow the colors to spread naturally, creating an ethereal, flowing effect. Remember to cure each layer of gel paint fully before adding the next level of decoration to prevent smudging.
The hallmark of these “glamorous” sets is the maximalist use of high-quality rhinestones and 3D elements. Large centerpiece gems, such as the prominent heart-shaped crystals, must be secured using a durable adhesive like builder gel or a specialized rhinestone glue, cured thoroughly under UV/LED light. Cluster smaller crystals (using varying sizes from SS3 to SS10) around these focal points and along the cuticle line to create a cascading, light-reflecting effect. For the realistic 3D bows, colored acrylic powder and monomer are essential. Sculpt the bow segments carefully while the acrylic is still pliable, ensuring definition and symmetry. Once the entire design is complete, encapsulate any hand-painted details with a non-wipe top coat, but strategically avoid coating the faceted rhinestones directly, as this dulls their sparkle. This meticulous preparation ensures the set’s longevity and striking visual impact.
6 Quick Nail Routines

Achieving beautiful, long-lasting manicures always starts with meticulous preparation, even for a quick routine. As shown in the top left visual, the first crucial step is addressing your cuticles. Use a high-quality cuticle oil or serum, gently massaging it into the skin around the nail plate. This softens the skin, making it easier to push back and preventing painful hangnails, which are often the enemy of a clean look. Next, focus on shaping. The bottom left visual shows the process of filing. Always file your nails in one direction, rather than sawing back and forth, to prevent splitting and weakening the nail edge. For quick routines, a gentle round or squoval shape tends to be the most resilient and easiest to maintain. Ensure the nail surface is completely clean and free of any oil residue (using a swipe of rubbing alcohol or nail cleanser) before proceeding to polish application.
The secret to a durable manicure, whether it’s a simple sheer look or a vibrant art design, lies in the foundational layers. As depicted in the top right visual, applying a base coat is non-negotiable. A dedicated base coat serves two vital purposes: it prevents the pigment from colored polishes from staining your natural nails, and more importantly, it creates a gripping surface for the subsequent layers of polish, significantly extending the wear time. Use a very thin, even layer, making sure to “cap the edge” of the nail—brushing the product lightly along the very tip—to seal the entire structure and prevent premature chipping. Allow this layer a full minute to dry tacky before introducing your chosen color or final nude shade (as suggested by the bottom right visual, which shows the application of a lighter polish).
When time is of the essence, selecting the right final products and adhering to a methodical technique is key to maintaining quality while speeding up the process. Once your color coat (or coats) is applied, immediately follow up with a quick-dry top coat. This step is crucial for sealing the layers, providing high shine, and dramatically cutting down the curing time. When applying the top coat, ensure you cover the entire nail bed, including capping the free edge again, just as you did with the base coat. For truly quick routines, consider using formulas marketed as “1-step” or “express dry” polishes, which integrate the color and top coat properties. If you accidentally smudge a fresh application, resist the urge to repaint; instead, dip a clean fingertip in cuticle oil and gently smooth the disturbed area before applying a final layer of top coat over the repair. This methodical approach ensures your quick routine yields salon-quality results that last.
8 Chic Short Spring Manis
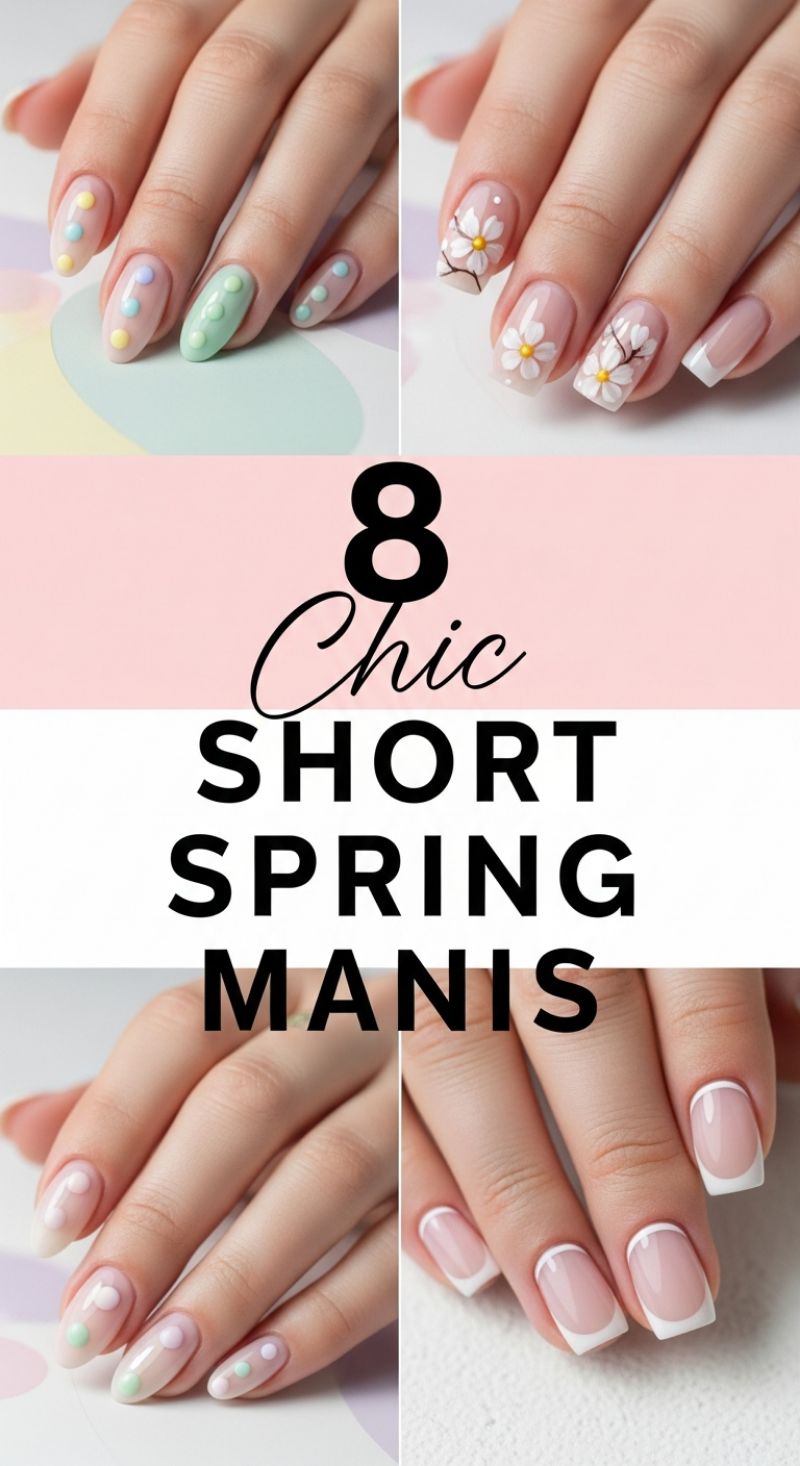
The essence of spring nail art is captured beautifully in the playful yet sophisticated use of sheer bases and soft pastels, perfect for short, functional nail lengths. Two variations of the popular polka dot trend are showcased here, utilizing the nude base as a versatile canvas. The first approach features vibrant pastel dots—like light yellow, sky blue, and mint green—scattered across a sheer base. An expert tip involves creating contrast with a single accent nail, perhaps coating it completely in a solid pastel shade (like the mint green shown) and using dimensional or slightly larger dots of the same color for a tactile, jelly-like or 3D effect. The second variation offers a more subtle take, placing smaller dots primarily near the cuticle or the lower half of the nail on an oval shape, using softer, almost translucent colors (white, baby pink, soft mint) to keep the look understated and elegant, perfect for minimalist styling.
For those who prefer intricate detailing, the floral designs provide a stunning, delicate alternative. This look elevates the classic sheer manicure by featuring delicate white daisies or cherry blossoms painted across a milky pink or nude base. To recreate this professional finish, start with a perfectly manicured short, square or squoval nail shape. Use a fine detail brush and highly pigmented white polish to paint the petals, finishing with a small yellow dot in the center. The use of minimalist brown or black lines to represent branches anchors the design and adds a sense of depth and artistry. Notice how this style is balanced: some nails feature the detailed art, while others maintain a simple sheer polish or a subtle, natural-looking French tip on the free edge, ensuring the overall look is cohesive but not overwhelming.
While patterns and art dominate, the timeless French manicure proves its perpetual relevance, especially when adapted for shorter nails. The modern short French (bottom right) features a clean, thin, stark white line tracing the free edge of a perfectly shaped square or squoval nail, providing a crisp, polished appearance that subtly lengthens the fingers. Regardless of the specific design chosen—be it whimsical dots, intricate florals, or the classic French—the unifying factor across these chic spring manicures is the commitment to functional, short length and the strategic use of sheer or milky bases. This foundation allows the seasonal colors and details to truly shine, making these looks universally flattering, easy to transition from work to weekend, and low maintenance throughout the warmer season.
10 Perfect PROM NAIL IDEAS
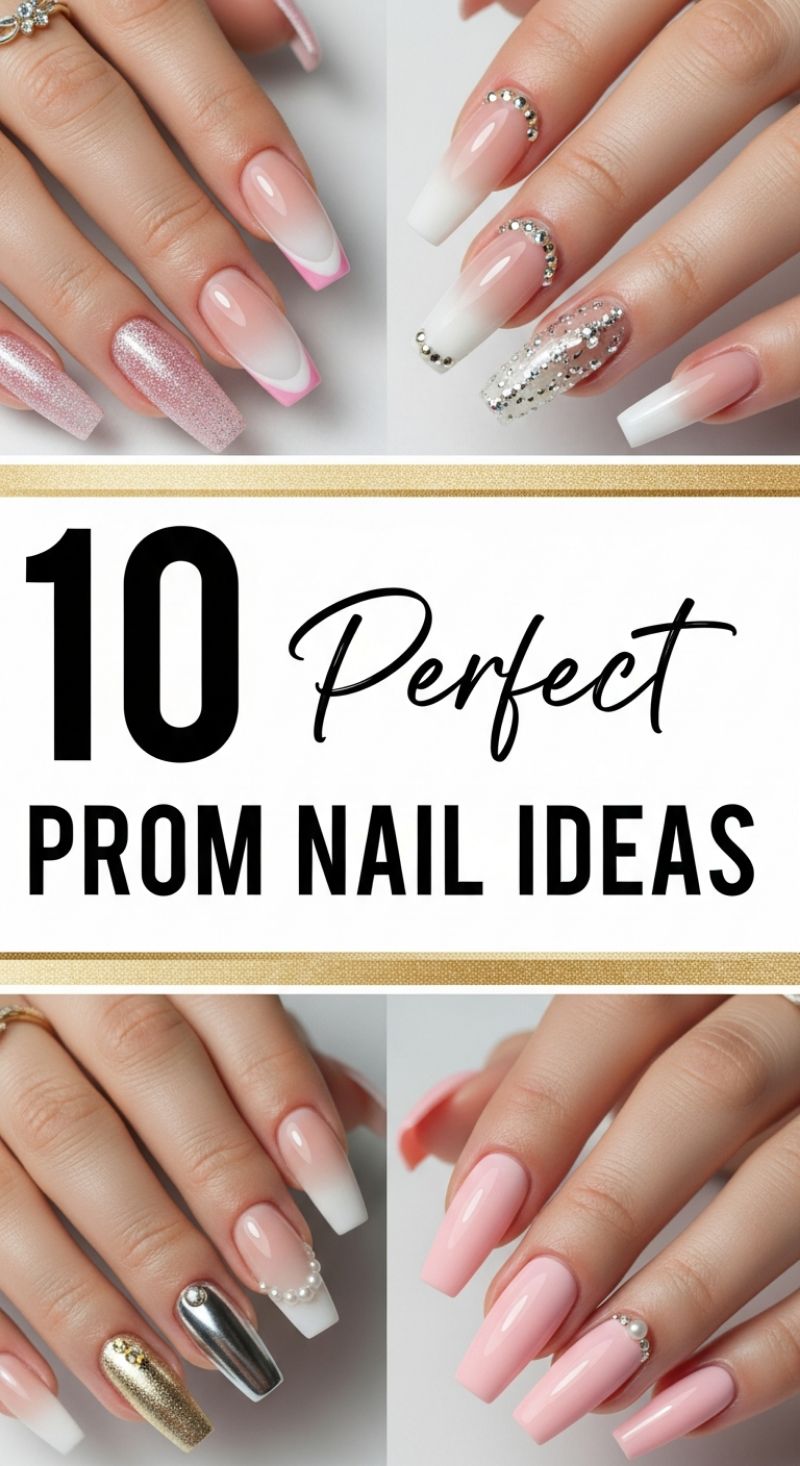
Prom night calls for nails that are elegant, glamorous, and durable enough to last through a night of dancing. The dominant trend showcased here is the elevated French manicure, specifically the ‘Baby Boomer’ ombre style, characterized by the seamless vertical blend of a nude or sheer pink base into crisp white tips. To recreate this look, start with a high-quality builder gel or acrylic in a soft pink shade, ensuring the apex is perfectly structured for long coffin or tapered square shapes. The ombre effect is best achieved using a blending brush or sponge, feathering the white tip color about halfway up the nail bed before curing. This technique is universally flattering and provides a subtle, sophisticated canvas that pairs effortlessly with any dress color, making it the ultimate safe yet chic choice for a major event like prom. Finish with a high-shine, non-wipe top coat to maximize that glossy, perfected finish.
To transform this classic foundation into a true prom statement, strategic embellishment is key. Focus on accent nails to incorporate sparkle and dimension without overwhelming the overall look. As seen in the top right image, rhinestones should be applied meticulously, often following the natural curve of the cuticle (a ‘cuff’ design) or tracing the smile line of the nail bed for maximum impact and symmetry. Use a strong nail resin or thick builder gel to set each rhinestone piece securely. For those looking to incorporate their outfit’s metallic elements, utilize foil flakes, high-pigment glitter gels (like the sparkly pink shown), or liquid chrome powders on one or two accent nails (such as the striking silver and gold examples). Remember to seal all glitter and chrome under two layers of topcoat to prevent chipping and dullness. Expert tip: Ensure your metallic or pearl accents (as seen on the ring finger with the pearl string) are placed strategically on the dominant hand’s ring finger to draw attention to your accessories and jewelry.
For a softer yet equally refined option, consider the solid, flawless application of a ballet or bubblegum pink shade, as shown on the bottom right. While less complex in design, achieving this look requires perfect application, starting with meticulous cuticle work and consistent color saturation. If choosing a long coffin shape, ensure all nails are filed to exactly the same length and taper to maintain visual uniformity. Whether you opt for an elaborate French ombre with rhinestones or a clean solid color, the key to success is longevity. Because prom is an all-night affair, always use a professional gel system or properly cured acrylics, and ensure the free edge of every nail is capped during application. This detail ensures chip-free wear, guaranteeing your ‘perfect’ nails last from the pre-party photos right through to the after-party.
5 Lucky Nail Designs
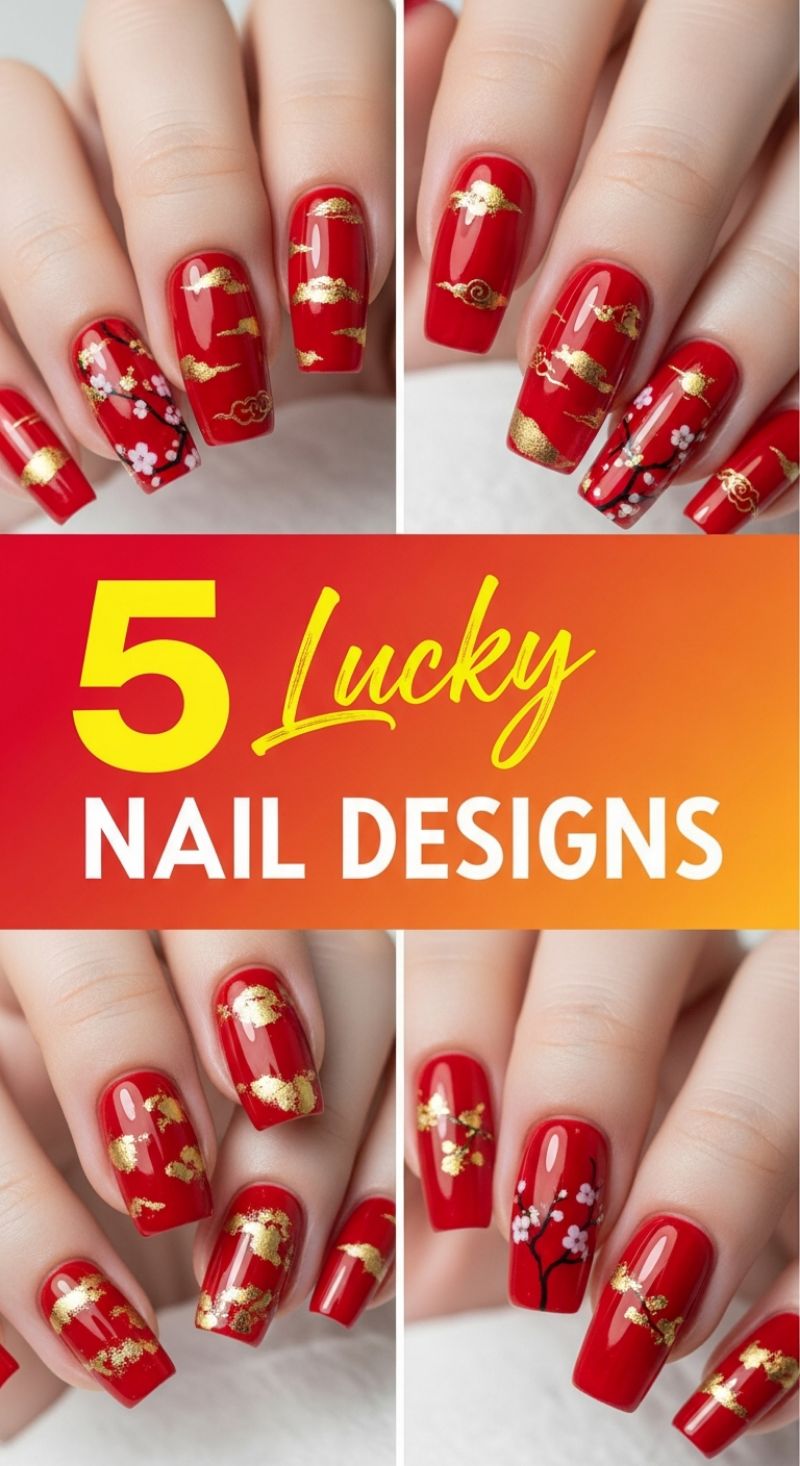
This powerful set of manicures draws inspiration from traditional symbols of good fortune and prosperity, making them ideal for occasions like the Lunar New Year, anniversaries, or anytime you want an infusion of auspicious energy. The core palette relies on the bold combination of rich, opaque red—symbolizing power, happiness, and luck—paired with metallic gold, representing wealth and success. To replicate the gorgeous red and gold foil design, start by curing a minimum of two coats of a highly pigmented red gel polish. Next, apply a specialized foil transfer gel or a thin layer of no-wipe top coat, depending on the tackiness required for your specific foil product. Before curing the final top layer (or while the adhesive is tacky), press irregular pieces of metallic gold foil flakes onto the nail surface, focusing on achieving a natural, scattered, almost abstract appearance. Use a silicone tool or a dry brush to press the foil flat against the nail, then seal the entire design immediately with a durable, high-shine top coat to prevent the delicate metallic pieces from lifting or catching on clothing.
The featured designs also showcase intricate traditional Chinese motifs: the Lucky Cloud (or Ruyi Cloud) and the Plum Blossom. The Ruyi cloud symbolizes divine blessing and good fortune. To execute the cloud design, use a fine-tipped detail brush and an ultra-pigmented gold gel polish. Focus on creating delicate, scrolling, S-shaped lines that undulate across the nail, varying the placement so some clouds appear to float higher or lower, creating depth and movement. For the elegant plum or cherry blossom accent nail, first paint delicate, thin branches using black polish. Once cured, use a small dotting tool and white or pale pink polish to create clusters of five dots, forming the petals. Finish the center of each flower with a tiny dot of yellow or coordinating gold polish to give the blossoms a realistic pop. This design is best reserved for one or two accent nails to maintain sophistication and prevent the overall look from appearing too cluttered.
Expert nail technicians advise ensuring absolute consistency in both the red base color and the exact shade of gold used across all five design variations. Though the techniques vary—from hand-painted clouds and blossoms to loose foil flakes—matching the materials ensures the manicure reads as a single, cohesive art piece. These striking designs look best on a medium-length nail with a softened square or squoval shape, which provides an ideal canvas size for displaying the intricate details without distortion. Due to the raised nature of the foil and potential thickness from multiple hand-painted layers, it is critical to finish the entire set with two smooth, thin coats of a robust topcoat. This step not only maximizes shine but also encapsulates the artwork completely, guaranteeing longevity and wearability, making this manicure truly ready for a prosperous celebration.
9 Coastal Beachy Summer Nails

To capture the vibrant essence of the coastline, this summer manicure relies heavily on cool-toned blues, rich teals, and crisp whites, often blending them to mimic the transition of ocean water into frothy waves or sandy shores. The foundational technique for achieving this look is a flawless ombré or gradient, transitioning from a deep turquoise or teal at the nail bed to a pure, stark white at the tip. To execute this perfectly, apply the base color (teal) and the tip color (white) in thin stripes onto a makeup sponge. Lightly dab and roll the sponge onto the nail, repeating the process two to three times until the blend is seamless. Ensure that you use a glossy top coat, which is crucial for achieving the ‘wet look’ finish that makes the ocean colors truly pop. For those who prefer a more sophisticated take, the classic French manicure can be reinvented by replacing the traditional pink or nude base with a sheer, pale aqua blue, framing the crisp white tip with a subtle hint of sea color.
Elevate your coastal manicure by incorporating different textures and artistic twists. The French variation shown utilizes a captivating glitter accent nail, where the base color is light blue and features a sprinkle of holographic or iridescent micro-glitter, often concentrated towards the cuticle and fading out towards the tip. This effect, which mimics the sun glistening on the water’s surface, is best achieved using a loose fine glitter pigment mixed into a clear builder gel or applied directly over a cured color coat before sealing. For a full-coverage sparkle, apply two coats of a highly pigmented teal glitter polish over a colored base. When working with glitter, remember to carefully cap the free edge of the nail with top coat to prevent chipping and maintain that intense, diamond-like reflection. Consistency and quality of product are key; use high-quality gel polishes for maximum opacity and shine.
No coastal design is complete without expertly placed thematic embellishments. The 3D starfish charm seen on the accent nail is the perfect focal point and requires careful application for long-lasting wear. Start by fully curing your base design (the ombré). Next, use a small dot of strong adhesive, such as a thick rubber base coat or dedicated rhinestone glue gel, to secure the charm in place. Press firmly and flash cure briefly before ensuring that the edges of the charm are sealed seamlessly with a non-acidic primer or thin layer of clear gel, without covering the charm itself, to preserve its textural detail. For added interest and dimension, strategically place small silver microbeads or pearls around the charm, mimicking scattered beach treasures. Maintain the integrity of these long, dramatic nail shapes (coffin or tapered square) by advising regular cuticle oil application and wearing gloves during heavy cleaning to protect the artwork.
6 Rustic Western Nail Art

The ‘Rustic Western’ aesthetic captures the grounded beauty of the countryside, translated into sophisticated, yet earthy manicures. The foundation of this trend lies in its rich, warm color palette: think deep terracotta, burnt sienna, saddle brown, and creamy nudes. To achieve this look, start with two coats of your chosen base color, ensuring a high-gloss finish to mimic polished leather or rich wood grain, as seen in the solid nails throughout these examples. Expert advice dictates using colors with slight dusty or muted undertones rather than bright reds, maintaining the rustic feel. For a cohesive look, keep the nail shape practical—a rounded square or squoval shape complements the natural, enduring spirit of the Western theme best. Even when utilizing a metallic accent, like the striking, distressed silver stroke on the accent nail (bottom left), ensure the surrounding nails are deeply pigmented and glossy to keep the focus on the texture and contrast.
To introduce patterns, the cow print is the quintessential element of Western chic (top left). Begin with a clean, fully cured white base coat. Using a fine detail brush or a small dotting tool dipped in black polish, create irregular, organic blobs. Crucially, these spots should not be perfectly circular; they should vary in size and shape, often bleeding slightly into each other near the edges, to mimic natural hide patterns. Combine this bold pattern with solid nails that incorporate minimalist hardware, such as the strategic use of small, clear rhinestones. These gems should be placed sparingly, often forming a subtle curve along the cuticle line or running vertically down the center of the nail bed. This placement is meant to evoke the look of silver conchos or studded leatherwork, adding a touch of intentional glamour to the earthy backdrop.
Beyond prints, elevate the rustic theme with dimensional accents and gradients. The top right design showcases a sophisticated variation using a subtle ombré fade from a deep rust tone near the tip into a sheerer nude near the cuticle. This can be achieved using a blending brush or sponge. Alternatively, utilize metallic details to mimic jewelry findings: employ a thin striper brush and silver polish to create curved lines—a ‘half-moon’ design or a French tip variation—that elegantly separates the color block from the natural nail bed. Always secure rhinestones with a drop of builder gel or strong nail glue, curing them under an LED lamp if necessary, ensuring they sit flush against the nail surface. This blend of textured metallics, organic prints, and warm, matte colors guarantees a Western manicure that is both trendy and timeless.