Discover The Ultimate Nail Art Lookbook featuring 65+ stunning designs for every occasion! Get perfect manis for Prom, fresh looks for Spring, edgy acrylics, coquette trends, and more. Find your next nail obsession here.
8 Soft PURPLE PROM LOOKS
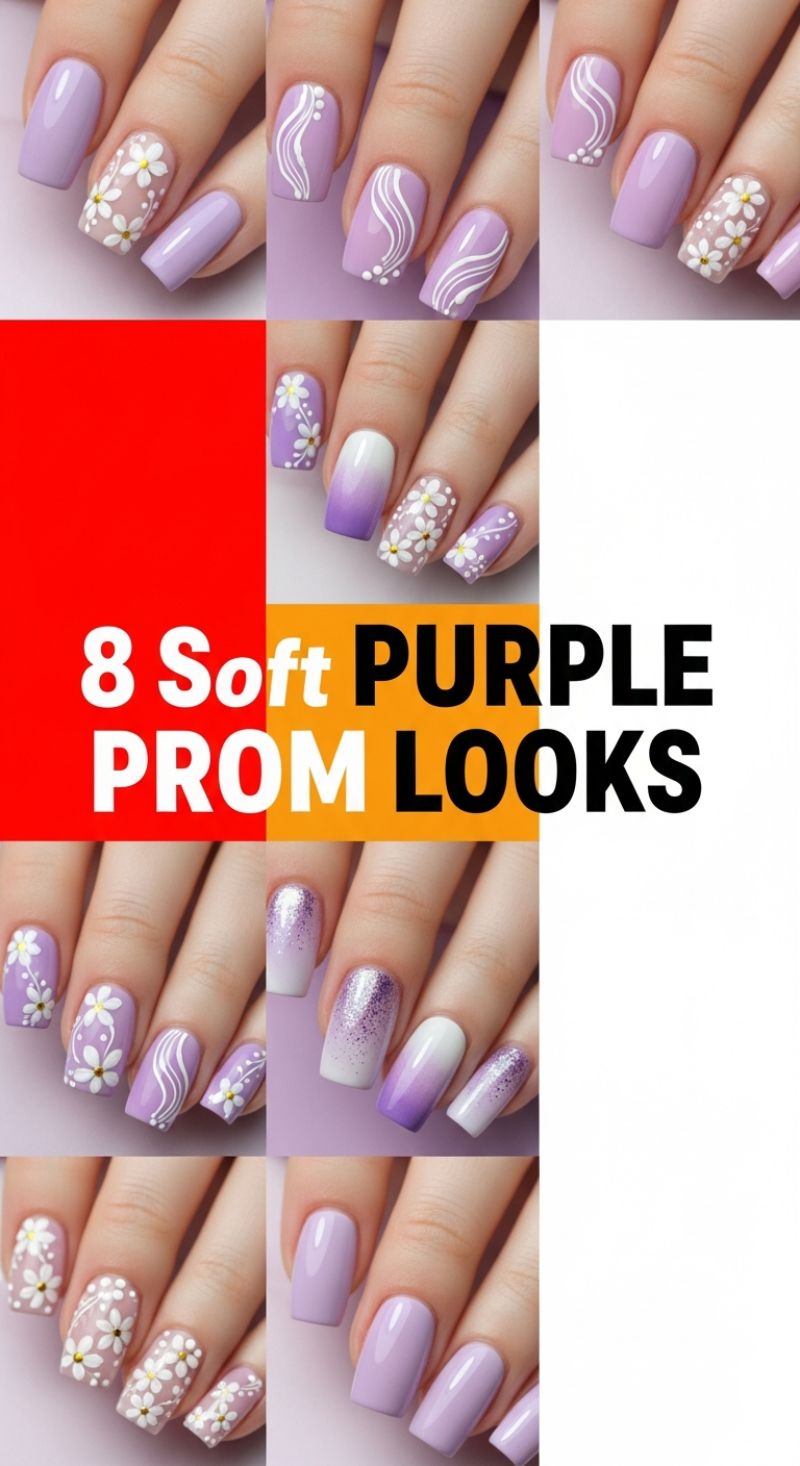
Soft purple, particularly lavender and lilac, is a perpetually chic choice for prom, offering a blend of youthful vibrancy and delicate elegance. This collection features eight distinct ways to utilize this dreamy hue, ensuring a perfect match for any sophisticated spring occasion. The most straightforward looks involve a perfect, glossy application of a solid lavender shade—a clean, classic choice that pairs seamlessly with almost any dress color. For those wanting a subtle artistic flair, several designs incorporate sweet, easy-to-create daisy patterns. To achieve this look, begin with a strong foundation, either a fully opaque soft purple or a sheer nude base coat on your accent nails. Use a fine-tipped dotting tool and crisp white nail polish to create five small dots clustered in a circle for each petal. Once dry, place a tiny dot of yellow or gold glitter polish in the center to complete the daisy. This technique works beautifully on one accent nail per hand or scattered across all nails for a true spring bouquet effect.
Elevate the soft purple foundation further using sophisticated ombré, elegant line work, and textured finishes. The featured ombré styles transition seamlessly from a deep, vibrant violet up to a soft white tip, or sometimes simply a light lavender gradient. To execute a flawless ombré, paint a stripe of white polish next to a stripe of your chosen purple shade onto a dense makeup sponge. Gently dab the sponge onto the nail, ensuring the colors blend at the center, then seal with a quick-dry top coat. For the elegant, contemporary swirl designs, precision is key. Use a specialized striping brush and highly pigmented white polish (such as a white gel paint) to draw smooth, flowing ‘S’ shapes or gentle curves, often accented by a few strategically placed white dots near the cuticle. Expert Tip: Keep the white lines thin and consistent; if they are too thick, they lose their delicate, ethereal appearance. Finally, don’t overlook the power of texture: several looks incorporate fine iridescent or purple micro-glitter, applied densely at the cuticle or tip and carefully feathered downward to mimic a shimmering cascade, adding celebratory sparkle perfect for the dance floor.
10 Perfect Acrylic Nail Hacks
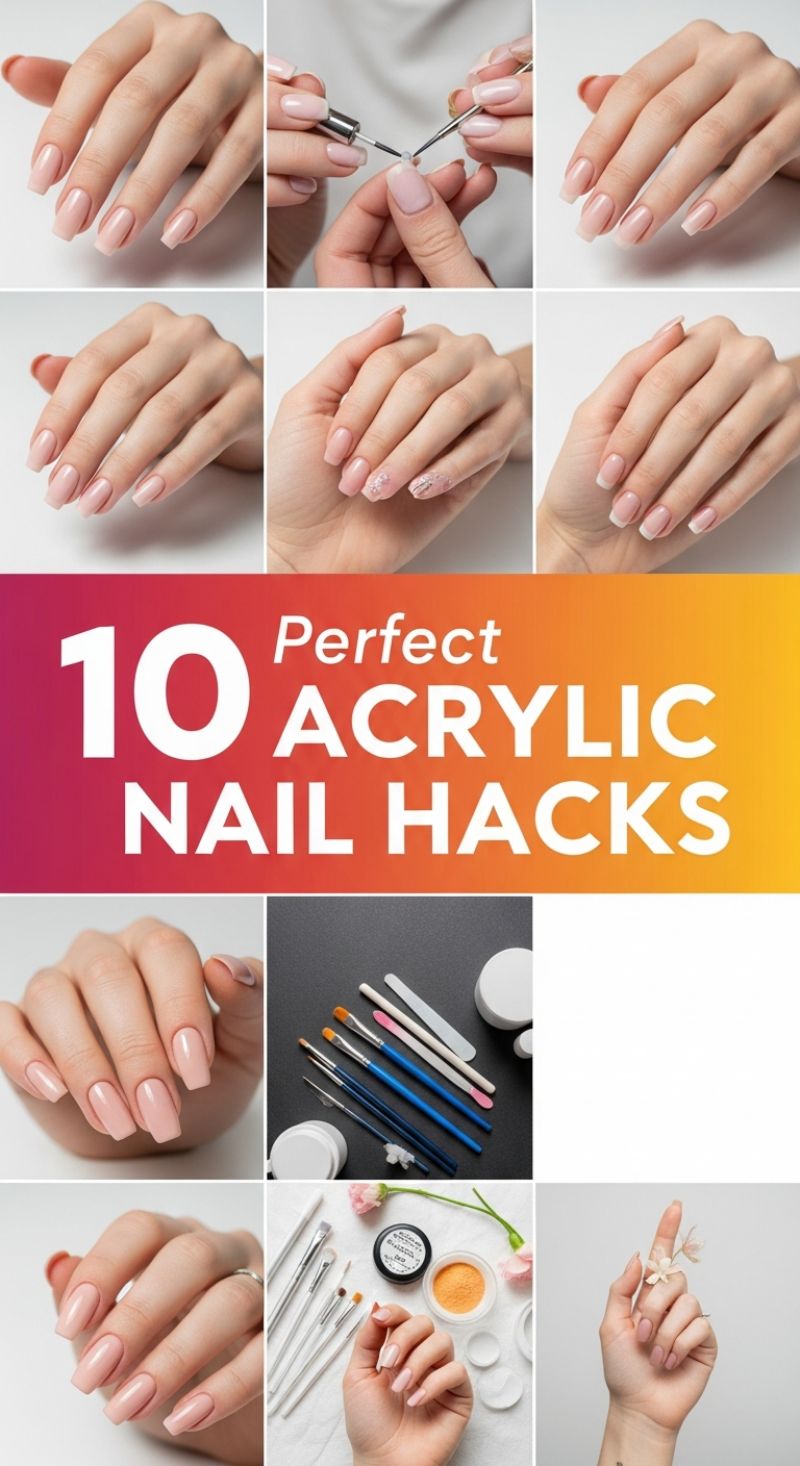
Achieving that flawlessly smooth, natural acrylic base—as evidenced by the various nude and blush-toned sets pictured—starts with mastering the “perfect bead” application. A core acrylic hack involves controlling the liquid-to-powder ratio precisely. Dip your brush just enough into the monomer (liquid) and then tap off the excess on a dry paper towel to prevent flooding the cuticle area. When picking up the powder, aim for a bead consistency that is neither too wet (runny) nor too dry (crumbly). The key technique is placing this bead near the cuticle area and gently guiding it down toward the free edge, ensuring the bulk of the product forms the apex—the highest point of the nail structure—to maximize strength and prevent breakage, especially vital for the longer, structural styles favored in modern nail lookbooks. This initial foundational step determines the entire shape, resilience, and longevity of the subsequent design.
The visual guide hints at several detailing hacks necessary for professional results, particularly when executing precise designs like the crisp French tips or delicate glitter accents shown. For a perfect smile line (French tip), utilize a smaller, sharply pointed acrylic brush or even a specialized detail liner brush to sculpt the white tip acrylic. Instead of applying one large swipe, try building the smile line in two sections from the side walls, meeting precisely in the center. For incorporating sparkle, like the micro-glitter and embedded flakes seen on the accent nail, apply a very thin layer of clear acrylic first, place your embellishments, and then cap the entire area with another small, clear bead. This “sandwich” technique ensures the glitter is locked in, preventing texture issues and keeping the surface completely smooth for a high-gloss, premium finish. Proper tool selection, including the array of high-quality sable brushes visible in the layout, is non-negotiable for achieving these meticulous effects.
Once the acrylic application is complete, the final, crucial hack lies in expert shaping and finishing, which dictates the overall lookbook-worthy appeal. Whether opting for the chic squared look or a softer coffin shape, always use a high-grit file (100/180) to carve the initial shape, then switch to finer buffers (220+) to meticulously smooth away all file marks. A common professional trick is to hold the file parallel to the nail’s surface when smoothing the top to maintain the integrity of the apex. Avoid aggressive over-filing near the sidewalls or cuticle, as this can lead to premature lifting. For maximum shine and durability, especially for high-wear events like Prom or Spring breaks, finish with a high-quality, non-wipe gel top coat and cure fully. This final sealing step ensures the acrylic remains flawless and chip-resistant for weeks, offering a perfect, lasting finish.
7 Bold HOT PINK NAILS
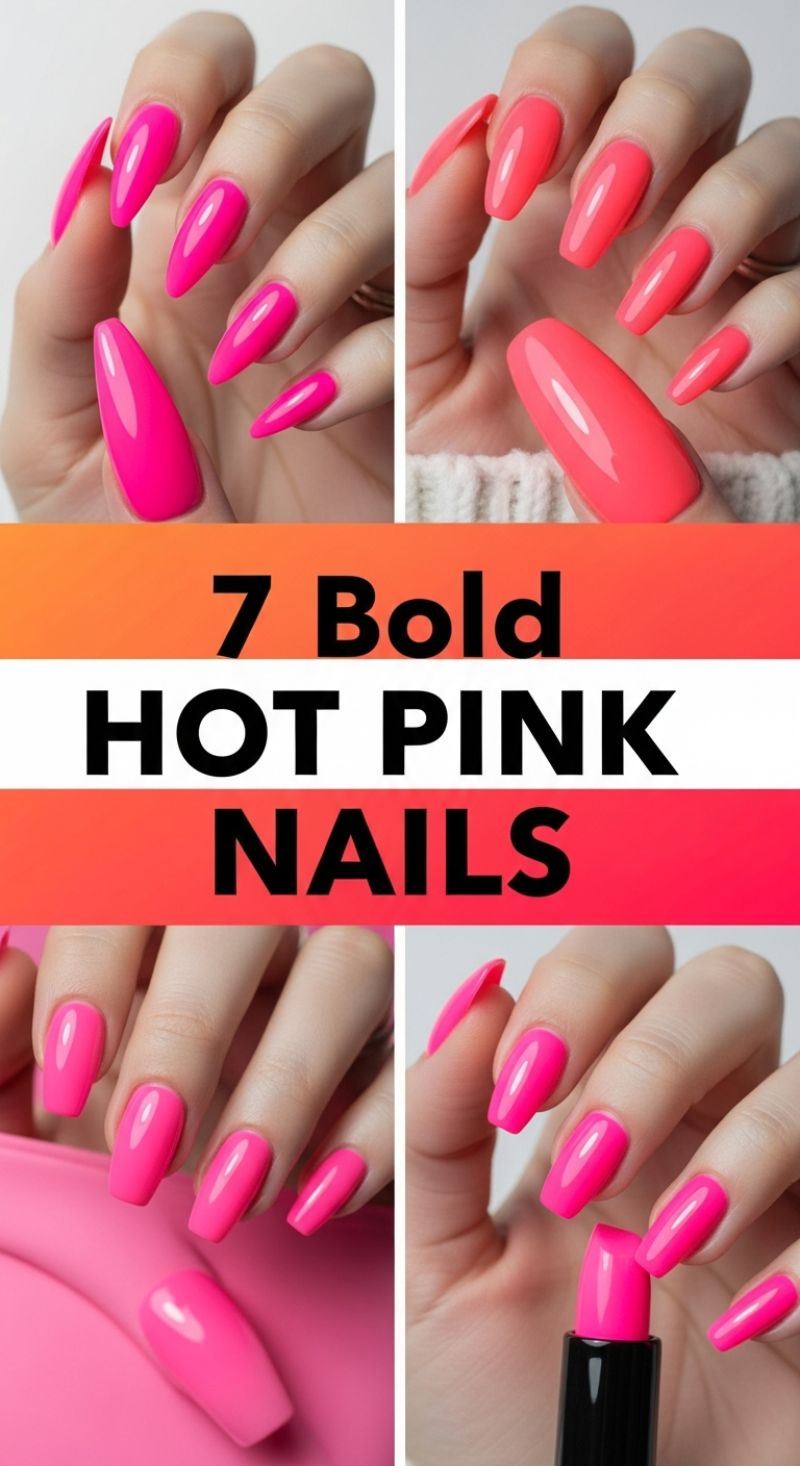
Dive headfirst into high-octane glamour with this compilation of bold, hot pink nail looks. Hot pink, encompassing shades from electric fuchsia to near-neon coral, is the quintessential choice for high-energy events like prom or for injecting maximum vibrancy into your spring and summer wardrobe. The key to mastering this aesthetic, as demonstrated across these featured styles, lies in the pairing of an intensely saturated pigment with a flawless, high-gloss finish. Notice the various shapes presented: we see both the dramatic, elongating stiletto/almond shape and the more structured, fashionable medium coffin cut. For professionals attempting to replicate this level of color payoff, start by applying a true opaque white base coat. Neon pigments are often translucent, and the white foundation acts as a reflector, ensuring that the pink hue registers with maximum brilliance and prevents the color from sinking into the natural nail bed. Follow the base with two thin, evenly cured coats of your chosen hot pink gel or lacquer, making sure to cap the free edge on every step to prevent chipping.
Achieving the smooth, reflective glass-like surface shown here requires meticulous application and high-quality products. After securing your color coats, the most critical step is the top coat. For this level of intensity and shine, opt for a non-wipe, high-shine hard gel or top coat specifically designed for maximum reflection. Apply the top coat slightly thicker than usual to help smooth out any minor imperfections in the color layer, ensuring a perfectly domed apex on the longer nail shapes for durability. Since these are mostly long enhancements, maintaining sharp edges and a consistent shape is vital; file gently only after the base structure (whether acrylic or hard gel) is established. A common challenge with neons is streaking; mitigate this by ensuring your polish coats are thin and fully cured before applying the next layer. Finally, lavish care on the surrounding skin. A perfect neon manicure demands pristine cuticles; finish the look by massaging cuticle oil around the eponychium and proximal fold to highlight the contrast between the vibrant color and healthy skin.
This bold pink look is inherently a statement, requiring very little, if any, additional embellishment. However, if you wish to personalize the style, consider incorporating a single accent nail on the ring finger. Subtle additions like a thin layer of iridescent shimmer powder or a delicate chrome effect—particularly a pink-to-gold shift—can catch the light without detracting from the primary color’s power. For clients attending formal events, the bold nature of this pink pairs beautifully with metallic accents, such as gold rings or silver jewelry. Remember that longer, bold colors like these require robust structural integrity; if you are using tips or extensions, ensure the product is applied correctly to withstand daily wear. Maintenance fills should be scheduled every two to three weeks to keep the sharp shape and vibrant color looking fresh, making this the perfect look for anyone embracing the maximalist or modern Barbiecore aesthetic.
10 Edgy BLACK FRENCH TIPS
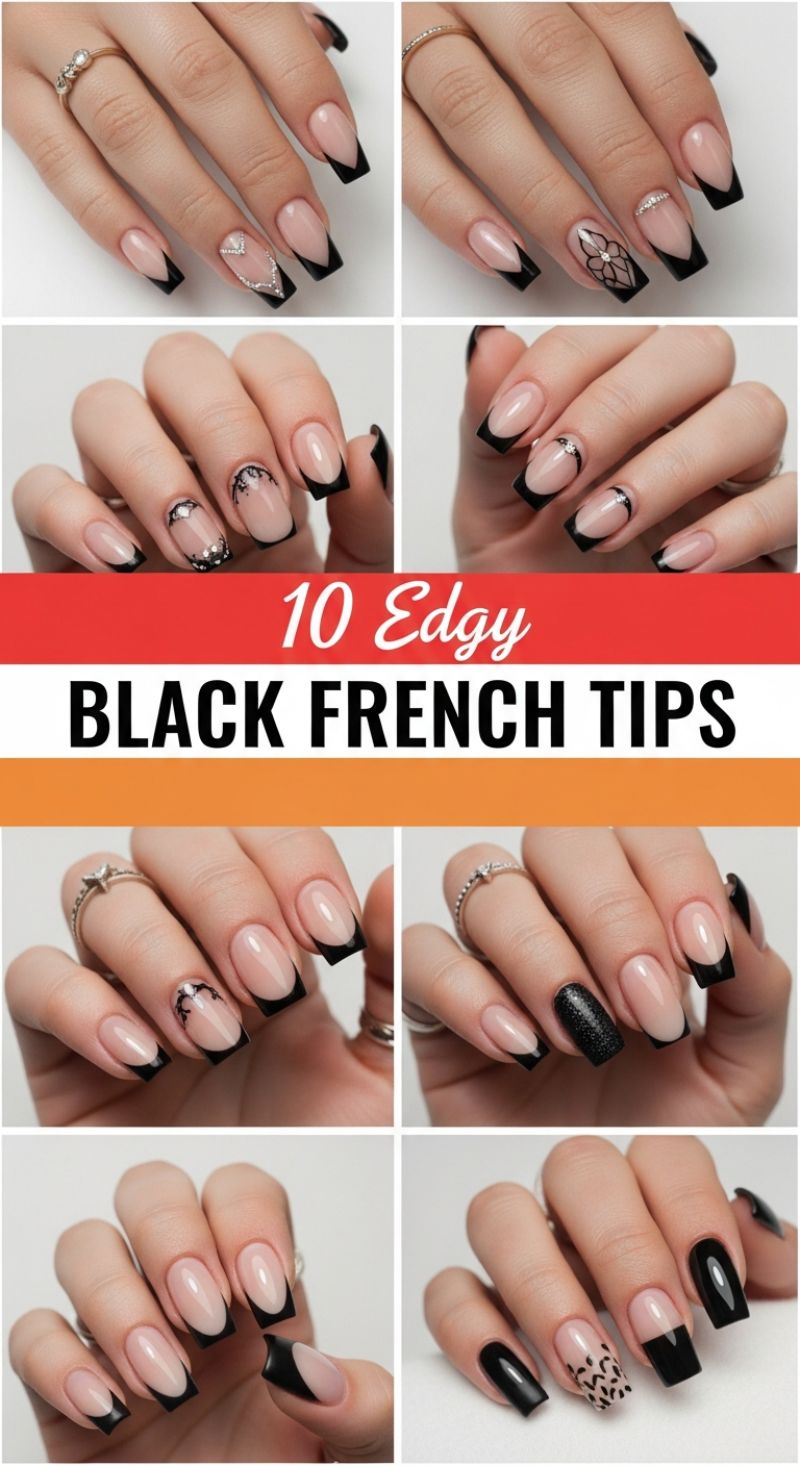
Black French tips are the epitome of sophisticated edge, offering a dramatic twist on the classic manicure that is perfect for high-stakes events like prom or a chic evening out. To recreate this powerful look, begin with a meticulously shaped canvas; long square, coffin, or angular almond nails best showcase the deep contrast of the black tip. Apply a flawless base coat of sheer pink or nude builder gel to provide a healthy, high-shine foundation. The key to achieving the ‘edgy’ aesthetic lies in varying the shape of the smile line. While some designs feature the traditional soft curve, several highly impactful looks here utilize a sharp, deep ‘V’ shape (chevron) for the tip. To execute this, use a fine detail brush and highly pigmented black gel polish. Start from the center point and pull the line diagonally toward the sides, ensuring both sides are perfectly symmetrical and the edges are crisp and clean. Curing this layer ensures a sharp boundary between the natural base and the striking black polish.
To elevate the simple black tip, incorporate intricate detailing and luxury accents. Several featured designs utilize negative space and fine line work, mimicking lace or delicate gothic patterns. Use an ultra-thin nail art brush (00 or 000 size) to draw swirls, delicate florals, or complex outlines extending from the tip line toward the cuticle, as seen in the top right and middle-left examples. For added glamour, integrate rhinestone detailing; placing small clear or black gems along the curve of the smile line, or using them to trace a geometric shape (like the ‘V’ on the ring finger), creates an instant focal point. A particularly trendy variation seen here involves the ‘reverse French’ or ‘half-moon’ technique, where a thin arc of silver or glitter is applied just above the main black tip, drawing attention to the perfect symmetry of the application. This requires a steady hand and a precision liner brush to keep the line consistent across all fingers.
Finally, maximize the impact of this look by utilizing textured and full-coverage accent nails. Instead of strictly adhering to the French tip style on every finger, choose one or two nails for a contrasting design. Options include a full-coverage nail using a glitter-infused black polish, which adds depth and shimmer without detracting from the overall dark aesthetic. Another sophisticated choice is the use of animal print—specifically a delicate black leopard or cheetah print—applied over a nude base on the ring or middle finger. To achieve the print, apply small, irregular black spots using a dotting tool, then use a matte top coat on just the accent nail for a tactile and visual contrast against the glossy French tips. Finishing all nails with a high-gloss, UV-cured top coat will seal the design, enhance the shine, and ensure this ultimate edgy manicure lasts for weeks.
5 Dramatic Acrylic Nail Shapes
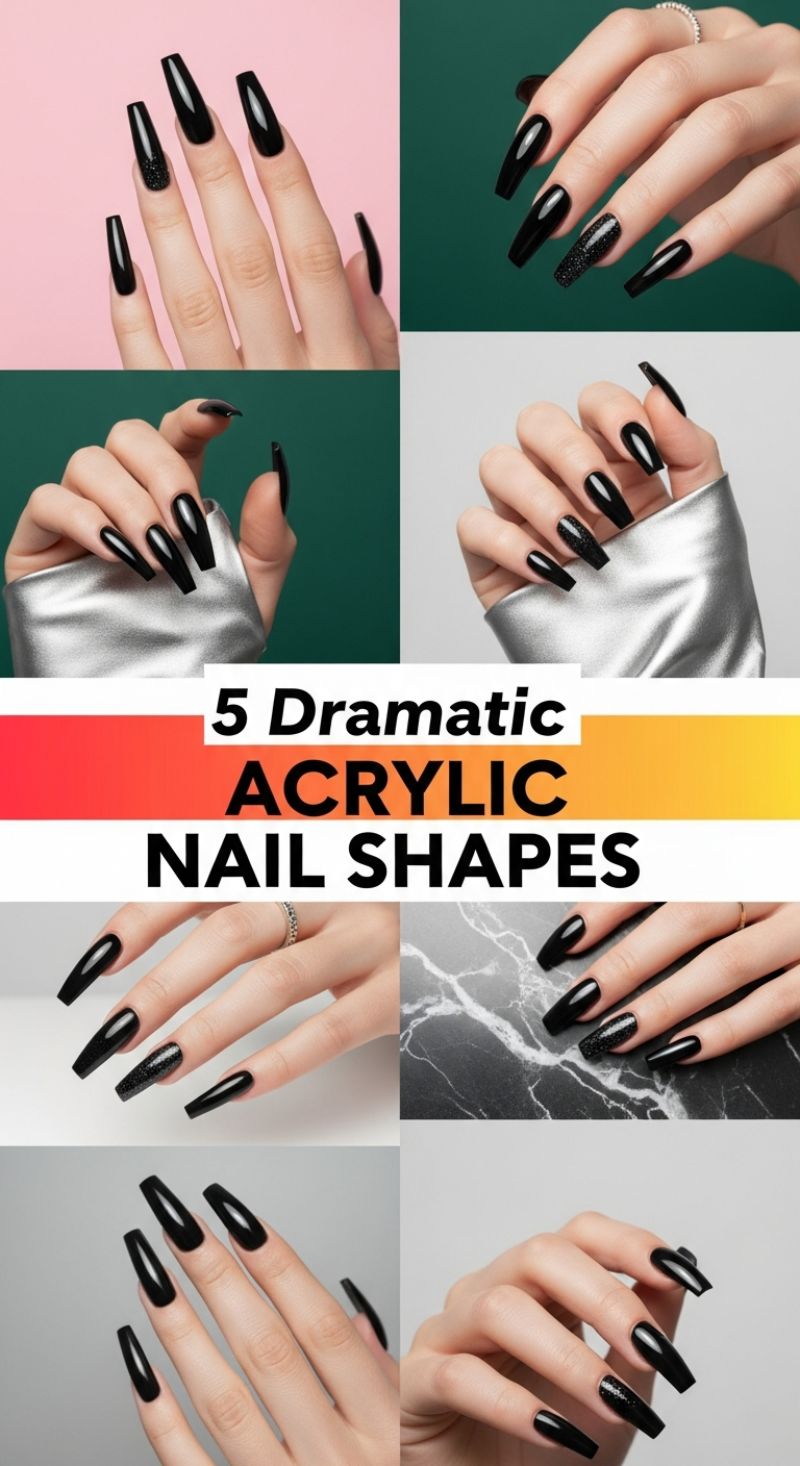
The long, deep black manicure showcased here is the epitome of high-impact glamour, making it a perfect choice for prom, sophisticated evening events, or anyone looking to inject drama into their everyday style. Achieving this aesthetic begins with selecting the appropriate dramatic shape, which defines the overall look. The visuals feature three main contenders: the Coffin (or Ballerina) shape, characterized by straight, tapered sides and a flat, squared-off tip; the bold Stiletto shape, which tapers dramatically to a sharp point; and the long, subtly Tapered Square. When consulting with your nail technician, discuss your lifestyle, as extreme lengths require different levels of maintenance and durability. For maximum visual elongation and a trendy, angular aesthetic, the Coffin shape is often the most requested for acrylics, offering a beautiful balance between striking length and everyday functionality compared to the sharper Stiletto. The foundation must be flawless; ensure the acrylic application provides a smooth, uniform surface and the C-curve is sculpted correctly to prevent breakage at this length.
To recreate the luxurious finish seen in the image, two key elements are utilized: high-gloss jet black polish and strategically placed black glitter accents. The base coat should be a rich, opaque black gel or lacquer to maximize the depth of the color. The high-shine effect is crucial—this is achieved using a non-wipe, UV/LED compatible top coat that cures to a glass-like finish. For the accent nail, typically the ring finger, replicate the shimmering effect by either applying a heavy coat of black micro-glitter polish or, for an ultra-fine texture, dusting loose black glitter onto a layer of uncured top coat before sealing it with a final clear layer. Expert tip: always cap the free edge with both the color and the top coat to prevent chipping, especially with long, square or coffin tips. This detail ensures the manicure maintains its sharp appearance for the full wear time.
Maintaining these powerful, long black nails requires commitment. Schedule acrylic fills every two to three weeks, depending on your natural nail growth, to keep the structure strong and balanced. Regularly apply cuticle oil to the skin surrounding the nail bed to keep the hands looking moisturized and healthy, offsetting the starkness of the dark polish. When styling this look, remember that the polish itself is a statement accessory. Black nails pair beautifully with metallic jewelry, such as silver rings or bracelets (as hinted by the silver material in the image), and can provide an edgy contrast to softer fabrics or bright spring colors, seamlessly bridging the gap between dramatic evening wear and sophisticated daily elegance.
5 Clean Acrylic Designs
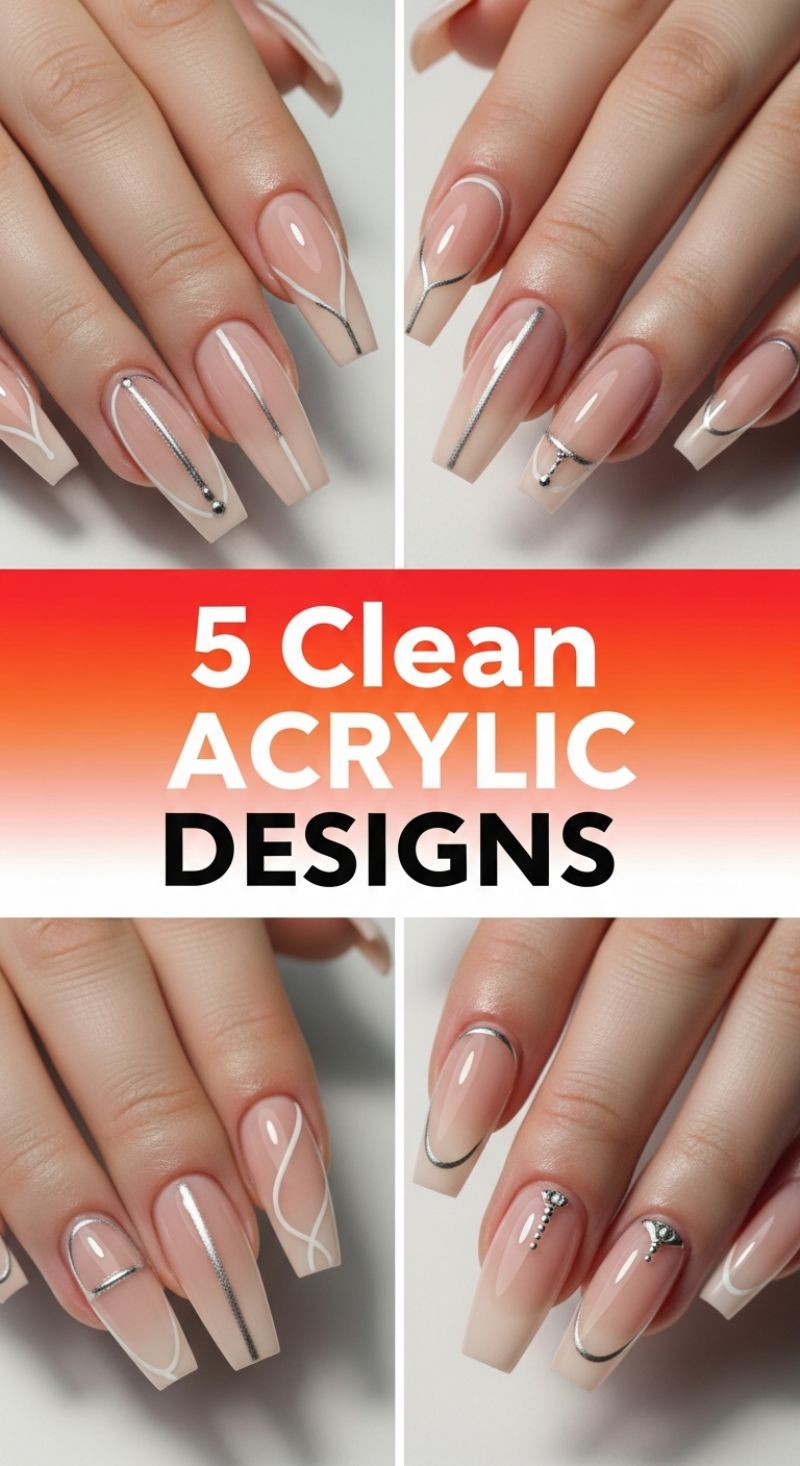
The “Clean Acrylic Design” aesthetic is defined by masterful execution of minimalist elements over a flawless foundation. To replicate these sophisticated looks, begin with the foundation: a perfectly sculpted, long coffin or tapered square shape. The base color should be a milky pink or soft nude ombré, often referred to as the ‘baby boomer’ technique, transitioning seamlessly from a natural pink near the cuticle to a sheer, bright white or pale nude at the tip. This blended base is essential for the design’s elegant subtlety and ensures the fine line work takes center stage. Expert advice for this stage involves using high-quality monomer and polymer for crystal-clear encapsulation and filing the side walls to be sharp and uniform before applying any design elements, which provides a professional, durable canvas.
The core of these five designs lies in precision line work using both crisp white and highly reflective metallic silver polish or gel. The designs range from simple geometric elegance to modern French interpretations. For the straight, vertical lines (as seen on the index finger), using specialized nail striping tape or a very long, fine striper brush dipped in metallic gel polish is crucial to maintain perfect symmetry and avoid wobbly edges. For the modern “floating French” style, where silver lines contour the cuticle area and the tip, use a detail brush to create perfectly curved arcs that mimic the natural nail boundaries without filling them in. This technique plays heavily with negative space, demanding a clean cuticle and flawless base application. When executing the abstract white, wavy lines, ensure the pressure on your striper brush is light and consistent, creating movement across the nail bed without looking busy.
To elevate the look for events like prom or a spring gala, incorporate minimal yet impactful embellishments, as shown with the small crystal accents. For attaching tiny rhinestones or metallic beads securely, dot a small amount of builder gel or specialized jewelry adhesive where you want the crystal placed, cure it, and then apply a thin layer of top coat around the embellishment. Remember, the key to the ‘clean’ aesthetic is restraint; choose one or two focal nails per hand for ornamentation. Finish every nail with a durable, high-shine, non-yellowing gel top coat to encapsulate the art and protect the sheer ombré base, ensuring maximum longevity and a glass-like finish that makes these sophisticated designs truly stand out.
Sparkling Chrome Nail Trend
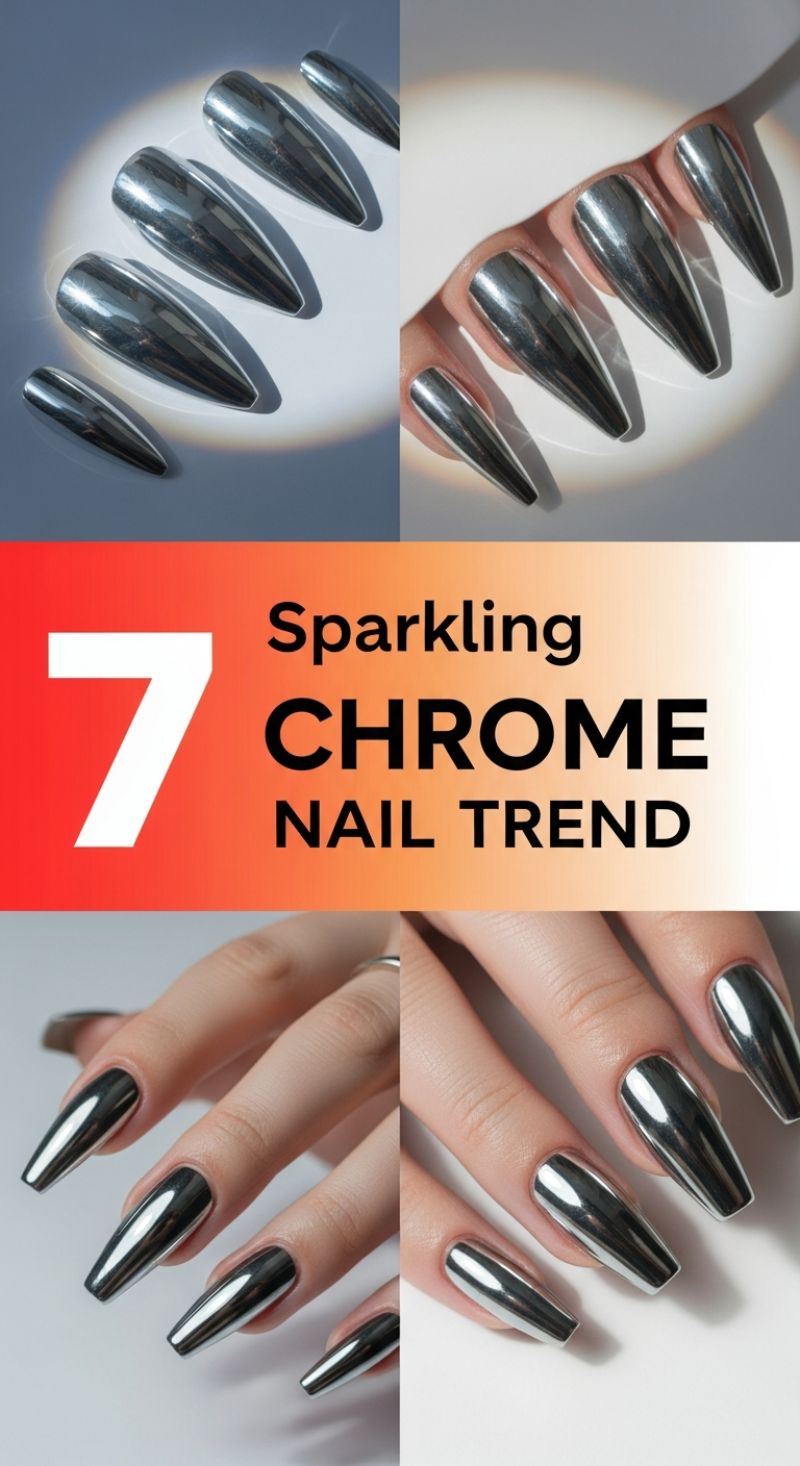
The Sparkling Chrome Nail Trend is a bold, futuristic statement that elevates any manicure. The defining feature is the intense, mirror-like reflectivity, often achieved with a fine metallic powder, transforming the nails into highly polished, sculptural pieces. This striking look is showcased here across popular long shapes, including the fierce, tapered stiletto/almond and the sleek, angular coffin shape. The silver chrome finish provides a neutral yet powerful statement, catching the light dramatically and offering an instant touch of high glamour, making it a perfect choice for prom, high-fashion events, or simply demanding attention.
To achieve this pristine, seamless mirror effect, standard metallic polish simply won’t suffice. The true chrome finish requires utilizing specialized micro-fine chrome powder, typically applied over a cured, non-tacky (no-wipe) gel top coat. After preparing the nails and curing the base color, apply the no-wipe top coat and cure it completely. The chrome powder is then rubbed vigorously onto the nail surface using a silicone tool or a sponge applicator until the highly reflective transformation occurs. This precise buffing technique is crucial for achieving that flawless, non-gritty, liquid metal appearance. Finally, the finished look must be sealed with another layer of durable top coat, ensuring you cap the free edge to prevent chipping and maintain the integrity of the chrome layer.
For an ultra-modern aesthetic like the one pictured, experts suggest maintaining long, meticulously shaped nails, as the high shine naturally exaggerates the nail structure. While the silver chrome is the quintessential choice, this technique offers immense versatility; try layering the powder over a black base to maximize the mirror intensity, or experiment with a deep colored base (like sapphire or emerald) for a jewel-toned metallic effect. When styling, let the nails be the focal point of your look. Pair this powerful trend with structural, minimal rings or clean-lined outfits. The chrome finish transitions seamlessly across aesthetics, offering unmatched sophistication and guaranteed attention throughout the spring and beyond.
5 Darling COQUETTE NAILS
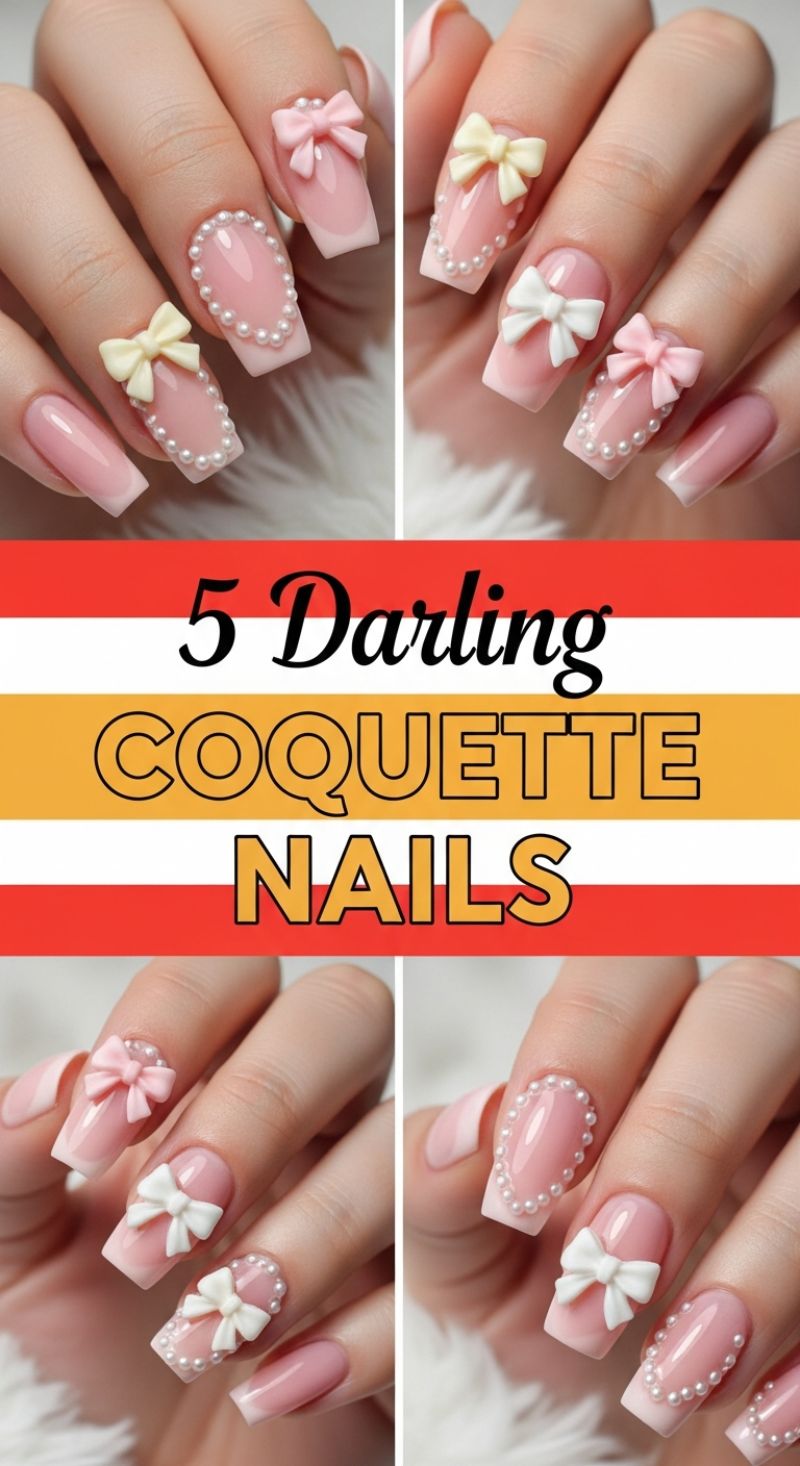
This “5 Darling Coquette Nails” look perfectly encapsulates the hyper-feminine, romantic aesthetic that has swept fashion and beauty, making it an ideal choice for prom, spring events, or anytime you want a sweet, high-impact manicure. To replicate this highly detailed style, start with a well-prepped base. These nails are shaped into a medium-to-long square or soft coffin, providing an ideal canvas for the delicate embellishments. The foundation is a classic French manicure, but modernized: use a sheer, milky pink or nude polish for the base coat, followed by a crisp, bright white application on the free edge. For a professional, durable finish, this intricate look requires high-quality materials, including sheer pink and bright white gel polishes, various colors of pre-made 3D bow charms (pink, cream, white), ultra-small micro-pearls or caviar beads, and a reliable nail art adhesive or thick builder gel to ensure longevity.
The signature element of this design is the delicate pearl outline framing the nail bed, often forming a continuous heart or an elongated oval shape that highlights the nude base color. After curing your French base, work one nail at a time to create this intricate border. Apply a thin, precise line of rhinestone glue or a thick non-wipe top coat in the desired shape around the center of the nail, leaving the center clear. Using a wax pen or fine dotting tool, carefully pick up the micro-pearls and set them sequentially along the adhesive line, ensuring they are tightly packed to create a seamless, continuous border. The key to making this look professional is maintaining symmetry—the pearl outline should follow the natural curve of the cuticle beautifully while leaving the inner area exposed. Cure the design thoroughly once the entire pearl border is perfectly secured, ensuring every bead is firmly set.
The final and most dimensional step involves adding the adorable 3D bow charms. Strategically place these charms using a strong nail glue or a dab of hard gel on designated accent nails. As shown in the image, vary the charms—some nails feature just a bow near the cuticle or center, while others pair a bow directly with the pearl design (often placed near the tip of the pearl border). The variety in bow colors (pink, white, cream) adds visual interest and playful contrast without overwhelming the soft, pastel palette. Once all charms are securely attached, finish the entire manicure with a high-shine, non-wipe top coat. Crucially, take extreme care to brush the top coat around the 3D bows and pearls rather than over them. This technique preserves the texture and dimension of the embellishments, guaranteeing a sophisticated, ultra-girly look that will turn heads.
Dreamy Pink Prom Nail Inspiration
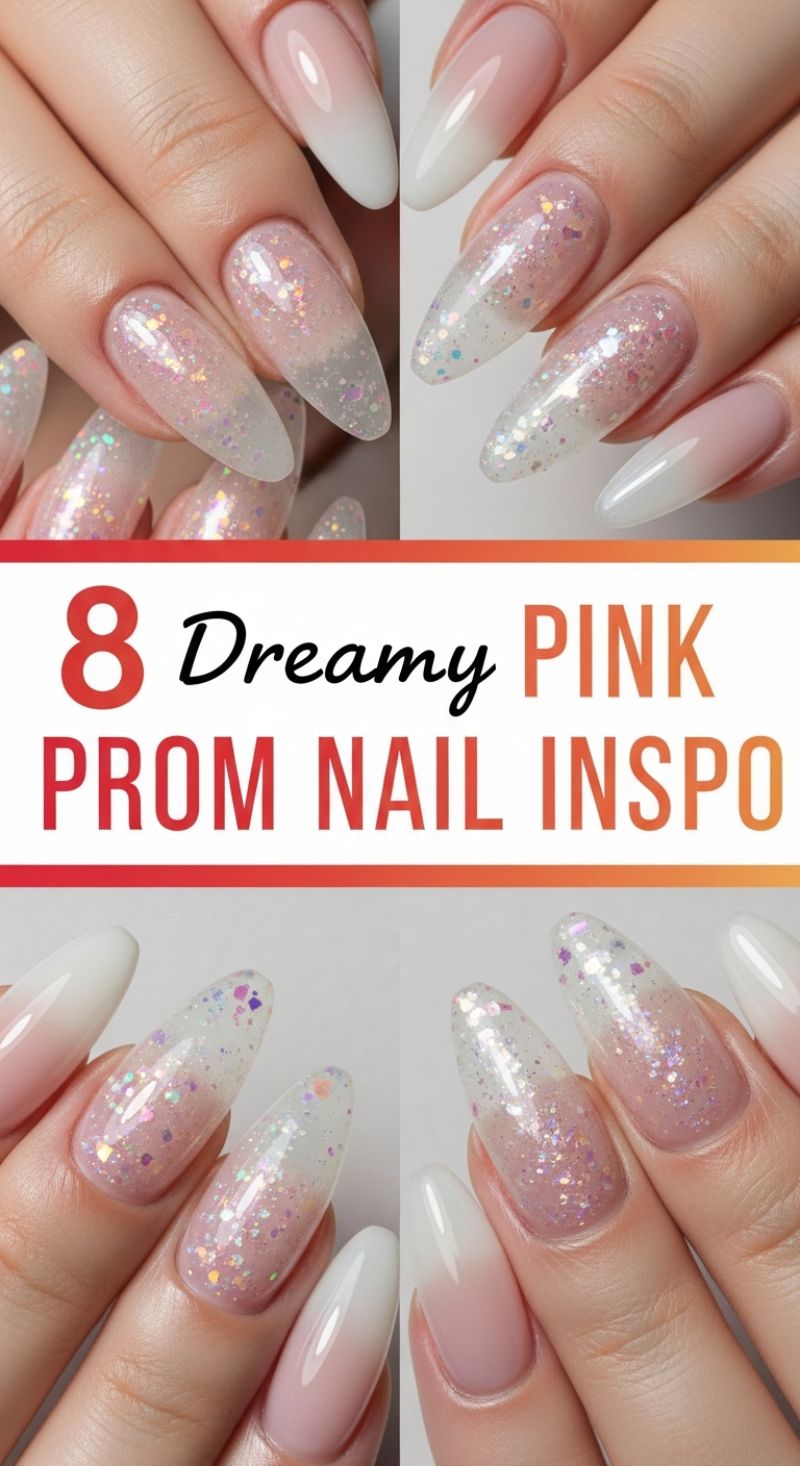
This compilation presents two stunning, complementary approaches to the ultimate romantic prom manicure, centered around soft pinks and ethereal white transitions. The first style elevates the classic French look into the sophisticated “Baby Boomer” or French Ombre. To recreate this, begin by laying down a sheer, milky pink builder gel or dip powder near the cuticle. The crucial step involves using a soft blending brush or sponge to seamlessly graduate the milky pink into a stark, yet soft, milky white applied heavily on the free edge. Unlike a crisp French line, this design demands patience to feather and tap the colors until the transition is perfectly diffused and cloud-like, achieving a natural, elongating effect that is universally flattering and complements any formal attire.
For those seeking maximal sparkle and visual intrigue, the second featured style utilizes a mesmerizing glitter fade technique. Start with a clear or lightly tinted sheer pink base, then select chunky, iridescent, or holographic glitter flakes—these particles catch the light far better than fine powder. Apply the glitter heavily around the central body of the nail, gradually lessening the density as you move toward the tip or the cuticle, depending on the desired gradient direction. To achieve the smooth, high-end finish seen here, the glitter must be fully encapsulated. Apply a layer of clear hard gel or acrylic over the sparkle before shaping and buffing. This encapsulation not only protects the design but also creates incredible depth, making the glitter look suspended in a glossy layer of ice.
Both the ombre and the glitter fade designs are showcased on long, elegantly sculpted almond or stiletto shapes, which significantly enhances the drama and sophistication perfect for prom night. Expert advice for finishing these looks emphasizes high shine: always seal with a durable, non-wipe top coat specifically formulated for maximum gloss. A high-shine finish is indispensable as it amplifies the flawless blend of the ombre and ensures the holographic glitter truly catches the light while you dance. Because these are complex, sculpted designs, ensure your nail appointment is scheduled as close to the event as possible to guarantee a fresh, chip-free look.
6 Fresh Spring Nail Trends
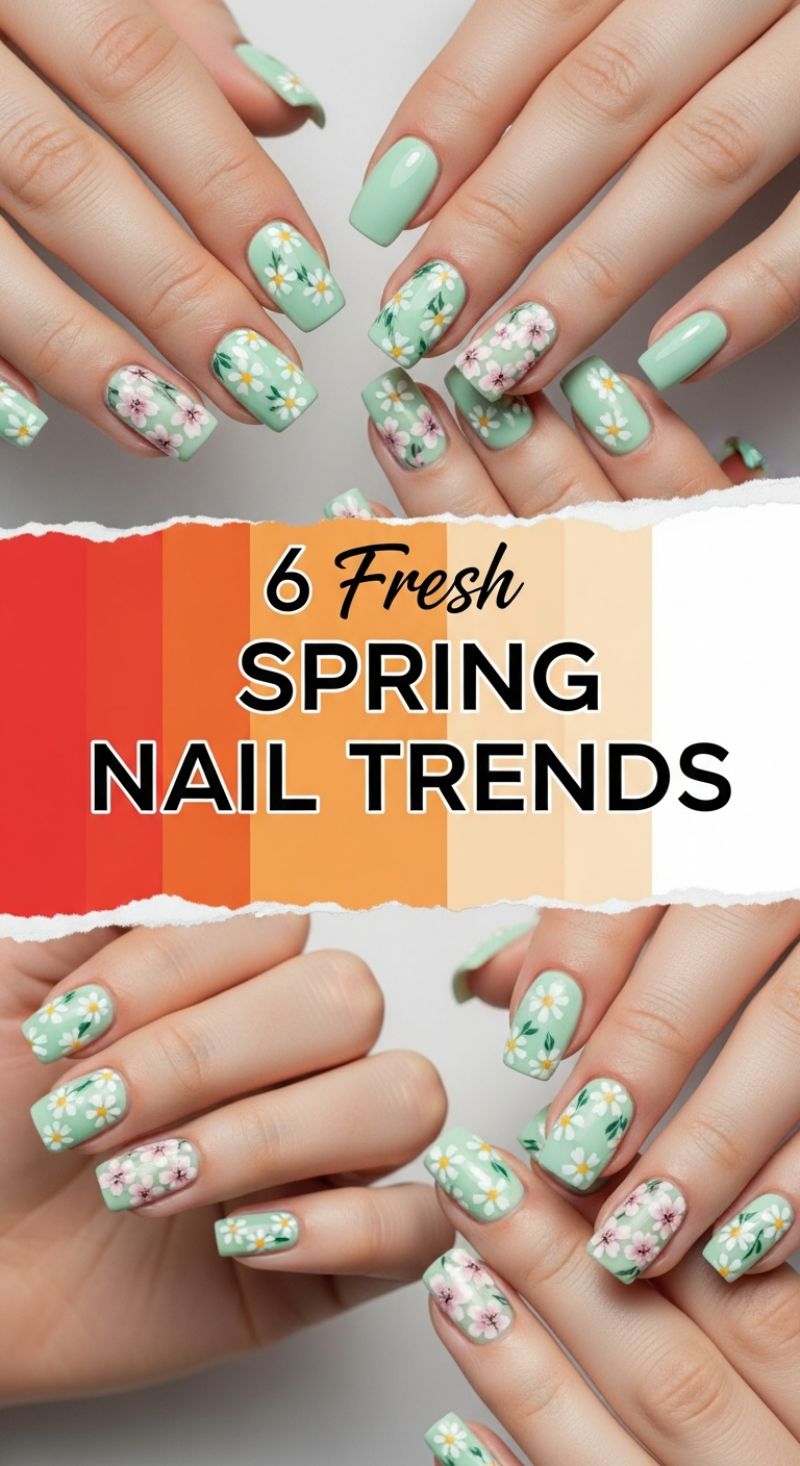
This delightful design encapsulates the essence of spring with its vibrant pastel base and delicate floral detailing. To recreate this look, begin by perfecting your canvas. After prepping the nails, apply a high-quality base coat. The key to this trend is selecting the perfect pastel—a soft, glossy mint green or sage hue is ideal, representing the fresh foliage of the season. Apply two thin, even coats of your base color, ensuring full opacity and allowing each layer to dry completely before moving on to the artistry. The square or ‘squoval’ shape displayed here provides a classic, clean surface that perfectly showcases the detailed artwork, so make sure your filing is precise and symmetrical.
Achieving the dual-floral pattern requires precision and a small selection of specialized tools, primarily a fine-tipped detail brush and a dotting tool. The design utilizes a beautiful mix-and-match approach. For the simple daisy nails, use pure white polish and the dotting tool to create 5-7 small petals radiating from a central point. Follow this immediately by using a bright yellow polish to dot the center of the flower. For the more elaborate accent nails, such as the ring finger, switch to a light pink or rose color to paint clusters of cherry blossoms or similar delicate blooms. Instead of forming perfect circles, use tiny, irregular strokes to build up the appearance of overlapping petals, giving the design depth. Contrast this pink with small touches of dark green polish for the leaves, carefully tucking them between the flowers to mimic natural growth and add necessary definition against the lighter mint background. Expert tip: Vary the size and placement of the flowers across each nail; some should appear full, while others should look partially cut off by the nail edge, creating a seamless, organic feel.
Once all the floral elements are fully dry—which is crucial to prevent smudging—seal the entire design with a high-shine top coat. A thick, protective top coat not only locks in the intricate artwork but also gives the pastel color a wet, glossy finish that makes the overall look appear professional and durable. For those looking to adapt this style for events like prom, consider using a subtle shimmer in the base polish or adding a tiny, clear rhinestone to the center of a few key flowers for added sparkle. Regardless of the occasion, regular application of cuticle oil will keep the skin around your nails hydrated, drawing maximum attention to this intricate and utterly fresh spring manicure.
10 Moody VAMPY PROM LOOKS
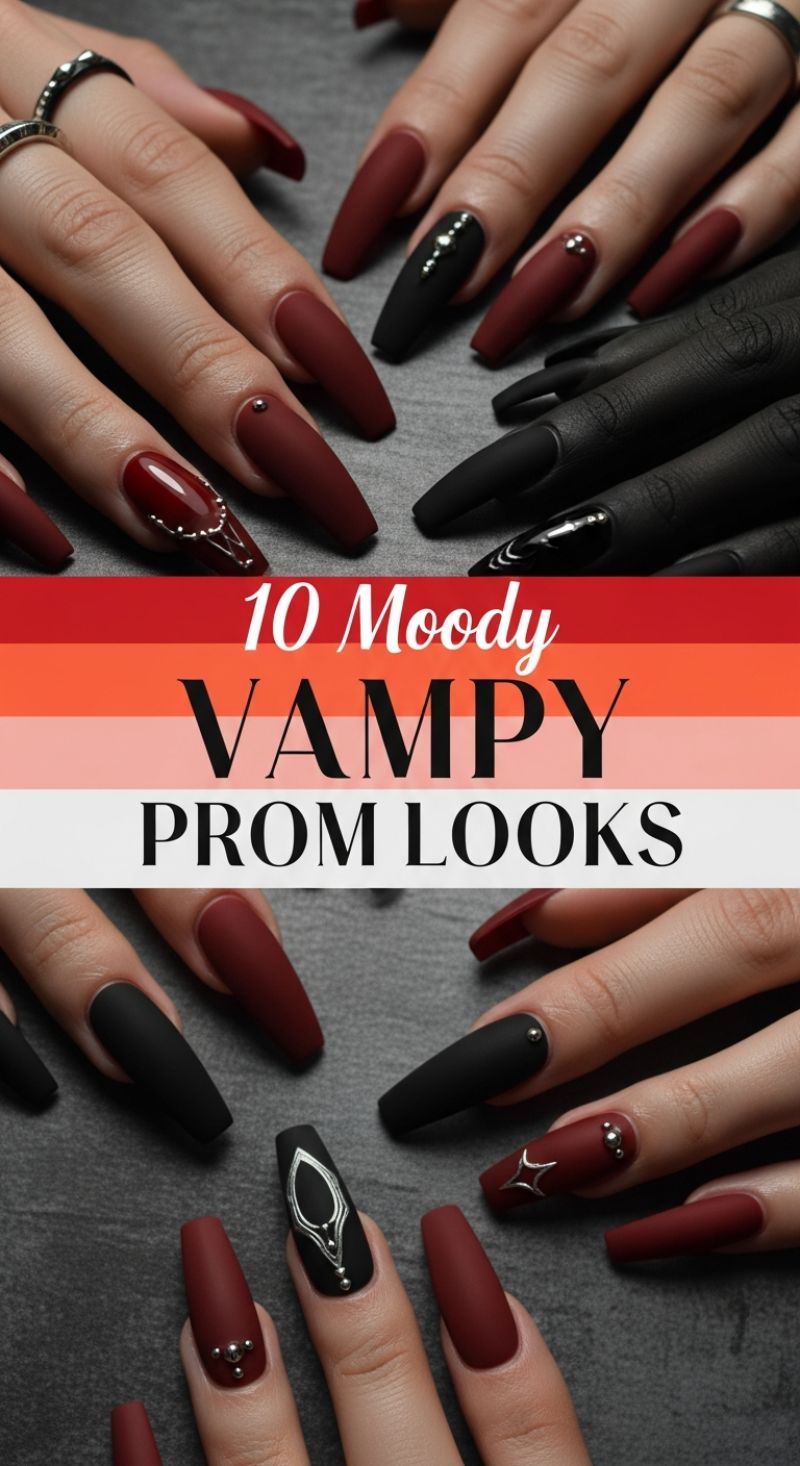
To achieve this deeply dramatic and elegant “vampy” aesthetic for prom, the foundation relies entirely on the interplay between dark, contrasting colors and a sophisticated matte finish. This design utilizes a rich, deep burgundy (oxblood) paired with classic matte black, primarily executed in a long, tapered coffin or ballerina shape to maximize impact. The key to the moodiness is the texture: the matte topcoat absorbs light, making the colors look deeper and more velvety. To replicate this, apply two thin, opaque coats of your chosen gel colors, cure fully, and then finish with a premium non-wipe matte topcoat. For expert application, ensure the matte topcoat is applied in a single, even stroke, avoiding pooling near the cuticle, as streaks will be highly visible in this flat finish. Strategically alternate the black and burgundy across the fingers to maintain visual balance and keep the look cohesive yet dynamic.
The real artistry lies in the metallic accents, which provide striking contrast against the dark, flat backdrop. This look incorporates intricate silver hardware, including vertical lines of micro-rhinestones on the matte black accent nail and gothic-inspired charms—such as the ornate silver filigree piece on the index finger and the sharp geometric star on the ring finger. When applying these larger metal pieces, use a specialized strong nail glue or a very thick builder gel/topcoat to secure them firmly, ensuring the entire backing of the charm is adhered to the nail surface. For added security, use a fine detail brush to seal the edges of the metal piece with a thin layer of topcoat, being meticulous not to drag that glossy topcoat onto the surrounding matte area. To break the matte uniformity, introduce a single high-gloss accent nail, like the glossy burgundy ring finger shown, which features delicate silver droplet detailing, adding depth and mimicking the look of patent leather.
This moody manicure is the perfect statement piece for a gothic or highly sophisticated prom gown, complementing dark fabrics like velvet or black lace. For optimal wearability and durability on a busy night, always ensure nails are properly prepped (dehydrated and primed) before application, especially when using longer extensions. If the coffin length is too intimidating, this design translates beautifully onto a medium almond or short square shape, where the high-contrast color scheme and silver embellishments still deliver the intended dramatic effect. Maintaining the look requires minimal effort; simply avoid harsh chemicals that could damage the matte finish. This design proves that dark doesn’t mean dull; it’s about high fashion, high contrast, and unforgettable drama.
9 Ethereal Cinderella Nails

Capture the magic of a fairytale ball with these stunning Cinderella-inspired nail designs, perfect for a glamorous prom night or a whimsical spring look. The foundation of this trend lies in a delicate palette of icy blues, sheer whites, and shimmering silvers. To replicate the core aesthetic, begin by mastering the ombré technique shown in the first panel: use a sponge to softly blend a pale powder blue shade upwards into a milky or sheer nude base coat, creating a sophisticated baby boomer gradient. Alternatively, opt for the crisp, clean French tip variation, but update it by utilizing a highly pigmented, metallic or holographic powder blue polish on the free edge instead of traditional white. This metallic shimmer is crucial for mimicking the look of the iconic glass slipper, giving the nails a reflective, enchanting finish. For added longevity and a flawless, seamless transition, ensure both the ombré blend and the French tip application are sealed under a robust layer of builder gel or clear dip powder.
The real enchantment comes from the carefully applied embellishments and glitter accents. Incorporate a variety of textures by mixing fine, iridescent shimmer dust with larger, holographic light-blue flake glitters. For the full-glitter accent nails, suspend these flakes in a clear top coat or a thin layer of setting gel, ensuring they are concentrated towards the tip or applied sparsely over the entire nail to look like freshly fallen snow or captured starlight. When it comes to rhinestones and pearls, placement is key. Instead of scatter placement, create structured details: try a vertical line of graduating silver rhinestones down the center of the nail, or cluster a delicate arch of tiny pearls along the cuticle line of a solid blue nail. These linear arrangements draw the eye and add an element of couture refinement that elevates the manicure from simple sparkle to true royalty.
Expert tip for maintaining these complex looks: Always use a high-quality gem glue or a dedicated sculpting gel to anchor all stones and pearls; flash cure the placement before applying a non-wipe top coat around—but not over—the stones, as coating the gems dulls their sparkle. This look works best on a medium-to-long nail length (square or squoval are shown here) to maximize the canvas for the gradient and embellishment details. Feel free to mix and match the nine designs shown here across your ten fingers for a custom look—for example, pairing a soft ombré thumb and pinky with a metallic French pointer and a glitter accent ring finger. This strategic variation ensures the overall set remains cohesive yet visually dynamic, providing the ultimate princess polish for any grand occasion.
15 Stunning BLUE PROM MANIS
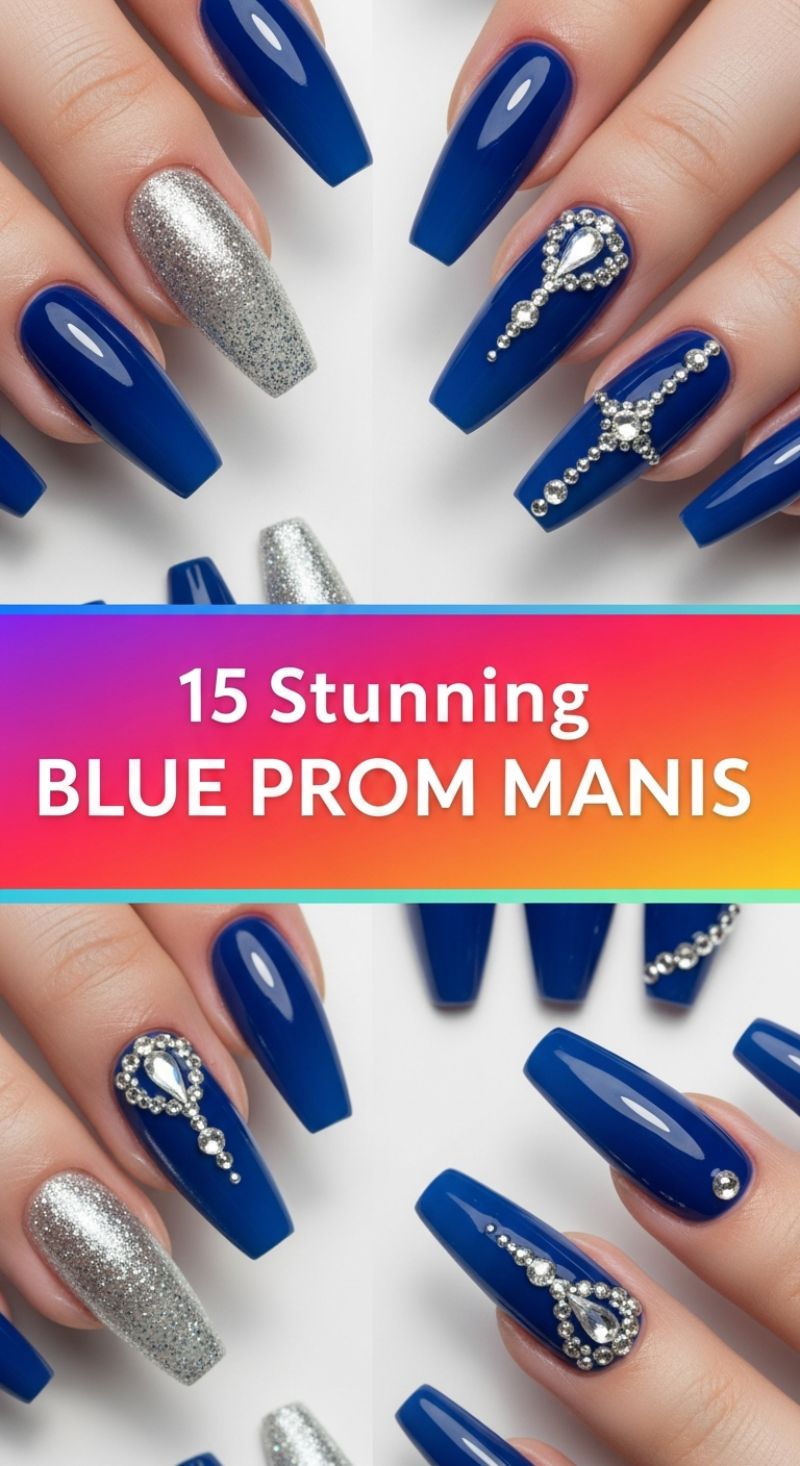
This striking design, titled “15 Stunning Blue Prom Manis,” offers the ultimate luxurious look for a formal occasion. The foundation of this manicure is a rich, highly pigmented cobalt blue gel polish, applied to long, elegantly shaped coffin nails. The deep, glossy finish of the blue immediately reads as sophisticated and complements virtually any neutral or metallic dress shade. To achieve the perfect base, ensure two layers of color are applied over a cured base coat, followed by a non-wipe high-shine topcoat. The essential contrasting element is the accent nail, typically applied to the ring or middle finger, which utilizes a chunky, dense silver glitter polish. This heavy metallic texture perfectly balances the smoothness of the cobalt, adding necessary dimension and ensuring the look catches the light from every angle.
The true artistry of this mani lies in the elaborate, jewelry-inspired rhinestone placement. These designs elevate the nails from simple blue to red-carpet ready. To replicate this look, start by mapping out the design using a large, teardrop-shaped crystal as the centerpiece, usually placed near the cuticle or the center of the nail bed, depending on the desired drape. Use specialized rhinestone adhesive gel or a thick builder gel to secure the stones, curing briefly after placement to lock them in place. The main design is formed by creating a cascading or chain-like pattern using various sizes of round clear chatons. For the full glamorous effect, aim for symmetry on at least one pair of fingers (like the pointer and pinky) where stones form a linear cluster down the middle of the nail. For the accent nail, where the main pendant design resides, ensure the stones frame the central teardrop crystal before flowing into a delicate line down the length of the nail, creating a sophisticated statement piece that catches all the light.
For maximum wear time—especially crucial for a long night like prom—expert application is key. After placing and curing your rhinestones, use a fine detail brush dipped in topcoat to meticulously seal the edges of every crystal without brushing over the facets themselves, as this dulls the stone’s sparkle. For those who prefer a less dramatic look, the core concept of blue and silver glitter can be maintained using a shorter, squoval shape, and limiting the rhinestone application to a simple cluster near the cuticle instead of a full pendant design. Finally, when coordinating this opulent manicure with your overall prom ensemble, lean into silver or white gold jewelry to echo the cool tones of the glitter accent. The deep cobalt blue is particularly flattering against navy, black, silver, or even complementary colors like vibrant pinks or reds, making this a versatile and striking choice for any prom night outfit.
The 20 Ultimate PROM NAIL GUIDE
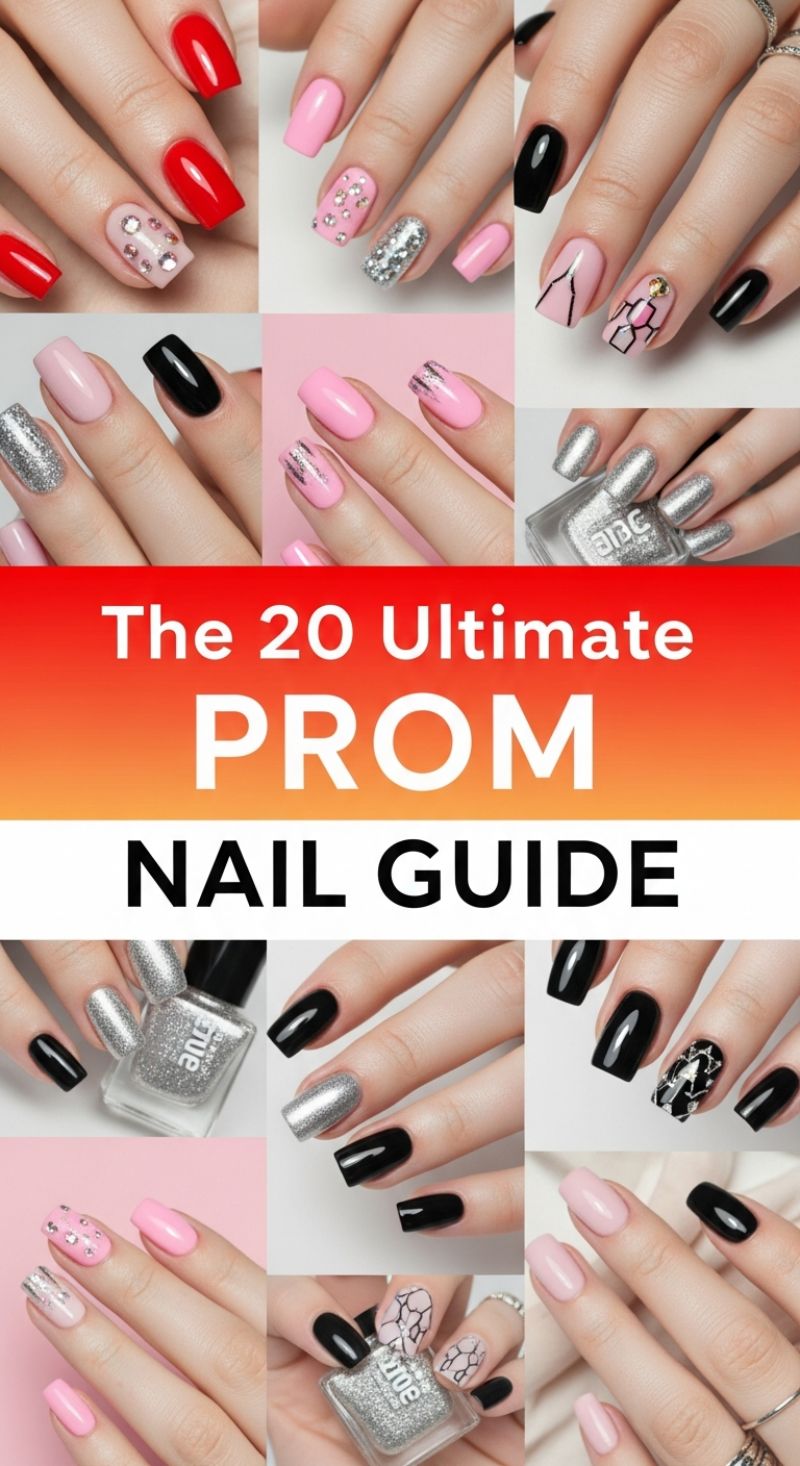
The Ultimate Prom Nail Guide showcases a dynamic collection of sophisticated and glamorous designs perfect for complementing any formal attire. The aesthetic centers around a high-contrast palette featuring classic black, vibrant red, soft blush pinks, and stunning silver glitter accents, making it versatile yet striking. When recreating these looks, the key is balance; utilize the bright, creamy solids (like the vibrant red or soft pink) as anchors, reserving the high-drama elements for accent nails. Notice the prevalence of medium-length, square or squoval shapes, which lend a polished and contemporary feel. For a timeless yet flashy choice, incorporate solid silver metallic or full-coverage chunky glitter nails, often paired with a deep black or a delicate pink for maximum visual impact. Expert tip: Ensure all solid colors are applied with at least two coats for flawless opacity, especially if using stark contrasts like black and light pink side-by-side, to achieve a professional finish ready for the big night.
To execute the featured intricate designs, specific tools and techniques are necessary. For the glamorous rhinestone looks, apply a generous dot of clear top coat or specialized nail glue where you desire the placement, then carefully set the gems (mixed sizes add depth) using a wax pencil or tweezers before curing or allowing to dry fully. Achieving the modern, abstract black line work on a nude or light pink base requires a very fine striping brush and steady hand, or utilizing thin nail tape to create sharp, geometric boundaries before filling in shapes. Another striking design featured is the black and pale pink crackle/marble effect; this can be achieved using specialized stamping plates, or by applying a thin layer of the pale base, letting it dry, then floating a thick drop of black polish and manipulating it with a dotting tool or needle for a marbled vein appearance. If you opt for the light pink base with shimmering silver strokes, use a dry brush technique or an intentional flicking motion with the silver polish brush, focusing the pigment near the center of the nail bed.
When finalizing your prom manicure, attention to detail and long wear are paramount. Select a gel or high-quality extended-wear lacquer to ensure the manicure lasts through dancing and celebrations without chipping. If your dress is patterned, choose one or two solid colors from the pattern for your nails; if your dress is a solid metallic or sequined, opt for softer nude or pink bases with just a touch of glitter or small, precise nail art. A crucial piece of expert advice: invest in a high-gloss, quick-dry top coat. Not only does it protect the design, but the intense shine amplifies the glamour, making the glitter pop and the creamy polishes look exceptionally rich. Don’t forget proper cuticle oil application after the polish is completely dry—healthy cuticles frame the perfect prom manicure beautifully, ensuring your hands look picture-perfect from every angle.
7 Luxe Jewel Tone Manis
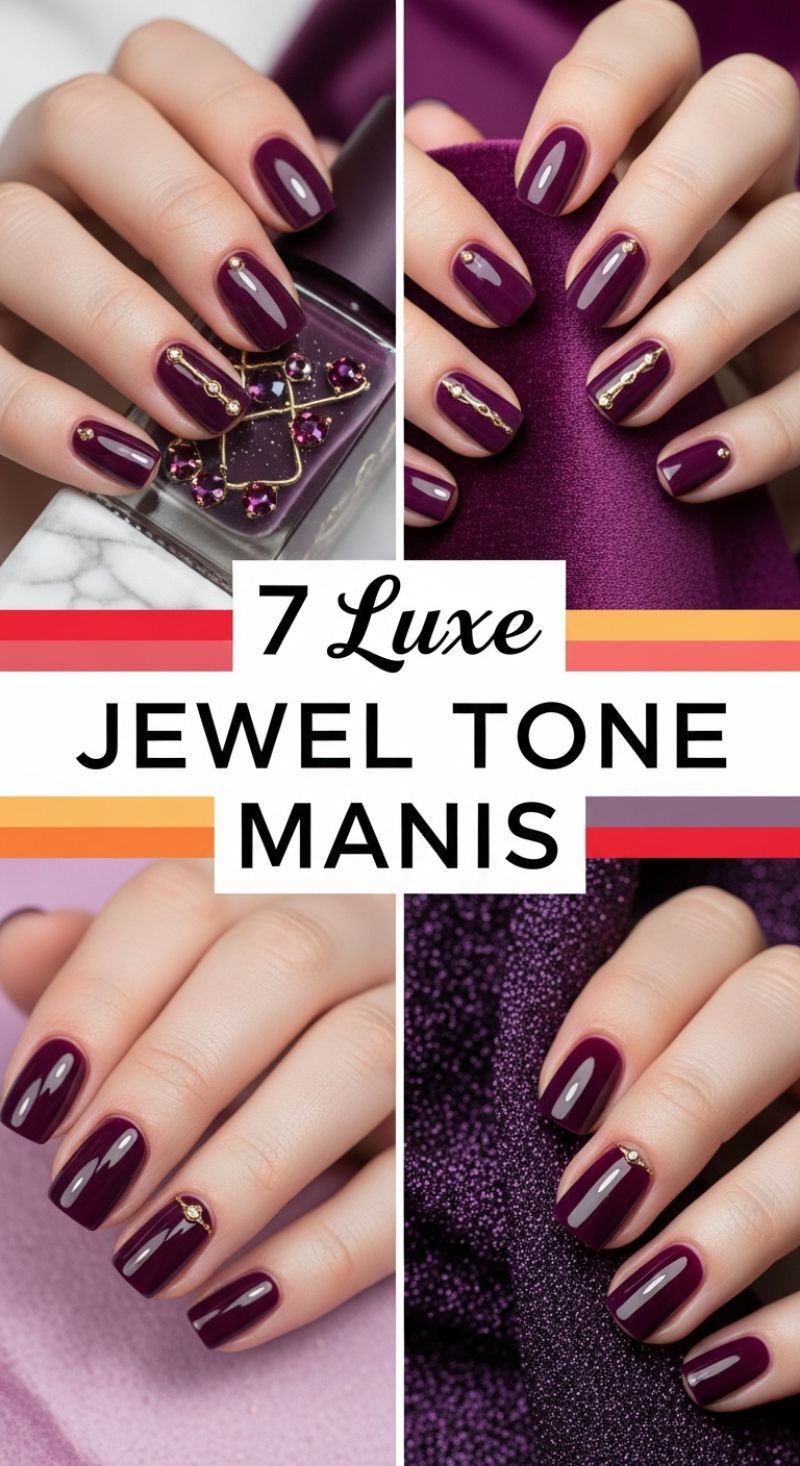
The ‘Luxe Jewel Tone Manis’ showcased here epitomize sophistication, offering a rich, deep aesthetic perfect for formal occasions like prom or elevated evening wear. To achieve this high-end look, start with meticulous nail preparation. Jewel tones, specifically the rich, high-gloss aubergine/amethyst hue featured, demand a perfectly smooth base to maximize their reflective quality. After shaping your nails into a flattering squoval or rounded shape, apply a quality base coat to prevent staining. Next, apply two thin, even coats of your chosen deep plum or burgundy polish, ensuring each layer cures or dries completely before moving on. The hallmark of a ‘luxe’ mani is its mirror-like shine; seal the color with a high-quality, non-yellowing gel topcoat or an extra-glossy conventional topcoat. This foundation is crucial as it elevates the dramatic color and makes the subsequent delicate embellishments truly pop.
The nail art featured is minimalist yet impactful, focusing on strategic placement of gold accents to simulate fine jewelry. The primary technique involves using tiny gold studs, micro-rhinestones, or pre-made gold chain decals. For a subtly regal look, place a single gold stud directly above the lunula (the white crescent near the cuticle) on several fingers. For the signature accent nail, typically the ring finger or middle finger, use a thin line of specialized nail adhesive or builder gel to secure a vertical line of three to five connected gold studs or a small, curving gold chain decal. This vertical placement elegantly elongates the nail plate. Expert application requires precision; utilize specialized fine-tip tweezers and a dotting tool for handling these small charms. When positioning the line of studs, ensure they are perfectly centered to maintain balance and symmetry across the nail plate.
To ensure longevity, especially important for long event nights, proper sealing of the embellishments is non-negotiable. After placing all the gold charms, apply a generous layer of topcoat over the entire nail surface, paying special attention to encapsulating the base and edges of the studs and decals without obscuring their sparkle. For 3D charms, a second, thicker layer of topcoat or even a bit of builder gel placed delicately around the charm’s edges will secure it against snagging clothes or hair. This particular amethyst design pairs beautifully with metallic accents and dark velvet textures, making it an ideal choice for fall and winter events, but its inherent glamour translates seamlessly into a bold choice for a spring prom look when paired with lighter fabrics or complementary colors like emerald green or sapphire blue.
12 Regal Green Nail Ideas
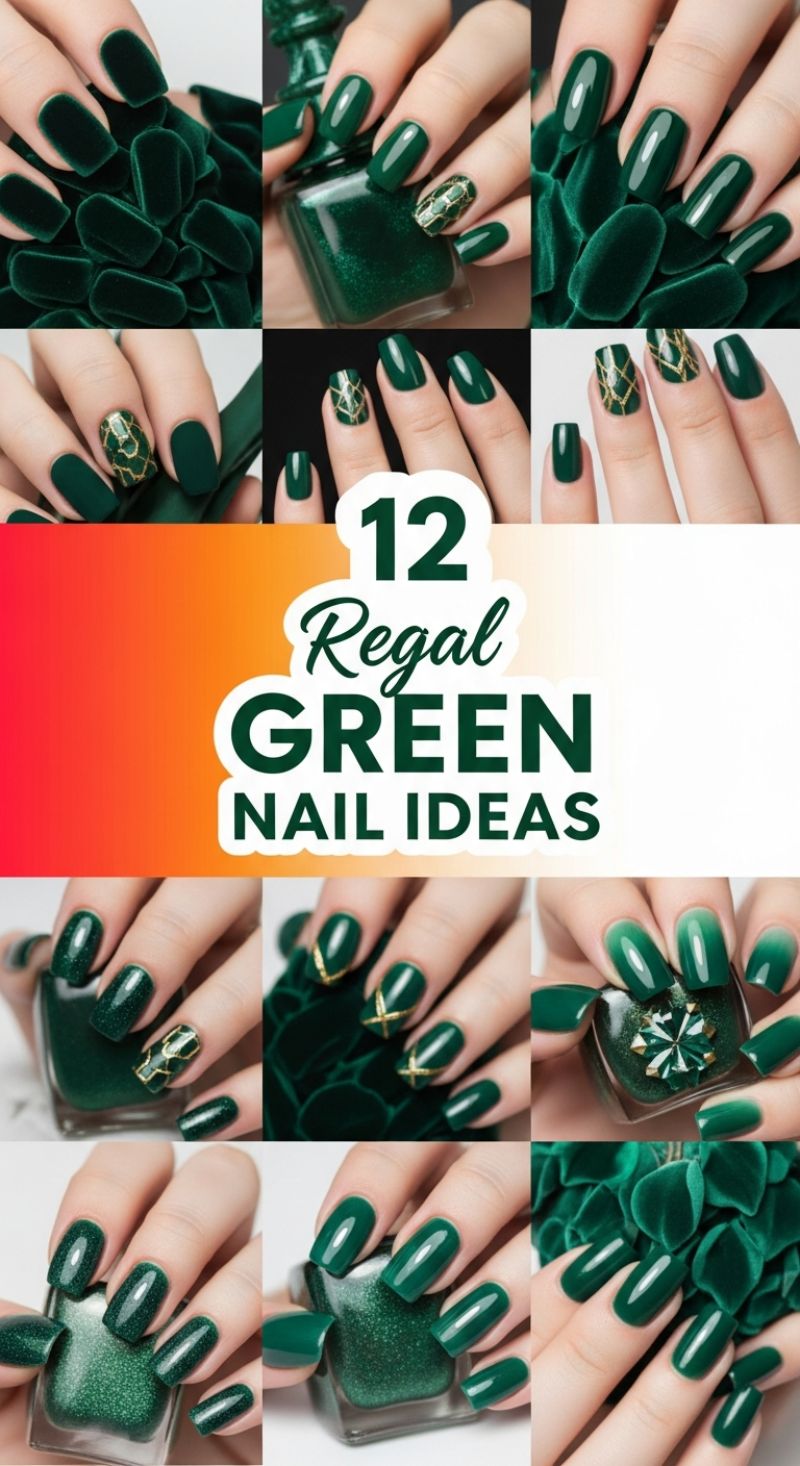
The collection of looks presented here revolves around the opulent beauty of deep emerald and forest green shades, making them a perfect, sophisticated choice for formal events like prom or high-end spring gatherings. Achieving this rich, flawless base requires meticulous application. Always start with a high-quality ridge-filling base coat, as darker pigments can highlight imperfections and potentially stain the natural nail bed. For the perfect regal finish, apply two thin, even coats of your chosen deep green lacquer. Note the variety of finishes showcased: if opting for the trending ‘velvet’ effect seen in the top row, a specialized magnetic polish or flocked powder applied over a wet top coat is necessary. For a simple matte finish, use a dedicated matte top coat over the cured or dried green base, ensuring you swipe the brush across the free edge to seal the manicure completely and prevent premature chipping.
To truly elevate the standard green manicure, as demonstrated in several of these inspiring looks, integrate metallic gold accents, which immediately lend a majestic quality. The most popular designs visible here are the complex geometric foil patterns and the delicate criss-cross designs. For the geometric patterns (like the honeycomb or stained-glass effect), start with a completely dry green nail. Apply a thin layer of specialized gold foil glue or a tacky base coat where you want the design to appear. Once tacky, gently press transfer foil onto the area and peel back sharply. Alternatively, use precision nail vinyls or stencils, applying a gold lacquer or chrome powder over the cutout, then immediately removing the stencil while the paint is still wet to ensure exceptionally crisp, clean lines. For the elegant criss-cross lines, use thin striping tape or a fine-tipped nail art brush loaded with highly pigmented gold polish; stability is crucial for these linear designs, so resting your hand on a flat surface while drawing the lines from the cuticle outward guarantees sharpness and symmetry.
Beyond simple application and striping, experiment with mixing textures and specialty polishes for a truly custom, luxe manicure. This lookbook includes variations showcasing dense shimmers and subtle green-to-darker green ombré effects. To achieve the deep, reflective shimmer visible on the polish bottles, choose a high-density micro-glitter lacquer or apply a subtle iridescent top coat over the solid green. If incorporating 3D elements, such as the large central jewel stone shown, use professional nail glue or a thick builder gel to secure the embellishment firmly, ensuring all edges are completely sealed to prevent snagging or displacement. Always finish these complex designs with two coats of high-gloss, quick-drying top coat (or the matte coat, if preferred). When sealing designs involving foils or large jewels, ‘float’ the first layer of top coat gently over the design without excessive brushing, and always cap the free edge; this professional sealing method dramatically increases the longevity of the intricate art, allowing your regal green look to remain flawless well beyond the event.
7 Dazzling RED PROM NAILS
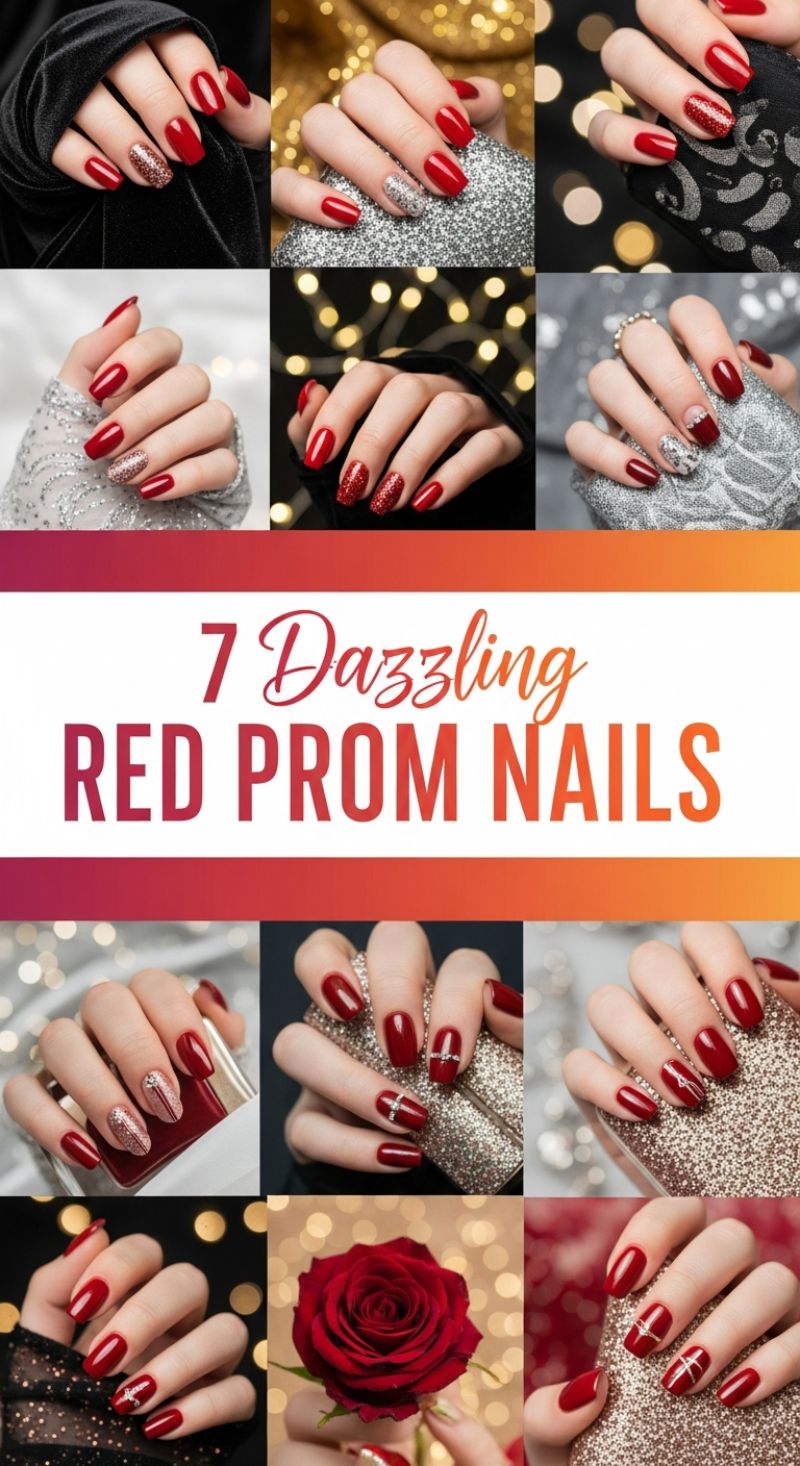
Red is the quintessential power color for prom, offering timeless glamour and dramatic contrast against formal wear. These designs focus on a rich, saturated cherry red base, which serves as a striking backdrop for dazzling silver, gold, and crystal accents. To replicate this look, start with meticulous nail preparation: buffing the plate and applying a high-quality base coat is crucial to prevent staining (a common issue with deep reds). Apply two thin, precise coats of your chosen lacquer, ensuring full opacity and feathering the color slightly away from the cuticle line. The shapes featured here are primarily short, elegant almonds and squovals, maintaining a chic, non-intrusive silhouette ideal for dancing and handling accessories. Ensure your final layer of red polish is completely dry before moving on to any accent work.
The key to elevating these red looks lies in the strategic use of metallic and glitter accent nails. The collage prominently features champagne gold, rose gold, and classic bright silver glitter, typically applied fully on the ring finger or occasionally split across two nails for maximum impact. For a high-impact, opaque glitter finish, avoid simply brushing on a thin layer. Instead, use a makeup sponge or a dabbing technique to press the dense glitter polish onto the nail surface. This ensures maximum flake density and sparkle. Alternatively, several designs showcase partial glitter application—such as a diagonal split or a reverse French tip—creating a sophisticated negative space effect that keeps the focus sharp. For a particularly striking look, consider pairing a full glitter accent nail with a subtle metallic cuff detail near the cuticle of an adjacent nail to create balance and texture variety, often seen utilizing deep merlot red paired with chunky silver glitter.
Beyond glitter, several designs incorporate minimalist yet dramatic rhinestone detailing and precise geometric lines. The most prominent theme is the use of small, silver flat-back crystals arranged in crisp linear patterns, often forming a delicate “X” or a subtle cross shape directly centered on the nail bed. To execute this precision work, apply a small dot of nail glue or a thick clear builder gel where the crystals should rest, using a wax pencil or dotting tool to pick up and place the gems with accuracy. For the sleek, continuous silver lines featured in the lower row, use metallic striping tape cut precisely to length, or employ an ultra-fine liner brush with highly pigmented chrome polish. Remember that any intricate detail must be sealed correctly: float a generous layer of high-shine, UV-cured top coat over the entire design, ensuring the edges of all glitter and rhinestones are encapsulated to prevent snagging and guarantee that stunning, dazzling finish lasts well past the final dance.
11 Gilded Gold Prom Nail Art
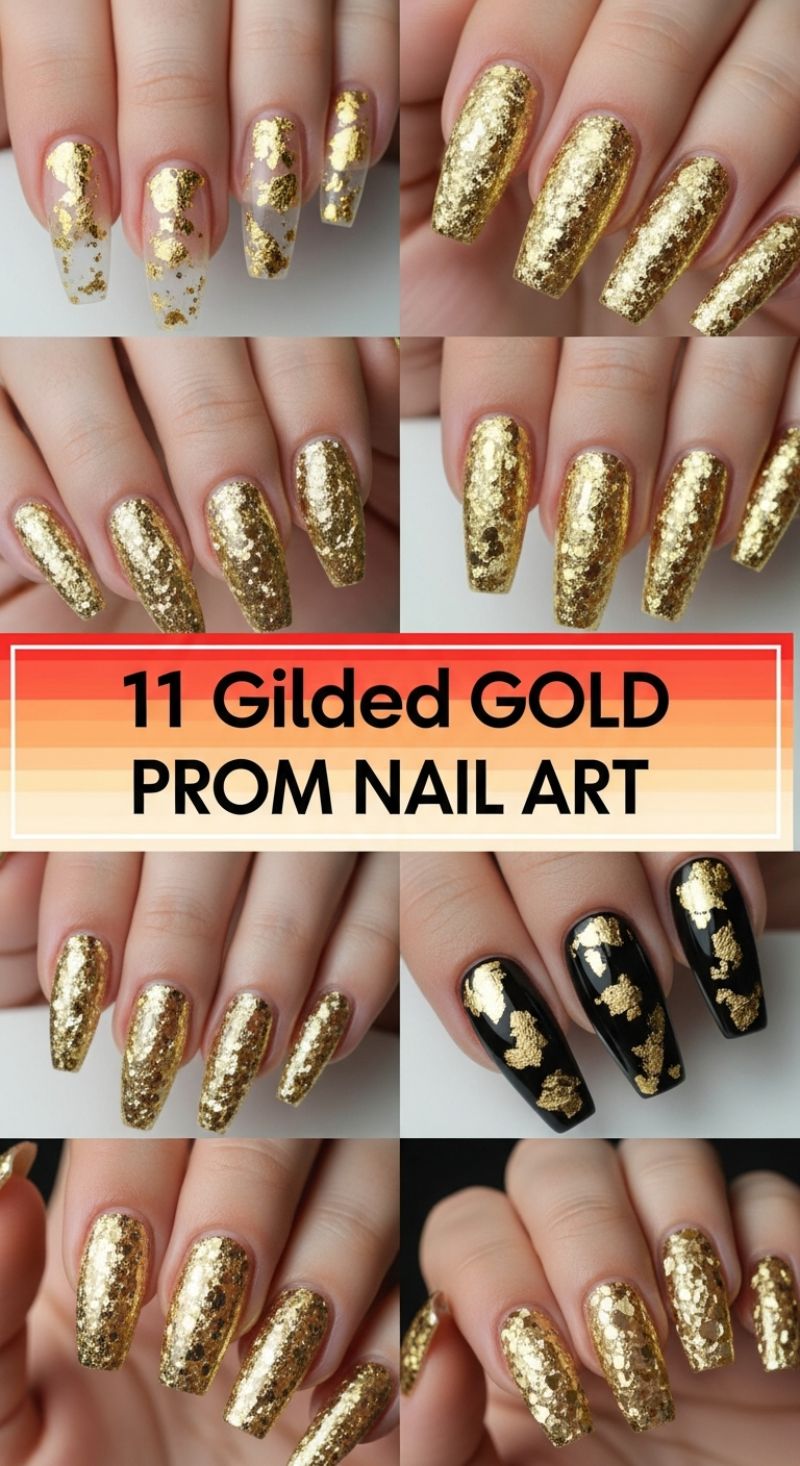
Gilded gold nails are the epitome of prom night glamour, offering a luxurious and dynamic look that captures light beautifully. This style relies on the rich texture of gold foil or chunky flakes rather than smooth metallic polish, creating an expensive, cracked-ice effect. The image collage showcases the versatility of this trend, ranging from full-coverage solid gold looks that scream opulence, to sophisticated, minimalist designs featuring gold flakes scattered over a clear or nude base for an elegant French-tip gradient effect. The beauty of the gilded approach is its forgiving nature; the irregular placement of the flakes adds to the organic, high-end appearance, making it a surprisingly accessible look for DIY enthusiasts looking to elevate their evening attire. This look is particularly impactful on longer nail shapes like coffin or ballerina, as the large surface area allows the texture and brilliance of the gold to truly shine.
To achieve the signature full-coverage gilded look, start with a carefully prepped nail and a strong base coat. If you desire maximum color depth, apply a base color that complements the gold tone—a bright yellow or deep mustard polish works well beneath yellow-gold flakes, ensuring complete opacity. The key to the texture is the application medium. Apply a layer of specialized foil adhesive or a thick layer of sticky clear top coat (gel works best). Using fine tweezers or a dampened silicone tool, pick up and carefully press the gold leaf or flakes onto the wet surface, ensuring the pieces overlap slightly to achieve maximum density and a fully textured appearance. Once fully covered, gently smooth the surface. For the clear, scattered gradient look, use a sheer nude or transparent base and apply flakes sparingly near the free edge of the nail, allowing them to thin out towards the cuticle for an airy, delicate finish.
For a truly dramatic statement, take inspiration from the striking black and gold variation shown in the collection. A flawless, jet-black gel polish base provides a stunning, high-contrast canvas that makes the gold flakes pop with intense reflectivity—perfect for complementing a darker or monochromatic prom dress. Regardless of the base color chosen, sealing the gilded design correctly is crucial for long-lasting wear. After applying the flakes, it is essential to embed the chunky pieces securely by encapsulating the entire nail surface, including the free edge, with two layers of durable top coat. We highly recommend using a scratch-resistant hard gel or a glossy UV top coat, which ensures your glittering, textured manicure remains flawless and chip-free throughout the entire prom night festivities, providing a memorable and luxurious finish to your ensemble.
8 Soft ROSE GOLD GLOW
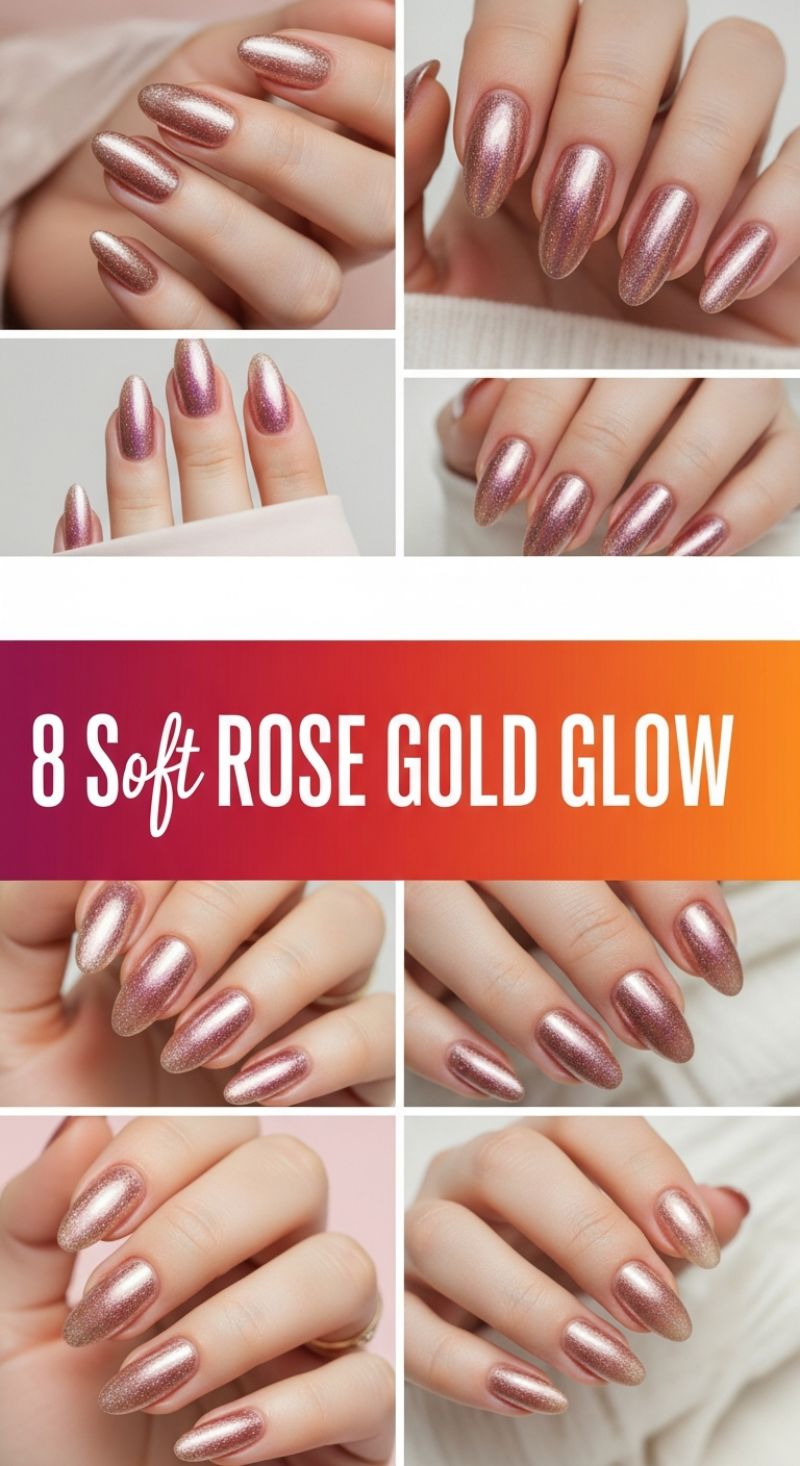
The soft rose gold glow design elevates the classic metallic nail look with a finely milled, highly reflective finish, making it an ideal choice for sophisticated spring events and high-glamour occasions like prom. This look utilizes a shimmering or chrome effect to achieve a liquid metal appearance in a warm, universally flattering shade of rose gold. The visuals predominantly feature an elegant almond nail shape, which complements the polish by making the fingers appear elongated and delicate. Rose gold is particularly versatile because it contains both pink and yellow undertones, meaning it harmonizes beautifully with all skin tones while providing a polished, expensive aesthetic that feels modern and luxurious without being overly intense.
To perfectly replicate this high-shine, reflective manicure, the use of professional chrome powder over a gel system is necessary for the optimal mirror effect shown. Begin with careful cuticle work and proper nail preparation, followed by a durable base coat. Apply 1-2 thin coats of a neutral pink or soft beige gel polish as the foundation color, curing each layer. The critical step is applying a high-quality, no-wipe gel top coat and curing it fully. Immediately after the final cure (while the nail surface is still perfectly smooth), use a silicone applicator or sponge brush to vigorously rub the rose gold chrome pigment onto the nail surface. This rubbing action buffs the pigment into the non-wipe layer, activating the metallic shine. Ensure you cover the entire nail evenly, applying a little pressure to maximize the reflectivity.
Once the desired chrome effect is achieved, remove any excess loose powder using a soft brush. For maximum longevity and protection against chipping, especially if you have long, almond-shaped enhancements, the design must be properly sealed. Apply two thin coats of a standard or specialized scratch-resistant top coat, making sure to carefully cap the free edge of the nail on both passes. For a subtle variation on this trend, you can substitute the full-coverage chrome with a high-pigment, micro-shimmer metallic lacquer for a slightly softer finish, or incorporate the rose gold pigment as a refined ombré effect, blending the metallic glow up from the tips toward a nude base for a gradient look that screams springtime elegance.
9 Chic CHERRY NAIL DESIGNS

The sophisticated French manicure gets a playful, retro-inspired update with this collection of nine cherry and heart-themed designs. The foundation for all these looks is a perfectly executed long coffin or tapered square nail shape, coated in a sheer, milky nude or blush pink base. To recreate this look, start by mastering the clean, crisp tip—whether you opt for the traditional deep smile line in stark white or experiment with high-contrast red tips. Note the variations here: some designs utilize a full red tip for maximum impact, while others integrate red or black accent lines just above the white tip for a layered effect. The most modern interpretation involves the ‘V-tip’ or angled French tip, often used as a frame for a small painted heart, instantly modernizing the classic design and providing the perfect canvas for the subsequent fruit art.
To achieve the intricate cherry designs, precision is key. After curing your white tip base, use a fine detail brush and highly pigmented red polish to paint two small, perfectly round circles for the fruit. Allow these to cure completely before adding the stems and leaves using a bright green liner polish. The trick to making the cherries look three-dimensional is adding a tiny dot of white or a sheer topcoat highlight to mimic light reflection. The image showcases several methods for integrating the cherries: some hands feature a full set of cherry tips accented with tiny red dots (polka dots) for a truly whimsical feel, while others use the cherry art as a single statement nail, balanced by complementary white tips accented with small black or red hearts near the cuticle or embedded in the tip design. For the heart accents, a small dotting tool or the tip of a toothpick dipped in polish can create the basic shape, which is then perfected with a liner brush.
These cherry and French mashups are ideal for anyone seeking a vibrant yet polished look for spring, summer, or even a fun event like prom. The combination of classic red, white, and nude ensures the design remains timeless, while the fruit and heart motifs add personality and charm. For longevity, always finish your detailed art with two layers of a durable, high-shine top coat, capping the free edge to prevent chipping. For an expert finish, hydrate the surrounding skin with high-quality cuticle oil, ensuring the natural nail bed complements the pristine artwork. Don’t be afraid to mix and match the nine styles shown—for instance, pairing a solid red tip nail next to a cherry accent nail keeps the overall set cohesive while showcasing different artistic techniques.