Explore the ultimate collection of 50+ stunning nail design ideas for every season, shape, and trend. Find inspiration for spring florals, summer neons, holiday art, stiletto shapes, short manicures, and current aesthetic trends.
9 Fresh Spring Colors
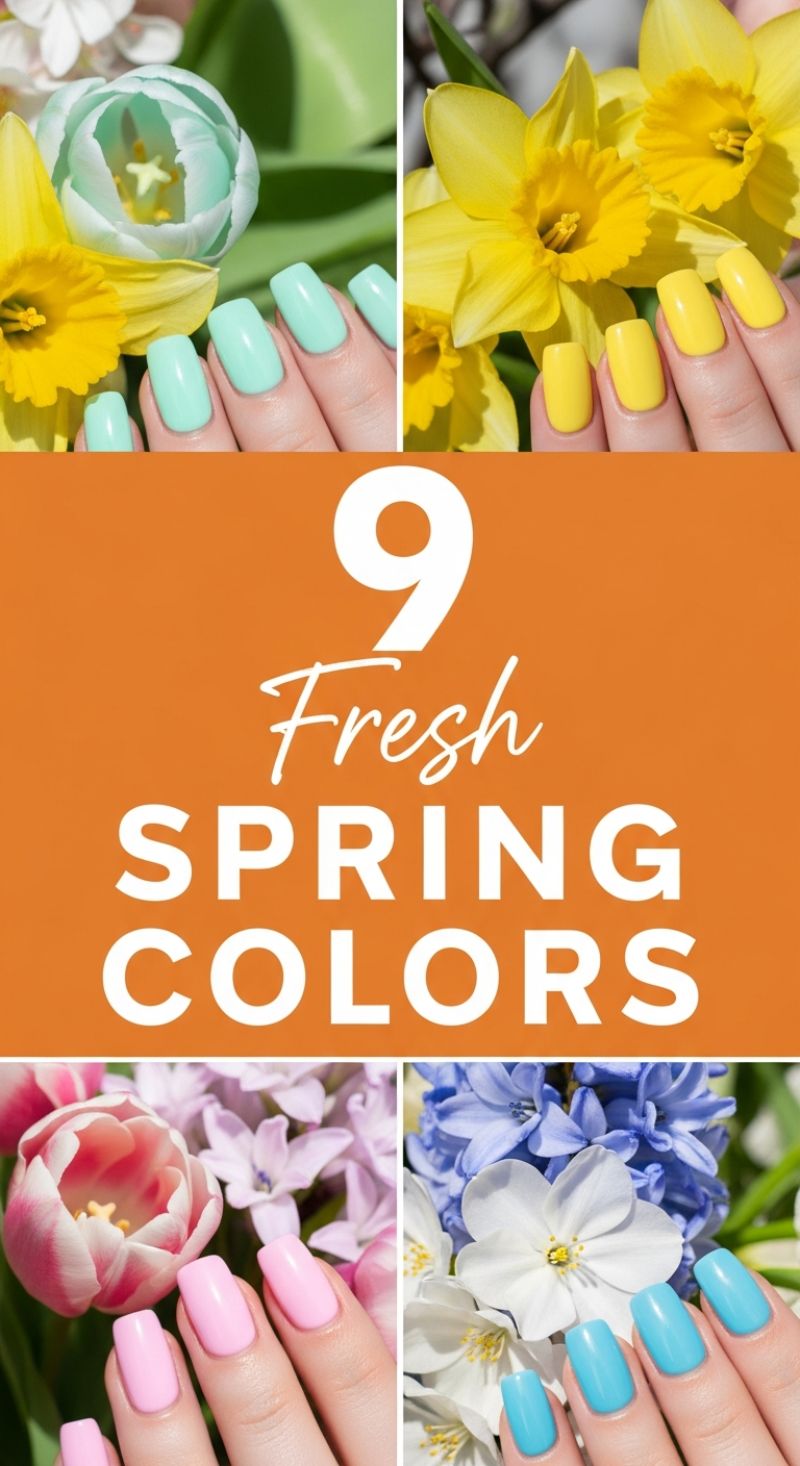
The arrival of spring necessitates a full refresh of your nail wardrobe, swapping out deep winter hues for shades that mimic the season’s first blooms and bright skies. The essential spring palette is built on vibrant, yet soft, solids—as demonstrated by the stunning combinations of Mint Green (evoking fresh foliage and soft tulips), Sunny Yellow (like bright daffodils), Soft Baby Pink, and Bright Turquoise. To master this solid color look, apply these shades as clean, opaque block coats, which highlights the pigment’s vibrancy and provides a modern, high-impact finish suitable for all nail lengths and shapes, particularly the elegant short square or squoval seen in these visuals. The beauty of these colors lies in their ability to instantly brighten and reflect the cheerfulness of the season, making them foundational staples for your spring design directory. Achieving true color payoff with these types of pastel and bright formulas requires specific technique to prevent streaking or a sheer appearance. Always start with a high-quality base coat; this is critical not only for longevity but also for protecting the nail plate from potential staining, particularly when using strong pigments like yellow and certain blues. Apply the color in very thin, even coats. While you might be tempted to use thick coats, this leads to bubbling and a longer drying time. Instead, aim for three thin coats of polish, allowing adequate drying time between each layer. This meticulous layering process is key to achieving the smooth, highly saturated look visible in these examples. Finish with a high-shine, fast-drying topcoat, ensuring you ‘cap’ the free edge of the nail to seal the manicure and prevent premature chipping, guaranteeing maximum wear time. While these colors are gorgeous as stand-alone solids, they also serve as excellent bases for integrated spring designs. For a subtle twist, consider using two complementary colors, such as the Mint Green and Baby Pink, for a sophisticated color-blocked accent nail on your ring finger. Alternatively, these pastels are perfect for executing a modern take on the French manicure, where the traditional white tip is replaced with a vibrant color like Turquoise or Yellow. Embrace the floral inspiration surrounding these manicures by adding delicate, hand-painted details like tiny white blossoms or simple dotting tool designs near the cuticle line. Consistent cuticle oil application is essential during the transition to brighter polishes, as well-hydrated cuticles make these clean, vibrant colors look even more polished and professional.
12 Regal Purple Nail Inspiration
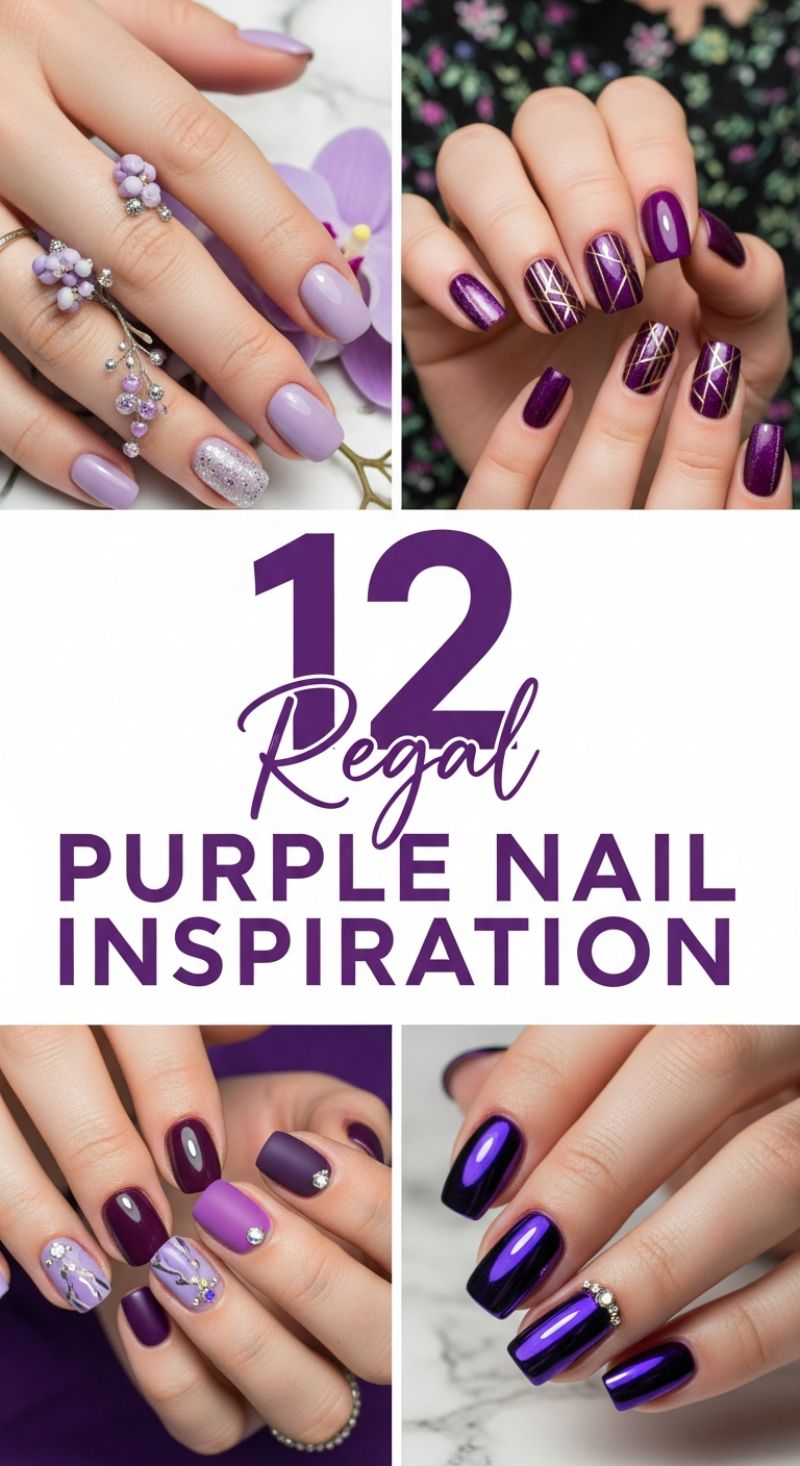
Purple is the color of royalty, creativity, and luxury, making it a powerful choice for any sophisticated nail design. This collection demonstrates the vast spectrum of purple possibilities, ranging from soft, delicate lavender to intense, glossy chrome. To master this trend, begin by selecting your dominant shade and finish. For a delicate, spring-like look (like the top left), opt for a creamy lilac base, applying two thin coats for full opacity. To introduce texture, dedicate an accent nail (often the ring finger) to a fine silver glitter polish or a chunky iridescent flake. For bolder, autumnal looks, lean into rich jewel tones like plum and eggplant. These deeper shades pair beautifully with metallic accents; use striping tape and a gold metallic polish to create the intricate geometric patterns seen in the top right image, ensuring the polish is fully dry before carefully peeling off the tape to reveal crisp lines.
Achieving multi-textured and complex designs requires careful layering and complementary shade selection. The bottom-left look perfectly illustrates how to combine glossy deep burgundy, velvety matte violet, and light lavender marble work. To replicate the marble effect, apply two shades of purple polish onto a small mixing palette, lightly swirl them together with a fine brush, and then delicately drag the brush across the nail base coat, allowing the colors to naturally blend without overmixing. After curing, add small metallic dots or strategically placed rhinestones near the cuticle or along the design lines for a touch of sparkle. Remember that matte polish instantly elevates deep colors, providing a sophisticated, tactile finish; always use a dedicated high-quality matte top coat over your cured color.
For the ultimate statement, embrace high-shine finishes like the intense chrome showcased in the bottom right design. The chrome effect is typically achieved using specialized chrome powder buffed into a tacky, no-wipe gel top coat that has been cured for a short period (usually 30 seconds, depending on the lamp). The base color for intense purple chrome is often a deep black or very dark indigo, which maximizes the vibrancy and mirror effect of the reflective powder. Finish this dramatic look by sealing the entire design with a final top coat and adding a tiny cluster of micro-rhinestones near the cuticle line. Expert tip: When placing rhinestones, use a dot of specialized nail glue or thick builder gel and cure them instantly to ensure they stay locked in place for the full duration of your manicure.
7 Chic Stiletto Nails
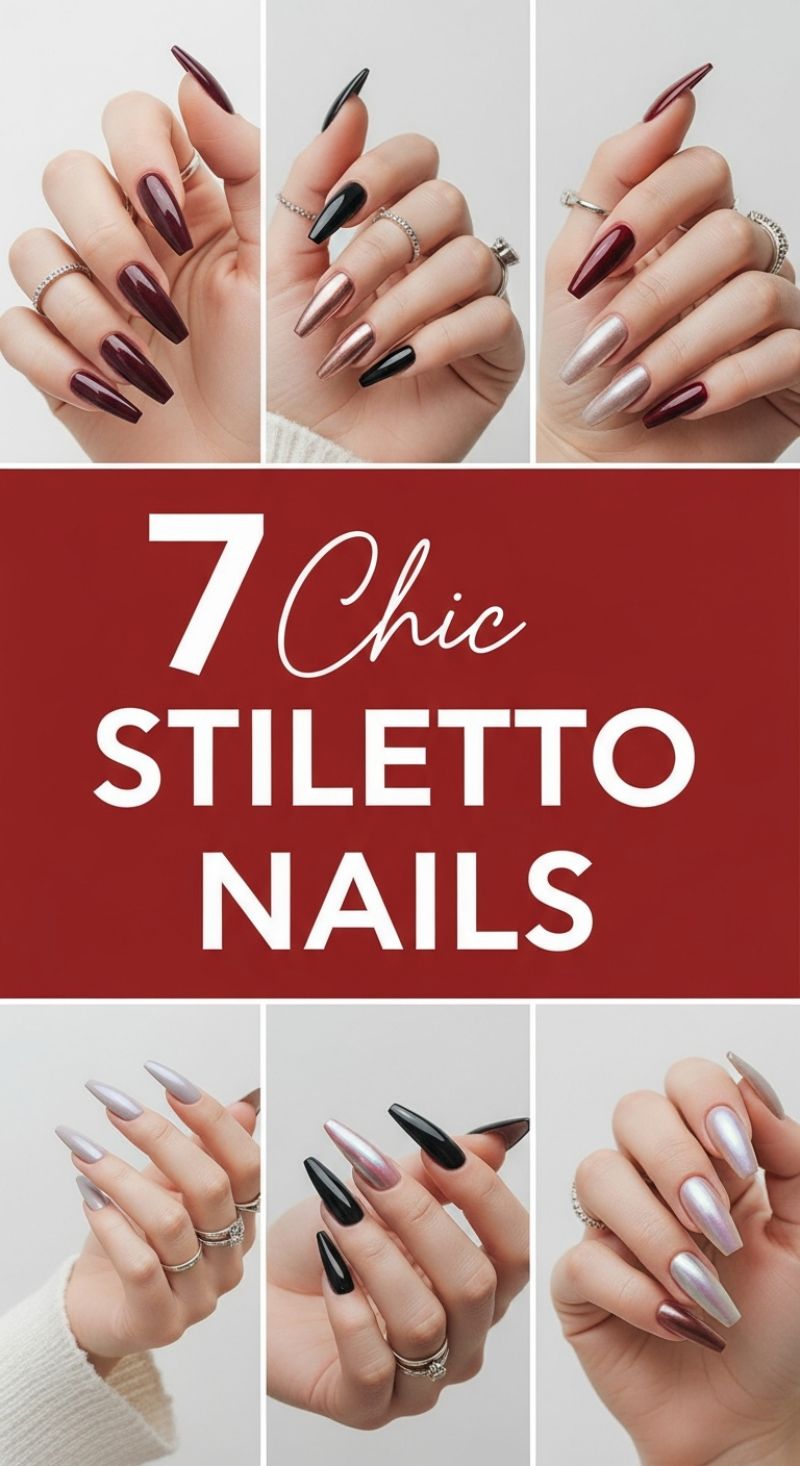
The stiletto or long tapered coffin nail shape, showcased in these examples, is the ultimate statement for those seeking a dramatic, high-fashion manicure. The core trend highlighted here involves leveraging deep, saturated solids alongside brilliant metallic and iridescent chromes to create dynamic, mixed-finish sets. To replicate this chic aesthetic, start by selecting two dominant color families: a deep, glossy jewel tone (like the rich, vampy burgundy or classic jet black seen here) and a reflective metallic or pearlized shade (such as rose gold, champagne shimmer, or lavender iridescence). The contrast between the matte depth of the solids and the light-catching brilliance of the metallics is what elevates this look from simple to sophisticated. For maximum impact, ensure that all glossy colors receive a super high-shine top coat to prevent dullness, which is essential for capturing that luxurious, polished feel. Remember that while these are classified as stiletto nails, the tapered coffin silhouette is also featured, offering a slightly more practical yet equally dramatic point.
Mastering the mixed-media mani requires strategic placement of the accent colors. As demonstrated across several hands, the metallic or chrome shades are typically reserved for the ring finger or the middle finger to draw the eye without overwhelming the overall design. When applying chrome powder to achieve that true mirror-like finish (as seen in the rose gold and iridescent lavender examples), it is crucial to use it over a non-wipe gel top coat that has been cured for the exact time specified by the product instructions—this creates the ideal tacky surface for the micro-fine powder to adhere smoothly. For the non-accent nails, applying two coats of the deep color ensures full opacity. Consider using the metallic shade on the thumb and ring finger, while keeping the index, middle, and pinky fingers in the dark solid color for a balanced, modern arrangement. This technique ensures consistency across both hands and ties the varied colors and textures together seamlessly.
Achieving and maintaining the integrity of such extreme lengths and shapes usually requires professional application using high-quality materials like sculpted hard gel or acrylic overlays for structural support. When filing the nail shape, focus on creating a perfect, straight taper from the side walls toward the tip. For stiletto, the point should be sharp and precise; for the tapered coffin, ensure the very tip is filed straight across to create the signature flat edge. Longevity is key for these intricate designs, so always cap the free edge with the top coat to prevent chipping and ensure the design lasts. For those with shorter natural nails, replicating this color palette on a slightly rounded square or oval shape will still capture the deep, luxurious mood of this ‘chic’ style, offering adaptability regardless of your preferred length.
15 Gorgeous Spring Nail Inspiration: The Floral French Accent
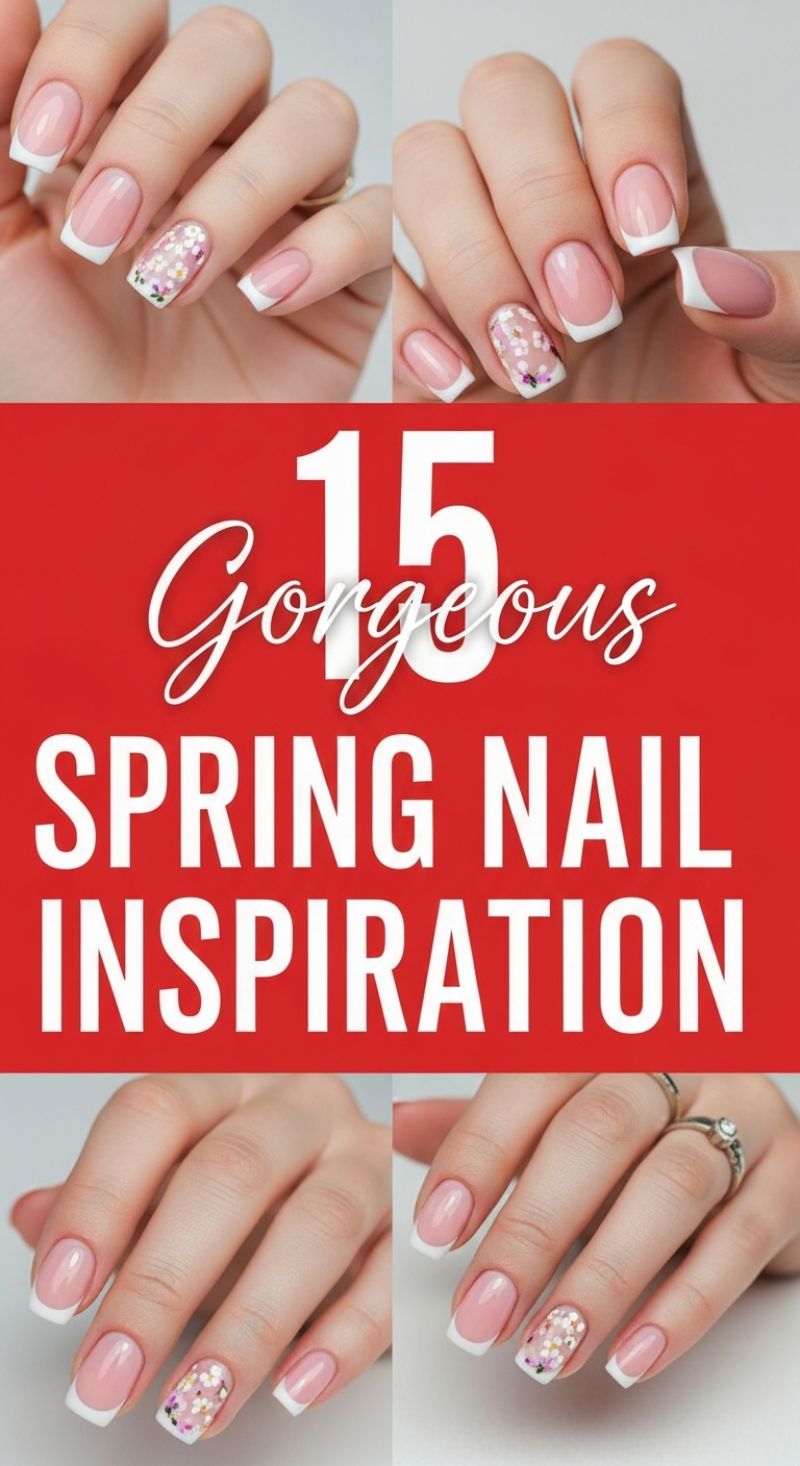
This sophisticated spring design flawlessly merges the timeless elegance of the French manicure with the playful, fresh vibrancy of miniature spring blooms. To replicate this look, start with meticulous nail preparation: shape the nails into a soft square or ‘squoval’ style, which is traditional for the French tip and allows maximum canvas space for the floral art. Apply a durable builder or rubber base coat to ensure longevity and a smooth canvas. Select a sheer, milky pink or neutral nude polish for the base color, ensuring full, even coverage that enhances the natural nail bed. The crucial step is achieving the crisp, uniform white tips. For professional precision, use a thin, flexible striping brush for freehand application, or utilize guiding stickers or a French tip stamper for perfectly curved smile lines. Curing each layer properly is essential before moving to the artistic accent element, ensuring the foundational French look is flawless.
The key to the design’s “gorgeous” spring appeal lies in the accent nail, which typically features on the ring finger. This art utilizes a sparse application of miniature, multi-hued flowers that appear delicate and scattered over the sheer base. For a hyper-realistic, three-dimensional effect, embed high-quality dried flower confetti or floral waterslide decals into a thin layer of clear builder gel before curing. If opting for hand-painting, select a fine detail brush and a spectrum of soft pastel polishes (lilac, pale yellow, white, and soft pink). Create the blooms by placing 3-5 small dots of color in a circular pattern to form the petals, then use a contrasting darker shade for a tiny center dot (the stamen). The florals should be spaced irregularly and concentrated on the tip area, ensuring they don’t cover the entire surface—this maintains the clean, negative-space aesthetic inherent to the French base coat.
To maximize the lifespan and brilliance of this design, apply a thick layer of a non-wipe, high-gloss top coat, ensuring it thoroughly encapsulates any decals or painted elements, especially where the white tip meets the base color. Expert Tip: For a subtle twist on this classic, consider swapping the bright white tip for a soft pastel color, such as mint green or pale lavender, which heightens the overall spring aesthetic without sacrificing structure. While this design is showcased beautifully on shorter, squoval nails, the technique translates seamlessly to longer almond or coffin shapes, proving its versatility as a seasonal staple. Finish the look by moisturizing the cuticles to make the finished manicure truly pop.
5 Pro DIY Nail Hacks
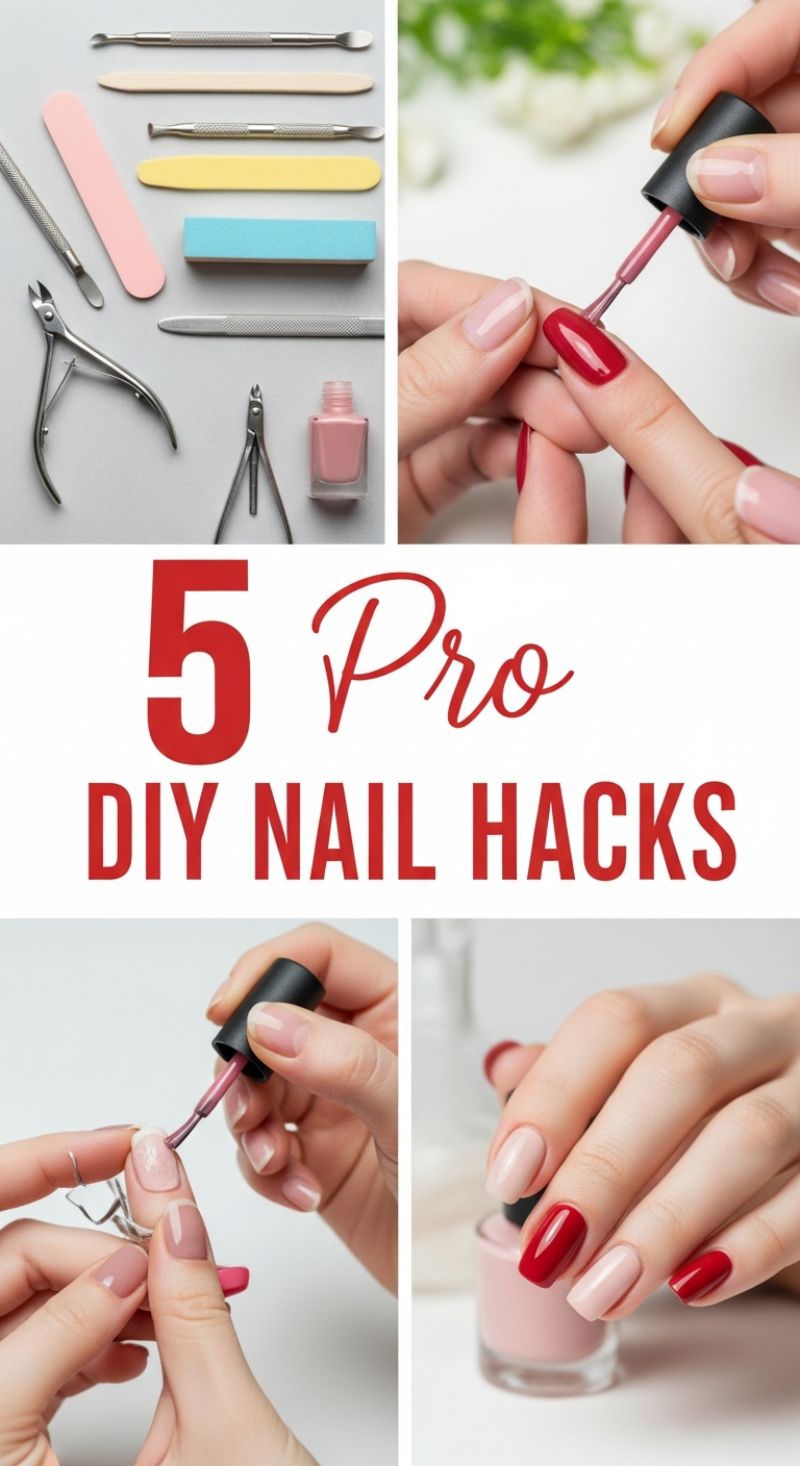
Achieving a truly professional DIY manicure begins long before the first swipe of color. The top left quadrant of the image showcases the essential arsenal: metal cuticle tools, nippers, and multi-sided files. Expert hack number one is proper prep. Start by gently pushing back your cuticles using a metal pusher or orange stick, never cutting them unless absolutely necessary (and only with specialized nippers, as pictured). Next, shape your nails consistently using the coarse side of a file, then refine the edges. Crucially, use a buffer block (like the colorful ones shown) to smooth the nail plate. A smooth surface eliminates ridges, preventing chips and ensuring the polish adheres evenly, making your application look flawless. The secret to longevity lies in this base work.
Hack number two focuses on flawless polish application, which is demonstrated in the top right image where a glossy red shade is being applied. Regardless of whether you choose a bold color or a soft nude, the key to streak-free coverage is the ‘three-stroke’ technique: apply a stripe down the center of the nail, then one stripe on each side, leaving a small, clean gap around the cuticle area. Hack number three, clearly visible in the bottom left, addresses the most common DIY frustration: polish on the surrounding skin. While special curved protectors are available (as shown), a simple DIY substitute is applying a thin layer of liquid latex or even petroleum jelly around the nail bed before painting. This creates a barrier, allowing you to paint messily right up to the edge; once the polish is dry, the barrier peels off cleanly, leaving a crisp, salon-quality line.
The final polished look, displayed in the bottom right, features a stylish contrast of alternating bold red and creamy nude shades. Hack number four involves maximizing wear time. After applying two thin coats of color, ensure you ‘wrap the tip’ with your top coat. This means drawing the brush horizontally along the very edge of the nail tip, effectively sealing the color layers beneath and preventing premature chipping and wear at the free edge. Hack number five focuses on quick drying and hardening the finish. If you aren’t using a UV/LED lamp, immerse your freshly polished nails in a bowl of ice water for a minute or two after they have set for about five minutes. This shocking temperature change cures the polish faster and hardens the finish, resulting in that perfectly glossy, durable look seen in the final result.
8 Must-Have APRIL NAIL TRENDS
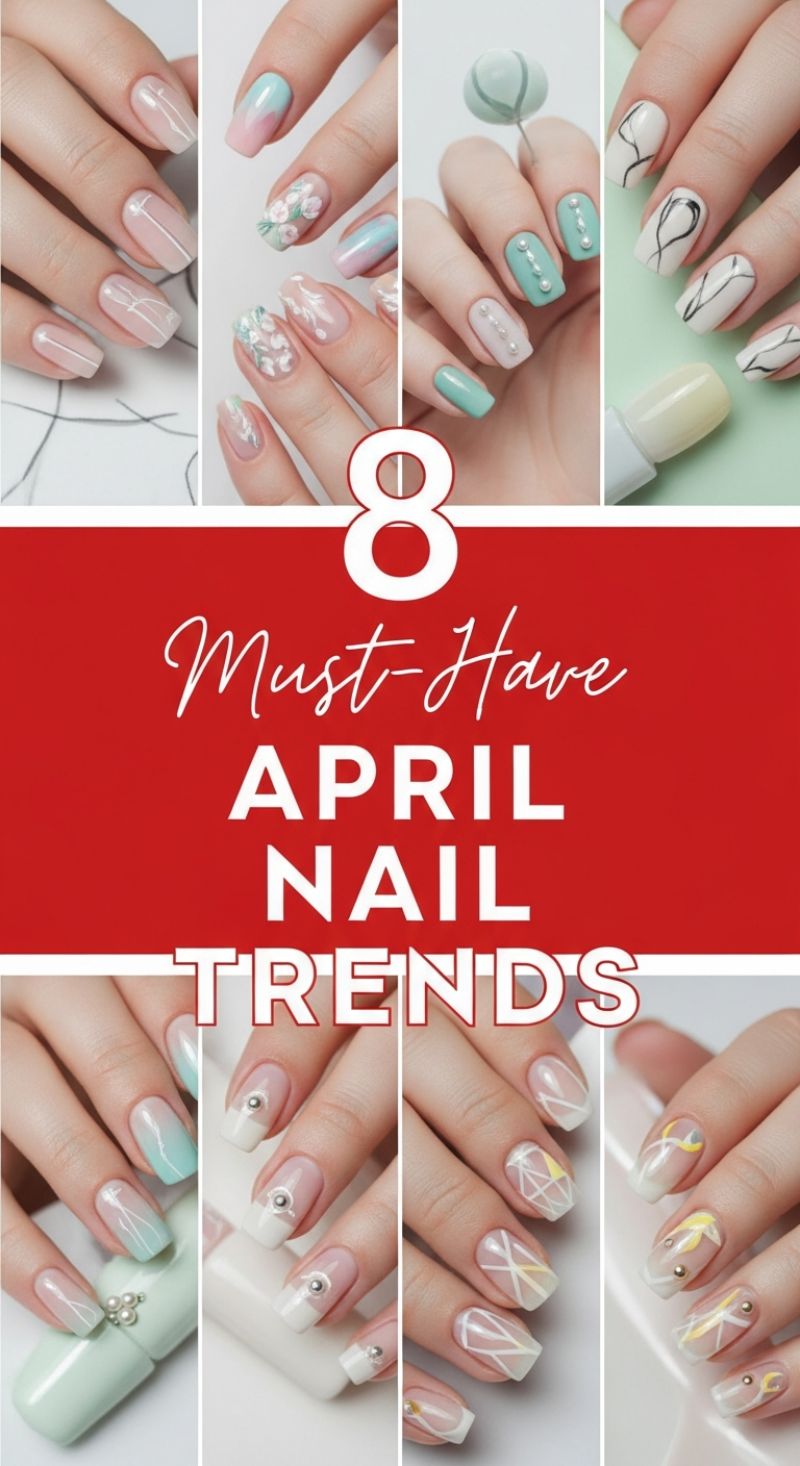
April signals the transition into true spring beauty, and the trending manicures perfectly reflect this shift, prioritizing fresh pastels, delicate textures, and refined minimalism. The foundation for all eight featured looks is a flawless, natural base—the “clean girl aesthetic”—achieved through sheer milky whites, nudes, or soft pink builder gels. To replicate this universally flattering canvas, start with meticulous cuticle preparation and file the nail into a medium-length almond or soft square shape. Apply 1-2 coats of a highly sheer, milky polish to blur imperfections while maintaining the natural nail line. This translucent foundation is key, as it allows the subsequent detailed artwork, whether abstract black lines or gentle white flowers, to float on the surface without looking heavy or cluttered. For the pastel gradient tips shown, apply a sponge technique using light mint or pale blue polish, ensuring the color diffuses smoothly into the sheer base before sealing the entire nail with a thin layer of topcoat.
The featured designs can be broadly categorized into two high-impact styles: intricate floral motifs and sophisticated linear geometry. For the white florals (a classic springtime choice), utilize a fine-tipped dotting tool and a highly pigmented white gel polish. Instead of painting full, heavy flowers, focus on delicate, wispy petals and slender foliage, often placed near the cuticle or sweeping across the tip, mimicking watercolor. The graphic trends, conversely, require precision. To achieve the popular minimalist black abstract lines or the crisscrossing white and yellow geometric patterns, invest in a dedicated striping brush (ideally 5mm or shorter) and practice creating steady, unbroken strokes. For perfect symmetry, load the brush sparingly and rest your pinky finger on the table for stability. These clean, structured designs are elevated by using complementary seasonal colors; note the strategic inclusion of soft butter yellow and pale mint, which provide a modern update to traditional white line work.
To give these minimalist designs a touch of luxury, integration of strategic three-dimensional embellishments is essential. Pearls and small metallic studs are used sparingly but effectively throughout these April trends. When applying these accents, use a rhinestone pick-up tool and a specialized gem adhesive or thick builder gel. Notice the linear arrangement of small pearls running vertically down the middle of a pastel nail, or the placement of single metallic beads at the base of a sharp white French tip—these placements elongate the finger and draw the eye. Expert advice for securing 3D accents is to ensure the bead is fully encased by two separate coats of non-wipe topcoat (curing after each application) to prevent snagging and chipping. This ensures longevity, allowing these sophisticated spring trends to last well into the season.
10 Edgy Goth V-Day Nails
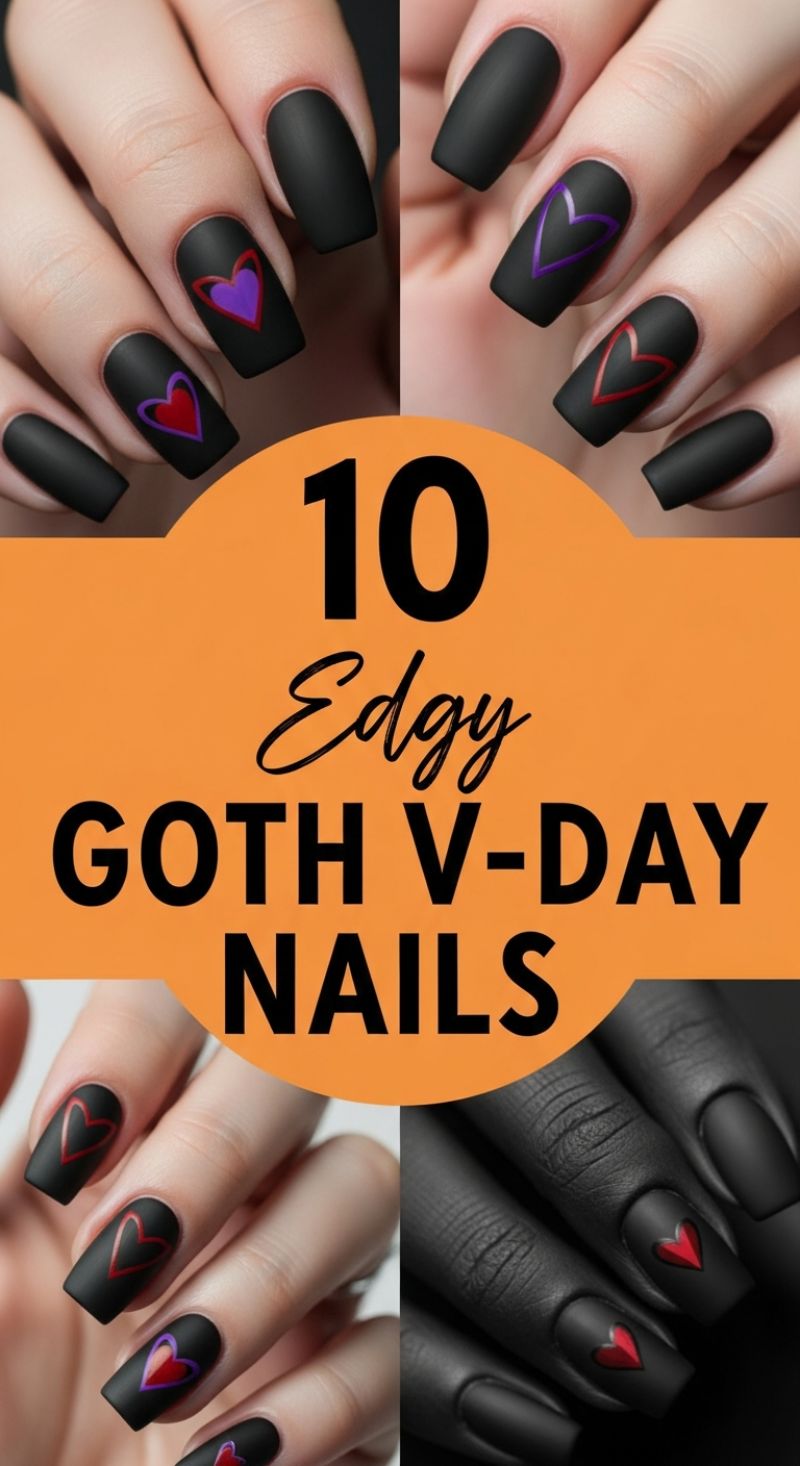
This design category, affectionately dubbed “Edgy Goth V-Day Nails,” offers a dramatic and sophisticated alternative to typical Valentine’s Day pastels. The foundation for this stunning look is a flawless, rich black polish, which is absolutely essential for anchoring the gothic theme. To achieve the signature moody aesthetic seen here, apply two smooth coats of a highly pigmented black polish, ensuring full opacity, and immediately follow with a high-quality matte top coat. The matte finish is crucial; it diffuses light, giving the nails a velvety texture that contrasts beautifully with the sharp vibrancy of the heart details. This style is best showcased on medium-length nails with a gentle square or soft coffin shape, providing an ample canvas for the small motifs without looking overcrowded. For the best application results, ensure proper nail preparation, including a light buffing of the nail plate before the base coat, which prevents streaks in the final demanding matte layer. The success of this look hinges on the depth and evenness of that matte black foundation.
The artistry lies in the precise execution of the minimalist heart application. For the clean, graphic designs shown, you will need an ultra-fine detail brush (a striper brush works well) or a very sharp-tipped dotting tool. The chosen color palette—deep crimson red and vibrant royal purple—is intentionally selected to provide a sharp, slightly jarring contrast against the stark matte black canvas. To replicate the look, alternate between solid, filled hearts and crisp heart outlines across different fingers, varying the colors for visual interest. When creating the outlines, steady your hand and use a minimal amount of polish on the brush to ensure a consistently thin line. For the filled hearts, always start by carefully outlining the desired shape before filling the interior. A critical technique for maintaining the overall matte texture while protecting the glossy heart details is precision sealing: use a small detail brush to apply a regular, glossy top coat *only* over the finished heart designs, ensuring the surrounding black base retains its luxurious matte finish.
This design is highly versatile and transcends the holiday, translating perfectly year-round for anyone who embraces dark glamor. To personalize the look, consider integrating metallic elements; for instance, swapping out colored polish for silver or gunmetal chrome powder when creating the heart outlines can add a subtle, sophisticated industrial edge. Another compelling variation is the single “negative space” heart, where the matte black frames the natural nail underneath in the shape of a heart, adding an element of subtle intrigue. For professional longevity, remember that matte finishes tend to show oils and dirt more readily than glossy ones. Advise clients to occasionally restore the true velvety texture by wiping the nail surface gently with a lint-free cloth dampened with rubbing alcohol (avoiding acetone), which ensures the vibrant heart colors remain the clean, polished focal point. This design expertly merges romance with rebellion, making it the ultimate sophisticated choice for those who prefer drama over delicate femininity.
11 Dainty Valentine Nail Art
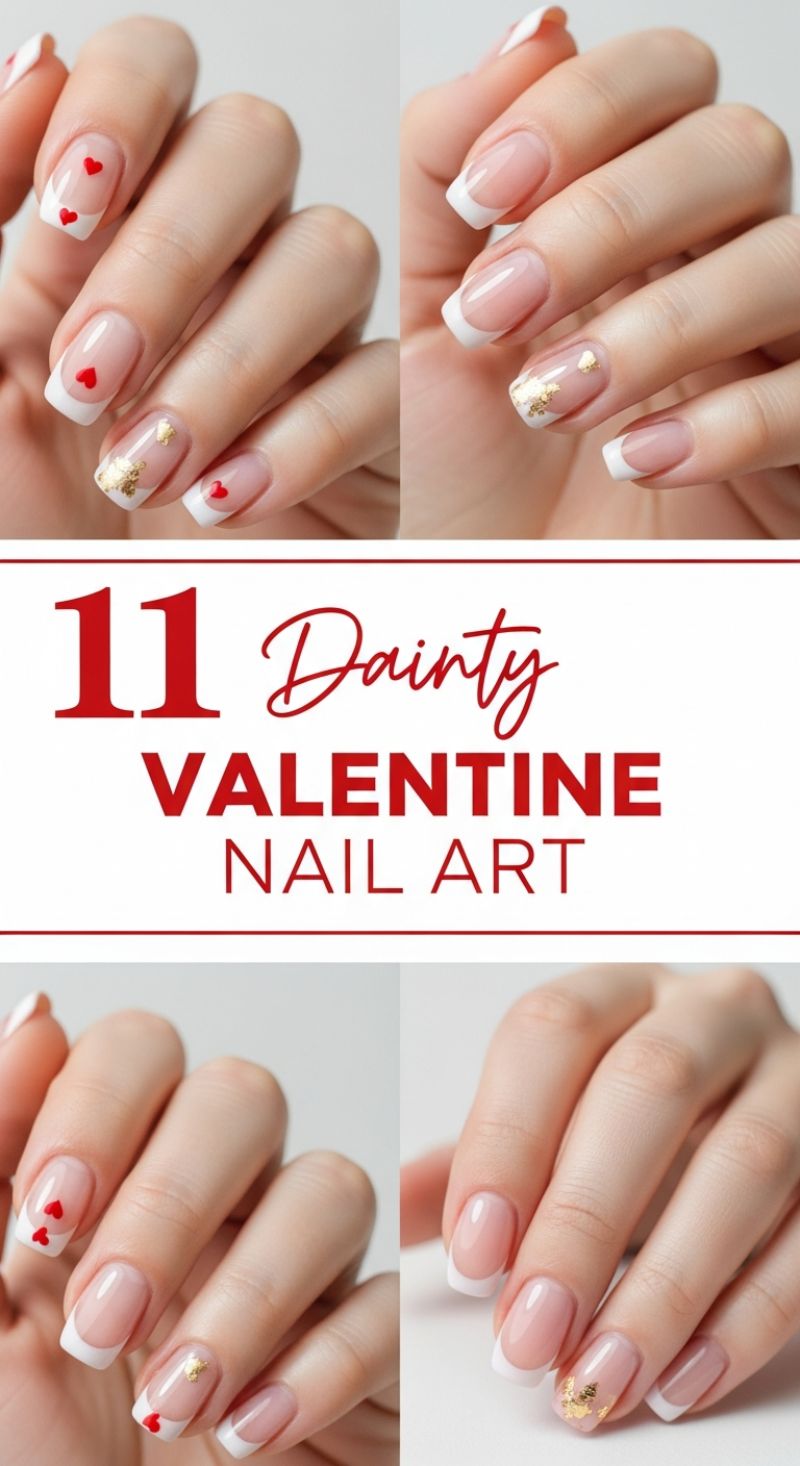
This design masterfully blends the timeless elegance of a French manicure with subtle, romantic accents, making it the perfect sophisticated choice for Valentine’s Day or any time you desire a delicate, polished look. The foundation of this style is a pristine French tip on a natural or sheer pink base, which requires careful application to ensure the ‘smile line’ is perfectly symmetrical and crisp. Start by prepping the nails and applying a sheer, milky pink or nude gel polish that complements your skin tone; this provides the flawless base required for a ‘dainty’ finish. Once the base coat is cured, use a highly pigmented white polish and a thin striping brush or a specialized French tip stencil to create the clean white arc at the tip of the nail. For a squoval or medium-length square nail shape, the tip should be of moderate thickness, emphasizing the neatness and precision of the line work. The minimalist design philosophy ensures that the romantic elements enhance, rather than overwhelm, the classic structure.
The real artistry lies in the deliberate, sparse placement of the embellishments. For the tiny red hearts, utilize a very fine dotting tool or the tip of a toothpick and a rich red polish. These hearts are applied either singularly near the base of the nail, slightly above the cuticle, or in small clusters of two near the edge of the white tip on accent nails. Precision is key; the hearts must be uniformly small to maintain the ‘dainty’ aesthetic. Similarly, the gold foil requires strategic placement. Using fine tweezers, place small, irregular flakes of gold leaf onto the nail surface. This is best done immediately after applying a clear topcoat (or a layer of unset gel polish) to ensure a strong adhesion. Clustered placement on the ring finger or pinky creates a beautiful, randomized texture that contrasts elegantly with the structured white tips and the smooth, glossy base, providing just enough metallic shimmer without appearing gaudy.
To ensure the longevity and impeccable finish of this intricate yet subtle design, sealing is paramount. After all hearts and gold foil are placed and cured, apply two thin layers of a high-shine, non-wipe topcoat. When applying the topcoat over the gold foil, ensure you gently encapsulate the edges of the flakes to prevent them from lifting or snagging. Expert advice for preserving this delicate look includes confirming that the foil lies as flat as possible before curing the final topcoat layers. For variation, consider swapping the traditional white tip for a soft blush pink tip for an even softer gradient, or substituting silver foil for gold if you prefer cooler tones. This design is highly versatile and works beautifully on slightly rounded almond shapes as well, maintaining its sophisticated charm regardless of minor adjustments, making it a reliable choice for achieving high-impact minimalism.
10 Sweet V-Day Nail Designs
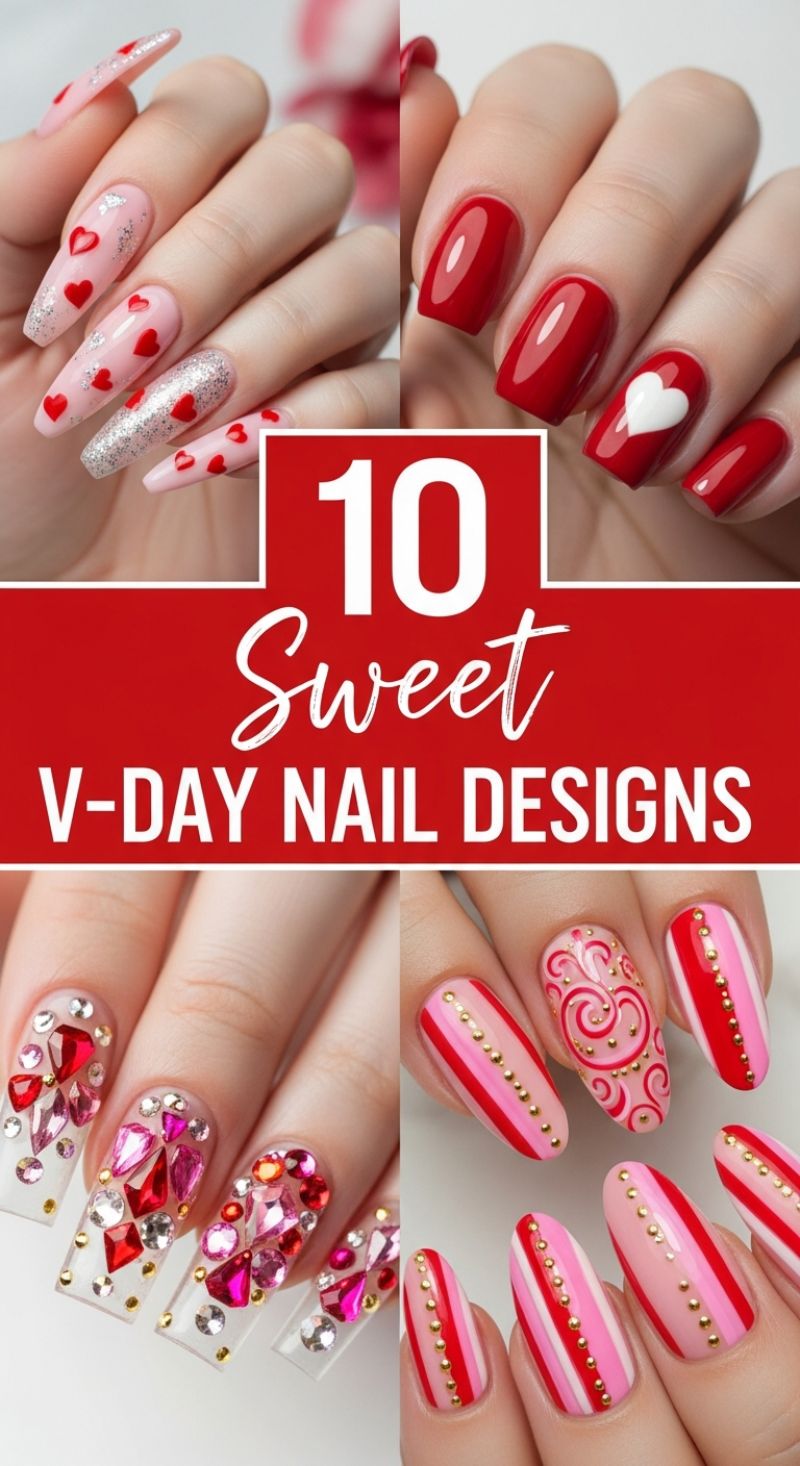
The classic aesthetic of Valentine’s Day is centered on passionate reds, delicate pinks, and heart motifs, but these designs elevate the theme with varying levels of complexity, shape, and shine. The simplest yet most impactful look is the solid red square manicure featuring a single, clean white heart on the accent nail. To achieve this flawless, high-gloss finish, begin by meticulously prepping the nails with a smoothing base coat, applying two thin coats of a richly pigmented red cream polish, and sealing everything with a high-shine UV top coat. The crucial element—the white heart—should be applied using a small dotting tool (creating two slightly overlapping dots for the top lobes) and a fine liner brush to pull the paint down to form the point, ensuring crisp, professional edges against the vibrant red canvas. For a softer, yet equally romantic feel, the pink coffin manicure utilizes a sheer nude-pink base, overlaid with scattered red hearts, often achieved efficiently using stamping plates or small vinyl stencils, and punctuated by striking silver glitter accents on the full ring finger or in a gradient on the tips. For a smooth glitter fade, apply a heavy layer of chunky silver glitter polish near the desired focal point, then use a brush dipped in top coat to subtly thin out the product as you move across the nail plate, ensuring a seamless transition.
For those who prefer a more sophisticated and layered design, the pink-and-red striped almond nails are an excellent choice. This look demands precision in application, utilizing high-quality striping tape over fully cured or dried nude and light pink polish to ensure every red line is perfectly crisp and straight. Once the polish is dry, the design is elevated by adding vertical lines of small gold microbeads down the center of select nails, applied carefully using nail glue or wet top coat and a wax pencil for accurate placement. The intricate middle finger accent, featuring detailed red swirling filigree, requires a fine-tip brush and a steady hand, or alternatively, a highly detailed stamping plate, creating a baroque-inspired texture that contrasts beautifully with the clean lines of the stripes. Always finish this intricate work with a thin, clear top coat to protect the small gold embellishments from lifting or snagging.
If the goal is maximum drama and statement glamour, the high-bling, clear extension design is the ultimate declaration of love. This look requires very strong, long tips (or robust builder gel extensions) and an extensive collection of faceted rhinestones in varying shapes and shades of red, fuchsia, and clear crystal. The key to securely affixing such large, heavy gems is not standard top coat, but rather a strong adhesive like specialized nail jewelry glue or a small dollop of clear sculpting gel (builder gel) cured under a UV lamp, which effectively encapsulates the stone’s base. Strategy dictates placing the larger, focal stones first—perhaps creating a clustered heart shape near the cuticle—then filling in the remaining negative space with smaller rhinestones and metallic accents to ensure a fully saturated sparkle effect. Crucially, when applying the final seal, use a non-wipe top coat, carefully navigating around the facets of the stones; coating the top of the rhinestones will dull their brilliance and reduce the light-catching effect.
7 Perfect Spring Designs: Delicate Watercolor Florals on Nude Base

Achieving this perfect, airy spring manicure relies heavily on preparation and technique, simulating a delicate watercolor effect on a minimalist canvas. Start by shaping your nails into a soft oval or squoval shape, as this complements the natural, organic feel of the design. The key to the ‘spring’ aesthetic is the translucent base. Apply one coat of a sheer nude, milky white, or pale pink jelly polish. This prevents the design from looking cluttered or heavy and allows the natural nail to peek through. For the floral execution, you will need highly pigmented nail art paint or slightly thinned regular polish, along with a fine detail brush (size 00 or a short striping brush). The flowers should be painted using a simple five-dot technique for the petals; dip your brush, press lightly, and pull slightly inward to create a heart shape or simple rounded petal. Avoid heavy application; the flowers should look slightly blurred or faded, mimicking freshly sprung blossoms.
The true charm of this design lies in the vibrant yet harmonious pastel palette and the fluid greenery that connects the clusters. Select three to four spring colors—such as baby blue, pale yellow, mint green, and soft coral or pink. Work in small, spaced clusters across the nail plate, focusing on the tips and the cuticle area to frame the nail rather than overwhelming it. Once the flowers are dry, use a dark, rich green polish and a liner brush to paint delicate, curving vines and small, pointed leaves. These stems should look organic and slightly wispy; connecting the different colored flowers with the same green unifies the entire look across all ten fingers. Expert tip: if your polish is too thick for fine line work, thin it slightly with a drop of nail lacquer thinner (never acetone) to ensure the lines glide smoothly and don’t clump or look rigid.
To ensure maximum longevity and protect your intricate artwork, proper sealing is essential. Allow the entire design to dry completely—this step is crucial, as wet polish or paint can easily bleed or smudge under the topcoat. Apply a generous layer of high-shine, quick-dry top coat. Use the ‘floating’ technique, where you lay the top coat down with minimal brush strokes, allowing the product to self-level without dragging the brush too hard against the flowers underneath. If you prefer a softer, garden-fresh look, seal the design with a matte top coat instead, which will enhance the watercolor appearance of the florals. This versatile design works beautifully as a full set or as accent nails paired with a simple pastel shade.
6 Easy Funky Nail Art

The ‘Funky Nail Art’ trend is the ultimate expression of maximalist personality, blending the graphic simplicity of the 90s with the vibrant, eye-popping hues of modern rave culture. To achieve this look, the key is using a high-contrast palette. Start by investing in a collection of highly pigmented, true neon polishes: think lime green, electric orange, shocking pink, and cobalt blue. The foundation of these designs relies heavily on stark black and white accents to ground the intense colors. Visually, these nails are characterized by color blocking, geometric shapes, and playful doodle-style graphics, applied primarily to short, neatly filed square or squoval tips. For maximum impact, ensure that every nail features a completely different design and color combination, embracing asymmetry and visual chaos. Expert tip: Due to the high visibility of neon shades, always apply a white base coat before your main colors to ensure the fluorescent pigment truly pops and remains true to its bottle shade.
Executing these funky designs requires precision tools, though the aesthetic is intentionally rough around the edges, making them surprisingly accessible for DIY enthusiasts. For the structured patterns, such as the black-and-white or orange-and-black checkerboard patterns and the complex color blocks, use fine striping brushes or pre-cut nail vinyls to achieve crisp edges. When tackling the abstract elements, like the wavy lines, cartoonish hearts, and simplified smiley faces, switch to a small dotting tool and a detail brush. This is where you can truly embrace the ‘funky’ nature; do not strive for perfection—the slight imperfection inherent in hand-painted doodles adds to the nostalgic, rebellious charm of the style. For example, the wavy pink lines on a black background or the haphazard placement of dots and geometric divisions are meant to look spontaneous and energetic.
Once all six (or more) individual designs are complete, the final step is crucial for both longevity and style. Apply a generous layer of high-quality top coat. While a super glossy finish will enhance the vibrancy of the neon polishes, lending a plastic-like, maximalist shine, a matte top coat can provide a surprisingly sophisticated and modern update to this retro style. This look is exceptionally versatile for warm weather, festivals, or injecting personality into a formal outfit, making it a required entry in any comprehensive nail art directory. Focus on short nail lengths; these busy, bold designs tend to look overwhelming on long extensions but achieve perfect balance on a natural nail base.
12 Quick Simple Spring Ideas
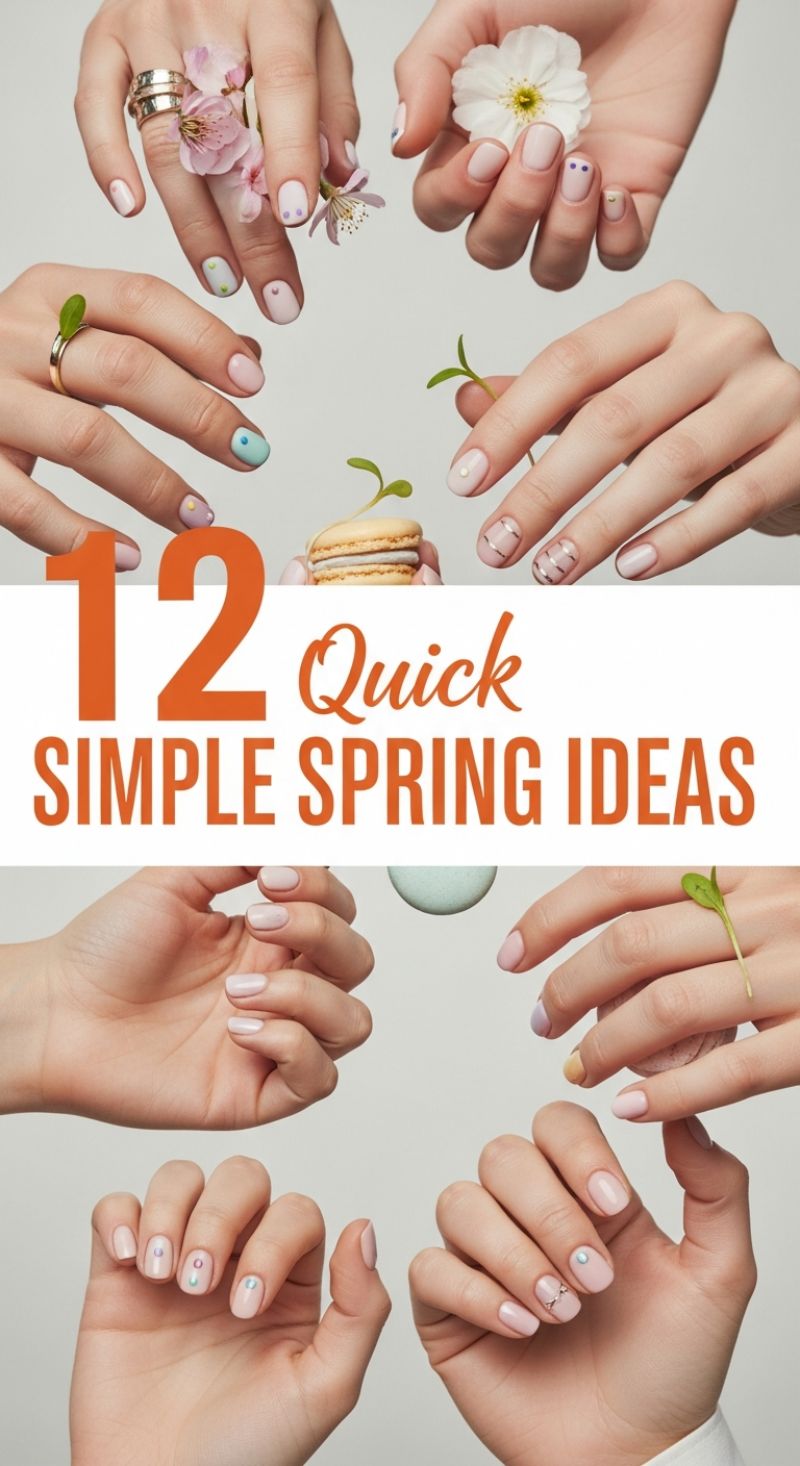
This delicate collection of spring nail art ideas champions the power of minimalism, transforming the classic nude manicure into a canvas for subtle pops of color and light metallic accents. The overall look is characterized by sheer, milky base coats—typically a soft pink or muted beige—allowing the natural nail bed to provide warmth and depth. The beauty of these designs lies in their strategic use of negative space, which keeps the application fast and forgiving, making them ideal for anyone short on time but wanting a high-fashion finish. Visual elements include tiny, perfectly placed pastel dots (in colors like baby blue, mint green, and soft lavender), simple horizontal or vertical metallic stripes, and small, iridescent rhinestones placed near the cuticle or the nail tip. This aesthetic perfectly captures the freshness and renewal of spring with its light, effortless charm.
To recreate the quintessential ‘Spring Dot’ look, begin by prepping the nails and applying one to two thin coats of a sheer nude or pink polish, ensuring the polish remains translucent rather than fully opaque. The key tool for this design is a high-quality dotting tool, or, if unavailable, a hairpin or the tip of a fine toothpick. Dip the tool into your chosen pastel polish—remembering that less polish is more—and place a single, neat dot onto the designated accent nail. Experiment with placement: some designs feature the dot close to the base (the cuticle area), while others place it slightly off-center towards the free edge. For the linear accent nails, use thin metallic striping tape (or a very fine striping brush) to apply two or three parallel lines across the nail plate. Expert advice: ensure your base polish is completely dry before applying any design element, especially if using striping tape, to avoid lifting or smudging the foundation color.
These designs are highly customizable and incredibly flattering on short, naturally rounded or squoval nails, enhancing the elegance of a well-maintained manicure without requiring significant length. To adopt the mixed-media approach displayed in the directory, select 3-4 different quick ideas—such as a single pastel dot, two metallic stripes, and one iridescent rhinestone—and assign one design to each finger, keeping the remaining nails in the solid sheer base color. This technique provides visual interest and texture while maintaining a cohesive, sophisticated theme. Always finish your quick spring design with a high-shine, fast-drying top coat, which will not only seal and protect the tiny details but also provide that coveted glass-like finish essential for a clean, modern aesthetic.
10 Obsessed PINK NAIL LOOKS
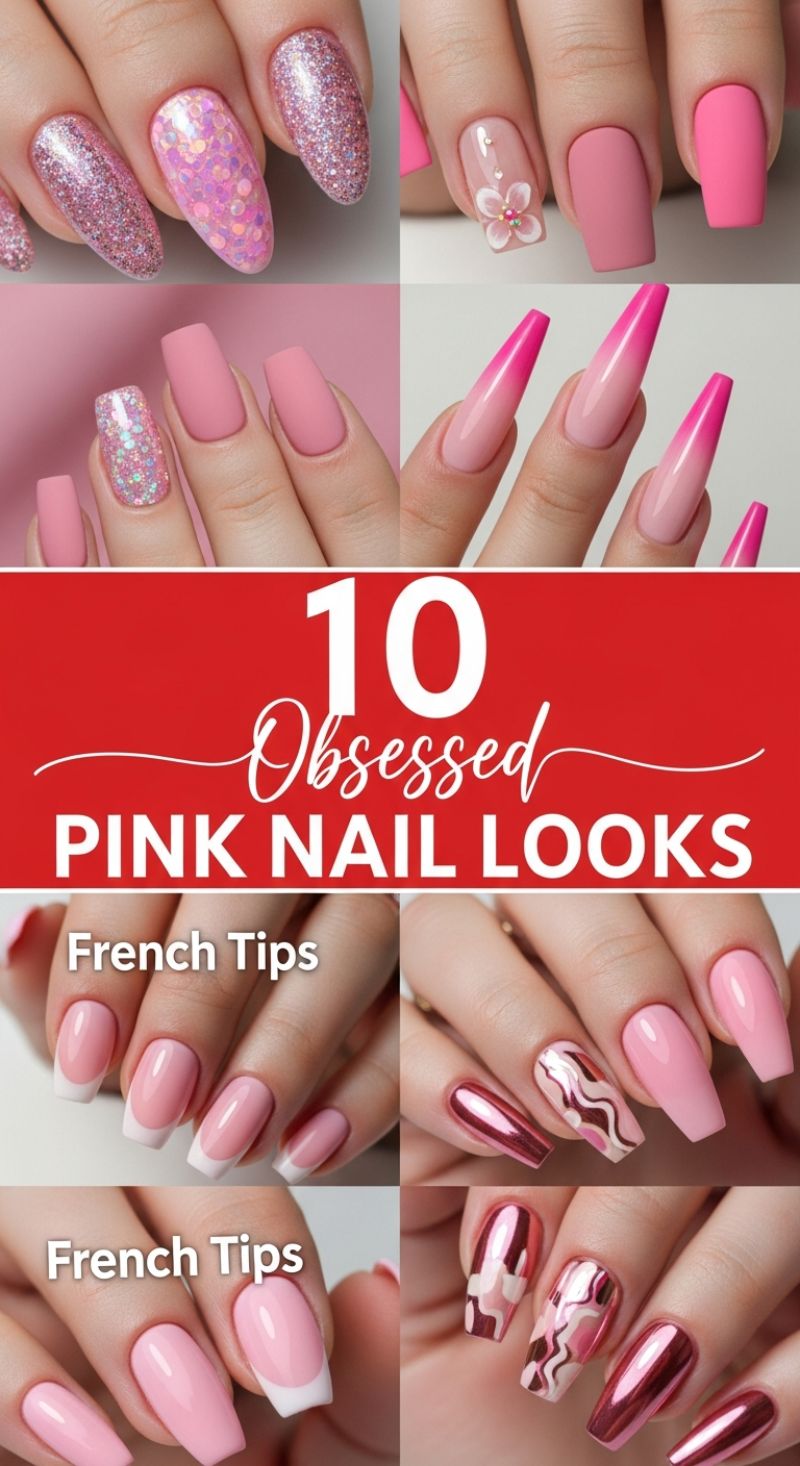
Pink is arguably the most versatile color in the nail art spectrum, transitioning seamlessly from soft wedding elegance to vibrant summer fun. This collection demonstrates the sheer range achievable, mixing foundational techniques with bold, trend-driven statements. To successfully execute this lookbook, start by identifying your desired pink shade—whether it’s a muted dusty rose, a creamy blush nude, or a blinding hot fuchsia. Note the contrasting finishes used across the designs: matte topcoats provide a sophisticated, velvety texture perfect for solid colors and offer a beautiful counterpoint when paired with high-shine accent nails, such as the chunky holographic glitter or the brilliant chrome finish. When designing your set, use varying lengths (like the squared-off tips or the dramatic tapered coffin shape) to help define the mood, ensuring the pink base complements your natural skin tone for the most harmonious result.
Several major trends are highlighted here, demanding precise execution. For the popular French Tip styles shown, modernize the classic white arc by maintaining a soft, semi-sheer pink base; this elongates the nail bed while offering a healthy, polished appearance. If attempting the bright pink ombre or French fade, achieving a seamless gradient is key. This effect is typically created by sponge application, blending the vibrant tip color (fuchsia) down into the softer base color. Ensure you cure each thin layer separately if using gel polish to prevent flooding the cuticle area. Furthermore, the inclusion of artistic details, such as the delicate 3D floral art on the nude accent nail, requires precision work using thick sculpting gel or acrylic to give the petals lift and dimension, often finished with tiny rhinestones or metallic microbeads for center detail.
The most high-impact designs involve metallic and abstract elements. The striking rose gold/pink chrome effect is achieved by rubbing specialized fine chrome powder onto a cured, tack-free gel topcoat before sealing it with a final gloss coat. For the abstract wavy patterns, combine the reflective chrome finish with creamy pink and white polishes, using a thin striping brush to create fluid, non-uniform curves across the nail bed. The juxtaposition of the mirror-like shine and the flat creme colors creates a captivating visual tension, making these nails the ultimate statement piece. When applying complex designs, always reserve them for the ring or middle finger to ensure the overall look remains balanced and wearable.
9 Vibrant Multicolored Nails

Dive into the most energetic nail trend of the season with vibrant, multicolored manicures that scream fun and freedom. This collection highlights the power of combining high-saturation solids with dynamic art techniques like swirling and ombré gradients, perfect for making a bold, dopamine-dressing statement. To achieve the striking solid color combinations seen here (often called the ‘Skittle’ manicure), the foundation is critical. Start by selecting 4-5 highly complementary neon or primary colors—think electric blue, fuchsia, safety orange, and lime green. The essential professional tip for maximum luminosity is the preparation: always apply a crisp, opaque white gel or polish base coat before adding your colored layers. This technique prevents translucent neon pigments from looking muddy or dull and ensures the colors pop directly off the nail bed. Apply two thin coats of your chosen vibrant color to each nail, intentionally mixing and matching the shade placement across your fingers for maximum visual impact.
Elevating this already eye-catching look involves introducing artistic elements such as the psychedelic swirls and multi-color fades. For the captivating swirl designs, you must work with heavily contrasting shades (e.g., electric blue, hot pink, and neon yellow). Using a very fine detail brush or a specialized striping brush, lightly drag the colors through each other while the polish is still wet to create a controlled marbling effect. Alternatively, utilize a “blooming gel” base, which allows the colors applied on top to naturally spread and blend into soft, organic, lava-lamp-like patterns. For the gradient ombré nails, the sponge technique is essential for blending. Apply several colors directly onto a small makeup sponge, then gently dab repeatedly onto the nail. Ensure the colors overlap slightly in the middle to create a seamless, non-streaky fade from base to tip, often transitioning dramatically from a deep hue (like indigo) into a glowing neon (like chartreuse).
These vibrant nail designs are inherently playful and are the quintessential manicure for summer, music festivals, or embracing any Y2K-inspired fashion aesthetic. Because these designs involve multiple layers of polish and complex art, utilizing durable materials like sculpted builder gel or acrylic is highly recommended, especially for maintaining the structured, medium-to-long coffin and square shapes demonstrated in these examples. When using the sponging method for ombré, protect the surrounding skin with a liquid latex barrier before you start dabbing. Always seal the finished artwork with a durable, high-shine, UV-protective top coat. This step is crucial for deepening the vibrancy of the neons, smoothing out any texture from the swirls or sponging, and ensuring the detailed artwork lasts for weeks without chipping.
8 Fierce VALENTINE NAILS
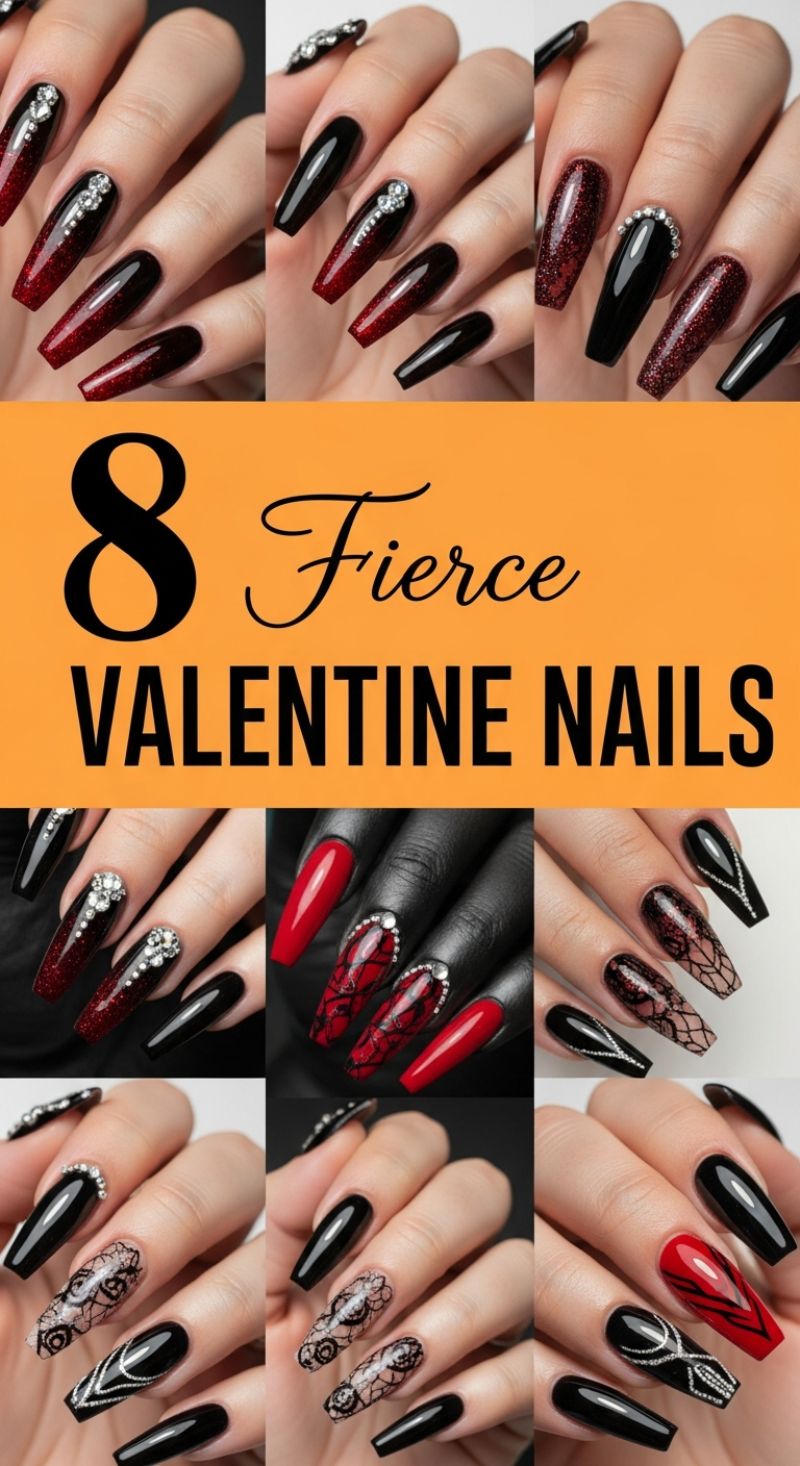
These stunning designs redefine classic romance, opting for a fierce, high-contrast aesthetic perfect for a bold celebration. This collection primarily features long, tapered coffin or ballerina shapes, which are essential to provide the ample canvas space needed for these intricate details. The foundation of this look is a dramatic juxtaposition of glossy jet black and deep, opulent ruby red—often enhanced with holographic glitter or shimmer, as seen in the striking ombre and full-coverage glitter nails featured throughout the collage. To achieve the signature ‘fierce’ quality, the base colors must be opaque and highly pigmented, ensuring the darkest black remains true and the glitter red catches the light with maximum depth, contrasting sharply with the pale skin tone or the matte black backdrop used in some images. This is not a subtle manicure; it requires meticulous application of gel or high-quality acrylics to support the length and complexity of the art.
To replicate these designs, several key techniques are utilized. Detailed accent nails incorporate intricate black lace stamping or fine hand-painted line work, often laid over a nude or sheer pink base to create a delicate, almost hosiery-like effect, providing texture and sophisticated contrast against the solid black nails. The application of precise, structural embellishments is vital; high-quality rhinestones are placed strategically in geometric patterns, such as elegant diagonal lines running from the cuticle toward the tip, or curved accents mimicking a half-moon or a V-neckline. For stability, these jewels must be secured using a strong builder gel or specialized rhinestone adhesive, which is then cured thoroughly to ensure zero snagging and long-term wear. For the striking graphic designs (like the red and black V-shapes or the silver beaded patterns on the lower right), a fine-tipped liner brush (size 000 or a striping brush) and highly pigmented silver or white polish are mandatory for achieving clean, sharp lines.
When styling and maintaining this level of intricate nail art, expert advice emphasizes durability and finish. Since the designs are multidimensional, incorporating both flat stamping and raised rhinestones, a high-shine, non-wipe top coat is crucial to encapsulate the flat art while providing a final layer of brilliance over the entire set. Because of the extreme length and structure required, this is a look best performed by a professional using gel extensions or sculpted acrylics to ensure the nails withstand daily activities. Maintenance requires diligent use of cuticle oil to keep the surrounding skin healthy, which further enhances the glossy, dramatic finish of the black and red lacquers. These nails are ideal for clients seeking a luxurious, vampy, and unquestionably glamorous style statement that goes far beyond traditional hearts and pastels for a seasonal holiday.
15 Cute Short Nail Inspiration: Floral, Plaid, and Classic French Tips
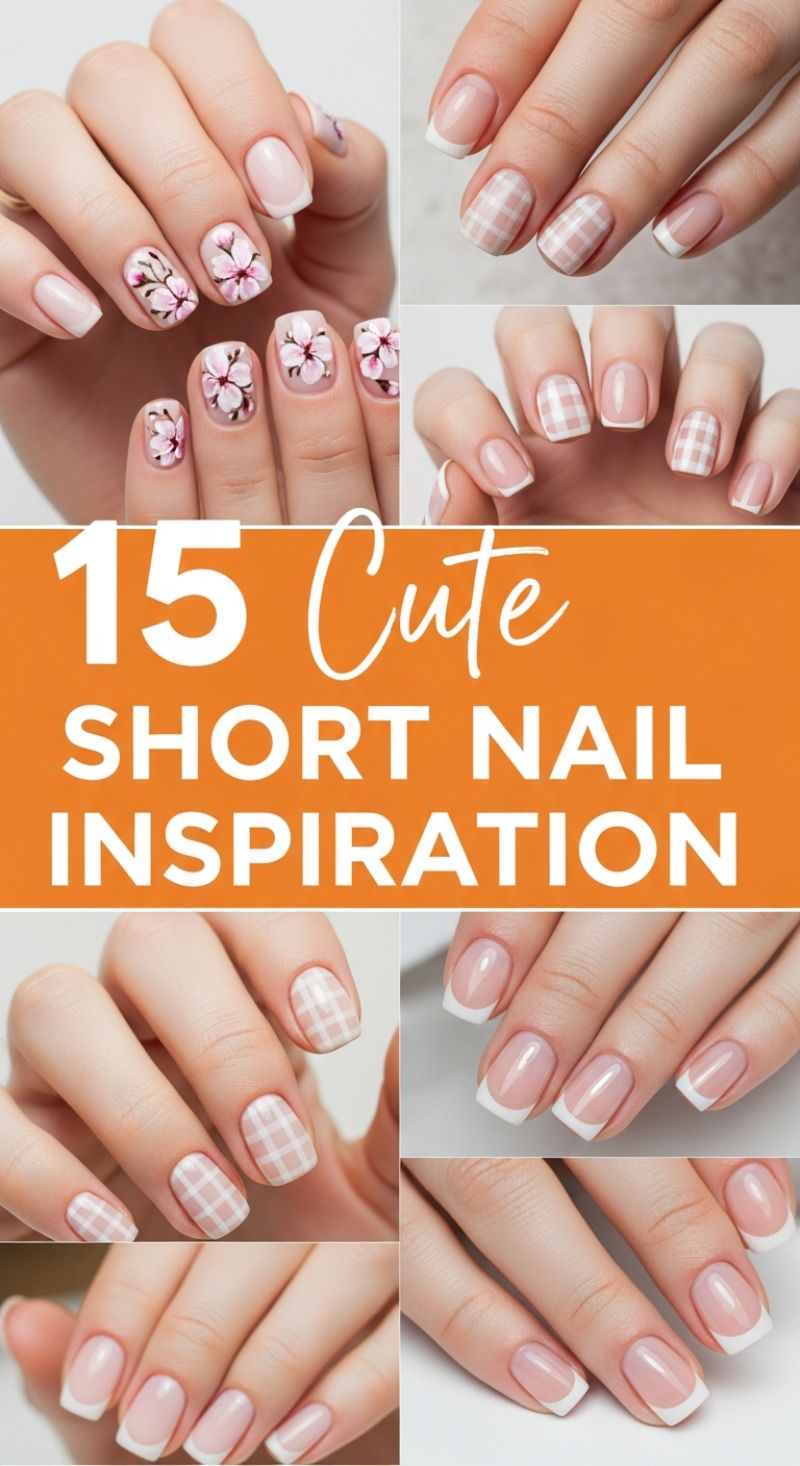
Short nails are the ultimate blend of practicality and polish, proving that you don’t need significant length to showcase intricate or elegant designs. This collection of 15 inspirations highlights three distinct yet cohesive trends perfect for a smaller canvas: delicate floral art, trendy muted plaids, and the timeless classic French manicure. The key to successful short nail art is emphasizing clean lines and sophisticated color pairings. Before beginning any design, ensure your nails are filed to a uniform square or squoval shape, and your cuticles are meticulously pushed back and hydrated. A well-prepped base on a short nail dramatically enhances the perceived length and overall neatness, providing the perfect foundation for any featured design.
To recreate the subtle plaid or the charming floral designs shown, you will need precision tools and patience. For the plaid look, select a pale, opaque base color like taupe or light beige. Use a thin striping brush (or striping tape for sharp edges) and highly pigmented white polish to paint thin, even vertical lines, followed by horizontal lines, ensuring they cross precisely to form a neat grid pattern. For the delicate blossoms, apply a milky nude base. Using a small detail brush or a fine dotting tool, dab on five small pink or maroon petals, then use white polish to add highlights or a central accent. The trick is to keep these accent designs limited to one or two fingers per hand, pairing them with simple coordinating French tips to prevent the look from becoming too busy on the small nail surface.
The French manicure, a staple in this inspiration set, looks particularly clean and chic on short, square-shaped nails. Achieving the perfect smile line on a short nail requires adjusting the curve—it should be flatter and slightly thicker than on a long nail to complement the shape. Opt for modern French manicures by using a sheer, milky pink or jelly nude base coat rather than an opaque beige, which gives a healthy, translucent finish. The white tip should be crisp and clean, balancing the natural look of the base. Finish all these designs with a high-gloss, quick-drying top coat to seal in the artwork and protect the tips from chipping, ensuring your chic, short manicure lasts for weeks.
10 Hot Summer Nail Predictions
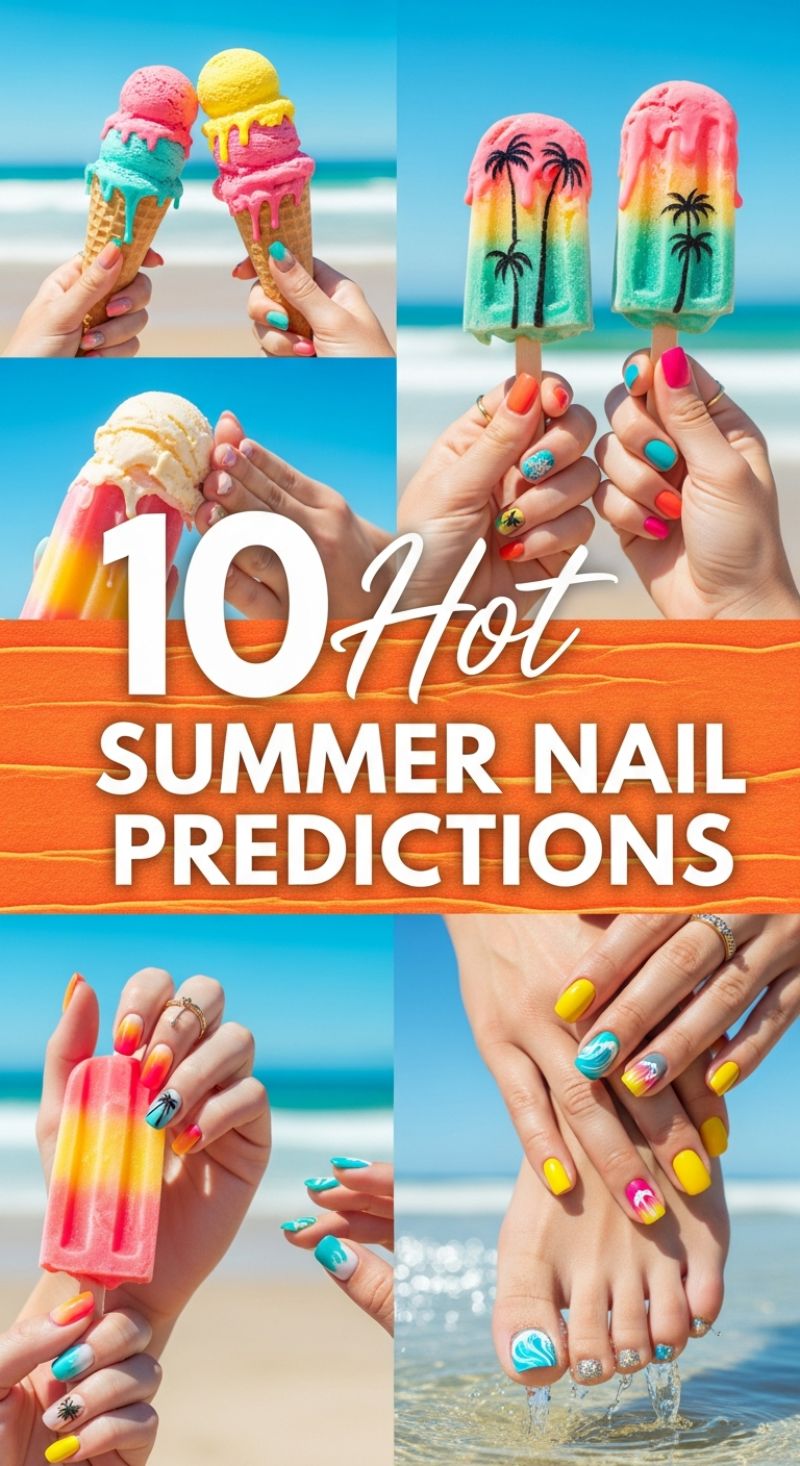
Achieve the ultimate summer manicure and pedicure by embracing vibrant, sun-drenched hues like electric yellows, shocking pinks, sunset oranges, and deep aquamarines. The foundational trend predicted here is the tropical gradient or ombre effect, perfectly mimicking melting ice cream and colorful popsicles. To replicate this look, start with a pristine white base coat to maximize the opacity and brilliance of your chosen neon colors. Use a dedicated makeup sponge or gradient brush to lightly dab two or three contrasting shades onto the nail, blending them seamlessly at the transition point. Expert tip: Working quickly with thin, wet layers is crucial for achieving a smooth blend and preventing a patchy appearance. For maximum summer durability against chlorine, sand, and saltwater, opt for a long-wear gel polish system, ensuring each layer is cured completely before applying subsequent art.
Elevate your colorful canvas with specialized summer-themed artwork, focusing on highly contrasting details. The iconic palm tree silhouette, prominently featured over vibrant ombre accent nails, is created by first completing and curing your colorful base. Then, use a very fine detail brush (000 size) and jet-black polish to carefully draw the trunk and fanned leaves. Keeping the silhouette simple yet bold ensures maximum visual impact against the neon background. For the dynamic ocean wave art, beautifully visible on the hands and particularly the big toe, use a specific swirling technique. Apply a solid base color (like turquoise or teal), then immediately place small dots or lines of white or lighter blue polish. Using a clean fine brush or dotting tool, gently drag and swirl the colors together quickly before they set, creating the realistic illusion of frothy sea foam washing up on the shore.
These summer predictions encourage maximalist personalization and playful mixing. Don’t feel obligated to use the exact same design on every nail; the visual evidence suggests incorporating a balance by pairing solid, bright colors (like the bold yellow nails) with intricate art (palms, waves, glitter accents) on neighboring fingers or toes. For the essential matching pedicure, focus the most detailed art—such as the multicolored gradient or the white wave swirl—on the larger surface area of the big toe, leaving the smaller toes in a coordinating solid shade or a subtle shimmer polish. Since summer means open-toe shoes, make sure your nail beds are meticulously prepped and hydrated. Always finish both manicure and pedicure with a high-gloss, UV-protectant topcoat. This final step seals the design and prevents these dazzling, light-sensitive colors from fading under intense sunlight.
10 Festive MARDI GRAS NAILS
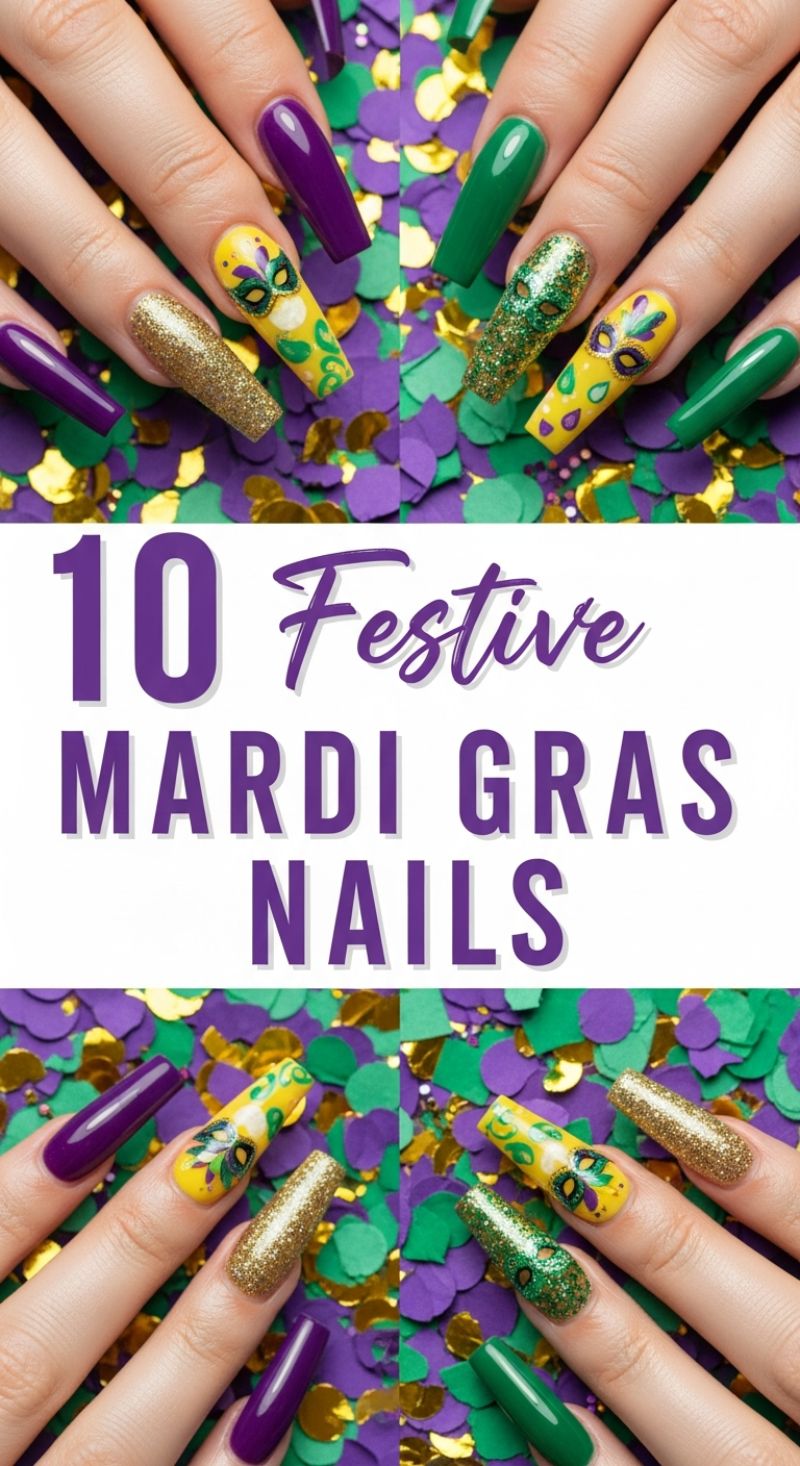
To recreate this striking Mardi Gras manicure, begin by prepping the nails into a long, tapered square or coffin shape, which provides an excellent canvas for intricate designs and bold colors. The core of this look hinges on the traditional carnival palette: deep, royal purple (representing justice), emerald green (representing faith), and brilliant gold (representing power). Gather high-pigment gel polishes in these three shades, ensuring you also have a fine gold glitter polish and a vibrant opaque yellow for the base of the accent nails. Start by applying a base coat and curing. Assign each color strategically: solids are perfect for the thumb and pinky, reserving the middle fingers for maximum impact with glitter and detailed artwork. Achieving a true, non-streaky color, especially with deep purples and greens, often requires two to three thin, carefully cured coats to ensure deep saturation and professional longevity.
The hallmark of this celebratory design is the custom accent nail, typically worn on the ring or index finger. For the yellow accent nail, apply a bright, opaque yellow base. Once cured, use a thin striping brush and the green and purple polishes to create swirling vine patterns, confetti dots, or abstract French Quarter-inspired flourishes. The central feature is the iconic Mardi Gras mask. Using a fine detail brush and black polish, lightly sketch the outline of a simple Venetian-style mask. Fill in the design using contrasting colors—a deep green for the eye area, accented with small drops of gold polish for jewels or trimming. Alternatively, for a glittery accent variation, use a rich, deep green polish mixed with chunky iridescent green glitter as the base. Once cured, paint a mask outline in black or deep purple, giving the illusion of a sparkling, textured costume piece. Precision and patience are key when drawing these miniature figures, ensuring each color layer is fully cured before moving to the next detail.
The remaining nails require perfect execution of solid and full-coverage glitter finishes. For the solid gold nail, use a dense gold micro-glitter polish. Apply the polish in a dabbing motion rather than strokes to ensure the glitter particles lay flat and evenly cover the nail bed, minimizing patchy areas. If the glitter is sparse, an expert trick is to apply a thin layer of clear polish first, then gently sprinkle loose gold cosmetic glitter over the tacky surface using a fan brush before curing and sealing. Finish the entire manicure with a high-quality, ultra-glossy topcoat. Apply the topcoat slightly thicker over the glitter nails to smooth out any rough texture, ensuring the final result is glass-like and durable. This technique guarantees your festive Mardi Gras mani will reflect the light brilliantly, capturing the energetic, celebratory spirit of Carnival season.
5 Future Nail Trends 2026: Sculptural and Chrome Extremes

The nail landscape is rapidly accelerating into a realm of wearable art, moving far beyond traditional polish and simple enhancements. These “Future Nail Trends 2026” champion extreme, avant-garde 3D forms, blending high-fashion jewelry aesthetics with cyberpunk fluidity. To master this look, the foundation is everything. Begin by selecting a strong, structural base—either custom-sculpted hard gel or high-quality full-coverage nail tips capable of supporting significant weight and length. These designs are characterized by extreme stiletto or spiked extensions and highly architectural, often liquid-metal-inspired shapes that hug the finger. Achieving the required visual drama demands meticulous application of material, ensuring that the finished product maintains perfect symmetry and structural integrity, crucial for pieces that mimic finger armor or claws. Expert tip: Due to the complexity, practice the 3D application using thicker builder gel or polygel before transitioning to the final metallic finishes, focusing on filing the edges into razor-sharp (but safe) points.
Once the foundational shape is cured and perfected, the instructional focus shifts to the signature chrome and metallic finishing. The liquid silver and brilliant gold effects seen here require ultra-fine, high-quality chrome powders applied meticulously over a cured, no-wipe top coat. For the most reflective, mirror-like finish, ensure the base color underneath is pure black or a matching metallic gel. Use a soft silicone applicator or dedicated eyeshadow sponge to burnish the powder until it transforms into a seamless sheet of metal. Beyond the monochromatic chrome, introduce sculptural detailing—these nails often feature embedded elements like small, perfectly placed iridescent opals or dark blue rhinestones that look like integrated technology. For truly high-end editorial looks, these 3D structures are typically formed using specialized, non-flexible metal components (press-on claws or jewelry-grade caps), ensuring they can maintain the gravity-defying, intricate swirls and sharp points seen in the collection.
Executing the final touches requires dedication to polish and longevity, especially given the extreme surfaces involved. After achieving the desired chrome effect, the entire surface must be encapsulated with a durable, scratch-resistant top coat. Given the sharp curves and prominent points, standard top coats may chip quickly. Opt for a thicker hard gel or a specialized chrome sealer top coat, ensuring you fully cover all edges and intricate 3D carvings without pooling or obscuring the detail. These sculptural nails often incorporate elements that extend beyond the nail plate—such as spheres, spikes, or elongated hooks—necessitating custom sizing and placement for comfort. While these are primarily editorial or runway looks, you can adapt the aesthetic for wearable street style by reducing the length and simplifying the 3D elements to one or two feature nails per hand, focusing on the high-shine chrome finish as the primary trend application.
8 Aesthetic Western Nail Art Designs
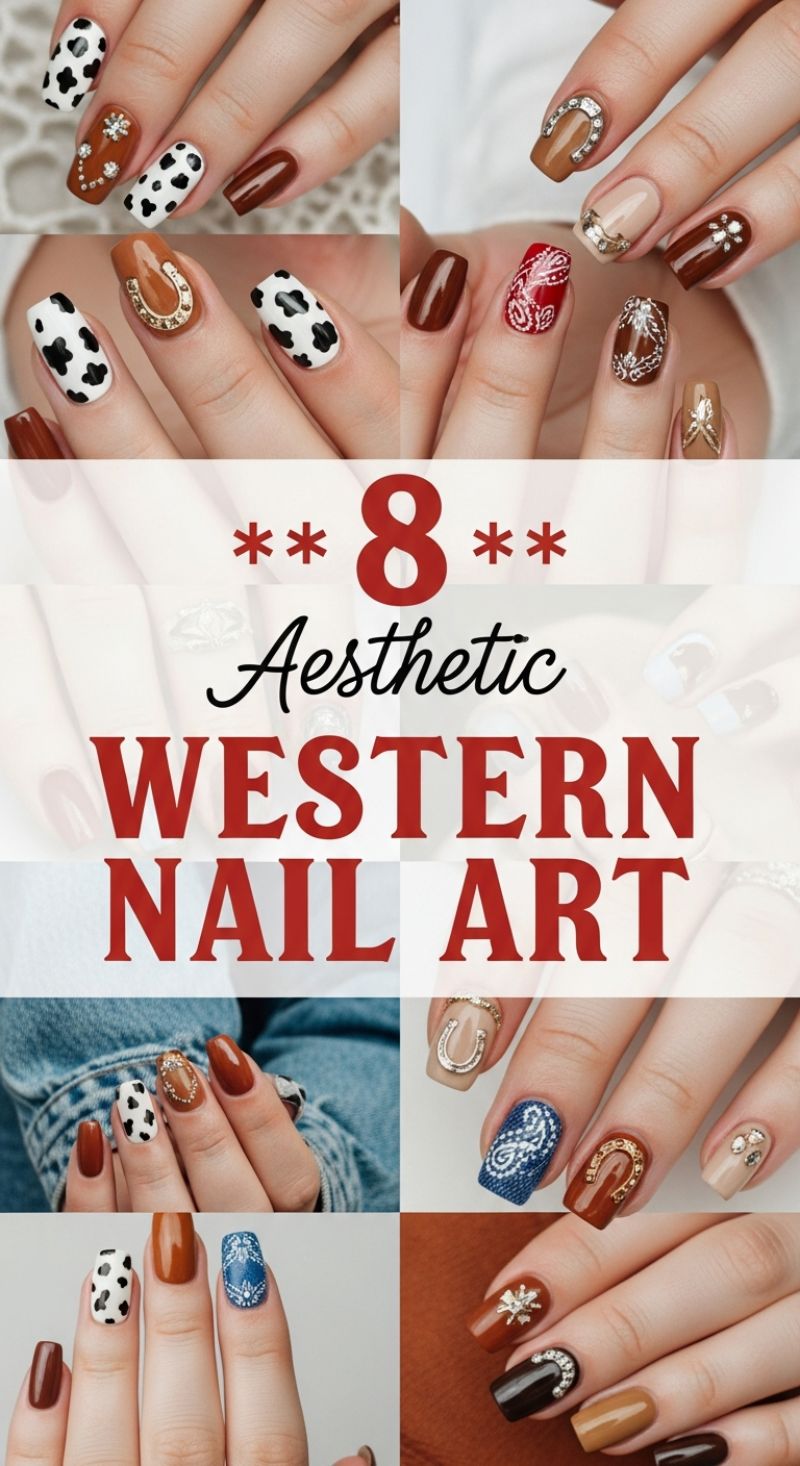
The “Western Aesthetic” manicure trend relies heavily on a curated palette of earthy, rich colors combined with iconic rustic prints and hardware. To successfully execute this look, select base colors featuring deep browns, rusty terracotta, camel tan, and stark white and black for striking contrast. The cornerstone of this design is often the cow print, typically executed on a white or light tan base using irregular, amorphous black spots. For the best result, use a fine detail brush and ensure the spots are organic and varied in size, avoiding perfect geometric shapes. Alternatively, specialized nail stamping plates offer a quicker, more uniform application for complex patterns like cowhide. It is critical to pair these bold prints with solid nails in the complementary brown shades to create visual anchors and ensure the overall look remains chic and intentional, not chaotic.
What truly elevates Western nail art are the metallic and rhinestone “hardware” accents. The most popular motif is the horseshoe, which should be applied as a 3D charm, often bedazzled with micro-rhinestones, placed strategically near the cuticle or center of the nail bed. For maximum impact and durability, these heavier charms must be secured using specialized gem glue or thick builder gel, then meticulously sealed around the edges with a non-wipe top coat to prevent snags. Beyond horseshoes, incorporate other Western iconography such as star clusters, silver or gold foil details, and intricate patterns reminiscent of tooling leather or classic bandana textiles. For the highly detailed bandana print (shown here in red and denim blue), opt for high-quality stamping plates featuring paisley designs. Applying the stamp over a matte base, especially the denim texture, significantly enhances the rustic, authentic feel of the design.
For a professional and enduring Western manicure, the shape of the nail is key—medium-length coffin or squoval shapes are ideal as they provide ample surface area for intricate detail work and charms. When designing a full set, remember the rule of visual balance: limit heavy embellishment or the primary statement print (like cowhide) to only 1–2 nails per hand; the remaining nails should act as grounding solids. Mix finishes—a high gloss on the solid brown nails placed next to a matte finish on the denim or bandana print—to add textural complexity. This rugged yet fashionable nail trend pairs seamlessly with everyday attire, particularly denim, chunky silver jewelry, and suede accessories, making it a perfect year-round statement for injecting a personalized, stylish edge into your look.