Dive into the ultimate 2026 nail lookbook! Explore 75+ chic, elegant, and vibrant nail designs perfect for transitioning from February
’s romance to March
’s fresh spring vibes.
As the calendar flips from cozy winter days to the promise of blooming spring, your manicure should reflect this beautiful transition. The months of February and March offer a unique opportunity to experiment with palettes and styles, moving from deep, romantic reds and sparkly glamour to fresh, vibrant greens, soft pastels, and delicate floral accents. We
’ve curated the ultimate resource
—a comprehensive lookbook featuring over 75 chic nail designs perfectly tailored for Spring 2024. Whether you need high-impact glam for a special occasion, easy minimalist looks, or bold, trendy colors that signal the start of warmer weather, this guide is your essential blueprint for achieving the perfect seasonal style.
12 Elegant March Nails: Delicate Florals and Minimalist Lines
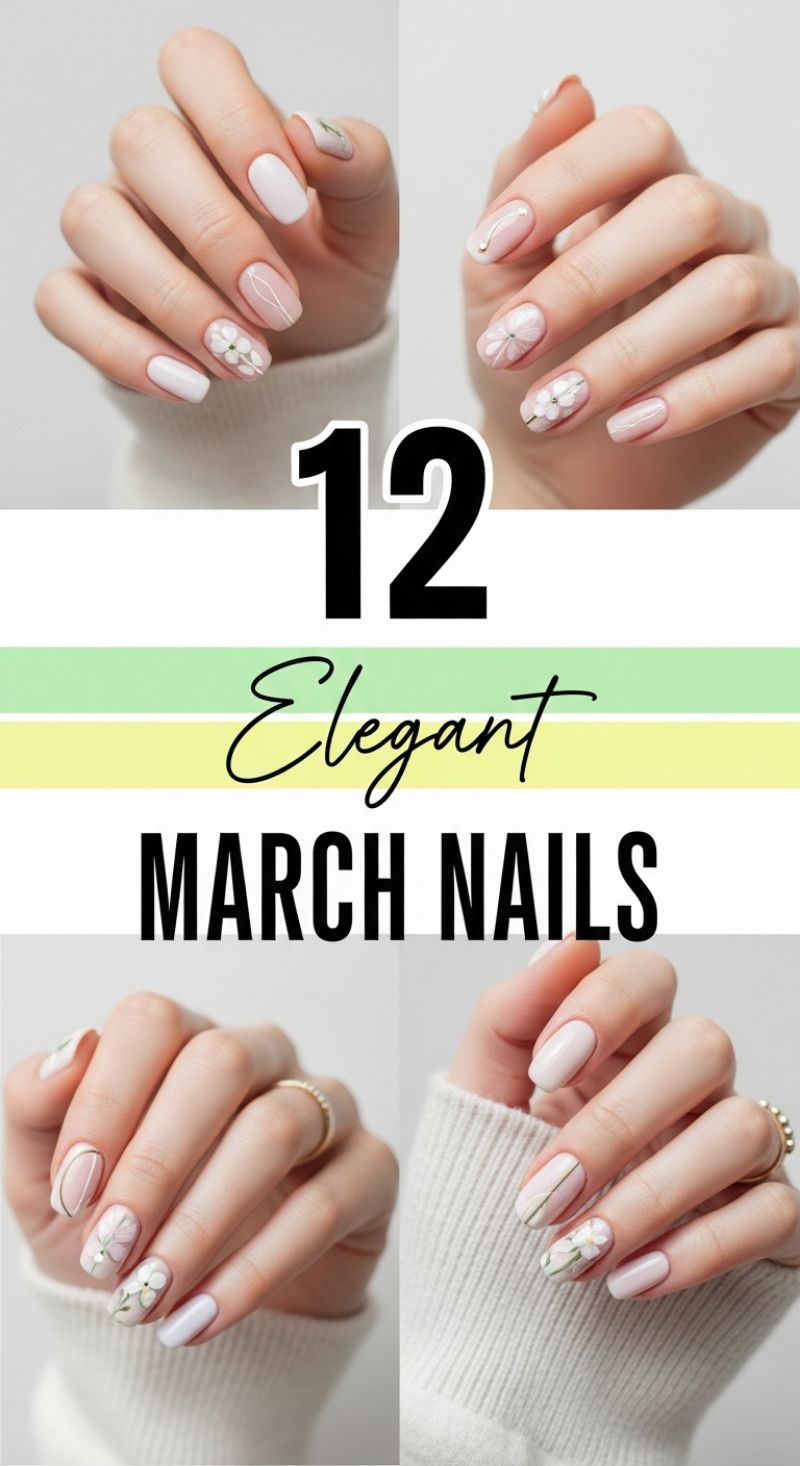
As the calendar flips to March, these elegant designs serve as the perfect transitional manicure, bridging the gap between winter simplicity and vibrant spring color. This style champions a soft, feminine aesthetic built upon a sheer canvas and intricate white detailing. To begin, shape the nails into a short oval or soft almond. The foundation is critical; choose a high-quality, milky pink or sheer nude jelly polish that allows the natural nail line to show through slightly. Apply two thin coats of this base color, ensuring a smooth, flawless finish. This base provides the necessary ‘negative space’ and subtle warmth that makes the stark white accents pop without looking too harsh. Proper nail preparation—including meticulous cuticle work and gentle buffing—is essential to achieve the polished, ‘clean girl’ look inherent in this design.
Once the sheer base is cured, attention shifts to the delicate artistry. This look requires mastering two distinct white-on-nude techniques. The first involves abstract striping: using a fine liner brush and crisp white gel polish, create thin, graceful lines that follow the curvature of the nail, sometimes resembling a minimalist French tip variation or a subtle contour. The second technique focuses on the floral motif. On one or two accent nails, use a small dotting tool or the tip of a fine brush to create simple, five-petal flowers. The petals should be slightly imperfect and thin, giving them a hand-painted, watercolor effect. For depth, utilize a very pale shade of spring green or lime for subtle stems and leaves, making sure this color is used sparingly to maintain the dominance of the white and nude palette. Crucially, allow the flowers to sit slightly off-center or along the edges of the nail to preserve the airy feel of the design.
To elevate the elegance factor, incorporate minor metallic accents. After placing the floral and line designs but before the final topcoat, strategically place tiny gold microbeads or minute specks of gold foil near the cuticle line or within the curve of the white stripe. These details should be minimal—perhaps one small dot per accent nail—to catch the light without overpowering the design’s delicate nature. Finish the entire manicure with a high-shine, durable non-wipe top coat, ensuring the encapsulated details are fully sealed for longevity. This March-inspired style is highly versatile; if you wish to introduce more color, try swapping the white detailing for a pale lavender or soft baby blue while keeping the sheer nude base intact for an equally chic early spring adaptation.
15 Vibrant March Ideas

March serves as the official threshold to spring, making it the perfect time to shed heavy winter hues and embrace fresh, mood-boosting colors. This vibrant collection of ideas centers around soft yet saturated pastels that immediately evoke renewal. The key colors here are a crisp, acidic lime green, a serene powder blue or mint, and a soft lavender-lilac. These shades are best executed with a creamy, opaque finish, which provides maximum color impact without needing extra shine or glitter. For a professional-looking application, ensure your nails are shaped consistently—the medium, soft square shown in the images is universally flattering and maximizes the nail surface for the bright colors. Proper nail preparation, including gentle buffing and using a color-adherent base coat, is crucial, especially when working with highly pigmented shades like lime green, as it prevents staining and ensures an even, streak-free application.
To achieve this look, begin with a high-quality base coat designed to grip polish. When applying the main color, use the three-stroke method: one stripe down the center and one on either side, ensuring you push the polish close to the cuticle without touching the skin. Two thin coats are always superior to one thick coat, as thin layers dry more quickly, reduce bubbling, and allow the true vibrancy of the pastel pigment to shine through. After the second coat has dried, seal the manicure with a long-wear, high-shine top coat, taking care to “cap” the free edge of the nail. The beauty of this March palette lies in its versatility for the Skittle Manicure trend, where you use three or four different colors across one hand. For example, alternate between the vibrant green and the serene blue, or pair the lavender with a metallic gold accent nail for sophisticated warmth that perfectly suits the transitional season.
For expert longevity, always finish your treatment by applying cuticle oil liberally. Because these shades are light and vibrant, any dryness around the nail bed will be immediately noticeable. If you are using gel polish, remember that bright colors can sometimes cure unevenly or slightly alter in shade under UV light, so ensure you are using a professional-grade lamp and following the manufacturer’s cure times precisely. If you wish to elevate these solid-color looks without committing to intricate nail art, consider a subtle detail like painting a single, thin white stripe at the base of the nail (the ‘micro French’ effect) or utilizing negative space near the cuticle line. This keeps the focus squarely on the exciting March color story while adding a touch of contemporary design flair to your early spring style.
5 Chic Pink Nail Designs for Early Spring
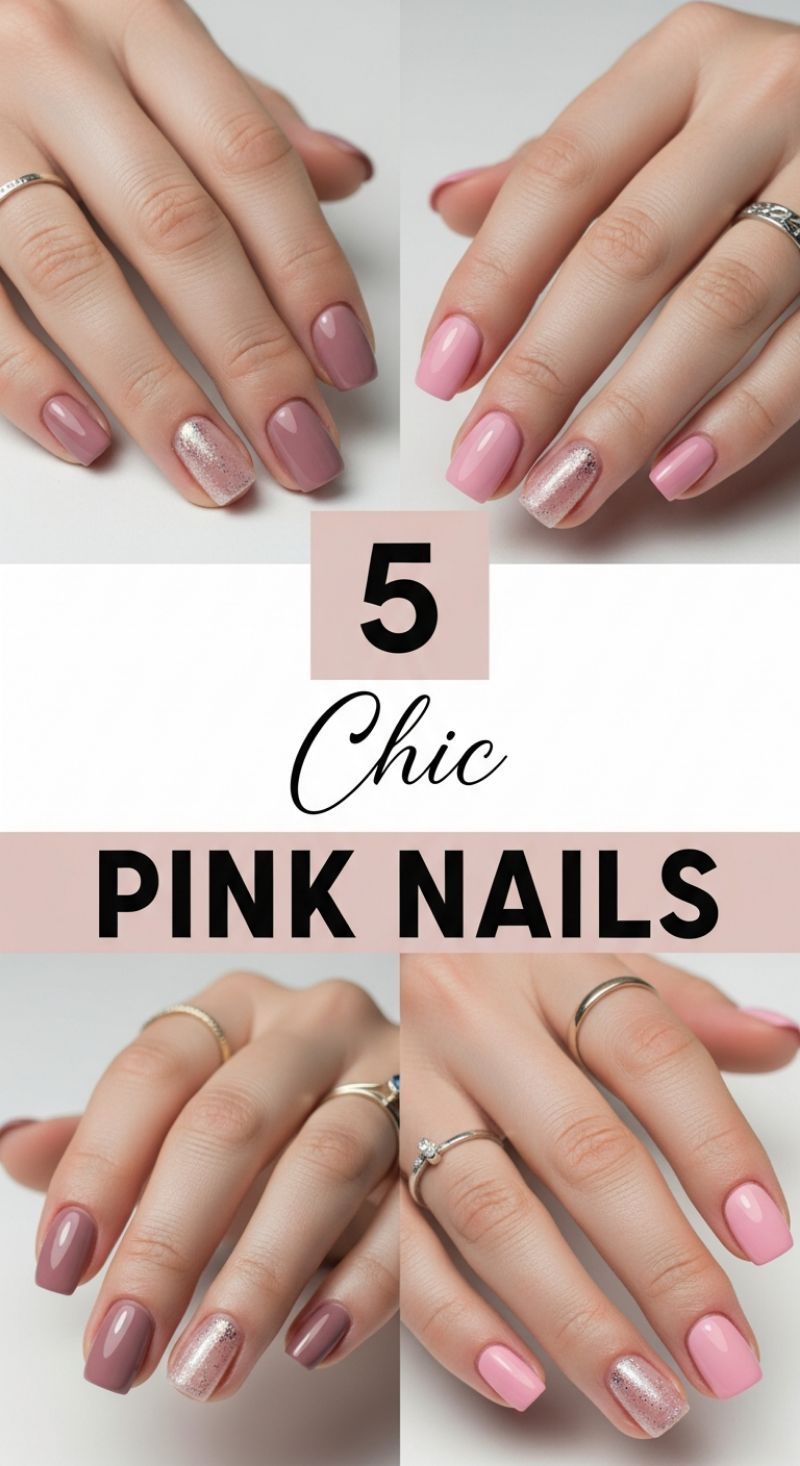
This nail lookbook entry captures the essence of sophisticated femininity, showcasing two distinct yet equally chic ways to wear pink as you transition into spring. The core aesthetic relies on contrasting a rich, opaque pink base with a single, high-impact glitter accent nail. The first variation features a dusty, deep mauve pink, a perfect choice for late February as it balances richness with subtle color. The second style opts for a brighter, bubblegum pastel pink, offering immediate freshness ideal for early March. Both designs maintain a clean, short squoval shape, ensuring the look remains polished and versatile enough for any daily or professional setting, while the high-gloss finish elevates the entire manicure to luxurious status.
The defining feature of both styles is the single accent nail, typically placed on the ring finger, which utilizes a dense, metallic glitter to provide a striking visual break. To replicate this level of opulence, we recommend using a highly pigmented rose-gold or silver glitter gel polish, applied in two thin coats for full, seamless coverage. Alternatively, for an ultra-chunky, foiled look, apply a thin layer of builder gel to the accent nail, and then sprinkle or press loose glitter flakes or fine pigment onto the sticky layer before curing. The contrast between the smooth, solid pink base and the textured, light-reflecting glitter creates an irresistible dimension. Always remember to seal the glitter work with a thick, durable non-wipe top coat, paying close attention to capping the free edge to lock the sparkles in place and prevent any rough texture.
For expert results, impeccable nail preparation is crucial for achieving the flawless polish lines shown. Before application, ensure cuticles are meticulously pushed back and hydrated, as clean solid colors highlight any imperfections. While the image utilizes chunky glitter, you can adapt this look by choosing a subtle chrome pigment or a delicate shimmer topcoat over the accent nail for a less dramatic daytime option. These pink palettes are seasonally versatile; the deeper mauve pairs wonderfully with neutral or dark clothing, while the pastel pink is a natural match for the burgeoning florals and lighter fabrics of spring. By offering two different pink moods, this design ensures you have a perfectly tailored manicure for any February-to-March mood.
11 Easy Simple Nails

The transition from winter to spring calls for a refreshing, minimalist approach to nail art, and this collection of 11 easy simple designs delivers just that. These looks prioritize short to medium, naturally shaped nails, serving as the perfect complement to professional attire or casual elegance. The core aesthetic relies heavily on soft, translucent bases—ranging from creamy nudes and blush pinks to milky whites—interspersed with delicate pops of color like pale blue and soft rose. This style is not about elaborate geometry or heavy embellishments; it’s about strategic placement and sophisticated restraint. Expertly chosen, these designs offer a clean, chic appearance that is both timeless and perfectly on-trend for Spring 2024, proving that simplicity is the ultimate sophistication.
Achieving the linear and metallic accent designs, featured prominently in this lookbook, is surprisingly simple and relies mostly on quality materials rather than intricate brushwork. To replicate the vertical striping, begin with two thin coats of your chosen nude or pastel base. Once fully dry (or cured, if using gel), carefully apply thin strips of gold or silver striping tape vertically down the center of the nail bed, ensuring the lines are taut and straight. For the small decals, such as the subtle hearts or arrows, place a dab of topcoat where the decal is meant to rest, use a specialized tool or fine tweezers to position the tiny embellishment, and press firmly. The critical final step for both techniques is sealing the design completely with two generous coats of high-shine topcoat, wrapping the free edge to prevent the tape or decal from lifting or snagging, thereby ensuring maximum wear time.
Beyond the metallic accents, this selection introduces modern twists on classic techniques, notably the abstract dot work and the updated French manicure. The sophisticated dot pattern uses varying sizes of a dotting tool to randomly place small circles in a curated neutral palette of taupe, black, brown, and cream against a nude base. The trick here is density: keep the dots concentrated on just one or two accent nails to maintain overall lightness. For the contemporary French tips and half-moons, skip the harsh white line traditionally used and opt instead for a milky white or a barely-there pastel color, painting only a thin, shallow curve on the free edge, or even reversing the technique to emphasize the lunula (the half-moon at the nail base). These low-contrast designs thrive on a flawless, high-gloss finish, making them ideal for the minimalist who values subtle yet impactful detail.
10 Dreamy February Nail Designs

February marks the transition from deep winter coziness to the first hints of spring romance, and this set captures that mood perfectly using luxurious, saturated colors. The foundation of this design is a rich, high-gloss maroon or deep wine red, which provides immediate warmth and sophistication. To replicate this look, start with a meticulous nail preparation, shaping the nails into a medium to long tapered square or coffin shape—the length enhances the dramatic color impact. Apply a minimum of two thin coats of your chosen burgundy polish, ensuring full opacity, followed by a thick, ultra-glossy topcoat to create the reflective shine seen in the images. Expert advice for achieving a professional dark manicure is to always ‘cap the free edge’ with polish to prevent chipping, and to use a fine detail brush dipped in acetone to clean up any polish that bleeds onto the cuticles for a flawless, salon-quality finish.
The key to keeping this dark look from becoming monolithic is the strategic placement of accent nails. The visuals demonstrate a beautiful contrast using metallic and abstract patterns. For a glamorous effect, dedicate one or two fingers to a full-coverage accent. Options include a deep red glitter polish on the ring finger for texture, or a shimmering silver or light gold metallic polish to introduce a frosty, elevated element, perfect for evening wear or Valentine’s Day. Alternatively, integrate an abstract or marbled design on the accent nails using a combination of white, gray, and fine black lines over a nude or sheer white base. This technique requires patience; use a dotting tool or fine brush to drop small amounts of color onto a wet base layer (or blooming gel) and allow them to spread slightly before curing. The contrast between the solid, deep red nails and the intricate, lighter accent nails creates dynamic visual interest, elevating the entire manicure from simple winter polish to a deliberate, artistic statement.
This Dreamy February Nail Look is incredibly versatile, fitting seamlessly within the ‘February through March’ timeframe outlined in our lookbook. While the deep red anchors the design to winter elegance and romance, the mixed-media accents hint at the complexity and renewal of spring. To maintain the integrity of such a high-gloss, dark manicure, incorporate daily cuticle oil application and consider applying a fresh layer of high-shine topcoat every 3–4 days to combat dulling and minor surface scratches. Furthermore, the combination of deep reds and contrasting silver or gold accents makes pairing jewelry simple, allowing you to stack rings (as modeled here) to complement the polished, sophisticated vibe. This style proves that dark colors can be both striking and seasonally appropriate well into the start of spring, offering a perfect blend of cozy luxury and high-fashion flair.
6 Practical Short Nails
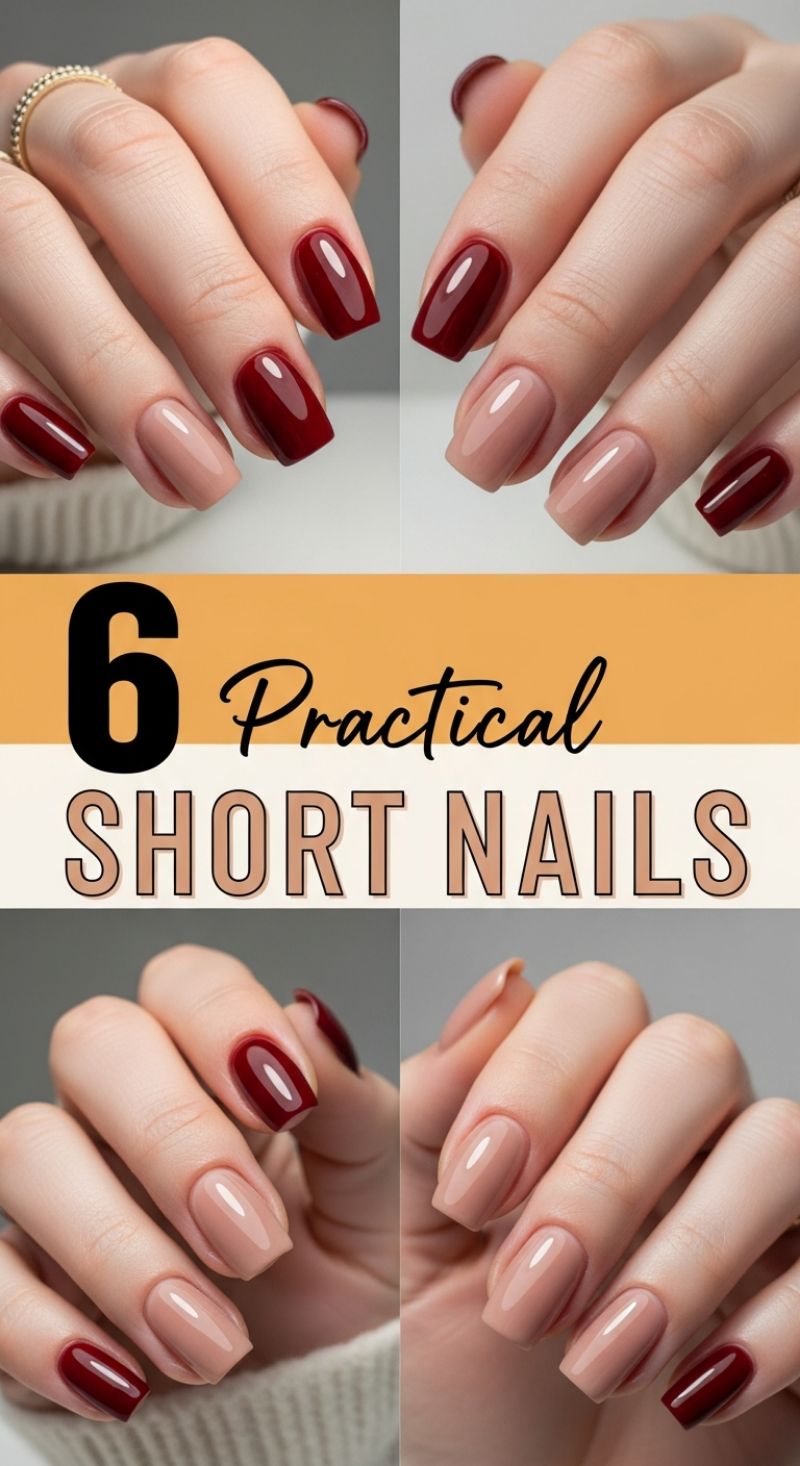
This design showcases the supreme elegance and practicality achievable with short, meticulously manicured nails, making it a perfect transition look for late winter into early spring (February and March). The aesthetic relies on a sophisticated color story: a deep, high-gloss burgundy or oxblood red paired with a warm, glossy neutral beige or nude. This intentional contrast—dark and rich versus light and soft—prevents the overall look from being monochromatic or overly seasonal. To replicate this style, first, ensure your nails are filed into a clean, short squoval shape. This shape provides the durability necessary for practical wear while maintaining a soft edge. The high-shine finish is crucial; apply a super glossy topcoat to both shades to maximize the richness of the red and the creamy depth of the nude, giving the nails a polished, jewel-like appearance. The beauty of this look is its simplicity, proving that chic style doesn’t require elaborate nail art or extreme length.
Executing this alternating two-tone design requires precision, especially on shorter beds. Begin with proper nail preparation—pushing back and trimming cuticles cleanly, and buffing the surface for a flawless canvas. Before applying any color, use a high-quality staining base coat, which is essential when working with deep reds like burgundy, preventing the pigment from seeping into the natural nail plate. Next, apply your chosen colors, making sure to alternate strategically. A popular technique is to reserve the accent color (the red) for the middle two fingers (index and middle) and perhaps the pinky, leaving the thumb and ring finger in the neutral shade. Apply two thin, even coats of each polish, allowing thorough drying time between coats to achieve the maximum opacity and glass-like shine visible in the image. Keep the application clean, ensuring the polish stops just shy of the cuticle line to give the illusion of professional growth.
Expert advice for maintaining this practical yet stylish look emphasizes durability and subtle adaptation for Spring 2024. Because short nails are exposed to more wear and tear, investing in a chip-resistant, UV-cured topcoat is highly recommended to extend the life of the manicure beyond one week. While the burgundy provides a sophisticated anchor perfect for the chillier start of spring, you can slightly update the look by adjusting the undertones. If you wish to lean into a warmer Spring feel, ensure your nude polish has a subtle pink or peach undertone, which flatters most skin tones and brightens the hand. If the deep red feels too heavy as March progresses, consider swapping it for a deep berry or a saturated brick red, maintaining the rich contrast while offering a slightly softer hue. This two-tone short manicure is the ultimate choice for the busy professional who requires style without sacrificing function.
9 Quicky MINIMAL EFFORT

For the transitioning months of early spring, manicures must be both refreshing and efficient. This section is dedicated to achieving high-impact nails with minimal time and technique investment. The cornerstone of a minimal effort look is flawless execution of simple color, as evidenced by the sleek, pale pink nails showcased. To master this look, start with immaculate nail preparation—file and shape your nails uniformly, lightly buff the surface, and ensure cuticles are pushed back and clean. When working with neutral or nude polishes, any imperfection in the nail bed or cuticle line is magnified. Use a sheer, fast-drying formula (like the one pictured) that allows for quick layering. Apply two thin coats of your chosen nude, allowing only 60 seconds of drying time between each, ensuring that the base is set before moving on to the top coat for true speed.
Minimal effort doesn’t mean sacrificing creativity; it means strategic application. Introduce vibrant spring hues, like the hot pink and mint green shown, using the accent-nail method. Instead of spending time on complex designs across all ten fingers, select one or two nails to showcase a bold, saturated color. This provides a striking visual contrast that reads as polished and deliberate. Furthermore, to eliminate the biggest time-sink in quick manicures—the cleanup—incorporate tools designed for efficiency. The top visual demonstrates the use of a nail guard or stencil system, which adheres around the cuticle area, acting as a shield against overflow. Using these guides ensures a professional, crisp line without requiring tedious cleanup with acetone and a precision brush, cutting your overall manicure time in half. This is particularly effective when working with darker or highly pigmented polishes like the deep purple shown.
To solidify the ‘quick’ aspect of this style, always prioritize a high-quality, fast-setting top coat. A thick, glossy top coat not only seals the color, protecting against chips, but also drastically accelerates the overall drying process, allowing you to return to your daily tasks sooner. Expert tip: When using a quick-dry top coat, float the brush over the nail, applying slightly more product than you typically would to create a single, thick, self-leveling layer. This minimizes brush strokes and achieves that salon-quality shine while ensuring the polish underneath sets quickly. Embrace simple shapes—like the classic square or soft oval—and let the speed and clarity of the color be the star of your chic, low-maintenance spring manicure.
Bold 8 Green Designs: Emerald and Gold Nail Inspiration
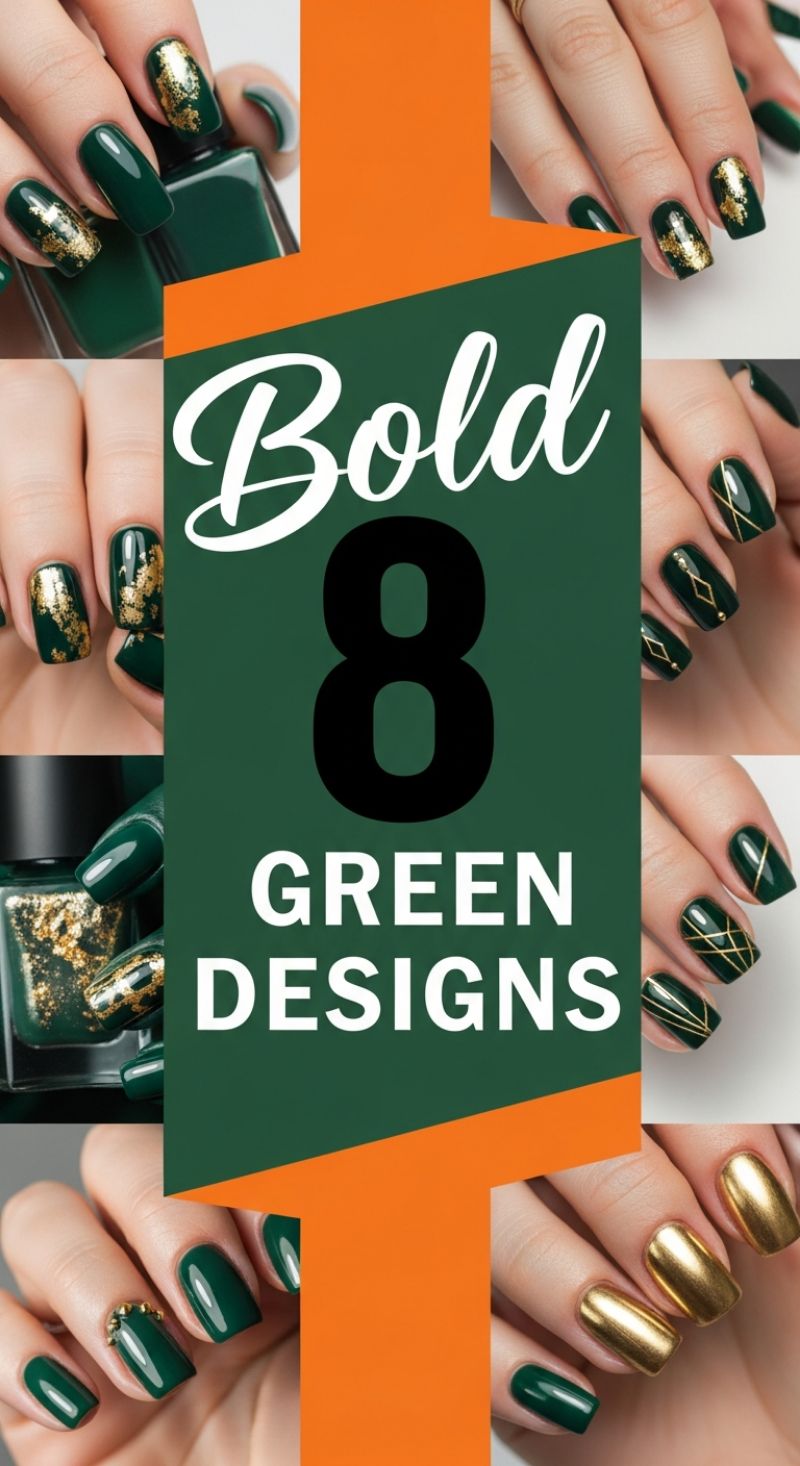
This visual collection presents eight variations on a stunning, sophisticated theme: deep, rich emerald green paired with luxurious gold accents. The core color is a dark forest or jewel-toned green, providing depth that contrasts beautifully with the warm metallic gold. The featured designs range from abstract gold leaf placements—perfect for an organic, textured look—to precise, sharp geometric lines that appeal to a contemporary aesthetic. The designs are expertly balanced, utilizing negative space and varying placement of the gold elements, such as subtle stud detailing near the cuticle or dramatic full metallic accent nails. This combination offers a perfect transitional style for early spring, bridging the cozy richness of winter tones with the sophisticated glamour required for 2024 events.
To recreate these opulent manicures, start with two coats of a highly pigmented, glossy dark green crème polish, ensuring a clean, uniform base. For the popular gold foil look shown on the index and middle fingers, apply a specialized foil adhesive (or a tack-free top coat cured under UV/LED light) directly onto the dried green polish where you desire the gold placement. While tacky, press thin sheets of transfer foil or delicate gold leaf flakes onto the nail surface using a silicone tool or clean fingertip, gently peeling away the excess to leave fragmented metallic texture. For the striking geometric patterns, precision is key. Utilize ultra-fine gold striping tape or a thin detail brush loaded with metallic gold polish. If freehanding, plan your design—such as the simple vertical stripe or the Art Deco-inspired diamond shapes—and apply thin, clean lines, taking care to allow each line to fully dry before applying the top coat to prevent smudging.
The key to pulling off this complex, multi-design manicure is achieving the right balance and ensuring longevity. If opting for the full metallic gold nail, choose a high-shine chrome or mirror finish to maximize the visual contrast against the depth of the emerald shade. Finish every nail, regardless of the complexity of the design, with a durable, high-gloss top coat formulated to protect the gold detailing and enhance the reflective depth of the green. For an even more textural, modern approach suitable for spring, consider using a matte top coat over the solid green nails while keeping the gold accents strictly glossy, adding dimension that makes these rich designs truly unforgettable and ready for your chicest Spring 2024 looks.
10 Clean Girl Nails

The “Clean Girl” aesthetic, defined by polished minimalism and effortless elegance, remains a dominant force for Spring 2024, especially in nail design. This look is less about complicated art and more about achieving the perfect foundation. To begin, meticulous nail preparation is non-negotiable. Start by shaping your nails into a soft square or squoval shape—a universally flattering and practical length that communicates sophistication. The color palette centers around sheer coverage: think milky whites, pale blush pinks, and translucent nudes that mimic the look of perfectly healthy, natural nails. Expert application dictates using sheer, jelly-like formulas or only one to two thin coats of a cream polish to maintain that natural translucency at the cuticle line. This style requires impeccable cuticle care; push back or gently trim cuticles and hydrate with a quality oil, as any imperfection will detract from the overall pristine finish that defines this trend.
While the core look is minimalist, the image demonstrates how to add subtle visual interest without breaking the ‘clean’ rule. For example, incorporating a single solid white accent nail (as shown on the pointer and middle fingers in the top panel) adds a modern, high-contrast element against the softer nude base on the remaining fingers. For those looking to elevate the look for evening or simply add a luxurious touch, take inspiration from the metallic ring finger shown in the bottom panel. A smooth, reflective rose gold or chrome accent elevates the design instantly. When recreating this metallic feature, ensure the application is perfectly smooth to mirror the highly polished, almost liquid effect. The brilliance of this style lies in its versatility; it pairs flawlessly with any outfit or event, making it the ideal transitional style as we move from the cozy months of February into the bloom of March.
To ensure your “Clean Girl” manicure lasts and maintains its flawless appearance throughout the season, maintenance is key. Invest in a high-gloss, non-yellowing top coat to seal the color and protect the delicate nude shades from environmental wear. Reapply this top coat every two to three days to maintain maximum shine. Moreover, consistent hydration of the nail bed and surrounding skin is critical; dryness will instantly cheapen the look. Apply cuticle oil religiously twice daily, gently massaging it into the skin around the nail plate. This commitment to upkeep is what truly separates a basic nude manicure from the highly coveted, aspirational “Clean Girl” nail look, providing a flawless finish suitable for any professional or chic environment during Spring 2024.
Modern Coffin Shape: Pastel Lilac, Mint, and Gold Foil Elegance
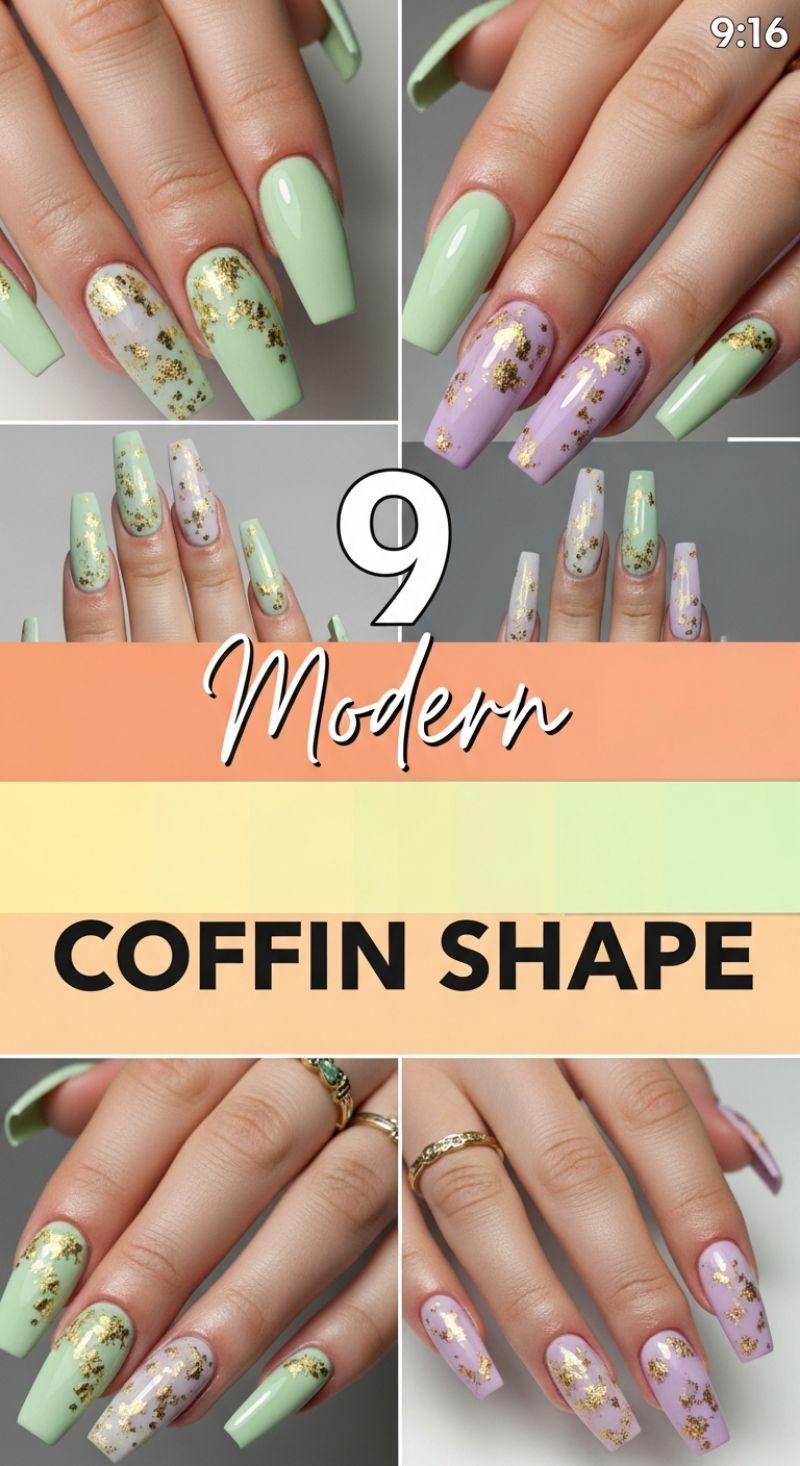
This design flawlessly merges the trending elongated coffin shape with a sophisticated spring pastel palette, anchored by luxurious gold foil accents. The visual appeal lies in the strategic alternation between two primary colors—a soft, creamy mint green and a pale, dreamy lilac—which prevents the long nails from feeling visually heavy. Notice the expert application: some nails are solid color, providing structure, while others serve as accent nails, featuring a sheer wash of color topped with random, shimmering flakes of gold leaf. This mixed-media approach elevates the standard solid pastel manicure into a look perfect for the transition from late winter to early spring, offering glamour without sacrificing delicacy.
To recreate this high-end look, begin with meticulous nail preparation, ensuring the long coffin tips are filed symmetrically. Apply a high-quality rubber base coat for structure, especially crucial for lengthy nails. For the solid color nails (like the thumb, pinky, and index finger in the examples), apply two coats of your chosen pastel gel. For the foil accent nails, apply one thin layer of a sheer, milky white or light opal polish. Once cured, apply a specialized foil glue or a tack-free gel top coat over the desired area. Before curing the glue/top coat (if necessary, check product instructions), use tweezers or an orange stick to press delicate fragments of gold leaf randomly onto the sticky surface. Gently pat down the foil to ensure it adheres fully, especially near the cuticle and side walls. If using a non-wipe top coat for adhesion, flash cure quickly.
Expert advice for maximizing the lifespan of this design centers on proper encapsulation. After applying the gold foil, it is vital to seal the entire nail with two layers of a durable, high-shine top coat, making sure to ‘cap’ the free edge of the nail tips thoroughly. This technique prevents the thin gold foil from lifting and protects the delicate pastel colors from chipping or dulling. The coffin shape, with its flat squared-off tip, provides the perfect canvas for maximizing the impact of the scattered gold leaf, allowing the light to catch the foil beautifully. For those with shorter nails, adapting this design to an almond or square shape still achieves the modern aesthetic by focusing the gold foil on just one or two accent nails per hand.
20 High-Impact V-Day Looks
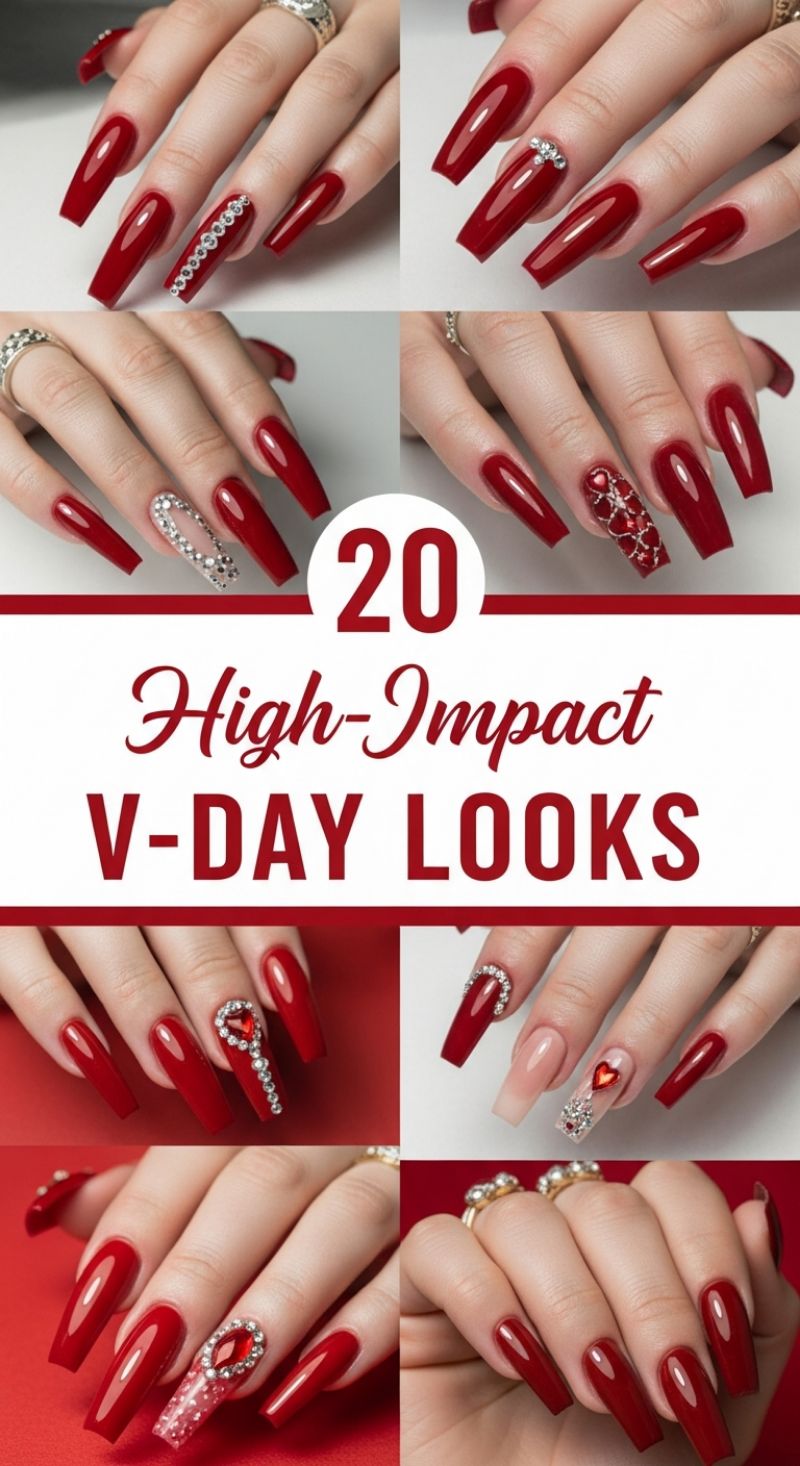
These opulent, jewel-toned manicures set the standard for high-glamour holiday dressing, perfectly encapsulating the dramatic romance of Valentine’s Day and setting a fierce tone for early Spring style. The foundation of this look is a flawless, deeply pigmented cherry or oxblood red polish, applied to long, structured coffin or ballerina-shaped extensions. This length and shape are crucial, providing the necessary canvas to support the elaborate rhinestone and gem work without overcrowding the nail bed. Achieving the high-gloss, mirror-like finish requires professional gel or acrylic application, ensuring the color is rich and cured perfectly before moving onto the embellishments. When prepping the nails, focus on creating sharp, clean sidewalls and edges, as precision is paramount for this highly polished aesthetic.
Mastering the high-impact sparkle involves intricate planning and expert placement of various-sized rhinestones. To recreate the stunning accent nails seen in this lookbook, you will need specialty nail adhesive or a thick, non-wipe builder gel to anchor the gems securely. For linear designs, like the vertical row of diamonds, use a wax pencil or fine tweezers to place SS10 or SS12 flat-back crystals down the center of the nail, ensuring perfect symmetry and minimizing gaps. For the more complex centerpiece designs—such as the oversized heart shapes or full coverage ‘bling’ nails—start with the largest component (the main red or clear gem) and then outline it or fill the remaining space with micro beads (SS6 or smaller). A key technical instruction is to flash cure after every few major placements and avoid brushing the topcoat directly over the facet of the gem, which dulls its sparkle; instead, use a fine detail brush to seal only the edges and anchor points, maintaining maximum brilliance.
While the dominant color palette is deep red and shimmering crystal, variations introduce sophisticated contrast. Notice the inclusion of accent nails featuring a soft nude base or subtle Ombre, which softens the overall intensity while still allowing the 3D elements to pop. This technique, useful for transitioning the style past February, proves that drama can be balanced with delicacy. Expert advice for wearability suggests maintaining perfectly groomed cuticles and pairing the nails with simple, elegant jewelry—cooler metals like silver or white gold are recommended, as they enhance the icy brilliance of the clear rhinestones. This collection proves that when executed with precision and high-quality materials, V-Day nails become a statement piece that lasts well into the March social season.
7 Budget-Friendly Cute Designs
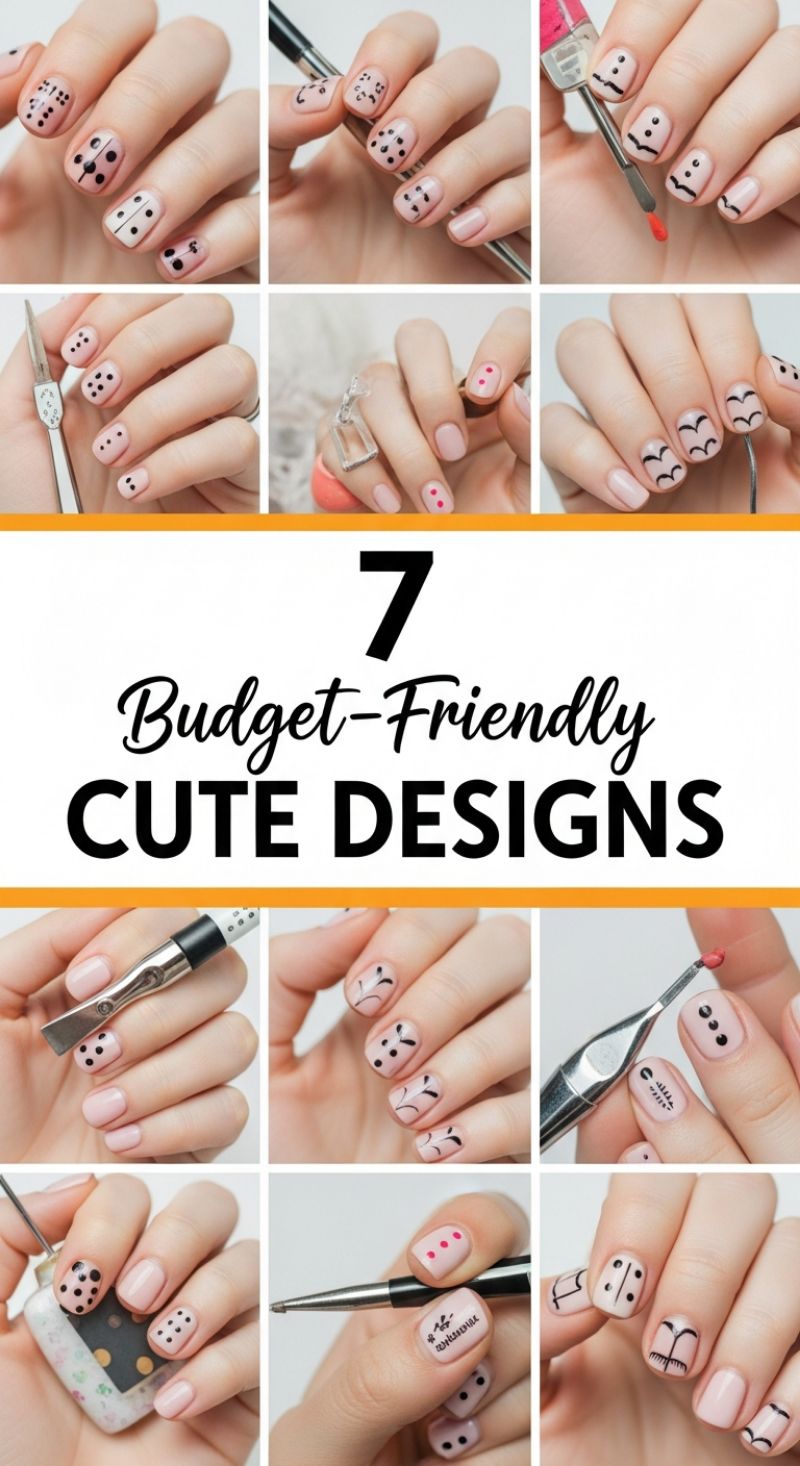
These playful, minimalist designs prove that chic nail art doesn’t require complex techniques or expensive tools. Utilizing negative space and simple geometric shapes on a pale, nude base, this collection offers seven distinct looks that are perfect for a quick refresh. The foundation for success across all these styles is a flawlessly smooth base coat—opt for a milky pink, sheer nude, or blush tone to achieve that coveted ‘clean girl’ aesthetic. Before starting any artwork, ensure the base is completely dry. Your most essential tool for these budget-friendly looks will be a high-quality dotting tool (or a makeshift alternative like a bobby pin end or toothpick). Practice applying a highly pigmented black polish to achieve uniform, crisp dots, which form the basis for several designs, including the popular domino and simple polka-dot patterns.
The real magic of this lookbook is how easily you can transform simple dots and lines into engaging motifs. To achieve the whimsical ‘Character Nails’ (simple faces/emojis), use a striping brush to create quick, slightly downturned smiles or delicate eyebrows. Then, immediately place two small dots above them using the smallest dotting tool for eyes. For the highly structured patterns, such as the full-coverage polka-dot look or the minimalist ‘Red Dot’ accent, precision is key. Load your dotting tool with a controlled amount of polish; too much results in blobs, and too little creates dragging. For the elegant, swirling botanical designs, use a very fine-tipped liner brush, focusing on creating swift, confident strokes rather than slow, shaky lines. Start at the base of the nail and sweep upward, letting the line naturally thin out toward the tip.
Expert tip for maximum longevity: always seal these delicate designs with a durable, high-shine top coat. Since these designs are often thin and use only one layer of color, they are prone to rubbing off if not properly protected. For an elevated, sophisticated finish, avoid placing the same design on every finger. Mix and match the seven styles—pair a full polka-dot coverage on the ring finger with a simple wave pattern on the index finger, and finish the thumb with just two small red accent dots. This staggering technique provides visual interest and prevents the overall look from feeling too busy. Furthermore, while the images feature classic black accents, experiment with trendy spring colors like mint green or periwinkle blue to adapt these easy patterns for the upcoming season.
8 Minimalist Short Nails
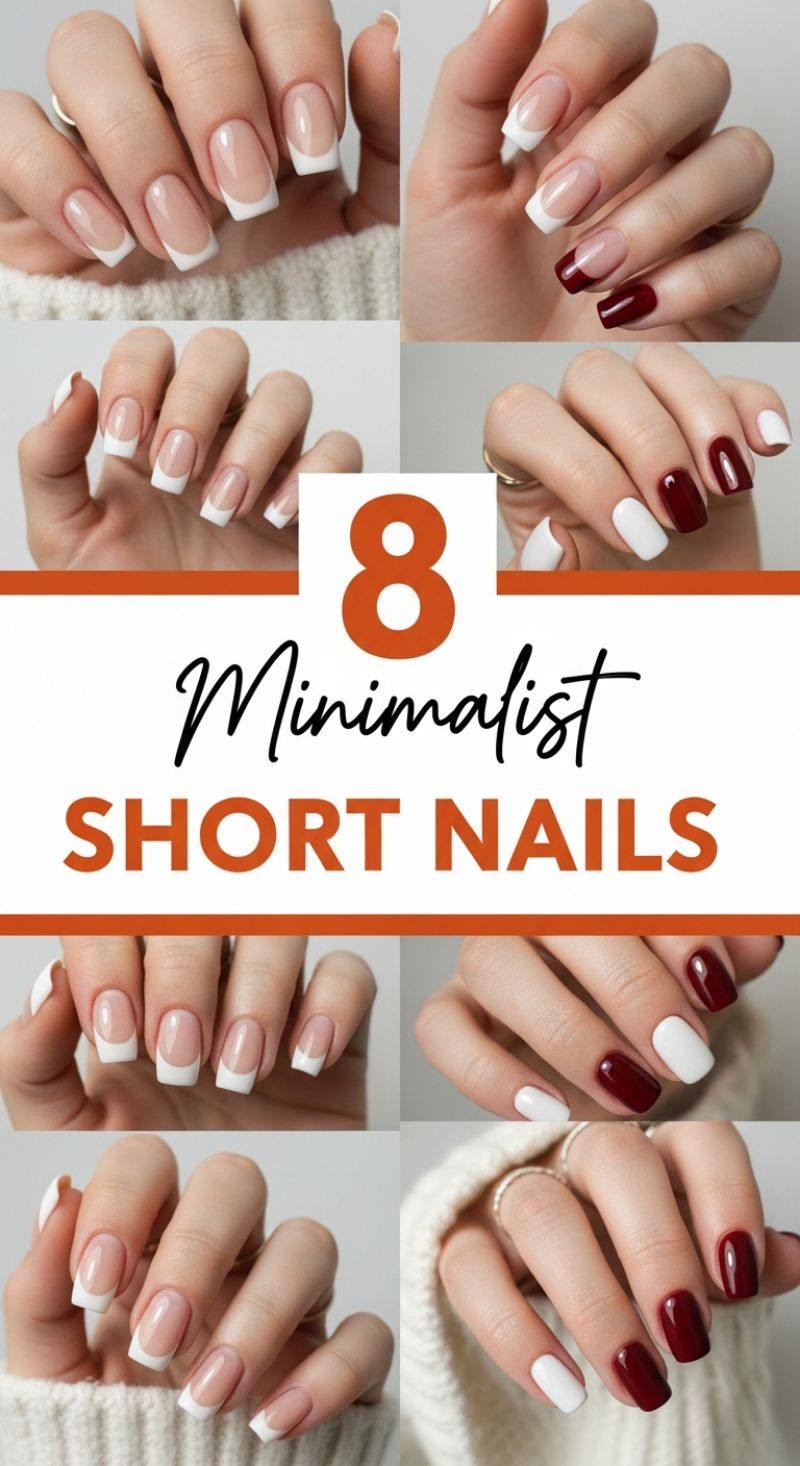
Minimalist short nails are the epitome of sophisticated chic, offering a clean, professional aesthetic that is perfectly suited for the early spring transition period. This section showcases two key minimalist looks: the modern French manicure and a sharp, two-tone solid color block. The French designs featured utilize a milky or sheer pink base coat, paired with a crisp, classic white tip. To achieve this level of refinement on a short nail, the key is precision in the smile line. Ensure the nail shape is a soft square or squoval, which provides the maximum surface area for the tip while preventing chipping. For application, use a very thin liner brush dipped in highly pigmented white polish to trace the natural curve of the nail’s free edge, keeping the line relatively thin to maintain the ‘short nail’ illusion and avoid making the nails look stubby. A glossy top coat is essential for magnifying the health and cleanliness of this understated style.
Beyond the classic French, the collage also highlights a striking yet simple color-block design featuring a deep, glossy burgundy or maroon paired with a stark, opaque white accent nail. This combination is highly effective for late winter/early spring, offering depth and warmth while the white provides a fresh, bright contrast. To replicate this look, start with immaculate preparation—short nails require perfectly pushed back cuticles to maximize the nail bed. Apply two thin, even coats of each color, allowing adequate drying time between layers to prevent streaking or bubbling. The choice of which finger receives the white accent is flexible, but the ring finger (as shown) is traditionally chosen for balance and focus. Expert tip: If burgundy feels too heavy for your spring transition, swap it out for a rich, high-gloss navy blue or a deep emerald green, keeping the bright white accent nail for that crucial pop.
Maintaining the integrity of minimalist short nails requires diligent care. Because the design is inherently simple, any imperfections—like dry cuticles or chipped edges—will be immediately noticeable. Regularly apply cuticle oil and use a rubber-based base coat or a thin layer of builder gel to add structure, preventing breakage and allowing the polish to adhere flawlessly. The beauty of this trend lies in its versatility; it’s perfect for those in corporate settings or anyone who prefers an elevated, low-maintenance look. Embrace the minimalist canvas; it allows your natural nail shape and hand aesthetic to take center stage, proving that sometimes, less is indeed more.
Artsy Spring Floral Designs: Vibrant Watercolor Blooms
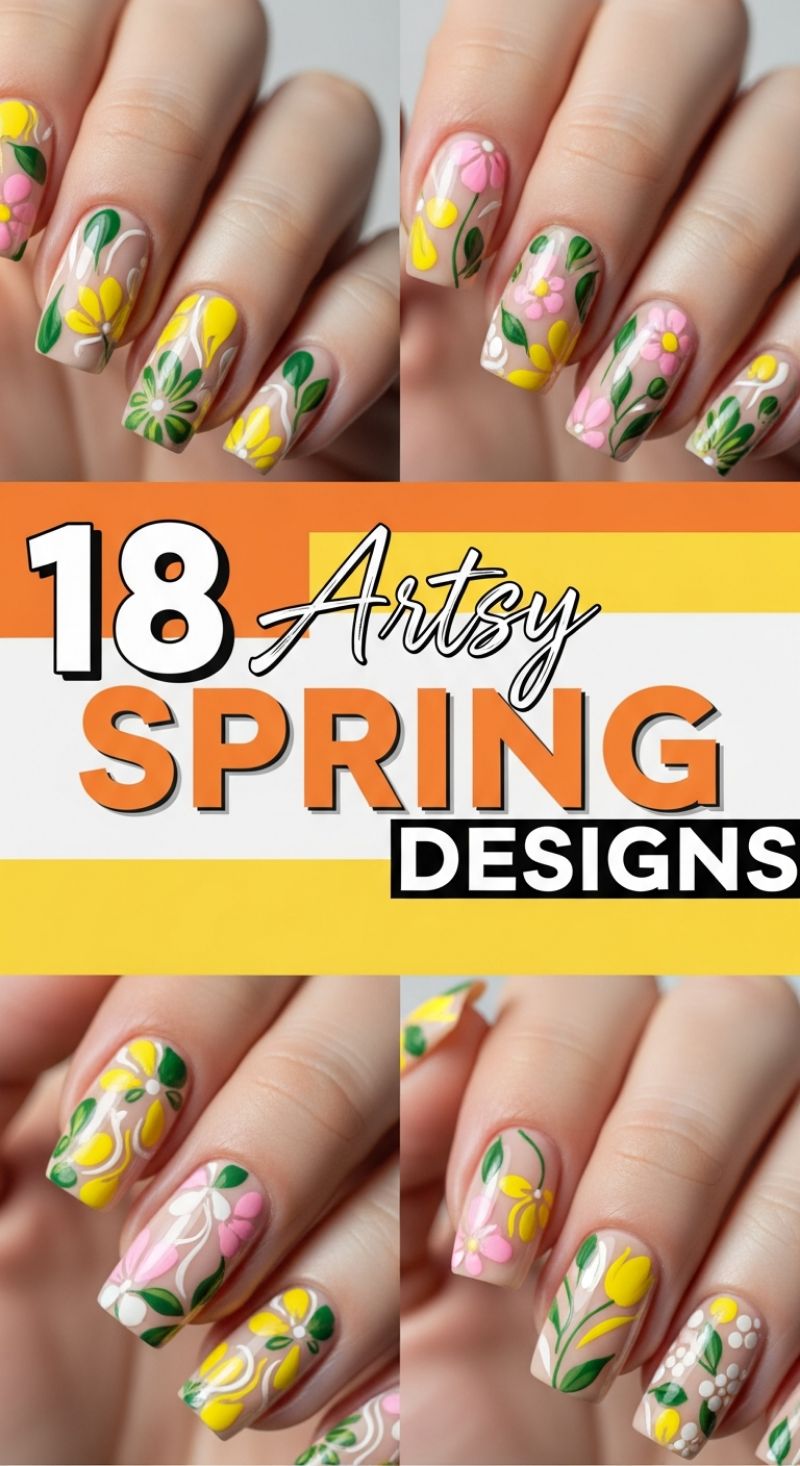
Capture the fresh, optimistic energy of springtime with these truly artistic floral designs. The success of this look hinges on the contrast between a sheer, minimalist nude base and highly pigmented, vibrant floral elements in sunny yellow, cheerful pink, and rich emerald green. This negative space technique prevents the design from feeling heavy or overwhelming, giving the impression of abstract flowers delicately floating on the nail bed. Notice how the application technique mimics a watercolor painting—the colors are bold yet appear softly blended at the edges, often featuring simple dot details and sweeping green stems. This style is best executed on medium-length nails with a gentle square or squoval shape to maximize the canvas space for intricate details.
To achieve this detailed yet flowing look, start with a single coat of a milky white or sheer nude jelly polish to create the perfect transparent base. Once cured, use a fine detail or striping brush (00 or 000 size is ideal) and highly pigmented gel polishes. Rather than focusing on botanical accuracy, prioritize organic movement: use a dotting tool for simple petals, then quickly blend the edges slightly while the gel is still wet to give that watercolor effect. The leaves should be painted using varying shades of green, employing a one-stroke technique to create wide, natural-looking foliage. The most critical step is adding the white elements—the thin, curving lines and small dotted accents that appear throughout the design. These fine lines provide separation, define the layers, and elevate the look from simple decals to genuinely expressive artistry.
Expert application requires patience and the right tools. Use gel polish for this design, as it allows time to maneuver the product before curing, enabling the artsy blending required for the petal and leaf shapes. For a personalized touch, try integrating different floral motifs across your hands; as shown in the image, mix simple daisies and abstract tulips to create visual variety. To ensure this masterpiece lasts, encapsulate the entire design with a non-wipe, high-gloss topcoat. The sheen will make the vibrant colors pop beautifully against the subtle nude background, ensuring your look remains chip-free and radiant for weeks, perfectly capturing the exuberance of late February through March.
13 Chic Shape Ideas: Mastering the Tapered Nail in Ruby Red

The foundation of any breathtaking manicure is the shape, and this design lookbook centers around the elegance of the long, tapered nail—a sophisticated blend often leaning towards a refined stiletto or a sleek almond shape. Achieving this ‘chic shape’ requires consistent filing to create a graceful elongation, ensuring the free edge tapers evenly to maximize the slimming effect on the fingers. For designs featuring this length, especially those utilizing deep, glossy colors like the prominent ruby red shown here, expert application of a durable base is paramount. Whether opting for structured builder gel or acrylic enhancements, the material must support the length without sacrificing the delicate taper. The high-gloss finish is non-negotiable for this look; it provides depth and luxury to the rich red hue, transforming a simple color choice into a statement of high fashion. To transition this deep color into the Spring 2024 season, pair it with complementary soft neutrals, utilizing the deep red primarily for strong structural elements like the tips or solid accent nails.
The primary design variation showcased is the elevated French manicure, featuring a deep, curved or slightly V-shaped ruby red tip set against a milky nude or sheer pink base. This design requires meticulous freehand painting or precise stencil work. To execute the deep French correctly, use a thin, flexible striping brush to first define the smile line (the border between the tip color and the base color), pulling the red color back significantly further than a traditional French to create that bold, sweeping crescent. The contrast between the opaque, high-shine red and the subtle, natural nude is what makes this design feel fresh and modern. Alongside this, incorporate textural variance through an accent nail: notice the shimmering champagne or fine glitter nude on the ring finger, which breaks up the intensity of the solid colors without competing with the complexity of the French tips. This accent should be applied evenly, typically with two coats of highly pigmented fine glitter polish, and sealed with a high-shine topcoat to ensure maximum light reflection.
To maintain cohesion across all nails, ensure the red used for the solid colors, the French tips, and any partial designs is an exact match in tone and finish. For longevity and chip resistance, cure each layer thoroughly and encapsulate all art and glitter under a robust, non-yellowing top coat. When replicating these ‘chic shape ideas,’ consider the overall balance of your hand; while the long, tapered shape is universally flattering, adjust the exact length to suit your lifestyle. The versatility of the ruby red and nude combination ensures this look pairs seamlessly with both transitional wardrobes and bold early spring color palettes, offering a manicure that is undeniably sophisticated and commands attention. Remember, precision in the shape and crispness in the French line are the hallmarks of this top-tier nail design.
17 Soft Pastel Colors
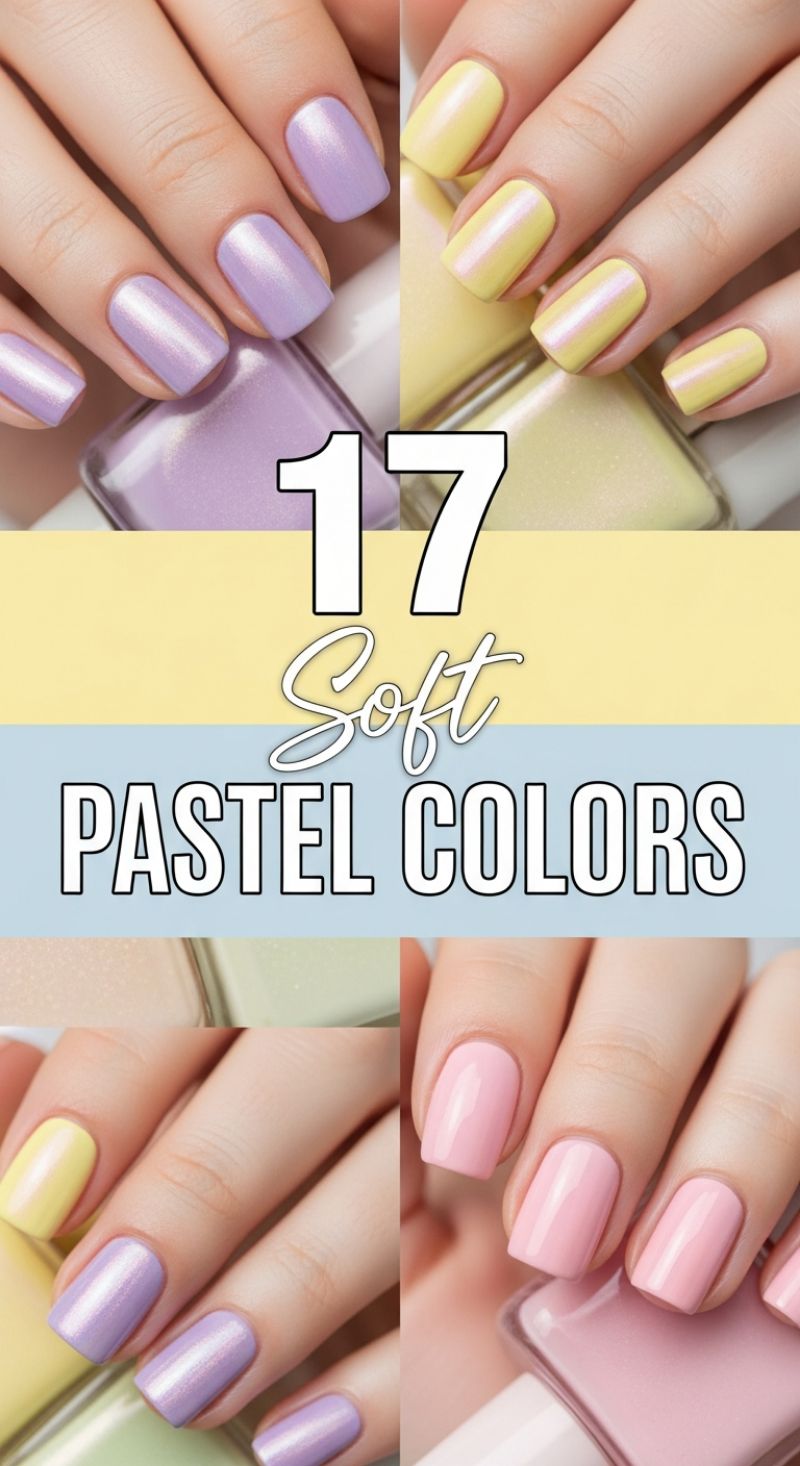
The arrival of early spring (February and March) demands a shift in palette, moving away from deep winter tones toward light, airy hues. This stunning look capitalizes on the perennial trend of pastels but elevates them with an essential modern twist: the iridescent or pearlescent finish. The core colors showcased—shimmering lilac, buttery pale yellow, and creamy bubblegum pink—are the epitome of spring freshness. Unlike flat, chalky pastels of previous seasons, this finish adds a dimensional quality, catching the light with subtle flashes of contrasting color (often pink or gold shift on the yellow and lilac bases). This technique transforms a basic pastel manicure into something sophisticated and vibrant, perfectly aligning with the popular ‘Clean Girl’ aesthetic while injecting necessary seasonal color. For maximum impact, ensure your chosen polishes are highly pigmented even in their sheer form; many brands are now offering specific iridescent pastel collections designed to give this exact ethereal glow.
To flawlessly execute this look at home, meticulous preparation is key, especially since lighter colors tend to highlight imperfections. Begin by shaping your nails into a short, rounded oval or squoval—the classic, gentle curves seen here pair beautifully with soft hues. Apply a high-quality ridge-filler base coat; this is crucial when working with subtle, light-reflective polishes, as it creates a smooth canvas, preventing streaks or uneven pigment distribution. For the application itself, whether you opt for a single color or a mix-and-match approach, always apply two to three very thin coats. Thinner coats dry faster and reduce the risk of bubbling, which is often magnified by shimmer particles. Allow each layer to dry completely before applying the next. If you are using a slightly sheerer iridescent polish, a third coat will deepen the color saturation without sacrificing the luminous finish. Expert Tip: If your polish tends to streak, try “floating” the brush (using minimal pressure) over the final coat to gently smooth out the pigments without dragging the brush too firmly.
Styling these soft pastels offers versatility for the transition period into warmer weather. While a full monochromatic set in one shade is elegant, embracing the mix-and-match trend—as seen here with the blend of pink, yellow, and lilac—is highly recommended for Spring 2024. If you desire a touch of art, pastels make an ideal base for subtle detailing. Consider adding micro-French tips in a metallic silver or rose gold, or applying tiny gold foil flakes randomly across one or two accent nails. For longevity and maximum shine, seal your manicure with a high-gloss, quick-drying top coat. Re-applying the top coat every two to three days will maintain the brilliant, light-catching shimmer and protect these delicate shades from chipping as you await the full bloom of spring.
14 Lovely Heart Accents
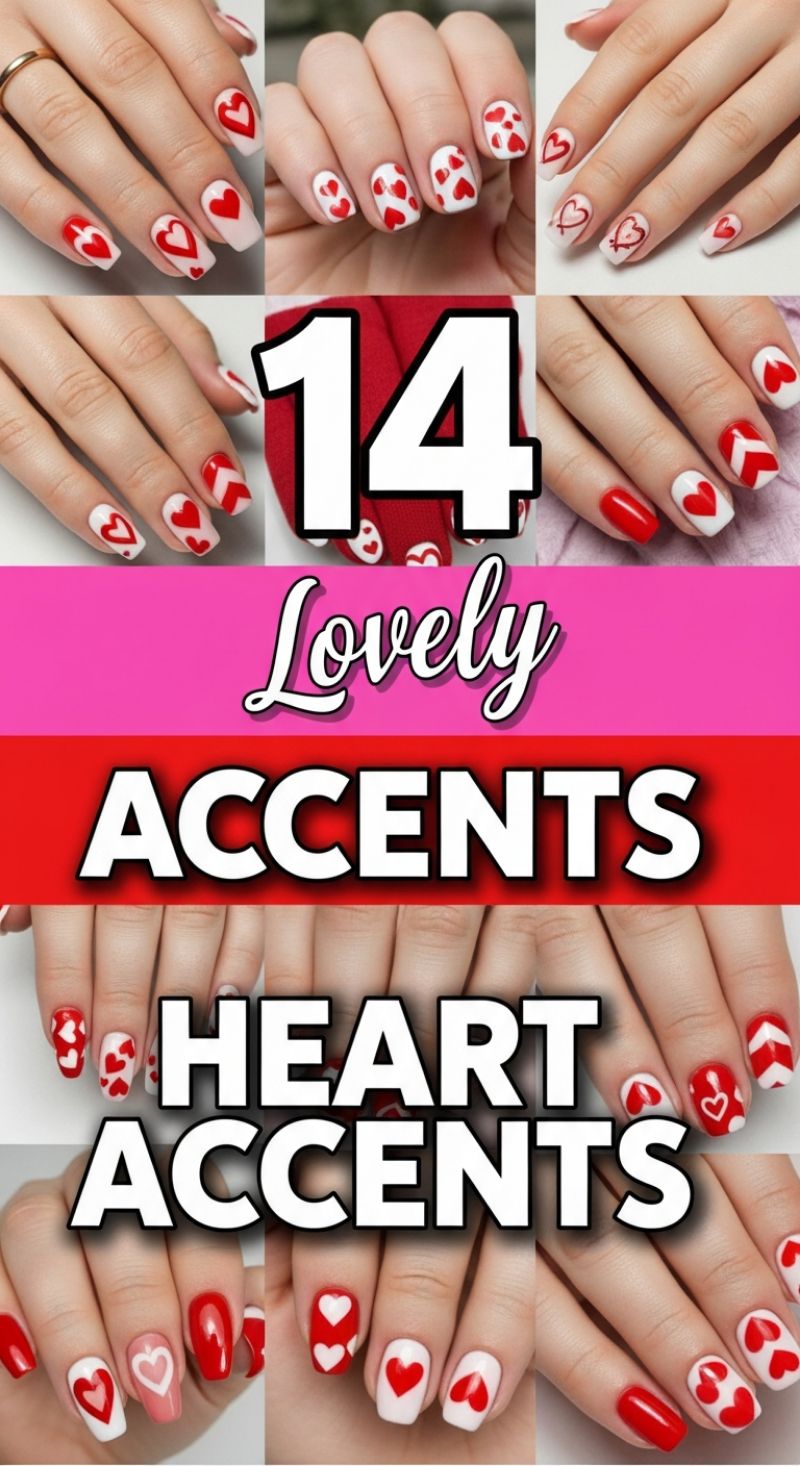
The ‘Lovely Heart Accents’ collection offers a vibrant and versatile approach to romantic nail art, making it an ideal choice for the February transition into early Spring themes. The designs overwhelmingly rely on a high-contrast palette of crisp white and classic siren red, ensuring maximum visual impact. To replicate the perfect heart, start by prepping your nails with a smooth, opaque white base coat. For the heart shape itself, precision is key. An expert technique involves using a fine-tipped dotting tool: place two parallel dots of red polish where the top curves of the heart should meet. Immediately, without curing, use a thin striping brush to draw the polish down from the gap between the two dots, converging into a sharp ‘V’ point at the base of the desired heart size. This method helps maintain symmetry and crisp edges. For smaller, scatter-style hearts, use the smallest available dotting tool and keep the dots closely spaced before dragging the center down. Ensure each heart element is fully dry before proceeding to the top coat to prevent smudging or dragging the colors.
The designs featured showcase various levels of complexity, ranging from simple large central hearts to intricate patterned coverage. For an easily achievable, yet playful look, opt for the random polka-dot heart pattern—simply scatter small hearts across a few accent nails while keeping the others solid red or solid white. More advanced styles incorporate negative space or outlining: try painting a large red heart on a white nail, then using a clean, fine brush dipped in acetone to carefully wipe away the center, leaving only a thin red outline. The collection also introduces structural variety, such as pairing heart motifs with geometric elements like sharp red chevron stripes, providing visual relief and modernity to the overall look. When creating these intricate patterns, particularly on accent nails, use a magnifying lamp to ensure clean lines and sharp points, elevating the finished manicure to professional quality.
To ensure this romantic look remains chic well past Valentine’s Day and into the heart of Spring, consider subtle modifications. While the square and tapered square shapes showcased are universally flattering, transitioning the color palette can broaden the appeal. Swap the intense red for softer spring hues like pastel pink, coral, or light lavender while maintaining the white base coat for contrast. Alternatively, use a sheer nude or milky pink polish as your base instead of stark white; this allows the red hearts to appear as if they are ‘floating,’ creating a softer, more delicate effect suitable for March and beyond. Finish every design with a high-shine, non-yellowing UV top coat, paying close attention to capping the free edge of the nail. This not only adds a glossy protective layer but also locks in the detailed artwork, extending the wear time of these lovely heart accents.
15 Romantic PINK NAILS

This gorgeous collection of designs, anchored by soft blush hues and shimmering rose gold, is the quintessential look for February and transitioning into early March. To achieve this level of delicate sophistication, start with a solid base of milky pink or pale nude gel polish, ensuring the nails are shaped into a medium square or squoval for a classic, clean canvas. The central theme relies on strategic contrast: pair solid color nails with glitter-soaked accent nails, specifically utilizing a fine rose-gold or iridescent pink shimmer polish to catch the light. For maximum longevity, prep is crucial—dehydrate the nail plate thoroughly and use a rubber base coat before layering two thin coats of your foundational color. This soft base allows the dramatic 3D elements and heavy sparkle to feel romantic and luxurious, rather than overwhelming.
The real artistry lies in the intricate embellishments and texture application. To replicate the detailed hearts seen throughout the lookbook, you’ll need various elements: flat-back heart rhinestones, small pearl beads, and thick builder gel or specialized gem glue. For the fully covered pearl nail, apply a thick layer of clear builder gel and meticulously place half-dome pearl beads of varying sizes before curing, creating a raised, caviar-like texture. For the outlined heart charms (often seen on the ring finger), affix a larger 3D pearl or metal heart charm, then surround the perimeter with micro-beads or very small accent rhinestones for a bezel effect. Expert advice: When securing substantial charms like the 3D bows or large hearts, use non-wipe hard gel as the adhesive, flash cure the charm in place, and then fully cure to ensure durability, especially around the edges where the charm meets the nail plate.
To ensure this romantic style remains chic beyond Valentine’s Day, modify the intensity of the red accents. For March wear, swap out the vivid red hearts for opaque white or iridescent white heart accents, maintaining the texture while shifting the color palette toward a softer spring feel. Experiment with different finishes: notice how some nails feature a high-gloss top coat over the glitter, while others (like the one featuring the 3D white bow) appear to have a soft, almost velvety matte finish. Applying a matte top coat to one or two solid nails provides grounding contrast against the sparkle and shine of the heavily embellished nails. Remember to seal all edges meticulously, especially when dealing with glitter, but avoid coating the actual 3D charms or pearls with a top coat unless explicitly required for sealing, as this can dull their dimension and shine.
Feminine Pink Styles: Bows, Hearts, and Pearls
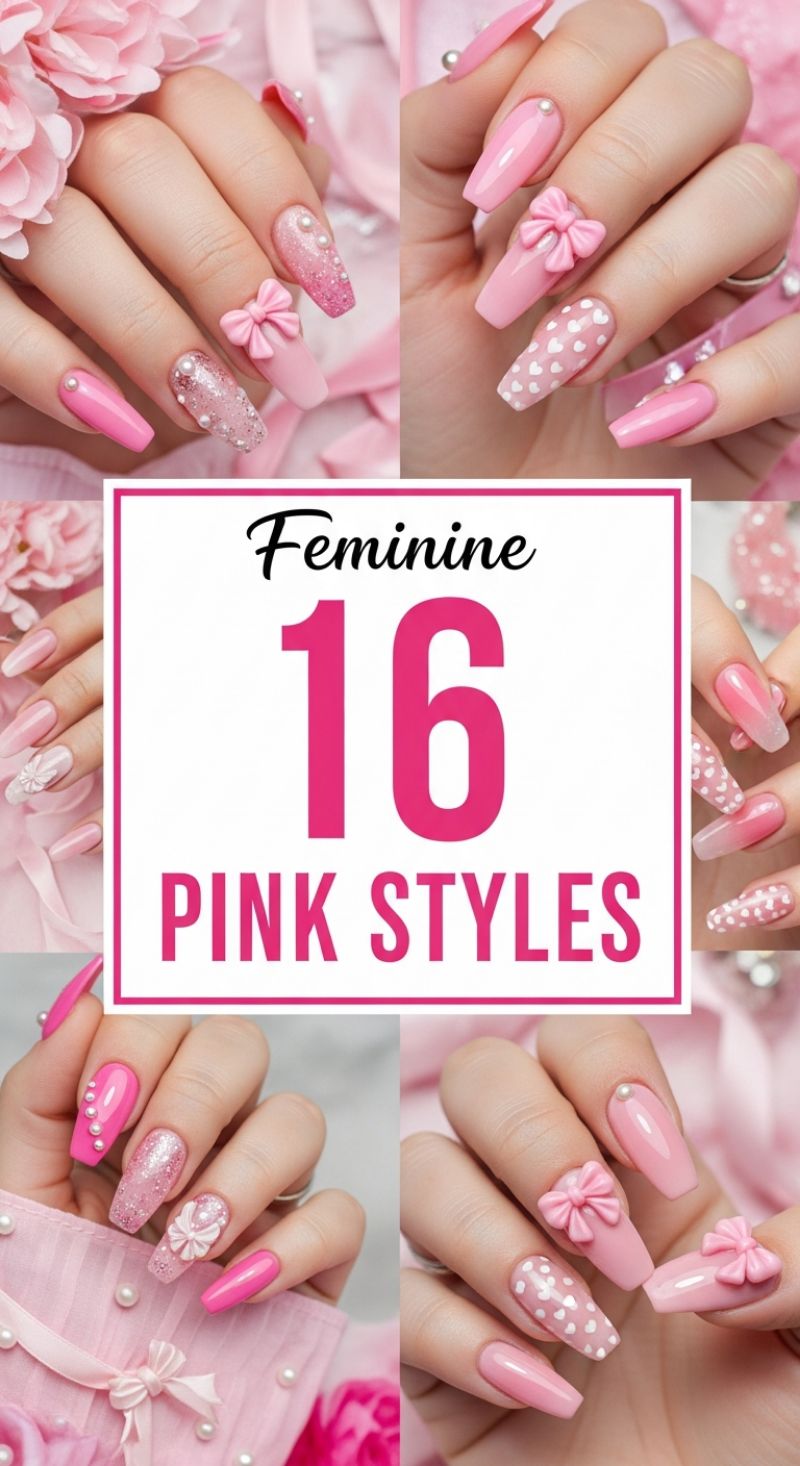
The ‘Feminine Pink Styles’ collection is the epitome of coquette core, making it the perfect transitional look from Valentine’s Day into early Spring 2024. This trend showcases an array of delicate baby pinks, vibrant fuchsias, and soft pastels, often applied on long, sculpted nail beds, typically in a coffin or ballerina shape. To recreate this highly layered aesthetic, begin with meticulous nail preparation, ensuring the surface is perfectly smooth and the chosen shape is consistent across all fingers. For the sheer, luminous base seen in several examples, utilize a milky pink jelly polish or a light builder gel, curing two thin coats. If opting for the intense glitter accent nails, first apply a clear base, then encapsulate fine holographic or iridescent pink glitter, using a small brush to blend the glitter down toward the tip for a subtle ombré effect before sealing it with a layer of clear gel.
The key to unlocking this feminine style lies in the precise application of 3D embellishments and pattern work. The hallmark feature is the sculpted 3D bow charm, usually applied to an accent nail (like the ring or middle finger). To secure these larger acrylic pieces, dispense a small dollop of thick builder gel or specialized nail glue onto the desired placement area, press the bow firmly into the medium, and cure immediately to lock it in place. Supplement this with smaller decorative elements, such as round white pearls. Place micro-pearls strategically along the cuticle line or scatter them artistically across the glitter nails for texture. For the delicate white heart pattern seen on the index or ring finger, use a fine-tipped dotting tool and a highly pigmented white gel polish. Dip the tool, create two adjacent dots slightly above the center of the nail, and then use the tip of an art brush to gently drag the polish down and meet in a point, forming a heart shape.
Expert tip for maximum longevity: Since this look is heavy on dimensional decorations, the final seal is crucial. After all colors, glitters, and 3D elements are set, apply a non-wipe high-gloss top coat to all nails, carefully painting around the base of the 3D bows and larger pearls without submerging them entirely. This reinforces the structure and prevents snags. The beauty of this look is its versatility; experiment by pairing a solid hot pink nail (like the thumb) with a heavily decorated accent nail (like the middle finger) to create balance. This pink paradise is both romantic and playfully chic, ensuring your manicure stands out through the early spring season.
7 Glamorous 3D Designs
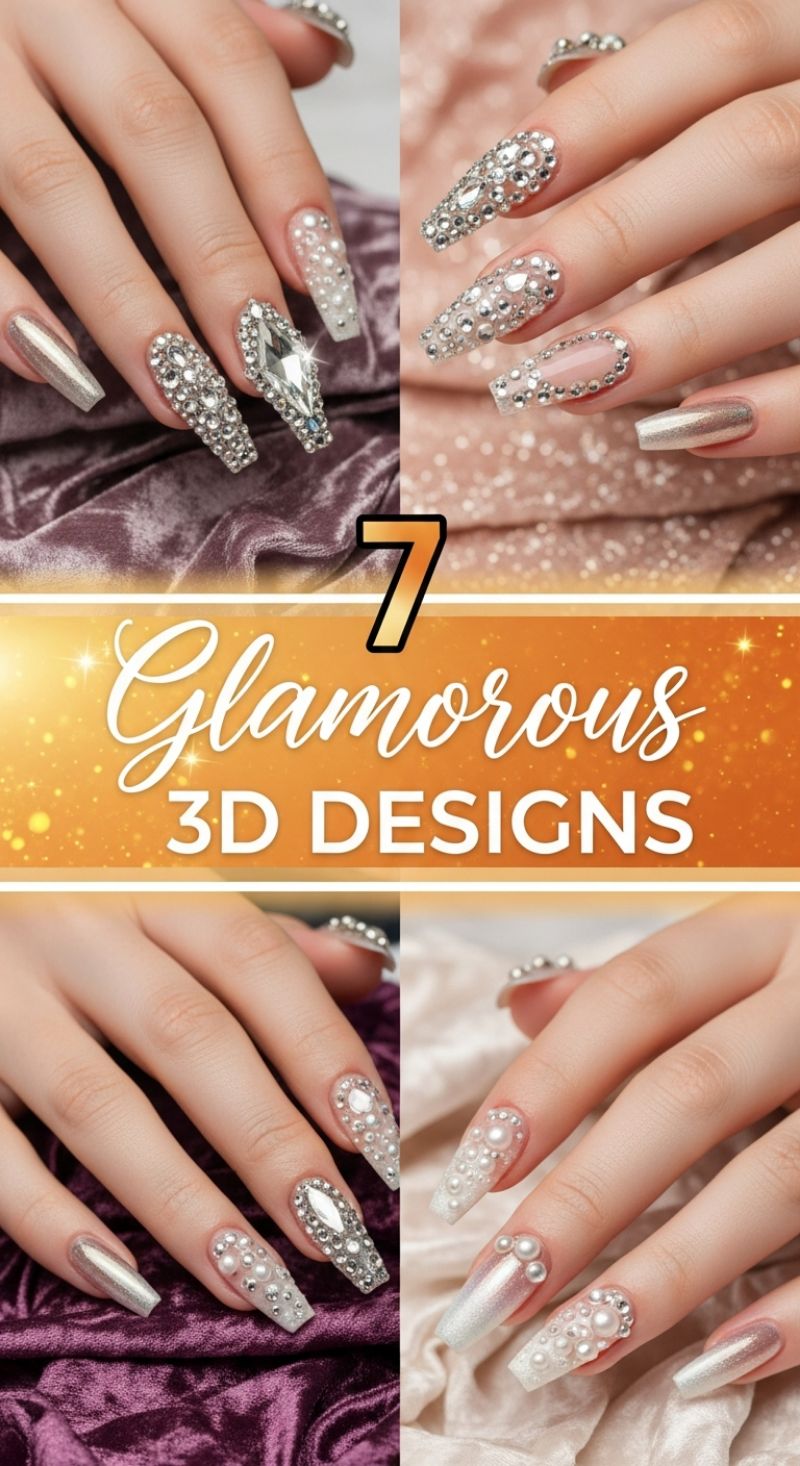
These stunning designs redefine luxury nail art, utilizing comprehensive 3D embellishment techniques that are perfect for making a dramatic statement during high-glamour events in early spring, such as formal galas or wedding season. The featured look uses long, tapered coffin or ballerina shapes, providing ample surface area for intricate decoration. Key elements include massive, faceted focal rhinestones (often coffin or marquise-cut) surrounded by graduating sizes of circular crystals to create dense, shimmering texture. Furthermore, the incorporation of luminous pearls alongside traditional rhinestones introduces a softer, yet equally opulent, contrast. Note the strategic placement: some nails feature full-coverage bling, while others utilize a nude base with clustered jewels bordering the cuticle or cascading down the nail center, balanced by metallic chrome or iridescent shimmer nails for contrast. This complexity requires a strong structural foundation, typically achieved with acrylic or hard gel extensions, ensuring the durability needed to support the weight and dimension of the heavy jewelry.
Executing these elaborate 3D designs requires precision and the correct adhesive technique to ensure longevity and prevent snagging. For application, first perfect your base color—whether it’s a sheer milky nude, a sparkly glitter white, or a solid metallic chrome. Before curing the final topcoat, use a specialized jewelry or rhinestone adhesive gel, which is thicker than standard gel polish, directly onto the desired placement area. Press the gems firmly into the uncured gel, starting with the largest focal pieces and filling in gaps with smaller stones and pearls. Expert advice dictates that you must “float” the stones in the gel rather than pressing them so hard that the gel oozes over the facets, which would dull their shine. Once placement is finalized, cure the adhesive completely under a UV/LED lamp. After curing, use a thin detail brush dipped in topcoat (or a non-wipe builder gel) to carefully seal the edges and bases of the larger stones without coating the top surface of the jewels, providing maximum security against lifting or catching.
While these designs are visually demanding, proper care ensures they remain pristine throughout their wear. Maintain the integrity of the 3D elements by avoiding excessive soaking in water and wearing gloves when handling household cleaners. Due to the high-volume decoration, these nails may not be practical for everyday tasks, making them ideal statement pieces for short-term wear during special occasions in February or March. The reflective silver, brilliant white, and chrome finishes pair beautifully with cool-toned event wear. For a fresher Spring 2024 adaptation, consider pairing this design with delicate pastel accents on the metallic nails, or swapping some silver stones for AB (Aurora Borealis) crystals that reflect soft pinks and blues. Remember that the ultimate goal of these 3D glamorous designs is to provide a dazzling, multidimensional visual impact that catches the light and demands attention from every angle.