Discover 100+ inspiring and budget-friendly DIY decor ideas to refresh every room in your home and celebrate all holidays. The ultimate sourcebook for creative home transformation.
11 Fresh DECOR IDEAS

Achieving a truly “fresh” and revitalizing interior design aesthetic hinges on two critical elements: maximizing natural light and integrating powerful biophilic elements. As demonstrated across various rooms in this collection, the foundation of this look is a bright, neutral palette—think crisp white walls, white trim, and light-colored main furniture pieces (like the white sofa or the clean, simple white desk). This white canvas is essential for bouncing natural light deep into the space, a technique enhanced by using sheer or light-filtering window treatments, such as the translucent drapes in the living room or the white Roman shade in the kitchen. To counteract any potential sterility from the all-white base, introduce large, statement houseplants like the Monstera or Fiddle Leaf Fig. These elements not only purify the air but provide vital texture, scale, and organic shape. When selecting planters, opt for materials like woven baskets or textured, pale ceramic pots, which add subtle artisanal warmth without overwhelming the clean lines of the room.
Once the neutral foundation and greenery are established, strategic color injection becomes paramount. The key to maintaining freshness is using bright, high-saturation colors as focused accents rather than main components. This imagery expertly uses a brilliant, sunshine yellow and a calming, light cerulean blue. Notice how easily replaceable items carry the color load: a yellow throw pillow on the sofa, a vase of yellow tulips on the kitchen island, a bright yellow articulating lamp in the office, and a functional yellow bath mat. Similarly, the blue is introduced via the large bedding ensemble in the bedroom and the modern, ergonomic chair in the office. This technique offers maximum impact with minimal commitment; if you tire of the color, simply swap out the textile or accessory. For DIY enthusiasts, this means colorizing is as simple as finding the perfect shade of cotton fabric for new pillow covers or painting a vintage side stool (like the bright yellow one seen in the bathroom).
Finally, grounding these bright, airy spaces requires attention to tactile materials and clean, functional organization. The use of natural wood—seen in the mid-century modern nightstand, the sleek kitchen cabinetry, and the subtle flooring—adds a necessary layer of warmth and sophistication, preventing the space from feeling cold or overly modern. In highly functional areas like the office and bathroom, embrace organization and clear lines. The office desk is sparse and dedicated solely to work tools, while the bathroom features a frameless glass shower enclosure and bright white tiling to maximize the illusion of space and cleanliness. When curating your decor, always prioritize items that serve a dual purpose or offer simple, elegant functionality, reinforcing the overall fresh, uncluttered aesthetic.
8 Clever Kitchen Counter Organizing & Styling Ideas
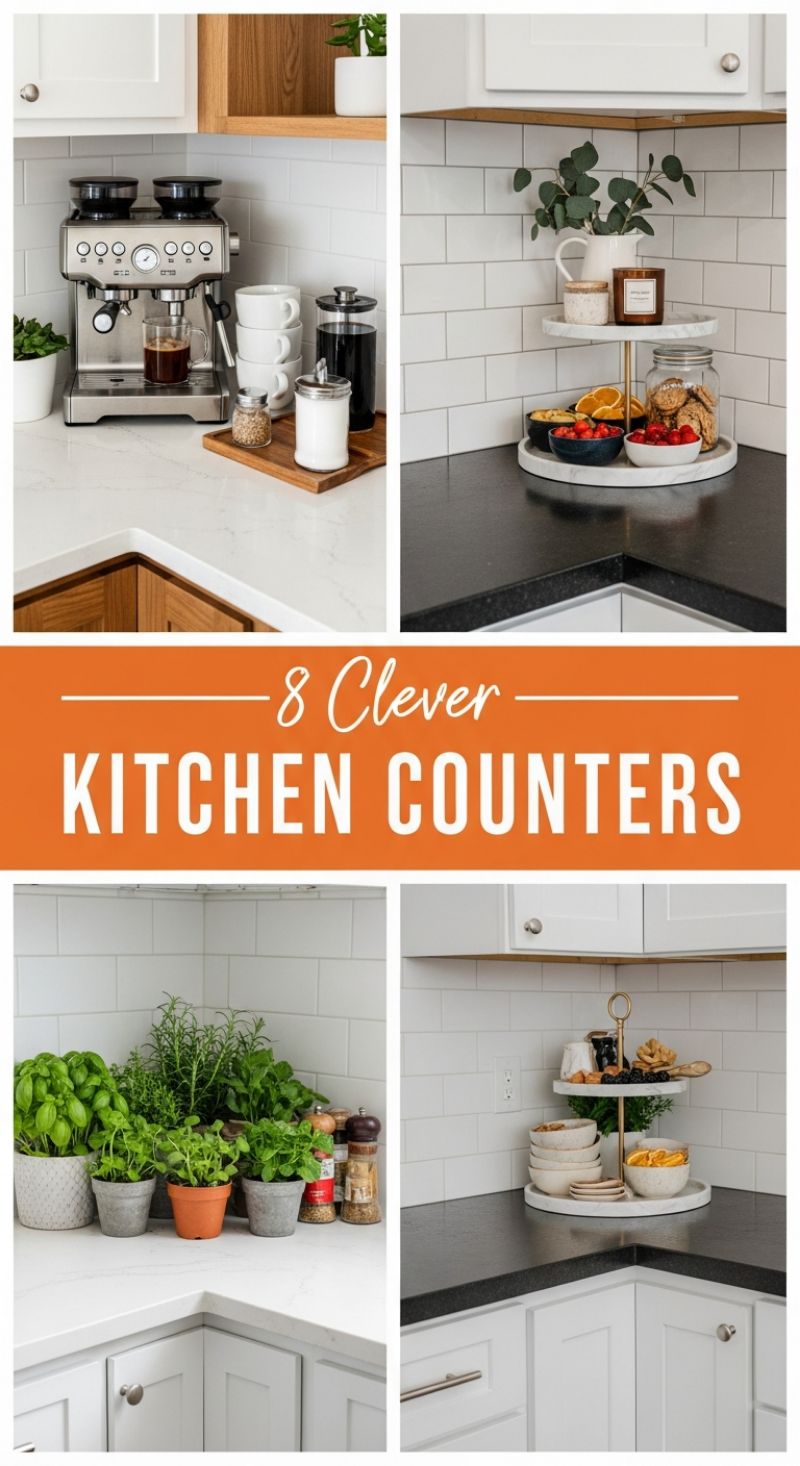
The secret to maintaining highly functional and beautiful kitchen countertops lies in defining specific zones and strategically utilizing vertical space, especially in often-forgotten corner areas. To achieve a high-end look while maximizing utility, designate a specific area for necessary but often messy appliances, like the dedicated coffee or espresso station shown here. Group all related accessories—stacked mugs, sugar containers, and stirrers—onto a decorative tray. Using a natural material like wood or marble for the tray not only corrals the clutter but also provides an intentional, polished base, protecting your counter surface from spills and scratches. This zoning technique ensures that even heavy-use areas maintain an organized, boutique-like appearance, making daily routines smoother and instantly elevating your kitchen’s overall decor aesthetic.
Maximizing vertical real estate is the most effective DIY decor strategy for minimizing visual clutter while increasing storage. Tiered serving stands are indispensable tools for counter styling; they draw the eye up and allow you to display both decorative elements and practical items without eating up much precious counter space. For a breakfast corner or snack area, use a two-tier marble stand to hold fresh fruit, serving bowls, or homemade treats sealed in glass jars. In addition to food, integrate a small decorative pitcher with faux or real greenery (like eucalyptus) and a scented candle to infuse the space with texture and aroma. If you are entertaining, swap out the everyday items for small appetizers, cocktail napkins, and stackable serving dishes, transforming a static corner into a dynamic, accessible serving station.
Another clever way to merge functionality and style is by creating a dedicated culinary station, bringing life and color into the space. A collection of potted fresh herbs (basil, rosemary, mint) creates a vibrant, natural focal point that is both beautiful and highly useful for cooking. To ensure the look is cohesive and intentional, use planters that share a complementary color palette or texture, mixing materials like terracotta, distressed concrete, and woven baskets. Group these pots next to your most-used spice mills and grinders. This simple arrangement turns everyday kitchen tools into an organized display, providing immediate access to fresh ingredients and transforming a previously bare corner into an active, stylish, and functional part of your kitchen design. Remember that repetition—whether through coordinating pots or matching marble trays—is key to achieving a polished, magazine-worthy finish.
9 Glam BEAUTY ROOMS
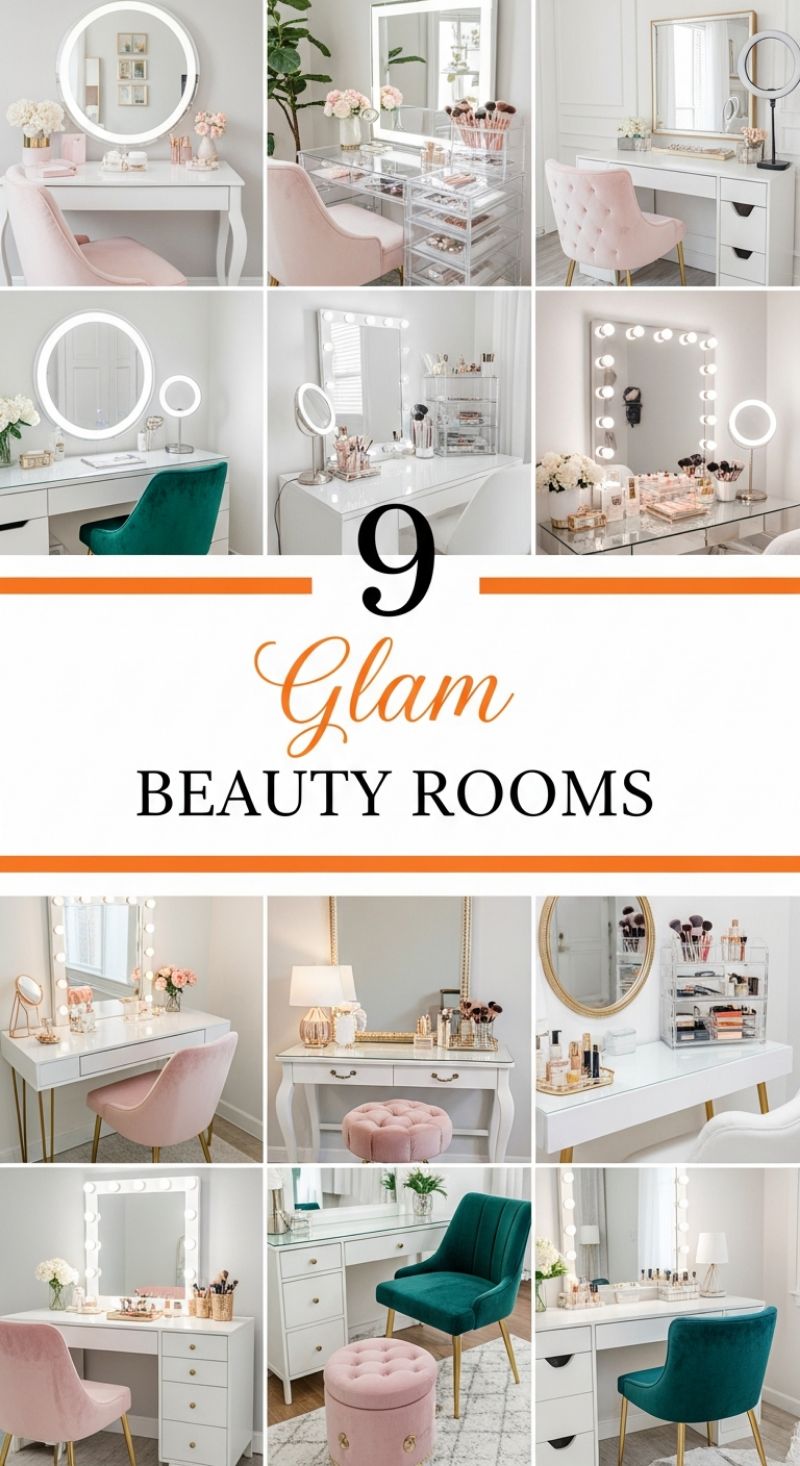
Achieving the ultimate ‘glam’ beauty room requires a thoughtful combination of luxurious textures, strategic storage, and most importantly, brilliant lighting. Start your design by establishing a clean, bright foundation. Most high-end vanity looks, as shown here, rely on a crisp white desk or vanity unit, which serves as a neutral backdrop for colorful accessories and makeup products. When selecting your main furniture piece, prioritize a desk with hidden storage or pair a simple surface with modular, clear acrylic drawer units. The visual clarity of acrylic allows your colorful products to become part of the decor while keeping them organized and dust-free. The seating is crucial for comfort and style; opt for a plush, upholstered chair or stool, preferably in rich velvet. Blush pink and deep jewel tones like emerald green are perfect choices, especially when paired with elegant gold or brass hardware, which instantly elevates the entire setup from standard to luxurious.
Flawless illumination is the absolute hallmark of a true beauty room and should be treated as a functional necessity, not just an aesthetic addition. To perfectly replicate the luxurious vanity glow, integrate lighting directly around your mirror. This can be achieved through a classic Hollywood mirror framed with exposed LED bulbs (choose daylight or neutral white bulbs for accurate color rendering) or a modern, sleek backlit mirror that provides an even halo of light. Avoid relying solely on harsh overhead room lighting, which casts deep shadows that interfere with precise makeup application. Expert advice suggests layering your lighting: supplement the main vanity mirror with a secondary source, such as a stylish table lamp or a small, integrated-light magnification mirror, ensuring every angle is perfectly lit for detail work.
Finalizing the space involves careful attention to organization and decorative styling. The key to maintaining a glam aesthetic is displaying only the most beautiful items while neatly storing the rest. Use decorative metallic trays, often found in rose gold or polished brass, to group and present luxury items like perfumes, favorite foundations, or beautiful brush sets. This containment prevents clutter sprawl while highlighting your most cherished products. Maintain the soft, feminine palette—predominantly white and metallic, accented by pops of pink and jewel tones—by adding subtle touches like fresh flowers (peonies or roses are ideal) in a chic vase. By thoughtfully integrating these elements—white base furniture, plush seating, focused illumination, and intentional organization—you transform a simple space into a stunning, magazine-worthy beauty sanctuary.
15 Essential SPRING HOME DECOR

The core of a spring home refresh lies in transitioning your textiles and color palette. Start by lightening your load: put away heavy velvet or wool blankets and replace them with breathable, chunky cotton knits or linen throws, focusing on neutral shades like cream, ivory, or light beige, as demonstrated by the woven throw draped over the sofa. Introduce spring color through throw pillows using soft pastels—think pale mint, blush pink, or light sky blue. To implement this DIY refresh quickly, purchase inexpensive pillow covers rather than new pillows, allowing you to easily swap them out seasonally. Ensure your primary furniture remains neutral (white, light gray) so these seasonal accents truly pop, creating a clean, airy foundation that immediately feels lighter and more expansive than winter palettes.
Bringing the outdoors in is paramount to spring decor, and this doesn’t require a large commitment. Focus on two main elements: maximizing natural light and incorporating live greenery. Swap heavy, dark drapes for sheer white or off-white curtains, as seen in the bottom panels, which filter sunlight beautifully, creating soft, diffused illumination that enhances the feeling of spaciousness. For natural elements, utilize inexpensive seasonal bouquets like tulips or daffodils, displayed simply in clear glass vases (like the vibrant yellow and orange arrangement pictured) mixed with trailing greenery such as eucalyptus to add texture. Furthermore, style your windowsills or kitchen counters with small potted herbs, like basil or mint, which offer both visual appeal and a fresh, subtle fragrance, serving as functional, living decor.
Once the foundation of light and fresh textiles is set, focus on creating stylized vignettes that reflect the season’s energy. A simple, effective DIY technique is incorporating citrus elements. Display bright yellow lemons or oranges in a decorative pedestal bowl (as shown on the coffee table) alongside a small stack of stylish books. This instantly injects a burst of saturated, cheerful color and an immediate sense of freshness without requiring permanent changes. Maintain a minimalist approach to surfaces; remove unnecessary clutter to emphasize the light, airy feeling. This strategic placement of natural elements, coupled with sheer window treatments, creates an effortlessly chic and revitalizing atmosphere essential for welcoming the warmer months.
20 Cute Classroom Doors: DIY Valentine’s Day Decor

Transforming a standard classroom door into a festive display is a beloved tradition, especially for holidays like Valentine’s Day. These 20 examples illustrate how simple, affordable paper crafts can yield spectacular results. To begin your decoration project, focus on a high-contrast color palette, primarily utilizing bold reds, soft pinks, and bright whites. The most crucial element is the heart cutout. For large focal points, use poster board hearts overlaid with ruffled borders made from crepe paper or layers of smaller cutouts for texture. For surrounding decorations, cut dozens of small hearts (3-5 inches) from construction paper to create repetitive borders or scatter patterns, ensuring they contrast with the door color (e.g., white hearts on a red door). Expert tip: Before taping anything, lay out your design on the floor first to ensure symmetry and balance, paying special attention to how the hardware (door handle and peep-hole) integrates into the final layout.
Several of the most striking designs feature large, central characters, particularly the classic winged cherub or Cupid. To achieve a professional-looking figure, sketch or project a simple outline onto large sheets of colored poster board (red body, white wings). Cutting large, intricate shapes requires patience and a sharp craft knife or precision scissors. Once your figures are prepared, ensure your messaging is clear and positive. Phrases like ‘Class Has Heart,’ ‘You Are Loved,’ or ‘Happy Valentine’s Day’ should be printed or cut from contrasting vinyl/cardstock and backed by an oversized heart shape to make them pop against a busy background. Another effective technique seen here involves using vertical pink or red streamers across the entire door surface to mimic a dramatic curtain. These streamers provide immediate texture and movement, creating an ideal backdrop for layered heart banners.
For added dimension and flair, incorporate specific 3D elements. Instead of flat hearts, try folding small cutouts to create subtle depth, or use paper doilies (as seen in the top row) which naturally provide an elegant, lace-like texture. If you plan to use an entire sheet of bulletin board paper to cover the door, secure the edges tightly with duct tape that matches your theme color, then use a contrasting ribbon or rick-rack border to hide the seam. Although these designs are perfect for classrooms, the concept—a strong central theme, border elements, and positive text—is fully adaptable. Simply swap the hearts for eggs for Easter, or stars and stripes for the Fourth of July, demonstrating that a simple door makeover can be the perfect touch for any room or holiday.
6 Simple St. Patrick’s Day Decor Ideas Using Potted Shamrocks
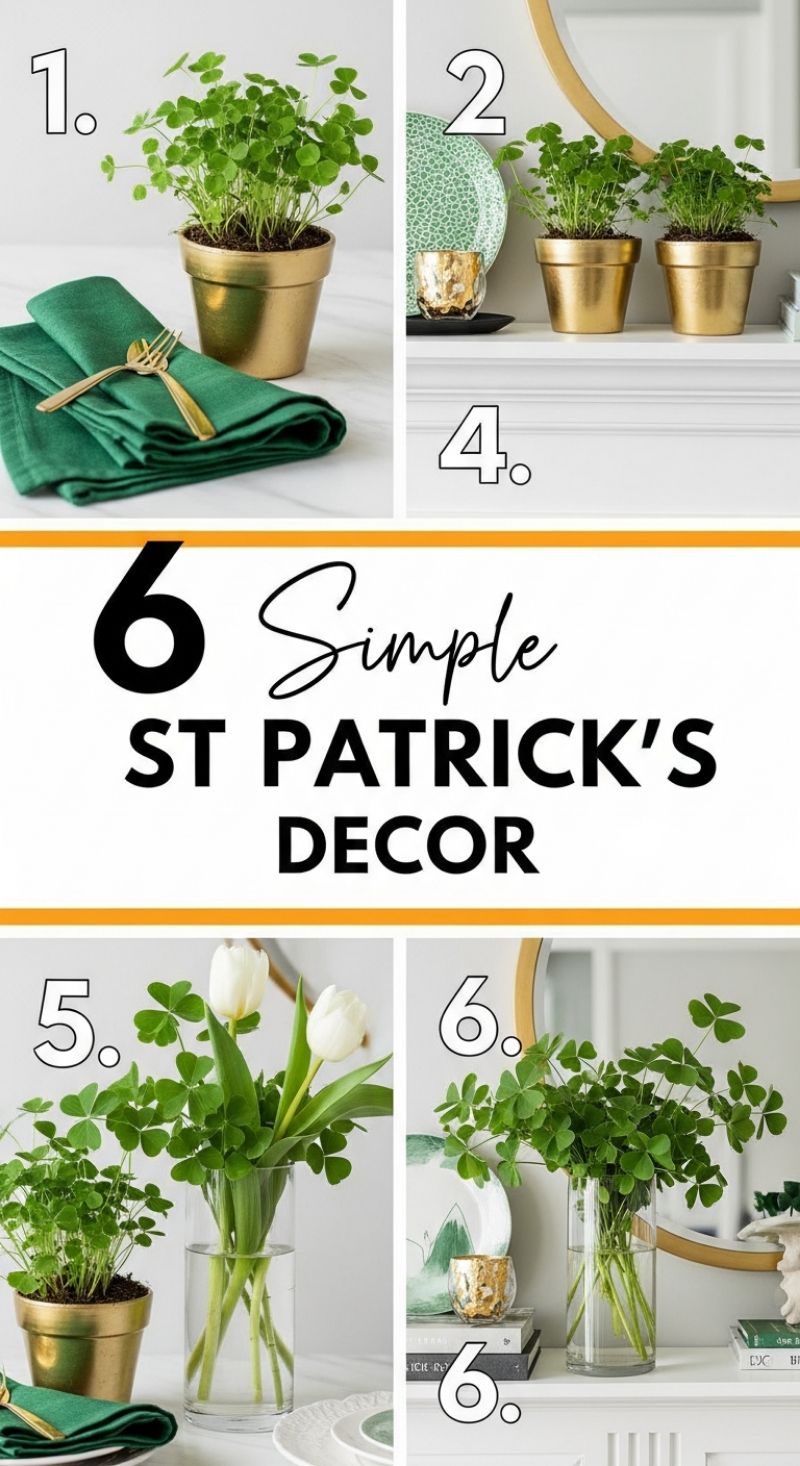
Utilizing living greenery is the ultimate way to elevate holiday décor, and for St. Patrick’s Day, nothing works better than the classic shamrock (often sold as Oxalis regnellii or Oxalis triangularis). This fresh approach immediately bypasses cheap plastic decor, introducing vibrant life and rich texture to your space. To recreate the elegant looks seen in examples 1, 2, and 5, begin by sourcing several small potted shamrock plants. The secret to transforming these simple plants into sophisticated holiday décor lies entirely in the container. Ditch the nursery pots and nestle them inside chic metallic vessels, specifically vibrant gold pots, as shown. If you can’t find pre-gilded pots, a quick coat of gold spray paint on basic terracotta or plastic planters works wonders and offers a significant impact for minimal cost. Use a single plant (Visual 1) to anchor a minimalist tablescape featuring crisp green linen napkins and golden cutlery, or arrange them in pairs or multiples (Visual 2) on a mantel or console table to create a cohesive, natural focal point.
Beyond keeping the plants potted, consider using cut stems to create stunning, minimalist floral arrangements that highlight the unique three-lobed leaves. The large, mature leaves of the shamrock plant function beautifully as greenery fillers in a vase, providing a lush, clover-filled aesthetic without needing to purchase expensive flowers. In Visual 5, the shamrock stems are paired expertly with classic white tulips, offering a beautiful contrast that transitions perfectly from late winter into spring. For an even simpler look, Visual 6 shows a striking arrangement made solely of cut shamrock stems placed in a tall, clear cylindrical vase. This technique maximizes the visual impact of the greenery and adds height to your styling. Expert tip: When using cut stems, make sure the water is changed daily, and keep the arrangements away from direct heat to prolong their freshness. Use clear glass vases to allow light to filter through the stems, enhancing the bright green color.
To complete these sophisticated St. Patrick’s Day vignettes, layering is essential. Notice how the visuals consistently pair the rich green of the plants with high-sheen metallics and neutral white backgrounds. On a mantel or shelf (Visual 2 and 6), use existing books to create varying heights for your arrangements, stacking them beneath vases or small gold candles. Introduce textured accessories like gilded candleholders, patterned plates in complementary greens, and reflective mirrors (Visual 2) to bounce light and add depth. Since Oxalis is easy to care for—requiring bright indirect light and regular watering—this décor is not only stunning for the holiday but can continue to thrive as a beautiful houseplant long after March 17th has passed, making it a highly sustainable and economical decor investment.
Must-Try 12 TEEN DIYS
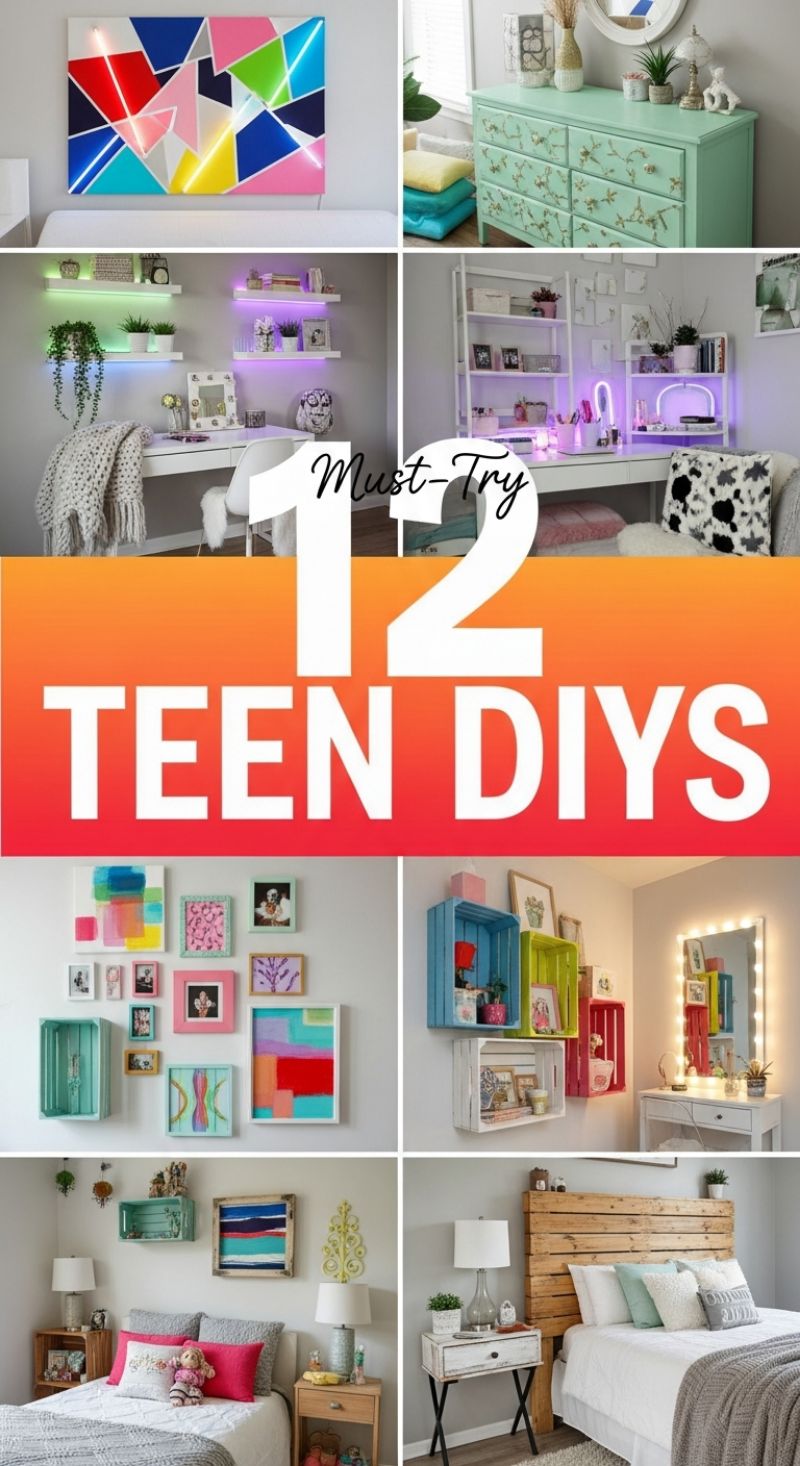
Creating a personal sanctuary is essential, and these 12 DIY projects offer the perfect blend of style, storage, and personalization ideal for any teen’s room or first apartment. We see visual elements ranging from custom illuminated artwork and storage solutions crafted from repurposed materials to major furniture upcycles. To start, tackle the ambient lighting projects visible in the study areas. For the geometric light canvas, begin by mapping out your angular design onto a blank canvas using painter’s tape. After painting the various geometric sections in contrasting colors, remove the tape when the paint is dry, leaving crisp white lines. The “how-to” magic lies in adhering LED light strips or electroluminescent wire precisely along these lines using a strong adhesive or small clips, plugging it in, and transforming basic art into a futuristic statement piece. For practical lighting, install floating shelves above a desk and adhere thin, remote-controlled RGB LED strips along the underside. This not only highlights decorative items but also provides customizable ambient light for studying or setting a mood, ensuring the wires are neatly concealed with channel molding or cord covers for a polished, high-end look.
The key to maximizing space while adding bohemian flair is repurposing affordable materials, most notably the versatile wooden crate. In this collection of ideas, crates are used as bright, wall-mounted display shelves, integrated into dynamic gallery walls, and even stacked to form unique nightstands. To replicate the colorful wall storage, start by cleaning and thoroughly sanding standard wooden crates to eliminate splinters. Prime them, then paint them in vibrant, contrasting colors like teal, lime green, and magenta. The expert advice here is critical: when mounting crates to the wall, use heavy-duty hardware and always locate and anchor them directly into wall studs. This ensures they can safely bear the weight of books and decorative items. Furniture upcycling is also prominently featured, such as the dresser painted a soft mint green and decorated with delicate stencil work (like floral patterns or subtle geometric motifs). For successful furniture rejuvenation, thoroughly clean and lightly sand the piece before priming; utilize high-quality chalk paint for minimal prep, and finish with several coats of durable polyurethane to protect the design from daily wear and tear.
Finally, focus on two foundational elements for a complete bedroom transformation: the headboard and the vanity. The rustic wooden headboard is constructed from reclaimed or new pallet wood. For this DIY, safety and prep are paramount: source heat-treated (HT stamped) pallets, not chemically treated (MB stamped). Dismantle the pallets carefully, heavily sand the wood, and then assemble the slats onto two vertical support boards placed behind the mattress. This approach provides a custom, cozy, farmhouse feel that requires minimal staining. For the celebrity-inspired illuminated vanity mirror, purchase a simple, large mirror and affix string lights designed for vanity use (typically round globe bulbs) evenly around the frame. Ensure the cord is neatly managed and tucked away behind the mirror or dressing table. The overall design philosophy demonstrated in these projects is to combine utility (shelving, storage) with vibrant self-expression (bright colors, custom lighting), making them ideal for personalizing a room effectively and affordably.
12 Must-See Baby Shower Decor
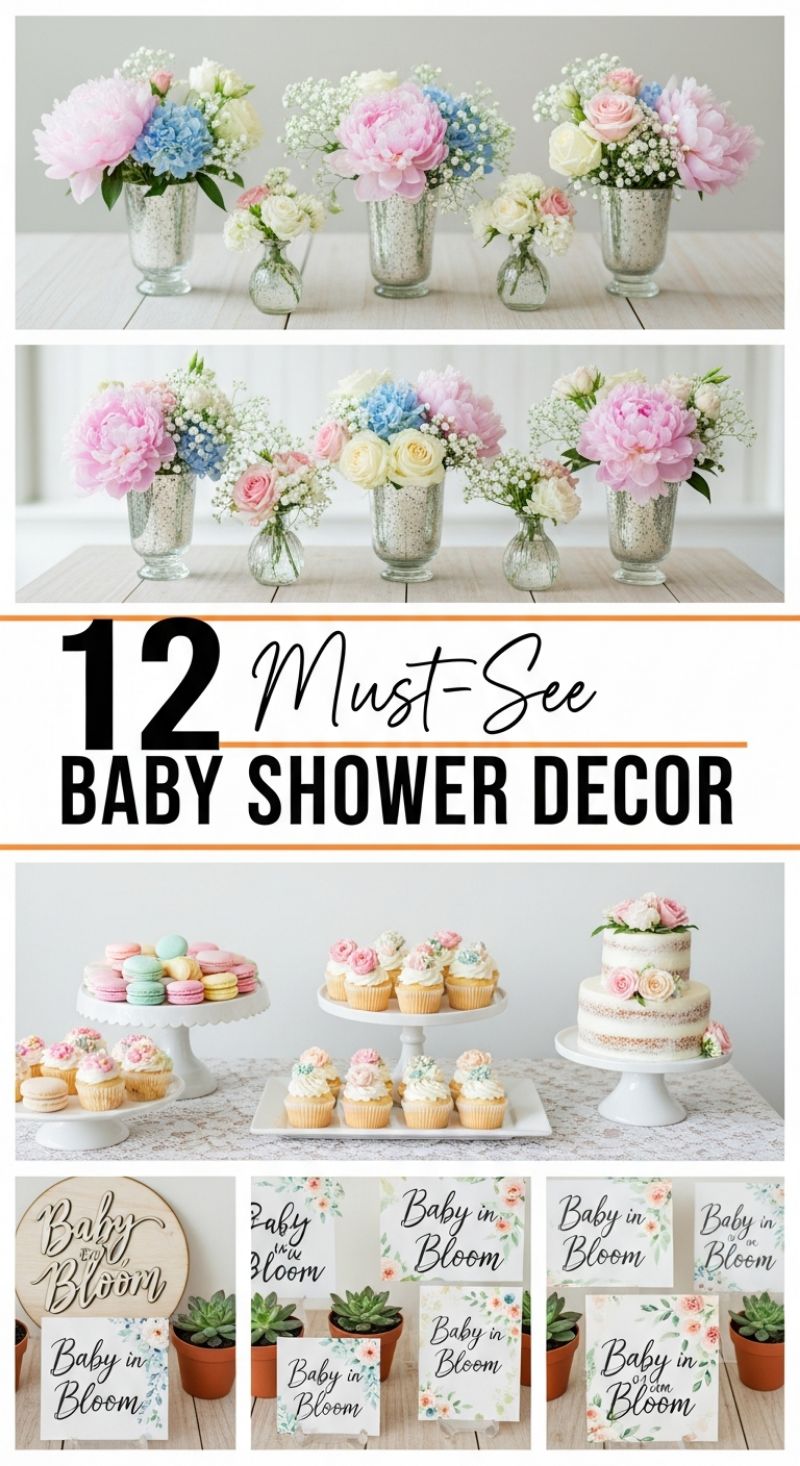
The “Baby in Bloom” theme offers a sophisticated, gender-neutral approach to baby shower decor, centered around a soft pastel palette and lush botanical elements. To recreate this look, the primary focus must be on elevated floral arrangements that mix color and texture expertly. Use a combination of soft pink peonies, delicate white and cream roses, and small clusters of dusty blue hydrangeas and baby’s breath. The key to achieving this high-end aesthetic is the vessel selection; opt for mixed metallic finishes, specifically speckled mercury glass vases, paired with simple, clear glass bud vases. This variation in size and material adds visual depth and a vintage elegance that elevates the standard centerpiece. Arrange the larger blooms (peonies, hydrangeas) in the mercury glass as anchor points, and use the smaller bud vases for single stems or tight groupings of roses and baby’s breath, scattering them liberally across the table surface to create continuous floral interest. Remember that balance is crucial; ensure your arrangements are voluminous but airy, allowing the individual flower types to breathe and contribute to the overall soft color story.
Next, the dessert display must echo the gentle sophistication of the florals through careful presentation and color coordination. Constructing a dynamic dessert bar requires leveraging multiple tiers and varying heights. Utilize white, ceramic pedestal cake stands of different sizes to display colorful treats, such as pastel macarons and classic vanilla cupcakes topped with small, edible floral garnishes. The centerpiece dessert should be simple and refined, like a rustic ‘naked’ cake—a lightly frosted layer cake adorned only with fresh pink roses. Using all-white serving ware ensures the focus remains on the food and the underlying texture of the table linens (like a delicate lace overlay). This cohesive approach turns the dessert table from a mere serving station into a decorative focal point, maintaining the lightness of the overall design while providing varied sweet options for guests.
Finally, integrate the “Baby in Bloom” motif into personalized signage and guest favors to complete the look. Personalized touches, while seemingly small, significantly enhance the custom feel of the party. Start with a statement welcome sign, such as a laser-cut wooden hoop featuring script lettering for a tactile, dimensional look. Complement this with smaller, DIY watercolor print signs featuring soft, sprawling floral borders to guide guests or identify different stations. For favors, small potted succulents are an ideal, low-maintenance choice that perfectly aligns with the ‘bloom’ concept. Pair each succulent pot with a miniature version of the floral watercolor sign, which can double as a place card or thank you tag. This instructional step ensures that the theme is consistently carried through every element, providing guests with a beautiful, lasting memento of the celebratory event.
6 Festive Galentine’s DIYs
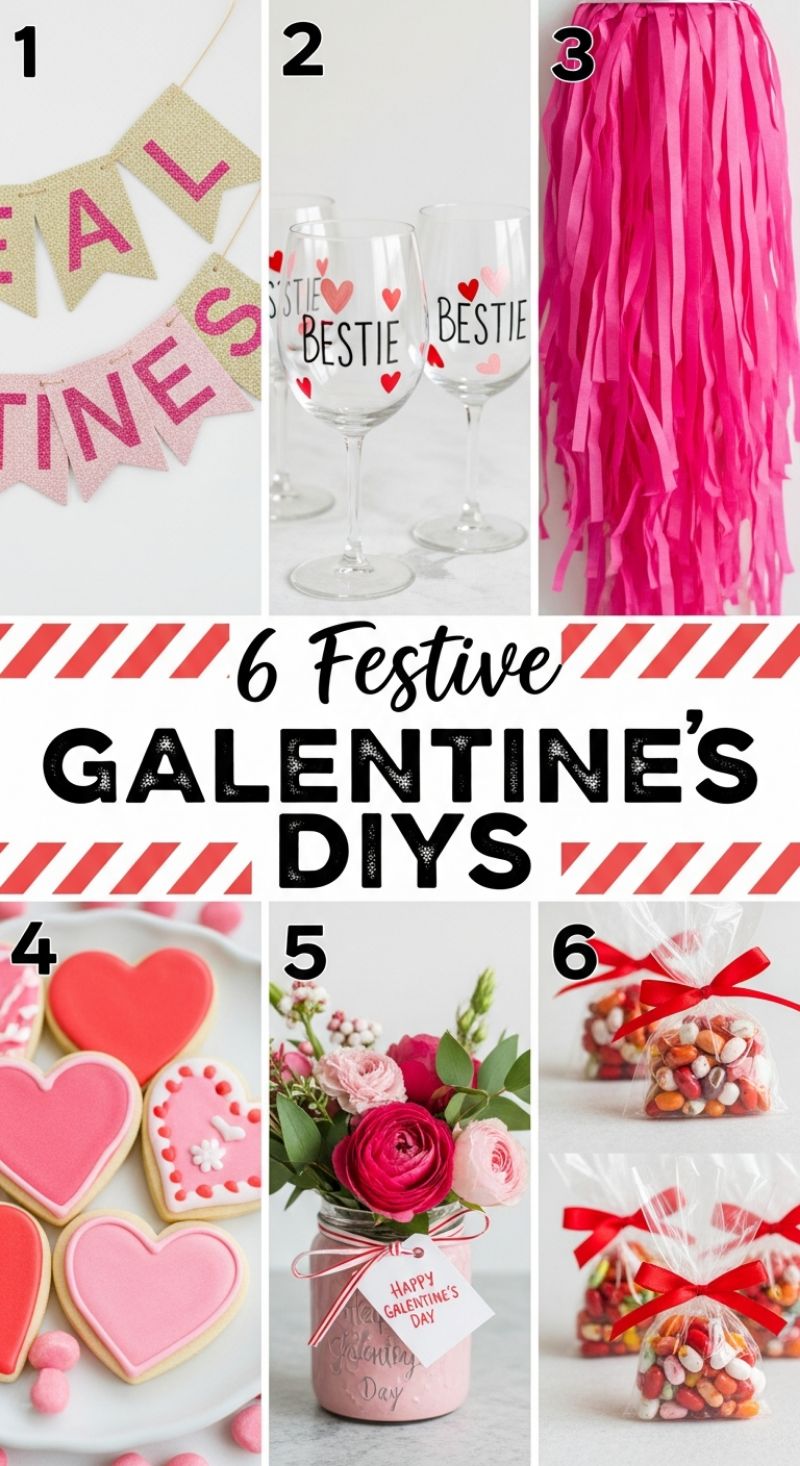
Creating the perfect Galentine’s Day celebration requires personalized touches that celebrate friendship, and these six DIYs cover everything from mood-setting decor to thoughtful favors. To execute the essential custom party banner (DIY 1), select sturdy burlap or thick cardstock pennants. Using a cutting machine, cut large letters out of vibrant pink glitter vinyl—or use adhesive stencil vinyl and fabric paint—to spell out your desired message, such as “GALENTINES.” Ensure the letters are centered and affixed securely before stringing the pennants onto twine or ribbon. Complement this banner with custom stemware (DIY 2) that doubles as both decor and a keepsake for your guests. Clean high-quality wine glasses with rubbing alcohol to ensure a grease-free surface. Using permanent vinyl (or specialized glass enamel paint markers), apply friendship-themed decals like “BESTIE,” framed by small red and light pink hearts. When using vinyl, transfer the design carefully using transfer tape, pressing out all air bubbles, and allow the glasses to cure for 72 hours before washing to ensure longevity. These two projects immediately set a custom, celebratory tone for your gathering.
To build a visually striking backdrop, the hot pink tassel garland (DIY 3) provides high impact with minimal effort. Purchase large sheets of high-quality tissue paper in fuchsia or hot pink. Stack several sheets and cut even strips along the length, leaving about an inch uncut at the top to serve as the spine. Twist the uncut portion and loop it over a long piece of rope or heavy twine, securing it tightly with florist wire or hot glue. Hang these tassels densely to create the maximum voluminous effect, perfect for a photo booth backdrop or accenting the dessert table. The celebration wouldn’t be complete without custom treats (DIY 4); craft heart-shaped sugar cookies and use royal icing tinted in varying shades of pink and red. Expert advice dictates using a piping consistency icing to create a clean border, followed by a thinner, flood consistency to fill the centers smoothly. Once the base layer is dry, add delicate details like small white blossoms, polka dots, or contrasting piped borders for professional-looking results.
Finalizing your party details involves thoughtful centerpieces and memorable favors. The painted mason jar floral arrangement (DIY 5) acts as both a beautiful centerpiece and a personalized hostess gift. Begin by painting a clear mason jar with a few coats of blush pink chalk paint for a matte finish. While the paint is still tacky, use a fine stylus or toothpick to etch an affectionate message like “Happy Galentine’s Day” into the paint, allowing the glass beneath to show through for an authentic distressed look. Fill the jar with lush, mixed-pink seasonal flowers like ranunculus and garden roses, and attach a hand-written tag with striped ribbon. For quick, charming party favors (DIY 6), fill small, clear cellophane bags with colorful candies, such as pink, red, and white jelly beans or conversation hearts. Tie the top of each bag securely with a bright red satin ribbon bow. Presenting these favors neatly stacked or placed at each setting offers a sweet thank-you that perfectly encapsulates the festive spirit of Galentine’s Day.
7 Cozy EASTER MANTLE
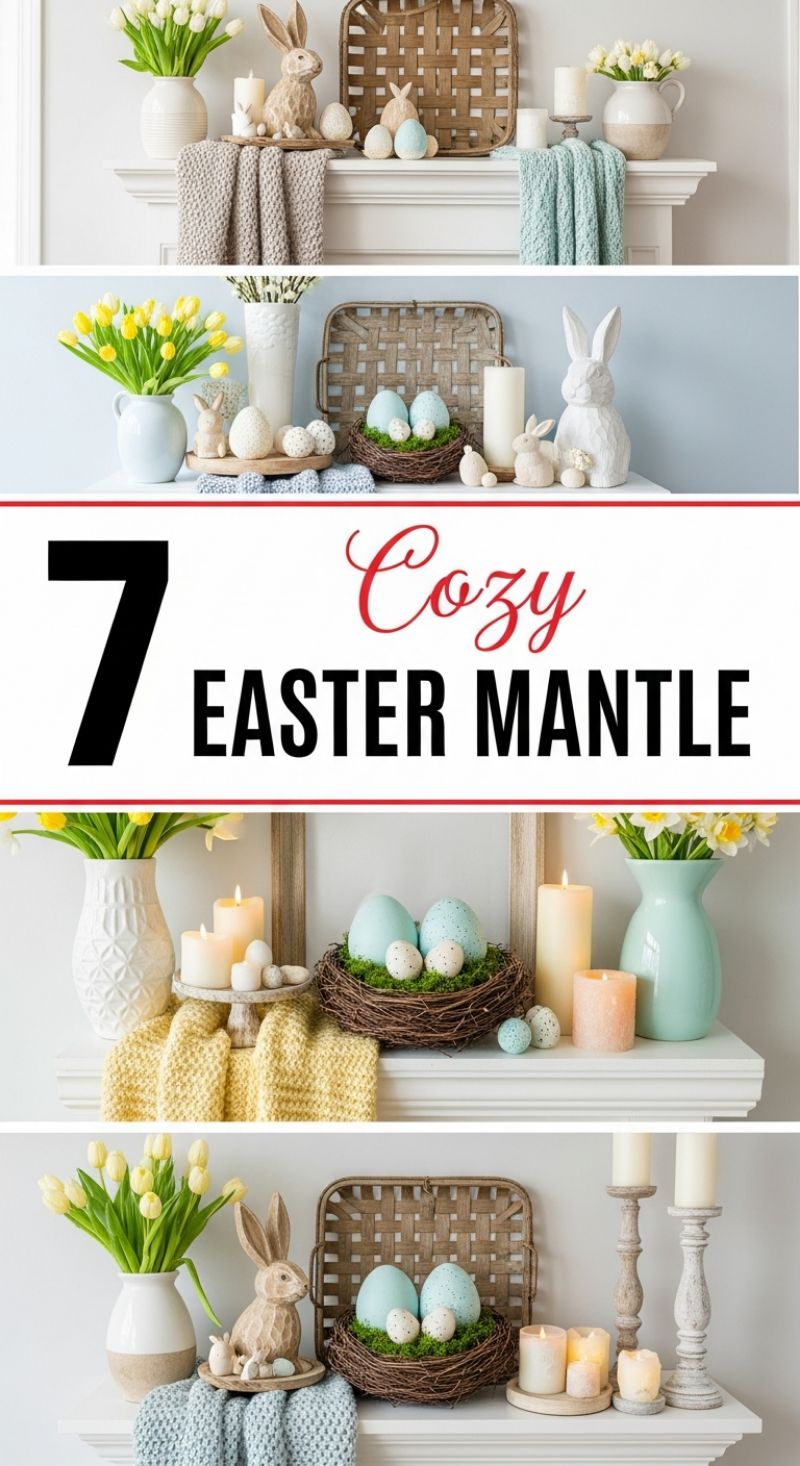
Achieving a cozy Easter mantel starts with texture and a soft color palette. This style leans heavily into the farmhouse aesthetic, prioritizing natural materials and comforting textiles. Begin by draping knitted or chunky-knit throws (in light spring colors like pale yellow, robin’s egg blue, or creamy white) over the mantel edge. These textiles instantly add depth, softness, and warmth, acting as a foundation for your smaller decor items. Expert advice for mantel staging is to work in asymmetrical groupings of three or five items, allowing the eye to move across the display naturally. Use wooden elements—such as a weathered wooden frame or a simple woven tobacco basket—to anchor the center or the sides, providing a rustic backdrop that contrasts beautifully with the soft pastels of the eggs and florals.
The centerpiece of this seasonal display revolves around classic Easter iconography: bunnies and nests filled with eggs. Source decorative eggs in varying sizes and finishes, such as large speckled blue eggs alongside smaller white ones. Place these within natural, moss-lined twig nests, ensuring they are slightly elevated—perhaps resting on a small stack of books or a wooden pedestal—to give them prominence. Integrate various bunny figurines; mixing materials like carved wood, white textured ceramic, and softer fabric bunnies adds crucial visual interest. When grouping these elements, remember the rule of contrast: place a light-colored object next to a darker background (like a white ceramic bunny against the woven basket) to ensure each item stands out. Small vignettes of nested eggs, a petite bunny, and a short candle create appealing, contained scenes across the mantel shelf.
Creating dynamic height is crucial for an engaging mantel display. Use tall, slender vases filled with fresh spring flowers, such as cheerful yellow or white tulips and daffodils, placed at the ends of the mantel to frame the setup. Balance the height with varying candlestick holders—mixing rustic, distressed wood candle holders with shorter pillar candles on simple wooden risers. The soft glow of lit candles (use flameless LED options for safety near textiles) enhances the “cozy” factor, especially in the evening. Complete the look by scattering smaller filler items, such as smooth pebbles or tiny clusters of mini eggs, around the base of the candles and vases. This technique fills negative space, making the entire arrangement feel lush, cohesive, and welcoming for the spring holiday.
7 Easy VALENTINE DIYs

To recreate the charming, vintage-inspired look of the book-page heart garland, you will need old book pages or printed paper with fine text, along with hot glue and twine. The secret to the dimensional effect is folding: start by tracing and cutting out three identical paper hearts. Fold each heart sharply down the center line. Using a reliable craft glue or a hot glue gun, apply a thin bead of adhesive along one half-fold of the first heart, and press it firmly against the corresponding half-fold of the second heart. Repeat this step with the third heart. Before fully sealing the final heart to the first, lay a piece of thin twine or jute ribbon along the central crease where the hearts meet and secure it with a small dab of glue. This technique ensures the hearts hang perfectly along the string, providing a beautiful, textured focal point for any wall or mantlepiece. Repeat the process to create a full banner, spacing the dimensional hearts evenly for maximum visual impact.
Elevate your everyday decor with a personalized touch, taking inspiration from the cozy mug display. While store-bought mugs are fine, customizing plain ceramic ware adds a thoughtful element. Use oil-based paint pens designed specifically for ceramics (ensuring they are non-toxic and oven-safe) to write words like “LOVE” or draw simple shapes like the heart seen in the image. Once the design is thoroughly dry, follow the paint pen manufacturer’s instructions for baking the mugs; this critical step cures the paint, making the design permanent and more resistant to washing. Arrange these personalized mugs on rustic wooden coasters or a natural log slice, as pictured, to introduce organic texture and warmth into your setup. Complement this vignette with a flickering pillar candle—the soft, warm light instantly transforms a simple breakfast or reading nook into a romantic, Hygge-inspired space.
Finalize your Valentine’s decor by incorporating simple, natural elements and utilizing basic crafting supplies. The image beautifully showcases an effortless, rustic bouquet of mixed pink and white wildflowers and natural greenery, expertly arranged in a clear glass vessel, such as a repurposable Mason jar. The key to this casual style is embracing variety and varying heights; use eucalyptus or other sturdy greenery for structure and height, then layer in delicate blooms like cosmos, daisies, or babies’ breath, keeping the arrangement loose and untamed for an organic feel. Utilize the remaining crafting materials—scissors, twine, paper, and a hot glue gun—to create quick finishing accents. Cut small, layered hearts from contrasting cardstock (red and white work perfectly) and use the hot glue gun to attach them to existing twine or punch a hole in a small cardstock square to create personalized gift tags. These small, handmade details are essential for tying the entire festive, cohesive look together.
7 Spa-Like Bathroom Ideas

Achieving the signature spa look starts with a foundation of pristine white and clean lines. Notice how the images rely heavily on white marble and crisp, rolled towels to evoke cleanliness and luxury. To replicate this, invest in thick, high-quality, pure white cotton towels. The way they are displayed is key: roll them tightly into cylindrical shapes (like professional bath bombs) and stack them pyramid style on an open wooden shelf or place them neatly in a decorative tray near the sink. This instantly signals relaxation and sophistication. If installing new marble is outside your budget, use large format white subway tile or a glossy, solid white paint on the walls to mimic the clean, bright backdrop. Ensure lighting is soft; avoid harsh, unflattering overhead fixtures and focus on diffuse illumination that enhances the feeling of serenity.
Introduce warmth and organic contrast by integrating natural wooden elements. The cool, clean lines of the marble countertops in the photographs are beautifully balanced by the rich tones of the wooden trays and mirror frames. This DIY decor element is easy to implement: procure small bamboo, teak, or light oak trays to corral items on the counter, such as scented candles, a small succulent, or decanted soaps. Speaking of ambiance, candles are non-negotiable for creating a relaxing atmosphere. Use unscented or subtly scented pillar candles of varying heights (white, cream, or light grey) for visual interest and a gentle glow. For an authentic spa experience, choose scents scientifically proven to promote relaxation, such as eucalyptus, lavender, or subtle linen, placing them strategically away from flammable materials but close enough to the bathing area to enjoy their soothing aroma.
The final touches involve meticulous organization and updating the utilitarian fixtures. The metal hardware seen in the images
both the faucets and the towel racks
should be consistent, often utilizing brushed nickel or stainless steel to add quiet sophistication without dominating the design. A critical step for mastering the spa aesthetic is the purging of clutter; a true spa environment is minimalist. Store everyday items like toothbrushes, makeup, and excessive products inside drawers or cabinets. Only the decorative soap dispensers (preferably matching ceramic or glass bottles), candles, and neatly stacked towels should remain visible. Additionally, always maximize natural light where possible. If your bathroom lacks a window, ensure your mirrors are clean and thoughtfully placed to bounce light around the room, making even a small space feel bright, open, and utterly luxurious.
10 Chic Galentine’s Decor
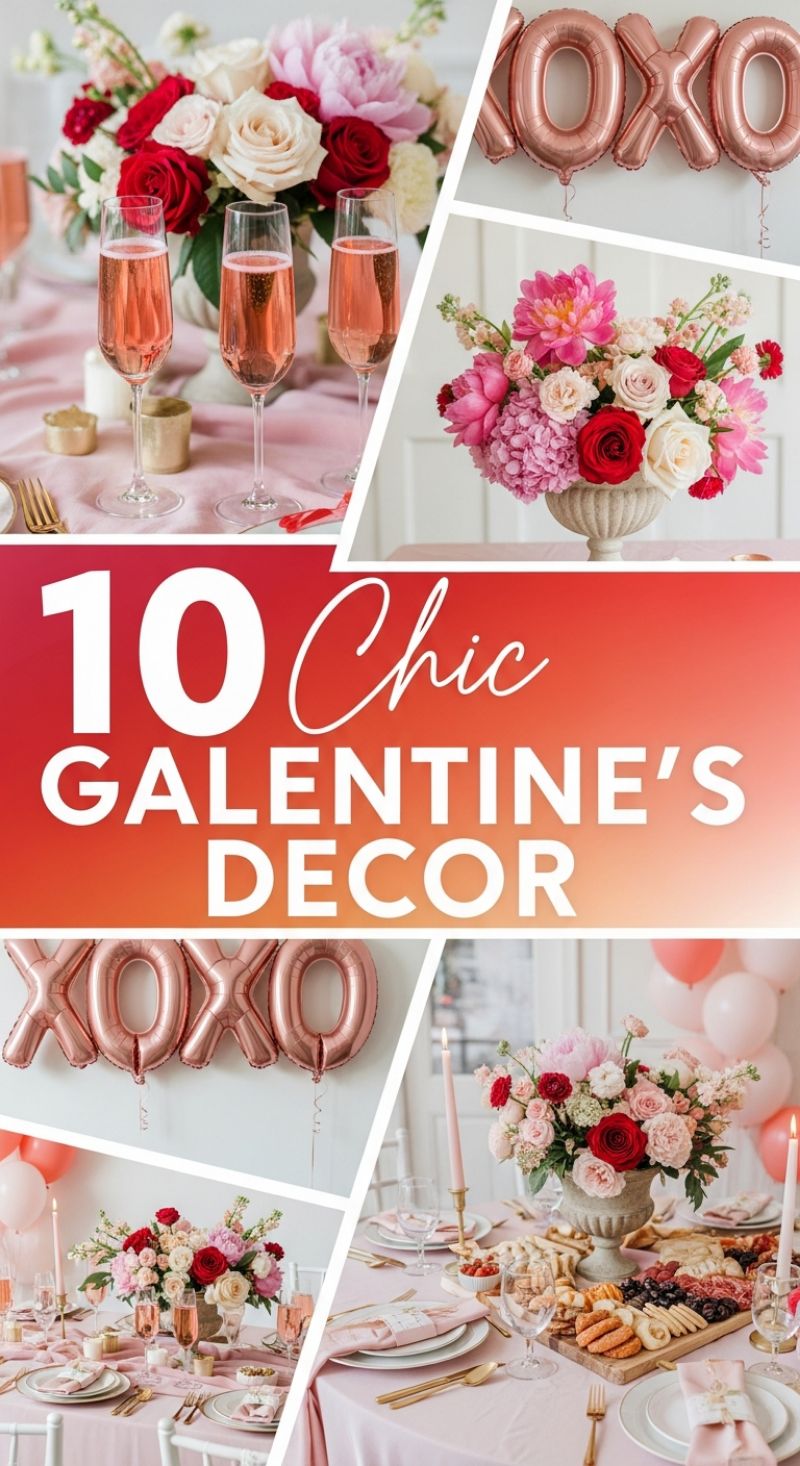
A successful Galentine’s celebration hinges on a cohesive, romantic color palette, moving beyond typical Valentine’s red into sophisticated blush tones. Begin by anchoring your space with a soft pink or dusty rose linen tablecloth. This provides a warm, feminine base without being overly saccharine. Layering is key for a high-end look; consider a slightly darker pink or textured white table runner if desired. The primary accent metallic should be gold or, as seen here, rose gold. Incorporate this through your cutlery (a flatware set instantly elevates the setting), slim taper candle holders, and small decorative bowls. For your color story, combine deep ruby red (for impact) with lighter shades of pink (peonies, blush napkins) and creamy white (roses, plates). Expert tip: Ensure your chosen light source—whether natural window light or soft candlelight—enhances these tones, casting a flattering glow perfect for a daytime or evening gathering.
The centerpiece is the undeniable star of this decor scheme. Recreate this abundant look by combining large, statement blooms like blush peonies and vibrant red roses with smaller, textured flowers such as white stock, pink hydrangea, and spray roses. Present these arrangements in a substantial, classically styled urn or stone vase to provide weight and contrast against the delicate pink linen. For place settings, adopt a layered approach: use standard white dinner and salad plates for a clean foundation, then introduce texture and color with soft pink fabric napkins, perhaps tied with simple twine or a ribbon, and placed atop the salad plate. Don’t overlook the functional decor: integrate the food display seamlessly. A large, beautifully arranged charcuterie or grazing board filled with artisanal cheeses, fresh berries (like raspberries and blackberries), cured meats, and crackers serves as a beautiful centerpiece addition, encouraging interaction and relaxed dining among friends.
To finalize the celebratory atmosphere, incorporate festive yet chic details. The rose gold foil “XOXO” balloons immediately communicate the theme without being childish; hang them against a clean, white wall backdrop to maximize their visibility and impact. Ensure they are correctly inflated for that plump, professional look. Complementing the table setting, tall, slender pink taper candles (set in gold holders) add vertical interest and crucial warm light. Finally, think about the drinks presentation. Champagne or rosé served in classic, tall flutes adds to the elegant aesthetic, often mirroring the blush tones of the decor. To make the gathering feel personalized and intimate—a hallmark of Galentine’s Day—consider adding small favors or personalized name cards wrapped into the napkin setting. These small touches transform the event from a generic party into a meaningful celebration of friendship and style.
10 Best SUMMER VIBES
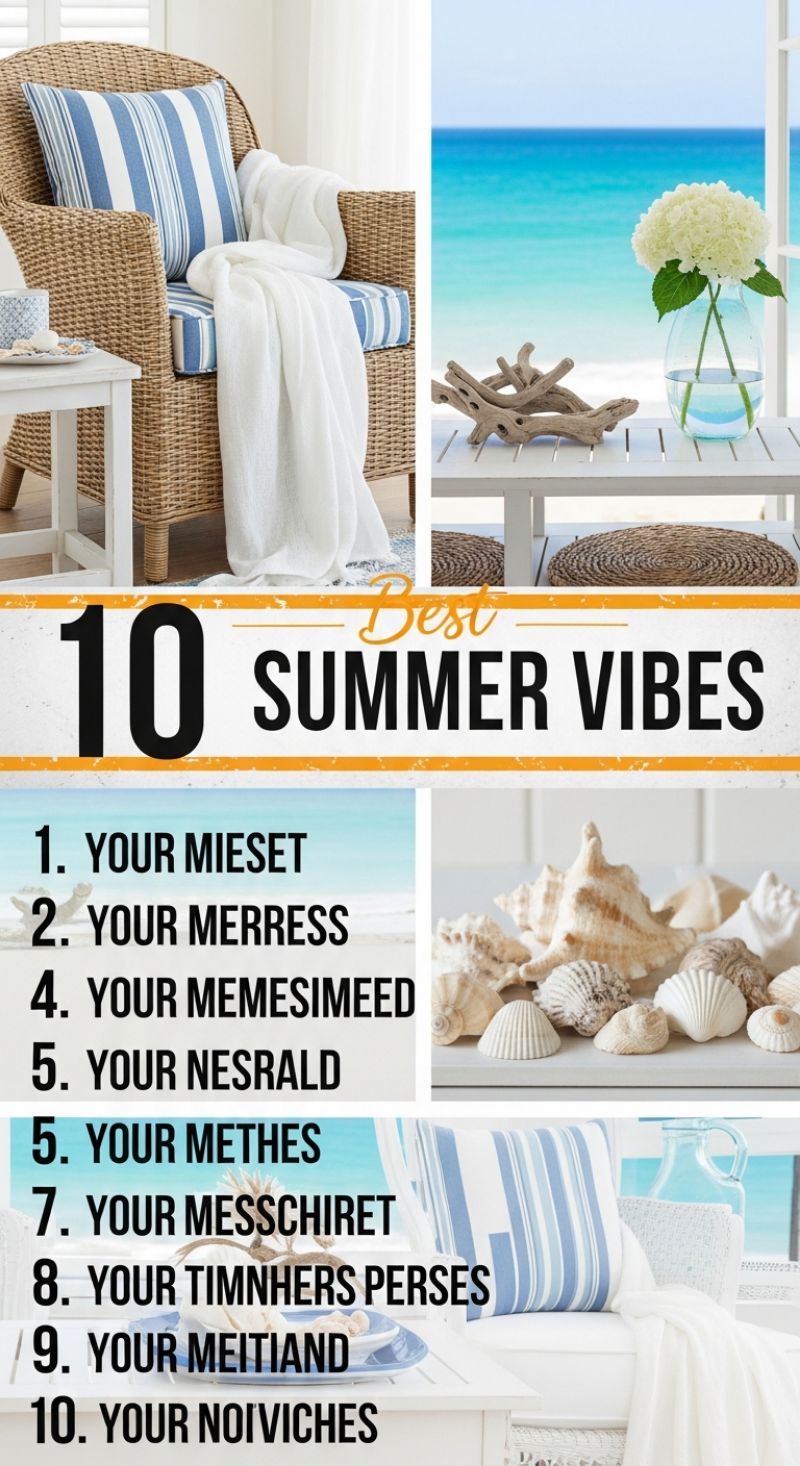
Achieving the ultimate summer vibe in your home relies on mastering a mix of light, texture, and natural elements. The foundation for this aesthetic begins with a clean, crisp color palette. Utilize pure white as your primary base—on walls, linens, and large furniture pieces—to maximize natural light and evoke an airy, cloud-like feeling. Contrast this base with splashes of oceanic hues: deep navy, sky blue, and bright turquoise stripes, primarily introduced through textiles like throw pillows and chair cushions. To replicate the coastal charm seen here, incorporate natural textures such as wicker, rattan, or woven grass into seating and area rugs. If replacing furniture isn’t an option, a DIY approach involves using white slipcovers for existing chairs and focusing your budget on high-impact, textured accent pieces, such as the classic blue and white striped cushions, which can easily be sewn or sourced for a quick seasonal update.
Expert coastal decor relies heavily on curating found objects from nature, which provides a rich source of free DIY decor. Start by collecting or purchasing natural elements like seashells and driftwood. For a stunning centerpiece, gather various sizes and types of shells, cleaning them thoroughly, and arranging them artfully in a tiered display or a clear glass vessel, mirroring the image’s vignette. Similarly, driftwood pieces should be cleaned and bleached slightly (if desired) before being used as sculptural focal points on tables or shelves. Consider combining these natural finds with fresh, white floral accents, such as hydrangeas, placed in simple, clear glass vases to maintain the clean lines and reinforce the connection to the outdoors. This intentional use of organic materials prevents the bright white decor from feeling sterile, adding warmth and authenticity.
To complete this rejuvenating summer sanctuary, focus on maximizing the room’s openness and light quality. If you are blessed with a view, frame it with sheer, white curtains that diffuse sunlight without obstructing the scenery. If an ocean view isn’t available, strategically placed mirrors can reflect light and expand the sense of space. Remember that comfort is paramount for true summer relaxation; incorporate soft, tactile elements like cotton or linen throw blankets (always white, for visual consistency) draped casually over seating. The goal is to create a seamless transition between indoor and outdoor living, ensuring every detail, from the textured wicker to the marine-inspired blue stripes, contributes to a perpetually relaxed, sun-kissed environment, making these simple changes among the most satisfying DIY seasonal shifts you can make.
10 Ultimate Grad Party Decor

Graduation is a monumental achievement, and the decor should reflect the significance and joy of the occasion. The ultimate grad party begins with establishing a strong theme through a well-chosen color palette, like the featured rich maroon, sunny yellow, and elegant navy blue. Start by creating an immediate impact at the entryway with an impressive balloon arch—a simple DIY element that makes for a fantastic photo backdrop, especially when accented with a foil banner like “Congrats Grad.” Moving to the dining area, elevate simple tablescapes by incorporating gold and navy for a sophisticated look. Use gold charger plates layered under navy napkins, secured with a simple ring or tie. For centerpieces, choose arrangements that reflect the season and school colors; the pictured sunflowers and white roses offer a bright contrast to the deep navy. If hosting outdoors, expert advice dictates investing in proper lighting: string lights woven throughout a large tent transform the venue into a magical, intimate space perfect for an evening celebration.
To maximize visual impact and photo opportunities, dedicate a specific area to personalized backdrops and the dessert display. Foil number balloons spelling out the graduation year (e.g., “2024”) instantly anchor the space and require minimal setup, especially when hung against a simple striped curtain backdrop in coordinating colors. The dessert table should feature a show-stopping personalized cake, often decorated with graduation motifs and the graduate’s name, complemented by dozens of matching cupcakes and color-coordinated treats. Beyond aesthetics, engagement stations are crucial for a successful party flow. Set up an interactive “Sign Our Yearbook” table using a laptop or tablet for digital messages, flanked by Instax cameras so guests can snap photos and immediately pin them up or drop them into a memory box. This blends modern technology with nostalgic yearbook tradition, ensuring the graduate has lasting, immediate memories of the event.
Finally, incorporate thoughtful details and interactive elements that keep all ages entertained. Create customized party favors by decorating simple paper or canvas bags with small black graduation caps and yellow tassels, transforming inexpensive containers into themed keepsakes filled with personalized treats. For outdoor gatherings, setting up oversized yard games, such as giant Connect Four or personalized cornhole boards, encourages mingling and friendly competition, turning open lawn space into an activity hub. Do not overlook the power of sentimentality: dedicate a prominent wall to a “Memory Line.” This curated gallery wall should feature framed photos tracing the graduate’s journey from childhood through senior year. Use a variety of frame sizes and materials to add visual interest, making this sentimental focal point a perfect place for guests to pause and reminisce about the graduate’s achievements.
15 Dreamy Bridal Table Decor and Floral Arch Inspirations
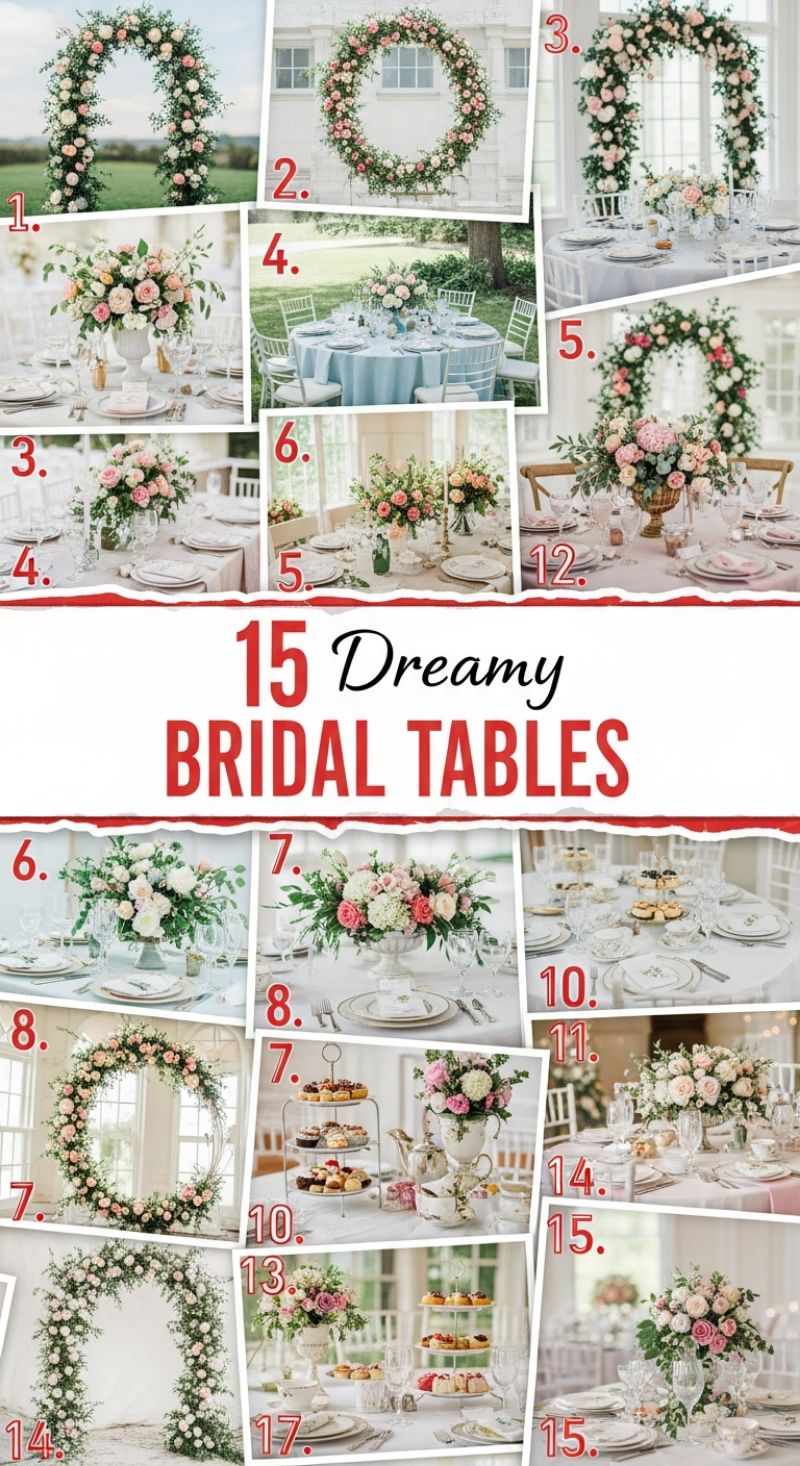
Creating a truly dreamy bridal setting requires blending lush floral design with carefully curated table architecture. The primary focal point for a ceremony or head table is often a breathtaking floral arch or wreath, as demonstrated in visuals 1, 2, 3, and 8. For a DIY approach to these statement pieces, start with a solid, lightweight structure—such as a metal hoop for a wreath (Image 2) or heavy-duty PVC or bent rebar for an arch (Image 1). The key to achieving this romantic, abundant look lies in layering diverse greenery (think silver dollar eucalyptus, smilax, or ruscus) first, creating a dense base. Once the structure is completely obscured, strategically place your primary florals (roses, peonies, hydrangeas) in clusters, prioritizing asymmetrical coverage for a more organic feel. Focus 70% of your budget on quality foliage, as it provides the depth and volume necessary to elevate the design from simple to spectacular. Remember to secure all elements tightly using floral wire or zip ties to ensure stability throughout the event, especially if setting up outdoors.
Moving to the tablescape, the height and vessel choice of your centerpieces (seen in 3, 4, 6, 7, and 15) dictates the entire mood. For formal elegance, opt for elevated arrangements placed in classical urns or trumpet vases (Image 15), allowing guests to maintain sightlines across the table while providing dramatic impact. If aiming for a more intimate, conversational setting, low, wide compote bowls (Image 7) or small collections of vintage teacups (Image 10) work beautifully, spreading the floral interest closer to the diners. When assembling, always ensure your flowers cascade slightly over the rim of the vessel, mimicking the natural movement of a garden. Use soft colors—blush, cream, peach—and ensure the arrangement incorporates texture through different bloom sizes and abundant green fillers. For added polish, select linens that complement the palette; a dusty blue tablecloth (Image 4) can refresh a traditional setting, while a soft blush runner (Image 11) adds warmth.
Finally, expert tablescape styling pulls the entire look together. The place setting is where personality shines, whether through antique-style, gold-rimmed china (Images 10 and 15) or simple white plates topped with a personalized menu card. A crucial DIY detail is the napkin fold and placement—tucked neatly under the top plate with a sprig of greenery, or secured with a ribbon. If integrating a specific theme, such as the charming Afternoon Tea setup (Images 9, 10, and 13), utilize multi-tiered stands for desserts and favors, replacing traditional centerpieces with elegant teapots and vintage saucers. This thematic detail not only enhances the visual appeal but also provides functionality, maximizing table space while delivering an unforgettable experience.
14 Easy Prom Decor Photo Backdrops
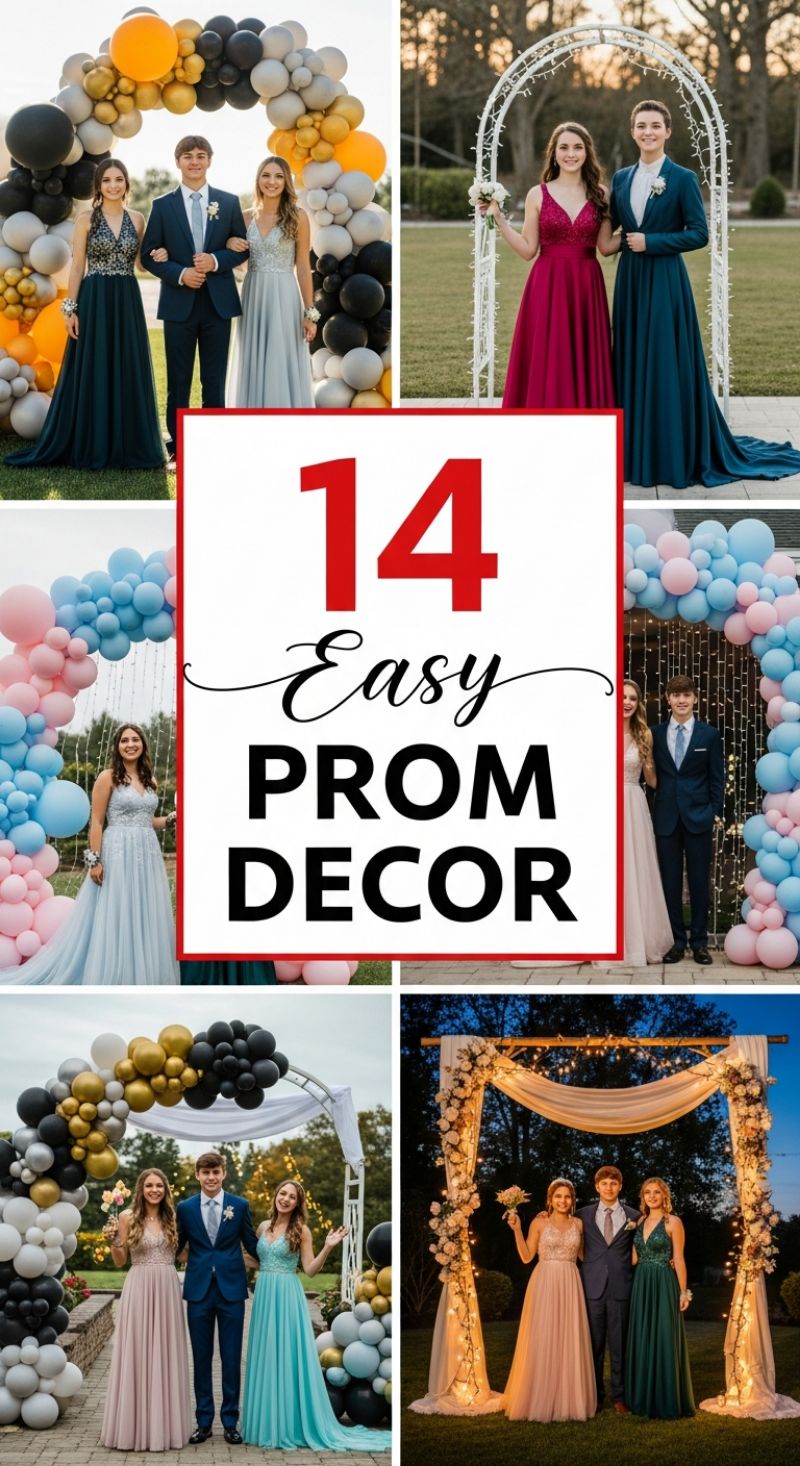
Creating a show-stopping balloon arch is one of the easiest and most impactful ways to define a prom photo zone. The key to achieving the professional, organic look showcased in these examples is variation in balloon size and strategic clustering. Start with a sturdy frame, typically a wire or PVC pipe arch kit, anchored securely into the ground. Inflate balloons in three or four different sizes (from 5 inches to 24 inches) using an electric pump to save time. Mix metallic, matte, and standard colors, such as the vibrant black, gold, and orange palette shown, or the softer pink and baby blue combination. Use balloon decorating strip tape or fishing line to thread and secure the balloons together. Expert advice: ensure the largest balloons anchor the structure, and use mini balloons to fill in any gaps, creating a dense, professional garland that ensures the arch looks full and luxurious from every angle.
For a more sophisticated and romantic atmosphere, the DIY fabric and floral archway offers timeless elegance, especially for evening photos. This design requires a wooden arbor or a white metal wedding arch. The primary decorative elements are sheer drapery and warm lighting. Purchase several yards of white or cream chiffon or tulle and artfully drape it over the top beam of the arch, allowing the fabric to pool slightly at the base. Next, intertwine warm white string lights or fairy lights around the structure and beneath the draped fabric; this technique provides a soft glow that beautifully illuminates formal attire, as seen in the stunning nighttime setup. Finish the look by wrapping faux floral and greenery garlands (like roses or hydrangeas) down the vertical posts of the arch, securing them with discreet zip ties. This combination transforms a simple frame into a magical focal point perfect for capturing lasting memories.
When implementing these decor ideas for a large event like a prom, careful consideration of logistics is crucial. If setting up outdoors, remember to heavily anchor your arches using sandbags or weights, especially if incorporating fabric which can catch the wind. Location is also vital; place the backdrop slightly away from the main traffic flow but ensure it’s well-lit and easily accessible. For the best photo results, position the backdrop where the sun sets behind the subjects (if shooting during golden hour) or ensure powerful overhead lighting if using the backdrop indoors or late at night. Whether you choose the festive vibrancy of a balloon installation or the classic grace of a draped pergola, these DIY backdrops offer maximum visual return for minimal effort, creating designated, attractive areas that encourage guest interaction and stunning photographs.
8 Gorgeous Patio Decor
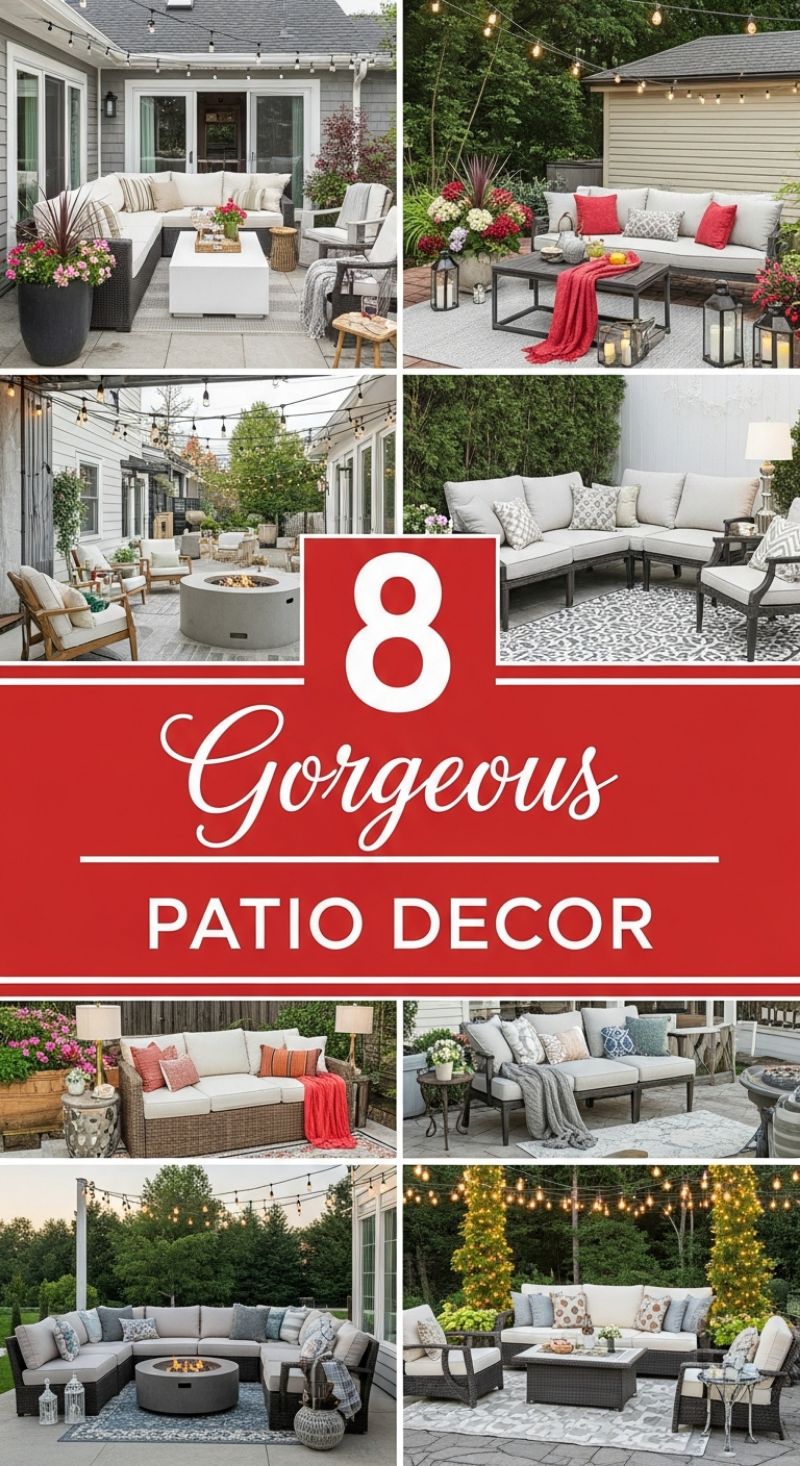
Establishing a truly gorgeous patio involves transforming an open slab into an extension of your indoor living space, focusing heavily on comfort, structure, and ambiance—all achievable through thoughtful DIY implementation. Start by defining the seating area, often utilizing large, cozy sectional sofas or deep-seating wicker sets, as seen across these examples. To anchor this outdoor room, incorporate an appropriately sized, weather-resistant area rug, preferably in a neutral or subtle geometric pattern, which immediately grounds the furniture and adds textural softness underfoot. The crucial element distinguishing these luxurious patios is the layered lighting: suspend commercial-grade bistro string lights overhead, running them high across the space to mimic a twinkling canopy; this requires sturdy attachment points, possibly via decorative poles or house eaves. Supplement this overhead glow with ambient sources: decorative floor lanterns (often housing LED pillars for safety and convenience) and elegant tabletop lamps placed on side tables, ensuring multi-directional illumination that enhances the intimate, welcoming atmosphere once the sun sets.
Once the foundational seating and lighting are established, introduce key focal points and layers of texture to elevate the design from functional to high-end. A central feature like a modern round concrete or stone fire pit serves as both an aesthetic centerpiece and a functional gathering spot, offering warmth and mesmerizing movement. DIY enthusiasts can build custom wood planter boxes or simply source oversized, stylish pots, filling them with vibrant, resilient flora such as hydrangeas, ornamental grasses, or deep red foliage to inject natural color and vertical dimension—this is where seasonal effort pays off dramatically. Furthermore, inject luxurious comfort by accessorizing generously. Throw pillows should coordinate with the rug and furniture base but provide the main color accents (e.g., contrasting bright reds or soft blues against gray cushions). Don’t forget functional throws and blankets, draped casually over seating to suggest warmth and encourage lingering, making the patio feel just as styled and inviting as any indoor living room.
To ensure your patio achieves and maintains a truly “gorgeous” aesthetic, focus on material quality and visual cohesion. The most successful designs shown here utilize a predominantly neutral palette for major pieces—light gray cushions, dark wicker or metal frames—allowing colorful textiles (pillows, throws) to be the easy, inexpensive element to refresh seasonally. When selecting outdoor furnishings, prioritize durable, all-weather materials that require minimal upkeep, such as resin wicker or rust-proof aluminum. For wood elements, ensure they are properly sealed or choose naturally resistant woods like teak. Finally, pay attention to scale; the furniture must fit the space without overwhelming it, leaving room for easy circulation and maximizing the impact of the central features like the fire pit. By integrating robust seating, strategic ambient lighting, personalized focal points, and layered textiles, you create an outdoor retreat that embodies sophistication and comfort, perfect for year-round enjoyment.
9 Stunning Porch Decor Ideas for Spring and Summer
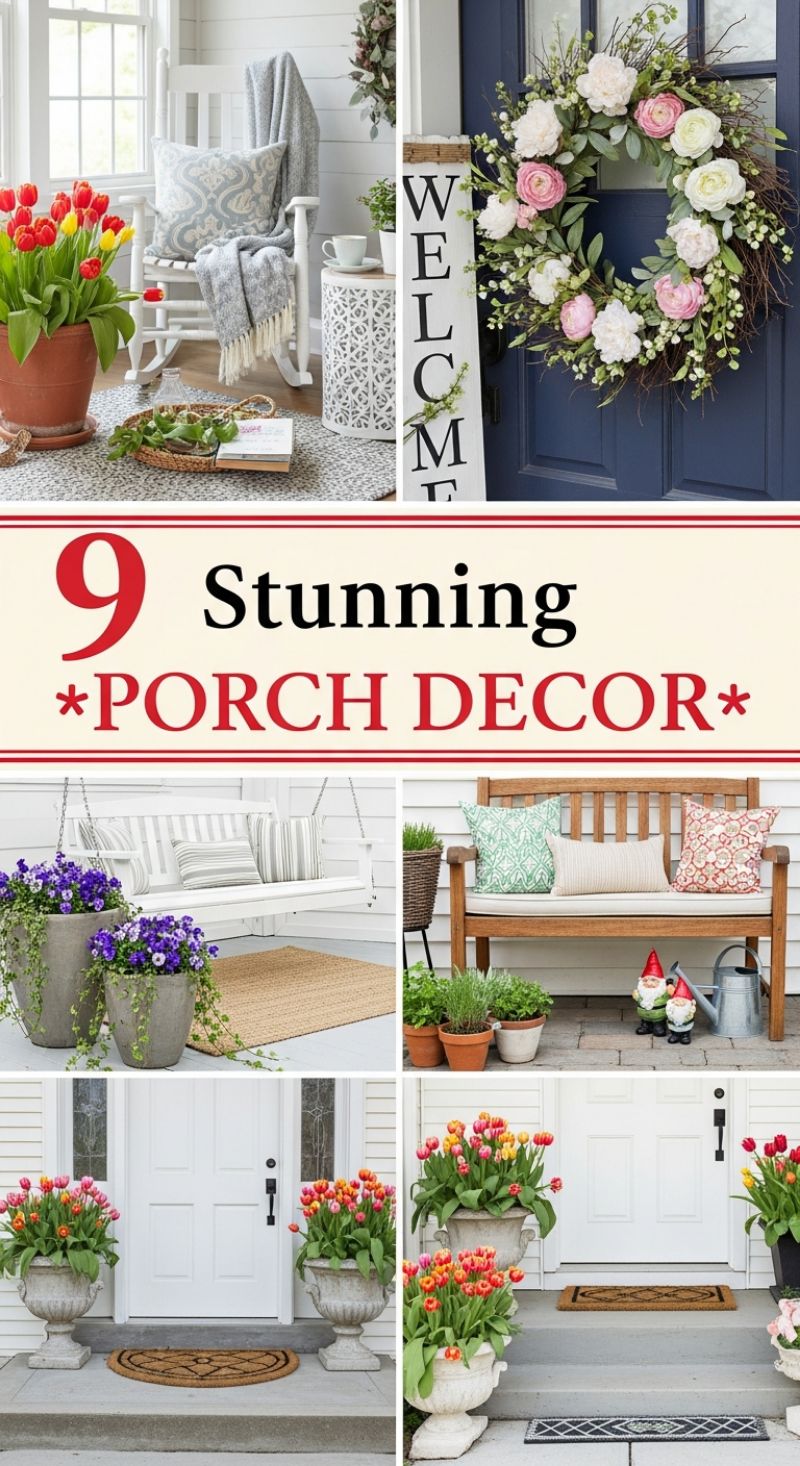
Transforming a porch into a true outdoor living space requires a strategic approach to comfort, texture, and seasonal color. To replicate the cozy lounging areas seen here, start by focusing on seating and textiles. A white rocking chair or a porch swing instantly elevates the inviting factor. The key is layering: anchor the space with a large, durable outdoor rug (like a neutral woven sisal or a patterned polypropylene), then add soft furnishings. Choose pillows and throws made from fade-resistant, quick-drying outdoor fabrics. For a charming touch, drape a cozy blanket over the chair back—even if it’s only for looks—and ensure you have a small side table, perhaps a decorative cut-out design like the one pictured, to hold a book or a morning cup of coffee. When planning your potted arrangements, use varied materials; structural concrete or stone planters filled with draping purple petunias contrast beautifully with simple terra cotta pots housing bright spring tulips, creating a dynamic visual flow.
Mastering curb appeal means making a statement at the front door. The most impactful elements are symmetry and seasonal focal points. Flank your entryway with two substantial, decorative urns filled with vibrant blooms like tulips or ranunculus. To sustain this look throughout the season, plan for succession planting—start with bulbs for early spring color, then swap them for flowering annuals or potted herbs in late spring and summer. Enhance the vertical appeal by hanging a lush, floral wreath (peonies and eucalyptus are excellent choices for a faux wreath that lasts all season) on a deeply contrasting door color, such as navy blue. Next to the door, incorporate a tall, vertical element like a DIY painted wooden ‘WELCOME’ sign. This simple project adds height and a personalized, friendly greeting. Finally, don’t overlook the doormat; layer a large, solid-colored woven rug beneath a smaller, patterned or novelty welcome mat to add immediate depth and visual complexity to the threshold.
For smaller vignettes, like the charming bench area, focus on mixing functional items with decorative accents. A simple wooden bench becomes instantly appealing with plump, patterned outdoor pillows in complementary colors (e.g., mixing greens, creams, and warm reds). Beside the bench, create a mini garden display by grouping various potted plants—herbs, succulents, or small shrubs—in differing sized pots, ranging from simple terra cotta to glazed ceramic. Grouping items in odd numbers (like three or five pots) creates the most natural and pleasing arrangement. Finish the scene with whimsical details: a galvanized watering can adds a rustic, practical element, while small garden gnomes or other figurines inject personality and charm. This attention to detail ensures every corner of your porch contributes to a cohesive, stunning outdoor design.
5 Perfect VALENTINE TABLES

Creating a spectacular Valentine’s Day tablescape, as stunningly captured here, relies on the dramatic use of color, texture, and abundant illumination. To start, establish a foundation of luxury by choosing a deep, saturated red (think oxblood or cabernet) for your primary textile accents. Layering is key for depth: begin with a neutral white or cream tablecloth, then introduce a crushed velvet or rich satin table runner that flows generously down the center. Use this main color for your dinner napkins, folding them elegantly and letting them drape over the edge of the plate setting. For a truly high-end effect, ensure all fabrics have a soft sheen to catch the candlelight, mimicking the lavish, draped look seen in these examples. The contrast between the brilliant red and the crisp white china creates the classic, powerful romantic aesthetic essential for this holiday.
Ambiance is the single most important element in achieving this romantic glow. The setting requires both height and diffusion in its lighting sources. Place tall, stately taper candles in polished gold or brass holders at either end of the runner to provide vertical structure and a traditional, sophisticated flicker. Supplement this height with numerous low-sitting tea lights or unscented votive candles clustered along the runner between the settings. These low lights are crucial as they scatter soft illumination, highlighting the texture of the runner and the richness of the red roses. Speaking of centerpieces, opulence is paramount. Fill a substantial gold or bronze urn with a dense, mounding arrangement of deep red roses. The centerpiece should feel overflowing and lavish, serving as the powerful visual anchor of the entire display. Keep the arrangement lower than the taper candles to ensure conversation flows easily across the table.
Finalizing the place settings with metallic accents elevates the entire scene from simple dinner to grand romance. Select white china that features a gold rim or use decorative gold chargers underneath your main plates to unify the metallic theme present in the candlesticks and vase. Gold cutlery (knives, forks, and spoons) is a mandatory detail for achieving this lush, luxurious feel—avoiding silver will keep the look consistent and warm. For a final DIY touch on each setting, insert a menu card secured with a deeply folded red napkin, or simply place a single, perfect rosebud on top of the plate before guests arrive. Ensure your stemware is clear crystal to maximize the reflection and sparkle generated by the surrounding sea of candlelight, culminating in an intimate, truly unforgettable dining experience.