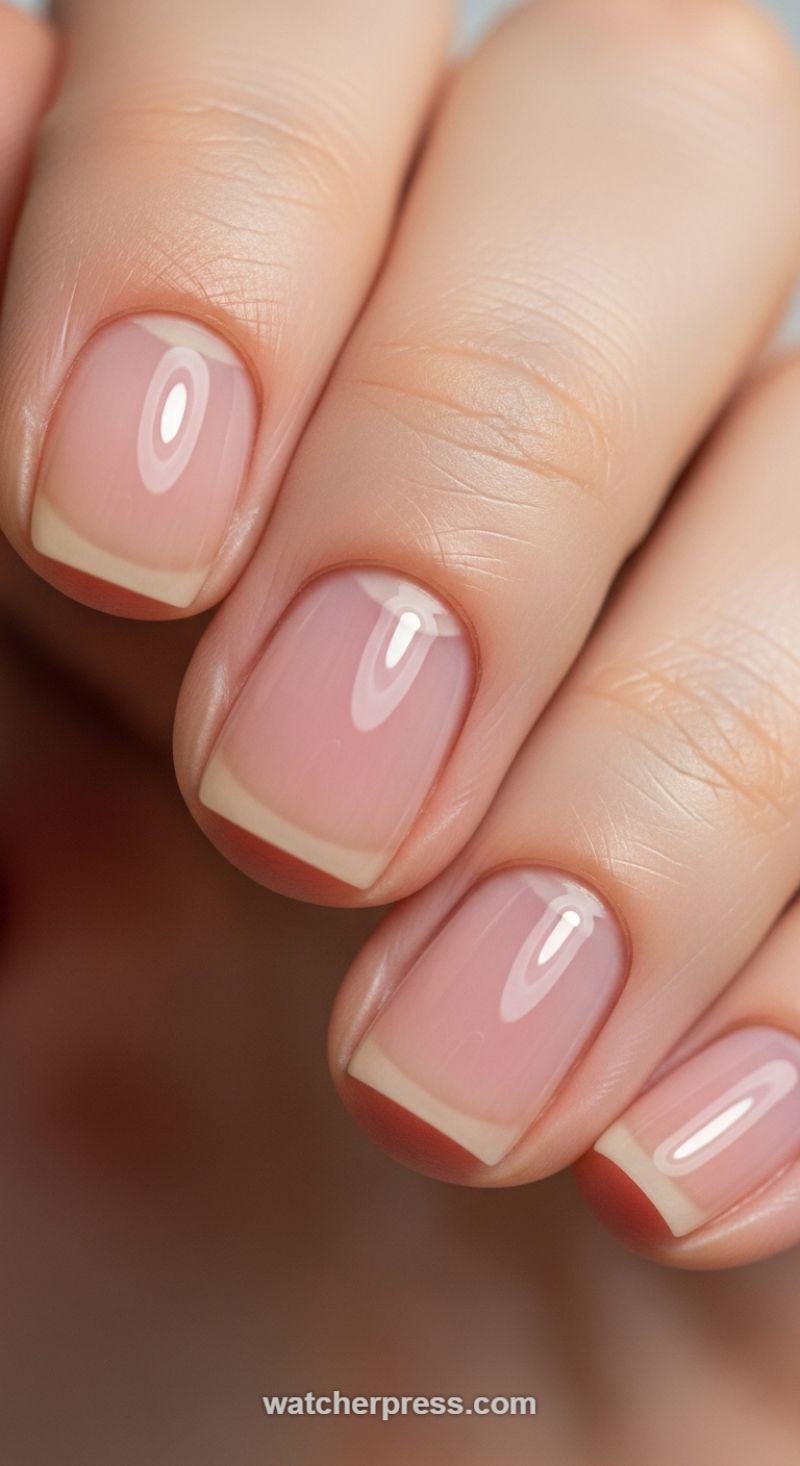
Get ready for romance with our Top 20 Valentine’s Day nail ideas! Discover soft pinks, chic minimalist designs, and feminine heart patterns perfect for your date night.
Crisp White Coffin Nails with a Ruby Red Vertical Line
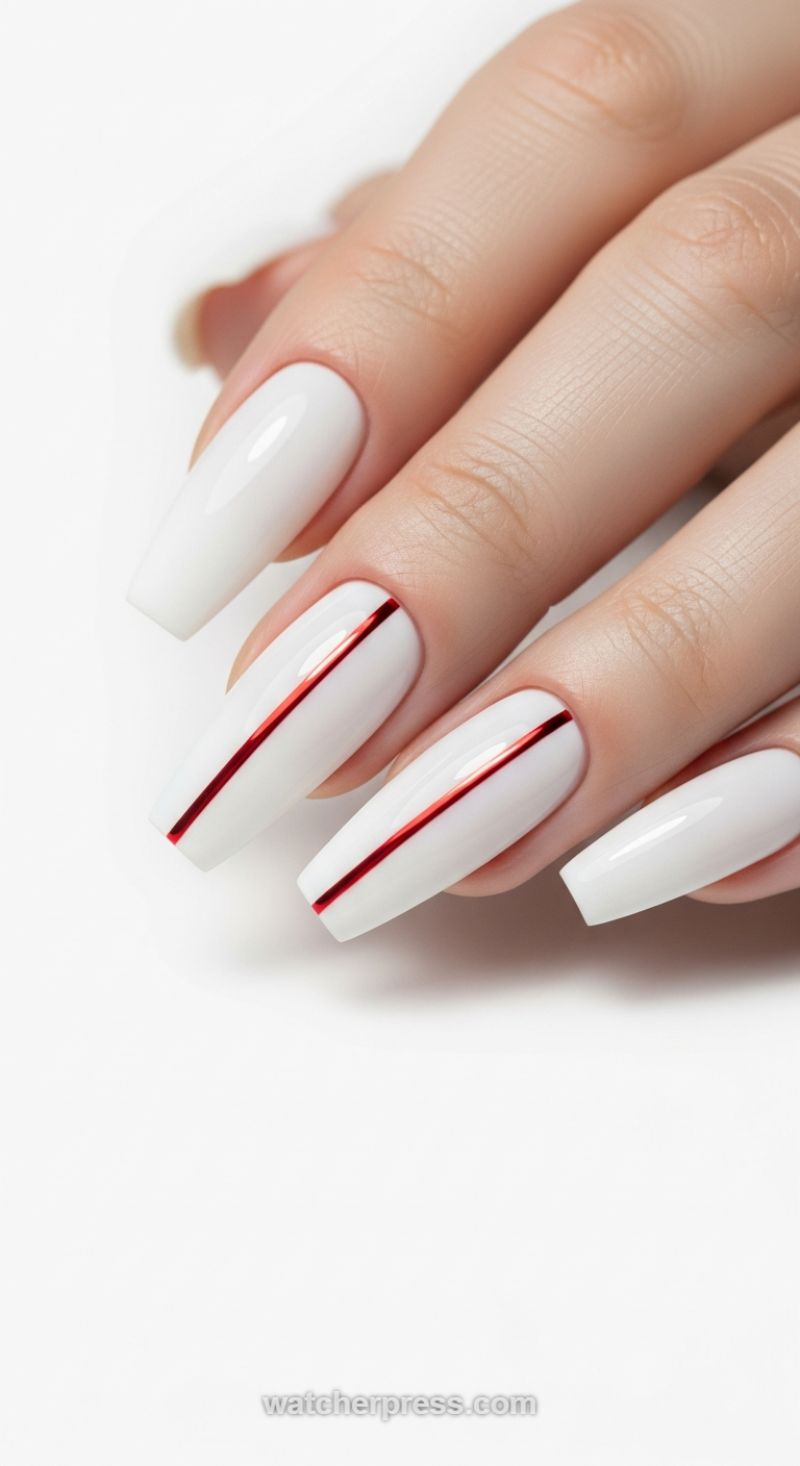
This design perfectly captures the chic and minimalist trend while still offering an undeniable nod to Valentine’s Day through its striking color palette. The foundation is an opaque, glossy white, which provides a clean, modern canvas. The brilliance of this look lies in the high-contrast focal point: a single, ultra-thin vertical line of metallic ruby red placed dead center on accent nails (here, the ring and middle fingers). This choice is highly flattering, as the vertical line visually elongates the nail bed, making it appear sleek and graceful. To truly achieve the high-fashion impact seen here, professional execution of the nail shape is essential; the long, tapered coffin shape must be perfectly balanced and crisp at the tip. For clients seeking a polished look that avoids typical V-Day clichés, this design offers dramatic flair and sophistication.
To recreate this flawless, opaque base, start by prepping the natural nail and applying a clear rubber base coat to ensure longevity, especially when working with longer extensions or press-ons. When applying the white color—which is notoriously difficult to get streak-free—opt for a highly pigmented gel polish and apply three thin, even coats rather than two thick ones. Curing fully between each application will prevent bubbling and shrinking. Once the base color is cured and wiped of its inhibition layer, the design element must be applied with precision. The easiest and most reliable method for achieving this laser-straight line is using metallic nail art striping tape (available in 1mm thickness), which is a flexible, self-adhesive foil. Measure and place the tape exactly down the center line of the desired nails, pressing firmly down the sides to ensure full adhesion.
Alternatively, if using metallic gel polish for the line, choose a quality liner brush with very long, fine bristles—the length helps stabilize your stroke and keep the line straight. Begin the line slightly above the cuticle area and draw the entire length in one continuous, slow motion toward the tip. Avoid lifting the brush mid-stroke, which can create bumps or wavering lines. Expert tip: brace your working hand against the table or your opposing hand to minimize movement. Once the metallic line is cured (whether foil or paint), the entire nail must be sealed with a high-quality, high-shine non-wipe topcoat. Encasing the striping tape completely ensures it does not lift or snag, guaranteeing a flawless, week-long wear that maintains the stunning reflective finish necessary for this design to truly pop.
Blooming Love Branch Manicure on Milky White
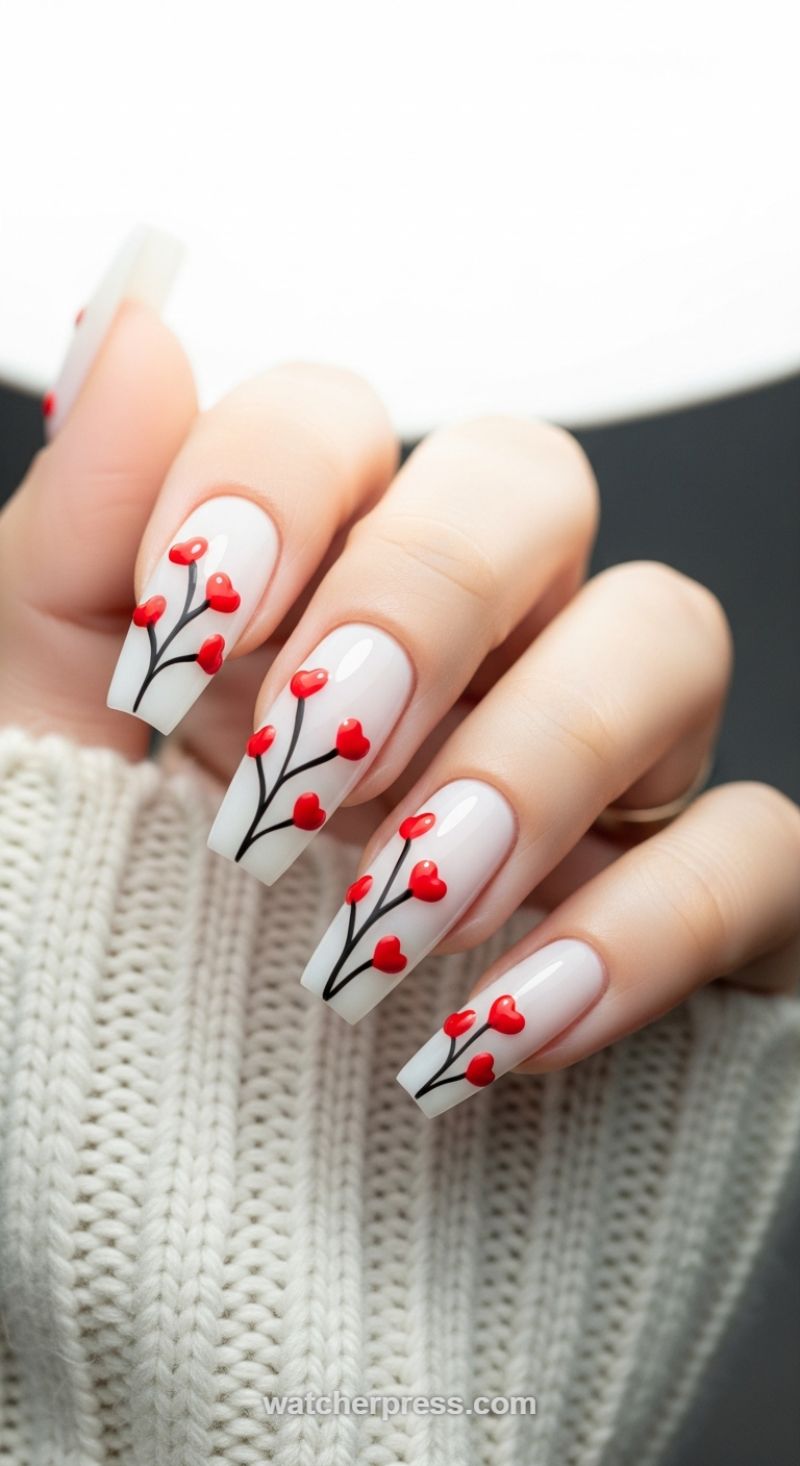
This breathtaking design elevates the classic Valentine’s Day manicure by combining trending minimalist aesthetic with tactile, three-dimensional elements. The foundation of this look is a creamy, milky white or soft translucent pink base applied to a long coffin or squareletto nail shape. This base color is crucial as it offers a clean, bright canvas that makes the red hearts truly pop without overwhelming the delicate design. To achieve this smooth, high-gloss finish, apply two coats of highly pigmented opaque white gel polish, ensuring smooth coverage right up to the cuticle line, followed by a non-wipe top coat before starting the art. The length and shape—long and tapered but slightly blunt at the tip—provide ample space for the graceful, sprawling branch design, maximizing the visual impact of the composition across all five fingers.
Executing the ‘Blooming Love Branch’ motif requires precision and the correct tools for creating dimension. Begin by utilizing a fine-tipped liner brush (typically 7mm or thinner) and black gel paint for the branches. Start the main line near the center of the nail bed, drawing a thin, slightly curved line towards the tip. From this main stem, pull smaller, delicate offshoots, ensuring they look organic and uneven, mimicking natural growth. Once the branches are cured, move on to the focal point: the 3D hearts. For maximum dimension, use thick builder gel or a specialized 3D sculpting gel mixed with a vibrant true-red pigment. Alternatively, you can create the heart shape using regular red gel polish and then immediately encapsulate it with clear dipping powder or clear acrylic powder before curing to achieve a raised texture. Carefully dot and sculpt small, uniform hearts where the branches terminate. The trick is to apply two small adjacent dots of red material and then use the brush tip to pull the bottom halves slightly inward and downward, creating the signature cleft of the heart shape.
To ensure this intricate, dimensional design lasts, sealing is paramount. Once all the branches and heart elements are fully cured, apply a robust layer of high-shine top coat, taking care to float the top coat over the 3D elements rather than brushing heavily, which could distort their shape. This design is highly adaptable; while shown beautifully on long coffin nails, it can be scaled down for shorter almond or oval shapes by reducing the number of hearts to two or three per nail. This look is perfect for the woman seeking a sophisticated, understated romance this Valentine’s season, offering a chic alternative to overly glittery or saturated pink designs. The contrast of the stark black line work against the pure white base and the rich texture of the red hearts provides visual depth, making this manicure an undeniable showstopper.
Soft Focus: Modern Matte Pastel Split-Tones
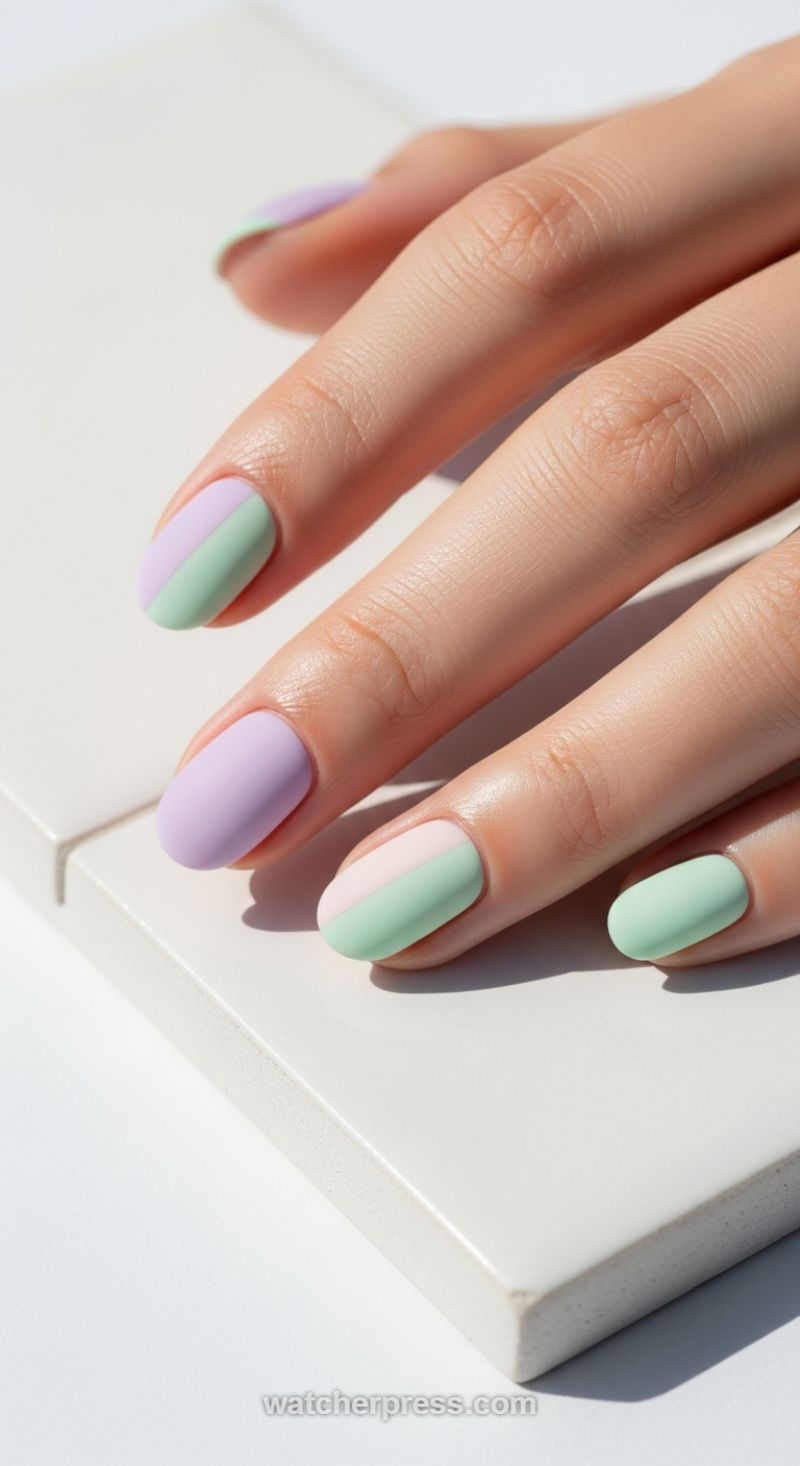
If your ideal Valentine’s Day aesthetic leans toward effortless chic rather than dramatic flair, the Matte Pastel Split-Tone look is your perfect match. This design pivots away from traditional reds and vibrant pinks, opting instead for a refreshing palette of cool pastels—specifically a delicate lavender and a soft mint green. The visual power of this manicure comes from the combination of the striking vertical color block and the sophisticated matte finish, which gives the colors a velvety, touchable texture. The use of split tones on several fingers (like the pointer and ring finger shown) juxtaposed with a solid pastel on another (the middle finger) creates visual movement and depth without becoming busy. This look is inherently modern, highly versatile, and provides a romantic, subdued energy that perfectly complements delicate jewelry and soft fabrics, ensuring your hands look impeccably groomed for any romantic rendezvous.
Executing this crisp, dual-tone design requires precision, making gel polish ideal for its self-leveling properties and guaranteed opaque coverage. Begin your application by meticulously preparing the nails and applying a base coat. Select your lighter color (often the lavender) and paint the entire nail, curing fully under the lamp. To create the perfect division for the color block, the expert technique involves using a thin strip of nail vinyl or painter’s tape. Carefully place the tape vertically down the center of the nail, ensuring it is pressed firmly along the edge where the colors will meet to prevent bleeding. Next, apply your second, contrasting color (the mint green) to the exposed half of the nail. For the sharpest result, apply a thin coat first, then a second coat if needed for full opacity. The crucial step is the removal of the tape: pull the tape off immediately while the second coat of polish is still wet or semi-cured. This prevents the polish from setting around the tape’s edge, eliminating any potential chipping or ragged lines. Repeat this process, alternating the primary and secondary colors on the split-tone nails, while applying solid colors (like the lavender on the middle finger) directly.
The final element that elevates this manicure from playful to polished is the matte top coat. Once all color layers have been perfectly cured, apply a high-quality, non-wipe matte top coat evenly across every nail. This step instantly transforms the surface, absorbing light and providing that desirable soft-focus, velvet effect that is so popular in high-end fashion manicures. Expert advice for maintaining a matte manicure is to regularly apply cuticle oil; matte finishes can sometimes appear dull or grab dirt, and keeping the surrounding skin hydrated enhances the clean contrast of the polish itself. The choice of an oval or almond nail shape maximizes the elongated, feminine appeal of the split-tone design, making this a chic and unexpected way to embrace the subtlety and romance of Valentine’s Day style.
Gothic Romance: Matte Black and 3D Red Hearts
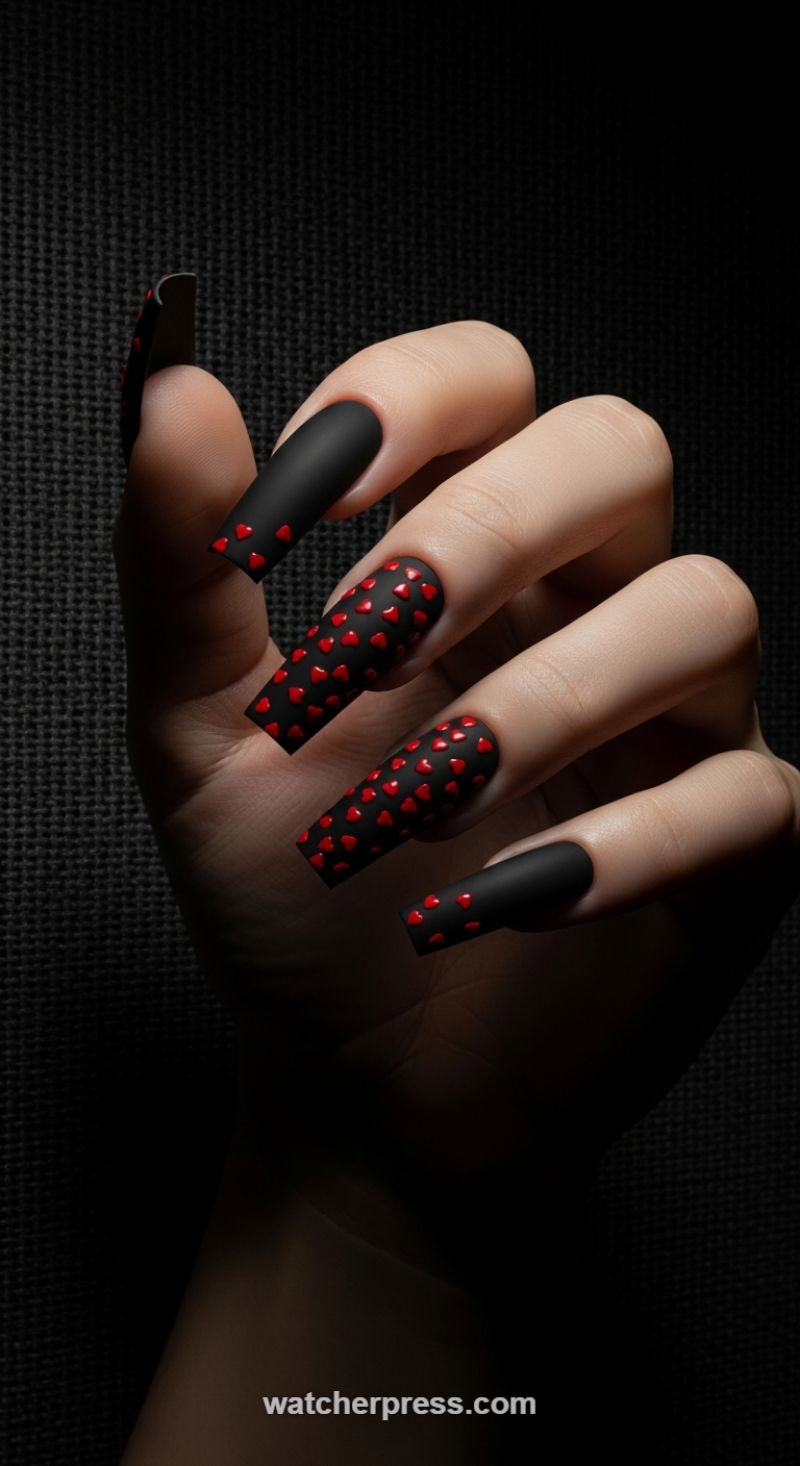
For those seeking a Valentine’s Day look that eschews soft pinks and creams in favor of high-drama sophistication, this matte black design is the perfect choice. This manicure masterfully blends the inherent romance of the heart motif with the undeniable chicness of a monochrome, matte finish. The foundation is a striking, deep matte black, preferably applied to long, structured coffin or ballerina shaped nails, which provides an ideal canvas for the edgy aesthetic. The key visual element is the contrast created by the tiny, glossy, raised red hearts scattered across the surface. These hearts aren’t flat decals; they appear slightly rounded and three-dimensional, adding a textural depth that catches the light and instantly elevates the design beyond a simple print. This look proves that Valentine’s elegance can be achieved through boldness, creating a sophisticated ‘dark romance’ vibe that is both fiercely feminine and incredibly high-fashion.
To recreate this detailed look, precision in application is paramount. Begin by shaping your nails into a sharp coffin style and apply two coats of a highly pigmented black gel polish. Before curing the final color coat, wipe off any stickiness (inhibition layer) and apply a specialized matte topcoat. This step is crucial, as the contrast between the matte base and the glossy accents is the entire premise of the design. Once the matte topcoat is cured, the heart application begins. These hearts are often small acrylic shapes or meticulously placed dots of thick, highly pigmented red gel, cured to achieve a glossy dome effect, or high-quality 3D heart rhinestones/charms. Expert tip: strategically vary the density of the hearts. Notice how the middle and ring fingers are fully saturated with hearts, while the thumb and pinky feature the design only near the cuticle or the tip. This strategic negative space prevents the design from feeling cluttered and maintains a balanced, intentional artistry.
While the extra-long coffin shape seen here maximizes the drama, this design is easily adaptable for increased wearability. If the length is too intense, switch to a medium-length almond or squoval shape—the high-contrast colors and textures will still deliver the dramatic effect. For expert styling, ensure the 3D elements are secured using a strong adhesive, such as builder gel or rubber base coat, to prevent them from lifting. This mani pairs beautifully with silver jewelry or deep burgundy lipstick, leaning into the sultry, sophisticated mood. This ‘Gothic Romance’ nail art is the ultimate statement for the non-traditional celebrant, offering a chic, bold, and unforgettable approach to Valentine’s glamour that is guaranteed to turn heads and stand out among the usual pink and red fanfare.
Matte Black Gothic Romance with Crimson Foil Accents
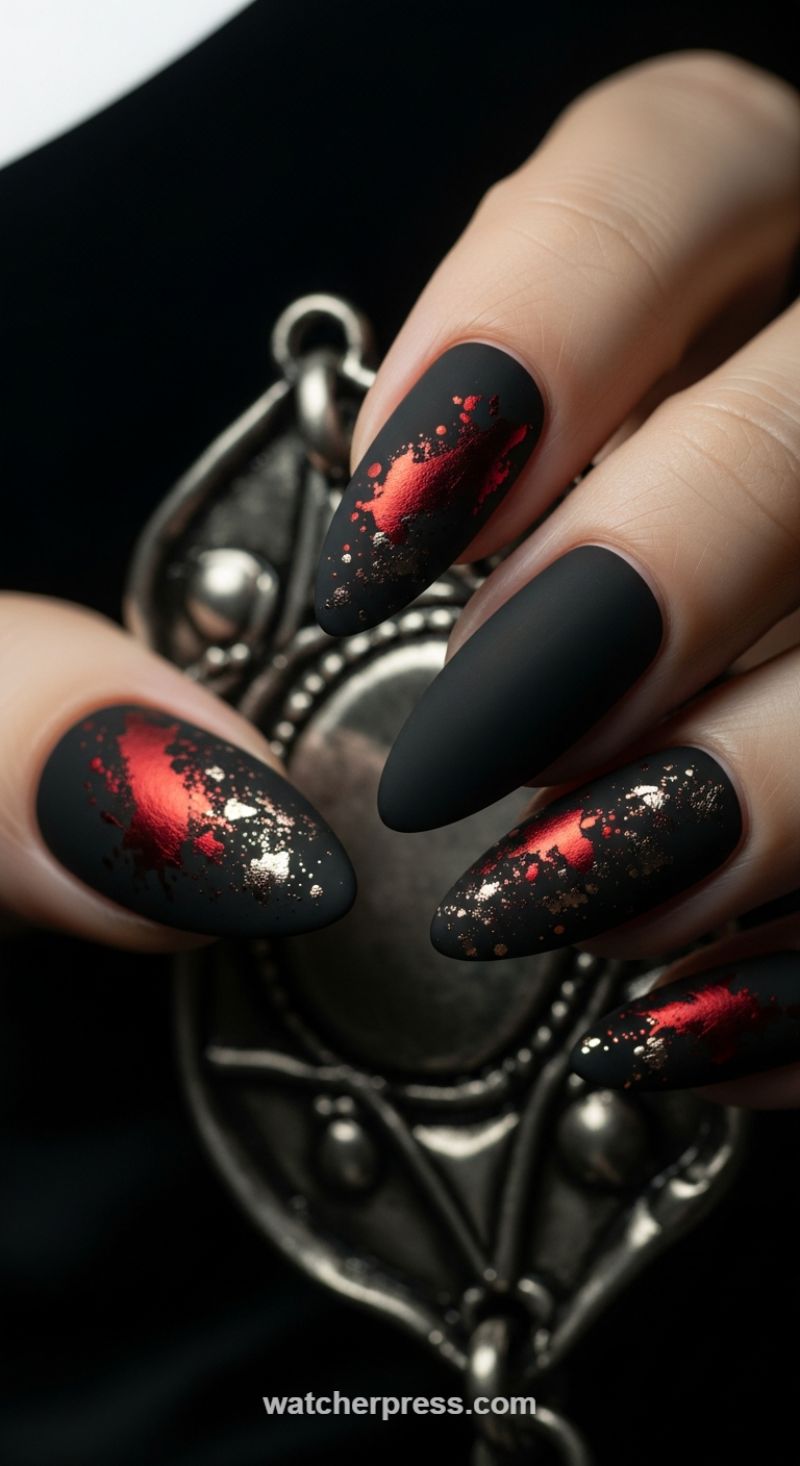
While Valentine’s Day often calls for soft pinks and classic reds, the Matte Black Gothic Romance look is designed for those who prefer a sophisticated, high-drama aesthetic. This design is the ultimate statement nail, combining the sleek depth of matte black with explosive metallic accents. Start by prepping and shaping your nails into a sharp almond or stiletto shape, which dramatically enhances the edgy feel of the design. Apply two smooth, opaque layers of highly pigmented black gel polish. The key to achieving the luxurious, velvety finish seen here is to seal the black base with a premium matte top coat and cure fully. The contrasting textures—the absorbent matte black base versus the reflective metallic foils—are what make this look so arresting and luxurious, proving that dark colors can be exquisitely chic for a romantic occasion.
The defining element of this design is the vibrant, abstract crimson splash. This is best achieved using red metallic nail art foil and a specialized foil transfer gel. After curing the matte top coat, lightly buff the surface just in the areas where you plan to apply the foil to improve adhesion, then wipe clean. Apply a thin layer of foil adhesive only to the center of the nail, creating an organic, abstract shape that mimics a deliberate splatter or deep reflection. Wait until the adhesive turns completely clear and tacky (this is crucial for successful transfer). Press the red metallic foil firmly onto the tacky area and quickly peel back. The resulting imperfection creates a high-shine, highly textural focal point that symbolizes passion and dramatic love, contrasting powerfully against the dead-matte backdrop.
To elevate the design from edgy to truly glamorous, incorporate delicate gold leaf or flakies scattered around the crimson splash. Use a fine detail brush to pick up tiny fragments of gold foil and adhere them sparsely around the edges of the red transfer using a minimal amount of top coat or tacky base coat. This subtle shimmer adds dimension and prevents the design from looking flat. For expert longevity, the solid nails (like the middle finger shown) should be sealed once, but the decorated nails must be sealed with a second, thin layer of matte top coat specifically over the textured areas. This encapsulates the foils, preventing chipping and ensuring the high-impact design lasts through the holiday and beyond. For the chicest finish, ensure cuticle oil is applied to keep the skin around the dramatic nails soft and hydrated.
Dark Romance: Matte Black Flames with Chain Accents
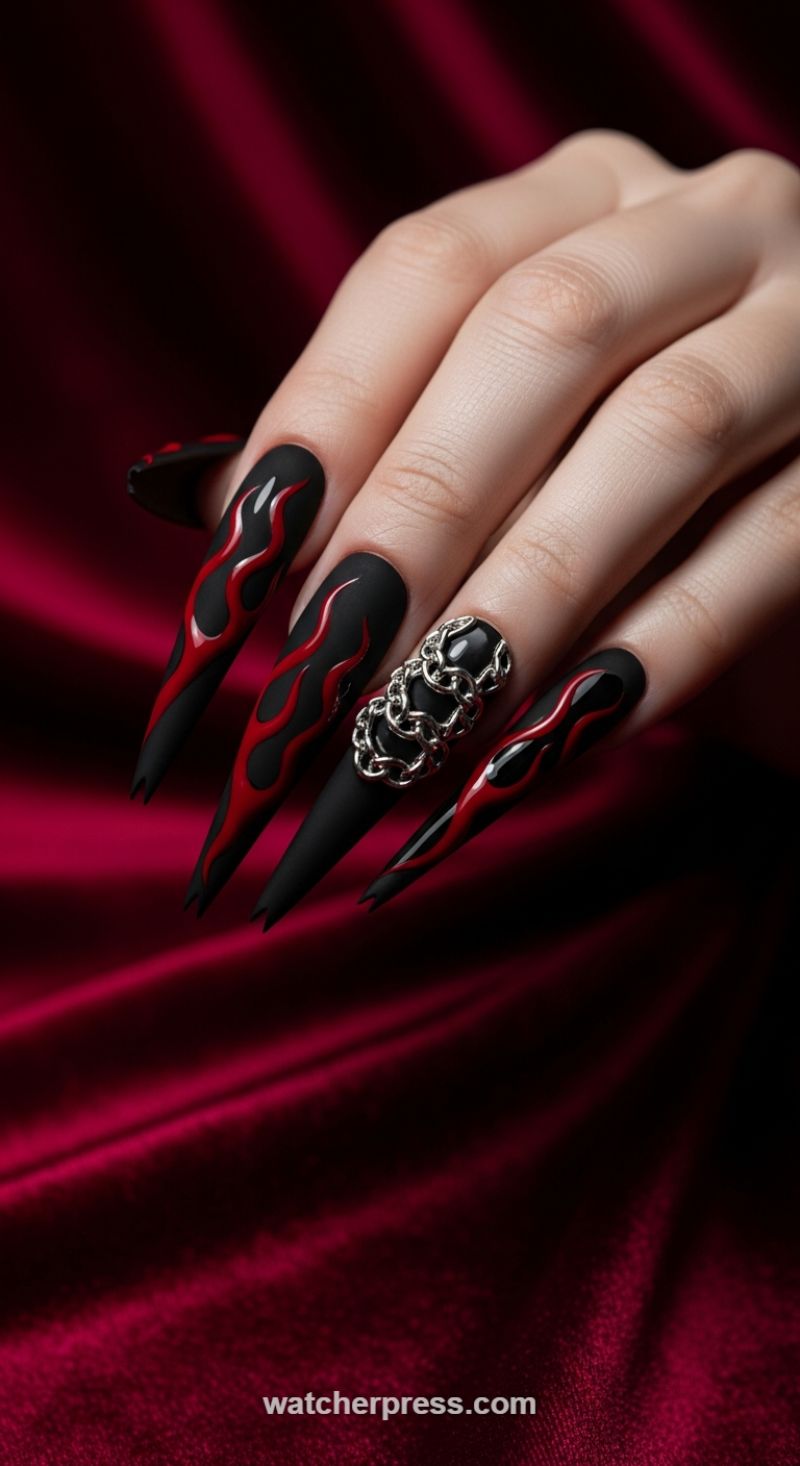
For the Valentine who prefers a look that screams ‘sultry vixen’ rather than ‘sweetheart,’ this high-contrast, edgy aesthetic is the ultimate choice. Moving far beyond traditional soft pinks, this design grounds the passionate deep crimson in a powerful matte black base. The visual appeal lies in the dramatic tension between the velvety matte texture of the background and the glossy, almost wet-look finish of the elongated flame patterns. The extreme, tapered stiletto shape emphasizes the boldness of the design, instantly elevating the manicure from casual to couture. To replicate this level of luxury, ensure you are using a high-quality, non-yellowing top coat for the matte finish, while the flame design itself should be executed using a vibrant, high-pigment gloss polish to maximize the dimensional contrast.
Achieving the iconic flame or abstract wave pattern requires a steady hand and specialized tools. Start by prepping the extremely long nail bed (typically achieved via sculpted acrylic or structured gel tips) with two flawless coats of matte black. Once cured, use a fine, long-bristle striping brush (often called a ‘liner brush’) dipped in the crimson polish. Begin tracing the undulating, curvy lines from the cuticle down towards the sharp point, ensuring the lines appear seamless and flowing like real fire. Expert tip: map out the shape with a quick, lighter stroke first, then build the opacity. The beauty of this flame style is its asymmetry; each nail features a unique interpretation of the pattern, from thin, sharp points near the tip to broader, more abstract waves near the nail bed. This artistic variation keeps the look dynamic and bespoke.
The defining element of this design is the bold 3D hardware accent featured prominently on the ring finger. To secure chunky metallic details like these silver chains, you must use a strong medium, such as thick builder gel or professional nail adhesive, cured under a UV/LED lamp for maximum longevity—regular topcoat will not suffice. Position the chains vertically to follow the flow of the long nail shape. When styling this daring manicure for Valentine’s Day, keep your outfit accessories minimal, allowing the nails to command attention. This look pairs perfectly with luxurious, dark fabrics like crushed velvet or deep satin, mirroring the rich texture of the background and completing a high-impact, dominant, and unquestionably chic aesthetic for a sophisticated date night.
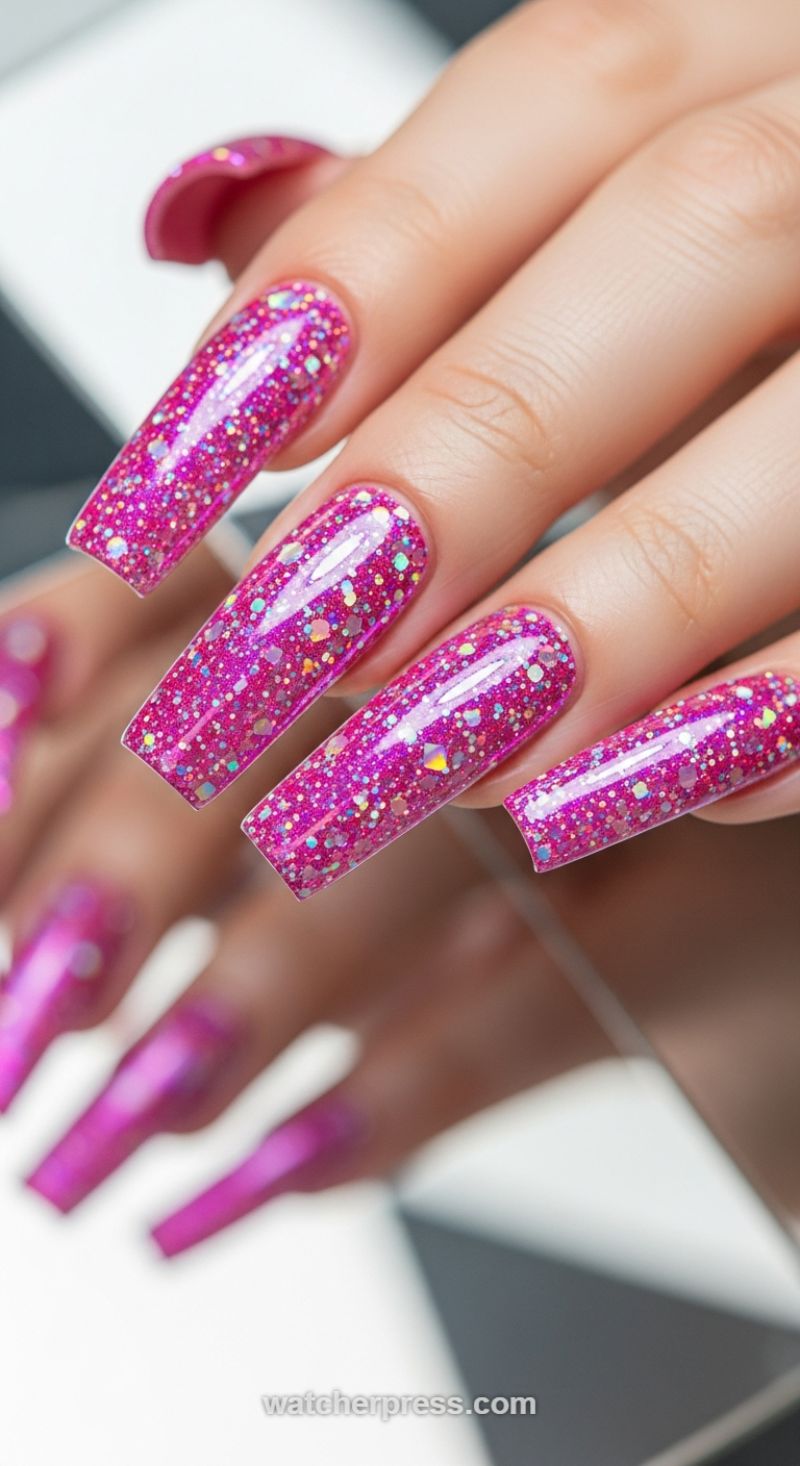
Fuchsia and Silver Glitter Diagonal French Manicure

This dramatic nail art offers a glamorous, high-impact take on Valentine’s Day manicures, perfectly balancing a vibrant, feminine color with show-stopping glitter. The visual foundation of this design is a rich, reflective fuchsia pink—a modernized version of the classic Valentine red—executed with a high-shine, nearly metallic lacquer that catches the light beautifully. The key to achieving this luxe base is meticulous polish application; always use two thin, even coats of the fuchsia polish over a ridge-filling base coat, allowing full curing time (if using gel) or drying time between layers. The long, squared or coffin shape of the nail provides the necessary canvas for the bold design, ensuring the sharp geometric element of the glitter can truly stand out against the saturated pink backdrop. This style is an ideal choice for a sophisticated evening date or a festive celebration where you want your hands to make an elegant statement.
Executing the signature diagonal V-tip requires precision and the correct type of glitter. Unlike standard fine glitter, this look utilizes chunky, multi-sized holographic silver glitter, which provides intense light refraction and superior coverage. After your fuchsia base is fully cured/dried, the critical step is mapping out the sharp, diagonal line that separates the pink from the silver. Professionals often use fine striping tape or a thin detail brush to apply a strong adhesive layer—such as a thick clear builder gel or specialized glitter glue—only to the triangular section near the free edge. Once the adhesive is applied, the chunky glitter must be pressed, not brushed, onto the surface to ensure maximum density and full opacity. Working over a silicone mat allows you to easily collect and reuse the excess glitter. Use a small, stiff brush dipped in isopropyl alcohol or acetone (depending on your products) to carefully clean up the dividing line before curing, guaranteeing that razor-sharp geometric edge.
The final sealing process is paramount, especially when working with chunky glitter that tends to create a rough, uneven surface. A standard thin topcoat will sink between the glitter pieces and fail to provide a smooth finish, leading to snagging and premature wear. To properly encapsulate this highly dimensional texture, apply a generous layer of a self-leveling, thick topcoat or a non-wipe builder gel over the glitter section, allowing it to fully flood the texture and create a smooth dome. Once this layer is cured, follow with a final high-gloss topcoat over the entire nail to marry the textures—the slick, reflective pink and the now-smooth, shimmering silver—into one durable, cohesive design. This ensures longevity and maintains the sophisticated, glossy aesthetic required for a top-tier, holiday-ready manicure.
Groovy Love Swirls: A Chic, Retro-Inspired Valentine’s Mani
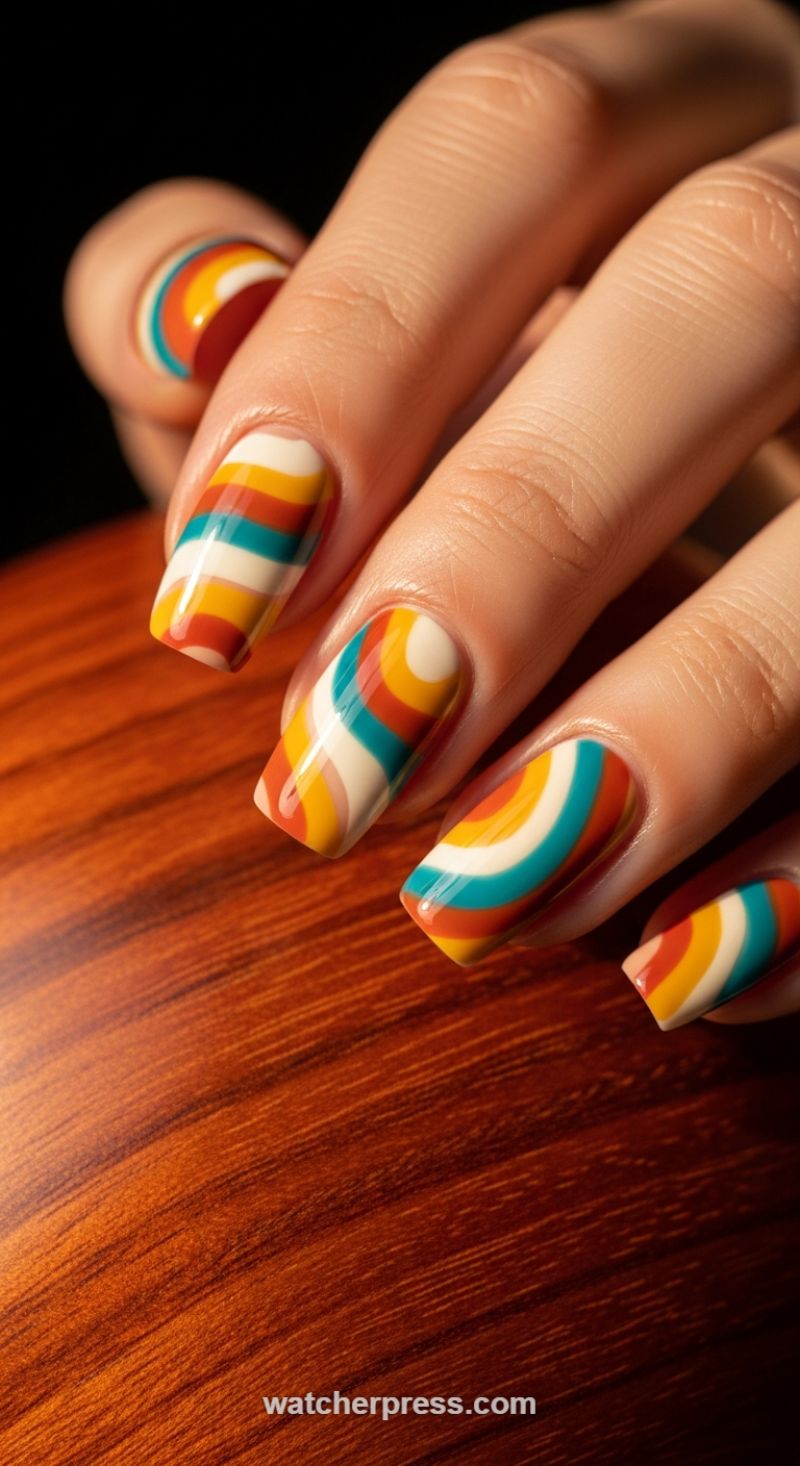
For those seeking a Valentine’s look that transcends traditional hearts and baby pinks, the ‘Groovy Love Swirls’ design offers a sophisticated and eye-catching alternative. This mani draws heavily on 1970s aesthetic influences, featuring bold, continuous wavy lines and a vibrant, warm color palette that speaks to confidence and passion. The expert use of deep oxblood red, fiery orange, and mustard yellow is balanced by creamy white and a surprising pop of rich teal, ensuring the overall effect remains polished and modern, not childish. The high-gloss gel finish is non-negotiable here; the reflective shine accentuates the fluid movement of the lines, creating a hypnotic, almost three-dimensional optical illusion that elevates this design far beyond a simple stripe. To truly maximize the visual impact, this pattern works best on medium to long nails with a structured square or squoval shape, providing ample canvas for the full scope of the winding curves.
Executing the perfect swirl requires precision and patience, ideally utilizing highly pigmented gel polishes to prevent bleeding and ensure clean color separation. Begin by applying a full base coat of the lightest color—the creamy off-white—and fully curing it. This base provides a clean, bright canvas. Next, using a high-quality fine liner brush (a 000 brush is recommended), start with your darkest color (the oxblood red). Draw a sweeping, asymmetrical C-curve that starts near the cuticle and moves dynamically toward the opposite free edge. Immediately follow this line with the next color (orange), slightly overlapping or hugging the curve of the red stripe, maintaining an even thickness throughout. Continue this process with the warm mustard yellow, ensuring the pattern maintains a sense of movement across the nail bed, making sure no two parallel lines look stiff or straight. The key to the ‘groovy’ look is ensuring the curves are organic and flow from one side of the nail to the other in a continuous, uninterrupted fashion.
The final layer of color is where this design truly comes alive: the addition of the vibrant teal. This cool tone strategically contrasts the majority warm palette, preventing the look from feeling too autumnal or outdated. Apply the teal stripe adjacent to the yellow, continuing the established wave pattern. Use the initial cream color strategically to frame and separate the bold colors, ensuring the edges of the swirls are sharp and defined rather than blurred. For consistency, try to keep the number of stripes (typically 5 to 6 distinct color layers) uniform across all nails, although the exact direction of the swirl can be varied slightly from finger to finger for added visual interest. Once you are satisfied with the sharpness and flow of the design, cure thoroughly. Finish with a thick, jewel-like top coat that is cured for the recommended time, guaranteeing a flawless, high-shine dome effect that makes these bold, chic swirls the definitive statement accessory for Valentine’s Day.
Romantic Watercolor Blossom Design
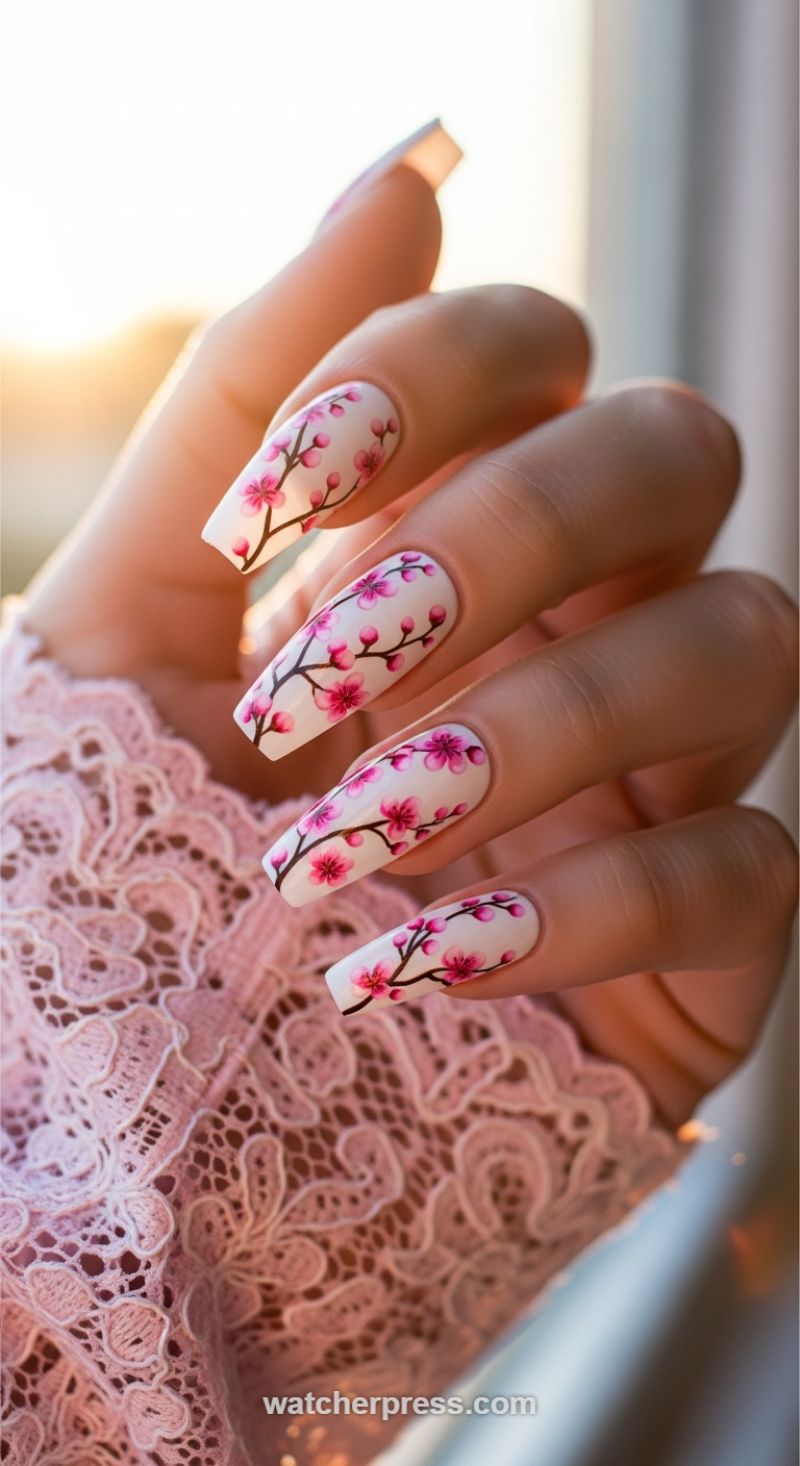
This intricate cherry blossom (Sakura) design transforms the classic feminine manicure into a soft, ethereal work of art, perfectly suited for a sophisticated Valentine’s Day look. The key to achieving this chic aesthetic lies in the canvas and the execution. Start with a foundation of long, elegant nails—the coffin or tapered square shape provides the ideal surface area for the sprawling branch motif seen here. The base color must be a flawless milky white or a sheer, pale blush pink to allow the delicate colors of the blossoms to truly pop. This design succeeds because it mimics a watercolor painting; the colors are subtly blended and semi-transparent, avoiding heavy, opaque application. To begin, ensure your base coat is cured perfectly smooth before moving onto the detailed artwork, as any imperfection will distract from the delicacy of the florals.
Executing the design requires patience and specialized tools, namely a very fine liner brush and a quality dotting tool. Start by mapping out the branches using a highly pigmented, deep espresso brown or black gel polish. The branches should flow diagonally across the nail plate, mimicking the natural asymmetry of a real tree branch, focusing on creating thin, organic lines rather than thick, structured ones. Once the framework is cured, move onto the blossoms. Using a light pink or magenta gel polish that has been slightly diluted with a clear top coat (or dedicated nail art paint), use the fine liner brush to dab the shape of the petals. For depth, layer two shades of pink—a soft bubblegum pink for the base and a vibrant fuchsia or magenta concentrated toward the center and tips of the petals. This layering technique gives the watercolor dimension. Finish by using a minute amount of white or pale yellow paint placed directly in the center of the largest blooms to simulate pollen and add necessary highlights, bringing the flowers to life.
For an expert finish, consider the overall balance; since this is a complex design, the branches and blossoms should ideally flow across all four fingers of the focus hand to create a continuous mural, as demonstrated in the image. This continuity makes the manicure feel cohesive and high-end. While the image shows a high-gloss finish, which enhances the vibrancy of the pinks, applying a high-quality matte top coat can lend a hyper-realistic, velvety texture, truly selling the watercolor effect—a great option if you prefer a less reflective finish. This manicure pairs exquisitely with soft, lace details and nude or blush-toned clothing, making it the definitive choice for a romantic, yet utterly chic, Valentine’s celebration.
Lip Gloss Nails with a Micro French Tip
This sophisticated style, often dubbed the ‘Clean Girl’ manicure or ‘Lip Gloss Nails,’ represents the pinnacle of soft, minimalist elegance perfect for Valentine’s Day. Unlike typical holiday manicures that rely on bold reds or overt glitter, this look focuses on impeccable nail health and quiet luxury. The visual elements showcase a medium-short, rounded square (‘squoval’) shape, which is universally flattering and practical. The core of this look is the base—a sheer, milky pink or soft nude shade that enhances the natural color of the nail bed, giving it a healthy, hydrated, and luminous appearance, much like a layer of high-shine lip gloss. This sheer application allows the natural crescent (lunula) to peek through, adding to the organic beauty of the design. The subtle romance is conveyed through its flawless execution and high-gloss top coat, which reflects light intensely, symbolizing purity and polish.
To recreate this coveted aesthetic, meticulous preparation is essential. Begin by shaping the nails into a gentle squoval form and thoroughly pushing back and hydrating the cuticles, as the perfection of the natural nail is central to this style. For the sheer base, opt for a builder gel or a highly pigmented jelly polish in a dusty rose or warm nude shade. Apply one to two thin coats until the desired milkiness is achieved while still maintaining transparency. The crucial defining feature is the ‘Micro French Tip.’ Unlike traditional French manicures, this tip should be exceptionally thin—no wider than a hair or 1mm at its peak. Using a fine-tipped liner brush and a soft, slightly off-white lacquer (avoiding harsh optic white for V-Day softness), carefully trace the free edge. For flawless precision, keep the tip curved to mimic the natural line of the finger, ensuring the application is swift and uniform across all nails. The subtlety of this technique prevents the design from looking dated and maintains the highly chic, understated vibe.
Expert advice for maximizing this Valentine’s Day look involves prioritizing the shine and longevity. A high-quality, non-wipe gel top coat is non-negotiable; curing this under UV/LED light provides that signature, glass-like finish captured perfectly in the image. Since the base color is sheer, nail growth is far less noticeable than with opaque shades, offering excellent wearability—up to three weeks if using gel products. For a very subtle nod to the holiday without compromising the minimalist integrity, consider adding a single, tiny, rose-gold or iridescent sparkle near the base of one accent finger. Finish the entire manicure ritual by massaging rich cuticle oil into the surrounding skin. This final step enhances the overall hydrated appearance, making the hands look youthful and perfectly groomed, delivering a genuinely soft, feminine, and profoundly chic statement for your romantic celebrations.
Chic Heartbeat French Tips with Microbead Accents
This intricate design elevates the timeless French manicure into a sophisticated and undeniably romantic Valentine’s statement. To recreate this look, begin by shaping the nails into a sharp square or softly squared-off coffin shape to provide a generous canvas for the detailed artwork. Apply a single layer of a sheer nude or milky pink builder gel to create the healthy, high-gloss base characteristic of a modern French style. The core technique involves replacing the traditional painted smile line with a border of miniature red hearts. Use a crisp white gel polish for the tip, but before curing, utilize a fine-tipped detail brush (such as a 00 liner brush) to meticulously paint tiny, uniform red hearts directly along the curve where the pink base meets the white tip. For those seeking consistency, tiny heart-shaped water decals or vinyl stencils can be strategically applied and sealed before the final topcoat to ensure perfect uniformity across all ten fingers.
To add depth and visual variety, incorporate the advanced negative-space technique seen on the middle and ring fingers of the showcased hand. Instead of the standard curved tip, carve a deep, rounded ‘U’ shape into the center of the white tip, exposing a large crescent of the nude base underneath. This technique, often referred to as a ‘deep reverse French,’ highlights the natural lunula area of the nail bed while maintaining the French tip structure around the edges. When adding the hearts to these accent nails, position them along the inner curve of the white frame, making the hearts look as though they are crowning the nude section. Expert advice for this step is to paint the full white tip first, cure it, and then use a solvent-dampened brush dipped in acetone or cleanser to carefully clean out the center ‘U’ shape, providing sharp, clean negative space boundaries.
Finally, introduce the sparkling embellishments that complete the chic aesthetic. On the nails featuring the negative-space design, apply a line of ultra-fine silver microbeads or rhinestones along the natural cuticle line. This application method creates a beautiful ‘reverse French’ effect at the base of the nail, balancing the intricate design at the tip. To adhere the microbeads securely, apply a very thin line of clear builder gel or rhinestone adhesive along the desired placement line, press the microbeads into the gel using a wax tool or dotting tool, and cure thoroughly. Finish the entire manicure with a high-shine, non-wipe topcoat to encapsulate all the elements—the glossy nude base, the delicate red hearts, and the sparkling silver accents—ensuring maximum durability and a stunning, light-reflecting finish perfect for a soft, feminine, and romantic occasion like Valentine’s Day.
Romantic Pink Ombre Almonds with Jelly Heart Accent
This sophisticated manicure perfectly captures the essence of soft romance, combining classic techniques with a playful, modern accent nail. The foundation is built upon a long, elegantly sculpted almond shape, which is crucial for achieving the chic length and taper required for this style. To recreate the soft, gradient base seen on the majority of the nails, you will need a milky or sheer nude pink builder gel (often referred to as a ‘cover pink’) and a slightly deeper, more saturated cool pink polish for the tips. This application utilizes the popular ‘baby boomer’ or soft French ombre technique: apply the sheer pink near the cuticle area and gently blend the deeper pink toward the free edge using a fine sponge or an ombre brush before curing. The goal is a seamless transition, giving the nails a naturally enhanced, elongated look that maintains maximum luminosity and softness. Ensure all nails are finished with a high-shine, non-wipe top coat to enhance the glossy, liquid appearance of the pinks.
The centerpiece of this Valentine’s look is the striking jelly heart accent nail, typically placed on the ring finger. To achieve this translucent effect, start with a clear or highly sheer nude base coat, mimicking a “jelly” texture. Once cured, the pattern is created using highly pigmented true red polish and a fine detail brush or, for quicker execution, small red heart decals. If hand-painting, focus on creating consistently sized, small hearts scattered diagonally across the entire surface of the nail, ensuring the red is crisp against the sheer background. The visual effect is crucial here: the translucent base allows the natural nail bed to peek through, softening the intensity of the red pattern and preventing the design from feeling too heavy or opaque. For maximum precision, seal the design layer with a quick matte coat before applying the final, high-shine top coat, ensuring the heart lines don’t bleed when sealed.
To elevate this look from cute to truly chic, pay close attention to the overall balance and finishing details. The combination of the refined ombre technique on most fingers paired with the unexpected, whimsical heart pattern on the accent nail creates visual interest without overwhelming the aesthetic. Expert tip: The health of the cuticles is paramount when wearing long, glossy nails; apply nourishing cuticle oil daily to maintain a pristine, finished look. This design is versatile enough for both professional settings and romantic evenings out, providing a feminine statement that is subtle yet impactful. Consider pairing this manicure with soft fabrics, like silk or satin—as modeled in the image—and delicate rose gold jewelry to complement the soft pink and red palette.
Regal Amethyst and Emerald Glamour: The Feathered Statement Nail
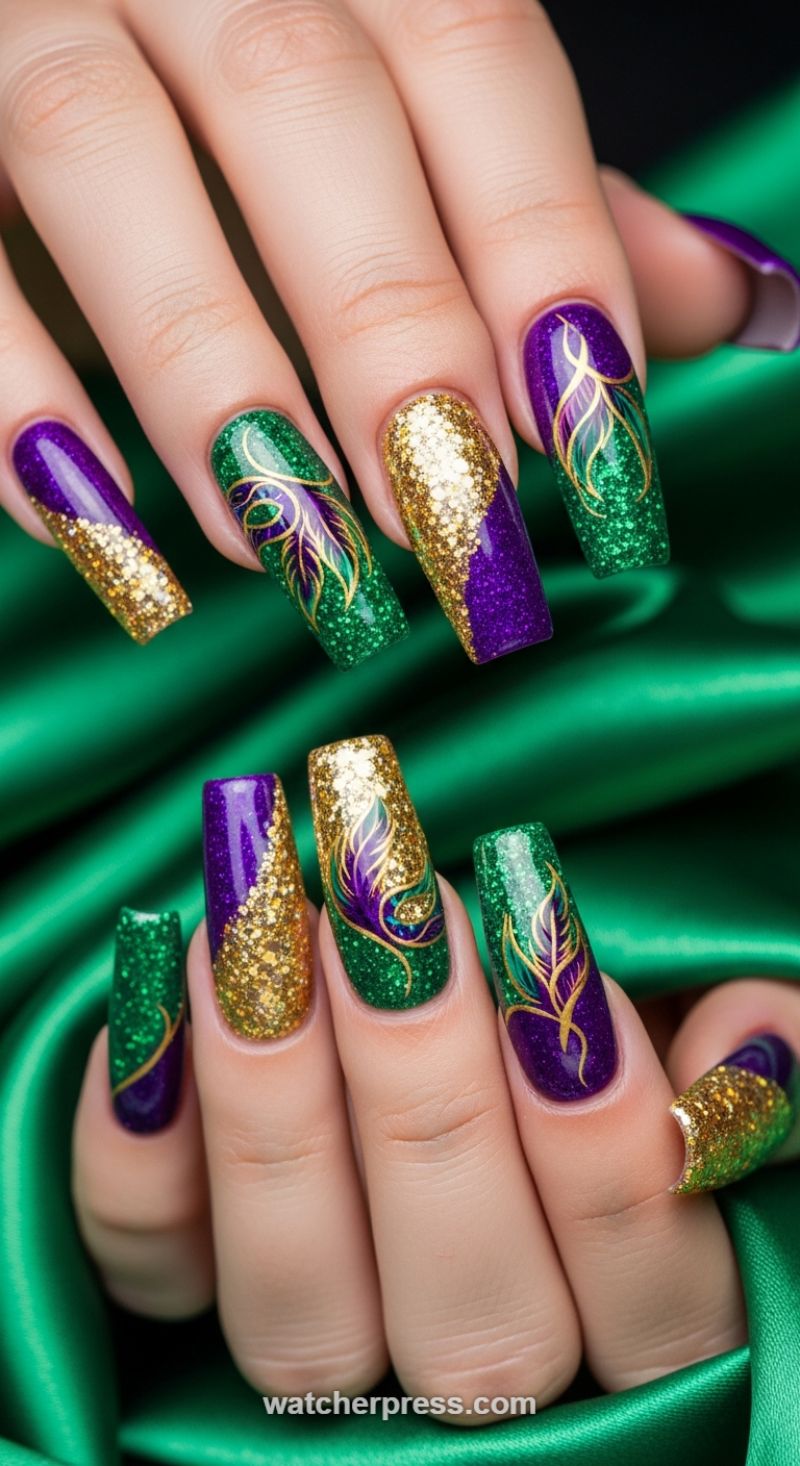
For the Valentine celebrating with high drama, or attending a formal masquerade-style event, this regal combination of deep emerald green, shimmering amethyst purple, and dazzling gold glitter offers an unforgettable, high-fashion statement. This look is inherently luxurious and demands attention, moving away from soft pinks toward rich jewel tones that symbolize power, wealth, and deep emotion. To achieve this level of glamour, start with a long, shaped nail base—coffin or ballerina works best—as the extended canvas is essential for showcasing the intricate artistry and the striking contrast of the colors. Use highly pigmented gel polishes saturated with fine micro-glitter for the green and purple sections, ensuring two layers for complete opacity and intense depth. The gold should be a mix of chunky and fine glitter particles, applied either as a sharp, diagonal French tip or a dynamic V-shape near the cuticle to create visual interest and maximize light reflection. Professional application requires meticulous attention to the crisp line separating the color fields, often requiring a striping brush and cure steps after each color application to prevent bleeding.
Creating the intricate feathered design is the pièce de résistance of this look, transforming a simple glitter manicure into wearable art. On your selected accent nails (typically the ring and middle fingers), apply the base color—often a mix of the green and purple glitter, setting a rich backdrop. Using a highly opaque metallic gold gel paint and an ultra-fine detailing brush (000 size is recommended), begin by sketching the central rachis (spine) of the feather. The key to successful feather art is fluidity and dimension; do not aim for a flat sticker effect. Build the barbs of the feather using fine, tapered strokes that follow the curvature of the nail. For extra depth, use small amounts of the opposing color (e.g., dabbing deep purple shimmer into the green base before applying the gold lines) within the feather structure itself, giving the illusion that the gold lines are layered over a dimensional jewel-toned foundation. This detailing requires a steady hand and multiple quick curing sessions to prevent the gold lines from blurring or running together.
Expert advice for maintaining this elaborate design through a romantic weekend involves using a high-quality structure top coat. Since this design utilizes chunky glitters and layered art, a thick, resilient top coat is necessary to encapsulate the design fully, preventing glitter flaking and ensuring a perfectly smooth, glass-like finish that accentuates the sparkle. For a slightly softened version that fits the Valentine’s theme while retaining glamour, consider substituting the emerald green for a deep ruby red glitter or a soft rose gold glitter. When pairing this bold manicure with attire, opt for simple, classic fabrics like black velvet or silk to let the nails serve as the main, dazzling accessory. This opulent design proves that Valentine’s Day nails don’t always require traditional pastels; sometimes, the most chic look is one that celebrates rich color and unapologetic brilliance.
Vibrant Violet and Crisp Heart Accents
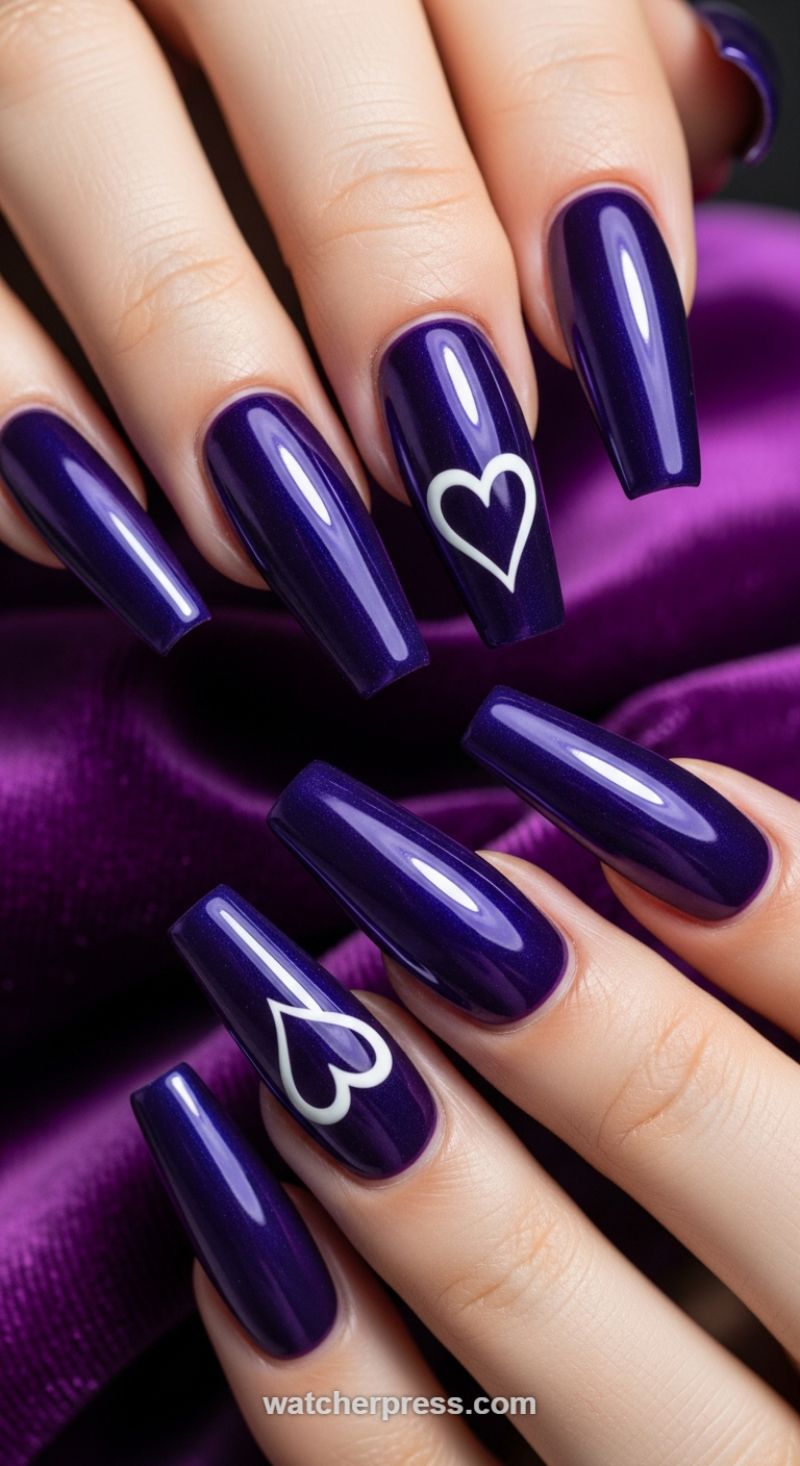
This dramatic and sophisticated nail design offers a luxurious twist on traditional Valentine’s Day manicures by substituting classic reds and pinks with a mesmerizing deep violet shimmer. The foundation of this look is a long, highly polished coffin or ballerina shape, which inherently conveys elegance and drama. To achieve this stunning depth of color, start with two coats of a highly pigmented royal purple or eggplant gel polish that features a subtle metallic or pearlescent micro-shimmer. This reflective quality is crucial, as it ensures that the nails catch the light and appear high-end, contrasting beautifully against the velvety background often associated with romance. Expert tip: Due to the length and shape of these nails, proper preparation is key; ensure you are using durable tips or an overlay like hard gel or acrylic to maintain structural integrity, followed by a non-yellowing base coat to protect the natural nail from such a saturated color.
To execute the clean, crisp heart design featured on the accent nails (typically the ring finger and/or thumb), you will require a highly opaque white gel polish and a fine detail or striping brush (often called a ‘liner brush’). Before starting the design, ensure the deep purple base color is fully cured and wiped clean of any tacky layer. Using the liner brush, carefully draw the outline of the heart. For perfect symmetry, start by placing two small dots at the top where the curves of the heart will meet, and then draw a delicate ‘V’ shape for the bottom point. Connect the top dots to the ‘V’ point with smooth, continuous curves, being careful to keep the line weight consistent throughout. This outline technique, rather than a solid fill, provides a more sophisticated and minimalist aesthetic that perfectly complements the rich, dark base color, preventing the design from looking too busy or juvenile. If needed, cure the outline immediately after drawing the shape to prevent blurring.
Once the designs are cured, the final step involves locking in the shine and ensuring longevity. Apply a thick layer of a high-gloss, non-wipe top coat over all nails, paying special attention to capping the free edge to prevent chips and shrinkage. The extreme high-gloss finish not only protects the manicure but enhances the metallic sheen of the purple polish, making the entire look appear liquid smooth. For a truly luxurious presentation perfect for a chic date night, consider incorporating minor variations; for example, swap the white outline for a fine line of metallic silver or rose gold chrome powder to introduce a different texture. This deep violet manicure is the ideal choice for those seeking a bold, passionate look that feels grown-up, glamorous, and perfectly aligned with the romantic spirit of Valentine’s Day.
Regal Red Coffin Nails with Cascading Gold Chains
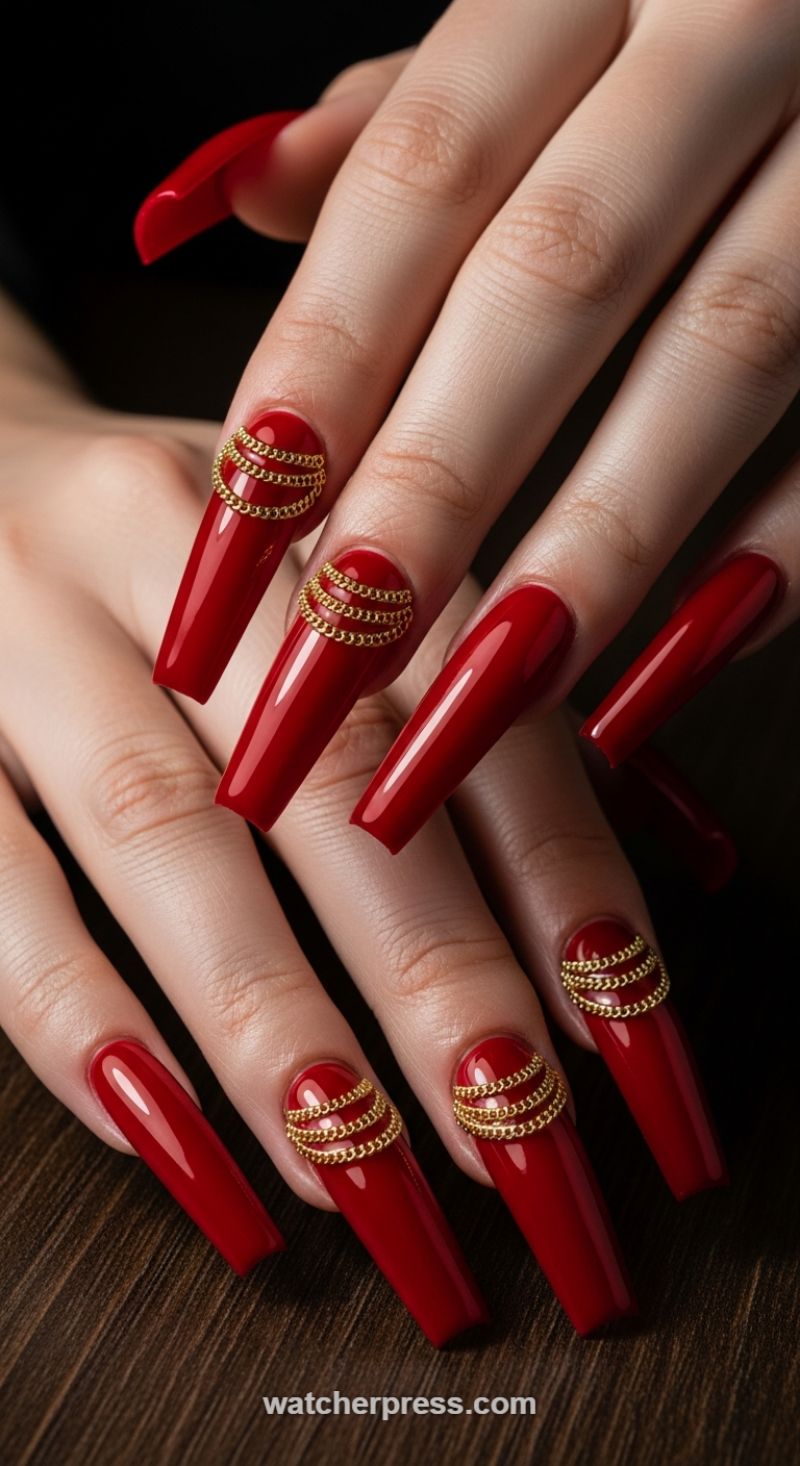
This breathtaking look elevates the classic Valentine’s Day red manicure into a statement of high fashion and regal elegance. The foundation is a set of ultra-long, perfectly sculpted coffin nails coated in a high-gloss, deep crimson gel. This specific shade of saturated red is universally flattering and perfectly embodies passion and romance, making it an ideal choice for a sophisticated holiday look. The length and shape—known as the coffin or ballerina shape—add a striking, elongated silhouette, transforming the hands into a powerful feminine accessory. When recreating this design, the first step is achieving absolute perfection in the nail architecture. Whether utilizing acrylic or gel extensions, ensure the sides are straight and parallel, tapering slightly towards the squared-off tip for that authentic, luxurious coffin profile. The seamless, mirror-like finish of the red polish is essential; two to three thin coats of a richly pigmented lacquer followed by a brilliant, durable top coat will achieve this high-end effect.
The true artistry of this design lies in the meticulous application of the gold chain accents, transforming the manicure from simple color into 3D wearable jewelry. These miniature chains are strategically placed near the cuticle area, stacked in three or four concentric layers to create a raised, dome-like effect. To execute this technique successfully, you must use thin, flexible jewelry-grade nail art chains and a strong, non-tacky adhesive—either thick builder gel or professional nail jewelry glue. Apply small, targeted amounts of adhesive directly onto the cured red polish where the chain will rest. Starting with the lowest chain near the cuticle, gently press the gold links into the adhesive using tweezers or a dotting tool, carefully ensuring the chains remain circular and taut. Repeat this layering process, working upward toward the middle of the nail bed, allowing the adhesive to cure completely after the final chain is positioned. This precision ensures the chains appear to cascade down the nail rather than looking bulky or haphazard.
Expert application and careful maintenance are key to making this elaborate design last through Valentine’s Day and beyond. To maximize longevity, gently encapsulate the edges of the chains with a final, thin layer of top coat, but avoid flooding the chain links themselves, which would diminish the desired 3D texture and sheen. This design is most effective and chic when applied as an accent—as shown, adorning the index, middle, ring, and pinky fingers, leaving the thumb perhaps solid red for balance. When styling this dramatic manicure, keep your jewelry minimalist; thin gold bands or delicate bracelets will complement the nail hardware without competing with it. This look is perfect for anyone seeking a bold yet undeniably feminine statement, effortlessly merging edgy hardware with timeless romantic color for a truly show-stopping finish.
Galentine’s Garden: Pastel Rainbow French Tips with Daisy Accents
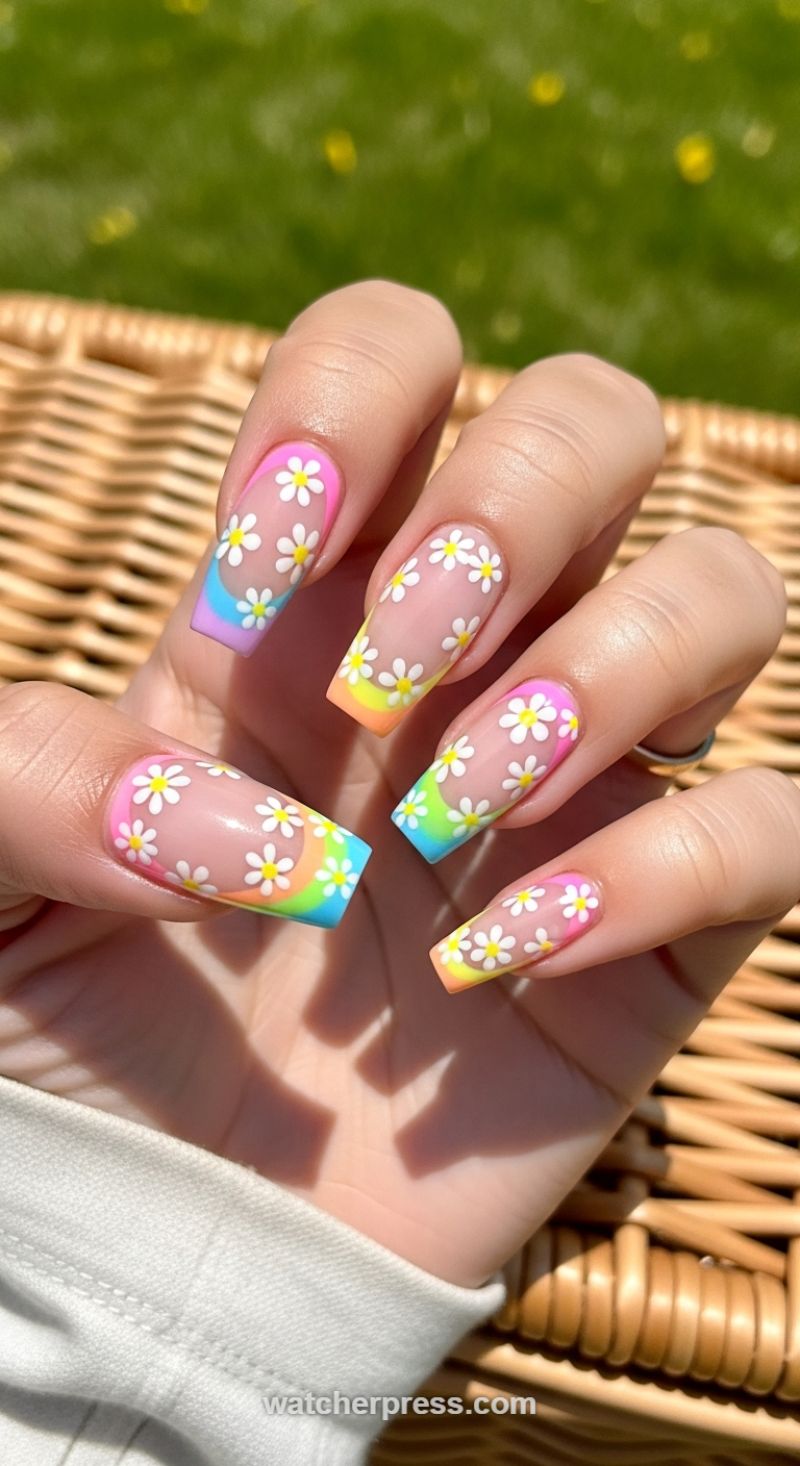
This delightful design offers a whimsical, feminine twist on the classic French manicure, perfect for those seeking a playful and bright aesthetic that transitions seamlessly from Valentine’s Day into the spring season. To achieve this high-impact look, start by prepping the nail to a clean, structural coffin or square shape. The foundational element is a sheer, milky nude or translucent pink base coat, often referred to as a ‘jelly’ finish. This base is crucial as it allows the vibrant colors and delicate daisy art to pop against a soft background, mimicking the look of negative space. The complexity lies in creating the deep, curved smile line of the French tip using a pastel rainbow gradient. To master the gradient, select 3-5 complementary pastel shades (e.g., hot pink, lilac, mint, and sky blue). Apply the colors in thin stripes directly onto a makeup sponge, then gently dab the sponge across the tip of the nail, repeating the process until the desired color saturation and seamless blend are achieved. For precision, use a fine liner brush dipped in pure white or a coordinating pastel color to sharped the upper edge of the curved French tip before curing, ensuring a crisp separation between the sheer base and the vibrant tip.
Once the pastel gradient tip is cured and sealed, the detailed daisy artwork is applied. This step requires precision and a steady hand, utilizing a fine-tipped dotting tool and an ultra-fine detail brush (size 00 or 000). Use highly pigmented white gel polish for the petals. To create the look of natural, scattered daisies, begin by placing five small, slightly elongated white dots in a circular arrangement to form each flower. Expert advice for an organic look is to vary the size and direction of the flowers—some should appear partially cut off at the edge of the nail, while others should be fully centered. Place the daisies strategically: some resting on the clear base, and others overlapping the colorful French tip. The final touch for the floral motif is the center; use a vibrant yellow or even a metallic gold polish for the central dot, instantly bringing the flowers to life. Curing each layer of art as you go prevents smudging and maintains the sharp lines necessary for this high-definition design.
This look is ultimately sealed with a high-gloss topcoat to lock in the intricate details and enhance the saturation of the pastel rainbow colors, delivering a mirror-like finish. While traditional Valentine’s looks feature hearts and deep reds, this design celebrates a blossoming romance and the youthful joy of Galentine’s Day through its soft, cheerful palette. For longevity, opt for high-quality gel polishes for both the base and the art, as the detailed French tip and miniature decals require the durability that gel provides. This style pairs beautifully with white, airy fabrics or delicate gold jewelry, making it the perfect chic statement for any spring occasion or playful romantic outing.
Soft Pastel Swirl Nails: The Groovy Valentine
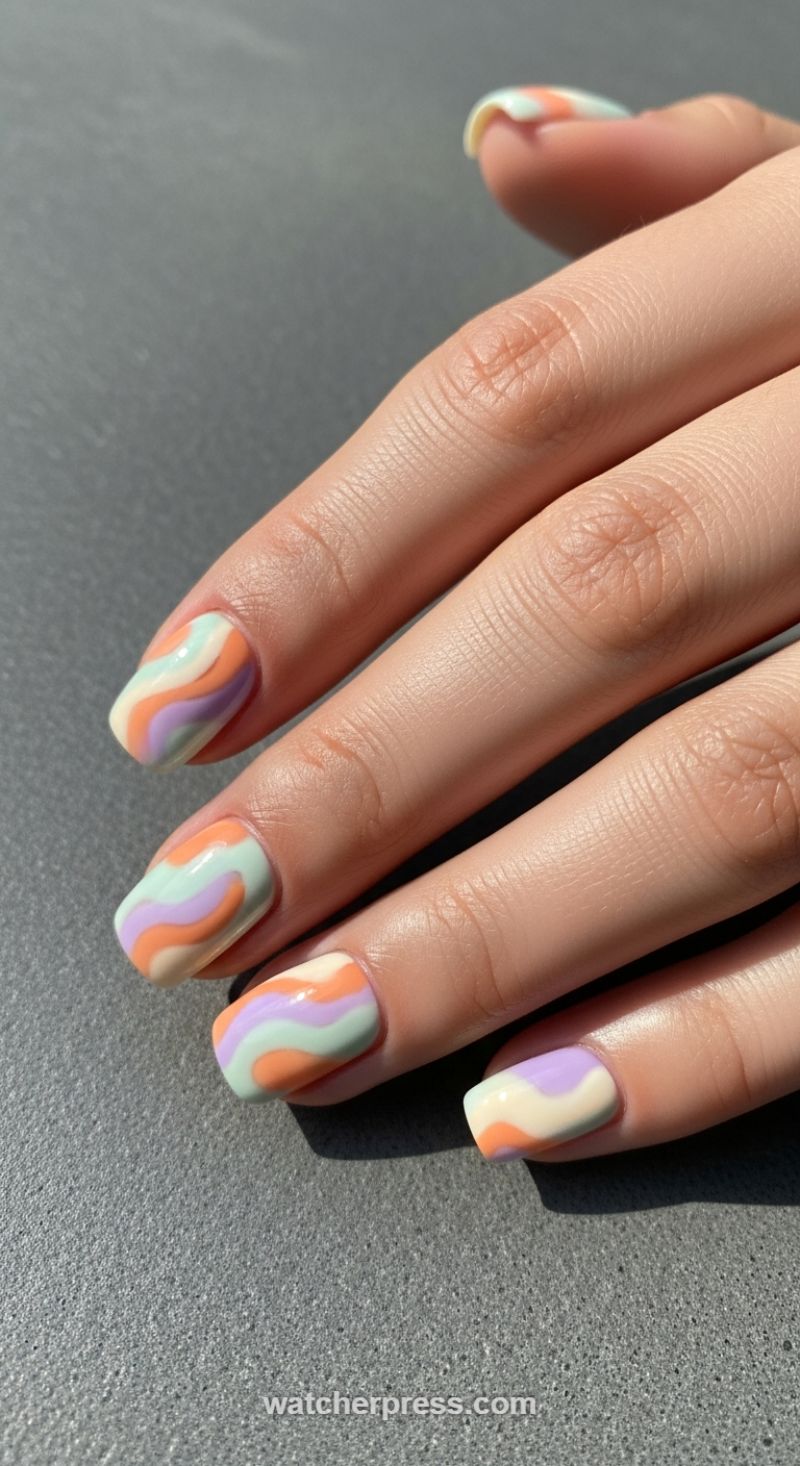
For those seeking a Valentine’s Day look that eschews traditional reds and hot pinks, the Soft Pastel Swirl design offers a refreshing, high-fashion, and distinctly feminine aesthetic. This look utilizes a groovy, 70s-inspired wavy pattern rendered in muted, creamy pastel tones—such as pale lilac, dusty peach, mint green, and off-white/cream—making it incredibly versatile yet perfectly suited for a romantic date night. The key to nailing this style is choosing shades that are slightly desaturated; they should feel playful but sophisticated. Visually, the design thrives on the contrast between the organic, free-flowing lines and the smooth, high-gloss finish, which gives the impression of layered, almost melted enamel. This is best achieved on a moderate square or squoval shape, allowing ample canvas space for the vibrant waves to flow dynamically across the nail plate. To elevate the chic factor, ensure all colors are opaque and richly pigmented, opting for high-quality gel polishes for the cleanest lines and durability.
Executing the perfect groovy swirl requires patience and precision with detail brushes. Begin by applying a creamy base coat (the lightest color, typically the off-white or cream) and fully cure it. The design is built color by color, starting with the broadest wave first. Using a fine striping brush or a specialized detail brush, pick up the second color (e.g., the mint green) and gently drag a smooth, undulating line from the cuticle to the free edge, allowing the curves to overlap the base coat. Cure this layer completely. Repeat this process with the next color (e.g., the lilac), ensuring the new wave tucks tightly alongside the previous one without blending. The movement should feel natural and asymmetrical; the pattern doesn’t need to look identical on every nail, adding to the free-spirited charm. Expert advice suggests staggering the wave direction slightly on each nail (e.g., starting high on the pinky and lower on the index finger) to create visual continuity across the hand.
To perfectly tailor this look for Valentine’s Day without changing the pastel scheme, consider small, tasteful modifications. If you want a more obvious romantic touch, designate one accent nail (like the ring finger) to feature the swirl pattern, but incorporate a tiny, negative-space heart shape where the color should be, allowing the creamy base coat to show through. Alternatively, swap out the mint green for a soft, dusty rose or millennial pink to lean further into the holiday’s typical palette while maintaining the retro wave motif. Once all colors are applied and cured, the most crucial step is applying a thick, self-leveling non-wipe top coat. This step seals the intricate lines, provides that desirable plump, glossy dimension, and protects the nail art for maximum longevity—allowing your soft, chic V-Day manicure to last well into the following weeks.
Ethereal Pearl French with Seashell Charm Accent

This design takes the classic soft Valentine’s look and elevates it with an ethereal, iridescent finish, perfectly embodying ‘soft, feminine, and chic.’ The core of this manicure is its luminous, jelly-like base. Start with a milky pink or sheer nude builder gel or gel polish applied in 1-2 thin coats to retain transparency while adding a healthy plumpness to the nail bed. What makes this look truly distinctive is the ‘aurora’ or ‘unicorn’ chrome effect layered over the color. This specialized fine powder catches the light, reflecting shifts of lavender, gold, and opalescent white, mimicking the inner luster of a seashell or a pearl. Note how the nail tips remain slightly clearer and brighter—achieve this subtle French effect by ensuring the pink jelly color is pulled thinner toward the free edge, or by using a slightly more opaque white or off-white sheer gel exclusively on the tip before encapsulating the whole look. This duality of milky base and clear tip creates depth and maximizes the pearlescent shimmer.
To recreate the signature iridescent finish, proper layering is key. After curing your base color and ensuring the surface is perfectly smooth, apply a layer of non-wipe gel top coat. *Crucial Tip:* Cure this top coat for only half the recommended time (e.g., 30 seconds instead of 60 seconds), leaving a slight tackiness. Immediately rub a high-quality aurora or fine mermaid chrome powder vigorously onto the surface using a silicone tool or a soft eyeshadow applicator. The partial cure allows the powder to adhere intensely but leaves the underlying color intact. Brush away any excess powder, then completely seal the entire nail with a generous second layer of durable top coat, making sure to cap the free edge to prevent chipping and maintain the mirror-like shine. This technique ensures the iridescent glow is maximized and protected for weeks.
The final touch is the elegant 3D seashell charm, which transforms this soft manicure into a delicate piece of wearable art, perfect for a romantic date night. The accent should ideally be placed on the ring finger. To securely adhere a metallic charm of this size, avoid standard top coat or nail glue alone. Instead, use a dab of thick builder gel or specialized rhinestone glue directly where the charm will rest. Press the charm into the gel, ensuring the edges are fully encapsulated by the adhesive without covering the decorative ridges of the shell itself. Cure the nail under a UV lamp for the full time recommended by the gel product. Expert advice for long-term wear: once the charm is cured, use a thin detail brush to carefully trace the base of the charm with top coat and cure again. This extra step locks the charm into place, preventing snags and loss, guaranteeing your chic, ethereal look lasts well past Valentine’s Day.
Fuchsia Glitter Bomb: The Ultimate Valentine’s Statement Mani
This dramatic nail look, featuring a high-octane fuchsia base saturated with holographic glitter, offers a fearless alternative to traditional Valentine’s Day reds and pale pinks. The core aesthetic relies on extreme shine and texture, making it perfect for those who embrace high-glamour. Visually, the nails are exceptionally long and filed into a crisp coffin or squared shape, which mandates the use of professional extensions (acrylic or hard gel). The sparkle is multidimensional, achieved by mixing varying sizes of glitter – from fine dust to chunky, iridescent hexagonal pieces – ensuring that every movement catches the light with rainbow flashes. This level of saturation requires careful application to maintain the smooth, high-gloss surface evident in the image, preventing the chunky glitter from creating a rough, uneven texture. While the length is a bold choice, the feminine hot pink hue keeps the design rooted in romantic holiday styling, transforming a standard glitter manicure into a show-stopping accessory.
Achieving this densely packed glitter effect requires strategic layering. Begin with a fully opaque, high-pigment fuchsia gel polish base coat to ensure the color reads true and vibrant. Once cured, the crucial next step is the application of the glitter mix. For maximum saturation without bulk, we recommend creating a custom glitter mixture by combining loose, chunky holographic glitters with a clear builder gel or a slightly thicker top coat. Apply this mixture slowly, pressing and floating the glitter across the entire nail surface, paying close attention to the cuticle area to maintain a rounded, clean edge. Since the larger glitter pieces can be prone to lifting, it is vital to encapsulate them completely. Cure the glitter layer thoroughly, then apply a second, thin layer of clear builder gel over the entire nail to seal and smooth the surface, correcting any minor bumps caused by the glitter texture.
After full encapsulation, proper finishing is essential to achieve the polished, mirror-like shine seen in the photograph. Before applying the final top coat, file and buff the encapsulated layer to ensure the nail is perfectly smooth and the edges are crisp (especially important for the long, square shape). The final step is a generous application of a non-wipe, high-gloss UV top coat. Expert advice for wearability: If the extreme length is too dramatic for everyday wear, adapt this look by maintaining the saturated glitter technique but applying it to a shorter, oval or almond nail shape, which softens the overall impact while retaining the glamour. Regardless of length, regular cuticle oil application is mandatory; with such a bold manicure, flawless surrounding skin elevates the look from fun to truly chic.
Romantic Sky-and-Sunshine Watercolor Gradient
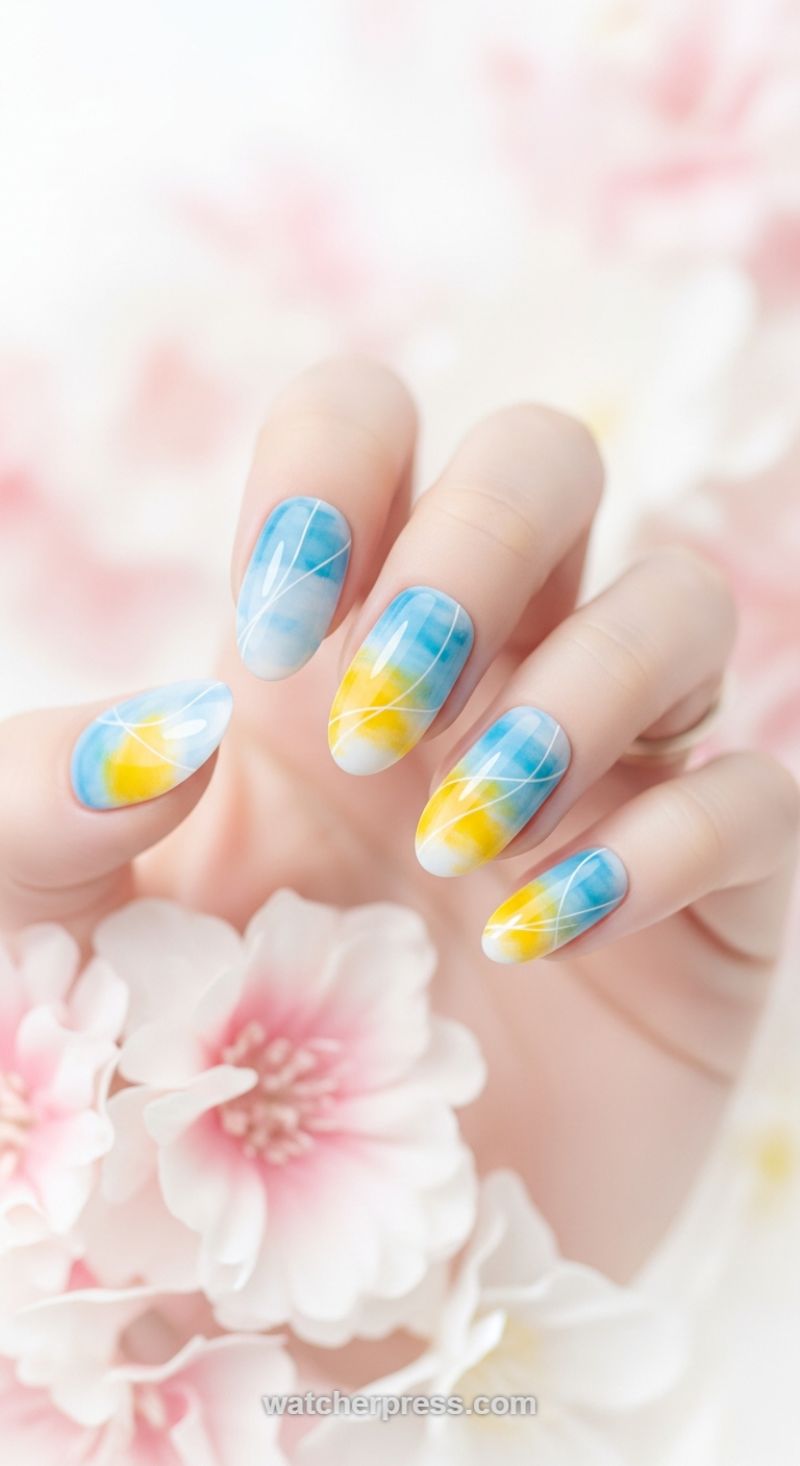
This sophisticated design offers a chic, non-traditional twist on Valentine’s romance, opting for the optimistic shades of a bright spring sky and warm sunshine instead of traditional reds and pinks. To recreate this delicate watercolor effect, start with oval or almond-shaped nails, as the elongated shape beautifully complements the flowing gradient. The core technique involves blending an opaque white base with light cerulean blue and a sunny yellow. The most effective method utilizes a specialized ‘blooming gel’ or a ‘wet-on-wet’ technique with diluted gel polish. After applying a thin coat of white polish and curing, apply a layer of clear blooming gel (but do not cure it). While the gel is wet, place small dots of the light blue near the cuticle and the yellow across the center of the nail bed, ensuring they meet in the middle. The blooming gel allows the colors to naturally spread and blur, creating that soft, atmospheric transition reminiscent of clouds or a beautiful sunset. Gently guide the colors with a clean brush if needed, then cure immediately once the desired bleed is achieved.
Once the base gradient is fully cured, the true artistry of the look begins with the intricate white linear work. This detail elevates the manicure from a simple blend to an abstract, gallery-worthy design. Using a highly pigmented white striping gel and a fine detail brush (ideally a 000 or ‘rigger’ brush), draw fluid, sweeping lines across the nail. The key is abstraction: the lines should cross diagonally and obliquely, looking almost like threads of silk caught in the wind or a modern geometric sketch overlaid on the color wash. Maintain a light hand to keep the lines thin and precise; any thick application will detract from the overall softness. For the most professional finish, try two intersecting lines on each nail, ensuring they vary slightly in angle and curve across the different fingers to maintain an organic, artistic appearance.
To lock in the ethereal quality of this design, a high-shine, non-wipe top coat is essential, mimicking the glossy sheen of a wet watercolor painting. This manicure is the perfect choice for the modern woman who prefers subtlety and lighthearted elegance over overt romanticism for Valentine’s Day. The palette signifies optimism and happiness, making it an ideal expression of joyous affection. When styling this look, lean into minimal, delicate gold jewelry, such as stacking rings or a thin bracelet, which will complement the warmth of the yellow tones without overwhelming the soft artistry on the nails. This manicure promises a fresh, airy, and utterly chic statement.