Discover 10 stunning, heart-melting baby animal portraits. From playful puppies to fluffy bunnies, sweet lambs, and curious foxes, these images are guaranteed to brighten your day and lift your spirits.
The Leaping Albino Bunny: Mastering High-Key Motion
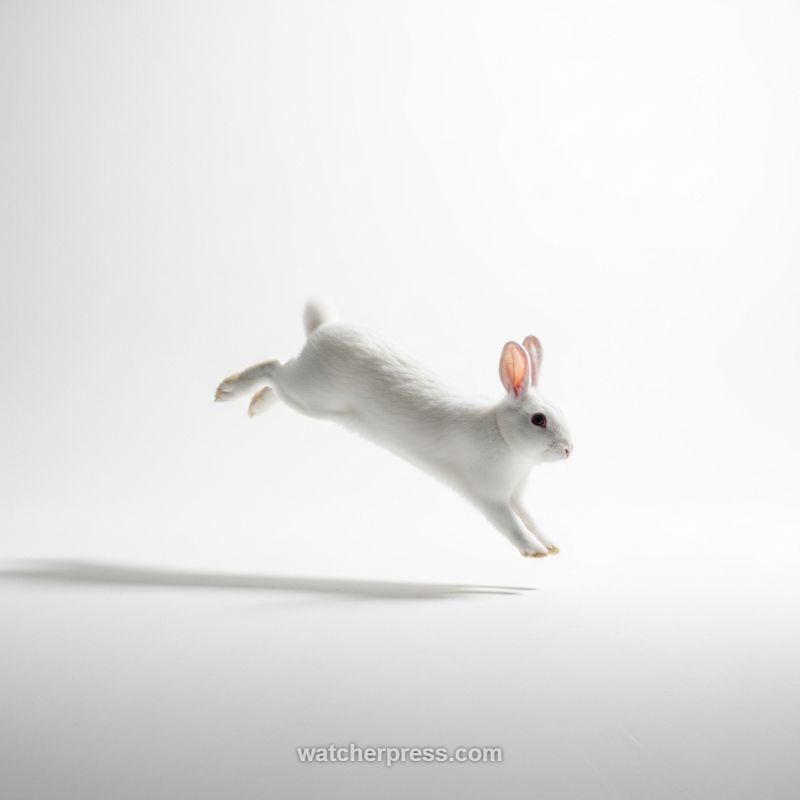
Achieving this stunning high-key portrait requires meticulous attention to studio lighting and technical camera settings. The subject—a pure white albino rabbit—is dramatically isolated against a seamless, blown-out white backdrop, creating a sense of weightlessness. To execute this ‘floating’ effect, you must utilize a multi-light setup. Typically, this involves two rear lights aimed directly at the background to ensure it registers as pure R-255 G-255 B-255 white, and at least one powerful key light positioned slightly above and forward to illuminate the rabbit while maintaining soft highlights. Crucially, capturing the animal mid-air requires either an extremely fast mechanical shutter speed (e.g., 1/1000s or faster) or, more practically in a studio setting, utilizing high-speed sync flash with a very short flash duration (the t.5 time). This brief, powerful burst of light effectively freezes the rapid motion of the jump, rendering the paws and the delicate pink ears razor-sharp, a necessity for professional animal photography where movement is often unpredictable.
Working with fast-moving, sensitive subjects like rabbits demands immense patience and preparation. Set up your lighting and camera controls beforehand, focusing on pre-setting the focus zone where you anticipate the animal will jump—often using continuous autofocus or manually setting a trap focus point. Use a moderately wide aperture (such as f/4.0 to f/5.6) to maintain enough depth of field to cover the animal’s entire length, from nose to tail, while still subtly separating it from the floor plane. The composition here is brilliant in its simplicity: the rabbit is positioned dynamically but given ample negative space above and in front of its direction of movement, which strongly emphasizes the feeling of propulsion and freedom. Expert tip: utilize high-speed burst mode (continuous shooting) when you anticipate the jump. For every single perfect mid-jump shot, you should be prepared to discard dozens of frames where the legs are awkwardly tucked or the crucial focus has been missed. Always prioritize capturing the eyes sharply to convey emotion and connection.
Beyond the capture phase, the final aesthetic relies heavily on post-processing finesse, particularly concerning the challenge of
The Essence of Innocence: Mastering High-Key Animal Portraiture
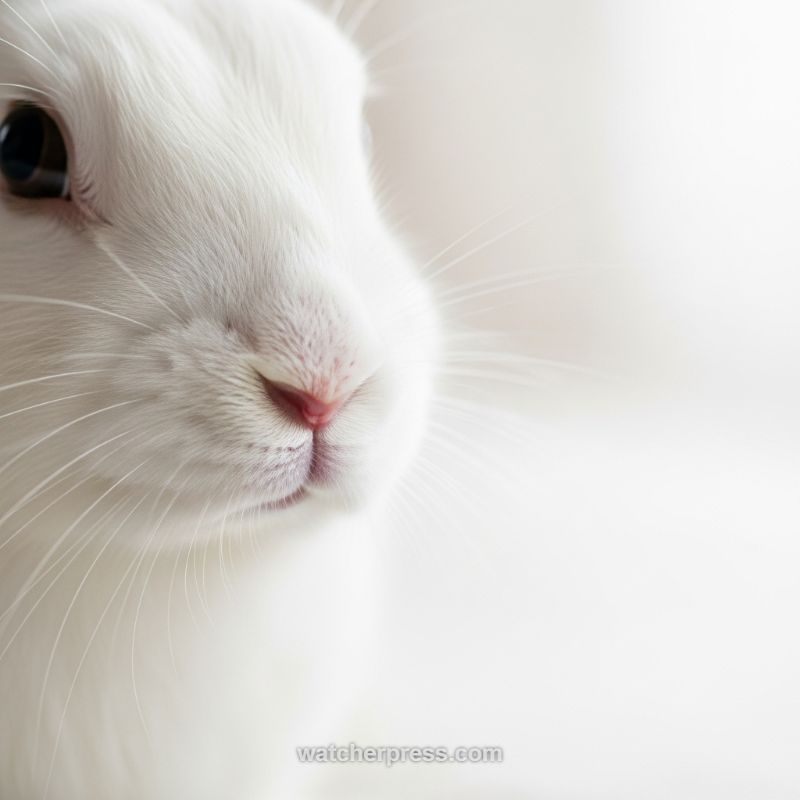
Achieving this ethereally soft and high-key portrait requires precise control over lighting and composition, essential for capturing the delicate features of small, white subjects like this rabbit. The primary technique is utilizing high-key exposure, where the overall scene is intentionally overexposed to create a bright, airy aesthetic, effectively using negative space—in this case, pure white—to isolate the subject. To replicate this effect, place your subject against a seamless white background (like a sheet or large reflector) and position them near a large, soft light source, such as a north-facing window on a bright day or a studio strobe equipped with a massive softbox. The key is light wrap: the light must envelop the subject evenly, minimizing hard shadows that would detract from the gentle mood. Compose the shot by deliberately cropping in tight, focusing only on the most endearing features—the velvet texture of the fur, the tiny pink nose, and the large, dark eye, which serves as the crucial anchor point in the sea of white.
From a technical perspective, successful high-key photography hinges on exposure compensation and metering. Set your camera to meter off the brightest part of the subject’s fur while intentionally dialing in +1 to +2 stops of exposure compensation (EC) to ensure the white background truly blows out to pure white without losing all texture in the animal’s coat. For this level of detail and sharpness, use a large aperture (like f/2.8 or f/4) to maintain a shallow depth of field, blurring any distracting elements while ensuring the eye and the nose are tack sharp. Crucially, focus must be pinpoint accurate, ideally locking onto the eye closest to the camera. Use a fast shutter speed (e.g., 1/250th of a second or faster) to freeze any slight movements, which are common when photographing energetic small animals.
Post-processing is vital for finalizing the high-key look and emphasizing the animal’s charm. In your editing software, review the histogram to confirm that the white point is pushed almost entirely to the right, signifying pure whites. However, be cautious not to clip the detail in the subject’s highlights entirely. Use global adjustments to increase overall brightness and subtle local adjustments to boost contrast only on the essential features—the dark pupil and the pink of the nose—making them pop slightly against the overwhelming whiteness. Finally, selectively sharpen the whiskers and the texture of the fur around the snout. This careful balance ensures the image maintains its softness and dreamlike quality while retaining enough structural integrity to highlight the irresistible innocence of the animal, making for a truly heart-melting portrait.
Mastering the Low-Key Pet Portrait
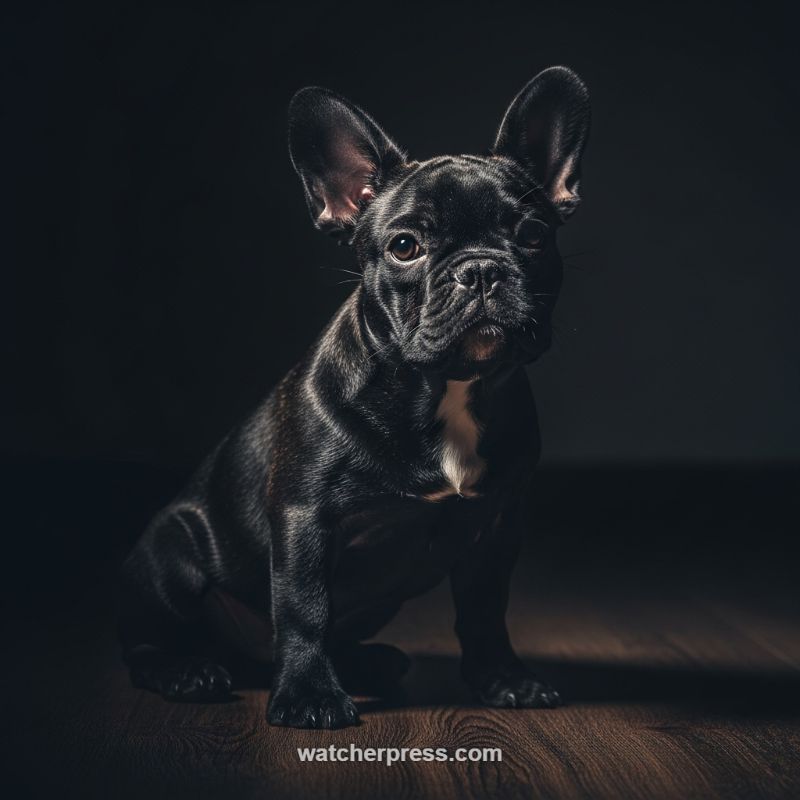
This breathtaking image demonstrates the impact of low-key photography, a style crucial for creating dramatic and intimate pet portraits. To successfully replicate this look, the environment must be meticulously controlled. Begin by establishing a dark studio space using a black seamless backdrop or heavy velvet curtains to eliminate stray light reflection. The surface the puppy sits on should also be dark, like the rich wooden floor seen here, or a non-reflective black mat, ensuring the subject is the only element that catches the light. The key to low-key lighting is utilizing a single, highly controlled light source. Position a strobe or speedlight equipped with a softbox and a grid (or a snoot for more isolation) high and slightly off-center from the puppy. This dramatic angle creates deep shadows and sculpts the contours of the dog’s face, making the ears and the subtle white patch on its chest pop against the surrounding darkness. Metering should prioritize the highlights on the subject’s fur, ensuring the background registers as pure black, usually requiring it to be underexposed by 2 to 3 stops.
Technical execution is paramount when photographing black or dark-colored animals in this high-contrast setting. Set your camera to manual mode, employing a wide-to-mid aperture (f/4.0 to f/5.6) to guarantee the puppy’s eyes and nose remain tack sharp, as they are the primary focal points that convey emotion. Use the lowest possible ISO (typically ISO 100 or 200) to maintain impeccable image quality and avoid introducing noise into the vast shadow areas. Since puppies are prone to sudden movements, maintain a relatively fast shutter speed (at least 1/125th of a second, even with strobes) to eliminate motion blur. Compositionally, utilizing the center-weighted approach, as seen here, draws the viewer’s immediate attention to the subject’s intensity. Expert tip: To capture this appealing, earnest gaze, work with an assistant who can hold a small treat or squeaky toy directly over the top of your lens, maximizing the chances of the puppy looking straight into the camera.
Post-processing transforms a great low-key capture into a finished masterpiece. The primary goal in editing is to preserve the rich, detailed texture of the black fur while ensuring the background is entirely devoid of detail. Start by carefully setting the black point to crush any residual gray tones in the background, but use a localized adjustment brush to slightly lift the exposure in the shadows of the dog’s coat. Utilize dodging and burning techniques to subtly enhance the light fall-off, highlighting the edges of the ears and the ridge of the snout. Finally, selective sharpening should be applied only to the eyes and nose—the areas critical for conveying the dog’s emotional expression. This technique ensures that the portrait retains its dramatic intensity and velvety texture, creating a truly heart-melting result that stands out among standard pet photographs.
Mastering the Minimalist Puppy Portrait with Clean Lines
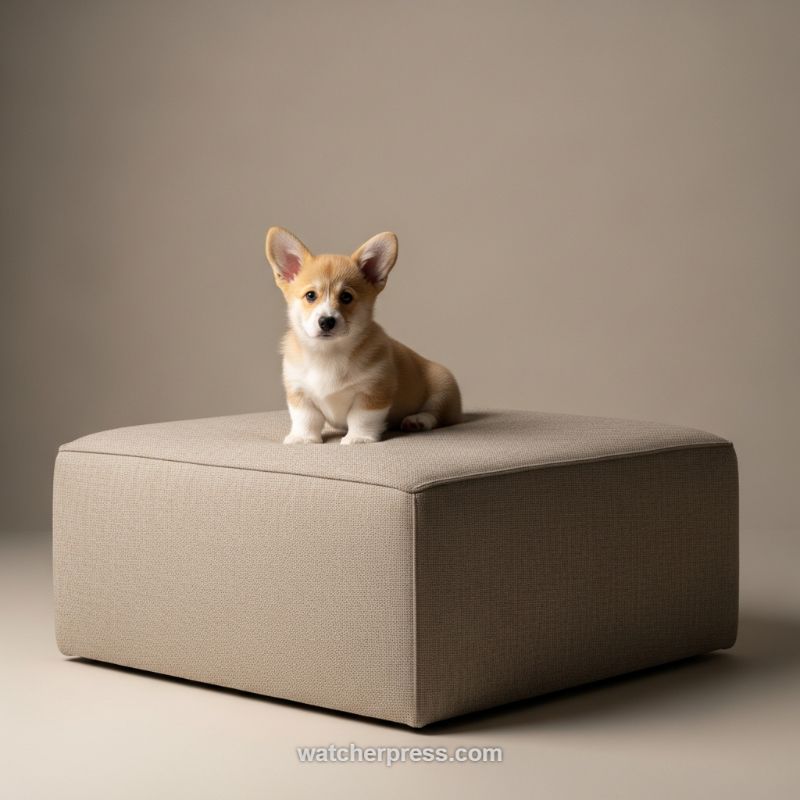
Creating a high-end pet portrait, especially of a tiny puppy like this Corgi, relies heavily on meticulous staging and an understanding of scale. The key instructional takeaway from this image is the deliberate use of large, simple geometric props in conjunction with a restrained color palette. Notice how the large, taupe, textured ottoman serves two vital functions: first, it provides a clean, elevated stage that is perfectly suited for a studio environment, and second, its sheer size dramatically emphasizes the minuscule scale of the puppy. To replicate this expert composition, choose a prop that contrasts geometrically with the subject—here, the soft, rounded lines of the Corgi are set against the hard, rectangular edges of the furniture. Maintain a strictly monochromatic or analogous color scheme (beige, taupe, cream) for both the background and the prop. This minimalist approach ensures that every bit of visual attention is instantly drawn to the puppy’s expression, preventing any distraction from clutter or conflicting colors, a hallmark of sophisticated portraiture.
Achieving this soft, airy lighting and seamless background requires careful studio setup. The backdrop should be a matte, seamless surface (either paper or a painted wall) in a neutral tone that complements the prop, ensuring a smooth visual transition from foreground to background. The lighting is crucial: use a large softbox or diffusion panel positioned slightly above and to the side of the subject. This creates gentle shadows that define the puppy’s form without being harsh, especially important for highlighting the texture of the Corgi’s short coat and the alert shape of its ears. For instructional integrity, always use a reflector placed opposite the main light source to ‘fill’ the shadows, particularly underneath the chin and belly, which prevents the puppy from looking too heavy or dark. Furthermore, utilize negative space—the vast, empty area above the Corgi—which is an advanced compositional technique that gives the subject ‘room to breathe’ and adds a sense of grandeur and calm to the overall image, turning a simple snap into a magazine-worthy photograph.
Executing a perfect puppy portrait also hinges on subject management and precise post-processing. Because young puppies have notoriously short attention spans, plan your shot quickly and have a hidden handler or assistant ready with a high-value reward (like a small treat or a squeaky toy) positioned near the lens to capture that direct, curious gaze. The Corgi’s eyes are pin-sharp, confirming that the photographer utilized a narrow depth of field, focused squarely on the face, which is the most critical element of an animal portrait. In the post-production phase, emphasize cleanliness: carefully clone out any stray hairs, dust, or small creases in the backdrop. Perfect the white balance, ensuring the white areas of the puppy’s chest and paws are bright and clean without being overexposed. This final polish elevates the image quality, turning excellent raw capture into a flawless, emotionally resonant final product designed to immediately capture the viewer’s heart.
The Ultimate Guide to Capturing Soft-Focus Bunny Portraits
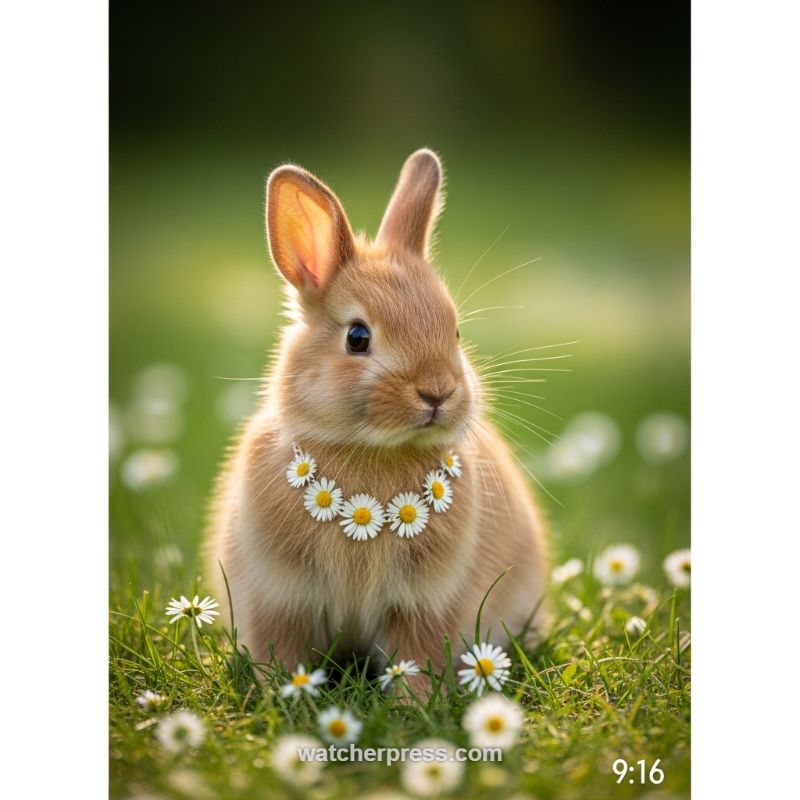
To recreate this heartwarming portrait of a springtime bunny, your primary focus must be on achieving ultra-shallow depth of field combined with perfect natural backlighting. Begin by selecting a location featuring dense, yet short, green grass dotted with small wildflowers, such as wild daisies or clover, ensuring the background is far enough away to blur into a creamy bokeh. For technical execution, use a fast prime lens (ideally 50mm or 85mm) set to a wide aperture, such as f/1.8 to f/2.8. Positioning your camera at ground level is crucial; this low perspective allows the tiny subject to dominate the frame, conveying its small scale and vulnerability. Ensure your focus point is precisely locked onto the rabbit’s eyes. Any slight misfocus will detract significantly from the portrait’s overall appeal, especially when working with such a narrow plane of focus. The subtle scattering of daisies in the immediate foreground and middle ground helps frame the subject and adds textural interest without competing for attention, guiding the viewer directly to the bunny’s face and the charming daisy chain around its neck.
Expertly managing the light is the key to elevating this image from a simple snapshot to a professional portrait. The best results are achieved during the Golden Hour, either shortly after sunrise or just before sunset, which provides the necessary warm color temperature and low-angle sun. Position your subject so that the light source is directly behind it (backlighting). This technique creates a luminous rim light effect visible across the bunny’s ears and the fine hairs of its coat, giving the impression of an ethereal glow. While backlighting is beautiful, it can plunge the face into shadow, so you must use a subtle fill light. Place a small, white reflector just out of the frame in front of the rabbit to bounce soft light back onto its face, lifting the shadows beneath the chin and eyes and ensuring all crucial details are preserved. When adding props like the daisy necklace, ensure you are working with a professional animal handler or that the prop is digitally composited in post-production, as the safety and comfort of the animal are always paramount.
Finally, the post-processing stage solidifies the portrait’s soft, magical mood. While maintaining sharp focus on the eyes, apply a slight reduction in the overall Clarity slider to gently soften the texture of the fur and the surrounding grass, enhancing the dreamlike bokeh effect. Carefully boost the saturation and luminance of the greens and yellows to bring out the vibrancy of the spring setting and the golden tones of the rabbit’s coat. A critical final touch involves color grading: slightly warming the overall White Balance (shifting toward yellow and magenta) helps reinforce the golden hour feeling. Remember to crop the image to a vertical aspect ratio, similar to the 9:16 seen here, which emphasizes the subject’s height and creates a compelling composition perfect for sharing across social media and mobile platforms.
Backlit Bunny Ears: Capturing Translucent Detail
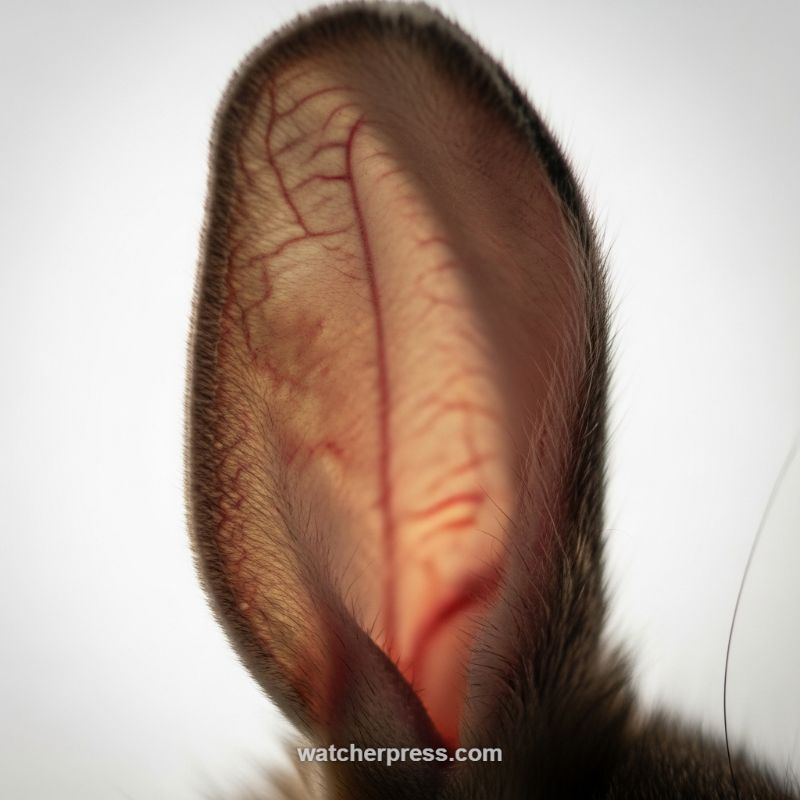
To capture the ephemeral beauty and delicate structure shown in this macro portrait—an extreme close-up of a rabbit’s ear—mastering backlighting and subsurface scattering is paramount. This technique reveals details often invisible to the naked eye, turning a simple ear into an architectural wonder of biological design. The “how-to” involves positioning a powerful, diffused light source directly behind the subject, aiming the light toward the camera. This is typically achieved using a controlled studio flash or strobes set to a high-key exposure. The goal is to make the subject’s fine, thin tissue (the pinna) translucent, allowing the light to pass through and highlight the intricate network of blood vessels and capillaries. Use a macro lens (100mm or greater) to fill the frame with detail. Metering is critical: expose for the subject’s skin and fur, ensuring the highlights on the background blow out to a pure white, thus eliminating distractions and elevating the focus entirely onto the subject’s texture and delicate internal structure. This creates the high-contrast, high-key effect that makes the image so striking.
Achieving critical focus when working this close requires precision and planning. Given the shallow depth of field inherent to macro photography, even the slightest movement from the animal will result in a blurry image. We recommend setting your camera on a stable tripod and utilizing a remote trigger to minimize camera shake. Focus manually on the most prominent feature—in this case, the large central vein and the fine hairs surrounding the ear’s edge—and consider employing focus stacking if your subject is exceptionally still, to ensure maximum sharpness from front to back. Compositionally, the power of this image lies in its extreme crop, which transforms a common feature into an abstract piece of art. When framing, look for symmetry, patterns, and the subtle textures, such as the downy fur or the ripples of the cartilage beneath the skin, using the clean, expansive negative space of the white background to draw the viewer’s eye directly to these exquisite details.
Beyond technical execution, expert animal portraiture demands utmost consideration for the subject’s comfort and safety. This type of close-range photography can be stressful for small animals. Ensure you are working in a quiet, temperature-controlled environment and that the lighting setup is safe, cool, and diffused to avoid irritating the animal’s eyes or skin. In post-processing, the backlit effect can be further refined by globally increasing contrast to make the subtle reds of the veins pop against the delicate pinkish skin. Use local adjustments to sharpen the visible textures and ensure the white background is indeed pure white (RGB 255, 255, 255), reinforcing the clean, isolated look. By merging high-level macro lighting techniques with patient and ethical handling, you transform a simple portrait into a stunning demonstration of biological elegance, fitting perfectly within an article celebrating the adorable and fragile beauty of baby animals.
The Cozy Capture: Mastering the Swaddle Technique for Baby Animal Portraits

Achieving a portrait this captivating requires meticulous attention to the animal’s environment. For newborn subjects like this tiny bunny, the visual strategy centers on maximizing comfort and minimizing distractions. Note how the photographer utilized the luxurious pink drapery. This high-saturation, yet soft, color choice serves two purposes: it creates an immediate sense of warmth and vulnerability, and the voluminous folds act as a perfect, naturally textured frame, guiding the viewer’s eye directly to the subject. Expert advice dictates choosing fabrics that provide high contrast in texture but low contrast in hue relative to the subject, preventing the setting from overpowering the fragile animal. Furthermore, the material itself must be safe, non-irritating, and slightly warm, which subtly encourages the animal to remain still and nestled for the duration of the short shoot, prioritizing the baby’s safety and cooperation.
The emotional impact of this image hinges entirely on technical execution, specifically the use of shallow depth of field (achieved often with a wide aperture, f/2.8 or lower). This technique isolates the bunny, rendering the surrounding pink fabric into a soft, creamy bokeh, thereby ensuring the viewer’s focus rests exclusively on the animal’s face. Crucially, the focus is razor-sharp on the bunny’s eyes. When photographing any portrait, especially animals, maintaining focus on the eyes establishes the critical connection point that drives emotional response. To achieve this level of precision with a potentially moving subject, utilize fast shutter speeds (1/125s or higher) and continuous autofocus if possible, tracking the eyes even if the animal is shifting slightly. Soft, diffuse lighting—likely achieved via a large window or a softbox—prevents harsh shadows and complements the gentle texture of the fur and fabric, enhancing the overall dreamy quality.
Notice the tight, centered framing. By sinking the bunny deep into the nest of fabric, the photographer emphasizes its small scale and vulnerability. This composition often works best for “melting heart” shots, as the subject appears protected and safe within its surroundings. For high-quality animal portraiture, the instruction goes beyond visuals and enters ethical practice. Never stress or endanger the baby animal for the sake of a photograph; sessions must be quick and conducted only when the animal is calm, often after feeding. Post-processing should be subtle and professional: a gentle increase in clarity applied specifically to the fur, minor dodging/burning to enhance the sparkle in the eyes, and careful color correction to ensure the pink remains true without casting undesirable color shifts onto the bunny’s brown coat, thus maintaining the overall integrity and professional finish of this adorable portrait.
The Miniature Magic of a Teacup Bunny Portrait

To achieve a portrait that evokes immediate warmth and tenderness, like this stunning ‘teacup bunny’ shot, mastering scale is paramount. The choice of a delicate, ornate teacup serves not just as a charming prop, but as a deliberate tool to underscore the rabbit’s minuscule size and fragile nature. Notice the juxtaposition: the pure white, elegant porcelain provides a clean, refined base, while the soft, russet tones of the bunny’s fur offer organic texture and warmth. The color harmony is key here; the subject’s golden-brown coat perfectly complements the warm, ambient bokeh lighting in the background—a technique that instantly elevates the mood from a simple snapshot to a professional, high-art pet portrait. When staging your own miniature animal subjects, always prioritize a prop that is safe, appropriately scaled, and possesses an aesthetically pleasing texture or pattern to frame your subject effectively. The gentle, creamy background blur ensures maximum focus on the subject, making the vulnerability of the small animal the central emotional theme.The secret ingredient transforming this image into an ‘I-Dying’ moment is the flawless execution of shallow depth of field, achieved by using a wide aperture (a low f-number, perhaps f/1.8 to f/2.8). This technique ensures the bunny’s face—specifically its large, expressive eyes and fine whiskers—are in razor-sharp focus, while everything else melts into a creamy blur. To replicate this, position your subject away from the background lights (creating separation is vital for achieving large, pleasing bokeh circles). Manual focusing is often recommended for animals, guaranteeing the focal point lands precisely on the nearest eye. Furthermore, observe how the soft golden lights provide a subtle backlighting effect, creating a faint ‘rim light’ around the bunny’s ears and head. This separation technique adds three-dimensionality and drama, preventing the subject from merging visually with the dark background. For home setups, using Christmas fairy lights or a string of LEDs positioned several feet behind the subject is an excellent, inexpensive way to generate this professional bokeh look, ensuring they are positioned just outside the plane of focus.While the technical aspects are crucial, the ethical and compositional elements seal the deal. Safety is non-negotiable when photographing small animals; ensure the cup is stable, the duration of the shoot is short, and an assistant is ready just off-camera to prevent accidents. Compositionally, the image adheres beautifully to principles of framing and visual weight. The rabbit is centered yet its gaze is directed slightly off-camera, inviting the viewer into its world and creating a narrative hook. In post-production, amplify the existing ambiance. Boost the saturation selectively in the warm tones to intensify the golden bokeh glow, and apply gentle clarity adjustments to enhance the texture of the bunny’s fur without making it look harsh. The final touch should be subtle vignetting to draw the eye back to the luminous subject within the teacup, cementing the magical, intimate feel of the miniature scene and ensuring the final result is worthy of an editorial feature.
The Fluffy Cloud of Joy: Mastering the Minimalist Puppy Portrait

The secret to capturing the overwhelming cuteness of breeds like this pure white Pomeranian lies in meticulous preparation and minimalist studio execution. Visually, this image succeeds by isolating the incredibly fluffy subject against a perfectly clean, neutral gray background. To replicate this effect, photographers must prioritize a seamless backdrop—either a studio cove or a roll of neutral gray paper—ensuring there are absolutely no distracting elements, seams, or textures. Since the subject is white, the mid-tone gray serves two purposes: it prevents the white fur from blending into the background (which a high-key white background would cause) and it provides enough contrast to accentuate the puppy’s dark eyes and nose. For puppies, position the camera at their eye level. This low perspective immediately draws the viewer into the animal’s world, maximizing the emotional impact and making the small subject appear monumental and centered, which is vital for a captivating portrait.
Expert lighting is crucial for defining the texture of dense fur without casting harsh shadows that detract from the soft aesthetic. Use a large light modifier, such as a massive octabox or a shoot-through umbrella, positioned slightly above and off-axis from the camera. This setup provides broad, diffused illumination that wraps softly around the puppy, making the white fur appear voluminous and cloud-like. Pay special attention to the catchlights—the small reflections in the eyes. These tiny, bright pinpoints are the keys to bringing the subject to life; the larger the light source, the better the catchlights will look. When capturing the shot, patience is paramount. Use high-value treats or a favorite squeaky toy held just above the lens to encourage direct eye contact, and be prepared to shoot in burst mode, as a puppy’s attention span is fleeting, often only lasting a second or two.
Finally, the post-processing phase is where the portrait’s charm is perfected. Before shooting, ensure the puppy is impeccably groomed, as dirt and stray hairs will be amplified in the clean studio environment. In editing, focus on selectively enhancing the contrast. While the overall mood should remain soft, sharpen the details around the eyes, nose, and mouth to make the puppy’s expression pop. Carefully adjust the curves to lift the whites of the fur without blowing out the highlights, ensuring that subtle texture remains visible even in the brightest areas. This balance of softness and selective sharpness, coupled with the clean, distraction-free environment, is the formula for achieving a portrait that melts hearts and stands out in a crowded digital feed.
Mastering the Moody Puppy Portrait: High Contrast and Chiaroscuro
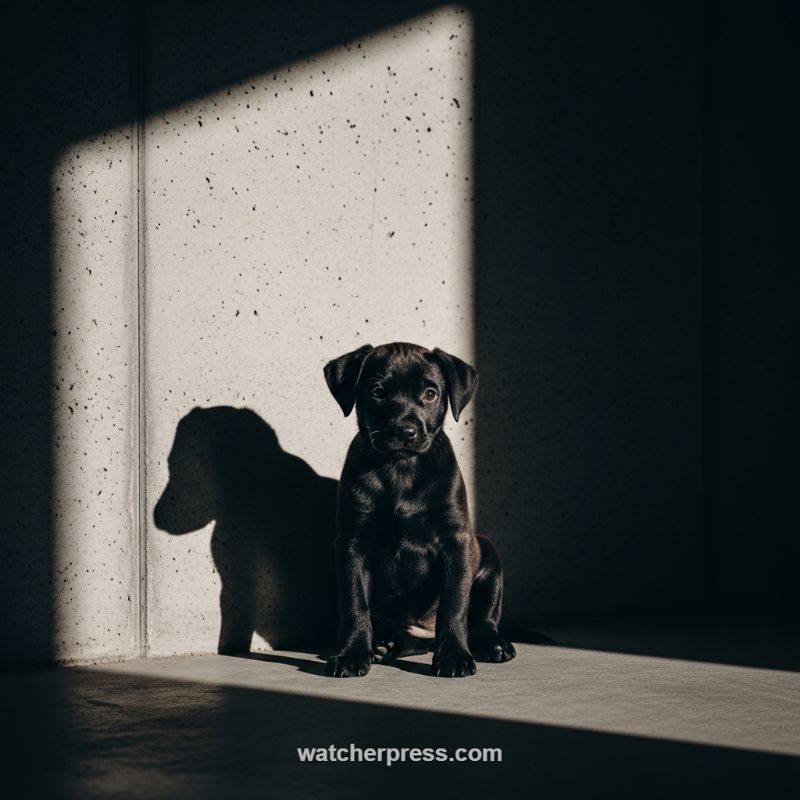
This portrait exemplifies the power of chiaroscuro—the extreme use of light and shadow—to create a dramatic and sophisticated image, despite the subject being a simple puppy. The harsh, directional sunlight striking the textured concrete wall provides a bright, almost reflective backdrop, while the deep shadows engulf the majority of the frame, isolating the puppy and drawing immediate attention to its face and form. Notice how the bright spot dramatically highlights the rough texture of the concrete, emphasizing the stark, minimalist environment. For photographers aiming to replicate this dramatic look, seek out strong, single-source natural light that intersects a neutral, textured background (like concrete or stucco). Positioning the subject precisely at the transition point between light and shadow is key to achieving this powerful visual separation and maximizing depth; you want the puppy illuminated just enough to separate it from the deep shadows, creating that striking ‘pop’ essential for a high-tier animal portrait.
Effective composition is crucial for portraits shot under such demanding lighting conditions. Here, the subject is centered, but the overall balance is achieved through the use of negative space and the anchoring diagonal line created by the sunlight beam in the foreground. The most compelling narrative element, however, is the oversized, distinct shadow cast upon the wall. This shadow acts as a secondary subject, often perceived as the potential ‘adult’ dog or a symbolic representation of the dog’s future self, adding a poignant and thoughtful layer of depth to what is otherwise a simple puppy portrait. To capture a shadow this clear and sharp, ensure your light source is extremely intense and directional, often achieved by shooting near a window or doorway where light is highly concentrated. When framing, always allow ample negative space around the shadow so it is clearly defined and not cropped too tightly, giving the shadow itself weight and importance equal to the subject.
Photographing a black puppy (or any dark-furred animal) in such extreme high contrast presents a significant technical exposure challenge. The goal is to retain rich detail and texture in the deep black fur without entirely blowing out the bright concrete highlights. Expert advice is to expose strategically for the mid-tones or highlights, slightly underexposing the overall scene, and then utilize post-processing techniques (specifically adjusting the shadows, blacks, and clarity sliders) to gently lift the detail in the puppy’s coat and, most importantly, its eyes. Critical focus on the eyes is non-negotiable; even when the subject is partially shrouded in shadow, sharp, bright eyes convey emotion and create the ultimate connection with the viewer. Because the lighting is so unforgiving, subject movement must be minimized. Use a fast shutter speed (ideally 1/250th or higher) to freeze motion, and pair it with an aperture that allows for sufficient depth of field (f/4 to f/5.6 usually works best in a high-contrast environment) to ensure the entire adorable face is tack sharp.
The Fluffy White Puppy Lick: Mastering the Moment of Mischief

This portrait captures the essence of puppy cheekiness through perfect timing. Notice the stark contrast between the luminous white fur of this fluffy dog (likely a Pomeranian or related spitz breed) and its deep, expressive eyes. The key visual element here is the pink tongue mid-lick, creating a dynamic, instantaneous moment that oozes personality. To replicate this level of professional detail, utilize a fast prime lens (such as a 50mm or 85mm) set to a wide aperture (f/1.8 to f/2.8). This technique maximizes the shallow depth of field, resulting in the creamy, blurred background (known as bokeh) which immediately isolates the subject and emphasizes the dog’s exquisite texture. Crucially, ensure your focus point is locked precisely on the nearest eye; even minor misfocus on the subject’s face can negate the emotional impact of an otherwise perfectly timed shot. The clarity of the eyes and the wetness of the tongue are what transform this into a captivating masterpiece.Capturing an authentic animal expression, especially one as brief and unpredictable as a nose lick, requires patience, readiness, and strategic preparation. Expert pet photographers know that moments of peak action often follow a carefully planned stimulus. Before the session, ensure your puppy is comfortable, well-rested, and happy in the environment. To intentionally elicit the tongue-out moment, you can strategically place a tiny, appealing scent (such as a small smear of plain yogurt or pet-safe broth) just above their nose or lip line. Once the stimulant is placed, immediately raise your camera to eye level and be ready to shoot continuously using burst mode the instant the puppy begins to engage with the scent. You must anticipate the action rather than react to it, as this facial movement is often over in a fraction of a second. Paying close attention to the dog’s posture and ear position is also vital, as a relaxed and interested animal provides the most natural and endearing portraits.The soft, pure quality of the white fur in this photograph is magnificently enhanced by expertly utilized natural lighting. Harsh direct sunlight would severely blow out the highlights and obscure the delicate, cloud-like texture of the coat. To achieve this ethereal glow, ideally shoot during the ‘golden hour’ (early morning or late afternoon) or, as is likely the case here, capture the puppy in bright, open shade. Position your subject so the light gently wraps around them, providing dimensionality and defining the edges of the fluff without introducing hard shadows. For environmental control, select a uniform, non-distracting background color—like this deep, unfocused green lawn—and ensure there is substantial physical distance (many feet) between the puppy and the backdrop. This distance, combined with the wide aperture, maximizes the background blurring effect, successfully eliminating distraction and ensuring the viewer’s attention remains squarely fixed on the puppy’s irresistible expression.
Capturing the Softest Textures: The Art of Fluff Photography

The stunning visual quality of this image lies in its expert rendering of texture, volume, and light, making the fur look almost tangible. To achieve this level of detail in a baby animal portrait—especially subjects known for dense, fine white coats like Arctic fox kits or fluffy white puppies—a technical approach is essential. Start by using a lens that allows for tight cropping, such as a macro lens or a telephoto lens (100mm or greater) combined with extension tubes, which helps isolate the subject’s unique textural attributes. The natural radiating pattern visible here, originating from a central point, should guide your composition; brush the fur gently or coax the animal into a position that highlights these natural swirls or cowlicks, creating dynamic visual flow. Crucially, ensure the ambient lighting is absolutely flawless; fine hair requires clean, debris-free fur and positioning that avoids shadows that would flatten the volume.
Mastering the lighting is the most critical step for translating fluffiness into a high-quality photograph. This pure white, high-key appearance is best achieved using extremely soft, diffused light—a large softbox or natural window light on an overcast day works perfectly. Positioning the light slightly behind and to the side of the subject (sidelighting or subtle backlighting) is key, as this technique catches the very edges of the individual hair shafts, creating a luminous rim that emphasizes depth and separation from the surrounding fur. When metering, remember that cameras often under-expose white subjects, rendering them gray; therefore, intentionally overexpose the shot by approximately +1 to +1.5 stops to ensure the whites are bright and pure without losing detail in the highlights. Use a moderately open aperture (f/4 to f/5.6) to provide enough depth of field to keep the central focus area sharp, while allowing the surrounding hair tips to dissolve softly into bokeh, enhancing the overall feeling of luxurious softness.
Finally, the delicate balance between sharpness and softness must be perfected in post-processing. When working with pure white subjects, vigilantly check the histogram to ensure that highlights are pushed to the brink of clipping, maximizing brightness, but retaining just enough detail to show the fine texture. Apply selective sharpening—avoiding global sharpening—specifically to the focal point, such as the swirl’s center or the most prominent tufts of hair, to define the texture without introducing harshness elsewhere. Subtle use of the clarity slider can enhance the definition of the hair shafts without increasing overall contrast, maintaining the ethereal glow. Remember that noise reduction should be applied minimally; overly aggressive reduction will erase the subtle micro-textures of the fur, making it look artificial or plasticky rather than naturally soft and deep.
Golden Slumber: Capturing the Cozy Canine Nap
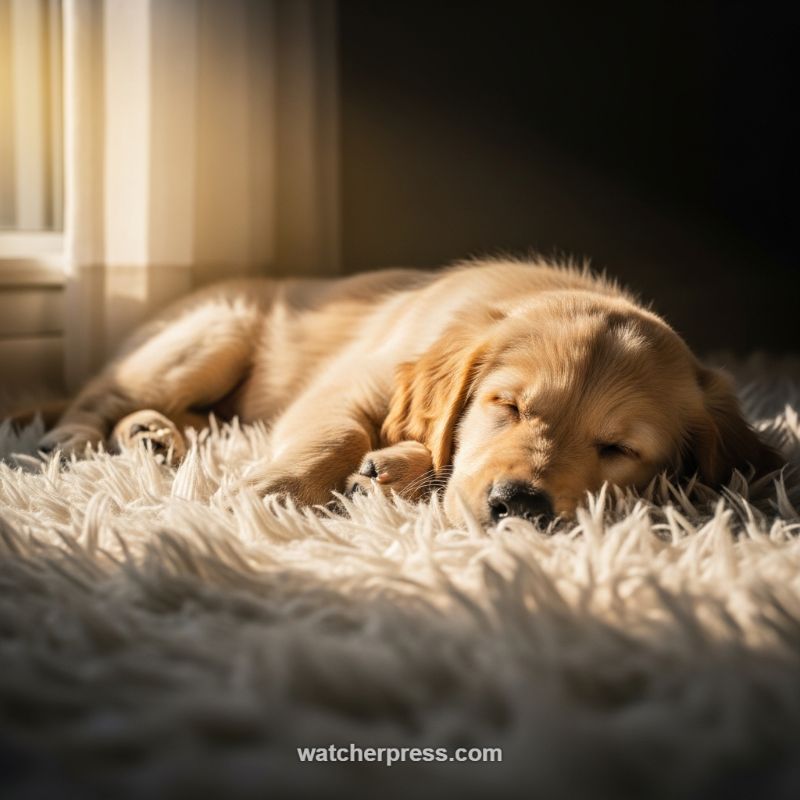
To replicate the peaceful intimacy shown in this golden retriever puppy portrait, the first step is selecting the right environment and textural components. The composition brilliantly utilizes a high-pile, cream-colored shag rug which acts as both a soft, inviting bed and a dynamic textural element, contrasting sharply with the puppy’s smooth, short coat. When attempting this type of shot, photographers should prioritize comfort for the animal; a genuine, deep sleep ensures relaxed features and natural positioning. Position the puppy where soft, natural window light can graze their fur, often early morning or late afternoon, as this provides the crucial warm tones. The foreground blur created by the texture of the rug draws the eye directly to the subject, establishing an immediate sense of cozy depth and enhancing the tactile quality of the image, making the viewer feel like they could reach out and pet the sleeping dog.
The dramatic lighting technique employed here is fundamental to the portrait’s success. The photograph uses strong sidelighting, sourced from the window area, which creates beautiful ‘rim lighting’—a glow that outlines the puppy’s silhouette against the darker background. To achieve this, place the puppy parallel to the light source, rather than facing it. Technically, you must meter for the highlights on the puppy’s face and fur, ensuring the bright areas retain detail and don’t become ‘blown out.’ For gear settings, utilize a wide aperture (such as f/1.8 to f/2.8) to maximize the shallow depth of field, keeping the focus critically sharp on the eyes and muzzle while softening everything else. This technique isolates the adorable features and eliminates distracting background elements, successfully directing all emotional energy toward the serene face of the sleeping subject.
Finally, optimizing the color and contrast in post-processing transforms a good shot into a stunning portrait. Notice the predominant warm, golden palette; this is achieved by adjusting the white balance to a higher Kelvin temperature, reinforcing the cozy, sunlit mood. Expert advice dictates subtle manipulation of the tone curve to deepen the shadows on the right side of the frame while slightly boosting the luminosity in the rim-lit areas. This heightens the contrast and sense of drama. The overall result is a masterful demonstration of capturing vulnerability: by focusing on a relaxed, sleeping animal in perfect lighting, the photograph avoids aggressive posing and instead captures a pure, heart-melting moment of tranquility, making the image resonate deeply with viewers seeking genuine emotional connection.
Capturing the Ethereal Fox Kit in Golden Light
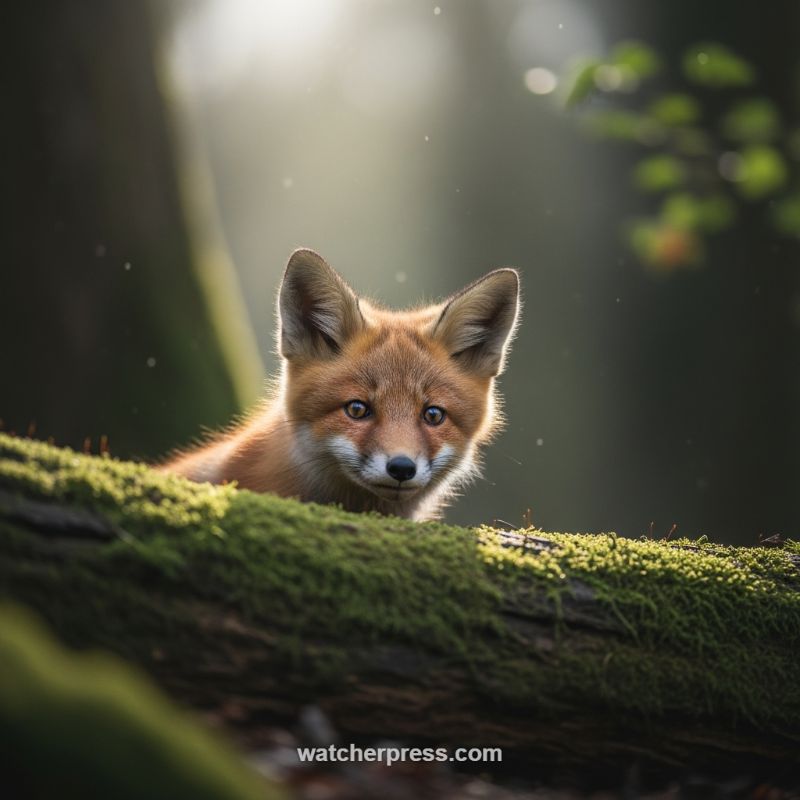
Achieving this stunning, almost magical portrait of a fox kit relies entirely on utilizing exceptional natural light, specifically strong backlighting often found during the ‘golden hour’ shortly after sunrise or before sunset. To replicate this effect, position yourself so the sun is directly behind your subject. This creates a powerful ‘rim light’ that outlines the edges of the animal—notice how the fur on the ears and back glows vibrantly against the dark background. Technically, this requires careful exposure management; meter off the subject itself, or use positive exposure compensation (+0.7 to +1.5 stops) to ensure the fox’s face is correctly illuminated, even though the overall scene is dark. The resulting contrast between the bright highlights and the deep shadows of the forest floor, coupled with the visible dust motes dancing in the light, enhances the sense of depth and isolates the subject, contributing significantly to the ethereal mood.
The visual appeal is dramatically heightened by the strategic use of foreground interest and an extreme shallow depth of field (low aperture, e.g., f/2.8 to f/4). The moss-covered log acts as a crucial compositional element, grounding the subject and adding rich texture and color contrast (the deep green against the reddish-orange fur). When composing, ensure the fox’s eyes—the most expressive element—are perfectly sharp; utilizing a camera’s spot focus on the nearest eye is essential. Furthermore, the log partially obscures the fox, creating a natural frame and a sense of curiosity and interaction, as if the viewer has just stumbled upon the shy creature. This technique of using a natural barrier emphasizes the tiny size and vulnerability of the kit while directing the viewer’s focus straight to the engaging gaze.
For high-level wildlife photography, approaching subjects like fox kits demands patience, distance, and stringent ethical practice. Use a long telephoto lens (300mm to 500mm is often necessary) to maintain a respectful distance while still achieving the tight framing and intense background compression required for that beautifully blurred bokeh effect. Since wildlife is inherently unpredictable, maintaining a fast shutter speed (1/500th of a second or higher, depending on available light) is non-negotiable, even if the animal appears momentarily still, to guarantee absolute sharpness and freeze any subtle movements, like a twitch of the nose or an ear adjustment. Most importantly, never bait, call, or disturb young animals for a photograph; capture these fleeting moments by setting up quietly in known habitats and waiting motionlessly, allowing the fox kit to exhibit its natural, charming curiosity safely and on its own terms.
The Softest Subject: Capturing the Miniature Lop
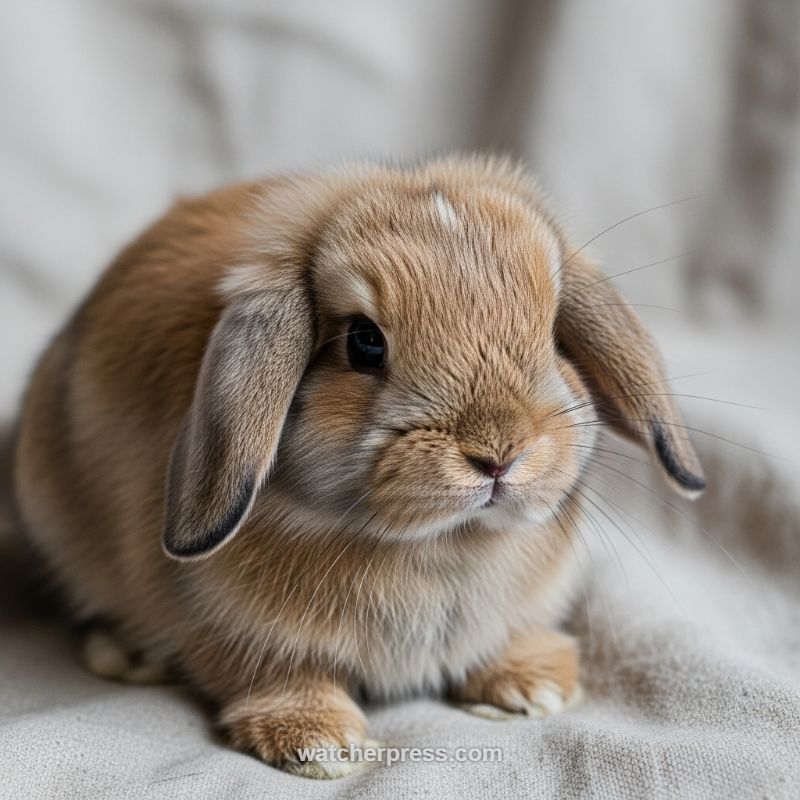
To achieve a portrait as endearing as this, the visual setup must prioritize softness and neutrality, allowing the bunny’s textures and expression to be the sole focus. Begin by selecting a muted, natural backdrop—a textured fabric like unbleached linen or heavyweight cotton works perfectly, providing just enough visual interest without competing with the subject’s fur. This specific image benefits greatly from extremely soft, diffused lighting, likely achieved either by placing the subject near a large window on an overcast day or using professional studio lighting filtered through an oversized softbox. Position your light source slightly to one side and slightly above the subject to create subtle contouring, highlighting the plump cheeks and the definition of the floppy ears. Crucially, photograph the subject from their level. By getting low—often requiring the camera be placed almost directly on the floor—you achieve a more intimate, larger-than-life perspective that emphasizes the subject’s vulnerability and adorableness.
Technically, capturing the delicate textures of a rabbit requires mastery of shallow depth of field. Use a fast prime lens (like an 85mm or 50mm) set to a wide aperture, ideally between f/1.8 and f/2.8, to maximize the beautiful bokeh seen in the background, which isolates the subject from its surroundings. Precision focus is non-negotiable; you must nail the focus on the eye nearest to the camera. If the eye is even slightly soft, the entire portrait loses its impact. Given that small animals can be unpredictable, maintaining a reasonably quick shutter speed (1/100s to 1/160s, depending on movement) is necessary to prevent motion blur. Adjust your ISO accordingly to ensure correct exposure without introducing excessive noise. This balance of sharp focus on the eye and creamy background blur is the signature element of professional animal portraiture.
The most challenging aspect of photographing baby animals is subject management. Prey animals, especially rabbits, are easily stressed by rapid movements or loud noises. Create a quiet, contained shooting environment where the rabbit feels safe and comfortable. Instead of trying to force a specific pose, allow the animal time to settle on the chosen surface. The best portraits are often captured during moments of natural curiosity or stillness, like the quiet, contemplative gaze seen here. Utilize a longer focal length from a respectful distance; this reduces your physical proximity, making the bunny less intimidated, while the lens compression beautifully enhances the intimate look. Patience is your most powerful tool; wait for the natural pause, and be ready to click immediately when the soft expression presents itself.
The Terracotta Kit: Creating Depth with Simple Props
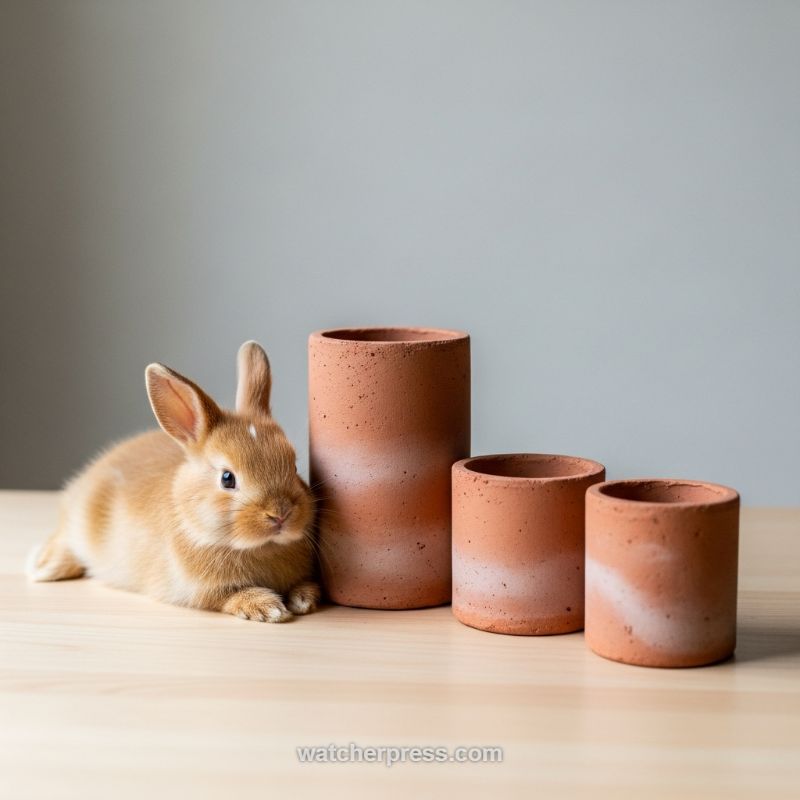
To capture a portrait with such deep emotional warmth and visual harmony, the photographer expertly employed principles of composition and color theory, prioritizing a minimalist, rustic aesthetic. The focal point, the adorable baby rabbit, is placed against a trio of vertical terracotta cylinders. This use of props serves multiple instructional purposes: first, the cylindrical shapes provide grounding geometric stability against the soft, organic lines of the animal. Second, the varying heights (tall, medium, short) create immediate visual depth and a staggered visual path for the viewer’s eye to follow from the main subject rightward. When attempting a similar portrait, ensure your subject is comfortable and nestled against the largest prop, as demonstrated here; this creates a sense of safety and encourages the relaxed, curious pose that defines this shot. Furthermore, the selection of raw, untreated terracotta, with its uneven white finish, is crucial. Its natural, earthy orange-red hue inherently complements the fawn and copper tones of the rabbit’s fur, ensuring the entire image maintains a rich, monochromatic warmth without becoming visually busy.
Mastering the lighting and technical setup is vital for achieving this gentle, soft-focus mood. The primary key to replicating this high-quality portrait lies in utilizing expansive, diffused natural light, typically sourced from a large window located off-camera to the left. This side lighting sculpts the bunny’s face, highlights the texture of the fur, and creates long, soft shadows behind the pots, which communicate depth without being harsh or distracting. Instructional setup involves placing the scene on a simple, light-toned surface—here, a pale wooden table—and using a neutral, seamless backdrop (the smooth, light gray wall). This choice of backdrop eliminates any distracting elements, forcing all attention onto the subject and props. Technically, shoot with a wide aperture (e.g., f/2.8 or lower if possible) to achieve a shallow depth of field. Notice how the rabbit’s eyes and nose are pin-sharp while the background and foreground subtly dissolve into soft bokeh, effectively isolating the charming subject and giving the image a professional, three-dimensional quality.
For a top-tier blog presentation, attention must be paid to the post-processing that emphasizes the rustic minimalist theme. After ensuring perfect exposure and focus, focus on subtle color grading. Maintain the saturation of the warm tones (the oranges and browns) but slightly desaturate the cool tones (the gray backdrop) to push them back visually. Avoid aggressive sharpening; the softness of the fur and the muted ambiance is what generates the “heart-melting” factor. Expert advice for contrast: keep the overall image contrast low to moderate. High contrast would result in deep, distracting black shadows, which would break the gentle mood. Instead, lift the shadows slightly to retain detail, giving the entire image a quiet, almost contemplative feel that perfectly elevates the sweet vulnerability of the tiny subject. This careful balance of soft light, complementary props, and controlled contrast defines the success of this style of animal portraiture.
The Golden Lamb: A Masterclass in Backlit Innocence
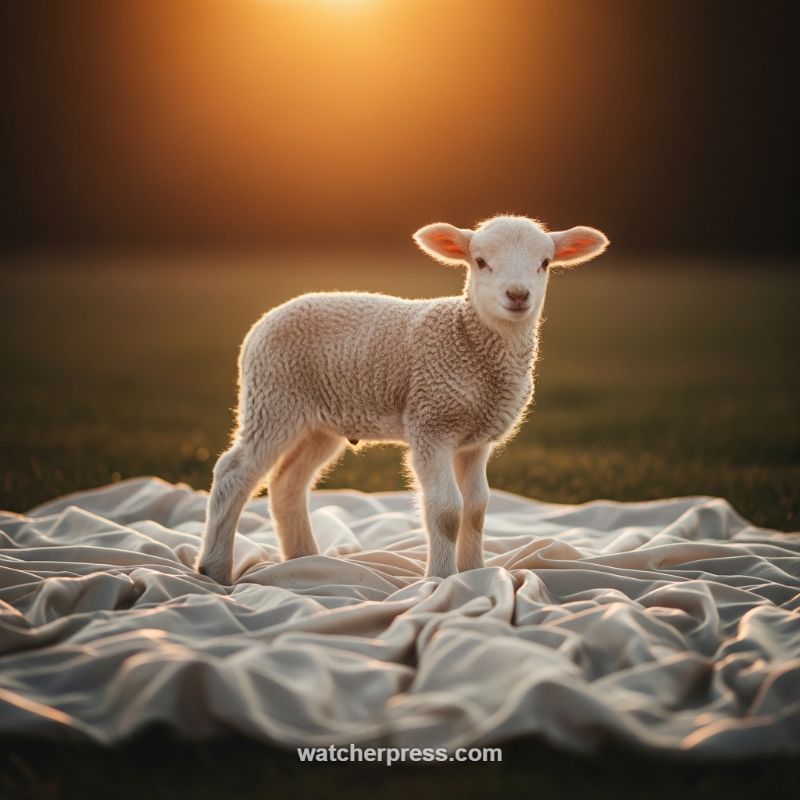
This captivating portrait of a lamb serves as a prime example of how to utilize the ‘Golden Hour’ effectively for baby animal photography. To replicate this angelic glow, position your subject so the setting or rising sun is directly behind them. This technique is known as backlighting, and its success hinges on creating a powerful rim light, or ‘halo effect,’ around the subject’s contours. Notice how the bright sunlight catches every curl of the lamb’s wool, separating the texture dramatically from the darker background. Expert photographers should use a high-quality lens (preferably a fast prime lens like an 85mm or 135mm) wide open (f/2.8 or lower) to manage the challenging exposure and ensure the background collapses into a soft, golden-hued blur, thereby maximizing focus solely on the subject’s pure features.
The compositional staging elevates this shot from a simple snapshot to professional portraiture. The lamb stands centered on a carefully arranged, neutral-toned fabric. This prop serves two major purposes: it creates a clean, intentional foreground that prevents the subject from blending into the grass, and the subtle, rhythmic wrinkles add depth and visual interest without overwhelming the main focus. When photographing young animals, it is crucial to shoot at eye-level—or even slightly below—to enhance their stature and vulnerability, establishing a direct connection with the viewer. The shallow depth of field (low f-stop) further isolates the lamb, turning the grassy field into a wash of deep emerald and warm umber, preventing any visual clutter.
Achieving this level of emotional impact requires patience and technical precision. The slight head tilt and direct eye contact are the heart of this ‘melt your heart’ shot. When working with baby animals, minimize distractions and ensure the environment is calm. Have your settings pre-dialed—fast shutter speed to freeze potential movement (at least 1/500th of a second), wide aperture for the bokeh, and exposure adjusted for the tricky backlighting (you may need to slightly overexpose to brighten the face, or use a subtle reflector/fill flash). Capturing that split-second moment of curiosity and engagement is the final ingredient that transforms a technically good photo into an unforgettable, tender portrait.
Capturing the Pure Innocence of a Spring Lamb Portrait

The secret to capturing the overwhelming cuteness of subjects like this young lamb is establishing immediate visual connection, which is achieved primarily through compositional choice and camera angle. To replicate the intimacy seen in this portrait, the photographer must abandon the standard standing height and position themselves directly at the subject’s eye level. This low perspective not only eliminates distracting elements in the foreground but also grants the viewer a unique, immersive peek into the animal’s world. Notice how the lamb is centered, framed perfectly by the surrounding grasses and the golden glow of the buttercups. Experts advise that when photographing any baby animal, strive for direct eye contact if the animal is calm, as this emotional engagement is what truly transforms a simple snapshot into a heart-melting portrait. Pay close attention to the ambient light; soft, diffused sunlight, often found during the golden hours (shortly after sunrise or before sunset), illuminates the fluffy texture of the wool beautifully without casting harsh, unflattering shadows under the chin or around the eyes.
The technical mastery of depth of field is crucial for isolating such a light-colored subject against a complex, busy background. To achieve the sublime separation and creamy background blur (bokeh) visible here, you must shoot with a wide aperture, typically f/2.8, f/2.0, or even lower, depending on your lens capabilities. This shallow focus pulls the lamb sharply into relief, ensuring every curl of its wool is crisp, while transforming the field of yellow flowers into luminous, soft circles of color. When working in an environment abundant with grass and flowers, careful focus is paramount. Set your camera to a single focus point aimed directly at the nearest eye. Even a small misfocus can ruin the connection, especially since the narrow depth of field leaves almost no margin for error. We recommend utilizing a lens with a focal length of 70mm or greater to compress the background further, enhancing the three-dimensional pop of the lamb against the meadow.
Finally, preparation and patience are key ingredients for successful baby animal photography. Unlike human models, these subjects will not hold a pose, and the moments of profound vulnerability or curiosity—like the one captured here—are fleeting. Be prepared to shoot in continuous or burst mode to maximize your chances of catching the perfect expression or tilt of the head. Since you will be low to the ground, use kneeling pads or a blanket to ensure comfort, allowing you to remain steady and ready for longer periods without tiring. Always give the animal space and respect its natural behavior; the most captivating portraits are often those where the subject is simply existing naturally in its environment, curious about the strange person aiming a camera its way.
Ethereal Lamb Portrait: Mastering Golden Hour Backlighting

Capturing the innocent charm of a baby animal like this requires more than just luck—it demands strategic composition and a low shooting angle. To replicate this stunning portrait of a young lamb, position your camera at the animal’s eye level, which often means lying low in the grass. This technique not only establishes an intimate connection with the subject but also helps separate the animal from its surroundings by maximizing the foreground elements. Notice how the centered, front-facing pose of the lamb conveys approachability and confidence. Expert tip: Ensure your focus point is locked precisely on the nearest eye to guarantee sharpness, even when using an extremely shallow depth of field, as fuzzy eyes can instantly ruin an otherwise perfect portrait. The choice of location—a patch of dewy grass bordering a dark, soft background—is critical for creating contrast and mood. The key technical element that elevates this photo from simple snapshot to breathtaking portrait is the intentional use of golden hour backlighting. Shooting late in the afternoon allows the low sun to shine directly from behind the subject, which creates a luminous outline, known as rim lighting, defining the woolly texture and making the lamb almost glow. Crucially, this strong backlight is what illuminates the lamb’s thin, expressive ears with a vibrant pink hue, adding warmth and personality. When attempting this technique, you must remember to overexpose slightly (use +0.7 to +1.5 stops of exposure compensation) to prevent the camera’s meter from underexposing the subject due to the large amount of bright light flooding the frame. Proper exposure ensures the white wool is bright and detailed, not rendered as flat gray shadows against the intense background light. To achieve the dreamy, ethereal quality seen in this portrait, a very shallow depth of field is essential. This effect, which blurs the foreground and background while keeping the subject tack sharp, is best accomplished using a wide aperture (f/1.8 to f/2.8) and a fast prime lens (e.g., 85mm or 135mm). Observe how the wide aperture compresses the distant trees and yellow flowers into smooth, non-distracting colors and shapes (bokeh). Even more impactful is the foreground bokeh: the morning or evening dew settled on the grass blades catches the backlight, turning into brilliant, sparkling orbs of light. This sparkling effect adds incredible dimension and texture, guiding the viewer’s eye directly to the crisp, perfectly focused lamb. Mastering the use of high-quality lenses at their widest settings is the definitive pathway to creating these emotionally resonant, melt-your-heart baby animal portraits.
Capturing the Softness: Portrait of an Alpaca in the Mist

Achieving this level of intimacy and texture in animal portraiture, particularly with subjects possessing voluminous white coats like this alpaca, relies heavily on maximizing environmental light and composition. The primary instructional takeaway here is leveraging diffused light. Notice how the heavy morning fog acts as the ultimate natural softbox, diffusing the light evenly across the scene. This effect is crucial for revealing the intricate curls and soft texture of the alpaca’s fleece without harsh shadows or clipped highlights. To replicate this, schedule your shoot during atmospheric conditions—fog, overcast skies, or the ‘golden hour’ filtered through light cloud cover—which naturally flatten the dynamic range. Furthermore, the mist serves to completely blur and neutralize the background, transforming the distant landscape into a seamless, monochromatic canvas that prevents distraction and focuses all attention squarely on the subject’s inquisitive face and expressive eyes.
From a technical perspective, capturing the tactile quality of the wool requires meticulous focus and careful exposure compensation. When photographing bright, white subjects, the camera’s meter often misreads the scene, assuming the overall luminosity should average to middle gray. This frequently results in underexposure, making the white fur appear dingy. Expert advice dictates using positive exposure compensation, often between +0.3 and +0.7 EV, to ensure the white coat is properly rendered as brilliant and luminous. Critically, ensure the eyes are razor-sharp; in animal portraits, the eyes are the gateway to personality, and a slight miss in focus can destroy the emotional impact. If you are shooting with an aperture around f/4.0 to f/5.6 to maintain some depth of field across the entire head, use a single-point autofocus system centered directly on the nearest eye to guarantee sharpness.
Finally, the power of this portrait lies in the direct, centered composition and the subject’s immediate engagement with the lens. To achieve this intense connection, you must position yourself at the subject’s eye level. Crouching down not only creates a flattering perspective but also conveys respect, making the portrait feel more personal and less like a snapshot from above. Use a mild telephoto lens (e.g., 85mm to 135mm on a full-frame equivalent) to compress the background further and enhance the subject isolation. If the animal is shy, utilize a small, gentle sound—like a soft whistle or a momentary rustle of grass—just off-camera to elicit that moment of curiosity and direct gaze, allowing you to capture the genuine, heart-melting expression that defines a successful animal portrait.